

Page 1
Quick Start Guide
PORTABLE MINIDISC RECORDER
MODEL
MD-MT280E
Quick Setup Guide
Follow the setup procedure (1-3)
before you use this unit.
Quick Operation Guide
Explains basic recording and playback
procedures.
Refer to the operation manual for details.
If you require any advice or assistance regarding
your Sharp product, please visit our web-site
www.sharp.co.uk/customersupport.
Customers without Internet access may telephone
08705 274277 during office hours (or (01) 676 0648
if telephoning from Ireland).
TINSE0517AWZZ
03A R AO 1
0101
Page 2
1
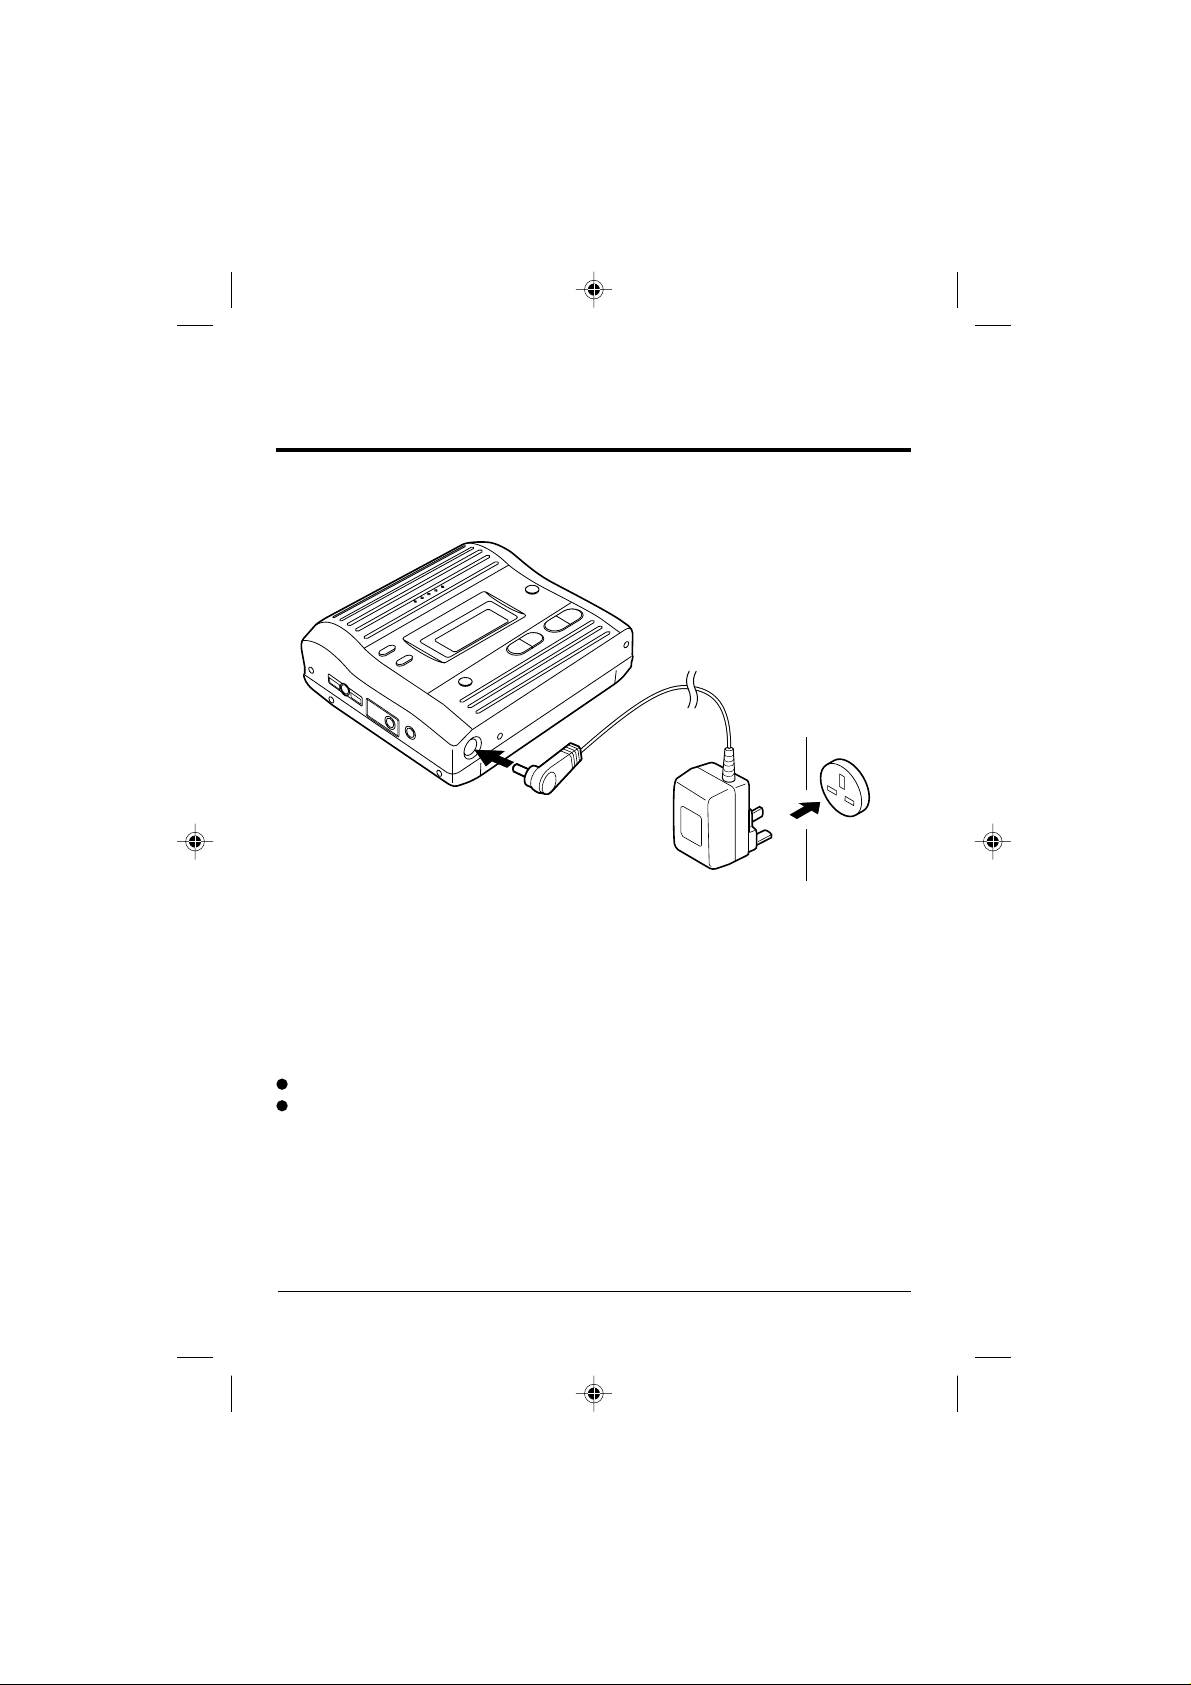
Connect the AC adaptor
AC 230V,
50/60 Hz
To the DC IN
5V socket
To wall socket.
1
Plug the AC adaptor into the
wall socket.
2
Insert the plug on the other
end into the DC IN 5V socket.
Caution:
Insert the plugs firmly.
When the unit is not in use for extended periods, remove the AC adaptor from
the wall socket.
- 1 -
Page 3
2
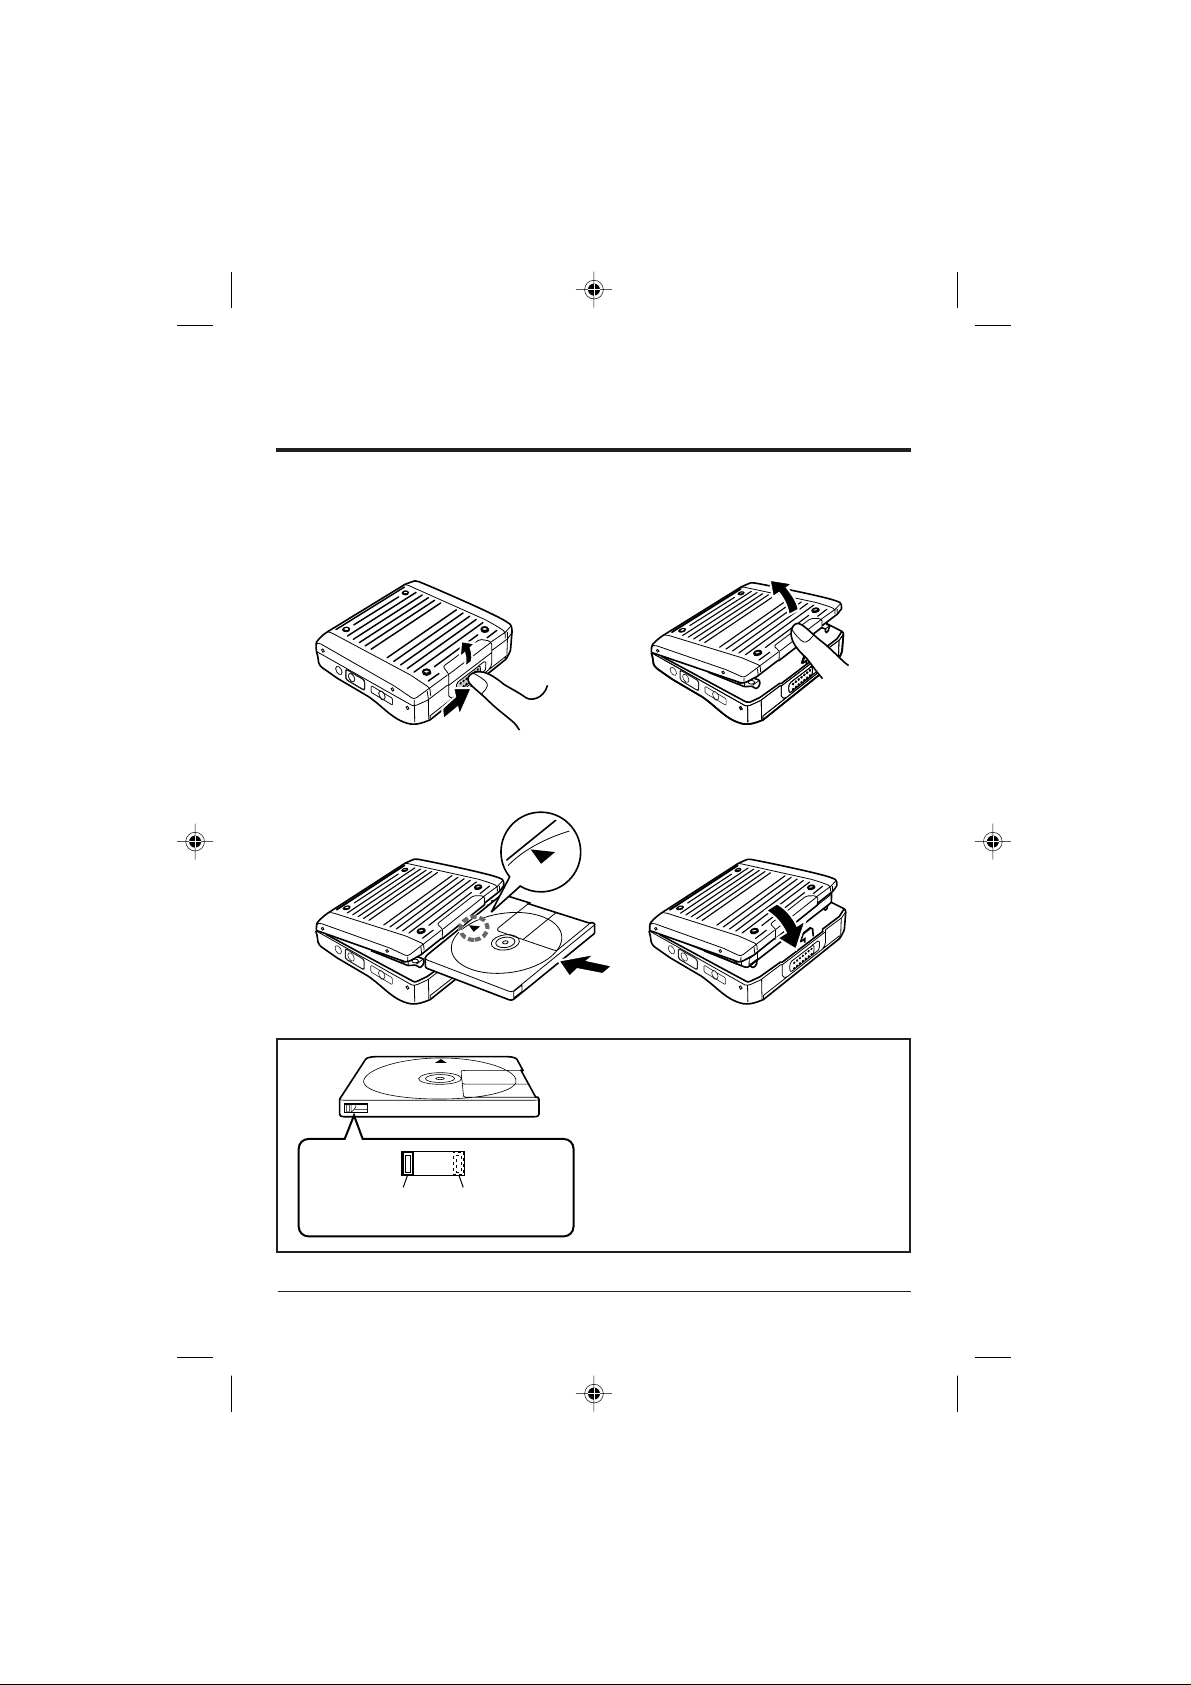
Insert a MiniDisc
1
Slide the OPEN lever to release the compartment
door.
Insert a MiniDisc.
3
Insert according to the direction arrow.
Lift up the compartment door.
2
Close the compartment door.
4
When you record on a MiniDisc,
check that the erase prevention tab
is set to the “Recordable” position.
Recordable
Recording
prevented
- 2 -
Page 4
3
Connections
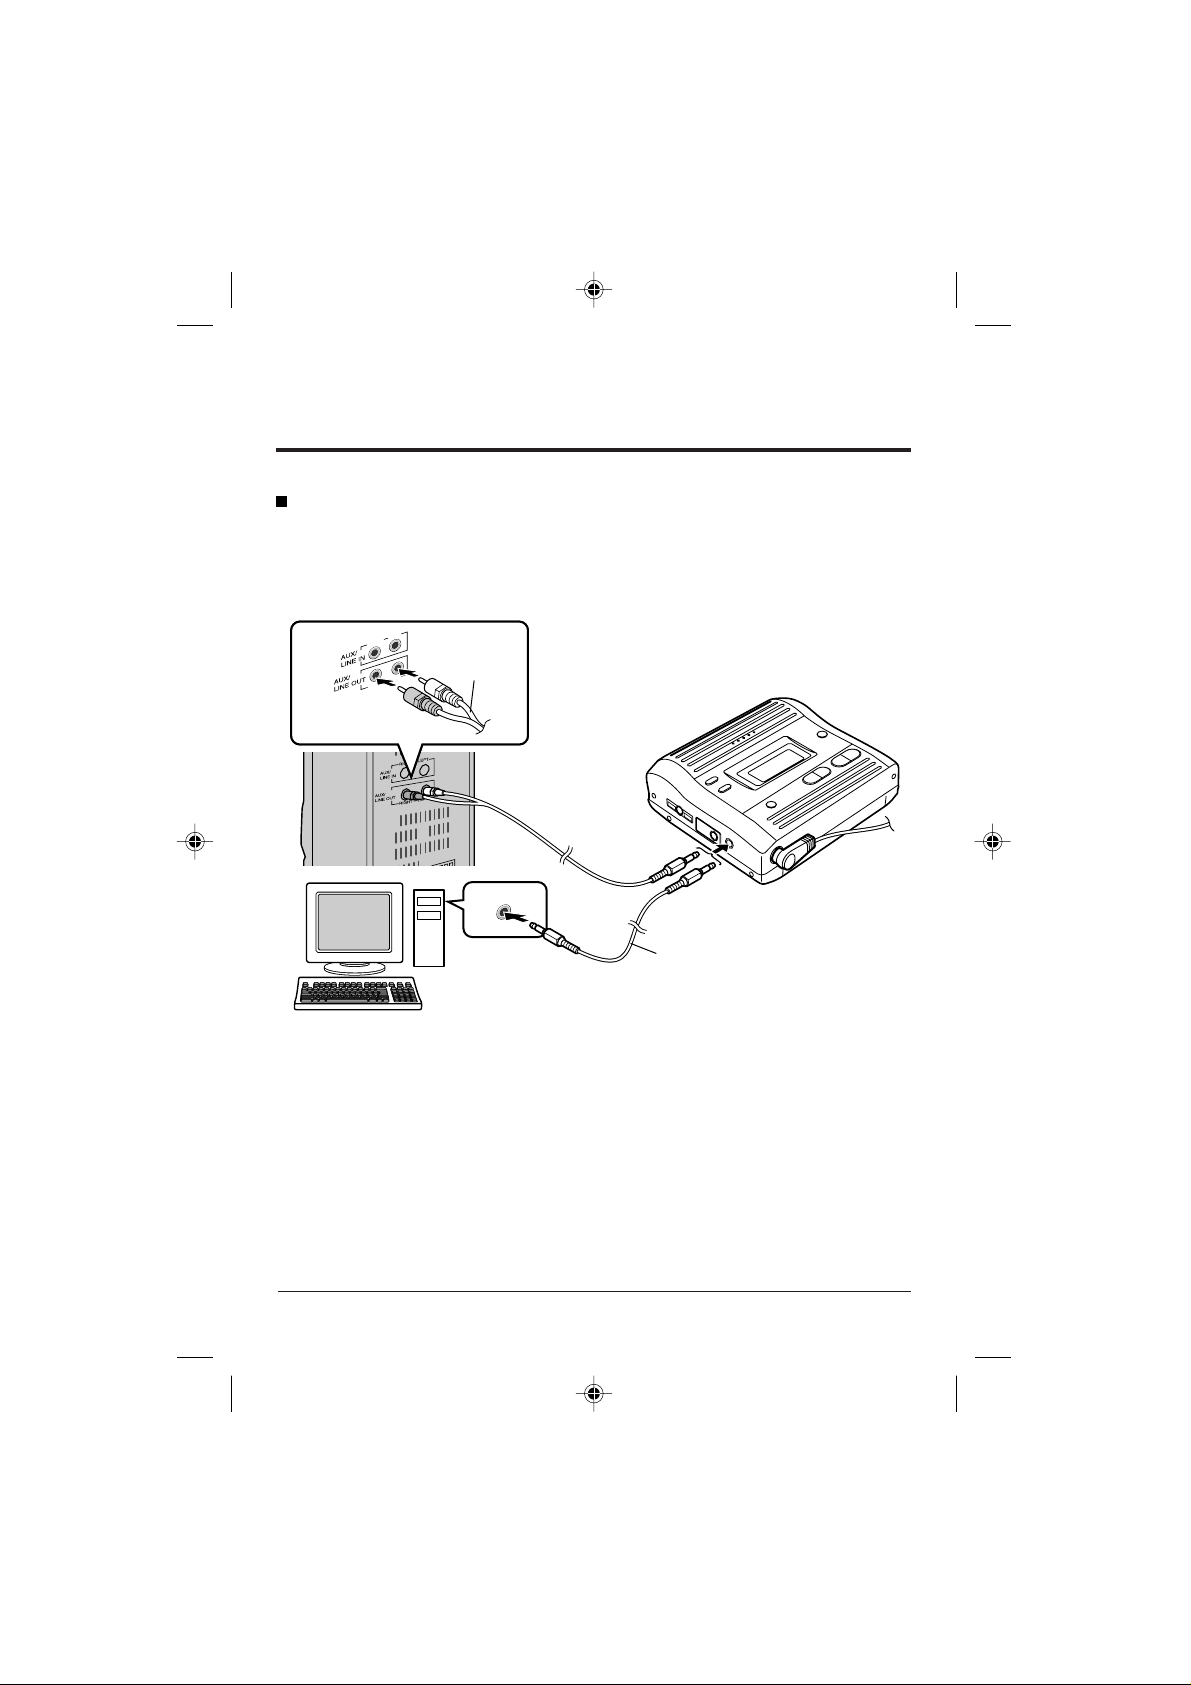
To connect to a stereo system with "LINE OUT" or "AUDIO OUT" sockets (analogue connection)
If the audio system has only one pair of sockets, they are usually for input only and recording via this connection is not possible.
LEFT
LEFT
Supplied
connection
cable
RIGHT
RIGHT
Red : to right
White : to left
AUDIO OUT
NOTE:
Refer to page 13 (operation manual) for connecting the unit to a stereo system with
"DIGITAL OUT" or "OPTICAL OUT" socket.
- 3 -
To the OPTICAL/
LINE IN socket
Supplied connection cable
(for PC analogue recording)
Page 5
Preparation for use
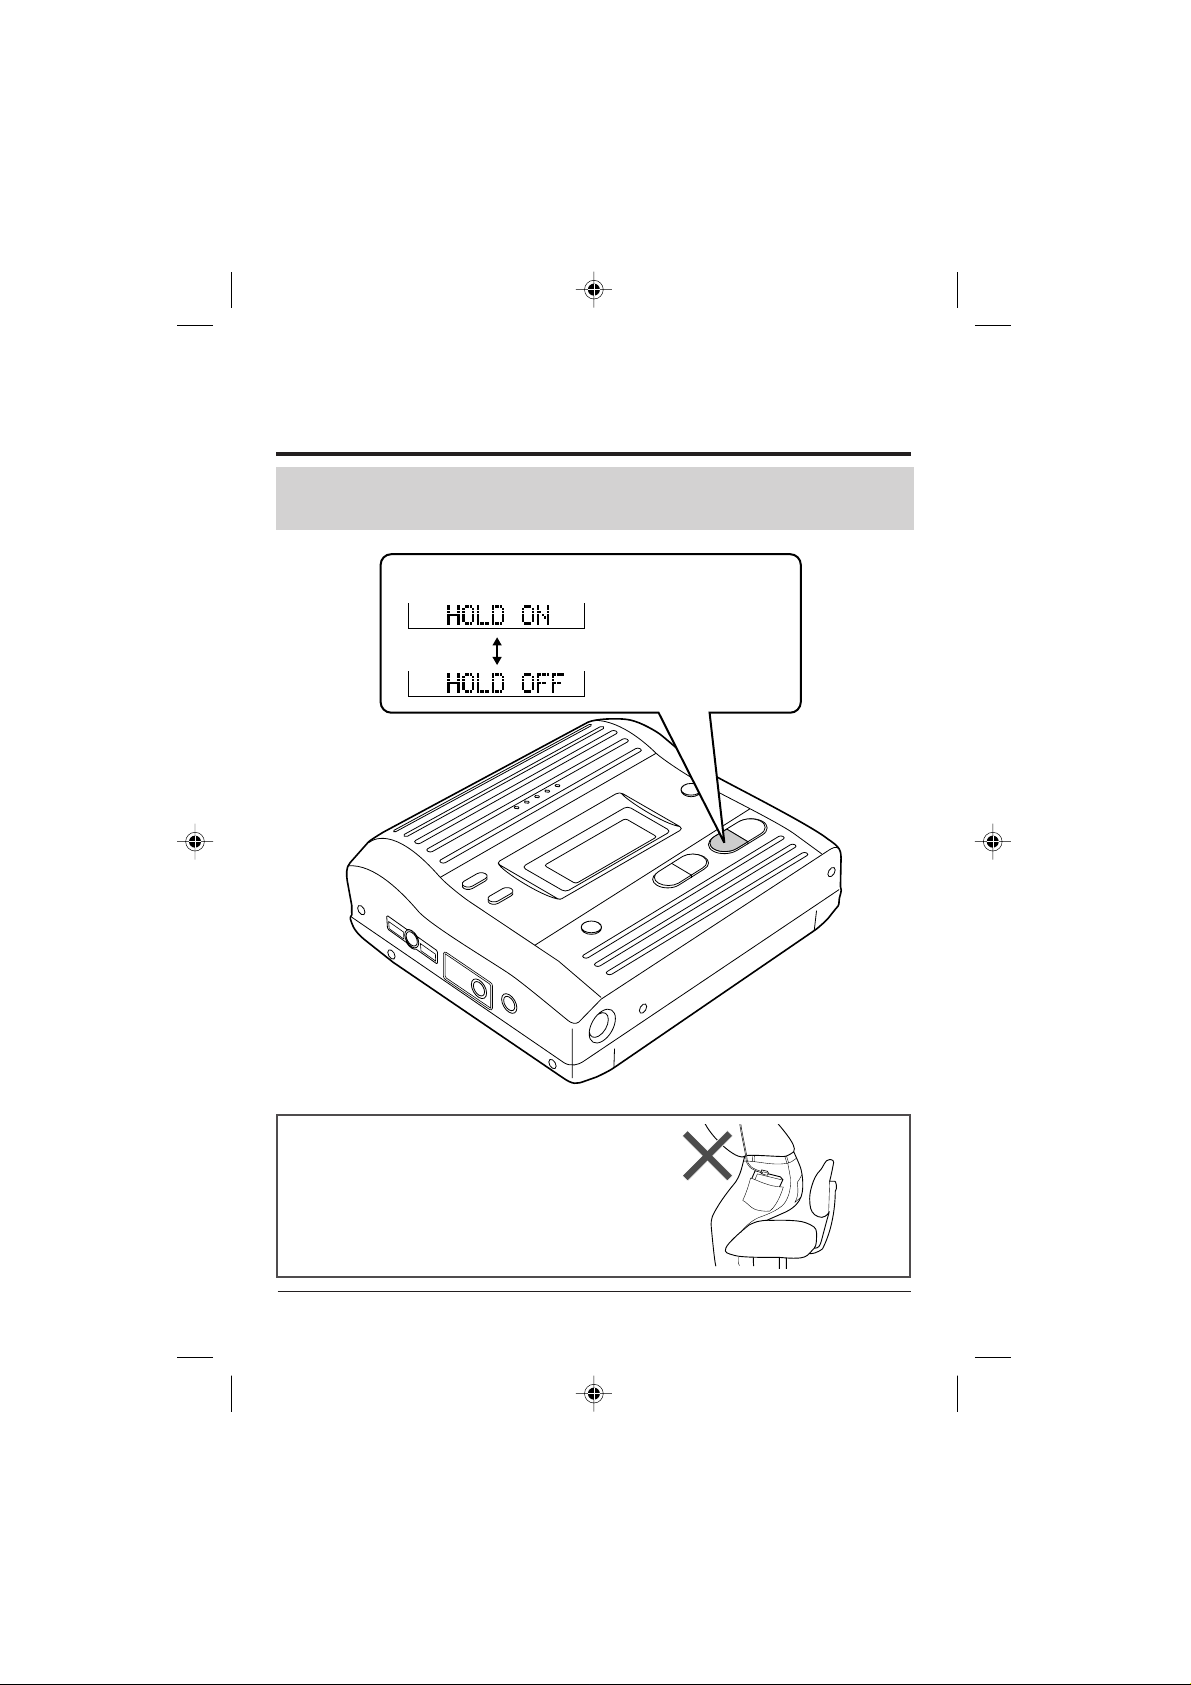
The unit does not work
if the HOLD button is set to HOLD.
Press the HOLD button for 2 seconds or more.
Hold
Released
CAUTION:
It is not recommended to put the
portable MD into a rear pocket, as this
may damage the product when sitting.
- 4 -
Page 6
Recording
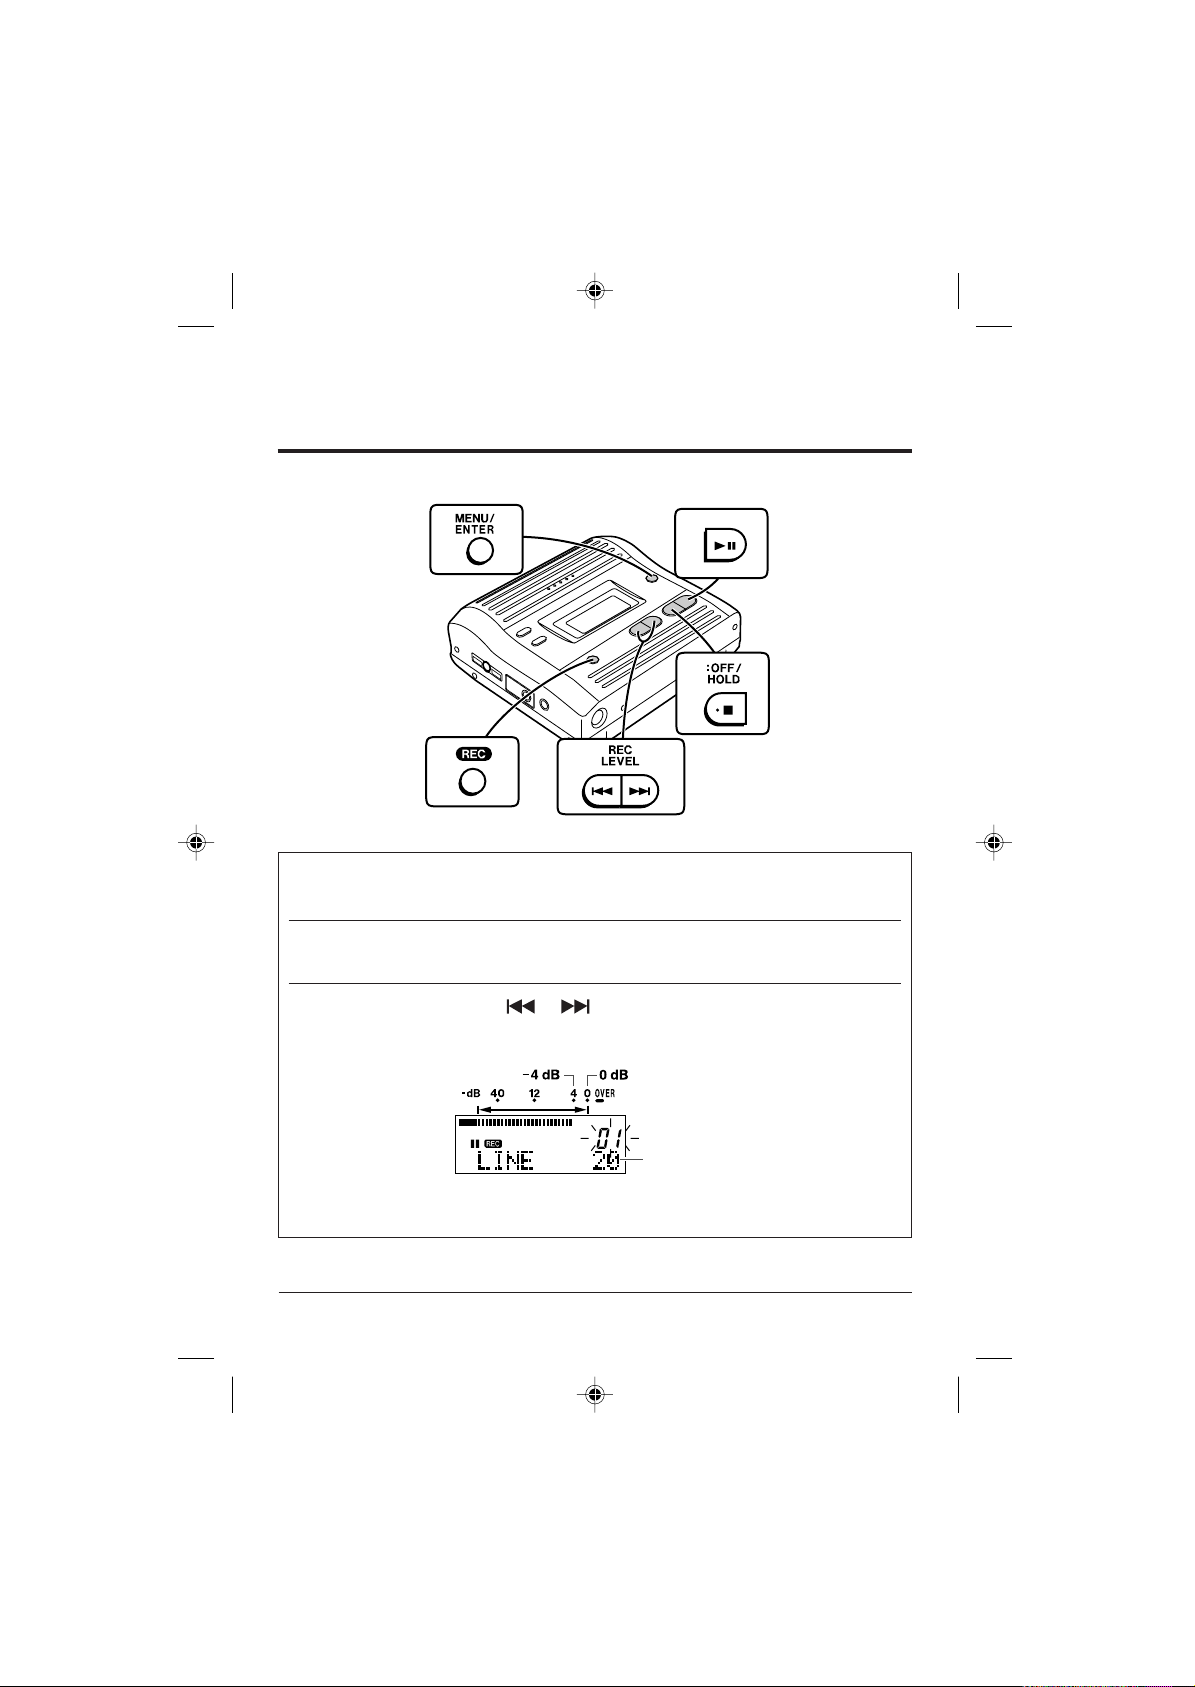
Check that the unit is connected to the stereo system.
Press the REC button.
1
Record pause mode is entered.
Begin playback on the stereo system connected to this portable MD.
2
To enable the record level to be set.
Press the REC LEVEL or button to adjust the recording level.
3
Adjust the recording level so that the maximum sound volume from the
source makes the reading swing somewhere between –4 dB and 0 dB.
0 - 30
This unit can adjust the digital recording level just the same as the analogue recording (see page 16 in the operation manual).
- 5 -
Page 7
Recording: continued
Press the PAUSE button on the stereo system to enter the
4
playback pause mode.
Here, you can search for the track to be recorded.
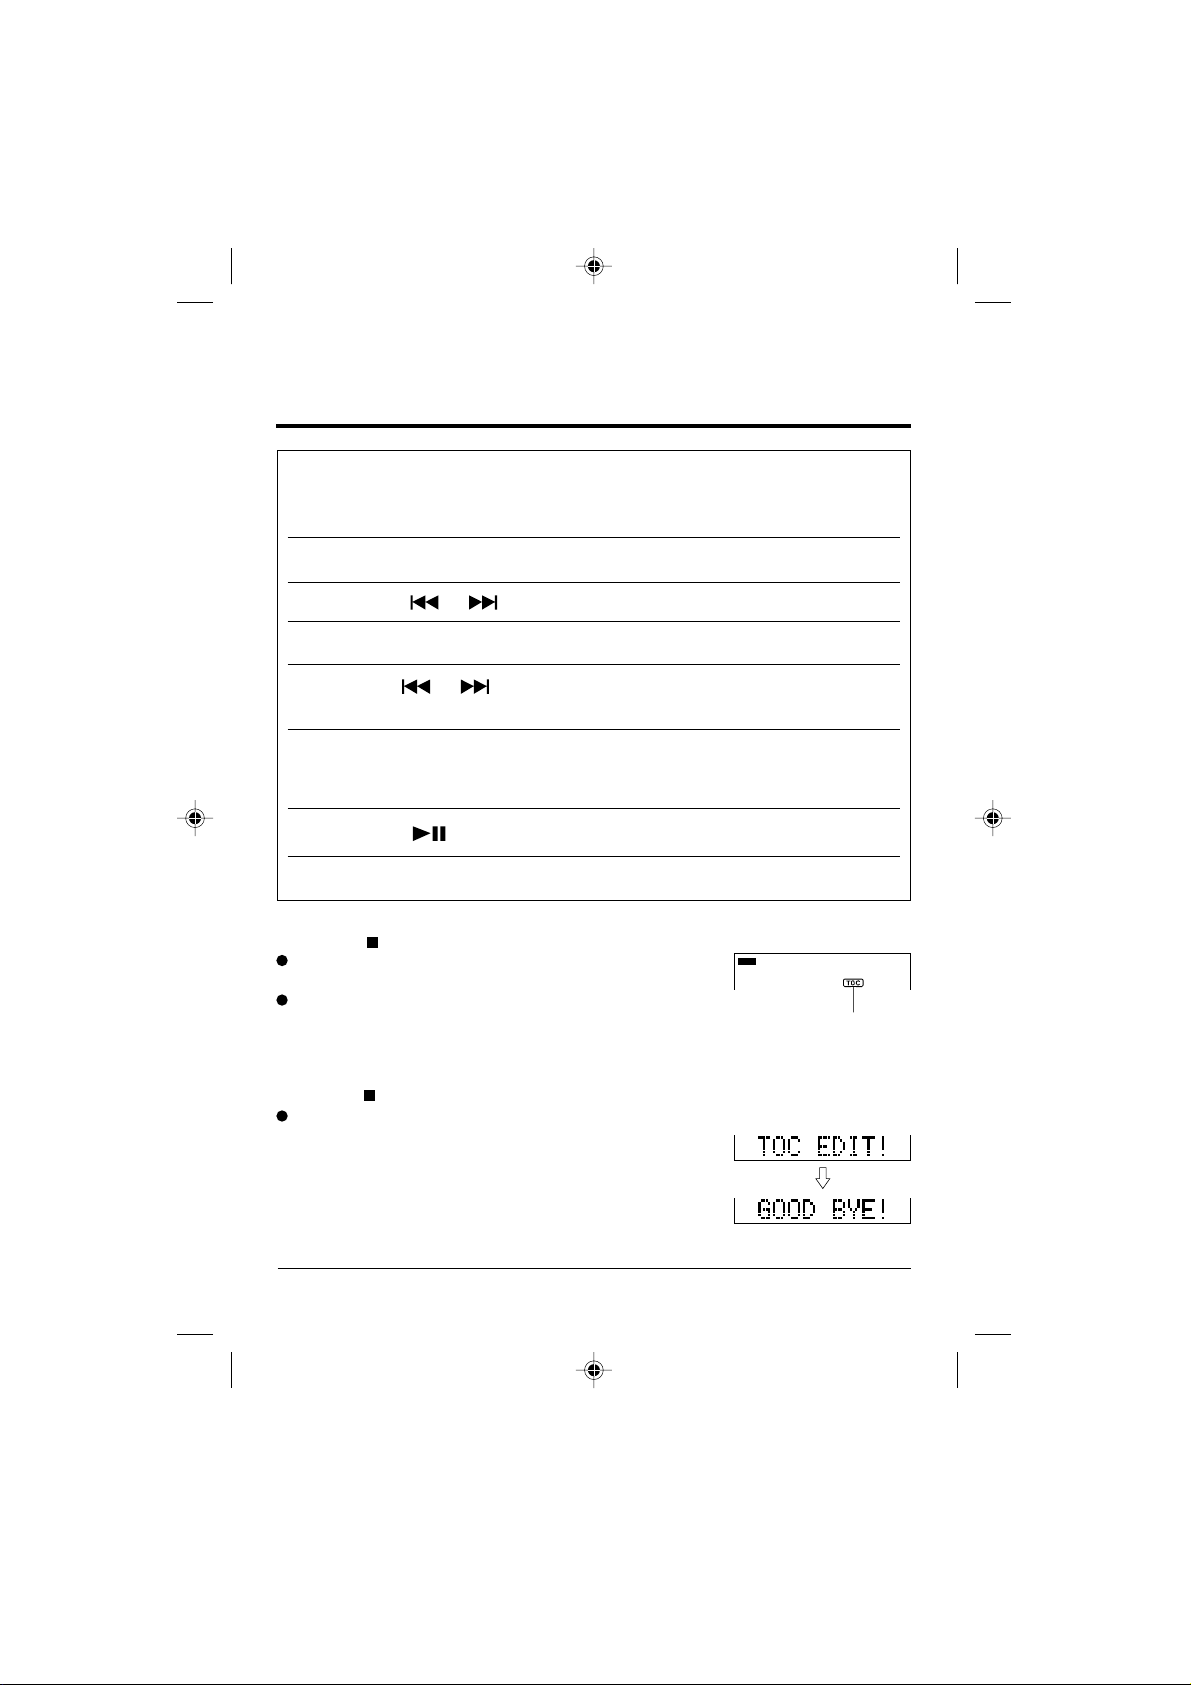
Press the MENU/ENTER button.
5
Press the or button repeatedly to select “REC MODE”.
6
Press the MENU/ENTER button.
7
Press the or button repeatedly to select the desired record-
8
ing mode from SP, LP2, LP4 or MONO.
Press the MENU/ENTER button.
9
The mode will be set automatically after 7 seconds even if the
MENU/ENTER button is not pressed.
10
Press the button to start the MiniDisc unit recording.
Begin playback on the stereo system, and the output will be recorded.
11
To stop recording
Press the :OFF/HOLD button.
Whilst “TOC” is displayed, the MiniDisc recorded
contents are not yet updated.
It is not possible to remove the MiniDisc whilst
"TOC" is displayed, to prevent the new recording
from being lost.
TOC display
To update the recorded contents of the MiniDisc
Press the :OFF/HOLD button whilst in the stop mode.
The power turns off after recorded contents have
been updated on the MiniDisc.
Warning:
If the power is removed (Battery/AC adaptor) whilst “TOC”
is displayed, the MiniDisc unit lid will remain locked until
the battery/main power is restored and the unit is turned
on. Your new recordings or edited changes will be lost
and your MiniDisc may become unusable.
- 6 -
Page 8
Playback
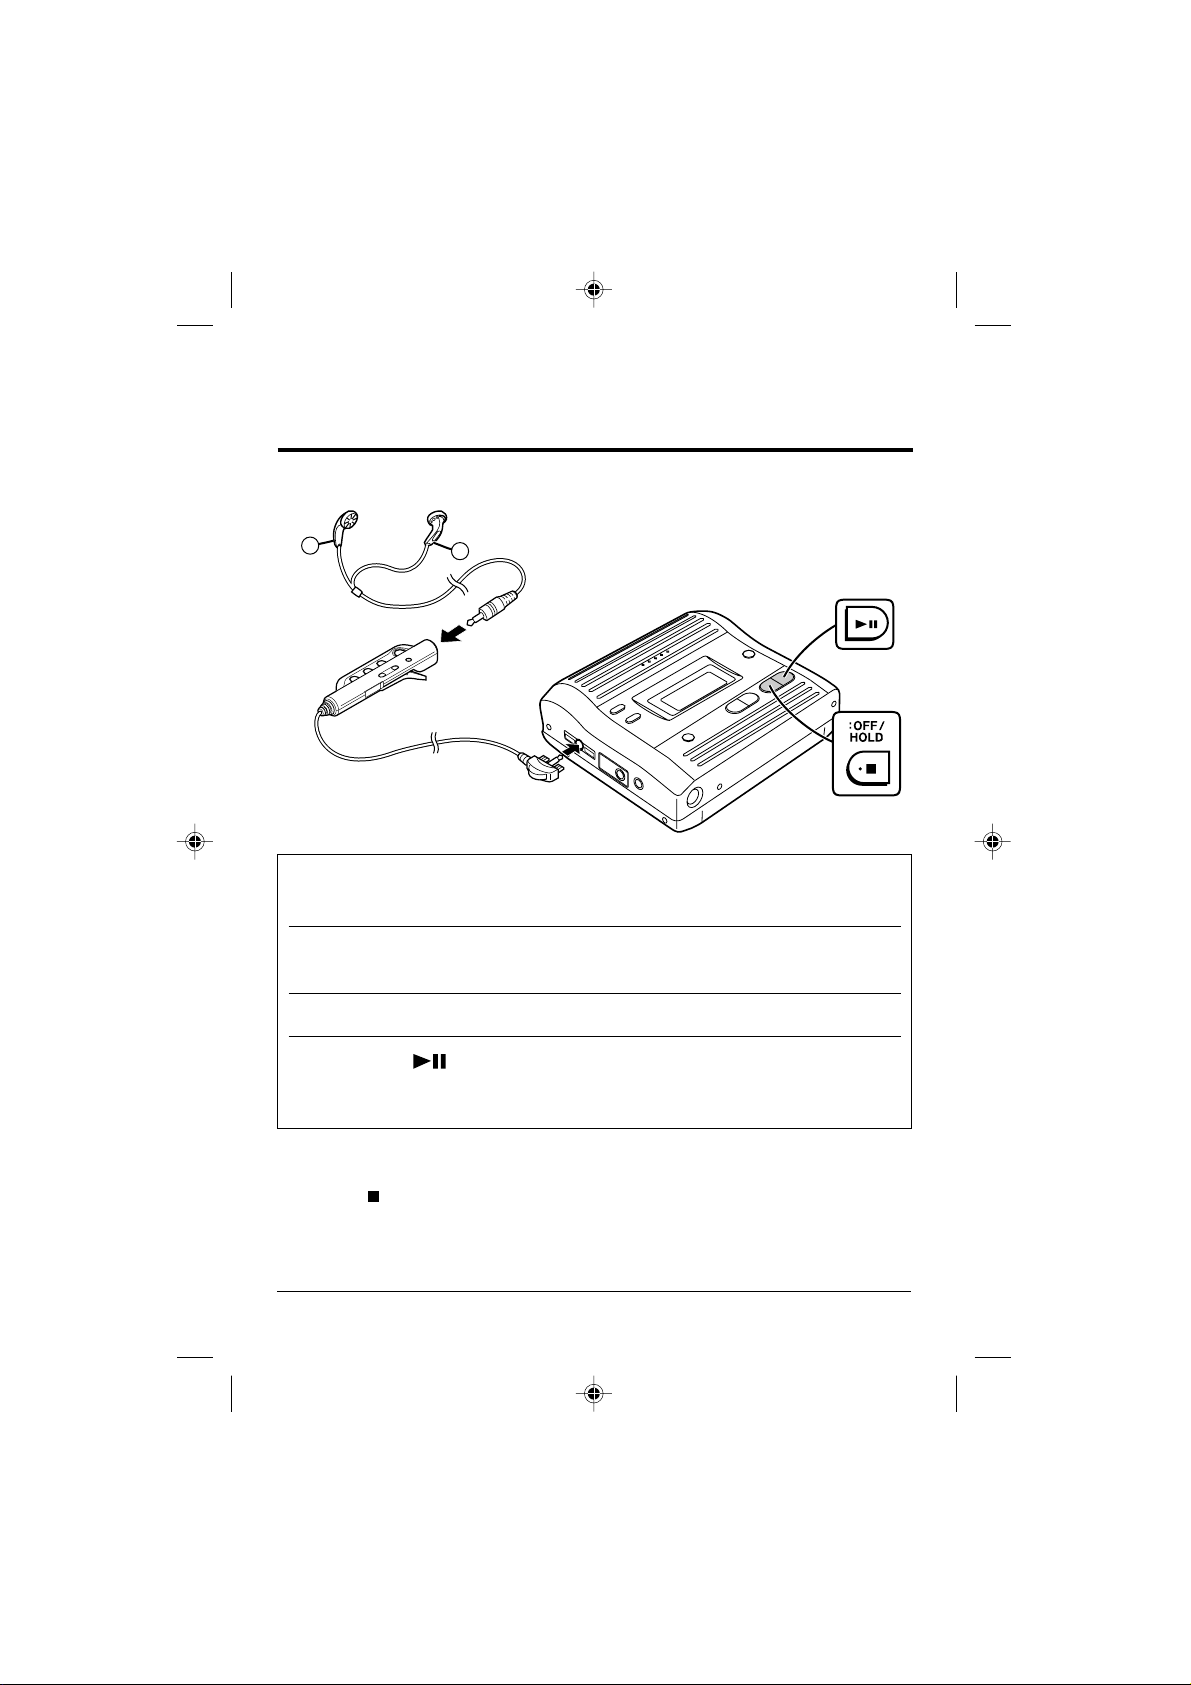
Left
channel
L
1
Insert the earphones plug firmly into the earphones socket
on the remote control unit.
Plug the remote control into the REMOTE/PHONES socket on
2
the unit.
Insert a MiniDisc.
3
Right
channel
R
To the
REMOTE
/PHONES
socket
Press the button.
4
Playback starts automatically with a playback only MiniDisc or a MiniDisc
which is protected against accidental erasure (Auto-play function).
To stop playback
Press the :OFF/HOLD button.
The power will turn off automatically
after 2 minutes if the unit is left in the
stop mode.
- 7 -
 Loading...