

Page 1

LCD Monitor
Moniteur LCD
Monitor LCD
LL-M15X1U
OPERATION MANUAL
MODE D’EMPLOI
MANUAL DE FUNCIONAMIENTO
EnglishFrançaisEspañol
English ...... E1
Français .... F1
Español ..... S1
Page 2

Page 3
ENGLISH
EnglishDeutschFrançaisItalianoEspañolEnglish
IMPORTANT:
To aid in reporting in case of loss or theft, please
record the monitor’s model and serial numbers
in the space provided. The numbers are located
on the rear of the monitor.
Model No.:
Serial No.:
U.S.A. ONLY
IMPORTANT INFORMATION
WARNING: TO REDUCE THE RISK OF FIRE OR ELECTRIC SHOCK, DO
NOT EXPOSE THIS PRODUCT TO RAIN OR MOISTURE.
The lightning flash with
arrowhead symbol, within an
CAUTION
RISK OF ELECTRIC SHOCK.
DO NOT OPEN.
CAUTION: TO REDUCE THE RISK OF ELECTRIC SHOCK,
DO NOT REMOVE COVER (OR BACK).
NO USER-SERVICEABLE PARTS INSIDE.
REFER SERVICING TO QUALIFIED SERVICE
PERSONNEL.
equilateral triangle, is intended
to alert the user to the presence
of uninsulated “dangerous
voltage” within the product’s
enclosure that may be of
sufficient magnitude to
constitute a risk of electric
shock to persons.
The exclamation point within a
triangle is intended to alert the
user to the presence of
important operating and
maintenance (servicing)
instructions in the literature
accompanying the product.
E1
Page 4
IMPORTANT INFORMATION
FCC Statement
WARNING – FCC Regulations state that any unauthorized changes or modifications to this equipment
not expressly approved by the manufacturer could void the user’s authority to operate this equipment.
Note: This equipment has been tested and found to comply with the limits for a Class B digital device
pursuant to Part 15 of the FCC Rules.
These limits are designed to provide reasonable protection against harmful interference in a residential
installation. This equipment generates, uses and can radiate radio frequency energy and, if not
installed and used in accordance with the instructions, may cause harmful interference to radio
communications. However, there is no guarantee that interference will not occur in a particular
installation. If this equipment does cause harmful interference to radio or television reception, which
can be determined by turning the equipment off and on, the user is encouraged to try to correct the
interference by one or more of the following measures:
- Reorient or relocate the receiving antenna.
- Increase the distance between the equipment and receiver.
- Connect the equipment into an outlet on a circuit different from that to which the receiver is
connected.
- Consult the dealer or an experienced radio/TV technician for help.
Use nothing but the included cables and AC cord to insure compliance with FCC regulation for Class
B computing equipment.
U.S.A. ONLY
Declaration of Conformity
SHARP LCD Color Monitor LL-M15X1U
This device complies with part 15 of the FCC rules. Operation is subject to the following conditions:
(1) this device may not cause harmful interference, and (2) this device must accept any interference
received, including interference that may cause undesired operation.
Responsible Party: SHARP ELECTRONICS CORPORATION
Sharp Plaza, Mahwah, New Jersey 07430
TEL: 1-800-BE-SHARP
“Note to CATV system installer: This reminder is provided to call the CATV system installer’s attention
to Article 820-40 of the National Electrical Code that provides guidelines for proper grounding and, in
particular, specifies that the cable ground shall be connected to the grounding system of the building,
as close to the point of cable entry as practical.”
This product utilizes tin-lead solder, and fluorescent lamp containing a small amount of mercury.
Disposal of these materials may be regulated due to environmental considerations. For disposal or
recycling information, please contact your local authorities or the Electronic Industries Alliance:
www.eiae.org
* As an ENERGY STAR Partner, SHARP has determined that this product meets the ENERGY STAR
guidelines for energy efficiency.
U.S.A. ONLY
E2
Page 5

Table of Contents
Getting started
Tips and safety precautions . . . . . . . . . . . . . . . . . . . . . . . . . . . . . . . . . . . . . . . . . . . . . . . . . . . . . . . . . . . . E5
Important safety precautions . . . . . . . . . . . . . . . . . . . . . . . . . . . . . . . . . . . . . . . . . . . . . . . . . . . . . . . . E5
Monitor and accessory checklist . . . . . . . . . . . . . . . . . . . . . . . . . . . . . . . . . . . . . . . . . . . . . . . . . . . . . E7
Product description . . . . . . . . . . . . . . . . . . . . . . . . . . . . . . . . . . . . . . . . . . . . . . . . . . . . . . . . . . . . . . . . . . E8
Main unit . . . . . . . . . . . . . . . . . . . . . . . . . . . . . . . . . . . . . . . . . . . . . . . . . . . . . . . . . . . . . . . . . . . . . . . . E8
Remote control . . . . . . . . . . . . . . . . . . . . . . . . . . . . . . . . . . . . . . . . . . . . . . . . . . . . . . . . . . . . . . . . . . . E9
Cable clamp . . . . . . . . . . . . . . . . . . . . . . . . . . . . . . . . . . . . . . . . . . . . . . . . . . . . . . . . . . . . . . . . . . . . E10
Angle adjustment . . . . . . . . . . . . . . . . . . . . . . . . . . . . . . . . . . . . . . . . . . . . . . . . . . . . . . . . . . . . . . . . E10
Remote control . . . . . . . . . . . . . . . . . . . . . . . . . . . . . . . . . . . . . . . . . . . . . . . . . . . . . . . . . . . . . . . . . . . . . E11
Using the remote control . . . . . . . . . . . . . . . . . . . . . . . . . . . . . . . . . . . . . . . . . . . . . . . . . . . . . . . . . . E11
Batteries for the remote control . . . . . . . . . . . . . . . . . . . . . . . . . . . . . . . . . . . . . . . . . . . . . . . . . . . . . E11
Connection and preparation
Connecting the monitor to a computer . . . . . . . . . . . . . . . . . . . . . . . . . . . . . . . . . . . . . . . . . . . . . . . . . . E12
Antenna connection . . . . . . . . . . . . . . . . . . . . . . . . . . . . . . . . . . . . . . . . . . . . . . . . . . . . . . . . . . . . . . . . . E13
Antennas. . . . . . . . . . . . . . . . . . . . . . . . . . . . . . . . . . . . . . . . . . . . . . . . . . . . . . . . . . . . . . . . . . . . . . . E13
Outdoor antenna connection . . . . . . . . . . . . . . . . . . . . . . . . . . . . . . . . . . . . . . . . . . . . . . . . . . . . . . . E13
Cable TV (CATV) connection . . . . . . . . . . . . . . . . . . . . . . . . . . . . . . . . . . . . . . . . . . . . . . . . . . . . . . . E14
Connecting the monitor to AV equipment . . . . . . . . . . . . . . . . . . . . . . . . . . . . . . . . . . . . . . . . . . . . . . . . E15
Examples of equipment you can connect . . . . . . . . . . . . . . . . . . . . . . . . . . . . . . . . . . . . . . . . . . . . . E15
VCRs and game systems . . . . . . . . . . . . . . . . . . . . . . . . . . . . . . . . . . . . . . . . . . . . . . . . . . . . . . . . . . E15
AV equipment with S-video output terminals . . . . . . . . . . . . . . . . . . . . . . . . . . . . . . . . . . . . . . . . . . E16
Connecting the monitor to a power source . . . . . . . . . . . . . . . . . . . . . . . . . . . . . . . . . . . . . . . . . . . . . . . E17
Instructions for attaching a VESA-compliant mount . . . . . . . . . . . . . . . . . . . . . . . . . . . . . . . . . . . . . . . . E18
Selecting the item in the MENU screen . . . . . . . . . . . . . . . . . . . . . . . . . . . . . . . . . . . . . . . . . . . . . . . . . E19
Adjusting the computer display (AUTO ADJUSTMENT) . . . . . . . . . . . . . . . . . . . . . . . . . . . . . . . . . . . . E20
Setting TV channels . . . . . . . . . . . . . . . . . . . . . . . . . . . . . . . . . . . . . . . . . . . . . . . . . . . . . . . . . . . . . . . . . E21
Selecting broadcast (AIR) or cable TV (CABLE) for Channel Setting . . . . . . . . . . . . . . . . . . . . . . . E22
Saving broadcast TV channels in the memory (CHANNEL SEARCH) . . . . . . . . . . . . . . . . . . . . . . E23
Adding weak or additional channels or erasing unwanted channels from TV memory (CHANNEL MEMORY) . . . . . E24
EnglishDeutschFrançaisItalianoEspañolEnglish
Common operations
Common operations . . . . . . . . . . . . . . . . . . . . . . . . . . . . . . . . . . . . . . . . . . . . . . . . . . . . . . . . . . . . . . . . E25
Turning power on/off. . . . . . . . . . . . . . . . . . . . . . . . . . . . . . . . . . . . . . . . . . . . . . . . . . . . . . . . . . . . . . E25
Switching display modes (INPUT) . . . . . . . . . . . . . . . . . . . . . . . . . . . . . . . . . . . . . . . . . . . . . . . . . . . E25
Adjusting the volume . . . . . . . . . . . . . . . . . . . . . . . . . . . . . . . . . . . . . . . . . . . . . . . . . . . . . . . . . . . . . E26
Adjusting the backlight . . . . . . . . . . . . . . . . . . . . . . . . . . . . . . . . . . . . . . . . . . . . . . . . . . . . . . . . . . . . E27
Selecting the language on the screen. . . . . . . . . . . . . . . . . . . . . . . . . . . . . . . . . . . . . . . . . . . . . . . . E27
PC mode
Listening to TV or another audio source while viewing the computer screen (SOUND) . . . . . . . . . . . E28
Adjusting the display . . . . . . . . . . . . . . . . . . . . . . . . . . . . . . . . . . . . . . . . . . . . . . . . . . . . . . . . . . . . . . . . E29
How to adjust . . . . . . . . . . . . . . . . . . . . . . . . . . . . . . . . . . . . . . . . . . . . . . . . . . . . . . . . . . . . . . . . . . . E29
ADJUSTMENT menu . . . . . . . . . . . . . . . . . . . . . . . . . . . . . . . . . . . . . . . . . . . . . . . . . . . . . . . . . . . . . E30
GAIN CONTROL menu . . . . . . . . . . . . . . . . . . . . . . . . . . . . . . . . . . . . . . . . . . . . . . . . . . . . . . . . . . . E31
COLOR CONTROL menu . . . . . . . . . . . . . . . . . . . . . . . . . . . . . . . . . . . . . . . . . . . . . . . . . . . . . . . . . E31
MODE SELECT menu . . . . . . . . . . . . . . . . . . . . . . . . . . . . . . . . . . . . . . . . . . . . . . . . . . . . . . . . . . . . E32
Preventing changes to adjusted values (ADJUSTMENT LOCK) . . . . . . . . . . . . . . . . . . . . . . . . . . . E33
Resetting adjustment values for specific menu (RESET) . . . . . . . . . . . . . . . . . . . . . . . . . . . . . . . . . E33
Resetting all adjustment values (ALL RESET) . . . . . . . . . . . . . . . . . . . . . . . . . . . . . . . . . . . . . . . . . E34
Installing set-up information and the ICC profile (For Windows) . . . . . . . . . . . . . . . . . . . . . . . . . . . . . . E35
Information about the ColorSync profile (For MacOS) . . . . . . . . . . . . . . . . . . . . . . . . . . . . . . . . . . . . . . E38
E3
Page 6

Table of Contents
TV/AV mode
Watching TV . . . . . . . . . . . . . . . . . . . . . . . . . . . . . . . . . . . . . . . . . . . . . . . . . . . . . . . . . . . . . . . . . . . . . . . E39
Watching TV . . . . . . . . . . . . . . . . . . . . . . . . . . . . . . . . . . . . . . . . . . . . . . . . . . . . . . . . . . . . . . . . . . . . E39
Selecting the channels . . . . . . . . . . . . . . . . . . . . . . . . . . . . . . . . . . . . . . . . . . . . . . . . . . . . . . . . . . . . E39
Selecting MTS (Multi ch TV Sound) . . . . . . . . . . . . . . . . . . . . . . . . . . . . . . . . . . . . . . . . . . . . . . . . . . E40
Returning to previous channel (FLASHBACK) . . . . . . . . . . . . . . . . . . . . . . . . . . . . . . . . . . . . . . . . . E40
Setting the Closed Caption (CLOSED CAPTION) . . . . . . . . . . . . . . . . . . . . . . . . . . . . . . . . . . . . . . E41
Adjusting the V-chip settings (V-CHIP) . . . . . . . . . . . . . . . . . . . . . . . . . . . . . . . . . . . . . . . . . . . . . . . E42
Enjoying DVDs, games, and other equipment . . . . . . . . . . . . . . . . . . . . . . . . . . . . . . . . . . . . . . . . . . . . E48
Handy features (for TV/AV mode) . . . . . . . . . . . . . . . . . . . . . . . . . . . . . . . . . . . . . . . . . . . . . . . . . . . . . . E49
Switching power off after a specified length of time (SLEEP) . . . . . . . . . . . . . . . . . . . . . . . . . . . . . E49
Adjusting the display . . . . . . . . . . . . . . . . . . . . . . . . . . . . . . . . . . . . . . . . . . . . . . . . . . . . . . . . . . . . . . . . E50
How to adjust . . . . . . . . . . . . . . . . . . . . . . . . . . . . . . . . . . . . . . . . . . . . . . . . . . . . . . . . . . . . . . . . . . . E50
VIDEO ADJUST menu . . . . . . . . . . . . . . . . . . . . . . . . . . . . . . . . . . . . . . . . . . . . . . . . . . . . . . . . . . . . E51
CHANNEL SETTING menu (TV mode only) . . . . . . . . . . . . . . . . . . . . . . . . . . . . . . . . . . . . . . . . . . . E51
MODE SELECT menu . . . . . . . . . . . . . . . . . . . . . . . . . . . . . . . . . . . . . . . . . . . . . . . . . . . . . . . . . . . . E51
CLOSED CAPTION menu . . . . . . . . . . . . . . . . . . . . . . . . . . . . . . . . . . . . . . . . . . . . . . . . . . . . . . . . . E52
V-CHIP BLOCK menu . . . . . . . . . . . . . . . . . . . . . . . . . . . . . . . . . . . . . . . . . . . . . . . . . . . . . . . . . . . . E52
Preventing changes to adjusted values (ADJUSTMENT LOCK) . . . . . . . . . . . . . . . . . . . . . . . . . . . E53
Resetting adjustment values for specific menu (RESET) . . . . . . . . . . . . . . . . . . . . . . . . . . . . . . . . . E53
Resetting all adjustment values (ALL RESET) . . . . . . . . . . . . . . . . . . . . . . . . . . . . . . . . . . . . . . . . . E54
Other features
Other features . . . . . . . . . . . . . . . . . . . . . . . . . . . . . . . . . . . . . . . . . . . . . . . . . . . . . . . . . . . . . . . . . . . . . . E55
Checking the current channel and audio mode on screen (DISPLAY) . . . . . . . . . . . . . . . . . . . . . . E55
Muting the sound (MUTE) . . . . . . . . . . . . . . . . . . . . . . . . . . . . . . . . . . . . . . . . . . . . . . . . . . . . . . . . . E55
Changing BRIGHT MODE . . . . . . . . . . . . . . . . . . . . . . . . . . . . . . . . . . . . . . . . . . . . . . . . . . . . . . . . . E56
Using headphones (commercially available) . . . . . . . . . . . . . . . . . . . . . . . . . . . . . . . . . . . . . . . . . . E56
Appendix
Monitor care . . . . . . . . . . . . . . . . . . . . . . . . . . . . . . . . . . . . . . . . . . . . . . . . . . . . . . . . . . . . . . . . . . . . . . . E57
Troubleshooting . . . . . . . . . . . . . . . . . . . . . . . . . . . . . . . . . . . . . . . . . . . . . . . . . . . . . . . . . . . . . . . . . E57
Monitor care . . . . . . . . . . . . . . . . . . . . . . . . . . . . . . . . . . . . . . . . . . . . . . . . . . . . . . . . . . . . . . . . . . . . E58
Storage . . . . . . . . . . . . . . . . . . . . . . . . . . . . . . . . . . . . . . . . . . . . . . . . . . . . . . . . . . . . . . . . . . . . . . . . E58
Specifications . . . . . . . . . . . . . . . . . . . . . . . . . . . . . . . . . . . . . . . . . . . . . . . . . . . . . . . . . . . . . . . . . . . . . . E59
E4
Page 7
Tips and safety precautions
Thank you for your purchase of the Sharp LCD monitor. To ensure safety and many years of trouble-free
operation of your product, please read the safety precautions carefully before using this monitor.
Important safety precautions
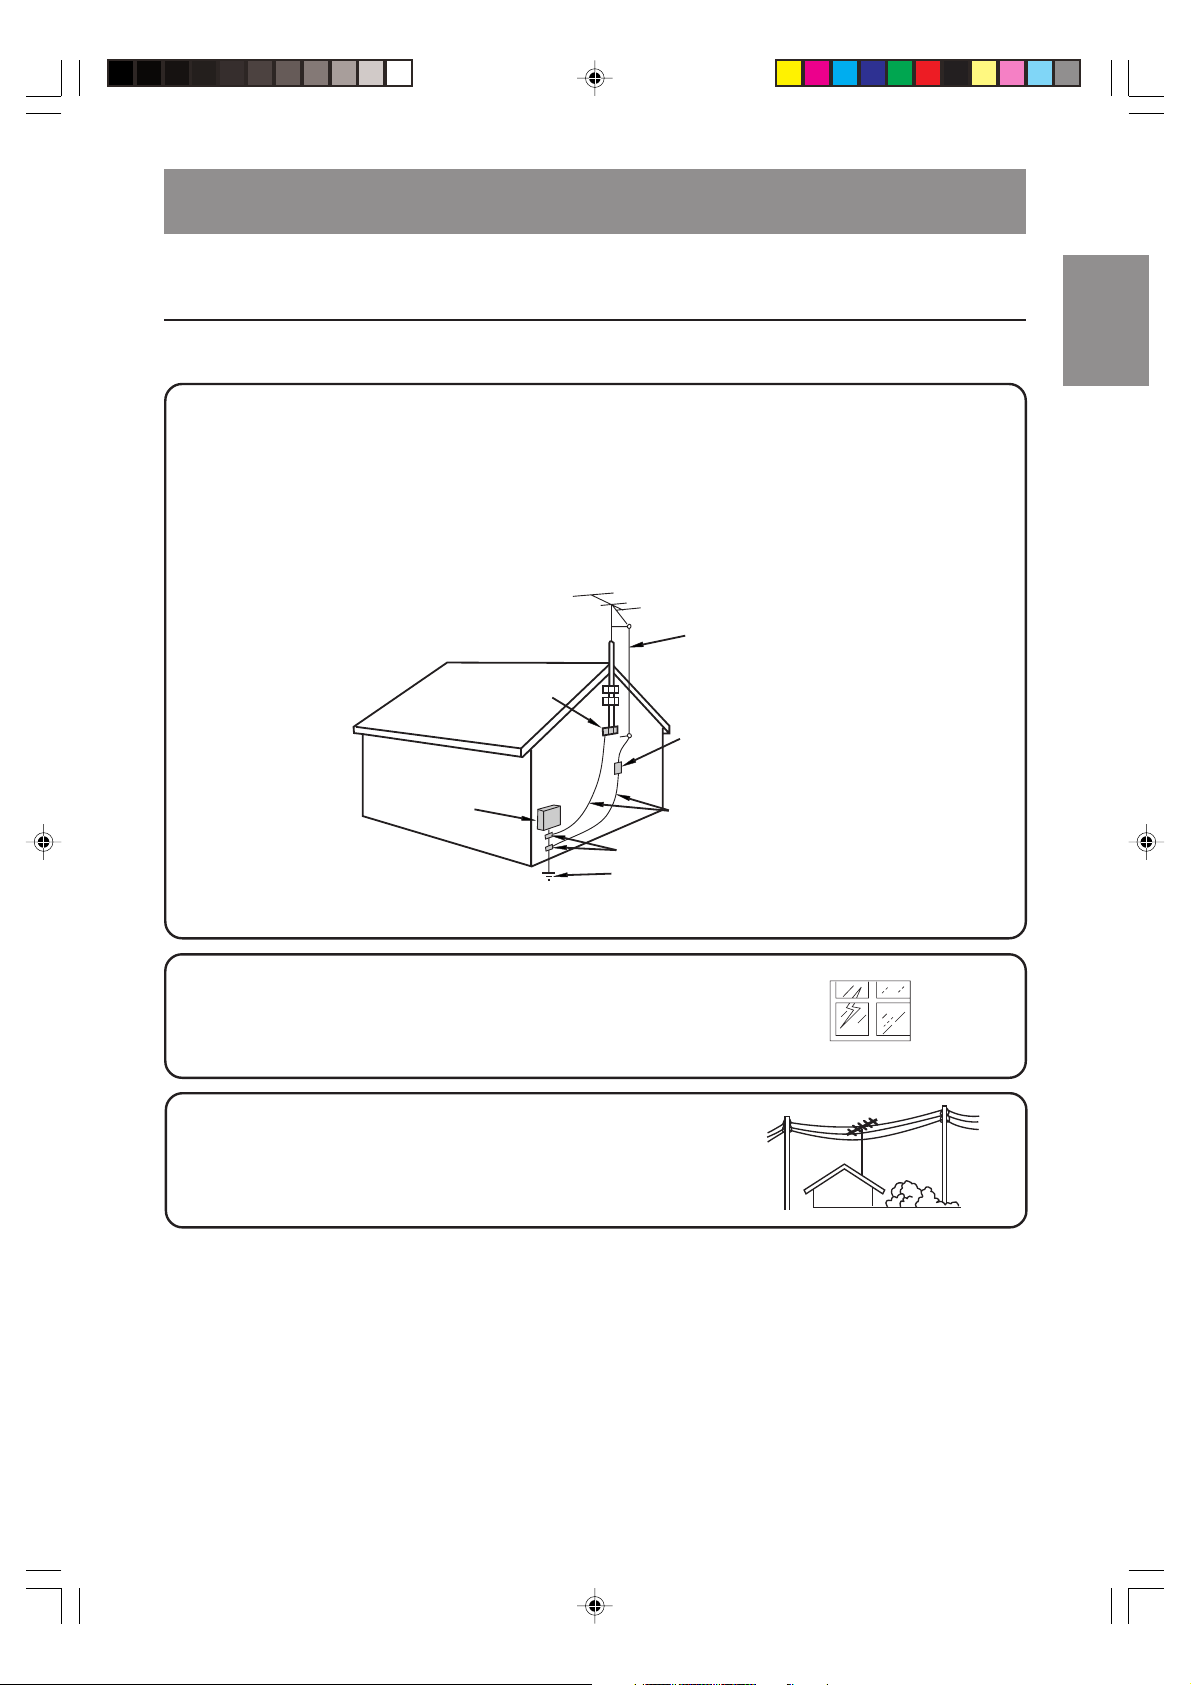
- If an outside antenna is connected to the equipment, be sure the antenna system is grounded so
as to provide some protection against voltage surges and built-up static charges.
Section 810 of the National Electrical Code provides information with respect to proper grounding
of the mast and supporting structure, grounding of the lead-in wire to an antenna discharge unit,
size of grounding conductors, location of antenna-discharge unit, connection to grounding
electrodes, and requirements for the grounding electrode.
EXAMPLE OF ANTENNA GROUNDING AS PER
NATIONAL ELECTRICAL CODE
ANTENNA
LEAD IN
WIRE
GROUND
CLAMP
ANTENNA
ELECTRIC
SERVICE
EQUIPMENT
NEC-NATIONAL ELECTRICAL CODE
GROUND CLAMPS
POWER SERVICE GROUNDING
ELECTRODE SYSTEM
(NEC ART 250, PART H)
DISCHARGE UNIT
(NEC SECTION 810-20)
GROUNDING CONDUCTORS
(NEC SECTION 810-21)
EnglishDeutschFrançaisItalianoEspañolEnglish
- For added protection for this equipment during a lightning
storm, or when it is left unattended and unused for long periods
of time, unplug it from the wall outlet and disconnect the
antenna. This will prevent damage to the equipment due to
lightning and power-line surges.
- An outside antenna system should not be located in the
vicinity of overhead power lines or other electric light or
power circuits, or where it can fall into such power lines or
circuits. When installing an outside antenna system,
extreme care should be taken to keep from touching such
power lines or circuits as contact with them might be fatal.
E5
Page 8

Tips and safety precautions
- The TFT color LCD panel used in this monitor is
made with the application of high precision
technology. However, there may be minute
points on the screen where pixels never light or
are permanently lit. Also, if the screen is viewed
from an acute angle there may be uneven colors
or brightness. Please note that these are not
malfunctions but common phenomena of LCDs
and will not affect the performance of the
monitor.
- Do not leave the screen displaying idly for long
periods of time, as this could cause an
afterimage to remain.
- If the brightness is adjusted to the minimum
setting it may be difficult to see the screen.
- The quality of the computer signal may influence
the quality of the display. We recommend using a
computer able to emit high quality video signals.
- Never rub or tap the monitor with hard objects.
- Please understand that Sharp Corporation bears
no responsibility for errors made during use by
the customer or a third party, nor for any other
malfunctions or damage to this product arising
during use, except where indemnity liability is
recognized under law.
- This monitor and its accessories may be
upgraded without advance notice.
Location
- Do not use the monitor where ventilation is poor,
where there is a lot of dust, where humidity is
high, or where the monitor may come into
contact with oil or steam, as this could lead to
fire.
- Ensure that the monitor does not come into
contact with water or other fluids. Ensure that no
objects such as paper clips or pins enter the
monitor as this could lead to fire or electric
shock.
- Do not place the monitor on top of unstable
objects or in unsafe places. Do not allow the
monitor to come into contact with strong shocks
or vibrations. Causing the monitor to fall or
topple over may damage it.
- Do not use in places where the monitor will be
subject to direct sunlight, near heating
equipment or anywhere else where there is
likelihood of high temperature, as this may lead
to generation of excessive heat and outbreak of
fire.
The Power Cord
- Do not damage the power cord nor place heavy
objects on it, stretch it or over bend it. Also, do
not add extension cords. Damage to the cord
may result in fire or electric shock.
- Use only the power cord supplied with the monitor.
- Insert the power plug directly into the AC outlet.
Adding an extension cord may lead to fire as a
result of overheating.
- Do not remove or insert the power plug with wet
hands. Doing so could result in electric shock.
Use of AC adapter
- Do not use the AC adapter for other than the
specified equipment.
- Unplug the AC adapter if it is not used for long
time.
- Do not place any objects on the AC adapter.
- Do not use the AC adapter outdoors.
- Do not attempt to repair the AC adapter if it is
broken or malfunctioning. Refer the servicing to
the service representative.
- Do not try to open the AC adapter.
- Do not use water or wet cloth for cleaning the
AC adapter.
Manual Scope
- In this manual, Microsoft Windows XP will be
referred to as “Windows XP”, Microsoft Windows
Millennium as “Windows Me”, Microsoft
Windows 2000 as “Windows 2000”, Microsoft
Windows 98 as “Windows 98”, Microsoft
Windows 95 as “Windows 95”, and Microsoft
Windows Version 3.1 as “Windows 3.1”. When
there is no need to distinguish between
programs, the term “Windows” will be used.
- Microsoft and Windows are registered
trademarks of Microsoft Corporation.
- Macintosh is a registered trademark of Apple
Computer, Inc.
- All other brand and product names are
trademarks or registered trademarks of their
respective holders.
E6
Page 9
Tips and safety precautions
Monitor and accessory checklist
Please check that the following items are included
in the package.
-
LCD monitor (1)
- AC adapter (1)
(model name: NL-A70J)
PC analog signal cable (1)
(model name: 0NIT15V1-0183)
-
PC audio cable (1)
(model name: 0NIT17A3-U006)
- Antenna cable (1)
(model name: 0NIM17W1-0154)
- Remote control (1)
- “AAA” size (UM/SUM-4) dry battery (2)
- Cable clamp (1)
- CD-ROM (Utility Disk for Windows/Macintosh) (1)
- Operation manual (1)
Notes:
- You are advised to retain the carton in case the
monitor needs to be transported.
- Sharp Corporation holds authorship rights to the
Utility Disk program. Do not reproduce it without
permission.
- The shape of the supplied accessories may not
be exactly same as shown in this manual.
EnglishDeutschFrançaisItalianoEspañolEnglish
E7
Page 10
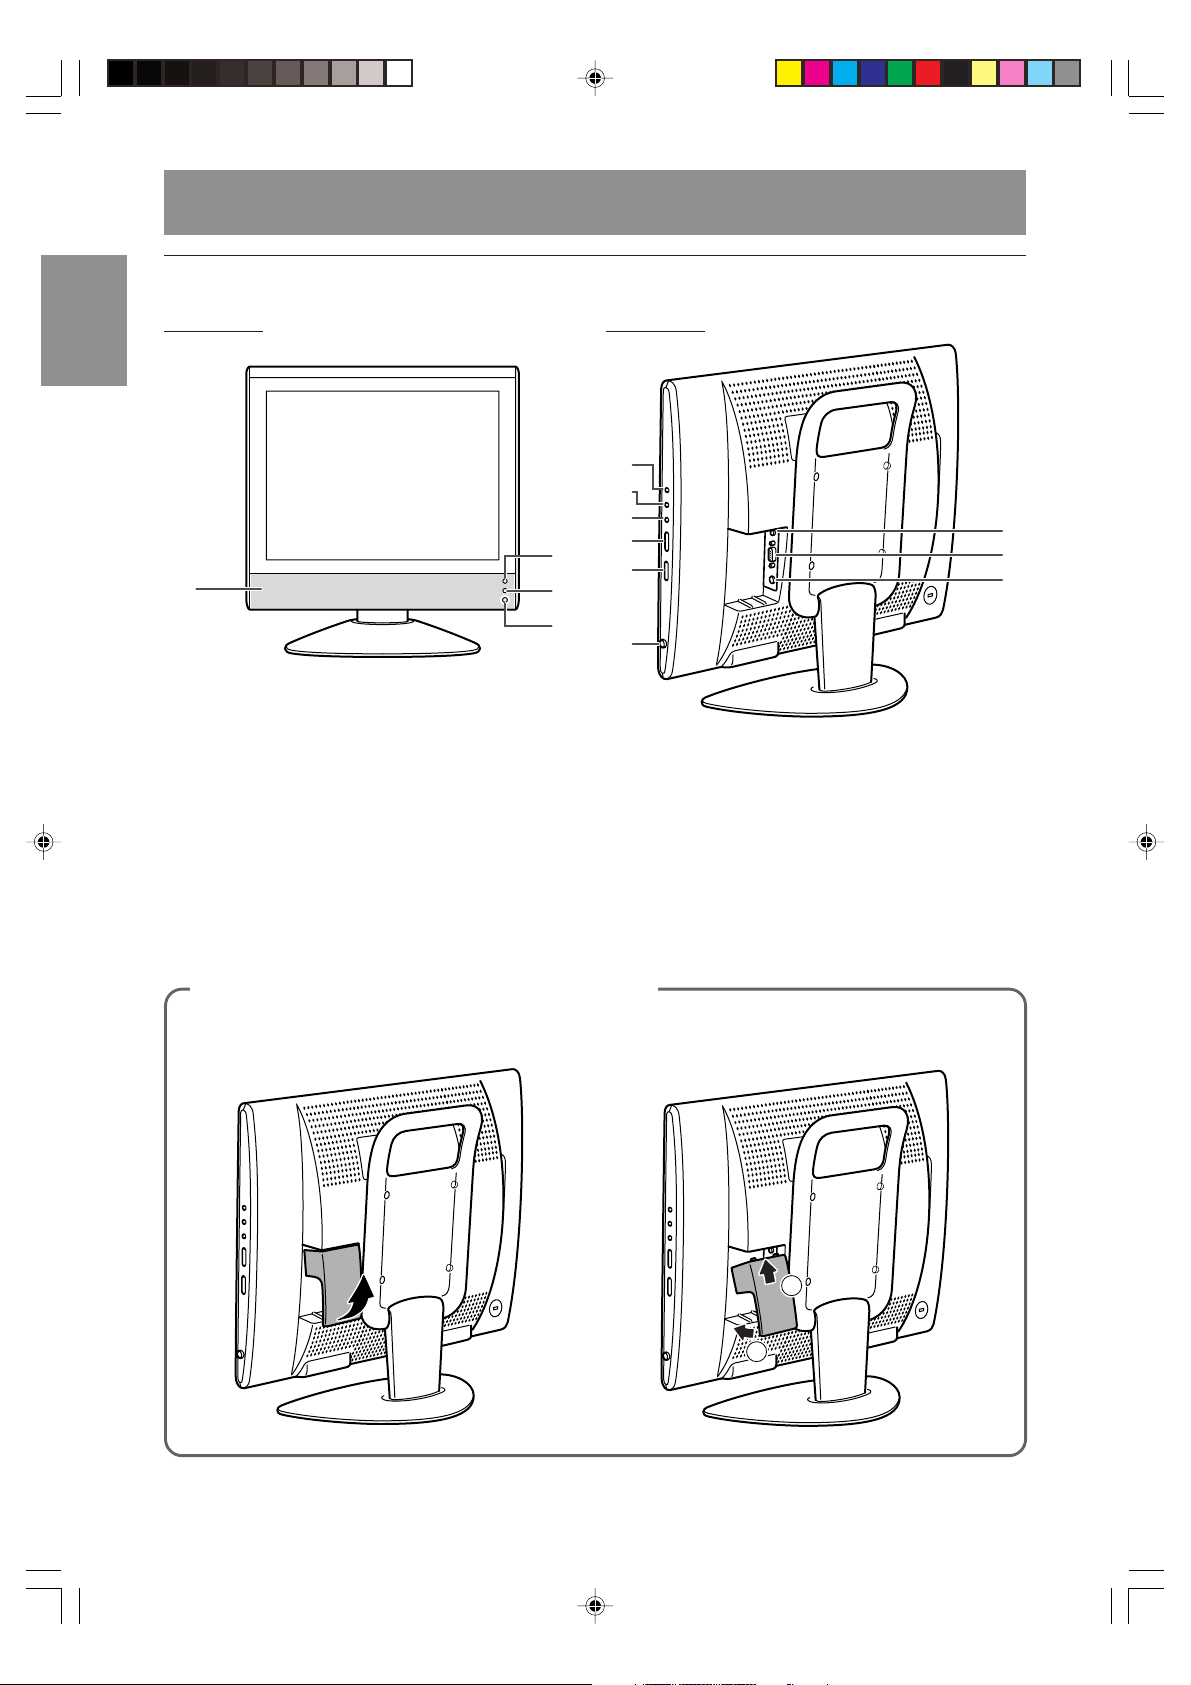
Main unit
Product description
Front view
1
1. Speakers
2. Power LED
Green: in use
Red: in standby mode
Orange: in power-saving mode
(only for PC mode)
Off: power off
3. Remote sensor window
4. Headphone terminal
Right view
5
6
7
2
3
4
8
9
10
5. INPUT button
6. MENU button
7. ENTER/BRIGHT MODE button
8. CH (channel) buttons
9. VOL/BRIGHT buttons
10. MAIN POWER button
11. PC audio input terminal
12. PC analog RGB input terminal
13. Power input terminal
11
12
13
Removing/replacing the terminal cover
Removing the cover
E8
Replacing the cover
1
2
Page 11
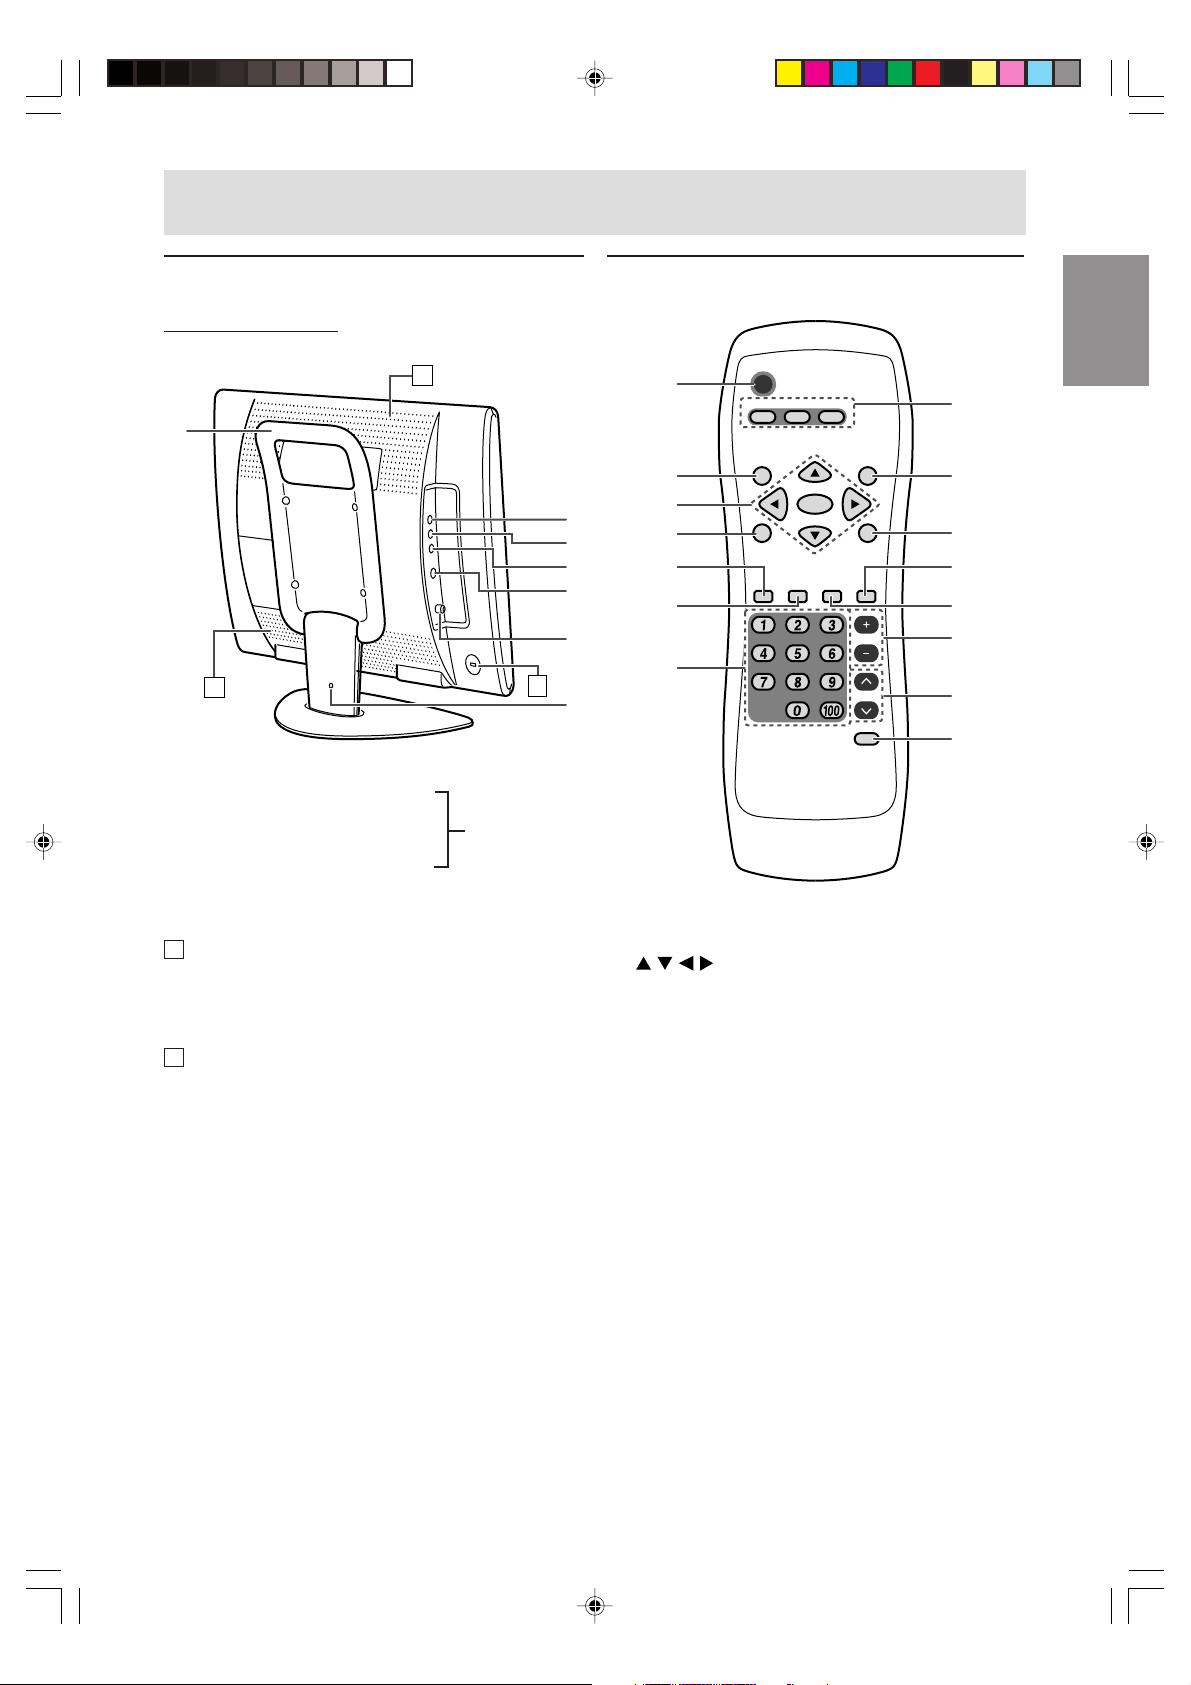
Product description
0
Main unit
Left view/rear view
A
14
A
14.Handle
15. Video input terminal
16. Audio input terminal - Left
17. Audio input terminal - Right
18. S-video input terminal
19. Antenna input terminal
20. Lug-hole for cable clamp (See next page.)
A Ventilation openings
Never block the ventilation openings as this may
lead to overheating inside the monitor and result
in malfunction.
B Security lock anchor
By connecting a security lock (commercially
available) to the security lock anchor, the monitor
is fixed so that it cannot be transported. The
security slot works in conjunction with Kensington
Micro Saver Security Systems.
B
AV-IN
Remote control
POWER
1
2
15
16
17
18
3
4
5
6
19
7
2
1. POWER button
2. SLEEP button
3.
buttons and ENTER button
4. BRIGHT MODE button
5. DISPLAY button
6. CC (Closed Caption) button
7. Channel buttons
8. Input buttons (PC, TV, and AV)
9. MENU button
10. BRIGHT button
11. MUTE button
12. MTS (Multi ch TV Sound) button
13. VOL buttons
14. CH (channel) buttons
15. FLASHBACK button
PC AVTV
SLEEP
BRIGHT
MODE
DISPLAY
CC MTS MUTE
ENTER
MENU
BRIGHT
VOL
CH
FLASHBACK
EnglishDeutschFrançaisItalianoEspañolEnglish
8
9
10
11
12
13
14
15
E9
Page 12
Product description
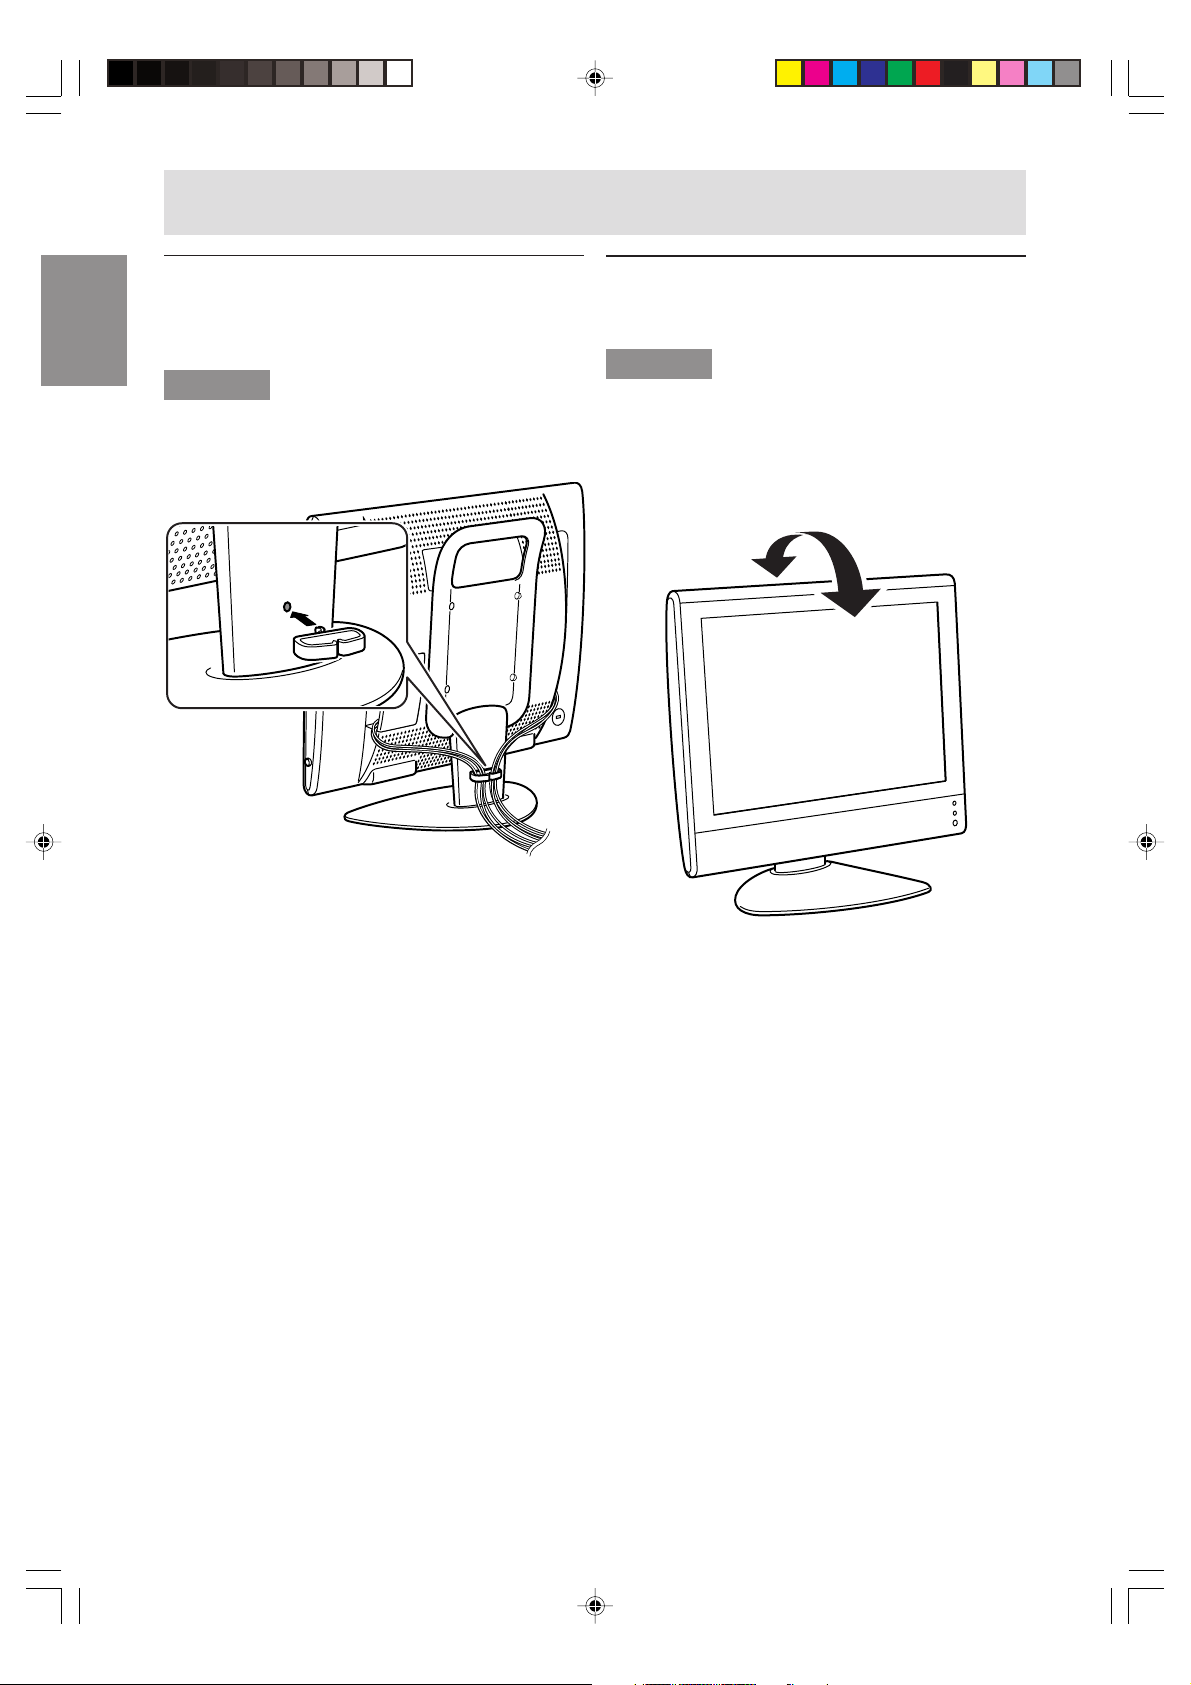
Cable clamp
Fix the cables and cords with the supplied cable
clamp.
CAUTION!
- When adjusting the viewing angle, cables and
cords may be pulled. Therefore, fix the cables
and cords with sufficient slack.
Angle adjustment
Adjust to an easy to view angle.
CAUTION!
- Be sure to hold both sides of the monitor when
adjusting the viewing angle. The LCD panel
used in this monitor is made of glass. Pressure
from hands on the LCD panel could cause
damage.
- Be careful not to allow your fingers to be pinched.
approx. 20°
approx. 5°
E10
Page 13
Remote control
Using the remote control
Use the remote control by pointing it towards the remote sensor window on the monitor. Objects between
the remote control and sensor window may prevent proper operation.
Cautions regarding use of remote control
- Do not expose the remote control to shock.
In addition, do not expose the remote control to liquid, and do not place in an area with high humidity.
- Do not install or place the remote control under direct sunlight. The heat may deform the unit.
- The remote control may not work properly if the remote sensor window of the monitor is under direct
sunlight or strong lighting. In such case, change the angle of the lighting or monitor, or operate the
remote control closer to the remote sensor window.
- Do not use the remote control simultaneously with remote controls of other equipments.
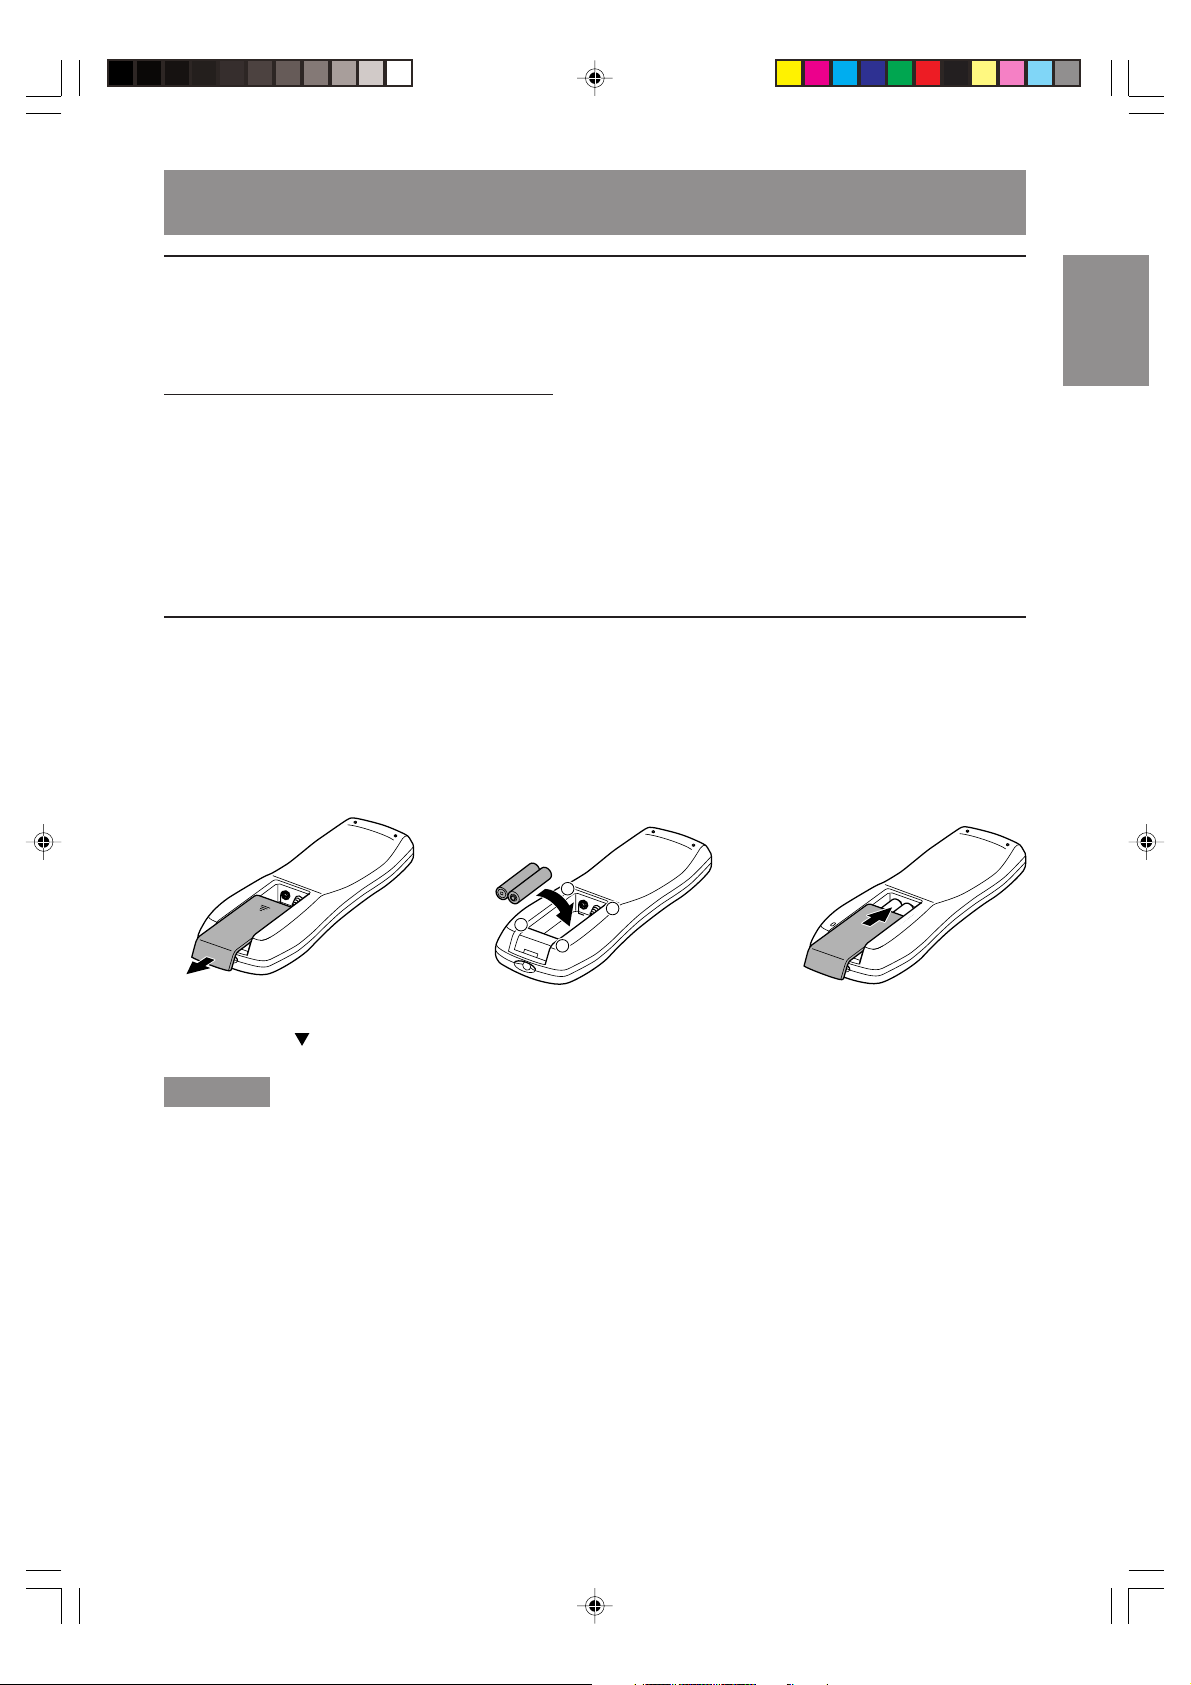
Batteries for the remote control
Before using the monitor for the first time, install two (“AAA” size, UM/SUM-4) batteries (supplied).
When the batteries become depleted and the remote control fails to operate, replace the batteries with
new (“AAA” size, UM/SUM-4) batteries.
EnglishDeutschFrançaisItalianoEspañolEnglish
1 Open the battery
cover.
Slide the cover while
pressing the ( ) part.
CAUTION!
Improper use of batteries can result in chemical leakage and/or explosion. Be sure to follow the
instructions below.
- Place batteries with their terminals corresponding to the (+) and (–) indications.
- Different types of batteries have different characteristics. Do not mix batteries of different types.
- Do not mix old and new batteries. Mixing old and new batteries can shorten the life of new battery
and/or cause the old battery to leak chemicals.
- Remove batteries when they become weak.
Chemicals that leak from batteries can cause a rash. If chemical leakage is found, wipe with a cloth.
- The batteries supplied with the product may have a shorter life expectancy due to storage conditions.
- If the remote control will not be used for an extended period of time, remove the batteries from the
remote control.
2 Insert two (“AAA” size,
UM/SUM-4) batteries.
+
-
-
+
Position the positive and
negative ends of the batteries
as indicated in the compartment.
3 Close the battery
cover.
Engage the claw on the
cover into the battery
housing and slide shut.
E11
Page 14

Connecting the monitor to a computer
CAUTION!
- When connecting, ensure that the monitor and all the equipment you are connecting to it are switched
off.
- Be careful not to over bend the cable or add extension cords as this could lead to a malfunction.
- When using the monitor for the first time or after having changed the system settings during use,
perform an automatic screen adjustment (see page E20).
See page E8 for information on removing/replacing the terminal cover.
PC audio cable
(accessory)
PC analog signal cable
(accessory)
Audio output terminal
The monitor’s speakers will play the computer’s
audio when you connect the two devices with the
PC audio cable accessory.
Notes:
- Depending on the computer or OS, you may
have to install the set-up information for the
monitor. (See page E35.)
- When connecting to a notebook and the
notebook computer’s screen is set so that it is
displaying at the same time, the MS-DOS screen
may not be able to display properly. In this case,
change the settings so that only the monitor is
displaying.
Analog RGB terminal
(Mini D-sub15 pin 3 rows)
Paying attention to the connector direction, firmly
insert the signal cable straight into the connector, and
then tighten the screws at both ends.
If connecting to a D-sub15 pin 2 row Apple Power
Macintosh, attach a Macintosh conversion adapter
(commercially available) to the analog signal
cable.
Power Macintosh
Macintosh conversion adapter
E12
Page 15
Antenna connection
CAUTION!
- When connecting, ensure that the monitor is switched off.
Antennas
The antenna requirements for good color television reception are more important than those for black &
white television reception. For this reason, a good quality outdoor antenna is strongly recommended.
The following is a brief explanation of the type of connections that are provided with the various antenna
systems.
1. A 75-ohm system is generally a round cable with F-type
connector that can easily be attached to a terminal without
tools (not supplied).
2. A 300-ohm system is a flat “twin-lead” cable that can be
attached to a 75-ohm terminal through a 300-75-ohm
adapter (not supplied).
75-ohm coaxial cable (round)
300-ohm twin-lead cable (flat)
F-type connector
Notes:
- The 75-ohm coaxial cable is recommended.
- TV memory for channels is empty at shipment. To receive channels, use the CHANNEL SETTING
menu. (See pages E21 through E24.)
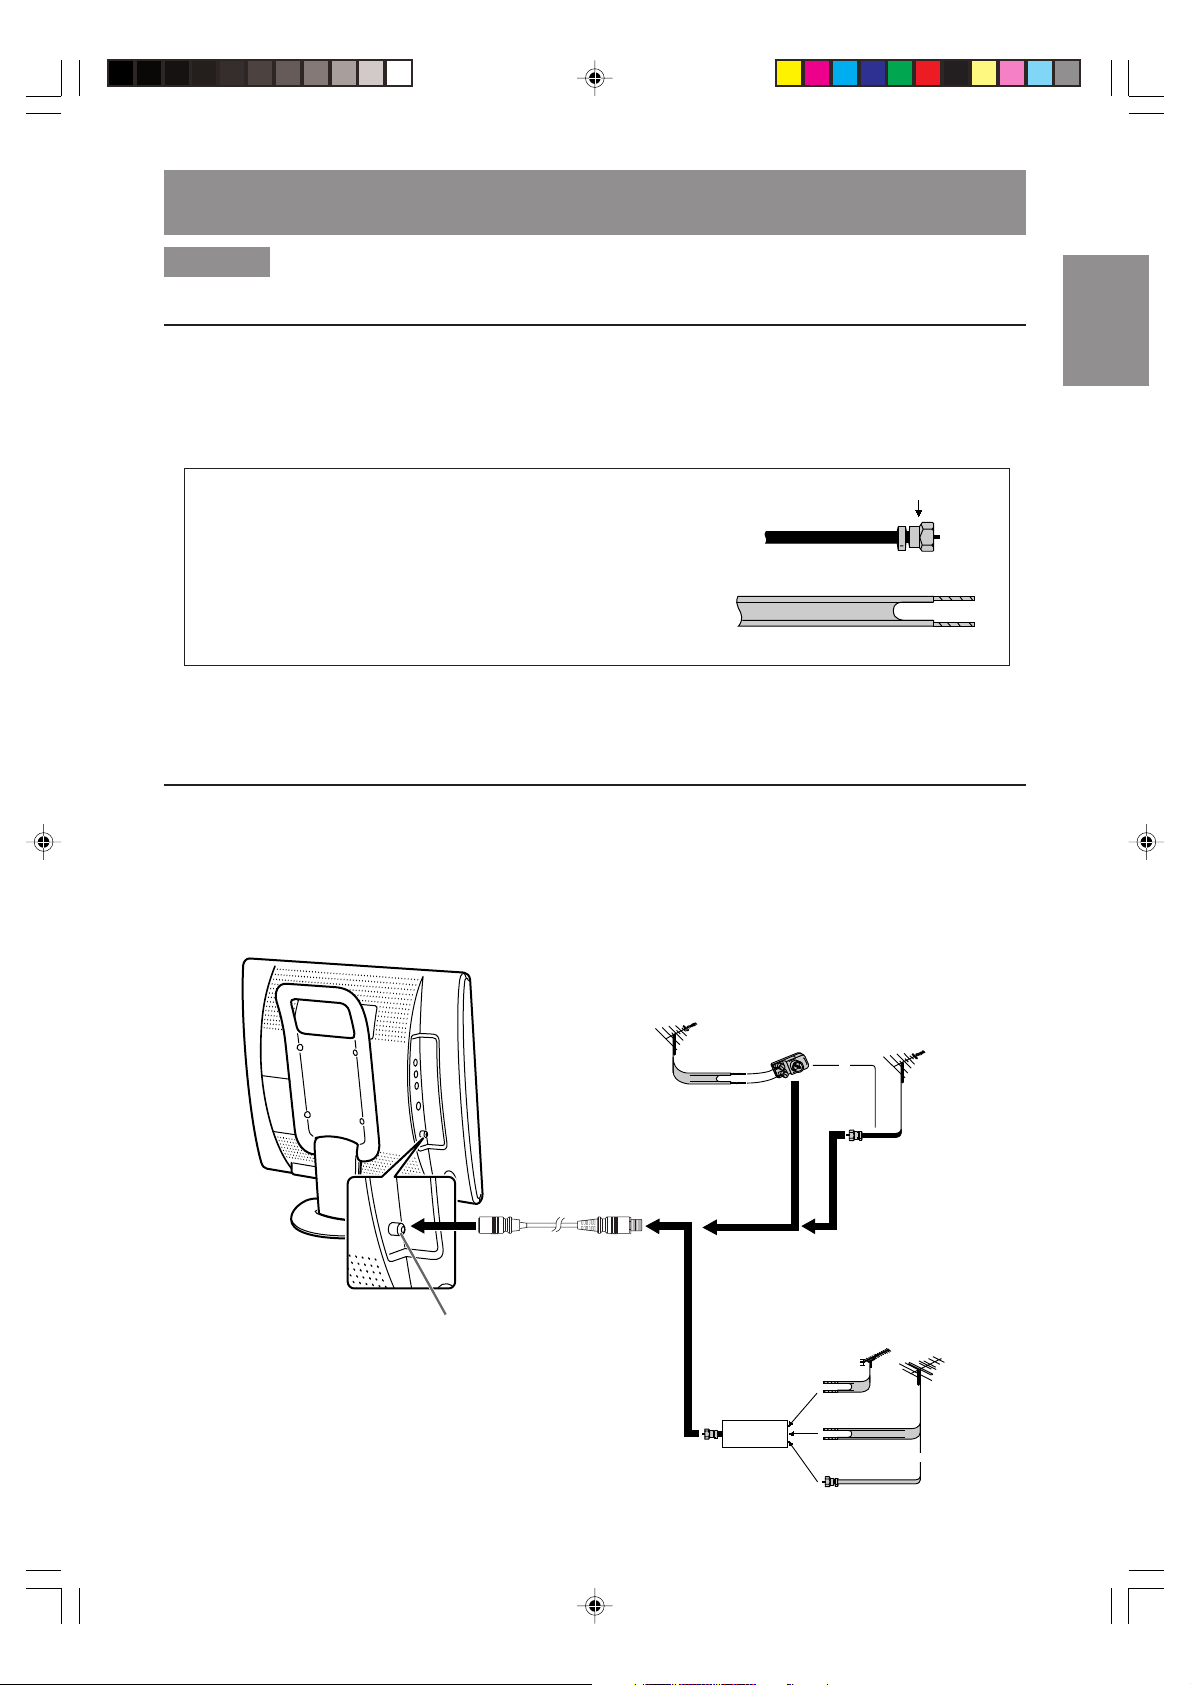
Outdoor antenna connection
- Use one of the following two diagrams if you connect an outdoor antenna.
A: Using a VHF/UHF combination outdoor antenna.
B: Using separate VHF and/or UHF outdoor antennas.
- Connect the outdoor antenna cable lead-in to the ANT (antenna input) terminal on the left side of the
monitor.
EnglishDeutschFrançaisItalianoEspañolEnglish
Antenna cable (supplied)
Antenna input terminal
(ANT.)
E13
VHF/UHF
antenna
A. Combination VHF/UHF Antenna
300-ohm
twin-lead
300/75-ohm
adapter
(not supplied)
VHF/UHF
antenna
or
75-ohm
coaxial cable
B. Separate VHF and/or
UHF Antennas
UHF
VHF
antenna
or
Combiner
(not supplied)
IN
OUT
300-ohm
twin-lead
300-ohm
twin-lead
75-ohm
coaxial cable
antenna
Page 16
Antenna connection
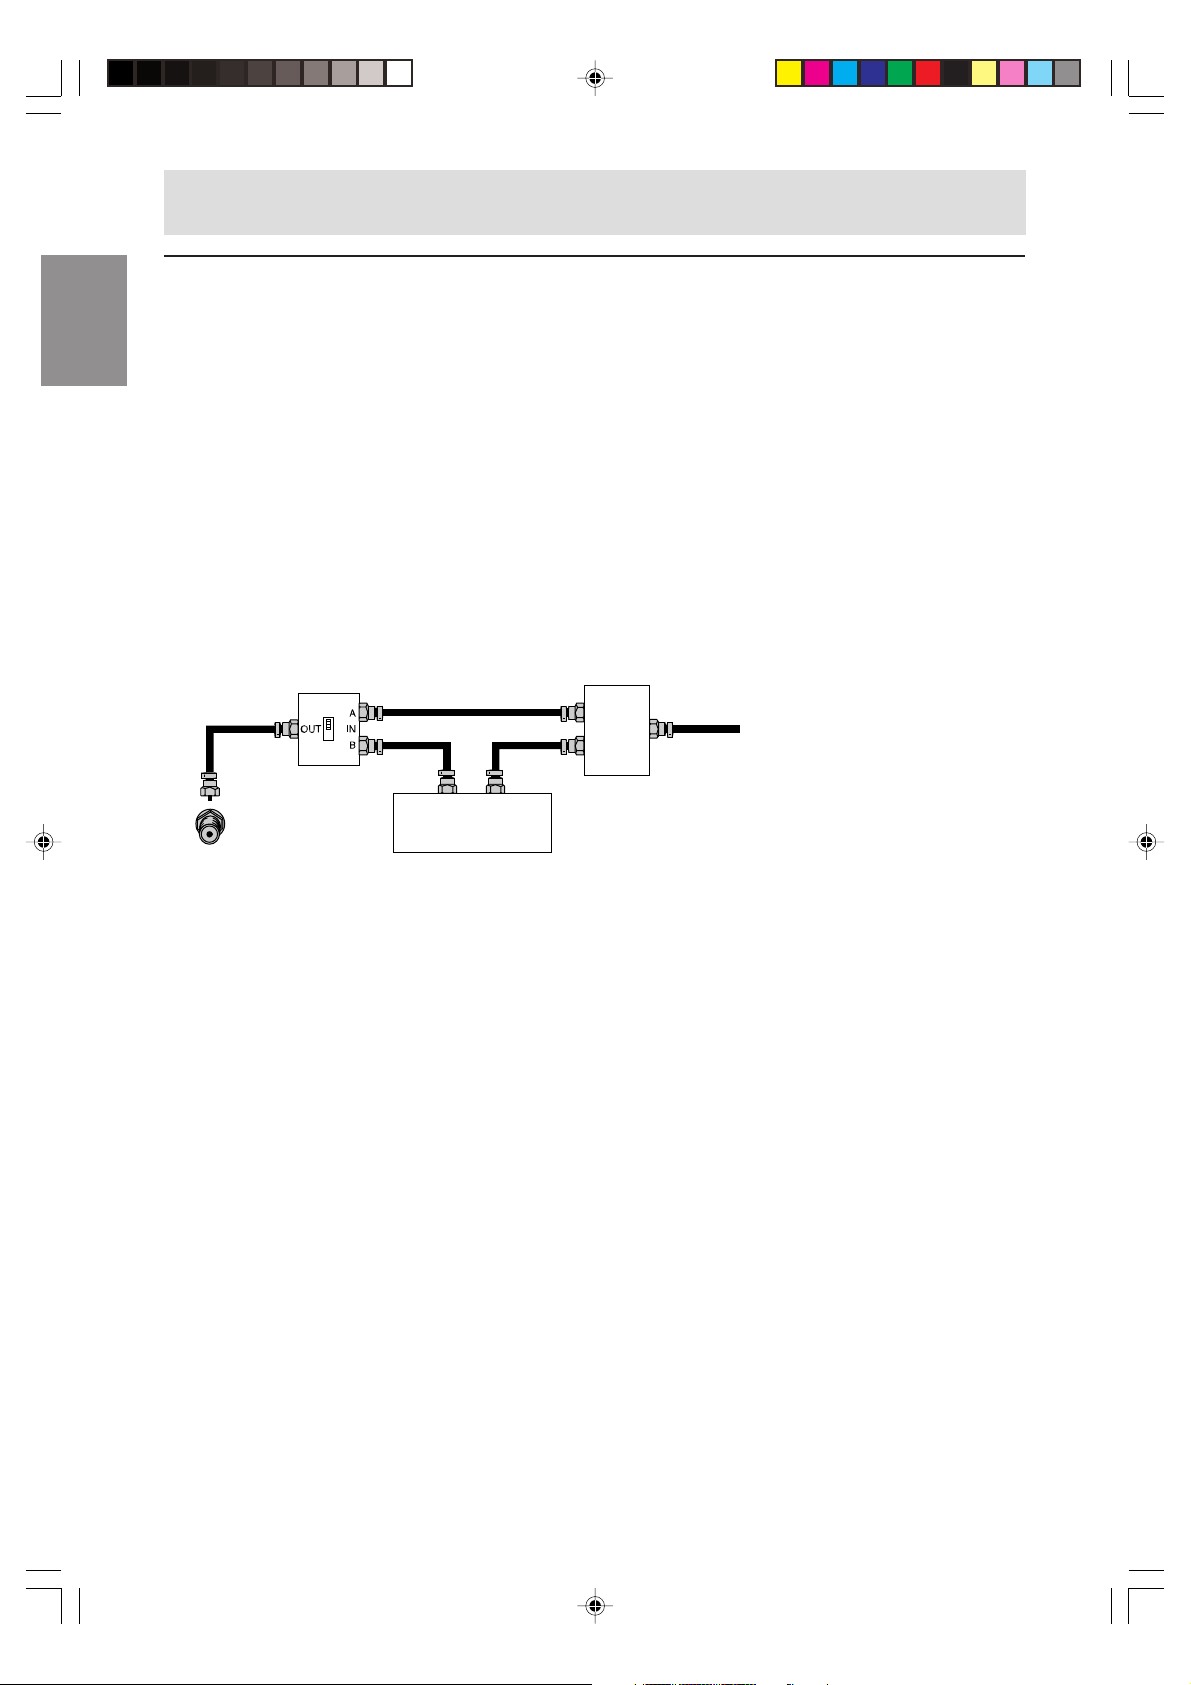
Cable TV (CATV) connection
- A 75-ohm coaxial cable connector is built into the set for easy hookup. When connecting the 75-ohm
coaxial cable to the set, screw the 75-ohm cable to the ANT (antenna input) terminal.
- Some cable TV companies offer “premium pay channels”. Since the signals of these premium pay
channels are scrambled, a cable TV converter/descrambler is generally provided to the subscriber by
the cable TV company. This converter/descrambler is necessary for normal viewing of the scrambled
channels. (Set your monitor to channel 3 or 4, typically one of these channels is used. If this is
unknown, consult your cable TV company.) For more specific instructions on installing cable TV,
consult your cable TV company. One possible method of utilizing the converter/descrambler provided
by your cable TV company is explained below.
Please note: An RF switch provided with two inputs (A and B) is required (not supplied).
“A” position on the RF switch (not supplied): You can view all unscrambled channels by using the
monitor’s channel buttons.
“B” position on the RF switch (not supplied): You can view the scrambled channels via the converter/
descrambler by using the converter’s channel keys.
RF switch (not supplied)
OUT
Cable TV converter/
IN
descrambler
(not supplied)
Two-set
signal
splitter
(not
supplied)
Cable TV Line
Note:
- Consult your SHARP Dealer or Service Center for the type of splitter, RF switch or combiner that might
be required.
E14
Page 17
Connecting the monitor to AV equipment
CAUTION!
- Ensure that the monitor and all the equipment you are connecting to it are switched off before you
begin.
Examples of equipment you can connect
EnglishDeutschFrançaisItalianoEspañolEnglish
VCRs
Video cameras
Home video game systems
Videodisc players
DVD players etc.
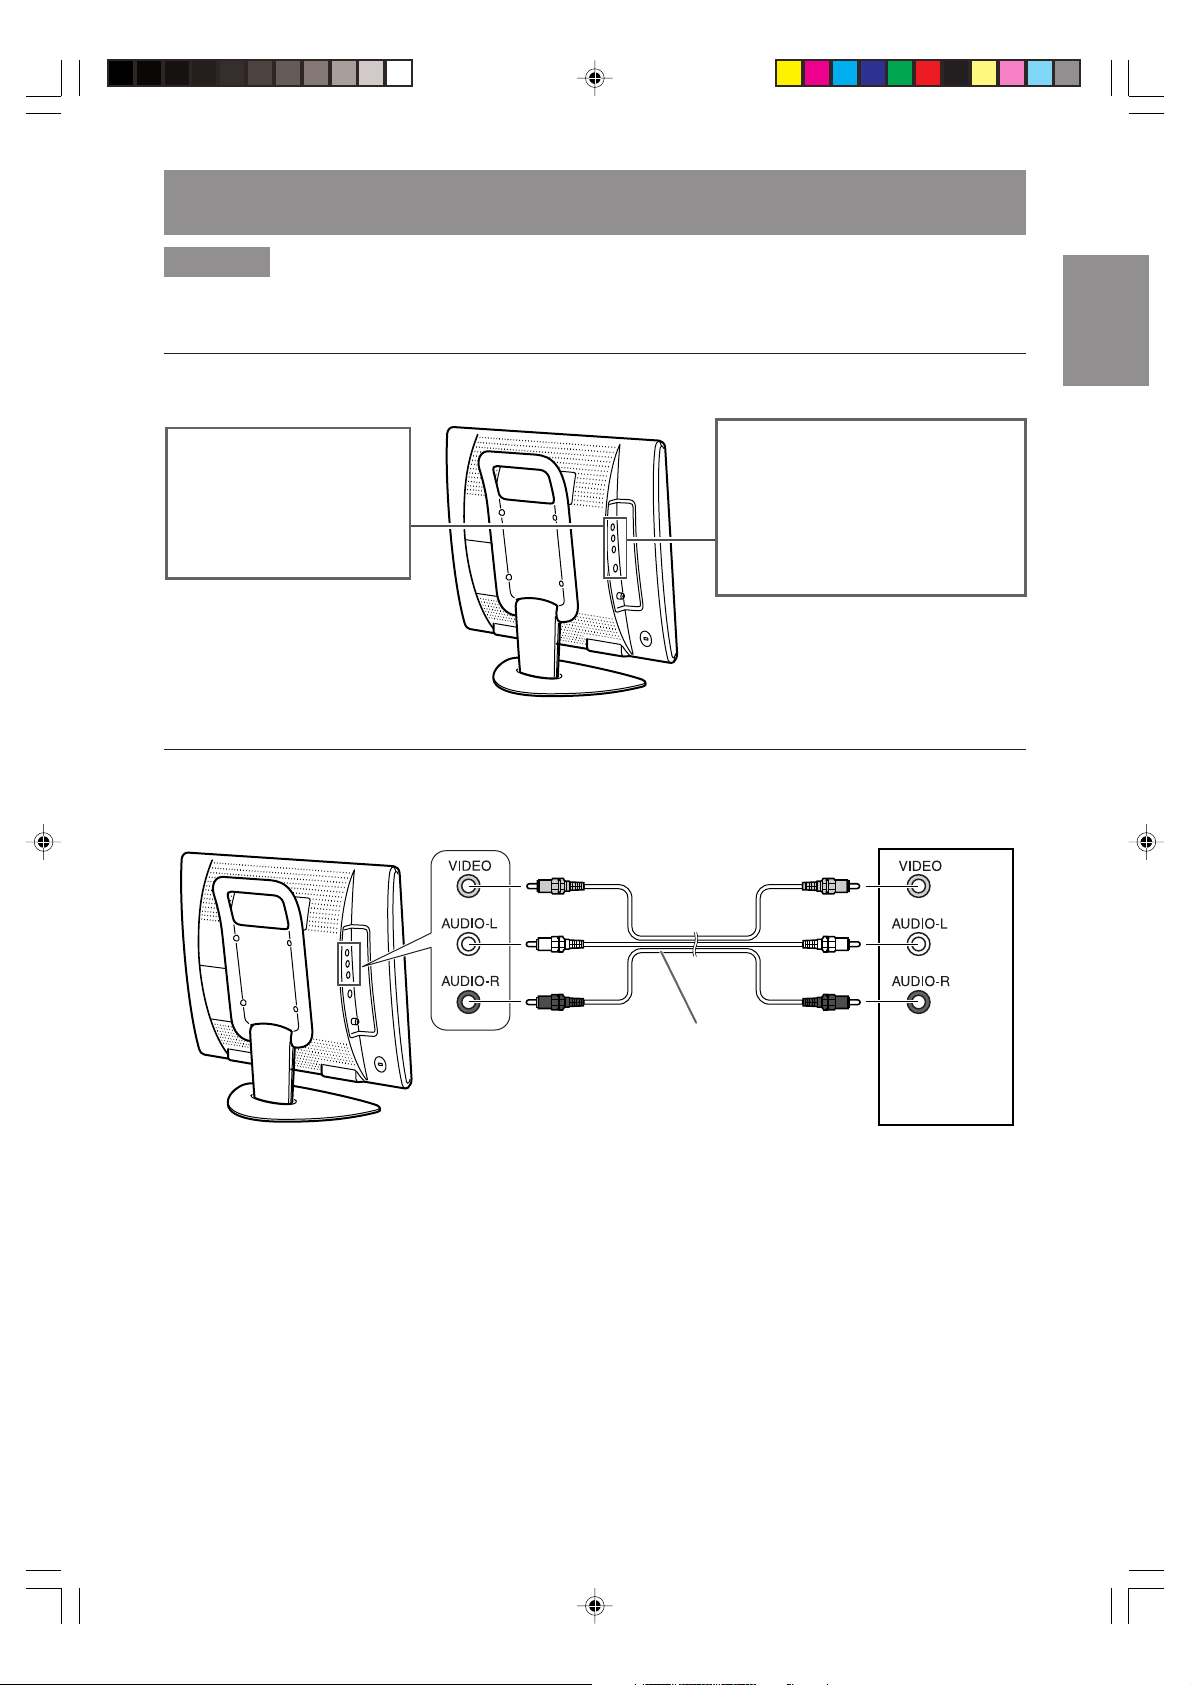
VCRs and game systems
Equipment with S-video output terminals
VCRs
Video cameras
Home video game systems
Videodisc players
DVD players etc.
AV-INLeft side of the monitor
(Yellow) (Yellow)
(White) (White)
(Red) (Red)
VCR etc.
RCA pin cable (commercially available)
Note:
- When you are using the video input terminal, do not connect cables to the S-video input terminal.
E15
Page 18
Connecting the monitor to AV equipment
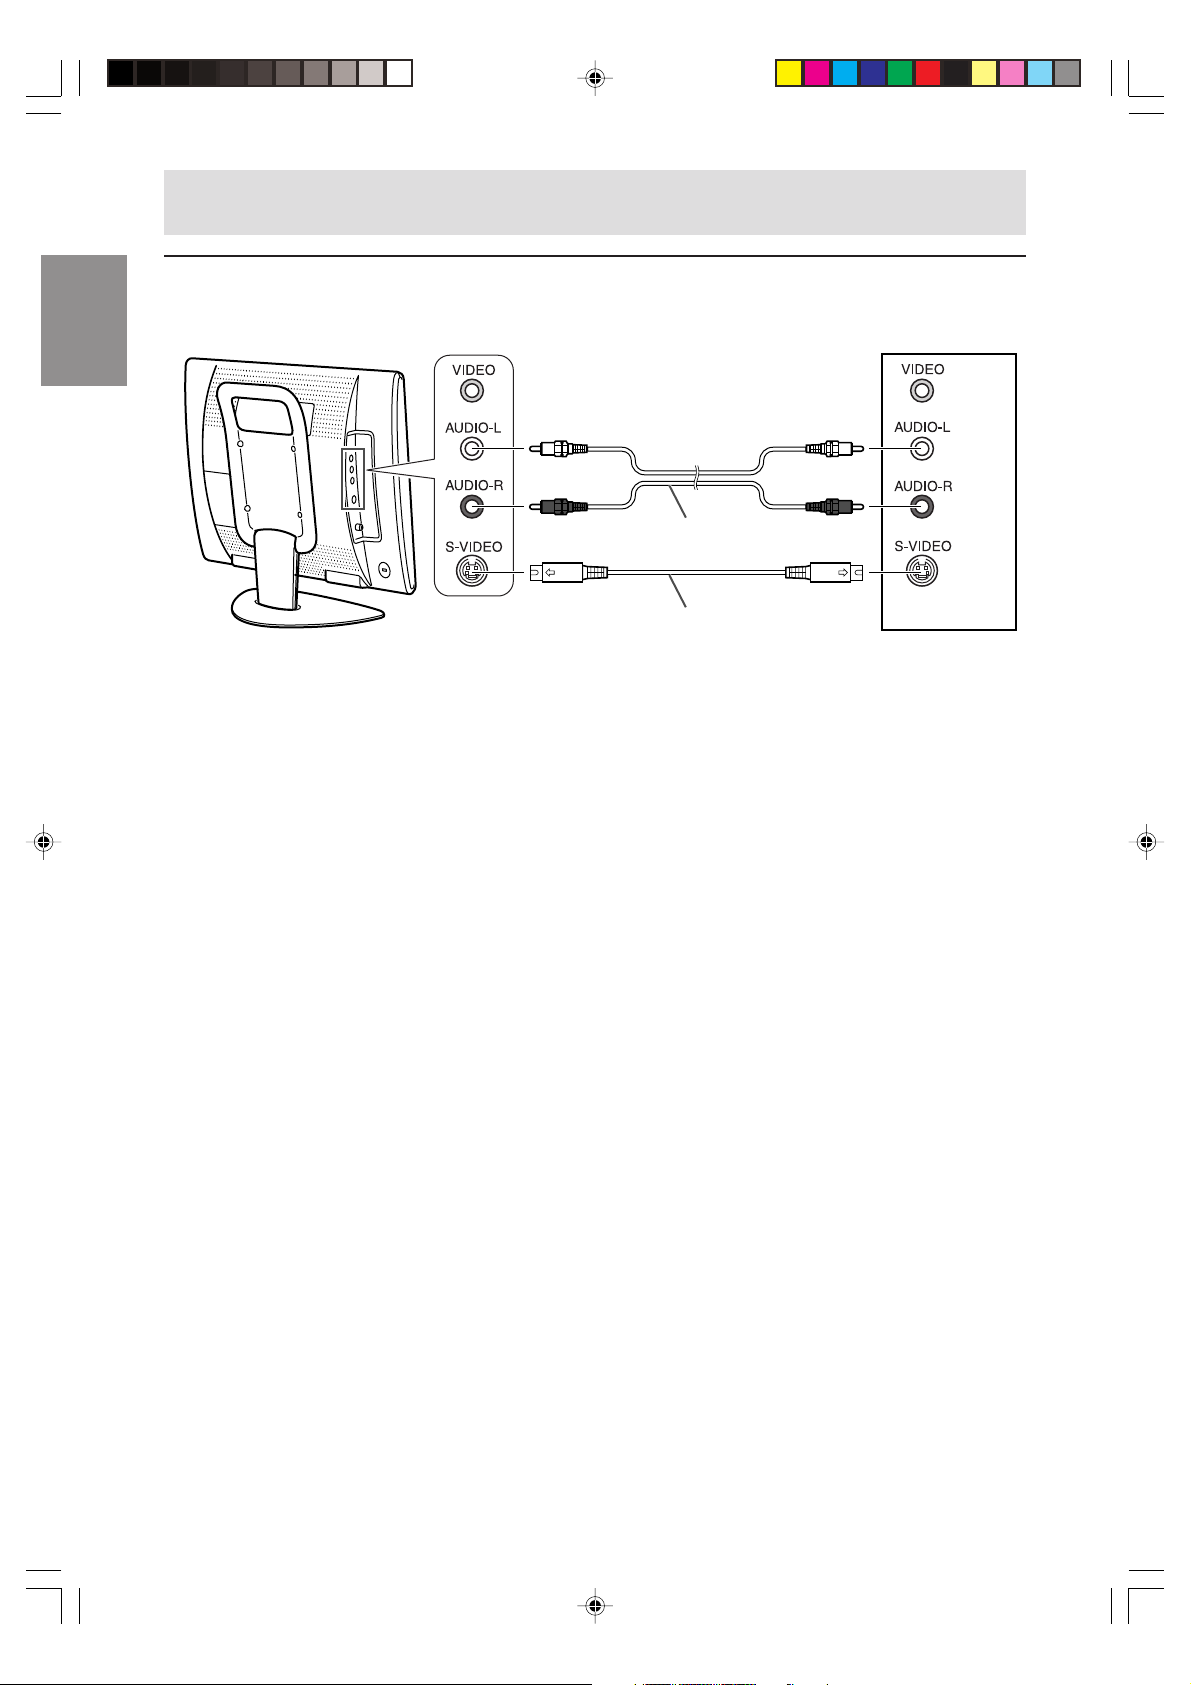
AV equipment with S-video output terminals
Left side of the monitor
Note:
- When you are using the S-video input terminal, do not connect the cable to the video input terminal.
AV-IN
(White) (White)
(Red) (Red)
RCA pin cable (commercially available)
S-video cable (commercially available)
VCR etc.
E16
Page 19
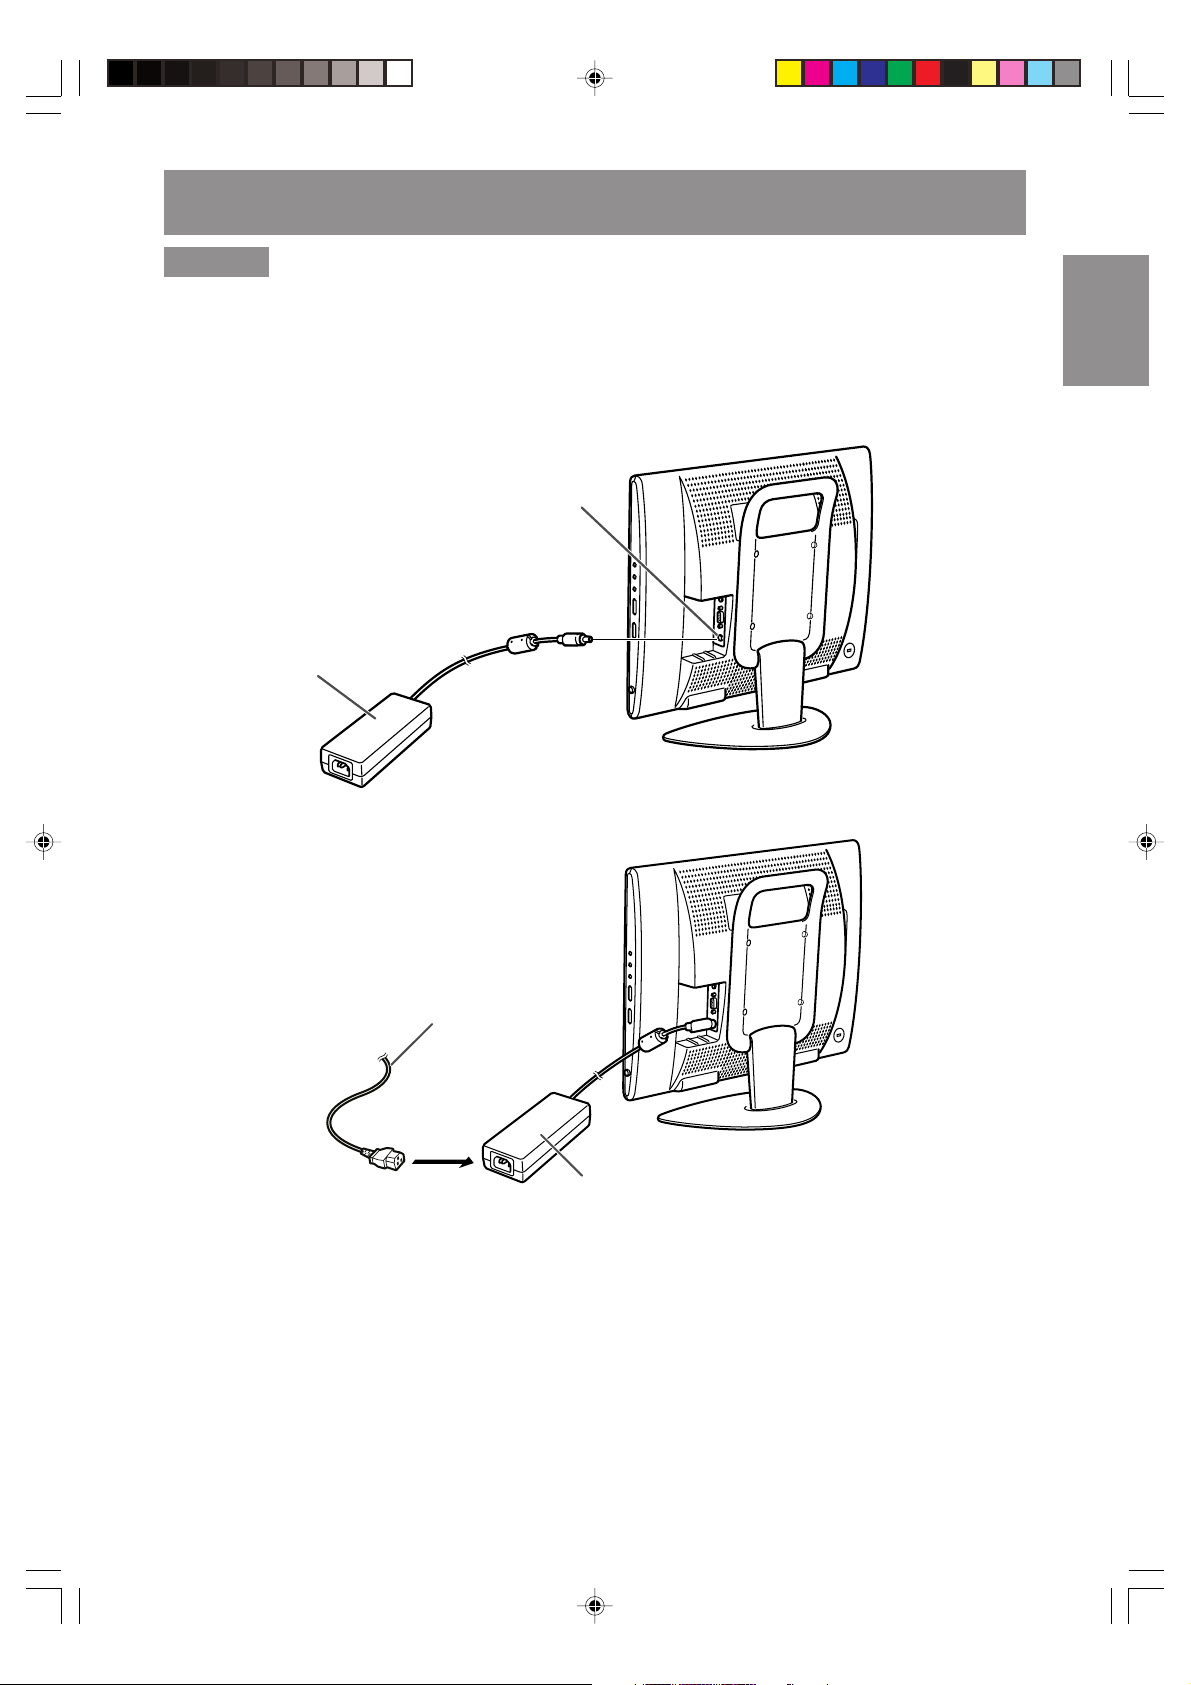
Connecting the monitor to a power source
CAUTION!
- When connecting, ensure that the monitor is switched off.
- Always use the AC adapter that came with the monitor.
- Be careful not to over bend the cable or add extension cords as this could lead to a malfunction.
See page E8 for information on removing/replacing the terminal cover.
1.Connect the AC adapter to the power input terminal.
Power input terminal
AC adapter
EnglishDeutschFrançaisItalianoEspañolEnglish
2.Plug the power cord into the AC adapter and then place the power plug into an AC outlet.
Power cord
AC outlet
AC adapter
E17
Page 20
Instructions for attaching a VESA-compliant mount
An arm or stand based on the VESA standard
(commercially available) can be attached to the
monitor.
Procurement of the arm or stand is at the
customer’s discretion.
Arms or stands able to be used
Attachments must satisfy the following.
- Compatible with the VESA standard.
- Have a gap of 75 mm x 75 mm between the
screw holes on the section to be attached.
- Not be likely to fall off or break off after being
attached to the monitor.
How to attach the arm or stand
- Be careful not to over bend the cable or add
extension cords as this could lead to
malfunction.
- While following these instructions, please also
refer to the installation instructions in the
operation manual included with the arm or
stand.
CAUTION!
- Be careful not to get your fingers pinched
between the display and stand nor to let the
stand drop. These could lead to injury.
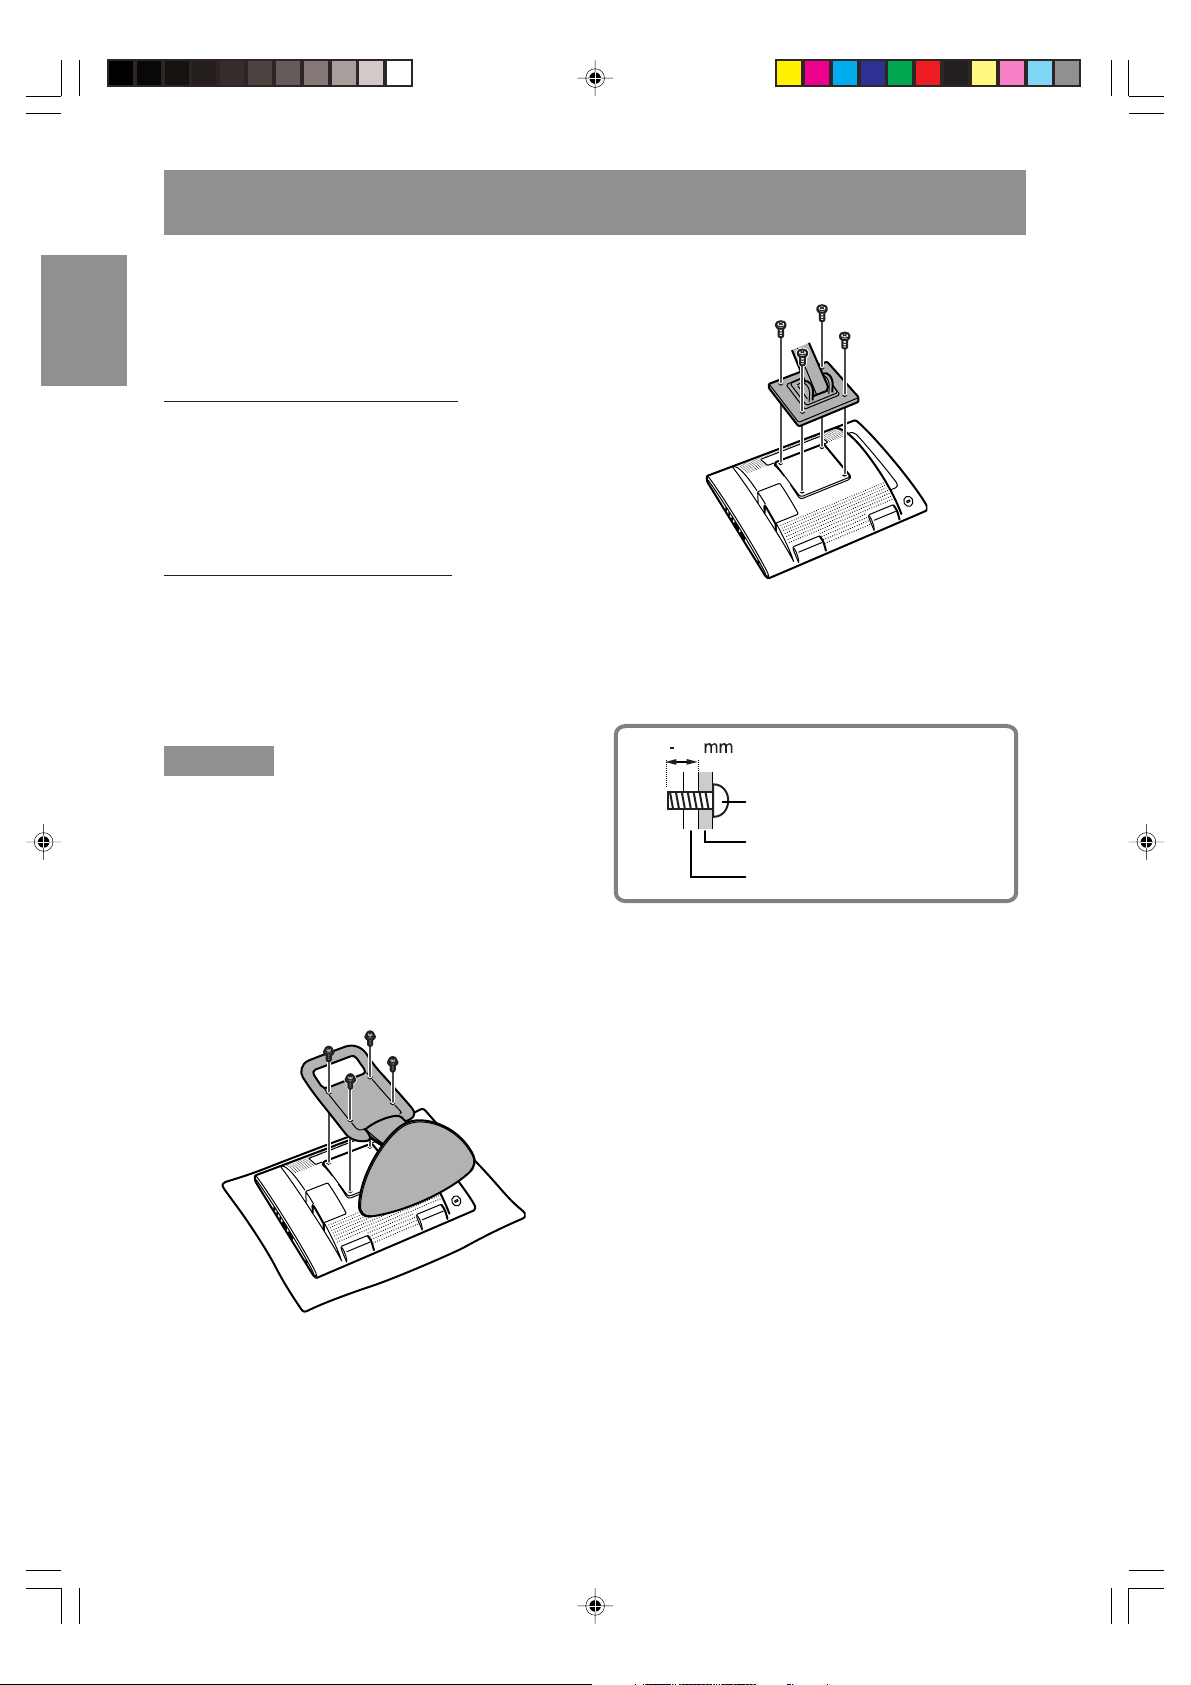
1. Remove the cables.
2.Spread out a soft cloth on a suitable horizontal
surface. Being careful not to damage the
monitor, gently lay the monitor on it display-side
down.
3.Remove the four screws and then remove the
stand from the monitor.
4. Attach the arm to the monitor with the four
screws.
Note:
- The screws used to attach the arm should be M4
screws with a length of 10 - 12 mm protruding
from the surface to be attached. Using different
screws could cause the monitor to fall off or to be
internally damaged.
10 12
Screw used to attach arm
Arm
Part of monitor to which arm is
attached
Notes:
- The stand is specially made for use with this
monitor. Once having removed the stand, never
attempt to attach it to another equipment.
- Once having removed the screws, store them
together with the stand and if the stand is ever
re-attached be sure to use the original screws.
Using different screws could lead to a
malfunction.
E18
Page 21

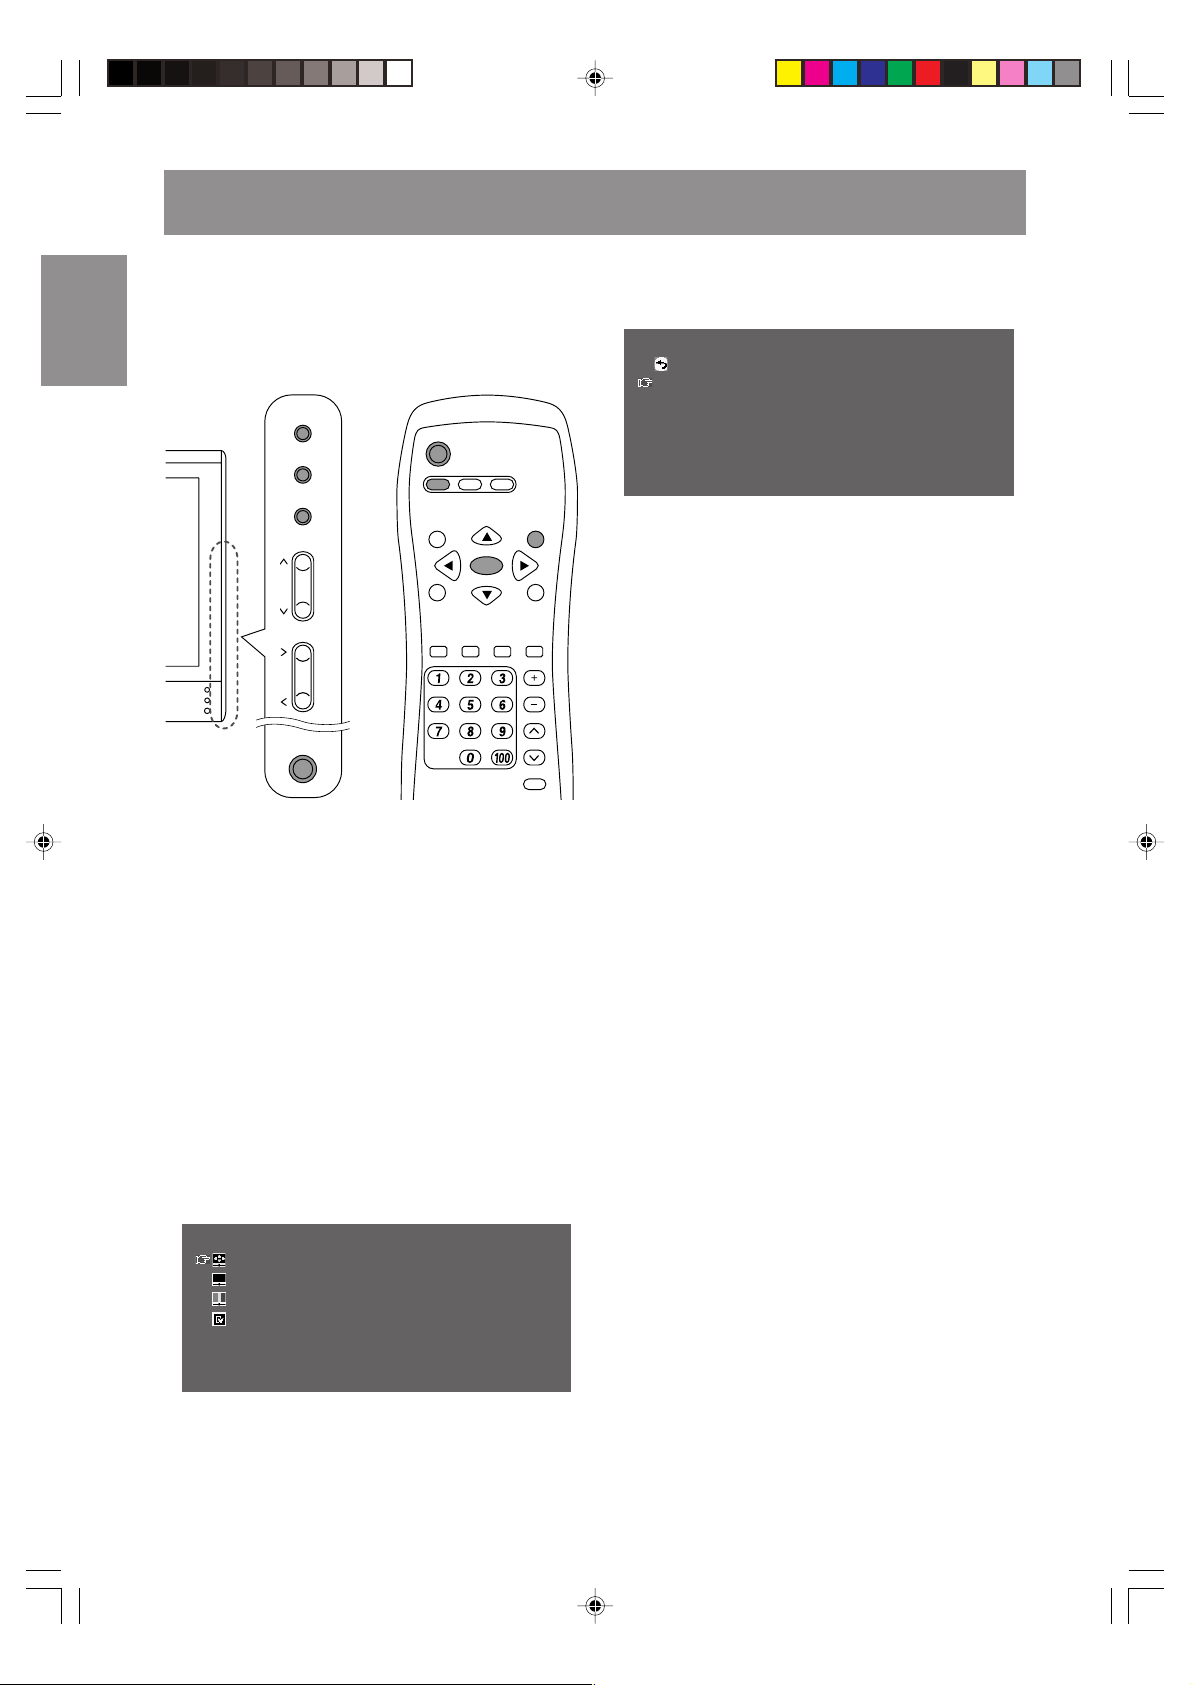
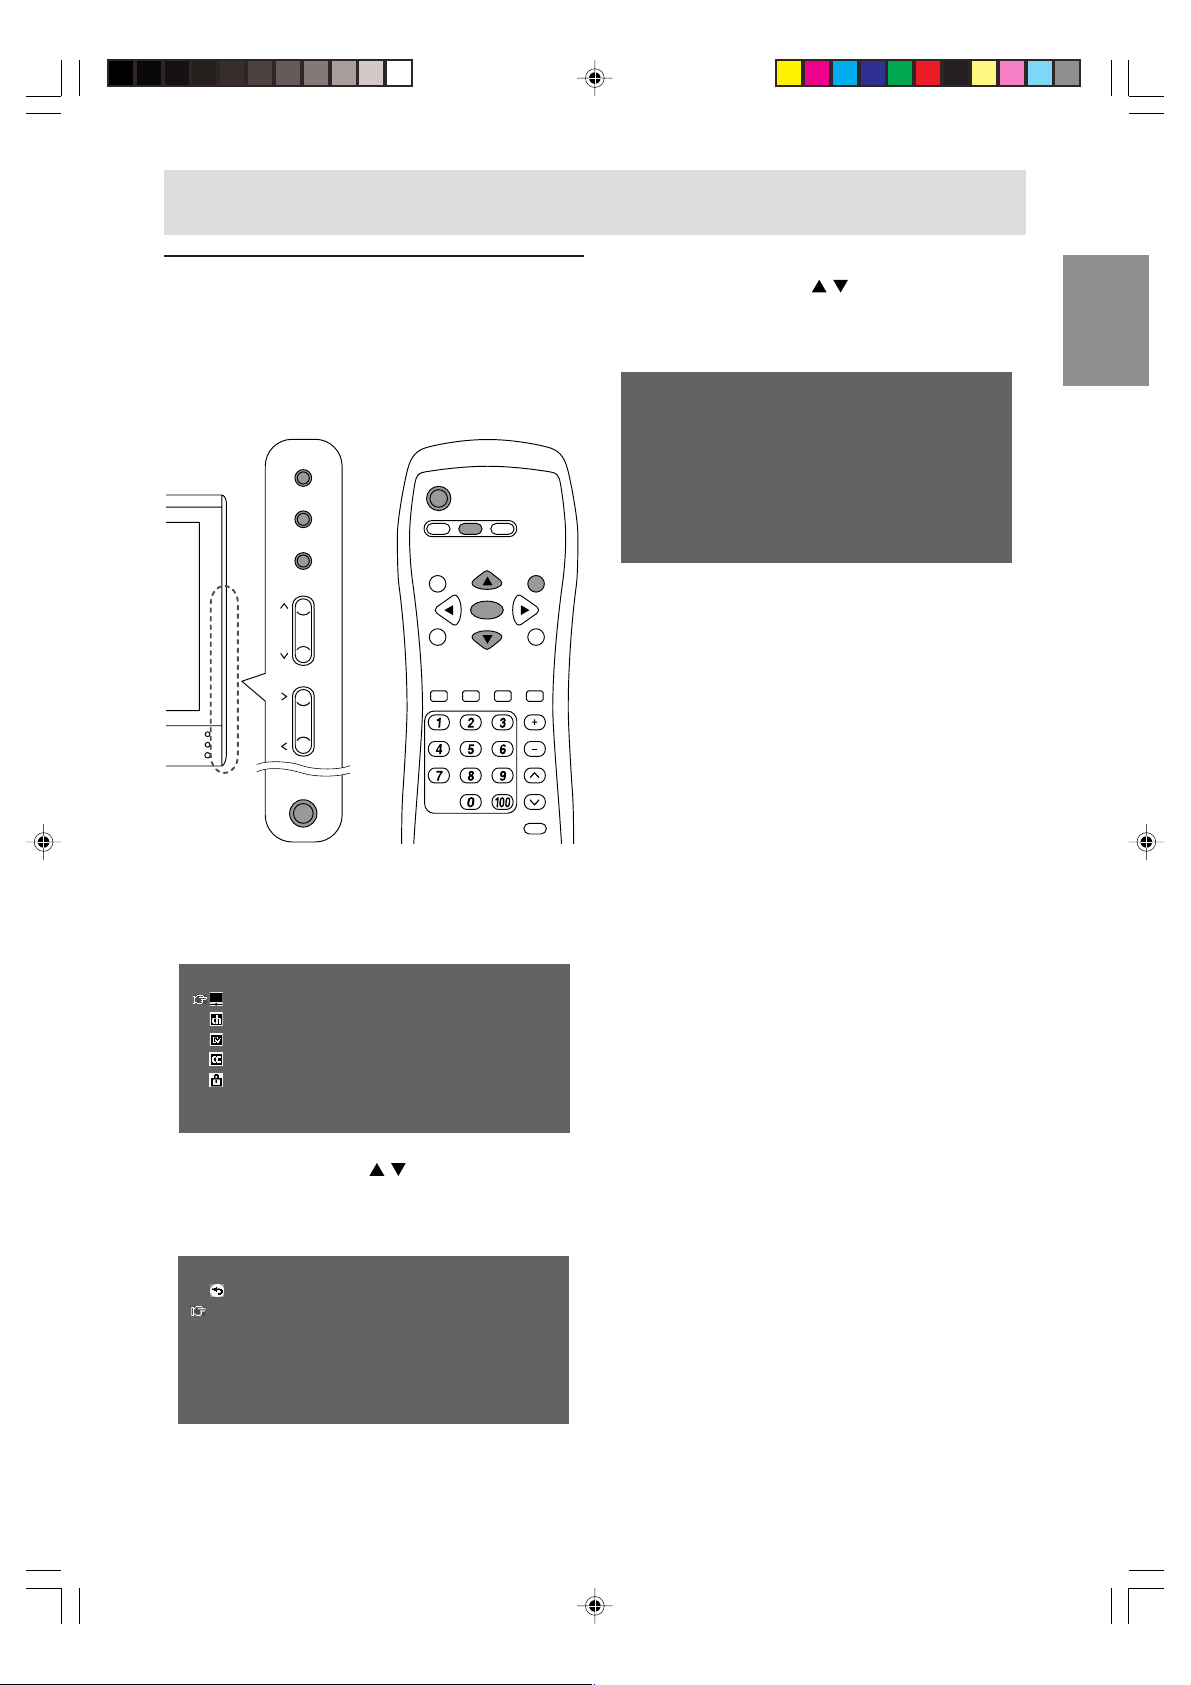
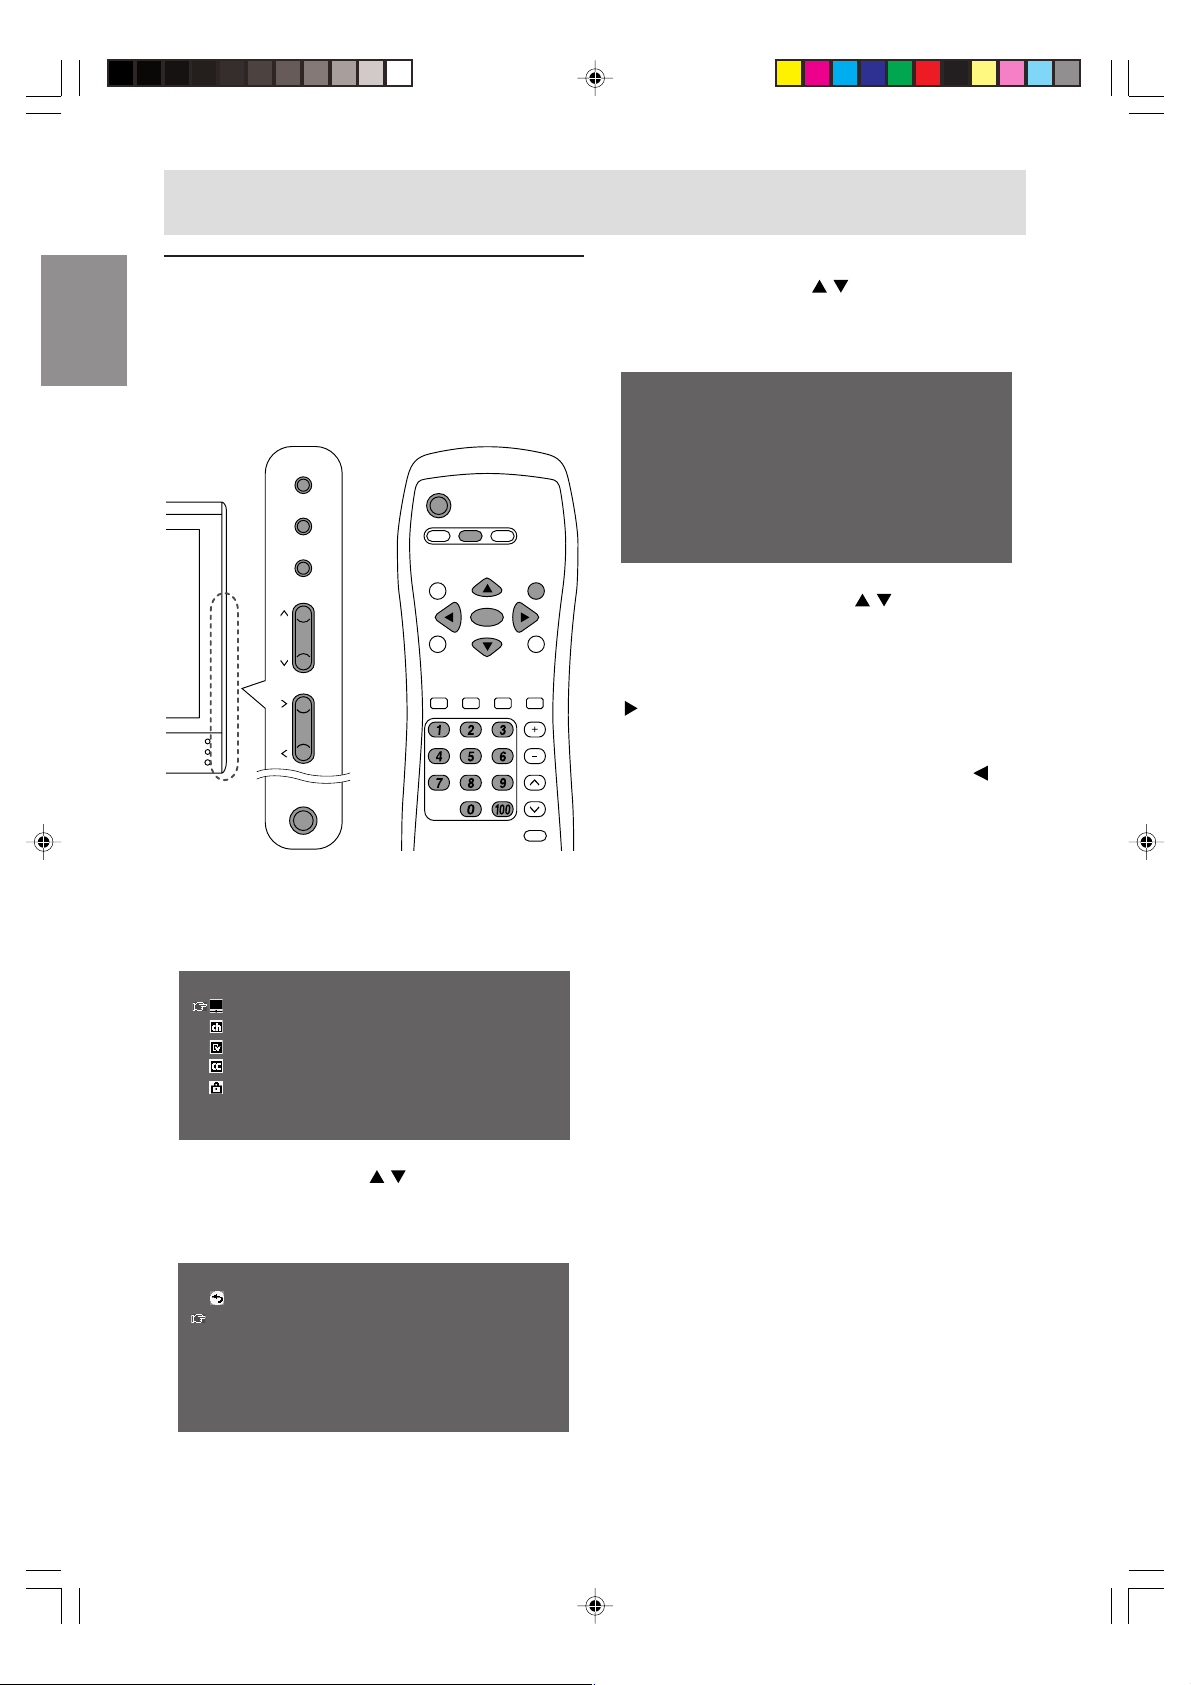
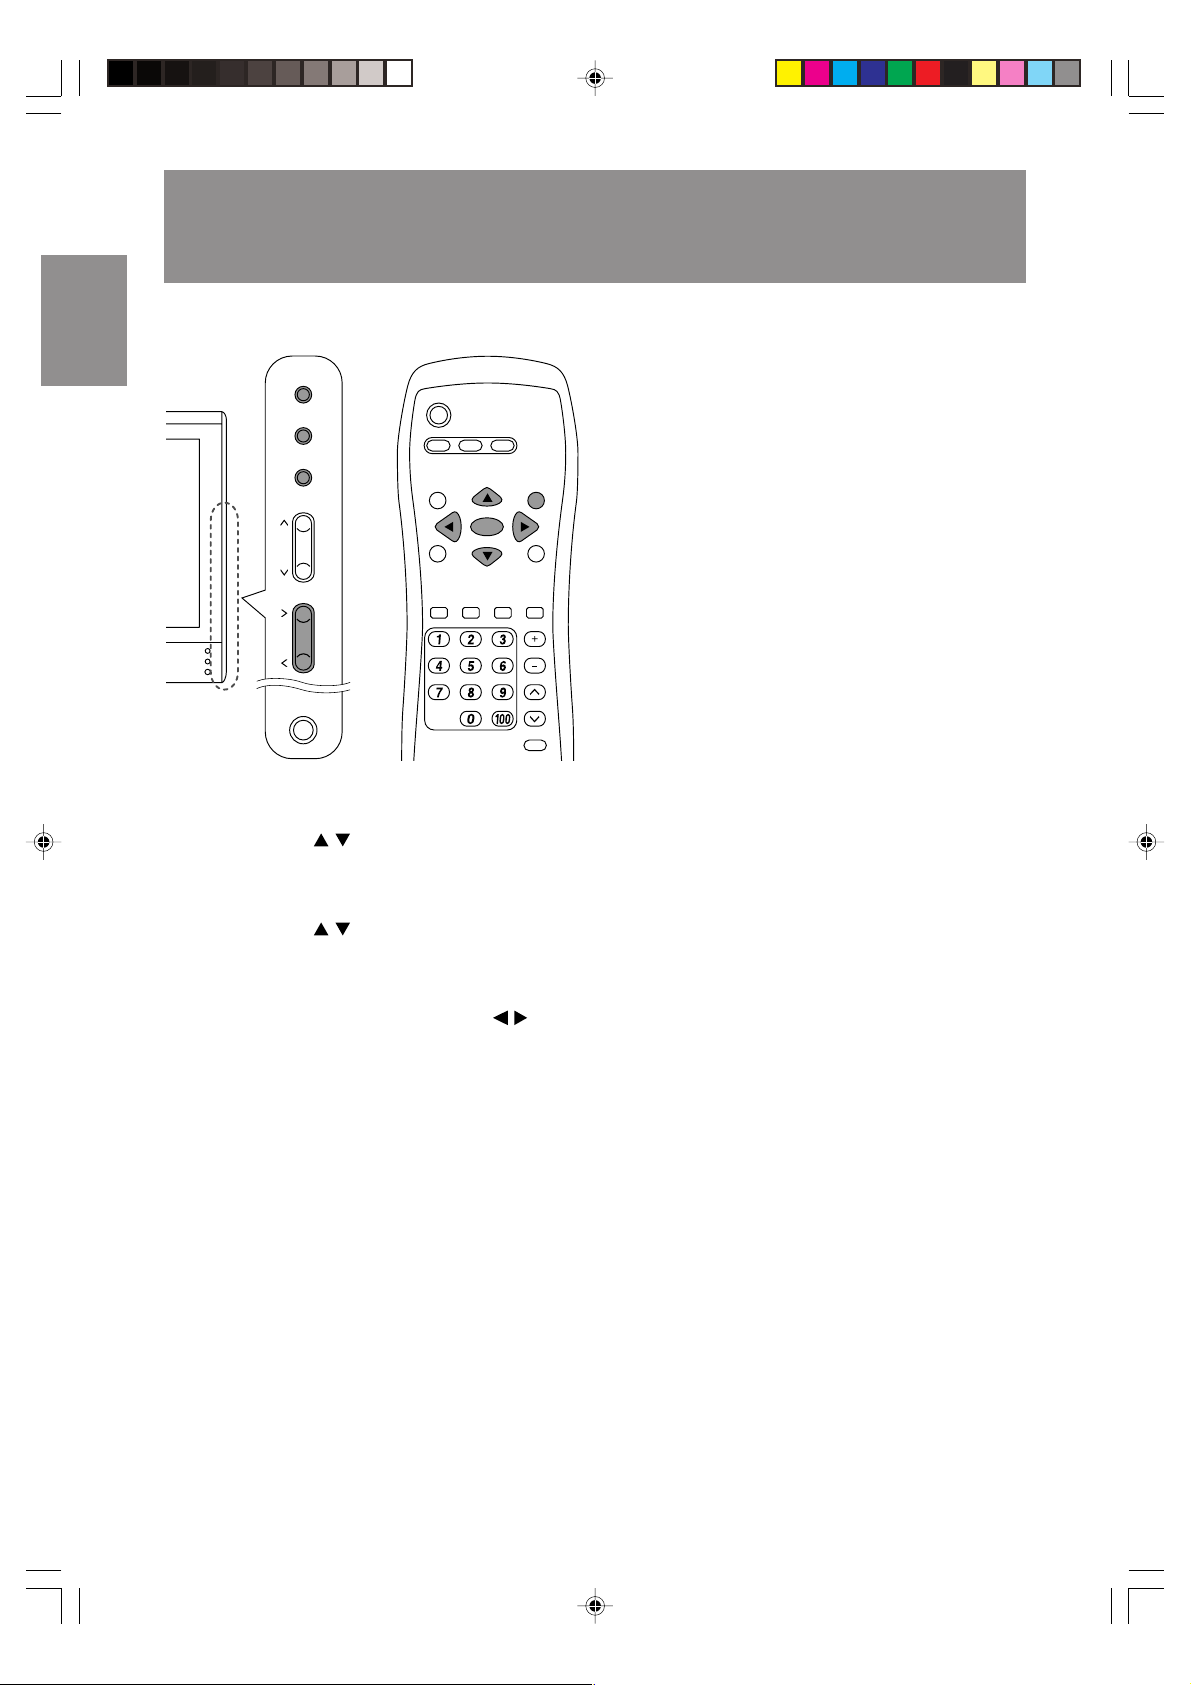
Selecting the item in the MENU screen
To select an item, start by moving the cursor ( ) to the desired item.
[Monitor]
1.Press the MENU button.
Each time you press the button, the cursor moves down one item.
If you press the button at the bottom, the cursor returns to the top.
Example: Each time you press the MENU button in the TV/AV MENU screen, the cursor moves in the
following order:
VIDEO ADJUST → CHANNEL SETTING → MODE SELECT → CLOSED CAPTION →
V-CHIP BLOCK → VIDEO ADJUST...
MENU
VIDEO ADJUST
CHANNEL SETTING
MODE SELECT
CLOSED CAPTION
V-CHIP BLOCK
[Remote control]
1.Press the buttons.
Each time you press the
Each time you press the button, the cursor moves down one item.
button, the cursor moves up one item.
>>
>>
>>
>>
>>
<
TV/AV
>
EnglishDeutschFrançaisItalianoEspañolEnglish
E19
Page 22
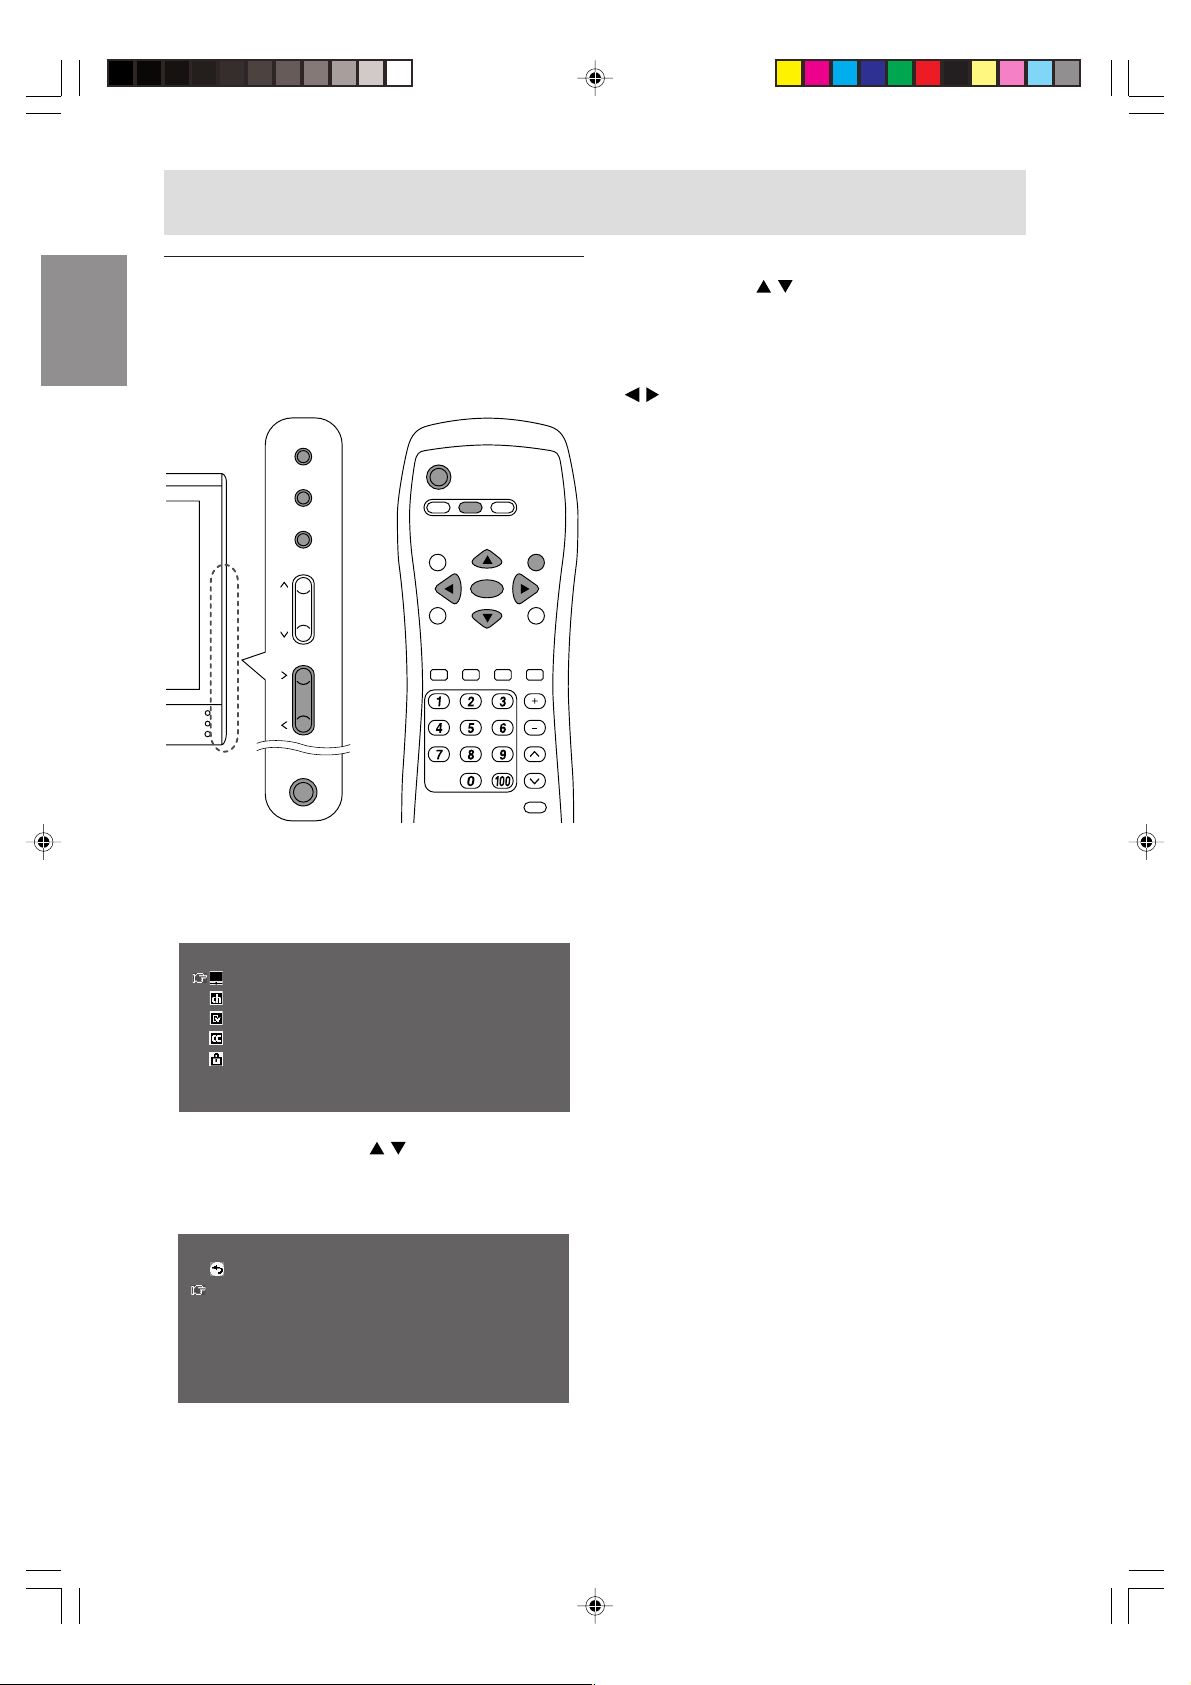
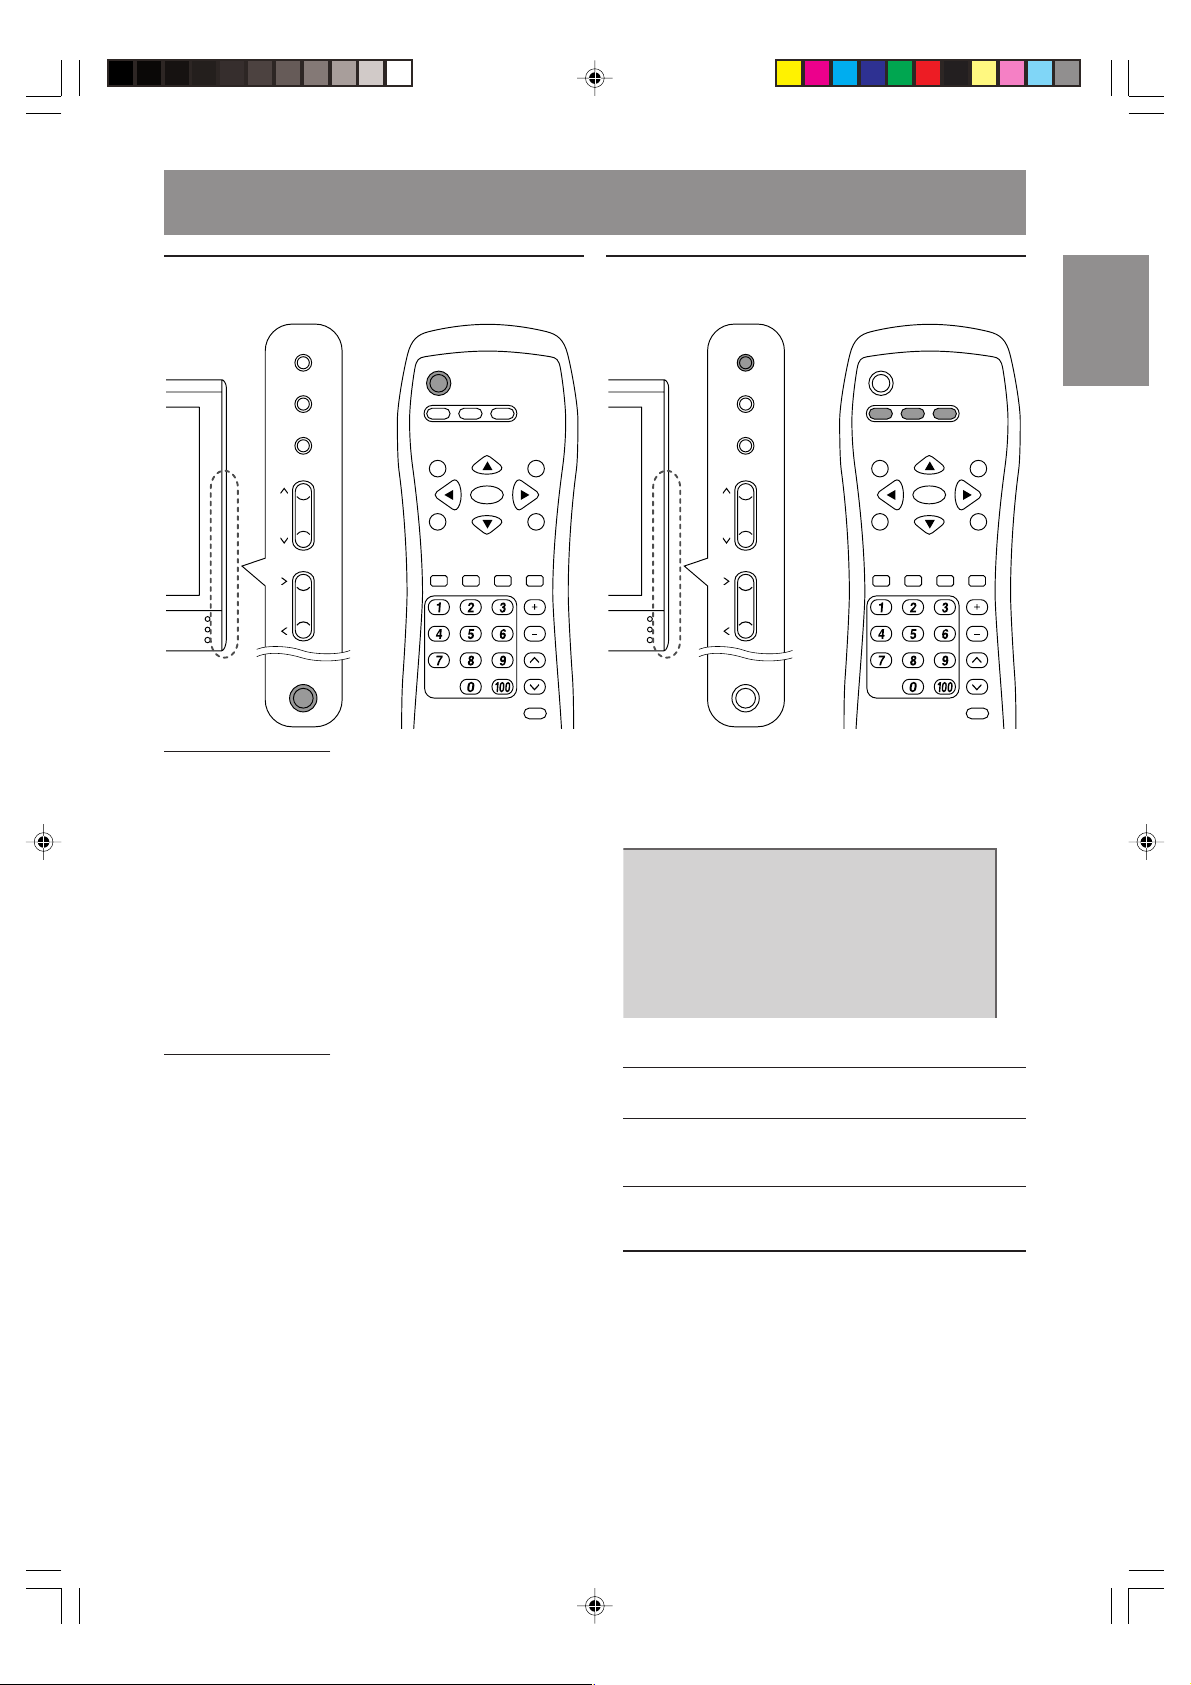
Adjusting the computer display (AUTO ADJUSTMENT)
When using the monitor as a computer display for
the first time or after having changed the system
settings during use, perform an automatic screen
adjustment. “CLOCK”, “PHASE”, “H-POS”, and “VPOS” will be set to their optimum states.
INPUT
POWER
MENU
ENTER
/
CH
VOL/BRIGHT
MAIN
POWER
BRIGHT
MODE
SLEEP
BRIGHT
MODE
DISPLAY
PC TV
AV
MENU
ENTER
BRIGHT
CC MTS MUTE
VOL
CH
FLASHBACK
1.Press the MAIN POWER button to turn on the
monitor.
When the power LED lights red, press the
POWER button on the remote control.
2.Select the PC mode using the INPUT button
(monitor) or the PC button (remote control).
When using the INPUT button (monitor), each
time you press it, the input changes in the
following order:
PC → Number (TV) → AV → PC...
3.Turn on the computer, and then display an image
that makes the entire screen display light colors
(such as a light desktop background).
If you are running Windows, you can use the
Adjustment Pattern on the accompanying Utility
Disk (see page E29).
4.Display the MENU screen using the MENU
button.
The cursor is positioned at “ADJUSTMENT”.
5.Press the ENTER/BRIGHT MODE button
(monitor) or the ENTER button (remote control).
The ADJUSTMENT menu will be displayed.
ADJUSTMENT
RETURN
AUTO
CLOCK
PHASE
H-POS
V-POS
RESET
[
127
[
16
[
200
[
50
]
>>
]
>>
]
>>
]
>>
<PC>
6.Press the ENTER/BRIGHT MODE button
(monitor) or the ENTER button (remote control)
to auto-adjust the settings.
The screen will go dark and “ADJUSTING” will
be displayed. After a few seconds, the
ADJUSTMENT menu will return.
7.Press the INPUT button (monitor) or the MENU
button (remote control).
Adjustment is complete.
Notes:
- It may not be possible to achieve correct
adjustment with the first automatic adjustment. In
such a case, try repeating the automatic
adjustment 2 or 3 times.
- If necessary due to any of the following, manual
adjustments (page E29) can be performed after
the automatic adjustment.
- When further fine adjustment is needed.
- When the computer’s video input signals are
Composite Sync or Sync on Green. (Automatic
adjustments may not be possible.)
- When “OUT OF ADJUST” is displayed. (When
the screen displays an entirely dark image, the
automatic screen adjustment may be disabled.
When making an automatic adjustment, be
sure to either use the Adjustment Pattern or try
displaying an image that makes the entire
screen very bright.)
- Automatic adjustment may not be achieved
correctly depending on what is displayed on the
screen - moving pictures or the MS-DOS prompt
etc.
MENU
ADJUSTMENT
GAIN CONTROL
COLOR CONTROL
MODE SELECT
<PC>
>>
>>
>>
>>
E20
Page 23

Setting TV channels
The following table shows the channels this
monitor can receive.
VHF Channels 2 through 13
UHF Channels 14 through 69
Cable
(You must subscribe to a cable TV service to
receive cable channels.)
TV memory for channels is empty at shipment. To
receive channels, use the CHANNEL SETTING
menu.
Note:
- Release the adjustment lock (see page E33) if it
has been set. You cannot use the CHANNEL
SETTING menu while the adjustment lock is set.
Channel 1 (HRC and IRC mode only)
Channels 2 through 125 (STD, HRC and IRC)
Channel setting methods
There are two ways to set channels.
Automatically setting channels you can receive
(CHANNEL SEARCH)
The monitor will automatically set the channels it
can receive in your area.
Setting channels one at a time
(CHANNEL MEMORY)
This method is for manually setting the channels
you want one by one. Use this method if you want
to add other channels after using “CHANNEL
SEARCH”.
EnglishDeutschFrançaisItalianoEspañolEnglish
E21
Page 24
Setting TV channels
Selecting broadcast (AIR) or cable
TV (CABLE) for Channel Setting
It is necessary to set the receiving mode to “AIR” or
“CABLE” channels to receive locally broadcast TV
programs.
INPUT
POWER
MENU
ENTER
/
CH
VOL/BRIGHT
MAIN
POWER
BRIGHT
MODE
SLEEP
BRIGHT
MODE
DISPLAY
PC TV
1.Turn on the monitor power.
2.Select the TV mode using the INPUT button
(monitor) or the TV button (remote control).
3.Display the MENU screen using the MENU
button.
MENU
VIDEO ADJUST
CHANNEL SETTING
MODE SELECT
CLOSED CAPTION
V-CHIP BLOCK
ENTER
CC MTS MUTE
<
>>
>>
>>
>>
>>
AV
MENU
FLASHBACK
TV/AV
BRIGHT
VOL
CH
>
5.Select “AIR/CABLE” using the MENU button
(monitor) or the
buttons (remote control),
and press the ENTER/BRIGHT MODE button
(monitor) or the ENTER button (remote control).
6.Select the desired mode (“AIR” or “CABLE”)
using the VOL/BRIGHT buttons (monitor) or the
buttons (remote control).
7.Exit the MENU screen using the INPUT button
(monitor) or the MENU button (remote control).
4.Select “CHANNEL SETTING” using the MENU
button (monitor) or the
buttons (remote
control), and press the ENTER/BRIGHT MODE
button (monitor) or the ENTER button (remote
control).
CHANNEL SETTING
RETURN
AIR/CABLE
CHANNEL SEARCH
CHANNEL MEMORY
[
AIR
<
TV/AV
]
>>
>>
>
E22
Page 25
Setting TV channels
Saving broadcast TV channels in the
memory (CHANNEL SEARCH)
“CHANNEL SEARCH” allows you to search
through available channels (“AIR” or “CABLE”) in
your area.
The tuner saves them to TV memory automatically.
INPUT
POWER
MENU
ENTER
/
CH
VOL/BRIGHT
MAIN
POWER
BRIGHT
MODE
SLEEP
BRIGHT
MODE
DISPLAY
PC TV
1.Turn on the monitor power.
2.Select the TV mode using the INPUT button
(monitor) or the TV button (remote control).
3.Display the MENU screen using the MENU
button.
MENU
VIDEO ADJUST
CHANNEL SETTING
MODE SELECT
CLOSED CAPTION
V-CHIP BLOCK
4.Select “CHANNEL SETTING” using the MENU
button (monitor) or the
buttons (remote
control), and press the ENTER/BRIGHT MODE
button (monitor) or the ENTER button (remote
control).
ENTER
CC MTS MUTE
<
>>
>>
>>
>>
>>
AV
MENU
FLASHBACK
TV/AV
BRIGHT
VOL
CH
>
5.Select “CHANNEL SEARCH” using the MENU
button (monitor) or the
buttons (remote
control), and press the ENTER/BRIGHT MODE
button (monitor) or the ENTER button (remote
control).
CHANNEL SEARCH
AIR
2
<
TV/AV
>
6.Press the ENTER/BRIGHT MODE button
(monitor) or the ENTER button (remote control).
The tuner will search through all available
channels in your area and save them to the TV
memory.
Note:
- To interrupt Channel Search, press the INPUT
button (monitor) or the MENU button (remote
control). Channel Search will stop at the current
channel and will not save any higher channels.
7.When Channel Search completes, the MENU
screen becomes off and TV screen becomes
minimum channel of TV memory.
If TV memory is empty, TV channel will be CH 2.
Notes:
- Searching channels are:
AIR channels:
VHF: 2 through 13
UHF: 14 through 69
CABLE channels:
1 (HRC and IRC mode only)
2 through 125 (STD, HRC and IRC)
- During Channel Search, the monitor will change
channels automatically.
- When Channel Search completes, all channels,
which were set previously, will be erased.
- If you search for channels but cannot receive
any, TV memory becomes empty.
EnglishDeutschFrançaisItalianoEspañolEnglish
CHANNEL SETTING
RETURN
AIR/CABLE
CHANNEL SEARCH
CHANNEL MEMORY
[
AIR
<
TV/AV
>
]
>>
>>
E23
Page 26
Setting TV channels
Adding weak or additional channels
or erasing unwanted channels from
TV memory (CHANNEL MEMORY)
Using “CHANNEL MEMORY”, you can add
channels that could not be saved by “CHANNEL
SEARCH” because the signal was too weak.
INPUT
POWER
MENU
ENTER
/
CH
VOL/BRIGHT
MAIN
POWER
BRIGHT
MODE
SLEEP
BRIGHT
MODE
DISPLAY
PC TV
1.Turn on the monitor power.
2.Select the TV mode using the INPUT button
(monitor) or the TV button (remote control).
3.Display the MENU screen using the MENU
button.
MENU
VIDEO ADJUST
CHANNEL SETTING
MODE SELECT
CLOSED CAPTION
V-CHIP BLOCK
ENTER
CC MTS MUTE
<
>>
>>
>>
>>
>>
AV
MENU
FLASHBACK
TV/AV
BRIGHT
VOL
CH
>
5.Select “CHANNEL MEMORY” using the MENU
button (monitor) or the
buttons (remote
control), and press the ENTER/BRIGHT MODE
button (monitor) or the ENTER button (remote
control).
CHANNEL MEMORY
AIR
2
<
TV/AV
>
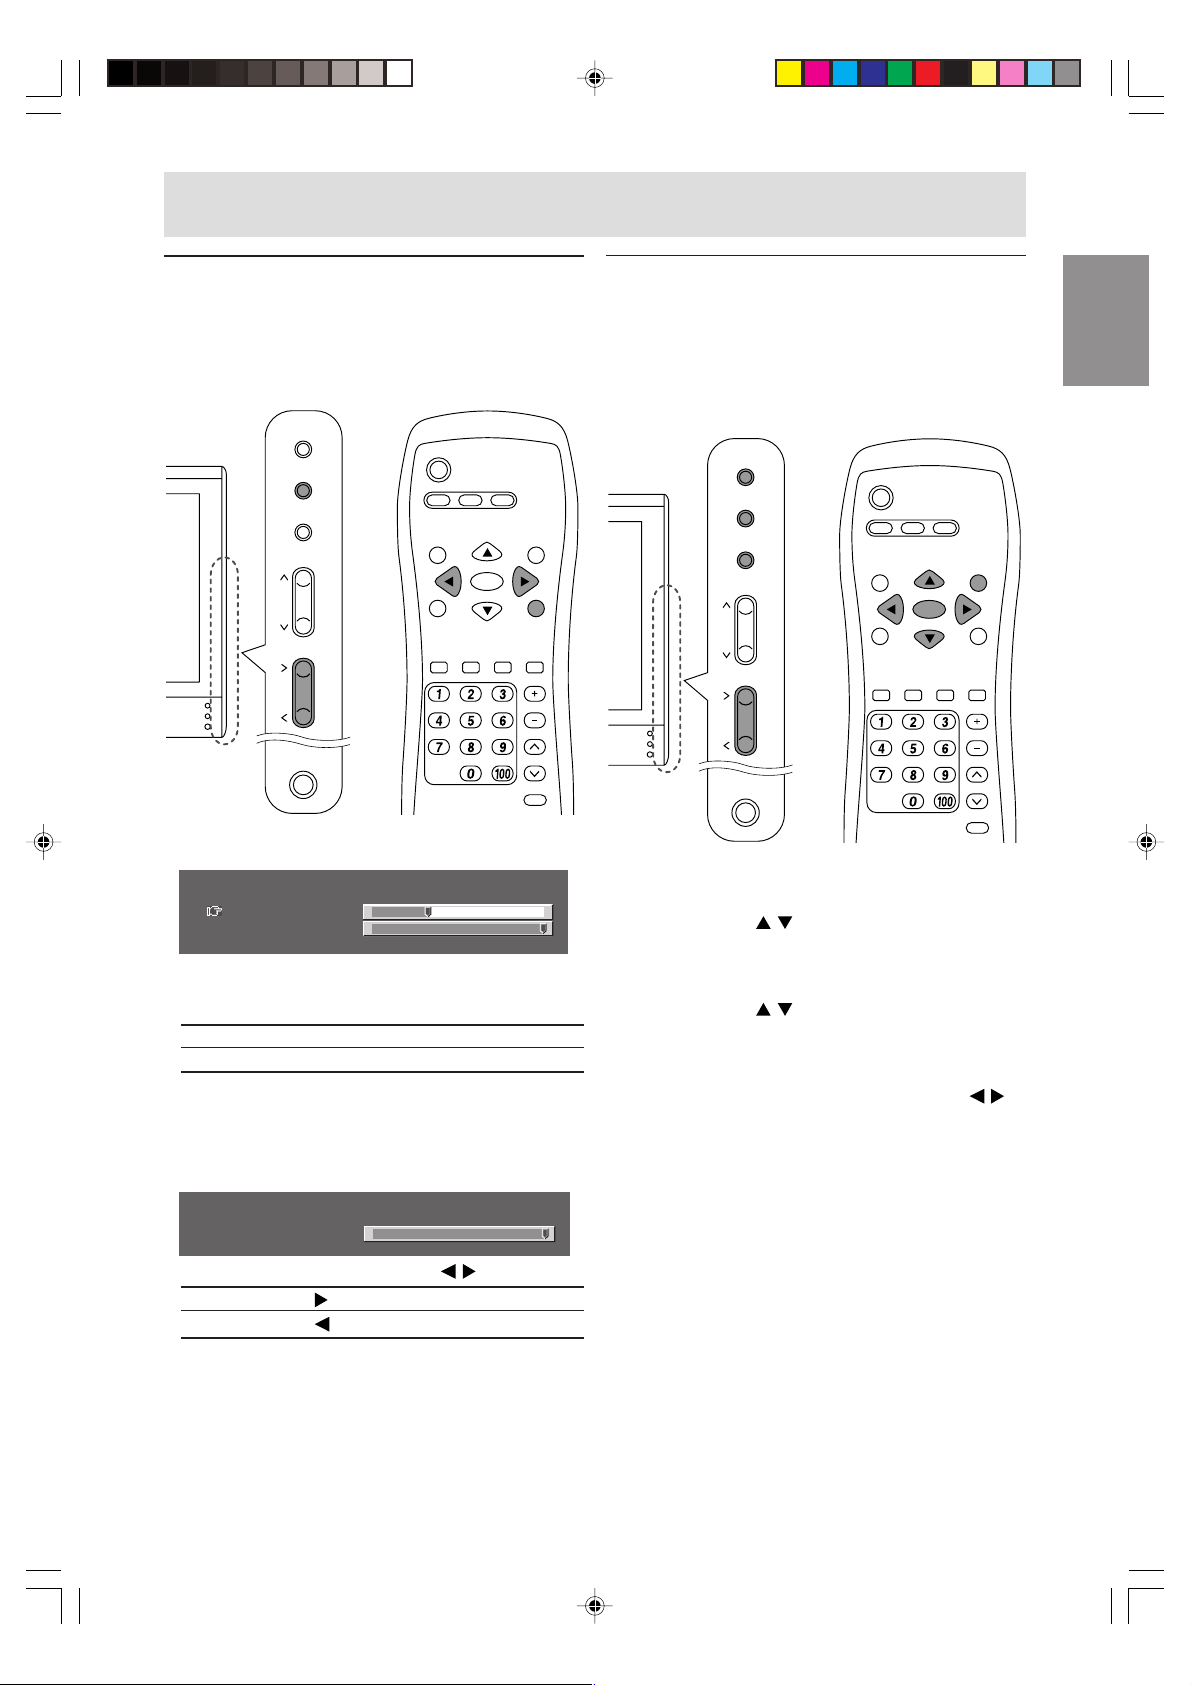
6.Select each desired channel to add or erase
using the CH buttons or the
buttons (remote
control).
You can use the channel buttons on the remote
control.
7.Press the VOL/BRIGHT > button (monitor) or the
button (remote control) to add the channel to
the TV memory.
To erase the channel from the TV memory, press
the VOL/BRIGHT < button (monitor) or the
button (remote control).
8.Exit the MENU screen using the INPUT button
(monitor) or the MENU button (remote control).
4.Select “CHANNEL SETTING” using the MENU
button (monitor) or the
buttons (remote
control), and press the ENTER/BRIGHT MODE
button (monitor) or the ENTER button (remote
control).
CHANNEL SETTING
RETURN
AIR/CABLE
CHANNEL SEARCH
CHANNEL MEMORY
[
AIR
<
TV/AV
]
>>
>>
>
E24
Page 27
Common operations
Turning power on/off
INPUT
POWER
MENU
ENTER
/
CH
VOL/BRIGHT
MAIN
POWER
BRIGHT
MODE
SLEEP
BRIGHT
MODE
DISPLAY
PC TV
Turning power on
When the power LED is off:
1.Press the MAIN POWER button on the monitor.
2.Turn on power for the connected equipment.
The power LED will light green, and then the
display mode will be displayed for several
seconds.
When the power LED is lit red (standby):
1.Press the POWER button on the remote control.
2.Turn on power for the connected equipment.
The power LED will light green, and then the
display mode will be displayed for several
seconds.
AV
MENU
ENTER
BRIGHT
CC MTS MUTE
VOL
CH
FLASHBACK
Switching display modes (INPUT)
INPUT
POWER
MENU
ENTER
/
CH
VOL/BRIGHT
MAIN
POWER
BRIGHT
MODE
SLEEP
BRIGHT
MODE
DISPLAY
PC TV
AV
MENU
ENTER
BRIGHT
CC MTS MUTE
VOL
FLASHBACK
[Monitor]
1.Press the INPUT button.
Each time you press the button, the input
changes in the following order:
PC → Number (TV) → AV → PC...
P C
EnglishDeutschFrançaisItalianoEspañolEnglish
CH
Turning off power
1.Turn off power for the connected equipment.
2.Press the POWER button on the remote control.
The power LED will light red (standby).
3.Press the MAIN POWER button on the monitor.
The power LED will go out.
Notes:
- Always wait at least 5 seconds between
switching power off/on. Rapid switching may
damage the monitor or cause it to malfunction.
- After switching power on, it may take a little
while before the screen displays an image.
- Do not turn off the power immediately after
changing various settings on the screen. The
changed values may not have been saved in the
memory yet.
Display modes
PC PC mode Displays the computer’s
image.
Number TV mode Displays the TV’s image.
The number will be the
channel being received.
AV AV mode Displays the image from
the equipment connected
to the AV input.
E25
Page 28

Common operations
[Remote control]
1.Press the PC, TV, or AV button.
The monitor will switch to the display mode for
the button you pressed.
Notes:
- When you turn on the monitor, the initial display
mode will be the mode being used when the
monitor was last turned off. (The factory setting is
PC.)
- CH buttons or channel buttons on the remote
control (1-9, 0 and 100) also automatically
switch to TV mode except when you are listening
to TV in PC mode (see page E28).
In this case, switch the display mode to TV using
the INPUT button (monitor) or the TV button
(remote control).
Adjusting the volume
The volume can be set individually for PC mode
and TV/AV mode. Start by switching to the display
mode for which you want to set the volume.
INPUT
POWER
MENU
BRIGHT
ENTER
/
MODE
CH
VOL/BRIGHT
MAIN
POWER
SLEEP
BRIGHT
MODE
DISPLAY
[Monitor]
1.Press the VOL/BRIGHT buttons.
PC TV
AV
MENU
ENTER
BRIGHT
CC MTS MUTE
VOL
CH
FLASHBACK
<PC>
VOLUME 30
BRIGHT 31
2.Select “VOLUME” using the MENU button.
3.Adjust the volume using the VOL/BRIGHT
buttons.
Increase VOL/BRIGHT
Decrease VOL/BRIGHT
The screen for adjusting the volume will
automatically disappear after about 15 seconds.
[Remote control]
1.Press the VOL +/- buttons to adjust.
-
-
>
button
<
button
<PC>
VOLUME 30
Increase VOL + button
Decrease VOL - button
The screen for adjusting the volume will
automatically disappear after several seconds.
-
+
+
+
E26
Page 29
Common operations
Adjusting the backlight
The brightness of the backlight can be set
individually for PC mode and TV/AV mode. Start by
switching to the display mode for which you want
to adjust the backlight.
INPUT
POWER
MENU
ENTER
/
CH
VOL/BRIGHT
MAIN
POWER
BRIGHT
MODE
SLEEP
BRIGHT
MODE
DISPLAY
PC TV
[Monitor]
1.Press the VOL/BRIGHT buttons.
VOLUME 30
BRIGHT 31
-
-
2.Select “BRIGHT” using the MENU button.
3.Adjust the brightness using the VOL/BRIGHT
buttons.
Increase VOL/BRIGHT
Decrease VOL/BRIGHT
>
<
The screen for adjusting the brightness will
automatically disappear after about 15 seconds.
[Remote control]
1.Press the BRIGHT button.
BRIGHT 31
-
ENTER
CC MTS MUTE
button
button
AV
MENU
BRIGHT
VOL
CH
FLASHBACK
<PC>
+
+
<PC>
+
Selecting the language on the
screen
You can select the language (English/French/
Spanish) using the MODE SELECT menu while in
any mode. (The selected language will be
displayed in all modes.)
INPUT
POWER
MENU
ENTER
/
CH
VOL/BRIGHT
MAIN
POWER
BRIGHT
MODE
SLEEP
BRIGHT
MODE
DISPLAY
PC TV
1.Display the MENU screen using the MENU
button.
2.Select “MODE SELECT” using the MENU button
(monitor) or the
buttons (remote control),
and press the ENTER/BRIGHT MODE button
(monitor) or the ENTER button (remote control).
3.Select “LANGUAGE” using the MENU button
(monitor) or the
buttons (remote control),
and press the ENTER/BRIGHT MODE button
(monitor) or the ENTER button (remote control).
4.Select the language you want to display using
the VOL/BRIGHT buttons (monitor) or the
buttons (remote control).
5.Exit the MENU screen using the INPUT button
(monitor) or the MENU button (remote control).
The procedure is complete.
AV
MENU
ENTER
BRIGHT
CC MTS MUTE
VOL
CH
FLASHBACK
EnglishDeutschFrançaisItalianoEspañolEnglish
2.Adjust the brightness using the buttons.
Increase button
Decrease button
The screen for adjusting the brightness will
automatically disappear after several seconds.
E27
Page 30
Listening to TV or another audio source while
viewing the computer screen (SOUND)
You can listen to TV or another audio source while
the monitor is displaying the computer screen.
INPUT
POWER
ENTER
MENU
/
CH
BRIGHT
MODE
SLEEP
BRIGHT
MODE
PC TV
AV
ENTER
MENU
BRIGHT
VOL/BRIGHT
MAIN
POWER
DISPLAY
CC MTS MUTE
VOL
CH
FLASHBACK
1.Display the MENU screen using the MENU
button.
2.Select “MODE SELECT” using the MENU button
(monitor) or the
buttons (remote control),
and press the ENTER/BRIGHT MODE button
(monitor) or the ENTER button (remote control).
3.Select “SOUND” using the MENU button
(monitor) or the
buttons (remote control),
and press the ENTER/BRIGHT MODE button
(monitor) or the ENTER button (remote control).
4.Select the audio you want to hear using the
VOL/BRIGHT buttons (monitor) or the
buttons (remote control).
5.Exit the MENU screen using the INPUT button
(monitor) or the MENU button (remote control).
The procedure is complete.
Notes:
- To switch the channel for TV audio, press the CH
buttons or the channel buttons (remote control).
- To switch the audio mode for TV audio, press the
MTS button (remote control). (See page E40.)
- When “STATUS” in the V-CHIP BLOCK menu is
“ON” (see page E46), TV/AV-IN SOUND is not
available in PC mode.
E28
Page 31

Adjusting the display
You can adjust the color of the computer screen
image using menus for the PC mode.
Adjustment Pattern
If you are using Windows, you can use the
Adjustment Pattern on the accompanying CDROM.
This explanation is for Windows 95/98/2000/Me/
XP, and assumes that the CD-ROM drive is “D”
drive.
1.Load the accessory CD-ROM into the CD-ROM
drive of the computer.
2.Open [My Computer] and select CD-ROM.
If using Windows 3.1, open [File Manager] and
choose “D” drive.
3.Double click on [Adj_uty.exe] to run the
Adjustment Program.
The Adjustment Pattern will appear.
Adjustment Pattern
After completing the adjustments, press the
computer’s [Esc] key to exit the Adjustment
Program.
Note:
- If your computer’s display mode is set to 65K
colors, you may see the different color levels in
each color pattern or the gray scale may look
colored. (This is due to the specification of the
input signal and is not a malfunction.)
How to adjust
The following procedure describes the basic
operation method. See pages E30 through E32
regarding individual options.
1.Select the PC mode using the INPUT button
(monitor) or the PC button (remote control).
2.Display the MENU screen using the MENU
button.
MENU
ADJUSTMENT
GAIN CONTROL
COLOR CONTROL
MODE SELECT
3.Select the menu you want to set using the
MENU button (monitor) or the
(remote control), and press the ENTER/BRIGHT
MODE button (monitor) or the ENTER button
(remote control).
4.Select the option you want to set using the
MENU button (monitor) or the
(remote control), and press the ENTER/BRIGHT
MODE button (monitor) or the ENTER button
(remote control).
5.Change the numbers/values using the
VOL/BRIGHT buttons (monitor) or the
buttons (remote control).
You can continue to set other options.
Do the following to return to the previous
screen:
(1) Select “RETURN” using the MENU button
(monitor) or the
(2) Press the ENTER/BRIGHT MODE button
(monitor) or the ENTER button (remote
control).
6.Exit the MENU screen using the INPUT button
(monitor) or the MENU button (remote control).
The procedure is complete.
buttons (remote control).
>>
>>
>>
>>
buttons
buttons
<PC>
EnglishDeutschFrançaisItalianoEspañolEnglish
Notes:
- If you do not press any buttons for about 30
seconds while in a menu screen, the settings
you made up to that point will be applied and
the screen will automatically disappear.
- This manual describes display adjustment
based on the use of the Adjustment Pattern (for
Windows).
E29
Page 32

ADJUSTMENT menu
Adjusting the display
Option
AUTO
CLOCK
PHASE
H-POS, V-POS
Description
Automatically adjusts “CLOCK”, “PHASE”, “H-POS”, and “V-POS”.
See page E20 for more information.
Adjusts the clock so that no vertical flicker noise is emitted.
Vertical flicker noise
Makes an adjustment after “CLOCK” is properly adjusted so that no
horizontal flicker noise is emitted.
Horizontal flicker noise
Adjusts the position of the Adjustment Pattern so that it appears centered
on screen.
Screen frame
Adjustment
Pattern
RESET
Resets adjustment values for this menu to their original factory settings.
See page E33 for more information.
E30
Page 33

GAIN CONTROL menu
Adjusting the display
Option
AUTO
BLACK LEVEL
CONTRAST
RESET
Notes about auto adjustment:
- If you are not using the Adjustment Pattern, it is necessary to have black area and white area of at
least 5 mm x 5 mm on the screen. Adjustment may not be possible without those areas.
- If the signal coming from the computer is Composite Sync or Sync on Green, automatic adjustment
cannot be performed. Please perform manual adjustment instead.
- If “OUT OF ADJUST” is displayed, perform manual adjustment.
Description
Automatically adjusts “BLACK LEVEL” and “CONTRAST” based on
brightest and darkest colors of the image displayed.
Adjusts screen brightness while you watch the color pattern.
Color pattern
Adjusts contrast so that all gradations appear while you watch the color
pattern.
Resets adjustment values for this menu to their original factory settings.
See page E33 for more information.
the
COLOR CONTROL menu
Option
COLOR MODE
WHITE BALANCE
RESET
Description
Selects the color tone.
...........
- STD
- sRGB
- VIVID
Adjusts the color temperature.
Set “WHITE BALANCE” to “STD” if you want to display all gradations.
- COOL2
- COOL1
...........
- STD
- WARM1
- WARM2
- USER
Resets adjustment values for this menu to their original factory settings.
See page E33 for more information.
Displays images using the original color tone of the LCD
monitor.
........
sRGB is an international standard for color representation
defined by the IEC (International Electrotechnical
Commission). Colors are converted by taking into account
the liquid crystal’s characteristics and thereby represent
color tone close to the original image.
........
Displays images in vivid primary colors.
.....
Color tone bluer than standard.
.....
Color tone slightly bluer than standard.
Standard setting for color tone.
....
Color tone slightly redder than standard.
....
Color tone redder than standard.
........
Allows you to individually adjust red, green, and blue
contrast.
EnglishDeutschFrançaisItalianoEspañolEnglish
Note:
- “WHITE BALANCE” will be automatically set to “STD” when “COLOR MODE” is set to “sRGB” or
“VIVID”.
E31
g02.P65 9/17/2003, 3:00 PM31
Page 34

MODE SELECT menu
Adjusting the display
Option
SOUND
SCALING
LANGUAGE
RESET
Description
Selects the audio to listen to while displaying the computer screen.
When “STATUS” in the V-CHIP BLOCK menu is “ON” (see page E46), TV/
AV-IN SOUND is not available in PC mode.
Adjusts the image to optimum sharpness when it is enlarged.
Selects the language (English, French or Spanish) on the screen.
See page E27 for more information.
Resets adjustment values for this menu to their original factory settings.
See page E33 for more information.
g02.P65 9/17/2003, 3:00 PM32
E32
Page 35

Adjusting the display
Preventing changes to adjusted
values (ADJUSTMENT LOCK)
Disabling the control buttons other than the
following buttons (monitor and remote control)
prevents adjusted values from being changed.
The changing of adjusted values for not only PC
mode, but for TV/AV mode as well will be
prevented.
[Monitor]
- MAIN POWER button
- VOL/BRIGHT buttons
- INPUT button
- CH buttons
[Remote control]
- POWER button
- VOL buttons
- MUTE button
- Input buttons (PC, TV, and AV)
- CH buttons
- Channel buttons (0-9 and 100)
- FLASHBACK button
Perform this procedure on the monitor.
1.Turn off the monitor power.
2.While pressing the MENU button, press the
MAIN POWER button (i.e. turn the power on).
Continue to press the buttons until
“ADJUSTMENT LOCKED” appears on the
screen. The lock is set when the message is
displayed.
Releasing the adjustment lock
Perform this procedure on the monitor.
1.Turn off the monitor power.
2.While pressing the MENU button, press the
MAIN POWER button (i.e. turn the power on).
Continue to press the buttons until
“ADJUSTMENT UNLOCKED” appears on the
screen. The lock is released when the message
is displayed.
Resetting adjustment values for
specific menu (RESET)
Adjustment values for the selected menu can be
reset to their original factory settings.
Resetting is not possible while the adjustment lock
is set. Release the adjustment lock before
resetting.
1.Select the PC mode using the INPUT button
(monitor) or the PC button (remote control).
2.Display the MENU screen using the MENU
button.
MENU
ADJUSTMENT
GAIN CONTROL
COLOR CONTROL
MODE SELECT
3.Select the menu to reset using the MENU button
(monitor) or the
and press the ENTER/BRIGHT MODE button
(monitor) or the ENTER button (remote control).
A list of options will appear.
4.Select “RESET” using the MENU button
(monitor) or the
and press the ENTER/BRIGHT MODE button
(monitor) or the ENTER button (remote control).
5.Exit the MENU screen using the INPUT button
(monitor) or the MENU button (remote control).
Resetting is complete.
buttons (remote control),
buttons (remote control),
>>
>>
>>
>>
<PC>
EnglishDeutschFrançaisItalianoEspañolEnglish
CAUTION!
- When the adjustment lock is set, all buttons on
the monitor and remote control other than the
above buttons are disabled. To use buttons other
than the above buttons, release the adjustment
lock.
g02.P65 9/17/2003, 3:00 PM33
E33
Page 36

Adjusting the display
Resetting all adjustment values
(ALL RESET)
All adjustment values will be reset. This includes
not only PC mode, but TV/AV mode (including
channel settings and the secret number for the Vchip Block) as well.
Resetting all adjustment values is not possible
while the adjustment lock is set. Release the
adjustment lock before resetting.
Perform this procedure on the monitor.
1.Turn off the monitor power.
2.While pressing down the MENU and ENTER/
BRIGHT MODE buttons, press the MAIN POWER
button (i.e. switch the power on).
Continue to press the buttons until “ALL RESET”
appears on the screen. Resetting is complete
when the displayed message disappears.
Note:
- Control buttons will be disabled while “ALL
RESET” is displayed.
g02.P65 9/17/2003, 3:00 PM34
E34
Page 37

Installing set-up information and the ICC profile (For Windows)
Depending on the type of computer or OS, you
may need to install the monitor set-up information
on your system. If so, follow the steps below to
install the monitor set-up information. (Depending
on the type of computer or OS, command names
and methods may differ. Please follow the
computer’s own operation manual while reading
this.)
About the ICC profile
An ICC (International Color Consortium) profile is
a file that describes the color reproduction
characteristics of the LCD monitor. Using an
application compatible with an ICC profile, highly
accurate color reproduction can be realized.
- Windows 98/2000/Me/XP all use the ICC profile.
- When installing Windows 98/2000/Me/XP set-up
information (described below), the ICC profile is
also installed. If you would like to install the ICC
profile only, please refer to Installing the ICC
profile on page E37.
- When using the ICC profile, set “COLOR MODE”
and “WHITE BALANCE” to “STD”.
For Windows 95
Installing monitor set-up information into
Windows 95.
This explanation assumes that the CD-ROM drive
is “D” drive.
1. Load the accessory CD-ROM into the CD-ROM
drive of the computer.
2. Click on the [Start] button. From [Settings],
choose [Control Panel].
3. Double click on [Display].
4. Click on [Settings], [Advanced Properties], and
[Monitor], then [Change].
5. Click on [Have disk], confirm that [Copy
manufacturer’s files from:] is [D:] then click [OK].
6. Confirm that the monitor details are selected,
and click [OK].
7. Check that the monitor details are displayed,
then click [Apply].
8. Click [OK], and close the window.
For Windows 98
Installing monitor set-up information into
Windows 98, and setting the monitor’s ICC profile
as a predetermined value.
This explanation assumes that the CD-ROM drive
is “D” drive.
If the “Add New Hardware Wizard” has appeared:
1. Load the accessory CD-ROM into the CD-ROM
drive of the computer.
2. Click [Next].
3. Check [Display a list of all the drivers in a
specific location, so you can select the driver
you want.], then click [Next].
4. When [Models] is displayed, click on [Have
disk], confirm that [Copy manufacturer’s files
from:] is [D:], and click [OK].
5. Confirm that the monitor details are selected,
then click [Next], [Next], and [Finish]. If the “Add
New Hardware Wizard” appears, repeat the
installation commands beginning from 2
above.
If the “Add New Hardware Wizard” has not
appeared:
1. Load the accessory CD-ROM into the CD-ROM
drive of the computer.
2. Click on the [Start] button. From [Settings],
choose [Control Panel].
3. Double click on [Display].
4. Click on [Settings], [Advanced] and [Monitor].
5. In [Options], check [Automatically detect Plug &
Play monitors] and click on [Change].
6. Click [Next].
7. Click on [Display a list of all the drivers in a
specific location, so you can select the driver
you want.], then click [Next].
8. When [Models] is displayed, click on [Have
disk], confirm that [Copy manufacturer’s files
from:] is [D:], and click [OK].
9. Confirm that the monitor details are selected,
then click [Next], [Next], and [Finish].
10. Check that the monitor details are displayed,
then click [Apply].
11. Click [OK], and close the window.
EnglishDeutschFrançaisItalianoEspañolEnglish
g02.P65 9/17/2003, 3:00 PM35
E35
Page 38

Installing set-up information and the ICC profile (For Windows)
For Windows 2000
Installing monitor set-up information into
Windows 2000, and setting the monitor’s ICC
profile as a predetermined value.
This explanation assumes that the CD-ROM drive
is “D” drive.
1. Load the accessory CD-ROM into the CD-ROM
drive of the computer.
2. Click on the [Start] button. From [Settings],
choose [Control Panel].
3. Double click on [Display].
4. Click on [Settings], [Advanced] and [Monitor].
5. Click on [Properties], [Driver] and [Update
Driver].
6. When [Upgrade Device Driver Wizard]
appears, click [Next].
7. Check [Display a list of the known drivers for
this device so that I can choose a specific
driver] and click [Next].
8. When [Models] is displayed, click on [Have
disk], confirm that [Copy manufacturer’s files
from:] is [D:], and click [OK].
9. Select the monitor from the list displayed and
click [Next].
10. Click [Next], confirm that the monitor’s name
appears on the screen, and click [Finish]. If
[The Digital Signature Not Found] appears,
click [Yes].
11. Click on [Close].
12. Click [OK], and close the window.
For Windows Me
Installing monitor set-up information into Windows
Me, and setting the monitor’s ICC profile as a
predetermined value.
This explanation assumes that the CD-ROM drive
is “D” drive.
If the “Add New Hardware Wizard” has appeared:
1. Load the accessory CD-ROM into the CD-ROM
drive of the computer.
2. Check [Specify the location of the driver
[Advanced]] and click [Next].
3. Check [Display a list of all the drivers in a
specific location, so you can select the driver
you want.], then click [Next].
4. When [Models] is displayed, click on [Have
disk], confirm that [Copy manufacturer’s files
from:] is [D:], and click [OK].
5. Select the monitor details from the list, then
click [Next], [Next], and [Finish]. If the “Add New
Hardware Wizard” appears, repeat the
installation commands beginning from 2 above.
If the “Add New Hardware Wizard” has not
appeared:
1. Load the accessory CD-ROM into the CD-ROM
drive of the computer.
2. Click on the [Start] button. From [Settings],
choose [Control Panel].
3. Double click on [Display].
4. Click on [Settings], [Advanced] and [Monitor].
5. In [Options], check [Automatically detect Plug &
Play monitors] and click on [Change].
6. Check [Specify the location of the driver
[Advanced]] and click [Next].
7. Check [Display a list of all the drivers in a
specific location, so you can select the driver
you want.] and click [Next].
8. When [Models] is displayed, click on [Have
disk], confirm that [Copy manufacturer’s files
from:] is [D:], and click [OK].
9. Select the monitor details, then click [Next],
[Next], and [Finish].
10. Check that the monitor details are displayed,
then click [Apply].
11. Click [OK], and close the window.
g02.P65 9/17/2003, 3:00 PM36
E36
Page 39

Installing set-up information and the ICC profile (For Windows)
For Windows XP
Installing monitor set-up information into Windows
XP, and setting the monitor’s ICC profile as a
predetermined value.
This explanation assumes that the CD-ROM drive
is “D” drive.
1. Load the accessory CD-ROM into the CD-ROM
drive of the computer.
2. Click on the [Start] button. Choose [Control
Panel].
3. Switch to “Classic View”.
4. Double click on [Display].
5. Click on [Settings], [Advanced] and [Monitor].
6. Click on [Properties], [Driver] and [Update
Driver].
7. When [Hardware Update Wizard] appears,
check [Install from a list or specific location
[Advanced]] and click [Next].
8. Check [Don’t search. I will choose the driver to
install.] and click [Next].
9. Click on [Have Disk], confirm that [Copy
manufacturer’s files from:] is [D:], and click [OK].
10. Select the monitor from the list displayed and
click [Next].
If [has not passed Windows Logo testing...]
appears, click [Continue Anyway].
11. Confirm that the monitor’s name appears on
the screen.
12. Click on [Finish].
13. Click on [Close].
14. Click [OK], and close the window.
Installing the ICC profile
Installing the monitor’s ICC profile. (If the set-up
information has already been installed, so too has
the profile, and there is no need to install it.)
This explanation assumes that the CD-ROM drive
is “D” drive.
1. Load the accessory CD-ROM into the CD-ROM
drive of the computer.
2. Click on the [Start] button. From [Settings],
choose [Control Panel].
3. Double click on [Display].
4. Click on [Settings] and [Advanced].
5. Click on [General] and from [Compatibility]
select [Apply the new display setting without
restarting], then click on [Color Management].
6. Click [Add], and select CD-ROM as the file
location.
7. Choose the color profile that you would like to
install, and click on [Add].
8. Choose the profile and click on [Set As
Default].
9. Click [OK], and close the window.
- When using the ICC profile, set “COLOR MODE”
and “WHITE BALANCE” to “STD”.
EnglishDeutschFrançaisItalianoEspañolEnglish
g02.P65 9/17/2003, 3:00 PM37
E37
Page 40

Information about the ColorSync profile (For MacOS)
About the ColorSync profile
ColorSync is Apple Computer’s color management
system and enables color reproduction
characteristics to be realized when used with a
compatible application. A ColorSync profile
describes the color characteristics of the LCD
monitor.
Notes:
- This monitor’s ColorSync profile works with
MacOS 8.5 or above.
- When using the ColorSync profile, set “COLOR
MODE” and “WHITE BALANCE” to “STD”.
Setting up the ColorSync profile
Notes:
- It is necessary to have PC Exchange or File
Exchange installed in your system.
- Depending on the type of computer or OS,
command names and methods may differ.
Please follow the computer’s own operation
manual while reading this.
1.Load the accessory CD-ROM into the CD-ROM
drive of the computer.
2.Copy the profile to be used from the CD-ROM to
the ColorSync profile folder in the system folder.
3.Using the ColorSync on the control panel,
choose the profile to be used.
g02.P65 9/17/2003, 3:00 PM38
E38
Page 41

Watching TV
Watching TV
TV memory for channels is empty at shipment.
The first time you use the monitor or when you
move to a new area, set the channels using the
CHANNEL SETTING menu. (See page E21.)
INPUT
POWER
MENU
ENTER
/
CH
VOL/BRIGHT
MAIN
POWER
BRIGHT
MODE
SLEEP
BRIGHT
MODE
DISPLAY
PC TV
1.Select a channel using the CH buttons or
channel buttons on the remote control. (See the
right column.)
Pressing one of these buttons automatically
switches to TV mode if the monitor was in PC or
AV mode.
2.Adjust the volume.
See page E26 for more information.
Note:
- Use the INPUT button (monitor) or the TV button
(remote control) to switch the display mode to TV
when you are listening to TV in PC mode (see
page E28).
AV
MENU
ENTER
BRIGHT
CC MTS MUTE
VOL
CH
FLASHBACK
Selecting the channels
This monitor allows you to select up to 125
channels (1 to 125). To select a channel using the
channel buttons on the remote control, enter a 2or 3-digit number.
POWER
PC TV
SLEEP
BRIGHT
MODE
DISPLAY
To select a 1- or 2-digit channel number (e.g.,
Channel 5):
Complete the following procedure within 4 seconds.
1.Press the 0 button.
2.Press the 5 button.
Note:
- When selecting a 1-digit channel number, do not
fail to press the 0 button first.
To select a 3-digit channel number (e.g., Channel
115):
Complete the following procedure within 4 seconds.
1.Press the 100 button.
2.Press the 1 button.
3.Press the 5 button.
AV
MENU
ENTER
BRIGHT
CC MTS MUTE
VOL
CH
FLASHBACK
EnglishDeutschFrançaisItalianoEspañolEnglish
g02.P65 9/17/2003, 3:00 PM39
Notes:
- The 3-digit channel number can be selected
only when the receiving mode is set to “CABLE”
in the CHANNEL SETTING menu. (See pages
E21 and E22.)
- You can also change the channel up/down one
at a time using the CH buttons.
E39
Page 42

Watching TV
Selecting MTS (Multi ch TV Sound)
You can select MTS (Multi ch TV Sound) using the
MTS button on the remote control.
STEREO stereo audio
SAP second audio program
MONO monophonic audio
POWER
PC TV
SLEEP
BRIGHT
MODE
DISPLAY
1.Press the MTS button on the remote control.
The audio changes in the following order
depending on the broadcast you are receiving.
AV
MENU
ENTER
BRIGHT
CC MTS MUTE
VOL
CH
FLASHBACK
Returning to previous channel
(FLASHBACK)
You can return to the previous channel you were
watching.
Perform this procedure with remote control.
POWER
PC TV
SLEEP
BRIGHT
MODE
DISPLAY
1.Press the FLASHBACK button.
The monitor will return to the channel you were
previously watching.
AV
MENU
ENTER
BRIGHT
CC MTS MUTE
VOL
CH
FLASHBACK
Receiving a stereo broadcast:
STEREO → STEREO → MONO → STEREO...
Receiving a monaural + SAP (Second Audio
Program) broadcast:
MAIN → SAP → MONO → MAIN...
Receiving a stereo + SAP (Second Audio
Program) broadcast:
ST (SAP) → SAP (ST) → MONO → ST (SAP)...
Note:
- Switch to “MONO” if there is too much noise
during a stereo broadcast.
E40
g02.P65 9/17/2003, 3:00 PM40
Page 43

Watching TV
Setting the Closed Caption (CLOSED CAPTION)
This monitor is equipped with an internal Closed Caption decoder. “Closed Caption” is a system which
allows conversations, narration, and sound effects in TV programs and home videos to be viewed as
captions on the TV screen.
- Not all programs and videos will offer Closed Captioning.
- The Closed Caption broadcasts can be viewed in 2 modes: Caption (CAPTION) and Text (TEXT).
For each mode, two channels are available: CH1 and CH2.
The CAPTION mode shows subscripts of dialogs and commentaries of TV dramas and news programs
while allowing a clear view of the picture.
The TEXT mode displays various information over the picture (such as TV program schedules and
weather forecasts, etc.) that is independent of the TV programs.
Perform this procedure using the remote control or the MENU screen.
Here we will describe the procedure using the remote control.
(See page E52 for information on using the MENU screen.)
1.Display the CC/TEXT screen using the CC button.
POWER
CC/TEXT : OFF
PC TV
AV
EnglishDeutschFrançaisItalianoEspañolEnglish
SLEEP
BRIGHT
MODE
ENTER
MENU
BRIGHT
2.Change the setting using the CC button.
The setting changes in the following order:
DISPLAY
CC MTS MUTE
VOL
OFF → CC1 → CC2 → TEXT1 → TEXT2 → OFF...
CC1 Caption mode for CH1 data
CC2 Caption mode for CH2 data
TEXT1 Text mode for CH1 data
CH
FLASHBACK
TEXT2 Text mode for CH2 data
Notes:
- If a broadcast has Closed Caption and the MUTE button on the remote control is pressed, the monitor
enters the Caption mode automatically. Pressing the MUTE button again will return the monitor to its
previous condition.
- Closed Caption may malfunction (white blocks, strange characters, etc.) if signal conditions are poor
or if there are problems at the broadcast source.
- If no text broadcast is being received while viewing in the Text mode, the screen may become dark and
blank for some programs. Should this occur, switch the Closed Caption mode to “OFF”.
g02.P65 9/17/2003, 3:00 PM41
E41
Page 44

Watching TV
Adjusting the V-chip settings (V-CHIP)
This function allows TV programs to be restricted and TV usage to be controlled based on FCC data. It
prevents children from watching violent or sexual scenes that may be harmful.
- Restriction of TV programs includes two ratings that contain information about the program: the MPAA
rating and the TV Parental Guidelines. The MPAA rating is restricted by age. TV Parental Guidelines
are restricted by age and content.
- Since a TV program may use either the MPAA rating or the TV Guidelines, both should be adjusted for
complete control.
MPAA rating
Rating
G
PG
Age
base
PG-13
R
NC-17
X
For example:
PG-13 in the age-based rating is blocked, this will also automatically block the higher ratings (R, NC-17
and X).
GENERAL AUDIENCES. All ages admitted.
PARENTAL GUIDANCE SUGGESTED. Some material may not be suitable for children.
PARENTS STRONGLY CAUTIONED. Some material may be inappropriate for children under 13.
RESTRICTED. Under 17 requires accompanying parent or adult guardian.
NO ONE UNDER 17 ADMITTED.
X is an older rating that is unified with NC-17 but may be encoded in the data of older movies.
Note:
- The MPAA rating is only age-based.
g02.P65 9/17/2003, 3:00 PM42
E42
Page 45

Watching TV
TV Parental Guidelines
Content base
Rating
TV-Y (All children)
TV-Y7 (Direct to Older Children)
TV-G (General Audience)
Age
TV-PG
base
(Parental Guidance Suggested)
TV-14
(Parents Strongly Cautioned)
TV-MA (Mature Audience Only)
FV
(Fantasy
Violence)
: The content rating can be set.
Example 1:
When TV-Y7 in the age-based rating is set to BLOCK, this will automatically block the higher ratings: TVG, TV-PG, TV-14 and TV-MA. In addition, D, L, S, V and FV in CONTENT are automatically blocked unless
you manually set BLOCK CONTENT.
V
(Violence)
S
(Sexual
Situation)
L
(Adult
Language)
D
(Sexually
Suggestive
Dialog)
EnglishDeutschFrançaisItalianoEspañolEnglish
Example 2:
When the content-based rating: “D for TV-PG” is blocked, this will automatically block the higher rating: “D
for TV-14”.
Notes:
- Age-based ratings can be modified by the content-based ratings, but only in the combinations
indicated by an “X” in the table above.
- Choosing a lower age-based rating blocks the higher age-based ratings regardless of content rating
settings.
E43
g02.P65 9/17/2003, 3:00 PM43
Page 46

Watching TV
Setting V-chip for MPAA rating
INPUT
POWER
MENU
BRIGHT
ENTER
/
MODE
CH
VOL/BRIGHT
MAIN
POWER
1.Select the TV mode using the INPUT button
(monitor) or the TV button (remote control).
2.Display the MENU screen using the MENU
button.
MENU
VIDEO ADJUST
CHANNEL SETTING
MODE SELECT
CLOSED CAPTION
V-CHIP BLOCK
SLEEP
BRIGHT
MODE
DISPLAY
PC TV
ENTER
CC MTS MUTE
<
>>
>>
>>
>>
>>
AV
FLASHBACK
TV/AV
MENU
BRIGHT
VOL
CH
5.Select “MPAA” using the MENU button (monitor)
or the
buttons (remote control), and press
the ENTER/BRIGHT MODE button (monitor) or
the ENTER button (remote control).
6.Select, for example, “PG” using the MENU button
(monitor) or the
buttons (remote control),
and press the ENTER/BRIGHT MODE button
(monitor) or the ENTER button (remote control).
7.Select “BLOCK” using the VOL/BRIGHT buttons
(monitor) or the buttons (remote control).
If you set “PG” to “BLOCK”, “PG-13”, “R”, “NC-17”
and “X” are automatically blocked.
8.Exit the MENU screen using the INPUT button
(monitor) or the MENU button (remote control).
Notes:
- Set ratings are blocked only when you activate
V-chip Block (see page E46).
- If you set “G” to “BLOCK”, all ratings are
automatically blocked.
- If you set “X” to “BLOCK”, “G”, “PG”, “PG-13”, “R”
and “NC-17” are not blocked.
>
3.Select “V-CHIP BLOCK” using the MENU button
(monitor) or the
buttons (remote control),
and press the ENTER/BRIGHT MODE button
(monitor) or the ENTER button (remote control).
“INPUT SECRET NO.” screen will be displayed.
4.Input the 4-digit secret number using the
channel buttons (0-9).
Note:
- When you input the secret number for the first
time, press the ENTER/BRIGHT MODE button
(monitor) or the ENTER button (remote
control) to register it. Otherwise, continue to
the next step.
The V-CHIP BLOCK menu will be displayed.
V-CHIP BLOCK
RETURN
MPAA
TV GUIDELINES
STATUS
RESET
[
OFF
<
TV/AV
>
>>
>>
]
E44
g02.P65 9/17/2003, 3:00 PM44
Page 47

Watching TV
Setting V-chip for TV Parental Guidelines
(TV GUIDELINE)
INPUT
POWER
MENU
ENTER
/
CH
VOL/BRIGHT
MAIN
POWER
BRIGHT
MODE
SLEEP
BRIGHT
MODE
DISPLAY
PC TV
AV
MENU
ENTER
BRIGHT
CC MTS MUTE
VOL
CH
FLASHBACK
1.Repeat steps 1 to 4 of “Setting V-chip for MPAA
rating” on page E44.
(The V-CHIP BLOCK menu will be displayed.)
2.Select “TV GUIDELINES” using the MENU
button (monitor) or the
buttons (remote
control), and press the ENTER/BRIGHT MODE
button (monitor) or the ENTER button (remote
control).
TV GUIDELINES
<
TV/AV
>
RETURN
TV-Y
TV-Y7
TV-G
TV-PG
TV-14
TV-MA
BLOCK CONTENT
[
-----
[
BLOCK
[
BLOCK
[
BLOCK
[
BLOCK
[
BLOCK
]
]
]
]
]
]
>>
3.Select, for example, “TV-Y7” using the MENU
button (monitor) or the
buttons (remote
control), and press the ENTER/BRIGHT MODE
button (monitor) or the ENTER button (remote
control).
4.Select “BLOCK” using the VOL/BRIGHT buttons
(monitor) or the
buttons (remote control).
If you set “TV-Y7” to “BLOCK”, “TV-G”, “TV-PG”,
“TV-14” and “TV-MA” are automatically blocked.
In addition, “D”, “L”, “S”, “V” and “FV” in
CONTENT are automatically blocked.
5.Exit the MENU screen using the INPUT button
(monitor) or the MENU button (remote control).
Setting V-chip for Block Content (BLOCK
CONTENT)
INPUT
POWER
MENU
ENTER
/
CH
VOL/BRIGHT
MAIN
POWER
BRIGHT
MODE
SLEEP
BRIGHT
MODE
DISPLAY
PC TV
ENTER
CC MTS MUTE
1.Repeat steps 1 to 4 of “Setting V-chip for MPAA
rating” on page E44.
(The V-CHIP BLOCK menu will be displayed.)
2.Select “TV GUIDELINES” using the MENU
button (monitor) or the
buttons (remote
control), and press the ENTER/BRIGHT MODE
button (monitor) or the ENTER button (remote
control).
3.Select “BLOCK CONTENT” using the MENU
button (monitor) or the
buttons (remote
control), and press the ENTER/BRIGHT MODE
button (monitor) or the ENTER button (remote
control).
BLOCK CONTENT
Y
Y7 FV
G
PG
14
MA
4.
Select the desired cell (with character) on the screen
using the
buttons (remote control).
V
S
L
V
S
L
V
S
L
<
D
D
5.Press the ENTER/BRIGHT MODE button
(monitor) or the ENTER button (remote control).
Each time you press the button, the color of the
selected cell switches between black (blocked)
and gray (unblocked).
6.Exit the MENU screen using the INPUT button
(monitor) or the MENU button (remote control).
Note:
- If you set “TV-14” to “BLOCK”, “TV-MA” is
automatically blocked. Contents “D”, “L”, “S” and
“V” are automatically blocked in the table on
page E43.
E45
AV
MENU
FLASHBACK
TV/AV
EnglishDeutschFrançaisItalianoEspañolEnglish
BRIGHT
VOL
CH
>
g02.P65 9/17/2003, 3:00 PM45
Page 48

Watching TV
Activating or deactivating V-chip Block
(Setting STATUS)
You can activate V-chip Block after “Setting V-chip
for MPAA rating” and/or “Setting V-chip for TV
Parental Guidelines (TV GUIDELINE)”.
INPUT
POWER
MENU
ENTER
/
CH
VOL/BRIGHT
MAIN
POWER
BRIGHT
MODE
SLEEP
BRIGHT
MODE
DISPLAY
PC TV
AV
MENU
ENTER
BRIGHT
CC MTS MUTE
VOL
CH
FLASHBACK
1.Repeat steps 1 to 4 of “Setting V-chip for MPAA
rating” on page E44.
(The V-CHIP BLOCK menu will be displayed.)
2.Select “STATUS” using the MENU button
(monitor) or the buttons (remote control),
and press the ENTER/BRIGHT MODE button
(monitor) or the ENTER button (remote control).
3.Set “STATUS” to “ON” (activated) or “OFF”
(deactivated) using the VOL/BRIGHT buttons
(monitor) or the
buttons (remote control).
Note:
- If “STATUS” is set to “OFF”, V-chip Block will
not be activated.
4.Exit the MENU screen using the INPUT button
(monitor) or the MENU button (remote control).
Note:
- When “STATUS” in the V-CHIP BLOCK menu is
“ON”, TV/AV-IN SOUND is not available in PC
mode (see page E28).
Canceling the V-chip Block temporarily
INPUT
POWER
MENU
ENTER
/
CH
VOL/BRIGHT
MAIN
POWER
BRIGHT
MODE
SLEEP
BRIGHT
MODE
DISPLAY
PC TV
AV
MENU
ENTER
BRIGHT
CC MTS MUTE
VOL
CH
FLASHBACK
1.“V-CHIP HAS BEEN ACTIVATED” appears if you
watch a program with the same Program Rating
data you configured.
Note:
- “V-CHIP HAS BEEN ACTIVATED” will not be
displayed if “STATUS” is not configured to “ON”.
2.Press the ENTER/BRIGHT MODE button
(monitor) or the ENTER button (remote control)
to display “INPUT SECRET NO.”.
3.Input the 4-digit secret number using the
channel buttons (0-9).
V-chip Block is temporarily canceled.
If you input an incorrect secret number,
“SECRET NO. IS INCORRECT” is displayed. In
this case, input the correct secret number.
Notes:
- If you display the V-CHIP BLOCK menu again
(see page E44), V-chip Block will be activated
again.
- If you turn the power on from off, V-chip Block will
be activated again.
g02.P65 9/17/2003, 3:00 PM46
E46
Page 49

Watching TV
Resetting the V-chip Block settings
The settings will be reset to the default status.
However, the secret number will not be cleared.
INPUT
POWER
MENU
ENTER
/
CH
VOL/BRIGHT
MAIN
POWER
BRIGHT
MODE
SLEEP
BRIGHT
MODE
DISPLAY
PC TV
AV
MENU
ENTER
BRIGHT
CC MTS MUTE
VOL
CH
FLASHBACK
1.Repeat steps 1 to 4 of “Setting V-chip for MPAA
rating” on page E44.
(The V-CHIP BLOCK menu will be displayed.)
2.Select “RESET” using the MENU button
(monitor) or the buttons (remote control),
and press the ENTER/BRIGHT MODE button
(monitor) or the ENTER button (remote control).
3.Exit the MENU screen using the INPUT button
(monitor) or the MENU button (remote control).
Resetting is complete.
Changing or clearing the secret number
If you forgot the secret number, clear it as follows.
INPUT
POWER
MENU
ENTER
/
CH
VOL/BRIGHT
MAIN
POWER
BRIGHT
MODE
SLEEP
BRIGHT
MODE
DISPLAY
PC TV
AV
MENU
ENTER
BRIGHT
CC MTS MUTE
VOL
CH
FLASHBACK
1.Repeat steps 1 to 3 of “Setting V-chip for MPAA
rating” on page E44.
(“INPUT SECRET NO.” screen will be displayed.)
2.Press and hold the CH
button (monitor) and
the VOL/BRIGHT > button (monitor)
simultaneously until the “INPUT SECRET NO.”
blinks. The secret number will be cleared.
3.Input the new 4-digit secret number or exit the
MENU screen using the INPUT button (monitor)
or the MENU button (remote control).
EnglishDeutschFrançaisItalianoEspañolEnglish
g02.P65 9/17/2003, 3:00 PM47
E47
Page 50

Enjoying DVDs, games, and other equipment
You can enjoy the AV equipment connected to
your monitor such as VCRs, DVD players, and
game systems. (See page E15.)
INPUT
POWER
ENTER
MENU
/
CH
BRIGHT
MODE
SLEEP
BRIGHT
MODE
PC TV
AV
ENTER
MENU
BRIGHT
VOL/BRIGHT
MAIN
POWER
DISPLAY
CC MTS MUTE
VOL
CH
FLASHBACK
1.Switch the display mode to AV.
See page E25 for more information.
AV
VIDEO
2.Turn on the connected AV equipment, and then
play a tape, DVD, or game.
3.Adjust the volume.
See page E26 for more information.
Notes:
- Sometimes no image will be displayed during
fast searching of video.
- The display may flicker during slow playback of
video depending on the VCR or videotape you
are using.
- You cannot play shooting games that use gun
controllers with this monitor.
g02.P65 9/17/2003, 3:00 PM48
E48
Page 51

Handy features (for TV/AV mode)
Switching power off after a specified
length of time (SLEEP)
The monitor can automatically switch off (standby)
after a specified length of time. This is handy if you
want to watch the monitor at bedtime.
Perform this operation using the remote control.
POWER
PC TV
SLEEP
BRIGHT
MODE
DISPLAY
AV
MENU
ENTER
BRIGHT
CC MTS MUTE
VOL
CH
FLASHBACK
Notes:
- When there are only 5 minutes remaining on the
SLEEP timer, the remaining time will be
displayed every minute.
- Pressing the power button while the SLEEP
timer is operating will clear the timer.
- Switching to PC mode automatically clears the
SLEEP timer.
- You can also set the SLEEP timer from the
MODE SELECT menu. (See page E51.)
EnglishDeutschFrançaisItalianoEspañolEnglish
1.Press the SLEEP button.
2.Specify in how many minutes you want the
monitor to switch off by pressing the SLEEP
button.
The time changes in the following order each
time you press the button:
30 min → 60 min → 90 min → 120 min →
150 min → --- min → 30 min
When the specified time elapses, the monitor
automatically switches off and clears the SLEEP
timer.
Checking the time remaining on the SLEEP
timer
1.Press the DISPLAY button.
The time remaining on the SLEEP timer will be
displayed for about 5 seconds. You can also
check the time remaining by pressing the SLEEP
button once.
Changing the specified time
1.Press the SLEEP button.
The remaining time will be displayed.
2.Change the specified time by pressing the
SLEEP button several times as needed.
g02.P65 9/17/2003, 3:00 PM49
E49
Page 52

Adjusting the display
You can adjust TV and video images and perform
various settings using menus for the TV/AV mode.
- All the menus except for the CHANNEL
SETTING menu are common for TV and AV
modes. All the values set in TV mode will be also
applied in AV mode.
How to adjust
The following procedure describes the basic
operation method. See pages E51 and E52
regarding individual options.
1.Select the TV mode or AV mode.
See page E25 for more information.
2.Display the MENU screen using the MENU
button.
MENU
VIDEO ADJUST
CHANNEL SETTING
MODE SELECT
CLOSED CAPTION
V-CHIP BLOCK
>>
>>
>>
>>
>>
<
TV/AV
>
3.Select the menu you want to set using the MENU
button (monitor) or the
control), and press the ENTER/BRIGHT MODE
button (monitor) or the ENTER button (remote
control).
4.Select the option you want to set using the
MENU button (monitor) or the
(remote control), and press the ENTER/BRIGHT
MODE button (monitor) or the ENTER button
(remote control).
5.Change the numbers/values using the
VOL/BRIGHT buttons (monitor) or the
buttons (remote control).
You can continue to set other options.
Do the following to return to the previous screen:
(1) Select “RETURN” using the MENU button
(monitor) or the
control).
(2) Press the ENTER/BRIGHT MODE button
(monitor) or the ENTER button (remote
control).
6.Exit the MENU screen using the INPUT button
(monitor) or the MENU button (remote control).
The procedure is complete.
Note:
- If you do not press any buttons for about 30
seconds while in a menu screen, the settings
you made up to that point will be applied and the
screen will automatically disappear.
buttons (remote
buttons
buttons (remote
g02.P65 9/17/2003, 3:00 PM50
E50
Page 53

VIDEO ADJUST menu
Adjusting the display
Option
CONTRAST
BLACK LEVEL
COLOR
TINT
SHARPNESS
WHITE BALANCE
RESET
Description
Adjusts contrast.
Adjusts the overall brightness of the screen.
Adjusts the color depth.
Adjusts the color tone.
Adjusts the image quality.
Adjusts the color temperature.
.................
- STD
- WARM
Resets adjustment values for this menu to their original factory settings.
See page E53 for more information.
.............
Standard setting for color tone.
Color tone redder than standard.
CHANNEL SETTING menu (TV mode only)
Option
AIR/CABLE
CHANNEL SEARCH
CHANNEL MEMORY
Description
Sets the receiving mode broadcast (AIR) or cable TV (CABLE).
See page E22 for more information.
Sets available channels automatically.
See page E23 for more information.
Sets channels manually.
See page E24 for more information.
MODE SELECT menu
EnglishDeutschFrançaisItalianoEspañolEnglish
Option
SLEEP TIMER
LANGUAGE
RESET
Description
Specifies how many minutes until the monitor switches off (standby).
This can also be set using the remote control. (See page E49.)
Selects the language (English, French or Spanish) on the screen.
See page E27 for more information.
Resets adjustment values for this menu to their original factory settings.
See page E53 for more information.
E51
g02.P65 9/17/2003, 3:00 PM51
Page 54

CLOSED CAPTION menu
Adjusting the display
Option
CC/TEXT
V-CHIP BLOCK menu
Option
MPAA
TV GUIDELINES
STATUS
RESET
Description
Sets the CC/TEXT mode.
See page E41 for more information.
Description
Sets whether MPAA block or unblock (-----).
See page E44 for more information.
Sets whether TV GUIDELINES block or unblock (-----).
See page E45 for more information.
Sets whether the block setting status is ON or OFF.
When “STATUS” in the V-CHIP BLOCK menu is “ON”, TV/AV-IN
SOUND is not available in PC mode (see page E28).
See page E46 for more information.
Resets adjustment values for this menu to their original factory
settings.
See page E47 for more information.
g02.P65 9/17/2003, 3:00 PM52
E52
Page 55

Adjusting the display
Preventing changes to adjusted
values (ADJUSTMENT LOCK)
Disabling the control buttons other than the
following buttons (monitor and remote control)
prevents adjusted values from being changed.
The changing of adjusted values for not only TV/
AV mode, but for PC mode as well will be
prevented.
[Monitor]
- MAIN POWER button
- VOL/BRIGHT buttons
- INPUT button
- CH buttons
[Remote control]
- POWER button
- VOL buttons
- MUTE button
- Input buttons (PC, TV, and AV)
- CH buttons
- Channel buttons (0-9 and 100)
- FLASHBACK button
Perform this procedure on the monitor.
1.Turn off the monitor power.
2.While pressing the MENU button, press the
MAIN POWER button (i.e. turn the power on).
Continue to press the buttons until
“ADJUSTMENT LOCKED” appears on the
screen. The lock is set when the message is
displayed.
Releasing the adjustment lock
Perform this procedure on the monitor.
1.Turn off the monitor power.
2.While pressing the MENU button, press the
MAIN POWER button (i.e. turn the power on).
Continue to press the buttons until
“ADJUSTMENT UNLOCKED” appears on the
screen. The lock is released when the message
is displayed.
Resetting adjustment values for
specific menu (RESET)
Adjustment values for the selected menu can be
reset to their original factory settings.
Resetting will be applied to both TV mode and AV
mode.
Resetting is not possible while the adjustment lock
is set. Release the adjustment lock before
resetting.
1.Select the TV mode or AV mode using the INPUT
button (monitor) or the TV or AV button (remote
control).
2.Display the MENU screen using the MENU
button.
MENU
VIDEO ADJUST
CHANNEL SETTING
MODE SELECT
CLOSED CAPTION
V-CHIP BLOCK
3.Select the menu to reset using the MENU button
(monitor) or the
and press the ENTER/BRIGHT MODE button
(monitor) or the ENTER button (remote control).
A list of options will appear.
4. Select “RESET” using the MENU button
(monitor) or the
and press the ENTER/BRIGHT MODE button
(monitor) or the ENTER button (remote control).
5.Exit the MENU screen using the INPUT button
(monitor) or the MENU button (remote control).
Resetting is complete.
buttons (remote control),
buttons (remote control),
>>
>>
>>
>>
>>
<
TV/AV
>
EnglishDeutschFrançaisItalianoEspañolEnglish
CAUTION!
- When the adjustment lock is set, all buttons on
the monitor and remote control other than the
above buttons are disabled. To use buttons other
than the above buttons, release the adjustment
lock.
g02.P65 9/17/2003, 3:00 PM53
E53
Page 56

Adjusting the display
Resetting all adjustment values
(ALL RESET)
All adjustment values will be reset. This includes
not only TV/AV mode, but PC mode (including
channel settings and the secret number for the Vchip Block) as well.
Resetting all adjustment values is not possible
while the adjustment lock is set. Release the
adjustment lock before resetting.
Perform this procedure on the monitor.
1.Turn off the monitor power.
2.While pressing down the MENU and ENTER/
BRIGHT MODE buttons, press the MAIN POWER
button (i.e. switch the power on).
Continue to press the buttons until “ALL RESET”
appears on the screen. Resetting is complete
when the displayed message disappears.
Note:
- Control buttons will be disabled while “ALL
RESET” is displayed.
g02.P65 9/17/2003, 3:00 PM54
E54
Page 57

Other features
Checking the current channel and
audio mode on screen (DISPLAY)
You can check the current display mode, channel
being received, MTS mode, and time remaining on
the SLEEP timer.
Perform this operation using the remote control.
POWER
PC TV
SLEEP
BRIGHT
MODE
DISPLAY
1.Press the DISPLAY button.
Various information about the current state will
be displayed.
AV
MENU
ENTER
BRIGHT
CC MTS MUTE
VOL
CH
FLASHBACK
Muting the sound (MUTE)
This feature is handy when you want to mute the
sound such as when the phone rings or someone
comes to the door.
Perform this operation using the remote control.
POWER
PC TV
SLEEP
BRIGHT
MODE
DISPLAY
1.Press the MUTE button.
The sound will be muted and “MUTE” will be
displayed.
“MUTE” will disappear after several seconds.
AV
MENU
ENTER
BRIGHT
CC MTS MUTE
VOL
CH
FLASHBACK
EnglishDeutschFrançaisItalianoEspañolEnglish
10
STEREO
The information will disappear after several
seconds.
Notes:
- The information displayed will vary depending
on the current display mode and other settings.
- If the broadcast changes in TV mode while the
information is displaying, the broadcast and
MTS mode may not match.
Canceling muting
1.Press the MUTE button again, or press the
VOL/BRIGHT buttons (monitor) or the VOL
buttons (remote control).
E55
g02.P65 9/17/2003, 3:00 PM55
Page 58

Other features
Changing BRIGHT MODE
You can lower energy consumption by decreasing
screen brightness.
INPUT
POWER
MENU
BRIGHT
ENTER
/
MODE
CH
VOL/BRIGHT
MAIN
POWER
1.Press the ENTER/BRIGHT MODE button
(monitor) or the BRIGHT MODE button (remote
control).
The mode switches in the following order each
time you press the button:
SLEEP
BRIGHT
MODE
DISPLAY
PC TV
AV
MENU
ENTER
BRIGHT
CC MTS MUTE
VOL
CH
FLASHBACK
Using headphones
(commercially available)
You can connect headphones (commercially
available) to the monitor.
Headphone
terminal
Headphones
Note:
- When the headphones are connected, no sound
can be heard from the monitor speakers.
[PC mode]
DARK (power save) → BRIGHT →
DARK (power save)...
[TV/AV mode]
NORMAL (power save 1) → DARK (power save 2) →
BRIGHT → NORMAL (power save 1)...
g02.P65 9/17/2003, 3:00 PM56
E56
Page 59

Monitor care
Troubleshooting
If you think the monitor may be faulty, please check the following points before taking it to be repaired.
If afterwards it still does not work, please contact the shop where you purchased the monitor or your
nearest Sharp authorized Service Center.
The monitor’s fluorescent tubes have a limited life span.
- If the screen darkens, persistently flickers or does not light up, it may be necessary to replace the
fluorescent tube unit. Please inquire at the shop where you purchased the monitor or your nearest
Sharp authorized Service Center. (Never attempt this replacement on your own.)
- In the initial period of use, due to the characteristics of fluorescent tubes the screen may flicker. (This
is not a malfunction.) Should this happen, check by first turning off the power, then turning it on
again.
EnglishDeutschFrançaisItalianoEspañolEnglish
Problem
There is no picture.
(Power LED does not light.)
There is no picture.
(Power LED is lit orange.)
The image appears distorted.
The remote control does not work.
There is no TV picture.
A particular channel will not tune in.
There are stripes or dots on
TV picture.
The picture wavers.
The TV picture is doubled.
There are color bands.
The TV picture is distorted.
TV shows a blue screen.
There is no video picture.
There is no game picture.
What to Check
- Are the AC adapter and power cord properly connected? (Page E17)
- Is power turned on? (Page E25)
- Is the monitor properly connected to the computer? (Page E12)
- Is the computer turned on?
- Does the computer’s signal timing correspond to monitor
specifications? (Page E60)
- Is the computer in power-saving mode?
Try pressing a key on the keyboard or moving the mouse.
- Does the computer’s signal timing correspond to monitor
specifications? (Page E60)
- Perform automatic adjustment. (Page E20)
- Change the Vsync frequency (refresh rate) on the computer you
are using to a low value if possible. (Page E60)
- Have the batteries of the remote control run out? (Page E11)
- Are the batteries placed in the right direction in the remote
control? (Page E11)
- Is the adjustment lock on? (Pages E33 and E53)
- Is the monitor connected to an antenna? Check the connection.
(Pages E13 and E14)
- Is the monitor switched to TV mode? (Page E25)
- Have you set TV channels properly? (Page E21)
- Is there interference from automobiles, trains, neon signs,
computers, or other sources?
- Place the antenna as far as possible away from potential
sources of interference.
- Place the antenna line as far as possible from the computer.
- Is the antenna is facing the right direction?
- There may be reflected electric waves from nearby mountains or
buildings. Try changing the antenna’s height and direction.
- Is there interference from a nearby TV?
Changing the antenna’s height and direction may help.
- Try switching power off, waiting several seconds, and then
turning power back on.
- A blue screen appears when there is bad reception or a
channel cannot be tuned in.
- Is the monitor connected to an antenna? Check the connection.
(Pages E13 and E14)
- Have you set TV channels properly? (Page E21)
- Are the cables properly connected? (Pages E15 and E16)
- Have you switched to AV mode? (Page E25)
- Have you turned on the connected equipment?
E57
g02.P65 9/17/2003, 3:00 PM57
Page 60

Monitor care
Problem
There is no sound.
Control buttons do not work.
The MENU screen does not appear.
What to Check
- Are the audio cables properly connected? (Pages E12, E15
and E16)
- Did you press the MUTE button? (Page E55)
- No sound can be heard from the monitor’s speakers while
headphones are connected.
- Adjust the volume. (Page E26)
- No sound can be heard from the monitor’s speakers while the
monitor is in power-saving mode.
- When “STATUS” in the V-CHIP BLOCK menu is “ON”, TV/AV-IN
SOUND is not available in PC mode. (Pages E28 and E46)
- Is the adjustment lock set? (Pages E33 and E53)
Monitor care
Always remove the plug from the AC outlet when cleaning the monitor.
Cabinet and control panel section
Use a soft dry cloth to lightly wipe away any grime from the cabinet and control panel.
If they are very dirty, apply neutral detergent to a dampened soft cloth, wring it out well and wipe away
grime.
LCD panel section
Use a soft dry cloth to lightly wipe away dirt and dust from the surface of the LCD panel. (A soft cloth such
as gauze or that used for lens cleaning is suitable.)
CAUTION!
- Never use thinner, benzine, alcohol, glass cleaner, etc., as this could lead to color change or change
in shape.
- Never scratch the monitor with anything hard or apply strong pressure as this could leave marks or
result in malfunction.
Storage
If the monitor will not be used for a long period of time, be sure to remove the power plug from the AC
outlet.
CAUTION!
- Do not leave the monitor in contact with rubber or plastic items for long periods of time as this could
lead to color change or change in shape.
g02.P65 9/17/2003, 3:00 PM58
E58
Page 61

Specifications
Product specifications
Model name
LL-M15X1U
LCD display
38 cm measured diagonally TFT LCD module
Resolution (max.)
XGA 1024 x 768 pixels
Displayable colors (max.)
Approx. 16.19 million colors (6 bit + FRC)
Dot pitch
0.297 (H) x 0.297 (V) mm
Brightness (max.)
300 cd/m2 (when “WHITE BALANCE” is set to
“WARM” in TV/AV mode)
Contrast ratio
350:1
Angle of visibility
Left-right 160°; Up-down 135°
(contrast ratio
Screen display size
304.1 (H) x 228.1 (V) mm
Video signal
Analog RGB (0.7 Vp-p) [75Ω]
Sync signal
Separate Sync (TTL level: +/-), Sync on Green,
Composite Sync (TTL level: +/-)
Video signal format
NTSC
Expansion compensation
Digital scaling (Enlarges VGA/SVGA etc. to
XGA.)
Plug & Play
VESA DDC1/DDC2B compatible
Power management
VESA: based on DPMS
Speaker output
2.7 W + 2.7 W
Input terminals
Computer signal: Mini D-sub15 pin (3 rows) x 1
Computer audio: Mini stereo jack (φ 3.5 mm) x 1
Video image: RCA pin x 1
S-video image: x 1
Audio input terminal: RCA pin (L/R x 1)
Receivable TV channels
VHF: 2 through 13; UHF: 14 through 69;
Cable: 1 through 125
Headphone terminal
Mini stereo jack (φ 3.5 mm)
Screen tilt
Upward approx. 0 - 20°; downward approx. 0 - 5°
Power supply
AC 110 - 240 V, 50/60 Hz (Uses special AC
adapter, type NL-A70J of Sharp Corporation)
Temperature of operating environment
5 - 35°C
>
5)
Power consumption
35 W; 2 W in standby; 2 W in power-saving mode
(Uses special AC adapter)
Dimensions
Approx. 359 (W) x 184 (D) x 373 (H) mm
Weight
Approx. 4.4 kg (excluding signal cable and AC
adapter)
Approx. 3.4 kg (excluding stand)
Dimensions (Units: mm)
359
373
326
265
- PC analog signal cable: approx. 1.8 m
- PC audio cable: approx. 1.8 m
- Antenna cable: approx. 4 m
- Special AC adapter:
Approx. 1.5 m
Approx. 135 (W) x 60 (D) x 35 (H) mm
Note:
- As a part of our policy of continuous
improvement, SHARP reserves the right to make
design and specification changes for product
improvement without prior notice. The
performance specification figures indicated are
nominal values of production units. There may
be some deviations from these values in
individual units.
EnglishDeutschFrançaisItalianoEspañolEnglish
72
184
g02.P65 9/17/2003, 3:00 PM59
E59
Page 62

Specifications
Relevant signal timings (PC mode)
Display mode
VESA
US text
Power
Macintosh
series
Hsync
Vsync
Dot
frequency
- Recommended resolution is 1024 x 768.
- All are compliant only with non-interlaced.
- Frequencies for Power Macintosh are reference
values. To connect, another adapter
(commercially available) may be required.
- If the monitor is receiving timing signals that are
not compatible, “OUT OF TIMING” will appear.
Follow your computer’s instruction manual to set
the timing so that it is compatible with the
monitor.
- If the monitor is not receiving any signal (synch
signal), “NO SIGNAL” will appear.
The analog RGB input connector pin
(Mini D-sub connector with 15 pins)
No. Function
1 Red video signal input
2 Green video signal input
3 Blue video signal input
4 GND
5 GND
6 For red video signal GND
7 For green video signal GND
8 For blue video signal GND
9 +5V
10 GND
11 N.C.
12 DDC data
13 For Hsync signal input
14 For Vsync signal input
15 DDC clock
Power management
The monitor is based on VESA DPMS (Display
Power Management Signaling).
To activate the monitor’s power management
function, both the video card and the computer
must conform to the VESA DPMS standard.
g02.P65 9/17/2003, 3:00 PM60
DPMS mode Screen
ON Display on 35 W Yes Yes
STANDBY No Yes
SUSPEND Display off 2 W Yes No
OFF No No
Power
consumption
H-sync V-sync
DDC (Plug & Play)
This monitor supports the VESA DDC (Display
Data Channel) standard.
DDC is a signal standard for carrying out Plug &
Play functions on the monitor or PC. It transfers
information such as degree of resolution between
the monitor and PC. You can use this function if
your PC is DDC compliant and if it is set so that it
can detect the Plug & Play monitor.
There are many varieties of DDC due to the
differences between systems. This monitor works
with DDC1 and DDC2B.
E60
Page 63

FRANÇAIS
EnglishFrançais
IMPORTANT :
Pour faciliter la déclaration de perte ou de vol,
veuillez noter les numéros de modèle et de série
du moniteur dans l’espace prévu à cet effet. Ces
numéros se trouvent au dos du moniteur.
N° de modèle :
N° de série :
ÉTATS-UNIS SEULEMENT
INFORMATIONS IMPORTANTES
AVERTISSEMENT : POUR RÉDUIRE LES RISQUES D’INCENDIE OU
D’ÉLECTROCUTION, N’EXPOSEZ PAS CET
APPAREIL À LA PLUIE OU À L’HUMIDITÉ.
Ce symbole (éclair dans un
triangle équilatéral) avertit
ATTENTION
RISQUE
D’ÉLECTROCUTION.
NE PAS OUVRIR.
l’utilisateur de la présence dans
le boîtier de l’appareil d’une
“tension dangereuse” non isolée
suffisamment élevée pour causer
une électrocution aux personnes.
ATTENTION : AFIN DE RÉDUIRE LE RISQUE
D’ÉLECTROCUTION, NE PAS RETIRER LE
COUVERCLE (OU PANNEAU ARRIÈRE).
PAS DE PIÈCES RÉPARABLES PAR L’UTILISATEUR
À L’INTÉRIEUR.
CONFIER TOUTE PROCÉDURE D’ENTRETIEN À UN
PERSONNEL D’ENTRETIEN QUALIFIÉ.
F1
Ce symbole (point d’exclamation
dans un triangle équilatéral)
avertit l’utilisateur de la présence
d’instructions d’utilisation et
d’entretien (dépannage)
importantes dans la documentation
accompagnant l’appareil.
Page 64

INFORMATIONS IMPORTANTES
Déclaration FCC
AVERTISSEMENT – La réglementation FCC stipule que toute modification/changement non
autorisé(e) apporté(e) à cet équipement et non expressément approuvé(e) par le fabricant peut
annuler la capacité de l’utilisateur à se servir dudit équipement.
Remarque : Cet équipement a été testé et jugé conforme aux limites d’un appareil numérique
de Classe B, conformément à la section 15 de la réglementation FCC.
Ces limites sont destinées à assurer une protection raisonnable contre toute interférence nocive dans
le cadre d’une installation résidentielle. Cet équipement génère, utilise et est susceptible d’irradier de
l’énergie sous forme de radiofréquences et, s’il n’est pas installé et utilisé conformément aux
instructions, est susceptible de provoquer des interférences dommageables aux communications
radio. Toutefois, il n’est pas garanti qu’aucune interférence ne surviendra dans le cadre d’une
installation particulière. Si cet équipement provoque des interférences dommageables aux réceptions
radio ou télévision (interférences pouvant être déterminées en éteignant puis en rallumant le
matériel), l’utilisateur est invité à essayer de corriger ces interférences en adoptant une ou plusieurs
des mesures suivantes :
- Réorienter ou changer la position de l’antenne réceptrice.
- Augmenter la distance entre l’équipement et le récepteur.
- Brancher l’équipement à une prise électrique située sur un circuit différent de celui auquel le
récepteur est connecté.
- Consulter le revendeur ou un technicien spécialisé en TV/radio.
N’utilisez que les câbles et le cordon secteur joints avec l’appareil afin de garantir la conformité à la
réglementation FCC relative aux équipements de calcul de classe B.
ÉTATS-UNIS SEULEMENT
Déclaration de conformité
Moniteur LCD couleurs SHARP LL-M15X1U
Cet appareil répond à la section 15 de la réglementation FCC. Son utilisation est soumise aux
conditions suivantes : (1) cet appareil ne peut causer d’interférences dommageables, et (2) cet
appareil doit accepter toutes les interférences reçues, y compris les interférences susceptibles de
provoquer un fonctionnement de moindre capacité.
Tiers responsable : SHARP ELECTRONICS CORPORATION
Sharp Plaza, Mahwah, New Jersey 07430
TEL : 1-800-BE-SHARP
“Note à l’intention de l’installateur de télévision par câble : Nous attirons l’attention de l’installateur de télévision par
câble sur l’article 820-40 du Code National de l’Électricité qui fournit des directives pour l’exécution correcte de la
mise à la terre et spécifie notamment que la terre du câble doit être reliée au réseau de mise à la terre du bâtiment,
le plus près possible du point d’entrée du câble.”
Cet appareil comprend des soudures d’étain-plomb, ainsi qu’une lampe fluorescente contenant une
petite quantité de mercure. Il se peut que la mise au rebut de ces matériaux soit soumise à des
réglementations environnementales. Pour obtenir plus de détails sur la mise au rebut ou le recyclage,
veuillez contacter les autorités locales concernées ou consulter le site Web d’Electronic Industries
Alliance : www.eiae.org
ÉTATS-UNIS SEULEMENT
* En sa qualité de partenaire du programme ENERGY STAR, SHARP a fait en sorte que ce produit
réponde aux directives ENERGY STAR en matière d’économie d’énergie.
F2
Page 65

Table des matières
Pour démarrer
Conseils et mesures de sécurité . . . . . . . . . . . . . . . . . . . . . . . . . . . . . . . . . . . . . . . . . . . . . . . . . . . . . . . . F5
Consignes de sécurité importantes . . . . . . . . . . . . . . . . . . . . . . . . . . . . . . . . . . . . . . . . . . . . . . . . . . . F5
Moniteur et liste des accessoires . . . . . . . . . . . . . . . . . . . . . . . . . . . . . . . . . . . . . . . . . . . . . . . . . . . . F7
Description du produit . . . . . . . . . . . . . . . . . . . . . . . . . . . . . . . . . . . . . . . . . . . . . . . . . . . . . . . . . . . . . . . . F8
Moniteur . . . . . . . . . . . . . . . . . . . . . . . . . . . . . . . . . . . . . . . . . . . . . . . . . . . . . . . . . . . . . . . . . . . . . . . . F8
Télécommande . . . . . . . . . . . . . . . . . . . . . . . . . . . . . . . . . . . . . . . . . . . . . . . . . . . . . . . . . . . . . . . . . . . F9
Serre-câbles . . . . . . . . . . . . . . . . . . . . . . . . . . . . . . . . . . . . . . . . . . . . . . . . . . . . . . . . . . . . . . . . . . . . F10
Réglage de l’inclinaison . . . . . . . . . . . . . . . . . . . . . . . . . . . . . . . . . . . . . . . . . . . . . . . . . . . . . . . . . . F10
Télécommande. . . . . . . . . . . . . . . . . . . . . . . . . . . . . . . . . . . . . . . . . . . . . . . . . . . . . . . . . . . . . . . . . . . . . F11
Utilisation de la télécommande . . . . . . . . . . . . . . . . . . . . . . . . . . . . . . . . . . . . . . . . . . . . . . . . . . . . . F11
Piles pour la télécommande . . . . . . . . . . . . . . . . . . . . . . . . . . . . . . . . . . . . . . . . . . . . . . . . . . . . . . . F11
Raccordement et préparation
Raccordement du moniteur à un ordinateur . . . . . . . . . . . . . . . . . . . . . . . . . . . . . . . . . . . . . . . . . . . . . . F12
Raccordement de l’antenne . . . . . . . . . . . . . . . . . . . . . . . . . . . . . . . . . . . . . . . . . . . . . . . . . . . . . . . . . . F13
Antennes. . . . . . . . . . . . . . . . . . . . . . . . . . . . . . . . . . . . . . . . . . . . . . . . . . . . . . . . . . . . . . . . . . . . . . . F13
Raccordement d’une antenne extérieure . . . . . . . . . . . . . . . . . . . . . . . . . . . . . . . . . . . . . . . . . . . . . F13
Raccordement au réseau de télévision par câble . . . . . . . . . . . . . . . . . . . . . . . . . . . . . . . . . . . . . . F14
Raccordement du moniteur à l’équipement AV . . . . . . . . . . . . . . . . . . . . . . . . . . . . . . . . . . . . . . . . . . . F15
Exemples d’équipements que vous pouvez raccorder . . . . . . . . . . . . . . . . . . . . . . . . . . . . . . . . . . F15
Magnétoscopes et consoles de jeux . . . . . . . . . . . . . . . . . . . . . . . . . . . . . . . . . . . . . . . . . . . . . . . . . F15
Equipement AV avec les bornes sortie S-vidéo . . . . . . . . . . . . . . . . . . . . . . . . . . . . . . . . . . . . . . . . F16
Raccordement du moniteur à une source d’alimentation . . . . . . . . . . . . . . . . . . . . . . . . . . . . . . . . . . . F17
Instructions relatives à l’installation d’un bras conforme VESA . . . . . . . . . . . . . . . . . . . . . . . . . . . . . . . F18
Sélection de la donnée dans l’écran MENU . . . . . . . . . . . . . . . . . . . . . . . . . . . . . . . . . . . . . . . . . . . . . F19
Réglage de l’affichage de l’ordinateur (AUTO ADJUSTMENT) . . . . . . . . . . . . . . . . . . . . . . . . . . . . . . . F20
Réglage des canaux de télévision . . . . . . . . . . . . . . . . . . . . . . . . . . . . . . . . . . . . . . . . . . . . . . . . . . . . . F21
Sélection de la télédiffusion (AIR) ou de la télévision câblée (CABLE) pour le Réglage des Canaux . . . .
Sauvegardez les canaux de télédiffusion dans la mémoire (CHANNEL SEARCH). . . . . . . . . . . . F23
Addition de canaux faibles ou supplémentaires ou effacement des canaux indésirables
de la mémoire de la télévision (CHANNEL MEMORY) . . . . . . . . . . . . . . . . . . . . . . . . . . . . . . . . . . . F2
F22
EnglishFrançais
4
Opérations communes
Opérations communes . . . . . . . . . . . . . . . . . . . . . . . . . . . . . . . . . . . . . . . . . . . . . . . . . . . . . . . . . . . . . . . F25
Mise EN/HORS tension . . . . . . . . . . . . . . . . . . . . . . . . . . . . . . . . . . . . . . . . . . . . . . . . . . . . . . . . . . . F25
Commutation des modes d’affichage (INPUT) . . . . . . . . . . . . . . . . . . . . . . . . . . . . . . . . . . . . . . . . . F25
Réglage du volume . . . . . . . . . . . . . . . . . . . . . . . . . . . . . . . . . . . . . . . . . . . . . . . . . . . . . . . . . . . . . . F26
Réglage du rétroéclairage . . . . . . . . . . . . . . . . . . . . . . . . . . . . . . . . . . . . . . . . . . . . . . . . . . . . . . . . . F27
Sélection de la langue affichée sur l’écran . . . . . . . . . . . . . . . . . . . . . . . . . . . . . . . . . . . . . . . . . . . . F27
Mode PC
Ecouter la télévision ou une autre source audio pendant qu’on regarde l’écran de l’ordinateur (SOUND) . . .
Réglage de l’affichage . . . . . . . . . . . . . . . . . . . . . . . . . . . . . . . . . . . . . . . . . . . . . . . . . . . . . . . . . . . . . . . F29
Comment régler . . . . . . . . . . . . . . . . . . . . . . . . . . . . . . . . . . . . . . . . . . . . . . . . . . . . . . . . . . . . . . . . . F29
Menu ADJUSTMENT . . . . . . . . . . . . . . . . . . . . . . . . . . . . . . . . . . . . . . . . . . . . . . . . . . . . . . . . . . . . . F30
Menu GAIN CONTROL . . . . . . . . . . . . . . . . . . . . . . . . . . . . . . . . . . . . . . . . . . . . . . . . . . . . . . . . . . . F31
Menu COLOR CONTROL . . . . . . . . . . . . . . . . . . . . . . . . . . . . . . . . . . . . . . . . . . . . . . . . . . . . . . . . . F31
Menu MODE SELECT . . . . . . . . . . . . . . . . . . . . . . . . . . . . . . . . . . . . . . . . . . . . . . . . . . . . . . . . . . . . F32
Eviter les changements des valeurs réglées (ADJUSTMENT LOCK) . . . . . . . . . . . . . . . . . . . . . . . F33
Restauration des valeurs du réglage pour un menu spécifique (RESET) . . . . . . . . . . . . . . . . . . . . F33
Restauration de toutes les valeurs de réglage (ALL RESET) . . . . . . . . . . . . . . . . . . . . . . . . . . . . . F34
Installation des fichiers relatifs au paramétrage du moniteur et au profil ICC (Pour Windows) . . . . . . F35
Informations sur le profil ColorSync (Pour MacOS) . . . . . . . . . . . . . . . . . . . . . . . . . . . . . . . . . . . . . . . . F38
F3
F28
Page 66

Table des matières
Mode TV/AV
Regarder la télévision . . . . . . . . . . . . . . . . . . . . . . . . . . . . . . . . . . . . . . . . . . . . . . . . . . . . . . . . . . . . . . . F39
Regarder la télévision . . . . . . . . . . . . . . . . . . . . . . . . . . . . . . . . . . . . . . . . . . . . . . . . . . . . . . . . . . . . F39
Sélection des canaux . . . . . . . . . . . . . . . . . . . . . . . . . . . . . . . . . . . . . . . . . . . . . . . . . . . . . . . . . . . . . F39
Sélection de MTS (Multi ch TV Sound) . . . . . . . . . . . . . . . . . . . . . . . . . . . . . . . . . . . . . . . . . . . . . . . F40
Retour au canal précédent (FLASHBACK) . . . . . . . . . . . . . . . . . . . . . . . . . . . . . . . . . . . . . . . . . . . . F40
Réglage du sous-titrage (CLOSED CAPTION) . . . . . . . . . . . . . . . . . . . . . . . . . . . . . . . . . . . . . . . . . F41
Réglage de l’installation de la puce V (V-CHIP) . . . . . . . . . . . . . . . . . . . . . . . . . . . . . . . . . . . . . . . . F42
Profiter des DVD, des jeux et d’autres équipements . . . . . . . . . . . . . . . . . . . . . . . . . . . . . . . . . . . . . . . F48
Fonctions pratiques (pour le mode TV/AV) . . . . . . . . . . . . . . . . . . . . . . . . . . . . . . . . . . . . . . . . . . . . . . . F49
Mise hors tension du téléviseur après un certain délai (SLEEP) . . . . . . . . . . . . . . . . . . . . . . . . . . . F49
Réglage de l’affichage . . . . . . . . . . . . . . . . . . . . . . . . . . . . . . . . . . . . . . . . . . . . . . . . . . . . . . . . . . . . . . . F50
Comment régler . . . . . . . . . . . . . . . . . . . . . . . . . . . . . . . . . . . . . . . . . . . . . . . . . . . . . . . . . . . . . . . . . F50
Menu VIDEO ADJUST . . . . . . . . . . . . . . . . . . . . . . . . . . . . . . . . . . . . . . . . . . . . . . . . . . . . . . . . . . . . F51
Menu CHANNEL SETTING (mode TV seulement) . . . . . . . . . . . . . . . . . . . . . . . . . . . . . . . . . . . . . . F51
Menu MODE SELECT . . . . . . . . . . . . . . . . . . . . . . . . . . . . . . . . . . . . . . . . . . . . . . . . . . . . . . . . . . . . F51
Menu CLOSED CAPTION . . . . . . . . . . . . . . . . . . . . . . . . . . . . . . . . . . . . . . . . . . . . . . . . . . . . . . . . . F52
Menu V-CHIP BLOCK. . . . . . . . . . . . . . . . . . . . . . . . . . . . . . . . . . . . . . . . . . . . . . . . . . . . . . . . . . . . . F52
Eviter les changements des valeurs réglées (ADJUSTMENT LOCK) . . . . . . . . . . . . . . . . . . . . . . . F53
Restauration des valeurs du réglage pour un menu spécifique (RESET) . . . . . . . . . . . . . . . . . . . . F53
Restauration de toutes les valeurs de réglage (ALL RESET) . . . . . . . . . . . . . . . . . . . . . . . . . . . . . F54
Autres fonctions
Autres fonctions . . . . . . . . . . . . . . . . . . . . . . . . . . . . . . . . . . . . . . . . . . . . . . . . . . . . . . . . . . . . . . . . . . . . F55
Contrôle du canal reçu et du mode audio sur l’écran (DISPLAY) . . . . . . . . . . . . . . . . . . . . . . . . . . F55
Mise en sourdine (MUTE) . . . . . . . . . . . . . . . . . . . . . . . . . . . . . . . . . . . . . . . . . . . . . . . . . . . . . . . . . F55
Changement de BRIGHT MODE . . . . . . . . . . . . . . . . . . . . . . . . . . . . . . . . . . . . . . . . . . . . . . . . . . . . F56
Utilisation de casque (disponible dans le commerce) . . . . . . . . . . . . . . . . . . . . . . . . . . . . . . . . . . . F56
Appendices
Entretien du moniteur . . . . . . . . . . . . . . . . . . . . . . . . . . . . . . . . . . . . . . . . . . . . . . . . . . . . . . . . . . . . . . . F57
Dépannage. . . . . . . . . . . . . . . . . . . . . . . . . . . . . . . . . . . . . . . . . . . . . . . . . . . . . . . . . . . . . . . . . . . . . F57
Entretien du moniteur . . . . . . . . . . . . . . . . . . . . . . . . . . . . . . . . . . . . . . . . . . . . . . . . . . . . . . . . . . . . . F58
Stockage . . . . . . . . . . . . . . . . . . . . . . . . . . . . . . . . . . . . . . . . . . . . . . . . . . . . . . . . . . . . . . . . . . . . . . . F58
Caractéristiques techniques . . . . . . . . . . . . . . . . . . . . . . . . . . . . . . . . . . . . . . . . . . . . . . . . . . . . . . . . . . F59
F4
Page 67

Conseils et mesures de sécurité
Nous vous remercions d’avoir porté votre choix sur ce moniteur LCD Sharp. Pour assurer la sécurité et
le bon fonctionnement de cet appareil pendant de nombreuses années, veuillez lire attentivement les
consignes de sécurité avant de l’utiliser.
Consignes de sécurité importantes
- Si votre équipement est raccordé à une antenne extérieure, assurez-vous que celle-ci est reliée à la terre
afin de protéger le moniteur contre les surtensions transitoires et l’accumulation de charges électrostatiques.
La section 810 du Code national de l’électricité fournit des informations sur la mise à la terre correcte du
mât d’antenne et de sa structure de support, la mise à la terre de la descente d’antenne à une unité de
décharge d’antenne, le calibre des conducteurs de terre, l’emplacement de l’unité de décharge d’antenne,
le raccordement aux électrodes de terre et les conditions requises pour l’électrode de terre.
EXEMPLE DE MISE À LA TERRE D’UNE ANTENNE
SELON LE CODE NATIONAL DE L’ÉLECTRICITÉ
DESCENTE
D’ANTENNE
COLLIER DE MISE
À LA TERRE
UNITÉ DE DÉCHARGE
BOÎTIER DE
LA COMPAGNIE
D’ÉLECTRICITÉ
NEC – CODE NATIONAL DE L’ÉLECTRICITÉ
COLLIERS DE MISE À LA TERRE
ÉLECTRODE DE TERRE DE
LA COMPAGNIE D’ÉLECTRICITÉ
(NEC ART. 250, PARTIE H)
D’ANTENNE
(NEC SECTION 810-20)
CONDUCTEURS DE TERRE
(NEC SECTION 810-21)
EnglishFrançais
- Pour améliorer la protection de cet équipement pendant un orage, ou
lorsqu’il doit rester longtemps sans surveillance et inutilisé,
débranchez le de la prise murale et déconnectez l’antenne. Ceci
l’empêchera d’être endommagé par la foudre ou les surtensions de la
ligne électrique.
- L’antenne extérieure ne doit pas se trouver à proximité de lignes
électriques aériennes ou d’autres circuits d’éclairage ou de distribution
électrique. Elle ne doit pas non plus être installée sur une
position d’où elle pourrait tomber sur ces lignes ou circuits. Lors de
l’installation d’une antenne extérieure, toutes les précautions
doivent être prises pour ne pas toucher ces lignes ou circuits
électriques. Tout contact avec eux pourrait être mortel.
F5
Page 68

Conseils et mesures de sécurité
- L’écran couleur LCD TFT utilisé dans ce moniteur est
fabriqué avec une technologie de haute précision.
Cependant, il peut avoir quelques points minuscules
sur l’écran où les pixels ne s’allument jamais ou sont
allumés en permanence. De plus, si l’écran est
regardé avec un angle aigu, les couleurs ou la
luminosité peuvent paraître inégales. Noter que ce
n’est pas un mauvais fonctionnement mais un
phénomène courant des écrans LCD et que cela
n’affecte aucunement les performances du moniteur.
- Ne pas laisser le moniteur en veille inutilement
pendant de longues périodes car cela pourrait
provoquer l’apparition d’image récurrente.
- Si la luminosité est ajustée à son réglage minimum, il
peut s’avérer difficile de consulter le moniteur.
- La qualité du signal de l’ordinateur peut influencer la
qualité de la diffusion du moniteur. Il est recommandé
d’utiliser un ordinateur capable d’émettre des signaux
vidéo de haute qualité.
- Ne jamais heurter ou taper sur l’ordinateur avec des
objets durs.
- Il faut savoir que la société Sharp décline toute
responsabilité en cas d’erreur survenue durant
l’utilisation par le client ou une tierce personne, ainsi
qu’en cas de dysfonctionnement ou d’un
endommagement causé au produit en cours
d’utilisation, excepté lorsque qu’un dédommagement
sous garantie est reconnu par la loi.
- Ce moniteur ainsi que ces accessoires sont
susceptibles d’évoluer sans avis préalable.
Lieu d’installation
- Ne pas utiliser le moniteur dans un endroit faiblement
ventilé, poussiéreux, relativement humide, ou encore
là où il est susceptible d’entrer en contact avec de
l’huile ou de la vapeur car cela pourrait provoquer un
début d’incendie.
- S’assurer que le moniteur ne sera pas entrer en
contact avec de l’eau ou d’autres fluides. S’assurer
que des agrafes ou des attaches trombones ne
pénètrent pas à l’intérieur du moniteur car cela
pourrait provoquer un début d’incendie ou des chocs
électriques.
- Ne pas installer le moniteur au-dessus d’objets
instables ou dans des endroits peu sûrs. Faire
attention que le moniteur ne reçoive pas de chocs
important ni de vibrations. Laisser tomber le moniteur
peut l’endommager sérieusement.
- Ne pas utiliser le moniteur dans des endroits où il est
susceptible d’être exposé à la lumière directe du
soleil, à proximité d’une source de chaleur ou partout
ailleurs où il risque d’être soumis à des températures
élevées ; cela peut mener à des dégagements
excessifs de chaleur et conduire à un début
d’incendie.
Le cordon d’alimentation électrique
- Ne pas endommager le cordon d’alimentation, ne pas
déposer d’objets lourds sur le cordon, ne pas
l’étendre ni le plier de manière excessive. Ne pas y
ajouter de rallonge non plus. Tout endommagement du
cordon d’alimentation peut entraîner un début
d’incendie ou des chocs électriques.
- Utilisez uniquement le cordon d’alimentation fourni
avec le moniteur.
- Insérer la prise d’alimentation directement dans la
prise murale d’alimentation secteur. Ajouter une
rallonge peut entraîner une surchauffe, voire un début
d’incendie.
- Ne débranchez pas ni ne branchez la prise
d’alimentation avec des mains humides. En le faisant,
vous risquez l’électrocution.
Utiliser l’adaptateur secteur
- Ne pas utiliser l’adaptateur secteur pour un
équipement autre que l’équipement spécifié.
- Débrancher l’adaptateur secteur s’il n’est pas utilisé
pendant une longue période.
- Ne placer aucun objet sur l’adaptateur secteur.
- Ne pas utiliser l’adaptateur secteur à l’extérieur.
- Ne pas essayer de réparer l’adaptateur secteur s’il
est cassé ou fonctionne mal. Laisser le soin de
l’entretien au technicien.
- Ne pas essayer d’ouvrir l’adaptateur secteur.
- Ne pas utiliser d’eau ou de chiffon humide pour
nettoyer l’adaptateur secteur.
Étendue du Mode d’emploi
- Dans ce Mode d’emploi, “Windows XP” fera référence
à Microsoft Windows XP, “Windows Me” à Microsoft
Windows Millennium, “Windows 2000” à Microsoft
Windows 2000, “Windows 98” à Microsoft Windows
98, “Windows 95” à Microsoft Windows 95, et
“Windows 3.1” à la version 3.1 de Microsoft Windows ;
lorsqu’il n’y aura pas lieu de distinguer les
programmes, le terme “Windows” sera utilisé.
- Microsoft et Windows sont des marques déposées de
la Microsoft Corporation.
- Macintosh est une marque déposée de Apple
Computer, Inc.
- Toutes les autres marques sont la propriété des
compagnies respectives.
F6
Page 69

Conseils et mesures de sécurité
Moniteur et liste des accessoires
S’assurer que les éléments suivants sont bien
présents dans l’emballage :
- Moniteur LCD (1)
- Adaptateur secteur (1)
(nom du modèle : NL-A70J)
- Câble PC signal analogique (1)
(nom du modèle : 0NIT15V1-0183)
- Câble PC audio (1)
(nom du modèle : 0NIT17A3-U006)
- Câble d’antenne (1)
(nom du modèle : 0NIM17W1-0154)
- Télécommande (1)
- Piles format “AAA” (UM/SUM-4) (2)
- Serre-câbles (1)
- CD-ROM (Disque de mise en service pour
Windows/Macintosh) (1)
- Mode d’emploi (1)
Remarques :
- Il est conseillé de conserver le carton
d’emballage pour le cas où le moniteur devrait
être transporté.
- Sharp Corporation détient les droits d’auteur du
programme Disque de mise en service. Ne pas
le reproduire sans autorisation préalable.
- Il se peut que la forme des accessoires fournis
diffère légèrement de celle des accessoires
décrits dans ce Mode d’emploi.
EnglishFrançais
F7
Page 70

Moniteur
Description du produit
Face avant
1
1. Haut-parleurs
2. Témoin d’alimentation
Vert : en fonction
Rouge : mode veille
Orange : mode économie d’énergie
(seulement en mode PC)
Hors : équipement hors tension
3. Capteur de télécommande
4. Fiche pour casque audio
Vue droite
5
6
7
2
3
4
8
9
10
5. Touche INPUT
6. Touche MENU
7. Touche ENTER/BRIGHT MODE
8. Touches CH (canal)
9. Touches VOL/BRIGHT
10. Touche MAIN POWER
11. Borne d’entrée PC audio
12. Borne d’entrée PC RGB analogique
13.Borne d’alimentation
11
12
13
Enlever/remettre le couvercle du terminal
Enlever le couvercle
F8
Remettre le couvercle
1
2
Page 71

Description du produit
0
Moniteur
Vue gauche/vue arrière
A
14
A
14.Poignée
15. Borne d’entrée vidéo
16. Borne d’entrée audio - Gauche
17. Borne d’entrée audio - Droite
18. Borne d’entrée S-vidéo
19. Borne d’entrée antenne
20. Collier pour serre-câbles
(Voir à la page suivante.)
A Ouvertures de ventilation
Ne jamais obstruer les ouvertures de ventilation
car cela peut entraîner une surchauffe à l’intérieur
du moniteur et provoquer un dysfonctionnement.
B Ancrage du verrou de sécurité
En installant un verrou de sécurité (en vente dans
le commerce) sur le point d’ancrage du verrou, le
moniteur reste fixé et ne peut donc pas être
transporté. Les trous de prévention antivol sont
adaptés aux systèmes de sécurité Kensington
Micro Saver.
B
AV-IN
Télécommande
POWER
1
2
15
16
17
18
3
4
5
6
19
7
2
1. Touche POWER
2. Touche SLEEP
3. Touches
4. Touche BRIGHT MODE
5. Touche DISPLAY
6. Touche CC (Closed Caption)
7. Touches de canaux
8. Touches d’entrée (PC, TV, et AV)
9. Touche MENU
10. Touche BRIGHT
11. Touche MUTE
12. Touche MTS (Multi ch TV Sound)
13. Touches VOL
14. Touches CH (canal)
15. Touche FLASHBACK
PC AVTV
SLEEP
ENTER
BRIGHT
MODE
DISPLAY
CC MTS MUTE
et touche ENTER
MENU
BRIGHT
VOL
CH
FLASHBACK
EnglishFrançais
8
9
10
11
12
13
14
15
F9
Page 72

Description du produit
Serre-câbles
Fixez les câbles et les cordons avec le collier
serre-câbles.
ATTENTION !
- Lorsque vous réglez l’angle de vue, les câbles
et les cordons peuvent être tirés. Par
conséquent fixez les câbles et les cordons en
gardant suffisamment de mou.
Réglage de l’inclinaison
Trouver l’inclinaison idéale pour bien voir.
ATTENTION !
- Assurez vous de bien saisir les deux bords du
moniteur lorsque vous réglez l’angle de vue. Le
panneau LCD de cet appareil est en verre.
Appuyer les mains sur l’écran LCD peut
provoquer son endommagement.
- Prendre garde de ne pas se coincer les doigts.
approx. 20°
approx. 5°
F10
Page 73

Télécommande
Utilisation de la télécommande
Utilisez la télécommande en la pointant vers la fenêtre du capteur sur le moniteur. Des objets se trouvant
entre la fenêtre du capteur et la télécommande peuvent l’empêcher de fonctionner correctement.
Précautions d’utilisation de la télécommande
- Ne soumettez pas la télécommande à des chocs.
En outre, veillez à ne pas exposer la télécommande à des liquides, et à ne pas la placer dans un
endroit ayant une humidité élevée.
- N’installez pas ou ne placez pas la télécommande en plein soleil. La chaleur pourrait la déformer.
- La télécommande peut ne pas fonctionner correctement si la fenêtre du capteur est soumise
directement aux rayons du soleil ou à un éclairage intense. Dans ce cas, changez l’orientation de
l’éclairage ou du moniteur ou utilisez la télécommande plus près de la fenêtre du capteur.
- N’utilisez pas la télécommande en même temps que la télécommande d’un autre équipement.
Piles pour la télécommande
Avant d’utiliser le moniteur pour la première fois, mettez en place les deux piles (format “AAA”,
UM/SUM-4) (fournies). Lorsque les piles sont épuisées et que la télécommande ne fonctionne plus,
remplacez-les par des piles neuves (Format “AAA”, UM/SUM-4).
EnglishFrançais
1 Ouvrir le couvercle des
piles.
Déplacez le couvercle en
appuyant sur la partie ( ).
ATTENTION !
Si les piles ne sont pas correctement utilisées, elles peuvent couler et/ou exploser. Observez les
instructions ci-dessous.
- Disposez les piles en faisant correspondre leur polarité avec les indications (+) et (–) du logement.
- Des piles de types différents n’ont pas les mêmes caractéristiques. N’utilisez pas plusieurs types de
piles ensemble.
- N’utilisez pas des piles neuves avec des piles usagées. Ceci raccourcirait la durée de service des
piles neuves et/ou pourrait faire couler les piles usagées.
- Retirez les piles lorsqu’elles deviennent faibles.
Le liquide chimique qui en coule peut provoquer des éruptions cutanées. Si les piles coulent, essuyez
immédiatement le liquide arec un chiffon.
- Il se peut que les piles livrées avec le moniteur aient une durée de vie plus courte que prévue. Ceci
est dû aux conditions de stockage.
- Si vous prévoyez que la télécommande restera longtemps inutilisée, retirez les piles.
2 Introduisez deux piles
(Format “AAA”, UM/SUM-4).
+
-
-
+
Placez les extrémités positive et
négative des piles comme
indiqué à l’intérieur du logement.
3 Fermer le couvercle des piles.
Engagez la griffe sur le
couvercle dans le logement des
piles et coulissez pour fermer.
F11
Page 74

Raccordement du moniteur à un ordinateur
ATTENTION !
- Assurez-vous que le moniteur et tous les équipement qui vont lui être raccordés sont mis hors tension
avant de commencer.
- Ne pas courber le câble de manière excessive ni y ajouter de rallonge car cela peut provoquer un
dysfonctionnement.
- Lorsque vous utilisez le moniteur pour la première fois ou après avoir changé les réglages en cours
d’utilisation, exécutez un réglage automatique de l’écran (voir à la page F20).
Voyez à la page F8 les informations pour enlever/remettre le couvercle du terminal.
Câble PC audio
(accessoire)
Câble PC signal
analogique (accessoire)
Borne de sortie audio
Les hauts-parleurs du moniteur serviront
d’ensemble audio de l’ordinateur lorsque vous
raccordez les deux équipements avec le câble PC
audio.
Remarques :
- En fonction du système d’exploitation de
l’ordinateur, il peut s’avérer nécessaire d’utiliser
l’ordinateur pour installer l’information relative à
l’installation du moniteur. (Voir à la page F35.)
- En cas de raccordement à un ordinateur
portable, si l’écran de ce dernier est réglé de
façon à afficher en même temps, l’écran MSDOS peut ne pas s’afficher correctement. Dans
ce cas, modifier les paramètres afin que le
moniteur soit le seul à afficher.
Borne de analogique RGB
(mini D-sub à 15 broches sur 3 rangées)
Tout en faisant attention à la direction du connecteur,
insérez bien et verticalement le câble pour signal
dans le connecteur et ensuite, serrez les vis des deux
côtés.
S’il s’agit d’un D-sub à 15 broches sur 2 rangées
pour Apple Power Macintosh, installer un
adaptateur de conversion Macintosh (en vente
dans le commerce) sur le câble de signal
analogique.
Power Macintosh
Adaptateur de conversion Macintosh
F12
Page 75

Raccordement de l’antenne
ATTENTION !
- Lorsque vous faites un raccordement, assurez-vous que le moniteur est mis hors tension.
Antennes
L’antenne joue un rôle plus important pour la réception couleur que pour la réception noir et blanc. Il est
donc vivement recommandé d’utiliser une antenne extérieure de bonne qualité.
Vous trouverez ci-dessous une brève explication des modes de raccordement pour les différents
systèmes d’antenne.
1. Une antenne de 75 ohms comporte généralement un câble
rond avec un connecteur type F qui peut être facilement
raccordé sans outils à la borne (non fourni).
2. Une antenne de 300 ohms comporte un câble plat à deux
conducteurs (“câble méplat”) pouvant être raccordé à une
borne de 75 ohms par l’intermédiaire d’un adaptateur
300–75 ohms (non fourni).
Câble coaxial de 75 ohms (rond)
Câble méplat de 300 ohms (plat)
Connecteur type F
Remarques :
- Le câble coaxial de 75 ohms est recommandé.
- La mémoire de la télévision pour les canaux est vide au départ de l’usine. Pour recevoir les canaux,
utilisez le menu CHANNEL SETTING. (Voyez les pages F21 à F24.)
Raccordement d’une antenne extérieure
- Utilisez l’un des deux schémas ci-dessous pour raccorder l’antenne extérieure.
A : Utilisation d’une antenne extérieure mixte VHF/UHF
B : Utilisation d’antennes extérieures VHF et/ou UHF séparées
- Raccordez le câble de l’antenne extérieure à la borne ANT (entrée antenne) sur le côté gauche du moniteur.
EnglishFrançais
Câble d’antenne (fourni)
Borne d’entrée antenne
(ANT.)
F13
Antenne
VHF/UHF
A. Antenne mixte VHF/UHF
Câble méplat
300 ohms
Adaptateur
300/75 ohms
(non fourni)
ou
Câble coaxial
de 75 ohms
B. Antennes VHF et/ou
UHF séparées
Antenne
UHF
Câble méplat
300 ohms
Multiplexeur
(non fourni)
SORTIE ENTRÉE
Câble méplat
300 ohms
Câble coaxial
de 75 ohms
Antenne
VHF/UHF
Antenne
VHF
ou
Page 76

Raccordement de l’antenne
Raccordement au réseau de télévision par câble
- Le téléviseur est doté d’un connecteur pour câble coaxial de 75 ohms rendant facile le raccordement.
Pour raccorder le câble coaxial de 75 ohms au téléviseur, le visser sur la borne ANT.
- Certaines compagnies de télévision par câble proposent des “canaux payantes”. Les signaux de ces
canaux sont cryptés et un convertisseur/décodeur de télévision par câble est généralement fourni à
l’abonné par la société de télévision par câble. Ce convertisseur/décodeur est nécessaire pour voir en
clair les canaux cryptées. (Réglez votre moniteur sur la chaîne 3 ou 4, en général c’est une de ces
chaînes qui est utilisée. Si elle est inconnue, consultez votre société de télévision par câble.)
Pour plus d’informations sur l’installation de la télévision par câble, adressez-vous à votre compagnie
de télévision par câble. L’une des méthodes possibles d’utilisation du convertisseur/décodeur fourni
par votre compagnie de télévision par câble est expliquée ci-dessous.
Note : Un commutateur RF muni de deux entrées (A et B) est nécessaire (non fourni).
Position “A” du commutateur RF (non fourni) : Vous pouvez voir tous les canaux non brouillés en
utilisant les touches canaux du moniteur.
Position “B” du commutateur RF (non fourni) : Vous pouvez voir les canaux cryptées via le
convertisseur/décodeur en utilisant les touches de
sélection des canaux du convertisseur.
Commutateur RF (non fourni)
ENTRÉE
SORTIE ENTRÉE
SORTIE
Convertisseur/décodeur
de télévision par câble
(non fourni)
Remarque :
- Pour le type de répartiteur, commutateur RF ou multiplexeur éventuellement nécessaires, consultez
votre revendeur ou service après-vente SHARP.
Répartiteur
de signal à
deux
sorties
(non fourni)
Ligne de télévision
par câble
F14
Page 77

Raccordement du moniteur à l’équipement AV
ATTENTION !
- Assurez-vous que le moniteur et tous les équipement qui vont lui être raccordés sont mis hors tension
avant de commencer.
Exemples d’équipements que vous pouvez raccorder
EnglishFrançais
Magnétoscopes
Caméscopes
Consoles de jeux
Lecteurs de vidéodisques
Lecteurs de DVD etc.
Magnétoscopes et consoles de jeux
Côté gauche du moniteur
AV-IN
(Jaune) (Jaune)
(Blanc) (Blanc)
(Rouge) (Rouge)
Equipements avec les bornes sortie S-vidéo
Magnétoscopes
Caméscopes
Consoles de jeux
Lecteurs de vidéodisques
Lecteurs de DVD etc.
Magnétoscope etc.
Câble RCA pin
(disponible dans le commerce)
Remarque :
- Lorsque vous utilisez la borne d’entrée vidéo, ne raccordez pas les câbles à la borne d’entrée S-vidéo.
F15
Page 78

Raccordement du moniteur à l’équipement AV
Equipement AV avec les bornes sortie S-vidéo
Côté gauche du moniteur
Remarque :
- Lorsque vous utilisez la borne d’entrée S-vidéo, ne raccordez pas le câble à la borne d’entrée vidéo.
AV-IN
(Blanc) (Blanc)
(Rouge) (Rouge)
Câble RCA pin
(disponible dans le commerce)
Câble S-vidéo
(disponible dans le commerce)
Magnétoscope etc.
F16
Page 79

Raccordement du moniteur à une source d’alimentation
ATTENTION !
- Lorsque vous faites un raccordement, assurez-vous que le moniteur est mis hors tension.
- Utilisez toujours l’adaptateur secteur qui vous a été fourni avec le moniteur.
- Ne pas courber le câble de manière excessive ni y ajouter de rallonge car cela peut provoquer un
dysfonctionnement.
Voyez à la page F8 les informations pour enlever/remettre le couvercle du terminal.
1. Connecter l’adaptateur secteur à la borne d’alimentation du moniteur.
Borne d’alimentation
Adaptateur
secteur
EnglishFrançais
2. Brancher le cordon d’alimentation dans l’adaptateur secteur et insérer la fiche d’alimentation dans la
borne secteur.
Cordon d’alimentation
Secteur
Adaptateur secteur
F17
Page 80

Instructions relatives à l’installation d’un bras
conforme VESA
Un bras ou un support conforme à la norme VESA
(en vente dans le commerce) peut servir de
support au moniteur.
L’acquisition du bras ou du support est laissée à
l’appréciation du client.
Bras ou supports pouvant être utilisés
Les fixations doivent satisfaire aux points
suivants :
- Compatibilité avec la norme VESA
- Subsistance d’un écart d’au moins 75 mm x 75
mm entre les trous des vis présents sur la
section à fixer
- Le bras ou le support ne doit ni tomber ni se
rompre après l’installation du moniteur.
Comment fixer le bras ou le support
- Ne pas courber le câble de manière excessive
ni y ajouter de rallonge car cela peut provoquer
un dysfonctionnement.
- Tout en suivant ces instructions, se reporter aux
instructions relatives à l’installation dans le
mode d’emploi qui accompagne le bras ou le
support.
ATTENTION !
- Faites attention de ne pas vous pincer les doigts
entre l’affichage et le support ou de ne pas
laisser tomber le support. Ceci pourrait entraîner
des blessures corporelles.
1.Retirer les câbles.
2.Étendre un drap doux sur une surface
horizontale adéquate. Tout en prenant garde de
ne pas endommager le moniteur, déposer avec
précautions le moniteur l’écran tourné vers le
bas.
3.Retirer les quatre vis et ensuite le support du
moniteur.
Remarques :
- Le support est conçu spécifiquement pour ce
moniteur, ne pas l’utiliser pour un autre
équipement ou à d’autres fins.
- il est conseillé de conserver ensemble les
quatre vis retirées avec le support afin de
pouvoir réutiliser le support en le fixant à l’aide
des quatre vis adaptées. L’utilisation d’autres vis
risque d’endommager le moniteur.
4.Fixer le bras au moniteur à l’aide des quatre vis.
Remarque :
- Les vis servant à fixer le bras doivent être de
type M4 d’une longueur de 10 mm à 12 mm
dépassant de la surface à fixer. Utiliser d’autres
types de vis peut provoquer la chute du
moniteur ou un endommagement des pièces
internes.
10 12
Vis de fixation du bras
Bras
Partie du moniteur à laquelle
vient se fixer le bras
F18
Page 81

Sélection de la donnée dans l’écran MENU
Pour sélectionner un article, démarrez en manœuvrant le curseur ( ) jusqu’à l’article désiré.
[Moniteur]
1.Appuyez sur la touche MENU.
Chaque fois que vous appuyez sur la touche, le curseur descend d’une donnée.
Si vous appuyez sur la touche du fond, le curseur retourne au sommet.
Exemple : A chaque fois que vous appuyez sur la touche MENU dans l’écran TV/AV MENU, le
curseur se déplace dans l’ordre suivant :
VIDEO ADJUST → CHANNEL SETTING → MODE SELECT → CLOSED CAPTION →
V-CHIP BLOCK → VIDEO ADJUST...
MENU
VIDEO ADJUST
CHANNEL SETTING
MODE SELECT
CLOSED CAPTION
V-CHIP BLOCK
[Télécommande]
1.Appuyez sur les touches
A chaque fois que vous appuyez sur la touche , le curseur monte d’une donnée.
A chaque fois que vous appuyez sur la touche , le curseur descend d’une donnée.
.
>>
>>
>>
>>
>>
<
TV/AV
>
EnglishFrançais
F19
Page 82

Réglage de l’affichage de l’ordinateur (AUTO ADJUSTMENT)
Lorsqu’on utilise pour la première fois le moniteur
comme moniteur d’un ordinateur ou après avoir
changé les réglages du système en cours
d’emploi, exécutez un réglage automatique de
l’écran. “CLOCK”, “PHASE”, “H-POS”, et “V-POS”
vont être réglés à leurs états optimaux.
INPUT
POWER
MENU
BRIGHT
ENTER
/
MODE
CH
VOL/BRIGHT
MAIN
POWER
SLEEP
BRIGHT
MODE
DISPLAY
PC TV
AV
MENU
ENTER
BRIGHT
CC MTS MUTE
VOL
CH
FLASHBACK
1.Appuyez sur la touche MAIN POWER pour
mettre le moniteur sous tension.
Lorsque le témoin d’alimentation s’allume en
rouge, appuyez sur la touche POWER de la
télécommande.
2.Sélectionnez le mode PC en utilisant la touche
INPUT (moniteur) ou la touche PC
(télécommande).
Lorsque vous utilisez la touche INPUT
(moniteur), chaque fois vous appuyez dessus,
l’entrée change dans l’ordre suivant :
PC → Numéro (TV) → AV → PC...
3. Mettez en fonction l’ordinateur, puis affichez une
image qui occupe tout l’espace lumineux de
l’écran (telle la lumière de fond du bureau).
Si l’ordinateur fonctionne sous Windows, vous
pouvez utiliser le Modèle de Réglage sur le
Disque de mise en service qui l’accompagne
(voir à la page F29).
4. Affichez l’écran MENU en utilisant la touche
MENU.
Le curseur est positionné à “ADJUSTMENT”.
5. Appuyez sur la touche ENTER/BRIGHT MODE
(moniteur) ou sur la touche ENTER
(télécommande).
Le menu ADJUSTMENT va s’afficher.
ADJUSTMENT
RETURN
AUTO
CLOCK
PHASE
H-POS
V-POS
RESET
[
127
[
16
[
200
[
50
]
>>
]
>>
]
>>
]
>>
<PC>
6. Appuyez sur la touche ENTER/BRIGHT MODE
(moniteur) ou sur la touche ENTER
(télécommande) pour le réglage automatique.
L’écran va s’assombrir et “ADJUSTING” va
s’afficher. Après quelque secondes, le menu
ADJUSTMENT va revenir.
7. Appuyez sur la touche INPUT (moniteur) ou sur
la touche MENU (télécommande).
Le réglage est terminé.
Remarques :
- Il peut ne pas être possible de réaliser un
ajustement correct avec le premier ajustement
automatique. Dans ce cas, essayer de répéter
l’ajustement automatique 2 ou 3 fois.
- Si nécessaire, en raison d’un des facteurs
suivants, des réglages manuels (page F29)
peuvent être effectués après un réglage
automatique.
- Lorsqu’un réglage fin est nécessaire.
- Lorsque les signaux vidéo d’entrée de
l’ordinateur sont de type Composite Sync ou
Sync on Green. (Il se peut que le réglage
automatique soit impossible.)
- Lorsque “OUT OF ADJUST” est affiché.
(Lorsque le moniteur affiche une image
complètement noire, il se peut que le réglage
automatique de l’écran ne soit pas
opérationnel. Lors de la réalisation d’un
réglage automatique, veiller soit à utiliser le
Modèle de Réglage, soit à essayer d’afficher
une image très claire.)
- Il peut ne pas être possible de réaliser un
ajustement correct selon ce qui est affiché sur
l’écran - images animées, commandes MS-DOS,
etc.
MENU
ADJUSTMENT
GAIN CONTROL
COLOR CONTROL
MODE SELECT
<PC>
>>
>>
>>
>>
F20
Page 83

Réglage des canaux de télévision
Le tableau suivant indique les canaux que ce
moniteur peut recevoir.
VHF Canaux 2 à 13
UHF Canaux 14 à 69
Câble
(Vous devez souscrire auprès d’une société de
télévision par câble pour recevoir les canaux
câblés.)
La mémoire de la télévision pour les canaux est
vide au départ de l’usine. Pour recevoir les
canaux, utilisez le menu CHANNEL SETTING.
Remarque :
- Relachez le verrouillage du réglage (voir à la
page F33) si cela a été fait. Vous ne pouvez pas
utiliser le menu CHANNEL SETTING lorsque le
verrouillage du réglage a été mis.
Canal 1 (modes HRC et IRC seulement)
Canaux 2 à 125 (STD, HRCM et IRC)
Méthodes de réglage des canaux
Il y a deux moyens de régler les canaux.
Réglage automatique des canaux que vous
pouvez recevoir (CHANNEL SEARCH)
Le moniteur va régler automatiquement les
canaux que vous pouvez recevoir dans votre
région.
Réglage des canaux un par un
(CHANNEL MEMORY)
Cette méthode est un réglage manuel des canaux
que vous voulez, un par un. Utilisez cette méthode
si vous voulez ajouter d’autres canaux après avoir
utilisé “CHANNEL SEARCH”.
EnglishFrançais
F21
Page 84

Réglage des canaux de télévision
Sélection de la télédiffusion (AIR) ou
de la télévision câblée (CABLE) pour
le Réglage des Canaux
Il est nécessaire de régler le mode de réception
des canaux “AIR” ou “CABLE” pour recevoir les
programmes de télévision diffusés localement.
INPUT
POWER
MENU
ENTER
/
CH
VOL/BRIGHT
MAIN
POWER
BRIGHT
MODE
SLEEP
BRIGHT
MODE
DISPLAY
PC TV
AV
MENU
ENTER
BRIGHT
CC MTS MUTE
VOL
CH
FLASHBACK
5. Sélectionnez “AIR/CABLE” en utilisant la touche
MENU (moniteur) ou les touches
(télécommande), et appuyez sur la touche
ENTER/BRIGHT MODE (moniteur) ou la touche
ENTER (télécommande).
6. Sélectionnez le mode désiré (“AIR” ou “CABLE”)
en utilisant les touches VOL/BRIGHT (moniteur)
ou les touches
(télécommande).
7.Quittez l’écran MENU en utilisant la touche
INPUT (moniteur) ou la touche MENU
(télécommande).
1. Mettez le moniteur sous tension.
2. Sélectionnez le mode TV en utilisant la touche
INPUT (moniteur) ou la touche TV
(télécommande).
3. Affichez l’écran MENU en utilisant la touche
MENU.
MENU
VIDEO ADJUST
CHANNEL SETTING
MODE SELECT
CLOSED CAPTION
V-CHIP BLOCK
>>
>>
>>
>>
>>
<
TV/AV
>
4. Sélectionnez “CHANNEL SETTING” en utilisant
la touche MENU (moniteur) ou les touches
(télécommande), et appuyez sur la touche
ENTER/BRIGHT MODE (moniteur) ou la touche
ENTER (télécommande).
CHANNEL SETTING
RETURN
AIR/CABLE
CHANNEL SEARCH
CHANNEL MEMORY
[
AIR
<
TV/AV
>
]
>>
>>
F22
Page 85

Réglage des canaux de télévision
Sauvegardez les canaux de
télédiffusion dans la mémoire
(CHANNEL SEARCH)
“CHANNEL SEARCH” (Recherche des canaux)
vous permet de rechercher les canaux disponibles
(télédiffusés ou par câble) dans votre région.
Le tuner les enregistre dans la mémoire de la
télévision automatiquement.
INPUT
POWER
MENU
ENTER
/
CH
VOL/BRIGHT
MAIN
POWER
BRIGHT
MODE
SLEEP
BRIGHT
MODE
DISPLAY
PC TV
1. Mettez le moniteur sous tension.
2. Sélectionnez le mode TV en utilisant la touche
INPUT (moniteur) ou la touche TV
(télécommande).
3. Affichez l’écran MENU en utilisant la touche
MENU.
MENU
VIDEO ADJUST
CHANNEL SETTING
MODE SELECT
CLOSED CAPTION
V-CHIP BLOCK
4. Sélectionnez “CHANNEL SETTING” en utilisant
la touche MENU (moniteur) ou les touches
(télécommande), et appuyez sur la touche
ENTER/BRIGHT MODE (moniteur) ou la touche
ENTER (télécommande).
CHANNEL SETTING
RETURN
AIR/CABLE
CHANNEL SEARCH
CHANNEL MEMORY
[
AIR
]
ENTER
CC MTS MUTE
<
>>
>>
>>
>>
>>
<
>>
>>
AV
MENU
BRIGHT
VOL
CH
FLASHBACK
TV/AV
TV/AV
>
>
5. Sélectionnez “CHANNEL SEARCH” en utilisant
la touche MENU (moniteur) ou les touches
(télécommande), et appuyez sur la touche
ENTER/BRIGHT MODE (moniteur) ou la touche
ENTER (télécommande).
CHANNEL SEARCH
AIR
2
<
TV/AV
>
6. Appuyez sur la touche ENTER/BRIGHT MODE
(moniteur) ou la touche ENTER (télécommande).
Le tuner va rechercher tous les canaux
disponibles dans votre région et les enregistrer
dans la mémoire de la télévision.
Remarque :
- Pour interrompre la recherche des canaux,
appuyez sur la touche INPUT (moniteur) ou sur
la touche MENU (télécommande). Recherche
des canaux va s’arrêter au canal affiché et
n’enregistre aucun autre canal de rang plus
élevé.
7. Lorsque la recherche des canaux est terminée,
l’écran MENU s’éteint et l’écran affiché devient
le plus petit numéro de canal de la mémoire de
la télévision.
Si la mémoire de la télévision est vide, le canal
de la télévision sera CH 2.
Remarques :
- Les canaux recherchés sont :
Canaux télédiffusés :
VHF : 2 à 13
UHF : 14 à 69
Canaux câblés :
1 (modes HRC et IRC seulement)
2 à 125 (STD, HRC et IRC)
- Pendant la recherche des canaux, le moniteur va
changer automatiquement de canaux.
- Lorsque la recherche des canaux est terminée,
tous les canaux, qui étaient réglés auparavant,
vont être effacés.
- Si vous recherchez des canaux et que vous ne
pouvez pas en recevoir, la mémoire de la
télévision est vide.
EnglishFrançais
F23
Page 86

Réglage des canaux de télévision
Addition de canaux faibles ou
supplémentaires ou effacement des
canaux indésirables de la mémoire
de la télévision
En utilisant “CHANNEL MEMORY” (Mémoire des
canaux), vous pouvez ajouter des canaux qui ne
pouvaient pas être enregistrés par “CHANNEL
SEARCH” (Recherche des canaux) parce que le
signal était trop faible.
ENTER
(CHANNEL MEMORY)
INPUT
POWER
MENU
BRIGHT
/
MODE
CH
VOL/BRIGHT
MAIN
POWER
SLEEP
BRIGHT
MODE
DISPLAY
PC TV
AV
MENU
ENTER
BRIGHT
CC MTS MUTE
VOL
CH
FLASHBACK
5. Sélectionnez “CHANNEL MEMORY” en utilisant
la touche MENU (moniteur) ou les touches
(télécommande), et appuyez sur la touche
ENTER/BRIGHT MODE (moniteur) ou la touche
ENTER (télécommande).
CHANNEL MEMORY
AIR
2
<
TV/AV
>
6. Sélectionnez chaque canal désiré pour l’ajouter
ou l’effacer en utilisant les touches CH ou les
touches
(télécommande).
Vous pouvez utiliser les touches des canaux de
la télécommande.
7. Appuyez sur la touche VOL/BRIGHT >
(moniteur) ou la touche
(télécommande) pour
ajouter le canal à la mémoire de la télévision.
Pour effacer le canal de la mémoire de la
télévision, appuyez sur la touche VOL/BRIGHT <
(moniteur) ou la touche
(télécommande).
8. Quittez l’écran MENU en utilisant la touche
INPUT (moniteur) ou la touche MENU
(télécommande).
1.Mettez le moniteur sous tension.
2.
Sélectionnez le mode TV en utilisant la touche
INPUT (moniteur) ou la touche TV (télécommande).
3.Affichez l’écran MENU en utilisant la touche
MENU.
MENU
VIDEO ADJUST
CHANNEL SETTING
MODE SELECT
CLOSED CAPTION
V-CHIP BLOCK
>>
>>
>>
>>
>>
<
TV/AV
>
4. Sélectionnez “CHANNEL SETTING” en utilisant
la touche MENU (moniteur) ou les touches
(télécommande), et appuyez sur la touche
ENTER/BRIGHT MODE (moniteur) ou la touche
ENTER (télécommande).
CHANNEL SETTING
RETURN
AIR/CABLE
CHANNEL SEARCH
CHANNEL MEMORY
[
AIR
<
TV/AV
>
]
>>
>>
F24
Page 87

Opérations communes
Mise EN/HORS tension
INPUT
POWER
MENU
ENTER
/
CH
VOL/BRIGHT
MAIN
POWER
BRIGHT
MODE
SLEEP
BRIGHT
MODE
DISPLAY
PC TV
Mise sous tension
Lorsque le témoin d’alimentation est hors tension :
1. Appuyez sur la touche MAIN POWER du moniteur.
2.Mettez sous tension l’équipement raccordé.
Le témoin d’alimentation va s’allumer en vert,
puis le mode affichage va s’afficher pendant
quelques secondes.
Lorsque le témoin d’alimentation est allumé en
rouge (veille) :
1. Appuyez sur la touche POWER de la télécommande.
2.Mettez sous tension l’équipement raccordé.
Le témoin d’alimentation va s’allumer en vert,
puis le mode affichage va s’afficher pendant
quelques secondes.
AV
MENU
ENTER
BRIGHT
CC MTS MUTE
VOL
CH
FLASHBACK
Commutation des modes d’affichage
(INPUT)
INPUT
POWER
MENU
ENTER
/
CH
VOL/BRIGHT
MAIN
POWER
BRIGHT
MODE
SLEEP
BRIGHT
MODE
DISPLAY
PC TV
AV
MENU
ENTER
BRIGHT
CC MTS MUTE
VOL
CH
FLASHBACK
[Moniteur]
1.Appuyez sur la touche INPUT.
A chaque fois que vous appuyez sur la touche,
l’entrée change selon la séquence suivante :
PC → Numéro (TV) → AV → PC...
P C
EnglishFrançais
Mise hors tension
1.Mettez hors tension l’équipement raccordé.
2.
Appuyez sur la touche POWER de la télécommande.
Le témoin d’alimentation va s’allumer en rouge
(veille).
3.
Appuyez sur la touche MAIN POWER du moniteur.
Le témoin d’alimentation va s’éteindre.
Remarques :
- Attendez toujours au moins 5 secondes entre les
mises hors/en tension. Une manipulation rapide
de l’interrupteur peut causer des dommages au
moniteur ou entraîner des dysfonctionnements.
- Après la mise sous tension, il peut se passer un
petit moment avant que l’écran n’affiche une
image.
- Ne coupez pas la tension immédiatement après
avoir changé divers réglages sur l’écran. Les
valeurs changées peuvent ne pas être encore
sauvegardées dans la mémoire.
Modes d’affichage
PC mode PC Affiche les images de
l’ordinateur.
Numéro mode TV Affiche les images de la
télévision. Le numéro
sera celui du canal reçu.
AV mode AV Affiche les images de
l’équipement raccordé à
l’entrée AV.
F25
Page 88

Opérations communes
[Télécommande]
1.Appuyez sur la touche PC, TV, ou AV.
Le moniteur va passer en mode affichage de
l’équipement commandé.
Remarques :
- Lorsque vous mettez en fonction le moniteur, le
mode affichage initial va être le mode sur lequel
il était avant l’arrêt. (Le réglage en usine est sur
PC.)
- Les touches CH et les touches des canaux sur la
télécommande (1-9, 0 et 100) aussi passent
automatiquement au mode TV sauf quand vous
écoutez la télévision sur le mode PC (voir à la
page F28).
Dans ce cas, passez le mode affichage à TV en
utilisant la touche INPUT (moniteur) ou la touche
TV (télécommande).
Réglage du volume
Le volume peut être réglé individuellement pour le
mode PC et le mode TV/AV. Démarrez en passant
au mode affichage pour lequel vous voulez régler
le volume.
INPUT
POWER
MENU
ENTER
/
CH
VOL/BRIGHT
MAIN
POWER
BRIGHT
MODE
SLEEP
BRIGHT
MODE
DISPLAY
PC TV
[Moniteur]
1.Appuyez sur les touches VOL/BRIGHT.
AV
MENU
ENTER
BRIGHT
CC MTS MUTE
VOL
CH
FLASHBACK
<PC>
VOLUME 30
BRIGHT 31
2.Sélectionnez “VOLUME” en utilisant la touche
MENU.
3.Réglez le volume en utilisant les touches
VOL/BRIGHT.
Augmentez touche VOL/BRIGHT
Diminuez touche VOL/BRIGHT
L’écran pour le réglage du volume va
automatiquement disparaître au bout de 15
secondes.
[Télécommande]
1.Appuyez sur les touches VOL +/- pour régler.
-
-
>
<
<PC>
VOLUME 30
Augmentez touche VOL
Diminuez touche VOL
L’écran de réglage du volume va disparaitre
automatiquement au bout de quelques
secondes.
-
+
-
+
+
+
F26
Page 89

Opérations communes
Réglage du rétroéclairage
La luminosité du rétroéclairage peut être réglée
individuellement pour le mode PC et le mode TV/
AV. Démarrez le réglage en passant en mode
affichage l’équipement sur lequel vous voulez
régler le rétroéclairage.
INPUT
POWER
MENU
ENTER
/
CH
VOL/BRIGHT
MAIN
POWER
BRIGHT
MODE
SLEEP
BRIGHT
MODE
DISPLAY
PC TV
[Moniteur]
1.Appuyez sur les touches VOL/BRIGHT.
VOLUME 30
BRIGHT 31
-
-
2.Sélectionnez “BRIGHT” en utilisant la touche
MENU.
3.Réglez la luminosité en utilisant les touches
VOL/BRIGHT.
Augmentez touche VOL/BRIGHT
Diminuez touche VOL/BRIGHT
L’écran de réglage de la luminosité va disparaitre
automatiquement au bout de 15 secondes.
[Télécommande]
1.Appuyez sur la touche BRIGHT.
BRIGHT 31
-
AV
MENU
ENTER
BRIGHT
CC MTS MUTE
VOL
CH
FLASHBACK
<PC>
>
<
<PC>
+
+
+
Sélection de la langue affichée sur
l’écran
Vous pouvez sélectionner la langue (Anglais/
Français/Espagnol) en utilisant le menu MODE
SELECT dans n’importe quel mode. (La langue
sélectionnée sera affichée sur tous les modes.)
INPUT
POWER
MENU
ENTER
/
CH
VOL/BRIGHT
MAIN
POWER
BRIGHT
MODE
SLEEP
BRIGHT
MODE
DISPLAY
PC TV
1.Affichez l’écran MENU en utilisant la touche
MENU.
2.Sélectionnez “MODE SELECT” en utilisant la
touche MENU (moniteur) ou les touches
(télécommande), et appuyez sur la touche
ENTER/BRIGHT MODE (moniteur) ou la touche
ENTER (télécommande).
3.Sélectionnez “LANGUAGE” en utilisant la touche
MENU (moniteur) ou les touches
(télécommande), et appuyez sur la touche
ENTER/BRIGHT MODE (moniteur) ou la touche
ENTER (télécommande).
4.Sélectionnez langue que vous voulez afficher en
utilisant les touches VOL/BRIGHT (moniteur) ou
les touches (télécommande).
5.Quittez l’écran MENU en utilisant la touche
INPUT (moniteur) ou la touche MENU
(télécommande).
La procédure est terminée.
AV
MENU
ENTER
BRIGHT
CC MTS MUTE
VOL
CH
FLASHBACK
EnglishFrançais
2.Réglez la luminosité en utilisant les touches
.
Augmentez touche
Diminuez touche
L’écran de réglage de la luminosité va disparaitre
automatiquement au bout de quelques secondes.
F27
Page 90

Ecouter la télévision ou une autre source audio pendant
qu’on regarde l’écran de l’ordinateur (SOUND)
Vous pouvez écouter la télévision ou une autre
source audio pendant que le moniteur affiche
l’écran de l’ordinateur.
INPUT
POWER
ENTER
MENU
/
CH
BRIGHT
MODE
SLEEP
BRIGHT
MODE
PC TV
AV
ENTER
MENU
BRIGHT
VOL/BRIGHT
MAIN
POWER
DISPLAY
CC MTS MUTE
VOL
CH
FLASHBACK
1.Affichez l’écran MENU en utilisant la touche
MENU.
2.Sélectionnez “MODE SELECT” en utilisant la
touche MENU (moniteur) ou les touches
(télécommande), et appuyez sur la touche
ENTER/BRIGHT MODE (moniteur) ou la touche
ENTER (télécommande).
3.Sélectionnez “SOUND” en utilisant la touche
MENU (moniteur) ou les touches
(télécommande), et appuyez sur la touche
ENTER/BRIGHT MODE (moniteur) ou la touche
ENTER (télécommande).
4.Sélectionnez l’audio que vous voulez écouter en
utilisant les touches VOL/BRIGHT (moniteur) ou
les touches
(télécommande).
5.Quittez l’écran MENU en utilisant la touche
INPUT (moniteur) ou la touche MENU
(télécommande).
La procédure est terminée.
Remarques :
- Pour passer sur le canal audio de la télévision,
appuyez sur les touches CH ou les touches
canaux (télécommande).
- Pour passer sur le mode audio de la télévision,
appuyez sur la touche MTS (télécommande).
(Voir à la page F40.)
- Quand “STATUS” dans le menu V-CHIP BLOCK
est sur “ON” (voir à la page F46), SOUND de TV/
AV-IN n’est pas disponible sur le mode PC.
F28
Page 91

Réglage de l’affichage
Vous pouvez régler la couleur de l’image de
l’écran de l’ordinateur en utilisant les menus pour
le mode PC.
Modèle de Réglage
Si l’on se trouve sous un environnement Windows,
on peut se servir du Modèle de Réglage se
trouvant sur la CD-ROM fournie.
Les messages Windows mentionnés dans le
Mode d’emploi suivant se réfèrent à la version
anglaise de Windows.
Les explications qui suivent sont valables pour les
versions 95/98/Me/2000/XP de Windows et
considèrent que le lecteur de CD-ROM est le
lecteur “D”.
1. Placer le CD-ROM d’accessoires dans le lecteur
de CD-ROM de l’ordinateur.
2.Ouvrir [My Computer] et sélectionner CD-ROM.
S’il s’agit de Windows 3.1, ouvrir [File Manager]
et choisir le lecteur “D”.
3.Double-cliquer sur [Adj_uty.exe] pour lancer le
programme de réglage.
La Modèle de Réglage apparaîtra.
Modèle de Réglage
Après avoir effectué les réglages, appuyer sur la
touche [Esc] de l’ordinateur pour quitter le
programme de réglage.
Remarque :
- Si le mode d’affichage de l’ordinateur utilisé est
réglé sur 65K couleurs, il est possible de voir
différents niveaux de couleurs dans chaque mire
de couleurs ou il se peut que l’échelle de gris ait
l’air colorée. (Ceci est dû aux caractéristiques
techniques du signal d’entrée ; il ne s’agit pas
d’un dysfonctionnement.)
Comment régler
La procédure suivante décrit la méthode de
fonctionnement de base. Voyez les pages F30 à
F32 pour les options individuelles.
1.Sélectionnez le mode PC en utilisant la touche
INPUT (moniteur) ou la touche PC
(télécommande).
2.Affichez l’écran MENU en utilisant la touche MENU.
MENU
ADJUSTMENT
GAIN CONTROL
COLOR CONTROL
MODE SELECT
3.Sélectionnez le menu que vous voulez régler
en utilisant la touche MENU (moniteur) ou les
touches
la touche ENTER/BRIGHT MODE (moniteur) ou
la touche ENTER (télécommande).
4.Sélectionnez l’option que vous voulez régler en
utilisant la touche MENU (moniteur) ou les
touches
la touche ENTER/BRIGHT MODE (moniteur) ou
la touche ENTER (télécommande).
5.Changez les numéros/valeurs en utilisant les
touches VOL/BRIGHT (moniteur) ou les touches
(télécommande).
Vous pouvez continuer à régler d’autres options.
Faites les réglages suivants pour retourner à
l’écran précédent :
(1) Sélectionnez “RETURN” en utilisant la
(2) Appuyez sur la touche ENTER/BRIGHT
6.Quittez l’écran MENU en utilisant la touche
INPUT (moniteur) ou la touche MENU
(télécommande).
La procédure est terminée.
(télécommande), et appuyez sur
(télécommande), et appuyez sur
touche MENU (moniteur) ou les touches
(télécommande).
MODE (moniteur) ou la touche ENTER
(télécommande).
>>
>>
>>
>>
<PC>
EnglishFrançais
Remarques :
- Si vous n’appuyez sur aucune touche pendant
environ 30 secondes alors que vous vous
trouvez dans un écran menu, les réglages que
vous avez fait jusqu’à ce point vont être
exécutés et l’écran va disparaitre
automatiquement.
- Ce Mode d’Emploi décrit les réglages de
l’affichage en se basant sur l’utilisation du
Modèle de Réglage (pour Windows).
F29
Page 92

Menu ADJUSTMENT
Réglage de l’affichage
Option
AUTO
CLOCK
PHASE
H-POS, V-POS
Description
Règle automatiquement “CLOCK”, “PHASE”, “H-POS”, et “V-POS”.
Pour plus d’information, voir à la page F20.
Règle l’horloge afin d’éviter les bruits de scintillation verticale.
Scintillement vertical
Fait un réglage après qu’on a correctement réglé “CLOCK” afin d’éviter
les bruits de scintillation horizontale.
Scintillement horizontal
Règle la position du Modèle de Réglage pour qu’il apparaisse au centre
de l’écran.
Cadre de l’écran
Modèle de
Réglage
RESET
Restaure les valeurs de réglage de ce menu en son état originel à la
sortie d’usine.
Pour plus d’information, voir à la page F33.
F30
Page 93

Menu GAIN CONTROL
Réglage de l’affichage
Option
AUTO
BLACK LEVEL
CONTRAST
RESET
Remarques au sujet du réglage automatique :
- Si le Modèle de Réglage n’est pas utilisé, il est nécessaire de préserver une zone de noir et une zone
de blanc d’au moins 5 x 5 mm sur l’écran, car les réglages sont impossibles à effectuer sans ces
zones.
- Si le signal émis par l’ordinateur est Composite Sync ou Sync on Green, le réglage automatique ne
peut être exécuté. Exécuter un réglage manuel.
- Si “OUT OF ADJUST” est affiché, effectuer un réglage manuel.
Description
Règle automatiquement “BLACK LEVEL” et “CONTRAST” en se basant
sur les couleurs les plus brillantes et les plus sombres de l’image
affichée.
Règle la brillance de l’écran par l’observation du modèle de couleurs.
Modèle de couleurs
Règle le contraste pour faire apparaitre toutes les gradations par
l’observation du modèle de couleurs.
Restaure les valeurs de réglage de ce menu en son état originel à la
sortie d’usine.
Pour plus d’information, voir à la page F33.
Menu COLOR CONTROL
EnglishFrançais
Option
COLOR MODE
WHITE BALANCE
RESET
Remarque :
- “WHITE BALANCE” sera automatiquement réglé sur “STD” lorsque “COLOR MODE” est sur “sRGB”
ou “VIVID”.
Description
Sélectionne les teintes.
.............
- STD
- sRGB
- VIVID
Règle la couleur de température.
Réglez “WHITE BALANCE” à “STD” si vous voulez afficher toutes les
gradations.
- COOL2
- COOL1
.............
- STD
- WARM1
- WARM2
- USER
Restaure les valeurs de réglage de ce menu en son état originel à la
sortie d’usine.
Pour plus d’information, voir à la page F33.
Affiche les images en utilisant la teinte d’origine du
moniteur LCD.
..........
sRGB est une norme internationale de représentation des
couleurs définie par la Commission Internationale
d’Electrotechnique (International Electrotechnical
Commission). La conversion des couleurs prend en
compte les caractéristiques des cristaux liquides et par
conséquent, les teintes sont proches de l’image d’origine.
...........
Affiche les images dans les couleurs primaires vives.
.......
Teinte plus bleue que la norme.
.......
Teinte légèrement plus bleue que la norme.
Réglage des teintes suivant la norme.
......
Teinte légèrement plus rouge que la norme.
......
Teinte plus rouge que la norme.
..........
Vous permet de régler individuellement le contraste de rouge,
de vert et de bleu.
F31
Page 94

Menu MODE SELECT
Réglage de l’affichage
Option
SOUND
SCALING
LANGUAGE
RESET
Description
Sélectionne le canal audio à écouter pendant l’affichage de l’écran de
l’ordinateur.
Quand “STATUS” dans le menu V-CHIP BLOCK est sur “ON” (voir à la page
F46), SOUND de TV/AV-IN n’est pas disponible sur le mode PC.
Règle la netteté optimale de l’image lorsqu’elle est agrandie.
Sélectionne la langue (Anglais, Français ou Espagnol) sur l’écran.
Pour plus d’information, voir à la page F27.
Rétablit les valeurs de réglage de ce menu en son état originel à la sortie
d’usine.
Pour plus d’information, voir à la page F33.
F32
Page 95

Réglage de l’affichage
Eviter les changements des valeurs
réglées (ADJUSTMENT LOCK)
La mise hors service des touches de commande
autres que les touches suivantes (du moniteur et
de la télécommande) empêche les valeurs réglées
d’être modifiées.
Le changement des valeurs réglées non
seulement du mode PC, mais encore du mode TV/
AV vont être évités.
[Moniteur]
- Touche MAIN POWER
- Touches VOL/BRIGHT
- Touche INPUT
- Touches CH (canal)
[Télécommande]
- Touche POWER
- Touches VOL
- Touche MUTE
- Touches d’entrée (PC, TV, et AV)
- Touches CH (canal)
- Touches de canaux (0-9 et 100)
- Touche FLASHBACK
Exécutez cette procédure sur le moniteur.
1.Mettez hors tension le moniteur.
2.Tout en appuyant sur la touche MENU, appuyez
sur la touche MAIN POWER (c’est à dire mettez
le moniteur sous tension).
Continuez à appuyer sur les touches jusqu’à ce
que “ADJUSTMENT LOCKED” apparaisse sur
l’écran. Le verrouillage est effectué lorsque le
message est affiché.
Relâcher le verrouillage du réglage
Exécutez cette procédure sur le moniteur.
1.Mettez hors tension le moniteur.
2.Tout en appuyant sur la touche MENU, appuyez
sur la touche MAIN POWER (c’est à dire mettez
le moniteur sous tension).
Continuez à appuyer sur les touches jusqu’à ce
que “ADJUSTMENT UNLOCKED” apparaisse
sur l’écran. Le verrouillage est effectué lorsque
le message est affiché.
Restauration des valeurs du réglage
pour un menu spécifique (RESET)
Les valeurs de réglage pour le menu sélectionné
peuvent être restaurées en leur état originel à la
sortie d’usine.
La restauration n’est pas possible tant que le
verrouillage du réglage est en place. Relachez le
verrouillage du réglage avant la restauration.
1.Sélectionnez le mode PC en utilisant la touche
INPUT (moniteur) ou la touche PC
(télécommande).
2.Affichez l’écran MENU en utilisant la touche
MENU.
MENU
ADJUSTMENT
GAIN CONTROL
COLOR CONTROL
MODE SELECT
3.Sélectionnez le menu à restaurer en utilisant la
touche MENU (moniteur) ou les touches
(télécommande), et appuyez sur la touche
ENTER/BRIGHT MODE (moniteur) ou la touche
ENTER (télécommande).
Une liste d’options va apparaître.
4. Sélectionnez “RESET” en utilisant la touche
MENU (moniteur) ou les touches
(télécommande), et appuyez sur la touche
ENTER/BRIGHT MODE (moniteur) ou la touche
ENTER (télécommande).
5.Quittez l’écran MENU en utilisant la touche
INPUT (moniteur) ou la touche MENU
(télécommande).
La restauration est terminée.
>>
>>
>>
>>
<PC>
EnglishFrançais
ATTENTION !
- Lorsque le verrouillage du réglage est mis en
place, toutes les touches du moniteur et de la
télécommande autres que les touches ci-dessus
sont mises hors service. Pour utiliser les touches
autres que celles ci-dessus, relâchez le
verrouillage du réglage.
F33
Page 96

Réglage de l’affichage
Restauration de toutes les valeurs
de réglage (ALL RESET)
Toutes les valeurs de réglage peuvent être
restaurées. Ceci comprend non seulement le
mode PC, mais encore le mode TV/AV (y compris
les réglages des canaux et du numéro secret pour
le Blocage de la puce V).
La restauration de toutes les valeurs de réglage
n’est pas possible tant que le verrouillage du
réglage est en place. Relachez le verrouillage du
réglage avant la restauration.
Exécutez cette procédure sur le moniteur.
1.Mettez hors tension le moniteur.
2.Tout en appuyant sur la touche MENU et les
touches ENTER/BRIGHT MODE, appuyez sur la
touche MAIN POWER (c’est à dire mettez le
moniteur sous tension).
Continuez à appuyer sur les touches jusqu’à ce
que “ALL RESET” apparaisse sur l’écran. La
restauration est terminée lorsque le message
affiché s’éteint.
Remarque :
- Les touches de commandes vont être mises
hors service tant que “ALL RESET” est affiché.
F34
Page 97

Installation des fichiers relatifs au paramétrage du
moniteur et au profil ICC (Pour Windows)
En fonction du type d’ordinateur ou du système
d’exploitation, il peut parfois s’avérer nécessaire
d’utiliser l’ordinateur pour consulter les
paramètres relatifs à la configuration du moniteur.
Si c’est le cas, il convient de procéder comme suit
pour installer les fichiers relatifs aux paramétrage
du moniteur. (Le nom des commandes et les
procédures peuvent varier en fonction du type
d’ordinateur ou du système d’exploitation. Veiller à
suivre le propre Mode d’emploi de l’ordinateur tout
en lisant ce qui suit.)
A propos du profil ICC
Le profil ICC (International Color Consortium) est
un fichier qui décrit les caractéristiques de
l’affichage des couleurs du moniteur LCD.
L’utilisation d’une application compatible avec un
profil ICC permet de réaliser un affichage très
fidèle des couleurs.
- Windows 98/2000/Me/XP utilisent tous les trois
le profil ICC.
- Lors de l’installation des fichiers relatifs au
paramétrage du moniteur sous Windows 98/
2000/Me/XP (décrite ci-après), le profil ICC
s’installe également. Si l’on veut uniquement
installer le profil ICC, il faut se reporter à la
section Installation du profil ICC à la page F37.
- Lorsqu’on utilise le profil ICC, réglez “COLOR
MODE” et “WHITE BALANCE” sur “STD”.
Pour Windows 95
Installation des fichiers relatifs au paramétrage du
moniteur sous Windows 95. Les messages
Windows mentionnés dans le mode d’emploi
suivant se réfèrent à la version anglaise de
Windows.
Les explications qui suivent considèrent que le
lecteur de CD-ROM est le lecteur “D”.
1. Placer le CD-ROM d’accessoires dans le
lecteur de CD-ROM de l’ordinateur.
2. Cliquer sur le bouton [Start]. Dans le menu
[Settings], choisir l’option [Control Panel].
3. Double-cliquer sur [Display].
4. Cliquer sur [Settings], sur [Advanced
Properties], et sur [Monitor], et enfin sur
[Change].
5. Cliquer sur [Have disk], confirmer que le [Copy
manufacturer’s files from:] est [D:] et ensuite
cliquer sur [OK].
6. Confirmer la sélection des caractéristiques du
moniteur et ensuite cliquer sur [OK].
7. S’assurer que le moniteur affiche une image,
ensuite cliquer sur [Apply].
8. Cliquer sur [OK] et refermer la fenêtre.
Pour Windows 98
Installation des fichiers relatifs au paramétrage du
moniteur sous Windows 98, et au réglage du profil
ICC du moniteur en tant que valeur par défaut. Les
messages Windows mentionnés dans le Mode
d’emploi suivant se réfèrent à la version anglaise
de Windows.
Les explications qui suivent considèrent que le
lecteur de CD-ROM est le lecteur “D”.
Si la boîte de dialogue “Add New Hardware
Wizard” est affichée :
1. Placer le CD-ROM d’accessoires dans le
lecteur de CD-ROM de l’ordinateur.
2. Cliquer sur [Next].
3. Cocher la case [Display a list of all the drivers
in a specific location, so you can select the
driver you want.], ensuite cliquer sur [Next].
4. Lorsque [Models] apparaît, cliquer sur [Have
disk], confirmer que le [Copy manufacturer’s
files from:] est [D:] et ensuite cliquer sur [OK].
5. Confirmer la sélection des caractéristiques du
moniteur et ensuite cliquer sur [Next], [Next] et
[Finish]. Si la boîte de dialogue “Add New
Hardware Wizard” apparaît, répéter les
commandes d’installation à partir du point 2.
Si la boîte de dialogue “Add New Hardware
Wizard” n’est pas affichée :
1. Placer le CD-ROM d’accessoires dans le
lecteur de CD-ROM de l’ordinateur.
2. Cliquer sur le bouton [Start]. Dans le menu
[Settings], choisir l’option [Control Panel].
3. Double-cliquer sur [Display].
4. Cliquer sur [Settings], sur [Advanced], et sur
[Monitor].
5. Dans [Options], cocher [Automatically detect
Plug & Play monitors] et cliquer sur [Change].
6. Cliquer sur [Next].
7. Cocher la case [Display a list of all the drivers
in a specific location, so you can select the
driver you want.], ensuite cliquer sur [Next].
8. Lorsque [Models] apparaît, cliquer sur [Have
disk], confirmer que le [Copy manufacturer’s
files from:] est [D:] et ensuite cliquer sur [OK].
9. Confirmer la sélection des caractéristiques du
moniteur et ensuite cliquer sur [Next], [Next] et
[Finish].
10. S’assurer que le moniteur diffuse une image,
ensuite cliquer sur [Apply].
11. Cliquer sur [OK] et refermer la fenêtre.
F35
EnglishFrançais
Page 98

Installation des fichiers relatifs au paramétrage du moniteur et
au profil ICC (Pour Windows)
Pour Windows 2000
Installation des fichiers relatifs au paramétrage du
moniteur sous Windows 2000, et au réglage du
profil ICC du moniteur en tant que valeur par
défaut. Les messages Windows mentionnés dans
le Mode d’emploi suivant se réfèrent à la version
anglaise de Windows.
Les explications qui suivent considèrent que le
lecteur de CD-ROM est le lecteur “D”.
1. Placer le CD-ROM d’accessoires dans le
lecteur de CD-ROM de l’ordinateur.
2. Cliquer sur le bouton [Start]. Dans le menu
[Settings], choisir l’option [Control Panel].
3. Double-cliquer sur [Display].
4. Cliquer sur [Settings], sur [Advanced], et sur
[Monitor].
5. Cliquer sur [Properties], sur [Driver], et sur
[Update Driver].
6. Lorsque [Upgrade Device Driver Wizard]
apparaît, cliquer sur [Next].
7. Cocher la case [Display a list of the known
drivers for this device so that I can choose a
specific driver] et cliquer sur [Next].
8. Lorsque [Models] apparaît, cliquer sur [Have
disk], et s’assurer que [Copy manufacturer’s
files from:] est [D:] et cliquer sur [OK].
9. Sélectionner le moniteur dans la liste
déroulante et cliquer sur [Next].
10. Cliquer sur [Next], s’assurer que le nom du
moniteur apparaît dans l’écran et cliquer sur
[Finish]. Si [The Digital Signature Not Found]
apparaît, cliquer [Yes].
11. Cliquer sur [Close].
12. Cliquer sur [OK] et refermer la fenêtre.
Pour Windows Me
Installation des fichiers relatifs au paramétrage du
moniteur sous Windows Me, et au réglage du
profil ICC du moniteur en tant que valeur par
défaut. Les messages Windows mentionnés dans
le Mode d’emploi suivant se réfèrent à la version
anglaise de Windows.
Les explications qui suivent considèrent que le
lecteur de CD-ROM est le lecteur “D”.
Si la boîte de dialogue “Add New Hardware
Wizard” est apparue :
1. Placer le CD-ROM d’accessoires dans le
lecteur de CD-ROM de l’ordinateur.
2. Cocher la case [Specify the location of the
driver [Advanced]] et cliquer [Next].
3. Cocher la case [Display a list of all the drivers
in a specific location, so you can select the
driver you want.], ensuite cliquer sur [Next].
4. Lorsque [Models] apparaît, cliquer sur [Have
disk], et s’assurer que [Copy manufacturer’s
files from:] est [D:] et cliquer sur [OK].
5. Sélectionner les caractéristiques du moniteur
dans la liste et ensuite cliquer sur [Next], [Next]
et [Finish]. Si la boîte de dialogue “Add New
Hardware Wizard” apparaît, répéter les
commandes d’installation à partir du point 2.
Si la boîte de dialogue “Add New Hardware
Wizard” n’est pas apparue :
1. Placer le CD-ROM d’accessoires dans le
lecteur de CD-ROM de l’ordinateur.
2. Cliquer sur le bouton [Start]. Dans le menu
[Settings], choisir l’option [Control Panel].
3. Double-cliquer sur [Display].
4. Cliquer sur [Settings], sur [Advanced], et sur
[Monitor].
5. Dans [Options], cocher [Automatically detect
Plug & Play monitors] et cliquer sur [Change].
6. Cocher la case [Specify the location of the
driver [Advanced]] et cliquer sur [Next].
7. Cocher la case [Display a list of all the drivers
in a specific location, so you can select the
driver you want.] et cliquer sur [Next].
8. Lorsque [Models] apparaît, cliquer sur [Have
disk], et s’assurer que [Copy manufacturer’s
files from:] est [D:] et cliquer sur [OK].
9. Sélectionner les caractéristiques du moniteur
et ensuite cliquer sur [Next], [Next] et [Finish].
10. S’assurer que les caractéristiques du moniteur
sont affichés, ensuite cliquer sur [Apply].
11. Cliquer sur [OK] et refermer la fenêtre.
F36
Page 99

Installation des fichiers relatifs au paramétrage du moniteur et
au profil ICC (Pour Windows)
Pour Windows XP
Installation des fichiers relatifs au paramétrage du
moniteur sous Windows XP, et au réglage du profil
ICC du moniteur en tant que valeur par défaut. Les
messages Windows mentionnés dans le mode
d’emploi suivant se réfèrent à la version anglaise
de Windows.
Les explications qui suivent considèrent que le
lecteur de CD-ROM est le lecteur “D”.
1. Placer le CD-ROM d’accessoires dans le
lecteur de CD-ROM de l’ordinateur.
2. Cliquer sur le bouton [Start]. Sélectionner
[Control Panel].
3. Commutation sur “Classic View”.
4. Double-cliquer sur [Display].
5. Cliquer sur [Settings], sur [Advanced], et sur
[Monitor].
6. Cliquer sur [Properties], sur [Driver], et sur
[Update Driver].
7. Lorsque [Hardware Update Wizard] apparaît,
cocher la case [Install from a list or specific
location [Advanced]] et cliquer sur [Next].
8. Cocher la case [Don’t search. I will choose the
driver to install.] et cliquer sur [Next].
9. Cliquer sur [Have disk], et s’assurer que [Copy
manufacturer’s files from:] est [D:] et cliquer sur
[OK].
10. Sélectionner le moniteur dans la liste
déroulante et cliquer sur [Next].
Si [has not passed Windows Logo testing...]
apparaît, cliquer [Continue Anyway].
11. S’assurer que le nom du moniteur apparaît
dans l’écran et cliquer sur [Finish].
12. Cliquer sur [Close].
13. Cliquer sur [OK] et refermer la fenêtre.
Installation du profil ICC
Installation du profil ICC du moniteur. (Si
l’information relative à l’installation a déjà été
installée, alors le profil l’a été également, et il n’est
donc plus nécessaire de l’installer.)
Les messages Windows mentionnés dans le
mode d’emploi suivant se réfèrent à la version
anglaise de Windows.
Les explications qui suivent considèrent que le
lecteur de CD-ROM est le lecteur “D”.
1. Placer le CD-ROM d’accessoires dans le
lecteur de CD-ROM de l’ordinateur.
2. Cliquer sur le bouton [Start]. Dans le menu
[Settings], choisir l’option [Control Panel].
3. Double-cliquer sur [Display].
4. Cliquer sur [Settings] et sur [Advanced].
5. Cliquer sur [General] et dans [Compatibility]
sélectionner [Apply the new display setting
without restarting], ensuite cliquer sur [Color
Management].
6. Cliquer sur [Add], et sélectionner CD-ROM
comme emplacement du fichier.
7. Choisir le profile de couleur souhaité et cliquer
sur [Add].
8. Choisir le profil et cliquer sur [Set As Default].
9. Cliquer sur [OK] et refermer la fenêtre.
- Lorsqu’on utilise le profil ICC, réglez “COLOR
MODE” et “WHITE BALANCE” sur “STD”.
EnglishFrançais
F37
Page 100

Informations sur le profil ColorSync (Pour MacOS)
A propos du profil ColorSync
ColorSync est le système de gestion des couleurs
de Apple Computer et il permet de réaliser les
caractéristiques de l’affichage de couleurs lors
d’une utilisation avec une application compatible.
Un profil ColorSync décrit les caractéristiques de
couleur du moniteur LCD.
Remarques :
- Le profil ColorSync de ce moniteur fonctionne
sous MacOS 8.5 ou version ultérieure.
- Lorsqu’on utilise le profil ColorSync, réglez
“COLOR MODE” et “WHITE BALANCE” sur
“STD”.
Configuration du profil ColorSync
Remarques :
- Il est nécessaire que PC Exchange ou File
Exchange soient installés sur votre ordinateur.
- Le nom des commandes et les procédures
peuvent varier en fonction du type d’ordinateur
ou du système d’exploitation. Veiller à suivre le
propre mode d’emploi de l’ordinateur tout en
lisant ce qui suit :
1.Placer le CD-ROM d’accessoires dans le lecteur
de CD-ROM de l’ordinateur.
2.Copiez le profil à utiliser du CD-ROM dans le
dossier profil de ColorSync du dossier système.
3.En utilisant ColorSync sur le panneau de
configuration, choisir le profil souhaité.
F38
 Loading...