

Page 1
LCD Multimedia Monitor
LCD Multimedia Monitor
Moniteur LCD Multimédia
LCD Multimedia Monitor
LL-171ME
OPERATION MANUAL
BEDIENUNGSANLEITUNG
MODE D’EMPLOI
MANUALE D’USO
English ....... E1
Deutsch ......G1
Français ..... F1
Italiano ........IT1
EnglishDeutschFrançaisItaliano
Page 2

This equipment complies with the requirements of Directives 89/336/EEC and 73/23/EEC as amended
by 93/68/EEC.
Dieses Gerät entspricht den Anforderungen der EG-Richtlinien 89/336/EWG und 73/23/EWG mit
Änderung 93/68/EWG.
Ce matériel répond aux exigences contenues dans les directives 89/336/CEE et 73/23/CEE modifiées
par la directive 93/68/CEE.
Dit apparaat voldoet aan de eisen van de richtlijnen 89/336/EEG en 73/23/EEG, gewijzigd door 93/68/
EEG.
Dette udstyr overholder kravene i direktiv nr. 89/336/EEC og 73/23/EEC med tillæg nr. 93/68/EEC.
Quest’ apparecchio è conforme ai requisiti delle direttive 89/336/EEC e 73/23/EEC, come emendata
dalla direttiva 93/68/EEC.
Η εγκατασταση ανταποκρινεται στιζ απαιτησειζ των οδηγιων τηζ Ευρωπαïκηζ Ενωσηζ 89/336/ΕΟΚ κατ
73/23/ΕΟΚ, óπωζ οι κανονισµοι αυτοι συµπληρωθηκαν απó την οδηγια 93/68/ΕΟΚ.
Este equipamento obedece às exigências das directivas 89/336/CEE e 73/23/CEE, na sua versão
corrigida pela directiva 93/68/CEE.
Este aparato satisface las exigencias de las Directivas 89/336/CEE y 73/23/CEE, modificadas por
medio de la 93/68/CEE.
Denna utrustning uppfyller kraven enligt riktlinjerna 89/336/EEC och 73/23/EEC så som komplette ras
av 93/68/EEC.
Dette produktet oppfyller betingelsene i direktivene 89/336/EEC og 73/23/EEC i endringen 93/68/EEC.
Tämä laite täyttää direktiivien 89/336/EEC ja 73/23/EEC vaatimukset, joita on muutettu direktiivillä 93/
68/EEC.
CAUTION:
TO PREVENT ELECTRICAL SHOCK, DISCONNECT THE AC CORD BEFORE SERVICING.
CAUTION:
FOR A COMPLETE ELECTRICAL DISCONNECTION, PULL OUT THE MAIN PLUG.
VORSICHT:
UM DIE STROMZUFUHR VOLLSTÄNDIG ZU UNTERBRECHEN, DEN NETZSTECKER
HERAUSZIEHEN ENTFERNEN.
ATTENTION :
POUR UN ARRET TOTAL DE L’APPAREIL, DEBRANCHEZ LA PRISE DU COURANT SECTEUR.
VARNING:
FÖR TOTAL ELEKTRISK URKOPPLING, KOPPLA UR KONTAKTEN OCH.
PRECAUCION:
PARA UNA COMPLETA DESCONEXION ELECTRICA DESENCHUFE LA CLAVIJA DE LA RED.
PRECAUCION:
A FIN DE EVITAR DESCARGAS ELÉCTRICAS, DESCONECTE EL ENCHUFE DE LA RED ANTES DE
REALIZAR CUALQUIER OPERACIÓN DE SERVICIO.
ATTENZIONE:
PER EVITARE FOLGORAZIONI, SCOLLEGATE IL CAVO DI COLLEGAMENTO ALLA RETE IN
ALTERNATA PRIMA DI EFFETTUARE UN INTERVENTO DI SERVIZIO TECNICO.
ATTENZIONE:
PER UNO SCOLLEGAMENTO ELETTRICO COMPLETO, TIRATE FUORI LA SPINA PRINCIPALE.
Page 3

E1
EnglishDeutschFrançaisItalianoEspañolEnglish
ENGLISH
FOR CUSTOMERS IN U.K.
IMPORTANT
The wires in this mains lead are coloured in accordance with the following code:
GREEN-AND-YELLOW : Earth
BLUE : Neutral
BROWN : Live
As the colours of the wires in the mains lead of this apparatus may not correspond with the coloured
markings identifying the terminals in your plug proceed as follows:
• The wire which is coloured GREEN-AND-YELLOW must be connected to the terminal in the plug
which is marked by the letter E or by the safety earth
or coloured green or green-and-yellow.
• The wire which is coloured BLUE must be connected to the terminal which is marked with the
letter N or coloured black.
• The wire which is coloured BROWN must be connected to the terminal which is marked with the
letter L or coloured red.
Ensure that your equipment is connected correctly. If you are in any doubt consult a qualified
electrician.
“WARNING: THIS APPARATUS MUST BE EARTHED.”
Page 4

E2
Table of Contents
Getting started
Tips and safety precautions . . . . . . . . . . . . . . . . . . . . . . . . . . . . . . . . . . . . . . . . . . . . . . . . . . . . . . . . . . . . E4
Monitor and accessory checklist . . . . . . . . . . . . . . . . . . . . . . . . . . . . . . . . . . . . . . . . . . . . . . . . . . . . . . . . E5
Product description . . . . . . . . . . . . . . . . . . . . . . . . . . . . . . . . . . . . . . . . . . . . . . . . . . . . . . . . . . . . . . . . . . E6
Main unit . . . . . . . . . . . . . . . . . . . . . . . . . . . . . . . . . . . . . . . . . . . . . . . . . . . . . . . . . . . . . . . . . . . . . . . . E6
Remote control . . . . . . . . . . . . . . . . . . . . . . . . . . . . . . . . . . . . . . . . . . . . . . . . . . . . . . . . . . . . . . . . . . . E7
Cable clamp . . . . . . . . . . . . . . . . . . . . . . . . . . . . . . . . . . . . . . . . . . . . . . . . . . . . . . . . . . . . . . . . . . . . . E8
Using headphones (commercially available) . . . . . . . . . . . . . . . . . . . . . . . . . . . . . . . . . . . . . . . . . . . E8
Angle adjustment . . . . . . . . . . . . . . . . . . . . . . . . . . . . . . . . . . . . . . . . . . . . . . . . . . . . . . . . . . . . . . . . . E8
Remote control . . . . . . . . . . . . . . . . . . . . . . . . . . . . . . . . . . . . . . . . . . . . . . . . . . . . . . . . . . . . . . . . . . . . . . E9
Using the remote control . . . . . . . . . . . . . . . . . . . . . . . . . . . . . . . . . . . . . . . . . . . . . . . . . . . . . . . . . . . E9
Batteries for the remote control . . . . . . . . . . . . . . . . . . . . . . . . . . . . . . . . . . . . . . . . . . . . . . . . . . . . . . E9
Connection and preparation
Connecting the monitor to a computer . . . . . . . . . . . . . . . . . . . . . . . . . . . . . . . . . . . . . . . . . . . . . . . . . . E10
Antenna connection . . . . . . . . . . . . . . . . . . . . . . . . . . . . . . . . . . . . . . . . . . . . . . . . . . . . . . . . . . . . . . . . . E11
Connecting the monitor to AV equipment . . . . . . . . . . . . . . . . . . . . . . . . . . . . . . . . . . . . . . . . . . . . . . . . E12
AV equipment with 21-pin Euro-SCART (RGB) terminals . . . . . . . . . . . . . . . . . . . . . . . . . . . . . . . . E12
AV equipment with video output terminals . . . . . . . . . . . . . . . . . . . . . . . . . . . . . . . . . . . . . . . . . . . . E12
AV equipment with S-video output terminals . . . . . . . . . . . . . . . . . . . . . . . . . . . . . . . . . . . . . . . . . . E13
Connecting the monitor to a power source . . . . . . . . . . . . . . . . . . . . . . . . . . . . . . . . . . . . . . . . . . . . . . . E14
First installation . . . . . . . . . . . . . . . . . . . . . . . . . . . . . . . . . . . . . . . . . . . . . . . . . . . . . . . . . . . . . . . . . . . . E15
Selecting the item in the MENU screen . . . . . . . . . . . . . . . . . . . . . . . . . . . . . . . . . . . . . . . . . . . . . . . . . E16
Adjusting the computer display (AUTO ADJUSTMENT) . . . . . . . . . . . . . . . . . . . . . . . . . . . . . . . . . . . . E17
Common operations
Common operations . . . . . . . . . . . . . . . . . . . . . . . . . . . . . . . . . . . . . . . . . . . . . . . . . . . . . . . . . . . . . . . . E18
Turning power on/off. . . . . . . . . . . . . . . . . . . . . . . . . . . . . . . . . . . . . . . . . . . . . . . . . . . . . . . . . . . . . . E18
Switching display modes (INPUT) . . . . . . . . . . . . . . . . . . . . . . . . . . . . . . . . . . . . . . . . . . . . . . . . . . . E18
Adjusting the volume . . . . . . . . . . . . . . . . . . . . . . . . . . . . . . . . . . . . . . . . . . . . . . . . . . . . . . . . . . . . . E19
Adjusting the backlight . . . . . . . . . . . . . . . . . . . . . . . . . . . . . . . . . . . . . . . . . . . . . . . . . . . . . . . . . . . . E19
Selecting the language on the screen . . . . . . . . . . . . . . . . . . . . . . . . . . . . . . . . . . . . . . . . . . . . . . . . E19
PC mode
Watching TV or other video in a window on the computer screen (PICTURE IN PICTURE) . . . . . . . . E20
Selecting the video and audio sources . . . . . . . . . . . . . . . . . . . . . . . . . . . . . . . . . . . . . . . . . . . . . . . E20
Listening to TV or another audio source while viewing the computer screen . . . . . . . . . . . . . . . . . . . . E21
Adjusting the display . . . . . . . . . . . . . . . . . . . . . . . . . . . . . . . . . . . . . . . . . . . . . . . . . . . . . . . . . . . . . . . . E22
How to adjust . . . . . . . . . . . . . . . . . . . . . . . . . . . . . . . . . . . . . . . . . . . . . . . . . . . . . . . . . . . . . . . . . . . E22
ADJUSTMENT menu . . . . . . . . . . . . . . . . . . . . . . . . . . . . . . . . . . . . . . . . . . . . . . . . . . . . . . . . . . . . . E23
GAIN CONTROL menu . . . . . . . . . . . . . . . . . . . . . . . . . . . . . . . . . . . . . . . . . . . . . . . . . . . . . . . . . . . E24
COLOUR CONTROL menu . . . . . . . . . . . . . . . . . . . . . . . . . . . . . . . . . . . . . . . . . . . . . . . . . . . . . . . . E24
MODE SELECT menu . . . . . . . . . . . . . . . . . . . . . . . . . . . . . . . . . . . . . . . . . . . . . . . . . . . . . . . . . . . . E25
PICTURE IN PICTURE menu . . . . . . . . . . . . . . . . . . . . . . . . . . . . . . . . . . . . . . . . . . . . . . . . . . . . . . E25
Installing set-up information and the ICC profile (For Windows) . . . . . . . . . . . . . . . . . . . . . . . . . . . . . . E26
Information about the ColorSync profile (For MacOS) . . . . . . . . . . . . . . . . . . . . . . . . . . . . . . . . . . . . . . E29
Page 5

E3
EnglishDeutschFrançaisItalianoEspañolEnglish
TV/AV mode
Setting TV channels . . . . . . . . . . . . . . . . . . . . . . . . . . . . . . . . . . . . . . . . . . . . . . . . . . . . . . . . . . . . . . . . . E30
Saving broadcast TV channels in the memory (AUTOMATIC SEARCH) . . . . . . . . . . . . . . . . . . . . . E30
Adjusting the individual settings of programmes (MANUAL ADJUSTMENT) . . . . . . . . . . . . . . . . . E31
Changing the programme positions (SORT) . . . . . . . . . . . . . . . . . . . . . . . . . . . . . . . . . . . . . . . . . . E32
Erasing the programme range . . . . . . . . . . . . . . . . . . . . . . . . . . . . . . . . . . . . . . . . . . . . . . . . . . . . . . E32
Enter/change the name of an individual programme . . . . . . . . . . . . . . . . . . . . . . . . . . . . . . . . . . . . E33
Watching TV . . . . . . . . . . . . . . . . . . . . . . . . . . . . . . . . . . . . . . . . . . . . . . . . . . . . . . . . . . . . . . . . . . . . . . . E34
Selecting the channels . . . . . . . . . . . . . . . . . . . . . . . . . . . . . . . . . . . . . . . . . . . . . . . . . . . . . . . . . . . . E34
Selecting the channels using the programme table . . . . . . . . . . . . . . . . . . . . . . . . . . . . . . . . . . . . . E34
Selecting the audio reception mode . . . . . . . . . . . . . . . . . . . . . . . . . . . . . . . . . . . . . . . . . . . . . . . . . E35
Watching Teletext . . . . . . . . . . . . . . . . . . . . . . . . . . . . . . . . . . . . . . . . . . . . . . . . . . . . . . . . . . . . . . . . E36
Using the Child Lock function . . . . . . . . . . . . . . . . . . . . . . . . . . . . . . . . . . . . . . . . . . . . . . . . . . . . . . E39
Enjoying DVDs, games, and other equipment . . . . . . . . . . . . . . . . . . . . . . . . . . . . . . . . . . . . . . . . . . . . E42
Handy features (for TV/AV mode) . . . . . . . . . . . . . . . . . . . . . . . . . . . . . . . . . . . . . . . . . . . . . . . . . . . . . . E43
Pausing the screen (FREEZE) . . . . . . . . . . . . . . . . . . . . . . . . . . . . . . . . . . . . . . . . . . . . . . . . . . . . . . E43
Returning to previous channel (FLASHBACK) . . . . . . . . . . . . . . . . . . . . . . . . . . . . . . . . . . . . . . . . . E43
Switching power off after a specified length of time (SLEEP) . . . . . . . . . . . . . . . . . . . . . . . . . . . . . E43
Adjusting the display . . . . . . . . . . . . . . . . . . . . . . . . . . . . . . . . . . . . . . . . . . . . . . . . . . . . . . . . . . . . . . . . E44
How to adjust . . . . . . . . . . . . . . . . . . . . . . . . . . . . . . . . . . . . . . . . . . . . . . . . . . . . . . . . . . . . . . . . . . . E44
PICTURE menu . . . . . . . . . . . . . . . . . . . . . . . . . . . . . . . . . . . . . . . . . . . . . . . . . . . . . . . . . . . . . . . . . E45
PROGRAMMES menu (TV mode only) . . . . . . . . . . . . . . . . . . . . . . . . . . . . . . . . . . . . . . . . . . . . . . . E45
AV CONNECTIONS menu . . . . . . . . . . . . . . . . . . . . . . . . . . . . . . . . . . . . . . . . . . . . . . . . . . . . . . . . . E45
MODE SELECT menu . . . . . . . . . . . . . . . . . . . . . . . . . . . . . . . . . . . . . . . . . . . . . . . . . . . . . . . . . . . . E46
CHILD LOCK menu . . . . . . . . . . . . . . . . . . . . . . . . . . . . . . . . . . . . . . . . . . . . . . . . . . . . . . . . . . . . . . E46
Other features
Other features . . . . . . . . . . . . . . . . . . . . . . . . . . . . . . . . . . . . . . . . . . . . . . . . . . . . . . . . . . . . . . . . . . . . . . E47
Checking the current channel and audio reception mode on screen (DISPLAY) . . . . . . . . . . . . . . E47
Changing BRIGHT MODE . . . . . . . . . . . . . . . . . . . . . . . . . . . . . . . . . . . . . . . . . . . . . . . . . . . . . . . . . E47
Muting the sound (MUTE) . . . . . . . . . . . . . . . . . . . . . . . . . . . . . . . . . . . . . . . . . . . . . . . . . . . . . . . . . E47
Changing the screen size (VIEW MODE) . . . . . . . . . . . . . . . . . . . . . . . . . . . . . . . . . . . . . . . . . . . . . E47
Preventing changes to adjusted values (ADJUSTMENT LOCK) . . . . . . . . . . . . . . . . . . . . . . . . . . . E48
Resetting all adjustment values (ALL RESET) . . . . . . . . . . . . . . . . . . . . . . . . . . . . . . . . . . . . . . . . . E48
Instructions for attaching a VESA-compliant mount . . . . . . . . . . . . . . . . . . . . . . . . . . . . . . . . . . . . . . . . E49
Appendix
Monitor care . . . . . . . . . . . . . . . . . . . . . . . . . . . . . . . . . . . . . . . . . . . . . . . . . . . . . . . . . . . . . . . . . . . . . . . E50
Troubleshooting . . . . . . . . . . . . . . . . . . . . . . . . . . . . . . . . . . . . . . . . . . . . . . . . . . . . . . . . . . . . . . . . . E50
Monitor care . . . . . . . . . . . . . . . . . . . . . . . . . . . . . . . . . . . . . . . . . . . . . . . . . . . . . . . . . . . . . . . . . . . . E51
Storage . . . . . . . . . . . . . . . . . . . . . . . . . . . . . . . . . . . . . . . . . . . . . . . . . . . . . . . . . . . . . . . . . . . . . . . . E51
Specifications . . . . . . . . . . . . . . . . . . . . . . . . . . . . . . . . . . . . . . . . . . . . . . . . . . . . . . . . . . . . . . . . . . . . . . E52
Table of Contents
Page 6

E4
The Power Cord
- Do not damage the power cord nor place heavy
objects on it, stretch it or over bend it. Also, do
not add extension cords. Damage to the cord
may result in fire or electric shock.
- Use only the power cord supplied with the monitor.
- Insert the power plug directly into the AC outlet.
Adding an extension cord may lead to fire as a
result of overheating.
- Do not remove or insert the power plug with wet
hands. Doing so could result in electric shock.
Use of AC adapter
- Do not use the AC adapter for other than the
specified equipment.
- Unplug the AC adapter if it is not used for long
time.
- Do not place any objects on the AC adapter.
- Do not use the AC adapter outdoors.
- Do not attempt to repair the AC adapter if it is
broken or malfunctioning. Refer the servicing to
the service representative.
- Do not try to open the AC adapter.
- Do not use water or wet cloth for cleaning the
AC adapter.
Manual Scope
- In this manual, Microsoft Windows XP will be
referred to as “Windows XP”, Microsoft Windows
Millennium as “Windows Me”, Microsoft
Windows 2000 as “Windows 2000”, Microsoft
Windows 98 as “Windows 98”, Microsoft
Windows 95 as “Windows 95”, and Microsoft
Windows Version 3.1 as “Windows 3.1”. When
there is no need to distinguish between
programmes, the term “Windows” will be used.
- Microsoft and Windows are registered
trademarks of Microsoft Corporation.
- Macintosh is a registered trademark of Apple
Computer, Inc.
- All other brand and product names are
trademarks or registered trademarks of their
respective holders.
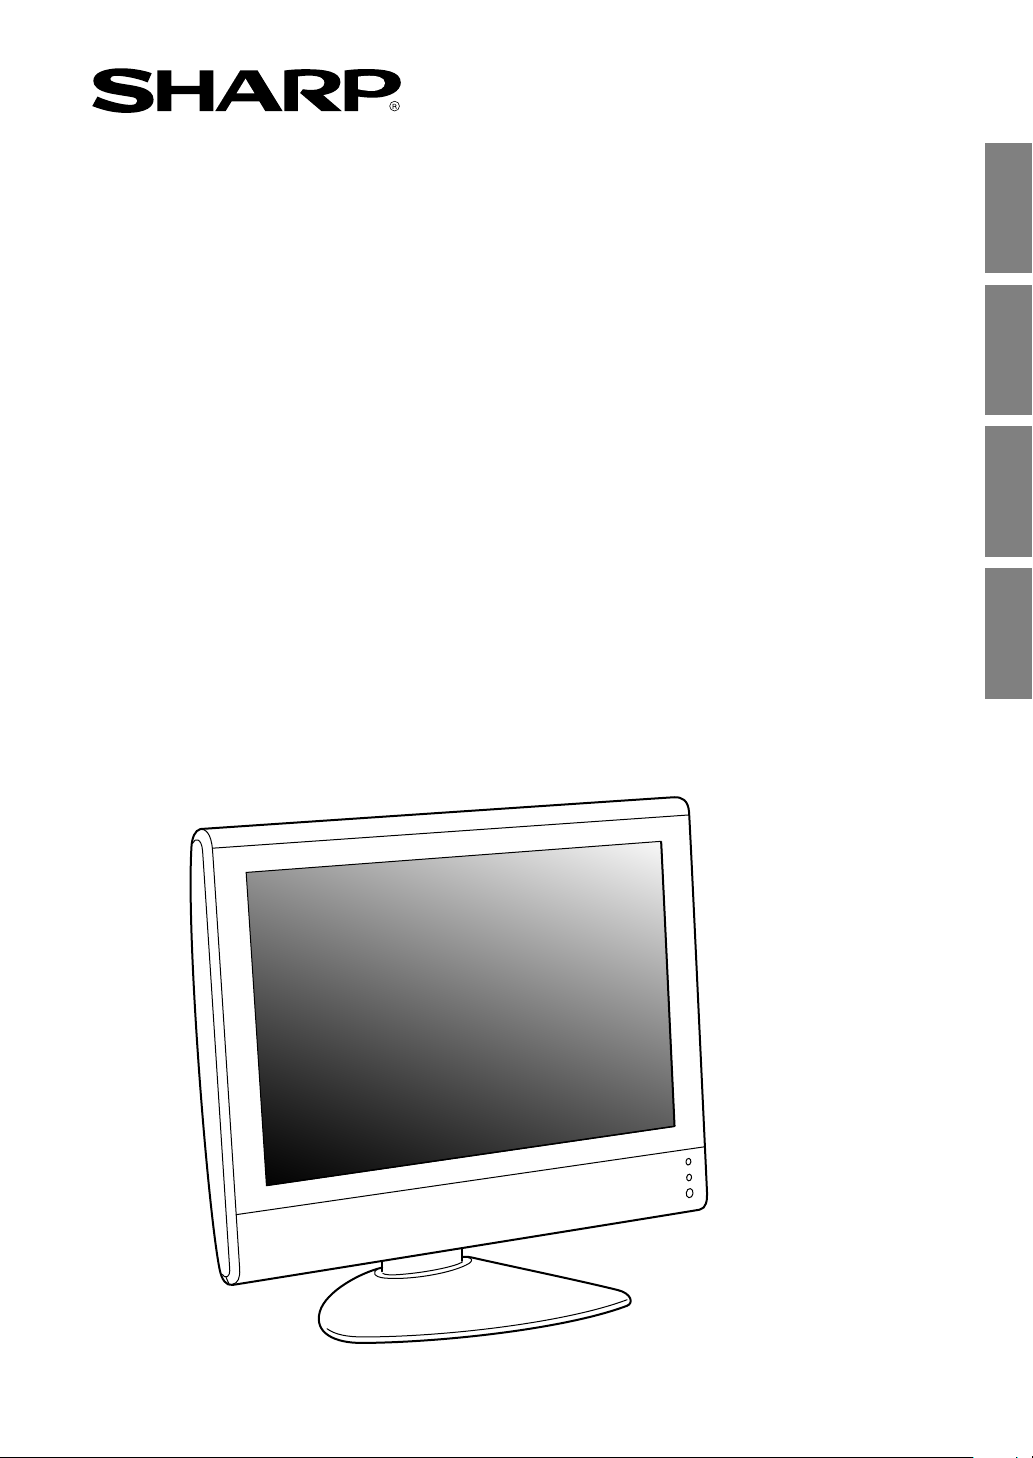
Thank you for your purchase of the Sharp LCD
Multimedia Monitor. To ensure safety and many
years of trouble-free operation of your product,
please read the safety precautions carefully before
using this monitor.
- The TFT colour LCD panel used in this monitor
is made with the application of high precision
technology. However, there may be minute
points on the screen where pixels never light or
are permanently lit. Also, if the screen is viewed
from an acute angle there may be uneven
colours or brightness. Please note that these are
not malfunctions but common phenomena of
LCDs and will not affect the performance of the
monitor.
- Do not leave the screen displaying idly for long
periods of time, as this could cause an
afterimage to remain.
- If the brightness is adjusted to the minimum
setting it may be difficult to see the screen.
- The quality of the computer signal may influence
the quality of the display. We recommend using a
computer able to emit high quality video signals.
- Never rub or tap the monitor with hard objects.
- Please understand that Sharp Corporation bears
no responsibility for errors made during use by
the customer or a third party, nor for any other
malfunctions or damage to this product arising
during use, except where indemnity liability is
recognized under law.
- This monitor and its accessories may be
upgraded without advance notice.
Location
- Do not use the monitor where ventilation is poor,
where there is a lot of dust, where humidity is
high, or where the monitor may come into
contact with oil or steam, as this could lead to
fire.
- Ensure that the monitor does not come into
contact with water or other fluids. Ensure that no
objects such as paper clips or pins enter the
monitor as this could lead to fire or electric
shock.
- Do not place the monitor on top of unstable
objects or in unsafe places. Do not allow the
monitor to come into contact with strong shocks
or vibrations. Causing the monitor to fall or
topple over may damage it.
- Do not use in places where the monitor will be
subject to direct sunlight, near heating
equipment or anywhere else where there is
likelihood of high temperature, as this may lead
to generation of excessive heat and outbreak of
fire.
Tips and safety precautions
Page 7

E5
EnglishDeutschFrançaisItalianoEspañolEnglish
Please check that the following items are included
in the package.
- LCD multimedia monitor (1)
- AC adapter (1)
(model name: NL-A69J)
- Power cord (1)
- PC analog signal cable (1)
(model name: 0NIT15V1-0183)
- PC audio cable (1)
(model name: 0NIT17A3-U006)
- Remote control (1)
- R-03 (“AAA” size, UM/SUM-4) dry battery (2)
- Cable clamp (1)
- CD-ROM (Utility Disk for Windows/Macintosh) (1)
- Operation manual (1)
Notes:
- You are advised to retain the carton in case the
monitor needs to be transported.
- Sharp Corporation holds authorship rights to the
Utility Disk programme. Do not reproduce it
without permission.
- The shape of the supplied accessories may not
be exactly same as shown in this manual.
Monitor and accessory checklist
Page 8
E6
Product description
Front view
1
4
3
2
1. Speakers
2. Power LED
Green: in use
Red: in standby mode
Orange: in power-saving mode
(only for PC mode)
Off: power off
3. Remote sensor window
4. Headphone terminal
Main unit
Removing/replacing the terminal cover
Removing the cover
Replacing the cover
1
2
Right view/rear view
5
6
7
8
9
10
11
12
13
5. INPUT button
6. MENU button
7. OK/BRIGHT MODE button
8. (channel) buttons
9. ( (volume) /BRIGHT) buttons
10. MAIN POWER button
11. PC audio input terminal
12. PC analog RGB input terminal
13. Power input terminal
Page 9
E7
EnglishDeutschFrançaisItalianoEspañolEnglish
Product description
Main unit
Left view/rear view
B
A
A
14
15
16
17
18
19
20
21
14.Handle
15. 21-pin Euro-SCART (RGB) terminal
16. Video input terminal
17. Audio input terminal - Left
18. Audio input terminal - Right
19. S-video input terminal
20. Antenna input terminal
21. Lug-hole for cable clamp (See next page.)
A Ventilation openings
Never block the ventilation openings as this may
lead to overheating inside the monitor and result
in malfunction.
B Security lock anchor
By connecting a security lock (commercially
available) to the security lock anchor, the monitor
is fixed so that it cannot be transported. The
security slot works in conjunction with Kensington
Micro Saver Security Systems.
Remote control
POWER
PC AV2AV1TV
SLEEP
OK
MENU
BRIGHT
DISPLAY
FREEZE
/HOLD
SOUND
CH
SUBPAGE SUBTITLE
VIEW MODE
TEXT
REVEAL
PIP
BRIGHT
MODE
4
5
7
6
3
2
1
9
10
11
8
14
15
12
16
17
18
13
19
20
21
22
1. POWER button
2. SUBPAGE button
3. REVEAL button
4. SLEEP button
5.
buttons and OK button
6. BRIGHT MODE button
7. Red, Green, Yellow and Cyan buttons
(for Teletext)
8. DISPLAY button
9. FREEZE/HOLD button
10. Channel buttons
11. (flashback) button
12. VIEW MODE button
13. PIP (Picture in Picture) button
14. Input buttons (PC, TV, AV1, and AV2)
15. TEXT button (for Teletext)
16. SUBTITLE button
17. MENU button
18. BRIGHT button
19.
(mute) button
20. SOUND button
21.
(volume) + – buttons
22. (channel) buttons
AV-IN1
AV-IN2
Page 10
E8
Product description
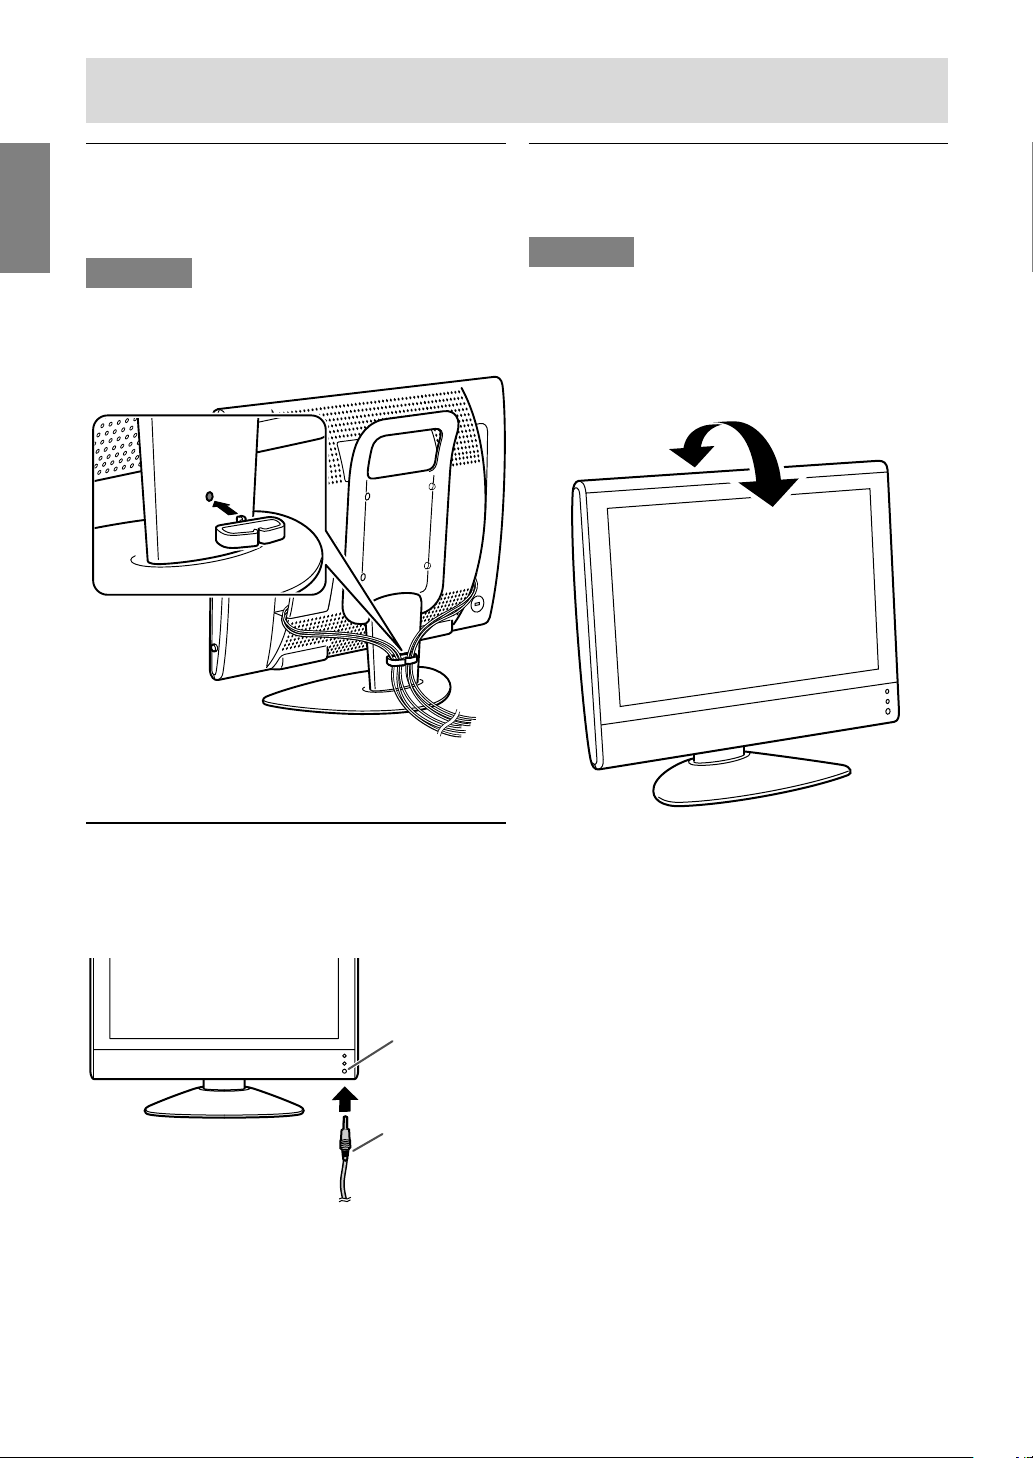
Cable clamp
Use the supplied cable clamp to secure the cables
connected to the terminals.
CAUTION!
- When adjusting the viewing angle, cables may
be pulled. Therefore, ensure that the cables
have sufficient slack.
Angle adjustment
Adjust to an easy to view angle.
CAUTION!
- Be sure to hold both sides of the monitor when
adjusting the viewing angle. The LCD panel
used in this monitor is made of glass. Pressure
from hands on the LCD panel could cause
damage.
- Be careful not to allow your fingers to be pinched.
approx. 20°
approx. 5°
Using headphones
(commercially available)
You can connect headphones (commercially
available) to the monitor.
Note:
- When the headphones are connected, no sound
can be heard from the monitor speakers.
Headphone
terminal
Headphones
Page 11
E9
EnglishDeutschFrançaisItalianoEspañolEnglish
Remote control
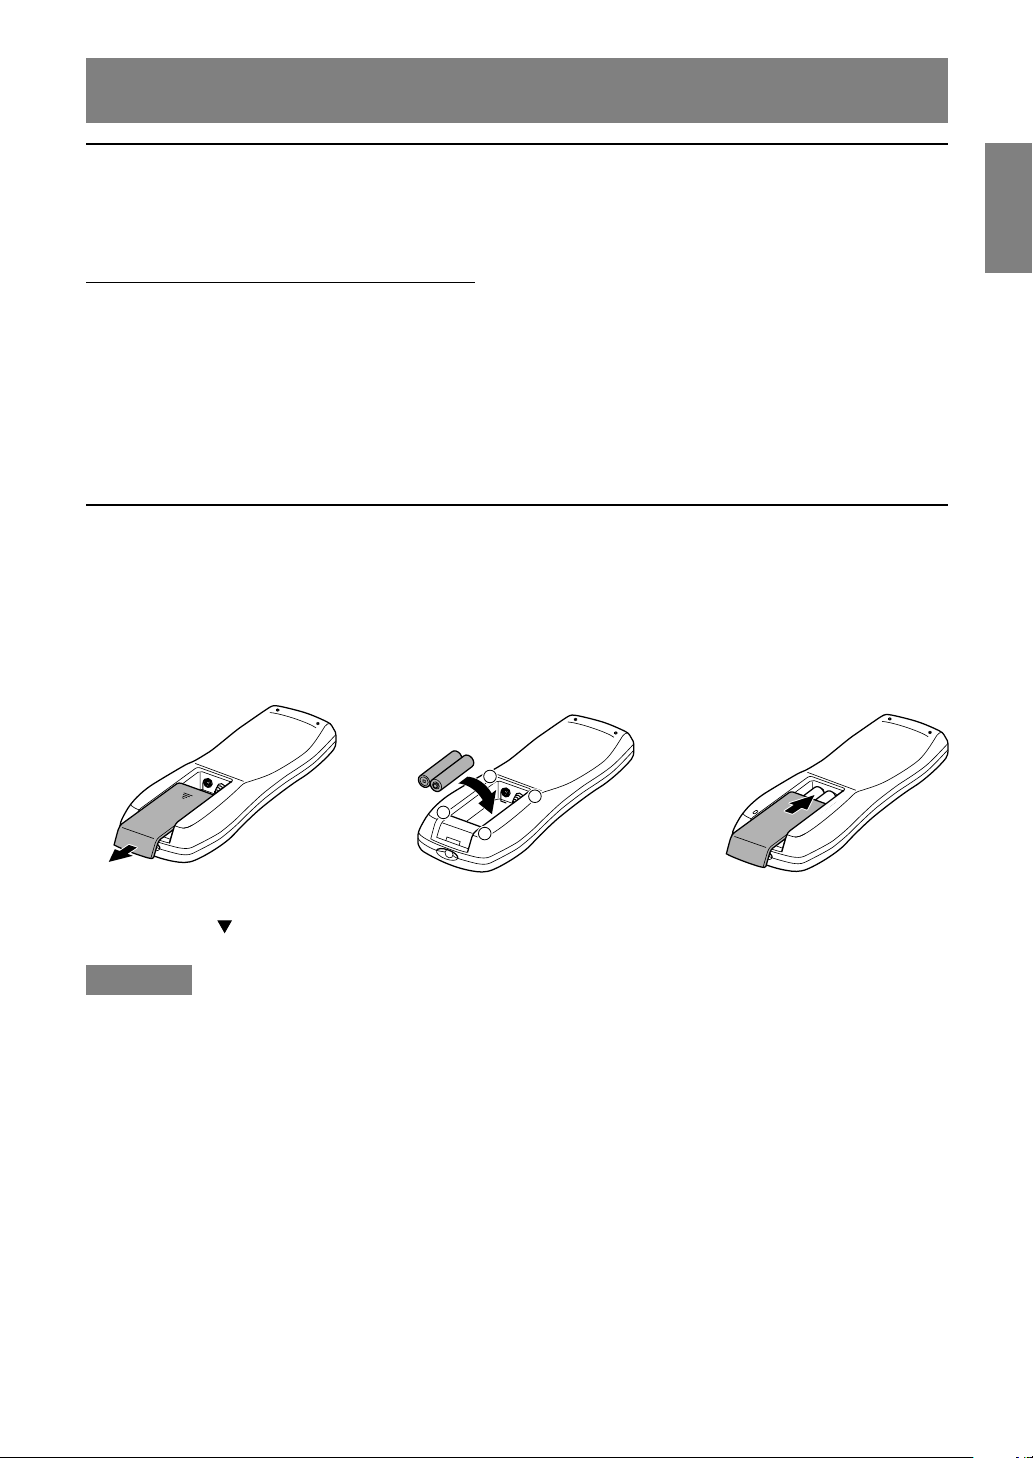
Batteries for the remote control
Before using the monitor for the first time, install two R-03 (“AAA” size, UM/SUM-4) batteries (supplied).
When the batteries become depleted and the remote control fails to operate, replace the batteries with
new R-03 (“AAA” size, UM/SUM-4) batteries.
CAUTION!
Improper use of batteries can result in chemical leakage and/or explosion. Be sure to follow the
instructions below.
- Place batteries with their terminals corresponding to the (+) and (–) indications.
- Different types of batteries have different characteristics. Do not mix batteries of different types.
- Do not mix old and new batteries. Mixing old and new batteries can shorten the life of new battery
and/or cause the old battery to leak chemicals.
- Remove batteries when they become weak.
Chemicals that leak from batteries can cause a rash. If chemical leakage is found, wipe with a cloth.
- The batteries supplied with the product may have a shorter life expectancy due to storage conditions.
- If the remote control will not be used for an extended period of time, remove the batteries from the
remote control.
Use the remote control by pointing it towards the remote sensor window on the monitor. Objects between
the remote control and sensor window may prevent proper operation.
Cautions regarding use of remote control
- Do not expose the remote control to shock.
In addition, do not expose the remote control to liquid, and do not place in an area with high humidity.
- Do not install or place the remote control under direct sunlight. The heat may deform the unit.
- The remote control may not work properly if the remote sensor window of the monitor is under direct
sunlight or strong lighting. In such case, change the angle of the lighting or monitor, or operate the
remote control closer to the remote sensor window.
- Do not use the remote control simultaneously with remote controls of other equipments.
1 Open the battery
cover.
Slide the cover while
pressing the ( ) part.
2 Insert two R-03 (“AAA” size,
UM/SUM-4) batteries.
+
+
-
-
Position the positive and
negative ends of the batteries
as indicated in the compartment.
3 Close the battery
cover.
Engage the claw on the
cover into the battery
housing and slide shut.
Using the remote control
Page 12
E10
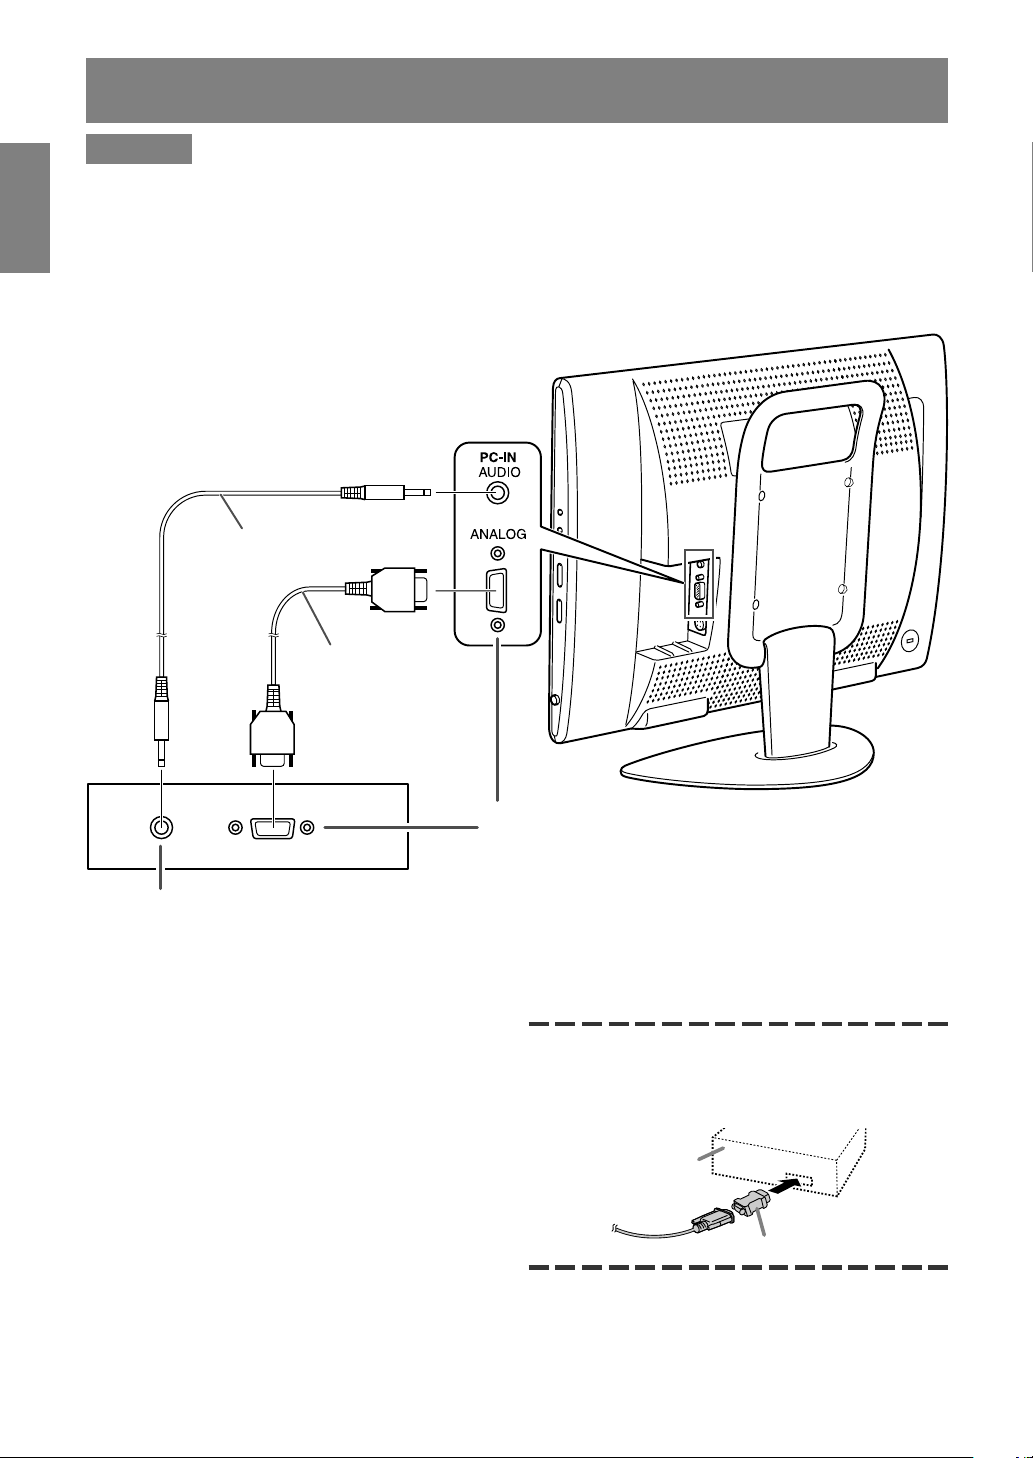
Connecting the monitor to a computer
CAUTION!
- When connecting, ensure that the monitor and all the equipment you are connecting to it are switched
off.
- Be careful not to over bend the cable or add extension cords as this could lead to a malfunction.
- When using the monitor for the first time or after having changed the system settings during use,
perform an automatic screen adjustment (see page E17).
See page E6 for information on removing/replacing the terminal cover.
Audio output terminal
The monitor’s speakers will play the computer’s
audio when you connect the two devices with the
PC audio cable accessory.
Notes:
- Depending on the computer or OS, you may
have to install the set-up information for the
monitor. (See page E26.)
- When connecting to a notebook and the
notebook computer’s screen is set so that it is
displaying at the same time, the MS-DOS screen
may not be able to display properly. In this case,
change the settings so that only the monitor is
displaying.
If connecting to a D-sub15 pin 2 row Apple Power
Macintosh, attach a Macintosh conversion adapter
(commercially available) to the analog signal
cable.
Macintosh conversion adapter
Analog RGB terminal
(Mini D-sub15 pin 3 rows)
Paying attention to the connector direction, firmly
insert the signal cable straight into the connector, and
then tighten the screws at both ends.
PC analog signal cable
(accessory)
PC audio cable
(accessory)
Power Macintosh
Page 13
E11
EnglishDeutschFrançaisItalianoEspañolEnglish
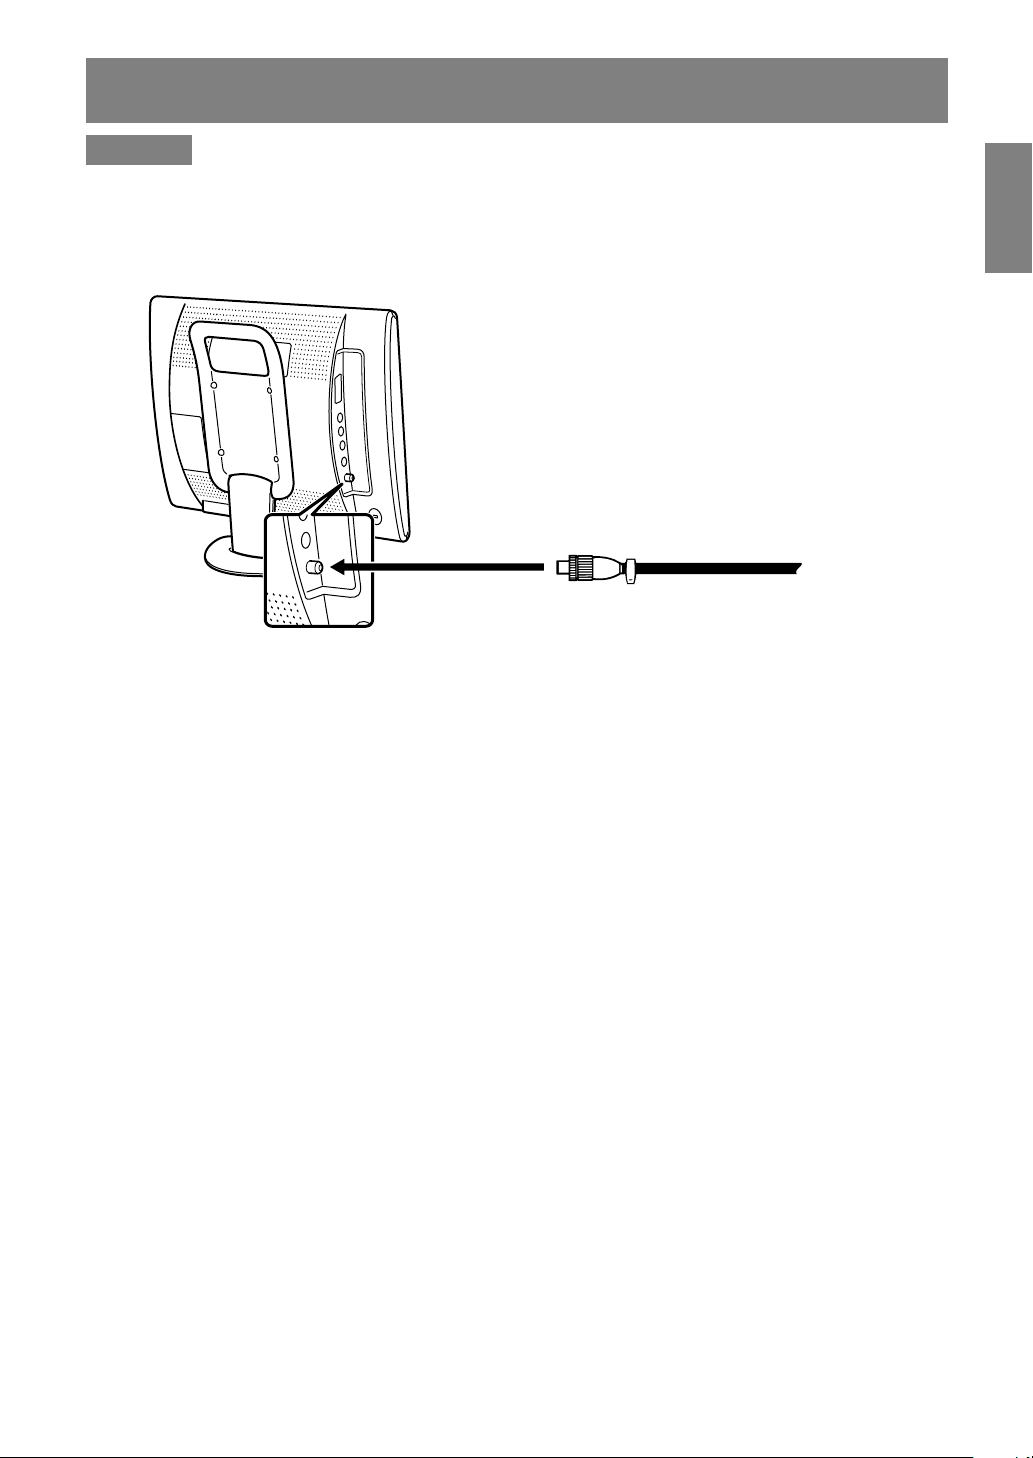
Antenna connection
CAUTION!
- When connecting, ensure that the monitor is switched off.
To enjoy a clearer picture, we recommend that you use an outdoor antenna.
Use a 75-ohm coaxial cable with a DIN45325 (IEC169-2) plug to connect the outdoor antenna to the
antenna input terminal on the left side of the monitor.
Antenna
input terminal
(ANT)
75-ohm coaxial cable (round cable)
(not supplied)
Page 14
E12
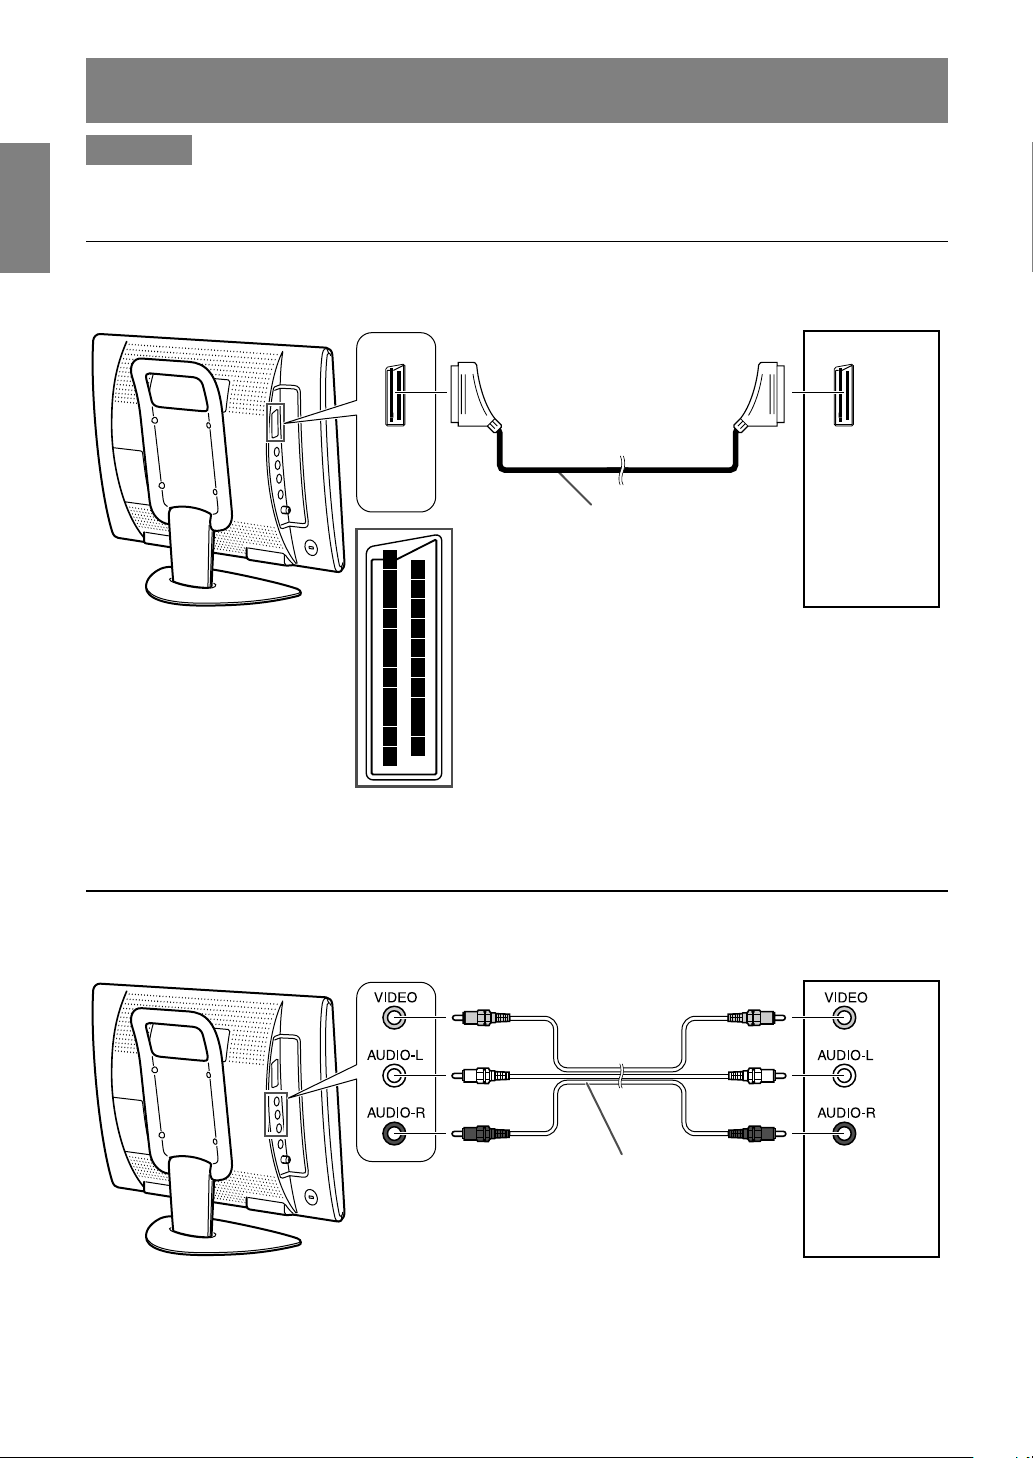
Connecting the monitor to AV equipment
CAUTION!
- Ensure that the monitor and all the equipment you are connecting to it are switched off before you
begin.
AV equipment with 21-pin Euro-SCART (RGB) terminals
6
2
4
8
10
12
14
16
18
20
1
3
5
7
9
11
13
15
17
19
21
AV equipment with video output terminals
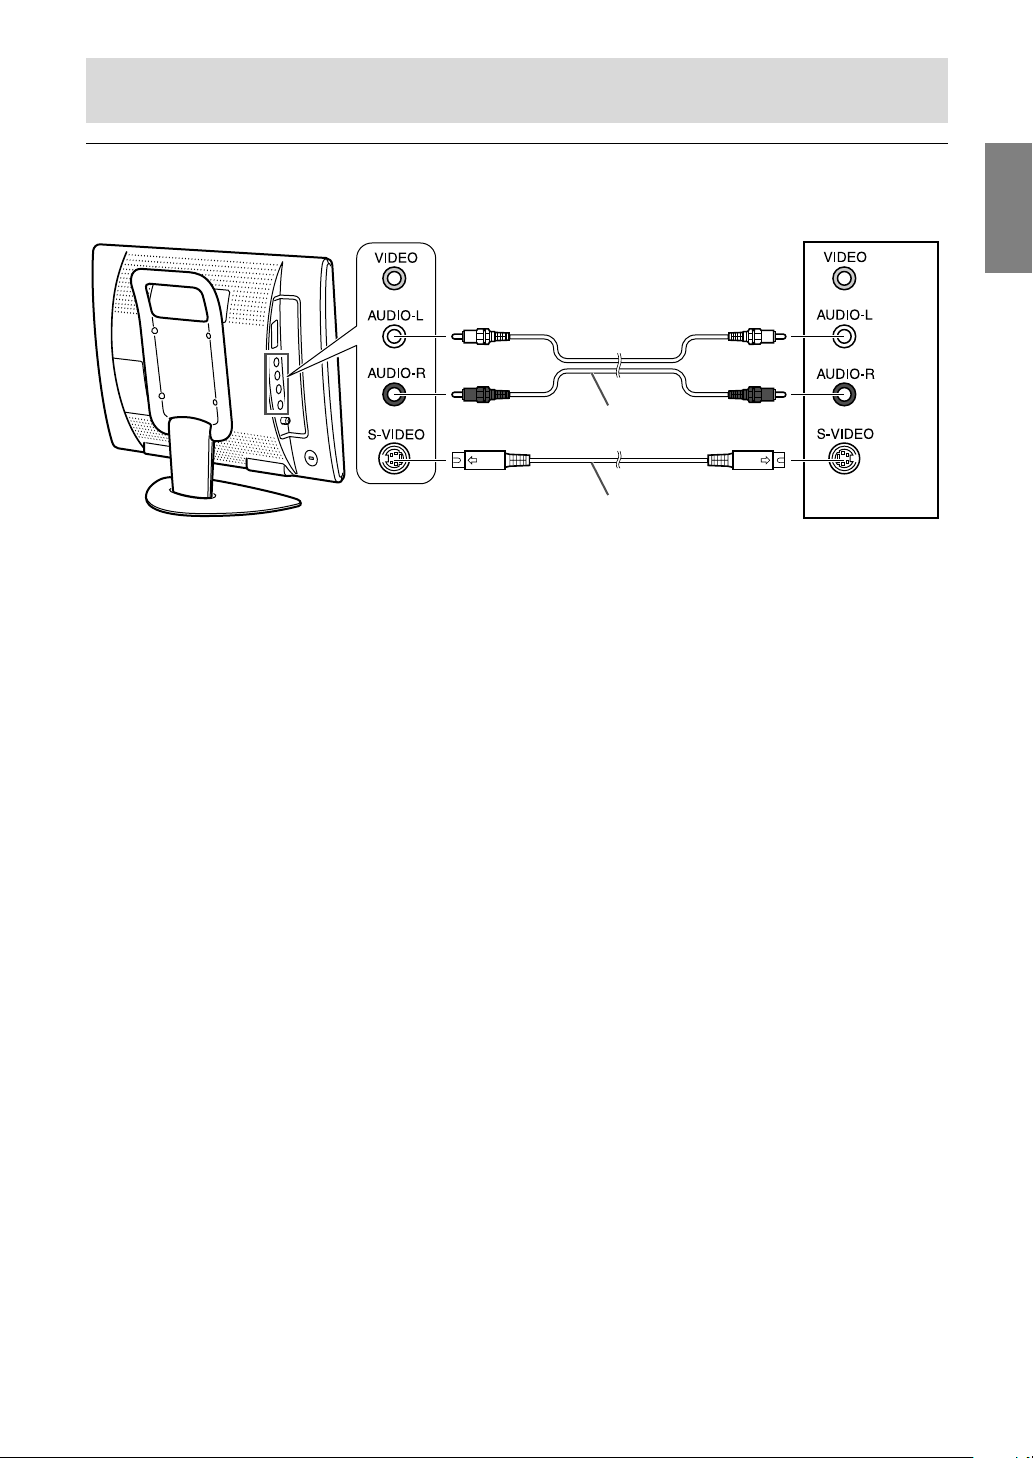
Note:
- When you are using the video input terminal, do not connect the cable to the S-video input terminal.
Left side of the monitor
VCR etc.
AV-IN2
(Yellow) (Yellow)
(White) (White)
(Red) (Red)
RCA pin cable (commercially available)
Left side of the monitor
Decoder etc.
AV-IN1
21-pin Euro-SCART cable
(commercially available)
Page 15
E13
EnglishDeutschFrançaisItalianoEspañolEnglish
Connecting the monitor to AV equipment
AV equipment with S-video output terminals
Note:
- When you are using the S-video input terminal, do not connect the cable to the video input terminal.
(White) (White)
(Red) (Red)
RCA pin cable (commercially available)
S-video cable (commercially available)
Left side of the monitor
VCR etc.
AV-IN2
Page 16
E14
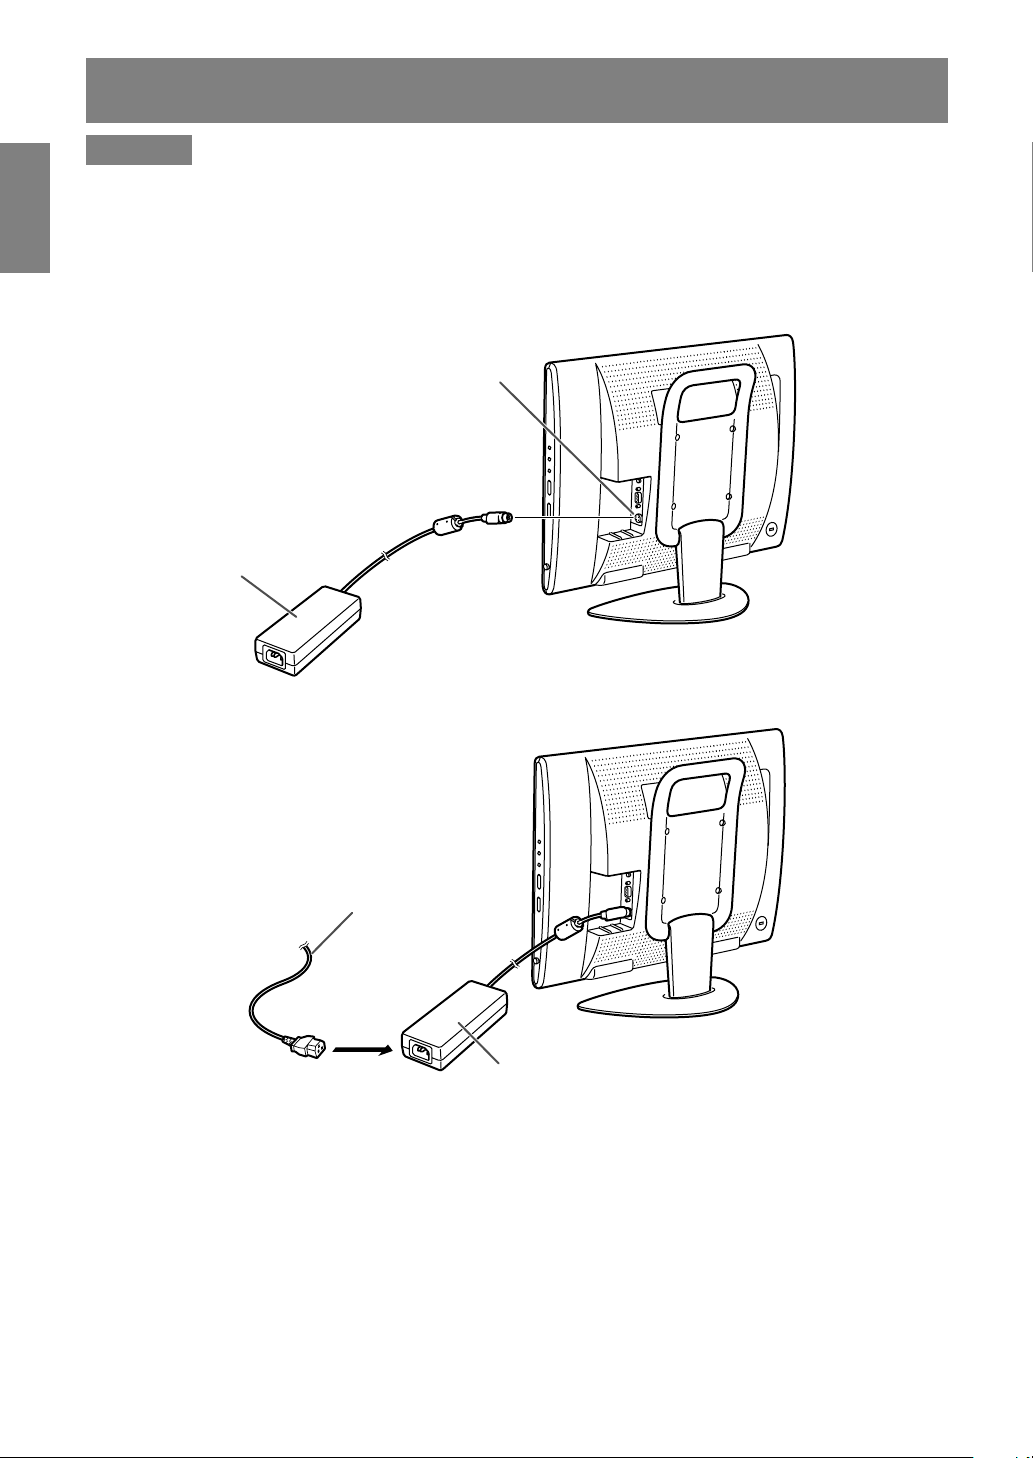
Connecting the monitor to a power source
CAUTION!
- When connecting, ensure that the monitor is switched off.
- Always use the AC adapter that came with the monitor.
- Be careful not to over bend the cable or add extension cords as this could lead to a malfunction.
See page E6 for information on removing/replacing the terminal cover.
1.Connect the AC adapter to the power input terminal.
2.Plug the power cord into the AC adapter and then place the power plug into an AC outlet.
Note:
- The shape of the power cord may vary in some countries.
Power input terminal
AC adapter
Power cord
AC adapter
AC outlet
Page 17
E15
EnglishDeutschFrançaisItalianoEspañolEnglish
First installation
When you turn on the monitor power for the first
time or after the ALL RESET operation (refer to the
end of this manual), the FIRST INSTALLATION
routine, which makes installation easier, is
activated. Using this routine, you can select the
on-screen display language, and automatically
search for and store the receivable channels.
Note:
- This routine activates every time you turn on the
monitor power until the automatic programme
search is started once.
MAIN
POWER
/BRIGHT
CH
MENU
INPUT
OK
/
BRIGHT
MODE
POWER
PC AV2AV1TV
SLEEP
OK
MENU
BRIGHT
DISPLAY
FREEZE
/HOLD
SOUND
CH
SUBPAGE SUBTITLE
VIEW MODE
TEXT
REVEAL
PIP
BRIGHT
MODE
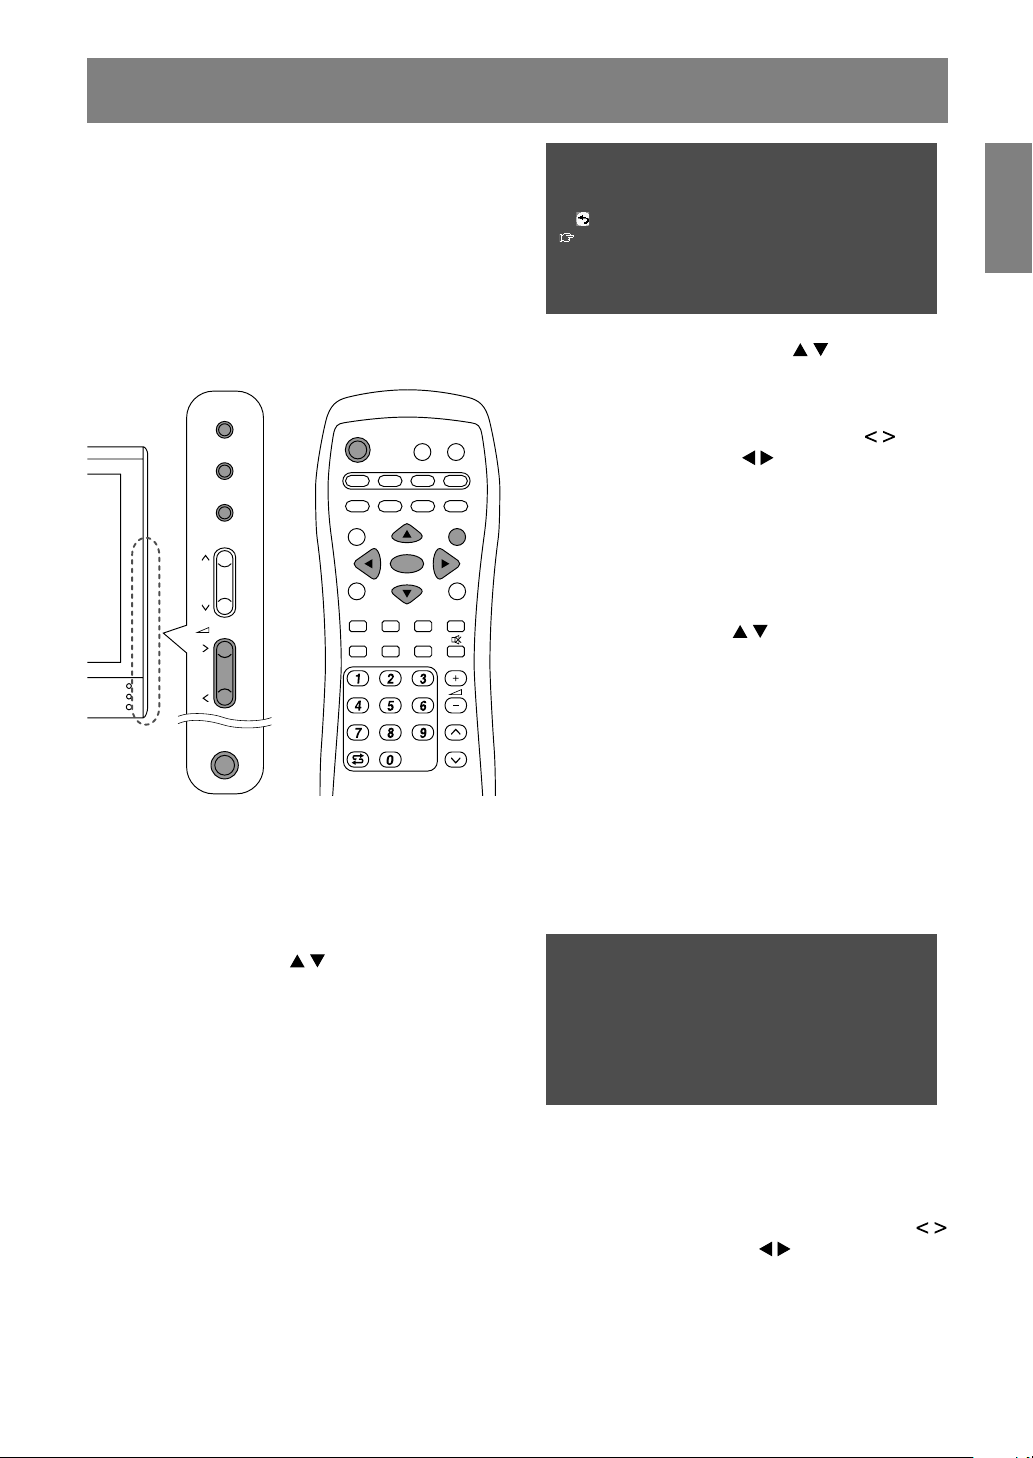
1. Press the MAIN POWER button to turn on the
monitor.
When the power LED lights red, press the
POWER button on the remote control.
The “FIRST INSTALLATION (LANGUAGE)”
screen will be displayed.
2.Select the desired language using the MENU
button (monitor) or the buttons (remote
control).
The on-screen display will switch to the selected
language.
Notes:
- The procedures described in this manual use
screenshots in ENGLISH (factory setting).
- You can change the on-screen display
language after the FIRST INSTALLATION
routine is completed. (See page E19.)
3.Press the OK/BRIGHT MODE button (monitor) or
the OK button (remote control).
The “FIRST INSTALLATION (AUTOMATIC
SEARCH)” screen will be displayed.
FIRST INSTALLATION
(AUTOMATIC SEARCH)
RETURN
COUNTRY
[
UK
]
COLOUR SYSTEM
[
PAL
]
SOUND SYSTEM
[
I
]
START SEARCH
4.Select the desired adjustment item using the
MENU button (monitor) or the buttons
(remote control), and press the
OK/BRIGHT MODE button (monitor) or the
OK button (remote control).
Then select the desired item using the
buttons (monitor) or the buttons (remote
control).
Note:
- Select your country from the following: UK,
Germany, France, Italy or “OTHERS”. When
“OTHERS” is selected, you can change the
other two systems.
5.Select “START SEARCH” using the MENU
button (monitor) or the buttons (remote
control).
6.Press the OK/BRIGHT MODE button (monitor) or
the OK button (remote control).
The automatic programme search will start.
Note:
- If you want to stop the process after it has
started, press the INPUT button (monitor) or
the MENU button (remote control). In this case,
you can set channels using “AUTOMATIC
SEARCH” in the PROGRAMMES menu in
TV mode. (See page E30.)
When the search is completed, the new
programmes found are displayed on the list.
START SEARCH
<
TV/AV
>
SEARCH IS COMPLETED
00 05 10 15
01 E02 06 11 16
02 E03 07 12 17
03 E04 08 13 18
04 09 14 19
Notes:
- The programmes are named automatically
and the programmes whose names could not
be found are displayed with “-----”. Names can
be entered later. (See page E33.)
- To display the previous or next list, use the
buttons (monitor) or the buttons (remote
control).
7.Exit the screen using the INPUT button (monitor)
or the MENU button (remote control).
Page 18

E16
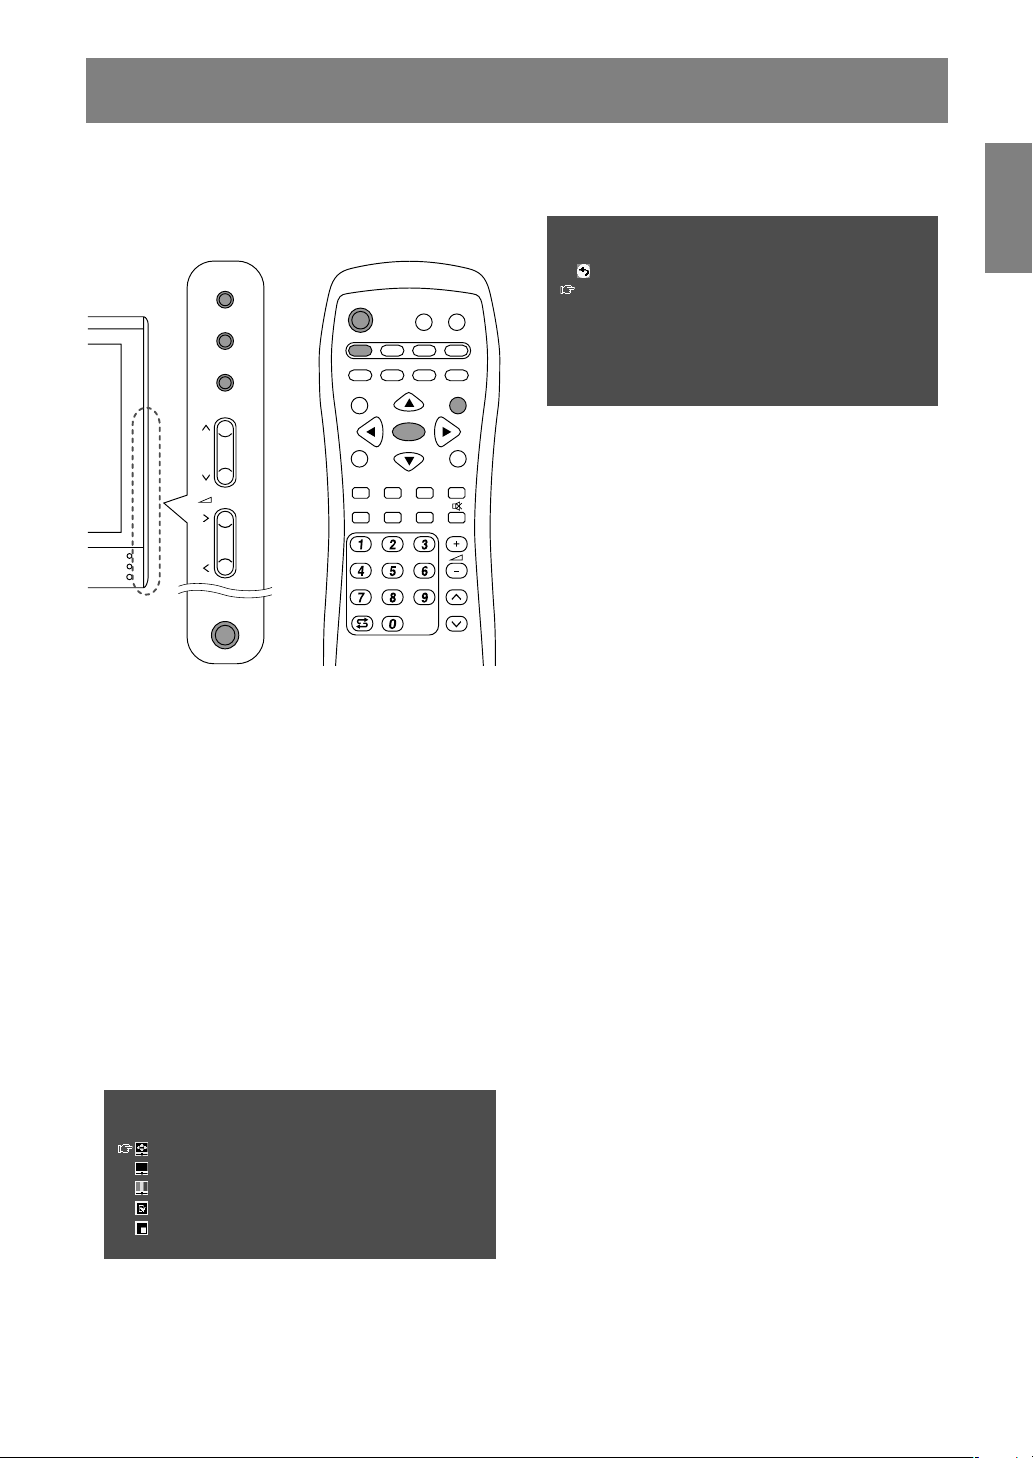
To select an item, start by moving the cursor ( ) to the desired item.
[Monitor]
1.Press the MENU button.
Each time you press the button, the cursor moves down one item.
If you press the button at the bottom, the cursor returns to the top.
Example: Each time you press the MENU button in the TV MENU screen, the cursor moves in the
following order:
PICTURE → PROGRAMMES → AV CONNECTIONS → MODE SELECT → CHILD LOCK → PICTURE…
MENU
<
TV/AV
>
PICTURE
>>
PROGRAMMES
>>
AV CONNECTIONS
>>
MODE SELECT
>>
CHILD LOCK
>>
[Remote control]
1.Press the buttons.
Each time you press the button, the cursor moves up one item.
Each time you press the button, the cursor moves down one item.
Selecting the item in the MENU screen
Page 19
E17
EnglishDeutschFrançaisItalianoEspañolEnglish
Adjusting the computer display (AUTO ADJUSTMENT)
When using the monitor as a computer display for
the first time or after having changed the system
settings during use, perform an automatic screen
adjustment. “CLOCK”, “PHASE”, “H-POS”, and
“V-POS” will be set to their optimum states.
MAIN
POWER
CH
MENU
INPUT
PC AV2AV1TV
BRIGHT
MODE
BRIGHT
CH
POWER
SLEEP MENU
DISPLAY
FREEZE
/HOLD
SOUND
SUBPAGE SUBTITLE
VIEW MODE
TEXT
REVEAL
PIP
OK
/BRIGHT
OK
/
BRIGHT
MODE
1.Press the MAIN POWER button to turn on the
monitor.
When the power LED lights red, press the
POWER button on the remote control.
2.Select the PC mode using the INPUT button
(monitor) or the PC button (remote control).
When using the INPUT button (monitor), each
time you press it, the input changes in the
following order:
PC → Number (TV) → AV1 → AV2 → PC...
3.Turn on the computer, and then display an image
that makes the entire screen display light
colours (such as a light desktop background).
If you are running Windows, you can use the
Adjustment Pattern on the accompanying Utility
Disk (see page E22).
4.Display the MENU screen using the MENU
button.
The cursor is positioned at “ADJUSTMENT”.
MENU
<PC>
ADJUSTMENT
>>
GAIN CONTROL
>>
COLOUR CONTROL
>>
MODE SELECT
>>
PICTURE IN PICTURE
>>
5.Press the OK/BRIGHT MODE button (monitor) or
the OK button (remote control).
The “ADJUSTMENT” screen will be displayed.
ADJUSTMENT
<PC>
RETURN
AUTO
CLOCK
[
127
]
>>
PHASE
[
16
]
>>
H-POS
[
200
]
>>
V-POS
[
50
]
>>
RESET
6.Press the OK/BRIGHT MODE button (monitor) or
the OK button (remote control) to auto-adjust the
settings.
The screen will go dark and “ADJUSTING” will
be displayed. After a few seconds, the
“ADJUSTMENT” screen will return.
7.Exit the screen using the INPUT button (monitor)
or the MENU button (remote control).
Notes:
- When you are using the 1280 x 768 or 1024 x
768 mode, specify the horizontal resolution of a
768-line screen in the MODE SELECT menu.
(See page E25.)
- It may not be possible to achieve correct
adjustment with the first automatic adjustment.
In such a case, try repeating the automatic
adjustment 2 or 3 times.
- If necessary due to any of the following, manual
adjustments (page E22) can be performed after
the automatic adjustment.
- When further fine adjustment is needed.
- When the computer’s video input signals are
Composite Sync or Sync on Green. (Automatic
adjustments may not be possible.)
- When “OUT OF ADJUST” is displayed. (When
the screen displays an entirely dark image, the
automatic screen adjustment may be disabled.
When making an automatic adjustment, be
sure to either use the Adjustment Pattern or try
displaying an image that makes the entire
screen very bright.)
- Automatic adjustment may not be achieved
correctly depending on what is displayed on the
screen - moving pictures or the MS-DOS prompt
etc.
Page 20

E18
Common operations
Turning power on/off
MAIN
POWER
CH
MENU
INPUT
PC AV2AV1TV
BRIGHT
MODE
BRIGHT
CH
POWER
SLEEP MENU
DISPLAY
FREEZE
/HOLD
SOUND
SUBPAGE SUBTITLE
VIEW MODE
TEXT
REVEAL
PIP
OK
/BRIGHT
OK
/
BRIGHT
MODE
Turning power on
When the power LED is off:
1.Press the MAIN POWER button on the monitor.
2.Turn on power for the connected equipment.
After a while the power LED will light green, and
then the display mode will be displayed for
several seconds.
When the power LED is lit red (standby):
1.Press the POWER button on the remote control.
2.Turn on power for the connected equipment.
The power LED will light green, and then the
display mode will be displayed for several
seconds.
Turning off power
1.Turn off power for the connected equipment.
2.Press the POWER button on the remote control.
The power LED will light red (standby).
3.Press the MAIN POWER button on the monitor.
The power LED will go out.
Notes:
- Always wait at least 5 seconds between
switching power off/on. Rapid switching may
damage the monitor or cause it to malfunction.
- After switching power on, it may take a little
while before the screen displays an image.
- Do not turn off the power immediately after
changing various settings on the screen. The
changed values may not have been saved in the
memory yet.
Switching display modes (INPUT)
[Monitor]
1.Press the INPUT button.
Each time you press the button, the input
changes in the following order:
PC → Number (TV) → AV1 → AV2 → PC...
P C
Display modes
PC PC mode Displays the computer’s
image.
Number TV mode Displays the TV’s image.
The number will be the
channel being received.
AV1 AV1 mode Displays the image from
the equipment connected
to the AV1 input.
AV2 AV2 mode Displays the image from
the equipment connected
to the AV2 input.
[Remote control]
1.Press the PC, TV, AV1, or AV2 button.
The monitor will switch to the display mode for
the button you pressed.
Notes:
- When you turn on the monitor, the initial display
mode will be the mode being used when the
monitor was last turned off.
- Using the
buttons or channel buttons on the
remote control (0-9), or selecting channels using
the programme table also automatically switches
to TV mode, except for the following cases when
in PC mode.
- When you are watching TV in the PIP window
(see page E20).
- When you are listening to TV (see page E21).
In these cases, switch the display mode to TV
using the INPUT button (monitor) or the TV
button (remote control).
Page 21

E19
EnglishDeutschFrançaisItalianoEspañolEnglish
Common operations
Adjusting the volume
The volume can be set individually for PC mode
and TV/AV mode. Start by switching to the display
mode for which you want to set the volume.
[Monitor]
1.Press the buttons.
<PC>
VOLUME 30
BRIGHT 31
+
-
+
-
2.Select “VOLUME” using the MENU button.
3.Adjust the volume using the buttons.
Increase
button
Decrease
button
The screen for adjusting the volume will
automatically disappear after about 15 seconds.
[Remote control]
1.Press the
+/– buttons to adjust.
<PC>
VOLUME 30
+
-
Increase + button
Decrease – button
The screen for adjusting the volume will
automatically disappear after several seconds.
Adjusting the backlight
The brightness of the backlight can be set
individually for PC mode and TV/AV mode. Start by
switching to the display mode for which you want
to adjust the backlight.
[Monitor]
1.Press the buttons.
<PC>
VOLUME 30
BRIGHT 31
+
-
+
-
2.Select “BRIGHT” using the MENU button.
3.Adjust the brightness using the buttons.
Increase
button
Decrease
button
The screen for adjusting the brightness will
automatically disappear after about 15 seconds.
[Remote control]
1.Press the BRIGHT button.
<PC>
BRIGHT 31
+
-
2.Adjust the brightness using the buttons.
Increase button
Decrease button
The screen for adjusting the brightness will
automatically disappear after several seconds.
Selecting the language on the
screen
You can select the language (English, German,
Spanish, French or Italian) using the MODE
SELECT menu while in any mode. (The selected
language will be displayed in all modes.)
1.Display the MENU screen using the MENU
button.
2.Select “MODE SELECT” using the MENU button
(monitor) or the buttons (remote control),
and press the OK/BRIGHT MODE button
(monitor) or the OK button (remote control).
3.Select “LANGUAGE” using the MENU button
(monitor) or the
buttons (remote control),
and press the OK/BRIGHT MODE button
(monitor) or the OK button (remote control).
4.Select the language you want to display using
the
buttons (monitor) or the buttons
(remote control).
5.Exit the screen using the INPUT button (monitor)
or the MENU button (remote control).
Page 22

E20
Watching TV or other video in a window on the
computer screen (PICTURE IN PICTURE)
Selecting the video and audio
sources
You can select the video source for the PIP
window between TV, AV1 and AV2. You can also
select the audio you want to hear while the PIP
window is being displayed.
1.Display the MENU screen using the MENU
button in PC mode.
2.Select “PICTURE IN PICTURE” using the MENU
button (monitor) or the buttons (remote
control), and press the OK/BRIGHT MODE
button (monitor) or the OK button (remote
control).
3.Select “PIP INPUT” using the MENU button
(monitor) or the buttons (remote control),
and press the OK/BRIGHT MODE button
(monitor) or the OK button (remote control).
4.Select the PIP image you want to view using the
buttons (monitor) or the buttons (remote
control).
5.Select “PIP SOUND” using the MENU button
(monitor) or the buttons (remote control),
and press the OK/BRIGHT MODE button
(monitor) or the OK button (remote control).
6.Select the audio you want to hear using the
buttons (monitor) or the buttons (remote
control).
PC: Computer audio
PIP: PIP window audio
7.Exit the screen using the INPUT button (monitor)
or the MENU button (remote control).
Note:
- To switch the audio reception mode for TV audio,
press the SOUND button (remote control). (See
page E35.)
You can watch TV or other video in a small window
(PIP window) on the computer screen.
MAIN
POWER
CH
MENU
INPUT
PC AV2AV1TV
BRIGHT
MODE
BRIGHT
CH
POWER
SLEEP MENU
DISPLAY
FREEZE
/HOLD
SOUND
SUBPAGE SUBTITLE
VIEW MODE
TEXT
REVEAL
PIP
OK
/BRIGHT
OK
/
BRIGHT
MODE
1.Select the PC mode using the INPUT button
(monitor) or the PC button (remote control).
2.Press the PIP button (remote control).
The small window will be displayed (the factory
setting is TV picture).
To change channels in the small window, press the
buttons or the channel buttons (remote
control), or use the programme table. (See page
E34.)
To adjust volume, see page E19.
To close the small window, press the PIP button
(remote control) again.
Note:
- With the PICTURE IN PICTURE menu, you can
do the following:
- Open/close the PIP window.
- Set the size/position of the PIP window. (See
page E25.)
- Set the video and audio sources of the PIP
window. (See right column.)
Page 23

E21
EnglishDeutschFrançaisItalianoEspañolEnglish
You can listen to TV or another audio source while
the monitor is displaying the computer screen.
MAIN
POWER
CH
MENU
INPUT
PC AV2AV1TV
BRIGHT
MODE
BRIGHT
CH
POWER
SLEEP MENU
DISPLAY
FREEZE
/HOLD
SOUND
SUBPAGE SUBTITLE
VIEW MODE
TEXT
REVEAL
PIP
OK
/BRIGHT
OK
/
BRIGHT
MODE
1.Display the MENU screen using the MENU
button in PC mode.
2.Select “MODE SELECT” using the MENU button
(monitor) or the
buttons (remote control),
and press the OK/BRIGHT MODE button
(monitor) or the OK button (remote control).
3.Select “SOUND” using the MENU button
(monitor) or the buttons (remote control),
and press the OK/BRIGHT MODE button
(monitor) or the OK button (remote control).
4.Select the audio you want to hear using the
buttons (monitor) or the buttons (remote
control).
5.Exit the screen using the INPUT button (monitor)
or the MENU button (remote control).
Notes:
- To switch the channel for TV audio, press the
buttons or the channel buttons (remote
control), or use the programme table. (See page
E34.)
- To switch the audio reception mode for TV audio,
press the SOUND button (remote control). (See
page E35.)
- This setting is disabled while a PIP window is
displayed. The audio source (PIP SOUND) set in
the PICTURE IN PICTURE menu takes
precedence.
- When “STATUS” in the CHILD LOCK menu is
“ALL” or “INDIVIDUAL” (see page E40), TV/AV-IN
SOUND is not available in PC mode.
Listening to TV or another audio source while
viewing the computer screen
Page 24

E22
Adjusting the display
You can adjust the colour of the computer screen
image and make picture-in-picture settings using
menus for the PC mode.
Adjustment Pattern
If you are using Windows, you can use the
Adjustment Pattern on the accompanying
CD-ROM.
This explanation is for Windows 95/98/2000/Me/
XP, and assumes that the CD-ROM drive is “D”
drive.
1.Load the accessory CD-ROM into the CD-ROM
drive of the computer.
2.Open [My Computer] and select CD-ROM.
If using Windows 3.1, open [File Manager] and
choose “D” drive.
3.Double click on [Adj_uty.exe] to run the
Adjustment Programme.
The Adjustment Pattern will appear.
Adjustment Pattern
After completing the adjustments, press the
computer’s [Esc] key to exit the Adjustment
Programme.
Note:
- If your computer’s display mode is set to 65K
colours, you may see the different colour levels
in each colour pattern or the gray scale may look
coloured. (This is due to the specification of the
input signal and is not a malfunction.)
How to adjust
The following procedure describes the basic
operation method. See pages E23 through E25
regarding individual items.
1.Select the PC mode using the INPUT button
(monitor) or the PC button (remote control).
2.Display the MENU screen using the MENU
button.
MENU
<PC>
ADJUSTMENT
>>
GAIN CONTROL
>>
COLOUR CONTROL
>>
MODE SELECT
>>
PICTURE IN PICTURE
>>
3.Select the menu you want to set using the
MENU button (monitor) or the buttons
(remote control), and press the
OK/BRIGHT MODE button (monitor) or the
OK button (remote control).
4.Select the item you want to set using the MENU
button (monitor) or the
buttons (remote
control), and press the OK/BRIGHT MODE
button (monitor) or the OK button (remote
control).
5.Change the numbers/values using the
buttons (monitor) or the buttons
(remote control).
You can continue to set other items.
Do the following to return to the previous
screen:
(1) Select “RETURN” using the MENU button
(monitor) or the buttons (remote control).
(2) Press the OK/BRIGHT MODE button
(monitor) or the OK button (remote control).
6.Exit the screen using the INPUT button
(monitor) or the MENU button (remote control).
Notes:
- If you do not press any buttons for about 30
seconds while in a menu screen, the settings
you made up to that point will be applied and
the screen will automatically disappear.
- This manual describes display adjustment
based on the use of the Adjustment Pattern (for
Windows).
Page 25

E23
EnglishDeutschFrançaisItalianoEspañolEnglish
Item
AUTO
CLOCK
PHASE
H-POS, V-POS
RESET
Description
Automatically adjusts “CLOCK”, “PHASE”, “H-POS”, and “V-POS”.
(See page E17.)
Adjusts the clock so that no vertical flicker noise is emitted.
Makes an adjustment after “CLOCK” is properly adjusted so that no
horizontal flicker noise is emitted.
Adjusts the position of the Adjustment Pattern so that it appears centred
on screen.
Resets adjustment values for this menu to their original factory settings.
Adjusting the display
ADJUSTMENT menu
Horizontal flicker noise
Adjustment
Pattern
Screen frame
Vertical flicker noise
Page 26

E24
Adjusting the display
Item
AUTO
BLACK LEVEL
CONTRAST
RESET
Notes about auto adjustment:
- If you are not using the Adjustment Pattern, it is necessary to have black area and white area of at
least 5 mm x 5 mm on the screen. Adjustment may not be possible without those areas.
- If the signal coming from the computer is Composite Sync or Sync on Green, automatic adjustment
may not be possible. Please perform manual adjustment instead.
- If “OUT OF ADJUST” is displayed, perform manual adjustment.
COLOUR CONTROL menu
Item
COLOUR MODE
WHITE BALANCE
RESET
Note:
- “WHITE BALANCE” will be automatically set to “STD” when “COLOUR MODE” is set to “sRGB” or
“VIVID”.
GAIN CONTROL menu
Description
Automatically adjusts “BLACK LEVEL” and “CONTRAST” based on
the
brightest and darkest colours of the image displayed.
Adjusts screen brightness while you watch the colour pattern.
Adjusts contrast so that all gradations appear while you watch the colour
pattern.
Resets adjustment values for this menu to their original factory settings.
Colour pattern
Description
Selects the colour tone.
- STD
...........
Displays images using the original colour tone of the LCD
monitor.
- sRGB
........
sRGB is an international standard for colour representation
defined by the IEC (International Electrotechnical
Commission). Colours are converted by taking into account
the liquid crystal’s characteristics and thereby represent
colour tone close to the original image.
- VIVID
........
Displays images in vivid primary colours.
Adjusts the colour temperature.
Set “WHITE BALANCE” to “STD” if you want to display all gradations.
- COOL2
.....
Colour tone bluer than standard.
- COOL1
.....
Colour tone slightly bluer than standard.
- STD
...........
Standard setting for colour tone.
- WARM1
....
Colour tone slightly redder than standard.
- WARM2
....
Colour tone redder than standard.
- USER
........
Allows you to individually adjust red, green, and blue
contrast.
Resets adjustment values for this menu to their original factory settings.
Page 27

E25
EnglishDeutschFrançaisItalianoEspañolEnglish
MODE SELECT menu
Item
VIEW MODE
768 LINES
SOUND
SCALING
LANGUAGE
RESET
PICTURE IN PICTURE menu
Item
PIP DISPLAY
PIP SIZE
PIP POSITION
PIP INPUT
PIP SOUND
RESET
Adjusting the display
Description
Selects the screen size.
- NORMAL
.........
Expands the image to or near its aspect ratio.
- WIDE
...............
Expands the image so that it fills the screen.
You can also set this item using the remote control. (See page E47.)
Specifies the horizontal resolution of a 768-line screen.
- 1024
................
1024 x 768 dot mode
- 1280
................
1280 x 768 dot mode
Selects the audio to listen to while displaying the computer screen.
When displaying a PIP window, the audio set by “PIP SOUND” takes
precedence.
When “STATUS” in the CHILD LOCK menu is “ALL” or “INDIVIDUAL” (see
page E40), TV/AV-IN SOUND is not available in PC mode.
Adjusts the image to optimum sharpness when it is enlarged.
Selects the language (English, German, Spanish, French or Italian) on the
screen. (See page E19.)
Resets adjustment values for this menu to their original factory settings.
Description
Sets whether to display TV or other video source in a small window (PIP
window) on the computer screen.
You can also set this item using the remote control. (See page E20.)
Adjusts the size of the PIP window.
Adjust the position of the PIP window.
To move up and down, use the
buttons (monitor) or buttons
(remote control).
To move left and right, use the
buttons (monitor) or buttons
(remote control).
Selects the source of the PIP window. (See page E20.)
Selects the audio you want to hear while displaying the PIP window.
- PC
....................
Computer audio
- PIP
...................
PIP window audio
(See page E20.)
Resets adjustment values for this menu to their original factory settings.
Page 28

E26
Installing set-up information and the ICC profile (For Windows)
Depending on the type of computer or OS, you
may need to install the monitor set-up information
on your system. If so, follow the steps below to
install the monitor set-up information. (Depending
on the type of computer or OS, command names
and methods may differ. Please follow the
computer’s own operation manual while reading
this.)
About the ICC profile
An ICC (International Color Consortium) profile is
a file that describes the colour reproduction
characteristics of the LCD monitor. Using an
application compatible with an ICC profile, highly
accurate colour reproduction can be realized.
- Windows 98/2000/Me/XP all use the ICC profile.
- When installing Windows 98/2000/Me/XP set-up
information (described below), the ICC profile is
also installed. If you would like to install the ICC
profile only, please refer to Installing the ICC
profile on page E28.
- When using the ICC profile, set “COLOUR
MODE” and “WHITE BALANCE” to “STD”.
For Windows 95
Installing monitor set-up information into
Windows 95.
This explanation assumes that the CD-ROM drive
is “D” drive.
1. Load the accessory CD-ROM into the CD-ROM
drive of the computer.
2. Click on the [Start] button. From [Settings],
choose [Control Panel].
3. Double click on [Display].
4. Click on [Settings], [Advanced Properties], and
[Monitor], then [Change].
5. Click on [Have disk], confirm that [Copy
manufacturer’s files from:] is [D:] then click [OK].
6. Confirm that the monitor details are selected,
and click [OK].
7. Check that the monitor details are displayed,
then click [Apply].
8. Click [OK], and close the window.
For Windows 98
Installing monitor set-up information into
Windows 98, and setting the monitor’s ICC profile
as a predetermined value.
This explanation assumes that the CD-ROM drive
is “D” drive.
If the “Add New Hardware Wizard” has appeared:
1. Load the accessory CD-ROM into the CD-ROM
drive of the computer.
2. Click [Next].
3. Check [Display a list of all the drivers in a
specific location, so you can select the driver
you want.], then click [Next].
4. When [Models] is displayed, click on [Have
disk], confirm that [Copy manufacturer’s files
from:] is [D:], and click [OK].
5. Confirm that the monitor details are selected,
then click [Next], [Next], and [Finish]. If the “Add
New Hardware Wizard” appears, repeat the
installation commands beginning from 2
above.
If the “Add New Hardware Wizard” has not
appeared:
1. Load the accessory CD-ROM into the CD-ROM
drive of the computer.
2. Click on the [Start] button. From [Settings],
choose [Control Panel].
3. Double click on [Display].
4. Click on [Settings], [Advanced] and [Monitor].
5. In [Options], check [Automatically detect Plug &
Play monitors] and click on [Change].
6. Click [Next].
7. Click on [Display a list of all the drivers in a
specific location, so you can select the driver
you want.], then click [Next].
8. When [Models] is displayed, click on [Have
disk], confirm that [Copy manufacturer’s files
from:] is [D:], and click [OK].
9. Confirm that the monitor details are selected,
then click [Next], [Next], and [Finish].
10. Check that the monitor details are displayed,
then click [Apply].
11. Click [OK], and close the window.
Page 29

E27
EnglishDeutschFrançaisItalianoEspañolEnglish
For Windows 2000
Installing monitor set-up information into
Windows 2000, and setting the monitor’s ICC
profile as a predetermined value.
This explanation assumes that the CD-ROM drive
is “D” drive.
1. Load the accessory CD-ROM into the CD-ROM
drive of the computer.
2. Click on the [Start] button. From [Settings],
choose [Control Panel].
3. Double click on [Display].
4. Click on [Settings], [Advanced] and [Monitor].
5. Click on [Properties], [Driver] and [Update
Driver].
6. When [Upgrade Device Driver Wizard]
appears, click [Next].
7. Check [Display a list of the known drivers for
this device so that I can choose a specific
driver] and click [Next].
8. When [Models] is displayed, click on [Have
disk], confirm that [Copy manufacturer’s files
from:] is [D:], and click [OK].
9. Select the monitor from the list displayed and
click [Next].
10. Click [Next], confirm that the monitor’s name
appears on the screen, and click [Finish]. If
[The Digital Signature Not Found] appears,
click [Yes].
11. Click on [Close].
12. Click [OK], and close the window.
Installing set-up information and the ICC profile (For Windows)
For Windows Me
Installing monitor set-up information into Windows
Me, and setting the monitor’s ICC profile as a
predetermined value.
This explanation assumes that the CD-ROM drive
is “D” drive.
If the “Add New Hardware Wizard” has appeared:
1. Load the accessory CD-ROM into the CD-ROM
drive of the computer.
2. Check [Specify the location of the driver
[Advanced]] and click [Next].
3. Check [Display a list of all the drivers in a
specific location, so you can select the driver
you want.], then click [Next].
4. When [Models] is displayed, click on [Have
disk], confirm that [Copy manufacturer’s files
from:] is [D:], and click [OK].
5. Select the monitor details from the list, then
click [Next], [Next], and [Finish]. If the “Add New
Hardware Wizard” appears, repeat the
installation commands beginning from 2 above.
If the “Add New Hardware Wizard” has not
appeared:
1. Load the accessory CD-ROM into the CD-ROM
drive of the computer.
2. Click on the [Start] button. From [Settings],
choose [Control Panel].
3. Double click on [Display].
4. Click on [Settings], [Advanced] and [Monitor].
5. In [Options], check [Automatically detect Plug &
Play monitors] and click on [Change].
6. Check [Specify the location of the driver
[Advanced]] and click [Next].
7. Check [Display a list of all the drivers in a
specific location, so you can select the driver
you want.] and click [Next].
8. When [Models] is displayed, click on [Have
disk], confirm that [Copy manufacturer’s files
from:] is [D:], and click [OK].
9. Select the monitor details, then click [Next],
[Next], and [Finish].
10. Check that the monitor details are displayed,
then click [Apply].
11. Click [OK], and close the window.
Page 30

E28
For Windows XP
Installing monitor set-up information into Windows
XP, and setting the monitor’s ICC profile as a
predetermined value.
This explanation assumes that the CD-ROM drive
is “D” drive.
1. Load the accessory CD-ROM into the CD-ROM
drive of the computer.
2. Click on the [Start] button. Choose [Control
Panel].
3. Switch to “Classic View”.
4. Double click on [Display].
5. Click on [Settings], [Advanced] and [Monitor].
6. Click on [Properties], [Driver] and [Update
Driver].
7. When [Hardware Update Wizard] appears,
check [Install from a list or specific location
[Advanced]] and click [Next].
8. Check [Don’t search. I will choose the driver to
install.] and click [Next].
9. Click on [Have Disk], confirm that [Copy
manufacturer’s files from:] is [D:], and click [OK].
10. Select the monitor from the list displayed and
click [Next].
If [has not passed Windows Logo testing...]
appears, click [Continue Anyway].
11. Confirm that the monitor’s name appears on
the screen.
12. Click on [Finish].
13. Click on [Close].
14. Click [OK], and close the window.
Installing the ICC profile
Installing the monitor’s ICC profile. (If the set-up
information has already been installed, so too has
the profile, and there is no need to install it.)
This explanation assumes that the CD-ROM drive
is “D” drive.
1. Load the accessory CD-ROM into the CD-ROM
drive of the computer.
2. Click on the [Start] button. From [Settings],
choose [Control Panel].
3. Double click on [Display].
4. Click on [Settings] and [Advanced].
5. Click on [General] and from [Compatibility]
select [Apply the new display setting without
restarting], then click on [Color Management].
6. Click [Add], and select CD-ROM as the file
location.
7. Choose the colour profile that you would like to
install, and click on [Add].
8. Choose the profile and click on [Set As
Default].
9. Click [OK], and close the window.
- When using the ICC profile, set “COLOUR
MODE” and “WHITE BALANCE” to “STD”.
Installing set-up information and the ICC profile (For Windows)
Page 31

E29
EnglishDeutschFrançaisItalianoEspañolEnglish
Information about the ColorSync profile (For MacOS)
About the ColorSync profile
ColorSync is Apple Computer’s colour
management system and enables colour
reproduction characteristics to be realized when
used with a compatible application. A ColorSync
profile describes the colour characteristics of the
LCD monitor.
Notes:
- This monitor’s ColorSync profile works with
MacOS 8.5 or above.
- When using the ColorSync profile, set “COLOUR
MODE” and “WHITE BALANCE” to “STD”.
Setting up the ColorSync profile
Notes:
- It is necessary to have PC Exchange or File
Exchange installed in your system.
- Depending on the type of computer or OS,
command names and methods may differ.
Please follow the computer’s own operation
manual while reading this.
1.Load the accessory CD-ROM into the CD-ROM
drive of the computer.
2.Copy the profile to be used from the CD-ROM to
the ColorSync profile folder in the system folder.
3.Using the ColorSync on the control panel,
choose the profile to be used.
Page 32

E30
Saving broadcast TV channels in the
memory (AUTOMATIC SEARCH)
“AUTOMATIC SEARCH” allows you to search
through available channels in your area.
The tuner saves them to TV memory automatically.
Notes:
- Release the adjustment lock (see page E48)
and cancel Child Lock (see page E41) if they
have been set.
- Up to 100 channels (0-99) can be stored in TV
memory.
MAIN
POWER
CH
MENU
INPUT
PC AV2AV1TV
BRIGHT
MODE
BRIGHT
CH
POWER
SLEEP MENU
DISPLAY
FREEZE
/HOLD
SOUND
SUBPAGE SUBTITLE
VIEW MODE
TEXT
REVEAL
PIP
OK
/BRIGHT
OK
/
BRIGHT
MODE
1.Turn on the monitor power.
2.Select the TV mode using the INPUT button
(monitor) or the TV button (remote control).
3.Display the MENU screen using the MENU
button.
MENU
<
TV/AV
>
PICTURE
>>
PROGRAMMES
>>
AV CONNECTIONS
>>
MODE SELECT
>>
CHILD LOCK
>>
4.Select “PROGRAMMES” using the MENU button
(monitor) or the buttons (remote control),
and press the OK/BRIGHT MODE button
(monitor) or the OK button (remote control).
PROGRAMMES < TV/AV >
RETURN
AUTOMATIC SEARCH
>>
MANUAL ADJUSTMENT
>>
SORT
>>
ERASE PROGRAMME RANGE
>>
ENTER/CHANGE NAME
>>
5.Select “AUTOMATIC SEARCH” using the MENU
button (monitor) or the buttons (remote
control), and press the OK/BRIGHT MODE button
(monitor) or the OK button (remote control).
AUTOMATIC SEARCH
<
TV/AV
>
RETURN
COUNTRY
[
UK
]
COLOUR SYSTEM
[
PAL
]
SOUND SYSTEM
[
I
]
STORE PROGR. FROM
>>
START SEARCH
6.Select the desired adjustment item using the
MENU button (monitor) or the buttons
(remote control), and press the OK/BRIGHT
MODE button (monitor) or the OK button (remote
control).
Then select the desired item using the
buttons (monitor) or the buttons (remote
control).
Note:
- Select your country from the following: UK,
Germany, France, Italy or “OTHERS”. When
“OTHERS” is selected, you can change
“COLOUR SYSTEM” and “SOUND SYSTEM”.
7.Select “STORE PROGR. FROM” using the MENU
button (monitor) or the buttons (remote
control), and press the OK/BRIGHT MODE button
(monitor) or the OK button (remote control).
8.Select the programme position from which the
programmes are to be stored using the
buttons (monitor) or the buttons (remote
control), and press the OK/BRIGHT MODE button
(monitor) or the OK button (remote control).
9.Select “START SEARCH” using the MENU
button (monitor) or the buttons (remote
control), and press the OK/BRIGHT MODE button
(monitor) or the OK button (remote control).
When the search is completed, the new
programmes found are displayed on the list.
Notes:
- To interrupt the automatic search or to exit the
list, press the INPUT button (monitor) or the
MENU button (remote control).
- The programmes are named automatically
when an identification signal is sent. Or, they
are named automatically from the table
registered in the monitor memory.
- Programmes whose names could not be found
are displayed with “-----”. Names can be
entered manually later. (See page E33.)
Setting TV channels
Page 33

E31
EnglishDeutschFrançaisItalianoEspañolEnglish
Setting TV channels
Adjusting the individual settings of
programmes
(MANUAL ADJUSTMENT)
Using “MANUAL ADJUSTMENT”, you can adjust
the individual settings of programmes.
Note:
- Release the adjustment lock (see page E48)
and cancel Child Lock (see page E41) if they
have been set.
MAIN
POWER
CH
MENU
INPUT
PC AV2AV1TV
BRIGHT
MODE
BRIGHT
CH
POWER
SLEEP MENU
DISPLAY
FREEZE
/HOLD
SOUND
SUBPAGE SUBTITLE
VIEW MODE
TEXT
REVEAL
PIP
OK
/BRIGHT
OK
/
BRIGHT
MODE
1.Display the “PROGRAMMES” screen by
performing steps 1 to 4 of “Saving broadcast TV
channels in the memory (AUTOMATIC
SEARCH)” on page E30.
2.Select “MANUAL ADJUSTMENT” using the
MENU button (monitor) or the buttons
(remote control), and press the
OK/BRIGHT MODE button (monitor) or the OK
button (remote control).
MANUAL ADJUSTMENT
<
TV/AV
>
RETURN
CHANNEL
[
1
]
FREQUENCY
[
048.25MHz
]
NAME
[
E02
]
COLOUR SYSTEM
[
PAL
]
SOUND SYSTEM
[
I
]
SKIP
[
OFF
]
3.Select the desired adjustment item using the
MENU button (monitor) or the buttons
(remote control), and press the
OK/BRIGHT MODE button (monitor) or the OK
button (remote control).
Then make the adjustment using the buttons
(monitor) or the
buttons (remote control).
(See the table below for details.)
Notes:
- You can also use the channel buttons (0-9) on
the remote control to enter the frequency.
- To adjust “NAME”, first press the
OK/BRIGHT MODE button (monitor) or the OK
button (remote control) to activate the text
input mode. Then select the input position
using the
buttons (monitor) or the
buttons (remote control), and select the
desired character using the
buttons
(monitor) or the buttons (remote control).
When you finish, press the OK/BRIGHT MODE
button (monitor) or the OK button (remote
control).
4.Exit the screen using the INPUT button (monitor)
or the MENU button (remote control).
Note:
- Depending on the settings in the colour system
of the channels, switching between channels
may be slow. If you want to speed up channel
switching, switch “AUTO” in “COLOUR SYSTEM”
to the current reception system (“PAL” or
“SECAM”).
Item
CHANNEL
FREQUENCY
NAME
COLOUR SYSTEM
SOUND SYSTEM
SKIP
Choice/Value range
0-99
45.75-863.25 (MHz)
A-Z, 0-9, +, –, . , /, !, space
AUTO, PAL, SECAM
B/G, I, D/K, L
ON
OFF
Description
The channel changes to the higher or lower channel.
Receivable frequencies depending on TV norm,
installation site, and range.
Programme name (up to five characters).
Colour norm.
TV norm.
Channels with SKIP set to “ON” will be skipped when
you press the
buttons during TV viewing.
Page 34

E32
Setting TV channels
Changing the programme positions
(SORT)
The programme positions for individual
programmes can be freely changed.
1.Display the “PROGRAMMES” screen by
performing steps 1 to 4 of “Saving broadcast TV
channels in the memory (AUTOMATIC
SEARCH)” on page E30.
2.Select “SORT” using the MENU button (monitor)
or the buttons (remote control), and press
the OK/BRIGHT MODE button (monitor) or the
OK button (remote control).
SORT
<
TV/AV
>
00 05 10 15
01 E02 06 11 16
02 E03 07 12 17
03 E04 08 13 18
04 09 14 19
3.Select the desired programme using the
buttons (monitor) or the buttons
(remote control), and press the
OK/BRIGHT MODE button (monitor) or the OK
button (remote control).
Move mode will be activated.
4.Select the desired position using the
buttons (monitor) or the buttons (remote
control) and press the OK/BRIGHT MODE button
(monitor) or the OK button (remote control).
The selected programme will be moved to the
selected position.
Note:
- When moving the programme, the buttons
(monitor) or the
buttons (remote control)
are not available.
5.Exit the screen using the INPUT button (monitor)
or the MENU button (remote control).
Erasing the programme range
The individual programme or programmes in a
consecutive range can be erased.
1.Display the “PROGRAMMES” screen by
performing steps 1 to 4 of “Saving broadcast TV
channels in the memory (AUTOMATIC
SEARCH)” on page E30.
2.Select “ERASE PROGRAMME RANGE” using
the MENU button (monitor) or the buttons
(remote control), and press the
OK/BRIGHT MODE button (monitor) or the OK
button (remote control).
ERASE PROGRAMME RANGE
<
TV/AV
>
00 05 10 15
01 E02 06 11 16
02 E03 07 12 17
03 E04 08 13 18
04 09 14 19
3.Select the programme at the beginning of the
desired range to be erased using the
buttons (monitor) or the buttons (remote
control), and press the OK/BRIGHT MODE
button (monitor) or the OK button (remote
control).
4.Select the programme at the end of the range
using the buttons (monitor) or the
buttons (remote control).
When you want to select a single programme,
skip this step.
5.Press the OK/BRIGHT MODE button (monitor) or
the OK button (remote control) to erase the
selected programme(s).
All subsequent programmes move up.
6.Exit the screen using the INPUT button (monitor)
or the MENU button (remote control).
Page 35

E33
EnglishDeutschFrançaisItalianoEspañolEnglish
Setting TV channels
Enter/change the name of an
individual programme
The name of an individual programme can be
entered or changed.
1.Display the “PROGRAMMES” screen by
performing steps 1 to 4 of “Saving broadcast TV
channels in the memory (AUTOMATIC
SEARCH)” on page E30.
2.Select “ENTER/CHANGE NAME” using the
MENU button (monitor) or the buttons
(remote control), and press the
OK/BRIGHT MODE button (monitor) or the OK
button (remote control).
ENTER/CHANGE NAME
<
TV/AV
>
00 05 10 15
01 E02 06 11 16
02 E03 07 12 17
03 E04 08 13 18
04 09 14 19
3.Select the desired programme using the
buttons (monitor) or the buttons
(remote control), and press the
OK/BRIGHT MODE button (monitor) or the
OK button (remote control).
The character at the input position is
highlighted.
4.Select the input position using the buttons
(monitor) or the
buttons (remote control),
and select the desired character using the
buttons (monitor) or the buttons (remote
control).
5.Press the OK/BRIGHT MODE button (monitor) or
the OK button (remote control) to accept the
name entered.
6.Exit the screen using the INPUT button (monitor)
or the MENU button (remote control).
Page 36

E34
Watching TV
Selecting the channels
This monitor allows you to select up to 100
channels (0-99).
MAIN
POWER
CH
MENU
INPUT
PC AV2AV1TV
BRIGHT
MODE
BRIGHT
CH
POWER
SLEEP MENU
DISPLAY
FREEZE
/HOLD
SOUND
SUBPAGE SUBTITLE
VIEW MODE
TEXT
REVEAL
PIP
OK
/BRIGHT
OK
/
BRIGHT
MODE
Using the channel buttons (remote control)
To select a 1-digit channel number (e.g., Channel 5):
Select the channel number using one of the
following procedures.
- Press the 5 button and wait for approximately
3 seconds.
- Press the 0 button followed by the 5 button
within 3 seconds.
To select a 2-digit channel number (e.g., Channel 12):
Press the 1 button followed by the 2 button within
3 seconds.
Using the buttons (monitor/remote control)
- Press the
button and the channel changes in
the order shown below:
1 → 2 … → 98 → 99 → 0 → 1 → 2 → …
- Press the
button and the channel changes in
the order shown below:
2 → 1 → 0 → 99 → 98 … → 2 → 1 → 0 → …
Notes:
- Pressing one of the above buttons or using the
programme table (see right column)
automatically switches to TV mode if the monitor
is in PC or AV mode.
- Use the INPUT button (monitor) or the TV button
(remote control) to switch the display mode to TV
in the following cases when in PC mode.
- When you are watching TV in the PIP window
(see page E20).
- When you are listening to TV (see page E21).
- Channels set to be skipped cannot be displayed
using the
buttons. (See page E31.)
- Channel “0” is reserved for RF output from a
VCR.
Selecting the channels using the
programme table
The programme table shows a list of programmes
in TV memory. They are located in channels 0 to
99. The currently selected programme is displayed
in yellow and child-locked programmes which
have not been cancelled are displayed in red.
1.Select the TV mode using the INPUT button
(monitor) or the TV button (remote control).
2.Press the OK button (remote control).
The programme table will be displayed.
Note:
- While the Teletext screen or the menu screen
is being displayed, you can not display the
programme table by pressing the OK button
(remote control).
PROGRAMME TABLE
<
TV/AV
>
00 05 10 15
01 E02 06 11 16
02 E03 07 12 17
03 E04 08 13 18
04 09 14 19
3.Select the desired programme using the
buttons (remote control).
To display the previous or next list of the
programme table:
- Press the
buttons (remote control) when
the cursor is at a programme in the upper-left
or low-right position.
- Press the
buttons (remote control) when
the cursor is at a programme in the left or right
column.
4.Display the selected programme using the OK
button (remote control).
Page 37

E35
EnglishDeutschFrançaisItalianoEspañolEnglish
Watching TV
Selecting the audio reception mode
You can select the audio reception mode (stereo,
bilingual or monaural) when you receive NICAM
broadcasts and A2 stereo broadcasts as follows:
NICAM NICAM-B/G, I, D/K, L signal
A2 stereo A2 stereo-B/G signal
PC AV2AV1TV
BRIGHT
MODE
BRIGHT
CH
POWER
SLEEP MENU
DISPLAY
FREEZE
/HOLD
SOUND
SUBPAGE SUBTITLE
VIEW MODE
TEXT
REVEAL
PIP
OK
1. Press the SOUND button on the remote control.
The audio reception mode changes in the
following order depending on the broadcast you
are receiving.
NICAM broadcasts
Receiving a stereo broadcast
STEREO → MONO → STEREO ...
Receiving a bilingual broadcast
CH A → CH B → CH AB → MONO → CH A ...
Receiving a monaural broadcast
NICAM → MONO → NICAM ...
A2 stereo broadcasts
Receiving a stereo broadcast
STEREO → MONO → STEREO...
Receiving a bilingual broadcast
CH A → CH B → CH AB → CH A...
Receiving a monaural broadcast
MONO (fastened)
Page 38

E36
Watching Teletext
Teletext is an information service organized like a
magazine, which is provided by some TV stations
in addition to regular television broadcasting. Your
monitor receives Teletext signals broadcast by a
TV station, processes the information and displays
it graphically on the screen. News, weather and
sports information, stock exchange prices,
programme reviews and closed captioning
(subtitle) are among the many services available
through Teletext.
Notes:
- Operation in Teletext mode is described along
with the remote control in this manual.
- Teletext is available only in TV/AV mode, not in
PC mode (including when watching TV in PIP
window).
Watching TV
Turning on and off the Teletext mode
PC AV2AV1TV
BRIGHT
MODE
BRIGHT
CH
POWER
SLEEP MENU
DISPLAY
FREEZE
/HOLD
SOUND
SUBPAGE SUBTITLE
VIEW MODE
TEXT
REVEAL
PIP
OK
1.Select a TV channel that is broadcasting the
Teletext programme.
2.Press the TEXT button.
The Teletext screen will be displayed.
3.Press the TEXT button again to turn off the
Teletext mode.
Notes:
- If necessary, you can change the character set
displayed on the Teletext screen. (See page
E38.)
- The Teletext mode cannot be turned off or
switched to other display modes with the input
buttons.
Page 39

E37
EnglishDeutschFrançaisItalianoEspañolEnglish
Watching TV
Returning to the page selected previously
Press the
(flashback) button.
Note:
- The Teletext flashback memory is cleared when
channels are changed after Teletext mode is
switched to TV mode.
Selecting the TOP table
When TOP Teletext is being broadcast, you can
display the TOP table by pressing the OK button.
Select the desired subject in the table as follows:
- To move upwards, press the Red button.
- To move downwards, press the Cyan button.
- To select the highlighted item, press the Green
button.
Note:
- The TOP (Table of Pages) system for Teletext is
transmitted in Germany currently.
Selecting the Teletext index
When FLOF Teletext is being broadcast, you can
display the index page (usually p.100) by pressing
the OK button.
Note:
- The FLOF (Full Level One Features) system for
Teletext is transmitted in UK currently.
Selecting a Teletext page
PC AV2AV1TV
BRIGHT
MODE
BRIGHT
CH
POWER
SLEEP MENU
DISPLAY
FREEZE
/HOLD
SOUND
SUBPAGE SUBTITLE
VIEW MODE
TEXT
REVEAL
PIP
OK
Using the buttons
- To select the next page, press the button.
- To select the previous page, press the button.
Using the channel buttons
Enter the desired page number (100-899) using
the channel buttons (0-9).
Notes:
- Page numbers beginning with 0 or 9 do not
exist.
- If you enter the wrong numbers, simply complete
the input of the 3-digit number and then enter
the desired number again.
Using the colour buttons
Select the desired subject using the colour buttons
(Red/Green/Yellow/Cyan) corresponding to the
coloured options at the bottom of Teletext screen.
The configuration of the coloured options varies
depending on the Teletext system.
Page 40

E38
Watching TV
Selecting the subpages
When a selected Teletext page consists of several
subpages, the desired subpages can be selected
as follows:
1.Press the SUBPAGE button.
“S****” is displayed in the left side of the header.
2.Enter a 4-digit number using the channel
buttons (0-9) while this message is being
displayed.
The selected subpage is displayed.
Selecting the character set
1.Display the “CHARACTER SET” screen using
the MENU button.
CHARACTER SET
PAN EUROPE
FRENCH/ARABIC
TURKISH/GREEK
CYRILLIC
2.Select the desired character set using the
buttons.
The colour of the letters will turn to yellow. When
selecting the character set, pressing the OK
button will change the letters to red for an instant
and then return them back to yellow.
3.Exit the screen using the MENU button.
Useful features for Teletext
To hold the current Teletext page
Press the FREEZE/HOLD button.
You can stop updating the Teletext page.
To cancel, press the FREEZE/HOLD button again.
To zoom the current Teletext page
Press the
buttons.
Each time the button is pressed, the current page
is displayed as below.
ABC
DEF
ABC DEF
To quickly activate subtitles
Press the SUBTITLE button in TV/AV mode.
Subtitles activate quickly.
To cancel, press the TEXT button.
Note:
- You do not have to turn on the Teletext mode
before pressing the SUBTITLE button.
To display the hidden information
Press the REVEAL button.
You can display the hidden information such as
solutions to riddles and puzzles.
To cancel, press the REVEAL button again.
Page 41

E39
EnglishDeutschFrançaisItalianoEspañolEnglish
Watching TV
Using the Child Lock function
Important:
- Please refer to the end of this manual for
“Disengaging Child Lock”.
The Child Lock function blocks the viewing of any
channel for which Child Lock has been set,
including the PIP window. When all programmes
are locked, viewing video images in AV mode is
also blocked.
To use the Child Lock function, you first need to
define your PIN (Personal Identification Number).
Defining a PIN
MAIN
POWER
CH
MENU
INPUT
PC AV2AV1TV
BRIGHT
MODE
BRIGHT
CH
POWER
SLEEP MENU
DISPLAY
FREEZE
/HOLD
SOUND
SUBPAGE SUBTITLE
VIEW MODE
TEXT
REVEAL
PIP
OK
/BRIGHT
OK
/
BRIGHT
MODE
1.Select the TV mode using the INPUT button
(monitor) or the TV button (remote control).
2.Display the MENU screen using the MENU
button (remote control).
3.Select “CHILD LOCK” using the buttons
(remote control), and press the OK button
(remote control).
The “PLEASE ENTER YOUR PIN” screen will be
displayed.
4.Input the desired 4-digit PIN (e.g. 1234) using
the channel buttons (0-9) on the remote control.
Notes:
- Be sure to make a written note of your PIN.
- When you input the PIN for the first time, press
the OK button (remote control) to register it.
The “CHILD LOCK” screen will be displayed.
CHILD LOCK
<
TV/AV
>
RETURN
STATUS
[
OFF
]
INDIVIDUAL PROGRAMME
>>
RESET
5.Perform the next procedures or exit the screen
using the MENU button (remote control).
Page 42

E40
Watching TV
Setting Child Lock
Notes:
- To activate the Child Lock function, turn off the
monitor and then turn it on again after finishing
the settings.
- When “STATUS” in the CHILD LOCK menu is
“ALL” or “INDIVIDUAL”, TV/AV-IN SOUND is not
available in PC mode (see page E21).
To set Child Lock for all programmes
1.Display the “CHILD LOCK” screen by performing
steps 1 to 4 of “Defining a PIN” on page E39.
2.Select “STATUS” using the MENU button
(monitor) or the
buttons (remote control),
and press the OK/BRIGHT MODE button
(monitor) or the OK button (remote control).
3.Select “ALL” using the buttons (monitor) or
the
buttons (remote control).
4.Exit the screen using the INPUT button (monitor)
or the MENU button (remote control).
Note:
- This setting locks AV mode and TV function in all
modes.
To set Child Lock for individual programmes
1.Display the “CHILD LOCK” screen by performing
steps 1 to 4 of “Defining a PIN” on page E39.
2.Select “STATUS” using the MENU button
(monitor) or the
buttons (remote control),
and press the OK/BRIGHT MODE button
(monitor) or the OK button (remote control).
3.Select “INDIVIDUAL” using the
buttons
(monitor) or the
buttons (remote control).
4.Select “INDIVIDUAL PROGRAMME” using the
MENU button (monitor) or the buttons
(remote control), and press the
OK/BRIGHT MODE button (monitor) or the
OK button (remote control).
The “INDIVIDUAL PROGRAMME” screen will be
displayed.
5.Select the desired programme using the
buttons (monitor) or the buttons
(remote control), and press the
OK/BRIGHT MODE button (monitor) or the
OK button (remote control).
The locked programme is displayed in red.
Note:
- To unlock the programme, perform the step 5
again.
6.Exit the screen using the INPUT button (monitor)
or the MENU button (remote control).
Notes:
- Even when Child Lock is activated, unlocked
programmes can be viewed, but the
PROGRAMMES menu cannot be selected on
the TV MENU screen. To adjust the
PROGRAMMES menu, you need to cancel the
Child Lock setting temporarily. (See page E41.)
- When Child Lock is activated individually, if you
try to select the programme and the PIN input
screen appears, you can use the buttons to
find other unlocked programmes.
Page 43

E41
EnglishDeutschFrançaisItalianoEspañolEnglish
Watching TV
Temporarily cancelling the Child Lock
setting
By temporarily cancelling the Child Lock setting,
you can view the programmes for which the Child
Lock has been set.
If you are currently at the PIN input screen, input
your PIN using the channel buttons (0-9) on the
remote control.
When the PIN is correctly entered, the normal
screen is displayed.
If you are not currently at the PIN input screen,
perform steps 1 to 3 of “Defining a PIN” on page
E39, and input your PIN.
Notes:
- When the PIN input screen appears for the
locked programme in the PIP window, closing
the PIP window using the PIP button (remote
control) enables you to operate the monitor in
PC mode.
- When the power is turned off and on after the
Child Lock is cancelled, the Child Lock becomes
effective again.
- Unless the Child Lock is cancelled within
approximately 20 seconds, the monitor goes to
the standby mode.
Page 44

E42
Enjoying DVDs, games, and other equipment
You can enjoy two additional pieces of AV
equipment connected to your monitor such as
VCRs, DVD players, and game systems. (See
pages E12 and E13.)
Equipment connected to AV-IN1:
Display mode “AV1”
Equipment connected to AV-IN2:
Display mode “AV2”
Note:
- Since the use of AV1 and AV2 is the same, this
manual refers to AV1 mode and AV2 mode as
“AV mode”.
MAIN
POWER
CH
MENU
INPUT
PC AV2AV1TV
BRIGHT
MODE
BRIGHT
CH
POWER
SLEEP MENU
DISPLAY
FREEZE
/HOLD
SOUND
SUBPAGE SUBTITLE
VIEW MODE
TEXT
REVEAL
PIP
OK
/BRIGHT
OK
/
BRIGHT
MODE
1.Make adjustments for connections with external
devices on the “AV CONNECTIONS” screen.
(See page E45.)
2.Switch the display mode to AV1 or AV2.
See page E18 for more information.
AV1
RGB
3.Turn on the connected AV equipment, and then
play a tape, DVD, or game.
4.Adjust the volume.
See page E19 for more information.
Notes:
- Sometimes no image will be displayed during
fast searching of video.
- The display may flicker during slow playback of
video depending on the VCR or videotape you
are using.
- You cannot play shooting games that use gun
controllers with this monitor.
Page 45

E43
EnglishDeutschFrançaisItalianoEspañolEnglish
Handy features (for TV/AV mode)
Switching power off after a specified
length of time (SLEEP)
The monitor can automatically switch off (standby)
after a specified length of time. This is handy if you
want to watch the monitor at bedtime.
Perform this operation using the remote control.
1.Press the SLEEP button.
2.Specify in how many minutes you want the
monitor to switch off by pressing the SLEEP
button.
The time changes in the following order each
time you press the button:
30 min → 60 min → 90 min → 120 min →
150 min → --- min → 30 min
When the specified time elapses, the monitor
automatically switches off and clears the SLEEP
timer.
Checking the time remaining on the SLEEP
timer
1.Press the DISPLAY button.
The time remaining on the SLEEP timer will be
displayed for several seconds. You can also
check the time remaining by pressing the SLEEP
button once.
Changing the specified time
1.Press the SLEEP button.
The remaining time will be displayed.
2.Change the specified time by pressing the
SLEEP button several times as needed.
Notes:
- When there are only 5 minutes remaining on the
SLEEP timer, the remaining time will be
displayed every minute.
- Pressing the POWER button while the SLEEP
timer is operating will clear the timer.
- Switching to PC mode automatically clears the
SLEEP timer.
- You can also set the SLEEP timer from the
MODE SELECT menu. (See page E46.)
Pausing the screen (FREEZE)
This feature pauses the image from the TV or other
connected AV equipment. This is handy when you
want to write down a recipe or the address for a
prize contest.
Perform this operation using the remote control.
1.Press the FREEZE/HOLD button.
The images will pause.
Cancelling pausing
1.Press the FREEZE/HOLD button again.
Notes:
- You cannot pause the TV or video image in the
picture-in-picture window.
- Changing channels or switching the display
mode (input) automatically cancels pausing.
Returning to previous channel
(FLASHBACK)
You can return to the previous channel you were
watching.
Perform this procedure with remote control.
1.Press the
button.
The monitor will return to the channel you were
previously watching.
Page 46

E44
Adjusting the display
You can adjust TV and video images and perform
various settings using menus for the TV/AV mode.
- All the menus except for the PROGRAMMES
menu are common for TV and AV modes. All the
values set in TV mode will be also applied in AV
mode.
How to adjust
The following procedure describes the basic
operation method. See pages E45 and E46
regarding individual items.
1.Select the TV mode or AV mode.
See page E18 for more information.
2.Display the MENU screen using the MENU
button.
MENU
<
TV/AV
>
PICTURE
>>
PROGRAMMES
>>
AV CONNECTIONS
>>
MODE SELECT
>>
CHILD LOCK
>>
3.Select the menu you want to set using the MENU
button (monitor) or the buttons (remote
control), and press the OK/BRIGHT MODE
button (monitor) or the OK button (remote
control).
4.Select the item you want to set using the MENU
button (monitor) or the buttons (remote
control), and press the OK/BRIGHT MODE
button (monitor) or the OK button (remote
control).
5.Change the numbers/values using the
buttons (monitor) or the buttons (remote
control).
You can continue to set other items.
Do the following to return to the previous screen:
(1) Select “RETURN” using the MENU button
(monitor) or the buttons (remote control).
(2) Press the OK/BRIGHT MODE button
(monitor) or the OK button (remote control).
6.Exit the screen using the INPUT button (monitor)
or the MENU button (remote control).
Note:
- If you do not press any buttons for about 30
seconds while in a menu screen, the settings
you made up to that point will be applied and the
screen will automatically disappear.
Page 47

E45
EnglishDeutschFrançaisItalianoEspañolEnglish
Adjusting the display
PICTURE menu
Item
CONTRAST
BLACK LEVEL
COLOUR
TINT
SHARPNESS
WHITE BALANCE
RESET
PROGRAMMES menu (TV mode only)
Item
AUTOMATIC SEARCH
MANUAL ADJUSTMENT
SORT
ERASE PROGRAMME
RANGE
ENTER/CHANGE NAME
AV CONNECTIONS menu
Item
AV1 SIGNAL TYPE
AV1 COLOUR SYSTEM
AV1 CONTROL VOLTAGE
AV2 COLOUR SYSTEM
RESET
Notes:
- When a normal picture is not displayed, change the signal type and/or colour system.
- Switching between AV input signals may be slow, depending on the settings in “COLOUR SYSTEM”.
If you want to speed up signal switching, switch “AUTO” in “COLOUR SYSTEM” to the current reception
colour system.
Description
Adjusts contrast.
Adjusts the overall brightness of the screen.
Adjusts the colour depth.
Adjusts the colour tone.
Adjusts the image quality.
Adjusts the colour temperature.
- STD
.................
Standard setting for colour tone.
- WARM
.............
Colour tone redder than standard.
Resets adjustment values for this menu to their original factory settings.
Description
Sets available programmes automatically. (See page E30.)
Adjusts programmes manually. (See page E31.)
Changes the programme positions freely. (See page E32.)
Erases the individual programme or programmes in a consecutive range.
(See page E32.)
Enters or changes the name of an individual programme. (See page E33.)
Description
Selects the signal type of the external equipment connected to AV-IN1.
- AUTO
..............
Original factory setting.
- CVBS
..............
Composite video signal.
- Y/C
..................
S-video signal.
Selects the colour system of the external equipment connected to AV-IN1
:
PAL/SECAM/N358(NTSC 3.58)/N443(NTSC 4.43)/PAL60/PAL-M/PAL-N
.
Sets whether to temporarily output the image and sound of AV-IN1 in TV
mode.
- OFF
.................
Original factory setting.
- ON
..................
Responds to the signal from AV-IN1 in TV mode.
Selects the colour system of the external equipment connected to AV-IN2:
PAL/SECAM/N358(NTSC 3.58)/N443(NTSC 4.43)/PAL60/PAL-M/PAL-N.
Resets adjustment values for this menu to their original factory settings.
Page 48

E46
Adjusting the display
MODE SELECT menu
Item
VIEW MODE
SLEEP TIMER
LANGUAGE
RESET
CHILD LOCK menu
Item
STATUS
INDIVIDUAL PROGRAMME
RESET
Description
Sets unlock or lock for all programmes, or sets an individual programme
lock. (See page E40.)
- OFF
.................
Original factory setting.
- ALL
.................
Locks all TV programmes and video images in AV mode.
- INDIVIDUAL
...
Locks the specified TV programmes only.
When “STATUS” in the CHILD LOCK menu is “ALL” or “INDIVIDUAL”,
TV/AV-IN SOUND is not available in PC mode (see page E21).
Selects the programme to be locked when “INDIVIDUAL” is selected for
“STATUS”. (See page E40.)
Resets adjustment values for this menu to their original factory settings.
However, the PIN you have set is not cleared. Concerning the PIN, refer to
the end of this manual for “Disengaging Child Lock”.
Description
Selects the screen size.
- NORMAL
........
Displays the screen at 4:3.
- WIDE
..............
Displays the screen at 16:9.
- ZOOM1
...........
Enlarges and displays the entire screen, but with a
smaller screen size than “ZOOM2”. Please use this mode
when captions or telops at the top or bottom of the screen
are cut off.
- ZOOM2
...........
Enlarges and displays the entire screen at 4:3.
You can also set this item using the remote control. (See page E47.)
When you select “ZOOM1” or “ZOOM2”, the top and bottom of the screen
will be cut off slightly.
Specifies how many minutes until the monitor switches off (standby).
This can also be set using the remote control. (See page E43.)
Selects the language (English, German, Spanish, French or Italian) on the
screen. (See page E19.)
Resets adjustment values for this menu to their original factory settings.
Page 49

E47
EnglishDeutschFrançaisItalianoEspañolEnglish
Other features
Muting the sound (MUTE)
This feature is handy when you want to mute the
sound such as when the phone rings or someone
comes to the door.
Perform this operation using the remote control.
1.Press the
button.
The sound will be muted and “MUTE” will be
displayed.
“MUTE” will disappear after several seconds.
Cancelling muting
1.Press the
button again, or press any other
buttons.
Changing the screen size
(VIEW MODE)
You can change the screen size to match the video
on videotapes and DVDs.
Perform this operation using the remote control.
1.Press the VIEW MODE button.
The mode switches in the following order each
time you press the button:
[PC mode]
NORMAL → WIDE → NORMAL...
NORMAL: Expands the image to or near its aspect ratio.
WIDE: Expands the image so that it fills the screen.
[TV/AV mode]
NORMAL → WIDE → ZOOM1 → ZOOM2 → NORMAL...
NORMAL: Displays the screen at 4:3.
WIDE: Displays the screen at 16:9.
ZOOM1: Enlarges and displays the entire
screen, but with a smaller screen size
than “ZOOM2”. Please use this mode
when captions or telops at the top or
bottom of the screen are cut off.
ZOOM2:
Enlarges and displays the entire screen at 4:3.
Notes:
- When you select “ZOOM1” or “ZOOM2” in TV/AV
mode, the top and bottom of the screen will be
cut off slightly.
- You can set this item individually for PC mode
and TV/AV mode in the MODE SELECT menu.
(See pages E25 and E46.)
Checking the current channel and
audio reception mode on screen
(DISPLAY)
You can check the current display mode, channel
being received, audio reception mode, and time
remaining on the SLEEP timer.
Perform this operation using the remote control.
1.Press the DISPLAY button.
Various information about the current state will
be displayed.
The information will disappear after several
seconds.
Notes:
- The information displayed will vary depending
on the current display mode and other settings.
- If the broadcast changes in TV mode while the
information is displaying, the broadcast and the
audio reception mode may not match.
Changing BRIGHT MODE
You can lower energy consumption by decreasing
screen brightness.
1.Press the OK/BRIGHT MODE button (monitor) or
the BRIGHT MODE button (remote control).
The mode switches in the following order each
time you press the button:
[PC mode]
DARK (power save) → BRIGHT →
DARK (power save)...
[TV/AV mode]
NORMAL (power save 1) → DARK (power save 2) →
BRIGHT → NORMAL (power save 1)...
Page 50

E48
Preventing changes to adjusted
values (ADJUSTMENT LOCK)
Disabling the control buttons other than the
following buttons (monitor and remote control)
prevents adjusted values from being changed.
The changing of adjusted values for not only PC
mode, but for TV/AV mode as well will be
prevented.
[Monitor]
- MAIN POWER button
- buttons
- INPUT button
- buttons
[Remote control]
- POWER button
- + – buttons
- button
- Input buttons (PC, TV, AV1, and AV2)
- buttons
- Channel buttons (0-9)
- OK button
- TEXT button
- SUBTITLE button
- FREEZE/HOLD button
-
button
Perform this procedure on the monitor.
1.Turn off the monitor power using the MAIN
POWER button.
2.While pressing the MENU button, press the
MAIN POWER button (i.e. turn the power on).
Continue to press the buttons until
“ADJUSTMENT LOCKED” appears on the
screen. The lock is set when the message is
displayed.
Releasing the adjustment lock
Perform this procedure on the monitor.
1.Turn off the monitor power using the MAIN
POWER button.
2.While pressing the MENU button, press the
MAIN POWER button (i.e. turn the power on).
Continue to press the buttons until
“ADJUSTMENT UNLOCKED” appears on the
screen. The lock is released when the message
is displayed.
CAUTION!
- When the adjustment lock is set, all buttons on
the monitor and remote control other than the
above buttons are disabled. To use buttons other
than the above buttons, release the adjustment
lock.
Other features
Resetting all adjustment values
(ALL RESET)
All adjustment values will be reset. This includes
not only PC mode, but also TV/AV mode (including
channel settings, etc.). Concerning the ALL
RESET procedure, refer to the end of this manual.
Page 51

E49
EnglishDeutschFrançaisItalianoEspañolEnglish
Instructions for attaching a VESA-compliant mount
An arm or stand based on the VESA standard
(commercially available) can be attached to the
monitor.
Procurement of the arm or stand is at the
customer’s discretion.
Arms or stands able to be used
Attachments must satisfy the following.
- Compatible with the VESA standard.
- Have a gap of 100 mm x 100 mm between the
screw holes on the section to be attached.
- Not be likely to fall off or break off after being
attached to the monitor.
How to attach the arm or stand
- Be careful not to over bend the cable or add
extension cords as this could lead to
malfunction.
- While following these instructions, please also
refer to the installation instructions in the
operation manual included with the arm or
stand.
CAUTION!
- Be careful not to get your fingers pinched
between the display and stand nor to let the
stand drop. These could lead to injury.
1. Remove the cables.
2.Spread out a soft cloth on a suitable horizontal
surface. Being careful not to damage the
monitor, gently lay the monitor on it display-side
down.
3.Remove the four screws and then remove the
stand from the monitor.
Notes:
- The stand is specially made for use with this
monitor. Once having removed the stand, never
attempt to attach it to another equipment.
- Once having removed the screws, store them
together with the stand and if the stand is ever
re-attached be sure to use the original screws.
Using different screws could lead to a
malfunction.
4. Attach the arm to the monitor with the four
screws.
Note:
- The screws used to attach the arm should be M4
screws with a length of 10-12 mm protruding
from the surface to be attached. Using different
screws could cause the monitor to fall off or to be
internally damaged.
Screw used to attach arm
Arm
Part of monitor to which arm is
attached
10-12 mm
Page 52

E50
Monitor care
Troubleshooting
If you think the monitor may be faulty, please check the following points before taking it to be repaired.
If afterwards it still does not work, please contact the shop where you purchased the monitor or your
nearest Sharp authorized Service Centre.
The monitor’s fluorescent tubes have a limited life span.
- If the screen darkens, persistently flickers or does not light up, the fluorescent tube has reached the
end of its operational life span. Please inquire at the shop where you purchased the monitor or your
nearest Sharp authorized Service Centre.
- In the initial period of use, due to the characteristics of fluorescent tubes the screen may flicker. (This
is not a malfunction.) Should this happen, check by first turning off the power, then turning it on
again.
Problem
There is no picture.
(Power LED does not light.)
There is no picture.
(Power LED is lit orange.)
The image appears distorted.
The remote control does not work.
There is no TV picture.
A particular channel will not tune in.
There are stripes or dots on
TV picture.
The picture wavers.
The TV picture is doubled.
There are colour bands.
The TV picture is distorted.
There is no video picture.
There is no game picture.
What to Check
- Are the AC adapter and power cord properly connected? (Page E14)
- Is power turned on? (Page E18)
- Is the monitor properly connected to the computer? (Page E10)
- Is the computer turned on?
- Does the computer’s signal timing correspond to monitor
specifications? (Page E53)
- Is the computer in power-saving mode?
Try pressing a key on the keyboard or moving the mouse.
- Does the computer’s signal timing correspond to monitor
specifications? (Page E53)
- Perform automatic adjustment. (Page E17)
- Change the Vsync frequency (refresh rate) on the computer you
are using to a low value if possible. (Page E53)
- Have the batteries of the remote control run out? (Page E9)
- Are the batteries placed in the right direction in the remote
control? (Page E9)
- Is the adjustment lock on? (Page E48)
- Is the monitor connected to an antenna? Check the connection.
(Page E11)
- Is the monitor switched to TV mode? (Page E18)
- Have you set TV channels properly? (Pages E30 to E33)
- Have you set TV channels properly? (Pages E30 to E33)
- Is there interference from automobiles, trains, neon signs,
computers, or other sources?
- Place the antenna as far as possible away from potential
sources of interference.
- Place the antenna line as far as possible from the computer.
- Is the antenna is facing the right direction?
- There may be reflected electric waves from nearby mountains or
buildings. Try changing the antenna’s height and direction.
- Is there interference from a nearby TV?
Changing the antenna’s height and direction may help.
- Try switching power off, waiting several seconds, and then
turning power back on.
- Are the cables properly connected? (Pages E12 and E13)
- Have you switched to AV mode? (Page E18)
- Have you turned on the connected equipment?
- Change the signal type and/or colour system. (Page E45)
Page 53

E51
EnglishDeutschFrançaisItalianoEspañolEnglish
Monitor care
Always remove the plug from the AC outlet when cleaning the monitor.
Cabinet and control panel section
Use a soft dry cloth to lightly wipe away any grime from the cabinet and control panel.
If they are very dirty, apply neutral detergent to a dampened soft cloth, wring it out well and wipe away
grime.
LCD panel section
Use a soft dry cloth to lightly wipe away dirt and dust from the surface of the LCD panel. (A soft cloth such
as gauze or that used for lens cleaning is suitable.)
CAUTION!
- Never use thinner, benzine, alcohol, glass cleaner, etc., as this could lead to colour change or change
in shape.
- Never scratch the monitor with anything hard or apply strong pressure as this could leave marks or
result in malfunction.
Storage
If the monitor will not be used for a long period of time, be sure to remove the power plug from the AC
outlet.
CAUTION!
- Do not leave the monitor in contact with rubber or plastic items for long periods of time as this could
lead to colour change or change in shape.
Problem
The TV picture does not move.
The video picture does not move.
I have forgotten my PIN
(Personal Identification Number).
There is no sound.
Control buttons do not work.
The MENU screen does not appear.
“PROGRAMMES” in the MENU screen
for TV mode cannot be selected.
What to Check
- Is the screen pausing? Did you press the FREEZE/HOLD
button? (Page E43)
- See “Disengaging Child Lock” at the end of this manual.
- Are the audio cables properly connected? (Pages E10, E12
and E13)
- Did you press the button? (Page E47)
- No sound can be heard from the monitor’s speakers while
headphones are connected.
- Adjust the volume. (Page E19)
- No sound can be heard from the monitor’s speakers while the
monitor is in power-saving mode.
- When “STATUS” in the CHILD LOCK menu is “ALL” or
“INDIVIDUAL”, TV/AV-IN SOUND is not available in PC mode.
(Pages E21 and E40)
- In AV mode, sound cannot be heard if there is no video input
signal.
- Is the adjustment lock set? (Page E48)
- Is Child Lock set? Cancel the lock temporarily. (Page E41)
- Is the monitor switched to TV mode? (Page E18)
Monitor care
Page 54

E52
Specifications
Product specifications
Model name
LL-171ME
LCD display
43 cm measured diagonally TFT LCD module
Resolution (max.)
WXGA 1280 x 768 pixels
Displayable colours (max.)
Approx. 16.19 million colours (6 bit + FRC)
Dot pitch
0.289 (H) x 0.289 (V) mm
Brightness (max.)
260 cd/m2 (PC mode); 400 cd/m2 (when “WHITE
BALANCE” is set to “WARM” in TV/AV mode)
Contrast ratio
600:1
Angle of visibility
Left-right 170°; up-down 170°
(contrast ratio
>
=
10)
Screen display size
369.6 (H) x 221.76 (V) mm
Video signal
Analog RGB (0.7 Vp-p) [75Ω]
Sync signal
Separate Sync (TTL level: +/-), Sync on Green,
Composite Sync (TTL level: +/-)
Video colour system
PAL/SECAM/NTSC
TV-standard
B/G, I, D/K, L
Stereo/bilingual
NICAM, A2 stereo
Expansion compensation
Digital scaling (Enlarges VGA/SVGA/XGA etc. to
full screen size.)
[Enlarged display (full screen, Fixed aspect
ratio)]
- 1:1 display is not possible.
Plug & Play
VESA DDC1/DDC2B compatible
Power management
VESA: based on DPMS
Speaker output
2.7 W + 2.7 W
Input terminals
Computer signal: Mini D-sub15 pin (3 rows) x 1
Computer audio: Mini stereo jack (φ 3.5 mm) x 1
Antenna (DIN): x 1
21-pin Euro-SCART (RGB) terminal x 1
Video image: RCA pin x 1
S-video image: x 1
Audio input terminal: RCA pin (L/R x 1)
Headphone terminal
Mini stereo jack (φ 3.5 mm)
Screen tilt
Upward approx. 0-20°; downward approx. 0-5°
Power supply
AC 110-240 V, 50/60 Hz (Uses special AC
adapter, type NL-A69J of Sharp Corporation)
Temperature of operating environment
5-35°C
Power consumption
60 W; 2.2 W in standby; 2.2 W in power-saving
mode (Uses special AC adapter)
Dimensions
Approx. 432 (W) x 184 (D) x 373 (H) mm
Weight
Approx. 5.9 kg (excluding signal cable and AC
adapter)
Approx. 5.0 kg (excluding stand)
Dimensions (Units: mm)
184
78
326
373
265
432
- PC analog signal cable: approx. 1.8 m
- PC audio cable: approx. 1.8 m
- Special AC adapter:
Approx. 1.5 m
Note:
- As a part of our policy of continuous
improvement, SHARP reserves the right to make
design and specification changes for product
improvement without prior notice. The
performance specification figures indicated are
nominal values of production units. There may
be some deviations from these values in
individual units.
Approx. 150 (W) x 60 (D) x 35 (H) mm
Page 55

E53
EnglishDeutschFrançaisItalianoEspañolEnglish
Relevant signal timings (PC mode)
- Recommended resolution is 1280 x 768 or
1024 x 768.
- All are compliant only with non-interlaced.
- Frequencies for Power Macintosh are reference
values. To connect, another adapter
(commercially available) may be required.
- If the monitor is receiving timing signals that are
not compatible, “OUT OF TIMING” will appear.
Follow your computer’s instruction manual to set
the timing so that it is compatible with the
monitor.
- If the monitor is not receiving any signal (synch
signal), “NO SIGNAL” will appear.
Specifications
Display mode
VESA
Hsync
Vsync
Dot
frequency
WXGA
US text
Power
Macintosh
series
The analog RGB input connector pin
(Mini D-sub connector with 15 pins)
No. Function
1 Red video signal input
2 Green video signal input
3 Blue video signal input
4 GND
5 GND
6 For red video signal GND
7 For green video signal GND
8 For blue video signal GND
9 +5V
10 GND
11 N.C.
12 DDC data
13 For Hsync signal input
14 For Vsync signal input
15 DDC clock
21-pin Euro-SCART terminal (RGB)
2
4
6
8
10
12
14
16
18
20
1
3
5
7
9
11
13
15
17
19
21
No. Function
1
2
3
4
5
6
7
8
9
10
11
12
13
14
15
16
17
18
19
20
21
Audio right output
Audio right input
Audio left output
Common earth for audio
Earth for blue
Audio left input
BLUE input
Audio-video control
Earth for green
Not used
GREEN input
Not used
Earth for red
Not used
RED input/Chroma S-video input
RED/GREEN/BLUE control
Earth for video
Earth for RED/GREEN/BLUE control
Video output
Video input (PAL/SECAM/NTSC)/S-video input
Plug shield
Page 56

E54
Specifications
Power management
The monitor is based on VESA DPMS (Display
Power Management Signalling).
To activate the monitor’s power management
function, both the video card and the computer
must conform to the VESA DPMS standard.
DDC (Plug & Play)
This monitor supports the VESA DDC (Display
Data Channel) standard.
DDC is a signal standard for carrying out Plug &
Play functions on the monitor or computer. It
transfers information such as degree of resolution
between the monitor and computer. You can use
this function if your computer is DDC compliant
and if it is set so that it can detect the Plug & Play
monitor.
There are many varieties of DDC due to the
differences between systems. This monitor works
with DDC1 and DDC2B.
DPMS mode Screen
Power
H-sync V-sync
consumption
ON Display on 60 W Yes Yes
STANDBY No Yes
SUSPEND Display off 2.2 W Yes No
OFF No No
Page 57

MEMO/NOTIZEN/BLOC-NOTES/APPUNTI
Page 58

MEMO/NOTIZEN/BLOC-NOTES/APPUNTI
Page 59

We suggest that you remove the following two instructions from the operation manual to prevent children
from reading them. Keep the instructions in a safe place for future reference.
Disengaging Child Lock
If you have forgotten your PIN (Personal Identification Number) and cannot disengage Child Lock, follow
the procedure below.
1.When the PIN input screen is displayed, press and hold the button (monitor) and the button
(monitor) simultaneously until “PLEASE ENTER YOUR PIN” blinks on the screen.
The PIN will be cleared.
2. Input a new 4-digit PIN or exit the screen using the INPUT button (monitor) or the MENU button
(remote control).
Resetting all adjustment values (ALL RESET)
All adjustment values will be reset. This includes not only PC mode, but also TV/AV mode (including
channel settings and the PIN for Child Lock). Resetting all adjustment values is not possible while the
adjustment lock is set. Release the adjustment lock before resetting. (See page E48 of the manual.)
Perform this procedure on the monitor.
1.Turn off the monitor power using the MAIN POWER button.
2. While pressing down the MENU and OK/BRIGHT MODE buttons simultaneously, press the MAIN
POWER button (i.e. switch the power on).
Continue to press the buttons until “ALL RESET” appears on the screen. Reset is complete when the
displayed message disappears and the “FIRST INSTALLATION (LANGUAGE)” screen appears. (See
page E15 of the manual.)
Note:
- Control buttons will be disabled while “ALL RESET” is displayed.
Wir empfehlen, die folgenden beiden Anwensungen aus der Bedienungsanleitung zu entfernen, um zu
verhindern, dass sie von Kindern gelesen werden. Bewahren Sie die Anweisungen zum Nachschlagen
an einem sicheren Ort auf.
Deaktivieren der Kindersicherung
Wenn Sie Ihre PIN (persönliche ID-Nummer) vergessen haben und die Kindersicherung nicht
deaktivieren können, verfahren Sie wie unten beschrieben.
1.Wenn der PIN-Eingabebildschirm erscheint, halten Sie die Taste (Monitor) und die Taste (Monitor)
gleichzeitig gedrückt, bis “PLEASE ENTER YOUR PIN” im Bildschirm blinkt.
Die PIN wird gelöscht.
2. Geben Sie eine neue 4-stellige PIN ein oder verlassen Sie den Bildschirm mit der Taste INPUT
(Monitor) oder der Taste MENU (Fernbedienung).
Rücksetzen aller Einstellwerte (ALL RESET)
Alle Einstellwerte werden zurückgesetzt. Dazu gehört nicht nur der PC-Modus sondern auch für TV/AVModus (einschließlich Kanaleinstellungen und PIN für Kindersicherung). Rückstellung aller
Einstellwerte ist nicht möglich, wenn die Einstellungssperre aktiviert ist. Heben Sie die
Einstellungssperre vor dem Rücksetzen auf. (Siehe Seite G48 in der Bedienungsanleitung.)
Führen Sie diesen Schritt am Monitor aus.
1.Schalten Sie den Monitor mit der Taste MAIN POWER aus.
2.Halten Sie die Tasten MENU und OK/BRIGHT MODE gleichzeitig gedrückt, und drücken Sie die Taste
MAIN POWER (d.h. Sie schalten das Gerät ein).
Halten Sie die Tasten weiter gedrückt, bis “ALL RESET” im Bildschirm erscheint. Die Rückstellung ist
beendet, wenn die angezeigte Meldung verschwindet, und der Bildschirm “FIRST INSTALLATION
(LANGUAGE)” erscheint. (Siehe Seite G15 in der Bedienungsanleitung.)
Hinweis:
- Steuertasten sind deaktiviert, während “ALL RESET” erscheint.
Page 60

Nous vous suggérons de retirer les deux instructions suivantes de ce mode d’emploi afin que les
enfants ne puissent pas les lire. Gardez-les cependant dans un endroit sûr pour toute référence future.
Annulation de la Sécurité Enfants
Si vous avez oublié votre PIN (numéro d’indentification personnelle) et que vous ne pouvez pas annuler
la Sécurité Enfants, procédez comme suit.
1. Quand la page-écran de saisie PIN s’affiche, appuyez simultanément et maintenez appuyé les
boutons (moniteur) et (moniteur) jusqu’à ce le message “PLEASE ENTER YOUR PIN” clignote sur
l’écran.
Le PIN sera annulé.
2. Saisissez un nouveau PIN à 4 chiffres ou quittez la page-écran en utilisant le bouton INPUT
(moniteur) ou le bouton MENU (télécommande).
Réinitialisation de toutes les valeurs de réglage (ALL RESET)
Toutes les valeurs de réglage seront réinitialisées. Ceci couvre non seulement le mode PC mais aussi le
mode TV/AV (y compris les réglages de chaînes et le PIN pour la Sécurité Enfants). La réinitialisation de
toutes les valeurs de réglage est impossible quand le verrouillage des réglages est activé. Annulez le
verrouillage des réglages avant la réinitialisation. (Voir à la page F48 de ce mode d’emploi.)
Effectuer cette procédure sur le moniteur.
1.Mettez hors tension le moniteur avec le bouton MAIN POWER.
2.Tout en appuyant simultanément sur les boutons MENU et OK/BRIGHT MODE, appuyez sur le bouton
MAIN POWER (c-a-d mettre sous tension).
Continuez d’appuyer sur les boutons jusqu’à ce que “ALL RESET” apparaîsse sur l’écran. La
réinitialistion est terminée quand le message affiché disparaît et que la page-écran “FIRST
INSTALLATION (LANGUAGE)” apparaît. (Voir à la page F15 de ce mode d’emploi.)
Remarque :
- Les boutons de commande seront désactivés tant que le message “ALL RESET” reste affiché.
Suggeriamo che rimuovete le seguenti due istruzioni dal manuale d’uso per evitare che i bambini
possano leggerle. Conservate le istruzioni in un posto sicuro per un futuro riferimento.
Disinnesto della funzione Sicura per Bambini
Se avete dimenticato il vostro PIN (Numero di Identificazione Personale) e non potete disabilitare la
funzione Sicura per Bambini, seguite la procedura qui sotto.
1.Quando lo schermo di ingresso PIN viene visualizzato, premete e mantenete premuto il tasto
(monitor) ed il tasto (monitor) simultaneamente fino a che “PLEASE ENTER YOUR PIN” lampeggia
sullo schermo.
Il PIN verrà annullato.
2.Immettere un nuovo PIN da 4 cifre o uscite dallo schermo utilizzando il tasto INPUT (monitor) o il tasto
MENU (telecomando).
Ripristino di tutti i valori di regolazione (ALL RESET)
Tutti i valori di regolazione saranno ripristinati. Ciò include non solo il modo PC, ma anche il modo TV/AV
(compreso le impostazioni di canale ed il PIN per la funzione Sicura per Bambini). Il ripristino di tutti i
valori di regolazione non è possibile mentre viene abilitato il blocco di regolazioni. Disinserite il blocco
di regolazione prima di ripristinare. (Vedi la pagina IT48 del manuale.)
Effettuate questa procedura sul monitor.
1.Scollegate l’alimentazione del monitor usando il tasto MAIN POWER.
2.Mentre si mantiene premuto i tasti MENU e OK/BRIGHT MODE simultaneamente, premete il tasto
MAIN POWER (cioè, viene accesa l’alimentazione).
Continuate a premere i tasti fino a che “ALL RESET” compare sullo schermo. Il ripristino è completato
quando il messaggio visualizzato sparisce e lo schermo “FIRST INSTALLATION (LANGUAGE)”
compare. (Vedi la pagina IT15 del manuale.)
Nota:
- I tasti di controllo vengono disabilitati mentre “ALL RESET” viene visualizzato.
Page 61

Page 62

SHARP CORPORATION
Printed in Taiwan
Gedruckt in Taiwan
Imprimé à Taiwan
Stampato a Taiwan
P/N: 0NI-171M-E002 (1)
1925-1300-5640
Page 63

documentation manual, user maintenance, brochure, user reference, pdf manual
This file has been downloaded from:
User Manual and User Guide for many equipments like mobile phones, photo cameras, monther board, monitors, software, tv, dvd, and othes..
Manual users, user manuals, user guide manual, owners manual, instruction manual, manual owner, manual owner's, manual guide,
manual operation, operating manual, user's manual, operating instructions, manual operators, manual operator, manual product,
 Loading...