

Page 1
LCD Multimedia Monitor
LCD Multimedia Monitor
Moniteur LCD Multimédia
LCD Multimedia Monitor
LL-171ME
OPERATION MANUAL
BEDIENUNGSANLEITUNG
MODE D’EMPLOI
MANUALE D’USO
English ....... E1
Deutsch ......G1
Français ..... F1
Italiano ........IT1
EnglishDeutschFrançaisItaliano
Page 2

This equipment complies with the requirements of Directives 89/336/EEC and 73/23/EEC as amended
by 93/68/EEC.
Dieses Gerät entspricht den Anforderungen der EG-Richtlinien 89/336/EWG und 73/23/EWG mit
Änderung 93/68/EWG.
Ce matériel répond aux exigences contenues dans les directives 89/336/CEE et 73/23/CEE modifiées
par la directive 93/68/CEE.
Dit apparaat voldoet aan de eisen van de richtlijnen 89/336/EEG en 73/23/EEG, gewijzigd door 93/68/
EEG.
Dette udstyr overholder kravene i direktiv nr. 89/336/EEC og 73/23/EEC med tillæg nr. 93/68/EEC.
Quest’ apparecchio è conforme ai requisiti delle direttive 89/336/EEC e 73/23/EEC, come emendata
dalla direttiva 93/68/EEC.
Η εγκατασταση ανταποκρινεται στιζ απαιτησειζ των οδηγιων τηζ Ευρωπαïκηζ Ενωσηζ 89/336/ΕΟΚ κατ
73/23/ΕΟΚ, óπωζ οι κανονισµοι αυτοι συµπληρωθηκαν απó την οδηγια 93/68/ΕΟΚ.
Este equipamento obedece às exigências das directivas 89/336/CEE e 73/23/CEE, na sua versão
corrigida pela directiva 93/68/CEE.
Este aparato satisface las exigencias de las Directivas 89/336/CEE y 73/23/CEE, modificadas por
medio de la 93/68/CEE.
Denna utrustning uppfyller kraven enligt riktlinjerna 89/336/EEC och 73/23/EEC så som komplette ras
av 93/68/EEC.
Dette produktet oppfyller betingelsene i direktivene 89/336/EEC og 73/23/EEC i endringen 93/68/EEC.
Tämä laite täyttää direktiivien 89/336/EEC ja 73/23/EEC vaatimukset, joita on muutettu direktiivillä 93/
68/EEC.
CAUTION:
TO PREVENT ELECTRICAL SHOCK, DISCONNECT THE AC CORD BEFORE SERVICING.
CAUTION:
FOR A COMPLETE ELECTRICAL DISCONNECTION, PULL OUT THE MAIN PLUG.
VORSICHT:
UM DIE STROMZUFUHR VOLLSTÄNDIG ZU UNTERBRECHEN, DEN NETZSTECKER
HERAUSZIEHEN ENTFERNEN.
ATTENTION :
POUR UN ARRET TOTAL DE L’APPAREIL, DEBRANCHEZ LA PRISE DU COURANT SECTEUR.
VARNING:
FÖR TOTAL ELEKTRISK URKOPPLING, KOPPLA UR KONTAKTEN OCH.
PRECAUCION:
PARA UNA COMPLETA DESCONEXION ELECTRICA DESENCHUFE LA CLAVIJA DE LA RED.
PRECAUCION:
A FIN DE EVITAR DESCARGAS ELÉCTRICAS, DESCONECTE EL ENCHUFE DE LA RED ANTES DE
REALIZAR CUALQUIER OPERACIÓN DE SERVICIO.
ATTENZIONE:
PER EVITARE FOLGORAZIONI, SCOLLEGATE IL CAVO DI COLLEGAMENTO ALLA RETE IN
ALTERNATA PRIMA DI EFFETTUARE UN INTERVENTO DI SERVIZIO TECNICO.
ATTENZIONE:
PER UNO SCOLLEGAMENTO ELETTRICO COMPLETO, TIRATE FUORI LA SPINA PRINCIPALE.
Page 3

E1
EnglishDeutschFrançaisItalianoEspañolEnglish
ENGLISH
FOR CUSTOMERS IN U.K.
IMPORTANT
The wires in this mains lead are coloured in accordance with the following code:
GREEN-AND-YELLOW : Earth
BLUE : Neutral
BROWN : Live
As the colours of the wires in the mains lead of this apparatus may not correspond with the coloured
markings identifying the terminals in your plug proceed as follows:
• The wire which is coloured GREEN-AND-YELLOW must be connected to the terminal in the plug
which is marked by the letter E or by the safety earth
or coloured green or green-and-yellow.
• The wire which is coloured BLUE must be connected to the terminal which is marked with the
letter N or coloured black.
• The wire which is coloured BROWN must be connected to the terminal which is marked with the
letter L or coloured red.
Ensure that your equipment is connected correctly. If you are in any doubt consult a qualified
electrician.
“WARNING: THIS APPARATUS MUST BE EARTHED.”
Page 4

E2
Table of Contents
Getting started
Tips and safety precautions . . . . . . . . . . . . . . . . . . . . . . . . . . . . . . . . . . . . . . . . . . . . . . . . . . . . . . . . . . . . E4
Monitor and accessory checklist . . . . . . . . . . . . . . . . . . . . . . . . . . . . . . . . . . . . . . . . . . . . . . . . . . . . . . . . E5
Product description . . . . . . . . . . . . . . . . . . . . . . . . . . . . . . . . . . . . . . . . . . . . . . . . . . . . . . . . . . . . . . . . . . E6
Main unit . . . . . . . . . . . . . . . . . . . . . . . . . . . . . . . . . . . . . . . . . . . . . . . . . . . . . . . . . . . . . . . . . . . . . . . . E6
Remote control . . . . . . . . . . . . . . . . . . . . . . . . . . . . . . . . . . . . . . . . . . . . . . . . . . . . . . . . . . . . . . . . . . . E7
Cable clamp . . . . . . . . . . . . . . . . . . . . . . . . . . . . . . . . . . . . . . . . . . . . . . . . . . . . . . . . . . . . . . . . . . . . . E8
Using headphones (commercially available) . . . . . . . . . . . . . . . . . . . . . . . . . . . . . . . . . . . . . . . . . . . E8
Angle adjustment . . . . . . . . . . . . . . . . . . . . . . . . . . . . . . . . . . . . . . . . . . . . . . . . . . . . . . . . . . . . . . . . . E8
Remote control . . . . . . . . . . . . . . . . . . . . . . . . . . . . . . . . . . . . . . . . . . . . . . . . . . . . . . . . . . . . . . . . . . . . . . E9
Using the remote control . . . . . . . . . . . . . . . . . . . . . . . . . . . . . . . . . . . . . . . . . . . . . . . . . . . . . . . . . . . E9
Batteries for the remote control . . . . . . . . . . . . . . . . . . . . . . . . . . . . . . . . . . . . . . . . . . . . . . . . . . . . . . E9
Connection and preparation
Connecting the monitor to a computer . . . . . . . . . . . . . . . . . . . . . . . . . . . . . . . . . . . . . . . . . . . . . . . . . . E10
Antenna connection . . . . . . . . . . . . . . . . . . . . . . . . . . . . . . . . . . . . . . . . . . . . . . . . . . . . . . . . . . . . . . . . . E11
Connecting the monitor to AV equipment . . . . . . . . . . . . . . . . . . . . . . . . . . . . . . . . . . . . . . . . . . . . . . . . E12
AV equipment with 21-pin Euro-SCART (RGB) terminals . . . . . . . . . . . . . . . . . . . . . . . . . . . . . . . . E12
AV equipment with video output terminals . . . . . . . . . . . . . . . . . . . . . . . . . . . . . . . . . . . . . . . . . . . . E12
AV equipment with S-video output terminals . . . . . . . . . . . . . . . . . . . . . . . . . . . . . . . . . . . . . . . . . . E13
Connecting the monitor to a power source . . . . . . . . . . . . . . . . . . . . . . . . . . . . . . . . . . . . . . . . . . . . . . . E14
First installation . . . . . . . . . . . . . . . . . . . . . . . . . . . . . . . . . . . . . . . . . . . . . . . . . . . . . . . . . . . . . . . . . . . . E15
Selecting the item in the MENU screen . . . . . . . . . . . . . . . . . . . . . . . . . . . . . . . . . . . . . . . . . . . . . . . . . E16
Adjusting the computer display (AUTO ADJUSTMENT) . . . . . . . . . . . . . . . . . . . . . . . . . . . . . . . . . . . . E17
Common operations
Common operations . . . . . . . . . . . . . . . . . . . . . . . . . . . . . . . . . . . . . . . . . . . . . . . . . . . . . . . . . . . . . . . . E18
Turning power on/off. . . . . . . . . . . . . . . . . . . . . . . . . . . . . . . . . . . . . . . . . . . . . . . . . . . . . . . . . . . . . . E18
Switching display modes (INPUT) . . . . . . . . . . . . . . . . . . . . . . . . . . . . . . . . . . . . . . . . . . . . . . . . . . . E18
Adjusting the volume . . . . . . . . . . . . . . . . . . . . . . . . . . . . . . . . . . . . . . . . . . . . . . . . . . . . . . . . . . . . . E19
Adjusting the backlight . . . . . . . . . . . . . . . . . . . . . . . . . . . . . . . . . . . . . . . . . . . . . . . . . . . . . . . . . . . . E19
Selecting the language on the screen . . . . . . . . . . . . . . . . . . . . . . . . . . . . . . . . . . . . . . . . . . . . . . . . E19
PC mode
Watching TV or other video in a window on the computer screen (PICTURE IN PICTURE) . . . . . . . . E20
Selecting the video and audio sources . . . . . . . . . . . . . . . . . . . . . . . . . . . . . . . . . . . . . . . . . . . . . . . E20
Listening to TV or another audio source while viewing the computer screen . . . . . . . . . . . . . . . . . . . . E21
Adjusting the display . . . . . . . . . . . . . . . . . . . . . . . . . . . . . . . . . . . . . . . . . . . . . . . . . . . . . . . . . . . . . . . . E22
How to adjust . . . . . . . . . . . . . . . . . . . . . . . . . . . . . . . . . . . . . . . . . . . . . . . . . . . . . . . . . . . . . . . . . . . E22
ADJUSTMENT menu . . . . . . . . . . . . . . . . . . . . . . . . . . . . . . . . . . . . . . . . . . . . . . . . . . . . . . . . . . . . . E23
GAIN CONTROL menu . . . . . . . . . . . . . . . . . . . . . . . . . . . . . . . . . . . . . . . . . . . . . . . . . . . . . . . . . . . E24
COLOUR CONTROL menu . . . . . . . . . . . . . . . . . . . . . . . . . . . . . . . . . . . . . . . . . . . . . . . . . . . . . . . . E24
MODE SELECT menu . . . . . . . . . . . . . . . . . . . . . . . . . . . . . . . . . . . . . . . . . . . . . . . . . . . . . . . . . . . . E25
PICTURE IN PICTURE menu . . . . . . . . . . . . . . . . . . . . . . . . . . . . . . . . . . . . . . . . . . . . . . . . . . . . . . E25
Installing set-up information and the ICC profile (For Windows) . . . . . . . . . . . . . . . . . . . . . . . . . . . . . . E26
Information about the ColorSync profile (For MacOS) . . . . . . . . . . . . . . . . . . . . . . . . . . . . . . . . . . . . . . E29
Page 5

E3
EnglishDeutschFrançaisItalianoEspañolEnglish
TV/AV mode
Setting TV channels . . . . . . . . . . . . . . . . . . . . . . . . . . . . . . . . . . . . . . . . . . . . . . . . . . . . . . . . . . . . . . . . . E30
Saving broadcast TV channels in the memory (AUTOMATIC SEARCH) . . . . . . . . . . . . . . . . . . . . . E30
Adjusting the individual settings of programmes (MANUAL ADJUSTMENT) . . . . . . . . . . . . . . . . . E31
Changing the programme positions (SORT) . . . . . . . . . . . . . . . . . . . . . . . . . . . . . . . . . . . . . . . . . . E32
Erasing the programme range . . . . . . . . . . . . . . . . . . . . . . . . . . . . . . . . . . . . . . . . . . . . . . . . . . . . . . E32
Enter/change the name of an individual programme . . . . . . . . . . . . . . . . . . . . . . . . . . . . . . . . . . . . E33
Watching TV . . . . . . . . . . . . . . . . . . . . . . . . . . . . . . . . . . . . . . . . . . . . . . . . . . . . . . . . . . . . . . . . . . . . . . . E34
Selecting the channels . . . . . . . . . . . . . . . . . . . . . . . . . . . . . . . . . . . . . . . . . . . . . . . . . . . . . . . . . . . . E34
Selecting the channels using the programme table . . . . . . . . . . . . . . . . . . . . . . . . . . . . . . . . . . . . . E34
Selecting the audio reception mode . . . . . . . . . . . . . . . . . . . . . . . . . . . . . . . . . . . . . . . . . . . . . . . . . E35
Watching Teletext . . . . . . . . . . . . . . . . . . . . . . . . . . . . . . . . . . . . . . . . . . . . . . . . . . . . . . . . . . . . . . . . E36
Using the Child Lock function . . . . . . . . . . . . . . . . . . . . . . . . . . . . . . . . . . . . . . . . . . . . . . . . . . . . . . E39
Enjoying DVDs, games, and other equipment . . . . . . . . . . . . . . . . . . . . . . . . . . . . . . . . . . . . . . . . . . . . E42
Handy features (for TV/AV mode) . . . . . . . . . . . . . . . . . . . . . . . . . . . . . . . . . . . . . . . . . . . . . . . . . . . . . . E43
Pausing the screen (FREEZE) . . . . . . . . . . . . . . . . . . . . . . . . . . . . . . . . . . . . . . . . . . . . . . . . . . . . . . E43
Returning to previous channel (FLASHBACK) . . . . . . . . . . . . . . . . . . . . . . . . . . . . . . . . . . . . . . . . . E43
Switching power off after a specified length of time (SLEEP) . . . . . . . . . . . . . . . . . . . . . . . . . . . . . E43
Adjusting the display . . . . . . . . . . . . . . . . . . . . . . . . . . . . . . . . . . . . . . . . . . . . . . . . . . . . . . . . . . . . . . . . E44
How to adjust . . . . . . . . . . . . . . . . . . . . . . . . . . . . . . . . . . . . . . . . . . . . . . . . . . . . . . . . . . . . . . . . . . . E44
PICTURE menu . . . . . . . . . . . . . . . . . . . . . . . . . . . . . . . . . . . . . . . . . . . . . . . . . . . . . . . . . . . . . . . . . E45
PROGRAMMES menu (TV mode only) . . . . . . . . . . . . . . . . . . . . . . . . . . . . . . . . . . . . . . . . . . . . . . . E45
AV CONNECTIONS menu . . . . . . . . . . . . . . . . . . . . . . . . . . . . . . . . . . . . . . . . . . . . . . . . . . . . . . . . . E45
MODE SELECT menu . . . . . . . . . . . . . . . . . . . . . . . . . . . . . . . . . . . . . . . . . . . . . . . . . . . . . . . . . . . . E46
CHILD LOCK menu . . . . . . . . . . . . . . . . . . . . . . . . . . . . . . . . . . . . . . . . . . . . . . . . . . . . . . . . . . . . . . E46
Other features
Other features . . . . . . . . . . . . . . . . . . . . . . . . . . . . . . . . . . . . . . . . . . . . . . . . . . . . . . . . . . . . . . . . . . . . . . E47
Checking the current channel and audio reception mode on screen (DISPLAY) . . . . . . . . . . . . . . E47
Changing BRIGHT MODE . . . . . . . . . . . . . . . . . . . . . . . . . . . . . . . . . . . . . . . . . . . . . . . . . . . . . . . . . E47
Muting the sound (MUTE) . . . . . . . . . . . . . . . . . . . . . . . . . . . . . . . . . . . . . . . . . . . . . . . . . . . . . . . . . E47
Changing the screen size (VIEW MODE) . . . . . . . . . . . . . . . . . . . . . . . . . . . . . . . . . . . . . . . . . . . . . E47
Preventing changes to adjusted values (ADJUSTMENT LOCK) . . . . . . . . . . . . . . . . . . . . . . . . . . . E48
Resetting all adjustment values (ALL RESET) . . . . . . . . . . . . . . . . . . . . . . . . . . . . . . . . . . . . . . . . . E48
Instructions for attaching a VESA-compliant mount . . . . . . . . . . . . . . . . . . . . . . . . . . . . . . . . . . . . . . . . E49
Appendix
Monitor care . . . . . . . . . . . . . . . . . . . . . . . . . . . . . . . . . . . . . . . . . . . . . . . . . . . . . . . . . . . . . . . . . . . . . . . E50
Troubleshooting . . . . . . . . . . . . . . . . . . . . . . . . . . . . . . . . . . . . . . . . . . . . . . . . . . . . . . . . . . . . . . . . . E50
Monitor care . . . . . . . . . . . . . . . . . . . . . . . . . . . . . . . . . . . . . . . . . . . . . . . . . . . . . . . . . . . . . . . . . . . . E51
Storage . . . . . . . . . . . . . . . . . . . . . . . . . . . . . . . . . . . . . . . . . . . . . . . . . . . . . . . . . . . . . . . . . . . . . . . . E51
Specifications . . . . . . . . . . . . . . . . . . . . . . . . . . . . . . . . . . . . . . . . . . . . . . . . . . . . . . . . . . . . . . . . . . . . . . E52
Table of Contents
Page 6

E4
The Power Cord
- Do not damage the power cord nor place heavy
objects on it, stretch it or over bend it. Also, do
not add extension cords. Damage to the cord
may result in fire or electric shock.
- Use only the power cord supplied with the monitor.
- Insert the power plug directly into the AC outlet.
Adding an extension cord may lead to fire as a
result of overheating.
- Do not remove or insert the power plug with wet
hands. Doing so could result in electric shock.
Use of AC adapter
- Do not use the AC adapter for other than the
specified equipment.
- Unplug the AC adapter if it is not used for long
time.
- Do not place any objects on the AC adapter.
- Do not use the AC adapter outdoors.
- Do not attempt to repair the AC adapter if it is
broken or malfunctioning. Refer the servicing to
the service representative.
- Do not try to open the AC adapter.
- Do not use water or wet cloth for cleaning the
AC adapter.
Manual Scope
- In this manual, Microsoft Windows XP will be
referred to as “Windows XP”, Microsoft Windows
Millennium as “Windows Me”, Microsoft
Windows 2000 as “Windows 2000”, Microsoft
Windows 98 as “Windows 98”, Microsoft
Windows 95 as “Windows 95”, and Microsoft
Windows Version 3.1 as “Windows 3.1”. When
there is no need to distinguish between
programmes, the term “Windows” will be used.
- Microsoft and Windows are registered
trademarks of Microsoft Corporation.
- Macintosh is a registered trademark of Apple
Computer, Inc.
- All other brand and product names are
trademarks or registered trademarks of their
respective holders.
Thank you for your purchase of the Sharp LCD
Multimedia Monitor. To ensure safety and many
years of trouble-free operation of your product,
please read the safety precautions carefully before
using this monitor.
- The TFT colour LCD panel used in this monitor
is made with the application of high precision
technology. However, there may be minute
points on the screen where pixels never light or
are permanently lit. Also, if the screen is viewed
from an acute angle there may be uneven
colours or brightness. Please note that these are
not malfunctions but common phenomena of
LCDs and will not affect the performance of the
monitor.
- Do not leave the screen displaying idly for long
periods of time, as this could cause an
afterimage to remain.
- If the brightness is adjusted to the minimum
setting it may be difficult to see the screen.
- The quality of the computer signal may influence
the quality of the display. We recommend using a
computer able to emit high quality video signals.
- Never rub or tap the monitor with hard objects.
- Please understand that Sharp Corporation bears
no responsibility for errors made during use by
the customer or a third party, nor for any other
malfunctions or damage to this product arising
during use, except where indemnity liability is
recognized under law.
- This monitor and its accessories may be
upgraded without advance notice.
Location
- Do not use the monitor where ventilation is poor,
where there is a lot of dust, where humidity is
high, or where the monitor may come into
contact with oil or steam, as this could lead to
fire.
- Ensure that the monitor does not come into
contact with water or other fluids. Ensure that no
objects such as paper clips or pins enter the
monitor as this could lead to fire or electric
shock.
- Do not place the monitor on top of unstable
objects or in unsafe places. Do not allow the
monitor to come into contact with strong shocks
or vibrations. Causing the monitor to fall or
topple over may damage it.
- Do not use in places where the monitor will be
subject to direct sunlight, near heating
equipment or anywhere else where there is
likelihood of high temperature, as this may lead
to generation of excessive heat and outbreak of
fire.
Tips and safety precautions
Page 7

E5
EnglishDeutschFrançaisItalianoEspañolEnglish
Please check that the following items are included
in the package.
- LCD multimedia monitor (1)
- AC adapter (1)
(model name: NL-A69J)
- Power cord (1)
- PC analog signal cable (1)
(model name: 0NIT15V1-0183)
- PC audio cable (1)
(model name: 0NIT17A3-U006)
- Remote control (1)
- R-03 (“AAA” size, UM/SUM-4) dry battery (2)
- Cable clamp (1)
- CD-ROM (Utility Disk for Windows/Macintosh) (1)
- Operation manual (1)
Notes:
- You are advised to retain the carton in case the
monitor needs to be transported.
- Sharp Corporation holds authorship rights to the
Utility Disk programme. Do not reproduce it
without permission.
- The shape of the supplied accessories may not
be exactly same as shown in this manual.
Monitor and accessory checklist
Page 8
E6
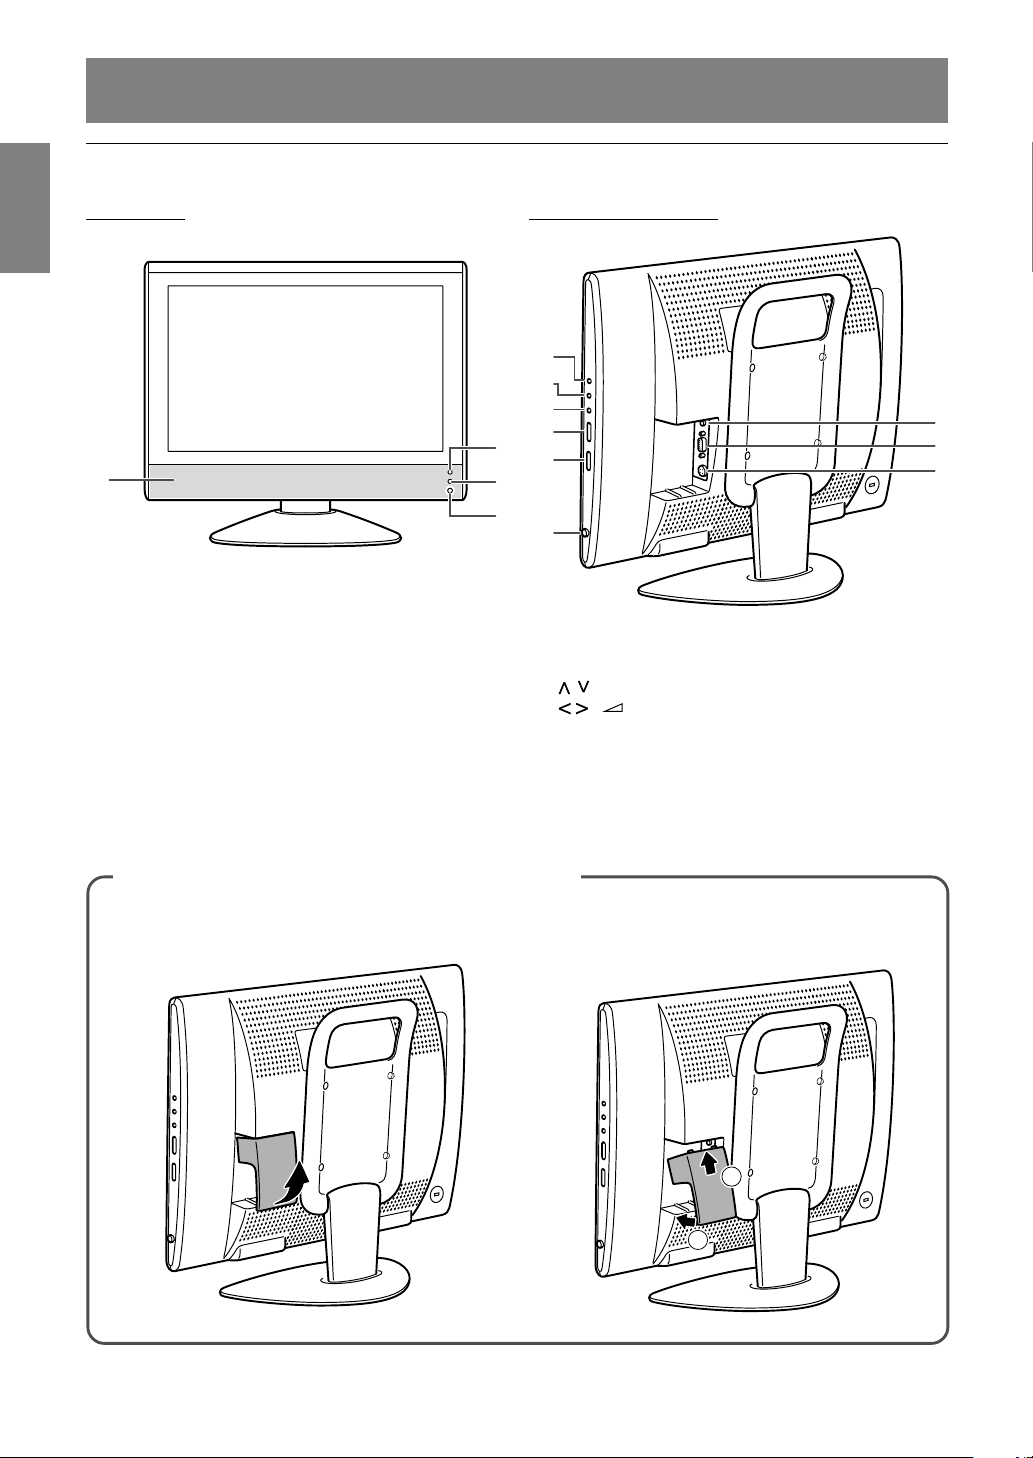
Product description
Front view
1
4
3
2
1. Speakers
2. Power LED
Green: in use
Red: in standby mode
Orange: in power-saving mode
(only for PC mode)
Off: power off
3. Remote sensor window
4. Headphone terminal
Main unit
Removing/replacing the terminal cover
Removing the cover
Replacing the cover
1
2
Right view/rear view
5
6
7
8
9
10
11
12
13
5. INPUT button
6. MENU button
7. OK/BRIGHT MODE button
8. (channel) buttons
9. ( (volume) /BRIGHT) buttons
10. MAIN POWER button
11. PC audio input terminal
12. PC analog RGB input terminal
13. Power input terminal
Page 9
E7
EnglishDeutschFrançaisItalianoEspañolEnglish
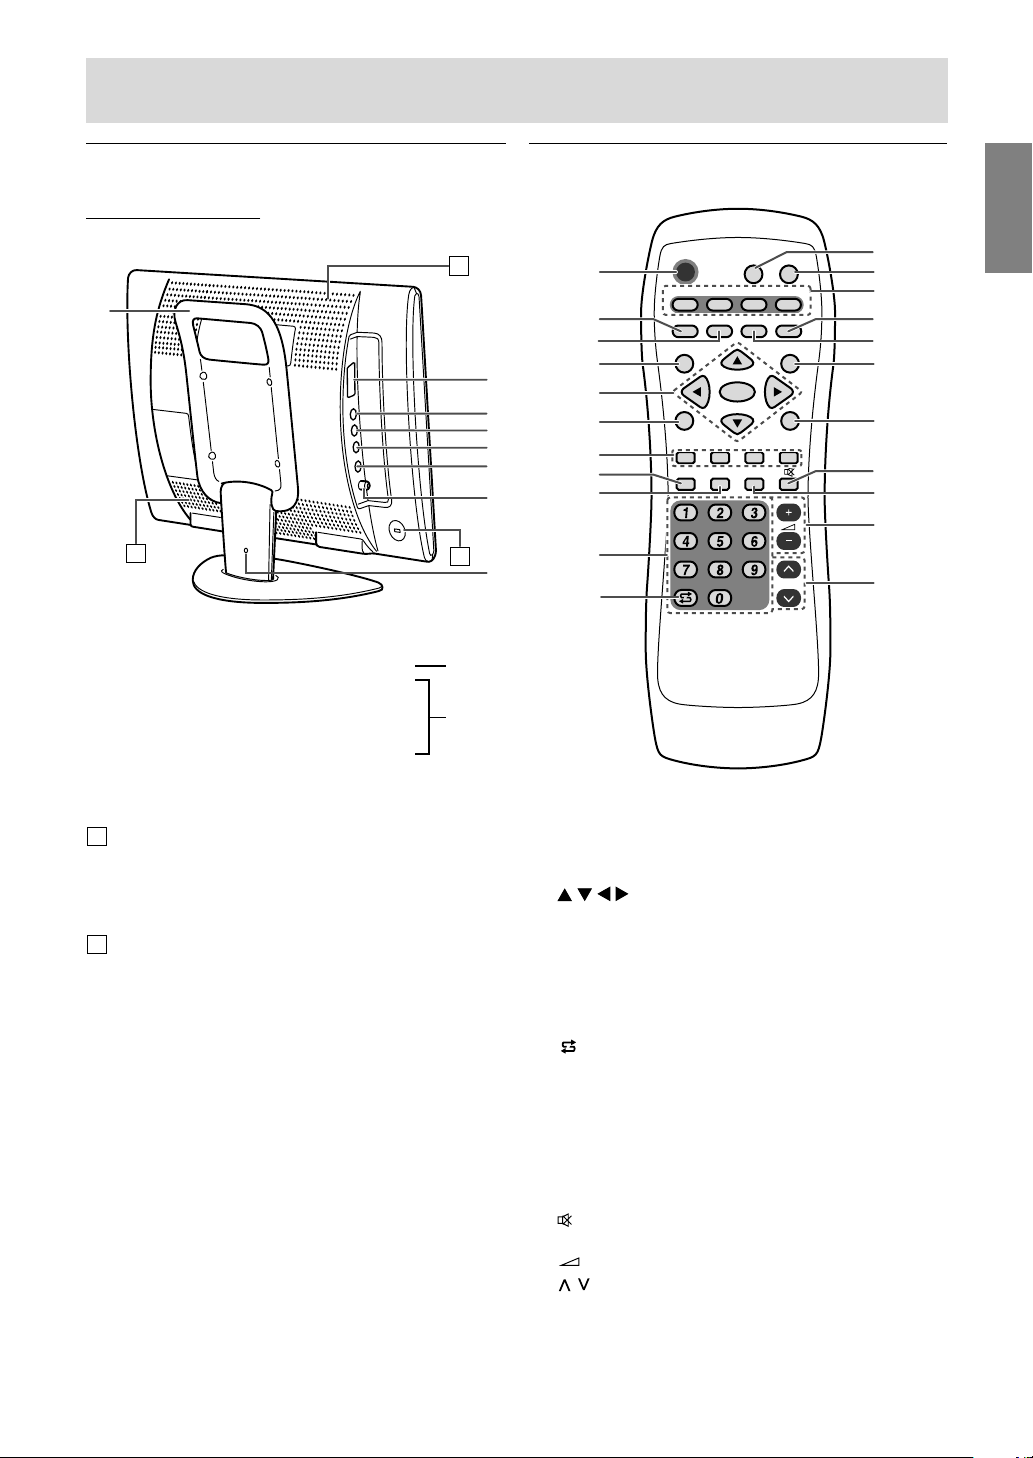
Product description
Main unit
Left view/rear view
B
A
A
14
15
16
17
18
19
20
21
14.Handle
15. 21-pin Euro-SCART (RGB) terminal
16. Video input terminal
17. Audio input terminal - Left
18. Audio input terminal - Right
19. S-video input terminal
20. Antenna input terminal
21. Lug-hole for cable clamp (See next page.)
A Ventilation openings
Never block the ventilation openings as this may
lead to overheating inside the monitor and result
in malfunction.
B Security lock anchor
By connecting a security lock (commercially
available) to the security lock anchor, the monitor
is fixed so that it cannot be transported. The
security slot works in conjunction with Kensington
Micro Saver Security Systems.
Remote control
POWER
PC AV2AV1TV
SLEEP
OK
MENU
BRIGHT
DISPLAY
FREEZE
/HOLD
SOUND
CH
SUBPAGE SUBTITLE
VIEW MODE
TEXT
REVEAL
PIP
BRIGHT
MODE
4
5
7
6
3
2
1
9
10
11
8
14
15
12
16
17
18
13
19
20
21
22
1. POWER button
2. SUBPAGE button
3. REVEAL button
4. SLEEP button
5.
buttons and OK button
6. BRIGHT MODE button
7. Red, Green, Yellow and Cyan buttons
(for Teletext)
8. DISPLAY button
9. FREEZE/HOLD button
10. Channel buttons
11. (flashback) button
12. VIEW MODE button
13. PIP (Picture in Picture) button
14. Input buttons (PC, TV, AV1, and AV2)
15. TEXT button (for Teletext)
16. SUBTITLE button
17. MENU button
18. BRIGHT button
19.
(mute) button
20. SOUND button
21.
(volume) + – buttons
22. (channel) buttons
AV-IN1
AV-IN2
Page 10
E8
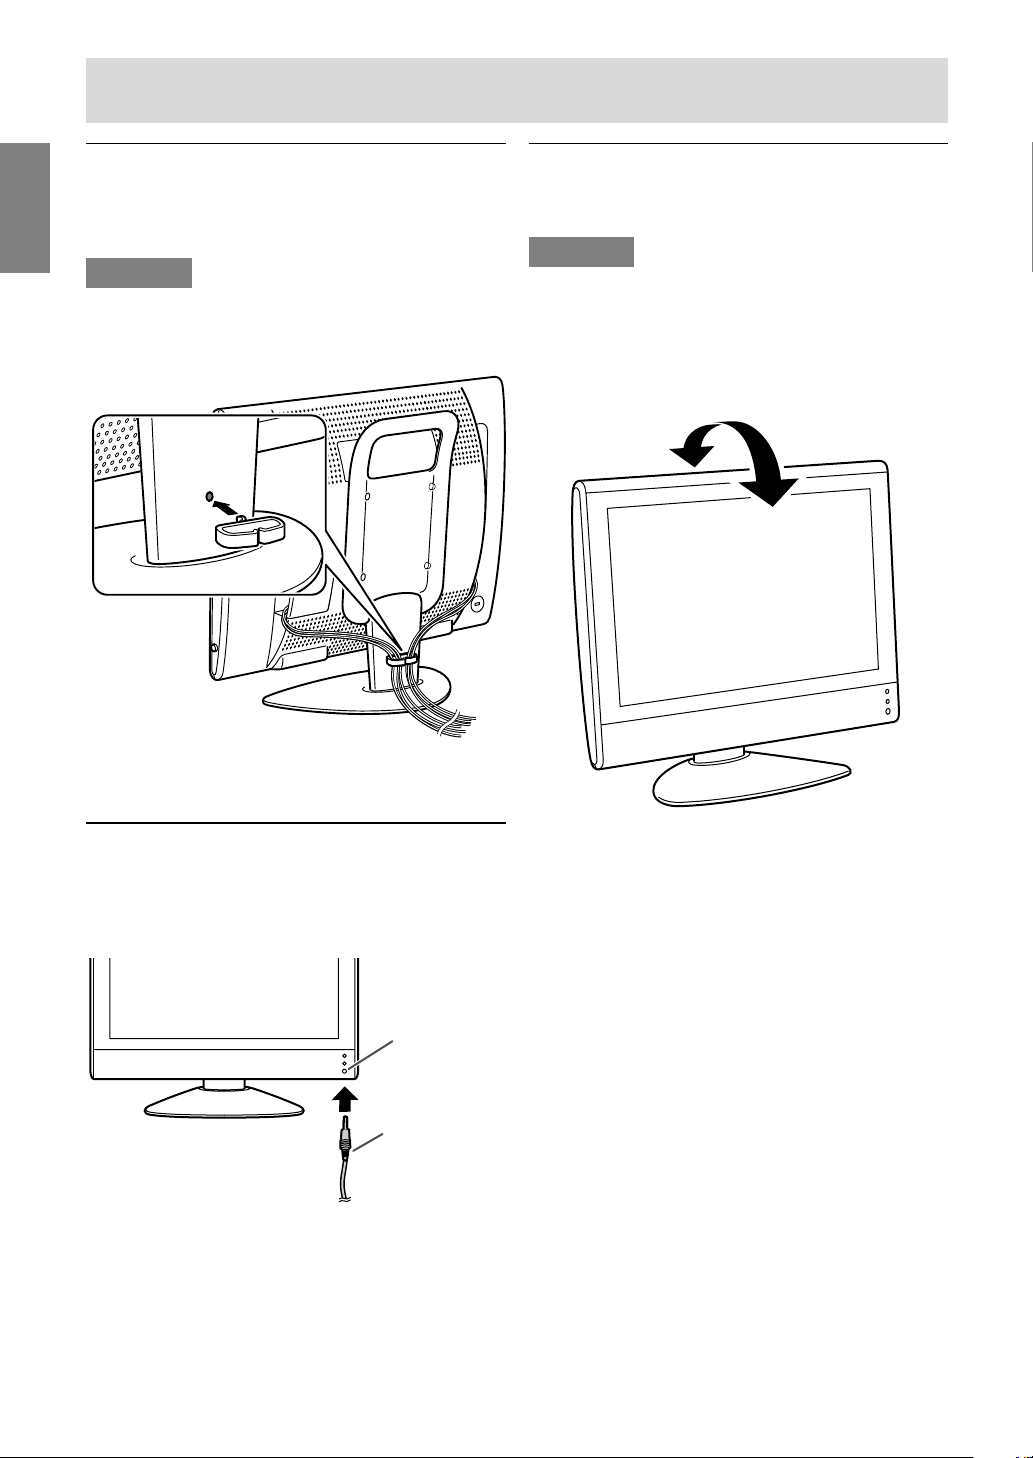
Product description
Cable clamp
Use the supplied cable clamp to secure the cables
connected to the terminals.
CAUTION!
- When adjusting the viewing angle, cables may
be pulled. Therefore, ensure that the cables
have sufficient slack.
Angle adjustment
Adjust to an easy to view angle.
CAUTION!
- Be sure to hold both sides of the monitor when
adjusting the viewing angle. The LCD panel
used in this monitor is made of glass. Pressure
from hands on the LCD panel could cause
damage.
- Be careful not to allow your fingers to be pinched.
approx. 20°
approx. 5°
Using headphones
(commercially available)
You can connect headphones (commercially
available) to the monitor.
Note:
- When the headphones are connected, no sound
can be heard from the monitor speakers.
Headphone
terminal
Headphones
Page 11
E9
EnglishDeutschFrançaisItalianoEspañolEnglish
Remote control
Batteries for the remote control
Before using the monitor for the first time, install two R-03 (“AAA” size, UM/SUM-4) batteries (supplied).
When the batteries become depleted and the remote control fails to operate, replace the batteries with
new R-03 (“AAA” size, UM/SUM-4) batteries.
CAUTION!
Improper use of batteries can result in chemical leakage and/or explosion. Be sure to follow the
instructions below.
- Place batteries with their terminals corresponding to the (+) and (–) indications.
- Different types of batteries have different characteristics. Do not mix batteries of different types.
- Do not mix old and new batteries. Mixing old and new batteries can shorten the life of new battery
and/or cause the old battery to leak chemicals.
- Remove batteries when they become weak.
Chemicals that leak from batteries can cause a rash. If chemical leakage is found, wipe with a cloth.
- The batteries supplied with the product may have a shorter life expectancy due to storage conditions.
- If the remote control will not be used for an extended period of time, remove the batteries from the
remote control.
Use the remote control by pointing it towards the remote sensor window on the monitor. Objects between
the remote control and sensor window may prevent proper operation.
Cautions regarding use of remote control
- Do not expose the remote control to shock.
In addition, do not expose the remote control to liquid, and do not place in an area with high humidity.
- Do not install or place the remote control under direct sunlight. The heat may deform the unit.
- The remote control may not work properly if the remote sensor window of the monitor is under direct
sunlight or strong lighting. In such case, change the angle of the lighting or monitor, or operate the
remote control closer to the remote sensor window.
- Do not use the remote control simultaneously with remote controls of other equipments.
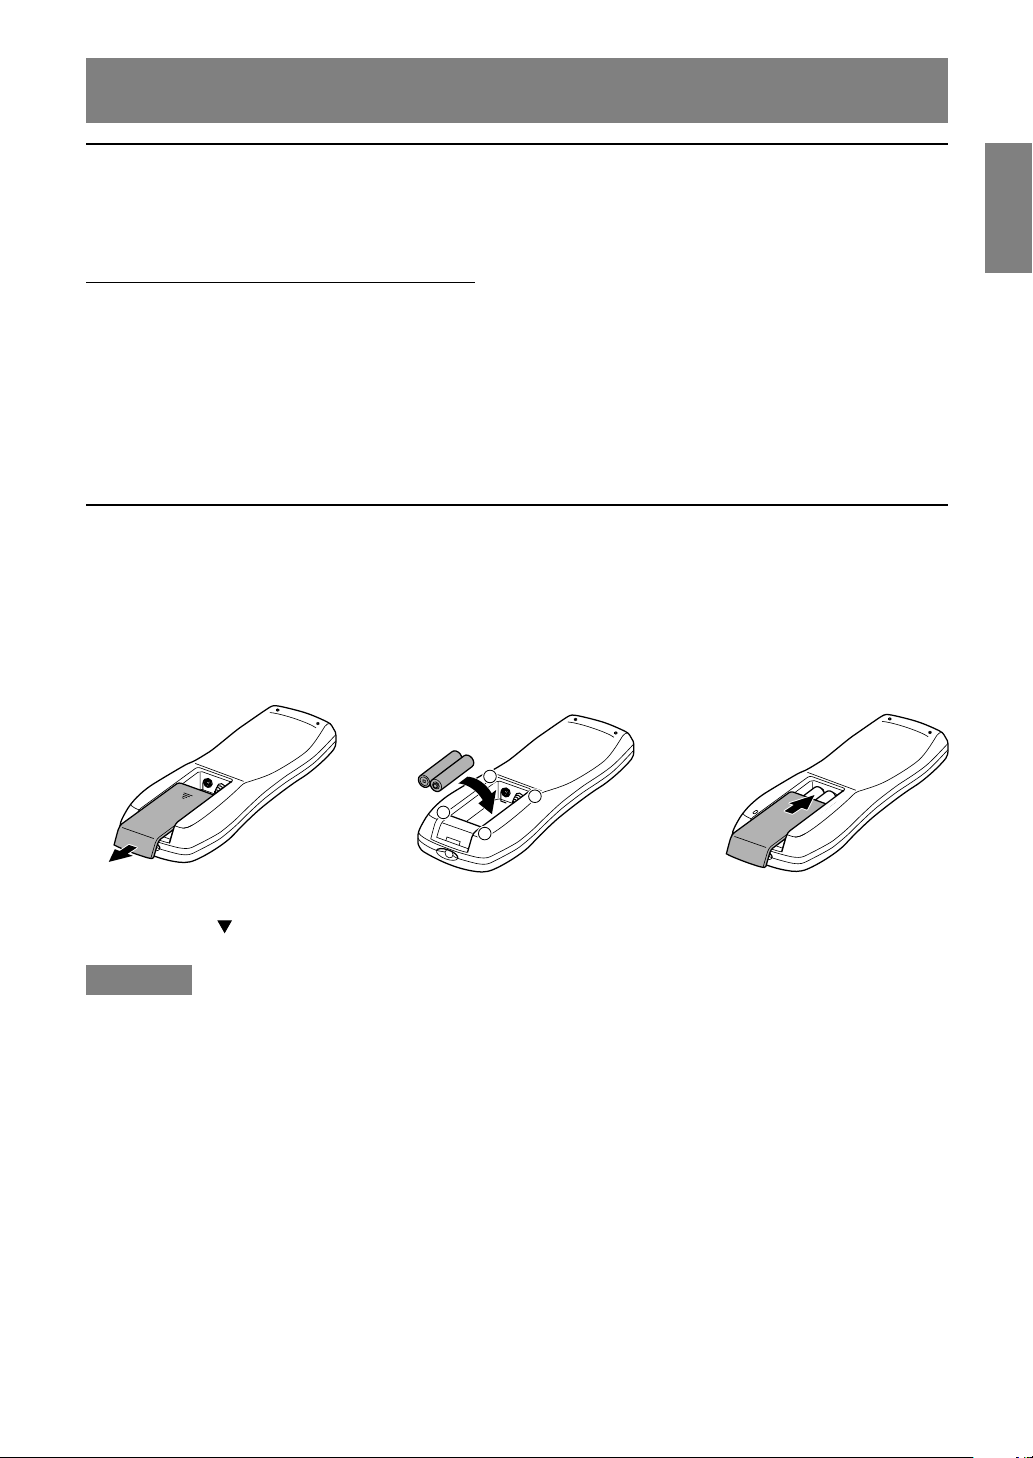
1 Open the battery
cover.
Slide the cover while
pressing the ( ) part.
2 Insert two R-03 (“AAA” size,
UM/SUM-4) batteries.
+
+
-
-
Position the positive and
negative ends of the batteries
as indicated in the compartment.
3 Close the battery
cover.
Engage the claw on the
cover into the battery
housing and slide shut.
Using the remote control
Page 12
E10
Connecting the monitor to a computer
CAUTION!
- When connecting, ensure that the monitor and all the equipment you are connecting to it are switched
off.
- Be careful not to over bend the cable or add extension cords as this could lead to a malfunction.
- When using the monitor for the first time or after having changed the system settings during use,
perform an automatic screen adjustment (see page E17).
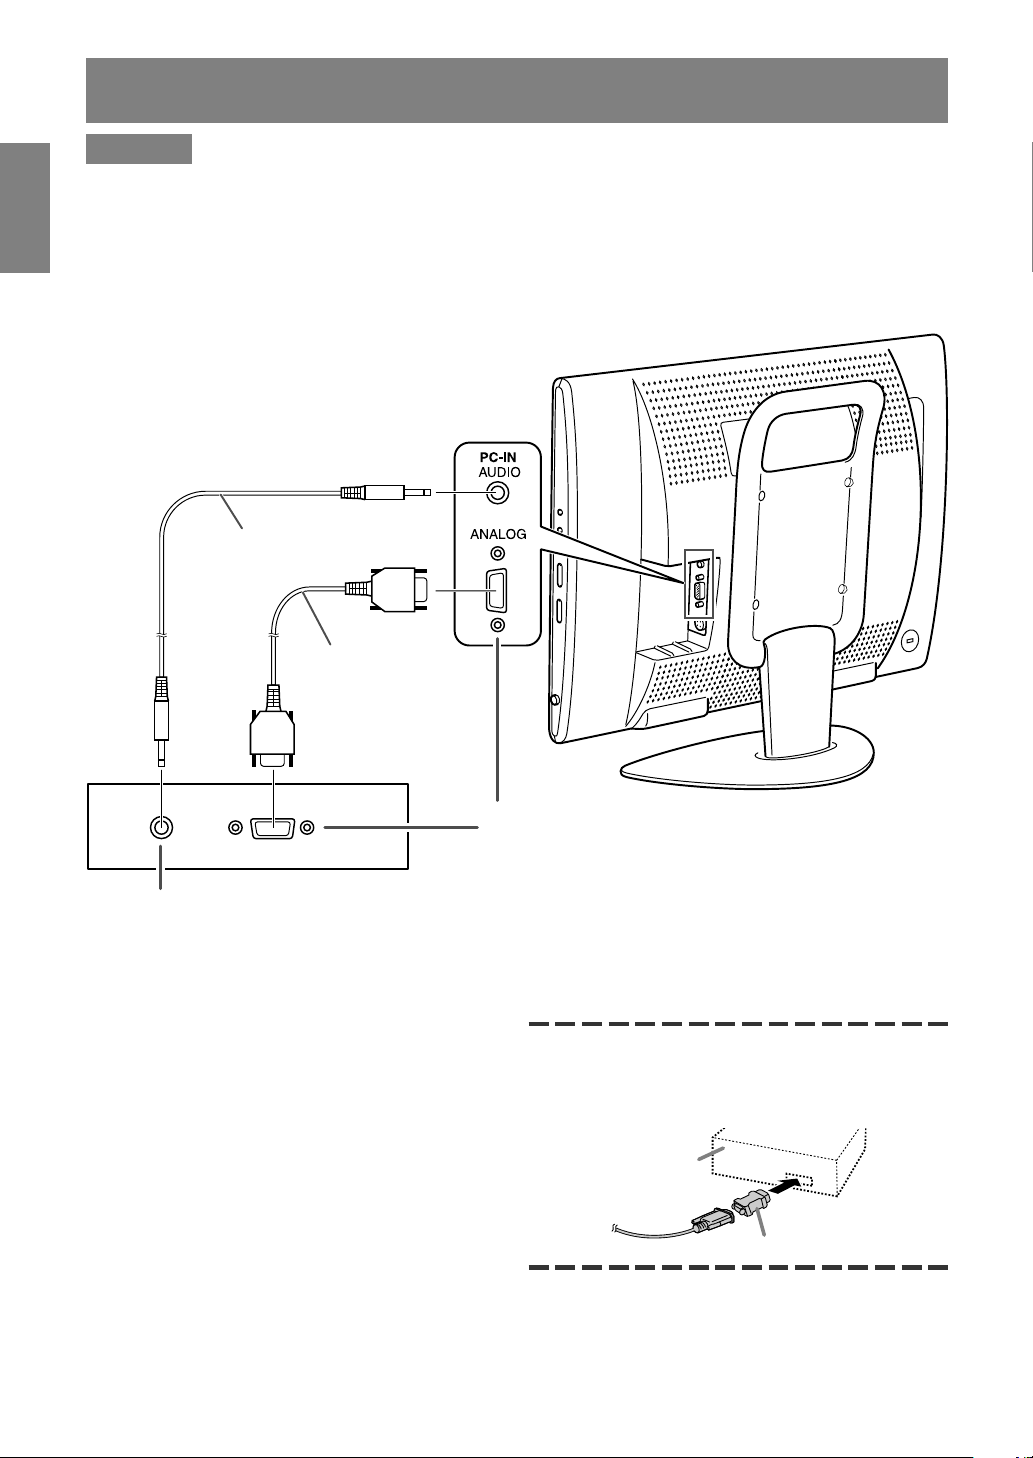
See page E6 for information on removing/replacing the terminal cover.
Audio output terminal
The monitor’s speakers will play the computer’s
audio when you connect the two devices with the
PC audio cable accessory.
Notes:
- Depending on the computer or OS, you may
have to install the set-up information for the
monitor. (See page E26.)
- When connecting to a notebook and the
notebook computer’s screen is set so that it is
displaying at the same time, the MS-DOS screen
may not be able to display properly. In this case,
change the settings so that only the monitor is
displaying.
If connecting to a D-sub15 pin 2 row Apple Power
Macintosh, attach a Macintosh conversion adapter
(commercially available) to the analog signal
cable.
Macintosh conversion adapter
Analog RGB terminal
(Mini D-sub15 pin 3 rows)
Paying attention to the connector direction, firmly
insert the signal cable straight into the connector, and
then tighten the screws at both ends.
PC analog signal cable
(accessory)
PC audio cable
(accessory)
Power Macintosh
Page 13
E11
EnglishDeutschFrançaisItalianoEspañolEnglish
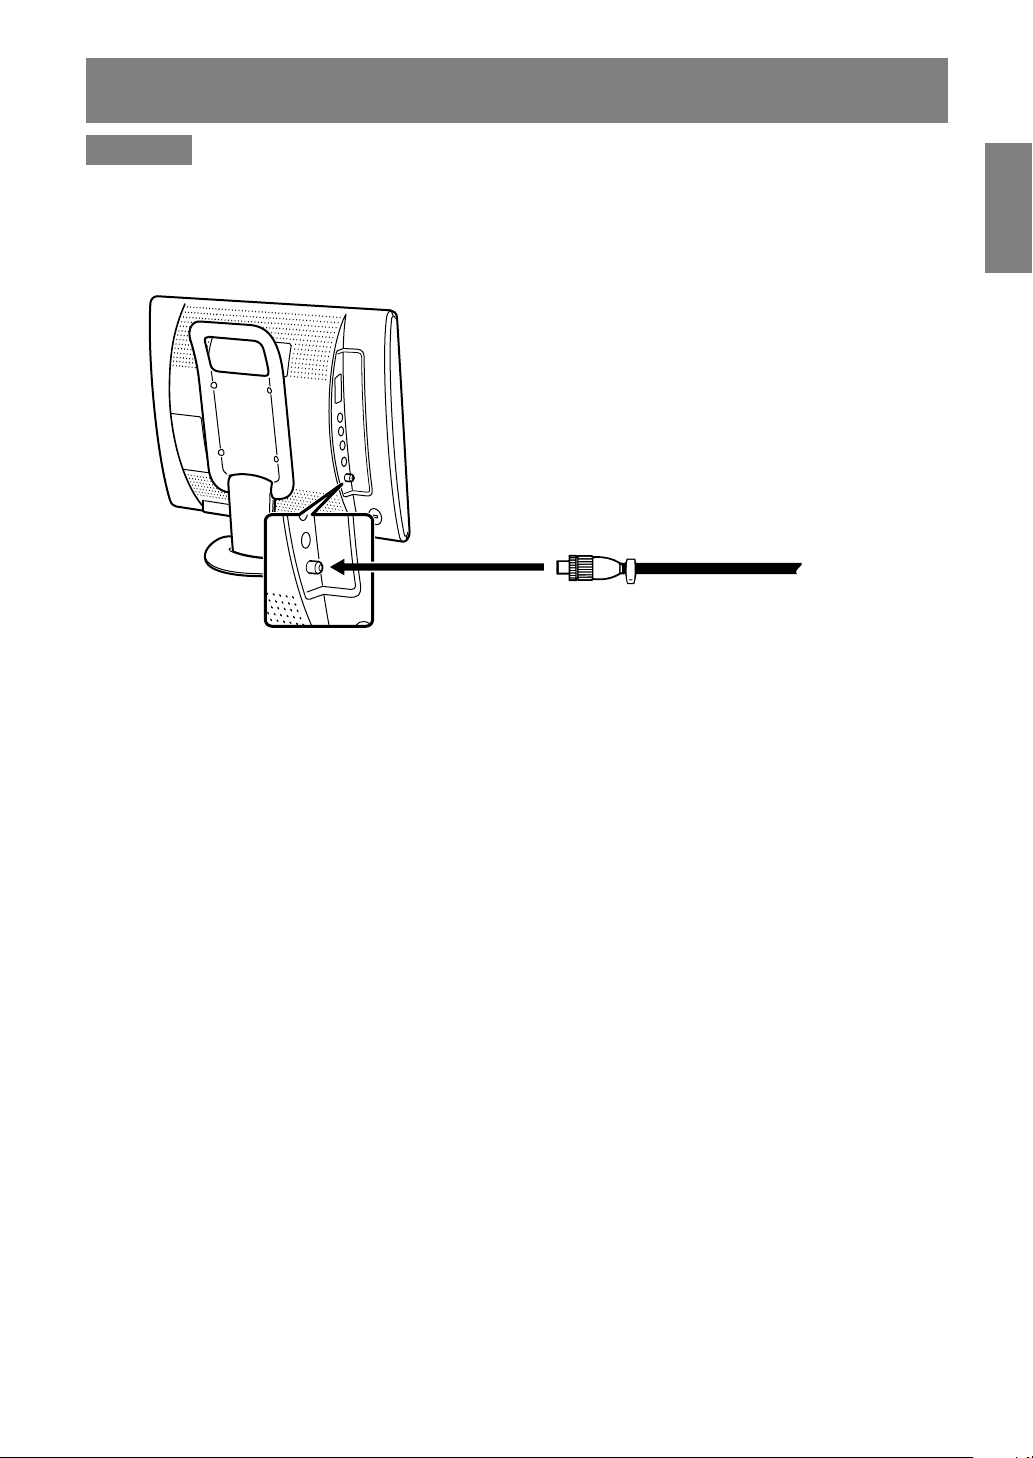
Antenna connection
CAUTION!
- When connecting, ensure that the monitor is switched off.
To enjoy a clearer picture, we recommend that you use an outdoor antenna.
Use a 75-ohm coaxial cable with a DIN45325 (IEC169-2) plug to connect the outdoor antenna to the
antenna input terminal on the left side of the monitor.
Antenna
input terminal
(ANT)
75-ohm coaxial cable (round cable)
(not supplied)
Page 14
E12
Connecting the monitor to AV equipment
CAUTION!
- Ensure that the monitor and all the equipment you are connecting to it are switched off before you
begin.
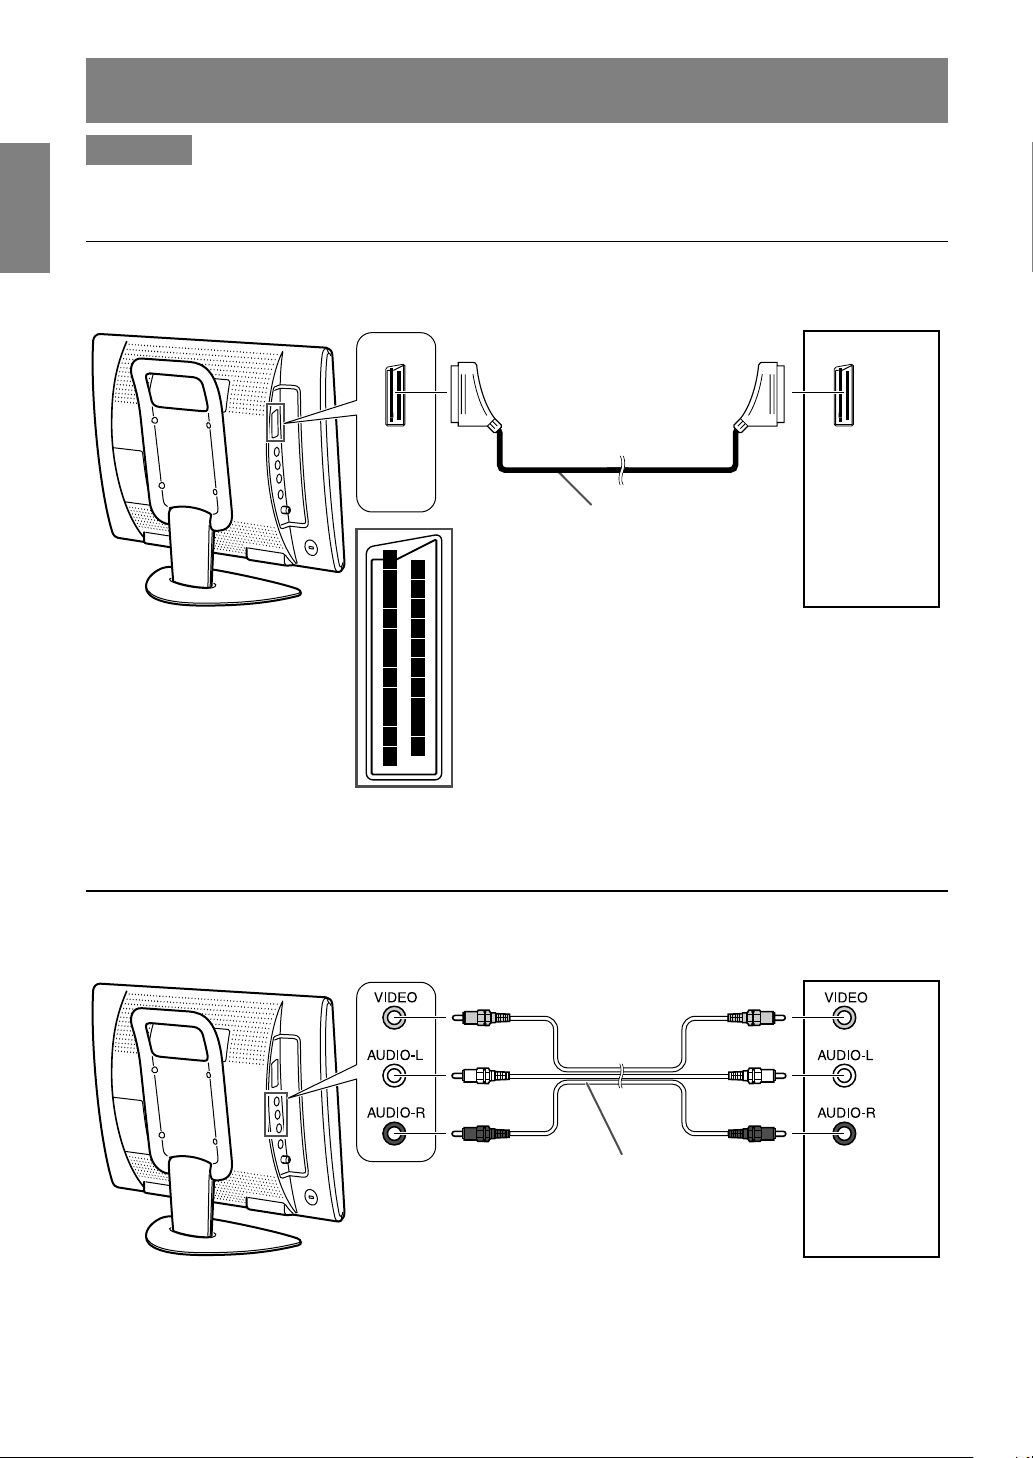
AV equipment with 21-pin Euro-SCART (RGB) terminals
6
2
4
8
10
12
14
16
18
20
1
3
5
7
9
11
13
15
17
19
21
AV equipment with video output terminals
Note:
- When you are using the video input terminal, do not connect the cable to the S-video input terminal.
Left side of the monitor
VCR etc.
AV-IN2
(Yellow) (Yellow)
(White) (White)
(Red) (Red)
RCA pin cable (commercially available)
Left side of the monitor
Decoder etc.
AV-IN1
21-pin Euro-SCART cable
(commercially available)
Page 15
E13
EnglishDeutschFrançaisItalianoEspañolEnglish
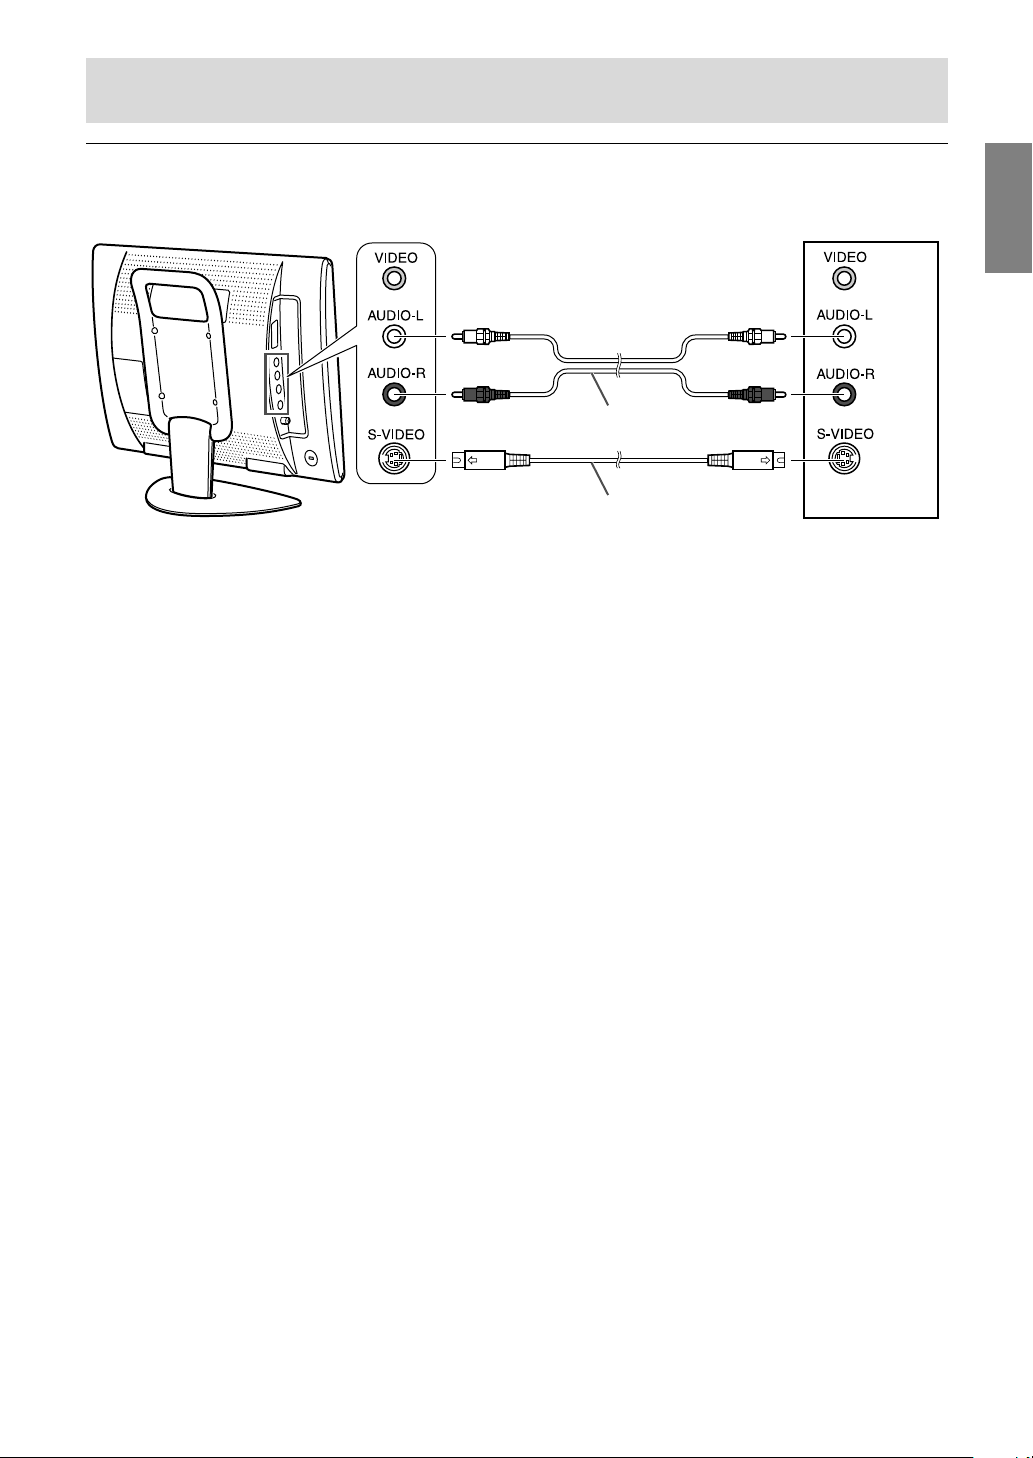
Connecting the monitor to AV equipment
AV equipment with S-video output terminals
Note:
- When you are using the S-video input terminal, do not connect the cable to the video input terminal.
(White) (White)
(Red) (Red)
RCA pin cable (commercially available)
S-video cable (commercially available)
Left side of the monitor
VCR etc.
AV-IN2
Page 16
E14
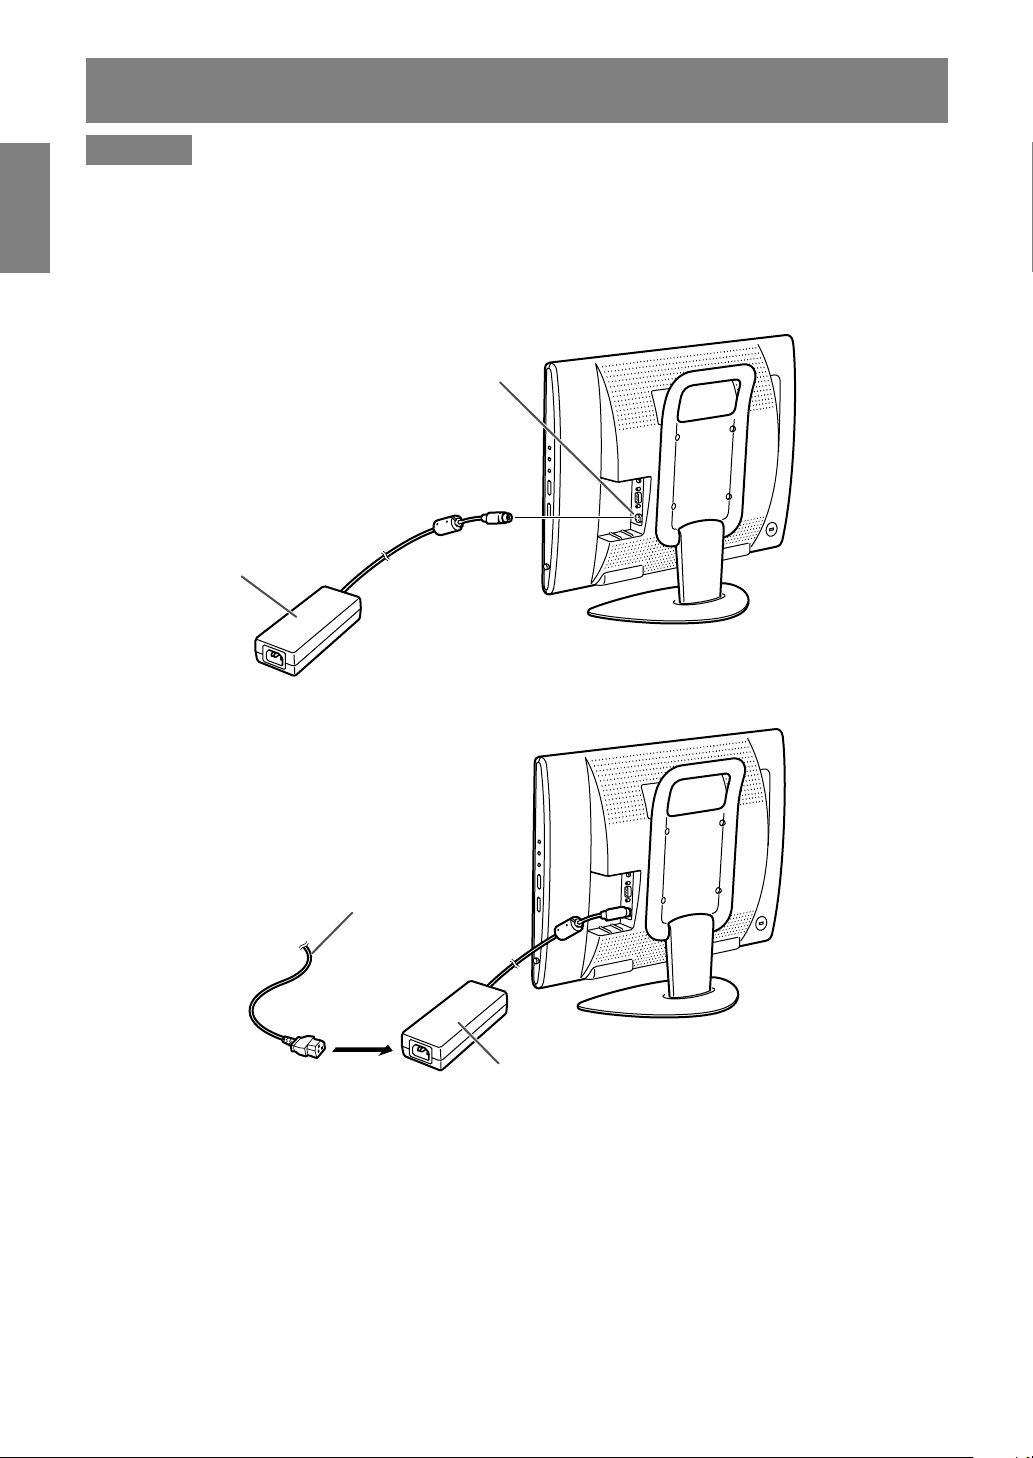
Connecting the monitor to a power source
CAUTION!
- When connecting, ensure that the monitor is switched off.
- Always use the AC adapter that came with the monitor.
- Be careful not to over bend the cable or add extension cords as this could lead to a malfunction.
See page E6 for information on removing/replacing the terminal cover.
1.Connect the AC adapter to the power input terminal.
2.Plug the power cord into the AC adapter and then place the power plug into an AC outlet.
Note:
- The shape of the power cord may vary in some countries.
Power input terminal
AC adapter
Power cord
AC adapter
AC outlet
Page 17
E15
EnglishDeutschFrançaisItalianoEspañolEnglish
First installation
When you turn on the monitor power for the first
time or after the ALL RESET operation (refer to the
end of this manual), the FIRST INSTALLATION
routine, which makes installation easier, is
activated. Using this routine, you can select the
on-screen display language, and automatically
search for and store the receivable channels.
Note:
- This routine activates every time you turn on the
monitor power until the automatic programme
search is started once.
MAIN
POWER
/BRIGHT
CH
MENU
INPUT
OK
/
BRIGHT
MODE
POWER
PC AV2AV1TV
SLEEP
OK
MENU
BRIGHT
DISPLAY
FREEZE
/HOLD
SOUND
CH
SUBPAGE SUBTITLE
VIEW MODE
TEXT
REVEAL
PIP
BRIGHT
MODE
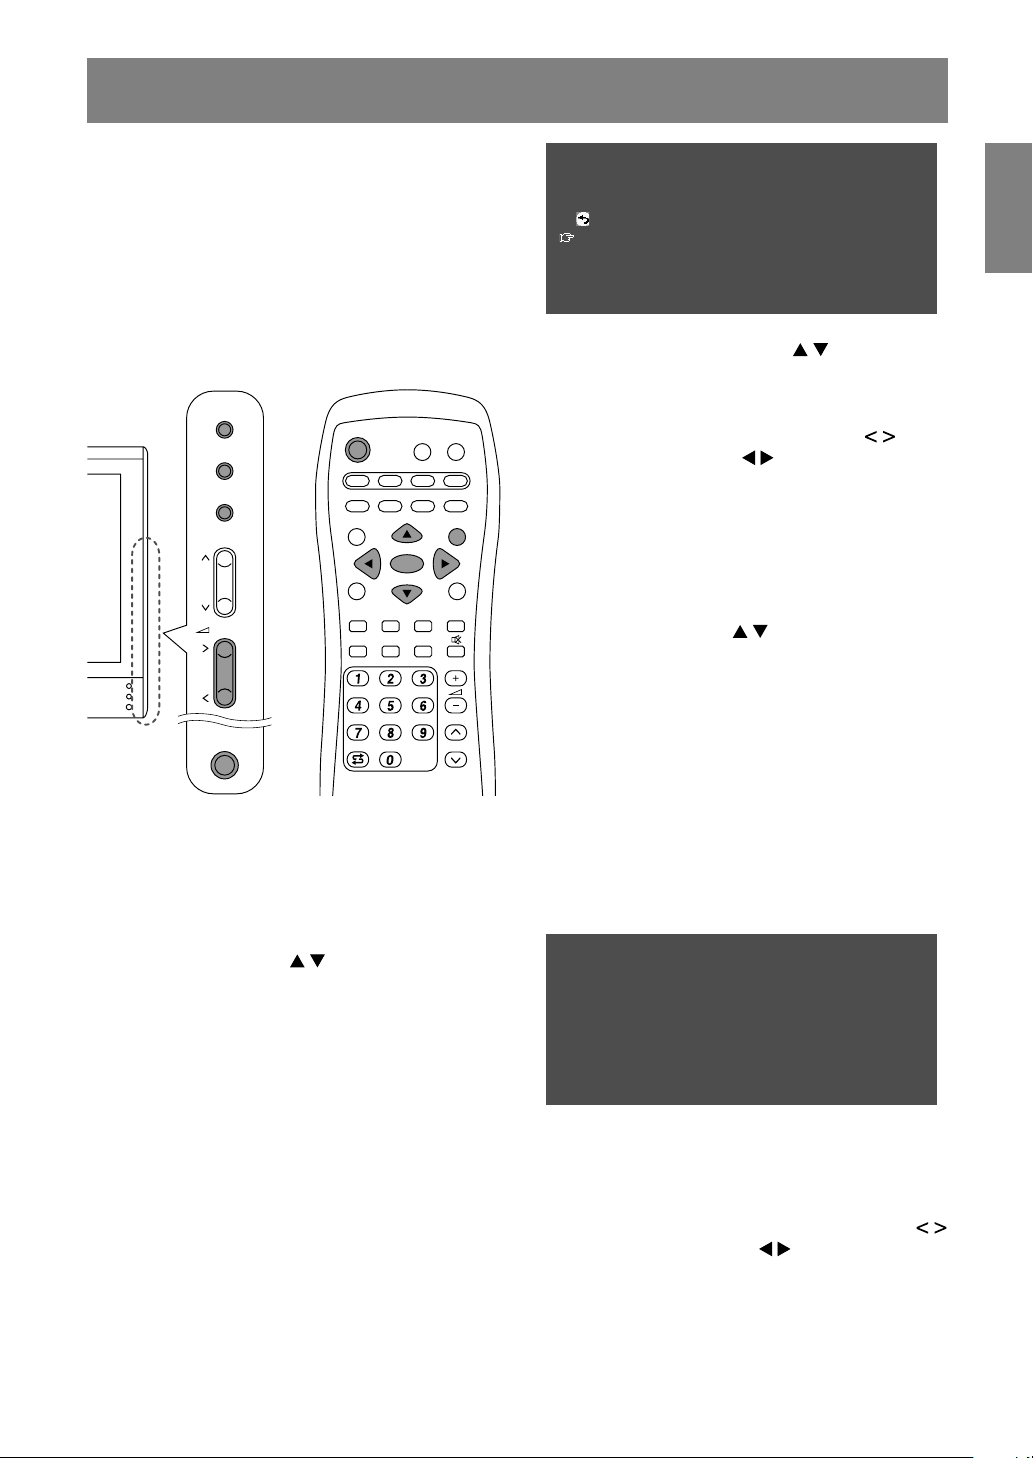
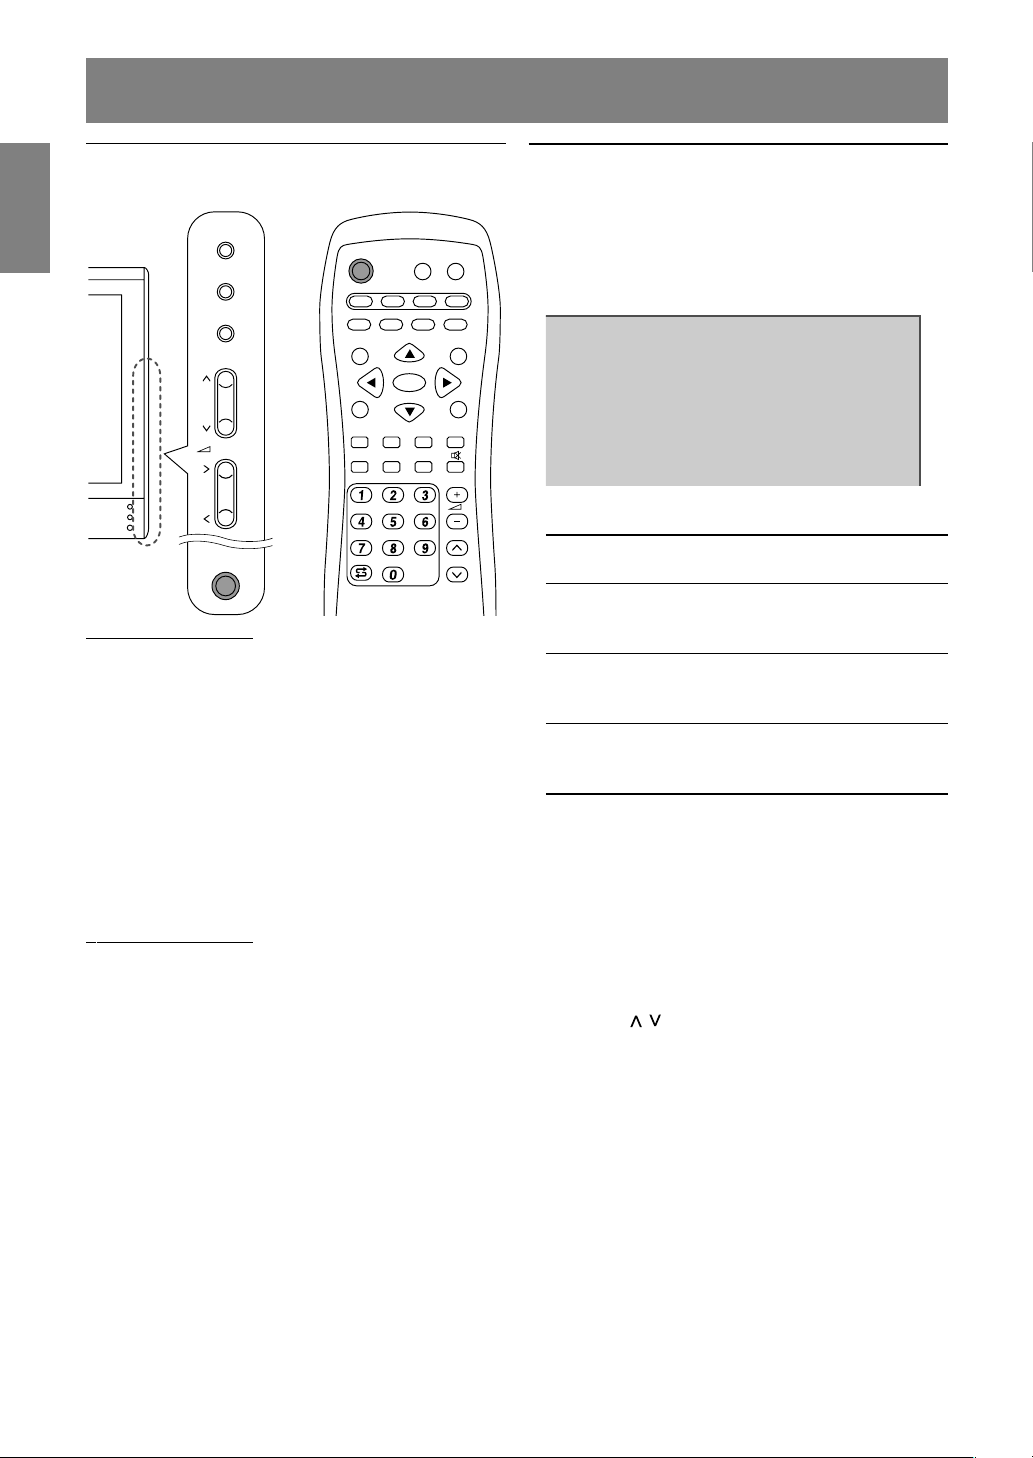
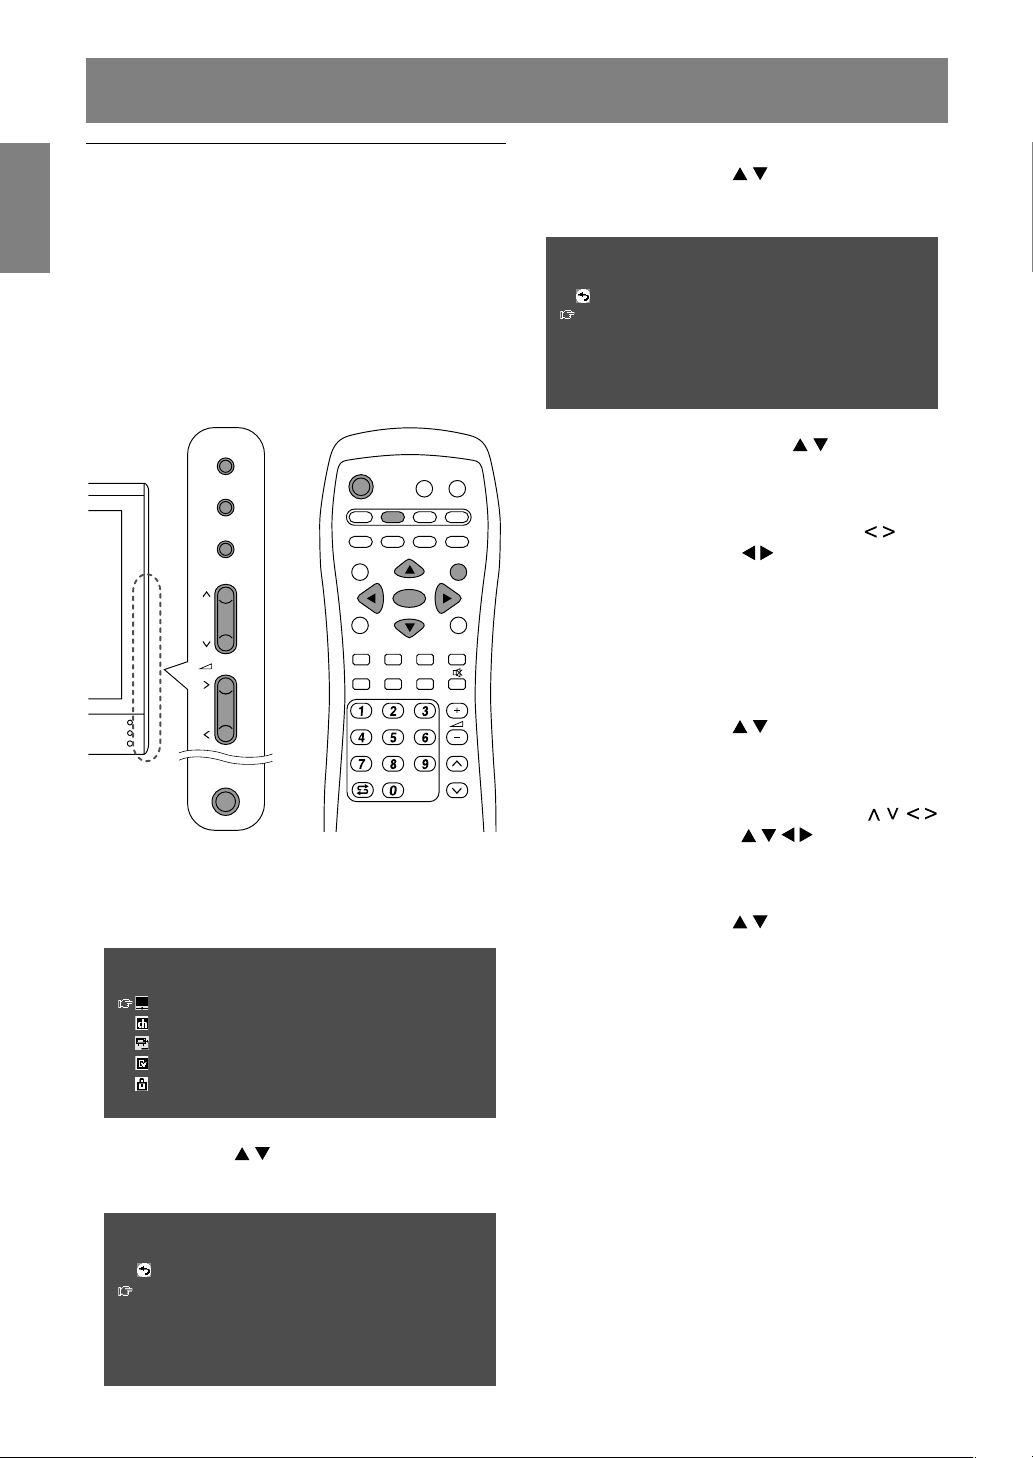
1. Press the MAIN POWER button to turn on the
monitor.
When the power LED lights red, press the
POWER button on the remote control.
The “FIRST INSTALLATION (LANGUAGE)”
screen will be displayed.
2.Select the desired language using the MENU
button (monitor) or the buttons (remote
control).
The on-screen display will switch to the selected
language.
Notes:
- The procedures described in this manual use
screenshots in ENGLISH (factory setting).
- You can change the on-screen display
language after the FIRST INSTALLATION
routine is completed. (See page E19.)
3.Press the OK/BRIGHT MODE button (monitor) or
the OK button (remote control).
The “FIRST INSTALLATION (AUTOMATIC
SEARCH)” screen will be displayed.
FIRST INSTALLATION
(AUTOMATIC SEARCH)
RETURN
COUNTRY
[
UK
]
COLOUR SYSTEM
[
PAL
]
SOUND SYSTEM
[
I
]
START SEARCH
4.Select the desired adjustment item using the
MENU button (monitor) or the buttons
(remote control), and press the
OK/BRIGHT MODE button (monitor) or the
OK button (remote control).
Then select the desired item using the
buttons (monitor) or the buttons (remote
control).
Note:
- Select your country from the following: UK,
Germany, France, Italy or “OTHERS”. When
“OTHERS” is selected, you can change the
other two systems.
5.Select “START SEARCH” using the MENU
button (monitor) or the buttons (remote
control).
6.Press the OK/BRIGHT MODE button (monitor) or
the OK button (remote control).
The automatic programme search will start.
Note:
- If you want to stop the process after it has
started, press the INPUT button (monitor) or
the MENU button (remote control). In this case,
you can set channels using “AUTOMATIC
SEARCH” in the PROGRAMMES menu in
TV mode. (See page E30.)
When the search is completed, the new
programmes found are displayed on the list.
START SEARCH
<
TV/AV
>
SEARCH IS COMPLETED
00 05 10 15
01 E02 06 11 16
02 E03 07 12 17
03 E04 08 13 18
04 09 14 19
Notes:
- The programmes are named automatically
and the programmes whose names could not
be found are displayed with “-----”. Names can
be entered later. (See page E33.)
- To display the previous or next list, use the
buttons (monitor) or the buttons (remote
control).
7.Exit the screen using the INPUT button (monitor)
or the MENU button (remote control).
Page 18

E16
To select an item, start by moving the cursor ( ) to the desired item.
[Monitor]
1.Press the MENU button.
Each time you press the button, the cursor moves down one item.
If you press the button at the bottom, the cursor returns to the top.
Example: Each time you press the MENU button in the TV MENU screen, the cursor moves in the
following order:
PICTURE → PROGRAMMES → AV CONNECTIONS → MODE SELECT → CHILD LOCK → PICTURE…
MENU
<
TV/AV
>
PICTURE
>>
PROGRAMMES
>>
AV CONNECTIONS
>>
MODE SELECT
>>
CHILD LOCK
>>
[Remote control]
1.Press the buttons.
Each time you press the button, the cursor moves up one item.
Each time you press the button, the cursor moves down one item.
Selecting the item in the MENU screen
Page 19
E17
EnglishDeutschFrançaisItalianoEspañolEnglish
Adjusting the computer display (AUTO ADJUSTMENT)
When using the monitor as a computer display for
the first time or after having changed the system
settings during use, perform an automatic screen
adjustment. “CLOCK”, “PHASE”, “H-POS”, and
“V-POS” will be set to their optimum states.
MAIN
POWER
CH
MENU
INPUT
PC AV2AV1TV
BRIGHT
MODE
BRIGHT
CH
POWER
SLEEP MENU
DISPLAY
FREEZE
/HOLD
SOUND
SUBPAGE SUBTITLE
VIEW MODE
TEXT
REVEAL
PIP
OK
/BRIGHT
OK
/
BRIGHT
MODE
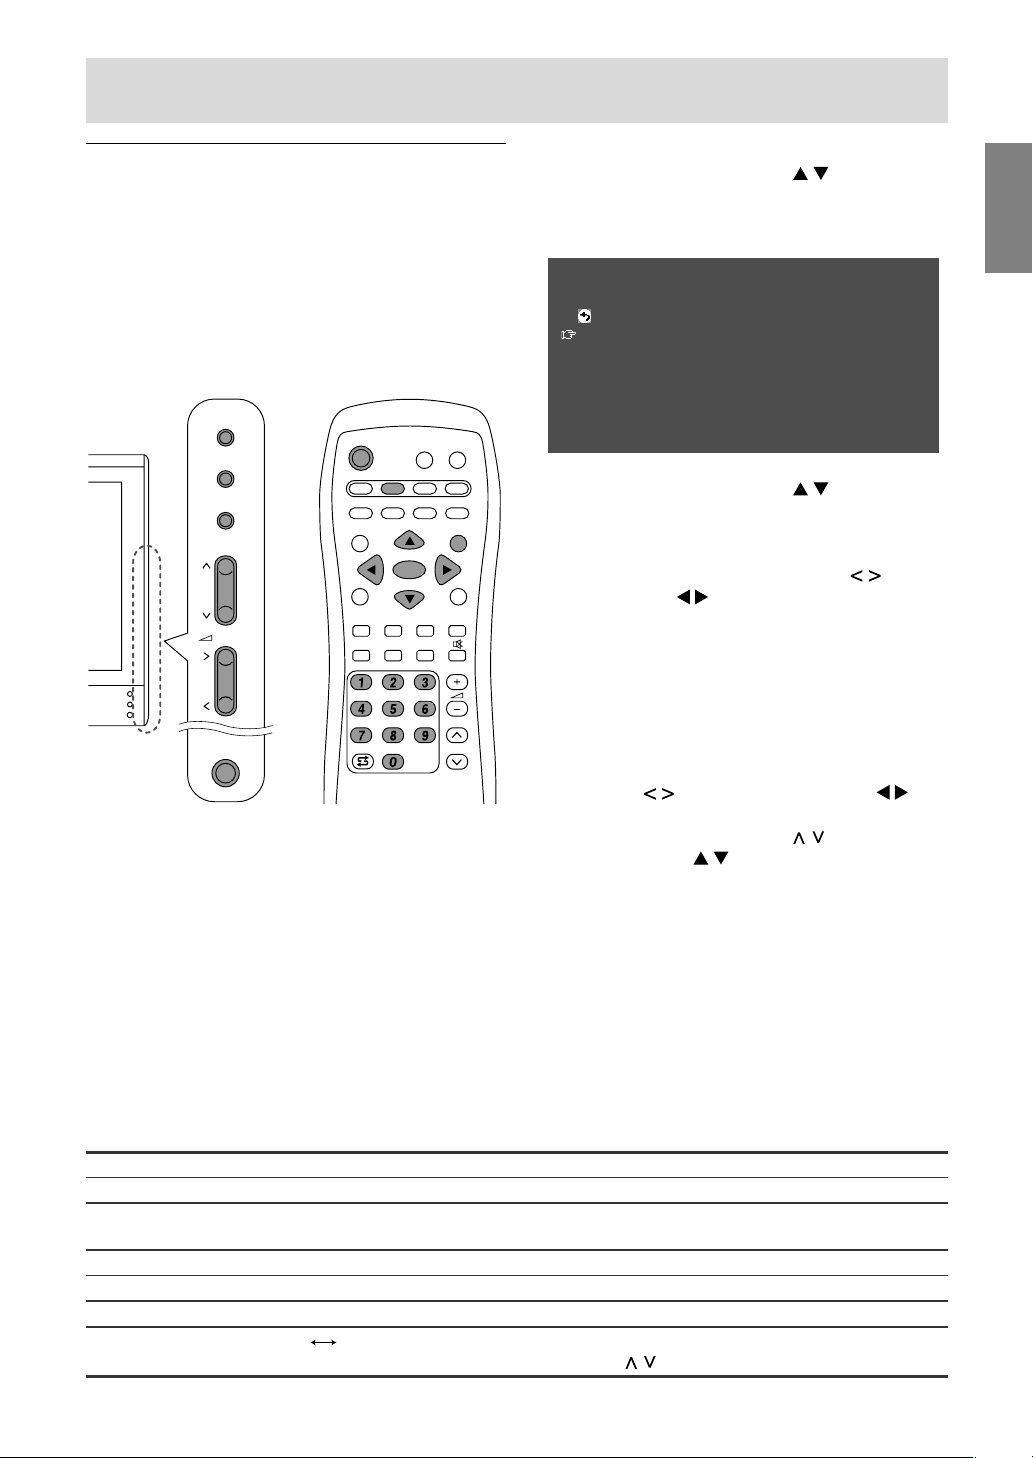
1.Press the MAIN POWER button to turn on the
monitor.
When the power LED lights red, press the
POWER button on the remote control.
2.Select the PC mode using the INPUT button
(monitor) or the PC button (remote control).
When using the INPUT button (monitor), each
time you press it, the input changes in the
following order:
PC → Number (TV) → AV1 → AV2 → PC...
3.Turn on the computer, and then display an image
that makes the entire screen display light
colours (such as a light desktop background).
If you are running Windows, you can use the
Adjustment Pattern on the accompanying Utility
Disk (see page E22).
4.Display the MENU screen using the MENU
button.
The cursor is positioned at “ADJUSTMENT”.
MENU
<PC>
ADJUSTMENT
>>
GAIN CONTROL
>>
COLOUR CONTROL
>>
MODE SELECT
>>
PICTURE IN PICTURE
>>
5.Press the OK/BRIGHT MODE button (monitor) or
the OK button (remote control).
The “ADJUSTMENT” screen will be displayed.
ADJUSTMENT
<PC>
RETURN
AUTO
CLOCK
[
127
]
>>
PHASE
[
16
]
>>
H-POS
[
200
]
>>
V-POS
[
50
]
>>
RESET
6.Press the OK/BRIGHT MODE button (monitor) or
the OK button (remote control) to auto-adjust the
settings.
The screen will go dark and “ADJUSTING” will
be displayed. After a few seconds, the
“ADJUSTMENT” screen will return.
7.Exit the screen using the INPUT button (monitor)
or the MENU button (remote control).
Notes:
- When you are using the 1280 x 768 or 1024 x
768 mode, specify the horizontal resolution of a
768-line screen in the MODE SELECT menu.
(See page E25.)
- It may not be possible to achieve correct
adjustment with the first automatic adjustment.
In such a case, try repeating the automatic
adjustment 2 or 3 times.
- If necessary due to any of the following, manual
adjustments (page E22) can be performed after
the automatic adjustment.
- When further fine adjustment is needed.
- When the computer’s video input signals are
Composite Sync or Sync on Green. (Automatic
adjustments may not be possible.)
- When “OUT OF ADJUST” is displayed. (When
the screen displays an entirely dark image, the
automatic screen adjustment may be disabled.
When making an automatic adjustment, be
sure to either use the Adjustment Pattern or try
displaying an image that makes the entire
screen very bright.)
- Automatic adjustment may not be achieved
correctly depending on what is displayed on the
screen - moving pictures or the MS-DOS prompt
etc.
Page 20
E18
Common operations
Turning power on/off
MAIN
POWER
CH
MENU
INPUT
PC AV2AV1TV
BRIGHT
MODE
BRIGHT
CH
POWER
SLEEP MENU
DISPLAY
FREEZE
/HOLD
SOUND
SUBPAGE SUBTITLE
VIEW MODE
TEXT
REVEAL
PIP
OK
/BRIGHT
OK
/
BRIGHT
MODE
Turning power on
When the power LED is off:
1.Press the MAIN POWER button on the monitor.
2.Turn on power for the connected equipment.
After a while the power LED will light green, and
then the display mode will be displayed for
several seconds.
When the power LED is lit red (standby):
1.Press the POWER button on the remote control.
2.Turn on power for the connected equipment.
The power LED will light green, and then the
display mode will be displayed for several
seconds.
Turning off power
1.Turn off power for the connected equipment.
2.Press the POWER button on the remote control.
The power LED will light red (standby).
3.Press the MAIN POWER button on the monitor.
The power LED will go out.
Notes:
- Always wait at least 5 seconds between
switching power off/on. Rapid switching may
damage the monitor or cause it to malfunction.
- After switching power on, it may take a little
while before the screen displays an image.
- Do not turn off the power immediately after
changing various settings on the screen. The
changed values may not have been saved in the
memory yet.
Switching display modes (INPUT)
[Monitor]
1.Press the INPUT button.
Each time you press the button, the input
changes in the following order:
PC → Number (TV) → AV1 → AV2 → PC...
P C
Display modes
PC PC mode Displays the computer’s
image.
Number TV mode Displays the TV’s image.
The number will be the
channel being received.
AV1 AV1 mode Displays the image from
the equipment connected
to the AV1 input.
AV2 AV2 mode Displays the image from
the equipment connected
to the AV2 input.
[Remote control]
1.Press the PC, TV, AV1, or AV2 button.
The monitor will switch to the display mode for
the button you pressed.
Notes:
- When you turn on the monitor, the initial display
mode will be the mode being used when the
monitor was last turned off.
- Using the
buttons or channel buttons on the
remote control (0-9), or selecting channels using
the programme table also automatically switches
to TV mode, except for the following cases when
in PC mode.
- When you are watching TV in the PIP window
(see page E20).
- When you are listening to TV (see page E21).
In these cases, switch the display mode to TV
using the INPUT button (monitor) or the TV
button (remote control).
Page 21
E19
EnglishDeutschFrançaisItalianoEspañolEnglish
Common operations
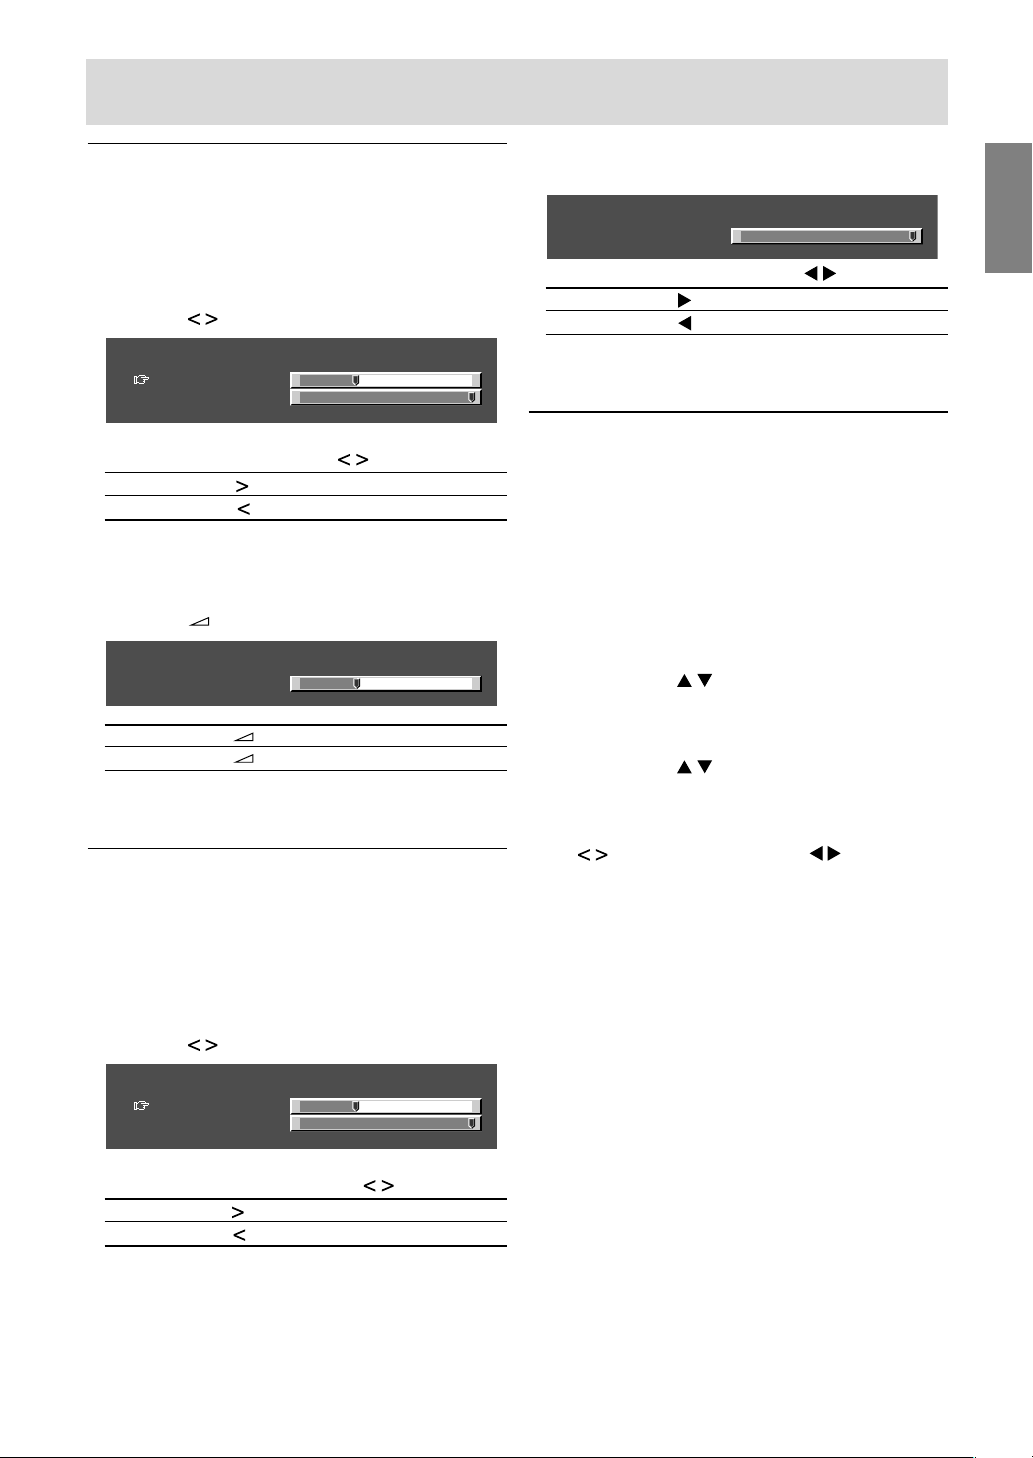
Adjusting the volume
The volume can be set individually for PC mode
and TV/AV mode. Start by switching to the display
mode for which you want to set the volume.
[Monitor]
1.Press the buttons.
<PC>
VOLUME 30
BRIGHT 31
+
-
+
-
2.Select “VOLUME” using the MENU button.
3.Adjust the volume using the buttons.
Increase
button
Decrease
button
The screen for adjusting the volume will
automatically disappear after about 15 seconds.
[Remote control]
1.Press the
+/– buttons to adjust.
<PC>
VOLUME 30
+
-
Increase + button
Decrease – button
The screen for adjusting the volume will
automatically disappear after several seconds.
Adjusting the backlight
The brightness of the backlight can be set
individually for PC mode and TV/AV mode. Start by
switching to the display mode for which you want
to adjust the backlight.
[Monitor]
1.Press the buttons.
<PC>
VOLUME 30
BRIGHT 31
+
-
+
-
2.Select “BRIGHT” using the MENU button.
3.Adjust the brightness using the buttons.
Increase
button
Decrease
button
The screen for adjusting the brightness will
automatically disappear after about 15 seconds.
[Remote control]
1.Press the BRIGHT button.
<PC>
BRIGHT 31
+
-
2.Adjust the brightness using the buttons.
Increase button
Decrease button
The screen for adjusting the brightness will
automatically disappear after several seconds.
Selecting the language on the
screen
You can select the language (English, German,
Spanish, French or Italian) using the MODE
SELECT menu while in any mode. (The selected
language will be displayed in all modes.)
1.Display the MENU screen using the MENU
button.
2.Select “MODE SELECT” using the MENU button
(monitor) or the buttons (remote control),
and press the OK/BRIGHT MODE button
(monitor) or the OK button (remote control).
3.Select “LANGUAGE” using the MENU button
(monitor) or the
buttons (remote control),
and press the OK/BRIGHT MODE button
(monitor) or the OK button (remote control).
4.Select the language you want to display using
the
buttons (monitor) or the buttons
(remote control).
5.Exit the screen using the INPUT button (monitor)
or the MENU button (remote control).
Page 22
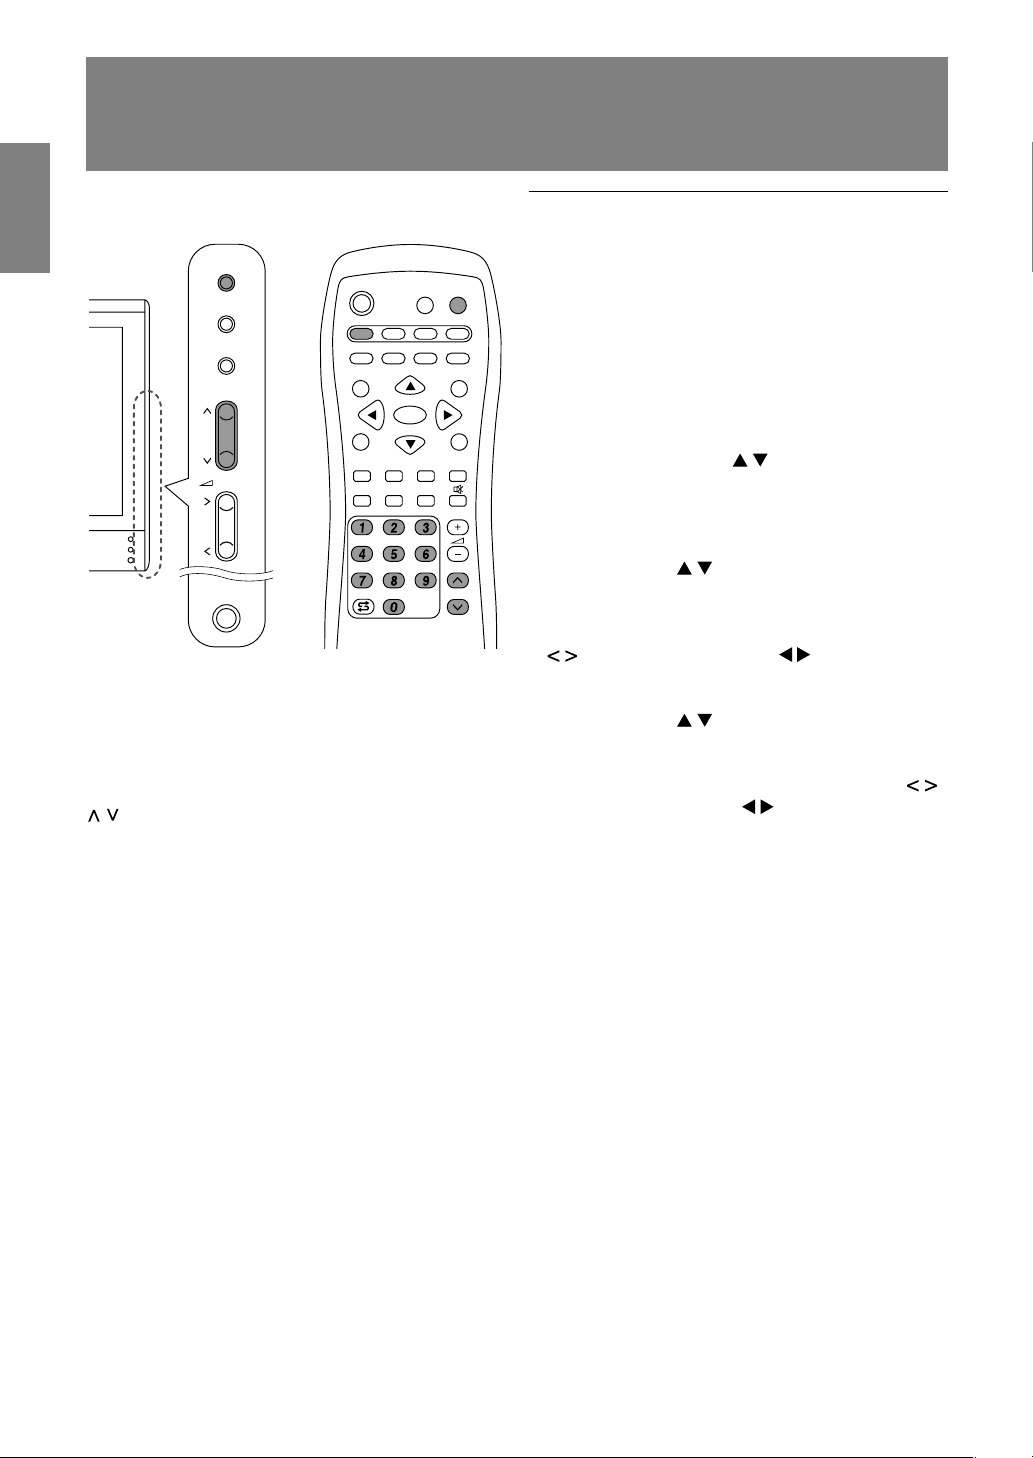
E20
Watching TV or other video in a window on the
computer screen (PICTURE IN PICTURE)
Selecting the video and audio
sources
You can select the video source for the PIP
window between TV, AV1 and AV2. You can also
select the audio you want to hear while the PIP
window is being displayed.
1.Display the MENU screen using the MENU
button in PC mode.
2.Select “PICTURE IN PICTURE” using the MENU
button (monitor) or the buttons (remote
control), and press the OK/BRIGHT MODE
button (monitor) or the OK button (remote
control).
3.Select “PIP INPUT” using the MENU button
(monitor) or the buttons (remote control),
and press the OK/BRIGHT MODE button
(monitor) or the OK button (remote control).
4.Select the PIP image you want to view using the
buttons (monitor) or the buttons (remote
control).
5.Select “PIP SOUND” using the MENU button
(monitor) or the buttons (remote control),
and press the OK/BRIGHT MODE button
(monitor) or the OK button (remote control).
6.Select the audio you want to hear using the
buttons (monitor) or the buttons (remote
control).
PC: Computer audio
PIP: PIP window audio
7.Exit the screen using the INPUT button (monitor)
or the MENU button (remote control).
Note:
- To switch the audio reception mode for TV audio,
press the SOUND button (remote control). (See
page E35.)
You can watch TV or other video in a small window
(PIP window) on the computer screen.
MAIN
POWER
CH
MENU
INPUT
PC AV2AV1TV
BRIGHT
MODE
BRIGHT
CH
POWER
SLEEP MENU
DISPLAY
FREEZE
/HOLD
SOUND
SUBPAGE SUBTITLE
VIEW MODE
TEXT
REVEAL
PIP
OK
/BRIGHT
OK
/
BRIGHT
MODE
1.Select the PC mode using the INPUT button
(monitor) or the PC button (remote control).
2.Press the PIP button (remote control).
The small window will be displayed (the factory
setting is TV picture).
To change channels in the small window, press the
buttons or the channel buttons (remote
control), or use the programme table. (See page
E34.)
To adjust volume, see page E19.
To close the small window, press the PIP button
(remote control) again.
Note:
- With the PICTURE IN PICTURE menu, you can
do the following:
- Open/close the PIP window.
- Set the size/position of the PIP window. (See
page E25.)
- Set the video and audio sources of the PIP
window. (See right column.)
Page 23

E21
EnglishDeutschFrançaisItalianoEspañolEnglish
You can listen to TV or another audio source while
the monitor is displaying the computer screen.
MAIN
POWER
CH
MENU
INPUT
PC AV2AV1TV
BRIGHT
MODE
BRIGHT
CH
POWER
SLEEP MENU
DISPLAY
FREEZE
/HOLD
SOUND
SUBPAGE SUBTITLE
VIEW MODE
TEXT
REVEAL
PIP
OK
/BRIGHT
OK
/
BRIGHT
MODE
1.Display the MENU screen using the MENU
button in PC mode.
2.Select “MODE SELECT” using the MENU button
(monitor) or the
buttons (remote control),
and press the OK/BRIGHT MODE button
(monitor) or the OK button (remote control).
3.Select “SOUND” using the MENU button
(monitor) or the buttons (remote control),
and press the OK/BRIGHT MODE button
(monitor) or the OK button (remote control).
4.Select the audio you want to hear using the
buttons (monitor) or the buttons (remote
control).
5.Exit the screen using the INPUT button (monitor)
or the MENU button (remote control).
Notes:
- To switch the channel for TV audio, press the
buttons or the channel buttons (remote
control), or use the programme table. (See page
E34.)
- To switch the audio reception mode for TV audio,
press the SOUND button (remote control). (See
page E35.)
- This setting is disabled while a PIP window is
displayed. The audio source (PIP SOUND) set in
the PICTURE IN PICTURE menu takes
precedence.
- When “STATUS” in the CHILD LOCK menu is
“ALL” or “INDIVIDUAL” (see page E40), TV/AV-IN
SOUND is not available in PC mode.
Listening to TV or another audio source while
viewing the computer screen
Page 24
E22
Adjusting the display
You can adjust the colour of the computer screen
image and make picture-in-picture settings using
menus for the PC mode.
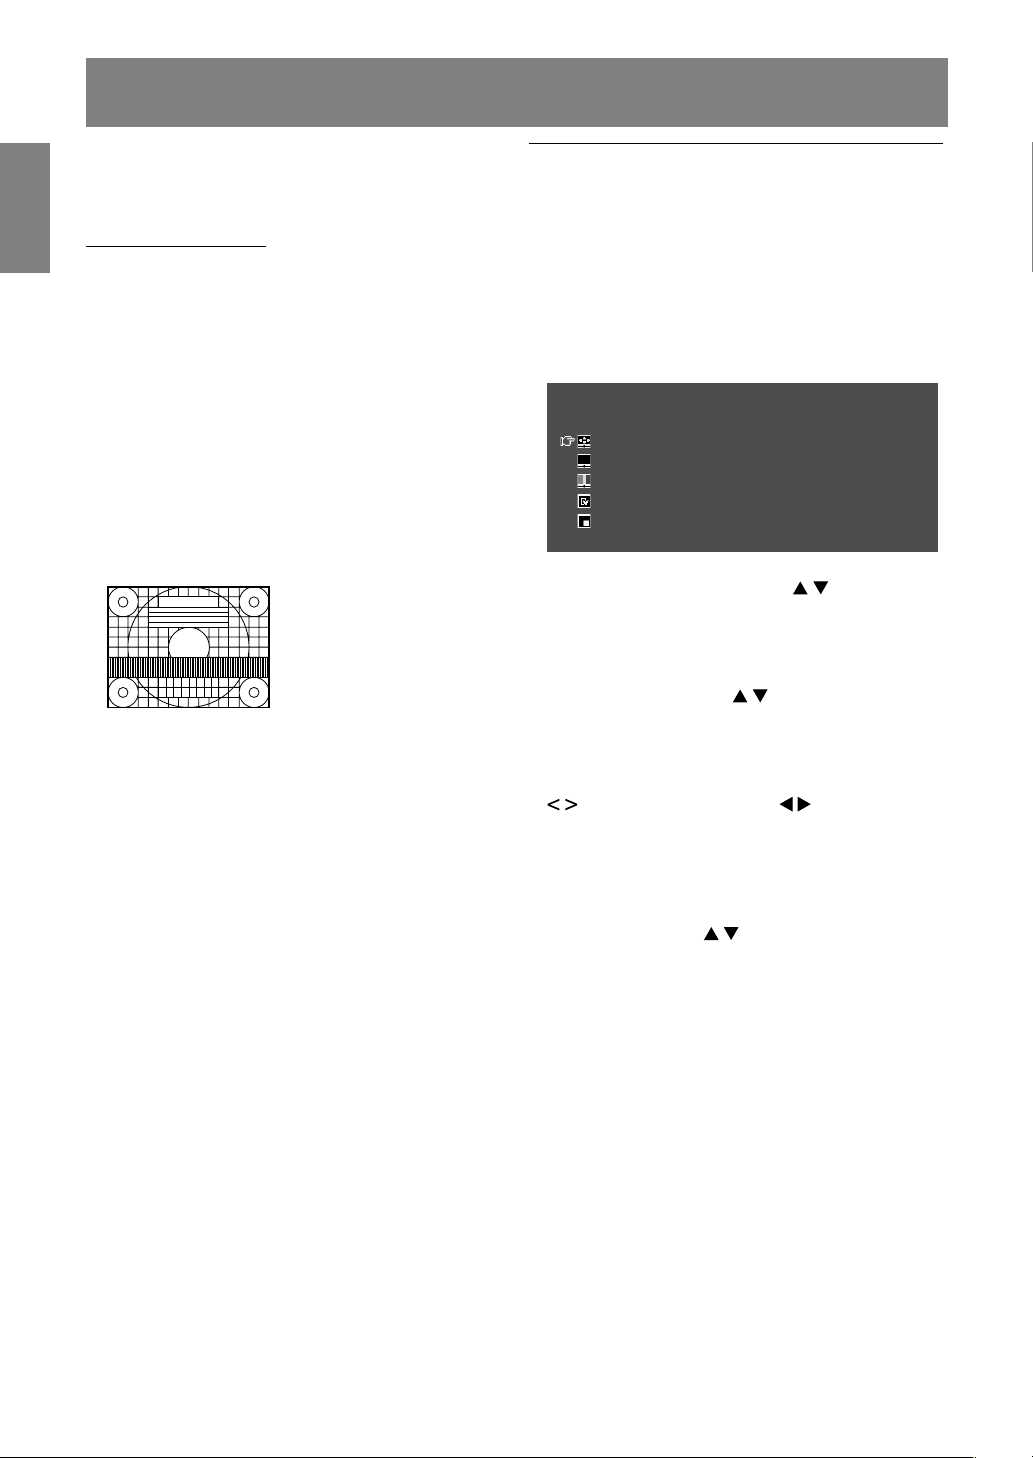
Adjustment Pattern
If you are using Windows, you can use the
Adjustment Pattern on the accompanying
CD-ROM.
This explanation is for Windows 95/98/2000/Me/
XP, and assumes that the CD-ROM drive is “D”
drive.
1.Load the accessory CD-ROM into the CD-ROM
drive of the computer.
2.Open [My Computer] and select CD-ROM.
If using Windows 3.1, open [File Manager] and
choose “D” drive.
3.Double click on [Adj_uty.exe] to run the
Adjustment Programme.
The Adjustment Pattern will appear.
Adjustment Pattern
After completing the adjustments, press the
computer’s [Esc] key to exit the Adjustment
Programme.
Note:
- If your computer’s display mode is set to 65K
colours, you may see the different colour levels
in each colour pattern or the gray scale may look
coloured. (This is due to the specification of the
input signal and is not a malfunction.)
How to adjust
The following procedure describes the basic
operation method. See pages E23 through E25
regarding individual items.
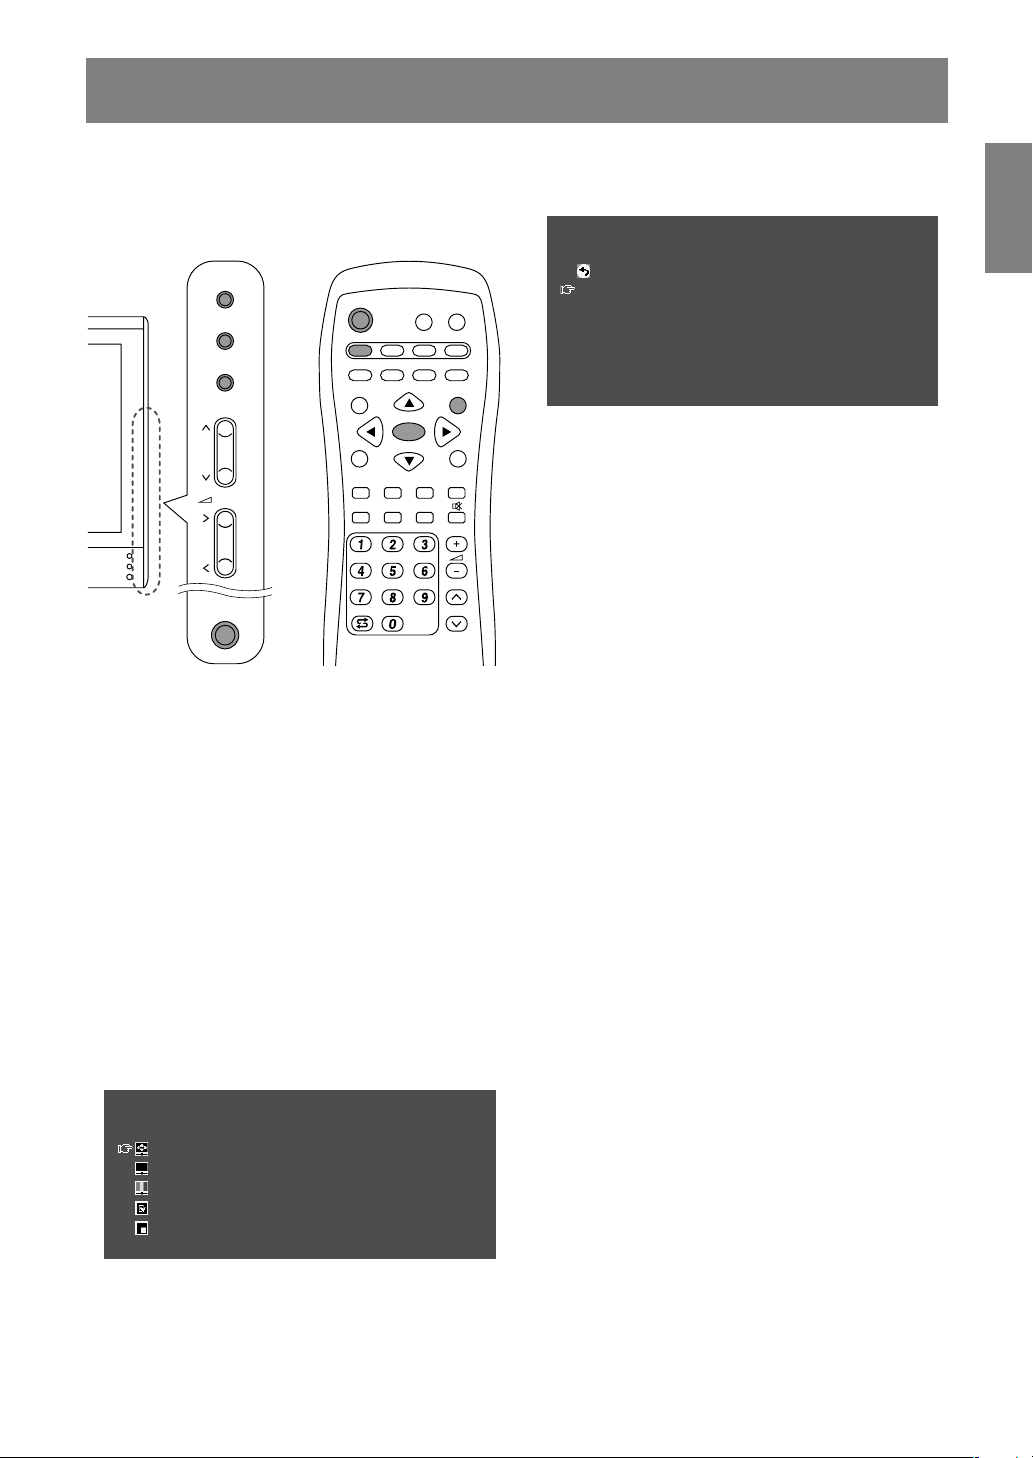
1.Select the PC mode using the INPUT button
(monitor) or the PC button (remote control).
2.Display the MENU screen using the MENU
button.
MENU
<PC>
ADJUSTMENT
>>
GAIN CONTROL
>>
COLOUR CONTROL
>>
MODE SELECT
>>
PICTURE IN PICTURE
>>
3.Select the menu you want to set using the
MENU button (monitor) or the buttons
(remote control), and press the
OK/BRIGHT MODE button (monitor) or the
OK button (remote control).
4.Select the item you want to set using the MENU
button (monitor) or the
buttons (remote
control), and press the OK/BRIGHT MODE
button (monitor) or the OK button (remote
control).
5.Change the numbers/values using the
buttons (monitor) or the buttons
(remote control).
You can continue to set other items.
Do the following to return to the previous
screen:
(1) Select “RETURN” using the MENU button
(monitor) or the buttons (remote control).
(2) Press the OK/BRIGHT MODE button
(monitor) or the OK button (remote control).
6.Exit the screen using the INPUT button
(monitor) or the MENU button (remote control).
Notes:
- If you do not press any buttons for about 30
seconds while in a menu screen, the settings
you made up to that point will be applied and
the screen will automatically disappear.
- This manual describes display adjustment
based on the use of the Adjustment Pattern (for
Windows).
Page 25

E23
EnglishDeutschFrançaisItalianoEspañolEnglish
Item
AUTO
CLOCK
PHASE
H-POS, V-POS
RESET
Description
Automatically adjusts “CLOCK”, “PHASE”, “H-POS”, and “V-POS”.
(See page E17.)
Adjusts the clock so that no vertical flicker noise is emitted.
Makes an adjustment after “CLOCK” is properly adjusted so that no
horizontal flicker noise is emitted.
Adjusts the position of the Adjustment Pattern so that it appears centred
on screen.
Resets adjustment values for this menu to their original factory settings.
Adjusting the display
ADJUSTMENT menu
Horizontal flicker noise
Adjustment
Pattern
Screen frame
Vertical flicker noise
Page 26

E24
Adjusting the display
Item
AUTO
BLACK LEVEL
CONTRAST
RESET
Notes about auto adjustment:
- If you are not using the Adjustment Pattern, it is necessary to have black area and white area of at
least 5 mm x 5 mm on the screen. Adjustment may not be possible without those areas.
- If the signal coming from the computer is Composite Sync or Sync on Green, automatic adjustment
may not be possible. Please perform manual adjustment instead.
- If “OUT OF ADJUST” is displayed, perform manual adjustment.
COLOUR CONTROL menu
Item
COLOUR MODE
WHITE BALANCE
RESET
Note:
- “WHITE BALANCE” will be automatically set to “STD” when “COLOUR MODE” is set to “sRGB” or
“VIVID”.
GAIN CONTROL menu
Description
Automatically adjusts “BLACK LEVEL” and “CONTRAST” based on
the
brightest and darkest colours of the image displayed.
Adjusts screen brightness while you watch the colour pattern.
Adjusts contrast so that all gradations appear while you watch the colour
pattern.
Resets adjustment values for this menu to their original factory settings.
Colour pattern
Description
Selects the colour tone.
- STD
...........
Displays images using the original colour tone of the LCD
monitor.
- sRGB
........
sRGB is an international standard for colour representation
defined by the IEC (International Electrotechnical
Commission). Colours are converted by taking into account
the liquid crystal’s characteristics and thereby represent
colour tone close to the original image.
- VIVID
........
Displays images in vivid primary colours.
Adjusts the colour temperature.
Set “WHITE BALANCE” to “STD” if you want to display all gradations.
- COOL2
.....
Colour tone bluer than standard.
- COOL1
.....
Colour tone slightly bluer than standard.
- STD
...........
Standard setting for colour tone.
- WARM1
....
Colour tone slightly redder than standard.
- WARM2
....
Colour tone redder than standard.
- USER
........
Allows you to individually adjust red, green, and blue
contrast.
Resets adjustment values for this menu to their original factory settings.
Page 27
E25
EnglishDeutschFrançaisItalianoEspañolEnglish
MODE SELECT menu
Item
VIEW MODE
768 LINES
SOUND
SCALING
LANGUAGE
RESET
PICTURE IN PICTURE menu
Item
PIP DISPLAY
PIP SIZE
PIP POSITION
PIP INPUT
PIP SOUND
RESET
Adjusting the display
Description
Selects the screen size.
- NORMAL
.........
Expands the image to or near its aspect ratio.
- WIDE
...............
Expands the image so that it fills the screen.
You can also set this item using the remote control. (See page E47.)
Specifies the horizontal resolution of a 768-line screen.
- 1024
................
1024 x 768 dot mode
- 1280
................
1280 x 768 dot mode
Selects the audio to listen to while displaying the computer screen.
When displaying a PIP window, the audio set by “PIP SOUND” takes
precedence.
When “STATUS” in the CHILD LOCK menu is “ALL” or “INDIVIDUAL” (see
page E40), TV/AV-IN SOUND is not available in PC mode.
Adjusts the image to optimum sharpness when it is enlarged.
Selects the language (English, German, Spanish, French or Italian) on the
screen. (See page E19.)
Resets adjustment values for this menu to their original factory settings.
Description
Sets whether to display TV or other video source in a small window (PIP
window) on the computer screen.
You can also set this item using the remote control. (See page E20.)
Adjusts the size of the PIP window.
Adjust the position of the PIP window.
To move up and down, use the
buttons (monitor) or buttons
(remote control).
To move left and right, use the
buttons (monitor) or buttons
(remote control).
Selects the source of the PIP window. (See page E20.)
Selects the audio you want to hear while displaying the PIP window.
- PC
....................
Computer audio
- PIP
...................
PIP window audio
(See page E20.)
Resets adjustment values for this menu to their original factory settings.
Page 28

E26
Installing set-up information and the ICC profile (For Windows)
Depending on the type of computer or OS, you
may need to install the monitor set-up information
on your system. If so, follow the steps below to
install the monitor set-up information. (Depending
on the type of computer or OS, command names
and methods may differ. Please follow the
computer’s own operation manual while reading
this.)
About the ICC profile
An ICC (International Color Consortium) profile is
a file that describes the colour reproduction
characteristics of the LCD monitor. Using an
application compatible with an ICC profile, highly
accurate colour reproduction can be realized.
- Windows 98/2000/Me/XP all use the ICC profile.
- When installing Windows 98/2000/Me/XP set-up
information (described below), the ICC profile is
also installed. If you would like to install the ICC
profile only, please refer to Installing the ICC
profile on page E28.
- When using the ICC profile, set “COLOUR
MODE” and “WHITE BALANCE” to “STD”.
For Windows 95
Installing monitor set-up information into
Windows 95.
This explanation assumes that the CD-ROM drive
is “D” drive.
1. Load the accessory CD-ROM into the CD-ROM
drive of the computer.
2. Click on the [Start] button. From [Settings],
choose [Control Panel].
3. Double click on [Display].
4. Click on [Settings], [Advanced Properties], and
[Monitor], then [Change].
5. Click on [Have disk], confirm that [Copy
manufacturer’s files from:] is [D:] then click [OK].
6. Confirm that the monitor details are selected,
and click [OK].
7. Check that the monitor details are displayed,
then click [Apply].
8. Click [OK], and close the window.
For Windows 98
Installing monitor set-up information into
Windows 98, and setting the monitor’s ICC profile
as a predetermined value.
This explanation assumes that the CD-ROM drive
is “D” drive.
If the “Add New Hardware Wizard” has appeared:
1. Load the accessory CD-ROM into the CD-ROM
drive of the computer.
2. Click [Next].
3. Check [Display a list of all the drivers in a
specific location, so you can select the driver
you want.], then click [Next].
4. When [Models] is displayed, click on [Have
disk], confirm that [Copy manufacturer’s files
from:] is [D:], and click [OK].
5. Confirm that the monitor details are selected,
then click [Next], [Next], and [Finish]. If the “Add
New Hardware Wizard” appears, repeat the
installation commands beginning from 2
above.
If the “Add New Hardware Wizard” has not
appeared:
1. Load the accessory CD-ROM into the CD-ROM
drive of the computer.
2. Click on the [Start] button. From [Settings],
choose [Control Panel].
3. Double click on [Display].
4. Click on [Settings], [Advanced] and [Monitor].
5. In [Options], check [Automatically detect Plug &
Play monitors] and click on [Change].
6. Click [Next].
7. Click on [Display a list of all the drivers in a
specific location, so you can select the driver
you want.], then click [Next].
8. When [Models] is displayed, click on [Have
disk], confirm that [Copy manufacturer’s files
from:] is [D:], and click [OK].
9. Confirm that the monitor details are selected,
then click [Next], [Next], and [Finish].
10. Check that the monitor details are displayed,
then click [Apply].
11. Click [OK], and close the window.
Page 29

E27
EnglishDeutschFrançaisItalianoEspañolEnglish
For Windows 2000
Installing monitor set-up information into
Windows 2000, and setting the monitor’s ICC
profile as a predetermined value.
This explanation assumes that the CD-ROM drive
is “D” drive.
1. Load the accessory CD-ROM into the CD-ROM
drive of the computer.
2. Click on the [Start] button. From [Settings],
choose [Control Panel].
3. Double click on [Display].
4. Click on [Settings], [Advanced] and [Monitor].
5. Click on [Properties], [Driver] and [Update
Driver].
6. When [Upgrade Device Driver Wizard]
appears, click [Next].
7. Check [Display a list of the known drivers for
this device so that I can choose a specific
driver] and click [Next].
8. When [Models] is displayed, click on [Have
disk], confirm that [Copy manufacturer’s files
from:] is [D:], and click [OK].
9. Select the monitor from the list displayed and
click [Next].
10. Click [Next], confirm that the monitor’s name
appears on the screen, and click [Finish]. If
[The Digital Signature Not Found] appears,
click [Yes].
11. Click on [Close].
12. Click [OK], and close the window.
Installing set-up information and the ICC profile (For Windows)
For Windows Me
Installing monitor set-up information into Windows
Me, and setting the monitor’s ICC profile as a
predetermined value.
This explanation assumes that the CD-ROM drive
is “D” drive.
If the “Add New Hardware Wizard” has appeared:
1. Load the accessory CD-ROM into the CD-ROM
drive of the computer.
2. Check [Specify the location of the driver
[Advanced]] and click [Next].
3. Check [Display a list of all the drivers in a
specific location, so you can select the driver
you want.], then click [Next].
4. When [Models] is displayed, click on [Have
disk], confirm that [Copy manufacturer’s files
from:] is [D:], and click [OK].
5. Select the monitor details from the list, then
click [Next], [Next], and [Finish]. If the “Add New
Hardware Wizard” appears, repeat the
installation commands beginning from 2 above.
If the “Add New Hardware Wizard” has not
appeared:
1. Load the accessory CD-ROM into the CD-ROM
drive of the computer.
2. Click on the [Start] button. From [Settings],
choose [Control Panel].
3. Double click on [Display].
4. Click on [Settings], [Advanced] and [Monitor].
5. In [Options], check [Automatically detect Plug &
Play monitors] and click on [Change].
6. Check [Specify the location of the driver
[Advanced]] and click [Next].
7. Check [Display a list of all the drivers in a
specific location, so you can select the driver
you want.] and click [Next].
8. When [Models] is displayed, click on [Have
disk], confirm that [Copy manufacturer’s files
from:] is [D:], and click [OK].
9. Select the monitor details, then click [Next],
[Next], and [Finish].
10. Check that the monitor details are displayed,
then click [Apply].
11. Click [OK], and close the window.
Page 30

E28
For Windows XP
Installing monitor set-up information into Windows
XP, and setting the monitor’s ICC profile as a
predetermined value.
This explanation assumes that the CD-ROM drive
is “D” drive.
1. Load the accessory CD-ROM into the CD-ROM
drive of the computer.
2. Click on the [Start] button. Choose [Control
Panel].
3. Switch to “Classic View”.
4. Double click on [Display].
5. Click on [Settings], [Advanced] and [Monitor].
6. Click on [Properties], [Driver] and [Update
Driver].
7. When [Hardware Update Wizard] appears,
check [Install from a list or specific location
[Advanced]] and click [Next].
8. Check [Don’t search. I will choose the driver to
install.] and click [Next].
9. Click on [Have Disk], confirm that [Copy
manufacturer’s files from:] is [D:], and click [OK].
10. Select the monitor from the list displayed and
click [Next].
If [has not passed Windows Logo testing...]
appears, click [Continue Anyway].
11. Confirm that the monitor’s name appears on
the screen.
12. Click on [Finish].
13. Click on [Close].
14. Click [OK], and close the window.
Installing the ICC profile
Installing the monitor’s ICC profile. (If the set-up
information has already been installed, so too has
the profile, and there is no need to install it.)
This explanation assumes that the CD-ROM drive
is “D” drive.
1. Load the accessory CD-ROM into the CD-ROM
drive of the computer.
2. Click on the [Start] button. From [Settings],
choose [Control Panel].
3. Double click on [Display].
4. Click on [Settings] and [Advanced].
5. Click on [General] and from [Compatibility]
select [Apply the new display setting without
restarting], then click on [Color Management].
6. Click [Add], and select CD-ROM as the file
location.
7. Choose the colour profile that you would like to
install, and click on [Add].
8. Choose the profile and click on [Set As
Default].
9. Click [OK], and close the window.
- When using the ICC profile, set “COLOUR
MODE” and “WHITE BALANCE” to “STD”.
Installing set-up information and the ICC profile (For Windows)
Page 31

E29
EnglishDeutschFrançaisItalianoEspañolEnglish
Information about the ColorSync profile (For MacOS)
About the ColorSync profile
ColorSync is Apple Computer’s colour
management system and enables colour
reproduction characteristics to be realized when
used with a compatible application. A ColorSync
profile describes the colour characteristics of the
LCD monitor.
Notes:
- This monitor’s ColorSync profile works with
MacOS 8.5 or above.
- When using the ColorSync profile, set “COLOUR
MODE” and “WHITE BALANCE” to “STD”.
Setting up the ColorSync profile
Notes:
- It is necessary to have PC Exchange or File
Exchange installed in your system.
- Depending on the type of computer or OS,
command names and methods may differ.
Please follow the computer’s own operation
manual while reading this.
1.Load the accessory CD-ROM into the CD-ROM
drive of the computer.
2.Copy the profile to be used from the CD-ROM to
the ColorSync profile folder in the system folder.
3.Using the ColorSync on the control panel,
choose the profile to be used.
Page 32
E30
Saving broadcast TV channels in the
memory (AUTOMATIC SEARCH)
“AUTOMATIC SEARCH” allows you to search
through available channels in your area.
The tuner saves them to TV memory automatically.
Notes:
- Release the adjustment lock (see page E48)
and cancel Child Lock (see page E41) if they
have been set.
- Up to 100 channels (0-99) can be stored in TV
memory.
MAIN
POWER
CH
MENU
INPUT
PC AV2AV1TV
BRIGHT
MODE
BRIGHT
CH
POWER
SLEEP MENU
DISPLAY
FREEZE
/HOLD
SOUND
SUBPAGE SUBTITLE
VIEW MODE
TEXT
REVEAL
PIP
OK
/BRIGHT
OK
/
BRIGHT
MODE
1.Turn on the monitor power.
2.Select the TV mode using the INPUT button
(monitor) or the TV button (remote control).
3.Display the MENU screen using the MENU
button.
MENU
<
TV/AV
>
PICTURE
>>
PROGRAMMES
>>
AV CONNECTIONS
>>
MODE SELECT
>>
CHILD LOCK
>>
4.Select “PROGRAMMES” using the MENU button
(monitor) or the buttons (remote control),
and press the OK/BRIGHT MODE button
(monitor) or the OK button (remote control).
PROGRAMMES < TV/AV >
RETURN
AUTOMATIC SEARCH
>>
MANUAL ADJUSTMENT
>>
SORT
>>
ERASE PROGRAMME RANGE
>>
ENTER/CHANGE NAME
>>
5.Select “AUTOMATIC SEARCH” using the MENU
button (monitor) or the buttons (remote
control), and press the OK/BRIGHT MODE button
(monitor) or the OK button (remote control).
AUTOMATIC SEARCH
<
TV/AV
>
RETURN
COUNTRY
[
UK
]
COLOUR SYSTEM
[
PAL
]
SOUND SYSTEM
[
I
]
STORE PROGR. FROM
>>
START SEARCH
6.Select the desired adjustment item using the
MENU button (monitor) or the buttons
(remote control), and press the OK/BRIGHT
MODE button (monitor) or the OK button (remote
control).
Then select the desired item using the
buttons (monitor) or the buttons (remote
control).
Note:
- Select your country from the following: UK,
Germany, France, Italy or “OTHERS”. When
“OTHERS” is selected, you can change
“COLOUR SYSTEM” and “SOUND SYSTEM”.
7.Select “STORE PROGR. FROM” using the MENU
button (monitor) or the buttons (remote
control), and press the OK/BRIGHT MODE button
(monitor) or the OK button (remote control).
8.Select the programme position from which the
programmes are to be stored using the
buttons (monitor) or the buttons (remote
control), and press the OK/BRIGHT MODE button
(monitor) or the OK button (remote control).
9.Select “START SEARCH” using the MENU
button (monitor) or the buttons (remote
control), and press the OK/BRIGHT MODE button
(monitor) or the OK button (remote control).
When the search is completed, the new
programmes found are displayed on the list.
Notes:
- To interrupt the automatic search or to exit the
list, press the INPUT button (monitor) or the
MENU button (remote control).
- The programmes are named automatically
when an identification signal is sent. Or, they
are named automatically from the table
registered in the monitor memory.
- Programmes whose names could not be found
are displayed with “-----”. Names can be
entered manually later. (See page E33.)
Setting TV channels
Page 33
E31
EnglishDeutschFrançaisItalianoEspañolEnglish
Setting TV channels
Adjusting the individual settings of
programmes
(MANUAL ADJUSTMENT)
Using “MANUAL ADJUSTMENT”, you can adjust
the individual settings of programmes.
Note:
- Release the adjustment lock (see page E48)
and cancel Child Lock (see page E41) if they
have been set.
MAIN
POWER
CH
MENU
INPUT
PC AV2AV1TV
BRIGHT
MODE
BRIGHT
CH
POWER
SLEEP MENU
DISPLAY
FREEZE
/HOLD
SOUND
SUBPAGE SUBTITLE
VIEW MODE
TEXT
REVEAL
PIP
OK
/BRIGHT
OK
/
BRIGHT
MODE
1.Display the “PROGRAMMES” screen by
performing steps 1 to 4 of “Saving broadcast TV
channels in the memory (AUTOMATIC
SEARCH)” on page E30.
2.Select “MANUAL ADJUSTMENT” using the
MENU button (monitor) or the buttons
(remote control), and press the
OK/BRIGHT MODE button (monitor) or the OK
button (remote control).
MANUAL ADJUSTMENT
<
TV/AV
>
RETURN
CHANNEL
[
1
]
FREQUENCY
[
048.25MHz
]
NAME
[
E02
]
COLOUR SYSTEM
[
PAL
]
SOUND SYSTEM
[
I
]
SKIP
[
OFF
]
3.Select the desired adjustment item using the
MENU button (monitor) or the buttons
(remote control), and press the
OK/BRIGHT MODE button (monitor) or the OK
button (remote control).
Then make the adjustment using the buttons
(monitor) or the
buttons (remote control).
(See the table below for details.)
Notes:
- You can also use the channel buttons (0-9) on
the remote control to enter the frequency.
- To adjust “NAME”, first press the
OK/BRIGHT MODE button (monitor) or the OK
button (remote control) to activate the text
input mode. Then select the input position
using the
buttons (monitor) or the
buttons (remote control), and select the
desired character using the
buttons
(monitor) or the buttons (remote control).
When you finish, press the OK/BRIGHT MODE
button (monitor) or the OK button (remote
control).
4.Exit the screen using the INPUT button (monitor)
or the MENU button (remote control).
Note:
- Depending on the settings in the colour system
of the channels, switching between channels
may be slow. If you want to speed up channel
switching, switch “AUTO” in “COLOUR SYSTEM”
to the current reception system (“PAL” or
“SECAM”).
Item
CHANNEL
FREQUENCY
NAME
COLOUR SYSTEM
SOUND SYSTEM
SKIP
Choice/Value range
0-99
45.75-863.25 (MHz)
A-Z, 0-9, +, –, . , /, !, space
AUTO, PAL, SECAM
B/G, I, D/K, L
ON
OFF
Description
The channel changes to the higher or lower channel.
Receivable frequencies depending on TV norm,
installation site, and range.
Programme name (up to five characters).
Colour norm.
TV norm.
Channels with SKIP set to “ON” will be skipped when
you press the
buttons during TV viewing.
Page 34

E32
Setting TV channels
Changing the programme positions
(SORT)
The programme positions for individual
programmes can be freely changed.
1.Display the “PROGRAMMES” screen by
performing steps 1 to 4 of “Saving broadcast TV
channels in the memory (AUTOMATIC
SEARCH)” on page E30.
2.Select “SORT” using the MENU button (monitor)
or the buttons (remote control), and press
the OK/BRIGHT MODE button (monitor) or the
OK button (remote control).
SORT
<
TV/AV
>
00 05 10 15
01 E02 06 11 16
02 E03 07 12 17
03 E04 08 13 18
04 09 14 19
3.Select the desired programme using the
buttons (monitor) or the buttons
(remote control), and press the
OK/BRIGHT MODE button (monitor) or the OK
button (remote control).
Move mode will be activated.
4.Select the desired position using the
buttons (monitor) or the buttons (remote
control) and press the OK/BRIGHT MODE button
(monitor) or the OK button (remote control).
The selected programme will be moved to the
selected position.
Note:
- When moving the programme, the buttons
(monitor) or the
buttons (remote control)
are not available.
5.Exit the screen using the INPUT button (monitor)
or the MENU button (remote control).
Erasing the programme range
The individual programme or programmes in a
consecutive range can be erased.
1.Display the “PROGRAMMES” screen by
performing steps 1 to 4 of “Saving broadcast TV
channels in the memory (AUTOMATIC
SEARCH)” on page E30.
2.Select “ERASE PROGRAMME RANGE” using
the MENU button (monitor) or the buttons
(remote control), and press the
OK/BRIGHT MODE button (monitor) or the OK
button (remote control).
ERASE PROGRAMME RANGE
<
TV/AV
>
00 05 10 15
01 E02 06 11 16
02 E03 07 12 17
03 E04 08 13 18
04 09 14 19
3.Select the programme at the beginning of the
desired range to be erased using the
buttons (monitor) or the buttons (remote
control), and press the OK/BRIGHT MODE
button (monitor) or the OK button (remote
control).
4.Select the programme at the end of the range
using the buttons (monitor) or the
buttons (remote control).
When you want to select a single programme,
skip this step.
5.Press the OK/BRIGHT MODE button (monitor) or
the OK button (remote control) to erase the
selected programme(s).
All subsequent programmes move up.
6.Exit the screen using the INPUT button (monitor)
or the MENU button (remote control).
Page 35
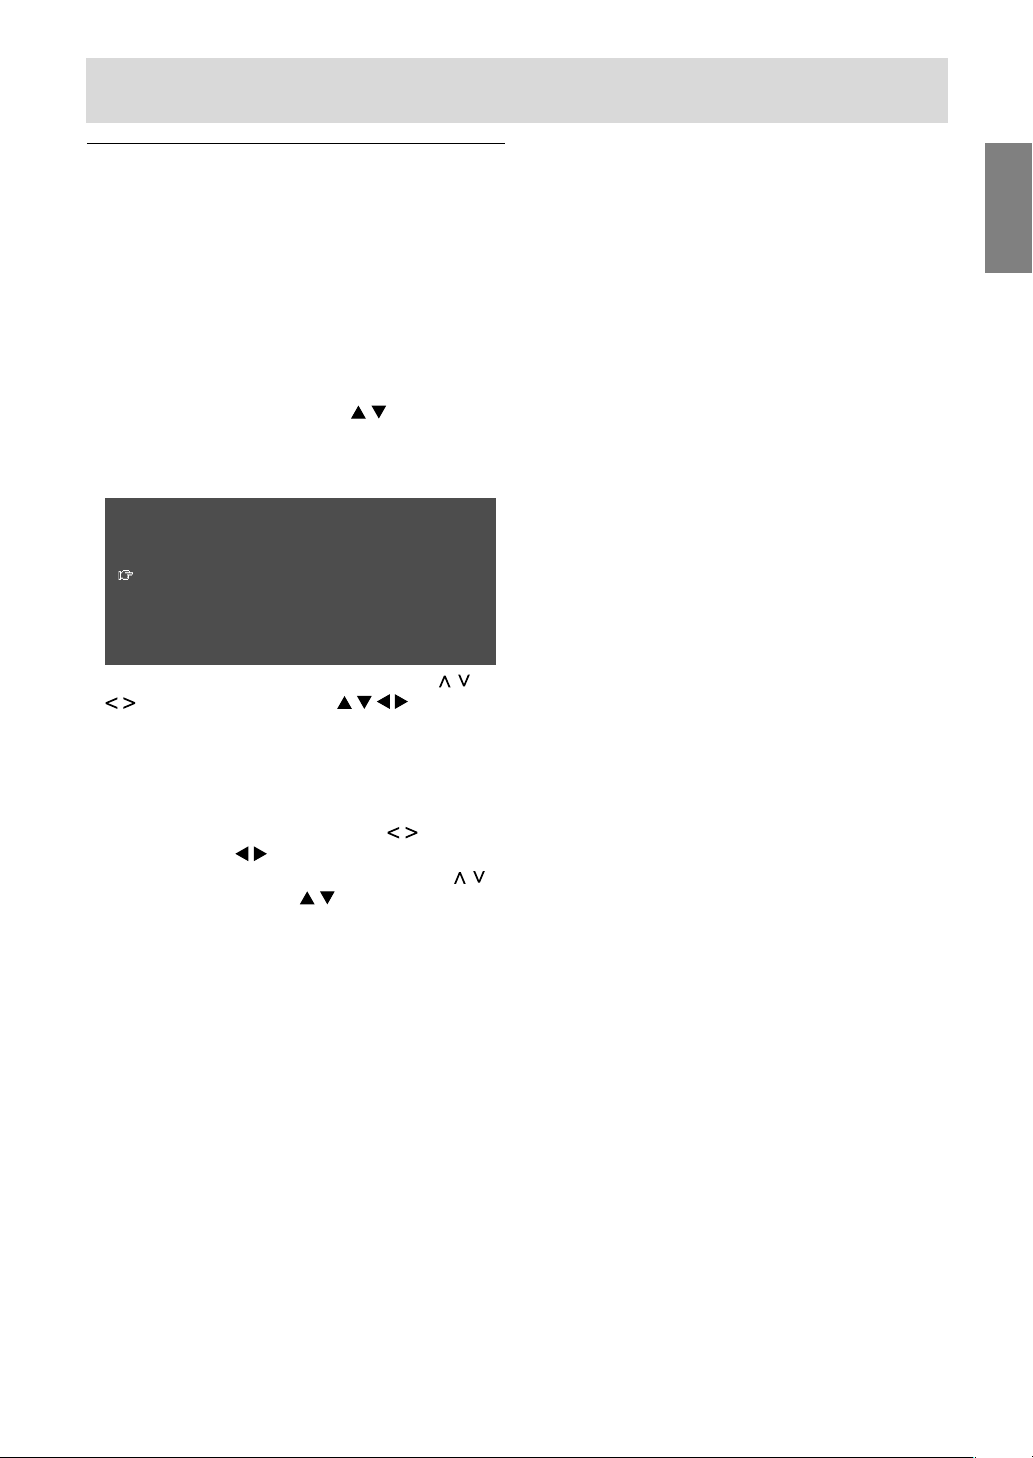
E33
EnglishDeutschFrançaisItalianoEspañolEnglish
Setting TV channels
Enter/change the name of an
individual programme
The name of an individual programme can be
entered or changed.
1.Display the “PROGRAMMES” screen by
performing steps 1 to 4 of “Saving broadcast TV
channels in the memory (AUTOMATIC
SEARCH)” on page E30.
2.Select “ENTER/CHANGE NAME” using the
MENU button (monitor) or the buttons
(remote control), and press the
OK/BRIGHT MODE button (monitor) or the OK
button (remote control).
ENTER/CHANGE NAME
<
TV/AV
>
00 05 10 15
01 E02 06 11 16
02 E03 07 12 17
03 E04 08 13 18
04 09 14 19
3.Select the desired programme using the
buttons (monitor) or the buttons
(remote control), and press the
OK/BRIGHT MODE button (monitor) or the
OK button (remote control).
The character at the input position is
highlighted.
4.Select the input position using the buttons
(monitor) or the
buttons (remote control),
and select the desired character using the
buttons (monitor) or the buttons (remote
control).
5.Press the OK/BRIGHT MODE button (monitor) or
the OK button (remote control) to accept the
name entered.
6.Exit the screen using the INPUT button (monitor)
or the MENU button (remote control).
Page 36
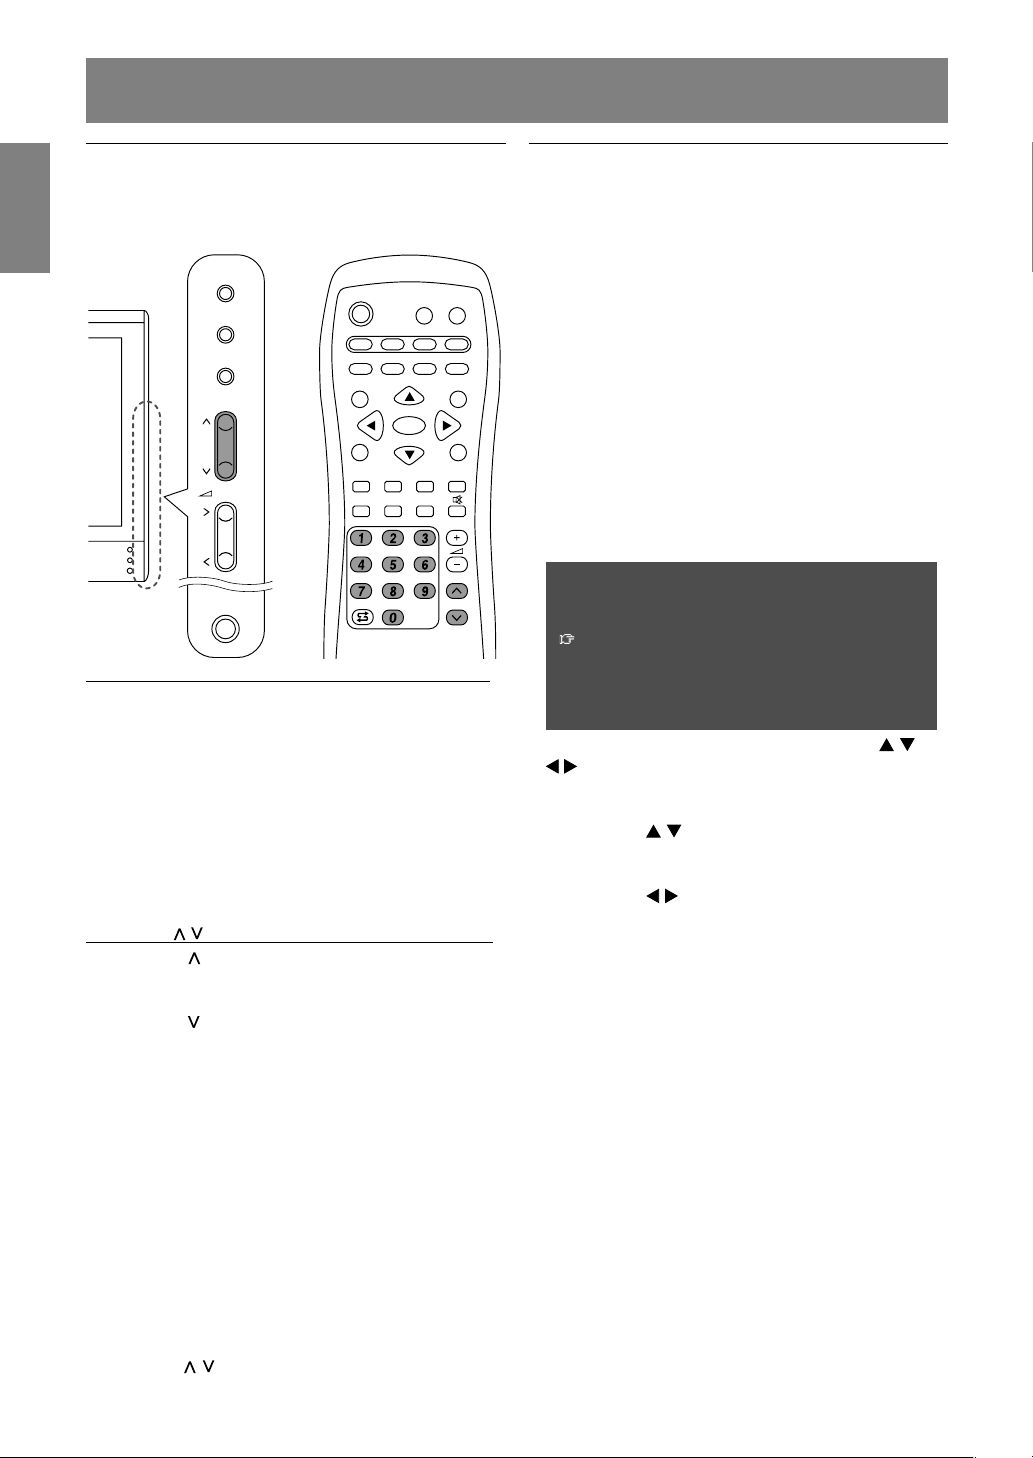
E34
Watching TV
Selecting the channels
This monitor allows you to select up to 100
channels (0-99).
MAIN
POWER
CH
MENU
INPUT
PC AV2AV1TV
BRIGHT
MODE
BRIGHT
CH
POWER
SLEEP MENU
DISPLAY
FREEZE
/HOLD
SOUND
SUBPAGE SUBTITLE
VIEW MODE
TEXT
REVEAL
PIP
OK
/BRIGHT
OK
/
BRIGHT
MODE
Using the channel buttons (remote control)
To select a 1-digit channel number (e.g., Channel 5):
Select the channel number using one of the
following procedures.
- Press the 5 button and wait for approximately
3 seconds.
- Press the 0 button followed by the 5 button
within 3 seconds.
To select a 2-digit channel number (e.g., Channel 12):
Press the 1 button followed by the 2 button within
3 seconds.
Using the buttons (monitor/remote control)
- Press the
button and the channel changes in
the order shown below:
1 → 2 … → 98 → 99 → 0 → 1 → 2 → …
- Press the
button and the channel changes in
the order shown below:
2 → 1 → 0 → 99 → 98 … → 2 → 1 → 0 → …
Notes:
- Pressing one of the above buttons or using the
programme table (see right column)
automatically switches to TV mode if the monitor
is in PC or AV mode.
- Use the INPUT button (monitor) or the TV button
(remote control) to switch the display mode to TV
in the following cases when in PC mode.
- When you are watching TV in the PIP window
(see page E20).
- When you are listening to TV (see page E21).
- Channels set to be skipped cannot be displayed
using the
buttons. (See page E31.)
- Channel “0” is reserved for RF output from a
VCR.
Selecting the channels using the
programme table
The programme table shows a list of programmes
in TV memory. They are located in channels 0 to
99. The currently selected programme is displayed
in yellow and child-locked programmes which
have not been cancelled are displayed in red.
1.Select the TV mode using the INPUT button
(monitor) or the TV button (remote control).
2.Press the OK button (remote control).
The programme table will be displayed.
Note:
- While the Teletext screen or the menu screen
is being displayed, you can not display the
programme table by pressing the OK button
(remote control).
PROGRAMME TABLE
<
TV/AV
>
00 05 10 15
01 E02 06 11 16
02 E03 07 12 17
03 E04 08 13 18
04 09 14 19
3.Select the desired programme using the
buttons (remote control).
To display the previous or next list of the
programme table:
- Press the
buttons (remote control) when
the cursor is at a programme in the upper-left
or low-right position.
- Press the
buttons (remote control) when
the cursor is at a programme in the left or right
column.
4.Display the selected programme using the OK
button (remote control).
Page 37
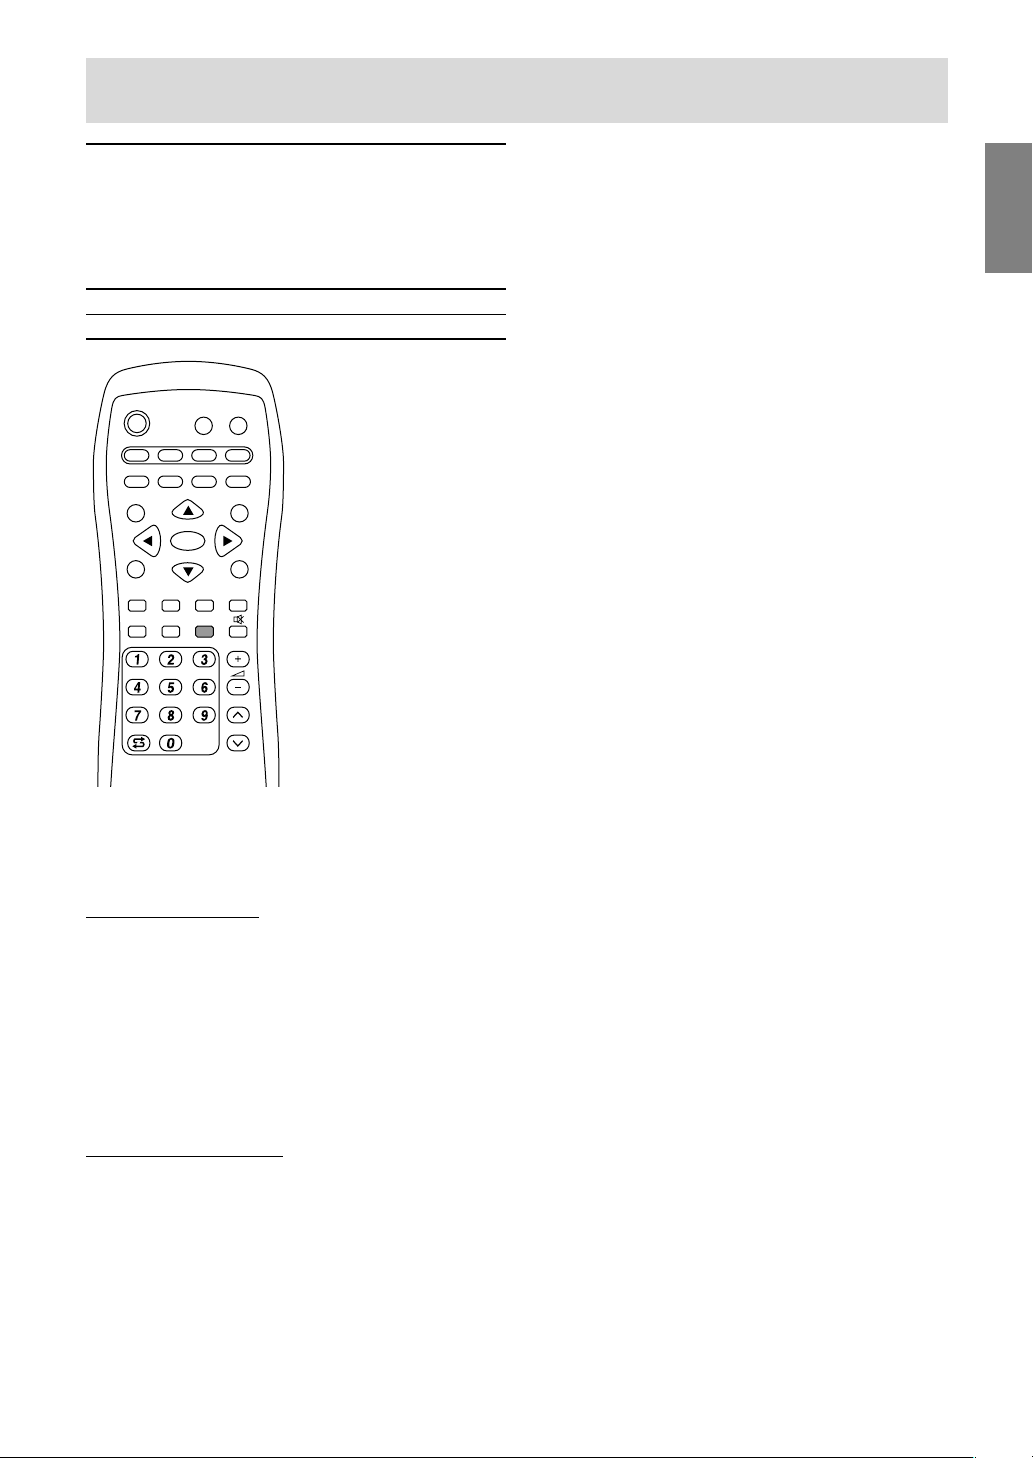
E35
EnglishDeutschFrançaisItalianoEspañolEnglish
Watching TV
Selecting the audio reception mode
You can select the audio reception mode (stereo,
bilingual or monaural) when you receive NICAM
broadcasts and A2 stereo broadcasts as follows:
NICAM NICAM-B/G, I, D/K, L signal
A2 stereo A2 stereo-B/G signal
PC AV2AV1TV
BRIGHT
MODE
BRIGHT
CH
POWER
SLEEP MENU
DISPLAY
FREEZE
/HOLD
SOUND
SUBPAGE SUBTITLE
VIEW MODE
TEXT
REVEAL
PIP
OK
1. Press the SOUND button on the remote control.
The audio reception mode changes in the
following order depending on the broadcast you
are receiving.
NICAM broadcasts
Receiving a stereo broadcast
STEREO → MONO → STEREO ...
Receiving a bilingual broadcast
CH A → CH B → CH AB → MONO → CH A ...
Receiving a monaural broadcast
NICAM → MONO → NICAM ...
A2 stereo broadcasts
Receiving a stereo broadcast
STEREO → MONO → STEREO...
Receiving a bilingual broadcast
CH A → CH B → CH AB → CH A...
Receiving a monaural broadcast
MONO (fastened)
Page 38
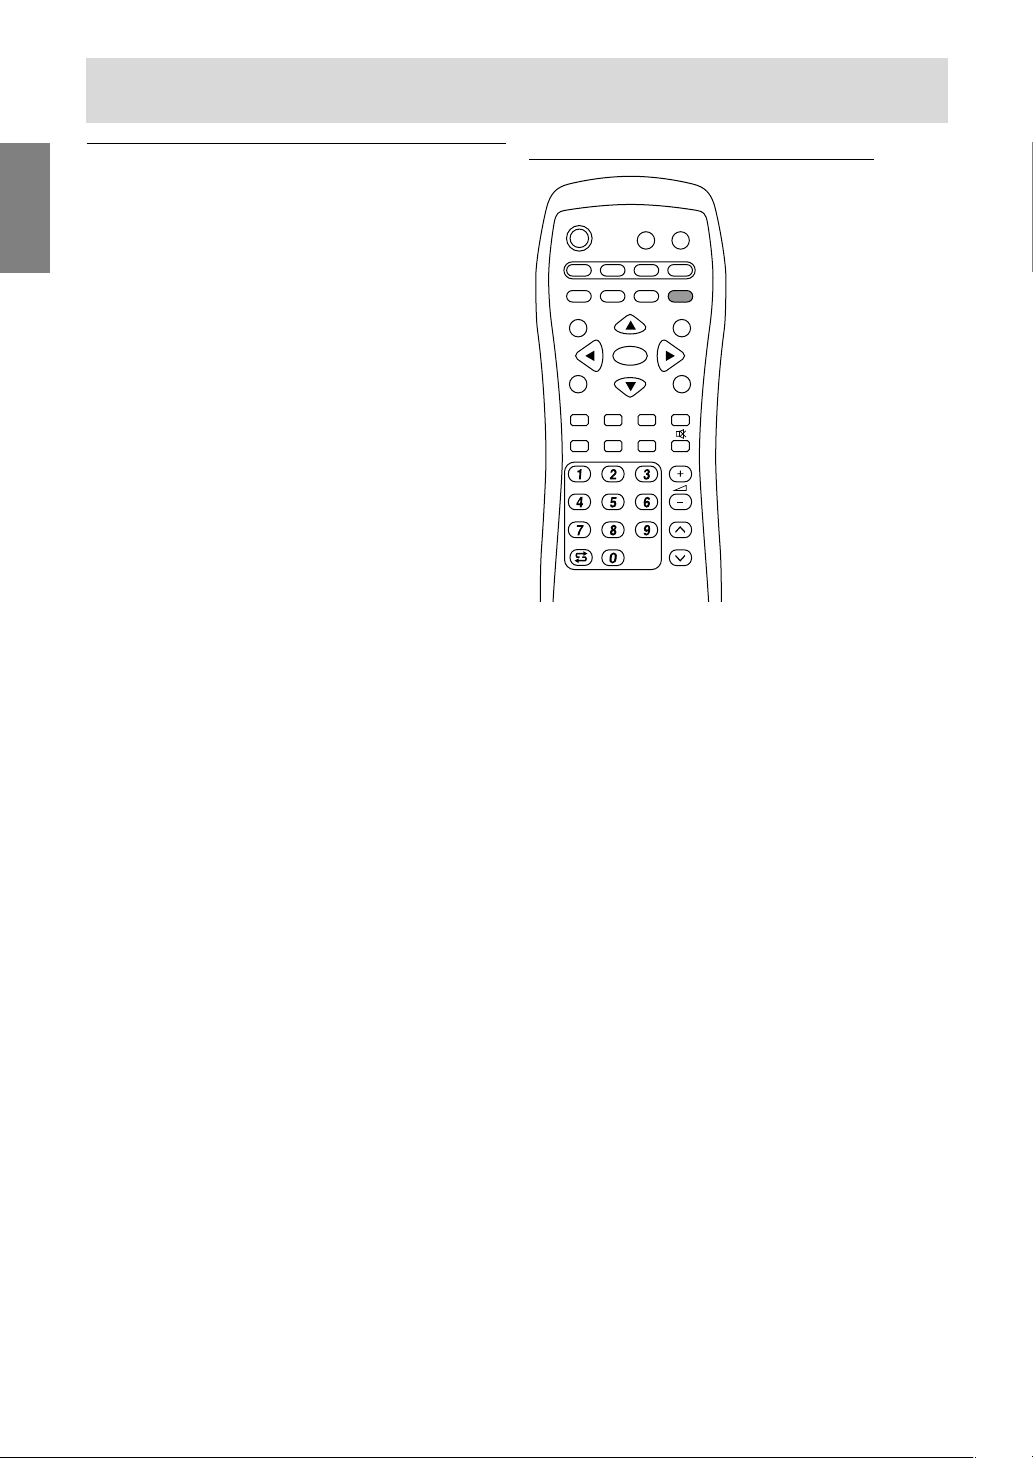
E36
Watching Teletext
Teletext is an information service organized like a
magazine, which is provided by some TV stations
in addition to regular television broadcasting. Your
monitor receives Teletext signals broadcast by a
TV station, processes the information and displays
it graphically on the screen. News, weather and
sports information, stock exchange prices,
programme reviews and closed captioning
(subtitle) are among the many services available
through Teletext.
Notes:
- Operation in Teletext mode is described along
with the remote control in this manual.
- Teletext is available only in TV/AV mode, not in
PC mode (including when watching TV in PIP
window).
Watching TV
Turning on and off the Teletext mode
PC AV2AV1TV
BRIGHT
MODE
BRIGHT
CH
POWER
SLEEP MENU
DISPLAY
FREEZE
/HOLD
SOUND
SUBPAGE SUBTITLE
VIEW MODE
TEXT
REVEAL
PIP
OK
1.Select a TV channel that is broadcasting the
Teletext programme.
2.Press the TEXT button.
The Teletext screen will be displayed.
3.Press the TEXT button again to turn off the
Teletext mode.
Notes:
- If necessary, you can change the character set
displayed on the Teletext screen. (See page
E38.)
- The Teletext mode cannot be turned off or
switched to other display modes with the input
buttons.
Page 39
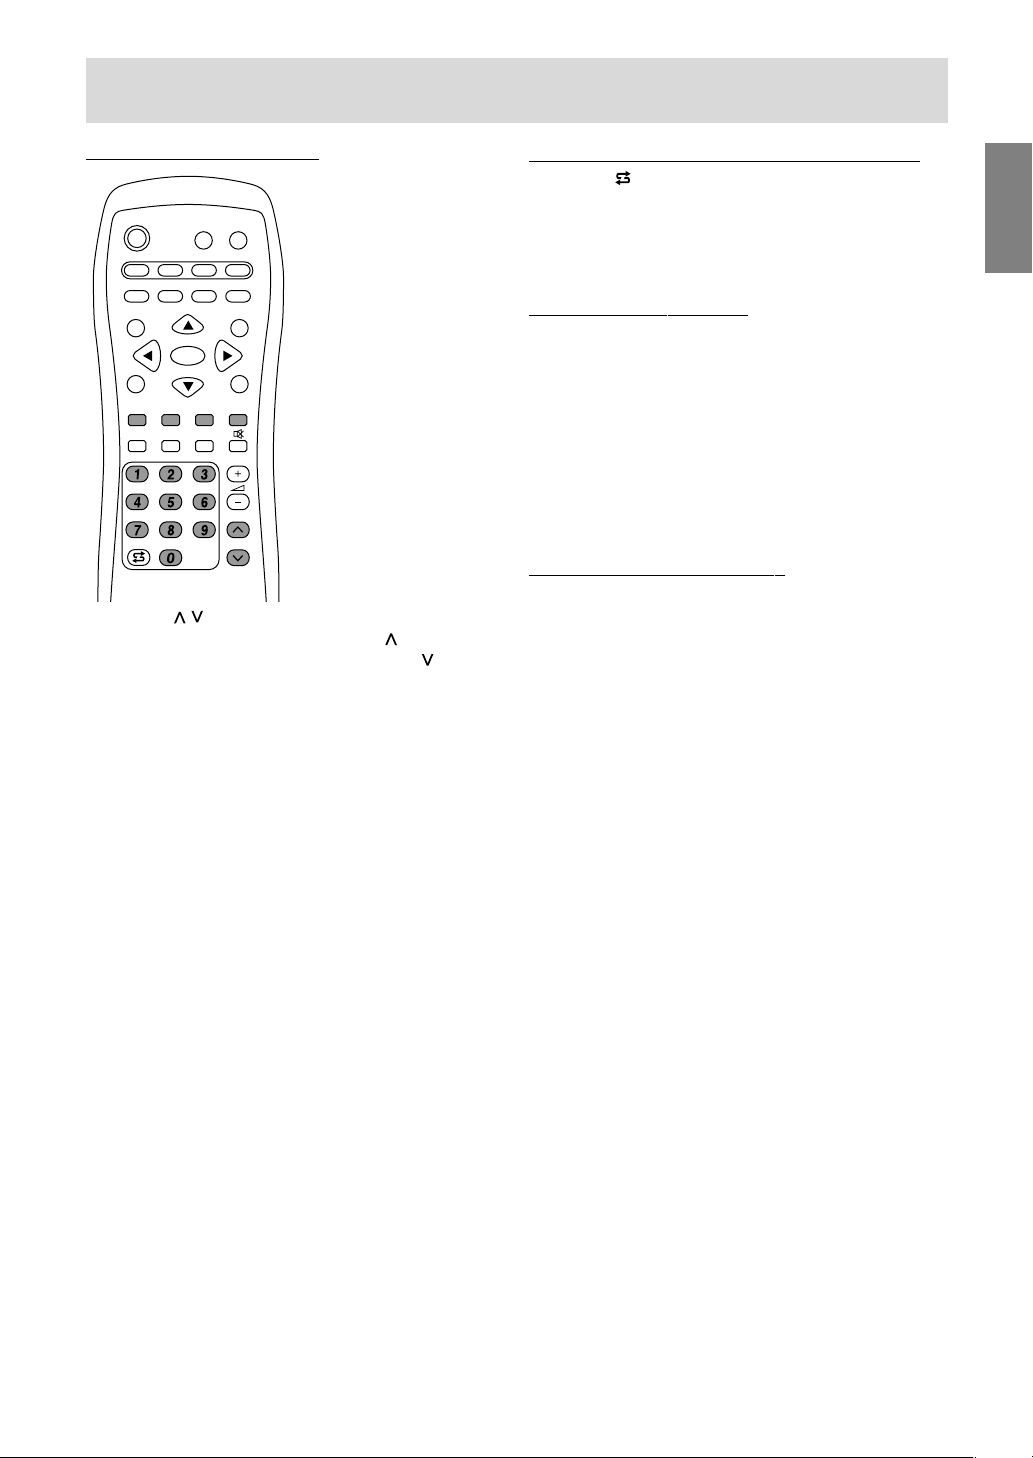
E37
EnglishDeutschFrançaisItalianoEspañolEnglish
Watching TV
Returning to the page selected previously
Press the
(flashback) button.
Note:
- The Teletext flashback memory is cleared when
channels are changed after Teletext mode is
switched to TV mode.
Selecting the TOP table
When TOP Teletext is being broadcast, you can
display the TOP table by pressing the OK button.
Select the desired subject in the table as follows:
- To move upwards, press the Red button.
- To move downwards, press the Cyan button.
- To select the highlighted item, press the Green
button.
Note:
- The TOP (Table of Pages) system for Teletext is
transmitted in Germany currently.
Selecting the Teletext index
When FLOF Teletext is being broadcast, you can
display the index page (usually p.100) by pressing
the OK button.
Note:
- The FLOF (Full Level One Features) system for
Teletext is transmitted in UK currently.
Selecting a Teletext page
PC AV2AV1TV
BRIGHT
MODE
BRIGHT
CH
POWER
SLEEP MENU
DISPLAY
FREEZE
/HOLD
SOUND
SUBPAGE SUBTITLE
VIEW MODE
TEXT
REVEAL
PIP
OK
Using the buttons
- To select the next page, press the button.
- To select the previous page, press the button.
Using the channel buttons
Enter the desired page number (100-899) using
the channel buttons (0-9).
Notes:
- Page numbers beginning with 0 or 9 do not
exist.
- If you enter the wrong numbers, simply complete
the input of the 3-digit number and then enter
the desired number again.
Using the colour buttons
Select the desired subject using the colour buttons
(Red/Green/Yellow/Cyan) corresponding to the
coloured options at the bottom of Teletext screen.
The configuration of the coloured options varies
depending on the Teletext system.
Page 40
E38
Watching TV
Selecting the subpages
When a selected Teletext page consists of several
subpages, the desired subpages can be selected
as follows:
1.Press the SUBPAGE button.
“S****” is displayed in the left side of the header.
2.Enter a 4-digit number using the channel
buttons (0-9) while this message is being
displayed.
The selected subpage is displayed.
Selecting the character set
1.Display the “CHARACTER SET” screen using
the MENU button.
CHARACTER SET
PAN EUROPE
FRENCH/ARABIC
TURKISH/GREEK
CYRILLIC
2.Select the desired character set using the
buttons.
The colour of the letters will turn to yellow. When
selecting the character set, pressing the OK
button will change the letters to red for an instant
and then return them back to yellow.
3.Exit the screen using the MENU button.
Useful features for Teletext
To hold the current Teletext page
Press the FREEZE/HOLD button.
You can stop updating the Teletext page.
To cancel, press the FREEZE/HOLD button again.
To zoom the current Teletext page
Press the
buttons.
Each time the button is pressed, the current page
is displayed as below.
ABC
DEF
ABC DEF
To quickly activate subtitles
Press the SUBTITLE button in TV/AV mode.
Subtitles activate quickly.
To cancel, press the TEXT button.
Note:
- You do not have to turn on the Teletext mode
before pressing the SUBTITLE button.
To display the hidden information
Press the REVEAL button.
You can display the hidden information such as
solutions to riddles and puzzles.
To cancel, press the REVEAL button again.
Page 41
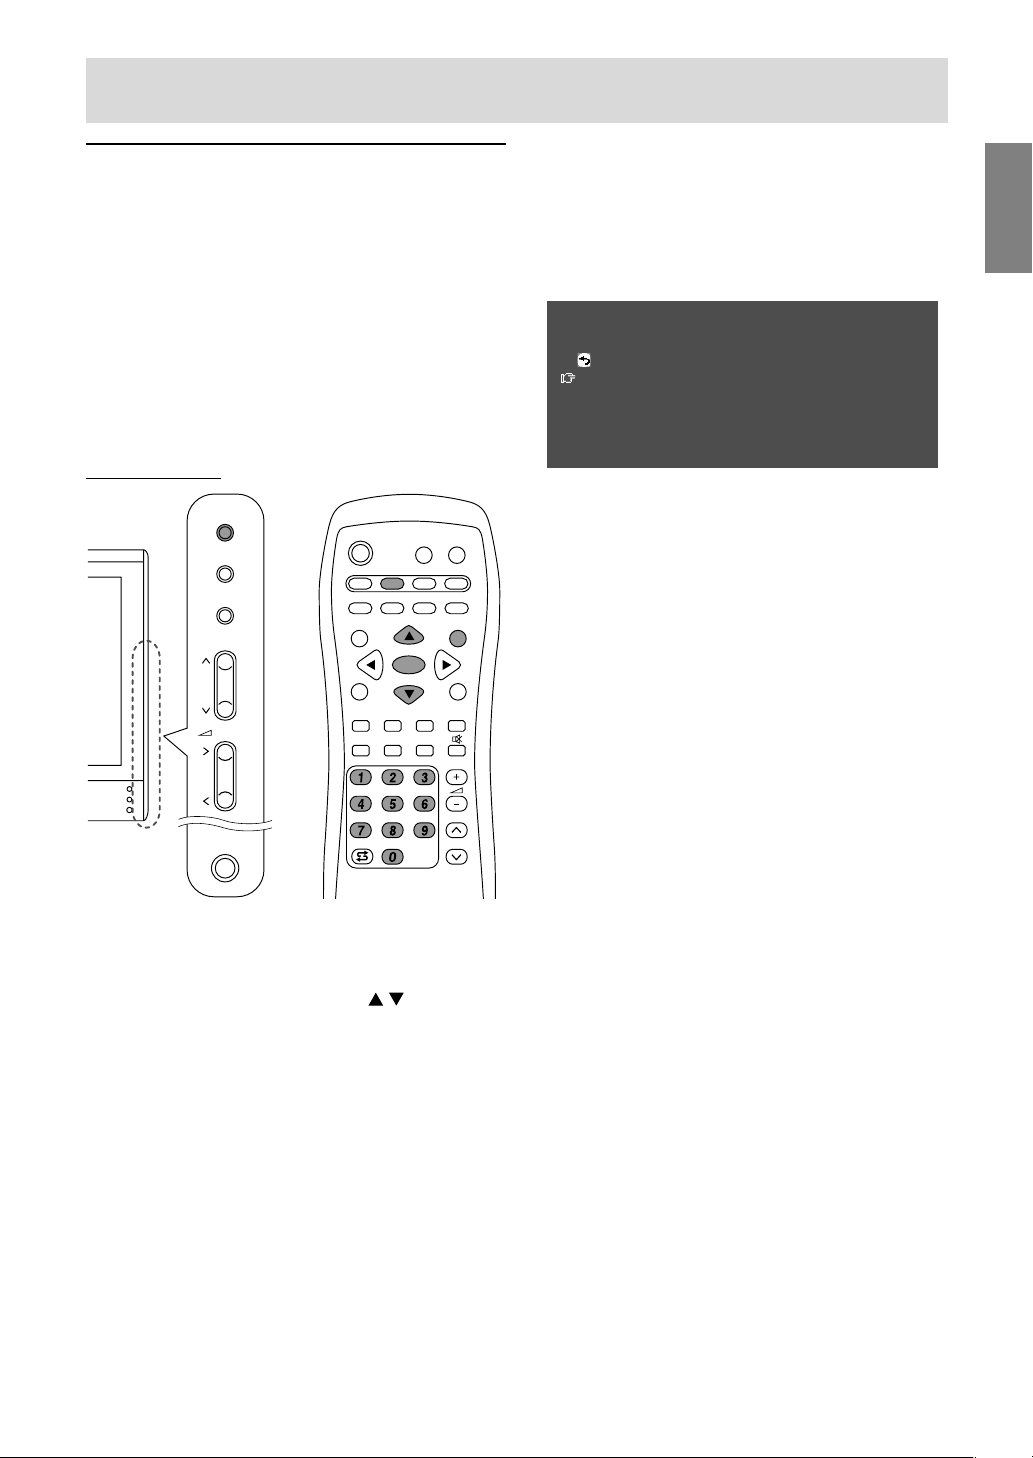
E39
EnglishDeutschFrançaisItalianoEspañolEnglish
Watching TV
Using the Child Lock function
Important:
- Please refer to the end of this manual for
“Disengaging Child Lock”.
The Child Lock function blocks the viewing of any
channel for which Child Lock has been set,
including the PIP window. When all programmes
are locked, viewing video images in AV mode is
also blocked.
To use the Child Lock function, you first need to
define your PIN (Personal Identification Number).
Defining a PIN
MAIN
POWER
CH
MENU
INPUT
PC AV2AV1TV
BRIGHT
MODE
BRIGHT
CH
POWER
SLEEP MENU
DISPLAY
FREEZE
/HOLD
SOUND
SUBPAGE SUBTITLE
VIEW MODE
TEXT
REVEAL
PIP
OK
/BRIGHT
OK
/
BRIGHT
MODE
1.Select the TV mode using the INPUT button
(monitor) or the TV button (remote control).
2.Display the MENU screen using the MENU
button (remote control).
3.Select “CHILD LOCK” using the buttons
(remote control), and press the OK button
(remote control).
The “PLEASE ENTER YOUR PIN” screen will be
displayed.
4.Input the desired 4-digit PIN (e.g. 1234) using
the channel buttons (0-9) on the remote control.
Notes:
- Be sure to make a written note of your PIN.
- When you input the PIN for the first time, press
the OK button (remote control) to register it.
The “CHILD LOCK” screen will be displayed.
CHILD LOCK
<
TV/AV
>
RETURN
STATUS
[
OFF
]
INDIVIDUAL PROGRAMME
>>
RESET
5.Perform the next procedures or exit the screen
using the MENU button (remote control).
Page 42

E40
Watching TV
Setting Child Lock
Notes:
- To activate the Child Lock function, turn off the
monitor and then turn it on again after finishing
the settings.
- When “STATUS” in the CHILD LOCK menu is
“ALL” or “INDIVIDUAL”, TV/AV-IN SOUND is not
available in PC mode (see page E21).
To set Child Lock for all programmes
1.Display the “CHILD LOCK” screen by performing
steps 1 to 4 of “Defining a PIN” on page E39.
2.Select “STATUS” using the MENU button
(monitor) or the
buttons (remote control),
and press the OK/BRIGHT MODE button
(monitor) or the OK button (remote control).
3.Select “ALL” using the buttons (monitor) or
the
buttons (remote control).
4.Exit the screen using the INPUT button (monitor)
or the MENU button (remote control).
Note:
- This setting locks AV mode and TV function in all
modes.
To set Child Lock for individual programmes
1.Display the “CHILD LOCK” screen by performing
steps 1 to 4 of “Defining a PIN” on page E39.
2.Select “STATUS” using the MENU button
(monitor) or the
buttons (remote control),
and press the OK/BRIGHT MODE button
(monitor) or the OK button (remote control).
3.Select “INDIVIDUAL” using the
buttons
(monitor) or the
buttons (remote control).
4.Select “INDIVIDUAL PROGRAMME” using the
MENU button (monitor) or the buttons
(remote control), and press the
OK/BRIGHT MODE button (monitor) or the
OK button (remote control).
The “INDIVIDUAL PROGRAMME” screen will be
displayed.
5.Select the desired programme using the
buttons (monitor) or the buttons
(remote control), and press the
OK/BRIGHT MODE button (monitor) or the
OK button (remote control).
The locked programme is displayed in red.
Note:
- To unlock the programme, perform the step 5
again.
6.Exit the screen using the INPUT button (monitor)
or the MENU button (remote control).
Notes:
- Even when Child Lock is activated, unlocked
programmes can be viewed, but the
PROGRAMMES menu cannot be selected on
the TV MENU screen. To adjust the
PROGRAMMES menu, you need to cancel the
Child Lock setting temporarily. (See page E41.)
- When Child Lock is activated individually, if you
try to select the programme and the PIN input
screen appears, you can use the buttons to
find other unlocked programmes.
Page 43

E41
EnglishDeutschFrançaisItalianoEspañolEnglish
Watching TV
Temporarily cancelling the Child Lock
setting
By temporarily cancelling the Child Lock setting,
you can view the programmes for which the Child
Lock has been set.
If you are currently at the PIN input screen, input
your PIN using the channel buttons (0-9) on the
remote control.
When the PIN is correctly entered, the normal
screen is displayed.
If you are not currently at the PIN input screen,
perform steps 1 to 3 of “Defining a PIN” on page
E39, and input your PIN.
Notes:
- When the PIN input screen appears for the
locked programme in the PIP window, closing
the PIP window using the PIP button (remote
control) enables you to operate the monitor in
PC mode.
- When the power is turned off and on after the
Child Lock is cancelled, the Child Lock becomes
effective again.
- Unless the Child Lock is cancelled within
approximately 20 seconds, the monitor goes to
the standby mode.
Page 44

E42
Enjoying DVDs, games, and other equipment
You can enjoy two additional pieces of AV
equipment connected to your monitor such as
VCRs, DVD players, and game systems. (See
pages E12 and E13.)
Equipment connected to AV-IN1:
Display mode “AV1”
Equipment connected to AV-IN2:
Display mode “AV2”
Note:
- Since the use of AV1 and AV2 is the same, this
manual refers to AV1 mode and AV2 mode as
“AV mode”.
MAIN
POWER
CH
MENU
INPUT
PC AV2AV1TV
BRIGHT
MODE
BRIGHT
CH
POWER
SLEEP MENU
DISPLAY
FREEZE
/HOLD
SOUND
SUBPAGE SUBTITLE
VIEW MODE
TEXT
REVEAL
PIP
OK
/BRIGHT
OK
/
BRIGHT
MODE
1.Make adjustments for connections with external
devices on the “AV CONNECTIONS” screen.
(See page E45.)
2.Switch the display mode to AV1 or AV2.
See page E18 for more information.
AV1
RGB
3.Turn on the connected AV equipment, and then
play a tape, DVD, or game.
4.Adjust the volume.
See page E19 for more information.
Notes:
- Sometimes no image will be displayed during
fast searching of video.
- The display may flicker during slow playback of
video depending on the VCR or videotape you
are using.
- You cannot play shooting games that use gun
controllers with this monitor.
Page 45

E43
EnglishDeutschFrançaisItalianoEspañolEnglish
Handy features (for TV/AV mode)
Switching power off after a specified
length of time (SLEEP)
The monitor can automatically switch off (standby)
after a specified length of time. This is handy if you
want to watch the monitor at bedtime.
Perform this operation using the remote control.
1.Press the SLEEP button.
2.Specify in how many minutes you want the
monitor to switch off by pressing the SLEEP
button.
The time changes in the following order each
time you press the button:
30 min → 60 min → 90 min → 120 min →
150 min → --- min → 30 min
When the specified time elapses, the monitor
automatically switches off and clears the SLEEP
timer.
Checking the time remaining on the SLEEP
timer
1.Press the DISPLAY button.
The time remaining on the SLEEP timer will be
displayed for several seconds. You can also
check the time remaining by pressing the SLEEP
button once.
Changing the specified time
1.Press the SLEEP button.
The remaining time will be displayed.
2.Change the specified time by pressing the
SLEEP button several times as needed.
Notes:
- When there are only 5 minutes remaining on the
SLEEP timer, the remaining time will be
displayed every minute.
- Pressing the POWER button while the SLEEP
timer is operating will clear the timer.
- Switching to PC mode automatically clears the
SLEEP timer.
- You can also set the SLEEP timer from the
MODE SELECT menu. (See page E46.)
Pausing the screen (FREEZE)
This feature pauses the image from the TV or other
connected AV equipment. This is handy when you
want to write down a recipe or the address for a
prize contest.
Perform this operation using the remote control.
1.Press the FREEZE/HOLD button.
The images will pause.
Cancelling pausing
1.Press the FREEZE/HOLD button again.
Notes:
- You cannot pause the TV or video image in the
picture-in-picture window.
- Changing channels or switching the display
mode (input) automatically cancels pausing.
Returning to previous channel
(FLASHBACK)
You can return to the previous channel you were
watching.
Perform this procedure with remote control.
1.Press the
button.
The monitor will return to the channel you were
previously watching.
Page 46

E44
Adjusting the display
You can adjust TV and video images and perform
various settings using menus for the TV/AV mode.
- All the menus except for the PROGRAMMES
menu are common for TV and AV modes. All the
values set in TV mode will be also applied in AV
mode.
How to adjust
The following procedure describes the basic
operation method. See pages E45 and E46
regarding individual items.
1.Select the TV mode or AV mode.
See page E18 for more information.
2.Display the MENU screen using the MENU
button.
MENU
<
TV/AV
>
PICTURE
>>
PROGRAMMES
>>
AV CONNECTIONS
>>
MODE SELECT
>>
CHILD LOCK
>>
3.Select the menu you want to set using the MENU
button (monitor) or the buttons (remote
control), and press the OK/BRIGHT MODE
button (monitor) or the OK button (remote
control).
4.Select the item you want to set using the MENU
button (monitor) or the buttons (remote
control), and press the OK/BRIGHT MODE
button (monitor) or the OK button (remote
control).
5.Change the numbers/values using the
buttons (monitor) or the buttons (remote
control).
You can continue to set other items.
Do the following to return to the previous screen:
(1) Select “RETURN” using the MENU button
(monitor) or the buttons (remote control).
(2) Press the OK/BRIGHT MODE button
(monitor) or the OK button (remote control).
6.Exit the screen using the INPUT button (monitor)
or the MENU button (remote control).
Note:
- If you do not press any buttons for about 30
seconds while in a menu screen, the settings
you made up to that point will be applied and the
screen will automatically disappear.
Page 47

E45
EnglishDeutschFrançaisItalianoEspañolEnglish
Adjusting the display
PICTURE menu
Item
CONTRAST
BLACK LEVEL
COLOUR
TINT
SHARPNESS
WHITE BALANCE
RESET
PROGRAMMES menu (TV mode only)
Item
AUTOMATIC SEARCH
MANUAL ADJUSTMENT
SORT
ERASE PROGRAMME
RANGE
ENTER/CHANGE NAME
AV CONNECTIONS menu
Item
AV1 SIGNAL TYPE
AV1 COLOUR SYSTEM
AV1 CONTROL VOLTAGE
AV2 COLOUR SYSTEM
RESET
Notes:
- When a normal picture is not displayed, change the signal type and/or colour system.
- Switching between AV input signals may be slow, depending on the settings in “COLOUR SYSTEM”.
If you want to speed up signal switching, switch “AUTO” in “COLOUR SYSTEM” to the current reception
colour system.
Description
Adjusts contrast.
Adjusts the overall brightness of the screen.
Adjusts the colour depth.
Adjusts the colour tone.
Adjusts the image quality.
Adjusts the colour temperature.
- STD
.................
Standard setting for colour tone.
- WARM
.............
Colour tone redder than standard.
Resets adjustment values for this menu to their original factory settings.
Description
Sets available programmes automatically. (See page E30.)
Adjusts programmes manually. (See page E31.)
Changes the programme positions freely. (See page E32.)
Erases the individual programme or programmes in a consecutive range.
(See page E32.)
Enters or changes the name of an individual programme. (See page E33.)
Description
Selects the signal type of the external equipment connected to AV-IN1.
- AUTO
..............
Original factory setting.
- CVBS
..............
Composite video signal.
- Y/C
..................
S-video signal.
Selects the colour system of the external equipment connected to AV-IN1
:
PAL/SECAM/N358(NTSC 3.58)/N443(NTSC 4.43)/PAL60/PAL-M/PAL-N
.
Sets whether to temporarily output the image and sound of AV-IN1 in TV
mode.
- OFF
.................
Original factory setting.
- ON
..................
Responds to the signal from AV-IN1 in TV mode.
Selects the colour system of the external equipment connected to AV-IN2:
PAL/SECAM/N358(NTSC 3.58)/N443(NTSC 4.43)/PAL60/PAL-M/PAL-N.
Resets adjustment values for this menu to their original factory settings.
Page 48

E46
Adjusting the display
MODE SELECT menu
Item
VIEW MODE
SLEEP TIMER
LANGUAGE
RESET
CHILD LOCK menu
Item
STATUS
INDIVIDUAL PROGRAMME
RESET
Description
Sets unlock or lock for all programmes, or sets an individual programme
lock. (See page E40.)
- OFF
.................
Original factory setting.
- ALL
.................
Locks all TV programmes and video images in AV mode.
- INDIVIDUAL
...
Locks the specified TV programmes only.
When “STATUS” in the CHILD LOCK menu is “ALL” or “INDIVIDUAL”,
TV/AV-IN SOUND is not available in PC mode (see page E21).
Selects the programme to be locked when “INDIVIDUAL” is selected for
“STATUS”. (See page E40.)
Resets adjustment values for this menu to their original factory settings.
However, the PIN you have set is not cleared. Concerning the PIN, refer to
the end of this manual for “Disengaging Child Lock”.
Description
Selects the screen size.
- NORMAL
........
Displays the screen at 4:3.
- WIDE
..............
Displays the screen at 16:9.
- ZOOM1
...........
Enlarges and displays the entire screen, but with a
smaller screen size than “ZOOM2”. Please use this mode
when captions or telops at the top or bottom of the screen
are cut off.
- ZOOM2
...........
Enlarges and displays the entire screen at 4:3.
You can also set this item using the remote control. (See page E47.)
When you select “ZOOM1” or “ZOOM2”, the top and bottom of the screen
will be cut off slightly.
Specifies how many minutes until the monitor switches off (standby).
This can also be set using the remote control. (See page E43.)
Selects the language (English, German, Spanish, French or Italian) on the
screen. (See page E19.)
Resets adjustment values for this menu to their original factory settings.
Page 49

E47
EnglishDeutschFrançaisItalianoEspañolEnglish
Other features
Muting the sound (MUTE)
This feature is handy when you want to mute the
sound such as when the phone rings or someone
comes to the door.
Perform this operation using the remote control.
1.Press the
button.
The sound will be muted and “MUTE” will be
displayed.
“MUTE” will disappear after several seconds.
Cancelling muting
1.Press the
button again, or press any other
buttons.
Changing the screen size
(VIEW MODE)
You can change the screen size to match the video
on videotapes and DVDs.
Perform this operation using the remote control.
1.Press the VIEW MODE button.
The mode switches in the following order each
time you press the button:
[PC mode]
NORMAL → WIDE → NORMAL...
NORMAL: Expands the image to or near its aspect ratio.
WIDE: Expands the image so that it fills the screen.
[TV/AV mode]
NORMAL → WIDE → ZOOM1 → ZOOM2 → NORMAL...
NORMAL: Displays the screen at 4:3.
WIDE: Displays the screen at 16:9.
ZOOM1: Enlarges and displays the entire
screen, but with a smaller screen size
than “ZOOM2”. Please use this mode
when captions or telops at the top or
bottom of the screen are cut off.
ZOOM2:
Enlarges and displays the entire screen at 4:3.
Notes:
- When you select “ZOOM1” or “ZOOM2” in TV/AV
mode, the top and bottom of the screen will be
cut off slightly.
- You can set this item individually for PC mode
and TV/AV mode in the MODE SELECT menu.
(See pages E25 and E46.)
Checking the current channel and
audio reception mode on screen
(DISPLAY)
You can check the current display mode, channel
being received, audio reception mode, and time
remaining on the SLEEP timer.
Perform this operation using the remote control.
1.Press the DISPLAY button.
Various information about the current state will
be displayed.
The information will disappear after several
seconds.
Notes:
- The information displayed will vary depending
on the current display mode and other settings.
- If the broadcast changes in TV mode while the
information is displaying, the broadcast and the
audio reception mode may not match.
Changing BRIGHT MODE
You can lower energy consumption by decreasing
screen brightness.
1.Press the OK/BRIGHT MODE button (monitor) or
the BRIGHT MODE button (remote control).
The mode switches in the following order each
time you press the button:
[PC mode]
DARK (power save) → BRIGHT →
DARK (power save)...
[TV/AV mode]
NORMAL (power save 1) → DARK (power save 2) →
BRIGHT → NORMAL (power save 1)...
Page 50

E48
Preventing changes to adjusted
values (ADJUSTMENT LOCK)
Disabling the control buttons other than the
following buttons (monitor and remote control)
prevents adjusted values from being changed.
The changing of adjusted values for not only PC
mode, but for TV/AV mode as well will be
prevented.
[Monitor]
- MAIN POWER button
- buttons
- INPUT button
- buttons
[Remote control]
- POWER button
- + – buttons
- button
- Input buttons (PC, TV, AV1, and AV2)
- buttons
- Channel buttons (0-9)
- OK button
- TEXT button
- SUBTITLE button
- FREEZE/HOLD button
-
button
Perform this procedure on the monitor.
1.Turn off the monitor power using the MAIN
POWER button.
2.While pressing the MENU button, press the
MAIN POWER button (i.e. turn the power on).
Continue to press the buttons until
“ADJUSTMENT LOCKED” appears on the
screen. The lock is set when the message is
displayed.
Releasing the adjustment lock
Perform this procedure on the monitor.
1.Turn off the monitor power using the MAIN
POWER button.
2.While pressing the MENU button, press the
MAIN POWER button (i.e. turn the power on).
Continue to press the buttons until
“ADJUSTMENT UNLOCKED” appears on the
screen. The lock is released when the message
is displayed.
CAUTION!
- When the adjustment lock is set, all buttons on
the monitor and remote control other than the
above buttons are disabled. To use buttons other
than the above buttons, release the adjustment
lock.
Other features
Resetting all adjustment values
(ALL RESET)
All adjustment values will be reset. This includes
not only PC mode, but also TV/AV mode (including
channel settings, etc.). Concerning the ALL
RESET procedure, refer to the end of this manual.
Page 51
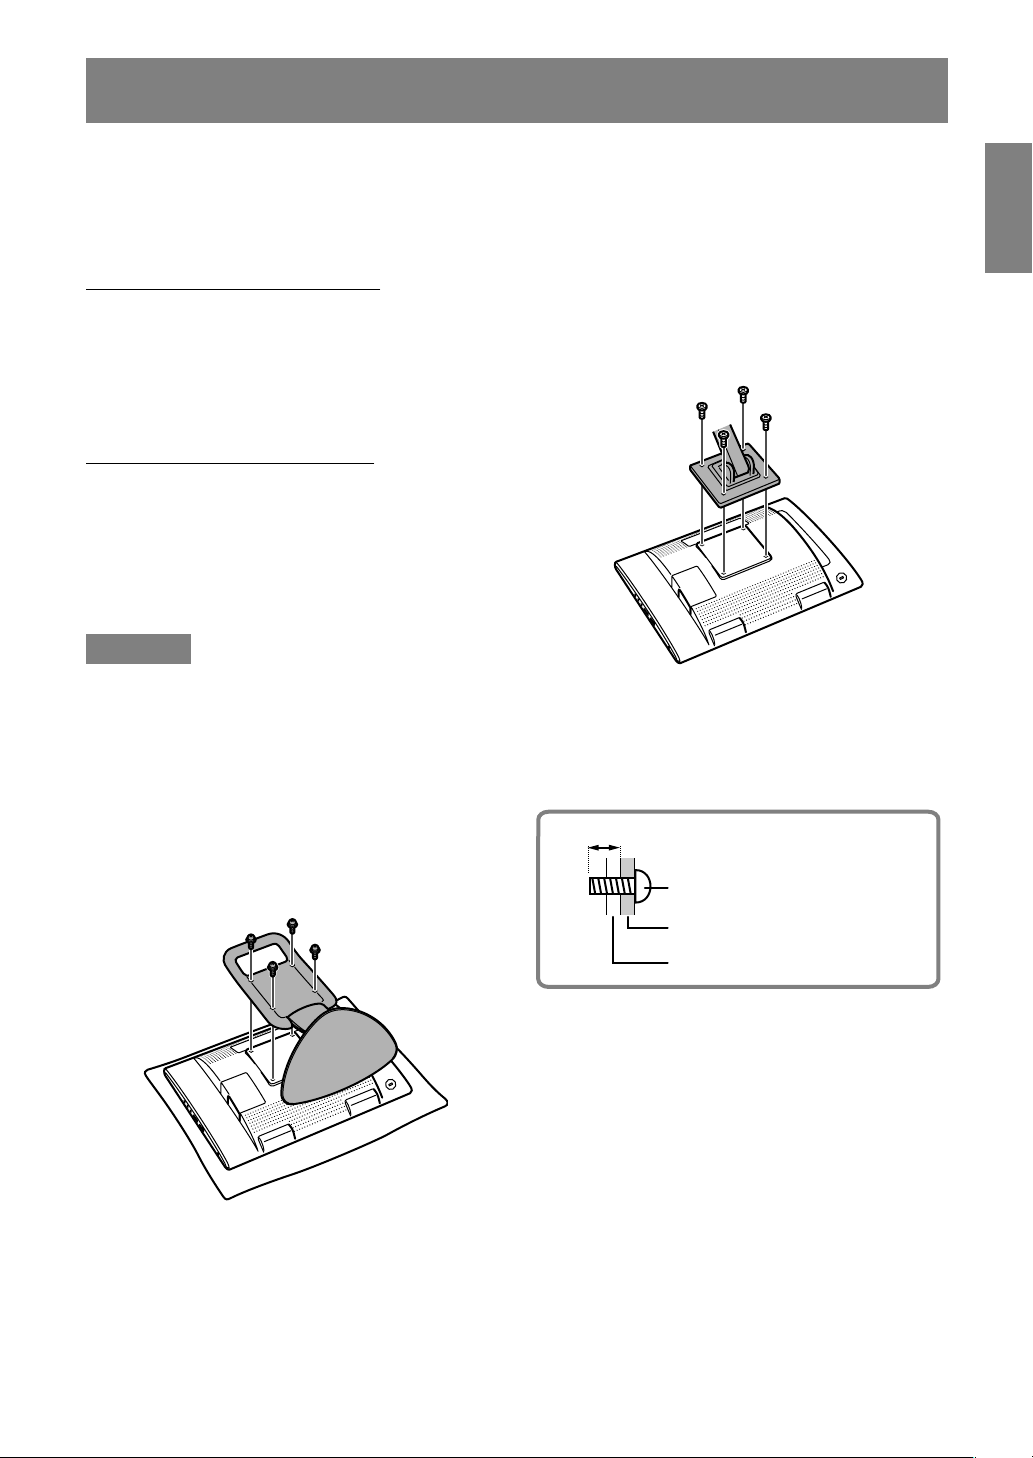
E49
EnglishDeutschFrançaisItalianoEspañolEnglish
Instructions for attaching a VESA-compliant mount
An arm or stand based on the VESA standard
(commercially available) can be attached to the
monitor.
Procurement of the arm or stand is at the
customer’s discretion.
Arms or stands able to be used
Attachments must satisfy the following.
- Compatible with the VESA standard.
- Have a gap of 100 mm x 100 mm between the
screw holes on the section to be attached.
- Not be likely to fall off or break off after being
attached to the monitor.
How to attach the arm or stand
- Be careful not to over bend the cable or add
extension cords as this could lead to
malfunction.
- While following these instructions, please also
refer to the installation instructions in the
operation manual included with the arm or
stand.
CAUTION!
- Be careful not to get your fingers pinched
between the display and stand nor to let the
stand drop. These could lead to injury.
1. Remove the cables.
2.Spread out a soft cloth on a suitable horizontal
surface. Being careful not to damage the
monitor, gently lay the monitor on it display-side
down.
3.Remove the four screws and then remove the
stand from the monitor.
Notes:
- The stand is specially made for use with this
monitor. Once having removed the stand, never
attempt to attach it to another equipment.
- Once having removed the screws, store them
together with the stand and if the stand is ever
re-attached be sure to use the original screws.
Using different screws could lead to a
malfunction.
4. Attach the arm to the monitor with the four
screws.
Note:
- The screws used to attach the arm should be M4
screws with a length of 10-12 mm protruding
from the surface to be attached. Using different
screws could cause the monitor to fall off or to be
internally damaged.
Screw used to attach arm
Arm
Part of monitor to which arm is
attached
10-12 mm
Page 52

E50
Monitor care
Troubleshooting
If you think the monitor may be faulty, please check the following points before taking it to be repaired.
If afterwards it still does not work, please contact the shop where you purchased the monitor or your
nearest Sharp authorized Service Centre.
The monitor’s fluorescent tubes have a limited life span.
- If the screen darkens, persistently flickers or does not light up, the fluorescent tube has reached the
end of its operational life span. Please inquire at the shop where you purchased the monitor or your
nearest Sharp authorized Service Centre.
- In the initial period of use, due to the characteristics of fluorescent tubes the screen may flicker. (This
is not a malfunction.) Should this happen, check by first turning off the power, then turning it on
again.
Problem
There is no picture.
(Power LED does not light.)
There is no picture.
(Power LED is lit orange.)
The image appears distorted.
The remote control does not work.
There is no TV picture.
A particular channel will not tune in.
There are stripes or dots on
TV picture.
The picture wavers.
The TV picture is doubled.
There are colour bands.
The TV picture is distorted.
There is no video picture.
There is no game picture.
What to Check
- Are the AC adapter and power cord properly connected? (Page E14)
- Is power turned on? (Page E18)
- Is the monitor properly connected to the computer? (Page E10)
- Is the computer turned on?
- Does the computer’s signal timing correspond to monitor
specifications? (Page E53)
- Is the computer in power-saving mode?
Try pressing a key on the keyboard or moving the mouse.
- Does the computer’s signal timing correspond to monitor
specifications? (Page E53)
- Perform automatic adjustment. (Page E17)
- Change the Vsync frequency (refresh rate) on the computer you
are using to a low value if possible. (Page E53)
- Have the batteries of the remote control run out? (Page E9)
- Are the batteries placed in the right direction in the remote
control? (Page E9)
- Is the adjustment lock on? (Page E48)
- Is the monitor connected to an antenna? Check the connection.
(Page E11)
- Is the monitor switched to TV mode? (Page E18)
- Have you set TV channels properly? (Pages E30 to E33)
- Have you set TV channels properly? (Pages E30 to E33)
- Is there interference from automobiles, trains, neon signs,
computers, or other sources?
- Place the antenna as far as possible away from potential
sources of interference.
- Place the antenna line as far as possible from the computer.
- Is the antenna is facing the right direction?
- There may be reflected electric waves from nearby mountains or
buildings. Try changing the antenna’s height and direction.
- Is there interference from a nearby TV?
Changing the antenna’s height and direction may help.
- Try switching power off, waiting several seconds, and then
turning power back on.
- Are the cables properly connected? (Pages E12 and E13)
- Have you switched to AV mode? (Page E18)
- Have you turned on the connected equipment?
- Change the signal type and/or colour system. (Page E45)
Page 53

E51
EnglishDeutschFrançaisItalianoEspañolEnglish
Monitor care
Always remove the plug from the AC outlet when cleaning the monitor.
Cabinet and control panel section
Use a soft dry cloth to lightly wipe away any grime from the cabinet and control panel.
If they are very dirty, apply neutral detergent to a dampened soft cloth, wring it out well and wipe away
grime.
LCD panel section
Use a soft dry cloth to lightly wipe away dirt and dust from the surface of the LCD panel. (A soft cloth such
as gauze or that used for lens cleaning is suitable.)
CAUTION!
- Never use thinner, benzine, alcohol, glass cleaner, etc., as this could lead to colour change or change
in shape.
- Never scratch the monitor with anything hard or apply strong pressure as this could leave marks or
result in malfunction.
Storage
If the monitor will not be used for a long period of time, be sure to remove the power plug from the AC
outlet.
CAUTION!
- Do not leave the monitor in contact with rubber or plastic items for long periods of time as this could
lead to colour change or change in shape.
Problem
The TV picture does not move.
The video picture does not move.
I have forgotten my PIN
(Personal Identification Number).
There is no sound.
Control buttons do not work.
The MENU screen does not appear.
“PROGRAMMES” in the MENU screen
for TV mode cannot be selected.
What to Check
- Is the screen pausing? Did you press the FREEZE/HOLD
button? (Page E43)
- See “Disengaging Child Lock” at the end of this manual.
- Are the audio cables properly connected? (Pages E10, E12
and E13)
- Did you press the button? (Page E47)
- No sound can be heard from the monitor’s speakers while
headphones are connected.
- Adjust the volume. (Page E19)
- No sound can be heard from the monitor’s speakers while the
monitor is in power-saving mode.
- When “STATUS” in the CHILD LOCK menu is “ALL” or
“INDIVIDUAL”, TV/AV-IN SOUND is not available in PC mode.
(Pages E21 and E40)
- In AV mode, sound cannot be heard if there is no video input
signal.
- Is the adjustment lock set? (Page E48)
- Is Child Lock set? Cancel the lock temporarily. (Page E41)
- Is the monitor switched to TV mode? (Page E18)
Monitor care
Page 54
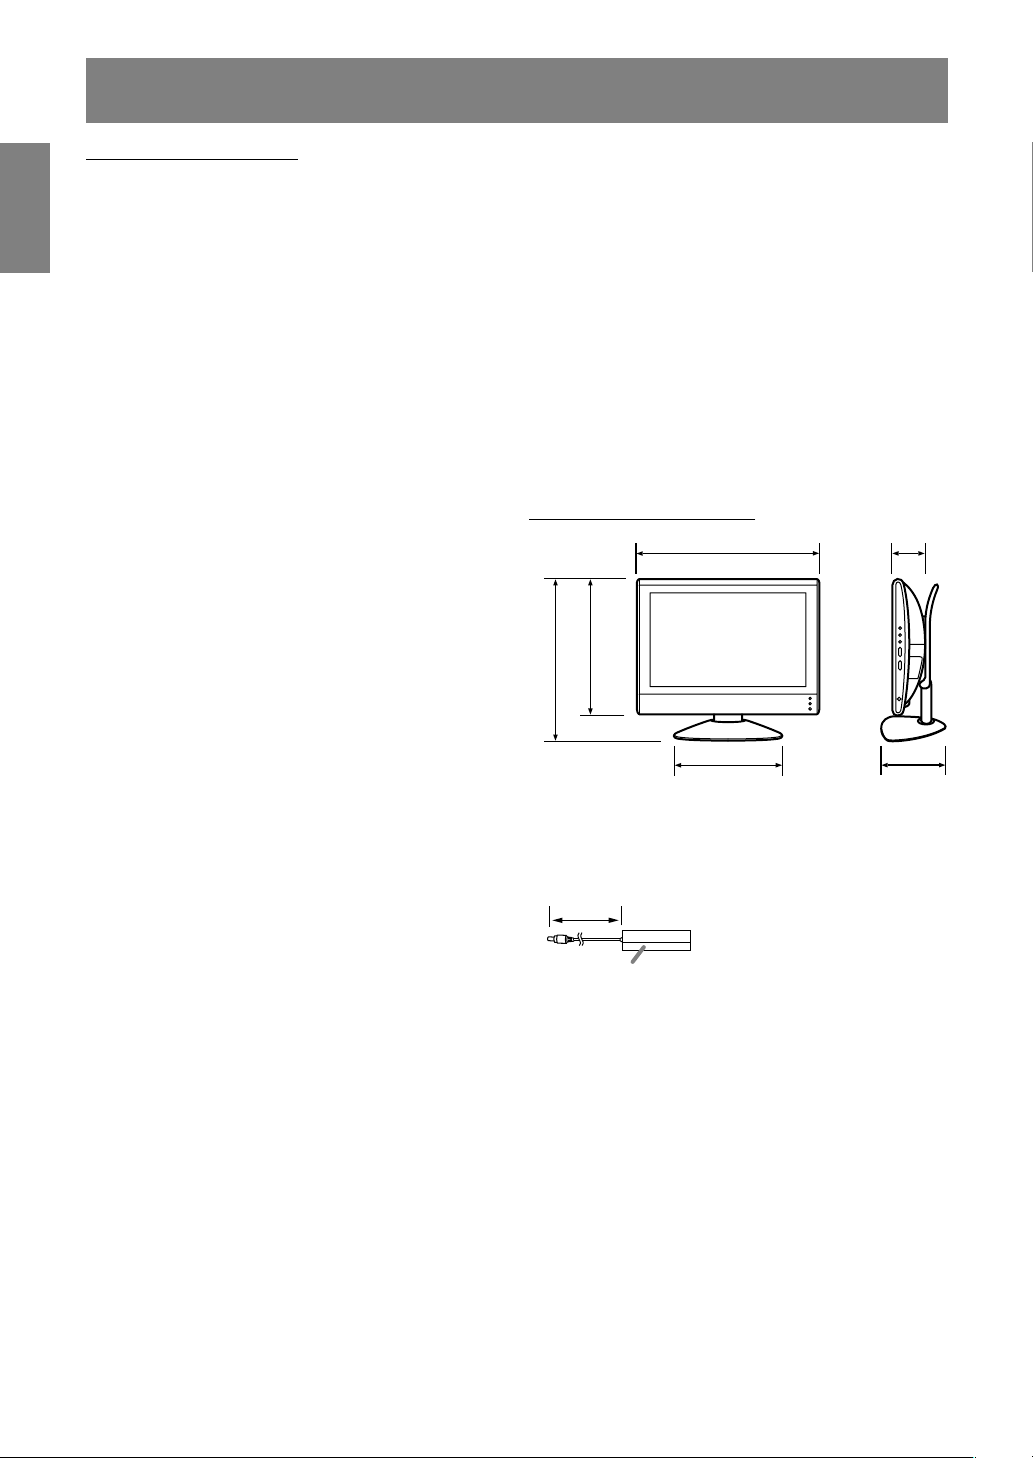
E52
Specifications
Product specifications
Model name
LL-171ME
LCD display
43 cm measured diagonally TFT LCD module
Resolution (max.)
WXGA 1280 x 768 pixels
Displayable colours (max.)
Approx. 16.19 million colours (6 bit + FRC)
Dot pitch
0.289 (H) x 0.289 (V) mm
Brightness (max.)
260 cd/m2 (PC mode); 400 cd/m2 (when “WHITE
BALANCE” is set to “WARM” in TV/AV mode)
Contrast ratio
600:1
Angle of visibility
Left-right 170°; up-down 170°
(contrast ratio
>
=
10)
Screen display size
369.6 (H) x 221.76 (V) mm
Video signal
Analog RGB (0.7 Vp-p) [75Ω]
Sync signal
Separate Sync (TTL level: +/-), Sync on Green,
Composite Sync (TTL level: +/-)
Video colour system
PAL/SECAM/NTSC
TV-standard
B/G, I, D/K, L
Stereo/bilingual
NICAM, A2 stereo
Expansion compensation
Digital scaling (Enlarges VGA/SVGA/XGA etc. to
full screen size.)
[Enlarged display (full screen, Fixed aspect
ratio)]
- 1:1 display is not possible.
Plug & Play
VESA DDC1/DDC2B compatible
Power management
VESA: based on DPMS
Speaker output
2.7 W + 2.7 W
Input terminals
Computer signal: Mini D-sub15 pin (3 rows) x 1
Computer audio: Mini stereo jack (φ 3.5 mm) x 1
Antenna (DIN): x 1
21-pin Euro-SCART (RGB) terminal x 1
Video image: RCA pin x 1
S-video image: x 1
Audio input terminal: RCA pin (L/R x 1)
Headphone terminal
Mini stereo jack (φ 3.5 mm)
Screen tilt
Upward approx. 0-20°; downward approx. 0-5°
Power supply
AC 110-240 V, 50/60 Hz (Uses special AC
adapter, type NL-A69J of Sharp Corporation)
Temperature of operating environment
5-35°C
Power consumption
60 W; 2.2 W in standby; 2.2 W in power-saving
mode (Uses special AC adapter)
Dimensions
Approx. 432 (W) x 184 (D) x 373 (H) mm
Weight
Approx. 5.9 kg (excluding signal cable and AC
adapter)
Approx. 5.0 kg (excluding stand)
Dimensions (Units: mm)
184
78
326
373
265
432
- PC analog signal cable: approx. 1.8 m
- PC audio cable: approx. 1.8 m
- Special AC adapter:
Approx. 1.5 m
Note:
- As a part of our policy of continuous
improvement, SHARP reserves the right to make
design and specification changes for product
improvement without prior notice. The
performance specification figures indicated are
nominal values of production units. There may
be some deviations from these values in
individual units.
Approx. 150 (W) x 60 (D) x 35 (H) mm
Page 55
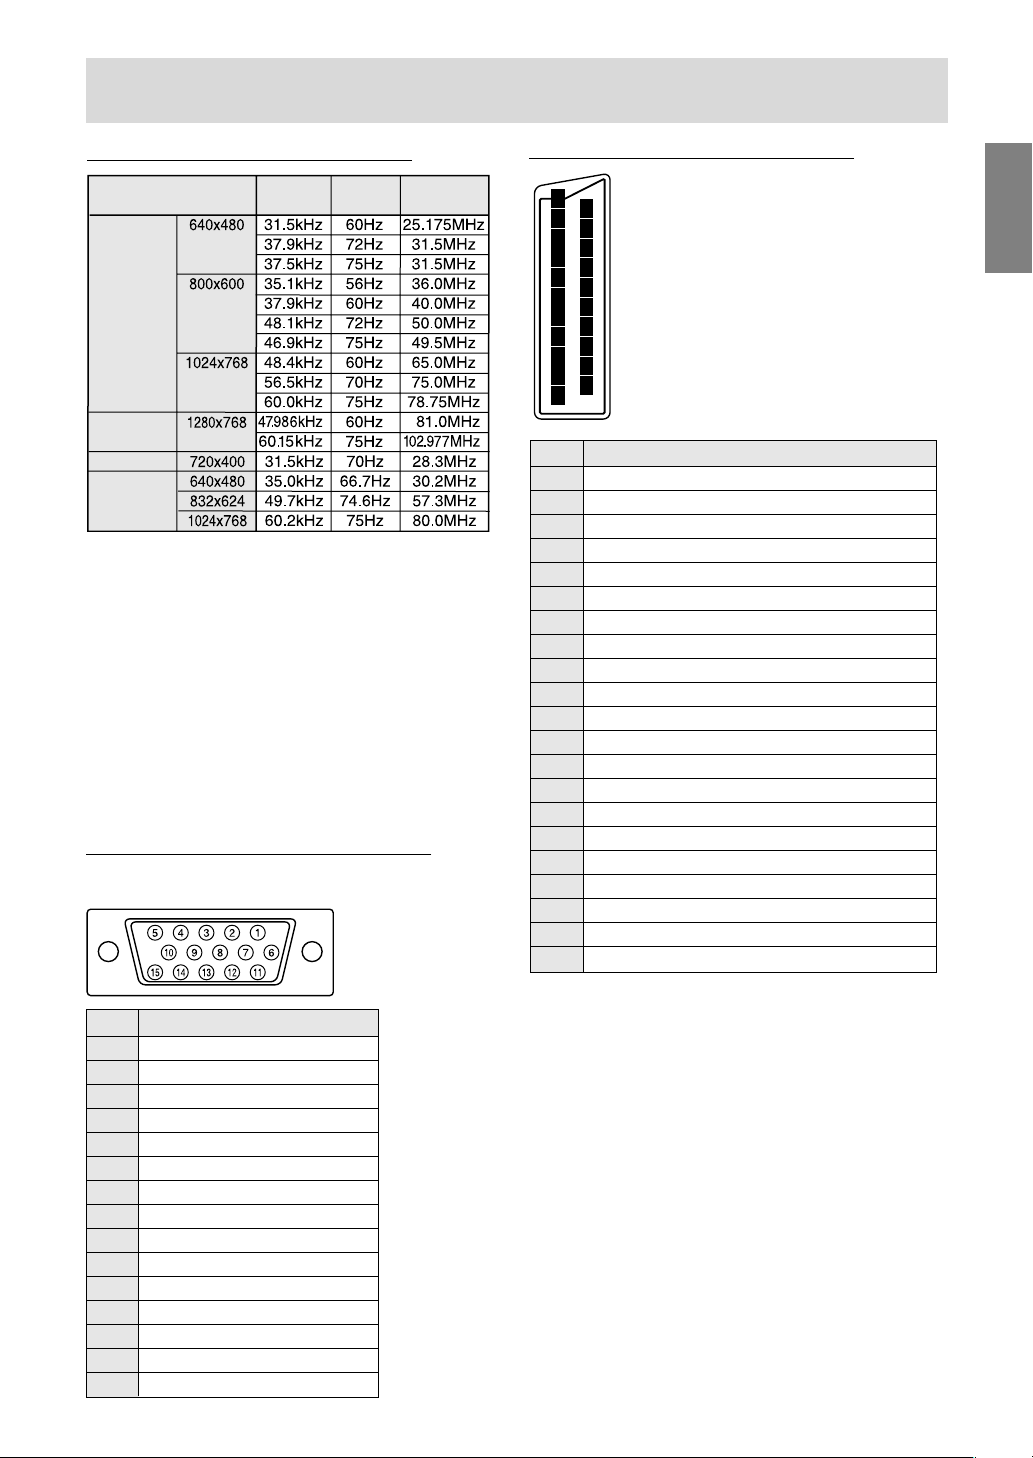
E53
EnglishDeutschFrançaisItalianoEspañolEnglish
Relevant signal timings (PC mode)
- Recommended resolution is 1280 x 768 or
1024 x 768.
- All are compliant only with non-interlaced.
- Frequencies for Power Macintosh are reference
values. To connect, another adapter
(commercially available) may be required.
- If the monitor is receiving timing signals that are
not compatible, “OUT OF TIMING” will appear.
Follow your computer’s instruction manual to set
the timing so that it is compatible with the
monitor.
- If the monitor is not receiving any signal (synch
signal), “NO SIGNAL” will appear.
Specifications
Display mode
VESA
Hsync
Vsync
Dot
frequency
WXGA
US text
Power
Macintosh
series
The analog RGB input connector pin
(Mini D-sub connector with 15 pins)
No. Function
1 Red video signal input
2 Green video signal input
3 Blue video signal input
4 GND
5 GND
6 For red video signal GND
7 For green video signal GND
8 For blue video signal GND
9 +5V
10 GND
11 N.C.
12 DDC data
13 For Hsync signal input
14 For Vsync signal input
15 DDC clock
21-pin Euro-SCART terminal (RGB)
2
4
6
8
10
12
14
16
18
20
1
3
5
7
9
11
13
15
17
19
21
No. Function
1
2
3
4
5
6
7
8
9
10
11
12
13
14
15
16
17
18
19
20
21
Audio right output
Audio right input
Audio left output
Common earth for audio
Earth for blue
Audio left input
BLUE input
Audio-video control
Earth for green
Not used
GREEN input
Not used
Earth for red
Not used
RED input/Chroma S-video input
RED/GREEN/BLUE control
Earth for video
Earth for RED/GREEN/BLUE control
Video output
Video input (PAL/SECAM/NTSC)/S-video input
Plug shield
Page 56
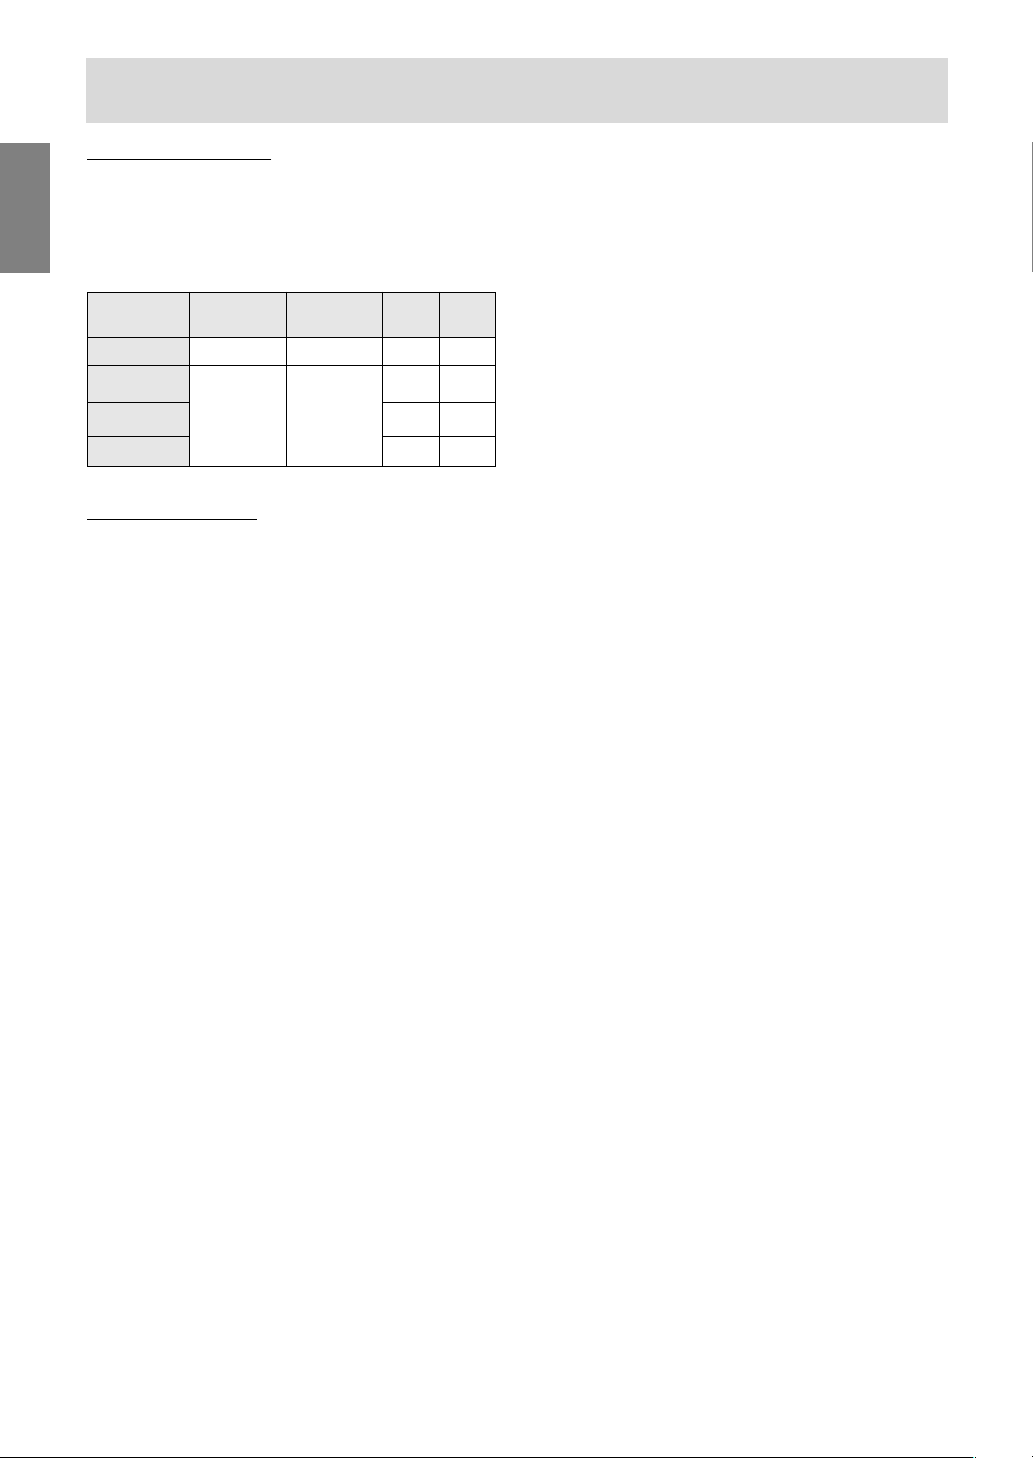
E54
Specifications
Power management
The monitor is based on VESA DPMS (Display
Power Management Signalling).
To activate the monitor’s power management
function, both the video card and the computer
must conform to the VESA DPMS standard.
DDC (Plug & Play)
This monitor supports the VESA DDC (Display
Data Channel) standard.
DDC is a signal standard for carrying out Plug &
Play functions on the monitor or computer. It
transfers information such as degree of resolution
between the monitor and computer. You can use
this function if your computer is DDC compliant
and if it is set so that it can detect the Plug & Play
monitor.
There are many varieties of DDC due to the
differences between systems. This monitor works
with DDC1 and DDC2B.
DPMS mode Screen
Power
H-sync V-sync
consumption
ON Display on 60 W Yes Yes
STANDBY No Yes
SUSPEND Display off 2.2 W Yes No
OFF No No
Page 57

G1
DeutschDeutschFrançaisItalianoEspañolEnglish
DEUTSCH
Page 58

G2
Inhaltsverzeichnis
Erste Schritte
Tipp und Sicherheitsvorkehrungen . . . . . . . . . . . . . . . . . . . . . . . . . . . . . . . . . . . . . . . . . . . . . . . . . . . . . . G4
Checkliste für Monitor und Zubehör . . . . . . . . . . . . . . . . . . . . . . . . . . . . . . . . . . . . . . . . . . . . . . . . . . . . . G5
Produktbeschreibung . . . . . . . . . . . . . . . . . . . . . . . . . . . . . . . . . . . . . . . . . . . . . . . . . . . . . . . . . . . . . . . . G6
Hauptgerät . . . . . . . . . . . . . . . . . . . . . . . . . . . . . . . . . . . . . . . . . . . . . . . . . . . . . . . . . . . . . . . . . . . . . . G6
Fernbedienung . . . . . . . . . . . . . . . . . . . . . . . . . . . . . . . . . . . . . . . . . . . . . . . . . . . . . . . . . . . . . . . . . . . G7
Kabelklammer . . . . . . . . . . . . . . . . . . . . . . . . . . . . . . . . . . . . . . . . . . . . . . . . . . . . . . . . . . . . . . . . . . . G8
Verwendung von Kopfhörern (im Handel erhältlich) . . . . . . . . . . . . . . . . . . . . . . . . . . . . . . . . . . . . . G8
Winkeleinstellung . . . . . . . . . . . . . . . . . . . . . . . . . . . . . . . . . . . . . . . . . . . . . . . . . . . . . . . . . . . . . . . . G8
Fernbedienung. . . . . . . . . . . . . . . . . . . . . . . . . . . . . . . . . . . . . . . . . . . . . . . . . . . . . . . . . . . . . . . . . . . . . . G9
Verwendung der Fernbedienung . . . . . . . . . . . . . . . . . . . . . . . . . . . . . . . . . . . . . . . . . . . . . . . . . . . . . G9
Batterien für die Fernbedienung . . . . . . . . . . . . . . . . . . . . . . . . . . . . . . . . . . . . . . . . . . . . . . . . . . . . . G9
Anschluss und Vorbereitung
Verbinden des Monitors mit einem Computer . . . . . . . . . . . . . . . . . . . . . . . . . . . . . . . . . . . . . . . . . . . G10
Antennenverbindung . . . . . . . . . . . . . . . . . . . . . . . . . . . . . . . . . . . . . . . . . . . . . . . . . . . . . . . . . . . . . . . G11
Anschließen des Monitors an Audio/Video-Geräte . . . . . . . . . . . . . . . . . . . . . . . . . . . . . . . . . . . . . . . G12
Audio/Video-Geräte mit 21poligen Euro-SCART (RGB)-Anschlüssen . . . . . . . . . . . . . . . . . . . . . G12
Audio/Video-Geräte mit Video-Ausgangsanschlüssen . . . . . . . . . . . . . . . . . . . . . . . . . . . . . . . . . G12
Audio/Video-Geräte mit S-Video-Ausgangsanschlüssen . . . . . . . . . . . . . . . . . . . . . . . . . . . . . . . G13
Anschließen des Monitors an eine Stromquelle . . . . . . . . . . . . . . . . . . . . . . . . . . . . . . . . . . . . . . . . . G14
Erste Installation . . . . . . . . . . . . . . . . . . . . . . . . . . . . . . . . . . . . . . . . . . . . . . . . . . . . . . . . . . . . . . . . . . G15
Wählen des Gegenstands im Bildschirm MENU. . . . . . . . . . . . . . . . . . . . . . . . . . . . . . . . . . . . . . . . . G16
Einstellen des Computer-Displays (AUTO ADJUSTMENT) . . . . . . . . . . . . . . . . . . . . . . . . . . . . . . . . . G17
Gemeinsame Vorgänge
Gemeinsame Vorgänge . . . . . . . . . . . . . . . . . . . . . . . . . . . . . . . . . . . . . . . . . . . . . . . . . . . . . . . . . . . . G18
Ein- und ausschalten . . . . . . . . . . . . . . . . . . . . . . . . . . . . . . . . . . . . . . . . . . . . . . . . . . . . . . . . . . . . G18
Umschalten der Displaymodi (INPUT) . . . . . . . . . . . . . . . . . . . . . . . . . . . . . . . . . . . . . . . . . . . . . . G18
Einstellen der Lautstärke . . . . . . . . . . . . . . . . . . . . . . . . . . . . . . . . . . . . . . . . . . . . . . . . . . . . . . . . . G19
Einstellen der Rückbeleuchtung . . . . . . . . . . . . . . . . . . . . . . . . . . . . . . . . . . . . . . . . . . . . . . . . . . . G19
Wählen der Sprache auf dem Bildschirm . . . . . . . . . . . . . . . . . . . . . . . . . . . . . . . . . . . . . . . . . . . . G19
PC-Modus
Fernsehen oder Videosehen in einem Fenster im Computerbildschirm (PICTURE IN PICTURE) . . G20
Die Video- und Audioquellen wählen . . . . . . . . . . . . . . . . . . . . . . . . . . . . . . . . . . . . . . . . . . . . . . . G20
Hören von Fernsehgerät oder einer anderen Audioquelle beim Betrachten des Computerbildschirms . .
G21
Einstellen des Displays . . . . . . . . . . . . . . . . . . . . . . . . . . . . . . . . . . . . . . . . . . . . . . . . . . . . . . . . . . . . G22
Einstellung . . . . . . . . . . . . . . . . . . . . . . . . . . . . . . . . . . . . . . . . . . . . . . . . . . . . . . . . . . . . . . . . . . . . G22
Menü ADJUSTMENT . . . . . . . . . . . . . . . . . . . . . . . . . . . . . . . . . . . . . . . . . . . . . . . . . . . . . . . . . . . . G23
Menü GAIN CONTROL . . . . . . . . . . . . . . . . . . . . . . . . . . . . . . . . . . . . . . . . . . . . . . . . . . . . . . . . . . G24
Menü COLOUR CONTROL . . . . . . . . . . . . . . . . . . . . . . . . . . . . . . . . . . . . . . . . . . . . . . . . . . . . . . . G24
Menü MODE SELECT . . . . . . . . . . . . . . . . . . . . . . . . . . . . . . . . . . . . . . . . . . . . . . . . . . . . . . . . . . . . G25
Menü PICTURE IN PICTURE . . . . . . . . . . . . . . . . . . . . . . . . . . . . . . . . . . . . . . . . . . . . . . . . . . . . . . G25
Installieren der Setup-Informationen und des ICC-Profils (Für Windows) . . . . . . . . . . . . . . . . . . . . . G26
Informationen zum Profil ColorSync (Für MacOS) . . . . . . . . . . . . . . . . . . . . . . . . . . . . . . . . . . . . . . . . G29
Page 59

G3
DeutschDeutschFrançaisItalianoEspañolEnglish
Inhaltsverzeichnis
TV/AV-Modus
Einstellen von TV-Kanälen. . . . . . . . . . . . . . . . . . . . . . . . . . . . . . . . . . . . . . . . . . . . . . . . . . . . . . . . . . . G30
Speichern von ausgestrahlten TV-Kanälen im Speicher (AUTOMATIC SEARCH) . . . . . . . . . . . . G30
Einstellen der individuellen Einstellungen von Programmen (MANUAL ADJUSTMENT) . . . . . . . G31
Ändern der Programmpositionen (SORT) . . . . . . . . . . . . . . . . . . . . . . . . . . . . . . . . . . . . . . . . . . . G32
Löschen des Programmbereichs. . . . . . . . . . . . . . . . . . . . . . . . . . . . . . . . . . . . . . . . . . . . . . . . . . G32
Eingeben/Ändern des Namens eines einzelnen Programms . . . . . . . . . . . . . . . . . . . . . . . . . . . G33
Fernsehen . . . . . . . . . . . . . . . . . . . . . . . . . . . . . . . . . . . . . . . . . . . . . . . . . . . . . . . . . . . . . . . . . . . . . . . G34
Wählen der Kanäle . . . . . . . . . . . . . . . . . . . . . . . . . . . . . . . . . . . . . . . . . . . . . . . . . . . . . . . . . . . . . G34
Wählen der Kanäle mit der Programmtabelle . . . . . . . . . . . . . . . . . . . . . . . . . . . . . . . . . . . . . . . . G34
Den Audio-Empfangsmodus wählen . . . . . . . . . . . . . . . . . . . . . . . . . . . . . . . . . . . . . . . . . . . . . . . G35
Betrachten von Teletext . . . . . . . . . . . . . . . . . . . . . . . . . . . . . . . . . . . . . . . . . . . . . . . . . . . . . . . . . . G36
Verwendung der Kindersicherung-Funktion . . . . . . . . . . . . . . . . . . . . . . . . . . . . . . . . . . . . . . . . . . G39
Genießen von DVDs, Spielen und anderen Zusatzgeräten . . . . . . . . . . . . . . . . . . . . . . . . . . . . . . . . . G42
Praktische Merkmale (für TV/AV-Modus) . . . . . . . . . . . . . . . . . . . . . . . . . . . . . . . . . . . . . . . . . . . . . . . . G43
Pausieren des Bildschirms (FREEZE). . . . . . . . . . . . . . . . . . . . . . . . . . . . . . . . . . . . . . . . . . . . . . G43
Zurückschalten zum vorherigen Kanal (FLASHBACK) . . . . . . . . . . . . . . . . . . . . . . . . . . . . . . . . . . G43
Ausschalten nach einer vorgegebenen Zeitspanne (SLEEP) . . . . . . . . . . . . . . . . . . . . . . . . . . . . G43
Einstellen des Displays . . . . . . . . . . . . . . . . . . . . . . . . . . . . . . . . . . . . . . . . . . . . . . . . . . . . . . . . . . . . G44
Einstellung . . . . . . . . . . . . . . . . . . . . . . . . . . . . . . . . . . . . . . . . . . . . . . . . . . . . . . . . . . . . . . . . . . . . G44
Menü PICTURE . . . . . . . . . . . . . . . . . . . . . . . . . . . . . . . . . . . . . . . . . . . . . . . . . . . . . . . . . . . . . . . . G45
Menü PROGRAMMES (nur TV-Modus) . . . . . . . . . . . . . . . . . . . . . . . . . . . . . . . . . . . . . . . . . . . . . . G45
Menü AV CONNECTIONS . . . . . . . . . . . . . . . . . . . . . . . . . . . . . . . . . . . . . . . . . . . . . . . . . . . . . . . . . G45
Menü MODE SELECT . . . . . . . . . . . . . . . . . . . . . . . . . . . . . . . . . . . . . . . . . . . . . . . . . . . . . . . . . . . . G46
Menü CHILD LOCK . . . . . . . . . . . . . . . . . . . . . . . . . . . . . . . . . . . . . . . . . . . . . . . . . . . . . . . . . . . . . G46
Andere Merkmale
Andere Merkmale . . . . . . . . . . . . . . . . . . . . . . . . . . . . . . . . . . . . . . . . . . . . . . . . . . . . . . . . . . . . . . . . . . G47
Prüfen des aktuellen Kanals und des Audio-Empfangsmodus im Bildschirm (DISPLAY) . . . . . G47
Ändern des BRIGHT MODE . . . . . . . . . . . . . . . . . . . . . . . . . . . . . . . . . . . . . . . . . . . . . . . . . . . . . . . G47
Stummschalten des Tons (MUTE) . . . . . . . . . . . . . . . . . . . . . . . . . . . . . . . . . . . . . . . . . . . . . . . . . G47
Wählen der Bildschirmgröße (VIEW MODE) . . . . . . . . . . . . . . . . . . . . . . . . . . . . . . . . . . . . . . . . . G47
Verhinderung von Änderungen an eingestellten Werten (ADJUSTMENT LOCK) . . . . . . . . . . . . . G48
Rücksetzen aller Einstellwerte (ALL RESET). . . . . . . . . . . . . . . . . . . . . . . . . . . . . . . . . . . . . . . . . G48
Anweisungen zum Anbringen eines VESA-kompatiblen Monitorarms . . . . . . . . . . . . . . . . . . . . . . . . G49
Anhang
Pflege des Monitors . . . . . . . . . . . . . . . . . . . . . . . . . . . . . . . . . . . . . . . . . . . . . . . . . . . . . . . . . . . . . . . . G50
Fehlersuche . . . . . . . . . . . . . . . . . . . . . . . . . . . . . . . . . . . . . . . . . . . . . . . . . . . . . . . . . . . . . . . . . . . G50
Pflege des Monitors . . . . . . . . . . . . . . . . . . . . . . . . . . . . . . . . . . . . . . . . . . . . . . . . . . . . . . . . . . . . . G51
Lagerung . . . . . . . . . . . . . . . . . . . . . . . . . . . . . . . . . . . . . . . . . . . . . . . . . . . . . . . . . . . . . . . . . . . . . G51
Technische Daten . . . . . . . . . . . . . . . . . . . . . . . . . . . . . . . . . . . . . . . . . . . . . . . . . . . . . . . . . . . . . . . . . G52
Page 60

G4
Das Netzkabel
- Beschädigen Sie das Netzkabel nicht, stellen
Sie keine schweren Gegenstände darauf, und
überdehnen oder knicken Sie es nicht.
Verwenden Sie keine Verlängerungskabel. Ein
beschädigtes Kabel kann einen Brand oder
Stromschlag verursachen.
- Nur das mit dem Monitor mitgelieferte Netzkabel
verwenden.
- Stecken Sie den Netzstecker direkt in die
Netzsteckdose. Die Verwendung eines
Verlängerungskabels kann aufgrund von
Überhitzung zu einem Brand führen.
- Den Netzstecker nicht mit nassen Händen
abziehen oder einstecken. Dadurch können
elektrische Schläge verursacht werden.
Verwendung des Netzadapters
- Der Netzadapter darf nur für das angegebene
Gerät verwendet werden.
- Stecken Sie den Netzadapter aus, wenn Sie ihn
längere Zeit nicht benutzen.
- Stellen Sie keine Gegenstände auf dem
Netzadapter ab.
- Verwenden Sie den Netzadapter nicht im Freien.
- Führen Sie keine Reparaturversuche an einem
beschädigten oder nicht funktionstüchtigen
Netzadapter aus. Überlassen Sie
Reparaturarbeiten dem Kundendienst.
- Öffnen Sie den Netzadapter nicht.
- Reinigen Sie den Netzadapter nicht mit Wasser
oder einem nassen Tuch.
Inhalt de Anleitung
- In dieser Anleitung wird Microsoft Windows XP
als “Windows XP” bezeichnet, Microsoft
Windows Millennium als “Windows Me”,
Microsoft Windows 2000 als “Windows 2000”,
Microsoft Windows 98 als “Windows 98”,
Microsoft Windows 95 als “Windows 95” und
Microsoft Windows Version 3.1 als “Windows
3.1”. Falls keine Unterscheidung zwischen den
Programmen erforderlich ist, wird der Begriff
“Windows” verwendet.
- Microsoft und Windows sind eingetragene
Warenzeichen der Microsoft Corporation.
- Macintosh ist ein eingetragenes Warenzeichen
der Apple Computer, Inc.
- Alle andere Warenzeichen sind das Eigentum
der jeweiligen Gesellschaften.
Herzlichen Glückwunsch zum Kauf des Sharp
LCD Multimedia Monitors. Um Ihre Sicherheit und
jahrelangen störungsfreien Betrieb dieses
Produkts zu gewährleisten, lesen Sie bitte die
Vorsichtsmaßregeln zur Sicherheit vor der
Verwendung dieses Monitors durch.
- Das TFT-Farb-LCD-Panel wurde unter Einsatz
hochentwickelter Technologie gefertigt. Es jann
jedoch vorkommen, dass an einigen Stellen
Bildpunkte nicht aufleuchten oder permanent
angezeigt werden. Wenn der Bildschirm von der
Seite aus angesehen wird, können die Farben
unregelmäßig oder zu hell erscheinen. Dies ist
normal bei LCD-Monitoren und hat keinen
Einfluss auf die Leistungsfähigkeit des Gerätes.
- Die Bildschirmanzeige sollte nicht über lange
Zeiträume hinweg stehenbleiben, da dies einen
Einbrenneffekt zur Folge haben könnte.
- Wenn die Helligkeit auf die Mindesteinstellung
gesetzt wird, ist der Bildschirm eventuell
schlecht lesbar.
- Die Qualität des Computersignals kann die
Anzeigequalität beeinträchtigen. Wir empfehlen
den Einsatz eines Computers, der Videosignale
hoher Qualität aussenden kann.
- Der Monitor darf niemals mit harten
Gegenständen abgerieben oder berührt werden.
- Wir bitten um Ihr Verständnis, dass Sharp
Corporation über die gesetzlich anerkannte
Leistungshaftung hinaus keine Haftung für
Fehler übernimmt, die sich aus der Verwendung
durch den Kunden oder einen Dritten ergeben,
und auch nicht für sonstige Funktionsstörungen
oder Schäden, die während der Verwendung am
Gerät entstehen.
- Eine Aktualisierung dieses Monitors und seines
Zubehörs ist vorbehalten.
Aufstellort
- Verwenden Sie den Monitor nicht an schlecht
belüfteten Orten mit hoher Staubentwicklung,
hoher Luftfeuchtigkeit oder an Orten, an denen
der Monitor mit Öl oder Dampf in Kontakt
kommen könnte, da dies ein Brandrisiko birgt.
- Achten Sie darauf, dass der Monitor nicht mit
Wasser oder anderen Flüssigkeiten in Berührung
kommt. Achten Sie darauf, dass keinerlei
Gegenstände, beispielsweise Büroklammern
oder sonstige spitze Gegenstände, in den
Monitor gesteckt werden. Die Folge könnte ein
Brand oder Stromschlag sein.
- Stellen Sie den Monitor nicht auf wacklige
Unterlagen oder auf unsichere Stellen. Setzen
Sie den Monitor keinen starken Stößen oder
Erschütterungen aus. Wenn der Monitor
herunterfällt oder umkippt, könnte er Schaden
nehmen.
- Stellen Sie den Monitor nicht an Stellen auf, die
direkter Sonneneinstrahlung ausgesetzt sind,
und nicht in der Nähe von Heizungen oder an
anderen Stellen, an denen hohe Temperaturen
auftreten, da dies zu einer übermäßig starken
Erhitzung mit der Folge eines Brandes führen
könnte.
Tipp und Sicherheitsvorkehrungen
Page 61

G5
DeutschDeutschFrançaisItalianoEspañolEnglish
Prüfen Sie den Kartoninhalt auf Vollständigkeit.
- LCD Multimedia Monitor (1)
- Netzadapter (1)
(Modellbezeichnung: NL-A69J)
- Netzkabel (1)
- PC-Analogsignalkabel (1)
(Modellbezeichnung: 0NIT15V1-0183)
- PC-Audiokabel (1)
(Modellbezeichnung: 0NIT17A3-U006)
- Fernbedienung (1)
- R-03 (“AAA”, Microzelle) Trockenbatterie (2)
- Kabelklammer (1)
- CD-ROM (Utility Disk für Windows/Macintosh) (1)
- Bedienungsanleitung (1)
Hinweise:
- Bewahren Sie den Karton für einen eventuellen
Transport des Monitors auf.
- Sharp Corporation besitzt Urheberrechte am
Programm Utility Disk. Eine Reproduktion ist
ohne Genehmigung nicht zulässig.
- Die Form des mitgelieferten Zubehörs kann von
den Abbildungen in diese Anleitung abweichen.
Checkliste für Monitor und Zubehör
Page 62

G6
Produktbeschreibung
Vorderansicht
1
4
3
2
1. Lautsprecher
2. Betriebs-LED
Grün: im Betrieb
Rot: im Standby-Modus
Orange: im Stromsparmodus
(nur für PC-Modus)
Aus: ausgeschaltet
3. Sensorfenster des Fernsehgerätes
4. Kopfhöreranschluss
Hauptgerät
Entfernen/Ersetzen der Anschlussabdeckung
Entfernen der Abdeckung
Ersetzen der Abdeckung
1
2
Rechte Ansicht/Rückansicht
5
6
7
8
9
10
11
12
13
5. Taste INPUT
6. Taste MENU
7. Taste OK/BRIGHT MODE
8. (Kanal)-Tasten
9. ( (Lautstärke) /BRIGHT)-Tasten
10. Taste MAIN POWER
11.PC-Audioeingangsanschluss
12.PC-Analog-RGB-Eingangsanschluss
13.Netzeingangsanschluss
Page 63

G7
DeutschDeutschFrançaisItalianoEspañolEnglish
Produktbeschreibung
Hauptgerät
Linke Ansicht/Rückansicht
B
A
A
14
15
16
17
18
19
20
21
14. Griff
15.
21poliger Euro-SCART (RGB)-Anschluss
16. Videoeingangsanschluss
17. Audioeingangsanschluss - Links
18. Audioeingangsanschluss - Rechts
19. S-Videoeingangsanschluss
20. Antenneneingangsanschluss
21. Laschenloch für Kabelklammer
(Siehe nächste Seite.)
A Lüftungsöffnungen
Decken Sie nie die Lüftungsöffnungen ab, da sich
das Monitorinnere sonst zu stark erwärmen würde
und dies Funktionsstörungen zur Folge hätte.
B Sicherheitsverriegelung
Wenn Sie eine Sicherheitsverriegelung anbringen
(im Handel erhältlich), wird der Monitor so
befestigt, dass er nicht wegtransportiert werden
kann. Die Diebstahlsicherung wird in Verbindung
mit dem Kensington-Mikrosicherheitssystem
eingesetzt.
Fernbedienung
POWER
PC AV2AV1TV
SLEEP
OK
MENU
BRIGHT
DISPLAY
FREEZE
/HOLD
SOUND
CH
SUBPAGE SUBTITLE
VIEW MODE
TEXT
REVEAL
PIP
BRIGHT
MODE
4
5
7
6
3
2
1
9
10
11
8
14
15
12
16
17
18
13
19
20
21
22
1. Taste POWER
2. Taste SUBPAGE
3. Taste REVEAL
4. Taste SLEEP
5. Tasten und OK
6. Taste BRIGHT MODE
7. Tasten Rot, Grün, Gelb und Cyan
(für Teletext)
8. Taste DISPLAY
9. Taste FREEZE/HOLD
10. Kanal-Tasten
11. Taste
(Flashback)
12. Taste VIEW MODE
13. Taste PIP
(Picture in Picture: Bild in Bild)
14. Eingangstasten (PC, TV, AV1 und AV2)
15. Taste TEXT (für Teletext)
16. Taste SUBTITLE
17. Taste MENU
18. Taste BRIGHT
19. Taste
(Stummschalten)
20. Taste SOUND
21. Tasten (Lautstärke) + –
22. (Kanal)-Tasten
AV-IN1
AV-IN2
Page 64
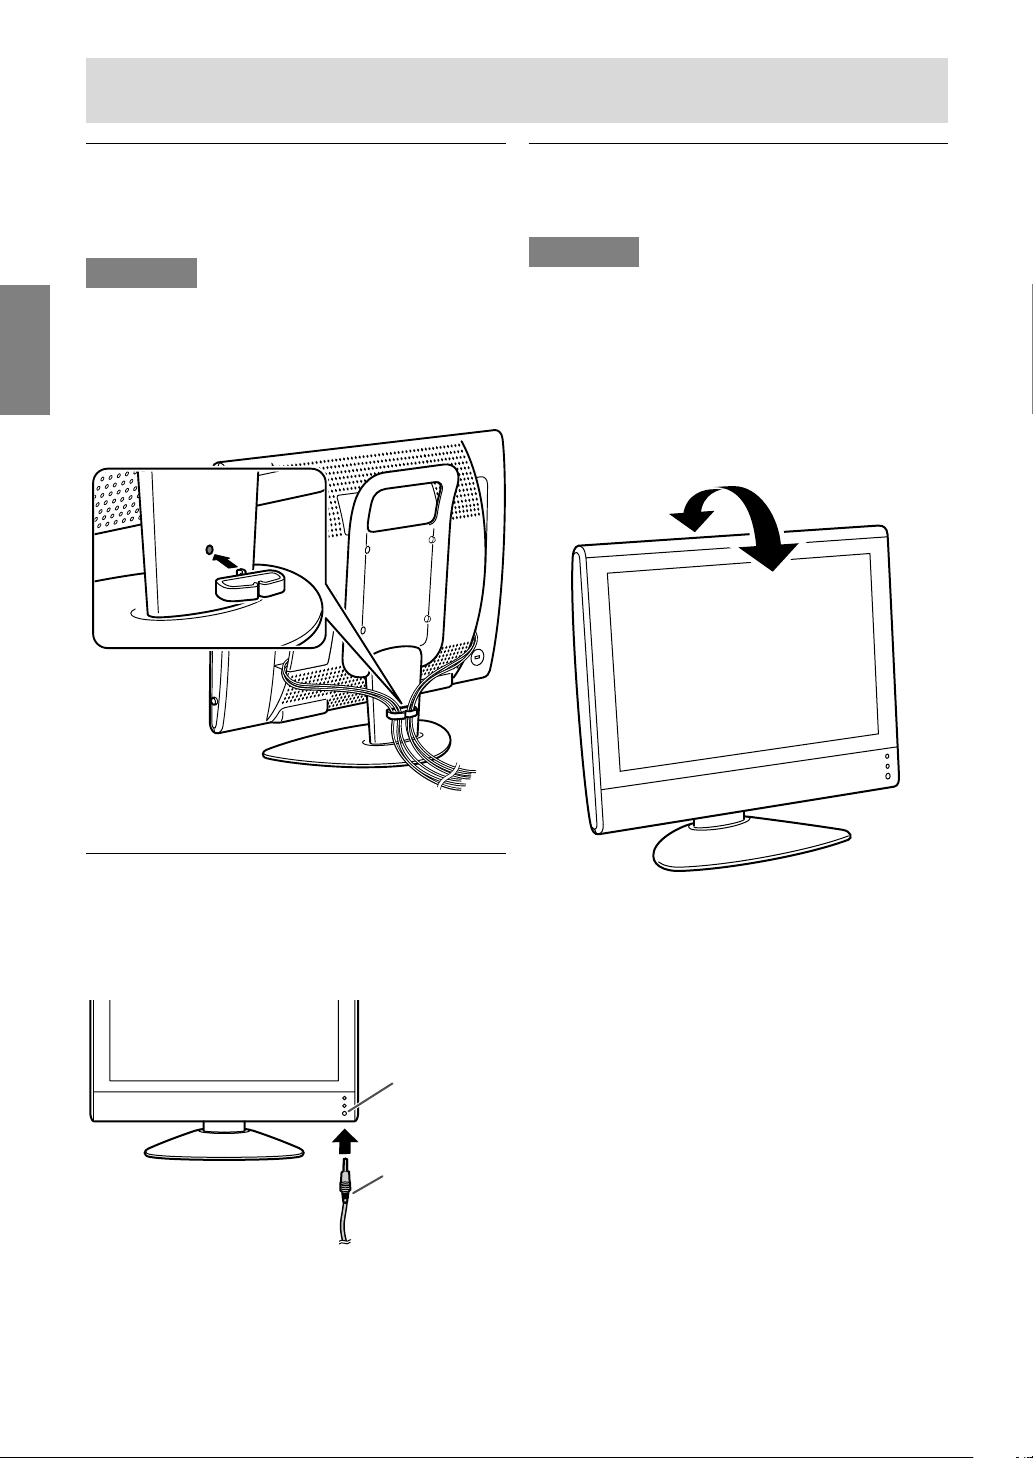
G8
Produktbeschreibung
Kabelklammer
Verwenden Sie die mitgelieferte Kabelklammer
zum Befestigen der Kabel an den Anschlüssen.
ACHTUNG!
- Beim Einstellen des Sichtwinkels können Kabel
gezogen werden. Stellen Sie deshalb sicher,
dass die Kabel immer ausreichend Durchhang
haben.
Winkeleinstellung
Einstellen auf einen leichten Sichtwinkel.
ACHTUNG!
- Achten Sie darauf, den Monitor beim Einstellen
des Sichtwinkels immer an beiden Seiten zu
halten. Das in diesem Monitor verwendete LCDPanel besteht aus Glas. Durch Druck mit der
Hand auf das LCD-Panel können Schäden
hervorgerufen werden.
- Vorsichtig vorgehen und darauf achten, dass die
Finger nicht eingeklemmt werden.
Ca. 20°
Ca. 5°
Verwendung von Kopfhörern
(im Handel erhältlich)
Sie können Kopfhörer (im Handel erhältlich) an
den Monitor anschließen.
Hinweis:
- Wenn Kopfhörer angeschlossen sind, ertönt aus
den Lautsprechern des Monitors kein Klang.
Kopfhöreranschluss
Kopfhörer
Page 65
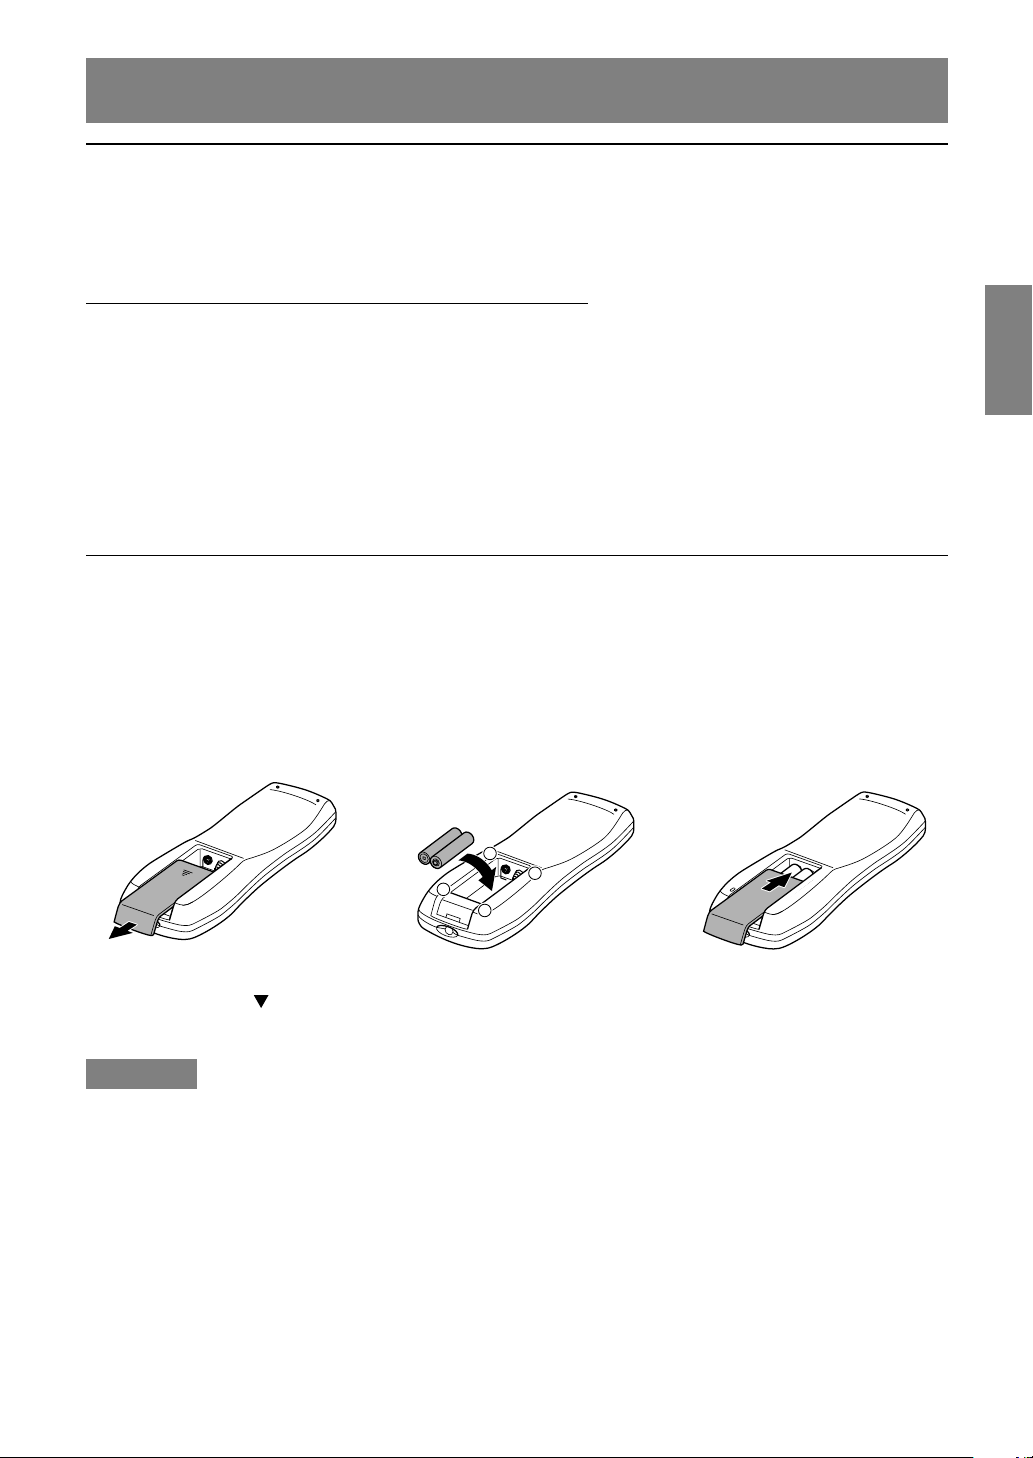
G9
DeutschDeutschFrançaisItalianoEspañolEnglish
Fernbedienung
Batterien für die Fernbedienung
Vor der ersten Verwendung des Monitors setzen Sie die beiden R-03-Batterien (“AAA”, Microzelle)
(mitgeliefert) ein.
Wenn die Batterien erschöpft werden und die Fernbedienung nicht mehr funktioniert, so ersetzen Sie
die Batterien durch neue Batterien R-03 (“AAA”, Microzelle).
ACHTUNG!
Falsche Verwendung von Batterien kann zu Austreten von Chemikalien und/oder Explosionen führen.
Folgen Sie immer den Anweisungen unten.
- Legen Sie die Batterien so ein, dass ihre Pole mit den Markierungen (+) und (–) übereinstimmen.
- Verschiedene Batteriesorten haben unterschiedliche Eigenschaften. Verwenden Sie keine Batterien
unterschiedlicher Sorten zusammen.
- Nicht alte und neue Batterien gemischt einlegen. Durch gemischtes Einlegen von alten und neuen
Batterien kann die Batterielebensdauer beeinträchtungt werden und/oder Austreten von Chemikalien
verursacht werden.
- Batterien entfernen, wenn sie schwach werden.
Kontakt mit austretenden Batteriechemikalien kann Hautreizungen verursachen. Wenn Chemikalien
vorgefunden werden, wischen Sie diese mit einem Lappen ab.
- Die Lebensdauer der mitgelieferten Batterien kann je nach den Lagerbedingungen kürzer sein als angegeben.
- Wenn die Fernbedienung längere Zeit nicht benutzt wird, sollten die Batterien entnommen werden.
Verwenden Sie die Fernbedienung, indem Sie sie auf das Sensorfenster des Fernsehgerätes am
Monitor richten. Gegenstände zwischen der Fernbedienung und dem Sensorfenster können richtigen
Betrieb verhindern.
Vorsichtshinweise zum Gebrauch der Fernbedienung
- Setzen Sie die Fernbedienung keinen Stößen aus.
Verschütten Sie auch keine Flüssigkeiten über die Fernbedienung und bewahren Sie sie nicht an
einem Ort mit hoher Luftfeuchtigkeit auf.
- Vermeiden Sie das Installieren oder Ablegen der Fernbedienung in direktem Sonnenlicht. Die Wärme
kann Verformung der Fernbedienung verursachen.
- Die Fernbedienung arbeitet moglicherweise nicht richtig, wenn das Sensorfenster des Fernsengerätes
dem direkten Sonnenlicht oder einer starken Lichtquelle ausgesetzt ist. In diesem Fall ändern Sie den
Winkel der Beleuchtung oder des Monitors, oder bedienen die Fernbedienung näher am
Sensorfenster des Fernsehgerätes.
- Verwenden Sie die Fernbedienung nicht gleichzeitig mit den Fernbedienungen anderer Geräte.
1 Öffnen Sie den
Batteriefachdeckel.
Den Deckel abschieben,
während der Teil ( )
gedrückt wird.
2 Legen Sie zwei Batterien R-03
(“AAA”, Microzelle) ein.
+
+
-
-
Die Batterien entsprechend der
im Fach angezeigten Polarität
einlegen.
3 Schließen Sie den
Batteriefachdeckel.
Setzen Sie die Klaue auf
die Abdeckung im
Batteriegehäuse und
schieben Sie den Deckel
zu.
Verwendung der Fernbedienung
Page 66
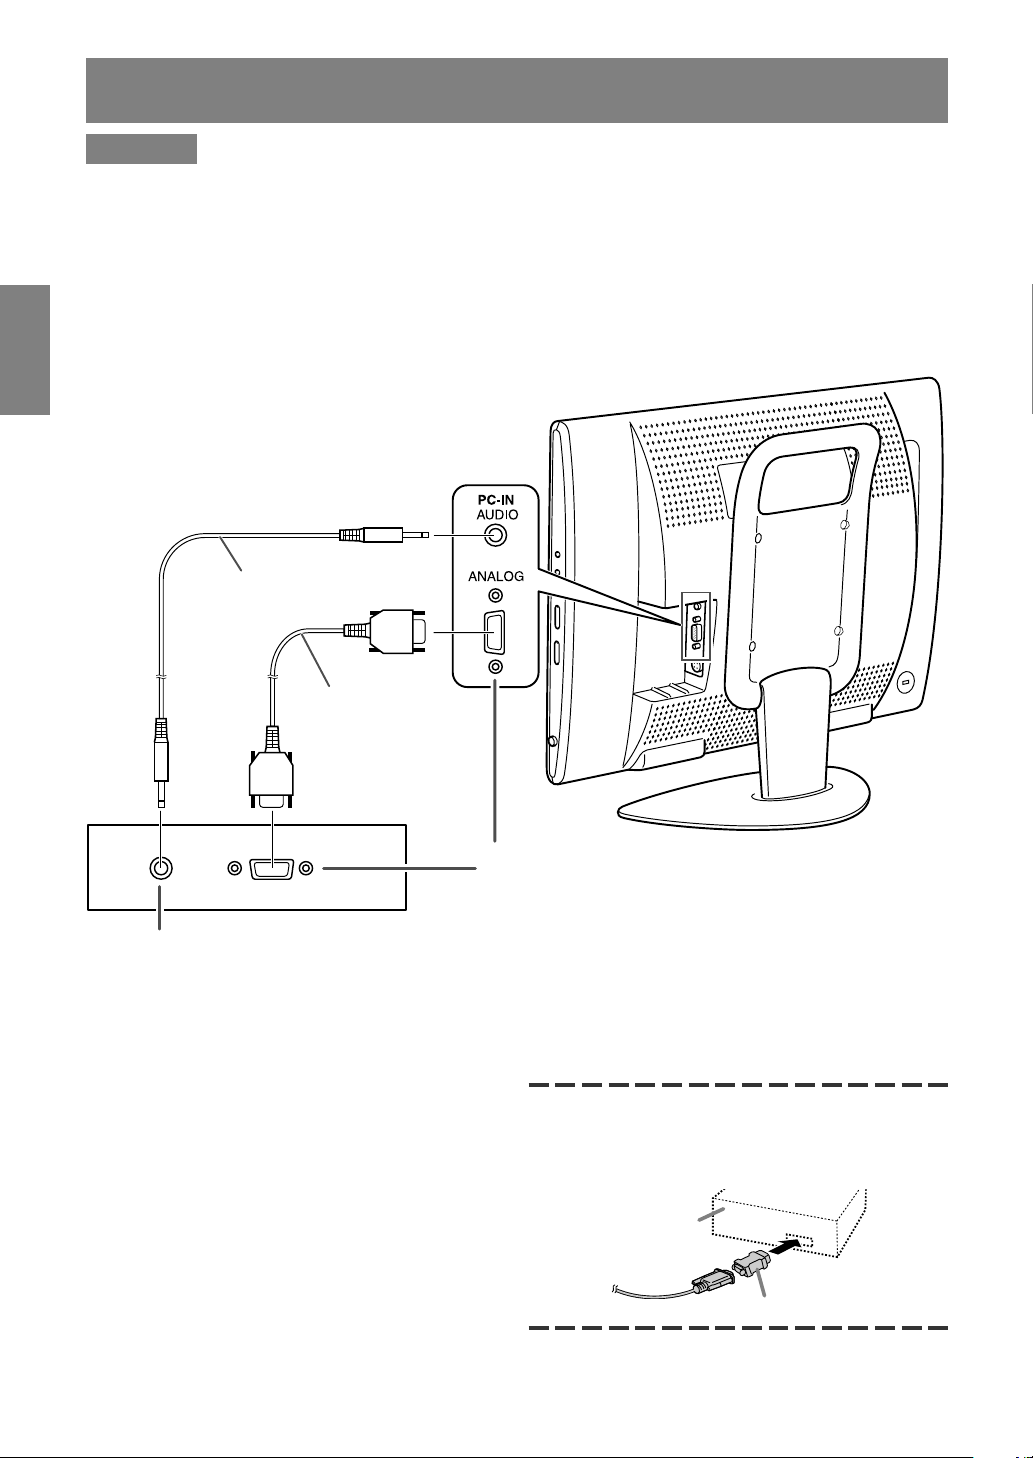
G10
Verbinden des Monitors mit einem Computer
ACHTUNG!
- Beim Anschließen stellen Sie sicher, dass der Monitor und alle angeschlossenen Geräte
ausgeschaltet sind.
- Achten Sie darauf, sich nicht über das Kabel zu biegen oder Verlängerungskabel hinzuzufügen, da
dies zu einer Fehlfunktion führen kann.
- Bei der ersten Verwendung des Monitors oder beim Ändern der Systemeinstellungen beim Betrieb
führen Sie eine automatische Bildschirmeinstellung durch (siehe Seite G17).
Siehe Seite G6 für Information zum Entfernen/Ersetzen der Anschlussabdeckung.
Audioausgangsanschluss
Die Monitorlautsprecher spielen den Ton vom
Computer, wenn Sie die beiden Geräte mit dem
als Zubehör erhältlichen PC-Audiokabel
verbinden.
Hinweise:
- Ja nach Computer oder Betriebssystem kann es
sein, dass Sie die Setup-Information für den
Monitor installieren müssen. (Siehe Seite G26.)
- Wenn der Bildschirm eines angeschlossenen
Notebooks so eingestellt ist, dass er gleichzeitig
angezeigt wird, wird der MS-DOS-Bildschirm
möglicherweise nicht einwandfrei angezeigt.
Ändern Sie in diesem Fall die Einstellungen so,
dass die Anzeige nur auf dem Monitor erfolgt.
Beim Anschluss eines 15-poligen, 2reihigen
D-Sub Apple Power Macintosh befestigen Sie am
Analogsignalkabel einen MacintoshWandleradapter (im Handel erhältlich).
Macintosh-Wandleradapter
Analoger RGB-Anschluss
(Mini D-Sub 15polig mit 3 Reihen)
Stecken Sie das Signalkabel unter Beachtung der
Steckerrichtung gerade in den Steckverbinder und
ziehen Sie die Schrauben an beiden Enden fest.
PC-Analogsignalkabel
(Zubehör)
PC-Audiokabel
(Zubehör)
Power Macintosh
Page 67

G11
DeutschDeutschFrançaisItalianoEspañolEnglish
Antennenverbindung
ACHTUNG!
- Beim Anschließen stellen Sie sicher, dass der Monitor ausgeschaltet ist.
Um ein schärferes Bild zu genießen, empfehlen wir die Verwendung einer Außenantenne.
Verwenden Sie ein 75-Ohm-Koaxkabel mit einem DIN45325 (IEC169-2)-Stecker zum Verbinden der
Außenantenne mit dem Antenneneingangsanschluss an der linken Seite des Monitors.
Antenneneingangsanschluss
(ANT)
75-Ohm-Koaxkabel (Rundkabel)
(nicht mitgeliefert)
Page 68
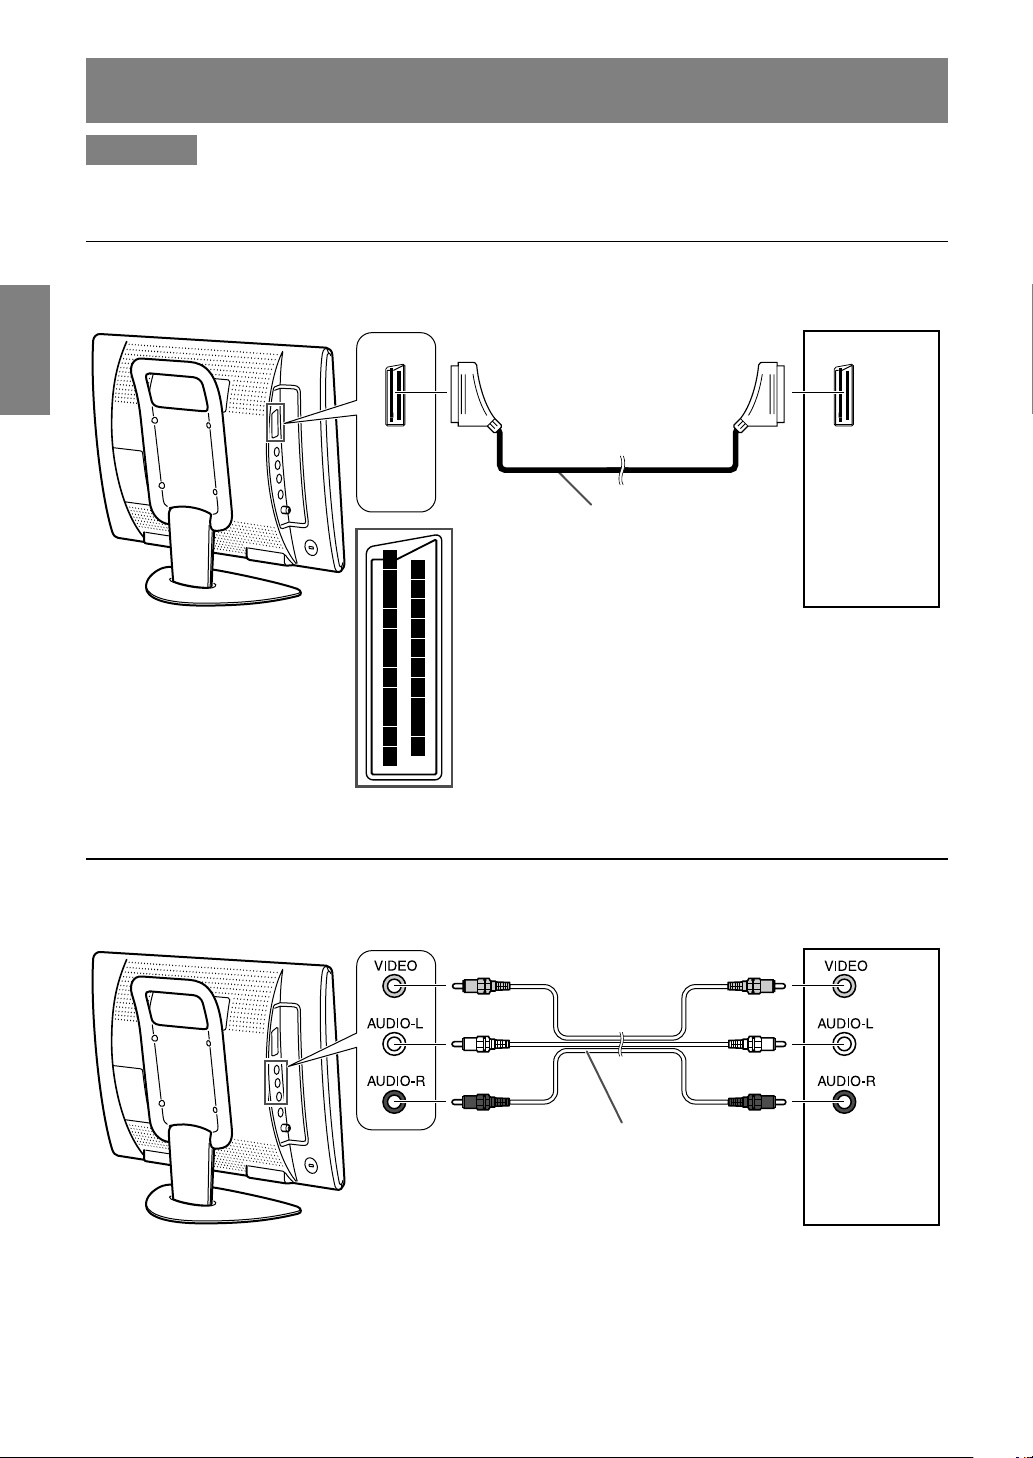
G12
Audio/Video-Geräte mit Video-Ausgangsanschlüssen
Hinweis:
- Wenn Sie den Videoeingangsanschluss verwenden, schließen Sie nicht das Kabel an den
S-Videoeingangsanschluss an.
Anschließen des Monitors an Audio/Video-Geräte
ACHTUNG!
- Stellen Sie sicher, dass der Monitor und alle angeschlossenen Geräte vor dem Beginnen
ausgeschaltet sind.
Audio/Video-Geräte mit 21poligen Euro-SCART (RGB)-Anschlüssen
6
2
4
8
10
12
14
16
18
20
1
3
5
7
9
11
13
15
17
19
21
Linke Seite des Monitors
Videorecorder
usw.
AV-IN2
(Gelb) (Gelb)
(Weiß) (Weiß)
(Rot) (Rot)
RCA-Klinkenkabel (im Handel erhältlich)
Linke Seite des Monitors
Decoder usw.
AV-IN1
21poliges Euro-SCART-Kabel
(im Handel erhältlich)
Page 69
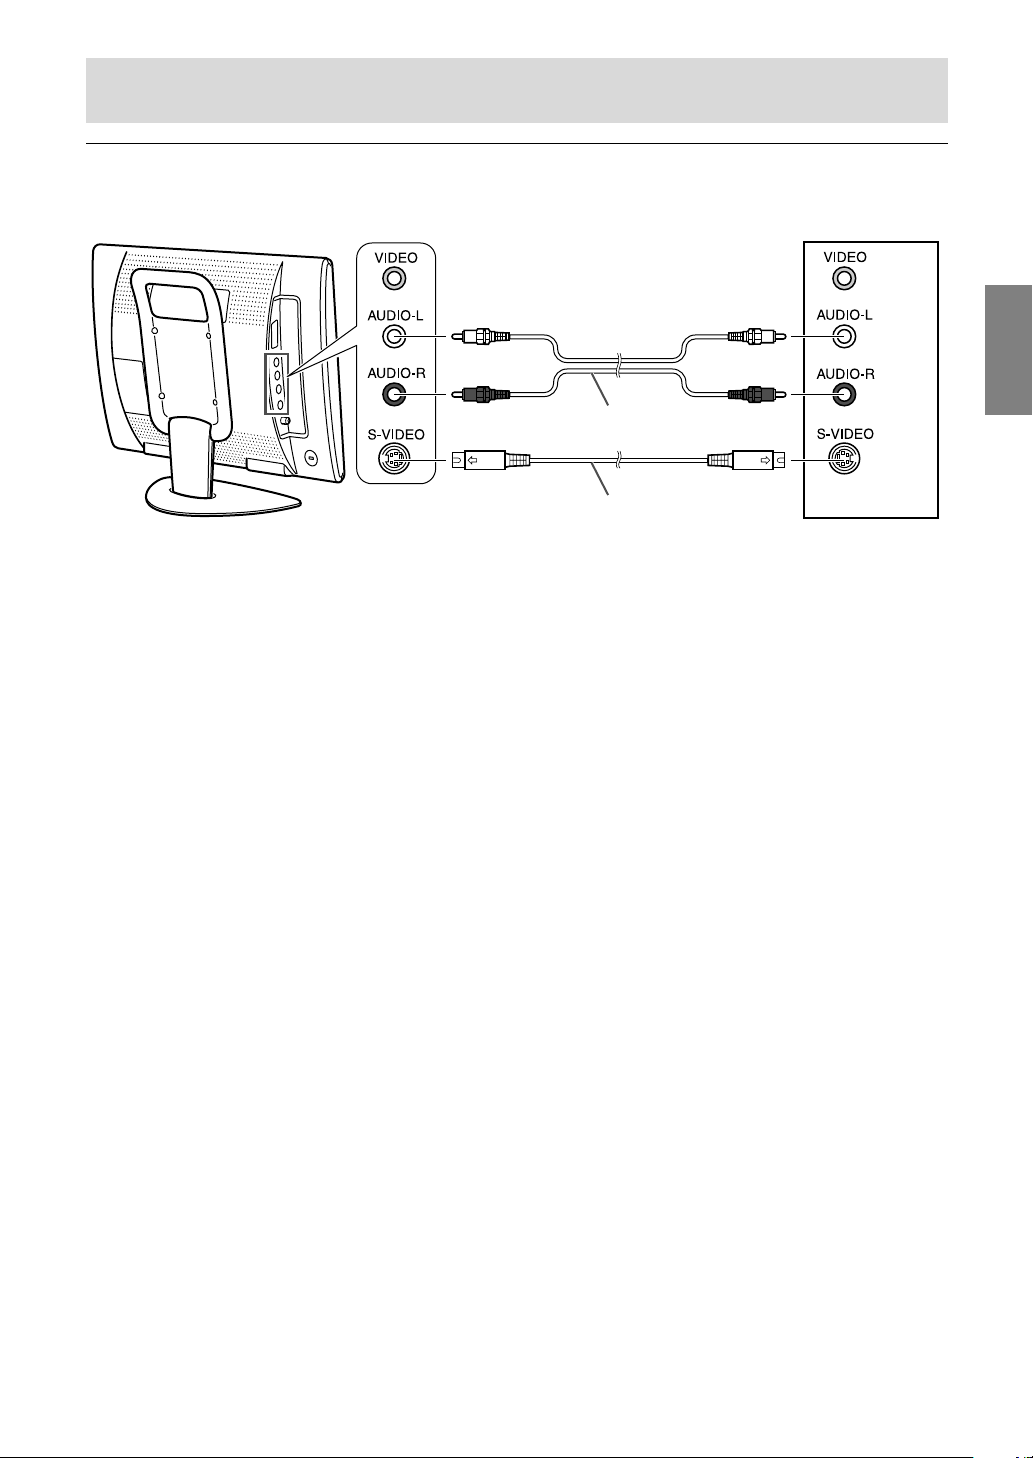
G13
DeutschDeutschFrançaisItalianoEspañolEnglish
Audio/Video-Geräte mit S-Video-Ausgangsanschlüssen
Hinweis:
- Wenn Sie den S-Videoeingangsanschluss verwenden, schließen Sie nicht das Kabel an den
Videoeingangsanschluss an.
Anschließen des Monitors an Audio/Video-Geräte
(Weiß) (Weiß)
(Rot) (Rot)
RCA-Klinkenkabel (im Handel erhältlich)
S-Video-Kabel (im Handel erhältlich)
Linke Seite des Monitors
Videorecorder
usw.
AV-IN2
Page 70
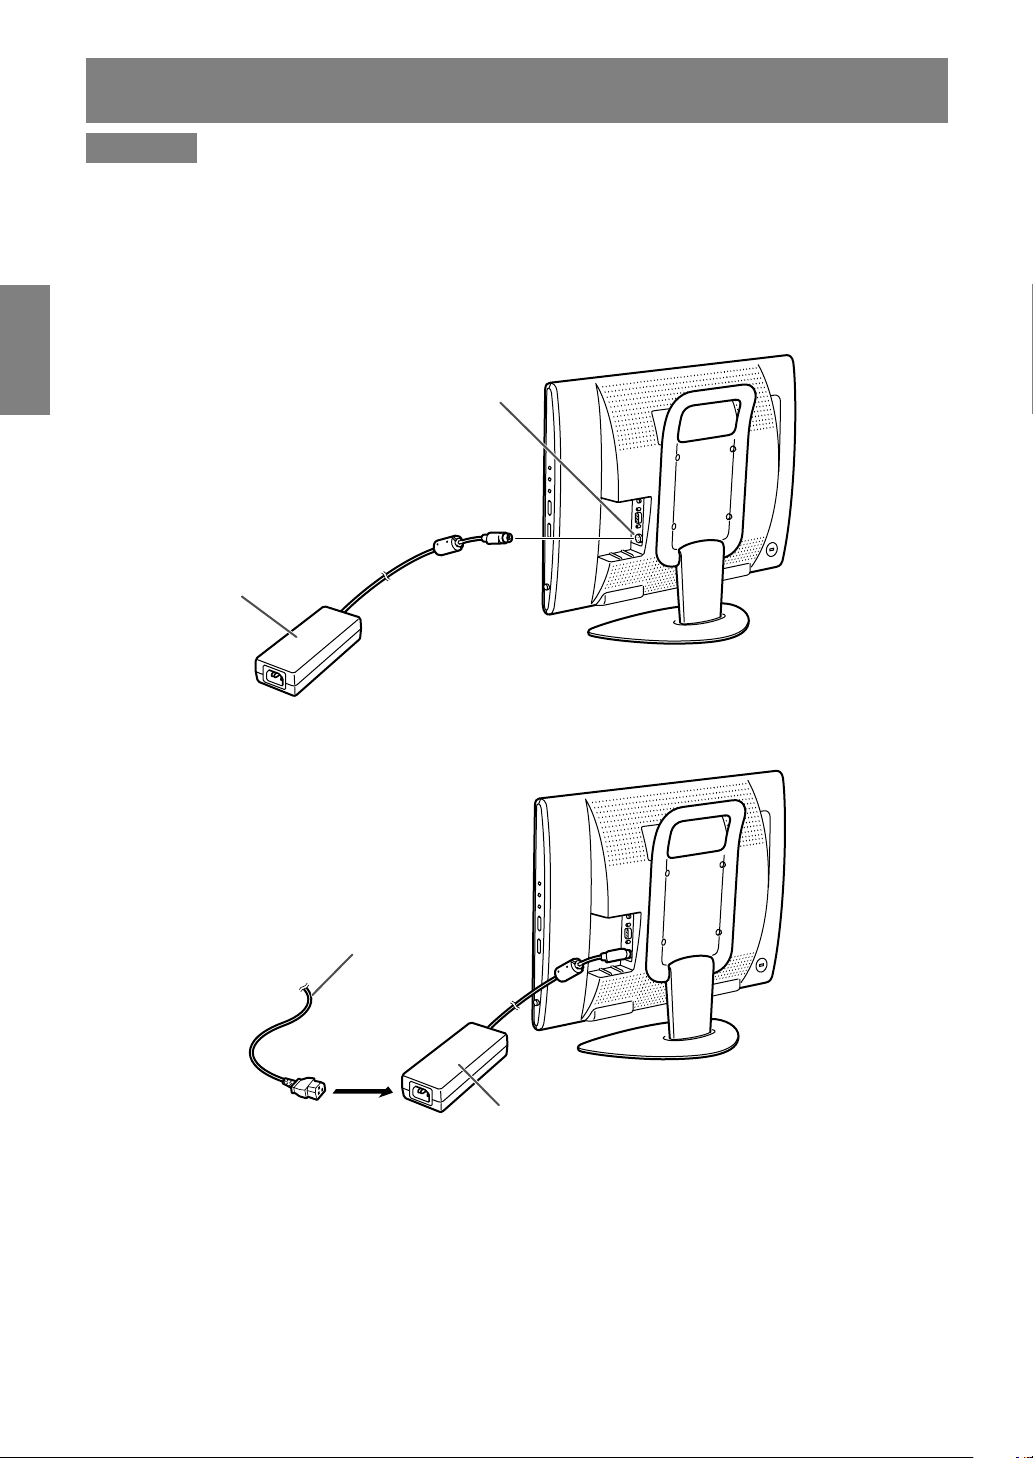
G14
Anschließen des Monitors an eine Stromquelle
ACHTUNG!
- Beim Anschließen stellen Sie sicher, dass der Monitor ausgeschaltet ist.
- Verwenden Sie immer das mit dem Monitor mitgelieferte Netzadapter.
- Achten Sie darauf, sich nicht über das Kabel zu biegen oder Verlängerungskabel hinzuzufügen, da
dies zu einer Fehlfunktion führen kann.
Siehe Seite G6 für Information zum Entfernen/Ersetzen der Anschlussabdeckung.
1.Schließen Sie den Netzadapter an den Netzeingangsanschluss an.
2.Stecken Sie das Netzkabel in den Netzadapter und stecken Sie den Netzstecker in eine
Netzsteckdose.
Hinweis:
- Die Form des Netzkabels kann je nach Land unterschiedlich sein.
Netzeingangsanschluss
Netzadapter
Netzkabel
Netzadapter
Netzsteckdose
Page 71
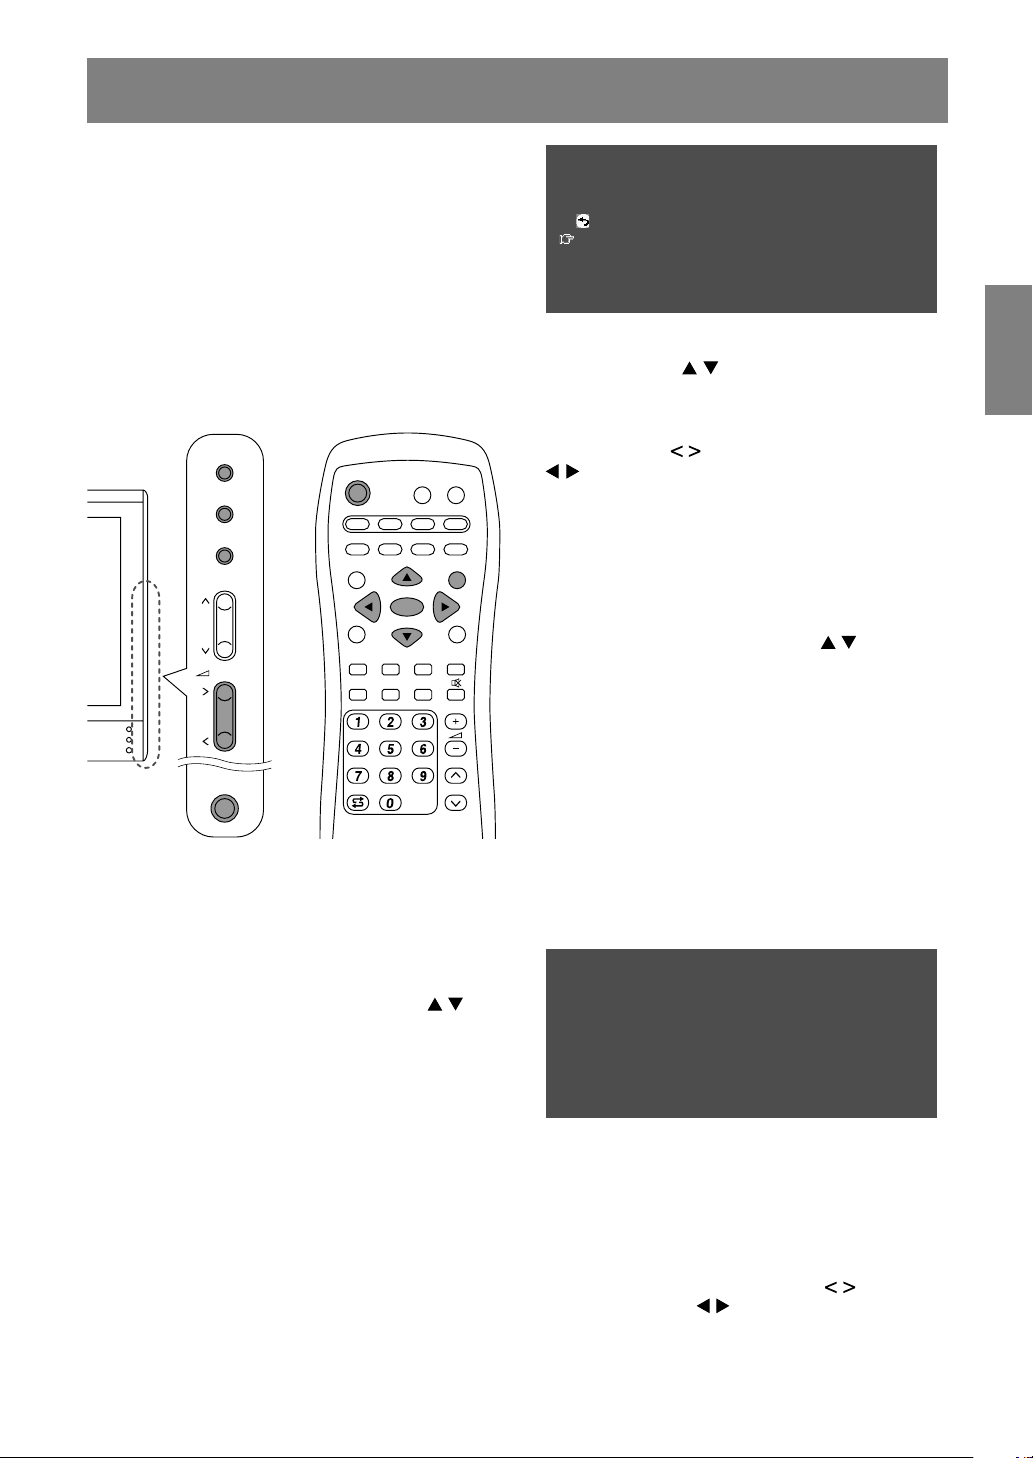
G15
DeutschDeutschFrançaisItalianoEspañolEnglish
Erste Installation
Bei der ersten Verwendung des Monitors oder
nach dem ALL RESET-Vorgang (siehe Ende dieser
Anleitung), wird die Routine FIRST INSTALLATION
(ERSTINBETRIEBNAHME), die die Installation
leichter macht, aktiviert. Unter Verwendung dieser
Routine können Sie die BildschirmDisplaysprache wählen und automatisch nach
empfangbaren Kanälen suchen und diese
abspeichern.
Hinweis:
- Diese Routine wird bei jedem Einschalten des
Monitors aktiviert, bis die automatische
Programmsuche einmal ausgeführt ist.
MAIN
POWER
/BRIGHT
CH
MENU
INPUT
OK
/
BRIGHT
MODE
POWER
PC AV2AV1TV
SLEEP
OK
MENU
BRIGHT
DISPLAY
FREEZE
/HOLD
SOUND
CH
SUBPAGE SUBTITLE
VIEW MODE
TEXT
REVEAL
PIP
BRIGHT
MODE
1. Drücken Sie die Taste MAIN POWER einmal, um
den Monitor einzuschalten.
Wenn die Betriebs-LED rot aufleuchtet, drücken
Sie die Taste POWER an der Fernbedienung.
Der Bildschirm “FIRST INSTALLATION
(LANGUAGE)” erscheint.
2. Wählen Sie die gewünschte Sprache mit der
Taste MENU (Monitor) oder den Tasten
(Fernbedienung).
Die Bildschirmanzeige schaltet auf die
gewünschte Sprache um.
Hinweise:
- Die Beschreibungen in dieser Anleitung
zeigen die Screenshots (Bildschirmfotos) in
ENGLISCH (werkseitige Einstellung).
- Sie können die Onscreen-Displaysprache erst
nach dem Ausführen der Routine FIRST
INSTALLATION ändern. (Siehe Seite G19.)
3. Drücken Sie die Taste OK/BRIGHT MODE
(Monitor) oder die Taste OK (Fernbedienung).
Der Bildschirm “FIRST INSTALLATION
(AUTOMATIC SEARCH)” erscheint.
FIRST INSTALLATION
(AUTOMATIC SEARCH)
RETURN
COUNTRY
[
UK
]
COLOUR SYSTEM
[
PAL
]
SOUND SYSTEM
[
I
]
START SEARCH
4. Wählen Sie den gewünschten
Einstellgegenstand mit der Taste MENU (Monitor)
oder den Tasten
(Fernbedienung), und
drücken Sie die Taste OK/BRIGHT MODE
(Monitor) oder die Taste OK (Fernbedienung).
Wählen Sie dann den gewünschten Gegenstand
mit den Tasten
(Monitor) oder den Tasten
(Fernbedienung).
Hinweis:
- Wählen Sie Ihr Land unter den folgenden:
Großbritannien, Deutschland, Frankreich,
Italien oder “OTHERS” (Anderes). Wenn
“OTHERS” gewählt ist, können Sie die
anderen beiden Systeme umschalten.
5. Wählen Sie “START SEARCH” mit der Taste
MENU (Monitor) oder den Tasten
(Fernbedienung).
6. Drücken Sie die Taste OK/BRIGHT MODE
(Monitor) oder die Taste OK (Fernbedienung).
Die automatische Programmsuche beginnt.
Hinweis:
- Wenn Sie den Prozess stoppen wollen,
nachdem er gestartet ist, drücken Sie die
Taste INPUT (Monitor) oder die Taste MENU
(Fernbedienung). In diesem Fall können Sie
die Kanäle mit “AUTOMATIC SEARCH” im
Menü PROGRAMMES im Modus TV einstellen.
(Siehe Seite G30.)
Wenn die Suche beendet ist, werden die neu
gefundenen Programme in dieser Liste gezeigt.
START SEARCH
<
TV/AV
>
SEARCH IS COMPLETED
00 05 10 15
01 E02 06 11 16
02 E03 07 12 17
03 E04 08 13 18
04 09 14 19
Hinweise:
- Die Programme werden automatisch
benanntn, und die Programme, deren Namen
nicht gefunden werden konnten, werden mit
“-----” dargestellt. Namen können später
eingegeben werden. (Siehe Seite G33.)
- Zur Anzeige der vorherigen oder nächsten
Liste verwenden Sie die Tasten
(Monitor)
oder die Tasten
(Fernbedienung).
7. Verlassen Sie den Bildschirm mit der Taste
INPUT (Monitor) oder der Taste MENU
(Fernbedienung).
Page 72

G16
Zum Wählen eines Gegenstand bewegen Sie zunächst den Cursor ( ) zum gewünschten
Gegenstand.
[Monitor]
1. Drücken Sie die Taste MENU.
Bei jedem Tastendruck bewegt sich der Cursor um einen Gegenstand nach unten.
Wenn Sie die Taste unten drücken, kehrt der Cursor nach oben zurück.
Beispiel: Bei jedem Drücken der Taste MENU im Bildschirm TV MENU bewegt sich der Cursor in der
folgenden Reihenfolge.
PICTURE → PROGRAMMES → AV CONNECTIONS → MODE SELECT → CHILD LOCK → PICTURE…
MENU
<
TV/AV
>
PICTURE
>>
PROGRAMMES
>>
AV CONNECTIONS
>>
MODE SELECT
>>
CHILD LOCK
>>
[Fernbedienung]
1. Drücken Sie die Tasten .
Bei jedem Drücken der Taste bewegt sich der Cursor um einen Gegenstand nach oben.
Bei jedem Drücken der Taste bewegt sich der Cursor um einen Gegenstand nach unten.
Wählen des Gegenstands im Bildschirm MENU
Page 73
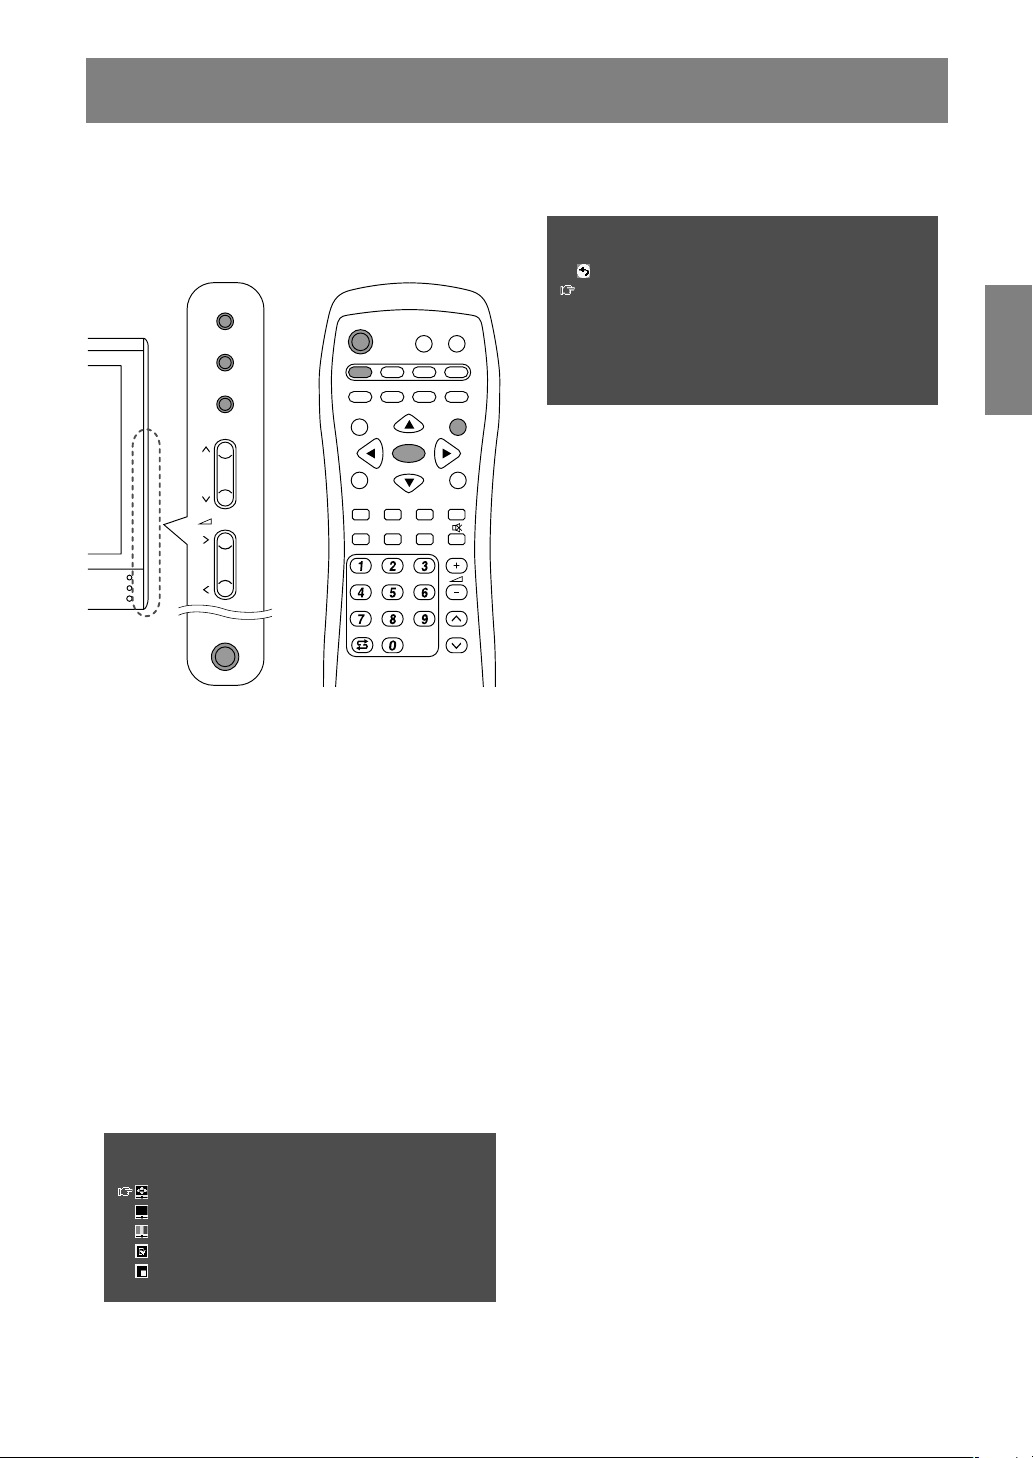
G17
DeutschDeutschFrançaisItalianoEspañolEnglish
Einstellen des Computer-Displays (AUTO ADJUSTMENT)
Bei der ersten Verwendung des Monitors als
Computer-Display oder nach dem Ändern der
Systemeinstellungen beim Betrieb führen Sie eine
automatische Bildschirmeinstellung durch.
“CLOCK”, “PHASE”, “H-POS” und “V-POS” werden
auf ihre optimalen Werte eingestellt.
MAIN
POWER
CH
MENU
INPUT
PC AV2AV1TV
BRIGHT
MODE
BRIGHT
CH
POWER
SLEEP MENU
DISPLAY
FREEZE
/HOLD
SOUND
SUBPAGE SUBTITLE
VIEW MODE
TEXT
REVEAL
PIP
OK
/BRIGHT
OK
/
BRIGHT
MODE
1. Drücken Sie die Taste MAIN POWER einmal, um
den Monitor einzuschalten.
Wenn die Betriebs-LED rot aufleuchtet, drücken
Sie die Taste POWER an der Fernbedienung.
2. Wählen Sie den PC-Modus mit der Taste INPUT
(Monitor) oder der Taste PC (Fernbedienung).
Bei Verwendung der Taste INPUT (Monitor) wird
bei jedem Tastendruck die Eingabe in der
folgenden Reihenfolge umgeschaltet.
PC → Zahl (TV) → AV1 → AV2 → PC...
3.Schalten Sie den Computer ein, und rufen Sie
dann ein Bild ins Display, dass im gesamten Bild
helle Farben zeigt (wie einen hellen DesktopHintergrund).
Wenn Sie Windows verwenden, können Sie das
Einstellmuster auf der beiliegenden Utility Disk
verwenden (siehe Seite G22).
4. Rufen Sie den Bildschirm MENU mit der Taste
MENU ab.
Der Cursor befindet sich bei “ADJUSTMENT”.
MENU
<PC>
ADJUSTMENT
>>
GAIN CONTROL
>>
COLOUR CONTROL
>>
MODE SELECT
>>
PICTURE IN PICTURE
>>
5. Drücken Sie die Taste OK/BRIGHT MODE
(Monitor) oder die Taste OK (Fernbedienung).
Der Bildschirm “ADJUSTMENT” erscheint.
ADJUSTMENT
<PC>
RETURN
AUTO
CLOCK
[
127
]
>>
PHASE
[
16
]
>>
H-POS
[
200
]
>>
V-POS
[
50
]
>>
RESET
6. Drücken Sie die Taste OK/BRIGHT MODE
(Monitor) oder die Taste OK (Fernbedienung) zur
automatischen Vornahme der Einstellungen.
Der Bildschirm wird dunkel, und “ADJUSTING”
erscheint. Nach einigen Sekunden kehrt der
Bildschirm “ADJUSTMENT” zurück.
7. Verlassen Sie den Bildschirm mit der Taste
INPUT (Monitor) oder der Taste MENU
(Fernbedienung).
Hinweise:
- Wenn Sie den Modus 1280 x 768 oder 1024 x
768 verwenden, geben Sie die horizontale
Auflösung eines 768-Zeilen-Bildschirms im
Menü MODE SELECT ein. (Siehe Seite G25.)
- Es ist möglich, dass mit der ersten
automatischen Einstellung keine richtige
Einstellung erzielt werden kann. In diesem Fall
sollte die automatische Einstellung zwei bis drei
Mal wiederholt werden.
- Falls erforderlich, können in folgenden Fällen
nach der automatischen Einstellung auch noch
manuelle Einstellungen vorgenommen werden
(Seite G22).
- Wenn eine weitere Feineinstellung
erforderlich ist.
- Wenn das Videoeingangssignal des
Computers Composite Sync oder Sync on
Green ist. (Die automatische Einstellung ist
eventuell nicht möglich.)
- Wenn “OUT OF ADJUST” angezeigt wird.
(Wenn auf dem Bildschirm ein ganz dunkles
Bild angezeigt wird, ist die automatische
Bildschirmjustierung möglicherweise
deaktiviert. Vergewissern Sie sich beim
Ausführen einer automatischen Einstellung,
dass entweder das Einstellmuster verwendet
wird, oder versuchen Sie, ein Bild anzuzeigen,
das den gesamten Bildschirm sehr hell
erscheinen lässt.)
- Es ist möglich, dass eine automatische
Einstellung abhängig von der auf dem Bildschirm
wiedergegebenen Anzeige - bewegliche Bilder
oder die MS-DOS-Eingabeaufforderung - nicht
ausgeführt werden kann.
Page 74

G18
Gemeinsame Vorgänge
Ein- und ausschalten
MAIN
POWER
CH
MENU
INPUT
PC AV2AV1TV
BRIGHT
MODE
BRIGHT
CH
POWER
SLEEP MENU
DISPLAY
FREEZE
/HOLD
SOUND
SUBPAGE SUBTITLE
VIEW MODE
TEXT
REVEAL
PIP
OK
/BRIGHT
OK
/
BRIGHT
MODE
Einschalten
Wenn die Betriebs-LED erloschen ist.
1. Drücken Sie die Taste MAIN POWER am
Monitor.
2.Schalten Sie das angeschlossene Gerät ein.
Nach einer kurzen Zeit leuchtet die
Betriebs-LED grün, und der Displaymodus wird
mehrere Sekunden lang angezeigt.
Wenn die Betriebs-LED rot leuchtet (Standby).
1. Drücken Sie die Taste POWER an der
Fernbedienung.
2.Schalten Sie das angeschlossene Gerät ein.
Die Betriebs-LED leuchtet grün, und der
Displaymodus wird mehrere Sekunden lang
angezeigt.
Ausschalten
1.Schalten Sie das angeschlossene Gerät aus.
2. Drücken Sie die Taste POWER an der
Fernbedienung.
Die Betriebs-LED leuchtet rot (Standby).
3. Drücken Sie die Taste MAIN POWER am
Monitor.
Die Betriebs-LED erlischt.
Hinweise:
- Immer mindestens 5 Sekunden zwischen dem
Ein- oder Ausschalten warten. Durch schnelles
Umschalten kann der Monitor beschädigt
werden, oder es können Fehlfunktionen
verursacht werden.
- Nach dem Einschalten kann es eine kurze Zeit
dauern, bevor der Bildschirm ein Bild zeigt.
- Nicht sofort nach der Vornahme verschiedener
Einstellungen am Bildschirm einschalten. Die
geänderten Werte sind möglicherweise noch
nicht im Speicher abgelegt.
Umschalten der Displaymodi (INPUT)
[Monitor]
1. Drücken Sie die Taste INPUT.
Bei jedem Drücken der Taste wird die Eingabe in
der folgenden Reihenfolge umgeschaltet:
PC → Zahl (TV) → AV1 → AV2 → PC...
P C
Displaymodi
PC PC-Modus Zeigt das Bild des
Computers.
Zahl TV-Modus Zeigt das Bild des TV-
Geräts. Die Zahl zeigt den
empfangenen Kanal an.
AV1 AV1-Modus Zeigt das vom an den
Eingang AV1
angeschlossenen Geräts
empfangene Bild an.
AV2 AV2-Modus Zeigt das vom an den
Eingang AV2
angeschlossenen Geräts
empfangene Bild an.
[Fernbedienung]
1. Drücken Sie die Taste PC, TV, AV1 oder AV2.
Der Monitor schaltet auf Displaymodus für die
gedrückte Taste um.
Hinweise:
- Wenn Sie den Monitor einschalten, ist der
anfängliche Displaymodus der Modus, der beim
letzten Ausschalten des Monitors verwendet
wurde.
- Verwendung der Tasten
oder Kanaltasten
an der Fernbedienung (0 - 9), oder Wählen von
Kanälen mit der Programmtabelle schalten
ebenfalls automatisch auf TV-Modus um,
ausgenommen bei den folgenden Fällen, wenn
im PC-Modus.
- Wenn Sie Fernsehen im PIP-Fenster
betrachten (siehe Seite G20).
- Wenn Sie Fernsehen im hören (siehe Seite
G21).
In diesen Fällen schalten Sie den Displaymodus
mit der Taste INPUT (Monitor) oder der Taste TV
(Fernbedienung) auf TV um.
Page 75
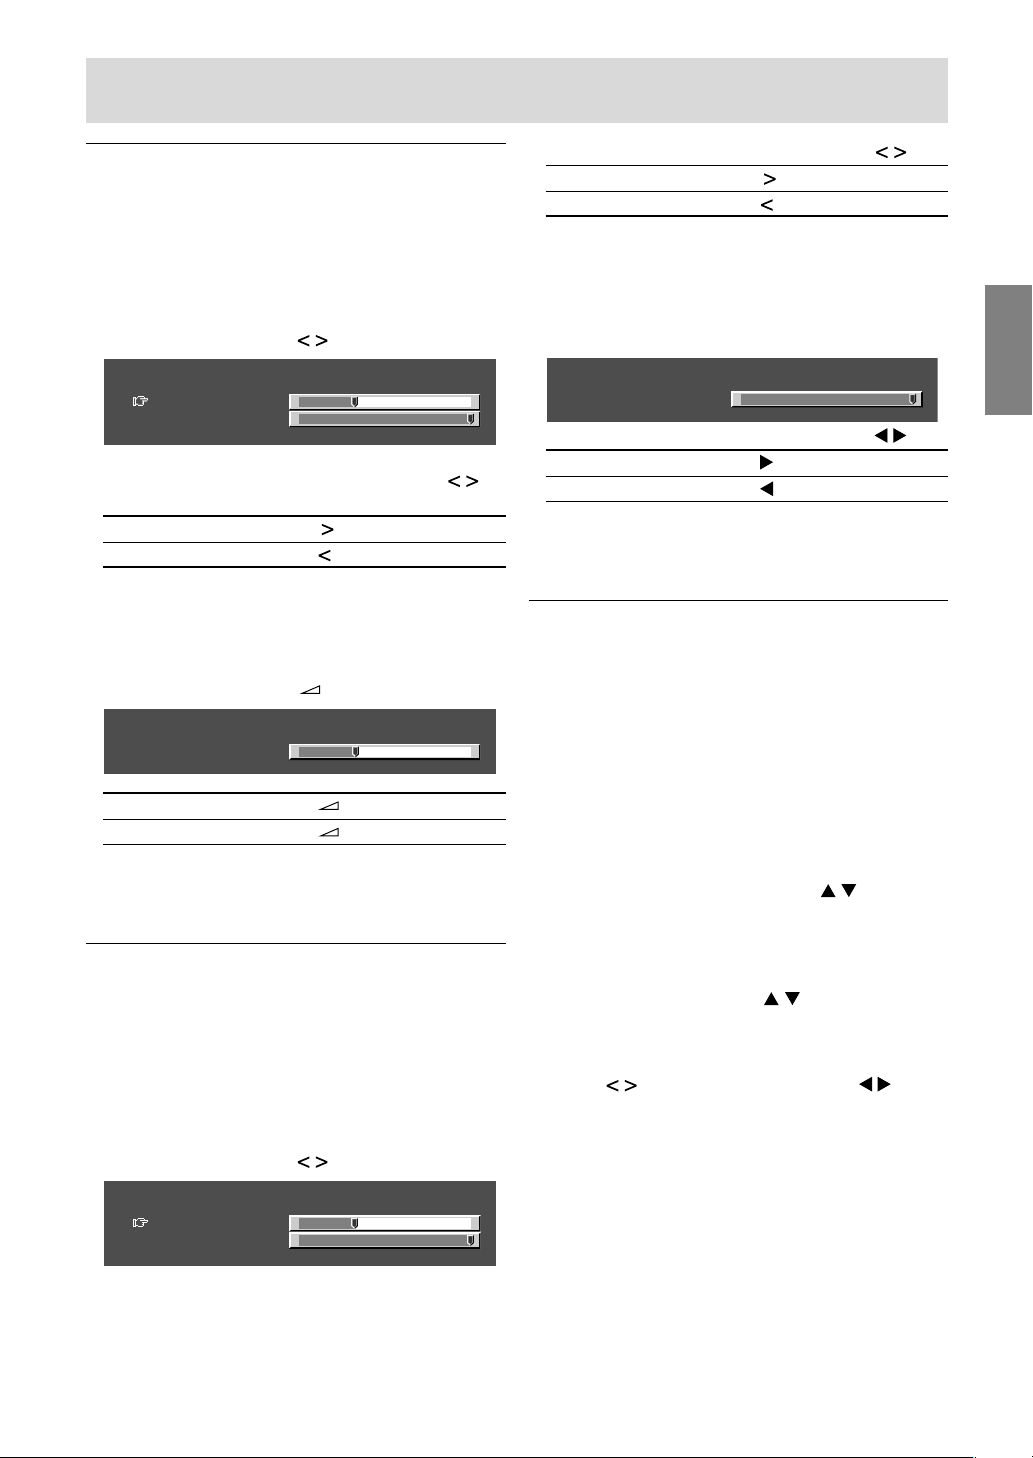
G19
DeutschDeutschFrançaisItalianoEspañolEnglish
Gemeinsame Vorgänge
Einstellen der Lautstärke
Die Lautstärke kann einzeln für PC-Modus und
TV/AV-Modus eingestellt werden. Starten Sie
durch Umschalten auf den Displaymodus, für den
die Lautstärke eingestellt werden soll.
[Monitor]
1. Drücken Sie die Tasten .
<PC>
VOLUME 30
BRIGHT 31
+
-
+
-
2. Wählen Sie “VOLUME” mit der Taste MENU.
3. Stellen Sie die Lautstärke mit den Tasten
ein.
Steigern Taste
Senken Taste
Der Bildschirm zur Einstellung der Lautstärke
verschwindet automatisch nach ca. 15
Sekunden.
[Fernbedienung]
1.Drücken Sie die Tasten +/– zur Einstellung.
<PC>
VOLUME 30
+
-
Steigern Taste +
Senken Taste –
Der Bildschirm zur Einstellung der Lautstärke
verschwindet automatisch nach mehreren
Sekunden.
Einstellen der Rückbeleuchtung
Die Helligkeit der Rückbeleuchtung kann einzeln
für PC-Modus und TV/AV-Modus eingestellt
werden. Starten Sie durch Umschalten auf den
Displaymodus, für den die Rückbeleuchtung
eingestellt werden soll.
[Monitor]
1.Drücken Sie die Tasten .
<PC>
VOLUME 30
BRIGHT 31
+
-
+
-
2.Wählen Sie “BRIGHT” mit der Taste MENU.
3.Stellen Sie die Helligkeit mit den Tasten
ein.
Steigern Taste
Senken Taste
Der Bildschirm zur Einstellung der Helligkeit
verschwindet automatisch nach ca. 15
Sekunden.
[Fernbedienung]
1.Drücken Sie die Taste BRIGHT.
<PC>
BRIGHT 31
+
-
2.Stellen Sie die Helligkeit mit den Tasten ein.
Steigern Taste
Senken Taste
Der Bildschirm zur Einstellung der Helligkeit
verschwindet automatisch nach mehreren
Sekunden.
Wählen der Sprache auf dem
Bildschirm
Sie können die Sprache (Englisch, Deutsch,
Spanisch, Französisch oder Italienisch) mit dem
Menü MODE SELECT einstellen, während Sie in
jedem Modus sind. (Die gewählte Sprache wird in
allen Modi gezeigt.)
1.Rufen Sie den Bildschirm MENU mit der Taste
MENU ab.
2.Wählen Sie “MODE SELECT” mit der Taste
MENU (Monitor) oder den Tasten
(Fernbedienung), und drücken Sie die Taste
OK/BRIGHT MODE (Monitor) oder die Taste OK
(Fernbedienung).
3.Wählen Sie “LANGUAGE” mit der Taste MENU
(Monitor) oder den Tasten (Fernbedienung),
und drücken Sie die Taste OK/BRIGHT MODE
(Monitor) oder die Taste OK (Fernbedienung).
4.Wählen Sie die gewünschte Sprache mit den
Tasten (Monitor) oder den Tasten
(Fernbedienung).
5.Verlassen Sie den Bildschirm mit der Taste
INPUT (Monitor) oder der Taste MENU
(Fernbedienung).
Page 76

G20
Fernsehen oder Videosehen in einem Fenster im
Computerbildschirm (PICTURE IN PICTURE)
Die Video- und Audioquellen wählen
Sie können die Videoquelle für das PIP-Fenster
zwischen TV, AV1 und AV2 umschalten. Sie
können auch das den gewünschten Ton zum
Hören bei der Anzeige des PIP-Fensters wählen.
1. Rufen Sie den Bildschirm MENU mit der Taste
MENU im PC-Modus ab.
2.Wählen Sie “PICTURE IN PICTURE” mit der
Taste MENU (Monitor) oder den Tasten
(Fernbedienung), und drücken Sie die Taste
OK/BRIGHT MODE (Monitor) oder die Taste OK
(Fernbedienung).
3.Wählen Sie “PIP INPUT” mit der Taste MENU
(Monitor) oder den Tasten
(Fernbedienung), und drücken Sie die Taste
OK/BRIGHT MODE (Monitor) oder die Taste OK
(Fernbedienung).
4. Wählen Sie das zu sehen gewünschte PIP-Bild
mit den Tasten (Monitor) oder den Tasten
(Fernbedienung).
5. Wählen Sie “PIP SOUND” mit der Taste MENU
(Monitor) oder den Tasten
(Fernbedienung), und drücken Sie die Taste
OK/BRIGHT MODE (Monitor) oder die Taste OK
(Fernbedienung).
6. Wählen Sie den zu hören gewünschten Ton mit
den Tasten (Monitor) oder den Tasten
(Fernbedienung).
PC: Computerton
PIP: PIP-Fenster-Ton
7. Verlassen Sie den Bildschirm mit der Taste
INPUT (Monitor) oder der Taste MENU
(Fernbedienung).
Hinweis:
- Zum Umschalten des Audio-Empfangsmodus
für TV-Audio drücken Sie die Taste SOUND
(Fernbedienung). (Siehe Seite G35.)
Sie können Fernseh- oder Videoprogramme in
einem Fenster im Computerbildschirm (PIPFenster) sehen.
MAIN
POWER
CH
MENU
INPUT
PC AV2AV1TV
BRIGHT
MODE
BRIGHT
CH
POWER
SLEEP MENU
DISPLAY
FREEZE
/HOLD
SOUND
SUBPAGE SUBTITLE
VIEW MODE
TEXT
REVEAL
PIP
OK
/BRIGHT
OK
/
BRIGHT
MODE
1. Wählen Sie den PC-Modus mit der Taste INPUT
(Monitor) oder der Taste PC (Fernbedienung).
2. Drücken Sie die Taste PIP (Fernbedienung).
Das kleine Fenster wird gezeigt (die werkseitige
Einstellung ist TV-Bild).
Zum Wechseln der Kanäle im kleinen Fenster
drücken Sie die Tasten oder die Kanaltasten
(Fernbedienung), oder verwenden Sie die
Programmtabelle. (Siehe Seite G34.)
Zum Einstellen der Lautstärke siehe Seite G19.
Zum Schließen des kleinen Fensters drücken Sie
die Taste PIP (Fernbedienung) erneut.
Hinweis:
- Mit dem Menü PICTURE IN PICTURE (Bild in
Bild) können Sie folgendes ausführen:
- Das kleine PIP-Fenster öffnen/schließen.
- Größe/Position des PIP-Fensters einstellen.
(Siehe Seite G25.)
- Die Video- und Audioquellen des PIP-Fensters
einstellen. (Siehe rechte Spalte.)
Page 77

G21
DeutschDeutschFrançaisItalianoEspañolEnglish
Sie können Ton vom Fernsehgerät oder einer
anderen Audioquelle beim Betrachten des
Computerbildschirms im Monitor hören.
MAIN
POWER
CH
MENU
INPUT
PC AV2AV1TV
BRIGHT
MODE
BRIGHT
CH
POWER
SLEEP MENU
DISPLAY
FREEZE
/HOLD
SOUND
SUBPAGE SUBTITLE
VIEW MODE
TEXT
REVEAL
PIP
OK
/BRIGHT
OK
/
BRIGHT
MODE
1. Rufen Sie den Bildschirm MENU mit der Taste
MENU im PC-Modus ab.
2.Wählen Sie “MODE SELECT” mit der Taste
MENU (Monitor) oder den Tasten
(Fernbedienung), und drücken Sie die Taste
OK/BRIGHT MODE (Monitor) oder die Taste OK
(Fernbedienung).
3.Wählen Sie “SOUND” mit der Taste MENU
(Monitor) oder den Tasten (Fernbedienung),
und drücken Sie die Taste OK/BRIGHT MODE
(Monitor) oder die Taste OK (Fernbedienung).
4. Wählen Sie den zu hören gewünschten Ton mit
den Tasten (Monitor) oder den Tasten
(Fernbedienung).
5.Verlassen Sie den Bildschirm mit der Taste
INPUT (Monitor) oder der Taste MENU
(Fernbedienung).
Hören von Fernsehgerät oder einer anderen Audioquelle
beim Betrachten des Computerbildschirms
Hinweise:
- Zum Wechseln des Kanals auf TV-Audio drucken
Sie die Tasten oder die Kanaltasten
(Fernbedienung), oder verwenden Sie die
Programmtabelle. (Siehe Seite G34.)
- Zum Umschalten des Audio-Empfangsmodus
für TV-Audio drücken Sie die Taste SOUND
(Fernbedienung). (Siehe Seite G35.)
- Diese Einstellung ist deaktiviert, während ein
PIP-Fenster erscheint. Die Audioquelle (PIP
SOUND) wie im Menü PICTURE IN PICTURE
eingestellt hat Vorrang.
- Wenn “STATUS” im Menü CHILD LOCK auf
“ALL” oder “INDIVIDUAL” gestellt ist (siehe Seite
G40), steht der TV/AV-IN SOUND nicht im
PC-Modus zur Verfügung.
Page 78

G22
Einstellen des Displays
Sie können die Farbe des Bildes im
Computerbildschirm einstellen und Bild-in-BildEinstellungen mit den Menüs für den PC-Modus
vornehmen.
Einstellmuster
Wenn Sie mit Windows arbeiten, können Sie das
Einstellmuster auf der mitgelieferten CD-ROM
verwenden.
Die in den nachstehenden Bedienungshinweisen
erwähnten Windows-Meldungen basieren auf der
englischen Windows-Version. Diese Anweisungen
betreffen Windows 95/98/2000/Me/XP. Dabei wird
von Laufwerk “D” als CD-ROM-Laufwerk
angenommen.
1.Die mitgelieferte CD-ROM in das CD-ROMLaufwerk des Computer einlegen.
2.Öffnen Sie [My Computer], und wählen Sie
CD-ROM. Unter Windows 3.1 öffnen Sie
[File Manager], und wählen Sie Laufwerk “D”.
3.Doppelklicken Sie auf [Adj_uty.exe], um das
Einstellprogramm auszuführen.
Das Einstellmuster wird angezeigt.
Einstellmuster
Nach dem Ausführen aller Einstellungen
drücken Sie am Computer auf die Taste [Esc],
um das Einstellprogramm zu beenden.
Hinweis:
- Wenn der Anzeigemodus Ihres Computers auf
65K Farben eingestellt ist, lassen sich die
verschiedenen Farbgrade in den einzelnen
Farbmustern darstellen, oder die Graustufen
sehen farbig aus. (Dies liegt an der Spezifikation
des Eingangssignals und ist keine
Funktionsstörung.)
Einstellung
Das folgende Verfahren beschreibt die
grundlegende Bedienung. Einzelne Punkte siehe
Seite G23 bis G25.
1. Wählen Sie den PC-Modus mit der Taste INPUT
(Monitor) oder der Taste PC (Fernbedienung).
2. Rufen Sie den Bildschirm MENU mit der Taste
MENU ab.
MENU
<PC>
ADJUSTMENT
>>
GAIN CONTROL
>>
COLOUR CONTROL
>>
MODE SELECT
>>
PICTURE IN PICTURE
>>
3. Wählen Sie den gewünschten
Einstellgegenstand mit der Taste MENU
(Monitor) oder den Tasten
(Fernbedienung), und drücken Sie die Taste
OK/BRIGHT MODE (Monitor) oder die Taste OK
(Fernbedienung).
4. Wählen Sie den gewünschten
Einstellgegenstand mit der Taste MENU
(Monitor) oder den Tasten
(Fernbedienung), und drücken Sie die Taste
OK/BRIGHT MODE (Monitor) oder die Taste OK
(Fernbedienung).
5. Ändern Sie die Zahlen/Werte mit den Tasten
(Monitor) oder den Tasten
(Fernbedienung).
Sie können fortsetzen und andere
Gegenstände einstellen.
Verfahren Sie wie folgt, um zum vorherigen
Bildschirm zurückzuschalten.
(1) Wählen Sie “RETURN” mit der Taste MENU
(Monitor) oder den Tasten
(Fernbedienung).
(2) Drücken Sie die Taste OK/BRIGHT MODE
(Monitor) oder die Taste OK
(Fernbedienung).
6. Verlassen Sie den Bildschirm mit der Taste
INPUT (Monitor) oder der Taste MENU
(Fernbedienung).
Hinweise:
- Wenn Sie keine etwa 30 Sekunden lang keine
Tasten betätigen, während ein Menü-Bildschirm
angezeigt wird, werden die bis zu diesem Punkt
vorgenommenen Einstellungen angelegt, und
der Bildschirm verschwindet automatisch.
- Diese Anleitung beschreibt die DisplayEinstellungen basierend auf der Verwendung
des Einstellmusters (für Windows).
Page 79

G23
DeutschDeutschFrançaisItalianoEspañolEnglish
Menü ADJUSTMENT
Gegenstand
AUTO
CLOCK
PHASE
H-POS, V-POS
RESET
Beschreibung
“CLOCK”, “PHASE”, “H-POS” und “V-POS” werden automatisch
eingestellt. (Siehe Seite G17.)
Stellt die Uhr so ein, dass kein vertikales Flimmern erzeugt wird.
Nimmt eine Einstellung vor, nachdem “CLOCK” richtig eingestellt ist, so
dass kein horizontales Flimmern erzeugt wird.
Stellt die Position des Einstellmusters so ein, dass es auf dem Bildschirm
zentriert erscheint.
Stellt die Einstellwerte für dieses Menü auf ihre originalen werkseitigen
Einstellungen zurück.
Einstellen des Displays
Horizontales Flimmern
Vertikales Flimmern
Einstellmuster
Bildschirmrahmen
Page 80

G24
Einstellen des Displays
Gegenstand
AUTO
BLACK LEVEL
CONTRAST
RESET
Hinweise zur automatischen Einstellung:
- Wenn Sie das Einstellmuster nicht verwenden, müssen Sie einen schwarzen und weißen Bereich in
einer Größe von 5 mm x 5 mm anzeigen lassen, ansonsten ist keine Einstellung möglich.
- Wenn es sich bei dem vom Computer kommenden Signal um das Signal Composite Sync oder Sync
on Green handelt, ist keine automatische Einstellung möglich. Nehmen Sie die Einstellung statt
dessen manuell vor.
- Wenn “OUT OF ADJUST” angezeigt wird, sollte die manuelle Einstellung durchgeführt werden.
Menü COLOUR CONTROL
Gegenstand
COLOUR MODE
WHITE BALANCE
RESET
Hinweis:
- “WHITE BALANCE” wird automatisch auf “STD” gestellt, wenn “COLOUR MODE” auf “sRGB” oder
“VIVID” gestellt wird.
Menü GAIN CONTROL
Beschreibung
Stellt automatisch “BLACK LEVEL” und “CONTRAST” basierend auf den
hellsten und dunkelsten Farben des angezeigten Bildes ein.
Stellt die Bildschirmhelligkeit ein, während Sie das Farbmuster
betrachten.
Stellt den Kontrast so ein, dass alle Abstufungen verschwinden, während
Sie das Farbmuster betrachten.
Stellt die Einstellwerte für dieses Menü auf ihre originalen werkseitigen
Einstellungen zurück.
Farbmuster
Beschreibung
Wählt den Farbton.
- STD
...........
Zeigt Bilder mit dem Originalfarbton des LCD-Monitors.
- sRGB
........
sRGB ist eine internationale Norm zur Farbdarstellung,
definiert von der IEC (International Elektrotechnische
Komission). Farben werden unter Beachtung der
Flüssigkristalleigenschaften konvertiert und stellen deshalb
den Farbton dar, der dem Originalbild am nächsten ist.
- VIVID
........
Zeigt Bilder in lebendigen Primärfarben.
Stellt die Farbtemperatur ein.
Stellen Sie “WHITE BALANCE” auf “STD”, wenn Sie alle Abstufungen
anzeigen wollen.
- COOL2
.....
Farbton dunkler als Standard.
- COOL1
.....
Farbton leicht dunkler als Standard.
- STD
...........
Standardeinstellung für Farbton.
- WARM1
....
Farbton leicht rötlicher als Standard.
- WARM2
....
Farbton rötlicher als Standard.
- USER
........
Erlaubt individuelle Einstellung von Kontrast für Rot, Grün
und Blau.
Stellt die Einstellwerte für dieses Menü auf ihre originalen werkseitigen
Einstellungen zurück.
Page 81
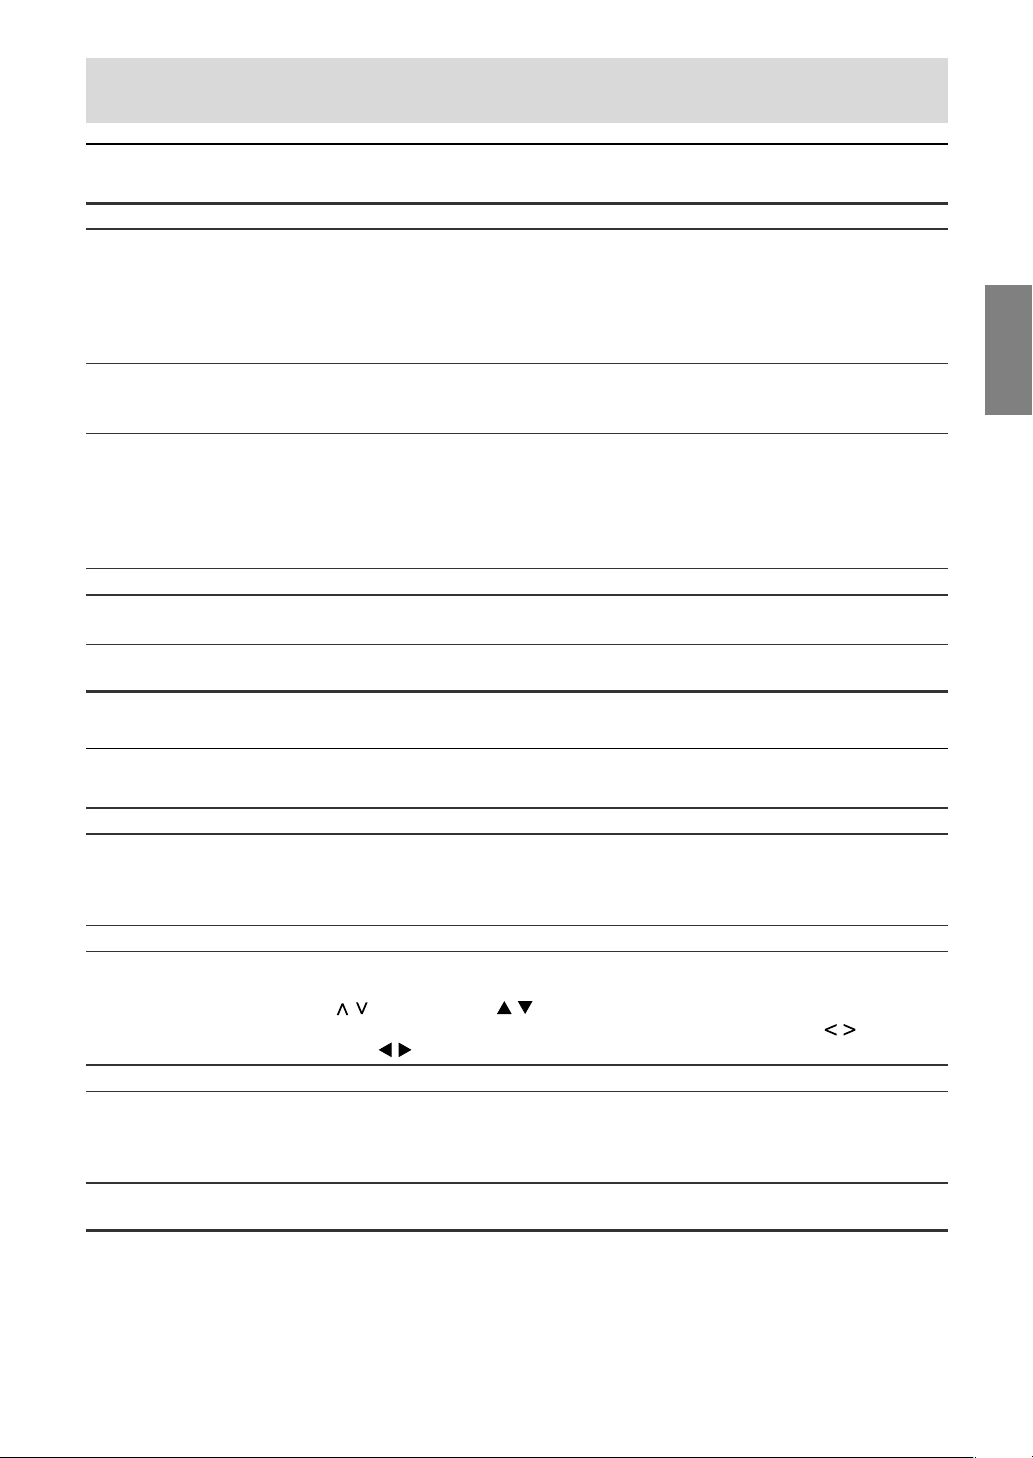
G25
DeutschDeutschFrançaisItalianoEspañolEnglish
Menü MODE SELECT
Gegenstand
VIEW MODE
768 LINES
SOUND
SCALING
LANGUAGE
RESET
Menü PICTURE IN PICTURE
Gegenstand
PIP DISPLAY
PIP SIZE
PIP POSITION
PIP INPUT
PIP SOUND
RESET
Einstellen des Displays
Beschreibung
Wählt die Bildschirmgröße.
- NORMAL
.........
Erweitert das Bild auf oder in die Nähe des
Seitenverhältnisses.
- WIDE
...............
Erweitert das Bild so, dass es den Bildschirm ausfüllt.
Sie können diesen Gegenstand auch mit der Fernbedienung einstellen.
(Siehe Seite G47.)
Gibt die horizontale Auflösung eines 768-Zeilen-Bildschirms an.
- 1024
................
1024 x 768 Punkt-Modus
- 1280
................
1280 x 768 Punkt-Modus
Wählt den zu hörenden Ton bei der Anzeige des Computerbildschirms.
Bei der Anzeige eines PIP-Fensters hat der von “PIP SOUND” eingestellte
Ton Vorrang.
Wenn “STATUS” im Menü CHILD LOCK auf “ALL” oder “INDIVIDUAL”
gestellt ist (siehe Seite G40), steht der TV/AV-IN SOUND nicht im
PC-Modus zur Verfügung.
Stellt das Bild bei Vergrößerung auf optimale Schärfe ein.
Wählt die Sprache (Englisch, Deutsch, Spanisch, Französisch oder
Italienisch) im Bildschirm. (Siehe Seite G19.)
Stellt die Einstellwerte für dieses Menü auf ihre originalen werkseitigen
Einstellungen zurück.
Beschreibung
Wählt, ob Fernseh- oder andere Videoquellen in einem kleinen Fenster im
Computerbildschirm (PIP-Fenster) gezeigt werden.
Sie können diesen Gegenstand auch mit der Fernbedienung einstellen.
(Siehe Seite G20.)
Stellt die Größe des PIP-Fensters ein.
Stellt die Position des PIP-Fensters ein.
Zum Herauf- und Herunterbewegen verwenden Sie die Tasten
(Monitor) oder (Fernbedienung).
Zum Links- und Rechtsbewegen verwenden Sie die Tasten (Monitor)
oder (Fernbedienung).
Wählt die Quelle des PIP-Fensters. (Siehe Seite G20.)
Wählt den zu hören gewünshten Ton bei der Anzeige des PIP-Fensters.
- PC
....................
Computerton
- PIP
...................
PIP-Fenster-Ton
(Siehe Seite G20.)
Stellt die Einstellwerte für dieses Menü auf ihre originalen werkseitigen
Einstellungen zurück.
Page 82

G26
Installieren der Setup-Informationen und des ICC-Profils (Für Windows)
Je nach dem verwendeten Computer oder
Betriebssystem muss die Installation der MonitorSetup-Informationen usw. eventuell über den
Computer erfolgen. Führen Sie in diesem Fall die
unten beschriebenen Schritte zum Installieren der
Monitor-Setup-Informationen aus. (Je nach dem
verwendeten Computertyp oder Betriebssystem
können die Befehlsnamen und Verfahren von den
hier beschriebenen abweichen. Lesen Sie auch
das Benutzeranleitung Ihres Computers.)
Informationen zum ICC-Profil
Ein ICC-Profil (International Color Consortium) ist
eine Datei, in der die Farbwiedergabeeigenschaften
des LCD-Monitors beschrieben sind. Durch
Einsatz einer Anwendung, die mit einem ICCProfil zusammenarbeitet, lässt sich hochgenaue
Farbreproduktion erzielen.
- Windows 98/2000/Me/XP verwenden alle das
ICC-Profil.
- Beim Installieren der Setup-Informationen unter
Windows 98/2000/Me/XP (unten beschrieben)
wird auch das ICC-Profil installiert. Falls Sie nur
das ICC-Profil installieren möchten, lesen Sie
die Anweisungen unter Installieren des ICC-
Profils auf Seite G28.
- Bei Verwendung des ICC-Profils stellen Sie
“COLOUR MODE” und “WHITE BALANCE” auf
“STD”.
Für Windows 95
Installieren der Monitor-Setup-Informationen unter
Windows 95. Die in den nachstehenden
Bedienungshinweisen erwähnten WindowsMeldungen basieren auf der englischen WindowsVersion.
Dabei wird von Laufwerk “D” als CD-ROMLaufwerk angenommen.
1. Die mitgelieferte CD-ROM in das CD-ROM-
Laufwerk des Computer einlegen.
2. Klicken Sie auf die Schaltfläche [Start]. Wählen
Sie unter [Settings] die Option [Control Panel].
3. Doppelklicken Sie auf [Display].
4. Klicken Sie auf [Settings], [Advanced
Properties] und [Monitor] und dann auf
[Change].
5. Klicken Sie auf [Have disk], bestätigen Sie, dass
neben [Copy manufacturer’s files from:] [D:]
angezeigt wird, und klicken Sie dann auf [OK].
6. Bestätigen Sie, dass die Monitordetails
ausgewählt sind, und klicken Sie auf [OK].
7. Prüfen Sie, ob der Monitor angezeigt wird, und
klicken Sie dann auf [Apply].
8. Klicken Sie auf [OK], und schließen Sie das
Fenster.
Für Windows 98
Installieren der Monitor-Setup-Informationen unter
Windows 98 und Festlegen des Monitor-ICCProfils als vorbestimmter Wert. Die in den
nachstehenden Bedienungshinweisen erwähnten
Windows-Meldungen basieren auf der englischen
Windows-Version.
Dabei wird von Laufwerk “D” als CD-ROMLaufwerk angenommen.
Wenn der “Add New Hardware Wizard” angezeigt
wird:
1. Die mitgelieferte CD-ROM in das CD-ROMLaufwerk des Computer einlegen.
2. Klicken Sie auf [Next].
3. Aktivieren Sie [Display a list of all the drivers in
a specific location, so you can select the driver
you want.], und klicken Sie auf [Next].
4. Wenn [Models] angezeigt wird, klicken Sie auf
[Have disk], bestätigen Sie, dass neben [Copy
manufacturer’s files from:] [D:] angezeigt wird,
und klicken Sie dann auf [OK].
5. Bestätigen Sie, dass die Monitordetails
ausgewählt sind, klicken Sie dann auf [Next],
[Next] und auf [Finish]. Wenn der “Add New
Hardware Wizard” angezeigt wird, wiederholen
Sie die Installationsschritte ab Schritt 2.
Wenn der “Add New Hardware Wizard” nicht
angezeigt wird:
1. Die mitgelieferte CD-ROM in das CD-ROMLaufwerk des Computer einlegen.
2. Klicken Sie auf die Schaltfläche [Start]. Wählen
Sie unter [Settings] die Option [Control Panel].
3. Doppelklicken Sie auf [Display].
4. Klicken Sie auf [Settings], [Advanced] und
[Monitor].
5. Aktivieren Sie unter [Options] [Automatically
detect Plug & Play monitors], und klicken Sie
auf [Change].
6. Klicken Sie auf [Next].
7. Klicken Sie auf [Display a list of all the drivers
in a specific location, so you can select the
driver you want.] und dann auf [Next].
8. Wenn [Models] angezeigt wird, klicken Sie auf
[Have disk], bestätigen Sie, dass neben [Copy
manufacturer’s files from:] [D:] angezeigt wird,
und klicken Sie dann auf [OK].
9. Bestätigen Sie, dass die Monitordetails
ausgewählt sind, klicken Sie dann auf [Next],
[Next] und auf [Finish].
10. Prüfen Sie, ob der Monitor angezeigt wird, und
klicken Sie dann auf [Apply].
11. Klicken Sie auf [OK], und schließen Sie das
Fenster.
Page 83

G27
DeutschDeutschFrançaisItalianoEspañolEnglish
Für Windows Me
Installieren der Monitor-Setup-Informationen unter
Windows Me und Festlegen des Monitor-ICCProfils als vorbestimmter Wert. Die in den
nachstehenden Bedienungshinweisen erwähnten
Windows-Meldungen basieren auf der englischen
Windows-Version.
Dabei wird von Laufwerk “D” als CD-ROMLaufwerk angenommen.
Wenn der “Add New Hardware Wizard” angezeigt
wird:
1. Die mitgelieferte CD-ROM in das CD-ROMLaufwerk des Computer einlegen.
2. Aktivieren Sie [Specify the location of the driver
[Advanced]], und klicken Sie auf [Next].
3. Aktivieren Sie [Display a list of all the drivers in
a specific location, so you can select the driver
you want.], und klicken Sie auf [Next].
4. Wenn [Models] angezeigt wird, klicken Sie auf
[Have disk], bestätigen Sie, dass neben [Copy
manufacturer’s files from:] [D:] angezeigt wird,
und klicken Sie dann auf [OK].
5. Wählen Sie die Monitordetails aus der Liste
aus, klicken Sie dann auf [Next], [Next] und auf
[Finish]. Wenn der “Add New Hardware Wizard”
angezeigt wird, wiederholen Sie die
Installationsschritte ab Schritt 2.
Wenn der “Add New Hardware Wizard” nicht
angezeigt wird:
1. Die mitgelieferte CD-ROM in das CD-ROMLaufwerk des Computer einlegen.
2. Klicken Sie auf die Schaltfläche [Start]. Wählen
Sie unter [Settings] die Option [Control Panel].
3. Doppelklicken Sie auf [Display].
4. Klicken Sie auf [Settings], [Advanced] und
[Monitor].
5. Aktivieren Sie unter [Options] [Automatically
detect Plug & Play monitors], und klicken Sie
auf [Change].
6. Aktivieren Sie [Specify the location of the driver
[Advanced]], und klicken Sie auf [Next].
7. Aktivieren Sie [Display a list of all the drivers in
a specific location, so you can select the driver
you want.], und klicken Sie auf [Next].
8. Wenn [Models] angezeigt wird, klicken Sie auf
[Have disk], bestätigen Sie, dass neben [Copy
manufacturer’s files from:] [D:] angezeigt wird,
und klicken Sie dann auf [OK].
9. Wählen Sie die Monitordetails, klicken Sie
dann auf [Next], [Next] und auf [Finish].
10. Prüfen Sie, ob die Monitordetails angezeigt
werden, und klicken Sie dann auf [Apply].
11. Klicken Sie auf [OK], und schließen Sie das
Fenster.
Installieren der Setup-Informationen und des ICC-Profils (Für Windows)
Für Windows 2000
Installieren der Monitor-Setup-Informationen unter
Windows 2000 und Festlegen des Monitor-ICCProfils als vorbestimmter Wert. Die in den
nachstehenden Bedienungshinweisen erwähnten
Windows-Meldungen basieren auf der englischen
Windows-Version.
Dabei wird von Laufwerk “D” als CD-ROMLaufwerk angenommen.
1. Die mitgelieferte CD-ROM in das CD-ROMLaufwerk des Computer einlegen.
2. Klicken Sie auf die Schaltfläche [Start]. Wählen
Sie unter [Settings] die Option [Control Panel].
3. Doppelklicken Sie auf [Display].
4. Klicken Sie auf [Settings], [Advanced] und
[Monitor].
5. Klicken Sie auf [Properties], [Driver] und
[Update Driver].
6. Wenn [Upgrade Device Driver Wizard]
angezeigt wird, klicken Sie auf [Next].
7. Aktivieren Sie [Display a list of the known
drivers for this device so that I can choose a
specific driver], und klicken Sie auf [Next].
8. Wenn [Models] angezeigt wird, klicken Sie auf
[Have disk], bestätigen Sie, dass neben [Copy
manufacturer’s files from:] [D:] angezeigt wird,
und klicken Sie dann auf [OK].
9. Wählen Sie den Monitor aus der angezeigten
Liste aus, und klicken Sie auf [Next].
10. Klicken Sie auf [Next], vergewissern Sie sich,
dass der Name des Monitors angezeigt wird,
und klicken Sie auf [Finish]. Wenn [The Digital
Signature Not Found] angezeigt wird, klicken
Sie auf [Yes].
11. Klicken Sie auf [Close].
12. Klicken Sie auf [OK], und schließen Sie das
Fenster.
Page 84

G28
Installieren des ICC-Profils
Installieren des Monitor-ICC-Profils. (Wenn die
Setup-Informationen bereits installiert wurden, ist
auch das Profil bereits installiert. Es braucht dann
nicht mehr extra installiert zu werden.)
Die in den nachstehenden Bedienungshinweisen
erwähnten Windows-Meldungen basieren auf der
englischen Windows-Version.
Dabei wird von Laufwerk “D” als CD-ROMLaufwerk angenommen.
1. Die mitgelieferte CD-ROM in das CD-ROMLaufwerk des Computer einlegen.
2. Klicken Sie auf die Schaltfläche [Start]. Wählen
Sie unter [Settings] die Option [Control Panel].
3. Doppelklicken Sie auf [Display].
4. Klicken Sie auf [Settings] und [Advanced].
5. Klicken Sie auf [General], und wählen Sie unter
[Compatibility] die Option [Apply the new
display setting without restarting]. Klicken Sie
dann auf [Color Management].
6. Klicken Sie auf [Add], und wählen Sie als
Dateipfad CD-ROM aus.
7. Wählen Sie das Farbprofil, das Sie installieren
möchten, und klicken Sie auf [Add].
8. Wählen Sie das Profil, und klicken Sie auf [Set
As Default].
9. Klicken Sie auf [OK], und schließen Sie das
Fenster.
- Bei Verwendung des ICC-Profils stellen Sie
“COLOUR MODE” und “WHITE BALANCE” auf
“STD”.
Installieren der Setup-Informationen und des ICC-Profils (Für Windows)
Für Windows XP
Installieren der Monitor-Setup-Informationen unter
Windows XP und Festlegen des Monitor-ICCProfils als vorbestimmter Wert. Die in den
nachstehenden Bedienungshinweisen erwähnten
Windows-Meldungen basieren auf der englischen
Windows-Version.
Dabei wird von Laufwerk “D” als CD-ROMLaufwerk angenommen.
1. Die mitgelieferte CD-ROM in das CD-ROMLaufwerk des Computer einlegen.
2. Klicken Sie auf die Schaltfläche [Start]. Wählen
[Control Panel].
3. Wechseln Sie auf “Classic View”.
4. Doppelklicken Sie auf [Display].
5. Klicken Sie auf [Settings], [Advanced] und
[Monitor].
6. Klicken Sie auf [Properties], [Driver] und
[Update Driver].
7. Wenn [Hardware Update Wizard] angezeigt
wird, aktivieren Sie [Install from a list or specific
location [Advanced]], und klicken Sie auf [Next].
8. Aktivieren Sie [Don’t search. I will choose the
driver to install.], und klicken Sie auf [Next].
9. Aktivieren Sie [Have Disk], bestätigen Sie,
dass neben [Copy manufacturer’s files from:]
[D:] angezeigt wird, und klicken Sie dann auf
[OK].
10. Wählen Sie den Monitor aus der angezeigten
Liste aus, und klicken Sie auf [Next].
Wenn [has not passed Windows Logo testing...]
angezeigt wird, klicken Sie auf [Continue
Anyway].
11. Vergewissern Sie sich, dass der Name des
Monitors angezeigt wird.
12. Klicken Sie auf [Finish].
13. Klicken Sie auf [Close].
14. Klicken Sie auf [OK], und schließen Sie das
Fenster.
Page 85

G29
DeutschDeutschFrançaisItalianoEspañolEnglish
Informationen zum Profil ColorSync (Für MacOS)
Informationen zum Profil ColorSync
ColorSync ist das Farbverwaltungssystem von
Apple Computers. Mit dieser Funktion erkennt das
System die Farbwiedergabeeigenschaften bei
Verwendung mit einer kompatiblen Anwendung.
Ein ColorSync-Profil beschreibt die
Farbeigenschaften des LCD-Monitors.
Hinweise:
- Das ColorSync-Profil dieses Monitors kann
zusammen mit MacOS 8.5 oder höher eingesetzt
werden.
- Bei Verwendung des ColorSync-Profils stellen
Sie “COLOUR MODE” und “WHITE BALANCE”
auf “STD”.
Einstellen des Profils ColorSync
Hinweise:
- Auf Ihrem System muss entweder PC Exchange
oder File Exchange installiert sein.
- Je nach dem verwendeten Computertyp oder
Betriebssystem können die Befehlsnamen und
Verfahren von den hier beschriebenen
abweichen. Lesen Sie auch das
Benutzeranleitung Ihres Computers.
1.Die mitgelieferte CD-ROM in das CD-ROM-
Laufwerk des Computer einlegen.
2.Kopieren Sie das zu verwendende Profil von der
CD-ROM zum Profilordner ColorSync im
Systemordner.
3.Wählen Sie mit Hilfe von ColorSync im
Kontrollfeld das zu verwendende Profil aus.
Page 86
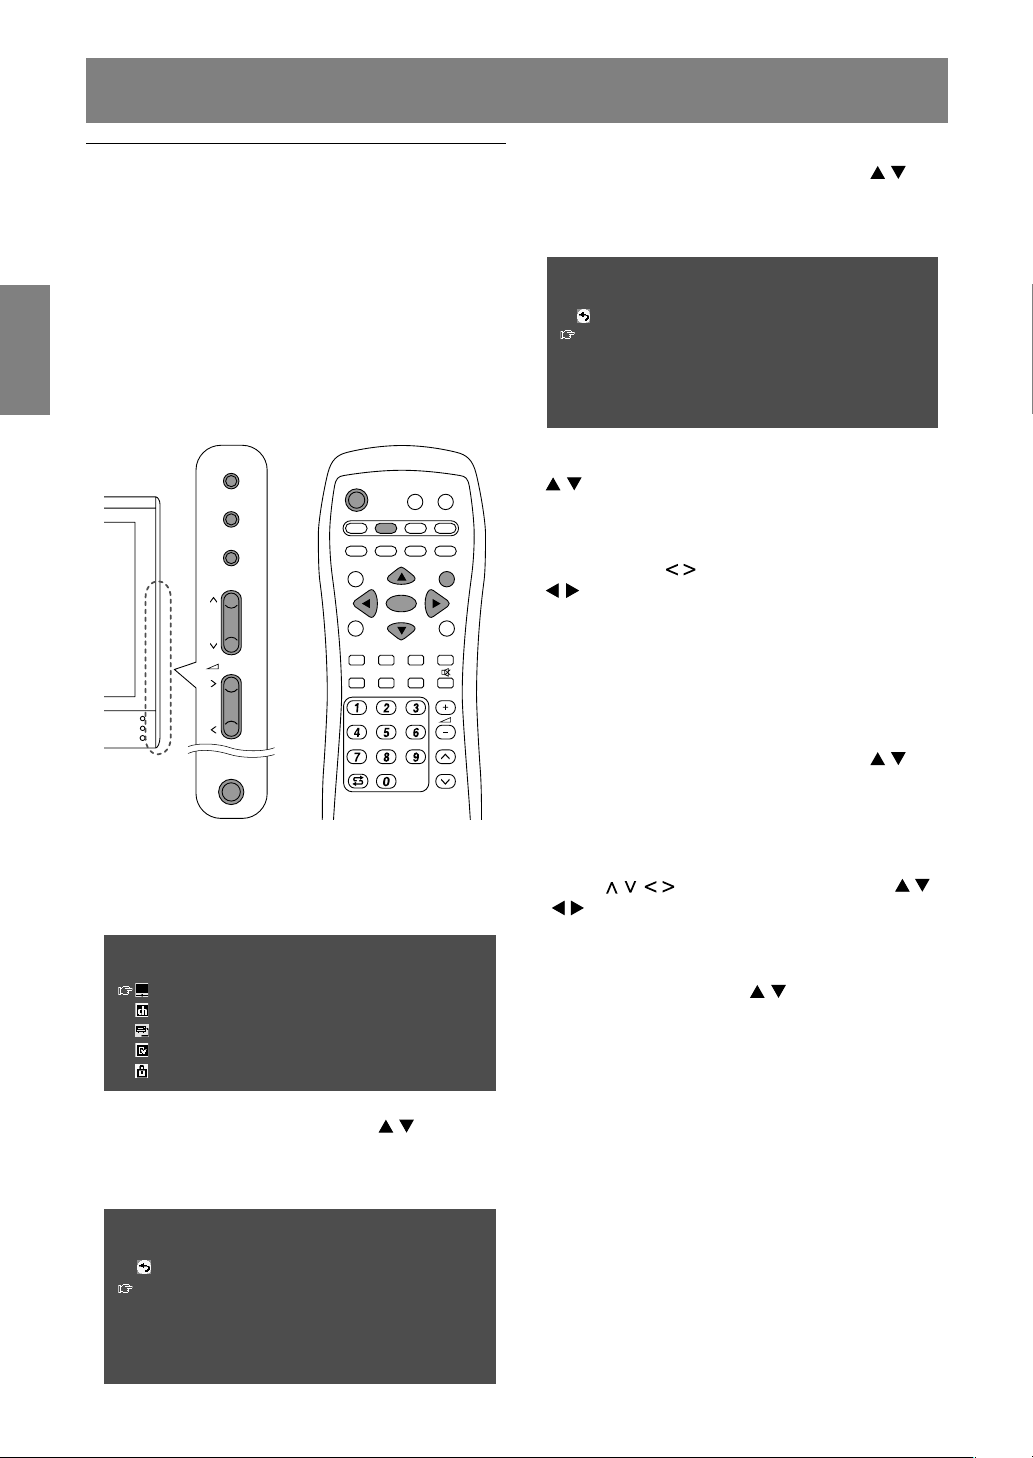
G30
Speichern von ausgestrahlten TV-Kanälen
im Speicher (AUTOMATIC SEARCH)
“AUTOMATIC SEARCH” (AUTOMATISCH
SUCHEN) erlaubt es Ihnen, alle verfügbaren
Kanäle in Ihrem Gebiet abzusuchen. Der Tuner
speichert sie automatisch im TV-Speicher ab.
Hinweise:
- Heben Sie die Einstellungssperre auf (siehe Seite
G48) und deaktivieren sie die Kindersicherung
(siehe Seite G41), falls sie aktiv sind.
- Bis zu 100 Kanäle (0 - 99) können im TV-
Speicher abgelegt werden.
MAIN
POWER
CH
MENU
INPUT
PC AV2AV1TV
BRIGHT
MODE
BRIGHT
CH
POWER
SLEEP MENU
DISPLAY
FREEZE
/HOLD
SOUND
SUBPAGE SUBTITLE
VIEW MODE
TEXT
REVEAL
PIP
OK
/BRIGHT
OK
/
BRIGHT
MODE
1. Schalten Sie den Monitor ein.
2.Wählen Sie den TV-Modus mit der Taste INPUT
(Monitor) oder der Taste TV (Fernbedienung).
3.Rufen Sie den Bildschirm MENU mit der Taste
MENU ab.
MENU
<
TV/AV
>
PICTURE
>>
PROGRAMMES
>>
AV CONNECTIONS
>>
MODE SELECT
>>
CHILD LOCK
>>
4. Wählen Sie “PROGRAMMES” mit der Taste
MENU (Monitor) oder den Tasten
(Fernbedienung), und drücken Sie die Taste
OK/BRIGHT MODE (Monitor) oder die Taste OK
(Fernbedienung).
PROGRAMMES
<
TV/AV
>
RETURN
AUTOMATIC SEARCH
>>
MANUAL ADJUSTMENT
>>
SORT
>>
ERASE PROGRAMME RANGE
>>
ENTER/CHANGE NAME
>>
5. Wählen Sie “AUTOMATIC SEARCH” mit der
Taste MENU (Monitor) oder den Tasten
(Fernbedienung), und drücken Sie die Taste
OK/BRIGHT MODE (Monitor) oder die Taste OK
(Fernbedienung).
AUTOMATIC SEARCH
<
TV/AV
>
RETURN
COUNTRY
[
UK
]
COLOUR SYSTEM
[
PAL
]
SOUND SYSTEM
[
I
]
STORE PROGR. FROM
>>
START SEARCH
6. Wählen Sie den gewünschten Einstellgegenstand
mit der Taste MENU (Monitor) oder den Tasten
(Fernbedienung), und drücken Sie die Taste
OK/BRIGHT MODE (Monitor) oder die Taste OK
(Fernbedienung).
Wählen Sie dann den gewünschten Gegenstand
mit den Tasten
(Monitor) oder den Tasten
(Fernbedienung).
Hinweis:
- Wählen Sie Ihr Land unter den folgenden:
Großbritannien, Deutschland, Frankreich,
Italien oder “OTHERS” (Anderes). Wenn
“OTHERS” gewählt ist, können Sie “COLOUR
SYSTEM” und “SOUND SYSTEM” ändern.
7. Wählen Sie “STORE PROGR. FROM” mit der
Taste MENU (Monitor) oder den Tasten
(Fernbedienung), und drücken Sie die Taste
OK/BRIGHT MODE (Monitor) oder die Taste OK
(Fernbedienung).
8. Wählen Sie die Programmposition, von der die
Programme gespeichert werden sollen mit den
Tasten
(Monitor) oder den Tasten
(Fernbedienung), und drücken Sie die Taste
OK/BRIGHT MODE (Monitor) oder die Taste OK
(Fernbedienung).
9. Wählen Sie “START SEARCH” mit der Taste MENU
(Monitor) oder den Tasten
(Fernbedienung),
und drücken Sie die Taste OK/BRIGHT MODE
(Monitor) oder die Taste OK (Fernbedienung).
Wenn die Suche beendet ist, werden die neu
gefundenen Programme in dieser Liste gezeigt.
Hinweise:
- Zum Unterbrechen der automatischen Suche
oder zum Verlassen der Liste drücken Sie die
Taste INPUT (Monitor) oder die Taste MENU
(Fernbedienung).
- Die Programme werden automatisch benannt,
wenn ein Identifikationssignal gesandt wird.
Oder sie werden automatisch entsprechend
der im Monitorspeicher registrierten Tabelle
benannt.
- Programme, deren Namen nicht gefunden
werden, werden mit “-----” dargestellt. Namen
können später manuell eingegeben werden.
(Siehe Seite G33.)
Einstellen von TV-Kanälen
Page 87
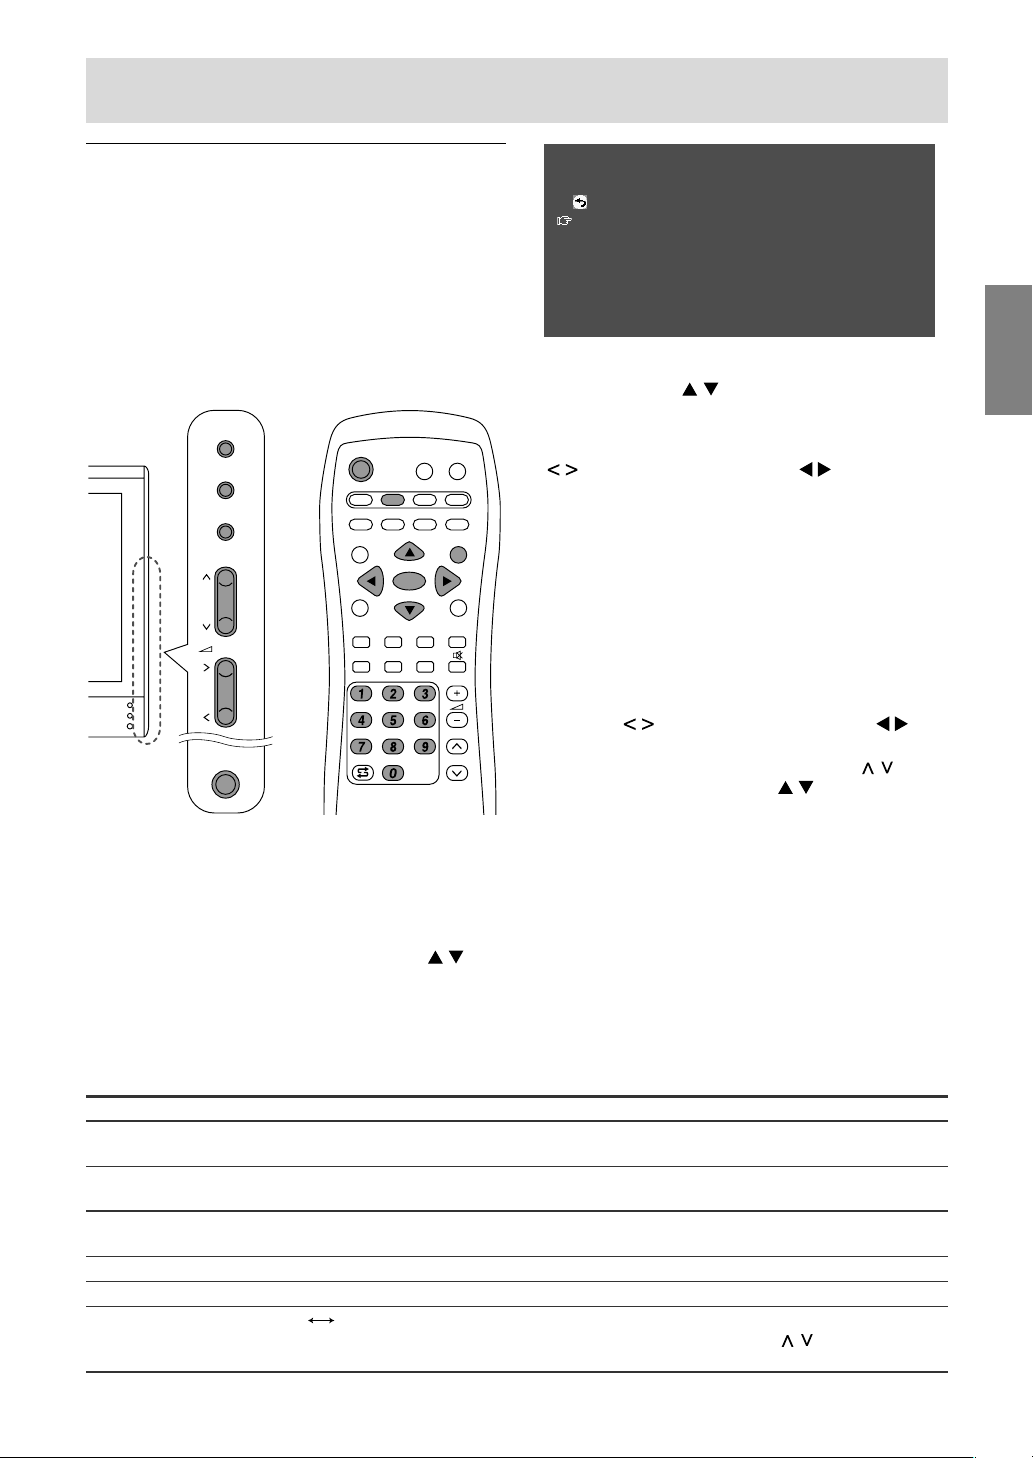
G31
DeutschDeutschFrançaisItalianoEspañolEnglish
Einstellen von TV-Kanälen
Einstellen der individuellen
Einstellungen von Programmen
(MANUAL ADJUSTMENT)
Sie können mit “MANUAL ADJUSTMENT”
(MANUELL EINSTELLEN) die individuelle
Einstellung von Programmen einstellen.
Hinweis:
- Heben Sie die Einstellungssperre auf (siehe Seite
G48) und deaktivieren sie die Kindersicherung
(siehe Seite G41), falls sie aktiv sind.
MAIN
POWER
CH
MENU
INPUT
PC AV2AV1TV
BRIGHT
MODE
BRIGHT
CH
POWER
SLEEP MENU
DISPLAY
FREEZE
/HOLD
SOUND
SUBPAGE SUBTITLE
VIEW MODE
TEXT
REVEAL
PIP
OK
/BRIGHT
OK
/
BRIGHT
MODE
1.Rufen Sie “PROGRAMMES” in den Bildschirm,
indem Sie Schritte 1 bis 4 unter “Speichern von
ausgestrahlten TV-Kanälen im Speicher
(AUTOMATIC SEARCH)” auf Seite G30
ausführen.
2.Wählen Sie “MANUAL ADJUSTMENT” mit der
Taste MENU (Monitor) oder den Tasten
(Fernbedienung), und drücken Sie die Taste
OK/BRIGHT MODE (Monitor) oder die Taste OK
(Fernbedienung).
MANUAL ADJUSTMENT
<
TV/AV
>
RETURN
CHANNEL
[
1
]
FREQUENCY
[
048.25MHz
]
NAME
[
E02
]
COLOUR SYSTEM
[
PAL
]
SOUND SYSTEM
[
I
]
SKIP
[
OFF
]
3.Wählen Sie den gewünschten
Einstellgegenstand mit der Taste MENU (Monitor)
oder den Tasten
(Fernbedienung), und
drücken Sie die Taste OK/BRIGHT MODE
(Monitor) oder die Taste OK (Fernbedienung).
Nehmen Sie dann die Einstellung mit den Tasten
(Monitor) oder den Tasten
(Fernbedienung) vor. (Einzelheiten siehe Tabelle
unten.)
Hinweise:
- Sie können auch die Kanaltasten an der
Fernbedienung (0 - 9) zur Eingabe der
Frequenz verwenden.
- Zum Einstellen von “NAME” drücken Sie
zuerst die Taste OK/BRIGHT MODE (Monitor)
oder die Taste OK (Fernbedienung) zur
Aktivierung des Texteingabe-Modus.
Wählen Sie dann die Eingabeposition mit den
Tasten
(Monitor) oder den Tasten
(Fernbedienung), und wählen Sie das
gewünschte Zeichen mit den Tasten
(Monitor) oder den Tasten
(Fernbedienung). Wenn Sie fertig sind,
drücken Sie die Taste OK/BRIGHT MODE
(Monitor) oder die Taste OK (Fernbedienung).
4.Verlassen Sie den Bildschirm mit der Taste
INPUT (Monitor) oder der Taste MENU
(Fernbedienung).
Hinweis:
- Je nach den Einstellungen im Farbsystem der
Kanäle kann Umschalten zwischen den Kanälen
langsam sein. Wenn Sie den
Kanalumschaltvorgang beschleunigen wollen,
schalten Sie “AUTO” in “COLOUR SYSTEM” auf
das aktuelle Empfangssystem (“PAL” oder
“SECAM”) um.
Gegenstand
CHANNEL
FREQUENCY
NAME
COLOUR SYSTEM
SOUND SYSTEM
SKIP
Wahl/Wertebereich
0 - 99
45,75 - 863,25 (MHz)
A-Z, 0 - 9, +, –, . , /, !,
Leerstelle
AUTO, PAL, SECAM
B/G, I, D/K, L
ON
OFF
Beschreibung
Der Kanal wird auf einen höheren oder niedrigeren
Kanal umgestellt.
Empfangbare Frequenzen hängen von der
Fernsehnorm, dem Installationsort und dem Bereich ab.
Programmname (bis zu fünf Zeichen).
Farbnorm.
Fernsehnorm.
Kanäle, für die SKIP auf “ON” gestellt ist, werden
übersprungen, wenn Sie die Tasten
beim
Fernsehen drücken.
Page 88
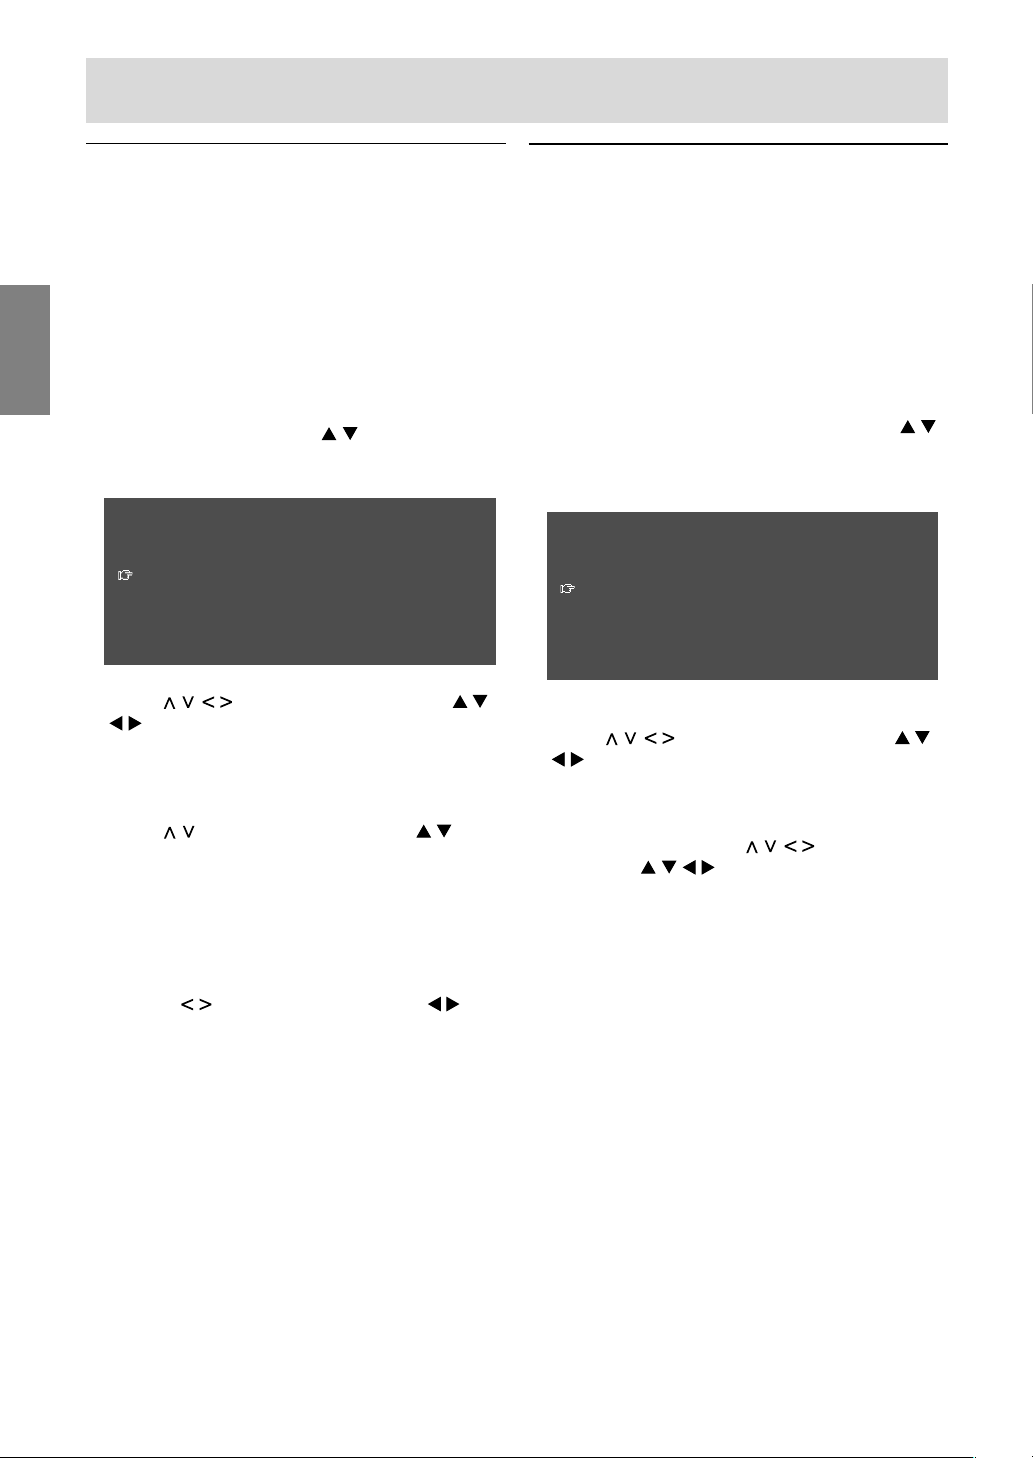
G32
Einstellen von TV-Kanälen
Ändern der Programmpositionen
(SORT)
Die Programmpositionen für einzelne Programme
können beliebig geändert werden.
1. Rufen Sie “PROGRAMMES” in den Bildschirm,
indem Sie Schritte 1 bis 4 unter “Speichern von
ausgestrahlten TV-Kanälen im Speicher
(AUTOMATIC SEARCH)” auf Seite G30
ausführen.
2. Wählen Sie “SORT” mit der Taste MENU
(Monitor) oder den Tasten (Fernbedienung),
und drücken Sie die Taste OK/BRIGHT MODE
(Monitor) oder die Taste OK (Fernbedienung).
SORT
<
TV/AV
>
00 05 10 15
01 E02 06 11 16
02 E03 07 12 17
03 E04 08 13 18
04 09 14 19
3. Wählen Sie das gewünschte Programm mit den
Tasten (Monitor) oder den Tasten
(Fernbedienung), und drücken Sie die
Taste OK/BRIGHT MODE (Monitor) oder die
Taste OK (Fernbedienung).
Der Verschieben-Modus wird aktiviert.
4.Wählen Sie die gewünschte Position mit den
Tasten (Monitor) oder den Tasten
(Fernbedienung), und drücken Sie die Taste
OK/BRIGHT MODE (Monitor) oder die Taste OK
(Fernbedienung).
Das gewählte Programm wird zur gewählten
Position verschoben.
Hinweis:
- Beim Verschieben des Programms sind die
Tasten (Monitor) oder die Tasten
(Fernbedienung) nicht verfügbar.
5. Verlassen Sie den Bildschirm mit der Taste
INPUT (Monitor) oder der Taste MENU
(Fernbedienung).
Löschen des Programmbereichs
Das einzelne Programm oder die Programme in
einem ununterbrochenen Bereich können
gelöscht werden.
1. Rufen Sie “PROGRAMMES” in den Bildschirm,
indem Sie Schritte 1 bis 4 unter “Speichern von
ausgestrahlten TV-Kanälen im Speicher
(AUTOMATIC SEARCH)” auf Seite G30
ausführen.
2. Wählen Sie “ERASE PROGRAMME RANGE” mit
der Taste MENU (Monitor) oder den Tasten
(Fernbedienung), und drücken Sie die Taste
OK/BRIGHT MODE (Monitor) oder die Taste OK
(Fernbedienung).
ERASE PROGRAMME RANGE
<
TV/AV
>
00 05 10 15
01 E02 06 11 16
02 E03 07 12 17
03 E04 08 13 18
04 09 14 19
3.Wählen Sie die Programmposition am Anfang
des zu löschen gewünschten Bereichs mit den
Tasten (Monitor) oder den Tasten
(Fernbedienung), und drücken Sie die
Taste OK/BRIGHT MODE (Monitor) oder die
Taste OK (Fernbedienung).
4. Wählen Sie das Programm am Ende des
Bereichs mit den Tasten (Monitor) oder
den Tasten (Fernbedienung).
Wenn Sie ein einzelnes Programm wählen
wollen, überspringen Sie diesen Schritt.
5. Drücken Sie die Taste OK/BRIGHT MODE
(Monitor) oder die Taste OK (Fernbedienung)
zum Löschen des(der) gewählten Programm(e).
Alle nachfolgenden Programme bewegen sich
um eine Stelle nach oben.
6. Verlassen Sie den Bildschirm mit der Taste
INPUT (Monitor) oder der Taste MENU
(Fernbedienung).
Page 89

G33
DeutschDeutschFrançaisItalianoEspañolEnglish
Einstellen von TV-Kanälen
Eingeben/Ändern des Namens eines
einzelnen Programms
Der Name eines einzelnen Programms kann
eingegeben oder geändert werden.
1. Rufen Sie “PROGRAMMES” in den Bildschirm,
indem Sie Schritte 1 bis 4 unter “Speichern von
ausgestrahlten TV-Kanälen im Speicher
(AUTOMATIC SEARCH)” auf Seite G30
ausführen.
2. Wählen Sie “ENTER/CHANGE NAME” mit der
Taste MENU (Monitor) oder den Tasten
(Fernbedienung), und drücken Sie die Taste
OK/BRIGHT MODE (Monitor) oder die Taste OK
(Fernbedienung).
ENTER/CHANGE NAME
<
TV/AV
>
00 05 10 15
01 E02 06 11 16
02 E03 07 12 17
03 E04 08 13 18
04 09 14 19
3. Wählen Sie das gewünschte Programm mit den
Tasten (Monitor) oder den Tasten
(Fernbedienung), und drücken Sie die Taste
OK/BRIGHT MODE (Monitor) oder die Taste OK
(Fernbedienung).
Das Zeichen an der Eingabeposition wird
hervorgehoben.
4. Wählen Sie die Eingabeposition mit den Tasten
(Monitor) oder den Tasten
(Fernbedienung), und wählen Sie das
gewünschte Zeichen mit den Tasten
(Monitor) oder den Tasten (Fernbedienung).
5. Drücken Sie die Taste OK/BRIGHT MODE
(Monitor) oder die Taste OK (Fernbedienung)
zum Akzeptieren des eingegebenen Namens.
6. Verlassen Sie den Bildschirm mit der Taste
INPUT (Monitor) oder der Taste MENU
(Fernbedienung).
Page 90

G34
Fernsehen
Wählen der Kanäle
Dieser Monitor erlaubt die Wahl von bis zu 100
Kanälen (0 - 99).
MAIN
POWER
CH
MENU
INPUT
PC AV2AV1TV
BRIGHT
MODE
BRIGHT
CH
POWER
SLEEP MENU
DISPLAY
FREEZE
/HOLD
SOUND
SUBPAGE SUBTITLE
VIEW MODE
TEXT
REVEAL
PIP
OK
/BRIGHT
OK
/
BRIGHT
MODE
Verwendung der Kanaltasten (Fernbedienung)
Zum Wählen einer 1-stelligen Kanalnummer
(z.B. Kanal 5):
Wählen Sie die Kanalnummer auf eine der
folgenden Weisen.
- Drücken Sie die Taste 5 und warten Sie ca. 3
Sekunden lang.
- Drücken Sie die Taste 0, gefolgt von der Taste 5
innerhalb von 3 Sekunden.
Zum Wählen einer 2-stelligen Kanalnummer
(z.B. Kanal 12):
Drücken Sie die Taste 1, gefolgt von der Taste 2
innerhalb von 3 Sekunden.
Verwendung der Tasten (Monitor/Fernbedienung)
- Drücken Sie die Taste , und der Kanal schaltet
in der unten gezeigten Reihenfolge um:
1 → 2 … → 98 → 99 → 0 → 1 → 2 → …
- Drücken Sie die Taste
, und der Kanal schaltet
in der unten gezeigten Reihenfolge um:
2 → 1 → 0 → 99 → 98 … → 2 → 1 → 0 → …
Hinweise:
- Durch Drücken einer der obigen Tasten oder
durch Verwendung der Programmtabelle (siehe
rechte Spalte) wird automatisch auf TV-Modus
umgeschaltet, wenn der Monitor im PC- oder AVModus ist.
- Verwenden Sie die Taste INPUT (Monitor) oder
die Taste TV (Fernbedienung), um den
Displaymodus in den folgenden Fällen auf TV
umzuschalten, wenn im PC-Modus.
- Wenn Sie Fernsehen im PIP-Fenster
betrachten (siehe Seite G20).
- Wenn Sie Fernsehen hören (siehe Seite G21).
- Kanäle, die zum Überspringen eingestellt sind,
können mit den Tasten
nicht gezeigt werden.
(Siehe Seite G31.)
- Kanal “0” ist für HF-Ausgabe von einem
Videorecorder reserviert.
Wählen der Kanäle mit der
Programmtabelle
Die Programmtabelle zeigt eine Liete von
Programmen im TV-Speicher. Sie liegen in
Kanälen 0 bis 99. Das aktuell gewählte Programm
wird in Gelb gezeigt, und Programme mit
Kindersicherung, die nicht aufgehoben sind,
werden in Rot gezeigt.
1. Wählen Sie den TV-Modus mit der Taste INPUT
(Monitor) oder der Taste TV (Fernbedienung).
2. Drücken Sie die Taste OK (Fernbedienung).
Die Programmtabelle wird gezeigt.
Hinweis:
- Während der Teletext-Bildschirm oder der
Menü-Bildschirm gezeigt wird, können Sie
nicht die Programmtabelle durch Drücken der
Taste OK (Fernbedienung) anzeigen.
PROGRAMME TABLE
<
TV/AV
>
00 05 10 15
01 E02 06 11 16
02 E03 07 12 17
03 E04 08 13 18
04 09 14 19
3. Wählen Sie das gewünschte Programm mit den
Tasten (Fernbedienung).
Zur Anzeige der vorherigen oder nächsten Liste
in der Programmtabelle:
- Drücken Sie die Tasten (Fernbedienung),
wenn der Cursor bei einem Programm in der
oberen linken oder unteren rechten Position
ist.
- Drücken Sie die Tasten (Fernbedienung),
wenn der Cursor bei einem Programm in der
linken oder rechten Spalte ist.
4. Zeigen Sie das gewählte Programm mit der
Taste OK (Fernbedienung) an.
Page 91

G35
DeutschDeutschFrançaisItalianoEspañolEnglish
Fernsehen
Den Audio-Empfangsmodus wählen
Sie können den Audio-Empfangsmodus (Stereozweisprachig oder Mono) wählen, wenn Sie
NICAM-Sendungen und A2-Stereosendungen
empfangen wie folgt:
NICAM NICAM-B/G, I, D/K, L-Signal
A2-Stereo A2-Stereo-B/G-Signal
PC AV2AV1TV
BRIGHT
MODE
BRIGHT
CH
POWER
SLEEP MENU
DISPLAY
FREEZE
/HOLD
SOUND
SUBPAGE SUBTITLE
VIEW MODE
TEXT
REVEAL
PIP
OK
1. Drücken Sie die Taste SOUND an der
Fernbedienung.
Der Audio-Empfangsmodus wechselt in der
folgenden Reihenfolge je nach der
empfangenen Sendung um.
NICAM-Sendungen
Empfang einer Stereosendung
STEREO → MONO → STEREO ...
Empfang einer zweisprachigen Sendung
CH A → CH B → CH AB → MONO → CH A ...
Empfang einer Monosendung
NICAM → MONO → NICAM ...
A2-Stereosendung
Empfang einer Stereosendung
STEREO → MONO → STEREO...
Empfang einer zweisprachigen Sendung
CH A → CH B → CH AB → CH A...
Empfang einer Monosendung
MONO (festgesetzt)
Page 92

G36
Betrachten von Teletext
Teletext ist ein Informationsdienst mit der Struktur
einer Zeitschrift, der von manchen TV-Sendern
zusätzlich zur normalen Fernsehsendung
ausgestrahlt wird. Ihr Monitor empfängt TeletextSignalsendungen von einem TV-Sender,
verarbeitet die Information und zeigt sie grafisch
auf dem Bildschirm. Nachrichten, Wetter- und
Sportinformation, Aktienpreise,
Programmrezensionen und Closed-Caption
(Untertitel) gehören zu den zahlreichen über
Teletext verfügbaren Diensten.
Hinweise:
- Bedienung im Teletext-Modus werden in dieser
Anleitung anhand der Fernbedienung
beschrieben.
- Teletext steht nur im TV/AV-Modus zur
Verfügung, nicht im PC-Modus (auch beim
Fernsehen im PIP-Fenster).
Fernsehen
Ein- und Ausschalten des Teletext-Modus
PC AV2AV1TV
BRIGHT
MODE
BRIGHT
CH
POWER
SLEEP MENU
DISPLAY
FREEZE
/HOLD
SOUND
SUBPAGE SUBTITLE
VIEW MODE
TEXT
REVEAL
PIP
OK
1. Wählen Sie einen TV-Kanal, der das TeletextProgramm ausstrahlt.
2. Drücken Sie die Taste TEXT.
Der Teletext-Bildschirm erscheint.
3. Drücken Sie die Taste TEXT erneut, um den
Teletext-Modus auszuschalten.
Hinweise:
- Wenn erforderlich können Sie den im TeletextBildschirm gezeigten Zeichensatz ändern.
(Siehe Seite G38.)
- Der Teletext-Modus kann nicht mit den
Eingabetasten ausgeschaltet oder auf andere
Displaymodi umgeschaltet werden.
Page 93

G37
DeutschDeutschFrançaisItalianoEspañolEnglish
Fernsehen
Zurückschalten zur vorher gewählten Seite
Drücken Sie die Taste
(Flashback).
Hinweis:
- Der Teletext-Flashback-Speicher wird gelöscht,
wenn Kanäle gewechselt werden, nachdem der
Teletext-Modus auf TV-Modus umgeschaltet
wird.
Wählen der TOP-Tabelle
Wenn TOP-Teletext gesendet wird, können Sie die
TOP-Tabelle durch Drücken der Taste OK
anzeigen.
Wählen Sie das gewünschte Objekt in der Tabelle
wie folgt:
- Zum Aufwärtsbewegen drücken Sie die rote
Taste.
- Zum Abwärtsbewegen drücken Sie die
cyanfarbene Taste.
- Zum wählen des markierten Gegenstands
drücken Sie die grüne Taste.
Hinweis:
- Das TOP (Table of Pages = Seitenverzeichnis)
System für Teletext wird zur Zeit nur in
Deutschland verwendet.
Wählen des Teletext-Index
Wenn FLOF-Teletext gesendet wird, können Sie
die Index-Seite (normalerweise S.100) durch
Drücken der Taste OK anzeigen.
Hinweis:
- Das FLOF (Full Level One Features) System für
Teletext wird zur Zeit nur in Großbritannien
verwendet.
Wählen einer Teletext-Seite
PC AV2AV1TV
BRIGHT
MODE
BRIGHT
CH
POWER
SLEEP MENU
DISPLAY
FREEZE
/HOLD
SOUND
SUBPAGE SUBTITLE
VIEW MODE
TEXT
REVEAL
PIP
OK
Verwendung der Tasten
- Zum Wählen der nächsten Seite drücken Sie die
Taste .
- Zum Wählen der vorherigen Seite drücken Sie
die Taste .
Verwendung der Kanaltasten
Geben Sie die gewünschte Seitennummer
(100 - 899) mit den Kanaltasten (0 - 9) ein.
Hinweise:
- Mit 0 oder 9 beginnende Seitennummern gibt es
nicht.
- Wenn Sie die falschen Zahlen eingeben,
beenden Sie einfach die Eingabe der 3-stelligen
Zahl und geben die gewünschte Zahl erneut ein.
Verwendung der Farb-Tasten
Wählen Sie das gewünschte Objekt mit den
Farbtasten (Rot/Grün/Gelb/Cyan) entsprechend
den Farboptionen unten im Teletext-Bildschirm.
Die Konfiguration der Farboptionen ist je nach
Teletext-System unterschiedlich.
Page 94
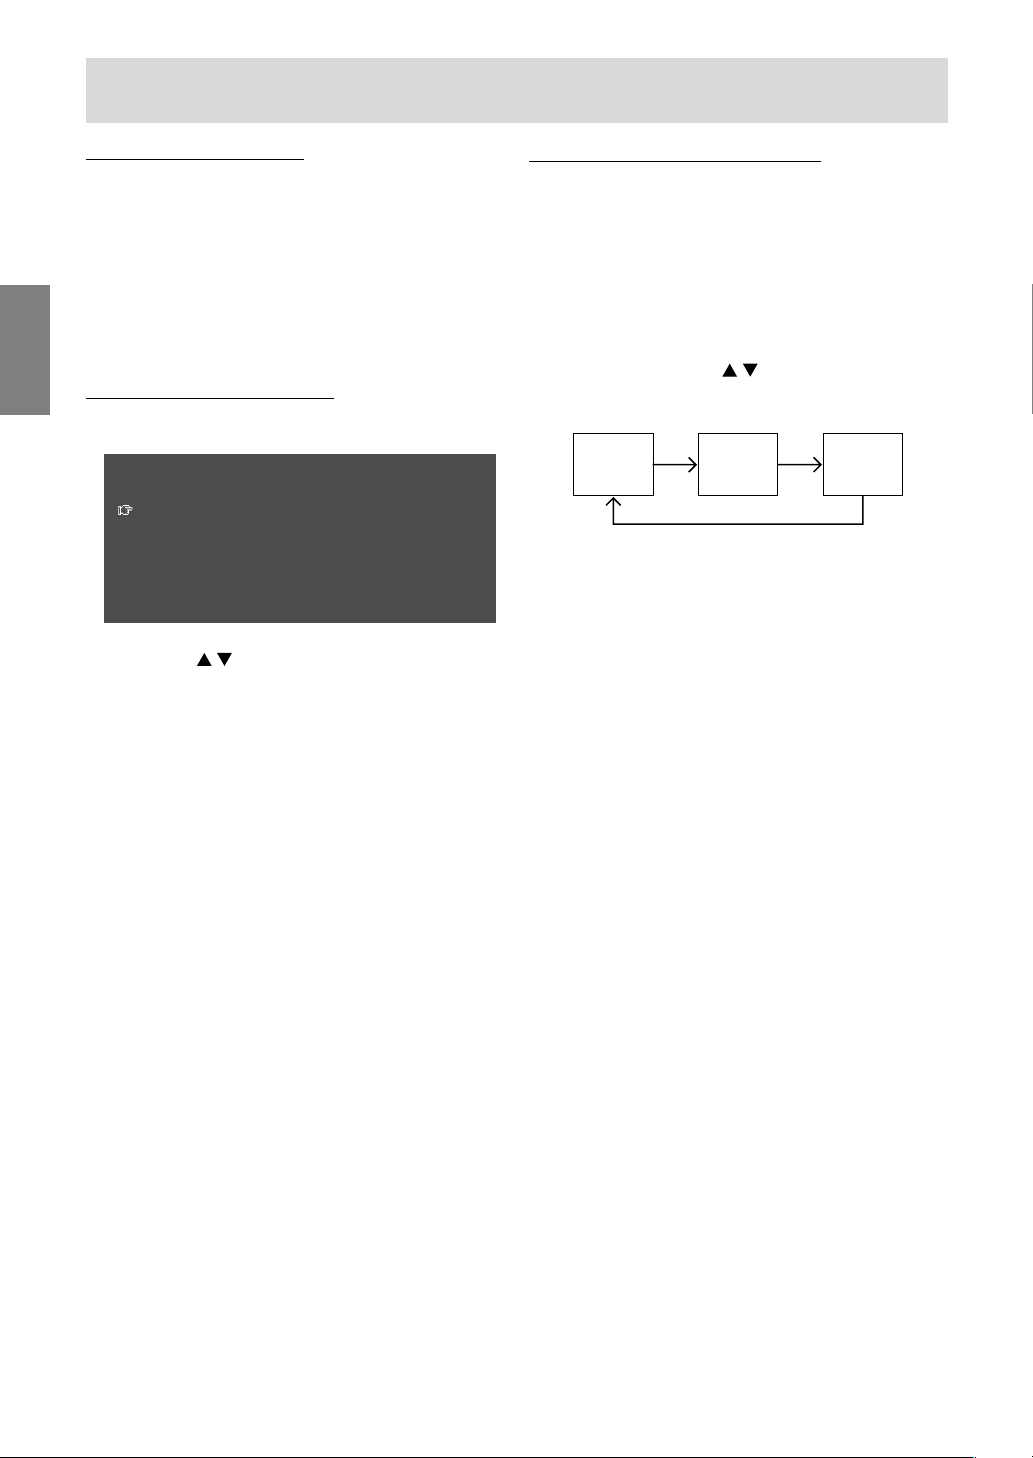
G38
Fernsehen
Wählen der Unterseiten
Wenn eine gewählte Teletext-Seite aus mehreren
Unterseiten besteht, können die gewünschten
Unterseiten wie folgt gewählt werden:
1. Drücken Sie die Taste SUBPAGE.
“S****” erscheint links in der Titelzeile.
2. Geben Sie eine 4-stellige Zahl mit den
Kanaltasten (0 - 9) ein, während diese Meldung
erscheint.
Die gewählte Unterseite wird gezeigt.
Wählen des Zeichensatzes
1. Rufen Sie den Bildschirm “CHARACTER SET”
mit der Taste MENU ab.
CHARACTER SET
PAN EUROPE
FRENCH/ARABIC
TURKISH/GREEK
CYRILLIC
2. Wählen Sie den gewünschten Zeichensatz mit
den Tasten .
Die Farbe der Buchstaben wechselt auf Gelb um.
Beim Wählen des Zeichensatzes werden durch
Drücken der Taste OK die Buchstaben kurz auf
Rot umgeschaltet und kehren dann auf Gelb
zurück.
3. Verlassen Sie den Bildschirm MENU mit der
Taste MENU.
Nützliche Merkmale für Teletext
Zum Halten der aktuellen Teletext-Seite
Drücken Sie die Taste FREEZE/HOLD.
Sie können die Aktualisierung der Teletext-Seite
stoppen.
Zum Abbrechen drücken Sie die Taste
FREEZE/HOLD erneut.
Zum Vergrößern der aktuellen Teletext-Seite
Drücken Sie die Tasten
.
Bei jedem Tastendruck wird die aktuelle Seite wie
folgt gezeigt.
ABC
DEF
ABC DEF
Zum schnellen Aktivieren von Untertiteln
Drücken Sie die Taste SUBTITLE im TV/AV-Modus.
Untertitel werden schnell aktiviert.
Zum Abbrechen drücken Sie die Taste TEXT.
Hinweis:
- Sie brauchen nicht den Teletext-Modus
einzuschalten, bevor Sie die Taste SUBTITLE
drücken.
Zum Anzeigen der versteckten Information
Drücken Sie die Taste REVEAL.
Sie können die versteckte Information wie die
Lösungen zu Rätseln und Puzzlespielen.
Zum Abbrechen drücken Sie die Taste REVEAL
erneut.
Page 95

G39
DeutschDeutschFrançaisItalianoEspañolEnglish
Fernsehen
Verwendung der KindersicherungFunktion
Wichtig:
- Bitte beachten Sie “Deaktivieren der
Kindersicherung” hinten in dieser Anleitung.
Die Kindersicherung-Funktion blockiert das
Betrachten jedes Kanals, für den die
Kindersicherung eingestellt ist, einschließlich im
PIP-Fenster. Wenn alle Programme gesperrt sind,
ist das Betrachten von Videobildern im AV-Modus
ebenfalls blockiert.
Zur Verwendung der Kindersicherung-Funktion
müssen Sie zuerst Ihre PIN (persönliche
ID-Nummer) definieren.
Eine PIN definieren
MAIN
POWER
CH
MENU
INPUT
PC AV2AV1TV
BRIGHT
MODE
BRIGHT
CH
POWER
SLEEP MENU
DISPLAY
FREEZE
/HOLD
SOUND
SUBPAGE SUBTITLE
VIEW MODE
TEXT
REVEAL
PIP
OK
/BRIGHT
OK
/
BRIGHT
MODE
1. Wählen Sie den TV-Modus mit der Taste INPUT
(Monitor) oder der Taste TV (Fernbedienung).
2. Rufen Sie den Bildschirm MENU mit der Taste
MENU (Fernbedienung) ab.
3. Wählen Sie “CHILD LOCK” mit den Tasten
(Fernbedienung), und drücken Sie die Taste OK
(Fernbedienung).
Der Bildschirm “PLEASE ENTER YOUR PIN”
(BITTE GEBEN SIE IHRE PERSÖNLICHE
GEHEIMNUMMER EIN) erscheint.
4. Geben Sie die gewünschte 4-stellige PIN
(z.B. 1234) mit den Kanaltasten (0 - 9) an der
Fernbedienung ein.
Hinweise:
- Machen Sie immer eine schriftliche Notiz Ihrer
PIN.
- Beim ersten Eingeben der PIN drücken Sie die
Taste OK (Fernbedienung) zur Registrierung.
Der Bildschirm “CHILD LOCK” erscheint.
CHILD LOCK
<
TV/AV
>
RETURN
STATUS
[
OFF
]
INDIVIDUAL PROGRAMME
>>
RESET
5. Führen Sie das nächste Verfahren aus oder
verlassen Sie den Bildschirm mit der Taste
MENU (Fernbedienung).
Page 96

G40
Fernsehen
Einrichten der Kindersicherung
Hinweise:
- Zum Aktivieren der Kindersicherung-Funktion
schalten Sie den Monitor aus und dann erneut
ein, nachdem die Einstellungen vorgenommen
sind.
- Wenn “STATUS” im Menü CHILD LOCK auf
“ALL” oder “INDIVIDUAL” gestellt ist, steht der
TV/AV-IN SOUND nicht im PC-Modus zur
Verfügung (siehe Seite G21).
Einstellen von Kindersicherung für alle
Programme
1.Rufen Sie “CHILD LOCK” in den Bildschirm,
indem Sie Schritte 1 bis 4 unter “Eine PIN
definieren” auf Seite G39 ausführen.
2. Wählen Sie “STATUS” mit der Taste MENU
(Monitor) oder den Tasten
(Fernbedienung),
und drücken Sie die Taste OK/BRIGHT MODE
(Monitor) oder die Taste OK (Fernbedienung).
3. Wählen Sie “ALL” mit den Tasten (Monitor)
oder den Tasten (Fernbedienung).
4. Verlassen Sie den Bildschirm mit der Taste
INPUT (Monitor) oder der Taste MENU
(Fernbedienung).
Hinweis:
- Diese Einstellung sperrt den AV-Modus und die
TV-Funktion in allen Modi.
Einstellen von Kindersicherung für einzelne
Programme
1. Rufen Sie “CHILD LOCK” in den Bildschirm,
indem Sie Schritte 1 bis 4 unter “Eine PIN
definieren” auf Seite G39 ausführen.
2. Wählen Sie “STATUS” mit der Taste MENU
(Monitor) oder den Tasten (Fernbedienung),
und drücken Sie die Taste OK/BRIGHT MODE
(Monitor) oder die Taste OK (Fernbedienung).
3. Wählen Sie “INDIVIDUAL” mit den Tasten
(Monitor) oder den Tasten (Fernbedienung).
4. Wählen Sie “INDIVIDUAL PROGRAMME” mit
der Taste MENU (Monitor) oder den Tasten
(Fernbedienung), und drücken Sie die Taste
OK/BRIGHT MODE (Monitor) oder die Taste OK
(Fernbedienung).
Der Bildschirm “INDIVIDUAL PROGRAMME”
erscheint.
5. Wählen Sie das gewünschte Programm mit den
Tasten (Monitor) oder den Tasten
(Fernbedienung), und drücken Sie die Taste
OK/BRIGHT MODE (Monitor) oder die Taste OK
(Fernbedienung).
Das gesperrte Programm wird in Rot gezeigt.
Hinweis:
- Zum Freigeben des Programms führen Sie
Schritt 5 erneut aus.
6. Verlassen Sie den Bildschirm mit der Taste
INPUT (Monitor) oder der Taste MENU
(Fernbedienung).
Hinweise:
- Auch wenn die Kindersicherung aktiviert ist,
können freigegebene Programme betrachtet
werden, aber das Menü PROGRAMMES kann
nicht im Bildschirm TV MENU des Fernsehgeräts
gewählt werden. Zur Vornahme von
Einstellungen im Menü PROGRAMMES müssen
Sie die Kindersicherung zeitweilig aufheben.
(Siehe Seite G41.)
- Wenn eine Kindersicherung einzeln aktiviert ist,
Sie versuchen das Programm zu wählen und
der Eingabebildschirm PIN erscheint, können
Sie die Tasten
verwenden, um andere
gesperrte Programme zu finden.
Page 97

G41
DeutschDeutschFrançaisItalianoEspañolEnglish
Fernsehen
Zeitweiliges Aufheben der Kindersicherung
Indem Sie die Kindersicherung zeitweilig
aufheben, können Sie Programme betrachten, für
die die Kindersicherung eingestellt ist.
Wenn Sie momentan im PIN-Eingabebildschirm
sind, geben Sie Ihre PIN mit den Kanaltasten (0 - 9)
an der Fernbedienung ein.
Wenn die PIN richtig eingegeben wird, erscheint
der normale Bildschirm.
Wenn Sie momentan nicht im PINEingabebildschirm sind, führen Sie Schritt 1 bis 3
von “Eine PIN definieren” auf Seite G39 aus und
geben Ihre PIN ein.
Hinweise:
- Wenn der Bildschirm zur Eingabe von PIN für
das gesperrte Programm im PIP-Fenster
erscheint, können Sie durch Schließen des PIPFensters mit der Taste PIP (Fernbedienung) den
Monitor im PC-Modus betreiben.
- Durch Aus- und erneutes Einschalten nach dem
Aufheben der Kindersicherung wird die
Kindersicherung erneut aktiviert.
- Wenn die Kindersicherung nicht innerhalb von
etwa 20 Sekunden aufgehoben wird, schaltet
der Monitor auf Standby-Modus.
Page 98
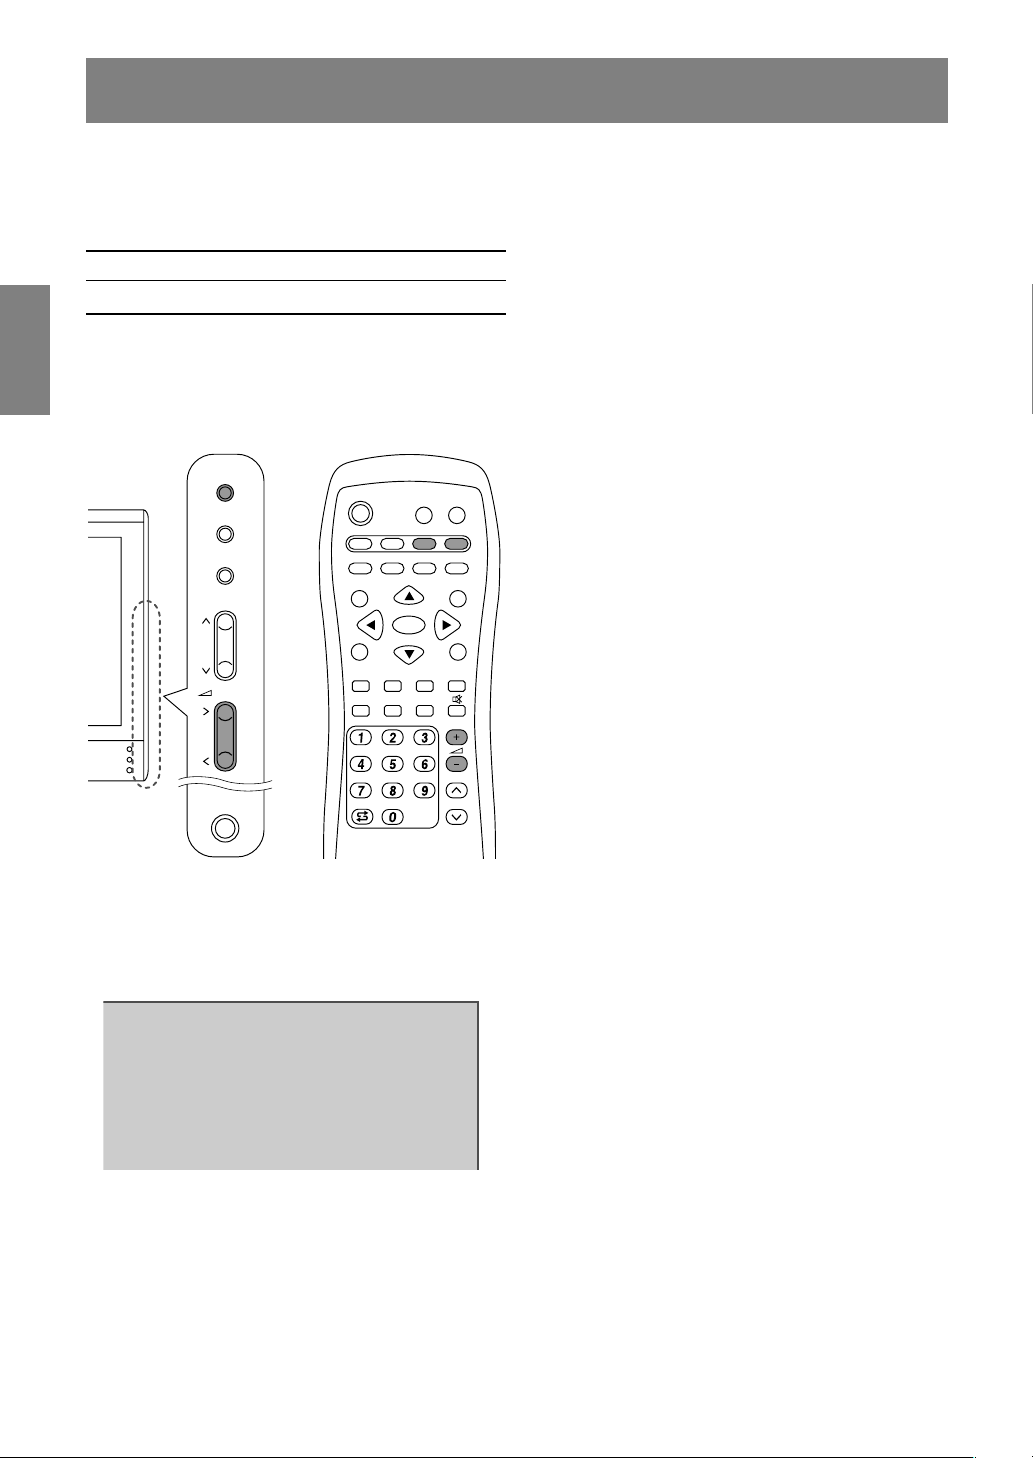
G42
Genießen von DVDs, Spielen und anderen Zusatzgeräten
Sie können zwei zusätzliche Audio/Video-Geräte
an Ihren Monitor anschließen, wie etwa
Videorecorder, DVD-Player oder Spielkonsolen.
(Siehe Seite G12 und G13.)
An AV-IN1 angeschlossene Geräte: Display-Modus “AV1”
An AV-IN2 angeschlossene Geräte: Display-Modus “AV2”
Hinweis:
- Da die Verwendung von AV1 und AV2 gleich ist,
werden in dieser Anleitung sowohl der Modus
AV1 als auch AV2 gemeinsam als “AV-Modus”
beschrieben.
MAIN
POWER
CH
MENU
INPUT
PC AV2AV1TV
BRIGHT
MODE
BRIGHT
CH
POWER
SLEEP MENU
DISPLAY
FREEZE
/HOLD
SOUND
SUBPAGE SUBTITLE
VIEW MODE
TEXT
REVEAL
PIP
OK
/BRIGHT
OK
/
BRIGHT
MODE
1. Nehmen Sie Einstellungen für Verbindungen mit
externen Geräten im Bildschirm
“AV CONNECTIONS” vor. (Siehe Seite G45.)
2.Schalten Sie den Display-Modus auf AV1 oder
AV2.
Weitere Informationen siehe Seite G18.
AV1
RGB
3. Schalten Sie das angeschlossene Audio/VideoGerät ein und starten Sie die Wiedergabe von
Band, DVD oder das Spiel.
4. Stellen Sie die Lautstärke ein.
Weitere Informationen siehe Seite G19.
Hinweise:
- Manchmal kommt beim schnellen Absuchen von
Videomaterial kein Bild.
- Bei der langsamen Wiedergabe von
Videomaterial kann das Bild je nach dem
verwendeten Videorecorder oder Videoband
flickern.
- Sie können keine Schießspiele mit PistolenControllern mit diesem Monitor verwenden.
Page 99

G43
DeutschDeutschFrançaisItalianoEspañolEnglish
Praktische Merkmale (für TV/AV-Modus)
Ausschalten nach einer
vorgegebenen Zeitspanne (SLEEP)
Der Monitor kann automatisch nach einer
vorgegebenen Zeitspanne ausschalten (Standby).
Dies ist praktisch, wenn Sie vor dem
Schlafengehen etwas im Monitor sehen wollen.
Führen Sie diesen Vorgang mit der Fernbedienung
aus.
1. Drücken Sie die Taste SLEEP.
2. Geben Sie ein, nach wie vielen Minuten der
Monitor ausschalten soll, indem Sie die Taste
SLEEP drücken.
Bei jedem Drücken der Taste wird die Zeit in der
folgenden Reihenfolge umgeschaltet.
30 min → 60 min → 90 min → 120 min →
150 min → --- min → 30 min
Wenn die festgelegte Zeit abgelaufen ist, schaltet
der Monitor automatisch aus und löscht den
SLEEP-Timer.
Prüfen der im SLEEP-Timer verbleibenden Zeit
1. Drücken Sie die Taste DISPLAY.
Die im SLEEP-Timer verbleibende Zeit wird
mehrere Sekunden lang angezeigt. Sie können
auch die verbleibende Zeit prüfen, indem Sie
die Taste SLEEP einmal drücken.
Ändern der festgelegten Zeit
1. Drücken Sie die Taste SLEEP.
Die verbleibende Zeit erscheint.
2. Ändern Sie die die festgelegte Zeit, indem Sie
die Taste SLEEP mehrmals nach Bedarf
drücken.
Hinweise:
- Wenn nur 5 Minuten im SLEEP-Timer
verbleiben, wird die verbleibende Zeit jede
Minute angezeigt.
- Durch Drücken der Taste POWER während der
SLEEP-Timer arbeitet, wird der Timer gelöscht.
- Durch automatisches Umschalten auf PC wird
der SLEEP-Timer gelöscht.
- Sie können auch dem SLEEP-Timer vom Menü
MODE SELECT einstellen. (Siehe Seite G46.)
Pausieren des Bildschirms
(FREEZE)
Dieses Merkmal pausiert das Bild vom
Fernsehgerät oder angeschlossenen Audio/VideoGerät. Das ist praktisch, um z.B. ein ein Rezept
oder die Adresse für ein Preisausschreiben zu
notieren.
Führen Sie diesen Vorgang mit der Fernbedienung
aus.
1. Drücken Sie die Taste FREEZE/HOLD.
Das Bild wird pausiert.
Aufheben der Pause
1. Drücken Sie die Taste FREEZE/HOLD erneut.
Hinweise:
- Sie können nicht das TV- oder Videobild im Bildin-Bild-Fenster pausieren.
- Durch automatisches Wechseln von Kanälen
oder Umschalten des Displaymodus (Eingang)
wird die Pause aufgehoben.
Zurückschalten zum vorherigen
Kanal (FLASHBACK)
Sie können zum vorher betrachteten Kanal
zurückschalten.
Führen Sie diesen Vorgang mit der Fernbedienung
aus.
1. Drücken Sie die Taste .
Der Monitor schaltet auf den vorher betrachteten
Kanal zurück.
Page 100

G44
Einstellen des Displays
Sie können TV- und Videobilder einstellen und
verschiedene Einstellungen mit den Menüs für
den TV/AV-Modus vornehmen.
- Alle Menüs mit Ausnahme des Menüs
PROGRAMMES sind für die Modi TV und AV
gleich. Alle im TV-Modus eingestellten Werte
werden auch im AV-Modus angelegt.
Einstellung
Das folgende Verfahren beschreibt die
grundlegende Bedienung. Einzelne Punkte siehe
Seite G45 bis G46.
1. Wählen Sie den TV-Modus oder AV-Modus.
Weitere Informationen siehe Seite G18.
2. Rufen Sie den Bildschirm MENU mit der Taste
MENU ab.
MENU
<
TV/AV
>
PICTURE
>>
PROGRAMMES
>>
AV CONNECTIONS
>>
MODE SELECT
>>
CHILD LOCK
>>
3. Wählen Sie den gewünschten
Einstellgegenstand mit der Taste MENU
(Monitor) oder den Tasten (Fernbedienung),
und drücken Sie die Taste OK/BRIGHT MODE
(Monitor) oder die Taste OK (Fernbedienung).
4. Wählen Sie den gewünschten
Einstellgegenstand mit der Taste MENU
(Monitor) oder den Tasten (Fernbedienung),
und drücken Sie die Taste OK/BRIGHT MODE
(Monitor) oder die Taste OK (Fernbedienung).
5. Ändern Sie die Zahlen/Werte mit den Tasten
(Monitor) oder den Tasten
(Fernbedienung).
Sie können fortsetzen und andere Gegenstände
einstellen.
Verfahren Sie wie folgt, um zum vorherigen
Bildschirm zurückzuschalten.
(1) Wählen Sie “RETURN” mit der Taste MENU
(Monitor) oder den Tasten
(Fernbedienung).
(2) Drücken Sie die Taste OK/BRIGHT MODE
(Monitor) oder die Taste OK (Fernbedienung).
6. Verlassen Sie den Bildschirm mit der Taste
INPUT (Monitor) oder der Taste MENU
(Fernbedienung).
Hinweis:
- Wenn Sie keine etwa 30 Sekunden lang keine
Tasten betätigen, während ein Menü-Bildschirm
angezeigt wird, werden die bis zu diesem Punkt
vorgenommenen Einstellungen angelegt, und
der Bildschirm verschwindet automatisch.
 Loading...