

Page 1
Page 2
Page 3

LCY-W-07201 Page 1 of 29
NOTICE
This publication is the proprietary of SHARP and is copyrighted, with all rights reserved. Under the copyright laws,
no part of this publication may be reproduced or transmitted in any form or by any means, electronic or mechanical
for any purpose, in whole or in part, without the express written permission of SHARP. Express written permission
is also required before any use of this publication may be made by a third party.
The application circuit examples in this publication are provided to explain the representative applications of
SHARP's devices and are not intended to guarantee any circuit design or permit any industrial property right or
other rights to be executed. SHARP takes no responsibility for any problems related to any industrial property right
or a third party resulting from the use of SHARP's devices, except for those resulting directly from device
manufacturing processes.
In the absence of confirmation by device specification sheets, SHARP takes no responsibility for any defects that
occur in equipment using any of SHARP's devices, shown in catalogs, data books, etc. Contact SHARP in order to
obtain the latest device specification sheets before using any SHARP's device.
SHARP reserves the right to make changes in the specifications, characteristics, data, materials, structures and
other contents described herein at any time without notice in order to improve design or reliability. Contact SHARP
in order to obtain the latest specification sheets before using any SHARP's device. Manufacturing locations are
also subject to change without notice.
Observe the following points when using any device in this publication. SHARP takes no responsibility for
damage caused by improper use of the devices.
The devices in this publication are designed for use in general electronic equipment designs, such as:
Personal computers Office automation Telecommunication equipment
Test and measurement equipment Industrial control Personal Digital Assistant
Audio visual and multimedia equipment Consumer electronics
The appropriate design measures should be taken to ensure reliability and safety when SHARP's devices are
used for equipment such as:
Transportation control and safety equipment(i.e. aircraft, trains, automobiles, etc.)
Traffic signals Gas leakage sensor breakers
Alarm equipment Various safety devices etc.
SHARP's devices shall not be used for equipment that requires extremely high level of reliability, such as:
Military and space applications Nuclear power control equipment
Medical equipment for life support
Contact a SHARP representative, in advance, when intending to use SHARP's devices for any "specific"
applications other than those recommended by SHARP.
Contact and consult with a SHARP representative if there are any questions about the contents of this
publication.
Page 4
1. Applicable Scope
This specification is applicable to TFT-LCD Module “LQ035Q1DH01”.
2. General Description
LCY-W-07201 Page 2 of 29
This module is a color active matrix LCD module incorporating amorphous silicon TFT (T
hin Film Transistor).
It is composed of a color TFT-LCD panel, driver IC, Input FPC, a back light unit and a touch panel.
Graphics and texts can be displayed on a 320 × RGB × 240 dots panel with about 262k colors by supplying
18bit data signals (6bit × RGB), four timing signals, 3wires 9bit serial interface signals, logic (Typ. +3.3V),
analog (Typ. +3.3V) supply voltages for TFT-LCD panel driving and supply voltage for back light.
3. Mechanical (Physical) Specifications
Item Specifications Unit
Screen size 8.8 (3.5” type) diagonal cm
Active area 70.56 (H) × 52.92 (V) mm
320 (H) × 240 (V) pixel
Pixel format
1 Pixel = R+G+B dots
-
Pixel pitch 0.2205 (H) × 0.2205 (V) mm
Pixel configuration R,G,B vertical stripes -
Display mode Normally white -
Unit outline dimensions *
63.9 (W) × 76.9 (H) × 4.5 (D) mm
Mass Approx. 43 g
Surface hardness 2H -
Surface treatment Anti glare -
*The above-mentioned table indicates module sizes without some projections and FPC.
For detailed measurements and tolerances, please refer to 19. Outline Dimensions.
Page 5

LCY-W-07201 Page 3 of 29
4. Input Terminal Names and Functions
Recommendation CN㧦[HIROSE] FH26G-67S-0.3SHBW(05) or [KYOCERA ELCO] 00 6281 067 2X2 829 +
Pin No. Symbol I/O Description Remarks
1 LED_C (-) - Power supply for LED (Low voltage)
2 LED_A(+) - Power supply for LED (High voltage)
3 DGND1 - Digital Ground
4 X1 O Touch Panel Right Electrode
5 Y2 O Touch Panel Bottom Electrode
6 X2 O Touch Panel Left Electrode
7 Y1 O Touch Panel Top Electrode
8 AGND1 - Analog Ground
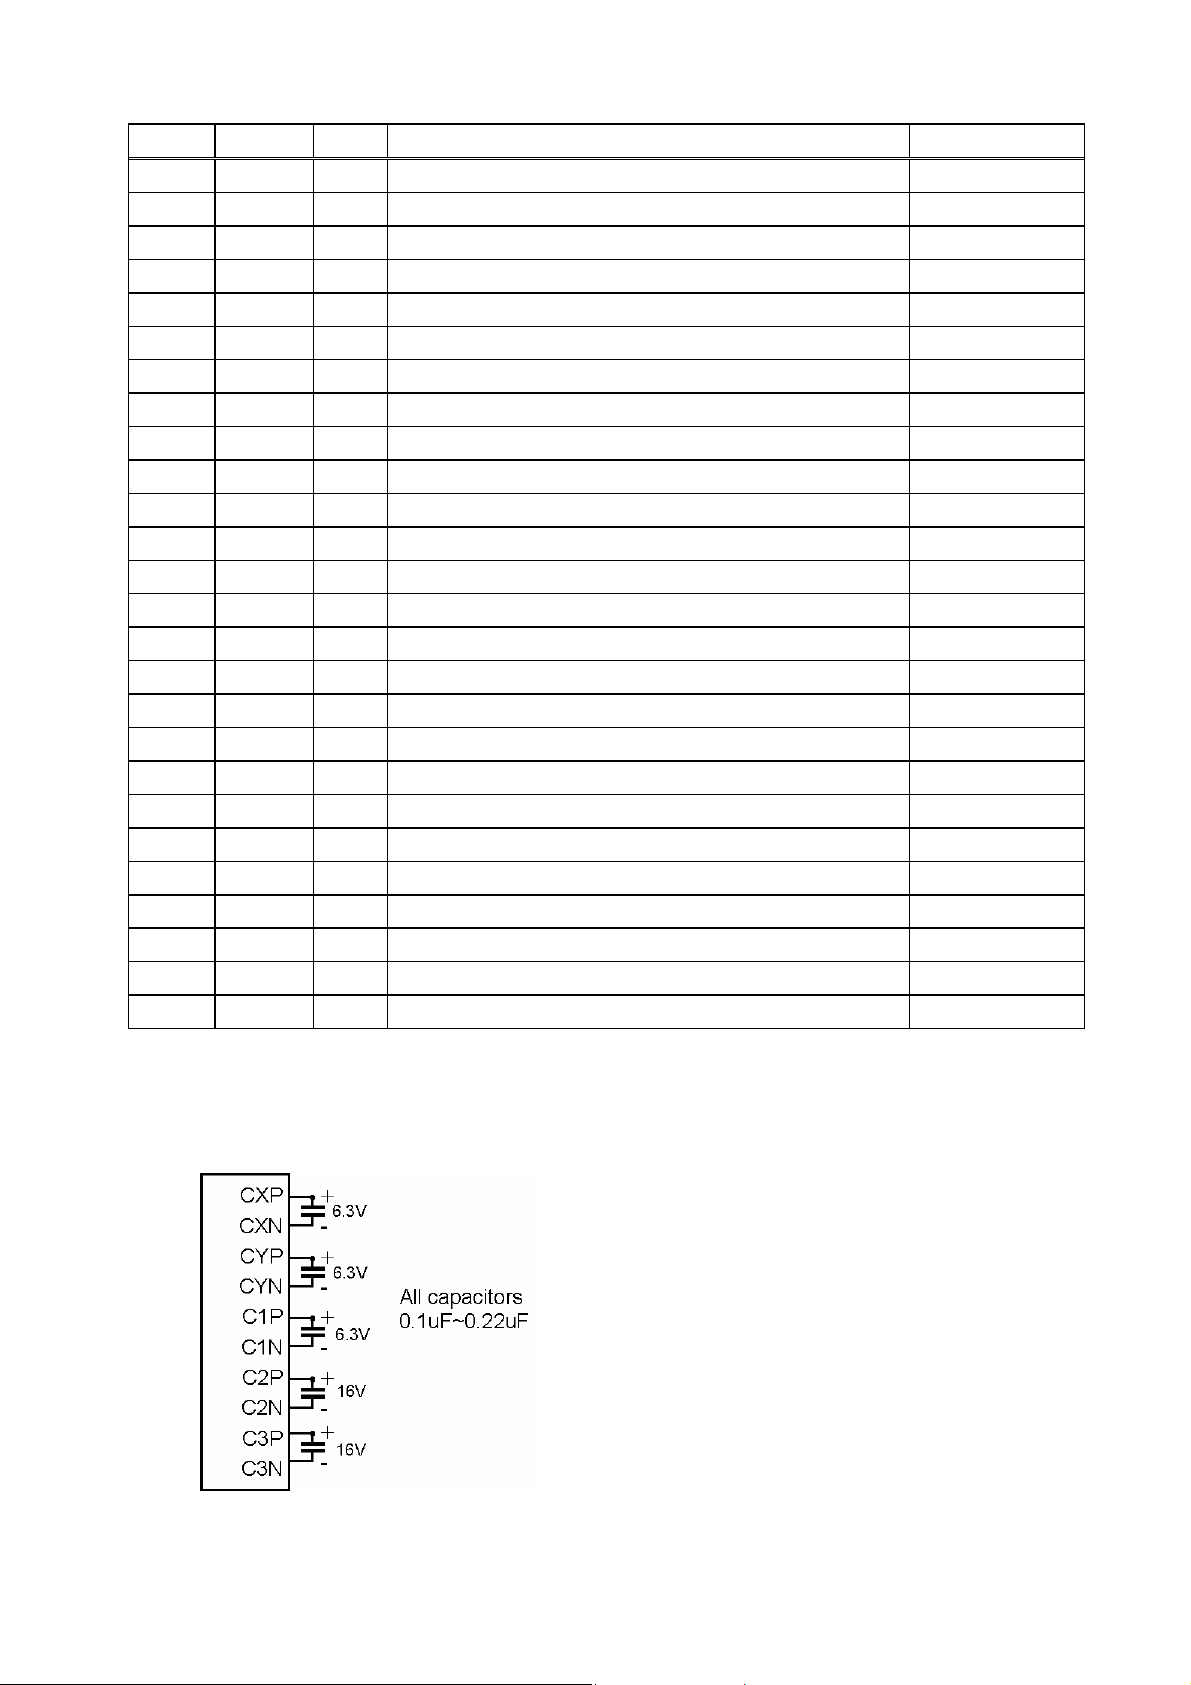
9 VGH - Connect to a Stabilizing capacitor Note 4
10 C2P - Connect a Booster capacitor to C2N Note 3
11 C2N - Connect a Booster capacitor to C2P Note 3
12 C1P - Connect a Booster capacitor to C1N Note 3
13 C1N - Connect a Booster capacitor to C1P Note 3
14 VGL - Connect a Stabilizing capacitor to GND Note 4
15 C3P - Connect a Booster capacitor to C3N Note 3
16 C3N - Connect a Booster capacitor to C3P Note 3
17 AGND2 - Analog Ground
18 V
- Connect a Stabilizing capacitor to GND Note 4
CIX2
19 CYP - Connect a Booster capacitor to CYN Note 3
20 CYN - Connect a Booster capacitor to CYP Note 3
21 VCI - Booster input voltage pin Note 4
22 NC - Not connected Note 1
23 AGND3 - Analog Ground
24 V
- Connect a Stabilizing capacitor to GND Note 4
CIM
25 CXP - Connect a Booster capacitor to CXN Note 3
26 CXN - Connect a Booster capacitor to CXP Note 3
27 ID O MFG ID pin Note 2
28 RESB I System reset
29 DGND2 - Digital Ground
30 V
31 V
- Voltage input pin for logic I/O
DDIO
- Connect a Stabilizing capacitor to GND Note 4
CORE
32 DGND3 - Digital Ground
33 SHUT I Sleep mode control
34 CSB I Chip select pin of serial interface
35 SDI I Data input pin in serial mode
36 SCK I Clock input pin in serial mode
37 V
- Connect a Stabilizing capacitor
DROP
38 DEN I Display enable
39 B5 I BLUE data signal(MSB)
40 B4 I BLUE data signal
41 B3 I BLUE data signal
Page 6
LCY-W-07201 Page 4 of 29
Pin No. Symbol I/O Description Remarks
42 B2 I BLUE data signal
43 B1 I BLUE data signal
44 B0 I BLUE data signal(LSB)
45 G5 I GREEN data signal(MSB)
46 G4 I GREEN data signal
47 G3 I GREEN data signal
48 G2 I GREEN data signal
49 G1 I GREEN data signal
50 G0 I GREEN data signal(LSB)
51 R5 I RED data signal(MSB)
52 R4 I RED data signal
53 R3 I RED data signal
54 R2 I RED data signal
55 R1 I RED data signal
56 R0 I RED data signal(LSB)
57 VSYNC I Frame synchronization signal
58 HSYNC I Line synchronization signal
59 DOTCLK I Dot-clock signal
60 CDUM0 - Connect a Stabilizing capacitor to GND Note 4
61 DGND4 - Digital Ground
62 V
63 V
64 V
- Connect a Stabilizing capacitor to GND Note 4
LCD63
- Connect a Stabilizing capacitor to GND Note 4
COMH
- Connect a Stabilizing capacitor to GND Note 4
COML
65 DGND5 - Digital Ground
66 CSVCMP - Connect a Stabilizing capacitor to CSVCMN Note 4
67 CSVCMN - Connect a Stabilizing capacitor to CSVCMP Note 4
Note 1) this pin should be opened.
Note 2) ID is connected to V
via FPC.
DDIO
Note 3) Booster Capacitors
Page 7
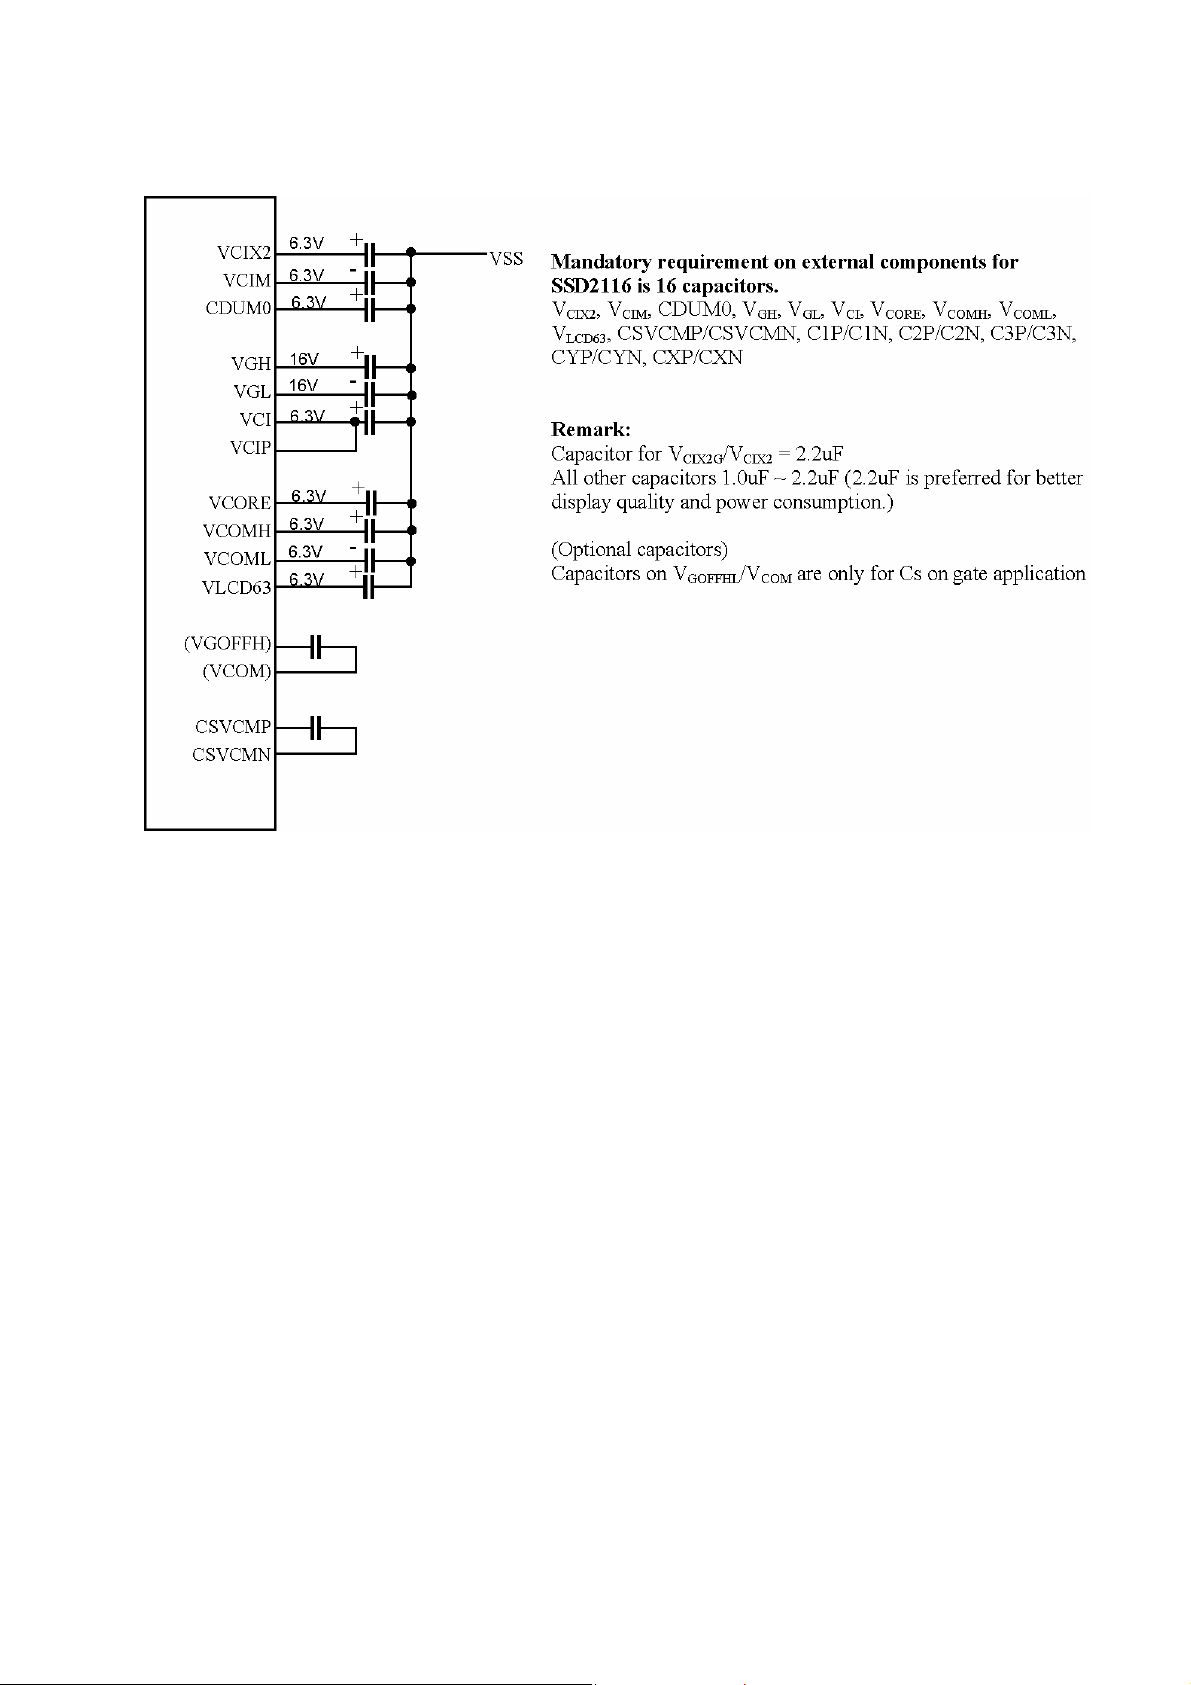
Note 4) Stabilization and charge sharing Capacitors
LCY-W-07201 Page 5 of 29
Page 8
5. Absolute Maximum Ratings
LCY-W-07201 Page 6 of 29
Item Symbol
Input voltage
Logic I/O power supply voltage
Analog power supply voltage
Temperature for storage
Temperature for operation
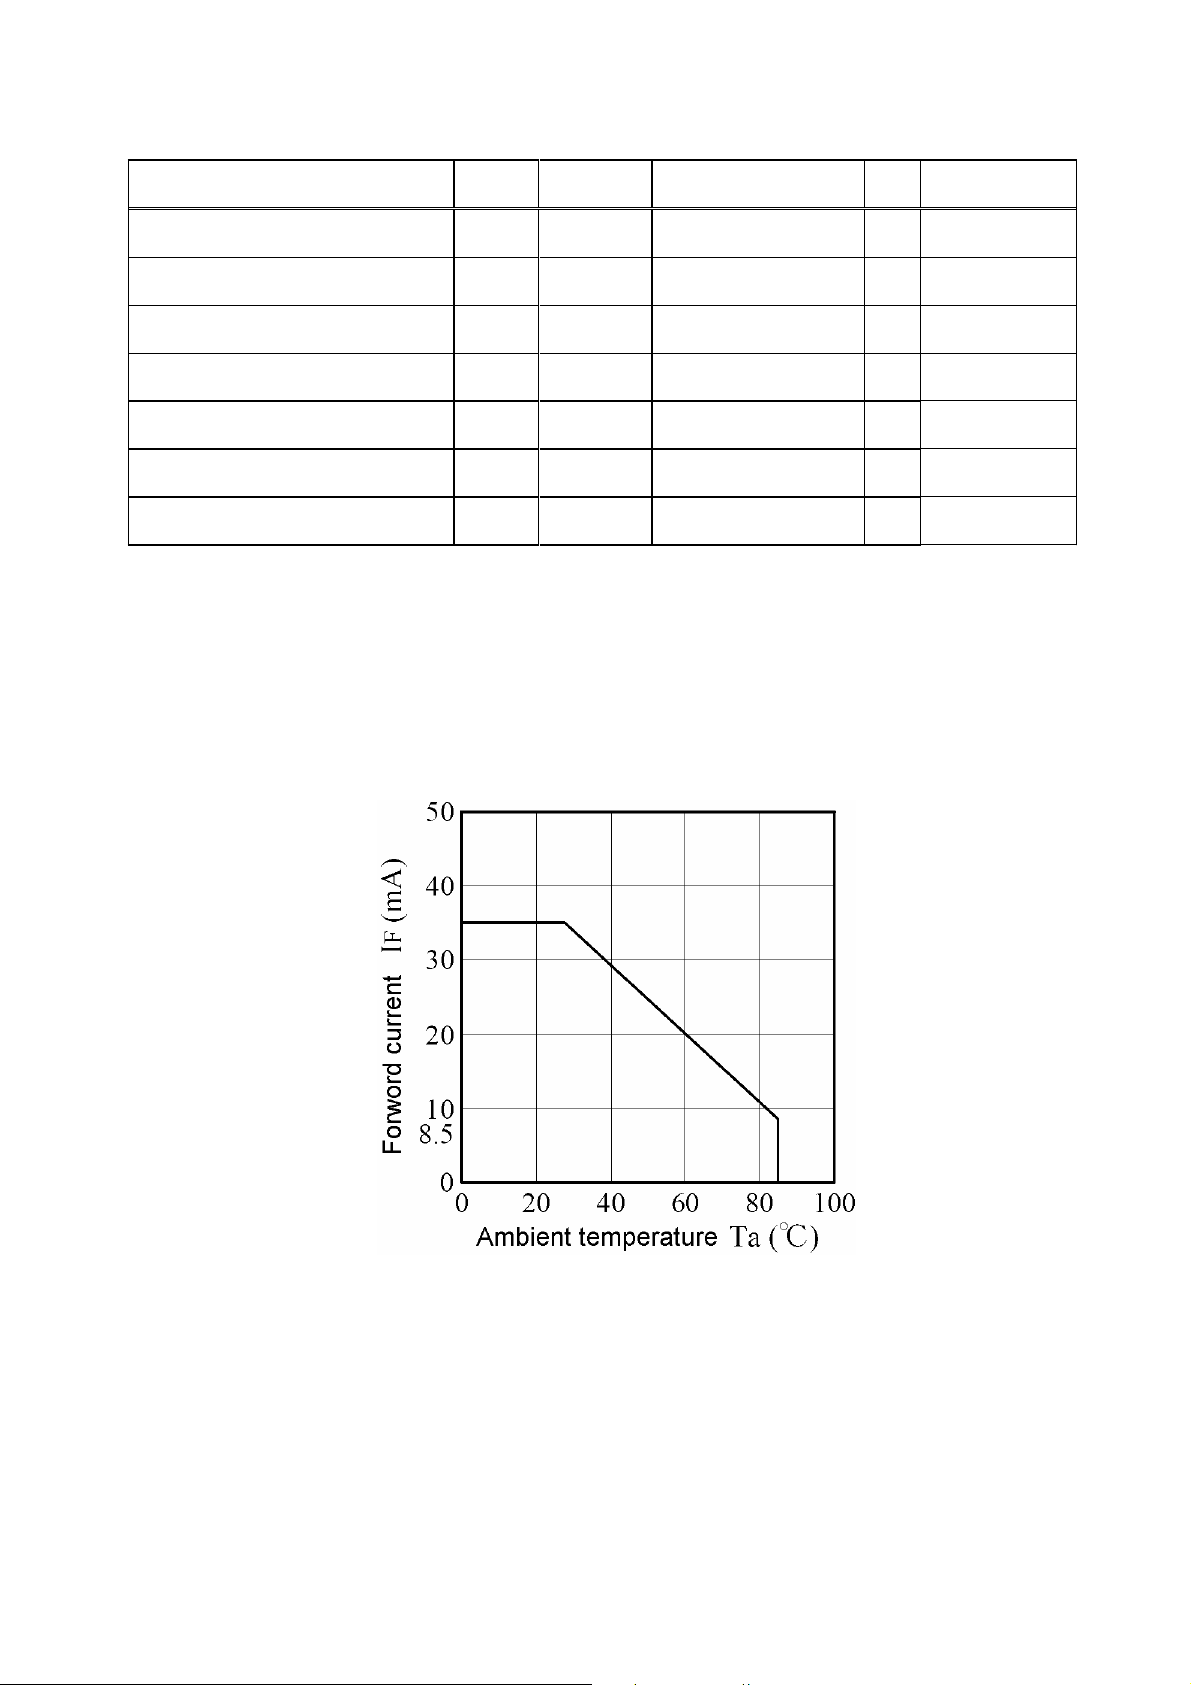
LED input electric current
LED electricity consumption
V
V
Tstg - -30 ~ +85
Topr - -10 ~ +70
I
P
Conditions Rated value
VI
DDIO
CI
LED
LED
Ta = 25qC
Ta = 25qC
Ta = 25qC
Ta = 25qC
Ta = 25qC
-0.3 ~ V
AGND-0.3 ~ +5.0
+0.3
DDIO
-0.3 ~ +4.0
35
123
Unit Remarks
V
Note 1
V
V
q
C
q
C
Note 2
Note 3
mA
mW
Note 1) RESB, SHUT, CSB, SDI, SCK, DEN, B5~B0, G5~G0, R5~R0, VSYNC, HSYNC, DOTCLK
Note 2) Humidity: 80%RH Max. (Ta҇40qC)
Maximum bulb temperature under 39qC (Ta>40qC) See to it that no dew will be condensed.
Note 3) Panel surface temperature prescribes.
(Reliability is examined at ambient temperature of 50qC.)
Note 4) Power consumption of one LED (Ta = 25qC). (use 7 pieces LED)
Ambient temperature and the maximum input are fulfilling the following operating conditions.
Ambient temperature and the maximum input
Page 9
6. Electrical Characteristics
6-1. TFT LCD Panel Driving
LCY-W-07201 Page 7 of 29
Ta = 25qC
Item Symbol
Logic I/O
power supply
Analog
power supply
DC voltage
DC Current
DC voltage
DC Current
Permissive input
Ripple voltage
Logic
Input Voltage
High
Low
Logic input Current IIH / IIL -1 - 1
Note 1) V
= VCI = +3.3V
DDIO
Current situation for I
Current situation for I
Min. Typ. Max.
+2.5 +3.3 +3.6
V
DDIO
- 0.35 0.50
I
VDDIO
V
CI
I
VCI
V
RFVDDIO
V
RFVCI
V
IH
V
IL
: Black & White checker flag pattern
VDDIO
: All black pattern
CI
+2.5 or V
DDIO
- 8.5 12.0
- - (100)
- - (100)
0.8 V
DDIO
0 - 0.2 V
+3.3 +3.6
mVp-p
mVp-p
- V
DDIO
DDIO
Unit Remarks
V
mA
Note 1
V
mA
Note 1
Note 2
Note 2
V
V
μA
Note 3
Note 3
Note 3
Note 2) V
= VCI = +3.3V
DDIO
Note 3) RESB, SHUT, CSB, SDI, SCK, DEN, B5~B0, G5~G0, R5~R0, VSYNC, HSYNC, DOTCLK
Page 10
6-2. Register Setting
Reg. # Register
R01 h Driver output control 2AEF h
R02 h LCD drive AC control 0300 h
R03 h Power control (1) 7A7E h
R0B h Frame cycle control DC00 h
R0C h Power control (2) 0005 h
R0D h Power control (3) 0002 h
R0E h Power control (4) 2900 h
R0F h Gate scan starting Position 0000 h
R16 h Horizontal Porch 9F86 h Note1
R17 h Vertical Porch 0002 h Note2
R1E h Power control (5) 0000 h
R2E h 3 Gamma B945 h
R30 h Gamma control (1) 0000 h
R31 h Gamma control (1) 0707 h
R32 h Gamma control (1) 0003 h
R33 h Gamma control (1) 0401 h
R34 h Gamma control (1) 0307 h
R35 h Gamma control (1) 0000 h
R36 h Gamma control (1) 0707 h
R37 h Gamma control (1) 0204 h
R3A h Gamma control (2) 0D0B h
R3B h Gamma control (2) 0D0B h
R40 h Gamma control (3) 0000 h
R41 h Gamma control (3) 0707 h
R42 h Gamma control (3) 0003 h
R43 h Gamma control (3) 0401 h
R44 h Gamma control (3) 0307 h
R45 h Gamma control (3) 0000 h
R46 h Gamma control (3) 0707 h
R47 h Gamma control (3) 0204 h
R4A h Gamma control (4) 0D0B h
R4B h Gamma control (4) 0D0B h
R50 h Gamma control (5) 0000 h
R51 h Gamma control (5) 0707 h
R52 h Gamma control (5) 0003 h
R53 h Gamma control (5) 0401 h
R54 h Gamma control (5) 0307 h
R55 h Gamma control (5) 0000 h
R56 h Gamma control (5) 0707 h
R57 h Gamma control (5) 0204 h
R5A h Gamma control (6) 0D0B h
R5B h Gamma control (6) 0D0B h
LCY-W-07201 Page 8 of 29
Data
(Gamma 2.2)
Remark
Page 11

Note 1)
LCY-W-07201 Page 9 of 29
Page 12

Note 2)
LCY-W-07201 Page 10 of 29
6-3. Back light driving
The back light system has 7 LEDs
[NSSW020B]
Parameter Symbol Min. Typ. Max. Unit Remark
Rated Voltage
Rated Current
V
BL
I
L
- 22.4 24.5 V
- 20 - mA
Ta=25qC
Power consumption WL - 448 - mW
Page 13

7. Timing characteristics of input signals
7-1. Pixel Clock Timing
LCY-W-07201 Page 11 of 29
Pixel Clock Timing
Page 14

7-2. Data Transaction Timing in Normal Operating Mode (262k color)
LCY-W-07201 Page 12 of 29
Page 15

7-3. Synchronization Signals Timing in Power Save Mode (8 color)
LCY-W-07201 Page 13 of 29
Page 16

7-4. VGH Output against SHUT & RESB
LCY-W-07201 Page 14 of 29
Page 17

7-5. Power Up Sequence
LCY-W-07201 Page 15 of 29
Page 18

7-6. Power Down Sequence
LCY-W-07201 Page 16 of 29
Page 19

7-7. SPI Interface Timing Diagram & Transaction Example (9 bit)
LCY-W-07201 Page 17 of 29
Page 20

7-8. Input Data Signals and Display Position on the screen
LCY-W-07201 Page 18 of 29
Please refer to Input Terminal Names and Functions
Page 21

LCY-W-07201 Page 19 of 29
8. Input Signals, Basic Display Colors and Gray Scale of Each Color
㩷 Colors &
Gray Gray R0 R1 R2 R3 R4 R5 G0 G1 G2 G3 G4 G5 B0 B1 B2 B3 B4 B5
㩷 Scale Scale LSB MSB LSB MSB LSB MSB
Date signal
Black
Blue
Basic Color
Green
Cyan
Red
Magenta
Yellow
White
Black GS0 0 0 0 0 0 0 0 0 0 0 0 0 0 0 0 0 0 0
Gray Scale of Red
×
Darker
×
Ø
Brighter
Ø
Red GS63 1 1 1 1 1 1 0 0 0 0 0 0 0 0 0 0 0 0
㧙
㧙
㧙
㧙
㧙
㧙
㧙
㧙
GS1 1 0 0 0 0 0 0 0 0 0 0 0 0 0 0 0 0 0
GS2 0 1 0 0 0 0 0 0 0 0 0 0 0 0 0 0 0 0
ÈÈ È È
ÈÈ È È
GS61 1 0 1 1 1 1 0 0 0 0 0 0 0 0 0 0 0 0
GS62 0 1 1 1 1 1 0 0 0 0 0 0 0 0 0 0 0 0
0 0 0 0 0 0 0 0 0 0 0 0 0 0 0 0 0 0
0 0 0 0 0 0 0 0 0 0 0 0 1 1 1 1 1 1
0 0 0 0 0 0 1 1 1 1 1 1 0 0 0 0 0 0
0 0 0 0 0 0 1 1 1 1 1 1 1 1 1 1 1 1
1 1 1 1 1 1 0 0 0 0 0 0 0 0 0 0 0 0
1 1 1 1 1 1 0 0 0 0 0 0 1 1 1 1 1 1
1 1 1 1 1 1 1 1 1 1 1 1 0 0 0 0 0 0
1 1 1 1 1 1 1 1 1 1 1 1 1 1 1 1 1 1
Black GS0 0 0 0 0 0 0 0 0 0 0 0 0 0 0 0 0 0 0
Gray Scale of Green
×
Darker
×
Ø
Brighter
Ø
Green GS63 0 0 0 0 0 0 1 1 1 1 1 1 0 0 0 0 0 0
Black GS0 0 0 0 0 0 0 0 0 0 0 0 0 0 0 0 0 0 0
Gray Scale of Blue
×
Darker
×
Ø
Brighter
Ø
Blue GS63 0 0 0 0 0 0 0 0 0 0 0 0 1 1 1 1 1 1
GS1 0 0 0 0 0 0 1 0 0 0 0 0 0 0 0 0 0 0
GS2 0 0 0 0 0 0 0 1 0 0 0 0 0 0 0 0 0 0
ÈÈ È È
ÈÈ È È
GS61 0 0 0 0 0 0 1 0 1 1 1 1 0 0 0 0 0 0
GS62 0 0 0 0 0 0 0 1 1 1 1 1 0 0 0 0 0 0
GS1 0 0 0 0 0 0 0 0 0 0 0 0 1 0 0 0 0 0
GS2 0 0 0 0 0 0 0 0 0 0 0 0 0 1 0 0 0 0
ÈÈ È È
ÈÈ È È
GS61 0 0 0 0 0 0 0 0 0 0 0 0 1 0 1 1 1 1
GS62 0 0 0 0 0 0 0 0 0 0 0 0 0 1 1 1 1 1
0: Low level voltage, 1: High level voltage
Each basic color can be displayed in 64 gray scales from 6 bit data signals.
According to the combination of 18 bit data signals, the 262k color display can be achieved on the screen.
Page 22

9. Optical Characteristics
LCY-W-07201 Page 20 of 29
Ta = 25qC, V
= +3.3V, VCI = +3.3V
DDIO
Parameter Symbol Condition Min. Typ. Max. Unit Remark
Viewing
angle
range
(Without
Wide View)
Horizontal
Vertical
ș21 - 45 - deg.
ș22 - 45 -
CR㧪10
ș11 - 20 -
ș12
- 55 -
deg.
deg.
deg.
ޣNote1,4ޤ
Optimum
Contrast ratio CR
viewing
100 300 -
ޣNote2,4ޤ
angle
Response Rise IJr - 30 45 ms
Time Decay IJ
ș=0°
d
- 30 45 ms
ޣNote3,4ޤ
x 0.26 0.31 0.36 Chromaticity of
2
ޣNote4ޤ
I
=20mA
LED
ޣNote6ޤ
ޣNote5ޤ
White
Luminance of white X
y 0.29 0.34 0.39
300 400 - cd/m
L1
Uniformity U 70 80 %
* The optical characteristics measurements are operated under a stable luminescence
= 20mA) and a dark condition. (Refer to Fig.9-1)
(I
LED
Photodetector(SR-3:TOPCON)
Field=2°
TFT-LCD module
Center of the screen
400mm
LCD panel
Fig.9-1 Optical characteristics measurement method
Page 23

ޣ
Note 1 ޤDefinitions of viewing angle range
ș
22
ș
12
6 o’clock
ޣ
Note 2 ޤDefinition of contrast ratio
The contrast ratio is defined as the following
(CR)ratioontrastC
Normal line
LCY-W-07201 Page 21 of 29
ș
11
ș
21
whitepixelsall withs)(brightnesLuminance
blackpixelsall withs)(brightnesLuminance
ޣ Note 3 ޤDefinition of response time
The response time is defined as the following figure and shall be measured
by switching the input signal for “Black” and “White”
White White
Photo detector output
(Relative value)
Black
Time
ޣ Note 4 ޤThis shall be measured at center of the screen.
Black
Page 24

ޣ
Note 5 ޤDefinition of Uniformity
LCY-W-07201 Page 22 of 29
1/6
Uniformity
BrightnessMinimum
BrightnessMaximum
The brightness should be measured on the
9-point as shown in the right figure.
ޣ
Note 6 ޤThis shall be measured
as shown in the right figure.
on the 9-point
= whiteofLuminance
(%)100u
1/6
Brightnesspoint-9theofSummation
9
Page 25

LCY-W-07201 Page 23 of 29
10. Touch panel characteristics
Parameter Min. Typ. Max. Unit Remark
Input voltage - 5.0 7.0 V
Resistor between terminals(XL-XR) 260 615 1,200 ȍ
Resistor between terminals(YU-YD) 160 400 800 ȍ
Line linearity(X direction) - - 1.5 %
Line linearity(Y direction) - - 1.5 %
Insuration resistance 20 - - Mȍ at DC25V
Minimum tension for detecting - - 0.8 N
Provisional
specification
Note) For use of finger input
11. Handling of modules
11-1. Inserting the FPC into its connector and pulling it out
1) Be sure to turn off the power supply and the signals when inserting or disconnecting the cable.
2) Please insert for too much stress not to join FPC in the case of insertion of FPC.
11-2. About handling of FPC
1) The bending radius of the FPC should be more than 1.4mm, and it should be bent evenly.
2) Do not dangle the LCD module by holding the FPC, or do not give any stress to it.
11-3. Mounting of the module
1) The module should be held on to the plain surface. Do not give any warping or twisting stress to
the module.
2) Please consider that GND can ground a modular metal portion etc. so that static electricity is not
charged to a module.
3) Design guidance for touch panel (T/P)
a) Example of housing design
(1) If a consumer will put a palm on housing in normal usage, care should be taken as follows.
(2) Keep the gap, for example 0.3 to 0.7mm, between bezel edge and T/P surface.
The reason is to avoid the bezel edge from contacting T/P surface that may cause a “short”
with bottom layer. (See Fig.11-3-1)
(3) Insertion a cushion material is recommended.
(4) The cushion material should be limited just on the busbar insulation paste area.
If it is over the transparent insulation paste area, a ”short” may be occurred.
(5) There is one where a resistance film is left in the T/P part of the end of the pole.
Design to keep insulation from the perimeter to prevent from mis-operation and so on.
Page 26

LCY-W-07201 Page 24 of 29
b) Mounting on display and housing bezel
(1) In all cases, the T/P should be supported from the backside of the Plastic.
(2) Do not to use an adhesive-tape to bond it on the front of T/P and hang it to the housing bezel.
(3) Never expand the T/P top layer (PET-film) like a balloon by internal air pressure.
The life of the T/P will be extremely short.
(4) Top layer, PET, dimension is changing with environmental temperature and humidity.
Avoid a stress from housing bezel to top layer, because it may cause “waving”.
(5) The input to the touch panel sometimes distorts touch panel itself.
Housing
Cushion material
(=Cushion Area)
PET Film
Insulation metal
Transparent
Insulation Paste
Glass
Key Area
Prohibition Area
Fig.11-3-1
Electrode
0.3 to 0.7mm
Layer
11-4. Cautions in assembly / Handling pre cautions
As the polarizer can be easily scratched, be most careful in handling it.
1) Work environments in assembly.
Working under the following environments is desirable:
a) Implement more than 1Mȍ conductive treatment (by placing a conductive mat or applying conductive
paint) on the floor or tiles.
b) No dusts come in to the working room. Place an adhesive, anti-dust mat at the entrance of the room.
c) Humidity of 50 to 70% and temperature of 15 to 27qC are desirable.
d) All workers wear conductive shoes, conductive clothes, conductive fingerstalls and grounding belts
without fail.
e) Use a blower for electrostatic removal. Set it in a direction slightly tilt downward so that each Module
can be well subjected to its wind. Set the blower at an optimum distance between the blower and the
module.
2) How the remove dust on the polarizer
a) Blow out dust by the use of an N2 blower with antistatic measures taken. Use of an ionized air Gun is
recommendable.
b) When the panel surface is soiled, wipe it with soft cloth.
3) In the case of the module’s metal part (shield case) is stained, wipe it with a piece of dry, soft cloth.
If rather difficult, give a breath on the metal part to clean better.
Page 27

LCY-W-07201 Page 25 of 29
4) If water dropped, etc. remains stuck on the polarizer for a long time, it is apt to get discolored or cause
stains. Wipe it immediately.
5) As a glass substrate is used for the TFT-LCD panel, if it is dropped on the floor or hit by something hard,
it may be broken or chipped off.
6) Since CMOS LSI is used in this module, take care of static electricity and take the human earth into
consideration when handling.
11-5. Others
1) Regarding storage of LCD modules, avoid storing them at direct sunlight-situation.
You are requested to store under the following conditions:
(Environmental conditions of temperature/humidity for storage)
a) Temperature: 0 to 40qC
b) Relative humidity : 95% or less
As average values of environments (temperature and humidity) for storing, use the following control
guidelines:
Summer season: 20 to 35qC, 85㧑 or less Winter season: 5 to 15qC, 85㧑 or less
If stored under the conditions of 40qC and 95% RH, cumulative time of storage must be less than 240
hours.
2) If stored at temperatures below the rated values, the inner liquid crystal may freeze, causing cell
destruction. At temperatures exceeding the rated values for storage, the liquid crystal may become
isotropic liquid, making it no longer possible to come back to its original state in some cases.
3) If the LCD is broken, do not drink liquid crystal in the mouth. If the liquid crystal adheres to a hand or
foot or to clothes, immediately cleanse it with soap.
4) If a water drop or dust adheres to the polarizer, it is apt to cause deterioration. Wipe it immediately.
5) Be sure to observe other caution items for ordinary electronic parts and components.
6) If local pressure joins T/P surface for a long time, it will become the cause of generating of Newton’s
ring.
Page 28

LCY-W-07201 Page 26 of 29
12. Reliability test items
No. Test item Conditions
High temperature storage test
1
Low temperature storage test
2
High temperature
3
& high humidity operation test
4 High temperature operation test
5 Low temperature operation test
Ta = 85qC 240h
Ta = -30qC 240h
Ta = 40qC ; 95%RH 240h
(No condensation)
Ta = 70qC 240h
(The panel temp. must be less than 50qC)
Ta = -10qC 240h
Frequency range: 10 to 55Hz
Vibration test
6
(non- operating)
Stroke: 1.5mm
Sweep time: 1minutes
Test period: 2 hours for each direction of X,Y,Z
7 Shock test
8 Thermal shock test
Point activation test
9
(Touch panel)
10
Electro static discharge test
Direction: ±X, ±Y, ±Z, Time: Third for each direction.
Impact value: 980m/s², Action time 6ms
Ta=-10qC to 70qC /10 cycles
(30 min) (30min)
Hit it 100,000 times with a silicon rubber.
Hitting force : 2.4 N
Hitting speed : 2 times per second
s
200Vy200pF(0
ȍ) to Terminals(Contact)
(1 time for each terminals)
r
4kV150pF(330
r
8kV150pF(330
ȍ) to Housing bezel or T/P(Contact)
ȍ) to Housing bezel or T/P(in Air)
ޣ
NoteޤTa = Ambient temperature, Tp = Panel temperature
ޣ
Check items
ޤ
(a)Test No.1 to No.8
In the standard condition, there shall be no practical problems that may affect the display function.
(b)Test No.9
The measurements after the tests are satisfied “10 Touch panel characteristics”.
13. Display Grade
The standard regarding the grade of color LCD displaying modules should be based on the delivery
inspection standard.
14. Delivery Form
14-1. Carton storage conditions
1) Carton piling-up: Max 8 rows
2) Environments
Temperature: 0㨪40°C
Humidity: 65% RH or less (at 40°C)
There should be no dew condensation even at a low temperature and high humidity.
3) Packing form: As shown in 16. LCD module packing carton
Cartons are weak against damp, and they are apt to be smashed easily due to the compressive
pressure applied when piled up. The above environmental conditions of temperature and humidity are
set in consideration of reasonable pile-up for storage.
Page 29

LCY-W-07201 Page 27 of 29
14-2. Packing composition
Name quantity Note
Carton size 1 575×360×225 (mm)
Tray 12 Material: Electrification prevention polypropylene
(The number of Module) 120 12 unit/tray: 120 unit/carton
Electrification prevention bag
2
Material: Electrification prevention polyethylene
680mm(length)×500mm(depth)×50μm(thin)
Carton weight (120 modules): Approx. 9.8kg
15. Lot No. marking
The lot No. will be indicated on individual labels. The location is as shown
Indication Label
LQ035Q1DH01٤ ٤٤٤٤٤٤٤٤٤ ٤
Processing place code (Q, L, etc.)
Model No + Parts code (A~H)
16. LCD module packing carton
Lot No = Production year(07~) + mouth(A~L) + Serial No(000001~)
Page 30

LCY-W-07201 Page 28 of 29
17. Others
1 Disassembling the module can cause permanent damage and you should be strictly avoided.
2 Please be careful that you don’t keep the screen displayed fixed pattern image for a long time,
since retention may occur.
3 If you pressed down a liquid crystal display screen with your finger and so on, the alignment disorder
of liquid crystal will occur. And then It will become display fault.
Therefore, be careful not to touch the screen directly, and to consider not stressing to it.
4 If any problem arises regarding the items mentioned in this specification sheet or otherwise, it should be
discussed and settled mutually in a good faith for remedy and/or improvement.
18. Sticking position of insulated tape in Soldering area
Page 31

 Loading...