

Page 1
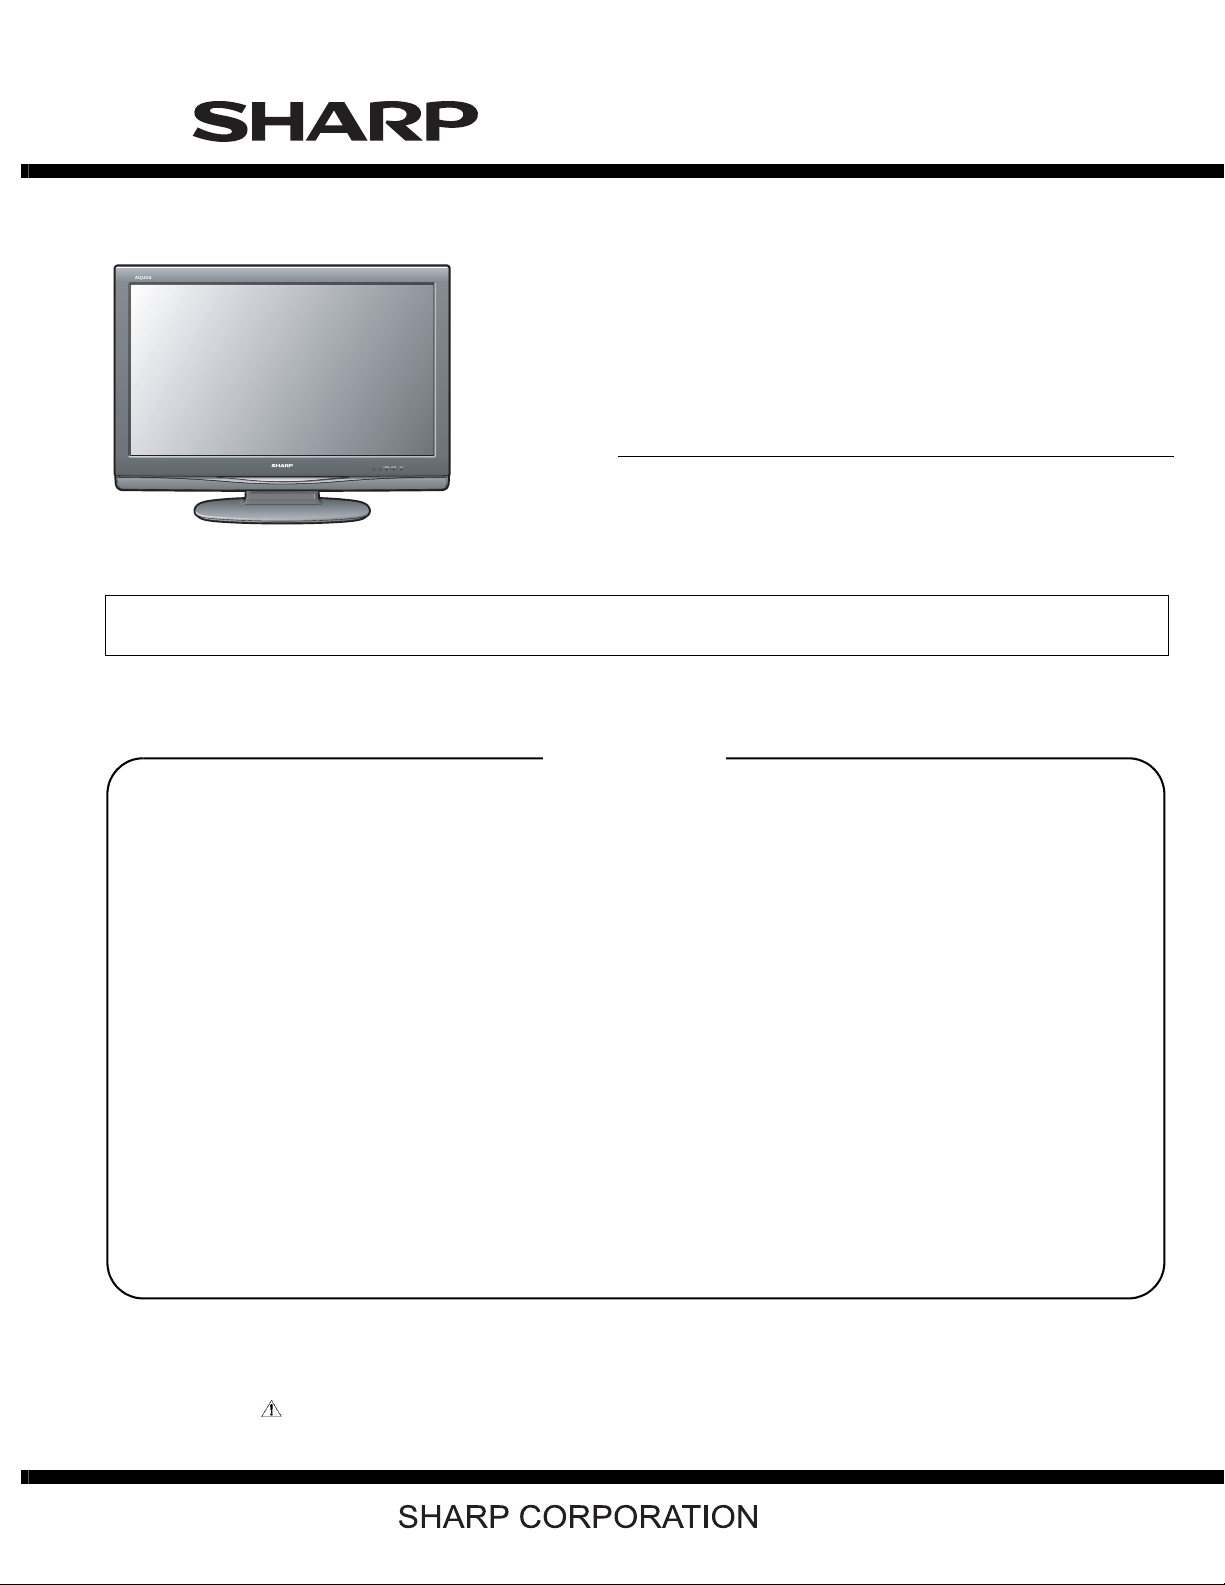
LC-32R24B
SERVICE MANUAL
No. S98P4LC32R24B
LCD COLOR TELEVISION
MODEL
In the interests of user-safety (Required by safety regulations in some countries) the set should be restored to its original condition and only parts identical to those specified should be used.
LC-32R24B
CONTENTS
SAFETY PRECAUTION
IMPORTANT SERVICE SAFETY PRE-
CAUTION ............................................................i
PRECAUTIONS FOR USING LEAD-FREE
SOLDER ........................................................... ii
PRECAUTIONS IN SERVICING THE
HDCP-KEY ROM ...............................................ii
CHAPTER 1. OPERATION MANUAL
[1] SPECIFICATIONS ........................................ 1-1
[2] OPERATION MANUAL .................................. 1-2
[3] DIMENSIONS ............................................... 1-7
CHAPTER 5. MAJOR IC INFORMATIONS
[1] MAJOR IC INFORMATIONS .........................5-1
CHAPTER 6. OVERALL WIRING/BLOCK DIAGRAM
[1] OVERALL WIRING DIAGRAM ......................6-1
[2] SYSTEM BLOCK DIAGRAM.........................6-2
CHAPTER 7. PRINTED WIRING BOARD ASSEMBLIES
[1] MAIN Unit ...................................................... 7-1
[2] KEY Unit ........................................................7-5
[3] R/C, LED Unit ................................................7-6
CHAPTER 2. REMOVING OF MAJOR PARTS
[1] REMOVING OF MAJOR PARTS ................... 2-1
CHAPTER 3. ADJUSTMENT
[1] ADJUSTMENT PROCEDURE ....................... 3-1
CHAPTER 4. TROUBLESHOOTING TABLE
[1] TROUBLESHOOTING TABLE ....................... 4-1
Parts marked with " " are important for maintaining the safety of the set. Be sure to replace these parts with specified ones for maintaining the
safety and performance of the set.
CHAPTER 8. SCHEMATIC DIAGRAM
[1] DESCRIPTION OF SCHEMATIC DIA-
GRAM............................................................ 8-1
[2] SCHEMATIC DIAGRAM................................8-2
Parts Guide
This document has been published to be used for
after sales service only.
The contents are subject to change without notice.
Page 2
LC-32R24B
SAFETY PRECAUTION
IMPORTANT SERVICE SAFETY PRECAUTION
Service work should be performed only by qualified service technicians who are thoroughly familiar with all safety checks and the
servicing guidelines which follow:
WARNING
1. For continued safety, no modification of any circuit should be
attempted.
2. Disconnect AC power before servicing.
CAUTION: FO R C O N T I N U E D PROTECTION
AGAINST A RISK OF FIRE REPLACE ONLY WITH
SAME TYPE FUSE.
F7101 (250V 6.3A)
F7102 (250V 1A)
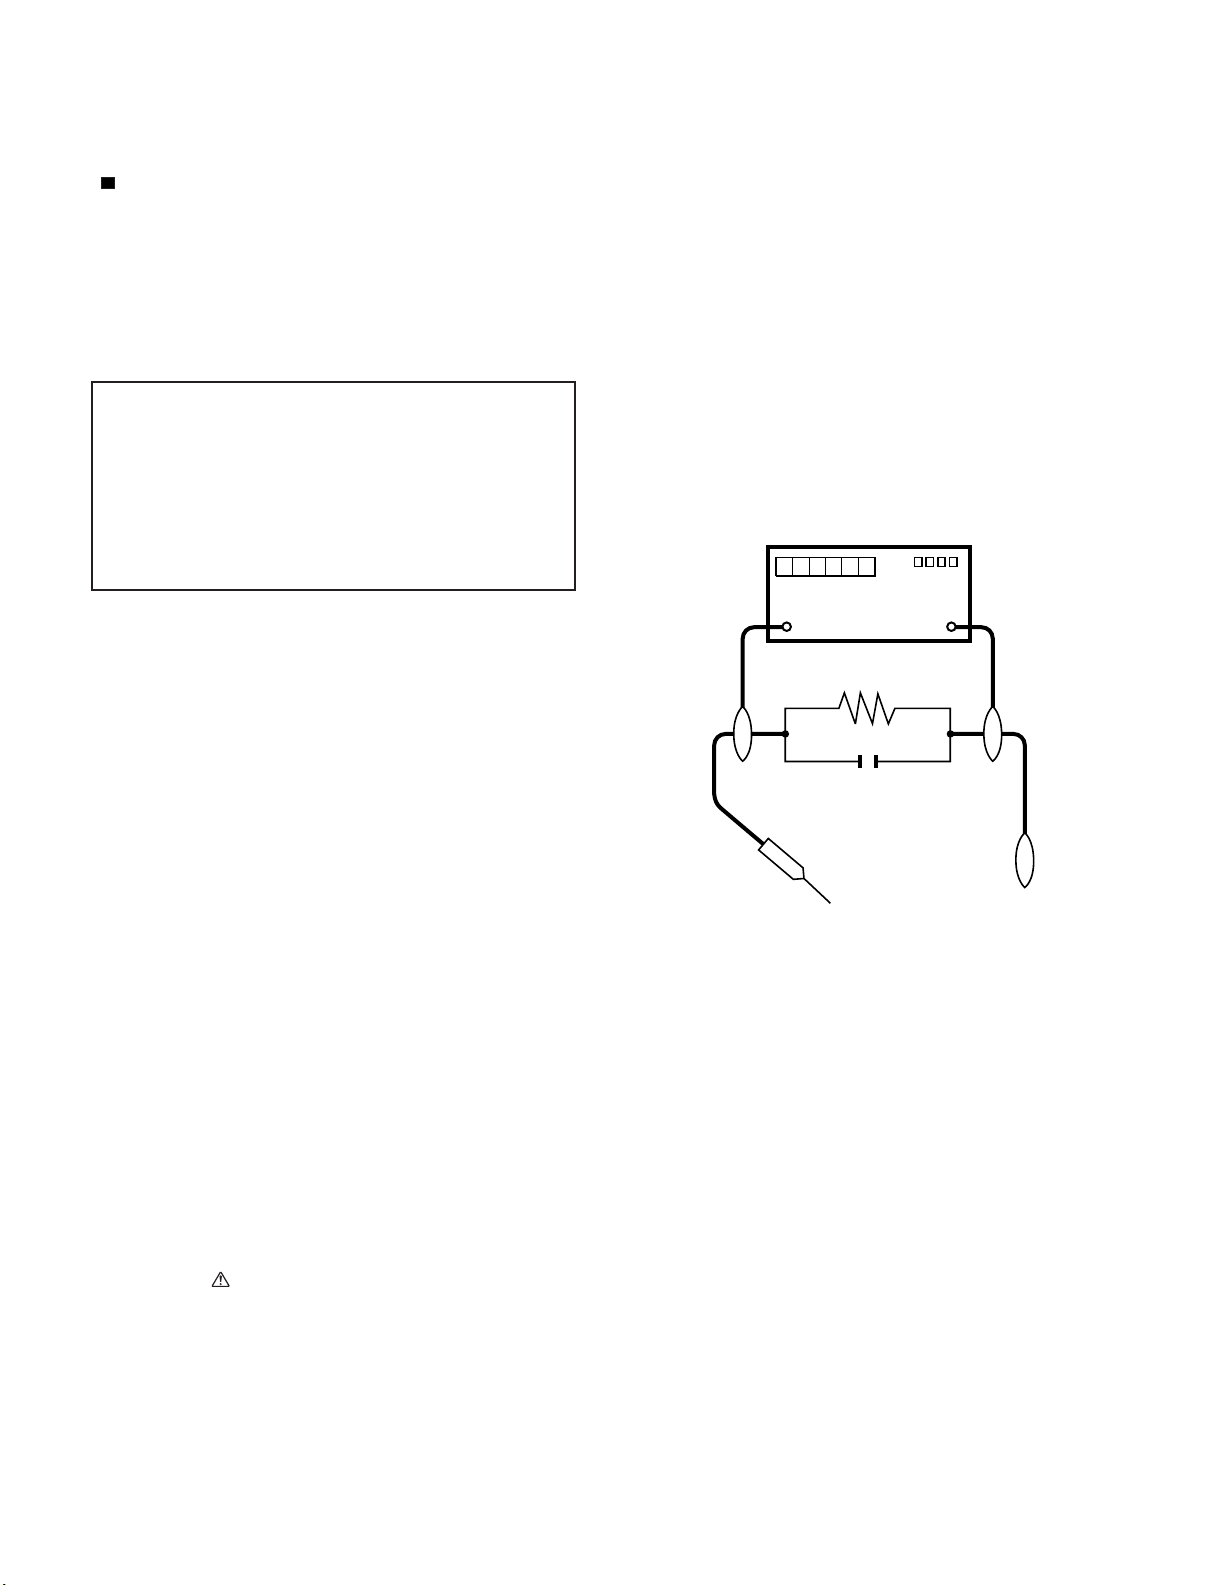
• Use an AC voltmeter having with 5000 ohm per volt, or higher, sensitivity or measure the AC voltage drop across the resistor.
• Connect the resistor connection to all exposed metal parts having a
return to the chassis (antenna, metal cabinet, screw heads, knobs
and control shafts, escutcheon, etc.) and measure the AC voltage
drop across the resistor.
All checks must be repeated with the AC cord plug connection
reversed. (If necessary, a nonpolarized adaptor plug must be used
only for the purpose of completing these checks.)
Any reading of 0.75 Vrms (this corresponds to 0.5 mA rms AC.) or
more is excessive and indicates a potential shock hazard which
must be corrected before returning the monitor to the owner.
DVM
BEFORE RETURNING THE RECEIVER (Fire &
Shock Hazard)
Before returning the receiver to the user, perform the following
safety checks:
3. Inspect all lead dress to make certain that leads are not pinched,
and check that hardware is not lodged between the chassis and
other metal parts in the receiver.
4. Inspect all protective devices such as non-metallic control knobs,
insulation materials, cabinet backs, adjustment and compartment
covers or shields, isolation resistor-capacitor networks, mechanical
insulators, etc.
5. To be sure that no shock hazard exists, check for leakage current in
the following manner.
• Plug the AC cord directly into a 120 volt AC outlet.
• Using two clip leads, connect a 1.5k ohm, 10 watt resistor paralleled by a 0.15µF capacitor in series with all exposed metal cabinet
parts and a known earth ground, such as electrical conduit or electrical ground connected to an earth ground.
///////////////////////////////////////////////////////////////////////////////////////////////////////////////////////////////////////////////////////////////////////////////////////////////////////////////////////////////////////////
TO EXPOSED
METAL PARTS
AC SCALE
1.5k ohm
10W
0.15µF
TEST PROBE
CONNECT TO
KNOWN EARTH
GROUND
SAFETY NOTICE
Many electrical and mechanical parts in LCD color television have
special safety-related characteristics.
These characteristics are often not evident from visual inspection, nor
can protection afforded by them be necessarily increased by using
replacement components rated for higher voltage, wattage, etc.
Replacement parts which have these special safety characteristics are
identified in this manual; electrical components having such features
are identified by " " and shaded areas in the Replacement Parts List
and Schematic Diagrams.
///////////////////////////////////////////////////////////////////////////////////////////////////////////////////////////////////////////////////////////////////////////////////////////////////////////////////////////////////////////
For continued protection, replacement parts must be identical to those
used in the original circuit.
The use of a substitute replacement parts which do not have the same
safety characteristics as the factory recommended replacement parts
shown in this service manual, may create shock, fire or other hazards.
i
Page 3
LC-32R24B
PRECAUTIONS FOR USING LEAD-FREE SOLDER
Employing lead-free solder
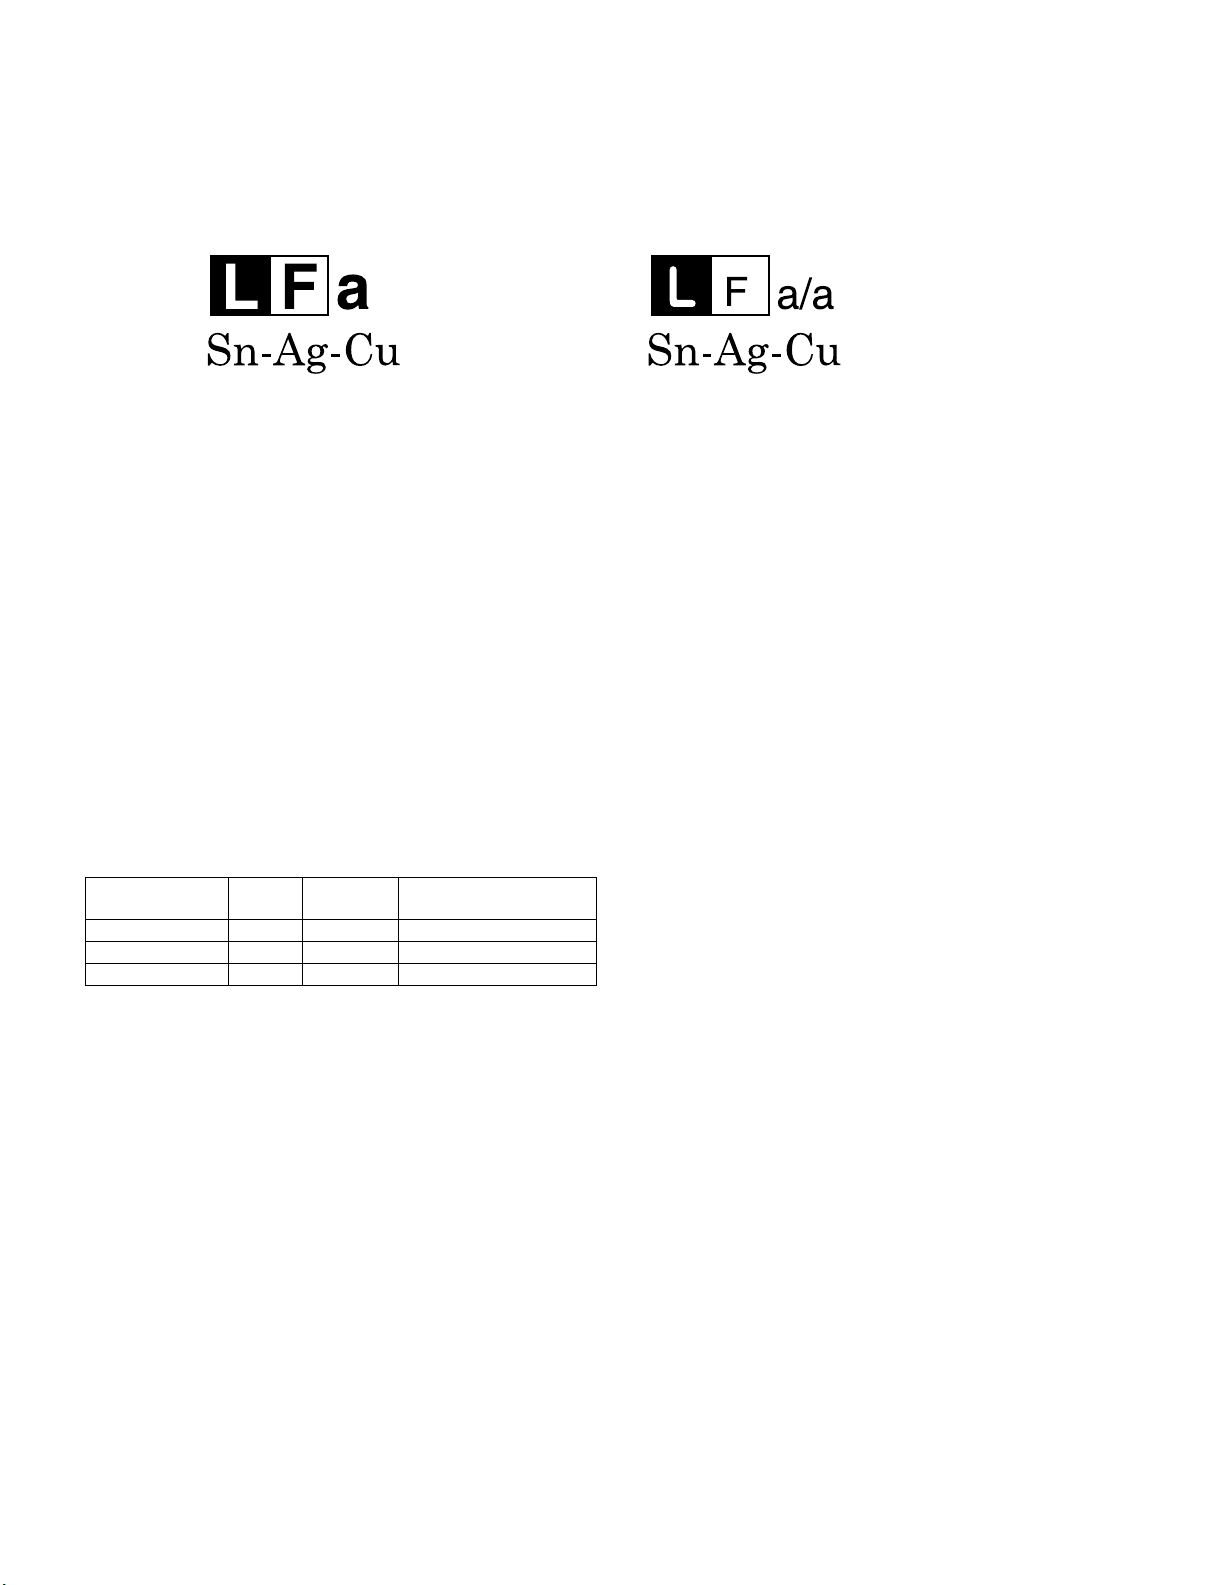
• “PWBs” of this model employs lead-free solder. The LF symbol indicates lead-free solder, and is attached on the PWBs and service manuals. The
alphabetical character following LF shows the type of lead-free solder.
Example:
Indicates lead-free solder of tin, silver and copper. Indicates lead-free solder of tin, silver and copper.
Using lead-free wire solder
• When fixing the PWB soldered with the lead-free solder, apply lead-free wire solder. Repairing with conventional lead wire solder may cause damage or accident due to cracks.
As the melting point of lead-free solder (Sn-Ag-Cu) is higher than the lead wire solder by 40 C, we recommend you to use a dedicated soldering
bit, if you are not familiar with how to obtain lead-free wire solder or soldering bit, contact our service station or service branch in your area.
Soldering
• As the melting point of lead-free solder (Sn-Ag-Cu) is about 220 C which is higher than the conventional lead solder by 40 C, and as it has poor
solder wettability, you may be apt to keep the soldering bit in contact with the PWB for extended period of time. However, Since the land may be
peeled off or the maximum heat-resistance temperature of parts may be exceeded, remove the bit from the PWB as soon as you confirm the
steady soldering condition.
Lead-free solder contains more tin, and the end of the soldering bit may be easily corroded. Make sure to turn on and off the power of the bit as
required.
If a different type of solder stays on the tip of the soldering bit, it is alloyed with lead-free solder. Clean the bit after every use of it.
When the tip of the soldering bit is blackened during use, file it with steel wool or fine sandpaper.
• Be careful when replacing parts with polarity indication on the PWB silk.
Lead-free wire solder for servicing
PARTS CODE
ZHNDAi123250E BL J φ0.3mm 250g (1roll)
ZHNDAi126500E BK J φ0.6mm 500g (1roll)
ZHNDAi12801KE BM J φ1.0mm 1kg (1roll)
PRICE
RANK
PART
DELIVERY
DESCRIPTION
PRECAUTIONS IN SERVICING THE HDCP-KEY ROM
Applied part: HDCP-KEY ROM
IC8451 RH-IXC616WJQZY (updated ROM)
The HDCP-KEY ROM shall be protected and managed for its information inside. In servicing this ROM, therefore, take the following information protection/management measures.
1) When disposing of the component parts and PWBs, destruct the IC itself in a proper way.
(For repairing or replacing the component parts and PWBs as well as clearing those in stock)
2) In storing the component parts, protect and manage them against theft and disclosure.
(For storing the service parts, service units, etc.)
ii
Page 4
LC-32R24B
CHAPTER 1. OPERATION MANUAL
[1] SPECIFICATIONS
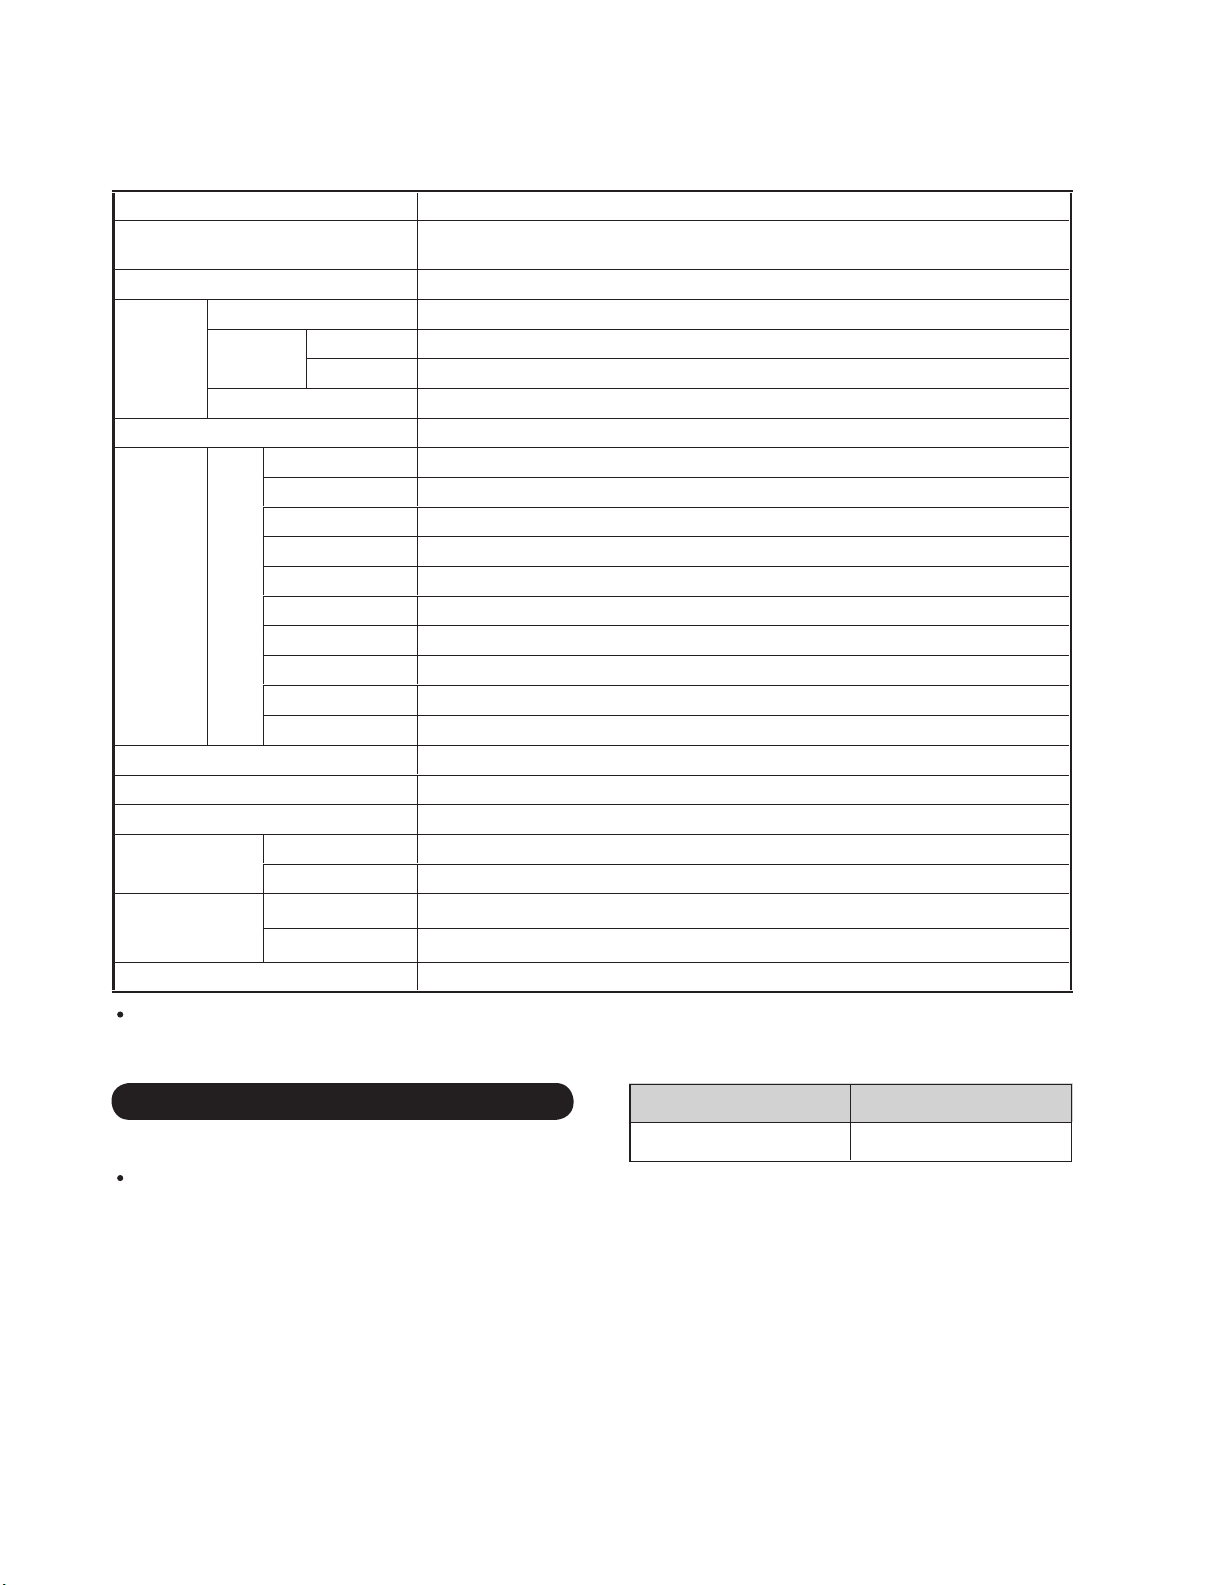
Item Model: LC-32R24B
LCD panel
Resolution 1,049,088 pixels (1,366 x 768)
Receiving System PAL-M, PAL-N, NTSC System
TV
Function
Audio out 10W x 2
Terminals Rear
OSD language Português/Español/English
Power Requirement AC 110-240 V, 50/60 Hz
Power Consumption 140 W (0.9 W Standby)
Weight
Dimension
(WxHxD)
Operating temperature 0°C to +40°C
Receiving
Channel
Audio multiplex BTSC System
VHF/UHF VHF 2-13ch, UHF 14-69ch
CATV 1-135ch
INPUT 1 AV in, COMPONENT in
INPUT 2 AV in, S-VIDEO in
INPUT 3 COMPONENT in
INPUT 4 HDMI in with HDCP
INPUT 5 Audio in, HDMI in with HDCP
INPUT 6 15-pin mini D-sub female connector, Audio in (Ø 3.5 mm jack)
ANT/CABLE 75 Ω Unbalance, F Type x 1 for Analog (VHF/UHF/CATV)
DIGITAL AUDIO OUTPUT
OUTPUT Audio out
SERVICE Software update
TV + stand 13.5 kg
TV only 11.5 kg
TV + stand 776 x 575 x 230 mm
TV only 776 x 523 x 94 mm
32" screen size class Advanced Super View & BLACK TFT LCD
(Diagonal Measurement : 31
Optical Digital audio output x 1 (PCM)
1
/2")
As part of policy of continuous improvement, SHARP reserves the right to make design and specification changes for product
improvement without prior notice. The performance specification figures indicated are nominal values of production units.
There may be some deviations from these values in individual units.
Optional Accessory
The listed optional accessory is available for the Liquid
Crystal Television. Please purchase it at your nearest shop.
Additional optional accessories may be available in the near
future. When purchasing, please read the newest catalogue for
compatibility and check the availability.
Part name
Wall mount bracket
Model number
AN-37AG5
1 – 1
Page 5
[2] OPERATION MANUAL
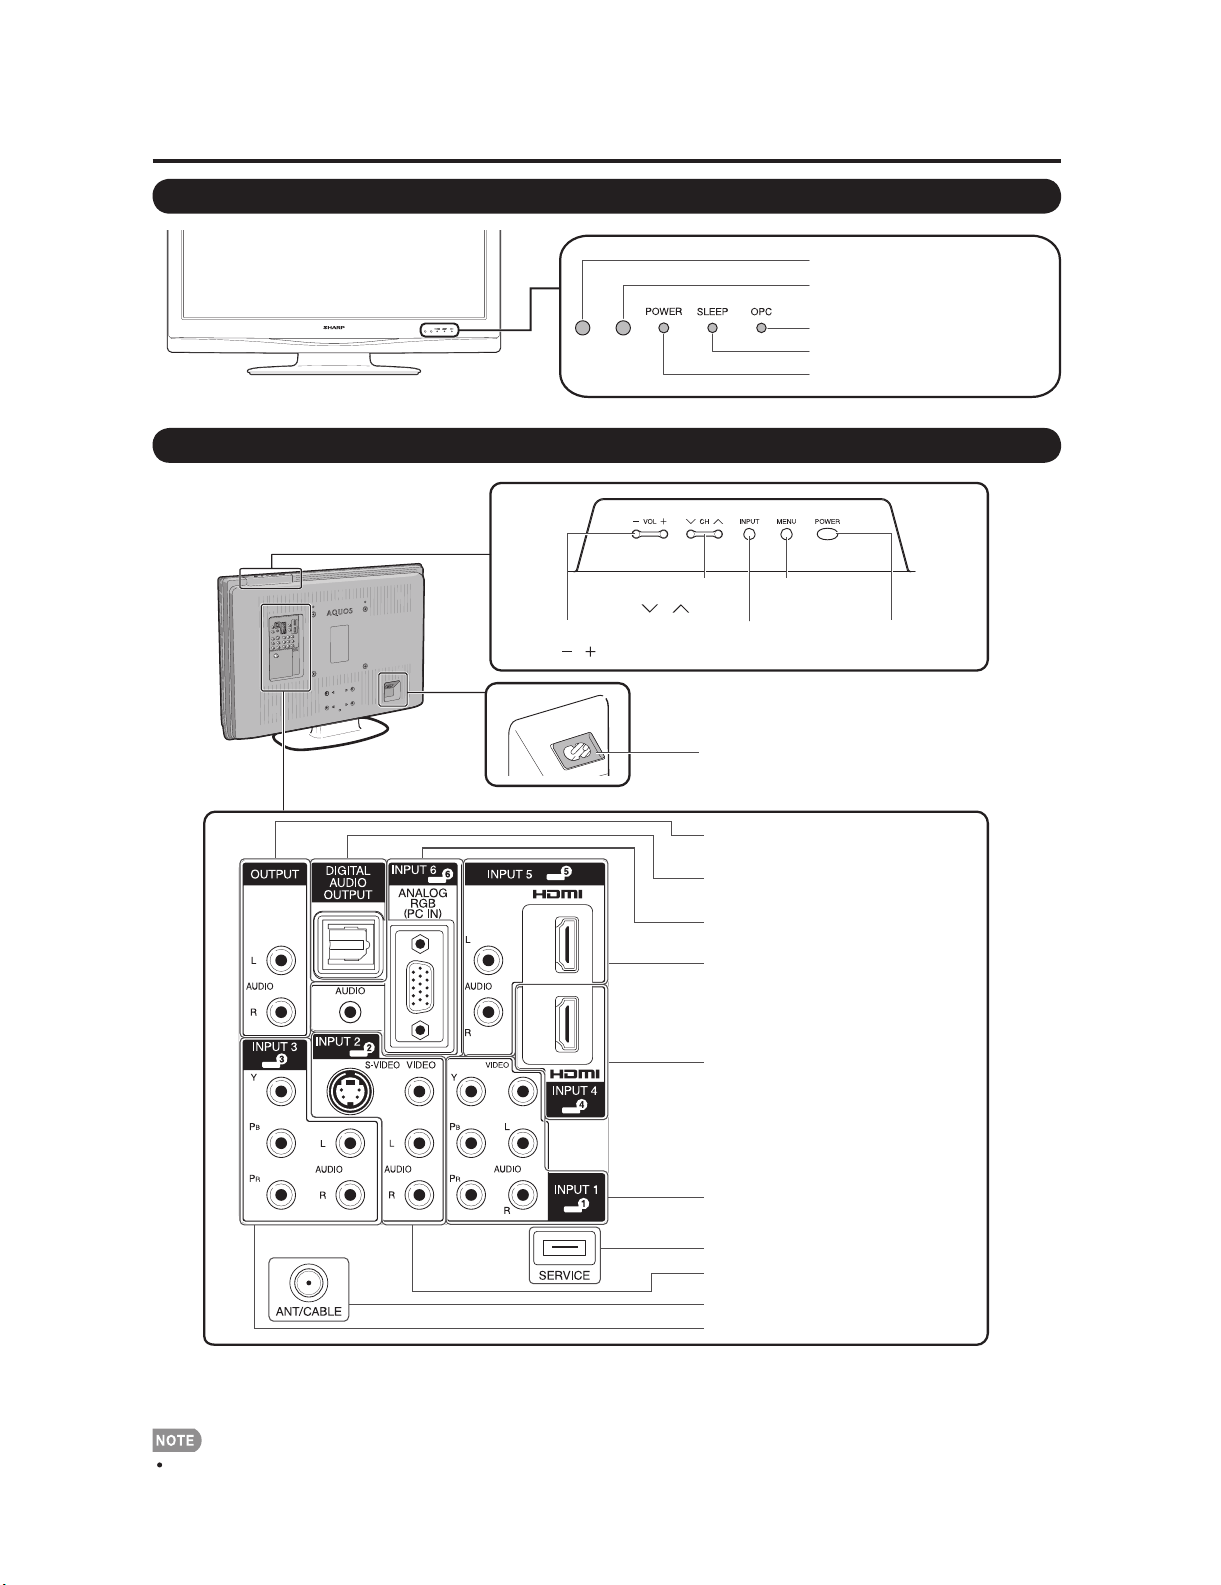
Part Names
TV (Front)
*OPC: Optical Picture Control
TV (Top/Rear)
LC-32R24B
Remote control sensor
OPC sensor*
OPC indicator
SLEEP indicator
POWER indicator
*2
Channel buttons
(CH /)
Volume buttons
(VOL /)
*3
MENU button
INPUT button
AC INPUT terminal
AUDIO OUTPUT terminals
DIGITAL AUDIO OUTPUT terminal
INPUT 6 terminals (PC-IN)
INPUT 5 terminals (HDMI)
INPUT 4 terminal (HDMI)
POWER button
*1
INPUT 1 terminals
SERVICE terminal
INPUT 2 terminals
Antenna/Cable in
INPUT 3 terminals
*1 External equipment connection.
*2 Button operations.
*3 Connecting the AC cord.
The illustrations in this operation manual are for explanation purposes and may vary slightly from the actual operations.
1 – 2
Page 6
LC-32R24B
Part Names
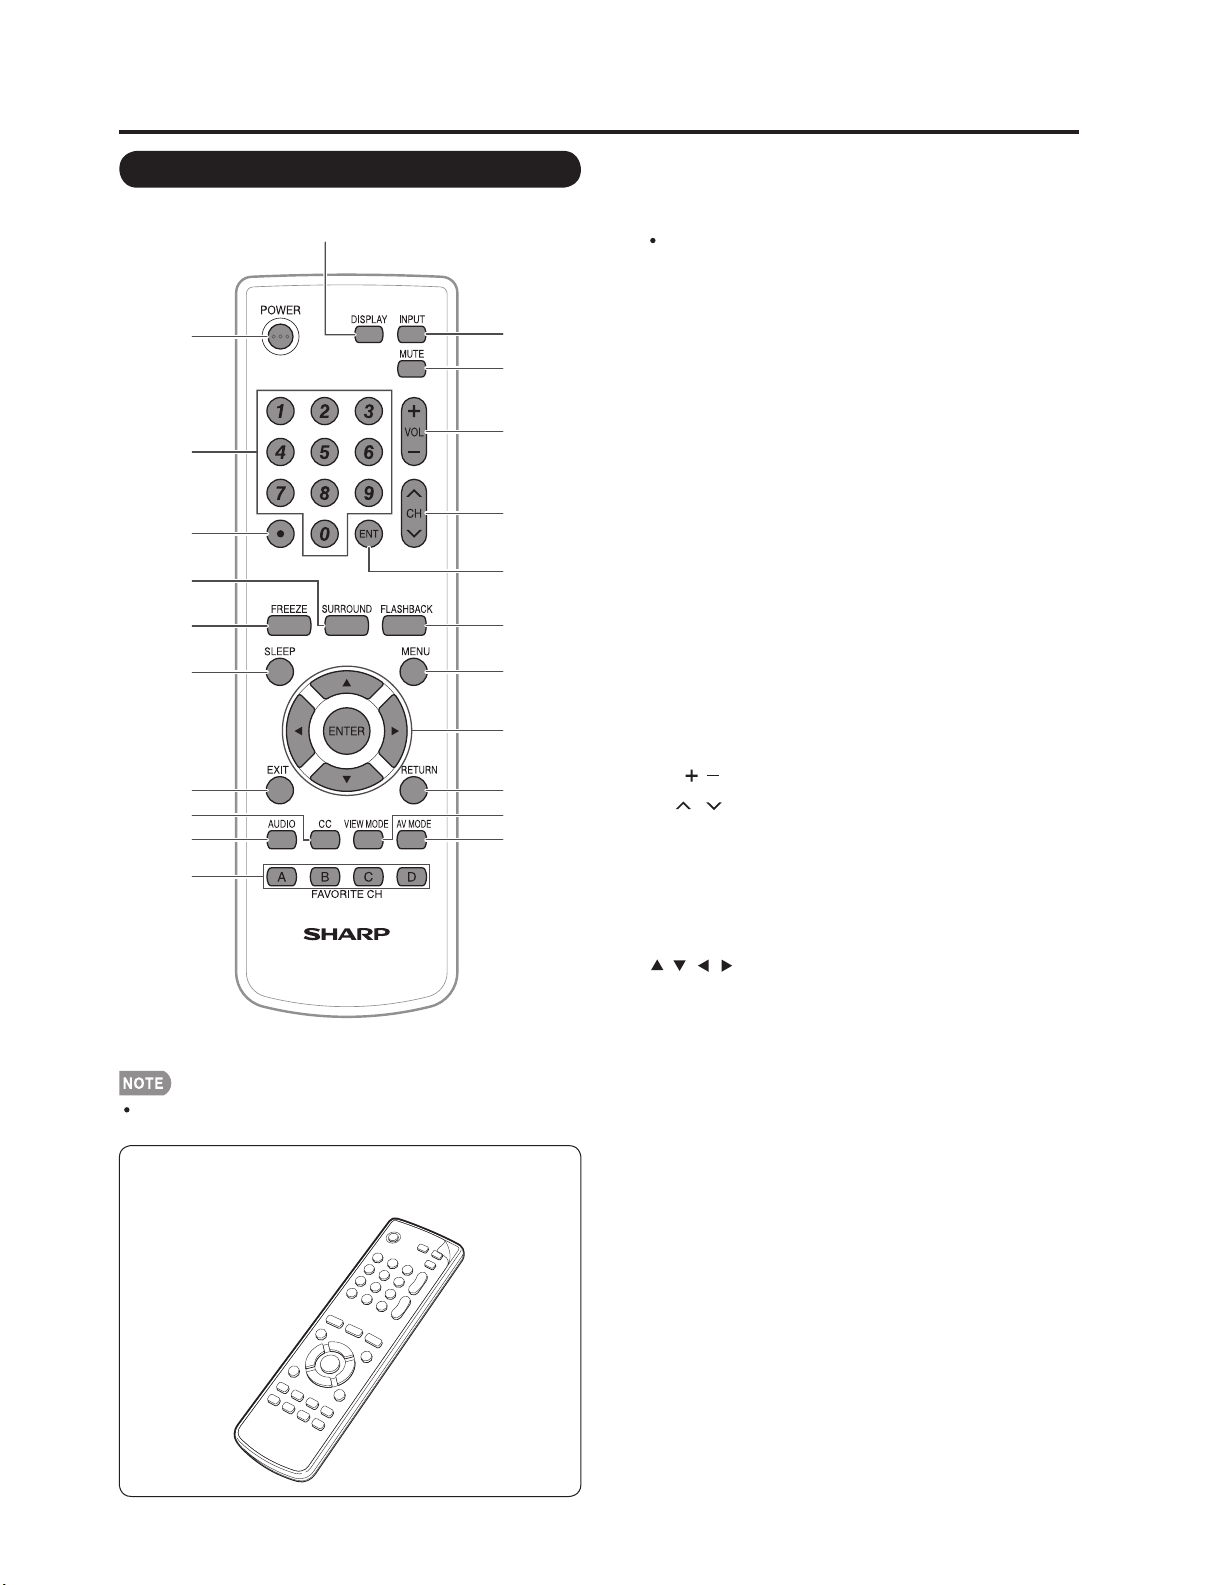
Remote Control Unit
11
1
12
13
14
2
15
3
4
5
6
16
17
18
19
7
8
9
20
21
22
10
When using the remote control unit, point it at the TV.
There is a protective film covering the face of the remote
control. Please remove this film before use.
1 POWER: Switch the TV power on or enters standby.
20–9: Set the channel.
3 (DOT): Jumps to a channel after selecting with the 0–9
buttons.
4 SURROUND: Select Surround settings.
5 FREEZE: Set the still image. Press again to return to
normal screen.
6 SLEEP: Set the sleep timer.
7EXIT:Turn off the menu screen.
8CC:Display captions from a closed-caption source.
9 AUDIO: Selects the MTS/SAP or the audio mode during
multi-channel audio broadcasts.
10 FAVORITE CH
A, B, C, D: Select 4 preset favorite channels in 4 different
categories.
While watching, you can toggle the selected channels by
pressing A, B, C and D.
11 DISPLAY: Display the channel information.
12 INPUT: Select a TV input source. (TV, INPUT 1, INPUT 2,
INPUT 3, INPUT 4, INPUT 5, INPUT 6)
13 MUTE: Mute the sound.
14 VOL / : Set the volume.
15 CH / : Select the channel.
16 ENT: Jumps to a channel after selecting with the 0–9
buttons.
17 FLASHBACK: Return to the previous channel or external
input mode.
18 MENU: Display the menu screen.
19 ///,ENTER: Select a desired item on the screen.
20 RETURN: Return to the previous menu screen.
21 VIEW MODE: Select the screen size.
22 AV MODE: Select an audio or video setting.
(When the input source is TV, INPUT 1, 2 or 3:
STANDARD, MOVIE, GAME, USER, DYNAMIC (Fixed),
DYNAMIC. When the input source is INPUT 4, 5 or 6:
STANDARD, MOVIE, GAME, PC, USER, DYNAMIC
(Fixed), DYNAMIC)
1 – 3
Page 7
QUICK REFERENCE
LC-32R24B
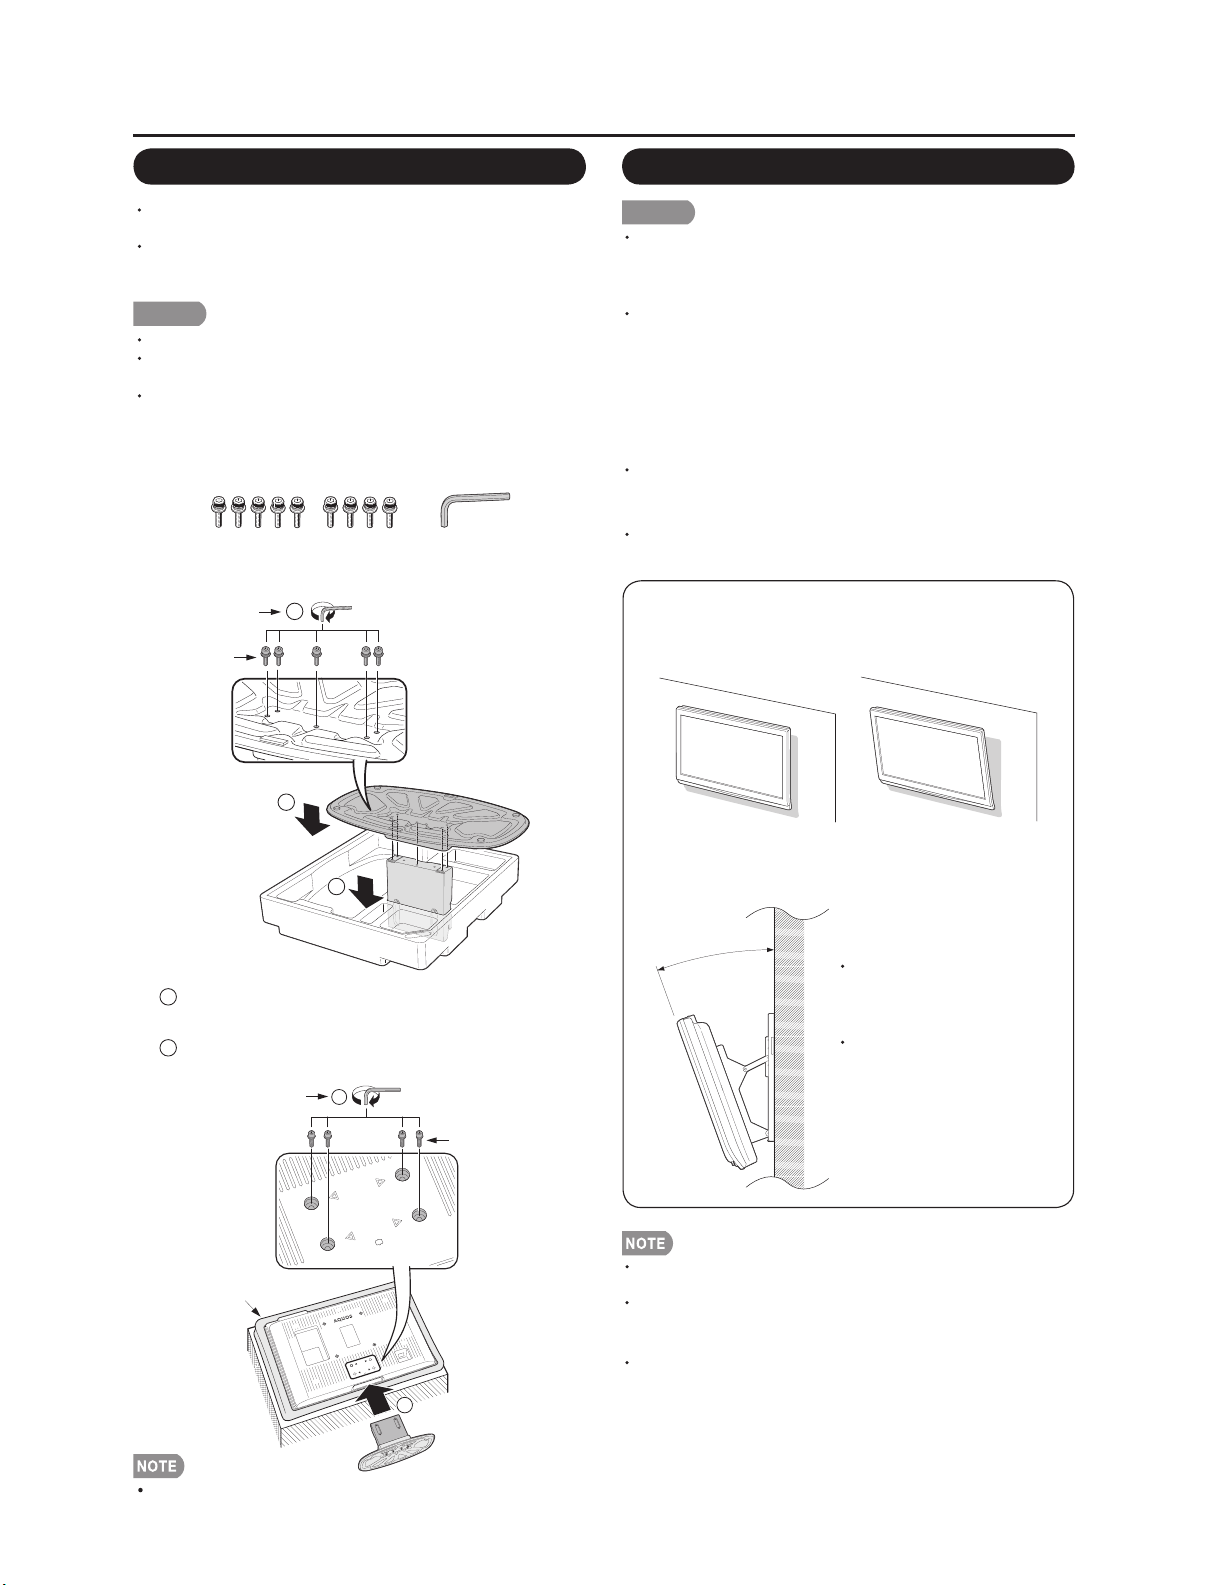
Attaching/Detaching the Stand
Before attaching (or detaching) the stand, unplug the AC
cord from the AC INPUT terminal.
Before performing work spread cushioning over the base
area to lay the TV on. This will prevent it from being
damaged.
CAUTION
Attach the stand in the correct direction.
Do not remove the stand from the TV unless using an
optional wall mount bracket to mount it.
Be sure to follow the instructions. Incorrect installation
of the stand may result in the TV falling over.
1 Confirm that there are 9 screws and a hex key
supplied with the stand unit.
2 Attach the supporting post for the stand unit onto
the base using the box for the stand unit as shown
below.
Hex key
Screws
3
Setting the TV on the Wall
CAUTION
This TV should be mounted on the wall only with the
AN-37AG5 (SHARP) wall mount bracket. The use of
other wall mount brackets may result in an unstable
installation and may cause serious injuries.
Installing the TV requires special skill that should
only be performed by qualified service personnel.
Customers should not attempt to do the work
themselves. SHARP bears no responsibility for
improper mounting or mounting that results in
accident or injury.
Using an optional bracket to mount the TV
You can ask a qualified service professional about
using an optional AN-37AG5 bracket to mount the TV
to the wall.
Carefully read the instructions that come with the
bracket before beginning work.
Hanging on the wall
AN-37AG5 wall mount bracket.
(See the bracket instructions for details.)
2
1
1
3 Insert the stand into the openings on the bottom
of the TV.
2
Insert and tighten the 4 screws into the 4 holes
on the rear of the TV.
Hex key
Soft cushion
2
Screws
1
Vertical mounting Angular mounting
About setting the TV angle
0/5/10/15/20°
The center of the display:
4.0 mm under the “A”
position.
Refer to the operation
manual of AN-37AG5 for
details.
Detach the cable clamp on the rear of the TV when using
the optional mount bracket.
Due to the terminal configuration on this TV, when you
wall-mount this model, make sure there is enough space
between the wall and the TV for the cables.
To use this TV mounted on a wall, first remove the
adhesive tape at the 4 locations on the rear of the TV, and
then use the screws supplied with the wall mount bracket
to secure the bracket to the rear of the TV.
To detach the stand, perform the steps in reverse order.
1 – 4
Page 8
LC-32R24B
Appendix
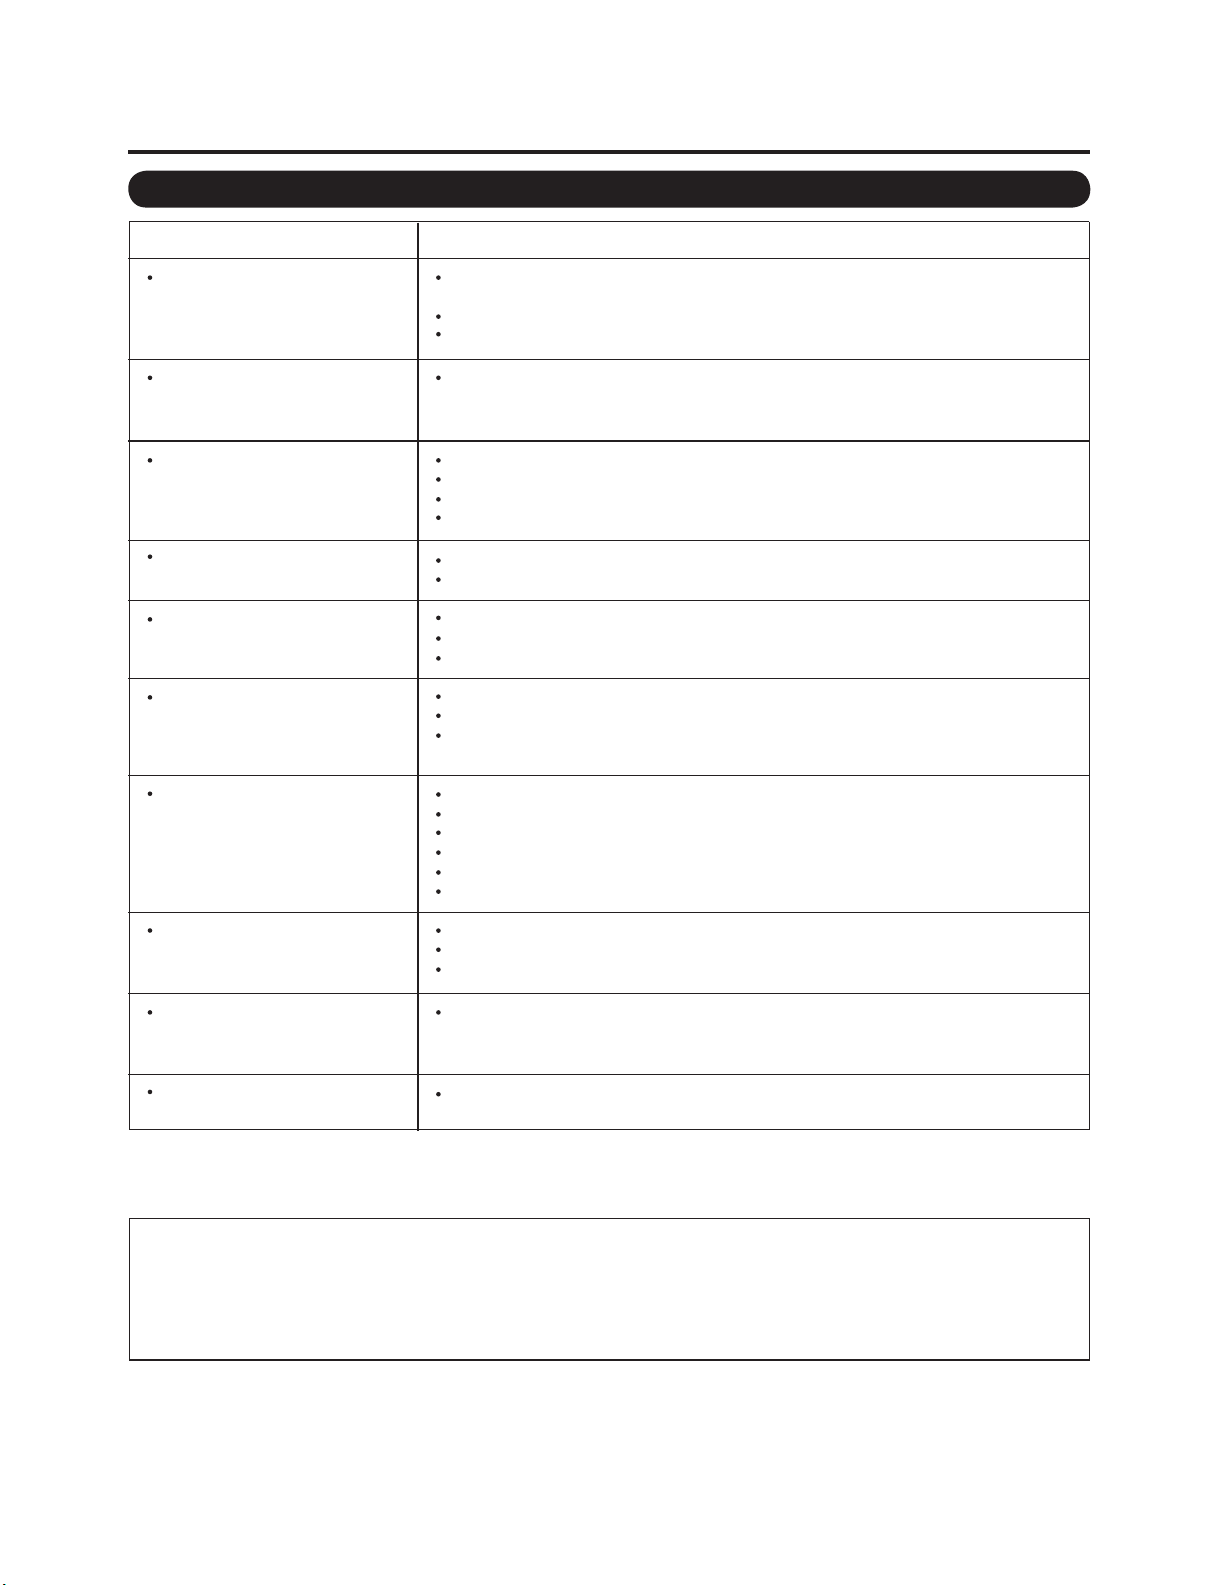
Troubleshooting
Problem
No power
Unit cannot be operated.
Remote control unit does not
operate.
Picture is cut off/with sidebar
screen.
Strange color, light color, or color
misalignment
Power is suddenly turned off.
No picture
Possible Solution
Check if you pressed POWER on the remote control unit. If the
indicator on the TV does not light up, press POWER on the TV.
Is the AC cord disconnected?
Has the power been turned on?
External influences such as lightning, static electricity, may cause improper operation.
In this case, operate the unit after first turning off the power of the TV or unplugging
the AC cord and replugging it in after 1 or 2 minutes.
Are batteries inserted with polarity (+, -) aligned?
Are batteries worn out? (Replace with new batteries.)
Are you using it under strong or fluorescent lighting?
Is a fluorescent light illuminated near the remote control sensor?
Is the image position correct?
Are screen mode adjustments such as picture size made correctly?
Adjust the picture tone.
Is the room too bright? The picture may look dark in a room that is too bright.
Check the input signal setting.
Is the sleep timer set?
Check the power control settings.
The unit's internal temperature has increased. Remove any objects blocking vent or
clean.
Is connection to other components correct?
Is correct input signal source selected after connection?
Is the correct input selected?
Is picture adjustment correct?
Is “On” selected in “Audio Only”?
Is a non-compatible signal being input?
No sound
The TV sometimes makes a
cracking sound.
monochrome.
Is the volume too low?
Is “Variable” selected in “Output Select”?
Have you pressed MUTE on the remote control unit?
This is not a malfunction. This happens when the cabinet slightly expands and
contracts according to change in temperature. This does not affect the TV's
performance.
Is the correct CH color system selected?The screen image displays in
Cautions regarding use in high and low temperature environments
When the unit is used in a low temperature space (e.g. room, office), the picture may leave trails or appear slightly delayed.
This is not a malfunction, and the unit will recover when the temperature returns to normal.
Do not leave the unit in a hot or cold location. Also, do not leave the unit in a location exposed to direct sunlight or near a
heater, as this may cause the cabinet to deform and the Liquid Crystal panel to malfunction.
Storage temperature: -20°C to +60°C
1 – 5
Page 9
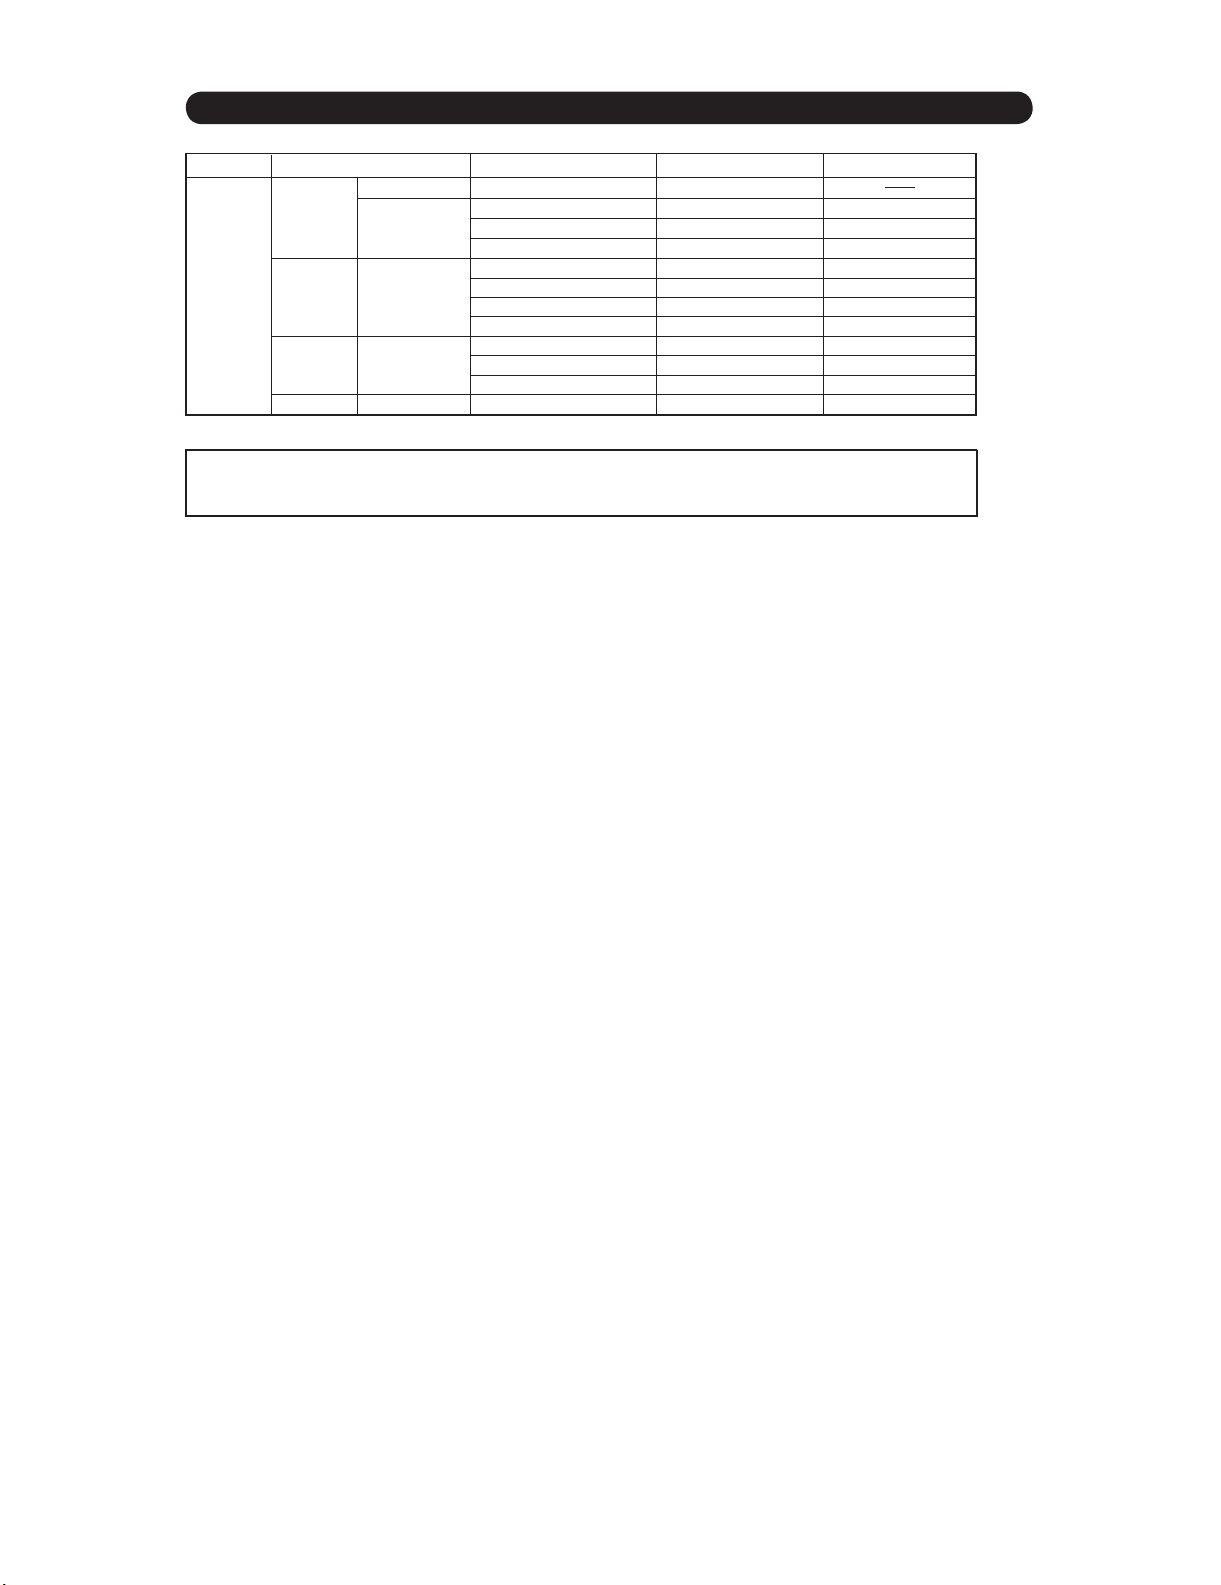
PC Compatibility Chart
It is necessary to set the PC correctly to display XGA and WXGA signal.
PC Horizontal Frequency VESA StandardResolution Vertical Frequency
720 x 400
VGA
PC
XGA 1024 x 768
WXGA 1360 x 768
*These 4 formats are not supported by the analog RGB terminal.
DDC is a registered trademark of Video Electronics Standards Association.
Power Management is a registered trademark of Sun Microsystems, Inc.
VGA and XGA are registered trademarks of International Business Machines Corp.
640 x 480
800 x 600SVGA
31.5 kHz
31.5 kHz
37.9 kHz
37.5 kHz
35.1 kHz
37.9 kHz
48.1 kHz
46.9 kHz
48.4 kHz
56.5 kHz
60.0 kHz
47.7 kHz
70 Hz
60 Hz
72 Hz
75 Hz
56 Hz
60 Hz
72 Hz
75 Hz
60 Hz
70 Hz
75 Hz
60 Hz
LC-32R24B
O
O
O
O
O
O
O
O
O
O
O
*
*
*
*
1 – 6
Page 10
LC-32R24B
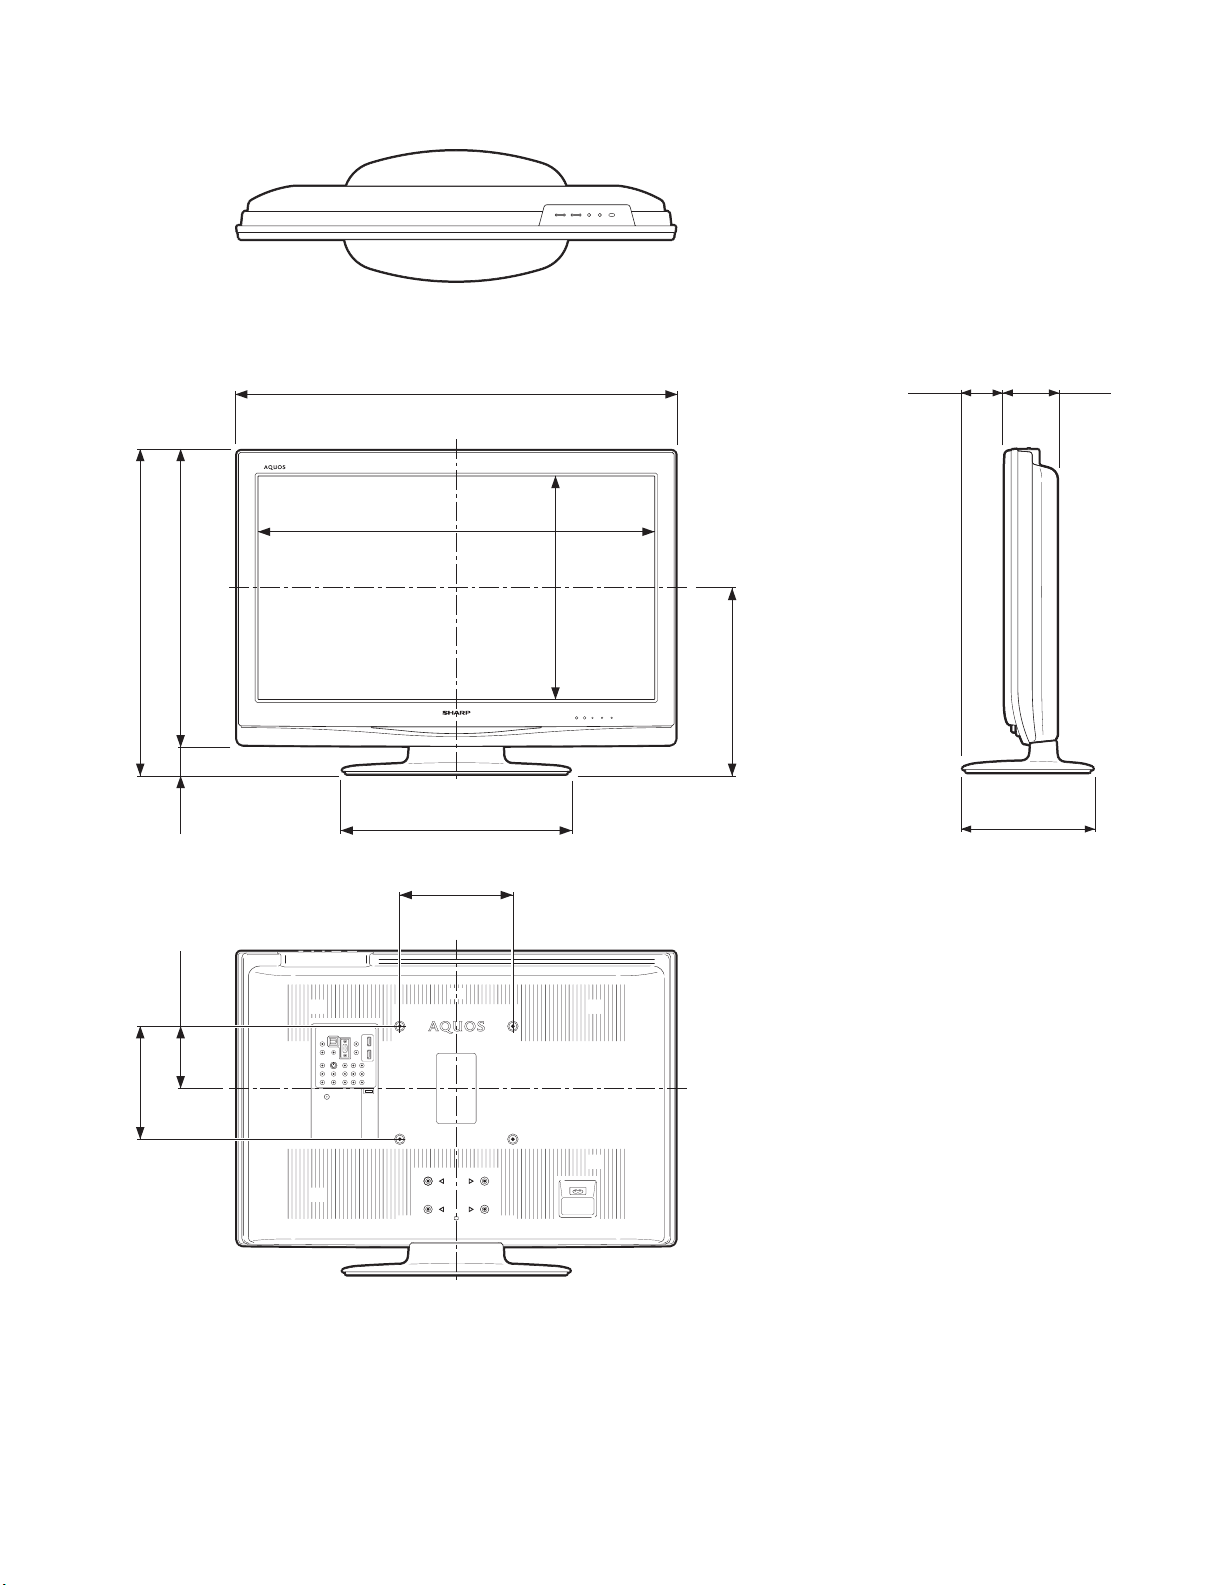
[3] DIMENSIONS
Unit: mm
575
523
52
699.2
776
402
200
74 94
393.8
332
230
200
110
1 – 7
Page 11
CHAPTER 2. REMOVING OF MAJOR PARTS
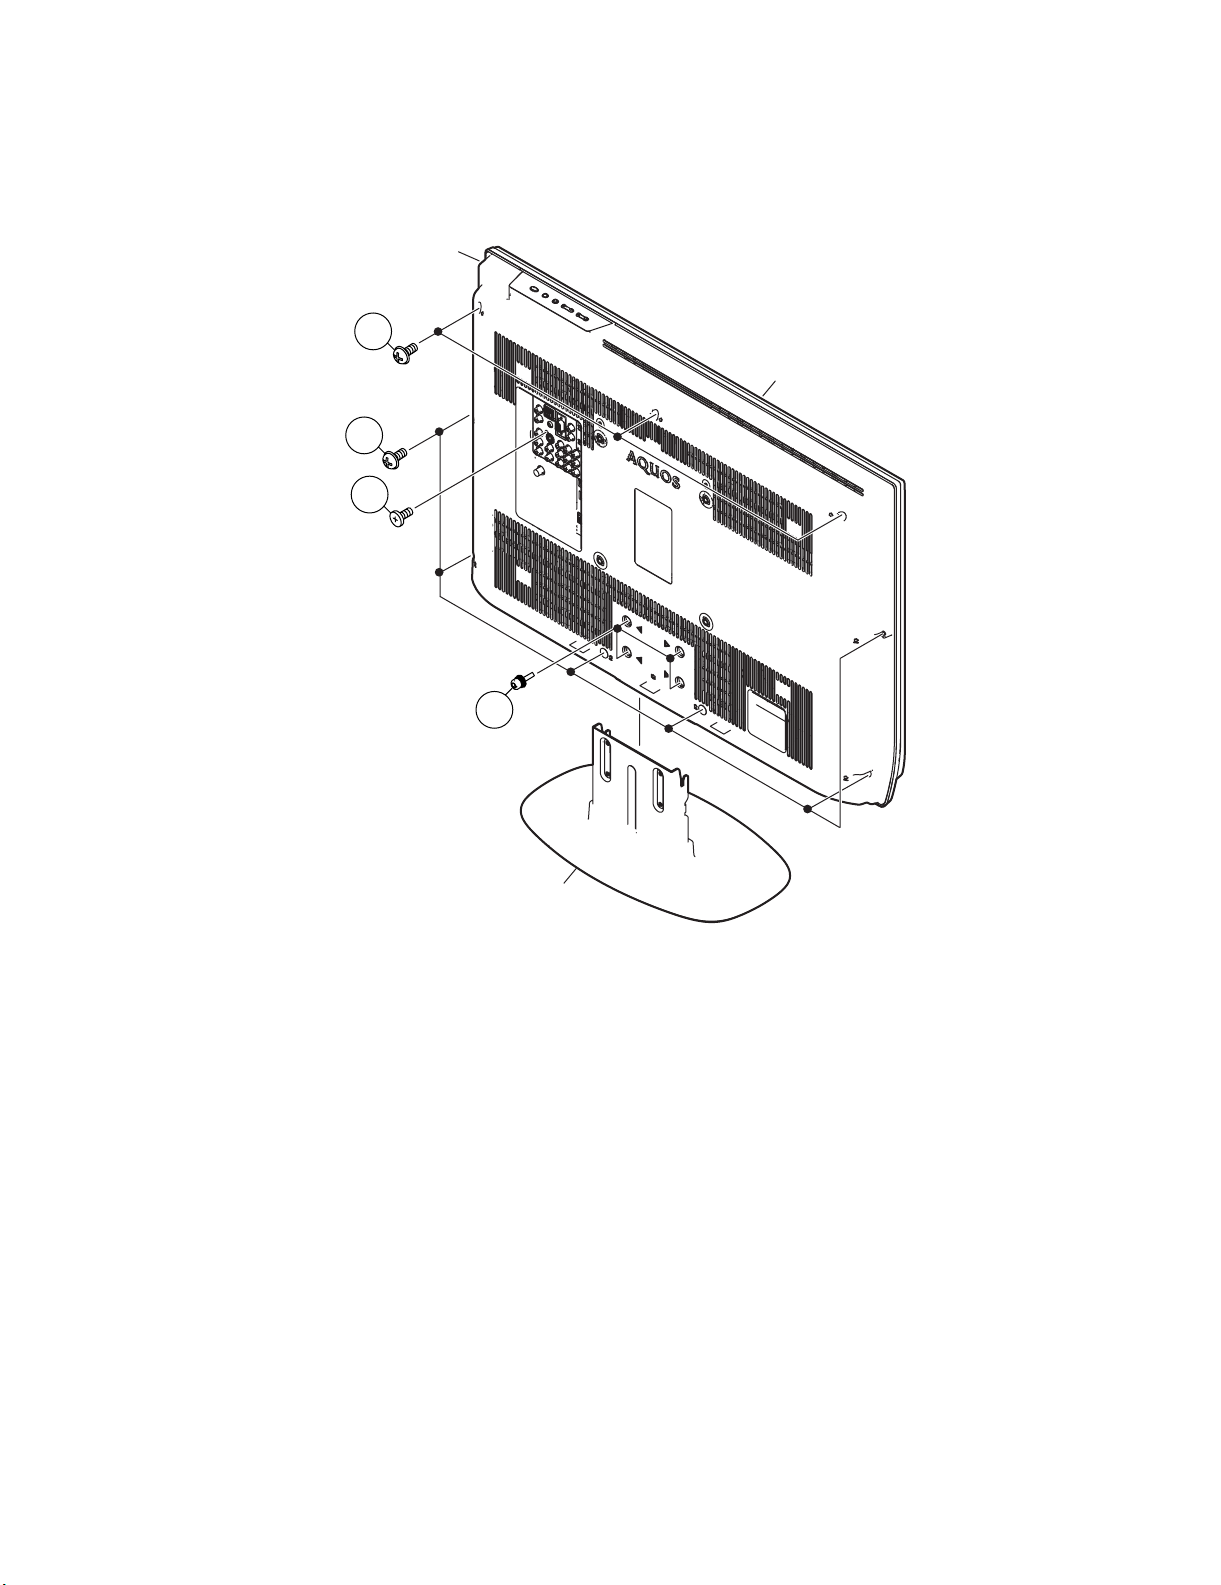
[1] REMOVING OF MAJOR PARTS
1. Remove the 4 lock screws and detach the Stand.
2. Remove the 3 lock screws, 6 lock screws, 1 lock screw and detach the Rear Cabinet.
Rear Cabinet
2
2
2
LC-32R24B
Front Cabinet
1
Stand
2 – 1
Page 12
LC-32R24B
Leandro Palmeira
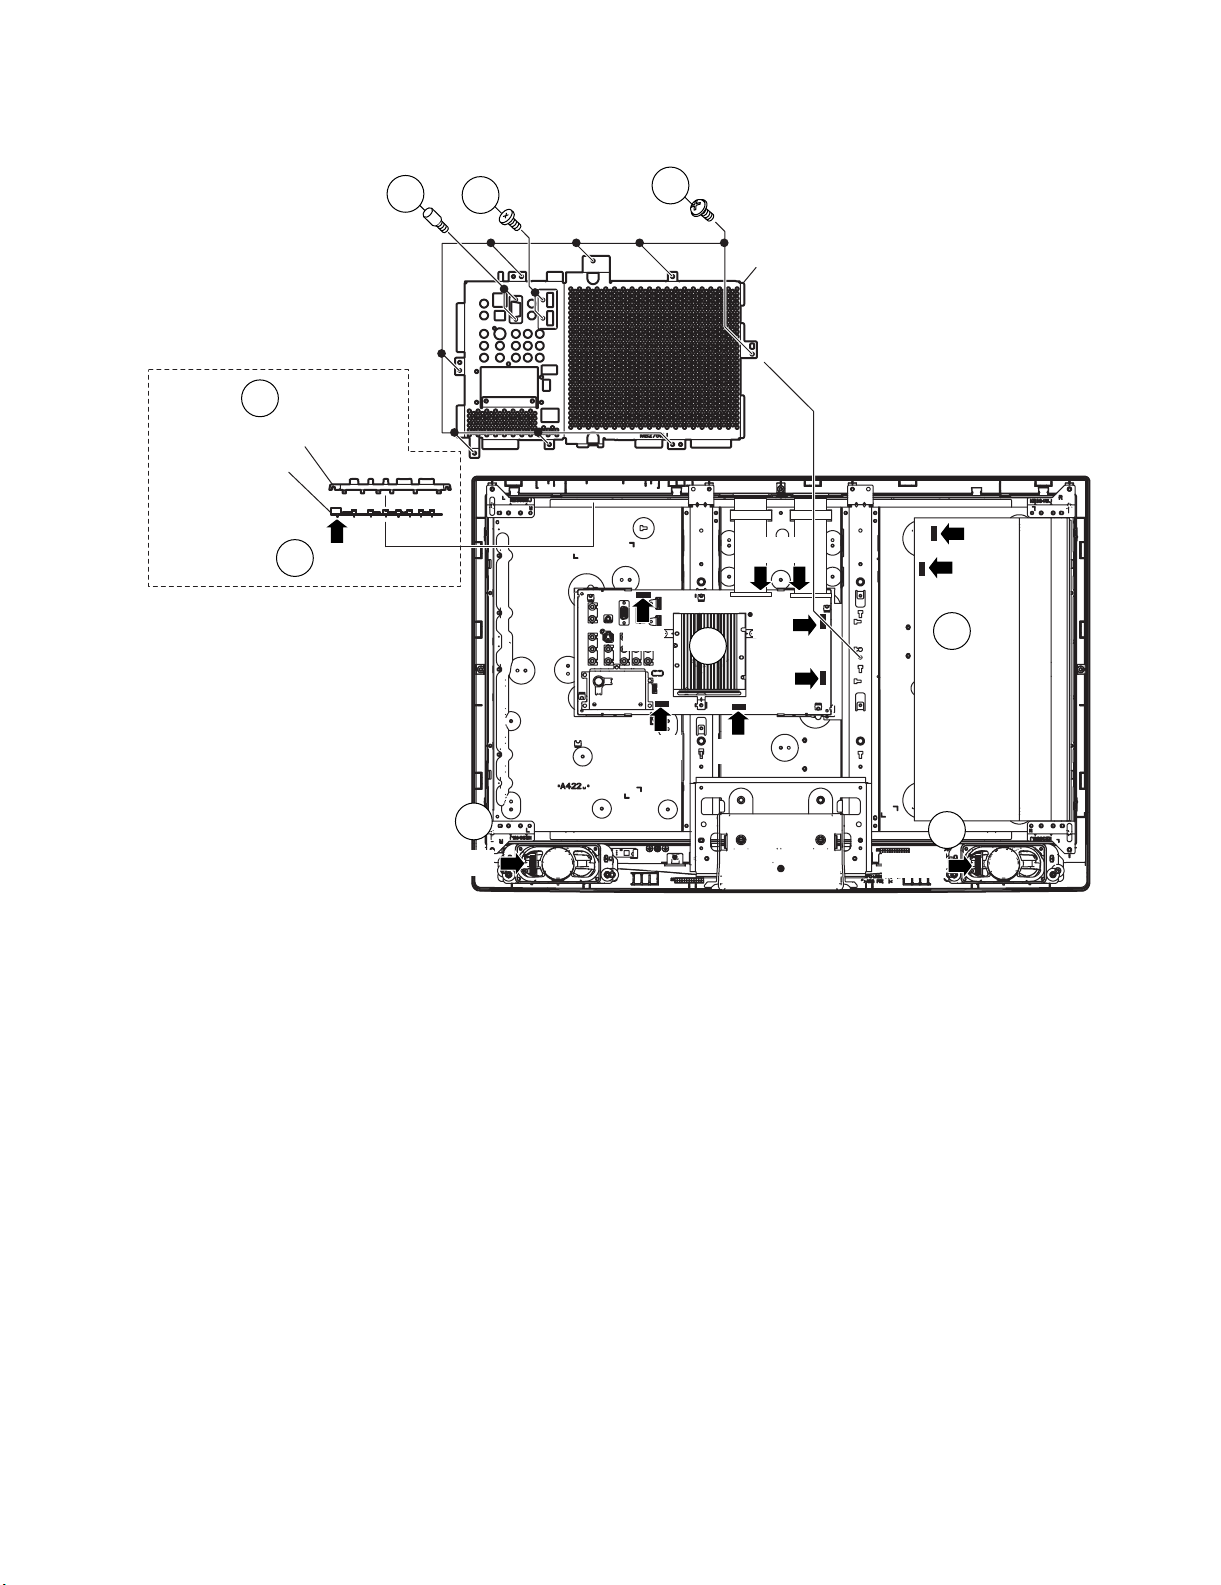
3. Remove the 8 lock screws, 2 lock screws, 2 lock shafts and detach the Main Shield.
4. Disconnect all the connectors from all the PWBs.
5. Remove the KEY Unit Ass'y.
KEY Unit Ass'y
5
Operation Button
KEY Unit
4
KM
3
3
3
Main Shield
LB
FPC
PD
KM
LB
4
4
PD
RA
SP
4
SP-R
4
SP-L
2 – 2
Page 13
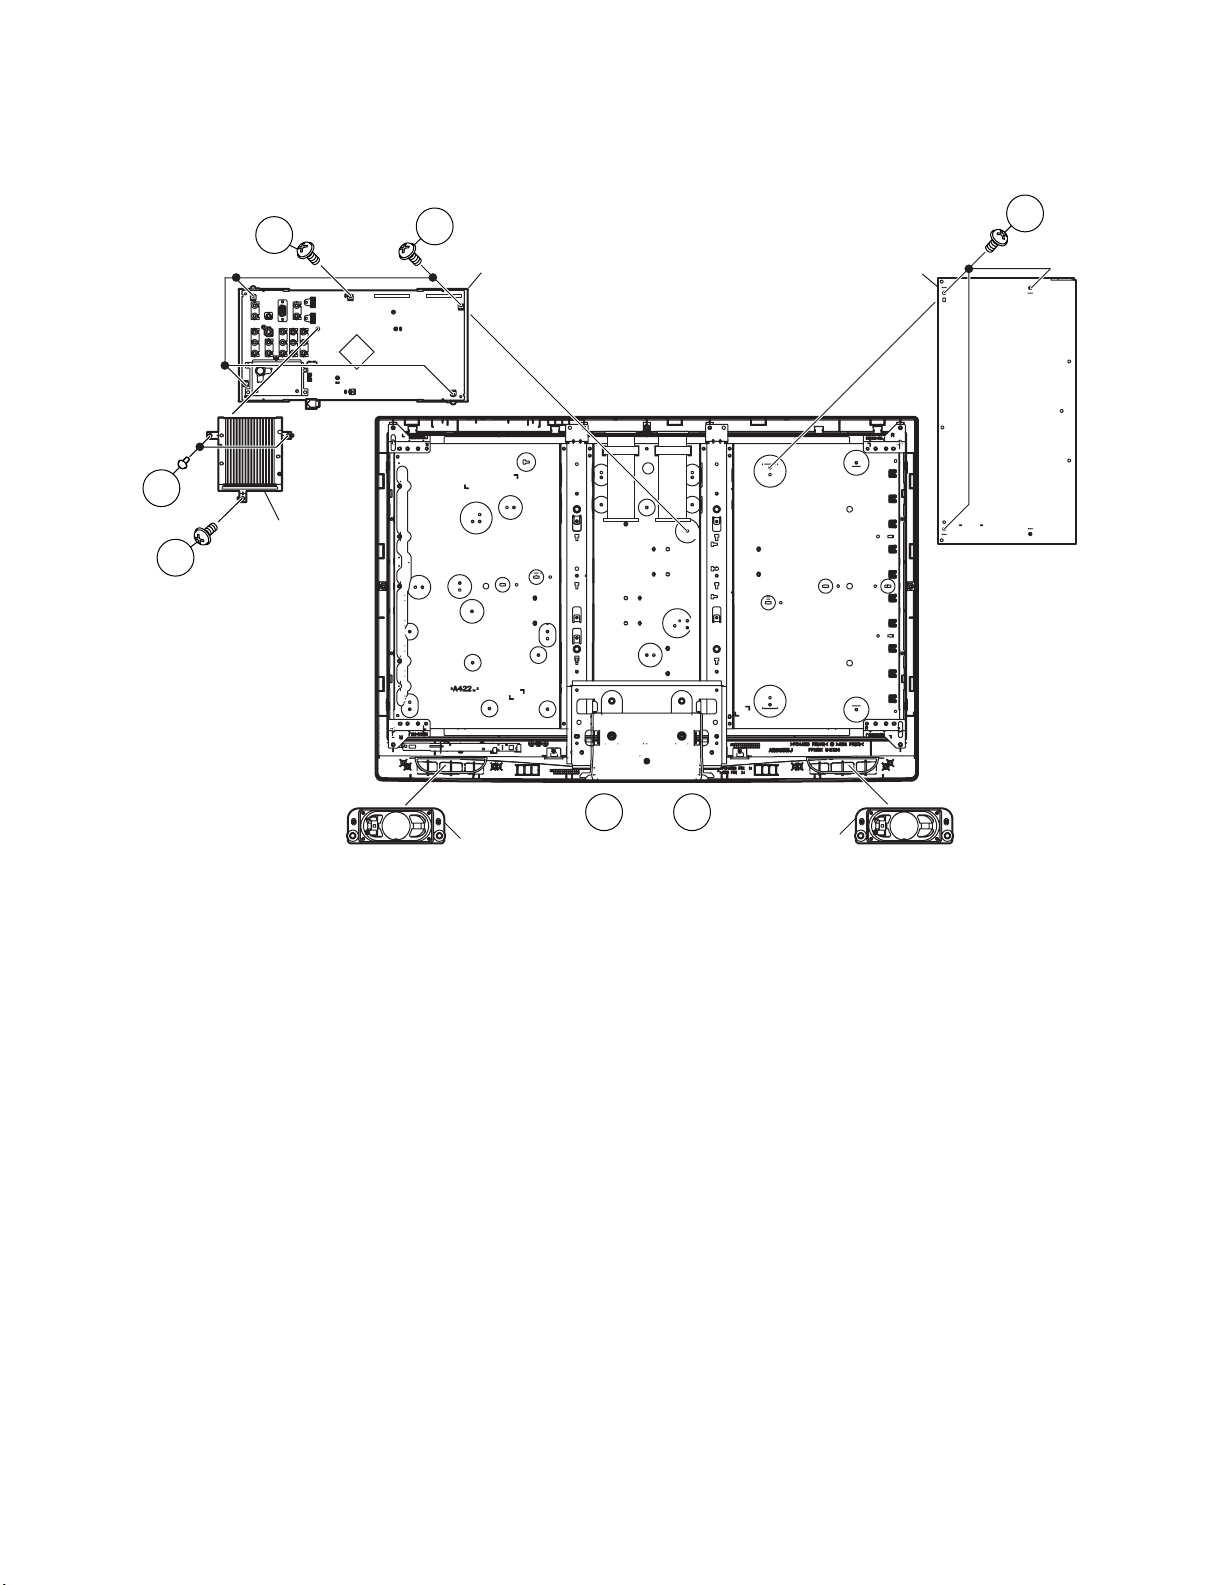
6. Remove the Speaker (L) (R).
Leandro Palmeira
7. Remove the 3 lock screws and detach the POWER/INVERTER Unit.
8. Remove the 4 lock screws, 2 lock screws and detach the MAIN Unit.
9. Remove the 2 lock rivets and detach the Heat Sink.
LC-32R24B
8
8
MAIN Unit
POWER/INVERTER Unit
7
9
Heat Sink
8
Speaker (R)
6
6
Speaker (L)
2 – 3
Page 14
LC-32R24B
Leandro Palmeira
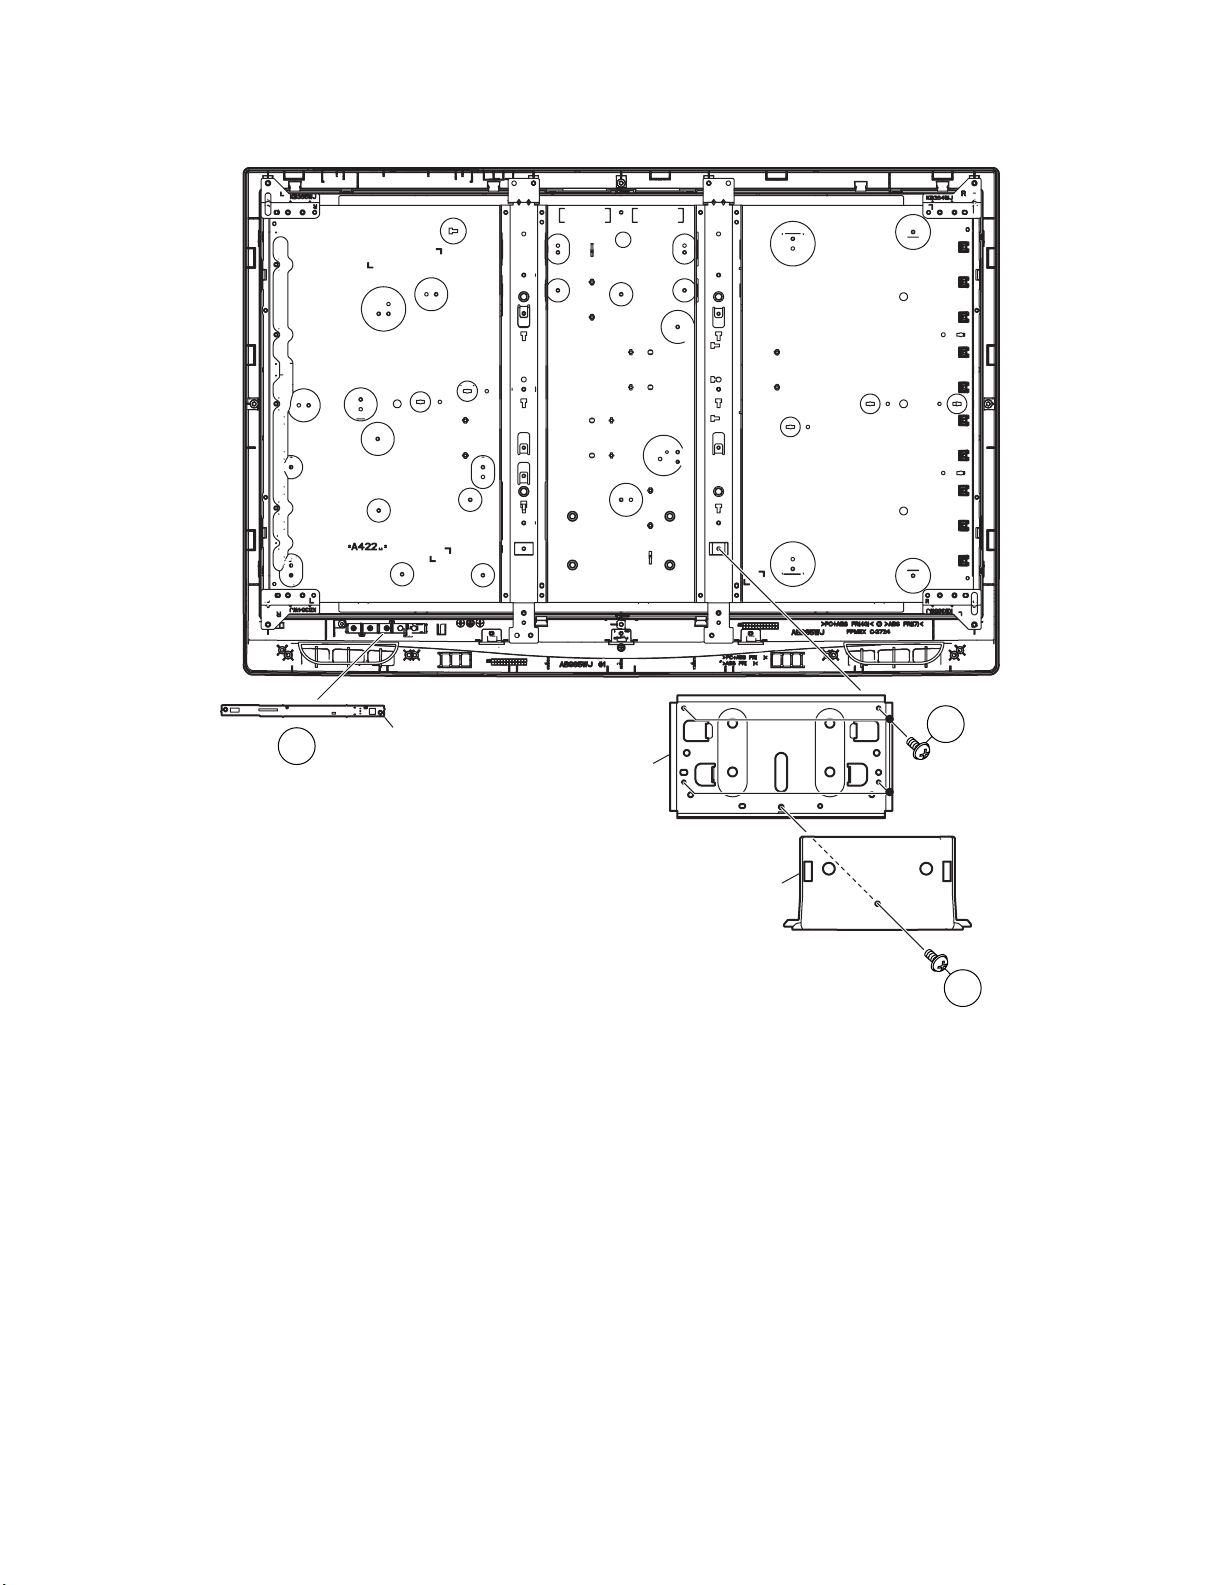
10.Remove the 1 lock screw and detach the Bottom Cover.
11.Remove the 4 lock screws and detach the Stand Fix Angle.
12.Remove the R/C, LED Unit.
12
R/C, LED Unit
Stand Fix Angle
11
Bottom Cover
10
2 – 4
Page 15
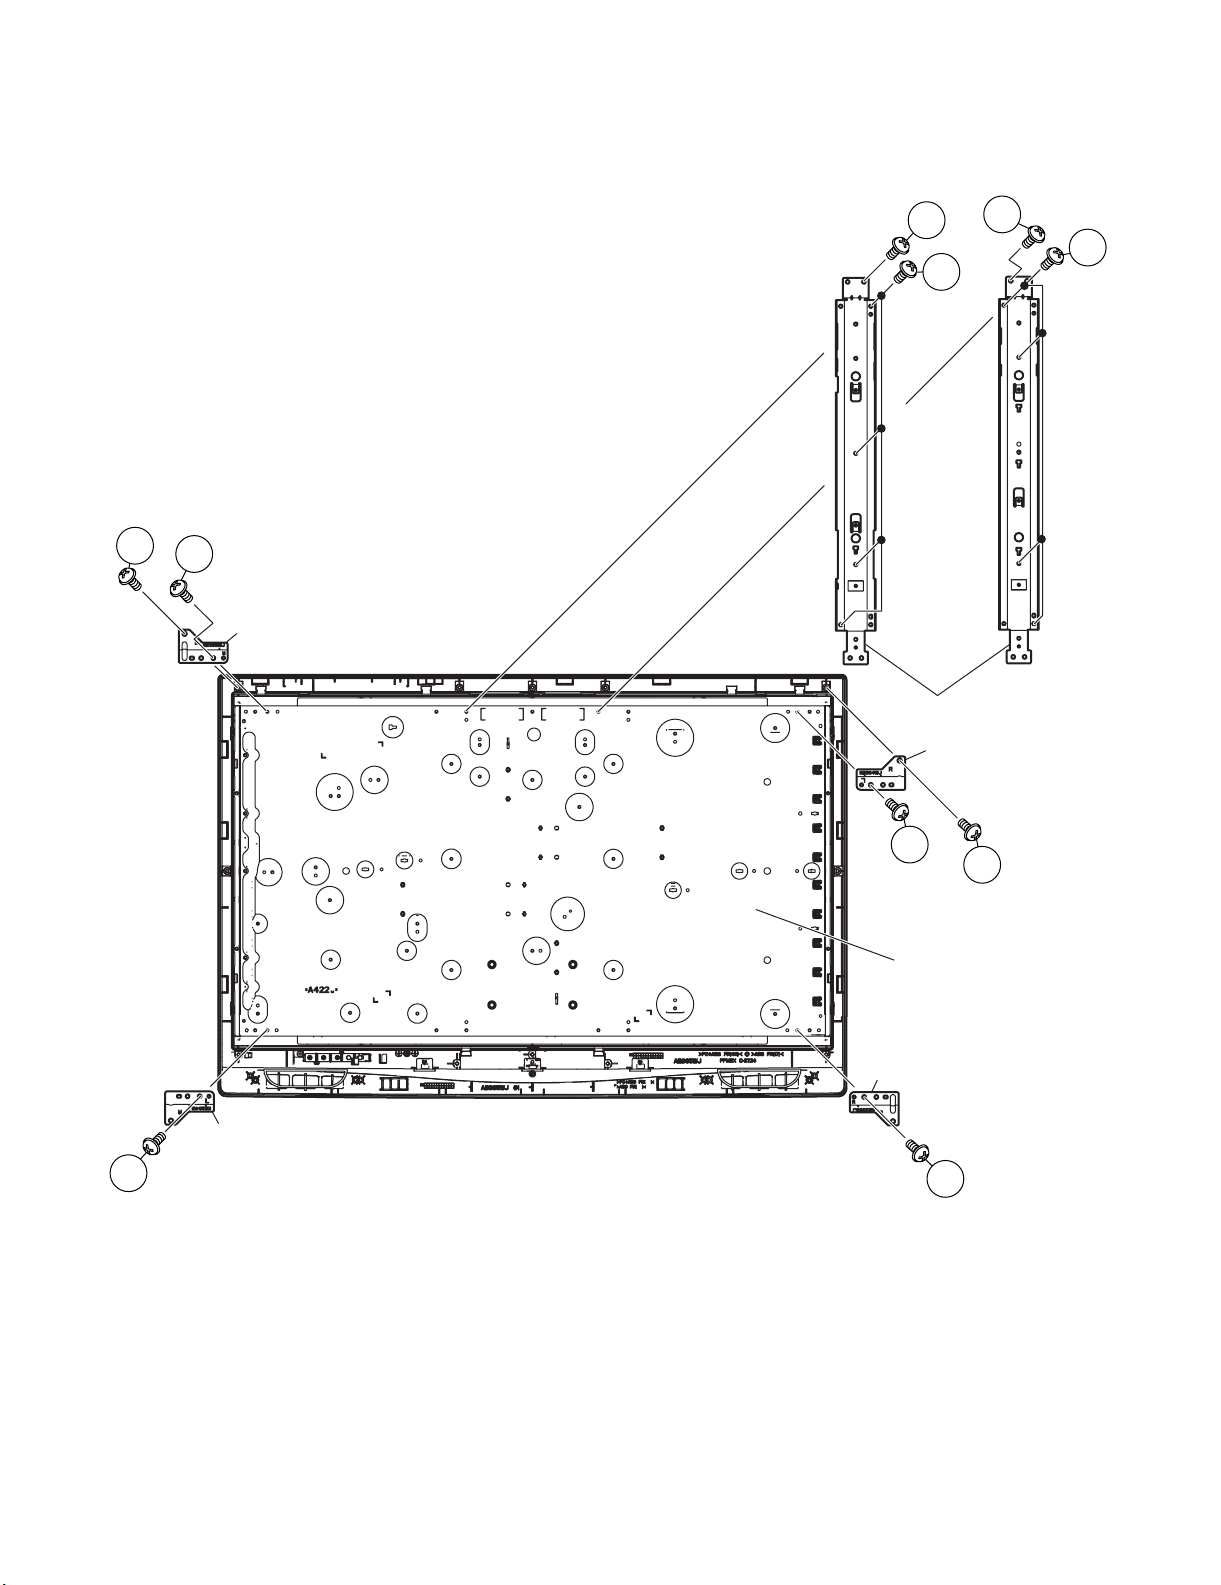
13.Remove the 4 lock screws and detach the LCD Panel Module.
Leandro Palmeira
14.Remove the 2 lock screws and detach the LCD Fix Angle-A.
15.Remove the 2 lock screws and detach the LCD Fix Angle-B.
16.Remove the 8 lock screws and detach the VESA Angle.
LC-32R24B
13
15
LCD Fix Angle-B
13
13
16
VESA Angle
LCD Fix Angle-A
16
14
14
13
LCD Panel Module
LCD Fix Angle-B
LCD Fix Angle-A
15
2 – 5
Page 16
LC-32R24B
Leandro Palmeira
CHAPTER 3. ADJUSTMENT
[1] ADJUSTMENT PROCEDURE
The adjustment values are set to the optimum conditions at the factory before shipping. If a value should become improper or an adjustment is
required due to part replacement, make an adjustment according to the following procedure.
1. After replacement of any PWB unit and/or IC for repair, please note the following.
• When replacing the following units, make sure to prepare the new units loaded with updated software.
MAIN Unit: DUNTKE450FM09
2. Upgrading of each microprocessor software
CAUTION: Never “POWER OFF” the unit when software upgrade is ongoing.
Otherwise the system may be damaged beyond recovery.
2.1. Software version upgrade
The model employs the following software.
•Main software
• Monitor microprocessor software.
• Panel timing controller software.
The main software, monitor microprocessor software, and Panel timing controller software can be upgraded by using a general-purpose USB Memory.
The followings are the procedures for upgrading, explained separately for the main software, monitor microprocessor software, and Panel timing controller software.
2.2. Main software version upgrade
2.2.1 Get ready before you start
• USB Memory of 128MB or higher capacity.
• PC running on Windows 98/98SE/ME/2000/XP operating system.
• USB Memory reader/writer or PC with a USB port.
• The file system of a USB memory is FAT. (FAT32 is not applied)
• Use the USB memory without other functions. (lock and memory reader...etc)
2.2.2 Preparations
To upgrade the main software, it is necessary to get ready the USB Memory for version upgrade before you start.
Follow the steps below and create the USB Memory for version upgrade.
1. Copy the file R24BAxxx.USB (named temporarily) for version upgrade to the root directory (folder) of the USB Memory.
NOTE: In the USB Memory drive, do not store other folders or unrelated files, or more than one file for version upgrade.
Now the USB Memory for version upgrade is ready.
2.2.3 How to upgrade the software
1. Unplug the AC cord.
2. Insert the USB Memory for version upgrade (prepared as above) into the service socket located Right side from center at terminals, below HDMI4
terminal in the rear of the unit.
3. Plug in the AC cord with power button pressed down after 5 seconds, unpress the power button.
4. After the unit startup, the system upgrade screen as shown below appears within 20-40 seconds.
4$
U0808221B
3 – 1
Page 17
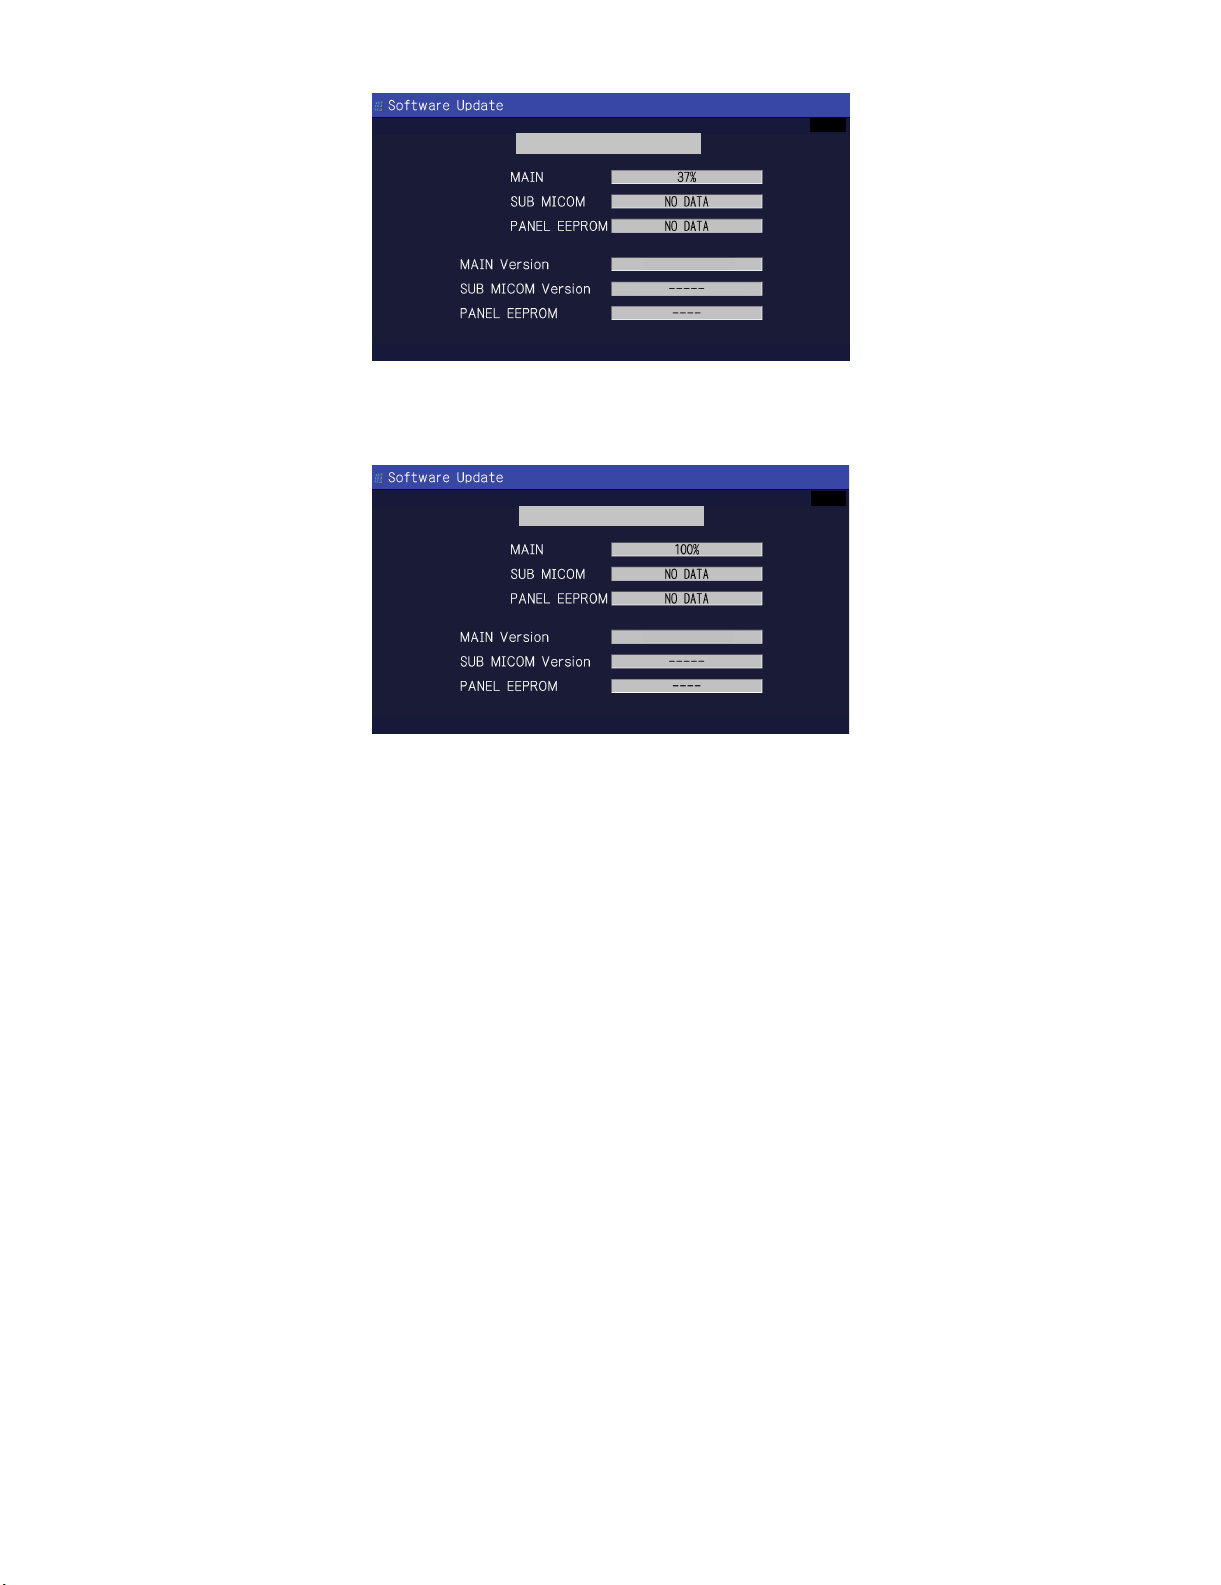
5. Even a single failure in the process will trigger the upgrade failure screen.
Leandro Palmeira
LC-32R24B
UPGRADE FAILURE
4$
U0808221B
NOTE: In the event of a failure, repeat the upgrade process. If the process repeatedly fails, it is l kely that the hardware need fixing.
6. Upon completion of the whole process, the upgrade success screen as shown below appears. You can check the new software version on this
screen. The version information appears after the upgrade is complete.
UPGRADE SUCCESS
4$
U0808221B
7. Unplug the AC cord and remove the USB Memory for version upgrade.
8. Now the software version upgrade is complete.
NOTE: When you are done with the software version upgrade, start the set, go to the top page of the adjustment process screen and check the main
software version information.
3 – 2
Page 18
LC-32R24B
Leandro Palmeira
2.3. Monitor microprocessor software version upgrade
Create the USB memory for monitor microprocessor software version upgrade in the same manner as explained in the “Main software version
upgrade”.
Copy the file R24BAxxx.USB and D44UMxxx.BIN (named temporarily) for monitor microprocessor software version upgrade to the USB memory.
2.3.1 How to upgrade the software
1. Unplug the AC cord.
2. Insert the USB memory for version upgrade (prepared as above) into the service socket located Right side from center at terminals, below HDMI4
terminal in the rear of the unit.
3. Plug in the AC cord with power button pressed down.
4. After 5 seconds, unpress the power button.
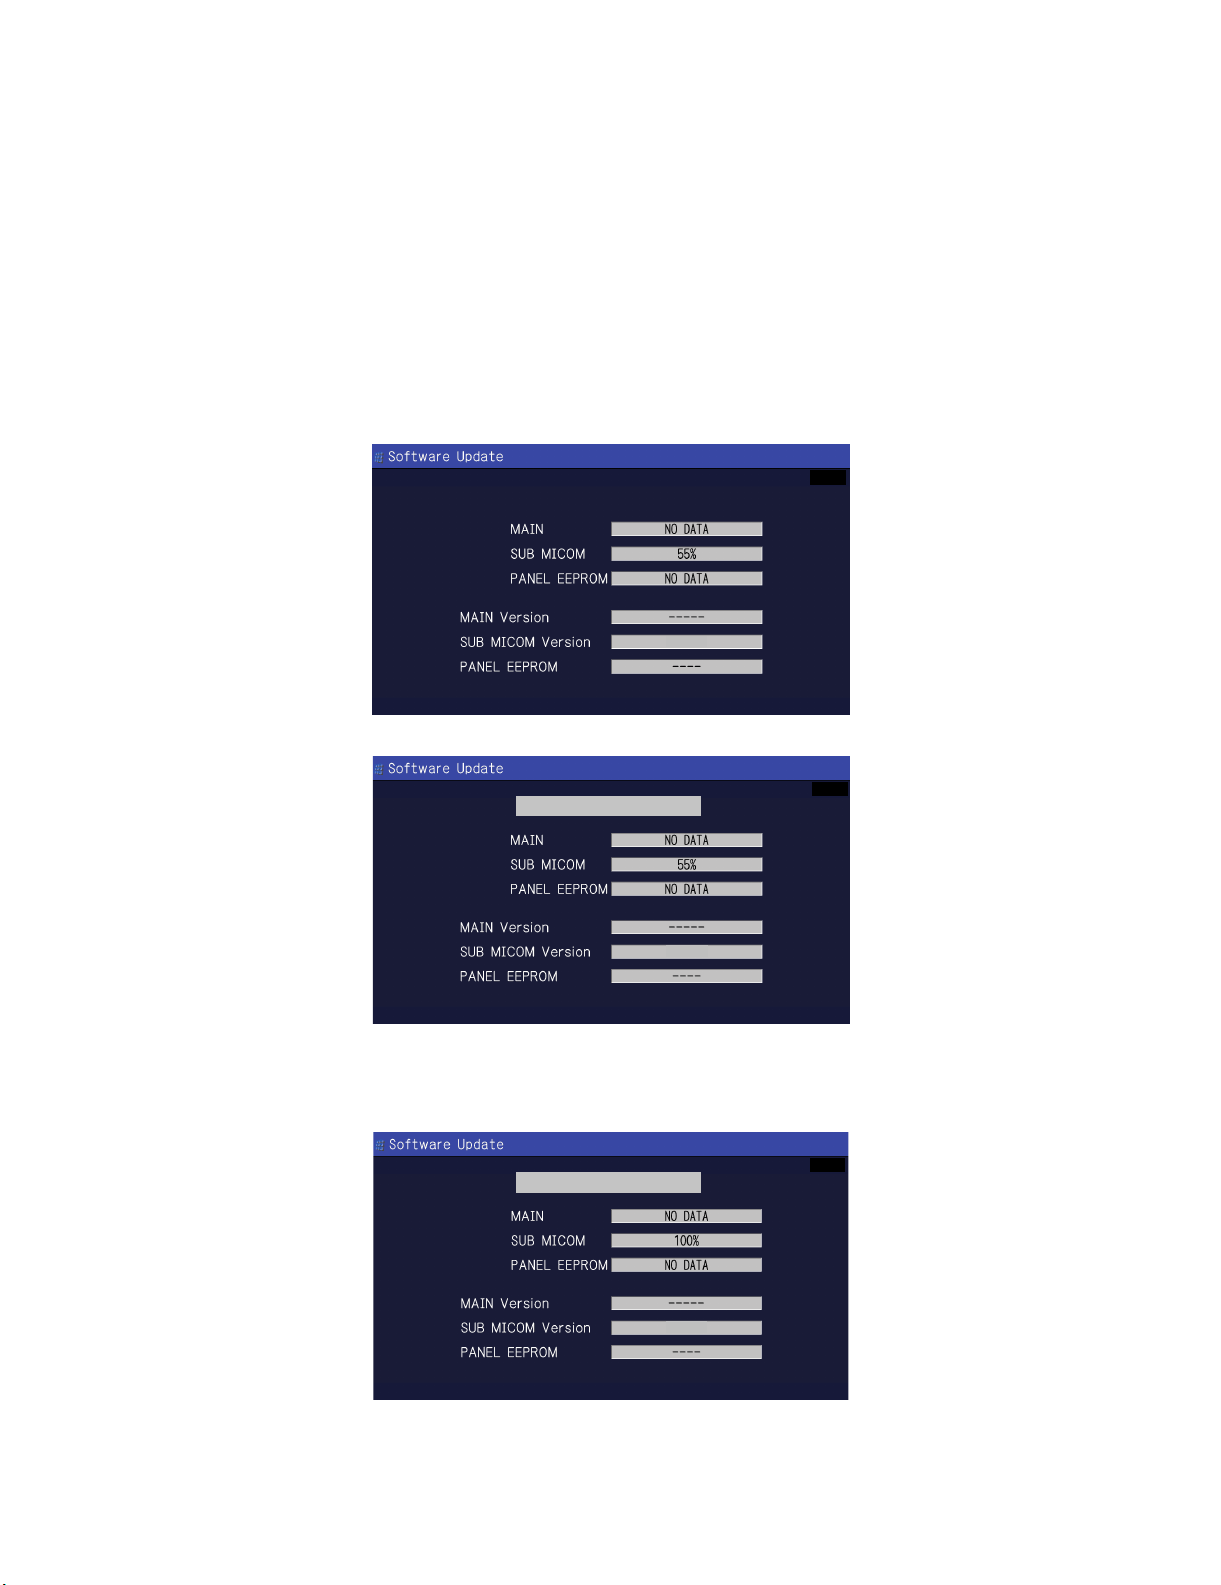
CAUTION: • The moment this operation is done, the upgrading of the monitor microprocessor software starts. While the upgrade is ongoing, never
5. After the unit startup, the upgrade starts. The power LED will blink continuously. Also, an upgrade screen will be shown during a minor upgrade.
power off the unit. Otherwise the upgrade will fail and the system may be serious damaged beyond recovery (inability to start).
• After the monitor microprocessor software is upgraded, also perform the 'Industry Init'.
4$
1.02
6. If the upgrade fails, power LED will stop blinking. Also, the upgrade failure screen will be shown if upgrade screen was shown at 5.
UPGRADE FAILURE
4$
1.02
NOTE: In the event of a transient failure, upgrade will be automatically retried up to three times. If the process repeatedly fails, hardware may be the
cause.
7. Up on completion of the whole process, power and OPC LED will blink alternately. Also, the upgrade success screen will be shown if upgrade
screen was shown at 5.
UPGRADE SUCCESS
4$
8. Unplug the AC cord and remove the USB Memory for version upgrade.
9. Now the software version upgrade is complete.
NOTE: When you are done with the software version upgrade, start the set, go to the top page of the adjustment process screen and check the mon-
1.02
itor microprocessor software version information and panel size information.
3 – 3
Page 19
LC-32R24B
Leandro Palmeira
2.4. Upgrading Panel timing controller software
Create the USB memory for Panel timing controller software version upgrade in the same manner as explained in the “Main software version
upgrade.”
Copy the file R24BAxxx.USB and D44UAxxx.TCD to USB memory.
2.4.1 How to upgrade the software
1. Unplug the AC cord.
2. Insert the USB Memory for version upgrade (prepared as above) into the service socket located Right side from center at terminals, below HDMI4
terminal in the rear of the unit.
3. Plug in the AC cord with power button pressed down after 5 seconds, unpress the power button.
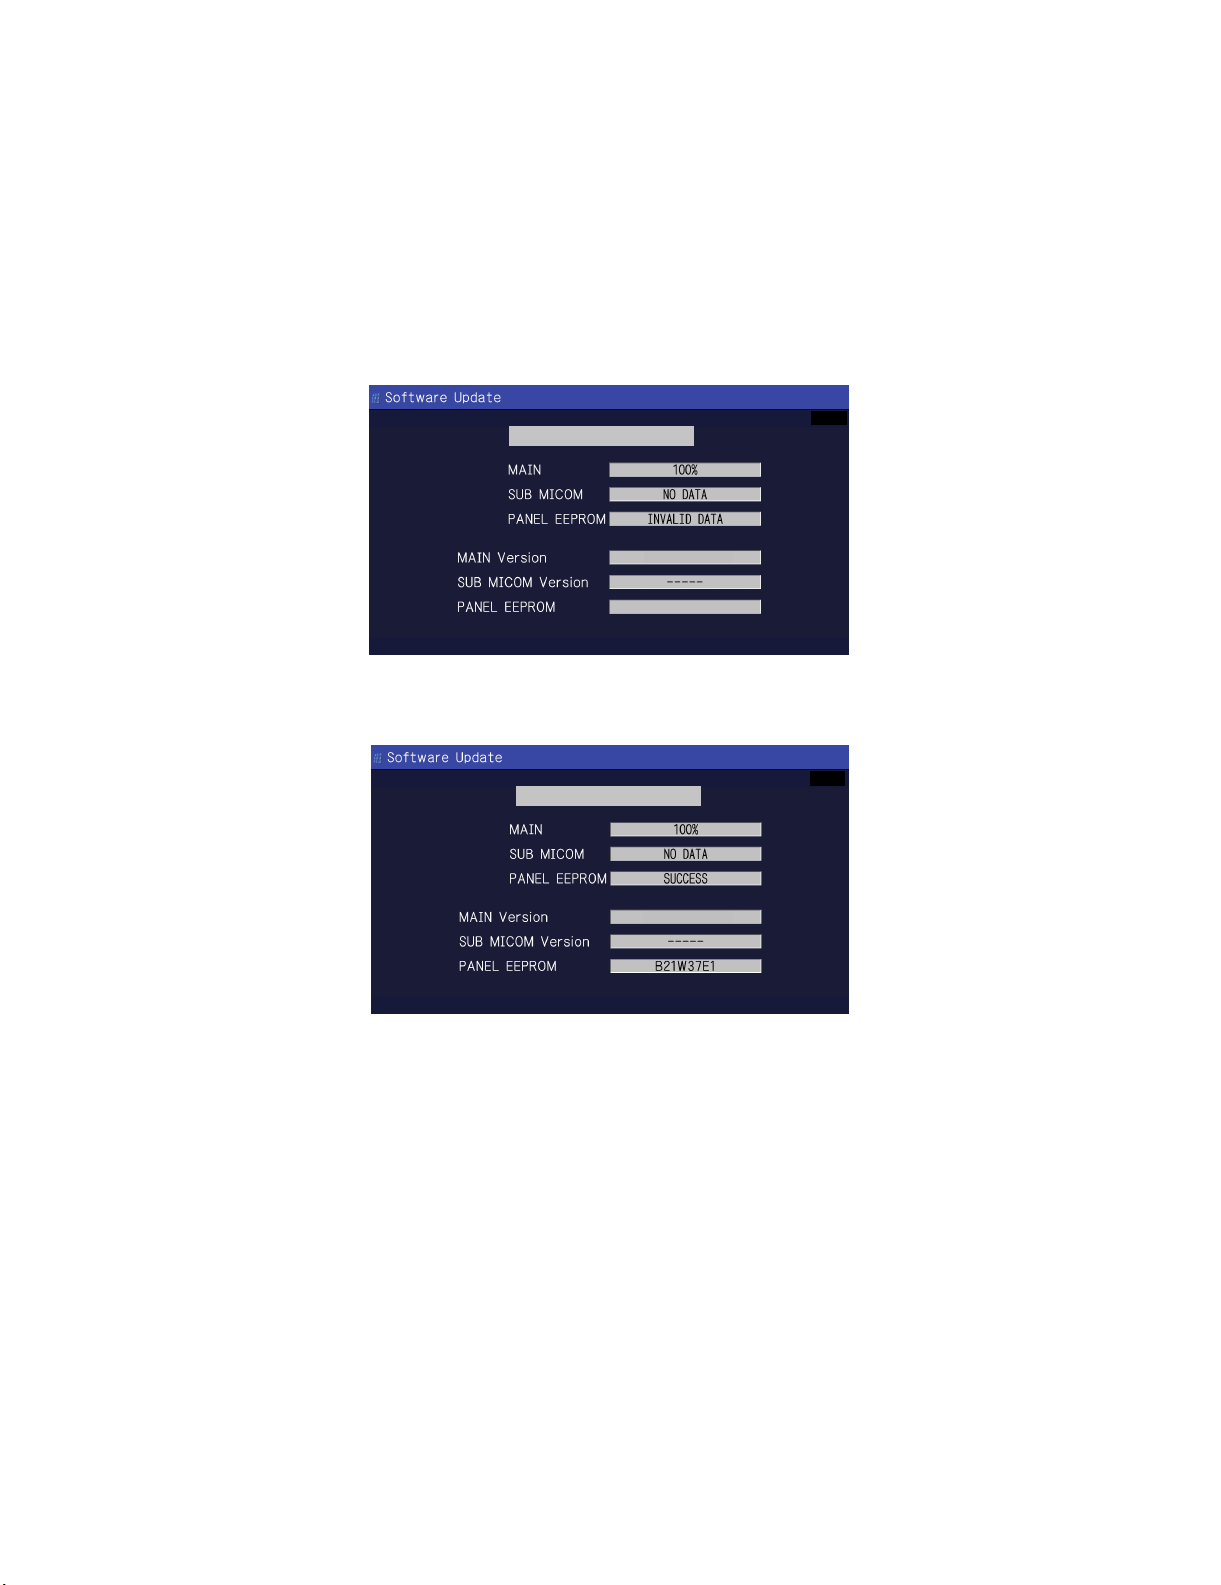
4. After the unit startup, the upgrade starts. The screen is not shown. This take about a minute.
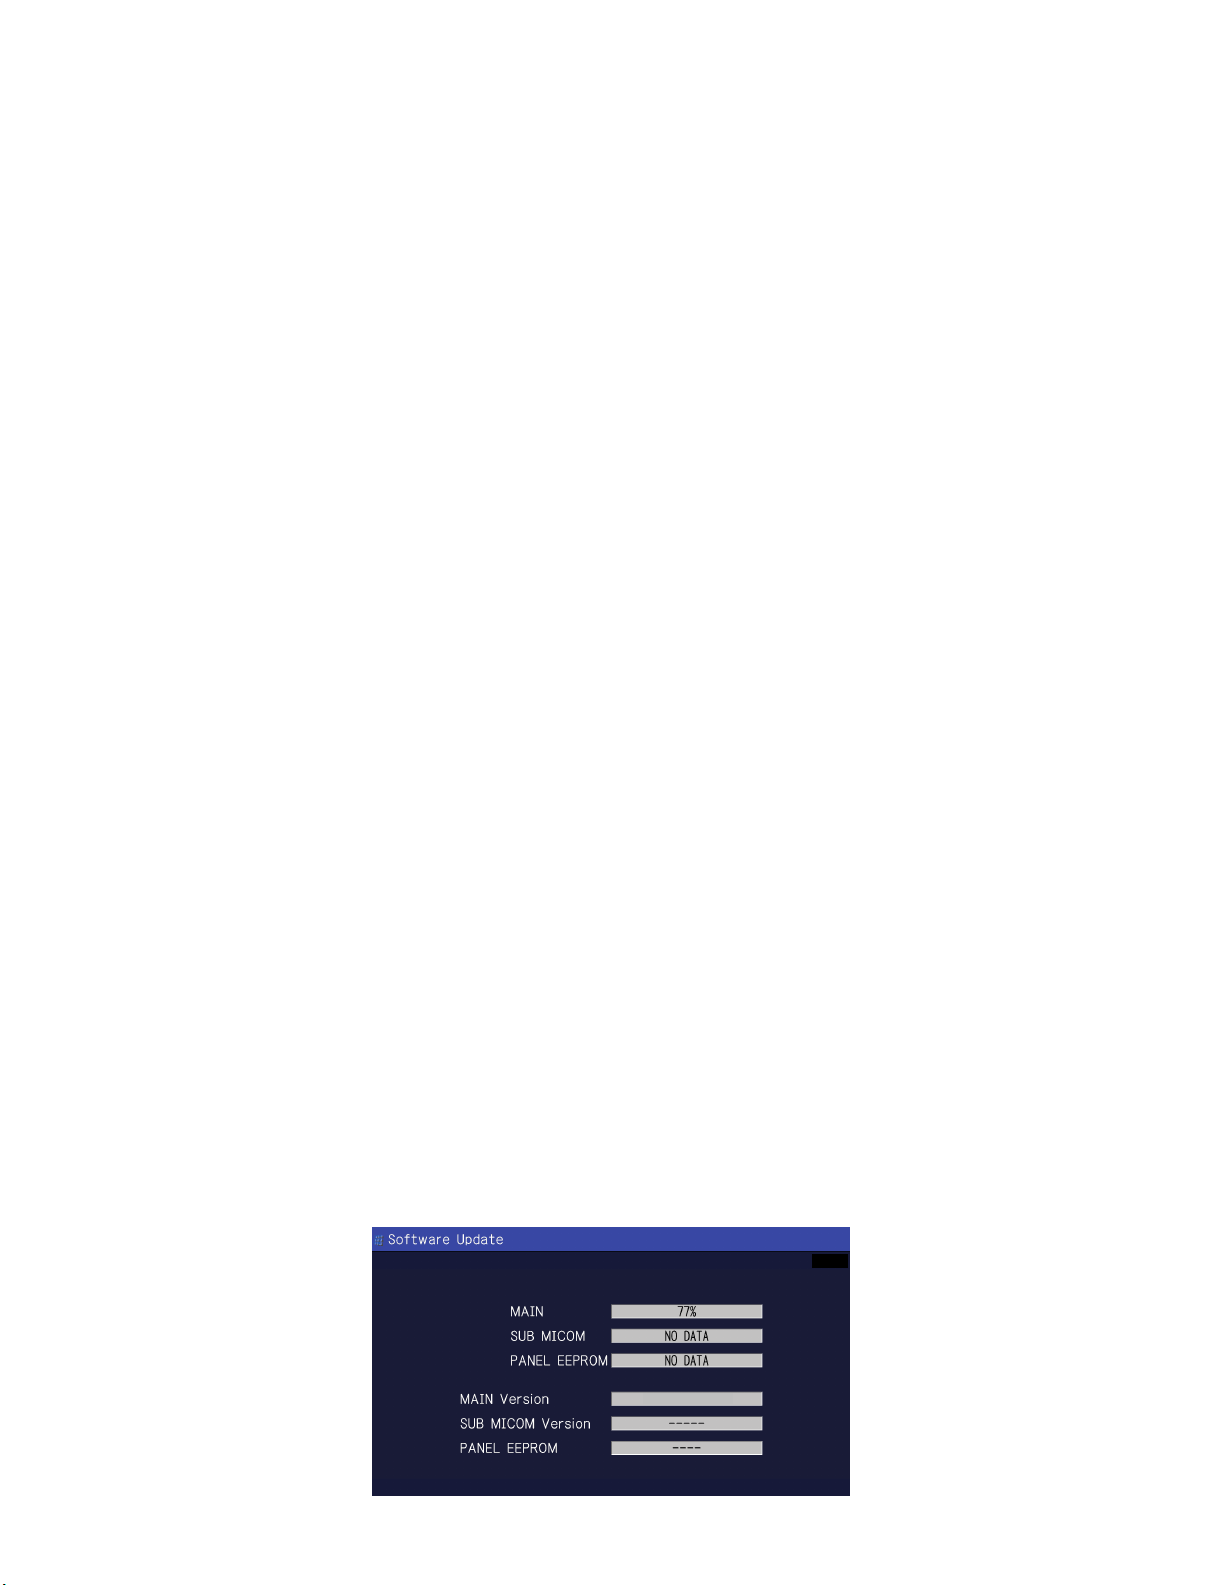
5. When there is an error, ‘PANEL EEPROM’ field display the type. Ignore ‘UPGRADE SUCCESS’ that is displayed at the top.
UPGRADE SUCCESS
4$
U0808221B
6. Upon completion of the whole process, the upgrade success screen as shown below appears. You can check the new software version on this
screen. The version information appears after the upgrade is complete.
UPGRADE SUCCESS
4$
U0808221B
7. Unplug the AC cord and remove the USB Memory for version upgrade.
8. Now the software version upgrade is complete.
3 – 4
Page 20
LC-32R24B
Leandro Palmeira
3. Entering and exiting the adjustment process mode
1) Before entering the adjustment process mode, the AV position RESET in the video adjustment menu.
2) While holding down the “VOL (–)” and “INPUT” keys at a time, plug in the AC cord of the main unit to turn on the power.
The letter “<K>” appears on the screen.
3) Next, hold down the “VOL (–)” and “CH ( )” keys at a time.
(The “VOL (–)” and “CH ( )” keys should be pressed and held until the display appears.)
Multiple lines of blue characters appearing on the display indicate that the unit is now in the adjustment process mode.
When you fail to enter the adjustment process mode (the display is the same as normal startup), retry the procedure.
4) To exit the adjustment process mode after the adjustment is done, unplug the AC cord from the outlet to make a forced shutdown. (When the
power was turned off with the remote controller, once unplug the AC cord and plug it again. In this case, wait 10 seconds or so before plugging.)
CAUTION: Use due care in handling the information described here lest your users should know how to enter the adjustment process mode. If the
4. Remote controller key operation and description of display in adjustment process mode
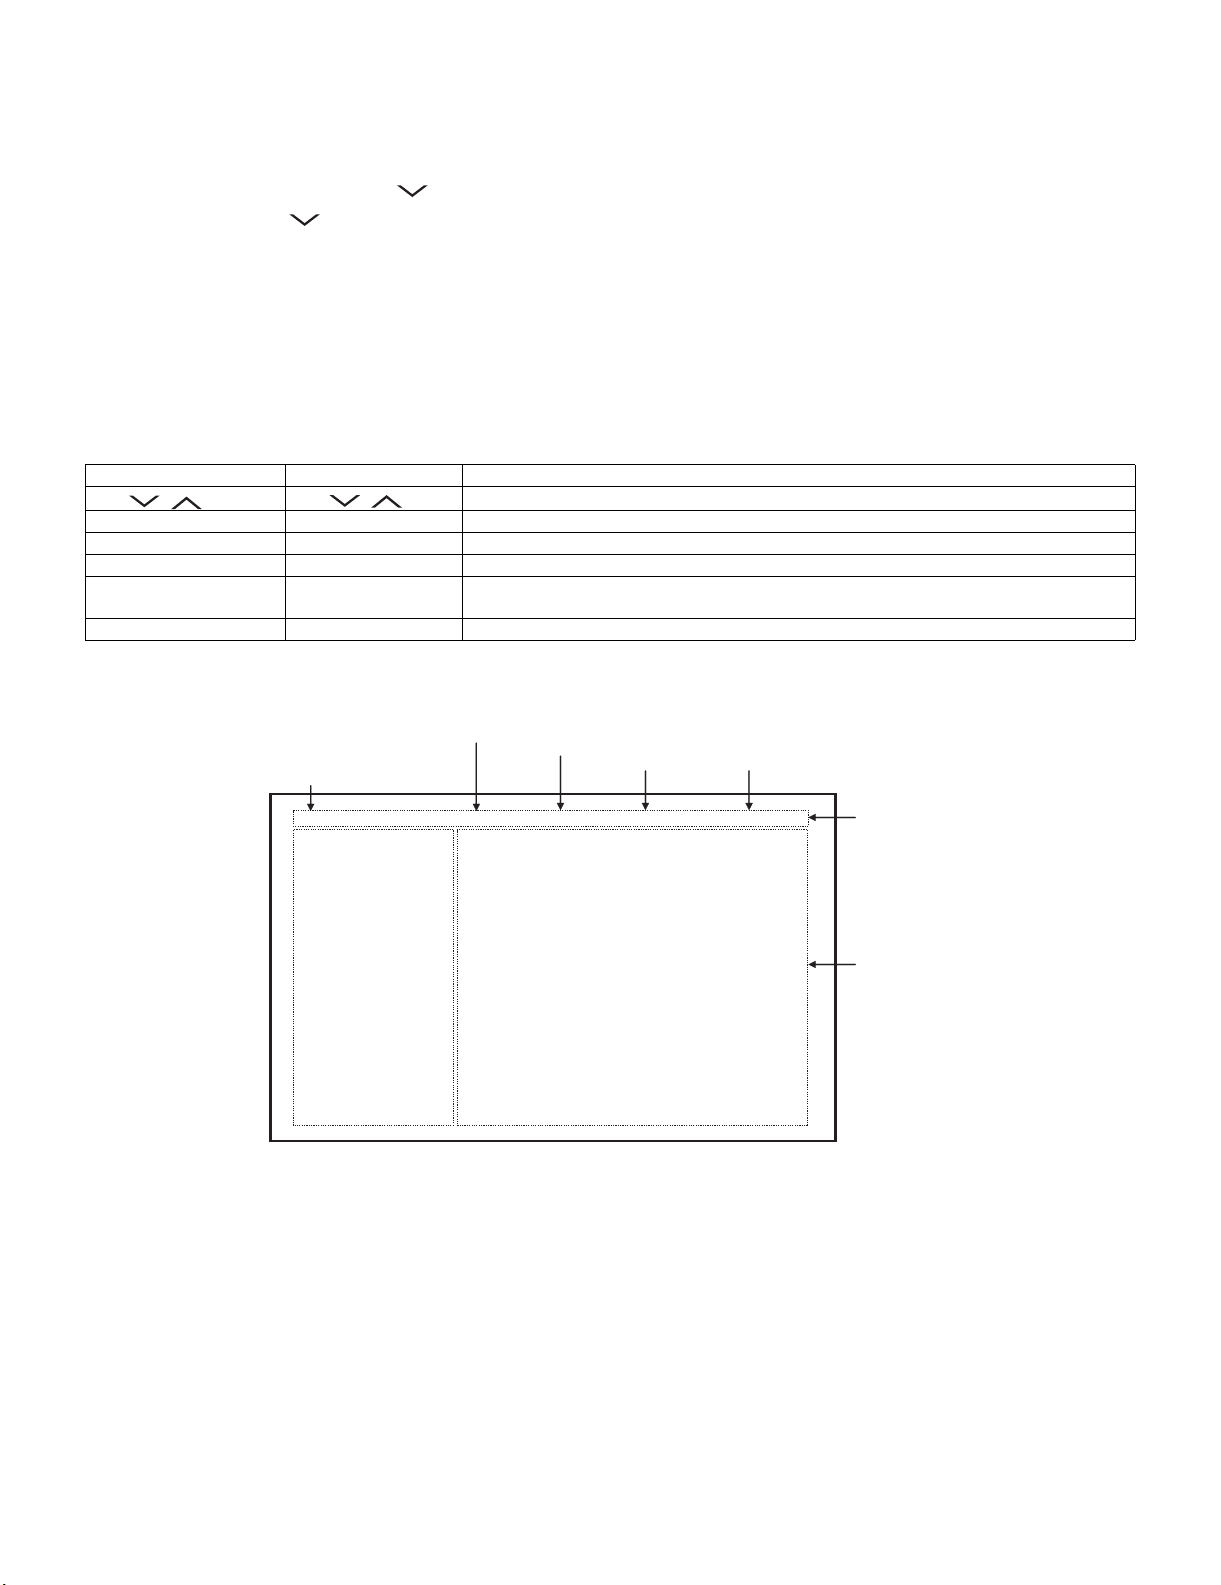
1) Key operation
Remote controller key Main unit key Function
CH ( / ) CH ( / )
VOL (+/–) VOL (+/–) Changing a selected item setting (+1/ –1)
Cursor (UP/DOWN) ————— Turing a page (PREVIOUS/NEXT)
Cursor (LEFT/RIGHT) ————— Changing a selected line setting (+10/ –10)
INPUT ————— Input switching (toggle switching)
ENTER ————— Executing a function
settings are tampered in this mode, unrecoverable system damage may result.
Moving an item (line) by one (UP/DOWN)
(TUNER→INPUT1→INPUT2→INPUT3→INPUT4→INPUT5→INPUT6)
*Input mode is switched automatically when relevant adjustment is started so far as the necessary input signal is available.
2) Description of display
(2) Current selected input
(1) Current page/ (4) Destination
Total pages
1/33 INPUT5 N358 USA 32 UNDER
MAINVersion 1.05(U2008/08/221B)
BOOT Version R24B 1.00
Monitor Version 1.02
Monitor BOOT Version 1.00
EQ DATACHECKSUM ROM
TEMPERATURE 7B
LAMP ERROR 0
MONITOR ERR CAUSE 0
NORMAL STANDBY CAUSE
ERROR STANDBY CAUSE 1) 0 2) 0 3) 0
(3) Current color system
0
0H 0M 0H 0M 0H 0M
4) 0 5) 0
0H 0M 0H 0M
(5) LCD Panel size/Speaker type
(6) Adjustment
process menu
header
(7) Parameters
3 – 5
Page 21
LC-32R24B
Leandro Palmeira
5. List of adjustment process mode menu
Page Line Item Description Remarks (adjustment detail, etc.)
1
1 MAIN Version Main software version
2BOOT Version
3 Monitor Version Monitor software version
4 Monitor BOOT Version
5 EQ DATA CHECKSUM Audio data checksum
6 TEMPERATURE Panel temperature
7 LAMP ERROR Number of termination due to lamp error
8 MONITOR ERR CAUSE
9 NORMAL STANDBY CAUSE Refer to *1 under the list for details
10 ERROR STANDBY CAUSE Refer to *2 under the list for details
2
1 INDUSTRY INIT (+Cause) Initialization to factory settings
2 INDUSTRY INIT
3 PUBLIC MODE Public Mode
4 Center Acutime Accumulated main operation time
5 RESET Reset
6 Backlight Acutime Accumulated monitor operation time
7 RESET Reset
8 LAMP ERROR RESET Reset LAMP ERROR
9 VIC XPOS X-coordinate setting for VIC READ
10 VIC YPOS Y-coordinate setting for VIC READ
11 VIC COLOR Collected color data setting for VIC READ
12 VIC SIGNAL TYPE Signal type setting for VIC READ
13 VIC READ Picture level acquisition function Level appears in green on the upper right
3
1 N358 ALL ADJ (INPUT1) CVBS and TUNER signal level adjustment
2 N358 ALL ADJ (INPUT2)
3 N358 MAIN ADJ (INPUT1) CVBS signal level adjustment
4 N358 MAIN ADJ (INPUT2)
5 TUNER DAC ADJ TUNER signal level adjustment
6VCOM ADJ
7 N358 CONTRAST A_GAIN
8 N358 CONTRAST D_GAIN
9 N358 CONTRAST OFFSET
10 TUNER CONTRAST A_GAIN
11 TUNER CONTRAST D_GAIN
4
1 TUNER TEST (10ch) Tuning test (10ch)
2 TUNER TEST (7ch) Tuning test (7ch)
3 TUNER TEST (15ch) Tuning test (15ch)
4 TUNER TEST (69ch) Tuning test (69ch)
5 INSPECT USB TERM
6 HDMI CEC TEST
5
1 COMP15K ADJ (INPUT1) Component 15K picture level adjustment (main)
2 COMP15K ADJ (INPUT3)
3 COMP15K Y A_GAIN
4 COMP15K Cb A_GAIN
5 COMP15K Cr A_GAIN
6 COMP15K Y D_GAIN
7 COMP15K Cb D_GAIN
8 COMP15K Cr D_GAIN
9 COMP15K Y OFFSET Y OFFSET adjustment value
10 COMP15K Cb OFFSET Cb OFFSET adjustment value
11 COMP15K Cr OFFSET Cr OFFSET adjustment value
3 – 6
Page 22
LC-32R24B
Leandro Palmeira
Page Line Item Description Remarks (adjustment detail, etc.)
6
1 COMP33K ADJ (INPUT1) Component 33K picture level adjustment (main)
2 COMP33K ADJ (INPUT3)
3 COMP33K Y A_GAIN
4 COMP33K Cb A_GAIN
5 COMP33K Cr A_GAIN
6 COMP33K Y D_GAIN
7 COMP33K Cb D_GAIN
8 COMP33K Cr D_GAIN
9 COMP33K Y OFFSET Y OFFSET adjustment value
10 COMP33K Cb OFFSET Cb OFFSET adjustment value
11 COMP33K Cr OFFSET Cr OFFSET adjustment value
7
1 ANALOG RGB ADJ Analog RGB picture level adjustment
2 R A-GAIN
3 G A-GAIN
4 B A-GAIN
5 R D-GAIN
6 G D-GAIN
7 B D-GAIN
8R OFFSET
9 G OFFSET
10 B OFFSET
8
1 LEVL Standard value Low Adjustment gradation setting.
2 LEVH Standard value High
9
1 MGL R WB adjustment Point Low, R adjustment value Parameter for 2-point adjustment
2 MGL G WB adjustment Point Low, G adjustment value
3 MGL B WB adjustment Point Low, B adjustment value
4 MGH R WB adjustment Point High, R adjustment value
5 MGH G WB adjustment Point High, G adjustment value
6 MGH B WB adjustment Point High, B adjustment value
10
1 Audio Switch
2 Flat Mode
3 ADC Volume 1
4 ADC Volume 2
5 ADC Volume 3
6 ADC Volume 4
7 ADC Volume 5
8 ADC Volume 6
11
1 Lip Sync LR
2 Lip Sync Monitor
3 Lip Sync SW
4 LR Func Vol AIN (2ch)
5 LR Func Vol HDMI (2ch)
6 LR Func Vol ATV (2ch)
7 LR Func Vol DTV (2ch)
8 Input Trim (2ch)
12
1 PEQ1 F0
2 PEQ1 Q
3 PEQ1 Gain
4 PEQ1 Gain Limit
5 PEQ1 Fade Time
6 PEQ2 F0
7 PEQ2 Q
8 PEQ2 Gain
9 PEQ2 Gain Limit
10 PEQ2 Fade Time
3 – 7
Page 23
LC-32R24B
Leandro Palmeira
Page Line Item Description Remarks (adjustment detail, etc.)
13
1 PEQ3 F0
2 PEQ3 Q
3 PEQ3 Gain
4 PEQ3 Gain Limit
5 PEQ3 Fade Time
6 PEQ4 F0
7 PEQ4 Q
8 PEQ4 Gain
9 PEQ4 Gain Limit
10 PEQ4 Fade Time
14
1 PEQ5 F0
2 PEQ5 Q
3 PEQ5 Gain
4 PEQ5 Gain Limit
5 PEQ5 Fade Time
6 PEQ6 F0
7 PEQ6 Q
8 PEQ6 Gain
9 PEQ6 Gain Limit
10 PEQ6 Fade Time
15
1 PEQ7 F0
2 PEQ7 Q
3 PEQ7 Gain
4 PEQ7 Gain Limit
5 PEQ7 Fade Time
6 Subsonic Filter
16
1 Output Trim
2 Clipper
3 Sub Volume Default
4 Sub Volume SH Bass
5 Mon Func Vol AIN
6 Mon Func Vol HDMI
7 Mon Func Vol ATV
8 Mon Func Vol DTV
9 SW Func Vol AIN
10 SW Func Vol HDMI
11 SW Func Vol ATV
12 SW Func Vol DTV
17
1 BE ATT
2 BE G Limit
3 Bass Center ATT
4Bass Vol 0 MIN
5Bass Vol 60 MIN
6 Bass Vol 60 Center
7Bass Vol 0 MAX
8Bass Vol 60 MAX
18
1 Treble Center ATT
2 Treble Vol 0 MIN
3 Treble Vol 60 MIN
4 Treble Vol 60 Center
5 Treble Vol 0 MAX
6 Treble Vol 60 MAX
7 VS Path
8 VS Option
9 VS SP Interval
10 VS Width
11 VS Input Gain (2ch)
3 – 8
Page 24
LC-32R24B
Leandro Palmeira
Page Line Item Description Remarks (adjustment detail, etc.)
19
1Bass AGC
2 Bass Harmonics
3 Bass LPF Fc
4Bass HPF Fc
5Bass AGC Max
6Bass AGC Min
7 Bass AGC Attack Time
8 Bass AGC Release Time
9 Bass AGC Threshold
10 Bass AGC HPF F0
11 Bass Harmonics Level
12 Bass Harmonics LPF F
13 Bass Harmonics HPF F
20
1 PANNEL SELECT
2PWM
3PWN FREQ
4 PWM DUTY
5OSC FREQ
6 OSC DUTY
21
1 BRIGHTNESS DA0
2 BRIGHTNESS DA1
3 BRIGHTNESS DA2
4 BRIGHTNESS DA3
5 BRIGHTNESS DA4
6 BRIGHTNESS DA5
7 BRIGHTNESS DA6
8 BRIGHTNESS DA7
9 BRIGHTNESS DA8
10 BRIGHTNESS DA9
11 BRIGHTNESS DA10
12 BRIGHTNESS DA11
22
1 BRIGHTNESS DA12
2 BRIGHTNESS DA13
3 BRIGHTNESS DA14
4 BRIGHTNESS DA15
5 BRIGHTNESS DA16
6 BRIGHTNESS DA17
7 BRIGHTNESS DA18
8 BRIGHTNESS DA19
9 BRIGHTNESS DA20
10 BRIGHTNESS DA21
11 BRIGHTNESS DA22
23
1 BRIGHTNESS DA23
2 BRIGHTNESS DA24
3 BRIGHTNESS DA25
4 BRIGHTNESS DA26
5 BRIGHTNESS DA27
6 BRIGHTNESS DA28
7 BRIGHTNESS DA29
8 BRIGHTNESS DA30
9 BRIGHTNESS DA31
10 BRIGHTNESS DA32
3 – 9
Page 25
LC-32R24B
Leandro Palmeira
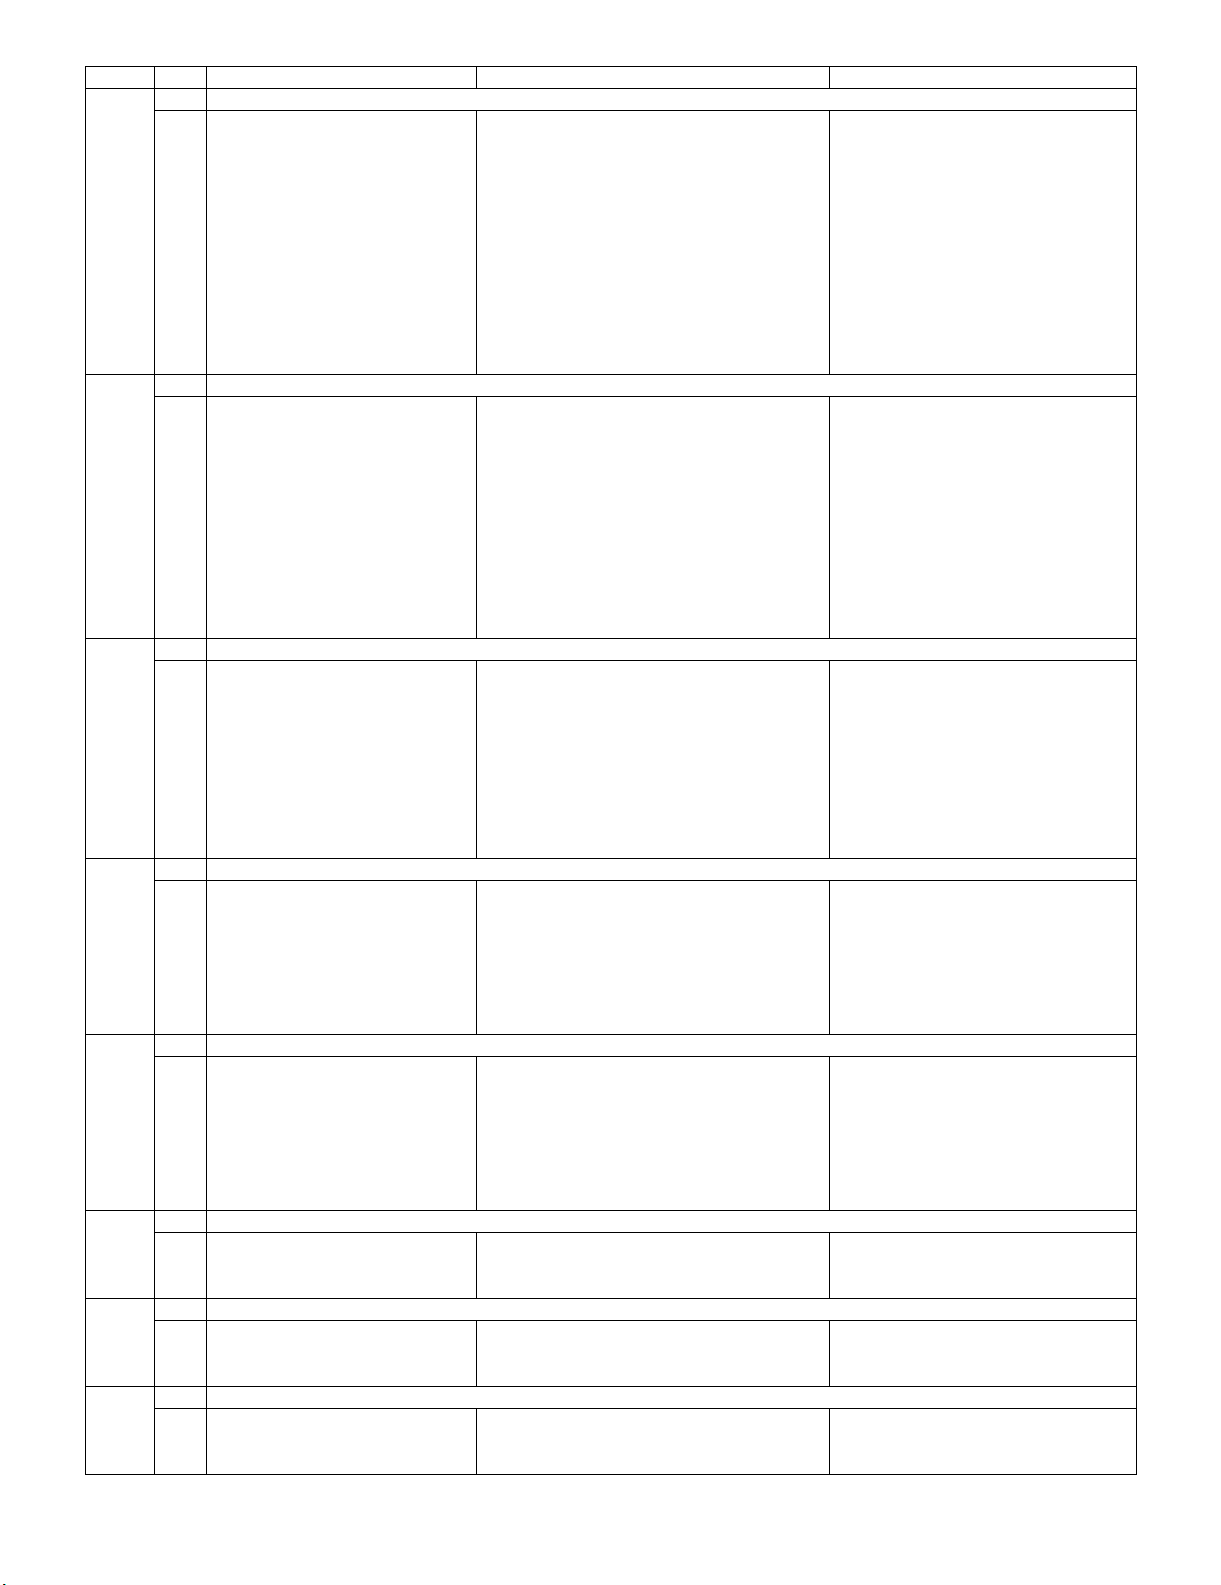
Page Line Item Description Remarks (adjustment detail, etc.)
24
1 OPC33 ADLEVEL 0
2 OPC33 ADLEVEL 1
3 OPC33 ADLEVEL 2
4 OPC33 ADLEVEL 3
5 OPC33 ADLEVEL 4
6 OPC33 ADLEVEL 5
7 OPC33 ADLEVEL 6
8 OPC33 ADLEVEL 7
9 OPC33 ADLEVEL 8
10 OPC33 ADLEVEL 9
11 OPC33 ADLEVEL 10
12 OPC33 ADLEVEL 11
25
1 OPC33 ADLEVEL 12
2 OPC33 ADLEVEL 13
3 OPC33 ADLEVEL 14
4 OPC33 ADLEVEL 15
5 OPC33 ADLEVEL 16
6 OPC33 ADLEVEL 17
7 OPC33 ADLEVEL 18
8 OPC33 ADLEVEL 19
9 OPC33 ADLEVEL 20
10 OPC33 ADLEVEL 21
11 OPC33 ADLEVEL 22
26
1 OPC33 ADLEVEL 23
2 OPC33 ADLEVEL 24
3 OPC33 ADLEVEL 25
4 OPC33 ADLEVEL 26
5 OPC33 ADLEVEL 27
6 OPC33 ADLEVEL 28
7 OPC33 ADLEVEL 29
8 OPC33 ADLEVEL 30
9 OPC33 ADLEVEL 31
27
1V6 OS THERMO 1
2V6 OS THERMO 2
3V6 OS THERMO 3
4V6 OS THERMO 4
5V6 OS THERMO 5
6V6 OS THERMO 6
7V6 OS THERMO 7
28
1V5 OS THERMO 1
2V5 OS THERMO 2
3V5 OS THERMO 3
4V5 OS THERMO 4
5V5 OS THERMO 5
6V5 OS THERMO 6
7V5 OS THERMO 7
29
1BL TEMP1
2BL TEMP2
3BL TDUTY
30
1 MONITOR TIME OUT
2 MONITOR MAX TEMP
3 MONITOR ERROR CAUSE RESET
31
1 LCD TEST PATTERN
2 TV TEST PATTERN 1
3 TV TEST PATTERN 2
3 – 10
Page 26
LC-32R24B
Leandro Palmeira
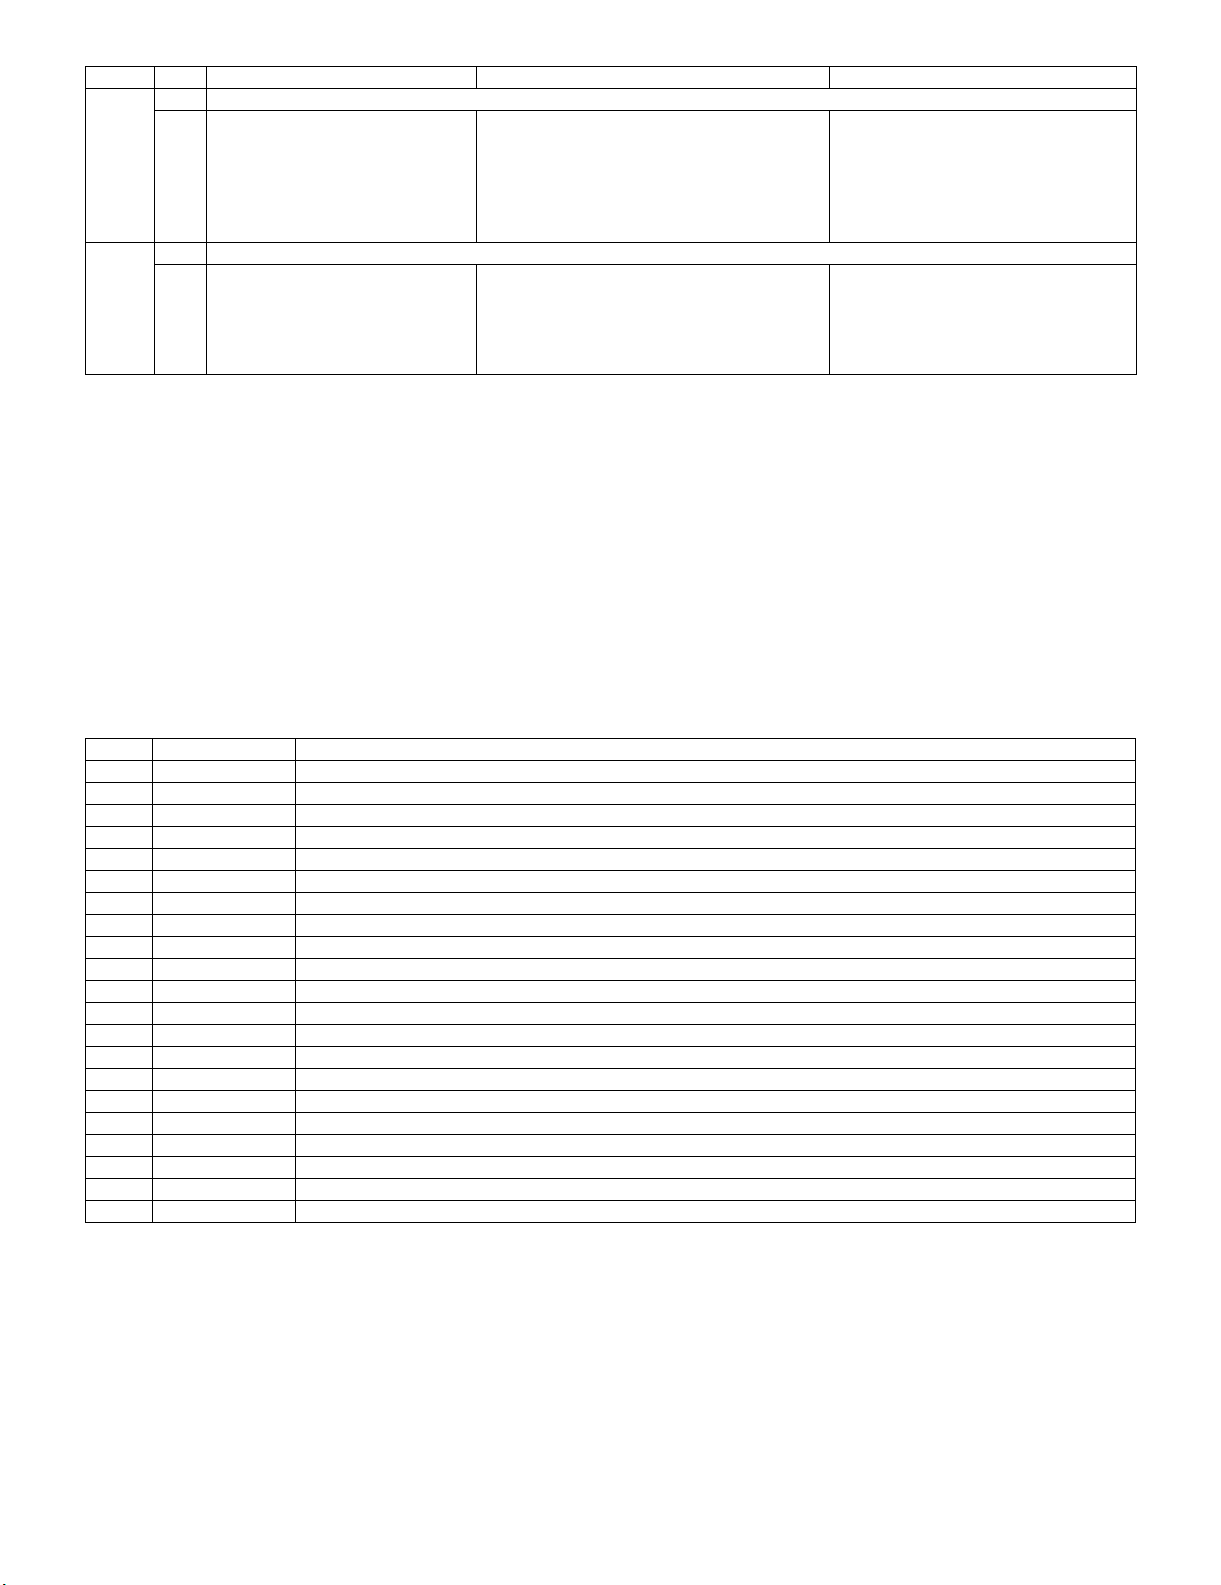
Page Line Item Description Remarks (adjustment detail, etc.)
32
1 KEY LOCK (1217)
2 KOUTEI AREA ALL CLEAR
3 A MODE AREA CLEAR
4 BACKUP AREA CLEAR
5 B MODE AREA CLEAR
6 EXECUTION
33
1 EEP SAVE Writing setting values to EEPROM.
2 EEP RECOVER Reading setting values from EEPROM.
3 STANDBY CAUSE RESET Reset stand by cause.
4 SETTING FOR ADJ
5 PANEL SIZE
6. Special features
* STANDBY CAUSE (Page 1/33)
Display of a cause (code) of the last standby
The cause of the last standby is recorded in EEPROM whenever poss ble.
Checking this code will be useful in finding a problem when you repair the troubled set.
* EEP SAVE (Page 33/33)
Storage of EEP adjustment value
* EEP RECOVER (Page 33/33)
Retrieval of EEP adjustment value from storage area
7. Code list for Standby Cause
Code Indication Description
1 RC_STNBY /* Standby set by remote control */
2 NO_OPERT /* Off caused by no operation */
3 NO SIGNA /* Off caused by no signal */
4 PC_MODE1 /* Set by the PC power management mode 1 */
5 PC_MODE2 /* Set by the PC power management mode 2 */
6 SLEEP TM /* Set by off timer */
8 OFF_232C /* Set by the command from RS232C */
9 AVC_TACT /* Set by the front switch at the AVC center */
A BSBOOKED /* The pre-set time has passed since TV was turned on from standby by the BS timer. */
B E_MONIPW /* Monitor main power failure detected */
10 E_CCKMVT /* Abnormal voltage of CCKM line detected */
11 OUT_OF_R “/* While a PC display is on, unspecified input continued long time. */”
12 E_NOMONI /* Incompatible monitor is connected to the AVC center. */
14 E_AVCFAN /* Fan failure at the AVC center */
15 E_BSSUBM /* Communication failure with the BS sub microcomputer (Not used) */
16 E_CVICIC /* CVIC failure */
17 E_AVCTMP /* Abnormal temperature at the AVC center */
18 E_1BITAU /* 1Bit-AMP failure */
1A E_MONITR /* Monitor problem detected */
1B E_FNLOCK /* Fan lock for North America */
40 E_DSDEV /* Failure in Digital Standby */
3 – 11
Page 27
LC-32R24B
Leandro Palmeira
8. Signal adjustment
8.1. Checking the Device
Before starting the adjustment, make sure the adjustment tool and signal generator are set for Sharp LCD US.
Checking the signal generator level adjustment (Set to the standard level.)
• Composite signal : 0.714Vp-p ± 0.02Vp-p (from pedestal to white)
• 15K component signal : Y level : 0.714Vp-p ± 0.02Vp-p (from pedestal to white)
PB, PR level : 0.7Vp-p ± 0.02Vp-p
• 33K component signal : Y level : 0.7Vp-p ± 0.02Vp-p (from pedestal to white)
PB, PR level : 0.7Vp-p ± 0.02Vp-p
• Analog RGB signal : RGB level : 0.7Vp-p ± 0.02Vp-p (from pedestal to white)
8.2. Process mode
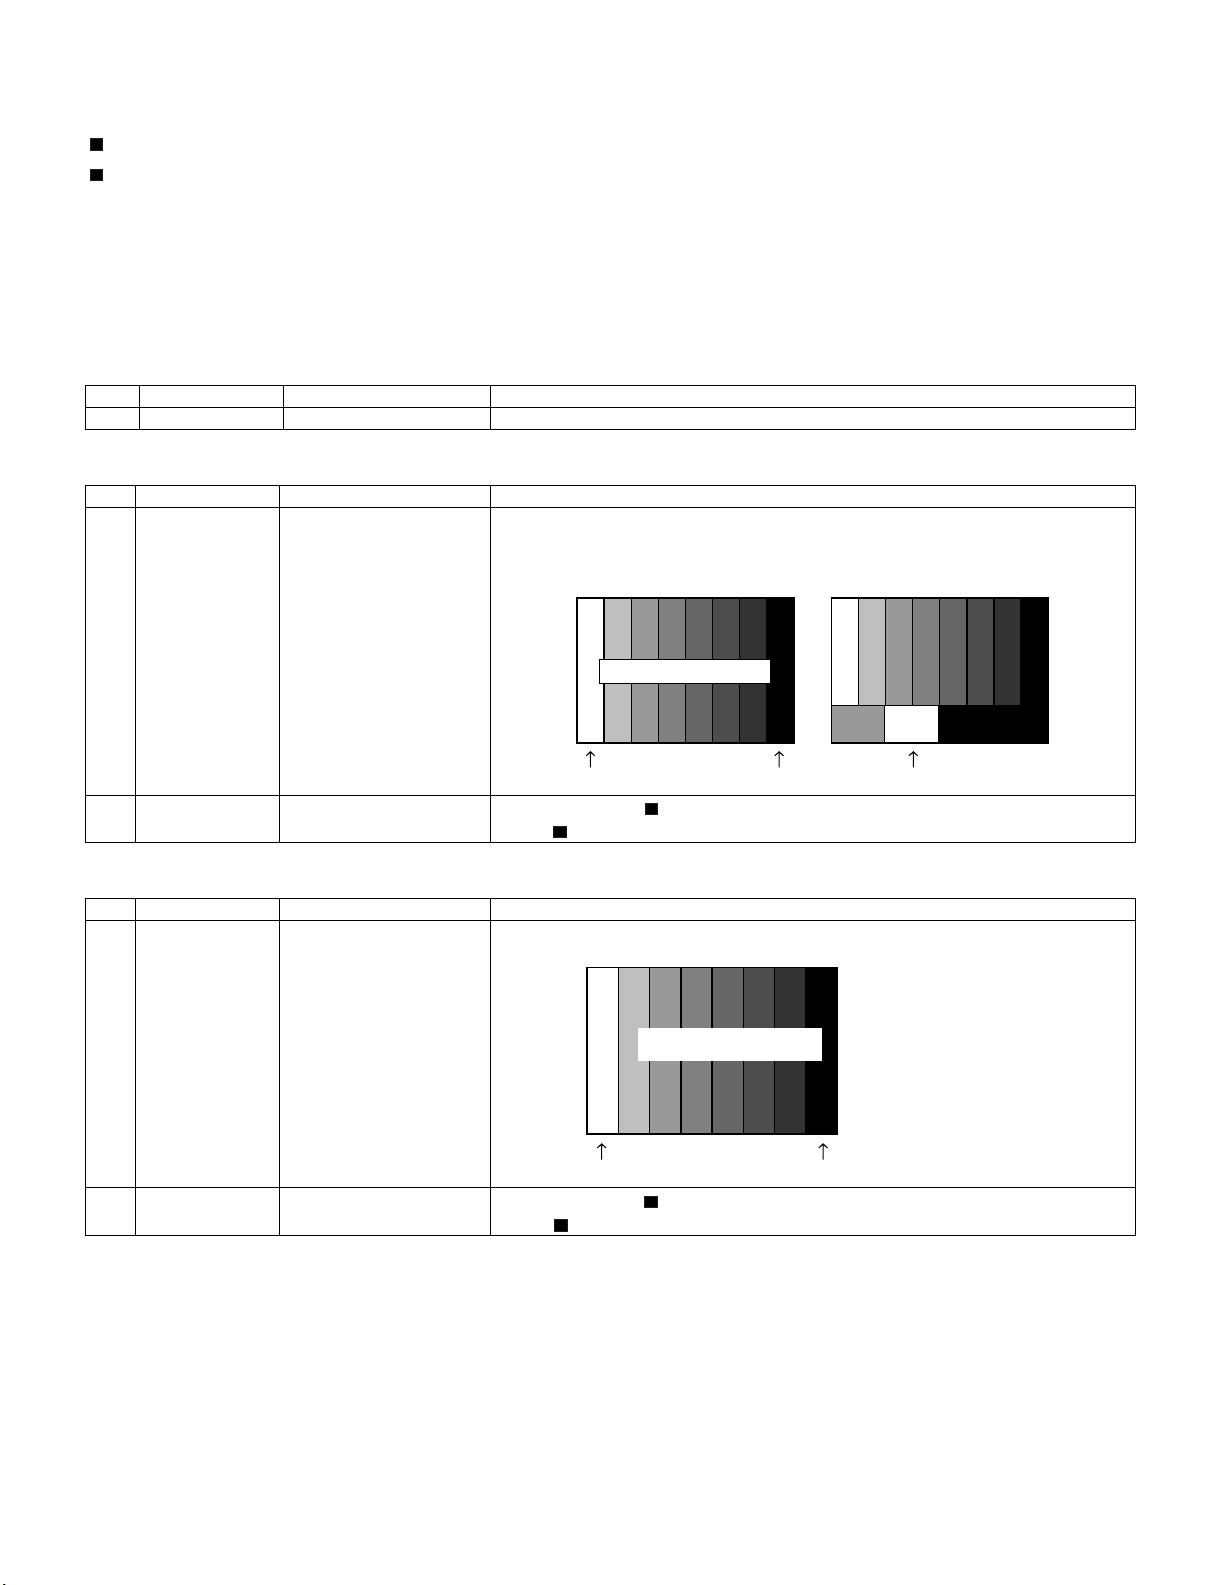
Adjustment item Adjustment conditions Adjustment procedure
1 Process mode Enter the process adjustment mode using the process adjustment remote controller.
8.3. Composite N358 signal/tuner adjustment
Adjustment item Adjustment conditions Adjustment procedure
1 Setting NTSC-J (N358) signal
US-10ch
Feed the NTSC-J N358 color bar signal (75% color saturation) to VIDEO 1 input.
Feed the RF signal (by use of US-10ch) to TUNER.
[Video input signal] [US-10ch]
75% Color saturation
100% white 0% black 100% white
2 Automatic adjust-
ment execution
Move the cursor to [ N358 ALL ADJ] and press the [ENTER] key.
When [ N358 ALL ADJ OK] appears, the adjustment is complete.
8.4. Component 15K signal adjustment
Adjustment item Adjustment conditions Adjustment procedure
1 Setting 480i signal Feed the 100% color bar signal to VIDEO 1 COMPONENT input.
480i
100% color bar
0% black
2 Automatic adjust-
ment execution
100% Color saturation
100% white
Move the cursor to [ COMP 15K ADJ] and press the [ENTER] key.
When [ COMP 15K ADJ OK] appears, the adjustment is complete.
3 – 12
Page 28
LC-32R24B
Leandro Palmeira
8.5. Component 33K signal adjustment
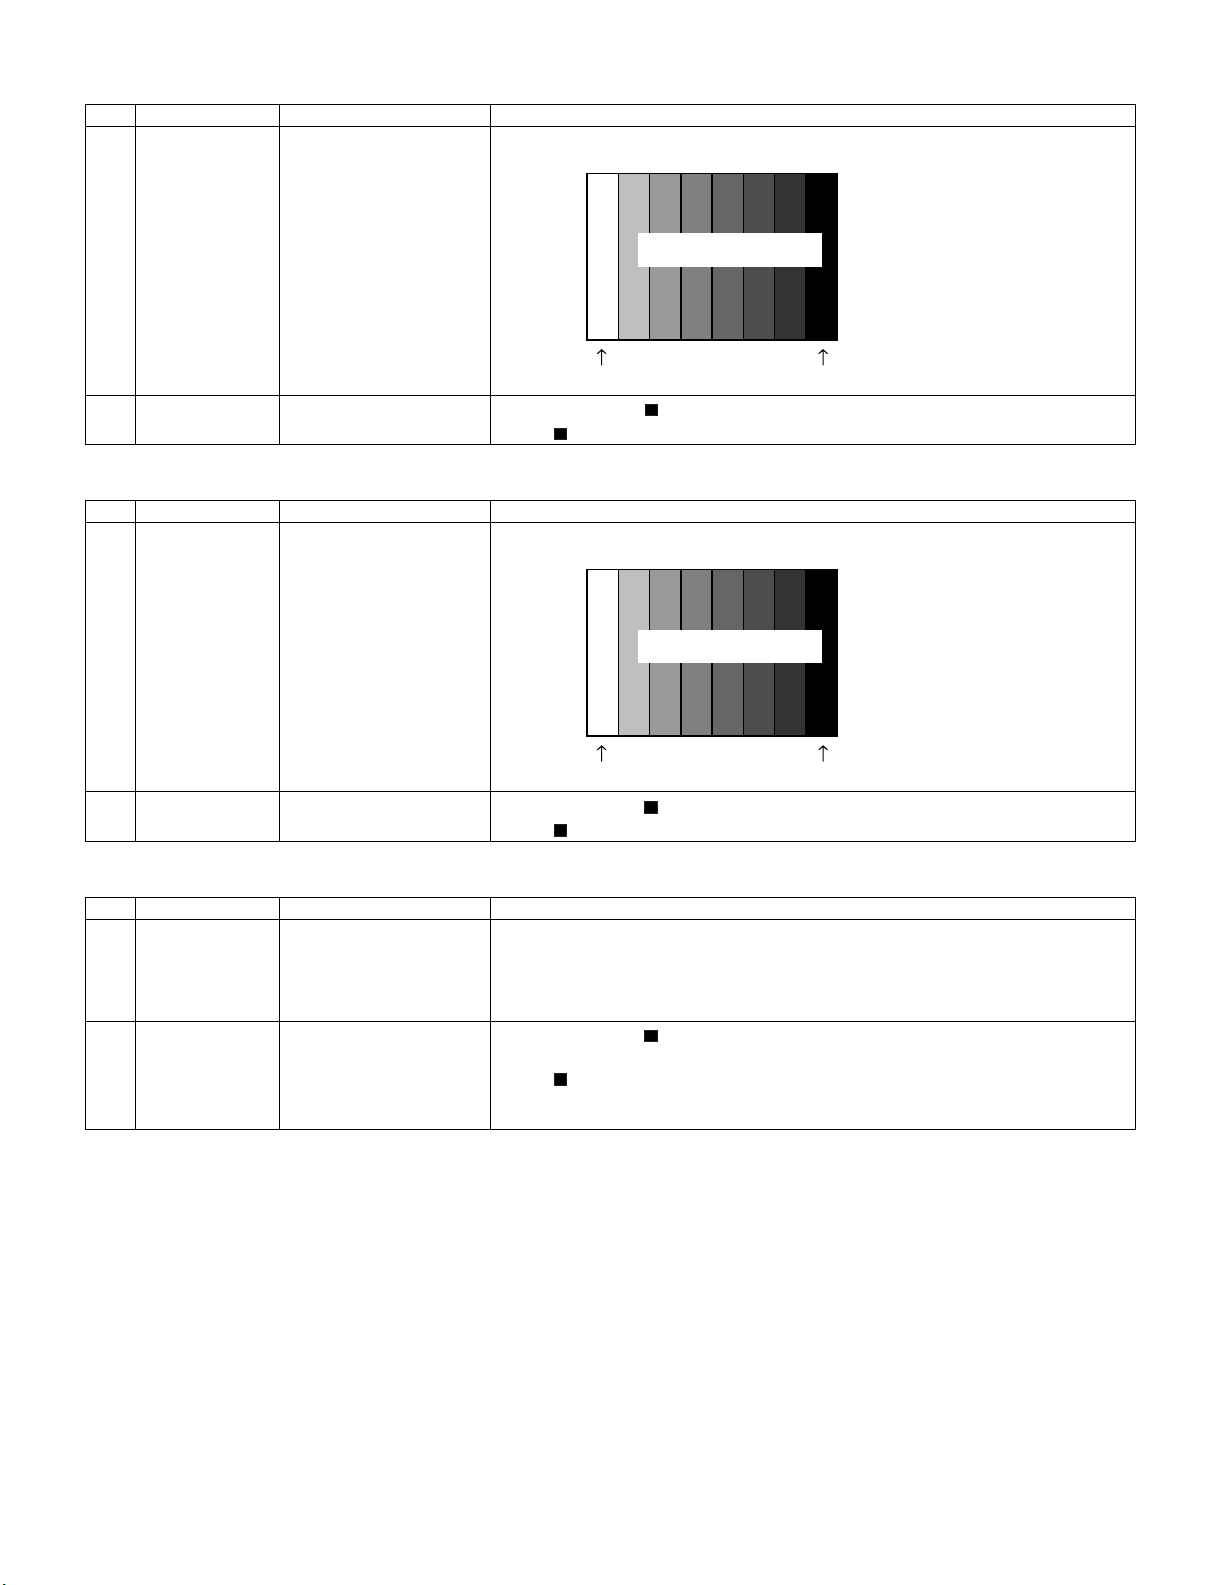
Adjustment item Adjustment conditions Adjustment procedure
1 Setting 1080i signal Feed the 100% color bar signal to VIDEO 1 COMPONENT input.
100% Color saturation
100% white
2 Automatic adjust-
ment execution
Move the cursor to [ COMP 33K ADJ] and press the [ENTER] key.
When [ COMP 33K ADJ OK] appears, the adjustment is complete.
8.6. Analog RGB signal adjustment
Adjustment item Adjustment conditions Adjustment procedure
1 Setting Analog RGB signal: XGA
(1024x768) 60Hz
SYNC: HV separate
Feed the XGA 100% color bar signal to ANALOG RGB input.
100% Color saturation
100% white
2 Automatic adjust-
ment execution
Move the cursor to [ ANALOG RGB ADJ] and press the [ENTER] key.
When [ ANALOG RGB ADJ OK] appears, the adjustment is complete.
1080i
100% color bar
0% black
XGA
100% color bar
0% black
8.7. Tuner test
Adjustment item Adjustment conditions Adjustment procedure
1 Setting NTSC RF signal
US-10(AIR)ch
2 Automatic adjust-
ment execution
Feed the NTSC signal to RF ANTENNA input.
Move the cursor to [ TUNER TEST (*10ch)] and press the [ENTER] key. (* Select the
channel according to the RF signal.)
When [ A-OK(***.**)] appears in blue, the test is complete. (If [A-NG] appears in yellow
or red, the test is incomplete.)
Make sure a displacement of ± 0.0625 MHz from the center frequency is acceptable.
3 – 13
Page 29
LC-32R24B
Leandro Palmeira
9. White balance adjustment
9.1. White balance adjustment
Adjustment item Adjustment conditions Adjustment procedure
1 Adjustment Detail of adjustment method refer to [KAMEYAMA models monitor WB adjustment spec
2 Auto adjustment
Performance
[Command]
Service mode
KRSW0001
KKT10037
Setting
KYOF0000
OSDS0001
SBSL0016
V1.9].
1) Setting the set with below condition.
AV MODE : [DYNAMIC]
Backlight : +16
Aging Time : Min. 60 minutes
2) Connect the white balance jigs with set.
[Adjustment Method]
1) Press R/C to enter [monitor adjustment] code.
2) Set the HIGH point to the appointed steps, decide the strongest color as fixed color,
decrease to become reference value by adjusting the RGB.
3) Set the LOW point to the appointed steps, set the correction value of G (176 x HIGH
point G value/832) and adjust RB to the nearest reference value.
4) Use MSET0002 command, input the adjusted value and off the AC power.
* Initial value at each point: setting steps level.
Multi-points adjust mode
MSET0001
HIGH point
WBIH0832
MGHG****
MGHB****
MGHR****
LOW point
WBIL0176
MGLG****
MGLB****
MGLR****
WRITE
MSET0002 y = 0.277
[Adjusted value]
•Based on teaching set [LC-32R24B] as [standard setting] submitted by Eng Depart-
ment.
[Reference value]
Machine: Minolta CA-210 analyzer
Level Ref Value Spec Inspect Spec
HIGH 832
LOW 176
Remark LCDTV condition
x = 0.272
x = 0.272
y = 0.277
AV MODE: [DYNAMIC] (Reset)
Active Contrast: OFF
Color Temp: HIGH
Back Light: +16
Aging Time: 60 minutes
±0.0010 ±0.0020
±0.0020 ±0.0030
3 – 14
Page 30
LC-32R24B
Leandro Palmeira
9.2. Key writing
EDID writing (Main PWB: QPWBXE450WJZZ, analog RGB input terminal / HDMI input terminal)
Adjustment item Adjustment conditions Adjustment procedure
1 Analog RGB EDID
writing
2 HDMI EDID writing Inspection mode
File version checking 1) Using the checker, write the EDID data for Analog RGB to IC2202 that is
mounted on the main PWB.
TL2293: I2C clock, TL2295: I2C data
TL2296: 5V, TL2294: GND
TL2297: VCLK (Write: H, Read: V pulse)
2) In the analog RGB inspection, use a DDC-compatible device. If the EDID has
not been written, the analog RGB input does not function normally.
1) Using the checker, write the HDMI EDID data to IC1601 and IC1603 that are
File version checking
mounted on the main PWB.
TL1606/1613: I2C clock, TL1604/1614: I2C data
TL1611/1615: 5V, TL1604/1607: GND
TL1616/1618: Write protection (H: Write, L: Write enable)
2) Write the data before the HDMI inspection with the checker.
In the HDMI inspection, use a DDC-compatible device. If the EDID has not
been written, the HDMI does not function normally.
3 – 15
Page 31

9.3. Adjustment sequence (adjustment according to the G adjustment value of gradation High)
Leandro Palmeira
* Make sure the adjusting point gradations are correct since they are different for each model.
PC Set
Set the light level to MAX with the light control command
SBSL0016
Setting is complete.
OK
Multi point adjustment mode setting
MSET0001
Multi point adjustment mode is set.
OK
Adjustment gradation setting (point HIGH = 832 gradation adjustment*)
WBIH0832
Pattern display
Adjustment values are set.
OK
LC-32R24B
Repeat until RGB
become the target
values.
Adjust RGB to the target xy values.
MGHGXXXX
MGHBXXXX
MGHRXXXX
* XXXX indicates the adjusted values between 0000 and 1023
(4 digit decimal number with zero fill).
* In order to adjust by reducing the value, set the strongest color
as the fixed color.
* The default adjustment value of RGB is the parameter value of
the WBIH command.
The adjustment value is
reflected in the image.
Adjustment values are set.
OK
Adjustment gradation setting (point LOW = 176 gradation adjustment*)
WBIL0176
Pattern display
Adjustment values are set.
OK
Correction of G value
MGLGXXXX
When G is changed at gradation HIGH, calculate the ratio of the
change and set the following value to XXXX: (the value set with
WBIL) (the ratio).
Adjustment values are set.
OK
3 – 16
Page 32

LC-32R24B
Leandro Palmeira
Start measurement
Repeat until RGB
become the target
values.
PC Set
Adjust RB to the target xy values.
MGLRXXXX
MGLBXXXX
* XXXX indicates the adjusted values between 0000 and 1023
(4 digit decimal number with zero fill).
* G is fixed.
* The default adjustment value of RGB is the parameter value of
the WBIL command.
The adjustment value is
reflected in the image.
Adjustment values are set.
OK
Writing of adjusted values
MSET0002
Writing is complete.
OK
Completion of adjustment
10. Factory settings
After making the factory settings, pull off the AC cord.
NOTE: Do not turn on the power once the factory settings have been made. Otherwise the factory settings must be made again.
Adjustment item Adjustment conditions Adjustment procedure
1 Factory settings Finally pull off the AC cord. • Move the cursor to the [INDUSTRY INIT (+Cause)] line. Using the
[VOL+/-] keys, set this item ON and press the [ENT] key.
The version confirm window appears on the green screen. When
[SUCCESS] appears at the top, the factory settings are complete.
(If an error occurs. [ERROR] appears on the red screen.)
• Finally turn off the AC power.
The following settings are returned to the factory ones.
1) User settings
2) Channel data (broadcast frequencies, etc.)
3) Password setting
4) Operation time
5) Automatic installation flag
11. Software version
Change of software version is notified at a technical report.
* Main microprocessor
* Monitor microprocessor
* EDID data (HDMI/analog RGB)
3 – 17
Page 33

Leandro Palmeira
CHAPTER 4. TROUBLESHOOTING TABLE
[1] TROUBLESHOOTING TABLE
No video (1)
LC-32R24B
COMPOSITE: No external input video
[INPUT-1]
Is INPUT-1 selected on the input select menu screen? Is INPUT-2 selected on the input select menu screen?
NO
Is the video signal detection function normal?
Check the line between pin (2) of J501 and pin AD4 of
IC8001
YES
Is video signal fed to AN16 of IC8001 via L.P.F composed of capacitor and inductor between Q511 and Q521?
NO
Check the line between pin (3) of J501 and pin AN16 of
IC8001.
YES
Are digital video (LVDS) signals sent from pins B5~7, C5~7, D5~7, and E5~7 of IC8001?
YES
Are digital video (RSDS) signals sent from IC5103 to SC5201 and
SC5202?
YES
Is video signal fed to AN17 of IC8001 via L.P.F composed of capacitor and
inductor between Q512 and Q522?
YES
NO Check the line between IC5103 and SC5201 and SC5202.
COMPOSITE: No external input video
[INPUT-2]
NO
Is the video signal detection function normal?
Check the line between pin (2) of J503 and pin AC6 of
IC8001
NO
Check the line between pin (3) of J503 and pin AN17 of
IC8001.
NO
Check the line between IC8001 and IC5103.
Check IC8001 and peripheral circuits.
YES
Check between (SC5201, SC5202) and LCD Panel.
Check IC5103 and peripheral circuits.
4 – 1
Page 34

LC-32R24B
Leandro Palmeira
No video (2)
COMPONENT: No external input video
[INPUT-1]
COMPONENT: No external input video
[INPUT-3]
Is INPUT-1 selected on the input select menu screen? Is INPUT-3 selected on the input select menu screen?
NO
Is the video signal detection function normal?
Check the line between pin (2) of J502 and pin AC7 of
IC8001
YES
Are component video signals fed to pins AM21, AN21 and AL21
(Y,PB,PR) of IC8001 via each L.P.F composed of capacitor and
inductor between (Q501,Q506,Q504) and (Q515,Q516,Q517)
Is the video signal detection function normal?
Check the line between pin (2) of J509 and pin AE1 of
IC8001
YES
Are component video signals fed to pins AN22, AP22 and AL22
(Y,PB,PR) of IC8001 via each L.P.F composed of capacitor and inductor
between (Q502,Q503,Q505) and (Q518,Q519,Q520) respectively?
NO
respectively?
NO
Check the line between each pin of J502 and each
input pin of IC8001.
YES
Check the line between each pin of J509 and each input pin
of IC8001.
YES
NO
Are digital video (LVDS) signals sent from pins B5~7, C5~7, D5~7, and E5~7 of IC8001?
NO
Check the line between IC8001 and IC5103.
Check IC8001 and peripheral circuits.
YES
Are digital video (RSDS) signals sent from IC5103 to SC5201 and
SC5202?
YES
Check between (SC5201, SC5202) and LCD Panel.
NO Check the line between IC5103 and SC5201 and SC5202.
Check IC5103 and peripheral circuits.
4 – 2
Page 35

No video (3)
Leandro Palmeira
S-VIDEO: No external input video [INPUT-2]
Is INPUT-2 selected on the input select menu screen?
NO
Is the video signal detection function normal?
Check the line between pin (6) of J504 and pin AE2 of
IC8001
YES
Are Y and C signals fed to pins AL17 and AL16 of IC8001 via L.P.F composed of capacitor and inductor between (Q513,Q514) and (Q523,Q524)
respectively?
NO
Check the line between J504 and IC8001.
(Q513,Q524,etc)/(Q514,Q524,etc)
YES
Are digital video (LVDS) signals sent from pins B5~7, C5~7, D5~7, and
E5~7 of IC8001?
LC-32R24B
NO Check the line between IC8001 and IC5103.
YES
Are digital video (RSDS) signals sent from IC5103 to SC5201 and
SC5202?
YES
Check between (SC5201, SC5202) and LCD Panel.
Check IC8001 and peripheral circuits.
NO Check the line between IC5103 and SC5201 and SC5202.
Check IC5103 and peripheral circuits.
4 – 3
Page 36

LC-32R24B
Leandro Palmeira
No video at UHF/VHF broadcast signal reception
Is the specified TV signal selected on the input select menu
screen?
Is video signal fed to AM19 of IC8001 via a buffer amplifier?
NO
Check TU1101 and its peripheral circuits (SDA3/
SCL3, etc.).
Check the line between AM19 of IC8001 and pin
13 of TU1101 (Q510, etc.).
YES
Are digital video (LVDS) signals sent from pins B5~7, C5~7, D5~7,
and E5~7 of IC8001?
No video (4)
YES
Are digital video (RSDS) signals sent from IC5103 to SC5201 and
SC5202?
YES
Check between (SC5201, SC5202) and LCD Panel.
NO Check the line between IC5103 and SC5201 and
SC5202.
Check IC5103 and peripheral circuits.
4 – 4
Page 37

[HDMI signal input] No video (5)
Leandro Palmeira
HDMI: No external input video [INPUT-4] HDMI: No external input video [INPUT-5]
Is INPUT-4 selected on the input select menu screen? Is INPUT-5 selected on the input select menu screen?
LC-32R24B
NO
Select INPUT-4 on the input select menu
screen for the right input signal.
Does the HOT PLUG detection function? Does the HOT PLUG detection function?
Does the DDC5V signal come from pin (18) of
SC1601 to pin (72) of IC1604 (HDMI-SW)?
NO
Check the line between
the input terminals of
SC1601 and IC1604.
YES
Does the HPD signal come from pin (56) of
IC1604 to pin (19) of SC1601?
NO NO
Check the line between
IC1604 and SC1601.
YES
IC1604 pin (56)
IC1607 pin (4)
SC1601 pin (19)
Are there the TMDS signal inputs at pins (58/59) (CLK-/+), (61/62)
(D0-/+), (64/65) (D1-/+), (67/68) (D2-/+), all of IC1604?
NO
Select INPUT-5 on the input select menu screen for the
right input signal.
Does the DDC5V signal come from pin (18) of SC1602 to
pin (52) of IC1604 (HDMI-SW)?
NO
Check the line between the input terminals of SC1602 and IC1604.
YES
Does the HPD signal come from pin (36) of IC1604 to pin
(19) of SC1602?
Check the line between IC1604 and
SC1602.
YES
IC1604 pin (36)
IC1608 pin (4)
SC1602 pin (19)
Are there the TMDS signal inputs at pins (38/39) (CLK-/+), (41/42) (D0-/+),
(44/45) (D1-/+), (47/48) (D2-/+), all of IC1604?
NO
Is IC1601 (EEPROM) accessed by I2C, with
HDMI connected, to read the DDC_I2C SCL/
Is IC1603 (EEPROM) accessed by I2C, with HDMI connected, to read the DDC_I2C SCL/SDA data?
NO
SDA data?
NO NO
YES
Check the DDC line and its peripheral circuits. (IC1601 and its peripherals).
YES
Check the DDC line and its peripheral circuits. (IC1603 and
its peripherals).
Are there the TMDS signal inputs at pins (AM1/AM2) (CLK-/+), (AN1/AN2) (D0-/+), (AM3/AM4) (D1-/+), (AP2/AN3) (D2-/+), all of IC8001 (CPU)?
NO
Check IC1604, IC8001 and their peripheral circuits.
YES
Are digital video (LVDS) signals sent from pins B5~7, C5~7, D5~7,
NO Check the line between IC8001 and IC5103.
and E5~7 of IC8001?
Check IC8001 and peripheral circuits.
YES
Are digital video (RSDS) signals sent from IC5103 to SC5201 and
NO Check the line between IC5103 and SC5201 and SC5202.
SC5202?
Check IC5103 and peripheral circuits.
YES
Check between (SC5201, SC5202) and LCD Panel.
4 – 5
Page 38

LC-32R24B
Leandro Palmeira
PC: No external input video [INPUT-6]
Is INPUT-6 selected on the input select menu screen?
NO
Select INPUT-6 on the input select menu
screen for the right input signal.
Is IC2202 (EEPROM) accessed by I2C,
with PC connected, to read the DDC_I2C
SCL/SDA data?
Check the DDC line and its peripheral cir-
YES
Are there the video signal inputs at pins (AN15) (G), (AM15) (B)
and (AK16) (R) of IC8001(CPU)?
Are there the VSYNC/HSYNC signal inputs at pins (AJ16) and
(AH16) of IC8001?
cuits. (IC2202 and its peripherals).
No video (6)
NO
Check the line between SC2201 and IC8001 (Q2211, IC2201,
etc.).
YES
Are digital video (LVDS) signals sent from pins B5~7, C5~7,
D5~7, and E5~7 of IC8001?
YES
Are digital video (RSDS) signals sent from IC5103 to SC5201 and
SC5202?
YES
Check between (SC5201, SC5202) and LCD Panel.
NO Check the line between IC8001 and IC5103.
Check IC8001 and peripheral circuits.
NO Check the line between IC5103 and SC5201 and SC5202.
Check IC5103 and peripheral circuits.
4 – 6
Page 39

No audio (1)
Leandro Palmeira
INPUT-1 No audio INPUT-2 No audio
Is INPUT-1 selected on the input select menu screen? Is INPUT-2 selected on the input select menu screen?
LC-32R24B
NO
Is the audio output selected for “VARIABLE” on the
menu screen?
Is the audio output selected for “VARIABLE” on the
menu screen?
NO
Set the audio output to “FIXED”. Set the audio output to “FIXED”.
YES
Does the audio signal come from pins (5) (L) and (7) (R) of input terminal (J501) to pins (35) (L) and (36) (R) of IC1403 (CODEC)?
NO
YES
Does the audio signal come from pins (5) (L) and (7) (R) of input terminal (J503) to pins (37) (L) and (38) (R) of IC1403 (CODEC)?
NO
Check the line between J501 and IC1403. Check the line between J503 and IC1403.
YES
YES
Does the audio signal come from pins (4) (COD_LRCK), (5) (COD_BCK) and (6) (COD_SDOUT) of IC1403 to pins (AK24), (AH24) and (AJ24) of
IC8001 (CPU)?
NO
Check the line between IC1403 and IC8001.
YES
Does the audio signal come from pins (AN28) (SPOUT_LP), (AN29)
(SPOUT_RN), (AP28) (SPOUT_LN), and (AP29) (SPOUT_RP) of IC8001
NO
Check the line between IC8001 and IC2701, and their
peripheral circuits. (AMP_MUTE line, etc.)
to pins (5) (SP_LP), (6) (SP_LN), (8) (SP_RN), and (9) (SP_RP) of
IC2701 (AMP)?
YES
Is the audio output from IC2701 as specified? NO Check IC2701 and its peripheral circuits.
YES
Check the connector (P2701), speakers and their peripheral circuits.
4 – 7
Page 40

LC-32R24B
Leandro Palmeira
No audio (1)
INPUT-3 No audio
Is INPUT-3 selected on the input select menu screen?
NO
Is the audio output selected for “VARIABLE” on the menu
screen?
Set the audio output to “FIXED”.
YES
Does the audio signal come from pins (2) (R) and (4) (L) of input terminal
(J506) to pins (40) (L) and (41) (R) of IC1403 (CODEC)?
NO
Check the line between J506 and IC1403, and their peripheral circuits.
YES
Does the audio signal come from pins (4) (COD_LRCK), (5) (COD_BCK)
and (6) (COD_SDOUT) of IC1403 to pins (AK24), (AH24) and (AJ24) of
IC8001 (CPU)?
NO
Check the line between IC1403 and IC8001.
YES
Does the audio signal come from pins (AN28) (SPOUT_LP), (AN29)
(SPOUT_RN), (AP28) (SPOUT_LN), and (AP29) (SPOUT_RP) of
NO
Check the line between IC8001 and IC2701, and their
peripheral circuits. (AMP_MUTE line, etc.)
IC8001 to pins (5) (SP_LP), (6) (SP_LN), (8) (SP_RN), and (9) (SP_RP)
of IC2701 (AMP)?
YES
Is the audio output from IC2701 as specified? NO Check IC2701 and its peripheral circuits.
YES
Check the connector (P2701), speakers and their peripheral circuits.
4 – 8
Page 41

No audio (2)
Leandro Palmeira
[HDMI analog audio input] INPUT-5 No audio [PC analog audio input] INPUT-6 No audio
Is INPUT-5 selected on the input select menu screen? Is INPUT-6 selected on the input select menu screen?
LC-32R24B
NO
Is the audio output selected for “VARIABLE” on
the menu screen?
Is the audio output selected for “VARIABLE” on the
menu screen?
NO
Set the audio output to “FIXED”. Set the audio output to “FIXED”.
Is the HDMI audio output selected for “Digital” on
the menu screen?
Set the HDMI audio output to “Analog”.
YES
Does the audio signal come from pins (2) (R) and (4) (L) of input terminal (J507) to pins (43) (L) and (44) (R) of IC1403(CODEC)?
NO
Check the line between J507 and IC1403, and
their peripheral circuits.
YES
YES
Does the audio signal come from pins (2) (L) and (3) (R) of input terminal (J508) to pins (46) (L) and (47) (R) of IC1403(CODEC)?
NO
Check the line between J508 and IC1403, and their
peripheral circuits.
YES
Does the audio signal come from pins (4) (COD_LRCK), (5) (COD_BCK) and (6) (COD_SDOUT) of IC1403 to pins (AK24), (AH24) and (AJ24) of
IC8001 (CPU)?
NO
Check the line between IC1403 and IC8001.
YES
Does the audio signal come from pins (AN28) (SPOUT_LP), (AN29)
(SPOUT_RN), (AP28) (SPOUT_LN), and (AP29) (SPOUT_RP) of
NO
Check the line between IC8001 and IC2701, and their
peripheral circuits. (AMP_MUTE line, etc.)
IC8001 to pins (5) (SP_LP), (6) (SP_LN), (8) (SP_RN), and (9) (SP_RP)
of IC2701 (AMP)?
YES
Is the audio output from IC2701 as specified? NO Check IC2701 and its peripheral circuits.
YES
Check the connector (P2701), speakers and their peripheral circuits.
4 – 9
Page 42

LC-32R24B
Leandro Palmeira
No audio at UHF/VHF broadcast signal reception
Is TV selected on the input select menu screen?
NO
Is the audio output selected for “VARIABLE” on the
menu screen?
Set the audio output to “FIXED”.
YES
Is there the SIF signal output at pin (15) of tuner (TU1101)?
NO
Check the tuner (TU1101) and its peripheral circuits.
YES
Does the SIF signal come from pin (15) of tuner (TU1101) to pin
(AN23) of IC8001?
NO
Check the line between TU1101 and IC8001.
(Q1101,Q1102, etc.)
YES
Does the audio signal come from pins (AN28) (SPOUT_LP), (AN29)
(SPOUT_RN), (AP28) (SPOUT_LN), and (AP29) (SPOUT_RP) of
IC8001 to pins (5) (SP_LP), (6) (SP_LN), (8) (SP_RN), and (9)
(SP_RP) of IC2701 (AMP)?
No audio (3)
NO Check the line between IC8001 and IC2701 and their periph-
eral circuit (AMP_MUTE line, etc.)
YES
Is the audio output from IC2701 as specified? NO Check IC2701 and its peripheral circuits.
YES
Check the connector (P2701), speakers and their peripheral circuits.
4 – 10
Page 43

No audio signal at Digital Audio Output terminal (Analog sound heard)
Leandro Palmeira
No INPUT-4/5(HDMI) audio
If no video appears, refer to “No external input video (HDMI)
[INPUT-4/5]”.
Is the HDMI_MUTE line as specified?
NO
Check Q1301, IC1302 and their peripheral circuits.
YES
Is there the SPDIF signal (OPT_OUT) output at pin (AP11) of
IC8001 (CPU)?
LC-32R24B
YES
Is there the SPDIF signal (OPT_OUT) input at pin (2) of IC1304
NO Check the line between IC8001 and IC1304.
(SPDIF_BUFF & MUTE)?
YES
Is there the MUTE signal input at pin (1) of IC1304? NO Check the MUTE_A_ALL and ACDET signals, and their
peripheral circuits. (Q1304, Q1312, D1310, etc.)
YES
Is there the SPDIF signal input at pin (1) of D1306 (OPTICAL OUT-
NO Check D1306 and its peripheral circuits.
PUT)?
No optical output under the following conditions as per
HDMI requirements.
*Audio contents protected.
*Audio frequency beyond 48kHz.
*Audio bit length beyond 16bits.
YES
Check the speakers and their peripheral circuits.
4 – 11
Page 44

LC-32R24B
Leandro Palmeira
INPUT-4 No audio (HDMI connected)
INPUT-5 No audio (HDMI connected)
[INPUT-4 input]
Is INPUT-4 selected on the input select menu screen?
[INPUT-5 input]
Is INPUT-5 selected on the input select menu screen?
NO
Is the audio output selected for “VARIABLE” on the
menu screen?
Set the audio output to “FIXED”.
YES
[INPUT-4 input] If no video appears, refer to “No external input video
(HDMI) [INPUT-4]”.
[INPUT-5 input] If no video appears, refer to “No external input video
(HDMI) [INPUT-5]”.
YES
Is the HDMI MUTE line as specified?
No audio (4)
NO
Check Q1301, IC1302 and their peripheral circuits.
YES
Does the audio signal come from pins (AN28) (SPOUT_LP), (AN29)
(SPOUT_RN), (AP28) (SPOUT_LN), and (AP29) (SPOUT_RP) of
NO
Check the line between IC8001 and IC2701, and their
peripheral circuits. (AMP_MUTE line, etc.)
IC8001 to pins (5) (SP_LP), (6) (SP_LN), (8) (SP_RN), and (9)
(SP_RP) of IC2701 (AMP)?
YES
Is the audio output from IC2701 as specified? NO Check IC2701 and its peripheral circuits.
YES
Check the connector (P2701), speakers and their peripheral circuits.
4 – 12
Page 45

No monitor audio output
Leandro Palmeira
LC-32R24B
Is the audio output from the monitor set at “VARIABLE” or “FIXED”
on the menu screen?
YES
Are there the audio signal outputs at pins (24) (LINE_L) and (25)
(LINE_R) of IC1403 (CODEC)?
YES
Does the audio signal come from pins (24) (LINE_L) and (25)
(LINE_R) of IC1403 to pins (2) (R) and (4) (L) of J505?
NO Check the bus line (SCL0/SDA0) and IC1403.
NO Check IC1403 and its peripheral circuits.
NO Check the line between IC1403 and J505. and their periph-
eral circuits.
Check the LINE_MUTE line and its peripheral circuits.
(Q507 thru Q509, etc.)
4 – 13
Page 46

LC-32R24B
Leandro Palmeira
LED flashing timing chart for error notification.
1) Green power LED
Error type Power green LED operation (1 cycle) Pins are monitor microprocessor pins.
Lamp failure
Flashes once: Fast
Power failure
Flashes twice
communication failure
with main CPU
Flashes 3 times
Monitor temperature failure
Flashes 5 times
Illegal Flash ROM Data
Flashes 8 times
H: On
L: Off
H: On
L: Off
H: On
L: Off
H: On
L: Off
H: On
250ms 1sec
ERR_PNL (pin 40): Abnormal L. Confirmed after 5 consecutive detections at 1 second intervals (detected only when the
backlight is on).
Note that after five detection counts, the lamp cannot be activated except in the monitoring process. (For the first time,
only the inverter is reset, and error OFF is not activated) Accumulated counts are cleared to 0 when the corresponding setting in the process A is made, when the power is turned on
with [CH_DOWN] and [VOL_UP] on the unit down or after
continuous illumination for 3 minutes.
Refer to “Power failure details”.
Refer to “Communication failure details”.
Communication line failure or main CPU communication failure → Check debug statements for the main CPU.
If the panel temperature is 60 C or more for 15 seconds or
more in a row, CAUTION appears on the OSD of AVC (flashes
in red in the lower right screen).
If the panel temperature is 60 C or more for 25 seconds or
more in a row, error standby is activated.
(MONITOR MAX TEMP on process A mode: Change of temperature failure AD value): Thermistor
Flash ROM of Monitor Microprocessor is illegal.
Update Monitor Microprocessor Software again.
L: Off
4 – 14
Page 47

2) Power failure details (Power LED flashes twice and OPC LED flashes)
Leandro Palmeira
Error type OPC green LED operation (1 cycle)
PS_ON
13V/UR10V failure
H: On
Flashes once
L: Off
EU_POW
Main 3.3V failure
H: On
Flashes twice
L: Off
D_POW
UR6V failure
H: On
Flashes 3 times
L: Off
PANEL_POW
Panel 5V failure
H: On
Flashes 5 times
L: Off
Main failure
Flashes 7 times
H: On
L: Off
LC-32R24B
Pins are monitor microprocessor pins unless otherwise
specified.
DET_POW1 (pin 34). Main converter 13V/UR10V is not
applied.
If error is detected during operation, the power is turned on
again by interrupt handling (instantaneous blackout processing).
DET_POW3 (pin 36): Abnormal (L). Main power 3.3V is not
applied.
If error is detected during operation, error standby is activated
by polling.
DET_POW0 (pin 33): Abnormal (L). UR6V is not applied.
If error is detected during operation, error standby is activated
by polling.
DET_POW2 (pin 35): Abnormal (L). Panel power is not
applied.
If error is detected during operation, error standby is activated
by polling.
Main microprocessor detection error (FAN error, 1bitAMP
error, etc.)
The details are displayed in “ERROR STANDBY CAUSE” on
page 1 of process A mode for the main microprocessor.
3) Communication failure details (Power LED flashes 3 times and OPC LED flash)
Error type OPC green LED operation (1 cycle)
Initial communication reception failure
Flashes once
H: On
L: Off
Time-out setting reception failure
Start-up confirmation reception failure
H: On
Flashes twice
L: Off
Regular communication failure
Flashes 3 times
H: On
L: Off
Basically, communication logs are analyzed by a bus
monitor or debug print logs are analyzed.
Initial communication from the main CPU is not received.
(After canceling the reset, request for the monitor model No. is
not received.) → Communication line failure or main CPU
start-up failure
Time-out setting and start-up mode change cannot be
received from the main CPU. (Start-up communication until
time-out setting and start-up mode change is not received.) →
Main CPU start-up failure or monitor microprocessor's reception failure
Regular communication that is performed at 1 second intervals in the normal operation is interrupted. → Main CPU operation failure or monitor microprocessor's reception failure
4 – 15
Page 48

LC-32R24B
Leandro Palmeira
CHAPTER 5. MAJOR IC INFORMATIONS
[1] MAJOR IC INFORMATIONS
• IC8001 (RH-iXC308WJQZQ)
This IC is a system LSI with the following function.
A cable, ground wave receiver, NTSC decoder, HDMI receiver, transport processor, MPEG video processor, digital audio decoder, analog video
processor, graphics processor, MLPS processor, and Peripheral controller.
5 – 1
Page 49

/
Leandro Palmeira
CHAPTER 6. OVERALL WIRING/BLOCK DIAGRAM
[1] OVERALL WIRING DIAGRAM
LC-32R24B
I
KEY UNIT
H
KM
QCNW-G724WJQZ : KM
5
1
FPC FPC
POWER/
UNIT
1
12
1
6
PD
INVERTER
LB
To LAMP
To LAMP
G
OUTPUT
L
F
E
AUDIO
R
INPUT 3
Y
DIGITAL
AUDIO
OUTPUT
AUDIO
S-VIDEO
INPUT 6
ANALOG
(PC IN)
INPUT 2
RGB
VIDEO
41
L
AUDIO
R
Y
KM
INPUT 1
VIDEO
HDMI
HDMI
MAIN UNIT
INPUT 5
INPUT 4
180
180
7
LB
1
QCNW-G728WJQZ : LB
To LAMP
To LAMP
To LAMP
P
B
L
AUDIO
P
R
R
D
ANT/CABLE
L
AUDIO
R
RA
C
P
P
110
L
B
AUDIO
R
R
USB(SERVICE)
QCNW-G727WJQZ : PD
BUS-CONE
(4pin)
SP
14
PD
12
To LAMP
1
To LAMP
To LAMP
AC IN
R/C, LED UNIT
B
RA
115
QCNW-G725WJQZ : RA
A
QCNW-H283WJPZ : SP
12345678910111213141516171819
6 – 1
20 21 22
Page 50

LC-32R24B
A
A
A
A
A
A
&
V
Leandro Palmeira
[2] SYSTEM BLOCK DIAGRAM
$.
㪣㪚㪛
㪧㪘㪥㪜㪣
&4+8'4
%8$5
/#+0
I
H
G
F
E
D
C
B
+0276
+0276
+0276
4( +0
+0276
+0276
+0276
52
%8$5.4
,
%QORQPGPV
,
%8$5.4
,
5
,
%QORQPGPV
,
#WFKQ 1WV
*&/+ #WFKQ
4)$ #WFKQ
/KPK 2NWI
126+%#.
176
&57$
4)$
*&/+
5%
*&/+
5%
.4
,
䇼㪪㪧䇽
㪧㪉㪎㪇㪈
㪜㪯㪫㪄㪪㪧
#)%#(6
67
#PCNQI
&KIKVCN
6WPGT
&A (
*& 8&
4 ) $
4: Z
4: Z
.4
;2D2T
%8$5
.4
5
.4
;2D2T
8
%
*&/+ .4
4)$ .4
+%
''241/
.4
8 #
+%
5+(
%10'%614
+%
''241/
670 %8$5
$75
126 176
+%
''241/
/WVG
8
㪠㪚㪉㪎㪇㪈
㪪㪧 㪘㪤㪧
㪰㪛㪘㪈㪋㪎㪪㪱
&KUENGVG
/WVG
#(6
6Z&4Z&
,
75$
G
UE G
/WVG
#/2 /76'
56#0&$;
2416'%6
(TQO %27
8
+%
8
:VCN
/*\
.+0' /76'
8
*&/+ .4
4)$ .4
$WHHGT
+%
6/&559
5++
+P
+P
+P
5GN
+%
+1
/
.4
.4
.4
*&/+ /76'
+%
-*\ 8
+%
-*\ 8
8
8 8
+%
+0
+0
+%
+0
%1&'%
#-#'
+0
+0
+0
+5
+5
176
176
176
+%
+%
52176 .4
.+0' .4
8
-*\
-*\ 8
+%
''241/
MDKV
+%
''241/
*&%2
8
+% -*\ 8
/*\
::VCN
/*\
0 456 %1&'%
%1& 5&176
%1& .4%- %1& $%-
&52 5&+0 &52 5&+0
&52 /%.- &52 $.-+0 &52 .4%-
6Q 456 QH GCEJ +%
52&+(
4'5'6 176D
0 %27 456
+%
+%
+%
+%
+( KP
#)%#(6
5+(
*&/+KP
*8
4)$ KP
&68+5
&6852&+(
4'5'6
0 54'5'6
0 &$) 456
2
%QPPGEVQT HQT
5QHVYCTG YTKVKPI
%8$55;2D2T
65 0176
+%
$%/9:)#
&KIKVCN #8 FGEQFG /CKP %27
.QEC $752%
/*\
8
+%
(.#5*
/D
7#46#
7#46$
.8&5 176
7#46%
8
8
8
75$A
75$A
+%
866
+%
&&4
/D
%08UU
1(.
2
%QPPGEVQT HQT
&GDWI
456 *(.5 %2.&
(.#5 9 %2.&
45 $7( %06
6JGTOKUVQT
$7 8
+%
4GUGV
2
%QPPGEVQT HQT
5QHVYCTG YTKVKPI
CPF GOWNCVQT
4Z& 6Z&
+%
)CVG
9*(7
4Z& 6Z&
6*'4/1
/*\
:VCN
2/ 4'3 %$1165
0 54'5'6
$7 8
ޣ4#ޤ2R
ޣ4#ޤ2R
+%
20. +% '
.8&5DKV EJ
7#46
#&
#&
#(6
/*\
+1
+1
+06
%
4
12%
$7 8
/%
/QPKVQT /KEQO
#&
;1;#-7
.'&
)
.'&
219
4
.'&
219
.'&
12%
+%
+% 59
&'6A20.8
+%
+1
+1
ޣ-/ޤ2R
ޣ-/ޤ2 R
(4#/' 4. 7& 6'/2=? 15 5'6
+1
56$
+1
(TQO %27
+%
''241/ 5%.5&#
+%
92
''241/
5%5,
'44 20.
#% &'6
+1
+1
$CEM7R
$78
$7 8
/#+0
#8
8
& 8
& 8
& 8
-';-';56#0&$;219
20. 10
(TQO %27
2QYGT UWRRN[ EKTEWKV
5*+2 '0 20'. '0
41/5'.
56$ %27
$7 8
&'6 8&'6 8
25 10
㪠㪚㪌㪉㪇㪈
㪠㪚㪌㪉㪇㪉
㪭㪚㪦㪤
㪛㪘㪚
748
㪙㪬㪌㪌㪇㪋㪈
㪠㪚㪌㪋㪇㪈
㪧㪦㪮㪚㪫㪩㪣
㪙㪛㪏㪈㪍㪉㪜㪢
㪙㪛㪏㪈㪋㪊㪤
㪬
㪠㪚㪌㪈㪇㪊
㪫㪄㪚㪦㪥
㪜㪘㪞㪣㪜㪉
㪠㪚㪌㪈㪇㪈
㪜㪜㪧㪩㪦㪤
㪤㪉㪋㪉㪌㪍㪙
((% ((%
45&5 (2%
45&5 (2%
((% ((%
+08'46'4
8QP
Y TG R
1(.
ޣ.$ޤ2 R P
ޣ.$ޤ2 R P
ޣ2)ޤ
R
ޣ#%ޤ
R
8
8
#% &'6
748
$78
2(%
/#+0
5VCPFD[
+08'46'4
8
X
74 X
㧔20. X㧕
$7㨢#%
219'4
25 10
Y TG R
ޣ2&ޤ219'4 22 0
ޣ2&ޤ219'4 22 0
20.219
&219
A
4% .'&
4%
12%
.'&
-';
12345678910111213141516171819
6 – 2
20 21 22
Page 51

Leandro Palmeira
CHAPTER 7. PRINTED WIRING BOARD ASSEMBLIES
[1] MAIN Unit
I
MAIN Unit (Side-A)
H
G
LC-32R24B
F
E
D
C
B
A
12345678910111213141516171819
7 – 1
20 21 22
Page 52

LC-32R24B
Leandro Palmeira
I
H
MAIN Unit (Side-A Chip)
Q1602
R1415
SC1601 SC1602
R539
R1411
J8001
L1101
1616
D1604
161
D1603
Q1605
LUG2202
R563
D522
FB502
R585
R588
R568
C544
FB516
R506
D517
R521
FB515
D516
R540
FB512
C542
FB513
C540
FB511
R535
R536
C538
R1424
C535
R1409
R141
R140
R1418
R1414
FB8001
C1407
B1605
Q1603
Q1606
C1611
IC1603
C1612
R1609
R1724
R1624
R1601
R1640
Q1609
IC1607
C514
Q1618
R1623
R1728
IC1604
C1626
C1627
C1629
C1628
C1675
C1637
C1633
R1670
C1632
C1636
R1672
624
C529
C525
C563
Q521
L507
R626
C522
Q515
Q501
512
510
R507
L501
R508
R505
C504
Q516
R562
L502
C513 C524
C539
R561
C505
R564
R614
R591
C541
L503
Q517
C549
C1422
R1432
R1425
C1423
C1441
C1424
SG1601
SG1607
SG1613
SG1619
SG1602
SG1608
SG1614
SG1620
R168
R161
R160
R1667
R1729
R1723
C1613
R1603
C1615
SG1603
SG1609
SG1615
SG1621
SG1604
SG1610
SG1616
SG1622
55
Q511
R622
R609
C517
R523
R538
R524
R534
Q506
C534
R537
R547
R530
R531
D515
Q504
C521
R519
R567
C506
R545
C526
C1421
C1440
R1427
R1422
C1414
C1415
IC1403
C1409
C1408
R1423
C1406
R1426
R9012
C1419
R8090
R1404
R1405
R1406
R1407
P9202
R1685
Q1620
IC1609
C1677
C8093
X8001
C8135
TP8049
R1687
IC1606
C1653
C8138
IC8003
C8144
R8043
C8143
C8128
C8127
C8120
C8110
C8108
C8148
C8085
C8119
C8118
C8133
C8117
C8132
C8129
C8130
C8131
R8094
C8126
C8125
R8021
R8040
R8088
R8085
C8134
R8087
L8
R8086
001
R8089
R8082
R8083
R8011
R8005
R8008
TP9304
R8018
C1617
C1618
C1674
R1674
C1642
1643
1644
R 739
R 740
R 741
R 742
R1 43
R1 44
R1 45
R1 46
1678
1679
1681
1605
C1673
R1606
R1682
R1680
R1675
C8089
C8091
C8107
C2236
L2204
C2238
L2
C2229
206
C2240
L2205
C2235
R2280
C2237
L2207
C2239
C2241
C2246
R2279
C2247
R8098
R8099
C8136
R8095
R8069
R8015
TP8047
R8042
R8130
TP8016
LUG2201
R1686
R8060
R8051
C8111
C8113
C8121
C8123
C8122
C8124
R8003
FL8001
TP8043
R8123
R8132
R8023
TP8010
TP8042
TP8002
R8135
D8002
R8032
R8124
IC2001
TP8045
TP8014
TP8051
TP8012
TP8013
TP8048
TP8011
TP8015
IC8001
TP8081
R8035
C8001
R8120
R8002
R5101
Q2603
R8033
R8034
R9201
IC2008
R8901
R8147
R8143
R2635
P2001
R2040
R2010
SC9201
R2029
C2020
R2016
C2026
IC2004
D2003
R2011
R2041
R2014
R8024
R9209
R9003
R9007
R8104
R8103
C8142
C8141
R8102
C8139
R8045
R8138
C8147
C8150
R8004
R8030
R8027
R8028
R2018
R2058
R2066
R2015
C2017
C2018
R2031
R8101
C8140
R8139
R8006
TP8044
R8156
R8128
R8126
R8127
R8113
R8125
R8117
TP8001
C8146
C8145
R8107
R8108
R8152
R8153
R8183
R8182
R8154
R8155
L5115
L5116
L5117
L5118
L5119
L5120
R8151
R8188
C8154
C8155
R8189
R8231
R8217
R8190
R8258
R8247
R8232
R8218
R8191
R8259
R8248
R8233
C8196
R8260
C8197
SC5201
L5108
C5125
L5109
C5132
L5110
L5111
C5131
L5112
L5113
C5129
L5114
C5142
FB5103
C5135
C5128
C5126
C5127
R5148
C5130
C5134
FB5102
C5139
C5141
C5144
FB5105
C5119
C5137
C5143
C5116
C5114
LUG2205
C8151
R8186
R8228
R8215
R8187
R8255
R8245
R8268
R8216
R8269
R8246
R8230
R8257
C8152
C8153
IC5103
C5112
C5111
C5110
R5108
R5110
R5112
R5116
R5106
R5117
R5122
R5107
R5123
R5102
R2636
IC8152
L5107
C5122
L5106
C5120
L5105
L5104
C5117
5103
L5102
C5115
R5143
C5105
C5107
5106
C51 8
5121
C5104
C5140
R5146
R5147
R5145
FB5104
C5102
5492
5493
5490
L5101
C5133
C5136
C5113
R5144
R5142
C5123
C5138
5489
R5486
R5482
R548
FB5101
R549
R548
R5483 R5485
C5454
R5105
R5104
Q5406
R5479
R5478
C5450
R5480
Q5408
R5473
R5474
IC5102
R5128
FL5101
R5121
R5124
R5126
R5109
R5111
R5113
3
R5115
R5129
R5125
R5127
L5402
L5401
L9602
1
IC8151
C8164
C8171
C8166
L9603
IC5402
Q5407
R5476
C5451
Q5409
IC5401
SC5202
13
LUG2209
R5484
C5457
C5456
C5455
R5503
R5502
R5501
R5498
R5499
R5496
R5494
C5214
C5212
IC5201
Q5410
R2623
R2605
C2603
C2606
R2621
Q2601
R2602
C2601
C5206
IC5202
C5201
R5222
R5211R5214
P2603
R2601
C5205
C5202
C5204
R52 5
R52 1
R52 4
R5202
C5207
520
520
R5208
R5207
R521
C5209
R521
C5211
C5213
R5 21
R5 23
C5217
R5224 R5220
C5218
R5226
R522
C5219
R5231
R523
C5220
C5221
R5235
R5236
R5232
R5233
R5450
R5218
521
C5215
R5213
C5208
R5139
C5101
R5118
P5101
R5120
R5119
C9001
IC9001
C5452
IC5403
C5458
IC5101
D5409
L5403
5
4
P9701
L9641
C8189
C8165
IC8452
P9301
TH2001
8474
C8460
C8461
C8462
R8475
IC8454
LUG2206
R1302
R1335
Q1309
Q1305
R1338
R1337
R1324
D1311
R1323
R9034
P9001
Q1304
D1304
R9035
P2701
D1307
D1302
R1336
R1310
D1310
D1312
C9005
C8186
C2710
L2704
C2728
C2731
C2737
D2701
C2742
FB2705
C2727
C2738
FB2704
C2743
D2702
L2703
IC2701
L9601
L2701
L2702
C2741
D2704
FB2702
D2703
C2745
C2744
C2725
C2730
FB2703
C2726
C2740
cam1 9
LUG2210
C2225
Q512
Q2210
R225
R2245
R2240
D2206
Q2211
R 250
C2220
2254
R 246
R225
R2257
C2219
R601
SC2201
FB2207
FB2206
223
222
R2 34
R2 33
R22 8
C2214
C2213
Q522
R627
55
R623
R610
IC2201
R2242
R625
D2208
C548
C2215
C531
C562
D508
L508
R503
J503
222
D2203
D2207
R2241
C2223
R 247
C2221
C2222
R2 51
R2 55
R2 58
R2304
Q2212
FB503
600
C582
C581
C579
C580
R598
59
FB501
222
P2002
R2248
FB2005
R2305
FB2001
C2027
C2029
C2028
FB2004
FB2003
R200
R200
J507
D2202
D2211
D2210
R2252
Q2213
C2216
J502
C2228
R226
R226
FB2208
R2259
R2260
IC2202
C2227
D505
R2237
R502
J501
VA8001
VA8002
R1416
FB8004
P9002
C2224
R2244
R22 3
C2217
R22 9
LUG2211
G
R582
R581
C570
FB523
R578
Q508
R587
R586
C571
Q509
R584
R583
Q507
R576
F
E
D
FB522
C569
R579
R580
R556
R633
C560
R632
Q524
D504
R517
C519
R543
527
507
R574
L504
C515
Q518
R613
R615
FB509
D511
R518
C520
R544
R616
C508
C528
Q503
L505
C516
Q519
R617
R618
C553
R501
D512
FB510
R526
Q502
R525
C536
R527 R528
C537
C523
FB508
D510
R520
C
R1120
R1121
C1112
R2314
R2313
Q1102
R1118
R1119
R596
R597 R557
C575
FB514
B
Q1101
R595
Q510
R111
R1115
R1113
R593
C1107
R594
R1110
L1301
C1311
C1312
C1313
C1310
R1311
IC1304
R1333
J505
Q1312
D1306
R605
R604
C586
FB525
J508
R608
R607
R612
Q514
C533
R631
L510
C554
TP2041
R634
C547
C552
D519
FB520
R572
D520
C565
J504
J509
R546
R533
R532
Q505
R510
FB505
R509
C502
C501
FB506
R511
C511
C503
R619
C53
Q520
R620
L506
C518
C509
R621
C543
R550
J506
512
D2205
R2239 C2218
FB2205
FB2204
FB2203
C585
D2201
FB504
60
R603
C584
C583
Q523
R630
C550
58
R59
C551
629
R628
C545
L509
532 C559
R570
D509
R611
D518
R504
Q513
R569
R606
R592
C546
FB521
FB519
R571
D521
C557
C558
R555
FB518
R558
C555
C556
R552
R554
FB517
TU1101
LUG2212
10
A
FB1101
C1101
C1102
FB1102
R1106
TP1102
R1101
R1102
C1104
R1104
R1103
C1108
R1109
R1107
R1105
C1110
C1109
C1111
R1117
P2201
12345678910111213141516171819
7 – 2
20 21 22
Page 53

I
Leandro Palmeira
H
MAIN Unit (Side-B)
G
LC-32R24B
F
E
D
C
B
A
12345678910111213141516171819
7 – 3
20 21 22
Page 54

LC-32R24B
Leandro Palmeira
I
H
MAIN Unit (Side-B Chip)
C1646
TL9318
TL9315
L1618
B1603
R1630
TL9345
TL9347
TL9349
TL9351
TL1615
C1607
C1631
C1425
D1619
C1609
R1602
TL1616
C1427
R1431
TL9344
TL9346
TL9348
TL9350
TL9357
TL9354
TL9313
C1430
R1722
D1611
C1431
TL9378
C1634
C1635
TL9312
C1676
R1730
D1607
IC1608
R1637
TL1607
TL1613
TL1614
C1622
C1623
C1625
C1624
R1666
R1665
R1663
R1662
C1630
D1601
R1604
R1629
TL1609
TL1619
1607
Q1607
1620
TL1606
TL8047
TL8048
TL516
TL8049
TL550
TL531
TL510
TL511
TL512
TL1604
C1429
C1432
TL8456
TL2003
TL2005
TL2002
TL2004
TL638
TL636
TL2296
TL556
TL523
TL518
TL526
TL520
TL519
TL522
TL521
TL8050
TL528
TP2205
C2226
L2202
TL2290
TL2292
TL639
TL637
TL527
TL529
TL2291
L2263
TL2264
TL2295
TL2261
TL2258
TL2293
TL2297
TL557
TL525
TL551
TL553
TL530
TL533
TL535
L2262
L2260
TL641
TL548
TL547
TL532
TL534
TL536
TL541
TL502
7
TL2231
TL1302
TL1304
TL546
TL2294
TL1303
TL642
TL640
TL539
TL540
TL538
TL503
TL501
TL554
TL544
TL537
TL542
TL504
TL506
TL508
TL545
TL543
TL552
TL549
TL555
TL505
TL507
TL509
TL524
TL515
TL1101
TL513
TL514
6
TP2206
C8456
R9303
TL9337
TL9338
TL9339
TL9340
TL9341
TL9342
TL9343
C8458
L9314
TL9311
TL9381
R1420
TL9355
R9009
R9001
R9006
TL9001
C1411
D9003
R1403
R1421
1405
C1418
C1412
IC1402
R1413
R1419
R1417
R9011
TL2217
TL2218
TL2216
Q2204
TL2219
R9002
D9001
TL9004
TL9002
D9002
TL9003
C1404
C1417
R1449
R1412
TL2215
X1401
R1450
R1402
IC1401
R1401
C1401
C1403
C1402
R9010
TL2214
TL2213
TL2210
TL2212
TL2201
TL9353
L2211
TL1120
L9352
TL1121
TL1119 TL1117
TL1116
TL1115
TL1114
TL1112
TL1111
TL1110
TL1108
TL1107
TL1102
TL558
11
R2003
TL 006
TL2023
C8061
C8055
Q2007
R9305
R20 3
C8014
TL8093
C8034
R9316
C2002
R2007
Q2001
Q2006
C2003
R2076
R2004
IC2007
R2052
C2024
C20 4
R20 1
R20 0
C2015
R2051
R2017
R2006
R2001
L2028
L 027
R2032
TL2030
TL 0 9
C2016
R2046
R2033
R2047
R2049
C2006
R2042
TL2035
TL2033
TL2040
TL2034
TP2005
C8082
C8080
R8146
C8064
R8145
C8106
C8003
R8038
C8105
R8039
C8075
C8079
R8100
C8043
C8062
C8036
C8059
C8044
C8052
C8022
C8060
C8007
C8005
C8006
C8063
C8004
C8023
C8020
C8013
C8021
C8015
C8019
C8068
C8057
C8008
C 048
C8067
C8066
C8065
C8046
C8033
TL8080
R9314
R9318
Q9301
C1308
IC1302
R1305
R1307
R1306
IC1301
TL2031
R8144
C8045
LUG2213
C2001
TL8046
R8026
C8907
C8905
C8904
56
0
C8
TP8046
TP8020
TP8084
R8456
IC8451
R9313
TL8070
TL8071
C8452
TL8042
FB8011
FB8010
009
FB8
C8915
C8914
FB8008
C89
C8903
3
FB8007
C
912
R8056
C8
901
C8911
C8095
C8115
C8094
C8116
C8902
C8101
C8077
31
C8102
R81
C8041
C8099
C8074
TP8050
C8090
R8014
R8013
R9317
R8009
TL8041
R8025
TL2248
TL8455
R8457
TL8044
C8069
R8084
C8081
C8112
C8097
C8916
C8149
R81 2
C8909
104
C8
TP8052
C 098
C8 09
C8027
C8103
C8038
C8096
C8040
C8910
C8908
C8010
C8042
C8906
C8025
C8011
C8017
C8054
C8018
C8058
C8009
R8065
C8050
R8059
R9315
R9310
C8088
R8031
R8097
R8114
R8096
TP8041
R8093
R8122
R9018
R8036
R8116
TL8036
R8055
TL8072
TL8069
TL8073
TL8075
TL8074
TL8077
TL8076
TL8079
TL8078
TL8454
C8451
C8453
TL8453
C9301
R1301
TL9240
TL9224
TL9201
TL9 23
TL9241
L9239
R9204
R9207
TL9206
TL9205
TL9204
R1725
FB1606
Q1619
R1726
C1652
R1683
FB1607
TL1622
C1679
C1678
C1648
C1647
TL8043
C8137
TL2226
8903
R8902
TP8074
C8100
C8071
C8083
C8078
C8114
C8072
C8092
P8055
C8084
C8073
C8070
R9014
TL8091
TP9302
TP9301
TP9303
R9324
R8010
TL9359
TL9375
TL9302
R8016
R8017
R8140
R8007
LUG2208
R8454
R8453
R8458
R8452
R9304
R8455
R8451
R9307
TL 3 4
TL9336
R9306
R9302
TL9331
TL9 35
TL9333
TL9382
TL9384
R9212
TL8045
C1620
TL9332
TL9222
TL93 9
TL 330
TL922
R9208
TL9203
R9202
C1619
R1684
TL9327
TL9380
TL9310
R9211
C1621
R1738
TL9328
D1605
C1640
C1641
TL9208
T 9 07
TL9202
R1737
R167
IC1601
TL9326
TL93 5
TL9323
TL9 9
R9005
TL9324
TL9383
D1614
R1641
9008
C1601
C1645
C1638
C1639
R1611
R1668
R1671
TP1633
TL1620
R1676
Q1616
TL 6 1
R1627
R1727
D1613
C1602
TL517
R549
C1428C1426
TL9316
TL9320
TL9322
TL9317
TL932
TL9319
TL9301
R2035
R2072
TL2013
X2002
R1330
R2025
TL8029
R2068
TL2014
T 2012
TL2007
TL 011
T 2 09
L 001
T 92 2
R2039
TL 213
R2019
TL9211
TP20 4
TL 2 0
R2027
TP2011
TL2303
C20 5
R2 05
R2 13
R2 02
R20 4
C2004
C2012
IC2002
TL2037
TL2039
TL2038
TL2010
TL2025
R2037
TL2024
TL2026
FB8003
D9302
C8086
C8039
R8137
R8136
TL8092
C8076
C8037
FB8002
C8026
C8024
C8028
R8029
C8047
R8129
C8032
C8016
C8012
C8030
C8049
C8051
C8053
C8002
C8029
R8168
R8163
C8035
C8031
R8201
R8199
R8200
R8198
C9304
R9308
D9304
R9301
D9301
IC9301
C9302
C9303
R9319
R9325
R9326
D9303
R1303
R2701
Q1301
R2719
D1305
R2718
R1304
R1322
R1309
C1301
R9205
R2030
TL9219
R2012
R2021
2020
C2007
R20 2
R2028
R2026
R2036
C2010
TL2017
TL2018
TL2036
TL2008
C8087
R8172
R8174
R8173
R8202
R8181
R1318
Q1306
C1314
C1303
R1308
R1341
TL5241
TL5236
IC8155
TL5237
TL5251
TL5239
TL5238
TL5250
TL5225
TL5245
TL5226
TL5224
TL5223
TL5235
TL5234
TL5231
TL5232
TL5244
TL5230
TL5222
TL5221
TL5228
L5229
LUG2207
TL5255
TL5227
TL5216
TL5218
TL5233
TL5214
TL5220
TL5219
TL5217
TL5215
TL5212
TL5213
TL5211
TL5202
TL5201
TL5210
TL5208
TL5203
TL5209
TL5205
TL5206
TL5207
TL5204
TL2015
TL9209
TP2007
R2034
TP2009
TL2020
TL2021
R2038
TL2022
IC8002
C8220
R8203
C8160
C8162
TL8152
C8194
C8170
R8226
R8270
TL8151
C8192
TL2704
C8169
R8225
C8218
C8219
C8217
TL2703
FB2701
R8204
C8221
R8205
C8222
C8156
R8206
C8161
C8163
C8158
C8167
C8168
R8240
R8227
R8243
C8207
C8208
C8209
C8216
C8205
C8206
C8225
R2708
C2703
R8207
C8157
R8241
R8244
R8242
R8169
R8251
R8167
R8170
C8223
R8208
C8159
R8171
C8224
R1329
R1321
R1317
R1326
R1328
Q1307
Q1308
R1 15
R1331
R1314
132
R1325
TL5254
TL5253
TL5252
TL5321
TL5320
TL5249
TL5248
TL5243
TL5247
TL5242
TL5246
TL5240
C5124
C5103
R5141
R5150
C5109
R5149
TL5114
TL5113
R5511
TL5112
TL5108
TL5111
TL5110
TL5107
TL5109
TL5106
D5410
R5433
C8193
Q5412
C5465
D5413
R546
R5465
D9605
C9708
IC9704
R2753
R2717
TL9720
R2754
C2748
C2716
C2723
R2741
TL5297
TL5299
TL5312
TL5313
L5316
TL5317
IC2601
C5420
R5443
D5407
C5424
R9609
C9718
R9611
R9625
TL2702
TL5296
C5467
C5463
C5423
R5446
C 606
R9601
IC9601
R9642
R9643
R9610
TL5294
TL5416
TL5414
TL5412
R2641
C9607
TL5323
TL5303
TL5302
TL5305
L5306
TL5304
TL5293
TL5295
TL5276
TL5273
TL5275
T 5 7
TL5281
TL5 77
TL5415
C5431
TL5272
L 2 9
TL5274
TL5278
TL5282
TL5280
C5453
R5475
R5441
C5448
C5461
C5460
R5453
R5452
R2606
Q5401
IC2602
R5454
C5417
R5437
R5427
R5434
C5412
R5435
542
R 436
R5507
R5438
R5426
R5432
R544
C5418
R5508
C5415
C5408
C5421
C5414
R5401
Q5404
C5402
R5459
R5 58
R54 0
R5415
R54 6
C543
C5401C5435
R5403
Q5403
C5404
R5411
R5413
R5414
R5412
C5430
R5405
TL5283
TL5284
TL5413
R5462
C2607
R 638
R 637
C2608
R5439
R5442
R5444
R5445
C5439
R5457
C9609
Q9602
R9617
R9 16
R9614
C9615
IC9605
R9629
C9608
C9614
IC9641
C9644
C9641
C9604
IC9602
C9642
C9643
C9624
C9629
TL9722
TL5322
TL5318
12
G
F
TL5101
E
TL5102
TL5103
TL5104
TL5105
TL5115
TL5307
TL5319
TL2606
L2605
TL2610
L2667
TL2604
L2618
R2603
TL2621
L2668
TL2602
L2603
TL2609
L2666
TL2669
FB2603
R5216
C5203
R5215
C5210
R5239
R5240
R5237
R5242
TL2654
R2604
TL2601
TL5311
TL5314
TL5315
C5216
TL5298
TL5301
TL5308
TL5310
TL5300
TL5309
R5495
R5497
C5223
R5238
R5241
C5226
R5227
R5228
C2602
C2609
C2604R5225
R5210C2605
R5209
R2640
D5101
C5462
D
C5444
C5459
D9703
TL9701
C
R9739
R9738
TL9710
TL9715
TL9702
TL9716
TL9733
TL9717
TL9708
R5467
D5408
D5406
R5470
R5466
5442
C5440
C5441
C5419
C5443
5423
C5434
TL9703
TL9734
TL9711
D5411
TL9724
D5405
TL9735
C5422
C5436
R5464
R5449
C5464
R5448
R5447
R9602
R5410
C9605
R9 07
R9 03
R9608
C9601
C9602
R9606
R9605
R9604
R9613
C9611
C9610
C9710
C9713
IC9703
R9641
R9740
TL9723
R9741
C9719
R9612
B
cam28
R2714
TL2701
R2713
A
TL5270
C5416
C5411
C5413
540
C5406
TL5256
TL5258
TL5257
L5285
TL5287
C5118
D5402
C9619
C9618
TL5259
TL9604
TL9605
R9704R9736
D9642
C9631
L5286
TL5291
TL5288
TL5292
TL5260
TL5261
R5140
R5103
C5445
C5446
Q5414
R5420
R5510
R5419
C5427
R5406
R5408
C5426
C5425
C5428
R5407
R5409
D5412
C9620
C9621
C9622
C9616
C9625
C9623
D9607
C9709
R9705
Q9702
D9701
C9711
D9603
D9702
D9643
D9609
D9602
TL9603
C2704R2709
C2705R2706
C2706R2710
C2707R2707
C2713
C2712
R2715
C2711
C2717
R2726
R2731
C2724
Q2704
R2744
R2725
R2730
R2742
2752
TL5289
TL5290
TL5267
TL5263
5269
L 2 5
TL5264
TL5268
TL5266
TL5262
C5449
R5477
R5424
C5447
R5451
R5469
Q5411
R5455
C5432
R5468
R5428
R5431
R5430
C5466
D5403
R5422
R5425
R5512
R5421
C5407
Q5413
R541
R5418
C5405
R5416
C5403
R5404
C5429
C9613
C9617
C9612
D9606
R9644
TL9602
C9645
C9646
D9641
D9601
Q9701
D9713
12345678910111213141516171819
7 – 4
20 21 22
Page 55

[2] KEY Unit
Leandro Palmeira
I
H
G
LC-32R24B
KEY Unit (Side-A)
F
E
D
C
B
KEY Unit (Side-A Chip)
S155
R153
D152
S154
S152
R151
D151
S151
R152
S153
R154
S156
S157
D155
P151
A
12345678910111213141516171819
7 – 5
20 21 22
Page 56

LC-32R24B
Leandro Palmeira
[3] R/C, LED Unit
I
H
R/C, LED Unit (Side-A)
G
F
E
R/C, LED Unit (Side-A Chip)
D
3
C107
RMC101
R101
C102
C
B
SLD101
D101
IC101
R132
C104
R135
R136
C105
R105
R102
D103
R117
R108
Q104
R137
R107
R104
R109
Q102
Q103
D114
R106
R138
R126
R121
Q105
R110
R123
Q106
D115
R127
Q107
R122
R124
C108
C110
C101
R103
RMC102
R120
R119
D116
C103
IC102
R118
R116
C111
P101
P102
R139 R140
A
12345678910111213141516171819
7 – 6
20 21 22
Page 57

Leandro Palmeira
CHAPTER 8. SCHEMATIC DIAGRAM
[1] DESCRIPTION OF SCHEMATIC DIAGRAM
1. VOLTAGE MEASUREMENT CONDITION:
1) The voltages at test points are measured on exclusive AC adaptor and the stable supply voltage of AC 110~240V. Signals are fed by a color bar signal
generator for servicing purpose and the above voltages are measured with a 20k ohm/V tester.
2. INDICATION OF RESISTOR & CAPACITOR:
RESISTOR
1) The unit of resistance "Ω" is omitted.
(K=kΩ=1000Ω, M=MΩ).
2) All resistors are ± 5%, unless otherwise noted.
(K= ± 10%, F= ± 1%, D= ± 0.5%)
3) All resistors are 1/16W, unless otherwise noted.
CAPACITOR
1) All capacitors are µF, unless otherwise noted.
(P=pF=µµF).
2) All capacitors are 50V, unless otherwise noted.
CAUTION:
This circuit diagram is original one, therefore there may be a slight
difference from yours.
LC-32R24B
SAFETY NOTES:
1) DISCONNECT THE AC PLUG FROM THE AC OUTLET
BEFORE REPLACING PARTS.
2) SEMICONDUCTOR HEAT SINKS SHOULD BE REGARDED AS
POTENTIAL SHOCK HAZARDS WHEN THE CHASSIS IS
OPERATING.
IMPORTANT SAFETY NOTICE:
PARTS MARKED WITH " " ( ) ARE IMPORTANT
FOR MAINTAINING THE SAFETY OF THE SET. BE SURE TO
REPLACE THESE PARTS WITH SPECIFIED ONES FOR MAINTAINING THE SAFETY AND PERFORMANCE OF THE SET.
8 – 1
Page 58

LC-32R24B
Leandro Palmeira
[2] SCHEMATIC DIAGRAM
MAIN Unit (1/20)
J
I
H
G
F
E
D
C
B
A
1
23
8
1097654
1311 191816151412 17
8 – 2
Page 59

MAIN Unit (2/20)
Leandro Palmeira
J
I
H
G
LC-32R24B
F
E
D
C
B
A
1
23
8
1097654
1311 191816151412 17
8 – 3
Page 60

LC-32R24B
Leandro Palmeira
MAIN Unit (3/20)
J
I
H
G
F
E
D
C
B
A
1
23
8
1097654
1311 191816151412 17
8 – 4
Page 61

MAIN Unit (4/20)
Leandro Palmeira
J
I
H
G
LC-32R24B
F
E
D
C
B
A
1
23
8
1097654
1311 191816151412 17
8 – 5
Page 62

LC-32R24B
Leandro Palmeira
MAIN Unit (5/20)
J
I
H
G
F
E
D
C
B
A
1
23
8
1097654
1311 191816151412 17
8 – 6
Page 63

MAIN Unit (6/20)
Leandro Palmeira
J
I
H
G
LC-32R24B
F
E
D
C
B
A
1
23
8
1097654
1311 191816151412 17
8 – 7
Page 64

LC-32R24B
Leandro Palmeira
MAIN Unit (7/20)
J
I
H
G
F
E
D
C
B
A
1
23
8
1097654
1311 191816151412 17
8 – 8
Page 65

MAIN Unit (8/20)
Leandro Palmeira
J
I
H
G
LC-32R24B
F
E
D
C
B
A
1
23
8
1097654
1311 191816151412 17
8 – 9
Page 66

LC-32R24B
Leandro Palmeira
MAIN Unit (9/20)
J
I
H
G
F
E
D
C
B
A
1
23
8
1097654
1311 191816151412 17
8 – 10
Page 67

MAIN Unit (10/20)
Leandro Palmeira
J
I
H
G
LC-32R24B
F
E
D
C
B
A
1
23
8
1097654
1311 191816151412 17
8 – 11
Page 68

LC-32R24B
Leandro Palmeira
MAIN Unit (11/20)
J
I
H
G
F
E
D
C
B
A
1
23
8
1097654
1311 191816151412 17
8 – 12
Page 69

MAIN Unit (12/20)
Leandro Palmeira
J
I
H
G
LC-32R24B
F
E
D
C
B
A
1
23
8
1097654
1311 191816151412 17
8 – 13
Page 70

LC-32R24B
Leandro Palmeira
MAIN Unit (13/20)
J
I
H
G
F
E
D
C
B
A
1
23
8
1097654
1311 191816151412 17
8 – 14
Page 71

MAIN Unit (14/20)
Leandro Palmeira
J
I
H
G
LC-32R24B
F
E
D
C
B
A
1
23
8
1097654
1311 191816151412 17
8 – 15
Page 72

LC-32R24B
Leandro Palmeira
MAIN Unit (15/20)
J
I
H
G
F
E
D
C
B
A
1
23
8
1097654
1311 191816151412 17
8 – 16
Page 73

MAIN Unit (16/20)
Leandro Palmeira
J
I
H
G
LC-32R24B
F
E
D
C
B
A
1
23
8
1097654
1311 191816151412 17
8 – 17
Page 74

LC-32R24B
Leandro Palmeira
MAIN Unit (17/20)
J
I
H
G
F
E
D
C
B
A
1
23
8
1097654
1311 191816151412 17
8 – 18
Page 75

MAIN Unit (18/20)
Leandro Palmeira
J
I
H
G
LC-32R24B
F
E
D
C
B
A
1
23
8
1097654
1311 191816151412 17
8 – 19
Page 76

LC-32R24B
Leandro Palmeira
MAIN Unit (19/20)
J
I
H
G
F
E
D
C
B
A
1
23
8
1097654
1311 191816151412 17
8 – 20
Page 77

MAIN Unit (20/20)
Leandro Palmeira
J
I
H
G
LC-32R24B
F
E
D
C
B
A
1
23
8
1097654
1311 191816151412 17
8 – 21
Page 78

LC-32R24B
Leandro Palmeira
KEY Unit
J
I
H
G
F
E
D
C
B
A
1
23
8
1097654
1311 191816151412 17
8 – 22
Page 79

R/C, LED Unit
Leandro Palmeira
J
I
H
G
LC-32R24B
F
E
D
C
B
A
1
23
8
1097654
1311 191816151412 17
8 – 23
Page 80

Page 81

PARTS GUIDE
Leandro Palmeira
No. S98P4LC32R24B
LCD COLOR TELEVISION
LC-32R24B
CONTENTS
[1] PRINTED WIRING BOARD
ASSEMBLIES
[2] LCD PANEL (NOTE: THE PARTS
HERE SHOWN ARE SUPPLIED AS
AN ASSEMBLY BUT NOT
INDEPENDENTLY.)
[3] DUNTKE264FM14 (R/C, LED Unit)
MODEL
[7] CABINET AND MECHANICAL
[8] LCD MODULE Assembly
[9] SUPPLIED ACCESSORIES
[10] PACKING PARTS
LC-32R24B
PARTS
(NOT REPLACEMENT ITEM)
Parts marked with " " are important for maintaining the safety of the set. Be sure to replace these
parts with specified ones for maintaining the safety and performance of the set.
[4] DUNTKE266FM10 (KEY Unit)
[5] DUNTKE450FM09 (MAIN Unit)
[6] NOTE
(Conductive cloth tape/Gasket)
[11] SERVICE JIG
(USE FOR SERVICING)
This document has been published to be used
for after sales service only.
The contents are subject to change without notice.
Page 82

LC-32R24B
Leandro Palmeira
NO. PARTS CODE
PRICE
RANK
[1] PRINTED WIRING BOARD ASSEMBLIES
N DUNTKE264FM14 N * R/C, LED Unit
N DUNTKE266FM10 N * KEY Unit
N DUNTKE450FM09 N * MAIN Unit
N RUNTKA419WJN1 N * POWER/INVERTER Unit
[2] LCD PANEL (NOTE: THE PARTS HERE SHOWN ARE SUPPLIED AS AN ASSEMBLY BUT NOT INDEPEN-
DENTLY.)
N R1LK315T3GW30Z CW N X 32" Wide LCD Panel Module Unit
[3] DUNTKE264FM14 (R/C, LED Unit)
C102 VCKYTV1CF225ZY AB J Capacitor 2.2 16V Ceramic
C104 VCEASX1CN106MY AC J Capacitor 10 16V Electrolytic
C105 VCKYCY1HF103ZY AA J Capacitor 0.01 50V Ceramic
C107 VCEASY1CN107MY AC J Capacitor 100 16V Electroly ic
D101 RH-EXA092WJZZY AB J Zener Diode UDZSNPTE-1712B
D103 RH-PX0421CEZZY AD J Diode CL-165HR/YG-D-T
D114 RH-PX0421CEZZY AD J Diode CL-165HR/YG-D-T
D115 RH-PX0421CEZZY AD J Diode CL-165HR/YG-D-T
IC101 VHiGA1S100W-1Y AE J IC GA1A1S100WP
P101 QPLGNA335WJZZY AD J Plug 15pin (RA)
Q102 VSKTC3875SG-1Y AB J Transistor KTC3875SGR-RTK
Q103 VSKTC3875SG-1Y AB J Transistor KTC3875SGR-RTK
Q104 VSKTC3875SG-1Y AB J Transistor KTC3875SGR-RTK
Q106 VSKTC3875SG-1Y AB J Transistor KTC3875SGR-RTK
Q107 VSKTC3875SG-1Y AB J Transistor KTC3875SGR-RTK
R101 VRS-CY1JF101JY AA J Resistor 100 1/16W Metal Oxide
R104 VRS-CY1JF273JY AA J Resistor 27k 1/16W Metal Oxide
R105 VRS-CY1JF393JY AA J Resistor 39k 1/16W Metal Oxide
R108 VRS-CY1JF161JY AA J Resistor 160 1/16W Metal Oxide
R109 VRS-CY1JF821JY AA J Resistor 820 1/16W Metal Oxide
R117 VRS-CY1JF103JY AA J Resistor 10k 1/16W Metal Oxide
R121 VRS-CY1JF821JY AA J Resistor 820 1/16W Metal Oxide
R122 VRS-CY1JF161JY AA J Resistor 160 1/16W Metal Oxide
R123 VRS-CJ1JF103JY AA J Resistor 10k 1/16W Metal Oxide
R124 VRS-CJ1JF103JY AA J Resistor 10k 1/16W Metal Oxide
R135 VRS-CY1JF000JY AA J Resistor 0 1/16W Metal Oxide
RMC101 RRMCUA053WJZZ AE J Remote Control
SLD101 PSLDPA076WJFW AD J Shield Case
[4] DUNTKE266FM10 (KEY Unit)
D151 RH-EX0646GEZZY AA J Zener Diode MTZJT-7215B
D152 RH-EX0646GEZZY AA J Zener Diode MTZJT-7215B
D155 RH-EX0646GEZZY AA J Zener Diode MTZJT-7215B
P151 QPLGNA059WJZZ AC J Plug 5pin (KM)
R151 VRD-RA2BE822JY AA J Resistor 8.2k 1/8W Carbon
R152 VRD-RA2BE123JY AA R Resistor 12k 1/8W Carbon
R153 VRD-RA2BE822JY AA J Resistor 8.2k 1/8W Carbon
R154 VRD-RA2BE123JY AA R Resistor 12k 1/8W Carbon
S151 QSW-K0003AJZZ+ AB R Switch CH-UP
S152 QSW-K0003AJZZ+ AB R Switch CH-DOWN
S153 QSW-K0003AJZZ+ AB R Switch INPUT
S154 QSW-K0003AJZZ+ AB R Switch VOL-UP
S155 QSW-K0003AJZZ+ AB R Switch VOL-DOWN
S156 QSW-K0003AJZZ+ AB R Switch MENU
S157 QSW-K0003AJZZ+ AB R Switch POWER
[5] DUNTKE450FM09 (MAIN Unit)
C501 VCKYTV1CB105KY AC J Capacitor 1 16V Ceramic
C503 VCKYTV1CB105KY AC J Capacitor 1 16V Ceramic
C504 VCCCCZ1HH220JY AB J Capacitor 22p 50V Ceramic
C505 VCCCCZ1HH220JY AB J Capacitor 22p 50V Ceramic
C506 VCCCCZ1HH220JY AB J Capacitor 22p 50V Ceramic
C507 VCCCCZ1HH220JY AB J Capacitor 22p 50V Ceramic
C508 VCCCCZ1HH220JY AB J Capacitor 22p 50V Ceramic
C509 VCCCCZ1HH220JY AB J Capacitor 22p 50V Ceramic
C510 VCCCCZ1HH560JY AB J Capacitor 56p 50V Ceramic
C512 VCCCCZ1HH3R0CY AA J Capacitor 3p 50V Ceramic
C513 VCCCCZ1HH3R0CY AA J Capacitor 3p 50V Ceramic
C514 VCCCCZ1HH3R0CY AA J Capacitor 3p 50V Ceramic
C515 VCCCCZ1HH3R0CY AA J Capacitor 3p 50V Ceramic
C516 VCCCCZ1HH3R0CY AA J Capacitor 3p 50V Ceramic
C517 RC-KZA237WJZZY AB J Capacitor 10 16V Ceramic
C518 VCCCCZ1HH3R0CY AA J Capacitor 3p 50V Ceramic
C519 RC-KZA237WJZZY AB J Capacitor 10 16V Ceramic
C520 RC-KZA237WJZZY AB J Capacitor 10 16V Ceramic
C521 RC-KZA237WJZZY AB J Capacitor 10 16V Ceramic
C522 RC-KZA237WJZZY AB J Capacitor 10 16V Ceramic
C523 RC-KZA237WJZZY AB J Capacitor 10 16V Ceramic
C524 VCCCCZ1HH560JY AB J Capacitor 56p 50V Ceramic
C525 VCCCCZ1HH120JY AB J Capacitor 12p 50V Ceramic
C526 VCCCCZ1HH560JY AB J Capacitor 56p 50V Ceramic
C527 VCCCCZ1HH560JY AB J Capacitor 56p 50V Ceramic
C528 VCCCCZ1HH560JY AB J Capacitor 56p 50V Ceramic
C529 VCCCCZ1HH270JY AB J Capacitor 27p 50V Ceramic
NEW
MARK
PAR T
DELIVERY
DESCRIPTION
2
Page 83

NO. PARTS CODE
Leandro Palmeira
PRICE
RANK
NEW
MARK
PAR T
DELIVERY
[5] DUNTKE450FM09 (MAIN Unit)
C530 VCCCCZ1HH560JY AB J Capacitor 56p 50V Ceramic
C531 VCCCCZ1HH120JY AB J Capacitor 12p 50V Ceramic
C532 VCCCCZ1HH120JY AB J Capacitor 12p 50V Ceramic
C533 VCCCCZ1HH120JY AB J Capacitor 12p 50V Ceramic
C534 RC-KZA237WJZZY AB J Capacitor 10 16V Ceramic
C535 VCKYTV1CB105KY AC J Capacitor 1 16V Ceramic
C536 RC-KZA237WJZZY AB J Capacitor 10 16V Ceramic
C537 RC-KZA237WJZZY AB J Capacitor 10 16V Ceramic
C539 RC-KZA237WJZZY AB J Capacitor 10 16V Ceramic
C540 VCKYTV1CB105KY AC J Capacitor 1 16V Ceramic
C541 RC-KZA237WJZZY AB J Capacitor 10 16V Ceramic
C543 RC-KZA237WJZZY AB J Capacitor 10 16V Ceramic
C544 RC-KZA237WJZZY AB J Capacitor 10 16V Ceramic
C545 RC-KZA237WJZZY AB J Capacitor 10 16V Ceramic
C546 RC-KZA237WJZZY AB J Capacitor 10 16V Ceramic
C547 VCKYCY1HB103KY AA J Capacitor 0.01 50V Ceramic
C548 VCCCCZ1HH270JY AB J Capacitor 27p 50V Ceramic
C549 RC-KZA237WJZZY AB J Capacitor 10 16V Ceramic
C550 RC-KZA237WJZZY AB J Capacitor 10 16V Ceramic
C551 VCCCCZ1HH270JY AB J Capacitor 27p 50V Ceramic
C552 RC-KZA237WJZZY AB J Capacitor 10 16V Ceramic
C553 VCCCCZ1HH270JY AB J Capacitor 27p 50V Ceramic
C554 RC-KZA237WJZZY AB J Capacitor 10 16V Ceramic
C555 VCKYTV1CB105KY AC J Capacitor 1 16V Ceramic
C557 VCKYTV1CB105KY AC J Capacitor 1 16V Ceramic
C559 VCCCCZ1HH3R0CY AA J Capacitor 3p 50V Ceramic
C560 VCCCCZ1HH3R0CY AA J Capacitor 3p 50V Ceramic
C562 VCCCCZ1HH3R0CY AA J Capacitor 3p 50V Ceramic
C563 VCCCCZ1HH3R0CY AA J Capacitor 3p 50V Ceramic
C565 VCKYCZ1EF104ZY AA J Capacitor 0.1 25V Ceramic
C569 VCKYTV1CB105KY AC J Capacitor 1 16V Ceramic
C570 VCKYTV1CB105KY AC J Capacitor 1 16V Ceramic
C571 RC-KZA237WJZZY AB J Capacitor 10 16V Ceramic
C575 VCKYCZ1EF104ZY AA J
579 VCKYTV1CB105KY AC J Capacitor 1 16V Ceramic
C
C581 VCKYTV1CB105KY AC J Capacitor 1 16V Ceramic
C583 VCKYTV1CB105KY AC J Capacitor 1 16V Ceramic
C585 VCKYTV1CB105KY AC J Capacitor 1 16V Ceramic
C1101 RC-KZA237WJZZY AB J Capacitor 10 16V Ceramic
C1102 RC-KZA237WJZZY AB J Capacitor 10 16V Ceramic
C1104 RC-KZA237WJZZY AB J Capacitor 10 16V Ceramic
C1107 VCKYCY1HB102KY AA R Capacitor 1000p 50V Ceramic
C1109 VCKYCY1HB103KY AA J Capacitor 0.01 50V Ceramic
C1111 VCKYCY1HB103KY AA J Capacitor 0.01 50V Ceramic
C1112 RC-KZA237WJZZY AB J Capacitor 10 16V Ceramic
C1301 VCKYCZ1AB104KY AB J Capacitor 0.1 10V Ceramic
C1303 RC-KZA237WJZZY AB J Capacitor 10 16V Ceramic
C1308 VCKYCZ1AB104KY AB J Capacitor 0.1 10V Ceramic
C1310 VCKYCZ1AB104KY AB J Capacitor 0.1 10V Ceramic
C1311 RC-KZA237WJZZY AB J Capacitor 10 16V Ceramic
C1312 VCKYCZ1AB104KY AB J Capacitor 0.1 10V Ceramic
C1313 RC-KZA237WJZZY AB J Capacitor 10 16V Ceramic
C1314 RC-KZA383WJZZY AC J Capacitor 10 25V Ceramic
C1401 VCCCCZ1HH120JY AB J Capacitor 12p 50V Ceramic
C1402 RC-KZA237WJZZY AB J Capacitor 10 16V Ceramic
C1403 VCKYCZ1AB104KY AB J Capacitor 0.1 10V Ceramic
C1404 VCCCCZ1HH120JY AB J Capacitor 12p 50V Ceramic
C1406 VCKYCZ1AB104KY AB J Capacitor 0.1 10V Ceramic
C1407 RC-KZA237WJZZY AB J Capacitor 10 16V Ceramic
C1409 VCKYCZ1AB104KY AB J Capacitor 0.1 10V Ceramic
C1414 RC-KZA237WJZZY AB J Capacitor 10 16V Ceramic
C1415 VCKYCZ1AB104KY AB J Capacitor 0.1 10V Ceramic
C1419 VCKYCZ1AB104KY AB J Capacitor 0.1 10V Ceramic
C1421 RC-KZA237WJZZY AB J Capacitor 10 16V Ceramic
C1422 RC-KZA237WJZZY AB J Capacitor 10 16V Ceramic
C1423 RC-KZA237WJZZY AB J Capacitor 10 16V Ceramic
C1424 VCKYCZ1AB104KY AB J Capacitor 0.1 10V Ceramic
C1425
C1426 RC-KZA237WJZZY AB J Capacitor 10 16V Ceramic
C1427 VCKYCZ1AB104KY AB J Capacitor 0.1 10V Ceramic
C1428 RC-KZA237WJZZY AB J Capacitor 10 16V Ceramic
C1429 VCKYTV1CB105KY AC J Capacitor 1 16V Ceramic
C1430 VCKYTV1CB105KY AC J Capacitor 1 16V Ceramic
C1440 VCKYCZ1AB104KY AB J Capacitor 0.1 10V Ceramic
C1441 VCKYCZ1AB104KY AB J Capacitor 0.1 10V Ceramic
C1601 VCKYCZ1HB331KY AA V Capacitor 330p 50V Ceramic
C1602 VCKYCZ1HB331KY AA V Capacitor 330p 50V Ceramic
C1607 RC-KZA237WJZZY AB J Capacitor 10 16V Ceramic
C1609 VCKYCZ1EB103KY AA R Capacitor 0.01 25V Ceramic
C1611 RC-KZA237WJZZY AB J Capacitor 10 16V Ceramic
C1612 VCKYCZ1EB103KY AA R Capacitor 0.01 25V Ceramic
C1619 VCKYCZ1AB104KY AB J Capacitor 0.1 10V Ceramic
C1620 RC-KZA237WJZZY AB J Capacitor 10 16V Ceramic
C1621 RC-KZA520WJQZY AA J Capacitor 1 10V Ceramic
C1623 VCKYCZ1HB102KY AB J Capacitor 1000p 50V Ceramic
VCKYCZ1EB103KY AA R C
Capacitor 0.1 25V Ceramic
apacitor 0.01 25V Ceramic
LC-32R24B
DESCRIPTION
3
Page 84

LC-32R24B
Leandro Palmeira
NO. PARTS CODE
[5] DUNTKE450FM09 (MAIN Unit)
C1625 VCKYCZ1HB102KY AB J Capacitor 1000p 50V Ceramic
C1626 VCKYCZ1AB104KY AB J Capacitor 0.1 10V Ceramic
C1627 VCKYCZ1HB102KY AB J Capacitor 1000p 50V Ceramic
C1628 VCKYCZ1AB104KY AB J Capacitor 0.1 10V Ceramic
C1629 VCKYCZ1HB102KY AB J Capacitor 1000p 50V Ceramic
C1630 RC-KZA237WJZZY AB J Capacitor 10 16V Ceramic
C1631 RC-KZA520WJQZY AA J Capacitor 1 10V Ceramic
C1632 VCKYCZ1AB104KY AB J Capacitor 0.1 10V Ceramic
C1633 VCKYCZ1HB102KY AB J Capacitor 1000p 50V Ceramic
C1635 VCKYCZ1HB102KY AB J Capacitor 1000p 50V Ceramic
C1636 VCKYCZ1AB104KY AB J Capacitor 0.1 10V Ceramic
C1637 VCKYCZ1HB102KY AB J Capacitor 1000p 50V Ceramic
C1638 VCKYCZ1AB104KY AB J Capacitor 0.1 10V Ceramic
C1639 VCKYCZ1HB102KY AB J Capacitor 1000p 50V Ceramic
C1640 VCKYCZ1AB104KY AB J Capacitor 0.1 10V Ceramic
C1641 VCKYCZ1HB102KY AB J Capacitor 1000p 50V Ceramic
C1642 RC-KZA237WJZZY AB J Capacitor 10 16V Ceramic
C1644 VCKYCZ1HB102KY AB J Capacitor 1000p 50V Ceramic
C1645 VCKYCZ1AB104KY AB J Capacitor 0.1 10V Ceramic
C1646 VCKYCZ1HB102KY AB J Capacitor 1000p 50V Ceramic
C1647 VCKYCZ1AB104KY AB J Capacitor 0.1 10V Ceramic
C1648 VCKYCZ1HB102KY AB J Capacitor 1000p 50V Ceramic
C1652 RC-KZA237WJZZY AB J Capacitor 10 16V Ceramic
C1673 VCKYCZ1AB104KY AB J Capacitor 0.1 10V Ceramic
C1674 VCKYCZ1HB102KY AB J Capacitor 1000p 50V Ceramic
C1675 VCKYCZ1AB104KY AB J Capacitor 0.1 10V Ceramic
C1676 VCKYCZ1AB104KY AB J Capacitor 0.1 10V Ceramic
C1677 VCKYCZ1AB104KY AB J Capacitor 0.1 10V Ceramic
C1678 VCKYCZ1EB103KY AA R Capacitor 0.01 25V Ceramic
C1679 RC-KZA237WJZZY AB J Capacitor 10 16V Ceramic
C2001 RC-KZA237WJZZY AB J Capacitor 10 16V Ceramic
C2002 VCKYCZ1HB152KY AB J Capacitor 1500p 50V Ceramic
C2003 VCKYCZ1AB104KY AB J Capacitor 0.1 10V Ceramic
C2006 VCKYCZ1AB104KY AB J
C2007 V
C2010 VCKYCZ1AB104KY AB J Capacitor 0.1 10V Ceramic
C2012 VCKYCZ1AB104KY AB J Capacitor 0.1 10V Ceramic
C2016 VCKYCZ1AB104KY AB J Capacitor 0.1 10V Ceramic
C2020 VCKYCZ1HB102KY AB J Capacitor 1000p 50V Ceramic
C2024 VCKYCZ1AB104KY AB J Capacitor 0.1 10V Ceramic
C2026 VCKYCZ1AB104KY AB J Capacitor 0.1 10V Ceramic
C2213 VCCCCZ1HH470JY AB J Capacitor 47p 50V Ceramic
C2214 VCCCCZ1HH470JY AB J Capacitor 47p 50V Ceramic
C2215 RC-KZA237WJZZY AB J Capacitor 10 16V Ceramic
C2216 VCKYCZ1AB104KY AB J Capacitor 0.1 10V Ceramic
C2217 VCKYCZ1CB103KY AB J Capacitor 0.01 16V Ceramic
C2218 RC-KZA237WJZZY AB J Capacitor 10 16V Ceramic
C2219 VCKYCZ1CB103KY AB J Capacitor 0.01 16V Ceramic
C2220 RC-KZA237WJZZY AB J Capacitor 10 16V Ceramic
C2221 VCKYCZ1CB103KY AB J Capacitor 0.01 16V Ceramic
C2222 RC-KZA237WJZZY AB J Capacitor 10 16V Ceramic
C2223 VCAAPE0JJ107MY AE J Capacitor 100 6.3V Electrolytic
C2224 VCKYCZ1CB103KY AB J Capacitor 0.01 16V Ceramic
C2225 VCKYCZ1CB103KY AB J Capacitor 0.01 16V Ceramic
C2226 VCKYCZ1CB103KY AB J Capacitor 0.01 16V Ceramic
C2227 RC-KZA237WJZZY AB J Capacitor 10 16V Ceramic
C2228 VCKYCZ1EB103KY AA R Capacitor 0.01 25V Ceramic
C2229 VCCCCZ1HH121JY AB J Capacitor 120p 50V Ceramic
C2235 VCCCCZ1HH270JY AB J Capacitor 27p 50V Ceramic
C2236 VCCCCZ1HH270JY AB J Capacitor 27p 50V Ceramic
C2237 VCCCCZ1HH330JY AB J Capacitor 33p 50V Ceramic
C2238 VCCCCZ1HH330JY AB J Capacitor 33p 50V Ceramic
C2239 VCCCCZ1HH121JY AB J Capacitor 120p 50V Ceramic
C2240 VCCCCZ1HH121JY AB J Capacitor 120p 50V Ceramic
C2241 VCCCCZ1HH150JY AB J Capacitor 15p 50V Ceramic
C2246 VCKYCY1HB472KY AA J Capacitor 4700p 50V Ceramic
C2247 VCKYCZ1EB103KY AA R Capacitor 0.01 25V Ceramic
C2602
C2606 VCKYCZ1AB104KY AB J Capacitor 0.1 10V Ceramic
C2703 VCKYCZ1EF104ZY AA J Capacitor 0.1 25V Ceramic
C2704 RC-KZA621WJQZY AA N R Capacitor 1 25V Ceramic
C2705 RC-KZA621WJQZY AA N R Capacitor 1 25V Ceramic
C2706 RC-KZA621WJQZY AA N R Capacitor 1 25V Ceramic
C2707 RC-KZA621WJQZY AA N R Capacitor 1 25V Ceramic
C2710 VCERMZ1EN477MY AE J Capacitor 470 25V Electroly ic
C2711 VCKYCZ1EF104ZY AA J Capacitor 0.1 25V Ceramic
C2712 RC-KZA154WJZZY AB J Capacitor 4.7 16V Ceramic
C2713 VCKYCZ1EF104ZY AA J Capacitor 0.1 25V Ceramic
C2716 RC-KZA621WJQZY AA N R Capacitor 1 25V Ceramic
C2717 RC-KZA621WJQZY AA N R Capacitor 1 25V Ceramic
C2723 RC-KZA621WJQZY AA N R Capacitor 1 25V Ceramic
C2724 RC-KZA621WJQZY AA N R Capacitor 1 25V Ceramic
C2725 VCKYCY1EB104KY AB J Capacitor 0.1 25V Ceramic
C2726 VCKYCY1EB104KY AB J Capacitor 0.1 25V Ceramic
C2727 VCKYCY1EB104KY AB J Capacitor 0.1 25V Ceramic
CKY
CZ1HB102KY AB J Capacitor 1000p 50V Ceramic
VCKYCZ1AB104KY AB J Capacit
PRICE
RANK
NEW
MARK
PAR T
DELIVERY
Capacitor 0.1 10V Ceramic
or 0.1
10V Ceramic
DESCRIPTION
4
Page 85

NO. PARTS CODE
Leandro Palmeira
PRICE
RANK
NEW
MARK
PAR T
DELIVERY
[5] DUNTKE450FM09 (MAIN Unit)
C2728 VCKYCY1EB104KY AB J Capacitor 0.1 25V Ceramic
C2730 VCKYTV1EB224KY AA J Capacitor 0.22 25V Ceramic
C2731 VCKYTV1EB224KY AA J Capacitor 0.22 25V Ceramic
C2737 VCCCCY1HH151JY AA J Capacitor 150p 50V Ceramic
C2738 VCCCCY1HH151JY AA J Capacitor 150p 50V Ceramic
C2740 VCCCCY1HH151JY AA J Capacitor 150p 50V Ceramic
C2741 VCCCCY1HH151JY AA J Capacitor 150p 50V Ceramic
C2748 VCCCCY1HH101JY AA J Capacitor 100p 50V Ceramic
C5101 VCKYCZ1AB104KY AB J Capacitor 0.1 10V Ceramic
C5102 VCKYCZ1AB104KY AB J Capacitor 0.1 10V Ceramic
C5103 VCCCCZ1HH680JY AB J Capacitor 68p 50V Ceramic
C5105 VCCCCZ1HH151JY AB J Capacitor 150p 50V Ceramic
C5106 VCCCCZ1HH680JY AB J Capacitor 68p 50V Ceramic
C5107 VCKYCZ1AB104KY AB J Capacitor 0.1 10V Ceramic
C5108 VCKYCZ1AB104KY AB J Capacitor 0.1 10V Ceramic
C5109 VCKYCZ1HB821KY AA J Capacitor 820p 50V Ceramic
C5110 VCKYCZ1AB104KY AB J Capacitor 0.1 10V Ceramic
C5111 VCKYCZ1HB821KY AA J Capacitor 820p 50V Ceramic
C5112 VCCCCZ1HH680JY AB J Capacitor 68p 50V Ceramic
C5113 VCCCCZ1HH680JY AB J Capacitor 68p 50V Ceramic
C5115 VCKYCZ1HB821KY AA J Capacitor 820p 50V Ceramic
C5117 VCCCCZ1HH680JY AB J Capacitor 68p 50V Ceramic
C5118 VCKYCZ1HB471KY AB J Capacitor 470p 50V Ceramic
C5119 VCKYCZ1HB471KY AB J Capacitor 470p 50V Ceramic
C5120 VCKYCZ1AB104KY AB J Capacitor 0.1 10V Ceramic
C5122 VCCCCZ1HH680JY AB J Capacitor 68p 50V Ceramic
C5123 VCKYCZ1AB104KY AB J Capacitor 0.1 10V Ceramic
C5124 VCKYCZ1HB681KY AB J Capacitor 680p 50V Ceramic
C5125 VCCCCZ1HH680JY AB J Capacitor 68p 50V Ceramic
C5126 VCCCCZ1HH680JY AB J Capacitor 68p 50V Ceramic
C5127 VCKYCZ1HB102KY AB J Capacitor 1000p 50V Ceramic
C5128 VCKYCZ1HB102KY AB J Capacitor 1000p 50V Ceramic
C5129 VCKYCZ1HB471KY AB J Capacitor 470p 50V Ceramic
C5130 VCKYCZ1HB471KY AB J
131 VCCCCZ1HH680JY AB J Capacitor 68p 50V Ceramic
C5
C5132 VCCCCZ1HH151JY AB J Capacitor 150p 50V Ceramic
C5133 VCCCCZ1HH151JY AB J Capacitor 150p 50V Ceramic
C5135 VCCCCZ1HH680JY AB J Capacitor 68p 50V Ceramic
C5136 RC-KZA403WJPZY AB N R Capacitor 4.7 6.3V Ceramic
C5138 VCKYCZ1HB102KY AB J Capacitor 1000p 50V Ceramic
C5140 RC-KZA237WJZZY AB J Capacitor 10 16V Ceramic
C5141 VCCCCZ1HH151JY AB J Capacitor 150p 50V Ceramic
C5142 RC-KZA403WJPZY AB N R Capacitor 4.7 6.3V Ceramic
C5143 RC-KZA403WJPZY AB N R Capacitor 4.7 6.3V Ceramic
C5144 RC-KZA403WJPZY AB N R Capacitor 4.7 6.3V Ceramic
C5201 RC-KZA621WJQZY AA N R Capacitor 1 25V Ceramic
C5203 RC-KZA178WJZZY AC V Capacitor 4.7 25V Ceramic
C5206 RC-KZA237WJZZY AB J Capacitor 10 16V Ceramic
C5208 RC-KZA621WJQZY AA N R Capacitor 1 25V Ceramic
C5212 VCKYCZ1EF104ZY AA J Capacitor 0.1 25V Ceramic
C5214 RC-KZA621WJQZY AA N R Capacitor 1 25V Ceramic
C5215 VCKYCZ1EF104ZY AA J Capacitor 0.1 25V Ceramic
C5216 VCKYCZ1HB102KY AB J Capacitor 1000p 50V Ceramic
C5223 VCKYCZ1EF104ZY AA J Capacitor 0.1 25V Ceramic
C5226 VCKYCZ1EF104ZY AA J Capacitor 0.1 25V Ceramic
C5401 RC-KZA237WJZZY AB J Capacitor 10 16V Ceramic
C5403 RC-KZA521WJQZY AA J Capacitor 0.1 16V Ceramic
C5404 VCKYCY1EB334KY AB J Capacitor 0.33 25V Ceramic
C5405 VCCCCZ1HH330JY AB J Capacitor 33p 50V Ceramic
C5406 RC-KZA403WJPZY AB N R Capacitor 4.7 6.3V Ceramic
C5408 RC-KZA237WJZZY AB J Capacitor 10 16V Ceramic
C5411 VCKYCY1EB104KY AB J Capacitor 0.1 25V Ceramic
C5412 VCKYCZ1HB331KY AA V Capacitor 330p 50V Ceramic
C5413 VCKYCY1EB473KY AA J Capacitor 0.047 25V Ceramic
C5414 VCKYCZ1EB103KY AA R Capacitor 0.01 25V Ceramic
C5415 VCKYCZ1AB104KY AB J Capacitor 0.1 10V Ceramic
C5416 RC-KZA403WJPZY AB N R Capacitor 4.7 6.3V Ceramic
C5417
C5418 VCKYCY1EB334KY AB J Capacitor 0.33 25V Ceramic
C5419 VCKYCY1HB104KY AA J Capacitor 0.1 50V Ceramic
C5420 VCKYCY1EB104KY AB J Capacitor 0.1 25V Ceramic
C5421 VCKYCZ1EB103KY AA R Capacitor 0.01 25V Ceramic
C5422 RC-KZA621WJQZY AA N R Capacitor 1 25V Ceramic
C5426 RC-KZA237WJZZY AB J Capacitor 10 16V Ceramic
C5428 VCKYCZ1HB331KY AA V Capacitor 330p 50V Ceramic
C5429 VCKYCZ1EB103KY AA R Capacitor 0.01 25V Ceramic
C5430 VCCCCZ1HH330JY AB J Capacitor 33p 50V Ceramic
C5431 RC-KZA213WJZZY AC J Capacitor 4.7 25V Ceramic
C5432 VCKYCY1AB105KY AB J Capacitor 1 10V Ceramic
C5433 VCCCCZ1HH680JY AB J Capacitor 68p 50V Ceramic
C5434 RC-KZA237WJZZY AB J Capacitor 10 16V Ceramic
C5435 RC-KZA213WJZZY AC J Capacitor 4.7 25V Ceramic
C5436 RC-KZA237WJZZY AB J Capacitor 10 16V Ceramic
C5439 VCKYCY1EB104KY AB J Capacitor 0.1 25V Ceramic
C5440 RC-KZA621WJQZY AA N R Capacitor 1 25V Ceramic
VCCCCZ1HH101JY AB J C
Capacitor 470p 50V Ceramic
apacitor 100p 50V Ceramic
LC-32R24B
DESCRIPTION
5
Page 86

LC-32R24B
Leandro Palmeira
NO. PARTS CODE
[5] DUNTKE450FM09 (MAIN Unit)
C5443 RC-KZA619WJZZY AB J Capacitor 0.47 50V Ceramic
C5444 RC-KZA619WJZZY AB J Capacitor 0.47 50V Ceramic
C5445 RC-KZA237WJZZY AB J Capacitor 10 16V Ceramic
C5446 RC-KZA237WJZZY AB J Capacitor 10 16V Ceramic
C5459 RC-KZA237WJZZY AB J Capacitor 10 16V Ceramic
C5462 RC-KZA383WJZZY AC J Capacitor 10 25V Ceramic
C5463 RC-KZA383WJZZY AC J Capacitor 10 25V Ceramic
C5464 RC-KZA383WJZZY AC J Capacitor 10 25V Ceramic
C5465 VCKYCZ1EB103KY AA R Capacitor 0.01 25V Ceramic
C5466 RC-KZA154WJZZY AB J Capacitor 4.7 16V Ceramic
C5467 RC-KZA383WJZZY AC J Capacitor 10 25V Ceramic
C8001 VCKYCZ1AB104KY AB J Capacitor 0.1 10V Ceramic
C8002 VCKYCZ1EB103KY AA R Capacitor 0.01 25V Ceramic
C8004 VCKYCZ1HB102KY AB J Capacitor 1000p 50V Ceramic
C8005 VCKYCZ1EB103KY AA R Capacitor 0.01 25V Ceramic
C8006 VCKYCZ1AB104KY AB J Capacitor 0.1 10V Ceramic
C8007 RC-KZA067WJZZY AB J Capacitor 4.7 10V Ceramic
C8008 VCKYCZ1HB102KY AB J Capacitor 1000p 50V Ceramic
C8009 VCKYCZ1EB103KY AA R Capacitor 0.01 25V Ceramic
C8010 VCKYCZ1AB104KY AB J Capacitor 0.1 10V Ceramic
C8011 RC-KZA067WJZZY AB J Capacitor 4.7 10V Ceramic
C8012 VCKYCZ1AB104KY AB J Capacitor 0.1 10V Ceramic
C8013 VCKYCZ1HB102KY AB J Capacitor 1000p 50V Ceramic
C8014 RC-KZA237WJZZY AB J Capacitor 10 16V Ceramic
C8015 VCKYCZ1EB103KY AA R Capacitor 0.01 25V Ceramic
C8016 VCKYCZ1AB104KY AB J Capacitor 0.1 10V Ceramic
C8017 VCKYCZ1AB104KY AB J Capacitor 0.1 10V Ceramic
C8018 RC-KZA067WJZZY AB J Capacitor 4.7 10V Ceramic
C8019 VCKYCZ1HB102KY AB J Capacitor 1000p 50V Ceramic
C8020 VCKYCZ1EB103KY AA R Capacitor 0.01 25V Ceramic
C8021 VCKYCZ1AB104KY AB J Capacitor 0.1 10V Ceramic
C8022 RC-KZA237WJZZY AB J Capacitor 10 16V Ceramic
C8023 RC-KZA237WJZZY AB J Capacitor 10 16V Ceramic
C8024 VCKYCZ1AB104KY AB J
C8025 R
C8027 VCKYCZ1AB104KY AB J Capacitor 0.1 10V Ceramic
C8028 VCKYCZ1HB102KY AB J Capacitor 1000p 50V Ceramic
C8029 VCKYCZ1HB102KY AB J Capacitor 1000p 50V Ceramic
C8030 VCKYCZ1EB103KY AA R Capacitor 0.01 25V Ceramic
C8031 VCKYCZ1EB103KY AA R Capacitor 0.01 25V Ceramic
C8032 VCKYCZ1AB104KY AB J Capacitor 0.1 10V Ceramic
C8033 VCKYCZ1AB104KY AB J Capacitor 0.1 10V Ceramic
C8034 RC-KZA403WJPZY AB N R Capacitor 4.7 6.3V Ceramic
C8035 VCKYCZ1HB102KY AB J Capacitor 1000p 50V Ceramic
C8036 VCKYCZ1HB102KY AB J Capacitor 1000p 50V Ceramic
C8037 VCKYCZ1EB103KY AA R Capacitor 0.01 25V Ceramic
C8038 VCKYCZ1EB103KY AA R Capacitor 0.01 25V Ceramic
C8039 VCKYCZ1AB104KY AB J Capacitor 0.1 10V Ceramic
C8040 VCKYCZ1AB104KY AB J Capacitor 0.1 10V Ceramic
C8041 VCKYCZ1HB102KY AB J Capacitor 1000p 50V Ceramic
C8042 RC-KZA403WJPZY AB N R Capacitor 4.7 6.3V Ceramic
C8043 VCKYCZ1EB103KY AA R Capacitor 0.01 25V Ceramic
C8044 VCKYCZ1HB102KY AB J Capacitor 1000p 50V Ceramic
C8045 VCKYCZ1AB104KY AB J Capacitor 0.1 10V Ceramic
C8046 VCKYCZ1EB103KY AA R Capacitor 0.01 25V Ceramic
C8047 VCKYCZ1HB102KY AB J Capacitor 1000p 50V Ceramic
C8048 VCKYCZ1AB104KY AB J Capacitor 0.1 10V Ceramic
C8049 VCKYCZ1EB103KY AA R Capacitor 0.01 25V Ceramic
C8050 RC-KZA403WJPZY AB N R Capacitor 4.7 6.3V Ceramic
C8051 VCKYCZ1AB104KY AB J Capacitor 0.1 10V Ceramic
C8052 VCKYCZ1HB102KY AB J Capacitor 1000p 50V Ceramic
C8053 VCKYCZ1HB102KY AB J Capacitor 1000p 50V Ceramic
C8054 VCKYCZ1EB103KY AA R Capacitor 0.01 25V Ceramic
C8055 VCKYCZ1EB103KY AA R Capacitor 0.01 25V Ceramic
C8056 VCKYCZ1AB104KY AB J Capacitor 0.1 10V Ceramic
C8057 VCKYCZ1AB104KY AB J Capacitor 0.1 10V Ceramic
C8058 RC-KZA403WJPZY AB N R Capacitor 4.7 6.3V Ceramic
C8059
C8060 VCKYCZ1EB103KY AA R Capacitor 0.01 25V Ceramic
C8061 VCKYCZ1AB104KY AB J Capacitor 0.1 10V Ceramic
C8062 VCKYCZ1EB103KY AA R Capacitor 0.01 25V Ceramic
C8063 RC-KZA237WJZZY AB J Capacitor 10 16V Ceramic
C8064 RC-KZA237WJZZY AB J Capacitor 10 16V Ceramic
C8065 VCKYCZ1HB102KY AB J Capacitor 1000p 50V Ceramic
C8066 VCKYCZ1EB103KY AA R Capacitor 0.01 25V Ceramic
C8067 VCKYCZ1AB104KY AB J Capacitor 0.1 10V Ceramic
C8068 RC-KZA237WJZZY AB J Capacitor 10 16V Ceramic
C8069 VCKYCZ1AB104KY AB J Capacitor 0.1 10V Ceramic
C8070 VCKYCZ1EB103KY AA R Capacitor 0.01 25V Ceramic
C8071 VCKYCZ1EB103KY AA R Capacitor 0.01 25V Ceramic
C8072 VCKYCZ1AB104KY AB J Capacitor 0.1 10V Ceramic
C8073 VCKYCZ1EB103KY AA R Capacitor 0.01 25V Ceramic
C8074 VCKYCZ1AB104KY AB J Capacitor 0.1 10V Ceramic
C8075 VCKYCZ1AB104KY AB J Capacitor 0.1 10V Ceramic
C8076 RC-KZA237WJZZY AB J Capacitor 10 16V Ceramic
C-KZA237WJZZY AB J Capacitor 10 16V Ceramic
VCKYCZ1HB102KY AB J Capacit
PRICE
RANK
NEW
MARK
PAR T
DELIVERY
DESCRIPTION
Capacitor 0.1 10V Ceramic
or 1000p 50V Ceramic
6
Page 87

NO. PARTS CODE
Leandro Palmeira
PRICE
RANK
NEW
MARK
PAR T
DELIVERY
[5] DUNTKE450FM09 (MAIN Unit)
C8077 VCKYCZ1AB104KY AB J Capacitor 0.1 10V Ceramic
C8078 VCKYCZ1AB104KY AB J Capacitor 0.1 10V Ceramic
C8079 VCKYCZ1AB104KY AB J Capacitor 0.1 10V Ceramic
C8081 VCKYCZ1EB103KY AA R Capacitor 0.01 25V Ceramic
C8082 RC-KZA237WJZZY AB J Capacitor 10 16V Ceramic
C8083 VCKYCZ1EB103KY AA R Capacitor 0.01 25V Ceramic
C8084 VCKYCZ1EB103KY AA R Capacitor 0.01 25V Ceramic
C8085 VCKYCZ1AB104KY AB J Capacitor 0.1 10V Ceramic
C8086 RC-KZA403WJPZY AB N R Capacitor 4.7 6.3V Ceramic
C8087 VCKYCZ1EB103KY AA R Capacitor 0.01 25V Ceramic
C8088 VCKYCZ1AB104KY AB J Capacitor 0.1 10V Ceramic
C8089 VCKYTV1CB105KY AC J Capacitor 1 16V Ceramic
C8090 VCKYCZ1AB104KY AB J Capacitor 0.1 10V Ceramic
C8091 VCKYTV1CB105KY AC J Capacitor 1 16V Ceramic
C8092 VCKYCZ1AB104KY AB J Capacitor 0.1 10V Ceramic
C8093 VCKYTV1CB105KY AC J Capacitor 1 16V Ceramic
C8095 VCKYCZ1EB103KY AA R Capacitor 0.01 25V Ceramic
C8096 VCKYCZ1AB104KY AB J Capacitor 0.1 10V Ceramic
C8097 VCKYCZ1AB104KY AB J Capacitor 0.1 10V Ceramic
C8098 VCKYCZ1EB103KY AA R Capacitor 0.01 25V Ceramic
C8099 VCKYCZ1AB104KY AB J Capacitor 0.1 10V Ceramic
C8100 VCKYCZ1AB104KY AB J Capacitor 0.1 10V Ceramic
C8101 VCKYCZ1AB104KY AB J Capacitor 0.1 10V Ceramic
C8103 VCKYCZ1EB103KY AA R Capacitor 0.01 25V Ceramic
C8104 VCKYCZ1EB103KY AA R Capacitor 0.01 25V Ceramic
C8105 VCKYCZ1AB104KY AB J Capacitor 0.1 10V Ceramic
C8106 VCKYCZ1AB104KY AB J Capacitor 0.1 10V Ceramic
C8107 VCKYTV1CB105KY AC J Capacitor 1 16V Ceramic
C8108 VCKYCZ1AB104KY AB J Capacitor 0.1 10V Ceramic
C8109 VCKYCZ1EB103KY AA R Capacitor 0.01 25V Ceramic
C8110 VCKYCZ1AB104KY AB J Capacitor 0.1 10V Ceramic
C8111 VCKYCZ1AB104KY AB J Capacitor 0.1 10V Ceramic
C8112 VCKYCZ1EB103KY AA R Capacitor 0.01 25V Ceramic
C8113 VCKYCZ1AB104KY AB J
114 VCKYCZ1EB103KY AA R Capacitor 0.01 25V Ceramic
C8
C8115 VCKYCZ1AB104KY AB J Capacitor 0.1 10V Ceramic
C8116 VCKYCZ1EB103KY AA R Capacitor 0.01 25V Ceramic
C8117 VCKYCZ1AB104KY AB J Capacitor 0.1 10V Ceramic
C8118 VCKYCZ1AB104KY AB J Capacitor 0.1 10V Ceramic
C8119 VCKYCZ1AB104KY AB J Capacitor 0.1 10V Ceramic
C8120 VCKYCZ1AB104KY AB J Capacitor 0.1 10V Ceramic
C8121 VCKYCZ1AB104KY AB J Capacitor 0.1 10V Ceramic
C8122 VCKYCZ1AB104KY AB J Capacitor 0.1 10V Ceramic
C8123 VCKYCZ1AB104KY AB J Capacitor 0.1 10V Ceramic
C8125 VCKYCZ1AB104KY AB J Capacitor 0.1 10V Ceramic
C8126 VCKYCZ1AB104KY AB J Capacitor 0.1 10V Ceramic
C8127 VCKYCZ1AB104KY AB J Capacitor 0.1 10V Ceramic
C8128 VCKYCZ1AB104KY AB J Capacitor 0.1 10V Ceramic
C8129 VCKYCZ1AB104KY AB J Capacitor 0.1 10V Ceramic
C8130 VCKYCZ1AB104KY AB J Capacitor 0.1 10V Ceramic
C8131 VCKYCZ1AB104KY AB J Capacitor 0.1 10V Ceramic
C8132 VCKYCZ1AB104KY AB J Capacitor 0.1 10V Ceramic
C8133 VCKYCZ1AB104KY AB J Capacitor 0.1 10V Ceramic
C8134 VCCCCZ1HH330JY AB J Capacitor 33p 50V Ceramic
C8135 VCCCCZ1HH9R0DY AA J Capacitor 9p 50V Ceramic
C8136 VCCCCZ1HH9R0DY AA J Capacitor 9p 50V Ceramic
C8137 RC-KZA067WJZZY AB J Capacitor 4.7 10V Ceramic
C8138 VCKYCZ1AB104KY AB J Capacitor 0.1 10V Ceramic
C8139 VCKYCZ1HB471KY AB J Capacitor 470p 50V Ceramic
C8140 VCKYTV1CB105KY AC J Capacitor 1 16V Ceramic
C8141 VCKYCZ1HB471KY AB J Capacitor 470p 50V Ceramic
C8142 VCKYTV1CB105KY AC J Capacitor 1 16V Ceramic
C8143 VCKYCZ1AB104KY AB J Capacitor 0.1 10V Ceramic
C8144 RC-KZA237WJZZY AB J Capacitor 10 16V Ceramic
C8145 VCKYCZ1HB471KY AB J Capacitor 470p 50V Ceramic
C8146 VCKYTV1CB105KY AC J Capacitor 1 16V Ceramic
C8147 VCKYCZ1HB471KY AB J Capacitor 470p 50V Ceramic
C8148
C8149 VCCCCZ1HH101JY AB J Capacitor 100p 50V Ceramic
C8150 VCKYTV1CB105KY AC J Capacitor 1 16V Ceramic
C8151 VCKYCZ1AB104KY AB J Capacitor 0.1 10V Ceramic
C8152 VCKYCZ1AB104KY AB J Capacitor 0.1 10V Ceramic
C8153 VCKYCZ1AB104KY AB J Capacitor 0.1 10V Ceramic
C8154 VCKYCZ1AB104KY AB J Capacitor 0.1 10V Ceramic
C8155 VCKYCZ1AB104KY AB J Capacitor 0.1 10V Ceramic
C8156 VCKYCZ1AB104KY AB J Capacitor 0.1 10V Ceramic
C8157 VCKYCZ1AB104KY AB J Capacitor 0.1 10V Ceramic
C8158 VCKYCZ1EB103KY AA R Capacitor 0.01 25V Ceramic
C8159 VCKYCZ1EB103KY AA R Capacitor 0.01 25V Ceramic
C8160 VCKYCZ1AB473KY AB J Capacitor 0.047 10V Ceramic
C8161 VCKYCZ1AB473KY AB J Capacitor 0.047 10V Ceramic
C8162 VCKYCZ1HB272KY AA J Capacitor 2700p 50V Ceramic
C8163 VCKYCZ1HB272KY AA J Capacitor 2700p 50V Ceramic
C8164 VCKYCZ1HB471KY AB J Capacitor 470p 50V Ceramic
C8165 VCKYCZ1HB471KY AB J Capacitor 470p 50V Ceramic
VCKYCZ1AB104KY AB J C
Capacitor 0.1 10V Ceramic
apacitor 0.1 10V Ceramic
LC-32R24B
DESCRIPTION
7
Page 88

LC-32R24B
Leandro Palmeira
NO. PARTS CODE
[5] DUNTKE450FM09 (MAIN Unit)
C8166 RC-KZA237WJZZY AB J Capacitor 10 16V Ceramic
C8167 VCKYCZ1AB104KY AB J Capacitor 0.1 10V Ceramic
C8168 VCKYCZ1HB471KY AB J Capacitor 470p 50V Ceramic
C8169 VCKYCZ1AB104KY AB J Capacitor 0.1 10V Ceramic
C8170 VCKYCZ1HB471KY AB J Capacitor 470p 50V Ceramic
C8186 RC-KZA237WJZZY AB J Capacitor 10 16V Ceramic
C8192 RC-KZA237WJZZY AB J Capacitor 10 16V Ceramic
C8193 RC-KZA237WJZZY AB J Capacitor 10 16V Ceramic
C8194 VCKYCZ1AB104KY AB J Capacitor 0.1 10V Ceramic
C8196 VCKYCZ1AB104KY AB J Capacitor 0.1 10V Ceramic
C8197 VCKYCZ1AB104KY AB J Capacitor 0.1 10V Ceramic
C8205 VCKYCZ1EB103KY AA R Capacitor 0.01 25V Ceramic
C8206 VCKYCZ1EB103KY AA R Capacitor 0.01 25V Ceramic
C8207 VCKYCZ1EB103KY AA R Capacitor 0.01 25V Ceramic
C8208 VCKYCZ1EB103KY AA R Capacitor 0.01 25V Ceramic
C8209 VCKYCZ1EB103KY AA R Capacitor 0.01 25V Ceramic
C8216 VCKYCZ1HB272KY AA J Capacitor 2700p 50V Ceramic
C8217 VCKYCZ1HB272KY AA J Capacitor 2700p 50V Ceramic
C8218 VCKYCZ1HB272KY AA J Capacitor 2700p 50V Ceramic
C8219 VCKYCZ1HB272KY AA J Capacitor 2700p 50V Ceramic
C8220 VCKYCZ1HB272KY AA J Capacitor 2700p 50V Ceramic
C8221 VCKYCZ1HB272KY AA J Capacitor 2700p 50V Ceramic
C8222 VCKYCZ1HB272KY AA J Capacitor 2700p 50V Ceramic
C8223 VCKYCZ1HB471KY AB J Capacitor 470p 50V Ceramic
C8224 VCKYCZ1HB471KY AB J Capacitor 470p 50V Ceramic
C8225 VCKYCZ1HB471KY AB J Capacitor 470p 50V Ceramic
C8451 VCKYCZ1AB104KY AB J Capacitor 0.1 10V Ceramic
C8456 VCKYCZ1AB104KY AB J Capacitor 0.1 10V Ceramic
C8458 VCKYCZ1AB104KY AB J Capacitor 0.1 10V Ceramic
C8460 VCKYCZ1AB104KY AB J Capacitor 0.1 10V Ceramic
C8901 VCKYCZ1AB104KY AB J Capacitor 0.1 10V Ceramic
C8902 RC-KZA403WJPZY AB N R Capacitor 4.7 6.3V Ceramic
C8903 VCKYCZ1AB104KY AB J Capacitor 0.1 10V Ceramic
C8904 RC-KZA403WJPZY AB N R
C8905 V
C8906 RC-KZA403WJPZY AB N R Capacitor 4.7 6.3V Ceramic
C8907 VCKYCZ1AB104KY AB J Capacitor 0.1 10V Ceramic
C8908 RC-KZA403WJPZY AB N R Capacitor 4.7 6.3V Ceramic
C8909 VCKYCZ1AB104KY AB J Capacitor 0.1 10V Ceramic
C8910 RC-KZA403WJPZY AB N R Capacitor 4.7 6.3V Ceramic
C9001 VCKYCZ1AB104KY AB J Capacitor 0.1 10V Ceramic
C9301 VCKYCZ1AB104KY AB J Capacitor 0.1 10V Ceramic
C9601 VCKYCZ1EB472KY AB J Capacitor 4700p 25V Ceramic
C9602 VCKYCZ1EB103KY AA R Capacitor 0.01 25V Ceramic
C9604 VCKYCZ1EB472KY AB J Capacitor 4700p 25V Ceramic
C9605 VCCCCZ1HH101JY AB J Capacitor 100p 50V Ceramic
C9606 VCKYCZ1HB681KY AB J Capacitor 680p 50V Ceramic
C9607 VCKYCZ1AB104KY AB J Capacitor 0.1 10V Ceramic
C9608 VCKYCZ1AB104KY AB J Capacitor 0.1 10V Ceramic
C9609 VCKYCY1EB104KY AB J Capacitor 0.1 25V Ceramic
C9610 VCCCCZ1HH101JY AB J Capacitor 100p 50V Ceramic
C9611 RC-KZA154WJZZY AB J Capacitor 4.7 16V Ceramic
C9612 VCKYCY1EB104KY AB J Capacitor 0.1 25V Ceramic
C9613 RC-KZA178WJZZY AC V Capacitor 4.7 25V Ceramic
C9614 RC-KZA178WJZZY AC V Capacitor 4.7 25V Ceramic
C9615 VCKYCZ1EB472KY AB J Capacitor 4700p 25V Ceramic
C9616 RC-KZA237WJZZY AB J Capacitor 10 16V Ceramic
C9617 RC-KZA178WJZZY AC V Capacitor 4.7 25V Ceramic
C9618 RC-KZA237WJZZY AB J Capacitor 10 16V Ceramic
C9619 RC-KZA237WJZZY AB J Capacitor 10 16V Ceramic
C9620 RC-KZA237WJZZY AB J Capacitor 10 16V Ceramic
C9621 RC-KZA237WJZZY AB J Capacitor 10 16V Ceramic
C9622 RC-KZA237WJZZY AB J Capacitor 10 16V Ceramic
C9623 RC-KZA237WJZZY AB J Capacitor 10 16V Ceramic
C9624 VCKYCY1EB104KY AB J Capacitor 0.1 25V Ceramic
C9625 RC-KZA237WJZZY AB J Capacitor 10 16V Ceramic
C9629 RC-KZA178WJZZY AC V Capacitor 4.7 25V Ceramic
C9631
C9641 VCKYCZ1AB104KY AB J Capacitor 0.1 10V Ceramic
C9642 VCKYCY1EB104KY AB J Capacitor 0.1 25V Ceramic
C9643 RC-KZA178WJZZY AC V Capacitor 4.7 25V Ceramic
C9644 VCKYCZ1EB472KY AB J Capacitor 4700p 25V Ceramic
C9645 RC-KZA237WJZZY AB J Capacitor 10 16V Ceramic
C9646 RC-KZA237WJZZY AB J Capacitor 10 16V Ceramic
C9708 RC-KZA237WJZZY AB J Capacitor 10 16V Ceramic
C9709 VCKYCZ1EB103KY AA R Capacitor 0.01 25V Ceramic
C9710 RC-KZA520WJQZY AA J Capacitor 1 10V Ceramic
C9711 RC-KZA520WJQZY AA J Capacitor 1 10V Ceramic
C9713 RC-KZA403WJPZY AB N R Capacitor 4.7 6.3V Ceramic
C9719 RC-KZA621WJQZY AA N R Capacitor 1 25V Ceramic
D504 RH-EXA541WJZZY AB R Zener Diode MAZ8100GML
D505 RH-EXA541WJZZY AB R Zener Diode MAZ8100GML
D508 RH-EXA541WJZZY AB R Zener Diode MAZ8100GML
D509 RH-EXA541WJZZY AB R Zener Diode MAZ8100GML
D510 RH-EXA541WJZZY AB R Zener Diode MAZ8100GML
CKYCZ1AB104KY AB J Capacitor 0.1 10V Ceramic
RC-KZA237WJZZY AB J Capacit
PRICE
RANK
NEW
MARK
PAR T
DELIVERY
DESCRIPTION
Capacitor 4.7 6.3V Ceramic
or 10 16V Ceramic
8
Page 89

NO. PARTS CODE
Leandro Palmeira
PRICE
RANK
NEW
MARK
PAR T
DELIVERY
[5] DUNTKE450FM09 (MAIN Unit)
D511 RH-EXA541WJZZY AB R Zener Diode MAZ8100GML
D512 RH-EXA541WJZZY AB R Zener Diode MAZ8100GML
D515 RH-EXA541WJZZY AB R Zener Diode MAZ8100GML
D516 RH-EXA541WJZZY AB R Zener Diode MAZ8100GML
D517 RH-EXA541WJZZY AB R Zener Diode MAZ8100GML
D518 RH-EXA541WJZZY AB R Zener Diode MAZ8100GML
D519 RH-EXA541WJZZY AB R Zener Diode MAZ8100GML
D520 RH-EXA541WJZZY AB R Zener Diode MAZ8100GML
D521 RH-EXA541WJZZY AB R Zener Diode MAZ8100GML
D522 RH-EXA541WJZZY AB R Zener Diode MAZ8100GML
D1302 VHD1SS361//-1Y AB R Diode 1SS361(T5L,F,T)
D1304 VHD1SS361//-1Y AB R Diode 1SS361(T5L,F,T)
D1305 VHD1SS361//-1Y AB J Diode 1SS361(T5L,F,T)
D1306 VHPGPFSV51V-1 AG R Photo Diode
D1307 VHD1SS361//-1Y AB R Diode 1SS361(T5L,F,T)
D1310 VHD1SS361//-1Y AB J Diode 1SS361(T5L,F,T)
D1311 RH-EXA523WJZZY AB V Zener Diode MAZ8056GML
D1312 VHD1SS361//-1Y AB J Diode 1SS361(T5L,F,T)
D1601 VHDRB520S30-1Y AC R Diode RB520S-30TE61
D1605 VHDMA152WK/-1Y AB R Diode MA152WK-(TX)
D1607 VHDMA152WK/-1Y AB R Diode MA152WK-(TX)
D1611 VHD1SS226//-1Y AC R Diode 1SS226(T5L,F,T)
D1613 VHD1SS226//-1Y AC R Diode 1SS226(T5L,F,T)
D1614 VHD1SS226//-1Y AC R Diode 1SS226(T5L,F,T)
D1619 VHD1SS226//-1Y AC R Diode 1SS226(T5L,F,T)
D2003 RH-PXA018WJZZY AC J Diode GM1HD55200A
D2201 VHD1PS184++-1Y AB J Diode 1PS184,115
D2202 RH-EXA523WJZZY AB V Zener Diode MAZ8056GML
D2203 RH-EXA523WJZZY AB V Zener Diode MAZ8056GML
D2205 VHDMAZ9120H-1Y AC J Diode MAZ91200H0L
D2206 VHDMAZ9120H-1Y AC J Diode MAZ91200H0L
D2207 VHDMAZ9120H-1Y AC J Diode MAZ91200H0L
D2208 VHDKDR720E/-1Y AB J Diode KDR720E-RTK/P
D2210 VHD1SS226//-1Y AC R
2211 VHD1SS226//-1Y AC R Diode 1SS226(T5L,F,T)
D
D5101 VHDRB521S30-1Y AC R Diode RB521S-30FJTE61
D5402 VHDDG1M3+++-1Y AC J Diode DG1M3-5063R
D5403 VHDDG1M3+++-1Y AC J Diode DG1M3-5063R
D5405 VHDRB550EA+-1Y AC J Diode RB550EATR
D5406 VHDRB550EA+-1Y AC J Diode RB550EATR
D5407 VHDRB550EA+-1Y AC J Diode RB550EATR
D5408 VHDMA3ZD12+-1Y AC J Diode MA3ZD1200L
D5409 VHDD1FM3+++-1Y AD J Diode D1FM3
D5410 VHDMA111G++-1Y AA J Diode MA2J1110GL
D5411 VHDD1F60///-1Y AC V Diode
D5412 VHDDG1M3+++-1Y AC J Diode DG1M3-5063R
D5413 RH-EXA512WJZZY AB R Zener Diode MAZ8039GHL
D8002 RH-PXA018WJZZY AC J Diode GM1HD55200A
D9001 RH-EX1234CEZZY AE J Zener Diode HZU3.6B2TRF
D9002 RH-EX1234CEZZY AE J Zener Diode HZU3.6B2TRF
D9003 RH-EX1234CEZZY AE J Zener Diode HZU3.6B2TRF
D9301 VHD1PS184++-1Y AB J Diode 1PS184,115
D9601 VHDD1FS4A++-1Y AC J Diode D1FS4A-5063
D9602 RH-EXA523WJZZY AB V Zener Diode MAZ8056GML
D9603 VHD1PS184++-1Y AB J Diode 1PS184,115
D9605 VHD1PS226++-1Y AB J Diode 1PS226,115
D9606 VHDD1FS4A++-1Y AC J Diode D1FS4A-5063
D9607 RH-EXA512WJZZY AB R Zener Diode MAZ8039GHL
D9609 VHDMA111G++-1Y AA J Diode MA2J1110GL
D9641 VHDD1FS4A++-1Y AC J Diode D1FS4A-5063
D9642 RH-EXA512WJZZY AB R Zener Diode MAZ8039GHL
D9643 VHDMA111G++-1Y AA J Diode MA2J1110GL
D9701 VHDMA111G++-1Y AA J Diode MA2J1110GL
D9702 VHDMA111G++-1Y AA J Diode MA2J1110GL
D9703 VHDMA111G++-1Y AA J Diode MA2J1110GL
D9713 VHD1PS184++-1Y AB J Diode 1PS184,115
FB501 RBLN-A045WJZZY AB J Ferrite Core
FB502
FB503 RBLN-A045WJZZY AB J Ferrite Core
FB504 RBLN-A045WJZZY AB J Ferrite Core
FB505 RBLN-A045WJZZY AB J Ferrite Core
FB506 RBLN-A045WJZZY AB J Ferrite Core
FB508 RBLN-A204WJZZY AA R Ferrite Core
FB509 RBLN-A204WJZZY AA R Ferrite Core
FB510 RBLN-A204WJZZY AA R Ferrite Core
FB511 RBLN-A045WJZZY AB J Ferrite Core
FB512 RBLN-A045WJZZY AB J Ferrite Core
FB513 RBLN-A204WJZZY AA R Ferrite Core
FB514 RBLN-A072WJZZY AA J Ferrite Core
FB515 RBLN-A204WJZZY AA R Ferrite Core
FB516 RBLN-A204WJZZY AA R Ferrite Core
FB517 RBLN-A045WJZZY AB J Ferrite Core
FB518 RBLN-A045WJZZY AB J Ferrite Core
FB519 RBLN-A204WJZZY AA R Ferrite Core
FB520 RBLN-A204WJZZY AA R Ferrite Core
RBLN-A204WJZZY AA R F
Diode 1SS226(T5L,F,T)
errite Core
LC-32R24B
DESCRIPTION
9
Page 90

LC-32R24B
Leandro Palmeira
NO. PARTS CODE
PRICE
RANK
[5] DUNTKE450FM09 (MAIN Unit)
FB521 RBLN-A204WJZZY AA R Ferrite Core
FB522 RBLN-A045WJZZY AB J Ferrite Core
FB523 RBLN-A045WJZZY AB J Ferrite Core
FB525 RBLN-A045WJZZY AB J Ferrite Core
FB1101 RBLN-A206WJZZY AA R Ferrite Core
FB1102 RBLN-A206WJZZY AA R Ferrite Core
FB1603 RBLN-A192WJZZY AA R Ferrite Core
FB1605 RBLN-A192WJZZY AA R Ferrite Core
FB1606 RBLN-A192WJZZY AA R Ferrite Core
FB1607 RBLN-A192WJZZY AA R Ferrite Core
FB2001 RBLN-A206WJZZY AA R Ferrite Core
FB2003 RBLN-A005WJZZY AA J Ferrite Core
FB2004 RBLN-A005WJZZY AA J Ferrite Core
FB2005 RBLN-A005WJZZY AA J Ferrite Core
FB2203 RBLN-0093GEZZY AB J Ferrite Core
FB2204 RBLN-0093GEZZY AB J Ferrite Core
FB2205 RBLN-0093GEZZY AB J Ferrite Core
FB2206 RBLN-A204WJZZY AA R Ferrite Core
FB2207 RBLN-A204WJZZY AA R Ferrite Core
FB2208 RBLN-A074WJZZY AA R Ferrite Core
FB2603 RBLN-A206WJZZY AA R Ferrite Core
FB2702 RBLN-A206WJZZY AA R Ferrite Core
FB2703 RBLN-A206WJZZY AA R Ferrite Core
FB2704 RBLN-A206WJZZY AA R Ferrite Core
FB2705 RBLN-A206WJZZY AA R Ferrite Core
FB5101 RBLN-A204WJZZY AA R Ferrite Core
FB5102 RBLN-A192WJZZY AA R Ferrite Core
FB5103 RBLN-A192WJZZY AA R Ferrite Core
FB5104 RBLN-A192WJZZY AA R Ferrite Core
FB5105 RBLN-A192WJZZY AA R Ferrite Core
FB8001 RBLN-A206WJZZY AA R Ferrite Core
FB8002 RBLN-A206WJZZY AA R Ferrite Core
FB8003 RBLN-A206WJZZY AA R Ferrite Core
FB8004 RBLN-A206WJZZY AA R
FB8007 R
FB8008 RBLN-0062TAZZY AB J Ferrite Core
FB8009 RBLN-0062TAZZY AB J Ferrite Core
FB8010 RBLN-0062TAZZY AB J Ferrite Core
FB8011 RBLN-0062TAZZY AB J Ferrite Core
FL5101 RFiLZA007WJZZY AD J Filter
IC1301 VHiM62320FP-1Y AH J IC M62320FPDF5J
IC1302 VHiT7SET08U1EY AC J IC TC7SET08FU(T5L,JF)
IC1304 VHiT7SET08U1EY AC J IC TC7SET08FU(T5L,JF)
IC1401 VHiTC7WU04F-1Y AD R IC TC7WU04F(TE12L,F)
IC1403 VHiAK4682AE-1Y AP N R IC AK4682AEQ
IC1601 RH-iXC356WJQZS AL N J IC BQC (HDMI EDID)
IC1603 RH-iXC357WJQZS AL N J IC BQC (HDMI EDID)
IC1604 VHiSii9185A-1Q AN J IC SII9185ACTU
IC1607 VHiAHC1G08W-1Y AD J IC 74AHC1G08GW/G,125
IC1608 VHiAHC1G08W-1Y AD J IC 74AHC1G08GW/G,125
IC1609 VHiPQ1LA185-1Y AD J IC PQ1LA185MSPQ
IC2001 VHiS80927NM-1Y AC R IC S-80927CNMC-G8XT2G
IC2002 RH-iXC331WJNEQ N J IC BQC (MONITOR MICON)
IC2004 VHiS24CS08J-1Y AE R IC S-24CS08AFJ-TB-1G
IC2007 VHiAHC1G08W-1Y AD J IC 74AHC1G08GW/G,125
IC2008 VHi7WH126FU-1Y AE J IC TC7WH126FU(TE12L,F)
IC2201 VHiLVC2G14G-1Y AD J IC 74LVC2G14GW,125
IC2202 RH-iXC358WJQZS AH N J IC BQC (RGB EDID)
IC2601 VHiHC2G66DP-1Y AD R IC 74HC2G66DP,125
IC2701 VHiYDA147SZ-1Y AM J IC YDA147-SZE2
IC5101 RH-iXA992WJZZY AM J IC M24256-BWMN6TP
IC5102 VHiTC7WU04K-1Y AC J IC TC7WU04FK(TE85L,F)
IC5103 VHiT3Z18AFG-1Q BA J IC T3Z18AFG-0003(O2)
IC5201 VHiBU55041+-1Y AF J IC BU55041HFN-TR-TR
IC5202 VHiBD8143MU-1Y AM J IC BD8143MUV-E2
IC5401 VHiBD8162EK-1Q AQ J IC BD8162EKV
IC8001 RH-iXC308WJQZQ BM N J IC
IC8002
IC8003 VHiR5523N1B-1Y AE V IC R5523N001B-TR-F
IC8151 RH-iXC317WJQZQ AV J IC HY5DU561622FTP-D43-C
IC8152 RH-iXC317WJQZQ AV J IC HY5DU561622FTP-D43-C
IC8155 RH-iXA361WJZZY AM J IC LP2995MX/NOPB
IC8451 --N-
IC8452 RH-iXC653WJQZQ N J IC BQC (PROGRAM)
IC8454 VHiBR24L64F-1Y AK J IC BR24L64F-WE2
IC9001 VHiHC2G66DP-1Y AD R IC 74HC2G66DP,125
IC9301 VHiAHC1G08W-1Y AD J IC 74AHC1G08GW/G,125
IC9601 RH-iXC169WJQZY AK R IC SN0702077PWR
IC9602 VHiMP1415C+-1Y AK R IC MP1415DSE-C100-LF-Z
IC9605 VHiMP1415C+-1Y AK R IC MP1415DSE-C100-LF-Z
IC9641 VHiMP1415C+-1Y AK R IC MP1415DSE-C100-LF-Z
IC9703 VHiTCR5SB33-1Y AC N J IC TCR5SB33(TE85L,F)
IC9704 VHiPQ090DNA-1Y AE J IC PQ090DNA1ZPH
J501 QJAKGA109WJZZ AE R Jack
BLN-0062TAZZY AB J Ferrite Core
VHiR1173S25-1Y AE J IC R
NEW
MARK
PAR T
DELIVERY
Ferrite Core
1173S251B-E2-F
IC IS24CO8A-2GLI-372 (Please replace the MAIN PWB when it is necessary to replace
this IC.)
DESCRIPTION
10
Page 91

NO. PARTS CODE
Leandro Palmeira
PRICE
RANK
NEW
MARK
PAR T
DELIVERY
[5] DUNTKE450FM09 (MAIN Unit)
J502 QJAKGA108WJZZ AE R Jack
J503 QJAKGA109WJZZ AE R Jack
J504 QSOCDA035WJZZ AD J Socket
J505 QJAKFA039WJZZ AD J Jack
J506 QJAKFA039WJZZ AD J Jack
J507 QJAKFA039WJZZ AD J Jack
J508 QJAKJ0008GEZZ AD J Jack
J509 QJAKGA108WJZZ AE R Jack
J8001 QSOCZA153WJQZ AG V Socket
L501 VPMKMR56JR70VY AB R Coil Peaking 0.56µH
L502 VPMKMR56JR70VY AB R Coil Peaking 0.56µH
L503 VPMKMR56JR70VY AB R Coil Peaking 0.56µH
L504 VPMKMR56JR70VY AB R Coil Peaking 0.56µH
L505 VPMKMR56JR70VY AB R Coil Peaking 0.56µH
L506 VPMKMR56JR70VY AB R Coil Peaking 0.56µH
L507 VPDBN220J4R1NY AB N R Coil Peaking 22µH
L508 VPDBN220J4R1NY AB N R Coil Peaking 22µH
L509 VPDBN220J4R1NY AB N R Coil Peaking 22µH
L510 VPDBN220J4R1NY AB N R Coil Peaking 22µH
L1101 RCiLPA207WJZZY AD N J Coil
L1301 VPCEM100MR70NY AC J Coil Peaking 10µH
L2202 VPCBM100KR50NY AC J Coil Peaking 10µH
L2204 RCiLQA006WJQZY AA R Coil
L2205 VPMKMR22JR37VY AB R Coil Peaking 0.22µH
L2206 VPMKMR22JR37VY AB R Coil Peaking 0.22
2207 VPMKMR47JR64VY AB R Coil Peaking 0.47µH
L
L2701 RCiLPA343WJPZY AD J Coil
L2702 RCiLPA343WJPZY AD J Coil
L2703 RCiLPA343WJPZY AD J Coil
L2704 RCiLPA343WJPZY AD J Coil
L5101 RCiLFA122WJZZY AD J Coil
L5102 RCiLFA122WJZZY AD J Coil
L5103 RCiLFA275WJZZY AC J Coil
L5104 RCiLFA122WJZZY AD J Coil
L5105 RCiLFA122WJZZY AD J Coil
L5106 RCiLFA122WJZZY AD J Coil
L5107 RCiLFA122WJZZY AD J Coil
L5108 RCiLFA122WJZZY AD J Coil
L5109 RCiLFA122WJZZY AD J Coil
L5110 RCiLFA275WJZZY AC J Coil
L5111 RCiLFA122WJZZY AD J Coil
L5112 RCiLFA122WJZZY AD J Coil
L5113 RCiLFA122WJZZY AD J Coil
L5114 RCiLFA122WJZZY AD J Coil
L5115 RCiLFA279WJZZY AC R Coil
L5116 RCiLFA279WJZZY AC R Coil
L5117 RCiLFA279WJZZY AC R Coil
L5118 RCiLFA279WJZZY AC R Coil
L5119 RCiLFA279WJZZY AC R Coil
L5120 RCiLFA279WJZZY AC R Coil
L5401 RCiLPA195WJZZY AD J Coil
L5402 RCiLPA195WJZZY AD J Coil
L5403 RCiLPA085WJZZY AD J Coil
L8001 VPMKM2R7JR77VY AB R Coil Peaking 2.7µH
L9601 RCiLPA086WJZZY AE J Coil
L9602 RCiLPA083WJZZY AD R Coil
L9603 RCiLPA898WJZZY AC V Coil
9641 RCiLPA898WJZZY AC V Coil
L
LUG2201 QLUGHA006WJZZY AC J Lug
LUG2202 QLUGHA009WJZZY AC J Lug
LUG2205 QLUGHA009WJZZY AC J Lug
LUG2206 QLUGHA006WJZZY AC J Lug
LUG2207 QLUGHA009WJZZY AC J Lug
LUG2208 QLUGHA009WJZZY AC J Lug
LUG2209 QLUGHA006WJZZY AC J Lug
LUG2210 QLUGHA006WJZZY AC J Lug
LUG2211 QLUGHA006WJZZY AC J Lug
LUG2212 QLUGHA006WJZZY AC J Lug
LUG2213 QLUGHA009WJZZY AC J Lug
P2001 QPLGN0060CEZZY AE J Plug 10pin
P2002 QPLGNA324WJZZY AC J Plug 4pin (KM)
P2201 QPLGNA330WJZZY AD J Plug 10pin (RA)
P2603 QPLGNA327WJZZY AC J Plug 7pin (LB)
P2701 QPLGNA160WJZZY AD J Plug 4pin (SP)
P9002 QPLGNA173WJZZY AD J Plug 4pin
P9202 QPLGNA144WJZZY AF J Plug 20pin
P9301 QCNCWA562WJQZY AF J Connector 60pin
P9701 QPLGNA168WJZZY AF J Plug 12pin (PD)
Q501 VS2SC2735//-1Y AB J Transistor 2SC2735JC21TL
Q502 VS2SC2735//-1Y AB J Transistor 2SC2735JC21TL
Q503 VS2SC2735//-1Y AB J Transistor 2SC2735JC21TL
Q504 VS2SC2735//-1Y AB J Transistor 2SC2735JC21TL
Q505 VS2SC2735//-1Y AB J Transistor 2SC2735JC21TL
Q506 VS2SC2735//-1Y AB J Transistor 2SC2735JC21TL
Q507 VSDTC614TK+-1Y AB J Transistor DTC614TKT146
LC-32R24B
DESCRIPTION
µH
11
Page 92

LC-32R24B
Leandro Palmeira
NO. PARTS CODE
[5] DUNTKE450FM09 (MAIN Unit)
Q508 VSDTC614TK+-1Y AB J Transistor DTC614TKT146
Q509 VSKTA1504SG-1Y AA R Transistor KTA15043GR-RTK
Q510 VSKTC3875SG-1Y AB J Transistor KTC3875SGR-RTK
Q511 VS2SC2735//-1Y AB J Transistor 2SC2735JC21TL
Q512 VS2SC2735//-1Y AB J Transistor 2SC2735JC21TL
Q513 VS2SC2735//-1Y AB J Transistor 2SC2735JC21TL
Q514 VS2SC2735//-1Y AB J Transistor 2SC2735JC21TL
Q515 VSKTA1504SG-1Y AA R Transistor KTA15043GR-RTK
Q516 VSKTA1504SG-1Y AA R Transistor KTA15043GR-RTK
Q517 VSKTA1504SG-1Y AA R Transistor KTA15043GR-RTK
Q518 VSKTA1504SG-1Y AA R Transistor KTA15043GR-RTK
Q519 VSKTA1504SG-1Y AA R Transistor KTA15043GR-RTK
Q520 VSKTA1504SG-1Y AA R Transistor KTA15043GR-RTK
Q521 VSKTA1504SG-1Y AA R Transistor KTA15043GR-RTK
Q522 VSKTA1504SG-1Y AA R Transistor KTA15043GR-RTK
Q523 VSKTA1504SG-1Y AA R Transistor KTA15043GR-RTK
Q524 VSKTA1504SG-1Y AA R Transistor KTA15043GR-RTK
Q1101 VSKTC3875SG-1Y AB J Transistor KTC3875SGR-RTK
Q1102 VSKTC3875SG-1Y AB J Transistor KTC3875SGR-RTK
Q1301 VSKRC404E++-1Y AB J Transistor
Q1304 VSKRC404E++-1Y AB J Transistor
Q1305 VSKRC404E++-1Y AB J Transistor
Q1306 VSiMH23T110-1Y AC J Transistor IMH23T110
Q1307 VSKTA1504SG-1Y AA R Transistor KTA15043GR-RTK
Q1308 VSiMH23T110-1Y AC J Transistor IMH23T110
Q1309 VSKTC3875SG-1Y AB J Transistor KTC3875SGR-RTK
Q1312 VSKRC404E++-1Y AB J Transistor
Q1616 VSiMD2A////-1Y AC J Transistor IMD2AT108
Q1618 VSiMD2A////-1Y AC J Transistor IMD2AT108
Q1619 VSRT1N141U/-1Y AB J Transistor RT1N141U-T111-1
Q1620 VSKTA1535T+-1Y AC J Transistor KTA1535T-RTK/P
Q2001 VSKRC404E++-1Y AB J Transistor
Q2006 VSRT1N141U/-1Y AB J Transistor RT1N141U-T111-1
Q2007 VSRT1N141U/-1Y AB J
Q2210 V
Q2211 VS2SC2735//-1Y AB J Transistor 2SC2735JC21TL
Q2212 VS2SC2735//-1Y AB J Transistor 2SC2735JC21TL
Q2704 VSKRC404E++-1Y AB J Transistor
Q5401 VSHN1B04FU/-1Y AC J Transistor HN1B04FU(TE85L,F
Q5403 VSTPCP8602+-1Y AD J Transistor VSTPCP8602+-1Y
Q5404 VSTPCP8505+-1Y AD J Transistor VSTPCP8505+-1Y
Q5410 VS2SC2881Y+-1Y AD N J Transistor 2SC2881-1Y(TE12L,CF
Q5411 VSSM3K7002F-1Y AC R Transistor SSM3K7002F(5LTST,F
Q5412 VSMCH6305++-1Y AE J Transistor MCH6305-TL-E
Q5413 VSRN1902///-1Y AC J Transistor RN1902(TE85L,F)/(T5L,F,T)
Q5414 VSKTA1504SG-1Y AA R Transistor KTA15043GR-RTK
Q9301 VSKTA1504SG-1Y AA R Transistor KTA15043GR-RTK
Q9602 VSFW808ME++-1Y AE R Transistor FW808-M-TL-E
Q9701 VSRN4982///-1Y AB J Transistor RN4982(TE85L,F)
Q9702 VSRN4982///-1Y AB J Transistor RN4982(TE85L,F)
R501 VRS-CZ1JF102JY AA V Resistor 1k 1/16W Metal Oxide
R502 VRS-CZ1JF102JY AA V Resistor 1k 1/16W Metal Oxide
R503 VRS-CZ1JF102JY AA V Resistor 1k 1/16W Metal Oxide
R504 VRS-CZ1JF102JY AA V Resistor 1k 1/16W Metal Oxide
R505 VRS-CZ1JF101FY AA J Resistor 100 1/16W Metal Oxide
R506 VRS-TQ2BD750JY AA J Resistor 75 1/8W Metal Oxide
R508 VRS-TV1JD471JY AA J Resistor 470 1/10W Metal Oxide
R509 VRS-CZ1JF221JY AA J Resistor 220 1/16W Metal Oxide
R510 VRS-CZ1JF104JY AA J Resistor 100k 1/16W Metal Oxide
R511 VRS-CZ1JF221JY AA J Resistor 220 1/16W Metal Oxide
R512 VRS-CZ1JF104JY AA J Resistor 100k 1/16W Metal Oxide
R517 VRS-TQ2BD750JY AA J Resistor 75 1/8W Metal Oxide
R518 VRS-TQ2BD750JY AA J Resistor 75 1/8W Metal Oxide
R519 VRS-TQ2BD750JY AA J Resistor 75 1/8W Metal Oxide
R520 VRS-TQ2BD750JY AA J Resistor 75 1/8W Metal Oxide
R521 VRS-TQ2BD750JY AA J Resistor 75 1/8W Metal Oxide
R523 VRS-CZ1JF103JY AA J Resistor 10k 1/16W Metal Oxide
R524
R525 VRS-CZ1JF103JY AA J Resistor 10k 1/16W Metal Oxide
R526 VRS-CZ1JF153JY AA J Resistor 15k 1/16W Metal Oxide
R527 VRS-CZ1JF103JY AA J Resistor 10k 1/16W Metal Oxide
R528 VRS-CZ1JF153JY AA J Resistor 15k 1/16W Metal Oxide
R530 VRS-CZ1JF103JY AA J Resistor 10k 1/16W Metal Oxide
R531 VRS-CZ1JF153JY AA J Resistor 15k 1/16W Metal Oxide
R532 VRS-CZ1JF103JY AA J Resistor 10k 1/16W Metal Oxide
R533 VRS-CZ1JF153JY AA J Resistor 15k 1/16W Metal Oxide
R534 VRS-CZ1JF103JY AA J Resistor 10k 1/16W Metal Oxide
R535 VRS-CZ1JF221JY AA J Resistor 220 1/16W Metal Oxide
R536 VRS-CZ1JF104JY AA J Resistor 100k 1/16W Metal Oxide
R537 VRS-CZ1JF153JY AA J Resistor 15k 1/16W Metal Oxide
R538 VRS-TV1JD471JY AA J Resistor 470 1/10W Metal Oxide
R539 VRS-CZ1JF221JY AA J Resistor 220 1/16W Metal Oxide
R540 VRS-CZ1JF104JY AA J Resistor 100k 1/16W Metal Oxide
R543 VRS-TV1JD471JY AA J Resistor 470 1/10W Metal Oxide
R544 VRS-TV1JD471JY AA J Resistor 470 1/10W Metal Oxide
S2SC2735//-1Y AB J Transistor 2SC2735JC21TL
VRS-CZ1JF153JY AA J Resistor
PRICE
RANK
NEW
MARK
PAR T
DELIVERY
DESCRIPTION
Transistor RT1N141U-T111-1
15k 1/16W Metal Oxide
12
Page 93

NO. PARTS CODE
Leandro Palmeira
PRICE
RANK
NEW
MARK
PAR T
DELIVERY
[5] DUNTKE450FM09 (MAIN Unit)
R545 VRS-TV1JD471JY AA J Resistor 470 1/10W Metal Oxide
R546 VRS-TV1JD471JY AA J Resistor 470 1/10W Metal Oxide
R547 VRS-TV1JD471JY AA J Resistor 470 1/10W Metal Oxide
R549 VRS-CZ1JF390JY AA J Resistor 39 1/16W Metal Oxide
R550 VRS-CZ1JF390JY AA J Resistor 39 1/16W Metal Oxide
R551 VRS-CZ1JF390JY AA J Resistor 39 1/16W Metal Oxide
R552 VRS-CZ1JF221JY AA J Resistor 220 1/16W Metal Oxide
R553 VRS-CZ1JF390JY AA J Resistor 39 1/16W Metal Oxide
R554 VRS-CZ1JF104JY AA J Resistor 100k 1/16W Metal Oxide
R555 VRS-CZ1JF221JY AA J Resistor 220 1/16W Metal Oxide
R556 VRS-CZ1JF390JY AA J Resistor 39 1/16W Metal Oxide
R557 VRS-CZ1JF390JY AA J Resistor 39 1/16W Metal Oxide
R558 VRS-CZ1JF104JY AA J Resistor 100k 1/16W Metal Oxide
R561 VRS-CZ1JF101FY AA J Resistor 100 1/16W Metal Oxide
R563 VRS-TQ2BD100JY AA J Resistor 10 1/8W Metal Oxide
R564 VRS-TV1JD471JY AA J Resistor 470 1/10W Metal Oxide
R567 VRS-CZ1JF101FY AA J Resistor 100 1/16W Metal Oxide
R568 VRS-TQ2BD680JY AA J Resistor 68 1/8W Metal Oxide
R569 VRS-TQ2BD100JY AA J Resistor 10 1/8W Metal Oxide
R570 VRS-TQ2BD680JY AA J Resistor 68 1/8W Metal Oxide
R571 VRS-TQ2BD750JY AA J Resistor 75 1/8W Metal Oxide
R572 VRS-CZ1JF102JY AA V Resistor 1k 1/16W Metal Oxide
R574 VRS-CZ1JF101FY AA J Resistor 100 1/16W Metal Oxide
R576 VRS-CZ1JF564JY AB J Resistor 560k 1/16W Metal Oxide
R578 VRS-CZ1JF564JY AB J Resistor 560k 1/16W Metal Oxide
R579 VRS-CZ1JF221JY AA J Resistor 220 1/16W Metal Oxide
R580 VRS-CZ1JF104JY AA J Resistor 100k 1/16W Metal Oxide
R581 VRS-CZ1JF221JY AA J Resistor 220 1/16W Metal Oxide
R582 VRS-CZ1JF104JY AA J Resistor 100k 1/16W Metal Oxide
R583 VRS-CZ1JF103JY AA J Resistor 10k 1/16W Metal Oxide
R584 VRS-CZ1JF473JY AA J Resistor 47k 1/16W Metal Oxide
R585 VRS-CZ1JF103JY AA J Resistor 10k 1/16W Metal Oxide
R586 VRS-CZ1JF222JY AA J Resistor 2.2k 1/16W Metal Oxide
R587 VRS-CZ1JF153JY AA J
R588 V
R589 VRS-CZ1JF103JY AA J Resistor 10k 1/16W Metal Oxide
R590 VRS-CZ1JF153JY AA J Resistor 15k 1/16W Metal Oxide
R592 VRS-CZ1JF103JY AA J Resistor 10k 1/16W Metal Oxide
R593 VRS-CZ1JF101JY AA J Resistor 100 1/16W Metal Oxide
R594 VRS-CZ1JF103JY AA J Resistor 10k 1/16W Metal Oxide
R595 VRS-CZ1JF153JY AA J Resistor 15k 1/16W Metal Oxide
R596 VRS-TV1JD471JY AA J Resistor 470 1/10W Metal Oxide
R597 VRS-CZ1JF680FY AA V Resistor 68 1/16W Metal Oxide
R598 VRS-CZ1JF221JY AA J Resistor 220 1/16W Metal Oxide
R599 VRS-CZ1JF104JY AA J Resistor 100k 1/16W Metal Oxide
R600 VRS-CZ1JF221JY AA J Resistor 220 1/16W Metal Oxide
R601 VRS-CZ1JF104JY AA J Resistor 100k 1/16W Metal Oxide
R602 VRS-CZ1JF221JY AA J Resistor 220 1/16W Metal Oxide
R603 VRS-CZ1JF104JY AA J Resistor 100k 1/16W Metal Oxide
R604 VRS-CZ1JF221JY AA J Resistor 220 1/16W Metal Oxide
R605 VRS-CZ1JF104JY AA J Resistor 100k 1/16W Metal Oxide
R606 VRS-CZ1JF153JY AA J Resistor 15k 1/16W Metal Oxide
R607 VRS-CZ1JF103JY AA J Resistor 10k 1/16W Metal Oxide
R608 VRS-CZ1JF153JY AA J Resistor 15k 1/16W Metal Oxide
R609 VRS-TV1JD471JY AA J Resistor 470 1/10W Metal Oxide
R610 VRS-TV1JD471JY AA J Resistor 470 1/10W Metal Oxide
R611 VRS-TV1JD471JY AA J Resistor 470 1/10W Metal Oxide
R612 VRS-TV1JD471JY AA J Resistor 470 1/10W Metal Oxide
R614 VRS-TV1JD471JY AA J Resistor 470 1/10W Metal Oxide
R615 VRS-TV1JD471JY AA J Resistor 470 1/10W Metal Oxide
R616 VRS-CZ1JF101FY AA J Resistor 100 1/16W Metal Oxide
R618 VRS-TV1JD471JY AA J Resistor 470 1/10W Metal Oxide
R619 VRS-CZ1JF101FY AA J Resistor 100 1/16W Metal Oxide
R621 VRS-TV1JD471JY AA J Resistor 470 1/10W Metal Oxide
R622 VRS-TV1JD911FY AA R Resistor 910 1/10W Metal Oxide
R623 VRS-TV1JD911FY AA R Resistor 910 1/10W Metal Oxide
R626 VRS-TV1JD471JY AA J Resistor 470 1/10W Metal Oxide
R627
R628 VRS-TV1JD911FY AA R Resistor 910 1/10W Metal Oxide
R630 VRS-TV1JD471JY AA J Resistor 470 1/10W Metal Oxide
R631 VRS-TV1JD911FY AA R Resistor 910 1/10W Metal Oxide
R633 VRS-TV1JD471JY AA J Resistor 470 1/10W Metal Oxide
R634 VRS-TQ2BD750JY AA J Resistor 75 1/8W Metal Oxide
R1101 VRS-CZ1JF470JY AA J Resistor 47 1/16W Metal Oxide
R1102 VRS-CZ1JF470JY AA J Resistor 47 1/16W Metal Oxide
R1103 VRS-CZ1JF683JY AA J Resistor 68k 1/16W Metal Oxide
R1107 VRS-CZ1JF101JY AA J Resistor 100 1/16W Metal Oxide
R1109 VRS-CZ1JF331JY AA J Resistor 330 1/16W Metal Oxide
R1113 VRS-CZ1JF123JY AA J Resistor 12k 1/16W Metal Oxide
R1114 VRS-CZ1JF392JY AA J Resistor 3.9k 1/16W Metal Oxide
R1115 VRS-CZ1JF101JY AA J Resistor 100 1/16W Metal Oxide
R1118 VRS-CZ1JF272JY AA J Resistor 2.7k 1/16W Metal Oxide
R1119 VRS-CZ1JF182JY AA J Resistor 1.8k 1/16W Metal Oxide
R1120 VRS-CZ1JF222JY AA J Resistor 2.2k 1/16W Metal Oxide
R1121 VRS-CZ1JF101JY AA J Resistor 100 1/16W Metal Oxide
RS-CZ1JF153JY AA J Resistor 15k 1/16W Metal Oxide
VRS-TV1JD471JY AA J R
Resistor 15k 1/16W Metal Oxide
esistor 470 1/10W Metal Oxide
LC-32R24B
DESCRIPTION
13
Page 94

LC-32R24B
Leandro Palmeira
NO. PARTS CODE
[5] DUNTKE450FM09 (MAIN Unit)
R1301 VRS-CJ1JF470JY AA J Resistor 47 1/16W Metal Oxide
R1302 VRK-SB1FF223JY AA R Resistor 22k 1/32W Metal Composition
R1303 VRS-CZ1JF101JY AA J Resistor 100 1/16W Metal Oxide
R1304 VRS-CZ1JF102JY AA V Resistor 1k 1/16W Metal Oxide
R1305 VRS-CZ1JF223JY AA J Resistor 22k 1/16W Metal Oxide
R1306 VRS-CZ1JF473FY AA J Resistor 47k 1/16W Metal Oxide
R1307 VRS-CZ1JF102JY AA V Resistor 1k 1/16W Metal Oxide
R1308 VRS-CZ1JF222JY AA J Resistor 2.2k 1/16W Metal Oxide
R1309 VRS-CJ1JF473JY AB J Resistor 47k 1/16W Metal Oxide
R1310 VRS-CZ1JF473JY AA J Resistor 47k 1/16W Metal Oxide
R1311 VRS-CZ1JF220JY AA J Resistor 22 1/16W Metal Oxide
R1314 VRS-CZ1JF473FY AA J Resistor 47k 1/16W Metal Oxide
R1315 VRS-CZ1JF103JY AA J Resistor 10k 1/16W Metal Oxide
R1317 VRS-CZ1JF102FY AA V Resistor 1k 1/16W Metal Oxide
R1318 VRS-CZ1JF102FY AA V Resistor 1k 1/16W Metal Oxide
R1321 VRS-CZ1JF473JY AA J Resistor 47k 1/16W Metal Oxide
R1322 VRS-CZ1JF102JY AA V Resistor 1k 1/16W Metal Oxide
R1323 VRS-CZ1JF103JY AA J Resistor 10k 1/16W Metal Oxide
R1324 VRS-CZ1JF472JY AA J Resistor 4.7k 1/16W Metal Oxide
R1325 VRS-CZ1JF473JY AA J Resistor 47k 1/16W Metal Oxide
R1326 VRS-CZ1JF102FY AA V Resistor 1k 1/16W Metal Oxide
R1327 VRS-CZ1JF102FY AA V Resistor 1k 1/16W Metal Oxide
R1329 VRS-CZ1JF473JY AA J Resistor 47k 1/16W Metal Oxide
R1330 VRS-CZ1JF473JY AA J Resistor 47k 1/16W Metal Oxide
R1333 VRS-CZ1JF223FY AA J Resistor 22k 1/16W Metal Oxide
R1335 VRS-CZ1JF562JY AA J Resistor 5.6k 1/16W Metal Oxide
R1336 VRS-CZ1JF473JY AA J Resistor 47k 1/16W Metal Oxide
R1337 VRS-CZ1JF103FY AB J Resistor 10k 1/16W Metal Oxide
R1338 VRS-CZ1JF332FY AA J Resistor 3.3k 1/16W Metal Oxide
R1341 VRS-CZ1JF153JY AA J Resistor 15k 1/16W Metal Oxide
R1401 VRS-CZ1JF101JY AA J Resistor 100 1/16W Metal Oxide
R1402 VRS-CZ1JF105JY AA J Resistor 1M 1/16W Metal Oxide
R1405 VRS-CZ1JF000JY AA J Resistor 0 1/16W Metal Oxide
R1407 VRS-CZ1JF000JY AA J
R1408 V
R1409 VRS-CZ1JF102JY AA V Resistor 1k 1/16W Metal Oxide
R1410 VRS-CZ1JF102JY AA V Resistor 1k 1/16W Metal Oxide
R1411 VRS-CZ1JF102JY AA V Resistor 1k 1/16W Metal Oxide
R1414 VRS-CZ1JF102JY AA V Resistor 1k 1/16W Metal Oxide
R1415 VRS-CZ1JF102JY AA V Resistor 1k 1/16W Metal Oxide
R1416 VRS-CZ1JF102JY AA V Resistor 1k 1/16W Metal Oxide
R1418 VRS-CZ1JF102JY AA V Resistor 1k 1/16W Metal Oxide
R1422 VRS-CZ1JF4R7JY AA J Resistor 4.7 1/16W Metal Oxide
R1423 VRS-CZ1JF101JY AA J Resistor 100 1/16W Metal Oxide
R1424 VRS-CZ1JF102JY AA V Resistor 1k 1/16W Metal Oxide
R1425 VRS-CZ1JF4R7JY AA J Resistor 4.7 1/16W Metal Oxide
R1426 VRS-CJ1JF470JY AA J Resistor 47 1/16W Metal Oxide
R1427 VRS-CZ1JF102JY AA V Resistor 1k 1/16W Metal Oxide
R1431 VRS-CZ1JF102JY AA V Resistor 1k 1/16W Metal Oxide
R1432 VRS-CZ1JF102JY AA V Resistor 1k 1/16W Metal Oxide
R1450 VRS-CZ1JF330JY AA J Resistor 33 1/16W Metal Oxide
R1604 VRS-CZ1JF273JY AA J Resistor 27k 1/16W Metal Oxide
R1606 VRS-CZ1JF472JY AA J Resistor 4.7k 1/16W Metal Oxide
R1607 VRS-CZ1JF000JY AA J Resistor 0 1/16W Metal Oxide
R1620 VRS-CZ1JF000JY AA J Resistor 0 1/16W Metal Oxide
R1623 VRS-CZ1JF000JY AA J Resistor 0 1/16W Metal Oxide
R1624 VRS-CZ1JF000JY AA J Resistor 0 1/16W Metal Oxide
R1627 VRS-CZ1JF473FY AA J Resistor 47k 1/16W Metal Oxide
R1629 VRS-CJ1JF473JY AB J Resistor 47k 1/16W Metal Oxide
R1630 VRS-CJ1JF100JY AA J Resistor 10 1/16W Metal Oxide
R1637 VRS-CZ1JF473FY AA J Resistor 47k 1/16W Metal Oxide
R1640 VRS-CJ1JF473JY AB J Resistor 47k 1/16W Metal Oxide
R1641 VRS-CJ1JF100JY AA J Resistor 10 1/16W Metal Oxide
R1665 VRS-CZ1JF100JY AA J Resistor 10 1/16W Metal Oxide
R1666 VRS-CZ1JF100JY AA J Resistor 10 1/16W Metal Oxide
R1668 VRS-CZ1JF472JY AA J Resistor 4.7k 1/16W Metal Oxide
R1670 VRS-CZ1JF100JY AA J Resistor 10 1/16W Metal Oxide
R1671
R1674 VRS-CZ1JF100JY AA J Resistor 10 1/16W Metal Oxide
R1676 VRS-CZ1JF100JY AA J Resistor 10 1/16W Metal Oxide
R1677 VRS-CZ1JF100JY AA J Resistor 10 1/16W Metal Oxide
R1678 VRS-CZ1JF103FY AB J Resistor 10k 1/16W Metal Oxide
R1679 VRS-CZ1JF100JY AA J Resistor 10 1/16W Metal Oxide
R1680 VRS-CZ1JF472JY AA J Resistor 4.7k 1/16W Metal Oxide
R1681 VRS-CZ1JF100JY AA J Resistor 10 1/16W Metal Oxide
R1682 VRS-CZ1JF472JY AA J Resistor 4.7k 1/16W Metal Oxide
R1683 VRS-CZ1JF751JY AA J Resistor 750 1/16W Metal Oxide
R1684 VRS-CZ1JF101JY AA J Resistor 100 1/16W Metal Oxide
R1685 VRS-CZ1JF104JY AA J Resistor 100k 1/16W Metal Oxide
R1688 VRS-CZ1JF103JY AA J Resistor 10k 1/16W Metal Oxide
R1722 VRS-CZ1JF472JY AA J Resistor 4.7k 1/16W Metal Oxide
R1723 VRS-CZ1JF102FY AA V Resistor 1k 1/16W Metal Oxide
R1724 VRS-CZ1JF102FY AA V Resistor 1k 1/16W Metal Oxide
R1725 VRS-CZ1JF103JY AA J Resistor 10k 1/16W Metal Oxide
R1726 VRS-CZ1JF331JY AA J Resistor 330 1/16W Metal Oxide
RS-CZ1JF102JY AA V Resistor 1k 1/16W Metal Oxide
VRS-CZ1JF472JY AA J Resistor
PRICE
RANK
NEW
MARK
PAR T
DELIVERY
DESCRIPTION
Resistor 0 1/16W Metal Oxide
4.7k 1/16W Metal Oxide
14
Page 95

NO. PARTS CODE
Leandro Palmeira
PRICE
RANK
NEW
MARK
PAR T
DELIVERY
[5] DUNTKE450FM09 (MAIN Unit)
R1727 VRS-CZ1JF102JY AA V Resistor 1k 1/16W Metal Oxide
R1728 VRS-CZ1JF102JY AA V Resistor 1k 1/16W Metal Oxide
R1737 VRS-CZ1JF000JY AA J Resistor 0 1/16W Metal Oxide
R1739 VRS-CZ1JF000JY AA J Resistor 0 1/16W Metal Oxide
R1740 VRS-CZ1JF000JY AA J Resistor 0 1/16W Metal Oxide
R1741 VRS-CZ1JF000JY AA J Resistor 0 1/16W Metal Oxide
R1742 VRS-CZ1JF000JY AA J Resistor 0 1/16W Metal Oxide
R1743 VRS-CZ1JF000JY AA J Resistor 0 1/16W Metal Oxide
R1744 VRS-CZ1JF000JY AA J Resistor 0 1/16W Metal Oxide
R1745 VRS-CZ1JF000JY AA J Resistor 0 1/16W Metal Oxide
R1746 VRS-CZ1JF000JY AA J Resistor 0 1/16W Metal Oxide
R2001 VRS-CZ1JF101JY AA J Resistor 100 1/16W Metal Oxide
R2003 VRS-CZ1JF102JY AA V Resistor 1k 1/16W Metal Oxide
R2004 VRS-CZ1JF103JY AA J Resistor 10k 1/16W Metal Oxide
R2006 VRS-CZ1JF223JY AA J Resistor 22k 1/16W Metal Oxide
R2007 VRS-CZ1JF472JY AA J Resistor 4.7k 1/16W Metal Oxide
R2008 VRS-CZ1JF102JY AA V Resistor 1k 1/16W Metal Oxide
R2009 VRS-CZ1JF102JY AA V Resistor 1k 1/16W Metal Oxide
R2010 VRS-CJ1JF333JY AA J Resistor 33k 1/16W Metal Oxide
R2011 VRS-CZ1JF472JY AA J Resistor 4.7k 1/16W Metal Oxide
R2012 VRS-CH1JF101JY AA J Resistor 100 1/16W Metal Oxide
R2014 VRS-CJ1JF472JY AA J Resistor 4.7k 1/16W Metal Oxide
R2015 VRS-CJ1JF103JY AA J Resistor 10k 1/16W Metal Oxide
R2016 VRS-CZ1JF103JY AA J Resistor 10k 1/16W Metal Oxide
R2017 VRS-CZ1JF100JY AA J Resistor 10 1/16W Metal Oxide
R2018 VRS-CZ1JF103JY AA J Resistor 10k 1/16W Metal Oxide
R2019 VRS-CZ1JF103JY AA J Resistor 10k 1/16W Metal Oxide
R2022 VRS-CZ1JF472JY AA J Resistor 4.7k 1/16W Metal Oxide
R2023 VRS-CZ1JF473FY AA J Resistor 47k 1/16W Metal Oxide
R2024 VRS-CZ1JF102FY AA V Resistor 1k 1/16W Metal Oxide
R2025 VRS-CZ1JF103JY AA J Resistor 10k 1/16W Metal Oxide
R2026 VRS-CZ1JF103JY AA J Resistor 10k 1/16W Metal Oxide
R2027 VRS-CZ1JF103JY AA J Resistor 10k 1/16W Metal Oxide
R2028 VRS-CZ1JF100JY AA J
029 VRS-CZ1JF100JY AA J Resistor 10 1/16W Metal Oxide
R2
R2030 VRS-CH1JF103JY AA J Resistor 10k 1/16W Metal Oxide
R2031 VRS-CZ1JF101JY AA J Resistor 100 1/16W Metal Oxide
R2032 VRS-CZ1JF223JY AA J Resistor 22k 1/16W Metal Oxide
R2033 VRS-CZ1JF101JY AA J Resistor 100 1/16W Metal Oxide
R2034 VRS-CZ1JF000JY AA J Resistor 0 1/16W Metal Oxide
R2035 VRS-CZ1JF223JY AA J Resistor 22k 1/16W Metal Oxide
R2037 VRS-CZ1JF000JY AA J Resistor 0 1/16W Metal Oxide
R2038 VRS-CZ1JF103JY AA J Resistor 10k 1/16W Metal Oxide
R2040 VRS-CZ1JF103JY AA J Resistor 10k 1/16W Metal Oxide
R2041 VRS-CZ1JF152JY AA J Resistor 1.5k 1/16W Metal Oxide
R2047 VRS-CZ1JF101JY AA J Resistor 100 1/16W Metal Oxide
R2049 VRS-CZ1JF272FY AA J Resistor 2.7k 1/16W Metal Oxide
R2050 VRS-CZ1JF101JY AA J Resistor 100 1/16W Metal Oxide
R2051 VRS-CZ1JF100JY AA J Resistor 10 1/16W Metal Oxide
R2052 VRS-CZ1JF100JY AA J Resistor 10 1/16W Metal Oxide
R2058 VRS-CZ1JF100JY AA J Resistor 10 1/16W Metal Oxide
R2068 VRS-CZ1JF103JY AA J Resistor 10k 1/16W Metal Oxide
R2071 VRS-CZ1JF100JY AA J Resistor 10 1/16W Metal Oxide
R2072 VRS-CZ1JF104JY AA J Resistor 100k 1/16W Metal Oxide
R2076 VRS-CZ1JF102JY AA V Resistor 1k 1/16W Metal Oxide
R2226 VRS-CZ1JF222JY AA J Resistor 2.2k 1/16W Metal Oxide
R2227 VRS-CZ1JF222JY AA J Resistor 2.2k 1/16W Metal Oxide
R2229 VRS-CZ1JF101JY AA J Resistor 100 1/16W Metal Oxide
R2230 VRS-CZ1JF101JY AA J Resistor 100 1/16W Metal Oxide
R2233 VRS-CZ1JF101JY AA J Resistor 100 1/16W Metal Oxide
R2234 VRS-CZ1JF102FY AA V Resistor 1k 1/16W Metal Oxide
R2238 VRS-CZ1JF101JY AA J Resistor 100 1/16W Metal Oxide
R2239 VRS-TV1JD750JY AA J Resistor 75 1/10W Metal Oxide
R2240 VRS-TV1JD750JY AA J Resistor 75 1/10W Metal Oxide
R2241 VRS-TV1JD750JY AA J Resistor 75 1/10W Metal Oxide
R2242 VRS-CZ1JF330JY AA J Resistor 33 1/16W Metal Oxide
R2243 VRS-CZ1JF103JY AA J Resistor 10k 1/16W Metal Oxide
R2244
R2245 VRS-CZ1JF103JY AA J Resistor 10k 1/16W Metal Oxide
R2246 VRS-CZ1JF183JY AA J Resistor 18k 1/16W Metal Oxide
R2247 VRS-CZ1JF103JY AA J Resistor 10k 1/16W Metal Oxide
R2248 VRS-CZ1JF183JY AA J Resistor 18k 1/16W Metal Oxide
R2249 VRS-CZ1JF101JY AA J Resistor 100 1/16W Metal Oxide
R2250 VRS-CZ1JF101JY AA J Resistor 100 1/16W Metal Oxide
R2251 VRS-CZ1JF101JY AA J Resistor 100 1/16W Metal Oxide
R2252 VRS-CZ1JF330JY AA J Resistor 33 1/16W Metal Oxide
R2253 VRS-CZ1JF561JY AA V Resistor 560 1/16W Metal Oxide
R2254 VRS-CZ1JF561JY AA V Resistor 560 1/16W Metal Oxide
R2255 VRS-CZ1JF561JY AA V Resistor 560 1/16W Metal Oxide
R2256 VRS-CZ1JF470JY AA J Resistor 47 1/16W Metal Oxide
R2257 VRS-CZ1JF470JY AA J Resistor 47 1/16W Metal Oxide
R2258 VRS-CZ1JF470JY AA J Resistor 47 1/16W Metal Oxide
R2259 VRS-CZ1JF473JY AA J Resistor 47k 1/16W Metal Oxide
R2260 VRS-CZ1JF100JY AA J Resistor 10 1/16W Metal Oxide
R2261 VRS-CZ1JF473JY AA J Resistor 47k 1/16W Metal Oxide
VRS-CZ1JF183JY AA J R
Resistor 10 1/16W Metal Oxide
esistor 18k 1/16W Metal Oxide
LC-32R24B
DESCRIPTION
15
Page 96

LC-32R24B
Leandro Palmeira
NO. PARTS CODE
[5] DUNTKE450FM09 (MAIN Unit)
R2262 VRS-CZ1JF100JY AA J Resistor 10 1/16W Metal Oxide
R2279 VRS-CZ1JF392JY AA J Resistor 3.9k 1/16W Metal Oxide
R2280 VRS-CZ1JF202JY AA V Resistor 2k 1/16W Metal Oxide
R2305 VRS-CZ1JF000JY AA J Resistor 0 1/16W Metal Oxide
R2313 VRS-CZ1JF750JY AA J Resistor 75 1/16W Metal Oxide
R2314 VRS-CZ1JF390JY AA J Resistor 39 1/16W Metal Oxide
R2603 VRS-CZ1JF103JY AA J Resistor 10k 1/16W Metal Oxide
R2604 VRS-CZ1JF220JY AA J Resistor 22 1/16W Metal Oxide
R2623 VRS-CZ1JF105JY AA J Resistor 1M 1/16W Metal Oxide
R2713 VRS-TV1JD000JY AA J Resistor 0 1/10W Metal Oxide
R2714 VRS-TV1JD000JY AA J Resistor 0 1/10W Metal Oxide
R2715 VRS-CZ1JF224FY AA J Resistor 220k 1/16W Metal Oxide
R2717 VRS-CZ1JF273FY AA J Resistor 27k 1/16W Metal Oxide
R2718 VRS-CZ1JF123JY AA J Resistor 12k 1/16W Metal Oxide
R2719 VRS-CZ1JF203JY AA V Resistor 20k 1/16W Metal Oxide
R2726 VRS-CZ1JF000JY AA J Resistor 0 1/16W Metal Oxide
R2730 VRS-CZ1JF224JY AA J Resistor 220k 1/16W Metal Oxide
R2741 VRS-CZ1JF753JY AA V Resistor 75k 1/16W Metal Oxide
R2742 VRS-CZ1JF203JY AA V Resistor 20k 1/16W Metal Oxide
R2744 VRS-CZ1JF220JY AA J Resistor 22 1/16W Metal Oxide
R2752 VRS-CZ1JF224JY AA J Resistor 220k 1/16W Metal Oxide
R2753 VRS-CZ1JF683FY AA J Resistor 68k 1/16W Metal Oxide
R2754 VRS-CZ1JF223FY AA J Resistor 22k 1/16W Metal Oxide
R5102 VRS-CZ1JF103JY AA J Resistor 10k 1/16W Metal Oxide
R5107 VRS-CZ1JF103JY AA J Resistor 10k 1/16W Metal Oxide
R5109 VRS-CZ1JF103JY AA J Resistor 10k 1/16W Metal Oxide
R5111 VRS-CZ1JF103JY AA J Resistor 10k 1/16W Metal Oxide
R5113 VRS-CZ1JF103JY AA J Resistor 10k 1/16W Metal Oxide
R5115 VRS-CZ1JF105JY AA J Resistor 1M 1/16W Metal Oxide
R5117 VRS-CZ1JF103JY AA J Resistor 10k 1/16W Metal Oxide
R5118 VRS-CZ1JF222JY AA J Resistor 2.2k 1/16W Metal Oxide
R5119 VRS-CZ1JF222JY AA J Resistor 2.2k 1/16W Metal Oxide
R5120 VRS-CZ1JF222JY AA J Resistor 2.2k 1/16W Metal Oxide
R5121 VRS-CZ1JF331JY AA J
R5122 V
R5124 VRS-CZ1JF103JY AA J Resistor 10k 1/16W Metal Oxide
R5126 VRS-CZ1JF103JY AA J Resistor 10k 1/16W Metal Oxide
R5129 VRS-CZ1JF103JY AA J Resistor 10k 1/16W Metal Oxide
R5139 VRS-CZ1JF103FY AB J Resistor 10k 1/16W Metal Oxide
R5141 VRS-CZ1JF000JY AA J Resistor 0 1/16W Metal Oxide
R5142 VRS-CZ1JF101JY AA J Resistor 100 1/16W Metal Oxide
R5143 VRS-CZ1JF101JY AA J Resistor 100 1/16W Metal Oxide
R5144 VRS-CZ1JF101JY AA J Resistor 100 1/16W Metal Oxide
R5145 VRS-CZ1JF101JY AA J Resistor 100 1/16W Metal Oxide
R5146 VRS-CZ1JF101JY AA J Resistor 100 1/16W Metal Oxide
R5147 VRS-CZ1JF101JY AA J Resistor 100 1/16W Metal Oxide
R5148 VRS-CH1JF101JY AA J Resistor 100 1/16W Metal Oxide
R5149 VRS-CZ1JF101JY AA J Resistor 100 1/16W Metal Oxide
R5150 VRS-CZ1JF101JY AA J Resistor 100 1/16W Metal Oxide
R5202 VRS-CZ1JF000JY AA J Resistor 0 1/16W Metal Oxide
R5203 VRS-CZ1JF000JY AA J Resistor 0 1/16W Metal Oxide
R5209 VRS-CZ1JF752FY AA J Resistor 7.5k 1/16W Metal Oxide
R5210 VRS-CZ1JF301JY AA J Resistor 300 1/16W Metal Oxide
R5211 VRS-CZ1JF000JY AA J Resistor 0 1/16W Metal Oxide
R5213 VRS-CZ1JF243FY AA J Resistor 24k 1/16W Metal Oxide
R5214 VRS-CZ1JF243FY AA J Resistor 24k 1/16W Metal Oxide
R5217 VRS-CZ1JF102FY AA V Resistor 1k 1/16W Metal Oxide
R5218 VRS-CZ1JF103FY AB J Resistor 10k 1/16W Metal Oxide
R5225 VRS-CZ1JF332FY AA J Resistor 3.3k 1/16W Metal Oxide
R5227 VRS-CZ1JF301JY AA J Resistor 300 1/16W Metal Oxide
R5228 VRS-CZ1JF332FY AA J Resistor 3.3k 1/16W Metal Oxide
R5232 VRS-CZ1JF000JY AA J Resistor 0 1/16W Metal Oxide
R5236 VRS-CZ1JF000JY AA J Resistor 0 1/16W Metal Oxide
R5237 VRS-CZ1JF183FY AA J Resistor 18k 1/16W Metal Oxide
R5238 VRS-CZ1JF912FY AA V Resistor 9.1k 1/16W Metal Oxide
R5239 VRS-CZ1JF913JY AA V Resistor 91k 1/16W Metal Oxide
R5240 VRS-CZ1JF183FY AA J Resistor 18k 1/16W Metal Oxide
R5241
R5242 VRS-CZ1JF913FY AA V Resistor 91k 1/16W Metal Oxide
R5402 VRS-CZ1JF563JY AA J Resistor 56k 1/16W Metal Oxide
R5403 VRS-CZ1JF513FY AA V Resistor 51k 1/16W Metal Oxide
R5404 VRS-CZ1JF203FY AA V Resistor 20k 1/16W Metal Oxide
R5405 VRS-CZ1JF222JY AA J Resistor 2.2k 1/16W Metal Oxide
R5406 VRS-CZ1JF000JY AA J Resistor 0 1/16W Metal Oxide
R5407 VRS-CZ1JF203FY AA V Resistor 20k 1/16W Metal Oxide
R5408 VRS-CZ1JF102JY AA V Resistor 1k 1/16W Metal Oxide
R5409 VRS-CZ1JF303FY AA V Resistor 30k 1/16W Metal Oxide
R5410 VRS-TW2HF3R3JY AA J Resistor 3.3 1/2W Metal Oxide
R5411 VRS-CZ1JF222JY AA J Resistor 2.2k 1/16W Metal Oxide
R5412 VRS-CZ1JF204FY AA V Resistor 200k 1/16W Metal Oxide
R5413 VRS-CZ1JF000JY AA J Resistor 0 1/16W Metal Oxide
R5414 VRS-CZ1JF183FY AA J Resistor 18k 1/16W Metal Oxide
R5415 VRS-CZ1JF000JY AA J Resistor 0 1/16W Metal Oxide
R5416 VRS-CZ1JF000JY AA J Resistor 0 1/16W Metal Oxide
R5417 VRS-CZ1JF153FY AA J Resistor 15k 1/16W Metal Oxide
RS-CZ1JF103JY AA J Resistor 10k 1/16W Metal Oxide
VRS-CZ1JF163FY AB J Resistor
PRICE
RANK
NEW
MARK
PAR T
DELIVERY
DESCRIPTION
Resistor 330 1/16W Metal Oxide
16k 1/16W Metal Oxide
16
Page 97

NO. PARTS CODE
Leandro Palmeira
PRICE
RANK
NEW
MARK
PAR T
DELIVERY
[5] DUNTKE450FM09 (MAIN Unit)
R5418 VRS-CZ1JF153FY AA J Resistor 15k 1/16W Metal Oxide
R5419 VRS-CZ1JF1R0JY AA J Resistor 1 1/16W Metal Oxide
R5420 VRS-CZ1JF1R0JY AA J Resistor 1 1/16W Metal Oxide
R5423 VRS-CZ1JF1R0JY AA J Resistor 1 1/16W Metal Oxide
R5426 VRS-CZ1JF513FY AA V Resistor 51k 1/16W Metal Oxide
R5427 VRS-CZ1JF102FY AA V Resistor 1k 1/16W Metal Oxide
R5428 VRS-CZ1JF390FY AA J Resistor 39 1/16W Metal Oxide
R5429 VRS-CZ1JF183FY AA J Resistor 18k 1/16W Metal Oxide
R5430 VRS-CZ1JF203FY AA V Resistor 20k 1/16W Metal Oxide
R5431 VRS-CZ1JF113FY AA J Resistor 11k 1/16W Metal Oxide
R5432 VRS-CZ1JF512FY AA V Resistor 5.1k 1/16W Metal Oxide
R5433 VRS-CZ1JF1R0JY AA J Resistor 1 1/16W Metal Oxide
R5434 VRS-CZ1JF102JY AA V Resistor 1k 1/16W Metal Oxide
R5435 VRS-CZ1JF682FY AA J Resistor 6.8k 1/16W Metal Oxide
R5436 VRS-CZ1JF204FY AA V Resistor 200k 1/16W Metal Oxide
R5437 VRS-CZ1JF183FY AA J Resistor 18k 1/16W Metal Oxide
R5438 VRS-CZ1JF683FY AA J Resistor 68k 1/16W Metal Oxide
R5439 VRS-CZ1JF393FY AA J Resistor 39k 1/16W Metal Oxide
R5440 VRS-CZ1JF222JY AA J Resistor 2.2k 1/16W Metal Oxide
R5442 VRS-CZ1JF153FY AA J Resistor 15k 1/16W Metal Oxide
R5444 VRS-CZ1JF334FY AA J Resistor 330k 1/16W Metal Oxide
R5445 VRS-CZ1JF753FY AA V Resistor 75k 1/16W Metal Oxide
R5446 VRS-CZ1JF133FY AA V Resistor 13k 1/16W Metal Oxide
R5447 VRS-CZ1JF753FY AA V Resistor 75k 1/16W Metal Oxide
R5448 VRS-CZ1JF391JY AA J Resistor 390 1/16W Metal Oxide
R5451 VRS-CZ1JF104JY AA J Resistor 100k 1/16W Metal Oxide
R5452 VRS-CZ1JF103JY AA J Resistor 10k 1/16W Metal Oxide
R5453 VRS-CZ1JF103JY AA J Resistor 10k 1/16W Metal Oxide
R5454 VRS-CZ1JF332JY AA J Resistor 3.3k 1/16W Metal Oxide
R5455 VRS-CZ1JF102JY AA V Resistor 1k 1/16W Metal Oxide
R5457 VRS-CZ1JF332FY AA J Resistor 3.3k 1/16W Metal Oxide
R5458 VRS-CZ1JF511FY AA J Resistor 510 1/16W Metal Oxide
R5459 VRS-CZ1JF1R0JY AA J Resistor 1 1/16W Metal Oxide
R5460 VRS-CZ1JF1R0JY AA J
461 VRS-CZ1JF474JY AA J Resistor 470k 1/16W Metal Oxide
R5
R5464 VRS-CZ1JF103JY AA J Resistor 10k 1/16W Metal Oxide
R5465 VRS-CZ1JF105JY AA J Resistor 1M 1/16W Metal Oxide
R5466 VRS-CZ1JF102JY AA V Resistor 1k 1/16W Metal Oxide
R5467 VRS-TQ2BD511JY AA J Resistor 510 1/8W Metal Oxide
R5468 VRS-TQ2BD511JY AA J Resistor 510 1/8W Metal Oxide
R5469 VRS-TQ2BD511JY AA J Resistor 510 1/8W Metal Oxide
R5470 VRS-CZ1JF102JY AA V Resistor 1k 1/16W Metal Oxide
R5484 VRK-SB1FF000JY AA J Resistor 0 1/32W Metal Composition
R5486 VRK-SB1FF000JY AA J Resistor 0 1/32W Metal Composition
R5489 VRS-CZ1JF000JY AA J Resistor 0 1/16W Metal Oxide
R5490 VRS-CZ1JF000JY AA J Resistor 0 1/16W Metal Oxide
R5492 VRS-CZ1JF000JY AA J Resistor 0 1/16W Metal Oxide
R5493 VRS-CZ1JF000JY AA J Resistor 0 1/16W Metal Oxide
R5507 VRS-CZ1JF913FY AA V Resistor 91k 1/16W Metal Oxide
R5508 VRS-CZ1JF133FY AA V Resistor 13k 1/16W Metal Oxide
R5510 VRS-CZ1JF103JY AA J Resistor 10k 1/16W Metal Oxide
R5511 VRS-CZ1JF472JY AA J Resistor 4.7k 1/16W Metal Oxide
R5512 VRS-CZ1JF000JY AA J Resistor 0 1/16W Metal Oxide
R8002 VRS-CZ1JF000JY AA J Resistor 0 1/16W Metal Oxide
R8003 VRS-CZ1JF000JY AA J Resistor 0 1/16W Metal Oxide
R8004 VRS-CZ1JF472FY AA J Resistor 4.7k 1/16W Metal Oxide
R8005 VRS-CK1JF470JY AB J Resistor 47 1/16W Metal Oxide
R8006 VRS-CZ1JF000JY AA J Resistor 0 1/16W Metal Oxide
R8007 VRS-CK1JF470JY AB J Resistor 47 1/16W Metal Oxide
R8008 VRS-CK1JF470JY AB J Resistor 47 1/16W Metal Oxide
R8009 VRS-CK1JF470JY AB J Resistor 47 1/16W Metal Oxide
R8010 VRS-CK1JF470JY AB J Resistor 47 1/16W Metal Oxide
R8011 VRS-CZ1JF470JY AA J Resistor 47 1/16W Metal Oxide
R8013 VRS-CZ1JF470JY AA J Resistor 47 1/16W Metal Oxide
R8014 VRS-CZ1JF470JY AA J Resistor 47 1/16W Metal Oxide
R8015 VRS-CZ1JF470JY AA J Resistor 47 1/16W Metal Oxide
R8016 VRS-CZ1JF470JY AA J Resistor 47 1/16W Metal Oxide
R8017
R8018 VRS-CK1JF472JY AA R Resistor 4.7k 1/16W Metal Oxide
R8021 VRS-CZ1JF750JY AA J Resistor 75 1/16W Metal Oxide
R8023 VRS-CZ1JF103JY AA J Resistor 10k 1/16W Metal Oxide
R8024 VRS-CH1JF103JY AA J Resistor 10k 1/16W Metal Oxide
R8025 VRS-CZ1JF103JY AA J Resistor 10k 1/16W Metal Oxide
R8026 VRS-CZ1JF272JY AA J Resistor 2.7k 1/16W Metal Oxide
R8029 VRS-CZ1JF272JY AA J Resistor 2.7k 1/16W Metal Oxide
R8030 VRS-CZ1JF472FY AA J Resistor 4.7k 1/16W Metal Oxide
R8038 VRS-CZ1JF511FY AA J Resistor 510 1/16W Metal Oxide
R8039 VRS-CZ1JF511FY AA J Resistor 510 1/16W Metal Oxide
R8040 VRS-CZ1JF561JY AA V Resistor 560 1/16W Metal Oxide
R8042 VRS-CZ1JF103JY AA J Resistor 10k 1/16W Metal Oxide
R8043 VRS-CZ1JF101JY AA J Resistor 100 1/16W Metal Oxide
R8056 VRS-TV1JD000JY AA J Resistor 0 1/10W Metal Oxide
R8059 VRS-CZ1JF272JY AA J Resistor 2.7k 1/16W Metal Oxide
R8060 VRS-CZ1JF000JY AA J Resistor 0 1/16W Metal Oxide
R8065 VRS-CZ1JF272JY AA J Resistor 2.7k 1/16W Metal Oxide
VRS-CZ1JF470JY AA J R
Resistor 1 1/16W Metal Oxide
esistor 47 1/16W Metal Oxide
LC-32R24B
DESCRIPTION
17
Page 98

LC-32R24B
Leandro Palmeira
NO. PARTS CODE
[5] DUNTKE450FM09 (MAIN Unit)
R8084 VRS-CZ1JF272JY AA J Resistor 2.7k 1/16W Metal Oxide
R8087 VRS-CZ1JF561FY AA V Resistor 560 1/16W Metal Oxide
R8088 VRS-CZ1JF220JY AA J Resistor 22 1/16W Metal Oxide
R8089 VRS-CZ1JF220JY AA J Resistor 22 1/16W Metal Oxide
R8090 VRS-CZ1JF330JY AA J Resistor 33 1/16W Metal Oxide
R8093 VRS-CZ1JF472JY AA J Resistor 4.7k 1/16W Metal Oxide
R8094 VRS-CZ1JF472JY AA J Resistor 4.7k 1/16W Metal Oxide
R8097 VRS-CZ1JF472JY AA J Resistor 4.7k 1/16W Metal Oxide
R8099 VRS-CZ1JF472JY AA J Resistor 4.7k 1/16W Metal Oxide
R8100 VRS-CZ1JF472JY AA J Resistor 4.7k 1/16W Metal Oxide
R8101 VRS-CZ1JF472FY AA J Resistor 4.7k 1/16W Metal Oxide
R8102 VRS-CZ1JF472FY AA J Resistor 4.7k 1/16W Metal Oxide
R8103 VRS-CZ1JF472FY AA J Resistor 4.7k 1/16W Metal Oxide
R8104 VRS-CZ1JF472FY AA J Resistor 4.7k 1/16W Metal Oxide
R8114 VRS-CZ1JF472JY AA J Resistor 4.7k 1/16W Metal Oxide
R8116 VRS-CZ1JF472JY AA J Resistor 4.7k 1/16W Metal Oxide
R8124 VRS-CZ1JF472JY AA J Resistor 4.7k 1/16W Metal Oxide
R8135 VRS-CZ1JF102JY AA V Resistor 1k 1/16W Metal Oxide
R8137 VRS-CZ1JF472JY AA J Resistor 4.7k 1/16W Metal Oxide
R8138 VRS-CZ1JF000JY AA J Resistor 0 1/16W Metal Oxide
R8139 VRS-CZ1JF000JY AA J Resistor 0 1/16W Metal Oxide
R8140 VRS-CZ1JF470JY AA J Resistor 47 1/16W Metal Oxide
R8142 VRS-CZ1JF392JY AA J Resistor 3.9k 1/16W Metal Oxide
R8143 VRS-CZ1JF472JY AA J Resistor 4.7k 1/16W Metal Oxide
R8144 VRS-CZ1JF472JY AA J Resistor 4.7k 1/16W Metal Oxide
R8145 VRS-CZ1JF472JY AA J Resistor 4.7k 1/16W Metal Oxide
R8146 VRS-CZ1JF472JY AA J Resistor 4.7k 1/16W Metal Oxide
R8147 VRS-CZ1JF472JY AA J Resistor 4.7k 1/16W Metal Oxide
R8151 VRK-SB1FF220JY AA R Resistor 22 1/32W Metal Composition
R8152 VRK-SB1FF220JY AA R Resistor 22 1/32W Metal Composition
R8153 VRK-SB1FF220JY AA R Resistor 22 1/32W Metal Composition
R8154 VRK-SB1FF220JY AA R Resistor 22 1/32W Metal Composition
R8155 VRK-SB1FF220JY AA R Resistor 22 1/32W Metal Composition
R8156 VRK-SB1FF220JY AA R
R8163 V
R8167 VRS-CZ1JF220JY AA J Resistor 22 1/16W Metal Oxide
R8168 VRS-CZ1JF220JY AA J Resistor 22 1/16W Metal Oxide
R8169 VRK-SB1FF220JY AA R Resistor 22 1/32W Metal Composition
R8170 VRK-SB1FF220JY AA R Resistor 22 1/32W Metal Composition
R8171 VRK-SB1FF220JY AA R Resistor 22 1/32W Metal Composition
R8172 VRK-SB1FF220JY AA R Resistor 22 1/32W Metal Composition
R8173 VRK-SB1FF220JY AA R Resistor 22 1/32W Metal Composition
R8174 VRK-SB1FF220JY AA R Resistor 22 1/32W Metal Composition
R8181 VRS-CZ1JF220JY AA J Resistor 22 1/16W Metal Oxide
R8182 VRS-CZ1JF220JY AA J Resistor 22 1/16W Metal Oxide
R8183 VRS-CZ1JF220JY AA J Resistor 22 1/16W Metal Oxide
R8186 VRK-SB1FF680JY AA J Resistor 68 1/32W Metal Composition
R8187 VRK-SB1FF680JY AA J Resistor 68 1/32W Metal Composition
R8188 VRK-SB1FF680JY AA J Resistor 68 1/32W Metal Composition
R8189 VRK-SB1FF680JY AA J Resistor 68 1/32W Metal Composition
R8190 VRK-SB1FF680JY AA J Resistor 68 1/32W Metal Composition
R8191 VRK-SB1FF680JY AA J Resistor 68 1/32W Metal Composition
R8198 VRK-SB1FF220JY AA R Resistor 22 1/32W Metal Composition
R8199 VRK-SB1FF220JY AA R Resistor 22 1/32W Metal Composition
R8200 VRK-SB1FF220JY AA R Resistor 22 1/32W Metal Composition
R8201 VRK-SB1FF220JY AA R Resistor 22 1/32W Metal Composition
R8202 VRK-SB1FF220JY AA R Resistor 22 1/32W Metal Composition
R8203 VRK-SB1FF220JY AA R Resistor 22 1/32W Metal Composition
R8204 VRK-SB1FF220JY AA R Resistor 22 1/32W Metal Composition
R8205 VRK-SB1FF220JY AA R Resistor 22 1/32W Metal Composition
R8206 VRK-SB1FF220JY AA R Resistor 22 1/32W Metal Composition
R8207 VRK-SB1FF220JY AA R Resistor 22 1/32W Metal Composition
R8208 VRK-SB1FF220JY AA R Resistor 22 1/32W Metal Composition
R8215 VRS-CZ1JF680JY AB V Resistor 68 1/16W Metal Oxide
R8216 VRS-CZ1JF680JY AB V Resistor 68 1/16W Metal Oxide
R8217 VRS-CZ1JF680JY AB V Resistor 68 1/16W Metal Oxide
R8218 VRS-CZ1JF680JY AB V Resistor 68 1/16W Metal Oxide
R8225
R8226 VRS-CZ1JF680JY AB V Resistor 68 1/16W Metal Oxide
R8227 VRS-CZ1JF680JY AB V Resistor 68 1/16W Metal Oxide
R8228 VRK-SB1FF680JY AA J Resistor 68 1/32W Metal Composition
R8230 VRK-SB1FF680JY AA J Resistor 68 1/32W Metal Composition
R8231 VRK-SB1FF680JY AA J Resistor 68 1/32W Metal Composition
R8232 VRK-SB1FF680JY AA J Resistor 68 1/32W Metal Composition
R8233 VRK-SB1FF680JY AA J Resistor 68 1/32W Metal Composition
R8240 VRK-SB1FF680JY AA J Resistor 68 1/32W Metal Composition
R8241 VRK-SB1FF680JY AA J Resistor 68 1/32W Metal Composition
R8242 VRK-SB1FF680JY AA J Resistor 68 1/32W Metal Composition
R8243 VRK-SB1FF680JY AA J Resistor 68 1/32W Metal Composition
R8244 VRK-SB1FF680JY AA J Resistor 68 1/32W Metal Composition
R8245 VRS-CZ1JF220JY AA J Resistor 22 1/16W Metal Oxide
R8246 VRS-CZ1JF220JY AA J Resistor 22 1/16W Metal Oxide
R8247 VRS-CZ1JF220JY AA J Resistor 22 1/16W Metal Oxide
R8248 VRS-CZ1JF220JY AA J Resistor 22 1/16W Metal Oxide
R8251 VRS-CZ1JF220JY AA J Resistor 22 1/16W Metal Oxide
RS-CZ1JF220JY AA J Resistor 22 1/16W Metal Oxide
VRS-CZ1JF680JY AB V Resistor
PRICE
RANK
NEW
MARK
PAR T
DELIVERY
DESCRIPTION
Resistor 22 1/32W Metal Composition
68 1/16W Metal Oxide
18
Page 99

NO. PARTS CODE
Leandro Palmeira
PRICE
RANK
NEW
MARK
PAR T
DELIVERY
[5] DUNTKE450FM09 (MAIN Unit)
R8255 VRK-SB1FF220JY AA R Resistor 22 1/32W Metal Composition
R8257 VRK-SB1FF220JY AA R Resistor 22 1/32W Metal Composition
R8258 VRK-SB1FF220JY AA R Resistor 22 1/32W Metal Composition
R8259 VRK-SB1FF220JY AA R Resistor 22 1/32W Metal Composition
R8260 VRK-SB1FF220JY AA R Resistor 22 1/32W Metal Composition
R8268 VRK-SB1FF680JY AA J Resistor 68 1/32W Metal Composition
R8269 VRK-SB1FF220JY AA R Resistor 22 1/32W Metal Composition
R8270 VRS-CZ1JF000JY AA J Resistor 0 1/16W Metal Oxide
R8451 VRS-CZ1JF000JY AA J Resistor 0 1/16W Metal Oxide
R8452 VRS-CZ1JF000JY AA J Resistor 0 1/16W Metal Oxide
R8456 VRS-CZ1JF470JY AA J Resistor 47 1/16W Metal Oxide
R8457 VRS-CZ1JF470JY AA J Resistor 47 1/16W Metal Oxide
R8474 VRS-CZ1JF470JY AA J Resistor 47 1/16W Metal Oxide
R8475 VRS-CZ1JF470JY AA J Resistor 47 1/16W Metal Oxide
R8902 VRS-CZ1JF105JY AA J Resistor 1M 1/16W Metal Oxide
R8903 VRS-CZ1JF105JY AA J Resistor 1M 1/16W Metal Oxide
R9001 VRS-CZ1JF000JY AA J Resistor 0 1/16W Metal Oxide
R9002 VRS-CZ1JF000JY AA J Resistor 0 1/16W Metal Oxide
R9003 VRS-CZ1JF103JY AA J Resistor 10k 1/16W Metal Oxide
R9007 VRS-CZ1JF103JY AA J Resistor 10k 1/16W Metal Oxide
R9008 VRS-CZ1JF472JY AA J Resistor 4.7k 1/16W Metal Oxide
R9009 VRS-CZ1JF472JY AA J Resistor 4.7k 1/16W Metal Oxide
R9010 VRS-CZ1JF182JY AA J Resistor 1.8k 1/16W Metal Oxide
R9011 VRS-CZ1JF182JY AA J Resistor 1.8k 1/16W Metal Oxide
R9012 VRS-CJ1JF472JY AA J Resistor 4.7k 1/16W Metal Oxide
R9014 VRS-CJ1JF472JY AA J Resistor 4.7k 1/16W Metal Oxide
R9018 VRS-CZ1JF272JY AA J Resistor 2.7k 1/16W Metal Oxide
R9034 VRS-CZ1JF152JY AA J Resistor 1.5k 1/16W Metal Oxide
R9035 VRS-CZ1JF152JY AA J Resistor 1.5k 1/16W Metal Oxide
R9209 VRS-CZ1JF470JY AA J Resistor 47 1/16W Metal Oxide
R9302 VRS-CH1JF472JY AA J Resistor 4.7k 1/16W Metal Oxide
R9305 VRS-CZ1JF102JY AA V Resistor 1k 1/16W Metal Oxide
R9306 VRS-CZ1JF103JY AA J Resistor 10k 1/16W Metal Oxide
R9308 VRS-CZ1JF473JY AA J
310 VRS-CZ1JF472JY AA J Resistor 4.7k 1/16W Metal Oxide
R9
R9313 VRS-CZ1JF104JY AA J Resistor 100k 1/16W Metal Oxide
R9314 VRS-CZ1JF272JY AA J Resistor 2.7k 1/16W Metal Oxide
R9315 VRS-CZ1JF472JY AA J Resistor 4.7k 1/16W Metal Oxide
R9316 VRS-CZ1JF473JY AA J Resistor 47k 1/16W Metal Oxide
R9317 VRS-CH1JF472JY AA J Resistor 4.7k 1/16W Metal Oxide
R9318 VRS-CZ1JF103JY AA J Resistor 10k 1/16W Metal Oxide
R9319 VRS-CZ1JF102JY AA V Resistor 1k 1/16W Metal Oxide
R9324 VRS-CZ1JF102JY AA V Resistor 1k 1/16W Metal Oxide
R9601 VRS-CZ1JF222JY AA J Resistor 2.2k 1/16W Metal Oxide
R9602 VRS-CZ1JF473FY AA J Resistor 47k 1/16W Metal Oxide
R9603 VRS-CZ1JF562JY AA J Resistor 5.6k 1/16W Metal Oxide
R9604 VRS-CZ1JF000JY AA J Resistor 0 1/16W Metal Oxide
R9605 VRS-CZ1JF393JY AA J Resistor 39k 1/16W Metal Oxide
R9606 VRS-CZ1JF224JY AA J Resistor 220k 1/16W Metal Oxide
R9607 VRS-CZ1JF122JY AA J Resistor 1.2k 1/16W Metal Oxide
R9608 VRS-CZ1JF473FY AA J Resistor 47k 1/16W Metal Oxide
R9609 VRS-CZ1JF472JY AA J Resistor 4.7k 1/16W Metal Oxide
R9610 VRS-CZ1JF682JY AA J Resistor 6.8k 1/16W Metal Oxide
R9611 VRS-CZ1JF393FY AA J Resistor 39k 1/16W Metal Oxide
R9612 VRS-CZ1JF472JY AA J Resistor 4.7k 1/16W Metal Oxide
R9613 VRS-CZ1JF223JY AA J Resistor 22k 1/16W Metal Oxide
R9614 VRS-CZ1JF103FY AB J Resistor 10k 1/16W Metal Oxide
R9616 VRS-CZ1JF183FY AA J Resistor 18k 1/16W Metal Oxide
R9617 VRS-CZ1JF331JY AA J Resistor 330 1/16W Metal Oxide
R9625 VRS-CZ1JF103FY AB J Resistor 10k 1/16W Metal Oxide
R9629 VRS-CZ1JF103FY AB J Resistor 10k 1/16W Metal Oxide
R9641 VRS-CZ1JF472JY AA J Resistor 4.7k 1/16W Metal Oxide
R9642 VRS-CZ1JF103FY AB J Resistor 10k 1/16W Metal Oxide
R9643 VRS-CZ1JF223FY AA J Resistor 22k 1/16W Metal Oxide
R9644 VRS-CZ1JF392JY AA J Resistor 3.9k 1/16W Metal Oxide
R9704 VRS-CZ1JF472JY AA J Resistor 4.7k 1/16W Metal Oxide
R9705 VRS-CZ1JF102JY AA V Resistor 1k 1/16W Metal Oxide
R9736
R9738 VRS-CZ1JF104JY AA J Resistor 100k 1/16W Metal Oxide
R9739 VRS-CZ1JF333FY AA J Resistor 33k 1/16W Metal Oxide
R9740 VRS-CZ1JF273JY AA J Resistor 27k 1/16W Metal Oxide
R9741 VRS-CZ1JF473FY AA J Resistor 47k 1/16W Metal Oxide
SC1601 QSOCZA136WJZZQ AG J Socket 23pin
SC1602 QSOCZA136WJZZQ AG J Socket 23pin
SC2201 QSOCNA716WJZZ AM V Socket 17pin
SC5201 QCNCW2367WJZZY AG V Connector 80pin
SC5202 QCNCW2367WJZZY AG V Connector 80pin
SG1601 RH-VXA187WJQZY AB J Discharge Gap EZAEG2A50AX
SG1602 RH-VXA187WJQZY AB J Discharge Gap EZAEG2A50AX
SG1603 RH-VXA187WJQZY AB J Discharge Gap EZAEG2A50AX
SG1604 RH-VXA187WJQZY AB J Discharge Gap EZAEG2A50AX
SG1607 RH-VXA187WJQZY AB J Discharge Gap EZAEG2A50AX
SG1608 RH-VXA187WJQZY AB J Discharge Gap EZAEG2A50AX
SG1609 RH-VXA187WJQZY AB J Discharge Gap EZAEG2A50AX
SG1610 RH-VXA187WJQZY AB J Discharge Gap EZAEG2A50AX
VRS-CZ1JF103JY AA J R
Resistor 47k 1/16W Metal Oxide
esistor 10k 1/16W Metal Oxide
LC-32R24B
DESCRIPTION
19
Page 100

LC-32R24B
Leandro Palmeira
NO. PARTS CODE
PRICE
RANK
[5] DUNTKE450FM09 (MAIN Unit)
SG1613 RH-VXA187WJQZY AB J Discharge Gap EZAEG2A50AX
SG1614 RH-VXA187WJQZY AB J Discharge Gap EZAEG2A50AX
SG1615 RH-VXA187WJQZY AB J Discharge Gap EZAEG2A50AX
SG1616 RH-VXA187WJQZY AB J Discharge Gap EZAEG2A50AX
SG1619 RH-VXA187WJQZY AB J Discharge Gap EZAEG2A50AX
SG1620 RH-VXA187WJQZY AB J Discharge Gap EZAEG2A50AX
SG1621 RH-VXA187WJQZY AB J Discharge Gap EZAEG2A50AX
SG1622 RH-VXA187WJQZY AB J Discharge Gap EZAEG2A50AX
TH2001 VHHM1103J03-1Y AC J Thermistor
TU1101 RTUDAA016WJQZ BD J Tuner
VA8001 RH-VXA074WJZZY AB J Varistor AVRL101A1R1NTB
VA8002 RH-VXA074WJZZY AB J Varistor AVRL101A1R1NTB
X1401 RCRSCA145WJZZY AE J Crystal 12.288MHz
X2002 RFiLZA023WJQZY AD J Filter
X8001 RCRSCA167WJQZY AG R Crystal
NEW
MARK
PAR T
DELIVERY
DESCRIPTION
20
 Loading...