

Page 1
KC-850U
AIR PURIFIER
with Humidifying Function
Device of this mark is a trademark of Sharp Corporation.
“Plasmacluster” and “Device of a cluster of grapes” are
registered trademarks of Sharp Corporation in Japan,
USA and elsewhere.
OPERATION MANUAL
Puricateur d’air à fonction
d’humidication
MANUEL D’UTILISATION
PURIFICADOR DE AIRE
Con función de humidicación
MANUAL DE OPERACIÓN
ENGLISH
FRANÇAISESPAÑOL
This product earned the ENERGY STAR by meeting
strict energy efficiency guidelines set by the US EPA.
US EPA does not endorse any manufacturer claims of
healthier indoor air from the use of this product.
The energy efficiency of this ENERGY STAR qualified
model is measured based on a ratio between the model’
s CADR for Dust and the electrical energy it consumes,
or CADR/Watt.
Ce produit a le droit de porter la marque ENERGY
STAR après avoir répondu à des critères stricts en ce
qui concerne l’efcacité énergétique, tels qu’établis par
l’agence EPA aux É-U. L’agence EPA aux É-U n’appuie
aucunement les témoignages publicitaires du fabricant
indiquant que ce produit rend l’air intérieur des locaux
plus sain.
L’efcacité énergétique de ce modèle, qui bénécie de
la reconnaissance ENERGY STAR, est mesurée par le
rapport entre le DAP (débit d’air purié) du modèle et l’
énergie électrique qu’il consomme, soit le rapport DAP/
Watt.
Page 2
Please read before operating your new Air Purier
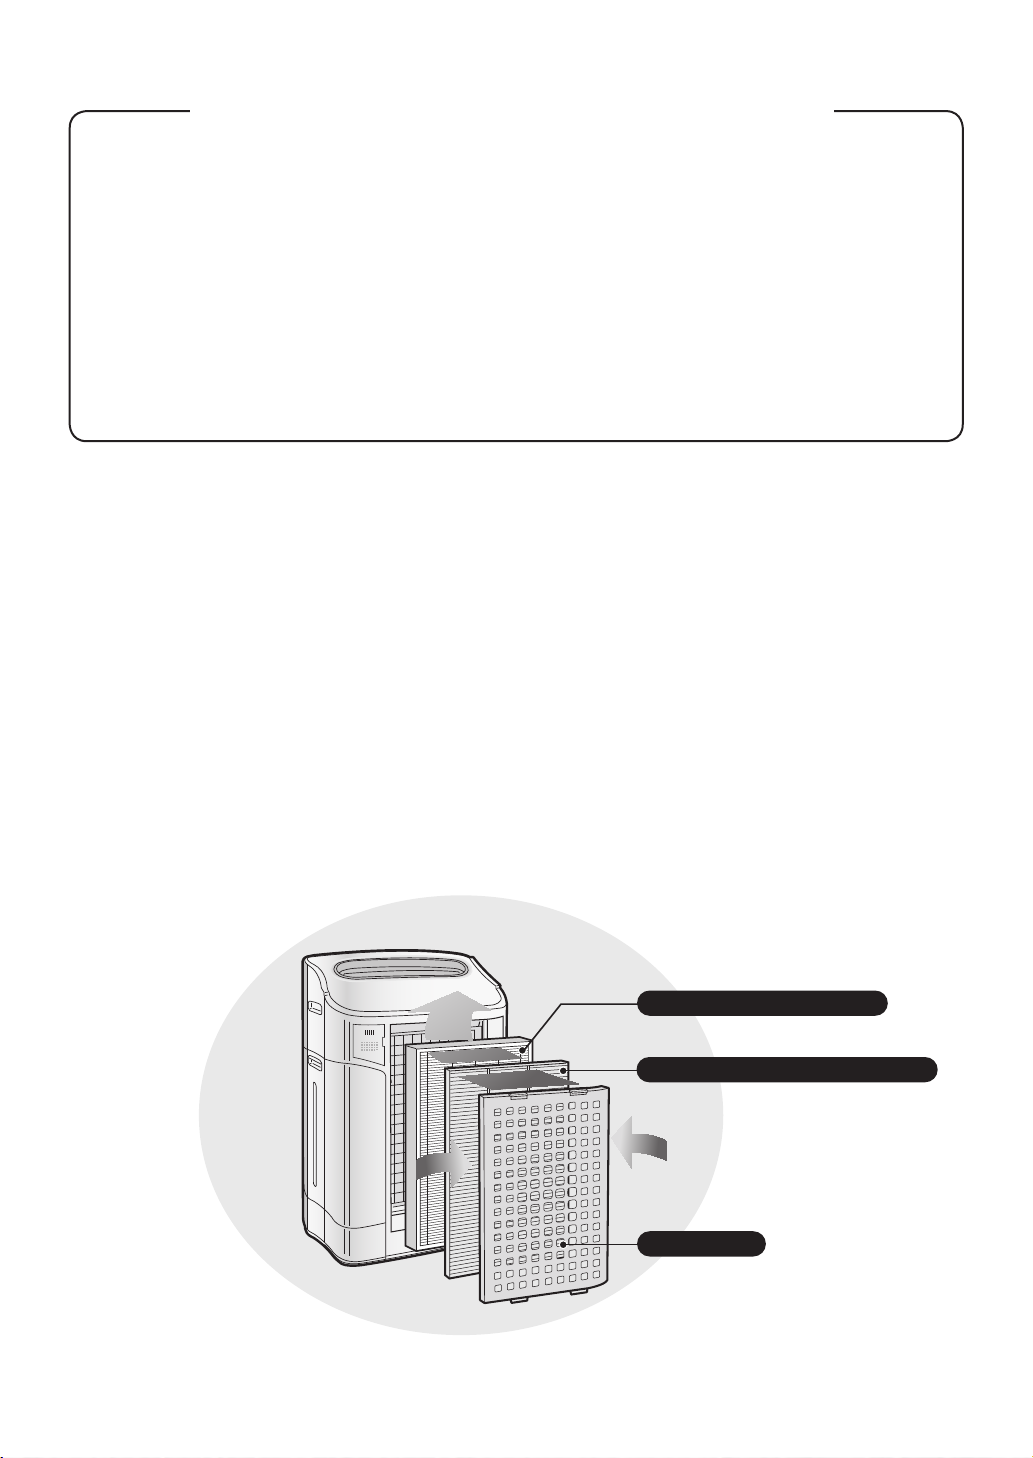
The air purier draws in room air from the air intake, passes the air through a PreFilter, a Washable Deodorizing lter and a True HEPA lter inside of the unit, then discharges the air through the air outlet. The True HEPA lter can remove 99.97% of dust
particles as small as 0.3 microns that pass through the lter and also helps absorb
odors. The Washable Deodorizing lter gradually absorbs odors as they pass through
the lter.
Some odors absorbed by the lters may break down over time, resulting in additional
odor. Depending on the usage environment, especially when the product is used in ex-
treme environments (signicantly more severe than normal household use), this odor
may become strong in a shorter period than expected. If the odor persists, the lters
should be replaced.
NOTE
• The air purifier is designed to remove air-suspended dust and odor, but not harmful gases (for
example, carbon monoxide contained in cigarette smoke). If the source of the odor still exists, the
air purier may not completely remove the odor.
True HEPA lter (white)
Washable Deodorizing lter (black)
Pre-lter
Page 3

ENGLISH
FEATURES
Unique Combination of Air Treatment
Technologies
Triple Filtration System + Plasmacluster
+ Humidication
TRAPS DUST*
Washable pre-filter traps dust and other
large airborne particles.
DECREASES ODORS
Washable deodorizing lter absorbs many
common household odors.
REDUCES POLLEN & MOLD*
True HEPA lter traps 99.97% of particles
as small as 0.3 microns.
FRESHENS
Plasmacluster refreshes the air similar to
the way nature cleans the environment by
emitting a balance of positive and negative
ions.
HUMIDIFIES
Runs up to 10 hours per lling.**
*When air is drawn through the filter sys-
tem.
**Room size : up to 254 sq. ft.
Sensor Technology continuously monitors
air quality, automatically adjusting operation based on detected air purity and humidity.
Declaration of Conformity
SHARP AIR PURIFIER KC-850U
This device complies with Part 18 of FCC rules.
Responsible Party:
SHARP ELECTRONICS CORPORATION
Sharp Plaza,
Mahwah, New Jersey 07495-1163
Declaration of Conformity
SHARP AIR PURIFIER KC-850U
This ISM device complies with Canadian
ICES-001
Responsible Party:
SHARP ELECTRONICS OF CANADA LTD.
335 Britannia Road East Mississauga, Ontario
L4Z 1W9 Canada
TEL: (905) 568-7140
CONTENTS
FOR CUSTOMER ASSISTANCE(U.S)
CONSUMER LIMITED WARRANTY(U.S)
FOR CUSTOMER ASSISTANCE(CANADA)
LIMITED WARRANTY(CANADA)
IMPORTANT SAFETY INSTRUCTIONS
• WARNING ..................................................
• CAUTIONS CONCERNING OPERATION .
• INSTALLATION GUIDELINES ....................
• FILTER GUIDELINES ................................
PART NAMES
• ILLUSTRATIVE DIAGRAM .........................
• BACK ..........................................................
• MAIN UNIT DISPLAY .................................
• FRONT MONITOR .....................................
PREPARATION FOR USE ..........................
• FILTER INSTALLATION ...........................
• REFILLING WATER TANK .......................
OPERATION
• CLEAN AIR & HUMIDIFY MODE .............
• CLEAN AIR MODE ...................................
• QUICK CLEAN MODE .............................
• FAN SPEED BUTTON ..............................
• Plasmacluster ON/OFF BUTTON .............
• POWER ON/OFF BUTTON ......................
• LIGHTS CONTROL BUTTON ..................
• WATER SUPPLY INDICATOR LIGHT ......
ADJUSTMENT OF SENSOR DETECTION SENSITIVITY
•
CARE AND MAINTENANCE
• FILTER INDICATOR LIGHT .....................
• BACK PANEL AND SENSORS ................
• MAIN UNIT ..............................................
• WATER TANK ...........................................
• WASHABLE DEODORIZING
FILTER .....................................................
• HUMIDIFYING TRAY ...............................
• HUMIDIFYING FILTER .............................
•
FILTER REPLACEMENT GUIDELINES
TROUBLESHOOTING
SPECIFICATIONS
.............................................
.............................................
.................
............................
....................................
Thank you for purchasing this SHARP Air Pu-
rier. Please read this manual carefully before using the air purier.
After reading, keep the manual in a convenient location for future reference.
......
.....
....
...........
...
..
.....
E-2
E-3
E-4
E-5
E-6
E-6
E-7
E-7
E-7
E-8
E-8
E-8
E-9
E-9
E-10
E-10
E-11
E-12
E-12
E-12
E-13
E-13
E-13
E-13
E-14
E-14
E-14
E-15
E-15
E-15
E-15
E-16
E-16
E-17
E-18
E-19
E-20
E-22
ENGLISH
E-1
Page 4

FOR CUSTOMER ASSISTANCE
To aid in answering questions if you call for service or for reporting loss or theft, please use
the space below to record the model and serial number located on the back of the unit.
MODEL NUMBER
SERIAL NUMBER
DATE OF PURCHASE
Dealer Name
Address
City
State
Zip
Telephone
(the United States)
TO PHONE: Dial 1-800-BE-SHARP (237-4277) for:
SERVICE (for your nearest Sharp Authorized Servicer)
PARTS (for your Authorized Parts Distributor)
ACCESSORIES
ADDITIONAL CUSTOMER INFORMATION
TO WRITE: For service problems, warranty information, missing items and other assistance:
Sharp Electronics Corporation
Customer Assistance Center
1300 Naperville Drive
Romeoville, IL 60446-1091
TO ACCESS OUR WEB SITE: www.sharpusa.com
Please provide the following information when you write or call: model number, serial
number, date of purchase, your complete mailing address (including zip code), your daytime
telephone number (including area code) and description of the problem.
E-2
Page 5
CONSUMER LIMITED WARRANTY
CONSUMER LIMITED WARRANTY FOR U.S. USERS
SHARP ELECTRONICS CORPORATION warrants to the rst consumer purchaser that this Sharp brand product (the
“Product”), when shipped in its original container, will be free from defective workmanship and materials, and agrees
that it will, at its option, either repair the defect or replace the defective Product or part thereof with a new or remanufac-
tured equivalent at no charge to the purchaser for parts or labor for the period(s) set forth below.
This warranty does not apply to any appearance items of the Product nor to the additional excluded item(s) set forth
below nor to any Product the exterior of which has been damaged or defaced, which has been subjected to improper
voltage or other misuse, abnormal service or handling, or which has been altered or modied in design or construction.
In order to enforce the rights under this limited warranty, the purchaser should follow the steps set forth below and provide proof of purchase to the servicer.
The limited warranty described herein is in addition to whatever implied warranties may be granted to purchasers by
law. ALL IMPLIED WARRANTIES INCLUDING THE WARRANTIES OF MERCHANTABILITY AND FITNESS FOR USE
ARE LIMITED TO THE PERIOD(S) FROM THE DATE OF PURCHASE SET FORTH BELOW. Some states do not
allow limitations on how long an implied warranty lasts, so the above limitation may not apply to you.
Neither the sales personnel of the seller nor any other person is authorized to make any warranties other than those described herein, or to extend the duration of any warranties beyond the time period described herein on behalf of Sharp.
The warranties described herein shall be the sole and exclusive warranties granted by Sharp and shall be the sole and
exclusive remedy available to the purchaser. Correction of defects, in the manner and for the period of time described
herein, shall constitute complete fulllment of all liabilities and responsibilities of Sharp to the purchaser with respect
to the Product, and shall constitute full satisfaction of all claims, whether based on contract, negligence, strict
liability or otherwise. In no event shall Sharp be liable, or in any way responsible, for any damages or defects in the
Product which were caused by repairs or attempted repairs performed by anyone other than an authorized servicer. Nor
shall Sharp be liable or in any way responsible for any incidental or consequential economic or property damage. Some
states do not allow the exclusion of incidental or consequential damages, so the above exclusion may not apply to you.
THIS WARRANTY GIVES YOU SPECIFlC LEGAL RIGHTS. YOU MAY ALSO HAVE OTHER RIGHTS WHICH VARY
FROM STATE TO STATE.
Your Product Model Number & Description:
Warranty Period for this Product:
Additional Item(s) Excluded From Warranty
Coverage:
Where to Obtain Service:
KC-850U Air Purier. Be sure to have this information available when
you need service for your Product.
One (1) year parts and labor from date of purchase.
Appearance items of the Product, lters, accessories, or any printed
materials. Product which has been used for rental and/or commercial
purposes.
From a Sharp Authorized Servicer located in the United States. To
nd the location of the nearest Sharp Authorized Servicer, call Sharp
Toll Free at 1-800-BE-SHARP.
ENGLISH
What to Do to Obtain Service:
TO OBTAIN SUPPLY, ACCESSORY OR PRODUCT INFORMATION, CALL 1-800-BE-SHARP, OR VISIT OUR WEBSITE AT
www.sharpusa.com
Ship prepaid or carry in your Product to a Sharp Authorized Servicer.
Be sure to have Proof of Purchase available. If you ship the Product,
be sure it is insured and packaged securely.
SHARP ELECTRONICS CORPORATION
Sharp Plaza, Mahwah, New Jersey 07495-1163
E-3
Page 6

FOR CUSTOMER ASSISTANCE
To aid in answering questions if you call for service or for reporting loss or theft, please use
the space below to record the model and serial number located on the back side of the unit.
MODEL NUMBER
SERIAL NUMBER
DATE OF PURCHASE
Dealer Name
Address
City
Province
Postal Code
Telephone
(Canada)
TO PHONE: Dial 1-905-568-7140 for:
SERVICE (for your nearest Sharp Authorized Servicer)
PARTS (for your Authorized Parts Distributor)
ACCESSORIES
ADDITIONAL CUSTOMER INFORMATION
TO WRITE: For service problems, warranty information, missing items and
other assistance:
Sharp Electronics of Canada Ltd.
Customer Care
335 Britannia Road East
Mississauga, Ontario L4Z 1W9
TO ACCESS OUR WEB SITE: www.sharp.ca
Please provide the following information when you write or call: model number, serial number,
date of purchase, your complete mailing address (including Postal Code), your daytime telephone number (including area code) and description of the problem.
E-4
Page 7
LIMITED WARRANTY
A
f
f
Consumer Electronics Products
Sharp Electronics of Canada Ltd. (hereinafter called “Sharp”) gives the following express warranty to the first consumer purchaser for this
Congratulations on your purchase!
Sharp brand product, when shipped in its original container and sold or distributed in Canada by Sharp or by an Authorized Sharp Dealer:
Sharp warrants that this product is free, under normal use and maintenance, from any defects in material and workmanship. If any such
defects should be found in this product within the applicable warranty period, Sharp shall, at its option, repair or replace the product as
specified herein.
This warranty shall not apply to:
(a) Any defects caused or repairs required as a result of abusive operation, negligence, accident, improper installation or inappropriate
use as outlined in the owner’s manual.
(b) Any Sharp product tampered with, modified, adjusted or repaired by any party other than Sharp, Sharp’s Authorized Service Centres
or Sharp’s Authorized Servicing Dealers.
(c) Damage caused or repairs required as a result of the use with items not specified or approved by Sharp, including but not limited to
head cleaning tapes and chemical cleaning agents.
(d) Any replacement of accessories, glassware, consumable or peripheral items required through normal use of the product including but
not limited to earphones, remote controls, AC adapters, batteries, temperature probe, stylus, trays, filters, belts, ribbons, cables and
paper.
(e) Any cosmetic damage to the surface or exterior that has been defaced or caused by normal wear and tear.
(f) Any damage caused by external or environmental conditions, including but not limited to transmission line/power line voltage or liquid
spillage.
(g) Any
product received without appropriate model, serial number and CSA/cUL markings.
(h) Any products used for rental or commercial purposes.
(i) Any installation, setup and/or programming charges.
Should this Sharp product fail to operate during the warranty period, warranty service may be obtained upon delivery of the Sharp product
together with proof of purchase and a copy of this LIMITED WARRANTY statement to an Authorized Sharp Service Centre or an
uthorized Sharp Servicing Dealer. In home warranty service may be provided at Sharp’s discretion on any Sharp television with the
screen size of 27” or larger and on any Sharp Over-the-Range Microwave Oven.
This warranty constitutes the entire express warranty granted by Sharp and no other dealer, service centre or their agent or employee is
authorized to extend, enlarge or transfer this warranty on behalf of Sharp. To the extent the law permits, Sharp disclaims any and all
liability for direct or indirect damages or losses or for any incidental, special or consequential damages or loss of profits resulting from a
defect in material or workmanship relating to the product, including damages for the loss of time or use of this Sharp product or the loss o
information. The purchaser will be responsible for any removal, reinstallation, transportation and insurance costs incurred. Correction o
defects, in the manner and period of time described herein, constitute complete fulfillment of all obligations and responsibilities of Sharp to
the purchaser with respect to the product and shall constitute full satisfaction of all claims, whether based on contract, negligence, strict
liability or otherwise.
ENGLISH
WARRANTY PERIODS: Parts & Labour (exceptions noted)
Audio Product 1 year
DVD Product 1 year
Projector 1 year (lamp 90 days)
LCD TV 1 year
Microwave Oven 1 year (magnetron component-4 additional years)
Air Purifier 1 year
Portable Air Conditioner 1 year
Plasmacluster Ion Generator 1 year
redrocmaC 1 year
To obtain the name and address of the nearest Authorized Sharp Service Centre or Dealer, please contact:
SHARP ELECTRONICS OF CANADA LTD. 335 Britannia Road East Mississauga, Ontario L4Z 1W9
H
E
T
B
E
E
B
S
O
T
T
For more information on this Warranty, Sharp Extended Warranty
Offers, Sharp Canada Products, Accessory Sales, Dealer or Service
Locations, please call (905) 568-7140
Visit our Web site: www.sharp.ca
E-5
T
H
R
O
U
G
H
C
SERVICE
U
S
T
O
E
M
N
O
I
T
C
A
F
S
I
T
A
S
R
Page 8

IMPORTANT SAFETY INSTRUCTIONS
When using electrical appliances, basic safety precautions should be followed, including the
following:
WARNING
• Read all instructions before using the unit.
• Use only a 120 volt outlet.
• The air purier has a polarized plug (one blade is wider than the other). This plug will t in a polar
ized outlet only one way. If the plug does not t into the outlet, reverse it. If it still does not t, contact a qualied electrician or service person.
• Do not use the unit if the power cord or plug is damaged or the connection to the wall outlet
is loosened.
• Periodically remove dust from the plug.
• Do not insert ngers or foreign objects into the air intake or air outlet.
• When removing the power plug, always hold the plug and never pull on the cord.
Electrical shock and/or re from a short circuit may occur as a result.
• Do not remove the plug when your hands are wet.
• Do not use this unit near gas appliances or replaces.
When relling the Water Tank, cleaning the unit, or when the unit is not in use, be sure to unplug
•
the unit. Electrical shock and/or re from a short circuit may occur as a result.
• If the power cord is damaged, it must be replaced by the manufacturer, its service agent, a
Sharp Authorized Service Center or similarly qualied person in order to avoid a hazard.
• Do not operate when using aerosol insecticides or in rooms where there is oily residue, incense,
sparks from lit cigarettes, chemical fumes in the air, or in locations where the unit may get wet,
such as a bathroom.
• Be cautious when cleaning the unit. Strong corrosive cleansers may damage the exterior.
• Only a Sharp Authorized Service Center should service this air purier. Contact the nearest Service
Center for any problems, adjustments, or repairs.
• When carrying the unit, remove the Water Tank and Humidifying Tray rst and hold the unit by handles on both sides.
• Do not drink the water in the Humidifying Tray or Water Tank.
• Change the water in the Water Tank daily with fresh tap water and regularly clean the Water Tank
and Humidifying Tray. (See E-16 and E-17). When unit is not in use, dispose of the water in the
Water Tank and Humidifying Tray. Leaving water in the Water Tank and/or Humidifying Tray may
result in mold, bacteria, and bad odors.
In rare cases, this bacteria may cause harmful physical effects.
- To reduce the risk of electrical shock, re or injury to persons:
-
NOTE
If this air purier should cause interference to radio or television reception, try to correct the interference by one or more of the following measures:
• Reorient or relocate the receiving antenna.
• Increase the separation distance between the unit and radio/TV receiver.
• Connect the equipment into an outlet on a circuit different from that to which the receiver is connected.
• Consult the dealer or an experienced radio/TV technician for help.
This product fulls the requirement of the International standard CISPR 11.
In conformity with this standard, this product is classied as group 2 class B equipment.
Group 2 means that the equipment intentionally generates radio-frequency in the form of electromagnetic radiation for electro-discharge machining equipment.
Class B equipment means that the equipment suitable to be used in domestic establishments.
- Radio or TV Interference
E-6
Page 9

CAUTIONS CONCERNING OPERATION
• Do not block the intake and/or air outlet.
• Do not use the unit near or on hot objects, such as stoves or heaters or where it may come into
contact with steam.
• Always operate the unit in an upright position.
• Always hold the handles on both sides of the unit when moving it.
Holding the back panel when carrying may cause it to detach, thus dropping the unit and resulting
in bodily injury.
• Do not operate the unit without the lters, Water Tank, and Humidifying Tray properly in-
stalled.
• Do not wash and reuse the True HEPA lter.
Washing will not improve lter performance, it may cause electric shock or malfunction.
• Clean the exterior with a soft cloth only.
Do not use volatile uids and/or detergents.
The unit surface may be damaged or cracked.
In addition, the sensors may malfunction as a result.
• Frequency of maintenance required (descaling) will depend on the hardness or the impuri
ties of the water that you use; the harder the water the more often descaling will be necessary.
• Keep the unit away from water.
INSTALLATION GUIDELINES
• During the operation of the product, please place the unit at least 6.5ft. (2m) away from
equipment utilizing electrical waves such as televisions, radios or wave clocks.
• Avoid a location where the sensor is exposed to direct breeze or draft.
The unit may not operate properly.
• Avoid use in locations where furniture, fabrics or other items may come in contact with and
restrict the air intake and/or air outlet.
• Avoid use in locations where the unit is exposed to condensation or rapid temperature
changes. (Use under appropriate conditions between 41 - 95˚F (5 - 35˚C) in the room.)
(If it is unavoidable please allow unit to stand for 1 hour before switching on.)
• Place on a stable surface with sufcient air circulation.
When placing the unit on a heavily carpeted area, the unit may vibrate slightly.
Place the unit on an even surface to avoid water leakage from the Water Tank and/or Humidifying
Tray.
• Avoid use in locations where grease or oily smoke is generated.
The unit surface may crack or the sensor may malfunction as a result.
• Place the unit about 1-2 ft. (30 - 60cm) away from the wall in order to ensure proper airow.
The wall directly behind the air outlet may become dirty over time. When using the unit for an
extended period of time in the same location, periodically clean the wall and protect the wall with a
vinyl sheet, etc. to prevent the wall from becoming dirty.
(such as in a kitchen, etc.).
ENGLISH
-
FILTER GUIDELINES
• Follow the instructions in this manual for correct care and maintenance of the lters.
Use only lters designed for this product.
E-7
Page 10
PART NAMES
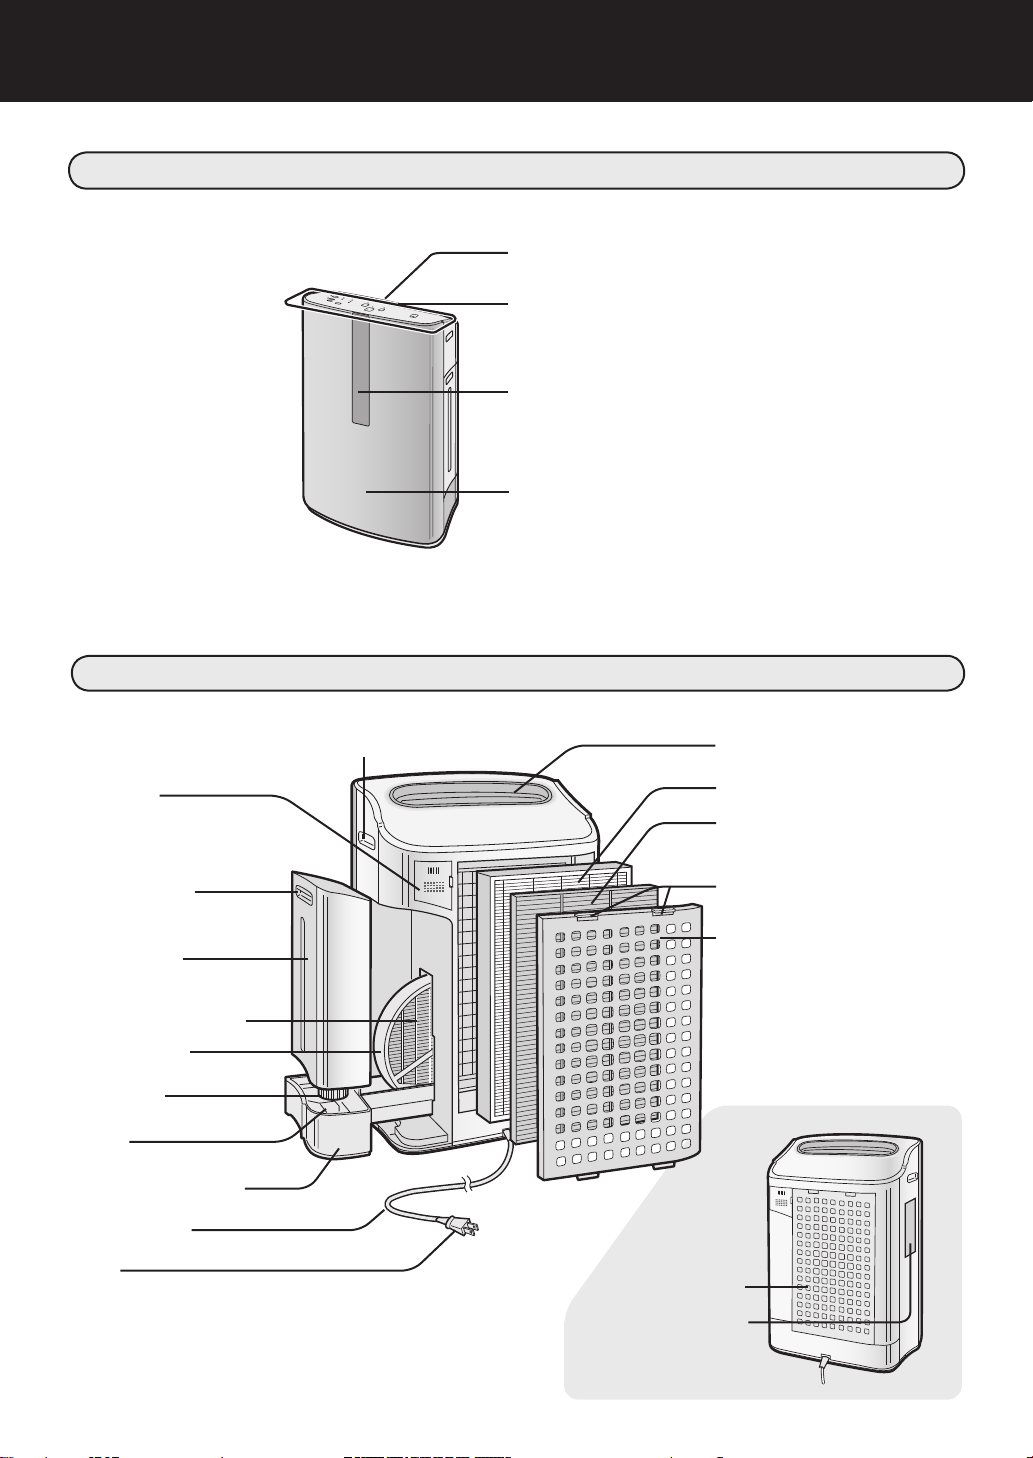
ILLUSTRATIVE DIAGRAM - FRONT
Air Outlet
Main Unit Display
Front Monitor
Main Unit
BACK
Handle(2 locations left and right)
Sensors
• Dust Sensor
•
Temperature / Humidity Sensor
Tank Handle
Water Tank
(For humidifying)
Humidifying Filter
Filter Frame
Tank Cap
Float
Humidifying Tray
Power Cord
Air Outlet
True HEPA lter (white)
Washable Deodorizing
lter (black)
Tabs
Back Panel (Pre-lter)
Plug
E-8
Air Inlet
Date Label
(Rating Label)
Page 11
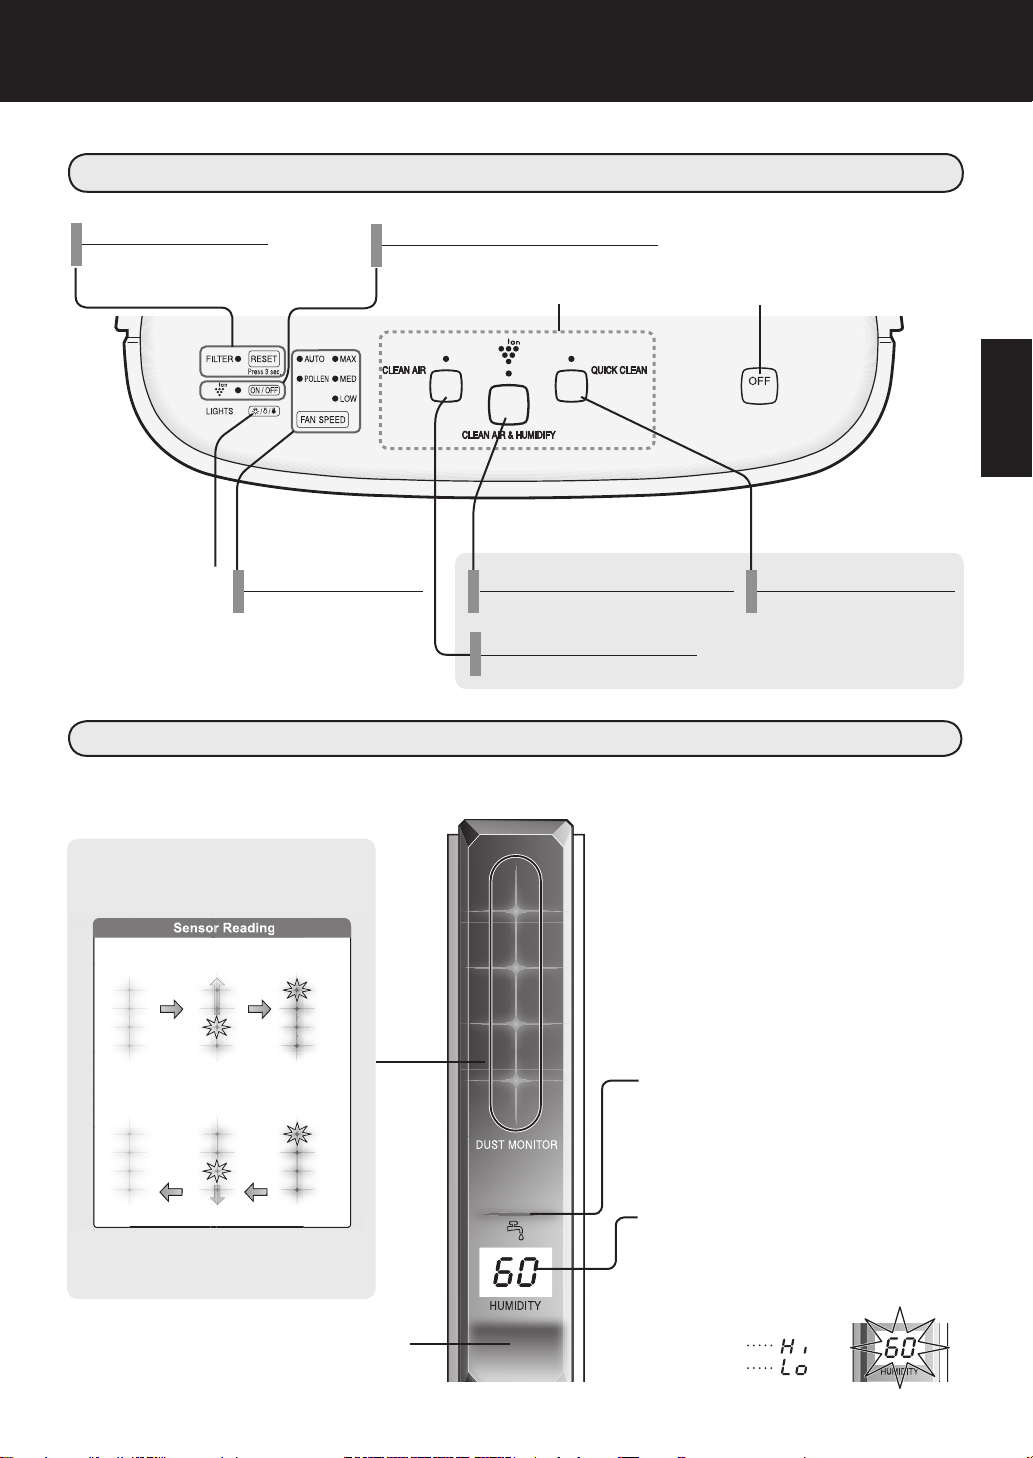
MAIN UNIT DISPLAY
Sensor Reading
Filter Reset Button/
Indicator Light (red)
Light Control Button
Fan Speed Button/
Plasmacluster ON/OFF Button/
Indicator Light (green)
Indicator Light (green)
FRONT MONITOR
Indicates condition and humidity of room air.
Power ON Button
Press any of the buttons to select
mode and start the unit.
Clean Air & Humidify MODE Button/
Indicator Light (green)
Power OFF Button
Quick Clean MODE Button/
Indicator Light (blue)
Clean Air MODE Button/
Indicator Light (green)
ENGLISH
DUST MONITOR
The dust sensor continuously monitors
the air and changes color depending on
air purity.
Sensor Reading
Clean
All green
Clean
All green
When the dust sensor detects dust, the
ashing light moves depending on the
amount of dust detected.
Green
Flashing
Yellow
Green
Flashing
Yellow
Very lmpure
Flashing
All red
Very lmpure
Flashing
All red
Plasmacluster Indicator Light (blue)
Blue: Plasmacluster ON
Light off: Plasmacluster OFF
Water Supply Indicator Light (red)
This light will illuminate when the water
tank needs to be re lled.
Humidity Indicator Light (green)
Displays the approximate humidity level
in the room. Humidity setting is pre-set
for maximum comfort.
(Ex.) At 60 % humidily
80 % or more
Less than 30 %
E-9
Page 12
Unplug the unit before installing
PREPARATION FOR
USE
or adjusting the lters.
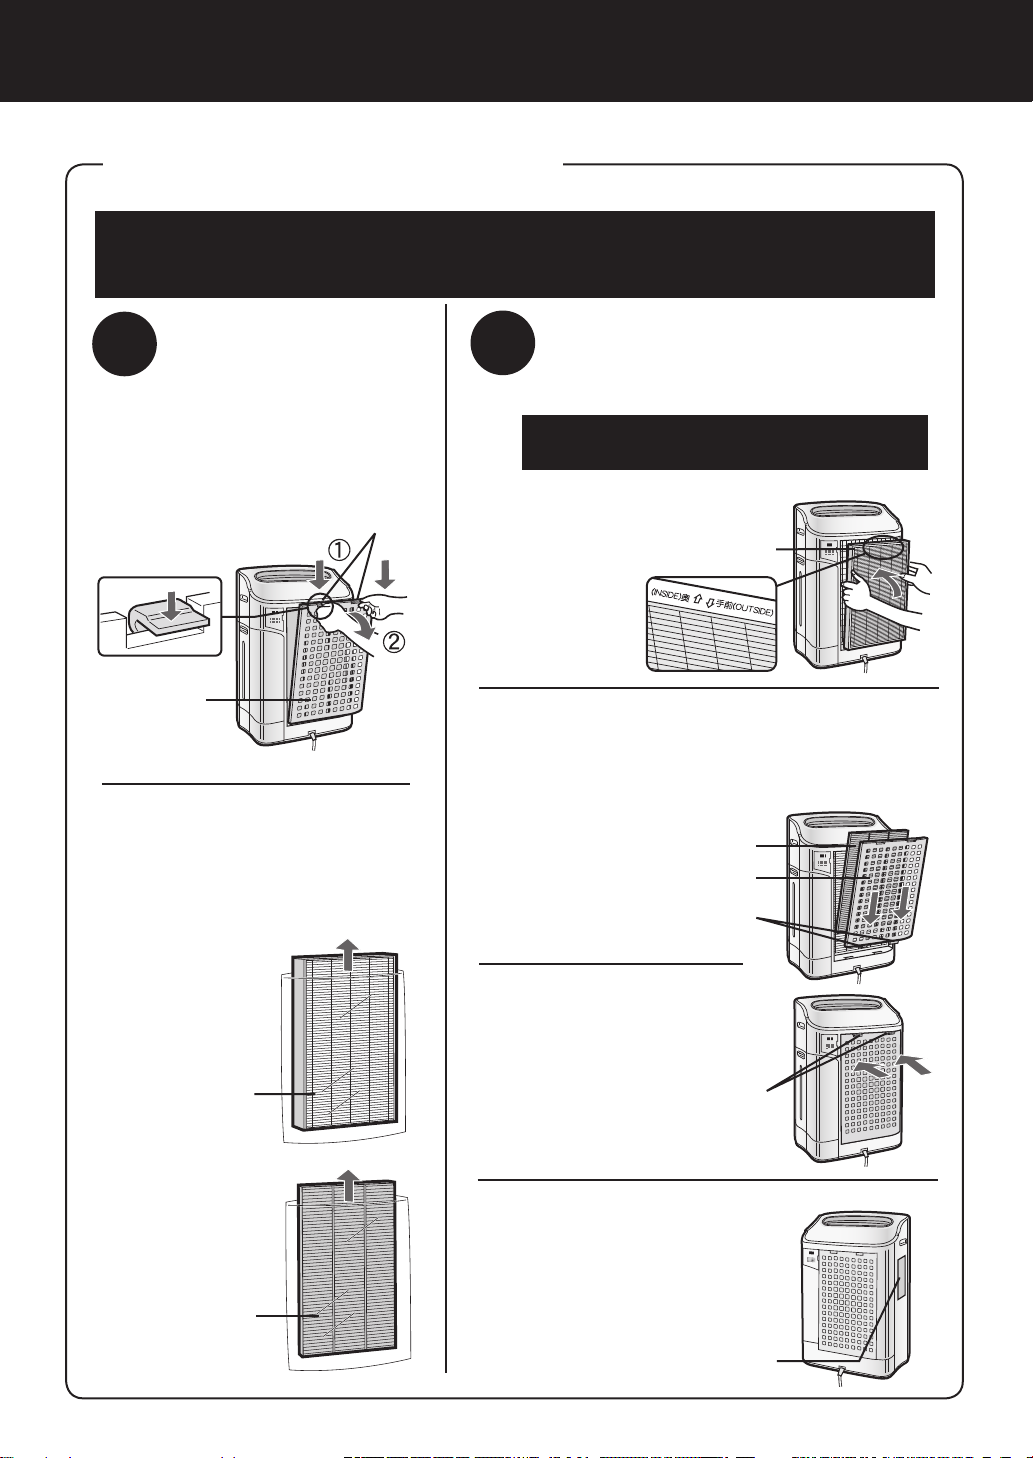
FILTER INSTALLATION
To maintain the quality of the lters, they are packed in plastic bags and placed in
the unit. Be sure to remove the lters from the plastic bags and replace the lters in
the unit before initial use.
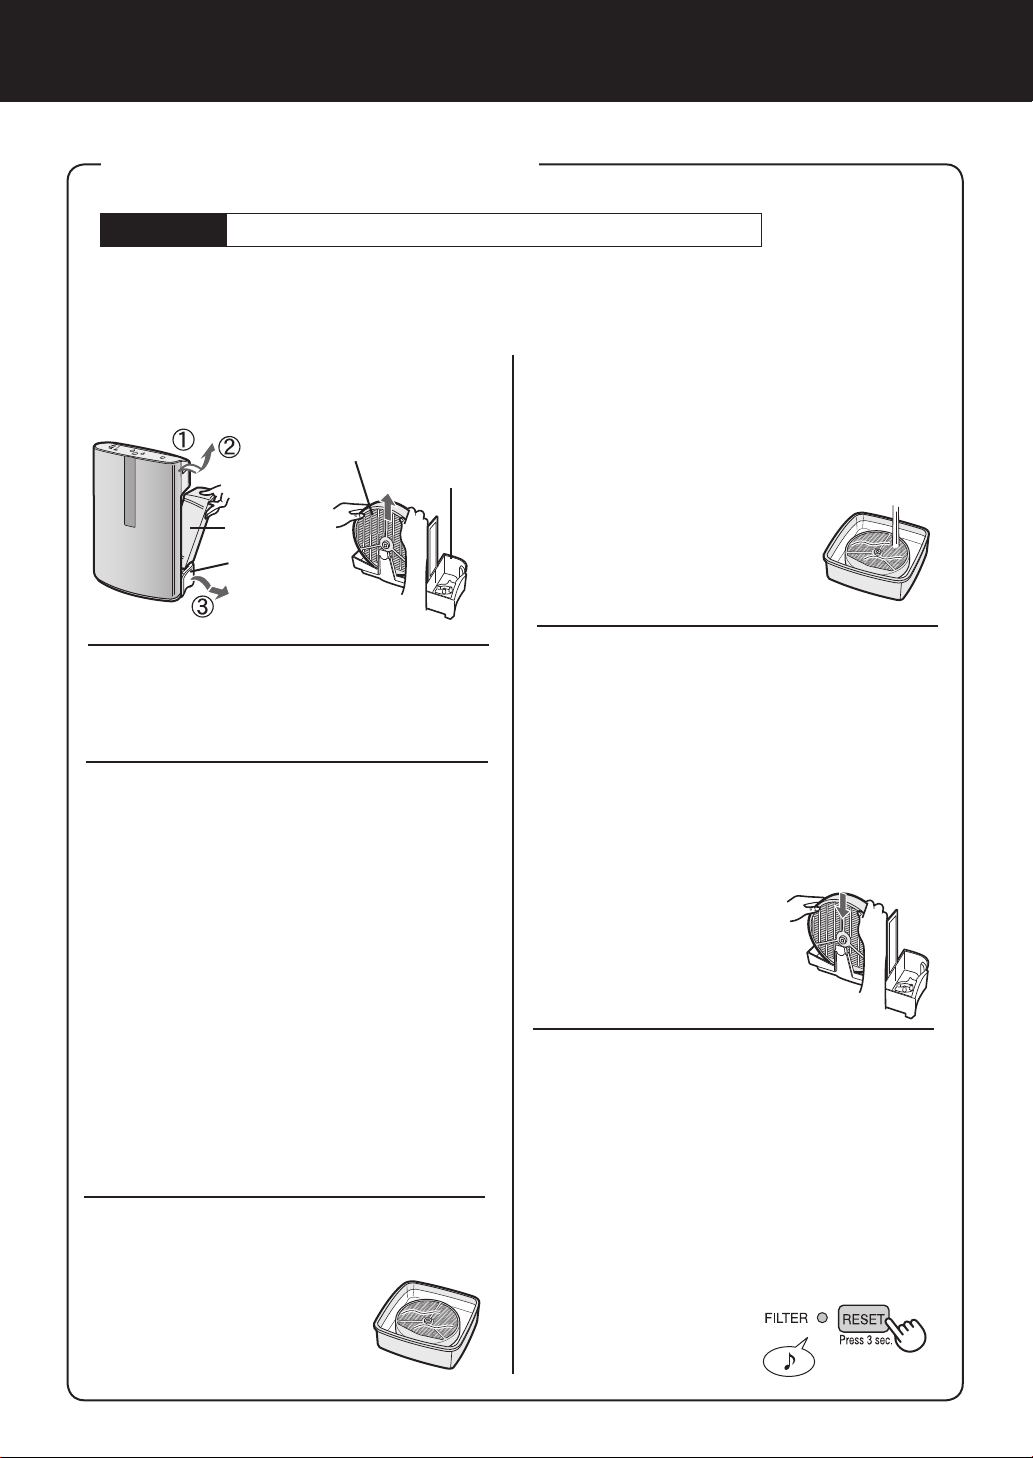
1
1
Back Panel
2
Remove the lters
Remove the Back Panel.
Gently push down on the tabs,
then tilt and remove the back
panel.
Tabs on the top
Remove the Washable
Deodorizing lter (black)
and True HEPA lter
(white) from the plastic
bags.
2
1
2
Install the lters
I
nstall the True HEPA lter.
Please make sure that the True HEPA
lter is placed in proper orientation.
Installing the lter backwards
will affect the performance of
the unit.
True HEPA lter
Insert the Back Panel’s 2 bottom tabs
(left and right) into the small holes in the
unit, and slide the Washable Deodorizing
lter between the True HEPA lter and
the Back Panel.
Washable Deodorizing lter
Back Panel
Bottom tabs
True HEPA filter
(white)
Washable
Deodorizing
lter (black)
Gently push in the
3
upper tabs (left
and right) to lock
in place.
Upper tabs
Fill in the usage
4
start date and
place on the unit as
guide for when the
lters should be
replaced.
Date Label
E-10
Page 13
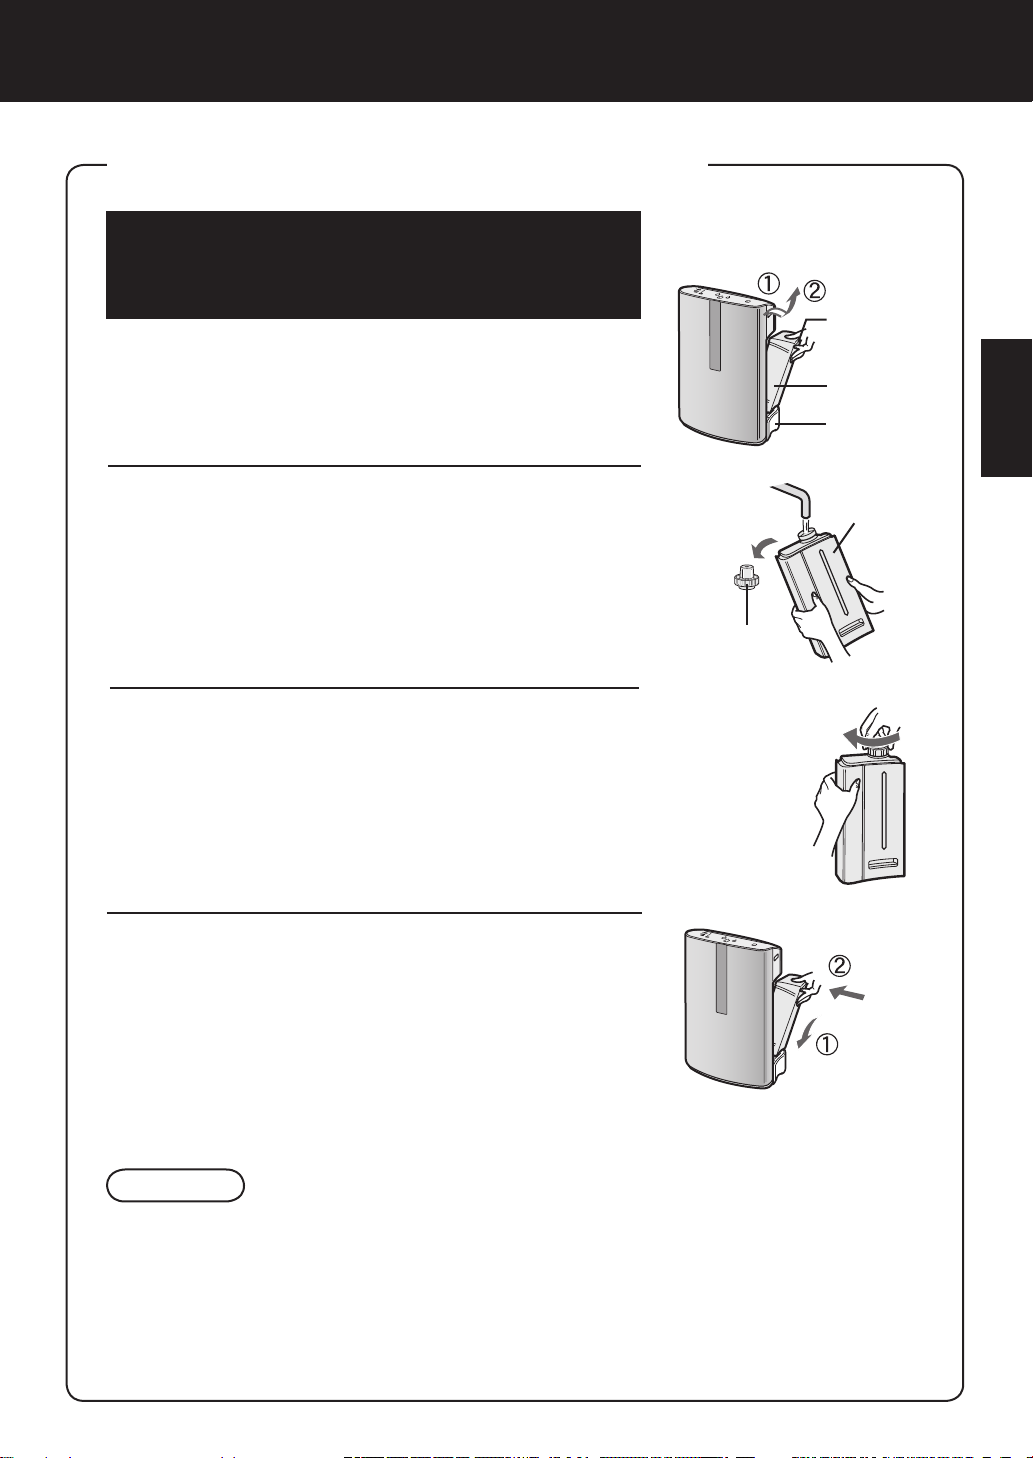
REFILLING THE WATER TANK
The unit can be used in the Clean Air Mode without
putting water in the Water Tank. When using the
Clean Air & Humidify Mode, or the Quick Clean Mode,
the Water Tank should be lled with water.
Remove the Water Tank by unlatching the
1
top.
Tank Handle
Water Tank
Humidifying
Tray
ENGLISH
Remove the Water Tank Cap and carefully
2
ll the Water Tank with tap water.
• Change the water in the Water Tank every day with
fresh tap water.
After lling, securely tighten the Tank Cap.
3
• Check to see that there is no water leaking.
• Be sure to wipe off any excess water on the outside
of the Water Tank.
• When carrying the Water Tank, hold it with both
hands so that the Water Tank opening is facing up.
Replace the Water Tank in the unit.
4
• The top latch will “click” in place when the Water
Tank is properly installed.
Water Tank
Tank Cap
tighten
CAUTION
• Do not expose the unit to water. Short circuit and/or electrical shock may occur as a result.
• Do not use hot water (104ºF or 40ºC), chemical agents, aromatic substances, dirty water,
or other damaging substances, deformation and/or malfunction may occur.
• Use only fresh tap water. Use of other water sources may promote the growth of mold, fungus and/or bacteria.
E-11
Page 14

OPERATION
Plasmacluster
ON/OFF Button
Clean Air MODE Button
Fan Speed
Button
Quick Clean MODE Button
Clean Air & Humidify MODE Button
Power OFF
Button
CLEAN AIR & HUMIDIFY MODE
Use the Clean Air & Humidify Mode to quickly clean the air, reduce odors and to humidify.
Fill Water Tank. (See E-11)
1
Press the CLEAN AIR & HUMIDIFY MODE
2
Button.
• If the power cord was not unplugged between uses, the
unit will automatically re-start at the previously selected
settings.
Press the FAN SPEED Button to select the
3
desired fan speed. (See E-13)
About Automatic Humidify Mode
The Temperature/Humidity sensors automatically detect and adjust humidity according to changes in room
temperature. Depending on the size and humidity of
the room, humidity may not reach 45 - 55 %. In such
cases, it is recommended that CLEAN AIR & HUMIDIFY/MAX MODE be used.
Temperature Humidity
64 and below 55%
64-75 50%
75 and above 45%
CLEAN AIR MODE
Use the Clean Air Mode when additional humidity is not required.
Press the CLEAN AIR MODE Button on the display
1
• If the power cord was not unplugged between uses, the
unit will automatically re-start at the previously selected
settings.
Press the FAN SPEED BUTTON to select the
2
desired fan speed. (See E-13)
E-12
.
Page 15
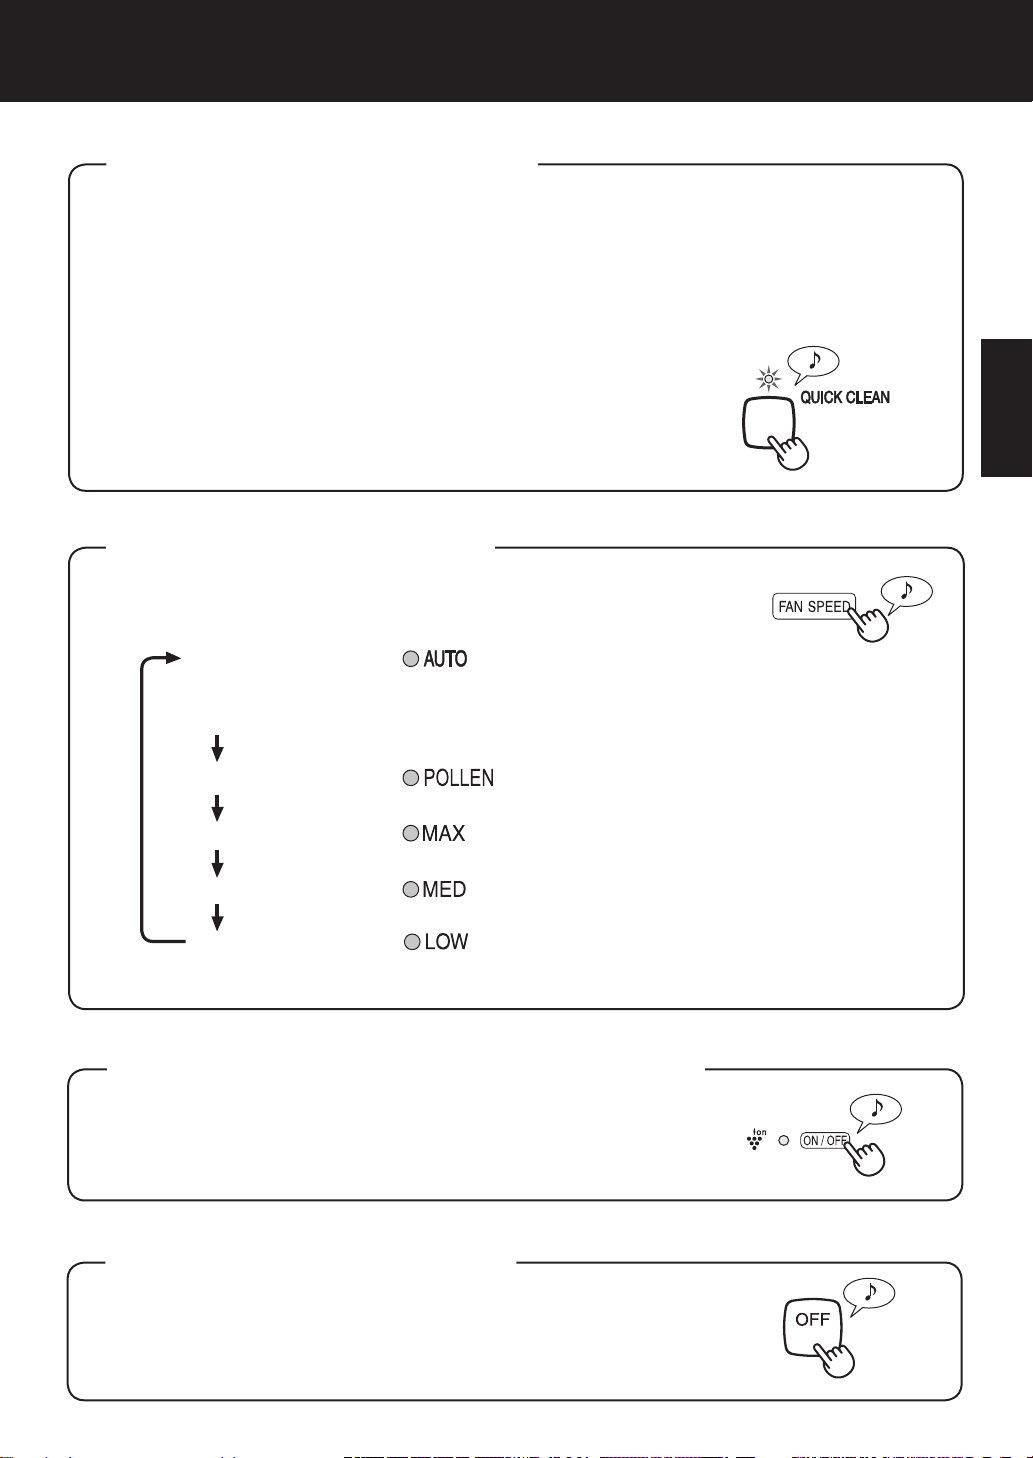
QUICK CLEAN MODE
QUICK CLEAN Mode with humidication releases high-density Plasmacluster ions. By con-
tinuously discharging strong airow cycles, the unit effectively removes airborne dust, pollen,
mold and allergens from the air as they are drawn through the lter system. Water must be in
the Water Tank when this mode is selected.
The unit humidies when there’s water in the Water Tank, and it operates without humidifying
when there is no water in it.
Press the QUICK CLEAN MODE Button on
1
the display to select this mode.
When the operation nishes, the unit will return to the
prior operation.
FAN SPEED Button
Press the FAN SPEED Button to select the preferred fan settings.
Indicator lights will show the speed currently selected. Please note
the fan speed cannot be adjusted during the QUICK CLEAN Mode.
AUTO operation
The fan speed is automatically switched (HIGH*, MEDIUM, LOW) depending on
the amount of impurities in the air. The sensors detect the impurities for efcient air
purication.
ENGLISH
POLLEN mode operation
MAX operation
MEDIUM operation
LOW operation
* HIGH fan speed is an intermediate speed between MEDIUM and MAX.
The unit will operate at High level for 10 minutes, then will
alternated between MED and HIGH every 20 minutes.
The unit will operate at maximun fan speed .
The unit will operate at medium fan speed .
The unit will operate quietly using minimal air intake.
Plasmacluster ON/OFF Button
Press the Plasmacluster ON/OFF Button to turn Plasmacluster Ion Mode ON and OFF. When Plasmacluster is ON, both
the Indicator Light and Plasmacluster Indicator Light on the
front display turn on.
POWER OFF Button
Press the Power OFF Button to turn the unit off.
E-13
Page 16
OPERATION
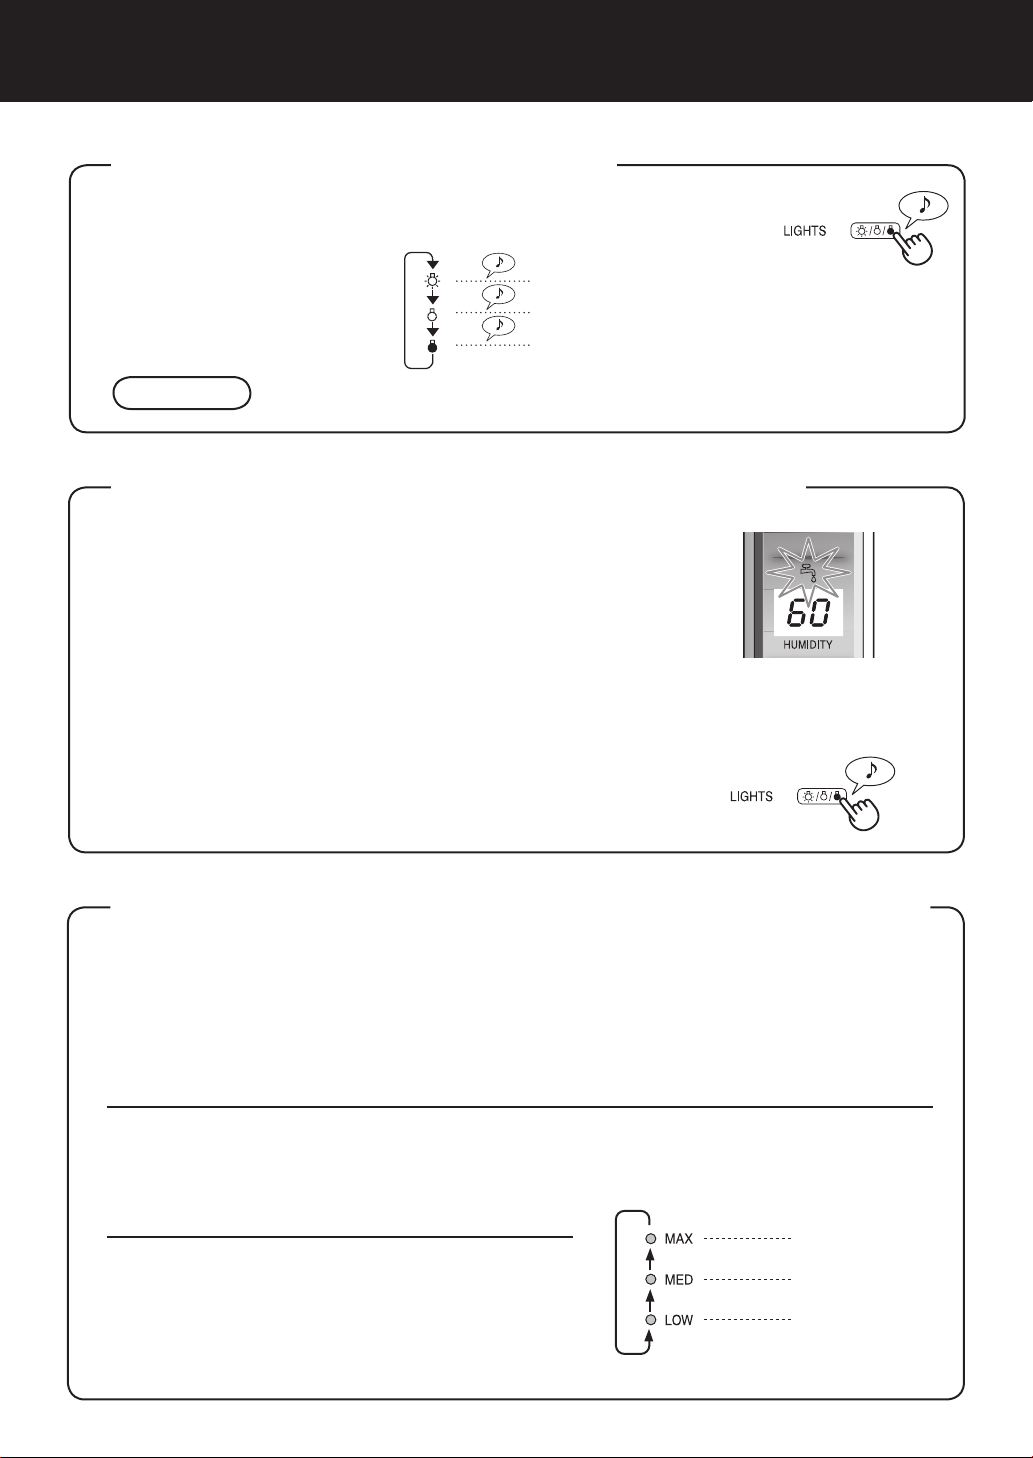
LIGHTS CONTROL Button
Use when the light on the
front panel is too bright.
CAUTION
The lights on the front monitor are always brighter when starting.
Refer to the diagram to select the desired
brightness on the front panel.
「 」
「 」
「 」
The lights on the front panel are brighter.
The lights on the front panel are darker.
The lights on the front monitor turn off.
WATER SUPPLY INDICATOR LIGHT
When the Water Tank is empty, the Water Supply Indicator Light will ash
to indicate that the Water Tank should be refilled. Please note the light
will not ash even when the Water Tank is empty during the Clean Air
Mode and the Quick Clean Mode.
Sound indicator setting for water supply.
In addition to the Indicator Light, the unit can be set to signal
with an audible beep when the Water Tank is empty. With the
unit OFF, press the Lights Control button for 3 seconds to turn
the audible signal ON.
Cancellation
To cancel the audible signal, with the unit OFF, press the Lights
Control button again more than 3 seconds.
ADJUSTMENT OF SENSOR DETECTION SENSITIVITY
Set to ‘low” if the DUST MONITOR is constantly red to reduce sensitivity, and set to
‘high’ if the DUST MONITOR is constantly green to increase sensitivity.
With the unit OFF, press the Fan Speed Button for 3 seconds.
1
The Fan Speed Indicator Lights will display the currently set sensor sensitivity level. The
factory setting is Standard, indicated by the MED light.
Press the Fan Speed Button to set
2
the desired sensor sensitivity.
Refer to the diagram on the right to select the
desired sensor sensitivity level.
Press the Power OFF Button.
3
Note that if the Power OFF Button is not pushed
within 8 seconds of adjusting sensor sensitivity,
the setting will be saved automatically. The sensor sensitivity setting will be saved even if the
unit is unplugged.
E-14
Fan Speed
Indicator Light
Sensor Detection
sensitivity
High
Standard
Low
Page 17
CARE AND MAINTENANCE
To maintain optimum performance of this air purier, please clean the unit including
the sensor opening and lters periodically.
When cleaning the unit, be sure to rst unplug the power cord, and never handle the
plug with wet hands. Electrical shock and/or bodily injury may occur as a result.
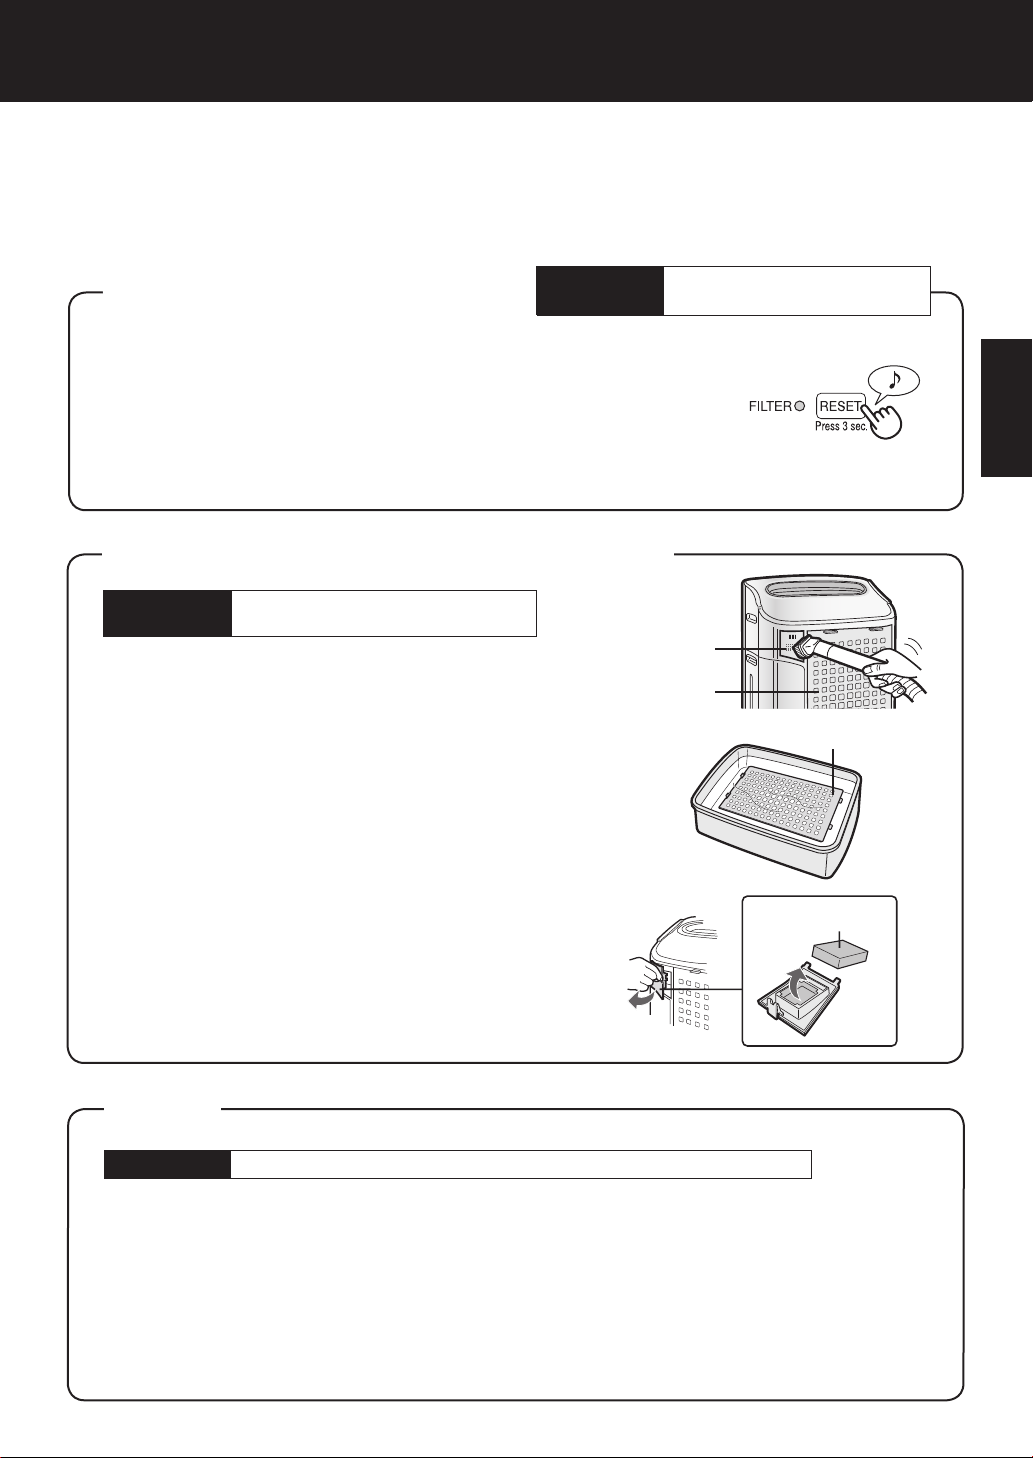
FILTER INDICATOR LIGHT
The Filter Indicator Light will illuminate as a reminder to perform mainte-
nance of the Back Panel, Sensors, and Humidifying lter. The Indicator
Light will turn on after approximately 720 hours of use.
After performing maintenance, reset the Filter Indicator. Plug the unit in,
turn power ON, and press the RESET button for 3 seconds. The Filter
Indicator Light will go off. Even if the Filter Indicator Light is already off,
the RESET button should be pressed to reset the maintenance timer.
Care Cycle
After 720 hours of use
(30days ×24hours = 720)
BACK PANEL and SENSORS
Care Cycle
Gently remove dust from the sensor opening and the
back panel, using a vacuum cleaner attachment or
similar tool.
When the back panel has stubborn dirt
In case of oily dirt, soak the back panel in water with
1
kitchen detergent.
Avoid scrubbing the back panel when washing.
Rinse the back panel repeatedly with clean water to re-
2
move the solution residue.
Drip dry panel to remove excess water.
3
Whenever dust accumulates
on the unit or every 2 months
Sensor
Back Panel
ENGLISH
Back Panel
SENSOR FILTER CARE
Remove the sensor filter and tap it lightly over a sink
or bin to dislodge dust. If it is very dirty, wash it gently
with lukewarm water. Do not use any detergents or
chemicals of any kind to clean the lter. Dry the lter
completely before replacing in the unit. Do not operate
unit without all lters properly installed.
Sensor lter
UNIT
Care Cycle
To prevent dirt or stains on the unit, clean regularly. If stains are allowed to remain, they may
become difcult to remove.
Wipe with a dry, soft cloth
For stubborn stains or dirt, use a soft cloth dampened with warm water.
Do not use volatile uids
Benzene, paint thinner, polishing powder, may damage the surface.
Do not use detergents
Detergent ingredients may damage the unit.
Whenever dust accumulates on the unit or every 2 months
E-15
Page 18

CARE AND MAINTENANCE
WATER TANK
Care Cycle
Rinse the inside of the tank by leaving a small amount of lukewarm water inside, closing the tank cap firmly, and shaking
the tank. Mild household detergents may be used to clean the
inside of the tank, but detergent should be diluted and the tank
should be thoroughly rinsed to remove all detergent residue.
(Note the Water Tank is not dishwasher safe.)
TANK CAP CARE
The small cap back of the tank cap is removable.
When the tank cap and small cap are dirty and/or
slimy, cleaning is necessary.
Use a cotton swab or a toothbrush.
Every day when Humidifying
<care cycle... once a month>
Tank Cap
Tank Cap
Water Tank
Toothbrush
WASHABLE DEODORIZING FILTER CARE
HAND WASH ONLY!
DO NOT DRY IN CLOTHES
DRYER!
Care Cycle
Rinse dirt from the WASHABLE DEODORIZING
1
FILTER under lukewarm water.
When an unpleasant odor is noticed from
the air outlet.
When performance of lter seems to be
reduced and odors persist.
CAUTION
• When washing the lter for the rst time, the rinse water may
be brown. This does not affect deodorization performance.
• Avoid bending or folding the lter when washing.
Drip dry lter to remove excess water.
2
Dry lter completely in a well ventilated area.
3
If possible, dry outdoors.
Dry lter in a sideways position to avoid warping of the lter.
The lter takes about 6 hours to dry completely.
CAUTION
• Avoid drying lter outdoors during inclement weather (e.g. rain or cold temperatures).
Do not allow lter to freeze.
• If lter is dried indoors, take precautions, such as placing towels, etc under the lter to
prevent water damage to the oor.
Replace the lter in unit. (See E-10).
4
Dry lter completely before replacing to prevent odors.
Do not operate unit without all lters properly installed.
E-16
Page 19
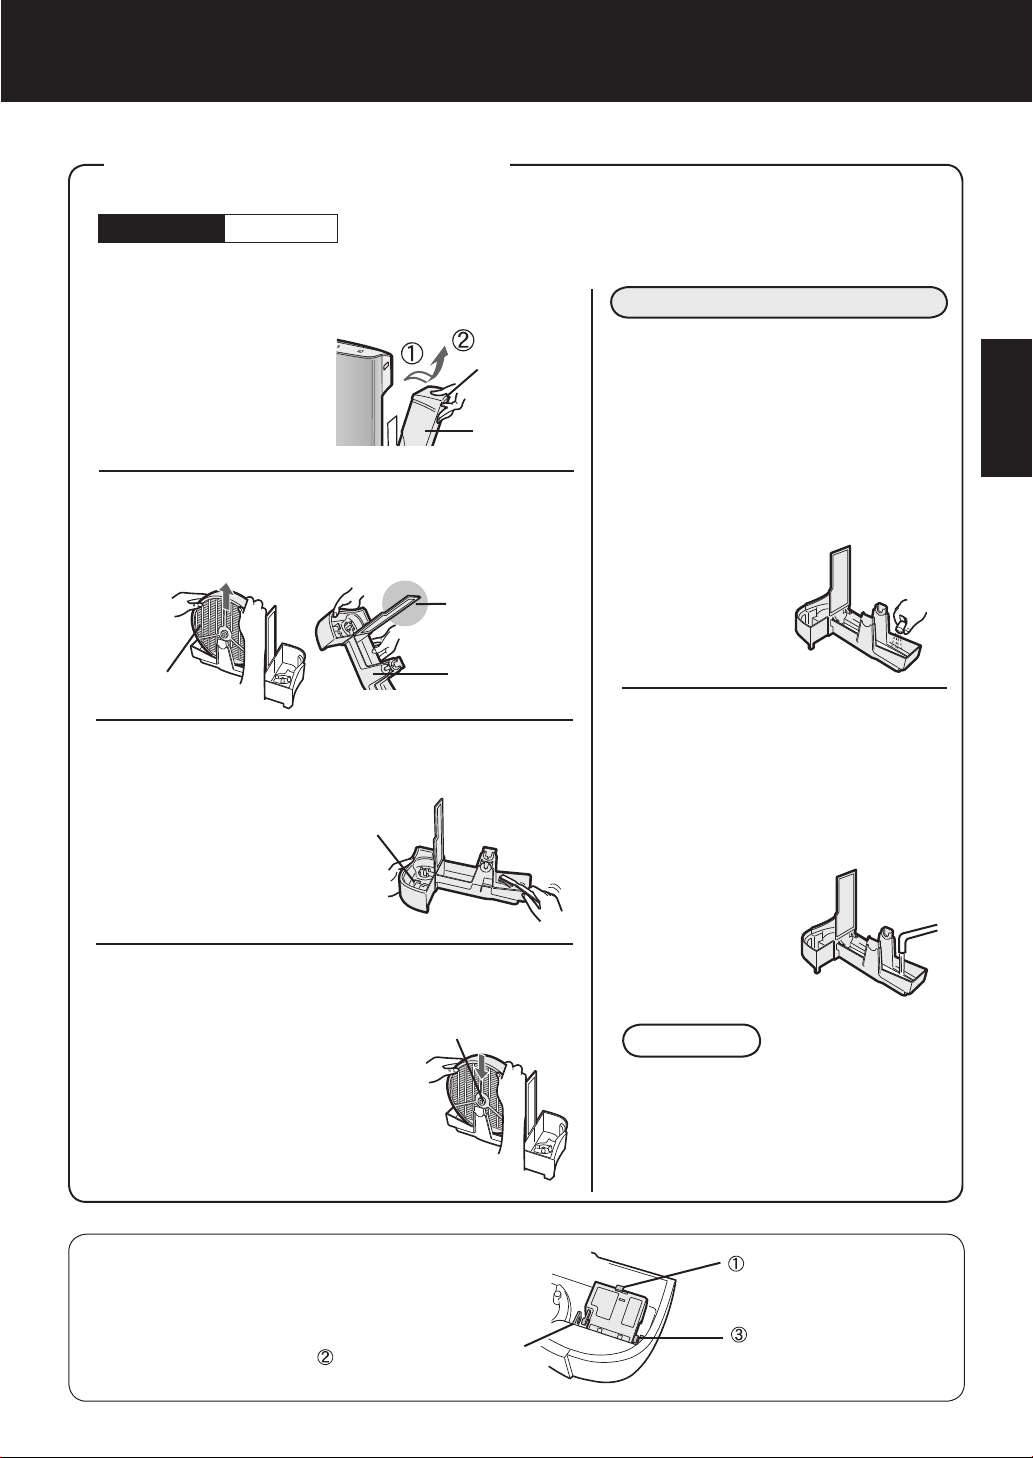
HUMIDIFYING TRAY
Care Cycle
1 month
Frequency of maintenance cycle will depend on the hardness
of the water. Avoid spilling water when removing or cleaning
the tray.
Remove the Water Tank and Humidifying Tray.
1
Unlatch the Water
Tank rst, then remove the tray. Use
both hands when
pulling out the
Humidifying Tray to
avoid spilling water.
Remove the Water Tank and Humidifying
2
lter from the Humidifying Tray. Drain accumulated water by tilting the Humidifying Tray slowly.
Humidifying lter
Tank Handle
Water Tank
Do not hold
this part.
Humidifying
Tray
Rinse the inside of the Humidifying
3
Tray with lukewarm water to remove
impurities.
• Do not remove the
Styrofoam oat .
• Clean difcult-to-
reach parts with a
cotton-tipped swab
or tooth brush.
Float
When Water Deposits are Difcult to Remove
Fill Humidifying Tray halfway
1
with lukewarm water, add a
small amount of mild kitchen
detergent, and leave to soak
for about 30 minutes.
Dilute detergent according to
instructions on the container.
Clean difcult-to-reach parts
with a cotton swab or tooth
brush.
Rinse the Humidifying
2
Tray with lukewarm water.
• Rinse until all detergent residue
is removed.
• Inadequate rinsing may
cause the detergent
odor or changes
in the shape/ color
of the main unit.
ENGLISH
Replace the Humidifying lter and re-
4
place the Humidifying Tray in the unit.
The Humidifying lter will not
t if placed in backwards. Be
sure there is no gap between
the Humidifying tray and the
unit when the Humidifying Tray
is replaced in the unit. The unit
may not operate properly if the
Humidifying Tray is not properly replaced in the unit.
If the Styrofoam oat comes off,
replace by inserting the tabs of
the Float into the holes in the
Humidifying Tray as shown in the
diagram.
Insert the tab of the
oat into the hole.
Color:Gray
E-17
CAUTION
• Use only mild kitchen detergents to
clean the Humidifying Tray. Use of
non-designated chemicals or detergents can cause deformation, tarnish-
ing, cracking (water leakage).
Insert the oat below
this tab.
Insert the tab on
the other side of the
oat into the hole.
Page 20
CARE AND MAINTENANCE
HUMIDIFYING FILTER
Care Cycle Once a month or when the Filter Indicator Light is on.
Frequency of maintenance cycle will depend on the hardness or the impuri
that you use; the harder the water the more often descaling will be necessary.
Pay attention not to spill water when cleaning the lter.
Remove the Water Tank and
1
Humidifying Tray.
Rinse the Humidifying lter
5
repeatedly with lukewarm water
ties of the water
to remove all the solution resi-
Humidifying lter
Humidifying
Tray
Water Tank
Humidifying
Tray
due.
Inadequate rinsing may cause odor and
affect the performance and/or appearance of the unit.
* Do not scrub the Humid-
ifying filter, rinse gently
under lukewarm water
only.
Attach the Humidifying lter to
Remove the Humidifying lter
2
from the Humidifying Tray.
Avoid spilling water from the Humidifying Tray.
Preparing the descaling solu-
3
tion.
Citric acid, available at some drugstores,
or 100% bottled lemon juice are used for
descaling. Choose either one to use, and
prepare the descaling solution.
<For using citric acid>
Dissolve 3 teaspoons of citric acid and 2
1/2 cups of lukewarm water in a suitable
container, and stir well.
<For using lemon juice>
100% bottled lemon juice can be used for
descaling. Use only 100% bottled lemon
juice with no pulp (strain juice if neces-
sary). Combine 1/4 cup lemon juice and
3 cups of lukewarm water in a container
large enough to hold the Humidifying lter
and stir well.
Pre-soak the Humidifying lter
4
in the solution for 30 minutes
before cleaning.
When using lemon juice,
it is recommended to presoak longer than citric
acid.
6
the Humidifying Tray, and replace the Humidifying Tray in
the unit.
• The Humidifying filter will not fit if
placed in backwards. Be sure there is
no gap between the Humidifying tray
and the unit when the Humidifying Tray
is replaced in the unit. The unit may not
operate properly if the Humidifying Tray
is not properly replaced in the unit.
• When not using the
unit for a long period of time, dry the
Humidifying filter
completely before
replacing.
Plug in the unit, turn power ON,
7
and press the Filter Reset Button on the display more than 3
seconds to reset.
You may notice reddish-brown or white
deposits forming on the surface of the
Humidifying lter. These impurities (calcium, etc.) are due to the impurities con-
tained in tap water; this is not a defect.
Replace the Humidifying lter when it is
covered completely in white deposits.
E-18
Page 21
FILTER REPLACEMENT GUIDELINES
Filter life will vary depending on the room environment, usage, and location of the unit.
If dust or odors persist, replace the lters.
(Refer to “Please read before operating your new Air Purier”)
Guide for lter replacement timing
True HEPA lter
Filter life can be greatly reduced depending on the room environment. Cigarette smoke, pet dander, and other airborne particles can reduce lter life. Check lters regularly and replace as necessary.
Washable Deodorizing lter
The lter can be repeatedly used after washing, or it can be replaced.
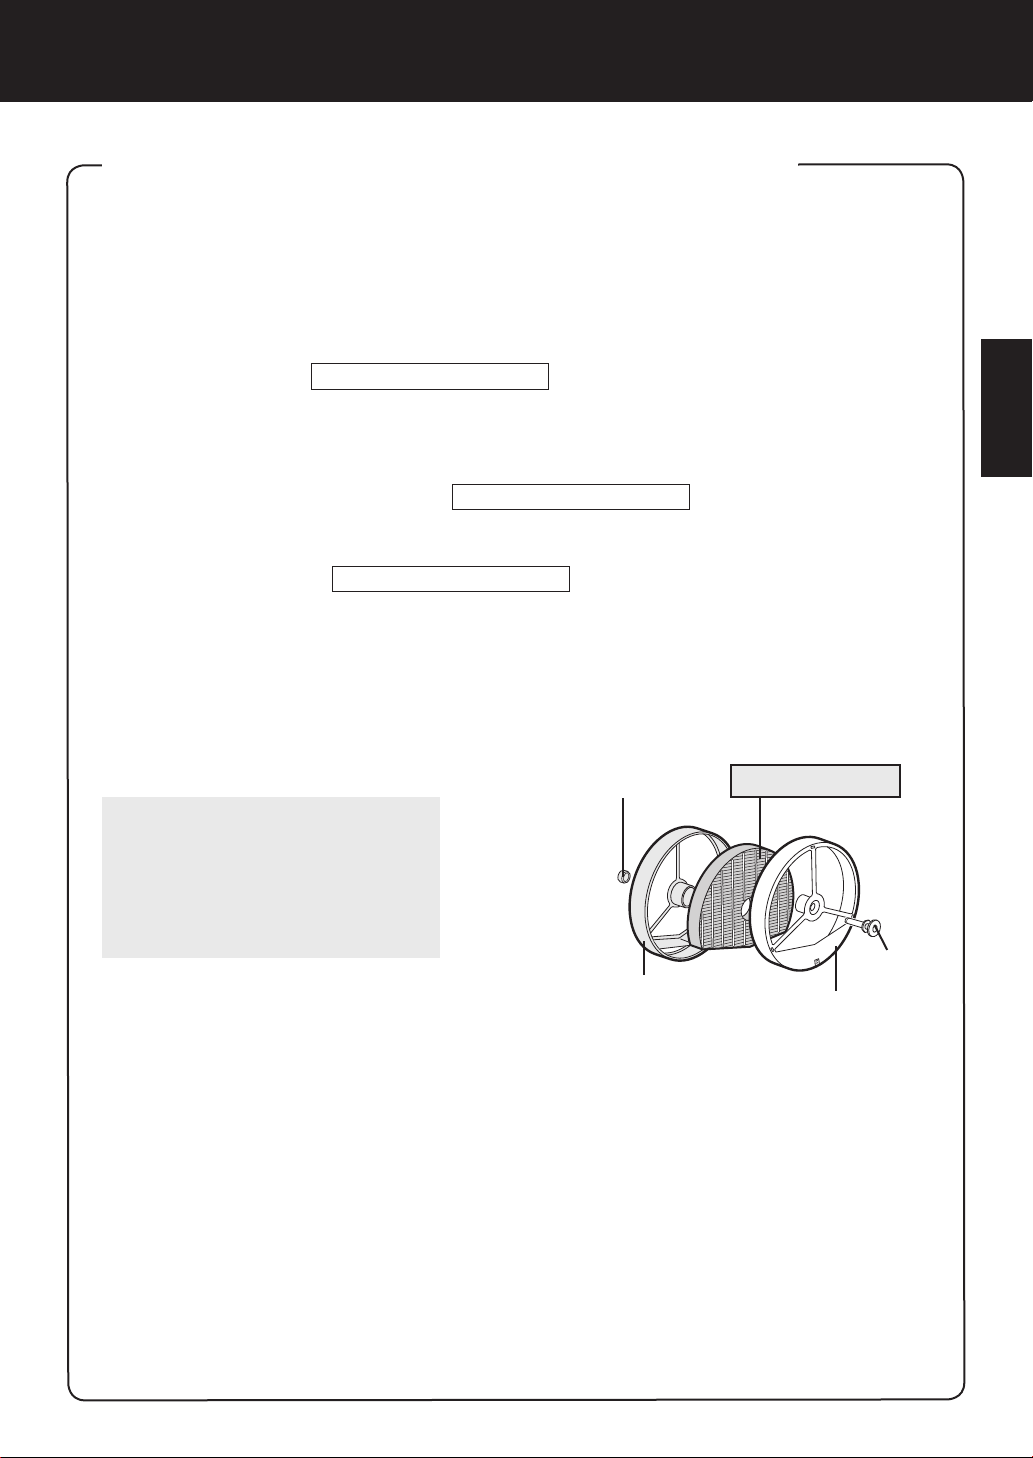
Humidifying lter
Filter life can be greatly reduced depending on the room environment. Even if 2 years have not
passed, replace the Humidifying lter if you notice the following:
• Mineral deposits (white, black, or red masses) which are not removed after cleaning or the Humidifying lter is still dirty.
• Filter is severely damaged or warped.
Replacement Filters
• True HEPA lter: 1unit
Model FZ-C100HFU
• Washable Deodorizing lter: 1unit
Model FZ-C100DFU
• Humidifying lter: 1unit
Model FZ-C100MFU
Up to 5 years after opening
Up to 5 years after opening
Up to 2 years after opening
Filter Frame(gray)
(gray)
Humidifying lter
(white)
Filter Frame(white)
ENGLISH
Replacing the Filters
1. Replace lters according to the instructions provided with the replacement lters.
2. Use the date labels as a reminder for when the lters should be replaced.
Disposal of Filters
Please dispose of used lters according to any local laws and regulations.
True HEPA lter materials:
• Filter: Polypropylene • Frame: Polyester
Washable Deodorizing lter Materials:
• Polyester, Rayon, Activated charcoal
Humidifying lter materials:
• Rayon, Polyester
E-19
Page 22

TROUBLESHOOTING
Before calling for service, please review the Troubleshooting chart below, since the problem may not
be a unit malfunction.
SYMPTOM REMEDY(not a malfunction)
Odors and smoke are not removed.
The Front Monitor illuminates green
even when the air is impure.
The Front Monitor illuminates orange or red even when the air is
clean.
A clicking or ticking sound is heard
from the unit.
The discharged air has an odor.
The unit does not operate when
cigarette smoke is in the air.
Filter Indicator Light is illminated.
• Clean or replace the lters if they appear to be heavily
soiled. (See E-15,E-16,E-18)
• The air could be impure at the time the unit was plugged
in.
Unplug the unit, wait one minute, and plug the unit in
again.
• Sensor operation is affected if the dust sensor openings
are dirty or clogged. Gently clean the dust sensors (See
E-15).
• Clicking or ticking sounds may be audible when the unit
is generating ions.
• Check to see if the lters are heavily soiled.
• Clean or replace the lters.
• Plasmacluster Air Puriers may produce a slight odor.
This is normal and is a result of the Plasmacluster Ions
refreshing the air.
• Is the unit installed in a location that is difficult for the
sensor to detect cigarette smoke?
• Are the dust sensor openings blocked or clogged?
(In this case, clean the openings.) (See E-15)
• After cleaning or replacing filters, connect the power
cord to an outlet and press the Filter Reset Button. (See
E-15)
The Front Monitor are turned off.
The Water Supply Indicator Light
does not illuminate when the tank
is empty.
Water level in the tank does not
decrease or decreases slowly.
The Front Monitor lights change
color frequently.
• Check to see if the Lights OFF Mode selected. If so, then
press the Lights Control Button to activate the indicator
lights. (See E-14)
• Check Styrofoam oat for impurities. Clean the Humidify-
ing Tray. Ensure unit is located on a level surface.
• Check to see if the Humidifying Tray and Water Tank are
correctly installed. Check the Humidifying lter.
• Clean or replace the lter when it is heavily soiled
(See E-18 and E-19).Check to see if Clean Air & Hu-
midify mode has been selected.
• The Dust Monitor lights automatically change colors as
impurities are detected by the dust sensor.
E-20
Page 23

ERROR DISPLAY
If error occurs again, contact the Sharp Service Center.
DIGITAL
INDICATION
LAMP INDICATION ERROR DETAILS REMEDY
Flashing of the Clean Air &
Humidify Indicator Light.
Flashing of the Fan Speed
Indicator Light '
Flashing of the Quick Clean
Indicator Light.
Flashing of the Clean Air Indicator Light.
Flashing of the Fan Speed Indicator Light '
Flashing of the Fan Speed Indicator Light '
'.
'.
'.
Abnormal humidifying
lter.
Abnormal fan motor.
Abnormal temperaturehumidity sensor.
Problem in circuit board.
Verify if the Humidifying filter,
Humidifying Tray and Water
Tank are properly installed and
then turn power ON again.
Turn power OFF to cancel the
error display, wait one minute,
and then turn power ON.
Unplug the unit, wait one
minute, and plug the unit in
again.
ENGLISH
E-21
Page 24

SPECIFICATIONS
Model KC-850U
Power supply 120 V 60 Hz
Fan Speed Adjustment MAX MED LOW
Fan Speed (CFM)
CLEAN AIR
CLEAN AIR &
HUMIDIFY
Recommended Room Size*1 254 sg.ft (23.6m
Rated Power (W)
Noise Level (dBA)
Fan Speed (CFM)
Rated Power (W)
Noise Level (dBA)
Humidication pints/hour)*2
CADR (Dust/Smoke/Pollen)
Water Tank Capacity (gallon) 0.96
Sensors
Filter type
Cord Lenght 6.5 ft (2.0m)
Dimensions
Weight 21.4 lbs (9.7 kg)
Dust collection True HEPA with Microbial control
Deodorization Washable Deodorizing
194 88 28
50 9 3.5
1 34 19
5
187 88 49
43 11 6.6
50 34 23
1.3 0.7
2
)
164 / 164 / 174
Dust/Temperature & Humidity
378 (W) × 265 (D) × 586 (H)
7
/8 in (W) × 10 1/2 in (D) × 23 in (H)
4
1
0.5
*1 • The Recommended Room Size is appropriate for operating the unit of maximum fan speed.
*2 • Humidication Amount changes in accordance with indoor and outdoor temperature and humidity.
Humidication Amount increases as temperatures rise or humidity decreases.
Humidication Amount decreases as temperatures decrease or humidity rises.
Standby Power
In order to operate the electrical circuits while the power plug is inserted in the wall outlet, this product
consumes about 0.4 W of standby power.
For energy conservation, unplug the power cord when the unit is not in use.
E-22
Page 25

ENGLISH
Page 26

Veuillez lire ces instructions avant de faire fonctionner votre nouveau puricateur d’air
Le puricateur d’air aspire l’air de la pièce par l’entrée d’air fait passer l’air à travers
un pré-ltre, un ltre désodorisant lavable et un ltre HEPA authentique à l’intérieur de
l’unité, puis rejette l’air par la sortie d’échappement. Le ltre HEPA authentique peut
intercepter 99,97 % des particules de poussière qui le traversent, d’une taille aussi
petite que 0,3 micron, en plus d’aider à absorber les odeurs. Le ltre désodorisant lavable absorbe graduellement les odeurs qui le traversent.
Certaines odeurs absorbées par les ltres peuvent se dégrader avec le temps et se
dégager sous forme de nouvelle odeur. Suivant le lieu d’utilisation, surtout dans des
conditions extrêmes (beaucoup plus exigeantes qu’une utilisation domestique normale), cette odeur risque de devenir forte dans un laps de temps plus court qu’à la
normale. Si l’odeur persiste, les ltres devraient être remplacés.
NOTE
• Le puricateur d’air est conçu pour éliminer la poussière et les odeurs en suspension dans l’air,
mais pas les gaz nocifs (par exemple le monoxyde de carbone contenu dans la fumée de cigarette).
Si la source de l’odeur est toujours présente, il se peut que le purificateur d’air ne chasse pas
entièrement l’odeur.
Filtre HEPA authentique (blanc)
Filtre désodorisant lavable (noir)
Pré-ltre
Page 27

FRANÇAIS
CARACTÉRISTIQUES
Combinaison unique de techniques de
traitement de l’air
Action de trois ltres + Plasmacluster +
Humidication
CAPTE LA POUSSIÈRE*
Le pré-filtre lavable capte la poussière et
les autres grosses particules en suspension
dans l’air.
ATTÉNUE LES ODEURS
Le ltre désodorisant lavable absorbe un grand
nombre d’odeurs domestiques courantes.
RÉDUIT LE POLLEN ET LES MOISISSURES
Le ltre HEPA authentique intercepte 99,97
% des particules, d’une taille aussi petite
que 0,3 micron.
RAFRAÎCHIT
Plasmacluster rafraîchit l’air à peu près de
la même façon que la nature se purie en
émettant un mélange équilibré d’ions positifs et négatifs.
HUMIDIFIE
Chaque remplissage permet jusqu’à 0
heures d’humidication.**
*Lorsque l’air est acheminé à travers les
ltres.
**
Taille de la pièce :
jusqu’à 254 pi²
Des capteurs contrôlent la qualité de l’air
en continu pour ajuster automatiquement le
fonctionnement en fonction de la pureté et
de l’humidité de l’air détectées.
Déclaration de conformité
PURIFICATEUR D’AIR KC-850U DE SHARP
Cet appareil satisfait à la partie 8 des règles
de la FCC.
Partie responsable :
SHARP ELECTRONICS CORPORATION
Sharp Plaza,
Mahwah, New Jersey 07495-63
*
TABLE DES MATIÈRES
POUR VOUS PROTÉGER
INSTRUCTIONS DE SÉCURITÉ IMPORTANTES
• AVERTISSEMENT .....................................
•
PRÉCAUTIONS CONCERNANT LE FONCTIONNEMENT
• GUIDE D’INSTALLATION ...........................
• GUIDE D’UTILISATION DES FILTRES .....
DÉSIGNATION DES PIÈCES
• SCHÉMA ILLUSTRATIF .............................
• DOS DE L’APPAREIL .................................
• AFFICHAGE DE L’UNITÉ PRINCIPALE ....
• MONITEUR AVANT ....................................
PRÉPARATIFS AVANT L’EMPLOI ...............
• INSTALLATION DES FILTRES ..................
•
REMPLISSAGE DU RÉSERVOIR D’EAU
FONCTIONNEMENT
• MODE D’ÉPURATION DE L’AIR ET
D’HUMIDIFICATION .................................
• MODE D’ÉPURATION DE L’AIR ..............
• MODE D’ÉPURATION RAPIDE ...............
•
BOUTON DE VITESSE DU VENTILATEUR
•
BOUTON
•
BOUTON
•
BOUTON
• LAMPE D’ALIMENTATION EN EAU ........
RÉGLAGE DE LA SENSIBILITÉ DES CAPTEURS
•
DE MARCHE/ARRÊT DU Plasmacluster
DE MARCHE/ARRÊT DE L’APPAREIL ....
DE MARCHE/ARRÊT DES TÉMOINS
SOIN ET ENTRETIEN
• LAMPE DU FILTRE ..................................
• PANNEAU ARRIÈRE ET CAPTEURS .....
• UNITÉ PRINCIPALE .................................
• RÉSERVOIR D’EAU .................................
• FILTRE DÉSODORISANT LAVABLE .......
• BAC D’HUMIDIFICATION ........................
• FILTRE D’HUMIDIFICATION ....................
•
GUIDE DE REMPLACEMENT DES FILTRES
RÉSOLUTION DES PROBLÈMES
CARACTÉRISTIQUES
...............................
..................
.....
...............................
.........
...
......
.............................
....
.......
............................
...
..
F-0
F-0
F-0
F-0
F-
.
F-
F-
F-2
F-2
F-2
F-3
F-3
F-3
F-3
F-4
F-4
F-5
F-6
F-7
F-8
F-20
F-2
F-4
F-4
F-5
F-5
F-5
F-6
F-6
F-6
F-6
F-6
F-8
F-8
F-9
FRANÇAIS
Déclaration de conformité
PURIFICATEUR D’AIR
Cet appareil ISM est conforme à la norme
NMB-00 du Canada
Partie responsable :
SHARP ELECTRONICS OF CANADA LTD.
335 Britannia Road East Mississauga, Ontario
L4Z W9 Canada
TÉL. : (905) 568-740
KC-850U
DE SHARP
Merci d’avoir acheté un purificateur d’air
SHARP. Veuillez lire attentivement ce manuel
avant d’utiliser le puricateur d’air.
Après avoir lu le manuel, gardez-le à portée de
main pour future référence.
F-
Page 28

POUR VOUS PROTÉGER
Pour nous aider à répondre à vos questions au cas où vous appelleriez pour nous demander d’intervenir ou pour déclarer le vol ou la perte de votre machine, veuillez écrire
les numéros de modèle et de série de la machine dans les espaces indiqués en bas de
cette page. Vous trouverez ces numéros sur le dos de I’unité.
NUMÉRO DE MODÈLE
NUMÉRO DE SÉRIE
DATE DE I’ACHAT
Nom du Détaillant
Adresse
Ville
Province
Code Postal
Téléphone
POUR TÉLÉPHONER : Composez le 1-905-568-7140 pour :
SERVICE (Pour obtenir les coordonnées du Centre de service agréé Sharp
le plus proche)
PIÈCES (Pour le nom d’un Revendeur de pièces agréé)
ACCESSOIRES
AUTRES INFORMATIONS
POUR NOUS ÉCRIRE : Pour de I’aide côté service, des informations sur la garantie, des
pièces manquantes ou autre :
Sharp Électronique du Canada Ltée.
Service aux Client(e)s
335 Britannia Road East
Mississauga, Ontario L4Z 1W9
F-2
Page 29

GARANTIE LIMITÉE
r
É
Produits Électronique grand public
Sharp Électronique du Canada Ltée (ci-après nommée “Sharp") donne la garantie expresse suivante à l'acheteur initial du produit ci-
Bravo! Vous Venez de faire un excellent achat!
dessous mentionné de Sharp, si celui-ci est emballé dans son contenant original et s'il est vendu et distribué au Canada par Sharp ou pa
un Détaillant autorisé Sharp.
Sharp garantit que ledit produit est, s'il est utilisé et entretenu normalement, exempt de défaut de fabrication. Si un défaut de fabrication est
décelé durant la période de garantie stipulée, Sharp s'engage à réparer ou remplacer, selon son choix, le produit spécifié ci-dessous.
La garantie offerte par Sharp ne s'applique pas:
(a) Aux appareils qui ont été l'objet d'un emploi abusif, de négligence, d'un accident, d'une installation inadéquate ou d'une utilisation non
appropriée, tel qu'il est mentionné dans le manuel du propriétaire;
(b) Aux produits Sharp altérés, modifiés, réglés ou réparés ailleurs qu'aux bureaux de Sharp, à un centre agréé de service Sharp ou à un
Détaillant autorisé au service Sharp;
(c) Au dommage causé ou réparation requise à la suite de l’utilis ation avec des articles non désignés ou approuvés par Sharp, y compris,
mais non limité aux rubans pour nettoyage de tête et les nettoyants chimiques;
(d) Au remplacement des accessoires, des pièces en verre, des articles consommables ou périphériques, devenu nécessaire à la suite
d'une utilisation normale du produit, y compris, mais sans en êt re limité, aux écouteurs, lles télécommandes, les adaptateurs c.a., les
piles, la sonde de température, les pointes de lecture, les plateaux, les filtres, les courroies, rubans, papier ou autre;
(e) Aux défauts cosmétiques à la surface ou à l'extérieur de l'appareil, et qui sont causés par une usure normale;
(f) Aux dommages causés par des conditions extérieures et relatives à l'environnement, y compris mais non limité à du liquide répandu,
une tension de la ligne électrique ou de transmission trop élevée ou autre;
(g) Aux produits dont le numéro de série et de modèle ou le marquage CSA/cUL, ou les deux, ont été enlevés ou effacés;
(h) Aux produits de consommation ou utilisés à des fins de location.
(i) Aux coûts d’installation, configuration et/ou programmation.
Si un défaut de fabrication est décelé dans ce produit Sharp au cours de la période de la garantie. La réparation sous garantie est offerte à
la condition que le produit Sharp soit livré accompagné de la preuve d'achat et une copie de cette GARANTIE LIMIT
de service Sharp ou à un Détaillant autorisé au service Sharp. La garantie de service à domicile peut être offerte, à la discrétion de Sharp,
sur tous les téléviseurs Sharp dont l’écran est de 27 pouces ou plus et sur les fours micro-onde Sharp au-dessus de la cuisinière.
La garantie ci-dessus constitue la seule garantie expresse accordée par Sharp. Aucun autre détaillant, aucun centre de service, leurs
représentants ou employés, ne sont autorisés à prolonger la durée de la garantie, à fournir des garanties autres ou à transférer cette
garantie au nom de Sharp. Dans la mesure où la loi en vigueur le permet, Sharp décline toute responsabilité pour les pertes ou les
dommages directs ou indirects, pour les pertes ou les dommages imprévus et pour les pertes de profits indirectes résultant d'un défaut de
fabrication du produit, y compris les dommages reliés à la perte de temps ou d'utilisation de ce produit Sharp. L'acheteur doit assumer les
coûts de démontage, de réinstallation, de transport et d'assurance de l'appareil. La réparation des défectuosités, selon la manière et durant
la période de temps ci-haut décrites, constitue l'exécution complète de toutes les obligations et les responsabilités de Sharp vis-à-vis de
l'acheteur en ce qui a trait au produit et constituera un acquittement complet pour toute réclamation, qu'elle soit basée sur le contrat, la
négligence, la responsabilité stricte ou autre.
PÉRIODES DE GARANTIE: Pièces et travail (exceptions notées)
Produits audio 1 an
Caméscope 1 an
Produits DVD 1 an
Téléprojecteurs 1 an (ampoule 90 jours)
TV à affichage aux cristaux liquids 1 an
Four au micro-ondes 1 an (magnétron 4 ans supplémentaires-piéces seulement)
Magnétoscopes 1 an
Purificateur d’air 1 an
Climatiseur portatif 1 an
Générateur à Ion Plasmacluster 1 an
E à un centre agréé
FRANÇAIS
Pour obtenir le nom et l’adresse du Centre de service ou du Détaillant autorisé au service Sharp le plus près, veuillez écrire ou téléphoner à:
SHARP ÉLECTRONIQUE DU CANADA LTÉE., 335 Britannia Road East, Mississauga, Ontario, L4Z 1W9
Pour plus de renseignements sur cette garantie, sur des offres de
garantie prolongée de Sharp, sur des produits de Sharp Canada,
sur la vente d’accessoires, sur l’emplacement de détaillants ou de
N
centres de service chez le détaillant, veuillez composer le
(905)-568-7140.
Visitez notre site web : www.sharp.ca
F-3
T
C
A
F
S
I
T
A
S
A
LE SERVICE
L
O
U
S
P
L
A
C
E
A
D
E
N
O
I
U
M
P
E
R
N
O
S
C
L
I
E
N
T
S
G
N
A
R
R
E
I
Page 30

INSTRUCTIONS DE SÉCURITÉ IMPORTANTES
Lors de l’utilisation d’appareils électriques, les précautions de sécurité de base doivent être
suivies, notamment les suivantes :
AVERTISSEMENT
• Lisez toutes les instructions avant d’utiliser l’appareil.
• Ne branchez qu’à une prise de 20 volts.
• Le puricateur d’air est doté d’une che polarisée (une lame est plus large que l’autre). Cette che s’
adapte dans une prise polarisée uniquement d’un côté. Si la che n’entre pas dans la prise, retournez-la. Si elle ne rentre toujours pas dans la prise, contactez un électricien ou un technicien qualié.
•
N’utilisez pas l’appareil si le câble d’alimentation ou sa che a subi des dommages ou encore
si le raccordement à la prise du secteur n’est pas sûr.
•
Dépoussiérez occasionnellement la che.
•
N’introduisez pas les doigts ou le moindre objet dans les bouches d’entrée d’air ou d’évacua-
tion.
•
Pour débrancher le câble d’alimentation, tirez-le en le tenant par la che, ne tirez jamais sur le câble.
Sinon, cela risque de provoquer une électrocution, un incendie ou les deux à la suite d’un court-circuit.
•
Ne débranchez pas la che avec les mains mouillées.
•
N’utilisez pas cet appareil près d’appareils à gaz ou de foyers.
•
Lorsque vous remplissez le réservoir d’eau, que vous nettoyez l’appareil ou que l’appareil ne sert
pas, assurez-vous de couper le courant au secteur. Sinon, cela risque de provoquer une électrocution, un incendie ou les deux à la suite d’un court-circuit.
•
Si le câble d’alimentation est endommagé, il doit être remplacé par le fabricant, son agent de serv-
ice, le centre de service agréé Sharp (SAV) ou une personne similairement qualiée pour éviter
tout danger.
•
N’utilisez pas lorsque l’atmosphère d’une pièce contient des insecticides en aérosol, des vapeurs
d’huile, de l’encens, des étincelles de cigarettes allumées ou des émanations chimiques ou dans les
endroits humides où l'appareil risque de se mouiller comme les salles de bains.
• Usez de prudence lors du nettoyage. Les nettoyants corrosifs puissants risquent d’endommager l’extérieur de l’appareil.
• Seul un centre de service agréé Sharp (SAV) devrait entretenir ce puricateur d’air. Contactez le centre de service le plus proche dans le cas de problèmes, de réglages nécessaires ou de réparations
quelconques.
• Lorsque vous transportez l’appareil, retirez d’abord le réservoir d’eau et le bac d’humidication et
tenez l’appareil par les poignées des deux côtés.
• Ne buvez pas l’eau du bac d’humidication ou du réservoir d’eau.
Cela pourrait vous rendre malade.
• Chaque jour, remplacez l’eau du réservoir par de l’eau fraîche du robinet et nettoyez régulièrement le
réservoir d’eau et le bac d’humidication. (Reportez-vous aux pages F-4 et F-5). Quand l’appareil
ne sert pas, jetez l’eau du réservoir d’eau et du bac d’humidication.
• Le fait de laisser de l’eau dans le réservoir d’eau et le bac d’humidification peut produire des
moisissures, des bactéries ou les deux.
- Pour réduire le risque d’électrocution, d’incendie ou de blessures corporelles :
NOTE
Si ce puricateur d’air perturbe la réception en radio ou en télévision, essayez de remédier aux interférences en prenant l’une des mesures suivantes ou plus :
• Réorientez ou déplacez l’antenne de réception.
• Éloignez l’appareil du poste de radio ou de télévision.
• Branchez l’équipement et le récepteur sur des circuits électriques différents.
• Consultez le revendeur ou un technicien radio/TV conrmé pour obtenir de l’aide.
Ce produit remplit les exigences de la norme internationale CISPR .
En conformité avec cette norme, ce produit est classé en tant qu’appareil de groupe 2 de classe B.
Le groupe 2 signie que l’équipement génère intentionnellement des radiofréquences sous la forme
de radiation électromagnétique pour le matériel d’usinage par étincelage.
Un appareil appartenant à la classe B convient à l’utilisation dans les établissements domestiques.
- Brouillage de la radio ou de la télévision
F-4
Page 31

PRÉCAUTIONS CONCERNANT LE FONCTIONNEMENT
• Ne bouchez ni la bouche d’entrée, ni la bouche d’évacuation.
• N’utilisez pas l’unité sur des objets chauds ou à proximité, comme sur une cuisinière ou un radia-
teur ou près d’une source de vapeur d’eau.
• Exploitez toujours l’unité en position verticale.
• Maintenez toujours les poignées des deux côtés de l’appareil lorsque vous le déplacez.
Tenir l’appareil par le panneau arrière risque de détacher ce dernier et de causer des blessures
corporelles par la chute de l’appareil.
• Ne faites jamais fonctionner l’appareil sans avoir les ltres, le réservoir d’eau et le bac d’hu-
midication bien installés.
• Il ne faut pas laver et réutiliser le ltre HEPA authentique.
Le lavage n'améliorera pas la performance du ltre, cela présente des risques d’électrocution ou
de dysfonctionnement.
• Ne nettoyez l’extérieur qu’avec un chiffon doux.
N’utilisez pas de liquides et/ou détergents volatils.
La surface de l’unité risque d’être endommagée ou craquelée.
De plus, les capteurs risquent de ne plus fonctionner.
• La fréquence de l’entretien requis (détartrage) dépend de la dureté ou des impuretés de l’eau
que vous utilisez ; plus l’eau est dure, plus souvent il faut détartrer.
• Ne mouillez pas l’appareil.
GUIDE D’INSTALLATION
• Lorsque le puricateur fonctionne, installez-le à plus de 6,5 pi (2 m) des appareils à ondes
électromagnétiques (télévision, radio, émetteurs…)
• Évitez les emplacements où les capteurs sont exposés directement à la brise ou projet.
L’appareil risque de ne pas fonctionner correctement.
• Évitez d’utiliser aux endroits où des rideaux ou autres choses pourraient entrer en contact
avec les bouches d’entrée, les bouches d’évacuation ou les deux.
• Évitez d’utiliser là où l’unité est exposée à la condensation ou à de fortes uctuations de
température. (Utilisation dans les conditions appropriées de la pièce entre 41 et 95°F (0 et
35°C).)
(Si nécessaire, laissez l’appareil hors tension pendant heure avant de le mettre sous tension.)
• Placez l’appareil sur une surface stable dans un endroit aéré.
Sur un tapis épais, l’appareil peut vibrer légèrement.
Placez l’appareil sur une surface plane pour éviter les fuites hors du réservoir d’eau, du bac d’hu-
midication ou des deux.
• Évitez les emplacements où de la fumée graisseuse ou huileuse est générée. (tel qu’une
cuisine, etc.)
La surface de l’unité peut craqueler ou le capteur risque de ne plus fonctionner.
• Placez l’appareil à environ 1~2 pi (30 cm~60 cm) du mur an de garantir une circulation d’air
sufsante.
Le mur situé directement derrière la bouche d’évacuation peut devenir sale avec le temps. Lors d’une
utilisation pendant une longue période de temps au même endroit, nettoyez périodiquement le mur et
protégez-le d’une feuille de vinyle, etc., pour empêcher qu’il ne se salisse.
FRANÇAIS
GUIDE D’UTILISATION DES FILTRES
• Suivez les instructions de ce manuel pour bien assurer le soin et l’entretien des ltres.
Utilisez seulement les ltres conçus pour ce produit.
F-5
Page 32

DÉSIGNATION DES PIÈCES
SCHÉMA ILLUSTRATIF - AVANT
Sortie d’air
Afchage de
l’unité principale
Moniteur avant
Unité principale
DOS DE L’APPAREIL
Poignée (2 emplacements, gauche et droit)
Capteurs
• Capteur de poussière
•
Capteur de température/d’humidité
Poignée du
réservoir
Réservoir d’eau
(pour l’humidication)
Filtre d’humidication
Cadre de ltre
Bouchon
du réservoir
Flotteur
Bac d’humidication
Câble
d’alimentation
Fiche
Sortie d’air
Filtre HEPA authentique
(blanc)
Filtre désodorisant
lavable (noir)
Languettes
Panneau arrière
(pré-ltre)
Entrée d’air
Étiquette de date
(étiquette de caracté-
ristiques nominales)
F-6
Page 33

Odeur dans la pièce
AFFICHAGE DE L’UNITÉ PRINCIPALE
Bouton de réinitialisation de ltre/
Lampe témoin (rouge)
Bouton de Contrôle
des témoins
Bouton de vitesse du ventilateur/
Lampe témoin (verte)
Bouton de marche/arrêt du Plasmacluster/
Lampe témoin (verte)
MONITEUR AVANT
Indique l’état et l’humidité de l’air de la pièce.
Bouton de marche de l’appareil
Appuyez sur l’un ou l’autre bou-
ton pour sélectionner un mode
et faire démarrer l’appareil.
Bouton de mode d’épuration de l’air
et d’humidi cation/
Lampe témoin (verte)
Bouton de mode d’épuration de l’air/
Lampe témoin (vert)
Bouton d’arrêt de l’appareil
Bouton de mode d’épuration rapide/
Lampe témoin (bleue)
FRANÇAIS
MONITEUR DE POUSSIÈRE
Le capteur de poussière surveille en
permanence l’air et change de couleur
en fonction de la pureté de l’air.
Odeur dans la pièce
Propre
Tout vert
Propre
Tout vert
Dès que le capteur détecte la présence
de poussières, le témoin clignotant se
déplace en fonction de la quantité de
poussière détecté.
Vert
Clignote
Jaune
Vert
Clignote
Jaune
Très impur
Clignote
Tout rouge
Très impur
Clignote
Tout rouge
Lampe témoin du Plasmacluster (bleue)
Bleu : Plasmacluster activé
Lampe éteinte : Plasmacluster désactivé
Lampe témoin de l’alimentation
en eau (rouge)
Cette lampe s’allume quand le réservoir
d’eau a besoin d’être rempli.
Lampe témoin d’humidité (verte)
Af che le niveau d’humidité approximatif dans la pièce. Le niveau d’humidité
est préréglé pour vous procurer un
maximum de confort.
(Ex.) À une humidité
de 60 %
80 % ou plus
Moins de 30 %
F-7
Page 34

Débranchez l’appareil avant d’in-
PRÉPARATIFS AVANT L’EMPLOI
staller ou d’ajuster les ltres.
INSTALLATION DES FILTRES
Pour maintenir la qualité des ltres, ceux-ci sont emballés dans des sacs en plastique
et placés dans l’appareil. N’oubliez pas de retirer les ltres des sacs et de les replacer
dans l’appareil avant l’utilisation initiale.
1
1
2
Retirez les ltres
Retirez le panneau arrière.
Pressez délicatement les
languettes, puis inclinez et retirez
le panneau arrière.
Languettes dans le haut
Panneau
arrière
Sortez le ltre désodori-
sant lavable (noir) et le
ltre HEPA authentique
(blanc) des sacs en plas-
tique.
2
1
2
Installez les ltres
Installez le ltre HEPA authentique.
Insérez de façon à ce que les languettes sur le ltre
HEPA authentique pointent vers vous. Le fait d’installer le ltre à l’envers nuit au
rendement de l’appareil.
Filtre HEPA authentique
Insérez les 2 languettes inférieures du
panneau arrière (gauche et droite) dans
les petites fentes dans l’appareil et glissez
le ltre désodorisant lavable entre le ltre
HEPA authentique et le panneau arrière.
Filtre désodorisant lavable
Panneau arrière
Languettes inférieures
Filtre HEPA
authentique
Filtre
désodorisant
lavable
Enfoncez dé-
3
licatement les
languettes
supérieures
(gauche et
droite) pour
verrouiller en
place.
Complétez avec la date
4
de début d’utilisation
et mettez I’étiquette sur
I’appareil comme guide
de remplacement de
ltres.
F-8
Languettes
supérieures
Étiquette de date
Page 35

REMPLISSAGE DU RÉSERVOIR D’EAU
On peut utiliser l’appareil en mode d’épuration de l’air
sans mettre d’eau dans le réservoir d’eau. En mode
d’épuration de l’air et d’humidication ou en mode
d’épuration rapide, il faut remplir le réservoir d’eau.
Retirez le réservoir d’eau en déverrouillant
1
le haut.
Poignée du
réservoir
Réservoir
d’eau
Bac d’humidication
Retirez le bouchon du réservoir d’eau et
2
remplissez soigneusement le réservoir
avec de l’eau du robinet.
• Remplacez chaque jour l’eau du réservoir par de l’eau
fraîche du robinet.
Après le remplissage, serrez bien le bou-
3
chon du réservoir.
• Assurez-vous qu’il n’y a pas de fuite d’eau.
• Ne manquez pas d’essuyer tout excès d’eau sur l’extérieur
du réservoir.
• Lorsque vous transportez le réservoir d’eau, tenez-
le des deux mains et orientez son ouverture vers le
haut.
Replacez le réservoir d’eau dans l’appareil.
4
• Le verrou supérieur s’enclenche lorsque le réservoir
d’eau est bien installé.
Réservoir
d’eau
FRANÇAIS
Bouchon du
réservoir
serrez
ATTENTION
• N’exposez pas l’appareil à l’eau. Cela risque de provoquer un court-circuit, une électrocution ou les deux.
• N’utilisez pas d’eau chaude (04 ºF ou 40 ºC), d’agents chimiques, de substances aromatiques, d’eau sale ou d’autres substances nusibles. Cela risque de provoquer une
déformation, un dysfonctionnement ou les deux.
• N’utilisez que l’eau de robinet. L'utilisation d'autres types d'eau risque de propager des
champignons de moisissure et des bactéries.
F-9
Page 36

FONCTIONNEMENT
Bouton de marche/arrêt
du Plasmacluster
Bouton de mode d'épuration de l'air
Bouton de vitesse du
ventilateur
Bouton de Mode
d'épuration rapide
Bouton de mode d'épuration de l'air et d'humidication
Bouton d'arrêt de l'appareil
MODE D’ÉPURATION DE L’AIR ET D’HUMIDIFICATION
Utilisez le mode d’épuration de l’air et d’humidication pour vite épurer l’air,
réduire les odeurs et humidier.
Remplissez le réservoir d’eau. (Reportez-vous à la page F-9.)
1
Appuyez sur le bouton de mode d’épuration
2
de l’air et d’humidication (CLEAN AIR & HUMIDIFY).
• Si le câble d’alimentation n’a pas été débranché entre les
utilisations, l’appareil redémarre automatiquement aux
réglages précédemment sélectionnés.
Appuyez sur le bouton de vitesse du ventila-
3
teur (FAN SPEED) pour sélectionner la vitesse
désirée. (Reportez-vous à la page F-11.)
À propos du mode d’humidication automatique
Les capteurs de température/d’humidité détectent et
ajustent automatiquement l’humidité en fonction des
uctuations de la température ambiante. Selon la taille
et l’humidité de la pièce, il se peut que l’humidité n’atteigne pas 44 - 55 %. Il est alors recommandé d’utiliser
le mode d’épuration de l’air et d’humidification/maximum (CLEAN AIR & HUMIDIFY/MAX MODE).
Température Humidité
64 ºF (8 ºC) et ci-dessous 55 %
64 ºF~75 ºF (8 ºC~24 ºC)
75 ºF (24 ºC) ans et plus
50 %
45 %
MODE D’ÉPURATION DE L’AIR
Utilisez le mode d’épuration de l’air lorsqu’il n’est pas nécessaire d’augmenter l’humidité.
Appuyez sur le bouton de mode d’épuration de l’air
1
(CLEAN AIR) sur l’afchage
• Si le câble d’alimentation n’a pas été débranché entre les
utilisations, l’appareil redémarre automatiquement aux
réglages précédemment sélectionnés.
Appuyez sur le bouton de vitesse du ventila-
2
teur (FAN SPEED) pour sélectionner la vitesse
désirée. (Reportez-vous à la page F-11.)
.
F-0
Page 37

MODE D’ÉPURATION RAPIDE
Le mode d’épuration rapide (QUICK CLEAN) avec humidication libère des ions Plasmaclus-
ter à densité élevée. Ce ux d’air puissant permet d’éliminer en 5 minutes toutes les poussières, l’appareil extrait efcacement la poussière, le pollen, les moisissures* et les allergènes
qui traversent le système de ltres. Il doit y avoir de l’eau dans le réservoir lorsque ce mode
est sélectionné.
L’appareil humidie s’il y a de l’eau dans le réservoir, et il fonctionne sans humidier si le réser-
voir est vide.
Appuyez sur le bouton de mode d’épuration
1
rapide (QUICK CLEAN) sur l'afcheur pour
sélectionner ce mode.
Une fois l’opération terminée, l’appareil rétablit l’opération
précédente.
Bouton DE VITESSE DU VENTILATEUR
Appuyez sur le bouton de vitesse du ventilateur (FAN SPEED) pour
sélectionner les réglages de ventilateur préférés. Les lampes témoins
montrent la vitesse actuellement sélectionnée. Veuillez noter que la
vitesse du ventilateur ne peut pas être ajustée en mode d’épuration
rapide (QUICK CLEAN).
Fonctionnement automatique
La vitesse du ventilateur est automatiquement commutée entre haute, moyenne et
basse (HIGH*, MEDIUM, LOW) selon la quantité d’impuretés dans l’air. Les capteurs détectent les impuretés pour assurer une purication efcace de l’air.
FRANÇAIS
Fonctionnement en mode POLLEN
Fonctionnement MAXIMUM
Fonctionnement MOYEN
Fonctionnement FAIBLE
* La vitesse haute (HIGH) du ventilateur est une vitesse intermédiaire entre
MEDIUM et MAX.
L’appareil fonctionne à plein régime pendant 0 minutes, puis alterne entre les modes MOYEN et MAX
toutes les 20 minutes.
L’appareil fonctionne à la vitesse maximale
du ventilateur.
L’appareil fonctionne à la vitesse moyenne
du ventilateur.
L’appareil fonctionne silencieusement en as-
pirant le minimum d’air.
Bouton DE MARCHE/ARRÊT DU Plasmacluster
Appuyez sur le bouton de marche/arrêt du Plasmacluster pour
activer et désactiver le mode d’ions Plasmacluster.
Plasmacluster est activé, les deux témoins Indicateur et de Plasmacluster sur l'afchage avant sont allumés.
Lorsque le
Bouton D’ARRÊT DE L’APPAREIL
Appuyez sur le bouton d’arrêt (OFF) de l’appareil pour éteindre
ce dernier.
F-
Page 38

FONCTIONNEMENT
Bouton DE CONTRÔLE DES TÉMOINS
S’utilise pour rédui-
re la luminosité des
lampes du panneau
avant.
Reportez-vous au schéma de droite pour sélectionner
le niveau de sensibilité souhaité du panneau avant.
「 」
「 」
「 」
Les lampes du panneau avant sont plus lumineuses.
Les lampes du panneau avant sont plus sombres.
Les lampes du panneau avant s’éteignent.
ATTENTION
Les lampes du moniteur avant sont toujours plus lumineux au démarrage.
LAMPE D’ALIMENTATION EN EAU
Lorsque le réservoir d’eau est vide, la lampe d’alimentation en eau clignote
pour indiquer que le réservoir a besoin d’être rempli. Veuillez noter que la
lampe ne clignote pas même si le réservoir d’eau est vide en mode d’épuration de l’air et en mode d’épuration rapide.
Réglage d’indicateur sonore de l’alimentation en eau.
En plus de la lampe témoin, l’appareil peut être réglé pour émettre
un signal sonore lorsque le réservoir d’eau est vide. Lorsque l’appareil est éteint, appuyez sur le bouton de contròle des témoins
pendant 3 secondes pour activer le signal sonore.
Annulation
Pour annuler le signal sonore, lorsque l’appareil est éteint, appuyez encore une fois sur le bouton de contróle des témoins pour
plus de 3 secondes.
RÉGLAGE DE LA SENSIBILITÉ DES CAPTEURS
Réglez sur basse (LOW) si le moniteur de poussière (DUST MONITOR) est toujours
rouge a n de réduire la sensibilité et réglez sur haute (HIGH) si le moniteur de poussière
est toujours vert a n d’accroître la sensibilité.
Lorsque l’appareil est éteint, appuyez sur le bouton de vitesse du
1
ventilateur pendant 3 secondes.
Les lampes témoins de vitesse du ventilateur affichent le niveau de sensibilité des
capteurs actuellement réglé. Le réglage d’usine est le niveau standard, indiqué par la
lampe MED.
Appuyez sur le bouton de vitesse du
2
ventilateur pour régler la sensibilité désirée des capteurs.
Reportez-vous au schéma de droite pour sélectionner le niveau de sensibilité désiré des capteurs.
Appuyez sur le bouton d’arrêt de l’appa-
3
reil.
Notez que si le bouton d’arrêt de l’appareil n’est pas
pressé dans les 8 secondes suivant le réglage de la
sensibilité des capteurs, le réglage est automatiquement sauvegardé. Le réglage de la sensibilité des
capteurs est sauvegardé même si l’appareil est débranché.
Lampe témoin
de vitesse du
ventilateur
Sensibilité des
capteurs
Haute
Standard
Basse
F-2
Page 39

SOIN ET ENTRETIEN
Pour maintenir le rendement optimal de ce puricateur d’air, veuillez nettoyer l'appareil périodiquement, y compris l'ouverture du capteur et les ltres.
Lorsque vous nettoyez l’appareil, prenez soin de débrancher le câble d’alimentation en premier et ne manipulez jamais la che avec les mains mouillées. Sinon, vous vous exposez à
une électrocution, à des blessures corporelles ou aux deux.
LAMPE DU FILTRE
La lampe du ltre s’allume pour rappeler qu’il est temps d’entretenir le panneau arrière, les capteurs et le
ltre d’humidication. La lampe témoin s’allume au bout d’environ 720 heures d’utilisation.
Après l’entretien, réinitialisez la lampe témoin du ltre. Branchez l’appareil, allumez-le et appuyez sur le bouton de réinitialisation (RESET) pendant 3 secondes.
La lampe du ltre s’éteint. Même si la lampe du ltre est déjà éteinte, le bouton de
réinitialisation (RESET) doit être enfoncé pour que la minuterie d’entretien soit réinitialisée.
Cycle
d’entretien
Après 720 heures d’utilisation
(30 jours × 24 h = 720)
PANNEAU ARRIÈRE ET CAPTEURS
Cycle
d’entretien
Dépoussiérez délicatement l’ouverture des capteurs et
le panneau arrière, à l’aide d’un accessoire d’aspirateur
ou d’un outil similaire.
Lorsque le panneau arrière est encrassé
Si ce dernier est recouvert d’une couche de crasse huileuse,
1
plongez-le dans une solution de détergent de cuisine.
Evitez toute éraure du panneau arrière pendant son lavage.
Rincez plusieurs fois le panneau arrière à l’eau propre
2
pour éliminer tout résidu de solution.
Faites égoutter le panneau pour que l’excès d’eau s’en
3
échappe.
Quand la poussière s’accumule
sur l’appareil ou tous les 2 mois
Capteur
Panneau
arrière
Panneau arrière
FRANÇAIS
ENTRETIEN DU FILTRE DE CAPTEUR
Retirez le ltre de capteur et tapotez-le légèrement au-dessus d’un
évier ou d’une poubelle pour déloger la poussière. S’il est très sale,
lavez-le avec précaution à l’eau tiède. N’utilisez aucun détergent
ou produit chimique, quel qu’il soit, pour nettoyer le ltre. Séchez le ltre complètement avant de le replacer dans l’appareil. Ne
faites pas fonctionner l’appareil sans que tous les ltres soient correctement installés.
Filtre de capteur
APPAREIL
Cycle d’entretien
An d’éviter l’accumulation de saleté ou de taches sur l’appareil, nettoyez régulièrement. Si
vous laissez les taches trop longtemps, elles peuvent être difciles à nettoyer.
Essuyez avec un chiffon sec et doux
Pour les taches ou les salissures rebelles, essuyez avec un chiffon doux humidié avec de l’eau tiède.
N’utilisez pas de liquides volatils
Le benzène, le diluant de peinture, la pâte à polir risquent d’endommager la surface.
N’utilisez pas de détergents
Les agents détersifs peuvent abîmer l’unité.
Quand la poussière s’accumule sur l’appareil ou tous les 2 mois
F-3
Page 40

SOIN ET ENTRETIEN
RÉSERVOIR D’EAU
Bouchon du
Cycle d’entretien
Rincez l’intérieur du réservoir en laissant une petite quantité d’
eau tiède à l’intérieur, en fermant bien le bouchon du réservoir,
puis en secouant le réservoir. Les détergents ménagers doux
peuvent servir à nettoyer l’intérieur du réservoir, mais ils doivent être dilués, et le réservoir doit être rincé méticuleusement
pour éliminer tout résidu de détergent.
(Notez que le réservoir d’eau ne va pas au lave-vaisselle.)
ENTRETIEN DU BOUCHON DE RESERVOIR
Le petit bouchon du réservoir peut être retiré.
Un nettoyage est nécessaire dès que le bouchon du réservoir et le petit bouchon sont sales et / ou visqueux.
Utilisez à cet effet un coton-tige ou une brosse à dents.
Chaque jour en cas d’humidication
<cycle d’entretien... une fois par mois>
Bouchon
du réservoir
ENTRETIEN DU FILTRE DÉSODORISANT LAVABLE
réservoir
Réservoir
d’eau
Brosse à dent
LAVAGE À MAIN UNIQUEMENT !
PAS DE SÉCHAGE EN
MACHINE !
Cycle
d’entretien
Lorsqu’une odeur déplaisante sort de
la sortie d’échappement.
Lorsque le rendement du ltre semble
baisser et que les odeurs persistent.
Rincez la saleté accumulée sur le FILTRE DÉ-
1
SODORISANT LAVABLE sous l’eau tiède.
ATTENTION
• Lorsque vous lavez le filtre pour la première fois, l’eau de
rinçage peut être brune. Ceci ne compromet en rien le pouvoir de désodorisation.
• Veillez à ne pas plier le ltre lors du lavage.
Faites égoutter le ltre pour que l’excès d’eau s’en échappe.
2
Séchez totalement le ltre dans un endroit bien
3
aéré. Si possible, séchez à l’extérieur.
Séchez le ltre en position latérale pour éviter qu’il ne se déforme.
Compter une durée de séchage d’environ 6 heures.
ATTENTION
• Évitez de sécher le ltre à l’extérieur s’il ne fait pas beau (ex. en cas de pluie ou de
temps froid). Ne laissez pas le ltre geler.
• Si le ltre est séché à l’intérieur, prenez des précautions (comme placer des serviettes,
etc., sous le ltre) pour éviter que l’eau n’endommage le sol.
Replacez le ltre dans l’appareil. (Reportez-vous à la page F-8.)
4
Séchez le ltre complètement avant de le replacer pour éviter les odeurs.
Ne faites pas fonctionner l’appareil sans que tous les ltres ne soient pas correctement
installés.
F-4
Page 41

BAC D’HUMIDIFICATION
Cycle d’entretien
1 mois
La fréquence du cycle d’entretien dépend de la dureté de l’eau.
Évitez de renverser de l’eau lorsque vous retirez ou nettoyez le
bac.
Retirez le réservoir d’eau et le bac d’humidication.
1
Déverrouillez d’abord
le réservoir d’eau,
puis retirez le bac.
Tirez le bac d’humidication avec les deux
mains pour éviter de
renverser de l’eau.
Poignée
du réservoir
Réservoir
d’eau
Retirez le réservoir d’eau et le ltre d’hu-
2
midication du bac d’humidication. Videz
l’eau accumulée en inclinant lentement le
bac d’humidication.
Ne tenez pas
cette partie.
Filtre d’humidication
Rincez l’intérieur du bac d’humidication à
3
l’eau tiède pour retirer les impuretés.
• Ne retirez pas le otteur de mousse de
polystyrène.
• Nettoyez les parties
difciles à atteindre
avec un coton-tige ou
une brosse à dents.
Flotteur
Bac d’humidication
Si les dépôts de l’eau sont difciles à enlever
Remplissez le bac d’humidi-
1
cation à demi avec de l’eau
tiède, ajoutez une petite
quantité de détergent de cuisine doux et laissez tremper
environ 30 minutes.
Diluez le détergent conformément aux instructions sur l’emballage.
Nettoyez les parties difciles à
atteindre avec un
coton-tige ou une
brosse à dents.
FRANÇAIS
Rincez le bac d’humidica-
2
tion à l’eau tiède.
•
Rincez jusqu’à ce que tout résidu
de détergent disparaisse.
•
Un rinçage inadéquat peut
causer une odeur de détergent
ou des changements dans la
forme/la couleur
de l’unité principale.
Remettez le filtre d’humidification en place et
4
réinsérez le bac d’humidication dans l’appareil.
Le ltre d’humidication n’entre pas
s’il est mis à l’envers. Assurez-vous
qu’il n’y a pas d’espace entre le bac
d’humidication et l’appareil lorsque
vous replacez le bac d’humidification dans l’appareil. L’appareil risque
de mal fonctionner si le bac d’humidication n’est pas adéquatement
inséré à l’intérieur.
Si le otteur de mousse de polystyrène
se détache, replacez-le en insérant les
languettes du flotteur dans les fentes
du bac d’humidication comme l’illustre
le schéma.
Insérez la languette
du flotteur dans la
fente.
Couleur : gris
F-5
ATTENTION
• N’utilisez que des détergents de
cuisine doux pour nettoyer le bac
d’humidification. L’utilisation de
produits chimiques ou de détergents non désignés peut entraîner
une déformation, un ternissement,
des craquelures (une fuite d’eau).
Insérez le flotteur
sous cette languette.
Insérez la languette
de l’autre côté du
flotteur dans la
fente.
Page 42

SOIN ET ENTRETIEN
FILTRE D’HUMIDIFICATION
Cycle d’entretien
La fréquence du cycle d’entretien dépend de la dureté ou des impure
utilisez ; plus l’eau est dure, plus souvent il faut détartrer.
Faites attention de ne pas renverser d’eau lors du nettoyage du ltre.
Retirez le réservoir d’eau et le
1
bac d’humidication.
Retirez le ltre d’humidication
2
du bac d’humidication.
Évitez de renverser de l’eau du bac d’humidication.
Préparez la solution de détartrage.
3
On utilise l’acide citrique, en vente dans
certaines pharmacies, ou le jus de citron
pur à 00 % en bouteille pour le détartrage. Choisissez l’un ou l’autre et préparez la solution de détartrage.
<Utilisation d’acide citrique>
Faites dissoudre 3 c. à thé d’acide citrique dans 2 tasses et demie d’eau tiède
dans un récipient approprié et brassez
bien.
<Utilisation de jus de citron>
Le jus de citron pur à 00 % en bouteille
peut servir au détartrage. N’utilisez que
du jus de citron pur à 00 % en bouteille
sans pulpe (passez le jus si nécessaire).
Combinez /4 c. de jus de citron et 3
tasses d’eau tiède dans un récipient assez grand pour recevoir le ltre d’humidication et brassez bien.
Laissez tremper le ltre d’hu-
4
midication dans la solution
pendant 30 minutes avant de
nettoyer.
Avec du jus de citron,
il est recommandé de
laisser tremper plus
longtemps qu’avec l’acide
citrique.
Une fois par mois ou lorsque la lampe du ltre est allumée.
tés de l’eau que vous
Rincez maintes fois le filtre d’hu-
5
midication à l’eau tiède pour élim-
Filtre d’humidication
Bac d’humidication
Réservoir
d’eau
Bac d’humidication
iner tout résidu de solution.
Un rinçage inadéquat peut causer des
odeurs et nuire au rendement de l’appareil, à son apparence ou aux deux.
* Ne frottez pas le ltre d’hu-
midication ; limitez-vous à
le rincer délicatement sous
l’eau tiède.
Attachez le ltre d’humidica-
6
tion au bac d’humidication et
replacez le bac d’humidication
dans l’appareil.
• Le filtre d’humidification n’entre pas s’il
est mis à l’envers. Assurez-vous qu’il n’y
a pas d’espace entre le bac d’humidication et l’appareil lorsque vous replacez le
bac d’humidication dans l’appareil. L’appareil risque de mal fonctionner si le bac
d’humidification n’est pas adéquatement
inséré à l’intérieur.
• Quand l’appareil
reste longtemps
inutilisé, séchez le
filtre d’humidification complètement
avant de le remettre
en place.
Branchez l’appareil, allumez-
7
le et appuyez sur le bouton
de réinitialisation du ltre sur
l'afcheur pendant plus de 3
secondes pour réinitialiser.
Vous verrez des dépôts de couleur
brune, rougeâtre ou blanche se former à
la surface du ltre d’humidication. Ces
impuretés (calcium, etc.) proviennent de
l’eau du robinet; il ne s’agit pas d’une
défectuosité. Replacez le ltre d’humidication lorsqu’il est entièrement couvert de
dépôts blancs.
F-6
Page 43

GUIDE DE REMPLACEMENT DES FILTRES
La durée de vie des ltres varie selon les conditions ambiantes, l’emploi et l’emplacement
de l’appareil. Si la poussière ou les odeurs persistent, remplacez les ltres.
(Reportez-vous à “Veuillez lire ces instructions avant de faire fonctionner votre nouveau puricateur
d’air”.)
Guide de remplacement des ltres
Filtre HEPA authentique
La durée de vie des ltres peut être considérablement réduite selon les conditions ambiantes. La
fumée de cigarette, les poils et les squames d’animaux domestiques et les autres particules en
suspension dans l’air peuvent écourter la durée de vie des ltres. Examinez les ltres régulièrement et remplacez-les au besoin.
Filtre désodorisant lavable
Le ltre peut être lavé et réutilisé maintes fois ou il peut être remplacé.
Filtre d’humidication
La durée de vie des ltres peut être considérablement réduite selon les conditions ambiantes. Même
avant que 2 années ne s’écoulent, remplacez le ltre d’humidication si vous remarquez ce qui suit :
• Des dépôts minéraux (des masses blanches, noires ou rouges) demeurent après le nettoyage ou
le ltre d’humidication est encore sale.
• Le ltre est gravement endommagé ou déformé.
Filtres de rechange
• Filtre HEPA authentique : unité
Modèle FZ-C00HFU
• Filtre désodorisant lavable : unité
Modèle FZ-C00DFU
• Filtre d’humidication : unité
Modèle FZ-C00MFU
Jusqu’à 5 ans après ouverture
Jusqu’à 5 ans après ouverture
Jusqu’à 2 ans après ouverture
(gris)
Filtre d’humidication
FRANÇAIS
(blanc)
Cadre de ltre (gris)
Cadre de ltre (blanc)
Remplacement des ltres
. Remplacez les ltres en suivant les instructions fournies avec les ltres de rechange.
2. Utilisez les étiquettes de date pour vous rappeler quand les ltres doivent être remplacés.
Élimination des ltres
Veuillez vous débarrasser des ltres usagés conformément à toutes lois et réglementations locales.
Matériaux de ltre HEPA authentique :
• Filtre : polypropylène • Cadre : polyester
Matériaux de ltre désodorisant lavable :
• Polyester, rayonne, charbon actif
Matériaux de ltre d’humidication :
• Rayonne, polyester
F-7
Page 44

RÉSOLUTION DES PROBLÈMES
Avant de faire appel au SAV, veuillez lire le tableau de résolution de problèmes ci-dessous, car le
problème n’est peut être pas un dysfonctionnement de l’appareil.
SYMPTÔME SOLUTION (pas un dysfonctionnement)
Les odeurs et la fumée ne sont
pas éliminées.
Le moniteur avant s’allume en
vert même lorsque l’air est impur.
Le moniteur avant s’allume en
orange ou en rouge même lorsque l’air est propre.
Un son “clic” ou “tic” est émis
par l’appareil.
L’air rejeté dégage une odeur.
L’appareil ne s’active pas en
présence de fumée de cigarette
dans l’air.
La lampe du ltre est allumée.
• Nettoyez ou remplacez les filtres s’ils semblent très sales.
(Reportez-vous aux pages F-3, F-4, F-6.)
•
L’air pourrait être pollué au moment où l’appareil a été branché.
Débranchez l’appareil, attendez une minute et rebranchez
l’appareil.
• Le fonctionnement des capteurs est compromis si les ouvertures des capteurs de poussière sont sales ou bouchées.
Nettoyez délicatement les capteurs de poussière (reportezvous à la page F-3).
• C’est le son qui est émis lorsque l’appareil est en mode de
génération d’ions.
• Est-ce que les ltres sont très sales ?
• Nettoyez ou remplacez les ltres.
• Il est possible que les Puricateurs d'Air Plasmacluster dégagent une légère odeur. Ceci est normal et provient du fait
que les Ions Plasmacluster rafraîchissent l'air.
• Est-ce que l’appareil est installé dans un endroit où il est difcile pour le capteur de détecter la fumée de cigarette ?
• Les ouvertures des capteurs de poussière sont-elles bloquées ou bouchées ?
(Dans ce cas, nettoyez les ouvertures.) (Reportez-vous à la
page F-3.)
• Après le nettoyage ou le remplacement des ltres, branchez
le câble d’alimentation sur le secteur et appuyez sur le
bouton de réinitialisation de ltre. (Reportez-vous à la page
F-3.)
Le moniteur avant est éteint.
La lampe d’alimentation en eau
ne s’allume pas quand le réservoir est vide.
Le robinet d’eau dans le réservoir ne s’abaisse pas ou baisse
lentement.
Les lampes du moniteur avant
changent fréquemment de couleur.
• Vériez si le mode lampes éteintes est sélectionné. Si c’est
le cas, appuyez sur le bouton de contrôle des témoins pendant 3 secondes pour activer les lampes témoins. (Reportez-vous à la page F-2.)
• Vériez s’il y a des impuretés sur le otteur de mousse de
polystyrène. Nettoyez le bac d’humidication. Assurez-vous
que l’appareil est situé sur une surface de niveau. Veuillez
vérier que le bac d'humidication et que le réservoir d'eau
sont installés correctement.
• Est-ce que le bac d’humidication et le réservoir d’eau sont
bien installés ? Vériez aussi le ltre d’humidication.
• Nettoyez ou remplacez le ltre lorsqu’il est très sale.
(Reportez-vous aux pages F-6 et F-7.) Veuillez vérifier
que le mode Air Pur & Humidication a été sélectionné.
• Les lampes du moniteur de poussière changent automatiquement de couleur lorsque des impuretés sont détectées
par le capteur de poussière.
F-8
Page 45

AFFICHAGE D’ERREUR
Si l'erreur se reproduit, contactez le centre de service Sharp.
AFFICHAGE
NUMERIQUE
AFFICHAGE LUMINEUX
Clignotement de la lampe
témoin d’épuration de l’air et
d’humidication.
Clignotement de la lampe
témoin de vitesse du ventilateur Faible «
Clignotement de la lampe
témoin de épuration rapide.
Clignotement de la lampe
témoin de pluie d’ions.
Clignotement de la lampe témoin
de vitesse du ventilateur
Faible «
».
».
ORIGINE
DE L’ERREUR
Anomalie du ltre
d’humidication.
Anomalie du moteur
de ventilateur.
Anomalie du capteur
de température/humidité.
Problème avec la carte
de circuits.
SOLUTION
Vériez si le ltre d’humidication, le bac d’humidication et le
réservoir d’eau sont bien installés, puis rallumez l’appareil.
Coupez le courant pour annuler
l’afchage d’erreur, attendez une
minute, puis rallumez l’appareil.
Débranchez l’appareil, attendez
une minute et rebranchez-le.
FRANÇAIS
Clignotement de la lampe témoin
de vitesse du ventilateur
Faible «
».
F-9
Page 46

CARACTÉRISTIQUES
Modèle KC-850U
Alimentation 20 V 60 Hz
Réglage de la vitesse du ventilateur MAX
Vitesse de ventilateur (CFM)
ÉUPURATION DE
L'AIR
É
PURATION ET
HUMIDIFICATION
DE L'AIR
Taille de pièce recommandée * 254 sg.ft (23,6m
Puissance nominale (W)
Niveau de bruit (dBA)
Vitesse de ventilateur (CFM)
Puissance nominale (W)
Niveau de bruit (dBA)
Humidication (points/heure)*2
94 88 28
50 9 3,5
5 34 9
87 88 49
43 6,6
50 34 23
,3 0,7
CADR (poussière/fumée/pollen)
Capacité du réservoir d’eau (gallon) 0,96
Capteurs
Type de ltre
Longueur du câble 6,5ft (2,0m)
Dimensions
Poids 2,4 lbs (9,7kg)
Collecte de poussière HEPA authentique antimicrobien
Désodorisation Désodorisant lavable
Poussière/température et humidité
378 (L) × 265 (P) × 586 (H)
7
/8 in (L) × 0 /
4
MOYEN FAIBLE
64 / 64 / 74
in (P) × 23 in (H)
2
0,5
2
)
* • La taille de pièce recommandée est déterminée pour le fonctionnement de l'appareil avec la vitesse de ventilateur maxi
male.
*2 • La quantité d’humidication change suivant la température et l’humidité intérieures et extérieures.
La quantité d’humidication augmente au fur et à mesure que la température monte ou que l’humidité baisse.
La quantité d’humidication diminue au fur et à mesure que la température baisse ou que l’humidité monte.
Consommation en veille
Pour être capable de faire fonctionner les circuits électriques lorsque le câble d’alimentation est raccordé au secteur, cet appareil consomme environ 0,4 W en mode veille.
Pour économiser l’énergie, débranchez le câble d’alimentation lorsque l’appareil n’est pas utilisé.
F-20
Page 47

FRANÇAIS
F-2
Page 48

Lea antes de operar su nuevo Purifi cador de aire
El purifi cador de aire absorbe el aire de la entrada de aire y éste pasa a través del
prefi ltro, un fi ltro desodorizador lavable y un Filtro True EPA en la parte interna de la
unidad, para descargarlo luego a través del orifi cio de descarga de aire. El Filtro True
EPA puede eliminar el 99.97% de las partículas de polvo de tamaño tan pequeño
como 0.3 micrones y también ayuda a absorber los olores. El filtro desodorizador
lavable absorbe gradualmente los olores a medida que atraviesan el fi ltro.
Algunos olores absorbidos por los filtros pueden descomponerse con el paso del
tiempo, causando olores adicionales. Dependiendo del ambiente en el que se use el
producto, especialmente cuando es usado en ambientes extremos (considerablemente
más severo que el uso doméstico normal), este olor puede volverse más fuerte en
un período más corto que el esperado. Si los olores persisten, debe reemplazar los
fi ltros.
NOTA
• El purifi cador de aire está diseñado para eliminar el polvo en suspensión en el aire y el olor, pero
no los gases nocivos (por ejemplo el monóxido de carbono contenido en el humo del cigarrillo).
Si aún continúa la fuente de los olores, el purifi cador de aire no los podrá eliminar completamente.
Filtro True HEPA (blanco)
Filtro desodorizador lavable (negro)
Pre-fi ltro
Page 49

ESPAÑOL
CARACTERÍSTICAS
Combinación única de tecnologías para
el tratamiento del aire
Sistema de triple fi ltrado
+ Plasmacluster + Humidifi cación
ATRAPA EL POLVO*
El pre-fi ltro lavable atrapa el polvo y otras
partículas grandes en el aire.
DISMINUYE LOS OLORES
El filtro desodorizador lavable absorbe la
mayoría de olores domésticos comunes.
REDUCE EL POLEN Y MOHO*
El filtro True HEPA atrapa el 99.97% de
partículas de tamaño tan pequeño como
0.3 micrones.
REFRESCA
Plasmacluster refresca el aire de manera
similar al proceso mediante el que la
naturaleza purifica el ambiente con una
emisión equilibrada de iones positivos y
negativos.
INCREMENTA LA HUMEDAD
Funciona hasta 10 horas por carga.**
**Cuando el aire es absorbido mediante el
sistema de fi ltro.
**Tamaño de la habitación: Hasta 254 pies
cuadrados.
La Tecnología basada en sensores monitorea
continuamente la calidad del aire, ajustando la
operación automáticamente según la pureza
y la humedad detectada en el aire.
Declaración de conformidad
PURIFICADOR DE AIRE SHARP KC-850U
Este dispositivo cumple con la Parte 18 del
reglamento FCC.
Parte responsable:
SHARP ELECTRONICS CORPORATION
Sharp Plaza,
Mahwah, New Jersey 07495-1163
CONTENIDO
INSTRUCCIONES DE SEGURIDAD IMPORTANTES
• ADVERTENCIA ..........................................
• PRECAUCIONES RELACIONADAS
CON LA OPERACIÓN ................................
• PAUTAS PARA LA INSTALACIÓN .............
• PAUTAS PARA EL FILTRO .......................
NOMBRE DE LAS PARTES
• DIAGRAMA ILUSTRATIVO ........................
• PARTE POSTERIOR ..................................
• PANTALLA DE LA UNIDAD PRINCIPAL ....
• MONITOR FRONTAL .................................
PREPARACIÓN PARA EL USO
• INSTALACIÓN DEL FILTRO ......................
• RECARGA DEL TANQUE DE AGUA ..........
OPERACIÓN
• MODO CLEAN AIR & MODO HUMIDIFY ...
• MODO CLEAN AIR ....................................
• MODO QUICK CLEAN ...............................
• BOTÓN FAN SPEED .................................
• BOTÓN Plasmacluster ON/OFF ................
• BOTÓN POWER ON/OFF .........................
• BOTÓN LIGHTS CONTROL ....................
• LUZ DEL INDICADOR DE SUMINISTRO
DE AGUA ..................................................
•
AJUSTE DE LA SENSIBILIDAD DE DETECCIÓN
DEL SENSO
...............................................
................................................
R
CUIDADO Y MANTENIMIENTO
• LUZ DEL INDICADOR DEL FILTRO ........
• PANEL POSTERIOR Y SENSORES ........
• UNIDAD PRINCIPAL ...............................
• TANQUE DE AGUA ..................................
• FILTRO DESODORIZADOR LAVABLE ...
• BANDEJA DEL HUMIDIFICADOR ...........
• FILTRO DEL HUMIDIFICADOR ...............
•
PAUTAS PARA REEMPLAZAR EL FILTRO
LOCALIZACIÓN DE FALLAS
ESPECIFICACIONES
..............................
....................
..............
.............
............
...
................
..
S-2
S-2
S-3
S-3
S-3
S-4
S-4
S-4
S-5
S-5
S-6
S-6
S-7
S-8
S-8
S-8
S-9
S-9
S-9
S-9
S-10
S-10
S-10
S-11
S-11
S-11
S-11
S-12
S-12
S-13
S-14
S-15
S-16
S-18
ESPAÑOL
Declaración de conformidad
PURIFICADOR DE AIRE SHARP KC-850U
Este dispositivo cumple con la norma
canadiense ICES-001.
Parte responsable:
SHARP ELECTRONICS OF CANADA LTD.
335 Britannia Road East Mississauga, Ontario
L4Z 1W9 Canada
TEL: (905) 568-7140
Gracias por comprar este Purifi cador de aire
SHARP.
Lea este manual detenidamente antes de
usar el purifi cador de aire. Después de leer e
manual, guárdelo en un lugar conveniente para
referencias futuras.
S-1
Page 50

INSTRUCCIONES DE SEGURIDAD IMPORTANTES
Al usar artefactos eléctricos, se deben cumplir precauciones de seguridad básicas,
incluyendo las siguientes:
ADVERTENCIA
• Lea todas las instrucciones antes de usar la unidad.
• Use únicamente en un tomacorriente de 120 voltios.
• El purificador de aire tiene un enchufe polarizado (una espiga es más ancha que la otra). Este
enchufe se adapta a un tomacorriente polarizado en una sola dirección. Si el enchufe no encaja en
el tomacorriente, invierta el sentido. Si el problema persiste, contáctese con un electricista o personal
de servicio califi cado.
• No use la unidad si el cable de alimentación o el enchufe están dañados o si la conexión en el
tomacorriente no es segura.
• Elimine periódicamente el polvo del enchufe.
• No introduzca los dedos ni objetos extraños en la entrada o la salida de aire.
• Al retirar el cable de alimentación, siempre sostenga el enchufe sin tirar del cable.
Un cortocircuito eléctrico puede causar choques eléctricos y/o incendios.
• No retire el enchufe con las manos húmedas.
• No use esta unidad cerca de artefactos a gas o chimeneas.
• Al recargar el tanque de agua, al limpiar la unidad o cuando la unidad no esté en uso, asegúrese de
desconestar la unidad. Un cortocircuito eléctrico puede causar choques eléctricos y/o incendios.
• Si el cable de alimentación está dañado, debe ser reemplazado por el fabricante, su agente de
servicio, centro de servicio autorizado Sharp o una persona califi cada para evitar peligros.
• No opere la unidad cuando utilice insecticidas en aerosol o en habitaciones con residuos de aceite,
incienso, chispas de cigarrillos encendidos, vapores químicos en el aire o en condiciones de alta
humedad, como en el baño.
• Tenga cuidado al limpiar la unidad. Los limpiadores fuertes de tipo corrosivo pueden dañar la parte
externa.
• Este purificadores de aire debe recibir servicio únicamente en un Centro de servicio autorizado
Sharp. Comuníquese con el Centro de servicio autorizado más cercano para cualquier problema,
ajuste o reparación.
• Si va a llevar la unidad, retire primero el tanque de agua y la bandeja de humidifi cador y sostenga la
unidad usando las manijas de ambos lados.
• No beba el agua de la bandeja del humidifi cador ni del tanque de agua. De hacerlo, le podría causar
enfermedades.
• Cambie diariamente el agua del tanque por agua del grifo y limpie regularmente el tanque y la
bandeja del humidifi cador. (Vea las secciones S-12 y S-13). Cuando la unidad no se encuentre en
uso, elimine el agua del tanque y de la bandeja. El agua almacenada en el tanque y/o en la bandeja
puede causar la formación de moho, bacterias y malos olores.
En ciertos casos, estas bacterias pueden causar efectos físicos dañinos.
- Para reducir el riesgo de choques eléctricos, incendios o lesiones a personas:
NOTA
Si este purifi cador de aire causa alguna interferencia con la recepción de la radio o televisión, intente
corregir la interferencia por medio de una o más de las medidas siguientes:
• Reoriente o reubique la antena de recepción.
• Aumente la separación entre la unidad y el receptor de radio/TV.
• Conecte el equipo en un tomacorriente de un circuito diferente al circuito en el cual se conecta el
receptor.
• Consulte al distribuidor o a un técnico de radio/TV con experiencia si requiere ayuda.
Este producto cumple los requisitos de la norma internacional CISPRR 11.
En conformidad con esta norma, este producto pertenece a los equipos del grupo 2 clase B.
Grupo 2 quiere decir que el equipo intencionalmente genera radiofrecuencia en forma de radiación
electromagnética para la electrodescarga de equipos mecanizados.
Equipo de clase B quiere decir que el equipo es apropiado para uso doméstico.
- Interferencia de radio o televisión
S-2
Page 51

PRECAUCIONES RELACIONADAS CON LA OPERACIÓN
• No bloquee la entrada y/o salida de aire.
• No use la unidad cerca de o con objetos calientes, como estufas o calentadores o donde pueda entrar
en contacto con el vapor.
• Siempre opere la unidad en posición vertical.
• Siempre sujete el asa por ambos lados de la unidad al moverla.
Si sujeta el panel posterior durante el transporte podría ocasionar que se desprenda, ocasionando
de este modo que se caiga la unidad y que sufra lesiones corporales.
• No opere la unidad sin haber instalado correctamente los fi ltros, el tanque de agua y la bandeja
del humidifi cador.
• No lave ni reutilice el fi ltro True HEPA.
El lavado no mejorará el desempeño del fi ltro, también puede causar choques eléctricos o fallas
en el funcionamiento.
• Sólo limpie la parte externa con un paño suave.
No utilice líquidos volátiles y/o detergentes.
Puede causar daños o grietas en la superfi cie de la unidad.
Además, puede dañar los sensores.
• La frecuencia de mantenimiento que debe recibir (decapado) dependerá de la dureza o
impurezas del agua que use; mientras más dura sea el agua, mayor será la frecuencia del
decapado.
• Mantenga la unidad alejada del agua.
PAUTAS PARA LA INSTALACIÓN
• Durante el funcionamiento del producto, coloque la unidad alejada al menos 6,5 pies (2 m)
de cualquier equipo que emita ondas eléctricas como televisores, radios o relojes.
• Evite lugares donde el sensor esté expuesto a la corriente directa de la brisa o el proyecto.
En caso contrario la unidad podría no funcionar correctamente.
• Evite usar la unidad en lugares donde las cortinas, etc. puedan entrar en contacto con la
entrada y/o salidas de aire.
• Evite usar la unidad en lugares donde esté expuesta a la condensación o a cambios rápidos
de temperatura. (Utilice la unidad en condiciones apropiadas que estén entre 41-95ºF (5-35ºC)
en la habitación).
(Si no puede evitarse deje que la unidad descanse por 1 hora antes de encenderla).
• Coloque la unidad sobre una superfi cie fi rme con sufi ciente circulación de aire.
Al colocarla en un área que tenga una alfombra gruesa, la unidad puede vibrar ligeramente.
Colóquela sobre una superfi cie nivelada para evitar fugas de agua del tanque de agua y/o bandeja
del humidifi cador.
• Evite los lugares donde se genere grasa o humo aceitoso (como por ejemplo en la cocina, etc.).
Esto puede causar grietas en la superfi cie de la unidad o fallas en el funcionamiento del sensor.
• Coloque la unidad unos 30 cm~60 cm (1~2 pies) lejos de la pared para garantizar un fl ujo de
aire adecuado.
La pared ubicada detrás de la salida de aire puede ensuciarse con el tiempo. Si va a usar la unidad
durante un período extendido de tiempo en el mismo lugar, limpie la pared periódicamente y
protéjala con una lámina de vinilo, etc. para evitar que la pared se ensucie.
ESPAÑOL
PAUTAS PARA EL FILTRO
• Siga las instrucciones de este manual para el cuidado y mantenimiento correcto de los fi ltros.
Use solamente fi ltros diseñados para este producto.
S-3
Page 52

NOMBRE DE LAS PARTES
DIAGRAMA ILUSTRATIVO - PARTE FRONTAL
Salida de aire
Pantalla de la unidad principal
Monitor frontal
Unidad principal
PARTE POSTERIOR
Manija (2 ubicadas a la derecha e izquierda)
Sensores
• Sensor de polvo
•
Sensor de temperatura/humedad
Manija del tanque
Tanque de agua
(para el humidifi cador)
Filtro del humidifi cador
Marco del fi ltro
Tapa del tanque
Flotador
Bandeja del humidifi cador
Cable de alimentación
Salida de aire
Filtro True HEPA (blanco)
Filtro desodorizador
lavable (negro)
Lengüetas
Panel posterior
(Pre-fi ltro)
Enchufe
Entrada de aire
Etiqueta de fecha
(Etiqueta de potencia)
S-4
Page 53

Aco
ndicionamiento
itación
del aire en la hab
del aire en la hab
d
PANTALLA DE LA UNIDAD PRINCIPAL
Botón reestablecer fi ltro /
Luz del indicador (roja)
Botón Plasmacluster ENCENDIDO/APAGADO /
Luz del indicador (verde)
Botón de velocidad
Botón control de
luces
del ventilador /
Luz del indicador (verde)
MONITOR FRONTAL
Indica la limpieza y humedad del aire de la habitación.
Botón para ENCENDIDO
Presione alguno de los botones para
seleccionar el modo y hacer funcionar
la unidad.
Botón de MODO aire limpio / humidifi cador/
Luz del indicador (verde)
Botón de MODO aire limpio /
Luz del indicador (verde)
Botón para APAGADO
Botón de MODO limpieza
rápida /
Luz del indicador (azul)
ESPAÑOL
MONITOR DE POLVO
El sensor de polvo monitorea
continuamente el aire y cambia de color
según sea la pureza del aire.
Acondicionamiento del aire en la habitación
Limpio
Todo verde
Limpio
Todo verde
Cuando el sensor de polvo detecta
polvo, la luz parpadeante se mueve
dependiendo de la cantidad de polvo
detectada.
Parpadeando
Parpadeando
Verde
Amarillo
Verde
Amarillo
Muy contaminado
Parpadeando
Todo rojo
Muy contaminado
Parpadeando
Todo rojo
Luz del indicador Plasmacluster (azul)
Azul: Plasmacluster ENCENDIDO
Luz apagada: Plasmacluster APAGADO
Luz del indicador de suministro
de agua (roja)
Esta luz se encenderá cuando sea
necesario recargar el tanque de agua.
Luz del indicador de humedad
(verde)
Muestra el nivel aproximado de humedad
en la habitación. El ajuste de humedad
está preajustado para mayor comodidad.
(Por Ej.: Al 60% de humedad)
80 % o más
Menos del 30 %
S-5
Page 54

PREPARACIÓN PARA EL USO
Desconecte la unidad antes de
instalar o ajustar los fi ltros.
INSTALACIÓN DEL FILTRO
Los fi ltros vienen empacados en bolsas de plástico y están colocados dentro de la
unidad para conservar su calidad. Asegúrese de retirar las bolsas de plástico y de
volver a colocar los fi ltros dentro de la unidad antes de usarla por primera vez.
1
1
2
Retire los fi ltros
Retire el panel posterior.
Presione suavemente las
lengüetas, luego incline y retire
el panel posterior.
Lengüetas en la parte superior
Panel
posterior
Retire el fi ltro
desodorizante lavable
(negro) y el Filtro True
HEPA (blanco) de las
bolsas de plástico.
2
1
2
Instale los fi ltros
Instale el fi ltro HEPA.
Introduzca de modo que las pestañas
en el Filtro True HEPA estén frente a
usted.
Instalar el fi ltro al revés
afectará el rendimiento
de la unidad.
Filtro True HEPA
Introduzca las dos lengüetas inferiores del panel
posterior (izquierda y derecha) dentro de los
agujeros pequeños en la unidad y deslice el Filtro
desodorizante lavable entre el fi ltro True HEPA
Filter y el panel posterior.
Filtro desodorizador lavable
Panel posterior
Lengüetas inferiores
Filtro True HEPA
(blanco)
Filtro
desodorizador
lavable (negro)
Presione
3
suavemente en las
lengüetas superiores
(izquierda y derecha)
para asegurarlas
en su lugar.
Por favor llene la
4
fecha de inicio en la
unidad como en la
guia, para cuando
los fi ltros deban ser
reemplazados.
Etiqueta para
la fecha
S-6
Lengüetas
superiores
Page 55

LLENADO DEL TANQUE DE AGUA
Puede usar la unidad en el Modo Clean Air (aire
limpio) sin colocar agua en el tanque de agua. Cuando
utilice el Modo Clean Air & Humidify (aire limpio
y humidificador) o el Modo Quick Clean (limpieza
rápida) debe llenar el Tanque de agua con agua.
Manija del
tanque
Retire el tanque de agua abriendo la parte
1
superior.
Retire la tapa del tanque de agua y llénelo
2
cuidadosamente con agua de grifo.
• Cambie diariamente el agua del tanque de agua con
agua fresca del grifo.
Después de llenar, apriete bien la tapa del
3
tanque.
• Revise que no haya fuga de agua.
• Asegúrese de limpiar cualquier exceso de agua de la
parte externa del tanque.
• Cuando transporte el tanque de agua, sosténgalo
con ambas manos para que la abertura del tanque
esté hacia arriba.
Reemplace el tanque de agua en la unidad.
4
• El pestillo superior hará “clic” al instalar
adecuadamente el tanque de agua.
Tapa del
tanque
apriete
Tanque de
agua
Bandeja del
humidifi cador
Tanque de
agua
ESPAÑOL
PRECAUCIÓN
• No exponga la unidad al agua. Puede causar un corto circuito y/o choque eléctrico.
• No utilice agua caliente (104ºF o 40ºC), agentes químicos, sustancias aromáticas, agua
sucia, etc. Puede causar deformación y/o funcionamiento defectuoso de la unidad.
• Use sólo agua fresca del grifo. El uso de otras fuentes de agua puede propiciar el
desarrollo de moho, hongos y/o bacterias.
S-7
Page 56

OPERACIÓN
Botón Plasmacluster
ENCENDIDO/APAGADO
Botón de MODO aire limpio
Botón de velocidad
del ventilador
Botón de MODO limpieza rápida
Botón de MODO aire limpio / humidifi cador
Botón para
APAGADO
MODO CLEAN AIR & HUMIDIFY
(AIRE LIMPIO Y HUMIDIFICADOR)
Utilice el Modo Clean Air & Humidify (Aire limpio y humidifi cador) para limpiar rápidamente
el aire, reducir olores y humidifi car.
Llene el tanque de agua. (Vea S-7)
1
Presione el botón de Modo CLEAN AIR &
2
HUMIDIFY (AIRE LIMPIO Y HUMIDIFICADOR) .
• Si el cable de alimentación no fue desconectado entre
usos, la unidad se reiniciará automáticamente en los
ajustes previamente seleccionados (velocidad de
ventilador, Plasmacluster on/off, etc).
Presione el botón FAN SPEED (VELOCIDAD
3
DEL VENTILADOR) para seleccionar la
velocidad de ventilador deseada. (Vea S-9)
Sobre el Modo Automatic Humidify (Humidifi cador automático)
Los sensores de temperatura/humedad detectan y
ajustan automáticamente la humedad según los cambios
en la temperatura de la habitación. Dependiendo del
tamaño y la humedad de la habitación, puede ser que
la humedad no alcance el 45-55%. En tales casos, se
recomienda usar el Modo CLEAN AIR & HUMIDIFY/
MÁX (AIRE LIMPIO Y HUMIDIFICADOR/MÁX.)
Temperatura Humedad
64ºF y por debajo de
64ºF~75ºF 50%
75ºF y por encima de
55%
45%
MODO CLEAN AIR (AIRE LIMPIO)
Utilice el Modo Clean Air (Aire limpio) cuando no requiera humedad adicional.
Presione el botón Modo CLEAN AIR (AIRE LIMPIO)
1
en la pantalla.
• Si el cable de alimentación no fue desconectado entre
usos, la unidad se reiniciará automáticamente en los
ajustes previamente seleccionados (velocidad de
ventilador, Plasmacluster on/off, etc).
Presione el BOTÓN FAN SPEED (VELOCIDAD
2
DEL VENTILADOR) para seleccionar la velocidad
de ventilador deseada. (Vea S-9)
S-8
Page 57

MODO QUICK CLEAN (LIMPIEZA RÁPIDA)
El Modo QUICK CLEAN (LIMPIEZA RÁPIDA) con humidifi cación libera iones Plasmacluster
de alta densidad. Al descargar continuamente ciclos de fl ujo de aire fuerte, la unidad elimina
eficazmente el polvo transportado por el aire, polen, moho y alergenos conforme son
extraídos a través del sistema del filtro. Al seleccionar este modo debe haber agua en el
tanque de agua.
La unidad humidifi ca cuando hay agua en el tanque de agua y funciona sin humidifi car cuando
no el tanque no tiene agua.
Presione el botón de MODO QUICK CLEAN (LIMPIEZA
1
RÁPIDA) en la pantalla para seleccionar este modo.
Al terminar la operación, la unidad regresará a la operación anterior.
Botón FAN SPEED
(VELOCIDAD DEL VENTILADOR)
Presione el botón FAN SPEED (VELOCIDAD DEL VENTILADOR)
para seleccionar los ajustes preferidos para el ventilador. Las luces
del indicador mostrarán la velocidad actual seleccionada. Tenga en
cuenta que la velocidad del ventilador no se puede ajustar durante
el Modo QUICK CLEAN (LIMPIEZA RÁPIDA).
Operación AUTOMÁTICA
La velocidad del ventilador cambia automáticamente (HIGH* -ALTA-, MEDIUM -MEDIA-,
LOW -BAJA) dependiendo de la cantidad de impurezas en el aire. Los sensores
detectan las impurezas para que haya una purifi cación de aire efi ciente.
ESPAÑOL
Funcionamiento en
modo POLEN
Operación MÁXIMA
Operación MEDIA
Operación BAJA
* La velocidad ALTA del ventilador es una velocidad intermedia entre MEDIA y MÁXIMA.
La unidad funcionará a velocidad de ventilador ALTA
durante 10 minutos, y después alternará entre velocidad
NORMAL y ALTA durante 20 minutos.
La unidad funcionará a la máxima velocidad del
ventilador.
La unidad funcionará a la velocidad media del
ventilador.
La unidad funcionará silenciosamente utilizando un
ingreso de aire mínimo.
Botón Plasmacluster ON/OFF
(ENCENDIDO/APAGADO)
Presione el botón Plasmacluster ON/OFF (ENCENDIDO/
APAGADO) para encender y apagar el Modo Plasmacluster Ion.
Al ENCENDER el Plasmacluster, tanto la luz del Indicador como la
del Plasmacluster en la pantalla frontal se encienden.
Botón POWER OFF (APAGADO)
Presione el botón Power OFF (APAGADO) para apagar la unidad.
S-9
Page 58

OPERACIÓN
Botón LIGHTS CONTROL
(CONTROL DE LUCES)
Use el botón cuando la luz
del panel delantero sea
demasiado brillante.
Consulte el diagrama para seleccionar la
cantidad de brillo deseada en el panel delantero.
「 」
「 」
「 」
Las luces del panel delantero tienen más brillo.
Las luces en el panel delantero son más oscuras.
Las luces en el monitor delantero se apagan.
PRECAUCIÓN
Las luces en el monitor delantero siempre son más brillantes al iniciar.
LUZ DEL INDICADOR DE SUMINISTRO DE AGUA
Cuando el tanque de agua está vacío, la luz del indicador del suministro de
agua destellará para indicar que se debe recargar el tanque de agua. Observe
que la luz no destellará aunque el tanque de agua esté vacío durante el
Modo Clean Air (Aire limpio) y el Modo Quick Clean (Limpieza rápida).
Ajuste del indicador sonoro para el suministro de agua.
Además de la luz del indicador, la unidad puede ajustarse para
que dé una señal con un pitido audible cuando el tanque de
agua esté vacío. Con la unidad APAGADA, presione el botón
Lights Control (Control de luces) durante 3 segundos para
ENCENDER la señal audible.
Cancelación
Para cancelar la señal audible, con la unidad APAGADA, presione
nuevamente el botón Lights Control (Control de luces) durante
más de 3 segundos.
AJUSTE DE LA SENSIBILIDAD DE DETECCIÓN DEL SENSOR
Fije en ‘low’ (bajo) si el MONITOR DE POLVO está constantemente rojo, para reducir la
sensibilidad, y fi je en ‘high’ (alto) si el MONITOR DE POLVO está constantemente verde,
para aumentar la sensibilidad.
Con la unidad APAGADA, presione el botón Fan Speed (velocidad del
1
ventilador) por 3 segundos.
Las luces del indicador de velocidad del ventilador mostrarán el nivel de sensibilidad del sensor establecido actualmente. El ajuste de fábrica es estándar, indicado por la luz MED (MEDIA).
Presione el botón Fan Speed (velocidad del ventilador) para determinar
2
la sensibilidad del sensor deseada.
Consulte el diagrama de la derecha para seleccionar
el nivel deseado para la sensibilidad del sensor.
Presione el botón Power OFF (APAGADO).
3
Observe que si el botón Power OFF (APAGADO)
no se presiona dentro de los 8 segundos siguientes
al ajuste de la sensibilidad del sensor, el ajuste se
guardará automáticamente. El ajuste de sensibilidad
del sensor será guardado incluso si la unidad está
desconectada.
Luz del indicador
de velocidad del
ventilador
Sensibilidad de
detección del
sensor
Alto
Estándar
Bajo
S-10
Page 59

CUIDADO Y MANTENIMIENTO
Para mantener un rendimiento óptimo de este purificador de aire, limpie
periódicamente la unidad incluyendo la apertura de sensores y fi ltros.
Cuando limpie la unidad, primero asegúrese de desconectar el cable de alimentación
y nunca manipule el enchufe con las manos húmedas. Puede causar choque
eléctrico y/o lesiones corporales.
LUZ DEL INDICADOR
Ciclo de
cuidado
Después de 720 horas de uso
(30 días x 24 horas = 720)
DEL FILTRO
La luz del indicador del filtro se iluminará como un aviso para realizar el
mantenimiento del panel posterior, los sensores y el fi ltro del humidifi cador. La
luz del indicador se encenderá después de aproximadamente 720 horas de uso.
Después de realizar el mantenimiento, restablezca el indicador del filtro.
Conecte la unidad, ENCIÉNDALA y presione el botón RESET (RESTABLECER)
por 3 segundos. La luz del indicador del fi ltro se apagará. Aunque la luz del
indicador del fi ltro ya estuviera apagada, se debe presionar el botón RESET
(RESTABLECER) para restablecer el temporizador de mantenimiento.
PANEL POSTERIOR y SENSORES
Ciclo de
cuidado
Retire suavemente el polvo de la abertura del sensor y del
panel posterior, utilizando un dispositivo de aspiradora o
una herramienta similar.
When the back panel has stubborn dirt
En caso de suciedad grasa, sumerja el panel posterior
1
en el agua con detergente de cocina.
Cuando lave el panel posterior, evite fregarlo.
Aclare el panel posterior varias veces con agua limpia
2
para quitar los residuos de la solución.
Escurra el panel para quitar el exceso del agua.
3
Cada vez que se acumule polvo en
la unidad o cada dos meses
Sensor
Panel
posterior
Panel posterior
ESPAÑOL
CUIDADO DEL SENSOR DEL FILTRO
Retire el sensor del fi ltro y golpéelo ligeramente sobre un
lavabo o basurero para desprender el polvo. Si está muy
sucio, lávelo cuidadosamente con agua templada. No use
ningún detergente o químico de ninguna clase para
limpiar el filtro. Seque completamente el filtro antes de
reinstalarlo en la unidad. No opere la unidad sin haber
instalado correctamente los fi ltros.
Sensor del fi ltro
UNIDAD
Ciclo de cuidado Cada vez que se acumule polvo en la unidad o cada dos meses
Limpie regularmente para evitar el polvo o manchas en la unidad. Si permite que las manchas
permanezcan, puede ser difícil retirarlas.
Limpie y seque con un paño suave
Para manchas o suciedad difícil, use un paño suave humedecido con agua tibia.
No use fl uidos volátiles
Benceno, disolvente de pinturas, polvo pulidor, etc. podrían dañar la superfi cie.
No use detergentes
Los ingredientes de los detergentes podrían dañar la unidad.
S-11
Page 60

CUIDADO Y MANTENIMIENTO
TANQUE DE AGUA
Ciclo de cuidado A diario cuando use el humidifi cador
Enjuague el interior del tanque dejando una pequeña cantidad
de agua templada en el interior, cerrando la tapa del tanque
fi rmemente y sacudiéndolo. Puede usar detergentes domésticos suaves para limpiar el interior del tanque, pero disuelva el
detergente y enjuague cuidadosamente el tanque para retirar
todo residuo de detergente.
(Observe que el tanque de agua no es apto para el lavaplatos.)
CUIDADO DE LA TAPA DEL TANQUE
La tapa pequeña en la parte trasera del tanque se puede quitar.
Cuando la ta
cias y/o pegajosas, es necesario limpiarlas.
Use un bastoncillo de algodón o un cepillo de dientes.
pa del tanque y la tapa pequeña están su-
<ciclo de cuidado... una vez al mes>
Tapa del
tanque
CUIDADO DEL FILTRO DESODORIZADOR LAVABLE
¡SÓLO LAVE A MANO!
¡NO SEQUE EN LA
SECADORA DE ROPA!
Ciclo de
cuidado
Enjuague la suciedad del FILTRO DESODORIZADOR
1
LAVABLE con agua templada.
Cuando observe un olor desagradable en
la salida de aire.
Cuando observe que ha disminuido el
rendimiento del fi ltro y el olor persista.
Tapa del
tanque
Tanque de
agua
Cepillo de
dientes
PRECAUCIÓN
• Al lavar el fi ltro por primera vez, el agua del enjuague puede ser
de color marrón. Esto no afecta el rendimiento de desodorizción.
• Evite curvar o doblar el fi ltro al lavarlo.
Deje escurrir el fi ltro para retirar el exceso de agua.
2
Seque completamente el fi ltro en un área bien
3
ventilada. De ser posible, seque al aire libre.
Seque el fi ltro en posición horizontal para evitar que el fi ltro se
deforme.
El fi ltro tarda alrededor de 6 horas en secarse completamente.
PRECAUCIÓN
• Evite secar el fi ltro al aire libre durante clima inclemente (por Ej. lluvia o temperaturas
frías). No permita que el fi ltro se congele.
• Si seca el fi ltro en el interior, tome precauciones, como colocar toallas, etc. debajo del
fi ltro para evitar que el agua dañe el piso.
Reemplazo del fi ltro en la unidad. (Vea S-6).
4
Seque completamente el fi ltro antes de reinstalarlo para evitar olores.
No opere la unidad sin haber instalado correctamente los fi ltros.
S-12
Page 61
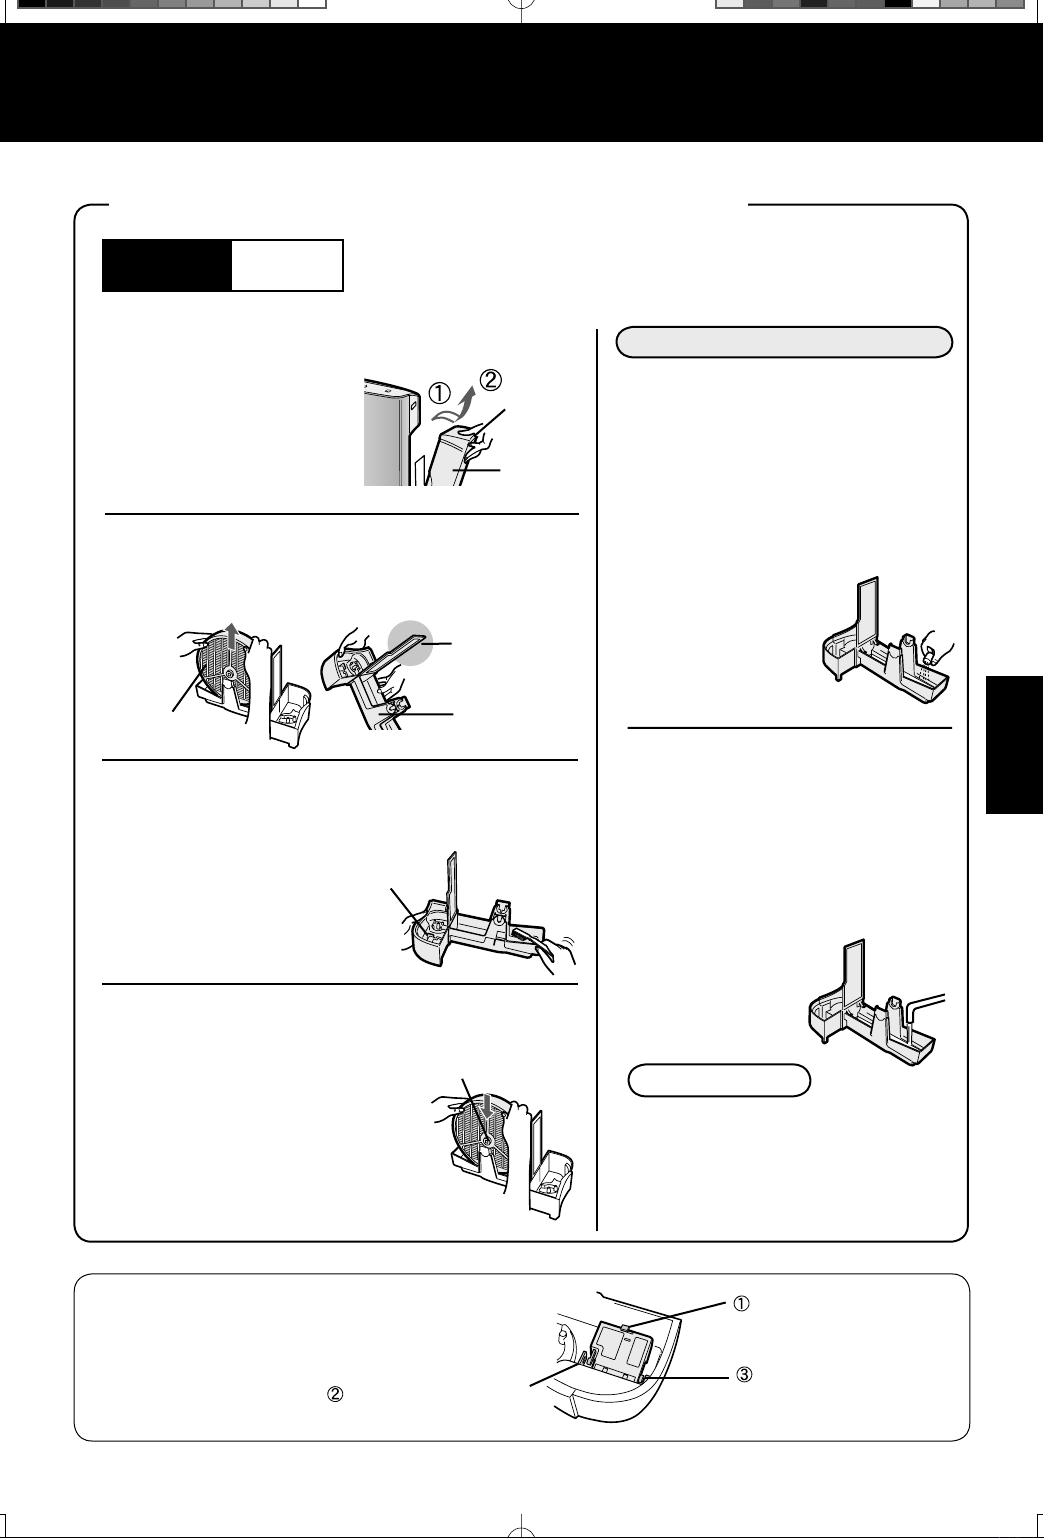
BANDEJA DEL HUMIDIFICADOR
Ciclo de
cuidado
1 mes
La frecuencia del ciclo de mantenimiento dependerá de la dureza del agua…Evite derramar agua cuando retire o limpie la
bandeja.
Retire el tanque de agua y la bandeja del
1
humidifi cador.
Primero retire el seguro del
tanque de agua, después
retire la bandeja.
Use ambas manos al tirar de la
bandeja del humidifi cador para
evitar que el agua se derrame.
Retire el tanque de agua y el filtro del
2
humidifi cador de la bandeja del humidifi cador.
Escurra el agua acumulada inclinando
lentamente la bandeja del humidifi cador.
Filtro del
humidifi cador
Manija del
tanque
Tanque de
agua
No sostenga
esta parte.
Bandeja del
humidifi cador
Enjuague la parte interior de la
3
bandeja del humidifi cador con agua
templada para retirar las impurezas.
• No retire el fl otador de
espuma de poliestireno.
• Limpie las partes difíciles
de alcanzar con un
hisopo de algodón o con
un cepillo de dientes.
Flotador
Cuando sea difícil retirar los depósitos de agua
Llene la Bandeja del humidifi cador
1
hasta la mitad con agua templada,
agregue una pequeña cantidad
de detergente suave para cocina
y deje remojando por cerca de 30
minutos.
Diluya el detergente según las
instrucciones en el envase.
Limpie las partes
difíciles de alcanzar
con un hisopo de
algodón o con un
cepillo de dientes.
Enjuague la bandeja del
2
humidifi cador con agua
ESPAÑOL
templada.
• Enjuague hasta retirar todos los
residuos de detergente.
• Un enjuague inadecuado puede
producir un olor a detergente o
cambios en la forma o color de la
unidad principal.
Vuelva a colocar el fi ltro del humidifi cador y
4
la bandeja del humidifi cador en la unidad.
El fi ltro del humidifi cador no encajará
si se coloca al revés. Asegúrese de
que no haya ningún espacio entre
la bandeja del humidifi cador y la
unidad al colocarla nuevamente
en la unidad. La unidad no podrá
funcionar correctamente si la bandeja
del humidifi cador no es colocada
correctamente en la unidad.
Si el fl otador de espuma de poliestireno
se sale, reemplácelo insertando las
lengüetas del flotador en los agujeros
de la bandeja del humidifi cador como se
muestra en el diagrama.
Inserte la lengüeta del
fl otador en el agujero.
Color:Gris
PRECAUCIÓN
• Use sólo detergentes suaves para
cocina para limpiar la bandeja
del purificador. Usar químicos o
detergentes no apropiados, puede
causar deformación, decoloración,
agrietamiento (fuga de agua).
Inserte el fl otador
debajo de esta
lengüeta.
Inserte la lengüeta en
el otro lado del fl otador
dentro del agujero.
S-13
Page 62

CUIDADO Y MANTENIMIENTO
FILTRO DEL HUMIDIFICADOR
Ciclo de cuidado
La frecuencia del ciclo de mantenimiento dependerá de la dureza o la cantidad de impurezas del
agua que use; mientras más dura sea el agua, mayor será la frecuencia del decapado.
Tenga cuidado de no derramar agua cuando limpie el fi ltro.
Retire el tanque de agua y la
1
bandeja del humidifi cador.
Una vez al mes o cuando la luz del indicador del fi ltro esté encendida.
Enjuague el fi ltro del
5
humidifi cador varias veces con
agua templada para retirar todos
Filtro del humidifi cador
Bandeja del
humidifi cador
Tanque de
agua
Bandeja del
humidifi cador
los residuos de la solución.
El enjuague inadecuado puede producir
olor y afectar el funcionamiento y/o el
aspecto de la unidad.
* No restriegue el filtro
del humidificador, sólo
enjuague suavemente
con agua templada.
Coloque el fi ltro del humidifi cador
6
Retire el fi ltro del humidifi cador
2
de la bandeja del humidifi cador.
Evite derramar agua de la bandeja del
humidifi cador.
Preparación de la solución
3
decapante.
Para decapar use ácido cítrico, de venta
en algunas farmacias, o jugo de limón
puro embotellado. Elija uno y prepare la
solución decapante.
<Para usar ácido cítrico>
Disuelva 3 cucharaditas de ácido cítrico
y 2 1/2 tazas de agua templada en un
recipiente adecuado y revuelva bien.
<Para usar jugo de limón>
Use sólo jugo de limón puro embotellado
sin pulpa (cuélelo de ser necesario).
Combine 1/4 de taza de jugo de limón y
3 tazas de agua templada en un
recipiente lo sufi cientemente grande
como para soportar el fi ltro del
humidifi cador y revuelva bien.
Remoje el fi ltro del
4
humidifi cador en la solución
antes de limpiarlo.
Cuando se usa jugo de
limón, se recomienda
remojar por más tiempo
que cuando se usa ácido
cítrico.
en la bandeja del humidifi cador
y vuelva a colocar la bandeja del
humidifi cador en la unidad.
•
El filtro del humidificador no encajará si
se coloca al revés. Asegúrese de que no
haya ningún espacio entre la bandeja
del humidificador y la unidad al colocarla
nuevamente en la unidad. La unidad no podrá
funcionar correctamente si la bandeja del
humidifi cador no es colocada correctamente
en la unidad.
•
Cuando no use la
unidad por un largo
período de tiempo,
seque completamente
el fi ltro del humidifi cador
antes de reinstalarlo.
Conecte la unidad, enciéndala,
7
y presione por más de 3
segundos el botón Reset
(Restablecer), ubicado en la
pantalla, para reiniciar el fi ltro.
Usted observará sedimentos de color
marrón rojizo o blanco formándose en
la superfi cie del fi ltro del humidifi cador.
Estas impurezas (calcio, etc.) se deben
a las impurezas que contiene el agua de
grifo; esto no es un defecto.
Reemplace el fi ltro del
humidifi cador cuando
esté completamente
cubierto de sedimentos
de color blanco.
S-14
Page 63

PAUTAS PARA REEMPLAZAR EL FILTRO
La duración del filtro variará dependiendo del ambiente de la habitación, el uso y la
ubicación de la unidad. Si el polvo o el olor persisten, reemplace los fi ltros.
(Consulte “Lea antes de usar su nuevo purifi cador de aire”)
Guía para programar el reemplazo del fi ltro
Filtro True HEPA
La duración del fi ltro se puede reducir en gran medida dependiendo del ambiente de la habitación.
El humo de cigarro, la caspa de las mascotas y otras partículas transportadas por el aire pueden
reducir la duración del fi ltro. Revise los fi ltros regularmente y reemplácelos de ser necesario.
Filtro desodorizador lavable
El fi ltro puede usarse varias veces después de lavarlo, o se puede reemplazar.
Filtro del humidifi cador
La duración del fi ltro se puede reducir en gran medida dependiendo del ambiente de la
habitación. Aunque no hayan pasado 2 años, reemplace el fi ltro del humidifi cador si observa lo
siguiente:
• Sedimentos minerales (grumos blancos, negros o rojos) que no hayan sido eliminados después
de limpiarlo o si el fi ltro del humidifi cador aún está sucio.
• Los fi ltros están severamente dañados o combados.
Filtros de reemplazo
• Filtro True HEPA: 1unidad
Modelo FZ-C150HFU
• Filtro desodorizador lavable: 1unidad
Modelo FZ-C150DFU
• Filtro humidifi cador: 1unidad
Modelo FZ-C100MFU
Hasta 5 años después de abrirlo
Hasta 5 años después de abrirlo
Hasta 2 años después de abrirlo
Marco del fi ltro (gris)
(gris)
Filtro del humidifi cador
(blanco)
Marco del fi ltro (blanco)
ESPAÑOL
Reemplazo de los fi ltros
1. Reemplace los fi ltros de acuerdo con las instrucciones proporcionadas con los fi ltros de reemplazo.
2. Use las etiquetas de fecha como recordatorio para cuando sea necesario reemplazar los fi ltros.
Eliminación de los fi ltros
Elimine los fi ltros usados de acuerdo con todas las leyes y reglamentos locales.
Materiales de los fi ltros True HEPA:
• Filtro: Polipropileno • Marco: Poliéster
Materiales de los fi ltros desodorizadores lavables:
• Poliéster, rayón, carbón activado
Materiales del fi ltro humidifi cador:
• Rayón, poliéster
S-15
Page 64

LOCALIZACIÓN DE FALLAS
Antes de llamar solicitando servicio, revise el cuadro de localización de fallas a continuación, ya que
el problema puede no ser causado por fallas de la unidad.
SÍNTOMA SOLUCIÓN (no es una falla)
No se eliminan los olores ni el
humo.
El monitor frontal enciende la
luz verde aunque el aire está
contaminado.
El monitor frontal enciende la luz
naranja o roja aunque el aire esté
limpio.
Se escucha un chasquido o tic-tac
desde la unidad.
El aire descargado tiene un olor.
La unidad no opera cuando hay
humo de cigarrillo en el aire.
Se ilumina la luz del indicador
del fi ltro
• Limpie o reemplace los fi ltros si parece que están muy
sucios. (Vea S-11,S-12,S-14)
• El aire podría estar contaminado a la vez que la unidad
está conectada.
Desconecte la unidad, espere un minuto y vuelva a
conectarla.
• El funcionamiento del sensor resulta afectado si las
aberturas del sensor de polvo están sucias u obstruidas.
Limpie cuidadosamente los sensores de polvo (Vea
S-11).
• Los sonidos de chasquido o tic-tac pueden ser audibles
cuando la unidad está generando iones.
• Verifi que si los fi ltros están muy sucios.
• Limpie o reemplace los fi ltros.
• Los purifi cadores de aire Plasmacluster podrían producir
un ligero olor. Esto es normal y es resultado de los
Iones Plasmacluster que refrescan el aire.
• ¿Está instalada la unidad en una ubicación en la que es
difícil que el sensor detecte el humo de cigarrillo?
• ¿Están bloqueadas u obstruidas las aberturas del
sensor de polvo? (En este caso, limpie las aberturas.)
(Vea S-11)
• Después de limpiar o cambiar los fi ltros, conecte el
cable de alimentación a un tomacorriente y presione el
botón Filter Reset (Restablecer fi ltro). (Vea S-11)
El monitor frontal está apagado.
La luz del indicador de suministro
de agua no se ilumina cuando el
tanque está vacío.
La palanca del agua en el tanque no
disminuye o lo hace lentamente.
Las luces del monitor frontal
cambiar de color frecuentemente.
• Check to see if the Lights OFF Mode selected. De ser
así, entonces presione el botón Lights Control (Control
de luces) para activar las luces del indicador. (Vea S-10)
• Revise el fl otador de espuma de poliestireno para
detectar impurezas. Limpie la bandeja del humidifi cador.
Asegúrese de que la unidad esté colocada en una
superfi cie nivelada.
• Verifi que si la bandeja del humidifi cador y el tanque de
agua están instalados correctamente. Revise el fi ltro del
humidifi cador.
• Limpie o reemplace el fi ltro cuando esté muy sucio
(Vea S-14 y S-15). Verifi que si se ha seleccionado el
modo de Aire Limpio y Humidifi cación.
• Las luces del monitor de polvo cambian automáticamente
de color cuando el sensor de polvo detecta impurezas.
S-16
Page 65

MENSAJES DE ERROR
Si ocurre un error, comuníquese con el Centro de servicio de Sharp.
INDICACIÓN
DIGITAL
SEÑAL LUMINOSA DETALLES DE ERROR SOLUCIÓN
Destello de la luz del
indicador de aire limpio y
humedad
Destello de la luz del
indicador de velocidad del
ventilador ‘
Destello de la luz del
indicador del limpieza rápida.
Destello de la luz del
indicador de aire limpio.
Destello de la luz del indicador de velocidad del ventilador ‘
’ (BAJO).
’.
Filtro de humedad
anormal
Motor del ventilador
anormal
Temperatura anormal sensor de humedad
Problema en el tablero
de circuito
Verifi que si el fi ltro
humidifi cador, la bandeja
humidifi cadora y el tanque
de agua están instalados
adecuadamente y vuelva a
ENCENDER la alimentación
eléctrica.
APAGUE la alimentación
eléctrica para cancelar el
mensaje de error, espere un
minuto y después ENCIENDA.
Desconecte la unidad,
espere un minuto y vuelva a
conectarla.
ESPAÑOL
Destello de la luz del indicador de velocidad del ventilador ‘
’.
S-17
Page 66

ESPECIFICACIONES
Modelo
Fuente de alimentación
Ajuste de velocidad del ventilador
Velocidad del ventilador (CFM)
AIRE LIMPIO
AIRE LIMPIO Y
HUMIDIFICADOR
Superfi cie de área aplicable *1
CADR (Polvo/Humo/Polen)
Capacidad del tanque de agua (gallon)
Sensores
Tipo de fi ltro
Longitud del cable
Dimensiones
Peso
Potencia nominal (Vatios)
Nivel de ruido (dBA)
Velocidad del ventilador (CFM)
Potencia nominal (Vatios)
Nivel de ruido (dBA)
Humidifi cación (pintas/hora)*2
Recolección de polvo
Desodorización
KC-850U
120 V 60 Hz
MAX MED LOW
194 88 28
50 9 3,5
51 34 19
187 88 49
43 11 6,6
50 34 23
1,3 0,7
254 sq.ft (23,6 m
164 / 164 / 174
0,96
Polvo/temperatura y humedad
True HEPA con control de microorganismos
Desodorizante lavable
6,5 pies (2,0m)
378mm (Ancho) × 265mm (Prof.) × 586mm (Alto)
7
/8 plug. (Ancho) × 10 1/2 plug. (Prof.) × 23 plug. (Alto)
14
21,4 lbs (9,7 kg)
2
)
0,5
*1 • El área de la superfi cie del piso aplicable es apropiada para operar la unidad a la máxima velocidad del ventilador.
• El área del tamaño recomendado de habitación indica el espacio en el cual se puede eliminar una cierta cantidad de
partículas de polvo en 30 minutos.
*2 • El total de humidifi cación cambia de acuerdo con la temperatura y humedad en el interior y exterior.
El total de humidifi cación aumenta cuando aumenta la temperatura o cuando disminuye la humedad.
El total de humidifi cación disminuye cuando disminuye la temperatura o cuando aumenta la humedad.
• Condiciones de medición : 68ºF(20ºC), 30% humedad (JEM1426)
Energía de reserva
Para operar los circuitos eléctricos mientras el cable de alimentación está insertado en el tomacorriente
de pared, este producto consume cerca de 0,4 vatios de energía de reserva.
Para ahorrar energía eléctrica, desenchufe el cable de energía cuando no esté usando la unidad.
S-18
Page 67

ESPAÑOL
Page 68

SHARP ELECTRONICS CORPORATION
Sharp Plaza, Mahwah,
New Jersey 07495-1163 U.S.A.
SHARP ELECTRONICS OF CANADA LTD.
335 Britannia Road East Mississauga,
Ontario L4Z 1W9 Canada
SHARP CORPORATION
Osaka, Japan
SHARP CORPORATION
Osaka, Japan
Printed in China / Impreso en China
TINS-A401KKRZ
1
 Loading...