

Page 1
<ドコモ インフォメーションセンター>
2011/3/23版
■ドコモの携帯電話からの場合
(局番なしの)151(無料)
※
一般電話などからはご利用になれません。
■一般電話などからの場合
※一部のIP電話からは接続できない場合があります。
●番号をよくご確認の上、お間違いのないようにおかけください。
●
各種手続き、故障・アフターサービスについては、上記お問い合わせ先にご連絡いただくか、ドコモホームページ、iモードサイト
にてお近くのドコモショップなどにお問い合わせください。
ドコモホームページ http://www.nttdocomo.co.jp/
<ドコモ インフォメーションセンター>
ドコモの携帯電話からの場合
滞在国の国際電話
アクセス番号
*一般電話などでかけた場合には、日本向け通話料がかかります。
※SH-10Cからご利用の場合は、+81-3-6832-6600でつながります。
(「+」は「0」ボタンを1秒以上押します。)
一般電話などからの場合
<ユニバーサルナンバー>
ユニバーサルナンバー用
国際識別番号
*滞在国内通話料などがかかる場合があります。
※主要国の国際電話アクセス番号/ユニバーサルナンバー用国際識
別番号については、ドコモの「国際サービスホームページ」をご
覧ください。
●紛失・盗難などにあわれたら、速やかに利用中断手続きをお取りください。
●お客様が購入されたFOMA端末に故障が発生した場合は、ご帰国後にドコモ指定の故障取扱窓口へご持参ください。
総合お問い合わせ先
■ドコモの携帯電話からの場合
(局番なしの)113(無料)
※
一般電話などからはご利用になれません。
■一般電話などからの場合
0120-800-000
海外での紛失、盗難、精算などについて
(24時間受付)
※一部のIP電話からは接続できない場合があります。
受付時間 24時間 (年中無休)受付時間 午前9:00~午後8:00 (年中無休)
iモードサイト ⅰMenu お客様サポート ドコモショップ
<ネットワークオペレーションセンター>
ドコモの携帯電話からの場合
-81-3-6832-6600
*
(無料)
滞在国の国際電話
アクセス番号
*一般電話などでかけた場合には、日本向け通話料がかかります。
※SH-10Cからご利用の場合は、+81-3-6718-1414でつながります。
(「+」は「0」ボタンを1秒以上押します。)
一般電話などからの場合
<ユニバーサルナンバー>
-8000120-0151
◎公共の場所で携帯電話をご利用の際は、周囲の方への心くばりを忘れずに。
環境保全のため、不要になった電池は
NTTドコモまたは代理店、リサイクル
協力店などにお持ちください。
*
ユニバーサルナンバー用
国際識別番号
*滞在国内通話料などがかかる場合があります。
※主要国の国際電話アクセス番号/ユニバーサルナンバー用国際識
別番号については、ドコモの「国際サービスホームページ」をご
覧ください。
再生紙を使用しています
故障お問い合わせ先
0120-800-000
海外での故障について
(24時間受付)
-81-3-6718-1414
-8005931-8600
*
(無料)
*
’11.●(1版)
TINSJA816AFZZ
11* **.* ** SM***
SH-10C
SH-10C
取扱説明書
取扱説明書
’11.●
1
’11.●
Page 2
ハンズフリーに設定して通話す
注意
る際や、着信音が鳴っていると
きなどは、必ずFOMA端末を耳
から離してください。
また、イヤホンマイクなどを
FOMA端末に装着し、ゲームや
音楽再生をする場合は、適度な
ボリュームに調節してくださ
い。
音量が大きすぎると難聴の原因となります。
また、周囲の音が聞こえにくいと、事故の原因と
なります。
Earphone Signal Level
The maximum output voltage for the music
player function, measured in accordance with
EN 50332-2, is 28.0 mV.
心臓の弱い方は、着信バイブ
レータ(振動)や着信音量の設定
に注意してください。
心臓に悪影響を及ぼす原因となります。
医用電気機器などを装着してい
る場合は、医用電気機器メーカ
もしくは販売業者に、電波によ
る影響についてご確認の上ご使
用ください。
医用電気機器などに悪影響を及ぼす原因となり
ます。
高精度な制御や微弱な信号を取
り扱う電子機器の近くでは、
FOMA端末の電源を切ってくだ
さい。
電子機器が誤動作するなどの悪影響を及ぼす原
因となります。
ご注意いただきたい電子機器の例
補聴器、植込み型心臓ペースメーカおよび植込み
型除細動器、その他の医用電気機器、火災報知器、
自動ドア、その他の自動制御機器など。植込み型
心臓ペースメーカおよび植込み型除細動器、その
他の医用電気機器をご使用される方は、当該の各
医用電気機器メーカもしくは販売業者に電波に
よる影響についてご確認ください。
万が一、ディスプレイ部やカメ
ラのレンズを破損した際には、
割れたガラスや露出したFOMA
端末の内部にご注意ください。
ディスプレイ部の表面には保護フィルム、カメラ
のレンズの表面にはプラスチックパネルを使用
し、ガラスが飛散りにくい構造となっております
が、誤って割れた破損部や露出部に触れますと、
けがの原因となります。
アンテナ、ストラップなどを
持ってFOMA端末を振り回さな
いでください。
本人や他の人に当たり、けがなどの事故の原因と
なります。
FOMA端末が破損したまま使用
しないでください。
火災、やけど、けが、感電の原因となります。
モーショントラッキングやモー
ションセンサーのご使用にあ
たっては、必ず周囲の安全を確
認し、FOMA端末をしっかりと
握り、必要以上に振り回さない
でください。
けがなどの事故の原因となります。
誤ってディスプレイを破損し、
液晶など内部の物質が漏れた場
合には、顔や手などの皮膚につ
けないでください。
失明や皮膚に傷害を起こす原因となります。
液晶など内部の物質が目や口に入った場合には、
すぐにきれいな水で洗い流し、直ちに医師の診断
を受けてください。
また、皮膚や衣類に付着した場合は、すぐにアル
コールなどで拭き取り、石鹸で水洗いしてくださ
い。
ディスプレイの表面には、落下
や衝撃等により破損した場合の
安全性確保(強化ガラスパネル
の飛散防止)を目的とする保護
フィルムがあります。このフィ
ルムは無理にはがしたり、傷つ
けたりしないでください。
フィルムをはがして使用した場合、ディスプレイ
が破損したときに、けがの原因となることがあり
ます。
目
次
/
注
意
事
項
9
Page 3
Quick Manual
EN60825-1:1994 A1:2002 & A2:2001
CLASS1
LED Product
e:
ɜ
:
i
(
(i
n
(
CAUTION
Use only the battery packs and adapters specified
by NTT DOCOMO for use with the FOMA terminal.
May cause fires, burns, bodily injury or electric shock.
Do not throw the battery pack into a fire.
The battery pack may catch fire, explode, overheat or
leak.
Do not dispose of used battery packs in ordinary
garbage.
May cause fires or damage to the environment. Place
tape over the terminals to insulate unnecessary battery
packs, and take them to a docomo Shop, retailer or
institution that handles used batteries in your area.
Avoid using the handset in extremely high or low
temperatures.
Use the FOMA terminal within the range of a
temperature between 5°C and 40°C (for temperatures
of 36°C or higher, such as in a room with a bath, limit
usage to a short period of time) and a humidity between
45% and 85%.
Charge battery in areas where ambient temperature
is between 5°C and 35°C.
Do not point the illuminated light directly at
someone’s eyes. Especially when you shoot still
pictures or moving pictures of young children, keep
1 m or more distance from them.
Do not use Picture Light near people’s faces. Eyesight
may be temporarily affected leading to accidents.
Picture Light
CAUTION:
Use of controls, adjustments or performance of
procedure other than those specified herein may result
in hazardous radiation exposure. As the emission level
from Picture Light LED used in this product is harmful to
the eyes, do not attempt to disassemble the cabinet.
Servicing is limited to qualified servicing station only.
Picture light source LED characteristics
a) Continuous illumination
b) Wavelength
c) Maximum output
White: ɜɜ-ɜɜ nm
d
Red: ɜɜ-ɜɜ nm
te:
White: ɜɜ mW (inside FOMA terminal ɜɜ mW)
:
Red: ɜɜ mW (inside FOMA terminal ɜɜ mW)
al
al
ఈ
116
Page 4
Before Using
Notch
IC (gold)
Tray
Tab
Notch
Tabs
With a recycle mark
side up
Inserting UIM
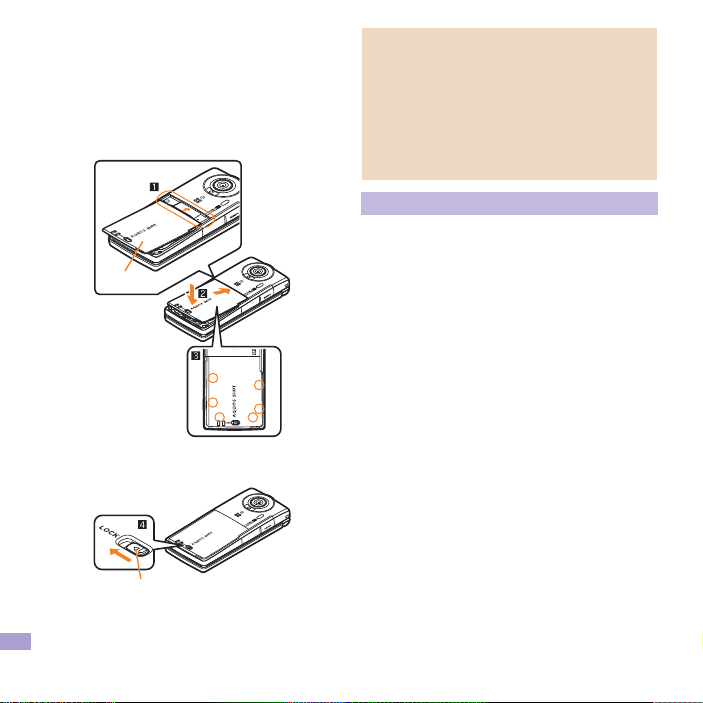
1 Hook a finger on the tab and pull out the tray (1)
Pull out the tray straight until it stops.
2 Hold the UIM with the IC
(gold) side turned up and
set on the tray (2)
3 Push the tray all the way in (3)
Note that inserting or removing the UIM forcibly
may damage the UIM or deform the tray.
Attaching battery pack
Perform with the FOMA terminal turned off and
closed while holding with your both hands.
The battery pack is not waterproof/dust-proof.
1 Slide the back cover lever in the direction of the
arrow (1) to unlock and remove the back cover
(2)
The FOMA terminal has a slot to remove the
back cover. Securely hold the FOMA terminal as
shown in the illustration to prevent excessive
force on the back cover and hook a nail on the
slot and remove the back cover upward.
Slot
2 Attach the battery
pack
Turn a recycle mark
side of the battery
pack up, match tabs
and attach the
battery pack.
その他
117
Page 5
3 Insert the tab of the top of the back cover into
Back cover
Securely push
tab areas down
with both hands
Lever
the FOMA terminal slot (1), attach it in the
direction of the arrow (2) and securely push
down with both hands (3)
The back of the back cover has also six tabs to
insert the back cover. Securely push tab areas
down with both hands so that gaps are not left
between the FOMA terminal and the back cover.
4 Slide the back cover lever in the direction of the
arrow (4) to lock
Using unnecessary force when attaching or
removing the battery pack may damage the
connector terminal for the battery pack (charger
terminal) on the FOMA terminal.
Securely close the back cover. If not closed
securely, the back cover may come off and the
battery pack may fall out due to vibration. May
damage the waterproof/dust-proof performance
and allow water to seep or dust to get in.
Charging
It is recommended that the accompanying desktop
holder be used for charging to prevent water from
seeping or dust from getting in caused by forgetting
to close the external connector terminal cover.
The AC adapter and desktop holder are not
waterproof/dust-proof. Never try to charge the
battery pack when the FOMA terminal is wet.
1 Turn the arrow side of the AC adapter connector
up and insert it into the connector terminal of the
desktop holder
Keep the connector parallel with the desktop
holder and securely push all the way in until it
clicks.
2 Insert the AC adapter power plug into an outlet
118
その他
Page 6
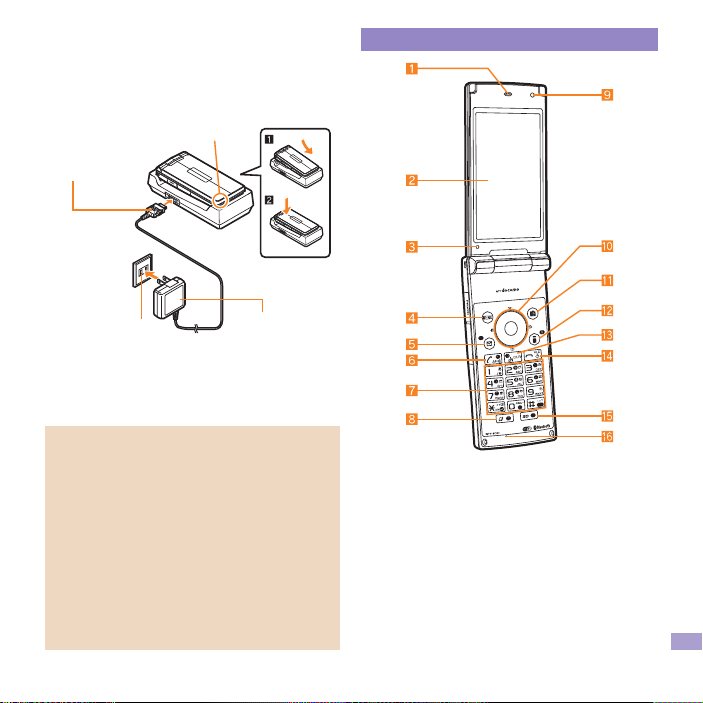
3 When placing the FOMA terminal in the desktop
Charging LED
Connector (with
the arrow side up)
100V AC
outlet
FOMA AC
Adapter 01/02
Key illustrations may look different from actual keys.
holder, charge alert is heard, charging LED
illuminates, and charging starts
Put the bottom of the FOMA terminal on the
desktop holder (1) and push down until it clicks
(2).
4 Charging is complete when charge alert is heard
and charging LED turns off
Hold the desktop holder and lift the FOMA
terminal out.
Pull the AC adapter out of the outlet when left
unused for a long period of time.
When charge alert is not heard or when charging
LED does not illuminate, check that the FOMA
terminal is placed securely in the desktop holder
(except when terminal is turned off, manner mode
is set or charge alert is [OFF]).
When placing the FOMA terminal in the desktop
holder, be careful not to catch a strap, etc.
When switching to the viewer position with the
FOMA terminal set in the desktop holder, operate
with holding the FOMA terminal so that it does not
come off the desktop holder.
Part Names and Functions
その他
119
Page 7

1 Earpiece
2 Main display/Touch panel
3 Brightness sensor
4 z: MENU/Operation guidance key
5 m: Mail/Operation guidance key
6 s: Start/Hands-free key
7 1 to 9, *, 0 and #: Dial/Character entry
keys
8 $: Multi/VeilView key
9 Sub camera
a wt: Multi-guide key
b C: Camera/TV/Operation guidance key
c i (,): i-mode/Operation guidance key
d c (J): i-Channel/Clear key
e H: Po wer/End key
f y: 3D/TV key
g Mouthpiece/Microphone
h Called/Charging LED
i External connector terminal
j HDMI terminal (type D)
k Strap hole
l FOMA antenna
m Sub display
n GPS antenna
o microSD Card slot
p 1Seg antenna
q Main camera
r Picture Light
s b mark
t In frared port
u Speaker
v &: Side key
w Back cover
x Back cover lever
y Charger terminal
120
その他
Page 8

Main icons
Icon display area
Viewing display
Battery level
bbbb
(High b Low)
Signal status
bbb (Strong b Weak)
When [ ] appears, the handset is
outside the service area or in a
place with no signal.
Wi-Fi
Hands-free
GPS
i-mode mail/SMS/Area Mail/
Information received
i-αppli
3D/2D display
Alarm/Schedule
Bluetooth
Ir communication
i-mode
UIM error
Self mode
Music&Video Channel program
reservation
3G/GSM
VeilView
USB connection
Record message
Keypad dial lock
Manner mode
Silent/Vibrator
Public mode (Drive mode)
microSD Card
Software update
IC card lock
Music&Video Channel
Personal data lock
1Seg recording
その他
121
Page 9

Basic Operations
Turning power on
1 H (for at least 2 seconds)
Press H for at least 2 seconds to turn the power
off.
Changing screen display to English
1 In the Normal menu, [本体設定] (Setting)/[文字表
示/入力] (Text display/input)/[Select
language]/[English]
Making initial setting
1 [Date and time setting]/set the date and time
2 [Password]/register a terminal security code
3 [Keypad sound]/set the keypad sound
4 [Text size]/set the font size collectively
5 [Request permit/deny]/set GPS location
provision
6 C
Checking your own phone number
1 In the Normal menu, [Profile]
Character entry
Switching entry modes
1 In the character entry screen, m
2 Select the entry mode
Entering characters
Ex.) When entering “電話”
1 In the character entry screen, enter “でんわ”
でんわ: 4 (four times)/* (once)/0 (three
times)/r/0 (once)
To enter multiple characters assigned to the
same key: Enter a character/r/enter a
character
2 C
3 t
その他
122
Entering pictograms/symbols
1 In the character entry screen, C
To switch between pictogram/Deco-mail
pictogram/Deco-mail picture: C
To switch between single- an d double-byte
symbols: z
2 Select a pictogram/symbol
Entering emoticons
1 In the character entry screen, z/[Pict/Symbol/
Smiley]/[Smiley]
For a mail message: In the character entry
screen, z/[Quote phrase/data]/[Pict/Symbol/
Smiley]/[Smiley]
2 Select a category/select an emoticon
Changing ring tone
1 In the Normal menu, [Setting]/[Sound/
Vibration/Manner]/[Ring tone]
2 Select an item
; [Call ring tone]
; [Videophone]
; [Mail]/select an item
3 Set each item/C
Lock/Security
Changing terminal security code
1 In the Normal menu, [Setting]/[Lock/
Security]/[Change security code]/enter the
current terminal security code
2 Enter the new terminal security code
3 Enter the new terminal security code again
4 C
Changing network security code
1 In stand-by, i/[お客様サポート] (user
support)/[各種設定 (確 認・変 更・利 用 )] (settings
(check/change/use))/[ネットワーク暗証番号変
更] (change network security code)
Page 10

Changing i-mode password
1 In stand-by, i/[English]/[Options]/
[Change i-mode Password]
Setting PIN code
1 In the Normal menu, [Setting]/[Lock/
Security]/[UIM setting]
2 Select an item
; [Change PIN1 code]/enter the terminal security
code/enter the current PIN1 code/enter the
new PIN1 code/enter the new PIN1 code
again/C
; [Change PIN2 code]/enter the terminal security
code/enter the current PIN2 code/enter the
new PIN2 code/enter the new PIN2 code
again/C
; [PIN1 entry ON/OFF]/[ON]/enter the PIN1
code
Various lock functions Incoming call restriction
All lock
1 In the Normal menu, [Setting]/[Lock/
Security]/[Lock settings]/[All lock]/enter the
terminal security code
Omakase Lock
Omakase Lock is a service to lock the personal data
and IC card functions in case of loss, etc. by only your
request to DOCOMO via phone.
Refer to “Mobile Phone User’s Guide [Basic Usage]”
for details on Omakase Lock.
Set/Release Omakase Lock
s 0120-524-360 Office hours: 24 hours (in
Japanese only) (open all year round)
※ Unavailable from part of IP phones.
※ Omakase Lock can also be set/released from the
My docomo website using PCs.
Self mode
1 In the Normal menu, [Setting]/[Other setting]/
[Self mode]/select the setting/[Yes]
Personal data lock
1 In the Normal menu, [Setting]/[Lock/
Security]/[Lock settings]/[Personal data
lock]/enter the terminal security code/select
the setting
Keypad dial lock
1 In the Normal menu, [Setting]/[Lock/
Security]/[Keypad dial lock]/enter the
terminal security code/select the setting
Auto-key lock
1 In the Normal menu, [Setting]/[Lock/
Security]/[Lock settings]/[Auto-key lock]/
select the lock type/enter the terminal security
code/set each item/C
IC card lock
1 In stand-by, r (for at least 1 second)/[Yes]
Setting response to a call with no caller ID
1 In the Normal menu, [Setting]/[Lock/
Security]/[Call rejection setting]
2 Select an item
; [Anonymous]/enter the terminal security code
/set each item/C
; [Payphone]/enter the terminal security code/
set each item/C
; [Unavailable]/enter the terminal security code
/set each item/C
Rejecting a call from a caller unset in phonebook
1 In the Normal menu, [Setting]/[Lock/
Security]/[Call rejection setting]
2 [Unregistered caller]/enter the terminal
security code/select the setting
その他
123
Page 11

Voice/Videophone Calls
Making a voice/videophone call
1 In stand-by, enter a phone number
2 s (Phone)/C (V.phone)
3 H to end the call
Receiving a voice/videophone call
1 When a call is received, the ring tone sounds
and the called LED flashes
2 s
3 H to end the call
Making a call with redials/received
calls
1 In stand-by, r (I) (Redial)/q (M) (Received
calls)
2 Point the cursor to the history
3 s (Phone)/i (V.phone)
Using overseas
Making a call to outside the country you stay in
(including Japan)
1 In stand-by, enter “+” (0 for at least 1 second),
country code, area code (city code) and other
party’s phone number
When the area code (city code) begins with “0”,
omit the “0” when dialing (Include “0” when
making a call to some countries or regions such
as Italy).
2 s (Phone)/C (V.phone)
Making a call in country you stay
1 In stand-by, enter a phone number
2 s (Phone)/C (V.phone)
Making a call to WORLD WING user overseas
When you make a call to a WORLD WING user
overseas, you make a call as an international call to
Japan regardless of your country of stay.
1 In stand-by, enter “+” (0 for at least 1 second),
country code “81” (Japan) and the other party’s
mobile phone number excluding the first “0”
2 s (Phone)/C (V.phone)
Mail
Sending i-mode mail
1 In stand-by, m/[Compose message]
2 Select the TO field/enter an address
3 Select the SUB field/enter a subject
4 [Message]/enter a message
5 C
Checking new i-mode mail
1 In stand-by, m/[Check new mail/message]
Replying to i-mode mail
1 In the received mail details screen, z/[Reply/
Forward]
2 Select the reply method
3 Compose and send a mail
Displaying a mail in Inbox/Outbox/
Unsent box
1 In stand-by, m
2 Select a box
3 Select a mail
124
その他
Page 12

Phonebook
Adding phonebook entries
1 In the Normal menu, [TEL function]/
[Phonebook]/[Add to phonebook]/[UIM
operation]
2 Set each item/C
Camera
Shooting still pictures
1 In stand-by, C
2 t/&
3 t/&
Shooting moving pictures
1 In the Normal menu, [CAMERA/TV/MUSIC]/
[Camera]/[Movie shooting]
2 t/&
3 t/& to end shooting
4 [Save]
Displaying shot still pictures
1 In the Normal menu, [Data box]/[My picture]
2 [Camera] folder/select a still picture
Playing shot moving pictures
1 In the Normal menu, [Data box]/[i-motion/
Movie]
2 [Camera] folder/select a moving picture
Watching 1Seg
Setting channels
1 In the Normal menu, [CAMERA/TV/MUSIC]/
[1Seg]/[Channel setting]
When the confirmation screen appears: [Yes]/
proceed to step 3
2 z/[Create]
3 Select the registration method
; [Use preset]
; [Auto setting]/[Yes]
・ If you do not select an area: [No]/proceed to
step 6
4 Select an area
5 Select a prefecture/district
6 [Yes]
Watching 1Seg
1 In the Normal menu, [CAMERA/TV/MUSIC]/
[1Seg]/[Activate 1Seg]
Playing recorded videos
1 In the Normal menu, [Data box]/[1Seg]
2 [Video] folder/select a video
Music Playback
Using Music&Video Channel
The Music&Video Channel service is provided in
Japanese.
1 In the Normal menu, [CAMERA/TV/MUSIC]/
[Music&Video Channel]
2 Select a program
Using MUSIC Player
1 In the Normal menu, [Data box]/[MUSIC]
2 Select music data
その他
125
Page 13

Network Services
Setting Voice Mail Service
Voice Mail Service is a paid option (monthly fees apply)
that requires subscription.
1 In the Normal menu, [TEL function]/[Voice mail
service]
2 [Activate]/[Yes]/[Yes]/enter the ringing
time/[OK]
Setting Call waiting service
Call waiting service is a paid option (monthly fees apply)
that requires subscription.
1 In the Normal menu, [TEL function]/[Other
network service]/[Call waiting]
2 [Activate]/[Yes]/[OK]
Setting Call Forwarding Service
Call Forwarding Service is a free option (no monthly
fees) that requires subscription.
1 In the Normal menu, [TEL function]/[Other
network service]/[Call forwarding]
2 [Activate]/[Yes]/[Yes]/enter a phone
number/C/[Yes]/enter the ringing time/
[OK]
Osaifu-Keitai
Hold the b mark of the FOMA terminal over the
scanning device to use as electronic money or
railway tickets or to retrieve ToruCa.
When the FOMA terminal is stolen or lost,
immediately contact your provider of Osaifu-Keitai
compatible service for handling methods.
Bluetooth function
The Bluetooth word mark and logos are owned by
the Bluetooth SIG, INC.
and any use of such marks by NTT DOCOMO, INC.
is under license.
Other trademarks and trade names are those of their
respective owners.
Registering Bluetooth devices on
FOMA terminal
Switch the other party’s Bluetooth device to the
registration stand-by status in advance.
1 In the Normal menu, [Tool]/[Bluetooth]/[List/
cnnct/discnct]
The device list screen appears when registered
device exists. Press C and proceed to step 3.
2 [Yes]
3 Point the cursor to the Bluetooth device to
register/z/[Register Devices]
4 Enter the Bluetooth passkey
Connecting with Bluetooth devices
1 In the Normal menu, [Tool]/[Bluetooth]/[List/
cnnct/discnct]
2 Select a Bluetooth device to connect to
General Notes
Options and related devices
Battery Pack SH27
FOMA AC Adapter 01 for Global use
FOMA AC Adapter 01/02
Desktop Holder SH35
126
その他
Page 14
Main specifications
s
h
Size
Weight
Continuous
talk time
Continuous
stand-by
time
Charge
time
* Approximate value
FOMA/3G
GSM
FOMA
/3G
GSM
FOMA AC
Adapter 01/02
FOMA DC
Adapter 01/02
ɜɜ (H) × ɜɜ (W) ×
ɜɜ (D) mm (ɜɜ at
thickest point) (when
folded)
ɜɜ Ũ (with battery
pack attached)
Voice call: ɜɜ min
Videophone: ɜɜ min
Voice call: ɜɜ min
3G/
GSM
When mobile: ɜɜ hr
setting:
3G
3G/
When mobile: ɜɜ hr
GSM
setting:
At rest: ɜɜ hr
AUTO
3G/
GSM
At rest: ɜɜ hr
setting:
AUTO
ɜɜ min
ɜɜ min
Specific Absorption Rate (SAR) of
Mobile Phone
This model SH-10C mobile phone complies with
*
*
*
*
*
*
Japanese technical regulations and international
guidelines regarding exposure to radio waves.
This mobile phone was designed in observance of
Japanese technical regulations regarding exposure to
radio waves (*1) and limits to exposure to radio waves
*
recommended by a set of equivalent international
*
guidelines. This set of international guidelines was set
*
out by the International Commission on Non-Ionizing
Radiation Protection (ICNIRP), which is in collaboration
with the World Health Organization (WHO), and the
*
permissible limits include a substantial safety margin
designed to assure the safety of all persons, regardless
of age and health condition.
*
The technical regulations and international guidelines
set out limits for radio waves as the Specific Absorption
Rate, or SAR, which is the value of absorbed energy in
any 10 grams of tissue over a 6-minute period. The
SAR limit for mobile phones is 2.0 W/kŨ. The highest
SAR value for this mobile phone when tested for use at
the ear is ɜɜ W/kŨ. There may be slight differences
i
T
between the SAR levels for each product, but they all
satisfy the limit.
The actual SAR of this mobile phone while operating
can be well below that indicated above. This is due to
automatic changes to the power level of the device to
ensure it only uses the minimum required to reach the
network. Therefore in general, the closer you are to a
base station, the lower the power output of the device.
This mobile phone can be used in positions other than
against your ear. This mobile phone satisfies the
international guidelines when used with a carrying case
or a wearable accessory approved by NTT DOCOMO,
INC. (*2). In case you are not using the approved
accessory, please use a product that does not contain
any metals, and one that positions the mobile phone at
least 1.5 cm away from your body.
ఈ
127
Page 15

The World Health Organization has stated that present
scientific information does not indicate that there are
harmful effects attributed to the use of mobile devices.
They recommend that if you are worried about your
exposure then you can limit your usage or simply use a
hands-free kit to keep the mobile device away from the
head and body.
Please refer to the WHO website if you would like more
detailed information.
http://www.who.int/docstore/peh-emf/publications/
facts_press/fact_english.htm
Please refer to the websites listed below if you would
like more detailed information regarding SAR.
Ministry of Internal Affairs and Communications
Website:
http://www.tele.soumu.go.jp/e/sys/ele/index.htm
Association of Radio Industries and Businesses
Website:
http://www.arib-emf.org/index02.html (in Japanese
only)
NTT DOCOMO, INC. Website:
http://www.nttdocomo.co.jp/english/product/sar/
SHARP Corporation Website:
http://www.sharp.co.jp/products/menu/phone/cellular/
sar/index.html
(in Japanese only)
*1 Technical regulations are defined by the Ministerial
Ordinance Related to Radio Law (Article 14-2 of
Radio Equipment Regulations).
*2 Regarding the method of measuring SAR when
using mobile phones in positions other than against
the ear, international standards (IEC62209-2) were
set in March of 2010. On the other hand, technical
regulation is currently being deliberated on by
national council (As of ɜɜ, 2011).
European RF Exposure Information
Your mobile device is a radio transmitter and receiver. It
is designed not to exceed the limits for exposure to
radio waves recommended by international guidelines.
These guidelines were developed by the independent
scientific organization ICNIRP and include safety
margins designed to assure the protection of all
persons, regardless of age and health.
The guidelines use a unit of measurement known as the
Specific Absorption Rate, or SAR. The SAR limit for
mobile devices is 2 W/kŨ and the highest SAR value for
this device when tested at the ear was ɜɜ W/kŨ
As SAR is measured utilizing the devices highest
transmitting power the actual SAR of this device while
operating is typically below that indicated above. This is
due to automatic changes to the power level of the
device to ensure it only uses the minimum level
required to reach the network.
The World Health Organization has stated that present
scientific information does not indicate the need for any
special precautions for the use of mobile devices. They
note that if you want to reduce your exposure then you
can do so by limiting the length of calls or using a
hands-free device to keep the mobile phone away from
the head.
* The tests are carried out in accordance with
international guidelines for testing.
*
.
128
ఈ
Page 16

FCC Notice
Hereby, Sharp Telecommunications of Europe
Ltd, declares that this SH-10C is in compliance
with the essential requirements and other
relevant provisions of Directive 1999/5/EC.
A copy of the original declaration of conformity
can be found at the following Internet address:
http://www.sharp.co.jp/k-tai/ (in Japanese only)
Declaration of Conformity
In some countries/regions, such as France, there are
restrictions on the use of Wi-Fi. If you intend to use
Wi-Fi on the handset abroad, check the local laws
and regulations beforehand.
T his device complies with part 15 of the FCC Rules.
Operation is subject to the following two conditions:
(1) This device may not cause harmful interference,
and (2) this device must accept any interference
received, including interference that may cause
undesired operation.
Ch anges or modifications not expressly approved by
the manufacturer responsible for compliance could
void the user’s authority to operate the equipment.
Information to User
This equipment has been tested and found to comply
with the limits of a Class B digital device, pursuant to
Part 15 of the FCC Rules. These limits are designed to
provide reasonable protection against harmful
interference in a residential installation. This equipment
generates, uses and can radiate radio frequency
energy and, if not installed and used in accordance with
the instructions, may cause harmful interference to
radio communications.
However, there is no guarantee that interference will not
occur in a particular installation; if this equipment does
cause harmful interference to radio or television
reception, which can be determined by turning the
equipment off and on, the user is encouraged to try to
correct the interference by one or more of the following
measures:
1. Reorient/relocate the receiving antenna.
2. Increase the separation between the equipment and
receiver.
3. Connect the equipment into an outlet on a circuit
different from that to which the receiver is
connected.
4. Consult the dealer or an experienced radio/TV
technician for help.
FCC RF Exposure Information
Your handset is a radio transmitter and receiver.
It is designed and manufactured not to exceed the
emission limits for exposure to radio frequency (RF)
energy set by the Federal Communications
Commission of the U.S. Government.
The guidelines are based on standards that were
developed by independent scientific organisations
through periodic and thorough evaluation of scientific
studies. The standards include a substantial safety
margin designed to assure the safety of all persons,
regardless of age and health.
その他
129
Page 17

The exposure standard for wireless handsets employs
is
d
a unit of measurement known as the Specific
Absorption Rate, or SAR. The SAR limit set by the FCC
is 1.6 W/kŨ.
The tests are performed in positions and locations (e.g.,
at the ear and worn on the body) as required by the
FCC for each model. The highest SAR value for this
model handset when tested for use at the ear is ɜɜ W/
an
kŨ and when worn on the body, as described in this
user guide, is ɜɜ W/kŨ.
Body-worn Operation; This device was tested for typical
body-worn operations with the back of the handset kept
1.5 cm from the body. To maintain compliance with
FCC RF exposure requirements, use accessories that
maintain a 1.5 cm separation distance between the
user’s body and the back of the handset. The use of
beltclips, holsters and similar accessories should not
contain metallic components in its assembly.
The use of accessories that do not satisfy these
requirements may not comply with FCC RF exposure
requirements, and should be avoided.
The FCC has granted an Equipment Authorization for
this model handset with all reported SAR levels
evaluated as in compliance with the FCC RF emission
guidelines. SAR information on this model handset is on
file with the FCC and can be found under the Display
Grant section of http://www.fcc.gov/oet/ea/fccid/ after
searching on FCC ID APYHRO00145.
Additional information on Specific Absorption Rates
(SAR) can be found on the Cellular
Telecommunications & Internet Association (CTIA)
Website at http://www.ctia.org/.
s
Inquiries
General inquiries
<docomo Information Center>
(Business hours: 9:00 a.m. to 8:00 p.m.)
s 0120-005-250 (toll free)
ɦ Service available in: English, Portuguese, Chinese,
Spanish, Korean.
ɦ Unavailable from part of IP phones.
(Business hours: 9:00 a.m. to 8:00 p.m. (open all year
round))
From DOCOMO mobile phones
(In Japanese only)
r (No prefix) 151 (toll free)
ɦ Unavailable from land-line phones, etc.
From land-line phones
(In Japanese only)
s 0120-800-000 (toll free)
ɦ Unavailable from part of IP phones.
Please confirm the phone number before you dial.
Repairs
(Business hours: 24 hours (open all year round))
From DOCOMO mobile phones
(In Japanese only)
r (No prefix) 113 (toll free)
ɦ Unavailable from land-line phones, etc.
From land-line phones
(In Japanese only)
s 0120-800-000 (toll free)
ɦ Unavailable from part of IP phones.
Please confirm the phone number before you dial.
130
ఈ
Page 18
For Applications or Repairs and After-Sales Service,
please contact the above-mentioned information
center or the docomo Shop etc. near you on the NTT
DOCOMO website or the i-mode site.
NTT DOCOMO website: http://
www.nttdocomo.co.jp/english/
i-mode site: iMenu/お客様サポート (user
support)/ドコモショップ (docomo Shop) (In
Japanese only)
Loss or theft of FOMA terminal or
payment of cumulative cost overseas
<docomo Information Center>
(available 24 hours a day)
From DOCOMO mobile phones
International call access
code for the country you
stay
*
You are charged a call fee to Japan when calling
from a land-line phone, etc.
※ If you use SH-10C, you should dial the number
+81-3-6832-6600
(to enter “+”, press the “0” key for at least 1
second).
From land-line phones
<Universal number>
Universal number
international prefix
* You might be charged a domestic call fee
according to the call rate for the country you
stay.
※ For international call access codes for major
countries and universal number international prefix,
refer to DOCOMO International Services website.
-81-3-6832-6600* (toll
free)
-8000120-0151
*
Failures encountered overseas
<Network Support and Operation Center>
(available 24 hours a day)
From DOCOMO mobile phones
International call access
code for the country you
stay
* You are charged a call fee to Japan when
calling from a land-line phone, etc.
※ If you use SH-10C, you should dial the number
+81-3-6718-1414
(to enter “+”, press the “0” key for at least 1
second).
From land-line phones
<Universal number>
Universal number
international prefix
* You might be charged a domestic call fee
according to the call rate for the country you
stay.
※ For international call access codes for major
countries and universal number international prefix,
refer to DOCOMO International Services website.
If you lose your FOMA terminal or have it stolen,
immediately take the steps necessary for
suspending the use of the FOMA terminal.
If the FOMA terminal you purchased is damaged,
bring your FOMA terminal to a repair counter
specified by DOCOMO after returning to Japan.
-81-3-6718-1414* (toll
free)
-8005931-8600
*
その他
131
 Loading...