

Page 1
Icon Message Page
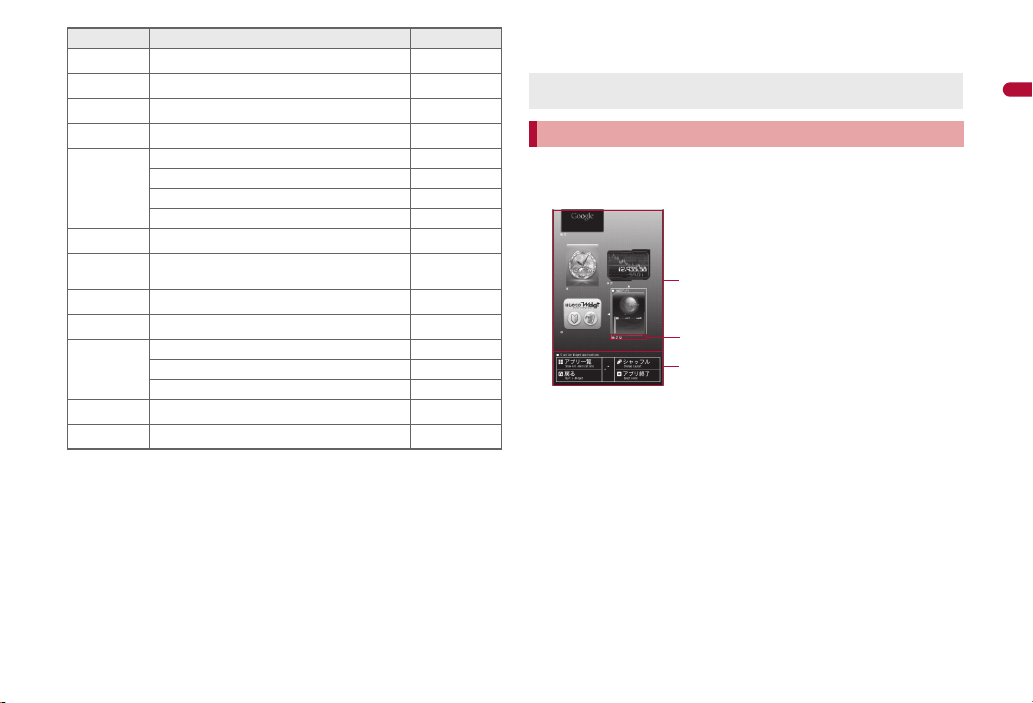
1Area where Widget appli is pasted
2Setting status icons for Widget appli
For details on the setting status icons
nP. 263
3Operation guidance
Available menus appear.
3
1
2
i-Widget screen
xx New Message R P. 157
L
xx New Message F P. 157
Q
xx new ToruCa P. 292
D
5
a
G
*1 When the 2in1 mode is set to [Dual mode], the number of [A mode] and
[B mode] appears each.
*2 The message that appears differs depending on the menu screen or
position.
In stand-by, a stock icon appears/t.
1
: When both the stock icon and the popup message appear, switch the
: Place the pointer over the stock icon in the stand-by display with
: Touch stock icons in the viewer position to display the message.
New auto send result P. 137
Update complete P. 496
Check update P. 496
6
Update required P. 494
Check for update P. 494
USB mode setting P. 346
D
Download successful (Music&Video
t
Channel)
Download failed (Music&Video Channel) P. 247
g
Charge limit exceeded P. 383
4
Send loc - No resp P. 306
Send loc - Resp P. 306
@
Send loc - Failed P. 306
New i-appli call P. 280
Custom menu/Basic menu/Menu
selection between the stock icon and the popup message with u.
Optical TOUCH CRUISER to display the message. Press t to
check details.
Touch again to check details.
*2
P. 247
P. 37
Select the stock icon/t.
2
: After the details are checked, the stock icon and message disappear.
Stock icons do not appear while the i-motion set as stand-by is played
or the i-appli stand-by is being activated.
Displaying and operating i-Widget
In the i-Widget screen, multiple i-Widget can be activated simultaneously
and viewed as a list.
For details on operation of i-Widget nP. 285
Before Using the Handset
33
Page 2
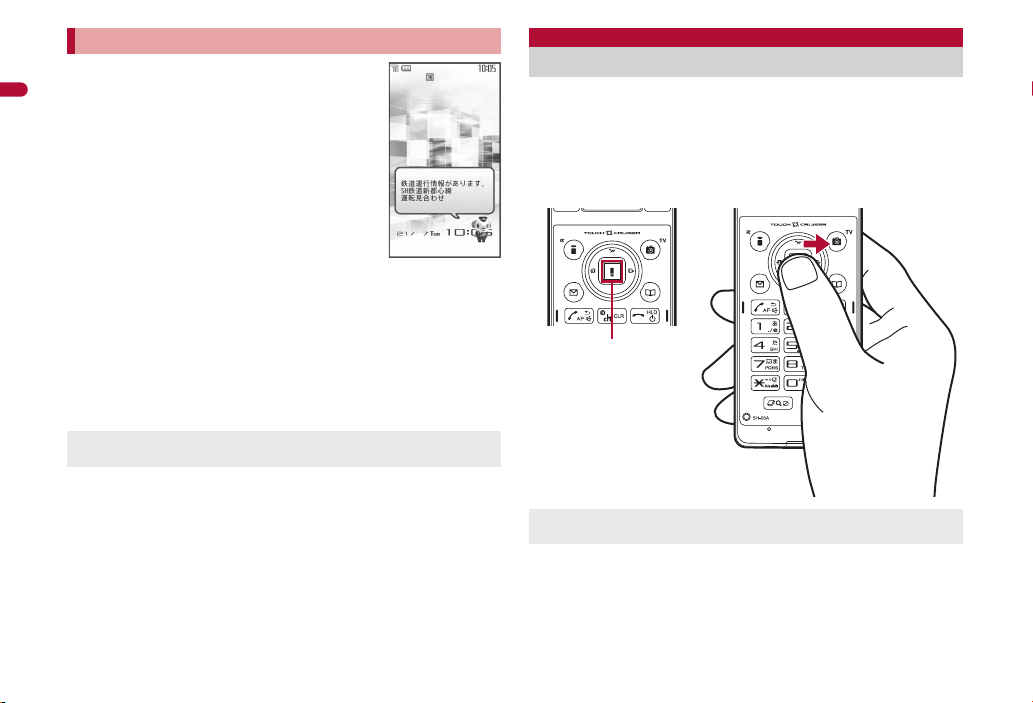
Activating i-concier with popup message
“
ひつじのしつじくん®”
©NTT DOCOMO
Operating range of
Optical TOUCH
CRUISER
Display popup messages in the stand-by display
when information is received. Activate i-concier with
the popup messages to check information details.
Before Using the Handset
In stand-by, a popup message appears/t.
1
: Alternatively, select the popup messages in the stand-by display with
Optical TOUCH CRUISER and press t to activate i-concier.
: In the viewer position, touch the popup message and point the
cursor. Then touch again to activate i-concier.
Select the popup message/t.
2
: The popup message disappears after activating i-concier.
Calendar or Stand-by memo does not appear while a popup message
appears.
Optical TOUCH CRUISER
Use the Optical TOUCH CRUISER to perform the same operations
as those for w of Multi-guide key (e.g. moving the cursor or
scrolling the screen) (Some operations may differ).
Move the pointer or cursor just as covering the whole operating range of
the Optical TOUCH CRUISER with finger while pressing a ball of the
finger.
The pointer or cursor moves in conjunction with sliding of the finger.
Depending on the screen, the Optical TOUCH CRUISER may not be
available.
34
Page 3
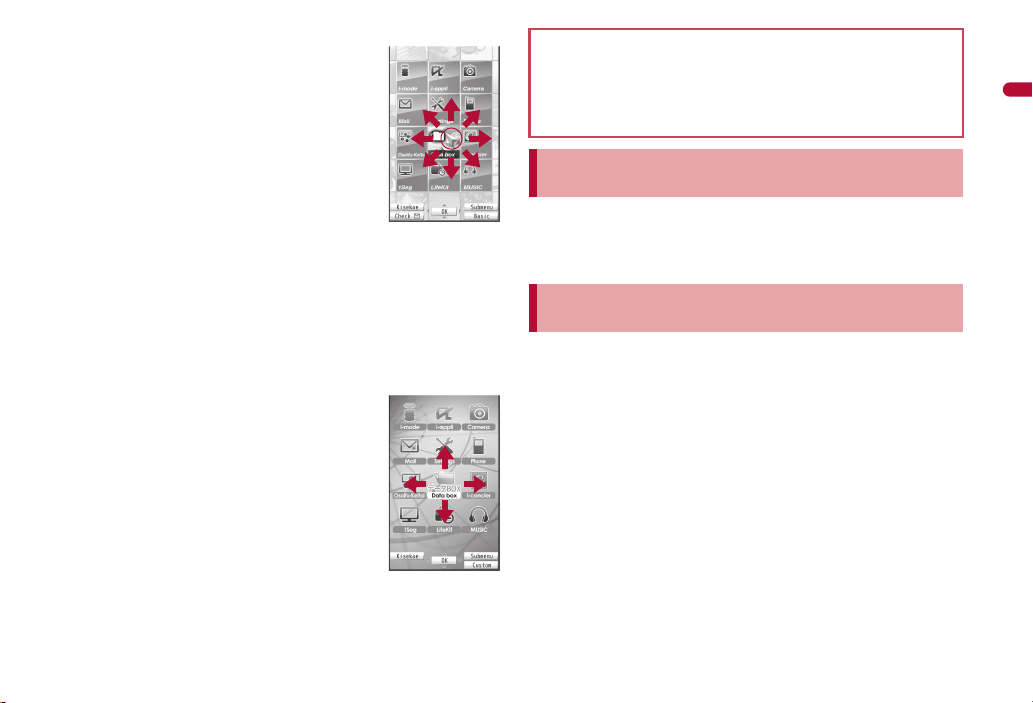
■ Moving pointer
e.g.) Custom menu
screen
e.g.) Basic menu
screen
In the stand-by display, in the Custom menu screen
or during i-mode or Full Browser, etc., move the
pointer ([L], [K], etc.) up/down, left/right or diagonally
to select an item.
In some Custom menus, the pointer shape varies
or the pointer is not supported.
Select icons displayed in the stand-by display and
press t to perform the following action.
Stock icon: To check information details
i-Channel ticker: To display the channel list
Stand-by memo: To display the Stand-by memo
input screen
Popup message: To activate i-concier
Stand-by clock (when Clock display is set to [ON(Large)]): To activate
Schedule
Move the pointer to the edge of the screen during i-mode or Full Browser
to show [G], [R]/[\], [Z] and scroll the screen to the direction of the
arrow. If link is set, [M] appears, and press t to move to the linked page.
The pointer moving speed varies depending on the finger sliding speed.
■ Moving cursor
In the Basic menu or Submenu, move the cursor up/
down and left/right in the same way as w of
Multi-guide key.
When there are multiple pages, move the cursor to
switch the pages.
Cautions when using the Optical TOUCH CRUISER
Do not operate the Optical TOUCH CRUISER using a pointed metallic
object such as a pen tip. May cause scratches or a failure of the
sensor.
Note that putting a sticker, etc. to the operating range may cause a
malfunction.
Setting whether to use Optical TOUCH CRUISER
<Usage settings>
In the Custom menu, select [Settings]/[General
1
settings]/[TOUCH CRUISER set]/[Usage settings].
Select the setting/t.
2
Setting pointer speed/scroll speed
<Pointer speed/Scroll speed>
In the Custom menu, select [Settings]/[General
1
settings]/[TOUCH CRUISER set]/[Pointer speed]/
[Scroll speed].
Select the speed/t.
2
Before Using the Handset
35
Page 4
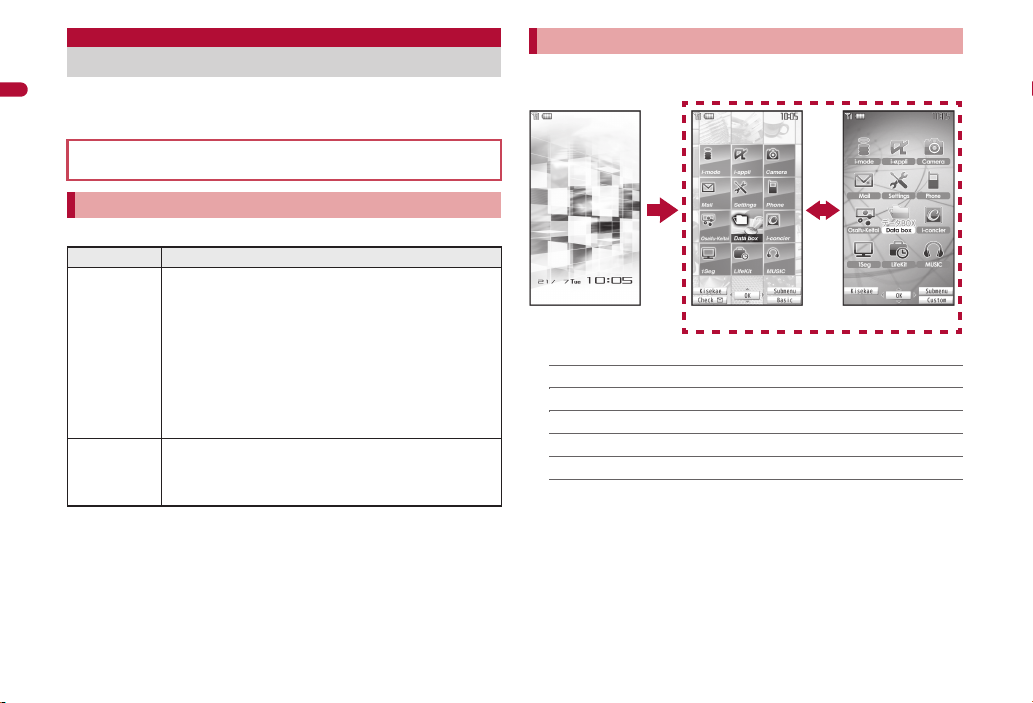
Setting and selecting menu
t a
Stand-by display Custom menu Basic menu
Set, change or save functions from the menu screens.
Before Using the Handset
Menus are classified by function (nP. 442).
For details on operations in the viewer position nP. 41
The explanations in this manual are based on how to retrieve a function
from the Custom menu.
Setting start menu <Menu priority>
Set the start menu that displayed when t is pressed in stand-by.
Start menu Characteristics
Custom menu The preset Kisekae Tool (nP. 103) can be selected and
Basic menu Select the icon displayed on the menu to retrieve the
In stand-by, press t/[Settings]/[Disp/LED/Power
1
saver]/[Menu priority].
Select the start menu/t/[Yes].
2
set. Each Kisekae Tool consists of different functions and
designs. Kisekae Tools can be downloaded from sites and
used.
Preset Kisekae Tools
White Black Red
拡大メニュー (Large) シンプル (Simple)
ダイレクトメニュー
※ Preset Kisekae Tools differ depending on the FOMA
terminal handset color.
function. Also, input the function number, which is
assigned to each function, to quickly retrieve the function
to be used.
Switching set start menu temporarily
Switch the start menu temporarily. When the stand-by display reappears,
the start menu returns to the one set in Menu priority.
■ Submenu operations for the Custom menu screen
[Assign function] nP. 104
[Rst func asgnment] nP. 104
[Reset menu screen] nP. 105
[Reset menu history] nP. 105
[Menu priority] nP. 36
[Operation guide]/select an item/t
36
Page 5

■ Submenu operations for the Basic menu screen
,
(;)
t
Custom menu When [Camera]
appears
When the camera
(shooting still
pictures) is activated
,
(;)
t
or
wt
or
ut
,
(;)
t
Basic menu When [Camera func]
appears
When the camera
(shooting still
pictures) is activated
,
(;)
t
or
wt
or
ut
[Icon settings]
/[Icon image] nP. 106
/[Dsp icon name] nP. 106
[Set background] nP. 106
[Reset menu screen] nP. 107
[Menu priority] nP. 36
[Operation guide]/select an item/t
Retrieving a function from each menu
For details on operating shortcut menu nP. 379
For details on the available functions nP. 442
Use w and the Optical TOUCH CRUISER in either menu.
Press the dial key corresponding to the menu item number (U, V, W,
etc.) to select a function. However, in the Custom menu, a function may
not be selected by using the menu item numbers.
The method for selecting functions may differ depending on the Kisekae
Tool set for the Custom menu.
Press c to re-select a function, and the previous screen reappears.
Press H to return to stand-by.
When a stock icon (nP. 32) appears in stand-by, select [G] to show
the each menu.
The way of activating camera (shooting still pictures) with Multi guide key
or Optical TOUCH CRUISER is explained as an example below.
For , (;), use the Optical TOUCH CRUISER to select an item.
The following shows the screen operated with the Optical TOUCH
CRUISER.
■ Retrieving from the Custom menu
■ Retrieving from the Basic menu
In the Basic menu, input the function number, which is assigned to
setting menu, to quickly retrieve the function to be used (nP. 442).
When the Custom menu screen is changed by Kisekae Tool, the
operation may differ from the description in this manual. In this case,
switch the menu screen to the Basic menu (nP. 36) or perform the
Reset menu screen (nP. 105).
Before Using the Handset
37
Page 6

Retrieving a function from the Simple menu
,
(;)
t
or
wt
,
(;)
t
or
wt
Simple menu When [Camera
func] appears
When the camera
(shooting still
pictures) is activated
Stand-by display Quick Settings
Pict
area
, (;)
t
Submenu screen
Refer to the menu list for details on [シンプル(Simple)] (nP. 463).
Before Using the Handset
Retrieving a function from Quick Settings
Select the Pict area in the stand-by display with Optical TOUCH CRUISER
and press t to display the Quick Settings. Select each key to activate the
corresponding function.
Press c to return to the stand-by display.
In the viewer position, touch the Pict area and touch each key. Touch
other than Quick Settings to return to the stand-by display.
For details on the available functions nP. 462
Selecting a function from Submenu
When [Submenu] appears in the operation guidance,
press C to display functions (Submenu) that can be
used in the screen. Select the displayed Submenu
with w or the Optical TOUCH CRUISER.
If there are multiple pages in the Submenu, change
pages with w or the Optical TOUCH CRUISER.
Alternatively, press the dial key corresponding to the
menu item number (U, V, W, etc.) to select a
function. However, some Submenus do not have item
numbers.
■ Target data when operating functions from Submenu
When operating functions from Submenu of data list screen, some
functions target at selected data only while other functions target at all
data in the list screen. When attempting to operate selected data only,
select the data to operate in advance.
Function targeting at selected data only
Example: Edit title, Edit file name, Delete one, etc.
Function targeting at all data in the list screen
Example: Delete all, Copy all in folder, Move all in folder, etc.
38
Page 7

Touch panel
Operating range of the touch panel
Operations in viewer position
In the viewer position, operate by putting the finger on the touch
panel (screen) instead of using the Multi-guide key and dial key in
the normal position.
This manual describes the key operation instead of touch panel
operation when both operations are available. The following explains
basic operations for touch panel.
The following range is available to operate with touch panel (Operating
range differs depending on the function).
When the screen is off, press & to display the screen and perform the
touch operation.
The message stating that the operation is not available appears when
the touch panel cannot be used.
In other than the viewer position, the touch panel is available when using
Writing authentication (nP. 113) and AF tracking (nP. 215).
When using the touch panel
The touch panel is designed to lightly touch with the finger. Do not
forcefully press with the finger, or press with a pointed object
(fingernail, ballpoint pen, pin, etc.).
In the following cases, the touch panel may not work even if it is
touched. May cause a malfunction.
Operation with a gloved finger
Operation with a fingernail
Operation with foreign objects placed on the operation pad
Operation on the touch panel on which a protective sheet or a
sticker is put
Basic operation in viewer position
The following shows the operation and its main purpose in the viewer
position, and example key operation which fulfills the same function in the
normal position.
Example in the
Operation Purpose
Touch
Put the finger on the
touch panel and put it
off.
Touch for a while
Keep the finger on the
touch panel.
Slide
Keep the finger on the
touch panel and slide it.
Select/OK
Touch the key displayed
Move the cursor and
select
For a list screen, touch
Continuous operation
For adjustment volume,
Scroll the screen
While viewing sites, etc.,
Cancel the selection
When the menu or item is
in the screen.
the object to point the
cursor and touch again.
fast forward/fast rewind,
etc., touch a key
displayed in the screen
for a while to operate
continuously.
slide up/down/left/right.
touched by mistake, slide
away from the menu or
item.
normal
position
t
w/t
o (for 1+
seconds)/p
(for 1+
seconds) or q
(for 1+
seconds)/r
(for 1+
seconds), etc.
w
–
Before Using the Handset
Continued on next page
39
Page 8

Operation Purpose
34 2
1
8
7
6
5
2413
Horizontal view
Example: Classic schedule
Vertical view
Example: Classic
schedule
14 2 3
Example: MUSIC Player
Quick slide
Before Using the Handset
Quickly slide the finger
and put it off.
Put the distance
between two fingers
apart/closer
Put two fingers on the
touch panel and slide
them with putting the
distance between two
fingers apart/closer.
Touch “CLR”/Press & Cancel/End
The operations differ depending on the function and screen in use.
When putting the finger on the touch panel, the tone sounds and the
vibrator is activated. However, the tone or vibrator may not be activated
while activating a camera, playing the music data, etc.
• The volume can be changed (nP. 94). The tone cannot be changed.
• The vibrator can be set to ON/OFF (nP. 95).
Switch pages
For a list screen, quickly
slide to the left/right.
Display previous/next data
While displaying images
or mails, etc., quickly
slide to the left/right.
Zoom in/Zoom out
While displaying an
image, put the distance
between two fingers
apart/closer.
Touch “CLR” (when it is
displayed).
While using a function,
press &.
Example in the
normal
position
v
3/1
c/H
■ Horizontal/Vertical view
The screen is displayed as follows in the viewer position.
Available screens or keys differ depending on the function.
When the FOMA terminal is switched from the normal position to the
viewer position, the screen may be displayed in full-screen depending on
the function.
1MULTI key
Touch to use Multi Assistant.
Alternatively, touch [MULTI] of control key.
2++縦横切替 key
Touch to switch the screen between vertical and horizontal view. If the
key does not appear, the screen cannot be switched between vertical
and horizontal view.
Alternatively, touch [++切替] of control key.
40
Page 9

3CLR key
iC
ma
iC
ma
amCi
Touch to return to the previous screen or delete numbers and texts.
Touch for a while to end the function being activated and return to the
stand-by display.
Alternatively, touch [CLR] of control key.
Same operation as that of c/H in the normal position is available.
4Operation guidance (nP. 41)
5Direction key
Touch to move the cursor.
Same operations as those of w in the normal position are available.
6tenkeysw key
Touch to display/hide the dial/text input keys.
7OK key
Touch to execute or set an item and menu.
Same operation as that of t in the normal position is available.
8Dial/Text input key
Touch to enter numbers or texts.
Same operations as those of 1 to 9, 0, *, # in the normal
position are available.
■ Operation guidance
The operation guidance appears as well as in the normal position. Touch
the operation guidance key to select/execute a menu.
This manual describes operations with the operation guidance as key
operations in the normal position. For operating in the viewer position,
select same operation guidance menu as that displayed in the normal
position. Same operation as that in the normal position is available.
The operation guidance menu in the viewer position corresponds to the
operation guidance menu, operated with the following keys in the normal
position.
Vertical view
Horizontal view
Before Using the Handset
The operation guidance menu, corresponding to the Multi guide keys in
the normal position may appear depending on the function.
For details on the operation guidance menu nP. 28
In the viewer position, the operation guidance menu displayed in the
normal position may appear as the control keys or Submenu.
Setting and selecting menu
In the viewer position, set, change, or register a function from the Stand-by
Display Touch Launcher/Touch menu.
Stand-by Display Touch Launcher
Quickly retrieve conveniently used functions in the viewer position.
The following functions can be retrieved from the Stand-by Display
Touch Launcher.
7 Mail menu ! GPS compatible i-appli
6 Phonebook 8 i-mode menu
9 Quick search + Data box
( i-concier * Shoot still picture
) 1Seg , Shoot moving picture
0 i-mode (Google) _ Card reader
$ TOP menu
G-GUIDE program schedule
-
remote control
*1 Touch menu appears.
*2 For details on registering the GPS compatible i-appli nP. 302
*1
My picture of Data box
:
(picture tile display)
Continued on next page
*2
41
Page 10

Touch menu
Stand-by (horizontal)
Touch
*
Stand-by Display Touch Launcher
Touch [$] (TOP menu)
Touch menu
Retrieve all functions available in the viewer position.
For details on functions available in the Touch menu nP. 442
Some functions are not available in the viewer position.
Before Using the Handset
The images and items in the Stand-by Display Touch Launcher or
Touch menu cannot be changed.
Operate the preset “Map Application” (nP. 303) while displaying a
map or using a navigation (including checking a route) in the viewer
position. In other cases, operate in the normal position.
i-appli that does not support the touch panel is not available in the
viewer position. Operate in the normal position.
■ Setting whether to display Stand-by Display Touch
Launcher <Stdby toch lnch disp>
Display the Touch menu directly without displaying the Stand-by Display
Touch Launcher.
In the Custom menu, select [Settings]/[Disp/LED/
1
Power saver]/[Set screen]/[Stdby toch lnch disp].
Select the setting/t.
2
■ Displaying Stand-by Display Touch Launcher/Touch menu
42
* Touch the wall paper (excluding an area where the clock or i-Channel
ticker is displayed, and the Pict area) on the stand-by display
(horizontal).
For the Stand-by Display Touch Launcher, if no operations are
performed for approximately 5 seconds, & is pressed or the area other
than the Stand-by Display Touch Launcher is touched, the stand-by
display (horizontal) reappears.
If the FOMA terminal is set to the viewer position while displaying the
Custom menu/Basic menu in the normal position, the Touch menu
appears.
Stand-by (horizontal)
When the FOMA terminal is switched from the normal position to the viewer
position in the stand-by display while Screen rotation setting is set to
[Stand-by], the stand-by display (horizontal) appears.
The stand-by display (horizontal) can be changed (nP. 97).
Page 11

Select the following items displayed in stand-by by touching.
Stand-by Display Touch Launcher
Touch [*]
When the camera (shooting still
pictures) is activated
Touch menu
Touch [Camera]
Camera menu
Touch [Shoot still pic]
When the camera (shooting still
pictures) is activated
Stock icon i-Channel ticker Stand-by memo
Stand-by clock Popup message
Notification of 1Seg recording history, etc.
■ Retrieving a function from each menu
Touch a menu icon to select a menu item from the Stand-by Display
Touch Launcher or Touch menu. For menus in list format, such as 1Seg
setting, touch a menu item to point the cursor and touch again. When a
menu contains multiple pages, quickly slide to the left/right to switch
pages.
Press & to return to the previous screen.
Touch operation or the way of activating the camera (shooting still
pictures) with the touch panel is explained as an example below.
Retrieving the camera (shooting still pictures) from Stand-by
Display Touch Launcher
Retrieving the camera (shooting still pictures) from Touch menu
Before Using the Handset
43
 Loading...