

Page 1

Abridged English Manual
For more information about handset operations and
functions, please go to the Vodafone K.K.
Website (www.vodafone.jp) for the full manual* or
dial 157 from a Vodafone handset for Customer Service.
*Please note that the full manual may not be available in English at
time of purchase. In this case, call Customer Service or check
Vodafone Website again at a later date.
18-1
Page 2

Accessories
■
Lithium-ion Battery
(Type 1)
(SHBAA1)*
USB Cable (Black)
■
* May also be purchased separately.
Abridged English Manual
** Upgrades or updates of included utility software may become available on the Vodafone Website (www.vodafone.jp) without
prior notification. Please check for the newest versions of utility applications and download as required.
Complimentary sample
.
★
.
Tip X
For accessory-related information, please contact Vodafone Customer Centre, General Information ( AP.18-48 ).
804SH is compatible with miniSD™ Memory Card; miniSD™ Memory Card is not included in this package. Purchase
miniSD™ Memory Card to use Memory Card-related handset functions.
★■
■
LCD Remote/Mic with
Headphones (white) (ZTBAA1)*
Utility Software (CD-ROM)
■
AC Charger (SHCAA1)*
**
★
18
18-2
Page 3
Safety Precautions
.
Read safety precautions before using handset.
.
Observe precautions to avoid injury to self or others, or
damage to property.
.
Vodafone is not liable for damages resulting from use of
this product.
Before Using Handset
Symbols
■
Make sure you thoroughly understand these symbols
before reading on. Symbols and their meanings are
described below:
DANGER
0
WARNING
0
CAUTION
0
12345
67
0
Great risk of death or serious injury
from improper use
Risk of death or serious injury from
improper use
Risk of injury or damage to
property from improper use
Prohibited Actions
Compulsory Actions
Attention Required
DANGER
0
Handset, Battery & Charger
Use only the specified battery, Charger or Holder.
6
Using non-specified equipment may cause malfunctions,
electric shock or fire due to battery leakage,
overheating or bursting.
Do not short-circuit Charger terminals.
1
Keep metal objects away from Charger terminals. Keep
handset away from jewellery. Battery may leak, overheat,
burst or ignite causing injury. Use a case to carry handset.
Battery
Prevent injury from battery leakage, breakage or
1
fire. Do not:
« Heat or dispose of battery in fire
« Disassemble, modify or break battery
« Damage or solder battery
« Use a damaged or deformed battery
« Use non-specified charger
« Force battery into handset
« Charge or place battery near fire, heat sources or
expose it to extreme heat
« Use battery for other equipment
If battery fluid contacts eyes, do not rub them.
6
Rinse with clean water and consult a doctor
immediately.
Eyes may be severely damaged.
Abridged English Manual
18
18-3
Page 4

WARNING
0
Handset, Battery & Charger
Do not insert foreign objects into handset.
1
Do not place metal or flammable objects in handset,
Charger or Holder. This may cause fire or electric
shock. Keep handset out of the reach of children.
Keep handset out of rain or extreme humidity.
3
Fire or electric shock may occur.
Keep handset away from liquid-filled containers.
1
Keep handset, Charger and Holder away from
chemicals/liquids. Fire or electric shock may result.
Avoid sources of fire.
1
Prevent fire or explosion. Do not use handset in the
presence of gas or fine particles (coal, dust, metal, etc.).
Abridged English Manual
Keep handset, Charger or Holder away from
1
microwave ovens.
Battery or handset may leak, burst, overheat or ignite
and cause accidents.
Do not disassemble or modify handset.
2
«
Do not open housing of handset, Charger or Holder;
may cause electric shock or injury. Contact Vodafone
Customer Centre, Customer Assistance for repairs.
«
Do not modify handset, Charger or Holder. Fire or
electric shock may result.
If water or foreign matter is inside handset:
7
Discontinue handset use to prevent fire or electric
shock. Turn handset power off, remove battery, unplug
Charger and contact Vodafone Customer Centre,
Customer Assistance.
Do not subject handset to shocks.
1
Subjecting handset, Charger or Holder to shocks may
cause malfunction or injury. Should the handset break,
remove the battery and contact Vodafone Customer
Centre, Customer Assistance. Discontinue handset use.
Fire or electric shock may occur.
If an abnormality occurs:
7
Should there be unusual sound, smoke or odour,
discontinue handset use to avoid fire or electric shock.
Turn handset power off, remove battery and unplug
Charger and contact Vodafone Customer Centre,
Customer Assistance.
18
18-4
Page 5

Handset
Keep Memory Card and Memory Card Adapter
1
out of the reach of children.
If swallowed, consult a doctor immediately.
Preventing accidents
1
«
For safety, never use handset while driving. Pull over
beforehand. Mobile phone use while driving is
prohibited by the revised Road Traffic Law (effective
1 November 2004).
«
Do not use headphones while driving or riding a
bicycle. Accidents may result.
«
Moderate volume outside, especially at level/road
crossings to avoid accidents.
Do not swing handset by LCD Remote/Mic or
1
handstrap.
May result in injury or breakage.
Turn handset power off before boarding aircraft.
6
Using wireless devices aboard aircraft may cause
electronic malfunctions or endanger aircraft operation.
Adjusting vibration and Ringtone settings:
6
Users with a heart condition/pacemaker/defibrillator
should adjust handset settings accordingly.
During thunderstorms, turn power off; find cover.
6
There is a risk of lightning strike or electric shock.
Charger
Use only the specified voltage.
1
Non-specified voltages may cause fire or electric shock.
«
AC Charger: AC 100V-240V Input
,
Vodafone is not liable for problems caused by
charging handset abroad.
«
In-Car Charger: DC 12V-24V Input
Do not use commercially available transformers.
1
Use of AC Charger with commercially available
transformers may cause fire, electric shock or damage.
Do not use In-Car Charger inside vehicles with a
1
positive earth.
Fire may result. Use In-Car Charger only inside vehicles
with a negative earth.
Charger Care
4
Do not touch blades with wet hands. Electric shock may
occur.
« Do not use multiple cords in one outlet. May generate
excess heat or fire.
1
« Do not bend, twist, pull or set objects on cord. Exposed
wire may cause fire or electric shock.
Do not short-circuit Charger terminals.
1
Keep metal away from terminals. May cause
overheating, fire or electric shock.
Abridged English Manual
18
18-5
Page 6

Do not use Desktop Holder inside vehicles.
1
Extreme temperature or vibration may cause fire or
damage handset, etc.
Preventing accidents
6
Secure In-Car Charger to avoid injury or accidents.
If AC/In-Car Charger cord is damaged:
6
May cause fire or electric shock; contact Vodafone
Customer Assistance to replace.
During thunderstorms:
7
Unplug Charger to avoid damage, fire or electric shock.
Keep Charger & Desktop Holder out of the reach
6
of children.
Electric shock or injury may occur.
Battery
«
If battery does not charge properly, stop charging.
6
Abridged English Manual
Battery may overheat, burst or ignite.
«
If there is leakage or abnormal odour, avoid fire
sources. It may catch fire or burst.
If there is abnormal odour, excessive heat,
discolouration or distortion, remove battery from
6
handset. It may leak, overheat or explode.
18
Handset Use & Electronic Medical Equipment
This section is based on "Guidelines on the Use of
Radio Communications Equipment such as Cellular
Telephones and Safeguards for Electronic Medical
Equipment" (Electromagnetic Compatibility
Conference, April 1997) and "Report of Investigation
of the Effects of Radio Waves on Medical Equipment,
etc." (Association of Radio Industries and Businesses,
March 2001).
People with implanted pacemakers/defibrillators
6
should keep handset more than 22
Implanted pacemakers or defibrillators may malfunction
due to radio waves.
Turn handset power off in crowded places such
6
as trains. People with implanted pacemakers/
defibrillators may be near.
Implanted pacemakers or defibrillators may malfunction
due to radio waves.
Observe these rules when visiting medical
6
facilities:
« Do not take handset into operating rooms or Intensive
or Coronary Care Units.
« Keep handset off in hospitals.
« Keep handset off in hospital lobbies. Electronic
equipment may be near.
« Obey rules regarding mobile phone use in medical
facilities.
Consult manufacturer for radio wave effects on
6
electronic medical equipment.
cm away.
18-6
Page 7

CAUTION
0
Handset, Battery & Charger
Handset Care
0
«
Place handset on stable surfaces to avoid malfunction
or injury.
«
Keep handset away from oily smoke or steam. Fire or
accidents may result.
«
Cold air from air conditioners may condense, resulting
in leakage or burnout.
«
Keep handset away from direct sunlight (inside
vehicles, etc.) or heat sources. Distortion,
discolouration or fire may occur. Battery shape may
be affected.
«
Keep handset out of extremely cold places to avoid
malfunction or accidents.
«
Keep handset away from fire sources to avoid
malfunction or accidents.
Usage Environment
0
«
Excessive dust may prevent heat release and cause
burnout or fire.
«
Avoid using handset on the beach. Sand may cause
malfunction or accidents.
«
Keep handset away from credit cards, phone cards,
etc. to avoid data loss.
Handset
Avoid leaving handset in extreme heat (inside
1
vehicles, etc.).
Handset may heat up and lead to burns.
Volume settings
0
Keep handset volume moderate.
Excessive volume may cause damage to your hearing.
LCD Remote/Mic
0
«
Do not unplug by pulling the cord. May cause damage
to the cord.
«
Keep plug clean to avoid noise and malfunction.
Inside vehicles:
0
Handset use may cause electronic equipment to
malfunction.
Should skin irritation occur, discontinue handset
6
use and consult a doctor.
Skin irritation, rashes, or itchiness may result depending
on your physical condition.
Abridged English Manual
18
18-7
Page 8

Charger
Charger & In-Car Charger
1
Grasp plug (not cord) to disconnect Charger. May cause
fire/electric shock.
«
Keep cord away from heaters. Exposed wire may
cause fire or electric shock.
6
«
Stop use if plug is hot or improperly connected. May
cause fire/electric shock.
«
Keep In-Car Charger socket clean. May overheat and
cause injury.
Do not touch Desktop Holder while in use.
1
May cause burns.
Use only the specified fuse.
6
1 A fuse for In-Car Charger. Or may cause damage/fire.
Always charge handset in a well-ventilated area.
0
Avoid covering/wrapping Charger/Desktop Holder. May
Abridged English Manual
18
18-8
cause damage/fire.
Do not use In-Car Charger when engine is off.
1
Start engine before use. Or car battery may be
weakened.
Long periods of disuse
7
Be sure to unplug AC/In-Car Charger after use.
Handset Maintenance
7
When cleaning, disconnect AC/In-Car Charger to
prevent shock/injury.
Installing In-Car Charger
0
Properly position the cable for safe driving to avoid
injury or accidents.
Battery
Do not throw or abuse battery. Battery may overheat,
1
burst or ignite.
Do not leave battery in direct sunlight or inside vehicles.
Overheating/fire may occur; may reduce performance.
1
Do not expose battery to liquids. Performance may
5
deteriorate.
If battery fluid contacts skin or clothes, rinse with clean
water immediately.
6
Do not dispose of exhausted batteries with ordinary
1
refuse. Tape over battery terminals before disposal, or
bring them to a Vodafone shop. Follow local regulations
regarding battery disposal.
Keep battery out of the reach of children.
6
« Charge battery within a range of 5
this range, battery may leak/overheat and
0
performance may deteriorate.
« If your child is using handset, explain all instructions
and supervise usage.
« If there is abnormal odour or excessive heat, stop
using battery and call Vodafone Customer Centre,
Customer Assistance.
« Do not leave battery uncharged. Charge at least once
every six months.
℃
to 35
; outside
℃
Page 9

General Notes
General Use
.
Vodafone is not liable for damages resulting from
accidental loss/alteration of handset or miniSD™
Memory Card data. Keep a copy of Phone Book entries,
etc. in a separate place.
.
Handset transmissions may be disrupted inside
buildings, tunnels or underground, or when moving into/
out of such places.
.
Use handset without disturbing others.
.
Handsets are radios as stipulated by the Radio Law.
Under the Radio Law, handsets must be submitted for
inspection upon request.
.
Handset use near landlines, TVs or radios may cause
interference.
.
Beware of eavesdropping.
Because this service is completely digital, the possibility
of signal interception is greatly reduced. However, some
transmissions may be overheard.
Eavesdropping
Deliberate/accidental interception of communications
constitutes eavesdropping.
Inside Vehicles
.
Never use handset while driving.
.
Do not park illegally to use handset.
.
Handset use may affect a vehicle's electronic equipment.
Aboard Aircraft
Never use handset aboard aircraft (keep power off).
Handset use may impair aircraft operation.
Electromagnetic Waves
For body worn operation, this phone has been tested and
meets RF exposure guidelines when used with an
accessory that contains no metal and that positions the
handset a minimum of 15
accessories may not ensure compliance with RF exposure
guidelines.
mm from the body. Use of other
.
.
Handset Care
If handset is left with no battery or an exhausted one,
data may be altered/lost. Vodafone is not liable for
resulting damages.
Use handset within temperatures of 5
humidity 35% to 85%. Avoid extreme temperatures/direct
sunlight.
Exposing lens to direct sunlight may damage colour filter
and affect image colour.
Do not drop or subject handset to shocks.
Clean handset with dry, soft cloth. Using alcohol, thinner,
etc. may damage it.
Do not expose handset to rain, snow or high humidity.
Never disassemble or modify handset.
Avoid scratching handset Display.
When closing handset, keep straps, etc. outside to avoid
damaging the Display.
℃
to 35
℃
and
.
.
.
.
.
.
.
Abridged English Manual
18
18-9
Page 10

.
When using headphones, moderate volume to avoid
sound bleed.
.
Handset is not water-proof. Avoid exposure to liquids
and high humidity.
,
Keep handset away from precipitation.
,
Cold air from air conditioning, etc. may condense
causing corrosion.
,
Avoid dropping handset in damp places (restrooms,
bath/shower rooms, etc.).
,
On the beach, keep handset away from water and
direct sunlight.
,
Perspiration may seep inside handset causing
malfunction.
.
Heavy objects or excessive pressure should be
avoided. May cause malfunction or injury.
,
Do not sit down with handset in a back pocket.
,
Do not place heavy objects on handset in a bag.
.
Connect only specified products to Headphone
Connector. Non-specified devices may malfunction or
cause damage.
Abridged English Manual
.
Always turn off handset before removing battery.
If battery is removed while saving data or sending mail,
data may be lost, changed or destroyed.
18
18-10
Copyrights
Copyright laws protect sounds, images, computer
programmes, databases, other materials and copyright
holders. Duplicated material is limited to private use only.
Use of materials beyond this limit or without permission of
copyright holders may constitute copyright infringement,
and be subject to criminal punishment. Comply with
copyright laws when using images captured with handset
camera.
FCC RF Exposure Information
Your handset is a radio transmitter and receiver.
It is designed and manufactured not to exceed the
emission limits for exposure to radio frequency (RF)
energy set by the Federal Communications Commission of
the U.S. Government.
The guidelines are based on standards that were
developed by independent scientific organisations through
periodic and thorough evaluation of scientific studies. The
standards include a substantial safety margin designed to
assure the safety of all persons, regardless of age and
health.
The exposure standard for wireless handsets employs a
unit of measurement known as the Specific Absorption
Rate, or SAR. The SAR limit set by the FCC is 1.6
The tests are performed in positions and locations (e.g., at
the ear and worn on the body) as required by the FCC for
each model. The highest SAR value for this model handset
when tested for use at the ear is 0.43
on the body, as described in this user guide, is
0.442
W/k g .
W/k g and when worn
W/k g .
Page 11

Body-worn Operation; This device was tested for typical
body-worn operations with the back of the handset kept
1.5
cm from the body. To maintain compliance with FCC
RF exposure requirements, use accessories that maintain
a 1.5
cm separation distance between the user's body and
the back of the handset. The use of beltclips, holsters and
similar accessories should not contain metallic
components in its assembly.
The use of accessories that do not satisfy these
requirements may not comply with FCC RF exposure
requirements, and should be avoided.
The FCC has granted an Equipment Authorisation for this
model handset with all reported SAR levels evaluated as in
compliance with the FCC RF emission guidelines. SAR
information on this model handset is on file with the FCC
and can be found under the Display Grant section of
http://www.fcc.gov/oet/fccid after searching on FCC ID
APYHRO00044.
Additional information on Specific Absorption Rates (SAR)
can be found on the Cellular Telecommunications &
Internet Association (CTIA) website at
http://www.phonefacts.net.
The guidelines use a unit of measurement known as the
Specific Absorption Rate, or SAR. The SAR limit for mobile
devices is 2 W/kg and the highest SAR value for this
device when tested at the ear was 0.395 W/kg*. As mobile
devices offer a range of functions, they can be used in
other positions, such as on the body as described in this
user guide**. In this case, the highest tested SAR value is
0.697 W/kg.
As SAR is measured utilizing the devices highest
transmitting power the actual SAR of this device while
operating is typically below that indicated above. This is
due to automatic changes to the power level of the device
to ensure it only uses the minimum level required to reach
the network.
The World Health Organization has stated that present
scientific information does not indicate the need for any
special precautions for the use of mobile devices. They
note that if you want to reduce your exposure then you can
do so by limiting the length of calls or using a hands-free
device to keep the mobile phone away from the head and
body.
Abridged English Manual
European RF Exposure Information
Your mobile device is a radio transmitter and receiver. It is
designed not to exceed the limits for exposure to radio
waves recommended by international guidelines. These
guidelines were developed by the independent scientific
organization ICNIRP and include safety margins designed
to assure the protection of all persons, regardless of age
and health.
* The tests are carried out in accordance with international
guidelines for testing.
** Please see General Notes (Electromagnetic Waves) on
page 18-9 for important notes regarding body worn
operation.
18
18-11
Page 12

Minding Mobile Manners
Please use your handset responsibly. Use these basic
tips as a guide. Inappropriate handset use can be
both dangerous and bothersome. Please take care
not to disturb others when using your handset. Adjust
handset use according to your surroundings.
.
Turn it off in theatres, museums and other places where
silence is the norm.
.
Refrain from using it in restaurants, hotel lobbies,
elevators, etc.
.
Observe signs and instructions regarding handset use
aboard trains, etc.
.
Refrain from use that interrupts the flow of pedestrian or
vehicle traffic.
Manner-Related Features
Take advantage of built-in features to help you use
your handset in public places without disturbing or
endangering others.
■
Offline Mode
Use Offline Mode to temporarily suspend all handset
transmissions. When Offline Mode is active, incoming
and outgoing calls/mail as well as incoming Vodafone
live! information are blocked.
Manner Mode
■
Press a single key to automatically mute all Ringtones
and activate Vibration mode for incoming calls/mail.
■
Vibration Mode
Activate Vibration mode to use handset vibration to
alert you to incoming calls, mail, etc. in public places.
Volume Settings
■
Decrease or mute Ringtone volume for incoming
calls/mail as well as tones for Web or V-applications
when carrying handset in public places.
Answer Phone
■
Use Answer Phone to handle incoming calls when it is
inappropriate or unsafe to answer.
Abridged English Manual
18
18-13
Page 13
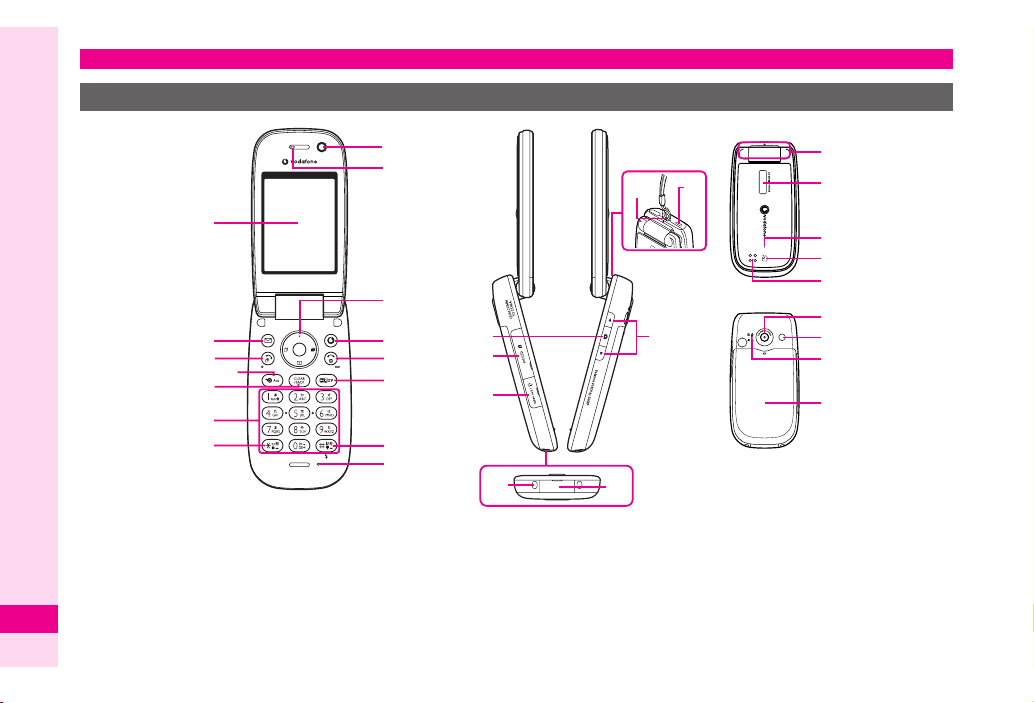
Handset Parts & Functions
Handset
Abridged English Manual
1
Display
2
Mail Key
Open Messaging menu or execute Soft Key function/
command.
3
18
18-14
Start Key
Initiate/answer calls.
Open records of All Calls.
1
2
3
5
6
7
4
8
9
a
b
c
d
e
f
g
h
i
j
o
lm
p
q
r
s
t
n
u
v
w
k
4
Shortcuts and A/a Key
In Standby, open Shortcuts menu.
In text entry windows, toggle upper/lower case roman
letters or standard/small hiragana/katakana.
5
Clear/Back Key
Delete entries/return to previous window.
Page 14

6
Keypad
7
*
Key/Keypad Lock
In Standby, press for 1+ seconds to toggle Keypad Lock.
In alphanumeric entry, open web/mail address prefixes
& suffixes.
8
Internal Camera
Use during Video Call.
9
Earpiece
a
Multi Selector
Select menu items, move cursor, scroll, etc.
b
Vodafone live! Key
Open Vodafone live! menu or execute Soft Key function/
command.
c
Power On/Off Key
Press for 2+ seconds to turn handset power on/off.
d
Multimedia/Text Key
Start Media Player or toggle between character entry
modes.
e
#
Key
In text entry windows, toggle Symbol/Pictograph Lists.
Press for 1+ seconds to activate/cancel Manner mode.
f
Microphone
g
Shutter Key
Open selected menu items or execute functions.
In Standby (handset open), press for 1+ seconds to
activate mobile camera.
h
Memory Card Slot
Insert miniSD™ Memory Card here.
i
Headphone Connector
Connect supplied LCD Remote/Mic, etc.
j
Charger Terminal
k
External Device Connector
Connect Charger here.
l
Strap Eyelet
Attach straps as shown.
m
Infrared Port
Use for infrared data transmissions.
n
Zoom/Select Key
Select menu items, move cursor, etc.
o
Internal Antenna Location
p
Sub Display
q Small Light
Illuminates red while charging. Flashes for incoming
calls/mail.
r m
Vodafone live! FeliCa contactless IC Card embedded
here. Place m over reader/writer to use IC Card.
s Speaker
t External Camera (Lens Cover)
Capture still and video images.
u Mobile Light
Flashes for incoming calls/mail. Serves as a strobe or
Pen Light.
v Portrait (o)/Macro (n) Selector
w Battery Cover
Note X Internal Antenna
. 804SH has no external antenna. Handset
transmits/receives signals via Internal Antenna.
. Do not cover or place stickers, etc. over the area
containing Internal Antenna. Voice quality will
vary depending on where/how handset is used.
Abridged English Manual
18
18-15
Page 15
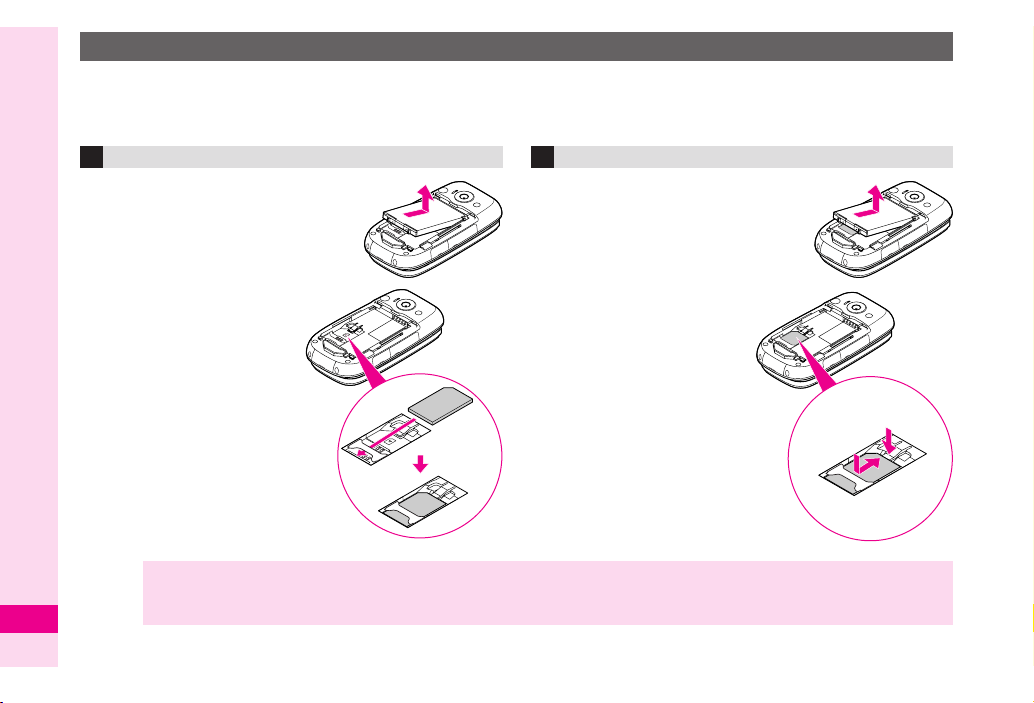
USIM Card
Vodafone Global Standard USIM Card is an IC Card containing customer information such as handset number.
USIM Card must be inserted before using a USIM Card-compatible handset. Without USIM Card, Network
services (calls, messaging, Web, etc.) are not available.
Inserting
Remove battery
1
2
Slide in USIM Card
with IC chip facing
down
Insert battery
3
Abridged English Manual
Note X.
18
18-16
Do not force USIM Card into or out of handset; damage may result. Be careful not to lose removed USIM Card.
.
Avoid touching USIM Card IC chip. May hinder performance. In such cases,
may automatically restart. This is not a malfunction. Avoid touching USIM Card terminals as well.
Removing
Remove battery
1
2
Press down tab and
slide out USIM Card
as shown
3
Insert battery
Insert USIM Card
!
@
may appear or handset
Page 16

Charging Battery
Battery & Charger
Charge a new battery before use or after a period of
disuse.
■
Battery Life
. Do not use or store battery at extreme temperatures. May
shorten battery life.
Ideal working temperature is between 5
Use specified Charger only. Other chargers may
damage handset, or cause battery to deteriorate,
overheat or ignite.
Replace battery if operating time is noticeably shorter
than normal.
Charging
.
.
■
. Do not use Charger for other purposes.
Battery may short-circuit, overheat or burst from contact
with metal objects.
Charger and battery may become warm during charging.
.
Move Charger away from home TVs or radios if
interference occurs.
and 35
℃
℃
. .
.
,
,
,
.
■
Precautions
. Use a dry cotton swab to clean handset, battery and
Charger terminals.
Avoid:
Extreme temperatures
.
Humidity, dust and vibration
Direct sunlight
Do not leave battery uncharged. Charge at least once
every six months.
Use a case when carrying battery separately.
Battery Disposal
■
Do not dispose of exhausted batteries with ordinary
refuse. Tape over battery terminals before disposal, or
bring them to a Vodafone shop. Follow local regulations
regarding battery disposal.
.
Abridged English Manual
18
18-17
Page 17

Charging (Use Specified Charger Only)
1
Open Terminal Cover, then squeeze release tabs
and insert Charger connector until it clicks
.
Use slot to gently pull Terminal
Abridged English Manual
Cover down then out, opening it
as shown.
Plug in Charger
2
.
Extend Charger blades. (Fold back
when not in use.)
.
Charging starts and Small Light
illuminates red.
18
4
2
AC 100V
Blades
AC Charger
Release Tabs
Charger Connector
Slot
Arrows Up
3
4
Note X.
3
1
Small Light
Terminal Cover
External Device Connector
Charging is complete when light goes out
.
Charging takes approximately 140 minutes* (with
handset power off).
* May vary with ambient temperature.
After charging battery, unplug Charger from
outlet, then handset
Do not pull, bend or twist AC Charger cord.
.
AC Charger is compatible with household currents
between AC 100V-240V.
.
Vodafone is not liable for problems caused by
charging handset abroad.
18-18
Page 18

Display Indicators
g@z-.iX6u]5
w kn;x qr|
2
1
3 54 76 8 9 a b
g@z-.iX6u]5
w kn;x qr|
dce h i jf g
1g Signal Strength / h 3G / i GSM
g
: Strong a: Moderate b: Low c: Weak
^
: Out-of-Range
2
|
Incoming Voice Call / @ Voice Call in Progress
*
Video Call in Progress
9
/ [ Packet Data Communication Status
f
Offline Mode
3z Unread Mail
|/{
/
Mail Reception Disabled
■
|
: Handset Memory Low
: USIM Card Memory Low
: Handset & USIM Card Memory Low
■
IC Card Lock Active
Call Forwarding or Voice Mail / 3 Auto Delivery Info
{
]
4 -
Receiving Mail / : Sending Mail
5 .
i
i
J
7 X
/ L / J / / miniSD™ Memory Card Status
6
: Loading / L : In Use
: Formatting / / : Unusable
/ | / W / Y / y / z External Transmission
: USB Transmission Ready
(red): Infrared Connection in Progress
: Infrared Transmission in Progress
: Bluetooth Transmission Ready
: Bluetooth Transmission in Progress
: Bluetooth Talk in Progress
8
Active V-Application
(grey) Paused V-Application
Music Player Active / W SSL
Silent / t Increasing Volume / s Vibration
Loudspeaker / _ Microphone Mute
/ [ / ; / , / v
]
: Meeting [: Activity ;: Car
,: Headset v: Manner
b 5 Battery Strength / m Pen Light
5: Strong 6: Moderate 7: Low 8: Empty
c w Answer Phone Active / [ Message
@: Answer Phone Active
[: Answer Phone Cancelled
d k Alarm Set
e n / o Schedule
Reminder On: n / Off: o
f ; Message Delivery Failure
g x New Voice Mail
h q Secret Mode Active
X
i r Function Lock Active / 0 Keypad Lock Active
j |(grey) Infrared Transmission Ready
|
W
Y
Mode Settings
y
z
6
6
1
9 u
-
Abridged English Manual
a ]
18
18-19
Page 19

Sub Display Indicators
Sub Display and Display indicators (
represent the same functions. Only major Sub
Display indicators are described below.
AP.18-19
% 15:05 G
1 2 3
1% / ~ Battery Strength
=
IC Card Lock Active
2
Time
3
G
Signal Strength
Symbols
)
Multi Selector
Use Multi Selector to select menu items, move cursor,
scroll, etc. In this manual, Multi Selector operations
are indicated as follows:
aÅ
cÇ
%
d
b
Incoming Communications
Indicator and number of calls/messages, etc. appear
for missed incoming communications or Alarm.
Missed Calls
Abridged English Manual
Message Recorder
New Messages
Auto Delivery Info
Alarm
Z
Calendar (Reminder set)
Y
Tasks (Reminder set)
)
Message Delivery Failure
#
18
18-20
Basic Multi Selector Operations
,e : Press a or
,f : Press c or
K
;
:
;
,g : Press a , b, c or
Menu Items
Use
b or
a to select menu items. (Example: Select
Text
and press %.)
b
d
d
Page 20

USIM PINs
PIN1 & PIN2
PIN1
Prevent unauthorised use of Vodafone handset
PIN2
Required to clear Call Costs and to set Max Cost
.
PIN1 & PIN2 are
.
PIN1 & PIN2 can be changed.
.
When
Switch On/Off
is required every time handset is turned on (with USIM
Card inserted).
PIN Lock & Cancellation (PUK Code*)
PIN1 Lock or PIN2 Lock is activated if PIN1 or PIN2 is
incorrectly entered three times consecutively. Cancel
PIN Lock by entering the Personal Unblocking Key
(PUK Code). For information on PUK Code, contact
Vodafone Customer Centre, General Information
(
AP.18-48
* USIM Personal Unblocking Key (PUK Code) unblocks a USIM
Card blocked after the wrong PIN has been entered three
consecutive times. Each USIM Card has a unique PUK Code.
Do not disclose it to unauthorised persons.
Note X.
.
9999
by default.
in
PIN Entry
is On, PIN1 (4-8 digits)
).
If PUK Code is incorrectly entered ten times, USIM
Card is locked and handset is disabled. Write
down PUK Code.
For procedures required to unlock USIM Card,
contact Vodafone Customer Centre, General
Information (
AP.18-48
).
Security Codes
Handset Code, Centre Access Code and Network
Password are needed for handset use.
Handset Code
9999 or the 4-digit number selected at initial
subscription. Handset Code is required to use/change
some handset functions. * appears when Handset
Code is entered. If incorrect,
incorrect!
appears.
Centre Access Code
The 4-digit number in the contract, required to access
Optional Services via landlines, and to subscribe to
fee-based information.
Handset code is
Abridged English Manual
18
18-21
Page 21

Network Password
The 4-digit number selected at initial subscription,
required to restrict handset services. If Network
Password is incorrectly entered three times
consecutively, Call Barring settings are locked. To
resolve, Network Password and Centre Access Code
must be changed. For details, contact Vodafone
Customer Centre, General Information (
Note X .
Tip X
Abridged English Manual
Write down Handset Code, Centre Access Code
and Network Password. If lost, contact Vodafone
Customer Centre, General Information (AP.18-
48)
. Do not reveal Handset Code, Centre Access Code
and Network Password. Vodafone is not liable for
misuse or damages.
. Change Handset Code and Network Password as
needed.
. Do not attempt to change Centre Access Code.
Contact Vodafone Customer Centre, General
Information (AP.18-48) for details.
18
AP.18-48
Basic Handset Operations
Handset Power On/Off
Turning On
Open handset
1
2
).
Press " for 2+ seconds
Turning Off
1
Open handset
Press " for 2+ seconds
2
English Display
1
Press %, select
2
Select
Language
Select
3
English
設定
and press %
and press %
Your Phone Number
Press % , select
1
2
Press " to exit
My Details
Setting Clock
Press %
1
Select
2
, select
Settings
Date & Time
and press %
and press %
and press
and press
%
%
18-22
Page 22

3
Select
Set Date/Time
4
Enter the date and the time (24-hour format) and
press
%
and press
%
Network Settings
Press %, select
1
2
Select
Network Settings
Select
3
4
Select Service
Select
Auto, 3G
For
Auto
depending on the language information on USIM Card.
, mode (3G or GSM) changes automatically
Settings
and press
or
GSM
and press
and press
%
and press
%
%
%
Initiating a Voice Call
Calling within Japan
1
Enter a phone number
Press
2
Service requires an additional contract, but no basic
monthly charges or application fees.
1
2
3 Select
!
Placing an International Call
Enter a phone number
Skip ahead to Step 6 when calling Vodafone handsets.
Press B ø
Int'l Call
and press %
4 Select a country and press %
5 Select
Japan
and press %
6 Press !
Note X . Omit the first 0 of the area code except when
Service requires an additional contract, but no basic
monthly charges or application fees.
calling a number in Italy or Russia.
For details on placing international calls, contact
Vodafone Customer Centre, General Information
( AP.18-48 ).
Calling from Outside Japan
1 Enter a phone number
When calling landlines or mobile phones within the
country, skip ahead to Step 6.
2 Press B ø
3 Select
Int'l Call
and press %
4 Select a country and press %
When calling Vodafone handsets, always select
日本
.
Select
5
Press !
6
(JPN)
Abroad
.
and press %
Abridged English Manual
18
18-23
Page 23

Redial
Press c
1
2
Select a record and press
Press
3
Calling from Received Calls
1
2
3
Initiating a Video Call
1
2
3
Abridged English Manual
Answering a Voice Call
1
2
!
Press
d
Select a record and press
Press
!
Enter a phone number
Press B
Select
Video Call
Handset rings/vibrates and Mobile Light flashes
for an incoming Voice Call
Open handset
Press
!
18
18-24
ø
%
%
and press
%
Answering a Video Call
1 Handset rings/vibrates and Mobile Light flashes
for an incoming Video Call
Open handset
2 Press ! to answer with voice and video image
Press B ø, select
to answer with voice only
Total Charges & Talk Time
Total Charges
1 Press %, select
2 Select
3 Select
Call Costs
All Calls
Total Talk Time
1 Press %, select
2 Select
3 Select
Muting Microphone
Even when Microphone is muted, other party's voice
can be heard through Earpiece.
Call Timers
Received Calls
press %
Hide Picture
Call Log
and press %
Call Log
and press %
and press %
and press %
and press %
or
Dialled Calls
and press %
and
1 During a call, press A Æ
2 Press A ¨ to cancel
Page 24

Answer Phone & Voice Mail
Activate Answer Phone or transfer incoming calls to Voice Mail to record caller messages.
Answer Phone
Message Recorded
Press % S
S
Select
Setting
Additional Contract Not Required Not Required
Message Indicator @/[ x
Play
Delete
When Handset Power
is Off
When Handset is
Out-of-Range
Tip X Activating Voice Mail cancels Call Forwarding.
S
S
S
Press
S Select
S Select
During playback, press B ø
S Select
Answer Phone
Select
Settings
Select
Switch On/Off
Choose
On
% S Select
Answer Phone
Play Answer Phone
Delete
Handset Voice Mail Centre
Press % S Select
S
Select
Tools
S Press
S Press
S Press
S Press
S Press
%
Tools
S Press %
S Press %
S Press % S Press B Y
Not Available
Not Available
%
%
%
%
S Press %
Select
S
S
S Select
S Select
S Select ring time (for
Press
S Select
Call/Video Call
Press % S Select
Press % SSelect
Activate
Always
% S Select
Call Voicemail
Available
Available
Voice Mail
Settings
S Select
Voicemail & Diverts
Voicemail
S Press %
or
No Answer
No Answer
Phone Book
S Press %
After playback, press 7
(except when the forwarding condition is
When Busy
(except when the forwarding condition is
When Busy
or
No Answer
or
No Answer
S Press
S Press %
S Press %
) S Press %
S Press %
%
Call Settings
)
)
Abridged English Manual
18
18-25
Page 25

Forwarding a Call
Transfer incoming calls to a specified phone number.
Activating Call Forwarding
1
Press %, select
2
Select
Call/Video Call
Select
3
4
5
6
7
8
9
Note X Activating Call Forwarding cancels Voice Mail.
Manner Mode
Abridged English Manual
Activate Manner mode to use handset without
disturbing others.
Call Settings
Select
Voicemail & Diverts
Select
Diverts
Select
Always
Select
Enter Phone Number
Enter a forwarding number and press
Select ring time and press % (for
Settings
and press
and press
or
No Answer
and press
%
and press
%
and press
and press
1 In Standby, press # for 1+ seconds
Default Manner Mode Settings:
! Mutes Keypad Tones, Warning Tone and Power
On/Off Sounds.
@ Simultaneously invokes: Volume for incoming calls/
new messages (Silent), General Volume (Silent),
18
18-26
Vibration for incoming calls/new messages (On).
Adjust settings as required.
Tip X Cancelling Manner Mode
In Standby, press # for 1+ seconds.
%
%
%
%
%
No Answer
Entering Characters
Entry Modes
Press & to toggle between character entry modes.
Single-byte alphanumerics
)
&
&
Single-byte numbers
&
Character Code
&
Kanji (hiragana)
&
Double-byte katakana
&
Single-byte katakana
&
Double-byte alphanumerics
Page 26

Key Assignments
Key
1
2
3
4
5
6
7
8
9
0
(
#
a
b
c
d
Single-byte Alphanumerics
Upper/Lower Case Lower Case
@./_-1 (Space) @./_-1 (Space) 1 1
ABCabc2 abc2 2 2
DEFdef3 def3 3 3
GHIghi4 ghi4 4 4
JKLjkl5 jkl5 5 5
MNOmno6 mno6 6 6
PQRSpqrs7 pqrs7 7 7
TUVtuv8 tuv8 8 8
WXYZwxyz9 wxyz9 9 9
,.0L(Line Break)
Single-byte Mail/Web Extensions
,.0L(Line Break)
1
Log, Single-byte Symbol/Double-byte Pictograph List #
Cursor Up
Cursor DownL(Line Break)
Cursor Left
Cursor Right
Single-byte
Numbers
2
0 +
* P (Pause) ? -
Character Code
0
3
& Change Character Entry Mode
'
$ (Press) Delete One Character
$
(Long Press)
! Recover up to 64 deleted characters
Toggle Case + Toggle Mode (upper/lower and lower case)
Delete Code/One Character
Delete before or after cursor
4
% OK
1
Extensions are listed for easy entry.
2
+
is for phone number entry. Press for 1+ seconds.
3
P
(Pause), ? and - are for phone number entry.
4
Press ! once for each character to recover immediately after deleting. [Not available after deleting text with $ (Long Press).]
Abridged English Manual
18
18-27
Page 27

Tip XEntering Consecutive Characters Assigned to the
Same Key
Press d to move cursor to the right, then enter the
next character.
Editing Characters
Use g to move cursor to a character. Press
delete it and then enter another.
Symbols, Pictographs & Emoticons
Symbols & Pictographs
1
Press
# to open Symbol List
2
Press B to toggle the list as
follows: Pictograph List (6 - 1) →
Log List (up to 20 recently
entered double-byte Symbols/
Pictographs are saved) →
Abridged English Manual
Symbol List
3
Use g to select one and
press
%
Press
4
Tip X In double-byte entry modes, press B to toggle
A ´
between three Symbol Lists.
to exit list
18
$ to
Emoticons
In a text entry window, press B
1
2
Select
Emoticons
3
Select an emoticon and press
and press
ø
%
%
18-28
Page 28

Saving to Phone Book
Save names with phone numbers, mail addresses, etc. to Phone Book.
Phone Book Entry Items
Item
Last Name:
First Name:
Reading:
Add Phone Number:
Add Email Address:
Category:
Address:
Homepage:
Note:
Birthday:
Picture:
Tone/Video for Incoming Call:
Tone/Video for New Message:
Secret:
,
Save up to 750 entries to handset Phone Book. On USIM Card, the number of entries you can save in Phone Book depends on the
card specification. Depending on the USIM Card in use, some items may not be supported, and character entry limits or number
of Groups may be lower. Also, the number of phone numbers or mail addresses per entry may be lower.
,
Save names, readings, phone numbers, mail addresses and Categories to USIM Card.
Note
X
Back-up Important Information
Keep a copy of important information in a separate place. When battery is exhausted or removed for long periods,
Phone Book entries may be lost. Handset damage may also affect information recovery. Vodafone is not liable for
damages resulting from accidental loss/alteration.
Enter up to 32 characters. (Select
Enter up to 64 characters
Enter up to three numbers on handset and two numbers on USIM Card (32 digits each)
Enter up to three addresses on handset and one address on USIM Card (128 single-byte
characters each)
Sort entries into 16 Groups (handset and USIM Card each). Group names can be changed.
Set Ringtone by Category (handset only).
Enter postal code (20 characters), country name (32 characters), state/province
(64 characters), city name (64 characters) and street name/number (64 characters)
Save URLs. Enter up to 1024 characters.
Add personal details. Enter up to 256 characters.
Enter birth date
Set an image to appear for incoming calls/mail
Set Ringtone or Ringvideo by caller/sender
Restrict access to Phone Book entries by saving them as Secret
Description
Name:
when saving to USIM Card.)
Abridged English Manual
18
18-29
Page 29

New Phone Book Entries
Enter a name, reading, phone number and mail
address.
1
Press %, select
2
Select
Phone Book List
3
Press B
4
Select
Add New Entry
Select
5
6
7
8
Abridged English Manual
Tip X
9
00
111100
18
18-30
111111
111122
11
22
Last Name:
Enter last name and press
Select
First Name:
Enter first name and press
Characters entered for names
appear after
Correcting Reading
Select
press %.
Select
Add Phone Number:
Enter a phone number and press %
Select an icon and press %
Select
Add Email Address:
ø
Reading:
Reading:
Phone Book
and press
and press
and press
%
and press
%
.
and press %. Correct spelling and
and press %
and press %
and press
%
%
%
%
%
33
111133
Enter a mail address and press %
44
111144
Select an icon and press %
55
111155
Press A ß
Note XEnter a name, phone number or mail address to
Tip X
create a Phone Book entry.
To Change Storage Media
In Standby, press % S Select
Press % S Select
Save New Entry
USIM Memory
. For
Ask Each Time
each new entry.
Settings
S Press % S Select
or
Ask Each Time
S Press % S Select
, select storage media for
Phone Book
S Press %
Handset,
S
Editing Phone Book
1
Open a Phone Book entry ( AP.18-31 "Dialling
from Phone Book")
2
Press B ø
3
Select
Edit/Add Details
press %
4
Select an item and press %
5
Edit contents and press %
After editing a phone number/mail address, select an
icon and press
6
Press A
ß
and
.
%
Page 30

Saving from Received Calls
Select a phone number (
1
Received Calls")
2
Press B
press
New Entry
3
1
2
Add to Existing Entry
1
2
ø
, select
%
Select
As New Entry
Perform Steps 5 - 15 on
Select a Phone Book entry and press
Press A
ß
AP.18-24
Save Number
and press
P.18-30
"Calling from
%
and
%
Dialling from Phone Book
Tip X To Open Phone Book Entries on USIM Card
In Standby, press % S Select
Press % S Select
Ph. Book Location
Memory
Settings
Press %
Phone Book
Press % S Select
Press % S Select
Search by Reading
1 Set search method to
By Reading Order
2 Press b
3 Enter reading
4 Select a name and press %
Tip X Multiple Numbers
Use e to select other numbers.
5 Press !
USIM
Changing Search Method
By Reading
Order
By Category Opens entries in the specified Category
By Katakana
Press %, select
1
Select
2
Select
3
4 Select
Katakana
Shows entries that start with specified
Reading
Shows entries with readings that start with
katakana in the specified row
Phone Book
Settings
View Phone Book
By Reading Order, By Category
and press
and press %
and press
%
and press
%
%
or
By
Mobile Camera
Before Using Camera
Select from two different shooting modes. Use
Camera
■
for still images and
Photo Camera
Image Size
Save to
File Format
Video Camera
S
S
S
W 1216 × H 1632 dots
W 960 × H 1280 dots
W 768 × H 1024 dots
W 480 × H 640 dots
W 240 × H 320 dots
W 120 × H 160 dots
Handset or miniSD™ Memory Card
JPEG (.jpg)
for videos.
S
Photo
Abridged English Manual
18
18-31
Page 31

Video Camera
.
c
■
W 176 × H 144 dots
Image Size
Save to
File Format
Camera Shake
If handset moves while shooting, images may blur. Hold
handset firmly or place it on a stable surface and use Selftimer.
Note X Lens Cover
Abridged English Manual
Be sure lens cover is clean before image capture.
Remove dust/smudges with a soft cloth.
Camera
Mobile camera is a precision instrument, however,
some pixels may appear brighter/darker.
Shooting/saving images while handset is hot may
affect the image quality.
Subjecting the lens to direct sunlight will damage
the camera's colour filter.
(QCIF)
W 128 × H 96 dots
(SQCIF)
Handset or
miniSD™ Memory Card
MPEG-4 (.3gp)
miniSD™ Memory Card
MPEG-4 (.3gp or .ASF)
Capturing Still Images
1
In Standby, press %
2
Select
18
18-32
Camera
Frame image on Display
3
If } (Video Camera indicator) appears at top of
Display, press
and press %
to switch to Photo Camera.
W 240 × H 320 dots
(QVGA)
4
Press %
5
Press B
Press " to exit
6
1
.
.
.
ß to save image
Capturing Self Portraits
Activate handset camera, then press ( to switch to
Internal Camera. Your image appears on Display as
a mirror image.
Data Folder
Contents
Saved files are organised in separate folders
according to file format.
< Data Folder >
Pictures
DCIM
Sounds&Ringtones
Custom Screens
V-appli
IC-appli
Videos
Text Templates
Other Documents
Still Images
Large Still Images
Downloaded Melodies and
other Sound Files
Shortcut to Custom Screens
Shortcut to V-applications
Shortcut to IC-appli
Video Images
Text Templates created in
vNote Format
Other Files such as vFiles,
Dictionary Files, etc.
Page 32

Opening Data Folder
Press %, select
1
2
Select a folder and press
.
To select a file in a created sub folder, select the sub
folder and press
.
To open miniSD™ Memory Card Data Folder,
press
d
3
Select a file and press
Press $ to return to file list
4
MMS Mail Attachments
Example: Attaching an image from Pictures folder
to MMS Mail
Press %, select
1
2
Select
Pictures
Select a file and press B
3
4
Select
Send
5 Select
As Message
Data Folder
%
.
Data Folder
and press
and press %
and press
%
.
%
and press
%
ø
and press %
%
%
6 Select the recipient field and press %
7 Enter a recipient and press %
8 Select the subject field and press %
9 Enter a subject and press %
00
111100
Select the message text field, enter text and
press %
11
111111
Select < on Media Console and press %
22
111122
Select
Send Message
and press %
Vodafone live!
Automatic Network Setup
To use Vodafone live! services, first download
network connection information from Vodafone live!
Service Centre. Handset initiates Network Setup
when B, A or % is pressed for the first time.
If handset is in Japanese mode, press A ˜, then
change to English mode (AP.18-22).
1 Press B, A or %
2 Press B Y
. Handset connects to the Network and retrieves
required information.
. Follow onscreen instructions.
Abridged English Manual
18
18-33
Page 33

Web
Use Web to access the Mobile Internet. Browse for
image or sound files as well as information.
Vodafone live! Main Menu
Access Mobile Internet sites by selecting a topic from
Vodafone live! Main Menu.
Auto Delivery Service
When available, request automatic info updates from
Mobile Internet sites and download files via Web.
Searching the Mobile Internet
Press %, select
1
Select
2
3
Abridged English Manual
4
5
6
7
Note XVodafone live! Main Menu content is subject to
Vodafone live!
Select
English
Select a menu item and press
Repeat Step 4
Press " to exit Web
Press B
change.
18
and press
Y
Vodafone live!
and press
%
and press
%
%
%
Web Options Menu
Open Vodafone live! and press B
following functions.
Item
Home
Bookmarks
Mark Page
Save This Link
Save Items
Enter URL Enter a Mobile Internet address directly
Access History
Reload Page Update information
Advanced
Exit Exit Web
Open information saved as "Home"
Open Bookmarks to access information or
edit the list
Save the current information to Bookmarks
Download files from links
Save images, sound files and vFiles to Data
Folder
Access Mobile Internet sites using access
histories
Send URL via SMS/MMS, open properties,
search within information, customise
settings, etc.
ø
Description
to use the
18-34
Page 34

Messaging
Vodafone text communication services are available
in Japan and overseas. Exchange text or multimedia
messages with compatible handsets, PCs, etc. via the
Internet.
SMS
Exchange short text messages of up to 160 singlebyte alphanumerics with SMS-compatible Vodafone
handsets.
MMS
Exchange long text messages of up to approximately
30,000 single-byte alphanumerics with MMS-compatible
Vodafone handsets, email-compatible handsets and
PCs and other devices via the Internet. Attach images,
sounds or vFiles to messages. Send/receive up to
300
KB (attachment and message text).
1
1
Note X 804SH handset is incompatible with Greeting,
Coordinator, Relay Mail or Hotline. Messages from
these services are not received.
Tip X
An additional contract is required to use MMS and
receive e-mail from PCs, etc.
If a recipient's handset is off or out-of-range, the
message is saved at the Centre, and delivered
when recipient handset connects to the Network.
The message is deleted if not received by the set
Expiry Time.
2
Opening Messages
Press % , select
1
2
Select
Received
press %
Select a message and press %
3
Messaging
,
Drafts
,
Sent
and press %
or
Unsent
and
Editing Messages
Open Draft or Unsent folder
1
Draft
2
Select a message and press %
Unsent
Select a message and press B ø
Select
Edit
and press %
3
Edit the message
Customising Handset Address
Change the account name (alphanumerics before @)
of initial handset mail address. Customising handset
mail address helps reduce spam.
Press % , select
1
2
Select
Vodafone live!
Handset connects to the Network and Vodafone live!
Main Menu opens.
Select
Select
My Vodafone
各種変更手続き
3
4
Vodafone live!
and press %
and press %
and press %
and press %
.
.
Abridged English Manual
18
18-35
Page 35

5
Select
オリジナルメール設定・各種メール設定
press %
Select the text entry field below
6
ください。
7
Enter Centre Access Code and press %
8
Select
OK
9
Select
1
00
111100
11
111111
22
111122
33
111133
Note: Error Messages
Abridged English Manual
ご希望の
既に登録されています。
他のアドレスを入力してく
ださい
オリジナルメールアドレス
を正しく入力してください
一定時間経過しましたので
再度暗証番号を入力して下
さい
暗証番号の入力に誤りがあ
18
ります
18-36
1
Select
Select the text entry field below
を入力してください。
Enter an account name and press %
Enter between 3 and 30 single-byte characters.
Select
OK
Message
E
メールアドレスは
and press %
and press %
.
各種メール設定
メールアドレス編集
.
and press %
and press %
and press %
The address is already in use.
Enter a different account name.
Entered address does not meet
format requirements; try another
The specified time has elapsed.
Press % and start again.
The Centre Access Code is
incorrect. Press % and enter the
correct Centre Access Code.
暗証番号を入力して
and press %
ご希望のアカウント
Description
and
Note X The procedure for searching the Mobile Internet
may change without prior notice. For further
information, contact Vodafone Customer Centre,
General Information ( AP.18-48 ).
Messaging Menu
Press % , then select
open Messaging menu.
Item
Create Message
Received
Drafts
Sent
Unsent
Templates
Server Mail Box
Mail Settings
Memory Status
Messaging
Create new message
Open received messages
Open draft messages
Open sent messages
Open undelivered/cancelled/failed
outgoing messages
Open messages saved as templates
Download and open list of messages
on Server, or receive all messages
on Server
Customise general items, SMS,
MMS, and My Folders. Create Speed
Mail List.
View memory status of each Mail
Box
and press % to
Description
Page 36

Sending Text Messages
Press %, select
1
2
Select
Create Message
press
%
3
Select the recipient field and
press
%
4
Enter a recipient
Phone Book
1
Select
and press
2
Select an entry and press
3
Select recipient's mail address or Vodafone
handset number and press
Speed Mail
1
Press B
press
%
2
Select a recipient and press
Sent Mail Record
1
Select a recipient and press
Direct Entry
1 Select
press %
2 Enter a Vodafone handset number or mail
address and press %
Sending to Group
1 Select
2 Select a Contact Group and press %
3 When multiple recipients are included, press A
b to return to New Message window
Messaging
and
From Phone Book
%
ø
, select
Speed Mail List
Enter Phone No.
Select Group
or
and press %
and press
Media Console
%
%
%
%
Enter Email
%
and
and
5 Enter subject (MMS only)
1 Select the subject field and press %
2 Enter a subject and press %
6 Select the message text field and enter text, then
press %
7 Press b until y appears on Media Console
For more about Media Console, see P.18-38.
8 Attach files (MMS only)
Attaching Images
1 Use f to select } on Media Console and
press %
2 Select
3 Select a file and press %
Attaching Sound Files
1 Use f to select > on Media Console and
2 Select
3 Select a file and press %
Attaching Video Images
1 Use f to select ? on Media Console and
2 Select
3 Select a file and press %
Saved Pictures
press %
Saved Sounds
press %
Saved Videos
and press %
and press %
and press %
9 When finished, use f to select < on Media
Console and press %
00
111100
Select
Send Message
and press %
Abridged English Manual
18
18-37
Page 37

Media Console
Media Console appears in New Message window for
mail-related functions.
.
When y appears on Media Console, use f to select
icons. Otherwise press
< Send
Enter a recipient, convert Message Type, send
message, or use option settings.
} Picture
Abridged English Manual
Attach still images.
> Sound
Attach sound files.
? Video
Attach video images.
* Others
Attach other types of files; attach Phone Book or
schedule entries; create slides; check message text or
attached files; or save to Drafts or Templates.
b
until y appears.
18
Incoming Text Messages
Receiving MMS & SMS Messages
When mail arrives, animation plays and
Received.
Information menu opens, press % to open Received
folder.
and appears followed by z. While
Opening Received Text Messages
1
Press %, select
Select
2
3
Received
Select a message and press
Messaging
and press
and press
%
%
Retrieving MMS Messages
The Centre delivers the initial portion of MMS
messages when:
.
The message was sent to multiple recipients
.
Files are attached to the message
Follow the steps below to download the entire
message and attachments:
Select a message (see above)
1
Select an MMS message N (MMS Notice).
2
Press B
3 Select
ø
Download
and press %
Message
%
18-38
Page 38

Replying & Forwarding
Replying to Messages
1
Open a received message (see
Press B
2
3
Select
4
Select
5
Select the message text field and enter text, then
press
6
Select < on Media Console and press
7
Select
Forwarding Messages
Open a received or sent message (
1
2
Press B
3 Select
ø
Reply
or
Reply All
Reply
or
Reply with Hist.
%
Send Message
ø
Forward
and press %
and press
P.18-38
and press
and press
%
)
%
%
AP.18-35
4 Press %
5 Enter a recipient and press %
6 Select < on Media Console and press %
7 Select
Send Message
and press %
%
V-applications
A variety of V-applications are available for use with
Vodafone handsets.
. Download V-applications via Web.
. Enjoy Network games or real time information.
. Set a V-application to activate in Standby.
V-appli Menu
Press %, then select
V-appli menu.
Item Description
V-appli Download, activate or delete V-applications
Settings Adjust V-application settings
Information View Java™ and JBlend™ rights
)
Downloading V-applications
1 Press %, select
2 Select
3 Select
V-appli
More V-Appli
Handset connects to the Network and Vodafone live!
Game Menu opens.
4 Open a Mobile Internet site offering V-applications
5 Select a V-application and press %
6 Press %
V-application is saved and confirmation appears.
7 Press B Y
V-appli
and press % to open
V-appli
and press %
and press %
and press %
Abridged English Manual
18
18-39
Page 39

Vodafone live! FeliCa
Basics
Vodafone live! FeliCa
Card-based services available via FeliCa-compatible
Vodafone handsets. 804SH supports Vodafone live!
FeliCa. To use services such as e-money, e-ticketing
and reward point systems, simply hold handset over a
compatible reader/writer at a shop or restaurant, etc.
■
FeliCa is a contactless IC card technology which enables
wireless data transmissions with compatible reader/writer
terminals.
IC Card is a FeliCa chip embedded in FeliCa-compatible
■
Abridged English Manual
Vodafone handsets.
IC Card contains information required for use of Vodafone
■
live! FeliCa.
.
,
■
IC-appli is a type of V-application required to use
Vodafone live! FeliCa.
Edy e-money IC-appli is preloaded on 804SH.
.
Edy is a prepaid e-money service run by bitWallet Inc.
encompasses a range of IC
FeliCa
IC Card
IC-appli
.
.
.
.
.
Service Usage Outline
Download IC-appli
Download IC-appli via Mobile Internet site.
IC-appli is saved to IC-appli folder.
V
Activate IC-appli, complete registration/customise settings.
Charge accounts, check balance or payment records, etc.
Complete Registration/Set Up
V
When using Vodafone live! FeliCa at shops, restaurants,
etc., position m (Sub Display side) over reader/writer.
Use e-money and e-tickets to shop and travel; earn reward
points, etc.
Note X
IC-appli registration and usage vary; contact the
service provider for details.
Vodafone is not liable for damages resulting from
accidental loss/alteration of IC Card data/settings.
Keep service passwords/customer service
contact information, etc. in a separate place.
Use Service
18
18-40
Note X IC Card data content varies by service and usage
history. Procedures to delete IC Card data vary by
IC-appli; contact the service provider for details.
Page 40

Starting IC-appli
To use Vodafone live! FeliCa, activate a service
IC-appli and complete service registration, setup,
charge, balance check, etc.
Main Menu
Select
1
■
S
To download an IC-appli, select
Select an application and press %
2
IC-appli starts.
■
"
To end the IC-appli, press
Note X IC-appli cannot be started during calls or when
Tip X IC-appli settings and usage patterns resemble those
IC-appli
IC-appli
.
another V-application is active.
of other V-applications ( AP.18-39 ).
.
and press
.
.
.
.
%
.
More IC-appli
X
Press %
Using Vodafone live! FeliCa
Follow these steps to conduct a transaction.
Example: making an electronic payment:
Complete service registration, setup and charge
beforehand.
You do not need to activate an IC-appli to complete a
transaction.
1
Place m (Sub Display side) over reader/writer
m
Reader/writer will scan FeliCa IC Card even during calls
or Vodafone live! transmissions.
Confirm scan results on reader/writer display.
If recognition is slow, move handset around slightly.
When handset is placed over the sensor, message may
appear or handset may vibrate depending on the
service. V-application, mail or Web may also activate
automatically. To disable handset response, see
"
Interface Settings " .
P.18-44
Abridged English Manual
18
18-41
Page 41

When Handset Power is Off
Vodafone live! FeliCa is available. However, IC-appli will
.
■
not start automatically.
After installing/reinstalling battery, always turn on
handset power to use Vodafone live! FeliCa.
When Battery is Low
■
.
X
X
S
X
Vodafone live! FeliCa is not available. Charge battery
beforehand.
Tip X . Align handset parallel to reader/writer.
Recognition may fail if metallic object is placed on
the Sub Display side.
S
Vodafone live! FeliCa Settings
IC Card Status
Main Menu
Abridged English Manual
1
Select
■
B
If IC Card Lock is set, press
Code
%
■
Press
IC Card Lock
Disable Vodafone live! FeliCa. Use this function to
restrict access to or prevent unauthorised use of
Vodafone live! FeliCa on your handset.
18
18-42
To disable Vodafone live! FeliCa via mail or phone, see
"
Remote Lock " on the right.
IC Card Lock is
IC-appli
IC Card Status
S
S
Press
.
to exit.
%
Off
by default.
.
S
IC Card Settings
and press
Y
%
Enter Handset
Main Menu
1
Enter Handset Code and press %
Choose
2
■
S
To cancel, choose
3
Press B Y
IC-appli
On
and press %
%
S
Off
IC Card Settings
Press
(Omit the next step.)
IC Card Lock
Remote Lock
To remotely disable Vodafone live! FeliCa, send a
message with specific subject (Mail Remote Lock) or
call from a specified phone (Call Remote Lock).
Preparation on Handset
Mail Remote Lock Password/Address
■
.
Save a password for Mail Remote Lock, and set mail
address to send IC Card Lock notice to.
Main Menu
Enter Handset Code and press %
1
Select
2
3
Select
Enter a password and press %
4
Enter between 5 and 16 alphanumerics.
Select
5
Select
6
Enter Email Address
IC-appli
Mail Remote Lock
Remote Lock PW
E-mail Lock Notice
From Contacts
IC Card Settings
S
,
Enter Phone Number
and press %
Remote Lock
and press %
and press %
and press %
or
Page 42

7
Select/enter mail address or Vodafone handset
number and press
8
To save settings without enabling Mail Remote
Lock, press A
.
To enable Mail Remote Lock, after Step 7, perform
from Step 3 in "
choose
On
Call Remote Lock Number/Count for Lock
■
Save up to two phone numbers from which to call
handset, and set Missed Call count required to
activate IC Card Lock (default count is 3 times).
. Enable or disable Remote Lock activation from
payphones.
Main Menu
1
Enter Handset Code and press %
Select
2
Select
3
■
Select
4
and press %
5
Select/enter a phone number and press %
■
Select
6
.
IC-appli
Call Remote Lock
Phone No. to Lck 1
To select whether to permit control from payphones,
S
% S
select
Choose
To save second phone number, select
S
3 times
Set Public Phone
On
From Contacts
% S
Press
Count for Lock
is set by default.
%
ß
Remote Lock Setup
in Step 4.
IC Card Settings
S
S
(permit) or
Repeat Steps 4 - 5
Off
or
and press %
" on right and
Remote Lock
and press %
and press %
Press
Press %
Enter Phone Number
Phone No. to Lck 2
.
.
7
Enter Missed Call count (3 - 10 consecutive times)
required to activate IC Card Lock and press %
8
To save settings without enabling Call Remote
Lock, press A ß
To enable Call Remote Lock, after Step 7, perform
from Step 3 in "
choose
Remote Lock Setup
Activate or cancel Mail Remote Lock/Call Remote Lock.
Both Remote Locks are
Main Menu
1
Enter Handset Code and press %
Select
2
3
4
5
Mail Remote Lock
and press %
Select
Switch On/Off
Choose
■
S
% ,
To cancel, choose
Saved mail address and phone numbers remain.
Reactivate Remote Lock to use the same setting.
Press A ß
Remote Lock Setup " below and
On
in Step 4.
Off
by default.
IC-appli
On
and press %
IC Card Settings
S
or
and press %
X
S
Off
Press
Call Remote Lock
X
S
Remote Lock
Abridged English Manual
18
18-43
Page 43

Activating Remote Lock
.
■
1
■
■
1
2
Abridged English Manual
■
Note X Missed Call count is reset by incoming calls from
.
Via Mail
Use MMS/e-mail to send password to handset
Enter password as subject; leave other fields blank.
To confirm IC Card Lock status, send a message
from a phone or PC with specified mail address
AP.18-42 ).
(
After Handset Receives Message
IC Card Lock is set and notice is sent from handset to
specified mail address.
Via Phone
Using one of the specified phones, call handset
End the call
The call is recorded as a Missed Call on your handset.
Within three minutes, repeat Steps 1 - 2 until the
specified number of Missed Calls are recorded.
Payphones can be used for this function if Set Public
Phone is activated beforehand.
After Specified Number of Missed Calls
X
IC Card Lock is set; a message announces Remote Lock
activation.
numbers not saved for this function. If series is
interrupted, start over from the beginning.
18
18-44
.
Interface Settings
Select reader/writer command acceptance
.
parameters. Choose
V-application,
Messaging
handset, and
message.
Interface Settings is
Main Menu
1
Enter Handset Code and press %
.
Select from
2
press %
3
Choose
to activate mail,
On
On
for
V-appli
Browser
Pop-up Message
IC-appli
V-appli
or
to access the Mobile Internet,
Vibration
On
for all items by default.
IC Card Settings
S
to
Pop-up Message
Off
and press %
to activate
to vibrate
to open pop-up
Interface Settings
S
and
Resetting Defaults
Cancel custom settings and return Vodafone live!
FeliCa settings to their defaults.
Main Menu
X
S
.
.
1
Enter Handset Code and press %
Press B Y
2
IC Card Lock, Remote Lock and Interface Settings
return to their default states.
Tip X
IC-appli
Set to Default does not affect downloaded IC-appli.
Memory All Clear (V-application Settings)/Reset All
(Master Reset) return IC-appli settings to defaults
and delete downloaded IC-appli. Memory All Clear
and Reset All are disabled if IC Card data remains.
IC Card Settings
S
Set to Default
Page 44

Function Menu
Main Menu Sub Menu Main Menu Sub Menu Main Menu Sub Menu
V-appli
Vodafone live!
Media Player
Messaging
Camera
V-appli
Settings DCIM Add New Entry
Information Sounds&Ringtones Call Voicemail
Vodafone live! Custom Screens Manage Category
Enter URL V-appli Speed Dial List
Bookmarks IC-appli Contact Groups
Saved Page Videos Settings
Access History Text Templates Manage Ph.Book
Browser Settings Other Documents Service Diall...
Music Memory Status
Videos
Streaming Alarms Received Calls
Create Message Auto Power On Call Timers
Received Calculator Data Counter
Drafts Answer Phone Call Costs
Sent Voice Recorder
Unsent Barcode IC Card Settings
Templates E-Book
Server Mail Box Stopwatch
Mail Settings Tasks Connectivity
Memory Status World Clock Call/Video Call
ー
Data Folder
Tools
Pictures
Phone Book
Calendar Dialled Numbers
Call Log
IC-appli
My Details
Settings
Countdown Timer Network Settings
Expenses Memo
Compass
Phone Help
Phone Book List
All Calls
IC-appli
ー
Phone Settings
Abridged English Manual
18
18-45
Page 45

Specifications
804SH
Weight Approximately 120
Continuous Talk Time
Continuous Standby Time (when closed)
Video Call Continuous Talk Time
Charging Time (Power off)
Dimensions (W × H × D)
Maximum Output
Abridged English Manual
.
Continuous Talk Time is an average measured with a
Approximately
Approximately
Approximately
Approximately
Approximately
AC Charger: Approximately
In-Car Charger: Approximately
Approximately 102 × 52 × 24.15 mm
(when closed, without protruding parts)
●●
●●
new, fully charged battery, with stable signals.
Continuous Talk Time may be less than half this value if
handset is out-of-range or signal is weak.
.
Continuous Standby Time is an average measured with a
new, fully charged battery, with handset closed without
calls or operations, in Standby with stable signals.
Standby Time may be less than half this value if handset
18
is out-of-range or signal is weak. Standby Time may vary
by environment (battery status, ambient temperature,
etc.).
18-46
W (3G)
W (GSM)
g
(with battery)
●●
minutes (3G)
minutes (GSM)
●●
hours (3G)
●●
●●
hours (GSM)
minutes
●●
minutes
●●
●●
minutes
.
Talk Time/Standby Time decrease with frequent use of
Display/Keypad Backlights.
.
Talk Time/Standby Time may decrease when a
V-application is active.
.
Talk Time/Standby Time decrease with handset use in
poor signal conditions.
.
Display employs precision technology. However, some
pixels may appear brighter or darker.
Page 46

AC Charger
Battery
Power Source AC 100V-240V, 50/60 Hz
Power
Consumption
Output
Voltage/Current
Charging
Temperature
Dimensions
(W × H × D)
Cord Length
VA
●●
●●
●●
DC
5
- 35
℃
Approximately
(without protruding parts, cord)
Approximately
mA
V/
℃
×
●●
●●
m
●●
Voltage
Battery Type Lithium-ion
Capacity
Dimensions
(W × H × D)
×
●●
mm
LCD Remote/Mic with Headphones
Weight
Cord Length
●●
V
mAh
●●
Approximately
(without protruding parts)
Approximately
Approximately
●●
●●
●●
×
g
cm
●●
mm
×
●●
Abridged English Manual
18
18-47
Page 47

Customer Service
If you have questions about Vodafone handsets or services, please call General Information.
For repairs, please call Customer Assistance.
Vodafone Customer Centres
From a Vodafone handset, dial toll free at
157 for General Information or
113 for Customer Assistance
Call these numbers toll free from landlines.
Hokkaido, Aomori, Akita, Iwate, Yamagata, Miyagi, Fukushima, Niigata,
Tokyo, Kanagawa, Chiba, Saitama, Ibaraki, Tochigi, Gunma, Yamanashi,
Nagano, Toyama, Ishikawa, Fukui
Aichi, Gifu, Mie, Shizuoka
Abridged English Manual
Osaka, Hyogo, Kyoto, Nara, Shiga, Wakayama
Hiroshima, Okayama, Yamaguchi, Tottori, Shimane
Tokushima, Kagawa, Ehime, Kochi
18
18-48
Fukuoka, Saga, Nagasaki, Oita, Kumamoto, Miyazaki, Kagoshima, Okinawa
Vodafone International Call Centre
From outside Japan, dial
+81-3-5351-3491 (fee applicable)
Subscription Area Service Centre Phone Number
General Information
Customer Assistance ƒ 0088-240-113
General Information
Customer Assistance ƒ 0088-241-113
General Information ƒ 0088-242-157
Customer Assistance ƒ 0088-242-113
General Information ƒ 0088-259-157
Customer Assistance ƒ 0088-259-113
General Information ƒ 0088-247-157
Customer Assistance ƒ 0088-247-113
General Information ƒ 0088-250-157
Customer Assistance ƒ 0088-250-113
ƒ 0088-240-157
ƒ 0088-241-157
 Loading...