

Page 1

NET Support Manager
Supplied By Sharp (UK) Ltd
Page 2

NetSupport Manager
Manual COPYRIGHT (C) 2000 Productive Computer Insight Ltd. All rights reserved.
The Information in this document is subject to change without notice. Productive Computer
Insight Ltd. reserves the right to revise this document and to make changes from time to time
in the content hereof without obligation to notify any person or persons of such revisions or
changes.
The software described in this document is supplied under a licence agreement and is
protected by international copyright laws. You may copy it only for the purpose of backup and
use it only as described in the Licence agreement.
Any implied warranties including any warranties of merchantability or fitness for a particular
purpose are limited to the terms of the express warranties set out in the licence agreement.
Program COPYRIGHT (C) 1991-2000 Productive Computer Insight Ltd. All rights
reserved.
Trademarks
NetSupport is a registered trademark of Productive Computer Insight Ltd.
Windows, Windows 95/98 and Windows NT are trademarks of Microsoft Corporation.
IBM and OS/2 are registered trademark of International Business Machines Corporation.
NetWare is a registered trademark of Novell Inc.
Other products, trademarks or registered trademarks are the property of their respective
owners.
Printed in England
1
Page 3

NetSupport Manager
Software Licence Agreement
Please read this agreement before installing or using your copy of NetSupport Software. This is a legal agreement between
you and Productive Computer Insight Ltd. If you do not wish to be bound by the terms of this licence agreement you must not
load, activate or use the software.
TERM: Subject to termination under Termination Clause below the Licence shall be perpetual.
GRANT OF LICENCE: This software is designed to run on standalone computers and computer networks. You may load the
software from a Network File server but you must purchase a licence for each workstation on which you will install or run the
software.
COPYRIGHT: This software is protected by international copyright laws. You may copy it only for backup purposes. The
software is licensed to you, but not sold to you.
RESTRICTIONS: Neither you nor any reseller may rent, lease, sell licensed copies on approval, or otherwise transfer the right
to use this software to another person, except that you may sell or give away your original copy, as long as you do not keep
any copies. The software may not be modified, disassembled or reverse engineered except with the prior written consent of
Productive Computer Insight Ltd.
LIMITED WARRANTY: Productive Computer Insight Ltd warrants that the Software will perform substantially in accordance
with the accompanying documentation for a period of ninety (90) days from the date of purchase. Productive Computer
Insight's entire liability and your exclusive remedy shall be either a) the replacement of the defective software or b) return of
the price paid. This remedy shall be at Productive Computer Insight's option and subject to proof of purchase from an
authorised source.
Any implied warranties including any warranties of satisfactory quality or fitness for a particular purpose are limited to the
terms of the express warranties. Productive Computer Insight Ltd. shall not in any event be liable for loss of profits, data or
information of any kind or for special, incidental, consequential, indirect or other similar damages arising from any breach of
these warranties or use of the Software even if they have been advised of the possibility of such damages. Some countries
do not allow the limitation or exclusion of incidental or consequential damages, so the above limitation or exclusion may not
apply to you. This warranty does not affect your statutory rights, and you may have other rights that vary from country to
country. In any event Productive Computer Insight’s maximum liability shall not exceed the price paid by the end-user /
licensee.
TERMINATION: You may terminate this Licence and this Agreement at any time by destroying the Program and its
documentation, together with any copies in any form.
Productive Computer Insight Ltd. may terminate this Licence forthwith by notice in writing to you if you commit any serious
breach of any term of this Licence and (in the case of a breach capable of being remedied) shall have failed within 30 days
after receipt of a request in writing from Productive Computer Insight Ltd. so to do, to remedy the breach (such request to
contain a warning of PCI’s intention to terminate). Upon termination you will destroy or return to PCI the original and all copies
of the software and will confirm in writing to PCI that this has been done.
SUPPORT: If you have a problem with the installation of the software you should in the first instance contact your supplier.
You can separately purchase support and maintenance which will also cover the supply of enhancements and upgrades.
GOVERNING LAW : This agreement shall be governed by the laws of England.
2
Page 4

NetSupport Manager
Table of Contents
PREFACE...................................................................................................11
SYNTAX.....................................................................................................11
INTRODUCTION.........................................................................................12
WHAT IS NETSUPPORT MANAGER?............................................................13
NETSUPPORT MANAGER FEATURES...........................................................14
NETSUPPORT MANAGER APPLICATIONS.....................................................16
INSTALLING NETSUPPORT .....................................................................17
INSTALLATION PREPARATION .....................................................................18
WINDOWS 2000 INSTALLATION...................................................................19
WINDOWS 95/98 OR NT INSTALLATION ......................................................20
WINDOWS 3.X INSTALLATION......................................................................22
DOS INSTALLATION...................................................................................25
OS/2 INSTALLATION...................................................................................26
UNATTENDED/SILENT INSTALLATIONS.........................................................27
INSTALLING NETSUPPORT ONTO/FROM A SERVER.......................................27
EVALUATION KIT........................................................................................28
USING THE CONTROL..............................................................................29
BASIC CONCEPTS ......................................................................................30
3
Page 5

NetSupport Manager
STARTING THE NETSUPPORT CONTROL......................................................31
CONNECTING TO CLIENTS...........................................................................34
Quick Connect......................................................................................35
Connecting to Clients on different Protocols........................................36
Connecting to Controls and Clients through Firewalls and Proxy
Servers.................................................................................................37
DISCONNECTING A CLIENT..........................................................................38
Disconnecting all Clients......................................................................38
REBOOTING OR LOGGING OUT CLIENTS ......................................................38
VIEWING CLIENTS ......................................................................................39
Maximising the View Area....................................................................40
Viewing Multiple Clients Screens Simultaneously...............................40
Scale to Fit Mode .................................................................................41
Displaying the View Settings for a Client.............................................41
SCANNING CLIENTS....................................................................................45
LAUNCHING APPLICATIONS.........................................................................46
USER DEFINED TOOLS ...............................................................................49
SHOWING THE CONTROL SCREEN TO CLIENTS.............................................51
Showing a Client’s screen on a number of Client Screens..................53
AUDIO SUPPORT........................................................................................54
Audio Announcements.........................................................................54
Adjusting Microphone and Speaker Volume........................................56
VIDEO PLAYER SUPPORT ...........................................................................57
Video Player Control Panel..................................................................59
RECORDING REPLAY FILES ........................................................................61
Watching Recorded Replay Files.........................................................62
Showing Replay Files to Clients...........................................................62
TRANSFERRING FILES ................................................................................63
4
Page 6

NetSupport Manager
Applying a filter to files in List View......................................................64
Changing the View format in the File Transfer Window.......................64
Changing the sort orders in a File Transfer Window ...........................64
Creating Directories..............................................................................65
Copying files and Directories ...............................................................65
Renaming Files ....................................................................................66
Deleting Files and Directories..............................................................66
Synchronising Directories ....................................................................67
Arranging multiple File Transfer Windows...........................................67
DISTRIBUTING FILES...................................................................................68
MANAGING FILES ON THE CONTROL WORKSTATION....................................69
CONTROL/CLIENT CHAT SESSIONS.............................................................70
SENDING MESSAGES..................................................................................72
DEALING WITH HELP REQUESTS.................................................................74
CAPTURING A CLIENT’S PRINTED OUTPUT....................................................75
REMOTE CLIPBOARD..................................................................................78
USING THE CLIENT...................................................................................79
THE CLIENT MAIN WINDOW ........................................................................80
Connecting to a Control .......................................................................81
Disconnecting from a Control...............................................................81
Raising a Help Request .......................................................................82
Chatting to a Control workstation.........................................................82
Receiving Messages from a Control workstation.................................82
Resetting the Client Video Driver.........................................................83
CONFIGURING CLIENT WORKSTATIONS..............................................84
CONFIGURING CLIENT WORKSTATIONS........................................................85
EDITING OR CREATING CONFIGURATION FILES............................................86
5
Page 7

NetSupport Manager
BASIC CLIENT CONFIGURATION..................................................................88
Basic Client Configuration – General Tab............................................89
Basic/Advanced Client Configuration – Transport Tab........................92
Basic/Advanced Client Configuration – Dial-in Bridge Tab .................94
Basic/Advanced Client Configuration – Audio Tab..............................96
ADVANCED CLIENT CONFIGURATION...........................................................97
Advanced Client Configuration – Security ...........................................99
Advanced Client Configuration – Remote Control Tab......................102
Advanced Client Configuration – Options Tab...................................105
Advanced Client Configuration – File Transfer Tab...........................108
Advanced Client Configuration – Customise Tab..............................110
Advanced Client Configuration – Protect Configuration Tab.............112
Advanced Client Configuration – Web Extensions Tab.....................114
Advanced Client Configuration – Users Tab......................................116
Advanced Client Configuration – Client Connect Tab .......................118
CONFIGURING CONTROL WORKSTATIONS.......................................120
CONFIGURING THE CONTROL WORKSTATION.............................................121
MULTIPLE CONTROL PROFILES.................................................................123
CLIENT SETTINGS ....................................................................................123
Control Configuration – Startup Tab..................................................124
Control Configuration – Transport Tab ..............................................126
Control Configuration – General Tab.................................................129
Control Configuration – View Tab......................................................131
Control Configuration – Print Capture and Tab .................................135
Control Configuration – Dial-in Bridge ...............................................138
Control Configuration – File Transfer Tab..........................................140
Control Configuration – User Interface Tab.......................................143
Control Configuration – Audio Tab.....................................................146
Control Configuration – Help Requests .............................................148
Control Configuration – File Locations...............................................150
THE USER INTERFACE...........................................................................152
THE CONTROL WINDOW ...........................................................................153
The Control Window - Menu Bar........................................................155
6
Page 8

NetSupport Manager
CUSTOMISING THE TOOLBAR....................................................................156
NetSupport Manager Control Toolbar Buttons ..................................158
The Control Window – Tree View......................................................160
The Control Window – List View........................................................161
The Control Window – Network Menu...............................................162
The Control Window – Client Menu...................................................162
The Control Window – Group Menu ..................................................164
The Control Window – View Menu.....................................................164
The Control Window – Tools Menu....................................................165
The Control Window – Window Menu................................................166
The Control Window – Help Menu.....................................................167
THE VIEW WINDOW..................................................................................168
The View Window – Menu Bar...........................................................169
The View Window – Client Menu.......................................................170
The View Window – View Menu.........................................................171
The View Window – Tools Menu .......................................................171
The View Window - Window Menu....................................................172
The View Window - Help....................................................................172
THE FILE TRANSFER WINDOW ..................................................................173
The File Transfer Window - Menu Bar...............................................174
The File Transfer Window – File Menu..............................................175
The File Transfer Window – Directory Menu .....................................175
The File Transfer Window – View Menu............................................176
The File Transfer Window – Tools Menu...........................................176
The File Transfer Window – Window Menu.......................................177
The File Transfer Window – Help Menu ............................................177
THE FILE DISTRIBUTION WINDOW .............................................................178
The File Distribution Window – Menu Bar..........................................179
The File Distribution Window – File Menu .........................................180
The File Distribution Window – Client Menu......................................180
The File Distribution Window – Directory Menu.................................181
The File Distribution Window – View Menu .......................................181
The File Distribution Window – Tools Menu ......................................182
The File Distribution Window – Window Menu..................................182
The File Distribution Window - Help Menu.........................................182
THE FILE MANAGER WINDOW...................................................................183
The File Manager – Menu Bar ...........................................................184
7
Page 9

NetSupport Manager
THE REGISTRY EDIT WINDOW...................................................................185
THE SCAN WINDOW .................................................................................186
THE REPLAY WINDOW..............................................................................187
MANAGING AND ORGANISING CLIENTS.............................................188
ADD A NEW CLIENT ..................................................................................189
DELETE A CLIENT.....................................................................................189
RENAMING A CLIENT ................................................................................190
SETTING CLIENT PROPERTIES ..................................................................191
CREATING A NEW GROUP.........................................................................192
ADDING/REMOVING CLIENTS IN A GROUP..................................................192
SETTING GROUP PROPERTIES ..................................................................193
USING CLIENT AND GROUP INFORMATION FROM PREVIOUS VERSIONS OF
NETSUPPORT ..........................................................................................193
REMOTE COMMUNICATIONS ................................................................194
REMOTE COMMUNICATIONS OVERVIEW.....................................................195
OPTIMISING REMOTE CONNECTIONS.........................................................195
SETTING UP REMOTE COMMUNICATIONS...................................................196
THE BRIDGE PROGRAMS..........................................................................197
THE WINDOWS BRIDGE ............................................................................197
THE DOS TSR BRIDGE ...........................................................................198
8
Page 10

NetSupport Manager
THE OS/2 BRIDGE ...................................................................................199
THE REMOTE PROGRAMS.........................................................................200
SETTING UP A MODEM..............................................................................201
USING NETSUPPORT OVER THE INTERNET.................................................202
ACTIVEX CONTROL................................................................................203
ACTIVEX CONTROL..................................................................................204
WEB EXTENSIONS....................................................................................205
PCIAX.CAB – CABINET FILE ..................................................................205
ACTIVEX CONTROL – HTML EXAMPLES ..................................................206
NETSUPPORT SCRIPTING .....................................................................208
STARTING THE SCRIPT EDITOR .................................................................210
CREATING A SIMPLE SCRIPT .....................................................................210
SCHEDULING AND RUNNING A SCRIPT.......................................................211
TECHNICAL REFERENCE.......................................................................212
HARDWARE AND SOFTWARE REQUIREMENTS............................................213
UNINSTALLING NETSUPPORT ...................................................................214
UNLOADING A NETSUPPORT CLIENT.........................................................214
USING COMPRESSION EFFECTIVELY .........................................................214
USING CLIENT CACHE EFFECTIVELY.........................................................215
9
Page 11

NetSupport Manager
REMOTE CLIENT HARDWARE AND SOFTWARE INVENTORIES ......................215
USING NETSUPPORT’S SECURITY FEATURES EFFECTIVELY........................216
10
Page 12

NetSupport Manager
Preface
About this Manual
This User Manual contains instructions for installing and running NetSupport Manager.
A basic premise of NetSupport that must be grasped is that the Control, sometimes called the
Guest, is the workstation being used to take over workstations. The Client, sometimes called
the Host, is the workstation being taken over.
Syntax
The following logical and easy to understand conventions are used in this manual: Step-by-step instructions which should be performed in sequence are shown as numbered
paragraphs, beneath a clearly stated, ‘Method’ heading. As there is often more than one way
of carrying out a task you will find ‘Or’ options also included.
Additional tips or explanatory notes regarding these instructions appear as bulleted
paragraphs under the heading ‘Note’.
Individual items in menu commands are enclosed in braces and should be followed in
sequence, for example: {Clients}{Broadcast}.
11
Page 13

NetSupport Manager
Introduction
In this chapter …
What is NetSupport Manager?
NetSupport Manager Features
NetSupport Manager Applications
12
Page 14

NetSupport Manager
What is NetSupport Manager?
NetSupport Manager is an international, award winning Remote Control software package.
NetSupport Manager has been designed to give IT managers, mobile professionals and
telecommuters the power and flexibility to access and control a workstation from anywhere, at
anytime. It enables busy support managers and Users to achieve the usually irreconcilable
objectives of improving customer service whilst cutting costs.
By using NetSupport Manager, staff can provide immediate support to end-Users without
needing to leave their desks. Wasted travel time is a thing of the past.
Both end Users and support personnel can see what a problem is in real time, enabling them
to focus on solving the problem rather than interpreting someone’s description. The result is
faster problem resolution, a satisfied User and a more effective support desk. As an additional
bonus, your support costs are dramatically reduced, as are the overheads of managing the
problem resolution process.
NetSupport Manager is fully Cross Platform compatible, and supports all the major operating
systems and network protocols. NetSupport runs over ISDN, Internet, Dial-up or Direct Serial
Links with the new ActiveX Control on the Internet, providing access to home and travelling
Users to workstations, data and services at central sites.
NetSupport Manager has been designed to be simple and efficient to install and configure.
Once installed, it allows you to Watch, Share and Control the screen, keyboard and mouse of
an individual or multiple workstations simultaneously, irrespective of colour resolution. In
addition, you can display your screen on others workstations, view workstations screens in
cycles on your workstation, or multiple screens simultaneously. Full two-way Audio Support,
Remote Clipboard and the ability to Record remote control sessions, sophisticated File
Transfer and File Distribution encryption security combined with the fully integrated Scripting
and Scheduling feature NetSupport Manager becomes the complete Desktop Management
tool.
NetSupport Manager is clearly in a league of its own.
13
Page 15

NetSupport Manager
NetSupport Manager Features
NetSupport Manager contains a wealth of features to assist you to Train, Support, Monitor and
Manage Clients.
Remote Control
Watch, Share or Control the screen, keyboard and mouse of a Client irrespective of colour
resolution, network protocol or operating system at either end. Ideal for providing on-line
support.
Connectivity
• Dynamically find and list all Clients on the Network.
• Connect by Client name.
• Connect by Network address.
• Connect via a database of known Clients.
• Connect entire groups in one step.
• Client/Control connection to Controls/Clients through Proxy Servers and Firewalls
Message
Send a message to one or more chosen Clients, or even broadcast a message to all Clients
on the network.
Chat
Conduct a two-way chat session in real time between the operator at the Control and the User
at the Client.
File Transfer and Distribution
Transfer and manipulate files between workstations, using advanced ‘Drag and Drop’
technology. Copy files from a workstation to many workstations, distribute Software or
Synchronise Directories. To ensure security whilst transferring files use DES Encryption on all
data being transferred. Includes support for Long File names, Remote File Edit, altar file
attributes and more.
Show
Display a Control’s screen on individual or multiple Clients workstations, or display a selected
Client’s screen to other Clients.
View
View more than one Clients screen at the same time, or sit back and watch each connected
screen in Scan Mode. The ability to record the activity on a Client workstation whilst it is
remotely controlled, capture a Client’s print output and cut and paste between workstation
applications come as standard functionality.
Scan
Automatically cycle through each Client's workstation in turn, displaying its screen on the
Control workstation. This enables the Control to keep a discrete watch over what the Clients
are running on their workstations.
Launch Applications
Launch an application on one or all Client Workstations at the press of a button.
14
Page 16

NetSupport Manager
Multimedia
NetSupport provides full Audio and Video Support.
Help Request
Clients can raise requests for help. Controls are instantly alerted to a Clients need for
assistance via a pop up box on their screen.
Scripting
NetSupport includes a powerful integrated Scripting Language and Scheduling Suite that
enables you to make use of all of its functions in unattended mode. Ideal for overnight
updates.
Remote Communications
Take control of workstations on remote LAN’s/WAN’s or standalone workstations, via Dial-up
Modem (PSTN), ISDN, Internet or Direct Serial Links.
Web Browser Integration
Use your Internet connection, download the 350k ActiveX Control software from your
Company Website and remote control your office workstation over IP. This is the ultimate, in
portable Remote Control.
Comprehensive Security Features
• Password protection at Client and Control workstation.
• User present acknowledgement required at Client workstation.
• Connection Audit trails.
• Allow a Control to Watch/Share or Control a workstation.
• Restrict File Transfer to specific drives, directories and files.
• Dialback to different numbers according to passwords.
• Restrict connections to named Controls.
• Customise Control and Client profiles to enable and disable virtually every feature
depending on the security level of the signed on User.
• Set Unique Security Keys on both Control and Client workstations.
• Integrates with existing NT profiles & Security.
• DES Encryption
• Client/Control connection to Controls/Clients through Proxy Servers and Firewalls.
Easy to Install and Configure
• Automatic Set-up and maintenance of Workstations.
• Silent Installation across WAN’s.
• Central maintenance of Client Profiles.
• Configuration utility for Windows.
• User definable Modem configuration.
• Built in Modem diagnostics.
• Protocol Transparent Control, (use IPX, NetBIOS and TCP/IP simultaneously).
Other Benefits
• Seamless Remote Client Hardware and Software Inventory
• Seamless Cross-platform support in a single package.
• All components come as standard. No hidden costs!
• Supports all video resolutions up to 16 .7 million colours
• 16 and 32 bit software included.
15
Page 17

NetSupport Manager
NetSupport Manager Applications
NetSupport’s wide range of features makes it an ideal tool for a wide range of applications.
Some examples might include:
Help Desk
Use the Remote Control features to provide fast, cost effective support to end-Users in an
Office or Help desk environment. Reduce the cost of providing support whilst improving
productivity and the speed of problem resolution.
Tele-working
Use the Remote Communications modules to enable staff to work from home, whilst having
access to all the functionality on their office workstation.
Training
Use the sophisticated Show functions to assist in a training room environment.
System Automation
Use the powerful integrated scripting language to automate regular tasks such as uploading
and downloading files.
Use the Launch Application function to set tasks running without end User intervention. Take
advantage of the scheduler to save costs by running these tasks overnight.
Desktop Management
Use the combination of File Distribution and Scripting to manage User desktops and distribute
software. Automatically retrieve workstation information such as Free Disk space.
Use the Registry Edit functions in Scripting to re-configure remote workstations.
User Management
Use the enhanced security features to configure utilities available at a Client.
Set up different profiles and access levels at both the Control and Client depending on the
Users level of responsibility.
Maintain a Replay File to audit the activity of a Client workstation.
ActiveX Control
The ultimate portable office: Remote Control a workstation from within your Internet Browser.
Use your Internet connection, download the ActiveX Control software from your Company
Website, and remote control your office workstation.
16
Page 18

NetSupport Manager
Installing NetSupport
In this chapter …
Installation Preparation
Windows 2000 Installation
Windows 95/98 and NT Installation
Windows 3.1 Installation
DOS Installation
OS/2 Installation
Unattended / Silent Installations
Installing NetSupport onto/from a Server
Evaluation Kits
17
Page 19

NetSupport Manager
Installation Preparation
Installing NetSupport is exceptionally easy. If you follow a few simple rules you should be up
and running within a very short time.
The first step is to decide what functions you want to install on each workstation.
Do you want it to be a Control or a Client?
Control To be able to control other workstations, install a Control, sometimes called a
Viewer.
Client To be controlled by another workstation, install a Client, sometimes called a Host.
What network protocol do you use?
The next step is to decide what networking protocol you have available on the workstation.
NetSupport supports IPX, NetBIOS/NetBEUI and TCP/IP.
Whilst NetSupport is multi-protocol, which means that the same Control can connect to Clients
running on different protocols, you must choose a default. You can change this later.
Note: By default, the Control will be configured to use TCP/IP. If you are using a different
protocol, you must configure this the first time you start a Control.
You are now ready to install the NetSupport Control and Client programs.
18
Page 20

NetSupport Manager
Windows 2000 Installation
Productive Computer Insight Limited (PCI) does not provide technical support for running
NetSupport Manager on beta operating systems such as the Windows 2000 Beta. Whilst
NetSupport Manager 5 will install on the Windows 2000 Beta, PCI can not guarantee any level
of functionality.
If you require NetSupport Manager to run on Windows 2000 Beta please contact Productive
Computer Insight for a list of known problems.
Note: If you are upgrading Windows NT to Windows 2000 you must ensure that you de-install
NetSupport Manager prior to upgrading the operating system. NetSupport Manager 5 can then
be re-installed once the operating system upgrade has been completed.
19
Page 21

NetSupport Manager
Windows 95/98 or NT Installation
If you are installing to a 95/98 and NT workstation, make sure that you are logged in as an
Administrator.
Starting the Installation
Insert the NetSupport CD into your workstation CD-ROM Drive.
The NetSupport welcome menu will automatically appear when you insert the CD. If it does
not, access the CD-ROM drive from your workstation and run PCIMENU.EXE.
Selecting a Set-up Type
Choose which language variant of NetSupport you wish to install and click RUN. This will start
the install program. If you are installing a downloaded copy, run the program PCIMENU.EXE
manually.
Note: The Autorun file calls PCIMENU.EXE, which in turn calls NSMSETUP.EXE from the
application directory. This determines if you are running on Intel or Alpha platforms and then
runs the SETUP.EXE in the appropriate directory, X86 and Alpha respectively. If you install
manually, make sure that you use the Set-up program and files from the appropriate directory.
NetSupport Licence Agreement
The message “Initialising NetSupport Set-up” will be displayed, after which you will be required
to read and accept the Licence Agreement. Once you have accepted the Licence Agreement
the NetSupport Set-up dialog will appear. If you reject the License Agreement NetSupport
Manager will not be installed and you will be directed to Exit from the install program.
Specify Installation Options
In the NetSupport Set-up dialog, enter the full path for where you want the software installed.
Press TAB to move to the name box.
Enter a unique name for the Control or Client. The name can be up to 15 characters. If you
leave the name as an asterisk * the MachineName, which is the same as ComputerName on
Microsoft Networks, will be used as the Client/Control name. Press TAB to move to the next
option box.
Select the components that you wish to install by checking or un-checking the boxes. Use the
following table to help you decide which components to check:
Component When to Select:
Client To control this workstation from another.
Control To control other workstations from this one.
The Program Manager Group Folder
NetSupport Set-up will now copy the program files for your selected options to the chosen
directory.
When it has finished copying the software onto your workstation, Set-up will create a Program
Manager Group called “NetSupport” and install icons for each of the selected options.
20
Page 22

NetSupport Manager
It will also install icons for the utilities such as the Client Configurator, which you can use for
resetting your options.
Note: Set-up will also create an "UNINSTALL" icon, which reverses any changes that are
made during installation. You can run this at any stage to return your workstation to its
previous state.
If you have elected to install a Client, Set-up will make the required amendments to your
System.INI and or registry, to load the Client as Windows initialises. NetSupport will not
replace any of your existing Drivers.
Specify your Licence Details
You will also be prompted for your licence details at this point. The details required for your
licence are supplied on the envelope your CD came in. If you are using NetSupport as an
evaluation, simply enter EVAL in the Licensee name field and leave all other fields unchanged.
Note: All entries on the licensing form are cAsE sEnSiTiVe.
Choosing a Client Configurator
You will then be prompted to run the NetSupport Configurator to set up the Client and install
options such as Remote Communications.
If you choose NO, the Client will be installed with the default setting to use TCP/IP protocol.
Choosing Network Transports
If you choose YES, you will be given the opportunity to select your protocol, set-up Remote
Communications, Audio Settings and other basic options.
Completing the Installation Process
NetSupport Manager has now been successfully installed. Remove the NetSupport CD and
choose to restart your workstation to use NetSupport.
21
Page 23

NetSupport Manager
Windows 3.x Installation
Starting the Installation
Insert the NetSupport CD and run PCIMENU.EXE or SETUP.EXE in the product sub-directory.
This will automatically start the install program.
Select a Set-up Type
The Set-up program automatically determines the operating system Windows 3.x, 95/98 or
NT, on which you are running and installs the appropriate versions of the Program.
The message “Initialising NetSupport Set-up” will be displayed, after which you will see the
NetSupport 16 bit Set-up dialog.
Specify Installation Options
Items that are not available in your environment such as installing a NetSupport Bridge under
TCP/IP will be greyed out.
Enter the full path for where you wish the programs to be installed. Press TAB to move to the
name box.
Enter a unique name for the Control or Client. The name can be up to 15 characters. If you
leave the name as an asterisk * the MachineName, which is the same as ComputerName on
Microsoft Networks, will be used as the Client/Control name. Press TAB to move to the next
option box.
Select the components that you wish to install by checking or un-checking the boxes. Use the
following table to help you decide which components to check:
Component When to Select:
Client To control this workstation from another.
Control To control other workstations from this one.
Windows You will be running Windows (any version).
DOS You may also be controlling this workstation whilst it is in Native
DOS or running a DOS Control on it.
NetBIOS You have a NetBIOS or NetBEUI network.
IPX You have an IPX/SPX network.
TCP/IP You have a TCP/IP (Windows sockets) network.
Remote You want to be able to dial out from this workstation or connect
to others over a Direct Serial Link.
Bridge You want to be able to dial into this workstation or connect to it.
You want dial-in access to other workstations on the Network
via this one.
Notes
• All protocols will be installed but you must check the appropriate box to indicate the
default protocol to use.
• If you are installing a Control and wish to be able to Show its screen to Clients, you must
also install the Client components.
22
Page 24

NetSupport Manager
When you are satisfied with your selections, press Continue. If you have elected to install a
Bridge to provide dial-in via NetSupport’s dialup module, you will be prompted to indicate if
you wish the Bridge to load automatically when the Client is loaded.
If you choose YES, then NetSupport will attempt to initialise the Bridge when Windows
initialises. If you choose NO, you will have to start it from the Clients menu.
NetSupport Set-up will now copy the program files for your selected options to the chosen
directory.
It will also install icons for the utilities such as the Client Configurator, which you can use for
resetting your options.
If you have elected to install a Client, Set-up will make the required amendments to your
System.INI and or registry to load the Client as Windows initialises. NetSupport will not
replace any of your existing Drivers.
Enter your Licence Details
You will be prompted for your licence details at this point. The details required for your licence
are supplied on the CD envelope. If you are using NetSupport as an evaluation, simply enter
EVAL in the licensee name field and leave all other fields empty.
Note: All entries on the Licensing form are cAsE sEnSiTiVe.
Select Modem
When this is completed and if you have chosen to install one or both of the Remote
Communication options, Bridge or Remote, for dial up or serial links, you will be prompted for
the communications configuration information.
Set your configuration and click DONE. As a rule choose the Hayes compatible modem at this
stage and set the Baud-rate to be one greater than the fastest speed the modem can achieve.
You can easily change these parameters at a later stage using the Configurator program.
You can also use the Configurator to load the Bridge in an "un-initialised" state by using the
/NOBRIDGE parameter. This means that the Bridge can be started from within Windows and
will not capture the serial port at start-up.
The Program Manager Group Folder
When it has finished copying files, Set-up will create a Program Manager Group called
“NetSupport” and install icons for each of the selected options. It will also install icons for the
utilities such as the Configuration Program, which you can use for resetting your options or
customising new and existing icons.
If you have elected to install a Client, Set-up will make the required amendments to your
SYSTEM.INI. NetSupport does not replace any of your existing Drivers.
Note: Set-up will also create an "UNINSTALL" icon, which reverses any changes that are
made during installation. You can run this at any stage to return your workstation to its
previous state.
Completing the Installation Process
23
Page 25

NetSupport Manager
NetSupport Manager has now been successfully installed. Remove the NetSupport CD and
choose to restart your workstation to use NetSupport.
24
Page 26

NetSupport Manager
DOS Installation
You install the DOS programs on a DOS only workstation or where you want to access a
Windows 3.1 or Windows for Workgroups workstation, prior to Windows being started. If you
also wish to be able to Control the workstation whilst it is in Windows, then you must use the
NetSupport Windows Set-up program.
To install support for DOS only:
Insert your NetSupport CD.
At the DOS prompt type CD Drive:\INSTALL.
The DOS Install menu will be displayed.
Enter the directory where you wish the programs to be installed.
Select the options you wish to be installed by pressing Y key or N key in the check boxes.
Use the TAB key to move between boxes and the space bar to turn the check mark on or off.
Use the following table to help you decide which options to check:
Component When to Select
Client To control the workstation from another
NetBIOS You have a NetBIOS or NetBEUI network
IPX You have an IPX/SPX Network.
Bridge You want to be able to dial into the workstation or network or
You only need to check Y key for Bridge if you will be using dial up or serial links via this
workstation.
connect over a serial link
Note: Installing a Bridge on a workstation gives dial-up access to all other Clients on the same
Network. You do not have to install a Bridge on each workstation, only a client.
When you are satisfied with your selections, enter a Y key in the “Proceed?” check box.
The install program will now copy the relevant files to the specified directory. When the
installation is completed, the program will advise you of successful installation. You may then
press ESC key to exit back to the DOS prompt.
You start a DOS Client from the command Line by typing: IPCLIENT Clientname in the case of an IPX Client
NBCLIENT Clientname in the case of a NetBIOS Client
You may also wish to edit you AUTOEXEC.BAT file to start the Client as the workstation
initialises.
25
Page 27

NetSupport Manager
OS/2 Installation
If you will only be using the workstation as a Client then you use the OS/2 installer
(PMINSTAL.EXE).
If you will be using the workstation as both a Control and a Client then you must have
WINOS2 installed. In this case, you install using the NetSupport Windows Set-up program in
a WINOS2 session.
To install an OS/2 Client: -
Place the NetSupport CD into the CD Drive.
Open the file PMINSTAL.EXE.
The Productive Computer Insight Licence Agreement will appear, please read carefully and
accept.
The NetSupport Set-up dialog will appear:
• Specify which directory you wish to install the NetSupport Program Folder.
• Specify which directory you wish to install the NetSupport Client on.
• Specify a name for the Client.
• Specify which Transports you want the Client to run over.
Choose OK to continue.
You will then be prompted to enter your licence details. Please note that these are CaSe
SeNsItIvE. Choose OK when you are finished.
NetSupport Set-up will now copy the program files for your selected options to the chosen
directory.
Choose to take this opportunity to configure the Client, by double clicking on the Configurator
icon in the NetSupport Client Program Group.
If you also wish to use the workstation for a Dial-up link you must manually add the Bridge
commands to the Start PMCLIENT line in STARTUP.CMD. See the Section on Remote
Communications for details.
If you wish to use the more advanced Client security features you must either manually amend
the START PMCLIENT line in STARTUP.CMD or use the PMCONFIG utility.
26
Page 28

NetSupport Manager
Unattended/Silent Installations
NetSupport allows you to pre-configure the way in which Clients and Controls will be installed.
It does this by allowing you to edit two files: DEFAULTS.INC which is used to pre-set options
that you would normally be prompted for during installation and RELEASE.INI which enables
you to pre-set the Advanced Client Configuration Options.
See the on-line Help for details.
Installing NetSupport onto/from a Server
You may wish to install NetSupport onto a server and then download NetSupport onto
individual workstations or utilise it as required.
To Install NetSupport on a Server
1. Follow instructions on how to install NetSupport onto Windows 95/98 or NT specifying
the server, rather than drive, you wish to install on.
To Install NetSupport from a Server
1. Either you can run PCIMENU.EXE or to avoid copying the entire contents of the CD
containing all products and language variants, copy across the specific directory for the
product you require and run SETUP.EXE.
27
Page 29

NetSupport Manager
Evaluation Kit
NetSupport Manager is available as an Evaluation Kit either from distributors or free as a
downloaded copy off the Internet. This allows you to trial NetSupport before your purchase.
The Evaluation Kit software is fully functional, apart from the following restrictions:
• A maximum of five Clients can be active on the network simultaneously;
• The Client and the Control programs will not run after the kit expiry date has passed.
Upon purchase, these restrictions are removed once serialisation has been completed. This
process upgrades the Evaluation Kit into a fully licensed copy.
To upgrade an Evaluation Kit to a fully Licensed copy
In the directory that you have installed the Program Manager Group ‘NetSupport’ open the file
PCILIC.EXE.
The NetSupport Manager Licence dialog box will appear asking you to enter your licence
details. Please note that all entries are cAsE sEnSiTiVe.
When you have entered the correct licence details click GENERATE. You now have a fully
licensed copy of NetSupport Manager!
28
Page 30

NetSupport Manager
Using the Control
In this chapter …
Basic Concepts
Starting the NetSupport Control
Finding Clients on the Network
Connecting to Clients
Quick Connect
Connecting to Clients on different Protocols
Connecting through Firewalls and Proxy Servers
Disconnecting a Client
Disconnecting all Clients
Rebooting or Logging out Clients
Viewing a Client screen
Maximising the View area
Viewing multiple Clients screens simultaneously
Scale to Fit Mode
Scanning Client screens
Launching Applications on Client workstations
User Defined Tools
Showing the Control screen on Client workstations
Showing a Client screen on a number of Client screens
Using Audio Support whilst Viewing a Client screen or Showing your screen on a Client
workstation
Using Audio Support to make an announcement
Adjusting microphone and speaker volume
Video Player Support
Video Player Control Panel
Recording Replay Files
Watching recorded Replay Files
Showing Replay Files to Clients
Transferring Files to a Client workstation
Arranging multiple file Transfer Windows
Distributing Files to Clients
Managing Files on Control workstations
Control/Client Chat sessions
Sending Messages to Clients
Dealing with Help Requests
Capturing a Clients Printer Output
Remotely Cutting and Pasting between Client and Control workstations
Using NetSupport over the Internet
29
Page 31

NetSupport Manager
Basic Concepts
In our terminology, the Client is the workstation that is being remote controlled, and the
Control is the workstation that is taking control.
A NetSupport Control can link to a NetSupport Client in four ways. It is important that these be
understood.
The main concepts are:
Available Client
When a Client has been installed on workstation, it becomes available for connection to a
Control. A Client must be available before a Control can connect to it.
Known Clients
Having browsed for available Clients, NetSupport Manager stores a list of Clients in the Tree
View, Client Folder. These are Known Clients.
Connected Client
All available Client’s or Groups of Clients can be chosen for simultaneous connection. A
Control can only remote control a Client they are connected.
Selected Client
When a connected Client is selected, a "one to one" session is established. A Control can
then View, Show or Send a Message etc. to that Client only. A Control can also Watch,
Control or Share the selected Clients screen, keyboard and mouse.
A Control can switch between multiple Clients, making each of them, in turn, the selected
Clients.
In addition, the following definitions need to be understood: -
The ‘Remote’ is the module that provides Dialout access from a Control.
The ‘Bridge’ is the module that provides Dial-in access to a LAN/WAN or Standalone Client.
The ‘Script Editor’ is the module for creating custom scripts to automate your NetSupport
tasks.
The ‘Script Scheduler’ is the module for scheduling when your scripts are run.
30
Page 32

NetSupport Manager
Starting the NetSupport Control
To start the NetSupport Manager Control program
1. Double click on the NetSupport Control icon in your NetSupport Program Group.
Or,
Choose {Start}{Programs}{NetSupport}{NetSupport Control} from your operating system.
As NetSupport Manager initialises, you will see a window in the middle of your screen with the
NetSupport logo and version information. This only appears for a few seconds whilst
NetSupport loads, after which, the Control Window will be displayed.
By default, the Control is configured to support the TCP/IP protocol, however, it can support
multiple protocols simultaneously. If you receive a protocol error message when starting the
Control or want to configure it to support Clients running on different protocols: Choose
{Network}{Configure – Transport Tab}.
31
Page 33

NetSupport Manager
Finding Clients on a network
Before you can open a View Window for remote control or file work with a Client or Clients,
you must first connect to them.
Rather than having to know all the Client names and their network addresses in advance,
NetSupport Manger provides a Browse facility that enables you to auto-discover them.
When you run a Browse action, the Control sends a message on all protocols for which it has
been configured, asking all Clients to “sign-in” with their name, network address and protocol.
The responses are added to the Browse folder in the Tree View and their details are displayed
in the List View. You can then connect and work with these Clients directly or organise them
into groups for later use.
Once you have connected to a Client discovered by the Browse function, its details are
automatically stored in the Clients Folder in the Tree View. These Clients then become
Known Clients and you can subsequently connect to them without the need to run a Browse
action first.
To find a Client on a network
1. Choose {Network}{Browse} from the Control Window drop down menu.
Or,
Click on the Browse icon on the Control Window Toolbar.
Or,
Select the Browse Folder in the Control Tree View and click on the “Look for New Clients”
icon in the List View.
2. The Browse dialog will appear.
Enter a partial Client name or blank for all Clients
Type in the first part of a Client name here to narrow the search. If you have many Clients on
your network, you may only be interested in those that begin with a certain word or letter. If
you have Clients that begin with ADMIN, typing this in would return Clients such as ADMIN1,
ADMIN_OFFICE and ADMINISTRATOR. To find all available Clients leave this field empty.
Only Clients Requesting Help
Select this check box to browse only for Clients that have requested help.
32
Page 34

NetSupport Manager
Once you have either provided a partial Client name or selected the check box, click OK to
begin the browse.
An information box will advise you that the Control is browsing for Clients. Press Cancel to
abort your browse for Clients. This will take a few seconds, after which, a list of Available
Clients on the Network meeting the criteria will be displayed in the Browse folder. You can
then right click on individual Clients to connect to them, display their properties or carry out
tasks.
33
Page 35

NetSupport Manager
Connecting to Clients
Before you can remote control a Client, you must first connect to it.
To connect to Clients
1. Select the Client you want to connect to in the Client or Browse Folders and choose
{Client}{Connect}.
Or,
Right click on the Client icon and choose {Connect}.
Or,
Double click on the Client icon to connect and View it immediately.
If the Client has been configured with security passwords you will be prompted to enter your
USERID and the correct Password. This must be equal to the USERID and Password that has
been set in the Clients Profiles. On 16 Bit Clients, you will simply be prompted for the
Password.
34
Page 36

NetSupport Manager
35
Page 37

NetSupport Manager
Quick Connect
Quick Connect allows you to directly connect to a Known Client either by Name or by Network
Address and saves you having to perform a network browse and then selecting the desired
Client from the List View.
To directly connect to Clients
1. Choose {Client}{Quick Connect} from the drop down menu.
2. The Quick Connect dialog will be displayed.
3. Enter the name of the Client or its Network Address and Protocol.
4. Click Connect.
5. A dialog box will inform you that NetSupport is trying to connect to the named Client.
If the connection attempt is successful the Connected Clients folder will be opened and the
Client Details displayed in the Client Status. You can then conduct one to one or group
tasks.
Notes
• If you are using TCP/IP the address is in the form >192.168.100.20.
• If you are using the IPX network transport, the address is in the form >000001-12345678.
• If you are using NetBIOS, the Client PC's address is the registered NetBIOS network
name of that PC.
36
Page 38

NetSupport Manager
Connecting to Clients on different Protocols
NetSupport supports connecting to Clients on multiple protocols. The three supported
transports that are IPX, TCP/IP and NetBIOS. Within NetBIOS there are eight logical adapters.
Transports can be configured and tested within the Client and Control Transport Configuration
Tabs.
When the Control performs a Browse, it searches for Clients on all configured transports you
then connect to it in the normal fashion.
Connected Clients on different transports happily coexist within the Control. Operations such
as View, Show, File Transfer, Chat sessions are all able to work over different protocols.
If you know that you only have Clients on one particular transport then the Control will initialise
slightly quicker if you only configure it for this transport.
37
Page 39

NetSupport Manager
Connecting to Controls and Clients through Firewalls and
Proxy Servers
It is possible to have NetSupport Clients/Controls running on the inside of a Firewall/Proxy
Server and still be available for connection to workstations on the outside, without
compromising the security of the network. Likewise, you are able to connect to Control and
Client workstations running outside Firewalls/Proxy Servers.
Connecting to Controls and Clients INSIDE Firewalls
For a Control on the external network of a Firewall to connect to Clients on the Firewalls
internal network, you must enable some form of address translation. This process translates
the address of a workstation on the internal network, which would otherwise be invisible, into
an address that is accessible from the external network. You should (depending on the
Firewall) be able to specify which IP addresses can access the internal workstation and which
Port (in our case 5405) is open.
Connecting to Controls and Clients INSIDE Proxy Servers
This will not be possible with Proxy Servers, as they will not provide a means of address
translation. A Proxy Server, by design, will not allow connections into a protected network.
Connecting from within a Firewall or Proxy Server network to a Client or Control on the
outside requires the following:
• Enable port number 5405 for outgoing connections on your Firewall or Proxy Server.
• A Client/Control on the other side listening on the same port number and visible to the
Client/Control on the inside of the Firewall/Proxy Server.
To make a connection to a Control
1. Choose {Call Control} from the Client Main Window {Commands} drop down menu.
2. Enter either the hostname or IP address of the Control you wish to connect to.
3. The Control will then receive a message stating that a Client is attempting to make a
connection. They can choose to accept or disconnect the attempt.
To make a connection to a Client
1. Choose {Client}{Quick Connect} from the Control Window drop down menu.
2. Enter either the hostname or IP address of the Client you wish to connect to.
3. Click OK.
Note: NetSupport will not communicate directly with a Proxy Server via SOCKS, and will
only work if a TCP/IP direct connection is available.
38
Page 40

NetSupport Manager
Disconnecting a Client
When you have finished remote controlling connected Clients you must disconnect from them
before closing your NetSupport session.
To disconnect a Client
1. Choose the Connected Clients folder from the Control Window
2. Select the Client you want to disconnect in the List View.
3. Choose {Client}{Disconnect} from the Control Window drop down menu.
Or,
Right click on the Client icon and choose Disconnect.
Disconnecting all Clients
Rather than disconnecting Clients individually, you can disconnect all connected Clients in a
single action.
To disconnect multiple Clients
1. Choose {Client}{Disconnect All} from the Control Window drop down menu.
Rebooting or Logging out Clients
Having connected to a Client or Group of Clients, this option will allow you to either Reboot
individual Clients or entire Groups. Under Windows NT, you can logout from each workstation.
To Reboot or Logout Clients
1. Choose {Client/Group}{Reboot/Logout} from the Control Window drop down menus.
2. The Reboot/Logout dialog will appear.
3. If you are happy to proceed, click Yes.
Note: Make sure that all workstations are available and not being used by other staff before
you use this function.
39
Page 41

NetSupport Manager
Viewing Clients
Having connected to a Client, you can now remote control it. This is called Viewing. The
Client’s Screen will be displayed in a Window on the Control workstation. NetSupport will
allow you to View multiple Client screens, each in its own Window, simultaneously.
To View a Client
1. Choose {Client}{View} from the Control Window drop down menu.
Or,
Right click on the Client’s icon you want to View, choose {View}.
Or,
Left click on the appropriate Client button in the Quick View Toolbar.
Or,
Double click on the Client icon in the List View.
2. The View Window for that Client will now appear with its screen displayed.
To return to the Control Window
1. Choose {Client}{Close} from the View Window drop down menu.
There are three modes in which you can View a Client
Share The Client’s screen will be displayed at both the Control and the Client. Both the
Watch The Client’s screen will be displayed at both the Control and the Client. Only the
Control The Client's screen will be displayed at both the Control and the Client. Only the
To change the View mode:
1. Select the mode Share, Watch or Control from the View Toolbar.
40
Control and the user at the Client will be able to enter Keystrokes and mouse
movements.
user at the Client will be able to enter keystrokes and mouse movements. The user
at the Control will be locked out.
user at the Control will be able to enter keystrokes and mouse movements. The
user at the Client will be locked out.
Or,
Press PAUSE+ALT keys and select Watch, Share or Control from the View Window
{Client} drop down menu.
Page 42

NetSupport Manager
Maximising the View Area
Viewing a Client in Full Screen Mode, maximises the View Window. What you see is exactly
what would be seen on the workstation you are Viewing.
To maximise the View area
1. Choose {View}{Full Screen} from the Client View Window drop down menu.
Or,
Click on the Full Screen icon in the Clients View Window toolbar.
2. The Full Screen dialog will appear.
By default NetSupport will provide you with a floating toolbar whilst in Full Screen Mode.
Viewing Multiple Clients Screens Simultaneously
NetSupport enables you to View multiple Clients screens simultaneously, each in its own
Window. You can even scale their individual View Windows to fit on the Control’s screen.
To View multiple Client screens
1. View each Client you want to include.
2. From the Control Window drop down menu or any Client {View} drop down menu, choose
{Window}{Tile} and then select which NetSupport Windows you want to display.
Your chosen Windows will be tiled on the Control’s screen. If you want to see the entire
Client’s screen then choose the Scale to Fit option in the toolbar of each Client’s View
Window.
Note: Scale to Fit is set by default. To View the screen in normal resolution, turn off Scale to
Fit.
Scale to Fit Mode
Scale to Fit allows you to view a remote screen within the available size of the Remote
Window rather than providing you with a series of scroll bars so that you can pan around the
screen.
With this feature, you can now view multiple screens simultaneously to maintain an overview
of a number of selected workstations.
It should be noted that using Scale to Fit does impact on the quality and clarity of the View,
and is designed to allow you to monitor a screen as opposed to work on it. Try it for yourself
and decide what level of scaling is acceptable for your purposes.
To view a View Window to scale
1. From the Client View Window, choose {View}{Scale to Fit}.
41
Page 43

NetSupport Manager
Or,
Click on the Scale to Fit icon on the View Toolbar.
Displaying the View Settings for a Client
This option allows you to configure all View Window settings for the current Client.
To adjust View Settings
1. Choose {View}{Settings for Client} from the View Window drop down menu’s.
Or,
Select the Settings button on the View Window Toolbar.
2. The Settings dialog will appear.
3. Configure which options will be enabled, when you start a View Session.
The following is a brief description of each option
BIOS Keyboard
Checking this option causes the Control to emulate keystrokes on the Client, at the BIOS level
rather than the Hardware level. Use this if an application at the Client does not appear to be
correctly accepting keystrokes from the Control. Only use this option if you are experiencing
problems with the default low-level keyboard option.
Confirm Switch to Full Screen
When this box is checked, you will be prompted to confirm switching to Full Screen mode.
Full Screen
42
Page 44

NetSupport Manager
Checking this options will force the Control to View a Client in Full Screen mode rather than a
Windowed mode.
Scale to Fit
Check this option if you want the contents of the View Window to be shrunk to fit the sizeable
frame.
Scrollbars
You can turn off scrollbars on the View Windows by checking this option. This is useful when
using AutoScroll, as you gain a little extra workspace.
Use Compression
Check this box to enable compression when Viewing a Client’s screen.
Wallpaper
Check this box if you want the Client’s wallpaper to be visible when Viewing. Normally this is
turned off to improve performance, so expect the screen update speed to be impacted by
selecting this option.
Hotkeys
When you are Viewing a Client in Full Screen mode, hotkeys provide a way of returning to the,
possibly hidden, user interface. If the screen resolution at the Client is smaller than the
resolution of the Control, you can simply click your mouse button outside the view window to
stop viewing and display the view window again. Check the boxes in this group to determine
the keys that are used as HOTKEYS.
Keyboard Layout
Select from the list provided a ***LINK*** keyboard layout to be used at the Control during
Viewing. These layouts map keys on the Control, to keys on the Client workstation. If both
Client and Control are using the same keyboard layout, you should select Unmapped
Keyboard from the list. You can also edit Control.KBD to add your own keyboard layout if
none of the ones provided work in your situation.
AutoScroll Speed
When you are Viewing, the Control can automatically scroll to see the top or bottom of the
Clients screen. Adjusting the sliding control, sets the speed at which the View Window scrolls,
from not at all to very fast.
Scroll Delay
When AutoScroll is enabled, you can change the delay before the scroll is activated. If you
want the View to scroll as soon as the mouse is at an edge of the screen, move the slider
towards Min. If you prefer a longer delay before the AutoScroll takes effect, move the slider
towards Max.
Mouse Delay
Adjusting the mouse delay allows you to reduce the rate at which mouse updates are sent
from the Control to the Client when controlling or sharing. Move the slider control towards
Infinite to reduce the rate and conserve bandwidth, or towards Min for the best mouse
response. This is useful on dial-up or very slow networks.
Default Mode
43
Page 45

NetSupport Manager
When you View a Client by default you start viewing in ***LINK*** Share Mode. If you prefer
to start Viewing in a different way, change the style from the list provided.
Cache Size
The NetSupport Control contains a ***LINK*** cache to help improve overall performance.
The cache sizes range from 1Mb to 16Mb and a separate cache is allocated to each Client
connection. If you are running applications on the Client that uses a large number of or large
bitmaps, increase the cache size to improve the performance.
Max Colour Depth
When you connect to a Client, you can restrict the colour depth that is sent. This is done to
reduce the amount of traffic between Client and Control. Reduce the colour depth to 16
colours if you are using applications that do not rely on anything other than the standard 16colour palette.
Change DOS Font
Use this dialog to select the font to use when displaying DOS screens. This will be either from
DOS Clients or from a Windows Client Full Screen DOS Box.
Change Japanese Font
Use this dialog to select the font to use when displaying Japanese DOS screens.
44
Page 46

NetSupport Manager
Scanning Clients
The Scan function enables you to cycle through each connected Clients screen in turn,
displaying its screen on the Control. It is an alternative to Viewing multiple Clients in scaled
windows, which may cause screens to be unreadable.
To Scan screens
1. Choose {Tools}{Scan} from the Control Window drop down menu.
Or,
Select the Scan button from the Control Window Toolbar.
2. The Scan dialog will appear. This dialog is used for setting the parameters for the Scan
session.
To end a Scan
1. Choose {Scan}{Close} from the drop down menu or the floating toolbar.
45
Page 47

NetSupport Manager
Launching Applications
This feature allows you to launch (execute) an application on an individual Client workstation
or a Group of Client workstation’s without the need to remote control them.
Note: The application itself must be installed on or available to the Client workstations.
To Execute an application on a Client Workstation:
1. Open the Connected or Browse Folder in the Tree View, select the required Client.
2. Choose {Client}{Execute} from the Control Window drop down menu bar.
Or,
1. Open the Clients, Connected or Browse Folder in the Tree View and right click on the
desired Client.
2. Choose Execute at Client.
46
Page 48

NetSupport Manager
3. The Execute Application dialog will appear.
4. Select the Execute Tab.
5. Enter the name and path of the application to execute at the Client.
6. Check the box Add to List, to save it for future use in the Saved List Tab.
7. Confirm the description and path.
8. Click Execute.
The application will now be launched at all selected Clients and the result of the operation
displayed in the Results Box.
To Execute an application on a Group of Clients
1. Open the Group Folder and right Click on the desired Group.
2. Choose Execute at Client.
Or,
1. Open the Group Folder, select the required Client.
2. Choose {Group}{Execute} from the Control Window drop down menu bar.
3. The Execute Application dialog will appear.
4. Enter the full path of the application you want to run, click OK.
The application will now be launched at all selected Clients in the Group and the result of the
operation displayed in the Results Box.
To Save the details of your executed application for future use
1. Open the Execute dialog box.
2. Select the Execute Tab.
3. Enter the name and path of the executable application.
4. Click Add to List button.
5. The Add/Edit Program details dialog will appear.
6. Confirm the description and path of the executable application.
7. Click OK.
8. Select the Saved List Tab.
9. Check the Show Toolbar box to execute from the Control Window toolbar.
10. Click Close.
A short cut button for easy launching of an application will appear on the Quick Execute
toolbar.
To edit a saved Executable applications
1. Open the Execute Application dialog.
2. Select the Saved List Tab.
3. Select the Application to edit.
4. Click Edit.
5. The Add/Edit Program details dialog will appear.
6. When finished, click OK.
To remove a saved Executable applications
1. Open the Execute Application dialog.
2. Select the Saved List Tab.
3. Select the Application to remove.
4. Click Remove.
47
Page 49

NetSupport Manager
5. A confirmation dialog is displayed, click Yes.
48
Page 50

NetSupport Manager
User Defined Tools
As well as allowing a Control to launch applications on Client workstations, you can
automatically run a task on a Control workstation using a Defined Tool. These tools can also
be copied to other Control workstations for use.
To Add a Tool
1. Choose {Tools}{User Defined – Edit} from the Control Window drop down menus.
2. The User Defined Tool dialog will appear.
3. Click on the Add button
4. The Add Tool dialog will appear
5. Choose to add a Program or Script tool by selecting the appropriate Tab
6. Enter the required information
7. Click OK
8. The tool will be listed.
To Edit or Delete a Tool
1. Choose {Tools}{User Defined – Edit} from the Control Window drop down menus.
2. The User Defined Tool dialog will appear.
3. Select the tool you wish to edit or delete.
4. Click on the Edit button
5. The Edit dialog will appear
6. Edit the appropriate information, click OK
To Delete a Tool
1. Choose {Tools}{User Defined – Edit} from the Control Window drop down menus.
2. The User Defined Tool dialog will appear.
3. Select the tool you wish to edit or delete.
4. Click on the Delete button
5. A confirmation dialog will appear, click Yes
6. The Tool will be removed
49
Page 51

NetSupport Manager
To run a Tool
1. Choose {Tools}{User Defined Tools} from the Control Window drop down menus.
2. Select the tool you wish to run.
3. The Tool automatically run
To copy User Defined Tool Settings to other Control workstations
1. From the Control Configurator, select the File Locations Tab
2. The Tools file section, click on the Change button
3. Specify and alternate location or name for the Tools file.
4. Make this file available to Control workstation that is going to adopt this Tools file
5. From the workstations Control configurator, {File Locations Tab – Tools file section}, click
on the Change button.
6. Select the new Tools file, click Open
7. The new Tools file will be implemented
50
Page 52

NetSupport Manager
Showing the Control screen to Clients
As well as enabling you to remote control Clients, NetSupport allows you to show your screen
to: -
• a selected individual Client.
• a pre-defined group of Clients.
• an ad hoc selection of Clients.
To Show a Control screen
1. Select the connected Client you wish to Show to.
2. Choose {Client}{Show} from the Control Window drop down menu.
Or,
Choose the Scan button on the Toolbar.
3. The Show Configuration dialog box will appear.
In this dialog, you must select the Client, or Clients, that you will Show your screen to. If you
are connected to only one Client, or have selected a specific Client before choosing Show,
they will appear as an individual option. If you only wish to Show to only this Client, click
Show, otherwise make your selection as follows:
These Clients
The list displays all of the connected Clients and their descriptions. If you are only connected
to one Client, this list is disabled. Once you have chosen the Clients you want to Show to, click
Show.
51
Page 53

NetSupport Manager
Show icon on taskbar and hide the main window during the Show
This option enables you to choose whether you want to display the NetSupport icon or button
on the Control task bar, when Showing. This icon is displayed on the taskbar of Windows
95/98 and Windows NT 4 operating systems. It is not available on Windows NT 3.51. By
double clicking on either, you return to the Show dialog box.
Enable Audio Support
This turns Audio Support on. If you are Showing to only one Client, both the Control and Client
can speak. If you are Showing to many, only the Control can speak (Announce).
See Using Audio Support for details.
Set Show Mode at Client (Windowed or Full Screen)
This option allows you to Show at the Client, either in a small window or in full screen.
To End the Show
1. Click on the NetSupport button on the taskbar.
Or,
Right click on the NetSupport icon on the taskbar.
2. This will display the Showing dialog.
The buttons have the following purposes: End
Ends the Show and releases the Client’s screens and keyboards.
Continue
The Client’s screens and keyboards will remain locked whilst you prepare other work at the
Control. They will not be able to see what you are doing. Effectively the Show is suspended.
Resume
Resumes the Show.
Note: In order to Show to a Client from the Control you must first have installed the Client
programs on the Control workstation. However, it does not need to be activated.
52
Page 54

NetSupport Manager
Showing a Client’s screen on a number of Client Screens
With NetSupport, it is possible to Show the Control’s screen to a number of connected Clients.
It is also possible to Show a Clients screen to a number of other connected Clients. This is
known as Exhibiting.
For example, it may be that workstation_1 has an application on it that you need to Show to
the Accounts department. Therefore, by Viewing workstation_1 and then Showing to all
members of the Accounts department, they will now be able to see workstation_1’s screen.
To Show a Clients screen
1. Connect to the Clients you wish to Show to and the Client you wish to View.
2. View the Client whose screen you wish to Show.
3. Choose {Tools}{Show} from the Control Window drop down menu.
Or,
Select the Show icon on the Toolbar.
4. Choose Show to ‘These Clients’.
5. Exclude the Client you are currently Viewing from the Show: the green tick should be
changed to a red cross. If you don’t do this, you will get an error saying that the Control
cannot Show to this Client while you are Viewing it.
6. Click Show to start the Show.
The Client’s screen that is being Viewed will be shown to the other Clients. You can use
features such as Scale to Fit and Full Screen to Show more of the Client’s screen.
53
Page 55

NetSupport Manager
Audio Support
NetSupport allows you to use Audio Support, via microphones, headphones and speakers
whilst Viewing a Clients screen and Showing your screen to a Client workstation. For this
function to work you must have Audio Support hardware and software installed.
To use Audio Support when Viewing
1. Click on the Audio Button on the Toolbar in the View Window.
2. The Audio options will be displayed. From here you can: -
• Turn Audio on or off
• Enable only the Control or the Client to talk
• Set the microphone sensitivity
• Select the Audio Quality.
• The Mute Button turns the speaker and microphone on and off.
To use Audio Support when Showing
1. In the Show dialog box select the check box Enable Audio Support.
2. The Audio Settings set in the Control Configurator Audio Tab will apply during these
sessions.
Audio Announcements
This feature sends an audible announcement to all selected Clients headphones or speakers.
They will be able to hear the Control but will not be able to speak back.
Making an Announcement
1. Click on {Tools}{Announce} from the Control Window drop down menu bar.
2. The Announce dialog Box will appear, include (green tick), or exclude (red cross),
Clients from the announcement, then click Announce.
54
Page 56

NetSupport Manager
3. A dialog box will then appear indicating that you can now announce. Click OK when
you have finished speaking.
55
Page 57

NetSupport Manager
Adjusting Microphone and Speaker Volume
You can adjust the audio settings within NetSupport to match the capabilities of your multimedia workstations or to fine tune performance. However, you should note that the higher the
quality of sound you select the greater the volume of data that needs to be sent. This can
affect screen update performance on slower workstations.
To Access the Volume Controls
1. Right click on the speaker icon in the task bar.
To change other options such as sound quality, do one of the following: Global Method (Changes default setting for all Clients)
1. Choose {View}{Current Settings – Audio Tab} from the Control Window drop down
menu.
Individual Client Method (During a Show or View):
1. Whilst Viewing the Client.
2. Choose {View}{Settings for Client – Audio Tab} from the View Window drop down
menu.
Or,
Click on the Settings button on the View Window Toolbar and select the Audio Tab.
Or,
Click on the Audio button on the View Window Toolbar.
In both cases, the Audio Setting dialog will be displayed. This allows you to set the following
properties:
Volume Settings adjustments
Threshold Microphone sensitivity
Microphone Volume of microphone
Speaker Volume of speakers
Wave Volume of Operating Systems Sound Effects
Enable Options
On Turn Audio on
Off Turn Audio off
Talk Set the Control Audio to Talk function only
Listen Set the Control Audio to Listen function only
56
Page 58

NetSupport Manager
Video Player Support
NetSupport provides exceptional multimedia support with full Audio, Video and Remote
Control capabilities. This section deals specifically with the use of the PCI Video Player.
Whilst the PCI Video Player can be used for viewing a video file on an individual workstation,
the combination of NetSupport’s remote control capabilities with full Audio Support allows you
to use this tool to enhance training sessions and demonstrations. By running a Show, then
launching PCI Video Player, all Clients will be able to watch video files from their own
workstations, with full audio support.
The PCI Video Player supports all standard video files for example, avi and mpg. The PCI
Video Player runs locally on each Client workstation whilst the video file can be accessed
locally or on a network drive. If video files are stored locally, network traffic is restricted to
video player controls and synchronisation and is therefore minimal, making it possible to
control video sequences running on a larger number of workstations simultaneously. If video
files are stored on a network drive and Clients are having to retrieve files across the network
there will be a greater impact on the network. For optimum performance, store the video files
locally on each workstation, you may wish to use File Distribution to do this.
Other influencing factors will be:
• The number of Client workstations accessing the file;
• The speed of the network eg: 10/100 MB;
• The size of the video file;
• Client workstation memory/performance specification;
• Other traffic on the network.
Note: If a Client workstation is required to retrieve files from a Server, for smooth operation,
ensure that the Client workstation has sufficient access rights to the relevant drive and files.
The quality of the display will be affected by the video adapter of the workstation and how the
screen resolution is configured.
To Play a Video file on a workstation
1. Perform a Show to the Client workstations you are wanting to watch the video file.
2. Whilst performing the Show, launch PCI Video Player using command line.
3. The PCI Video Player control panel will appear.
4. Choose {File}{Open} from the PCI Video Player drop down menus to select the correct
video file.
5. The PCI Video Player video screen will then appear below the toolbar with the selected
file loaded, ready to be played.
Note: NetSupport’s Video Player utilises the Audio Support software and hardware
installed on your operating system, please adjust these to suit your needs.
6. Click on the Play button on the PCI Video Player toolbar.
Or,
Choose {Play}{Play} from the PCI Video Player drop down menus.
To Pause or Stop a Video file and return to the beginning whilst it is playing
57
Page 59

NetSupport Manager
1. Click on the Pause or Stop button on the toolbar.
Or,
Choose {Play}{Stop or Pause} from the PCI Video Player drop down menus.
Note: The Pause command blanks any Clients video screens you may be Showing the
Video file to.
To return to the beginning video file
1. Click on the Start button on the toolbar to return to the beginning of the Video file.
Or,
Choose {Play}{Start} from the PCI Video Player drop down menus.
To fast forward to the end of the video file
1. Click on the End button on the toolbar to fast forward to the end of the Video file.
Or,
Choose {Play}{End} from the PCI Video Player drop down menus.
58
Page 60

NetSupport Manager
Video Player Control Panel
The PCI Video Player Control Panel operates in a similar manner to standard audio and visual
aids. Although the commands on the toolbar perform the same actions as would be expected,
please find a detailed explanation below:
File Menu
The File drop down menu contains the following options:
Open
Allows you to select and load the appropriate video file.
Close
Closes the open video file.
Exit
Shuts down PCI Video Player.
View Menu
The View drop down menu contains the following options:
Text Labels
Hides and displays text labels on the PCI Video Player toolbar.
Toolbar
Hides and displays the PCI Video Player toolbar.
59
Page 61

NetSupport Manager
Status Bar
Hides and displays the Status Bar of the PCI Video Player.
Zoom
Resizes the video screen
Play Menu
The Play drop down menu contains the following options:
Play
Starts the loaded video file.
Stop
Returns to the beginning of the loaded video file.
Pause
Blanks the Clients video screen and pauses the video file at the Control workstation.
Start
Returns to the beginning of the video file.
End
Fast forwards to the end of the video file.
Help Menu
Provides access to the on-line Help and general Version, Licensee, Technical Support and
Compression information.
60
Page 62

NetSupport Manager
Recording Replay Files
The NetSupport Client includes a function to record all screen and keyboard activity that takes
place whilst it is being remote controlled. This information is stored in a file that can later be
replayed on a Control workstation, with the appropriate access authorisation.
In order to use the Replay function either the Client or Control must be configured to create a
Replay File when a Control connects to it.
There are two ways to set up a Client workstation to record replay files: Through the Advanced
Client Configurator, from within the View Window via the Settings Tab or the Control
Configurator.
To record Replay files (at the Client):
1. Run the NetSupport Client Configurator on the Client Workstation.
2. Select the Advanced Configuration.
3. Select the Master Profile.
4. Select the Options Tab.
5. Enable the Record Replay File check box and specify where you wish the Replay Files
stored. This can be in a secure area, such as an NT Server.
6. If it is on a Server you may need to enter a USERNAME and PASSWORD that has
access rights to that area. This information will enable the Client to log on to that directory
when writing the Replay file.
7. Whenever a Control Views this Client, a sequential file will be created recording the
session. This file can later be replayed at a Control with the required access rights.
Note: If the Client is configured to record replay files, for security reasons, a Control User
cannot turn this off.
To record Replay files (at the Control):
1. Run the NetSupport Control Configurator on the Control Workstation
{Tools}{Configurations – select the correct Control Profile}{Settings – Print Capture and
Replay Tab} from the Control Window drop down menu.
2. Enable the Record Replay File check box and specify where you wish the Replay Files
stored. This can be in a secure area, such as an NT Server.
3. If it is on a Server you may need to enter a USERNAME and PASSWORD that has
access rights to that area. This information will enable the Client to log on to that directory
when writing the Replay file.
Notes
• The files created will be named incrementally in the format 00000001.rpf, 00000002.rpf
etc.
• Be aware that these files will be storing screen images and can become very large. You
will need to maintain these files outside NetSupport and ensure that there is adequate
disk space. Good housekeeping is therefore required with a policy of regularly deleting
old files.
• If you are creating a replay file on a Windows 3.x Client refer to the Helpfiles for 16 bit
Configurator.
61
Page 63

NetSupport Manager
Watching Recorded Replay Files
Replay Files recorded at a Client or Control workstation, and can be Viewed by a Control with
the appropriate access levels to files.
To watch Replay files
1. Choose {Tools}{Replay} from the Control Window drop down menu.
2. Navigate to the Directory where the Client Replay Files are stored.
3. Select the file to replay.
4. Click Open.
Note: Replay files are stored sequentially in the format nnnnnnnn.rpf
Showing Replay Files to Clients
With NetSupport it is possible to Show the Controls screen to a number of connected Clients.
It is also possible to Show a Replay file to connected Clients.
To Show Reply files to Clients
1. Connect to the Clients you wish to Show to.
2. Load the Replay file. Choose {Tools}{Replay} Control Window drop down menu.
3. The Replay files will begin, pause them and return to the Control Window.
4. Choose {Tool}{Show} Control Window drop down menu.
5. Choose to Show to ‘These Clients’, select the Clients you wish to include in the Show.
6. Click Show.
7. Return to the Replay Window and resume playing.
8. The Replay file playback will be shown to the connected Clients.
62
Page 64

NetSupport Manager
Transferring Files
NetSupport includes sophisticated File Transfer functionality that enables you to transfer files
to and from a Control and Client workstation.
To transfer files
1. Select the required Client in the List View.
2. Choose {Client}{File Transfer} from the Control Window drop down menu.
Or,
Select the File Transfer icon on the Control Toolbar.
Or,
Right click on the Client and choose File Transfer.
Or,
If you are Viewing the Client, choose {Tools}{File Transfer} from the View Window drop
down menu.
3. The File Transfer Window to that Client will open.
With NetSupport’s File Transfer it is also possible to copy files and directories between two
Clients. To do this, connect to each Client and display the File Transfer Window for each.
Arrange the File Transfer Windows so you can see both and simply drag file/directories from
one Client to the other.
You can see more of a Clients files and directories by moving the horizontal sizing bar or
clicking on the maximise button located above the Clients directory tree.
Applying a filter to files in List View
You can specify a filter to the contents of a Control or Client’s List View, so that only file
names which met a certain criteria will be displayed. To do this, use the Filter text boxes
located above both panes’ List Views.
Any filter settings applied to the Control Panel will not affect the display of the Client pane and
vice versa.
Filter settings will remain applied to a Control or Client pane until you reset them or close the
File Transfer Window.
63
Page 65

NetSupport Manager
To apply a filter to files in the List View
1. Click in the Filter text box above the pane whose List View you wish to filter
2. Replace the default filter (*.*) with your own, for example, if you wanted to view all file
names beginning with the letter MKT, then you would type MKT*.* in the Filter text box.
3. Press the Enter key to apply the filter
To reset the filter to files in the List View
1. Click in the Filter text box above the pane whose List View you wish to reset
2. Replace the contents of the Filter text box with (*.*), this is the default filter and means no
filter will be applied to the files in the current List View
3. Press the Enter key to apply the filter
Changing the View format in the File Transfer Window
The contents of the List Views of the Control pane and Client pane can be displayed in
different formats. You can also sort the contents of the List Views in order to make them easier
to navigate.
There are two types of view which you can display the contents of the List View in a File
Transfer Window:
Name Only view Displays only the file and directory names
Details view Displays the file and directory names, along with related details which are
displayed in adjacent columns.
To change the Name Only view
1. Click on Name Only button on the far right of the File Transfer Window
To change the Details View
1. Click the Detail button on the far right of the File Transfer Window
Note: You can also change the view type, choose {View}{Show Details} from the File Transfer
Window drop down menus.
Changing the sort orders in a File Transfer Window
Typically, the contents of List Views in a File Transfer Window can be sorted into the following
orders:
Sort Order Description
By Name The contents will be sorted alphanumerically by file name.
By Type The contents will be sorted alphanumerically by file extension. This is not
applicable to drives and directories in the List View.
By Modified Date The contents will be sorted according to the date they were last modified.
By Size The contents will be sorted according to the size of the file. This is not
applicable to drives and directories in the List View.
64
Page 66

NetSupport Manager
By Short Name The contents will be sorted alphanumerically using the shortened versions
Note: You can also specify whether the contents are to be sorted in ascending or descending
order.
To change the sort order
1. Select the appropriate pane (Control or Client)
2. Click the Sort Order button on the right hand side of the File Transfer Window
3. A drop down menu will be displayed
4. Select a Sort Order command
Note: When the List View will be displayed in Details View, you can click on the Columns
headings, such as Name and Description, to sort the order by an appropriate column heading.
Clicking on a column heading the second time will toggle the order direction, the current order
direction will be indicated by a small arrow on the right of the column heading by which the List
View is sorted, for example, an arrow pointing up indicates the List is sorted in ascending
order.
of their names.
Creating Directories
To create a Directory
1. Select the Client or Control Tree View
2. Select the drive or directory in which the directory you want to create will appear
3. Click on the toolbar Create button
4. The Create Directory dialog will be displayed
5. Enter a name for the directory, click OK
Copying files and Directories
You can use the File Transfer Window to copy files and directories to and from the Client
machine.
To copy files and Directories from a Control to a Client
1. From the Client Tree View, select the destination drive or directory into which the items
will be copied
2. From the Control List select the item(s) to be copied to the Client
3. Click on the toolbar Copy File button
4. A confirmation dialog will be displayed, click Yes
To copy files and Directories from a Client to a Control
1. From the Control Tree View, select the destination drive or directory into which the items
will be copied
2. From the Client List View, select the item(s) to be copied to the Client
3. Click on the toolbar Copy File button
4. A confirmation dialog will be displayed, click Yes
65
Page 67

NetSupport Manager
Renaming Files
To Rename a file
1. Select either the Control or Client pane List View
2. Select the file to be renamed
3. Click on the toolbar Rename button
4. Enter the new name for the file in the black boarder next the file icon
5. Press the Enter key when finished
Deleting Files and Directories
You can delete files and directories from either a Control or Client machine using the File
Transfer Window.
To delete a file
1. Select the file you wish to delete
2. Click on the toolbar Delete button
3. A confirmation dialog will be displayed, click Yes
To delete a Directory
1. Select the Directory you wish to delete
2. Click on the toolbar Delete button
3. The Remove Directory dialog will be displayed
4. Select the Include Contents check box
5. Click Yes
Note: You cannot remove more than one Directory at a time. If you have several directories
selected in the List View when performing the Delete operation, only the last selected
Directory will be removed.
66
Page 68

NetSupport Manager
Synchronising Directories
You can synchronise the contents of selected directories on the Control and Client. When you
synchronise two directories, any new or updated files in either directory will be automatically
copied to the other directory.
To synchronise Directories
1. Select the Control Directory from the Control Tree View to be synchronised with the
Client
2. Select the Client Directory from the Client Tree View to be synchronised with the Control
3. Click on the toolbar Synchronise button
4. The Synchronise Directories dialog will be displayed
5. Check the displayed paths of the two selected Directories
6. Choose to include the subdirectories by selecting the Include Subdirectories check box
7. Choose OK
8. A confirmation dialog will be displayed, click Yes
9. The Directory Synchronisation Progress dialog will be displayed
10. When completed, the result will be displayed in the Directory Synchronisation Results
dialog box
11. Read, click OK
Arranging multiple File Transfer Windows
Just as you can View to more than one Client at a time, you can have more than one File
Transfer Windows open at a time. These File Transfer Windows can be easily arranged using
the commands in the Window, Tile submenu.
To arrange multiple File Transfer Windows
1. Make sure a File Transfer Window or the Control Window is active.
2. Choose {Window}{Tile – File Transfer Windows} from the Control Window drop down
menus.
3. All open File Transfer Windows will be arranged so that they proportionality fill the Control
workstation screen.
Notes
• When working with multiple File Transfer Windows, refer to the File Transfer Window’s
title bar to check which Client is being viewed in a particular File Transfer Window.
• You can use the Tile Windows function, to similarly arrange all open View and Control
Windows.
67
Page 69

NetSupport Manager
Distributing Files
As well as enabling you to Transfer Files to and from individual Clients, NetSupport also
allows you to Distribute Files to multiple Clients simultaneously. This is called “File
Distribution”.
You can Distribute Files to
• All connected Clients by selecting the File Distribution button on the Toolbar;
• Pre-defined Groups of Clients by selecting the File Distribution button on the Toolbar;
• To an Ad Hoc Group of Clients;
• To included (green tick) or excluded (red cross) Clients found in the lower half of the
File Distribution Window.
Use the “Local Computer” Tree View, in the top left corner of the File Distribution Window to
navigate to correct directory on the Control. Select the files or directories you wish to distribute
and drag them to the pane, in the lower half of the window, containing the list of clients.
To Distribute Files to a Group of Clients
1. Select the Group of Clients you wish to distribute files to from the Group Folder in the
Tree View.
2. Choose {Group}{File Distribution} from the drop down menu.
Or,
Select the File Distribution button on the Toolbar.
3. The Group File Transfer Window will appear.
Note: The directory on the Client workstations where the files/directories are copied to, is
called the Destination Directory. Unless specified otherwise this will be the last directory
highlighted on the Local Computer.
To Distribute Files to an Ad Hoc group of Clients
1. Open the Clients, Browse or Connected Folder in the Tree View.
2. Connect to the required Clients.
3. Choose {Tools}{File Distribution} from the Control Window drop down menu bar.
Or,
Select the File Distribution button on the Toolbar.
4. The Group File Transfer Window will appear.
Note: The directory on the Client workstations where the files/directories are copied to, is
called the Destination Directory. Unless specified otherwise this will be the last directory
highlighted on the Local Computer.
68
Page 70

NetSupport Manager
Managing Files on the Control Workstation
You can manage files on a Control workstation using the File Manager Window. This is similar
to the File Transfer Window, but only displays the contents of the Control workstation.
To display the File Manager Window, choose {Tools}{File Manager} from the Control Window
drop down menu.
The File Manager Window contains:
• Menu Bar
• Toolbar
• Tree View
• List View
The Tree View
• To select a drive or directory in the Tree View, simply click on it, the contents of the
selected item will then be displayed in the List View (on the right).
• If the selected drive or directory contains subdirectories that are not displayed, then a
cross symbol will be displayed to the left of the item.
• To expand the contents of a drive or directory so that its subdirectories are visible in the
Tree View, either double click on the drive or on the directory, or click on the cross
symbol to the left of the drive or directory you wish to expand.
The List View
• To select an item in the List View, simply click on it.
• To select multiple items in the List View:
1. If the items are adjacent to one another, select the first item, hold down the Shift
Key and then select the last item.
2. If the items are not adjacent to one another, then select the first item, then hold
down the Control Key and select each of the other items.
• To display the contents of the drive or directory that is one level up from the current
directory, double click on the previous directory item at the top of the List View.
69
Page 71

NetSupport Manager
Control/Client Chat Sessions
NetSupport allows you to Chat to a selected Client, via a scrolling text window.
To hold a Chat session
1. Select the Client you want to Chat to in the List View.
2. Choose {Client}{Chat} from the Control Window drop down menu.
Or,
Click on the Chat icon on the Control Toolbar.
Or,
Right click on the Client and choose {Chat}.
3. The Chat window will appear on the Control and Client workstations. The title of the
window indicates to whom you are chatting.
Note: Clients can also initiate Chat sessions by raising the Client Main Window and choosing
{Commands}{Chat}.
The following options are available: Chat
If the Control begins a Chat session and the Client does not notice the window appear on their
screen, you can also send an audible Beep. Do this by selecting {Chat}{Send Beep} from the
Chat drop down menu.
Window
Only the Control’s Chat dialog box will have a Window drop down menu. This menu enables
you to swap between opened screens or Tile them.
Control
70
Page 72

NetSupport Manager
This is where you type your part of the conversation. Characters are sent in real time, so you
do not have to type a line of text and then send it. The backspace key can be used for editing
the text as you go, but you cannot use the direction keys.
Client
The response from the User at the Client appears here.
To End a Chat session
1. Press on the ‘x’ or close icon, in the top right corner of the Chat dialog box.
Or,
Click on {Chat} {Close} from the Chat dialog drop down menu.
71
Page 73

NetSupport Manager
Sending Messages
With NetSupport, you can send a message to an individual Client, a Group of Clients or all
Clients on the Network.
To send a message
1. Select the Client you want to send a message to, in the List View.
2. Choose {Client}{Message} from the Control Window drop down menu.
Or,
Click on the Message icon in the Control Toolbar.
Or,
Right-Click and choose Message.
3. The Message dialog box will appear. You can then choose whether you want to send the
message to all Available Clients, All Connected Clients or only the Currently Selected
Client.
The following options are available: All Available Clients (Broadcast)
The message will be sent to all available Clients.
All Connected Clients
The message will be sent to all currently connected Clients.
Currently Selected Clients
The Message will be sent to all clients selected in the current List View. If you are not
connected to a selected Client, you will be connected before the message is sent.
Send
This button will be disabled until you have entered a message to send. Once you have
selected who will receive the message and entered a message, press the Send button. The
Message will be displayed in a dialog box on the Clients screens, and will remain until the
User dismisses them, by clicking OK.
Cancel
72
Page 74

NetSupport Manager
Click Cancel to close the Message window, without sending a message.
73
Page 75

NetSupport Manager
Dealing with Help Requests
NetSupport Manager allows a User, at a Client workstation, to request help from a specified
Control workstation.
If a Control’s List View has been set to display Clients details {View}{Details} and customised
to display help messages, the Clients help request message will be immediately displayed in
the List View. The Help Request Folder in the Tree View will also turn green.
NetSupport Manager also allows you to configure Control workstations Help Request warning
settings.
To adjust a Controls Help Request warning settings
1. Choose {View}{Configurations – Settings}{Help Request Tab} from the Control Window
drop down menu.
2. A Control can choose to receive three additional warnings when a Client sends a help
request message:
• Have the Client selected in the List View;
• Display an independent help request message on the Controls screen;
• Play a sound when a help request message arrives.
A Control can also choose to be in one of three states of availability to receive Clients help
requests, by adjusting the following:
To adjust a Controls Help Request availability
1. Choose {View}{Configurations – Settings}{Help Request Tab} from the Control Window
drop down menu.
2. A Control can choose from the following three settings:
• Available to take all Help Requests
• Unavailable to take any Help Requests
• Busy at the moment (ensure that you specify the number of Clients you wish to be
connected to, for this status to take effect)
When Browsing for Clients, Controls have the option to browse only for Clients who have
requested help.
74
Page 76

NetSupport Manager
Capturing a Client’s printed output
Print Capture redirects printer output from a local printer at the Client workstation to the printer
or file at the Control. You would use this when running an application on a Client but want any
printed output redirected to the printer that is local to you.
To redirect a Clients print output
1. Choose {Tools}{Configurations} from the Control Window drop down menus.
2. Select appropriate Configuration.
3. Click Settings.
4. Click on the Print Capture and Replay Tab.
5. Check the Enable Print Capture box.
6. Select a printer to redirect the Clients output to.
Or,
Select a file to capture the print file to.
7. When you connect to a Client, a dialog is displayed informing you of the printer driver that
has been used.
Notes
• Print output from Windows programs is captured only from the port to which the
default printer is attached. Note that the Client may change this when Print Capture
is enabled, as described above.
• The Windows Client captures print output from DOS programs from all LPT ports
(LPT1, LPT2 and LPT3).
• The Windows NT Client captures print output from DOS programs from the port to
which the default printer is attached.
• The OS/2 Client does not support print capture.
75
Page 77

NetSupport Manager
In the Print Capture and Replay Tab you have the following options
Enable Print Capture
Check this box to enable the Print Capture feature. If this box is unchecked, the output will be
printed at the Client.
Capture to Printer
These options specify where the printed output will be redirected to on the Control. This can
be either a local or network printer, or a file.
Change button
Press this button to display a window containing all of the printers configured on your local
workstation.
Capture to File
By selecting this button, you can redirect the Client printing to a file that can be printed later.
This file can on a local or network path.
Browse button
A file browse window will appear when you press this button allowing you to find a location for
the capture file.
Use Client Printer Driver
For Windows programs, the Windows and NT Clients try to use the correct driver for the
Control's default printer (by changing the default printer on the Client workstation, although not
all applications notice this). For this to work, you need to install the appropriate printer driver
on the Client and assign it to LPT1, LPT2 or LPT3.
76
Page 78

NetSupport Manager
On Windows 95 and Windows NT, the User can change the printer name (in Control Panel,
Printers or Settings, Printers). To handle this situation, and because printer and driver
names vary between Windows 3.x, Windows 95 and NT, you can specify a list of printer
names and Drivers in this field. For example:
HP DeskJet 520,DESKJETC; HP DeskJet …where …
When Print Capture is enabled, the Control sends this information to the Client, and the Client
then looks for the closest match in the Drivers installed on the Client workstation. The NT
Client ignores the name of the driver file; the Windows and Windows 95 Clients match this
preferentially, using the printer name only in case of a tie.
Report Driver Used
When you connect to a client a dialog box will appear informing you of the printer driver that
has been used.
If you experience problems with the Windows Client, try:
• Disable 'fast printing direct to port' at the Client
• Removing any connection to a network printer at the Client.
• Print to port LPT1.DOS at the Client
• Change the printing priority at the Client to Low in Print Manager, Options,
• To capture printed output from DOS programs running under Windows 95, open
HP DeskJet 520 is a printer name that the Client might recognise
DESKJETC is the name of the driver file for this printer at the Client
(optional, .DRV assumed)
HP DeskJet is another printer name that the Client might recognise
Background printing.
{Printers}{Settings - Your printer}{Properties}{Details}{Port Settings} and ensure
that Spool MS-DOS print jobs is not checked.
77
Page 79

NetSupport Manager
Remote Clipboard
Remote Clipboard allows you to cut and paste between applications on a Client and Control
workstation.
To Cut and paste from a Control to a Client workstation
1. Open appropriate applications on Client and Control workstations.
2. Copy data from Control application.
3. View the Client.
4. Choose {Client}{Clipboard – Retrieve or Send Clipboard} from the View Window drop
down menus.
Or,
Choose the Clipboard button on the View Window toolbar.
5. Select Send Clipboard.
6. Choose {Edit}{Paste} Client application drop down menu.
To Cut and paste from a Client to a Control workstation
1. Open appropriate applications on Client and Control workstations.
2. View the Client.
3. Copy data from Client application.
4. Choose {Client}{Clipboard – Retrieve or Send Clipboard} from the View Window drop
down menus.
Or,
Choose the Clipboard button on the View Window toolbar.
5. Select Retrieve Clipboard.
6. Choose {Edit}{Paste} Control application drop down menu.
Note: Under some circumstances remote clipboard will not cut and paste data as expected, as
some data formats cannot be sent/received. Please refer to on-Help for details.
78
Page 80

NetSupport Manager
Using the Client
In this chapter …
The Client Main Window
Client Connect
Raising a Help Request
Chatting to a Control
Receiving Messages from a Control
Disconnecting from a Control
Resetting the Client Video Driver
79
Page 81

NetSupport Manager
The Client Main Window
When a Client either double clicks on the NetSupport icon on their task bar or presses the
hotkeys Alt-LShift-RShift, the Client Main Window appears.
From here a Client can:
• Initiate a Chat session with a Control;
• Request Help from a specific Control;
• Connect or Disconnect from a Control;
• Switch Desktops;
• Load or Unload a Bridge.
80
Page 82

NetSupport Manager
Connecting to a Control
The Client Connect function only works for TCP/IP connections and is intended to enable you
to establish a connection across a Firewall or Proxy Server.
To connect to a Control
Note: The Control must be running for a Client to connect.
1. Choose {Commands}{Call Control} from the Client Main Window drop down menus.
2. The Call Control dialog appears.
3. Enter the hostname or IP address of the Control you wish to connect to.
Or,
Select from a list of the 10 most recently connected Controls.
Note: A maximum of 10 Controls can be stored, after which the oldest is discarded.
The Control will receive a connecting message and either allow or disallow the connection. If
the connection is disallowed, the Control and Client will be able to behave as normal.
Disconnecting from a Control
To Disconnect from a Control
1. Bring up the Client Main Window and choose {Commands}{Disconnect} from the drop
down menu.
Or,
Right click on the Client icon in the Taskbar’s system tray.
2. When the short cut menu appears, choose the Disconnect command.
81
Page 83

NetSupport Manager
3. A dialog box will appear, listing the Controls to which you are currently connected. Select
the Control(s) from which you want to disconnect.
4. Choose OK to disconnect from the selected Controls.
82
Page 84

NetSupport Manager
Raising a Help Request
NetSupport Manager allows a User, at a Client workstation, to request help from a designated
Control workstation.
To Request Help
1. Choose {Commands}{Request Help} from the Client Main Window drop down menu.
Or,
Clients press the Hot Keys, usually ALT+LSHIFT+RSHIFT.
2. This opens a dialog box into which Clients type their name and help request message.
3. Clients can then specify which Control workstation they wish to send their help request
message to, by clicking on Show Control and selecting a Control workstation.
4. Clients can also choose to Cancel their previous help request by clicking Cancel Previous
Request.
5. Clients then click OK.
If a Control is connected when a Client sends a help request, the Control will be immediately
notified by the Help Request Folder turning green. If the Control is not connected, its Help
Request Folder will turn green the next time it connects to that Client.
Chatting to a Control workstation
You can Chat to a connected Control using the Chat Window. This window consists of two
large text boxes.
To initiate a Chat session
1. Choose {Commands}{Chat} from the Client Main Window drop down menus.
2. The Chat Window will appear.
3. Begin typing. Any text you enter will immediately appear in the Control’s Chat Window.
4. If you need to alert the Control User that you have initiated a chat session, choose
{Chat}{Send Beep} from the Chat Window drop down menus.
Receiving Messages from a Control workstation
Client workstations can receive messages from Control workstations. These messages are
automatically displayed on a Client’s screen in a message box.
83
Page 85

NetSupport Manager
The message box’s title bar includes the name of the Control that has sent the message,
along with the date and time the message was sent.
Having read the message sent by a Control, choose OK to remove the message.
Resetting the Client Video Driver
This procedure may be necessary if you install a new video display adapter or in 9x Clients
when you have changed the display settings.
In Windows 9x the video driver can be stored in the SYSTEM.INI or the registry. The default is
SYSTEM.INI however when you reset the video driver you can change where the information
is stored. If you choose to store in the information in the SYSTEM.INI file then you may need
to reset your video driver when you change screen resolution or other video driver settings.
Resetting the Video Driver
In NT
1. Choose {Start}{Programs}{NetSupport}{Reset Video Driver}.
2. Choose OK.
In Window 9x
1. Choose {Start}{Programs}{NetSupport}{Reset Video Driver}.
2. Choose OK.
3. Choose where you would like to store the NetSupport Manager display drivers.
84
Page 86

NetSupport Manager
Configuring Client
Workstations
In this chapter …
Configuring Client workstations
Editing or Creating Configuration Files
Basic Client Configuration
Editing and Creating Configuration Files
Basic Client Configuration – General Tab
Basic and Advanced Client Configuration – Transport Tab
Basic and Advanced Client Configuration – Audio Tab
Basic and Advanced Client Configuration – Dial-in Bridge Tab
Advanced Client Configuration
Advanced Client Configuration – Security Tab
Advanced Client Configuration – Remote Control Tab
Advanced Client Configuration – Options Tab
Advanced Client Configuration – File Transfer Tab
Advanced Client Configuration – Customise Tab
Advanced Client Configuration – Protect Configuration Tab
Advanced Client Configuration – Web Extensions Tab
Advanced Client Configuration – Users Tab
Advanced Client Configuration – Client Connect Tab
85
Page 87

NetSupport Manager
Configuring Client workstations
NetSupport Clients are configured using the NetSupport Configurator program. This makes all
the required changes to and sets up the initialisation commands.
The Configurator is started from the NetSupport Configurator Icon in the NetSupport Manager
Program Group. This will display the initial Client Configuration dialog.
The Client Configurator enables you to set all the possible options for the Client. It also
enables you to test the Network to ensure that the Network stack that you are attaching the
Client to is installed and operating correctly.
You can run the Configurator in two modes, Basic or Advanced.
Basic
Basic Configuration is used for standard settings such as the Client Name, the transport/s that
it will use and simple security such as password and security keys.
Choose this option if:
• You are using the Client Configurator for the first time.
• You only wish to set simple security and configuration options.
• You do not need to create multiple profiles for different Control Users who might connect
to this workstation.
Note: Do not use the Basic option if you have set up multiple profiles using the Advanced
Option as this will also change the Master Profile in the Advanced Configuration.
Advanced
The Advanced option provides access to NetSupport’s wealth of configuration and security
options. It lets you tailor the response of the Client to different Control Users who may access
the workstation and provides links to areas such as NT Security.
Choose this option if:
• You are an experienced User.
• You need the Client to react differently depending on which Control User is connecting.
• You wish to enable/disable individual features.
• You want to link to NT Security.
• You want to restrict a Control User’s access to specific drives, directories or files.
Note: Any changes you make to the Master Profile in the Advanced option will overwrite any
setting that you have made using the Basic option.
86
Page 88

NetSupport Manager
Editing or Creating Configuration Files
Configuration files are created by choosing the Advanced Option from the Client Configurator.
This will display the Advanced Configuration Window.
The default Configuration file is called CLIENT32.INI and is stored in the NetSupport Manager
installation directory of the Client workstation. You can use either this file or a different file on
Server to which the Client has access.
To open the default or an existing Configuration File
1. Open the NetSupport Program Folder NetSupport Configurator.
2. Select the Advanced Configuration Window.
3. Choose {File}{Open} from the Advanced Configuration Window drop down menu bar.
4. Select the Configuration File you want and click Open.
To create a new Configuration File
1. Open the NetSupport Program Folder NetSupport Configurator.
2. Select the Advanced Configuration Window.
3. Choose {File}{New} from the Advanced Configuration Window drop down menu bar.
4. A new file will be created with a Default master Profile.
To set the Configuration file the Client will use
The configuration file that the Client uses when it initialises can be on the same workstation or
on another workstation or Server to which that workstation has access. Multiple Clients can
share the same configuration file for ease of Administration.
To set the Configuration file the Client to use, choose {Profiles}{Client Parameters} from the
Advanced Configuration drop down menu bar.
Note: There are special requirements for setting Windows 9x Clients to use shared
configuration files on an NT workstation. See on-line support for details.
To Set the Client Name
1. Choose {Profiles}{Client Parameters} and insert a Client name.
Note: The Client name is separate from the Configuration file and is stored on the local
workstation. Make sure that you do not choose the same Client name as is used on another
workstation. Setting the Client name to be an asterisk is a useful strategy, as the Client name
will then be set to be the same as the Computer Name. The Computer Name should always
be unique.
To edit an existing Profile
1. Open or create the Configuration file you want the Client to use.
Select the profile you want to Edit
1. Open the NetSupport Program Folder NetSupport Configurator.
2. Select the Advanced Configuration Window.
3. Choose {Profile}{Edit} from the Advanced Configuration Window drop down menu bar.
4. Edit the Profile.
Note: If you leave the check boxes greyed, the settings from the Master Profile will be used.
87
Page 89

NetSupport Manager
To create a new Profile
1. Open the NetSupport Program Folder NetSupport Configurator.
2. Select the Advanced Configuration Window.
3. Open or create the Configuration file you want to use.
4. Choose {Profile}{Add} from the Advanced Configuration Window drop down menu bar.
5. Enter the name for the Profile.
Note: You can combine Profiles from other configuration files by choosing the "Include File"
option. This is useful where you are using Configuration file on the local workstation but want
to include information stored on a central configuration file or vice versa. For example, if the
local workstation was using a different NetBIOS Adapter number.
Each Profile contains a number of Property Sheets where the actual parameters are set.
88
Page 90

NetSupport Manager
Basic Client Configuration
For use in a simple environment where you do not require the Client to react differently
according to the Control User connecting to it and do not need to enable/disable individual
functions.
To find the Basic Client Configurator
1. Open your NetSupport Manager Program Folder by choosing
{Start}{Programs}{NetSupport}{NetSupport Configurator} from your operating system
menus.
Or,
Double click on the Configurator icon in the NetSupport Group.
2. Select the Basic Configurator.
3. The four tabs of the Basic Configurator will appear:
• Transport
• General
• Dial-in Bridge
• Audio
89
Page 91
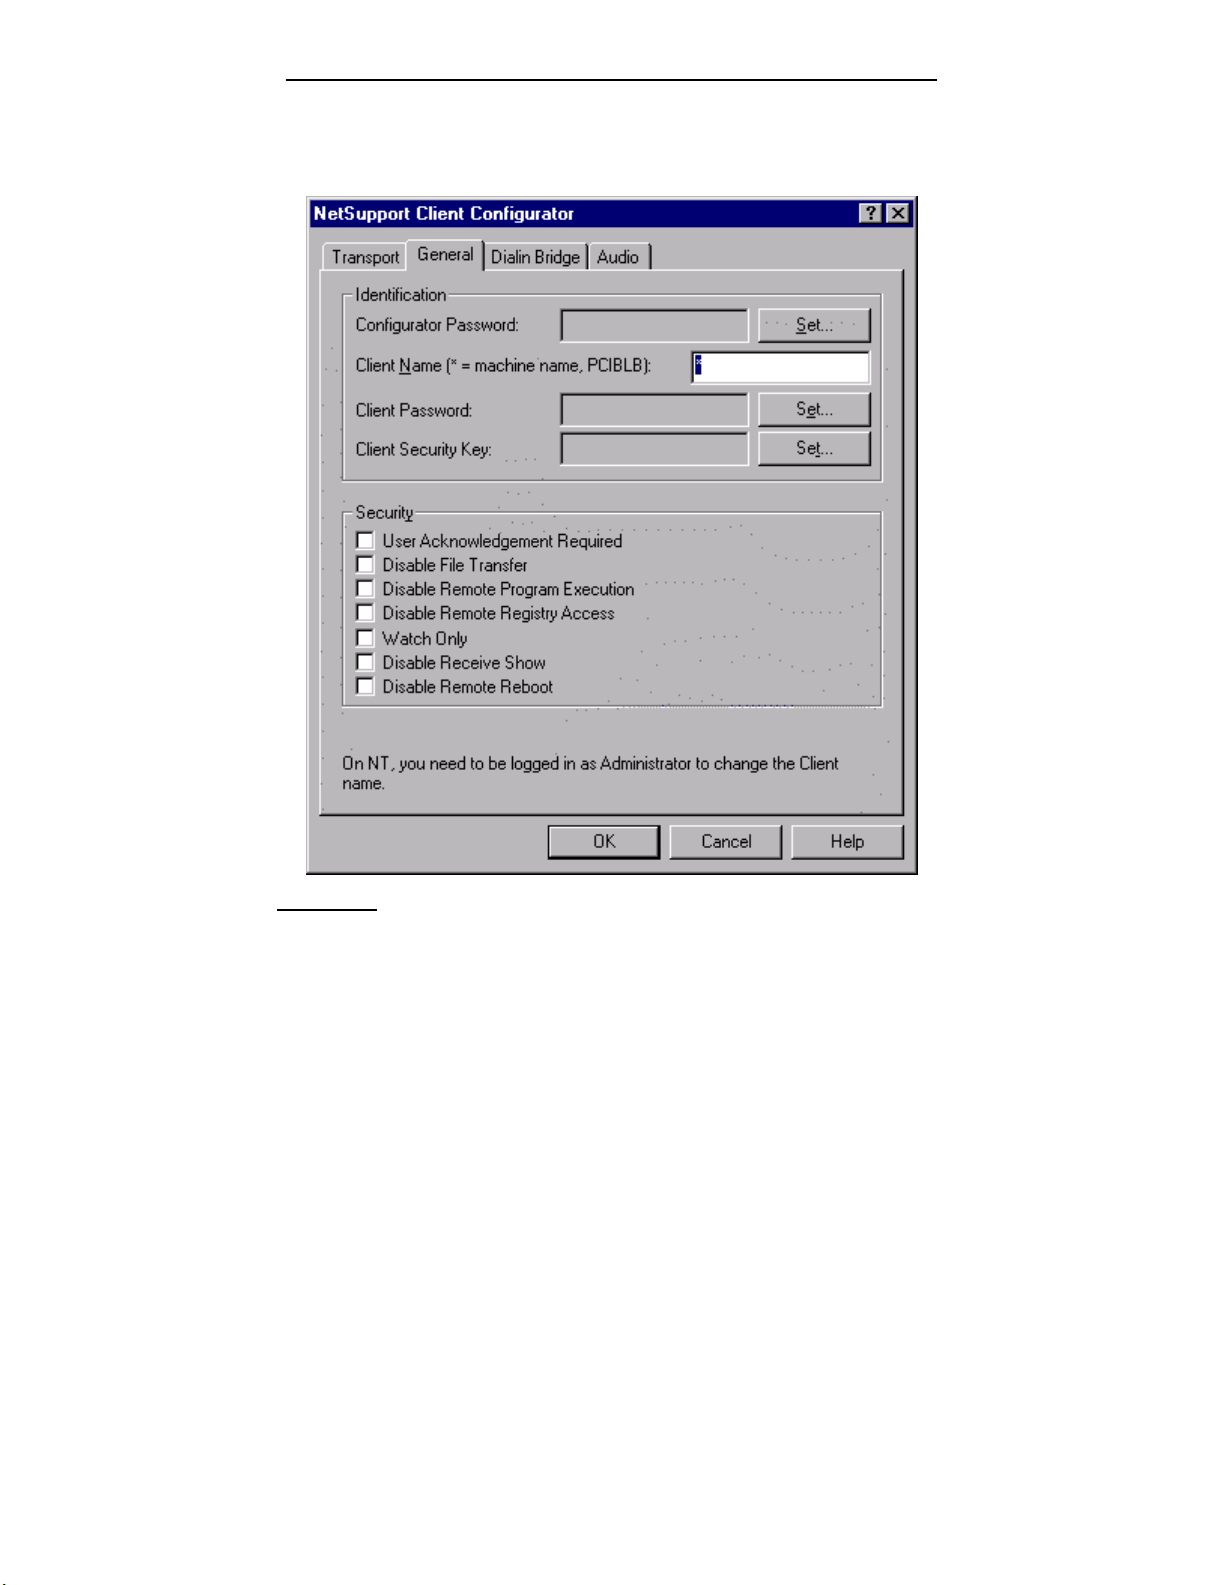
NetSupport Manager
Basic Client Configuration – General Tab
This property sheet is used to set the basic Client and security options.
Identification
Configurator Password
As an extra level of security, you can associate a password with a Configuration File. This
prevents unauthorised amendment of this Client’s configuration. When the Configurator is next
started, the User must enter the required password before being able to change any Client
parameters in this Configuration File. Choose SET, to set your password.
Client Name
90
Page 92

NetSupport Manager
Each NetSupport Client on the Network requires a unique name. You can either set a name of
your own or use an asterisk to default the Client name to be the same as the workstation
name.
On NT, you need to be logged in as Administrator to change the Client name.
Note: If setting the Client Name in Advanced Configuration choose {Profiles}{Client
parameters} from the Advanced Configuration Window menu bar.
Client Password
This helps to protect the Client from unauthorised access from a NetSupport Control. The
Control User will be required to enter the password before obtaining access to the Client.
Client Security Key
Provides additional security that enables Control Users to connect only if the Control has the
same security key as the Client. Optionally this can be set as your NetSupport Licence serial
number. You must set the Security key at both ends.
Quiet Mode (Client not visible on Taskbar)
Check this box to hide the Client icon on the Taskbar.
Security
User Acknowledgement Required
Prevents access to the Client unless a User is present. The User at the Client will have to
explicitly accept the request to connect before access is granted.
Disable File Transfer
This prevents a Control operator from being able to transfer files to and from the Client. The
Control User will not be able to copy, View or otherwise manipulate files on the Client using
the NetSupport Control File Transfer options.
Disable Remote Program Execution
This prevents a Control User from remotely executing applications at the Client from within
the menu option in the Control program. They can still start applications on the Client whilst
Remote Controlling the workstation.
Disable Remote Registry Access
Later versions of NetSupport Manager will include a function to enable a Control User to
remotely manage and edit the Registry on NetSupport Clients. Setting this option will disable
that function. This is already available in Scripting.
Watch Only
Enables the Control User to View the screen of the Client workstation but prevents them
from being able to enter keystrokes or mouse movements.
Disable Receive Show
91
Page 93

NetSupport Manager
Prevents the Client workstation from being able to display a Show sent by a NetSupport
Manager Control.
Disable Remote Reboot (Not applicable on NT)
This prevents a Control User from being able to remotely reboot the Client from the Menu
option in the Control Program.
92
Page 94

NetSupport Manager
Basic/Advanced Client Configuration – Transport Tab
This property sheet is used to set which protocols the transport will allow a Control to connect
to it by. These protocols must of course have been installed on the Client workstation first.
The 32-bit NetSupport Client installed on Windows 95/98 and NT supports multiple protocols.
This means that you can set it up to respond to NetSupport Control’s whether they are talking
over TCP/IP, IPX or NetBIOS.
TCP/IP
Use TCP/IP
Check this box if you went the Client to be able to communicate over TCP/IP.
Press TEST to check that the protocol is correctly installed on this workstation.
Send Keep Alive Packets
Some TCP stacks send Keep Alive Packets. In some circumstances, it may be desirable to
disable this. For example, on an ISDN line where a TCP/IP Client is loaded a symptom may
occur where the ISDN line is brought up unintentionally.
Port
The TCP/IP protocol requires that a port number be allocated for applications to communicate
through. The default registered port for NetSupport Manager is 5405.
Note: If you are using Routers, you must ensure that they are configured to pass through data
using this port.
93
Page 95

NetSupport Manager
IPX
Use IPX
Check this box if you wish the Client to be able to communicate over IPX.
Press TEST to check that the protocol is correctly installed on this workstation.
Use NetBIOS
Check this box if you wish the Client to be able to communicate over NetBIOS/NetBEUI.
If you are using NetBIOS, you must also select a NetBIOS Adapter Number.
Press TEST to check that the protocol is correctly installed on this workstation.
NetBIOS
Set NetBIOS Adapter Number
As you can have more than one NetBIOS stack loaded, Windows and OS/2 use the concept of
Adapter numbers. Each stack is allocated an Adapter number by the operating system. So for
example, NetBEUI may be allocated Adapter 1, NetBIOS over TCP, Adapter 2 and so on.
By default, the Client uses Adapter number 0. Depending on how your Network is configured
this may not be the correct Adapter number for your workstation. To overcome this you must
select the required stack from the drop down list.
Notes
• NetSupport allows you to select multiple NetBIOS Adapters. Make sure only the ones you
want are selected. If changing the selected adapter, make sure that you first de-deselect
the existing or default adapter number.
• Under Windows 95, changing you Network settings may also change the NetBIOS
adapter number. You may need to re-set the NetBIOS adapter number NetSupport uses
after such a change.
94
Page 96

NetSupport Manager
Basic/Advanced Client Configuration – Dial-in Bridge Tab
This property sheet is used to set up Dial-in NetSupport links either to this workstation or to
any NetSupport Client on the same LAN as this one.
Transport Protocol
By default, NetSupport Manager is set to have no transport for the Bridge selected.
Choose to use either the NetBIOS, IPX, TCP/IP protocols for NetSupport Bridge.
Load Bridge on Startup
Setting this option will cause the NetSupport Bridge to initialise when the Client loads. If you
do not set it then the User at the Client must load it before dial-in access will be available.
Security and Dialback
Password File
You can set up the Bridge to support both passwords and dialback with the additional
functionality of dial-ing back different telephone numbers according to the password.
Inactivity Timeout
Specify, in minutes, a maximum time span of inactivity at the Client before the Control
disconnects.
Modem
You must select a modem, from the list of modems installed in the Control Panel of the
workstation, for the Bridge to use. As a generalisation select the Hayes Modem and set the
Baud rate one level higher than your maximum anticipated modem speed.
95
Page 97

NetSupport Manager
96
Page 98

NetSupport Manager
Basic/Advanced Client Configuration – Audio Tab
This property sheet provides configuration options for using Audio Support at a Client and
Control workstation.
Volume Settings
Threshold – microphone sensitivity
Microphone – volume of microphone
Speaker – volume of speakers
Wave – volume of Operating Systems Sound Effects
Test
Check this box to test all of the above settings.
Advanced Client Configuration
The NetSupport Manager Client is exceptionally configurable and supports the ability to set
differing levels of security and response according to the identity of the Control User that is
connecting. This is achieved by the use of configuration files at the Client, which determine the
appropriate level of access for each Control User by means of a Profile.
It is important that the concepts behind Configuration Files and Profiles be fully understood.
Configuration File
A Configuration File is a Text File, consisting of sections called Profiles.
97
Page 99

NetSupport Manager
You can specify the Configuration File that the Client will use when it initialises. The
Configuration files themselves are stored in a check-summed file, normally Client32.Ini.
This file can be either on the Client workstation or on another workstation such as an NT
Server to which the Client workstation has access. You can even set the Client to use a
fallback configuration file in case the Server is unavailable.
Note: There are special requirements for setting Windows 9x workstations to use shared
configuration files.
Profile
A profile is a set of parameters that determine how the Client will respond to a particular
Control User and what functionality they will allow that Control User to have.
For example, one Control User may be allowed to View the Client in Watch only mode whilst
another may be allowed full functionality including File Transfer. You can even set up the
profile to pre-determine exactly what file access a Control User will have.
A profile set at the Client overrides a profile set at the Control. Security is therefore always
ensured.
When connecting to a profiled Client, the Control User will be prompted for a UserID and a
Password. The NetSupport Client will then interrogate the first matching Profile in its current
configuration file to determine what level of functionality has been assigned to that Control
User.
Master Profile
Each configuration file must contain a Master Profile. This is the standard profile and is the
one used if you only set a Basic Configuration. Whatever is set here will, by default, apply to
all other Profiles you create.
However, you can then amend those profiles to enable or disable particular features for
Control Users whose USERID and password match those set in the Profile.
As the Master Profile is the first one that the Client checks you should always set maximum
security features here to avoid leaving a security back door open.
The Master Profile is also used for setting a number of Global Parameters that apply across all
individual Profiles.
Individual Profile
An individual profile allows you to enable or disable individual features for a particular Control
User or Group of Control Users. When they connect, the Client will prompt them for a User
Name and Password. It will then search its internal profiles until it finds a match and then
apply the settings to the subsequent Control session.
98
Page 100

NetSupport Manager
Advanced Client Configuration – Security
This property sheet is used to fine tune the security at a Client, applied to Control Users.
Options
Disable this Profile when an NT User is logged on
If someone is logged in at the NT Client then this Profile will be deactivated and therefore not
available to a Control User. The value of this is that it prevents a Control User inheriting rights
on a workstation they would not otherwise have.
99
 Loading...