

Page 1

Introduction
C
Symbols
Thank you for purchasing the V604SH.
^
For proper handset use, read this manual beforehand.
^
For instructions on how to use Vodafone live!, see
Vodafone live! manual.
^
Keep this manual in a convenient place for reference.
^
Accessible Vodafone services may vary by service
area, subscription, etc.
V604SH transmits at 1.5 GHz and is compatible with
the Vodafone K.K. network. This product is exclusively
for use in Japan.
Note
^
Copying this manual in whole or part without
authorization is prohibited.
^
Manual content is subject to change without prior notice.
^
Efforts have been made to ensure the accuracy and
clarity of this manual. Please contact Customer
Service, General Information (see P.18-21)
concerning unclear or missing information.
Multi Selector
Use Multi Selector to select menu items, move cursor, scroll, etc.
In this manual, Multi Selector operations are
indicated as shown to the right.
^
Basic Multi Selector Operations
B E: Press C or D
B F: Press B or A
B G: Press C, D, B or A
Side Keys
Use Side Keys when Display is in Viewer
position (see P.1-12). In this manual, Side
Keys are indicated as shown to the right.
"S" is not inscribed on the actual Shutter Key.
B
b
A
D
Shutter Key h
Multi Key s
,
C Key r
Zoom/Select Key
m
^ In this manual, most operations are described with handset open (clamshell open:
see P.1-11) in Standby.
^ Sample screen shots, etc. are provided for reference only. Actual handset windows,
menus, etc. may differ in appearance.
n
i
Page 2
Page References
When I appears next to a page reference, indicated pages are in Vodafone live!
Manual. Page reference alone indicates pages in Basic Operations Manual.
Abbreviated Steps
Handset operations starting from Index Menu are abbreviated as follows:
Press b
Index Menu H Menu Item A Handy (e) A Selection A Operation A Menu (●●●●)
Select the menu item and press b
Press e to open Handy Features menu
Perform the operation such as opening a window
Select the folder or file and press b
Press the corresponding key in parentheses
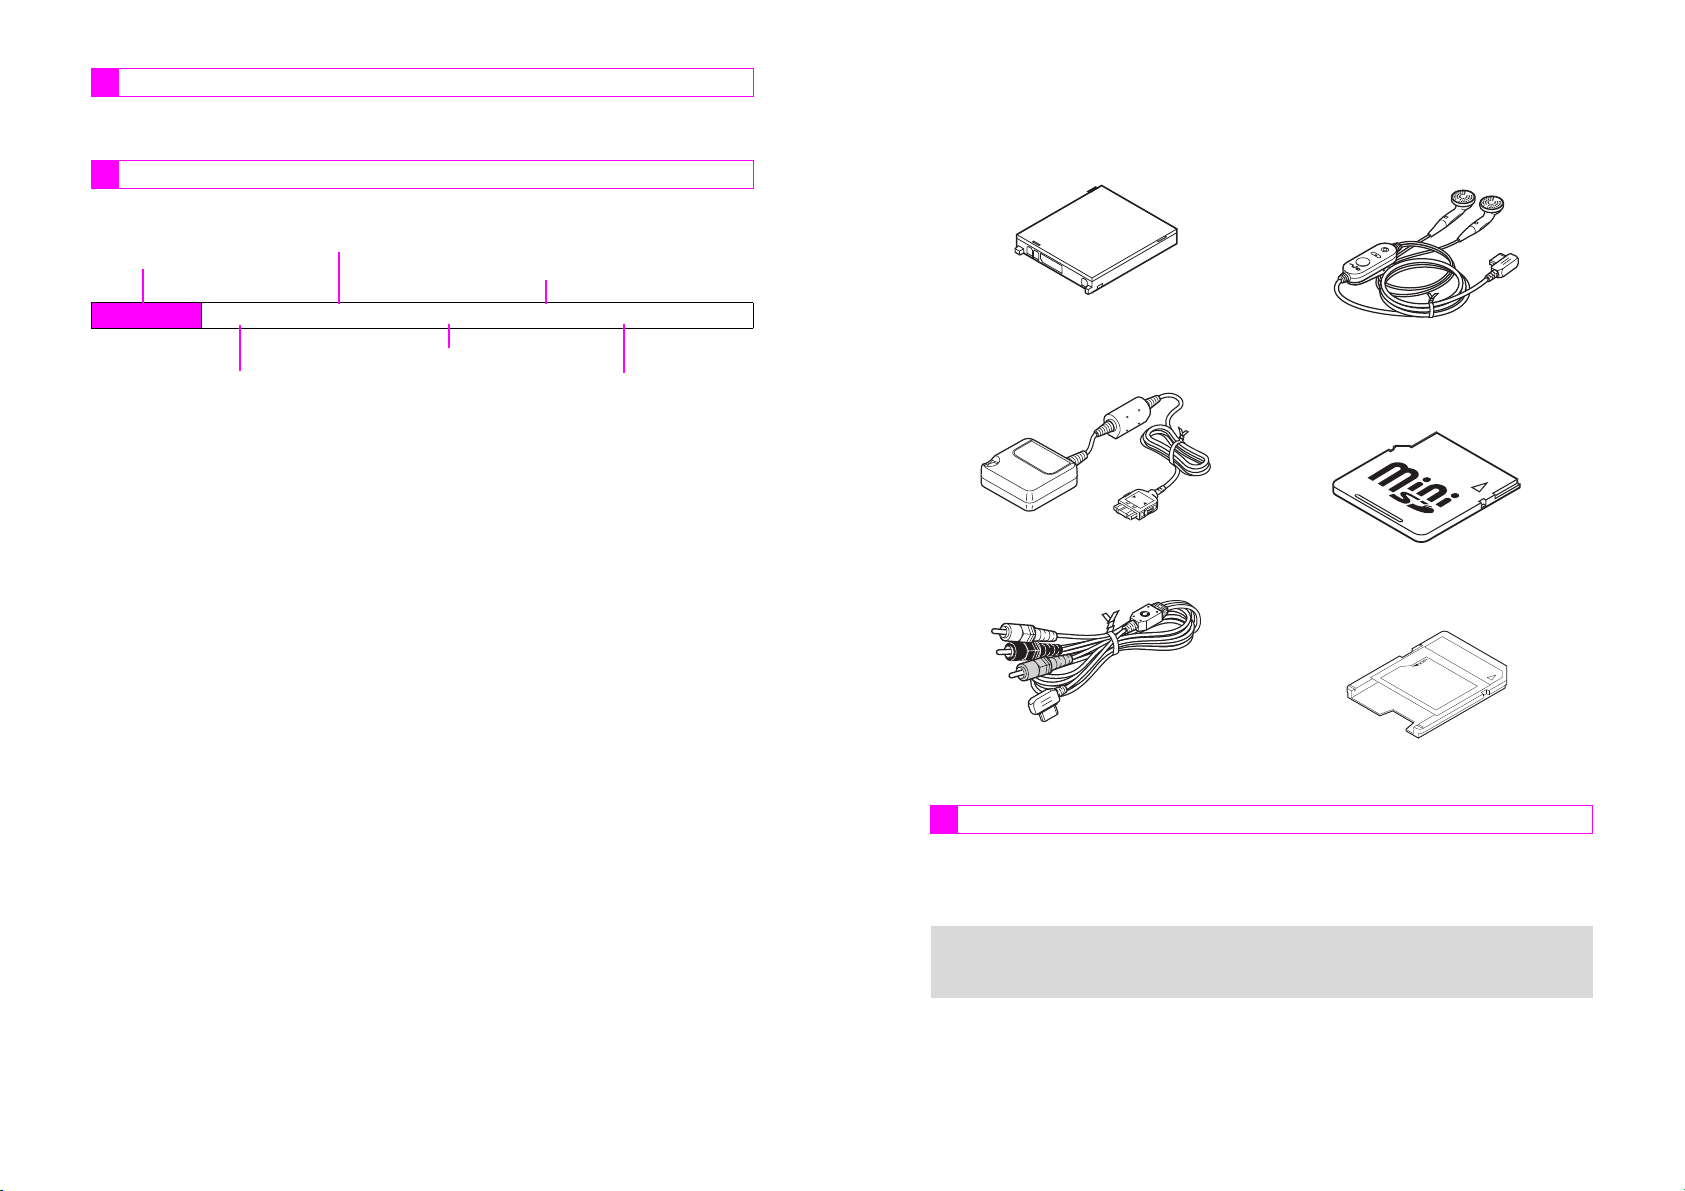
Accessories
C
Battery (SHBAF1)
(Type 1 lithium-ion battery)
C
Rapid Charger (SHCV01)
*
C
Headphones (SHLV01)*
(with Built-in TV Antenna)
*
C
miniSD! Memory Card
(32 MB card preloaded with Custom
Screens)
★
C
Video Cable (SHPU01)
*May also be purchased separately.
Optional Accessories
C
Analog Conversion Cable (ZTPH02)CIn-Car Charger (SHJH01)
C
Optical Conversion Cable (ZTPH01)CDesktop Holder (SHEAF1)
*Designed exclusively for V604SH.
^ For accessory-related information, please contact Vodafone Customer Center,
+
ii
General Information (see P.18-21).
^ In this manual, miniSD! Memory Card is referred to as "Memory Card."
*
C
miniSD! Memory Card
Adapter
★★★★
Complimentary sample not available for
purchase
★
*
iii
Page 3

Contents
Symbols....................................................................................................................... i
Accessories............................................................................................................... iii
Contents .................................................................................................................... iv
Safety Precautions ................................................................................................ xvii
General Notes ....................................................................................................... xxvi
Specific Absorption Rate (SAR) ........................................................................ xxviii
Function & Feature Preview............................................1-2
Handset Parts & Functions ............................................. 1-4
C
Handset ......................................................................1-4
C
Display Indicators .......................................................1-8
C
Sub Display Indicators.............................................. 1-10
Display Positions & Key Ops ........................................ 1-11
C
Rotating Display ....................................................... 1-11
C
Side Key Assignments (Viewer) ............................... 1-13
C
Motion Control ..........................................................1-14
Texture Panel..................................................................1-15
C
Replacing Texture Panel .......................................... 1-15
Battery & Charger ..........................................................1-17
C
Getting Started .........................................................1-17
C
Installing & Removing Battery ..................................1-21
C
Rapid Charger ..........................................................1-23
C
Desktop Holder......................................................... 1-24
C
In-Car Charger .........................................................1-25
Handset Power On/Off ...................................................1-26
C
Key Guard ................................................................ 1-27
Clock Settings ................................................................1-28
Handset Menus...............................................................1-29
C
Index Menu...............................................................1-29
C
Functions Menu........................................................1-30
C
Soft Keys ..................................................................1-32
C
Using MC Cursor...................................................... 1-33
C
Quick Operations...................................................... 1-34
C
Keypad Shortcuts .....................................................1-35
C
Guide........................................................................ 1-35
Handset Codes ...............................................................1-36
C
Security Code........................................................... 1-36
C
Center Access Code ................................................1-36
1
Getting
Started
Basic
2
Handset
Operations
Initiating a Call ................................................................. 2-2
●
Viewer Position ...................................................... 2-3
C
Redial......................................................................... 2-4
C
International Call & Send With Code ......................... 2-5
●
Setup Preset .......................................................... 2-5
●
International Call & Send With Code ..................... 2-5
C
Emergency Calls........................................................ 2-5
Incoming Call ................................................................... 2-6
●
Viewer Position ...................................................... 2-6
C
Call History................................................................. 2-8
Handling Incoming Calls ................................................. 2-9
C
Placing Callers on Hold.............................................. 2-9
●
Viewer Position ...................................................... 2-9
C
Quick Recorder ........................................................ 2-10
C
Clamshell Closed ..................................................... 2-11
Delayed Ringer............................................................... 2-12
Engaged Call Operations .............................................. 2-13
C
Earpiece Volume...................................................... 2-13
C
Voice Memo ............................................................. 2-14
C
Notepad Memory ..................................................... 2-15
●
Opening Entries ................................................... 2-15
Redial & Call History ..................................................... 2-16
●
Delete .................................................................. 2-16
Information Menu........................................................... 2-17
C
Information Menu Contents...................................... 2-18
C
Information Menu Settings ....................................... 2-19
●
Reset ................................................................... 2-19
●
Incoming Light ..................................................... 2-19
●
Time Out Setting.................................................. 2-19
Call Time......................................................................... 2-20
●
Reset ................................................................... 2-20
●
Instant Display ..................................................... 2-20
Call Charge..................................................................... 2-21
●
Reset ................................................................... 2-21
●
Instant Display ..................................................... 2-21
My Number & Owner Profile ......................................... 2-22
●
Edit, Delete & Copy ............................................. 2-22
iv
v
Page 4

Manner
3
Mode
Entering
4
Characters
Minding Mobile Manners ................................................. 3-2
Manner Mode ....................................................................3-3
C
Activating & Canceling ...............................................3-3
C
Manner Mode Settings ...............................................3-4
●
Message Recorder.................................................3-4
●
Ring Tone Level .....................................................3-4
●
Vibration .................................................................3-4
●
Alarm Volume......................................................... 3-4
●
Alarm Vibration.......................................................3-4
●
LED Indicator .........................................................3-5
●
Whisper Mode ........................................................3-5
●
Sound Volume........................................................3-5
●
V-Appli Volume ......................................................3-5
●
V-Appli Vibration ....................................................3-5
Off-Line Mode ...................................................................3-6
Character Selection .........................................................4-2
C
Entry Modes ............................................................... 4-2
C
Key Assignments........................................................ 4-3
Entering Characters.........................................................4-4
C
Kanji, Hiragana & Katakana .......................................4-4
C
Entering Alphanumerics .............................................4-6
C
Symbols, Pictographs & Emoticons ........................... 4-7
C
Mail & Web Extensions ..............................................4-8
C
Copying from Phone Book ......................................... 4-9
C
Character Code ..........................................................4-9
C
Pager Code .............................................................. 4-10
Conversion Methods (Japanese Only)......................... 4-12
C
Phonetic Conversion ................................................4-12
C
One-Hiragana Conversion........................................ 4-12
C
Hiragana to Katakana/Alphanumerics Conversion...4-13
C
Quick Conversion (for Hiragana).............................. 4-13
C
Conversion Settings .................................................4-14
●
Disable Predictive/Previous Usage ......................4-14
●
Reset Learning.....................................................4-14
Dictionaries (Japanese Only)........................................4-15
C
User Dictionary......................................................... 4-15
●
New Entry.............................................................4-15
●
Edit .......................................................................4-15
C
V501SH Download Dictionary ..................................4-15
●
Acquire Dictionary ................................................ 4-15
●
Cancel ..................................................................4-16
Editing Characters ......................................................... 4-16
C
Deleting .................................................................... 4-16
C
Replacing .................................................................4-16
C
Copy/Cut & Paste.....................................................4-17
C
Deleting Text Before or After Cursor ........................4-17
Phone Book
5
Text Memo ...................................................................... 4-18
C
Entering Text............................................................ 4-18
C
Text Memo Functions .............................................. 4-20
●
Edit/Delete ........................................................... 4-20
●
To Data Folder ..................................................... 4-20
●
Change to Vnote.................................................. 4-20
Overview........................................................................... 5-2
Saving to Phone Book..................................................... 5-3
C
Phone Book Entry Items ............................................ 5-3
C
New Phone Book Entries ........................................... 5-4
C
Photo.......................................................................... 5-6
C
Saving Secret Mode Entries ...................................... 5-7
C
Saving from Redial or Call History ............................. 5-8
C
Phone Book Memory Status ...................................... 5-8
Option Settings ................................................................ 5-9
C
Overview .................................................................... 5-9
C
Setting Options ........................................................ 5-10
●
Personal Ring Tone & Incoming Notice............... 5-10
●
Mail Folder ........................................................... 5-10
●
Auto Reply ........................................................... 5-11
Using Phone Book ......................................................... 5-11
C
Dialing from Phone Book ......................................... 5-11
C
Phone Book Search ................................................. 5-12
●
Memory No. Search............................................. 5-13
●
Katakana Search ................................................. 5-13
●
Group Search ...................................................... 5-13
●
Search by Reading .............................................. 5-13
C
Speed Dial ............................................................... 5-14
C
Show Photo.............................................................. 5-14
Editing Phone Book....................................................... 5-15
C
Correction/Change................................................... 5-15
C
Deleting Entries........................................................ 5-15
Group Settings............................................................... 5-16
C
Changing Group Name ............................................ 5-16
C
Group Ring Tone ..................................................... 5-16
vi
vii
Page 5

6
Mobile
Camera
Getting Started ................................................................. 6-2
C
File Formats & Save Locations .................................. 6-2
C
Mobile Camera Basics ...............................................6-3
C
Camera Display Indicators .........................................6-4
C
Viewfinder & Key Assignments .................................. 6-5
Still Images .......................................................................6-8
C
Still Image Modes....................................................... 6-8
C
Capturing Still Images ..............................................6-10
●
Add to Phone Book ..............................................6-12
●
Save As Thumb.................................................... 6-12
●
Rotate Thumb ......................................................6-12
C
Still Image Functions ................................................6-12
C
Self Timer .................................................................6-13
C
Adding Frames .........................................................6-14
C
Burst Mode ...............................................................6-16
Video ...............................................................................6-18
C
Video Mode .............................................................. 6-18
C
Recording Video....................................................... 6-20
C
Video Recording Operations ....................................6-22
Shooting Options ...........................................................6-23
●
Toggle Preview ....................................................6-23
●
Show/Hide Indicators ...........................................6-23
●
Shutter Click......................................................... 6-23
●
Mobile Light..........................................................6-24
Image Settings................................................................6-24
●
Brightness ............................................................ 6-24
●
Image Size ........................................................... 6-25
●
Image Quality .......................................................6-25
●
Shoot by Scene....................................................6-25
●
Mic Settings..........................................................6-25
Additional Settings ........................................................6-26
●
Select Mode ......................................................... 6-26
●
Save to .................................................................6-26
●
Auto Save.............................................................6-26
●
Auto Reset ...........................................................6-27
●
Key Ops Guide.....................................................6-27
Opening Images & Playing Video ................................. 6-27
C
Opening Still Images ................................................ 6-27
C
Playing Video ...........................................................6-29
Memory Status ...............................................................6-30
7
Display
Editing Video.................................................................. 6-30
C
Clipping Video.......................................................... 6-31
C
Saving Images from Video....................................... 6-32
C
Clipping Portions between Two Points .................... 6-32
C
Cropping Video Clips ............................................... 6-33
C
Editing Telops .......................................................... 6-33
●
Text Effects.......................................................... 6-35
●
Telop Scroll.......................................................... 6-35
Sending Images & Video............................................... 6-36
C
Sha-mail Mode Images ............................................ 6-36
C
Camera Mode Images ............................................. 6-38
C
Video Clips............................................................... 6-38
Digital Print Order Format (DPOF) ............................... 6-39
C
Selecting Images & Prints........................................ 6-39
C
Print Settings............................................................ 6-40
●
Number of Copies................................................ 6-40
●
Add Date.............................................................. 6-40
●
Index Print............................................................ 6-40
●
Check Settings..................................................... 6-40
Postcard & Calendar ..................................................... 6-41
C
Postcard................................................................... 6-41
C
Calendar .................................................................. 6-42
Wallpaper.......................................................................... 7-2
Clock & Calendar ............................................................. 7-3
C
Clock Display ............................................................. 7-3
C
Calendar .................................................................... 7-4
Display Images................................................................. 7-5
Index Menu Display ......................................................... 7-6
C
Preset Patterns .......................................................... 7-6
C
Original Patterns ........................................................ 7-6
Fonts ................................................................................. 7-7
Custom Screens .............................................................. 7-8
C
Basics ........................................................................ 7-8
C
Downloading Custom Screens (Requires Japanese) 7-9
C
Purchasing Custom Screen Keys .............................. 7-9
C
Custom Screen Setup.............................................. 7-10
●
Delete .................................................................. 7-11
●
Open Link ............................................................ 7-11
Display Patterns............................................................. 7-11
Light Settings................................................................. 7-12
●
Brightness............................................................ 7-13
●
In-Car Backlight ................................................... 7-13
viii
ix
Page 6

Display
7
Sounds &
8
Related
Functions
Music Player
9
Sub Display Settings ..................................................... 7-13
●
Sub Display On/Off ..............................................7-13
●
Backlight Settings................................................. 7-13
●
Adjust Contrast..................................................... 7-14
●
Recipient Display .................................................7-14
Other Display Settings...................................................7-14
●
Language ............................................................. 7-14
●
Power On Message..............................................7-14
●
Viewer Display .....................................................7-15
●
Dialing Display .....................................................7-15
●
Standby Animation ............................................... 7-15
●
Screen Animation.................................................7-16
●
Vodafone live! Animation .....................................7-16
Call Functions .................................................................. 8-2
C
Ring Tone Level .........................................................8-2
C
Ring Tone................................................................... 8-3
C
Handset Vibration.......................................................8-4
C
Mobile/Small Light ......................................................8-5
C
Ring Time ...................................................................8-5
Sound Effects ...................................................................8-6
C
Sounds .......................................................................8-6
C
Basic Sound Settings .................................................8-7
●
Sound Volume/ Set LED to Sound......................... 8-7
Original Voice ...................................................................8-8
Original Ring Tone ...........................................................8-9
C
Basics......................................................................... 8-9
C
Creating an Original Ring Tone................................8-13
C
Editing an Original Ring Tone .................................. 8-15
C
Deleting an Original Ring Tone ................................8-17
Instrument Effects..........................................................8-17
C
Basics....................................................................... 8-17
C
Creating Instrument Effects......................................8-21
Other Sound Related Functions ...................................8-22
●
Speaker Phone/Speaker ...................................... 8-22
●
Tone Octave.........................................................8-22
Music Player Basics......................................................... 9-2
C
Basic Functions ..........................................................9-2
C
Music Key & Music Player..........................................9-3
Recording Music .............................................................. 9-4
C
Basic Functions ..........................................................9-4
C
Connecting to Audio Sources.....................................9-6
C
Recording ...................................................................9-8
10
11
Voice
Recorder
Memory
Card
C
Recording Settings..................................................... 9-9
●
Monitor Level ......................................................... 9-9
●
Synchro Recording ................................................ 9-9
●
Bit Rate ................................................................ 9-10
●
Track Break Level................................................ 9-10
Playing Music................................................................. 9-10
C
Basic Functions........................................................ 9-10
C
Playback .................................................................. 9-12
C
Playback Settings .................................................... 9-14
●
Play Setting.......................................................... 9-14
●
Sound Effect ........................................................ 9-14
●
Train (Volume Control) ........................................ 9-14
●
Incoming Settings ................................................ 9-15
Music Files ..................................................................... 9-15
C
Play List ................................................................... 9-15
C
Managing Music Files .............................................. 9-15
●
Property ............................................................... 9-15
●
Rename Play List Items ....................................... 9-16
●
Move .................................................................... 9-16
●
Erase ................................................................... 9-16
Recording Voice ............................................................ 10-2
C
Basic Functions........................................................ 10-2
C
Recording................................................................. 10-3
C
Recording Settings................................................... 10-4
●
Mic Level.............................................................. 10-4
●
Recording Mode .................................................. 10-4
●
Delete .................................................................. 10-4
Playback ......................................................................... 10-5
C
Basic Functions........................................................ 10-5
C
Playback .................................................................. 10-5
C
Playback Settings .................................................... 10-7
●
Play Setting.......................................................... 10-7
●
Train (Volume Control) ........................................ 10-7
●
Split Data ............................................................. 10-7
Voice Ring Tone............................................................. 10-8
C
Editing Voice Files ................................................... 10-8
C
Using as Ring Tone ................................................. 10-8
Before Use...................................................................... 11-2
C
Precautions .............................................................. 11-2
C
Inserting & Removing Memory Card........................ 11-3
C
Memory Card Adapter.............................................. 11-4
C
File Organization...................................................... 11-5
Using Memory Card....................................................... 11-6
C
Format Card............................................................. 11-6
C
Opening Memory Card Files .................................... 11-6
x
xi
Page 7

Memory
11
Card
Managing
12
Files (Data
Folder)
Transferring Files........................................................... 11-8
C
Copy or Move ...........................................................11-9
C
Transfer All .............................................................11-10
Additional Functions ...................................................11-12
●
Local Contents ...................................................11-12
●
Synchronize .......................................................11-12
●
Autorun............................................................... 11-12
File Organization ............................................................12-2
Data Folder ..................................................................... 12-3
C
Contents ...................................................................12-3
C
Window Description..................................................12-4
C
Icons......................................................................... 12-5
C
Opening Files ........................................................... 12-6
C
Display Settings........................................................ 12-8
Opening Files ................................................................. 12-8
C
Handset Data Folder ................................................12-8
C
Sending Files via Super Mail....................................12-9
C
Properties ...............................................................12-10
Animation File .............................................................. 12-11
C
Simple Animation ...................................................12-11
C
Converting Animation Format.................................12-13
C
Creating E-Animation .............................................12-14
C
Opening Animation Files ........................................12-19
Using Images & Animation.......................................... 12-20
C
Changing Display Size ...........................................12-20
C
Setting Image & Animation as Wallpaper...............12-20
C
Setting Image & Animation as Display Images ......12-20
C
Saving Burst Shot Images...................................... 12-21
C
Slide Show .............................................................12-21
Editing Images..............................................................12-22
C
Changing Image Size ............................................. 12-22
C
Entering Text ..........................................................12-24
C
Adding Stamps .......................................................12-24
C
Visual Effects.......................................................... 12-25
C
Face Arrange.......................................................... 12-26
C
Additional Picture Effects ....................................... 12-28
●
Frames ...............................................................12-28
●
Rotate.................................................................12-28
●
File Format & Size.............................................. 12-28
●
Moving Photo Frame..........................................12-29
Combining Images .......................................................12-29
C
Split Screen ............................................................12-30
C
Panorama Images ..................................................12-31
C
Combining Split Mail Images ..................................12-33
13
14
Infrared
Handset
Security
Melody Files ................................................................. 12-33
C
Playback Volume ................................................... 12-33
C
Using for Incoming Tone/Sound Effects ................ 12-34
Chaku-Uta..................................................................... 12-34
C
Playback ................................................................ 12-34
C
Playback Settings .................................................. 12-35
●
Play Setting........................................................ 12-35
C
Using as Ring Tone ............................................... 12-35
●
Incoming Tone ................................................... 12-35
vFiles............................................................................. 12-36
C
Basics .................................................................... 12-36
C
File Organization.................................................... 12-36
C
Creating vFiles ....................................................... 12-38
C
Importing vFiles...................................................... 12-39
SVG Files ...................................................................... 12-39
E-Books ........................................................................ 12-40
C
Reading Content .................................................... 12-40
C
Using E-Book Images ............................................ 12-43
●
Save as Wallpaper............................................. 12-43
●
Embedded Information ...................................... 12-43
C
Using a Dictionary.................................................. 12-43
●
Look Up Word.................................................... 12-43
●
Property ............................................................. 12-43
Editing Files & Folders ................................................ 12-44
C
Adding Folders....................................................... 12-44
C
Changing File/Folder Name ................................... 12-44
C
Deleting Files & Folders......................................... 12-45
C
Protecting Folders.................................................. 12-45
C
Copying/Moving Files............................................. 12-46
Getting Started............................................................... 13-2
C
Available Files.......................................................... 13-2
C
Precautions .............................................................. 13-3
IR Password ................................................................... 13-3
Transferring Files .......................................................... 13-4
C
One File Transfer ..................................................... 13-4
C
All File Transfer........................................................ 13-5
C
Folders ..................................................................... 13-6
Changing Security Code ............................................... 14-2
Handset Locks ............................................................... 14-2
C
Keypad Lock ............................................................ 14-2
C
Auto Key Lock.......................................................... 14-3
C
Phone Book Lock..................................................... 14-3
C
Restrict Dial.............................................................. 14-3
xii
xiii
Page 8

14
15
Handset
Security
Additional
Functions
Accept Call & Reject Call............................................... 14-4
C
Saving Entries .......................................................... 14-4
C
Accept Call ............................................................... 14-5
C
Reject Call ................................................................14-5
C
Rejecting Other Calls ...............................................14-5
Secret Mode.................................................................... 14-6
C
Activating Secret Mode ............................................14-6
C
Opening Secret Mode Entries ..................................14-6
Reset ............................................................................... 14-7
C
Reset Defaults.......................................................... 14-7
C
Reset All ...................................................................14-7
Handy Call Functions ....................................................15-2
C
Signal Alert ...............................................................15-2
C
Push Tones .............................................................. 15-2
Side Key Settings........................................................... 15-3
C
For Incoming Calls ...................................................15-3
C
Standby c .................................................................15-3
Message Recorder ......................................................... 15-4
C
Activating.................................................................. 15-4
C
Deactivate ................................................................ 15-5
C
Playing Messages ....................................................15-5
Voice Memos .................................................................. 15-6
Alarm ............................................................................... 15-7
C
Setting Alarm............................................................ 15-7
C
Alarm Options...........................................................15-9
C
Canceling & Reactivating Alarm .............................15-10
●
Cancel ................................................................15-10
●
Delete................................................................. 15-10
●
Settings .............................................................. 15-10
Auto Power On/Off .......................................................15-11
C
Auto Power On .......................................................15-11
C
Auto Power Off .......................................................15-12
Schedule .......................................................................15-13
C
Saving Entries ........................................................ 15-13
C
Setting Alarm..........................................................15-16
●
Alarm.................................................................. 15-16
C
Schedule & Action Item Options.............................15-18
C
Opening Entries...................................................... 15-19
C
Editing Entries ........................................................ 15-20
C
Deleting Entries ......................................................15-20
●
Delete Item.........................................................15-20
●
One Day Schedules ...........................................15-21
●
Delete All............................................................ 15-21
C
Other Schedule Settings ........................................ 15-21
●
Auto Delete ........................................................ 15-21
●
Set Color............................................................ 15-21
●
View ................................................................... 15-21
●
Even List ............................................................ 15-21
Motion Control Sensor & Settings ............................. 15-22
C
MC Sensor ............................................................. 15-22
C
Motion Control Settings.......................................... 15-22
●
M-key Settings ................................................... 15-22
●
b-Key Settings ................................................... 15-22
●
Viewer Setting.................................................... 15-23
Compass....................................................................... 15-23
Shake Counter ............................................................. 15-24
Shake Sound ................................................................ 15-25
User Shortcuts ............................................................. 15-27
C
Using Shortcuts...................................................... 15-27
C
Assigning User Shortcuts....................................... 15-29
C
Editing & Deleting Shortcuts .................................. 15-30
●
Change Name.................................................... 15-30
●
Delete ................................................................ 15-30
Stopwatch..................................................................... 15-30
Kitchen Timer............................................................... 15-31
Barcode ........................................................................ 15-32
C
Scan & Capture...................................................... 15-33
●
Scan during Text Entry ...................................... 15-35
C
Reading Saved Barcode Images ........................... 15-35
C
Opening Saved Scan Results ................................ 15-36
Create QR Codes ......................................................... 15-37
C
Creating from Create QR Code Menu ................... 15-37
●
Owner Profile ..................................................... 15-37
●
Phone Book ....................................................... 15-37
●
Mail .................................................................... 15-38
●
Text.................................................................... 15-38
●
Melodies & Images ............................................ 15-38
C
Creating from Saved Data ..................................... 15-39
Text Scanner ................................................................ 15-39
●
Scan during Text Entry ...................................... 15-41
Battery Saving.............................................................. 15-41
C
Power Saving......................................................... 15-41
C
Panel Saving.......................................................... 15-41
Calculator ..................................................................... 15-42
Spending Memo ........................................................... 15-43
●
Entry .................................................................. 15-43
●
Totals ................................................................. 15-43
●
Delete ................................................................ 15-43
●
New Item............................................................ 15-44
xiv
xv
Page 9

15
16
Additional
Functions
Optional
Services
Pen Light.......................................................................15-44
●
Illuminate............................................................ 15-44
●
Pen Light Settings ..............................................15-44
Viewing Images on Other Devices..............................15-45
C
Connecting to Other Devices ................................. 15-45
C
Activating Video Out...............................................15-46
LCD Remote/Mic...........................................................15-47
C
Initiating Calls .........................................................15-47
C
Answering Calls...................................................... 15-47
C
Ringer Out ..............................................................15-48
Fax & PC Transmissions .............................................15-48
●
Fax Transmissions ............................................. 15-48
●
PC Transmissions .............................................. 15-48
Optional Services Overview..........................................16-2
Call Forwarding ..............................................................16-3
●
Set Fwd Number ..................................................16-3
●
Start Fwd.............................................................. 16-3
●
Cancel Secretary.................................................. 16-3
●
Check Secretary................................................... 16-3
Voice Mail........................................................................16-4
●
Voice Mail.............................................................16-4
●
Cancel Secretary.................................................. 16-4
●
Check Secretary................................................... 16-4
●
Play Voice Mail..................................................... 16-5
Ring Time........................................................................16-5
●
Ring Time............................................................. 16-5
Call Waiting.....................................................................16-6
●
Call Waiting On/Off ..............................................16-6
●
Confirm Service.................................................... 16-6
●
Incoming Calls......................................................16-6
3 Way Calling.................................................................. 16-7
●
Open Another Line ............................................... 16-7
●
Switch Line...........................................................16-7
●
Break Away (while Switching Lines) .................... 16-7
●
3 Way Calling .......................................................16-7
●
Break Away (from 2 Open Lines) .........................16-8
Safety Precautions
^
Read safety precautions before using handset.
^
Observe precautions to avoid injury to self or others, or damage to property.
^
Vodafone is not liable for any damages resulting from use of this product.
Before Using Handset
C
Symbols
Make sure you thoroughly understand these symbols before reading on.
Symbols and their meanings are described below:
!
!
!
C
Symbols
DANGER
WARNING
CAUTION
Great risk of death or serious injury from improper use
Risk of death or serious injury from improper use
Risk of injury or damage to property from improper use
$(%+* #) !
Prohibited Actions Compulsory Actions Attention Required
17
xvi
Appendix
Function List...................................................................17-2
Troubleshooting............................................................. 17-6
Character Code List .......................................................17-9
Specifications............................................................... 17-13
Index..............................................................................17-15
Warranty & After-Sales Services ................................ 17-20
Customer Service......................................................... 17-21
xvii
Page 10

DANGER
!
WARNING
!
Handset, Battery & Charger
Use only the specified battery,
Charger or Holder (see P.iii).
Using non-specified equipment may
cause malfunctions, electric shock or
fire due to battery leakage,
overheating or bursting.
#$
Battery
Prevent injury from battery
leakage, breakage or fire.
Do not:
^ Heat or dispose of battery in fire
^ Disassemble, modify or break
battery
^ Damage or solder battery
^ Use a damaged or deformed battery
^ Use non-specified charger (see P.iii)
^ Force battery into handset
^
Charge or place battery near fire, heat
sources or expose it to extreme heat
^ Use battery for other equipment
$#
Do not short-circuit Charger
terminals.
Keep metal objects away from
Charger terminals. Keep handset
away from necklaces, hairpins, etc.
Battery may leak, overheat, burst or
ignite causing injury. Use a case to
carry handset.
If battery fluid contacts eyes,
do not rub them. Rinse with
clean water and consult a
doctor immediately.
Eyes may be severely damaged.
Handset, Battery & Charger
Do not insert foreign objects
into handset.
Do not place metal or flammable
objects in handset, Charger or Holder.
This may cause fire or electric shock.
Keep handset out of the reach of
children.
Keep handset out of rain or
extreme humidity.
Fire or electric shock may occur.
Keep handset away from
liquid-filled containers.
Keep handset, Charger and Holder
away from chemicals/liquids.
Fire or electric shock may result.
Avoid sources of fire.
Prevent fire or explosion. Do not use
handset in the presence of gas or fine
particles (coal, dust, metal, etc.).
Do not use Mobile Light near
people's faces.
Eyesight may be temporarily affected
leading to accidents.
Keep handset, Charger or
Holder away from microwave
ovens.
Battery or handset may leak, burst,
overheat or ignite and cause
accidents.
$
%
$
$
$
$
Do not disassemble or modify
handset.
^ Do not open housing of handset,
Charger or Holder; may cause
electric shock or injury.
Contact Vodafone Customer Center,
Customer Assistance for repairs.
^ Do not modify handset, Charger or
Holder. Fire or electric shock may
result.
If water or foreign matter is
inside handset:
Discontinue handset use to prevent
fire or electric shock. Turn handset
power off, remove battery, unplug
Charger and contact Vodafone
Customer Center, Customer
Assistance.
Do not subject handset to
shocks.
Subjecting handset, Charger or Holder
to shocks may cause malfunction or
injury.
Should the handset break, remove the
battery and contact Vodafone
Customer Center, Customer
Assistance. Discontinue handset use.
Fire or electric shock may occur.
If an abnormality occurs:
Should there be unusual sound,
smoke or odor, discontinue handset
use to avoid fire or electric shock. Turn
handset power off, remove battery and
unplug Charger and contact Vodafone
Customer Center, Customer
Assistance.
(
)
$
)
xviii
xix
Page 11

WARNING
!
WARNING
!
Handset
Preventing accidents
^ For safety, never use handset while
driving. Pull over beforehand.
Mobile phone use while driving is
prohibited by the revised Road
Traffic Law
(effective November 1, 2004).
^ Do not use headphones while driving
or riding a bicycle.
Accidents may result.
^ Moderate volume outside, especially
at road/rail crossings to avoid
accidents.
Do not swing handset by
handstrap.
May result in injury or breakage.
Charger
Use only the specified voltage.
Non-specified voltages may cause fire
or electric shock.
^ Rapid Charger
100 VAC
^ In-Car Charger
12/24 VDC
Do not use In-Car Charger
inside vehicles with a positive
earth.
Fire may result.
Use In-Car Charger only inside
vehicles with a negative earth.
$
$
$
$
Keep Memory Card and
Memory Card Adapter out of
the reach of children.
If swallowed, consult a doctor
immediately.
Turn handset power off before
boarding aircraft.
Using wireless devices aboard aircraft
may cause electronic malfunctions or
endanger aircraft operation.
Adjusting vibration and Ring
Tone settings:
Users with a heart condition/
pacemaker/defibrillator should adjust
handset settings accordingly.
During thunderstorms, turn
power off; find cover.
There is a risk of lightning strike or
electric shock.
Charger Care
^ Do not touch blades with wet hands.
Electric shock may occur.
^ Do not use multiple cords in one
outlet. May generate excess heat or
fire.
^ Do not bend, twist, pull or set objects
on cord. Exposed wire may cause
fire or electric shock.
$
#
#
#
+
$
Charger
Do not short-circuit Charger
terminals.
Keep metal away from terminals.
May cause overheating, fire or electric
shock.
Do not use Desktop Holder
inside vehicles.
Extreme temperature or vibration may
cause fire or damage handset, etc.
Preventing accidents
Secure In-Car Charger to avoid injury
or accidents.
$
$
#
If Rapid/In-Car Charger cord is
damaged:
May cause fire or electric shock;
contact Vodafone Customer Center,
Customer Assistance to replace.
During thunderstorms:
Unplug Charger to avoid damage, fire
or electric shock.
Keep Charger & Desktop Holder
out of the reach of children.
Electric shock or injury may occur.
#
)
#
Handset Use & Electronic Medical Equipment
This section is based on "Guidelines on the Use of Radio Communications Equipment
such as Cellular Telephones and Safeguards for Electronic Medical Equipment"
(Electromagnetic Compatibility Conference, April 1997) and "Report of Investigation of
the Effects of Radio Waves on Medical Equipment, etc." (Association of Radio
Industries and Businesses, March 2001).
People with implanted
pacemakers/defibrillators
should keep handset more than
22 cm away.
Implanted pacemakers or defibrillators
may malfunction due to radio waves.
Turn handset power off in
crowded places such as trains.
People with implanted
pacemakers/defibrillators may
be near.
Implanted pacemakers or defibrillators
may malfunction due to radio waves.
#
#
Observe these rules when
visiting medical facilities:
^ Do not take handset into operating
rooms or Intensive or Coronary Care
Units.
^ Keep handset off in hospitals.
^ Keep handset off in hospital lobbies.
Electronic equipment may be near.
^ Obey rules regarding mobile phone
use in medical facilities.
Consult manufacturer for radio
wave effects on electronic
medical equipment.
#
#
xx
xxi
Page 12
WARNING
!
CAUTION
!
Battery
^ If battery does not charge properly,
stop charging. Battery may overheat,
burst or ignite.
^ If there is leakage or abnormal odor,
avoid fire sources.
It may catch fire or burst.
##
CAUTION
!
Handset, Battery & Charger
Handset care
^ Place handset on stable surfaces to
avoid malfunction or injury.
^ Keep handset away from oily smoke
or steam. Fire or accidents may
result.
^ Cold air from air conditioners may
condense, resulting in leakage or
burnout.
^ Keep handset away from direct
sunlight (inside vehicles, etc.) or
heat sources.
Distortion, discoloration or fire may
occur. Battery shape may be
affected.
^ Keep handset out of extremely cold
places to avoid malfunction or
accidents.
^ Keep handset away from fire
sources to avoid malfunction or
accidents.
!!
If there is abnormal odor, excessive
heat, discoloration or distortion,
remove battery from handset.
It may leak, overheat or explode.
Usage environment
^ Excessive dust may prevent heat
release and cause burnout or fire.
^ Avoid using handset on the beach.
Sand may cause malfunction or
accidents.
^ Keep handset away from credit
cards, phone cards, etc. to avoid
data loss.
Handset
Avoid leaving handset in extreme
heat (inside vehicles, etc.).
Handset may heat up and lead to
burns.
Headphones & Video Cable
^ Do not unplug by pulling the cord.
May cause damage to the cord.
^ Keep plug clean to avoid noise and
malfunction.
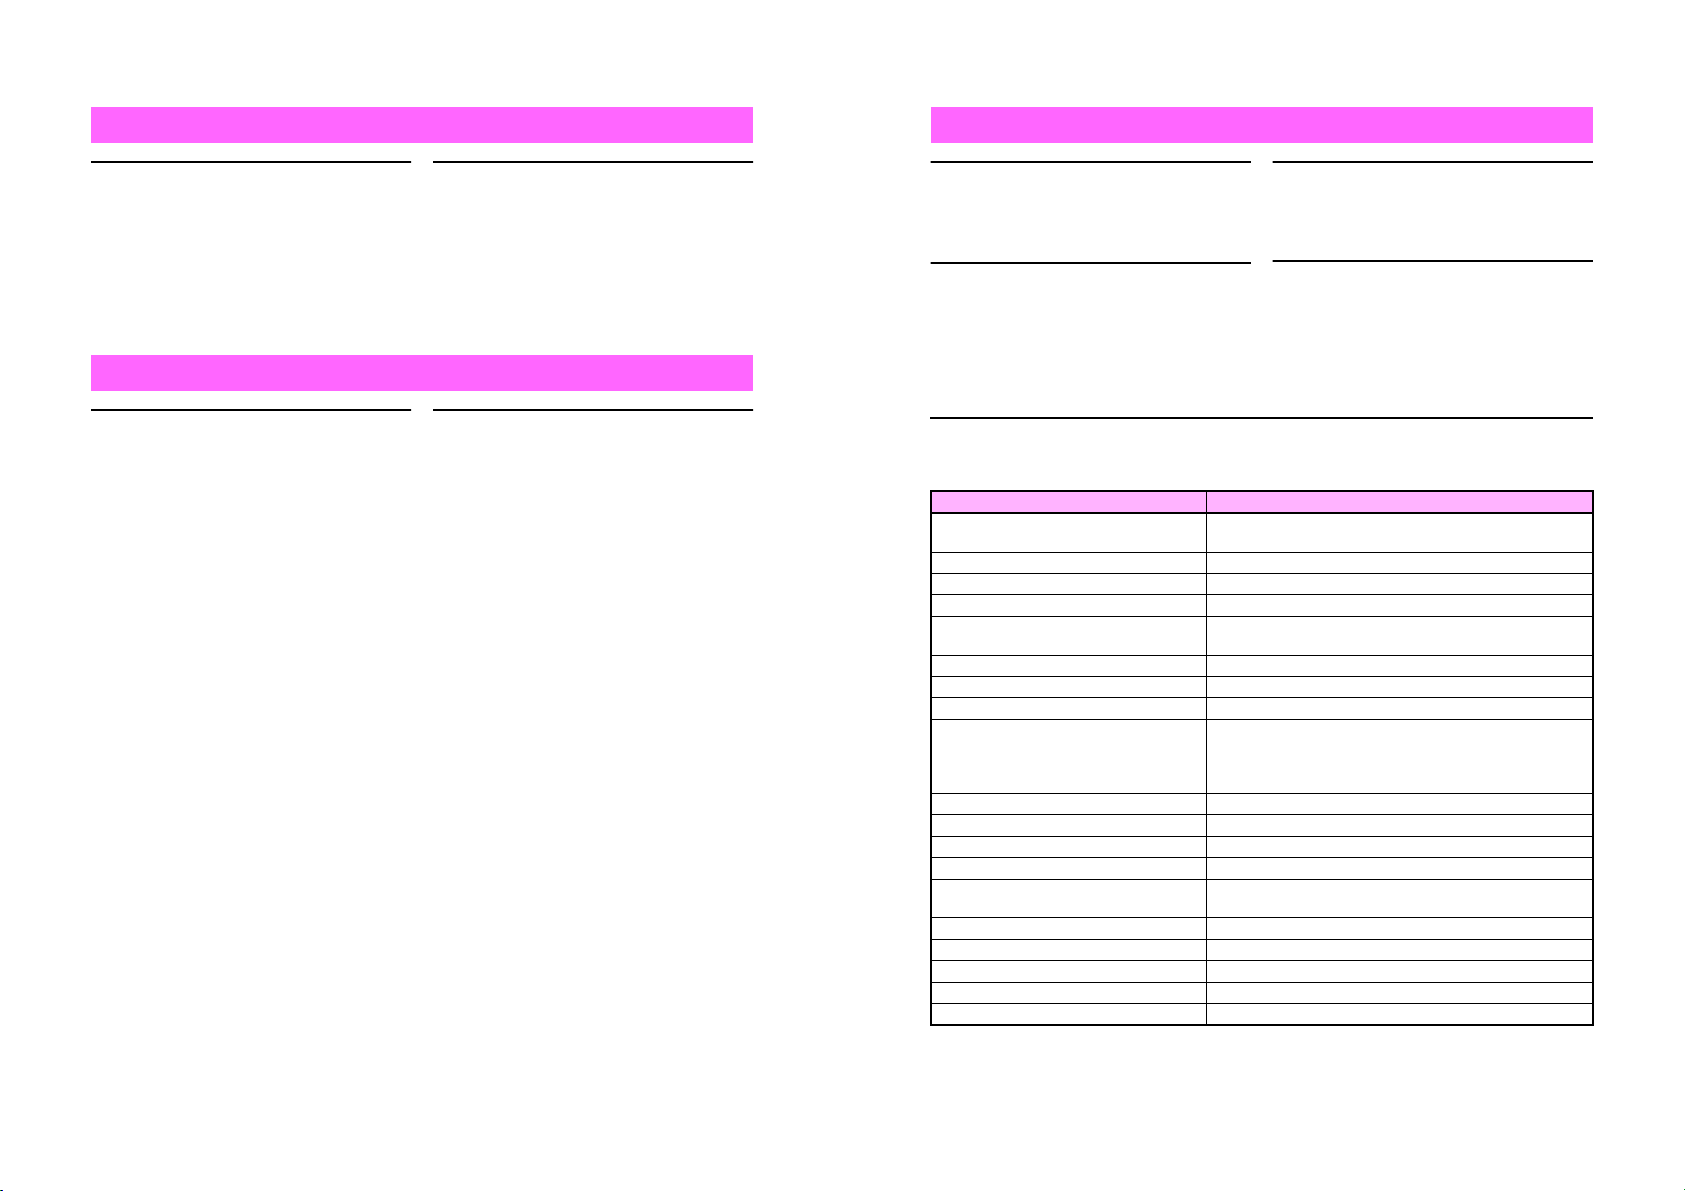
Should skin irritation occur, discontinue handset use and consult a doctor.
See below for handset materials. Some materials may cause skin irritation, rashes, or
itchiness depending on your physical condition.
Parts Materials & Finishing
Housing (Display side)
Housing (Display back side) ABS resin/Acrylic UV curing painting (sealer: acrylic painting)
Housing (Display bottom side) ABS resin/Acrylic UV curing painting (sealer: acrylic painting)
Display window, lens cover Acrylic resin
Back ornament (camera/Sub Display)
Screw cover (above Display) ABS resin/Painted
Screw cover (below Display) ABS resin/Acrylic UV curing painting
Housing (Keypad/battery side), Battery cover
Side Keys, Multi Selector, Vodafone live!
Key, Mail Key, Power On/Off Key, Start Key,
Keypad, Clear Key, Schedule/Memo Key,
Text Key
Function Key ABS resin/Chrome plating
Housing ornament ABS resin/Acrylic UV curing painting
Housing ornament (sides) ABS resin/Acrylic UV curing painting (sealer: acrylic painting)
Memory Card slot cover ABS resin/Acrylic UV curing painting (sealer: acrylic painting)
Headphone Connector cover, External
Device Connector cover
Screw cover (above Keypad, hinge) Urethane resin
Battery PC resin
Charger Terminal Nylon 6T/Brass, Au plating (sealer: nickel, copper)
Screw (Display side, Keypad side) SWCH12A/Ni plating
Face panel Acrylic resin/in-mold decorating
$
!
Magnesium alloy/Acrylic baking finish
(sealer: epoxy baking finish)
ABS resin/Acrylic UV curing painting
(sealer: aluminum deposition, acrylic painting)
ABS resin/Acrylic UV curing painting (sealer: acrylic painting)
PC resin/Acrylic UV curing painting
Elastomeric resin
Volume settings:
Keep handset volume moderate.
Excessive volume may cause damage
to your hearing.
Inside vehicles:
Handset use may cause electronic
equipment to malfunction.
!
!
#
xxii
xxiii
Page 13

CAUTION
!
CAUTION
!
Charger
Charger & In-Car Charger
^ Grasp plug (not cord) to disconnect
Charger. May cause fire/electric
shock.
^ Keep cord away from heaters.
Exposed wire may cause fire or
electric shock.
^ Stop use if plug is hot or improperly
connected.
May cause fire/electric shock.
^ Keep In-Car Charger socket clean.
May overheat and cause injury.
Do not touch Desktop Holder
while in use.
May cause burns.
Use only the specified fuse.
1 A fuse for In-Car Charger.
Or may cause breakage/fire.
Always charge handset in a
well-ventilated area.
Avoid covering/wrapping Charger/
Desktop Holder.
May cause damage/fire.
$
#
$
$
$
Do not use In-Car Charger
when engine is off.
Start engine before use. Or car battery
may be weakened.
Long periods of disuse
Be sure to unplug Rapid/In-Car
Charger after use.
Handset maintenance
When cleaning, disconnect Rapid/
In-Car Charger to prevent shock/
injury.
Installing In-Car Charger
Properly position the cable for safe
driving to avoid injury or accidents.
$
)
)
!
Battery
Do not throw or abuse battery.
Battery may overheat, burst or ignite.
Do not leave battery in direct sunlight
or inside vehicles.
Overheating/fire may occur; may
reduce performance.
Do not expose battery to liquids.
Performance may deteriorate.
If battery fluid contacts skin or clothes,
rinse with clean water immediately.
Do not dispose of exhausted batteries
with ordinary refuse. Tape over battery
terminals before disposal, or bring
them to a Vodafone shop.
Follow local regulations regarding
battery disposal.
Keep battery out of the reach of
children.
$
$
*
#
$
#
^ Charge battery within a range of
5]C - 35]C; outside this range,
battery may leak/overheat and
performance may deteriorate.
^ If your child is using handset, explain
all instructions and supervise usage.
^ If there is abnormal odor or
excessive heat, stop using battery
and call Vodafone Customer Center,
Customer Assistance.
^ Do not leave battery uncharged.
Charge at least once every 6
months.
!
xxiv
xxv
Page 14

General Notes
General Use
^
Vodafone is not liable for any damages resulting from accidental loss/alteration of
handset or Memory Card data. Please keep separate records of Phone Book entries, etc.
^
Handset transmissions may be disrupted inside buildings, tunnels or underground, or
when moving into/out of such places.
^
Use handset without disturbing others.
^
Handsets are radios as stipulated by the Radio Law. Under the Radio Law, handsets
must be submitted for inspection upon request.
^
Handset use near landlines, TVs or radios may cause interference.
Beware of eavesdropping.
^
Because this service is completely digital, the possibility of signal interception is greatly
reduced. However, some transmissions may be overheard.
Eavesdropping
Deliberate/accidental interception of communications constitutes eavesdropping.
Inside Vehicles
^
Never use handset while driving.
^
Do not park illegally to use handset.
^
Handset use may affect a vehicle's electronic equipment.
Aboard Aircraft
Never use handset aboard aircraft (keep power off).
Handset use may impair aircraft operation.
Handset Care
^
If handset is left with no battery or an exhausted one, data may be altered/lost. Vodafone
is not liable for any resulting damages.
^
Use handset between 5]C - 35]C and 35% - 85% humidity.
Avoid extreme temperatures/direct sunlight.
^
Exposing lens to direct sunlight may damage color filter and affect image color.
^
Do not drop or subject handset to shocks.
^
Clean handset with dry, soft cloth. Using alcohol, thinner, etc. may damage it.
^
Do not expose handset to rain, snow or high humidity.
^
Never disassemble or modify handset.
^
Avoid scratching handset Display.
^
When closing handset, keep straps, etc. outside to avoid damaging the Display.
^
When using headphones, moderate volume to avoid sound bleed.
Handset is not water-proof.
^
Avoid exposure to liquids and high humidity.
B Keep handset away from precipitation.
B Cold air from air conditioning, etc. may condense causing corrosion.
B Avoid dropping handset in damp places (restrooms, bath/shower rooms, etc.).
B On the beach, keep handset away from water and direct sunlight.
B Perspiration may seep inside handset causing malfunction.
Heavy objects or excessive pressure should be avoided.
^
May cause malfunction or injury.
B Do not sit down with handset in a back pocket.
B Do not place heavy objects on handset in a bag.
^
Connect only specified products to Headphone Connector. Non-specified devices may
malfunction or cause damage.
^
Always turn off handset before removing battery.
If battery is removed while saving data or sending mail, data may be lost, changed, or
destroyed.
^
Handset incorporates a magnetic sensor to detect its position. Handset may not operate
properly near other magnetic objects.
Copyrights
Copyright laws protect sounds, images, computer programs, databases, other
materials and copyright holders. Duplicated material is limited to private use only. Use
of materials beyond this limit or without permission of copyright holders may constitute
copyright infringement, and be subject to criminal punishment. Comply with copyright
laws when using images captured with handset camera.
xxvi
xxvii
Page 15

Specific Absorption Rate (SAR)
V501SH meets the government's requirements for exposure to radio waves.
^
These requirements are based on scientific basis to assure that radio waves emitted from
mobile phones and other handheld wireless devices do not affect human health. They
require that the Specific Absorption Rate (SAR), which is the unit of measurement for the
amount of radiofrequency absorbed by the body, shall not exceed 2 W/kg
includes a substantial safety margin designed to assure the safety of all persons,
regardless of age or health, and meets the international standard set by International
Commission on Non-Ionizing Radiation Protection (ICNIRP) in cooperation with World
Health Organization (WHO).
^
The highest SAR value for V501SH is 0.27 W/kg. Tests for SAR are conducted with
handset transmitting at its highest certified power level, and follow the testing methods set
by the government. While there may be differences between the SAR levels for various
handsets, they all meet the governmental requirements for safe exposure. The actual
SAR level of the handset while operating can be well below the highest value. This is
because the handset is designed to operate at multiple power levels so as to use only the
power required to reach the Network.
^
Additional information on SAR can be obtained on the following Websites:
B Ministry of Public Management
http://www.tele.soumu.go.jp/j/ele/index.htm
B Association of Radio Industries and Businesses (ARIB)
http://www.arib-emf.org/index02.html
*Requirements are stipulated in Radio Law (Ordinance Regulating Radio Equipment, Article 14-2).
*
. This limit
xxviii
Page 16

Getting Started
1-1
Page 17
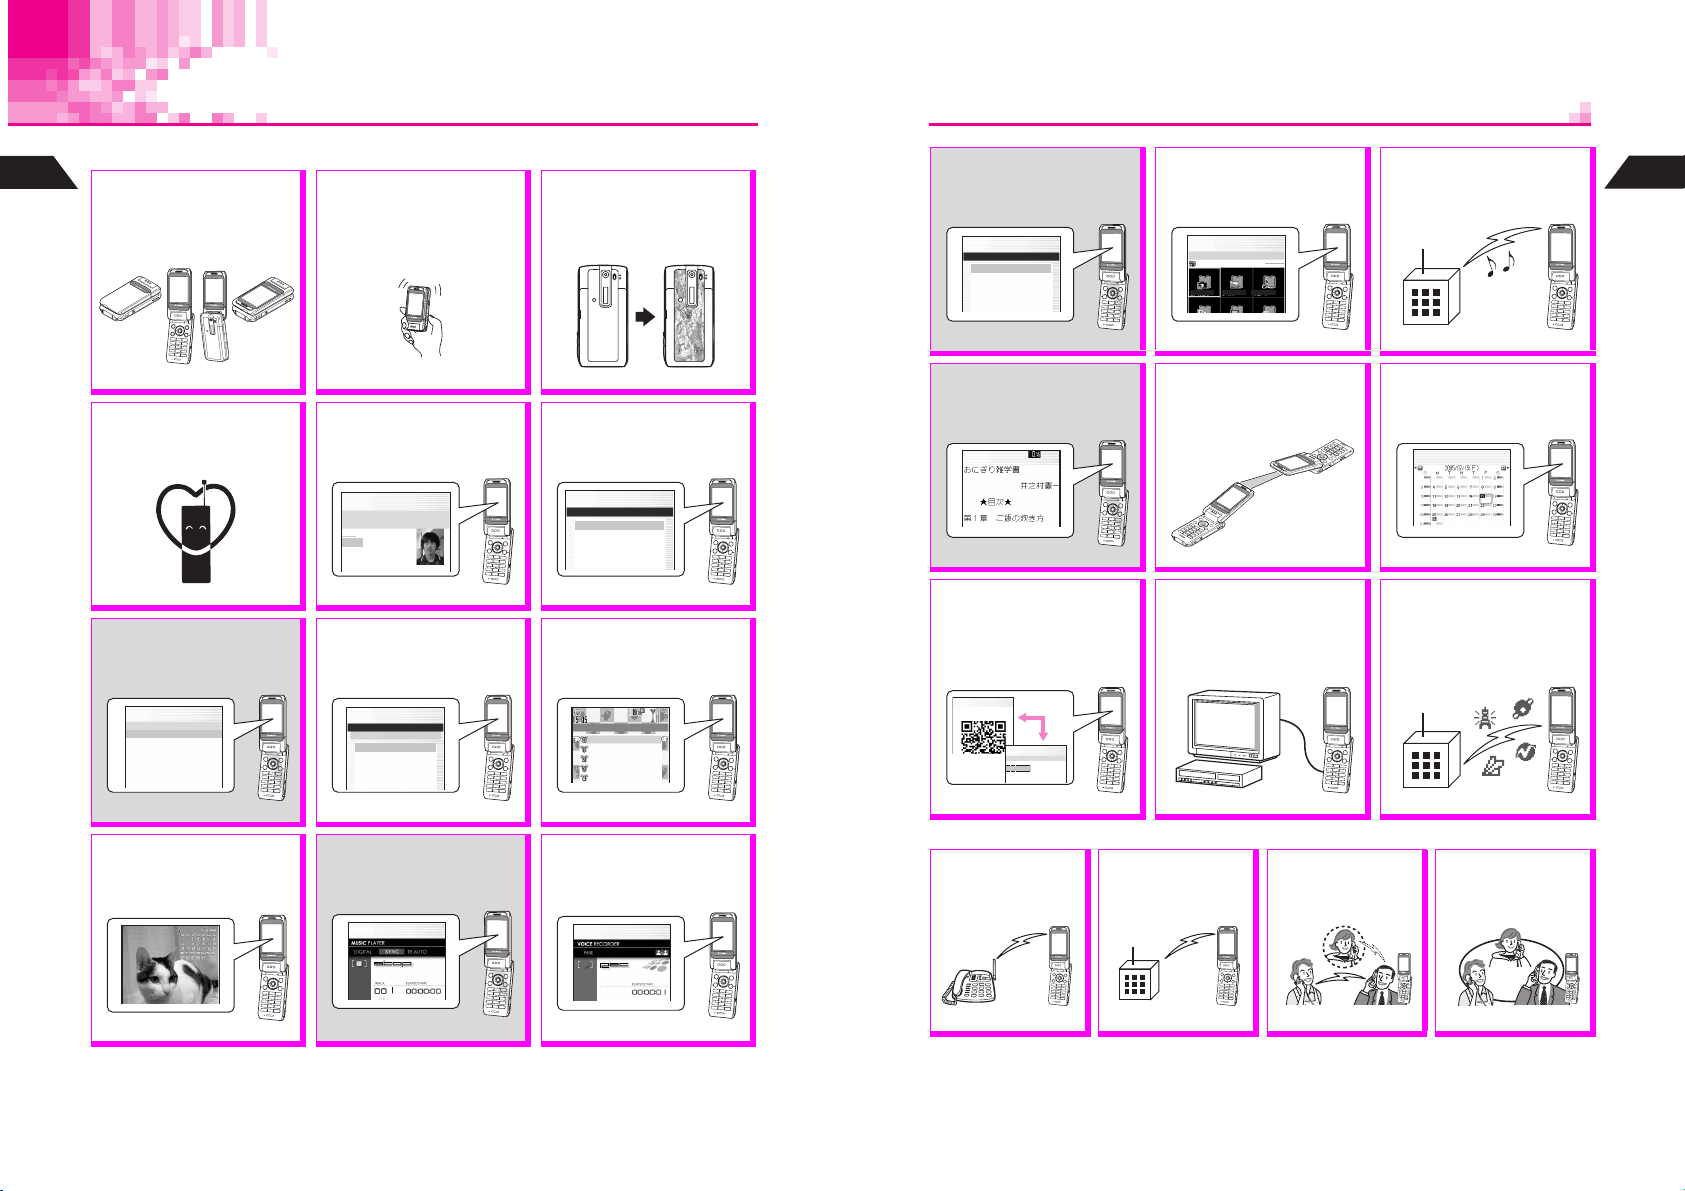
Function & Feature Preview
Memory Card is required for items with gray background.
1
Getting Started
Rotating Display
Change Display position for
Camera use
Portrait, Viewer
P.1-11
Manner Mode
Press a single key to mute
ringer and activate Message
Recorder automatically.
P.3-3
DPOF Printing
Specify images/print-count to
print Camera images on DPOFcompatible devices.
J d E
P
SpecifyDPOFPrints
DCIM
k100IMAGE
P.6-39
Postcard Maker
Add text or calendar mask to
still images to create original
Postcards or Calendars.
Standard, Self
—
& more.
—
N
c
Motion Control
MC Sensor detects handset
movement for MC Shortcut,
Shake Sound, Compass, etc.
P.1-14
Phone Book
Save up to 500 entries (with
up to three phone numbers
and mail addresses each).
JE
P
UedaMikio
0051Friends
eeii
m
P.5-3
Display Settings
Change Wallpaper, Display
Images, Fonts, et cetera to
customize handset UI.
JE
P
F4*:DisplaySettings
Off
K1WallpaperI
2DisplayImages
3PowerOnMessage
4FontSettings
5LetterPad
P.7-2, P.7-5, 7-11
Music Player
Download a Music Key (for a
one-time fee) to record/play
music to/from Memory Cards.
JS d
P
Memory Card
Texture Panel
Change handset look and
feel with interchangeable
panels (14 styles available).
P.1-15
Camera
Capture still and video
images with built-in
1.3-megapixel camera.
JmE
N
b
P
helfhz bhcM
Camera
K1Sha‑mailI
2Camera
3MovieSha‑mail
4MotionCamera
N
P.6-2
Custom Screen
Load uni-themed Wallpaper,
Indicators, Ring Tones, and
more, all at the same time.
N
P.7-8
F*
MyNumber
Sounds
Privacy
Settings1
Settings2
Save files to Memory Card to
expand handset memory or
back-up your handset files.
J dmE
P
MemoryCard
K1CustomScreenI
2MusicPlayer
3MemoryCardFiles
4SpecifyDPOFPrints
5TransferAll
N
P.11-2
Electronic Books
Purchase and download XMDF
E-Books via "Space Town"
to Memory Card.
J d E
P
N
P.12-40
Barcodes
Scan UPC and QR Codes or
create QR Codes from Phone
Book entries, etc. Enter URL
directly via a QR Code scan.
J A3
N
P
NormalScannning
J h
N
P
ScannedData
UedaMikio
03123XXXX3
aaa@xxx.yyy
P.15-32, P.15-37
Data Folder
Access handset image and
sound files from here; files
are organized by file type.
JG
P
bDataFolder
Camera
Camera Images Melodies
N
b
P.12-3
Infrared
Align handset IR port and
a compatible device port
for wireless file transfers.
P.13-2
Video Out
View handset camera
still or video images, or
a real-time Display image
feed on external monitor.
P.15-45
Chaku-Uta
Download Chaku-Uta# (MP4)
audio files and use them for
Ring Tones/Alarm Tones.
P.12-34
Schedule
Enter daily, weekly and
monthly events; set up
Alarms, etc. for events.
JG
P
P.15-13
Vodafone live!
Exchange mail, access the
Mobile Internet, download
V-Applications via Web, and
retrieve timely area-specific
information via Station.
Vodafone live! Manual
#
1
Getting Started
N
b
Optional Services
Voice Recorder
Record Voice Memos, etc.
using handset microphone
and save in Voice Folder.
JS z
Pb
Call Forwarding
Automatically direct
incoming calls to a
specified number.
Voice Mail
Manually redirect or
automatically direct
incoming calls to VM.
Call Waiting
Reduce missed calls!
Answer incoming call
while line is engaged.
3 Way Calling
Switch between two
lines or talk on both
simultaneously.
P.6-41
1-2
P.9-2
P.10-2
P.16-3
P.16-4
P.16-6
P.16-7
1-3
Page 18
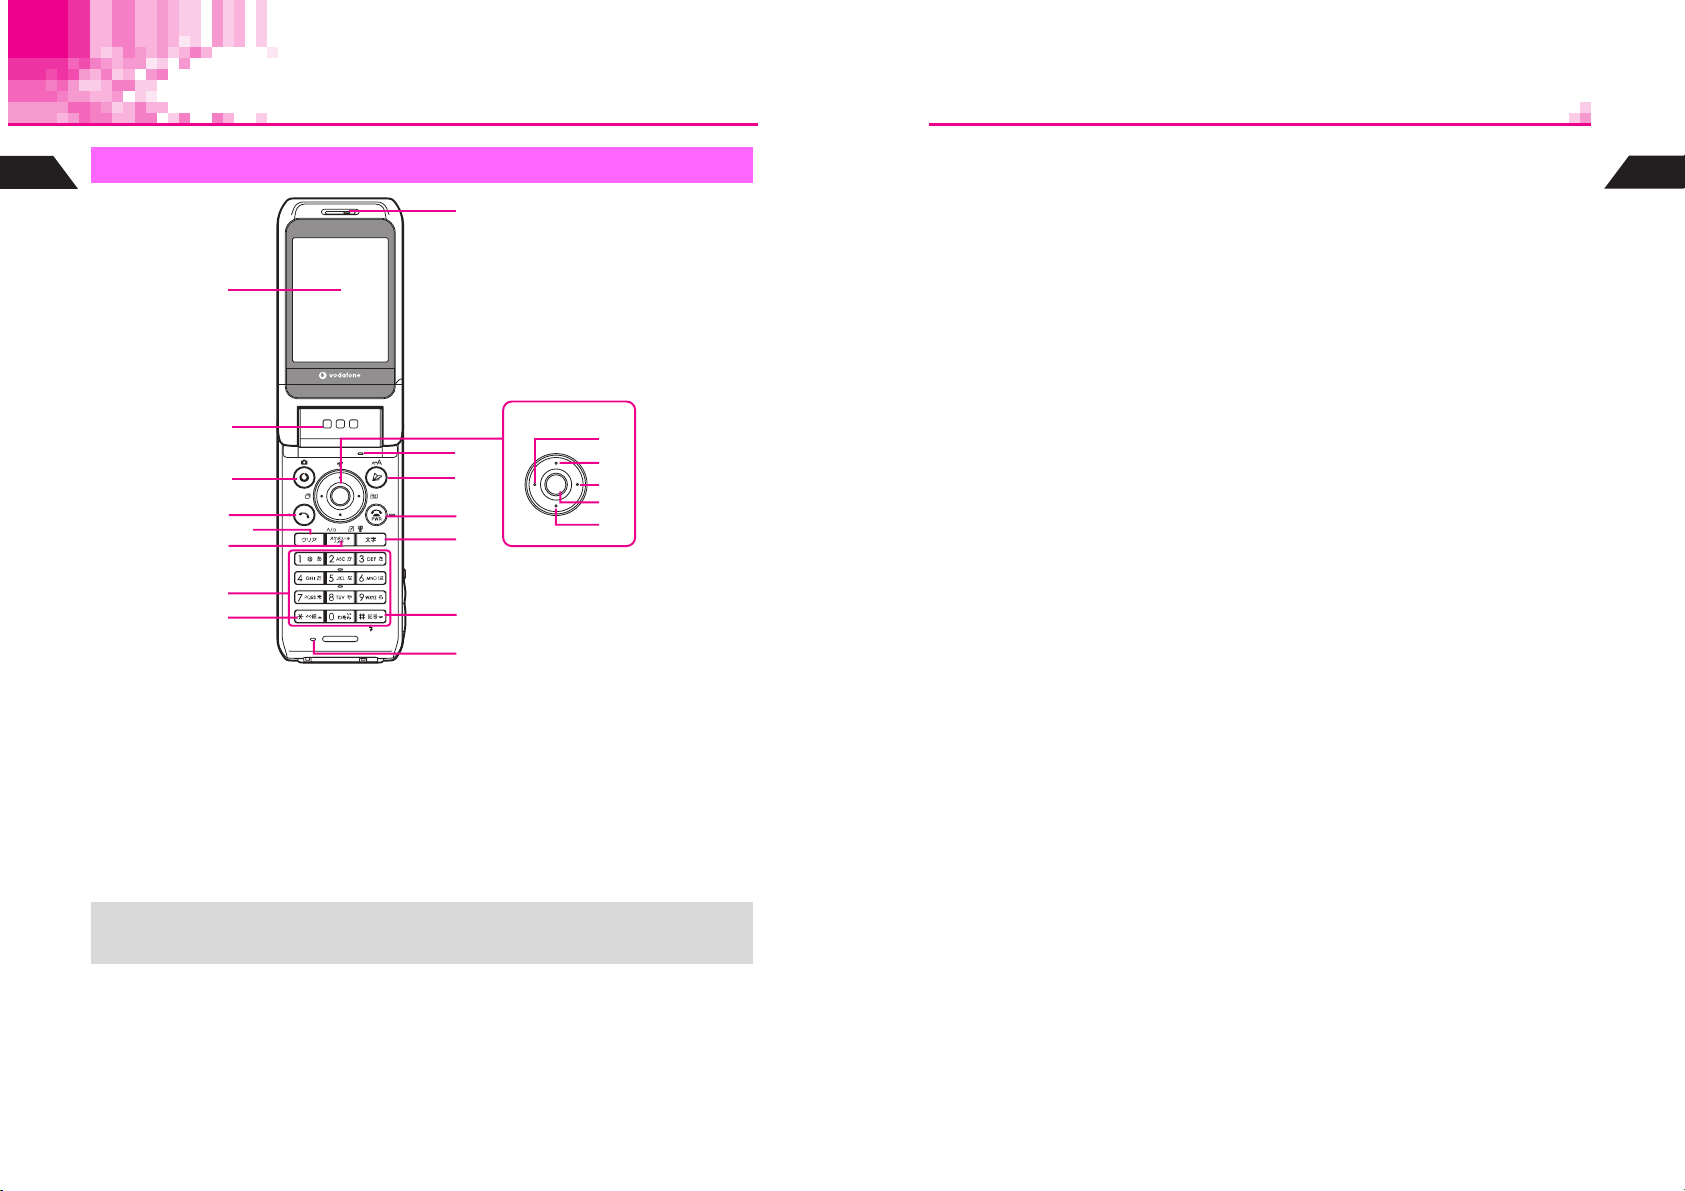
Handset Parts & Functions
1
Handset
Getting Started
1
2
3
4
1
2
3
4
5
6
7
8
Display
Speaker
Vodafone live! & Mobile Camera Key
^
Open Web menu or execute left Soft
Key functions.
^
Press for 1+ seconds to activate mobile
camera.
Start Key
Initiate or answer calls.
9
A
B
C
D
E
a
b
c
d
e
F
G
Clear Key
5
Delete entries or return to previous
window.
Schedule/Memo & A/a Key
6
Save/check Schedule or record/play
Voice Memos. In text entry windows,
toggle upper/lower case roman letters or
standard/small hiragana/katakana.
Change image display sizes.
Keypad
7
Key
8 U
While an image or message appears,
press to open previous one. In
alphanumeric entry, open web/mail
address prefixes & suffixes, and in kanji
(hiragana) entry, toggle Symbol/
Pictograph Lists.
Earpiece
9
Multi Selector
A
Select menu items, move cursor, scroll,
etc. or use for the following:
Redial & Notepad Memory Key
a
Select dialed numbers or return to the
previous window. Press for 1+
seconds to open Notepad Memory.
Shortcut Key
b
In Standby, open Shortcuts menu.
Press for 1+ seconds to open V-Appli
Library (default).
Phone Book Key
c
Open entries to make calls, send
messages or open selected menu
items. Press for 1+ seconds to save
new entries.
Function & Key Guard Key
d
Access Functions Menu. Press for 1+
seconds to toggle Key Guard.
Call History Key
e
Open received call records. Press for
1+ seconds to adjust Earpiece
Volume.
Microphone (in Viewer position)
B
Mail Key
C
Open Mail menu or execute right Soft
Key functions. Press for 1+ seconds to
enlarge font.
Power On/Off & End Key
D
End calls, place callers on hold or cancel
operations. Press for 2+ seconds to turn
handset power on/off.
Text & Manner Key (E)
E
Toggle between entry modes or create
Phone Book entries. Press for 1+
seconds to activate/cancel Manner
Mode.
# Key
F
When handset is open and mobile
camera is active, toggle Mobile Light on/
off. While an image or message
appears, press to open next one. In text
entry windows, toggle Symbol/
Pictograph Lists.
Microphone (clamshell open)
G
1
Getting Started
+
1-4
These descriptions (
camera and other specific key assignments, refer to the descriptions for each function.
P.1-4
-
) are illustrative of general handset usage. For mobile
1-7
1-5
Page 19
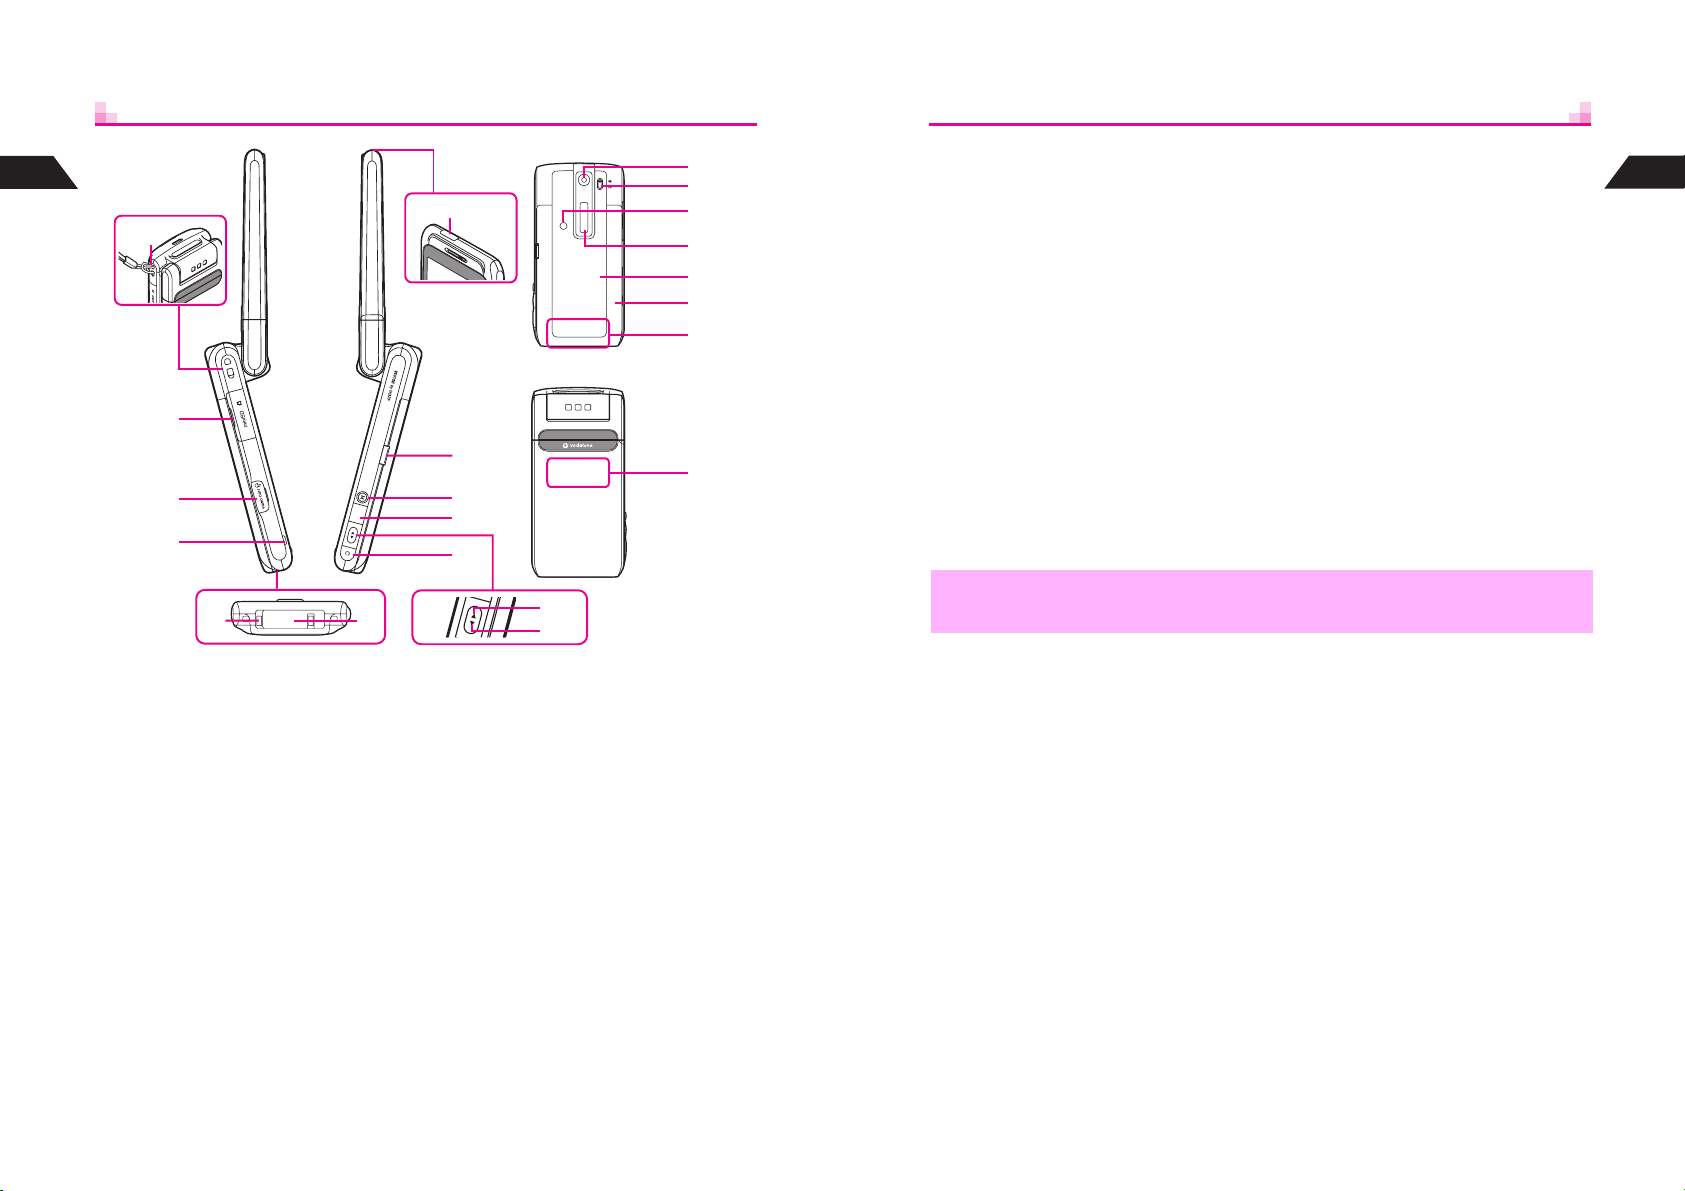
1
Getting Started
H
I
J
K
N
O
P
Q
S
T
U
V
W
X
Y
Z a
Z b
Shutter Key
Q
In Viewer position, press to open
selected menu items or execute
functions. In Standby, press for 1+
seconds to activate mobile camera.
Zoom/Select Key
R
Select menu items, move cursor, etc.
a
Move cursor up
b
Move cursor down
C Key
S
In Viewer position, press to open Mail
menu, cancel current operation/return
to previous window; when camera is
active, press for 1+ seconds to cancel.
Camera (lens cover)
T
Capture still and video images.
Portrait/Macro Selector
U
Mobile Light
V
Flashes for incoming calls/mail. Serves
as a strobe or Pen Light.
Sub Display
W
Texture Panel
X
Battery Cover
Y
Internal Antenna Locations
Z
a
In Viewer position, handset transmits
and receives signals from antenna
located here.
b
Otherwise (open or closed), handset
transmits and receives signals from
antenna located here.
1
Getting Started
Strap Eyelet
H
Attach straps as shown.
Memory Card Slot
I
Insert Memory Card here.
Video Out/Headphone/Optical Digital/
J
Line In Connector
Connect Video Cable, LCD Remote/Mic, etc.
Small Light
K
Illuminates red while charging. Set to
flash for incoming calls.
Charger Terminal
L
External Device Connector
M
Connect Charger here.
1-6
ML
R
Infrared Port
N
Use for infrared data transmissions.
Battery Cover Latch
O
Multi Key
P
Use for Motion Control. Double-press to
activate Pen Light.
a
b
,
Do not cover or place stickers, etc. over the area containing Internal Antenna.
1-7
Page 20

1
Display Indicators
Getting Started
1 J
2 i
3 j
4 G
5 K
EjFKmwdmkG
J
kDc9HBjl
helfhz bhdM
Battery Strength
Pen Light
g
J
and g flash when Pen Light is in
use.
Manner Mode Active
Information
Appears when there is an item in
Information Menu.
Off-Line Mode
w
Speaker Phone Active
Speaker Active
F
(gray) Station Menu Manual Update
H
Active V-Application
Paused V-Application
J
N
b
1
23456789AB C
EjFKmwdmkG
J
kDc
DE GF
IHJKLMNO
N
b
@ h Q
9HBjl
helfhz bhdM
PQ RST U V W
Line Active
6 m
Mail Server or Service Center
transmission is in progress
Video Out Active
w
Handset is connected to other devices
via Video Cable.
Music Player Active
7 w
Voice Recorder Active
z
Memory Card Status
8 d
User Shortcut
9 m
A shortcut can be created for the window.
SSL
X
SSL encrypted Web information.
Secret Mode Active
A k
Flashes when a Secret Mode entry is
open.
Signal Strength
B N
N
: StrongO: ModerateP: LowQ: Weak
s
: Out-of-Range
Infrared Transmission
N
, S, N, R Scroll
C G
The menu, information, etc. can be
scrolled.
Voice Mail
D k
New Voice Mail
Mail
E D
Unread mail except Super Mail
Super Mail
F k
Unread Super Mail
Handset, c Memory Card
G b
Accessing handset or Memory Card
Entry Mode
H
Current character entry mode
Original, g Enlarged
I h
Mail, Web or Data Folder image display
size
Web
J 9
Unread Web information
(red) Station
K H
Unread Station information
Delivery Report
L I
New Delivery Report
Message Recorder Active
M j
Message
N l
Message Recorder messages
MC Shortcut Active
O Q
,
+
Display is a precision device. However, some pixels may appear brighter or darker.
^ Although Vibration and Ring Tone Level for incoming calls and Vodafone live!
functions are set separately, f, g and h are Incoming Call indicators.
^ When Wallpaper (see P.7-2) is set, cancel Standby Indicators (see P.7-11) to hide
indicators.
/i Schedule
P h
Schedule alarm On
Alarm Set
Q e
Keypad Lock Active
R l
Vibration Active
S f
Silent
T h
Ringer is Silent.
Rising Tone
g
Ringer is set to Rising Tone.
Auto Reply Set
U z
V bhd
W M
Weather Indicators
Current forecast (A separate
subscription is required.)
Key Guard Active
h
/Off
i
1
Getting Started
1-8
1-9
Page 21
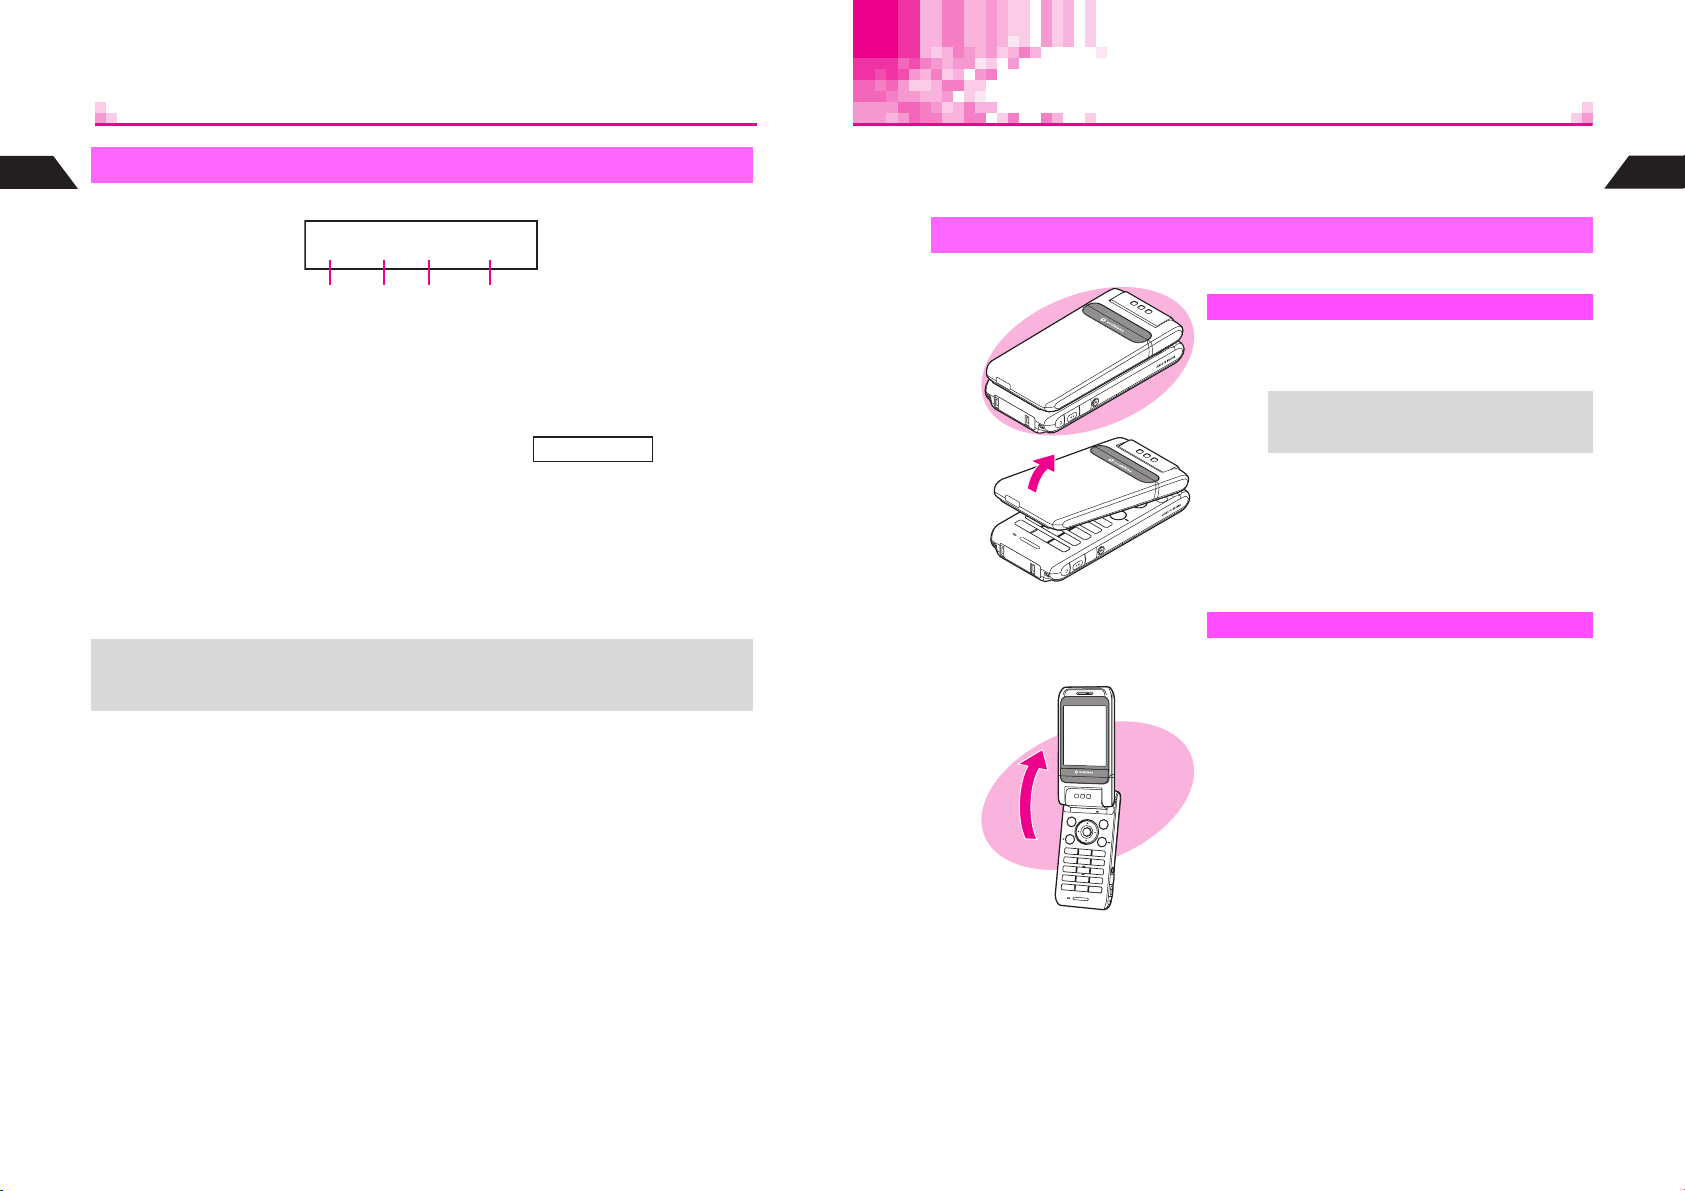
Display Positions & Key Ops
1
Sub Display Indicators
Getting Started
Sub Display & Display indicators represent the same functions (see P.1-8 - 1-9).
w Un P
1 2 3 4
Battery Strength
1 w
w
always appears in Standby. i, u,
x
, d, e or j appears with messages
for Alarm, incoming calls, information,
etc.
Pen Light
k
w
and k flash when Pen Light is in
use.
Signal Strength
2 U
When handset is closed (clamshell closed), press h for 1+ seconds or press r to
+
illuminate Sub Display Backlight. Backlight stays off if Sub Display Backlight Settings
(see P.7-13) is set to Off.
Information
3 n
Appears when there is an item in
Information Menu.
^
When n appears, press h for 1+
seconds to see specific indicators.
uideux
Off-Line Mode
Z
Auto Reply Set
n
Time/Music Player or Voice Recorder
4
Status
Current time and corresponding
indicator flash when Stopwatch,
Kitchen Timer, Music Player or Voice
Recorder is running.
V501SH features a rotating Display. Select from four positions. In this manual, most
operations are described with handset open (clamshell open). However, mobile
camera operations (see P.6-2) are mainly described with Display in Viewer position.
Rotating Display
Hold handset with both hands when changing Display position.
1
Clamshell Closed
Handset is closed with Display facing inward.
^
Keep handset in this position when not in use.
Place or answer calls with handset open
+
(clamshell open) or in Viewer position.
2
Open handset
3
Clamshell Open
Handset is open with Display facing inward.
^
Place or answer calls, or enter text.
1
Getting Started
1-10
1-11
Page 22
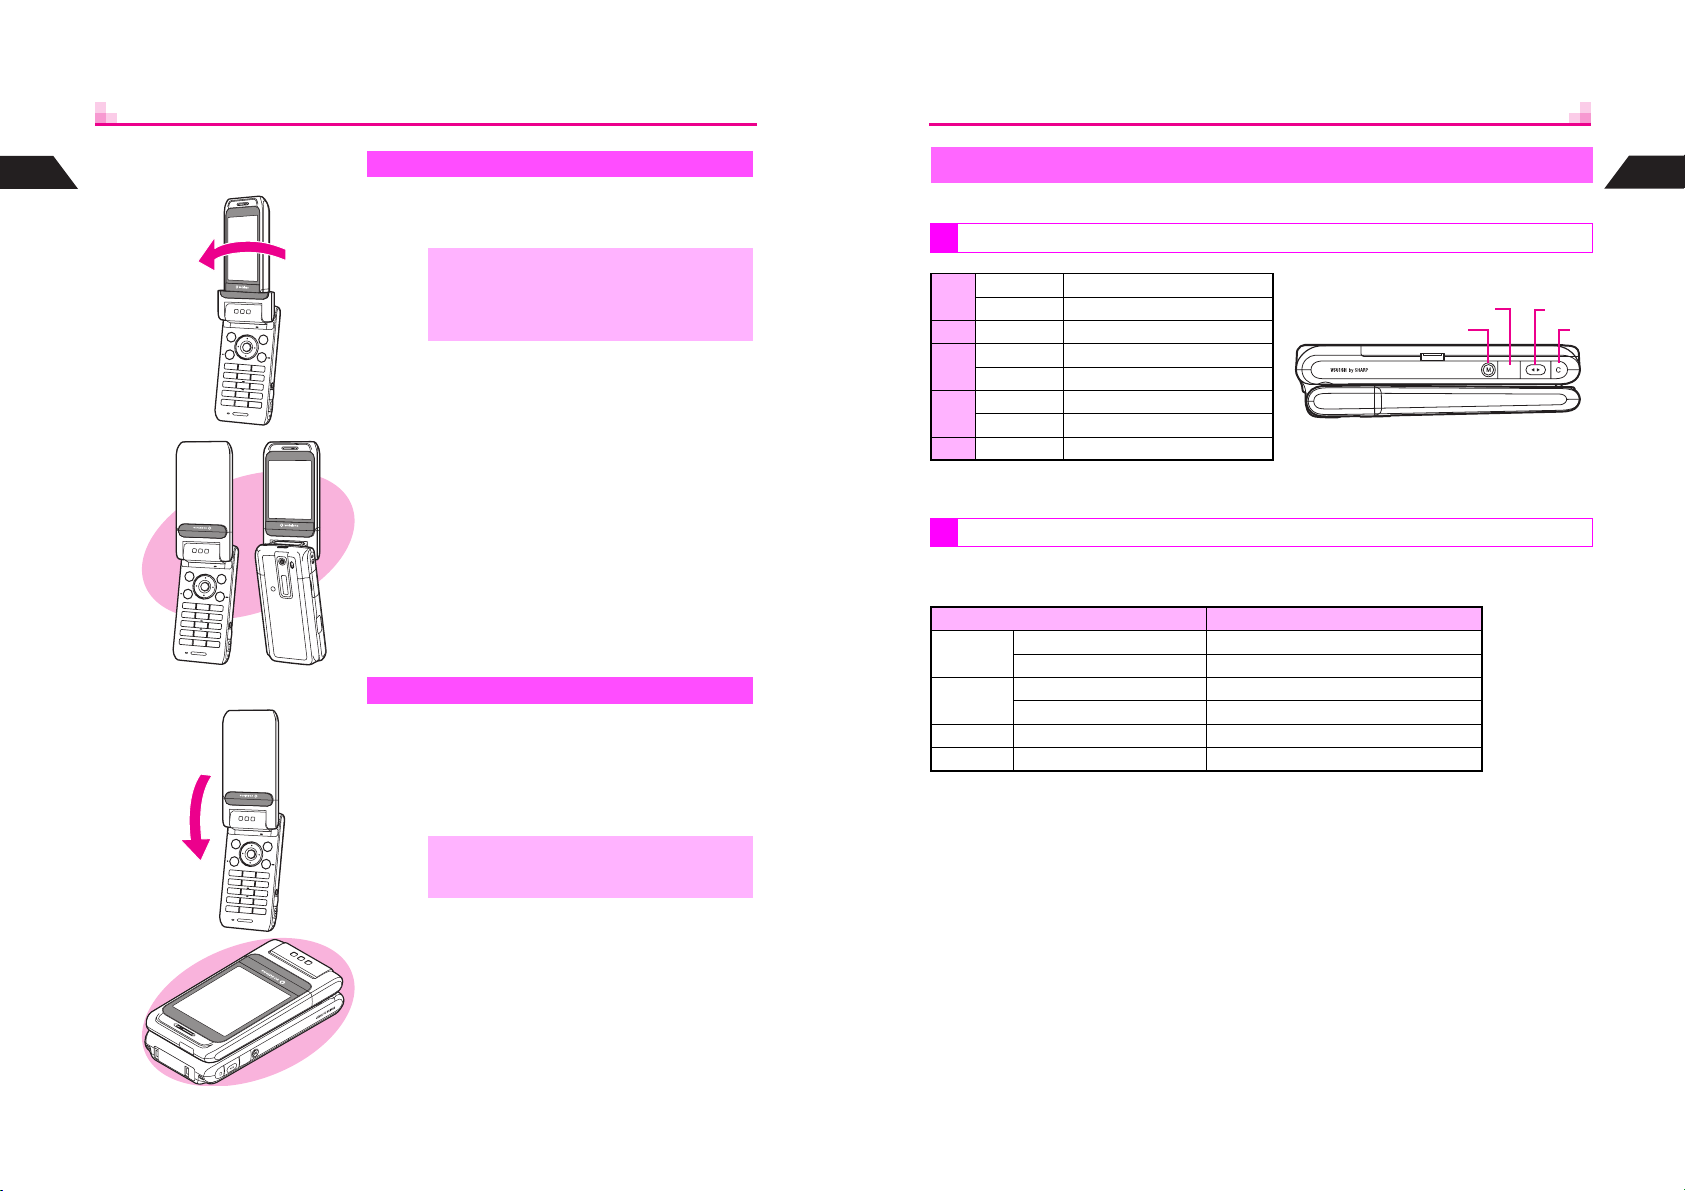
1
4
Getting Started
5
6
Rotate Display 180
degrees clockwise
Close handset
Self Portrait Position
Handset is open with Display facing outward.
^
Capture self portraits in this position.
^ Place or answer calls with handset open
,
(clamshell open) or in Viewer position.
^ Do not rotate Display counterclockwise
when changing to Self Portrait position.
Viewer Position
Handset is closed with Display facing outward.
^
Take landscape photos in this position.
^
Perform basic operations using h, c, M, L or
r
instead of keys used with handset open
(clamshell open).
Side Key Assignments (Viewer)
When handset is in Viewer position, use h, c, M, L or r to operate handset.
In Standby
Long Press Activate mobile camera
h
Press Open Index Menu
c Press Open Mail menu
Long Press Open V-Appli Library
1
M
Press List User Shortcuts
Long Press Adjust Earpiece volume
1
L
Press Open Call History
r Press List User Shortcuts
1
Key arrow directions appear reversed when handset is held Side Keys down.
2
Not available when Calendar (see P.7-4) appears in Standby.
2
2
2
2
r
During Operations
Use Side Keys to execute corresponding keypad functions indicated below (except
during calls, incoming calls, or while mobile camera or V-Application is active).
Viewer Position Clamshell Open
Long Press e
h
Press b
Long Press d
c
Press i
1
Press C or A
M
1
Press D or B
L
1
Key arrow directions appear reversed when handset is held Side Keys down.
2
Depends on Display content.
2
2
LMh
Getting Started
c
1
7
1-12
,
Do not carry handset with Display in Viewer
position. Display may be damaged.
1-13
Page 23
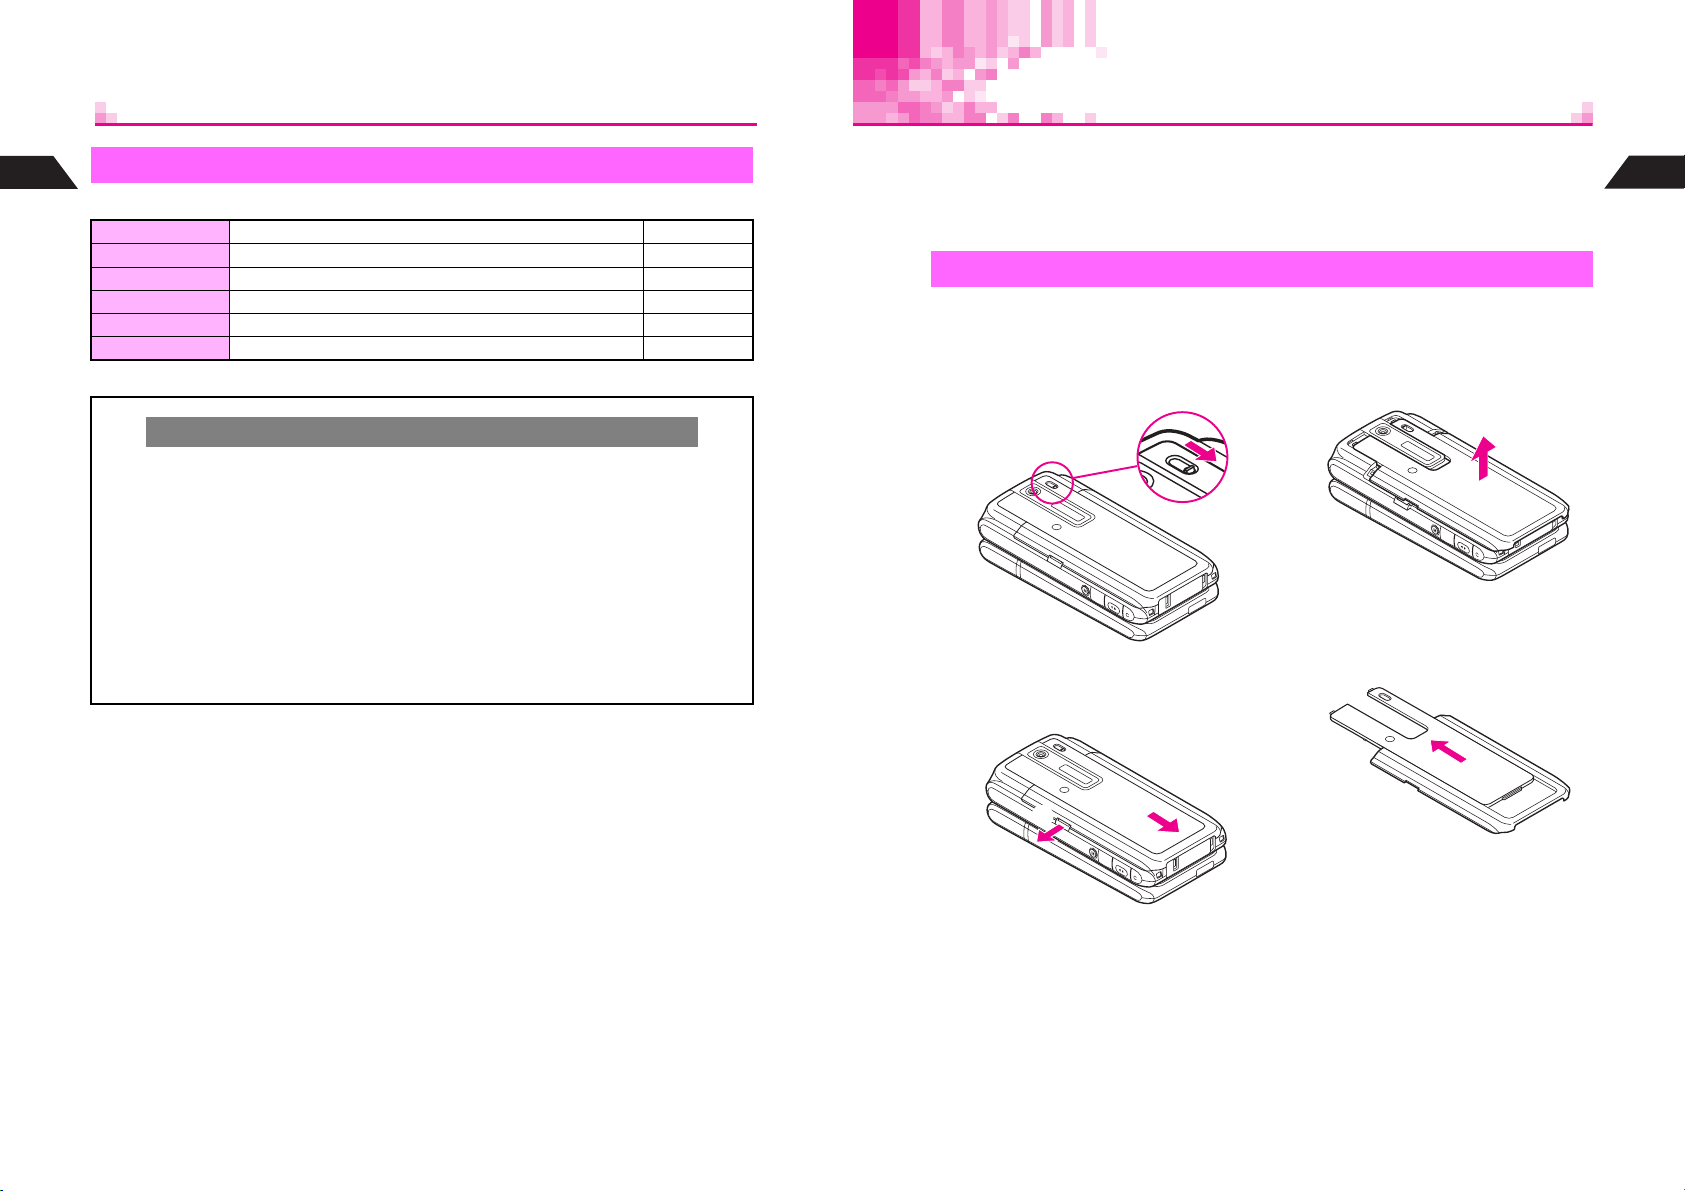
Texture Panel
1
Motion Control
Getting Started
Built-in sensor detects handset movement for the following functions.
MC Cursor Tilt handset to move cursor and proceed See P.1-33
MC Shortcut Shake handset to activate functions in User Shortcut See P.15-28
Shake Counter Count the number of times handset is shaken See P.15-24
Shake Sound Shake handset to produce sound effects See P.15-25
Compass Find magnetic north to calculate direction See P.15-23
Viewer Display In Viewer Position, change screen orientation automatically See P.7-15
In this manual, the above functions are collectively referred to as "Motion Control."
Precautions
C
Adjust MC Sensor (see P.15-22) before using Motion Control for the first time.
C
When shaking or moving handset:
^
Do not shake handset roughly. Handset may slip, resulting in injury or damage.
^
Do not drop or subject handset to shocks.
C
Motion Control may not work correctly when:
^
Aboard trains or in vehicles
^
In steel-framed buildings
^
Near magnetized objects
C
Motion Control may not work correctly after handset is placed near magnetized
objects (see below for examples). In this case, adjust MC Sensor (see P.15-22).
^
Magnets (for whiteboards, furniture, bags, etc.)
^
Audio speakers, magnetic necklaces, etc.
^
Near metal objects such as desks and shelves
^
Near or inside elevators
Change handset's tactile sensation by replacing the panel (Sub Display side).
^
Two Texture Panels are included in the package.
^
Additional Texture Panels may be purchased separately. Choose from various panels
with different sensation and texture such as metal, leather, stone, etc.
Replacing Texture Panel
Be careful not to remove battery when replacing Texture Panel with handset
power on.
Slide Portrait/Macro Selector
1
to Portrait
Pull out Battery Cover Latch
2
as shown in
e
, then slide
cover as indicated in
f
Lift and remove cover as
3
shown
Slide out Texture Panel
4
1
Getting Started
1-14
e
f
1-15
Page 24
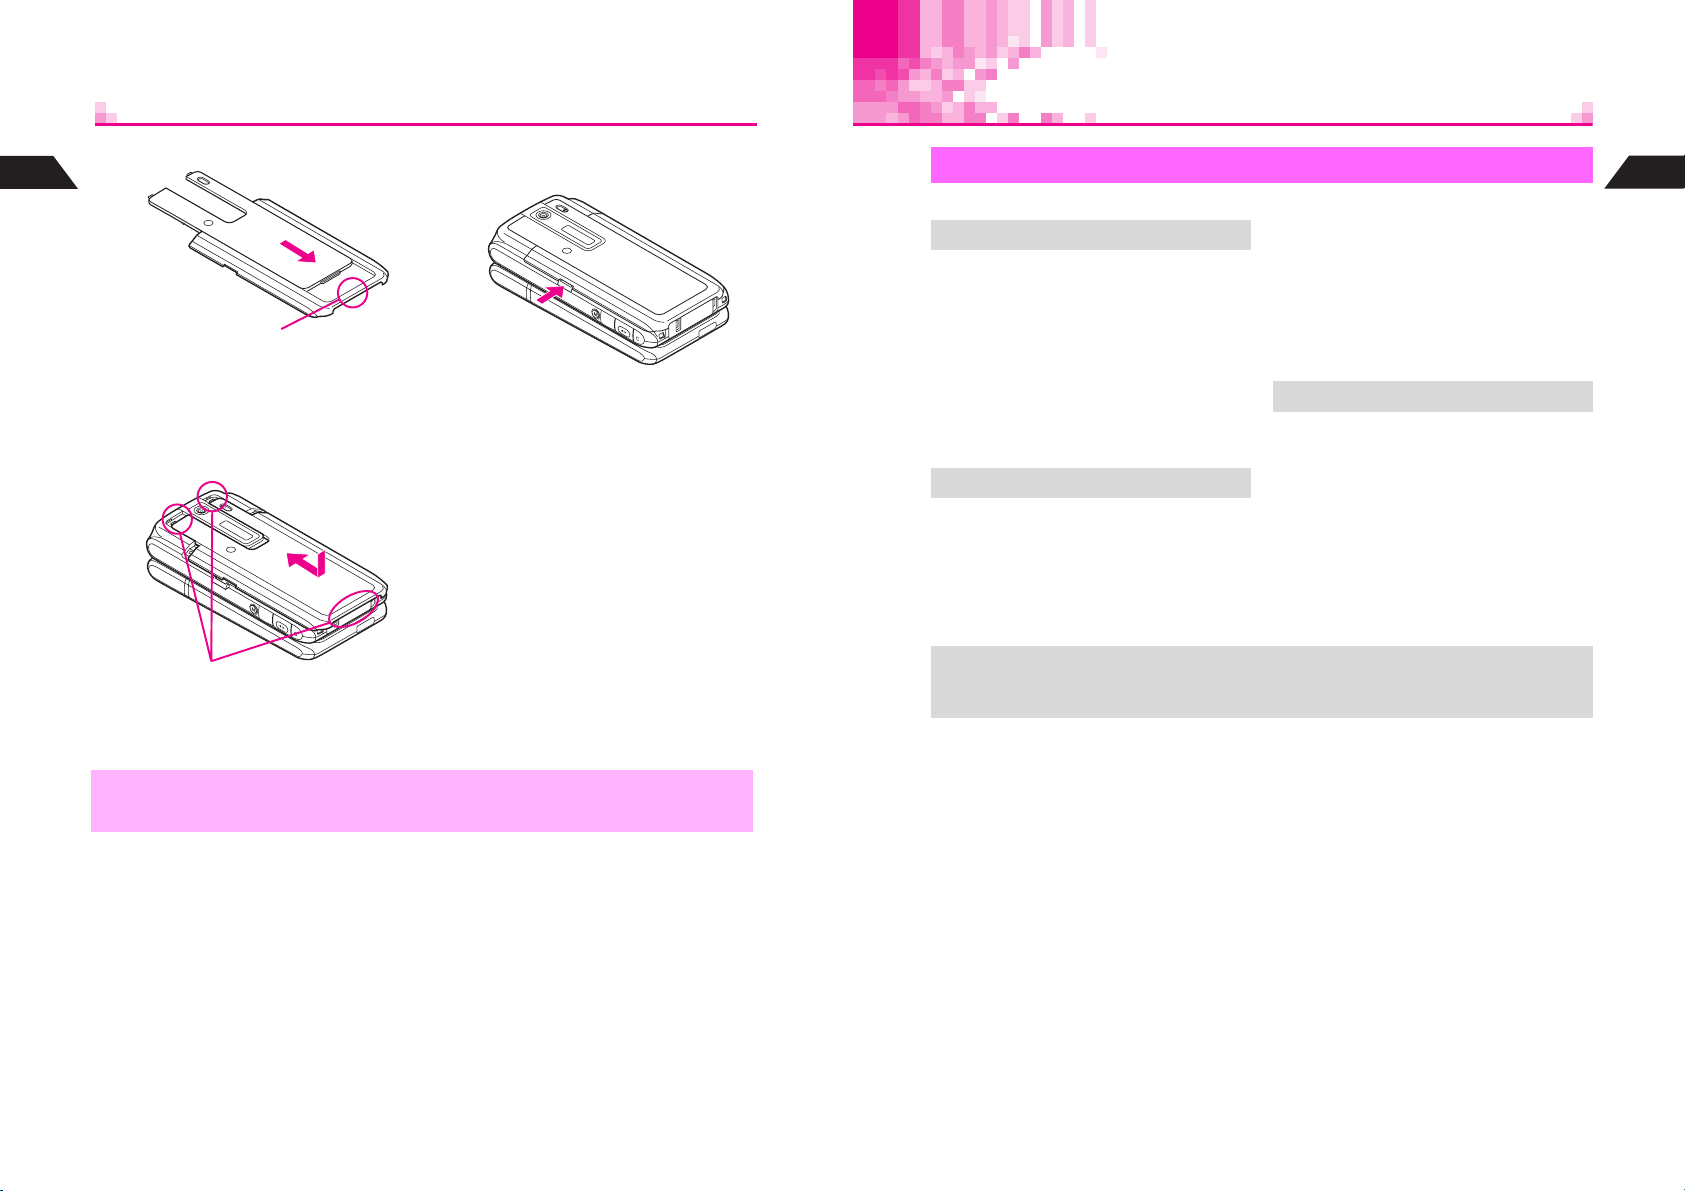
Battery & Charger
5
1
Getting Started
6
Insert another Texture Panel
^ Position and slide the panel as
shown until it stops.
With Portrait/Macro Selector
set to Portrait, close cover
^ Position and slide the cover as
shown until it stops.
^ Make sure these tabs are fitted into
slots.
Push in Battery Cover Latch
7
until it clicks
Getting Started
Charge a new battery before use or after a period of disuse.
^
Battery Life
^
Use specified Charger only. Other
chargers may damage handset, or
cause battery to deteriorate, overheat
or ignite.
^
Do not use or store battery at extreme
temperatures. May shorten battery life.
*Ideal working temperature is between
]
C - 35]C.
5
^
Replace battery if operating time is
noticeably shorter than normal.
Charging
^
Do not use Charger for other purposes.
^
Battery may short-circuit, overheat or
burst from contact with metal objects.
^
Small Light illuminates red while charging.
(It may take a while for the light to
illuminate when handset power is off.)
^ Battery must be inserted to charge handset.
+
^ Handset will charge with power on. J flashes and stays on when complete.
^ Handset will charge while open.
Charging takes approximately 115
minutes (with handset power off).
B Charging time may vary by ambient
temperature.
^
Charger and battery may become warm
during charging.
^
Move Charger away from home TVs or
radios if interference occurs.
Precautions
^
Use a dry cotton swab to clean handset,
battery and Charger terminals.
^
Avoid:
B Extreme temperatures
B Humidity, dust and vibration
B Direct sunlight
^
Do not leave battery uncharged. Charge
at least once every 6 months.
^
Use a case when carrying battery
separately.
1
Getting Started
,
1-16
^
Never use handset without Texture Panel. Damage may result from accumulated dust.
^ Texture Panel may become loose after repeated replacements.
1-17
Page 25
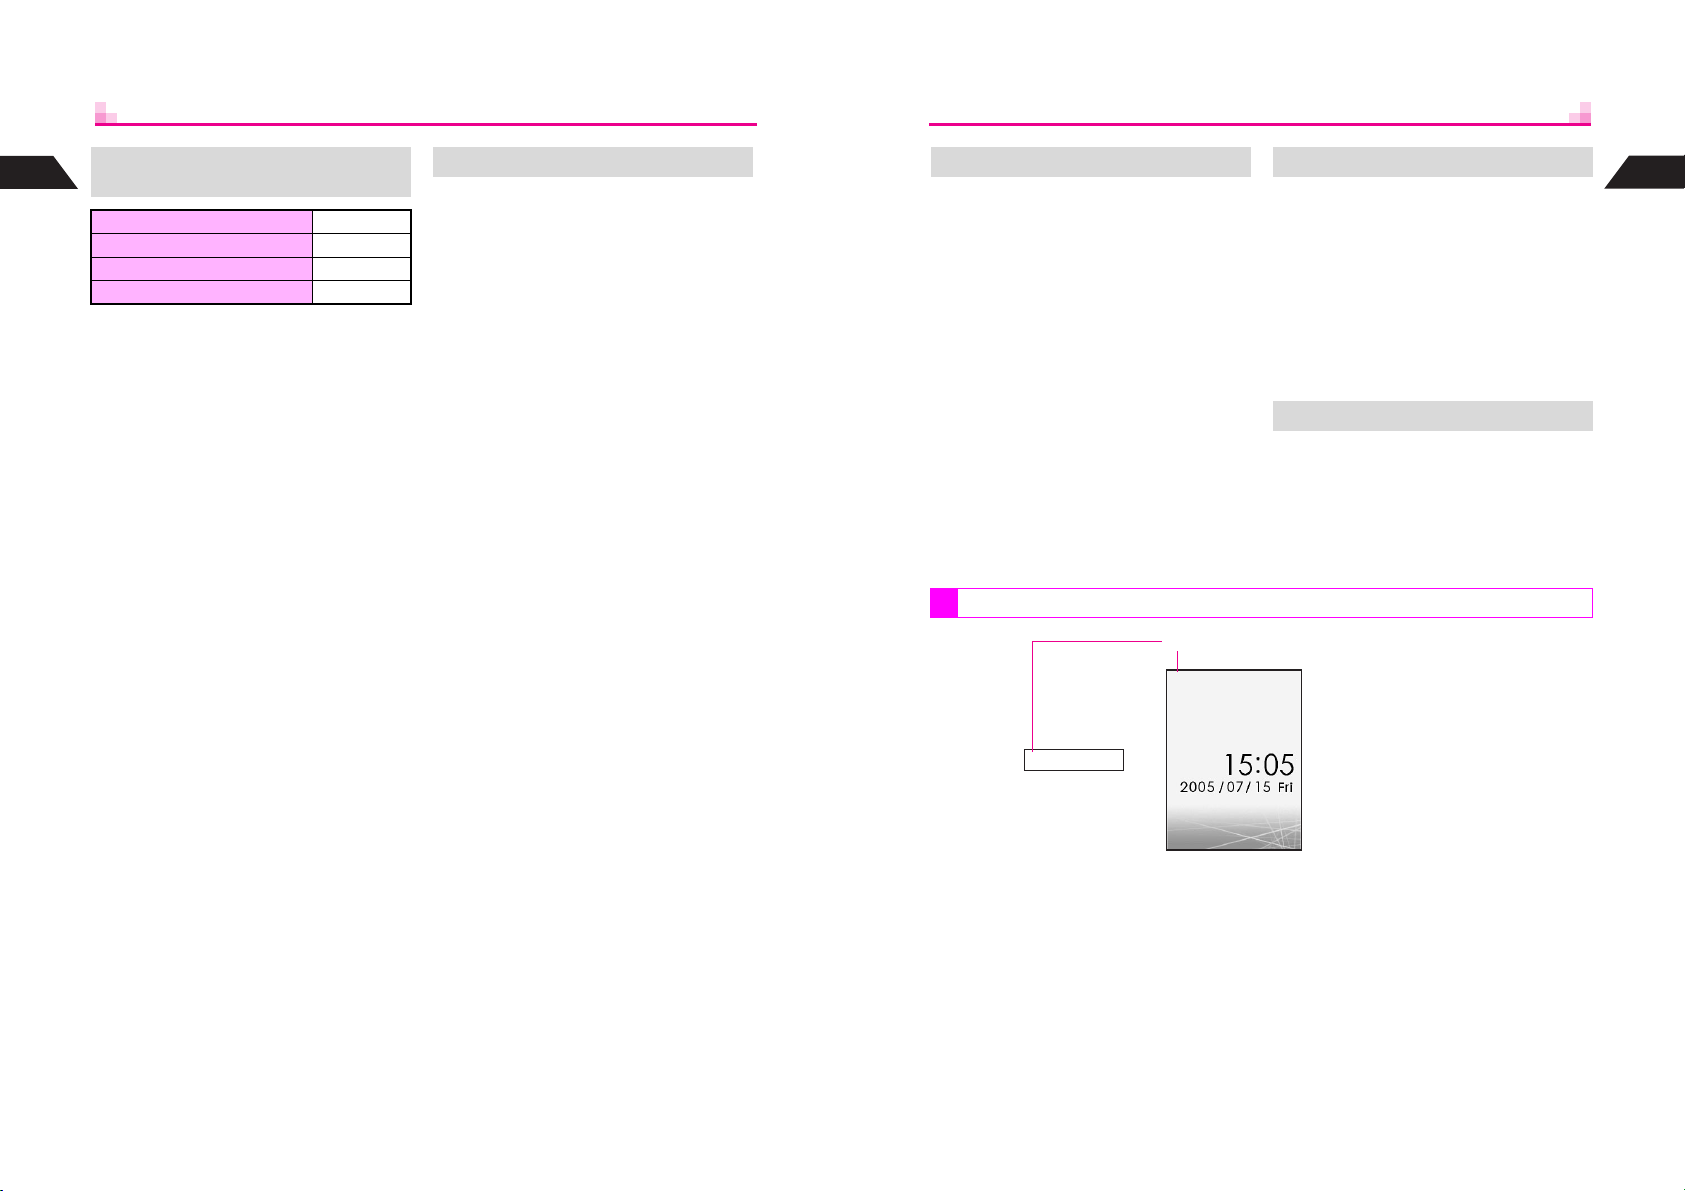
1
Getting Started
Estimated Hours of Use
(fully charged battery)
Continuous Call Time 130 minutes
Continuous Standby Time 450 hours
Continuous Operating Time 230 minutes
Continuous Playback Time 7.5 hours
*Above values are calculated with Backlight
Brightness set to Level 4 (default).
^
Continuous Call Time is an average
measured with a new, fully charged
battery, with both Power Saving and Panel
Saving off, with stable signals.
^
Continuous Standby Time is an average
measured with a new, fully charged
battery, with handset closed (clamshell
closed) without calls or operations, in
Standby with stable signals. Standby Time
may be less than half this value if handset
is out-of-range or signal is weak. Standby
Time may vary by environment (battery
status, temperature, etc.).
^
Continuous Operating Time is measured
while handset is operated without calls.
^
Continuous Playback Time is measured
while music is played in Off-Line Mode.
^
The above values (Battery Time) are
nominal values, measured under stable
signal conditions.
Battery Time
Battery Time may shorten when
handset is used in poor conditions:
^
Poor Usage Conditions
B Extreme temperatures (use within a range
of 5]C - 35]C)
B Dirty handset, battery or Charger terminals
(charging may be hampered)
B Weak signals or out-of-range
^
Operation
B V-Application is active
B Station service is in use
B Repeated mobile camera use or barcode
scanning
B Frequent use of Mobile Light
B Playing video images
B Frequent use of Pen Light
B Continuous Keypad use (Backlight stays
on for long periods)
B Use of Music Player/Voice Recorder
B Frequent infrared transfers
B Frequent opening/closing of handset
B Frequent use of Motion Control
^
Setting
B Backlight/Keypad Light time is set longer
B Wallpaper is animated
B Screen Animation is used
B Panel Saving is Off
B Backlight is set brighter
Extend Battery Time When Battery Runs Out
Adjust the following settings:
^
Backlight (see P.7-12)
^
Sub Display Backlight (see P.7-13)
^
Lighting Time of Mobile Light (see
P.6-24) or Pen Light (see P.15-44)
^
Panel Saving (see P.15-41)
Battery Strength
Strength Levels
J N
w U P
Sub Display
A message appears and short beeps
sound. Handset shuts down after
20 seconds unless charged.
Press g to stop short beeps. (Short
beeps do not sound in Manner Mode.) If
battery runs out during a call, short beeps
sound every five seconds. After
20 seconds, the call ends and handset
shuts down.
Battery Disposal
Do not dispose of exhausted batteries
with ordinary refuse.
Tape over battery terminals before
disposal, or bring them to a Vodafone
shop. Follow local regulations regarding
battery disposal.
1
Getting Started
1-18
M
When battery runs out (
), Recharge Battery appears and short beeps sound.
Handset shuts down after 20 seconds.
1-19
Page 26
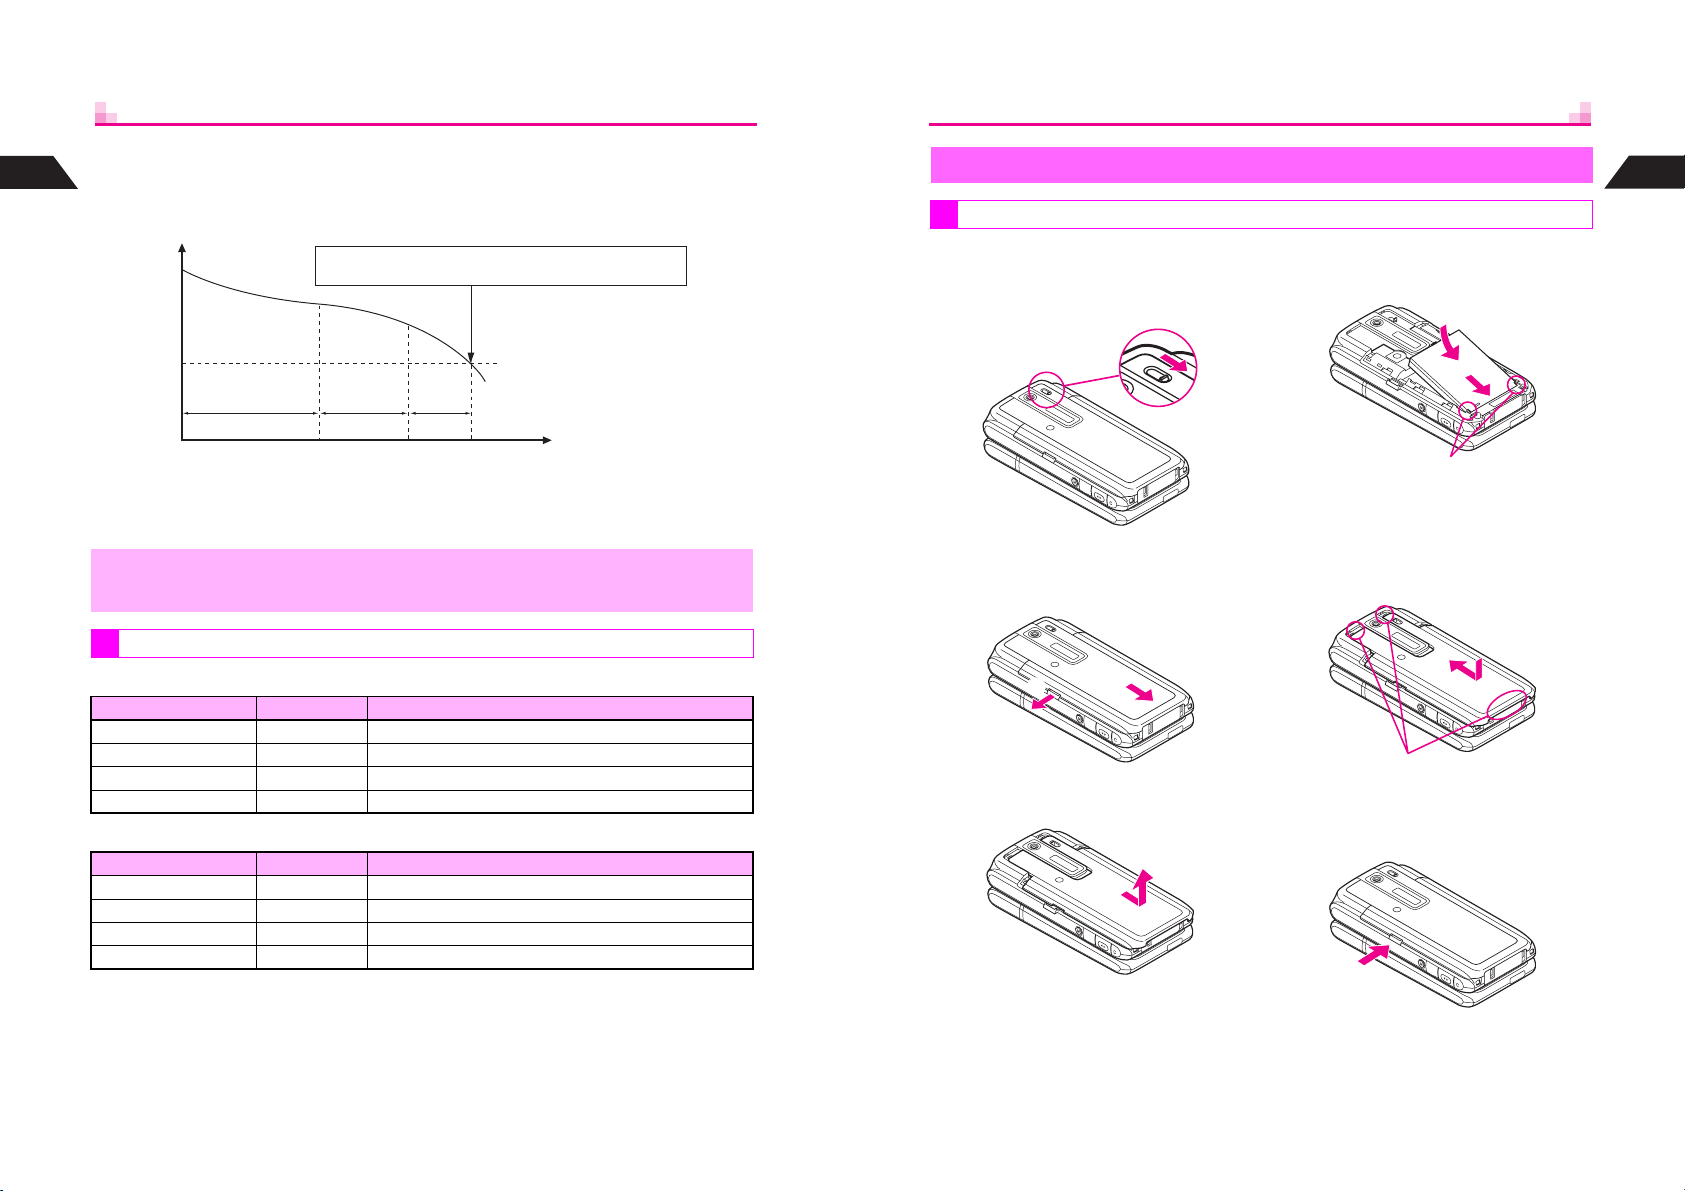
C
Indicator
Battery Strength indicator varies as shown.
1
Getting Started
Charge or replace when level is low.
Battery Strength indicator is for reference only.
Recharge Battery appears.
Charge or replace battery immediately.
Battery Voltage
Level 3 Level 2 Level 1 Level 0
Approx. 70% Approx. 20%
Remaining Strength (at 25]C)
C
Battery Strength & Environment
At low temperatures, battery is consumed faster.
At high temperatures, battery lasts longer.
At Level 1, some functions including Music Player, Voice Recorder, Motion Camera
,
C
C
(MPEG) mode, etc. do not operate (see P.6-20, P.9-4, P.9-11, P.10-2).
Small Light & Battery Strength Indicator
Handset Power On
Small Light Indicator (J) Conditions
Off Flashes Ambient temperature is outside the range of 5]C - 35]C
Flashes red Flashes Battery life has ended, or battery defect
Illuminates red Flashes Charging
Off Illuminate Charging completed
Handset Power Off
Small Light Indicator (J) Conditions
Off Off Ambient temperature is outside the range of 5]C - 35]C
Flashes red Off Battery life has ended, or battery defect
Illuminates red Off Charging
Off Off Charging completed
Approx. 10%
Minimum Operating
Voltage
MLKJ
Hours of Use
Installing & Removing Battery
Inserting
Turn handset power off before inserting battery.
Slide Portrait/Macro Selector
1
to Portrait
Pull out Battery Cover Latch
2
as shown in
e
, then slide
cover as indicated in
e
Lift and remove cover as
3
shown
^ Do not remove Texture Panel.
f
f
Insert battery
4
^ With printed side up, fit tabs into
With Portrait/Macro Selector
5
set to Portrait, close cover
^ Position and slide the cover as
^ Make sure these tabs are fitted into
Push in Battery Cover Latch
6
until it clicks
f
battery cavity slots.
shown until it stops.
slots.
1
Getting Started
e
1-20
1-21
Page 27
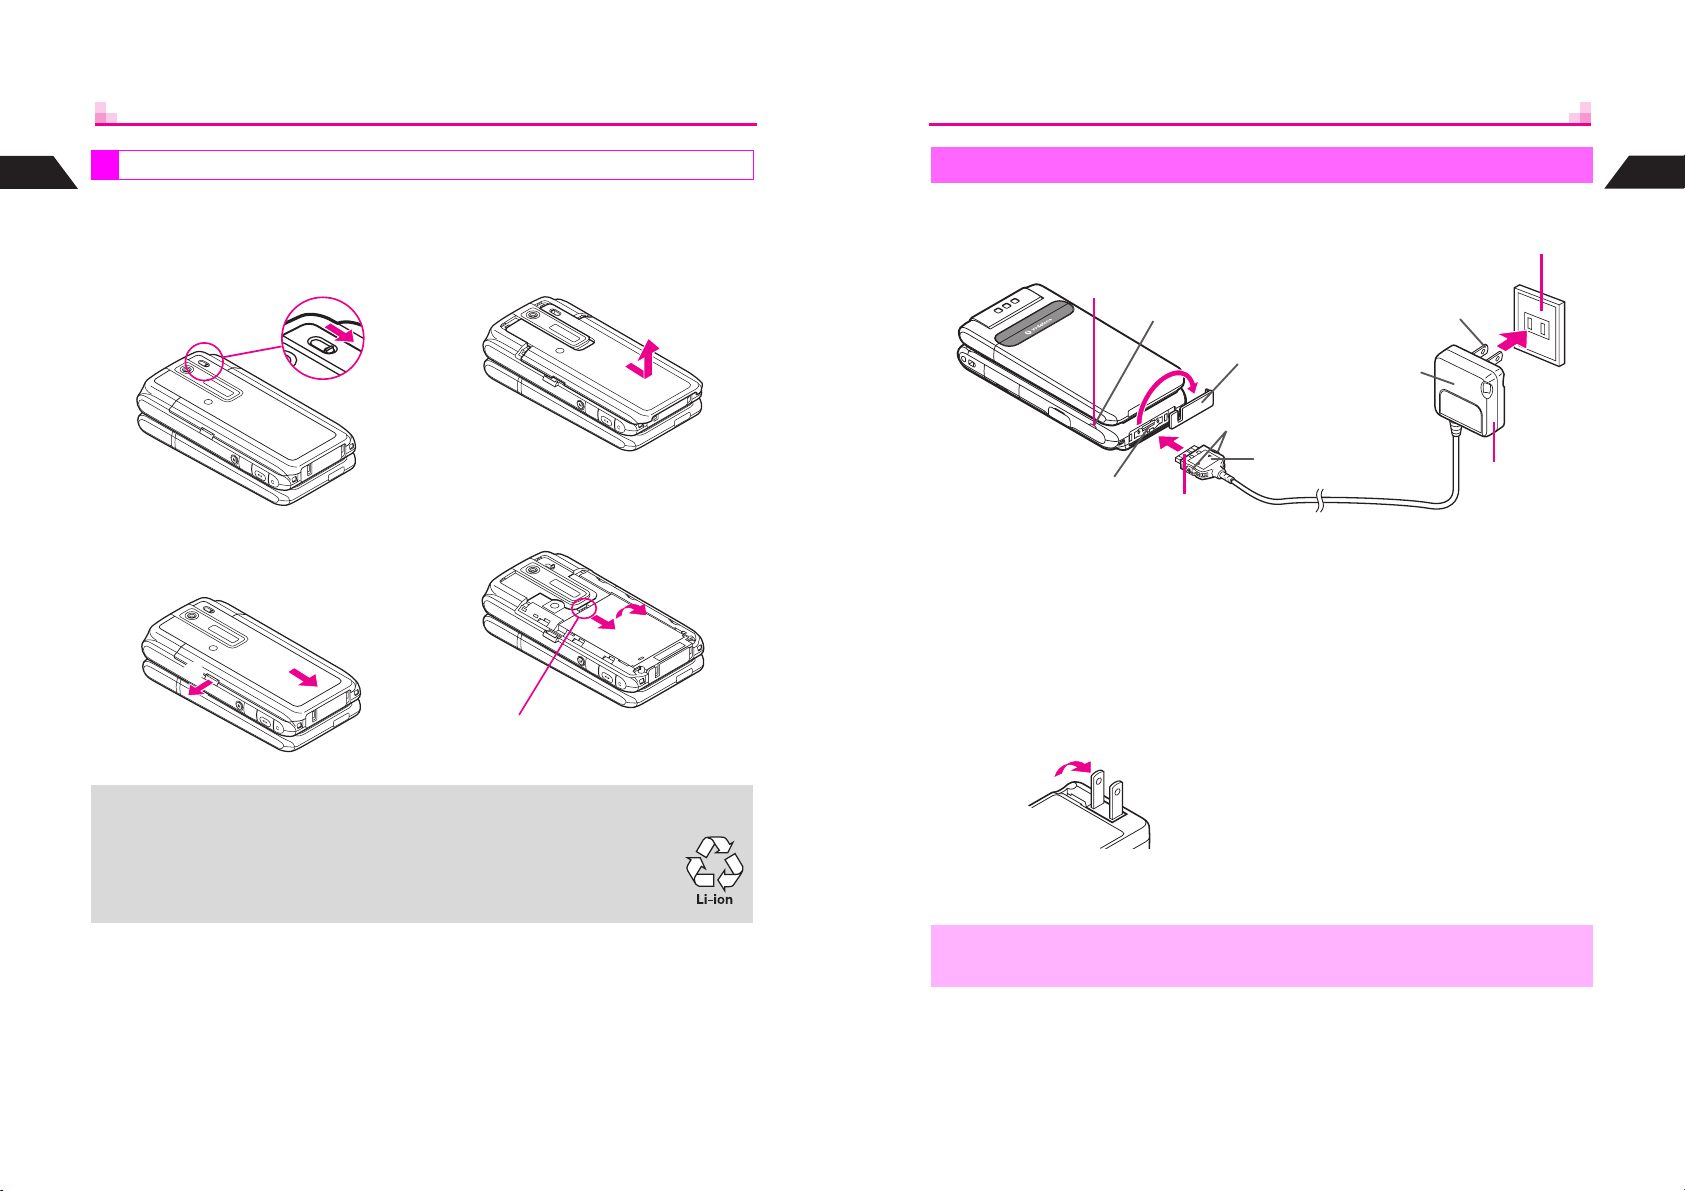
1
Getting Started
^
Turn handset power off before removing battery.
^
Do not remove battery immediately after saving files, sending messages, etc.
1
Removing
Slide Portrait/Macro Selector
to Portrait
Lift and remove cover as
3
shown
Rapid Charger
Use specified Charger only.
3
Small Light
100 VAC
Blade
2
1
Getting Started
Pull out Battery Cover Latch
2
as shown in
cover as indicated in
e
This product requires a lithium-ion battery.
+
Lithium-ion batteries are a recyclable resource.
^ To recycle a used lithium-ion battery, take it to any shop displaying the
symbol shown to the right.
^ To avoid fire or electric shock, do not:
B Short-circuit batteries B Disassemble batteries
e
, then slide
f
f
Remove battery
4
e
f
^ Take hold of Battery Tab here, push
down as shown in e, then lift as
indicated in f.
External Device Connector
Open Terminal Cover and
1
insert Charger connector until
it clicks
Plug in Charger
2
^ Extend Charger blades. (Fold back
when not in use.)
^ Charging starts and Small Light
illuminates red (see P.1-20).
Terminal Cover
Release Tab
1
AC Charger
Printed Side Up
Charging is complete when
3
light goes out
^ See P.1-17 for charging time.
After Charging
4
Unplug Charger from the AC
outlet, then handset
^ Squeeze release tabs and pull
connector straight out.
^ Replace Terminal Cover to protect
External Device Connector.
4
1-22
,
Do not pull, bend or twist Rapid Charger cord.
1-23
Page 28
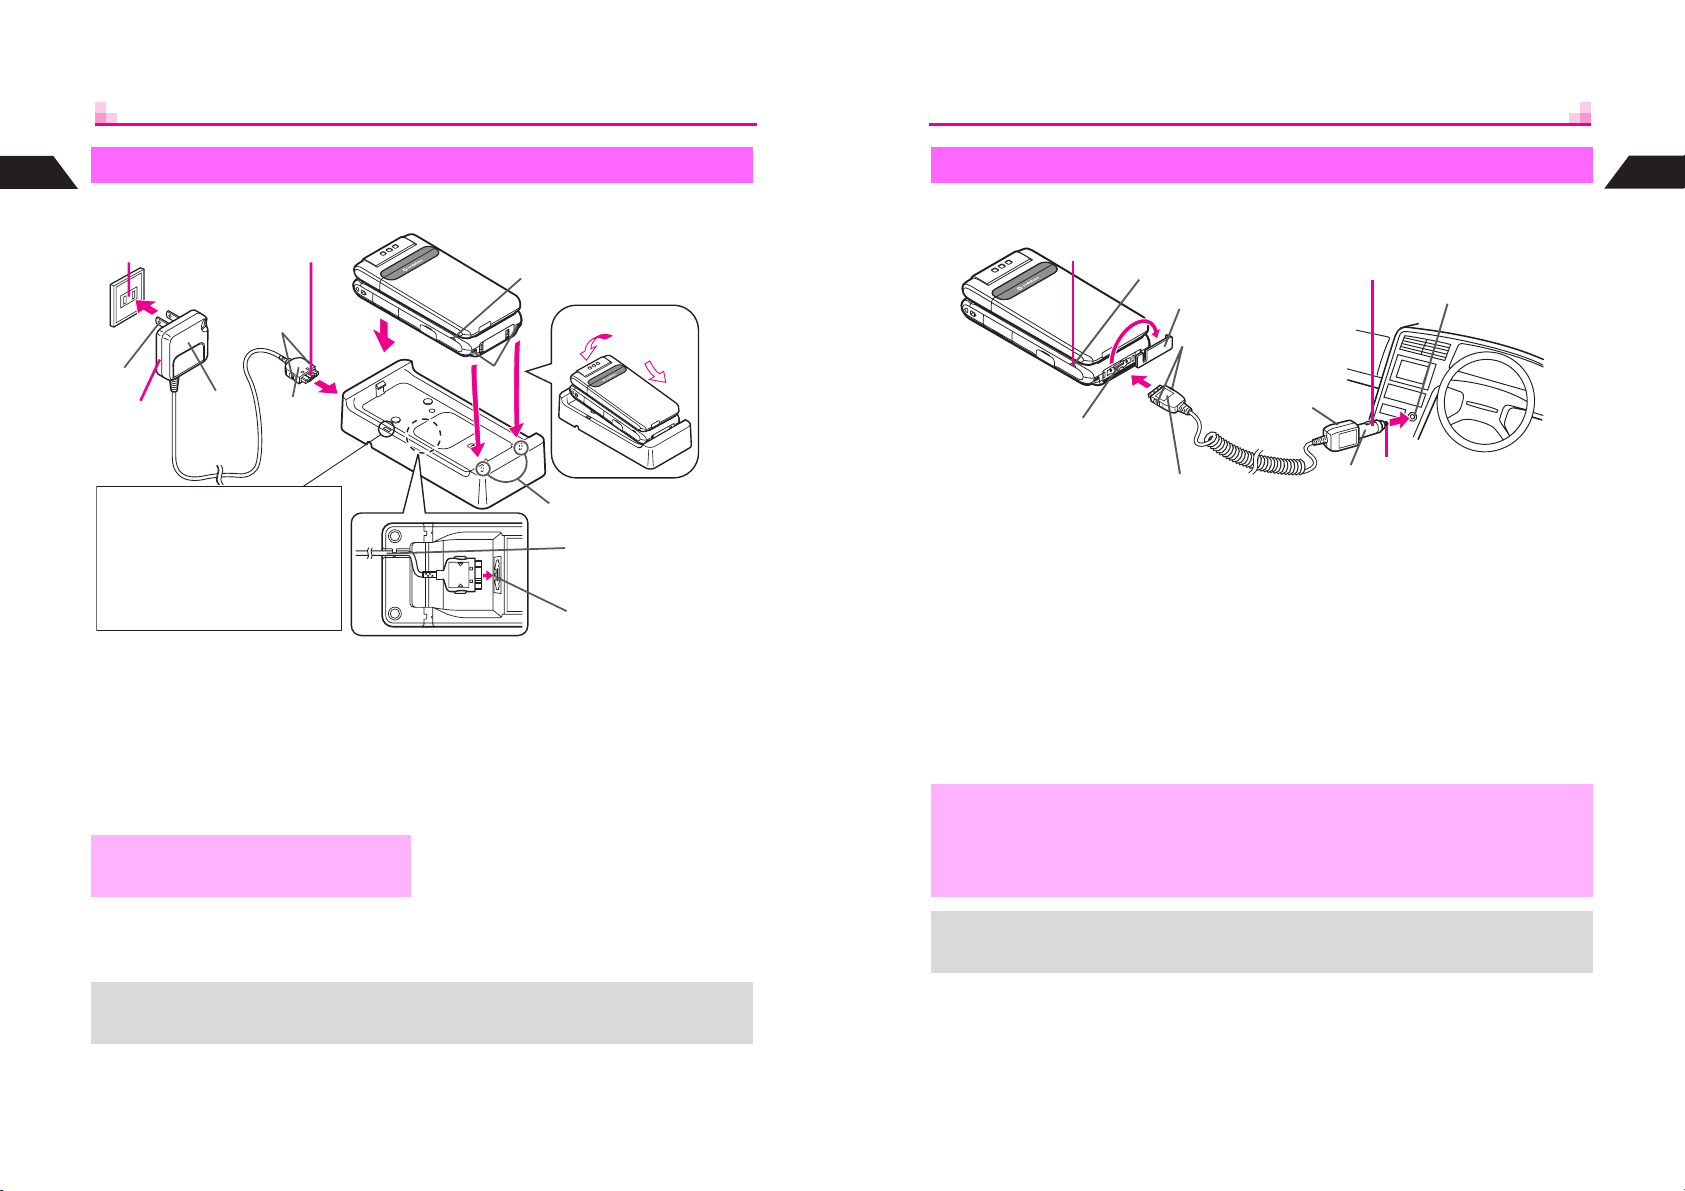
1
Desktop Holder
Getting Started
Use specified Charger and Holder only.
In-Car Charger
Use specified In-Car Charger only.
1
Getting Started
2
100 VAC
Release Tab
Blade
AC
5
Mobile Light Indicator
Activate Mobile Light (see P.8-5).
When active, Mobile Light
illuminates for incoming calls, mail
and Web/Station info. (Not
available when Manner Mode is
active. See P.3-3.)
1
2
,
Charger
Insert Charger connector into
Desktop Holder until it clicks
^ Connection Terminal is on the back of
Desktop Holder.
Plug in Charger
^ Extend blades. Fold back when not
in use.
Make sure that Battery Cover and
Texture Panel are set on handset.
1
Printed
Side Down
4
Small Light
2
Slot
Tab
Insert cord into the groove.
Connection Terminal
Gently insert handset into
3
Desktop Holder
^ Fit tabs into slots as shown in 1 and
push handset as indicated in 2 until it
clicks into place (resting flat).
^ Charging starts and Small Light
illuminates red (see P.1-20).
Charging is complete when
4
light goes out
^ See P.1-17 for charging time.
After Charging
5
Unplug Charger from outlet
and remove handset
1
3
4
Blade
2
Cigarette Lighter Socket
3
5
Small Light
Terminal Cover
Release Tab
In-Car Charger
External Device Connector
1
Printed Side Up
Open Terminal Cover and insert Charger connector until it clicks
1
Plug in Charger
2
Start car engine
3
^ Charging starts and Small Light illuminates red (see P.1-20).
Charging is complete when light goes out
4
^ See P.1-17 for charging time.
After Charging
5
Unplug Charger from cigarette lighter socket, then handset
^ Squeeze release tabs and pull connector straight out.
^ Cap Terminal Cover.
^ Use In-Car Charger inside vehicles with a negative earth only.
,
+
^ Disconnect Charger before leaving vehicle to prevent charging with engine off.
^ Do not use In-Car Charger with Desktop Holder.
^ Avoid charging battery inside extremely hot vehicles.
^ Never use handset while driving.
^ For more information, see In-Car Charger manual.
^ Use optional In-Car Holder to secure handset.
+
1-24
For more information, see Desktop Holder manual.
1-25
Page 29
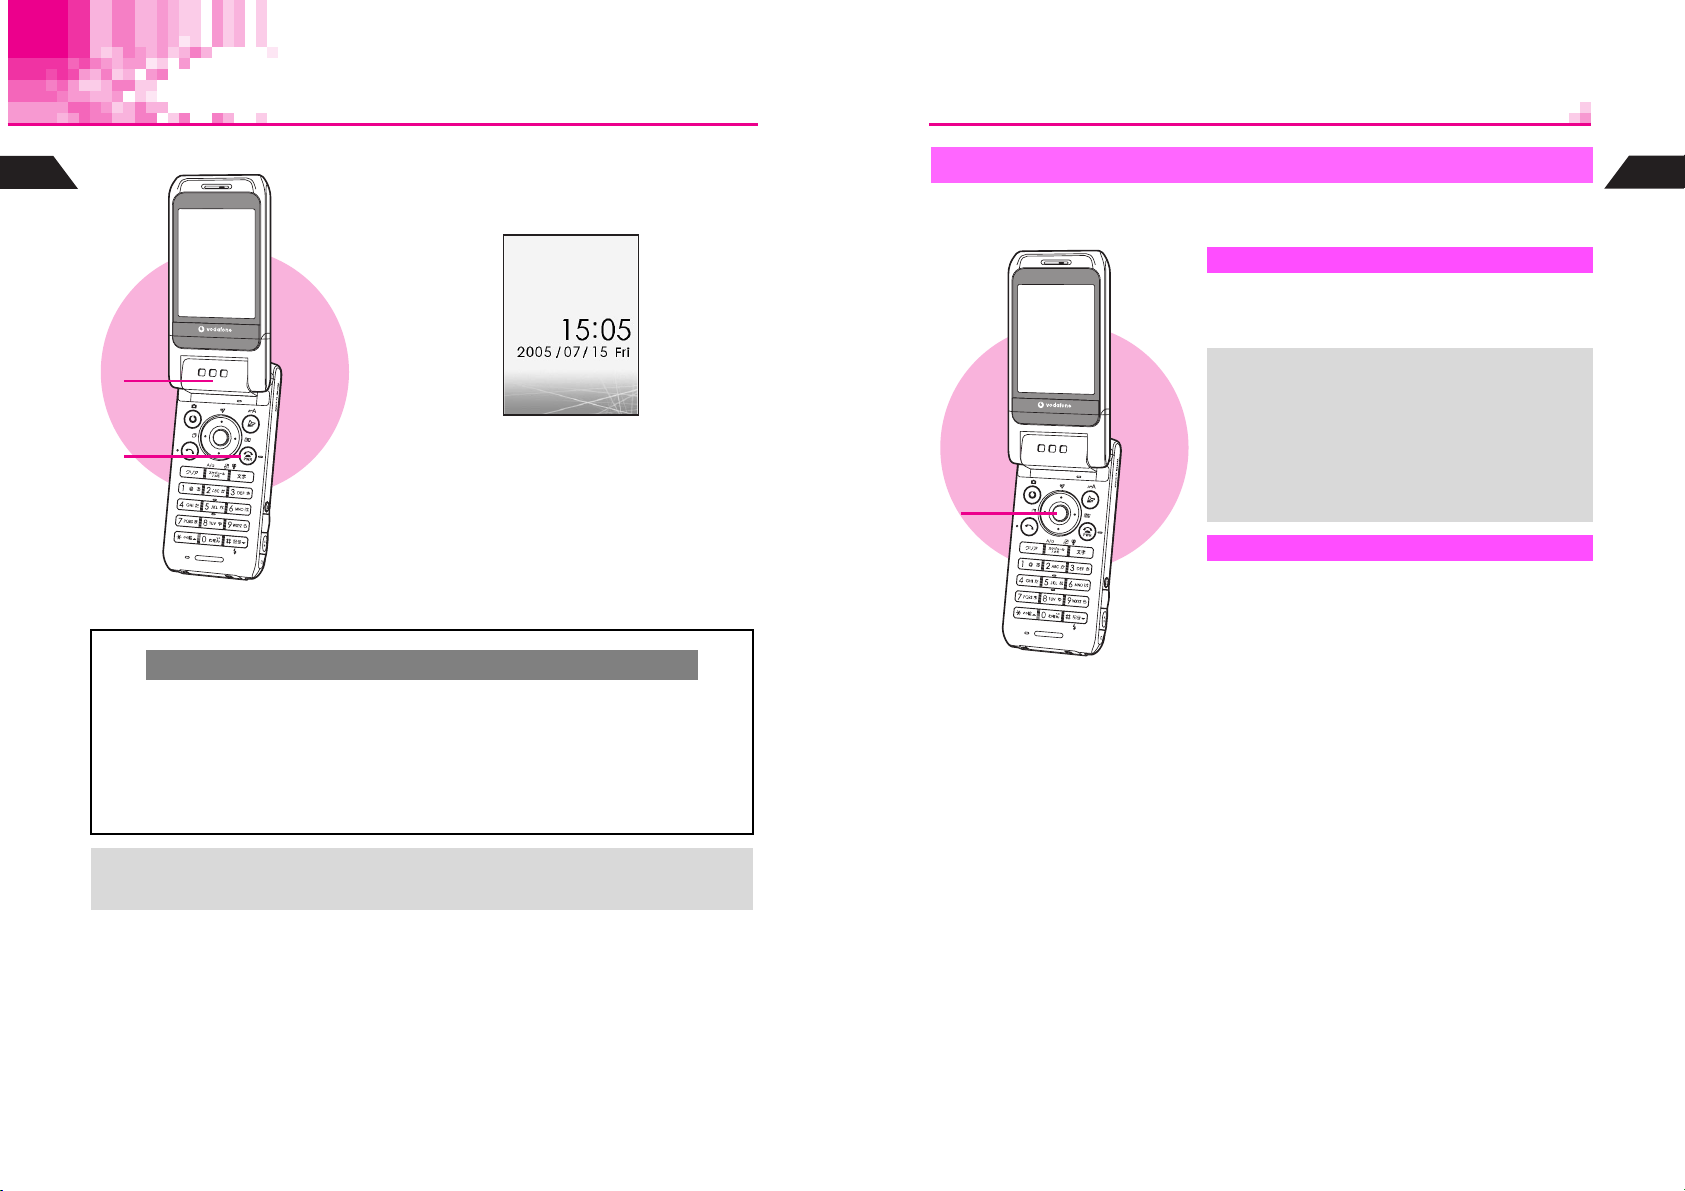
Handset Power On/Off
1
Getting Started
1111
2222
3333
C
C
Open handset (clamshell open)
1
Press g for 1+ seconds
2
J N
Backlight illuminates; after Power On Graphics,
handset enters Standby (shown above).
Press g for 2+ seconds to exit
3
After Power Off Graphic, handset shuts down.
Clock Settings & Network Setup
If date and time have not been set, a confirmation appears after Power On Graphic.
Yes
1
A
Choose
B
Choose
Handset initiates Network Setup when b, e, d, i, k, j or C is pressed
for the first time.
To continue, choose
^ See
I
2
P.1-4
Press b A Clock Settings window opens (see P.1-28)
No
A
Press b A Standby appears without date and time
Yes
1
A
for more about Network Setup.
Press
b
Key Guard
Use Key Guard to lock handset keys and prevent accidental activation of functions or
operations.
Activating
Press b for 1+ seconds
1
M appears and Key Guard is set.
When Key Guard is Active
+
1111
Canceling
1
^ Incoming calls temporarily cancel Key
Guard. To answer calls, press keys for
Anykey Answer (see P.2-6), or press h
for 1+ seconds in Viewer position. Key
Guard reactivates after the calls end.
^ Handset power does not turn off even if g
is pressed for 2+ seconds.
In Standby, press b for 1+ seconds
M disappears.
1
Getting Started
+
1-26
^ Handset receives incoming mail or Web/Station information while closed.
^ Display shuts down after a period of inactivity (see P.15-41 "Panel Saving").
1-27
Page 30
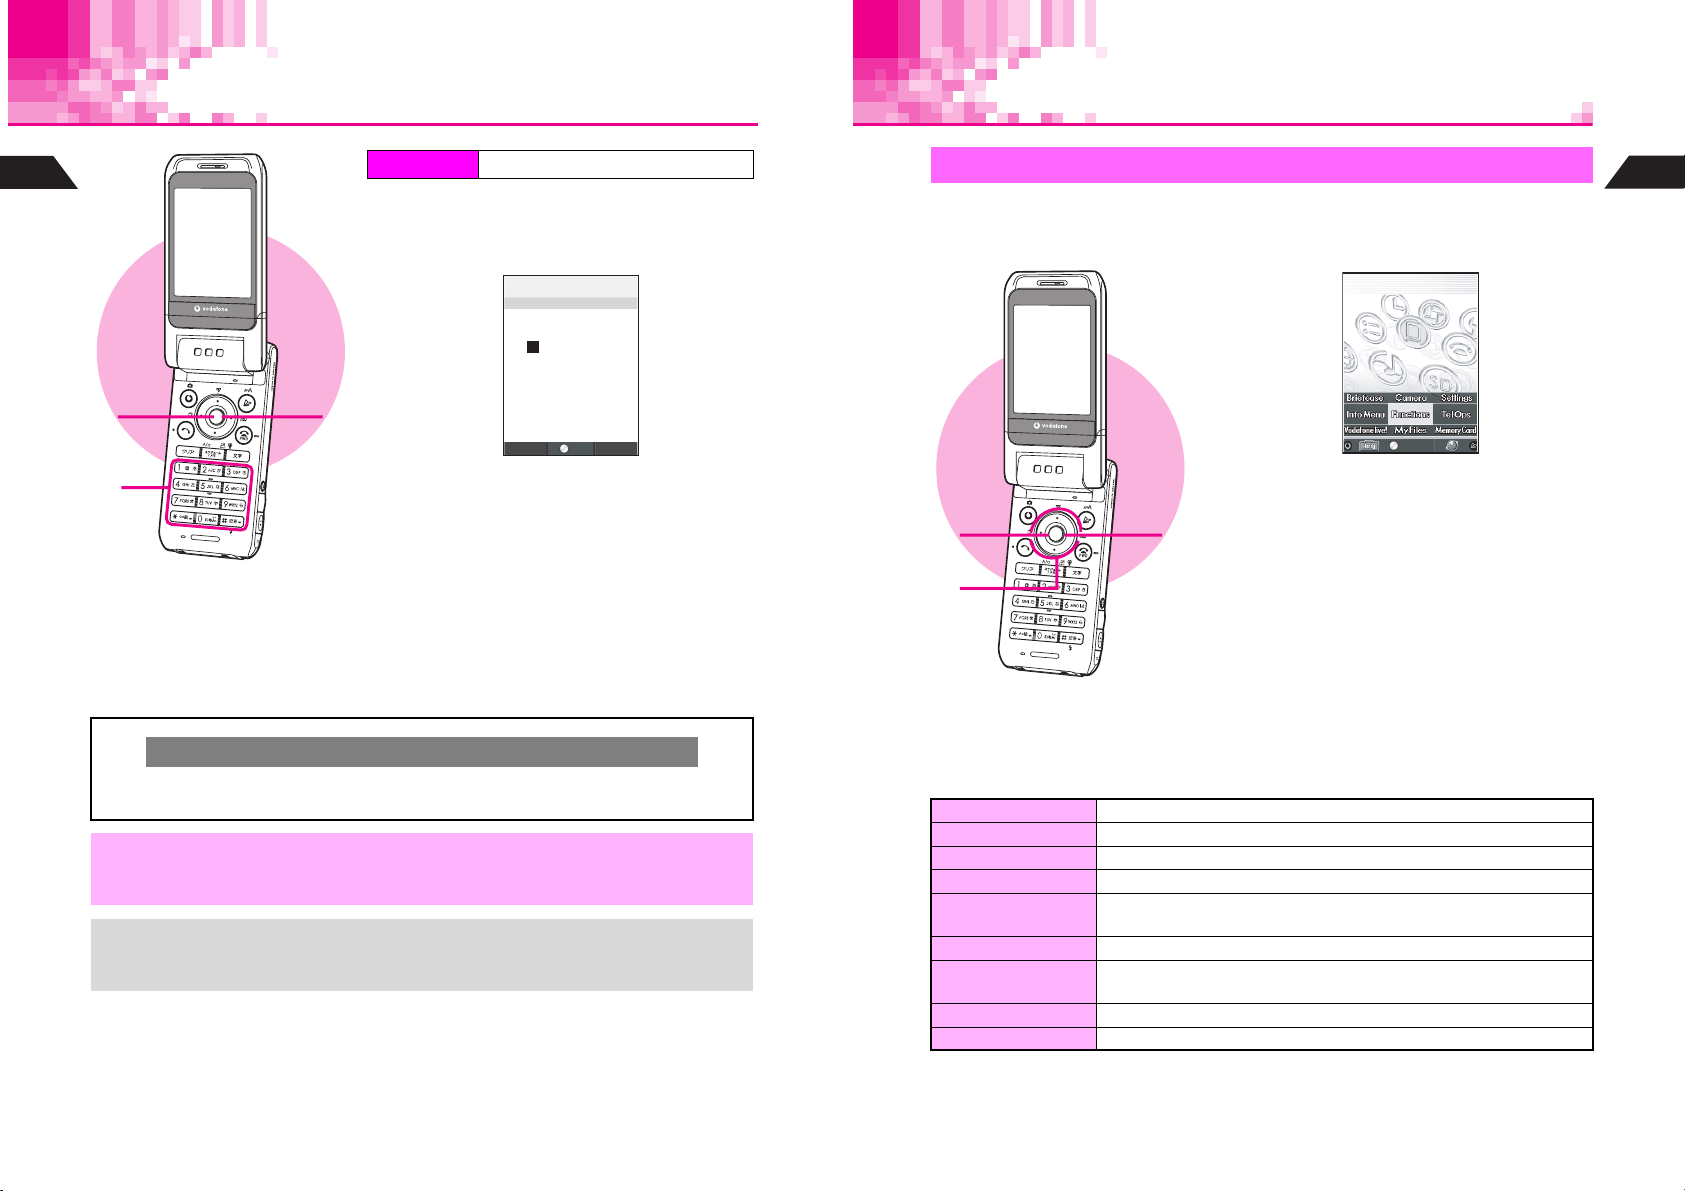
Clock Settings
Handset Menus
1
Getting Started
1111
2222
3333
4444
5555
Index Menu
Select 9Clock Settings and press
1
Enter the year
2
Example: Year 2005 A 2005
Enter the month and day
3
Example: July 15 A 0715
Enter the time
4
Apply 24-hour clock format.
Example: 3:05 PM A 1505
Press
5
Clock starts and Standby returns.
The day of the week is set automatically.
H
Functions A Clock
J
‑‑:‑‑
F59:ClockSettings
2005Y
ーーMーーD(ー)
ーー:ーー
b
N
OK
OK
Index Menu
b
Access functions/operations from Index Menu.
Press
1
Index Menu opens.
^ To customize Index Menu appearance, see
P.7-6.
33331111
2222
Use G to select an item
2
C To open Handy Features menu, press e.
C To open V-Appli Library, press d.
Press
3
Menu for each item opens.
b
JmG
P
b
Select
選択
N
1
Getting Started
Cursor
C
Use F or E to move cursor (C or highlight bar). Enter or edit characters at the
cursor position.
When removing the battery for replacement, etc., Clock settings remain. However,
,
+
1-28
should the handset go without power for an extended period of time (approximately
one month), Clock will need to be reset.
^ When Clock has not been set, --/-- --:-- appears for date and time.
^ Choose a Clock type and layout or use Calendar for Standby (see P.7-3, P.7-4)
^ Clock can be set during calls.
C
Index Menu Items
Briefcase Use Schedule, Calculator, Alarm, etc.
Camera Camera menu opens. Shoot images, scan barcodes, etc.
Setting Customize display, sounds, etc.
Info Menu Information menu opens
Functions
Call Create or search Phone Book entries. Check Redial and Call History.
Vodafone live!
Overview
My Files Open files saved in handset
Memory Card Memory Card menu opens. Use Memory Card-related functions.
Functions Menu opens (see P.1-30). Check and change settings of
various functions.
Use Mail, Web, V-Application, Station, etc.
1-29
Page 31

1
Getting Started
C
In Index Menu, press e
JmG
P
N
3
Select
選択
Handy Features
3
to access Handy Features.
JmG
P
e
Select
Back 選択
N
b
Index Menu Handy Features
Functions Menu
In Index Menu, select
Functions
functions and settings. A number is assigned to each handset function (see
C
Selecting First Layer Items
Select an item with
JmE
P
F*
K0MyNumberI
1Sounds
2Privacy
3Settings1
4Settings2
5Clock
6Charges
7Services
8Vodafonelive!
Selected item
is highlighted.
選択
Select
E
and press b.
N
and press b. Use Functions Menu to access handset
JmE
P
F1
0MyNumber
K1SoundsI
2Privacy
3Settings1
E b
4Settings2
5Clock
6Charges
7Services
8Vodafonelive!
First Layer Related Functions
選択
Select
N
JE
P
VideoCamera
ReceiveCallwhile
Recording?
1Yes
K2NoI
JmE
P
F1*:
K0CallFunctionsI
1Volume
3SoundEffects
5RingerOut
6Speaker
7OriginalTones
8InstrumentEffects
9ToneOctave
選択
Select
選択
Select
N
P.17-2
N
).
Selecting Functions by Numbers
C
In Standby, press b to open Index Menu, then enter numbers. Corresponding
function or menu opens.
J N
b15
JE
P
F15:RingerOut
1Earphone
K2Earphone/SpeakerI
選択
Select
N
Return to Standby
C
Press g to return to Standby (see
^
When confirmation appears, choose
^
Activate MC Sensor in Viewer Setting (see
) from function windows, menus, etc.
P.1-26
Yes and press
1
P.15-23
b
. Standby returns.
) to return to Standby quickly in
Viewer position by shaking handset.
Hot Switching (Mail)
C
During an operation, press d for 1+ seconds A Use mail-related functions
(open message, reply, etc.)
^
Press i to return.
^
In a message window (not in Inbox List), press d for 1+ seconds again to open
i
Inbox. Press
^
Hot Switching is not available during calls, in Standby, or when V-Application is
to return to message window.
active. An error message appears if mail function is not available.
Hot Switching (Multi Menu)
C
During an operation, press e for 1+ seconds A Multi Menu opens A Select a
function
^ Press
^
A
i
Multi Menu cannot be opened with the shortcut in a function opened from Multi
Menu.
^
In a function opened from Multi Menu, press d for 1+ seconds to open Inbox (read
only). Press
^
Hot Switching is not available during calls, in Standby, or when V-Application is
active. An error message appears if Multi Menu is not available.
b
Press
to return. (Press g to end Calculator.)
i
to return to the previous function.
1
Getting Started
1-30
1-31
Page 32

1
Shoot
Functions
Soft Keys
Getting Started
Soft Key functions appear at the bottom of Display.
JmG
P
N
When b Select appears, press b to open selected menu items,
execute functions, etc.
When B Convert appears, press D to convert kana to kanji, etc.
When Y Auto appears, press q to execute the function.
Press d to select or execute the assigned function or operation.
Select
選択
Press e to select or execute the assigned function or operation.
W appears while creating Original Ring Tone etc., press
When
assigned operation.
Soft Key Assignments (Viewer)
Soft Key functions appear at the top of Display when mobile camera is active in
Viewer position.
Mobile Camera Other Windows
ShootShoot
Shoot
JqP
KdhPJA by
p
UO
Functions
Functions
Press c for 1+ seconds to select or
execute the assigned function or operation.
Press c to select or execute the assigned
function or operation.
Slide L or M to select or execute the assigned
function or operation.
Press h
to select or execute the assigned
function or operation.
Press h for 1+ seconds to select or
execute the assigned function or operation.
hr
cLM
j
to execute the
JmG
P
選択
Select
N
Using MC Cursor
Tilt handset to move cursor. Activate MC Cursor in M-key Settings beforehand (see
P.15-22).
^
MC Cursor is not available with clamshell closed.
^
Tilt handset forward/backward, left/right or diagonally to navigate menus.
^
Read the precautions on
Select Item
C
Press r ( N or O appears) and tilt handset forward or backward to move cursor.
r
Press
again to cancel MC Cursor.
JmO
P
F*
K0MyNumberI
1Sounds
2Privacy
3Settings1
4Settings2
5Clock
6Charges
7Services
8Vodafonelive!
Cursor moves up
Select
N
r
(Or press
MC Cursor is not available when neither
Proceed or Return
C
Press r ( N appears) and tilt handset to the right to proceed with the selected menu
item. Tilt to the left to return. Press
JmO
P
F1
0MyNumber
K1SoundsI
2Privacy
3Settings1
4Settings2
5Clock
6Charges
7Services
8Vodafonelive!
N
r
Select Select
Menu Sub Menu
(Or press c)
MC Cursor is not available when
before using MC Cursor.
P.1-14
Tilt backward
M
)
N
r
again to cancel MC Cursor.
Tilt to the left
N
does not appear after pressing r.
JmO
P
F1
L
)
0MyNumber
K1SoundsI
2Privacy
3Settings1
4Settings2
5Clock
6Charges
7Services
8Vodafonelive!
Select
Tilt forward
(Or press
Cursor moves down
nor O appears after pressing r.
JmO
P
Tilt to the right
(Or press h)
F1*:
K0CallFunctionsI
1Volume
3SoundEffects
5RingerOut
6Speaker
7OriginalTones
8InstrumentEffects
9ToneOctave
N
N
1
Getting Started
1-32
1-33
Page 33

1
,
Getting Started
+
^ MC Cursor is canceled when:
B Display position is changed B Calls, mail, etc. arrive
B Display shuts down for Panel Saving
^ While MC Cursor is in use, screen orientation does not change automatically (see
P.7-15 "Viewer Display").
Activate b-key Settings (see P.15-22) to activate MC Cursor while b is pressed. MC
Cursor is canceled when b is released.
Keypad Shortcuts
In Standby, press Keypad or C for 1+ seconds to activate/open corresponding
functions/files saved in User Shortcuts (see P.15-27).
Guide
Open quick guides to functions inaccessible from Functions Menu.
Index Menu
H
Functions A Settings 1
1
Getting Started
Quick Operations
In Standby, enter numbers to access functions quickly.
Accessible functions vary by the number of digits entered.
(Functions shown to the right appear for single digits.)
To activate functions, press the key next to the function (press
f
for Speed Dial).
Quick Operations are not available in Viewer position.
Digits
Function
Speed Dial (see P.5-14) !!#####
Spending Memo (see P.15-43) !!!!!##
Add to Phone Book (see P.5-4) !!!!!!!
Entry Search
Calculator (see P.15-42) !!!!!!#
Send 2-Touch Mail (see IP.3-15) !######
Set Alarm
Schedule
1
Only Katakana Search is available.
2
Enter four digits (24-hour format) to set Alarm. Full appears when there are five entries.
Alarm set in Quick Operations (see
is Off).
3
Enter four digits for month and day. Check entries for the next 12 months.
1
(see P.5-13) !######
2
(see P.15-7) ###!###
3
(see P.15-19) ###!###
1 2 3 4 5 - 6 7 - 12
) is effective for one time only (Repeat Settings
P.15-7
J
P
J:SpeedDial
X:SpendingMemo
W:ToPhoneBook
::EntrySearch
N
1
Super SkyCalc
13 - 24
1111
C
Display Content
JE
P
F3*:Guide
<ClamshellOpen>
H
Redial
Show
N
Handset Position
Operations (Keys)
Function
Press b to use
the function
(Available for
some functions)
Select 0Guide and press
1
Pen Light guide appears.
Press C or
2
Guide for another function appears.
Press g to exit
3
D
b
2222
3333
JE
P
F3*:Guide
<ClamshellOpen>
Ringing
K
Hold
N
Situation
(Example: Incoming Call)
1-34
1-35
Page 34

Handset Codes
Both Security Code and Center Access Code are needed for handset use.
1
Security Code
Getting Started
9999 or the 4-digit number selected at initial subscription.
Security Code is required to use/change some handset functions.
^
U
appears when Security Code is entered.
^
If incorrect,
^
Change Security Code as needed (see
Invalid Code
appears. Enter correct Security Code.
).
P.14-2
Center Access Code
The 4-digit number in the contract, required to access Optional Services via landlines,
and to subscribe to fee-based information.
Do not attempt to change Center Access Code. Contact Vodafone Customer Center,
General Information (see P.17-21) for details.
^ Write down Center Access Code. If lost, contact Vodafone Customer Center,
,
General Information (see P.17-21).
^ Do not reveal Security Code and Center Access Code. Vodafone is not liable for
misuse or damages.
1-36
Page 35

Basic Handset Operations
2-1
Page 36

Initiating a Call
2
Basic Handset Operations
1
2
3
4
Confirm handset is on
1
^ Check signal.
^ Handset will not transmit when s, S, M or l
appears (see P.17-8).
Enter a phone number
2
J
P
J:Dial
W:ToPhoneBook
N
03123XXXX1
Calc
^ Include the area code, even for local numbers.
Sending/Blocking Caller ID
^ Press the following keys when placing a call.
B Send......186
B Block......184
Confirm the number and press
3
Correcting Numbers
^ Use F to move cursor and press i to
delete the digit above the cursor.
^ Press i for 1+ seconds to delete the entire
number and return to Standby.
^ If you misdial, press g to hang up and try
again.
Busy Numbers
^ Press g to end the call and try again later.
Press g to end call
4
^ Alternatively, close handset (clamshell closed).
Cancel Close to End Call to keep the line open
with handset closed (see P.2-3).
f
Viewer Position
Place calls with Display in Viewer position
CSave the number to Phone Book first (see
Press h A Select Tel Ops A Press h A Select 2Entry Search A
h A
Press
A
Select Dial A Press
^
In Viewer position, hold handset with Viewer in and Earpiece up.
^ Side Key Assignments during Calls:
h Open Call in Progress menu
c (Long Press) End call
M Increase volume
L Decrease volume
C
Select whether or not to end calls by closing handset (clamshell closed).
Press
Select
Select
On Calls end Off The other party hears no sound
^
Close to End Call is active by default.
^ Do not cover handset microphone
,
^ Avoid covering area over Internal
^ Voice quality is affected depending
^ For better voice quality, talk with
Open a Phone Book entry (see P.5-13) A Press
h
Close to End Call
Select Functions A Press b A Select 1Sounds A Press b A
b A
Call Functions A Press b A Select 1Incoming Call A Press b A
0
Close to End Call A Press b A Choose 1On or 2Off A Press
7
while talking on the phone.
Antenna (see P.1-7 Z).
on how and where handset is used.
handset open (clamshell open).
Microphone
(Viewer position)
Microphone
(handset open)
h I
).
P.5-4
2
Basic Handset Operations
b
2-2
+
^ Use Instant Display to see Call Time and Call Charge (see P.2-20, 2-21).
^ Confirm Total Talk Time (see P.2-20) and Total Charges (see P.2-21).
^ To use Speaker Phone or Speaker during calls, see P.8-22.
^ For information on international calls, contact Vodafone Customer Center, General
Information (see P.17-21).
2-3
Page 37

Redial
Place calls from Redial. Up to 20 recently dialed numbers are saved in Redial.
2
Basic Handset Operations
1
3
^ When the same number is dialed more than once, only the last record appears.
+
^ Names in Secret Mode entries appear only in Secret Mode.
^ Records remain even after handset power is turned off.
^ When there are 20 records, oldest records are replaced by new ones. To delete
records manually, see P.2-16.
2
Press
B
1
Dialed numbers appear with date and time.
Name appears if saved in Phone Book.
Select a record and press
2
Press
3
Number is dialed.
(F)
JE
P
Redial
2:7/1615:2*
UedaMikio
1:7/1518:45
Select
Memo Menu選択
f
N
*3123XXXX2
XReceived
b
International Call & Send With Code
Preset the number to add before dialing a phone number saved in Phone Book. Use
International Call to place international calls and Send With Code to add one prefix
such as 186 (Send Caller ID) or 184 (Block Caller ID).
Setup Preset
Index Menu
H
Preset the number to add before a phone number
KInternational Call: 0046010, Send With Code: None
Functions A Services A Setup Preset
Select 1International Call or 2Send With Code A Press b A Enter
A
a prefix
C To change the prefix, select 1International Call or 2Send With Code A Press b A
Press i (Long Press) A Enter a new prefix A Press b
^ Enter up to seven digits for International Call and up to six digits for Send With Code.
International Call
& Send With Code
Index Menu
Press
H
Select International Call or Send With Code A Press
b
Dial from Phone Book using the number set in Setup Preset
above
Tel Ops A Entry Search A Open an entry A Menu (b)
b
Emergency Calls
Emergency calls (110, 119, 118, etc.) are possible even while some handset
restrictions are active.
Active Restriction Emergency Calls
Off-Line Mode (see P.3-6) Not possible
Keypad Lock (see P.14-2) Possible
Restrict Dial (see P.14-3) Possible
Auto Key Lock (P.14-3) Possible
Key Guard (P.1-27) Not possible
2
Basic Handset Operations
2-4
2-5
Page 38

Incoming Call
2
Basic Handset Operations
1
2
Viewer Position
When a call arrives, open handset
1
J
P
<<IncomingCall>>
03123XXXX1
Menu
Number appears when Caller ID is sent. Caller's
name appears if saved in Phone Book.
3
Answer calls with Display in Viewer position
When Message Recorder is Active
^ Outgoing message plays and recording starts
(see P.15-4).
f
Press
2
^ Alternatively, press any of the following keys
(Anykey Answer): 0 - 9, q, p,
k, i, e, d, B, A
C Handling Incoming Calls: see P.2-9 - 2-11
Press g to end call
3
^ Alternatively, close handset (clamshell closed).
Cancel Close to End Call to keep the line open
with handset closed (see P.2-3).
Caller ID
C
N
Phone numbers appear only when Caller ID is sent.
C
Picture Call/Mail (see
Caller's name does not appear for Phone Book entries on Memory Card.
) and Personal Ring Tone (see
P.5-7
P.5-10
) are disabled and
2
Basic Handset Operations
Ring Tone Volume
C
Press C (up) or D (down) to adjust volume.
^
Ring Tone Level setting (see P.8-2) changes accordingly.
^
Cancel Manner Mode to adjust the level.
Quick Silent
C
Press j to instantly mute Ring Tone for that call only.
C
When Side Key Settings for Incoming Calls (see P.15-3) is set to
press the assigned key for 1+ seconds with clamshell closed during incoming calls to
mute ringer.
Quick Silent,
2
To Activate/Cancel Anykey Answer
Press b A Select Functions A Press b A Select 1Sounds A Press b A
C
Select
Select
^ Anykey Answer is active by default.
+
Call Functions A Press b A Select 1Incoming Call A Press b A
0
Anykey Answer A Press b A Choose 1On or 2Off A Press
8
^ Up to 20 incoming call details are saved (see P.2-16).
^ Activate Delayed Ringer (see P.2-12) to delay handset ringer for three seconds for
incoming calls from numbers not saved in Phone Book or Owner Profile.
^ To customize Ring Tone and Mobile/Small Light pattern, see P.8-2 "Call Functions."
b
When a call arrives, press h (Long Press) A To end the call, press
c
(Long Press)
^ Side Key Assignments for Incoming Calls:
c
h Open Incoming Call Menu
h
(Long Press)
c
B For operations during calls, see P.2-3.
Answer call
Activate Quick Silent (see P.2-7)
(Long Press)
L Decrease Ring Tone volume
M Increase Ring Tone volume
Place caller on hold (see
2-6
P.2-9
)
2-7
Page 39

Handling Incoming Calls
Call History
Up to 20 received calls are saved in Call History (see P.2-16). When Caller ID is sent,
2
numbers appear. Place calls directly to those numbers.
Basic Handset Operations
Press
D
JE
P
MissedCall
3:7/1717:2*
SuzukiItirou
2:7/1611:2*
UedaMikio
1:7/1512:45
03123XXXX1
XMemo
Redial Menu選択
Received numbers appear with date and time.
Name appears if saved in Phone Book.
Select a record and press
Press
f
Number is dialed.
N
Select
1
3
+
1
2
2
3
^ Names in Secret Mode entries appear only in Secret Mode.
^ Records remain even after handset power is turned off.
^ When there are 20 records, oldest records are replaced by new ones. To delete
records manually, see P.2-16.
b
Placing Callers on Hold
Callers placed on hold hear a message explaining that you cannot answer their call
right away and asking them to hold or call back later.
When a call arrives, open handset
1
g
Press
2
Hold tone sounds for five seconds.
^ No tone sounds when Ring Tone Level is set to
Silent.
Press f to answer the call
3
^ Alternatively, press keys for Anykey Answer
(see P.2-6).
1
3
Viewer Position
When a call arrives, press c (Long Press) A To answer the call,
h
press
(Long Press)
2
Place callers on hold with Display in Viewer position
2
Basic Handset Operations
2-8
Hold or Reject with Clamshell Closed
C
When Side Key Settings for Incoming Calls (see
Reject Call, press the assigned key for 1+ seconds during incoming calls to
3
activate the function.
^ Press g or close handset (clamshell closed) to end calls on hold. However, closing
,
handset does not end the call if Close to End Call (see P.2-3) is canceled.
^ Calls on hold end if callers hang up.
P.15-3
) is set to
Hold or
1
2-9
Page 40

Quick Recorder
Activate Message Recorder (see P.15-4) for one time only to record caller messages
2
on handset.
Basic Handset Operations
When a call arrives, open handset
1
bj
Press
2
Outgoing message plays and recording starts.
C Press bk to play recorded messages (see
P.15-5).
Clamshell Closed
When a call arrives, press a Side Key for 1+ seconds to activate the assigned function.
Message Recorder is assigned to
^
calls, assign functions to them first (see P.15-3).
^
Available Functions:
Hold Place callers on hold See P.2-9
Quick Silent Mute ringer for incoming calls See P.2-7
Reject Call Reject and end the call See P.2-9
Message Recorder Record caller messages on handset See P.15-4
Forward incoming calls to Voice Mail. (Available only
Forward Voice Mail
for subscribers in Kanto, Koshin, Tokai and Kansai
areas, and when used in those areas.)
c
by default. To use other Side Keys during incoming
See P.16-4
2
Basic Handset Operations
1
2
,
Message recorder is disabled when recording capacity is full (see P.15-4).
Voice Mail
C
Unanswered calls are forwarded to Voice Mail (see
P.16-4
When a call arrives, press r, h, L,
1
or c for 1+ seconds
M
Handset responds accordingly.
1
When Message Recorder is set but cannot record (see P.15-4), Quick Silent is
,
).
activated instead.
2-10
2-11
Page 41

Delayed Ringer
Engaged Call Operations
Activate Delayed Ringer to help screen one-ring sales calls. Handset ringer is delayed for
three seconds for incoming calls from numbers not saved in Phone Book or Owner Profile.
Delayed Ringer is Off by default.
2
Basic Handset Operations
Index Menu
Choose 1On and press
1
H
Functions A Sounds A Call
A
Functions
Delayed Ringer
Incoming Call A
1111
b
Earpiece Volume
Adjust Earpiece volume (5 levels). Earpiece volume is Level 5 by default.
During a call, press C or
1
Press C (up) or D (down) to adjust
2
volume level
Each press changes volume by one level.
^ Wait five seconds or press b to save the level.
^ Volume level remains as set even after handset
power is turned off.
1
2
D
2
Basic Handset Operations
2-12
2-13
Page 42

Voice Memo
2
Basic Handset Operations
During a call, press
1
seconds
Recording starts.
k
for 1+
Notepad Memory
Save up to 3 sets of numbers during a call.
^
Use up to 24 digits (0 - 9, U and #) per entry.
^
When full, oldest entries are deleted to make room for new ones.
^
Save phone numbers from Notepad Memory to Phone Book.
2
Basic Handset Operations
1111
,
Press b or
2
^ Recordings remain even after handset power is
turned off.
C To play or delete Voice Memo, see P.15-6.
k
to stop
2222
Closing handset (clamshell closed) ends a call and Voice Memo if Close to End Call
(see P.2-3) is active.
During a call, use Keypad to enter
1
digits
k
Press
2
Entered digits are saved to Notepad Memory.
^ When the current call ends or another call
arrives before Step 2, entered digits are saved
automatically.
2
1
Opening Entries
Index Menu
H
Select 6Notepad Memory A Press
^ Up to 3 sets of numbers appear, most recent first.
^ Press f to dial the number.
^ If there is no entry, Notepad Memory Not Found appears.
^ Alternatively, press Be ? to open Notepad Memory.
C Press g to exit.
C
To save to Phone Book, select an entry A Press d
A
Press b A See
C
To delete, select an entry A Press d
A
Choose
Open saved Notepad entries
Tel Ops
-
for more
5-5
b
1
A Press
Yes
P.5-4
b
I A
I
Select
A Select
Delete
Add to Phone Book
or
Delete All
A Pressb
2-14
2-15
Page 43

Redial & Call History
Information Menu
2
Basic Handset Operations
1111
Delete
Index Menu
Select 4Redial or 5Call History A Press b A Press d
Select Delete or Delete All
H
Opening Redial Records
Press B (F)
1
Dialed numbers appear with date and time.
^ When there is no Redial record, Call History
C Press f to dial the number.
C Press g to return to Standby.
Opening Call History Records
Press
1
Dialed numbers appear with date and time.
1111
Delete Redial/Call History records
Tel Ops
C Press f to dial the number.
C Press g to return to Standby.
A
Press b A Choose 1Yes A Press
appears.
D
I
A
b
Information Menu opens for missed incoming communications.
A call arrives, then ends
1
Date and time of the call and Missed Call notice
or Message Recorder notice appears.
1
2
After approximately five seconds,
2
Information Menu opens
J j E
P
Information
K1MissedCalls1I
2VoiceMessages*
3
4
Use
E
3
^ Press D or C to see more.
^ Press f to dial the number.
Press g to exit
4
to select an item and press
Select
2
Basic Handset Operations
N
Adjust選択
b
Call History Indicators
Call in Progress Answered call
Missed Call Unanswered call (including calls screened by Delayed Ringer)
Hold Disconnected after hold
Message Recorder Recorded on Message Recorder
Forward Voice Mail Forwarded to Voice Mail Center
Reject Rejected call
Payphone Call from payphone
No Caller ID Call without Caller ID
2-16
Unopened Information
C
When there is unopened information, j appears in Standby. Follow these steps to
open Information Menu.
Select
Info Menu
n
A Press
appears in Sub Display. Press h for
b
In Standby, press
C When handset is closed (clamshell closed),
1+ seconds to open specific indicators.
^ After Step 2, press g to close Information Menu without checking details.
+
j appears in Standby.
^ See P.2-16 to reopen Missed Call details.
b A
2-17
Page 44

Information Menu Contents
Information Menu Settings
J j E
2
P Dc9HBjl
Basic Handset Operations
Information
K1MissedCalls2I
2VoiceMessages1
3NewMail
4AutoReplySent
5AutoSent
6DeliveryReport
7WebInfo
8StationInfo
Adjust選択
Select
Missed Calls The number of missed calls appears
N
Voice Messages
New Mail New mail (see IP.2-4) received
Auto Reply Sent
Auto Send Messages saved as Auto Send were sent
Delivery Report New Delivery Report (see IP.2-4) received
Web Info New Web information (see IP.7-11) received
Station Info New Station information (see IP.13-7) received
Mail Box Full Server Mail is 80% full
Memory Full Handset memory is full
1
Select Auto Reply Sent and press b to check the result.
2
Delete messages, files, etc. to free memory.
3
Retrieve or delete Server Mail.
The number of recorded messages appears (see P.15-4)
Auto Reply message (see IP.6-2) was sent
(appears even if the delivery failed)
3
2
Reset
Index Menu
1
Choose 1Yes A Press
+
H
Mail Box Full and Memory Full remain even after resetting Information Menu.
Incoming Light
Index Menu
H
All Information Menu tallies return to 0
Functions A Settings 2 A Info Menu Settings A Reset
b
Set Mobile/Small Light to flash for unconfirmed information
KOff
Functions A Settings 2 A Info Menu Settings A Incoming Light
2
Basic Handset Operations
Mobile Light
A
Select an item
Select a color
Press b A Select 1Mobile Light A Press b A
A
Press
b
Small Light
Select an item
^ Small Light color is fixed.
A
Press b A Select 2Small Light A Press
b
Off
A
Select an item
^ Set Incoming Light for each type of information.
^ When Delayed Ringer is active, Mobile/Small Light does not flash for missed calls from
numbers not saved in Phone Book or Owner Profile.
Press b A Select 3Off A Press
b
2-18
^ Off-Line Mode light (see P.3-6) takes priority over Information Menu light.
+
Time Out Setting
Index Menu
^ Using Mobile/Small Light shortens Battery Time.
Use Time Out Setting to automatically return to Standby 10
seconds after Information Menu opens for new items
H
Functions A Settings 2 A Info Menu Settings A Time Out Setting
Select 1Time out On or 2Time out Off A Press
KTime out Off
b
2-19
Page 45

Call Time
Call Charge
Check estimated Call Time of the most recent call or Total Talk Time.
Call Time appears for calls made and those received.
2
Basic Handset Operations
Index Menu
Select 3Call Time and press
1
C For Total Talk Time, select 2Total Talk Time
Press g to exit
2
H
A Press b
1111
2222
Reset
Index Menu
Press b A Enter Security Code A Choose 1Yes A Press
Instant Display
Index Menu
Choose 1On or 2Off A Press
^ Call Charge also appears for calls you made.
+
H
H
^ Total Talk Time and Call Time remain even if handset power is turned off.
^ Ring time for incoming or outgoing calls is not counted. On hold time is counted.
Reset Total Talk Time
Functions A Charges A Total Talk Time
Set Call Time to appear automatically after each call
Functions A Charges A Instant Display
b
Functions A Charges
b
b
KOff
Check estimated Call Charge of the most recent call or Total Charges.
Press b
H
Functions A Charges
Index Menu
Select 1Call Charge and press
1
C For Total Charges, select 0Total Charges A
Press g to exit
2
1111
2222
Reset
Index Menu
Press b A Enter Security Code A Choose 1Yes A Press
Instant Display
Index Menu
Choose 1On or 2Off A Press
^ Call Charge will not appear after leaving a 3 Way Call (Break Away).
^ Call Time appears at the same time.
+
H
H
^ Total Charges and Call Charge remain even if handset power is turned off.
^ When the most recent call is a received call, -------Yen appears.
^ Sum of charges appears for 3 Way Calling (Optional Service).
^ Call Charge will not appear when calls are interrupted due to weak signal.
Reset Total Charges
Functions A Charges A Total Charges
Set Call Charge to appear automatically after each call
Functions A Charges A Instant Display
b
b
b
KOff
2
Basic Handset Operations
2-20
2-21
Page 46

My Number & Owner Profile
Confirm handset phone number.
^
Save name, reading, phone number, mail address, postal code, personal data and photo.
^
Handset phone number cannot be changed or deleted on the handset.
2
Basic Handset Operations
Index Menu
H
Functions
Select 0My Number and press
1
C To open Owner Profile, press d w A
Enter Security Code
^ Owner Profile contents are similar to those of
Phone Book (see P.5-12).
^ To create QR Code for Owner Profile, see
P.15-37.
Press g to exit
2
1111
2222
Edit, Delete & Copy
Index Menu
Enter Security Code A Press b A Select Edit A Press b A For
more, see Steps 4 - 6 in "Editing Phone Book" on P.5-15
C To delete Owner Profile (all items except handset number), enter Security Code and
C To copy an item in Owner Profile, enter security code and press b A Use F to select
H
press b A Press b A Select Delete A Press b A Choose 1Yes A Press b
an item A Press b A Select Copy A Press b A For more, see Step 5 and onward in
"Copy/Cut & Paste" on P.4-17
B Image for Photo cannot be copied.
Add, edit, delete or copy Owner Profile items
Functions A My Number A Details (d)
b
2-22
Page 47

Manner Mode
3-1
Page 48

Minding Mobile Manners
Manner Mode
Please use your handset responsibly. Use these basic tips as a guide. Inappropriate
handset use can be both dangerous and bothersome. Please take care not to disturb
others when using your handset. Adjust handset use according to your surroundings.
^
Turn it off in theaters, museums and other places where silence is the norm.
^
Refrain from using it in restaurants, hotel lobbies, elevators, etc.
^
3
Observe signs and instructions regarding handset use aboard trains, etc.
^
Refrain from use that interrupts the flow of pedestrian or vehicle traffic.
Manner Mode
Manner-Related Features
C
Manner Mode: see P.3-3
Press Manner Key to automatically mute all Ring Tones and activate Vibration mode
for incoming calls, mail and information.
C
Vibration Mode: see P.8-4
Activate Vibration mode to use handset vibration to alert you to incoming calls, mail,
etc. in public places.
C
Volume Settings: see P.8-2,
Decrease or mute Ring Tone volume for incoming calls/mail/information as well as
tones for Web or V-Applications when carrying handset in public places.
Whisper Mode: see P.3-5
C
Use Whisper Mode to increase microphone sensitivity, allowing you to lower your
voice and speak softly when you must use handset in public places.
Off-Line Mode: see P.3-6
C
Use Off-Line Mode to suspend all handset transmissions. In Off-Line Mode,
incoming/outgoing calls and Vodafone live! transmissions are blocked.
Message Recorder: see P.15-4
C
Use Message Recorder to handle incoming calls when it is inappropriate or unsafe to
answer.
I
P.12-2
Activating & Canceling
Activate or cancel Manner Mode in Standby, Web information, mail windows (List
View, message window, etc.) or while using V-Applications.
Activating Manner Mode
Press
1
i and Manner Mode Set appear. The following
indicators appear as set in Manner Settings (see
P.3-4).
j
Message Recorder
h Silent g Rising Tone
Canceling Manner Mode
In Standby, press
1
1
When Manner Mode is Active
C
Power On/Off and error tone as well as Keypad Sound are muted. Beeps in Call
Waiting and 3 Way Calling are heard.
C
Shake Sound and barcode recognition tone volume depend on Manner Settings.
C
Shutter Click and Self Timer tone sound even in Manner Mode.
C
Sound played on Music Player or Voice Recorder are muted (use headphones).
^
Even in Manner Mode, Ring Tone can be heard through headphones. Volume is
fixed to Level 1.
C
Settings for Manner Mode are applied to: Message Recorder, Ring Tone Level,
Vibration, LED Indicator, Whisper Mode, Sound Volume, Alarm Volume, Alarm
Vibration, V-Appli Volume and V-Appli Vibration.
C
When Message Recorder is recording messages, the other party's voice is heard
through Earpiece.
i disappears and Manner Mode is canceled.
for 1+ seconds
j
f Vibration
for 1+ seconds
j
3
Manner Mode
3-2
3-3
Page 49

Manner Mode Settings
Customize Manner Mode settings.
Default settings:
Message Recorder On Ring Tone Level Silent (All) Vibration On (All)
3
LED Indicator Small Light Whisper Mode On Sound Volume Silent
Manner Mode
Alarm Volume Silent Alarm Vibration On V-Appli Volume Silent
V-Appli Vibration On
LED Indicator
Index Menu
H
Select from 1Normal to 3Off A Press
Normal Mobile/Small Light flashes as set in Call Functions (see P.8-2)
Small Light Small Light flashes
Off No lights
Flash Mobile/Small Light for incoming communications
Functions A Settings 2 A Manner Settings A LED Indicator
b
3
Manner Mode
Message Recorder
Index Menu
H
Choose 1On or 2Off A Press
Ring Tone Level
Index Menu
H
Activate or deactivate Message Recorder
Functions A Settings 2 A Manner Settings A Message Recorder
b
Set Ring Tone volume
Functions A Settings 2 A Manner Settings A Ring Tone Level
Select from 1Incoming Call to 6Confirm Delivery A Press b A
1
Select
^ For Silent, Speaker is muted and sounds can be heard through headphones. Volume is
fixed to Level 1.
Index Menu
Silent, 2Rising Tone or 3Level 1 A Press
Vibration
H
Set vibration to alert you to incoming calls/mail
Functions A Settings 2 A Manner Settings A Vibration
b
Select from 1Incoming Call to 6Confirm Delivery A Press b A
1
Choose
Alarm Volume
Index Menu
On or 2Off A Press
H
Functions A Settings 2 A Manner Settings A Alarm Volume
Adjust level A Press
Adjust Alarm volume
b
b
Whisper Mode
Index Menu
H
Choose 1On or 2Off A Press
^ Use Whisper Mode to increase microphone sensitivity, allowing you to lower your voice and
speak softly when you must use handset in public places (i flashes).
Whisper Mode can be set On/Off during a call by pressing j for 1+ seconds.
+
Sound Volume
Index Menu
After the call, Whisper Mode will be canceled.
H
Select 6Sound Volume A Press b A Adjust level A Press
V-Appli Volume
Index Menu
H
Activate or deactivate Whisper Mode
Functions A Settings 2 A Manner Settings A Whisper Mode
b
Adjust sound volume
Functions A Settings 2 A Manner Settings
b
Adjust V-Appli volume
Functions A Settings 2 A Manner Settings
Select 9V-Appli Volume A Press b A Select 1Silent or 2Level 1
A
Press
V-Appli Vibration
b
Handset vibrates while using V-Applications
Alarm Vibration
Index Menu
H
Handset vibrates when Alarm Time arrives
Functions A Settings 2 A Manner Settings A Alarm Vibration
Choose 1On or 2Off A Press
3-4
b
Index Menu
H
Functions A Settings 2 A Manner Settings A V-Appli Vibration
Choose 1On or 2Off A Press
b
3-5
Page 50

Off-Line Mode
Use Off-Line Mode to suspend all handset transmissions.
^
In Off-Line Mode, incoming/outgoing calls and Vodafone live! transmissions are blocked.
^
Off-Line Mode is
by default.
Off
Activating Off-Line Mode
3
Manner Mode
1
+
H
Index Menu
Choose 1On and press
1
S appears.
Canceling Off-Line Mode
Index Menu
Choose
1
S disappears and Off-Line Mode is canceled.
^ When Off-Line Mode is set while a Network V-Application (see IP.10-4) is
paused, V-Appli Paused Cannot Connect to Network in Off-line Mode Off-line
Mode On? appears. Choose 1Yes and press b to enter Off-Line Mode. (Network
connection is disabled until Off-Line Mode is canceled.)
^ While handset is closed (clamshell closed) or Display shuts down for Panel Saving
in Off-Line Mode, Small Light flashes red, green and orange.
Functions A Settings 1 A
Off-Line Mode
b
H
Functions A Settings 1 A
Off-Line Mode
and press
2
Off
b
3-6
Page 51

Entering Characters
4-1
Page 52

Character Selection
Use Kana and Pager (see P.4-10) to enter alphanumerics, Symbols, hiragana, kanji,
katakana and Pictographs. With the exception "Pager Code" on P.4-10, most text
entry operations are described using Kana Mode.
Entry Modes
j
Press
F%G%H%@%A%B%D%F
Alternatively, use F to toggle between entry modes after pressing j once.
4
Entering Characters
@ABDFGH
NewMessage
^
Cancel Menu決定
Current Entry Mode
C
C
+
to toggle between character entry modes as follows:
Available Modes
*/12K
@ Kanji (hiragana) E
A Double-byte katakana F
B Single-byte katakana G Single-byte number
Double-byte alphanumerics
C
OK
(upper/lower case)
Double-byte alphanumerics
D
(lower/upper case)
Single-byte alphanumerics
(upper/lower case)
Single-byte alphanumerics
(lower/upper case)
H Pictograph Code
I Character Code
Upper & Lower Case
In double- or single-byte alphanumerics mode, press k to toggle between upper
case and lower case. For Pager Mode (see P.4-10), in double- or single-byte entry
mode, press
k
to toggle between upper and lower case.
k
@ABCFGH @ABDFGH
Pictograph & Character Codes
Press e to toggle as follows:
Pictograph Code 1
Pictograph Code 4
%
Code
^
Pictograph Code page number appears at the bottom.
Pictograph Code 1
^ Handset Character Codes correspond to 6,355 kanji.
^ Some characters are not available for mail addresses, etc.
%
Pictograph Code 2 % Pictograph Code 3 %
%
Pictograph Code 5 % Pictograph Code 6 % Character
Key Assignments
Multiple characters are assigned to each key. Press a key to toggle between character
options for that key.
1
Example: In katakana entry, press
When entering characters, press
f
three times for
to toggle between character options in reverse.
(Not available for entering single-byte number, Pictographs and Character Codes.)
Example: Enter
Kanji (Hiragana)
Key
[Double-byte]
あいうえお
あいうえお
1
2
3
4
5
6
7
8
9
0
q
p Log, Double-byte Symbol
j Change Entry Mode
k Toggle Case (for some characters)
i
Press
i
Long
Press
1
Disabled until hiragana is converted.
2
- is available only in single-byte katakana entry.
3
Extensions are listed for easy entry.
4
- and , (Pause) are for phone number entry.
5
Single-byte for single-byte katakana/alphanumeric entry.
6
Press f once for each character to recover immediately after deleting. [Not available
after deleting text with
7
List is not available for Character Codes.
あいうえおあいうえお
ぁぃぅぇぉ
ぁぃぅぇぉ
ぁぃぅぇぉぁぃぅぇぉ
かきくけこ
かきくけこ カキクケコ
かきくけこかきくけこ
さしすせそ
さしすせそ サシスセソ
さしすせそさしすせそ
たちつてとっ
たちつてとっ タチツテトッ
たちつてとったちつてとっ
なにぬねの
なにぬねの ナニヌネノ
なにぬねのなにぬねの
はひふへほ
はひふへほ ハヒフヘホ
はひふへほはひふへほ
まみむめも
まみむめも マミムメモ
まみむめもまみむめも
やゆよゃゅょ
やゆよゃゅょ ヤユヨャュョ
やゆよゃゅょやゆよゃゅょ
らりるれろ
らりるれろ ラリルレロ
らりるれろらりるれろ
わをんー、。
わをんー、。
わをんー、。わをんー、。
e(Line Break)
゛゜
゛゜
, Log/Double-byte
゛゜゛゜
Symbol/Pictograph List
C Conversion (Up) Cursor Up
D
Conversion (Down)
B Cursor Left
A Cursor Right
Delete One Character/
Cancel Conversion
f Recover up to 64 deleted characters
b OK
e
d
Phonetic
Conversion
Hiragana to Katakana/
Alphanumerics
Conversion
, then press f to return to
いいいい
Katakana
[Double & Single-byte]
アイウエオ
アイウエオ
アイウエオアイウエオ
ァィゥェォ
ァィゥェォ
ァィゥェォァィゥェォ
カキクケコ ABCabc2
カキクケコカキクケコ
サシスセソ DEFdef3
サシスセソサシスセソ
タチツテトッ GHIghi4
タチツテトッタチツテトッ
ナニヌネノ JKLjkl5
ナニヌネノナニヌネノ
ハヒフヘホ MNOmno6
ハヒフヘホハヒフヘホ
マミムメモ
マミムメモマミムメモ
ヤユヨャュョ TUVtuv8
ヤユヨャュョヤユヨャュョ
ラリルレロ
ラリルレロラリルレロ
ワヲンー、。
ワヲンー、。
ワヲンー、。ワヲンー、。
e(Line Break)
2
゛゜-
1
i
(Long Press).]
Alphanumerics
[Double & Single-byte]
@./_―1
@./_―1
@./_―1@./_―1
X (space)
ABCabc2 22222
ABCabc2ABCabc2
DEFdef3 33333
DEFdef3DEFdef3
GHIghi4 44444
GHIghi4GHIghi4
JKLjkl5 55555
JKLjkl5JKLjkl5
MNOmno6 66666
MNOmno6MNOmno6
PQRSpqrs7
PQRSpqrs7
PQRSpqrs7PQRSpqrs7
TUVtuv8 88888
TUVtuv8TUVtuv8
WXYZwxyz9
WXYZwxyz9
WXYZwxyz9WXYZwxyz9
,.0
,.0e
,.0,.0
(Line Break)
Single-byte Mail/
Web Extensions
5
/Pictograph List
Cursor Down e(Line Break)
Toggle Case + Toggle
Mode (upper/lower and
lower/upper case)
Delete One Character
Delete All
─────
─────
(space)
(space)(space)
ああああ
.
3
.
ウウウウ
Numbers
[Single-byte]
11111
77777
99999
00000
U -, (Pause)
####
───── ─────
6
Pictograph Code 1 - 6
& Character Codes
4
─────
─────
Delete Code/One
Character
Toggle Pictograph Code 1-
6 and Character Code +
Toggle Pictograph List 1 - 6
and Log List
Open list for
Pictograph Code 1 - 6
1
11
2
22
3
33
4
44
5
55
6
66
7
77
8
88
9
99
0
00
7
4
Entering Characters
7
4-2
4-3
Page 53

Entering Characters
B DE
DE
Kanji, Hiragana & Katakana
鈴木
Following the example below, enter
(hiragana) entry mode. Switch to double-byte or single-byte katakana mode to enter
katakana. Alternatively, enter hiragana and then select katakana from the word
suggestion list.
4
Entering Characters
Word suggestions change as hiragana are entered.
Press
1
three times
3
鈴木
to learn how to enter characters in kanji
鈴木鈴木
J@
P
NewMessage
す
N
*/12K
Press D
5
C To see other suggestions, press d J or e W.
k
and use E to select a word
C To exit the list, press i.
C To change segment, see "Segmenting Phrases" below.
b
Press
6
J@ E
P
NewMessage
鈴木
*7鈴木
*6スズキ
*5鱸
*4鈴木京香
*3鈴木田
*2鈴切
Back Next変換
J@
P
NewMessage
鈴木
Convert
Select
N
*/12K
N
1*/12K
4
Entering Characters
Press
2
3
4
A
^ When the next character is on the same key, press A first.
Press
Press
^ To enter hiragana without converting to kanji, skip to Step 6.
three times and press
3
2
twice
q
98すぐに
97すぐ
96する
95スケジュール
94すべて
93スタート
Convert
kanji
変換
J@
P
NewMessage
す
98すぐに
97すぐ
96する
95スケジュール
94すべて
93スタート
Convert
kanji
変換
J@
P
NewMessage
すず
61涼しい
6*鈴
59鈴木
58珠洲
57錫
56紗
Convert
kanji
変換
J@
P
NewMessage
すずき
*7鈴木
*6スズキ
*5鱸
*4鈴木京香
*3鈴木田
*2鈴切
Convert
kanji
変換
InputMethod
N
*/12K
InputMethod
N
*/12K
InputMethod
N
*/12K
InputMethod
21さん
2*くん
19ちゃん
18君
17様
16殿
Convert
Cancel Menu変換
OK
Learning Function
C
The most recently used word appears first in the list.
Predictive & Previous Usage
C
Use Predictive and Previous Usage to convert hiragana to kanji more quickly.
Predictive Word suggestions change as up to 5 hiragana are entered
Previous Usage
^
Both functions are active by default (see
Suggests words/characters likely to follow entry based on previous entries
).
P.4-14
User Dictionary
C
Save frequently used words/phrases to select from the word suggestion list (see
).
P.4-15
C
Segmenting Phrases
If the word is not in the list, press i after Step 5 to exit. Then use F to segment
hiragana to convert separately.
Example: Segment
みち みち 三ち 三智
みち
みち
みちみち
into
b
みみみみ
and
ちちちち
.
b
4-4
4-5
Page 54

C
D
Selecting Multiple Converted Words
Press
k
Example: To enter
にしやまだいすけ
西山大輔
西山大輔
西山大輔西山大輔
西山大輔
Small Kana (っっっっ , ッッッッ , etc.)
Enter small hiragana
ああああ, いいいい, うううう, ええええ, おおおお, つつつつ, やややや, ゆゆゆゆ
k
西山大輔
and
よよよよ
as well as small katakana.
Symbols, Pictographs & Emoticons
Symbols & Pictographs
Press
1
(Log List is available in some entry modes)
Recently used Symbols/Pictographs appear.
^ -- appears by default or when Log List is deleted (see below).
p
or
to open Log List
q
Enter a character and press
1
4
Entering Characters
k
Adding ゛゛゛゛ or ゜゜゜゜
Enter a character and press
1
^ In kanji (hiragana)/double-byte katakana entry, press the key
゛゛゛゛
once to add
characters, and press twice to remove. For
characters, press once to add
to remove.
In Single-byte Katakana Entry
+
^ Press q once to add
^ Press i to remove
to
かかかか
(Ka) row,
゙゙゙゙
q
ささささ
(Sa) row and
゛゛゛゛
, twice to add
゙゙゙゙
and twice for
゚゚゚゚
or
.
たたたた
(Ta) row
はははは
(Ha) row
゜゜゜゜
and three times
゚゚゚゚
. Symbols are single-byte.
Entering Alphanumerics
Enter alphanumerics in double-byte alphanumerics (upper & lower case) or
single-byte alphanumerics (upper & lower case) mode. Alternatively, enter numbers in
single-byte number mode.
a ad
^
In double-byte or single-byte alphanumerics mode, press k to toggle between upper
and lower case.
^
When the next character is on the same key (example: entering A then B), press A first
to move cursor.
3
Use
G
つ
k
っ
k
つ
は
q
ば
q
ぱ
q
は
2
^ Repeat Step 2 to enter more.
C To see more lists, press e or p. The list toggles as follows:
Press a key (
3
assigned character
^ Alternatively, press d W or i to exit list.
C
In a text entry window, press d
b A
C
Log List cannot be deleted in Pictograph Code mode.
C
To enter a Pictograph directly, enter 2 digits (see
C
To select from Pictograph List, follow these steps.
^
+
to select one and press
Log List % Symbol List (1 - 3) % Pictograph List (6 - 1)
B Press q to toggle the list in reverse order.
B Press D to scroll down.
0
9
-
) to exit list and enter the
Deleting Log List
Clear Symbols A Press b A Select 1OK A Press
5
Select
Press i twice to return to the text entry window.
B
In Pictograph Code Mode
B
To edit a code mid-entry, press i to clear first digit then enter correct digits.
Press
To toggle through Page 1 - 6 and Log List, press e.
A Select a Pictograph A Press
a
d
^ Single-byte Symbols do not appear in Log List.
^ Symbols are double or single-byte according to the entry mode. (Pictographs are all
double-byte.)
^ Alternatively, enter
and press D k. Some Symbols can be selected.
きごう
きごう
きごうきごう
b
I A
Select
I
Input/Conversion
0
P.17-8 - 17-10).
b
JF G
P
NewMessage
^
Page1 Back選択
b
Select
A
Press
N
5/12K
4
Entering Characters
4-6
4-7
Page 55

Emoticons
In a text entry window, press d
1
Select 8Emoticons and press
2
Select an emoticon and press
3
^ Enter two digits (01 - 50) to jump to the emoticon assigned to the number.
,
4
Entering Characters
+
Space
In a text entry window, press
1
^ Alternatively in alphanumeric entries, press 1 seven times to
enter a space.
I
b
b
Emoticons cannot be entered in Pictograph Code (1 - 6) mode.
^ For other emoticons, enter
^
Alternatively, enter a descriptive word such as
Corresponding emoticons can be selected.
and press D k.
かお
かお
かおかお
わーい
わーい
わーいわーい
or
うーん
うーん
うーんうーん
A
and press D
Ueda
Ueda
k
A
Copying from Phone Book
Insert Phone Book entry items into text entry windows.
Select from names, phone numbers, mail addresses or Personal Data.
In a text entry window, press d
1
Press e
2
Open a Phone Book entry
3
C To search Phone Book, see P.5-13.
B Skip the step of pressing A (l).
Use F to select an item and press
.
4
Use G to move cursor to target location
5
Press
6
Selected item is inserted.
4
b
I
b
J
P
NewMessage
Mr.Ueda'sphonenumber
is
Back Set開始
N
<Paste>
Start
4
Entering Characters
Line Break
Insert line breaks in text, Text Memo, BBS, etc.
Press D at the end of text
1
^ To insert line breaks in text, press 0 until e appears. For
kanji (hiragana) entry mode, then press b. Line break is inserted
at the cursor position.
^ Keystroke count varies by character entry mode (see P.4-3).
Mail & Web Extensions
In alphanumeric entry, press
1
Select an extension and press
2
^ Mail addresses and URLs are single-byte.
4-8
q
b
Contactmeat
D
Contactmeat
JF E
P
1.co.jp
2.ne.jp
3.ac.jp
4.or.jp
5http://
6www.
7.com
8@
9
選択
Select
N
Inserting TEL: or mailto:
C
To insert TEL: or mailto: before a phone number or mail address, follow these steps
after Step 5.
d j A
Press
In a text entry window, press d
e
C
Press
^
For more, see Steps 4 - 6 above.
Select 1Profile A Press b A Enter Security Code
b A
Select 1TEL: or 2mailto: A Press
Inserting Owner Profile
A Select XSaved Information A
I
b
Character Code
Use multi-digit Character Codes to enter characters.
In Character Code entry mode, enter four digits (see P.17-9 - 17-12)
1
4-9
Page 56

Pager Code
In a text entry window, press d
1
Select 0Input/Conversion and press
2
Select 1Input Method and press
3
Select 2Pager and press
4
Pager Code entry window opens.
C To switch to Kana Mode, select 1Kana A Press b
4
Entering Characters
Enter two digits (see P.4-11)
5
^ Pager Mode is active until switched to Kana Mode.
C
For text entry in Pager Mode, press j to toggle between entry modes as follows:
Single-byte lower case (
(
^
Press e to toggle between Pictograph Code 1 - 6 and Character Code mode.
C
Press k to toggle between upper and lower case.
+
I
b
b
b
Character Entry Modes
Pictograph Code 1 - 6 (H) & Character Code
M) %
Double-byte lower case (K)
I) %
^ Hiragana to Katakana/Alphanumerics Conversion is disabled in Pager Mode.
^ To enter ゛゛゛゛ or ゜゜゜゜, see Pager Code List on P.4-11.
Pager Code List
^
Blanks indicate no entry.
^
Upper and lower case are available for characters with gray background. Press k to switch.
Double-byte upper case Double-byte lower case
Second digit (Press secondly) Second digit (Press secondly)
1 2 3 4 5 6 7 8 9 0 1 2 3 4 5 6 7 8 9 0
1
ああああ いいいい うううう ええええ おおおお AAAA BBBB CCCC DDDD EEEE
2
かかかかききききくくくくけけけけここここ
3
ささささししししすすすすせせせせそそそそ
4
たたたたちちちち
つつつつててててとととと PPPP QQQQ RRRR SSSS TTTT
5
ななななににににぬぬぬぬねねねねのののの
6
ははははひひひひふふふふへへへへほほほほ
7
ままままみみみみむむむむめめめめもももも¥¥¥¥&&&&
8
やややや(((( ゆゆゆゆ)))) よよよよU####
First digit (Press first)
9
ららららりりりりるるるるれれれれろろろろ
0
わわわわををををんんんん゛゛゛゛
Single-byte upper case Single-byte lower case
Second digit (Press secondly) Second digit (Press secondly)
1 2 3 4 5 6 7 8 9 0 1 2 3 4 5 6 7 8 9 0
1
アアアア イイイイ ウウウウ エエエエ オオオオ AAAA BBBB CCCC DDDD EEEE
2
カカカカキキキキククククケケケケココココ
3
ササササシシシシススススセセセセソソソソ
4
タタタタチチチチ
ツツツツテテテテトトトト PPPP QQQQ RRRR SSSS TTTT
5
ナナナナニニニニヌヌヌヌネネネネノノノノ
6
ハハハハヒヒヒヒフフフフヘヘヘヘホホホホ
7
ママママミミミミムムムムメメメメモモモモ¥¥¥¥&&&&
8
ヤヤヤヤ(((( ユユユユ)))) ヨヨヨヨ
First digit (Press first)
9
ララララリリリリルルルルレレレレロロロロ11112222333344445555
0
ワワワワヲヲヲヲンンンン゛゛゛゛]66667777888899990000
*1
70
Press
*2
80
Press
^
and are double-byte.
FFFF GGGG HHHH IIII JJJJ
KKKK LLLL MMMM NNNN OOOO
UUUU VVVV WWWW XXXX YYYY
ZZZZ????!!!!‑‑‑‑////
11112222333344445555
]
66667777888899990000
FFFF GGGG HHHH IIII JJJJ
KKKK LLLL MMMM NNNN OOOO
UUUU VVVV WWWW XXXX YYYY
ZZZZ????!!!!‑‑‑‑////
U
####
to insert line breaks (in mail message text, Text Memo, etc.).
to toggle between upper and lower case.
Space
Space
*1
*2
*1
*2
1
ぁぁぁぁ ぃぃぃぃ ぅぅぅぅ ぇぇぇぇ ぉぉぉぉ aaaa bbbb cccc dddd eeee
2
3
4
5
6
7
8
First digit (Press first)
9
0
1
2
3
4
5
6
7
8
First digit (Press first)
9
0
っっっっ pppp qqqq rrrr ssss tttt
ゃゃゃゃ ゅゅゅゅ ょょょょ
ァァァァ ィィィィ ゥゥゥゥ ェェェェ ォォォォ aaaa bbbb cccc dddd eeee
ッッッッ pppp qqqq rrrr ssss tttt
ャャャャ ュュュュ ョョョョ
ffff gggg hhhh iiii jjjj
kkkk llll mmmm nnnn oooo
uuuu vvvv wwww xxxx yyyy
zzzz
、、、、。。。。
ffff gggg hhhh iiii jjjj
kkkk llll mmmm nnnn oooo
uuuu vvvv wwww xxxx yyyy
zzzz
,,,,....
Entering Characters
*1
*2
*1
*2
4
4-10
4-11
Page 57

Conversion Methods (Japanese Only)
DE
Phonetic Conversion
Enter alternate readings to search for kanji.
Enter reading in hiragana
1
Press e
2
Select a kanji and press
3
4
Entering Characters
One-Hiragana Conversion
Enter the first hiragana to access previously selected words.
Example: To enter
^
One-Hiragana Conversion and User Dictionary (see P.4-15) share memory. Selected
words may not be saved if User Dictionary is full.
^
Up to 20 entries are saved per hiragana (Title Word) between One-Hiragana Conversion
and User Dictionary. When memory is full, the oldest entry is deleted to make room for a
new entry. However, User Dictionary remains unchanged.
@
鈴木
鈴木
鈴木鈴木
b
鈴木す 鈴木
b
J@ G
P
[かい]
**1介会解回塊
壊廻快怪悔
*11恢懐戒拐改
魁晦械海灰
*21界皆絵芥蟹
開階貝凱蓋
*31街鎧骸會偕
懐懈槐榿薤
*41薈誨誡谿豈
罫堺鮭潰届
*51買桧丐乖价
傀儿囘剴匯
Back 採用
N
OK
Hiragana to Katakana/Alphanumerics Conversion
Enter katakana and alphanumerics in kanji (hiragana) entry mode.
Enter hiragana and press d
1
^ To enter AM, press 26 then d ^.
Use
E
2
^ Hiragana to Roman Letter Conversion (hiragana with ゛゛゛゛ or ゜゜゜゜ is converted to the same
^
to select a word and press
characters/Symbols):
ああああ@
@ いいいい.
@@
かかかかA
A ききききB
AA
ささささD
D ししししE
DD
たたたたG
G ちちちちH
GG
ななななJ
J ににににK
JJ
ははははM
M ひひひひN
MM
ままままP
P みみみみQ
PP
ややややT
T ゆゆゆゆU
TT
ららららW
W りりりりX
WW
わわわわ,
Hiragana to Number Conversion (hiragana with
B ああああ (A) row...1 B かかかか (Ka) row...2 B ささささ (Sa) row...3 B たたたた (Ta) row...4
B なななな (Na) row...5 B はははは (Ha) row...6 B まままま (Ma) row...7 B やややや (Ya) row...8
B らららら (Ra) row...9 B わをんー
, をををを.
,,
わをんー (Long Sound)、。
わをんーわをんー
^
b
. うううう/
..
B くくくくC
BB
E すすすすF
EE
H つつつつI
HH
K ぬぬぬぬL
KK
N ふふふふO
NN
Q むむむむR
QQ
U よよよよV
UU
X るるるるY
XX
. んんんん
..
/ ええええ_
//
C けけけけ
CC
F せせせせ
FF
I てててて
II
L ねねねね
LL
O へへへへ
OO
R めめめめS
RR
V
VV
Y れれれれZ
YY
Space
or
is converted to the same numbers):
゛゛゛゛
゜゜゜゜
、。Line Break...0
、。、。
_ おおおお
__
Space
Space
Space
Space
Space
S もももも
ーー ーー ーー ーー
ーーーー (Long Sound)、。
SS
Z ろろろろ
ZZ
ここここ
そそそそ
とととと
のののの
ほほほほ
、。 Line Break
、。、。
Space
Space
Space
Space
Space
Space
Space
Space
Space
Quick Conversion (for Hiragana)
Quick Conversion helps reduce keystrokes needed to enter frequently used words.
A list of word suggestions appears based on the key pressed.
Use Quick Conversion in kanji (hiragana) mode only.
微妙
Example: To enter
Normal Conversion
Quick Conversion
(for Hiragana)
微妙
微妙微妙
66q (びびびび) 77 (みみみみ) 888888 (ょょょょ )
111 (うううう) D k
6q (ばばばば) 7 (まままま) 8 (やややや) 1 (ああああ) C (convert)
4
Entering Characters
4-12
Enter hiragana and press
1
Cursor turns green.
^ While cursor is green, use F to segment entered hiragana and then convert one
segment at a time.
C To cancel Quick Conversion, press i A Press D for normal conversion
Use E to select a word and press
2
+
The most recently used word (mostly nouns) appears first.
C
b
4-13
Page 58

One Hiragana Predictive Entry
C
Enter hiragana and initiate Quick Conversion. Words starting with a hiragana in the
for
same row (
Example: When
5:00 - 10:59 11:00 - 16:59 17:00 - 22:59 23:00 - 4:59
朝一番
朝一番
朝一番朝一番
朝帰り
朝帰り
朝帰り朝帰り
行ってきます
行ってきます
行ってきます行ってきます
いってらっしゃい
いってらっしゃい
いってらっしゃいいってらっしゃい
4
Entering Characters
^
Words in the list are preset by time blocks.
^
If Clock is not set, only words for 11:00 - 16:59 are available.
ああああ, いいいい, うううう, ええええ, おおおお
is entered
ああああ
あちぃ〜
あちぃ〜
あちぃ〜あちぃ〜
後でね
後でね
後でね後でね
いただきま〜す♪
いただきま〜す♪
いただきま〜す♪いただきま〜す♪
移動中
移動中
移動中移動中
…
……
…
) appear. Word suggestions vary by time of day.
ああああ
遊ぼう
遊ぼう
遊ぼう遊ぼう
明日
明日
明日明日
急いで行くよ
急いで行くよ
急いで行くよ急いで行くよ
今どこ?
今どこ?
今どこ?今どこ?
…
……
…
…
……
…
アウチ!!
アウチ!!
アウチ!!アウチ!!
ありがとう
ありがとう
ありがとうありがとう
いえーい!!!
いえーい!!!
いえーい!!!いえーい!!!
行こうね
行こうね
行こうね行こうね
One Hiragana Word Call
Enter the first hiragana of entries you used Quick Conversion for. The most recently
selected word appears first.
Example: You entered
あたあさわ
あたあさわ
あたあさわあたあさわ
and selected
お父さんあ
お父さん
お父さん
お父さんお父さん
last time.
Conversion Settings
Disable Predictive/
Previous Usage
In a text entry window, press d
A
Press b A Select 2Predictive or 3Previous Usage A Press b
A
Choose 2Off A Press
Reset Learning
In a text entry window, press d
A
Press b A Select 4Reset Learning A Press b A Select 1OK A
b
Press
^ Words saved in User Dictionary remain.
Disable
Predictive
or
Previous Usage
I
A Select 0Input/Conversion
(see
P.4-5
b
Clear log of words selected in kanji conversion, Predictive, etc.
I
A Select 0Input/Conversion
Dictionaries (Japanese Only)
F43
User Dictionary
Save up to 100 frequently used words/phrases and assign Title Words in hiragana to entries.
In text entry windows, enter Title Word and convert. Entries appear among word suggestions.
Save up to five entries per Title Word.
New Entry
…
……
…
Index Menu
H
Enter a word/phrase A Press b A Enter Title Word A Press
^ Enter up to 15 characters per word/phrase and eight characters in hiragana per Title Word.
Edit
Index Menu
H
Edit
Select a word or phrase
A
Word
Press b A Select 1Overwrite or 2New Entry A Press
Deleting One Entry
Select a word or phrase A Press d
b A
)
KOn
Deleting All
Choose 1Yes A Press
d I A
Press
A
Press
b
V501SH Download Dictionary
Download specialized V501SH Download Dictionaries from Sharp's Space Town
Mobile Internet site. Activate up to two dictionaries at one time to improve handset
character conversion. Dictionary words appear among word suggestions.
For details, access Sharp's Space Town Mobile Internet site (see
Acquire Dictionary
Save words/phrases to User Dictionary
Functions A Settings 2 A User Dictionary A New Entry
Edit or delete entries
Functions A Settings 2 A User Dictionary A Edit
A
Press b A Edit A Press b A Edit Title
I A
Select 2Delete A Press
b
Select 3Delete All A Press b A Choose 1Yes
P.8-2).
I
Activate downloaded dictionaries
b
Entering Characters
b
4
4-14
Index Menu
H
Functions A Settings 2 A User Dictionary A Acquire Dictionary
Select a number A Press b A Select a dictionary A Press
C To replace current dictionary, select a number A Press b A Press d I A Select
Change A Press b A Select a dictionary A Press b
b
4-15
Page 59

C
Press b A Select
Select a folder
Select
B When a file is already saved, Overwrite? appears
Press
4
Index Menu
Entering Characters
Select a number A Press b A Press d
Press
Editing Characters
Deleting
Use G to select a character and press
1
The highlighted character is deleted.
^ Recover up to 64 characters deleted with i. Press f once
for each character to recover immediately after deleting. Pressing
any other key disables the recover function.
,
From Data Folder
Data Folder
1
A
Choose
I
Yes or 2No
1
A Select Cancel A
A
Press b A
I A
b
A
Save Dictionary
b
Cancel
H
Functions A Settings 2 A User Dictionary A Acquire Dictionary
My Files
Press b A Select a dictionary file A Press d
A Press b A Select
A
Press b A Select a number A Press
Cancel dictionary
b
i
Press i for 1+ seconds to delete an entire entry. Characters deleted in this
manner cannot be recovered.
Kinoshita
Kioshita
A
i
Copy/Cut & Paste
When Menu N appears, copy or cut and paste text (up to 15,000 single-byte
characters) into the same window or another.
In a text entry window, press d
1
Select 1Copy or 2Cut and press
2
Move cursor to the first character of text and
3
4
5
6
7
b
press
Start point is set (End appears).
C To change the start point, press i.
Move cursor to the end of text and press
Open text paste target window and press d
Select 3Paste and press
b
Move cursor to target location and press
Text is inserted.
I
b
b
I
b
J
P
NewMessage
Managerofalumni.Emplo
yeeofAtradingcompany
.Callathomeafter1*
PM.
Back 終了
JF
P
PersonalData
Managerofalumni.Call
athomeafter1*PM.
夜
Cancel Menu決定
<Cut>
End
Cut
OK
N
N
44/6*
4
Entering Characters
Deleting Text Before or After Cursor
Replacing
i
Press
1
Enter another character
2
4-16
to delete a character
Mikako
Mikko
Mikiko
i
○○○○○○○○○○○○○
Use Delete
Previous to
delete
Press d
1
Select 6Delete Posterior or 7Delete Previous and press
2
Press
3
I
b
Use Delete
Posterior to
delete
b
4-17
Page 60

Text Memo
Save frequently used phrases for use in mail message, etc.
^
Save up to 20 Text Memo phrases to handset and 300 to Memory Card.
^
When memory is full, delete text to make room for new ones (see
Entering Text
^
Save up to 1,000 single-byte characters in Memo format and 128 single-byte characters
in Note format.
^
Ten editable Text Art are saved by default. Edit and replace default entries.
4
Entering Characters
Memo Format
Index Menu
Select 9Text Memo and press
1
Titles or the first part of saved text appear.
C To open text, select one A Press b
C To switch to Memory Card, press d I A Select Memory Card A Press b
Press d
2
Select Create New and press
3
Select 1New Memo and press
4
Enter text and press
5
C To save to Memory Card, press e G.
H
Briefcase
b
I
b
b
b
B To switch back to handset, press e s.
P.4-20
Note Format
Index Menu
Press d
).
1
Select Create New and press
2
Select 2New Note and press
3
Select Body Text and press
4
Enter text and press
5
Select Category and press
6
Select a category and press
7
C To check date and time of entry and last edit, select Details A Press
Press e
8
C To save to Memory Card, press e G.
Choose 1Yes and press
9
^ To save more text, repeat Steps 1 - 9.
+
H
Briefcase A Text Memo
I
b
b
b
b
b
b
B Press i to return.
j
B To switch back to handset, press e s.
b
Note format Text Memo can be sent via infrared (see P.13-2).
b
4
Entering Characters
Choose 1Yes and press
6
Text is saved.
^ To save more text, repeat Steps 2 - 6.
Saving from Message or Phone Book
C
In a text entry window, press d
Move cursor to the first character of text A Press b A Move cursor to the
A
Press b A Choose 1Yes A Press
end of text
4-18
A
b
I
A Select
Save Text Memo A Press b
4
b
4-19
Page 61

Text Memo Functions
Edit/Delete
Index Menu
Edit Memo
Select text
Press
4
Edit Note
Select text
Entering Characters
Body Text or Category
e
j
Delete Single Text Memos
Select text
1
Yes A Press
To Data Folder
Index Menu
Select text A Press d
Enter title
^ Memo format text is saved in text format.
^ Create sub folders if necessary.
Change to Vnote
Edit or delete Text Memo
H
Briefcase A Text Memo
A
Press d
b A
Select 1New Entry or 2Overwrite A Press
A
Press d
I A
I A
A
Press b A Edit text A Press b A Press
Select Edit A Press b A Edit A
Select Edit A Press b A Select
A Select 1New Entry or 2Overwrite A Press
A
Press d
I
A Select Delete A Press b A Choose
b
Save Note format Text Memo to Data Folder (Etc.). Text is
saved as vFile (see
H
Briefcase A Text Memo
I A
A
Press b A Select a folder A Press
Change Memo format text to Note format
Select To Data Folder A Press b A
P.12-38
).
b
b
b
Index Menu
Select text A Press d
^ Text Memo contents may change when converting formats.
^ Note cannot be converted to Memo.
H
Briefcase A Text Memo
I A
Select Change to Vnote A Press
4-20
b
Page 62

Phone Book
5-1
Page 63

Overview
Saving to Phone Book
Save frequently used phone numbers and mail addresses to Phone Book. Entry
names appear for calls from numbers saved in Phone Book.
C
Dialing from Phone Book (see P.5-11)
5
Phone Book
JE
P
UedaMikio
0051Friends
eeii
m
nPattern1
oPattern2
pMailFolder1
qMailFolder2z
03123XXXX3
Back Menu
C
Sending Sky/Super Mail from Phone Book (see IP.3-3)
JE
P
UedaMikio
0051Friends
eeii
m
Pattern1
n
Pattern2
o
MailFolder1
p
MailFolder2
q
03123XXXX3
Back Menu
C
When a Call Arrives
N
b
f
N
b
A
z
J N
A call arrives
J
P
UedaMikio
03123XXXX3
JE
P
UedaMikio
0051Friends
eeii
m
Pattern2
o
MailFolder1
p
MailFolder2
q
z
aaa@xxx.yyy
Back Menu
J
P
<<IncomingCall>>
AokiItirou
03123XXXX1
Menu
N
N
b
bb
J
N
P
Menu
JE
P
SelectMailType
K1
2
SendSuperMail
SendSkyMail
選択
Select
N
Phone Book Entry Items
^
Save up to 500 entries (000 - 499) in Phone Book (handset).
^
Save up to 10,000 entries (0000 - 9999) in Phone Book (Memory Card).
Item Description
Enter up to 18 single-byte characters.
c Name
d Reading
e Phone Number
i Mail Address
k Group
N
I
l Personal Data Add personal details. Use up to 60 single-byte characters.
b Secret Mode
m Photo
Personal Ring Tone
Incoming Notice
Picture Call/Mail
Mail Folder
Auto Reply
Option Settings
C
Contents are temporarily saved for later editing. Contents reappear after the call
ends.
Use kanji, hiragana, katakana (double or single-byte),
alphanumerics (double or single-byte) and Pictographs.
Katakana, alphanumerics or Symbols appear as names are
entered (up to 18 single-byte characters including ゛゛゛゛ and ゜゜゜゜)
Enter up to three phone numbers (24 digits each)
Enter up to three mail addresses (60 single-byte characters each)
Sort entries into 10 Groups (0 - 9). Change Group names or set
Ring Tone by Group.
Restrict access to Phone Book entries by saving them as
Secret Mode entries
Select an image to appear when you open a Phone Book entry.
Activate Picture Call/Mail to see the image set here for
incoming calls/mail.
Set Ring Tone by caller
Set Ring Tone by sender
Set images to appear by caller or sender
Messages are sorted into folders
Send a reply automatically to messages from specified senders
Incoming Calls while Editing
5
Phone Book
,
+
5-2
Back-up Important Information
Keep a separate copy of important information. When battery is exhausted or
removed for long periods, Phone Book entries may be lost. Handset damage may
also affect information recovery. Vodafone is not liable for any damages resulting
from accidental loss/alteration.
^ Use Phone Book Lock to protect entries from accidental alteration and to restrict
access to Phone Book information (see P.14-3).
^ Exchange Phone Book entries with other handsets, etc. via infrared (see P.13-2).
5-3
Page 64

5
Phone Book
New Phone Book Entries
Index Menu
Enter a name
1
Press
2
Characters entered for names (reading for kanji) appear after d.
^ Reading does not appear for Pictographs, pasted characters and
names entered with Quick Conversion.
^ Katakana, roman letters, numbers and Symbols appear in
single-byte.
C To correct reading, select d A Press b A Edit reading A
C To cancel, press e 3 A Choose 1Yes A Press b
Select e and press
3
Enter a phone number
4
^ Include the area code for landline phone numbers.
C To correct phone number, press B to move cursor A Press i to delete a digit at the
C Press q twice to enter - between digits. (- counts as a digit.)
C To enter Push Tones, press q three times to enter Pause (,) A Enter alphanumerics
Press
5
Select an icon and press
6
C
Select i and press
7
Enter a mail address
8
Press
9
Select an icon and press
10
C
C To set a Group, select k A Press b A Select a Group A Press b
C To enter Personal Data, select l A Press b A Enter information A Press b
C Photo: see P.5-6
C Saving Secret Mode Entries: see P.5-7
H
Tel Ops A Add to Phone Book
J d E
P
cUedaMikio
b
Press b
dUedaMikio
eUnsaved
iUnsaved
k0Untitled
lUnsaved
bOff
mUnsaved
Optionsettings
Cancel Save選択
Phone Book Details
b
cursor position A Enter a phone number (Press i for 1+ seconds to clear all.)
B Each Pause (,) indicates a one-second pause. The subsequent alphanumerics are
also sent as Push Tones (see P.15-2).
b
b
To save additional phone numbers, select
e
Unsaved
A Press b A Repeat Steps 4 - 6
b
b
b
To save additional mail addresses, select
i
Unsaved
A Press b A Repeat Steps 8 - 10
Select
Press d
11
Memory Number entry window opens. Assign a Memory Number to each Phone Book entry.
Saving to Handset
12
1
N
q
Enter Memory No. (000 - 499)
Entry is saved to Phone Book.
C
Use LCD Remote/Mic to call the number saved in Memory Number 000 (see
C
Use Speed Dial to call numbers saved in Memory Numbers 000 - 099 (see
P.15-47
P.5-14
).
).
Saving to Memory Card
1
Press e
^ c
appears only when Memory Card is inserted.
CTo switch back to handset, press e s again.
2
Enter Memory No. (0000 - 9999)
C
Press q to assign the smallest available number.
C
To specify a range of numbers, enter hundreds or tens digit and press q.
^
To specify hundreds, enter first digit A Press
Example: Enter
^
To specify tens, enter two digits A Press
Example: Enter
C
Press q to assign the smallest available number.
C
To specify a range of numbers, enter thousands, hundreds or tens digit and press q.
^
To specify thousands, enter first digit A Press
Example: Enter
^
To specify hundreds, enter two digits A Press
Example: Enter
^
To specify tens, enter three digits A Press
Example: Enter
+
Exchange Phone Book entries between handset and Memory Card (see P.11-9).
G
Assign Memory No. Automatically (Handset)
q
3q
21q
. The range is 300 - 399.
q
. The range is 210 - 219.
Assign Memory No. Automatically (Memory Card)
q
3q
21q
123q
. The range is 3000 - 3999.
q
. The range is 2100 - 2199.
q
. The range is 1230 - 1239.
5
Phone Book
5-4
5-5
Page 65

Warning Messages
On Display Cause Operation
Choose 1Yes and press b to
overwrite the entry. Choose 2No
Overwrite?
Memory Full Cannot Save
Secret Data saved
5
Photo
Phone Book
Save an image to Phone Book entries. The image appears for calls/mail from that entry.
The Memory Number is
already in use
All Memory Numbers are in use
The number is already used for a
Secret Mode Phone Book entry
and press b to enter another
Memory Number.
To assign Memory Number
automatically, see P.5-5.
Overwrite or delete entries (see P.5-15)
Activate Secret Mode (see P.14-6)
to overwrite
Picture Call/Mail
When Photo is set, Picture Call/Mail is activated automatically and the image appears
for incoming calls/mail. To hide image, follow these steps to cancel Picture Call/Mail.
In Phone Book Details (see P.5-4), select Option settings and press
1
Select 3Picture Call/Mail and press
2
Choose 2Off and press
3
C To activate Picture Call/Mail, choose 1On A Press b
Press e
4
Phone Book Details (see P.5-4) returns. Complete other fields.
,
j
Picture Call/Mail is canceled when source image in Data Folder is deleted, renamed
or moved.
b
b
b
5
Phone Book
Setting Photo
When Photo is set, Picture Call/Mail (see P.5-7) in Option Settings is activated
automatically and the image appears for incoming calls/mail.
To hide image, cancel Picture Call/Mail.
In Phone Book Details (see P.5-4), select m and press
1
Selecting from Data Folder
2
1
Select 1Data Folder and press
2
Select an image and press
3
b
Press
Phone Book Details (see P.5-4) returns. Complete other fields.
^ Some images in Data Folder may be too large for Phone Book Photo.
b
b
b
Capturing New Image
1
Select 2Sha-mail Shoot and press
2
Frame image on Display
3
4
b
Press
Captured image appears.
b
Press
Image is saved to Data Folder and Phone Book Details (see P.5-4) returns.
Complete other fields.
b
Saving Secret Mode Entries
In Phone Book Details (see P.5-4), select b and press
1
Choose 1On and press
2
Phone Book Details (see P.5-4) returns. Complete other fields.
^ Activate Secret Mode (see P.14-6) to open Secret Mode entries.
C
Activate Secret Mode (see
Open a Phone Book entry (see P.5-11)
A
Select b A Press b A Choose 2Off A Press b A Save entry (see
Steps 6 - 8 on P.5-15)
Do not save confidential information in Phone Book. Security Code and thus Secret
,
+
Mode entries may be compromised.
When not in Secret Mode, Phone Book Names/Photo images do not appear for
incoming calls/mail from numbers/addresses in Secret Mode entries. Personal Ring
Tone and Incoming Notice are disabled. Names for numbers in Secret Mode entries do
not appear in Redial or Call History. Names saved in Redial/Call History before an entry
is converted to a Secret Mode entry appear even if handset is not in Secret Mode.
b
Change Secret to Standard
) and follow these steps.
P.14-6
A
Press b A Select Edit A Press b
b
5-6
5-7
Page 66

F31
5
Phone Book
Saving from Redial or Call History
Index Menu
Select 4Redial or 5Call History and press
1
Press d
2
Select Add to Phone Book and press
3
New Entry
4
New Item
,
+
H
Tel Ops
I
1
Select 1New Entry and press
2
Enter name and press
Phone number is entered automatically and Phone Book Details (see P.5-4) returns.
Complete other fields.
1
Select 2New Item and press
2
Open a Phone Book entry (see P.5-13)
^ Skip the step of pressing A (l).
^ When three phone numbers are already saved, the phone number is not added.
3
4
Call History records without Caller ID cannot be saved to Phone Book.
Numbers and mail addresses in received messages (see IP.4-8) or Notepad
Memory (see P.2-15) can be saved to Phone Book.
b
Press
Select an icon and press
Phone Book Details (see P.5-4) appears. Complete other fields.
b
b
b
b
Phone Book Memory Status
b
b
Option Settings
Set Personal Ring Tone, Incoming Notice, Picture Call/Mail (see P.5-7), Mail Folder
and Auto Reply (see
Set All
One Number/
Address
Overview
In Phone Book Details (see P.5-4), select Option settings and press
1
Option Settings menu appears.
Select an item and press
2
Apply Same Setting to All
3
4
1
Select 1Set All and press
Settings by Number/Address
1
Select 2One Number/Address and press
2
Select a number or address and press
3
Choose 1On and press
To cancel, choose
C
Canceling
1
Choose 3Off and press
Option Settings menu returns.
CPress e j to exit.
Set Options (see P.5-10 - 5-11)
Phone Book Details (see P.5-4) returns. Complete other fields.
I
P.6-2). Select Set All or One Number/Address.
Apply the same setting to every number/address in a single Phone
Book entry. Set All cancels One Number/Address settings.
Apply setting to each number/address independently. One
Number/Address cancels Set All settings.
b
b
b
JE
P
OptionSettings
Off
K1PersonalRingToneI
2IncomingNotice
3PictureCall/Mail
4MailFolder
5AutoReply
b
b
2
A Press b A Press e
Off
j
Set 選択
Select
Option Settings Menu
b
b
N
5
Phone Book
Index Menu
Select 1Memory and press
1
Number of entries appears.
C To see details, select 1Phone Book A Press b
C Press g to exit.
H
Functions A Settings 1
b
5-8
JE
P
F31:Memory
K1PhoneBookXXXI
2MemoryUsageXXX%
3FileCabinetXXX%
Select
N
Menu選択
,
For phone numbers, the following settings apply only to Vodafone handset
numbers: Incoming Notice, Mail Folder and Auto Reply.
5-9
Page 67

Setting Options
Follow these steps after opening Option Settings menu (see P.5-9).
5
Phone Book
Personal Ring Tone
& Incoming Notice
Ring Tone
Select 1Personal Ring Tone or 2Incoming Notice A Press b A Perform
Step 3 on P.5-9 to set target number/address
b A
Select a tone or melody (see Steps 1 - 3 on P.8-3) A Press e
A
Press e
Vibration
Select 1Personal Ring Tone or 2Incoming Notice A Press b A Perform
Step 3 on P.5-9 to set target number/address
b A
Select 1On, 2Off or 3SMAF Link A Press b A Press e
A
Press e
Vibration Pattern
Select 1Personal Ring Tone or 2Incoming Notice A Press b A Perform
Step 3 on P.5-9 to set target number/address
A
Press b A Select a pattern A Press b A Press e
e
Press
j
Mobile/Small Light
Select 1Personal Ring Tone or 2Incoming Notice A Press b A
Perform Step 3 on P.5-9 to set target number/address
Indicator
A
P.8-5 to set pattern
Number/Address, press
Ring Time (for Incoming Notice)
Select 2Incoming Notice A Press b A Perform Step 3 on P.5-9 to set
target number/address
(01 - 99 seconds)
For One Number/Address, press
^ When source file in Data Folder is deleted, renamed or moved, Ring Tone is
,
set to Pattern 1 for Personal Ring Tone and Mail for Incoming Notice.
^ To apply Personal Ring Tone or Incoming Notice setting to Secret Mode
entries, activate Secret Mode first.
Select Ring Tone, vibration, etc. for incoming calls/mail from
numbers/addresses saved in Phone Book
A
j A
j A
For One Number/Address, press e
For One Number/Address, press e
A For One Number/Address, press e
Press b A Perform Steps 1 - 3 in "Mobile/Small Light" on
A
Press e
e
A
A
Press b A Press e
j
j A
again
Press e
Select 5Ring Time A Press b A Enter time
j
e j
Select 1Ring Tone A Press
j
j
again
A
Select 2Vibration A Press
j
j
again
A
Select 3Vibration Pattern
j A
j
A
Select 4LED
j A
A Press e
again
For One
j
again
A
Auto Reply
Specify numbers/addresses to send a reply automatically to
messages from them
CTo activate the setting, set Auto Reply in Mail Settings to On (see IP.6-2).
Select 5Auto Reply A Press b A Perform Step 3 on P.5-9 to set target
number/address
e j
press
A
Press e
again
j
A For One Number/Address,
Using Phone Book
Dialing from Phone Book
Follow these steps to search Phone Book by Memory Number (default search method).
^
To dial numbers saved in Secret Mode entries, activate Secret Mode first (see
^
To search by other methods, see
Press A (l)
1
C To search Phone Book entries on Memory Card, press e A A Select a number
range A Press b
B Phone Book entries on Memory Card are grouped by 500 entries.
Press D
2
^ Press D + to open Phone Book Entry List in the order of
Memory Number.
^ Enter Memory Number to open Phone Book Entry List starting
from the entered number.
C Use E to select an entry.
Press
3
Phone Book entry opens.
C When multiple numbers or addresses are saved, use F to
select other icons.
Press
4
Number is dialed.
,
+
or enter Memory No.
b
f
Cancel Phone Book Lock (see P.14-3) to open Phone Book.
P.5-12
.
J d E
P
J [No.***‑**9]H
005UedaMikio
006AokiItirou
007OkadaNoriko
008HamadaShingo
Switch Menu選択
P.14-6
Select
).
N
Phone Book
b
5
Mail Folder
Specify Mail Folder for each Phone Book entry to sort
messages automatically
Select 4Mail Folder A Press b A Select 1Inbox Auto Sort or 2Sent Auto
A
Press b A Perform Step 3 on P.5-9 to set target number/address A
Sort
Select a folder
A
Press b A Press e
One Number/Address, press
e j
j
again
A Press
e j A
5-10
For
5-11
Page 68

5
Phone Book
Window Description
JE
1
P
UedaMikio
2
0051Friends
3
eeii
m
nPattern1
4
oPattern2
pMailFolder1
5
qMailFolder2z
03123XXXX3
Back Menu
N
b
6
7
8
9
Name
1
Memory No.
2
Icon for Saved Items
3
B
Phone Number (e Call, f Home,
g
Mobile, h Company)
B
Mail Address (i Internet, j Mobile)
B
Personal Data (l)
B
Photo (m)
Tone Set for Personal Ring Tone or
4
Incoming Notice
n
Personal Ring Tone, o Incoming
Notice
Mail Folders Set for Auto Sort
5
p
Inbox Mail Folder
q
Sent Mail Folder
Group Name
6
Image Set for Photo
7
Auto Reply
8
Phone Number or Mail Address
9
Switching Search Methods
Press
A
1
The method used last appears.
Press d
2
Select a method and press
3
Selected method appears.
^ To search and open an entry, see below.
(l)
I
b
Searching/Opening Phone Book Entries
Follow these steps in Standby. Skip the step of pressing A (l) when continuing
from Step 3 above.
Memory No.
Search
Search by Memory Number
CSet search method to
Memory No. Search
(see P.5-12).
Press A (l) A Enter Memory No. (000 - 499) A Select a name A
b
Press
C Press f to dial.
5
Phone Book
^ Use F to toggle saved items. Phone number or mail address appears in 9.
+
Personal Data or Photo image appears in a new window.
^ Press e W to return to Phone Book Entry List.
Phone Book Search
Search Methods
Memory No. Search Lists Memory Numbers including the one you enter
Katakana Search
Group Search Opens entries in a specified Group
Search by Reading Shows entries with Reading starting with entered character
Search method is Memory No. Search by default.
Shows entries with Reading starting with specified katakana or
katakana in the same row
Katakana Search
Press A (l) A Specify a row A Select a name A Press
C Press f to dial.
^ Katakana-Key Assignments:
アアアア(A) row 1 カカカカ (Ka) row 2 ササササ (Sa) row 3 タタタタ (Ta) row 4
ナナナナ (Na) row 5 ハハハハ (Ha) row 6 ママママ (Ma) row 7 ヤヤヤヤ (Ya) row 8
ララララ (Ra) row 9 ワワワワ (Wa) row 0
B When Reading starts with a roman letter, number or Symbol, or is not entered, select
Others.
Group Search
Search by katakana row which includes the first character of
Reading
CSet search method to
Katakana Search
(see P.5-12).
b
Others p
Search by Group
CSet search method to
Group Search
(see P.5-12).
Press A (l) A Select a Group A Press b A Select a name A
b
Press
C Press f to dial.
Search by Reading
Search by Reading saved in
CSet search method to
d
Search by Reading
(see P.5-12).
Press A (l) A Enter reading (up to 18 single-byte characters) A
b A
Press
C Press f to dial.
Select a name A Press
b
5-12
5-13
Page 69

Speed Dial
Use Speed Dial to call first phone number saved in Memory Numbers 000 - 099.
To dial numbers saved in Secret Mode entries, activate Secret Mode first (see
If not, Secret Data saved appears and Standby returns.
Dialing Memory No. 000 - 009
5
Phone Book
1
2
1
Enter the last digit (0 - 9)
Dialing Memory No. 010 - 099
1
Enter the last two digits (10 - 99)
f
Press
Name and phone number appear and the number is dialed.
^ When no entry/phone number is saved, No Number appears and Standby returns.
^ When multiple phone numbers are saved, the first one is dialed.
,
Cancel Phone Book Lock (see P.14-3) to use Speed Dial.
P.14-6
Editing Phone Book
).
Correction/Change
Press A (l), then open an entry
1
b
Press
2
Select Edit and press
3
Select an item and press
4
Edit contents.
^ Procedure is the same as when saving to Phone Book (see P.5-4).
^ Edit Reading manually after editing names.
Press b when finished
5
Phone Book Details returns.
^ To edit other items, repeat Steps 4 - 5.
C To cancel, press e 3 A Choose 1Yes A Press b
b
b
5
Phone Book
Show Photo
Show the assigned images in Phone Book Entry List.
J d E
P
J [No.***‑**9]H
005UedaMikio
006AokiItirou
007OkadaNoriko
008HamadaShingo
Switch Menu選択
Entry List
(Memory No. Search)
Press A (l) then D
1
Press d
2
Select Show Pics and press
3
Images appear in Phone Book Entry List.
C To hide images, while list with images appears, press d I A Select Show List A
Press b
I
Select
N
b
+
b
J d E
P
J [No.***‑**9]H
**5UedaMikio
*3123XXXX3
aaa@xxx.yyy
**6AokiItirou
*3123XXXX1
bbb@xxx.yyy
**7OkadaNoriko
*3123XXXX2
ddd@xxx.yyy
**8HamadaShingo
*3123XXXX4
eee@xxx.yyy
Switch Menu選択
Entry List with Images
(Memory No. Search)
Select
N
b
Press d
6
Press
7
Choose 1Yes and press
8
The entry is overwritten.
C To save to another Memory No., choose 2No A Press b A Enter another Memory
No. (or press q)
q
b
b
Deleting Entries
Press A (l), then open an entry
1
b
Press
2
Select Delete and press
3
Choose 1Yes and press
4
Next entry appears. If no other entries remain, Standby returns.
The source files remain in Data Folder, even if you delete entries containing Original
,
Ring Tones, Chaku-Uta, Voice files and images set for Personal Ring Tone, Incoming
Notice or Picture Call/Mail.
b
b
5-14
5-15
Page 70

F37
Group Settings
Rename Groups and customize Ring Tone settings by Group. Personal Ring Tone
and Incoming Notice settings (see P.5-10) take priority over Group Settings.
Changing Group Name
H
Functions A Settings 1 A Group Settings A Change Group Name
b
5
Phone Book
Index Menu
Select a Group and press
1
Enter a name
2
^ Enter up to 10 single-byte characters.
Press
3
^ Repeat Steps 1 - 3 for other Groups.
Press g to exit
4
Group Ring Tone
Group Ring Tone is Off for all Groups by default.
Index Menu
Select a Group and press
1
Select 1Incoming Call or 2Incoming Mail and press
2
Select 1Call Functions and press
3
Choose 1On and press
4
C To cancel, choose 2Off A Press b
Select from 2Ring Tone to 6Ring Time and press
5
^ 6Ring Time is available for incoming mail only.
C For Ring Tone settings, see P.8-3.
C For vibration and Mobile/Small Light patterns, see P.8-4 - 8-5.
C For Ring Time setting, see P.8-5.
H
Functions A Settings 1 A Group Settings A Group Ring Tone
b
b
b
b
b
b
Press g to exit
6
+
5-16
When Group Ring Tone is Off, Ring Tone setting for incoming calls applies.
Page 71

TV & FM Radio
6-1
Page 72

Getting Started
^
Handset becomes hot while using TV or FM. Avoid prolonged contact with skin, and do
not cover handset with paper, cloth, etc. May cause burn injuries or malfunction.
^
Handset TV/FM tuner is exclusively for use in Japan due to differing broadcast
frequencies overseas.
^
V604SH is compatible with terrestrial analog broadcasting.
^
Do not use TV or FM while driving or riding a bicycle. Accidents may result. [Cellphone
use while driving is prohibited by the revised Road Traffic Law (effective November 1,
2004).] Even as a pedestrian, to avoid accidents, always pay attention to your
surroundings, especially when near road/rail crossings.
^
Audio-visual quality may be affected by incoming messages or cellphones nearby.
Precautions
Battery
C
6
When battery is low (L), TV and FM do not activate (except while charging). If
TV & FM Radio
battery runs low during use, TV or FM ends automatically.
Auto Off Timer
C
TV and FM end automatically after 30 or 60 minutes (see P.6-19).
Audio
C
TV and FM audio from speaker and Headphones (with built-in TV antenna) is
monaural.
Antenna
C
For better TV and FM reception, extend Antenna or connect Headphones.
Alternatively, connect handset to an external antenna using optional TV Antenna
Connection Cable.
^
Extend Antenna fully. Adjust length for better TV reception when transmission source is near.
^
When using Headphones, straighten cord for better reception.
^
Active antenna varies by media. For details, refer to the table on P.6-4.
Charging
Use TV and FM while charging (Auto Off Timer remains active).
^
Use Rapid Charger only (may reduce electronic noise).
^
Keep Rapid Charger cord away from Antenna to prevent interference.
^
Charging takes longer when TV or FM is active.
Handset Transmissions
The handset operations listed below continue to function even while TV or FM is
active. After an operation ends, TV/FM window returns.
^
Outgoing Calls (Headphones are required. See P.16-50.)
^
Incoming Calls
^
Incoming Mail
^
Incoming Station Information
^
Incoming Web Information
^
Alarm
^
Inbox (reply, save to Phone Book, etc.)
^
Web Transmissions (access sites via links or retrieve NOW ON AIR information)
*Available when Pause Application is set for Incoming Settings (see P.6-20).
*
*
*
*
At Auto Power Off Time
Auto Power Off Time Editing... Turn Power Off? appears.
C
^
To turn off handset power, choose
^
To cancel, choose
No and press
2
Yes and press
1
b
.
b
or leave it for a minute.
Unavailable Functions while TV/FM is Active
^
Screen Animation
^
Pen Light
^
Panel Saving
6
TV & FM Radio
6-2
6-3
Page 73

Window Description
3 4
J
Q kl
1
2
Listing
Change Display orientation (see the table on P.6-19 for available options).
6
TV & FM Radio
n
FMMenu
TV
J
Q
1
5
Link TVMenu
n
FM
1
2
3
6
7
4
5
5
6
7
Signal Reception
Poor Reception Areas
Audio-visual quality degrades and broadcasts may not be available when:
^
Far from or too close to broadcasting stations^In mountainous areas or near buildings
^
Aboard trains or in vehicles
^
Near railroad tracks or highways^In tunnels or underground shopping malls
^
In any other areas where jamming signal exists or reception is unstable
^
Near high-voltage lines, neon lights or wireless stations
Multi Selector Guide
TV Channel
Frame Count (TV)
n
: One Frame
k
: Four Frames
l
: Nine Frames
Interval Rate (TV)
l
: Fast
m
: Standard
o
: Slow
Volume
Frequency
FM Channel
Headphones (with Built-in TV Antenna)
Open Headphone Connector Cover
1
Plug Headphones into handset
2
^
To listen to audio through Headphones, activate
Headphone
Connector
Plug
Earphone Priority
Headphones
(with Built-in TV Antenna)
Headphone Connector Cover
(see
P.6-21
"Sound Out").
6
TV & FM Radio
+
Search for channels automatically (see P.6-7, P.6-12 "Auto Scan").
Reception Devices
Use Headphones or TV Antenna Connection Cable. Input changes according to the
device and media.
Device
None Antenna Antenna - Antenna
Headphones Headphones Antenna - Headphones
TV Antenna
Connection Cable
,
To watch CATV, use TV Antenna Connection Cable.
VHF UHF CATV
TV Antenna
Connection Cable
TV
TV Antenna
Connection Cable
TV Antenna
Connection Cable
FM
TV Antenna
Connection Cable
6-4
,
+
^ Do not connect supplied Headphones to handsets other than V604SH. Malfunction
may result.
^ Keep the cord away from handset, Antenna and Rapid Charger to prevent signal
interference.
^ Do not disconnect Headphones while using TV. The current channel may become
unavailable or sensitivity may decrease.
While TV or FM is active, place calls using Headphones. TV or FM window returns
after the call ends.
6-5
Page 74

Key Assignments
Watching TV
Use Auto Scan (below) to search for channels or use the TVnano program guide
(Japanese only) to find programs.
To access TVnano, handset must connect to the Network (connection fees apply).
Index Menu H TV/FM
1
2
3
4
5
6
TV & FM Radio
1
2
3
4
5
6
7 Direct Channel Access
6
7
Activate & Toggle TV/FM
In Standby, press for 1+ seconds to
activate TV or FM. Press to toggle
between TV and FM.
Volume Control
C
Press
TVnano & FM Access Link
^
Press for 1+ seconds to open Multi
Menu. (Not available while recording or
capturing.)
Menu & Mute
Open menu. Press for 1+ seconds to mute.
Exit TV/FM
Horizontal/Vertical Display, Cancel
Full Auto (TV) & Frequency Entry (FM)
1
Press
(see P.6-16 for default key
assignments).
^
For FM, press for 1+ seconds to replace
assigned frequency with the current one.
(Not available when Manual Tuning is
active in Set Channels.)
Clamshell Open Viewer Position
(up) or D (down).
- 9, q, 0 or p
8
9
Channel Advance
8
B
Press
Press for 1+ seconds to search for
channels automatically (see P.6-7,
P.6-12 "Auto Scan").
Show Channel/Volume
9
The current channel and volume appear
for horizontal view.
^
Record/Capture (TV) & Record (FM)
A
Press to capture screenshots or record
FM radio, and press for 1+ seconds to
record TV programs.
Activate/Exit & Channel Advance
B
(only in Viewer position)
^
^
(reverse) or A (forward).
Press for 1+ seconds to activate or
cancel Manner Mode.
In Standby, press for 1+ seconds to
activate TV or FM. Press for 1+
seconds again to exit.
Channel advance is one-way only.
2
4
BA
Select 1Activate TV and press
1
By default, channel 1 (set in channel group
^ To switch the active channel group, see P.6-17.
C Key Assignments: see P.6-6
Select a channel
2
^ Use Keypad for direct channel access or F to toggle between
channels (see P.6-6).
^ To toggle between all channels regardless of settings, see P.6-8
"Manual Tuning."
^ When Skip Channel (see P.6-18) is set for the channel assigned to the key, the current
channel remains.
C To open program listing on TVnano, press e J
B When a V-Application is paused, choose 1Yes A Press b
C Press C (up) or D (down) to adjust volume.
C To mute, press b for 1+ seconds.
B To cancel, press b for 1+ seconds again.
B Alternatively, press C or D to cancel mute. Volume returns with one level higher or
lower than before (volume 0 and 5 remain the same).
C For handy TV functions, see P.6-19.
Auto Scan
+
Press g or
3
^ Settings (channel, Display orientation, volume and audio output) remain even after exiting
Press B or A for 1+ seconds to search for channels automatically.
No Channel Detected
No Signal Continue Auto Scan?
to exit
i
TV. However, volume and audio output are affected by changes to the corresponding
settings for FM.
b
設定
設定
1) appears.
設定設定
appears. To cancel, choose
J
Q n
Listing
and press b.
2
No
n
FMMenu
6
TV & FM Radio
,
6-6
Press d for 1+ seconds to activate TV or FM, whichever used last (default: TV).
6-7
Page 75

Manual Tuning
C
Follow these steps to select channels other than those in
Press
Press
Use F to toggle between channels (press for 1+ seconds to search automatically).
^
See P.6-16 for receivable channel ranges.
Select 1Set Channels A Press b A Select 6Manual Tuning A
b A
b
設定
設定
設定設定
1 to
設定
設定
設定設定
Recording TV Programs
Record a clip of up to 28 seconds on handset or up to 60 minutes on Memory Card.
^
Image size of recordings is fixed to W 320 x H 240 dots regardless of Display orientation.
Files are saved to TV Folder (see P.6-10) on handset or on Memory Card. Select storage
media beforehand (see P.6-9 "Save to").
^
Saved files cannot be edited, attached to mail or exported to other display devices.
6
Index Menu H TV/FM A Activate TV
TV & FM Radio
Press s for 1+ seconds
1
Recording starts. (Small Light illuminates green while recording.)
^ Volume is fixed for recordings.
C When a V-Application is paused, choose 1Yes A Press b
C Handset Responses & Available Operations while Recording:
see P.6-9
Saving to Handset
2
Press b or
1
Recording stops. When the maximum recording time is
reached, recording stops automatically.
^ Alternatively, press g or i (h in Viewer position).
To save, select 1Complete and press
2
CTo cancel, select 2Cancel A Press b A Choose 1Yes A Press b
s
b
J
Q
Handset Responses while Recording
5.
n
P
C
Recording stops automatically at Auto Power Off Time and Auto Power Off Time
Editing... Turn Power Off? appears.
^
When saving to handset:
B
Handset shuts down after a minute of inactivity. Alternatively, choose
press
b
. Recorded clip is not saved.
B
To cancel Auto Power Off, choose
prompts to save or cancel recorded clip.
^
When saving to Memory Card:
B
Recorded clip is automatically saved.
B
Handset shuts down after a minute of inactivity. Alternatively, choose
press
b
. To cancel Auto Power Off, choose
C
If Alarm Time arrives during recording, no tone will sound. Alarm will sound when
handset returns to Standby.
C
In the following cases, recording stops and recorded clip is saved. When saving to
handset, a confirmation appears. Select
^
Call arrives
^
Information, mail or Alarm Time arrives when Pause Application is set for
Incoming Settings (see P.6-20)
^
Auto Off Timer time has elapsed (see P.6-19)
^
Handset is closed (clamshell closed), then opened again while Close to Turn Off
(see P.6-20) is active
No, press
2
1
b
, and then follow onscreen
No and press
2
Complete or 2Cancel and press
b
1
1
.
Yes and
Yes and
b
.
6
TV & FM Radio
Available Operations while Recording
^
Adjusting volume (Mute is not available.)
^
Stop
Activating/canceling Manner Mode
Record Settings
Save to
Select handset or Memory Card
Saving to Memory Card
Press b or
1
Recording stops and is saved.
^ Alternatively, press g or i (h in Viewer position).
^ Recording stops automatically when memory is full. Recorded clip is saved.
Press
2
b
6-8
s
Index Menu
Select 1PHandset or 2bMemory Card A Press
Incoming Calls
Index Menu
Select 1Receive Calls or 2Block Calls A Press
^ For Receive Calls, handset responds as set in Incoming Settings (see P.6-20).
H TV/FM A Activate TV A Menu (b) A Record & Capture A Record
Settings A Save to
b
Receive or block incoming calls, mail, etc. while recording.
H TV/FM A Activate TV A Menu (b) A Record & Capture A Record
Settings A Incoming Calls
b
KHandset
KReceive Calls
6-9
Page 76

Playing Recorded TV Programs
Default file name is the recorded date and time.
Index Menu H My Files
Select 6TV Folder and press
1
C To switch to Memory Card, press d I A Select Memory Card A Press b
Select a file and press
2
^ For operations during playback, see P.7-32 "Playback Operations."
Deleting Recorded TV Programs
C
To delete a file on handset, follow these steps after Step 1 above.
6
C
TV & FM Radio
Select a file
Yes A Press
1
To delete a file on Memory Card, follow these steps after Step 1 above.
Press
d
Press
d
Press d
A
b
A Select Memory Card A Press b A Select a file A
I
A Select Delete A Press b A Choose 1Yes A Press
I
I
Capturing Screenshots
Capture screenshots while watching TV.
^
Set Frame Count to capture 1, 4 or 9 frames at one time (see P.6-11).
^
Captured images cannot be set as Wallpaper, saved to Memory Card, edited, attached to
Super Mail or exported to external devices.
^
Image size is 240 x 180 dots (vertical view) or 320 x 240 dots (horizontal view).
B Single-frame images are saved to Data Folder (Images).
B Sequential frames are saved to Data Folder (連写
Index Menu H TV/FM A Activate TV
Press
1
s
Captured image appears.
^ When Frame Count is set to Four Frames or Nine Frames,
Index Image appears.
Use F to view single frames.
^ While Capturing Image... appears, only C is available.
C To stop capturing, press b or s
b
b
A Select Delete A Press b A Choose
連写).
連写連写
b
J q F
Q km
n
Opening Captured Screenshots
C
Files are saved in Data Folder (Images or
To open them, see P.13-8 "Handset Data Folder."
; see P.6-10).
連写
連写
連写連写
Deleting Captured Screenshots
To delete a file in Images folder, press b A Select My Files A Press b A
C
Select
file
To delete a file in
C
1
Press
Data Folder A Press b A Select Images folder A Press b A Select a
1
Press d
A
Data Folder A Press b A Select
I
d
A Select Delete A Press b A Choose 1Yes A Press
I
folder, press b A Select My Files A Press b A Select
連写
連写
連写連写
A Select Delete A Press b A Choose 1Yes A Press
folder A Press b A Select a file A
連写
連写
連写連写
b
b
Capture Settings
Frame Count
Index Menu
H TV/FM A Activate TV A Menu (b) A Record & Capture A Capture
Settings A Frame Count
Select a number A Press
^ Setting returns to default when TV ends.
Interval Rate
Index Menu
H TV/FM A Activate TV A Menu (b) A Record & Capture A Capture
Settings A Interval Rate
Select a speed A Press
P
^ Setting returns to default when TV ends.
Select the number of frames that can be captured at a time
(One Frame, Four Frames or Nine Frames)
KOne Frame
b
For Frame Count Four Frames or Nine Frames, select a
capture interval rate (speed) from Fast to Slow
KStandard
b
6
TV & FM Radio
Press b to save
2
6-10
Save
Function
6-11
Page 77

Listening to FM Radio
NOW ON AIR
Index Menu H TV/FM
1
2
6
TV & FM Radio
3
C
C
Select 2Activate FM and press
C Key Assignments: see P.6-6
C NOW ON AIR: see P.6-13
b
J
Q
Select a channel
^ Use Keypad for direct channel access or F to toggle between
channels (see P.6-6). When Manual Tuning is active in Set
Channels, use F to adjust frequency by 0.1 MHz.
C Press C (up) or D (down) to adjust volume.
C To mute, press b for 1+ seconds.
B To cancel, press b for 1+ seconds.
B Alternatively, press C or D to cancel mute. Volume returns with one level higher or
lower than before (volume 0 and 5 remain the same).
C For handy FM functions, see P.6-19.
Press Keypad for 1+ seconds to replace assigned frequency with the current
+
Press g or
^ Settings (channel, volume and audio output) remain even after exiting FM. However,
one. (Channel name, URL, etc. remain.)
Frequency cannot be replaced when Manual Tuning is active in Set Channels.
Auto Scan
Press B or A for 1+ seconds to search for channels automatically.
No Channel Detected
No Signal Continue Auto Scan?
to exit
i
volume and audio output are affected by changes to the corresponding settings for TV.
appears. To cancel, choose
Link TVMenu
and press b.
2
No
Preset Frequencies
Assigned channel name (default: see P.6-16) appears for the current frequency.
^
Save a URL for each channel. Press
Link to access the Mobile Internet site.
N
Direct Frequency Entry
Activate FM and press k. Enter a frequency and press b (see P.6-16 for
frequency range).
Reception Area
Set a reception area automatically (Auto Update) or manually (Manual Update) to
n
access information (music title, artist name, etc.) on the current broadcast.
1 -
^
Set a reception area for each channel group (
group first (see P.6-17 "Switching the Active Channel Group").
^
For Auto Update, handset connects to the Network to detect reception area based on
Location Info.
^
For Manual Update, select an area and prefecture (see the table below).
Index Menu H TV/FM A Activate FM A Menu (b) A NOW ON AIR A Set Area
Select 1Auto Update or 2Manual Update and
1
press
b
^ For 1Auto Update, prefecture is set. (Omit the next steps.)
Select an area and press
2
Select a prefecture and press
3
Reception area is set.
NOW ON AIR Reception Area
C
Area Prefecture
1Hokkaido/Tohoku 1Hokkaido, 2Aomori, 3Iwate, 4Miyagi, 5Akita, 6Yamagata,
7Fukushima
2Hokuriku/Koshinetu 1Niigata, 2Yamanashi, 3Nagano, 4Toyama, 5Ishikawa, 6Fukui
3Kanto 1Ibaraki, 2Tochigi, 3Gunma, 4Saitama, 5Chiba, 6Tokyo,
7Kanagawa
4Tokai 1Shizuoka, 2Aichi, 3Gifu, 4Mie
5Kansai 1Shiga, 2Kyoto, 3Osaka, 4Hyogo, 5Nara, 6Wakayama
6Chugoku 1Tottori, 2Shimane, 3Okayama, 4Hiroshima, 5Yamaguchi
7Shikoku 1Tokushima, 2Kagawa, 3Ehime, 4Kochi
8Kyushu/Okinawa 1Fukuoka, 2Saga, 3Nagasaki, 4Kumamato, 5Oita, 6Miyazaki,
7Kagoshima, 8Okinawa
b
b
設定
設定
設定設定
5). Activate the target channel
設定
設定
設定設定
J E
Q
SetArea
NoAreaSetting
K1AutoUpdateI
2ManualUpdate
n
6
TV & FM Radio
6-12
6-13
Page 78

Accessing NOW ON AIR
Access information (music title, artist name, etc.) on the current broadcast. Some
programs may not provide information. Most content is in Japanese.
^
Set a reception area before accessing information.
^
URLs of accessed NOW ON AIR source sites are not saved to Log.
Index Menu H TV/FM A Activate FM A Menu (b) A NOW ON AIR
Select 1Acquire Info and press
1
Choose 1Yes and press
2
Stations supporting NOW ON AIR appear.
^ After checking information, press g to exit.
b
b
Recording FM Radio
Record FM radio to handset (up to 10 minutes) or Memory Card (up to 60 minutes).
6
TV & FM Radio
^
Files are saved to Voice Folder (see P.6-15) on handset or on Memory Card. Select
storage media beforehand (see P.6-15 "Save To").
^
Files cannot be used as Ring Tone, edited, copied, transferred or attached to Super Mail.
Index Menu H TV/FM A Activate FM
Press
1
2
s
Recording starts. (Small Light illuminates orange while recording.)
^ Volume is fixed for recordings.
C Handset Responses & Available Operations while Recording:
see P.6-9
Press b or s to stop
Recording stops. When the maximum recording time is reached,
recording stops automatically.
^ Alternatively, press h in Viewer position.
J
Q
Stop
Record Settings
Save to
Index Menu H TV/FM A Activate FM A Menu (b) A Record Settings A Save to
Select 1PHandset or 2bMemory Card A Press
Incoming Calls
Index Menu H TV/FM A Activate FM A Menu (b) A Record Settings A Incoming Calls
Select 1Receive Calls or 2Block Calls A Press
^ For Receive Calls, handset responds as set in Incoming Settings (see P.6-20).
Playing Recorded FM Radio
Index Menu H My Files
Select 7Voice Folder and press
1
n
P
C To switch to Memory Card, press d I A Select Memory Card A Press b
Select FM and press
2
^ Files are saved in FM folder (automatically created the first time FM is recorded).
Select a file and press
3
C For operations during playback, see P.11-6 "Playback Operations."
Press
4
C
To delete a file on handset, follow these steps after Step 2 above.
To delete a file on handset, follow these steps after Step 1 above.
C
b
Select a file
Yes A Press
1
Press d
A
1
I
Select a file A Press d
Yes A Press
Select handset or Memory Card
KHandset
b
Receive or block incoming calls, mail, etc. while recording
KReceive Calls
b
b
b
b
Deleting Recorded FM Radio
Press d
A
b
A Select Memory Card A Press b A Select FM A Press b
b
A Select Delete A Press b A Choose
I
I
A Select Delete A Press b A Choose
6
TV & FM Radio
6-14
6-15
Page 79

Presets
Preset frequently used channels and frequencies for easy access.
Receivable Channel/Frequency Ranges:
TV VHF channels 1 - 12, UHF channels 13 - 62, CATV channels 13 - 63
FM 76.0 MHz - 90.0 MHz
*Available when TV Antenna Connection Cable is connected.
1 -
^
Save up to five channel groups (
P.6-18 "Switch Position").
^
Default settings:
TV
C
Channel
Group
6
Name
TV & FM Radio
設定1‑
設定1‑
設定1‑設定1‑
設定5
設定5
設定5設定5
Key Channel
V1 (VHF channel 1)
1
V2 (VHF channel 2)
2
V3 (VHF channel 3)
3
V4 (VHF channel 4)
4
V5 (VHF channel 5)
5
V6 (VHF channel 6)
6
V7 (VHF channel 7)
7
V8 (VHF channel 8)
8
V9 (VHF channel 9)
9
V10 (VHF channel 10)
q
V11 (VHF channel 11)
0
V12 (VHF channel 12)
p
設定
設定
設定設定
On
Display
1FM 11
2FM 22
3FM 33
4FM 44
5FM 55
6FM 66
7FM 77
8FM 88
9FM 99
U FM U q
0FM 00
#FM #p
Channel Group Setup
Setting by Reception Area (TV)
Channels in the selected area are saved automatically.
Index Menu H TV/FM A Activate TV A Menu (b) A Set Channels
Select from
1
Select 1Set Area and press
2
Set Area window opens. Perform Steps 1 - 3 in "Reception Area" on P.6-13.
設定
設定
設定設定
1 to
5 and press d
設定
設定
設定設定
5). Reassign channels to other keys (see
設定
設定
設定設定
FM
C
Channel
Key Frequency (MHz)
Name
80.7 (FM Aichi or FM Fukuoka)
82.5 (NHK Tokyo or NHK Nagoya)
81.9 (NHK Yokohama)
84.7 (FM Yokohama)
I
b
77.8 (FM Nagoya)
78.7 (FM Kyushu)
80.0 (FM Tokyo)
80.2 (FM 802)
81.3 (J-WAVE)
84.8 (NHK Fukuoka)
85.1 (FM Osaka)
88.1 (NHK Osaka)
Setting Automatically (TV)
According to the area and reception, 12 channels are saved automatically.
Index Menu H TV/FM A Activate TV A Menu (b) A Set Channels
*
On
Display
1
2
3
4
5
6
7
8
9
U
0
#
Select from
1
Select 2Auto Set and press
2
Choose 1Yes and press
3
Setting Stations... appears. Detected channels are assigned to keys starting from 1.
C If No Signal Continue Auto Scan? appears, choose 1Yes or 2No A Press b
^
When less than 12 channels are detected, unchanged existing assignments remain.
+
^ To rename channel groups (
設定
設定
設定設定
1 to
5 and press d
設定
設定
設定設定
b
b
設定
設定
設定設定
1 -
設定
設定
設定設定
I
5), see P.6-18.
Setting Manually (TV/FM)
Index Menu H TV/FM A Activate TV or FM A Menu (b) A Set Channels
Select from
1
Select Manual Set and press
2
Select a channel and press
3
Select Set Station and press
4
TV/FM window returns.
Select a channel or frequency
5
^ Use F to select a channel or frequency manually or automatically (see P.6-7).
Press
6
b
設定
設定
設定設定
1 to
5 and press d
設定
設定
設定設定
b
b
b
I
6
TV & FM Radio
Switching the Active Channel Group
1 is active by default.
設定
設定
設定設定
Index Menu H TV/FM A Activate TV or FM A Menu (b) A Set Channels
Select from
1
設定
設定
設定設定
1 to
5 and press
設定
設定
設定設定
b
Choose 1Yes or 2No and press
3
6-16
b
6-17
Page 80

Additional Settings
Index Menu H TV/FM A Activate TV or FM A Menu (b) A Set Channels
Index Menu H TV/FM A Activate FM A Menu (b) A Set Channels
6
TV & FM Radio
Index Menu H TV/FM A Activate TV or FM A Menu (b) A Set Channels
Index Menu H TV/FM A Activate TV or FM A Menu (b) A Set Channels
Index Menu H TV/FM A Activate TV or FM A Menu (b) A Set Channels
Change Name
(TV/FM)
Select a group A Press d
Enter name A Press
A
^ If b is pressed without entry, default name returns.
Channel Name
(FM)
Select a group A Press d
channel
^ If b is pressed without entry, default name returns.
Skip Channel
Press b A Select Channel Name A Press b A Enter name A Press
A
(TV/FM)
Select a group A Press d
Select a channel A Press b A Select Skip Channel A Press b
A
Choose 1On or 2Off A Press
A
^ Skip up to 11 channels per group.
Set URL (TV/FM)
Select a group A Press d
Select a channel A Press b A Select Set URL A Press b A
A
Choose
Switch Position
On A Press b A Enter URL A Press
1
(TV/FM)
Select a group A Press d
Press b A Select Switch Position A Press b A Select a target key A Press
A
Rename channel groups (
Enter up to 18 single-byte characters
A Select Change Name A Press b
I
b
Rename FM channel names
Enter up to 10 single-byte characters
A Select Manual Set A Press b A Select a
I
Set to skip unwanted channels while selecting channels with
A Select Manual Set A Press b
I
b
Save a URL to each channel for easy access to the site
A Select Manual Set A Press b
I
Reassign channels to other keys by swapping positions
between two channels
A Select Manual Set A Press b A Select a channel
I
設定
設定
設定設定
1 -
設定
設定
設定設定
5)
b
b
F
KOff
b
Handy TV/FM Functions
Some functions are available only for TV or FM.
Function Description TV FM
Horizontal/Vertical
Display
Hide Picture Turn off Display (see P.6-21) Available Available
Viewer Display
Horizontal Display Rotate horizontal view (see P.6-23)AvailableN/A
Full Auto
TV Backlight Select Brightness (see P.6-22)AvailableN/A
Sound Out Select audio output (see P.6-21) Available Available
Record Settings (TV)
Capture Settings
Record Settings (FM)
Activate TV/FM Toggle between TV and FM (see P.6-22) Available Available
Access Link Access the Mobile Internet site (see P.6-22) Available Available
NOW ON AIR
Functions Available for TV & FM
Auto Off Timer
Index Menu H TV/FM A Auto Off A Auto Off Timer
Select 130 Min or 260 Min A Press
,
Auto Off Timer setting applies to TV and FM (cannot be set separately).
Toggle between vertical and horizontal views
(see P.6-23)
Rotate vertical view in Viewer position (see
P.6-21)
Change Display orientation automatically (see
P.6-23)
Select storage media and a handset response
to incoming mail, etc. (see P.6-9)
Select the number of frames to be captured
and a capture interval speed (see P.6-11)
Select storage media and a handset response
to incoming mail, etc. (see P.6-15)
Access information on the current broadcast
(see P.6-13)
TV and FM end automatically after 30 or 60 minutes
Available N/A
Available Available
Available N/A
Available N/A
Available N/A
N/A Available
N/A Available
b
K30 Minutes
6
TV & FM Radio
Reset (TV/FM)
Index Menu H TV/FM A Activate TV or FM A Menu (b) A Set Channels
Select a group A Press d
Choose
,
Yes A Press
1
All channels return to their default states. (NOW ON AIR reception area setting
is not affected.)
Reset channel group settings
A Select Reset A Press b A
I
b
6-18
6-19
Page 81

Index Menu H TV/FM A Auto Off A Close to Turn Off
6
Index Menu H TV/FM A Disable TV
TV & FM Radio
Index Menu H TV/FM A Disable FM
Index Menu H TV/FM A Incoming Settings
Close to Turn Off
Set TV and FM to end when handset is closed (clamshell
closed)
KOff (TV/FM remains active.)
Choose 1On (TV or FM ends when handset is closed) or 2Off A
Press
b
,
Enter Security Code A Choose 1On or 2Off A Press
Enter Security Code A Choose 1On or 2Off A Press
Incoming Settings
Close to Turn Off setting applies to TV and FM (cannot be set separately).
Disable TV
Disable FM
Restrict or allow access to TV
Restrict or allow access to FM
Select a handset response to incoming mail, etc. while using
TV or FM
KOff (allow access)
b
KOff (allow access)
b
KShow Message
Select from 1Incoming Mail to 4Alarm A Press b A Select
Pause Application or 2Show Message A Press
1
Pause Application TV or FM pauses for mail, information or alarm
Show Message
A message appears for mail, information or alarm (available only
for vertical view)
b
Hide Picture
Index Menu H TV/FM A Activate TV or FM A Menu (b) A Hide Picture
Choose 1Yes A Press
^ When Display is off, adjust volume or mute sounds as follows:
To adjust volume, use E with handset open or press m or n in Viewer position. To mute,
press b for 1+ seconds with handset open or press h for 1+ seconds in Viewer position.
^ To reactivate Display, press a key other than E, m and n.
With Close to Turn Off (see P.6-20) inactive, Display always turns off when
+
Viewer Display
Index Menu H TV/FM A Activate TV or FM A Menu (b)
handset is closed (clamshell closed), and turns back on when opened.
However, Display remains off when Hide Picture is active.
Turn off Display (audio is available)
KDisplay is active.
b
Manually or automatically rotate vertical view 180 degrees in
Viewer position
KOrientation 1 (standard view for clamshell open position)
TV
Select
Press
Press
^ Viewer Display can be selected only when Full Auto in Display Direction is inactive (see
P.6-23).
Display Direction A Press b A Select 1Viewer Display A
5
Select 1Orientation 1, 2Orientation 2 or 3Full Auto A
b A
b
FM
Select
Orientation 2 or 3Full Auto A Press
2
,
+
Viewer Display A Press b A Select 1Orientation 1,
4
b
When Viewer Display is set to Full Auto, Viewer Setting in MC Settings (see
P.16-25) returns to default.
^ View for clamshell open remains unchanged even after setting.
^ Viewer Display in Display Settings changes accordingly (see P.8-18).
6
TV & FM Radio
6-20
,
^ Incoming Settings setting applies to TV and FM (cannot be set separately).
^ While recording TV/FM, Alarm is automatically set to Show Message.
Sound Out
Index Menu H TV/FM A Activate TV or FM A Menu (b) A Sound Out
Select 1Earphone Priority or 2Speaker A Press
^ Audio is heard through Headphones even in Manner Mode.
^ When Speaker is set, plugging in Headphones does not redirect the audio
,
output. Select Earphone Priority in the above operation.
^ Sound Out setting applies to TV and FM (cannot be set separately).
Select Earphone Priority or Speaker to listen to audio
KEarphone Priority
b
6-21
Page 82

Access Link
Index Menu H TV/FM A Activate TV or FM A Menu (b) A Access Link
Access the Mobile Internet site saved for each channel
Accessing Preset Mobile Internet Site
Choose
C To return, press d I A Select Activate TV or Activate FM A Press b
B Either Activate TV or Activate FM can be selected regardless of the original window.
C To re-access the site, press b A Select Return to Web A Press b
^ Accessed URLs are saved to Log (see IP.7-7).
^ Save URLs to channels to use Access Link (see P.6-18).
Yes A Press b A Select 1Send A Press
1
Accessing Other Mobile Internet Sites
Yes A Press b A Select 2Edit A Press b A Perform
1
^ Access Link is disabled when Manual Tuning (see P.6-8, P.6-12) is active or
during Auto Scan (see P.6-7, P.6-12).
^ Activate Web and disable Link Limiter before accessing Mobile Internet sites.
Toggle between TV and FM
6
TV & FM Radio
Index Menu H TV/FM A Activate TV or FM A Menu (b)
Choose
Steps 3 - 5 in "Entering URLs Directly" on
C To return, press d I A Select Activate TV or Activate FM A Press b
B Either Activate TV or Activate FM can be selected regardless of the original window.
C To re-access the site, press b A Select Return to Web A Press b
^ Saved URLs (see P.6-18) remain.
,
Activate TV/FM
Select 0Activate FM or 9Activate TV A Press
^ Alternatively, press d to toggle (see P.6-6).
Handy TV Functions
Adjust settings for comfortable TV viewing.
TV Backlight
Index Menu H TV/FM A Activate TV A Menu (b) A TV Backlight
Use E to select a level A Press
,
Setting does not affect Brightness set in Light Settings (see P.8-16).
Select Brightness from three levels
b
CSave a URL beforehand (see
b
P.7-7
I
b
KLevel 3
P.6-18
Horizontal/Vertical
Display
).
Index Menu H TV/FM A Activate TV A Menu (b)
Select 2Horizontal Display or 2Vertical Display A Press
^ Alternatively, press k to switch the view (see P.6-6).
Toggle between vertical and horizontal views
KVertical Display
b
Horizontal View (TV)
C
With Manual Tuning active (see P.6-8), the current channel and volume appear at the
top and bottom respectively for three seconds (press j
pressed or when:
B
Channel or volume is changed
B
TV is activated
B
TV window returned from menu or by pressing e or
Display orientation is changed automatically (see "Full Auto" below).
B
C
With Manual Tuning inactive, a keypad number to which the current channel assigned
appears at the top first. Press
Horizontal Display
Index Menu
H TV/FM A Activate TV A Menu (b) A Display Direction
A Horizontal Display
j
to show current channel and press j again to hide.
Manually or automatically rotate horizontal view 180 degrees in
Viewer position
Select 1Orientation 1, 2Orientation 2 or 3Full Auto A Press
^ Orientation for vertical view remains unchanged even after setting.
^ When Horizontal Display is set to Full Auto, Viewer Setting in MC Settings
,
Index Menu H TV/FM A Activate TV A Menu (b) A Display Direction
Select 3Full Auto A Press
C To cancel, activate TV and press k.
^ View rotates automatically by 90 degrees in any of the following Display positions:
clamshell open, Self Portrait position and Viewer position.
+
(see P.16-25) returns to default.
^ Horizontal Display can be selected only when Full Auto in Display Direction
is inactive (see below).
Full Auto
Set view to rotate automatically according to handset
orientation
b
View may not rotate properly depending on the handset angle or when:
B Aboard trains or in vehicles
B Near metal objects such as desks and shelves
B In steel-framed buildings
B Near or inside elevators
B Near magnetized objects (see P.1-14)
When view does not rotate properly, adjust MC Sensor (see P.16-24).
to hide) when j is
d
KOrientation 1
b
6
TV & FM Radio
6-22
6-23
Page 83

Mobile Camera
7-1
Page 84

Getting Started
V604SH features a 3.2 megapixel CCD camera. Capture still images (see P.7-8) and
record video (see P.7-14).
*Some key operations are indicated for Viewer position and clamshell open.
Example: Press h or
Mobile Camera Basics
^
Clean dust/smudges from lens cover (see
^
If handset moves while shooting, images may blur. Hold handset firmly or place it on a
stable surface and use Self Timer (see P.7-19).
^
Mobile camera is a precision instrument, however, some pixels may appear brighter/darker.
^
Shooting/saving images while handset is hot may affect the image quality.
^
Subjecting the lens to direct sunlight will damage the camera's color filter.
7
C
Mobile Camera
C
C
C
C
C
Shutter Click volume is fixed, and sounds even in Manner Mode.
^
To change Shutter Click sound for still images, see P.7-26.
Before image capture, mobile camera ends after five minutes of inactivity and
handset returns to Standby.
Incoming Calls before Saving Image or while Recording Video
Captured image/recorded video is temporarily saved. To save to a folder, end the call
b
and press
When mail arrives, a message appears at the top of Display.
.
Camera/Video Camera Mode Image Orientation
Camera mode images and Video Camera mode video appear rotated 90 degrees
when captured with clamshell open (held vertically) and viewed on PCs. To
compensate for this, hold handset horizontally in Viewer position for image capture.
View images and video on PCs, TVs or other display devices via Video Cable (see
P.16-48).
b
Shutter Click
Auto Shut-off
Exporting Images
P.1-7
S) with a soft cloth before image capture.
Even in Viewer position, some windows appear with a longer vertical and shorter
+
horizontal.
Camera Display Indicators
Below are descriptions of icons that may appear on Display while mobile camera is
active. For details, see the referenced pages.
9
7
4
Jo qbUfqi H
Q rWwukl
JnQ
1
2
3
45
6
7
8
buqfoUrWwPqrklH
9
Optical Zoom (see P.7-24)
1
Auto Focus (see P.7-24)
2
r
: Standard, d: Manual, u: Macro, g: Landscape
Brightness (see P.7-27)
3
YX U V W
Dark B Standard A Bright
Shoot by Scene (see P.7-27)
4
o
: Full Auto, k: Night View, j: Action, i: Text, L: Fast Portrait, b: Backlight
f
: Portrait, q: Night Portrait
Microphone (see P.7-27)
5
i
: (Mic On Standard for Motion Camera), z: Mic On Fine (Motion Camera), j: Mic Off
Image Quality (see P.7-26)
6
f
: Standard, g: Fine, h: High Quality (Camera)
Toggle Preview (see P.7-25)
7
q
: 100%, p: 200% (Sha-mail)
q
: 100%, p: Enlarged (Movie Sha-mail/Motion Camera)
Image Size (see P.7-27)
8
Select Mode (see P.7-29)
9
b
: Sha-mail, c: Camera, e: Movie Sha-mail/Motion Camera/Video Camera
A Mobile Light (see P.7-25)
w
: Portrait, y: Full Auto, x: Macro
2
1
A
A
3
B
C
D
E
F
G
Clamshell OpenViewer Position
n
Sele
6
5D
G
P
B
F
E
C
8
7
Mobile Camera
7-2
7-3
Page 85

B
C
D
E
F
G
*Indicators in
Key Assignments
7
Mobile Camera
1
2
3
4
Save to (see P.7-28)
P
: Handset, b: Memory Card
Capacity (Sha-mail/Camera: see P.7-9, Movie Sha-mail: see P.7-15)
^ K
: More than 100
^
Red background: 5 or less
Picture Count
r
- s: Captured/Total
q
: Index Image (composite image for Overlap) is on Display.
Burst Mode
k
: 4-Burst Mode, l: 9-Burst Mode, m: 25-Burst Mode
o
: Auto Bracket, n: Overlap
Burst Speed
l
(red): Rapid, l (yellow): Slightly Fast, m: Normal, n: Moderate, o: Slow, p: Manual
l
(red): High, m: Normal (Auto Bracket/Overlap)
Self Timer (see P.7-19)
*
*
*
D
- F appear for Bust Modes (Sha-mail/Camera).
Viewer Position
2 3
41
Optical Zoom On/Off
Press to toggle Optical Zoom on/off.
Shutter/Camera Startup
Half press to lock focus and press further to capture images. Open selected menu items
or execute functions. In Standby, press for 1+ seconds to activate the mode used last
(default: Sha-mail).
Digital Zoom
n
(zoom in), m (zoom out)
^
Select menu items.
Menu/Cancel/End
^
Before saving, press to start over (or press for 1+ seconds to open menu).
Clamshell Open & Self Portrait Position
View a summary of key assignments on the handset (see P.7-29 "Key Ops Guide").
1
2
3
4
5
6
7
Brightness (see P.7-27)
1
C
(brighter), D (darker)
Optical Zoom On/Off (see P.7-24)/Camera Startup
2
Press to toggle Optical Zoom on/off. In Standby, press
mode used last (default: Sha-mail).
Focus Lock (see P.7-7)
3
Lock focus on subjects.
Toggle Preview (see P.7-25) & Show/Hide Indicators (see P.7-26)
4
Press to toggle as follows:
^
Sha-mail (except when Image Size is 240x320)
200% (with indicators)
^
Movie Sha-mail/Motion Camera
Enlarged (with indicators)
^
Sha-mail (Image Size: 240x320)/ Camera/Video Camera
Press to show or hide indicators.
Cancel
5
%
200% (no indicators) % 100% (with indicators)
%
Enlarged (no indicators) % 100% (with indicators)
8
9
A
B
C
D
E
F
e
for 1+ seconds to activate the
7
Mobile Camera
7-4
7-5
Page 86

Select Mode (see P.7-29)
6
While mobile camera is active, press keys to activate the corresponding modes.
1 Sha-mail (see P.7-8) 5 Video Camera (see P.7-14)
2 Camera (see P.7-8) 6 Scan Code (see P.16-34)
3 Movie Sha-mail (see P.7-14) 7 Text Scanner (see P.16-41)
4 Motion Camera (see P.7-14)
Image Size (see P.7-27)
7
Press before image capture to toggle size.
Menu
8
Shutter
9
Zoom
A
m
or B (zoom out), n or A (zoom in)
End
B
Auto Focus (see P.7-24)
C
%
w) %
D
7
Mobile Camera
E
F
Press to toggle modes as follows: Manual
Macro is not available when Optical Zoom is active.
^
High Speed Zoom (zoom in)
9
Press
Mobile Light (see P.7-25)
Press to toggle modes as follows: Portrait (
^
Full Auto is not available for recording video.
High Speed Zoom (zoom out)
. In Sha-mail mode, press 9 then A for the maximum zoom.
Optical Zoom
V604SH mobile camera features an Optical Zoom function.
^
Optical Zoom lens moves to change the focal length maintaining the image quality.
^
Use Optical Zoom with Digital Zoom.
^ Optical Zoom is not available when Auto Focus is set to Macro (see P.7-24).
,
^ When using Optical Zoom, maintain enough distance from subject to focus.
^ Camera motor may be audible when Optical Zoom or Auto Focus is in use or when
mobile camera shuts down.
^ Even if microphone is active during video recording, sound is temporarily paused
when lens moves.
Macro % Landscape % Standard
Full Auto (y) % Macro (x) % Off
Auto Focus
Mobile camera Auto Focus (AF) measures the distance between subject and lens to
adjust focus. Focus adjusts automatically when you press
h
Before Image Capture Auto Focus Image Capture
Switch to Macro or Landscape depending on subject and environment. Alternatively,
adjust focus manually for more flexibility (see P.7-24).
Focus Lock
Lock focus then recompose and capture image.
Viewer Position Clamshell Open
Activate Focus Lock Half press and hold h Press f
Focus Lock Active
Image Capture Press h fully Press b
^
Once focus locks, image is captured immediately after shutter is released.
^
To cancel Focus Lock, release h or press f again.
When recording moving subjects or shooting too close to subject, in poor lighting
,
conditions or because of camera shake, camera may not focus properly.
A white frame appears in the center and focus adjusts. When in focus,
frame turns green and a beep sounds.
h
or b for image capture.
7
Mobile Camera
7-6
7-7
Page 87

Still Images
Still Image Modes
Attach to Mail/save as Wallpaper
7
Mobile Camera
+
C
C
Sha-mail
Use Burst Shot & Picture Effects
Resize Images to Display
Use
Capture images for Mail,
Wallpaper or Display Images
Camera
Maximum Image Size:
W 2048 x H 1536 dots
Transfer images to PC, etc.
via Memory Card
^ Camera mode images meet Design rule for Camera File system (DCF) set by
Japan Electronics and Information Technology Industries Association (JEITA) to
ensure image compatibility with digital cameras, printers, and other devices.
Complete compatibility is not guaranteed.
^ Digital Print Order Format (DPOF) allows print settings (number of prints, etc.) to be
saved to media (see P.7-42 "Selecting Images & Prints" for more information).
Use
Editing Images on Other Devices
Copy original image files to the hard disk before editing an image.
Editing and re-saving images on PCs or other devices cancels DCF (see above)
compatibility and may make the image unopenable on handset.
Edit or print* images
on external devices
*V604SH is DPOF-compatible
Mode Comparison
2
330 files
1
1
3
Sha-mail Camera
W 2048 x H 1536 dots (QXGA)
W 240 x H 320 dots (QVGA)
Image Size
Save Location Data Folder (Images) Camera folder
Image Quality Standard/Fine Standard/Fine/High Quality
Optical Zoom 2x
Digital Zoom
Attach to Super Mail OK OK
Format JPEG (.jpg)
Memory Capacity 2,000 files
1
For Camera mode images, W 120 x H 160-dot thumbnails are saved with the originals.
2
Attach thumbnails, reduced images (W 240 x H 320 dots) or images saved to Data Folder.
3
Values are approximate for handset Data Folder, with default image size and quality.
^ Saved video, animations, melodies or V-Applications reduce still image memory.
+
^ To check memory status, see P.7-32.
W 120 x H 160 dots (QQVGA)
W 120 x H 128 dots
W 240 x H 320 dots: 1x - 12.8x
W 120 x H 160 dots: 1x - 25.6x
W 120 x H 128 dots: 1x - 25.6x
3
W 1600 x H 1200 dots (UXGA)
W 1280 x H 960 dots (SXGA)
W 1024 x H 768 dots (XGA)
W 640 x H 480 dots (VGA)
W 2048 x H 1536 dots: None
W 1600 x H 1200 dots: 1x - 1.3x
W 1280 x H 960 dots: 1x - 1.6x
W 1024 x H 768 dots: 1x - 2x
W 640 x H 480 dots: 1x - 3.2x
File Names
Image files are saved by date and time by default. Example:
Sha-mail
Camera Default file names appear as VFSH0001.JPG, VFSH0002.JPG, etc.
*If file name already exists,
05-12-15_12-34.jpg appears for image captured on December 15,
2005 at 12:34.
XX (00 - 99 or aa - zz) is automatically added to it.
[
*
Sha-mail image files can be renamed (see P.13-44).
7
Mobile Camera
7-8
,
Camera mode images may not appear on handset if file names are changed on PCs,
etc. (Camera mode files cannot be renamed on handset.)
7-9
Page 88

Capturing Still Images
Clamshell Open & Self Portrait Position
1
2
3
4
7
Mobile Camera
5
6
7
Viewer Position
In Viewer position (see P.1-12), press h for 1+ seconds
The mode used last activates (default: Sha-mail).
Press r
Select 1Sha-mail or 2Camera and press
Frame image on Display
C Key Assignments: see P.7-4
C Shooting Options: see P.7-24
C Manual Focus Control: see P.7-24
C Focus Lock: see P.7-7
Press h fully
After focus adjustment (see P.7-7), shutter clicks and the
captured image appears on Display.
C To start over, press r A Choose 1Yes A Press h
C To edit image (Sha-mail), press r (Long Press) A Select
Picture Effect A Press h A For more, see P.13-22 13-29
C To save to Memory Card, press r (Long Press) A Select Save to A Press h A
Select 2bMemory Card A Press h
(Images are saved to Memory Card until setting is changed.)
C To send image via Super Mail, press h (Long Press) A Perform from Step 2 on
IP.3-3
Set handset to save captured image automatically (see P.7-28 "Auto Save").
+
Press h to save image
Viewfinder returns for another shot.
Press r for 1+ seconds to exit
When Auto Save is active, omit the next step.
, select Select Mode and press
Z
h
h
Index Menu H Camera
Select 1Sha-mail or 2Camera and press
1
C To view a brief description of each mode, select a mode and
press e *.
Frame image on Display
2
C Key Assignments: see P.7-5
C Shooting Options: see P.7-24
C Manual Focus Control: see P.7-24
C Focus Lock: see P.7-7
Press
3
4
5
b
After focus adjustment (see P.7-7), shutter clicks and the captured
image appears on Display.
C To start over, press i A Choose 1Yes A Press b
C To edit image (Sha-mail), press d Z A Select Picture
Effect A Press b A For more, see P.13-22 - 13-29
C To save to Memory Card, press d Z A Select Save to A
Press b A Select 2bMemory Card A Press b
(Images are saved to Memory Card until setting is changed.)
C To send image via Super Mail, press e P A Perform from
Step 2 on IP.3-3
Set handset to save captured images automatically (see P.7-28 "Auto Save").
+
Press b to save image
Viewfinder returns for another shot.
Press g to exit
,
+
When Auto Save is active, omit the next step.
Self Portrait
Your image appears on Display as a mirror image. After shutter is released,
preview image appears reversed.
When Captured Image is Unsaved
Exit? appears.
^ Choose 1Yes and press b to end. Handset returns to Standby.
^ Choose 2No and press b to return to the captured image.
b
OptZoom
Sha‑mail
Shoot
Save
Functions
Functions
7
Mobile Camera
7-10
7-11
Page 89

Before Saving
^
To use the following functions, cancel Auto Save (see P.7-28) before image capture.
^
Follow these steps after capturing an image in Step 5 on P.7-10 or Step 3 on P.7-11.
7
Mobile Camera
Add to
Phone Book
Press r (Long Press) or d
Press h or b A Perform Step 4 on P.5-8
A
Save As Thumb
Press
Press
(Long Press) or d
r
or
h
Rotate Thumb
Press r (Long Press) or d
h
or
Press
^ To rotate further, press r for 1+ seconds or d z.
C Press h or b to save rotated thumbnails.
Save Sha-mail mode images to Phone Book
A Select 5Add to Phone Book
Z
Save only W 120 x H 160-dot thumbnails of Camera mode
images to Data Folder (Images)
A Select 1Save As Thumb A
Z
b
Rotate and save W 120 x H 160-dot thumbnails of Camera
mode images to Data Folder (Images)
A Select 2Rotate Thumb A
Z
b
Still Image Functions
Before Image Capture
*
Z
to use the following functions:
Add frames (see P.7-20)
*
Capture images with special effects (see P.7-21)
Press r or d
Image Quality Select Standard, Fine or High Quality (see P.7-26)
Image Size Select image size (see P.7-27)
Auto Focus Select auto or manual focus (see P.7-24)
Optical Zoom On/Off Activate or deactivate Optical Zoom (see P.7-24)
Mobile Light Select mode, color and lighting time (see P.7-25)
Shoot by Scene Select a mode according to lighting or subject (see P.7-27)
Toggle Preview Switch Viewfinder size (see P.7-25)
Self Timer Set Self Timer (see P.7-19)
Set Burst Mode Select mode and speed (see P.7-22)
Frame
Special
Features
Lens Effects
*Available for Sha-mail mode.
Shutter Click Change Shutter Click sound (see P.7-26)
Save to Select handset or Memory Card (see P.7-28)
Auto Save Save the captured image automatically (see P.7-28)
Option
Settings
Auto Reset
Delete Delete files on handset or Memory Card (see P.7-32)
Key Ops Guide View a summary of key assignments (see P.7-29)
Brightness Adjust amount of light (see P.7-27)
Select Mode Switch to other mobile camera modes (see P.7-29)
All settings return to defaults when mobile camera shuts down (see
P.7-29)
Before Saving
Press r for 1+ seconds or d
Sha-mail
C
1Toggle Preview Switch Viewfinder size (see P.7-25)
2Picture Effect Edit images (see P.13-22 - 13-29)
3Save to Select handset or Memory Card (see P.7-28)
4Attachment Attach images to Super Mail (see P.7-39)
5Add to Phone Book Save images to Phone Book (see P.7-12)
6Delete Delete files on handset or Memory Card (see P.7-32)
Camera
C
1Save As Thumb Save only thumbnails (see P.7-12)
2Rotate Thumb Rotate thumbnails by 90 degrees (see P.7-12)
3Attachment Attach thumbnails or reduced images to Super Mail (see P.7-41)
4Save to Select handset or Memory Card (see P.7-28)
5Delete Delete files on handset or Memory Card (see P.7-32)
6Toggle Preview Switch Viewfinder size (see P.7-26)
Z
to use the following functions:
7
Mobile Camera
7-12
7-13
Page 90

Video
Video Modes
Movie Sha-mail
Max Image Size:
W 128 x H 96 dots
Record up to 5 or 10 seconds
MPEG-4 Compatible
Attach to Super Mail
Motion Camera
Record up to 30 minutes
Attach single video frames to
7
Mobile Camera
Super Mail or edit video
Video Camera
Max Image Size:
W 320 x H 240 dots
Edit video clips
+
Video recording and playback are based on MPEG-4.
For best results, record within 1.5 meters, in well-lit conditions.
This product is licensed under the MPEG-4 Visual Patent Portfolio License for the personal
and non-commercial use of a consumer to (i) encode video in compliance with the MPEG-4
Video Standard ("MPEG-4 Video") and/or (ii) decode MPEG-4 Video that was encoded by a
consumer engaged in a personal and non-commercial activity and/or was obtained from a
licensed video provider. No license is granted or implied for any other use.
Additional information may be obtained from MPEG LA. See http://www.mpegla.com.
This product is licensed under the MPEG-4 Systems Patent Portfolio License for encoding in
compliance with the MPEG-4 Systems Standard, except that an additional license and
payment of royalties are necessary for encoding in connection with (i) data stored or replicated
in physical media which is paid for on a title by title basis and/or (ii) data which is paid for on a
title by title basis and is transmitted to an end user for permanent storage and/or use. Such
additional license may be obtained from MPEG LA, LLC.
See http://www.mpegla.com for additional details.
Use
Use
Use
Shoot video and attach files or
casual video recording
Use handset as a video camera
Record higher quality video
Mode Comparison
Movie Sha-mail Motion Camera Video Camera
W 128 x H 96 dots
Image Size
Save Location Data Folder (Movies)
Image Quality - Standard/Fine -
Optical Zoom 2x
Digital Zoom
Attach to Super Mail OK Clipped portion only N/A
Format MPEG-4 (.3gp) MPEG-4 (.ASF)
Memory Capacity 400 files
Recording Time
(per shot)
1
Select handset or Memory Card when saving.
2
When recorded to Data Folder with no files or recordings.
3
When recorded to handset Data Folder with no files or recordings, with default Image
Quality (Motion Camera mode), Image Size and Mic Settings.
^ Saved still images, animations, melodies or V-Applications reduce video memory.
+
^ To check memory status, see P.7-32.
(SQCIF)
W 80 x H 60 dots
1x - 12x
(W 128 x H 96 dots)
1x - 19.2x
(W 80 x H 60 dots)
2
5 seconds
(W 128 x H 96 dots)
10 seconds
(W 80 x H 60 dots)
W 176 x H 144 dots
(QCIF)
W 128 x H 96 dots
1
(SQCIF)
Motion Camera folder Video Camera folder
1x - 8.7x
(W 176 x H 144 dots)
1x - 12x
(W 128 x H 96 dots)
Approx. 32 minutes3Approx. 210 seconds
Approx. 3 minutes &
45 seconds (handset)
Up to 30 minutes
(Memory Card)
W 320 x H 240 dots
(QVGA)
1x - 4.2x
(Record Settings: High)
1x - 6.4x
(Record Settings:
Standard)
Approx. 30 seconds
(handset)
Capacity-based
(Memory Card)
File Names
Movie Sha-mail/
Motion Camera
Video Camera Default file names appear as MOL001.ASF, MOL002.ASF, etc.
*If file name already exists,
Video files are saved by date and time by default. Example:
05-12-15_12-34.3gp appears for image captured on December 15,
2005 at 12:34.
XX (00 - 99 or aa - zz) is automatically added to it.
[
*
Movie Sha-mail and Motion Camera files can be renamed (see P.13-44).
7
3
Mobile Camera
7-14
7-15
Page 91

Recording Video
ect
Make sure battery is adequately charged and there is enough free memory before
recording video. When battery is low (
are not available. If battery runs low or memory becomes full while recording video, a
warning appears and recording stops.
In Viewer position (see P.1-12), press h for 1+ seconds
1
The mode used last activates (default: Sha-mail).
C When handset is open, press b A Select
Press r (Functions), select Select Mode and press
2
Select 3Movie Sha-mail, 4Motion Camera or 5Video Camera and
3
7
Mobile Camera
4
press
C Receive Call while Recording? appears for 4Motion Camera or 5Video Camera.
Choose 1Yes or 2No A Press h or b
B To prevent disruptions, choose 2No to activate Off-Line Mode.
Frame image on Display
C Key Assignments: see P.7-4
C Shooting Options: see P.7-24
C Manual Focus Control: see P.7-24
C Focus Lock: see P.7-7
+
or
h
b
Remaining Recording Time for Motion Camera & Video Camera
^ -000 indicates less than 1 minute left.
^ In Motion Camera mode, maximum recording
time is 30 minutes regardless of time on Display
(when saving to Memory Card). Recording ends
and 30 minutes passed End appears.
^ Actual recording time may differ from that shown.
), Motion Camera and Video Camera modes
L
A Press b A Skip ahead to Step 3
Camera
h
Movie Sha-mail Mode
Recording Time
Remaining Time (minutes)
Motion Camera Mode
Press h or
5
Recording begins after a tone.
^ To record (Mic Settings On), hold handset no more than 50 cm from source.
+
Movie Sha-mail Mode
6
To stop, press h or
1
Recording stops with a tone.
^ Recording automatically ends when limit is reached.
C
CTo start over, select 3Cancel A Press h or b A
CTo add telops, select 6Telop Edit A Press h or b
Select 1Save and press h or
2
Video is saved and Viewfinder returns for another shot.
+
b
When Memory is Already Full
Insufficient Memory Cannot Record appears and Viewfinder returns. Perform
Steps 1 - 5 on P.7-32 to delete files and try again.
Memory Full while Recording (Motion Camera or Video Camera)
Recording stops automatically and Handset Insufficient Memory appears.
Select 1Complete and press h or b to save captured video.
b
To play back, select
Choose 1Yes A Press h or b
A Perform from Step 4 on P.7-37
2
Check Image A
Press h or
MovieSha‑mail
K1SaveI
2CheckImage
b
3Cancel
4Saveto
5Attachment
6TelopEdit
b
When Memory is Full
^ Perform Steps 1 - 5 on P.7-32 to delete files and try again.
^ When Memory Card is inserted, select 4Save to after recording and press
h or b to switch storage media.
Motion Camera/Video Camera Mode
To stop, press h or
1
Recording stops with a tone.
CWhen saving to Memory Card, a confirmation appears A Press h or b
(Omit the next step.)
CTo start over (when saving to handset), select 2Cancel A Press h or b A
Choose 1Yes A Press h or b
Select 1Complete and press h or
2
Video is saved and Viewfinder returns for another shot.
Press r for 1+ seconds or g to exit
7
If 2No was selected in Step 3 on P.7-16, Off-Line Mode is canceled after Step 7.
b
b
Selelect
Select
7
Mobile Camera
7-16
7-17
Page 92

Video Recording Operations
Special Features
Before Recording
Press r or d
Image Quality
Image Size
Auto Focus Select auto or manual focus (see P.7-24)
Optical Zoom On/Off Activate or deactivate Optical Zoom (see P.7-24)
Mobile Light Select mode, color and lighting time (see P.7-25)
Self Timer Set Self Timer (see P.7-19)
Toggle Preview
Show/Hide Indicators
Record Settings
Mic Settings Activate to record sound (see P.7-27)
7
Option Settings
Mobile Camera
Delete Delete files on handset or Memory Card (see P.7-32)
Key Ops Guide View a summary of key assignments (see P.7-29)
Brightness Adjust amount of light (see P.7-27)
Select Mode Switch to other mobile camera modes (see P.7-29)
1
Available for Motion Camera mode.
2
Available for Movie Sha-mail and Motion Camera modes.
3
Available for Video Camera mode.
Z
to use the following functions:
1
2
2
3
3
Save to Select handset or Memory Card (see P.7-28)
Auto Reset
Select Standard or Fine (see P.7-26)
Select video image size (see P.7-27)
Switch Viewfinder size (see P.7-25)
Hide indicators to frame image on full Display (see P.7-26)
Select High or Standard (see P.7-28)
All settings return to defaults when mobile camera shuts
down (see P.7-29)
Before Saving
For Movie Sha-mail mode, the following menu items appear after recording:
1Save Save video (see P.7-17)
2Check Image Play video (see P.7-17)
3Cancel Start over (see P.7-17)
4Save to Select handset or Memory Card (see P.7-28)
5Attachment Attach video to Super Mail (see P.7-41)
6Telop Edit Set telops to appear while playing video (see P.7-36)
Self Timer
Sha-mail ! Camera ! Movie Sha-mail !
Motion Camera ! Video Camera !
Delay shutter release by 2, 5 or 10 seconds after shutter release key is pressed to
capture still images or record video.
^
To capture an image using Self Timer, complete Steps 1 - 4 on P.7-10 or Steps 1 - 2 on
P.7-11, then execute steps below. To record video using Self Timer, complete Steps 1 - 4
on P.7-16, then execute steps below.
^
Self Timer is Off by default.
Press r or d
1
^ For video recordings, press r or d Z, then skip ahead to Step 3.
Select Special Features and press h or
2
Select Self Timer and press h or
3
C To change countdown time, select 2Set Time A Press h or b A Select time A
Press h or b
Select 1Self Timer On and press h or
4
Viewfinder returns (H appears).
C To cancel, select 1Self Timer Off A Press h or b
Frame image on Display and press h or
5
Tone sounds and countdown starts.
^ After the set time (default: 10 Seconds), shutter is released and captured image appears
or video recording starts.
^ To release shutter manually during countdown, press h or b. Image is captured or
video recording starts and Self Timer is canceled.
C To cancel Self Timer during countdown, press r, e 3 or i.
B Viewfinder returns. (Self Timer setting remains.)
Saving Still Images
6
Press h or
1
Self Timer is canceled and Viewfinder returns.
Z
b
b
b
b
b
7
Mobile Camera
7-18
Saving Video
To stop, press h or
1
CWhen saving to Memory Card, a confirmation appears A Press h or b (Omit
the next step.)
To save, select 1Complete or 1Save and press h or
2
Self Timer is canceled and Viewfinder returns.
Press r for 1+ seconds or g to exit
7
b
b
7-19
Page 93

^ When using Self Timer with Sha-mail, Camera or Movie Sha-mail, incoming calls
,
and Alarm times interrupt countdown, however Self Timer remains active.
B When using Self Timer with Motion Camera or Video Camera, Alarm times are
announced after mobile camera operations are concluded.
^ During countdown, the following settings are not available:
B Brightness, Mobile Light and Select Mode.
Adding Frames
Sha-mail ! Camera # Movie Sha-mail #
Motion Camera # Video Camera #
^
In addition to Preset Frames, use transparent PNG files obtained via Web or Super Mail.
^
Follow these steps before capturing an image (after Step 4 on P.7-10 or Step 2 on
P.7-11). After Step 4 below, perform from Step 5 on P.7-10 or Step 3 on P.7-11 to
complete.
1
7
Mobile Camera
2
3
4
Press r or d
Select 8Special Features and press h or
Select 3Frame and press h or
Preset Frames
Select 1Preset Frames and press h or
1
Select a frame and press h or
2
Selected image (frame) appears on Display.
CTo toggle between frames, press m or n, or press e W or d J.
Press h or
3
Original Frames
Select 2Original Frames and press h or
1
^ Some images may not be used as a frame.
Select a frame and press h or
2
Selected image (frame) appears on Display.
CTo change image (frame), press r or e W A Select a file A Press h or b
Press h or
3
^ When Image Size is 240x320, frames smaller than W 120 x H 160 dots are
enlarged.
Z
b
b
b
b
b
b
b
b
+
In Burst Mode, frame is added to each image.
Lens Effects
Sha-mail ! Camera # Movie Sha-mail #
Motion Camera # Video Camera #
To capture an image with Lens Effects, complete Steps 1 - 4 on P.7-10, or Steps 1 - 2
on P.7-11, then execute Steps 1 - 4 below; after Viewfinder returns, execute Step 5
below, then complete Steps 5 - 7 on P.7-10, or Steps 3 - 5 on P.7-11 to save the
finished image.
Press r or d
1
Select 8Special Features and press h or
2
Select 4Lens Effects and press h or
3
Select an effect and press h or
4
^ Lens Effects:
Sepia Capture image in sepia tones
Monochrome Capture image in black and white
Reversed Negative Capture image with inverted colors
Sketch Capture pencil sketch-like image
C To toggle between effects, press m or n, or press e W or d J
C To cancel, choose 5Off A Press h or b
Press h or
5
C Effect is set.
Z
b
b
b
b
7
Mobile Camera
Custom Screens (when active)
Select 3Custom Screens and press h or
1
Select a frame and press h or
2
Canceling
Choose 4Off and press h or
1
7-20
b
b
b
7-21
Page 94

Burst Mode
Sha-mail ! Camera ! Movie Sha-mail #
Motion Camera # Video Camera #
Capture a series of 4, 9 or 25 separate images automatically with a single press of the
shutter release key. Select from five speed settings or choose the manual option to
control the rate at which images are recorded.
Press h or b for the first shot. Handset captures the rest automatically.
Mode Description Sha-mail Camera
4-Burst Mode On Capture four separate images Available
9-Burst Mode On Capture nine separate images Available N/A
25-Burst Mode On Capture 25 separate images
Capture nine separate images.
Auto Bracket
7
Overlap On
Mobile Camera
1
Available when Image Size is 480x640.
2
Not available when Image Size is 240x320.
^
In 4-Burst or 9-Burst Mode, select shutter interval from five levels, or select Manual to
release shutter manually.
^
Follow these steps before capturing an image (after Step 4 on P.7-10 or Step 2 on
P.7-11).
1
2
3
4
Press r or d
Select 8Special Features and press h or
Select 2Set Burst Mode and press h or
In Sha-mail Mode
Select from 14-Burst Mode On to 5Overlap On and press h
1
or
b
For 25-Burst Mode, viewfinder returns with the corresponding indicator (see P.7-4).
Skip ahead to Step 6.
CTo cancel, choose Off A Press h or b (Skip ahead to Step 9)
Brightness and Mobile Light color vary
slightly for each shot.
Capture five images to create a
composite image
Z
b
2
Available N/A
Available N/A
b
1
N/A
Frame image on Display and press h or
6
The first frame is captured with subsequent frames captured at selected speed.
^ For manual shutter control (4-Burst and 9-Burst Modes), repeat Step 6 for each frame.
C To stop, press r or d C.
B Press h or b to save captured images.
C To cancel during manual shutter control, press r (Long Press) or e 3 A Choose
1Yes A Press h or b (Captured images are deleted.)
Index Image or a composite image appears
7
In Camera mode, the first captured image appears.
C Use m, n or F to toggle between frames and Index Image.
C To save images individually, select a frame or Index Image with
m, n or F A Press r (Long Press) or d Z A Select
1Save Image A Press h or b
C To send images via Super Mail, select a frame or Index Image
with m, n or F A Press r (Long Press) or d Z A
Select 2Attach Image A Press h or b (Attachment options
may appear depending on the image size.)
To save, press h or
8
Viewfinder returns with selected Burst Mode active.
^ In Sha-mail mode, captured frames are saved to Data Folder (連写
^ In Camera mode, captured frames are saved to Camera folder individually.
Press r for 1+ seconds or g to exit
9
,
C
Press r for 1+ seconds or d
1Save Image Save a selected image
2Attach Image Attach images to Super Mail
3Save to Select handset or Memory Card (see P.7-28)
4Delete Delete files on handset or Memory Card (see P.7-32)
5Toggle Preview Switch Viewfinder size (see P.7-25)
In low light or while Mobile Light is on, Burst Speed may slow down.
Before Saving
b
Z
to use the following functions:
b
連写) with Index Image.
連写連写
Sha‑mail
4-Burst Mode
Save
Functions
7
Mobile Camera
In Camera Mode
Select 14-Burst Mode On and press h or
1
CTo cancel, choose 2Off A Press h or b (Skip ahead to Step 9)
Select speed and press h or
5
Viewfinder returns with the corresponding indicator (see P.7-4).
^ Burst Speed is Normal by default.
b
7-22
b
7-23
Page 95

Shooting Options
^
Available options vary by selected image capture mode.
^
Follow these steps before capturing an image (after Step 4 on P.7-10 or Step 2 on
P.7-11) or recording video (after Step 4 on P.7-16). When the setting is complete,
Viewfinder returns. Perform from Step 5 on P.7-10, Step 3 on P.7-11 or Step 5 on P.7-17
to complete.
Auto Focus
Sha-mail ! Camera ! Movie Sha-mail !
Motion Camera ! Video Camera !
Press r or d
Select a mode
7
^ Macro is not available when Optical Zoom is active.
Mobile Camera
Standard Distance between subjects and mobile camera is measured to adjust focus
Manual Adjust focus manually
Macro Focus adjusts faster for close-up shots (approximately 10 cm from subjects)
Landscape Focus adjusts faster for far subjects
Select auto or manual focus
A Select Auto Focus A Press h or b A
Z
Press h or
A
b
KStandard
Mobile Light
Sha-mail ! Camera ! Movie Sha-mail !
Motion Camera !*Video Camera !
Select mode, color and lighting time
*
*Full Auto is not available.
KOff/1 Minute/Lychee
Mode
r
or d
Press
Select from Portrait Mode to Off
Portrait Mode Mobile Light activates (and brightens for still image capture)
Full Auto
(for Still Images)
Macro Mode Mobile Light activates and brightness is constant
A Select Mobile Light A Press h or b A
Z
Press h or
A
Mobile Light activates when light is low and brightens for image
capture
b
Lighting Time
r
or d
Press
Select Strobe Light
Press
+
or b A Select time A Press h or
h
Select shorter Lighting Time to lengthen Battery Time.
A Select Mobile Light A Press h or b A
Z
Press h or b A Select 1Lighting Time A
A
b
*
Mobile Camera
7
Manual Focus Control
Frame image on Display A Adjust focus with m, n or F A Press h or
C
Zoom functions are disabled during focus adjustment.
B
Optical Zoom
Sha-mail ! Camera ! Movie Sha-mail !
Motion Camera ! Video Camera !
Press r or d
Press h or
A
^ Alternatively, in Viewer position, press s (Opt Zoom) to toggle Optical Zoom on/off.
^ Optical Zoom is not available when Auto Focus is set to Macro.
^ When using Optical Zoom, maintain enough distance from subject to focus.
+
Use Optical Zoom with Digital Zoom. For more, see P.7-9, P.7-15.
Activate or deactivate 2x Optical Zoom
KOptical Zoom Off
A Select Optical Zoom On or Optical Zoom Off
Z
b
b
7-24
Color
r
or d
Press
Select Lighting Time
or
Toggle Preview
Sha-mail ! Camera ! Movie Sha-mail !
Motion Camera ! Video Camera #
Select a color A Press h or
b A
,
Do not use Mobile Light near people's faces or look into the light yourself.
Press r or d
^ Setting returns to default when the mode is changed or mobile camera shuts down.
A Select Mobile Light A Press h or b A
Z
Press h or b A Select 2Color A Press h
A
b
Switch Viewfinder size or hide indicators
K100% (with indicators)
A Select Toggle Preview A Press h or
Z
b
7-25
Page 96

Shutter Click
Change Shutter Click sound
Image Size
Select image size
Sha-mail ! Camera ! Movie Sha-mail #
Motion Camera # Video Camera #
Press r or d
Select
h
^ Shutter Click setting applies to both Sha-mail and Camera modes.
C To check sound, select a pattern and press h for 1+ seconds or e L.
,
7
Mobile Camera
Sha-mail # Camera # Movie Sha-mail #
Motion Camera # Video Camera !
Shutter Click A Press h or b A Select a pattern A Press
1
or
b
B Press h for 1+ seconds or e C to stop manually.
^ Volume is fixed.
^ Shutter Click sound for Burst Mode is unique and fixed.
Show/Hide
Indicators
Press r or d
Indicators
^ Setting returns to default when mobile camera shuts down.
Press h or
A
A Select Option Settings A Press h or b A
Z
Hide indicators to frame image on full Display
A Select 5Show Indicators or 5Hide
Z
b
Image Settings
^
Available options vary by selected image capture mode.
^
Follow these steps before capturing an image (after Step 4 on P.7-10 or Step 2 on
P.7-11) or recording video (after Step 4 on P.7-16). When the setting is complete,
Viewfinder returns. Perform from Step 5 on P.7-10, Step 3 on P.7-11 or Step 5 on P.7-17
to complete.
Image Quality
Sha-mail ! Camera ! Movie Sha-mail #
Motion Camera ! Video Camera #
Press r or d
Select quality
^ In Camera mode, High Quality is available.
The image quality increases as follows: Standard % Fine % High Quality.
+
Saving higher quality images/video requires more space in memory.
Select image or video quality
A Select Image Quality A Press h or b A
Z
Press h or
A
b
KStandard (Fine for Sha-mail 240 x 320)
KPattern 1
KShow Indicators
Sha-mail ! Camera ! Movie Sha-mail !
Motion Camera ! Video Camera #
KSha-mail: 120x160, Camera: 480x640, Movie Sha-mail & Motion Camera: 128x96
Press r or d
Select a size
Shoot by Scene
Sha-mail ! Camera ! Movie Sha-mail #
Motion Camera # Video Camera #
Press r or d
Select a mode
1Full Auto Automatic adjustment
2Night View Use in low light conditions
3Action Best suited for action sports or fast-moving subjects
4Text Most suitable for high contrast black and white subjects
5Fast Portrait Best suited for close-up shots of fast-moving subjects
6Backlight Brighten subjects in backlit conditions
7Portrait Most suitable for portraits
8Night Portrait Use to capture portraits in low light conditions
Brightness
Sha-mail ! Camera ! Movie Sha-mail !
Motion Camera ! Video Camera !
A
Z
A
Press r or d
Select from five levels
^ Setting returns to default when mobile camera shuts down.
Mic Settings
Sha-mail # Camera # Movie Sha-mail !
Motion Camera ! Video Camera !
Press r or d
Choose Mic On or Mic Off
^ Image quality is slightly different between Mic On and Mic Off.
,
Mic On (Fine) recording consumes more memory, shortening recording time.
A Select Image Size A Press h or b A
Z
Press h or
Select a mode according to lighting or subject
b
A Select Shoot by Scene A Press h or b A
Press h or
Adjust light sensitivity for still images and video
A Select Brightness A Press h or b A
Z
A
Record sound together with video
A Select Mic Settings A Press h or b A
Z
b
Press h or
Press h or
A
b
b
KFull Auto
K0 (standard)
KMic On
7
Mobile Camera
7-26
7-27
Page 97

Record Settings
Set priority to recording moving subjects or image quality
Auto Reset
All settings return to defaults when mobile camera shuts down
Sha-mail # Camera # Movie Sha-mail #
Motion Camera # Video Camera !
Press r or d
Select
^ Moving subjects appear smoother in High (15 fps) and the image quality is better in
Standard (10 fps).
High (15 fps) or 2Standard (10 fps) A Press h or
1
A Select Record Settings A Press h or b A
Z
Additional Settings
^
Available options vary by selected image capture mode.
^
Follow these steps before capturing an image (after Step 4 on P.7-10 or Step 2 on
P.7-11) or recording video (after Step 4 on P.7-16). When the setting is complete,
7
Viewfinder returns. (For Key Ops Guide, return to Viewfinder manually.) Perform from
Step 5 on P.7-10, Step 3 on P.7-11 or Step 5 on P.7-17 to complete.
Mobile Camera
Save to
Sha-mail ! Camera ! Movie Sha-mail !
Motion Camera ! Video Camera !
Press r or d
Select Save to
Memory Card A Press h or
2
b
Auto Save
Sha-mail ! Camera ! Movie Sha-mail #
Motion Camera # Video Camera #
Press r or d
Select
Press
Auto Save A Press h or b A Choose 1On or 2Off A
3
or
h
Select handset or Memory Card to save image/video files
A Select Option Settings A Press h or b A
Z
Press h or b A Select 1PHandset or
A
b
Set handset to save captured images automatically
A Select Option Settings A Press h or b A
Z
b
KHigh (15 fps)
b
KHandset
KOff
Sha-mail ! Camera ! Movie Sha-mail !
Motion Camera ! Video Camera !
KOff (Settings are retained.)
Press r or d
Select Auto Reset
Press
^ Auto Reset setting applies to all mobile camera modes.
,
Select Mode
Sha-mail ! Camera ! Movie Sha-mail !
Motion Camera ! Video Camera !
or
h
b
Setting does not affect Auto Save setting.
Press r or d
Select a mode
^ Mode used last activates whenever mobile camera is activated with Camera Startup key.
Key Ops Guide
Sha-mail ! Camera ! Movie Sha-mail !
Motion Camera ! Video Camera !
A
Press r or d
^ Press n or D to scroll down.
C To return to Viewfinder, press r or e W A Press r or e W
A Select Option Settings A Press h or b A
Z
Press h or b A Choose 1On or 2Off A
A
Switch to other mobile camera modes
A Select Select Mode A Press h or b A
Z
Press h or
View a summary of key assignments for operations with
handset open (clamshell open)
A Select Key Ops Guide A Press h or
Z
b
b
7
Mobile Camera
7-28
7-29
Page 98

Opening Images & Playing Video
Opening Still Images
Open Sha-mail/Camera mode images or Camera mode Burst Shot images.
^
To open Sha-mail mode Burst Shot images, see P.13-8 "Handset Data Folder."
^
View images on PCs, TVs or other display devices (see P.16-48).
Index Menu H Camera A Camera Files
Select 1Sha-mail Images or 2Camera Images
1
2
7
Mobile Camera
and press
C For Camera Images, select a folder A Press h or b
C To switch to Memory Card, press r (Long Press) or d I
A Select Memory Card A Press h or b
Select a file and press h or
Image appears.
C To open other files, press r or i.
+
or
h
b
b
To view available functions, open a file and press r for 1+ seconds or d
For more, see
P.13-20
-
13-33
.
Jm G
Q
PDataFolder
A*5‑12‑2112‑114.2KB
Check MenuShow
Sha-mail Images
n
I
Saving as Wallpaper or Data Folder File
Save a Camera mode image as Wallpaper or to Data Folder (Images), from where it
can be edited/attached to Super Mail. Follow these steps after opening a Camera
mode image (see P.7-30 "Opening Still Images").
Press r for 1+ seconds or d
1
Select Save As Wallpaper or To Data Folder and press h or
2
C For Save As Wallpaper, press h or b.
C For To Data Folder, select a folder A Press h or b
P
+
^ Image quality may change when saved as Wallpaper or to Data Folder.
^ From Standard view, the reduced image is saved.
^ When saving from Thumbnail view, select Wallpaper Thumbs or Data Folder
Thumbs. For Wallpaper, select a display type. For Data Folder, the image in
W 120 x H 160 is saved.
^ When saving from Original Size view, select Save As Wallpaper or Data
Folder Images. Only the portion on Display (W 240 x H 320) is saved.
I
b
7
Mobile Camera
Playing Video
^
To open files from Data Folder, see P.13-8.
^
.
View images on PCs, TVs or other display devices (see P.16-48).
Index Menu H Camera A Camera Files
Camera Mode Images
C
Images are reduced to fit Display. To restore the original size, see "Thumbnail or
Original Size View" below.
^
Use G to scroll up, down, left and right.
^
Press h or b to rotate images 90 degrees clockwise.
Thumbnail or Original Size View
Open Camera mode images in thumbnail or original size.
^
Thumbnails are small copies (W 120 x H 160) of images taken in Camera mode.
^
Follow these steps after opening a Camera mode image in Step 2 above.
Press r for 1+ seconds or d
1
Select Show Thumbnails or Original Size and press h or
2
C To return to the reduced size (Standard view), press r (Long Press) or d I A
Select Standard A Press h or b
I
7-30
b
Select 3MovieSha-mail Data, 4Motion Camera
1
Data or
C For Video Camera Data, select a folder A Press h or b
C To switch to Memory Card, press r (Long Press) or d I
A Select Memory Card A Press h or b
Select a file and press h or
2
Video plays and stops automatically at the end.
^ For Video Camera files on Memory Card, playback resumes from
where it was stopped.
^ While playing Movie Sha-mail video, press p or q to open
next or previous files.
C
To rotate video images, press r (Long Press) or d
Press
To play from the beginning (Video Camera files only), press r (Long Press) or d
C
A
C To add telops (Movie Sha-mail files only), press r (Long Press) or d I A Select
Other Edit Functions A Press h or b A Perform from Step 3 on P.7-36
C To open other files, press r or i.
Video Camera Data and press h or
5
b
or b A Select amount to rotate or
h
Select
Play from Start A
Press h or
Use Current
b
b
I
A Select
(no rotation) A Press h or
J
Q
PDataFolder
h*5‑12‑2115‑436.2KB
Check MenuPlay
Movie Sha-mail
Images
Rotate Image A
n
I
7-31
G
P
b
Page 99

Among Motion Camera files, V604SH plays only MPEG-4 video files. Nancy video
,
Fast Forward
Fast Reverse
Stop Press b to pause
Adjust Volume
Change Display
Size
1
2
files are not supported.
Playback Operations
1
1
2
Not available for Movie Sha-mail files.
For Video Camera files, press to show or hide indicators.
Press A. During fast forward, press b to pause.
Press B. During fast reverse, press b to pause.
Press C (up) or D (down) to adjust volume (with Mic On).
Select from six levels (0 - 5).
Press k to toggle display size as follows: enlarged (with indicators)
% enlarged (no indicators) % 100% (with indicators)
(When enlarged, images may not fit Display.)
Editing Video
1
Edit
Still Image
Select 2 points
Delete Front
Delete Back
Delete All
Telop Edit
1
Available for Motion Camera files.
2
Available for Motion Camera and Video Camera files.
3
Available for Movie Sha-mail files.
,
1
2
2
2
3
^ Some files may not be edited.
^ Edited video may not play properly if Memory Card is not formatted for V604SH.
Save portion of 5 or 10 seconds from selected point as a new file
Save selected frame as a new file
2
Save portion between two points as a new file
Save portion before or after selected point as a new file
Delete video being played
Add telops (text) to video
7
Mobile Camera
+
Press j for 1+ seconds to activate or cancel Manner Mode.
Memory Status
Index Menu H Functions A Settings 1 A Memory
Select 3File Cabinet and press h or
1
Memory usage status appears as a percentage (%).
To check Memory Card status, select
C
Select
A
When Memory is Full
When saving images, memory shortage warning may appear. To save images, press
r
or g and follow these steps to delete files.
Press r for 1+ seconds or press d
1
Select Delete and press h or
2
Select a file type and press h or
3
C To switch to Memory Card, press r (Long Press) or d I A Select Memory Card
A Press h or b
Select a file and press h or
4
Choose 1Yes and press h or
5
Memory Card A
Press h or
3
File Cabinet A
b
b
b
b
b
Press r (Long Press) or d
Z
b
I
7
Mobile Camera
+
Clipped Motion Camera video portions are saved to Data Folder (Movies) as MPEG-4
files with a .3gp extension. Use them as Super Mail attachments or add telops.
Clipping Video
Select a portion of video, then reduce image size (Reduce) or crop edges (Clipping).
^
If video was captured with Mic On (Fine), sound is disabled in clipped portions.
^
Clip up to 10 seconds when Image Size (see Step 4 below) is 80x60 and up to 5 seconds
when 128x96 is selected.
Index Menu H Camera A Camera Files A Motion Camera Data
Select a file and press
1
Video plays.
Press b at approximate start point for clipping
2
Video pauses.
Press d
3
Select 1Edit and press
4
C To change mode, select 2Edit Setting A Press b A Select 1Mode Setting A
Press b A Select 1Clipping or 2Reduce A Press b
C To set size, select 2Edit Setting A Press b A Select 2Image Size A Press b A
Select 180x60 or 2128x96 A Press b
Choose 1Yes and press
5
Z
b
b
b
7-32
7-33
Page 100

6
7
8
7
Saving Images from Video
Mobile Camera
Index Menu H Camera A Camera Files A Motion Camera Data
1
2
3
4
5
Use F to adjust start point
C To cancel, press e W
Press
b
Starting from the selected point, portion of 5 or 10 seconds is
clipped depending on the image size. Press b to stop manually.
C To play back clipped portion before saving, select 2Check
Image A Press b
C To start over, select 3Cancel A Press b
C To switch storage media, select 4Save to A Press b A
Select Handset or Memory Card A Press b
C To send via Super Mail, select 5Attachment A Press b A
Perform from Step 2 on IP.3-3
C To add telops, select 6Telop Edit A Press b A Perform from Step 4 on P.7-37
To save, select 1Save and press
Edited image is saved to Data Folder (Movies).
Select a file and press
Video plays.
Press b at approximate point to save
Video pauses.
^ Use F to adjust point to save.
Press d
Select 3Still Image and press
Press
Image is saved to Data Folder (Images) and Viewfinder returns.
Z
b
b
b
b
Q
Back Stop
Clipping Portions between Two Points
Index Menu H Camera A Camera Files
Select 4Motion Camera Data or 5Video Camera Data and press
1
C For Video Camera Data, select a folder A Press b
Select a file and press
2
Video plays.
Press b at approximate start point
3
Video pauses.
^ Use F to adjust start point.
Press d
4
Select Select 2 points and press
5
Choose 1Yes and press
6
^ Use F to adjust start point.
Press
7
Playback resumes.
Press b at the end point
8
^ Use F to adjust end point.
Press d
9
Clipped portion is saved and Viewfinder returns.
Z
b
j
b
b
b
Cropping Video Clips
Delete video before or after a selected point; then save what remains as a new file.
Index Menu H Camera A Camera Files
Select 4Motion Camera Data or 5Video Camera Data and press
1
C For Video Camera Data, select a folder A Press b
b
Mobile Camera
b
7
7-34
Select a file and press
2
Video plays.
Press b at approximate start point
3
Video pauses.
^ Use F to adjust start point.
b
7-35
 Loading...