

Page 1
DVD Video Player
5
MODEL
DV-SV97S(RU)
OPERATION MANUAL
Please read this Operation Manual carefully before using
your DVD Video Player.
The region number for this
DVD Video Player is 5.
Page 2
Page 3
SAFETY INFORMATION
Note:
This player can be used only where the power supply is
AC 220-240 V, 50 Hz. It cannot be used elsewhere.
CAUTION:
USE OF CONTROLS OR ADJUSTMENTS OR PER
FO R M A N C E OF PR O C E D U R E S OTHER T H A N
THOSE SPECIFIED HEREIN MAY RESULT IN HAZ
ARDOUS RADIATION EXPOSURE.
AS THE LASER BEAM USED IN THIS PLAYER IS
HARMFUL TO THE EYES, DO NOT ATTEMPT TO
DISASSEMBLE THE CABINET. REFER SERVICING
TO QUALIFIED PERSONNEL ONLY.
WARNING:
TO REDUCE TH E R ISK OF F IRE OR ELECTRI C
SHOCK, DO NOT EXPOSE THIS EQUIPMENT TO
RAIN OR MOISTURE.
TO REDUCE TH E R ISK OF F IRE OR ELECTRI C
SHOCK, AND ANNOYING INTERFERENCE, USE THE
RECOMMENDED ACCESSORIES ONLY.
Laser Diode Properties
Material: GaAs
Wavelength: DVD: 650 nm
CD: 790 nm
Emission duration: Continuous
Laser output: Max. 0.4 mW
Power Cord Protection
To avoid any malfunctions of the player, and to protect against
electric shock, fire or personal injury, please observe the following.
• Hold the plug firmly when connecting or disconnecting the
AC power cord.
• Keep the AC power cord away from heating appliances.
-
• Never put any heavy object on the AC power cord.
• Do not attempt to repair or reconstruct the AC power cord in
-
any way.
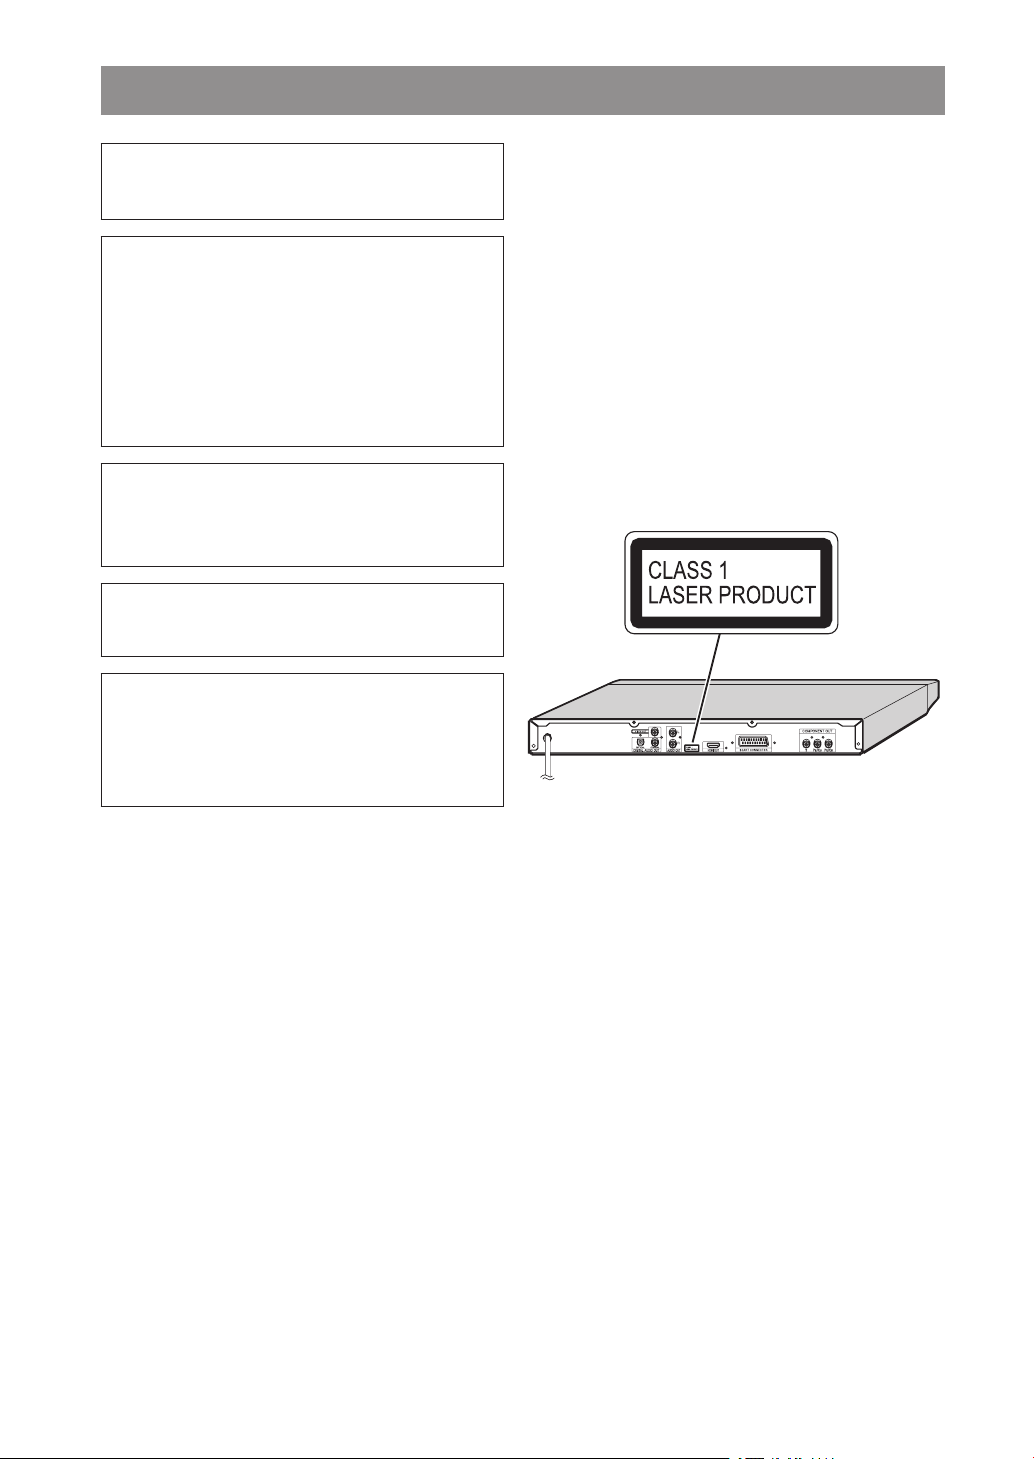
• This player is classified as a CLASS 1 LASER product.
• The CLASS 1 LASER PRODUCT label is located on the rear
cover.
• This product contains a low power laser device. To ensure
continued safety do not remove any cover or attempt to gain
access to the inside of the product. Refer all servicing to
qualified personnel.
- 1 -
EN
Page 4

SAFETY INFORMATION
Location and Handling
• Do not cover or place the player in enclosed spaces to
prevent excessive temperature build-up.
• Do not place the player in direct sunlight, or near heat
sources.
• Keep the player away from strong magnetic objects.
• Do not place any object containing water or other liquids
on the player. In the event that liquid should enter the
cabinet, unplug the player immediately and contact the
retailer or service centre approved by SHARP immediately.
• Do not remove the player cabinet. Touching parts inside
the cabinet could result in electric shock and/ or damage to the player. For service and adjustment inside the
cabinet, call a qualified dealer or service centre approved
by SHARP.
Non-use Periods
When the player is not being used, switch the player to
the Standby mode.
When left unused for a long period of time, the player should
be unplugged from the household AC outlet.
No Fingers or Other Objects Inside
Do not put any foreign object on the disc tray.
Stacking
Place the player in a horizontal position, and do not place
anything heavy on it.
Condensation
Moisture may form on the pickup lens in the following
conditions:
• immediately after a heater has been turned on.
• in a steamy or very humid room.
• when the player is suddenly moved from a cold environment to a warm one.
If moisture forms inside this player, it may not operate
properly. In this case, turn on the power and wait about
one hour for the moisture to evaporate.
Cleaning
Unplug your player before cleaning. Use a damp cloth
for cleaning. Do not use cleaning fluids or aerosols which
could enter the player and cause damage, fire, or electrical shock.
These substances may also deteriorate the finish of your
player.
If There Is Noise Interference on the TV While a Broad
cast Is Being Received
Depending on the reception condition of the TV, interfer
ence may appear on the TV monitor while you watch a TV
broadcast and the player is left on. This is not a malfunction of the player or the TV. To watch a TV broadcast, turn
off the player.
Service
Do not attempt to service this player yourself. Please
refer any service to the nearest service centre approved
by SHARP.
Copyright
Audio-visual material may consist of copyrighted works
which must not be recorded without the authority of the
owner of the copyright. Please refer to relevant laws in
your country.
Copy Protection
This player supports Macrovision copy protection. On DVDs
that include a copy protection code, if the contents of the
DVD are copied using a VCR, the copy protection code
prevents the videotape copy from playing normally.
U.S.Patent Nos. 4,631,603; 4,819,09 8; 4,907,093;
5,315,448; and 6,516,132
This product incorporates copyright protection technol
ogy that is protected by U.S. patents and other intel
lectual property rights. Use of this copyright protection
technology must be authorised by Macrovision, and is
intended for home and other limited viewing uses only
unless otherwise authorised by Macrovision. Reverse
engineering or disassembly is prohibited.
• When attempting to record copy protected material on a
VCR or other recording device, the copy protection will
activate and the protected material will not be recorded
correctly. In addition, attempting to display copy protected
material on a monitor connected via a VCR, whether for
the purpose of viewing or not, will cause an inferior quality
picture to be displayed. This is not a fault of the equipment.
Please view copy protected material by connecting the
product directly to the monitor.
Recommended Measures for Optimum Picture Excel
lence
The player is a precision device that is constructed using
extremely accurate technology.
Soiling or friction affecting the pickup lens or disc drive can
impair the image quality. At the worst, neither video nor
audio will be played back. Contact your authorised SHARP
supplier for details.
Do not attempt to clean the pickup lens yourself.
-
-
-
-
-
- 2 - EN
Page 5

TABLE OF CONTENTS
SAFETY INFORMATION ............................................................................1
TABLE OF CONTENTS .............................................................................3
ABOUT THIS MANUAL ..............................................................................4
GENERAL PROPERTIES .......................................................................... 4
SUPPLIED ACCESSORIES ....................................................................... 4
DISC TYPES COMPATIBLE WITH THE PLAYER .....................................5
SAFETY PRECAUTIONS ..........................................................................7
FRONT PANEL FUNCTIONS .....................................................................8
FRONT PANEL DISPLAY (VFD) ................................................................ 8
CONNECTORS ON THE REAR PANEL .................................................... 9
CONNECTION OF THE PLAYER WITH TV ............................................10
CONNECTION OF THE PLAYER WITH AV AMPLIFIER .........................12
REMOTE CONTROL ................................................................................14
REMOTE CONTROL FUNCTIONS ..........................................................15
DVD PLAYBACK .....................................................................................
Direct Selection of Scenes .......................................................................17
Repeat Play ..............................................................................................18
Convenient Functions ............................................................................... 18
VIDEO CD PLAYBACK ...........................................................................
Direct Selection of Scenes .......................................................................22
Repeat Play .............................................................................................23
Convenient Functions ............................................................................... 24
AUDIO CD PLAYBACK ........................................................................... 24
Direct Selection of Tracks .........................................................................25
Repeat Play ..............................................................................................26
Convenient Functions ............................................................................... 27
DISC MENU .............................................................................................28
USING SETUP MENU .............................................................................
LANGUAGE SETUP ...............................................................................31
VIDEO SETUP .........................................................................................31
AUDIO SETUP ......................................................................................... 33
OTHERS SETUP .....................................................................................33
TROUBLESHOOTING .............................................................................35
SPECIFICATIONS .................................................................................... 37
DEFINITION OF TERMS .........................................................................38
16
21
30
- 3 -
EN
Page 6

ABOUT THIS MANUAL
Instructions in this manual describe the controls on the remote control. You can also use the controls on the player if they
have the same or similar names as those on the remote control.
Dear Customers
We would like to thank you for purchasing this DVD/DVD-RW/DVD-R/DVD+RW/DVD+R/VCD/S-VCD/AUDIO CD/CDRW/CD-R/MP3/JPEG/MPEG-4/ DivX
We strongly recommend that you carefully study the operating instructions before attempting to operate the player and
that you note the listed safety precautions.
®
player.
GENERAL PROPERTIES
1)
DVD/DVD-RW/DVD-R/DVD+RW/DVD+R/VCD/S-VCD/AUDIO CD/CD-RW/CD-R/MP3/JPEG/MPEG-4/ DivX® playback
2) Official DivX® Certified product
Plays all versions of DivX® video (including DivX®6 ) with standard playback of DivX® media files
3) PAL/NTSC playback (according to disc content)
4) User-friendly multi-language OSD menu control
5) Vacuum Fluorescent Display (VFD)
6) DTS, Dolby Digital, LPCM audio, MPEG audio via coaxial, optical and HDMI digital audio outputs
7) Multiple Aspect Ratio support (16:9 Wide screen, 4:3 Letterbox, 4:3 PAN & SCAN)
8) Multi-Audio (up to 8) support
9) Multi-Subtitle (up to 32) support
10) Multi-Angle (up to 9) support
11) 8 level parental control
12) Fast forward and reverse at different speeds
13) Slow motion playback at different speeds
14) Frame-by-frame forward playback
15) Time Search
16) Repeat (disc, title, chapter, A-B)
17) Programme function for Audio CD, MP3 and JPEG
18) Scart connector
19) Component video output (Progressive scan and Interlace)
20) Composite video output
21) HDMI digital audio and video output (up to 1080i conversion)
Manufactured under licence from Dolby Laboratories. “Dolby” and the double-D symbol are trademarks of Dolby Laboratories.
•
is a trademark of DVD Format/Logo Licensing Corporation.
•
“DTS” and “DTS Digital Out” are trademarks of Digital Theater Systems, Inc.
•
DivX, DivX Certified, and associated logos are trademarks of DivX, Inc. and are used under licence.
•
“HDMI”, the HDMI logo and “High-Definition Multimedia Interface” are trademarks of HDMI Licensing LLC.
•
SUPPLIED ACCESSORIES
In the packaging material you will find the following:
(1) Remote control (2) Two R03 (AAA) batteries for the remote control (3) Operation manual
- 4 - EN
Page 7
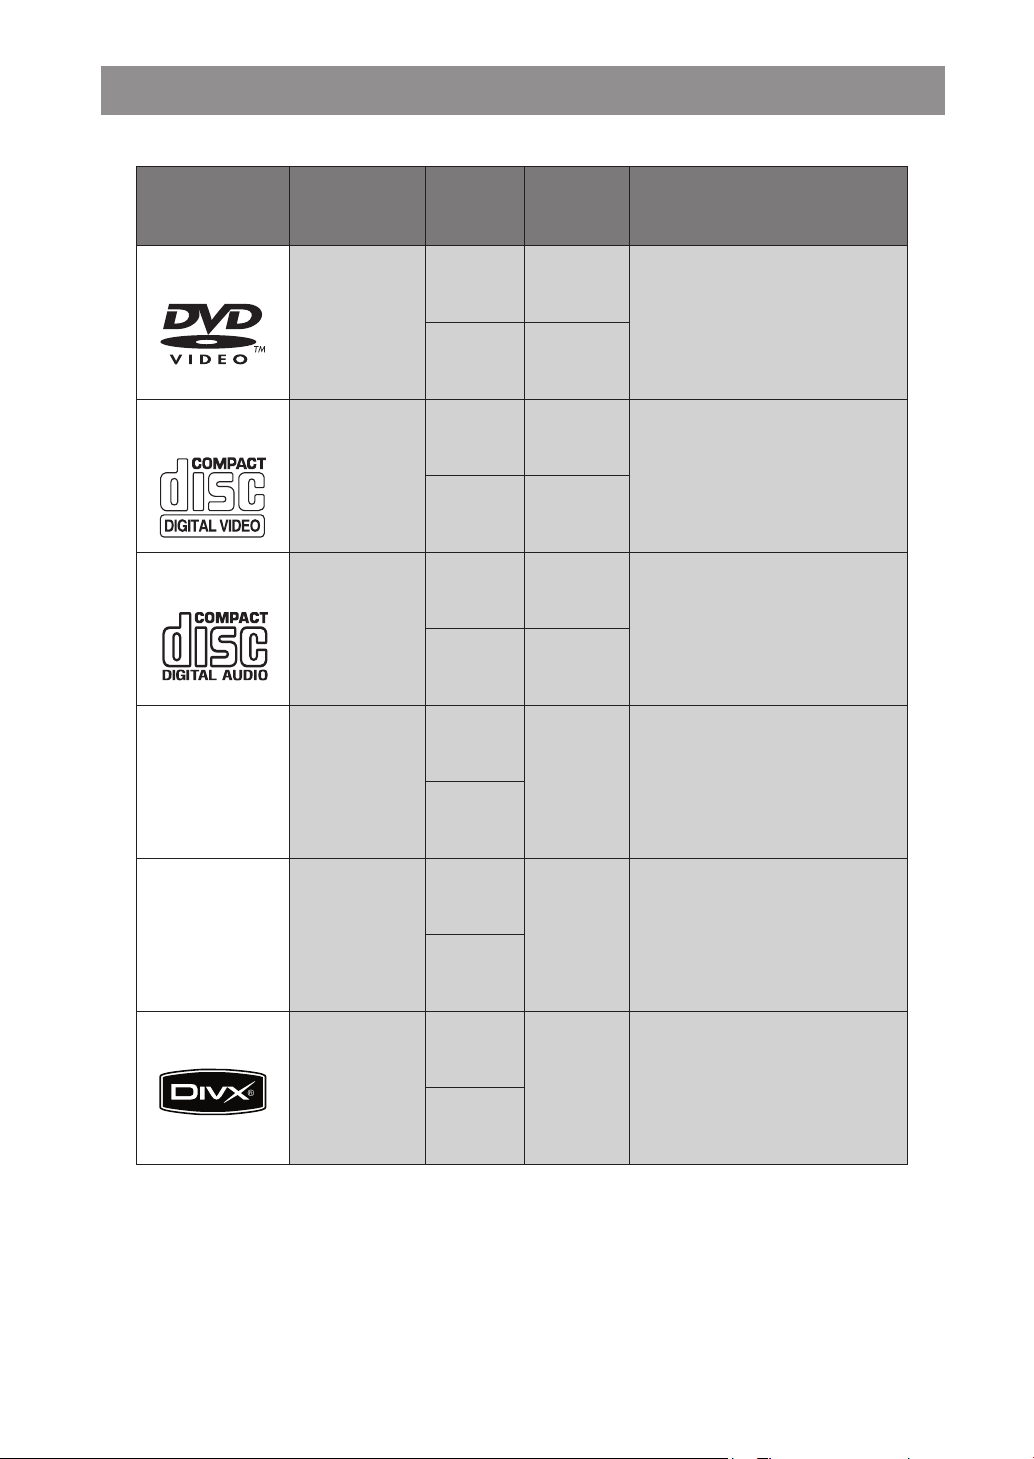
DISC TYPES COMPATIBLE WITH THE PLAYER
The player can play the following discs.
Disc Types
(Logos)
DVD
VIDEO-CD
AUDIO-CD
MP3-CD
Recording
Types
Audio
+
Video
Audio
+
Video
Audio
Audio
(xxxx.mp3)
Disc Size
12 cm
8 cm
Playing
Single - sided;
240 min.
Double - sided;
480 min.
Single - sided;
Double - sided;
160 min.
12 cm 74 min.
8 cm 20 min.
12 cm 74 min.
8 cm 20 min.
12 cm
It depends
on MP3
quality.
8 cm
Max.
Time
80 min.
Characteristics
• DV D contains exc ell ent sound a nd
video due to Dolby Digital and MPEG2 System.
• Various screen and audio functions
can be easily selecte d t hro ugh the
on-screen menu.
• Video with CD sound, VHS quality and
MPEG-1 compression technology.
• An LP is record ed a s an analogue
sig na l wi th m or e di st or ti on. CD is
recorded as a digital signal with better
audio quality, less distortion and less
deteri orati on of au dio q uality o ver
time.
• MP 3 i s r ecorded as a digital signal
with better audio quality, less distor
tion and less deterioration of audio
quality over time.
-
12 cm
It depends
on JPEG
quality.
• JPEG is recorded as a digital signal
with better picture quality over time.
PICTURE-CD
Video
(still picture)
8 cm
®
DivX
Audio
+
Video
12 cm
It depends
on DivX®
quality.
• DivX® media files contain highly com-
pressed video with high visual quality
that maintains a relatively small file
size.
8 cm
NOTE:
For DVD-RW/-R, DVD+RW/+R, only discs recorded in Video mode can be played back.
• Some DVD-RW/-R, DVD+RW/+R or CD-RW/-R discs made on personal computers, or on DVD recorders
may not be played back properly due to the factors such as scratches, dirt or special properties of the disc.
• Discs made on personal computers may not be played back properly due to the different environment or
the settings of the application you use. We recommend always to use the standardised, correctly formatted
discs.
- 5 -
EN
Page 8
The following discs cannot be played back on the player:
RECORD
SPRA
Y
THINNER
BENZENE
• DVD with region codes other than 5 or ALL.
• DVD-ROM
• DVD-RAM (Never play back, otherwise malfunction may result.)
• CDV (Only plays back the audio part.)
• CD-ROM
• CD-G (Only plays back the sound.)
• CD-I (Never play back, otherwise malfunction may result.)
• Super Audio CD (Only the sound recorded on the normal CD layer can be delivered. The sound recorded on the
high density Super Audio CD layer cannot be delivered.)
• Photo CD (Never play back, otherwise malfunction may result.)
• DualDisc
Any other discs without compatibility indications.
NOTE:
When an incompatible disc is inserted, a message appears in the VFD and the on-screen display indicating that
the disc is not playable.
Notes on discs:
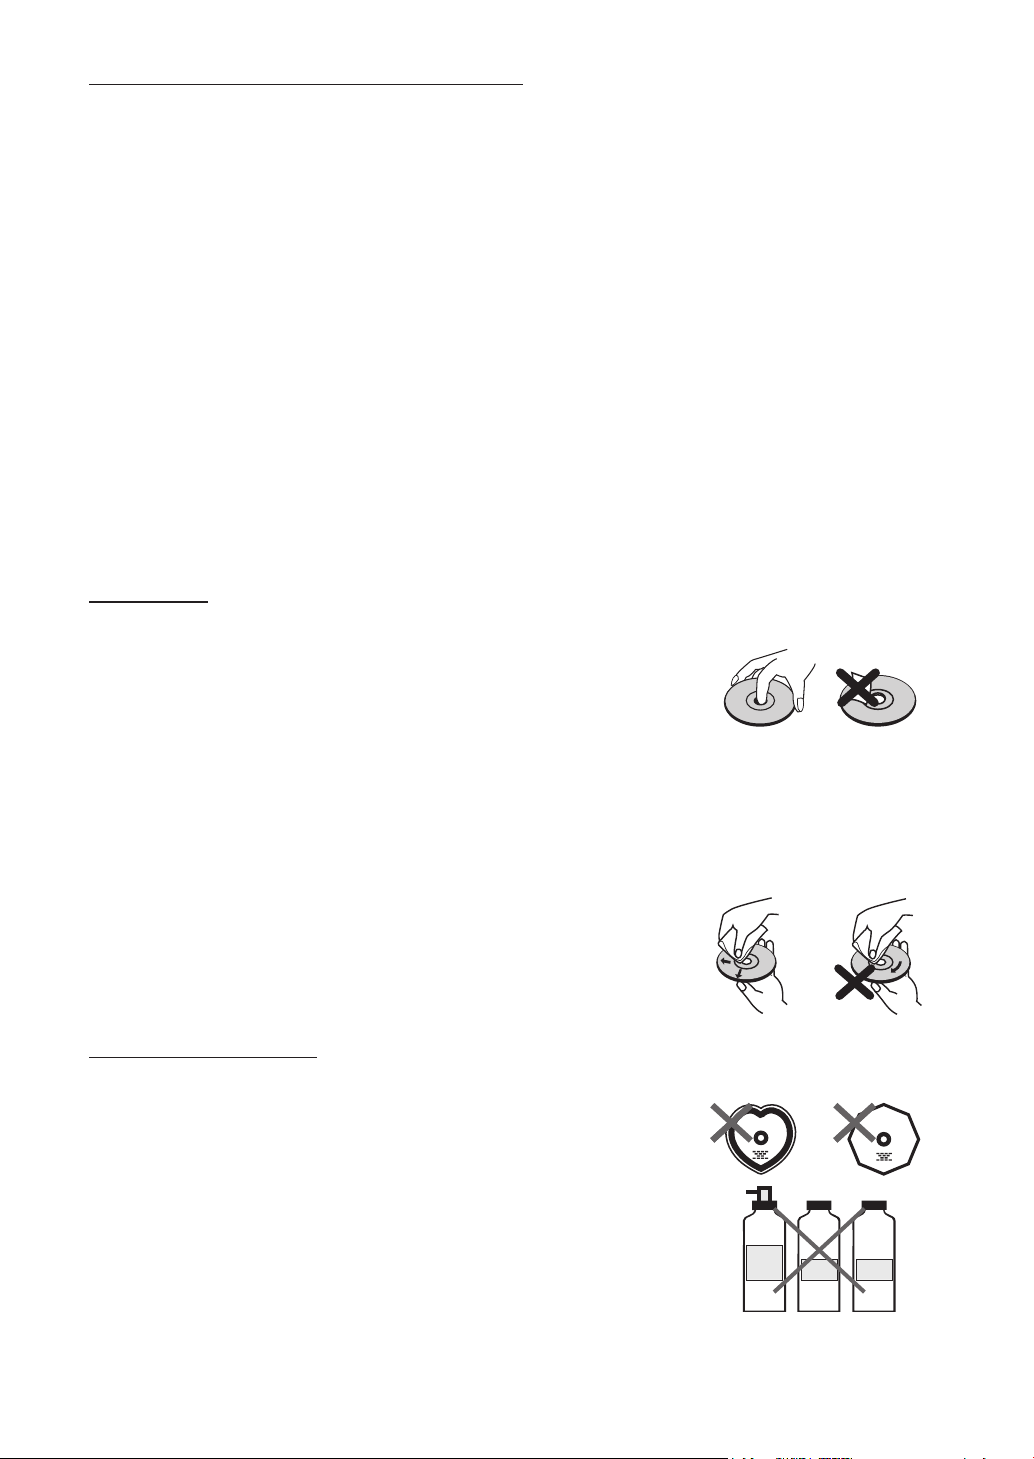
On handling discs
• To keep the disc clean, handle the disc by its edge. Do not touch the surface.
• Do not stick paper or tape on the disc.
• If the disc is contaminated with any substance such as glue, remove it before using the
disc.
• Do not expose the disc to direct sunlight or heat sources such as hot air ducts, or leave
it in a car parked in direct sunlight as the temperature can rise quickly and damage the
disc.
• After playing, store the disc in its case.
On cleaning
• Before playing, clean the disc with a cleaning cloth. Wipe the disc from the centre
out.
• Do not use solvents such as benzene, thinner, commercially available cleaners or antistatic spray intended for vinyl LPs.
Discs that should not be used
Only the discs including the marks shown on page 5 can be played.
NOTE:
• Discs with special shapes (heart-shaped discs, hexagonal discs, etc.) cannot be played.
Do not attempt to play such discs, as they may damage the player.
• Do not use record or anti-static spray. Also do not use volatile chemicals such as ben
zene or thinner.
- 6 - EN
-
Page 9
SAFETY PRECAUTIONS
Power Source
The player should be operated only from a 220-240 V, 50 Hz outlet. Please do not open the cover by yourself. There is
high voltage in the player, which will endanger your life. Please contact a local service agent for help and advice. Repairs
are to be carried out by a qualified technician only.
• The player is not disconnected from the AC power source (mains) as long as it is connected to the wall outlet, even if
the player itself has been turned off.
• If you are not going to use the player for a long time, be sure to disconnect the player from the wall outlet.
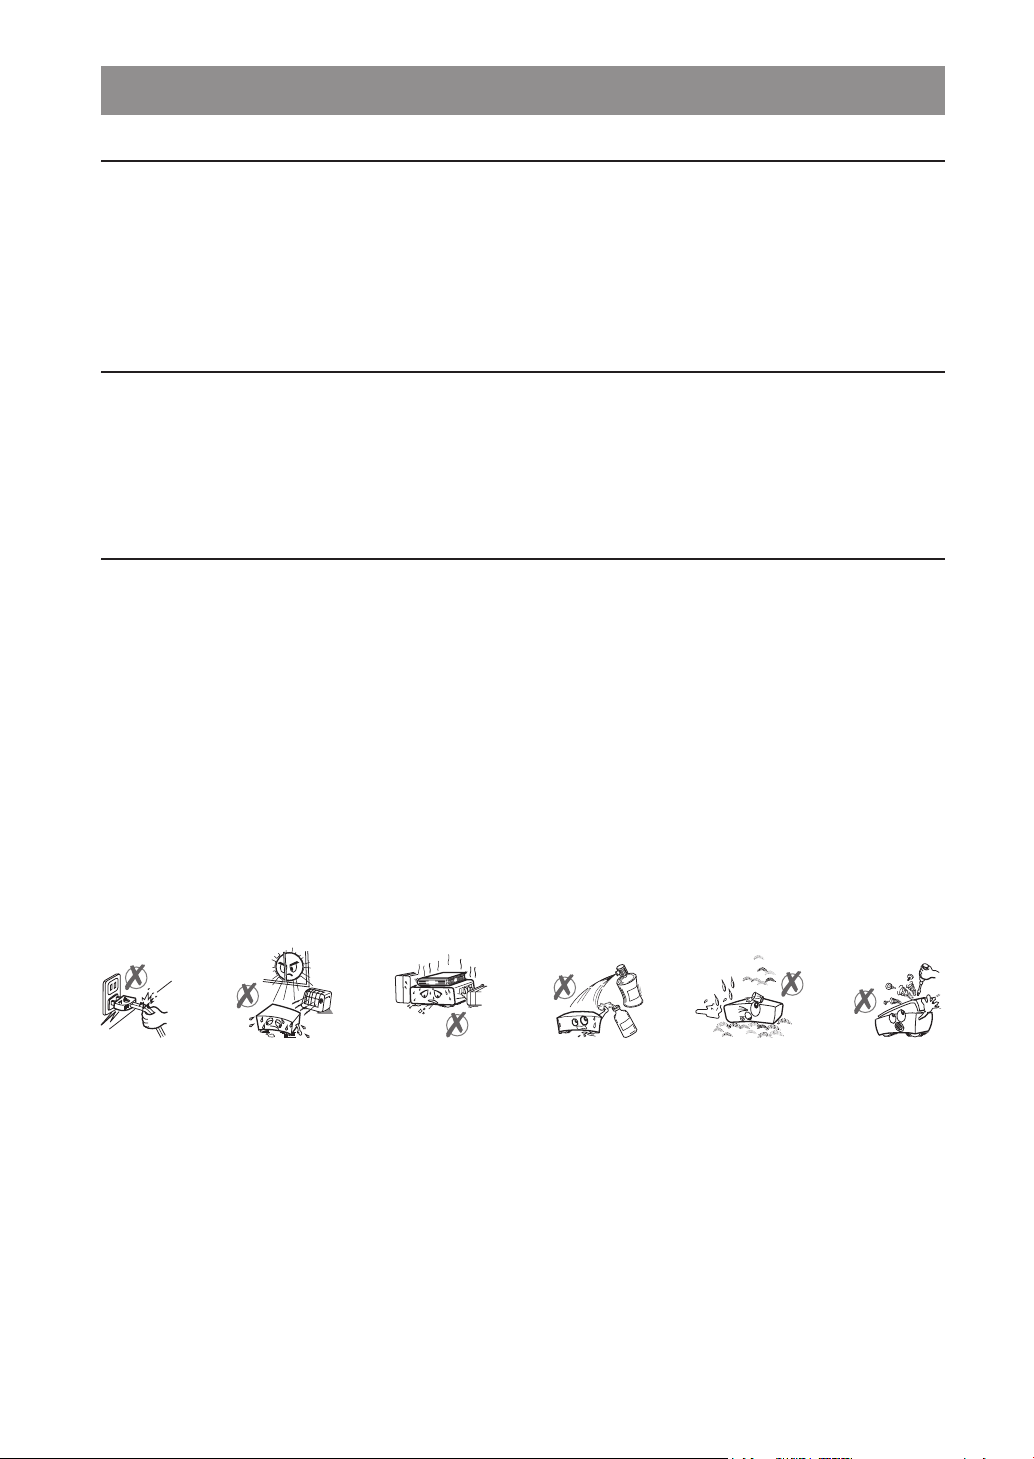
Power Cord
Do not place the player, a piece of furniture, etc., on the power cord (mains lead), or pinch the cord. Handle the power
cord by the plug. Do not pull out the plug by tugging the cord and never touch the power cord when your hands are wet
as this could cause a short circuit or electric shock. Never make a knot in the cord or tie it with other cords. The power
cord should be routed in such a way that it is not likely to be stepped on. A damaged power cord can cause fire or give
you an electrical shock. Check the power cord once in a while. When you find it damaged, ask your closest service agent
for help. When the AC power cord needs to be changed, it should be done at a qualified service shop only.
Choice of Location
• Please do not place the player in a place subject to direct sunlight, excessive dust or mechanical shock or in a location
near heat sources.
• The player should be placed on a solid and safe base. Do not place the player on a soft surface such as a rug that might
block the ventilation holes on the bottom.
• Do not place the player in a room subject to high humidity, such as a kitchen, as condensation may cause malfunction
or damage the player.
• Heating or other thermal radiation under the player also may cause malfunction or damage the player.
• The hot air, which arises during the operation, should be ventilated with sufficient air circulation. Please do not put the
set into closed areas and do not cover it.
• Do not allow the player to come in contact with water or humidity. Do not use the player near a bath or swimming
pool.
• Take care to provide good air circulation. Place the player in a location with adequate ventilation to prevent heat build-up
in the player.
• Should any solid object or liquid fall into the cabinet, unplug the player and have it checked by qualified personnel before
operating it any further.
- 7 -
EN
Page 10
1 2
9
8
1 43 56 7
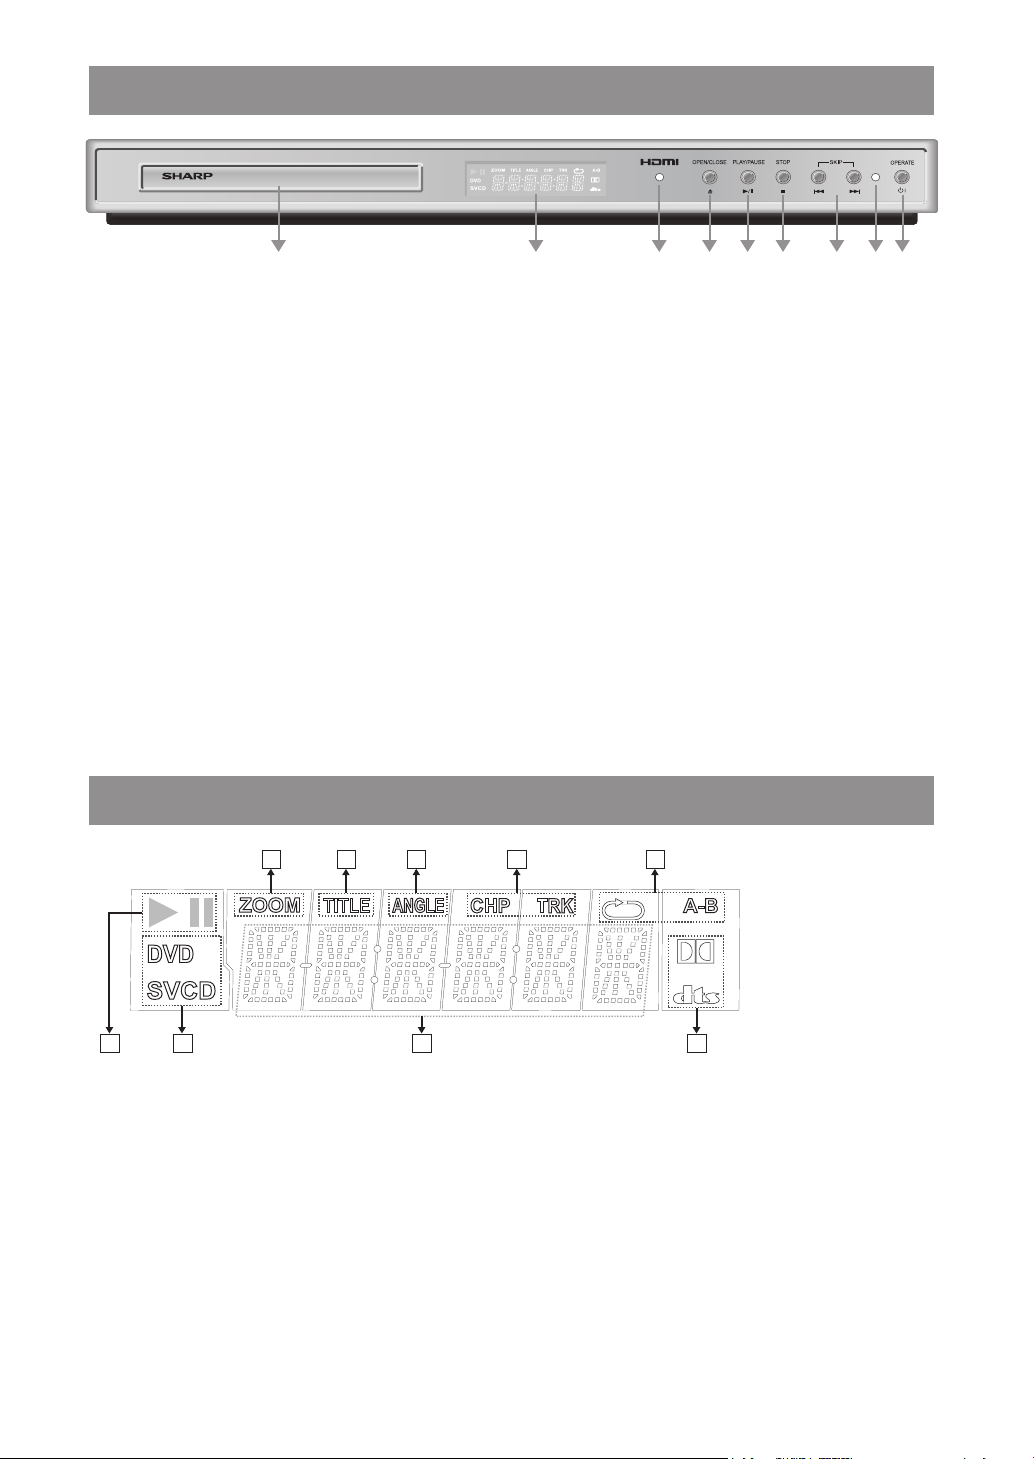
FRONT PANEL FUNCTIONS
5
6
7
8
9
1
2
3
4
1. Disc tray
Place a disc on the tray.
2. OPEN/CLOSE button
Opens or closes the disc tray.
3. PLAY/PAUSE button
Plays/pauses the disc.
4. STOP button
Stops playing the disc.
5. SKIP buttons
Press to go back to the preceding chapter/track or to go to the next chapter/track.
6. Front panel display (VFD)
Indicates the playing time, title, chapter/track, etc.
7. OPERATE button
Turns the player to Operate or Standby mode.
8. Operation indicator
Indicates the player’s operational status.
9. HDMI indicator
Indicates whether the image output through HDMI can be viewed on the TV screen.
FRONT PANEL DISPLAY (VFD)
1. Play/Pause
2. Disc loaded
3. Time or Title / Chapter / Track number
4. Dolby Digital / DTS
5. Zoom
6. Title number
7. Angle
8. Chapter / Track number
9. Repeat
- 8 - EN
Page 11
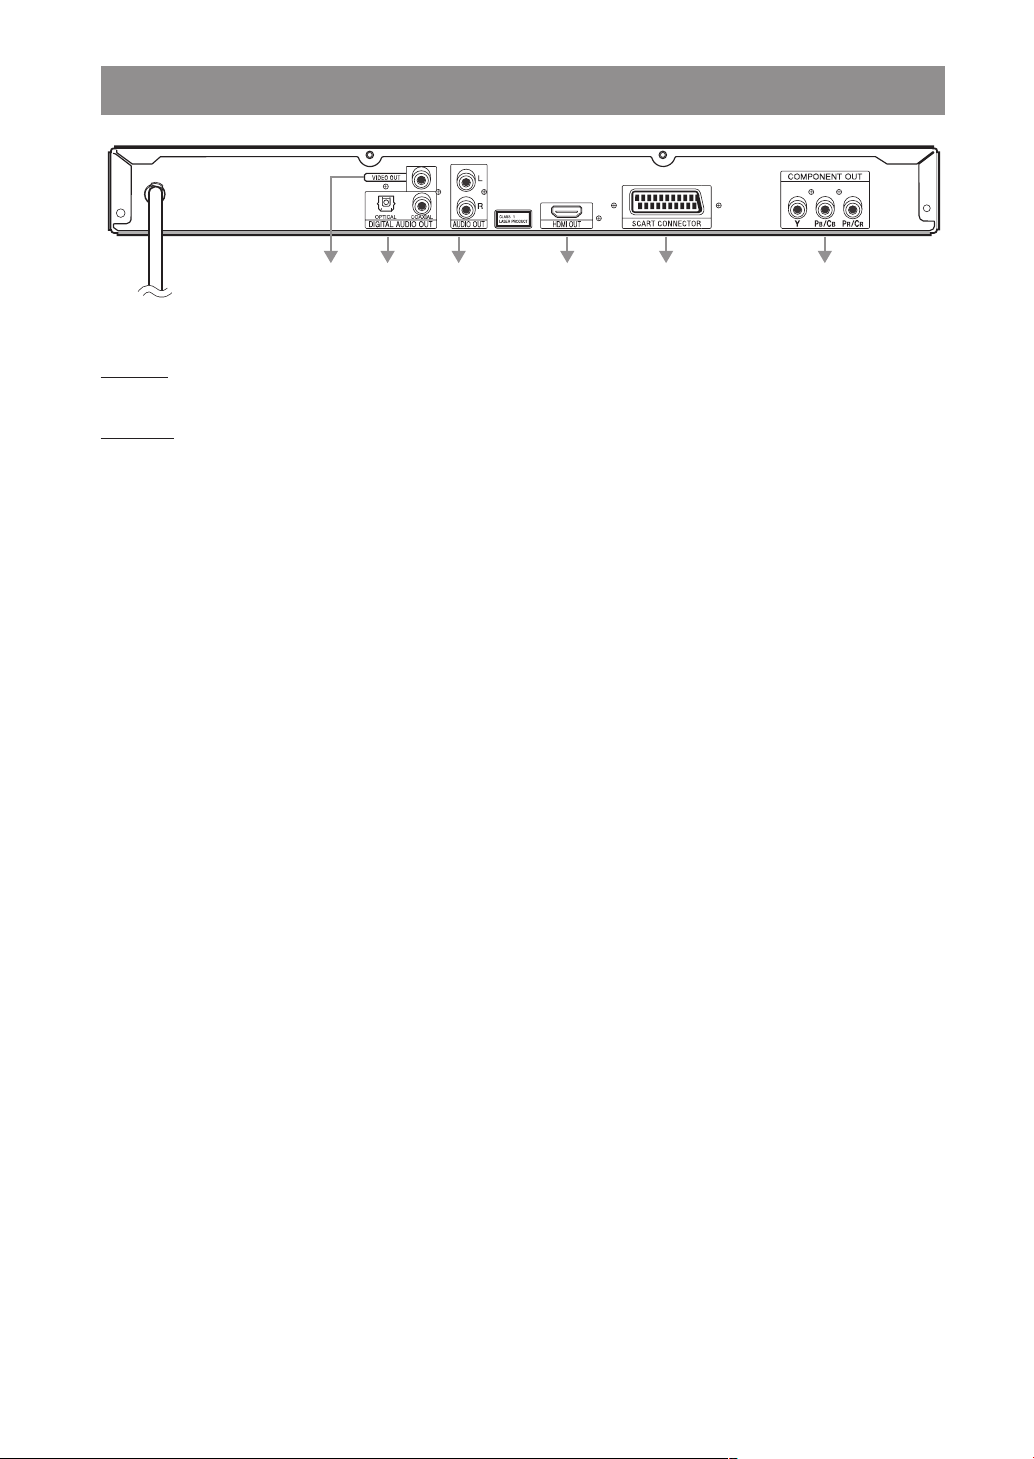
CONNECTORS ON THE REAR PANEL
6
5
4
2
1
3
1. DIGITAL AUDIO OUT connectors
OPTICAL :
Connects to an audio component using the optical digital connection cable.
COAXIAL :
Connects to an audio component using the coaxial digital connection cable.
2. AUDIO OUT connectors
Connects to the AV amplifier or audio input connector on the TV by using two cables (Left, Right).
3. VIDEO OUT connector
Connects to the TV using a video cable.
4. HDMI connector
Connects to the TV using the HDMI cable.
5. SCART connector
Connects to the TV using the SCART cable.
6. COMPONENT OUT connectors
Connects to the TV using a component video cable.
- 9 -
EN
Page 12
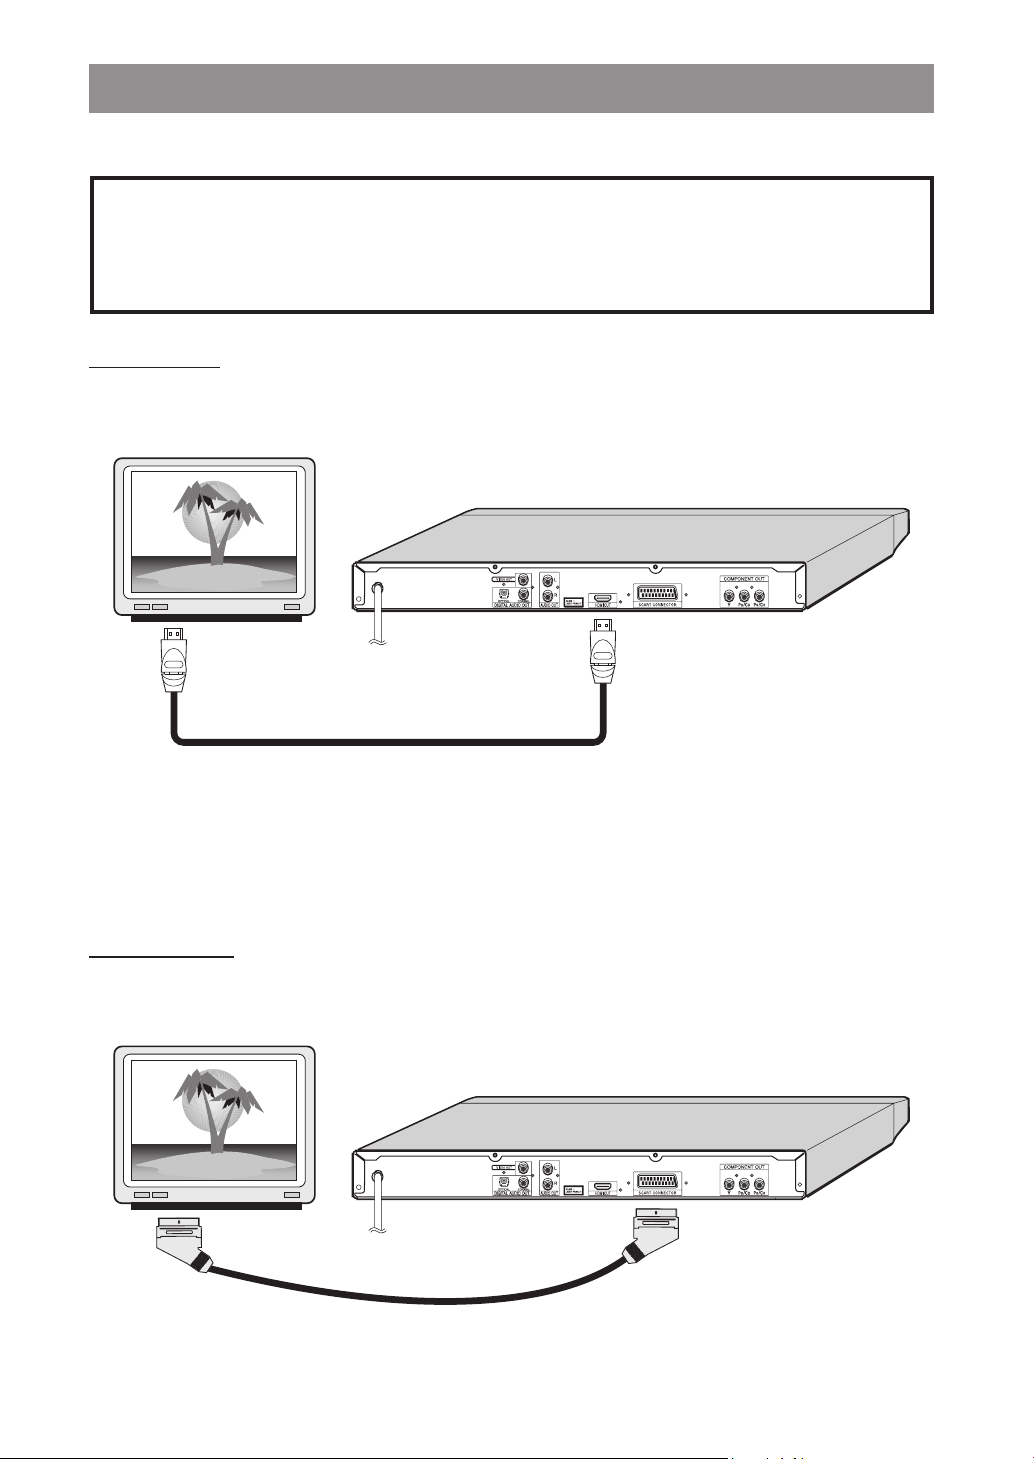
CONNECTION OF THE PLAYER WITH TV
Be sure to turn off the power of each component before making the connections.
Use one video connection for best picture performance
When the player is connected to multiple video output connectors, the picture performance may be affected by unde
sired video signals from the connectors that are not selected.
For best picture performance, it is recommended that you select the appropriate item from “Video” setup menu and
use only one video connection method. (See page 32.)
HDMI Connector:
The HDMI connector can be used to connect the player to your TV set or AV amplifier via the HDMI cable. For this con
nection, the TV set or AV amplifier must have an HDMI input connector.
TV
HDMI HDMI
-
-
HDMI cable (commercially available)
NOTE:
• The HDMI connector does not support the DVI output using an HDMI-to-DVI adaptor or cable.
• The HDMI enables the TV to obtain optimal-resolution images automatically.
•
You can manually change the output resolution (576p/720p/1080i) by using the HDMI button on the remote control.
SCART Connector:
If the player is not connected to a hi-fi set or AV amplifier to hear better sound, SCART is enough for both audio & video
connections.
TV
SCART
Scart cable (commercially available)
SCART
- 10 - EN
Page 13
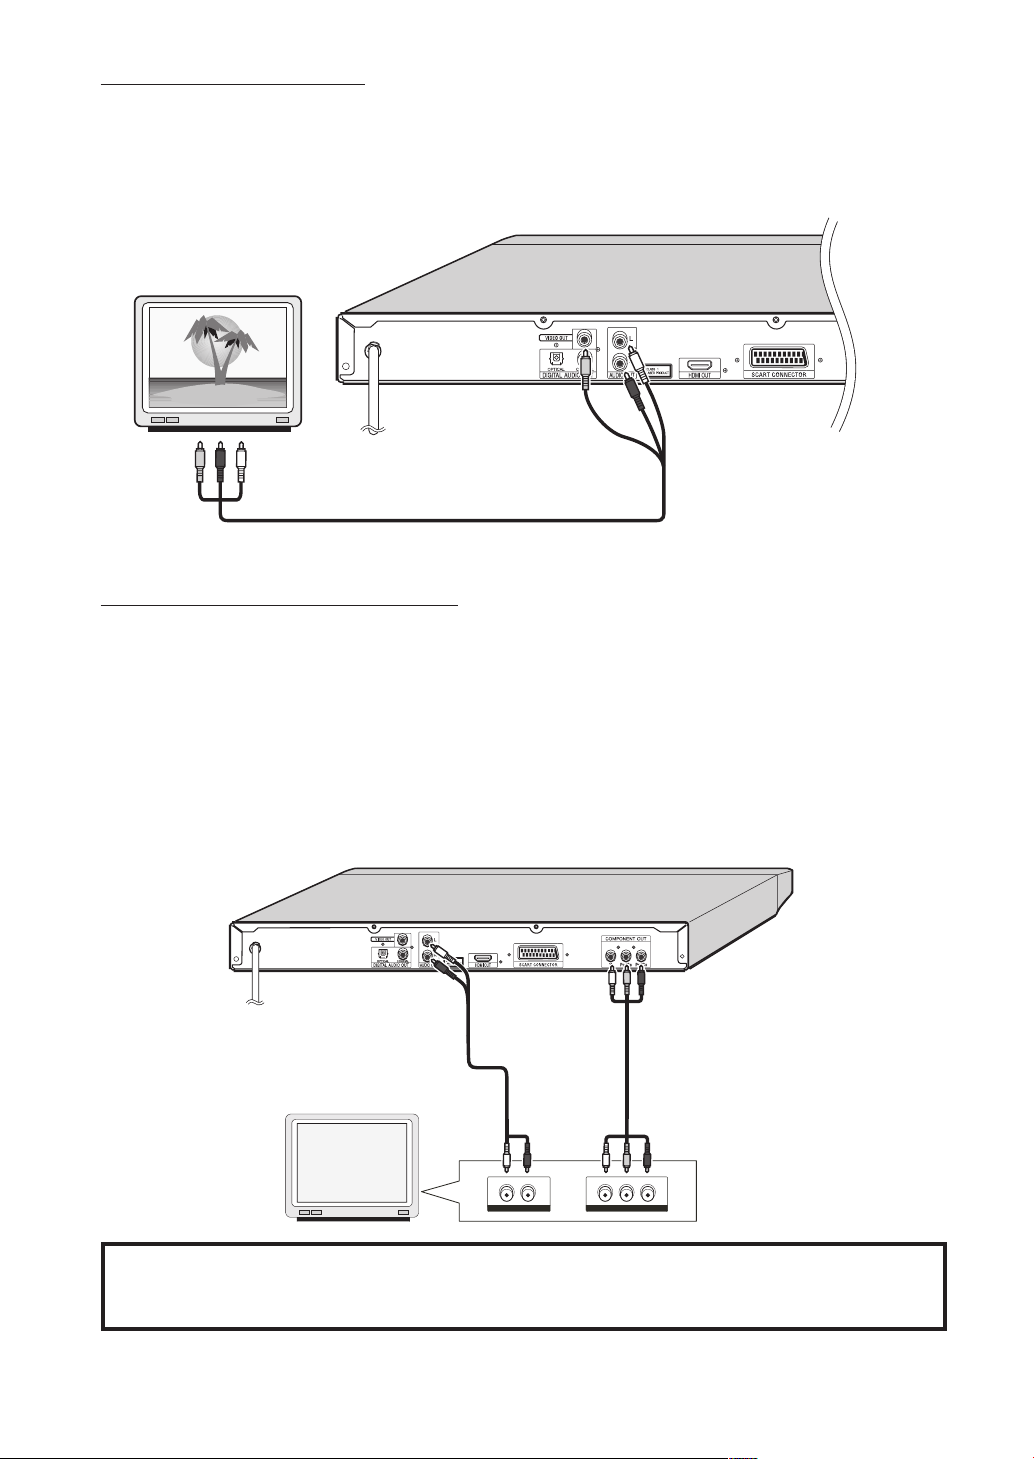
Video & Audio Output Connectors:
Y Pb Pr
COMPONENT VIDEO INPUT
LEFT RIGHT
AUDIO INPUT
Video (yellow) and audio (red: right, white: left) output connectors can be used to connect the player to your TV set via cables.
To make this connection, your TV set must have video and audio input connectors. This type of connection is alternative
to scart connection. Picture quality is not as good as SCART RGB connection but audio performance is the same.
TV
VIDEO OUT AUDIO OUT
(L-R)
Audio/Video cable (commercially available)
Component Video & Audio Output Connectors:
• If your TV set has component video input connectors, you can take advantage of the player’s Progressive Scan and
YPBPR (YUV) output for a high video resolution.
• If the TV set connected with a component cable does not have the Progressive Scan features although the Video output
mode of the player is set to “Y/PB/PR Progressive”, no image will be produced. In this case, switch Video output mode
from “Y/PB/PR Progressive” to “Y/PB/PR Interlace”. (See page 32.)
1. Connect the COMPONENT OUT connectors on the player to the corresponding input connectors on the TV, using a
component video cable.
2. Connect the L-R AUDIO OUT connectors of the player to the audio Left - Right input connectors on the TV using the
audio cable.
Audio cable
(commercially available)
Component video cable
(commercially available)
TV
Compatibility of the progressive scan TVs
Some progressive scan TVs are not fully compatible with the player, which may cause image distortion. In this case,
switch Video output mode from “Y/PB/PR Progressive” to “Video”, “Y/PB/PR Interlace” or “RGB”.
- 11 -
EN
Page 14
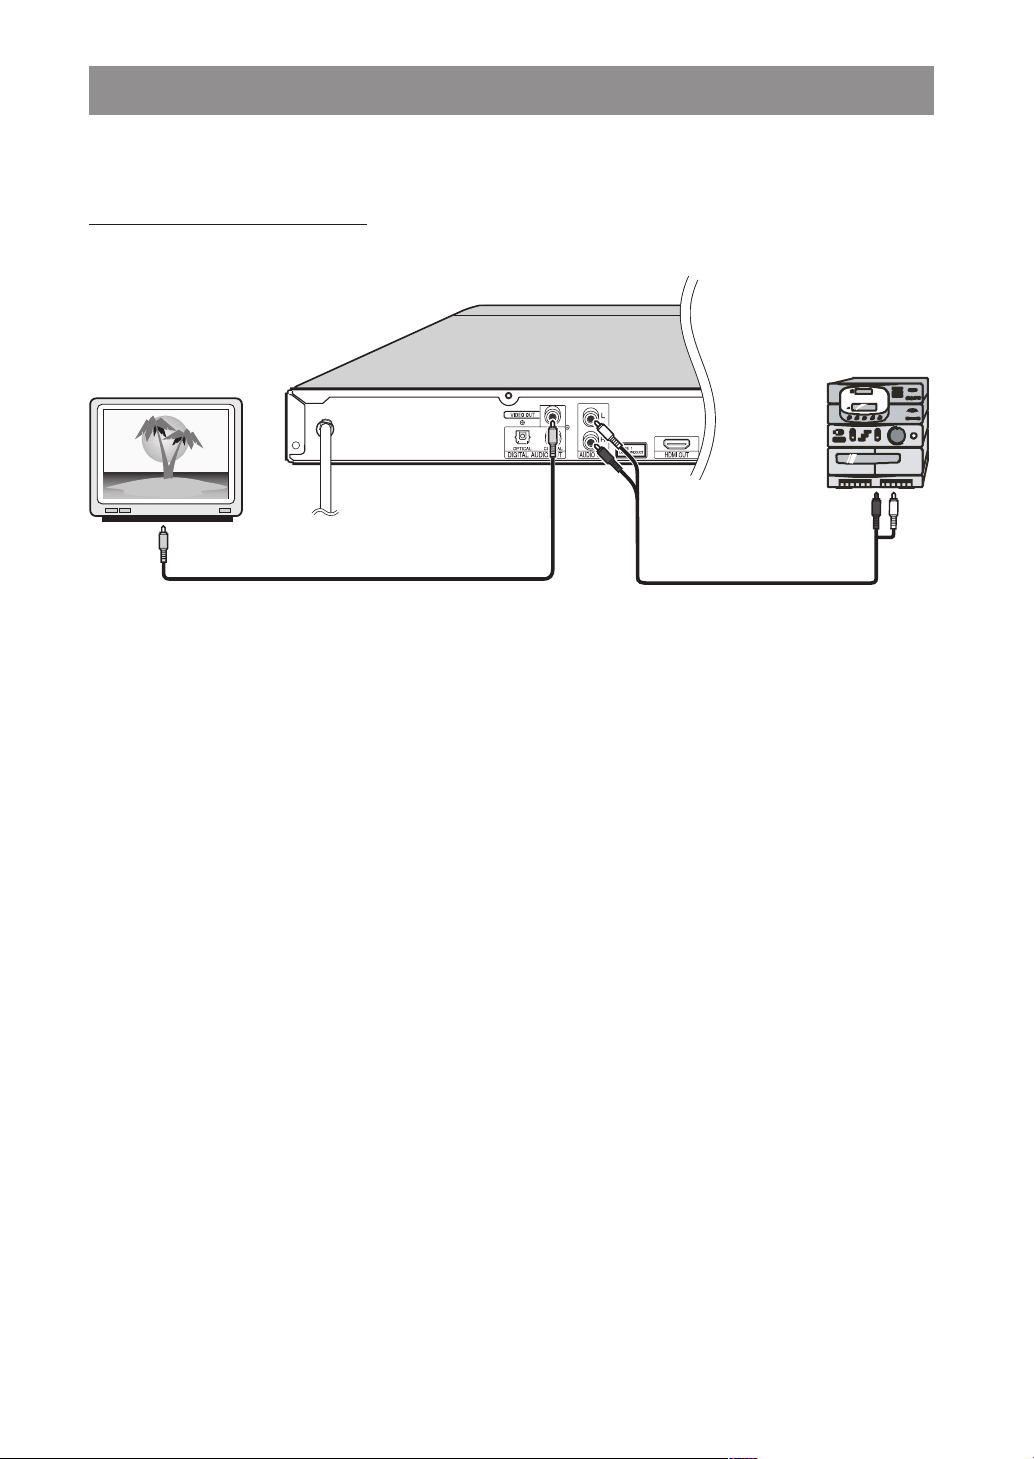
CONNECTION OF THE PLAYER WITH AV AMPLIFIER
Be sure to turn off the power of each component before making the connections.
Analogue Audio Output Connectors:
To achieve better sound quality, the player can be connected to an amplifier via
TV
VIDEO
OUT
Video cable
(commercially available)
AUDIO OUT connectors.
AUDIO OUT
(L-R)
(commercially available)
Amplifier
Audio cable
- 12 - EN
Page 15

IN
IN
Digital Audio Output Connectors:
For the best sound, the player can be connected via optical or coaxial digital audio outputs to an AV amplifier with a
built-in Dolby Digital/DTS/MPEG decoder. With the use of six speakers, you can enjoy 5.1-channel surround sound. (See
page 33.)
AmplifierDVD player
OR
Coaxial or optical cable
(commercially available)
to coaxial or optical
digital audio input connector
Front speaker
(Left)
Dust protection cap
DVD player
Amplifier
Front speaker
(Right)
Centre speaker
Subwoofer
Rear speaker
(Left)
Playing Dolby Digital, DTS or MPEG audio with a digital connection
Set the applicable type of signal (Dolby Digital, DTS or MPEG) in “Digital Output” to “Bitstream”. (See page 33.)
Playing 2 channel audio with a digital connection
Set the applicable type of signal (Dolby Digital or MPEG) in “Digital Output” to “LPCM”. (See page 33.)
For DTS, LPCM is not applicable.
NOTE:
• When the player is connected to a separate decoder box or amplifier through the DIGITAL AUDIO OUT connector, you
may sometimes hear a short noise when selecting the sound system in the DVD menu. This is not a malfunction.
- 13 -
Rear speaker
(Right)
EN
Page 16

REMOTE CONTROL
1
2
3
4
5
6
7
9
10
11
12
13
14
16
17
18
19
20
21
22
23
15
24
8
When using the remote control, point it towards the front
of the player. If the remote control does not work or the
chosen function cannot be selected, the batteries are most
probably exhausted and they should be replaced as soon
as possible.
Inserting the Batteries
The batteries (two R-03 batteries (“AAA” size, UM/SUM-4,
HP-16 or similar)) are included in the package.
1 Pull down the tab on the cover and remove the cover
towards the direction of the arrow.
2 Insert the included batteries.
• Insert the batteries making sure the polarities correctly
match the and marks inside the battery compartment.
3 Insert the lower tab of the cover into the opening, and lower
the cover until it clicks in place.
Incorrect use of the batteries may cause them to leak or explode. Please follow the precautions below.
Caution
• Danger of explosion if battery is incorrectly replaced.
Replace only with the same or equivalent type.
• Insert the batteries making sure the polarities correctly match and marks inside the battery compartment.
• Batteries of different types have different properties, therefore do not mix batteries of different types.
• Do not mix new and old batteries.
This may shorten the life of new batteries or may cause old batteries to leak.
• Remove the batteries from the remote control once they have run out, as leaving them can cause them to leak.
Battery fluid from leaked batteries is harmful to your skin, therefore ensure that you first wipe them and then remove
them using a cloth.
• The batteries included with the player may exhaust over a short period, depending on how they are kept.
Be sure to replace them as soon as possible with new batteries.
• Remove the batteries from the remote control if you do not use the remote control for a long time.
• Comply with the rules (ordinance) of each local government when disposing of worn-out batteries.
- 14 - EN
Page 17

REMOTE CONTROL FUNCTIONS
1. OPERATE button
Turns the player on or switches the player to Standby mode.
2. HDMI button
Changes HDMI resolution.
3. TIME button
Changes Playing time display mode of the disc, title, track, on the OSD and front panel display.
4. ZOOM button
Zooms the picture.
5. PLAY/PAUSE button
Plays/pauses the disc.
6. MENU button
Displays the DVD root menu on the screen. During VCD playback, shows the VCD menu if it exists.
7. TITLE button
Displays the title menu on the TV screen.
8. /// buttons
Move to the items or settings.
9. SEARCH MODE button
Puts the player in Search mode (title, chapter, track, time, index).
10. SUBTITLE button
Changes the language of the subtitle and switches the selected subtitle on/off for DVD or DivX®.
11. Number buttons
Press to directly enter track/chapter/title/time numbers.
12. +10 button
Enters numbers greater than 9.
13. OPEN/CLOSE ( ) button
Opens or closes the disc tray.
14. REPEAT button
Executes repeat, shuffle and programme functions.
15. A - B button
Executes the A - B repeat play.
16. SLOW/SEARCH buttons
Press to adjust the forward and reverse playback at different speed during playback (fast forward/reverse) and to
adjust the forward playback at different speed during Pause mode (slow motion).
17. SKIP/FRAME buttons
Go to the beginning of the current or next chapter/track during playback, or go to the next frame during pause.
18. STOP button
Stops playing disc.
19. DISPLAY button
Displays the current playing status or setup menu on the TV screen.
20. RETURN button
Returns to the preceding selection screen.
21. SELECT button
Executes the items or settings.
22. ANGLE button
Changes the angle when playing a DVD.
23. AUDIO button
Changes the language of the sound while playing a DVD.
Changes the audio channel (Stereo/Left/Right) while playing a Video CD.
24. C button
Deletes incorrect entries or cancel some functions.
- 15 -
EN
Page 18

DVD PLAYBACK
Preparations
If the player has been connected to an audio system, turn
it on and then turn on your TV.
Basic Play
1. Press OPERATE.
2. Press OPEN/CLOSE ( ) to open the disc tray.
3. Place a disc onto the tray.
Hold the disc without touching either of its surfaces, position it with the printed title side facing up, align it with the
guides, and place it in its proper position.
4. Press OPEN/CLOSE ( ).
A menu may be displayed on the TV screen after a few
moments or the film may start immediately after the intro
duction of the Film Company. This behaviour depends on
the disc content and may change.
5. Press /// or the number buttons to select the
preferred title.
6. Press SELECT.
Play of the selected items now starts. The played item
may be a motion picture, a still picture or another submenu
depending on the disc.
Stopping Play
Press STOP () twice.
When play is stopped, the player records the point where
STOP (
) was pressed once (Resume function). Press
PLAY/PAUSE again, and play will resume from this point.
When the tray is opened or the STOP () is pressed again,
the Resume function will be cleared.
To stop play permanently, press STOP () twice. When
STOP () is pressed for the first time, the message “Press
Play Key To Continue” is displayed on the screen to prompt
you whether to continue play. To stop play press STOP ()
again or you can press PLAY/PAUSE to continue.
Fast Forward / Reverse
Press SLOW/SEARCH (
on the remote control during playback.
Normal play is resumed when PLAY/PAUSE is pressed.
-
The speed of fast forward or fast reverse changes each
time or is pressed.
Skip Forward / Backward
Press SKIP/FRAME ( or ) during playback.
The chapter is skipped forward or backward each time the
button is pressed.
Fast reverse or Fast forward)
NOTE:
• Steps 5 and 6 are available only when a menu is recorded
on the disc.
• The disc controls the behaviour of the player during menu
operation.
To stop play and return to the menu screen (when a menu
is available on the disc), press
on the disc. Play is suspended, and the disc menu screen
is displayed.
After operation
When the player is not in use, remove the disc and press
OPERATE to turn off the player.
MENU or TITLE depending
NOTE:
• The disc continues to rotate while the menu is displayed
even after the player has finished playing a particular item.
When no further selections are to be played, be sure to
press STOP () to clear the menu display.
For your reference:
If an action corresponding to a button is prohibited, “ ” is
displayed on the screen.
Pause
Press PLAY/PAUSE once during playback.
Play pauses.
To return to normal play:
Press PLAY/PAUSE.
Step Forward
Press PLAY/PAUSE once during playback.
Play pauses.
Press SKIP/FRAME ().
The next frame of the movie is displayed.
Slow Motion Play Forward
Press PLAY/PAUSE once during playback.
Play pauses.
Press SLOW/SEARCH (
decrease the speed of the slow motion play.
The speed of slow motion play is displayed on the screen
each time you change it.
To return to normal play:
Press PLAY/PAUSE.
Slow forward) to increase or
- 16 - EN
Page 19

Direct Selection of Scenes
Selecting Scenes by Time and Title/Chapter Number
You can view the DVD starting from any desired time point
or any title/chapter you want.
Press SEARCH MODE on the remote control during playback or in Stop mode.
The “Time” and “Title/Chapter” search box is displayed
on the screen.
For setting time, enter the desired time in the “Time” field
using number buttons and press SELECT.
The disc is played beginning from the desired time, if not
prohibited by the DVD.
For setting a title/chapter, press
or “Chapter” field, enter the desired title/chapter number
using number buttons and press SELECT.
The disc is played beginning from the desired title/chapter,
if not prohibited by the DVD.
If you enter a wrong number, press C to clear the field.
You can press RETURN to cancel Search mode.
or to select the “Title”
Selecting Scenes using Bookmark Function
You can bookmark up to three frames during playback.
The bookmarked frames will be quickly searched out and
played back.
Press SEARCH MODE twice on the remote control during
playback.
The “Bookmark” box is displayed on the screen.
To close the “Bookmark” box, press RETURN.
Bookmarking
Display the “Bookmark” box during playback.
Press
or to select a “Bookmark” field, and when a
desired frame is displayed, press SELECT. The runtime
of the bookmarked frame is displayed in the “Bookmark”
field.
Playback of Bookmarked Frames
Display the “Bookmark” box during playback.
Press or to select the desired “Bookmark” field and
press SELECT. The bookmarked frame will be played
back.
Removing Bookmarks
Display the “Bookmark” box during playback.
Press or to select the “Bookmark” field you want to
remove and press C. The bookmark will be removed.
NOTE:
• The bookmark is cancelled when:
- The disc tray is opened.
- The power is turned off.
- 17 -
EN
Page 20

Repeat Play
Convenient Functions
Repeat Viewing
Press REPEAT during playback. The “Play Mode” box is
displayed on the screen.
Press to select the “Repeat” field and select one of the
items “Chapter”, “Title” and “Off” by using
Press REPEAT to close the “Play Mode” box.
If “Chapter” is selected, the current chapter will be played
again.
If “Title” is selected, the current title will be played again.
If “Off” is selected, Repeat mode is disabled.
SELECT.
NOTE:
• For DVDs, the “Mode” field in the “Play Mode” box cannot
be changed.
• Repeat play may be prohibited by some DVD titles.
Repeating Sections between Two Specific Points
(A – B Repeat)
Press A-B during playback at the point where Repeat play
is to start (A).
“A To B Set A” is displayed on the screen.
Press A-B again at the point where Repeat play is to end
(B).
“A To B Set B” is displayed and Repeat play of the selection between points A and B starts, if not prohibited by
the DVD.
To return to normal play:
Press A-B again. “A To B Cancelled” is displayed and the
A-B Repeat is disabled.
Displaying the Time Information
Press DISPLAY during playback.
Information is displayed on TV screen to indicate the current status of the disc. In the display screen you can find
the following information lines:
Line 1: Elapsed time and remaining time of title
Line 2: Title number, chapter number and angle number
Line 3: Audio language number, audio format, number of
output channels and audio language
Line 4: Subtitle language number and subtitle language
Press DISPLAY once more to close this display screen.
You can also display the time by pressing TIME.
Elapsed/Remaining times of title appear.
Press TIME once more to close this display screen.
Displaying a Scene with a Larger and Closer View
Zoom function enables you to take a closer look at the
scene you are viewing. This is particularly convenient when
you want to zoom in on part of the picture.
Press ZOOM during playback.
Press ZOOM consecutively to display the picture at different magnifications.
NOTE:
• Use /// to move the zoomed location.
To return to normal play:
Press ZOOM consecutively until “ Off ” is displayed on the
screen. The picture is now in its normal size.
- 18 - EN
Page 21

Displaying / Changing Subtitle Language
It is possible to change the subtitle language from the one
selected at the initial settings to a different language, if
available.
(This operation works only with discs on which multiple
subtitle languages are recorded.)
Press SUBTITLE during playback.
When no subtitles are recorded, “ Off ” is displayed on the
screen instead of the selected language.
Press SUBTITLE consecutively until the preferred language is selected.
When this button is pressed once, the first subtitle recorded
on the disc is displayed. The rest of the subtitles recorded
are displayed in sequence for each time SUBTITLE is
pressed.
To cancel the subtitles, press SUBTITLE consecutively
until “ Off ” is displayed on the screen.
NOTE:
• In some cases, the subtitle language is not changed im-
mediately to the selected one.
• When the desired language cannot be found after press-
ing SUBTITLE several times, it means that the language
is not available on the disc.
• When the player is restarted or the disc is changed, the
subtitle selection is automatically changed back to the
initial settings.
• If a language that is not supported by the disc is selected,
the subtitle language is automatically set to the disc’s
default language.
Changing Audio Soundtrack Language
It is possible to change the audio language from the one
selected at the initial settings to a different language, if
available.
(This operation works only with discs on which multiple
audio soundtrack languages are recorded.)
Press AUDIO during playback.
Press AUDIO consecutively until the preferred language
is selected.
NOTE:
• When the desired language cannot be found after pressing AUDIO several times, it means that the language is
not available on the disc.
• When the player is restarted or the disc is changed, the
language selection is automatically changed back to the
initial settings.
• If a language that is not supported by the disc is selected,
the language is automatically set to the disc’s default
language.
Viewing from Another Angle
Some DVDs may contain scenes that have been shot si
multaneously from a number of different angles. For these
discs, the same scenes can be viewed from each of these
different angles using ANGLE.
The number of recorded angles differs depending on the
disc used.
“ANGLE” is also displayed on the player display. From that
moment on, the
change the viewing angle until the end of the multi-angle
scene.
Press ANGLE during playback.
The current angle is changed.
Press ANGLE consecutively until the preferred viewing
angle is selected.
th
x
of total angles is played and you can
-
NOTE:
• This function will only work on discs where different angles
have been recorded.
• The viewing angles are shown on the screen. You can
select one of them for viewing.
• If you press ANGLE outside of a multi-angle scene on
a multi-angle title, “
means that only one angle is currently available.
- 19 -
1/1” is displayed on the screen. It
EN
Page 22

Using a DVD Menu
Some DVDs have unique menu structures called DVD
menus. For example, DVDs programmed with complex
content provide guide menus, and those recorded with
various languages provide menus for audio and subtitle
languages. Although the DVD menu content and opera
tions differ from disc to disc, the following explains basic
operation when this feature is available.
Press TITLE or MENU.
The DVD menu available on the disc is now displayed.
NOTE:
• If you press MENU, the root menu of DVD is displayed.
• If you press TITLE, the menu of the current title is displayed.
• MENU does not function in Stop mode.
Press /// to select the preferred item.
Press SELECT.
The selected item is now executed.
To resume playback, select an applicab le item on the
DVD menu.
-
NOTE:
• Some DVDs may not contain root and/or title menus.
- 20 - EN
Page 23

VIDEO CD PLAYBACK
Preparations
If the player has been connected to an audio system, turn
it on and then turn on your TV.
Basic Play
1. Press OPERATE.
2. Press OPEN/CLOSE ( ) to open the disc tray.
3. Place a disc onto the tray.
Hold the disc without touching either of its surfaces, position it with the printed title side facing up, align it with the
guides, and place it in its proper position.
4. Press OPEN/CLOSE ( ).
The disc tray is closed.
For Video CDs without playback control (PBC):
Play starts immediately.
For Video CDs provided with playback control (PBC):
If the disc contains a menu, the menu is displayed on the
screen after a few moments.
Menu Play
This function works only with Video CDs with playback
control (Version 2.0).
Follow the instructions on the menu screen for interactive
operation.
The details differ depending on the disc concerned. Also
refer to the instructions accompanying the disc.
After steps 1 to 4 above the menus are displayed on the
TV screen.
5. Press the nu mber buttons to s elect the prefe rr ed
item.
The player now starts to play the selected item.
NOTE:
• Use +10 to enter two-digit numbers.
• /// are not used for selecting items for Video
CDs.
What is playback control (PBC)?
If a Video CD has “playback control” written on the disc,
it means that particular scenes or informatio n can be
selected for viewing interactively with the TV by using the
menu screen.
Switching PBC On/Off
Press REPEAT when a Video CD with PBC is inserted.
The “Play Mode” box is displayed on the screen.
Select the “Mode” field in the “Play Mode” box and press
SELECT.
Each time this button is pressed, PBC switches On and
Off alternately.
NOTE:
• For Video CDs without PBC, the “Mode” field in the “Play
Mode” box cannot be changed.
• For Video CDs with PBC, you can also use MENU to
switch PBC On and Off.
When the menu continues onto another screen
After step 4, press SKIP/FRAME ().
To return to the previous menu screen, press SKIP/FRAME
().
NOTE:
• The disc continues to rotate while the menu is displayed
even after the player has finished playing a particular item.
When no further selections are to be played, be sure to
press STOP () to clear the menu display.
For your reference:
When “ ” is displayed on the screen while a button is
being operated, it means that the player prohibits the cor
responding operation.
Stopping Play
For Vide o CDs without PBC or when PBC m ode is
“Off ”.
Press STOP () twice.
When play is stopped, the player records the point where
) was pressed once (Resume function). Press
STOP (
PLAY/PAUSE again, and play will resume from this point.
When the tray is opened or STOP (
Resume function will be cleared.
To stop play permanently, press STOP () twice. When
STOP () is pressed once, the message “Press Play Key
To Continue” is displayed on the screen to prompt you
whether to continue play. To stop play press STOP ()
again or you can press PLAY/PAUSE to resume play.
For Video CDs with PBC and when PBC mode is “On”.
Press STOP () once.
No Resume function is available.
) is pressed again,
-
- 21 -
EN
Page 24

Fast Forward / Reverse
Press SLOW/SEARCH (
on the remote control during playback.
Press PLAY/PAUSE to resume normal play.
The speed of fast forward or fast reverse changes each
time or is pressed.
Fast reverse or Fast forward)
Direct Selection of Scenes
Selecting Scenes by Time and Track Number
You can view the Video CD starting from any desired time
point or any track you want.
NOTE:
• No sound will be heard during fast forward or reverse.
Skip Forward / Backward
Press SKIP/FRAME ( or ) during playback.
The track is skipped forward or backward each time the
button is pressed.
Pause
Press PLAY/PAUSE once during playback.
Play pauses.
To return to normal play:
Press PLAY/PAUSE.
Step Forward
Press PLAY/PAUSE once during playback.
Play pauses.
Press SKIP/FRAME ().
The next frame of the movie is displayed.
NOTE:
• Reverse stepping is not available.
Slow Motion Play Forward
Press PLAY/PAUSE once during playback.
Play pauses.
Press SLOW/SEARCH (
decrease the speed of slow motion play.
The speed of slow motion play is displayed on the screen
each time you change it.
To return to normal play:
Press PLAY/PAUSE.
Slow forward) to increase or
Track Search
Press SEARC H MODE on th e remot e con trol du ring
playback.
The “Track Search” box is displayed on the screen.
For setting time, enter the desired time in the “Time” field
using number buttons and press SELECT.
The player jumps to the entered time of the current track.
For setting a track, press
enter the desired track number using number buttons
and press SELECT.
The disc is played beginning from the desired track.
If you enter a wrong number, press C to clear the field.
Press RETURN to cancel Search mode.
Disc Search
(Video CDs without PBC or when PBC mode is “Off ”)
Press SEARCH MODE twice during playback.
The “Disc Search” box is displayed on the screen.
For setting time, enter the desired time in the “Time” field
using number buttons and press SELECT.
The player jumps to the entered time of the disc.
For setting a track, press
enter the desired track number using number buttons
and press SELECT.
The disc is played beginning from the desired track.
If you enter a wrong number, press C to clear the field.
Press RETURN to cancel Search mode.
to select the “Track” field,
to select the “Track” field,
NOTE:
• This operation is not available when PBC mode is “On”.
NOTE:
• Reverse slow motion play is not available.
- 22 - EN
Page 25

Selecting Scenes using Bookmark Function
Of
f
All
Off
Single Track
All
You can bookmark up to three frames during playback.
The bookmarked frames will be quickly searched out and
played back.
For Video CDs without PBC or when PBC mode is “Off ”,
press SEARCH MODE three times during playback.
For Video CDs with PBC and when PBC mode is “On”,
press SEARCH MODE twice during playback.
The “Bookmark” box is displayed on the screen.
To close the “Bookmark” box, press RETURN.
Bookmarking
Display the “Bookmark” box during playback
Press
or to select a “Bookmark” field, and when a
desired frame is displayed, press SELECT. The runtime
of the bookmarked frame is displayed in the “Bookmark”
field.
Playback of Bookmarked Frames
Display the “Bookmark” box during playback.
Press
or to select the desired “Bookmark” field and
press SELECT. The bookmarked frame will be played
back.
Removing Bookmarks
Display the “Bookmark” box during playback.
Press
or to select the “Bookmark” field you want to
remove and press C. The bookmark will be removed.
NOTE:
• The bookmark is cancelled when:
- The disc tray is opened.
- The power is turned off.
• What box is displayed depends on both whether PBC
is activated and on how many times SEARCH MODE is
pressed. See the table below.
Number of times
SEARCH MODE
is pressed
1
2 “Bookmark” box “Disc Search” box
3 − “Bookmark” box
Discs with PBC On
“Track Search” box “Track Search” box
Discs without PBC
Discs with PBC Off
Repeat Play
Press REPEAT during playback.
The “Play Mode” box is displayed on the screen.
Press to select the “Repeat” field and choose one of the
items by using SELECT.
Selectable items depend on whether PBC is activated or
not.
Playback control
(PBC)
Items of Repeat
play
Discs with PBC On
If “Single Track ” is selected, the cu rrent track will be
played again.
If “All ” is selected, the whole disc will be played again.
If “Off ” is selected, Repeat play is disabled.
Repeating Sections between Two Specific Points
(A – B Repeat)
Press A-B during playback at the point where Repeat play
is to start (A).
“A To B Set A” is displayed on the screen.
Press A-B again at the point where Repeat play is to end
(B).
“A To B Set B” is displayed and Repeat play of the selection
between points A and B starts.
To return to normal play:
Press A-B again. “A To B Cancelled” is di
A-B Repeat is disabled.
Discs without PBC
Discs with PBC Off
splayed and the
- 23 -
EN
Page 26

Convenient Functions
AUDIO CD PLAYBACK
Displaying the Time Information
Press DISPLAY during playback.
Information is displayed on TV screen to indicate the current status of the disc. In the display screen you can find
the following information lines:
Line 1: Type of Video CD, elapsed time and remaining time
of track
Line 2: Track numbers
Press DISPLAY once more to close this display screen.
You can also display the time by pressing TIME.
Elapsed/Remaining times of track appear.
Press TIME once more to close this display screen.
Displaying a Scene with a Larger and Closer View
Zoom function enables you to take a closer look at the
scene you are viewing. This is particularly convenient when
you want to zoom in on part of the picture.
Press ZOOM during playback.
Press ZOOM consecutively to display the picture at different magnifications.
NOTE:
• Zoom function works only when PBC mode is “Off ”.
• Use
/// to move the zoomed location.
To return to normal play:
Press ZOOM consecutively until “ Off ” is displayed on the
screen. The picture is now at normal size.
Preparations
If the player has been connected to an audio system, turn
it on.
Basic Play
1. Press OPERATE.
2. Press OPEN/CLOSE ( ) to open the disc tray.
3. Place a disc onto the tray.
Hold the disc without touching either of its surfaces, position it with the printed title side facing up, align it with the
guides, and place it in its proper position.
4. Press OPEN/CLOSE ( ).
Play starts.
After operation
When the player is not in use, remove the disc and press
OPERATE to turn off the player.
For your reference:
When “ ” is displayed on the screen while a button is being operated, it means that the corresponding operation is
prohibited by the player.
Stopping Play
Press STOP () twice.
When play is stopped, the player records the point where
STOP () was pressed once (Resume function). Press
PLAY/PAUSE or SELECT again, and play will resume from
this point. When the tray is opened or STOP () is pressed
again, Resume function will be cleared.
To stop play permanently, press STOP () twice. When
) is pressed once, the message “Press Play Key
STOP (
To Continue” is displayed on the screen to prompt you
whether to continue play. To stop play press STOP (
again or you can press PLAY/PAUSE to resume play.
)
- 24 - EN
Page 27

Fast Forward / Reverse
Press SLOW/SEARCH (
on the remote control during playback.
The speed of fast forward or fast reverse changes each
time or is pressed.
Press PLAY/PAUSE to resume normal play.
Fast reverse or Fast forward)
Direct Selection of Tracks
Selecting Scenes by Time and Track Number
You can play back the Audio CD starting from any desired
time point or any track you want.
NOTE:
• No sound will be heard during fast forward or reverse.
Skip Forward / Backward
Press SKIP/FRAME ( or ) during playback.
The track is skipped forward or backward each time the
button is pressed.
Pause
Press PLAY/PAUSE once during playback.
Play pauses.
To return to normal play:
Press PLAY/PAUSE.
Track Search
Press SEARCH MODE on the remote control during
playback.
The “Track Search” box is displayed on the screen.
For setting time, enter the desired time in the “Time” field
using number buttons and press SELECT.
The player jumps to the entered time of the current track.
For setting a track, press
enter the track number using number buttons and press
SELECT.
The disc is played beginning from the desired track.
If you enter a wrong number, press C to clear the field.
Press RETURN to cancel “Track Search”.
Disc Search
Press SEARCH MODE twice during playback.
The “Disc Search” box is displayed on the screen.
For setting time, enter the desired time in the “Time” field
using number buttons and press SELECT.
The player jumps to the entered time of the disc.
For setting a track, press
enter the track number using number buttons and press
SELECT.
The disc is played beginning from the desired track.
Press RETURN to cancel “Disc Search”.
to select the “Track” field,
to select the “Track” field,
- 25 -
EN
Page 28

Selecting using Bookmark Function
You can bookmark up to three time points during playback.
The bookmarked time points will be quickly searched out
and played back.
Press SEARCH MODE three times during playback.
The “Bookmark” box is displayed on the screen.
Press RETURN to close the “Bookmark” box.
Bookmarking
Display the “Bookmark” box during playback.
Press or to select a “Bookmark” field, and when the
desired part is reached, press
time point is displayed.
Playback of Bookmarked time point
Display the “Bookmark” box during playback.
Press
or to select the desired “Bookmark” field and
press SELECT. The bookmarked time point will be played
back.
Removing Bookmarks
Display the “Bookmark” box during playback.
Press
or to select the “Bookmark” field you want to
remove and press C. The bookmark will be removed.
SELECT. The bookmarked
NOTE:
• The bookmark is cancelled when:
- The disc tray is opened.
- The power is turned off.
Repeat Play
Press REPEAT during playback.
The “Play Mode” box is displayed on the screen.
Press to select the “Repeat” field and choose one of the
items by using SELECT.
If “Single Tr ack ” is selected , the current t rack will be
played again.
If “All ” is selected, the whole disc will be played again.
If “Off ” is selected, Repeat play is disabled.
NOTE:
• If “All” is selected and the programme list (Programme
function) is active, the programme list is repeated instead
of the whole disc.
Repeating Sections between Two Specific Points
(A – B Repeat)
Press A-B during playback at the point where Repeat play
is to start (A).
“A To B Set A” is displayed on the screen.
Press A-B again at the point where Repeat play is to end
(B).
“A To B Set B” is displayed and Repeat play of the selection
between points A and B starts.
To return to normal play:
Press A-B again. “A To B Cancelled” is displayed and the
A-B Repeat is disabled.
- 26 - EN
Page 29

Convenient Functions
Displaying the Time Information
Press DISPLAY during playback.
Information is displayed on TV screen to indicate the current status of the disc. In the display screen you can find
the following information lines:
Line 1: Type of CD, elapsed time and remaining time of
track
Line 2: Track numbers
Press DISPLAY once more to close this display screen.
You can also display the time by pressing TIME.
Elapsed/Remaining times of track appear.
Press TIME once more to close this display screen.
Programme Function
Press STOP () if a track is being played.
1. Press REPEAT. The “Play Mode” box is displayed on
the screen. You can press REPEAT again to close the
“Play Mode” box.
2. Press SELECT. The programme list is displayed on the
screen.
3. Press
4. After entering the track number, press
The screen is cleared and the player starts playing the
programme list.
/// to select a field in the programme list
and enter the track number using number buttons.
/// to
select “Play Program” and then press SELECT.
Shuffle Playback
Press REPEAT during playback.
The “Play Mode” box is displayed on the screen.
Press SELECT to select “Shuffle” in the “Mode” field.
Tracks in the disc will be played back randomly.
Press REPEAT again to close the “Play Mode” box.
NOTE:
• In Shuffle playback, Repeat is set to “Off ”.
NOTE:
• You can remove the track from the programme list by
pressing C.
• You can programme up to twelve tracks.
•
During playback, you cannot set the Programme function.
• The programme is cancelled when:
- “Off ” is selected in the “Mode” field in the “Play Mode”
box.
- The disc tray is opened.
- The power is turned off.
- 27 -
EN
Page 30

MP3
MPEG-4
DivX
DivX
MPEG-4
DISC MENU
JPEG
You can see the Disc menu of MP3, JPEG, MPEG-4 or
DivX® files.
Folder name
: MP3 : MPEG-4 or DivX® : JPEG
In the following explanations, white-letter signs indicating
file types are shown. The function mentioned there are only
available for the files represented by the signs. If no signs
are shown, the function works for any file.
Icon
File name
Fast Forward / Reverse
Press SLOW/SEARCH (or) during playback to decrease/increase play speed.
To return to normal play:
Press PLAY/PAUSE.
NOTE:
• No sound will be heard during fast forward or reverse.
Skip Forward / Backward
Press SKIP/FRAME () during playback.
The next file in the current directory is played.
Press SKIP/FRAME () during playback.
For JPEG files, the previous file is played.
For MP3, MPEG-4 or DivX® files, playback starts from the
beginning of the current file.
Basic Play
1. Press OPERATE.
2. Press OPEN/CLOSE ( ) to open the disc tray.
3. Place a CD-R/CD-RW disc onto the tray.
Hold the disc without touching either of its surfaces, position it with the printed title side facing up, align it with the
guides, and place it in its proper position.
4. Press OPEN/CLOSE ( ) to close the disc tray.
Disc loading message is displayed on the screen. Please
wait for a moment.
Disc menu is displayed. Folders and files are listed.
5. Press
6. Press SELECT on a file to play.
Selected JPEG is displayed in full screen.
Slide Show starts automatically.
Pause
Press PLAY/PAUSE once during playback.
To return to normal play:
Press PLAY/PAUSE.
/// to select a folder and a file to be
played.
Slow Motion Play Forward
Press PLAY/PAUSE once during playback.
Play pauses.
Press SLOW/SEARCH (
decrease the speed of slow motion play.
The speed of slow motion play is displayed on the screen
each time you change it.
To return to normal play:
Press PLAY/PAUSE.
Slow forward) to increase or
NOTE:
• Reverse slow motion play is not available.
Stopping Play
Press STOP (), play is stopped.
Disc menu is displayed.
- 28 - EN
Page 31

Displaying the Time Information
DivX
JPEG
MPEG-4
DivX
MPEG-4
DivX
You can display the time by pressing TIME.
Press TIME once more to close the display screen.
Zoom
Press PLAY/PAUSE to start slide show.
You can zoom in/out and pan.
Press ZOOM to turn on/off this function.
When this mode is on, pictures are displayed at the last
selected magnification.
The current magnification is displayed on the screen.
If Zoom mode is on, press SLOW/SEARCH
control the zoom in/out magnification.
Zoom function enables you to take a closer look at the
scene you are viewing.
you want to zoom in on part of the picture.
Press ZOOM during playback.
Press ZOOM consecutively to display the picture at different magnifications.
This is particularly convenient when
(or) to
NOTE:
• Use /// to move the zoomed location.
Repeat Play
Press REPEAT in Stop mode.
The “Play Mode” box is displayed on the screen.
Press to select the “Repeat” field and choose one of the
items by using SELECT.
If “Single Track” is selected, the current track will be played
again.
If “All” is selected, the whole disc will be played again.
If “Folder” is selected, the current whole folder will be
played.
If “Off” is selected, Repeat play is disabled.
NOTE:
• If “All” is selected and a programme list is active, the
programme list is repeated instead of the whole disc.
For JPEG files, Repeat mode setting is momentarily displayed in Slide show mode.
Repeating Sections between Two Specific Points
(A – B Repeat)
Press A-B during playback at the point where Repeat play
is to start (A).
“A To B Set A” is displayed on the screen.
Press A-B again at the point where Repeat play is to end (B).
“A To B Set B” is displayed and Repeat play of the selection
between points A and B starts.
To return to normal play:
Press A-B again. “A To B Cancelled” is displayed and the
A-B Repeat is disabled.
Programme Function
Press STOP () if a track is being played.
1. Press REPEAT. The “Play Mode” box is displayed on
the screen. You can press REPEAT again to close the
“Play Mode” box.
2. Press SELECT. The programme list is displayed on the
screen.
3. Press
4. After entering the track number, press
The screen is cleared and the player starts playing the
programme list.
/// to select a field in the programme list
and enter the track number using number buttons.
/// to
select “Play Program” and then press SELECT.
NOTE:
• You can remove the track from the programme list by
pressing C.
• You can programme up to twelve tracks.
•
During playback, you cannot set the Programme function.
• The programme is cancelled when:
- The disc tray is opened.
- The power is turned off.
Shuffle Playback
Press REPEAT during playback.
The “Play Mode” box is displayed on the screen.
Press SELECT to select “Shuffle” in the “Mode” field.
Files in the disc will be played back randomly.
Press REPEAT again to close the “Play Mode” box.
NOTE:
• In Shuffle playback, Repeat is set to “Off ”.
- 29 -
EN
Page 32

Rotating
JPEG
DivX
USING SETUP MENU
JEPG files can be rotated in clockwise direction by pressing ANGLE.
Subtitle Setting
Focus on a DivX® file and press SELECT.
If there is more than one subtitle, focus on the related
subtitle file of DivX
The DivX® file starts playing with the selected subtitle.
You can change the language of the subtitle and switch
selected subtitle on/off by pressing
®
file and press SELECT.
SUBTITLE.
NOTE:
• Some external subtitle files may be displayed incorrectly
or not at all.
• The following subtitle format file name extensions are
supported: .sub, .ssa, .srt, .smi, .psb, .ass. For more
details, see “DivX(R) Subtitle” on page 31.
Press DISPLAY when the player is not in Playback mode.
The setup menu is displayed. You can use this menu to
change the player settings.
Using Pages
Select pages using or .
When selected, the page name will be highlighted.
Press SELECT to enter the selected page.
The submenu for the selected item is displayed on the
screen, the items on the right of the submenus are current
settings.
Pages
Submenus
Current Settings
Sub-items
NOTE:
• To return to top page, press when the top item on the
submenu is selected.
• To close the setup menu, press DISPLAY.
Using Submenus
Press
or to select an item you want to change and
press SELECT.
Its corresponding sub-items are displayed on the right of
the current settings.
Press or to select
and press SELECT.
the sub-item you want to change
NOTE:
• To close the sub-items and return to the current settings,
press .
• For some submenus, no sub-items will be displayed.
- 30 - EN
Page 33

LANGUAGE SETUP
VIDEO SETUP
Set OSD Language:
You can select the default OSD language of the player
menus.
Subtitle:
You can select the default subtitle language if supported
by the DVD.
Audio:
You can select the default audio language if supported
by the DVD.
Disc Menu:
You can select the DVD menu language. The disc menu
is displayed in the selected language, if supported by the
DVD.
DivX(R) Subtitle:
You can select a DivX® subtitle language from among
“Western European”, “Central European” and “Slavonic
Cyrillic”.
TV Type:
The aspect ratio of the picture provided by the player can be
varied in line with the features available on the TV in use.
The items available are:
4:3 PS (4x3 Pan & Scan):
Allows you to see the movie in full screen on your TV, but
the right and left edges are obscured. This feature is disc
dependent.
4:3 LB (4x3 Letterbox):
Allows you to see movies in their original aspect ratio. You
will see the entire frame of the movie, but it will occupy a
smaller portion of the screen.
Western European:
Albanian, Catalan, Danish, Dutch, English, Finnish, French,
German, Irish, Italian, Norwegian, Portuguese, Spanish,
Swedish
Central European:
Croatian, Czech, Hungarian, Polish, Romanian, Slovak,
Slovenian, Sorbian
Slavonic Cyrillic:
Bulgarian, Russian, Ukrainian
16:9 (Wide screen 16x9):
Choose this setting if the player is connected to a wide
screen TV.
NOTE:
• Depending on the format of the DVD (e.g. 2.35:1), black
lines may still be displayed above and below the pic
ture.
-
- 31 -
EN
Page 34

Set TV Standard:
Select “Multi” or “PAL” for the video standard of player
output.
If “Multi” is selected, the output standard will be either NTSC
or PAL depending on the DVD being played.
If “PAL” is selected, the video output will be converted to
PAL standard irrespective of disc standard.
NOTE:
• When an NTSC disc is played, it is possible that some
subtitles will be distorted. If this happens please change
“Set TV Standard” to “Multi”.
Video Output:
Select “Video”, “Y/PB/PR Interlace”, “RGB” or “Y/PB/PR
Progressive” for the video output of the player.
NOTE:
• When the TV set is connected through HDMI, the player
will automatically establish the HDMI connection.
(See page 10.)
• When the player is connected to multiple video output
connectors, the picture performance may be affected by
undesired video signals from the connectors that are not
selected. For best picture performance, it is recommended
that you select the appropriate item from “Video” setup
menu and use only one video connection method.
Progressive Scan Output: (See page 11)
WARNING:
To be able to see the progressive video correctly, you should
have a progressive scan TV and should make the video
connections correctly.
1. Highlight “Y/PB/PR Progressive” in the Video output
menu and press SELECT.
2. A confirmation dialogue screen will be displayed.
3. If you see the picture correctly, select “YES” and press
SELECT.
4. If you cannot see the picture correctly, select “NO” and
press SELECT.
NOTE:
• If your TV set does not have a progressive scan feature,
nothing will be displayed on the screen, when “Y/PB/PR
Progressive” is selected.
• If you do not see anything on the screen or if you do not
select “YES” within 10 seconds, the video output setting
returns to the previous setting automatically.
• You can also change the video output setting directly by
pressing buttons on the remote control.
This function is useful when you select the video output
setting incorrectly and cannot see the picture correctly.
Press the following buttons to change the video output.
C-C-1 for “Video”
C-C-8 for “Y/PB/PR Interlace”
C-C-2 for “RGB”
C-C-7 for “Y/PB/PR Progressive”
The shortcuts can be used when there is no disc in the
player.
- 32 - EN
Page 35

AUDIO SETUP
OTHERS SETUP
Digital Output:
You can select the type of digital output, which determines
the audio format transferred via coaxial, optical and HDMI
digital audio outputs.
LPCM:
When this mode is selected, audio tracks contained in
the disc will be decoded by the player and passed on
to your TV set or AV amplifier through the digital output
in LPCM format.
Bitstream:
When this mode is selected, audio tracks contained in
the disc will be passed on directly, without decoding, to
the AV amplifier through the digital output. The AV amplifier must be capable of decoding the corresponding
audio stream.
DRC (Dynamic Range Compression):
When “On” is selected, this function will be activated and
will boost frequency response.
Down Sampling:
When output at 48 kHz, select “On”.
When the original sound is output, select “Off ”.
NOTE:
• It is not possible to connect speakers directly to the player;
an AV amplifier must be used.
Password:
The Parental Rating adjustment function can be disabled
or enabled by entering a 4-digit password.
“ ” indicates: the password protection is deactivated and
“ ” indicates: the password protection is activated and so
so Parental Rating can be changed. If you
want to activate the password protection,
enter a new password.
Parental Rating cannot be changed, and
the correct password should be entered to
unlock the protection.
NOTE:
• Factory preset of the password is: 0000. You have to enter
a 4-digit password each time you want to change Parental
Rating.
• You can use C to delete the incorrect entry.
Entering a password
Press
or to select the “Password” field, and enter
a password using number buttons. Each time you enter
the password, the password protection will be activated
or deactivated.
Changing the password
Unlock the password protection. Enter a new password using number buttons. The password protection is activated
and the new password is registered.
NOTE:
• When the password protection is activated, you cannot
select Parental Rating.
• If you forget the password, see page 39.
- 33 -
EN
Page 36

Parental Rating:
Playing of DVDs can be restricted depending on the age
of user. Parental control function allows the parent to set
the playback restriction level.
Parental Rating can be adjusted to one of the eight ratings. This restricts viewing to only DVDs with the same or
lower rating as that of the Parental Rating. “No Parental”
allows viewing of all DVD titles regardless of the rating of
the DVD.
Defaults:
If you select “Reset” and press SELECT, the factory presets
will be loaded. Even after the factory reset, the password
and Parental Rating will not be changed.
DivX(R) Registration:
There is a registration code in this page. This code is utilised
to register the player with the DivX
®
Video On Demand
service. This will allow you to rent and purchase video using
the DivX® Video On Demand format.
DivX® DRM User Steps
1. The user will open “DivX(R) Registration” page by enter-
ing “Others” from the setup menu of the player.
2. You will get the DivX® VOD registration code from the
player. The address for the DivX® VOD website is: www.
divx.com/vod.
3. After entering the address above on the Internet, go to
the section where registration is to be made for DivX
VOD membership.
4. Use the DivX® VOD registration (Activation) code you
receive from the player to register and set a username
and a password for yourself.
5. Once the registration process is over, you can download
the DivX
®
VOD activation file from the Internet and write
it onto a disc.
6. After inserting this disc into the player and playing the
activation file, you will have a new player DivX® VOD
Registration code activated for the player DivX® VOD.
7. When you want to download and watch movies, enter
the address www.divx.com/vod and you will be able to
download movies with your pre-designated username
and password by paying a certain charge. Upon writing
this film on the disc and inserting it into the player, you
can watch these the number of times that you are entitled
to watch.
®
- 34 - EN
Page 37

TROUBLESHOOTING
The picture quality is poor (DVD)
• Make sure the DVD surface is not damaged. (Scratches, fingerprints, etc.)
• Clean the DVD and try again.
• Make sure that the DVD is in the disc tray with the label facing up.
• A wet DVD or condensation may affect performance of the player. Allow the player
one or two hours in Standby mode for it to dry.
Disc does not play
• No disc in the player.
- Place a disc onto the tray.
• Disc incorrectly loaded.
- Make sure that the DVD is in the disc tray with the label facing up.
• Wrong type of disc. The player cannot play CD-ROMs etc.
- Use disc in supported formats described on page 5.
• The region code of the DVD must match that of the player.
Wrong OSD language
• Select the desired language in “Language” setup menu.
The language for the sound or subtitles on a DVD cannot be changed.
• Multilingual sound and/or subtitles not recorded on some DVDs.
• Try to change the sound or subtitles using the menu of the DVD. Some DVDs do not
allow changes to these settings without using the menu of the DVD.
Some functions (Angle, Zoom, etc.) do not work
• These functions may not be available on some DVDs.
• Angle can only be changed when the angle symbol is displayed on VFD.
Abnormal or no picture
• Check that the player is connected to the TV properly and that all connections between
the player and other attached equipment are secure.
• Have you pressed the correct buttons on the remote control? Try once more.
• Make sure the “TV Type” and “Video Output” are set correctly in “Video” setup
menu.
• Using shortcuts with the remote control, try to change the “Video Output” setting, see
page 32.
• If your TV set is connected through an HDMI cable, try to change the video resolution
with HDMI on the remote control.
- 35 -
EN
Page 38

No sound
• Check that the volume is set to an audible level.
• Make sure you have not switched the sound off accidently.
• Check the connections of the audio connectors, see pages 10 to 13.
Distorted sound
• Check that the appropriate listening mode setting is correct in audio system.
No response from remote control
• Check that the batteries are positioned correctly.
• Change the batteries.
• Operate the remote control within 30˚ angle on either side of the remote control sensor,
up to a distance of approximately 6 meters.
If nothing works
If you have tried the above solutions and nothing seems to work, try switching the player
off and on again. If you still encounter operational problems, unplug the AC power
cord and wait for a few minutes to allow the player to reset itself completely. If none
of these actions is successful, contact your supplier or DVD player repair technician.
Never attempt to repair a defective DVD player yourself.
- 36 - EN
Page 39

SPECIFICATIONS
DVD/DVD-RW/DVD-R/DVD+RW/DVD+R/VCD/S-VCD/AUDIO CD/CD-RW/CD-R/MP3/JPEG/MPEG-4/DivX® player.
Power
Requirements
Types of Discs
Supported
Video Type MPEG-2 Video Standard Decoding (MPEG-1 supported)
Video Output
220 - 240 V 50 Hz
Auto Adjustable
Power Consumption: 12 W (POWER ON)
Approx. 5 W (Standby mode)
DVD: SS/SL 120 mm (DVD-5)
SS/DL 120 mm (DVD-9)
DS/SL 120 mm (DVD-10)
DS/DL 120 mm (DVD-18)
DVD-RW (Video mode only)
DVD-R (Video mode only)
DVD+RW (Video mode only)
DVD+R (Video mode only)
VCD
S-VCD
AUDIO CD
CD-RW
CD-R
MP3
JPEG (Max resolution : 5M pixels)
MPEG-4
®
DivX
Full-Screen Video Display of 720 x 576 (PAL) & 720 x 480 (NTSC) pixel
50 and 60 Hz frame refresh rates (PAL & NTSC)
Digital bit-stream processing rate up to 10.08 Mbits/sec
Line resolution more than 500 lines
HDMI :
480p (in NTSC), 576p (in PAL), 720p, 1080i resolution
Analogue : (With 4 x 10-bits / 54 MHz video DACs)
CVBS : PAL/NTSC (negative synchronised)
1 Vpp [75 Ω (loaded)]
or
RGB + CVBS : Through Full Euroscart Output (Pin-8 Control)
Component : Y Output : 700 mVpp [75 Ω (loaded)], (PAL)
PB/CB Output : 700 mVpp [75 Ω (loaded)], (PAL)
PR/CR Output : 700 mVpp [75 Ω (loaded)], (PAL)
Audio Type Dolby Digital Out and Downmix
Audio Output
Dimensions 420 mm (W) x 49 mm (H) x 255 mm (D)
Weight
LPCM
DTS Digital Out
MPEG Multi channel
HDMI : IEC 61937
Digital : IEC 958
TOSLINK
Analogue : 20 Bit/96, 48, 44.1 kHz down-sampling DAC
2 RCA jack outputs (Left/Right)
Left/Right audio outputs of full Euroscart
Output / Channel: 2 Vrms (0 dB fs, 1 kHz)
2.2 kg
- 37 -
EN
Page 40

DEFINITION OF TERMS
Angle
Recorded onto some DVDs are scenes that have been simultaneously shot from a number of different angles (the same
scene is shot from the front, from the left side, from the right side, etc.). With such discs, ANGLE can be used to view
the scene from different angles.
Chapter Number
These numbers are recorded on DVDs. A title is subdivided into many sections, each of which is numbered, and specific
parts of video presentations can be searched quickly using these numbers.
®
DivX
DivX® is a digital video compression format developed by DivX, Inc.
Dolby Digital
Many movie theatres are equipped with 5.1 channel surround systems. This same type of technology is available to you
in your home. To enjoy full 5.1 channel surround, the player must be connected to an external Dolby Digital decoder via
the digital outputs (either coaxial or optical).
DTS
This is a digital sound system developed by Digital Theater Systems for use in cinemas. This system uses 6 audio chan
nels and provides accurate sound field positioning and realistic acoustics. (By connecting a DTS Digital Surround decoder,
you can also listen to DTS Digital Surround sound.)
DVD
This refers to a high-density optical disc on which high-quality pictures and sound have been recorded by means of digital
signals. Incorporating a video compression technology (MPEG II) and high-density recording technology, DVD enables
aesthetically pleasing full-motion video to be recorded over long periods of time (for instance, a whole movie can be
recorded).
DVD has a structure consisting of two 0.6 mm thin discs, which are adhered to each other. Since the thinner the disc, the
higher the density at which the information can be recorded, a DVD has a greater capacity than a single 1.2 mm thick
disc.
HDMI
The High-Definition Multi-media Interface (HDMI) is an industry-supported, uncompressed, all-digital audio/video interface.
The HDMI provides an interface between any compatible digital audio/video sources, such as a set-top box, a DVD player,
and an AV receiver and a compatible digital audio and/or video monitor, such as a digital television (DTV).
LPCM
LPCM stands for Linear Pulse Code Modulation and is digital audio.
MPEG
Short for Moving Picture Experts Group. This is an international standard for compression of moving images. On some
DVDs digital audio has been compressed and recorded in this format.
Playback Control (PBC)
This is recorded on a Video CD (Version 2.0). The scenes or information to be viewed (or listened to) can be selected
interactively with the TV by looking at the menu shown on the TV.
Subtitles
These are printed lines appearing at the bottom of the screen, which translate or transcribe the dialogue. They are re
corded on the DVDs.
Time Number
This indicates the playtime that has elapsed from the start of a disc or a title. It can be used to find a specific scene quickly.
(Not all discs permit the use of a time search feature. Availability is determined by the disc’s manufacturer.)
Title Number
These numbers are recorded on DVDs. When a disc contains two or more movies, these movies are numbered as title
1, title 2, etc.
Track Number
These numbers are assigned to the tracks that are recorded on Audio CDs. They enable specific tracks to be located
quickly.
Video CD
This contains recordings of pictures and sound whose quality is on a par with that of video tape. The player also supports
Video CDs with playback control (Version 2.0).
-
-
- 38 - EN
Page 41

Cut this information box out and
keep it in a safe place.
If you forget the password:
Press 1, 3, 6, 9.
Password will be cleared.
- 39 -
EN
Page 42

ENGLISH
A. Information on Disposal for Users (private households)
1. In the European Union
Attention: If you want to dispose of this equipment, please do not use the ordinary dust
bin!
Used electrical and electronic equipment must be treated separately and in accordance
with legislation that requires proper treatment, recovery and recycling of used electrical
and electronic equipment.
Following the implementation by member states, private households within the EU states
may return their used electrical and electronic equipment to designated collection facilities free of charge*. In some countries* your local retailer may also take back your old
product free of charge if you purchase a similar new one.
*) Please contact your local authority for further details.
Attention: Your product
is marked with this
symbol. It means that
used electrical and
electronic products
should not be mixed
with general household
waste. There is a sepa
rate collection system
for these products.
If your used electrical or electronic equipment has batteries or accumulators, please
dispose of these separately beforehand according to local requirements.
By disposing of this product correctly you will help ensure that the waste undergoes the
necessary treatment, recovery and recycling and thus prevent potential negative effects
on the environment and human health which could otherwise arise due to inappropriate
waste handling.
-
2. In Other Countries outside the EU
If you wish to discard this product, please contact your local authorities and ask for the
correct method of disposal.
For Switzerland: Used electrical or electronic equipment can be returned free of charge
to the dealer, even if you don’t purchase a new product. Further collection facilities are
listed on the homepage of www.swico.ch or www.sens.ch.
B. Information on Disposal for Business Users
1. In the European Union
If the product is used for business purposes and you want to discard it:
Please contact your SHARP dealer who will inform you about the take-back of the product.
You might be charged for the costs arising from take-back and recycling. Small products
(and small amounts) might be taken back by your local collection facilities.
For Spain: Please contact the established collection system or your local authority for
take-back of your used products.
2. In Other Countries outside the EU
If you wish to discard this product, please contact your local authorities and ask for the
correct method of disposal.
- 40 - EN
Page 43

- 41 -
EN
Page 44

SHARP CORPORATION
Printed on 100% post-consumer recycled paper.
Printed in Turkey
9JB50074840
06P04-TR-NV
 Loading...