

Page 1

DUPLICATOR : SD-4085
Date
:
Nov. 14, 1997
No. : DTE-319
ADJUSTING FOR TEXT BLURRING DUE TO DROP IN RDH
UNIT TRANSPORT PRESSURE.
1.Model Name: SD-4085
2.General: This report discusses how to adjust for text blurring caused by the RDH (drop in
exposure roller transport pressure) and should be used by maintenance personnel.
This kind of problem is thought to be extremely rare in copiers on the market, but if it
does occur, repair it using the methods described below.
(Note)
This method deals with text blurring (due to a drop in exposure roller transport pressure)
and will not be effective for other imaging problems due to other causes.
SHARP CORPORATION Reprography Division
1/5
Green
C
Page 2
1 Cause of the problem
The exposure rollers are made of a mix of rubber and granular plastic, and depending
on how long they are used, the coefficient of friction on the roller surface can change
slightly. Usually, cleaning the rollers with alcohol and removing any foreign particles
should return them to their original condition, but if the rubber is worn and too much
granular plastic appears on the surface, there may be problems with a drop in original
transport pressure. This usually appears as blurring on the front edges of original
images, particularly on the first exposure.
2 Solution
You can return the rollers to their original condition by removing the plastic from the
roller surface with a metal file and cleaning with alcohol. However, you must be
careful not to alter the diameter of the rollers or make them off-center.
(Using something finer, such as sandpaper, may be harmful.)
(Use a commercially available coarse metal file.)
Method
1. Clean the rollers and check that there is no more blurring using a magnification
equalizer (Sim 48-1).
(Check with the C-3 chart, D-D mode)
2. Open the RDH upper unit and rotate the exposure rollers using Sim 2-3-9.
(If you don’t turn on the upper unit F side check RCSW1, the rollers won’t rotate.)
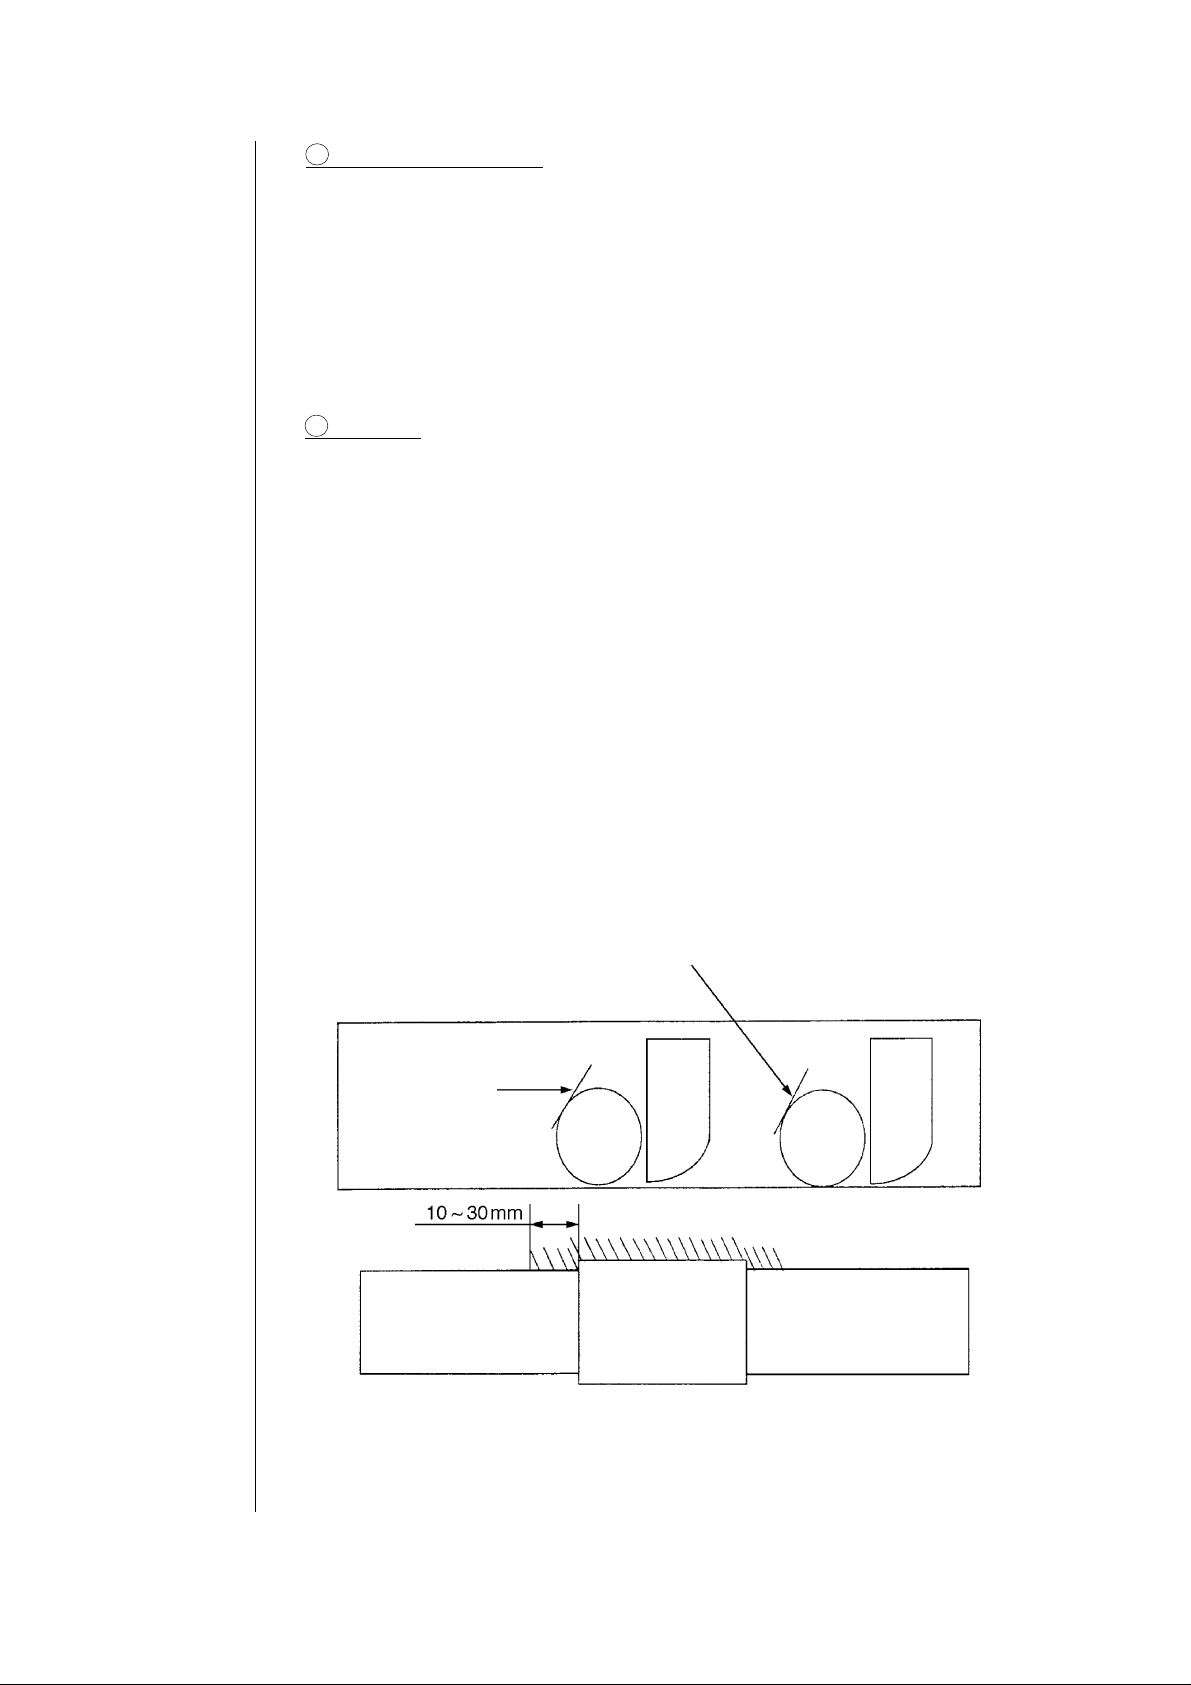
3. While the rollers are rotating, lightly press the metal file against the two exposure
rollers for 20 ~ 30 seconds and file.
Metal file
No.2 exposure roller
Metal file
No.1 exposure roller
2/5
Diagonal lines indicate areas on No.1 and No.2 rollers which must be filed
Page 3

4. After filing the rollers, clean the No. 1 and No. 2 rollers with the glass still on.
(You can clean with alcohol with Sim 2-3-9 as it is.)
5. Take out the glass and clean the glass surface with alcohol.
6. Clean Sim 2-3-9 and the rollers again with alcohol.
(Clean without the glass in.)
7. After cleaning, measure the pressure of the No. 1 and No. 2 exposure rollers and the
glass. See attachment for measuring instructions.
Adjust to between 900g ~ 1,500g and adjust so the there is a difference of within 100g
pressure between the two rollers.
(You can adjust with the amount of exposure roller filing.)
8. Equalize magnification using Sim 48-1.
(C = No.1 equivalent exposure magnification; D = No.2 equivalent exposure
magnification)
(Note)
There are two ways to adjust the transport pressure, to file the rollers and to add a glass
spacer, so adjust using the information below.
When replacing with new exposure rollers, add a glass spacer.
When there was no blurring when the exposure rollers were new or when there was
blurring even though transport pressure has been adjusted (blurring due to change in
transport pressure), file the rollers.
3/5
Page 4

SD-4085 RDH
(t0.25, t0.35, t0.5, t1.0) under the YL glass support springs attached to the RDH glass
Checking and adjusting the exposure unit No. 1 and No. 2 roller transport pressure
1. Open the RDH unit.
2. Manually turn on the RDH unit RCSW1 open/close detection switch.
3. Turn on the main switch and execute simulation ‘‘2-3-9.’’
(Exposure roller rotates.)
4. Using a transport pressure measuring sheet and a tension gauge (2,000g ~ 3,000g),
measure the pressure of the transport unit and check that it is between 900g ~ 1,500g.
5. If the transport pressure is too low, attach a transport pressure adjustment spacer
support plate.
The thickness of the transport pressure adjustment spacer is shown below.
6. Measure the transport pressure again and check that it is between 900g ~ 1,500g.
(Reference) If you increase the transport pressure here, the blurring problem may
improve.
Tools: transport pressure measuring sheet, tension gauge
No.2 exposure roller
No.1 exposure roller
Glass
Measure the center of the exposure rollers
Measure the load on the transport pressure measuring sheet between the glass and the
exposure rollers as described above.
Measure 2 ~ 3 times and take an average.
4/5
Page 5

Attaching a transport pressure adjustment spacer
Attach the transport pressure adjustment spacer between the YL glass support
1. Take out the RDH exposure glass.
2. Take out the RDH exposure unit or lift it up.
3.
springs attached to the RDH glass support plate and the RDH glass support plate.
YL glass support springs
RDH glass support plate
Transport pressure adjustment spacer
Thickness of the transport pressure spacer
A thickness of 0.1mm increases the transport pressure by approximately 100g.
(Standard)
Ref.
Model
No.
SD-4085 All ---- ----
<Interchange>
1. Interchangeable. 4. Not interchangeable.
2. Current type can be used in place of new type.
3. Current type cannot be used in place of new type.
Parts marked with ‘‘ ’’ is important for maintaining the safety of the set. Be sure to replace these parts with
specified ones for maintaining the safety and performance of the set.
Version P/G No.
name
New type cannot be used in place of current type.
New type can be used in place of current type.
Current parts New parts
Parts code Parts code
UKOGM5001BCZZ BT Tension gauge
UKOG-0259FCZZ AF Transport pressure measuring sheet
UKOG-0260FCZZ
UKOG-0261FCZZ Glass support spacer (t0.35)
UKOG-0262FCZZ Glass support spacer (t0.5)
UKOG-0263FCZZ Glass support spacer (t1.0)
UKOG-0258FCZZ
UKOG-0264FCZZ D chart (A4 size)
5. Interchangeable if replaced with same types of
related parts in use.
6. Others.
Price
rank
Glass support spacer (t0.25)
AC
D chart (letter size)
AX
Parts name
t0.25
t0.35
t0.5
t1.0
Effec-
tive
time
---- ----
Inter-
change-
ability
Note
For checking
blurring
5/5
 Loading...