

Page 1
®
1200 WATTS-HEAVY DUTY
COMMERCIAL MICROWAVE OVEN
MODEL R-22JT
OPERATION MANUAL
FOR CUSTOMER ASSISTANCE
To aid in reporting this commercial microwave oven in case of loss or theft, please record below
the model number and serial number located on the unit. We also suggest you record all the
information listed and retain for future reference.
MODEL NUMBER SERIAL NUMBER
DATE OF PURCHASE
Dealer Telephone
Servicer Telephone
TO PHONE:
SERVICE and PARTS
(for your nearest Sharp Authorized Servicer and Parts Distributor)
United States ..................................... 1-800-BE-SHARP(237-4277)
ADDITIONAL
CUSTOMER INFORMATION ............................................... 201-529-8706
TO WRITE:
For additional information:
Commercial Microwave Oven Department
Sharp Electronics Corporation
Sharp Plaza, Box 650
Mahwah, NJ 07430-2135
For service problems, warranty information, missing items and other assistance:
Sharp Electronics Corporation
Customer Assistance Center
1300 Naperville Drive
Romeoville, IL 60446-1091
Please provide the following information when you write or call: model number, serial number,
date of purchase, your complete mailing address (including zip code), your daytime telephone
number (including area code) and description of the problem.
TO ACCESS INTERNET:
WWW.sharpusa.com
SHARP ELECTRONICS CORPORATION
Sharp Plaza, Mahwah, New Jersey 07430–2135
SHARP CORPORATION
Osaka, Japan
Printed on recycled paper
TINSEB071WRRZ-D41 Printed in Japan
2004.9
Page 2

CONTENTS
For Customer Assistance ................ Front cover
Contents .......................................................... 1
Precautions to Avoid Possible Exposure to
Excessive Microwave Energy ...................... 1
Limited Warranty ............................................. 2
Important Safety Instructions .......................... 3
Service Call Check .......................................... 4
Grounding Instructions .................................... 5
Installation ....................................................... 6
Part Names ..................................................... 7
Before Operation ............................................. 8
Memory Operation .......................................... 8
Cooking with memory .................................. 8
Cooking double quantity with memory ......... 8
Memory program entry................................. 9
Memory check............................................ 10
Manual Operations ........................................ 11
Time cooking ............................................. 11
Multiple sequence cooking......................... 11
Express Defrost ......................................... 12
Express Defrost Chart................................ 12
Counter check ............................................ 13
Other Convenient Features ........................... 14
Signal setting ............................................. 14
Demonstration mode.................................. 14
Care and Cleaning ........................................ 14
Cooking Guide .............................................. 16
Utensils ...................................................... 16
Guidelines for microwave heating .............. 17
Timing guide .............................................. 18
Heating and cooking time guide ................ 19
Reminders ..................................................... 21
Specifications ................................................ 21
Conversion Chart .......................................... 23
Auto-Touch Guide ........................................ 24•25
PRECAUTIONS TO AVOID POSSIBLE EXPOSURE
TO EXCESSIVE MICROWAVE ENERGY
(a) Do not attempt to operate this oven with the door open since open-door operation can result
in harmful exposure to microwave energy. It is important not to defeat or tamper with the
safety interlocks.
(b) Do not place any object between the oven front face and the door or allow soil or cleaner
residue to accumulate on sealing surfaces.
(c) Do not operate the oven if it is damaged. It is particularly important that the oven door close
properly and that there is no damage to the: (1) door (bent), (2) hinges and latches (broken
or loosened), (3) door seals and sealing surfaces.
(d) The oven should not be adjusted or repaired by anyone except properly qualified service
personnel.
1
Page 3

LIMITED WARRANTY
SHARP ELECTRONICS CORPORATION warrants to the first end-user purchaser that this Sharp
brand product (the “Product”), when shipped in its original container, will be free from defective
workmanship and materials, and agrees that it will, at its option, either repair the defect or replace the
defective Product or part there of with a new or remanufactured equivalent at no charge to the purchaser
for parts or labor for the period(s) set forth below.
This warranty does not apply to any appearance items of the Product nor to the additional excluded
item(s) set forth below nor to any Product the exterior of which has been damaged or defaced, which
has been subjected to improper voltage or other misuse, abnormal service or handling, or which has
been altered or modified in design or construction.
In order to enforce the rights under this limited warranty, the purchaser should follow the steps set forth
below and provide proof of purchase to the servicer.
To the extent permitted by applicable state law, the warranties set forth herein are in lieu of, and
exclusive of, all other warranties, express or implied. Specifically, ALL OTHER WARRANTIES OTHER
THAN THOSE SET FORTH ABOVE ARE EXCLUDED. ALL EXPRESS AND IMPLIED WARRANTIES INCLUDING THE WARRANTIES OF MERCHANTABILITY, FITNESS FOR USE, AND FITNESS FOR A PARTICULAR PURPOSE ARE SPECIFICALLY EXCLUDED. If, under applicable state
law, implied warranties may not validly be disclaimed or excluded, the duration of such implied
warranties is limited to the period(s) from the date of purchase set forth below.
Neither the sales personnel of the seller nor any other person is authorized to make any warranties other
than those described herein, or to extend the duration of any warranties beyond the time period
described herein on behalf of Sharp.
The warranties described above shall be the sole and exclusive warranties granted by Sharp and shall
be the sole and exclusive remedy available to the purchaser. Correction of defects, in the manner and
for the period of time described herein, shall constitute complete fulfillment of all liabilities and
responsibilities of Sharp to the purchaser with respect to the Product, and shall constitute full
satisfaction of all claims, whether based on contract, negligence, strict liability or otherwise. In no event
shall Sharp be liable, or in any way responsible, for any damages or defects in the Product which were
caused by repairs or attempted repairs performed by anyone other than an authorized servicer. Nor
shall Sharp be liable or in any way responsible for any incidental or consequential economic or property
damage. Some states do not allow limits on warranties or on remedies for breach in certain
transactions; in such states, the limits herein may not apply.
Your Product Model Number & Description:
R-22JT
Commercial Microwave Oven
(Be sure to have this information available when you
need service for your oven.)
Warranty Period for this Product:
Additional Item(s) Excluded from
Warranty Coverage (if any):
Where to Obtain Service:
TO OBTAIN SUPPLY, ACCESSORY OR PRODUCT INFORMATION, CALL 1-800-BE-SHARP.
Save the proof of purchase as it is needed should your oven require warranty service.
Three (3) years for parts and labor in the end user’s
place of business.
Non-functional accessories and light bulb.
Contract your Sharp Authorized Servicer to obtain onsite service for this Product. The Servicer will come to
your location and if it is necessary to remove the
Product, the Servicer will reinstall it. Be sure to have
Proof of Purchase available.
2
Page 4

IMPORTANT SAFETY INSTRUCTIONS
When using electrical appliances basic safety precautions should be followed, including the following:
WARNING - To reduce the risk of burns, electric shock, fire, injury to persons or exposure to excessive
microwave energy:
1. Read all instructions before using the appliance.
2. Read and follow the specific
“PRECAUTIONS TO AVOID POSSIBLE
EXPOSURE TO EXCESSIVE MICROWAVE ENERGY”
3. This appliance must be grounded. Connect only to properly grounded outlet.
See
“GROUNDING INSTRUCTIONS” on page 5.
4. Install or locate this appliance only in accordance with the provided installation instructions.
5. Some products such as whole eggs and sealed containers – for example, closed glass jars – are able
to explode and should not be heated in this oven.
6. Use this appliance only for its intended use as described in this manual. Do not use corrosive chemicals
or vapors in this appliance. This type of oven is specifically designed to heat, cook or dry food. It is not
designed for industrial or laboratory use.
7. As with any appliance, close supervision is necessary when used by children.
8. Do not operate this appliance if it has a damaged cord or plug, if it is not working properly or if it has
been damaged or dropped.
9. This appliance should be serviced only by qualified service personnel. Contact nearest Sharp
Authorized Servicer for examination, repair or adjustment.
10.Do not cover or block any openings on the appliance.
11.Do not store or use this appliance outdoors. Do not use this product near water – for example, near
a kitchen sink, in a wet basement, near a swimming pool or similar locations.
12.Do not immerse cord or plug in water.
13.Keep cord away from heated surfaces.
14.Do not let cord hang over edge of table or counter.
15.See door surface cleaning instructions on pages 14-15.
16.To reduce the risk of fire in the oven cavity:
a. Do not overcook food. Carefully attend appliance when paper, plastic or other combustible
materials are placed inside the oven to facilitate cooking.
b. Remove wire twist-ties from paper or plastic bags before placing bag in oven.
c. If materials inside the oven ignite, keep oven door closed, turn oven off and disconnect the power
cord or shut off power at the fuse or circuit breaker panel.
d. Do not use the cavity for storage purposes. Do not leave paper products, cooking utensils or food
in the cavity when not in use.
17.Liquids, such as water, coffee, or tea are able to be overheated beyond the boiling point without
appearing to be boiling. Visible bubbling or boiling when the container is removed from the microwave
oven is not always present. THIS COULD RESULT IN VERY HOT LIQUIDS SUDDENLY
BOILING OVER WHEN A SPOON OR OTHER UTENSIL IS INSERTED INTO THE LIQUID.
To reduce the risk of injury to persons:
a. Do not overheat the liquid.
b. Stir the liquid both before and halfway through heating it.
c. Do not use straight-sided containers with narrow necks. Use a wide-mouthed container.
d. After heating, allow the container to stand in the microwave oven at least for 20 seconds before
removing the container.
e. Use extreme care when inserting a spoon or other utensil into the container.
on page 1.
SAVE THESE INSTRUCTIONS
3
Page 5
SERVICE CALL CHECK
Please check the following before calling for service!
1. Plug the power cord into a three-pronged electric-outlet. (See page 5)
2. Place one cup of water in a glass measure in the oven and close the door securely.
A. Does the oven light come on? Yes _______ No _______
B. Does the cooling fan work? Yes _______ No _______
(Put your hand over the back ventilating opening.)
C. If "No", please check wall outlet and circuit breaker.
3. Touch these pads:
SELECTATIME
A. Does the "ON" indicator come on? Yes _______ No _______
B. At the end of 1 minute, is the water hot? Yes _______ No _______
IF SERVICE IS NEEDED, PLEASE CONTACT YOUR NEARE
1
0
0
START
ST AUTHORIZED SHARP SERVICER.
ERROR MODE
Should any of the error indicators appear in the readout, follow the instructions:
EE Mode Reason Action Required
EE 1, EE 2 Magnetron failure Call for service.
EE 3 Both magnetrons failed Call for service.
EE 6, EE10, EE16
EE 7 Exhaust air temperature too high Check that nothing is blocking air intake open-
EE 8 Circuit failure Call for service.
EE 9 Maximum time is exceeded Check page 11 in the Operation Manual.
EE 0 Fan lock error Call for service.
Thermistors failure Call for service.
ings on oven back or that oven exterior is very
hot. Correct. Wait a few minutes and try again.
If problem persists, call for service.
Touch STOP/CLEAR pad, and reprogram correctly.
★
EE17 Magnetron temperature too high Touch STOP/CLEAR pad. Wait a few minutes
and try again. If problem persists, call for service.
★
EE 1 and EE 2: Can continue to use oven before service; however, check food carefully as additional
cooking time will be needed.
Any time the EE is flashing, the servicer should be called. When EE is not flashing, check the reason and correct.
Service is not necessary.
4
Page 6
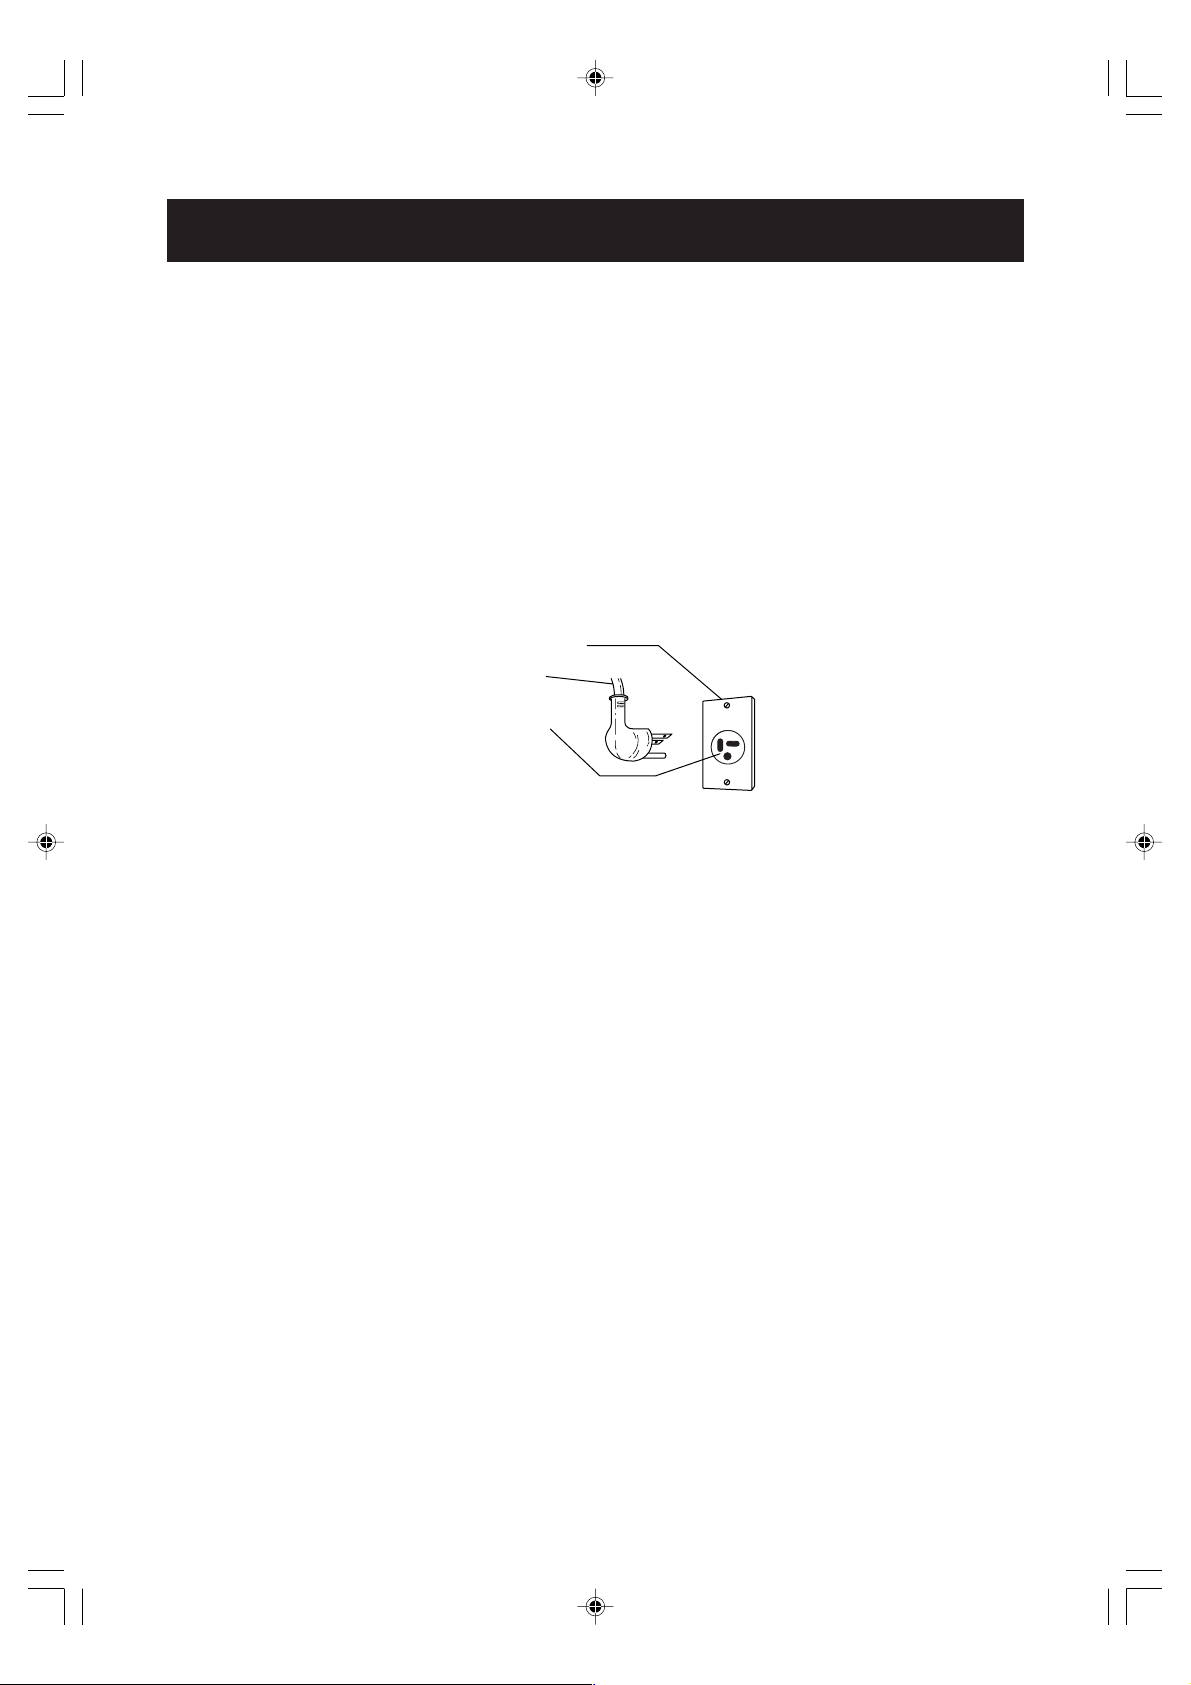
GROUNDING INSTRUCTIONS
GROUNDING INSTRUCTIONS
This appliance must be grounded. In the event of an electrical short circuit, grounding reduces the risk of
electric shock by providing an escape wire for the electric current. This appliance is equipped with a cord
having a grounding wire with a grounding plug. The plug must be plugged into an outlet that is properly
installed and grounded.
WARNING – Improper use of the grounding plug can result in a risk of electric shock. The electrical
requirements are 120 Volt, 60 Hz AC only, 20 Amp or more fused electrical supply. It is recommended
that a separate circuit serving only this appliance be provided. When installing this appliance, observe all
applicable codes and ordinances. If it is necessary to use an extension cord, use only a 3-wire extension
cord that has a 3-blade grounding plug and a 3-slot receptacle that will accept the plug on the appliance.
The marked rating of the extension cord should be AC 120 Volt 20 Amp. Consult a qualified electrician
or serviceman if the grounding instructions are not completely understood or if doubt exists as to whether
the appliance is properly grounded.
Receptacle Box Cover
3-Pronged plug
(NEMA 5-20)
3-Pronged, Receptacle
(NEMA 5-20)
120V 20A
Radio or TV Interference
Should there be any interference caused by the microwave oven to your radio or TV, check that the
microwave oven is on a different electrical circuit, relocate the radio or TV as far away from the oven as
feasible or check position and signal of receiving antenna.
5
Page 7
INSTALLATION
INSTALLATION
Because your Sharp Commercial Microwave Oven will be used frequently, place it so that there is easy
access for all users.
1. Be sure all electrical requirements are met. See page 5.
2. Exhaust vents are on the back of the unit near the top. Install the unit at least 2 inches away from the
nearest wall to permit adequate ventilation for proper cooling and air flow in the oven.
3. Install the unit where no excessive heat or steam are generated. Do not place next to an oven or
cooking surface.
4. The unit may be secured to a countertop or stand. There is a screw hole in the bottom of the unit. After
the oven is permanently placed, drill a hole through the counter top for a 3/16 inch (0.48 cm) selftapping screw. The hole should be 12 inches (30.5 cm) from the hinge side of the oven door and 51/
4 inches (13.3 cm) back from the front edge of the removable filter.
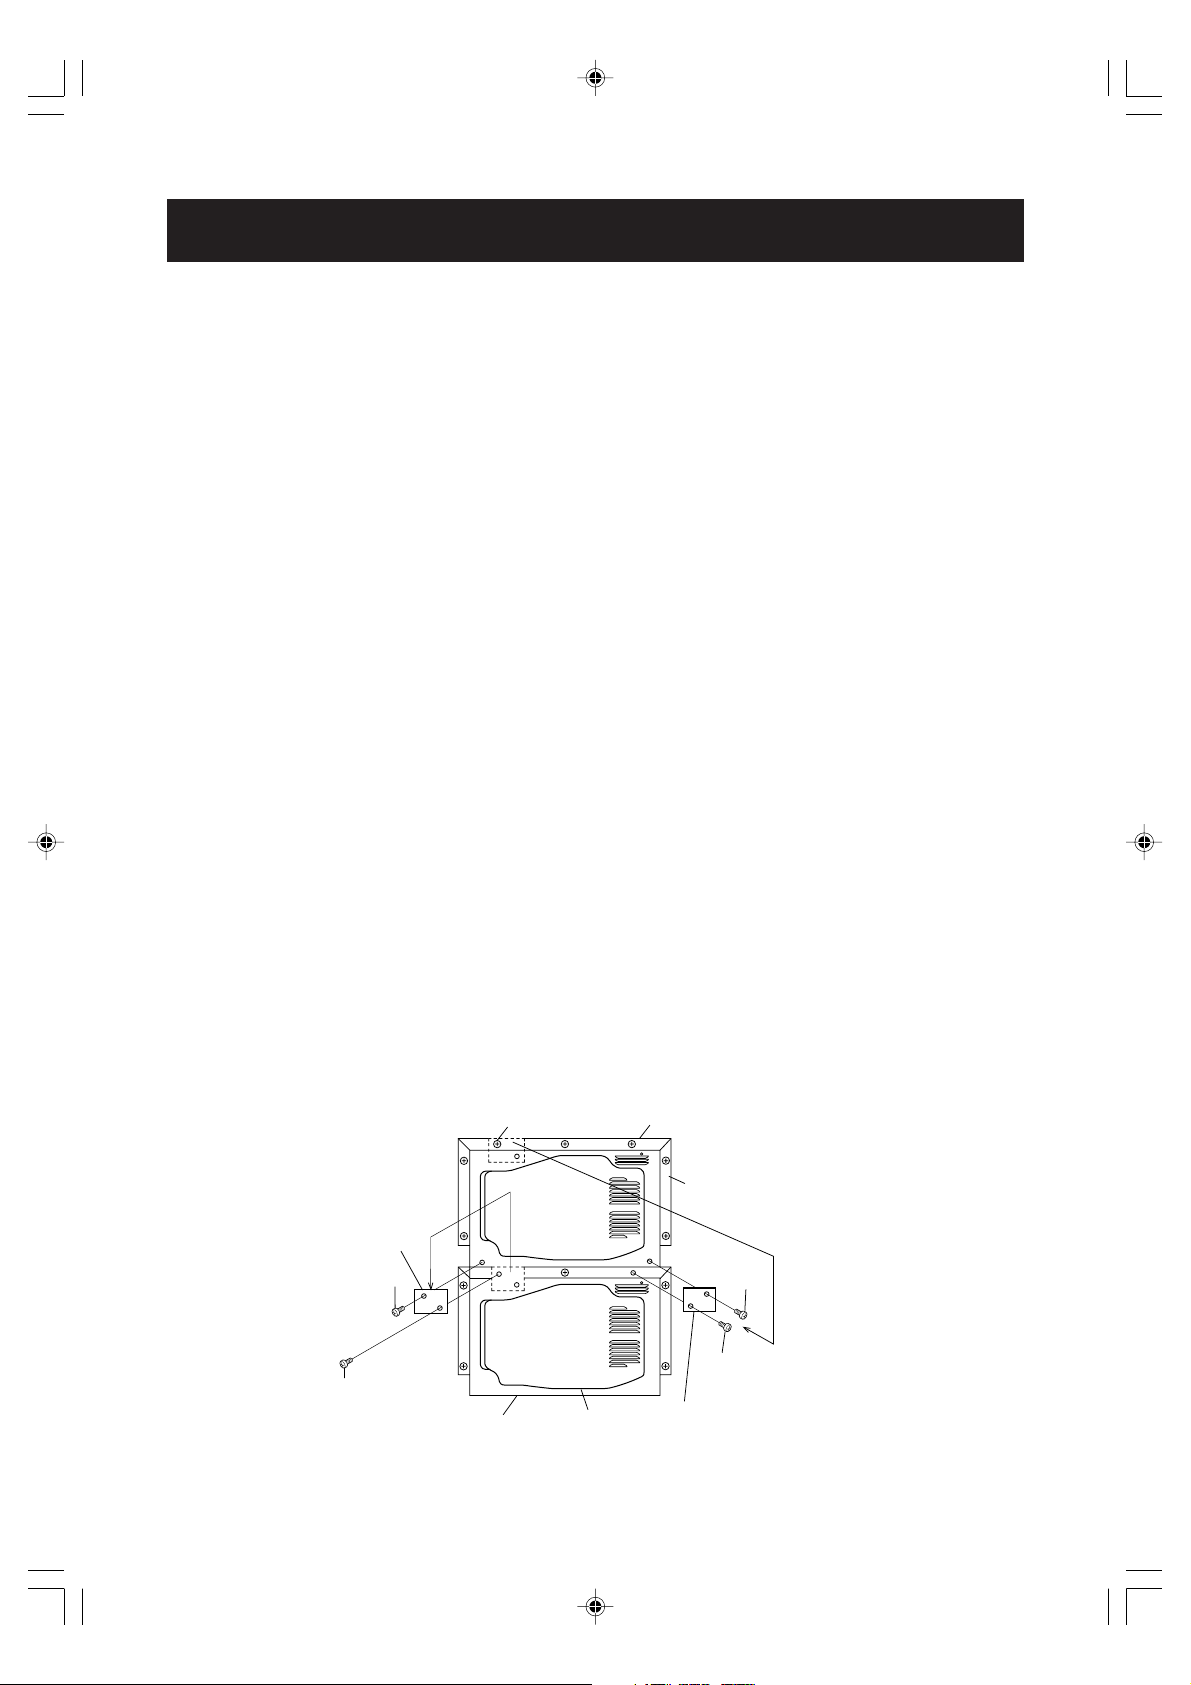
5. STACKING PROCEDURE FOR TWO MICROWAVE OVENS
Two R-22JT units can be installed together by placing one on top of the other. Follow these instructions:
a. Place oven A in the desired location. Position Oven B on top of Oven A as shown in the figure.
b. Remove Screws (b) from the lower edge of the back of Oven B.
c. Loosen Screw (a) which holds Mounting Plate A on the back of Oven A.
d. Turn Mounting Plate A 180° so that it is on the lower edge of Oven B.
e. Using Screw (b) removed in step b, install Mounting Plate A to the lower edge of Oven B as shown
in the figure.
f. Tighten Screw (a) which was loosened in step c.
g. Remove another Screw (a) which holds Mounting Plate B on the back of Oven B. Remove Mounting
Plate B.
h. Replace Screw (a) removed in step g and tighten.
i. Remove Screw (c) from the rear of Oven A.
j. Remove Screw (d) from the rear of Oven B.
k. Turn Mounting Plate B and position it on Ovens A and B as shown in the figure. Using Screws (c)
and (d), fasten Mounting Plate B in place.
WARNING:
When two ovens are installed together by placing one on top of another:
1. Always use two mounting plates.
2. Make sure that the power supply cords are not caught between the ovens.
3. Do not install more than one oven on top of another.
Oven B (Back)
Rear cabinet
Screw (d)
Screw (c)
Mounting plate B
Mounting plate A
Screw (b)
Screw (a)
Screw (a)
Oven A (Back)
Rear cabinet
Figure
6
Page 8
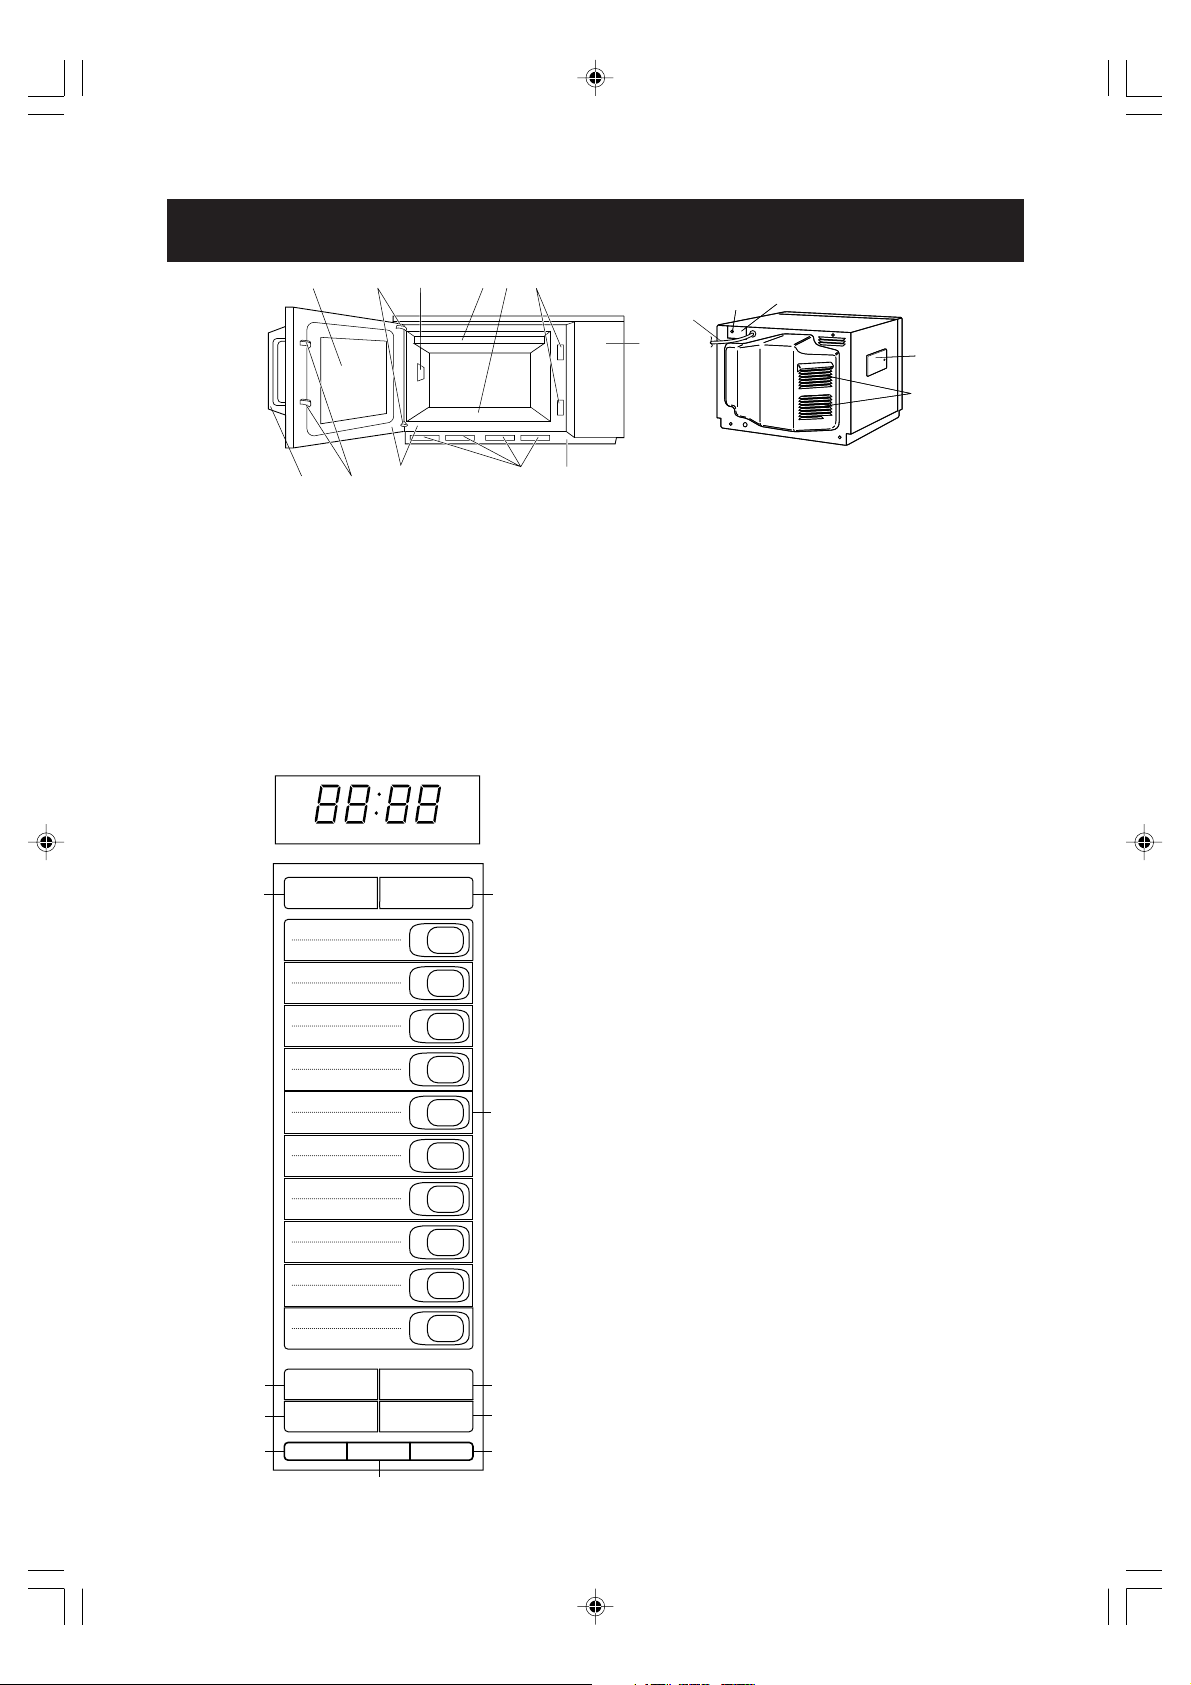
PART NAMES
5
10
9
4
3
2
15
1
17
16
14
14
13
13
11
12
1. Touch control panel
2. Door latch openings
3. Ceramic shelf
4. Splash cover
5. Oven light
6. Air intake filter
7. Air intake openings
8. Door seals and sealing surfaces
9. Door hinges
DEFONNO.X2CHECK
19
DOUBLE
QUANTITY
EXPRESS
DEFROST
11
1
12
2
13
3
14
4
15
5
20
21
678
10.Oven door with see-through window
11.Door latches
12.Door handle
13. Service window for replacing the oven
light bulb
14.Ventilation openings
15.Power supply cord
16.Mounting plate
17.Screw for mounting plate
19.DOUBLE QUANTITY pad
20.EXPRESS DEFROST pad
21.Ten number pads for time and memory programming
22.SELECTATIME pad
23.STOP/CLEAR pad; touch to stop operation of
oven and clear remaining heating time
24.SELECTAPOWER pad for setting variable
power level
25.START pad; touch to operate oven after door
is closed and time is set
26.SET pad for setting memory
27.CHECK pad for checking memory
28.SIGNAL pad for setting signal sound
22
SELECTATIME STOP/CLEAR
24
SELECTAPOWER
26
SET CHECK SIGNAL
27
16
17
18
19
20
START
6
Accessory: Menu labels
7
8
9
0
23
25
28
7
Page 9

NO.X2NO.
X2
DOUBLE
QUANTITY
BEFORE OPERATION
ON
X2
* Before operating your new oven, make sure you
read and understand this operation manual completely.
1) Plug in the oven.
* The digital display will then show
2) You can input the pads only when the door is
closed.
3) Oven light and fan motor work for 1 minute
whenever the door is opened or after cooking.
.
MEMORY OPERATION
This model has 20 memory banks which can store
cooking programs.
The first ten memory banks have been programmed previously as follows, but they can be
changed. See page 9.
Memory No.
1
2
3
4
5
6
7
8
9
0
Information in these memory banks is not lost due
to power interruptions. If the power goes off, the
oven does not need to be reprogrammed. No
batteries are necessary for this type of memory.
Cook Time
10 sec.
20 sec.
30 sec.
45 sec.
1 min.
1 min. 15 sec.
1 min. 30 sec.
2 min.
2 min. 30 sec.
3 min.
Output Power
100%
100%
100%
100%
100%
100%
100%
100%
100%
100%
4) The program and the check are canceled when
any pads are not touched for more than 3
minutes.
5) During cooking, except memory cooking, the
oven stops when the door is opened, and the
program is canceled if the START pad is not
touched within 1 minute after the door is closed.
6) The cooking is canceled when the door is
opened during memory cooking.
Cooking double quantity
with memory
Double quantity means the best time for cooking
two servings or twice the amount programmed in
the memory pad; it is not double the time.
* Suppose you want to cook 2 servings by memory
number 1.
Procedure Display
1 Place food in oven.
Touch DOUBLE
QUANTITY pad.
1
2 Touch number pad.
After about 1 sec.
Cooking with memory
* Suppose you want to cook by using memory 1,
which was programmed for 10 seconds at 100%.
Procedure Display
1
1 Place food in oven.
Touch number pad.
After about 1 sec.
NO.
ON
Note: The “MEMORY” cooking system does not
require the use of the START pad. Memory
pad cannot be used to start the oven if any
program is on display.
If the door is opened during memory cooking, the program is canceled. To stop the
cooking of a memory pad and then restart,
first, touch the STOP/CLEAR pad, then
open the door, check food, close door and
touch START.
If your programmed time is over maximum
time at Double Quantity, you cannot use
Double Quantity for the memory. You can
cook only 1 serving. See page 11.
Note: If you want to cook by using memory 11-20,
touch the desired number pad twice within
1 second.
8
Page 10

Memory program entry
SELECTATIME
DOUBLE
QUANTITY
NO.X2NO.
X2
X2
X2
NO.
You can change memory programs for memory
banks. See time cooking on page 11.
Memory banks 20
Cooking stage
Memory NO.1 -10 max. 3 stages
Memory NO. 11-20 max. 2 stages
Setting time and power level
* Suppose you want to set 4 minutes at 60% for
the 1st stage and 2 minutes at 30% for the 2nd
stage for 1 serving in memory 1.
Procedure Display
SET
1 Touch SET pad twice
within 2 sec.
x 2
NO.
1
2 Touch number pad.
SELECTATIME
NO.
3. If the cooking time is over the maximum
time, the display will show “EE 9”. See
page 11.
4. At step 1, no audible signal will be heard
when the SET key is touched the first
time. An audible signal will sound when
the SET key is touched the second time.
Setting magnification factor
Ovens are shipped with a magnification factor of
1.8 for DOUBLE QUANTITY.
You can change the magnification factor for double
quantity and have it stored in the memory.
* Suppose you want to set the magnification
factor to 1.67 for double quantity in memory 1.
Procedure Display
x 2
SET
1 Touch SET pad twice
within 2 sec.
2 Touch DOUBLE
QUANTITY pad.
4
00
3 Enter cooking time for
1st stage.
SELECTAPOWER
4 Enter power level in
1st stage.
SELECTATIME
2
00
5 Enter cooking time for
2nd stage.
SELECTAPOWER
6 Enter power level for
2nd stage.
SET
7 Touch SET pad twice.
6
3
x 2
Note: 1. Touch SELECTAPOWER twice for High
power when programming stages. If High
is the power level of the last stage, it is not
necessary to touch SELECTAPOWER
at all.
2. If you want to set memory 11-20, press
the desired number pad twice.
1
3 Touch number pad 1.
4 Touch SELECTATIME
pad.
1
67
5 Touch NUMBER pads
1,6 and 7.
SET
6 Touch SET pad twice.
Note: 1. In case you want to change the magnifi-
2. The magnification factor can be set from
3. At step 1, no audible signal will be heard
x 2
cation factor it must be set for each pad
separately.
0.00 to 9.99.
when the SET pad is touched the first
time. An audible signal will sound when
the SET pad is touched the second time.
9
Page 11

Memory check
NO.
CHECK
NO.X2CHECK
NO.X2CHECKX2CHECK
DOUBLE
QUANTITY
You can check the information programmed into the
memory.
Checking magnification
* Suppose you want to know the magnification fac-
tor for double quantity in memory 1.
Checking time and power level
* Suppose you want to know the information pro-
grammed into the memory 1, programmed for 4
minutes at 60% for the 1st stage and 2 minutes at
30% for the 2nd stage.
Procedure Display
CHECK
1 Touch CHECK
pad.
NO.
CHECK
1
2 Touch number
pad.
After about 1 sec.
NO.
Procedure Display
CHECK
1 Touch CHECK pad.
2 Touch DOUBLE
QUANTITY pad.
1
3 Touch number pad.
After about 1 sec.
Note: 1. To cancel memory check, touch the
CHECK pad.
2. The magnification factor 1.80 for the
DOUBLE QUANTITY is stored in all
memories when the oven is shipped.
REPEAT
Note: 1. To cancel memory check, touch the
CHECK pad.
2. When is displayed at Step 1,
the memory is not set.
3. If you want to check memory 11-20,
touch the desired number pad twice.
10
Page 12

MANUAL OPERATIONS
SELECTATIME
ON
SELECTATIME
Time cooking
Your oven can be programmed for up to 3 cooking
sequences and has 11 preset microwave power
levels.
Total cooking time Maximum of 30 minutes
Touch
SELECTAPOWER PAD
ONCE THEN TOUCH
SELECTAPOWER
9
8
7
6
5
4
3
2
1
0
* Not necessary to touch SELECTAPOWER if
only one stage or if the last stage.
* Suppose you want to cook for 2 minutes and 30
seconds at 50%.
Procedure Display
APPROXIMATE
PERCENTAGE OF
POWER
100%
90%
80%
70%
60%
50%
40%
30%
20%
10%
0%
Display
★
Multiple sequence cooking
* Suppose you want to cook for 4 minutes at 60 %
for 1st stage and then continue to cook for 2
minutes at 30% for 2nd stage.
Procedure Display
4
00
1 Enter cooking time for
1st stage.
SELECTAPOWER
2. Enter power level for
1st stage.
2
3. Enter cooking time for
2nd stage.
SELECTAPOWER
4. Enter power level for
2nd stage.
START
5. Touch START pad.
6
00
3
SELECTATIME
2
30
1 Enter cooking time.
SELECTAPOWER
2 Enter power level.
START
3 Touch START pad.
Note: It is not necessary to touch
SELECTAPOWER pad for 100%. If t he
cooking time is over the maximum time, the
display will show “EE 9”.
5
ON
11
Page 13

Express Defrost
Use EXPRESS DEFROST to defrost meat and poultry
faster and better. Calculate total defrost time from
chart below. Express Defrost can be programmed for
a maximum of 90 minutes.
* Suppose you want to defrost one pound of lamb
chops for 3 minutes and 30 seconds.
Procedure Display
EXPRESS
DEFROST
1 Touch EXPRESS
DEFROST pad.
3
30
2 Enter defrosting time.
(Refer to chart below.)
START
3 Touch START pad.
Midway through the defrosting cycle, CHECK
will light in the display and an audible signal will
be heard. You may open the door, turn food
over and shield any warm portions.
Close the door.
DEF
DEF
DEF
ON
TIPS: Allow foods to stand a few minutes after
defrosting to equalize the temperature for
better cooking results.
Check food after standing. If additional time
is needed, continue to defrost with time
cooking. It is better to defrost with 30%
power.
Foods that are the same thickness
throughout defrost better. If foods have
varied thickness, it may be necessary to
shield the thin edges with small flat pieces
of aluminum foil to prevent overdefrosting.
START
4 Touch START pad.
Express Defrost Chart
Food
Beef steak
Lamb chops
Pork chops
Boneless chicken
breasts
Fish steak
less than 1" (2.5 cm)
more than 1" (2.5 cm)
less than 1" (2.5 cm)
more than 1" (2.5 cm)
1
/2"–3/4" (1.3 cm - 1.9 cm)
3
/4"–1" (1.9 cm - 2.5 cm)
1
/2"–3/4" (1.3 cm - 1.9 cm)
3
/4"–1" (1.9 cm - 2.5 cm)
Thickness
1" (2.5 cm)
Time (min./lb.(min./kg))
4–41/2 (83/4–10)
5–51/2 (11–121/4)
4–5 (83/4–11)
1
/2–4 (73/4–83/4)
3
5–51/2 (11–121/4)
3
/4–11)
4–5 (8
41/2 –51/2 (10–121/4)
2–3 (41/2–61/2)
3–4 (61/2–83/4)
12
Page 14

Counter check
CHECK
Set counter to "0" before using oven for the first
time. See next column.
Counter check
You can check total number of using times, times
of using each memory, times of using manual
cooking and times of using EXPRESS DEFROST.
To clear the number of times
Each number of times can be cleared by touching
SET pad during checking mode.
* Suppose you want to clear the times of
memory 1.
Procedure Display
Total count Touch CHECK pad twice.
To check for each counter, touch each pad as
indicated below, after touching CHECK pad
twice.
Count of memory Touch each number pad
of memory.
Count of manual Touch SELECTATIME
cooking pad.
Count of EXPRESS Touch EXPRESS
DEFROST DEFROST pad.
* Suppose you want to know total using times and
times of using each memory. In that case the
oven was used 8268 times and the memory 1
was used 513 times.
Procedure Display
CHECK
x 2
1 Touch CHECK pad 2
times. Total count will
CHECK
be displayed.
1
NO.
2 Touch number pad 1,
for checking times of
using memory 1.
After about 1 sec.
CHECK
CHECK
x 2
1 Touch CHECK pad 2
times. Total count will
be displayed.
1
NO.
2 Touch number pad 1
for checking times of
using memory 1.*
SET
After about 1 sec.
3 Touch SET pad.
Note: 1. To cancel counter check, touch CHECK
pad.
2. To clear times of manual cooking, touch
SELECTATIME pad in Step 2 instead
of number pad.
3. To clear times of Express Defrost use,
touch EXPRESS DEFROST pad in Step
2 instead of number pad.
4. To clear total using times, skip Step 2.
CHECK
CHECK
CHECK
Note: 1. To cancel counter check, touch CHECK
pad.
2. You can know count of memory No.1 10 only. Memory No.11 - 20 cannot be
checked.
3. Each counter can count the times to
9999, and then it will return to 0.
CHECK
13
Page 15

OTHER CONVENIENT FEATURES
Signal setting
There is a choice of 2 different sounds and no
sound on your oven.
To set signal, touch the SET pad twice within 2
sec., and then touch the SIGNAL pad continuously
until you hear desired tone.
CARE AND CLEANING
VERY IMPORTANT CAUTIONS
*DO NOT OPERATE the oven without the
splash cover in place.
*DO NOT REMOVE the splash cover UNLESS
THE POWER CORD IS REMOVED FROM
THE OUTLET because the stirrer fan, which
is located on the ceiling, operates for 1 minute
after the door is opened and injury could
occur.
*DO NOT REMOVE the ceramic shelf from the
oven.
*DO NOT OPERATE the oven without the air
intake filter in place.
*DO NOT USE commercial oven cleaners,
abrasive or harsh cleaners or scouring pads
on any part of your microwave oven.
Demonstration Mode
To demonstrate, touch SELECTATIME, 0 and then
touch START and hold for 3 seconds. Cooking
operations can now be demonstrated with no power
in the oven. The timer will count down rapidly.
To cancel, touch SELECTATIME, then 0 and STOP/
CLEAR.
Oven Exterior
The outside of your oven can be easily cleaned
with mild soap and water. Then wipe with a clean
dampened cloth and polish dry with a soft cloth.
Control Panel
Care should be taken in cleaning the control
panel. Open the door before cleaning to inactivate
the control panel pads.
Using a soft cloth dampened with water only,
gently wipe the panel until it becomes clean. Avoid
the use of excess water. Do not use any sort of
chemical or abrasive cleaner because to do so
may cause severe damage to the panel and make
programming impossible.
14
Page 16

CARE AND CLEANING
Oven interior
1) For easy cleaning, wipe any spatters or spills
with a soft damp cloth or sponge at the end of
each day. For heavier spills, use mild soap and
wipe clean with a soft damp cloth.
2) At least once a week, remove the splash cover
and wash in a mild detergent solution. The
splash cover is located in the top of the oven
and may easily be removed. REMEMBER TO
UNPLUG THE POWER CORD.
Remove two thumb screws (A) as shown in
Fig. 1. Then remove the splash cover from the
oven.
To replace the splash cover, insert two projections of the cover (B) into the holes of the oven
cavity backplate as shown in Fig. 2. And secure the cover to the oven ceiling with two
thumb screws (A) as shown in Fig.1.
3) Wipe any grease, spills or spatters on the door
seal surfaces with a soft damp cloth or sponge
so that they do not build up. The door seals
must always be free of grease and spatters so
that the door closes properly.
Door
Fig.1
Splash cover
Door
Wipe the door and window on both sides frequently with a soft damp cloth to remove any spills
or spatters. Always keep the door seals and seal
surfaces clean so that any grease, spills or spatters are not allowed to build up. Such a build-up
could result in leakage of microwave energy from
the oven.
Air intake filter
Hole
Hole
Clip
Air intake filter
Clip
Keep the air intake filter clean. Clean at least every
two weeks or more often for heavy use.
Remove the air intake filter by pulling the two (2)
clips on the sides of the filter.
Wash the air intake filter in mild soapy water, rinse
and dry with a soft cloth.
After cleaning re-install the air intake filter.
Oven
(A)
Fig.2
Splash cover
(B)
Hole
15
Page 17

COOKING GUIDE
Utensils
METAL
1) Frozen Precooked Foods in Foil Containers
When cooking foods in foil containers, the container should be no more than 1/2-inch (1.3 cm) deep.
The best method to use is, after removing the foil cover, return the metal container to the paper box
or package it came in and place this entire unit in the microwave oven. There must be more food than
metal, and the metal container must not touch the oven walls.
2) Metal Skewers
Small metal skewers may be used if there is a large proportion of food to the amount of metal. If arcing
does begin, stop the oven, remove the food and change to a wooden skewer.
Whenever using metal foil, foil containers or metal skewers, be sure that the metal does not touch the
sides of the oven.
GLASS, GLASS-CERAMIC, CERAMIC AND CHINA UTENSILS
Most glass, glass ceramic, ceramic and china utensils are excellent for use in microwave ovens. Heatresistant glassware, unless it has metallic trim or metal portions, can almost always be used in the
microwave oven, no matter whether it is clear or opaque. However, you must be careful not to use delicate
glassware since it might crack from the heat of the food but not from the microwaves.
Most dinner plates, unless they have metallic trim, are acceptable for heating foods.
Utensils with metallic trim or metal parts, such as screws, bands, handles, etc. must be avoided. Cracked
or crazed glazes or chips are also indications that a dish should not be used. Ceramic mugs or cups with
glued on handles are also not recommended for use in a microwave oven.
PAPER GOODS
For low heat cooking, such as reheating or very short cooking times and for foods with low fat, sugar or
water content, paper is a good utensil for microwave oven use. Napkins, towels, plates, cups, cartons,
paper freezer wrap and the paper pulp board that some meats come packed in are also convenient utensils
for use in the microwave oven. Cardboard can also be used. Paper is used in the microwave oven as a
moisture insulator. Wax coated paper plates and cups should be avoided since the high temperatures that
the foods reach may cause the wax to melt. Plastic coated dishes, however, are fine for use in the
microwave oven.
Wax paper and paper towels provide an excellent loose cover for foods and help prevent spatters. Do not
use paper towels, plates or other utensils made from recycled paper. Recycled paper products may
contain certain impurities which could cause the paper to ignite during microwave heating. Some paper
products may contain harmful substances.
PLASTIC AND FOAM UTENSILS
Plastic and foam dishes and containers should not be used for cooking foods with high fat or high sugar
content since the heat of the food is too hot for the plastic and may cause it to melt or lose its shape. Cooking
pouches designed to withstand boiling and freezing for conventional cooking, work well in the microwave
oven. Do not close plastic cooking pouches with the metal tie wraps provided, since they get very hot and
will melt the plastic wrap. Any closed pouch or cooking container should be pierced so that steam is
allowed to escape. Do not attempt to cook in plastic storage bags as they will not withstand the heat of
the food. Plastic wrap may be used to cover foods during cooking. Stretch-type plastic wraps are not
suitable for use in the microwave oven because they form too tight a seal. Whenever removing plastic wrap
that has been tightly formed around the utensil, just lift the plastic away from you so that the steam can
vent and there will be no danger of scalding.
Melamine is not recommended for use in the microwave oven.
WICKER, WOOD AND STRAW
Wicker, wood and straw may be used in the oven for short periods of time; however, they should not be
used for high fat or high sugar content foods since the heat of the food could possibly char the utensil.
Wooden handle scrapers and spatulas may be left in the microwave oven during cooking.
16
Page 18

Guidelines for microwave heating
Several factors should be kept in mind when selecting utensils to be used for microwave heating.
1. A plate with a narrow rim of about 1/2-inch (1.3 cm) is recommended. This keeps the food all at the
same level for more even, uniform heating.
2. Casseroles and sauced items should be heated in straight sided containers.
3. Containers should be chosen to be large enough to contain foods as they expand with heating. Milk
products are especially subject to boil-overs.
4. Most foods heat better if they are covered. Covering retains the heat that has been created, reduces
dehydration and helps keep the oven clean. There should be an opening for steam to escape from
the food. Covers should also be non-metallic to allow for proper heating.
Techniques
1. Microwave cooking is ideal for times when you run out of certain items or for preparation during slow
periods.
2. Avoid overcooking. Small portions of food should stand 2-3 minutes following cooking; during this
standing time foods will complete cooking. Large portions require longer standing times.
3. When a range of times is given in a recipe (2-3 minutes), always cook the shorter amount of time
and check for doneness. Foods can always be returned to the microwave for additional cooking.
Overcooked foods are tough or dry.
4. Arrange foods with thicker portions or larger pieces toward the outside of the cooking container. Most
foods cook more evenly and faster if covered.
5. The microwave oven is quite useful in reducing broiling times for steaks and chops. Partially prepare
the meat in microwave oven, then broil for a shorter period of time.
6. Sliced meats should be at least 1/2-inch (1.3 cm) thick for best heating results. Turning the meat
product over once during the heating process will yield more uniform heating.
7. Stir liquids briskly before heating and allow to stand at least for 20 seconds after heating before
stirring or drinking to avoid eruption.
Pastries
1. Placing rolls or muffins on a paper towel or napkin or wrapping in a paper towel eliminates excess
moisture and gives best results.
2. Avoid overheating. Baked items will be hotter on the inside than on the outside. Overheating causes
baked products to be dry and tough.
Breakfast Items
1. Eggs should be slightly undercooked when preparing them for later reheating in the microwave. Cool
quickly and store covered.
2. Arrange foods on platter with easily heated items near center of plate (eggs) and denser items toward
outside (sausage).
3. Do not cook eggs in the shell. Pressure will build up inside the shell and it will burst. Do not reheat
cooked eggs unless they are scrambled or chopped. Puncture the yolk before cooking eggs.
Sandwiches
1. Pre-toast bread and cool on air rack. Egg and shortening rich bread gives best results.
2. Sandwich meats should be sliced very thin. When assembling sandwich, place thicker portions
toward outside edges.
3. Cover sandwiches and refrigerate no longer than three hours. When ready to heat in the microwave,
unwrap and place on paper towel or napkin. Most sandwiches should be heated uncovered unless
wrapped in paper towel or napkin. The paper absorbs excess moisture, preventing the sandwich
from becoming soggy.
4. Avoid overheating. Filling heats rapidly, and overheated sandwiches become dry and tough.
17
Page 19

Casseroles
1. Arrange casseroles with larger pieces or bulk of food around the perimeter of the casserole; depress
in center.
2. Casseroles should be heated covered with a non-metallic cover or plastic wrap except casseroles
with crusts. If tightly covered, puncture plastic wrap or loosen at one corner so steam can escape.
Be careful when removing plastic wrap; pull wrap away from you with the tines of a fork.
3. Cover casseroles evenly with sauce or gravy before refrigerating.
Vegetables
1. Arrange vegetables with larger pieces around the perimeter of the dish; depress in center.
2. Small uniform sized vegetables like peas, diced carrots and corn heat easily in the microwave oven.
A butter sauce will speed the process.
3. Heat vegetables covered with either a non-metallic cover or plastic wrap. If tightly covered, puncture
plastic wrap or loosen at one corner so steam can escape. Be careful when removing plastic wrap;
pull wrap away from you with the tines of a fork.
4. Most vegetables should be slightly undercooked when preparing for later reheating in the microwave. Cool quickly and store covered.
5. Microwaved vegetables retain their bright color, flavor and nutrients.
Defrosting
1. See page 12 for EXPRESS DEFROST directions.
2. Avoid over-defrosting. Foods should be removed from the microwave when they are still slightly icy
in the center. Allow foods to stand covered for 1 to 2 minutes to complete defrosting.
3. SELECTAPOWER allows you to defrost food at the power level and speed you choose. Generally
defrosting is done at 30% or lower. To use SELECTAPOWER for defrosting, first program time
followed by touching the SELECTAPOWER pad and the number pad for percentage of power level
(for example, 3 represents 30% power). The microwave power will pulse on and off to defrost frozen
foods gently without heating.
Timing guide
Since different foods heat at different rates of speed, there are several influencing factors that should be
taken into consideration when heating foods with microwave energy.
1. The lower the initial temperature of a food, the longer it will take to heat in a microwave oven.
2. Since with a microwave oven you are heating with time rather than temperature, it is helpful to know
the starting temperatures of the foods. Foods held at room temperature will heat more quickly than
refrigerated foods.
3. The different chemical makeups of foods affect the heating times. Highly salted foods heat faster
than non-cured items. Animal fats heat more quickly than lean parts of meat. Fats in a colloidal state
heat faster than protein (egg yolk cooks before the white).
4. The density of a food is determined by how compact the molecules are arranged within the food. A
pound of roast beef is denser than a pound of bread. Even though they weigh the same, the bread
contains more air and is therefore less dense. Denser foods require longer heating times.
5. The thicker the food, the longer the heating time. If two foods have the same density, the thinner food
will heat before the thicker one.
6. The shape of the food also affects the heating time. Low round foods that are depressed in the center
heat faster than highly mounded scooped foods. This has to do again with the density. The denser
the mass to be heated, the longer the heating time.
7. The more food placed in the oven cavity at one time, the longer the heating time. This is because
there is a constant level of energy coming out of the magnetron tube during the heating process. If
there are several food items in the oven, they will each absorb some of the energy thus making the
total heating time longer. The time required for heating is not directly proportional to the increased
amount of food. The heating time should be increased by about 80% for each additional like food
item.
18
Page 20

Heating and cooking time guide
Quantity Item Comment:
Pastries, Rolls and Baked Goods
2 Biscuit 10 Heat, uncovered, from room temp.
1 Bun 6 Heat, uncovered, from room temp.
1 Danish Pastry 10 Heat, uncovered, from room temp.
1 Dinner, Roll 6 Heat, uncovered, from room temp.
1 Doughnut 6 Heat, uncovered, from room temp.
1 Muffin (small) 6 Heat, uncovered, from room temp.
1 slice Pie 30 Heat, uncovered, from refrig.
1 Sweet Roll 10 Heat, uncovered, from room temp.
Breakfast Items
(230g) French Toast & Bacon 60-70 Heat, uncovered, from refrig.
8 oz.
8 oz.(230g) French Toast & Sausage 60-70 Heat, uncovered, from refrig.
6 oz.(170g) Pancakes & Bacon 40-50 Heat, uncovered, from refrig.
6 oz.(170g) Pancakes & Sausage 40-50 Heat, uncovered, from refrig.
5 oz.(140g) Scrambled Eggs & Bacon 45-55 Heat, covered, from refrig.
5 oz.(140g) Scrambled Eggs & Sausage 45-55 Heat, covered, from refrig.
4 strips Bacon 40-50 Heat, covered, from refrig.
4 links Sausage 40-50 Heat, covered, from refrig.
Sandwiches
(110g - 140g) Bacon & Tomato 20-30 Heat, uncovered, from refrig.
4-5 oz.
4-5 oz.(110g - 140g) Beef Barbecue 20-30 Heat, uncovered, from refrig.
4-5 oz.(110g - 140g) Burger 30-35 Heat, uncovered, from refrig.
4-5 oz.(110g - 140g) Cheeseburger 38-43 Heat, uncovered, from refrig.
4-5 oz.(110g - 140g) Corned Beef 20-30 Heat, uncovered, from refrig.
2 oz.(60g) Frankfurter 29-35 Heat, uncovered, from refrig.
5 oz.(140g) Jumbo Frankfurter 40-45 Heat, uncovered, from refrig.
31/2 oz.(100g) Grilled Cheese 20-30 Heat, uncovered, from refrig.
4 oz.(110g) Ham Sandwich 20-30 Heat, uncovered, from refrig.
4-5 oz.(110g - 140g) Ham & Cheese 20-30 Heat, uncovered, from refrig.
5 oz.(140g) Italian Sausage 30-40 Heat, uncovered, from refrig.
4-5 oz.(110g - 140g) Pastrami 20-30 Heat, uncovered, from refrig.
4 oz.(110g) Roast Beef 20-30 Heat, uncovered, from refrig.
4-5 oz.(110g - 140g) Submarine/Hoagie 20-30 Heat, uncovered, from refrig.
5 oz.(140g) Chili Burger 38-43 Heat, covered, from refrig.
4 oz.(110g) Chili Dog 20-30 Heat, covered, from refrig.
4 oz.(110g) Sloppy Joe 20-30 Heat, covered, from refrig.
Casseroles
(230g) Baked Beans 70-80 Heat, covered, from refrig. Stir.
8 oz.
8 oz.(230g) Beef Burgundy 80-90 Heat, covered, from refrig. Stir.
8 oz.(230g) Beef Goulash 70-80 Heat, covered, from refrig. Stir.
8 oz.(230g) Beef Stew 80-90 Heat, covered, from refrig. Stir.
8 oz.(230g) Beef Slices with Gravy 70-80 Heat, covered, from refrig.
8 oz.(230g) Cabbage Rolls 80-90 Heat, covered, from refrig.
8 oz.(230g) Chicken Fricassee 70-80 Heat, covered, from refrig.
8 oz.(230g) Chicken a la King 60-70 Heat, covered, from refrig. Stir.
8 oz.(230g) Chili Con Carne 70-80 Heat, covered, from refrig. Stir.
8 oz.(230g) Creamed Chicken 70-80 Heat, covered, from refrig. Stir.
8 oz.(230g) Lasagna 85-95 Heat, covered, from refrig.
8 oz.(230g) Meat Loaf 80-90 Heat, covered, from refrig.
8 oz.(230g) Macaroni (beef sauce) 65-75 Heat, covered, from refrig. Stir.
Approximate
Heating Time
100% Power (seconds)
19
Page 21

Heating and Cooking Time Guide Con’t
Quantity Item Comment:
8 oz.
(230g) Macaroni (cheese sauce) 65-75 Heat, covered, from refrig. Stir.
8 oz.(230g) Stuffed Peppers 85-95 Heat, covered, from refrig.
8 oz.(230g) Pot Pie 80-90 Heat, covered, from refrig.
(230g) Ravioli 80-90 Heat, covered, from refrig.
8 oz.
8 oz.
(230g) Shrimp Creole 60-70 Heat, covered, from refrig.
8 oz.(230g) Shrimp Newburg 60-70 Heat, covered, from refrig.
8 oz.(230g) Short Ribs of Beef 80-90 Heat, covered, from refrig.
8 oz.(230g) Spaghetti 60-70 Heat, covered, from refrig.
8 oz.(230g) Stew, Chicken 80-90 Heat, covered, from refrig.
8 oz.(230g) Tuna Casserole 80-90 Heat, covered, from refrig.
8 oz.(230g) Turkey Slices 70-80 Heat, covered, from refrig.
Vegetables
(110g) Asparagus 30-40 Heat, covered, from refrig.
4 oz.
4 oz.(110g) Beans, Green 30-40 Heat, covered, from refrig.
4 oz.(110g) Broccoli 30-40 Heat, covered, from refrig.
4 oz.(110g) Carrot Slices 40-50 Heat, covered, from refrig.
4 oz.(110g) Cauliflower 40-50 Heat, covered, from refrig.
4 oz.(110g) Corn Niblets 30-40 Heat, covered, from refrig.
4 oz.(110g) Mushrooms 20-30 Heat, covered, from refrig.
4 oz.(110g) Peas 20-30 Heat, covered, from refrig.
4 oz.(110g) Potatoes au Gratin 40-50 Heat, covered, from refrig.
8 oz.(230g) Potatoes (pre-baked) 70-80 Heat, uncovered, from refrig.
Approximate
Heating Time
100% Power (seconds)
Quantity Item Comment:
Plated Meals
1 small Plated Meal 11/2 -2 min. Heat, covered, from refrig.
1 large Plated Meal 2-3 min. Heat, covered, from refrig.
Primary Cooking
4 slices Bacon 13/4-2 min. Cook between paper towels.
1 lb.(450g) Bacon
(precook to reheat) 5 min. Cook between paper towels.
2 Scrambled Eggs 50-60 sec. Stir during cooking.
12 Scrambled Eggs 41/2 -5 min. Stir during cooking.
(precook to reheat)
1 ear Corn on the Cob 11/2 -2 min.
1 medium Potato 4 min. Wash, dry, prick.
2 medium Potatoes 71/4 min. Wash, dry, prick.
40 oz.(1130g) Frozen Broccoli
Pieces 11 min. Rearrange during cooking.
24 oz.(680g) Frozen Broccoli
Spears 6 min. Rearrange during cooking.
96 oz.(2720g) Refrigerated
Lasagna 30 min. at 50 % Cover with lid for first half of
Approximate
Heating Time
100% Power
Cover, turn over during cooking.
cooking time. Uncover for
second half of cooking time.
After cooking, allow to stand,
covered, for least 5 minutes
to make cutting and serving
easier.
20
Page 22

REMINDERS
1. Do not operate the oven empty. Either food or water should always be in the oven during operation
to absorb microwave energy.
2. Limit use of metal to those specific examples given in this booklet. Generally, metal should not be used
in the microwave oven during operation.
3. Do not heat eggs in the shell. Pressure will build up inside the shell and it will explode. Do not reheat
cooked eggs unless they are scrambled or chopped. Puncture the yolk before heating eggs.
4. Do not heat oil or fat for deep fat frying.
5. Pierce the “skin” of potatoes, whole squash, apples or any fruit, vegetable or meat with a skin covering
before heating.
6. Use only popcorn packaged in special microwavable packages. Pop using 100% power. Listen
carefully when popping corn. When popping slows to one or two seconds between pops, remove from
oven. Should you ever smell scorching, remove bag from oven immediately. If any unpopped kernels
remain, do not try to re-pop; it may cause a fire.
7. Do not use paper towels, plates or other utensils made from recycled paper for microwave heating.
Recycled paper products may contain certain impurities which could cause the paper to ignite during
microwave heating.
8. Stir liquids briskly before heating and allow to stand at least for 20 seconds after heating before stirring
or drinking to avoid eruption.
SPECIFICATIONS
AC Line Voltage
AC Power Required
Plug Configuration
Output Power
Frequency
Outside Dimensions
Cavity Dimensions
Weight
★ IEC Test Procedure
201/8"(W) x 181/2"(D) x 131/4"(H)
510mm(W) x 470mm(D) x 335mm(H)
330mm(W) x 330mm(D) x 180mm(H)
Single phase
120V, 60Hz,
A.C. only
1.95kW
17.0A
NEMA 5-20
1200W
2450 MHz
(including feet)
13"(W) x 13"(D) x 7
Approx. 60 lbs/27 kg
★
1
/8"(H)
The International Electrotechnical Commission’s standardized method for measuring output wattage.
This test method is widely recognized.
In Compliance with Standards set by
FCC – Federal Communications Commission Authorized.
DHHS – Complies with Department of Health and Human Services (DHHS) rule, CFR,
Title 21 Chapter I, Subchapter J.
– This symbol on the nameplate means the product is certified by NSF International (NSF-4).
®
This symbol on the nameplate means the product is listed by Underwriters Laboratories, Inc.
–
for both the UL and CSA (Canadian Standard Association) standards.
Health Canada – Complies with Health Canada, Radiation Emitting Device Regulation for microwave
oven.
21
Page 23

NOTES
22
Page 24

CONVERSION CHART
Kilograms
kg = lbs kg = lbs kg = lbs
0.25 0.6 2.65 5.8 5.00 11.0
0.35 0.8 2.75 6.0 5.10 11.2
0.50 1.1 2.90 6.4 5.25 11.5
0.65 1.4 3.00 6.6 5.35 11.8
0.75 1.7 3.10 6.8 5.50 12.1
0.90 2.0 3.25 7.1 5.65 12.5
1.00 2.2 3.35 7.4 5.75 12.7
1.10 2.4 3.50 7.7 5.90 13.0
1.25 2.8 3.65 8.0 6.00 13.2
1.35 3.0 3.75 8.3 6.10 13.4
1.50 3.3 3.90 8.6 6.25 13.8
1.65 3.6 4.00 8.8 6.35 14.0
1.75 3.9 4.10 9.0 6.50 14.3
1.90 4.2 4.25 9.4 6.65 14.7
2.00 4.4 4.35 9.6 6.75 14.9
2.10 4.6 4.50 9.9 6.90 15.2
2.25 5.0 4.65 10.3 7.00 15.4
2.35 5.2 4.75 10.5 7.10 15.7
2.50 5.5 4.90 10.8 7.20 15.9
Pounds (1 kg = 2.2 lbs)
°F
°C
°F=°C °F= °C ° F= °C
100 40 160 71 250 120
110 43 165 74 275 135
120 49 170 77 300 150
130 54 175 79 325 165
135 57 180 82 350 175
140 60 185 85 375 190
145 63 190 88 400 205
150 65 200 93 425 220
155 68 225 107 450 230
23
Page 25

AUTO-TOUCH GUIDE
EXPRESS
DEFROST
SET
For more complete information and safety precautions, refer to your Operation Manual.
MEMORY CHECK
Suppose you want to know
the information programmed
into the memory.
COUNTER CHECK
1. Touch CHECK pad 2
times.
CHECK
X 2
1. Touch CHECK pad.
2. Touch NUMBER
pad
.
1
MULTIPLE SEQUENCE
COOKING
Suppose you want to cook for
4 minutes at 60% and then
continue to cook for 2 minutes at 30%.
1. Enter cooking time for
1st stage.
2. Enter power level for 1st
stage.
3. Enter cooking time for
2nd stage.
4. Enter power level for 2nd
stage.
5. Touch START pad.
CHECK
1
SELECTATIME
4
00
SELECTAPOWER
6
SELECTATIME
2
00
SELECTAPOWER
3
START
Total count will be displayed.
To check each counter, touch each pad as indicated
below, after step 1 above.
Count of memory
Count of manual cooking
Count of EXPRESS DEFROST
To clear the number of times:
Suppose you want to clear
the times of memory 1.
1. Touch CHECK pad 2
times.
2. Touch NUMBER pad
3. Touch SET pad.
Any count can be canceled
by touching the SET pad
during the checking mode.
, etc.
1
.
1
1
SELECTATIME
CHECK
1
X 2
24
Page 26

AUTO-TOUCH GUIDE
3
30
EXPRESS
DEFROST
2
30
For more complete information and safety precautions, refer to your Operation Manual.
COOK WITH MEMORY
Suppose you want to cook by
using memory
1. Touch number pad
If you want to use memory
11-20, touch desired
number pad twice within 1
second.
1
COOKING DOUBLE
QUANTITY WITH
MEMORY
Suppose you want to cook 2
servings by memory 1.
1. Place food in oven.
Touch Double Quantity
pad.
2. Touch number pad
1
MEMORY PROGRAM
ENTRY
Suppose you want to set 4
minutes at 60% for the 1st
stage for 1 serving in the
memory 1.
1. Touch SET pad 2 times
within 2 seconds.
2. Touch number pad
3. Enter cooking time.
4. Enter power level.
5. Touch SET pad 2 times.
1
TIME COOKING
Suppose you want to cook
for 2 minutes and 30 seconds at 50%.
.
1
1. Touch SELECTATIME
2. Enter cooking time.
3. Touch
SELECTAPOWER
4. Enter power level.
SELECTATIME
SELECTAPOWER
5
DOUBLE
QUANTITY
5. Touch START pad.
EXPRESS DEFROST
.
.
1
SET
1
SELECTATIME
4
00
SELECTAPOWER
6
SET
X 2
X 2
Suppose you want to defrost
for 3 minutes and 30 seconds.
1. Touch EXPRESS
DEFROST pad.
2. Enter desired defrost
time.
(Refer to Express Defrost
Chart on page 12.)
3. Touch START pad.
4. Midway through the
defrosting cycle, CHECK
will light in the display
and an audible signal
will be heard.
You may open the door,
turn food over and shield
any warm portions Close
the door.
5. Touch START pad.
START
START
START
25
 Loading...