

Page 1
COLOUR TELEVISION
MODEL
CX51LTXZ
OPERATION MANUAL
Please read this operation manual
carefully before using the colour
television
Page 2
Contents
Page
Safety Precautions................................................ ‰ 1
Accessories ........................................................... ‰ 2
Antenna Connection ............................................. ‰ 2
Location of Controls.............................................. ‰ 3
Basic Operation .................................................... ‰ 5
Language Selection .............................................. ‰ 7
Presetting the Channels (MANUAL) .................... ‰ 8
Presetting the Channels (AUTO) ......................... ‰ 9
Channel Settings .................................................. ‰ 10
Selecting the Menu Items..................................... ‰11
Picture Adjustment ............................................... ‰ 13
Feature Adjustment .............................................. ‰14
• OFF Timer
• ON Timer
• Reminder
• Blue Back
Other Functions ................................................... ‰ 18
• Favourite Channels
• z Flashback
• u Sound Mute
∫ Call
•
• TV/Video, Video 1 and Video 2
TELETEXT Broadcasts ....................................... ‰ 20
Video Equipment Connections............................ ‰ 21
Troubleshooting.................................................... ‰ 22
Specifications ....................................................... ‰ 23
Page
Dear Sharp Customer
Thank you for buying SHARP Colour Television Receiver. To ensure proper operation, please read this
manual carefully. After reading, keep this manual in a safe place for future reference.
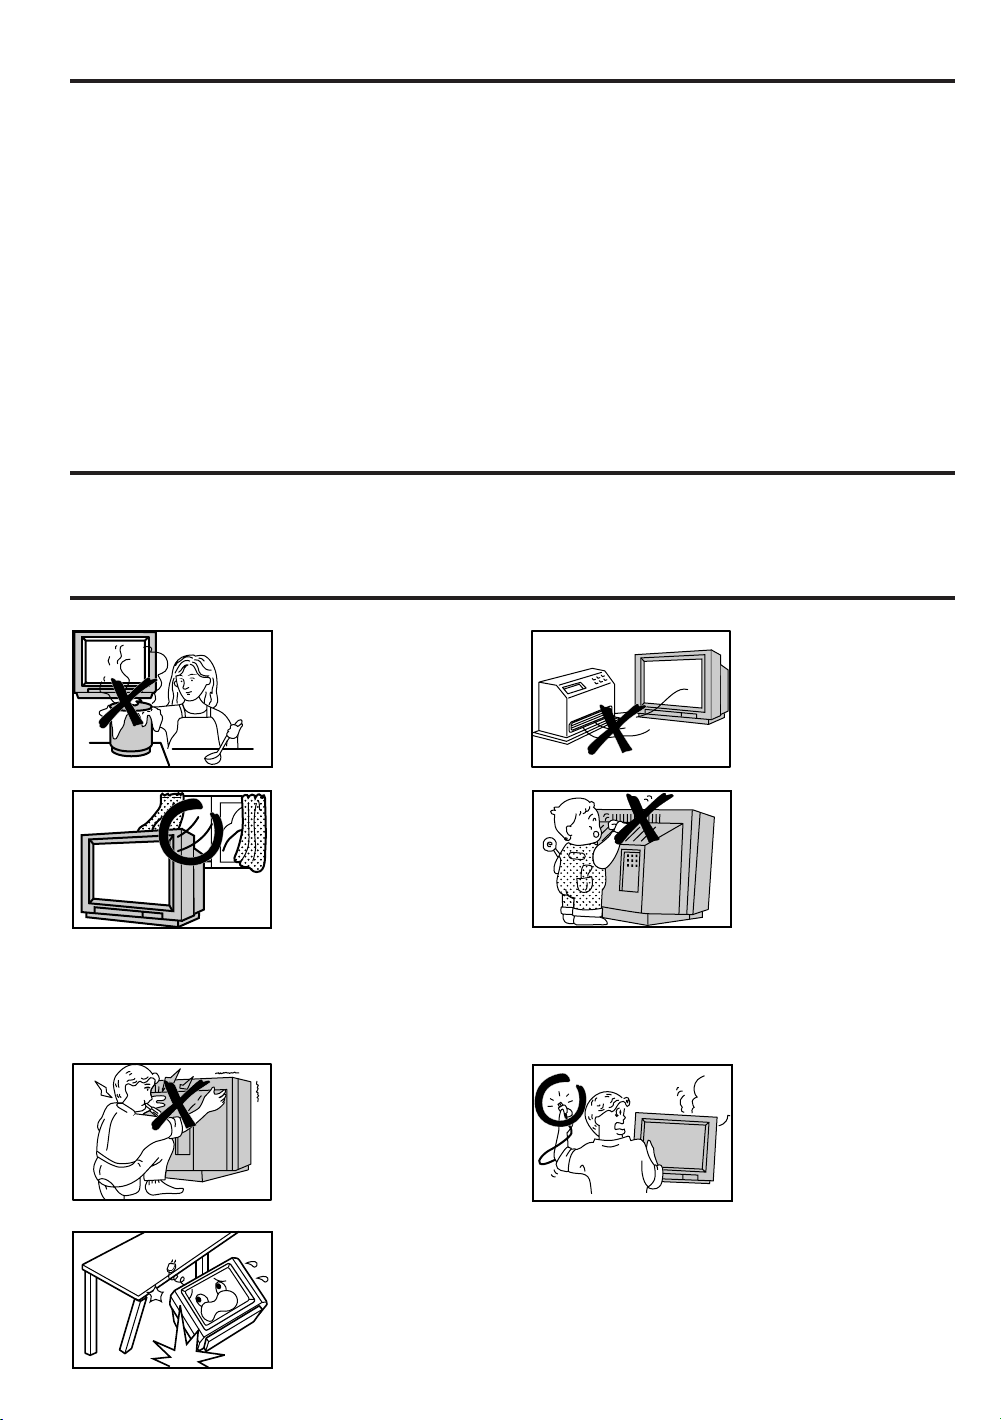
Safety Precautions
To prevent fire or electrical
shock, do not use the TV
set in an excessively
damp place.
Position the TV set out of
direct sunlight and away
from heat, as high
temperatures can damage
the cabinet, CRT, or other
electronic parts.
Do not cover the
ventilation holes at the
back of the TV set, this
can cause fire or other
serious problems. Leave
an adequate open space
behind the TV set for good
ventilation.
Do not place this set in
confined spaces, such as
a bookshelf or built-in
case.
Never remove the back of
the cabinet, as there is
high voltage inside the TV
set.
Do not place this television equipment on an unstable cart, stand or table. The
television equipment may fall, causing serious injury to a child or an adult and
serious damage to the equipment.
Use only with a cart or stand recommended by the manufacturer, or sold with the
television equipment.
Never insert or drop any
metallic or inflammable
objects into the ventilation
holes of the TV set, this
can cause fire, electrical
shock, or electrical failure.
Do not place a flower vase
or anything else containing
liquid on the TV set, as
liquid spilt on the TV set
can cause serious
problems.
Unplug the power cord
from the wall outlet
immediately if the TV set
begins to make unusual
noises or give off smoke or
an odd smell, then call our
service centre for service.
‰ 1
Page 3
Safety Precautions (continued)
Television equipment and cart
combination should be moved
with care. Quick stops,
excessive force, and uneven
surfaces may cause the
equipment and cart
combination to overturn.
Do place the TV set onto an
even stand, table or track
which size is bigger than the
TV set.
If the TV set is put onto a
smaller size or uneven stand,
table or track may cause the
TV cabinet distort.
Do not put or insert anything
between TV set and the stand,
table or track.
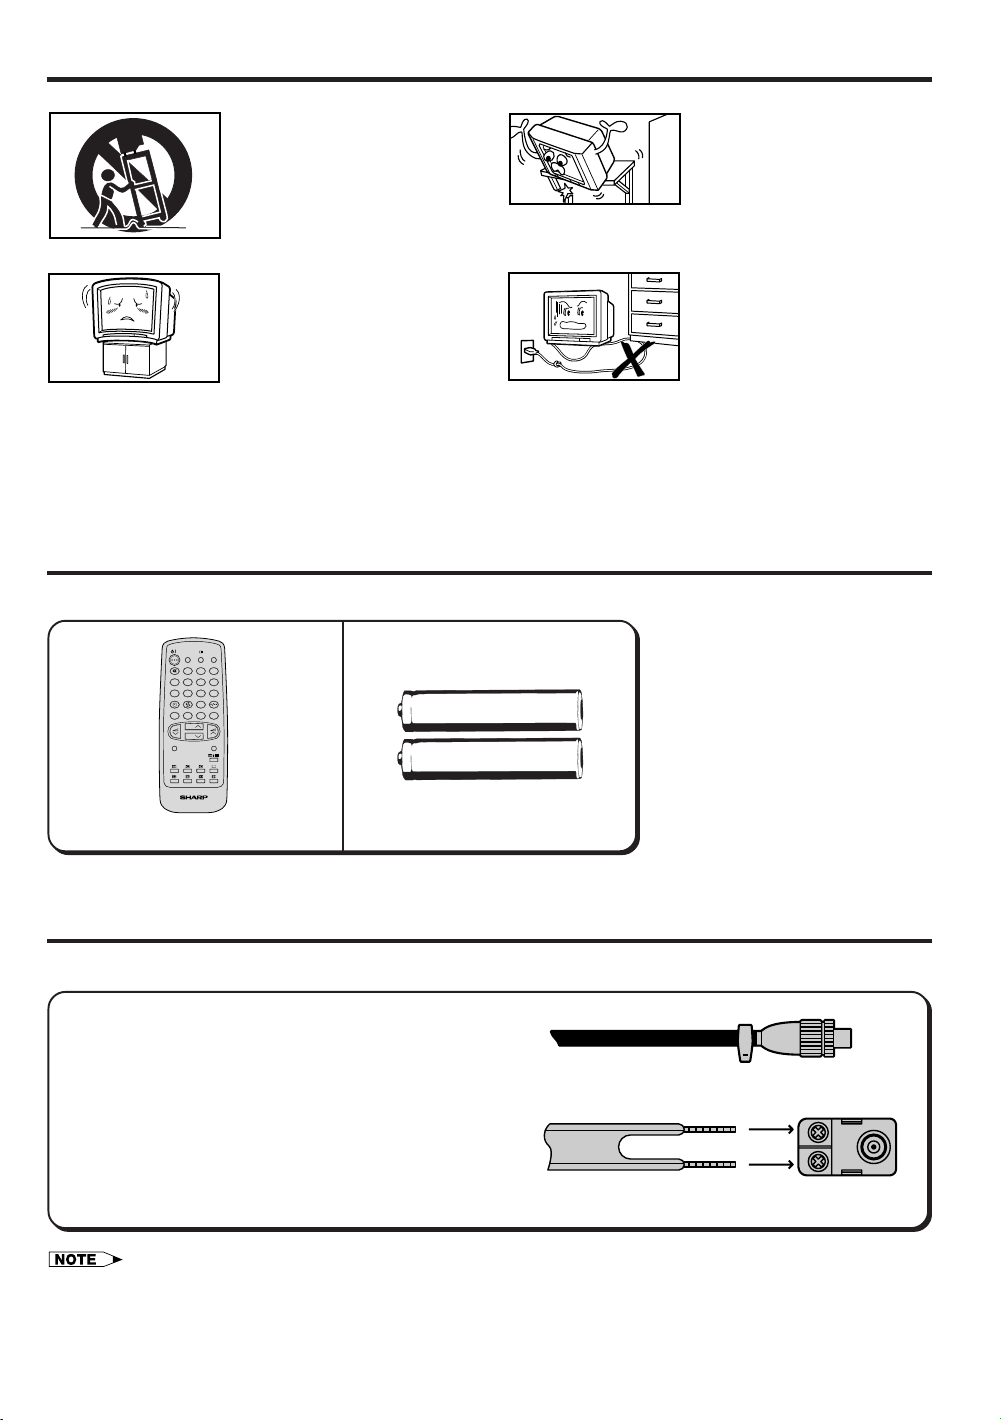
Accessories
After unpacking, check to make sure that the following accessories are included:
LANGUAGE
TV/VIDEO
12
3
VIDEO 1
456
VIDEO 2
7809
A
BCD
CH
CH
NORMAL
MENU
Wall or shelf mounting should
follow the manufacturer’s
instructions, and should use a
mounting kit approved by the
manufacturer.
To prevent electrical shock, do
not subject the AC power cord
to damage by bending or
twisting it, or by placing heavy
items on top of it and do not
place the AC power cord
under the TV set. If the AC
power cord becomes
damaged, unplug it from the
wall outlet immediately and
call your dealer for service.
TV/TEXT
Remote control Size-AA dry batteries
Antenna Connection
• The following is a brief explanation of the types of connection that are used for coaxial cables:
(1) If your outdoor antenna uses a 75-ohm coaxial
cable, then the connection to the TV is via
DIN45325 plug (shown at right). Plug this into
the antenna jack at the rear of the TV set.
(2) If your outdoor antenna uses a 300-ohm
twin-lead flat feeder, change this for a 300-ohm
to 75-ohm impedance converter and plug it into
the antenna jack at the rear of the TV set.
• Remove the power cord from the electrical outlet before connecting the antenna to the rear of the TV set.
75-ohm coaxial cable (round cable)
300-ohm twin-lead feeder
‰ 2
Page 4
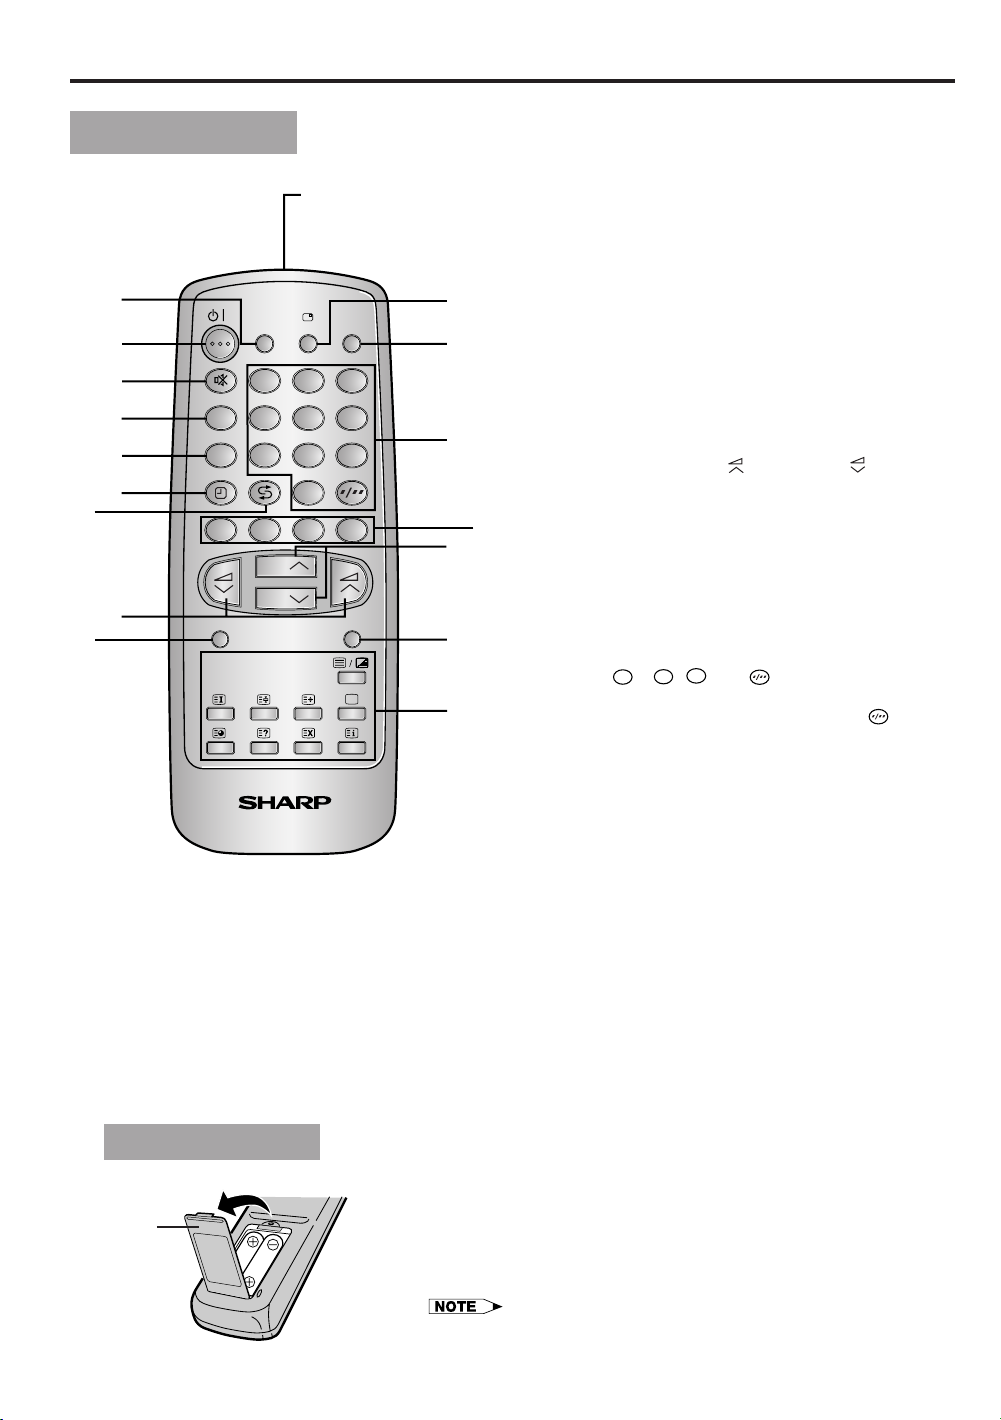
Location of Controls
Remote Control
&
(
!
@
#
$
%
^
*
VIDEO 1
VIDEO 2
A
NORMAL
Infrared Transmitter Window
• Aim this window at the
infrared sensor window on
your TV set.
LANGUAGE
TV/VIDEO
12
456
7809
BCD
CH
CH
MENU
TV/TEXT
! LANGUAGE button
@ STANDBY/ON (ø) button
# SOUND MUTE (u) button
• Press → Mutes sound.
• Press again → Restores sound to
)
Q
3
previous level.
$ VIDEO 1 button
% VIDEO 2 button
^ TIMER button
• For directly enter to OFF TIMER,
ON TIMER and REMINDER.
& FLASHBACK (z) button
W
• Returns to previously viewed channel.
* VOLUME UP (
) or DOWN ( ) button
• Used to adjust the volume.
• These buttons are also used for MENU
E
R
set up.
( NORMAL button
) CALL (
∫) button
• Displays the channel and timer settings
on the screen.
T
Q TV/VIDEO Select button
W CHANNEL SELECT buttons
1
- 9, 0 and button)
(
Y
• These buttons are also used to operate
TELETEXT functions. (except
button)
E COLOUR buttons
• These buttons are used to operate
TELETEXT functions. (see page 20)
• Favourite channels. (see page 18)
R CHANNEL UP (CH
∑) or
DOWN (CH≈) button
• Used to select the CHANNEL.
• These buttons are also used for MENU
set up.
T MENU button
• Used to call the MENU screen.
Y TELETEXT Control buttons
• These buttons are used to operate
TELETEXT functions. (see page 20)
Ë Installing dry batteries in the remote control unit
When using the TV set for the first time, install the supplied dry batteries in the remote control.
Inserting Batteries
Pull up
‰ 3
! With your thumbnail, pull up the slit as indicated by the
arrow to remove the back cover.
@ Insert two batteries (size “AA”). Be sure to match the
battery j/k terminals with the j/k marks inside the
compartment.
# Put back the battery cover.
• Remove batteries if weak or if the unit is not in use for long periods.
• Do not mix old and new batteries.
• Incorrect installation of the batteries may damage the remote control.
Page 5
Location of Controls (continued)
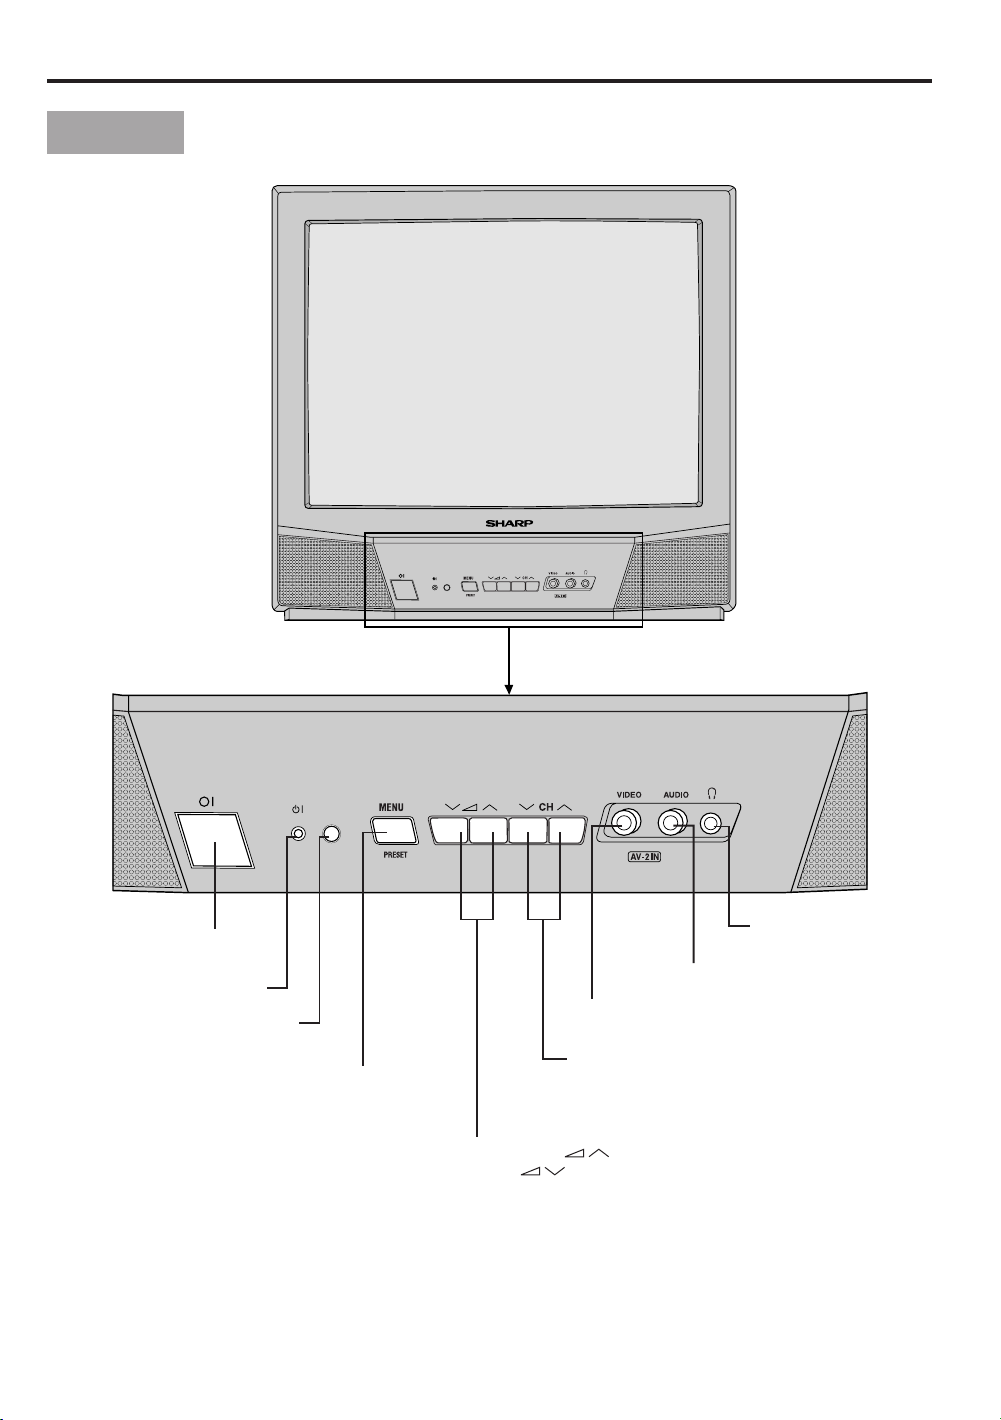
TV Front
POWER (Ø) switch
POWER (ø) indicator
Infrared sensor window
MENU/PRESET button
AUDIO INPUT terminal (AV-2)
VIDEO INPUT terminal (AV-2)
CHANNEL UP (CH∑) or
DOWN (CH≈) button
(These are also used to make adjustments
in PRESET mode.)
VOLUME UP ( ) or
DOWN ( ) button
(These are also used to make adjustments
in PRESET mode.)
HEADPHONE jack
Headphone Jack
• Select an appropriate volume so as not to injure your hearing.
• To avoid injure your hearing, do not put on the headphone on your ear before plug in the headphone to the
headphone jack and before the power is turn on.
• Take out the headphone from your ear before unplug the headphone from headphone jack and before the power is
turn off.
• The proper impedance for the headphone is 32 ohms.
• Remove the headphone plug from the jack when not using the headphone.
‰ 4
Page 6
Basic Operation
PAL
B/G
1
STANDBY/ON
(ø) button
LANGUAGE
VIDEO 1
VIDEO 2
A
NORMAL
TV/VIDEO
12
3
456
7809
BCD
CH
CH
MENU
TV/TEXT
POWER (Ø) switch
POWER (ø) indicator
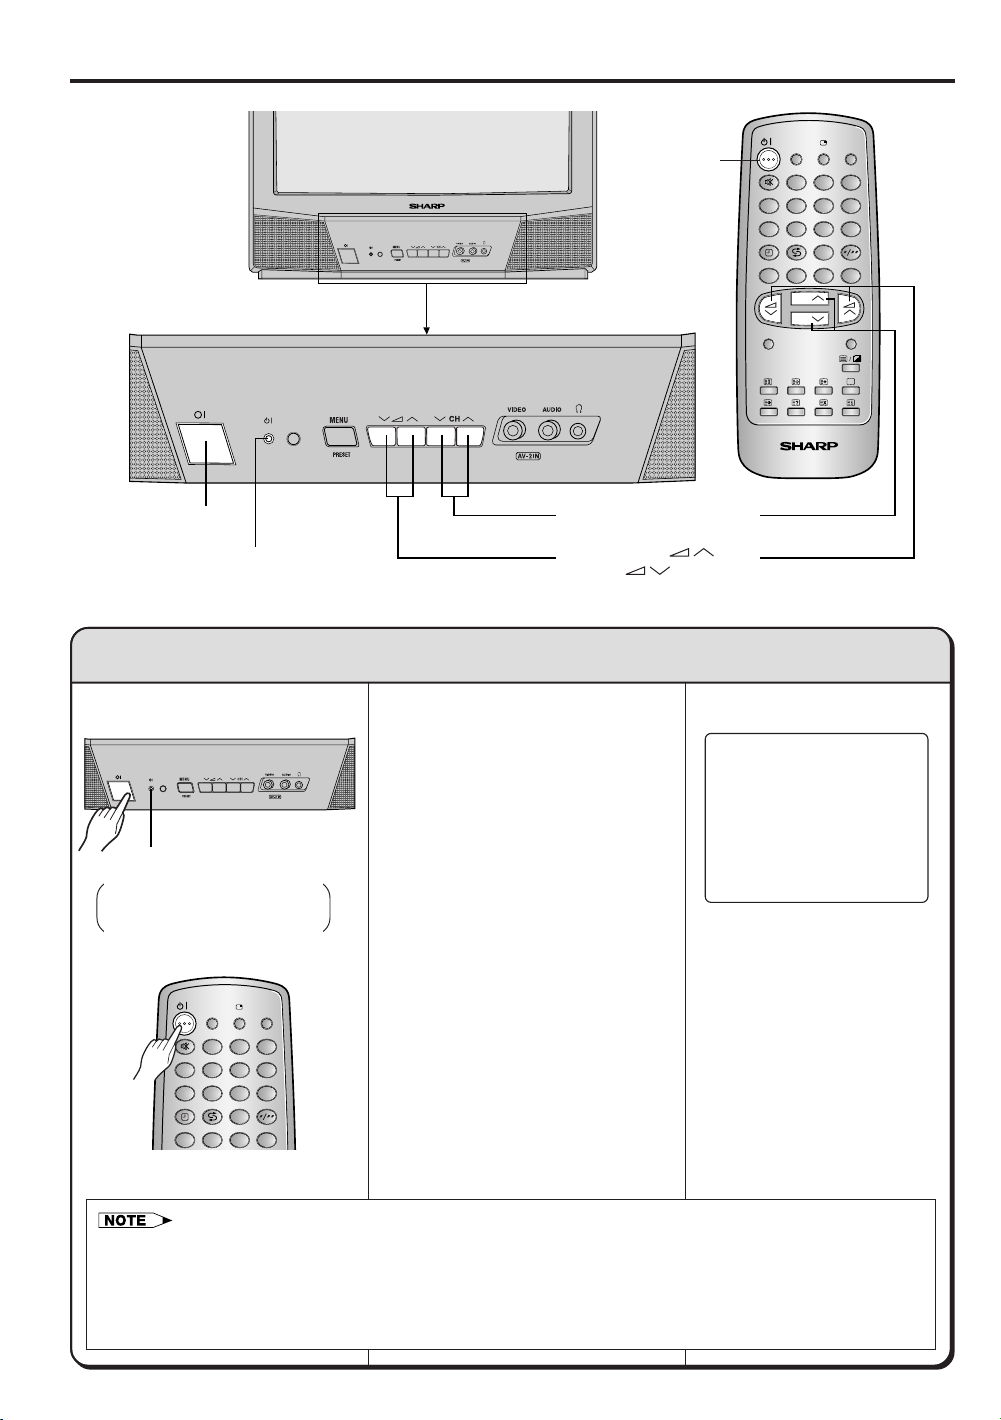
(1) Turn On the Power
(TV set)
POWER (ø) indicator
Green : A picture appears
Red : Standby mode
LANGUAGE
TV/VIDEO
12
VIDEO 1
VIDEO 2
3
456
7809
CHANNEL UP (CH∑) or
DOWN (CH≈) button
VOLUME UP ( ) or
DOWN ( ) button
! Press the POWER (Ø) switch
on the TV set to turn the TV set
ON. The POWER (ø) indicator
lights up in red.
@ Press the STANDBY/ON (ø)
button on the remote control or
either the CHANNEL UP
∑) or DOWN (CH≈)
(CH
button on the TV set. The
POWER (ø) indicator changes
from red to green and a picture
appears on the screen.
(On-screen display)
A
BCD
• Due to factory setting, when the first time you press the POWER (Ø) switch on the TV set , a picture appears
and the POWER (ø) indicator lights up green.
• The STANDBY/ON (ø) button on the remote control lets you switch between ON and Standby mode when
the main power is ON.
• If you will not be at home for a considerable length of time, as a safety precaution, turn off the main power by
pressing the POWER (Ø) switch on the TV set and unplug the cord from the outlet.
‰ 5
Page 7
Basic Operation (continued)
PAL
B/G
5
VOLUME 15
(2) Changing the Channels
Changing channels with the CHANNEL UP (CH∑) or DOWN (CH≈) button on the remote control
Press the CHANNEL UP (CH∑) button and the channels change in the order shown below:
1 → 2 → 3 → … → 98 → 99 → 0 → 1 → 2 → 3 → …
Press the CHANNEL DOWN (CH≈) button and the channels change in the order shown below:
3 → 2 → 1 → 0 → 99 → 98 → … → 3 → 2 → 1 → …
• When selecting the channel using the CHANNEL UP (CH∑) or DOWN (CH≈) button on the TV set, AV
mode is positioned as follows:
Channel up: 1 → 2 → 3 → . . . → 98 → 99 → AV1 → AV2 → 0 → 1 → 2 → 3 → . . .
Channel down: 3 → 2 → 1 → 0 → AV2 → AV 1 → 99 → 98 → . . . → 3 → 2 → 1 → . . .
• Skipped channels will not be displayed when selecting the channel using the CHANNEL UP (CH∑) or
DOWN (CH≈) button.
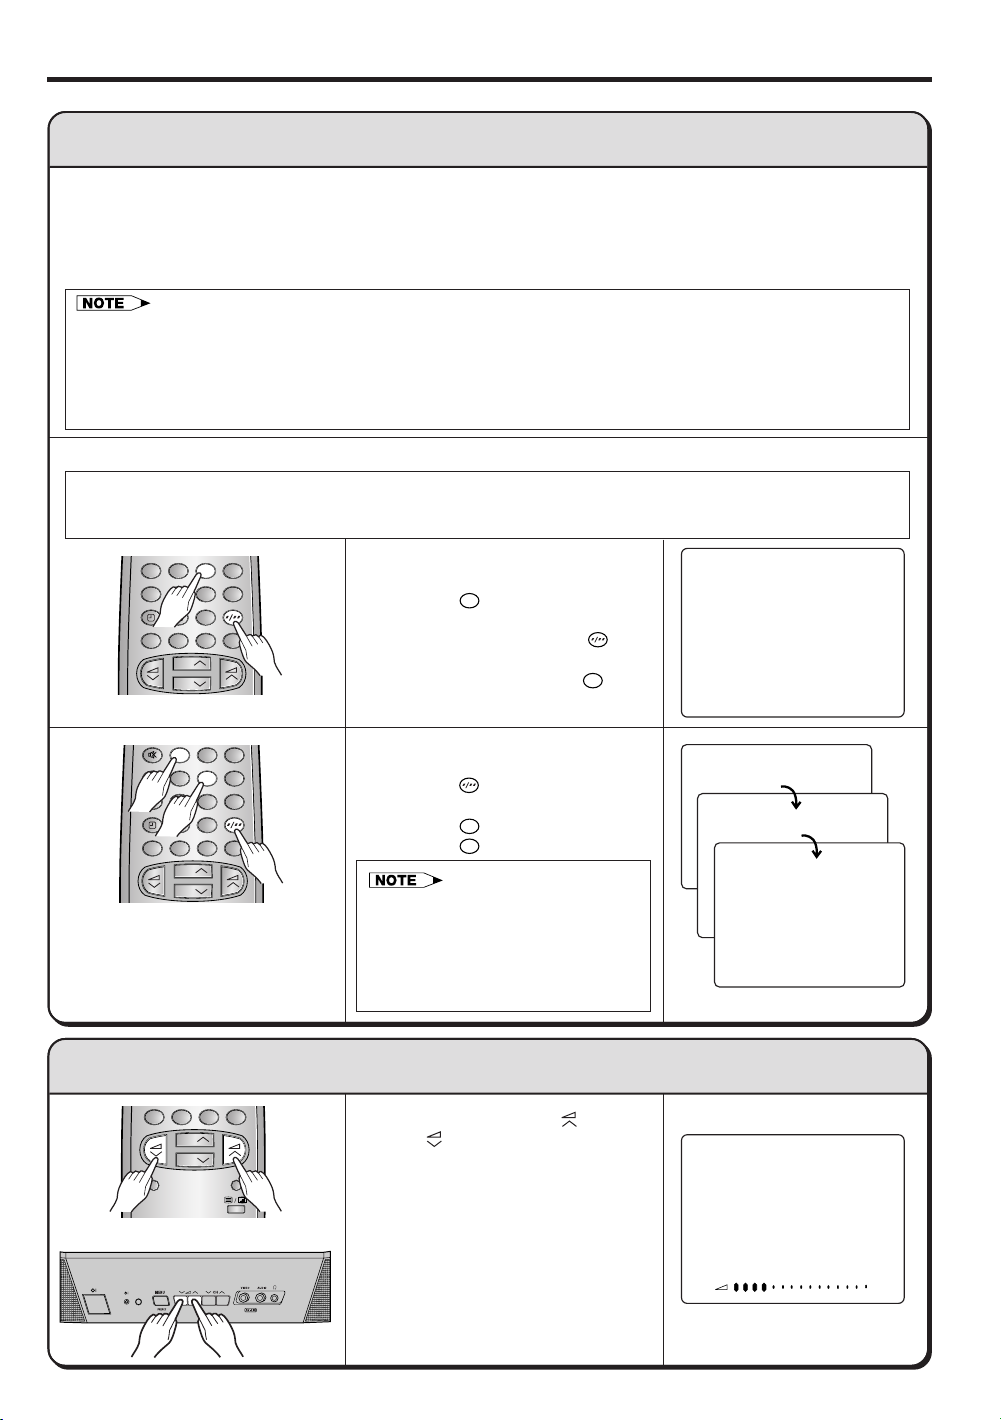
Changing channels using the CHANNEL SELECT buttons on the remote control
• To handle the increasing number of channels available, this TV set allows you to select up to 100
positions (Channels 0 to 99). One-digit and two-digit methods of selection can be used. Follow
the procedure shown below to select channels.
VIDEO 1
456
VIDEO 2
7809
A
BCD
CH
CH
To select a one-digit channel (e.g.,
Channel 5):
(1) Press the 5 button.
(2) If “5-” is indicated and the picture
does not change, press the
button to switch over to the 1-digit
select mode and press the 5 button
again.
12
VIDEO 1
VIDEO 2
A
3
456
7809
BCD
CH
CH
(3) Adjusting the Volume
A
BCD
CH
CH
NORMAL
MENU
(TV set)
To select a two-digit channel (e.g.,
Channel 15):
(1) Press the button to set the 2-digit
select mode.
(2) Press the 1 button.
(3) Press the 5 button.
• In this mode entering a 0 first will
enable selection of single digit
channels e.g. 07.
• Complete this procedure within 5
seconds, otherwise the selection
will not be made.
Press the VOLUME UP ( ) or
DOWN (
) button to adjust the
volume.
The number of oval blocks “ô”
indicates volume level.
The display disappears
approximately 3 seconds after the
volume adjustment has been
completed.
PAL
B/G
--
1-
15
‰ 6
Page 8

Language Selection
ENGLISH
FRANCAIS
BAHASA MELAYU
ENGLISH
SELECT:≈CH∑ RETURN:MENU
FRANCAIS
BAHASA MELAYU
AUTO(B/G)
VHF 1
48.25MHz
On-Screen Display language selection
LANGUAGE
VIDEO 1
VIDEO 2
A
NORMAL
TV/VIDEO
12
3
456
7809
BCD
CH
CH
MENU
TV/TEXT
(TV set)
!
@
6-LANGUAGE ON-SCREEN
DISPLAY
䡵 The language for this unit’s
On-Screen Display can be set
to ENGLISH, RUSSIAN,
CHINESE, ARABIC, FRENCH
or MALAY.
䡵 Setting the On-Screen Display
language
! Press the LANGUAGE button
on the remote control. The
LANGUAGE select mode
screen appears.
@ Press the CHANNEL UP
∑) or DOWN (CH≈)
(CH
button to select the language
you wish to display. The
selected language will be
highlighted in yellow.
# Wait for approximately 5
seconds to return to the normal
screen.
• Press LANGUAGE button can also
select the language you wish.
The MENU/PRESET button on the
TV set can also be used to select
the language.
(LANGUAGE screen)
!,@,$#
LANGUAGE
TV/VIDEO
12
VIDEO 1
456
VIDEO 2
7809
A
BCD
CH
CH
NORMAL
• The PRESET mode changes in the following order by pressing the MENU/PRESET button on the TV set.
‰ 7
MENU
! Press the MENU/PRESET
button on the TV set for more
than two seconds to display the
PRESET mode screen.
@ Press the MENU/PRESET
button until the LANGUAGE
select mode screen appears.
3
∑) or DOWN (CH≈)
(CH
# Press the CHANNEL UP
(LANGUAGE screen)
button to select the language
you wish to display.
$ Press the MENU/PRESET
#
LANGUAGEAUTO MANUAL
button to return to the normal
screen.
• Press LANGUAGE button can also
select the language you wish.
NORMAL SCREEN
Page 9
Presetting the Channels (MANUAL)
MANUAL(B/G)
VHF 5
48.25MHz
MANUAL(B/G)
VHF 1
48.25MHz
AUTO(B/G)
VHF 1
48.25MHz
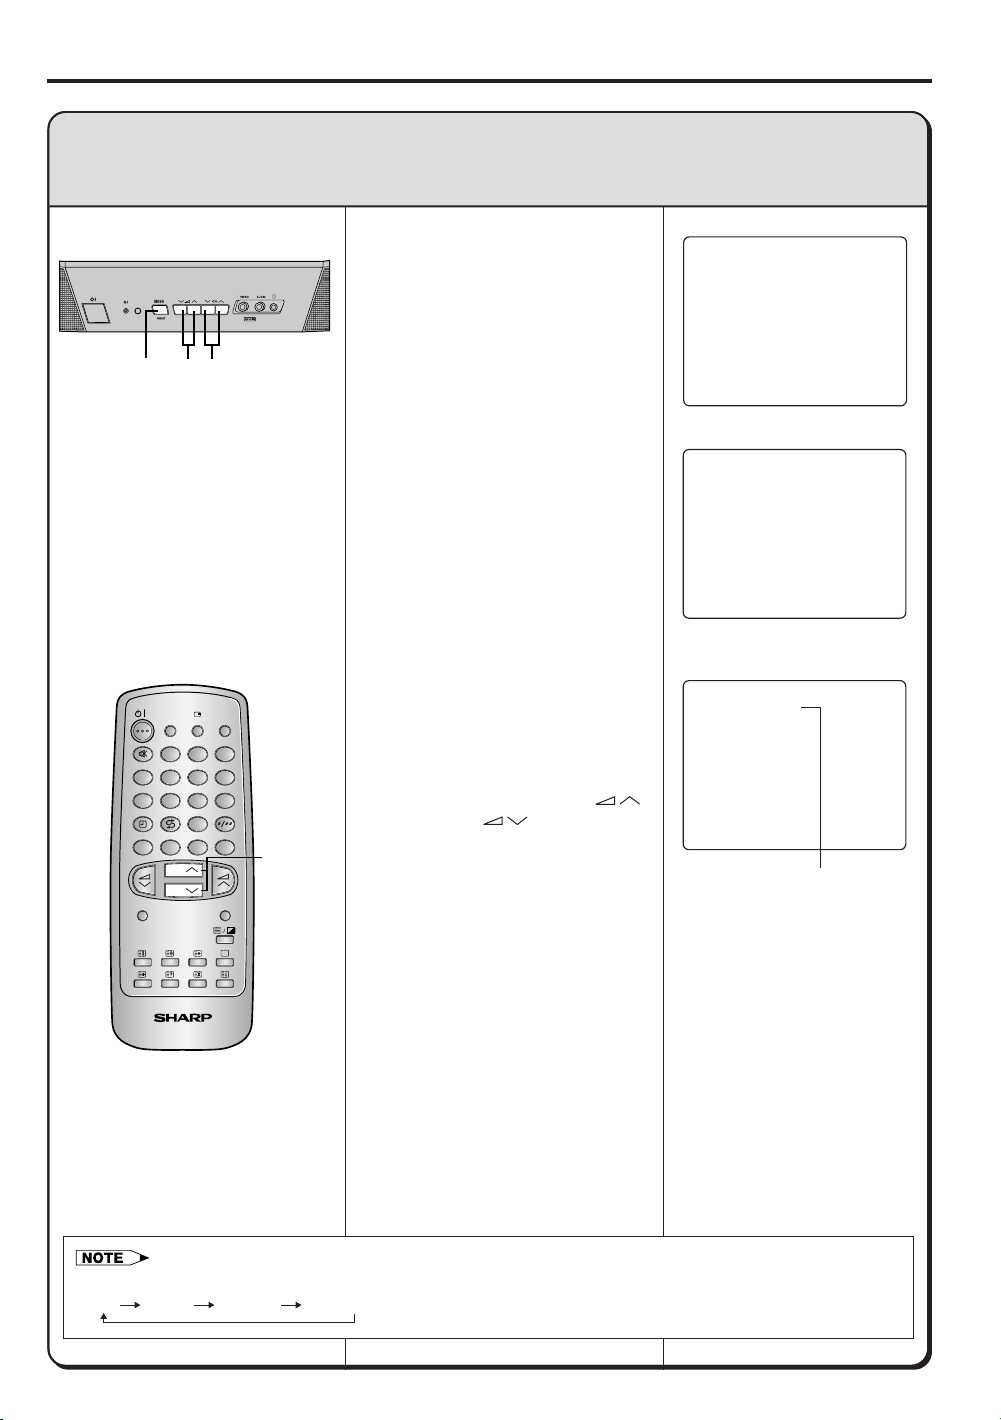
Manual Channel Preset (MANUAL):
Tuning in one or more channels. (e.g. tuning the TV to a VCR, tuning in an additional
TV station.)
(TV set)
!,@,^#$
LANGUAGE
12
VIDEO 1
456
VIDEO 2
7809
A
BCD
CH
CH
NORMAL
TV/VIDEO
3
MENU
#
! Press the MENU/PRESET
button on the TV set for more
than 2 seconds. The AUTO
mode screen appears.
@ Press the MENU/PRESET
button again to display the
MANUAL mode screen.
# Select the desired channel
position or preset number using
the CHANNEL UP (CH
∑) or
DOWN (CH≈) button. (e.g.
channel 5)
$ Press the VOLUME UP (
or DOWN (
) button on the
TV set to start searching for the
TV station you want to preset.
Search is initiated and when a
TV signal is received during the
search, the search stops.
Repeat this process until the
desired channel is found.
)
Channel position number
% Repeat steps 3 and 4 above to
TV/TEXT
preset the channel positions for
other broadcasts.
^ Press the MENU/PRESET
button until the normal screen
appears.
• The PRESET mode changes in the following order by pressing the MENU/PRESET button on the TV set.
LANGUAGEAUTO MANUAL
NORMAL SCREEN
‰ 8
Page 10

Presetting the Channels (AUTO)
PAL
B/G
1
AUTO(B/G)
VHF 1
48.25MHz
Full Auto Channel Preset (AUTO):
Automatically tunes in and presets all receivable TV stations, using consecutive
channel numbers.
(TV set)
!@
! Press the MENU/PRESET
button on the TV set for more
than 2 seconds. The AUTO
mode screen appears.
@ Press the VOLUME UP (
or DOWN (
) button on the
TV set.
All the TV stations in your area
that can be received by the TV
set are automatically preset
between channels 1 to 99. (This
process may take a few minutes
to complete.)
# The screen shows whatever is
on channel 1 when full auto
channel preset is finished.
)
• AUTO PRESET stores all receivable channels including those which may be very weak and not clearly visible.
To preset only those channels designated for the local viewing region, use MANUAL PRESET. (see page 8)
• The PRESET mode changes in the following order by pressing the MENU/PRESET button on the TV set.
‰ 9
• Unused channels are automatically
skipped.
LANGUAGEAUTO MANUAL
NORMAL SCREEN
Page 11

Channel Settings
MENU
PICTURE
FEATURE
CH-SETTING
SELECT:≈CH∑ ENTER:
≈¬∑
RETURN:MENU
CH-SETTING
POSITION CH 8
COLOUR-SYSTEM AUTO
SKIP OFF
FINE 123.45MHz
SELECT:≈CH∑ ADJUST:
≈¬∑
RETURN:MENU
CH-SETTING
POSITION AV1
COLOUR-SYSTEM AUTO
SELECT:≈CH∑ ADJUST:
≈¬∑
RETURN:MENU
Channel settings:
Picture system setting for each channel.
VIDEO 1
VIDEO 2
A
NORMAL
@,$
LANGUAGE
12
456
7809
BCD
CH
CH
TV/VIDEO
3
MENU
!,^
#,%
! Press the MENU button to call
the MENU screen.
@ Press the CHANNEL UP
∑) or DOWN (CH≈)
(CH
button to select
“CH-SETTING”.
# Press the VOLUME UP (
DOWN (
) button to display
) or
the CH-SETTING menu.
$ Press the CHANNEL UP
∑) or DOWN (CH≈)
(CH
button to select the desired
function mode.
% Press the VOLUME UP (
DOWN (
) button to adjust
) or
function settings:
• POSITION:
The channel position changes to the
upper or lower number.
• COLOUR-SYSTEM:
The mode changes in the following
order:
AUTO ↔ PAL (see note below)
• SKIP:
When skip is set to ON, that channel
can no longer be selected with the
CHANNEL UP (CH∑) or DOWN
(CH≈) button – only with the
numeric buttons on the remote control.
The mode changes in the following
order:
Channel numbers with a red dot on the
left are set to SKIP. To turn off SKIP,
press the CHANNEL SELECT buttons
to select the desired channel, and then
set the SKIP mode on the CHSETTING menu to “OFF”.
• FINE:
The frequency changes to allow fine
tuning.
ON ↔ OFF
^ Press the MENU button until
the normal screen appears.
(MENU screen)
(CH-SETTING menu)
• Switching COLOUR system
Set the system to AUTO for normal TV reception. The AUTO mode automatically detects the receiving signal
system and changes the reception system of the TV set. When the picture is not stable, switching to an
appropriate system may improve the picture quality.
• When using FINE tuning, the channel number changes from green to yellow.
• To return the channel to its original frequency setting, follow the manual channel preset procedure. (Please
see page 8 “Manual Channel Preset (MANUAL)” for details.)
• When you select the channel
position AV1 or AV2, the
CH-SETTING menu changes as
shown on the right, and the colour
mode changes in the following order:
‰ 10
Page 12

Selecting the Menu Items
TV/TEXT
NORMAL
MENU
A
CH
CH
BCD
CH
CH
This TV set allows you to adjust the picture, and set the channels and other features using the On-Screen
Display with the remote control or from the TV set. Select the desired menu item by following the steps
below and then refer to the indicated page for details.
Remote control
VOLUME UP ( ) or
DOWN ( ) button
CHANNEL UP (CH∑) or
DOWN (CH≈) button
MENU button
MENU/PRESET button
Selecting a menu item with the remote control
! Press the MENU button to
call the MENU screen.
MENU
@ Press the CHANNEL UP
∑) or DOWN (CH≈)
(CH
button to select the desired
menu item.
• The “◊” mark moves up or
down.
• The “◊” mark indicates the
selected menu item.
• The selected item is highlighted
in yellow.
CH
TV set
CHANNEL UP (CH∑) or
DOWN (CH≈) button
VOLUME UP ( ) or
DOWN ( ) button
# Press the VOLUME UP (
or DOWN (
) button to
enter the selected menu
item.
)
Selecting a menu item from the TV set
! Press the MENU/PRESET
button to call the MENU
screen.
• If you press the MENU/PRESET button for more than two seconds, the PRESET mode screen will appear
instead of the MENU screen. To display the MENU screen, press the MENU/PRESET button until the normal
screen appears, then press the button again.
CH
@ Press the CHANNEL UP
∑) or DOWN (CH≈)
(CH
button to select the desired
menu item.
• The “◊” mark moves up or
down.
• The “◊” mark indicates the
selected menu item.
• The selected item is highlighted
in yellow.
# Press the VOLUME UP ( )
or DOWN ( ) button to
enter the selected menu
item.
‰ 11
Page 13

Selecting the Menu Items (continued)
FEATURE
OFF --:- ON --:- VOLUME --
--:- BLUE BACK ON
SELECT:≈CH∑ ADJUST:
≈¬∑
RETURN:MENU
Menu Items
MENU
PICTURE
FEATURE
CH-SETTING
SELECT:≈CH
∑
≈¬∑
ENTER:
Operating guide
RETURN:MENU
PICTURE menu .......... Page 13 FEATURE menu .......... Page 14
PICTURE
CONTRAST
COLOUR
BRIGHTNESS
TINT
SHARPNESS
WHITE TEMP
SELECT:≈CH∑ ADJUST:
CH-SETTING menu .... Page 10
CH-SETTING
POSITION CH 8
COLOUR-SYSTEM AUTO
SKIP OFF
FINE 123.45MHz
SELECT:≈CH∑ ADJUST:
≈¬∑
RETURN:MENU
≈¬∑
RETURN:MENU
‰ 12
Page 14

Picture Adjustment
MENU
PICTURE
FEATURE
CH-SETTING
SELECT:≈CH∑ ENTER:
≈¬∑
RETURN:MENU
PICTURE
CONTRAST
COLOUR
BRIGHTNESS
TINT
SHARPNESS
WHITE TEMP
SELECT:≈CH∑ ADJUST:
≈¬∑
RETURN:MENU
CONTRAST 52
Adjusting the Picture
LANGUAGE
TV/VIDEO
12
VIDEO 1
VIDEO 2
A
NORMAL
3
456
7809
BCD
CH
CH
MENU
NORMAL button
#,%
@,$
!,*
! Press the MENU button to call
the MENU screen.
@ Press the CHANNEL UP
∑) or DOWN (CH≈)
(CH
button to select “PICTURE”.
# Press the VOLUME UP (
DOWN (
) button to display
) or
the PICTURE menu.
$ Press the CHANNEL UP
∑) or DOWN (CH≈)
(CH
button to select the adjustment
items.
% Adjust using the VOLUME UP
( ) or DOWN ( ) button.
^ Wait for approximately 5
seconds to return to the
PICTURE menu.
& Repeat steps 4 and 5 above to
adjust other items.
* Press the MENU button until
the normal screen appears.
(MENU screen)
(PICTURE menu)
• Pressing the NORMAL button while a PICTURE selection is displayed, only the selected mode is reset to the
standard (factory-setting) position.
• Pressing the NORMAL button while the PICTURE menu screen is displayed will reset all the items of
PICTURE menu to the standard (factory-setting) position.
Ë PICTURE menu screen
The following table lists the adjustment items shown in the PICTURE menu screen and how they
change as you press the VOLUME UP (
Selected Item Press the ( ) button Press the ( ) button
CONTRAST To decrease To increase
COLOUR For less colour For more colour
BRIGHTNESS For less For more
TINT*-1 To move tint toward To move tint toward
SHARPNESS For less For more
‰ 13
WHITE TEMP To reddish To bluish
• WHITE TEMP can only be adjusted on the PICTURE menu.
*-1: TINT can only be selected and adjusted when receiving NTSC signals or Colour System
is set to N443/N358.
) or DOWN ( ) button.
contrast contrast
intensity intensity
brightness brightness
red green
sharpness sharpness
background background
- +
- +
- +
- +
Page 15

Feature Adjustment
MENU
PICTURE
FEATURE
CH-SETTING
SELECT:≈CH∑ ENTER:
≈¬∑
RETURN:MENU
FEATURE
OFF --:- ON --:- VOLUME --
--:- BLUE BACK ON
SELECT:≈CH∑ ADJUST:
≈¬∑
RETURN:MENU
FEATURE
OFF 2:30
ON --:- VOLUME --
--:- BLUE BACK ON
SELECT:≈CH∑ ADJUST:
≈¬∑
RETURN:MENU
OFF 0:05
OFF 0:04
OFF 0:03
OFF 0:02
OFF 0:01
OFF 0:00
OFF Timer:
Automatically turns power off after a set length of time has passed.
LANGUAGE
12
VIDEO 1
456
VIDEO 2
7809
A
BCD
NORMAL
NORMAL button
TIMER button
(MENU screen)
TV/VIDEO
3
! Press the MENU button to call
the MENU screen.
• Press TIMER button will enter
directly to FEATURE menu screen.
@ Press the CHANNEL UP
∑) or DOWN (CH≈)
(CH
button to select “FEATURE”.
# Press the VOLUME UP (
DOWN (
) button to display
) or
(FEATURE menu)
MENU
#,%
@,$
CH
CH
!,^
the FEATURE menu.
$ Press the CHANNEL UP
∑) or DOWN (CH≈)
(CH
button to select “OFF
”.
% Press the VOLUME UP ( ) or
DOWN ( ) button to set the
time for the TV to turn off.
• Maximum time that can be
preset is 12 hours and 50
minutes.
• As soon as the time is
entered, the timer starts to
count down.
• To cancel the timer setting, press the NORMAL button when “◊” is displayed on the left of “OFF ” so as to
set the timer to “- - : - -”.
• The timer can be set in 10 minute intervals.
• The OFF TIMER is cancelled if the power is turned off or set to the standby mode using the STANDBY/ON
(ø) button on the remote control or the POWER (Ø) switch on the TV set, or if the power is otherwise
interrupted.
^ Press the MENU button until
the normal screen appears.
5 minutes before the OFF
TIMER activates, the remaining
time is displayed on the screen.
When the preset length of time
(in the example, 2 hours and 30
minutes) has passed, the TV
set enters the Standby mode.
Flashing for
approximately
5 seconds
‰ 14
Page 16

Feature Adjustment (continued)
MENU
PICTURE
FEATURE
CH-SETTING
SELECT:≈CH∑ ENTER:
≈¬∑
RETURN:MENU
FEATURE
OFF --:- ON --:- VOLUME --
--:- BLUE BACK ON
SELECT:≈CH∑ ADJUST:
≈¬∑
RETURN:MENU
FEATURE
OFF --:- ON 8:00
VOLUME --
--:- BLUE BACK ON
SELECT:≈CH∑ ADJUST:
≈¬∑
RETURN:MENU
FEATURE
OFF --:- ON 8:00
VOLUME 13
--:- BLUE BACK ON
SELECT:≈CH∑ ADJUST:
≈¬∑
RETURN:MENU
ON Timer:
Automatically turns power on after a set length of time has passed.
LANGUAGE
VIDEO 1
VIDEO 2
A
NORMAL
NORMAL button
TIMER button
ON TIMER indicator
lights up in orange
TV/VIDEO
12
3
456
7809
BCD
CH
CH
MENU
(TV set)
*
#,%,
&
@,$,
^
!
! Press the MENU button to call
the MENU screen.
• Press TIMER button will enter
directly to FEATURE menu screen.
@ Press the CHANNEL UP
∑) or DOWN (CH≈)
(CH
button to select “FEATURE”.
# Press the VOLUME UP (
) or
DOWN ( ) button to display
the FEATURE menu.
$ Press the CHANNEL UP
∑) or DOWN (CH≈)
(CH
button to select “ON ”.
% Press the VOLUME UP (
DOWN (
) button to set the
) or
time for the TV to turn on.
• Maximum time that can be
preset is 12 hours and 50
minutes.
• As soon as the time is
entered, ON TIMER starts to
count down.
^ Press the CHANNEL UP
∑) or DOWN (CH≈)
(CH
button to select “VOLUME”.
& Press the VOLUME UP (
DOWN (
) button to set the
) or
volume.
• Maximum volume can be
preset is 60.
* Press the STANDBY/ON (ø)
button to put the TV set into
Standby mode. The ON TIMER
indicator lights up in orange.
When the preset length of time
(in the above example, 8 hours)
has passed, the power turns on
and a picture appears on the
screen.
The ON TIMER speaker
volume gradually increases
from zero to the preset volume.
(MENU screen)
(FEATURE menu)
• To cancel the timer setting, press the NORMAL button when “◊” is displayed on the left of “ON ” so as to
set the timer to “- - : - -”.
• The timer can be set in 10 minute intervals.
• Always use the STANDBY/ON (ø) button on the remote control (Standby mode) to turn off the power. The
ON TIMER setting is cancelled if the power is turned off using the POWER (Ø) switch on the TV set.
• If the TV set is turned on by the ON TIMER, then the TV set will be automatically turned off in 2 hours if no
buttons are pressed on the TV set or remote control.
• The picture that appears on the screen, having been turned ON by the ON TIMER is set to the channel and
volume prior to the Standby mode.
• If the volume was not preset during the ON TIMER setting (“- - ” displayed), then it is set to the volume prior
to the Standby mode when the TV set is turned on by the ON TIMER.
‰ 15
Page 17

Feature Adjustment (continued)
MENU
PICTURE
FEATURE
CH-SETTING
SELECT:≈CH∑ ENTER:
≈¬∑
RETURN:MENU
FEATURE
OFF --:- ON --:- VOLUME --
--:- BLUE BACK ON
SELECT:≈CH∑ ADJUST:
≈¬∑
RETURN:MENU
FEATURE
OFF --:- ON --:- VOLUME - 1:50
BLUE BACK ON
SELECT:≈CH∑ ADJUST:
≈¬∑
RETURN:MENU
Reminder:
This function lets you know when a preset length of time has passed by displaying a
countdown timer on the screen. This is useful for timer cooking while you watch TV.
LANGUAGE
VIDEO 1
VIDEO 2
A
NORMAL
NORMAL button
TIMER button
TV/VIDEO
12
3
456
7809
BCD
CH
CH
MENU
#,%
@,$
!,^
! Press the MENU button to call
the MENU screen.
• Press TIMER button will enter
directly to FEATURE menu screen.
@ Press the CHANNEL UP
(CH∑) or DOWN (CH≈)
button to select “FEATURE”.
# Press the VOLUME UP (
) or
DOWN ( ) button to display
the FEATURE menu.
$ Press the CHANNEL UP
(CH∑) or DOWN (CH≈)
button to select “
% Press the VOLUME UP (
DOWN (
) button to set the
”.
) or
time.
• Maximum time that can be
preset is 12 hours and 50
minutes.
• The right example shows that the
REMINDER will be activated after
1 hour 50 minutes.
(MENU screen)
(FEATURE menu)
^ Press the MENU button until
the normal screen appears.
5 minutes before the preset
length of time has passed, the
remaining time is displayed as
shown on right.
When the preset length of time
(in above example 1 hour 50
minutes) has passed, the “
”
mark turns red.
• The Reminder function also works
when the TV set is in the Standby
mode. Power is automatically turned
on and performing above action. After
completion of these actions, the TV
set returns to Standby mode
automatically.
• To cancel the REMINDER setting, when the “◊” is displayed on the left of the REMINDER, press the
NORMAL button to set the timer to “- - : - -”.
• The REMINDER is cancelled if the POWER (Ø) switch on the TV set is turned off or if the power is otherwise
interrupted.
• The time can be set in ten-minute intervals. Pressing the NORMAL button to reset the set time.
5
4
3
2
1
0
Flashing for
approximately
1 minute
‰ 16
Page 18

Feature Adjustment (continued)
MENU
PICTURE
FEATURE
CH-SETTING
SELECT:≈CH∑ ENTER:
≈¬∑
RETURN:MENU
FEATURE
OFF --:- ON --:- VOLUME --
--:- BLUE BACK ON
SELECT:≈CH∑ ADJUST:
≈¬∑
RETURN:MENU
Blue Back:
Automatically turns the screen blue after 5 seconds if the broadcast signal is not
received. (e.g. when a TV station goes off the air.) After 15 minutes of non-reception,
the TV set enters Standby mode.
LANGUAGE
VIDEO 1
VIDEO 2
A
NORMAL
@,$
TV/VIDEO
12
3
456
7809
BCD
CH
CH
MENU
!,^
#,%
! Press the MENU button to call
the MENU screen.
@ Press the CHANNEL UP
∑) or DOWN (CH≈)
(CH
button to select “FEATURE”.
# Press the VOLUME UP ( ) or
DOWN (
) button to display
the FEATURE menu.
$ Press the CHANNEL UP
∑) or DOWN (CH≈)
(CH
button to select “BLUE BACK”.
% Press the VOLUME UP (
DOWN (
) button to select
) or
“ON”.
^ Press the MENU button until
the normal screen appears.
(MENU screen)
(FEATURE menu)
When the BLUE BACK is set to “ON”
No signal Blue screen Screen off
• Poor reception due to weak signals, and too much noise might activate the BLUE BACK function, despite the
presence of a broadcast signal. To continue watching TV under these conditions, switch the BLUE BACK to
“OFF”.
• When the OFF TIMER is set, the OFF TIMER setting has priority over BLUE BACK.
• During BLUE BACK, only Feature and CH-Setting menu are accessible.
‰ 17
after 5
seconds
ÆÆ
after 15
minutes
Standby mode
Page 19

Other Functions
12
12
12
Favourite Channels:
Using the COLOUR buttons on the remote control, your favourite channels can be
selected by just pressing one button. There are four COLOUR buttons (A, B, C, D)
to preset up to four channels.
VIDEO 1
VIDEO 2
A
NORMAL
LANGUAGE
12
456
7809
BCD
CH
CH
TV/TEXT
TV/VIDEO
3
MENU
@,#
!
! Press the CHANNEL UP
∑) or DOWN (CH≈)
(CH
button to select your favourite
channel. (e.g., Channel 12)
• The channel number is green
while the channel is tuned by
auto tuning.
• The channel number is yellow
while the channel is tuned
using fine tuning.
@ Press the COLOUR buttons
A
/B/C/D) continuously
(
until the Channel number turns
from Green/Yellow to White.
The display disappear after 3
seconds. The selected channel
is preset.
# To watch favourite channel
press COLOUR buttons
A/B
/C/D). The preset
(
favourite channel will be
displayed. (e.g. Channel 12)
$ To preset another favourite
channel, repeat the step 1 and
2 above.
• To change preset favourite
channel, repeat the step 1
and 2 above.
Display in Green
or Yellow
Turns to White
z Flashback:
Switches back to the channel you were watching just before the current channel.
LANGUAGE
TV/VIDEO
The channel previously viewed
returns to the screen.
Press the FLASHBACK (z) button.
12
VIDEO 1
VIDEO 2
3
456
7809
Example:
If after switching from channel 5 to
A
NORMAL
BCD
CH
CH
MENU
channel 7 the FLASHBACK (z)
button is pressed, the channel will
change to channel 5. Press the
FLASHBACK (z) button again to
return to channel 7.
TV/TEXT
(Example)
Press the 7 button
Press the z button
5
7
Press the z button
5
7
‰ 18
Page 20

Other Functions (continued)
u
OFF 0:07
ON 8:07
1:30
PAL
B/G
5
N358
N358
25
PAL
AV1
AV2
u Sound Mute:
Silences the sound.
LANGUAGE
TV/VIDEO
button. The sound mute symbol
(u) appears on the screen,
! Press the SOUND MUTE (u)
VIDEO 1
VIDEO 2
12
3
456
7809
and the sound is silenced.
Press the u button
@ Press the SOUND MUTE (u)
button again. The volume
returns to its previous level.
A
BCD
• Sound Mute will be cancelled if the VOLUME UP ( ) or DOWN ( ) button is pressed at any time.
∫ Call:
Displays the current channel number, the timer and other settings on the screen.
! Press the CALL (∫) button.
The time remaining on the OFF
TIMER, ON TIMER and
REMINDER appear on the
screen.
@ Press the CALL (
∫) button
again. The channel number and
colour system are
displayed on the screen.
# Press the CALL (
∫) button
once again. The channel
number display disappears and
the screen returns to normal
screen.
VIDEO 1
VIDEO 2
A
NORMAL
LANGUAGE
12
456
7809
BCD
CH
CH
TV/VIDEO
3
MENU
• When no timer is set, the channel number and colour system appear on the screen. Press the CALL (∫)
button again to clear this current setting display from the screen.
TV/Video, Video 1, Video 2:
Switches between TV broadcasts and AV input programmes.
LANGUAGE
12
VIDEO 1
‰ 19
VIDEO 2
A
456
7809
BCD
TV/VIDEO
3
Each time you press the TV/VIDEO
button, the input switches between
AV1, AV2 and TV programme.
• Press VIDEO 1 button to enter
directly to AV1.
• Press VIDEO 2 button to enter
directly to AV2.
• Press CHANNEL SELECT buttons to
returns to TV programme.
Page 21

TELETEXT Broadcasts
COLOUR (A, B, C, D)
• If link-page data are
transmitted from the TV
station, each link-page can
be viewed using the Colour
buttons.
• If no link-page data are
transmitted, pressing a
Colour button selects the
following pages, respectively:
A
: Current page No.
minus 1
B
: Current page No.
plus 1
C
: Current page No.
plus 10
D
: Current page No.
plus 100
Index M
• Press the M button to
display the index page.
Hold b
• Press the b button to
freeze the Teletext image
presently on the screen.
• Press the b button again to
turn off Freeze mode.
Time K
• While the TV is in Text, Mix
or Cancel mode, use the K
button to specify the
subcode (S****) for Teletext
pages transmitted in
Multi-page mode.
Enter the desired subcode
using the numeric buttons
(0-9).
• If the TV station currently
being viewed is
broadcasting Teletext, the
present-time information can
be displayed on the screen
by pressing the K button.
Reveal L
• Press the L button to
display hidden information,
such as the answers to a
quiz.
• Press the L button a
second time to hide the
displayed information.
• Press the L button a third
time to return to the start of
the sequence.
VIDEO 1
LANGUAGE
12
TV/VIDEO
3
456
VIDEO 2
7809
A
BCD
CH
CH
NORMAL
TV/TEXT
Text Page Selectors (0–9)
LANGUAGE
12
VIDEO 1
456
VIDEO 2
7809
• While the TV is in Text, Mix
or Cancel mode, the numeric
buttons (0-9) can be used to
directly select a page of the
Teletext broadcast that has a
3-digit number.
MENU
TV/VIDEO
3
Top/Bottom/Full N
• Press the N button to
enlarge the top half of the
Teletext image presently on
the screen.
• Press the N button a
second time to enlarge the
bottom half of the Teletext
image presently on the
screen.
• Press the N button a third
time to restore the regular
Teletext image.
• Press the N button a fourth
time to return to the start of
the sequence.
Text/Mix c/t
• Press the c/t button to
display the initial page of a
Teletext broadcast.
• Press the c/t button
again to simultaneously
display the TV picture and
Teletext in a split screen
format.
Picture v
• Press the v button when in
Teletext, Mix or Cancel mode
to return to TV mode. If the
c/t button is pressed
next, the previous page of
the Teletext broadcast is
re-displayed.
Reset J
• Press the J button to
return to TV mode.
If the c/t button is
pressed next, the initial page
of the Teletext broadcast is
re-displayed.
Cancel O
• Press the O button to
return to TV mode, and the
numeric buttons (0-9) and
Colour buttons to select
Teletext pages.
• The display on which teletext appears has priority over other on-screen displays.
‰ 20
Page 22

Video Equipment Connections
Enjoy the stunning visuals of a VIDEO CD PLAYER or VCR by connecting them to this TV set through its
audio/video in terminals.
FRONT <Example of connection>
REAR
To
antenna in
VCR
Front terminals
<Example of connection>
To RF out
To Audio/Video
out terminals
Camcorder
To Audio/Video
out terminals
TV set
To Audio/Video
out terminals
VCR
Editing
To Audio/Video in terminals
Antenna
in
AUDIOINAUDIO
VIDEOINVIDEO
OUT
OUT
Laser Disc Player or
Video CD Player
• When a VCR is connected via the Antenna in, tune the TV to the VCR using preset channel 0.
‰ 21
Page 23

Troubleshooting
The following problems do not always indicate a hardware failure. Therefore, please use the troubleshooting
guide below before calling for repair service.
If, after following the guide none of the remedies work, unplug the TV set and call for service.
Quick
Service
Check
List
Problems
Remote control does not work
Bars on screen
Picture distorted
Picture rolls vertically
No colour
Poor reception on some channels
Picture weak
Picture lines or streaks
Picture ghosting
Picture blurred
Sound OK, picture poor
Possible Causes/Remedies
Picture OK, sound poor
No picture or sound
Try a new channel to check for possible
station trouble
TV not plugged in
Outlet power OFF
POWER switch of TV not ON
Antenna not connected to terminal at the
rear of the TV set
If outside antenna is used, check for broken
wires
Check for local interference
Turn OFF using the POWER switch, then
turn ON again after a minute
Adjust COLOUR control
Check batteries in the remote control
Try fine tuning to correct
●●●●●●●●●●●
●●
●●
●●●●●●
●●●●●●●●●● ●
●●●●●●●
●●
●● ●
●
●●● ●●
Contrast setting in picture mode might be all
the way to the minus side. Press the NORMAL
button on the remote control to correct
Increase the volume
This unit is equipped with a microprocessor. Its performance could be adversely affected by external electrical noise
or interference. If this should happen, unplug the unit and plug it in again after a few minutes.
●●
●●
‰ 22
Page 24

Specifications
MODEL CX51LTXZ
Receiving System
TV Broadcasts PAL-B/G
/VCR Playback
VCR Playback PAL 60 Hz
(Using Video-in terminals)
Laserdisc PAL 5.5 MHz/60 Hz
Player Playback
(Using RF-in terminals)
Reception Channels
PAL-B/G VHF AU0-AU12 ch, NZ1–NZ11 ch, E2–E12 ch
CATV S1–S20 ch, S21–S41 ch (Hyper)
Receiving Frequency 44.25 MHz – 863.25 MHz
Teletext Language English
Channel Tuning 100-channel Electronic Tuner with Full Auto Tuning System
Picture Tube 51 cm Tinted
Terminals Audio/Video input × 2 (Front × 1, Rear × 1)
Sound Output 3.0 W (RMS)
Power Source Rated AC 220–240V, 50 Hz
Power Consumption 85 W
Dimensions 499 (W) × 474 (H) × 486 (D) mm
Weight 20 kg (Approx.)
NTSC 3.58 MHz
NTSC 4.43 MHz
UHF E21–E69 ch
Audio/Video output × 1 (Rear) , Headphone jack (Front × 1)
• Design and specifications are subject to change without notice.
• Receiving System;
These receiving systems, encompassing all currently available technology, include those with planned
broadcast, videotape and laserdisc hardware and software.
• Reception channels;
Some examples of the main receivable channels are shown above.
‰ 23
Page 25

Memo
‰ 24
Page 26

Memo
‰ 25
Page 27

Memo
‰ 26
Page 28

SHARP CORPORATION
OF NEW ZEALAND LIMITED
59 Hugo Johnston Drive
Penrose, Auckland, New Zealand.
SHARP CORPORATION
Printed in Malaysia
TINS-A187WJZZ
02P06-MSM
 Loading...