


CV-PD13PX
PORTABLE TYPE
ROOM AIR CONDITIONER
INSTALLATION AND OPERATION
MANUAL
ACONDICIONADOR DE AIRE
PARA HABITACIÓN TIPO
PORTÁTIL
MANUAL DE INSTALACIÓN
Y FUNCIONAMIENTO
* Plasmacluster is a trademark of
SHARP Corporation.
* Plasmacluster es una marca reg
-
istrada de SHARP Corporation.
ENGLISH
ESPAÑOL
CV-P12PX
CV-P13PX
CV-PD13PX


ENGLISH
ENGLISH
This manual explains the proper use of your new air conditioner. Please
read this manual carefully before using the product. This manual should
be kept in a safe place for handy reference.
CONTENTS
• FOR CUSTOMER ASSISTANCE (U.S.) .................................E-2
• CONSUMER LIMITED WARRANTY (U.S.) ............................
E-3
• PRECAUTIONS ......................................................................
E-4
• LOCATION ...............................................................................
E-6
• INCLUDED ...............................................................................
E-7
• PART NAMES ..........................................................................
E-8
• INSTALL WINDOW PANEL ......................................................
E-10
• INSTALLATION AND REMOVAL OF EXHAUST HOSE .........
E-18
• PRE-OPERATION CHECKS ...................................................
E-22
• COOL MODE ...........................................................................
E-24
• DEHUMIDIFICATION MODE ...................................................
E-24
• FAN MODE ..............................................................................
E-25
• VENTILATION MODE ..............................................................
E-25
• TO CHANGE AIR FLOW DIRECTION .....................................
E-26
• PLASMACLUSTER OPERATION ............................................
E-27
• MEGA COOL OPERATION ......................................................
E-28
• SLEEP OPERATION
................................................................E-28
• TIMER OPERATION ................................................................
E-29
• MAIN UNIT OPERATION .........................................................
E-30
• DRAINAGE ..............................................................................
E-30
• MAINTENANCE .......................................................................
E-31
• BEFORE CALLING FOR SERVICE ........................................
E-32
E-1
Declaration of Conformity
SHARP ROOM AIR CONDITIONER CV-P12PX,CV-P13PX,CV-PD13PX
This device complies with Part 18 of FCC rules.
Responsible Party:
SHARP ELECTRONICS CORPORATION.
Sharp Plaza, Mahwah, New Jersey 07430-2135
TEL: 1-800-BE-SHARP

E-2
FOR CUSTOMER ASSISTANCE
(the United States)
To aid in answering questions if you call for service or for reporting loss or theft, please
record below the model and serial number located on the back side of the unit.
MODEL NUMBER
SERIAL NUMBER
DATE OF PURCHASE
Dealer Name
Address
City
State
Zip
Telephone
TO PHONE:
Dial 1-800-BE-SHARP (237-4277) for:
SERVICE (for your nearest Sharp Authorized Servicer)
PARTS (for your Authorized Parts Distributor)
ACCESSORIES
ADDITIONAL CUSTOMER INFORMATION
TO WRITE:
For service problems, warranty information, missing items and other assistance:
Sharp Electronics Corporation
Customer Assistance Center
1300 Naperville Drive
Romeoville, IL 60446-1091
TO ACCESS THE INTERNET:
www.sharpusa.com
Please provide the following information when you write or call: model number, serial number,
date of purchase, your complete mailing address (including zip code), your daytime telephone
number (including area code) and description of the problem.

ENGLISH
E-3
CONSUMER LIMITED WARRANTY
TO OBTAIN SUPPLY, ACCESSORY OR PRODUCT INFORMATION, CALL 1-800-BE-SHARP, OR VISIT OUR WEBSITE AT
www.sharpusa.com
SHARP ELECTRONICS CORPORATION
Sharp Plaza, Mahwah, New Jersey 07430-2135
CONSUMER LIMITED WARRANTY FOR THE U.S. USERS
SHARP ELECTRONICS CORPORATION warrants to the rst consumer purchaser that this Sharp brand product
(the “Product”), when shipped in its original container, will be free from defective workmanship and materials, and
agrees that it will, at its option, either repair the defect or replace the defective Product or part thereof with a new or
remanufactured equivalent at no charge to the purchaser for parts or labor for the period(s) set forth below.
This warranty does not apply to any appearance items of the Product nor to the additional excluded item(s) set forth
below nor to any Product the exterior of which has been damaged or defaced, which has been subjected to improper
voltage or other misuse, abnormal service or handling, or which has been altered or modied in design or construction.
In order to enforce the rights under this limited warranty, the purchaser should follow the steps set forth below and
provide proof of purchase to the servicer.
The limited warranty described herein is in addition to whatever implied warranties may be granted to purchasers by
law. ALL IMPLIED WARRANTIES INCLUDING THE WARRANTIES OF MERCHANTABILITY AND FITNESS FOR
USE ARE LIMITED TO THE PERIOD(S) FROM THE DATE OF PURCHASE SET FORTH BELOW. Some states do not
allow limitations on how long an implied warranty lasts, so the above limitation may not apply to you.
Neither the sales personnel of the seller nor any other person is authorized to make any warranties other than those
described herein, or to extend the duration of any warranties beyond the time period described herein on behalf of
Sharp.
The warranties described herein shall be the sole and exclusive warranties granted by Sharp and shall be the sole and
exclusive remedy available to the purchaser. Correction of defects, in the manner and for the period of time described
herein, shall constitute complete fulllment of all liabilities and responsibilities of Sharp to the purchaser with respect
to the Product, and shall constitute full satisfaction of all claims, whether based on contract, negligence, strict liability
or otherwise. In no event shall Sharp be liable, or in any way responsible, for any damages or defects in the Product
which were caused by repairs or attempted repairs performed by anyone other than an authorized servicer. Nor shall
Sharp be liable or in any way responsible for any incidental or consequential economic or property damage. Some
states do not allow the exclusion of incidental or consequential damages, so the above exclusion may not apply to you.
THIS WARRANTY GIVES YOU SPECIFlC LEGAL RIGHTS. YOU MAY ALSO HAVE OTHER RIGHTS WHICH VARY
FROM STATE TO STATE.
Your Product Model Number & Description:
Warranty Period for this Product:
Additional Item(s) Excluded From Warranty
Coverage (If any):
Where to Obtain Service:
What to Do to Obtain Service:
CV-P12PX,CV-P13PX,CV-PD13PX
Portable Air Conditioner. Be sure to have this information available
when you need service for your Product.
One (1) year parts and labor from date of purchase. The warranty
period continues for a total of ve (5) years from date of purchase
for the Sealed Cooling System parts; labor and service are not
provided free of change for this additional period.
Appearance items of the Product, filters, or accessories, or any
printed materials.
Product which has been used for r ental and/or comm ercial
purposes.
From a Sharp Authorized Servicer located in the United States.
To nd the location of the nearest Sharp Authorized Servicer, call
Sharp Toll Free at 1-800-BE-SHARP.
Contact your Sharp Authorized Servicer to obtain in-home service
for this Product.
The Servicer will come to your home, and if it is necessary to
remove the Product, the Servicer will reinstall it. Be sure to have
Proof of Purchase available.

PRECAUTIONS
Points to keep in mind when using your air conditioner.
WARNINGS FOR USE
• Install the air conditioner in accordance with the installation instructions in the latter section of this
manual.
• Do not modify any part of this product.
• Do not insert anything into any part of the unit.
• Ensure the power supply used has an appropriate voltage rating.
Only use a three-pin grounded electrical AC socket rated 125V, 60Hz, and 15 amps
or more as shown on the right.
Use of a power supply with an improper voltage rating can result in damage to the
unit and possibly re.
• Always use a fuse with the proper amp rating.
Do not, under any circumstances, use wire, pins or other objects in place of a proper fuse.
• In the event of any abnormality with the air conditioner (ex. a burning smell), turn it off immediately
and disconnect the power supply.
WARNING FOR POWER SUPPLY CORD
• This air conditioner uses a plug with a built-in fuse.
Read the precautions on the plug before using the air conditioner.
• Alwaysconducta“PowerPlugCheck”beforeusetoconrmthepowerplugfunctionsnormally.
• This power plug must only be plugged into an appropriate wall socket. Do not use in conjunction
with any extension cords.
• Push the power plug securely into the socket and make sure it is not loose.
• Do not pull, deform, or modify the power supply cord, or immerse it in water.
Pulling or misuse of the power supply cord can result in damage to the unit and cause electrical shock.
• A damaged power supply cord must be replaced with a new power supply cord obtained from the
product manufacturer and not repaired. Replacement must be performed by manufacture's service
agent in order to avoid a hazard.
NOTE
Radio or TV Interference
If this room air conditioner should cause interference to radio or television reception, try to correct the interfer-
ence by one or more of the following measures:
• Reorient or relocate the receiving antenna.
• Increase the separation between the room air conditioner and radio/TV receiver.
• Connect the room air conditioner into an outlet on a circuit different from that to which the radio/TV receiver is
connected.
• Consult the dealer or an experienced radio/TV technician for help.
E-4
WARNING ABOUT GROUNDING
• Improper use of the grounding plug can result
in the risk of electric shock.
This appliance must be grounded. In the event of
an electrical short circuit, grounding reduces the
risk of an electric shock by providing a less resist-
ant conduit for the electric current.
This appliance is equipped with a cord that has a
grounding wire connected to a grounding plug. The
plug must be plugged into a socket that is properly
installed and grounded.
• Do not under any circumstances cut or remove
the round grounding pin from this plug.
Consult a qualied electrician or serviceman if the
grounding instructions are not completely under-
stood, or if in any doubt as to whether the appli-
ance is properly grounded.
If a grounding adapter is used, make sure the elec-
trical box is fully grounded.
Grounding wire
Screw
Tab for grounding
screw
Grounded electrical box
Grounding adapter
Grounding pin
3-Pin plug
3-Pin socket
Grounded
electrical box

ENGLISH
E-5
USAGE CAUTIONS
• Ventilate the room periodically during use, especially if using gas appliances.
• Be sure to turn the unit off and disconnect the power supply cord before performing any mainte
-
nance or cleaning.
• Do not splash or pour water directly onto the unit.
Water can cause electrical shock or equipment damage.
• Drainage should be performed whenever moving the air conditioner.
If any water remains in the tank, it may spill out while being moved.
• Remove the window panel in the event of particularly adverse weather.
Extremely adverse weather may cause water to leak in through the openings.
• To ensure proper drainage, the drainage hose must have no kinks or be on a different level during
dehumidicationmode.
The drained water may spill out into the room.
• The temperature around the drainage hose must not be below freezing point when used.
Drained water may freeze inside the hose, causing water inside the unit to overow into the room.
• Do not block the exhaust air outlet with obstacles.
Cooling performance may be reduced or stop completely.
NOTES ON OPERATION
• Allow 3 minutes for the compressor to restart cooling.
If you turn the air conditioner off and immediately restart it, allow three minutes for the compressor to restart
cooling. There is an electronic device in the unit that keeps the compressor turned off for three minutes for
safety.
• In the event of a power failure during use, allow 3 minutes before restarting the unit.
After power is reinstated, restart the air conditioner. If the power was off for less than three minutes, be sure
to wait at least three minutes before restarting the unit. If you restart the air conditioner within three minutes,
a protective device in the unit may cause the compressor to shut off. This protective device will prevent cool-
ing for about 5 minutes. Any previous settings will be canceled and the unit will return to its initial settings.
• Low temperature operation: Is your unit freezing up?
Freezing may occur when the unit is set close to 64°F in low ambient temperature conditions, especially at
night.
In these conditions, a further temperature drop may cause the unit to freeze.
Setting the unit to a higher temperature will prevent it from freezing.
• Dehumidicationmodeincreasesroomtemperature.
The unit generates heat during dehumidication mode and the room temperature will rise. Warm air will be
blown out from the Exhaust air outlet, but this is normal and does not indicate a problem with the unit.
• This air conditioner blows the warm air generated by the unit outside the room via the exhaust hose
while in cool mode.
Accordingly, the same amount of air as that blown out will enter the room from outside through any
openings into the room.
• When cooling operation is performed at high humidity conditions, water tank inside the unit may fre
-
quently become full.
When water tank inside the unit is full, the unit stops operating and TIMER, OPERATION and MEGA COOL
lamps will blink. In this case, perform drainage to drain out water within the unit.
MIN.12"
(30cm)
MIN.12"
(30cm)
PRECAUTIONS
E-6
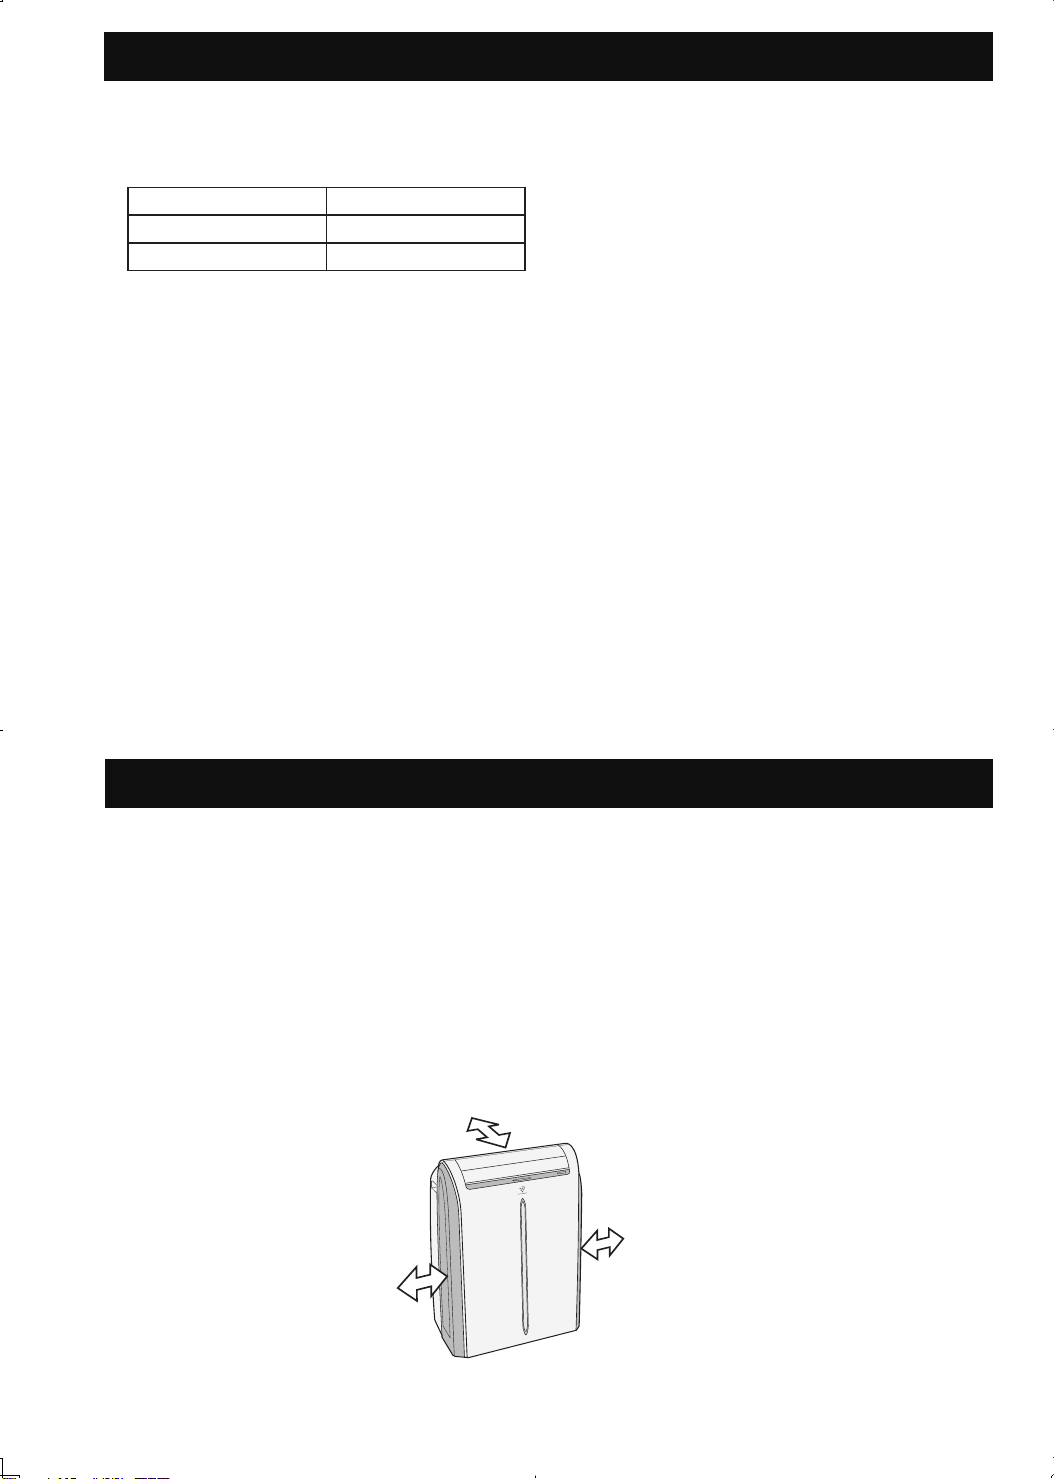
OPERATING CONDITIONS
• The air conditioner must be operated within the temperature range indicated below.
MODE Room temperature
Cool 64°F ~ 95°F
Dehumidication 59°F ~ 95°F
• A built-in safety device may cut off operation if the temperature exceeds these limits.
• When cooling operation is performed at high room temperature, the fan may run at a
slower speed.
ENERGY EFFICIENCY TIPS
• Avoid direct sunlight.
Close blinds, drapes or shades to keep out direct sunlight while in cooling mode.
• Keepthelterclean.
Keeping the lter clean greatly aids efcient operation.
A dirty lter blocks the ow of air, making your air conditioner work harder and less ef
-
ciently.
• Turn off unnecessary lights.
Your air conditioner must remove the heat produced by your lights or other heat-produc
-
ing appliances. Turn off any lights or appliances that are not in use.
• Turn off the air conditioner when no one is home.
Use only when necessary. The less time the air conditioner is used, the lower the run
-
ning costs.
LOCATION
• The air conditioner should be placed on a rm foundation to minimize noise and vibration.
For safe and secure positioning, place the unit on a smooth, level oor strong enough to
support the unit.
• The unit has casters to aid placement, but it should only be rolled on smooth, at sur-
faces. Use caution when rolling on carpet surfaces. Do not attempt to roll the unit over
objects.
• The unit must be placed within reach of a properly rated grounded socket.
• Never place any obstacles around the air inlet or outlet of the unit.
• Allow at least 12" (30cm) of space from the wall for efcient air-conditioning.
MIN.12"
(30cm)
ENGLISH
E-7
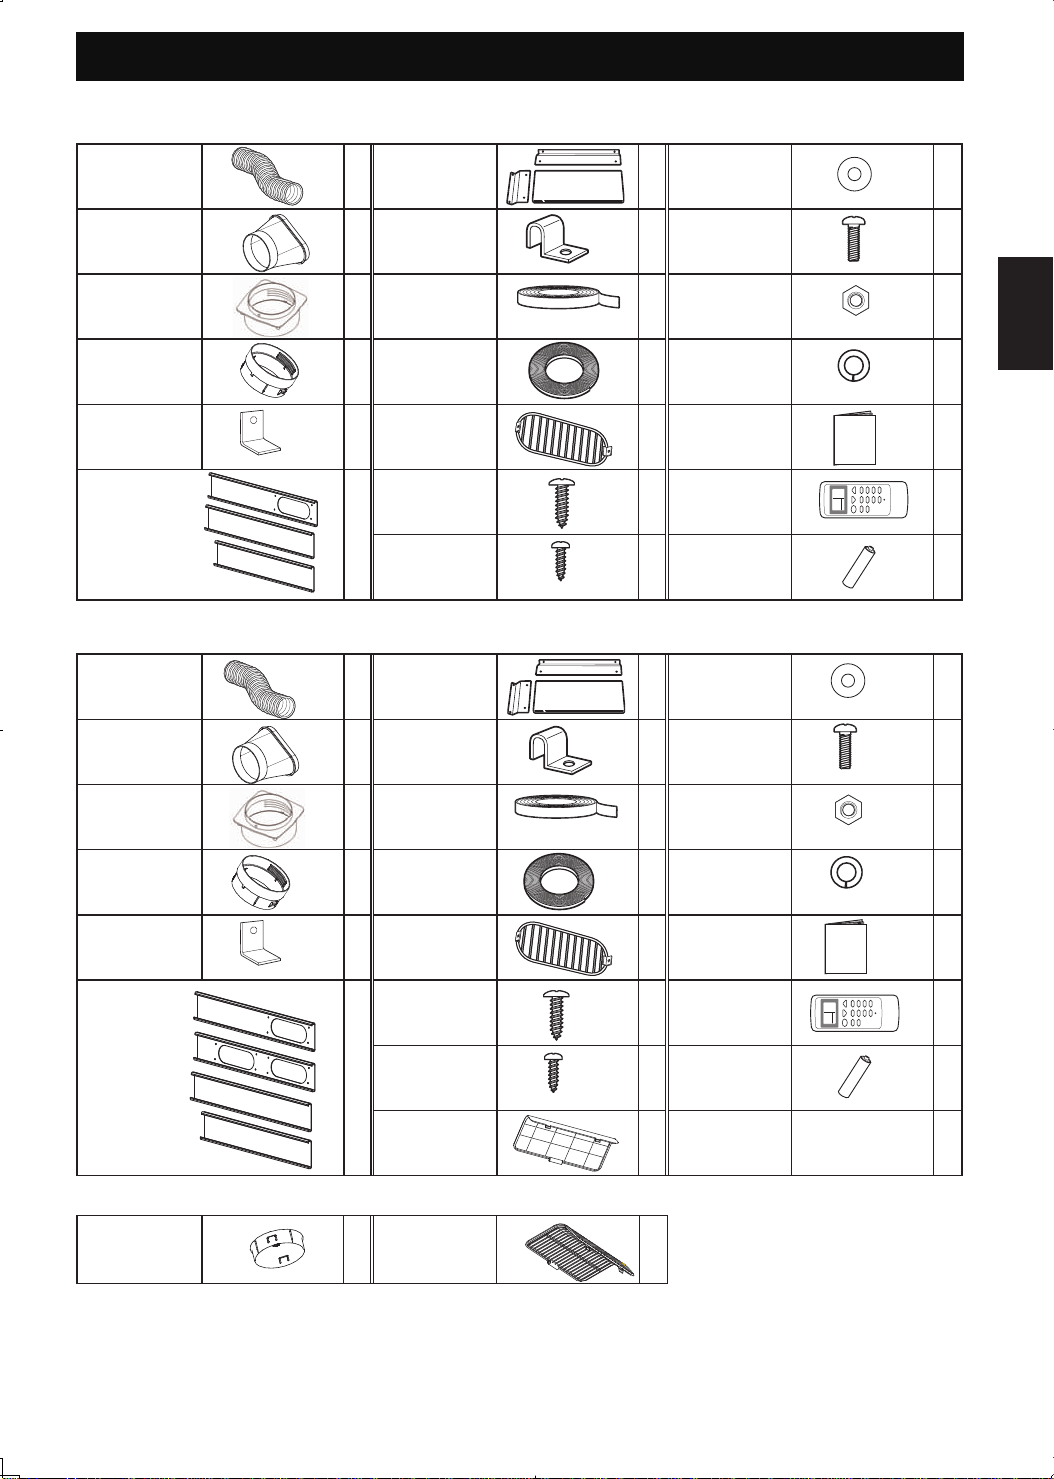
INCLUDED
CV-P12PX / CV-P13PX
Exhaust hose
1
Rain deector
assembly
1
Washer
4
Window exhaust
adapter
1
Window slider
bracket
2
Bolt
4
Exhaust hose
adapter A
1
Foam seal A
1
Nut
4
Exhaust hose
adapter B
1
Foam seal B
(adhesive type)
1
Split-ring
washer
4
Bracket
1
Protective
screen
1
Manual
1
Window panel
assembly
3
Large wood
screw
5
Remote control
1
Screw
2
Battery
(AAA.1.5V)
2
CV-PD13PX
Exhaust hose
2
Rain deector
assembly
2
Washer
8
Window exhaust
adapter
2
Window slider
bracket
2
Bolt
8
Exhaust hose
adapter A
2
Foam seal A
1
Nut
8
Exhaust hose
adapter B
2
Foam seal B
(adhesive type)
1
Split-ring
washer
8
Bracket
1
Protective
screen
2
Manual
1
Window panel
assembly
4
Large wood
screw
5
Remote control
1
Screw
4
Battery
(AAA.1.5V)
2
Bafe
1
The cover and the grille will be installed in the unit before leaving factory.
Cover
1
Grille
1
SUGGESTED TOOLS FOR WINDOW PANEL
INSTALLATION
1. Screwdriver(medium size Phillips) 2. Tape measure or ruler 3. Knife or scissors
4. Saw (In the event that the window panel needs to be cut down in size because the window is too narrow for
direct installation.)
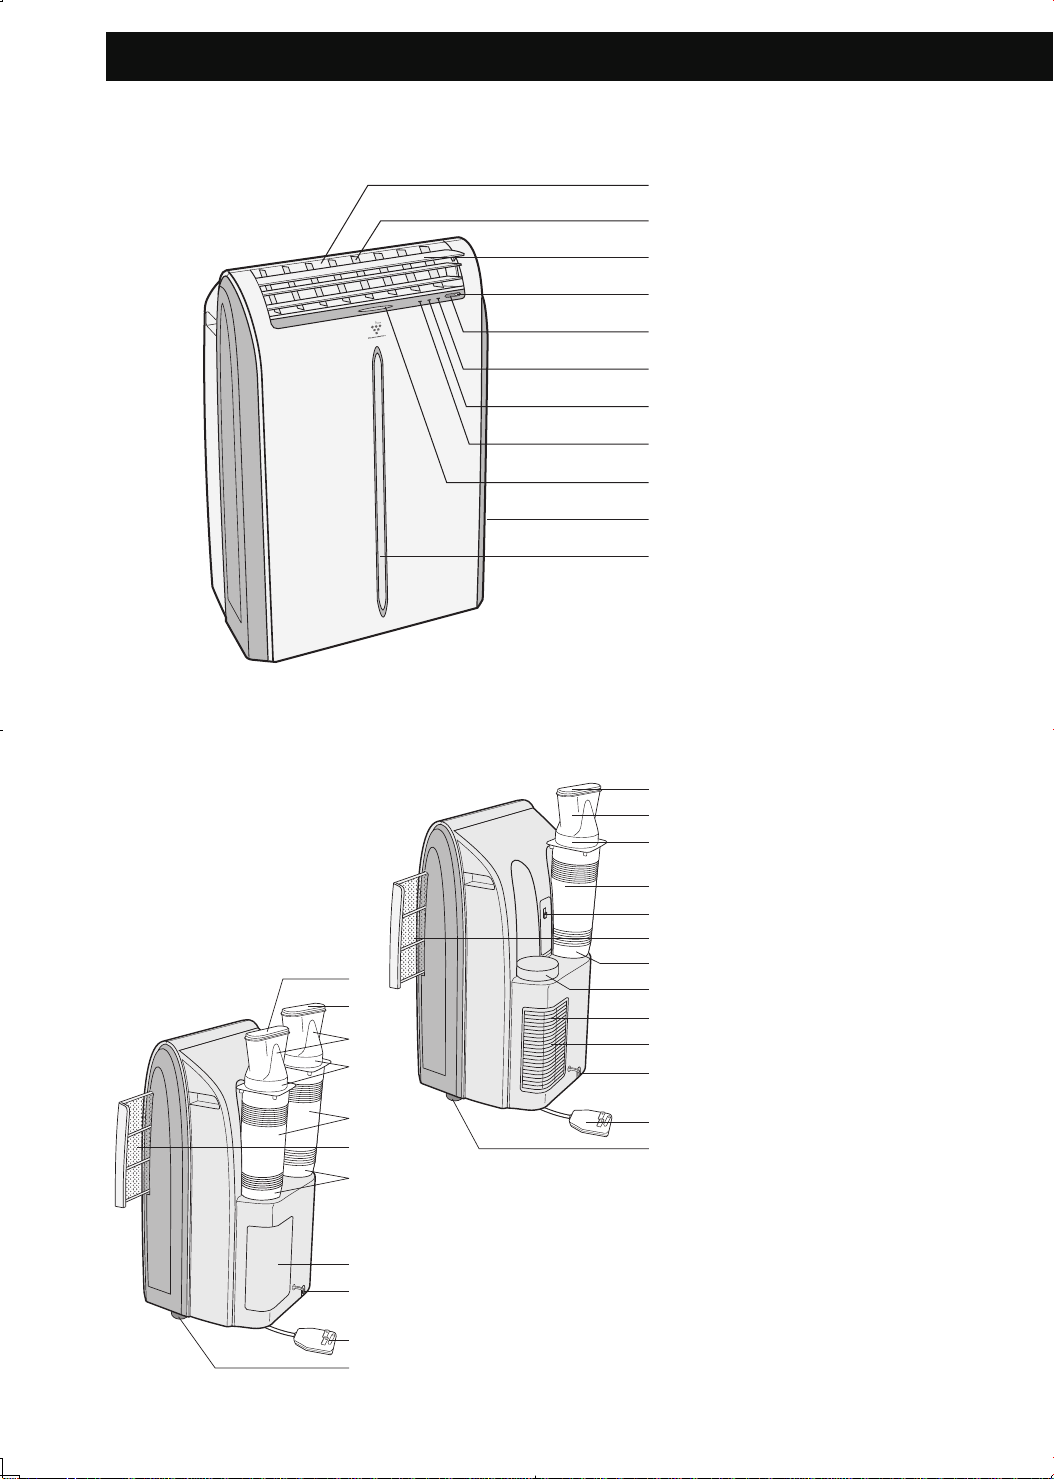
PART NAMES
1
Air Outlet
2
Vertical louvers
3
Horizontal louvers
4
POWER Button
5
Remote control signal
receiver window
6
OPERATION Lamp (red)
7
TIMER Lamp (orange)
8
MEGA COOL Lamp
(green)
9
PLASMACLUSTER
Lamp (blue)
0
Air inlet
REAR VIEW
NOTE: Actual unit might vary slightly from above illustration.
FRONT VIEW
q
Exhaust air outlet
w
Window exhaust adapter
e
Exhaust hose adapter A
r
Exhaust hose
t
Remote control hook
y
Airlter
u
Exhaust hose adapter B
i
Cover
o
Grille
p
Air inlet
a
Drainpipe and stopcock
s
Power plug
d
Casters(4)
f
Bafe
E-8
1
2
3
4
5
6
7
8
9
0
0
q
w
e
r
t
y
u
i
o
p
a
s
d
CV-P12PX
CV-P13PX
CV-PD13PX(Single Duct use)
CV-PD13PX(Dual Duct use)
p
q
w
e
r
y
u
f
a
s
d
ENGLISH
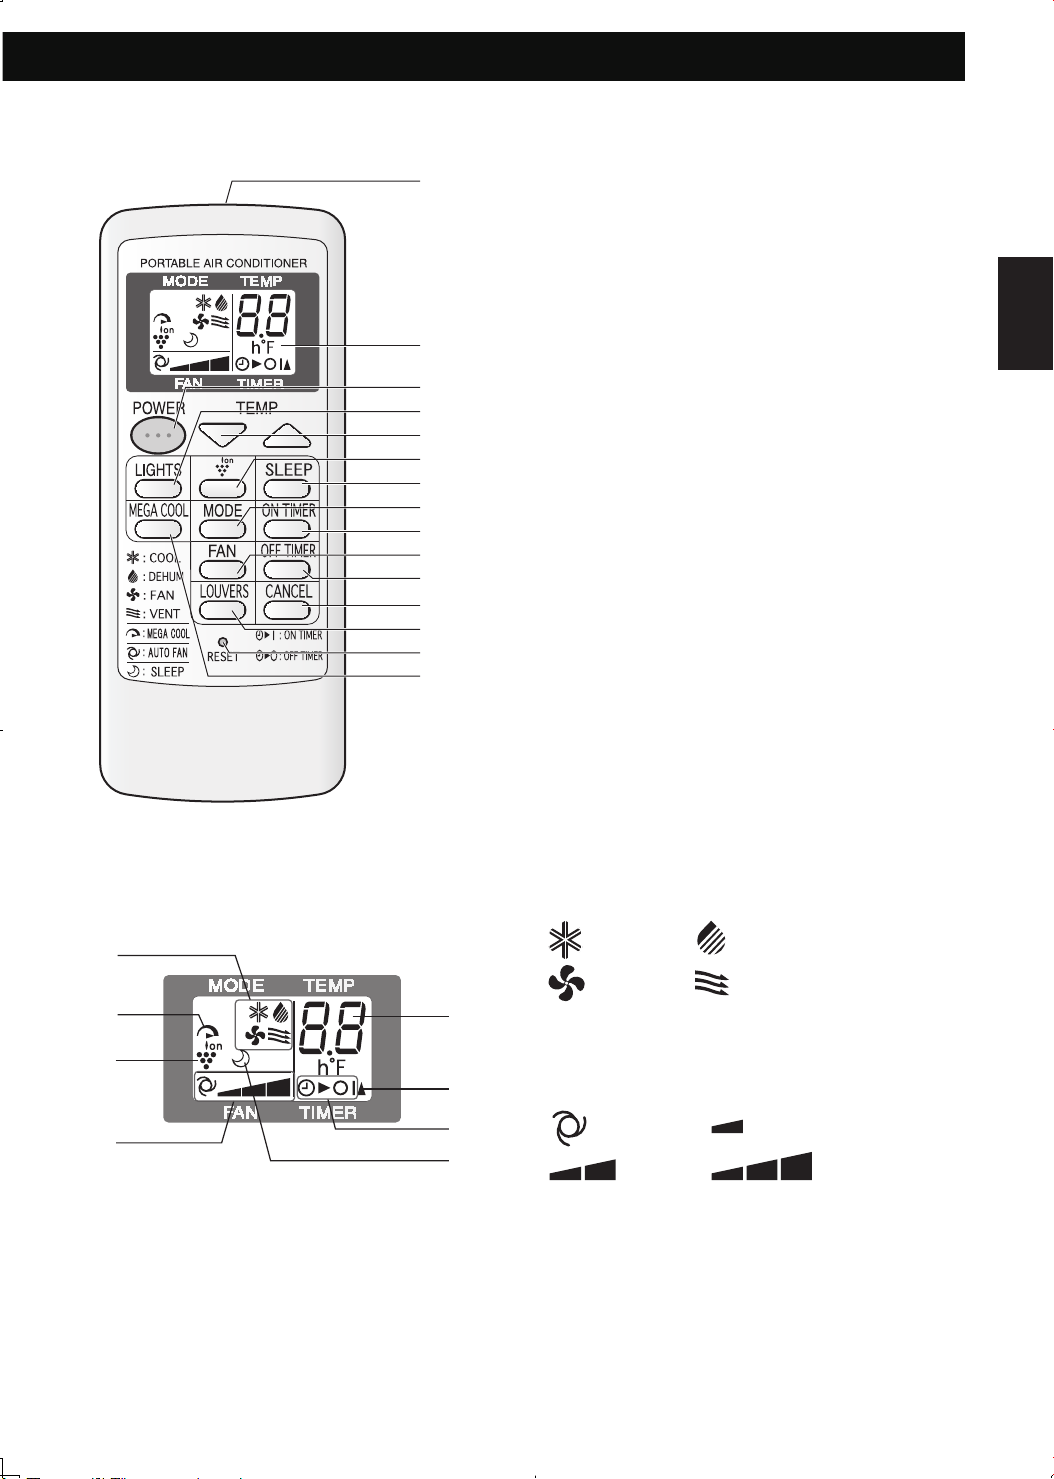
REMOTE CONTROL
1
Transmitter
2
Display
3
POWER Button
4
LIGHTS Button
5
TEMPERATURE Button
6
PLASMACLUSTER Button
7
SLEEP Button
8
MODE Button
9
ON TIMER Button
0
FAN Button
q
OFF TIMER Button
w
CANCEL Button
e
LOUVERS Button
r
RESET Button
t
MEGA COOL Button
E-9
y
MODE SYMBOLS
: COOL : DEHUMIDIFICATION
: FAN : VENTILATION
u
MEGA COOL SYMBOL
i
PLASMACLUSTER SYMBOL
o
FAN SPEED SYMBOLS
: AUTO : Quiet
: Low : High
p
TEMPERATURE AND TIMER COUNT
DOWN INDICATOR
a
TRANSMITTING SYMBOL
s
ON TIMER / OFF TIMER SYMBOL
d
SLEEP SYMBOL
REMOTE CONTROL DISPLAY
1
2
3
4
5
6
7
8
9
0
q
w
e
r
t
y
u
i
o
p
a
s
d
 Loading...