

Page 1

About Final Cut Pro 1.2.5
Includes installation instructions and
information on new features
Page 2

This document includes installation instructions and describes features and enhancements of
Final Cut Pro 1.2.5 not found in the Final Cut Pro User’s Manual or Final Cut Pro Help.
Enhancements and features include
m naming and sorting clips in the Browser
m specifying the maximum file size for capturing and exporting
m rendering in YCrCb (YUV) color space and updating projects
m working with anamorphic 16:9 media
m exporting QuickTime reference movies
Installing Final Cut Pro 1.2.5
Before you install Final Cut Pro, make sure you
m turn off any virus protection and security software installed on your computer
m install the version of QuickTime that is on the Final Cut Pro CD
If desired, unlock QuickTime Pro using the instructions provided in the update sheet that
came in your Final Cut Pro box.
The installation procedure has changed slightly from previous versions. To install Final Cut Pro,
follow these steps:
Insert the Final Cut Pro CD into your CD drive and double-click the CD’s icon to open it.
1
2 Double-click the Install Final Cut Pro icon and click Continue.
3 Read the Software License Agreement, then click Accept.
4 Read the Final Cut Pro 1.2.5 Read Me for important information, then click Continue.
5 If desired, select a location and folder where you want to install the software, then click Install.
6 Select your video capture method (DV or None/Don’t know) and the video format (NTSC or
PAL), then click Continue.
For specific information on various defaults that are set when you make your selections, see
“Defaults Set Based Upon Installation Options” on page 4.
7 When a message says installation was successful, click Restart.
3
Page 3

Defaults Set Based Upon Installation Options
The following table shows the default preferences that are set based on your video capture
method and format choices.
Defaults DV and NTSC DV and PAL
Editing timebase
29.97 fps 25 fps 29.97 fps 25 fps
None/Don’t
know and NTSC
None/Don’t
know and PAL
(frames per second)
Frame size 720x480 720x576 320x240 320x240
Sequence preset
(kilozertz)
Capture qualities All set to DV,
View External Video
using
DV with Audio
@48 kHz
DV with Audio
@48 kHz
PhotoJPEG
with Audio
@44.1 kHz
29.97 fps;
Presets 1 and 2
set to 16:9
All set to DV,
25 fps;
Presets 1 and 2
set to 16:9
All set to DV,
29.97 fps; Presets
1 and 2 set to 16:9
FireWire NTSC FireWire PAL None
(never asks for
DV device)
PhotoJPEG
with Audio
@44.1 kHz
All set to DV,
25 fps;
Presets 1 and 2
set to 16:9
None
(never asks for
DV device)
Naming and Sorting Clips in the Browser
The Browser sorts clips in numerical order on computers using Western language script
systems (English, French, and German). Keep this in mind when you are naming files, so they
sort in the desired order. In earlier versions of Final Cut Pro, you needed to insert a leading
zero in a clip’s name in order to sort in numerical order.
If items in the Browser consist only of Roman low-ASCII characters (values of 32–127),
followed by a number, then these items are sorted in numerical order, taking the value of the
ending number into account. For all other text, the previous alphabetic-only sorting is used.
This means that double-byte fonts (Kanji) still need a leading zero in a clip’s name in order to
sort in numerical order.
m Current way of sorting: Clip 1, Clip 5, Clip 30, Clip 100
m Previous way of sorting: Clip 1, Clip 100, Clip 30, Clip 5
4
Page 4
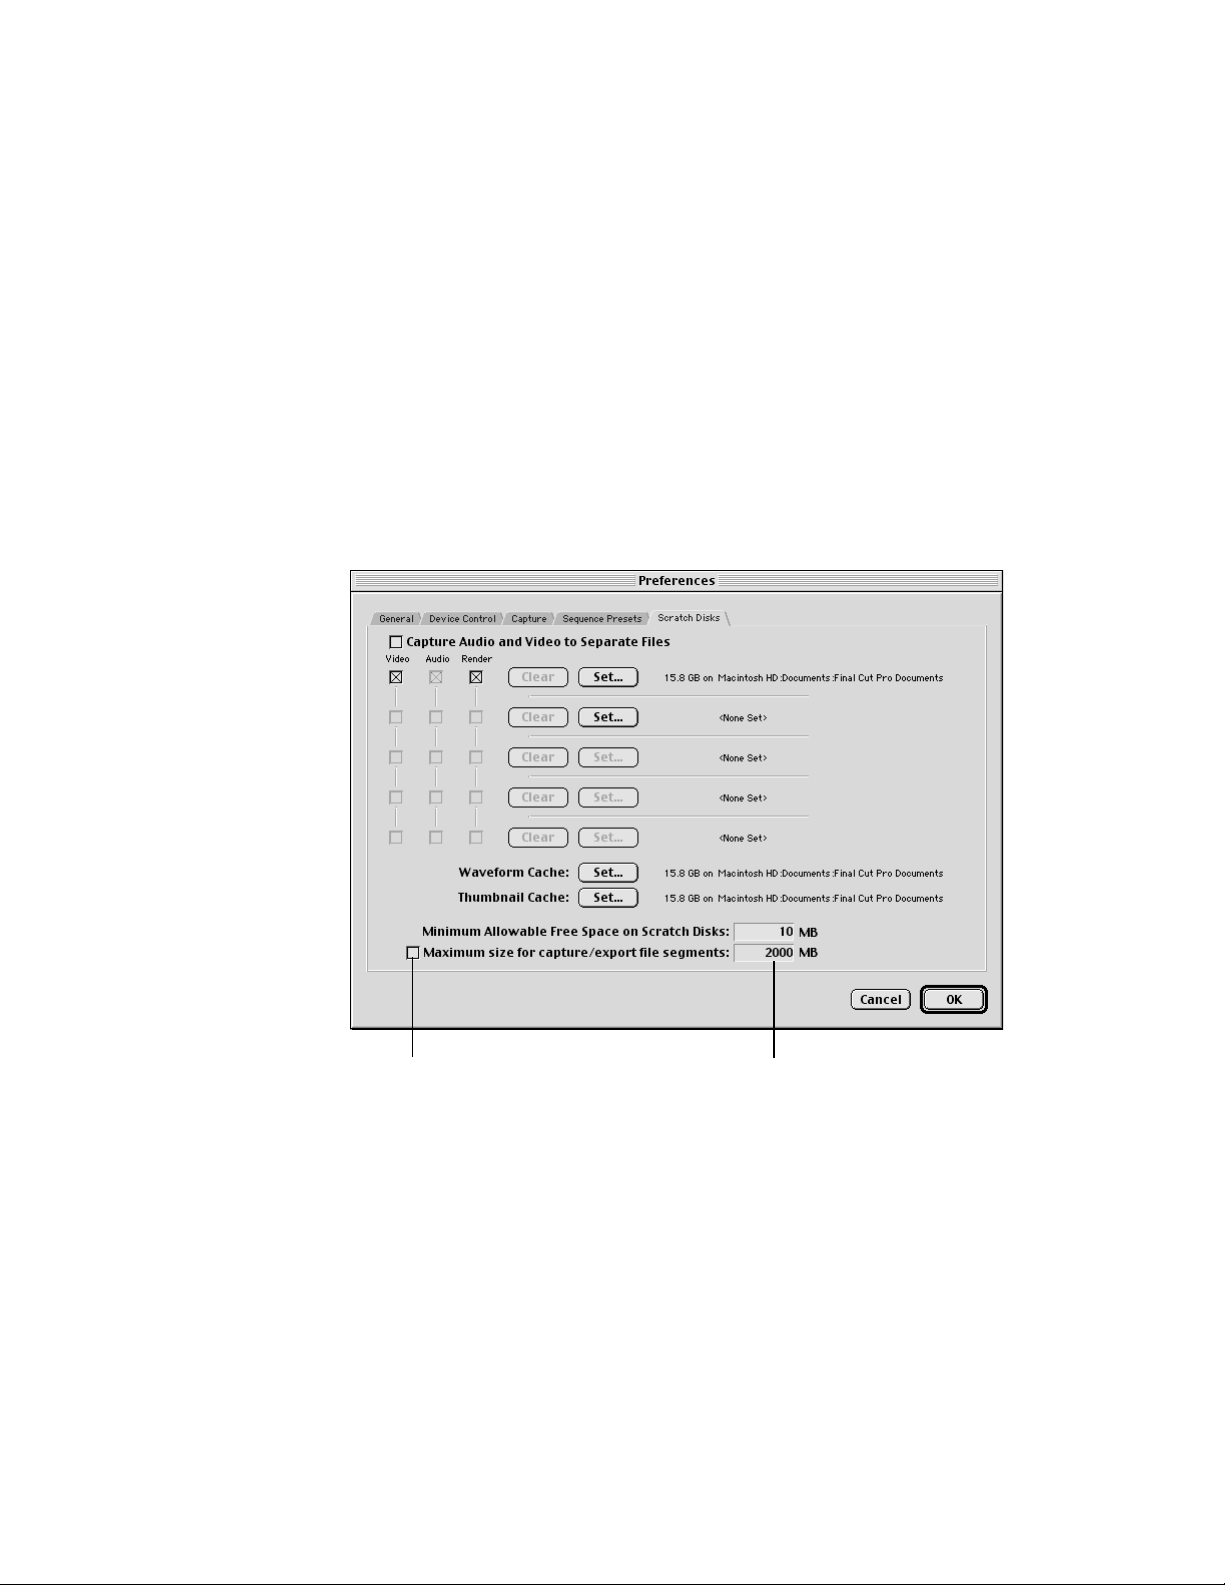
Specifying the Maximum File Size for Capturing and Exporting
A new option in the Scratch Disk preferences allows you to set the maximum file size for a
single capture or export session. If the maximum file size is reached during a capture or export
session, Final Cut Pro automatically creates another file and links these files together.
Note: For HFS volumes, additional files will automatically be created when the file size
reaches 2000 MB.
To set the maximum capture/export file size, follow these steps:
1 Choose Preferences from the File menu, then click the Scratch Disks tab.
2 Make sure there’s an X in the checkbox next to “Maximum size for capture/export file
segments,” then enter the desired file size.
To specify a maximum
file size, make sure there’s
an X in this checkbox.
Enter the desired
file size here.
5
Page 5

Rendering in YCrCb (YUV) Color Space
Final Cut Pro 1.2.5 supports image processing, or rendering, in the YCrCb color space
(sometimes referred to as YUV ), in addition to the RGB color space. There are also various
options for white level processing. Both of these let Final Cut Pro preserve the maximum color
fidelity for processed images.
Converting Between YCrCb and RGB Color Spaces
Many digital video formats store data in a color space known as YCrCb. Three components are
stored for each pixel—one for luminance ( Y) and two for color information (Cr and Cb).
Typically, computers store data in RGB color space, which also has three components for each
pixel—one each for the red, green, and blue parts of the image.
Information can be converted from one color space to the other. However, since the color
spaces are not identical, there are many colors in each space which cannot be described in the
other. These colors get “clipped” to the nearest value during conversion. This can cause very
saturated colors to become less intense and is referred to as “chroma clamping.”
Another problem between the two color spaces occurs because of the levels at which some DV
cameras produce Y values. In YCrCb color space, values are typically defined from 16–235,
while in RGB they range from 0–255. Some cameras produce Y values above the 235 range,
even as high as 254 (also known as super-white). When these values are converted to RGB,
they can’t go higher than 255. When the RGB value is converted back to YCrCb, it will have a
maximum value of 235, less than the original value, causing viewing differences in the media.
This is known as “luma clamping.”
Final Cut Pro 1.2.5 eliminates these two problems by processing in YCrCb when appropriate
and eliminating the conversion to and from RGB color space.
Working With the YCrCb Color Space
You can specify settings to take advantage of the new YCrCb color space rendering. These
options are in the Preset Editor and Sequence Settings windows.
Note: To use projects created in earlier versions of Final Cut Pro, you need to update them for
the new color space. For more information, see “Updating Projects Created With an Earlier
Version of Final Cut Pro” on page 7.
To select settings, follow these steps:
1 Do one of the following:
m Choose Settings from the Sequence menu.
m Choose Preferences from the Edit menu and click the Sequence Presets tab. Select a preset,
then click Edit.
2 Click the Video Processing tab.
6
Page 6

3 Select the desired options, then click OK.
Note: These options are available for codecs (compression/decompression standards) that
support YCrCb color space. To find out which codecs support this, go to the Final Cut Pro
Web site at www.apple.com/finalcutpro
m Always render in RGB: This forces codecs (compression/decompression standards) to be
processed in the RGB color space (instead of the YCrCb color space). Choosing this option
may cause color or intensity shifts in rendered material.
m “Process maximum white as” pop-up menu: This determines how RGB colors are mapped
into the YCrCb color space. You can use this option to match cameras that produce video
that is brighter than the standard white (also known as super-white). This option appears
only if “Always render in RGB” is not selected.
Updating Projects Created With an Earlier Version of Final Cut Pro
You can open and use projects created with an earlier version of Final Cut Pro, but you need to
specify how Final Cut Pro 1.2.5 handles these files in terms of the color space. Before updating
projects from earlier versions of Final Cut Pro, consider these things:
m Third-party scripts or scripts that you’ve already written or customized may need to be
modified to take full advantage of the YCrCb color space. For more information, go to the
Final Cut Pro Web site at www.apple.com/finalcutpro
7
Page 7

m All Final Cut Pro effects take advantage of the new color space. If you used any of the effects
listed below in previous projects, they may look slightly different when you recreate the
render files.
m Video Transitions: Map/Luminance Map, Wipe/Gradient Wipe
m Video Filters: Blur/Gaussian Blur; Channel/Invert; Image Control/Brightness and
Contrast, Gamma Correction, Levels, Proc Amp, Sepia, Tint; Key/Blue and Green Screen,
Color Key, Difference Matte
m Video Generators: Matte/Color
m Third-party Adobe
™
After Effects filters and QuickTime transitions and filters do not take
advantage of this new color space.
To update earlier projects, follow these steps:
1 When you open a project created using an earlier version of Final Cut Pro, a message says the
file’s format is outdated and asks if you want to update the format. Click Yes.
Click the appropriate checkboxes, then click OK.
2
Note: These options are available for codecs (compression/decompression standards) that
support YCrCb color space. To find out which codecs support this, go to the Final Cut Pro Web
site at www.apple.com/finalcutpro
Choosing these options will not rerender any material immediately. To render material if
necessary, you need to open the sequence and then render it.
m Update sequences for improved color fidelity: This sets the maximum white value to
super-white in the Video Processing panel of the Sequence Settings or Preset Editor
windows. All future rendering in the sequence will be done in YCrCb in super-white.
Note: If you check this option, the “Always render in RGB” option in the Sequence Settings
or Preset Editor window is not selected (see “Working With the YCrCb Color Space” on
page 6).
8
Page 8

m Remove existing render files: This deletes all render files on the scratch disk for the
sequences in this project. If you keep existing render files, the rendered media may have
sequences with color or intensity shifts. You cannot undo this action.
You’d want to keep existing render files if the quality difference is not a problem for your
projects, or if you need to get a project done fast and don’t want to rerender files. If you
keep existing render files and want consistent-looking media, you’ll have to rerender the
files because sequences in previously rendered media may have color or intensity shifts.
Important Deleted render files cannot be restored with the Undo command.
Working With Anamorphic 16:9 Media
In Final Cut Pro 1.2.5, you can capture, import, edit, and export anamorphic 16:9 media for
NTSC and PAL.
About 16:9 Media
Standard NTSC and PAL monitors have a picture aspect ratio of 4:3—the ratio of the width of
the visible area to the height of the visible area is 4/3, or 1.33. High Definition Television
(HDTV) uses several formats that have a picture aspect ratio of 16:9, or 1.78. If a program
recorded with an aspect ratio of 16:9 is displayed on a device with an aspect ratio of 4:3, black
bars are seen at the top and bottom of the picture, known as letterboxing.
If the original program material had 480 active lines (as in NTSC-DV ), then the area that
contains the active image for a letterboxed program is only 360 lines, or 75% of the total
viewable area. If this letterboxed program is recorded into a format that has an inherent
resolution of 480 lines, then 25% of the recorded material is empty.
To improve this situation, a technique called anamorphic transfer was developed. In this
process, the active area of the 16:9 program is stretched vertically to fill all 480 lines. To view
this type of material, the display device needs to squish the vertical dimension by 25%,
canceling out the stretch performed during recording. This puts 480 lines into a smaller
vertical space (360 lines), reducing the appearance of scan lines. If the source material is film,
which has no inherent line count, the vertical stretch is accomplished optically, giving an
increase in vertical resolution.
9
Page 9

Recording and Viewing 16:9 Media
With a camera that has an anamorphic lens adapter attached, recording can be done as usual.
In the camera’s viewfinder, the image will appear stretched vertically, and the recorded image
will only look correct on an NTSC or PAL monitor with a 16:9 setting.
Many DV cameras don’t squish an image to reproduce it in anamorphic form. If you have the
camera set to 16:9 mode, the image in the viewfinder will look correct, but the output of the
camera will need to be displayed on an NTSC or PAL monitor with a 16:9 setting to view it
properly.
Capturing and Importing 16:9 Media
When you capture 16:9 media, you need to specify that the material being captured is
anamorphic 16:9 in the Capture preferences. If you don’t, the media will fill the entire screen
image and look distorted.
You can import files that are in 16:9 aspect ratio. However, if you shoot DV with an anamorphic
lens but don’t mark it as 16:9 in the Capture preferences, the video will not be recognized as
16:9 when it is imported and you’ll need to change the settings in the Browser or in the Item
Properties windows.
To capture 16:9 media,
make sure there’s an X
in this checkbox.
10
Page 10

To batch capture 16:9 clips, select the appropriate capture preset in the Batch Capture
window. In the Capture Settings pop-up menu, choose Preset 1 or 2, which includes the
settings for 16:9 aspect ratio. You can also edit a sequence preset to specify the anamorphic
16:9 option in the Preset Editor window.
Choose Preset 1 or 2
in the pop-up menu
to batch capture 16:9
media.
Two new columns appear in the Browser, Anamorphic and Pixel Aspect, where you can edit
16:9 properties.
Two new columns appear
in the Browser.
11
Page 11

Make sure there’s an X
in this checkbox if
you’re creating a
16:9 sequence.
Creating 16:9 Sequences
To create a 16:9 sequence, specify the Anamorphic 16:9 option in the Sequence Settings or
Preset Editor window.
Editing Media
When you edit anamorphic 16:9 media, the following apply:
m All non-16:9 media added to a 16:9 sequence will be adjusted to match the pixel aspect
ratio.
m In the Viewer and Canvas, the default setting is “Show as Sq. Pixels” in the Zoom pop-up
menu. This properly adjusts anamorphic 16:9 content for viewing on the computer’s
monitor.
m Final Cut Pro will set the anamorphic bit in each DV frame rendered or played back.
12
Several new layouts are provided for properly arranging windows when editing anamorphic
material. These options appear in the Arrange submenu in the Window menu.
Page 12

The Item Properties window includes information on pixel aspect ratio, as well as an option for
Anamorphic 16:9 format.
If media is in 16:9 format,
an X appears in this checkbox.
Note: The Video Items section does not appear for clips that are already edited into a
sequence.
Rendering
m Any clips or sequences with anamorphic 16:9 settings selected in the Item Properties
window will be appropriately rendered in that format.
m When adding 16:9 clips to a 16:9 sequence, no rendering is necessary.
m If non-16:9 media is added to a 16:9 sequence, the new content is adjusted to maintain the
proper pixel aspect ratio and needs to be rendered.
13
Page 13

Exporting Media as 16:9
Any clips or sequences with anamorphic 16:9 settings in the Item Properties window will be
appropriately exported in that format.
If you want to export your video to a different format, such as a QuickTime movie for the Web
or CD-ROM, and maintain the widescreen look, you’ll need to use the correct aspect ratio so
the output height is 9/16 of the output width. To do this, follow these steps:
1 Capture and edit your 16:9 DV footage.
2 Choose Export from the File menu, then choose QuickTime from the submenu.
3 Click Options.
4 In the Video section, click Size, then click Use Custom Size.
5 Enter values for the width and height so the desired output height is 9/16 of the desired
output width (multiply the width by 0.5625), then click OK.
m If you are exporting to the native DV-NTSC size of 720 x 480, set the width to 720 and the
height to 405.
m If you want a smaller movie, for example, enter a width of 400 and a height of 225.
Exporting Reference Movies
You can output media as a QuickTime reference movie. When you do this, project files or
sequences are rendered to a single file that is very small. This QuickTime file contains
pointers, or references, to rendered video files and video files that don’t require rendering. All
audio files and all unrendered files are copied into the movie. This saves disk space and time,
since you don’t have to copy all of the files when exporting them.
14
Exporting as a reference movie is also useful if you are using other applications to recompress
files. You can also open a reference movie in another application and export the file to a
different format.
If you choose to make a reference movie, all audio tracks are copied into the movie. Any items
that need to be rendered will be rendered and put into the movie; the original file is not
rendered.
To export media as a QuickTime reference movie, follow these steps:
1 Select a clip or sequence in the Browser, or open the sequence in the Timeline.
2 Choose Export from the File menu, then choose Final Cut Pro Movie from the submenu.
Type a name under Export As.
3
Page 14

To create a reference
movie, make sure
there is no checkmark
in this checkbox.
4 Specify your settings, making sure there is no checkmark in the checkbox next to “Make Movie
Self-Contained.”
5 When you’re finished, click Save.
If you experience problems playing a reference movie.
If you encounter playback problems with a reference movie, export the media as a
self-contained movie (which includes all its media files), and not as a QuickTime reference
movie. To do this, make sure there is a checkmark in the “Make Movie Self-Contained”
checkbox in the Export dialog box.
You can also change
export options by
clicking Settings.
Doing a Batch Export
When you batch export files, a column titled Self-Contained appears in the Batch Export
window. If a checkmark appears in this column, Final Cut Pro will export the sequence as a
self-contained movie and not as a reference movie. You can change this option for the batch
by clicking in the column.
Items with a checkmark in
this column will be exported
as self-contained movies.
15
Page 15

To create a reference
movie, make sure there
is no X in this checkbox.
Another way to change this option is to click Settings, then select or deselect the Make
Self-Contained option.
16
Page 16

© 2000 Apple Computer, Inc. All rights reserved.
Apple, the Apple logo, Final Cut, FireWire, and QuickTime are trademarks of Apple Computer, Inc., registered in the U.S.
and other countries. Final Cut Pro is a trademark of Apple Computer, Inc. Adobe is a trademark of Adobe Systems Incorporated.
007-9375-A
Printed in U.S.A.
 Loading...