

Page 1

ELECTRONIC PRINTING CALCULATOR
DRUCKENDER TISCHRECHNER
CALCULATRICE IMPRIMANTE ÉLECTRONIQUE
CALCULADORA IMPRESORA ELECTRÓNICA
CALCOLATRICE ELETTRONICA STAMPANTE
ELEKTRONISK SKRIVANDE OCH VISANDE RÄKNARE
ELEKTRONISCHE REKENMACHINE MET AFDRUK
CALCULADORA ELETRÔNICA COM IMPRESSORA
ELEKTRONISESTI TULOSTAVA LASKIN
ENGLISH ............................................................... Page 2
CALCULATION EXAMPLES ................................. Page 115
DEUTSCH .............................................................. Seite 14
RECHNUNGSBEISPIELE ..................................... Seite 115
FRANÇAIS .............................................................Page 27
EXEMPLES DE CALCULS .................................... Page 116
ESPAÑOL .............................................................. Página 39
EJEMPLOS DE CÁLCULOS ................................. Página 116
ITALIANO .............................................................. Pagina 52
ESEMPI DI CALCOLO ...........................................Pagina 117
SVENSKA .............................................................. Sida 65
GRUNDLÄGGANDE RÄKNEEXEMPEL ............... Sida 117
NEDERLANDS ...................................................... Pagina 77
REKENVOORBEELDEN ....................................... Pagina 118
PORTUGUÊS ........................................................ Página 90
EXEMPLOS DE CÁLCULO ................................... Página 118
SUOMI ................................................................... Sivu 103
LASKENTAESIMERKKEJÄ ................................... Sivu 119
CS-4194H
OPERATION MANUAL
BEDIENUNGSANLEITUNG
MODE D’EMPLOI
MANUAL DE MANEJO
MANUALE DI ISTRUZIONI
BRUKSANVISNING
GEBRUIKSAANWIJZING
MANUAL DE INSTRUÇÕES
KÄYTTÖOHJE
Page 2

Notes for handling Lithium batteries:
CAUTION
Danger of explosion if battery is incorrectly replaced.
Replace only with the same or equivalent type recommended by
the manufacturer.
Dispose of used batteries according to the manufacturer’s
instructions.
Hinweise zur Handhabung von Lithium-Batterien:
VORSICHT
Bei Verwendung einer uneeigneten Ersatzbatterie besteht
Explosionsgefahr.
Nur durch den gleichen oder einen vom Hersteller empfohlenen
gleichwertigen Typ ersetzen.
Verbrauchte Batterien gemäß Herstelleranleitung entsorgen.
Remarques sur la manipulation des piles au lithium:
ATTENTION
Danger d’explosion de la pile si elle n’est pas remplacée
correctement.
Remplacez-la uniquement par le même type de pile ou un type
équivalent recommandé par le fabricant.
Débarrassez-vous des piles usagers en respectant les
instructions du fabricant.
Notas para el manejo de las baterías de litio:
PRECAUCIÓN
Peligro de explosión si reemplaza incorrectamente la batería.
Reemplácela por otra igual o de tipo equivalente recomendada
por el fabricante.
Deshágase de las baterías de acuerdo con las instrucciones del
fabricante.
Note concernenti le batterie al litio:
AVVERTENZA
Se la batteria non viene sostituita in modo corretto c’è pericolo di
esplosioni.
Sostituire la batteria con una dello stesso tipo o con una
equivalente raccomandata dalla fabbrica.
Smaltire le batterie usate seguendo le istruzioni della fabbrica.
Observera om hantering av litiumbatterier:
OBSERVERA!
Felaktigt batteribyte medför risk för explosion.
Byt endast ut batteriet mot ett batteri av samma eller
motsvarande typ rekommenderat av tillverkaren.
Kassera ett förbrukat batteri enligt tillverkarens anvisningar.
Opmerkingen betreffende de behandeling van lithiumbatterijen:
LET OP
Ontploffingsgevaar indien de batterij verkeerd wordt aangebracht.
Vervang uitsluitend door een batterij van hetzelfde of een
gelijkwaardig type, aanbevolen door de fabrikant.
Gooi gebruikte batterijen weg overeenkomstig de instructies van
de fabrikant.
Notas para o manuseio de pilhas de lítio:
PRECAUÇÃO
Existe o perigo de explosão se a pilha for trocada incorretamente.
Troque apenas com o mesmo tipo ou equivalente recomendado
pelo fabricante.
Descarte-se das pilhas usadas de acordo com as instruções do
fabricante.
Huomautuksia litiumparistojen käsittelystä:
HUOMAUTUS
Räjähdysvaara, jos paristo vaihdetaan väärin.
Paristo tulee vaihtaa vain samaniaiseen tai valmistajan
suosittelemaan vastaavaan tyyppiin.
Hävitä käytetyt paristot valmistajan antamien ohjeiden mukaisesti.
Page 3

Caution!
The socket outlet shall be installed near the equipment and shall be easily accessible.
Vorsicht!
Die Netzsteckdose muß in der Nähe des Gerätes angebracht und leicht zugänglich sein.
Attention!
La prise de courant murale doit être installée à proximité de l’appareil et doit être facilement
accessible.
Aviso!
El tomacorriente debe estar instalado cerca del equipo y debe quedar bien accesible.
Attenzione!
La presa della corrente deve essere installata in prossimità dell’apparecchio ed essere facilmente
accessibile.
Observera!
Anslut till ett vägguttag som återfinns nära enheten och är lätt åtkomligt.
Let op!
Het stopcontact moet in de buurt van het apparaat zijn en ook gemakkelijk toegankelijk zijn.
Atenção!
A tomada elétrica deve estar perto do equipamento e ser de fácil acesso.
Huomautus!
Pistorasia tulee asentaa laitteen lähelle paikkaan, jossa sen käyttöä on helppoa.
1
Page 4
ENGLISH
OPERATIONAL NOTES
To insure trouble-free operation of your SHARP
calculator, we recommend the following:
1. The calculator should be kept in areas free from
extreme temperature changes, moisture, and
dust.
2. A soft, dry cloth should be used to clean the
calculator. Do not use solvents or a wet cloth.
3. Since this product is not waterproof, do not use
it or store it where fluids, for example water, can
splash onto it. Raindrops, water spray, juice,
coffee, steam, perspiration, etc. will also cause
malfunction.
4. While the memory protection battery is not
installed, the tax/discount rate set up will be
cleared upon terminating the AC power supply.
The tax/discount rate set up will also be cleared
when the memory protection battery is removed
from the unit.
5. If service should be required on this equipment,
use only a SHARP servicing dealer, a SHARP
approved service facility or SHARP repair service
where available.
6. Do not wind the AC cord around the body or
otherwise forcibly bend or twist it.
• INSTALLING OF BATTERY FOR MEMORY
PROTECTION ................................................... 3
• OPERATING CONTROLS ................................ 4
• INK RIBBON REPLACEMENT ......................... 8
• PAPER ROLL REPLACEMENT ........................9
• ERRORS ......................................................... 10
• REPLACEMENT OF BATTERY FOR
MEMORY PROTECTION ................................ 10
• SPECIFICATIONS........................................... 12
• RESETTING THE UNIT .................................. 13
• CALCULATION EXAMPLES ......................... 115
• TAX RATE CALCULATIONS ......................... 134
• DISCOUNT RATE CALCULATION ............... 138
SHARP will not be liable nor responsible for any
incidental or consequential economic or
property damage caused by misuse and/or
malfunctions of this product and its peripherals,
unless such liability is acknowledged by law.
2
CONTENTS
Page
Page 5
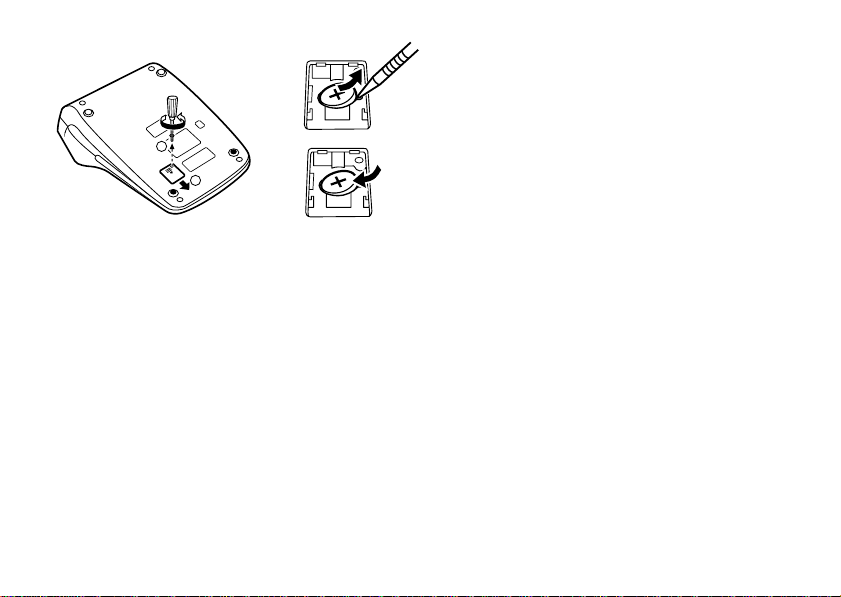
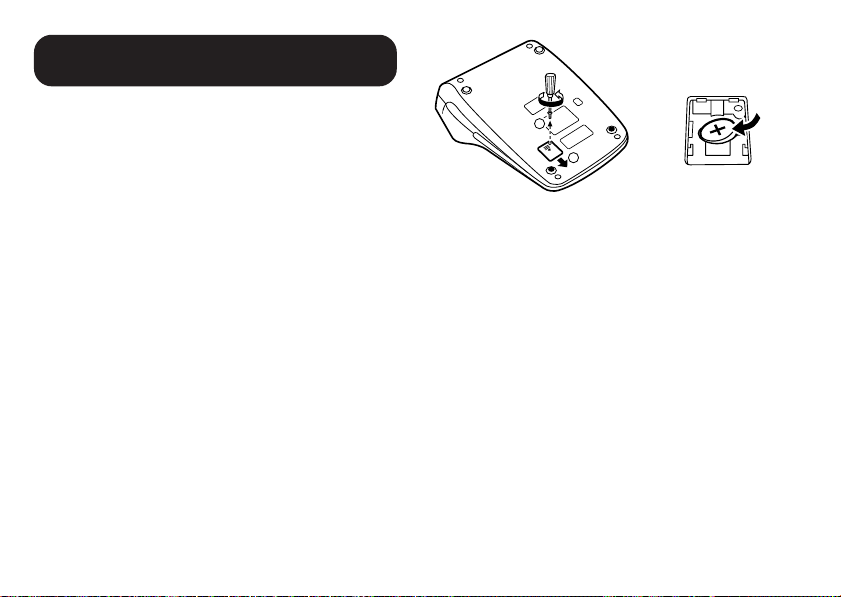
INSTALLING OF BATTERY FOR MEMORY PROTECTION
Before using for the first time, remove the attached
lithium battery, and install it in the equipment
according to the following procedure.
If the power cord is unplugged by accident when
operating with AC power only, the set tax rate and
the contents of memory will be lost.
1) Turn the power switch “OFF” and unplug the
power supply plug from the outlet.
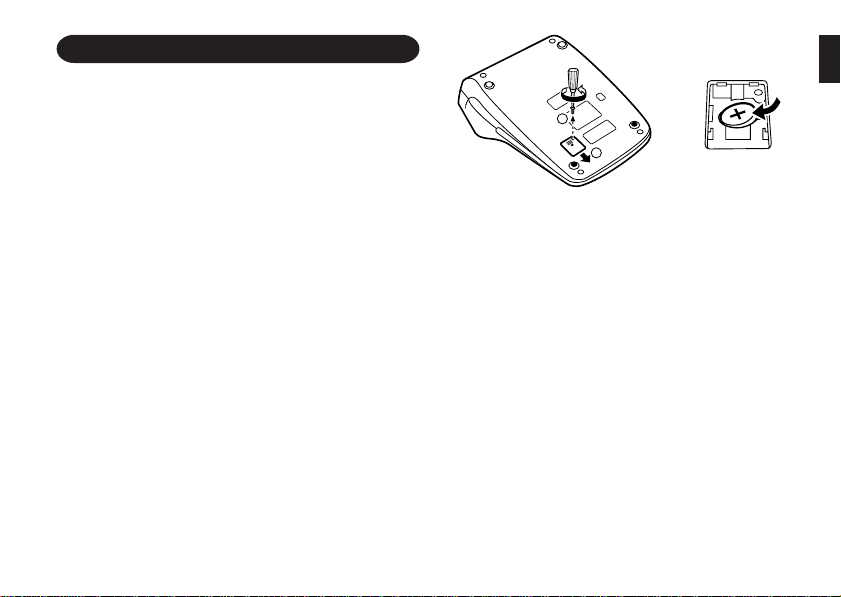
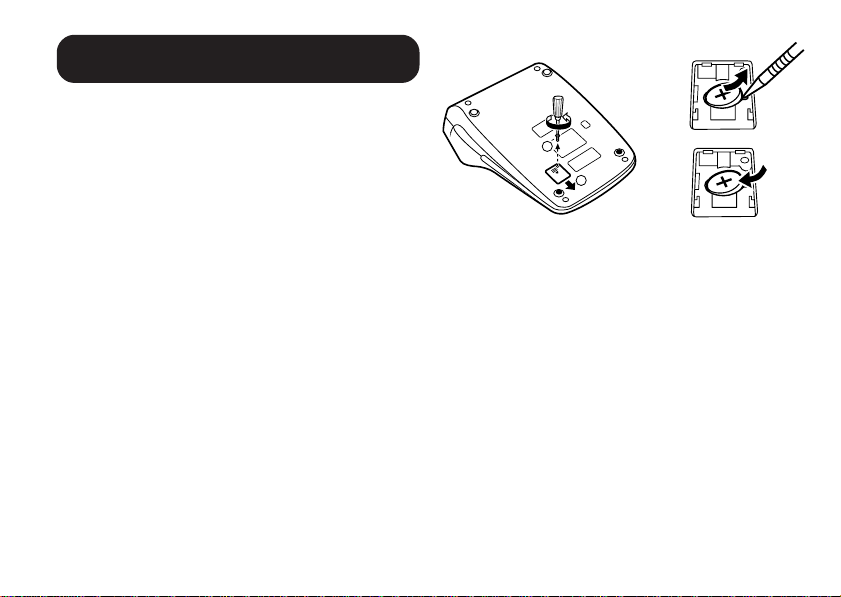
2) Remove the battery cover on the back of the unit.
(Fig. 1)
3) Wipe the battery well with a dry cloth and place
the plus “+” side upward. (Fig. 2)
4) Replace the battery cover by reversing the
removal procedure.
5) Press the RESET switch on the back of the unit
(See page 13).
1
2
Fig. 1 Fig. 2
After battery installation
• Connect the power supply plug to an outlet and
turn the power switch “ON”.
Check that “0.” is displayed. If “0.” is not
displayed, remove the battery, reinstall it, and
check the display again.
• On the battery replacement date label found on
the back of the unit, write down the month and
year when the battery is installed, as a reference
for the next battery replacement.
3
Page 6
OPERATING CONTROLS
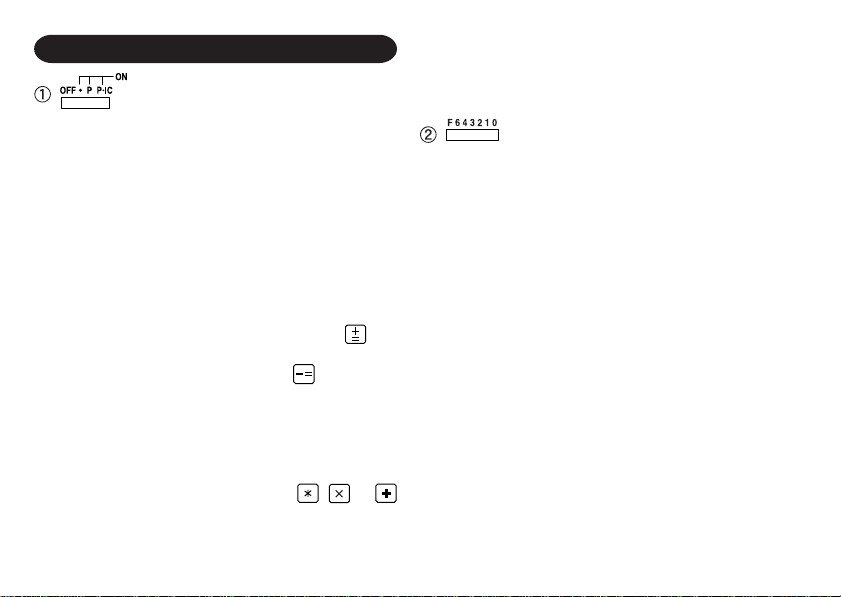
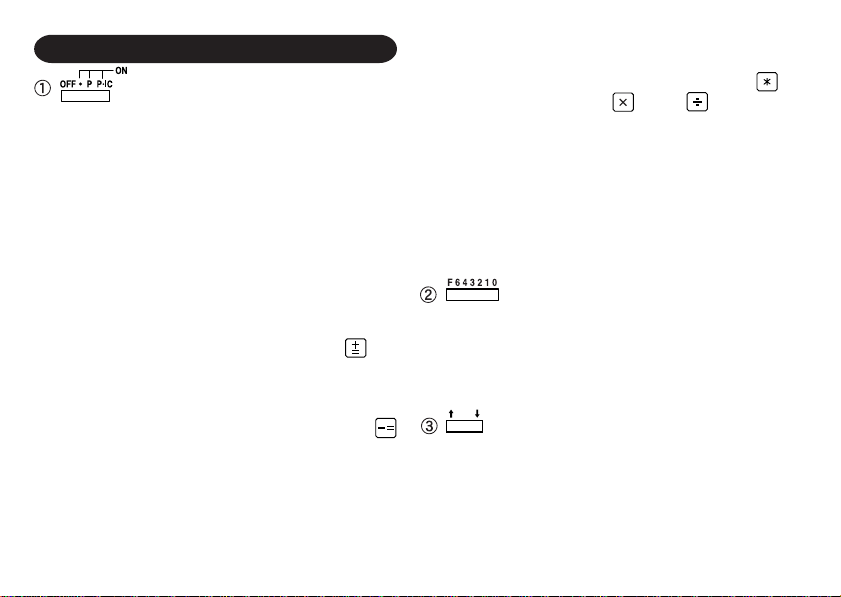
POWER SWITCH; PRINT / ITEM
COUNT MODE SELECTOR:
“OFF”: Power OFF.
“•”: Power ON. Set to the non-
print mode.
(“••• ...• • • –” will be printed.)
“P”: Power ON. Set to the print
mode.
(“••• ...• • • +” will be printed.)
“P•IC”: Power ON. Set to the print
and item count mode.
The counter will count the
number of times that
been pressed in addition.
Notes: • Each time
subtraction, 1 will be
subtracted from the count.
• The count is printed when
the calculated result is
obtained.
• Pressing of
clears the counter.
• The counter has a
maximum capacity of 3
has
is used in
, or
4
digits (up to ±999).
If the count exceeds the
maximum, the counter will
recount from zero.
DECIMAL SELECTOR:
Presets the number of decimal
places in the answer.
In the “F” position, the answer is
displayed in the floating decimal
system.
Page 7
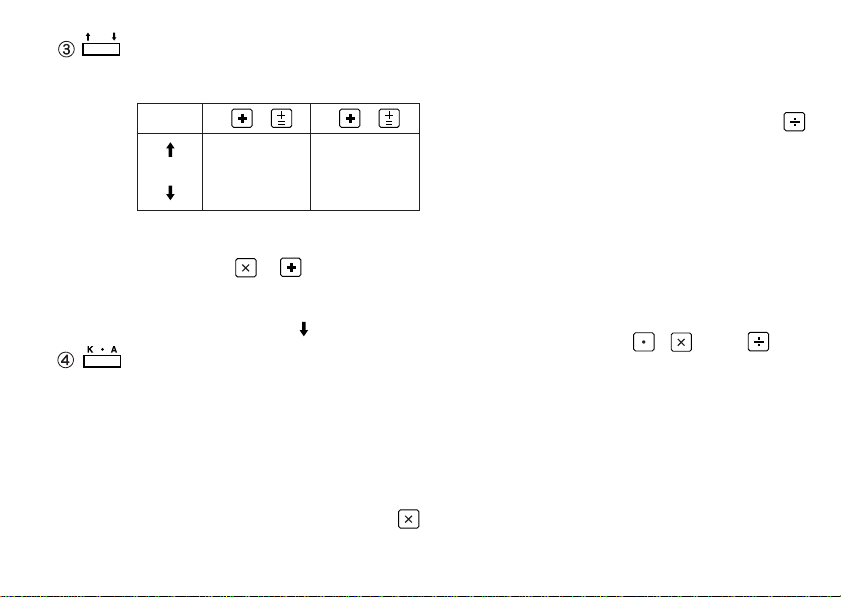
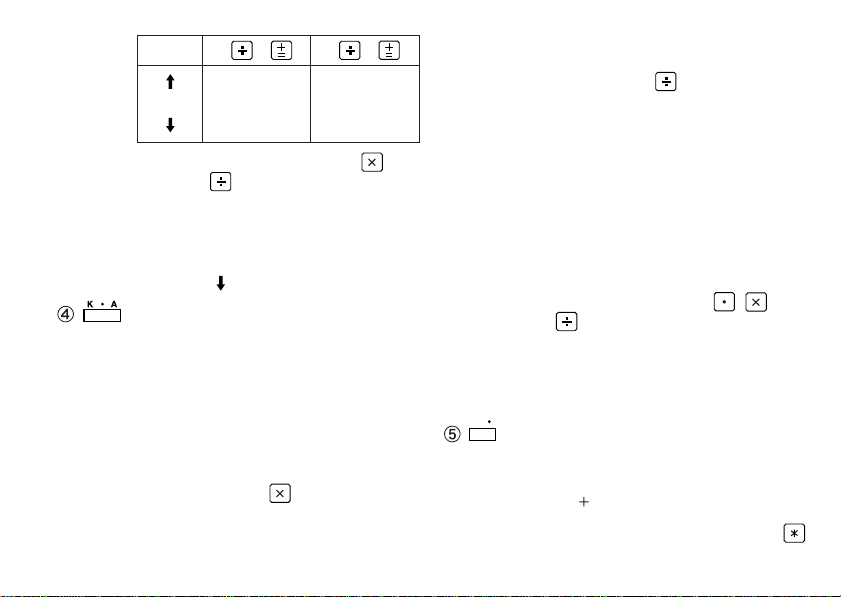
5/4
ROUNDING SELECTOR:
Example: Set decimal selector to “2”.
4
÷
9 = 0.444 ... , 5 ÷ 9 = 0.555 ...
9 5 9
4
0.45 0.56
5/4 0.44 0.56
0.44 0.55
Note: The decimal point floats during
successive calculation by the
use of
If the decimal selector is set to
“F” then the answer is always
rounded down (
CONSTANT / ADD MODE
SELECTOR:
“K” : The following constant functions
will be performed:
Multiplication: The calculator will
or .
).
automatically remember the first
number entered (the
multiplicand) and
instruction.
Division: The calculator will
“•”: Neutral
“A”: Use of the Add mode permits
addition and subtraction of
numbers without entry of the
decimal point. When the Add
mode is activated, the decimal
point is automatically positioned
according to the decimal selector
setting.
Use of
automatically override the Add
mode and decimally correct
answers will be printed at the
preset decimal position.
automatically remember the second
number entered (the
divisor) and
instruction.
, , and will
5
Page 8
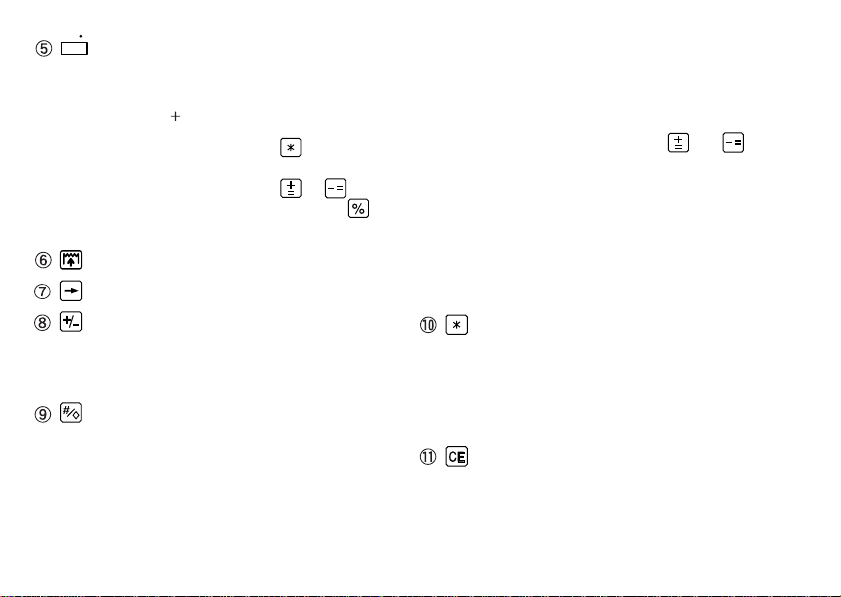
GT
GRAND TOTAL MODE SELECTOR:
“GT”: This selector will accumulate the
following:
✱
” will be printed.)
(“
1. Addition and subtraction totals
obtained with
.
2. Product and quotient totals
obtained with
3. Results obtained using
or .
.
“•”: Neutral
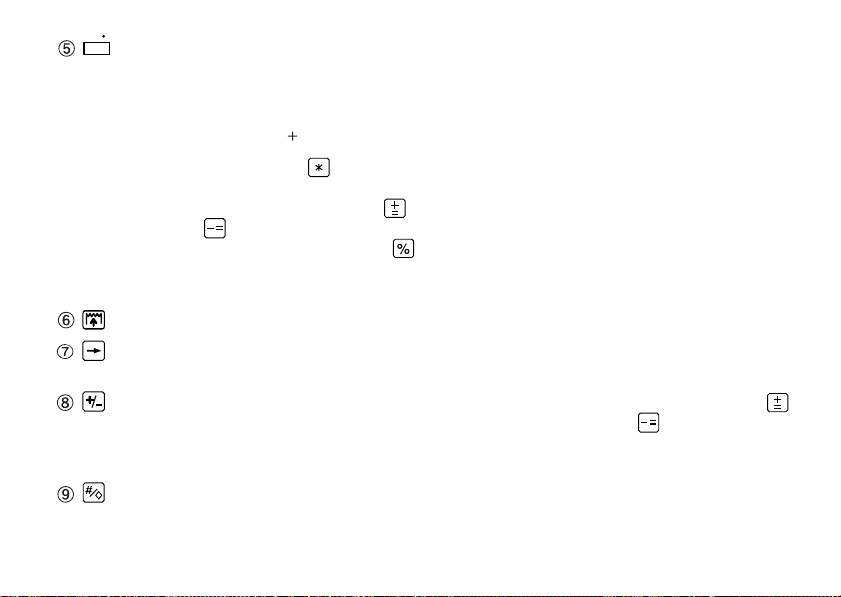
PAPER FEED KEY
LAST DIGIT CORRECTION KEY
CHANGE SIGN KEY:
Changes the algebraic sign of a
number (i.e. positive to negative or
negative to positive).
NON-ADD / SUBTOTAL KEY:
Non-Add – When this key is pressed
right after entry of a
number in the Print mode,
the entry is printed on the
left-hand side with “#”.
This key is used to print
out numbers not subject to
6
calculations such as
codes, dates, etc.
Subtotal – Used to get subtotal(s) of
additions and/or subtractions. When pressed
following
subtotal is printed with “
or , the
◊
and the calculation may be
continued.
By pressing this key even in the
Non-print mode, the displayed
number is printed without any
symbol.
TOTAL KEY:
Prints the total of addition and
subtraction with “ ✱ ”.
This key also serves as a clear key for
the calculation register and resets an
error condition.
CLEAR ENTRY KEY:
Clears numbers entered prior to use of
a function key.
Also used to clear an overflow error
caused by an entry.
”
Page 9
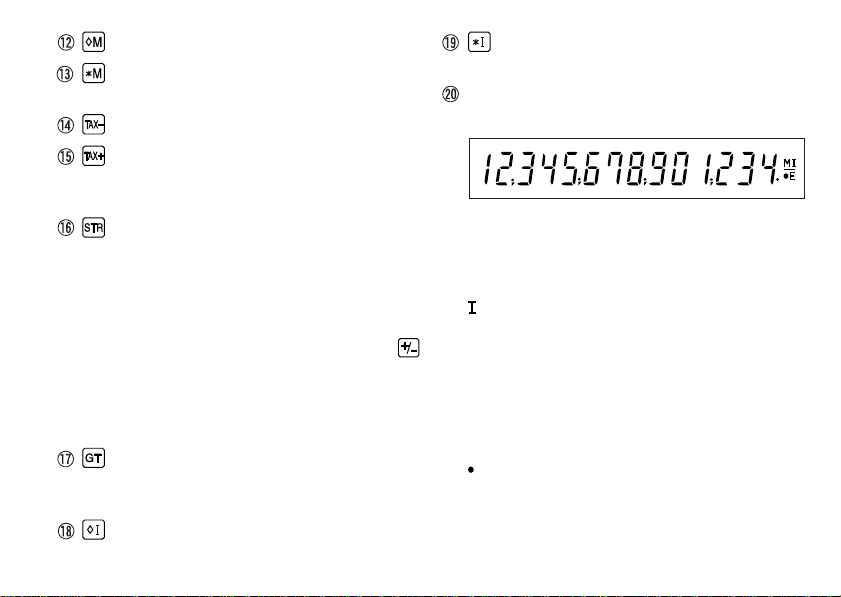
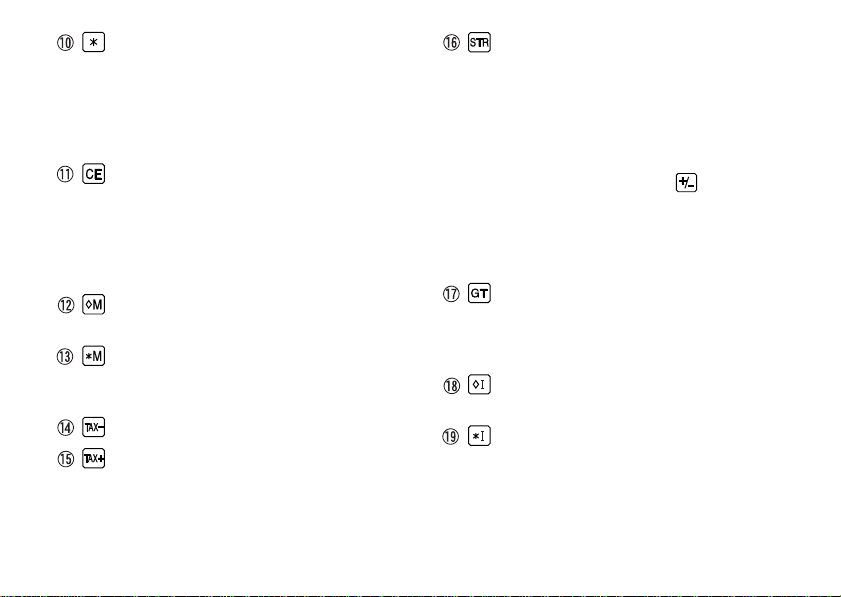
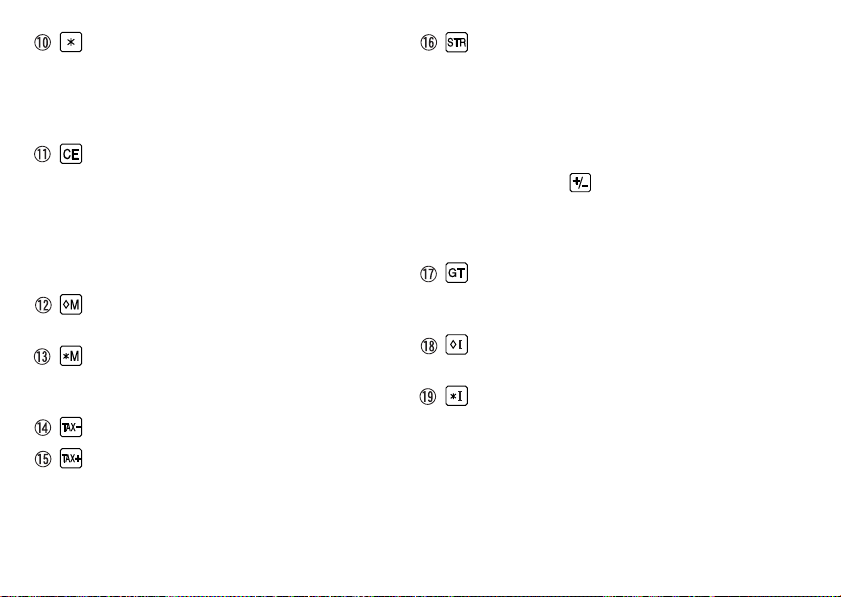
FIRST RECALL MEMORY KEY
FIRST RECALL AND CLEAR
MEMORY KEY
PRE-TAX KEY
TAX-INCLUDING KEY:
This key is used for calculations with
the tax/discount rate.
STORE KEY:
This key is used to store the tax/
discount rate.
• A maximum of 4 digits can be stored
(decimal point is not counted as a
digit).
• To store a discount rate, press
first.
• Only one rate can be stored. If you
enter a new rate, the previous rate
will be cleared.
GRAND TOTAL KEY:
Prints and clears the “GT” memory
contents.
SECOND RECALL MEMORY KEY
* Although all available symbols are shown here
for instruction purposes, these symbols will not
appear on the screen simultaneously.
7
SECOND RECALL AND CLEAR
MEMORY KEY
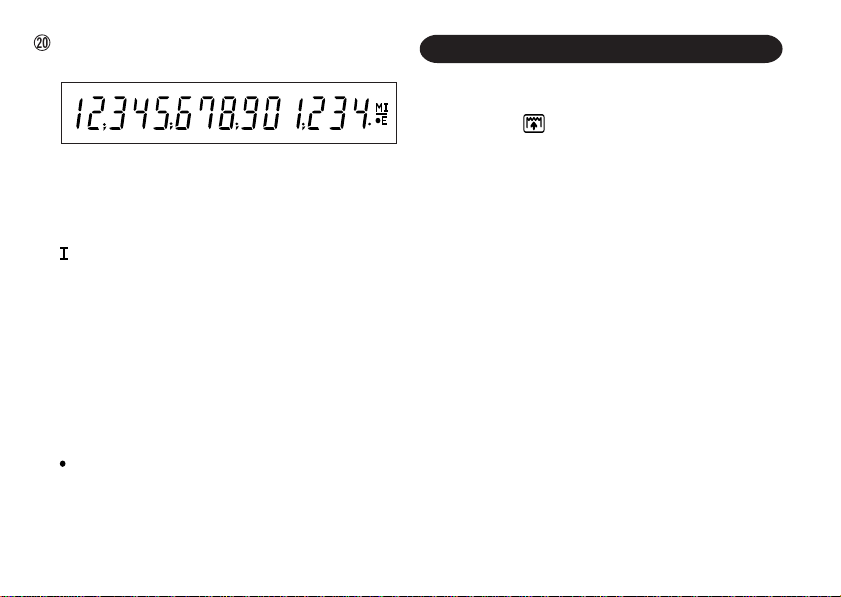
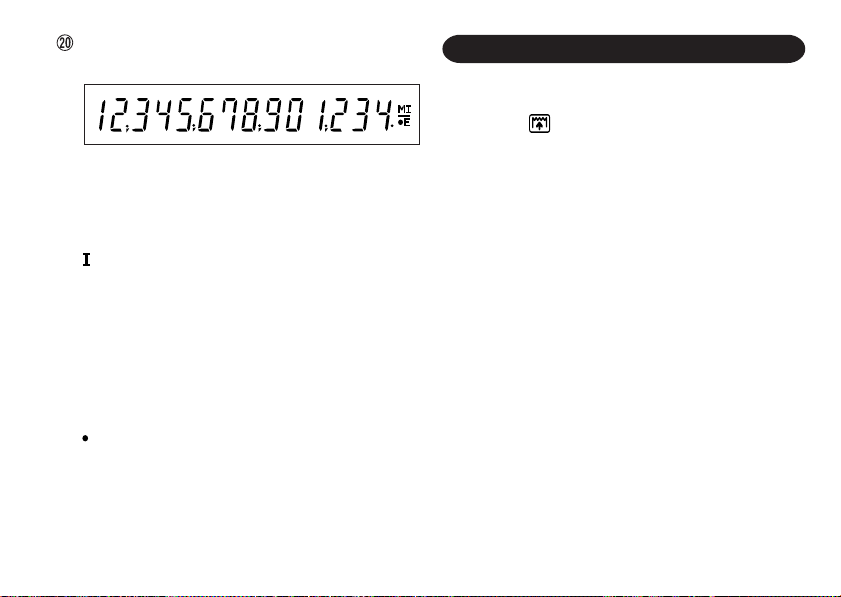
DISPLAY
Display format:
Symbols:
M : First memory symbol
Appears when a number has been
stored in First memory.
: Second memory symbol
Appears when a number has been
stored in Second memory.
– : Minus symbol
Appears when a number is a negative.
E : Error symbol
Appears when an overflow or other error
is detected.
: Grand total memory symbol
Appears when a number is in the grand
total memory.
Page 10

INK RIBBON REPLACEMENT
1. Remove the paper roll from the calculator. (Tear
the paper and remove it from the print
mechanism by using
2. Set the power switch to OFF.
Make sure that the print wheel has stopped.
3. Remove the printer cover by sliding it towards
the back of the calculator. (Fig. 1)
4. Remove the used ribbon.
5. Install the new ribbon.
6. With the black side of the ribbon facing upwards,
place one of the reels on the reel shaft on the
right. (Fig. 2) Make sure that the reel is securely
in place.
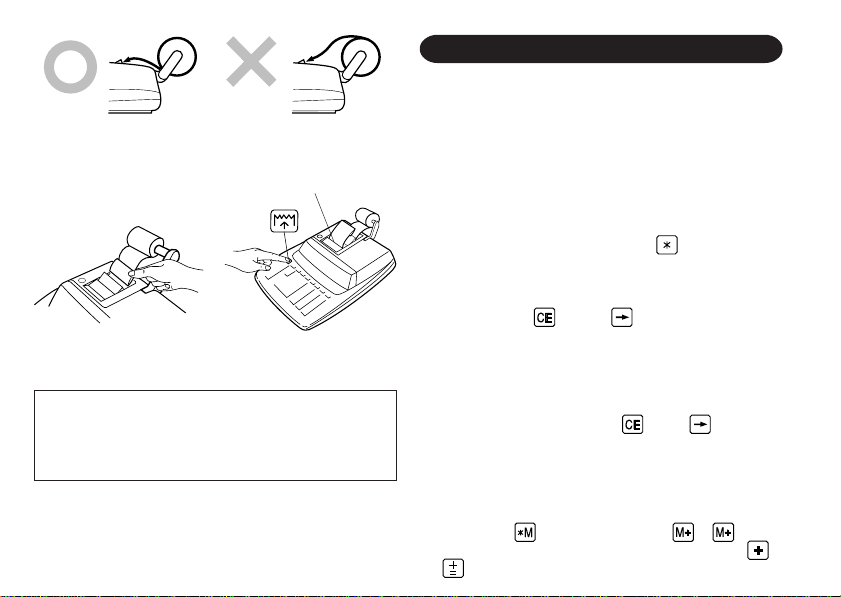
7. Thread the ribbon around the outside of the
metal guides. (Fig. 3)
8. Take up any slack by manually turning one of
the reels.
9. Replace the printer cover.
10. Replace the paper roll.
.)
Printer cover
Fig. 1
Reel
Reel shaft
Ink ribbon
Ink ribbon
Fig. 2
Fig. 3
8
Page 11
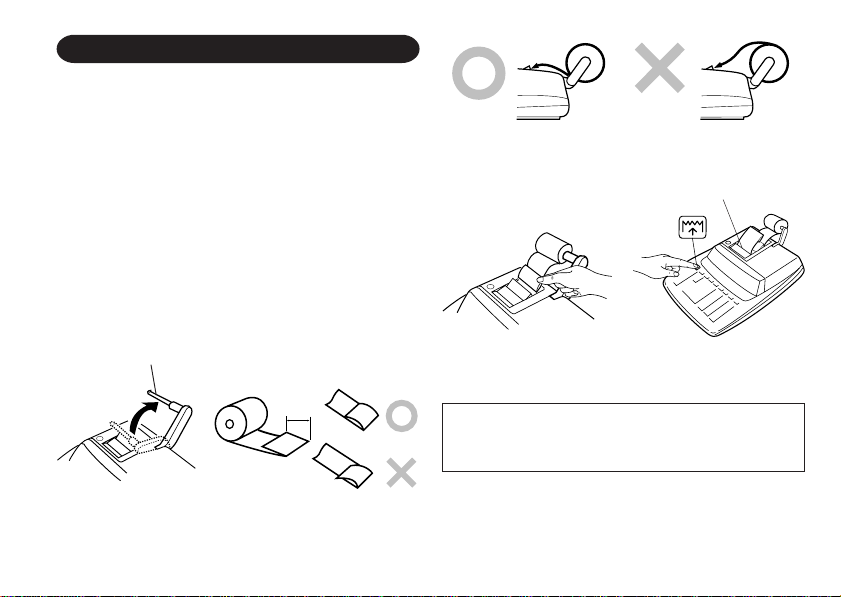
PAPER ROLL REPLACEMENT
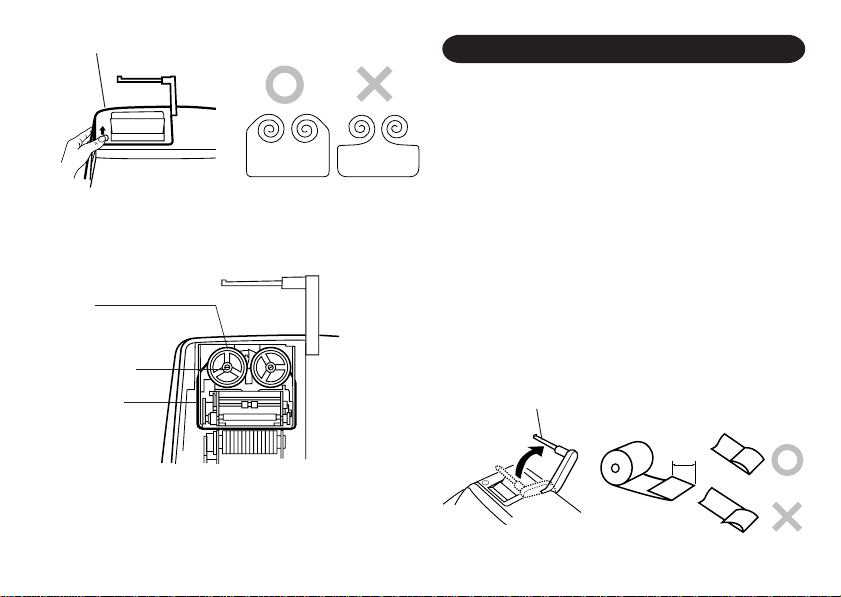
1. Lift the paper holder up. (Fig. 1)
2. Fold the leading edge of the paper roll 3 to 5 cm.
(Do not fold it slantwise.) (Fig. 2)
3. Insert the paper roll from the left side of the paper
holder and make sure the paper roll is set in the
proper direction (with the paper feeding from the
bottom). (Fig. 3)
4. Insert the leading edge of the paper into the
opening directly behind the print mechanism.
(Fig. 4)
5. Press the paper feed key and feed the paper
under the edge of the paper cutter. (Fig. 5)
Fig. 3
Paper cutter
Paper holder
3 cm – 5 cm
(1-3/16″ to
1-31/32″)
DO NOT PULL PAPER BACKWARDS AS THIS
MAY CAUSE DAMAGE TO PRINTING
MECHANISM.
Fig. 1
Fig. 2
9
Fig. 4
Fig. 5
Page 12
ERRORS
There are several situations which will cause an
overflow or an error condition. When this occurs,
the error symbol “E” will be displayed and all keys
will electronically lock.
The contents of the memory at the time of the error
are retained.
If “0•E” then “
of an error (in Non-print mode, error symbols are
only displayed),
calculator.
If an “E” with any numerals except zero is
displayed, the error may be cleared with
and the calculation can still be continued.
Error conditions:
1. Entry of more than 14 digits or 13 decimals.
This error can be cleared with
2. When the integer portion of an answer exceeds
14 digits.
3. When the integer portion of the contents of the
memory exceeds 14 digits.
(Ex.
4. When any number is divided by zero. (Ex. 5
0 )
, , , , , , ,
” is printed in red at the time
must be used to clear the
or .
99999999999999 1 )
or
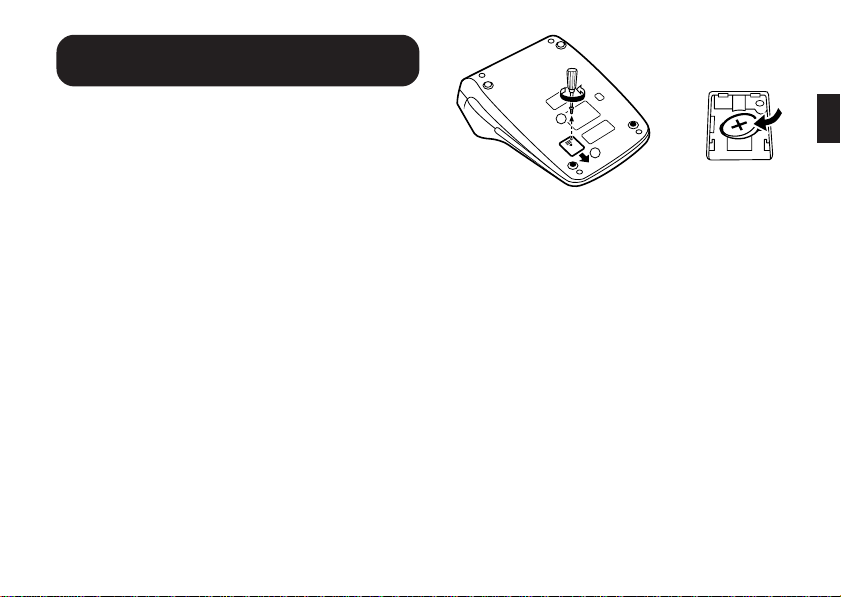
REPLACEMENT OF BATTERY FOR MEMORY PROTECTION
Time for battery replacement
Replace with a new battery once 2 year.
Method of battery replacement
Use one lithium battery (CR2032).
Note: When replacing the battery, the set tax rate
1) Turn the power switch “OFF” and unplug the
power supply plug from the outlet.
2) Remove the battery cover on the back of the unit.
(Fig. 1)
3) Remove the exhausted battery and install one
new lithium battery. Wipe the battery well with a
dry cloth and place the plus “+” side upward. (Fig.
2)
4) Replace the battery cover by reversing the
removal procedure.
5) Press the RESET switch on the back of the unit
(See page 13).
10
and the memory contents will be lost.
You may want to write down the tax rate and
other important numbers on a sheet of paper.
Page 13
Precautions on battery use
• Do not leave an exhausted battery in the
equipment.
• Do not expose the battery to water or flame, and
do not take it apart.
1
2
• Store batteries out of the reach of small children.
Fig. 1
Fig. 2
After battery replacement
• Connect the power supply plug to an outlet and
turn the power switch “ON”.
Check that “0.” is displayed. If “0.” is not
displayed, remove the battery, reinstall it, and
check the display again.
• Reset the tax rate.
• On the battery replacement date label found on
the back of the unit, write down the month and
year when the battery is replaced, as a reference
for the next battery replacement.
11
Page 14

SPECIFICATIONS
Operating capacity: 14 digits
Power supply: Operating:
Memory Protection Battery lifespan:
Calculations: Four arithmetic calcula-
AC: 220V–230V, 50Hz
Memory backup:
(DC)
3V
(Lithium battery CR2032 ×
1)
Approx. 2 years. (tested
and confirmed at 25°C
(77°F); may change due to
usage environment)
tions, constant multiplication and division, power
calculation, add-on/discount calculation, repeat
addition and subtraction,
reciprocal calculation,
grand total calculation,
item count calculation,
markup calculation,
memory calculation, etc.
PRINTING SECTION
Printer: Mechanical printer
Printing speed: Approx. 4.3 lines/sec.
Printing paper: 57 mm (2-1/4") ~ 58 mm
(2-9/32") wide
80 mm (3-5/32") in
diameter (max.)
Operation temperature: 0°C ~ 40°C (32°F ~ 104°F)
Power consumption: 53 mA
Dimensions: 250 mm (W) × 345 mm (D)
× 78 mm (H)
9-27/32" (W) × 13-19/32"
(D) × 3-1/16" (H)
Weight: Approx. 2.0 kg (4.41 lb.)
(with battery)
Accessories: 1 lithium battery, 1 battery
replacement date label
(attached on the unit’s
back body), 1 paper roll, 1
ink ribbon and operation
manual
12
Page 15
WARNING
THE VOLTAGE USED MUST BE THE SAME
AS SPECIFIED ON THIS CALCULATOR.
USING THIS CALCULATOR WITH A VOLTAGE
HIGHER THAN THAT SPECIFIED IS
DANGEROUS AND MAY RESULT IN A FIRE
OR OTHER TYPE OF ACCIDENT CAUSING
DAMAGE. SHARP WILL NOT BE HELD
RESPONSIBLE FOR ANY DAMAGE
RESULTING FROM USE OF THIS
CALCULATOR WITH OTHER THAN THE
SPECIFIED VOLTAGE.
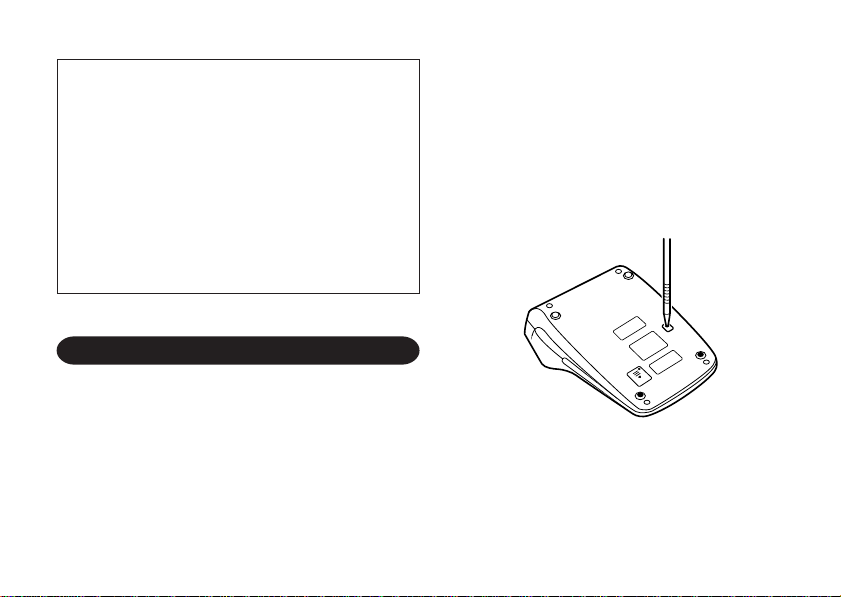
Notes:
• Pressing the RESET switch will clear the stored
tax rate and other data stored in the memory.
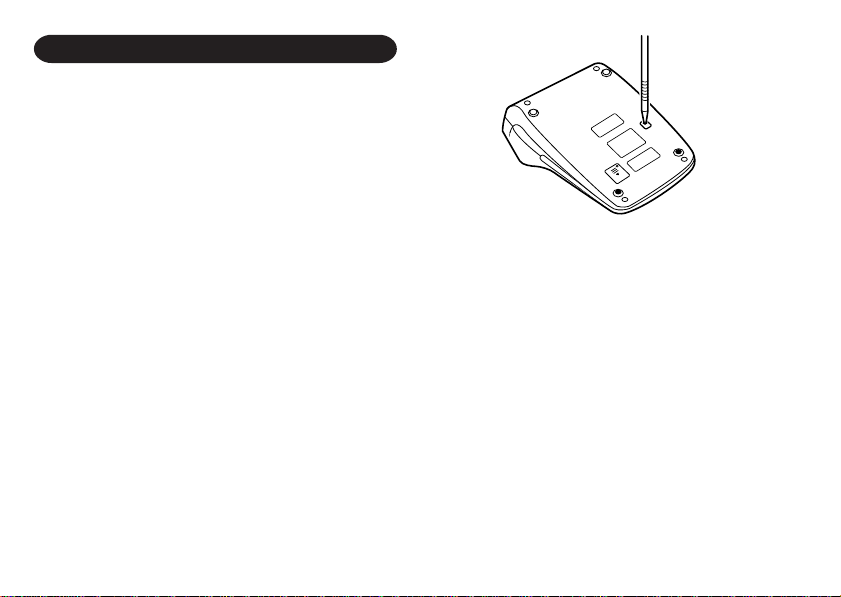
• Use only a ballpoint pen to press the RESET
switch. Do not use anything breakable or anything
with a sharp tip, such as a needle.
• After pressing the RESET switch, connect the
power supply plug to an outlet. Turn the power
switch “ON” and check that “0.” is displayed.
RESETTING THE UNIT
Strong impacts, exposure to electrical fields, or other
unusual conditions may render the unit inoperative,
and pressing the keys will have no effect. If this
occurs, you will have to press the RESET switch on
the bottom of the unit. The RESET switch should
be pressed only when:
• an abnormal event occurs and all keys are
disabled.
• you install or replace the battery.
13
Page 16
DEUTSCH
HINWEISE ZUM BETRIEB
Um den störungsfreien Betrieb dieses Rechners
von SHARP zu gewährleisten, empfehlen wir
folgende Massnahmen:
1. Verwenden Sie den Rechner nicht an Orten, an
denen hohe Temperaturunterschiede, hohe
Luftfeuchtigkeit oder Staub vorhanden ist.
2. Verwenden Sie ein weiches, trockenes Tuch zum
Reinigen des Rechners. Keine Lösungsmittel
oder ein feuchtes Tuch verwenden.
3. Da dieses Gerät nicht wasserbeständig ist, sollte
es nicht an Orten verwendet werden, an denen
Flüssigkeiten wie Wasser auf dem Gerät
verschüttet werden können. Wassertropfen,
Wasserspray, Saft, Kaffee, Dampf, Schweiss
usw. können Fehlfunktionen verursachen.
4. Wenn die Speichersicherungs-Batterie nicht
eingesetzt ist, werden nach dem Abtrennen des
Gerätes von der Stromversorgung die Raten für
Steuer und Abschlag gelöscht.
Die Raten für Steuer und Abschlag werden auch
gelöscht, wenn die Speichersicherungs-Batterie
aus dem Gerät entfernt wird.
5. Wenn eine Reparatur notwendig ist, beauftragen
Sie nur einen SHARP-Händler, einen von
SHARP zugelassenen Kundendienst oder einen
SHARP-Reparaturdienst.
6. Wickeln Sie das Netzkabel nicht um das Gerät
oder knicken oder biegen Sie es nicht.
• EINSETZEN DER BATTERIE ZUM
SPEICHERSCHUTZ ....................................... 15
• BETRIEBSTASTEN......................................... 16
• ERSETZEN DES FARBBANDES ...................20
• ERSETZEN DER PAPIERROLLE................... 21
• FEHLER ..........................................................22
• AUSWECHSELN DER BATTERIEN FÜR
DEN SPEICHERSCHUTZ ............................... 23
• TECHNISCHE DATEN ....................................24
• RÜCKSTELLUNG DES GERÄTES ................ 26
• BERECHNUNGSBEISPIELE ........................ 115
•B
ERECHNUNGEN DER STEUERRATE ........
• BERECHNUNGEN DER ABSCHLAGRATE . 138
SHARP übernimmt keine Verantwortung oder
Haftung für irgendwelche zufälligen oder aus
der Verwendung folgenden wirtschaftlichen oder
sachlichen Schäden, die aufgrund der falschen
Verwendung bzw. durch Fehlfunktionen dieses
Gerätes und dessen Zubehör auftreten,
ausgenommen diese Haftung ist gesetzlich
festgelegt.
14
INHALT
Seite
134
Page 17
EINSETZEN DER BATTERIE ZUM
SPEICHERSCHUTZ
Vor der erstmaligen Verwendung des Gerätes die
mitgelieferte Lithiumbatterie entfernen und sie
folgendermaßen im Gerät einsetzen.
Wenn das Netzkabel aus Versehen bei Betrieb des
Gerätes mit Wechselstrom von der Steckdose
abgetrennt wird, werden die eingestellte Steuerrate
und der Speicher gelöscht.
1) Den Netzschalter auf die Position “OFF”
einstellen und den Netzstecker von der
Steckdose abtrennen.
2) Die Batterieabdeckung auf der Rückseite des
Gerätes entfernen. (Abb. 1)
3) Die Batterie mit einem trockenen Tuch
abwischen und mit der Seite “+” nach oben
einlegen. (Abb. 2)
4) Die Batterieabdeckung wieder anbringen.
5) Den RESET-Schalter auf der Rückseite des
Gerätes drücken (siehe Seite 26).
Nach dem Einsetzen der Batterie
• Den Netzstecker an eine Steckdose anschließen
und den Netzschalter auf die Position “ON”
einstellen.
Sicherstellen, daß “0.” angezeigt wird. Wenn “0.”
nicht angezeigt wird, entfernen Sie die Batterie
und setzen Sie erneut ein; danach wieder die
Anzeige prüfen.
• Bitte notieren Sie als Anhaltspunkt für den
nächsten Batteriewechsel das Jahr und den
Monat, in dem die Batterie eingelegt wurde, auf
dem Batteriewechsel-Datenaufkleber der
Geräterückseite.
15
1
Abb. 1
2
Abb. 2
Page 18
BETRIEBSTASTEN
BETRIEBSTASTE; WAHLSCHALTER FÜR DRUCKEN/
POSTENZÄHLER:
“OFF”: Ausschalten.
“•”: Einschalten. Einstellung der
Betriebsart ohne Ausdruck.
(“•
• •
“P”: Einschalten. Einstellung der
“P•IC”: Einschalten. Einstellung auf
Hinweise: • Beim Drücken von
... • • • –” wird gedruckt.)
Betriebsart für Ausdruck.
• •
... • • • +” wird gedruckt.)
(“•
Ausdruck und Betriebsart für
Postenzähler.
Beim Drücken von
einer Addition wird jedesmal
eine Eins zum Postenzähler
hinzugefügt.
bei einer Subtraktion
wird jedesmal eine Eins
vom Postenzähler
abgezählt.
• Der Zähler wird
gedruckt, wenn ein
bei
5/4
16
Ergebnis ausgegeben
wird.
• Durch Drücken von
oder wird der
Zähler gelöscht.
• Der Zähler hat eine
maximale Kapazität von
drei Stellen (bis ±999).
Wenn der Zähler den
Maximalwert überschreitet, wird er wieder
auf Null zurückgestellt.
KOMMA-TABULATOR:
Einstellung der Anzahl der Dezimalstellen für das Ergebnis.
Bei Einstellung auf “F” wird das
Ergebnis im Gleitpunkt-System
angezeigt.
RUNDUNGS-WAHLSCHALTER:
Beispiel: Einstellung des Rundungs-
÷
4
Wahlschalters auf “2”.
9 = 0,444 ... , 5 ÷ 9 = 0,555 ...
,
Page 19
4
9 5 9
0.45 0.56
5/4 0.44 0.56
0.44 0.55
Hinweis: Bei Verwendung von oder
WAHLSCHALTER FÜR KONSTANTE/
ADDITION:
“K” : Die folgenden Konstanten-
Multiplikation: Der Rechner
Division: Der Rechner
gleitet der Dezimalpunkt
bei Folgeberechnungen.
Wenn der Komma-Tabulator
auf “F” gestellt ist, wird das
Ergebnis immer abgerundet
(
).
Funktionen werden ausgeführt:
speichert die zuerst
eingegebene Zahl
(den Multiplikanden)
und die Anweisung
.
speichert die als
zweites eingegebene
17
Zahl (den Divisor)
und die Anweisung
.
“•”: Neutral.
“A”: Bei der Additions-Betriebsart
können Additionen und Subtraktionen von Zahlen ohne einen
Dezimalpunkt ausgeführt werden.
Wenn die Additions-Betriebsart
aktiviert ist, wird der Dezimalpunkt
automatisch an der in der
Einstellung des Komma-Tabulators
gewählten Stelle eingefügt.
Die Verwendung von
deaktiviert automatisch die
Additions-Betriebsart und das
korrekte Ergebnis wird mit der
eingestellten Stelle für den
GT
Dezimalpunkt angezeigt.
WAHLSCHALTER FÜR ENDSUMME:
“GT”: Dieser Schalter dient der
Summierung folgender Punkte:
✱
” wird gedruckt.)
(“
1. Summen von Additionen und
Subtraktionen, die mit
erhalten wurden.
, oder
Page 20

2. Summen von Multiplikationen
und Divisionen, die mit
oder erhalten wurden.
3. Ergebnisse, die mit
“•”: Neutral.
TASTE FÜR PAPIERZUFÜHRUNG
TASTE FÜR KORREKTUR DER
LETZTEN STELLE
TASTE FÜR ÄNDERUNG DES
VORZEICHENS:
Änderung des Vorzeichens einer Zahl
(z.B. positiv in negativ oder negativ in
positiv).
TASTE FÜR NICHT-ADDIEREN/
ZWISCHENSUMME:
Nicht addieren – Wenn diese Taste in
erhalten wurden.
der Betriebsart für
Ausdruck direkt nach
der Eingabe einer
Zahl gedrückt wird,
wird der Eintrag mit
der Markierung “#”
auf der linken Seite
18
gedruckt.
Diese Taste wird gedrückt zum Ausdruck
von Zahlen, die nicht
Gegenstand von
Berechnungen sind,
z.B. einen Code,
Zwischensumme – Ausgeben von
Selbst wenn diese Taste in der
Betriebsart ohne Ausdruck gedrückt
wird, wird die angezeigte zahl ohne
ein Symbol gedruckt.
dem Datum u.a.
Zwischensumme(n)
von Additionen
bzw. Subtraktionen. Beim
Drücken von
oder wird die
Zwischensumme
mit der Markie-
◊
” gedruckt
rung “
und die Berechnung kann dann
fortgesetzt werden.
Page 21
ENDSUMME-TASTE:
Ausdruck der Endsumme von Additionen und Subtraktionen mit “ ✱ ”.
Diese Taste dient auch zum Löschen
des Endsummenspeichers und zum
Zurückstellen einer Fehlersituation.
TASTE ZUM EINTRAG LÖSCHEN:
Löschen von Zahlen vor der Verwendung einer Funktionstaste.
Auch verwendet zum Löschen einer
Kapazitätsüberschreitung bei einem
Eintrag.
TASTE ZUM ABRUF DES ERSTEN
SPEICHERS
TASTE ZUM ABRUF DES ERSTEN
SPEICHERS UND LÖSCHEN DES
SPEICHERS
OHNE-STEUERN-TASTE:
MIT-STEUERN-TASTE:
Zur Berechnung von Raten für Steuern
oder Abschlag.
SPEICHER-TASTE:
Zum Speichern von Raten für Steuern
oder Abschlag.
• Maximal können 4 Stellen gespeichert werden (der Dezimalpunkt
wird nicht als Stelle gerechnet).
• Zum Speichern einer Abschlagrate
drücken Sie zuerst
• Es kann immer nur eine Rate gespeichert werden. Wenn Sie eine
neue Rate eingeben, wird die alte
gelöscht.
GESAMTSUMMENTASTE:
Der Inhalt des Gesamtsummenspeichers “GT” wird gedruckt und
gelöscht.
TASTE ZUM ABRUFEN DES
ZWEITEN SPEICHERS
TASTE ZUM ABRUFEN UND
L Ö SCHEN DES ZWEITEN
SPEICHERS
.
19
Page 22
ANZEIGE
Anzeigeformat:
Symbole:
M : Symbol für ersten Speicher
Wird angezeigt, wenn eine Zahl im
ersten Speicher gespeichert wurde.
: Symbol für zweiten Speicher
Wird angezeigt, wenn eine Zahl im
zweiten Speicher gespeichert wurde.
– : Minus-Symbol
Wird angezeigt, wenn der angezeigte
Wert negativ ist.
E : Fehlersymbol
Wird angezeigt, wenn eine Kapazitätsüberschreitung oder ein Fehler entdeckt
wurde.
: Symbol für Gesamtsummen-Speicher
Wird angezeigt, wenn eine Zahl im
Gesamtsummen-Speicher vorhanden ist.
* Obwohl hier zur besseren Erklärung alle Symbole
dargestellt werden, erscheinen nicht alle Symbole
gleichzeitig auf der Anzeige.
1. Entfernen Sie die Papierrolle vom Rechner.
(Das Papier abreissen und unter Verwendung
der Taste
entfernen.)
2. Schalten Sie das Gerät aus.
Stellen Sie sicher, dass sich der Druckmechanismus nicht bewegt.
3. Entfernen Sie die Abdeckung des Druckers,
indem Sie sie in Richtung Rückseite des
Rechners schieben (Abb. 1).
4. Entfernen Sie das alte Farbband.
5. Setzen Sie das neue Farbband ein.
6. Mit der schwarzen Seite des Farbbandes nach
oben weisend eine der Rollen auf die Rollenwelle auf der rechten Seite einsetzen (Abb. 2).
Stellen Sie sicher, dass die Rolle richtig
eingesetzt ist.
7. Legen Sie das Farbband um die Aussenseite
der Metallführungen (Abb. 3).
8. Straffen Sie loses Band durch Drehen einer der
Rollen von Hand.
9. Bringen Sie die Druckerabdeckung wieder an.
10. Setzen Sie die Papierrolle wieder ein.
20
ERSETZEN DES FARBBANDES
aus dem Druckermechanismus
Page 23
Druckerabdeckung
Abb. 1
Rolle
Rollenwelle
Farbband
Abb. 3
Farbband
Abb. 2
ERSETZEN DER PAPIERROLLE
1. Heben Sie den Papierhalter an. (Abb. 1)
2. Falten Sie die einzulegende Kante der Papierrolle 3 bis 5 cm. (Falten Sie sie nicht schräg.)
(Abb. 2)
3. Schieben Sie die Papierrolle von der linken Seite
der Papierhalterung ein und stellen Sie sicher,
dass die Papierrolle in der richtigen Richtung
eingesetzt ist (mit der Papierzuführung von
unten). (Abb. 3)
4. Schieben Sie die vordere Kante der Papierrolle
in die Öffnung direkt hinter dem Druckermechanismus. (Abb. 1)
5. Drücken Sie die Taste für Papierzuführung und
schieben Sie das Papier unter der Kante des
Papiertrenners hindurch.
Papierhalter
3 cm – 5 cm
21
Abb. 1
Abb. 2
Page 24
In einigen Situationen kann es zur Kapazitätsüberschreitung oder zum Auftreten von Fehlern
Abb. 3
Papiertrenner
Abb. 4
DAS PAPIER NICHT IN RÜCKWÄRTSRICHTUNG ZIEHEN; DER DRUCKERMECHANISMUS KÖNNTE DADURCH
BESCHÄDIGT WERDEN.
Abb. 5
kommen. In diesem Fall wird das Fehlersymbol “E”
angezeigt und alle Tasten werden elektronisch
gesperrt. Der Speicherinhalt bleibt beim Auftreten
eines Fehlers erhalten.
Wenn “0•E” und dann “
eines Fehlers in Rot gedruckt wird (in der
Betriebsart ohne Ausdruck wird nur das
Fehlersymbol angezeigt), muss zum Löschen
verwendet werden.
Wenn “E” zusammen mit einigen Zahlen ausser
Null angezeigt wird, kann der Fehler durch
Drücken von oder gelöscht und die
Rechnung dann weitergeführt werden.
Fehlersituationen:
1. Eingabe von mehr als 14 Stellen oder 13
Dezimalstellen.
Dieser Fehler kann mit
werden.
2. Der ganzzahlige Anteil des Ergebnisses
überschreitet 14 Stellen.
3. Der ganzzahlige Anteil im Speicher überschreitet
14 Stellen.
(Beispiel: 99999999999999 1 )
4. Eine Zahl wird durch 0 geteilt. (Beispiel: 5 0
22
FEHLER
, , , , , , ,
)
” beim Auftreten
oder behoben
Page 25
AUSWECHSELN DER BATTERIEN
1
2
FÜR DEN SPEICHERSCHUTZ
Zeit zum Auswechseln der Batterien
Alle 2 Jahre durch eine neue Batterie ersetzen.
Vorgehen beim Auswechseln der Batterie
Eine Lithiumbatterie (CR2032) verwenden.
Hinweis: Beim Auswechseln der Batterie werden
1) Den Netzschalter auf die Position “OFF” ein-
2) Die Batterieabdeckung auf der Rückseite des
3) Die verbrauchte Batterie entfernen und eine
4) Die Batterieabdeckung wieder anbringen.
5) Den RESET-Schalter auf der Rückseite des
die eingestellte Steuerrate und der
Speicher gelöscht.
Die Steuerrate und andere wichtigen
Daten sollten als Referenz aufgeschrieben und aufbewahrt werden.
stellen und den Netzstecker von der Steckdose
abtrennen.
Gerätes entfernen. (Abb. 1)
neue Lithiumbatterie einsetzen. Die Batterie mit
einem trockenen Tuch abwischen und mit der
Seite “+” nach oben einlegen. (Abb. 2)
Gerätes drücken (siehe Seite 26).
Nach dem Auswechseln der Batterie
• Den Netzstecker an eine Steckdose anschließen
und den Netzschalter auf die Position “ON”
einstellen.
Sicherstellen, daß “0.” angezeigt wird. Wenn “0.”
nicht angezeigt wird, entfernen Sie die Batterie
und setzen Sie erneut ein; danach wieder die
Anzeige prüfen.
• Die Steuerrate erneut eingeben.
• Bitte notieren Sie als Anhaltspunkt für den
nächsten Batteriewechsel das Jahr und den
Monat, in dem die Batterie ausgewechselt wurde,
auf dem Batteriewechsel-Datenaufkleber der
Geräterückseite.
23
Abb. 1
Abb. 2
Page 26

Vorsichtsmaßnahmen bei der Verwendung der
Batterie
• Eine verbrauchte Batterie nicht im Gerät
belassen.
• Die Batterie nicht Wasser oder Feuer aussetzen
und sie nicht zerlegen.
• Batterien sollten außerhalb der Reichweite von
Kindern aufbewahrt werden.
Betriebskapazität: 14 Stellen
Stromversorgung: In Betrieb:
Lebensdauer der Batterie:
Berechnungen: Vier Grundrechenarten,
24
TECHNISCHE DATEN
Wechselstrom: 220V–230V,
50Hz
Speicher-Backup:
(Gleichstrom)
3V
(Lithiumbatterie CR2032 × 1)
Ca. 2 Jahre. (geprüft bei 25°C,
kann sich je nach
Umgebungsbedingungen
ändern.)
Multiplikation und Division mit
Konstanten, Potenz-Funktionen, Berechnungen von
Aufschlag und Abschlag,
Wiederholung von Additionen
und Subtraktionen, Berechnung von Kehrwerten,
Berechnung von Endsummen, Berechnungen mit
Postenzähler, Berechnung
von Gewinnspannen,
Speicherberechnungen u.a.
Page 27

DRUCKER
Drucker: Mechanischer Drucker
Druckgeschwindigkeit: Ca. 4,3 Zeilen/Sekunde
Druckerpapier: Breite: 57 mm - 58 mm
Betriebstemperatur: 0°C - 40°C
Nennleistung: 53 mA
Abmessungen: 250 mm (B) × 345 mm (T) ×
Gewicht: Ca. 2,0 kg (Mit Batterie)
Zubehör: 1 Lithiumbatterie, 1 Aufkleber
Geräuschpegel:
Sicherheitshinweise:
Die versorgende Steckdose muß nahe am Gerät
angebracht und leicht zugänglich sein.
Durchmesser der Rolle:
(max.) 80 mm
78 mm (H)
für Batteriewechseldaten (auf
der Geräterückseite), 1
Papierrolle, 1 Farbband
(eingesetzt) und Bedienungsanleitung
00 dB (Drucken), gemessen
nach DIN 45635
WARNUNG
DIE VERWENDETE STROMSPANNUNG
MUSS MIT DER AUF DEM RECHNER
ANGEGEBENEN ÜBEREINSTIMMEN. ES IST
GEFÄHRLICH, DEN RECHNER MIT EINER
HÖHEREN STROMSPANNUNG ALS DER AUF
DEM GERÄT ANGEGEBEN ZU BETREIBEN.
DIES KANN ZU FEUER ODER ANDEREN
UNFÄLLEN MIT SCHÄDEN FÜHREN. DER
HERSTELLER IST NICHT VERANTWORTLICH FÜR SCHÄDEN, DIE DURCH DIE
VERWENDUNG DES RECHNERS MIT EINER
ANDEREN ALS DER VORGESCHRIEBENEN
STROMSPANNUNG VERURSACHT
WERDEN.
25
Page 28
RÜCKSTELLUNG DES GERÄTES
Durch starke stöße, elektromagnetische Felder
order aus anderen Ursachen kann es vorkommen,
daß das Gerät nicht mehr funktioniert und daß keine
der Tasten mehr anspricht. In diesem Fall muß das
Gerät durch Eindrücken des RESET-Schalters auf
der Geräteunterseite zurückgestellt werden. Den
RESET-Schalter nur in den folgenden Fällen
eindrücken:
• Wenn eine außergewöhnliche Situation eintritt
und keine der Tasten mehr anspricht.
• Die Batterie werden eingesetzt oder ausgetauscht.
Hinweise:
• Durch das Drücken des RESET-Schalters wird
die gespeicherte Steuerrate und andere
gespeicherte Daten gelöscht.
• Zum Eindrücken des RESET-Schalters nur einen
Kugelschreiber verwenden. Keine leicht
brechbaren Gegenstände oder Gegenstände mit
dünnen Spitzen, z.B. Nadeln, verwenden.
• Nach dem Drücken des RESET-Schalters den
Netzstecker an eine Steckdose anschließen. Den
Netzschalter auf die Position “ON” einstellen und
prüfen, daß “0.” angezeigt wird.
26
Page 29
FRANÇAIS
PRÉCAUTIONS
Afin d’assurer un fonctionnement sans ennui de la
calculatrice SHARP, veuillez prendre les précautions suivantes:
1. Ne pas laisser la calculatrice dans les endroits
sujets à de forts changements de température,
à l’humidité, et à la poussière.
2. Pour le nettoyage de la calculatrice, utiliser un
chiffon doux et sec. Ne pas utiliser de solvants
ni un chiffon humide.
3. Cet appareil n’étant pas étanche, il ne faut pas
l’utiliser ou l’entreposer dans des endroits où il
risquerait d’être mouillé, par exemple par de
l’eau. La pluie, l’eau brumisée, l’humidité, le café,
la vapeur, la transpiration, etc. sont à l’origine
de dysfonctionnements.
4. Si la pile de protection de la mémoire n’est pas
installée, le taux de taxe/remise mis en mémoire
est effacé au moment où l’alimentation secteur
est coupée.
Le taux de taxe/remise mis en mémoire est
également effacé au moment où la pile de
protection de la mémoire est retirée.
5. Si une réparation s’avérait nécessaire, confier
l’appareil à un distributeur agréé par Sharp.
6. Ne pas entourer le cordon électrique autour du
corps de l’appareil ou ne pas le courber ou le
tordre fortement.
• MISE EN PLACE DE LA PILE EN VUE
DE LA PROTECTION DE LA MÉMOIRE ........ 28
• LES COMMANDES ......................................... 29
• REMPLACEMENT DU RUBAN
ENCREUR .......................................................33
• REMPLACEMENT DU ROULEAU DE
PAPIER............................................................ 34
• ERREURS .......................................................35
• REMPLACEMENT DE LA PILE EN VUE
DE PROTÉGER LA MÉMOIRE....................... 35
• FICHE TECHNIQUE .......................................37
• RÉINITIALISATION DE L’APPAREIL..............38
• EXEMPLES DE CALCULS ........................... 116
• CALCULS DE TAXE ...................................... 134
• CALCUL D’UN REMISE ................................ 138
SHARP ne peut pas être tenu responsable pour
tout incident ou dommages consécutifs
économiques ou à ses biens, causés par une
mauvaise utilisation et/ou un mauvais
fonctionnement de cet appareil et de ses
périphériques, à moins qu’une telle
responsabilité soit reconnue par la loi.
27
TABLE DES MATIÈRES
Page
Page 30

MISE EN PLACE DE LA PILE EN VUE
1
2
DE LA PROTECTION DE LA MÉMOIRE
Avant d’utiliser l’appareil pour la première fois,
retirez la pile au lithium fournie et mettez en place
dans l’appareil en procédant de la manière indiquée
ci-dessous.
Si la fiche du cordon d’alimentation est
accidentellement débranchée tandis que l’appareil
est alimenté par le secteur, le taux de taxe et le
contenu de la mémoire sont effacés.
1) Mettez l’appareil hors tension en mettant
l’interrupteur d’alimentation sur la position “OFF”
puis débranchez la fiche du cordon
d’alimentation de la prise murale.
2) Retirez le couvercle du logement de la pile, au
dos de l’appareil. (Fig. 1)
3) Essuyez l’intérieur du logement de la pile au
moyen d’un chiffon sec; placez la pile de manière
que le pôle “+” soit tourné vers le haut. (Fig. 2)
4) Remontez le couvercle du logement de la pile
en procédant en sens inverse.
5) Appuyez sur le bouton RESET, au dos de
l’appareil. (Reportez-vous à la page 38.)
Après remplacement de la pile
• Branchez la fiche du cordon d’alimentation sur
une prise murale et remettez l’appareil sous
tension en mettant l’interrupteur d’alimentation
sur la position “ON”.
Assurez que “0.” s’affiche. Si “0.” ne s’affiche pas,
retirez la pile et replacez-la et contrôlez à nouveau
l’indication affichée.
• Sur l’étiquette de la date de remplacement de la
pile qui se trouve à l’arrière de l’appareil, inscrivez
le mois et l’année d’installation de la pile. Cela
vous servira de référence pour le prochain
remplacement de la pile.
28
Fig. 1
Fig. 2
Page 31

LES COMMANDES
INTERRUPTEUR; SÉLECTEUR DE
MODE D’ IMPRESSION /
COMPTEUR D’ARTICLES:
“OFF”: Mise hors tension.
“•”: Mise sous tension. Pour
choisir le mode de non
impression.
• •
... • • • –” sera imprimé.)
(“•
“P”: Mise sous tension. Pour
choisir le mode impression.
• •
... • • • +” sera imprimé.)
(“•
“P•IC”: Mise sous tension. Pour
choisir le mode d’impression
et de comptage d’articles.
Le compteur comptera le
nombre de fois que
appuyée en addition.
Note: • Chaque fois que l’on agit
en soustraction, 1
sur
sera soustrait du compte.
• Le compte est imprimé
lorsque le résultat calculé
est obtenu.
a été
• Le compteur revient à
zéro en agissant sur
ou .
• La capacité du compteur
est de 3 chiffres maximum
(jusqu’à ±999). Si le
compte dépasse ce
maximum, le compteur
repartira de zéro.
SÉLECTEUR DE DÉCIMALE:
Il préétablit le nombre de décimales
dans le résultat. Pour la position “F”,
le résultat est affiché dans le
5/4
système à virgule flottante.
SÉLECTEUR D’ARRONDI:
Exemple: Placer le sélecteur de
décimale sur “2”.
4
÷
9 = 0,444 ... , 5 ÷ 9 = 0,555 ...
4 9 5 9
0.45 0.56
5/4 0.44 0.56
0.44 0.55
,
29
Page 32

Note: La virgule flotte durant un calcul
GT
successif en utilisant
ou .
Pour la position “F”, le résultat
est affiché dans le système à
virgule flottante (
).
SÉ LECTEUR CONSTANTE /
ADDITION:
“K” : Les opérations suivantes avec
constante sont possibles.
Multiplication: La calculatrice
rappelle automatiquement le premier
nombre introduit (le
multiplicande) ainsi
que l’instruction
.
Division: La calculatrice
rappelle automatiquement le deuxième nombre introduit (le diviseur) ainsi
que l’instruction
.
“•”: Neutre.
“A”: Il est possible d’additionner ou de
soustraire des nombres sans
qu’il soit nécessaire de taper le
point décimal. Ce dernier est
30
automatiquement positionné en
fonction du réglage effectué.
L’emploi de
, , et annule
ce mode de fonctionnement et le
résultat est imprimé en tenant
compte du nombre de décimales
choisies.
SÉLECTEUR DE MODE DE TOTAL
GÉNÉRAL:
“GT”: Ce sélecteur accumulera ce qui
suit:
✱
” sera imprimé.)
(“
1. Les totaux d’addition et de
soustraction obtenus avec
.
2. Les totaux de produit et de
quotient obtenus avec
ou
.
3. Les résultats obtenus avec
.
“•”: Neutre, GT OFF (arrêt)
TOUCHE DE MONTÉE DE PAPIER
TOUCHE DE CORRECTION DU
DERNIER CHIFFRE
Page 33

TOUCHE DE CHANGEMENT DE
SIGNE:
Permet de changer le signe algébrique
d’un nombre (c.à.d. de positif à négatif
ou de négatif à positif).
TOUCHE DE NON ADDITION / TOTAL
PARTIEL:
Non addition – Lorsqu’on agit sur
Total partiel – Sert à obtenir le(s)
cette touche juste
après l’introduction
d’un nombre dans le
mode d’impression,
l’entrée est imprimée
à gauche avec “#”.
Cette touche sert à
imprimer des nombres
qui ne sont pas sujets
au calcul tels que les
codes, les dates, etc.
total(aux) partiel(s)
des additions et/ou
des soustractions.
Lorsqu’on agit sur
cette touche à la suite
ou , le total
de
31
partiel est imprimé
conjointement avec
◊
” et le calcul peut
“
continuer.
En appuyant sur cette touche même
dans le mode de non impression, le
nombre affiché est imprimé sans
aucun symbole.
TOUCHE TOTAL:
Imprime le total d’une addition ou d’une
soustraction avec “ ✱ ”.
Cette touche sert également de touche
d’effacement des registres de calcul et
annule une condition d’erreur.
TOUCHE D’ EFFACEMENT
D’ENTRÉE:
Efface un nombre qui a été intoduit
avant l’utilisation d’une touche de
fonction.
Peut être également utilisée pour
effacer une erreur de dépassement de
capacité causée par une entrée.
PREMIÈRES TOUCHE DE RAPPEL
DE MÉMOIRE
Page 34

PREMIÈRES TOUCHE DE RAPPEL
ET D’EFFACEMENT DE MÉMOIRE
TOUCHE DE PRÉTAXE
TOUCHE DE TAXE INCLUE:
Cette touche permet les calculs avec
un taux de taxe/remise.
TOUCHE DE MISE EN MÉMOIRE:
Cette touche est utilisée pour mettre en
mémoire un taux de taxe/remise.
• Le nombre de chiffres ne peut pas
excéder 4 (le point décimal n’est pas
considéré comme un chiffre).
• Avant de mettre en mémoire un taux
de taxe/remise, appuyer sur
• Un seul taux peut être mémorisé; la
mise en mémoire d’un taux efface le
précédent.
TOUCHE DE TOTAL GÉNÉRAL:
Imprime le contenu de la mémoire du
total général “GT” et l’efface.
DEUXIÈME TOUCHE DE RAPPEL DE
MÉMOIRE
DEUXIÈME TOUCHE DE RAPPEL ET
D’EFFACEMENT DE MÉMOIRE
.
AFFICHAGE
Format d’affichage:
Symboles:
M : Symbole de première mémoire
– : Symbole de soustraction
E : Symbole d’erreur
* Bien que tous les symboles sont présentés ici
dans un souci d’information, ils ne s’affichent pas
tous sur l’écran simultanément.
32
Visualisé lorsqu’un nombre a été mis en
mémoire dans la première mémoire.
: Symbole de deuxième mémoire
Visualisé lorsqu’un nombre a été mis en
mémoire dans la deuxième mémoire.
Visualisé lorsque le nombre est négatif.
Visualisé en cas d’erreur ou de
dépassement de capacité.
: Symbole de mémoire du total général
Apparaît lorsqu’un nombre se trouve
dans la mémoire du total général.
Page 35

REMPLACEMENT DU RUBAN ENCREUR
1. Retirer le rouleau de papier de la calculatrice.
(Déchirer le papier et le retirer du mécanisme
d’impression au moyen de
2. Placer l’interrupteur sur la position OFF.
S’assurer que la roue d’impression est
arrêtée.
3. Déposer le couvercle de l’imprimante en le
faisant glisser vers l’arrière de la calculatrice.
(Fig. 1)
4. Retirer le ruban usagé.
5. Placer un nouveau ruban.
6. Présenter le ruban avec son côté noir dirigé vers
le haut, engager une des bobines sur l’axe de
la bobine de gauche. (Fig. 2) S’assurer que la
bobine est bien en place.
7. Mettre en place le ruban en le faisant passer à
l’extérieur des guides métalliques. (Fig. 3)
8. Si le ruban est lâche, le tendre en tournant une
des bobines à la main.
9. Remettre le couvercle de l’imprimante en place.
10. Réinstaller le rouleau de papier.
.)
Couvercle de l’imprimante
Fig. 1
Bobine
Axe de bobine
Ruban encreur
Ruban encreur
Fig. 2
Fig. 3
33
Page 36

REMPLACEMENT DU ROULEAU DE PAPIER
1. Soulever le porte-rouleau. (Fig. 1)
2. Plier l’amorce du rouleau de papier de 3 à 5 cm
(ne jamais plier en travers). (Fig. 2)
3. Engager le rouleau de papier sur la gauche du
porte-rouleau et s’assurer que le rouleau de
papier est dans la bonne direction (avec
l’alimentation en papier du bas) comme le montre
l’illustration. (Fig. 3)
4. Engager l’amorce du rouleau de papier dans
l’ouverture située juste derrière le mécanisme
d’impression. (Fig. 4)
5. Appuyer sur la touche de montée de papier et
faire sortir le papier derrière le coupe-papier. (Fig.
5)
Porte-rouleau
3 cm – 5 cm
Fig. 3
Coupe-papier
Fig. 4
Fig. 5
NE PAS TIRER LE PAPIER EN ARRIÈRE,
CAR CELA POURRAIT ENDOMMAGER LE
MÉCANISME IMPRIMANT.
Fig. 1
Fig. 2
34
Page 37

ERREURS
Il existe plusieurs cas qui entraînent un
dépassement de capacité ou une situation
d’erreur. Si cela se produit, le symbole d’erreur “E”
sera affiché et toutes les touches seront
verrouillées électroniquement. Le contenu de la
mémoire au moment de l’erreur est préservé.
Si “0•E” puis “
moment de l’erreur (en mode de non impression,
les symboles d’erreur uniquement apparaissent
sur l’écran), doit être utilisé pour effacer la
calculatrice.
Si un “E” accompagné de plusieurs chiffres (sauf
zéro) s’affiche l’erreur peut être effacée à l’aide de
ou et le calcul peut continuer.
Conditions d’erreur:
1. Introduction de plus de 14 chiffres ou 13
décimales.
Cette erreur peut être effacée à l’aide de
.
2. Lorsque la partie entière d’un résultat dépasse
14 chiffres.
3. Lorsque la partie entière du nombre en mémoire
excède 14 chiffres.
(Ex. 99999999999999 1 )
4. Lorsqu’un nombre est divisé par zéro. (Ex. 5
0 )
, , , , , , ,
” est imprimé en rouge au
Période de remplacement de la pile
Remplacez la pile tous les 2 ans.
Méthode de remplacement de la pile
Utilisez une pile au lithium (CR2032).
Remarque: Lors du remplacement de la pile, le
1) Mettez l’appareil hors tension en mettant
2) Retirez le couvercle du logement de la pile, au
ou
3) Retirez la pile usagée et mettez en place une
4) Remontez le couvercle du logement de la pile
35
REMPLACEMENT DE LA PILE EN
VUE DE PROTÉGER LA MÉMOIRE
taux de taxe et le contenu de la
mémoire sont effacés.
Nous vous conseillons de marquer le
taux de taxe et les autres chiffres
importants sur une feuille de papier.
l’interrupteur d’alimentation sur la position “OFF”
puis débranchez la fiche du cordon
d’alimentation de la prise murale.
dos de l’appareil. (Fig. 1)
pile neuve au lithium. Essuyez l’intérieur du
logement de la pile au moyen d’un chiffon sec;
placez la pile de manière que le pôle “+” soit
tourné vers le haut. (Fig. 2)
en procédant en sens inverse.
Page 38

5) Appuyez sur le bouton RESET, au dos de
l’appareil. (Reportez-vous à la page 38.)
1
2
Cela vous servira de référence pour le prochain
remplacement de la pile.
Précautions d’utilisation de la pile
• Ne conservez pas la pile dans l’appareil
lorsqu’elle est épuisée.
• N’exposez pas la pile à l’eau ni au feu, ne la
démontez pas.
• Conservez les piles hors de portée des enfants.
Fig. 1
Fig. 2
Après remplacement de la pile
• Branchez la fiche du cordon d’alimentation sur
une prise murale et remettez l’appareil sous
tension en mettant l’interrupteur d’alimentation
sur la position “ON”.
Assurez que “0.” s’affiche. Si “0.” ne s’affiche pas,
retirez la pile et replacez-la et contrôlez à nouveau
l’indication affichée.
• Réinitialisez le taux de taxe.
• Sur l’étiquette de la date de remplacement de la
pile qui se trouve à l’arrière de l’appareil, inscrivez
le mois et l’année de remplacement de la pile.
36
Page 39

FICHE TECHNIQUE
Capacité de travail: 14 chiffres
Alimentation: Fonctionnement:
Durée de vie de la pile de protection de la mémoire:
Calculs: Quatre opérations arith-
CA: 220V–230V, 50Hz
Mémoire de sauvegarde:
(CC)
3V
(pile au lithium CR2032
× 1)
Env. 2 ans
(testée et vérifiée à 25°C;
peut varier en fonction de
l’environnement d’utilisation)
métiques, multiplication
et division avec constante, calcul de puissance, calcul de majoration/rabais, addition et
soustraction successives, calcul inverse,
calcul avec mémoire,
comptage des articles,
calcul de hausse, im-
SECTION IMPRESSION
Température: 0°C ~ 40°C
Consommation: 53 mA
Dimensions: 250 mm (L) × 345 mm (P)
Poids: Env. 2,0 kg (avec la pile)
Accessoires: 1 pile au lithium, 1
37
pression de non addition,
calcul de total général,
etc.
Imprimante: Imprimante mécanique
Vitesse d’impression: Env. 4,3 lignes/s
Papier d’impression: Largeur: 57 mm ~ 58 mm
Diamètre (maxi.): 80 mm
× 78 mm (H)
étiquette de données de
remplacement de la pile
(attachée à l’arrière de
l’appareil), 1 rouleau de
papier, 1 ruban encreur
et mode d’emploi
Page 40

ATTENTION
LA TENSION UTILISÉE DOIT ÊTRE
IDENTIQUE À LA TENSION SPÉCIFIÉE SUR
CETTE CALCULATRICE. L’UTILISATION DE
CETTE CALCULATRICE AVEC UNE TENSION
PLUS ÉLEVÉE QUE CELLE SPÉCIFIÉE EST
DANGEREUSE ET PEUT ENTRAÎNER UN
INCENDIE OU TOUT AUTRE TYPE
D’ACCIDENT PROVOQUANT DES
DOMMAGES. SHARP DÉCLINE TOUTE
RESPONSABILITÉ EN CAS D’ACCIDENT
RÉSULTANT DE L’UTILISATION DE CETTE
CALCULATRICE AVEC UNE TENSION AUTRE
QUE LA TENSION SPÉCIFIÉE.
• Une situation inhabituelle s’est développée et
toutes les touches sont inopérantes.
• Vous avez mis en place les pile, ou vous les avez
remplacées.
Notes:
• Appuyer sur le commutateur RESET annule le
taux de taxe et les autres données en mémoire.
• Pour appuyer sur le bouton RESET, n’utilisez que
la pointe d’un stylo à bille. N’utilisez pas un
instrument susceptible de se casser, ni un
instrument pointu tel qu’une aiguille.
• Après avoir appuyé sur le bouton RESET,
branchez la fiche du cordon d’alimentation sur
une prise murale. Mettez l’appareil sous tension
en mettant l’interrupteur d’alimentation sur la
position “ON” et assurez-vous que “0.” s’affiche.
RÉINITIALISATION DE L’APPAREIL
Un choc violent, l’exposition à un champ électrique
et d’autres conditions inhabituelles, peuvent
empêcher le fonctionnement de l’appareil et rendre
les touches inopérantes. En ce cas, appuyez sur le
bouton RESET, placé à la partie inférieure de
l’appareil. Ce bouton RESET ne doit être utilisé que
dans les cas suivants:
38
Page 41

ESPAÑOL
NOTAS AL MANEJARLA
A fin de que su calculadora SHARP funcione sin
averías, le recomendamos lo siguiente:
1. Evite dejar la calculadora en ambientes en que
haya cambios de temperatura, humedad y polvo
bastante notables.
2. Al limpiar la calculadora, utilice un paño suave y
seco. No use disolventes ni tampoco un paño
húmedo.
3. Debido a que este producto no es a prueba de
agua, no deberá ser utilizado o guardado en
lugares donde pudiera ser salpicado por líquidos,
por ejemplo agua. Gotas de lluvia, salpicaduras
de agua, jugos o zumos, café, vapor, transpiración, etc. también perjudican el funcionamiento
del producto.
4. Mientras la pila de protección de la memoria no
esté instalada, la configuración de la tasa de
impuestos/descuentos se borrará al cortarse la
alimentación de CA.
La tasa de impuestos/descuentos también se
borrará cuando se quite la pila de protección de
la memoria.
5. Si se requiere algún servicio técnico o reparación
en este equipo, diríjase sólo a un distribuidor
SHARP de reparaciones, a un centro de servicio
autorizado por SHARP o a un centro de
reparaciones SHARP cercano a su localidad.
6. No bobine el cable de CA alrededor de la
• INSTALACIÓN DE LA PILA PARA
PROTECCIÓN DE LA MEMORIA ................... 40
• CONTROLES DE FUNCIONAMIENTO .......... 41
• CAMBIO DE LA CINTA ENTINTADA ..............45
• CAMBIO DEL ROLLO DEL PAPEL ................ 46
• ERRORES ....................................................... 47
• CAMBIO DE LA PILA PARA PROTECCIÓN
DE LA MEMORIA ............................................48
• ESPECIFICACIONES TÉCNICAS .................. 49
• REPOSICIÓN DE LA UNIDAD .......................51
• EJEMPLOS DE CÁLCULOS......................... 116
• CÁLCULOS CON EL TIPO DE IMPUESTO .134
CÁLCULO CON EL TIPO DE DESCUENTO .
•
SHARP no será responsable de ningún daño
imprevisto o resultante, en lo económico o en
propiedades, debido al mal uso de este
producto y sus periféricos, a menos que tal
responsabilidad sea reconocida por la ley.
39
calculadora, y no lo doble o retuerza a la fuerza.
ÍNDICE
Página
138
Page 42
INSTALACIÓN DE LA PILA PARA
1
2
PROTECCIÓN DE LA MEMORIA
Antes de iniciar la utilización por primera vez, retire
la pila de litio suministrada e instálela en el equipo
según el procedimiento siguiente.
Si el cable de alimentación se desenchufa por
accidente durante el funcionamiento con CA
solamente, el tipo de impuestos establecido y el
contenido de la memoria se perderán.
1) Ponga el interruptor de la alimentación en “OFF”
y desenchufe la clavija de alimentación de la
toma de corriente.
2) Retire la cubierta de la pila de la parte posterior
de la unidad. (Fig. 1)
3) Limpie bien la pila con un paño seco y coloque
el lado positivo “+” hacia arriba. (Fig. 2)
4) Vuelva a colocar la cubierta de la pila siguiendo
a la inversa el procedimiento de retirada.
5) Pulse el interruptor RESET de la parte posterior
de la unidad (consulte la página 51).
Después de instalar la pila
• Conecte la clavija de alimentación a una toma
de corriente y ponga el interruptor de la
alimentación en “ON”.
Compruebe que se visualice “0.”. Si no se
visualiza “0.”, retire la pila, vuelva a instalarla y
compruebe de nuevo la visualización.
• En la etiqueta de fecha de cambio de la pila
colocada en la parte trasera de la unidad, escriba
el mes y el año cuando se instaló la pila. Esto le
servirá de referencia para el próximo cambio de
la pila.
40
Fig. 1
Fig. 2
Page 43

CONTROLES DE FUNCIONAMIENTO
INTERRUPTOR DE CORRIENTE;
SELECTOR DEL MODO DE
IMPRESIÓN / MODO PARA
CONTAR ARTÍCULOS:
“OFF”: Apagado (OFF)
“•”: Encendido (ON). Fija el
modo de no impresión.
(Se imprimirá “•
“P”: Encendido (ON). Fija el
modo de impresión.
(Se imprimirá “•
“P•IC”: Encendido (ON). Fija el
modo de impresión y de
cuenta de artículos.
El contador contará las
veces que se ha apretado
en la suma.
Notas: • Cada vez que se use
en la resta, se restará 1
de la cuenta.
• La cuenta queda impresa
cuando se obtiene el
resultado calculado.
• •
... • • • –”.)
• •
... • • • +”.)
• Al apretar , o se
borra el contenido del
contador.
• El contador tiene una
capacidad de un máximo
de 3 cifras (hasta ±999).
Si la cuenta excede el
máximo, el contador
vuelve a contar partiendo
de cero.
SELECTOR DECIMAL:
Prefija el número de lugares
decimales de la respuesta.
En la posición “F”, la respuesta
aparecerá en la exhibición en el
sistema decimal flotante.
41
Page 44

5/4
SELECTOR DE REDONDEO:
Ejemplo: Fija el selector decimal en “2”.
4
÷
9 = 0,444 ... , 5 ÷ 9 = 0,555 ...
9 5 9
4
0.45 0.56
5/4 0.44 0.56
0.44 0.55
Nota: El punto (= coma) decimal flota
mientras se hacen cálculos
sucesivos usando
Si el selector decimal se coloca
en “F”, la respuesta siempre se
redondea por defecto (
SELECTOR DEL MODO DE
CONSTANTE / SUMA:
“K” : Se podrán realizar las siguientes
funciones de constantes:
Multiplicación: La calculadora
retendrá automáticamente el
primer factor
registrado (el multiplicando) y la
instrucción
o .
).
.
42
División: La calculadora
“•”: Posición neutra.
“A”: Utilizando el modo de suma se
pueden sumar y restar números
sin registrar el punto decimal.
Cuando se activa el modo de
suma, el punto decimal se coloca
automáticamente de acuerdo con
el ajuste del selector decimal.
El uso de
desactivará automáticamente el
modo de suma y las respuestas
decimalmente correctas se
imprimirán en la posición decimal
prefijada.
retendrá automáticamente el
segundo factor
registrado (el
divisor) y la
instrucción
, , y
.
Page 45
GT
SELECTOR DEL MODO DE TOTAL
GLOBAL:
“GT”: Este selector hará que se
acumule lo siguiente:
(Se imprimirá “
1. Totales de suma y resta
obtenidos con
✱
”.)
.
2. Totales de productos y
cocientes obtenidos con
o
.
3. Resultados obtenidos con
.
“•”: Posición neutra, total global,
desactivada.
TECLA DE AVANCE DEL PAPEL
TECLA DE CORRECCIÓN DE LA
ULTIMA CIFRA
TECLA DE CAMBIO DE SIGNO:
Cambia el signo algebraico de un
número (es decir, de positivo a negativo
o de negativo a positivo).
TECLA DE NO SUMA / TOTAL
PARCIAL:
No-suma – Cuando se aprieta esta
tecla inmediatamente
43
después de haber
ingresado un número
en el modo de
impresión, el número
registrado se imprime a
la izquierda, junto con
“#”.
Esta tecla se usa para
imprimir números que
no están sujetos a
cálculos como, por
ejemplo, códigos,
fechas, etc.
Total parcial – Se usa para obtener
uno o varios totales
parciales de sumas y/o
restas.
Cuando se aprieta a
continuación de
o
, se imprimirá el
total parcial junto con
◊
”, pudiéndose seguir
“
con los cálculos.
Apretando esta tecla incluso en el
modo de no impresión, el número
visualizado se imprimirá sin ningún
símbolo.
Page 46
TECLA DE TOTAL:
Imprime el total de la suma y resta con
“ ✱ ”. Esta tecla también sirve de tecla
de borrado para los registros de
cálculos, y anula un estado de error.
TECLA DE BORRADO DE
ENTRADAS:
Sirve para cancelar un número
introducido antes de utilizar una tecla
de función. Se usa también para
cancelar un error por exceso de
capacidad causado por una entrada.
TECLA DE RECUPERACIÓN DE LA
PRIMERA MEMORIA
TECLA DE RECUPERACIÓN Y
BORRADO DE LA PRIMERA
MEMORIA
TECLA DE ANTES DE IMPUESTOS
TECLA DE INCLUSIÓ N DE
IMPUESTO:
Esta tecla se usa para hacer cálculos
con el tipo de impuesto/descuento.
TECLA DE ALMACENAMIENTO:
Esta tecla se usa para almacenar el
tipo de impuesto/descuento.
• Se puede almacenar un máximo de 4
dígitos (el punto decimal no cuenta
como dígito).
• Para almacenar el tipo de descuento,
apriete
• Sólo puede almacenar un tipo. Si
introduce un nuevo tipo, borrará el
anterior.
TECLA DE TOTAL GLOBAL:
Imprime y borra el contenido de la
memoria de total global “GT”.
TECLA DE RECUPERACIÓN DE LA
SEGUNDA MEMORIA
TECLA DE RECUPERACIÓN Y
BORRADO DE LA SEGUNDA
MEMORIA
primero.
44
Page 47
EXHIBICIÓN
Formato de la exhibición:
Símbolos:
M: Símbolo de la primera memoria
Aparece cuando se ha almacenado un
número en la primera memoria.
:Símbolo de la segunda memoria
Aparece cuando se ha almacenado un
número en la segunda memoria.
– :Símbolo menos
Aparece cuando el número es negativo.
E: Símbolo de error
Aparece cuando se detecta un error o se
supera la capacidad.
:Símbolo del total global de la
memoria
Aparece cuando un número está en la
memoria de total global.
* Aunque los símbolos disponibles se muestran
aquí a modo de explicación, éstos no aparecerán
en la pantalla simultáneamente.
1. Quitar el rollo de papel de la calculadora. (Cortar
2. Colocar el interruptor de corriente en la
3. Quitar la tapa de la impresora deslizándola
4. Quitar la cinta usada.
5. Instalar la cinta nueva.
6. Con el lado negro de la cinta mirando para
7. Pasar la cinta por la parte exterior de las guías
8. Estirar cualquier parte de cinta floja girando con
9. Volver a poner la tapa de la impresora.
10. Volver a poner el rollo de papel.
45
CAMBIO DE LA CINTA ENTINTADA
el papel y sacarlo del mecanismo impresor
usando
posición marcada OFF.
Asegurarse de que la rueda de impresión se
haya detenido.
hacia la parte trasera de la calculadora. (Fig. 1)
arriba, colocar uno de los carretes en el eje del
carrete de la izquierda. (Fig. 2) Asegurarse de
que el carrete esté firmemente colocado en su
lugar.
metálicas. (Fig. 3)
la mano uno de los carretes.
.)
Page 48

Tapa de la impresora
Fig. 1
Carrete
Eje del carrete
Cinta entintada
Cinta entintada
Fig. 3
Fig. 2
CAMBIO DEL ROLLO DEL PAPEL
1. Levantar el sujetador del papel. (Fig. 1)
2. Doblar la punta del rollo de papel de 3 a 5 cm
(no la doble nunca de forma oblicua). (Fig. 2)
3. Introducir el rollo de papel desde el lado
izquierdo del sujetador del papel y asegurarse
de que el rollo de papel esté puesto en la
dirección correcta (con el avance del papel
desde el fondo) tal como muestra la figura. (Fig.
3)
4. Introducir la punta doblada en la abertura
directamente por detrás del mecanismo de
impresión. (Fig. 4)
5. Apretar la tecla de avance del papel haciendo
avanzar el papel por debajo del borde del
cortapapel. (Fig. 5)
Sujetador del papel
3 cm – 5 cm
46
Fig. 1
Fig. 2
Page 49

Existen diversos casos en los que ocurre un
exceso de capacidad o una condición de error. Al
Fig. 3
Cortapapel
Fig. 4
NO TIRAR DEL PAPEL HACIA ATRÁS PUES
PUEDE OCASIONAR DAÑOS AL MECANISMO
DE IMPRESIÓN.
Fig. 5
producirse esto, aparecerá el símbolo de error “E”
quedando electrónicamente bloqueadas todas las
teclas. Los contenidos de la memoria, en el
momento del error, quedan retenidos.
Si “0•E” y luego “
producirse un error (en el modo de no impresión,
los símbolos de error sólo se visualizan),
deberá ser utilizada para cancelar el error.
Si se visualiza el símbolo “E” con cualquier número
(excepto el cero), se puede borrar el error con
o pudiéndose continuar el cálculo.
Condiciones de error:
1. Entrada de más de 14 cifras o de 13 decimales.
2. Cuando la parte entera de un resultado excede
3. Cuando la parte entera de los contenidos de la
4. Cuando se divide un número cualquiera por un
47
ERRORES
, , , , , , ,
Este error puede borrarse con
las 14 cifras
memoria supera los 14 dígitos.
(Ej.
99999999999999 1 )
divisor de cero. (Ej. 5
” se imprimen en rojo al
0 )
o .
Page 50

CAMBIO DE LA PILA PARA
PROTECCIÓN DE LA MEMORIA
Plazo para cambiar la pila
Cambie la pila por otra nueva cada 2 años.
Método de cambio de la pila
Utilice una pila de litio (CR2032).
Nota: Cando cambie la pila, el tipo de impuestos
establecido y el contenido de la memoria se
perderán.
Tal vez le resulte conveniente anotar el tipo
de impuesto y otros datos importantes en
una hoja de papel.
1) Ponga el interruptor de la alimentación en “OFF”
y desenchufe la clavija de alimentación de la
toma de corriente.
2) Retire la cubierta de la pila de la parte posterior
de la unidad. (Fig. 1)
3) Retire la pila agotada e instale una pila de litio
nueva. Limpie bien la pila con un paño seco y
coloque el lado positivo “+” hacia arriba. (Fig. 2)
4) Vuelva a colocar la cubierta de la pila siguiendo
a la inversa el procedimiento de retirada.
5) Pulse el interruptor RESET de la parte posterior
de la unidad (consulte la página 51).
Después de cambiar la pila
• Conecte la clavija de alimentación a una toma
de corriente y ponga el interruptor de la
alimentación en “ON”.
Compruebe que se visualice “0.”. Si no se
visualiza “0.”, retire la pila, vuelva a instalarla y
compruebe de nuevo la visualización.
• Reponga el tipo de impuesto.
• En la etiqueta de fecha de cambio de la pila
colocada en la parte trasera de la unidad, escriba
el mes y el año del cambio de la pila. Esto le
servirá de referencia para el próximo cambio de
la pila.
48
1
Fig. 1
2
Fig. 2
Page 51

Precauciones al utilizar la pila
• No deje una pila descargada en el equipo.
• No exponga la pila al agua ni a las llamas, y no
la desarme.
• Guarde las pilas donde no puedan alcanzarlas
los niños.
Capacidad de cálculo: 14 cifras
Alimentación de corriente: Funcionado:
Duración de la pila de protección de la memoria:
Cálculos: Las cuatro opera-
49
ESPECIFICACIONES TÉCNICAS
CA: 220V–230V, 50Hz
Salvaguardia de la
memoria:
3V
(CC)
(Pila de litio CR2032 ×
1)
Aprox. 2 años.
(probada y confirmada
a una temperatura de
25°C, puede cambiar
dependiendo del
ambiente donde se
utilice.)
ciones aritméticas,
multiplicaciones y
divisiones por
constante, cálculos de
potencia, cálculos de
recargos/descuentos,
repetición de sumas y
restas, cálculos
Page 52

recíprocos, cálculos
con memoria, cálculos
de cuenta de artículos,
cálculos de aumento,
impresión de no suma,
cálculos de total global,
etc.
SECCIÓN DE LA IMPRESORA
Impresora: Impresora mecánica
Velocidad de impresión: Aprox. 4,3 líneas/seg.
Papel de impresión: 57 mm ~ 58 mm de
ancho, 80 mm de
diámetro (máx.)
Temperatura: 0°C ~ 40°C
Potencia: 53 mA
Dimensiones: 250 mm (An.) × 345
mm (Pr.) × 78 mm (Al.)
Peso: Aprox. 2,0 kg (con pila)
Accesorios: 1 pila de litio, 1 etiqueta
con la fecha de re-
emplazo de la pila
(colocada en la parte
trasera de la unidad), 1
rollo de papel, 1 cinta
entintada y manual de
manejo
AVISO
EL VOLTAJE USADO DEBE SER EL MISMO
QUE EL ESPECIFICADO EN ESTA
CALCULADORA. USAR ESTA
CALCULADORA CON UN VOLTAJE
SUPERIOR AL ESPECIFICADO RESULTA
PELIGROSO Y PUEDE CAUSAR UN
INCENDIO U OTRO TIPO DE ACCIDENTE.
SHARP NO SE HACE RESPONSABLE DE
NINGÚN DAÑO DEBIDO AL USO DE ESTA
CALCULADORA CON UN VOLTAJE
DIFERENTE DEL ESPECIFICADO.
50
Page 53

REPOSICIÓN DE LA UNIDAD
Los impactos fuertes, la exposición a campos
eléctricos u otras condiciones inusuales pueden ser
la causa de que la unidad no funcione, y presionar
las teclas no servirá de nada. Si pasa esto, tendrá
que presionar el interruptor RESET de la parte
inferior de la unidad. El interruptor RESET sólo
deberá presionarse cuando:
• Se produzca alguna anormalidad y no funcione
ninguna tecla.
• Instala o sustituye las pila.
Notas:
• Al presionar el interruptor RESET se borrará la
tasa de impuestos almacenada y otros datos
almacenados en la memoria.
• Use solamente un bolígrafo para presionar el
interruptor RESET. No use nada que pueda
romperse ni tampoco algo muy puntiagudo como,
por ejemplo, una aguja.
• Después de pulsar el interruptor RESET, conecte
la clavija de alimentación a una toma de corriente.
Ponga el interruptor de la alimentación en “ON”
y compruebe que se visualice “0.”.
51
Page 54

ITALIANO
NOTE INTRODUTTIVE
Per assicurarsi un uso senza problemi della
calcolatrice SHARP, raccomandiamo quanto
segue:
1. È necessario conservare la calcolatrice in aree
esenti da estreme escursioni termiche, da
umidità e da polvere.
2. Per pulire la calcolatrice si consiglia di usare un
panno morbido, asciutto. Non usare solventi o
un panno bagnato.
3. Poiché questo prodotto non è impermeabile, non
usarlo né conservarlo in luoghi in cui potrebbe
essere soggetto a schizzi di fluidi, come acqua.
Anche gocce di pioggia, spruzzi d’acqua, succo,
caffè, vapore, sudore, ecc. possono causare
malfunzionamenti.
4. Nel caso in cui non sia stata inserita la batteria
di appoggio della memoria, le percentuali di
aggiunta di tassa o di sconto applicato vengono
cancellate se si stacca il cavo di alimentazione
a corrente alternata di rete.
Le stesse percentuali vengono anche cancellate
se la batteria di appoggio della memoria viene
tolta dal calcolatore.
5. Se è necessario un intervento di manutenzione,
servirsi solo di un centro d’assistenza autorizzato
SHARP, di un servizio di manutenzione
approvato da SHARP o di un centro di riparazioni
SHARP.
6. Non avvolgere il cavo d’alimentazione elettrica
intorno all’apparecchio, né piegarlo o arrotolarlo
con forza in altra maniera.
• COME INSTALLARE LA PILA DI
SOSTEGNO DELLA MEMORIA ..................... 53
• COMANDI PER L’USO ................................... 54
• SOSTITUZIONE DEL NASTRO
INCHIOSTRATO .............................................. 58
• SOSTITUZIONE DEL ROTOLO DI CARTA .... 59
• ERRORI ........................................................... 60
• SOSTITUZIONE DELLA PILA DI
SOSTEGNO DELLA MEMORIA ..................... 61
• DATI TECNICI .................................................62
• INIZIALIZZAZIONE DELL’UNITÀ.................... 64
• ESEMPI DI CALCOLO .................................. 117
ALCOLO DELL’ALIQUOTA D’IMPOSTA ...........
•C
• CALCOLO ALIQUOTA DI SCONTO ............. 138
SHARP respinge ogni responsabilità per
qualsiasi incidente o danno economico o
materiale causato da errato impiego e/o
malfunzionamento di questo prodotto e delle
sue periferiche salvo che la responsabilità sia
riconosciuta dalla legge.
52
INDICE
Pagina
134
Page 55

COME INSTALLARE LA PILA DI
SOSTEGNO DELLA MEMORIA
Prima di usarla per la prima volta, rimuovere la pila
al litio installata e installarla nell’apparecchio
seguendo la procedura seguente.
Se la spina del cavo di alimentazione di corrente
viene, accidentalmente, scollegata quando l’unità
sta funzionando alimentata solo con corrente di rete
alternata (AC), l’aliquota d’imposta impostata e i
contenuti della memoria vanno persi.
1) Spegnere l’unità mettendo l’interruttore in
posizione “OFF” e scollegare la spina del cavo
di alimentazione dalla presa della rete elettrica.
2) Rimuovere il coperchio del vano pila sul retro
dell’unità. (Fig. 1)
3) Pulire bene la pila strofinandola con un panno
asciutto e collocare il lato positivo “+” in su. (Fig.
2)
4) Sostituire il coperchio del vano pila seguendo al
contrario la procedura per la rimozione.
5) Premere l’interruttore RESET sul retro dell’unità.
(Vedere a pagina 64.)
Dopo l’installazione della pila
• Collegare la spina del cavo di alimentazione a
una presa della rete elettrica e accendere l’unità
mettendo l’interruttore in posizione “ON”.
Controllare che sia visualizzato “0.”. Se “0.” non
è visualizzato, rimuovere la pila, reinstallarla e
accertare che esso sia visualizzato.
• Sull’etichetta per la data di sostituzione della pila,
che si trova sul retro dell’unità, scrivere il mese e
l’anno in cui si è installata la pila, come
promemoria di quando sostituirne una la prossima
volta.
53
1
Fig. 1
2
Fig. 2
Page 56

COMANDI PER L’USO
INTERRUTTORE POWER;
SELETTORE DI MODALITÀ DI
CONTEGGIO VOCI/STAMPA:
“OFF”: Spegnimento.
“•”: Accensione. Impostazione
sulla modalità di nonstampa.
• •
... • • • –” sarà
(“•
stampato).
“P”: Accensione. Impostazione
sulla modalità di stampa.
• •
... • • • +” sarà
(“•
stampato).
“P•IC”: Accensione. Impostazione
sulla modalità di conteggio
stampa e voci.
Il contatore conta il numero
delle voce che
premuto in integrazione.
Note: • Ogni volta che si preme il
tasto
dal contatore di elementi.
• Quando viene raggiunto il
risultato del calcolo, il
viene sottratto 1
ha
54
conteggio viene stampato.
• Premendo
cancella il conteggio.
• Il contatore ha la capacità
massima di 3 cifre (fino a
±999). Se il conteggio
supera il massimo, il
contatore inizia di nuovo a
contare da zero.
SELETTORE DECIMALE:
Preimposta il numero di posizioni
decimali per la risposta.
Nella posizione “F”, la risposta viene
visualizzata nel sistema decimale
variabile.
, o si
Page 57

5/4
SELETTORE DI ARROTONDAMENTO:
Esempio: Impostare il selettore
4
÷
Nota: Durante i calcoli successivi, il
SELETTORE DI MODALITÀ
COSTANTE/ADDIZIONE:
“K” : Vengono eseguite le seguenti
Moltiplicazione: La calcolatrice
decimale a “2”.
9 = 0,444 ... , 5 ÷ 9 = 0,555 ...
9 5 9
4
0.45 0.56
5/4 0.44 0.56
0.44 0.55
punto decimale viene variato
tramite l’uso di
Se il selettore decimale è impostato su “F”, la risposta viene
sempre arrotondata per difetto
(
).
funzioni costanti:
o .
ricorda automaticamente il primo
numero immesso
55
(il moltiplicando) e
Divisione: La calcolatrice
“•”: Neutro
“A”: L’uso della modalità Addizione
consente la somma e la sottrazione di numeri senza immissione
del punto decimale. Quando si
attiva la modalità Addizione, il
punto decimale viene posizionato
automaticamente in base all’impostazione del selettore decimale.
L’uso di
automaticamente la precedenza
sulla modalità Addizione e nella
posizione decimale preimpostata
vengono stampate risposte
corrette dal punto di vista dei
decimali.
l’istruzione
ricorda automaticamente il secondo
numero immesso
(il divisore) e l’istruzione
, e prende
.
.
Page 58

GT
SELETTORE DI MODALITÀ D’IMPOSTAZIONE TOTALE GENERALE:
“GT”: Questo selettore accumula
quanto segue:
✱
(“
” saranno stampati.)
1. Totali di addizione e sottrazione ottenuti con
.
2. Totali di prodotto e quoziente
ottenuti con
oppure .
3. Risultati ottenuti con il tasto
.
“•”: Neutro
TASTO ALIMENTAZIONE CARTA
TASTO CORREZIONE ULTIMA CIFRA
TASTO DI CAMBIO DEL SEGNO:
Modifica il segno algebrico di un
numero (da positivo a negativo, o
viceversa).
TASTO NON-ADDIZIONE/TOTALE
PARZIALE:
Non-addizione – Premendo questo
tasto subito dopo
l’inserimento di un
numero in modalità
56
di stampa, l’immissione viene
stampata sul lato
sinistro con “#”.
Questo tasto viene
utilizzato per
stampare numeri
non soggetti a
calcoli, come codici,
date, ecc.
Totale parziale – Usato per ottenere il
totale o i totali
parziali di addizioni
e/o sottrazioni.
Premendo Il tasto
dopo
o , il
totale parziale viene
◊
stampato con “
” e si
può proseguire il
calcolo.
Agendo su questo tasto in modalità
di non-stampa, il numero digitato
viene comunque stampato, ma senza
alcun simbolo che lo precede.
Page 59
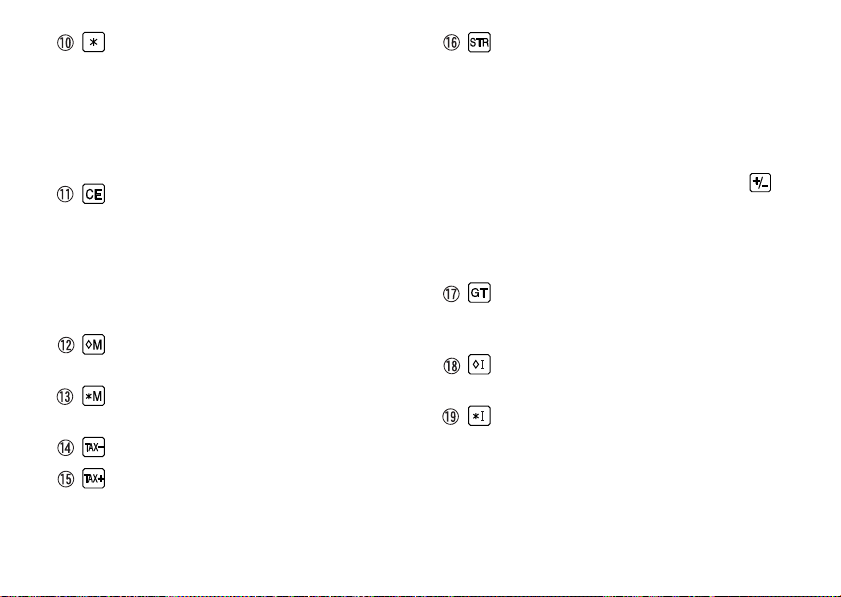
TASTO TOTALE:
Stampa il totale di addizione e sottrazione con “ ✱ ”.
Questo tasto serve anche come tasto di
cancellazione per la registrazione dei
calcoli e reimposta una condizione di
errore.
TASTO CANCELLAZIONE IMMISSIONE:
Cancella i numeri immessi prima
dell’uso di un tasto funzionale.
Viene anche utilizzato per cancellare un
errore di superamento del limite
superiore causato da un’immissione.
TASTO DI RICHIAMO PRIMA
MEMORIA
TASTO DI RICHIAMO E
AZZERAMENTO PRIMA MEMORIA
TASTO DI PRE-TASSA
TASTO INCLUSIONE DELLA
PERCENTUALE DI TASSA:
Tasto utilizzato per il calcolo con
percentuali di tassazione o di sconto.
TASTO DI MEMORIZZAZIONE:
Questo tasto serve a memorizzare la
percentuale di tassa o di sconto.
• Possono essere memorizzate sino
ad un massimo di 4 cifre (la virgola
non viene contata come cifra).
• Per memorizzare una percentuale di
sconto premere prima il tasto
• Si può memorizzare solamente una
percentuale. Memorizzandone una
nuova, quella precedente viene
cancellata.
TASTO DEL TOTALE GENERALE:
Stampa il totale generale e cancella
dalla memoria il contenuto “GT” stesso.
TASTO DI RICHIAMO DELLA
SECONDA MEMORIA
TASTO DI RICHIAMO E DI
CANCELLAZIONE DELLA SECONDA
MEMORIA
.
57
Page 60

DISPLAY
Formato del display:
Simboli:
M : Simbolo di Prima memoria
Appare quando un numero è stato
memorizzato nella Prima memoria.
: Simbolo di Seconda memoria
Appare quando un numero è stato
memorizzato nella Seconda memoria.
– : Simbolo Meno
Appare quando un numero è negativo.
E : Simbolo di errore
Appare quando viene rilevato un errore
di superamento limite massimo o un
errore di altro tipo.
: Simbolo di memoria del totale
generale
Appare quando un numero è nella
memoria del totale generale.
* Tutti i simboli disponibili sono stati visualizzati qui
insieme a scopo esemplificativo, ma i simboli
stessi non compaiono mai simultaneamente sullo
schermo.
SOSTITUZIONE DEL NASTRO INCHIOSTRATO
1. Rimuovere il rotolo di carta dalla calcolatrice.
(Strappare la carta e rimuoverla dal
meccanismo di stampa utilizzando
2. Spegnere l’alimentazione. Accertarsi che la
bobina di stampa sia ferma.
3. Rimuovere il coperchio della stampante
facendolo scorrere verso il retro della calcolatrice. (Fig. 1)
4. Rimuovere il vecchio nastro usato.
5. Inserire il nuovo nastro.
6. Con il lato nero del nastro rivolto verso l’alto,
posizionare una delle bobine sul relativo albero
di destra. (Fig. 2) Accertarsi che la bobina sia
inserita saldamente al suo posto.
7. Caricare il nastro intorno alla parte esterna delle
guide metalliche. (Fig. 3)
8. Eliminare qualsiasi allentamento ruotando
manualmente una delle bobine.
9. Riposizionare il coperchio della stampante.
10. Riposizionare il rotolo di carta.
58
).
Page 61

Coperchio della stampante
Fig. 1
Bobina
Nastro
d’inchiostro
Fig. 2
SOSTITUZIONE DEL ROTOLO DI CARTA
1. Sollevare il fermo carta (Fig. 1).
2. Ripiegare il bordo di entrata del rotolo di carta di
3-5 cm (Non piegarlo mai diagonalmente).
3. Inserire il rotolo dalla parte sinistra del fermo
carta accertandosi che il rullo sia posizionato
nella direzione adeguata (con l’alimentazione
della carta proveniente dal basso) (Fig. 3).
4. Inserire il bordo di entrata del rotolo di carta
nell’apertura posizionata direttamente dietro il
meccanismo di stampa (Fig. 4).
5. Premere il tasto di alimentazione della carta e
far avanzare la carta sotto il bordo dell’uscita
(Fig. 5).
Albero della bobina
Nastro d’inchiostro
Fig. 3
59
Fermo carta
Fig. 1
3 cm – 5 cm
Fig. 2
Page 62

Esistono varie situazioni in cui possono verificarsi
eccessi di cifre o altre condizioni di funzionamento
Fig. 3
Uscita carta
Fig. 4
NON TIRARE LA CARTA ALL’INDIETRO. CIÒ
POTREBBE DANNEGGIARE IL MECCANISMO
DI STAMPA.
Fig. 5
erroneo. In tali occasioni sul quadrante compare il
simbolo “E” e tutti i tasti si bloccano
automaticamente.
I contenuti della memoria al momento del
verificarsi dell’errore vengono comunque
mantenuti.
Se, al momento del verificarsi dell’errore, viene
stampata in rosso l’indicazione “0•E” seguita da
, , , , , , ,
“
dell’errore sono solamente visualizzati sul
quadrante) si deve utilizzare il tasto
ripristinare il calcolatore.
Se invece compare l’indicazione “E” seguita da
una qualunque cifra diversa da zero, l’errore può
essere corretto agendo su uno dei tasti
ed il calcolo può essere continuato.
Condizioni di errore:
1. Digitazione di oltre 14 cifre o di oltre 13 decimali.
Questo errore può essere corretto agendo su
uno dei tasto
2. Nel caso in cui la porzione intera di un risultato
superi le 14 cifre.
3. Nel caso in cui la porzione intera del contenuto
della memoria superi le 14 cifre
(es.:
4. In caso di divisione di un qualsiasi numero per
zero(es.: 5
60
ERRORI
” (in modalità di non-stampa i simboli
per
o ,
o .
99999999999999 1 ).
0 ).
Page 63

SOSTITUZIONE DELLA PILA DI
1
2
SOSTEGNO DELLA MEMORIA
Quando è tempo di sostituire la pila
Sostituire con una pila nuova ogni 2 anni.
Metodo di sostituzione della pila
Usare una pila al litio (CR2032).
Nota: Quando si sostituisce la pila, l’aliquota
d’imposta impostata e i contenuti della
memoria vanno persi.
Potrebbe essere utile prender nota, su un
foglio di carta, del valore d’aliquota
d’imposta e di altri numeri importanti.
1) Spegnere l’unità mettendo l’interruttore in
posizione “OFF” e scollegare la spina del cavo
di alimentazione dalla presa della rete elettrica.
2) Rimuovere il coperchio del vano pila sul retro
dell’unità. (Fig. 1)
3) Rimuovere la pila scarica e installare una pila al
litio nuova. Pulire bene la pila strofinandola con
un panno asciutto e collocare il lato positivo “+”
in su. (Fig. 2)
4) Sostituire il coperchio del vano pila seguendo al
contrario la procedura per la rimozione.
5) Premere l’interruttore RESET sul retro dell’unità.
(Vedere a pagina 64.)
Dopo la sostituzione della pila
• Collegare la spina del cavo di alimentazione a
una presa della rete elettrica e accendere l’unità
mettendo l’interruttore in posizione “ON”.
Controllare che sia visualizzato “0.”. Se “0.” non
è visualizzato, rimuovere la pila, reinstallarla e
accertare che esso sia visualizzato.
• Azzerare il valore d’aliquota d’imposta.
• Sull’etichetta per la data di sostituzione della pila,
che si trova sul retro dell’unità, scrivere il mese e
l’anno in cui si è installata la pila, come
promemoria di quando sostituirne una la prossima
volta.
61
Fig. 1
Fig. 2
Page 64

Precauzioni sull’uso della pila
• Non lasciare una pila scarica nell’apparecchio.
• Non esporre la pila ai rischi di acqua o fiamme, e
non smontarla.
• Conservare le pile fuori dalla portata dei bambini
piccoli.
DATI TECNICI
Capacità operativa: 14 cifre
Alimentazione: In funzione:
CA: 220V–230V, 50Hz
Backup di memoria:
(CC)
3V
Durata di vita utile della pila di protezione della
memoria: Ca. 2 anni.
Calcoli: Quattro calcoli aritmetici,
(Pila al litio CR2032 × 1)
(Provato e accertato a 25°C;
le condizioni ambientali d’uso
possono far cambiare il valore
effettivo.)
moltiplicazione e divisione
costante, calcolo potenza,
calcolo maggiorazione/
sconto, addizione e
sottrazione ripetuta, calcolo
reciproco, calcolo totale
generale, calcolo conteggio
voci, calcolo margine lordo,
calcolo memoria, ecc.
62
Page 65

SEZIONE DI STAMPA
Stampante: Stampante meccanica
Velocità di
stampa: Ca. 4,3 linee/sec.
Carta per
stampa: Larghezza 57 – 58 mm
80 mm di diametro (massimo)
Temperatura
operativa: 0°C – 40°C
Consumo di
energia: 53 mA
Dimensioni: 250 mm (L) × 345 mm (P) ×
78 mm (A)
Peso: Ca. 2,0 kg (con pila)
Accessori: 1 pila al litio, 1 etichetta per la
data di sostituzione della pila
(attaccata sul retro del corpo
dell’unità), 1 rotolo di carta, 1
nastro inchiostrato (installato)
e manuale di istruzioni
AVVERTENZA
LA TENSIONE UTILIZZATA DEVE ESSERE
QUELLA SPECIFICATA SULLA
CALCOLATRICE. L’USO DELLA
CALCOLATRICE CON UNA TENSIONE
MAGGIORE DI QUELLA SPECIFICATA È
PERICOLOSO E PUÒ PROVOCARE INCENDI
O ALTRI TIPI DI INCIDENTI CHE CAUSANO
DANNI. NON CI RITERREMO RESPONSABILI
PER NESSUN DANNO RISULTANTE DA UN
USO DELLA CALCOLATRICE CON TENSIONE
DIVERSA DA QUELLA SPECIFICATA.
63
Page 66

INIZIALIZZAZIONE DELL’UNITÀ
Se sottoposta a colpi, urti violenti, esposta a campi
elettromagnetici, o in condizioni fuori dalla norma
l’unità potrebbe non essere più operativa e non
rispondere alla pressione dei tasti. Se questo
accadesse, premere il tasto RESET che si trova sul
fondo dell’unità. Il tasto RESET deve essere
premuto solo quando:
• si è verificato un evento anormale.
• si è provveduto all’installazione o alla sostituzione
delle pila.
Note:
• Premendo l’interruttore RESET si cancella
l’aliquota d’imposta e gli altri dati memorizzati.
• Per premere il tasto RESET utilizzare solo la
punta di una penna a sfera. Non usare oggetti
che possano rompersi oppure siano appuntiti,
come gli aghi.
• Dopo aver premuto l’interruttore RESET,
collegare la spina del cavo di alimentazione a una
presa della rete elettrica. Accendere l’unità
mettendo l’interruttore in posizione “ON” e
controllare che sia visualizzato “0.”.
64
Page 67

SVENSKA
För att försäkra långvarig och felfri användning av
din räknare från SHARP rekommenderar vi det
följande:
1. Räknaren bör användas och förvaras på ställen
som ej utsätts för extrema temperaturväxlingar,
fukt eller damm.
2. Rengör räknaren med en mjuk, torr trasa. Använd
aldrig kemiska lösningar eller en våt trasa.
3. Då enheten inte är vattentät bör den inte
användas på ställen där den kan utsättas för
vätskor. Regndroppar, vattenstänk, juice, kaffe,
ånga, fukt o.dyl. kan orsaka fel.
4. Om batteriet för minnesskydd inte har satts dit,
raderas den inställda skattesatsen/rabatten när
strömmatningen avskärs.
Den inställda skattesatsen/rabatten raderas
också, när du tar bort batteriet för minnesskydd
från maskinen.
5. Om enheten kräver service bör du endast anlita
en SHARP-handlare eller en av SHARP
auktoriserad serviceverkstad.
6. Linda inte nätkabeln runt stommen och undvik
att tvinna eller böja kabeln.
• ISÄTTNING AV BATTERIET FÖR
MINNESSKYDD .............................................. 66
• REGLAGENS FUNKTIONER ......................... 67
• BYTE AV FÄRGBANDET ................................71
• BYTE AV PAPPERSRULLEN ......................... 72
• FEL .................................................................. 73
• BYTE AV BATTERI FÖR MINNESSKYDD .....73
• TEKNISKA DATA ............................................. 75
• NOLLSTÄLLNING AV ENHETEN ................... 76
• RÄKNEEXEMPEL ......................................... 117
• RÄKNING MED SKATTESATS ..................... 134
• RÄKNING MED RABATTSATS ..................... 138
SHARP åtar sig inget ansvar för några som helst
obetydliga eller betydande skador eller förluster
till följd av felaktigt bruk och/eller felfunktioner
hos denna produkt och dess kringutrustning,
såvida inte sådant ansvar är lagfäst.
65
INNEHÅLLOBSERVERA VID ANVÄNDNING
Sida
Page 68

ISÄTTNING AV BATTERIET FÖR
1
2
MINNESSKYDD
Innan enheten används för första gången bör du ta
ur det medföljande litiumbatteriet och installera det
på följande sätt.
Om nätkabeln kopplas ur av misstag vid drift med
enbart nätspänning kommer den inställda
skattesatsen och minnesinnehållet att raderas.
1) Ställ strömbrytaren på “OFF” och koppla bort
nätkabeln från vägguttaget.
2) Ta av batterilocket på enhetens baksida. (Fig.
1)
3) Torka av batteriet med en torr trasa och sätt i
det med plussidan “+” vänd uppåt. (Fig. 2)
4) Sätt på batterilocket genom att utföra proceduren
ovan i omvänd ordning.
5) Tryck in omkopplaren RESET på enhetens
baksida. (Se sidan 76.)
Efter isättning av batteriet
• Anslut nätkabeln till ett vägguttag och ställ
strömbrytaren på “ON”.
Kontrollera att “0.” visas på skärmen. Om “0.” inte
visas bör du ta ur batteriet, sätta i det på nytt och
kontrollera skärmen igen.
• På datumetiketten för batteribyte som återfinns
på enhetens baksida ska du skriva ner månaden
och året då batteriet sattes i och sedan använda
detta som referens för nästkommande batteribyte.
66
Fig. 1
Fig. 2
Page 69

REGLAGENS FUNKTIONER
STRÖMBRYTARE; VÄLJARE FÖR
UTSKRIFT/POSTRÄKNING:
“OFF”: Strömmen avslagen.
“•”: Strömmen på. Står i icke-
utskriftsläget.
• •
... • • • –” skrivs ut.)
(“•
“P”: Strömmen på. Står i
utskriftsläget.
• •
... • • • +” skrivs ut.)
(“•
“P•IC”: Strömmen på. Står i läget
för utskrift och posträkning.
Posträknaren noterar antalet
tryck på tangenten
addition.
Anm: • Vid subtraktion gör vart
tryck på
traheras från posträkningen.
• Posträkningen skrivs ut
när räkneresultatet erhålls.
• Ett tryck på
tömmer posträkningen.
• Posträkningen har en
maximal kapacitet på 3
att 1 sub-
vid
, eller
67
siffror (upp till ±999). Den
nollställs när denna gräns
överskrids.
DECIMALVÄLJARE:
Bestämmer antalet decimaler i
svaret.
I läget “F” visas svaret med ett
5/4
flytande decimalsystem.
AVRUNDNINGSVÄLJARE:
Exempel: När decimalväljaren står på
4
÷
Anm: Decimalpunkten är flytande
“2”.
9 = 0,444 ... , 5 ÷ 9 = 0,555 ...
4
9 5 9
0.45 0.56
5/4 0.44 0.56
0.44 0.55
under successiva beräkningar
med
eller .
Svaret avrundas alltid nedåt ( )
när decimalväljaren står på “F”.
Page 70
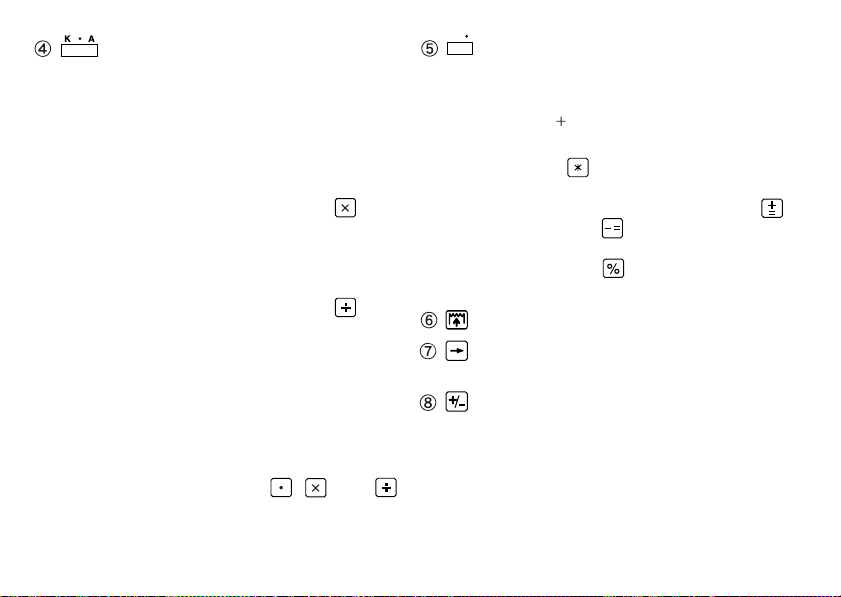
VÄLJARE FÖR KONSTANT/LÄGET
GT
ADD:
“K” : Följande konstantfunktioner
utförs:
Multiplikation: Räknaren kommer
automatiskt ihåg det
först inmatade talet
(multiplikanden) och
kommandot
.
Division: Räknaren kommer
automatiskt ihåg det
andra inmatade talet
(divisorn) och
kommandot
.
“•”: Neutralt läge
“A”: Användning av läget Add medger
addition och subtraktion utan att
behöva mata in en decimalpunkt.
När läget Add är aktiverat placeras
en decimalpunkt automatiskt i
enlighet med inställningen för
decimalväljaren.
Användning av
, eller
åsidosätter automatiskt läget Add
och skriver ut korrekta decimaler
enligt den förinställda decimal-
positionen.
68
VÄLJARE FÖR SLUTSVARSLÄGE:
“GT”: Denna räknare ackumulerar det
följande:
✱
(“
” skrivs ut.)
1. Resultat av addition och
subtraktion som erhållits med
.
2. Resultat av produkter och
kvoter som erhållits med
eller .
3. Resultat som har uppnåtts
med
.
“•”: Neutralt läge
TANGENT FÖR PAPPERSMATNING
TANGENT FÖR KORRIGERING AV
SISTA SIFFRA
TANGENT FÖR Ä NDRING AV
FÖRTECKEN:
Ändrar det algebraiska förtecknet för en
siffra (alltså plus till minus eller minus till
plus).
Page 71

TANGENT FÖR ICKE-ADDITION/
DELSVAR:
Icke-addition – Ett tryck på tangenten
strax efter inmatning
av ett tal i utskriftsläget
gör att talet skrivs ut
på vänster sida med
symbolen “#”.
Denna tangent
används för att skriva
ut tal som ej är föremål
för beräkning, t.ex.
Delsvar – Används för att erhålla
Om du trycker på denna tangent
skrivs den visade siffan ut utan
någon symbol, även i funktionen för
koder, datum o.dyl.
delsvar vid addition
och/eller subtraktion.
Ett tryck på tangenten
efter
att delsvaret skrivs ut
tillsammans med
symbolen “
beräkningen kan
sedan fortsättas.
eller gör
◊
”, och
69
icke-utskrift.
SVARSTANGENT:
Skriver ut svaret av addition och
subtraktion med “ ✱ ”.
Denna tangent fungerar också som
raderingstangent för räkneregistret och
för att återställa fel.
RADERINGSTANGENT:
Raderar tal som matats in före tryck på
en funktionstangent.
Raderar också spillfel orsakad av en
inmatning.
ÅTERKALLNING AV FÖRSTA
MINNET
ÅTERKALLNING OCH TÖMNING AV
FÖRSTA MINNET
TANGENT FÖR “FÖRE SKATT”
TANGENT FÖR “INKLUSIVE SKATT”:
Denna tangent används för beräkningar
med skattesatser/rabatter.
Page 72

TANGENT FÖR MINNESLAGRING:
Denna tangent används för
minneslagring av skattesatser/rabatter.
• Du kan minneslagra maximalt 4
siffror (decimalkomma räknas inte
som en siffra).
• Tryck först på
en rabatt.
• Endast en skattesats/rabatt kan
minneslagras. Om du matar in en ny
skattesats/rabatt, raderas den
tidigare skattesatsen/rabatten.
TANGENT FÖR TOTALSUMMA:
Skriver ut och raderar “GT”-minnets
innehåll.
ÅTERKALLNINGSTANGENT FÖR
ANDRA MINNET
Å TERKALLNINGS- OCH
RADERINGSTANGENT FÖR ANDRA
MINNET
för att minneslagra
BILDSKÄRM
Visningsformat:
Symboler:
M : Symbol för första minnet
– : Minussymbol
E : Felsymbol
* Även om alla tillgängliga symboler visas här i
instruktionssyfte, kommer dessa symboler inte att
visas samtidigt på displayen.
70
Visas när ett tal lagrats i det första
minnet.
: Symbol för andra minnet
Visas när ett tal lagrats i det andra
minnet.
Visas när ett tal är negativt.
Visas när ett spill eller annat fel
upptäcks.
: Symbol för slutsvarsminnet
Visas när ett tal förekommer i slutsvarsminnet.
Page 73

BYTE AV FÄRGBANDET
1. Ta bort pappersrullen från räknaren. (Riv av
papperet och ta bort det från skrivarmekanismen
med tangenten
2. Ställ strömbrytaren på OFF. Kontrollera att
skrivarhjulet har stoppats.
3. Ta av skrivarlocket genom att skjuta det mot
räknarens baksida. (Fig. 1)
4. Ta ur det gamla färgbandet.
5. Sätt i det nya färgbandet.
6. Kontrollera att den svarta sidan av färgbandet
är vänd uppåt och placera en av spolarna på
spolaxeln till höger. (Fig. 2) Kontrollera att
spolen sitter ordentligt på plats.
7. För bandet runt utsidan av metalledarna. (Fig.
3)
8. Vrid manuellt på en av spolarna för att spänna
bandet.
9. Sätt tillbaka skrivarlocket.
10. Sätt i pappersrullen igen.
.)
Skrivarlock
Spole
Spolaxel
Färgband
Fig. 1
Färgband
Fig. 2
Fig. 3
71
Page 74

BYTE AV PAPPERSRULLEN
1. Lyft upp pappershållaren. (Fig. 1)
2. Vik in den inledande pappersremsan 3 till 5 cm.
(Vik inte snett.) (Fig. 2)
3. Sätt på pappersrullen från den vänstra sidan av
pappershållaren och försäkra att rullen är
rättvänd (så att papperet matas underifrån). (Fig.
3)
4. För in den inledande pappersremsan i öppningen
strax bakom skrivarmekanismen. (Fig. 4)
5. Tryck på tangenten för pappersmatning och mata
fram papperet under kanten på pappersskäraren.
(Fig. 5)
Fig. 3
Pappersskärare
Pappershållare
3 cm – 5 cm
DRA INTE RAPPERET BAKLÄNGES
EFTERSOM DET KAN SKADA
SKRIVMEKANISMEN.
Fig. 1
Fig. 2
72
Fig. 4
Fig. 5
Page 75

FEL
BYTE AV BATTERI FÖR MINNESSKYDD
Det finns flera situationer som kan orsaka ett
överflödesfel eller en felkondition. När detta
inträffar, visas symbolen “E” på displayen och alla
tangenter låses elektroniskt.
Det innehåll som finns i minnet vid feltillfället
raderas inte.
Om “0•E” och därefter “
feltillfället (i funktionen för icke-utskrift visas endast
felsymbolen), måste du trycka på
återställa räknemaskinen.
Om ett “E” tillsammans med någon annan siffra än
0 visas på displayen, kan felet raderas med
eller och därefter kan uträkningen åfterupptas.
Felkonditioner:
1. Inmatning av mer än 14 siffror eller 13 decimaler.
Detta fel kan raderas med
2. När heltalsdelen av ett svar överstiger 14 siffror.
3. När heltalsdelen av innehållet i minnet överstiger
14 siffror.
(Ex.:
4. När något tal divideras med noll.
(Ex.: 5 0 )
99999999999999 1 )
, , , , , , ,
” skrivs ut i rött vid
för att
eller .
Tid för batteribyte
Ersätt med ett nytt batteri vart 2 år.
Metod för batteribyte
Använd ett litiumbatteri (CR2032).
Anm.: Tänk på att den inställda skattesatsen och
1) Ställ strömbrytaren på “OFF” och koppla bort
2) Ta av batterilocket på enhetens baksida. (Fig.
3) Ta ur det urladdade batterier och sätt i ett nytt
4) Sätt på batterilocket genom att utföra proceduren
5) Tryck in omkopplaren RESET på enhetens
73
minnesinnehållet raderas vid batteribyte.
Det kan vara lämpligt att skriva ner
skattesatsen och andra viktiga nummer på
ett separat papper.
nätkabeln från vägguttaget.
1)
litiumbatteri. Torka av det nya batteriet noga med
en torr trasa och sätt i det med plussidan “+”
vänd uppåt. (Fig. 2)
ovan i omvänd ordning.
baksida. (Se sidan 76.)
Page 76
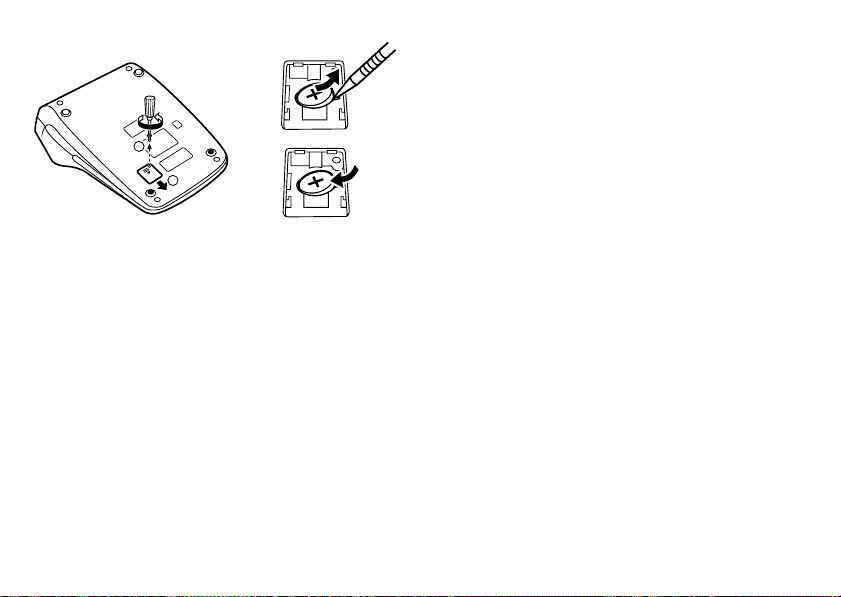
Angående batterier
• Lämna aldrig kvar ett urladdat batteri i enheten.
• Utsätt inte batteriet för vatten eller eld, och försök
aldrig att ta isär det.
• Förvara batterier utom räckhåll för småbarn.
1
2
Fig. 1
Fig. 2
Efter batteribyte
• Anslut nätkabeln till ett vägguttag och ställ
strömbrytaren på “ON”.
Kontrollera att “0.” visas på skärmen. Om “0.” inte
visas bör du ta ur batteriet, sätta i det på nytt och
kontrollera skärmen igen.
• Ställ in skattesatsen på nytt.
• På datumetiketten för batteribyte som återfinns
på enhetens baksida ska du skriva ner månaden
och året då batteriet byttes och sedan använda
detta som referens för nästkommande batteribyte.
74
Page 77

TEKNISKA DATA
Brukskapacitet: 14 siffror
Strömart: Verksam:
Vaxelstrom: 220V–230V,
50Hz
Minnesstöd:
(likström)
3V
Livslängd för minnestödsbatteri:
Beräkningar: Fyra aritmetiska beräkningar,
(Litiumbatteri CR2032 × 1)
Ca 2 år
(testad och bekräftad vid
25°C; kan variera beroende
på bruksmiljö)
multiplikation och division
med konstanter, potensräkning, räkning med påslag/
rabatt, repeterad addition och
subtraktion, räkning med
reciproka tal, slutsvarsräkning, räkning med posträknare, räkning med prishöjning, minnesräkning etc.
SKRIVARDELEN
Skrivare: Mekanisk skrivare
Utskriftshastighet: Ca 4,3 rader/sek.
Skrivarpapper: 57 – 58 mm brett
80 mm i diameter (max.)
Brukstemperatur: 0°C – 40°C
Strömförbrukning: 53 mA
Mått: 250 mm (B) × 345 mm (D) ×
78 mm (H)
Vikt: Ca 2,0 kg (med batteri)
Tillbehör: 1 litiumbatteri, 1 etikett för
batteribyte (fäst på enhetens
baksida), 1 pappersrulle, 1
färgband (isatt), bruksanvis-
ning
75
Page 78

VARNING
ANVÄND DEN SPÄNNING SOM STÅR
ANGIVEN PÅ RÄKNAREN. ANVÄNDNING AV
EN HÖGRE SPÄNNING ÄN DEN ANGIVNA
KAN ORSAKA BRAND OCH ANDRA
ALLVARLIGA SKADOR. VI ÅTAR OSS INGET
ANSVAR FÖR SKADOR SOM ORSAKAS AV
ATT RÄKNAREN ANVÄNDS MED FELAKTIG
SPÄNNING.
Enheten kan bli obrukbar om den utsätts för kraftiga
slag, elektriska fält eller annan yttre påverkan, och
tangenterna upphör då att fungera. Om detta
inträffar ska du trycka in nollställningsknappen
RESET på enhetens undersida. RESET får enbart
tryckas in när:
• ett onormalt fenomen inträffar och tangenterna
blir obrukbara.
• efter isättning eller byte av batteri.
Anm:
• Ett tryck på omkopplaren RESET raderar den
lagrade skattestatsen och all annan data som
lagrats i minnet.
• Använd en kulspetspenna eller liknande för att
trycka in RESET. Använd inga föremål som kan
brytas eller föremål med en skarp spets,
exempelvis en nål.
• Tryck in omkopplaren
RESET och anslut
sedan nätkabeln till ett
vägguttag. Ställ
strömbrytaren på “ON”
och kontrollera att “0.”
visas.
76
NOLLSTÄLLNING AV ENHETEN
Page 79

NEDERLANDS
OPMERKINGEN BETREFFENDE HET GEBRUIK
Neem de volgende punten in acht om een
storingsvrij gebruik van uw SHARP calculator te
verkrijgen:
1. Stel de calculator niet bloot aan extreme
temperatuurswisselingen en houd hem uit de
buurt van vochtige en stoffige plaatsen.
2. De calculator kan met een zachte, droge doek
worden schoongemaakt. Gebruik geen
oplosmiddelen of een natte doek.
3. Aangezien de calculator niet waterdicht is, mag
deze niet gebruikt of opgeborgen worden op een
plaats waar er water e.d. op kan spatten.
4. Wanneer er geen geheugen-beveiligingsbatterij
is aangebracht, zal het ingestelde belasting/
kortingtarief gewist worden wanneer het
apparaat van het lichtnet wordt losgekoppeld.
Het ingestelde belasting/kortingtarief wordt ook
gewist wanneer de geheugen-beveiligingsbatterij
uit het apparaat wordt verwijderd.
5. Als de calculator defect is, dient u deze naar een
SHARP servicedealer, een officieel SHARP
servicecentrum of een SHARP reparatiecentrum
te brengen.
6. Wikkel het netsnoer niet om het apparaat en buig
of draai het snoer ook niet te sterk.
PLAATSEN VAN DE GEHEUGENBATTERIJ .....
•
• BEDIENINGSORGANEN ................................79
• INKTLINT VERVANGEN ................................. 83
• PAPIERROL VERVANGEN............................. 84
• FOUTEN .......................................................... 85
• VERVANGEN VAN DE GEHEUGEN-
BATTERIJ ........................................................ 86
• TECHNISCHE GEGEVENS ............................ 87
• TERUGSTELLEN VAN HET APPARAAT
(RESET) .......................................................... 89
• REKENVOORBEELDEN ............................... 118
• BELASTINGBEREKENINGEN ..................... 134
• KORTINGBEREKENINGEN ......................... 138
SHARP kan niet aansprakelijk worden gesteld
voor directe of indirecte financiële verliezen of
beschadigingen veroorzaakt door een verkeerd
gebruik en/of defect van dit product en de
bijbehorende randapparatuur, tenzij deze
aansprakelijkheid wettelijk erkend is.
77
INHOUDSOPGAVE
Pagina
78
Page 80

PLAATSEN VAN DE GEHEUGENBATTERIJ
1
2
Voordat u het apparaat de eerste maal gebruikt,
moet u de bijgeleverde lithiumbatterij losmaken en
deze in het apparaat plaatsen zoals hierna wordt
beschreven.
Als voor de stroomvoorziening enkel netstroom
wordt gebruikt en dan per ongeluk de stekker uit
het stopcontact wordt getrokken, zullen het
ingestelde belastingtarief en de geheugeninhoud
worden gewist.
1) Zet de aan/uit-schakelaar op “OFF” en trek de
stekker uit het stopcontact.
2) Verwijder het dekseltje van het batterijvak aan
de achterkant van het apparaat. (Afb. 1)
3) Veeg het batterijvak met een droog doekje
schoon en plaats de batterij met de “+” kant naar
boven. (Afb. 2)
4) Breng het dekseltje van het batterijvak weer aan.
5) Druk op de RESET schakelaar aan de achterkant
van het apparaat (zie blz. 89).
Na het vervangen van de batterij
• Steek de stekker in het stopcontact en zet de aan/
uit-schakelaar op “ON”. Controleer of “0.”
verschijnt. Als “0.” niet wordt aangegeven, moet
u de batterij verwijderen en weer opnieuw
plaatsen, en dan nogmaals controleren of de
aanduiding verschijnt.
• Op het batterijvervangingslabel dat op de
achterkant van het apparaat is, schrijft u de
maand en het jaar dat de batterij is aangebracht,
zodat u weet wanneer de batterij moet worden
vervangen.
78
Afb. 1
Afb. 2
Page 81

BEDIENINGSORGANEN
SPANNINGSSCHAKELAAR:
AFDRUKKEN/POSTENTELLERKEUZESCHAKELAAR:
“OFF”: De calculator is uitgescha-
keld.
“•”: De calculator is ingescha-
keld. De “niet-afdrukken”
instelling is gekozen.
(“•
• •
... • • • –” wordt
afgedrukt.)
“P”: De calculator is ingescha-
keld. De “afdrukken”
instelling is gekozen.
(“•
• •
... • • • +” wordt
afgedrukt.)
“P•IC”: De calculator is ingescha-
keld. De “afdrukken en
postenteller” instelling is
gekozen.
De postenteller telt het
aantal keren dat op
wordt gedrukt om op te
tellen.
79
Opmerkingen:
• Wanneer op
af te trekken, zal van het aantal
getelde posten één worden
afgetrokken.
• Het aantal posten wordt afgedrukt
wanneer de uitkomst wordt
gegeven.
• Als op
gedrukt, wordt de tellerstand van
de postenteller gewist.
• De teller heeft drie cijfers (de
maximale tellerstand is ±999). Als
de maximale tellerstand overschreden wordt, telt de teller
verder vanaf nul.
DECIMAAL-KEUZESCHAKELAAR:
Kies met deze schakelaar het aantal
decimaalplaatsen in de uitkomst.
In de “F” stand wordt de uitkomst in
het drijvend decimaaltekensysteem
5/4
weergegeven.
AFRONDINGSKEUZESCHAKELAAR:
Voorbeeld: De afrondingskeuze-
wordt gedrukt om
, of wordt
Page 82

÷
GT
9 = 0,444 ... , 5 ÷ 9 = 0,555 ...
4
5/4 0.44 0.56
Opmerking: Het decimaalteken ‘drijft’
CONSTANTE/DECIMAALTEKENINVOEGING KEUZESCHAKELAAR:
“K” : De volgende functies met con-
stanten zijn beschikbaar:
Vermenigvuldigen:
De calculator onthoudt automatisch
het eerste getal dat wordt ingevoerd
(het vermenigvuldigtal) en de
instructie.
schakelaar staat op “2”.
4
9 5 9
0.45 0.56
0.44 0.55
bij opeenvolgende berekeningen waarbij
gebruikt wordt.
Als de decimaal-keuzeschakelaar op “F” staat,
wordt de uitkomst altijd
naar beneden (
gerond.
of
) af-
80
Delen:
De calculator onthoudt automatisch
het tweede getal dat wordt ingevoerd
(de deler) en de
“•”: Neutraalstand
“A”: I n deze stand (decimaalteken-
invoeging) kunnen getallen worden
opgeteld of afgetrokken zonder dat
het decimaalteken wordt ingevoerd. Wanneer de decimaaltekeninvoegingsfunctie is ingeschakeld,
wordt het decimaalteken automatisch geplaatst overeenkomstig
de instelling van de decimaalkeuzeschakelaar.
Bij gebruik van
deze functie automatisch opgeheven en wordt de decimaal
correcte uitkomst op de ingestelde
decimaalpositie afgedrukt.
EINDTOTAAL-KEUZESCHAKELAAR:
“GT”: I n deze stand worden de
volgende totalen bij elkaar
opgeteld:
✱
” wordt afgedrukt.)
(“
1. De totalen van optellingen en
instructie.
, of wordt
Page 83

aftrekkingen verkregen met
.
2. De totalen van vermenigvuldigingen en delingen
verkregen met
3. De uitkomsten van berekeningen verkregen met
“•”: Neutraalstand
PAPIERDOORVOERTOETS
CORRECTIETOETS VOOR LAATSTE
CIJFER
POSITIEF/NEGATIEF-OMSCHAKELTOETS:
Voor het veranderen van het algebraïsche teken van een getal (d.w.z.
van positief naar negatief, of negatief
naar positief).
NIET-TOEVOEGEN/SUBTOTAAL
TOETS:
Niet toevoegen –
Wanneer meteen nadat
een getal is ingevoerd op
deze toets wordt gedrukt,
en de calculator staat in
of .
.
81
de afdrukstand, zal het
getal aan de linkerzijde
afgedrukt worden samen
met het “#” symbool.
Gebruik deze toets om
getallen af te drukken die
niet in de berekeningen
moeten worden
opgenomen, zoals een
Subtotaal – Gebruik deze toets om de
Wanneer de toets in de “nietafdrukstand” stand wordt ingedrukt,
zal het getal dat op het display wordt
aangegeven zonder toevoeging van
een symbool worden afgedrukt.
code of datum.
subtotalen van optellingen
en/of aftrekkingen te
berekenen. Als na het
indrukken van
op deze toets wordt
gedrukt, zal het subtotaal
samen met het “
symbool worden afgedrukt
en kan de berekening
worden vervolgd.
of
◊
”
Page 84

TOTAALTOETS:
Voor het afdrukken van het totaal van
de optelling of aftrekking samen met
het “ ✱ ” symbool.
Deze toets werkt tevens als wistoets
voor het rekenregister en herstelt een
eventuele foutconditie.
INVOER-WISSEN TOETS:
Voor het wissen van een ingevoerd
getal voordat op de functietoets is
gedrukt.
Deze toets wordt tevens gebruikt om
een overloopfout ongedaan te maken
die is veroorzaakt door het invoeren
van een getal.
OPROEPTOETS VOOR EERSTE
GEHEUGEN
OPROEP- EN WISTOETS VOOR
EERSTE GEHEUGEN
EXCLUSIEF-BELASTING TOETS
INCLUSIEF-BELASTING TOETS:
Gebruik deze toets voor het uitvoeren
van berekeningen met het belasting/
kortingtarief.
82
VASTLEGTOETS:
Gebruik deze toets om het belasting/
kortingtarief vast te leggen.
• Maximaal kunnen 4 cijfers worden
vastgelegd (het decimaalteken wordt
niet als een cijfer geteld).
• Om een kortingtarief vast te leggen,
dient u eerst op
• Er kan slechts één tarief worden
vastgelegd. Als u een nieuw tarief
vastlegt, wordt het oude tarief gewist.
EINDTOTAALTOETS:
Voor het afdrukken en wissen van de
inhoud van het “GT” eindtotaalgeheugen.
OPROEPTOETS VOOR TWEEDE
GEHEUGEN
OPROEP- EN WISTOETS VOOR
TWEEDE GEHEUGEN
te drukken.
Page 85

DISPLAY
Displayformaat:
Symbolen:
M : Symbool voor eerste geheugen
Verschijnt wanneer er een getal in het
eerste geheugen is.
: Symbool voor tweede geheugen
Verschijnt wanneer er een getal in het
tweede geheugen is.
– : Min-symbool
Geeft een negatief getal aan.
E : Foutsymbool
Verschijnt wanneer er een overloopfout
of andere fout optreedt.
: Symbool voor eindtotaalgeheugen
Verschijnt wanneer er een getal in het
eindtotaalgeheugen is.
* Alhoewel alle beschikbare symbolen hier
gelijktijdig worden afgebeeld, zullen deze nooit
tegelijk op het scherm verschijnen.
INKTLINT VERVANGEN
1. Verwijder de papierrol uit de calculator. (Scheur
het papier en haal dit uit het printmechanisme
.)
met
2. Zet de spanningsschakelaar op OFF.
Controleer of het printwiel stilstaat.
3. Verwijder het printerdeksel door dit naar de
achterkant van de calculator te schuiven. (Afb.
1)
4. Verwijder het gebruikte lint.
5. Breng het nieuwe lint aan.
6. Met de zwarte kant van het lint naar boven
gekeerd, plaatst u een van de spoeltjes op de
spoelas aan de rechterkant. (Afb. 2) Zorg dat
het spoeltje stevig op zijn plaats zit.
7. Laat het lint rondom de buitenkant van de
metalen geleiders lopen. (Afb. 3)
8. Trek een eventuele lus strak door een van de
spoeltjes rond te draaien.
9. Breng het printerdeksel weer aan.
10. Breng de papierrol weer aan.
83
Page 86

Printerdeksel
Afb. 1
Spoeltje
Spoelas
Inktlint
Afb. 3
Inktlint
Afb. 2
PAPIERROL VERVANGEN
1. Klap de papierrolhouder omhoog. (Afb. 1)
2. Vouw de aanloopstrook van de papierrol 3 tot 5
cm om. (Vouw de strook niet schuin om.) (Afb.
2)
3. Schuif de papierrol vanaf de linkerkant op de
papierrolhouder en zorg dat de papierrol in de
juiste richting is geplaatst (het papier moet vanaf
de onderkant worden aangevoerd). (Afb. 3)
4. Steek de aanloopstrook van het papier in de
opening meteen achter het printmechanisme.
(Afb. 4)
5. Druk op de papierdoorvoertoets en voer het
papier door tot voorbij de rand van het
papiersnijmes. (Afb. 5)
Papierrolhouder
3 – 5 cm
84
Afb. 1
Afb. 2
Page 87

Er zijn diverse situaties die een overloopfout of een
andere fout kunnen veroorzaken. Indien dit
Afb. 3
Papiersnijmes
Afb. 4
TREK HET PAPIER NIET IN ACHTERWAARTSE
RICHTING TERUG AANGEZIEN DIT ZOU
KUNNEN RESULTEREN IN BESCHADIGINGEN
AAN HET PRINTMECHANISME.
Afb. 5
gebeurt, verschijnt het foutsymbool “E” en worden
alle toetsen elektronisch geblokkeerd. De
gegevens die in het geheugen vastgelegd zijn op
het moment dat de fout optreedt blijven bewaard.
Als “0•E” en dan “
afgedrukt bij het optreden van een fout (in de “nietafdrukken” stand worden alleen de foutsymbolen
aangegeven), moet gebruikt worden om de
calculator in de begintoestand terug te zetten.
Indien “E” met een ander cijfer als nul wordt
aangegeven, kan de fout ongedaan gemaakt
worden met of , waarna de berekening kan
worden vervolgd.
Foutcondities:
1. Invoeren van meer dan 14 cijfers of 13
2. Als het integer-gedeelte van een uitkomst meer
3. Als het integer-gedeelte van het getal in het
4. Als een getal gedeeld wordt door nul.
85
FOUTEN
, , , , , , ,
decimalen.
Deze fout kan ongedaan gemaakt worden met
of .
dan 14 cijfers heeft.
geheugen meer dan 14 cijfers heeft.
(Voorbeeld: 99999999999999 1 )
(Voorbeeld: 5
0 )
” in rood wordt
Page 88

VERVANGEN VAN DE GEHEUGENBATTERIJ
1
2
Tijdstip voor vervangen van de batterij
Vervang de batterij elke 2 jaar door een nieuwe.
Methode voor het vervangen van de batterij
Gebruik een lithiumbatterij (CR2032).
Opmerking: Bij het vervangen van de batterij
worden het ingestelde belastingtarief
en de geheugeninhoud gewist.
Wij raden u aan het belastingtarief en
andere belangrijke informatie op een
1) Zet de aan/uit-schakelaar op “OFF” en trek de
stekker uit het stopcontact.
2) Verwijder het dekseltje van het batterijvak aan
de achterkant van het apparaat. (Afb. 1)
3)
Neem de lege batterij uit de batterijvak en plaats
een nieuwe lithiumbatterij. Veeg het batterijvak
met een droog doekje schoon en plaats de nieuwe
batterij met de “+” kant naar boven. (Afb. 2)
4) Breng het dekseltje van het batterijvak weer aan.
5) Druk op de RESET schakelaar aan de achterkant
van het apparaat (zie blz. 89).
papier te noteren.
Na het vervangen van de batterij
• Steek de stekker in het stopcontact en zet de aan/
uit-schakelaar op “ON”. Controleer of “0.”
verschijnt. Als “0.” niet wordt aangegeven, moet
u de batterij verwijderen en weer opnieuw
plaatsen, en dan nogmaals controleren of de
aanduiding verschijnt.
• Stel het belastingtarief terug.
• Op het batterijvervangingslabel dat op de
achterkant van het apparaat is, schrijft u de
maand en het jaar dat de batterij is vervangen,
zodat u weet wanneer de batterij de volgende
keer moet worden vervangen.
86
Afb. 1
NOTE:
FOR NETHERLANDS ONLY
Afb. 2
Page 89

Voorzorgsmaatregelen betreffende het gebruik
van de batterij
• Laat de batterij niet in het apparaat zitten wanneer
deze leeg is.
• Stel de batterij niet bloot aan vuur en probeer de
batterij nooit te demonteren.
• Houd batterijen buiten het bereik van kinderen.
Bedrijfscapaciteit: 14 cijfers
Voeding: Hoofdvoeding:
Levensduur geheugen-ondersteuningsbatterij:
Berekeningen: Vier basisrekenfuncties,
87
TECHNISCHE GEGEVENS
Wisselstroom: 220V–230V,
50Hz
Geheugenbackup:
(gelijkstroom)
3V
(lithiumbatterij CR2032 × 1)
Ong. 2 jaar
(vastgestelde levensduur bij
25°C: kan verschillen
afhankelijk van de gebruiksomstandigheden)
vermenigvuldigen en delen
met constanten, machtsverheffen, opslag/korting
berekeningen, herhaald
optellen en aftrekken,
reciproque berekeningen,
eindtotaal berekeningen,
berekeningen met
postenteller, procentuele
prijsberekeningen, geheugenberekeningen enz.
Page 90

PRINTEENHEID
Printer: Mechanische printer
Afdruksnelheid: Ong. 4,3 regels/sec.
Papier: 57 mm – 58 mm breed
80 mm diameter (max.)
Bedrijfstemperatuur: 0°C – 40°C
Stroomverbruik: 53 mA
Afmetingen: 250 mm (B) × 345 mm (D) ×
78 mm (H)
Gewicht: Ong. 2,0 kg (met batterij)
Toebehoren: 1 Lithiumbatterij, 1 batterij-
vervangingslabel (op de
achterkant van het apparaat),
1 papierrol, 1 inktlint (aange-
bracht) en gebruiksaanwijzing
WAARSCHUWING
DEZE CALCULATOR MAG UITSLUITEND OP
DE VOORGESCHREVEN NETSPANNING
WORDEN GEBRUIKT. WANNEER DE
CALCULATOR OP EEN HOGERE SPANNING
WORDT GEBRUIKT, KAN DIT RESULTEREN
IN BRAND OF EEN ANDERE GEVAARLIJKE
SITUATIE, MET BESCHADIGING VAN DE
CALCULATOR TOT GEVOLG. DE FABRIKANT
KAN NIET AANSPRAKELIJK WORDEN
GESTELD VOOR EVENTUELE
BESCHADIGINGEN DIE HET GEVOLG ZIJN
VAN HET GEBRUIK OP EEN SPANNING DIE
HOGER IS DAN DE VOORGESCHREVEN
SPANNING.
88
Page 91
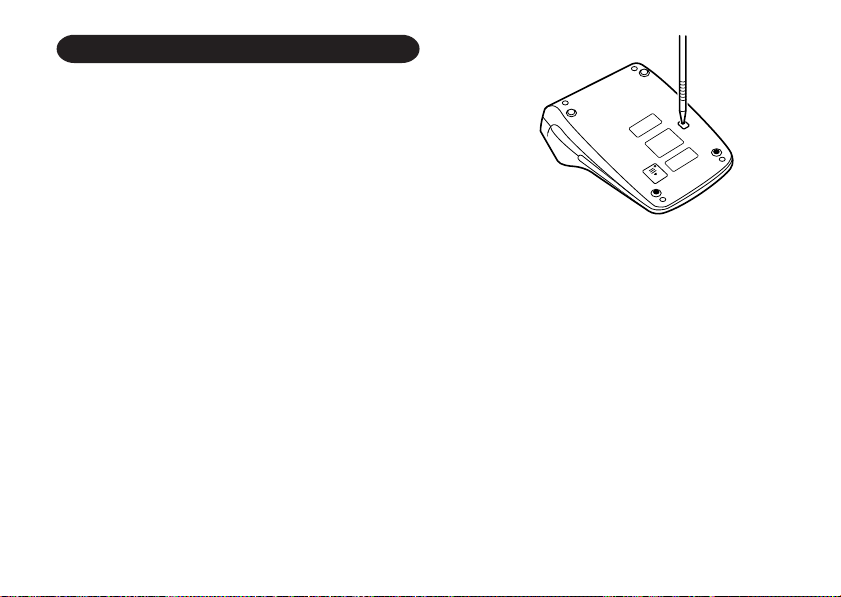
TERUGSTELLEN VAN HET APPARAAT (RESET)
Als het apparaat tijdens het gebruik wordt blootgesteld aan sterke schokken, krachtige elektrische
velden of een andere ongewone toestand, kan het
gebeuren dat geen van de toetsen meer werkt.
Mocht dit voorkomen, druk dan op de RESET
schakelaar aan de onderknat van het apparaat. De
RESET shakelaar mag alleen worden ingedrukt:
• indien er een abnormale situatie optreedt en geen
van de toetsen meer werkt.
• wanneer u de batterij gaat aanbrengen of ver-
vangen.
Opmerkingen:
• Bij indrukken van de RESET schakelaar worden
de vastgelegde valutakoers en eventuele andere
gegevens die in het geheugen zijn opgeslagen
gewist.
• Gebruik enkel een balpen om de RESET
schakelaar in te drukken. Gebruik geen voorwerp
waarvan de punt kan afbreken of een voorwerp
met een erg spitse punt, zoals een naald.
• Na indrukken van de RESET schakelaar steekt
u de stekker in het stopcontact. Vervolgens zet u
de aan/uit-schakelaar op “ON” en controleert dan
of “0.” verschijnt.
89
Page 92
PORTUGUÊS
Para garantir uma operação sem problemas da
sua calculadora SHARP, recomendamos o
seguinte:
1. A calculadora deve ser mantida em áreas livres
de mudanças extremas da temperatura, e de
áreas com muita umidade e poeira.
2. Utilize um pano macio e seco para limpar a
calculadora. Não utilize solventes nem um pano
molhado.
3. Como este produto não é à prova d'água, não o
utilize nem o guarde onde líquidos como, por
exemplo, água, possam espirrar nele. Gotas de
chuva, borrifo de água, suco, café, vapor,
perspiração, etc. também causam um mau
funcionamento.
4. Se a pilha de proteção da memória não estiver
instalada, a taxa de imposto/desconto definida
será apagada se o fornecimento de energia de
CA for desconectado.
A taxa de imposto/descontato também será
apagada se a pilha de proteção da memória for
retirada da unidade.
5. Se for preciso realizar algum conserto na calcula-
dora, encarregue o serviço a um revendedor
SHARP ou a um posto de assistência técnica
SHARP autorizado.
6. Não dobre o cabo de CA ao redor do corpo nem
o dobre ou torça forçosamente.
• INSTALAÇÃO DA PILHA PARA
PROTEÇÃO DA MEMÓRIA ............................91
• CONTROLES DE OPERAÇÃO ...................... 92
• TROCA DA FITA DE TINTA ............................96
• TROCA DO ROLO DE PAPEL ........................97
• ERROS ............................................................98
• TROCA DA PILHA DE PROTEÇÃO DA
MEMÓRIA ....................................................... 99
• ESPECIFICAÇÕES .......................................100
• REPOSIÇÃO DA UNIDADE ..........................102
• EXEMPLOS DE CÁLCULOS ........................ 118
• CÁLCULOS COM UMA TAXA DE
IMPOSTO ......................................................134
• CÁLCULO COM UMA TAXA DE
DESCONTO .................................................. 138
A SHARP não se responsabilizará por
quaisquer danos econômicos ou de
propriedade, incidentais ou conseqüentes,
causados pelo uso incorreto e/ou mau
funcionamento deste produto e seus periféricos,
a menos que se reconheça a responsabilidade
por lei.
90
ÍNDICENOTAS SOBRE A OPERAÇÃO
Página
Page 93

INSTALAÇÃO DA PILHA PARA PROTEÇÃO DA MEMÓRIA
Antes de utilizar pela primeira vez, retire a pilha de
lítio incluída, e instale-a no produto de acordo com
o seguinte procedimento.
Se o cabo de alimentação for desconectado
acidentalmente quando estiver operando apenas
com corrente alterna, a taxa de imposto definida e
o conteúdo da memória serão perdidos.
1) Desligue “OFF” o produto e desconecte o cabo
de alimentação da tomada elétrica.
2) Retire a tampa do compartimento da pilha da
unidade. (Fig. 1)
3) Limpe bem a pilha com um pano seco e coloque
o lado positivo “+” para cima. (Fig. 2)
4) Recoloque a tampa do compartimento da pilha
invertendo o procedimento de remoção.
5) Pressione o interruptor RESET na parte posterior
da unidade (vide página 102).
1
2
Fig. 1 Fig. 2
Após a instalação da pilha
• Conecte o cabo de alimentação a uma tomada
elétrica e ligue “ON” o produto.
Verifique se “0.” aparece no mostrador. Se “0.”
não aparecer, retire a pilha, instale-a de novo, e
verifique o mostrador de novo.
• Na etiqueta de data de troca da pilha encontrada
na parte posterior da unidade, escreva o mês e
ano em que a pilha foi instalada, como uma
referência para a próxima troca da pilha.
91
Page 94

CONTROLES DE OPERAÇÃO
INTERRUPTOR DE ALIMENTAÇÃO; SELETOR DE MODO COM
IMPRESSÃO/CONTAGEM DE
ITENS:
“OFF”: Desliga a calculadora.
“•”: Liga a calculadora.
Seleciona o modo sem
impressão.
• •
... • • • –” será im-
(“•
presso.)
“P”: Liga a calculadora.
Seleciona o modo com
impressão.
(“•
• •
... • • • +” será im-
presso.)
“P•IC”: Liga a calculadora.
Seleciona o modo de
contagem de itens.
O contador contará o
número de vezes que
pressionado numa adição.
Notas: • Cada vez que
numa subtração, 1 será
subtraído da contagem.
for
é usado
92
• A contagem é impressa
quando o resultado do
cálculo é obtido.
• Pressionar
limpa o contador.
• O contador tem uma
capacidade máxima de 3
dígitos (até ±999). Se a
contagem exceder da
capacidade máxima o
contador recomeçará a
contagem desde zero.
SELETOR DECIMAL:
Predefine o número de casas
decimais para a resposta.
Na posição “F”, a resposta é exibida
no sistema decimal flutuante.
, ou
Page 95

5/4
SELETOR DE ARREDONDAMENTO:
Exemplo: Ajuste o seletor decimal
÷
4
Nota: A vírgula decimal (um ponto no
SELETOR DE MODO DE
CONSTANTE/ADIÇÃO:
“K” : As seguintes funções de con-
Multiplicação: A calculadora
para “2”.
9 = 0,444 ... , 5 ÷ 9 = 0,555 ...
4
9 5 9
0.45 0.56
5/4 0.44 0.56
0.44 0.55
mostrador) flutua durante
cálculos sucessivos pelo uso de
ou .
Se o seletor decimal estiver na
posição “F”, a resposta será
sempre arredondada para baixo
(
).
stante serão realizadas:
memorizará automaticamente o
primeiro número
93
introduzido (o multiplicando) e a instrução
Divisão: A calculadora memorizará
“•”: Neutro
“A”: O uso do modo de adição permite
automaticamente o
segundo número introduzido (o divisor) e a
instrução
a adição e subtração de números
sem a entrada da vírgula decimal.
Quando o modo de adição está
ativado, a vírgula decimal é
posicionada automaticamente de
acordo com a definição do seletor
decimal.
O uso de
automaticamente o modo de
adição e a resposta correta será
impressa na posição decimal
predefinida.
, e sobrepõe
.
.
Page 96

GT
SELETOR DE MODO DE TOTAL
GERAL:
“GT”: E ste s e leto r acum ular á o
seguinte:
✱
” será impresso.)
(“
1. Os totais de adição e
subtração obtidos com
2. Os totais do produto e
quociente obtidos com
.
3. Resultados obtidos usando
.
“•”: Neutro
TECLA DE ALIMENTAÇÃO DE
PAPEL
TECLA DE CORREÇÃO DO ÚLTIMO
DÍGITO
TECLA DE MUDAR SINAL:
Muda o sinal algébrico de um número
(ou seja, positivo para negativo ou
negativo para positivo).
TECLA DE NÃO-ADIÇÃO/SUBTOTAL:
Não-adição – Quando esta tecla é
pressionada logo depois
.
ou
94
da entrada de um
número o modo com
impressão, a entrada é
impressa no lado
esquerdo com “#”.
Esta tecla é usada para
imprimir números não
sujeitos a cálculos, tais
como códigos, datas,
Subtotal – Esta tecla é usada para
Mesmo no modo Não-Imprimir,
pressionando-se esta tecla, o
número exibido será impresso sem
nenhum símbolo.
etc.
obter o(s) subtotal(is) de
adições e/ou subtrações.
Quando pressionada
depois de
subtotal é impresso com
“
◊
” e o cálculo pode ser
continuado.
ou , o
Page 97
TECLA DE TOTAL:
Imprime o total da adição e subtração
com “ ✱ ”.
Esta tecla também serve como uma
tecla de limpeza para o registro do
cálculo, e reposiciona uma condição de
erro.
TECLA DE LIMPAR ENTRADA:
Limpa os números introduzidos antes
do uso de uma tecla de função.
Esta tecla também é usada para limpar
um erro de estouro causado por uma
entrada.
TECLA DE PRIMEIRA CHAMADA DA
MEMÓRIA
TECLA DE PRIMEIRA CHAMADA E
LIMPEZA DA MEMÓRIA
TECLA SEM-TAXA
TECLA COM-TAXA:
Esta tecla é usada para cálculos
incluindo taxas de imposto/descontos.
TECLA ARMAZENAR:
Esta tecla é usada para armazenar a
taxa de imposto/desconto.
• Pode-se armazenar um máximo de 4
dígitos (ponto decimal não é contada
como dígito).
• Para armazenar uma taxa de
desconto, pressione
• Pode-se armazenar somente uma
taxa. Caso uma nova taxa seja
armazenada, a taxa anterior será
apagada.
TECLA TOTAL GERAL:
Imprime e limpa o conteúdo da
memória “GT”.
TECLA DE CHAMADA DA SEGUNDA
MEMÓRIA
TECLA DE CHAMADA E LIMPEZA DA
SEGUNDA MEMÓRIA
primeiro.
95
Page 98

MOSTRADOR
Formato de exibição:
Símbolos:
M: Símbolo da primeira memória
Aparece quando um número foi
armazenado na primeira memória.
:Símbolo da segunda memória
Aparece quando um número foi
armazenado na segunda memória.
– :Símbolo de menos
Aparece quando um número é negativo.
E: Símbolo de erro
Aparece quando um erro de estouro ou
outro erro é detectado.
:Símbolo da memória de total geral
Aparece quando um número é a
memória de total geral.
* Embora todos os símbolos disponíveis sejam
mostrados aqui para o propósito de instrução,
esses símbolos não aparecem na tela
simultaneamente.
1. Retire o rolo de papel da calculadora. (Rasgue
o papel e retire-o do mecanismo de impressão
usando
2. Coloque o interruptor de alimentação na
posição OFF.
Certifique-se de que a roda de impressão
pare.
3. Retire a tampa da impressora deslizando-a na
direção da parte posterior da calculadora. (Fig.
1)
4. Retire a fita usada.
5. Instale a fita nova.
6. Com o lado preto da fita virado para cima,
coloque um dos carretéis no eixo de carretel
na direita. (Fig. 2) Certifique-se de que o carretel
está posicionado firmemente.
7. Enfie a fita ao redor do exterior das guias de
metal. (Fig. 3)
8. Elimine qualquer folga, girando um dos carretéis
manualmente.
9. Recoloque a tampa da impressora.
10. Recoloque o rolo de papel.
96
TROCA DA FITA DE TINTA
.)
Page 99

Tampa da impressora
Fig. 1
Carretel
Fita de tinta
Fig. 2
TROCA DO ROLO DE PAPEL
1. Levante o porta-papel. (Fig. 1)
2. Dobre a borda de introdução do rolo de papel 3
a 5 cm. (Não a dobre obliquamente.) (Fig. 2)
3. Insira o rolo de papel desde o lado esquerdo do
porta-papel e certifique-se de que o rolo de papel
esteja na direção correta (com o papel sendo
alimentado pelo fundo). (Fig. 3)
4. Insira a borda de introdução do papel na abertura
diretamente atrás do mecanismo de impressão.
(Fig. 4)
5. Pressione a tecla de alimentação de papel e
alimente o papel sob a borda do cortador de
papel. (Fig. 5)
Eixo de carretel
Fita de tinta
Fig. 3
97
Porta-papel
Fig. 1
3 cm – 5 cm
Fig. 2
Page 100

Existem diversar situações que podem causar
transbordamentos ou uma condição de erro.
Fig. 3
Cortador de papel
Fig. 4
NÃO PUXE O PAPEL DE VOLTA POIS ISSO
PODERIA AVARIAR O MECANISMO DE
IMPRESSÃO.
Fig. 5
Quando vier a ocorrer, o símbolo “E” será exhibido
e todas as teclas ficarão eletronicamente travadas.
O conteúdo da memória no momento da
ocorrência do erro permanece inalterado.
Caso “0•E” e depois “
vermelho quando da ocorrência de um erro (no
modo Não-Imprimir, os símbolos de erro são
somente exibidos),
retornar a calculadora ao normal.
Caso um “E” com qualquer número exceto zero
seja exibido, o erro poderá ser anulado com
e o poder-se-á continuar com os cálculo.
Condições de erro:
1. Entrada de mais de 14 dígitos ou 13 decimais.
Este erro pode ser anulado com ou .
2. Quando a porção inteira de um resultado
exceder 14 dígitos.
3. Quando a porção inteira do conteúdo da
memória exceder 14 dígitos.
(Ex.:
4. Quando qualquer número é divido por zero.
(Ex.: 5 0 )
98
ERROS
, , , , , , ,
99999999999999 1 )
” seja impresso em
deve ser usado para
ou
 Loading...