

Page 1

ENGLISH ............................................ Page 2
CALCULATION EXAMPLES.............. Page 26
FRANÇAIS ......................................... Page 10
EXEMPLES DE CALCULS ................ Page 26
ESPAÑOL ........................................... Página 18
EJEMPLOS DE CALCULOS.............. Página 26
CS-2635H
ELECTRONIC PRINTING CALCULATOR
CALCULATRICE IMPRIMANTE ÉLECTRONIQUE
CALCULADORA IMPRESORA ELECTRÓNICA
OPERATION MANUAL
MODE D’EMPLOI
MANUAL DE MANEJO
Page 2

In U.S.A.:
This device complies with Part 15 of the FCC Rules. Operation is subject to the
following two conditions: (1) This device may not cause harmful interference, and (2)
this device must accept any interference received, including interference that may
cause undesired operation.
WARNING - FCC Regulations state that any unauthorized changes or modifications to
this equipment not expressly approved by the manufacturer could void the user’s
authority to operate this equipment.
Note: This equipment has been tested and found to comply with the limits for a Class
B digital device, pursuant to Part 15 of the FCC Rules.
These limits are designed to provide reasonable protection against harmful
interference in a residential installation. This equipment generates, uses, and can
radiate radio frequency energy and, if not installed and used in accordance with the
instructions, may cause harmful interference to radio communications. However, there
is no guarantee that interference will not occur in a particular installation. If this
equipment does cause harmful interference to radio or television reception, which can
be determined by turning the equipment off and on, the user is encouraged to try to
correct the interference by one or more of the following measures:
- Reorient or relocate the receiving antenna.
- Increase the separation between the equipment and receiver.
- Connect the equipment into an outlet on a circuit different from that to which the
receiver is connected.
- Consult the dealer or an experienced radio/TV technician for help.
Caution!
The socket outlet shall be installed near the equipment and shall be easily accessible.
Attention!
La prise de courant murale doit être installée à proximité de I’appareil et doit être
facilement accessible.
Aviso!
El tomacorriente debe estar instalado cerca del equipo y debe quedar bien accesible.
Page 3
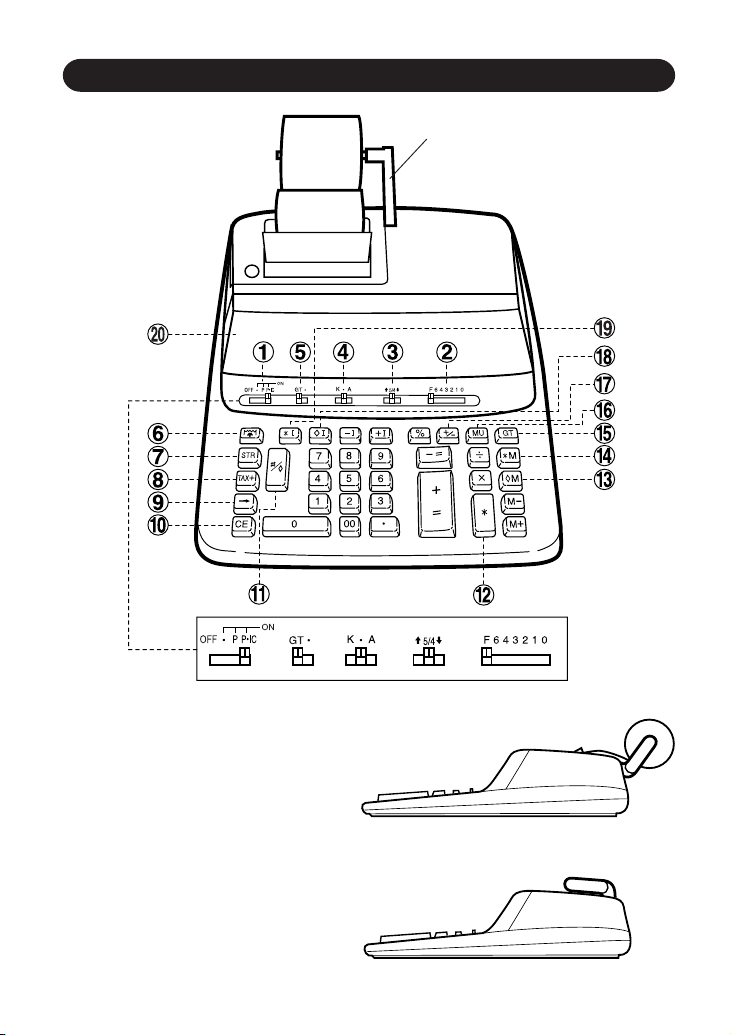
THE KEYBOARD LE CLAVIER EL TECLADO
FOLD DOWN PAPER HOLDER
PORTE-PAPIER PIVOTANT
SVJETADOR ABATIBLE DEL PAPEL
(A) For use with the paper holder.
Quand on utilise le porte-papier.
Para usar con el sujetador del papel.
(B) Not for use.
Quand on ne l’utilise pas.
No se utiliza.
(A)
(B)
– 1 –
Page 4

ENGLISH
INTRODUCTION
Thank you for your purchase of the SHARP electronic calculator, model CS-2635H.
Your SHARP calculator is specially designed to save work and increase efficiency in
all business applications and general office calculations. Careful reading of this
manual will enable you to use your new SHARP calculator to its fullest capability.
OPERATIONAL NOTES
To insure trouble-free operation of your SHARP calculator, we recommend the
following:
1. The calculator should be kept in areas free from extreme temperature changes,
moisture, and dust.
2. A soft, dry cloth should be used to clean the calculator. Do not use solvents or a
wet cloth.
3. Since this product is not waterproof, do not use it or store it where fluids, for
example water, can splash onto it. Raindrops, water spray, juice, coffee, steam,
perspiration, etc. will also cause malfunction.
4. If you are not going to use the calculator for a time period, please pull out the
power cord to cut electricity completely. In this case, the presently stored tax/
discount rate will be cleared.
5. If service should be required on this equipment, use only a SHARP servicing
dealer, a SHARP approved service facility or SHARP repair service where
available.
6. Do not wind the AC cord around the body or otherwise forcibly bend or twist it.
WARNING
THE VOLTAGE USED MUST BE THE SAME AS SPECIFIED ON THIS
CALCULATOR. USING THIS CALCULATOR WITH A VOLTAGE HIGHER THAN
THAT SPECIFIED IS DANGEROUS AND MAY RESULT IN A FIRE OR OTHER
TYPE OF ACCIDENT CAUSING DAMAGE. SHARP WILL NOT BE HELD
RESPONSIBLE FOR ANY DAMAGE RESULTING FROM USE OF THIS
CALCULATOR WITH OTHER THAN THE SPECIFIED VOLTAGE.
– 2 –
Page 5

CONTENTS
Page
• OPERATING CONTROLS ........................................................................................ 3
• INK RIBBON REPLACEMENT ................................................................................. 7
• PAPER ROLL REPLACEMENT ................................................................................8
• ERRORS ................................................................................................................... 9
• SPECIFICATIONS .................................................................................................... 9
• CALCULATION EXAMPLES ...................................................................................26
• TAX RATE CALCULATIONS ................................................................................... 39
• DISCOUNT RATE CALCULATION ......................................................................... 41
OPERATING CONTROLS
POWER SWITCH; PRINT / ITEM COUNT MODE SELECTOR:
“OFF”: Power OFF.
“•”: Power ON. Set to the non-print mode.
(“• • • ... • • • –P” will be printed.)
“P”: Power ON. Set to the print mode.
(“• • • ... • • • +P” will be printed.)
“P•IC”: Power ON. Set to the print and item count mode.
The counter will count the number of times that has been
pressed in addition.
Notes: • Each time is used in subtraction, 1 will be subtracted from
the count.
• The count is printed when the calculated result is obtained.
• Pressing of , or clears the counter.
• The counter has a maximum capacity of 3 digits (up to ±999).
If the count exceeds the maximum, the counter will recount
from zero.
DECIMAL SELECTOR:
Presets the number of decimal places in the answer.
In the “F” position, the answer is displayed in the floating decimal
system.
– 3 –
Page 6
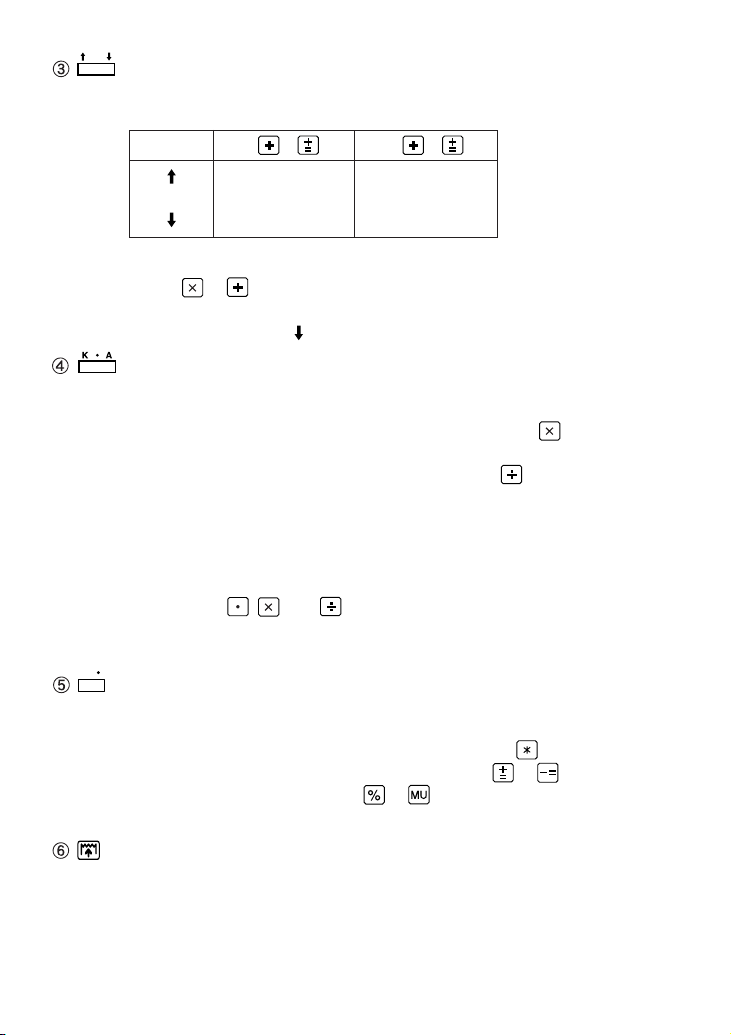
5/4
ROUNDING SELECTOR:
Example: Set decimal selector to “2”.
4 ÷ 9 = 0.444 ... , 5 ÷ 9 = 0.555 ...
4 9 5 9
0.45 0.56
5/4 0.44 0.56
0.44 0.55
Note: The decimal point floats during successive calculation by the use of
or .
If the decimal selector is set to “F” then the answer is always
rounded down ( ).
CONSTANT / ADD MODE SELECTOR:
“K” : The following constant functions will be performed:
Multiplication: The calculator will automatically remember the first
number entered (the multiplicand) and instruction.
Division: The calculator will automatically remember the second
number entered (the divisor) and instruction.
“•”: Neutral
“A”: Use of the Add mode permits addition and subtraction of numbers
without entry of the decimal point. When the Add mode is activated,
the decimal point is automatically positioned according to the decimal selector setting.
Use of , , and will automatically override the Add mode and
decimally correct answers will be printed at the preset decimal
position.
GT
GRAND TOTAL MODE SELECTOR:
“GT”: This selector will accumulate the following:
(“ ✱ +” will be printed.)
1. Addition and subtraction totals obtained with .
2. Product and quotient totals obtained with or .
3. Answers obtained with or .
“•”: Neutral
PAPER FEED KEY
– 4 –
Page 7

STORE KEY:
This key is used to store the tax/discount rate.
• A maximum of 4 digits can be stored (decimal point is not counted as a
digit).
• To store a discount rate, press first.
• Only one rate can be stored. If you enter a new rate, the previous rate
will be cleared.
TAX-INCLUDING KEY:
This key is used for calculations with the tax/discount rate.
LAST DIGIT CORRECTION KEY
CLEAR ENTRY KEY:
Clears numbers entered prior to use of a function key.
Also used to clear an overflow error caused by an entry.
NON-ADD / SUBTOTAL KEY:
Non-Add – When this key is pressed right after entry of a number in the
Print mode, the entry is printed on the left-hand side with “#”.
This key is used to print out numbers not subject to
calculations such as codes, dates, etc.
Subtotal – Used to get subtotal(s) of additions and/or subtractions. When
pressed following or , the subtotal is printed with “◊”
and the calculation may be continued.
By pressing this key even in the Non-print mode, the displayed
number is printed with “P”.
TOTAL KEY:
Prints the total of addition and subtraction with “ ✱ ”.
This key also serves as a clear key for the calculation register and resets
an error condition.
FIRST RECALL MEMORY KEY
FIRST RECALL AND CLEAR MEMORY KEY
GRAND TOTAL KEY:
Prints and clears the “GT” memory contents.
– 5 –
Page 8
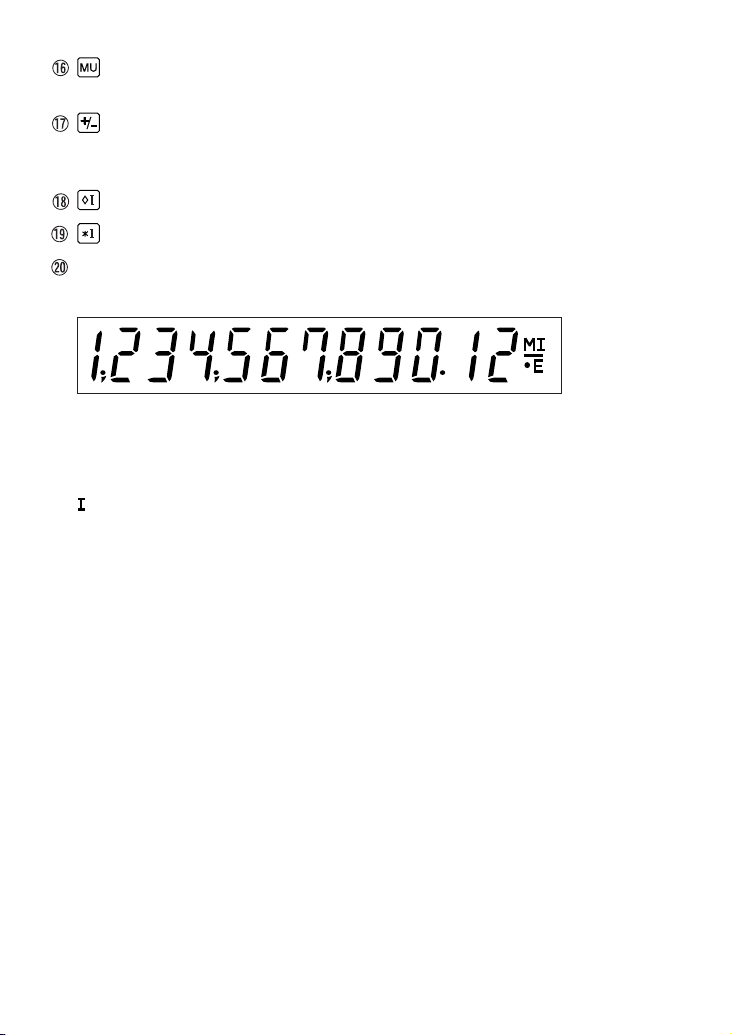
MULTIPLE USE KEY:
Performs mark-ups, percent change and automatic add-on/discount.
CHANGE SIGN KEY:
Changes the algebraic sign of a number (i.e. positive to negative or
negative to positive).
SECOND RECALL MEMORY KEY
SECOND RECALL AND CLEAR MEMORY KEY
DISPLAY
Display format:
Symbols:
M : First memory symbol
Appears when a number has been stored in First memory.
: Second memory symbol
Appears when a number has been stored in Second memory.
– : Minus symbol
Appears when a number is a negative.
E : Error symbol
Appears when an overflow or other error is detected.
• : Grand total memory symbol
Appears when a number is in the grand total memory.
– 6 –
Page 9

INK RIBBON REPLACEMENT
1. Remove the paper roll from the calculator. (Tear the paper and remove it from the
print mechanism by using .)
2. Set the power switch to OFF.
Make sure that the print wheel has stopped.
3. Remove the printer cover by sliding it towards the back of the calculator. (Fig. 1)
4. Remove the used ribbon.
5. Install the new ribbon.
6. With the black side of the ribbon facing upwards, place one of the reels on the reel
shaft on the right. (Fig. 2) Make sure that the reel is securely in place.
7. Thread the ribbon around the outside of the metal guides. (Fig. 3)
8. Take up any slack by manually turning one of the reels.
9. Replace the printer cover.
10. Replace the paper roll.
Printer cover
Fig. 1
Reel
Reel shaft
Ink ribbon
Ink ribbon
Fig. 2
Fig. 3
– 7 –
Page 10
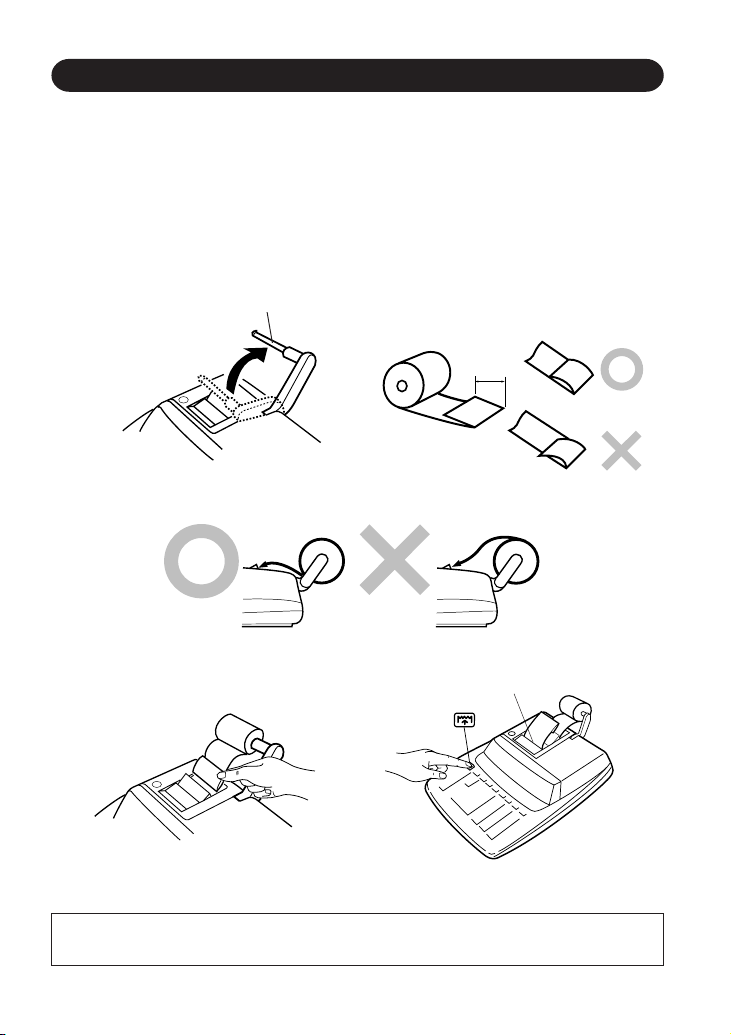
PAPER ROLL REPLACEMENT
1. Lift the paper holder up. (Fig. 1)
2. Fold the leading edge of the paper roll 3 to 5 cm. (Do not fold it slantwise.) (Fig. 2)
3. Insert the paper roll from the left side of the paper holder and make sure the paper
roll is set in the proper direction (with the paper feeding from the bottom). (Fig. 3)
4. Insert the leading edge of the paper into the opening directly behind the print
mechanism. (Fig. 4)
5. Press the paper feed key and feed the paper under the edge of the paper cutter.
(Fig. 5)
Paper holder
3 cm – 5 cm
(1-3/16″ to
1-31/32″)
Fig. 1
Fig. 2
Fig. 3
Paper cutter
Fig. 4
Fig. 5
DO NOT PULL THE PAPER BACKWARDS AS THIS MAY DAMAGE THE
PRINTER MECHANISM.
– 8 –
Page 11

ERRORS
There are several situations which will cause an overflow or an error condition. When
this occurs, the error symbol “E” will be displayed and all keys will electronically lock.
The contents of the memory at the time of the error are retained.
If an “0•E” is displayed at the time of the error, must be used to clear the calculator.
If an “E” with any numerals except zero is displayed, the error may be cleared with
or and the calculation can still be continued.
Error conditions:
1. Entry of more than 12 digits or 11 decimals.
This error can be cleared with or .
2. When the integer portion of an answer exceeds 12 digits.
3. When the integer portion of the contents of the memory exceeds 12 digits.
(Ex. 999999999999 1 )
4. When any number is divided by zero. (Ex. 5 0 )
SPECIFICATIONS
Operating capacity: 12 digits
Power source: AC: 120V, 60Hz
Calculations: Four arithmetic calculations, constant multiplication and
division, power calculation, add-on/discount calculation,
repeat addition and subtraction, reciprocal calculation, grand
total calculation, item count calculation, markup calculation,
memory calculation, etc.
PRINTING SECTION
Printer: Mechanical printer
Printing speed: Approx. 4.3 lines/sec.
Printing paper: 57 mm (2-1/4") ~ 58 mm (2-9/32") wide
80 mm (3-5/32") in diameter (max.)
Operation temperature: 0°C ~ 40°C (32°F ~ 104°F)
Power consumption: 126 mA
Dimensions: 250 mm (W) × 345 mm (D) × 78 mm (H)
9-27/32" (W) × 13-19/32" (D) × 3-1/16" (H)
Weight: Approx. 2.0 kg (4.41 lb.)
Accessories: 1 paper roll, 1 ink ribbon and operation manual
– 9 –
Page 12

CALCULATION EXAMPLES
EXEMPLES DE CALCULS
EJEMPLOS DE CALCULOS
1. Set the decimal selector as specified in each example.
The rounding selector should be in the “5/4” position unless otherwise specified.
2. The grand total mode selector and the constant/add mode selector should be in the
“•” position (off position) unless otherwise specified.
3. The print/item count mode selector should be in the “P” position unless otherwise
specified.
4. If an error is made while entering a number, press or and enter the correct
number.
5. Negative values are printed with “–” symbol in red.
1. Régler le sélecteur de décimale tel que spécifié dans chaque exemple.
Le sélecteur d’arrondi, doit être placé à la position “5/4” sauf indication contraire.
2. Le sélecteur de mode de grand total et de constante/d’addition, doivent être placés
à la position “•” (position arrêt) sauf indication contraire.
3. Le sélecteur de mode d’impression, et le sélecteur de mode du compteur d’articles
doivent être placés à la position “P” sauf indication contraire.
4. En cas d’erreur à l’introduction d’un nombre, appuyer sur ou et introduire le
nombre correct.
5. Les valeurs négatives sont accompagnées du symbole “–” imprimé en rouge.
1. Colocar el selector decimal según se especifique en cada ejemplo.
El selector de redondeo debe estar en la posición “5/4” salvo que se especifique lo
contrario.
2. El selector de modo de total global y selector del modo de constante/suma debe
estar en la posición “•” (posición de desconexión) salvo que se especifique lo
contrario.
3. El selector del modo de impresión/modo para contar artículos debe estar en la
posición “P” salvo que se especifique lo contrario.
4. Si se hace un error al ingresar un número, apretar ou e ingresar el número
correcto.
5. Los valores negativos se imprimen con el símbolo “–” en rojo.
– 26 –
Page 13

Note: All totals and sub-totals may be used for further calculations. RE-ENTER
Remarque: Tous les totaux et les totaux partiels peuvent être utilisés pour des
Nota: Se pueden usar todos los totales y los totales parciales para cálculos
EXAMPLE: EXEMPLE: EJEMPLO:
(123 + 456) × 2 =
Selector Operation Print Note
Sélecteur Opération Impression Note
Selector Operación Impresión Nota
F 6 4 3 2 1 0
the number into the calculator by using the FUNCTION key and continue
the problem.
calculs ultérieurs. RÉINTRODUIRE le nombre dans la calculatrice en
utilisant une touche de FONCTION et poursuivre le calcul.
posteriores. VOLVER A INGRESAR el número en la calculadora usando
una tecla de FUNCION y continuar efectuando la operación.
123 123.00 +
456 456.00 +
579.00 ✱
❇ 579.00 × ❇ Réintroduction du total
2 2
1,158.00 ✱
.
=
Re-entry of total
Reingreso del total
REPEAT ADDITION AND SUBTRACTION /
ADDITION ET SOUSTRACTION SUCCESSIVES /
REPETICION DE SUMAS Y RESTAS
123 + 123 + 123 + 456 – 100 – 100 =
Selector Operation Display Print
Sélecteur Opération Affichage Impression
Selector Operación Exhibición Impresión
(1) (2) (3) (4)
625
.
+
.
+
.
+
.
+
.
–
.
–
.
✱
F 6 4 3 2 1 0
123 123. 123
246. 123
369. 123
456 825. 456
100 725. 100
625. 100
625.
– 27 –
Page 14

ADDITION AND SUBTRACTION WITH ADD MODE /
ADDITION ET SOUSTRACTION AVEC MODE D’ADDITION /
SUMA Y RESTA CON MODO DE SUMA
12.45 + 16.24 + 19.35 – 5.21 =
(1) (2) *
F 6 4 3 2 1 0
1
(3) (4)
1245 12.45 12.45 +
1624 28.69 16.24 +
1935 48.04 19.35 +
521 42.83 5.21 –
42.83 ✱
42.83
*1 : was not used in the entries.
*1 : La n’a pas été utilisée dans les entrées.
*1 : La no ha sido usada en los registros.
MIXED CALCULATIONS / CALCUL COMPLEXE / CALCULOS MIXTOS
A. (10 + 2) × 5 =
(1) (2) (3) (4)
12.◊
.
+
.
+
F 6 4 3 2 1 0
10 10. 10
2 12. 2
12. 12.×
5 5
60
60.
B. 5 × 2 + 12 =
(1) (2) (3) (4)
F 6 4 3 2 1 0
5 5. 5.×
2 2
10
10.
10. 10
12 22. 12
22
22.
– 28 –
.
=
.
✱
.
=
.
✱
.
+
.
+
.
✱
Page 15

CONSTANT / CALCULS AVEC CONSTANTE / CONSTANTES
A. 62.35 × 11.11 = ①
62.35 × 22.22 = ②
(1) (2) (3) (4)
F 6 4 3 2 1 0
B. 11.11 ÷ 77.77 = ①
22.22 ÷ 77.77 = ②
(1) (2) (3) (4)
F 6 4 3 2 1 0
62.35 62.35 62.35 ×
11.11 11.11 =K
692.71 ✱ ①
692.71
22.22 22.22 =K
1,385.42 ✱ ②
1,385.42
11.11 11.11 11.11
77.77 77.77 =K
0.143 ✱ ①
0.143
22.22 22.22 =K
0.286 ✱ ②
0.286
÷
POWER / PUISSANCE / POTENCIA
A. 5.252 =
(1) (2) (3) (4)
F 6 4 3 2 1 0
5.25 5.25 5.25 ×
5.25 =
27.563 ✱
27.563
– 29 –
Page 16

B. 53 =
(1) (2) (3) (4)
F 6 4 3 2 1 0
5 5. 5.×
25
25.
25
125
125.
.
5
=K
.
✱
.
=K
.
✱
F 6 4 3 2 1 0
5 5. 5.×
25. 5.×
125
125.
PERCENT / POURCENTAGE / PORCENTAJES
A. 100 × 25% =
(1) (2) (3) (4)
F 6 4 3 2 1 0
B. 123 ÷ 1368 = (%)
(1) (2) (3) (4)
F 6 4 3 2 1 0
100 100. 100.×
25 25.%
25.00 ✱
25.00
123 123. 123
1368 1,368.%
8.99 ✱
8.99
.
5
=
.
✱
.
÷
– 30 –
Page 17

RECIPROCAL / INVERSES / RECIPROCOS
1
=
7
(1) (2) (3) (4)
5/4
F 6 4 3 2 1 0
7 7. 7
1. 7
0.14285714285 ✱
0.14285714285
.
÷
.
÷
.
7
=
ADD-ON AND DISCOUNT / MAJORATION ET RABAIS /
RECARGOS Y DESCUENTOS
A. 5% add-on to 100. / Majoration de 5% de 100. / Un 5% de recargo sobre 100.
(1) (2) (3) (4)
F 6 4 3 2 1 0
100 100. 100.×
5 5.%
5.00 Majoration
105.00 ✱ Total majoré
105.00
Increased amount
Incremento
New amount
Nueva cantidad
B. 10% discount on 100. / Rabais de 10% sur 100. / Un 10% de descuento sobre 100.
(1) (2) (3) (4)
F 6 4 3 2 1 0
100 100. 100.×
10 –10.%
–10.00 Remise
90.00 ✱ Montant net
90.00
– 31 –
Discount
Descuento
Net amount
Cantidad neta
Page 18

MARKUP AND MARGIN /
HAUSSE ET MARGE BÉNÉFICIAIRE /
INCREMENTO PORCENTUAL Y MARGEN
Markup and Profit Margin are both ways of calculating percent profit.
– Profit margin is percent profit vs. selling price.
– Markup is percent profit vs. cost.
– Cost is the cost.
– Sell is the selling price.
– GP is the gross profit.
– Mkup is the percent profit based on cost.
– Mrgn is the percent profit based on selling price.
Le calcul des majorations et des marges bénéficiaires sont deux façons de calculer un
pourcentage de profit.
– La marge bénéficiaire est un pourcentage de profit par rapport au prix de vente.
– La majoration est un pourcentage de profit par rapport au prix d’achat.
– Cost est le prix d’achat.
– Sell est le prix de vente.
– GP est le bénéfice brut.
– Mkup est le bénéfice par rapport au coût.
– Mrgn est le bénéfice par rapport au prix de vente.
Tanto la función del incremento porcentual como la del margen de beneficio son
formas de calcular el beneficio porcentual.
– El margen de beneficio es el beneficio porcentual con respecto al precio de venta.
El incremento porcentual es el beneficio porcentual con respecto al coste.
– Cost es el coste.
– Sell es el precio de venta.
– GP es el beneficio bruto.
– Mkup es el beneficio porcentual basado en el coste.
– Mrgn es el beneficio porcentual basado en el precio de venta.
– 32 –
Page 19

To find Knowing Operation
Pour trouver Quand on connaît Opération
Para encontrar Sabiendo Operación
Mrgn Sell, Cost Cost Sell
Mkup Sell, Cost Sell Cost
Sell Cost, Mrgn Cost Mrgn
Cost Sell, Mrgn Sell Mrgn
Sell Cost, Mkup Cost Mkup
Cost Sell, Mkup Sell Mkup
Ex. / Ex. / Ej.
Cost Sell GP Mkup Mrgn
$200 $250 $50 25% 20%
(1) (2) (3) (4)
F 6 4 3 2 1 0
200 200. 200
20 20.%M Mrgn
50.00
.
÷
Cost
250.00 ✱ Sell
50.00 GP GP
PERCENT CHANGE / VARIATION EN POUR CENT /
CAMBIO PORCENTUAL
• Calculate the dollar difference (a) and the percent change (b) between two yearly
sales figures $1,500 in one year and $1,300 in the previous.
• Calculer la différence en dollars (a) et la variation en pour cent (b) entre deux prix.
1.500 $ pour cette année et 1.300 $ pour l’année précédente.
• Calcular la diferencia en dólares (a) y el cambio porcentual (b) entre dos cifras de
ventas anuales, $1.500 en un año y $1.300 en el año anterior.
(1) (2) (3) (4)
F 6 4 3 2 1 0
1500 1,500.00 1,500.00 +
1300 200.00 1,300.00 –
200.00 ✱ (a)
15.38 %C (b)
15.38
– 33 –
Page 20

PERCENT PRORATION /
DISTRIBUTION PROPORTIONNELLE EN POURCENTAGE /
DISTRIBUCION PROPORCIONAL DE PORCENTAJE
• Calculate the percentage of each of the parts to the
whole.
• Calculer le pourcentage que chaque article représente
par rapport au tout.
• Calcular el porcentaje de cada artículo.
(1) (2) (3) (4)
2
F 6 4 3 2 1 0
*
123 123.00 123.00 +
456 579.00 456.00 +
5/4
789 1,368.00 789.00 +
123 1,368.00 ✱ (D)
8.99
M
8.99
456 456.F
M
33.33
M
33.33
789 789.F
M
57.68
M
57.68
M
100.00
100.00
Expenses
Dépenses %
Gastos
$123 (a)
456 (b)
789 (c)
(D) (d)
123.F
8.99 %P (a)
8.99 +M
33.33 %P (b)
33.33 +M
57.68 %P (c)
57.68 +M
100.00◊M (d)
100.00 ✱M
*2 : Press to clear the memory before starting a memory calculation.
*2 : Effacer le contenu de la mémoire ( ) avant de procéder à un calcul avec
mémoire.
*2 : Apretar para cancelar la memoria antes de empezar a efectuar un cálculo
con memoria.
– 34 –
Page 21

ITEM COUNT CALCULATION /
CALCUL DE COMPTE D’ARTICLES /
CALCULO DE CUENTA DE ARTICULOS
Bill No. Number of bills Amount
Facture n° Nbre de factures Montant
N° de factura Cantidad de facturas Importe
1 1 $100.55
2 1 $200.00
3 1 $200.00
4 1 $400.55
5 1 $500.65
Total Total Total (a) (b)
(1) (2) (3) (4)
F 6 4 3 2 1 0
100.55 100.55 100.55 +
200 300.55 200.00 +
500.55 200.00 +
400.55 901.10 400.55 +
500.65 1,401.75 500.65 +
005 (a)
1,401.75 ✱ (b)
1,401.75
– 35 –
Page 22

GRAND TOTAL / TOTAL GÉNÉRAL / TOTAL GLOBAL
100 + 200 + 300
= ①
+) 300 + 400 + 500 = ②
+) 500 – 600 + 700 = ③
Grand total / Total général / Total global ④
(1) (2) (3) (4)
F 6 4 3 2 1 0
100 100. 100
200 300. 200
300 600. 300
GT
300 300.
400 700.
500 1,200.
500 500.
600 100.
700 600.
MEMORY / MÉMOIRE / MEMORIA
A. 46 × 78 = ①
+) 125
÷
5 = ②
–)72× 8 = ③
Total / Total / Total ④
600.
1,200.
600.
2,400.
.
+
.
+
.
+
.
600
✱ + ①
•
•
•
•
•
•
−
•
•
•
300
400
500
1,200
500
600.–
700
600
2,400
.
+
.
+
.
+
.
✱ + ②
.
+
.
+
.
✱ + ③
.
✱ G ④
– 36 –
Page 23

(1) (2) (3) (4)
3
F 6 4 3 2 1 0
*
46 46. 46.×
78 78
M
3,588.
125 125.
M
3,588
125
5 5
M
25.
72 72.
M
25
72.×
8 8
M
576.
576.–M ③
3,037.◊
M
3,037.
B. (123 + 45) × (456 – 89) =
(1) (2) (3) (4)
3
F 6 4 3 2 1 0
123 123.
GT
456 456.
*
45 45.
89 367.
M
M
M
M
123
45
456
89.–
367.◊
.
=
.
+M ①
.
÷
.
=
.
+M ②
.
=
M ④
.
+M
.
+M
.
+
M
367.
168.
61,656.
M
M
367.×
168.◊
168
61,656
M
.
=
.
✱
*3 : Press to clear the memory before starting a memory calculation.
*3 : Effacer le contenu de la mémoire ( ) avant de procéder à un calcul avec
mémoire.
*3 : Apretar para cancelar la memoria antes de empezar a efectuar un cálculo con
memoria.
– 37 –
Page 24

(874 + 557) × (7 + 8)
C.
(1,746 + 876) ÷ (12 + 23)
=
(1) (2) (3) (4)
4
F 6 4 3 2 1 0
1746 1,746.
876 2,622.
*
12 12.
23 23.
M
M
M
M
12
23
1,746
876
2,622.◊
.
.
.
.
+M
+M
+
+
2,622.
M
2,622
35
.
.
÷
✱M
35.
.
35
75.
874 874.
557 557.
7 7.
8 15.
M
MI
MI
MI
MI
75
874
557
=
.
+M
.
+Ι
.
+Ι
.
7
+
.
8
+
15.◊
MI
15.
1,431.
21,465.
75.
286.
75.
MI
MI
MI
MI
I
15.×
1,431.◊
1,431
75.◊
75
286
75
1,431
.
.
.
.
.
Ι
÷
M
=
✱
✱M
✱Ι
1,431.
*4: Press then to clear the contents of the First and Second memories before
starting the operation.
*4: Avant de commercer les opérations, appuyer sur , puis sur pour effacer le
contenu de la première et deuxième mémoires.
*4: Antes de iniciar la operación, apriete y luego para borrar el contenido de la
primera y de la segunda memoria.
– 38 –
Page 25

TAX RATE CALCULATIONS
CALCULS DE TAXE
CALCULOS CON EL TIPO DE IMPUESTO
EXAMPLE 1: Set a 5% tax rate. Calculate the total amount for adding a 5% tax to
$800.
EXEMPLE 1: Choisir une taxe de 5%. Calculer le montant d’un article à $800 avec
cette taxe.
EJEMPLO 1: Fijar el tipo de impuesto al 5%. Calcular la cantidad total resultante de
añadir el impuesto del 5% a $800.
(1) (2) (3) (4)
F 6 4 3 2 1 0
- - - - - - - - - - - - - - - - - - - - - - - - - - - - - - - - - - - - - - - - - - - - - - - - - - - -
EXAMPLE 2: Calculate the total amount for adding a 5% tax to the sum of $500 and
EXEMPLE 2: Calculer la somme de deux articles, $500 et $460, avec cette taxe.
EJEMPLO 2: Calcular la cantidad total resultante de añadir el impuesto de 5% a la
5 5.
5.000
800 800
840.
$460.
suma de $500 y $460.
5.000 %
.
40.TX
.
840
TX
(1) (2) (3) (4)
F 6 4 3 2 1 0
500 500. 500
460 960. 460
960
48.TX
1,008
1,008.
– 39 –
.
+
.
+
.
✱
.
Page 26

EXAMPLE 3: Calculate the total amount for the sum of $500 with tax already
included and $460 with 5% tax to be added.
EXEMPLE 3: Calculer la somme d’un article à $500 taxe comprise et d’un article à
$460 auquel doit être ajoutée cette taxe.
EJEMPLO 3: Calcular la cantidad total resultante de sumar $500 con el impuesto ya
incluido y $460 con el impuesto del 5% a añadir.
(1) (2) (3) (4)
F 6 4 3 2 1 0
500 500. 500
460 460
.
+
.
23.TX
.
483
483.
.
483
+
.
983
✱
983.
– 40 –
Page 27

DISCOUNT RATE CALCULATION
CALCUL D’UNE REMISE
CALCULO CON EL TIPO DE DESCUENTO
EXAMPLE: Set an 8% discount rate. Calculate the final amount for an 8% discount
on $800.
EXEMPLE: Choisir une remise de 8%. Calculer le montant d’un article à $800 après
cette remise.
EJEMPLO: Fijar el tipo de descuento al 8%. Calcular la cantidad que se obtiene al
hacer un descuento del 8% a $800.
(1) (2) (3) (4)
F 6 4 3 2 1 0
- - - - - - - - - - - - - - - - - - - - - - - - - - - - - - - - - - - - - - - - - - - - - - - - - - - -
8 8. –
–8
8.000 –
800 800
–64
736.
.
000 %
736
TX
.
.
TX
.
– 41 –
Page 28

In U.S.A.:
www.sharp-usa.com
For your convenience, Genuine Sharp Supplies. Accessories, and
additional Sharp Products can be purchased from the Authorized
Sharp Reseller where you purchased your product or on-line at:
www.sharpplace.com
– 42 –
Page 29

MEMO / BLOC-NOTES / NOTAS
– 43 –
Page 30

MEMO / BLOC-NOTES / NOTAS
– 44 –
Page 31

Page 32

SHARP CORPORATION
PRINTED IN CHINA / IMPRIMÉ EN CHINE / IMPRESO EN CHINA
02BT(TINSZ0520EHZZ)
 Loading...