

Page 1

MINI COMPONENT SYSTEM
MODEL
CD-XP160W
OPERATION MANUAL
Thank you for purchasing this SHARP product.
To obtain the best performance from this product, please read
this manual carefully. It will guide you in operating your SHARP
product.
CD-XP160W Mini Component System consisting of CD-XP160W
(main unit) and CP-XP160 (speaker system).
*CDXP160WSCA_FRONT 02.12.20, 4:09 PM1
Page 2
1
02/5/27 CD-XP160W(SCA)E1.fm
CD-XP160W
Important Instruction
- Introduction / Special notes -
Introduction
Thank you for purchas ing this S HARP pro duct. To obtain th e best
performanc e f rom th is pr od uct, p le ase re ad th is m anual ca reful ly. It
will guide you in operating your SHARP product.
Special notes
Warning:
z
When the ON/ STAND-BY button is set at STAND-BY position,
mains voltage is still present inside the unit. When the ON/
STAND-BY button is set at STAND-BY position, the unit may be
brought into operation by the timer mode or remote control.
z
This unit contains no user serviceable parts. Never remove covers unless qualified to do so. This unit contains dangerous voltages, always remove mains plug from the socket before any
service operation and when not in use for a long period.
z
To prevent fire or shock haza rd, do not expose th is appl ianc e to
dripping or splashing. No objects filled with liquids, such as
vases, should be placed on the apparatus.
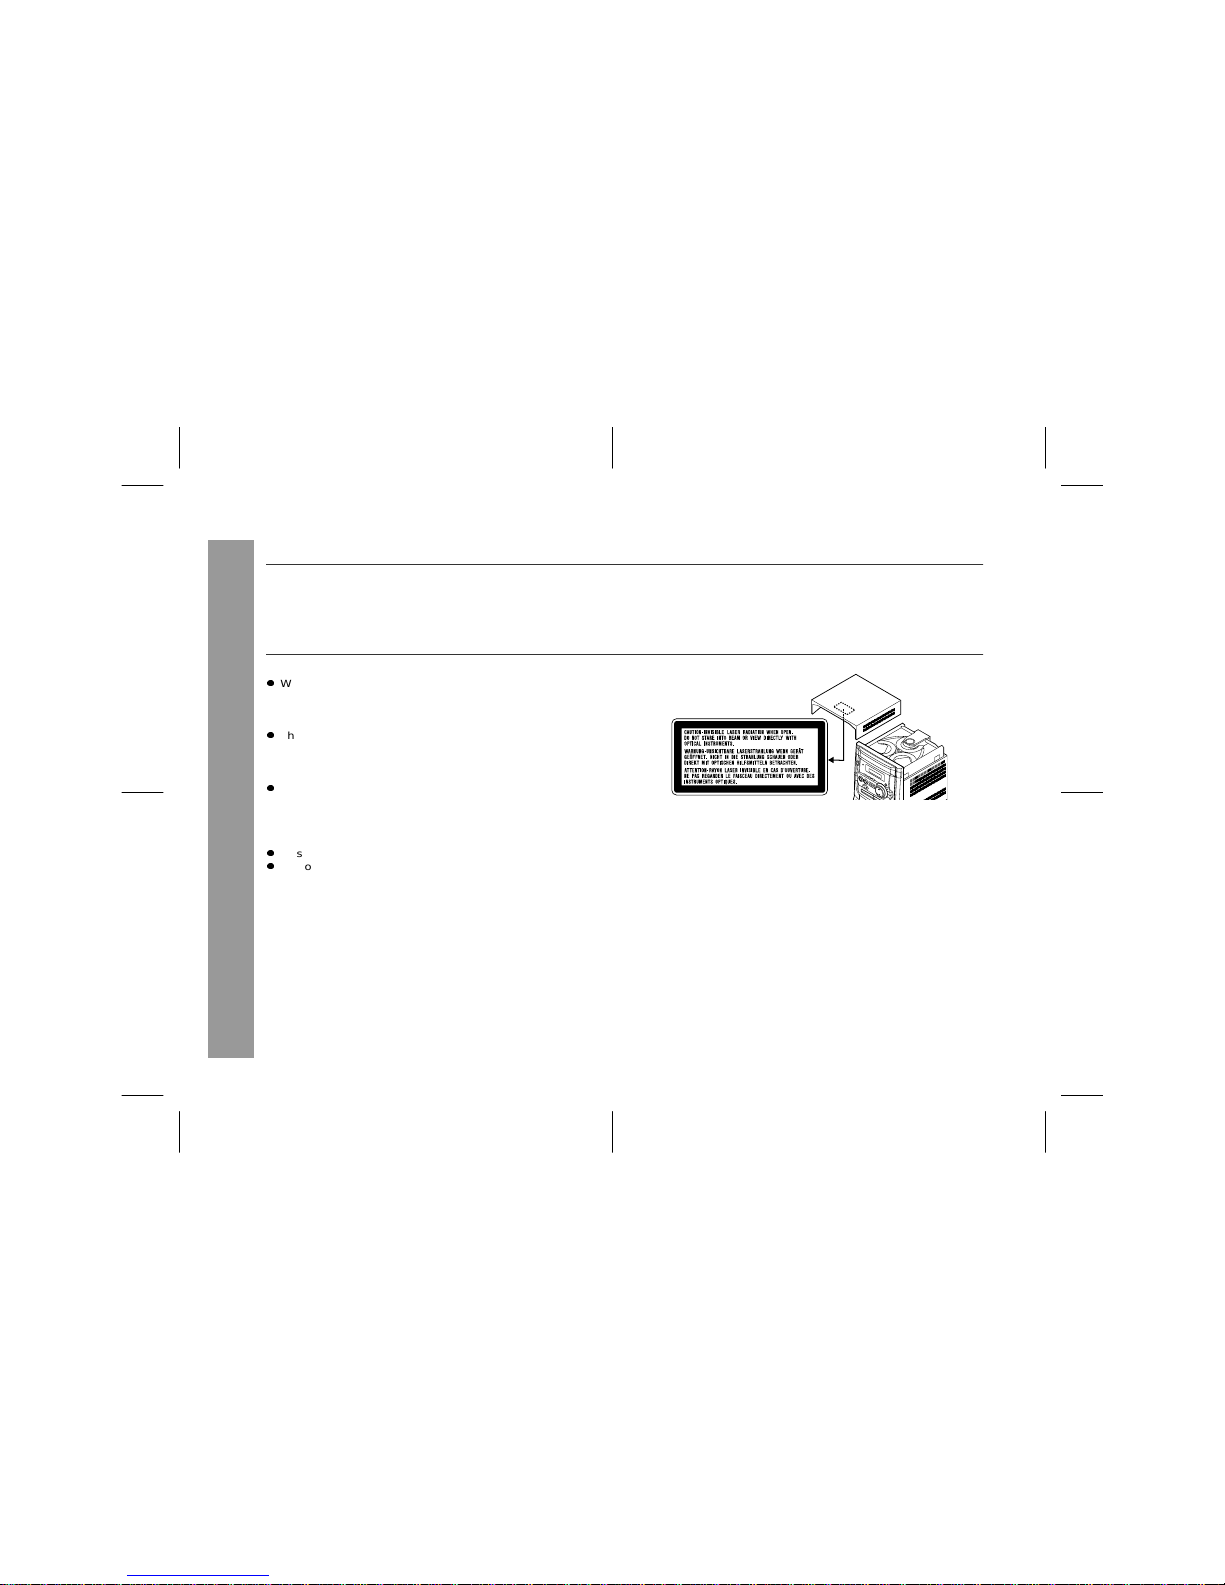
CAUTION
z
This product is clas s ifi ed as a C LASS 1 LASER product.
z
Use of con t ro ls , adju st ments or per f or m a nc e o f pro ce dures othe r
than tho se s p ec if i ed he r ei n ma y re s u lt i n ha zardous radiation e xposure.
As the laser beam used in this compact disc player is harmful to
the eyes, do not at te mp t to d is as sem ble t he cabi ne t. Refe r s ervi cing to qualified personnel only.
Laser Diode Properties
Material: GaAIAs
Wavelength: 780 nm
Emission D uration: continuous
Laser Output: max. 0.6 mW
Note for user s i n Austr a l ia:
Copyright may exist in material you wish to record. Copying or
broadcasting such material without permission of the relevant licensees or owners of the copyright is prohibited by law. SHARP is not
in a posi tion to au thoris e the co pying or b roadcast ing of copy right
materials and nothing in this OPERATION MANUAL should be
implied as giving that authority.
For other countr ies:
Audio-visual material may consist of copyrighted works which must
not be recorded without the authority of the owner of the copyright.
Please refer to the relevant laws in your country.
Page 3

02/5/27 CD-XP160W(SCA)E1.fm
2
CD-XP160W
General Informa ti on
- Accessories / Contents -
Accessories
Please confirm that the following accessories are included.
Note:
Only the above accessories ar e i ncluded.
Contents
Page
T
General Information
Precautions . . . . . . . . . . . . . . . . . . . . . . . . . . . . . . . . . . . . . . . . . 3
Controls and indicators . . . . . . . . . . . . . . . . . . . . . . . . . . . . . .4 - 6
T
Preparation for U se
System connections . . . . . . . . . . . . . . . . . . . . . . . . . . . . . . .7 - 10
Remote control . . . . . . . . . . . . . . . . . . . . . . . . . . . . . . . . . . . . . . 11
T
Basic Operation
Sound control . . . . . . . . . . . . . . . . . . . . . . . . . . . . . . . . . . . . . . . 12
Setting the clock . . . . . . . . . . . . . . . . . . . . . . . . . . . . . . . . . . . . 13
T
CD P layback
Listening to a CD (CDs) . . . . . . . . . . . . . . . . . . . . . . . . . . . . 14, 15
Advanced CD playback . . . . . . . . . . . . . . . . . . . . . . . . . . . . 16, 17
T
Radio
Listening to the radio . . . . . . . . . . . . . . . . . . . . . . . . . . . . . .18,19
Page
T
Tape Playback
Listening to a cassette tape . . . . . . . . . . . . . . . . . . . . . . . . 19, 20
T
Karaoke
Playing karaoke . . . . . . . . . . . . . . . . . . . . . . . . . . . . . . . . . . . . . 21
T
Tape Recording
Recording to a cassette tape . . . . . . . . . . . . . . . . . . . . . . . 22, 23
T
Advanced Features
Timer and sleep operation . . . . . . . . . . . . . . . . . . . . . . . . . 24, 25
T
References
Troubleshooting chart . . . . . . . . . . . . . . . . . . . . . . . . . . . . . 26, 27
Maintenance . . . . . . . . . . . . . . . . . . . . . . . . . . . . . . . . . . . . . . . . 28
Headphones . . . . . . . . . . . . . . . . . . . . . . . . . . . . . . . . . . . . . . . . 28
Specifications . . . . . . . . . . . . . . . . . . . . . . . . . . . . . . . . . . . . . . 29
Warranty . . . . . . . . . . . . . . . . . . . . . . . . . . . . . End of the manual
Remote control 1 "AA" size battery
(UM/SUM-3, R6,
HP-7 or similar) 2
AM loop aerial 1 AA FM aerial 1 AA AC power lead 1
Page 4
02/5/27 CD-XP160W(SCA)E1.fm
3
CD-XP160W
General Informa ti on
- Precautions -
Precautions
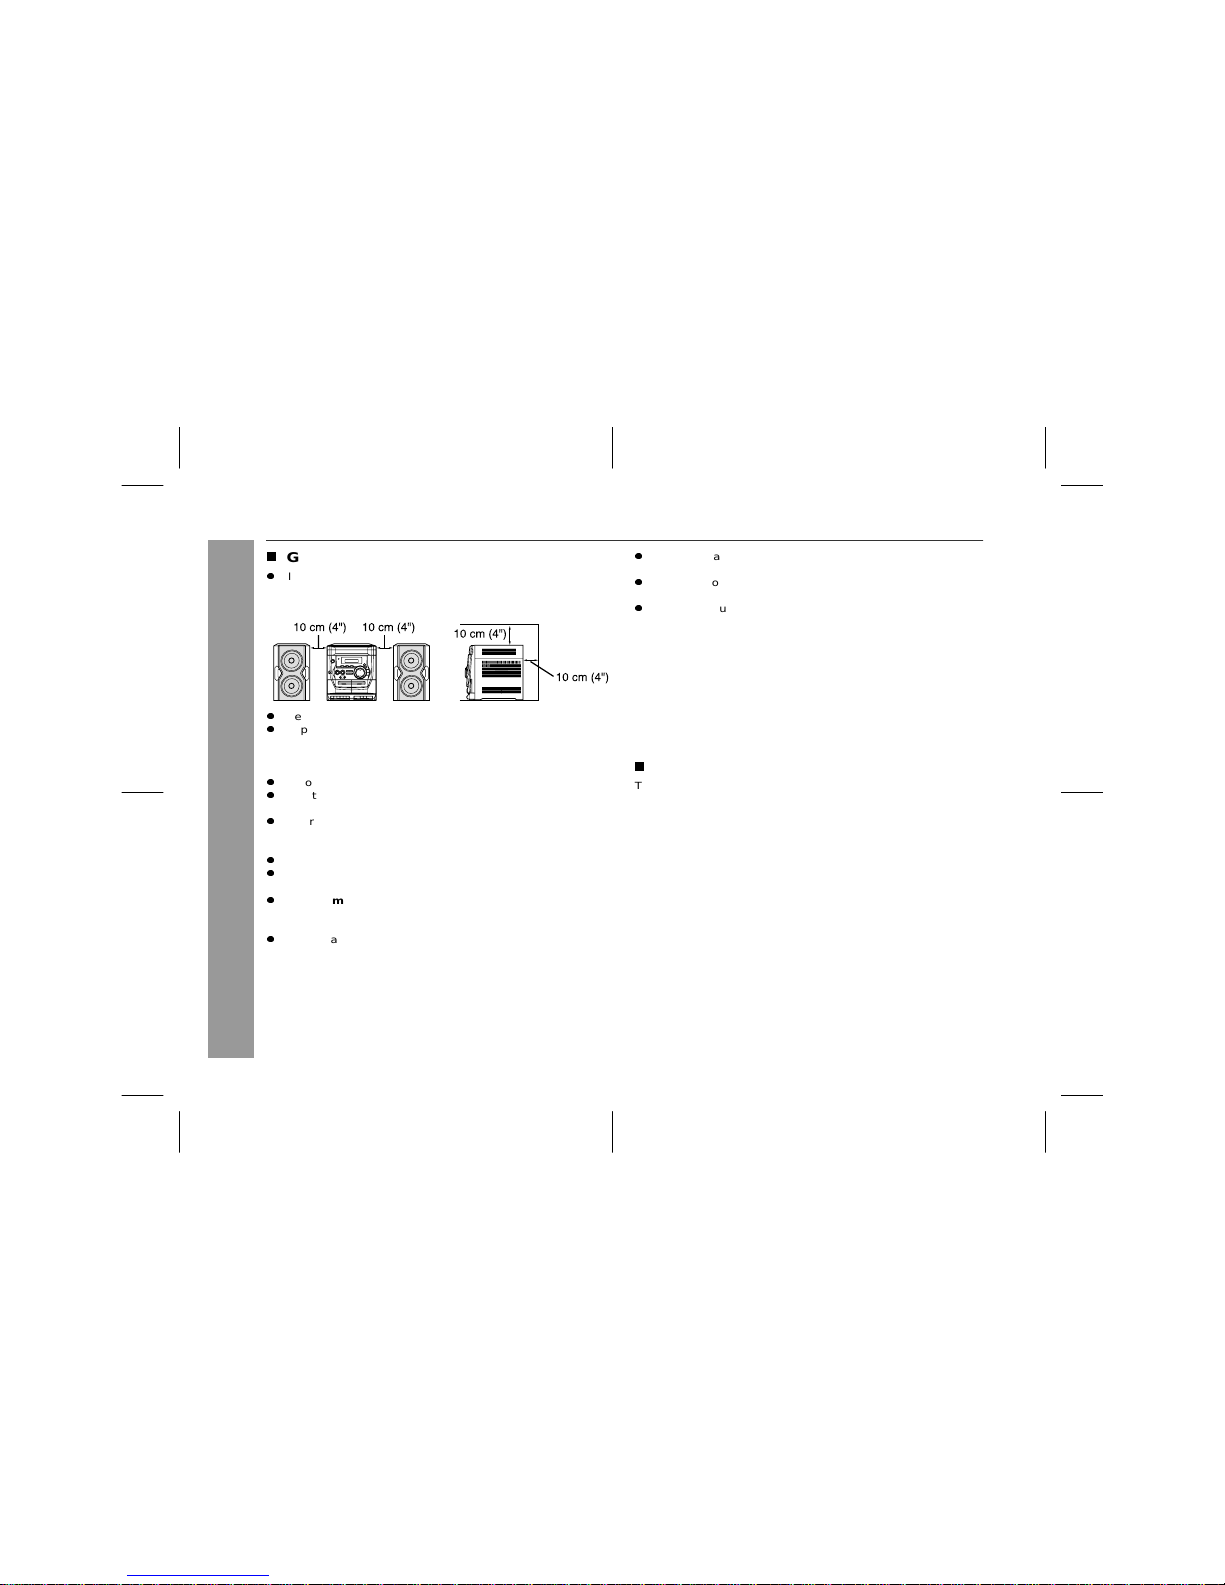
General
z
Please en sure that the equipmen t is position ed in a well venti lated are a and ensu re that t here is at least 10 c m (4") o f free
space along the sides, top and back of the equipment.
z
Use the unit on a firm, level surface free from vibration.
z
Keep the unit away from d irect su nlight, s trong m agnetic fi elds,
excessive dust, humidity and electronic/electrical equipment
(home computers, facsimiles, etc.) which generate electrical
noise.
z
Do not place anything on top of the unit.
z
Do not expose the unit to moisture, to temperatures higher than
60°C (140°F) or to extremely low temperatures.
z
If your system does not work proper ly, disconnect the AC power
lead from the w all socke t. Plu g the A C power l ead back in, and
then turn on your s y stem.
z
In case of an electrical storm, unplug the unit for safety.
z
Hold the AC power plug by the head when removing it from the
wall socket, as pu lling the le ad can damage i nternal wires.
z
Do not remove the o uter cover, as this may result in elec tri c
shock. Refer internal service to your local SHARP service
facility.
z
The ventilation should not be impeded by covering the ventilation
openings with items, s uch as newsp apers, table cloths, cu rtai ns,
etc.
z
No naked flame so urces, such as lighted ca ndles, should be
placed on the apparatus.
z
Attention should be drawn to the environmental aspects of battery disposal.
z
This unit should only be used within the range of 5°C - 35°C
(41°F - 95°F).
Warning:
The voltage us ed must be t he same as that specif ied on thi s unit.
Using this product with a higher voltage other than that which is
specified is dangerous and may result in a fire or other type of accident caus ing da mage. SHARP will n ot be he ld re spons ible for any
damage resulting from use of thi s unit with a voltage other than that
which is specified.
Volume control
The sound level at a given volume setting depends on speaker efficiency, location, and various other fact ors. It is adv isable to avoid
exposure to high volume levels. Do not tur n the volum e on to full a t
switch on and liste n t o mus i c at mo de ra te levels .
Page 5
02/5/27 CD-XP160W(SCA)E1.fm
4
CD-XP160W
General Informa ti on
- Controls and indic at ors -
Controls and indicators
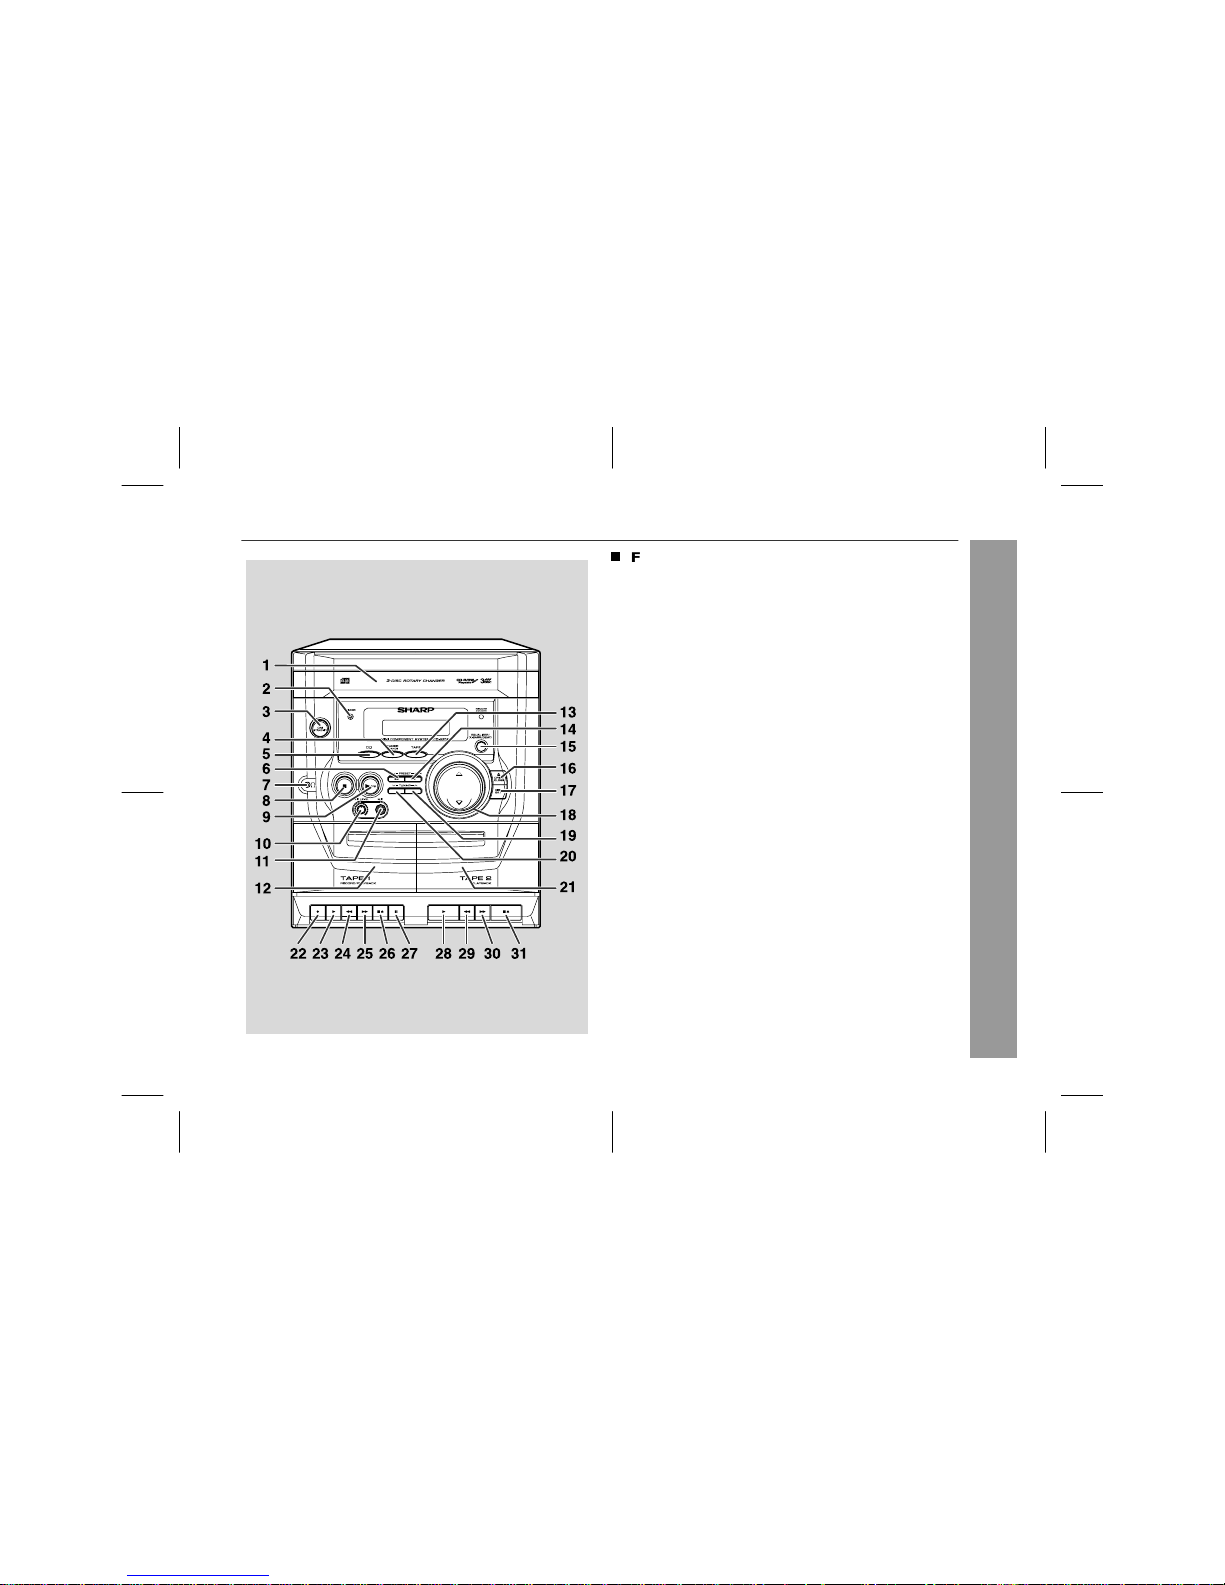
Front panel
Reference page
1.Disc Tray . . . . . . . . . . . . . . . . . . . . . . . . . . . . . . . . . . . . . . . . 14
2.Timer Set Indicator . . . . . . . . . . . . . . . . . . . . . . . . . . . . . . . 25
3.On/Stand-by Button . . . . . . . . . . . . . . . . . . . . . . . . . . . . . . . 10
4.Tuner (Band) Button . . . . . . . . . . . . . . . . . . . . . . . . . . . . . . 18
5.CD Button . . . . . . . . . . . . . . . . . . . . . . . . . . . . . . . . . . . . 14, 22
6.CD Track Down or Fast R everse,
Tuner Preset Down Button . . . . . . . . . . . . . . . . . . . . . . 15, 19
7.Headphone Socket . . . . . . . . . . . . . . . . . . . . . . . . . . . . . . . . 28
8.CD Stop Button . . . . . . . . . . . . . . . . . . . . . . . . . . . . . . . . . . 15
9.CD Play or Repeat Button . . . . . . . . . . . . . . . . . . . . . . . 14, 16
10. Microphone Level Control . . . . . . . . . . . . . . . . . . . . . . . . . . 21
11. Microphone Socket . . . . . . . . . . . . . . . . . . . . . . . . . . . . . . . 21
12. Tape 1 Cassette Com pa rtment . . . . . . . . . . . . . . . . . . . 20, 23
13.Tape Button . . . . . . . . . . . . . . . . . . . . . . . . . . . . . . . . . . 20, 23
14. C D Track Up or Fast Forward,
Tuner Preset Up Button . . . . . . . . . . . . . . . . . . . . . . . . . 15, 19
15. Equaliser Mode Select/ Ex t ra B as s/
Demo Mode Button . . . . . . . . . . . . . . . . . . . . . . . . . . . . 10, 12
16. Disc Tray Open/Close Button . . . . . . . . . . . . . . . . . . . . . . . 14
17. Disc Skip Button . . . . . . . . . . . . . . . . . . . . . . . . . . . . . . . . . 14
18. Volume Up and Down Buttons . . . . . . . . . . . . . . . . . . . . . . 12
19. Tuning Up Button . . . . . . . . . . . . . . . . . . . . . . . . . . . . . . . . . 18
20. Tuning Down Button . . . . . . . . . . . . . . . . . . . . . . . . . . . . . . 18
21. Tape 2 Cassette Com pa rtment . . . . . . . . . . . . . . . . . . . 20, 23
22.Tape 1 Record Button . . . . . . . . . . . . . . . . . . . . . . . . . . 22, 23
23. Tape 1 Play Button . . . . . . . . . . . . . . . . . . . . . . . . . . . . . . . . 20
24. Tape 1 Rewind Button . . . . . . . . . . . . . . . . . . . . . . . . . . . . . 20
25. Tape 1 Fast Forward Button . . . . . . . . . . . . . . . . . . . . . . . . 20
26. Tape 1 Stop/Eject Button . . . . . . . . . . . . . . . . . . . . . . . . . . . 20
27. Tape 1 Pause Button . . . . . . . . . . . . . . . . . . . . . . . . . . . . . . 20
28. Tape 2 Play Button . . . . . . . . . . . . . . . . . . . . . . . . . . . . . . . . 20
29. Tape 2 Rewind Button . . . . . . . . . . . . . . . . . . . . . . . . . . . . . 20
30. Tape 2 Fast Forward Button . . . . . . . . . . . . . . . . . . . . . . . . 20
31. Tape 2 Stop/Eject Button . . . . . . . . . . . . . . . . . . . . . . . . . . . 20
Page 6
02/5/27 CD-XP160W(SCA)E1.fm
5
CD-XP160W
General Informa ti on
- Controls and indic at ors -
Controls and indicators (continued)
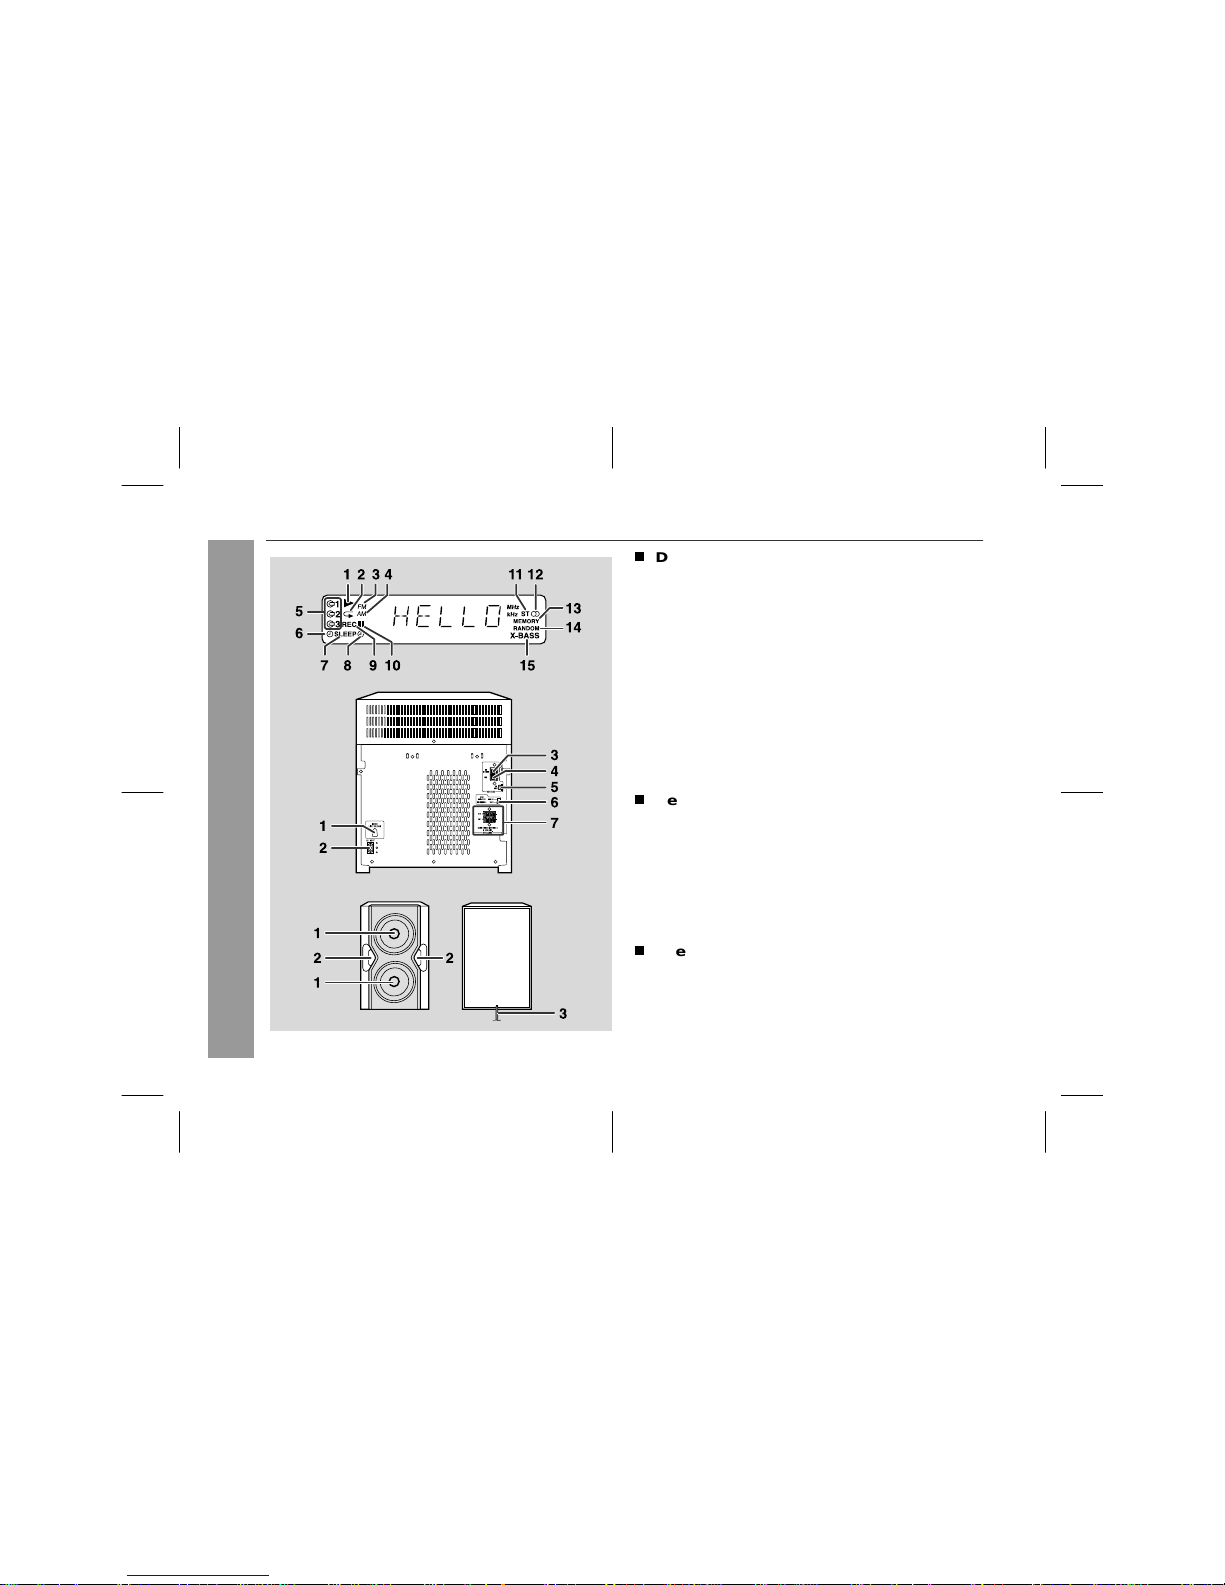
T
Display
1.CD Play Indicator
2.CD Repeat Play Indicator
3. FM Station Indicator
4.AM Station Indicator
5.Disc Number I ndicators
6.Clock Indicator
7.Sleep Indicator
8.Timer Play Indicator
9.Tape 1 Record Indicator
10. CD Pause Indicator
11. FM Stereo Mode Indica to r
12. FM Stereo Re ceiving Indicator
13. M emory Ind i cator
14. CD Random Play Indicator
15. Extra Bass Indicator
T
Rear panel
Reference page
1.AC Voltage Selector . . . . . . . . . . . . . . . . . . . . . . . . . . . . . . . . 9
2. AC Power Input Socket . . . . . . . . . . . . . . . . . . . . . . . . . . . . . 9
3.FM 75 Ohms Aerial Terminal . . . . . . . . . . . . . . . . . . . . . . . 7, 8
4.FM Aerial Earth Terminal . . . . . . . . . . . . . . . . . . . . . . . . . . 7, 8
5. AM Loop Aerial Socket . . . . . . . . . . . . . . . . . . . . . . . . . . . 7, 8
6. Span Selector Switch . . . . . . . . . . . . . . . . . . . . . . . . . . . . . . 10
7. Speaker Terminals . . . . . . . . . . . . . . . . . . . . . . . . . . . . . . . 7, 8
T
Speaker system
1.Woofers
2.Bass Reflex Ducts
3.Speaker Wire
Page 7
02/5/27 CD-XP160W(SCA)E1.fm
6
CD-XP160W
General Informa ti on
- Controls and indic at ors -
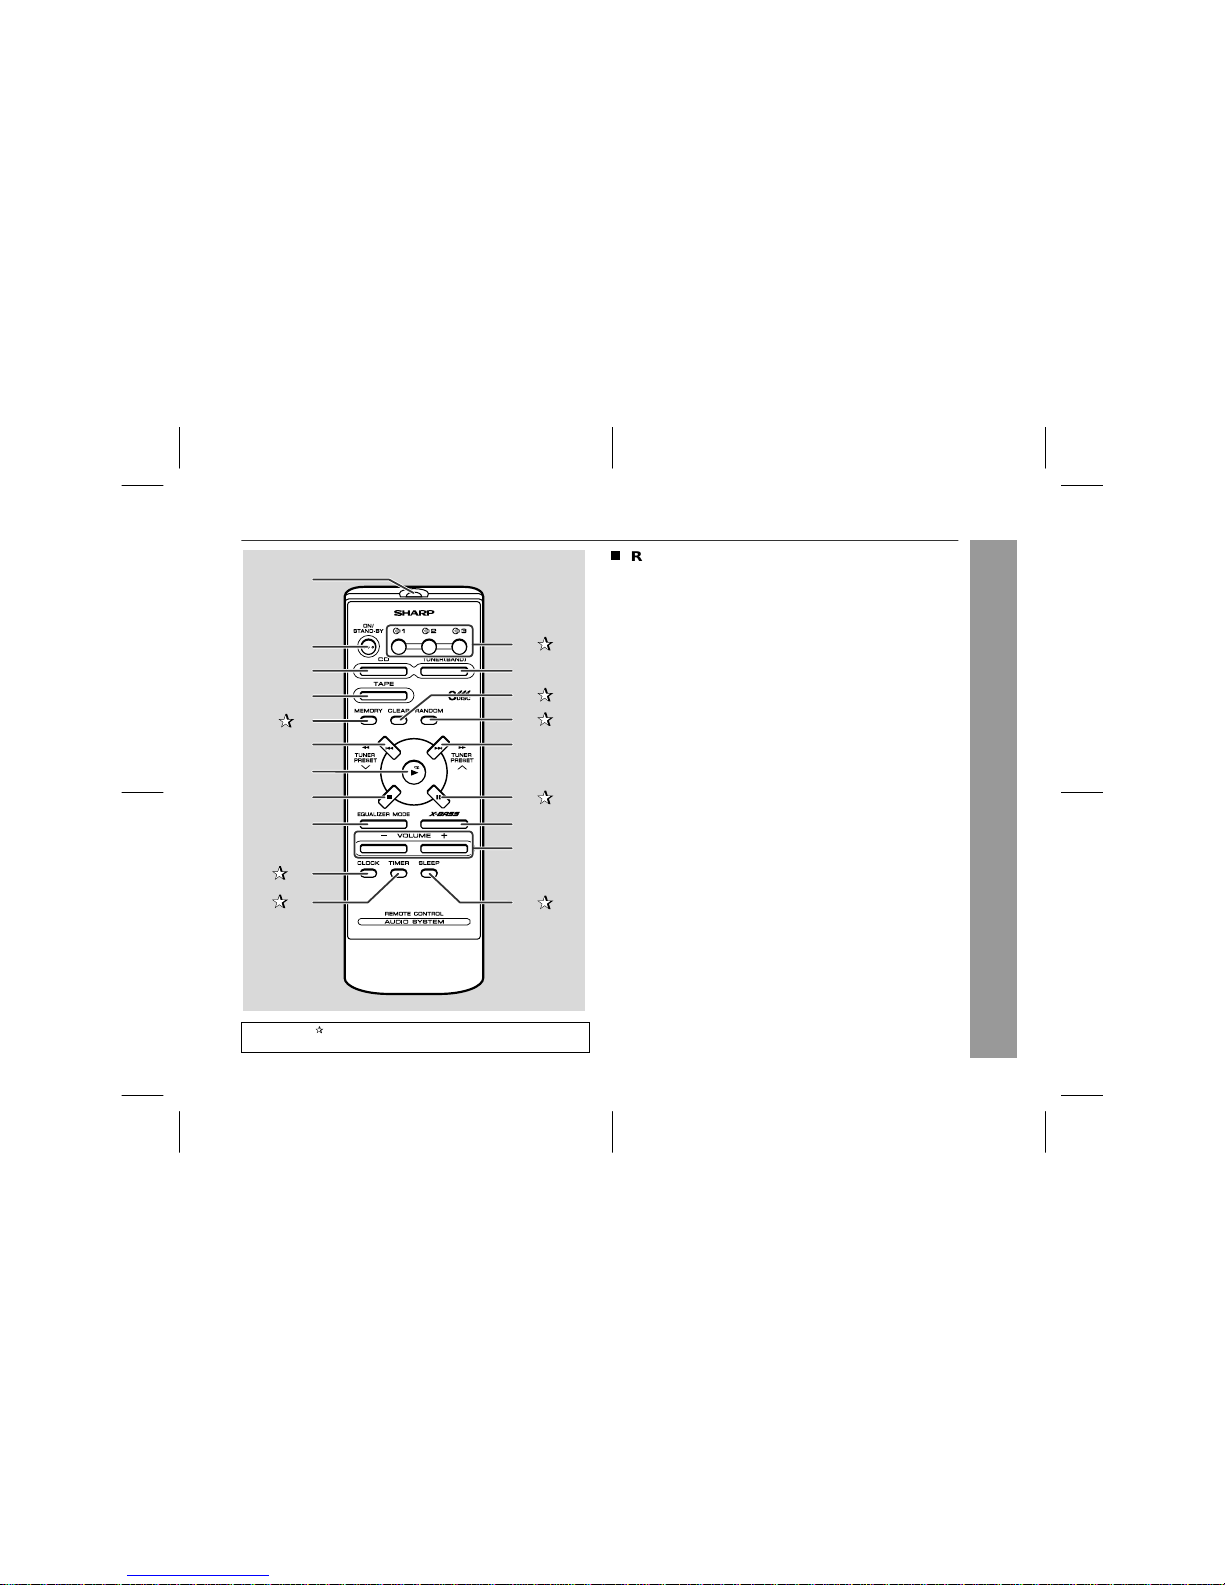
Remote control
Reference page
1. Remote Control Transmitter . . . . . . . . . . . . . . . . . . . . . . . . . . 11
2. On/Stand-by Button . . . . . . . . . . . . . . . . . . . . . . . . . . . . . . . . 11
3. CD Button . . . . . . . . . . . . . . . . . . . . . . . . . . . . . . . . . . . . 14, 22
4. Tape Button . . . . . . . . . . . . . . . . . . . . . . . . . . . . . . . . . . . 20, 23
5.Memory Button . . . . . . . . . . . . . . . . . . . . . . . . . . . . . 13, 17, 19
6. CD Track Down or Fast Reverse,
Tuner Preset Down Button . . . . . . . . . . . . . . . . . . . . . . . . 15, 19
7. CD Play or Repeat Button . . . . . . . . . . . . . . . . . . . . . . . . 14, 16
8. CD Stop Button . . . . . . . . . . . . . . . . . . . . . . . . . . . . . . . . . . . 15
9. Equaliser Mode Select Button . . . . . . . . . . . . . . . . . . . . . . . . 12
10.Clock Button . . . . . . . . . . . . . . . . . . . . . . . . . . . . . . . . . . 13, 24
11. Timer Button . . . . . . . . . . . . . . . . . . . . . . . . . . . . . . . . . . . . . 24
12. Disc Number Select Buttons . . . . . . . . . . . . . . . . . . 14, 17, 22
13. Tuner (Band) Button . . . . . . . . . . . . . . . . . . . . . . . . . . . . . . . . 18
14. Programme Clear Button . . . . . . . . . . . . . . . . . . . . . . . . . . . 17
15.CD Random Button . . . . . . . . . . . . . . . . . . . . . . . . . . . . . . . 16
16. C D Track Up or Fast Forward,
Tuner Preset Up Button . . . . . . . . . . . . . . . . . . . . . . . . . . 15, 19
17. CD Pause Button . . . . . . . . . . . . . . . . . . . . . . . . . . . . . . . . . 15
18. Extra Bass Button . . . . . . . . . . . . . . . . . . . . . . . . . . . . . . . . . 12
19. Volume Up and Down Buttons . . . . . . . . . . . . . . . . . . . . . . . . 12
20. Sleep Button . . . . . . . . . . . . . . . . . . . . . . . . . . . . . . . . . . . . . 25
1
2
3
4
5
6
7
8
9
11
10
15
18
14
13
12
16
17
19
20
Buttons with " " mark in the illustration or highlighted in bold on the
right can be oper ated on th e remote control only.
Page 8

02/5/27 CD-XP160W(SCA)E1.fm
7
CD-XP160W
Preparation for Use
- System connections -
System connections
Page 9
02/5/27 CD-XP160W(SCA)E1.fm
8
CD-XP160W
Preparation for Use
- System connections -
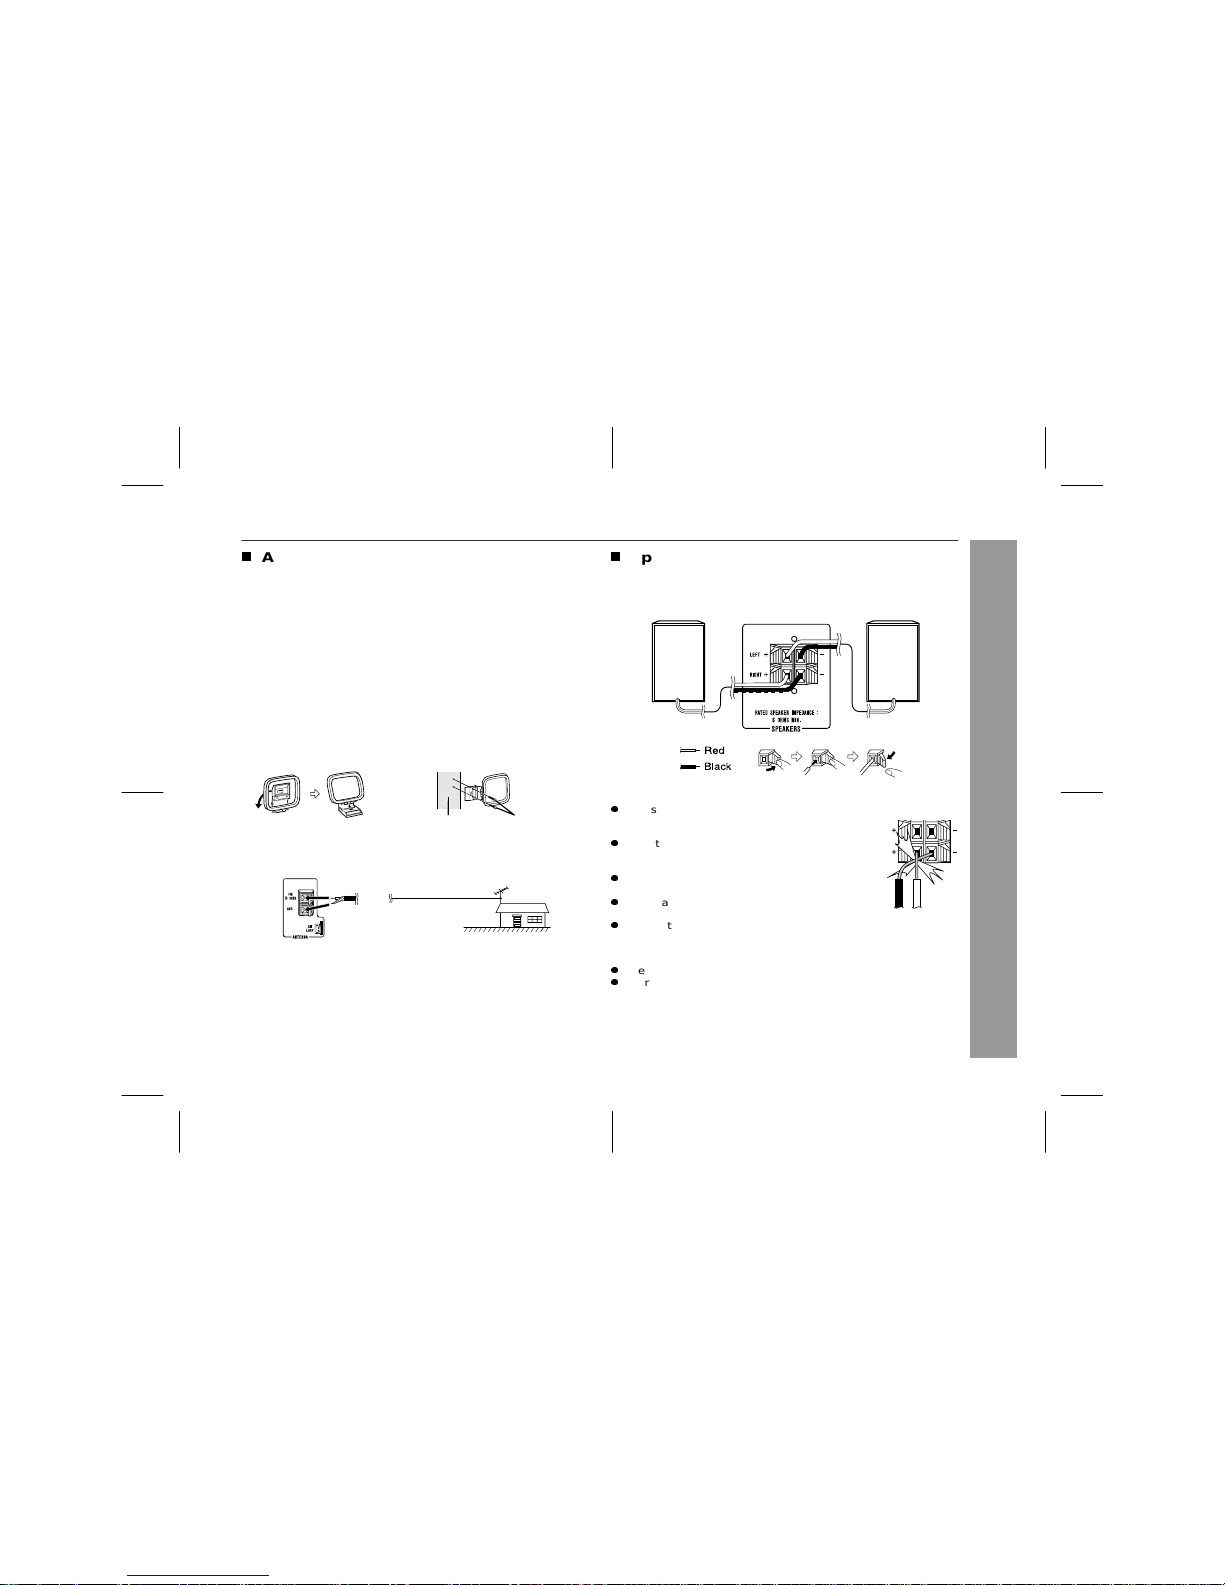
T
Aerial connection
Supplied FM aerial:
Connect the FM aerial wire to the FM 75 OHMS terminal and position the FM aerial wire in the direction where the strongest signal
can be rece ived.
Supplied AM loop aerial:
Connect the AM loop aerial to the AM LOOP socket. Position the
AM loop aerial for optimum reception. Place the AM loop aerial on a
shelf, etc., or attach it to a stand or a wall with screws (not supplied).
Note:
Placing the aerial on the unit or near the AC power lead may cause noise
pickup. Place the aerial away from the unit for better reception.
Installing the AM loop aerial:
External FM aerial:
Use an external FM aerial i f you require bet ter recepti on. Consult your
dealer.
Note:
When an externa l FM aer ial is used, di sconne ct the supp lied FM ae rial
wire.
T
Speaker connection
Connect the black wire to the minus (-) terminal and the red to the
plus (+) te rminal .
Caution:
Notes:
z
The spe aker grilles are not rem ovable.
z
There is no physical distinction between the right and left speakers.
< Assembling > < Attaching to the wall >
Wall Screws (not supplied)
External
FM aerial
75 ohm
coaxial
cable
z
Use speak ers with an impedanc e of 6 ohms or
more, as lower impedance speakers can damage
the unit.
z
Do not mistake the right and the left channels. The
right speak e r is th e on e on t h e righ t side when you
face th e u nit.
z
Do not let the bare speaker wires touch each
other.
z
Do not allow any objects to fall into or to be placed
in the bass reflex ducts.
z
Do not stand or sit on the speakers. You may be injured.
Incorrect
Right speaker
Left speaker
Page 10
02/5/27 CD-XP160W(SCA)E1.fm
9
CD-XP160W
Preparation for Use
- System connections -
System connections (continued)
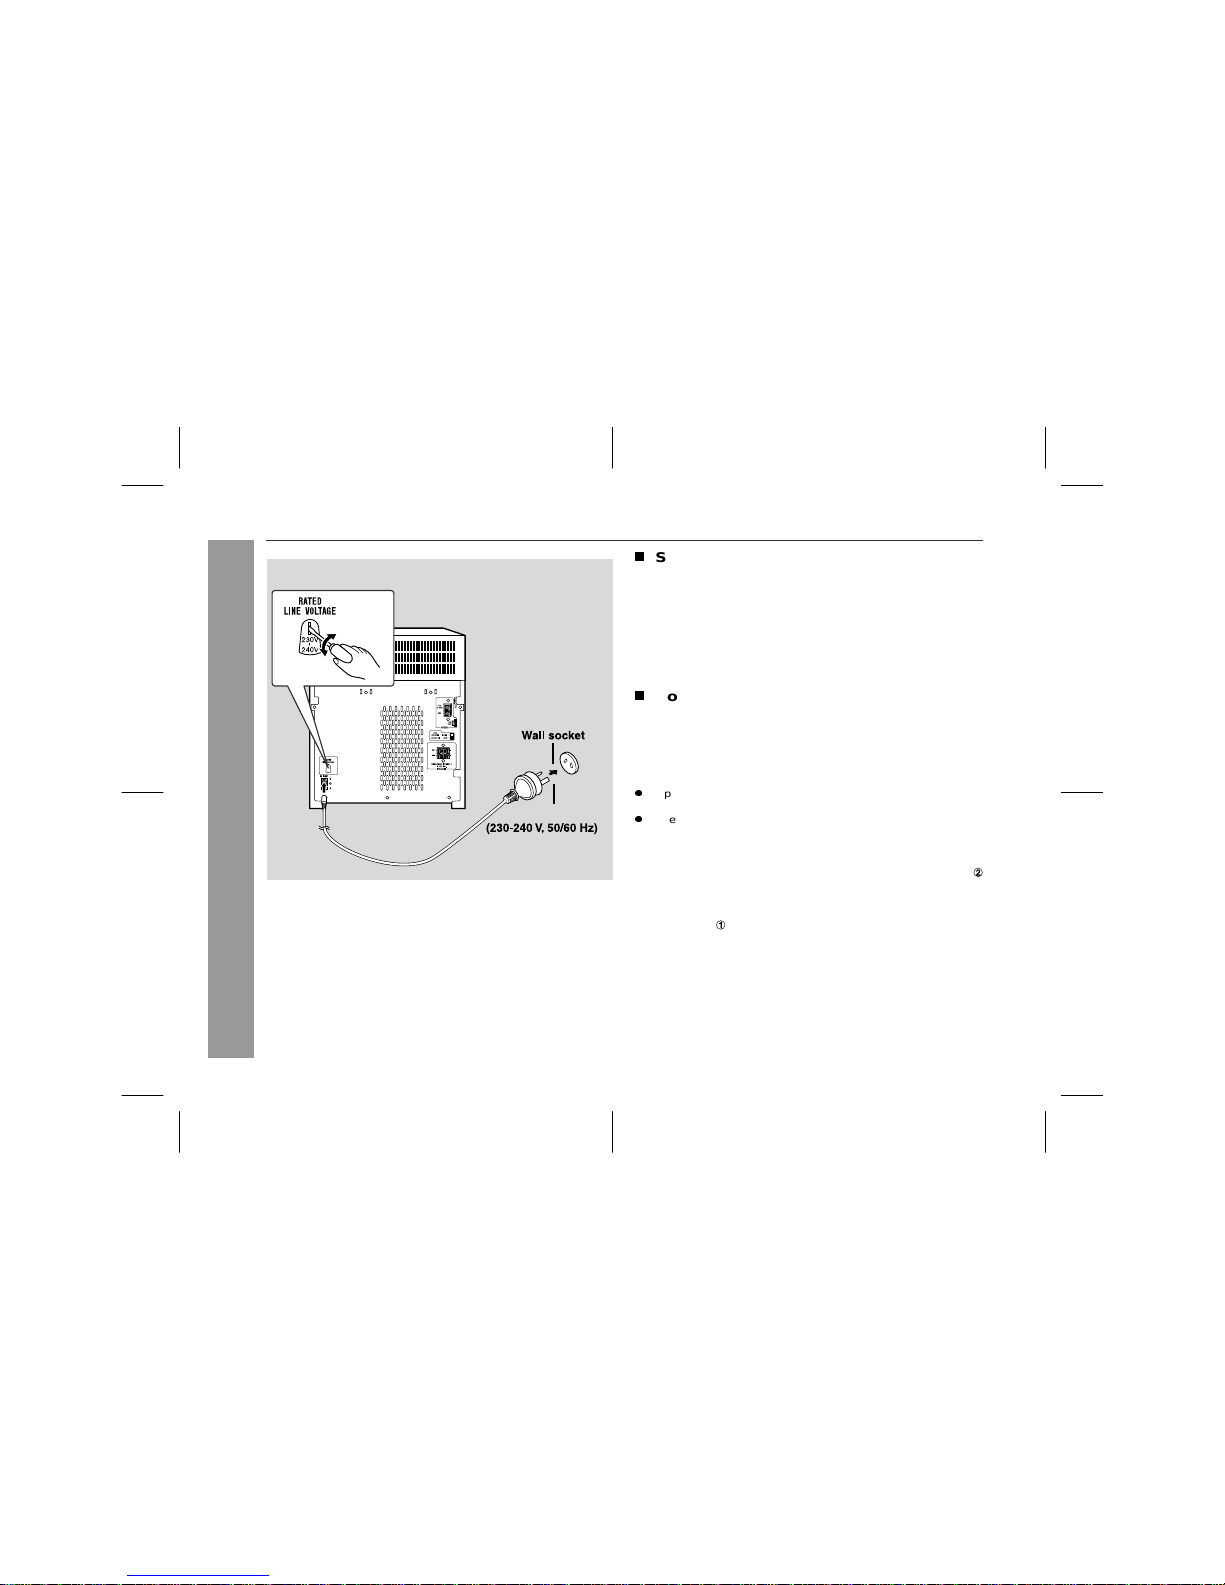
T
Setting the AC voltage sele ct o r
Check the setting of the AC voltage selector located on the rear
panel be fore plugging the unit into a wall socket. If necessary, adjust
the selector to correspond to the AC power voltage used in your
area.
Turn the selector with a screwdriver until the appropriate voltage number appears in the window (110 V, 127 V, 220 V or 230 V
- 240 V AC).
T
Connecting the AC power lead
After checking all the connections have been made correctly, connect the AC power lead to the AC power input socket, then plug the
AC power lead of this unit into the w all sock et. If yo u plug in the unit
first, th e un it w ill en t e r th e de m onstration mo de ( s e e pag e 10).
Notes:
z
Unplug th e AC power le ad from the wall socket if the unit will not
be in use for a prolonged period of time.
z
Never us e a po w er lead oth e r than the on e sup plie d. Other wi s e, a
malfunction or an accident may occur.
AC Plug Adaptor
In areas (or countries) where a wall socket as shown in illustration
is used, connect the unit using the AC plug adaptor supplied with
the unit, as illustrated. The AC plug adaptor is not included in areas
where the wall socket and AC power plug can be directly connected
(see illustration ).
Page 11

02/5/27 CD-XP160W(SCA)E1.fm
10
CD-XP160W
Preparation for Use
- System connections -
Setting the FM/AM span selector
The International Telecommunication Union (ITU) has established
that member count ries shou ld mai ntai n ei the r a 100 kH z or a 50 kHz
interval between broadcasting frequencies of FM stations and 10
kHz or 9 kHz for AM station. The illustration shows the 50/9 kHz
zones (regions 1 and 3), and the 100/10 kHz zone (region 2).
Before using the unit, set the
SPAN
SELECTOR switch (on the rear
panel) to the interval (span) of your area.
To change the tuning zone:
Caution:
This operation will erase all data stored in memory including clock,
timer settings, tuner preset, and CD programme.
Demonstration mode
To cancel the demonstration mode:
When the unit is in the power stand-by mode (demonstration mode),
press the EQUALIZER/X-BASS/D EMO button. The demonstration
mode will be cancelled and the display
will disappear
.
To return to the demonstration mode:
When the unit is in th e power sta nd-by mode, pr ess the EQ UALIZER/X-BASS/DEM O button agai n.
Note:
When the power is on, th e EQUALIZ ER /X-BASS/DEMO button can
be used to select the pre-programmed equaliser and extra bass
modes.
T o turn the power on
Press the ON/STAND-BY button to turn the power on.
1 Press the O N /STAND-B Y b utton to ent e r the stand-by mode .
2 Set the SPAN S ELECTOR switch (on the rear panel) as follows.
z
For 100 kHz F M int er v a l (1 0 kHz i n AM) 100/10
z
For 50 kHz FM interval (9 kHz in AM) 50/9
3 Whilst pressing down the TUNER (BAND) button and the DISC
SKIP button, pre ss the ON/S TAND- BY bu tton unti l "CLEAR " appears.
The first t ime the unit is plugged in, th e
unit will enter the dem onstration mo de.
You will see words scroll.
After use:
Press the ON/STAND-BY button to enter the power stand-by
mode.
Page 12

02/5/27 CD-XP160W(SCA)E2..fm
11
CD-XP160W
Preparation for Use
- Remote cont ro l -
Remote control
T
Battery installation
Precautions for batter y u se :
z
Replace all old batteries with new one s at the same t ime.
z
Do not mix old and new batteries.
z
Remove the batteries if the unit is not to be used for long periods
of time. This will prevent potential d amage due to batter y leakage.
Caution:
z
Do not use rechar ge able ba tteries (nickel-cad m iu m bat tery, etc.).
z
Installing the batteries incorrectly may cause the unit to malfunction.
Notes concerning use:
z
Replace t he batteries if the operating di stance is r educed or if the
operation becomes erratic. Purchase 2 "AA" size batteries (UM/
SUM-3, R6, HP-7 or similar).
z
Periodically clean t he transmit ter on the remote c ontrol and t he
sensor on the unit with a soft cloth.
z
Exposing the sensor on the unit to strong light may interfere with
operation. Change the light ing o r the dire ction of the unit.
z
Keep the remote control away from mois ture, heat, shock, a nd
vibrations.
T
Test of the remote control
Check the remote control after checking all the connections (see
pages 7 - 9).
Point the remote control directly at the remote sensor on the unit.
The remote control can be used within the rang e shown below:
Press the ON /STAND-BY butt on. Does the power t urn on? Now, you
can enjoy music.
1 Remove the battery cover.
2 Insert the batteries according to the direction indicated in
the battery comp artm en t .
When inserting or removing the batteries, push them towards the
battery terminals.
3 Replac e the cover.
0.2 m - 6 m
(8" - 20')
Remote sensor
Page 13

02/5/27 CD-XP160W(SCA)E2..fm
12
CD-XP160W
Basic Operation
- Sound control -
Sound control
T
Volume control
Main unit operation:
Press
the or button
to increase or decrease the volume.
Remote control operation:
Press the VOLUME (+ or -) button to increase or decrease the volume.
T
Pre-programmed equaliser/Extra bass
(X-BASS)
When the power is first turned on, the unit enters the X-BASS mode,
“X-BASS” is lit and the equaliser is set to FLAT.
Changing the mode:
Press the EQUALIZER/X-BASS/DE MO (EQUALIZER MODE) button repeatedly until the desired sound mode appears.
To enter or cancel the extra bass mo de by the remo t e control:
Press the X-BASS button to ligh t up “X-BAS S”. T he unit enters the
extra bass mode. Turn off “X-BASS” to cancel the extra bass mode.
12 29 30 VOLMAXVOLMIN
.....
ROCK (X-BASS off)
FLAT (X-BASS on)
FLAT (X-BASS off)
CLASSIC (X-BASS off)
The sound is not modified.
Bass frequencies are emphasised.
Bass and treble are emphasised.
POPS (X-BASS off)
Bass and treble are slightly emphasised.
JAZZ (X-BASS off)
Treble is cut a little.
Treble is reduced a lot.
VOCAL (X-BASS off)
Vocals (midrange tones) are emphasised.
Page 14

02/5/27 CD-XP160W(SCA)E2..fm
13
CD-XP160W
Basic Operation
- Setting the clock -
Setting the clock
This may be operated only with the remote control.
In this example, the clock is set for the 24-hour (0:00) display.
To confirm the time display:
Press the C LO C K butt on.
The time display will appear for about 8 seconds.
Note:
The time will f lash at the p ush of the CL OCK button whe n the AC
power supply is restored after a power failure or unplugging the unit.
Readjust the clock as follows.
To readjust the clock:
Perform "Setting the clock" from the beginning. If the "0:00" is not
flashing in step 2, st ep 3 (for s electi ng th e 24-ho ur or 1 2-hou r dis play) will be skipped.
To change the 24-hour or 12-hour display:
1 Press the ON/STAND-BY button to turn the power on.
2 Press the CLOCK button and w ithin 8 seconds, pr ess the
MEMORY button.
3 Within 30 seconds, pr ess the PRESET ( or ) button to
select 24- hou r or 12- hou r disp lay an d then press th e MEM ORY button.
"0:00" The 24-hour disp lay will appear.
(0:00 - 23:59)
"AM 12:0 0" The 12-hour disp lay will appear.
(AM 12:00 - PM 11:59)
Note tha t this can only be set when the unit is first installed or it
has been reset. [Refer to "Clearing all the memory (reset)" on
page 27 for details.]
4 Within 30 seconds, pres s the PRESET ( or ) button to
adjust the hour and then press the MEMORY button.
z
Press the PRESET ( or ) button once to advance the time
by 1 hour. Hold it down to advance continuously.
z
When the 12-hour display is selected, "AM" will change automatically to "PM".
5
Within 30 seconds, press the PRESET ( or ) butto n to adjust the min u te s a n d then pres s the MEMOR Y button.
z
Press the PRESET ( or ) button once to advance the time
by 1 minute. Hold it down to adva nc e co nt inuously.
z
The hour will no t advance eve n if minu tes advance from "59"
to "00".
1 Clear all the progr ammed co ntents. [Re fer to "Cle aring all the
memory (reset)" on page 27 for details.]
2 Perform "Setting the clock" from the beginning.
Page 15

02/5/27 CD-XP160W(SCA)E2..fm
14
CD-XP160W
CD P lay back
- Listening to a CD (CDs) -
Listening to a CD (CDs)
This system can also play audio CD-R and CD-RW discs, but cannot record.
Some audio C D - R an d CD -RW dis c s may no t be playable due to the
state of disc or the device that wa s used for recordi n g.
T
CD playback
1 Press the ON/STAND-BY button to turn the power on.
2 Press the CD button.
3 Press the OPEN/CLOSE button to open the disc tray.
4 Place the CD(s) on the disc tray, label side up.
When loadi ng a thir d di sc, p res s th e DIS C S KIP b utto n to
turn the disc tray, then place the CD in the open position.
z
CDs can be placed o n any open position on the disc tray.
z
Be sure to plac e 8 cm (3") C D(s) i n th e mi dd le of the disc positions.
5 Press the OPEN/CLOSE button to clo se t h e disc tray.
Total number of tracks on
the CD whose number is
flashing
Total play ing ti me of the CD
whose number is flashing
6 To select the CD you want to listen t o first, press one of
1 - 3 buttons on the remote control.
7 Press the / button to start playback.
z
Playback wi ll b egin fro m tra ck 1 on the disc you have select ed to play. After that disc finishes playing, the next disc will
automatically start playback.
z
When the last track on the third disc has finished playing, the
CD player will automatically stop.
z
When there is no CD in one of the disc 1 - 3 positions, that
position will be skipped and the next CD will begin t o play.
12 cm (5") 8 cm (3")
Page 16

02/5/27 CD-XP160W(SCA)E2..fm
15
CD-XP160W
CD P lay back
- Listening to a CD (CDs) -
Listening to a CD (CDs) (continued)
To interrupt playback:
Press the CD button on the remote control.
To resume playback from the same point, press
the button
.
To stop playback:
Press the button.
To remove the CDs:
Whilst in the stop mo de, press the OPEN/CLOSE button .
The disc tr a y w ill o pen . Remo v e the t wo di sc s . The n, pres s th e DI SC
SKIP button to rotate the disc tray and re m ove the remain ing disc.
Caution:
z
If you tilt t he unit forwar d in the p ower stand -by mode, th e disc
tray will open. The un it or CD may be dama ge d.
z
Do not place two CDs in one disc tray.
z
Do not play discs with special shapes (heart- or octagonshaped). It may cause malfunctions.
z
Do not push the disc tray whilst it is moving.
z
Do not turn the dis c tray by han d. Thi s may cause malfunct io ns.
z
If the power fails whilst the tray is open, wai t until th e power is
restored.
z
If the disc tray is stop ped with for ce, "OPEN " will appe ar in the
display. If this occurs, press the OPEN/CLOSE button.
z
If TV or radio interfer ence occurs d ur ing CD operati on, move the
unit away from the TV or radio.
z
If a disc is dam aged, dir ty, or loaded upsid e down, the di sc will
skip or not playback.
T
To locate the beginning of a track
Notes:
z
You can loc ate the begi nn ing of a track on a single disc
only
.
z
You can skip to any track by press ing the or button
repeatedly until the desired track number appears.
T
To locate the desired portion
Notes:
z
Normal playback will resume when the or button is
released.
z
You can locate the desired portion on a single disc only.
z
When the en d of the la st tra c k is reach ed during fast forward, the
unit will ent er th e stop mo de . Whe n th e begi nn in g of the fir st tra c k
is reached during fast reverse, playback will start when you
release the
button.
To move to the beginning of the next track:
Press the button for less than 0.5 seconds during playback.
To restart the track being played:
Press the button for less than 0.5 seconds during playback.
For audible fast forward:
Press and hold down the button during playback.
For audible fast reverse:
Press and hold down the button during playback.
Page 17

02/5/27 CD-XP160W(SCA)E2..fm
16
CD-XP160W
CD P lay back
- Advanced CD playback -
Advanced CD playback
T
Starting playback with a desired track
You can pl ay a disc sta rting with the desi re d trac k.
Notes:
z
When the DISC SKIP button is pressed during playback, the next
disc will begin automatically.
z
When one of the 1 - 3 butt ons on the remote control is
pressed during playback, the selected disc will begin automatically.
z
If you select a disc with the 1 - 3 buttons and a track with
the or but ton , a tra ck numbe r exceed ing t he to ta l tra ck
number on the disc may be displayed (maximum 99). In this
case, the last track on the s e lected disc is p layed back.
T
Repeat play
All tracks on up to 3 discs, or a programmed sequence can be continuously repeated .
To cancel repeat play:
Press the / button again. " " will go out.
T
Random play
The tracks on the disc(s) can be played in random order
automati-
cally
.
To cancel random play:
Press the RANDOM button.
Notes:
z
If you press t he butt on du r ing r ando m pl ay, you can move to
the track sele cted next by the random operation. On the other
hand, the button does not all ow you t o m ove to the p revio us
track. The beginning of the track being played will be located.
z
In random play, the CD player will select and play tracks automatically. (You cannot select the order of the tracks.)
Caution:
After performing repeat or random play, be sure to press the button. Otherwise, the disc(s) will play continuously.
1 Whilst in the stop mode , pre ss one of
the 1 - 3 buttons
on the remote control or DISC SKIP button to select the desired disc.
2 Press the or button to select the desired track.
Selected disc number
Selected track number
3 Press the / button to start playback.
Playback of the sel ected trac k is s t a rted. When the end of last
track of th e disc selec ted is reached, the next disc will be automatically start ed .
To repeat all tracks on u p to 3 discs:
Press the / button twice.
To repeat a desired track:
Perform steps 1 - 4 in the "Programmed play" section on page 17
and then press the / button twice.
Press the RANDOM button on the remote control to begin random play.
Page 18

02/5/27 CD-XP160W(SCA)E2..fm
17
CD-XP160W
CD P lay back
- Advanced CD playback -
Advanced CD playback (continued)
T
Programmed play
This may be operated only with the remote control.
You can choose up to 20 selections for playback in the order you
like.
Adding tracks to the programme:
If a programme has been previously stored, the "MEMORY" indicator will be displayed. Then follow steps 1 - 3 to add tracks. The n ew
tracks will be stored after the last track of the original programme.
Notes:
z
If you open the d is c
tray
, change to another func t i on or ent er the
stand-by mode, the programmed sequence is automatically cancelled.
z
During progra mme operation, random play is not possible.
T
Care of compact discs
Compact discs are fairly resistant to damage, however mistracking
can occu r due to an accumulation of d irt on the disc surface. Follow
the guidel ines be low for maxi mum enj oyment from your CD collec tion and player.
z
Do not write on either side of the disc, particularly the non-label
side from which sign al s are read. Do not ma rk th is surface .
z
Keep your discs away from direct sunlight, heat, and excessive
moisture.
z
Always hold the CDs by the edges. Fingerprints, dirt, or water on
the CDs can cause noise or mistracking. If a CD is dirty or does
not play properly, cl ean it with a soft, dry cloth, wiping straight out
from the centre, alo ng t he radius.
1 Whilst in the stop mode, press
one of the 1 - 3 buttons to
select the desired disc.
2 Press the or button to
select the desired track.
If you select and memorise a track whose number exceeds the
last track number on the disc, it will not be played back.
3 Press the MEMORY button to save the track n umber.
When the track is memorised, "MEMORY" will appear.
4 Repeat st eps 1 - 3 for o t her tracks. U p to 20 tracks can be
programmed.
If you make a mist ake, th e pro gramm ed tracks ca n be clear ed
by pres si ng the CLEAR button.
5 Press the / button to start playback.
To clear the programmed selections:
Whilst the "M EMORY" ind icator i s lit , set the
CD to the stop mode and then press the
CLEAR button.
Each time the button is pr essed, one tra ck
will be cl eare d, begi nnin g with t he la st tra ck
programmed. When all the tracks are
cleared, "MEMORY" will disappear.
NO YES
Correct
Selected disc number
Selected track nu mber
Playback order
Page 19

02/5/27 CD-XP160W(SCA)E2..fm
18
CD-XP160W
Radio
- Listen i ng to the radio -
Listening to the radio
T
Tuning
To receive an FM stereo transmission :
Press the TUNER (BAND) button to display the "ST" indicator.
z
" " will appear when an FM broadcast is in stereo.
z
If the FM reception is weak, press the TUNER (BAND) button to
extinguish the "ST" indicator. The reception changes to monaural, and th e so un d be comes clearer.
Note:
This product can receive FM stereo/FM monaural and AM monaural
broadcas ts. AM stereo broadcast s w ill not be played in stereo.
1 Press the ON/STAND-BY button to turn the power on.
2 Press the TUNER (BAND) button repeatedly to select
the desired frequency band (FM or AM).
3 Press the TUNING ( or ) button to tune in to the de-
sired station.
Manual tuning:
Press the TUN ING button as many times as required to t une in
to the desired sta t io n.
Auto tuning:
When the TU NING butto n is pressed for more than 0. 5 seconds, scanning will start automatically and the tuner will stop at
the first receivable broadcast station.
Notes:
z
When radio interference occurs, auto scan tuning may stop
automatically at that point.
z
Auto scan tuning will skip weak signal stations.
z
To stop the auto tu nin g, press th e T U N IN G bu tt o n again.
FM stereo mode indicator
FM stereo receiving indicator
Page 20

02/5/27 CD-XP160W(SCA)E2..fm
19
CD-XP160W
Radio / Tape Playback
- Listening to the radio / Listening to a cassette tape -
Listening to the radio (continued)
T
Memori si n g a station
This may be operated only with the remote control.
You can store 30 A M and FM station s in memo ry and recall them at
the push of a button. (P re s e t tuning)
Note:
The backup function protects the memorised stations for a few
hours sh ould th ere b e a power failure or if the AC p ower le ad dis connected.
T
To recall a memo r i sed station
Listening to a cassette tape
Before playback :
1 Perform steps 1 - 3 in
"Tuning"
on page 18.
2 Press the MEMORY button to
enter the preset tunin g saving mode.
3
Within 5 seconds, press the PRESET ( or ) button to
select the preset channel number.
Store the stations in memory, in order, starting with preset
channel 1.
4 Within 5 seconds, press the
MEMORY button to store that
station in memory.
If the preset number indicators go out before the station is
memorised, repeat th e o peration from step 2.
5 Repeat steps 1 - 4 to set other stations, or to change a pre-
set station.
When a new station is stored in memory, the station previously
memorised will be erased.
Press the PR ESET ( or ) butto n to sele ct the de sired station.
z
For playback, use norma l or low -noise tape s for
the best sound. (Metal or CrO tapes are not recommended.)
z
Do not use C-120 tapes or poor-quality tapes, as
they may cause ma lfunctio ns.
z
Before loading a tape into the cassette compartment, tighten the slack with a pen or a pencil.
Page 21

02/5/27 CD-XP160W(SCA)E2..fm
20
CD-XP160W
Tape Playback
- Listening to a cassette tape -
T
TAPE 1 or TAPE 2 playback
To stop playback:
Press the
button.
Fast forward/rewind:
To advance the ta pe, press the
button, th en pres s t he but-
ton. To rewind, press the
button, then press the button.
To interrupt playback (TAPE 1 only):
Press the button during playback.
Press the button again to resume playback.
z
Do not press the button whilst the fast forward or rewind operations are i n progress . The or button wil l not be re leased
when the tape end is reached. Once this occurs, press the
button.
Caution:
z
Before changing from one tape operation to another, press the
button.
z
If TAPE 1 and TAPE 2 are played simultaneously, only the sound
from TAPE 2 will be audible.
T
Continuous playback (TAPE 2 to TAPE 1)
Note:
When in the continuous play mode, pressing the
button of TAPE
2 will start TAPE 1 auto ma ti cally.
1 Press the ON/STAND-BY button to turn the power on.
2 Press the
button to open the cassette door.
3 Load a cassette into the TAPE 1
or TAPE 2 cassette compartment with the side to be played
facing toward you.
4 Press the TAPE butt on.
5 Press the button of TAPE 1 or TAPE 2 to start play-
back.
1 Press the ON/STAND-BY button to turn the power on .
2
Press the button to open the cassette door.
3 Load cassettes into the TAPE 1 and TAPE 2 cassette
compartments wi th t he si d e to be p l aye d facing toward
you.
4 Press the TAPE button.
5 Press the button of TAPE 2.
6 Press the button of TAPE 1.
7 Press the button of TAPE 1.
When TAPE 2 stops at the end of the tap e, the button of
TAPE 2 and the button of TAPE 1 will be automatically
released, and TAPE 1 will start playing.
Page 22

02/5/27 CD-XP160W(SCA)E3.fm
21
CD-XP160W
Karaoke
- Playing karaoke -
Playing karaoke
T
Karaoke play
Notes:
z
When you sing too loud through the microphone, your voice may
be distorted depending on the devices connected. If this happens, lower the microphone volume.
z
If an extremely sensitive microphone is used, howling may be
generated.
z
Unidire cti onal micr o phone is more appropriate for vocal use.
If squealing occurs:
z
Reduce t h e mi crophone volume.
z
Change th e direction of the microphone.
z
Reduce the volume of the main unit.
z
Move the microphone away from the speakers.
Caution:
z
When not using the microphone, remove it from the MIC socket.
z
When connecting or disconnecting the microphone, turn the MIC
LEVEL control fully anti-clockwise.
T
Recording of mixed sound to a cassette
tape
You can record mixed sound from the microphone and CD, TUNER
or TAPE 2.
Note:
To record the microphone signals only, load a cassette into the
TAPE 1 cassette compartment and press the TAPE button. Then,
press the button of TAPE 1.
1 Turn the MIC LEVEL cont ro l ful ly anti-clockwis e to p r o-
tect the speakers from shock noise and to avoid disturbing noises.
2 Connect the microphone to the MIC socket.
z
Use a microp ho ne with a 6 . 3 mm (1/4") plug, an impedan c e
of 600 ohms.
z
Use a standa r d pl ug adapto r when using a mi c rophone with
a 3.5 mm (1 / 8 ") diameter pl ug .
3 Press the ON/STAND-BY button to turn the power on.
4 Press the CD, TUNER or TAPE button to select the au-
dio source and play it.
5 Adjust the volume of the audio source using the VOL-
UME buttons.
6 Rotate the MIC LEVEL control cl ockwise to inc rease the
microphone volume and anti-clockwise to decrease it.
1 Perform steps 1 - 3 above.
2 Load a cassette into the TAPE 1 cassette compartment.
3 Perform steps 4 - 6 above.
4
Press the button
of TAPE
1.
5
Press the button
of TAPE
1, which also en gages the button .
6
Press the button
of TAPE
1 again to begin recording.
Page 23

02/5/27 CD-XP160W(SCA)E3.fm
22
CD-XP160W
Ta pe Recording
- Recording to a cassette tape -
Recording to a cassette tape
Before recording:
z
When recording important selections, make a preliminary test to
ensure that the desired material is properly recorded.
z
SHARP is not liable for damage or loss of your recording arising
from malfunction of this unit.
z
The volume and sound controls can be adju s t ed with no effect on
the recorded signal (Variable Sound Monitor).
z
For recording, use only no rmal tapes. Do not use metal or
CrO tapes.
z
Recording can be operated in the TAPE 1 compartment. The
TAPE 2 is for playback only.
T
Recording from a CD (CDs)
You can record 3 CDs continuously.
To stop recording:
Press the
button of TAPE 1.
To perform programmed recording:
Erase-prevention tab of cassette tapes:
z
When recording on a cassette tape,
make sure that the erase-prevention
tabs are not removed. Cassettes have
removable tabs that prevent accidental
recording or erasing.
z
To protect the recorded sound, remove
the tab after recording. Cover t he tab
hole with adhesive tape to record on the
tape withou t the tab.
Side A
Tab for
side B
Tab for
side A
1 Press the ON/STAND-BY button to turn the power on .
2 Load a cassette into the TA PE 1 cas sette compartment
with the side to be recorded on facing you.
Wind past the leader of the tape, on which recording cannot be
performed.
3 Press the CD button and load the desir ed disc .
4 Press one of the 1 - 3 buttons on the remote contr ol
to select the disc to be recorded first.
5 Press the button of TAPE
1, which also engag es th e
button.
CD
playback
and tape recording will star t.
1 Press the CD bu tt on.
2 Programme discs and tr acks (see page 17) .
3
Press the button of TAPE 1, which also engages the button.
Page 24

02/5/27 CD-XP160W(SCA)E3.fm
23
CD-XP160W
Ta pe Recording
- Recording to a cassette tape -
Recording to a cassette tape (continued)
T
Recording from the radio
To stop recording:
Press the
button of TAPE 1.
Note:
If you hear a whistling noise whilst recording an AM station, move
the AM loop aerial.
T
Erasing recorded tapes
Notes:
z
Do not co nn ect anything to the MIC socket.
z
Make sure that the TAPE 2 is not in us e.
T
Dubbing from tape to tape
You can record from TAPE 2 to TAPE 1.
To stop dubbing:
Press the
button of TAPE 1.
1 Tune in to the desired station (see page 18).
2 Load a cassette into t he TAPE 1 casset te compartment
with the side to be recorded on facing you.
Wind past t he lea de r of the tape, on whic h re co r di ng cannot be
performed.
3 Press the button of TAPE 1.
4 Press the button of TAPE 1,
which also engages the button.
5 Press the button of TAPE 1 again to begin recording.
1 Load the ta pe to be e rased into the TAPE 1 cassette compa rt-
ment with the side to be erased facing toward you.
2 Press t he TAPE button.
3
Press the button of TAPE 1, which also engag es th e
button
to begin erasin g.
1 Press the ON/STAND-BY button to turn the power on.
2
Load a prerecorded cassette
into the TAPE 2 cassette
compartment. Insert a blank
tape into the TAPE 1 cassette
compartment.
It is recommended that the recording tape is the same length as the
master tape.
3 Press the TAPE butt on.
4 Press the button of TAPE 1.
5 Press the button of TAPE 1, which also engages the
button.
6 Press the button of TAPE 2.
The button of TAPE 1 will be released automatically and dubbing from TAPE 2 to TAPE 1 will begin.
Page 25

02/5/27 CD-XP160W(SCA)E3.fm
24
CD-XP160W
Advanced Fe atures
- Timer and slee p operation -
Timer and sleep operation
This may be operated only with the remote control.
Timer playback:
The unit turns on and p lays the de sired s ource (C D, tuner) at t he
preset time.
Sleep ope ration:
The radio, compa ct disc and casse tte tape can all be turned off
automatically.
T
Timer playback
Before setting timer:
1 Press the CLOC K button to check that the clock is set to the
correct time. (Refer to page 13.)
2 Load the discs to b e played.
1 Press the ON/STAND-BY button to turn the power on .
2 Press the CD or TUNE R (BAND) button to se lect the de-
sired function.
When you selected the TUNER (BAND), tune into the desired
station.
3 Adjust the volume using the VOLUME buttons.
Do not turn the volume up too high. Timer playback starts at
the volume yo u se t her e.
4 Press the TIMER button and within 8 seconds, press
the MEMO RY button .
5 Within 30 seconds, press the PRESET ( or ) button
to specify the hour to start, then press the MEMORY
button.
- Timer and sleep operation -
Continued to the next page
Page 26

02/5/27 CD-XP160W(SCA)E3.fm
25
CD-XP160W
Advanced Fe atures
- Timer and slee p operation -
Timer and sleep operation (continued)
To reset or change the timer setting:
Perform "Timer playback" from the beginning.
Caution:
Do not tu rn t he volum e up too high . Playback star ts at the vol ume
set before en tering the timer st an d- by mode.
T
Sleep operation
To cancel the sleep operation:
Press the ON/STAND-BY button whilst the sleep timer is set.
To confirm the remaining sleep time:
Press the SLEEP button whilst the slee p tim er is set.
The remaining sleep time is displayed for about 3 seconds.
Note:
When you use the sl eep operat ion with a cassette, s et the s leep
time longer th an th e remai ning playback tim e of th e cass ette. If t he
unit enter s the stan d-by mo de before th e casse tte reac hes its en d,
the cassette mechanism or the tape may be damaged.
6
Within 30 seconds, press the PRESET ( or ) button to specify the minute to start, then press the
MEMORY button.
7 The unit will enter the timer stand-by mode automati-
cally.
To cancel the timer playback:
Press the ON/STAND-BY button to turn the power on.
8 When the preset time is reached, playb ack will start.
9 It will enter the power stand-by mode one hour after the
timer playback starts.
1 Play back the desired sound source.
2 Press the SLEEP button.
To change the sleep time:
Press the SLEEP button repeatedly to select the desired sleep
time. The time will decrease as follows.
The amou nt of sle ep tim e can als o be ch anged w hilst in t he
sleep mode.
3 Your system will enter the power stand-by mode auto-
matically after the preset time has elapsed.
3:00 2:00 1:30 1:00
0:10
0:15 0:300:05(cancel)
Page 27

02/5/27 CD-XP160W(SCA)E3.fm
26
CD-XP160W
References
- Troubleshooting chart -
Troubleshooting chart
Many potential problems can be resolved by the owner without calling a service technician.
If something is wrong with this pr oduct, check the followi ng before
calling your authorised SHARP dealer or service centre.
T
General
T
CD player
T
Tuner
T
Cassette deck
T
Remote control
Symptom Possible caus e
z
The clock is not set to the
correct time.
z
Did a power failure occur ? Reset
the clock. ( Refer to page 13.)
z
When a button is p res sed ,
the unit does not respond.
z
Set this unit to the power sta ndby mode and then turn it back on.
z
If the unit still malfunctio ns, reset
it. (Refer to page 27.)
z
No sound is heard.
z
Is the volume level s et to " MI N" ?
z
Are the headphones connected?
z
Are the speaker wires disconnected?
Symptom Possible caus e
z
Playbac k do es n ot star t.zIs the disc loaded upside down?
z
Playback stop s i n th e m id dle or is not performed
properly.
z
Does the disc sa tisfy the standards?
z
Is the disc distorted or scratched?
z
Playback sounds are skipped,
or stoppe d in t he middl e of a
track.
z
Is the unit lo cate d near exc essiv e
vibrations?
z
Is the disc very dirty?
z
Has condensation formed inside
the unit?
Symptom Possible cause
z
The radi o ma kes un usual
noises continuously.
z
Is the unit pl ace d near the TV or
computer?
z
Is the FM aer ia l or A M lo op aerial
placed properly? Move the aerial
away from t he AC powe r lead if
it’s located nearby .
Symptom Possible cause
z
Cannot re cord.
z
Is the erase-prevention tab removed?
z
Cannot rec ord t rac ks wi th
proper sound quality.
z
Is it a no rmal ta pe? (Y ou can not
record on a metal
or CrO tape
.)
z
Cannot erase comp le t e ly .
z
Sound skipping.
z
Is there any slack?
z
Is the tape stretched?
z
Cannot hear trebl e.
z
Sound fluctuation.
z
Are the capstans, pinch rollers,
or heads dirty?
Symptom Possible cause
z
The remote control does
not oper at e .
z
Is the AC power l ead of the uni t
plugged in?
z
Is the batte ry polarity res pe c ted?
z
Are the ba tt e r ies dead?
z
Is the distance or angle incorrect?
z
Does the remote control sensor
receive st ron g light?
Page 28

02/5/27 CD-XP160W(SCA)E3.fm
27
CD-XP160W
References
- Troubleshooting chart -
Troubleshooting chart (continued)
T
If trouble occurs
When this product is subjected to strong external interference
(mechanical shock, excessive static electricity, abnormal supply
voltage due to lightni ng, etc. ) or if it is operated incorre ctly, it may
malfunction.
If such a problem occurs, do the following:
1 Set the unit to the stand-by mode and turn the power on again.
2 If the unit is not restored in the previous operation, unplug and
plug in the unit, and then turn the power on.
Note:
If neither operation above restores the unit, clear all the memory by
resetting it.
T
Clearing all the memory (reset)
1 Press the ON/STAND-BY button to enter the power stand-by
mode.
2 Whilst pressing down the TUNER (BAND) button and the DISC
SKIP button, press the ON/STAND-BY button until "CLEAR"
appears.
Caution:
This operation will erase all data stored in memory including clock,
timer settings, tuner preset, and CD programme.
T
Condensation
Sudden temperatu r e changes, storage or opera tio n in an extrem ely
humid environment may cause condensation inside the cabinet (CD
pickup, tape heads, etc.) or on the transmitter on the remote control.
Condensation can cause the unit to malfunction. If this happens,
leave the power on with no disc (or cassette) in the unit until normal
playback is possibl e (about 1 ho ur). Wi pe of f any co ndensa tion on
the transmit t er with a soft cloth before operating the un it.
T
Before transporting the unit
1 Press the ON/STAND-BY but ton to turn t h e pow er on .
2 Remove all dis cs f rom the unit and clos e the di sc t ray.
3 Press the ON/STAND-BY button to enter the stand-by mode.
z
“SHARP” is displayed.
4 When “SHARP” disappears, unplug the AC power lead from the
AC outlet.
Page 29

02/5/27 CD-XP160W(SCA)E3.fm
28
CD-XP160W
References
- Maintenance / Headphones -
Maintenance
T
Cleaning the tape-handling parts
z
Dirty heads, caps tans or pinch rollers can cause poo r so und and
tape jam s. Cl ean t hese parts wi th a cott on swab mois te ned with
commercial head/pinch roller cleaner or isopropyl alcohol.
z
When cleaning the heads, pinch rollers, etc., unplug the unit
which contains high voltages.
z
After long use, the deck's heads and capstans may become magnetised, causing poor sound. Demagnetise these parts once
every 30 h ours of playing /reco rding tim e by usi ng a co mmer cial
tape head demagnetiser. Rea d the demagne tiser's inst ructions
carefully b efore use.
T
Cleaning the cabinet
Erase head Pinch roller
Record ing/Playback head Playback head
Capstan
TAPE 1
TAPE 2
A
C
C
D
D
E
B
Periodically wipe the cabinet with a soft cloth and a diluted soap
solution, then with a dry cl oth.
Caution:
z
Do not use chem icals for cl eaning (petrol , paint t hinner, etc. ). It
may damage th e cabi net finish.
z
Do not appl y oil to the inside of th e unit. It m ay cause mal functions.
Headphones
z
Before plugging in or unplugging the headphones, reduce the volume.
z
Be sure your headphones have a 3.5 mm (1/8") diameter plug and
are between 16 ohms and 50 ohms impedance. The recommended impedance is 32 ohms.
z
Plugging in the headphones disconnects the speakers automatically. Adjust the volume using the VOLUME buttons.
Page 30

02/5/27 CD-XP160W(SCA)E3.fm
29
CD-XP160W
References
- Specifications -
Specifications
As part of our policy of continuous improvement, SHARP reserves
the right to make design and specification changes
for
product
improvement witho ut prior notice. The per formance specificati on figures indicated are nominal values of production units. There may be
some deviatio ns from t h e se values in in dividual units.
T
General
T
Amplifier
T
CD player
T
Tuner
T
Cassette deck
T
Speaker
Power sour ce AC 110/127/220/230 - 240 V, 50/60 Hz
Power
consumption
70 W
Dimensions Width: 270 mm (10-5/8")
Height: 30 5 mm (12")
Depth: 343 mm (13-1/2")
Weight 6.6 kg (14.5 lbs.)
Output power MPO: 100 W (50 W + 50 W)
(10 % T.H.D .)
RMS: 66 W (33 W + 33 W)
(10 % T.H.D.)
RMS: 55 W (27.5 W + 27.5 W)
(0.9 %
T.H.D.)
Output terminals Spe akers: 6 ohms
Headphones: 16 - 50 ohms (recommended:
32 ohms)
Input terminal Microphone: 1 mV/600 ohms
Type 3-disc multi-play compact disc player
Signal readout Non-contact, 3-beam semi conductor laser
pickup
D/A converter 1-bit D/A converter
Frequency
response
20 - 20,000 Hz
Dynamic range 90 dB (1 kHz)
Frequency range FM: 88 - 108 MHz
AM: 531 - 1,60 2 kH z
Frequency
response
125 - 8,000 Hz (Normal tape)
Signal /noise ratio 50 dB (TAPE 1, recording/
playback
)
50 dB (TAPE 2,
playback
)
Wow and flutter 0.3 % (WRMS)
Type Twin-drive speaker system
10 cm (4") woofer x 2
Maximum inp ut
power
66 W
Rated input power 33 W
Impedance 6 ohms
Dimensions Width: 200 mm (7-7/8")
Height: 305 mm (12")
Depth: 17 5 mm ( 6- 9 /16")
Weight 2.6 kg (5.7 lbs.)/each
Page 31

WARRANTY
Consumer Electronic Products
Congratulations on Your Purchase!
This Sharp product is warranted against faults in materials and manufacture for a period of twelve (12) months
from the date of original purchase.
If service is required during the warranty period, please contact your nearest Sharp Approved Service Centre.
These repairs would be carried out at no charge to the owner, subject to the conditions specified herein.
The owner is responsible for any transportation and insurance costs if the product has to be returned for repair.
This warranty does not extend to accessories, defects or injuries caused by or resulting from causes not
attributable to faulty parts or the manufacture of the product, including but not limited to, defect or injury caused
by or resulting from misuse, abuse, neglect, accidental damage, improper voltage, liquid spillage, vermin
infestation, software, or any alterations made to the product which are not authorised by Sharp.
Please retain your sales documentation, as this should be produced to validate a warranty claim.
This warranty is in addition to and in no way limits, varies or excludes any express and implied rights and
remedies under any relevant legislation in the country of sale.
0212A
*CDXP160WSCA_OMA8 02.12.20, 4:15 PM1
Page 32

IMPORTANT
DO NOT RETURN THIS PAGE TO SHARP
For your reference, please enter the particulars of your purchase below and retain, with your purchase
documentation.
Model No.
Serial No.
Date of Purchase
Retailer
IMPORTANT NOTICE: This warranty applies only to products sold in Australia & New Zealand
FOR LOCATION ENQUIRIES WITHIN
AUSTRALIA
REGARDING YOUR
LOCAL
SHARP APPROVED SERVICE CENTRE
VISIT OUR WEBSITE AT
www.sharp.net.au
OR CALL SHARP
LOCAL CALL
1 300 135 022
SHARP CORPORATION OF AUSTRALIA PTY. LIMITED
A.B.N. 40 003 039 405
1 Huntingwood Drive Blacktown NSW 2148
FOR PRODUCTS PURCHASED IN
NEW ZEALAND
CONTACT YOUR SELLING DEALER/RETAILER
OR CALL
SHARP CUSTOMER SERVICES
TELEPHONE:
09 - 573 0111
FACSIMILE: 09 - 573 0113
WEB: www.sharpnz.co.nz
SHARP CORPORATION OF NEW ZEALAND LIMITED
59 Hugo Johnston Drive, Penrose Auckland
0212B
SHARP CORPORATION
TINSE0136SJZZ
02M N YT 1
*CDXP160WSCA_FRONT 02.12.20, 4:09 PM2
 Loading...