

Page 1
SHARP CORPORATION
72
72
72
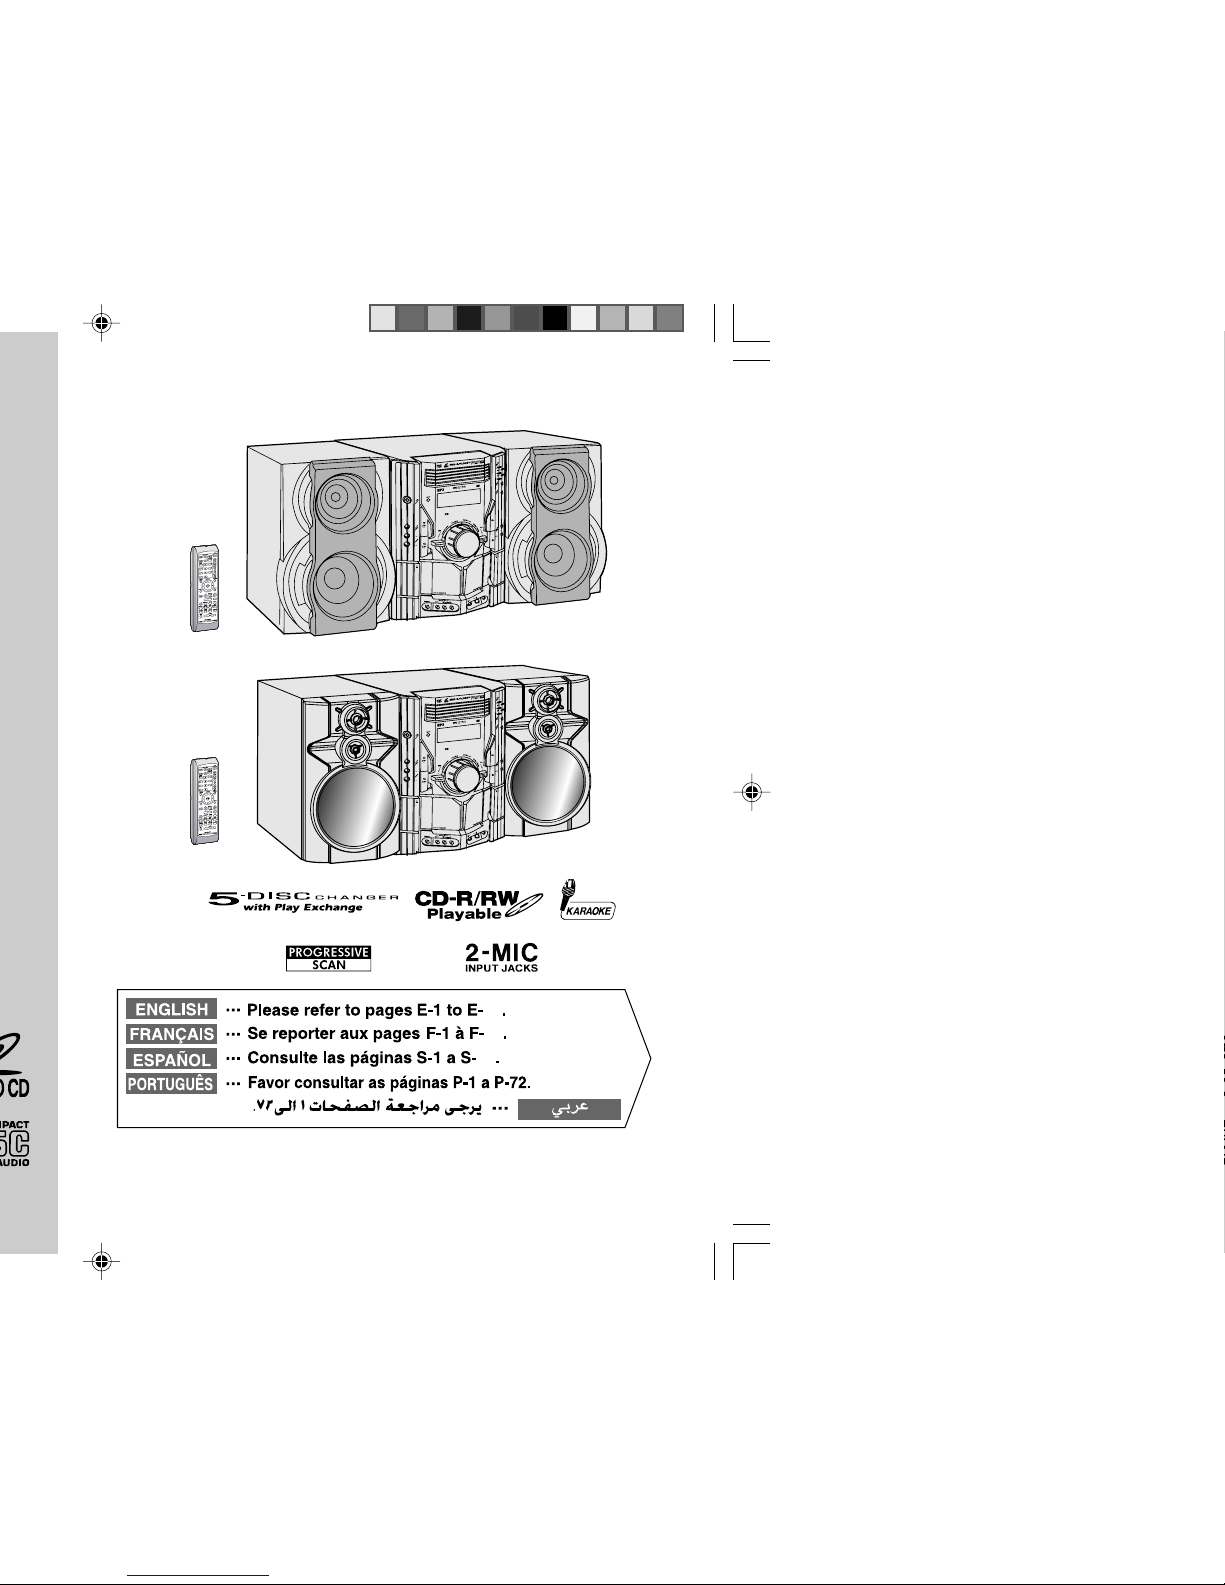
CD-DV650W
D
V
DM
I
N
I
S
Y
S
T
E
M
C
D
-DV
6
5
0
M
IC
M
I
C
LE
V
E
L
MI
N
M
A
X
1
2
D
V
D
M
IN
I
S
Y
S
T
E
M
C
D
-D
V
8
5
0
M
IC
M
I
C
LE
V
E
L
M
I
N
MA
X
1
2
CD-DV850W
Page 2
WARNINGS:
I When the ON/STAND-BY button is set at STAND-BY position,
mains voltage is still present inside the unit. When the ON/STANDBY button is set at STAND-BY position, the unit may be brought
into operation by the timer mode or remote control.
I This unit contains no user serviceable parts. Never remove covers
unless qualified to do so. This unit contains dangerous voltages,
always remove mains plug from the wall socket before any service
operation and when not in use for a long period.
I To prevent fire or shock hazard, do not expose this appliance to
dripping or splashing. No objects filled with liquids, such as vases,
shall be placed on the apparatus.
I Do not turn the volume on to full at switch on and listen to music at
moderate levels. Excessive sound pressure from earphones and
headphones can cause hearing loss.
CAUTION:
I This product is classified as a CLASS 1 LASER product.
I Use of controls, adjustments or performance of procedures other
than those specified herein may result in hazardous radiation
exposure.
As the laser beam used in this DVD player is harmful to the eyes,
do not attempt to disassemble the cabinet. Refer servicing to
qualified personnel only.
Laser Diode Properties
Material: AIGaAs/InGaAIP
Wavelength: 790 nm/650 nm
Emission Duration: continuous
Laser Output: max. 0.69 mW
CAUTION: VISIBLE AND INVISIBLE LASER RADIATION WHEN
OPEN. DO NOT STARE INTO BEAM OR VIEW DIRECTLY WITH
OPTICAL INSTRUMENTS.
WARNUNG: SICHTBARE UND UNSICHTBARE LASERSTRAHLUNG
WENN GERÄT
GEÖFFNET. NICHT IN DIE STRAHLUNG SCHAUEN
ODER DIREKT MIT OPTISCHEN HILFSMITTELN BETRACHTEN.
ATTENTION: RAYONS LASER VISIBLE ET INVISIBLE EN CAS
D'OUVERTURE. NE PAS REGARDER LE FAISCEAU DIRECTEMENT
OU AVEC DES INSTRUMENTS OPTIQUES.
Note:
Audio-visual material may consist of copyrighted works which must
not be recorded without the authority of the owner of the copyright.
Please refer to the relevant laws in your country.
ENGLISH
Page 3
CD-DV650W
CD-DV850W
E-2
Important Instruction
ENGLISH
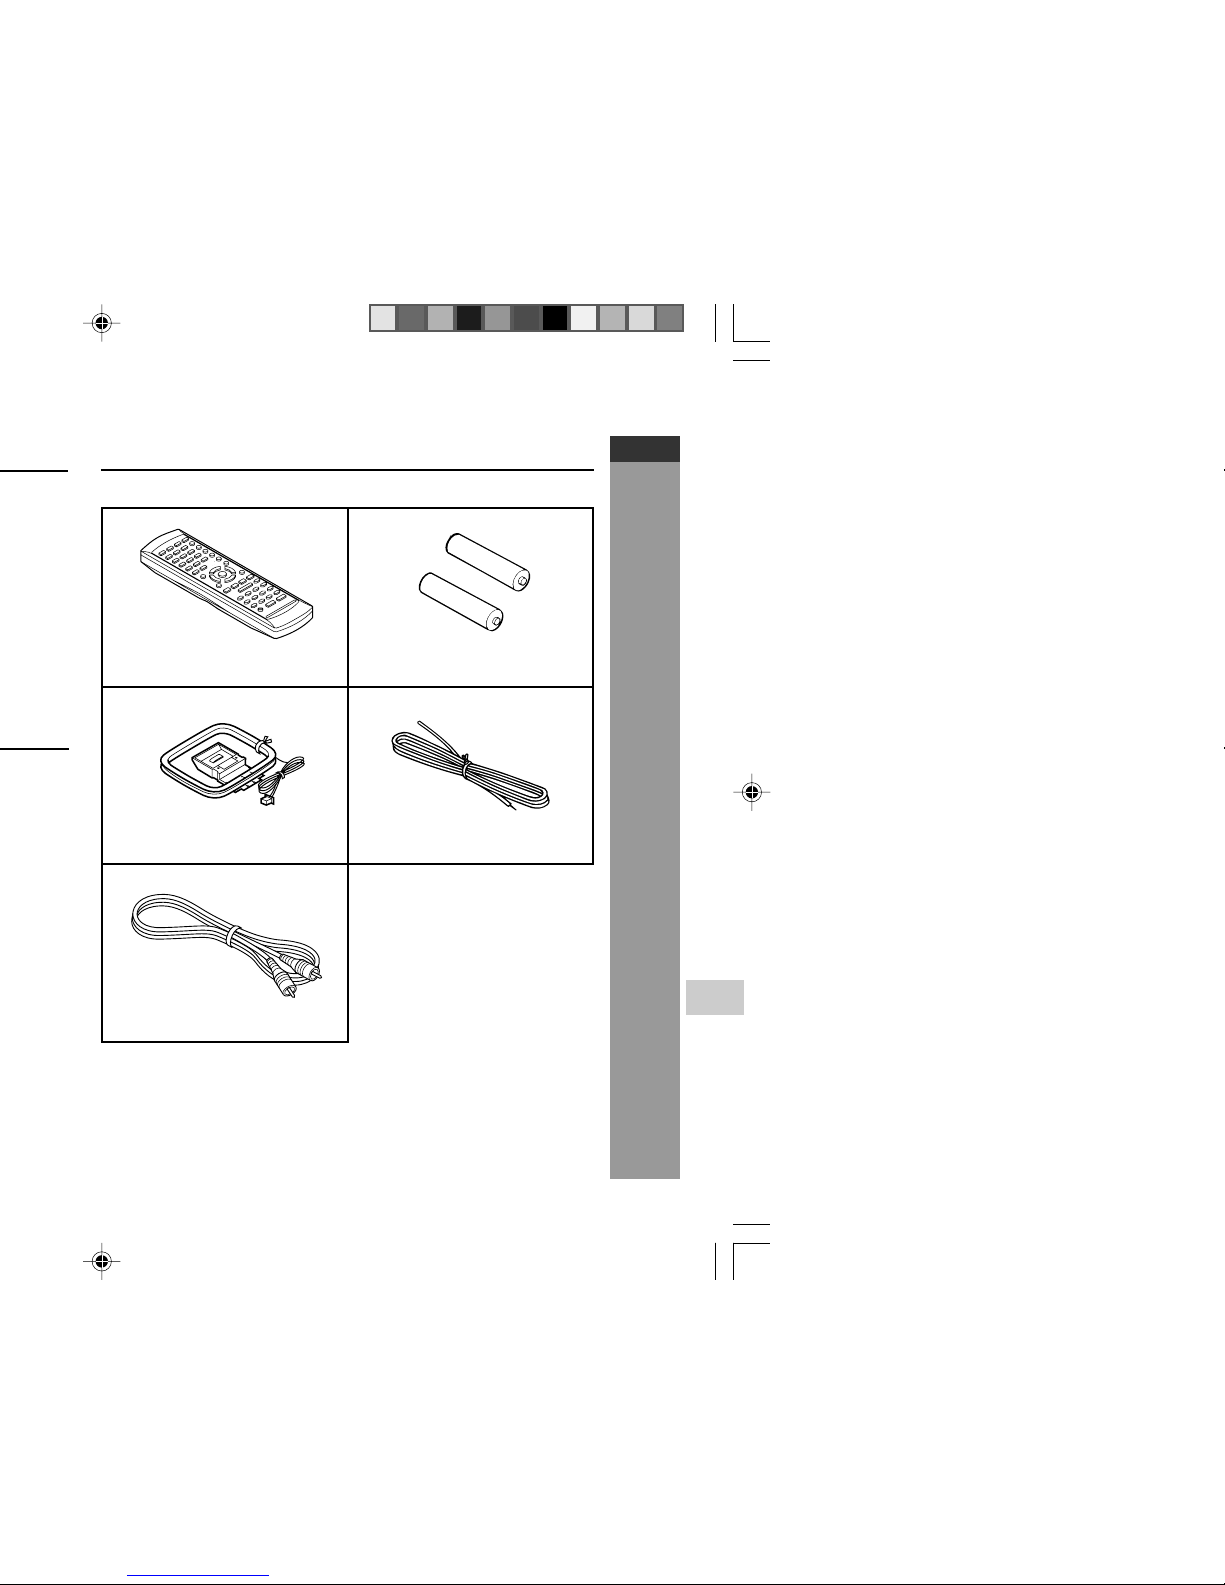
Remote control × 1
“AA” size battery (UM/SUM-3,
R6, HP-7 or similar) × 2
AM loop aerial × 1 FM aerial × 1
Accessories
Please confirm that the following accessories are included.
Video cable × 1
(Yellow)
Note:
Only the above accessories are included.
Page 4

H Disc Playback Page
Video CD ................................................................................41
Preparation for video CD playback .....................................41
Video CD playback ....................................................... 42 - 43
CD playback .................................................................. 44 - 47
MP3/WMA and JPEG disc ............................................ 48 - 49
H Karaoke
Playing karaoke ............................................................ 50 - 51
H Radio
Listening to the radio ................................................... 52 - 53
H Tape Playback
Listening to a cassette tape (TAPE 1)................................. 54
Listening to a cassette tape (TAPE 2)......................... 55 - 56
H Tape Recording
Recording to a cassette tape ....................................... 56 - 61
H Advanced Features
Timer and sleep operation ........................................... 62 - 65
Enhancing your system ............................................... 66 - 67
H References
Troubleshooting chart.................................................. 68 - 69
Maintenance ..........................................................................70
Specifications ............................................................... 70 - 72
Page 5
E-4
General Information
CD-DV650W
CD-DV850W
ENGLISH
Warning:
The voltage used must be the same as that specified on this unit.
Using this product with a higher voltage other than that which is
specified is dangerous and may result in a fire or other type of accident
causing damage. SHARP will not be held responsible for any damage
resulting from use of this unit with a voltage other than that which is
specified.
H Volume control
The sound level at a given volume setting depends on speaker
efficiency, location and various other factors. It is advisable to avoid
exposure to high volume levels. Do not turn the volume on to full at
switch on and listen to music at moderate levels. Excessive sound
pressure from earphones and headphones can cause hearing loss.
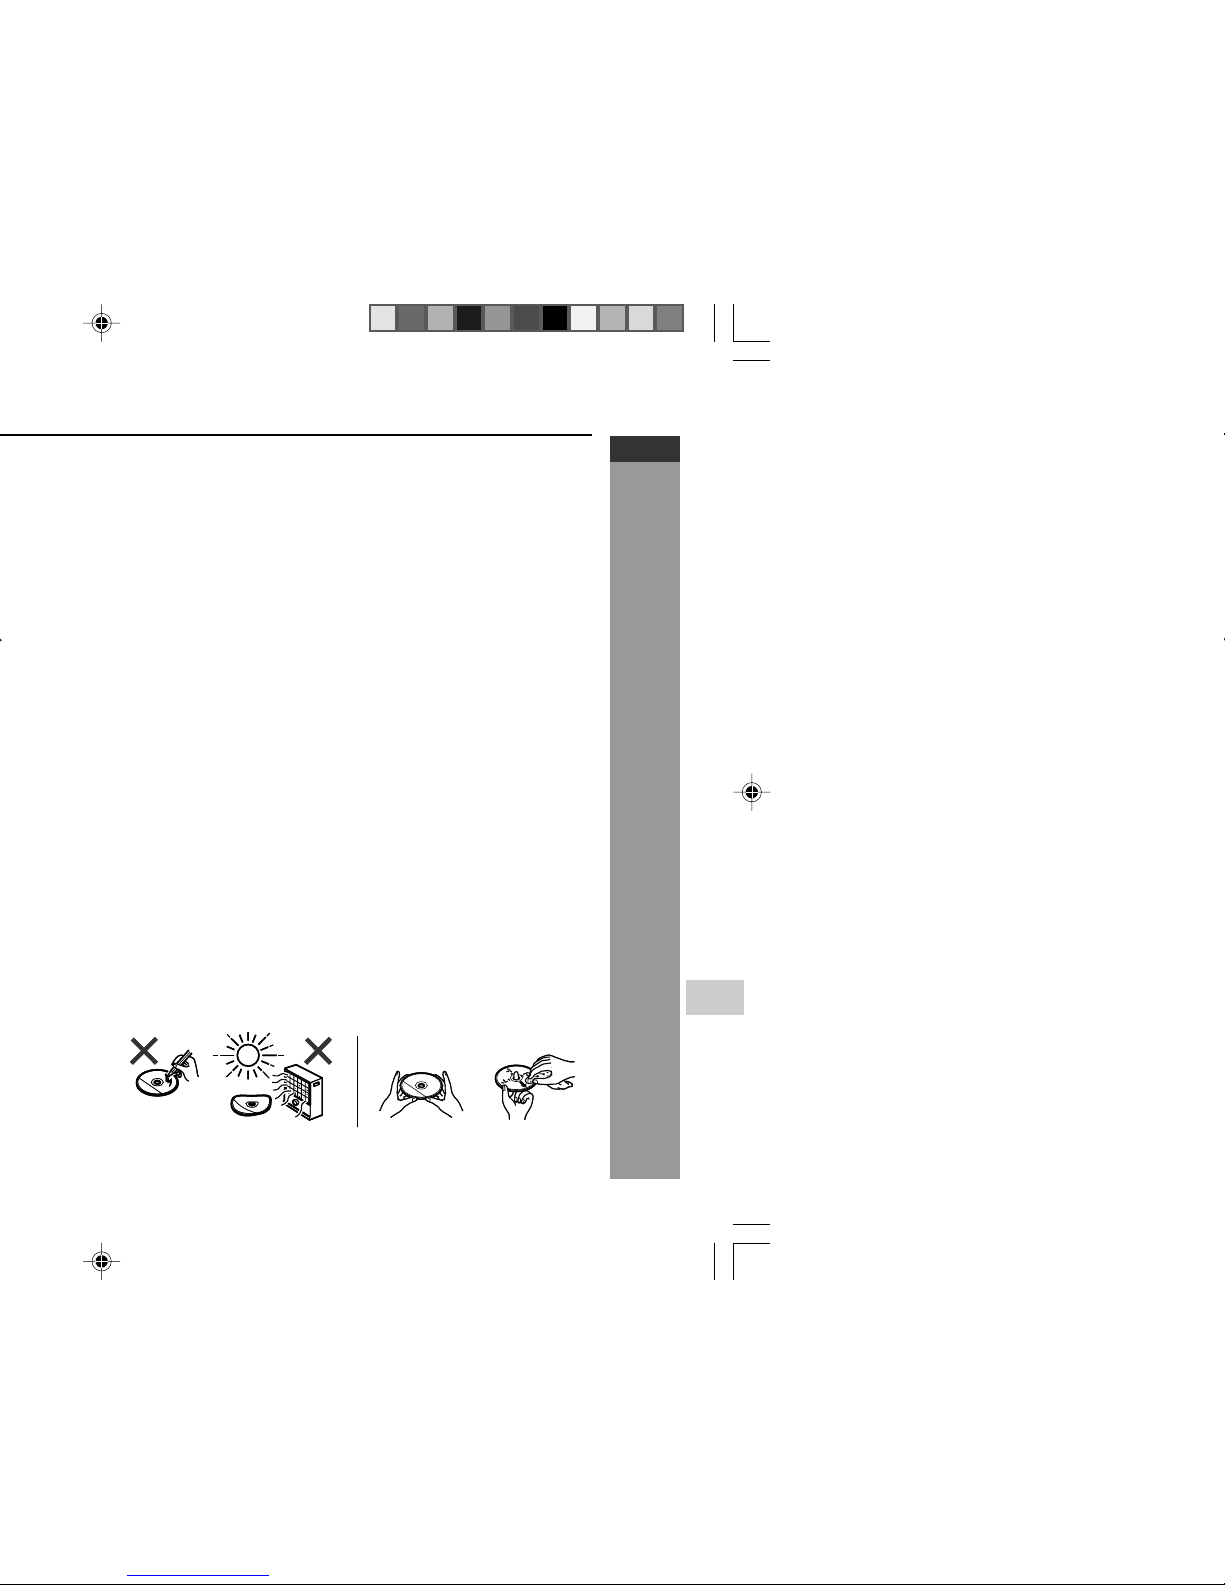
H Care of DVD/Video CD/CD discs
DVD/Video CD/CD discs are fairly resistant to damage, however
mistracking can occur due to an accumulation of dirt on the disc
surface. Follow the guidelines below for maximum enjoyment from
your DVD/Video CD/CD collection and player.
I Do not write on either side of the disc, particularly the non-label
side from which signals are read. Do not mark this surface.
I Keep your discs away from direct sunlight, heat, and excessive
moisture.
I Always hold the DVD/Video CD/CDs by the edges. Fingerprints,
dirt, or water on the DVD/Video CD/CDs can cause noise or
mistracking. If a DVD/Video CD/CD is dirty or does not play
properly, clean it with a soft, dry cloth, wiping straight out from the
centre, along the radius.
YES
CORRECT
NO
Page 6
H Front panel
Reference page
1. Disc Trays ................................................................................ 20, 42, 44
2. Timer Set Indicator ............................................................................. 63
3. On/Stand-by Button...................................................................... 15, 16
4. DVD Chapter Skip/DVD/Video CD/CD/MP3/WMA Track Up or
Fast Forward, Tape 2 Fast Forward, Tuner Preset Up,
Time Up Button ........................................................... 17, 33, 44, 53, 55
5. Clock/Timer Button....................................................................... 17, 62
6. Tuning Up Button................................................................................ 52
7. Tuning Down Button........................................................................... 52
8. DVD Chapter Skip/DVD/Video CD/CD/MP3/WMA Track Down or Fast
Reverse, Tape 2 Rewind, Tuner Preset Down,
Time Down Button ...................................................... 17, 33, 44, 53, 55
9. Equaliser Mode Select Button ........................................................... 16
10. Tape 1 Cassette Compartment .......................................................... 54
11. Headphone Socket ............................................................................. 66
12. Game/Video Input Sockets ................................................................ 66
13. Disc Number Select Buttons ................................................. 20, 31, 42
14. Disc Direct Play Button .................................................... 20, 31, 57, 58
15. Disc Tray Open/Close Button ................................................ 20, 31, 42
16. DVD/Video CD/CD/MP3/WMA Play, Tape 1 Play,
Tape 2 Forward Play Button ............................................ 31, 44, 54, 55
17. Memory/Set Button........................................................... 17, 47, 53, 62
18. Tape 2 Record Pause Button ....................................................... 57, 58
19. DVD/Video CD/CD/MP3/WMA or Tape Stop Button ................... 31, 55
20. Extra Bass/Demo Mode Button ................................................... 14, 16
21. Volume Control ............................................................................. 16, 62
22. Tape 2 Cassette Compartment .......................................................... 55
23. Microphone Socket 1.......................................................................... 50
24. Microphone Socket 2.......................................................................... 50
25. Microphone Level Control ................................................................. 50
26. Tuner (Band) Button ........................................................................... 52
27. DVD/CD Button ................................................................. 20, 31, 44, 58
28. Tape (1
VV
VV
V2) Button .................................................................. 50, 54, 55
29. Game/Video Button ...................................................................... 50, 66
13
14
15
22
24
17
18
16
19
20
25
21
23
29
28
Page 7
E-6
General Information
CD-DV650W
CD-DV850W
ENGLISH
H Display
1. Disc Number Indicators
2. DVD/Video CD/CD/MP3/WMA Play Indicator
3. DVD/Video CD/CD/MP3/WMA Pause Indicator
4. DVD/Video CD/CD/MP3/WMA Repeat Indicator
5. DVD Indicator
6. VCD Indicator
7. CD Indicator
8. MP3 Indicator
9. Extra Bass Indicator
10. Memory Indicator
11. DVD Angle Indicator
12. DVD Chapter Indicator
13. DVD Title Indicator
14. WMA Indicator
15. Virtual Surround Indicator
16. Tape Record Indicator
17. Timer Recording Indicator
18. Timer Play Indicator
19. Sleep Indicator
20. Tape Forward Play Indicator
21. FM Stereo Mode Indicator
22. FM Stereo Receiving Indicator
23. Daily Timer Indicator
24. Tuner Receiving Frequency Indicators
25. Karaoke Mode Indicator
Page 8

H Rear panel
Reference page
1. Audio Digital Output Socket .............................................................. 67
2. S-Video Output Socket....................................................................... 12
3. Component Video Out Sockets ......................................................... 13
4. AC Voltage Selector............................................................................ 13
5. Cooling Fan
6. AC Power Lead ............................................................................. 10, 13
7. FM 75 Ohms Aerial Terminal........................................................ 10, 11
8. FM Aerial Earth Terminal.............................................................. 10, 11
9. AM Loop Aerial Socket ................................................................. 10, 11
10. Span Selector Switch ......................................................................... 14
11. Video Output Socket .................................................................... 12, 67
12. Speakers Terminals ............................................................................ 11
10
9
11
12
8
7
4
4
5
H Speaker system
1. Tweeter
2. Woofer
3. Bass Reflex Duct
4. Speaker Wire
Speaker grilles are removable:
Make sure nothing comes into contact with the speaker diaphragms
when you remove the speaker grilles.
H Speaker system (CD-DV850W)
1. Tweeter
2. Super Tweeter
3. Woofer
4. Bass Reflex Duct
5. Speaker Wire
Speaker grilles are not removable
Page 9
E-8
General Information
CD-DV650W
CD-DV850W
ENGLISH
H Remote control
Reference page
1. Remote Control Transmitter ................................................................. 15
2. Disc Number Select Buttons..................................................... 20, 31, 42
3. DVD Top Menu Button ........................................................................ 40
4. Clock/Timer Button ......................................................................... 17, 62
5. Direct Search Buttons .................................................................. 47, 48
6. Clear/Display Button ........................................................................... 39
7. Enter Button ..................................................................................21, 24
8. Cursor Left Button........................................................................ 24, 47
9. Memory Button ................................................................... 17, 47, 53, 62
10. Cursor Down Button..................................................................... 24, 26
11. Tape Record Pause Button...................................................... 57, 58, 59
12. DVD Chapter Skip/DVD/Video CD/MP3/ WMA Fast Reverse/Video CD/
CD/MP3/WMA track up/Tape Fast Wind and Tuner Preset Down,
Time Down Button .................................................................... 33, 44, 46
13. DVD/Video CD/CD/MP3/WMA Pause Button..................................... 33
14. DVD Chapter Skip/DVD/Video CD/MP3/WMA Fast Forward/Video CD/
CD/MP3/WMA track up/Tape Fast Wind and Tuner Preset Up,
Time Up Button ......................................................................... 33, 44, 46
15. DVD/Video CD/CD/MP3/WMA/Tape Stop Button........................... 31, 47
16. DVD/Video CD/CD/MP3/WMA/Tape Play Button ........................... 31, 47
17. Shift Button ..................................................................................... 21, 46
18. Volume Up or Down Buttons ................................................................ 16
19. On/Stand-by Button ........................................................................ 15, 16
20. Echo Level Up/Down Buttons........................................................... 50
21. DVD Direct Button .............................................................................. 34
22. DVD Menu Button ............................................................................... 40
23. Return Button................................................................................ 21, 34
24. CD Random Button............................................................................. 46
25. Cursor Up Button.......................................................................... 24, 47
26. Cursor Right Button ..................................................................... 24, 47
27. DVD/Video CD Slow Button ............................................................... 33
28. DVD/Video CD/CD/MP3/WMA Repeat Button ................................... 46
29. DVD Subtitle Button ........................................................................... 40
30. DVD Angle Button ...............................................................................34
31. DVD Zoom Button............................................................................... 37
32. DVD/Video CD/CD/MP3/WMA Button ............................................ 20, 31
33. Tuner (Band) Button ............................................................................. 52
34. Tape (1 V 2) Button ................................................................. 50, 54, 55
35. Game/Video Button ........................................................................ 50, 66
36. Equaliser Mode Select Button .............................................................. 16
37. Extra Bass Button ................................................................................. 16
38. DVD 3-D Virtual Surround Button ..................................................... 35
39. DVD On Screen Button....................................................................... 28
GAME
/VIDEO
Page 10

H Remote control with shift button
Reference page
1. Karaoke Button ............................................................................. 50, 51
2. DVD Setup Button ......................................................................... 21, 24
3. DVD Sound Button ............................................................................. 35
4. DVD Picture Button ............................................................................ 37
5. DVD/Video CD/CD A-B Repeat Button .............................................. 38
6. DVD Gamma Button ........................................................................... 36
Page 11
E-10
Preparation for Use
CD-DV650W
CD-DV850W
ENGLISH
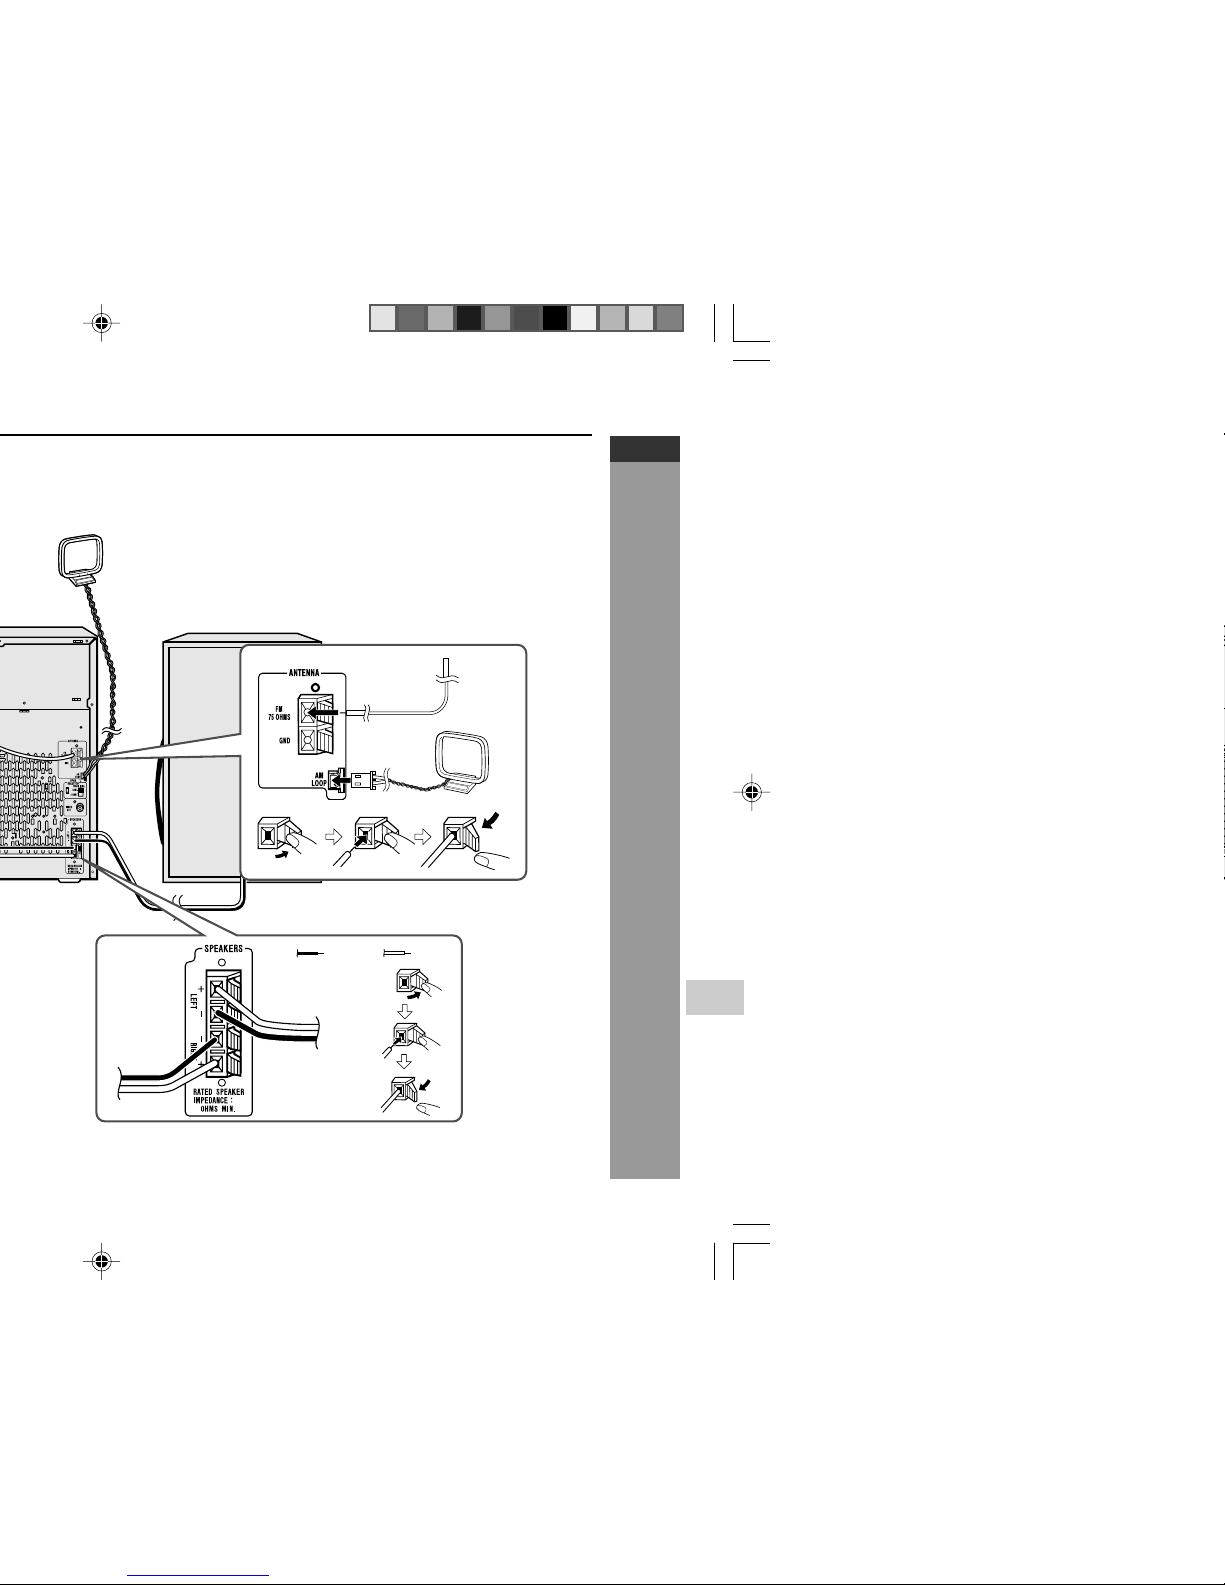
AM loop aerial
Left speaker
Black
Red
6
Page 12
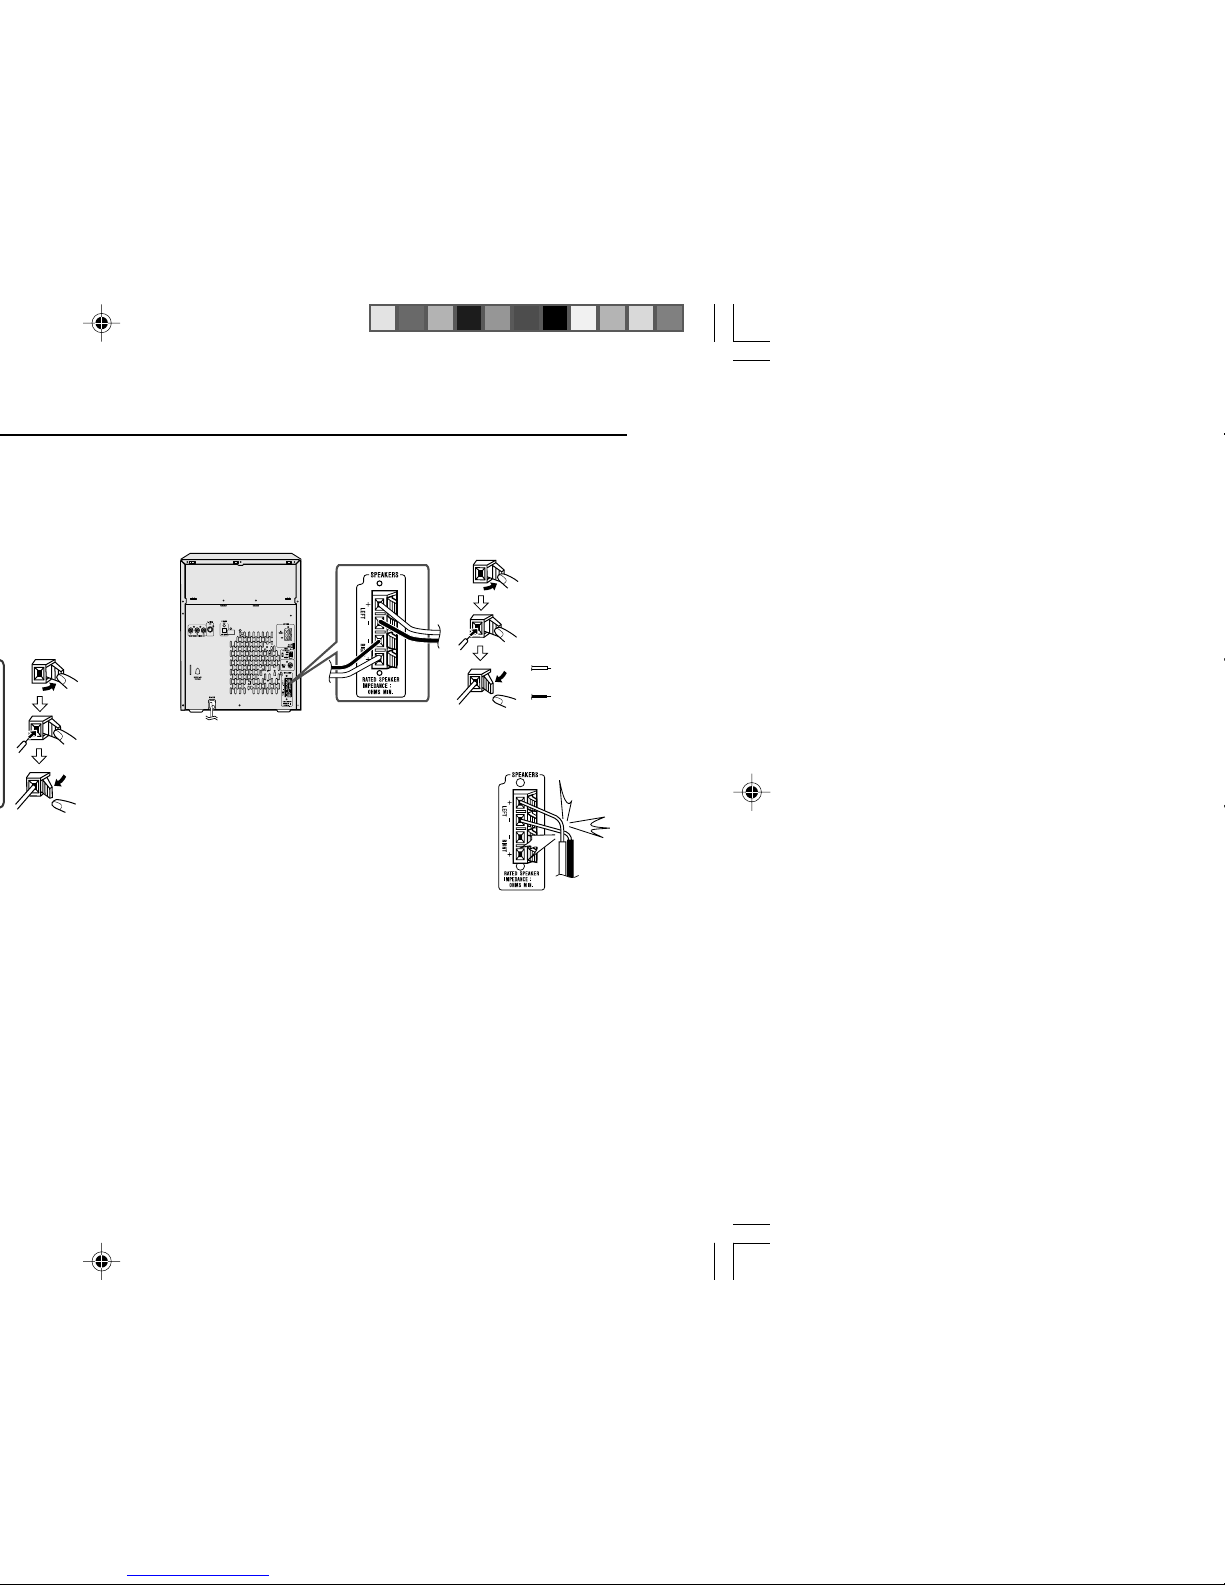
H Speaker connection
FRONT SPEAKERS:
Connect the black wire to the minus (-) terminal, and the red wire to
the plus (+) terminal.
Caution:
I Use speakers with an impedance of 6 ohms
or more, as lower impedance speakers can
damage the unit.
I Do not mistake the right and the left channels.
The right speaker is the one on the right side
when you face the unit.
I Do not let the bare speaker wires touch
each other.
I Do not allow any objects to fall into or to be
placed in the bass reflex ducts.
I Do not stand or sit on the speakers. You may
be injured.
Incorrect
6
6
Red
Black
Page 13
E-12
Preparation for Use
CD-DV650W
CD-DV850W
ENGLISH
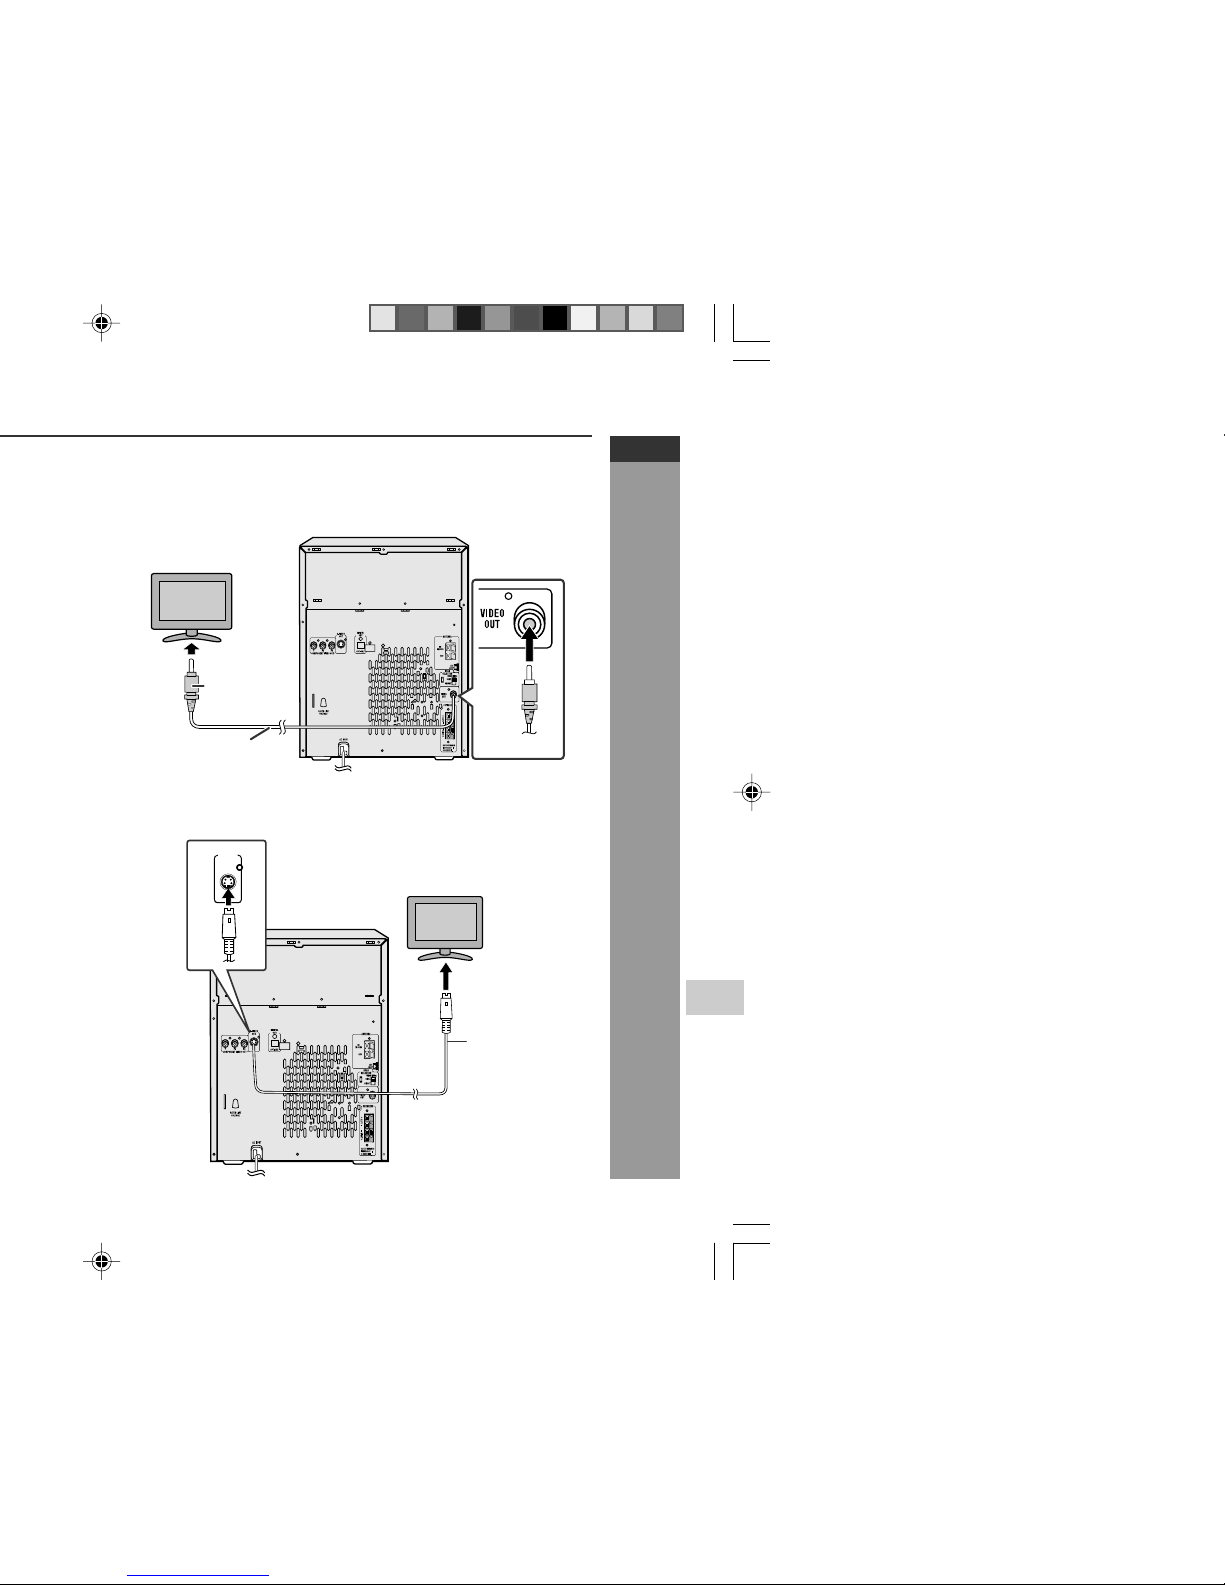
H TV/monitor connection
If the TV/monitor has a video input, connect it to the VIDEO OUT
socket on the rear of the unit.
TV
To video
input
socket
Video cable
Yellow
Yellow
H Connecting a TV with an S-video cable
S-VIDEO
OUT
TV
To S-video
input socket
S-video
cable
(not supplied)
Page 14
Main Unit
H Setting the AC voltage selector
Check the setting of the AC voltage selector located on the rear panel
before plugging the unit into a wall socket. If necessary, adjust the
selector to correspond to the AC power voltage used in your area.
Turn the selector with a screwdriver until the appropriate voltage
number appears in the window (110 V, 127 V, 220 V or 230 V - 240
V AC).
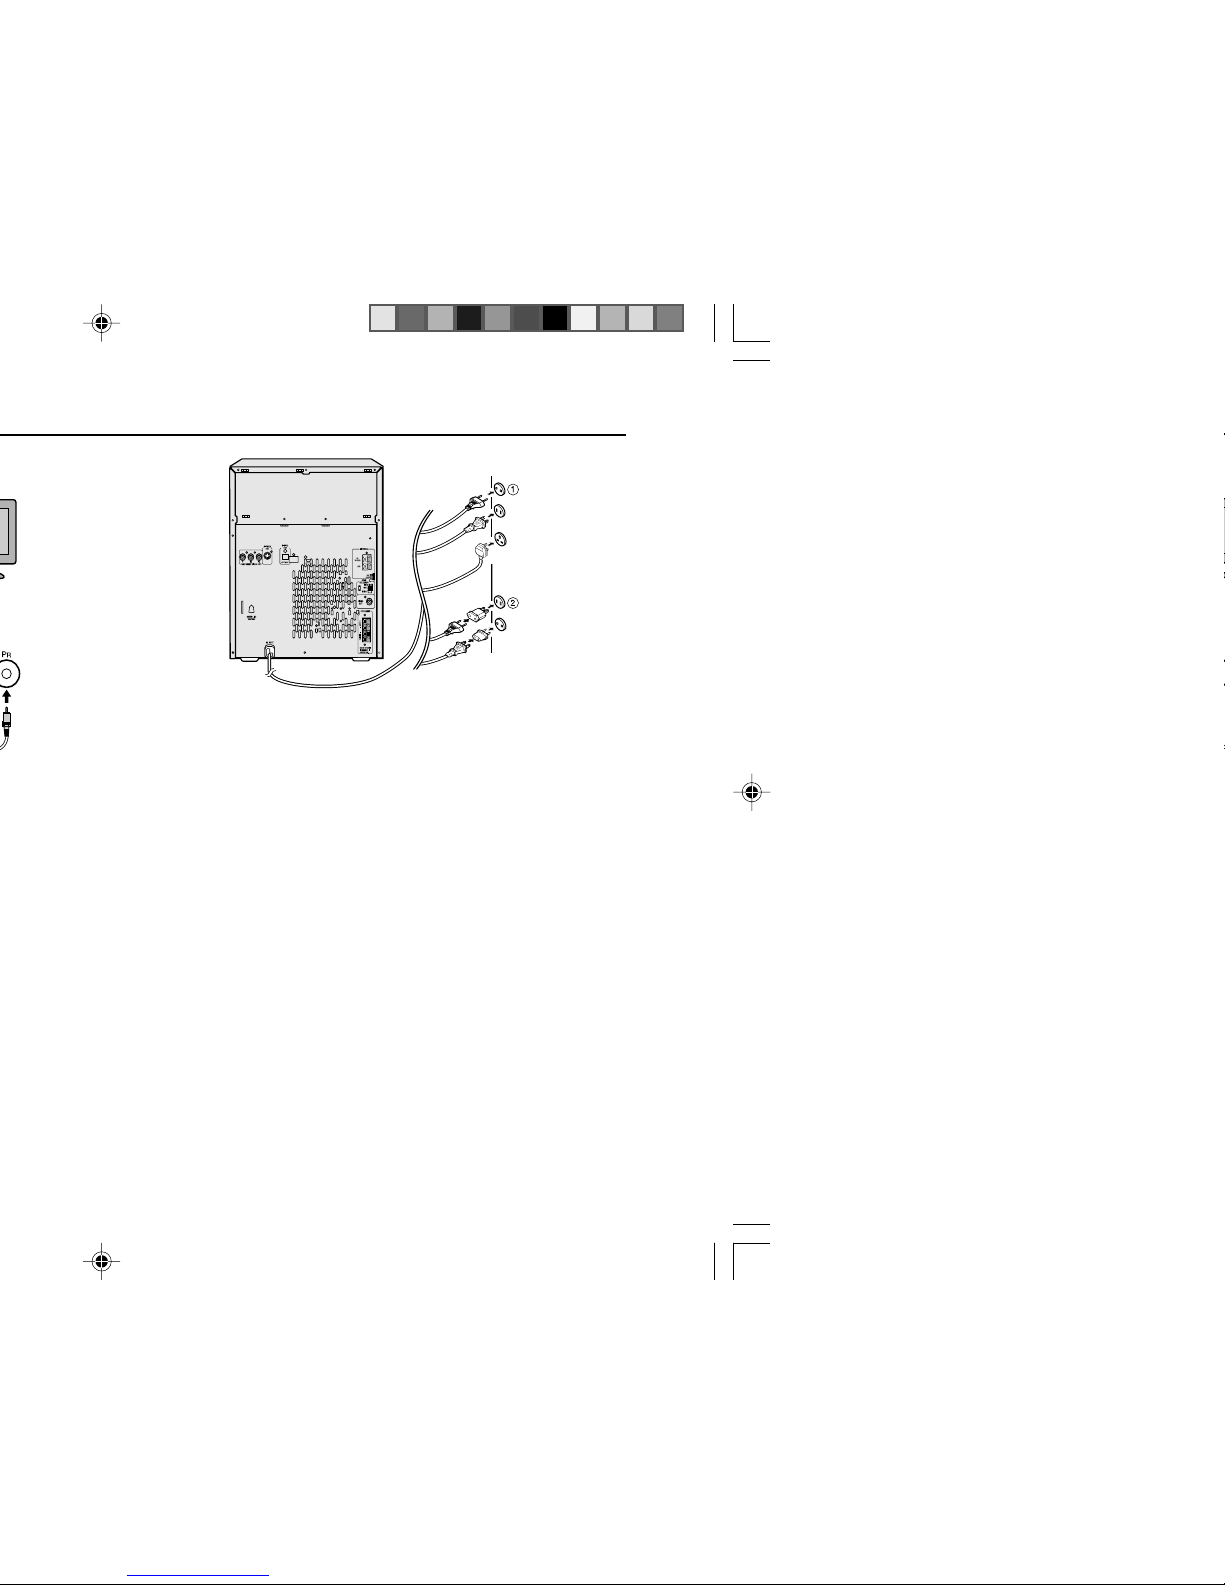
H Connecting the AC power lead
After checking all the connections have been made correctly, plug
the AC power lead of this unit into the wall socket. If you plug the unit
first, the unit will enter the demonstration mode (see page 14).
Notes:
I The unit will start the tape initialisation when plugged in to the AC
socket. During this process, initialising sound will be heard and
the unit cannot be turned on. Wait until the process is finished.
I Unplug the AC power lead from the wall socket if the unit will not
be in use for a prolonged period of time.
AC Plug Adaptor
In areas (or countries) where a wall socket as shown in illustration 2
is used, connect the unit using the AC plug adaptor supplied with the
unit, as illustrated. The AC plug adaptor is not included in areas where
the wall socket and AC power plug can be directly connected (see
illustration 1).
Component
video cable
(not
supplied)
RED
TV
Page 15
E-14
Preparation for Use
CD-DV650W
CD-DV850W
ENGLISH
To cancel the demonstration mode:
When the unit is in the power stand-by mode (demonstration mode),
press the X-BASS/DEMO button. The demonstration mode will be
cancelled and the display will disappear.
To return to the demonstration mode:
When the unit is in the power stand-by mode, press the
X-BASS/DEMO button.
Note:
When the power is on, the X-BASS/DEMO button can be used to
select the extra bass mode.
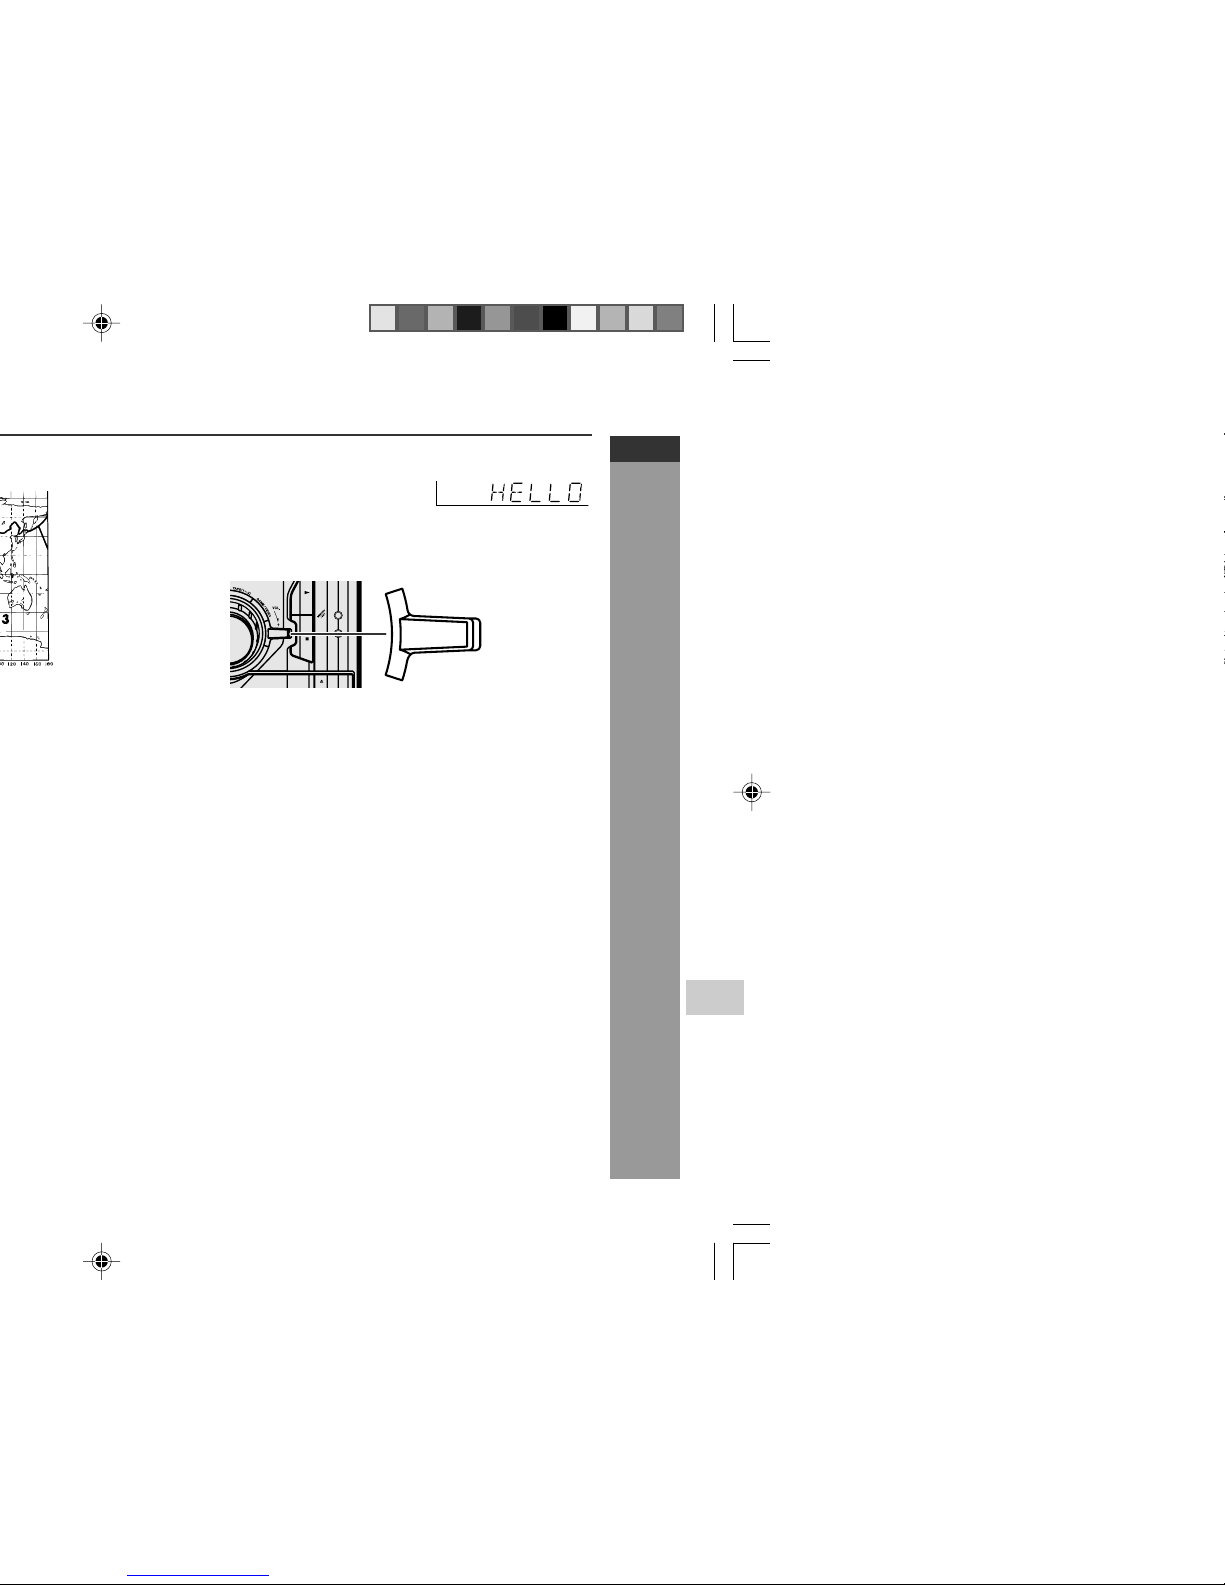
H Demonstration mode
The first time the unit is plugged in, the
unit will enter the demonstration mode.
You will see words scroll.
X-BASS
/DEMO
X-BASS
/DEMO
Page 16
Notes concerning use:
I Replace the batteries if the operating distance is reduced or if the
operation becomes erratic. Purchase 2 “AA” size batteries (UM/
SUM-3, R6, HP-7 or similar).
I Periodically clean the transmitter on the remote control and the
sensor on the unit with a soft cloth.
I Exposing the sensor on the unit to strong light may interfere with
operation. Change the lighting or the direction of the unit.
I Keep the remote control away from moisture, heat, shock and
vibrations.
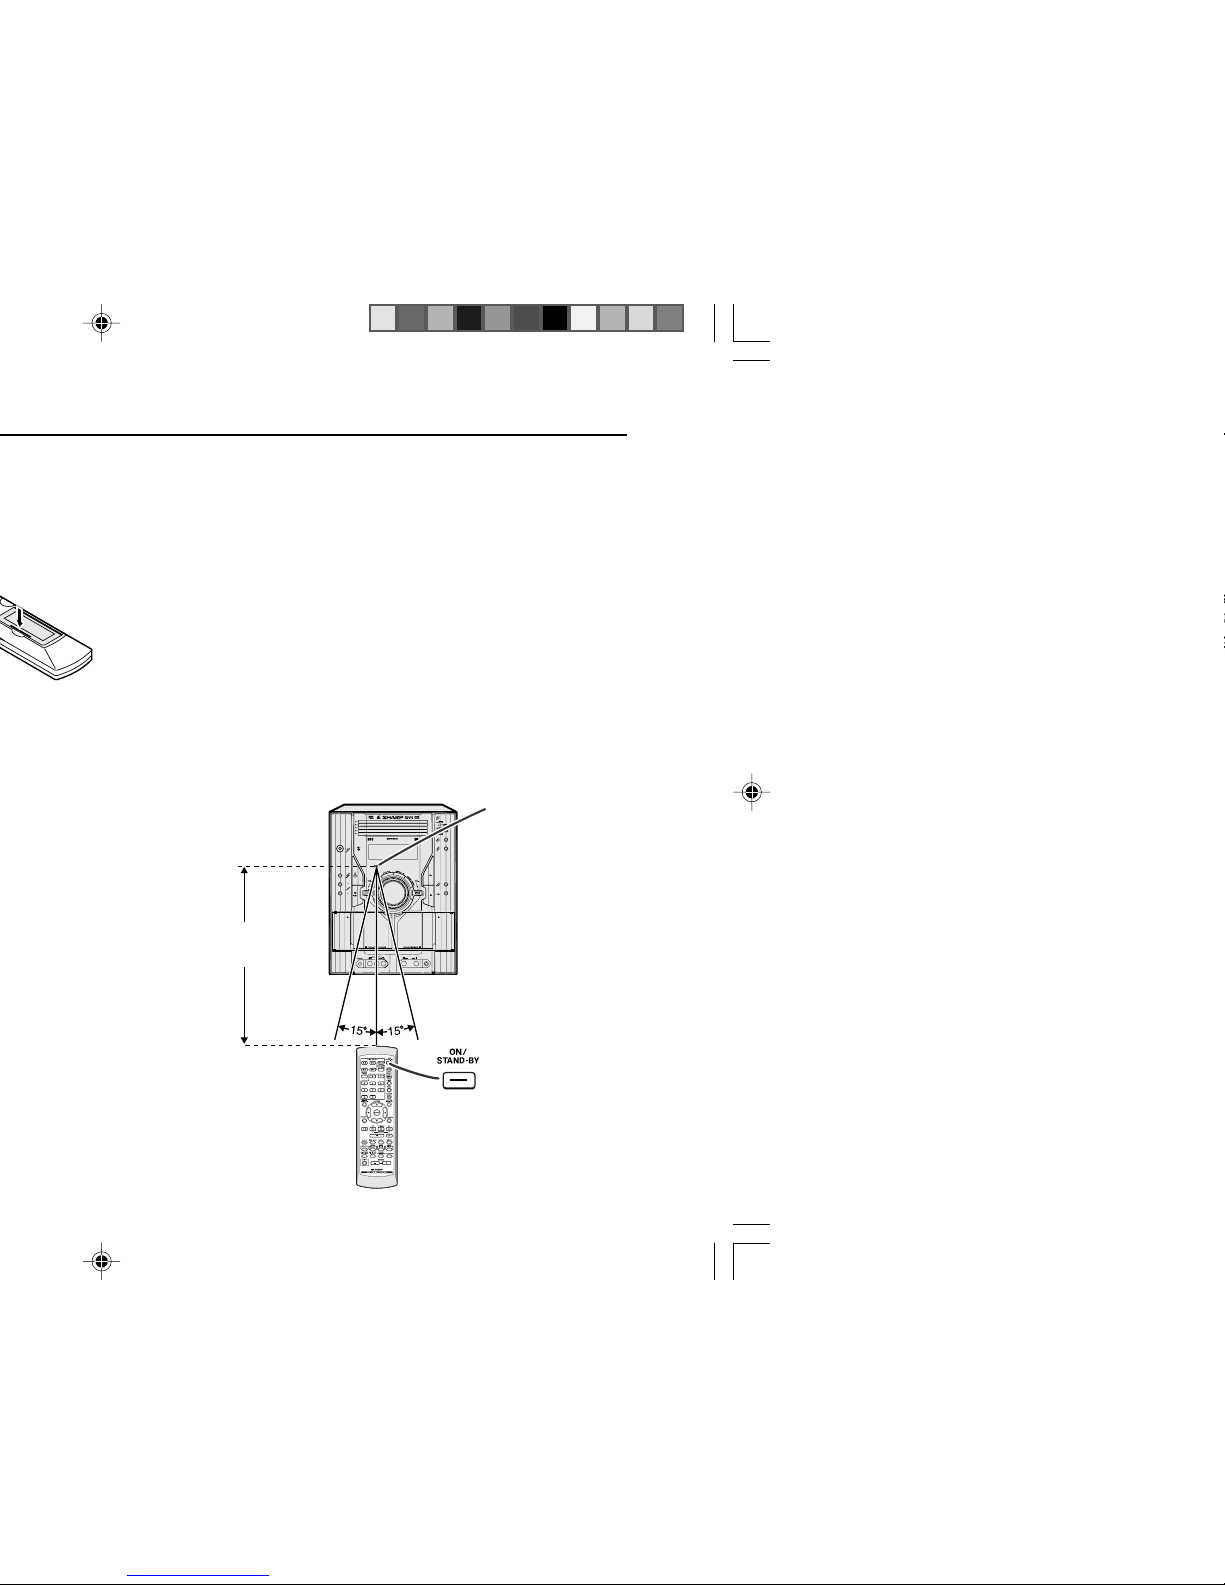
H Test of the remote control
Check the remote control after checking all the connections have been
made correctly. (See pages 10 - 14).
Point the remote control directly at the remote sensor on the unit.
The remote control can be used within the range shown below:
Press the ON/STAND-BY button. Does the power turn on? Now, you
can enjoy music.
Remote sensor
MIC
MIC LEVEL
MIN MAX
1
2
DVD MINI SYSTEM
CD-DV650
0.2 m - 6 m
(8" - 20')
Page 17

E-16
Basic Operation
CD-DV650W
CD-DV850W
ENGLISH
H Bass Control (X-BASS)
When the power is first turned on, the unit will enter the extra bass
mode which emphasises the bass frequencies, and “X-BASS” will
appear. To cancel the extra bass mode, press the X-BASS/DEMO
(X-BASS) button.
No equalisation.
For rock music.
For classical music.
For pop music.
Vocals are enhanced.
For jazz.
FLAT
MODE-1
MODE-2
MODE-3
MODE-4
MODE-5
H Equaliser
When the EQUALIZER button is pressed, the current mode setting
will be displayed. To change to a different mode, press the
EQUALIZER button repeatedly until the desired sound mode appears.
For Tuner, Tape and other than DVD/VCD disc
For DVD/VCD disc only
For Game/Video Mode
The sound is not modified.
Bass and treble are emphasised.
Treble is cut a little.
Bass is emphasised.
Vocals and treble are emphasised.
Bass and treble are emphasised
more.
Page 18
5
Press the 5 3 or 2 4 button to adjust the hour and
then press the MEMORY/SET button.
Press the 5 3 or 2 4 button once to advance the time
by 1 hour. Hold it down to advance continuously.
6
Press the 5 3 or 2 4 button to adjust the minutes and
then press the MEMORY/SET button.
Press the 5 3 or 2 4 button once to advance the time by
1 minute. Hold it down to change the time in 5-minutes intervals.
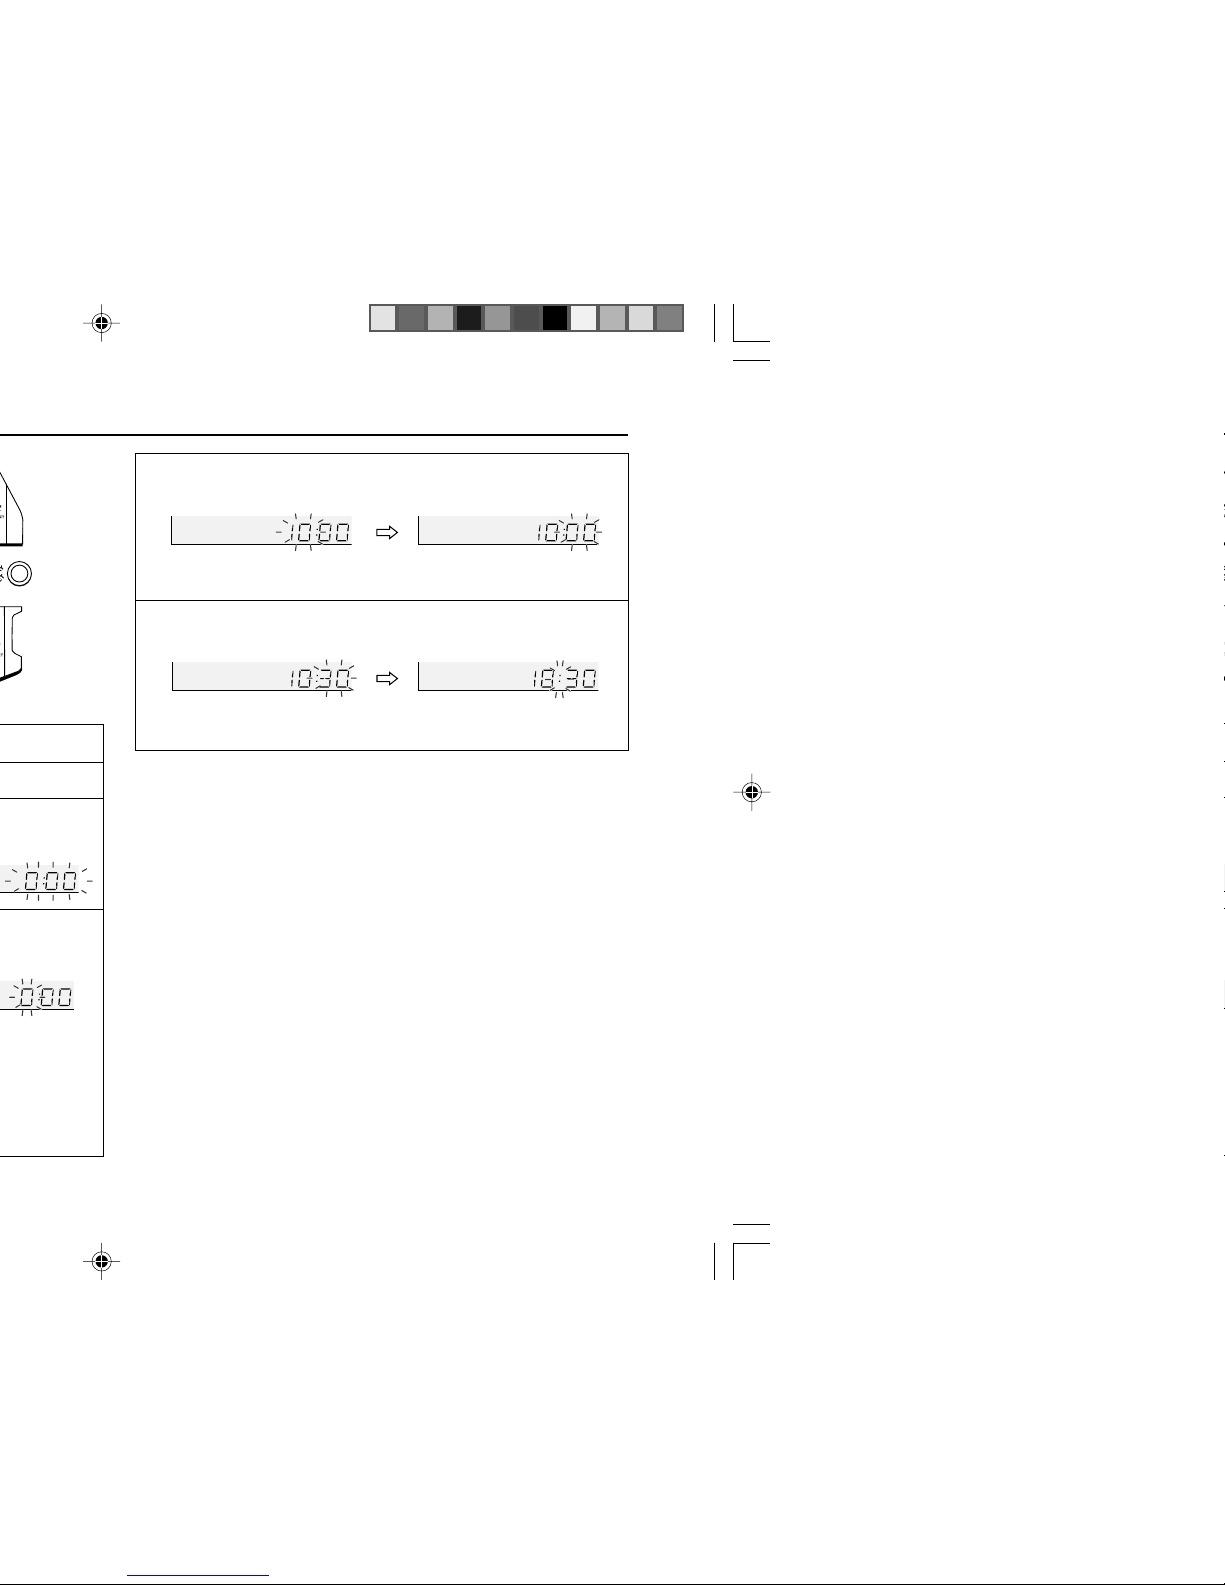
To confirm the time display:
[When the unit is in the stand-by mode]
Press the CLOCK/TIMER button.
The time display will appear for about 10 seconds.
[When the power is on]
Press the CLOCK/TIMER button.
Within 10 seconds, press the 5 3 or 2 4 button to display
the time.
The time display will appear for about 10 seconds.
Note:
The “CLOCK” will appear or time will flash to confirm the time display
when the AC power supply is restored after a power failure or
unplugging the unit. If incorrect, readjust the clock as follows.
To readjust the clock:
Perform “Setting the clock” from step 1. If the “CLOCK” does not
appear in step 3, step 4 (for selecting the 24-hour or 12-hour display)
will be skipped.
To change the 24-hour or 12-hour display:
1 Clear all the programmed contents. [Refer to “Clearing all the
memory (reset)” on page 69 for details.]
2 Perform “Setting the clock” from step 1 onwards.
Note:
The clock can also be set with the remote control.
Page 19
E-18
DVD Explanation
CD-DV650W
CD-DV850W
ENGLISH
Note 2:
The specific playback functionality for some DVD discs is determined
by the disc manufacturer. Because this system plays disc data in
accordance with the disc manufacturer’s guidelines, some functions
may not be available on some discs. Be sure to read the instructions
provided with the disc.
The “Prohibited” indicator or displayed during operation
indicates that such manufacturer-imposed restrictions apply.
Note 3:
This product supports the following modes.
I 2-channel (L/R) PCM audio
I Dolby Digital
I 2-channel MPEG audio
I 5.1 channel MPEG audio
I DTS audio (External decoder is required)
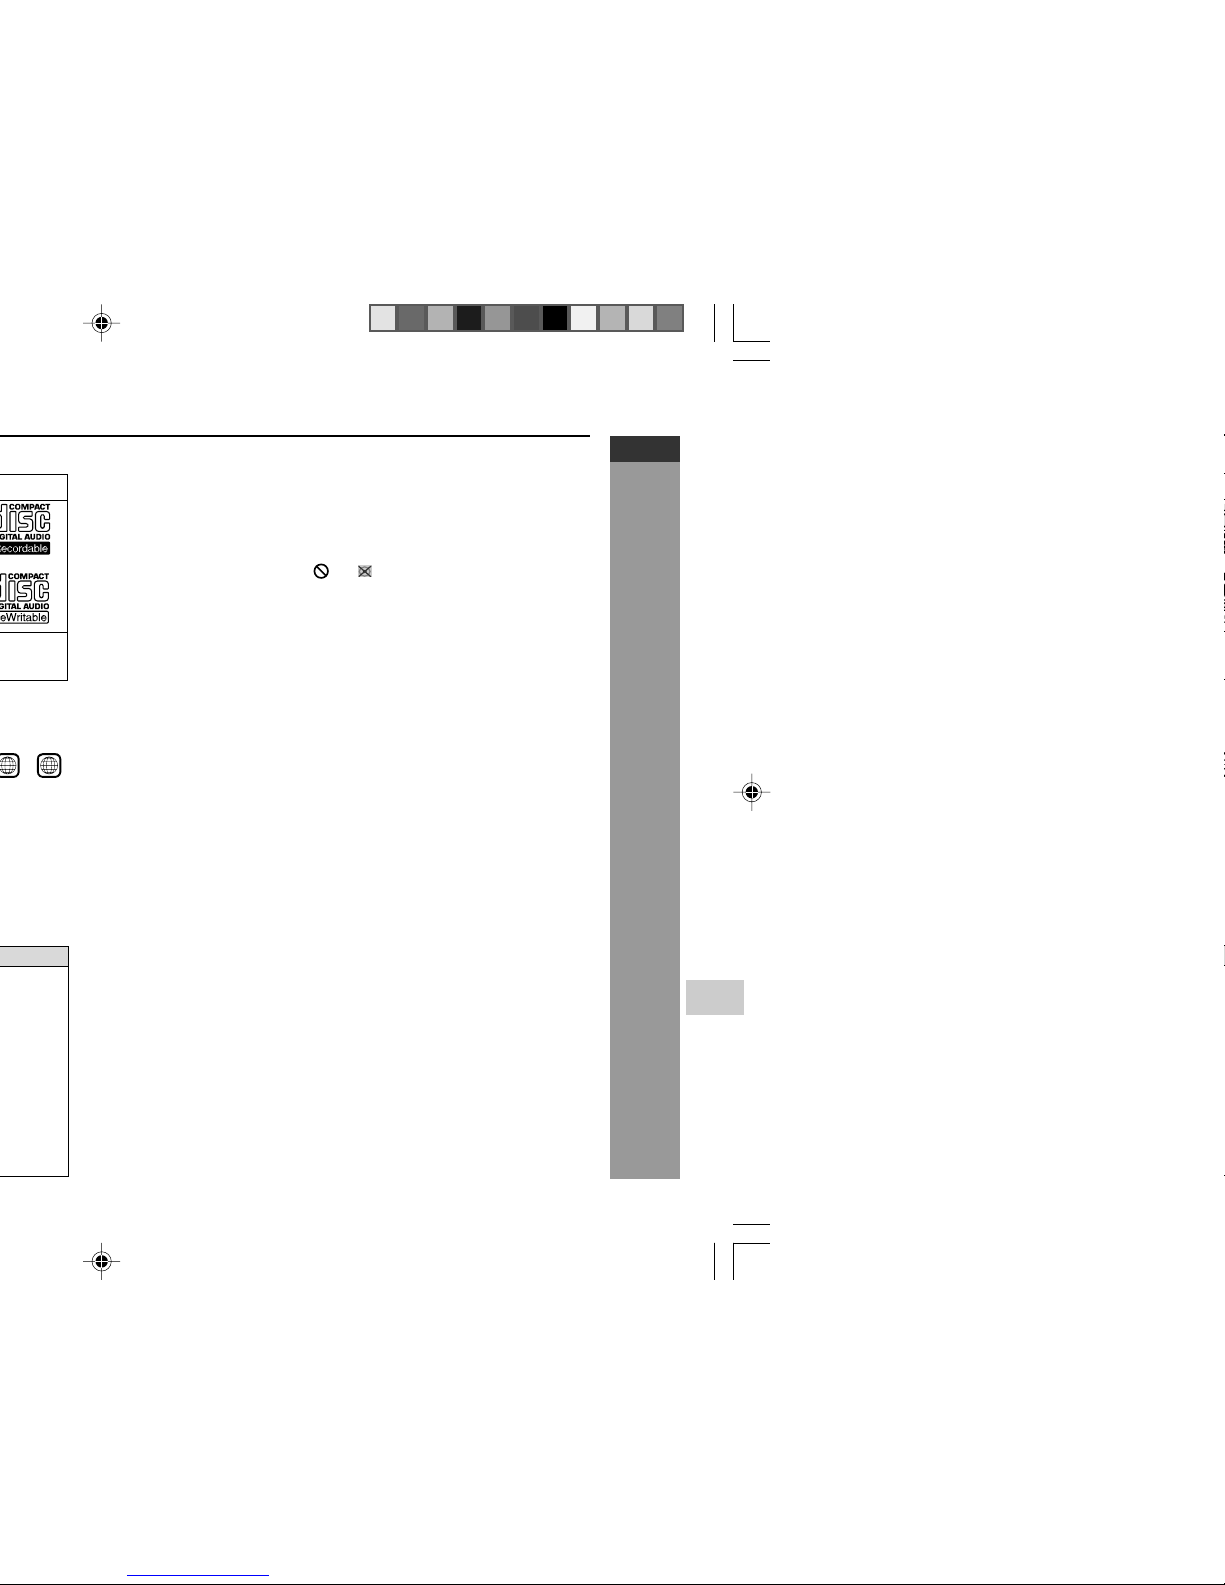
H DVD-R/DVD-RW Playback
I DVD-R disc that has been recorded in Video Mode.
I DVD-RW disc that has been recorded in Video Mode.
I Make sure the DVD-R/DVD-RW disc has been finalised after
recording process before playback on this unit.
I Further information about Video Mode, refer to DVD-R/DVD-RW
recorder operation manual.
Copyright:
Recording and playback of any material may require consent. Please
refer particularly the provisions of the Copyright Act 1956, the Dramatic
and Musical Performers Protection Act 1958, the Performers
Protection Acts 1963 and 1972 and to any subsequent statutory
enactments and orders.
3 4
Page 20
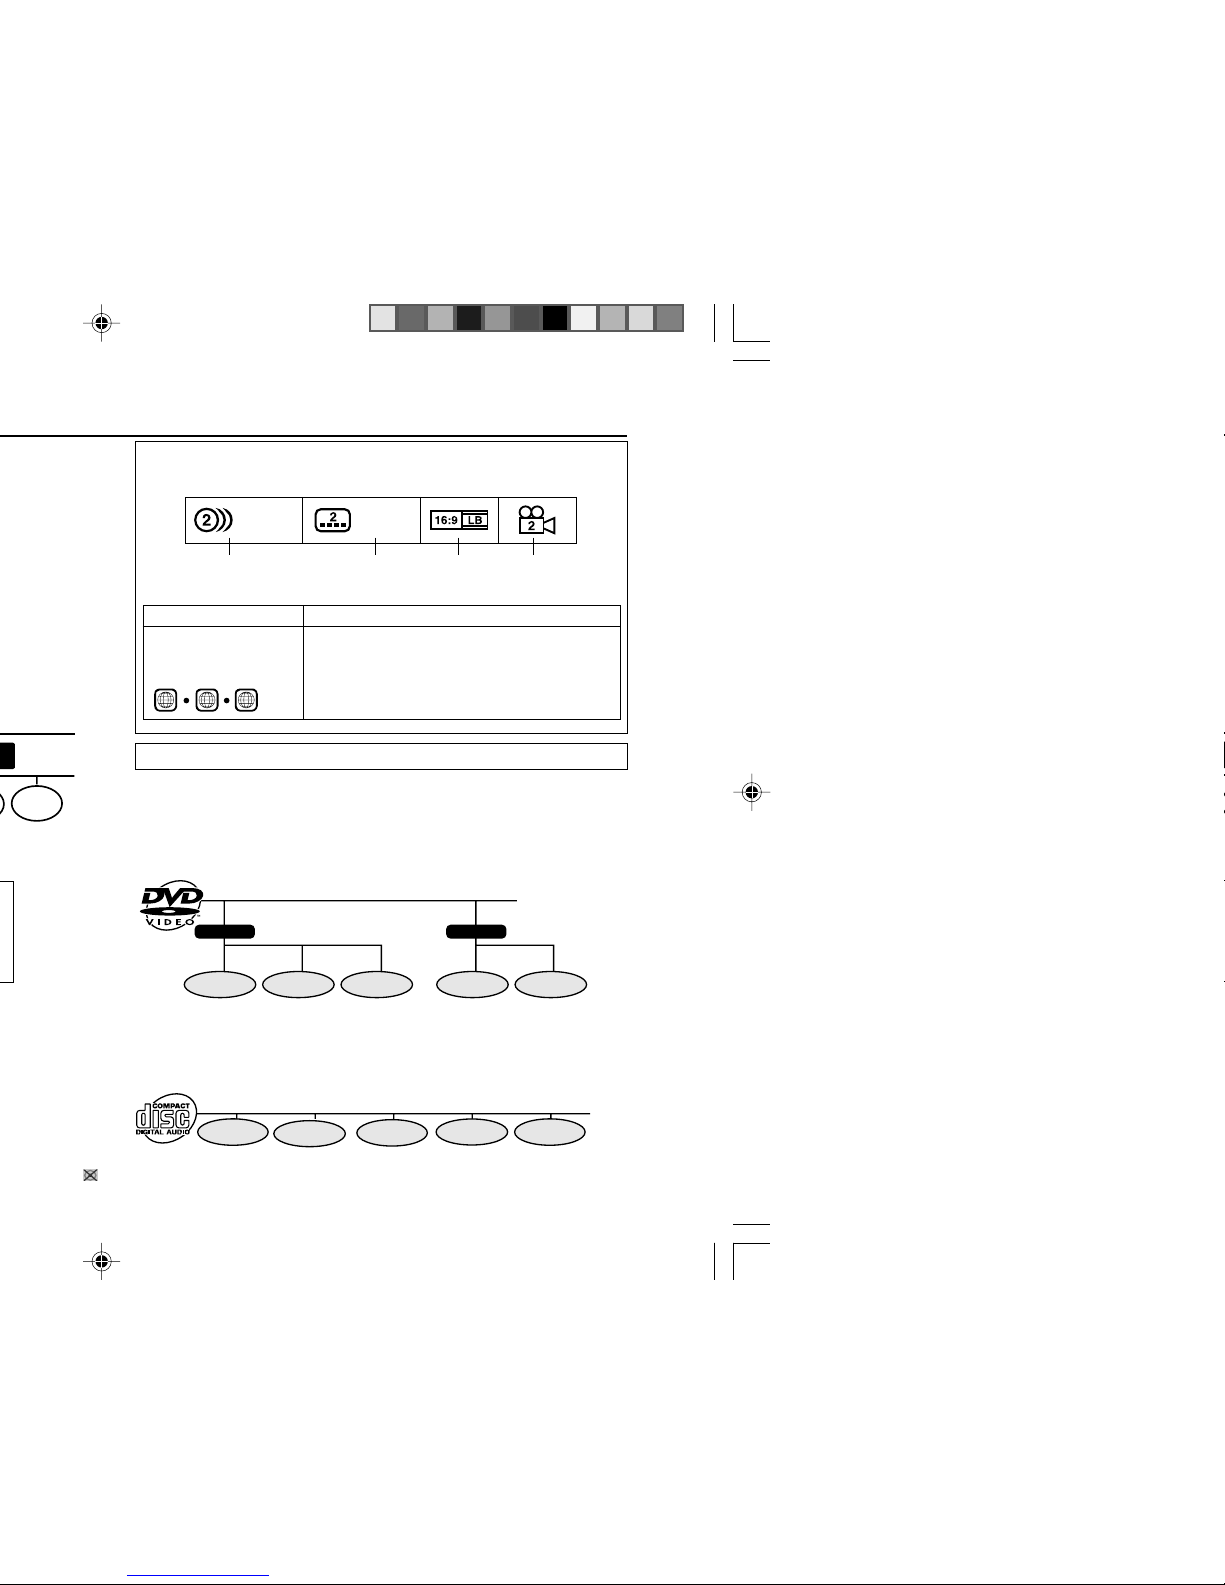
Title, chapter and track
DVDs are divided into “titles” and “chapters”. If the disc has more than one
movie on it, each movie would be a separate “title”. “Chapters” are
subdivisions of titles.
Example: DVD
Audio CDs are divided into “tracks”. You can think of a “track” as one
tune on an audio CD.
Example: Audio CD
Note:
Numbers identify each title, chapter and track on a disc. Most discs have
these numbers recorded on them.
Chapter 1
Title 1 Title 2
Chapter 2
Chapter 3 Chapter 1
Chapter 2
Track 1 Track 2 Track 3 Track 4 Track 5
1. English
2. Japanese
Type of subtitles
recorded
Video
format
Disc with multiple
camera angles
Number of recorded
audio tracks
1. English
2. Japanese
Icons used on DVD discs
Sample Icons
File 2
Display Description
Region number
(playable area
number)
DVD discs are programmed with region
numbers indicating countries in which they
can be played. This system can play discs
with region number on the back of the unit.
3 4
2
Page 21

E-20
DVD Explanation
CD-DV650W
CD-DV850W
ENGLISH
To watch DVD video images on the TV:
1 Turn on the TV.
2 Set the TV to “AV”, “VIDEO”, etc.
3 Turn on the unit and start play.
See page 31 for playing disc.
Note:
There is no audio signal supplied to the TV.
H Loading a DVD (DVDs)
1 Press the ON/STAND-BY button to turn the power on.
2 Press the DVD/CD button.
3 Press the s 1 button and within 5 seconds, press the OPEN/
CLOSE button to open the disc tray 1.
4 Place the DVD on the disc tray 1, label side up.
I Be sure to place 8 cm (3") DVD(s) in the middle of the disc
positions.
5 Press the OPEN/CLOSE button to close the disc tray.
Caution:
I Do not place two discs in one disc tray.
I Do not play discs with special shapes (heart, octagon, etc.). It
may cause malfunctions.
I Do not push the disc tray whilst it is moving.
I
If the power fails whilst the tray is open, wait until the power is
restored.
I If the disc tray is stopped with force, “ER-CD20” will appear on
the display for 3 seconds and the unit will not function. If this occurs,
press the ON/STAND-BY button to enter the power stand-by mode
and then turn the power on again.
I If TV or radio interference occurs during CD operation, move the
unit away from the TV or radio.
I If a disc is damaged, dirty or loaded upside down, the disc will
skip or not play.
12 cm (5")
8 cm (3")
D
V
D
M
IN
I S
Y
S
T
E
M
CD-DV650W
Page 22
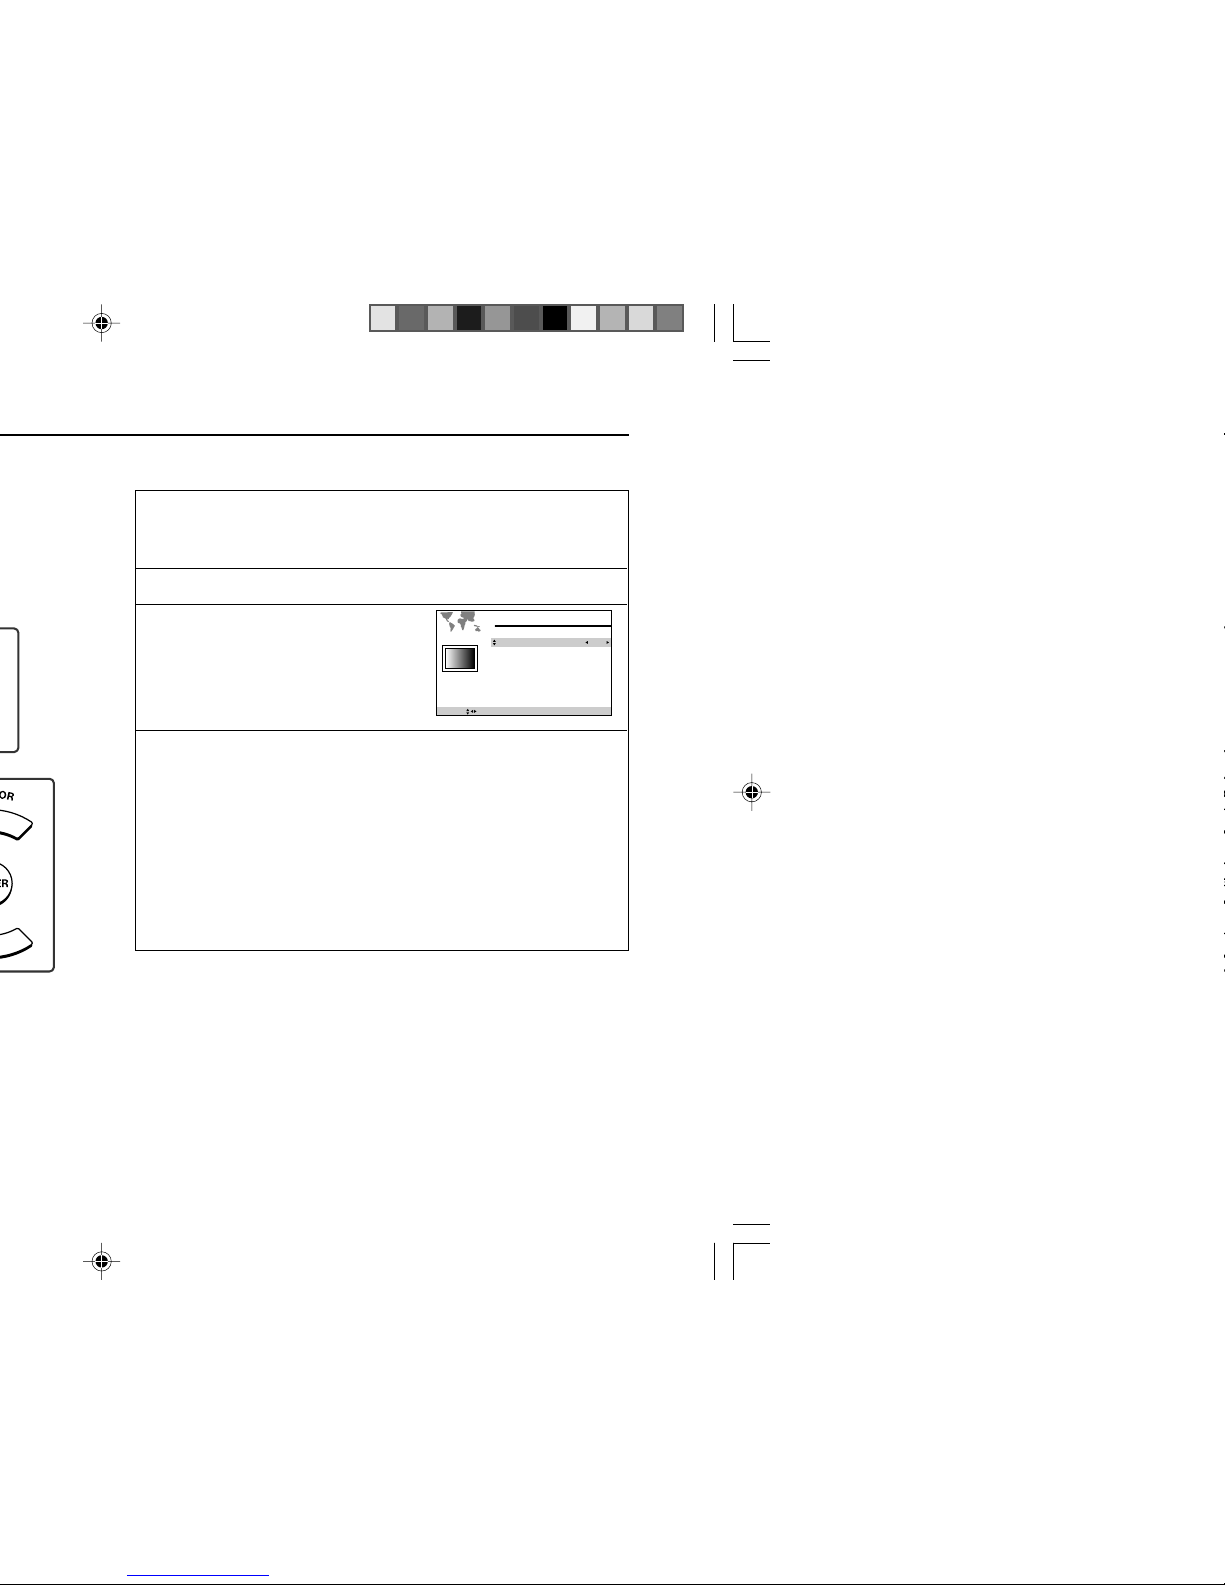
Used to specify the colour system in accordance with the TV
connected when playing back an NTSC disc.
1
Whilst a disc is stopped, press the SET UP button whilst
pressing down the SHIFT button to display the setup
screen.
2
Use the cursor ▲ or ▼ button to select the “Display”.
3
Press the ENTER button and
then use the cursor ▲ or ▼
button to select “TV MODE”.
4
Use the cursor 2 or 3 button to select “NTSC” or “PAL”.
About the NTSC settings:
NTSC:
Select this setting when you have an NTSC
TV or an NTSC-compatible Multi-System TV
connected to the unit.
PAL:
Select this setting when you have a PAL TV
connected to the unit.
To exit the setup screen and return to the startup screen, press
the SET UP button whilst pressing down the SHIFT button or the
RETURN button.
Notes:
I When you playback the PAL discs, either setting of “PAL” can be
used on a PAL TV or a Multi-System TV.
I This setting is disabled during play operation.
S3S
SELECT SAVE & QUIT SET UP
Display
TV TYPE:
TV MODE:
TV SCAN:
VOUT:
OFFSET:
4:3 LB
PAL
INTERLACE
CVBS/Y/C
Page 23
E-22
DVD Setting
CD-DV650W
CD-DV850W
ENGLISH
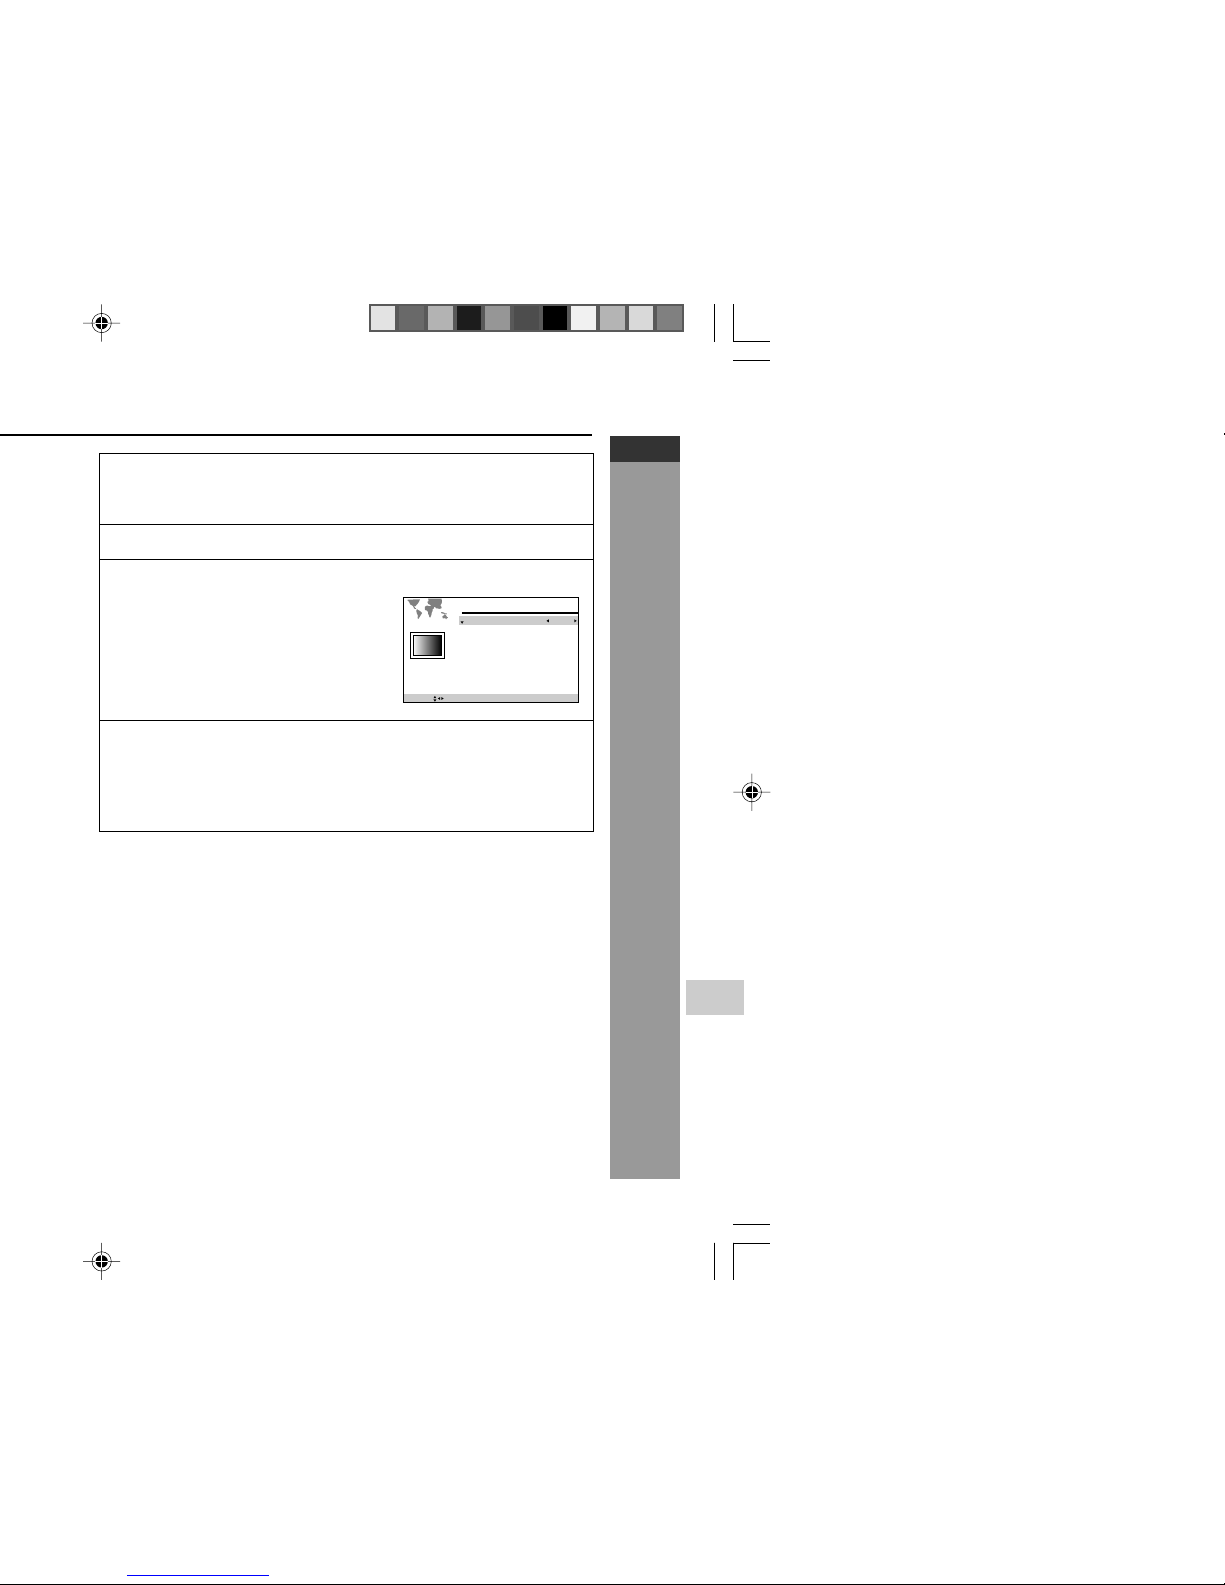
1
Whilst a disc is stopped, press the SET UP button whilst
pressing down the SHIFT button to display the setup
screen.
2
Use the cursor 3 or 4 button to select the “Display”.
3
Press the ENTER button and then use the cursor 3 or 4
button to select “TV TYPE”.
4
Use the cursor 2 or 3 button to select “
4:3 LB
”, “
4:3 PS
”
or “
16:9
”.
To exit the setup screen and return to the startup screen, press
the SET UP button whilst pressing down the SHIFT button or the
RETURN button.
Note:
If you select 16:9 whilst a 4:3 TV is connected, playing a 16:9 disc will
produce a vertically stretched image.
S3S
SELECT SAVE & QUIT SET UP
Display
TV TYPE:
TV MODE:
TV SCAN:
VOUT:
OFFSET:
4:3 LB
PAL
INTERLACE
CVBS/Y/C
Page 24

4:3 LB
PAL
INTERLACE
CVBS/Y/C
SAVE & QUIT SET UP
H Changing the video output setting
1 Whilst a disc is stopped, press the SET UP button
whilst pressing down the SHIFT button to display the
setup screen.
2 Use the cursor 3 or 4 button to select Display setup
operation.
3 Press the ENTER button and then use the cursor 3 or
4 button to select “VOUT”.
4 Use the cursor
1
or 2 button to select “CVBS/Y/C” or
“Pr/Y/Pb”.
To exit the setup screen and return to the startup screen, press
the SET UP button whilst pressing down the SHIFT button or
the RETURN button.
Notes:
I The progressive scan mode cannot be changed in resume play.
I CVBS/Y/C cannot be selected if TV SCAN is in PROGRESSIVE
mode.
I TV SCAN and VOUT must be set to suitable mode or it can affect
the video quality.
S
S
3
TV TYPE:
TV MODE:
TV SCAN:
VOUT:
OFFSET:
4:3 LB
PAL
INTERLACE
CVBS/Y/C
Display
SELECT
SAVE & QUIT SET UP
Page 25

E-24
DVD Setting
CD-DV650W
CD-DV850W
ENGLISH
H
Setting the parental level for the first time
1
Whilst a disc is stopped, press the SET UP button
whilst pressing down the SHIFT button to display
the setup screen.
2 Use the cursor 3 or 4 button
to select the “
PARENTAL”.
3 Press the ENTER button to display the password
specification screen.
4 Use the 0 - 9 buttons to enter a 4-digit password.
I The default password is set as “0000”. Please enter this
password when the first time you receive this unit.
5 Press the ENTER button to select level.
6
Use the cursor 1, 2 button to change the parental level.
I Level 1: for most restrictive viewing
Level 8: for adult viewing
(The smaller the number, the
greater the level of restriction.)
I When the parental level is set to
“OFF”, DVDs can be played back
regardless of the parental level.
SELECT SAVE & QUIT SET UP
Parental
ENTER PASSWORD
Enter a number in 4 digits
then press "ENTER".
SELECT SAVE & QUIT SET UP
Parental
PARENTAL LEVEL
CHANGE PASSWORD
OFF
Page 26

H
Setting the Dolby Digital Out
1
Whilst a disc is stopped, press the SET UP button whilst
pressing down the SHIFT button to display the setup
screen.
2
Use the cursor 3 or 4 button to select the “DIT/DA Output”.
3
Press the ENTER button and
then use the cursor 3 or 4
button to select “DOLBY
DIGITAL”.
4
Use the cursor 2 or 3 button to select “STREAM” or “PCM”.
STREAM:
Use this setting for a digital connection of a
receiver (amplifier) equipped with a Dolby
Digital decoder.
PCM:
Use this setting for a digital connection to the
PCM digital input socket of a DAT or MD, or
for a digital connection to a receiver (amplifier)
that does not have a Dolby Digital decoder.
To exit the setup screen and return to the startup screen, press
the SET UP button whilst pressing down the SHIFT button or the
RETURN button.
SELECT SAVE & QUIT SET UP
DIT/DA output
DOLBY DIGITAL
DIT
98kHz LPCM
STREAM
On
98kHz
Audio setting
Page 27

E-26
DVD Setting
CD-DV650W
CD-DV850W
ENGLISH
1 or 2
to
Language
ENGLISH
ENGLISH
ENGLISH
ENGLISH
Language
ENGLISH
ENGLISH
ENGLISH
ENGLISH
1
In step 4 to the left, select
“OTHERS” with the cursor
1 or 2
button, then press Numeric button
to enter the language code (see next
page). Example : Press 6570 to
select
Afrikaans.
SELECT SAVE & QUIT SET UP
Language
OSD:
AUDIO:
SUBTITLE:
DVD MENU:
ENGLISH
OTHERS:_ _ _ _
ENGLISH
ENGLISH
2
Press the ENTER button to set the language code.
To exit the setup screen and return to the startup screen, press
the SET UP button whilst pressing down the SHIFT button.
Notes:
I You cannot open the setup screen whilst a playback operation is
in progress. If a disc is playing, stop playback first.
I If you make a mistake when entering the number, press CLEAR/
DISPLAY button to erase it and then enter a new number.
Selecting a language from others
H
OSD language setting
1
Whilst a disc is stopped, press the SET UP button whilst
pressing down the SHIFT button to display the setup
screen.
2
Use the cursor 3 or 4 button to select the “Language”.
3
Press the ENTER button and then use the cursor 3 or 4
button to select “OSD”.
4
Select the language you want to use
with the cursor 2 or 3 button.
Only language below can be set.
SELECT SAVE & QUIT SET UP
Language
OSD:
AUDIO:
SUBTITLE:
DVD MENU:
ENGLISH
ENGLISH
ENGLISH
ENGLISH
ENGLISH
NEDERLANDS
GERMAN
ITALIANO
RUSSIAN
ESPAÑOL
DEUTSCH
SVENSKA
FRANÇAIS
Page 28

7686 lv Latvian, Lettish
7771 mg Malagasy
7773 mi Maori
7775 mk Macedonian
7776 ml Malayalam
7778 mn Mongolian
7779 mo Moldavian
7782 mr Marathi
7783 ms Malay
7784 mt Maltese
7789 my Burmese
7865 na Nauruan
7869 ne Nepali
7876 nl Dutch
7879 no Norwegian
7967 oc Occitan
7977 om (Afan) Oromo
7982 or Oriya
8065 pa Panjabi
8076 pl Polish
8083 ps Pashto, Pushto
8084 pt Portuguese
8185 qu Quechua
8277 rm
Rhaeto-Romance
8278 rn Kirundi
8279 ro Romanian
8285 ru Russian
8287 rw Kinyarwanda
8365 sa Sanskrit
8368 sd Sindhi
8371 sg Sango
8372 sh Serbo-Croatian
8373 si Singhalese
8375 sk Slovak
8376 sl Slovenian
8377 sm Samoan
8378 sn Shona
8379 so Somali
8381 sq Albanian
8382 sr Serbian
8383 ss Siswat
8384 st Sesotho
8385 su Sundanese
8386 sv Swedish
8387 sw Swahili
8465 ta Tamil
8469 te Telugu
8471 tg Tajik
8472 th Thai
8473 ti Tigrinya
8475 tk Turkmen
8476 tl Tagalog
8478 tn Setswana
8479 to Tonga
8482 tr Turkish
8483 ts Tsonga
8484 tt Tatar
8487 tw Twi
8575 uk Ukrainian
8582 ur Urdu
8590 uz Uzbek
8673 vi Vietnamese
8679 vo Volapük
8779 wo Wolof
8872 xh Xhosa
8973 yi Yiddish
8979 yo Yoruba
9072 zh Chinese
9085 zu Zulu
Code
ISO
Code
Language name
Code
ISO
Code
Language name
Page 29

E-28
DVD Setting
CD-DV650W
CD-DV850W
ENGLISH
H
DVD mode operation indicators
The following are examples of display indicators that appear during DVD
playback.
Play attempted without a disc
Play attempted with a noncompatible disc
Loading (data being read
from disc)
Stop
Play
Appears when display mode is “on”.
Pause
Appears when display mode is “on”
.
Slow
Appears when display mode is “on”.
Fast Forward
Appears when display mode is “on”.
Fast Reverse
Appears when display mode is “on”.
When resume function can be used
15/
NO DISC
UNKNOWN
DA
15/
NOW LOADING...
C
01
83/
15/
0
::23 40
RESUME
00:03:19/ 00:04:00
DVD
001/028
00:03:19/ 00:04:00
DVD
001/028
1
00:03:19/ 00:04:00
DVD
001/028
1
00:03:19/ 00:04:00
DVD
001/028
1
00:03:19/ 00:04:00
DVD
001/028
Page 30

button to select the item.
Description
A language for screen display can be set, such as for initial setting or messages.
A language for audio can be set.
You can specify a language for conversation and narration.
A language for subtitle can be set.
The subtitles are displayed in a specified language.
A language for DVD menus can be set.
Menu screens are displayed in a specified language.
The screen mode should be set according to the connected TV type.
4:3 LB: Select this mode to view in letter box size on a normal screen TV.
4:3 PS: Select this mode to view in pan scan size on a normal screen TV.
16:9: Select this mode to view on a wide screen TV.
Select a mode to optimise DVD or video CD images on a TV.
INTERLACE: Select this for a non-progressive scan TV
(use a video cable, S-video cable or component video cable)
PROGRESSIVE: Select this for a progressive scan TV
(use a component video cable)
This function can be set when VOUT is set Pr/Y/Pb only.
Select the correct colour system (TV standard)
PAL : Select this mode for the PAL TV.
NTSC: Select this mode for the NTSC TV.
Select the video output mode should be set according to the connected TV type.
CVBS/Y/C: Select this when the unit is connected to a TV with an S-video or
video cable.
Pr/Y/Pb: Select this when the unit is connected to a TV with a component
video cable.
The On Screen Display can be moved or shifted in 2 direction as below.
X-axis: 0-80
Y-axis : 0-128
Page 31

E-30
DVD Setting
CD-DV650W
CD-DV850W
ENGLISH
Select this when connecting the unit to a Dolby Digital/DTS surround amplifier.
Description
Page 32

H To play a disc
1
Press the ON/STAND-BY button to turn the power on.
2
Press the DVD/CD button to display the startup screen
shown.
3
Load the disc(s) you want to play.
See page 20 for information about loading discs.
4
Press the 0 button to start playback.
Notes:
I If the disc you are using supports auto start, it starts to play
automatically (even if you do not press the 0 button), as soon as
you close the disc tray.
I The indicator “ UNKNOWN” appears on the display if the disc
you are using is damaged, if you load the disc upside down, or if
the region number of the disc you are using is one that is not
supported by this unit. If the above indicator appears, reload the
disc or replace it with another one.
I A safety feature automatically sets the unit to the power stand-by
mode if you set the volume level too high whilst playing certain
types of discs. If this happens, lower the volume level and restart
playback.
I The unit also can directly power on at CD function by pressing
DVD/CD button or direct playback (if last function is CD) by pressing
0 button during stand-by mode.
To play the desired disc:
Press one of the s 1 - s 5 buttons to select the desired disc and then
press the DIRECT PLAY button.
To stop disc playback:
Press the H button.
Page 33

E-32
DVD Playback
CD-DV650W
CD-DV850W
ENGLISH
¡¡
¡¡
¡
H To resume playback after stopping
1
Whilst the disc is playing, press the H button at the point
you want to stop.
The system stores the point you stopped.
2
To restart play, press the 0 button.
I Play resumes from a point slightly before the point it was
stopped.
I Press the 0 button to resume disc play.
This resume operation does not work in the following cases:
I If you press the H button twice.
I If you press the H button during auto playback.
I If you remove a disc and then load another one.
Notes:
I After you press the H button to stop playback, you can press the
H button again and 0 button to start playback from the beginning
of the disc.
I This operation may not be performed with certain types of discs.
I Resume may not be performed during menu playback.
H Slow-motion play
1
Whilst a disc is playing, press the SLOW ? button.
Two speeds are available. Each time the button is pressed,
the speed of slow-motion playback changes in the following
sequence:
2
Press the 0 button to return to the normal playback.
Notes:
I On some discs, the slow-motion playback functions are disabled.
I Slow-motion playback is disabled on audio CDs.
1 (about 1/2) 2 (about 1/8)
Page 34

H Still (Pause) and frame advance
1
Whilst a disc is playing, press the
STILL
60
button.
I This freezes the image on the screen.
I Each press of the STILL 60 button advances the frame in
the still mode.
2
To cancel still picture and return to
normal play, press the
0
button.
Notes:
I You may not be able to use these functions with some discs.
I Frame advance cannot be used with audio CDs.
I This operation performs the audio CD pause function.
H Fast forward/Fast reverse
1 Press and hold down the 4
1 PRESET X or ¡¢
PRESET W button for more
than 1.5 seconds whilst a disc
is playing.
I The disc begins fast scan at x 2
speed (1).
I Three speeds are available.
Each time the 41
PRESET X or ¡¢
PRESET W button is pressed,
the speed of fast scan changes
in the sequence shown on the
right:
I You can also press the 4/1
or ¡/¢ button on the remote
control for the same operation.
2
Press the 0 button to return to normal playback.
Notes:
I On some discs, the fast scan function is disabled.
I On DVD video discs, sound and subtitles are not played back
during the fast scan playback.
I With a DVD video disc, you can search within one title only.
Playback starts from the beginning of the title.
Scanning speed selection
Fast scan image appears here
1
1 (about X 2)
↓
2 (about X 8)
↓
3 (about X 32)
Page 35

E-34
Advanced DVD Features
CD-DV650W
CD-DV850W
ENGLISH
H
Direct chapter skip
Example: Selecting chapter 10
1
Press the DIRECT button twice to select CHAPTER
SEARCH.
2
Use the 0 - 9 buttons to select
the chapter number to which
you want to skip.
3
Press the ENTER button.
The image changes to the beginning of the specified chapter.
Note:
The number of chapters you can enter depends on that of the chapters
recorded on the disc.
1
Press the DIRECT button to
select TITLE SEARCH.
2
Use the 0 - 9 buttons to select
the title number to which you
want to skip.
3
Press the ENTER button.
The image changes to the beginning of the specified title.
Notes:
I The number of titles you can enter depends on that of the titles
recorded on a disc you play.
I The direct title skip function is not performed with discs on which
no titles are recorded.
CHAPTER SEARCH___
CHAPTER SEARCH 010
H
Direct title skip
Example: Selecting title 5
TITLE SEARCH ___
TITLE SEARCH 05
Page 36

STEP:
1) Angle setting can be changed by pressing ANGLE button on the
remote control.
- Function control will appear on screen.
Note:
I This function can only be used for discs on which scenes shot
from multiple angles have been recorded.
H
Audio setting
A number of different methods are used to record audio onto a DVD
video disc, including multi-channels (used for voiceovers in other
languages), DTS, MPEG audio and Linear PCM. Your system provides
a number of different audio modes from which you can choose to suit
the type of disc you are playing.
STEPS:
1) Press SOUND button whilst pressing down the SHIFT on the remote
control.
- Function control screen appear.
2) Each time SHIFT + SOUND button is pressed, the audio format
recorded in the disc will change.
Notes:
I This function can only be used for discs on which the sound has
been recorded in multiple formats.
I With certain types of discs, you can change the audio using the
disc menu (see page 29).
H Virtual Surround
I You can enjoy Virtual Surround with DVD which recorded with
Dolby Digital Sound.
I You also can enjoy Virtual surround with 2 speakers.
STEP:
1)Press SURROUND button on the remote control to change
surround ON/OFF.
Notes:
I Virtual Surround will also function when headphone is in used.
I The Equaliser mode will change to FLAT mode when Virtual
surround is ON.
Caution:
When recording on a cassette tape during virtual sound on mode,
the virtual surround effects will also be recorded.
Page 37

E-36
Advanced DVD Features
CD-DV650W
CD-DV850W
ENGLISH
H
Gamma setting
Gamma is an image quality enhancement function that gives a richer
image by brightening the darker and more obscure portions of the
image without altering the brightness of the brighter portions, thereby
making the entire image easier to see.
Use the following procedure to change the setting between “ON” and
“OFF”, and the level for the gamma setting.
STEPS:
1) Press the GAMMA button whilst pressing down the SHIFT button
during playback.
- The Function control screen appear.
2) Every time GAMMA button is pressed, the setting will change as
G+1 → G+2 → G+3 → OFF.
Page 38

H
To zoom an image
Whilst a disc is playing, press the ZOOM button.
I Each press of the ZOOM button cycles through the zoom settings
as follows: +1 → +2 → +3 → +4 → +5.
Note that all of the above zoom factors are approximate only.
I Whilst an image is zoomed, you can press the cursor
1, 2, 3
and 4
button to shift the view and display the part you want.
I Whilst an image is zoomed, you can zoom out the image by
pressing RETURN button. The image can zoom out until -5 for
VCD/DVD and zoom out until -15 for JPEG.
ZOOM indicator
z + 1
Press the 1 button.Press the 4 button.
Press the 2 button.
Press the
ZOOM
button.
Press the 3 button.
I When you press the CLEAR/DISPLAY button, the zoom
operation is cancelled and the image returns to normal size.
Notes:
I An image may become distorted when zoomed.
I Subtitles cannot be zoomed.
Page 39

E-38
Advanced DVD Features
CD-DV650W
CD-DV850W
ENGLISH
H
Title repeat
Example: To repeat the title you are currently viewing
1
Play the title you want to repeat.
2
Press the button twice to
repeat the title.
To cancel repeat play, press the button again.
Note:
You may not be able to use this function with some discs.
H
A-B repeat
1
When playback reaches the
start point of the scene, press
the
button whilst
pressing down the SHIFT
button.
I This displays “A” (repeat) indicator.
I This registers the start point (A).
2
When playback reaches the end
point of the scene, press the
button whilst pressing
down the SHIFT button again.
I This starts A-B repeat from the start point (A) to the end
point (B).
I To cancel A-B repeat, press the A B button whilst pressing
down the SHIFT button again. This clears the “
AB
”
indicator from the display.
Notes:
I A-B repeat cannot be used with the multi-angle function (see page
35).
I You may not be able to use this function with some discs.
83/
25/
0
Title
83/
25/
0
A
83/250
B
AB
Page 40

3 or 4
button
Notes:
I Direct search button [1] to [0] can be used to select the title and
chapter.
I Disc without title or chapter registered cannot be programmed.
I To continue programme into same title or chapter, use direct search
button [1] to [0] to select and press ENTER button.
I Programme cannot be executed during playback or in pause mode.
I To discontinue the programme, press MEMORY/SET (MEMORY)
button.
I To play the same programme again, press MEMORY/SET
(MEMORY) button and then press PLAY button.
I Chapter from different title cannot be programme at the same time.
Page 41

E-40
Advanced DVD Features
CD-DV650W
CD-DV850W
ENGLISH
Setting parameters using the
disc menu
Some DVDs include a disc menu that you can use to select subtitle
set, audio channel, and DTS or MPEG audio. You can also turn disc
menu on and off.
H
To turn on subtitling (example)
This function can be performed with only discs that have been played
once, totally or partially.
1
Whilst the disc is stopped, press the MENU button to
display the disc menu.
2
Use the
cursor
3, 4, 1 or 2 button to select the subtitle
item on the disc menu.
3
Press the ENTER button to display the subtitle language
selection screen.
4
Use the
cursor
3, 4, 1 or 2 button to select the desired
subtitle language.
5
Press the ENTER button to register your selection and
display the subtitles in the language you have set.
Repeat the above procedure to make other settings (audio
channel, DTS, MPEG audio, etc.).
Notes:
I The procedure shown here provides only general steps. The actual
procedure for using the disc menu depends on the disc you are
using. See the disc jacket for details.
I The disc menu does not appear immediately after you load a disc.
It appears only if the disc has been played once, totally or partially.
I During playback, you can also press the SUB TITLE button on the
remote control for the same operation in steps 1 - 3.
Page 42

Preparation for video CD playback
H Selecting the video output format
Video CD is recorded in PAL or NTSC format.
Select the video output format (NTSC or PAL) according to your TV
or VCR.
Refer page 21 (TV output setting).
Page 43

E-42
Disc Playback
CD-DV650W
CD-DV850W
ENGLISH
Playback control:
Video CDs that support “Playback control” can display still pictures.
This function can be used with video CD software (video CDs with
playback control) that have a playback method recorded on them. You
can select items you want to watch from the menu displayed on the TV
screen, or you can show still pictures.
Turn on the TV and set the input selector to “VCR”.
H Playback
1
Press the ON/STAND-BY button to turn the power on.
2
Press the DVD/CD button.
3
Press the s 1 button and within 5 seconds, press the
OPEN/CLOSE button to open the disc tray 1.
4
Place discs on the disc tray, label side up.
I Be sure to place 8 cm (3") discs in the middle of the disc
positions.
5
Press the OPEN/CLOSE button to close the disc tray.
6
To select the disc you want to listen to first, press one of
the
s
1 -
s
5 buttons and within 5 seconds, press 0 button
to start playback.
I Playback will begin from track 1 on the disc you have
selected to play. After that disc finishes playing, the next
disc will automatically start playback.
I When the last track on the fifth disc has finished playing,
the CD player will automatically stop.
I When there is no disc in one of the disc 1 - 5 trays, that
tray will be skipped and the next disc will begin to play.
12 cm (5")
8 cm (3")
Page 44

button.
Caution:
I Do not place two discs in one disc tray.
I Do not play discs of special shapes (heart, octagon, etc.). It may
cause malfunctions.
I Do not push the disc tray whilst it is moving.
I Do not move the disc tray by hand. This may cause malfunctions.
I If the power fails whilst the tray is open, wait until the power is
restored.
I If the disc tray is stopped with force, “ER-CD20” will appear on the
display for 3 seconds and the unit will not function. If this occurs,
press the ON/STAND-BY button to enter the power stand-by mode
and then turn the power on again.
I If TV or radio interference occurs during CD operation, move the
unit away from the TV or radio.
I If a disc is damaged, dirty, or loaded upside down, the disc will
skip or not play back.
H To play without activating the playback control
function (Video CD with P.B.C. only)
You can play a video CD with P.B.C. without activating the playback
control function.
In this case, the menu screen will not appear, and the disc will be
played in the same way as a video CD without P.B.C.
I Default setting for VCD is P.B.C. OFF.
After finish VCD TOC reading, when play key is pressed
it will start play the VCD in P.B.C. OFF mode.
I To turn to P.B.C. ON mode, press TOP MENU button in remote
control whilst in stop or playback mode.
I “5 3 PRESET X ” and “2 4 PRESET W” button is invalid
during STOP whilst VCD disc in P.B.C ON mode.
Notes:
I The P.B.C. function also can be cancelled whilst in the playback
mode by pressing TOP MENU button in remote control.
I Some video CDs with P.B.C. cannot be played back when the
P.B.C. mode is off.
Page 45

E-44
Disc Playback
CD-DV650W
CD-DV850W
ENGLISH
H CD playback
1
Press the ON/STAND-BY button to turn the power on.
2
Press the DVD/CD button.
3
Press the s 1 button and within 5 seconds, press the
OPEN/CLOSE button to open the disc tray 1.
4
Place the CD on the disc tray 1, label side up.
I Be sure to place 8 cm (3") discs in the middle of the disc
positions.
5
Press the OPEN/CLOSE button to close the disc tray 1.
“ ” will appear.
6
You can place discs on the trays 2 - 5 by following steps
3 - 5.
7
Press the 0 button to start playback.
12 cm (5")
8 cm (3")
CD play indicator
Total number of tracks
on the CD whose
number is flashing
Total playing time of
the CD whose number
is flashing
Page 46

H To locate the beginning of a track
To move to the beginning of the next track:
Press the 2 4 PRESET W button for less than 1.5 seconds
during playback.
I You can skip to any track by pressing the 2 4 PRESET W
button repeatedly until the desired track number appears.
To restart the track being played:
Press the 5 3 PRESET X button for less than 1.5 seconds
during playback.
I You can skip to any track by pressing the 5 3 PRESET X
button repeatedly until the desired track number appears.
Notes:
I You can locate the beginning of a track on a single disc only.
I The 5/3 or 2/4 button on the remote control allows you
the same operation.
H To locate the desired portion
For fast forward:
Press and hold down the 2 4 PRESET W button for more
than 1.5 seconds during playback.
For fast reverse:
Press and hold down the 5 3 PRESET X button for more
than 1.5 seconds during playback.
I Three speeds are available. Each time the 5 3 PRESET
X or 2 4 PRESET W button is pressed, the speed of fast
scan changes in the following sequence:
Notes:
I Normal playback will resume when the 0 button is pressed.
I You can locate the desired portion on a single disc only.
I When the end of the last track is reached during fast forward, CD
will go to next CD and start playback. When the beginning of the
first track is reached during fast reverse, the unit will enter the
playback mode.
I The 5/3 or 2/4 button on the remote control allows you
the same operation.
WW
WW
W
1 (about 2) 2 (about 8) 3 (about 32)
Page 47

E-46
Disc Playback
CD-DV650W
CD-DV850W
ENGLISH
I In random play, the CD player will select and play tracks
automatically.
(You cannot select the order of the tracks.)
I The DVD, MP3 and WMA disc will be skipped and random
playback will be disabled.
I This function is invalid for WMA, MP3 and DVD discs.
I Repeat play cannot function during random play.
I To random play all disc press ALL PLAY button instead of pressing
DIRECT PLAY button.
Caution:
After using repeat or random play, be sure to press the ■ button.
Otherwise, the disc(s) will play continuously.
H Repeat play
CD playback can be repeated according to below sequence.
Press the button repeatedly on the remote control.
To cancel repeat play:
Press the button repeatedly to extinguish the “ ”.
Note : WMA, MP3 and DVD discs will be skipped for All disc repeat
mode.
H A-B repeat
1
When play reaches the start point of sound, press the
button whilst pressing down the SHIFT button.
I This displays “A ” (repeat) indicator.
I This registers the start point (A).
2
When play reaches the end point of sound, press the
button whilst pressing down the SHIFT button again.
I This starts A-B repeat from the start point (A) to the end
point (B).
I To cancel A-B repeat, press the A B button whilst pressing
down the SHIFT button again. This clears the “A B”
indicator from the display.
Notes:
I This function also valid for WMA and MP3 discs.
I Random play cannot function during repeat play.
All disc repeat
Normal playback
Track repeat
Disc repeat
Page 48

Adding tracks to the programme:
Programme setting has been previously stored.
Follow steps 1 - 3 to add tracks. The new tracks will be stored after
the last track of the original programme.
To clear the programmed selections:
1.
Whilst in the stop mode, press the MEMORY/SET (MEMORY) button.
2. Select the track to be erased, by pressing cursor 3 or 4.
3. Press the CLEAR/DISPLAY button.
Notes:
I If there is no disc to select the disc number or there is a DVD disc
or MP3 disc, the disc selection will be prohibited.
I Opening the disc tray automatically cancels the programmed
sequence.
I Even if you press the ON/STAND-BY button to enter the stand-by
mode, the programmed selections will not be cleared.
I During programme playback, random play is not possible.
I Once programmed, the contents will be memorised. When the
unit is stopped and then the 0 button is pressed, however, normal
CD playback will be resumed. To play back the memorised
programme, press the 0 button after press the MEMORY/SET
(MEMORY) button.
I To exit the programming procedure halfway through, press the
MEMORY/SET (MEMORY) button.
I This function is invalid for WMA and MP3 discs.
I If STOP button is pressed whilst in programme input mode, all
programmed tracks will be cleared.
I Programme mode cannot be entered whilst in repeat mode.
4
Repeat steps 2 - 3 for other tracks. Up to 32 tracks can be
programmed.
If you make a mistake, the programmed tracks can be cleared
by pressing the cursor
3
or 4 to go to unwanted number, then
press CLEAR/DISPLAY button.
5
Press the 0 button to start playback.
Track select condition
Select disc
Page 49

E-48
Disc Playback
CD-DV650W
CD-DV850W
ENGLISH
H Direct search of the track MP3/WMA and JPEG
By using the direct search buttons, the desired tracks can be played.
1
Whilst in the stop mode, press the s 1 - s 5 button
and 0
button to select the desired disc.
2
Use the direct search buttons on the remote control to
select the desired file.
Selected track number before press ENTER button
I The direct search buttons allow you to select all file.
When selecting number 10 or more, press directly the
number in sequence order directly.
A.For example, to choose 13
1 Press the “1” button once.
2 Press the “3” button.
B.For example, to choose 30
1 Press the “3” button.
2 Press the “0” button.
Selected file number after press ENTER button
3
Press the ENTER button to start playback.
Playback of the selected track is started. When the end of last
file is reached, the next disc will automatically be started.
To stop playback:
Press the ■ button.
Notes:
I The selected file can be started simply by pressing the direct search
buttons followed by ENTER button during playback.
I A file number higher than the number of files on the disc cannot
be selected.
I If ENTER button is not pressed after direct search buttons, the file
will not be selected.
I This system is unable to support any protected WMA files.
Page 50

Notes:
I Sometimes, the system does not follow the arrangement of the
song as per recorded on that specific MP3/WMA, JPEG disc.
I It can detect up to 8 layers of folder in an MP3 disc.
I This unit can playback a multi-session disc. If the first session is
an Audio CD format, then, it will judge it as an Audio CD and will
play the tracks of that format only.
I Noise may be heard during playback of an MP3 disc which
recorded at a very high speed.
I During stop or playback of an MP3/WMA disc, the file name of
currently selected track can be displayed in OSD by pressing
TOP MENU button in remote control.
I During stop of an MP3 disc, the file properties of currently selected
track can be displayed in OSD by pressing SUB TITLE button in
remote control.
Page 51

E-50
Karaoke
CD-DV650W
CD-DV850W
ENGLISH
1
Set the MIC LEVEL control to MIN to protect the speakers from
shock noise and to avoid disturbing noises.
2
Connect the microphone(s) to the MIC 1 or MIC 2 socket or both
sockets for enjoying duets.
I Use a microphone with a 6.3 mm (1/4") plug, an impedance of 600
ohms.
I Use a standard plug adaptor when using a microphone with a 3.5 mm
(1/8") diameter plug.
3
Press the ON/STAND-BY button to turn the power on.
4
Press the DVD/CD, TUNER (BAND), TAPE (1 V 2) or GAME/VIDEO
button to select the audio source and play it.
5
Adjust the volume of the audio source using the VOLUME control.
6
To control the volume of both microphones, turn the MIC LEVEL
control towards MAX to increase and towards MIN to decrease.
7
Press the ECHO + or – button on the remote control to increase
or decrease the microphone echo.
Notes:
I When you sing too loud through the microphone, your voice may be distorted
depending on the devices connected. If this happens, lower the microphone
volume.
I If an extremely sensitive microphone is used, howling may be generated.
I Unidirectional microphone is more appropriate for vocal use.
I The volume of both microphones is set simultaneously. It is recommended to
use microphones of the same sensibility.
If squealing occurs:
I Reduce the microphone volume.
I Change the direction of the microphone.
I Reduce the volume of the main unit.
I Move the microphone away from the speakers.
I Keep microphones away from each other.
Caution:
I When not using the microphone, remove it from the MIC socket.
I When connecting or disconnecting the microphone, set the MIC LEVEL control
to MIN.
I When using only one microphone, unplug the other.
Page 52

Notes:
I Use discs recorded in stereo. The function will not work with mono
sources.
I With some discs and tapes the original vocals may still be heard.
Notes on sound multiplexed karaoke discs:
Sound multiplexed karaoke discs are discs on which the main vocal
and the BGM (Background music) have been recorded on one of the
two channels and only the BGM on the other.
I The function will not work properly with discs which do not belong
to this group.
I Discs on which vocal has been recorded on the left channel and
music on the right may not play properly.
H Recording of mixed sound to a cassette tape
You can record mixed sound from the microphone and CD, TUNER,
TAPE 1 or GAME/VIDEO.
1.
Perform steps 1 - 3 in “Playing karaoke” on page 50.
2. Press the DVD/CD, TUNER (BAND), TAPE (1 V 2) or GAME/
VIDEO button to select the audio source.
3. To record mixed sound from TAPE 1, press the TAPE (1 V 2)
button and select “TAPE 1”.
4. Load a cassette into the TAPE 2 cassette compartment with side
A facing you.
5. Perform steps 5 - 7 in “Playing karaoke” on page 50.
6. Press the I6 button.
7. Press the 0 button to start recording.
H Recording of the microphone signals only to a
cassette tape
1.
Perform step 1 above.
2.
Press the TAPE (1 V 2) button until “TAPE 2” appears on the
display.
3.
Perform steps 3 - 7 above.
Page 53

E-52
Radio
CD-DV650W
CD-DV850W
ENGLISH
H Tuning
1
Press the ON/STAND-BY button to turn the power on.
2
Press the TUNER (BAND) button repeatedly to select the
desired frequency band (FM or AM).
3
Press the TUNING (X or W) button to tune in to the desired
station.
Manual tuning:
Press the TUNING button as many times as required to tune
in to the desired station.
Auto tuning:
When the TUNING button is pressed for more than 0.5
seconds, scanning will start automatically and the tuner will
stop at the first receivable broadcast station.
Notes:
I When radio interference occurs, auto scan tuning may stop
automatically at that point.
I
Auto scan tuning will skip weak signal stations.
I To stop the auto tuning, press the TUNING button again.
To receive an FM stereo transmission:
Press the TUNER (BAND) button to display the “ST” indicator.
I “j” will appear when an FM broadcast is in stereo.
I If the FM reception is weak, press the TUNER (BAND) button to
extinguish the “ST” indicator. The reception changes to monaural,
and the sound becomes clearer.
FM stereo mode indicator
FM stereo receiving indicator
Page 54

) button to
H To scan the preset stations
The stations saved in memory can be scanned automatically. (Preset
memory scan)
1.
Press the PRESET (X or W) button for more than 0.5 seconds.
The preset number will flash and the programmed stations will be
tuned in sequentially, for 5 seconds each.
2. Press the PRESET (X or W) button again when the desired station
is located.
H To erase entire preset memory
1. Press the ON/STAND-BY button to enter the stand-by mode.
2. Whilst pressing down the I6 button and the X-BASS/DEMO
button, press the TUNING W button until “TUNER CL” appears.
DVD MINI SYSTEM
CD-DV650
X-BASS
/DEMO
Page 55

E-54
Tape Playback
CD-DV650W
CD-DV850W
ENGLISH
1
Press the ON/STAND-BY button to turn the power on.
2
Press the TAPE (1 V 2) button to select TAPE 1.
3
Open the cassette door by pushing the area marked “7”.
4
Load a cassette into the TAPE 1
cassette compartment with the
side to be played facing towards
you.
5
Press the 0 button to start playback.
Tape playback
To stop playback:
Press the H (H) button.
Note:
You cannot fast forward or rewind the cassette in the TAPE 1
compartment.
Auto power on function:
When you press any of the following buttons, the unit turns on.
I TAPE (1 V 2) button (main unit and remote control): The unit
turns on and the “TAPE” function is activated.
I0 button (main unit and remote control): The unit turns on and
playback of the last function starts (DVD/CD/TAPE/TUNER/
GAME).
TAPE 1
Page 56

4
Load a cassette into the TAPE 2
cassette compartment with side A
facing you.
5
Press the 0 button to start playback.
To stop playback:
Press the H (H) button.
Fast forward/rewind:
To advance the tape, press the
2 4 PRESETW (2 / 4)
button.
To rewind it, press the
5 3
PRESET X (5 / 3) button.
Caution:
I To remove the cassette, press the H (H) button, and then open
the compartment.
I Before changing from one tape operation to another, press the H
(H) button.
I If a power failure occurs during tape operation, the tape head will
remain engaged with the tape and the cassette door will not open.
In this case, wait until the power is restored.
7
”.
TAPE 2
Page 57

E-56
Tape Recording
CD-DV650W
CD-DV850W
ENGLISH
Recording to a cassette tape
Before recording:
I When recording important selections, make a preliminary test
to ensure that the desired material is properly recorded.
I SHARP is not liable for damage or loss of your recording arising
from malfunction of this unit.
I The volume and sound controls can be adjusted with no effect
on the recorded signal (Variable Sound Monitor).
I For recording, use only normal tapes. Do not use metal or
CrO2 tapes.
Erase-prevention tab of cassette tapes:
I When recording on a cassette tape, make sure that the erase-
prevention tabs are not removed. Cassettes have removable
tabs that prevent accidental recording or erasing.
I To protect the recorded sound, remove the tab after recording.
Cover the tab hole with adhesive tape to record on the tape
without the tab.
Tab for side B
Tab for side A
Side A
Page 58

H Recording from a DVD (DVDs)
1
Press the ON/STAND-BY button to turn the power on.
2
Load a cassette into the TAPE 2 cassette compartment with
the side A facing you.
Wind past the leader of the tape, on which recording cannot
be performed.
3
Press the DVD/CD button and load the desired disc.
4
Press one of the s 1 - s 5 buttons to select the disc to be
recorded.
5
Press the 0 button to start DVD playback.
If the disc you are using supports auto start, it starts to play
automatically (even if you do not press the 0 button), as soon
as you close the disc tray.
6
Press the I6 button.
Recording will be paused.
7
When DVD playback reaches the desired point, press the
0
button to start recording.
To stop recording:
Press the ■ button.
I It will stop the tape only. Another press of the ■ button will stop
DVD playback.
I Even when the DVD playback is finished, the tape will not stop. To
stop the tape, press the ■ button.
Page 59

E-58
Tape Recording
CD-DV650W
CD-DV850W
ENGLISH
H Recording from MP3/WMA disc
You can record 5 CDs continuously.
1
Press the ON/STAND-BY button to turn the power on.
2
Load a cassette into the TAPE 2 cassette compartment with
the side A facing you.
Wind past the leader of the tape, on which recording cannot
be performed.
3
Press the DVD/CD button and load the desired disc.
4
Press one of the s 1 - s 5 buttons to select the disc to be
recorded and press PLAY button to start playback.
5
Press the I6 button.
Recording will be paused.
6
Select the desired track number by pressing the Direct
Search (0 – 9) buttons on the remote control.
7
Press the 0
button to start recording.
To stop recording:
Press the ■ button 2 times.
The CD and tape will stop.
Page 60

H Recording from a CD (CDs)
You can record the desired CD using the DIRECT PLAY button.
1
Press the ON/STAND-BY button to turn the power on.
2
Press the DVD/CD button
.
3
Load a cassette into the TAPE 2 cassette compartment with
the side A facing you.
Wind past the leader of the tape, on which recording cannot
be performed.
4
Press the I6 button.
Recording will be paused.
5
Press one of the s 1 - s 5 buttons to select the desired
disc.
6
Within 5 seconds, press the DIRECT PLAY button to start
recording.
I Recording starts from side A.
I Recording is started from the selected CD. When the
playback of the last track is finished or the end of the tape
is reached, the CD and the cassette will stop automatically.
I CD playback will start approximately 7 seconds after the
tape starts.
To stop recording:
Press the ■ button.
The CD and tape will stop.
Will disappear after short whilst display
Page 61

E-60
Tape Recording
CD-DV650W
CD-DV850W
ENGLISH
H Recording from the radio
1
Tune in to the desired station. (See page 52.)
2
Load a cassette into the TAPE 2 cassette compartment with
side A facing you.
Wind past the leader of the tape, on which recording cannot be
performed.
3
Press the I6 button.
Recording will be paused.
4
Press the 0
button to start recording.
To interrupt recording:
Press the I6 button.
To resume recording, press the same recording button you pressed
in step 4. Other buttons do not allow resuming.
To stop recording:
Press the H button.
Note:
If you hear a whistling noise whilst recording an AM station, move the
AM loop aerial.
H Erasing recorded tapes
1. Press the TAPE button.
2. Follow steps 2-5 in “Recording from the radio”.
Page 62

H
Erasing recorded tapes
1. Load the tape to be erased into the TAPE 2 cassette compartment
with the side to be erased facing towards you.
2. Press the TAPE (1 V 2) button until “TAPE 2” appears on the
display.
3. Press the I6 button.
4. Press the 0 button to start erasing.
Note:
Make sure that the TAPE 1 is not in use.
Page 63

E-62
Advanced Features
CD-DV650W
CD-DV850W
ENGLISH
H Timer playback or timer recording
Before setting timer:
1. Check that the clock is set to the correct time (refer to page
17). If it is not set, you cannot use the timer function.
2. For timer playback:
Load a cassette or discs to be played.
For timer recording:
Load a cassette for recording in the cassette compartment.
]
1
Press the ON/STAND-BY button to turn the power on.
2
Press the CLOCK/TIMER button.
3
Within 10 seconds, press the
41
or
¡¢
button
to select “ONCE” or “DAILY”, and press the MEMORY/SET
(MEMORY) button.
Set the unit to the correct time if “ONCE” or “DAILY” does not appear.
Continued to the next page
MIC
MIC LEVEL
MIN MAX
1 2
DVD MINI SYSTEM
CD-DV650
Page 64

button to
Red
8
Set the time to finish as in steps 6 and 7 above.
9
Switch input with the
5 3
or
2 4
button, and then
press the MEMORY/SET (MEMORY) button.
To select the timer playback source: DVD/CD, TUNER,TAPE 1
or TAPE 2.
To select the timer recording source: TUNER.
I When you select the tuner, select a station by pressing the
5 3 or 2 4 button, and then press the MEMORY/
SET (MEMORY) button.
I If a station has not been programmed, “NO P.SET” will be
displayed and timer setting will be cancelled.
10
Adjust the volume using the VOLUME control, and then press
the MEMORY/SET (MEMORY) button.
Do not turn the volume up too high.
11
Press the ON/STAND-BY button to enter the power stand-by
mode.
The “TIMER” indicator lights up and the unit is ready for timer
playback or timer recording.
DVD MINI SYSTEM
CD-DV650
Page 65

E-64
Advanced Features
CD-DV650W
CD-DV850W
ENGLISH
Checking the timer setting in the timer stand-by mode:
1. Press the CLOCK/TIMER button.
2. Within 10 seconds, press the 5 3 or 2 4 button to select
“ONCE” or “DAILY”, and press the MEMORY/SET (MEMORY)
button.
3. Within 10 seconds, press the 5 3 or 2 4 button to select
“ONCE CAL” or “DAILY CAL”, and press the MEMORY/SET
(MEMORY) button.
The unit returns to the timer stand-by mode after displaying the
settings in order.
Cancelling the timer setting in the timer stand-by mode:
1. Press the CLOCK/TIMER button.
2. Within 10 seconds, press the 5 3 or 2 4 button to select
“ONCE” or “DAILY”, and press the MEMORY/SET (MEMORY)
button.
3. Within 10 seconds, press the 5 3 or 2 4 button to select
“ONCE OFF” or “DAILY OFF”, and press the MEMORY/SET
(MEMORY) button. Timer will be cancelled (the setting will not be
cancelled).
Reusing the memorised timer setting:
The timer setting will be memorised once it is entered. To reuse the
same setting, perform the following operations.
1. Turn the power on and press the CLOCK/TIMER button.
2. Within 10 seconds, press the 5 3 or 2 4 button to select
“ONCE” or “DAILY”, and press the MEMORY/SET (MEMORY)
button.
3. Within 10 seconds, press the 5 3 or 2 4 button to select
“ONCE ON” or “DAILY ON”, and press the MEMORY/SET
(MEMORY) button.
4. Press the ON/STAND-BY button to enter the power stand-by mode.
Note:
The timer can also be set with the remote control.
Page 66

To cancel the sleep operation:
Press the ON/STAND-BY button whilst “SLEEP” is indicated.
To cancel the sleep operation without setting the system to the standby mode, proceed as follows.
1. Whilst “SLEEP” is indicated, press the CLOCK/TIMER button.
2. Within 10 seconds, press the 5 3 or 2 4 button to select
“SLEEP OFF”, and press the MEMORY/SET (MEMORY) button.
H To use timer and sleep operation together
Sleep and timer playback:
For example, you can fall asleep listening to the radio and wake up to
CD in the next morning.
Sleep and timer recording:
For example, you can fall asleep listening to the CD and record radio
programmes whilst sleeping.
1. Set the sleep time (see left, steps 1 - 5).
2. Whilst the sleep timer is set, set the timer playback or recording
(steps 2 - 10, pages 62 - 63).
Caution:
When using the cassette deck, be sure the tape length is long enough
to perform both functions. If you want to sleep and wake up listening
to a tape, and the length of the tape is shorter than the sleep timer
setting, timer playback will not be possible.
1 minute - 3 hours
Desired time
Timer playback or
recording setting
Sleep operation will
automatically stop
Timer playback or recording
start time
Sleep timer setting End time
Page 67

E-66
Advanced Features
CD-DV650W
CD-DV850W
ENGLISH
H Listening to playback sounds of Game, VCR,
DVD, etc.
1. Connect a video game system, VCR, DVD, etc. to the front
GAME INPUT (VIDEO, AUDIO L and R) sockets.
2. Connect a TV to the rear VIDEO OUT socket.
Switch the TV input to auxiliary.
3. Press the ON/STAND-BY button to turn the power on.
4. Press the GAME/VIDEO button.
5. Play the connected equipment.
You can enjoy sounds from the supplied speakers and images
on the TV.
Note:
To prevent noise interference, place the unit away from the television.
Auto power on function:
When you press any of the following buttons, the unit turns on.
I GAME/VIDEO button (main unit and remote control): The unit turns
on and “GAME” function is activated.
I0 button (main unit and remote control): The unit turns on and
playback of the last function starts (DVD/CD/TAPE/TUNER/GAME).
H To record on a tape from Game, VCR etc.
1. Insert a cassette in the TAPE 2 cassette compartment.
2. Press the GAME/VIDEO button.
3. Press the I6 button.
4. Press the 0 button.
5. Play the game system, VCR, etc.
H Headphones
I Do not turn the volume on to full at switch on and listen to music at
moderate levels. Excessive sound pressure from earphones and
headphones can cause hearing loss.
I Before plugging in or unplugging the headphones, reduce the volume.
I Be sure your headphones have a 3.5 mm (1/8") diameter plug
and are between 16 ohms and 50 ohms impedance. The
recommended impedance is 32 ohms.
I Plugging in the headphones disconnects the speakers
automatically. Adjust the volume using the VOLUME control.
Red
Page 68

To the digital input
socket
Optical digital lead
(not supplied)
To video input
socket
MD recorder, DTS/MPEG audio
processor or amplifier
Video cable
Yellow
TV
Yellow
Page 69

E-68
References
CD-DV650W
CD-DV850W
ENGLISH
H
DVD/CD player
Symptom
● No image from the
DVD video appears
on the screen of a
connected device.
● Playback does not
start.
● Playback stops in the
middle or is not
performed properly.
● Playback sounds are
skipped, or stopped
in the middle of a
track.
Possible cause
● Make sure the channel of the connected
TV is set to VIDEO or AV.
● Make sure video cables are connected
correctly.
● Is the disc loaded upside down?
● Does the disc dissatisfy the standards?
● Is the disc distorted or scratched?
● Is the unit located near excessive
vibrations?
● Is the disc very dirty?
● Has condensation formed inside the unit?
H
Remote control
Symptom
● The remote control
does not operate.
Possible cause
● Is the AC power lead of the unit
unplugged?
● Is the battery polarity wrong?
● Are the batteries dead?
● Is the distance or angle incorrect?
● Does the remote control sensor receive
strong light?
H
Video CD
Symptom
● The picture is not
displayed during
playback.
● The picture quality
is poor, or it is
distorted.
Possible cause
● Is the TV unplugged?
● Is the unit connected improperly?
● Is the input selector on the TV set to other
than “VCR”?
● Is the unit being played without selecting
video CD?
● Is the disc very dirty?
Page 70

H
Before transporting the unit
Remove all CDs from the unit. Make sure there is no CD in the disc
tray. Then, set the unit to the power stand-by mode. Carrying the unit
with discs left inside can damage the unit.
H
Clearing all the memory (reset)
1. Press the ON/STAND-BY button to enter the power stand-by mode.
2. Whilst pressing down the
I6I6
I6I6
I6 button and the X-BASS/DEMO
button, press the TUNING
X X
X X
X button until “CLEAR AL” appears.
Caution:
This operation will erase all data stored in memory including clock,
timer settings, tuner preset and CD programme.
H
Condensation
Sudden temperature changes, storage or operation in an extremely
humid environment may cause condensation inside the cabinet (CD
pickup, tape heads, etc.) or on the transmitter on the remote control.
Condensation can cause the unit to malfunction. If this happens, leave
the power on with no disc (or cassette) in the unit until normal playback
is possible (about 1 hour). Wipe off any condensation on the transmitter
with a soft cloth before operating the unit.
2
X-BASS
/DEMO
Page 71

E-70
References
CD-DV650W
CD-DV850W
ENGLISH
Specifications
As part of our policy of continuous improvement, SHARP reserves
the right to make design and specification changes for product
improvement without prior notice. The performance specification
figures indicated are nominal values of production units. There may
be some deviations from these values in individual units.
Main Unit
H General (CD-DV650W)
Power source AC 110/127/220/230 ~ 240 V, 50/60 Hz
Power consumption
110 W
Dimensions Width: 260 mm (10-1/4")
Height: 330 mm (13")
Depth: 326 mm (12-7/8")
Weight 7.4 kg (16.3 lbs.)
H General (CD-DV850W)
Power source AC 110/127/220/230 ~ 240 V, 50/60 Hz
Power consumption
140 W
Dimensions Width: 260 mm (10-1/4")
Height: 330 mm (13")
Depth: 326 mm (12-7/8")
Weight 8.9 kg (19.6 lbs.)
H Amplifier (CD-DV650W)
Output power Speakers:
MPO: 190 W (95 W + 95 W) (10 % T.H.D.)
RMS
: 100 W (50 W + 50 W) (10
% T.H.D.)
RMS: 76 W (38 W + 38 W) (0.9 % T.H.D.)
Output terminals Speakers: 6 ohms
Headphones: 16 - 50 ohms
(recommended: 32 ohms)
Audio digital out: optical
Input terminals Game/auxiliary (Audio Input): 500 mV/47 k
ohms
Microphone 1/2: 1 mV/600 ohms
Page 72

H Tuner
Frequency range FM: 88 - 108 MHz
AM: 531 - 1,602 kHz
H Cassette deck
Frequency 50 - 14,000 Hz (normal tape)
response
Signal/noise ratio 50 dB (recording/playback)
Wow and flutter 0.3 % (WRMS)
Page 73

E-72
References
CD-DV650W
CD-DV850W
ENGLISH
H Speaker (CD-DV850W)
Type 3-way type speaker system
Supert Tweeter
5 cm (2") tweeter
16 cm (6-5/16") woofer
Maximum input
300
W
power
Rated input power
150
W
Impedance 6 ohms
Dimensions Width: 200 mm (7-7/8")
Height: 330 mm (13")
Depth: 231 mm (9-1/8")
Weight 3.6 kg (7.9 lbs.)/each
Page 74

U P
CD-DV650W/CD-DV850W
DVD MINI SYSTEM
DOWN
 Loading...