

Page 1
MINI COMPONENT SYSTEM
MODEL
CD-XP160W
OPERATION MANUAL
Thank you for purchasing this SHARP product.
To obtain the best performance from this product, please read
this manual carefully . It will guide you in operating your SHARP
product.
CD-XP160W Mini Component System consisting of CD-XP160W
(main unit) and CP-XP160 (speaker system).
*CDXP160WSCA_FRONT 02.12.20, 4:09 PM1
Page 2
CD-XP160W
Important Instruction
Introduction
Thank yo u for purcha sing this SHARP product . To obtai n the best
perform anc e from th is pro duc t, p leas e rea d th is manu al care ful ly. It
will guide you in operating your SHARP product.
Special notes
Warning:
z
When the ON/STAND-BY button i s s et at STAND-BY position,
mains voltage is still present inside the unit. When the ON/
STAND-BY button is set at STAND-BY position, the unit may be
brought into operation by the timer mode or remote control.
z
This unit contains no user serviceable parts. Never remove covers unless qualified to do so. This unit contains dangerous voltages, always remove mains plug from the socket before any
service operation and when not in use for a long period.
z
To prevent fir e or shock haza rd, do n ot expose th is appl iance t o
dripping or splashing. No objects filled with liquids, such as
vases, should be placed on the apparatus.
CAUTION
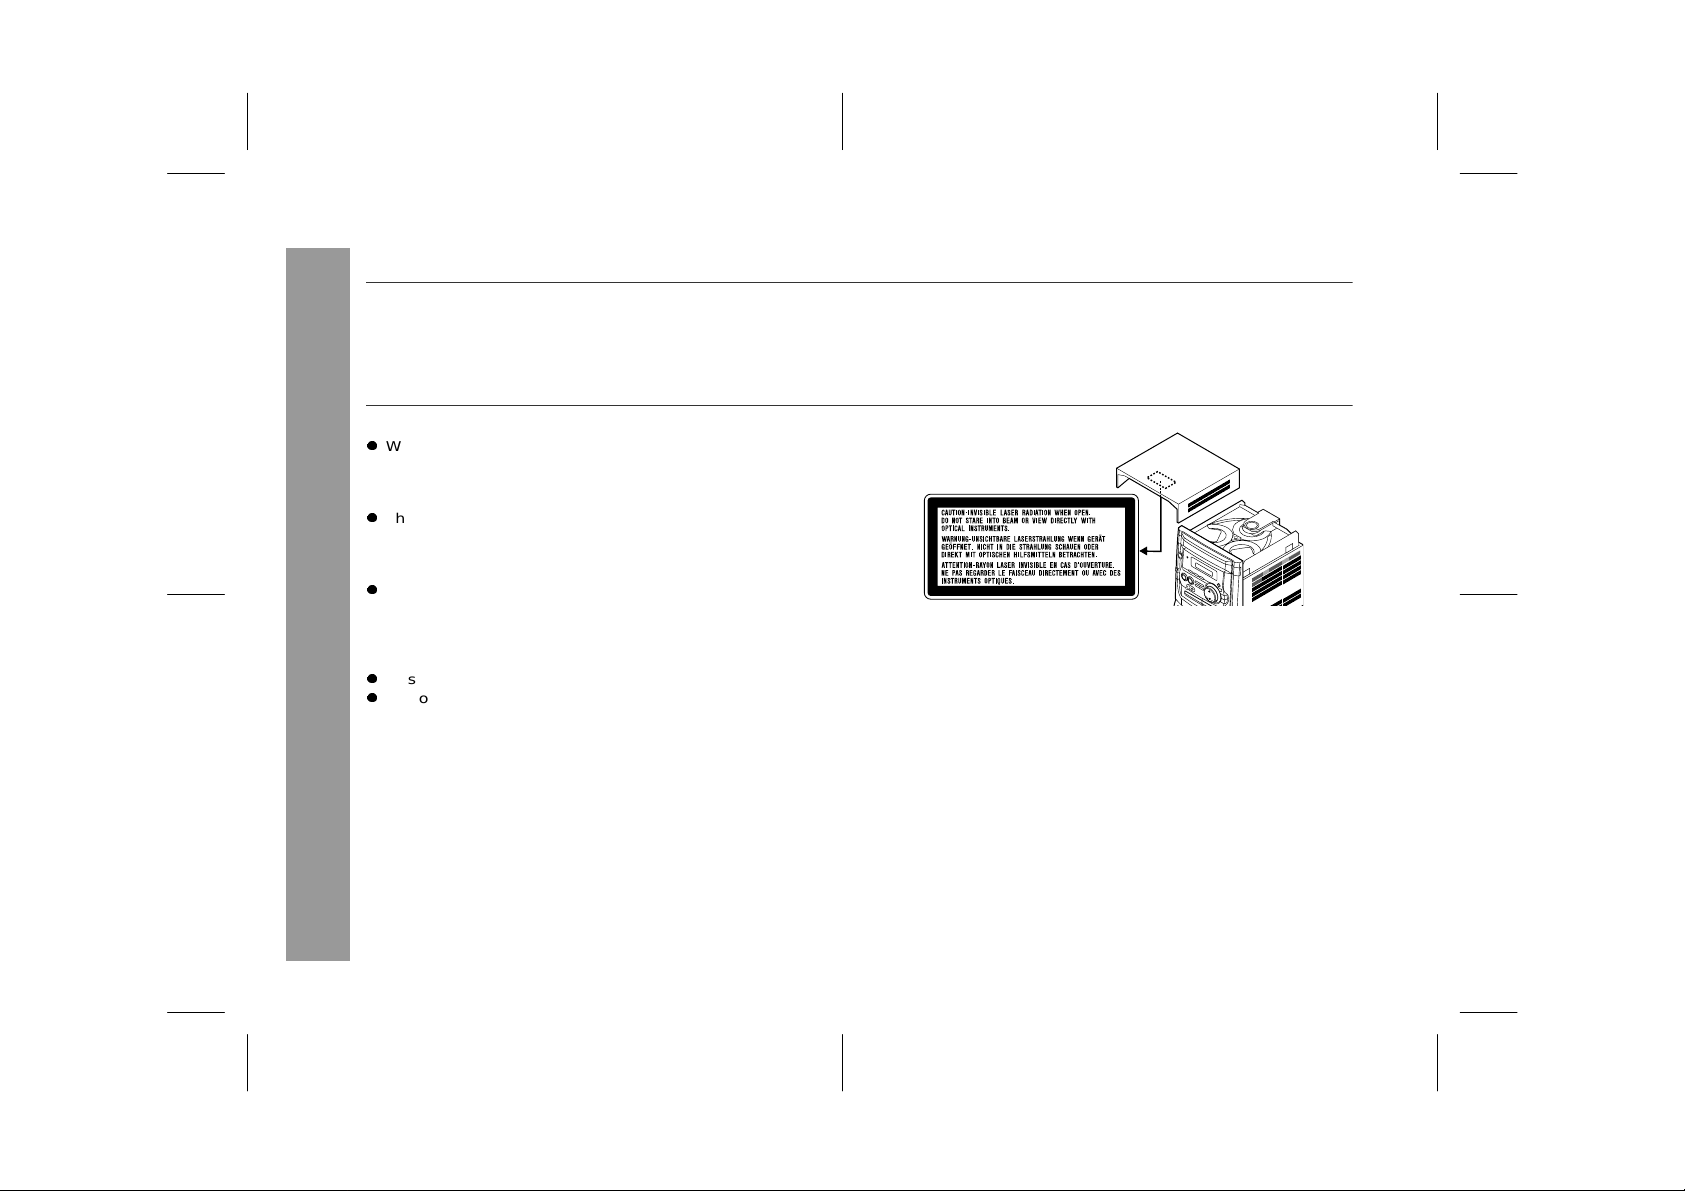
z
This product is cl as s ified as a C LASS 1 LASER product.
z
Use of c ontrols , adju st me nts or p erf or m a nc e of proce du r es ot he r
than t ho se s pecifi ed he rein may re s ult in haz ard ous radi ation ex posure.
- Introducti on / Spe c ial no te s -
As the laser beam used in this compact disc player is harmful to
the eyes, do not at te mpt t o d is as sem ble t he cabi ne t. Refe r s ervi cing to qualified personnel only.
Laser Diode Properties
Material: GaAIAs
Wavelength: 780 nm
Emission Duration: continuous
Laser Output: max. 0.6 mW
Note for us er s in Aust r a li a :
Copyright may exist in material you wish to record. Copying or
broadcasting such material without permission of the relevant licensees or owners of the copyright is prohibited by law. SHARP is not
in a po sition to author ise the c opying or broadca sting of c opyrigh t
materials and nothing in this OPERATION MANUAL should be
implied as giving that authority.
For other countries:
Audio-visual material may consist of copyrighted works which must
not be recorded without the authority of the owner of the copyright.
Please refer to the relevant laws in your country.
1
02/5/27 CD-XP160W(SCA)E1.fm
Page 3
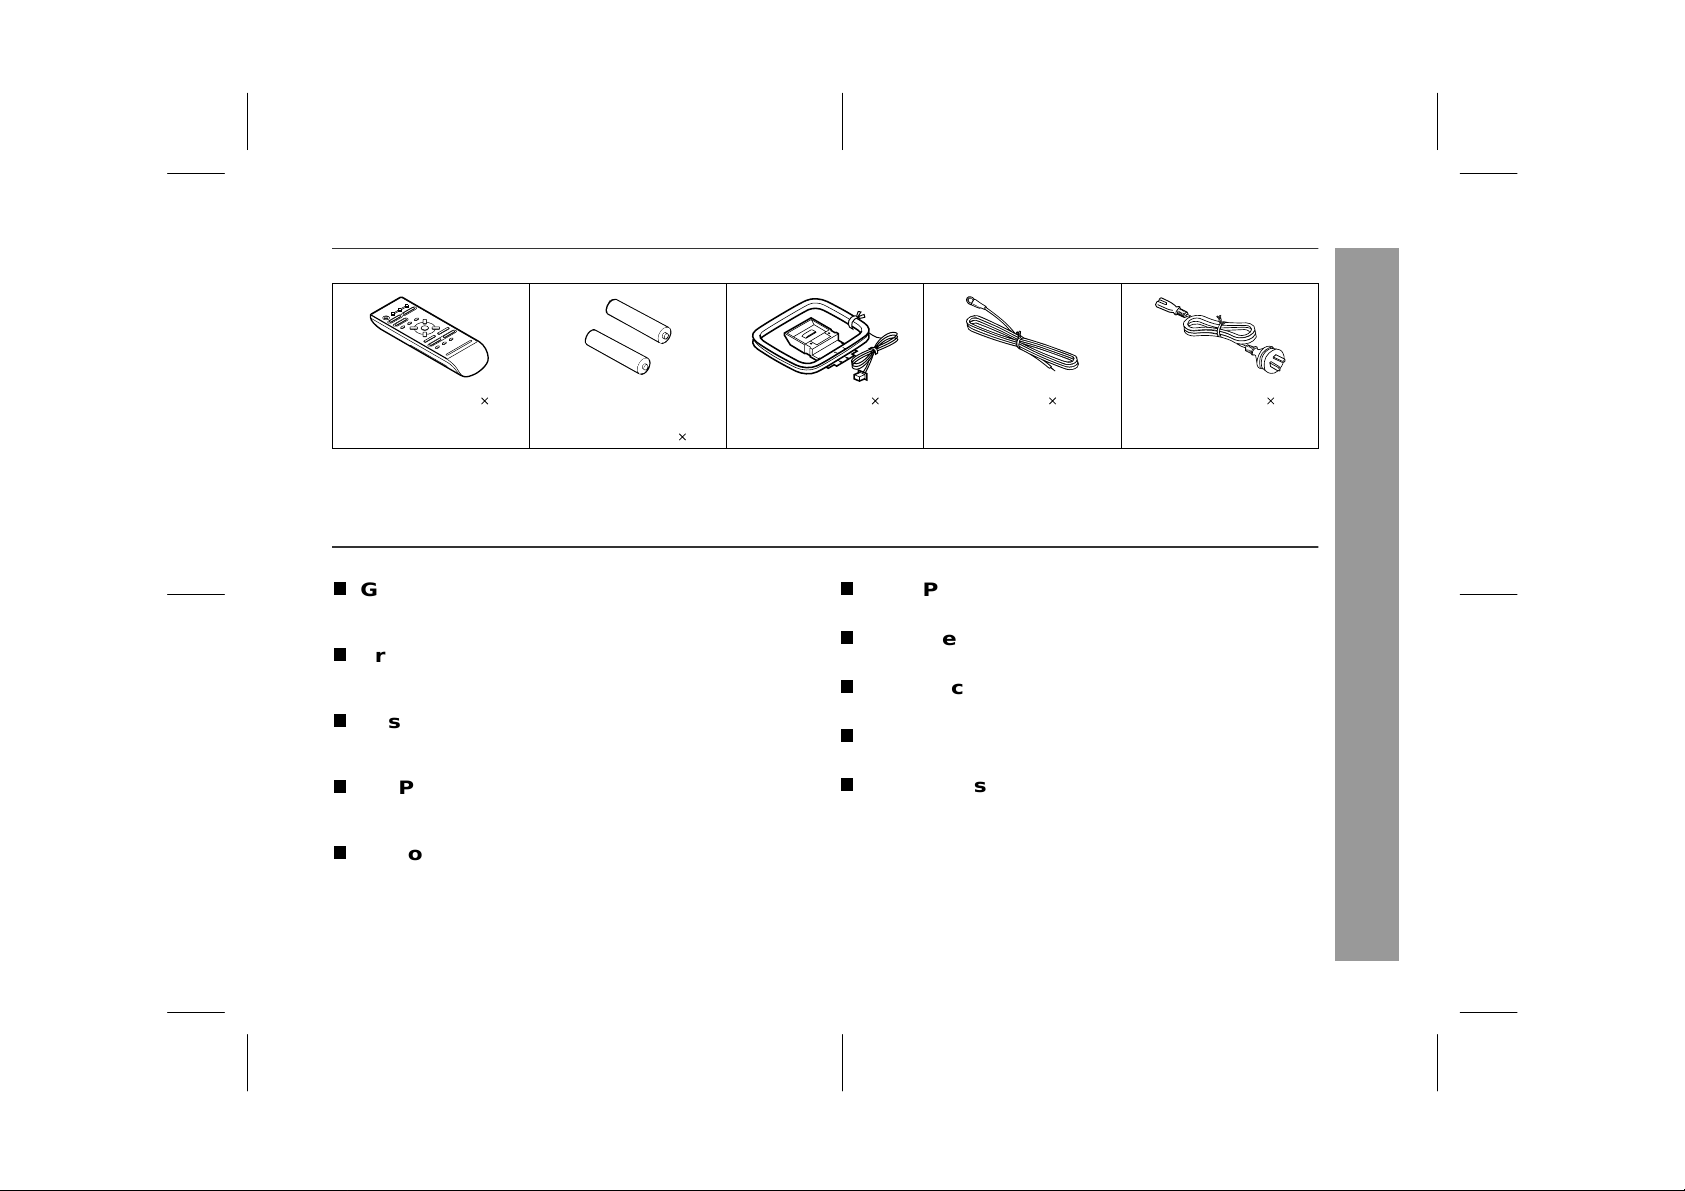
Accessories
Please confirm that the following accessories are included.
CD-XP160W
Remote control 1 "AA" size battery
(UM/SUM-3, R6,
HP-7 or similar) 2
Note:
Only the above accessorie s are inc l uded.
AM loop aerial 1 AA FM aerial 1 AA AC power lead 1
Contents
Page
T
General Inform ation
Precautions . . . . . . . . . . . . . . . . . . . . . . . . . . . . . . . . . . . . . . . . . 3
Controls and indicators . . . . . . . . . . . . . . . . . . . . . . . . . . . . . .4 - 6
T
Preparation for Use
System connections . . . . . . . . . . . . . . . . . . . . . . . . . . . . . . .7 - 10
Remote control . . . . . . . . . . . . . . . . . . . . . . . . . . . . . . . . . . . . . . 11
T
Basic Operation
Sound control . . . . . . . . . . . . . . . . . . . . . . . . . . . . . . . . . . . . . . . 12
Setting the clock . . . . . . . . . . . . . . . . . . . . . . . . . . . . . . . . . . . . 13
T
CD Playb ack
Listening to a CD (CDs) . . . . . . . . . . . . . . . . . . . . . . . . . . . . 14, 15
Advanced CD playback . . . . . . . . . . . . . . . . . . . . . . . . . . . . 16, 17
T
Radio
Listening to the radio . . . . . . . . . . . . . . . . . . . . . . . . . . . . . .18,19
Page
T
Tape Playback
Listening to a cassette tape . . . . . . . . . . . . . . . . . . . . . . . . 19, 20
T
Karaoke
Playing karaoke . . . . . . . . . . . . . . . . . . . . . . . . . . . . . . . . . . . . . 21
T
Tape Recording
Recording to a cassette tape . . . . . . . . . . . . . . . . . . . . . . . 22, 23
T
Advanced Features
Timer and sleep operation . . . . . . . . . . . . . . . . . . . . . . . . . 24, 25
T
References
Troubleshooting chart . . . . . . . . . . . . . . . . . . . . . . . . . . . . . 26, 27
Maintenance . . . . . . . . . . . . . . . . . . . . . . . . . . . . . . . . . . . . . . . . 28
Headphones . . . . . . . . . . . . . . . . . . . . . . . . . . . . . . . . . . . . . . . . 28
Specifications . . . . . . . . . . . . . . . . . . . . . . . . . . . . . . . . . . . . . . 29
Warranty . . . . . . . . . . . . . . . . . . . . . . . . . . . . . End of the manual
- Accessories / Contents -
General Information
2
02/5/27 CD-XP160W(SCA)E1.fm
Page 4
CD-XP160W
General Information
Precautions
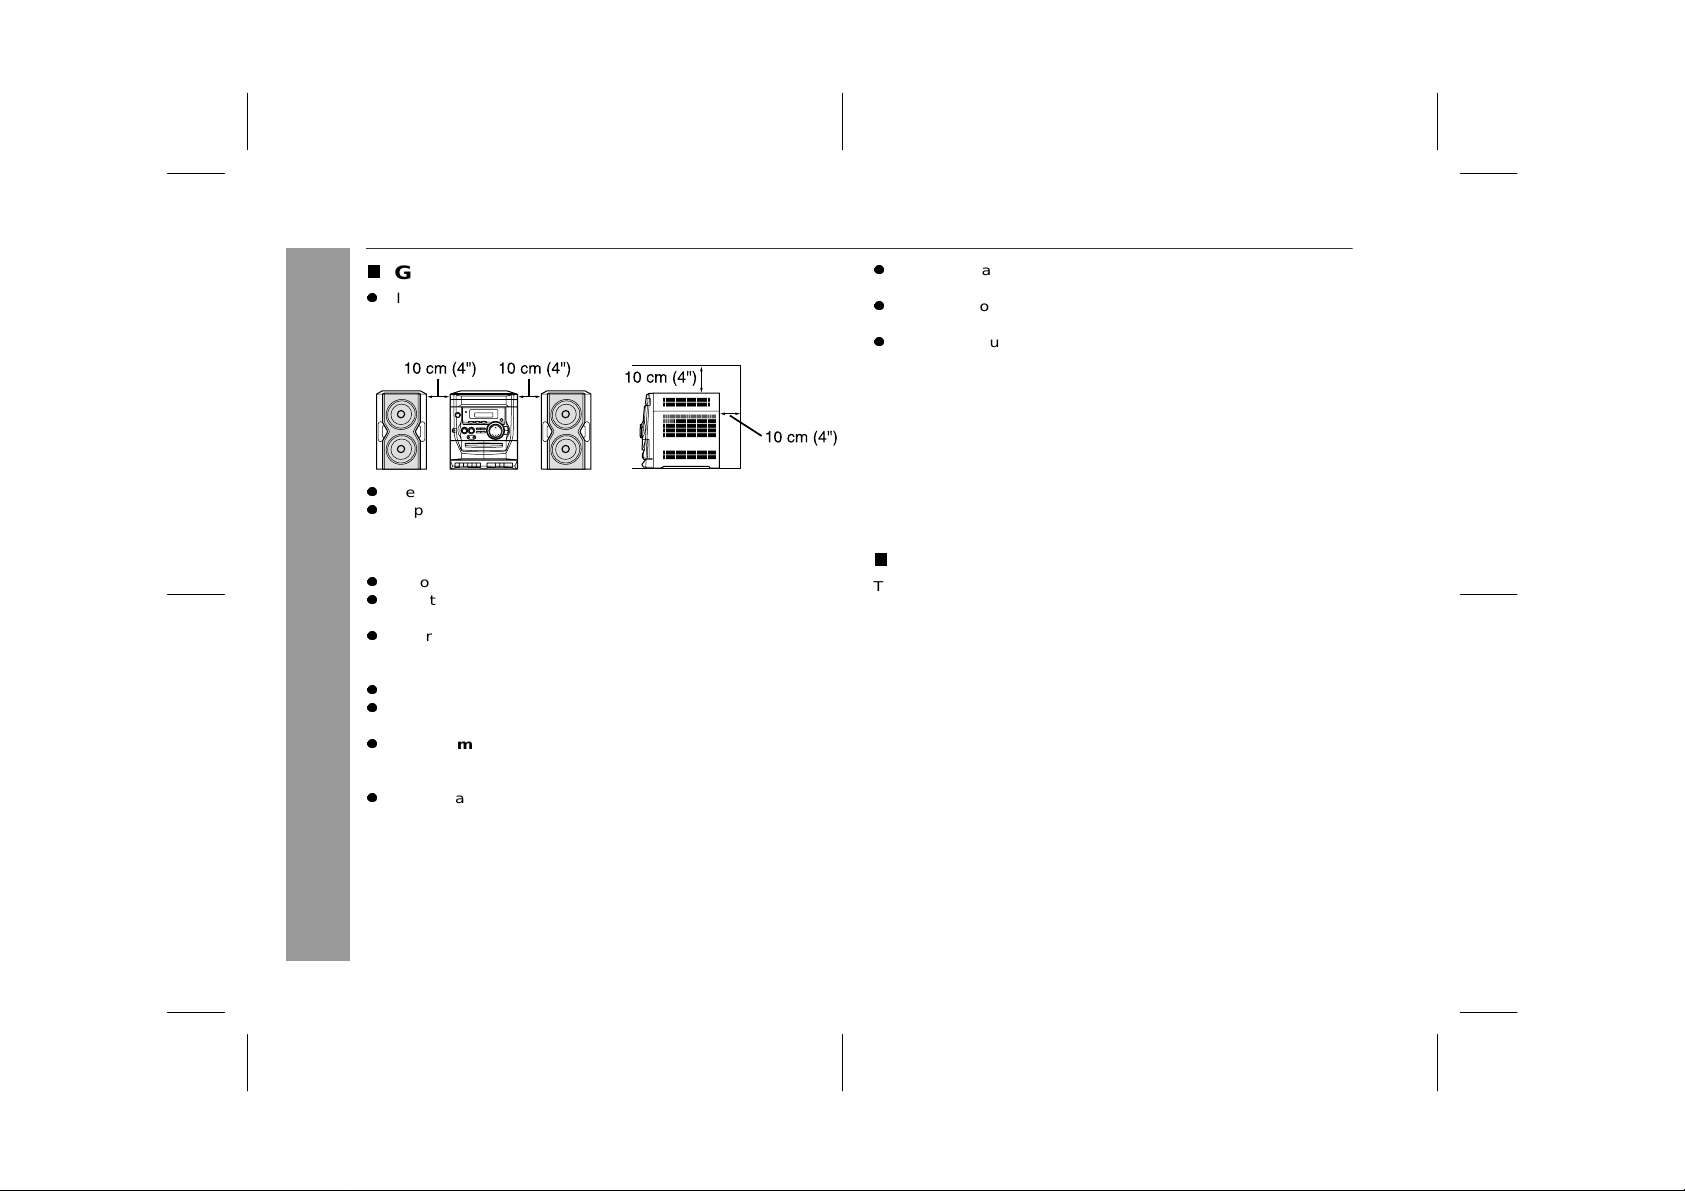
General
z
Please ensure that the equipm ent is positi oned in a well ven tilated area and en sure that there is at least 10 cm (4") of free
space along the sides, top and back of the equipment.
z
Use the unit on a firm, level surface free from vibration.
z
Keep the un it away from direct sunlight , strong magnetic fields,
excessive dust, humidity and electronic/electrical equipment
(home computers, facsimiles, etc.) which generate electrical
noise.
z
Do not place anything on top of the unit.
z
Do not expose the unit to moisture, to temperatures higher than
60°C (140°F) or to extremely low temperatures.
z
If your system does not work properly, disconnect the AC power
lead f rom t he wall s ocket. Plug th e AC powe r lea d back in, and
then turn on your sy stem.
- Precautions -
z
In case of an electrical storm, unplug the unit for safety.
z
Hold the AC power plug by the head when removing it from the
wall socket, as pull ing the le ad can damage i n terna l wires.
z
Do not remove the ou ter cove r, as this may res ult in e lec tric
shock. Refer internal service to your local SHARP service
facility.
z
The ventilation should not be impeded by covering the ventilation
openin gs with item s, such as new spapers , tablecloth s, curt ains,
etc.
z
No naked flame sources, such as lighted candles, should be
placed on the apparatus.
z
Attention should be drawn to the environmental aspects of battery disposal.
z
This unit should only be used within the range of 5°C - 35°C
(41°F - 95°F).
Warning:
The voltag e used must b e the sam e as that spec ified on this unit.
Using this product with a higher voltage other than that which is
specified is dangerous and may result in a fire or other type of accident ca using damag e. SHAR P wil l not be held r espon sible for any
damage re su lti ng fr om u se of thi s unit with a volt age other than that
which is specified.
Volume control
The sound level at a given volume setting depends on speaker efficiency, locatio n, and vario us other fa ctors. It is a dvisable to avoid
exposure to high volume levels. Do not tu rn th e volume on to full at
switch on and lis ten to musi c at mo de ra te levels .
3
02/5/27 CD-XP160W(SCA)E1.fm
Page 5
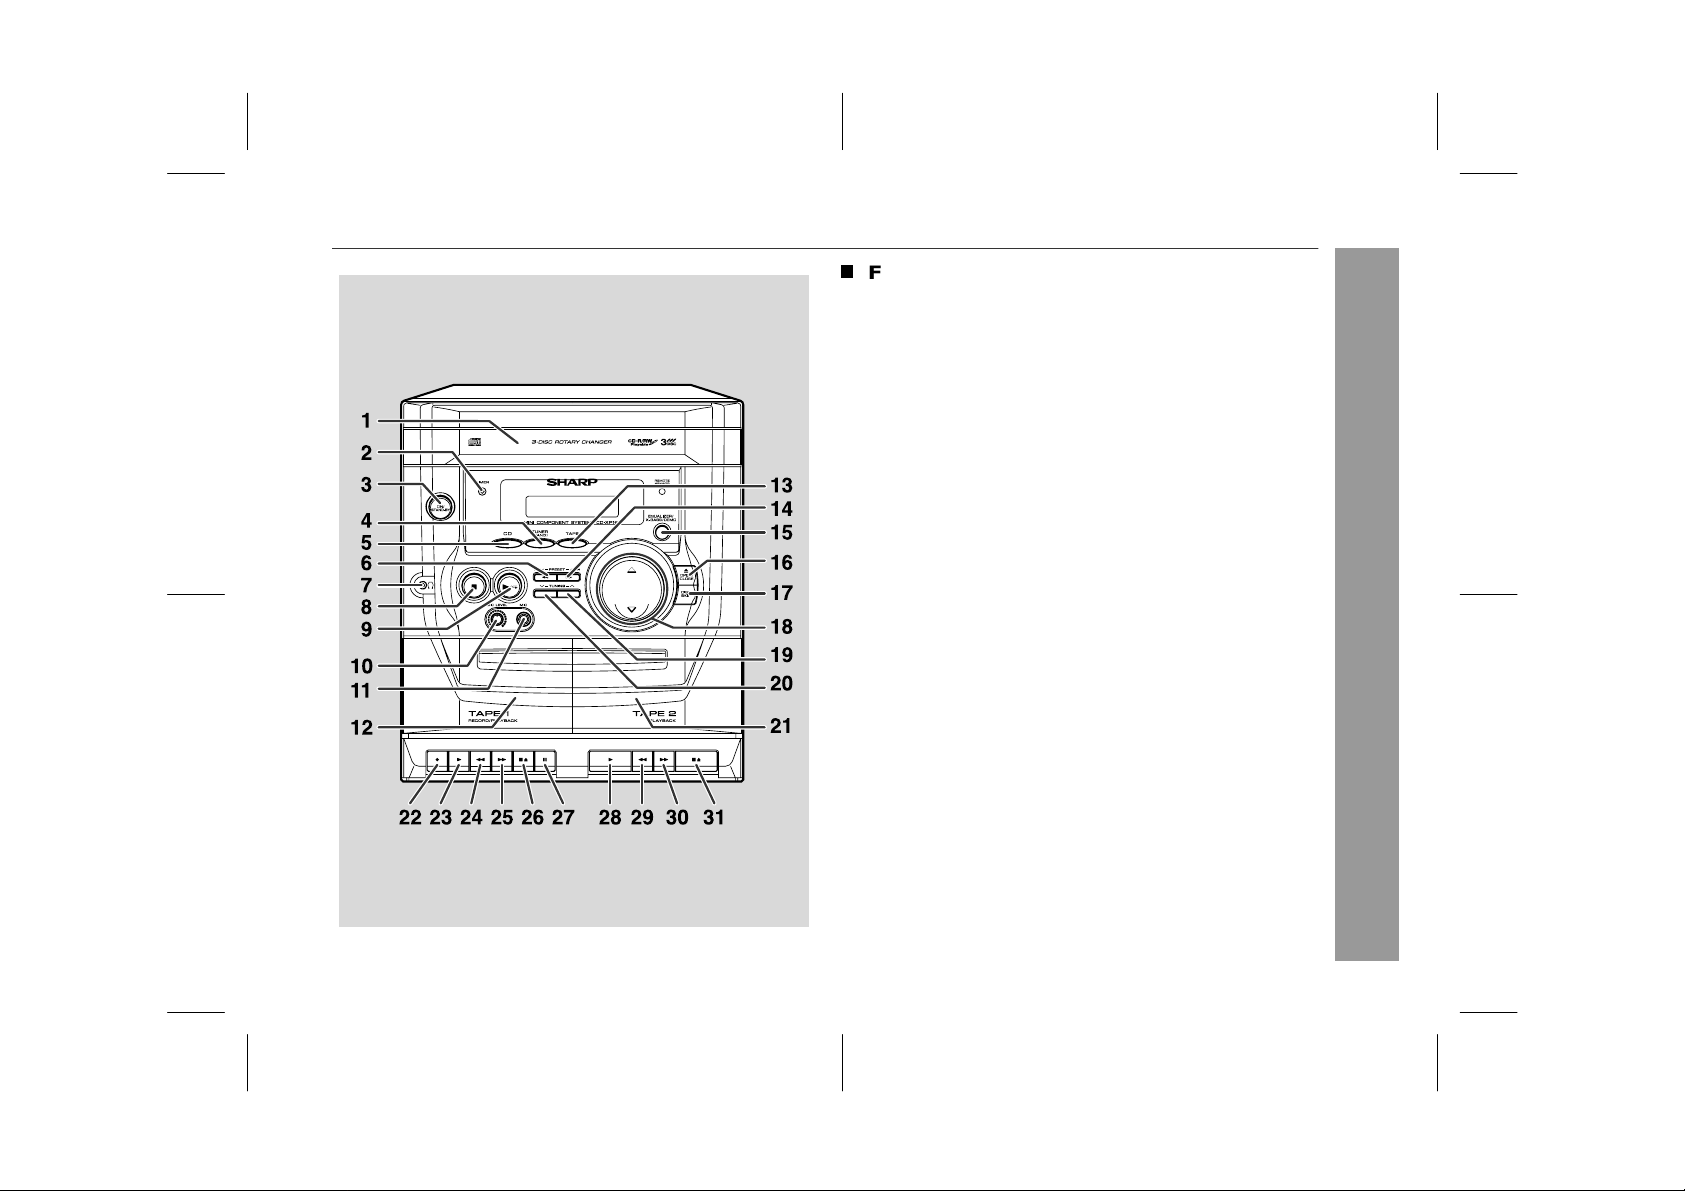
Controls and indicators
Front panel
1.Disc Tray . . . . . . . . . . . . . . . . . . . . . . . . . . . . . . . . . . . . . . . . 14
2.Timer Set Indicator . . . . . . . . . . . . . . . . . . . . . . . . . . . . . . . 25
3.On/Stand-by Button . . . . . . . . . . . . . . . . . . . . . . . . . . . . . . . 10
4.Tuner (Band) Button . . . . . . . . . . . . . . . . . . . . . . . . . . . . . . 18
5.CD Button . . . . . . . . . . . . . . . . . . . . . . . . . . . . . . . . . . . . 14, 22
6.CD Track Down or Fast Reverse,
Tuner Preset Down Button . . . . . . . . . . . . . . . . . . . . . . 15, 19
7.Headphone Socket . . . . . . . . . . . . . . . . . . . . . . . . . . . . . . . . 28
8.CD Stop Button . . . . . . . . . . . . . . . . . . . . . . . . . . . . . . . . . . 15
9.CD Play or Repeat Button . . . . . . . . . . . . . . . . . . . . . . . 14, 16
10. Microphone Level Control . . . . . . . . . . . . . . . . . . . . . . . . . . 21
11. Microphone Socket . . . . . . . . . . . . . . . . . . . . . . . . . . . . . . . 21
12. Tape 1 Cassette Com pa rtment . . . . . . . . . . . . . . . . . . . 20, 23
13.Tape Button . . . . . . . . . . . . . . . . . . . . . . . . . . . . . . . . . . 20, 23
14. CD Track Up or Fast Forward,
Tuner Preset Up Button . . . . . . . . . . . . . . . . . . . . . . . . . 15, 19
15. Eq ual iser Mod e Select/Extra Bas s/
Demo Mode Button . . . . . . . . . . . . . . . . . . . . . . . . . . . . 10, 12
16. Disc T ray Open/Close Button . . . . . . . . . . . . . . . . . . . . . . . 14
17. Disc Skip Button . . . . . . . . . . . . . . . . . . . . . . . . . . . . . . . . . 14
18. Volume Up and Down Buttons . . . . . . . . . . . . . . . . . . . . . . 12
19. Tuning Up Button . . . . . . . . . . . . . . . . . . . . . . . . . . . . . . . . . 18
20. Tuning Down Button . . . . . . . . . . . . . . . . . . . . . . . . . . . . . . 18
21. Tape 2 Cassette Com pa rtment . . . . . . . . . . . . . . . . . . . 20, 23
22.Tape 1 Record Button . . . . . . . . . . . . . . . . . . . . . . . . . . 22, 23
23. Tape 1 Play Button . . . . . . . . . . . . . . . . . . . . . . . . . . . . . . . . 20
24. Tape 1 Rewind Button . . . . . . . . . . . . . . . . . . . . . . . . . . . . . 20
25. Tape 1 Fast Forward Button . . . . . . . . . . . . . . . . . . . . . . . . 20
26. Tape 1 Stop/Eject Button . . . . . . . . . . . . . . . . . . . . . . . . . . . 20
27. Tape 1 Pause Button . . . . . . . . . . . . . . . . . . . . . . . . . . . . . . 20
28. Tape 2 Play Button . . . . . . . . . . . . . . . . . . . . . . . . . . . . . . . . 20
29. Tape 2 Rewind Button . . . . . . . . . . . . . . . . . . . . . . . . . . . . . 20
30. Tape 2 Fast Forward Button . . . . . . . . . . . . . . . . . . . . . . . . 20
31. Tape 2 Stop/Eject Button . . . . . . . . . . . . . . . . . . . . . . . . . . . 20
Reference page
CD-XP160W
General Information
- Controls and in di ca tors -
02/5/27 CD-XP160W(SCA)E1.fm
4
Page 6
CD-XP160W
General Information
Controls and indicators (continued)
- Controls and in di ca tors -
T
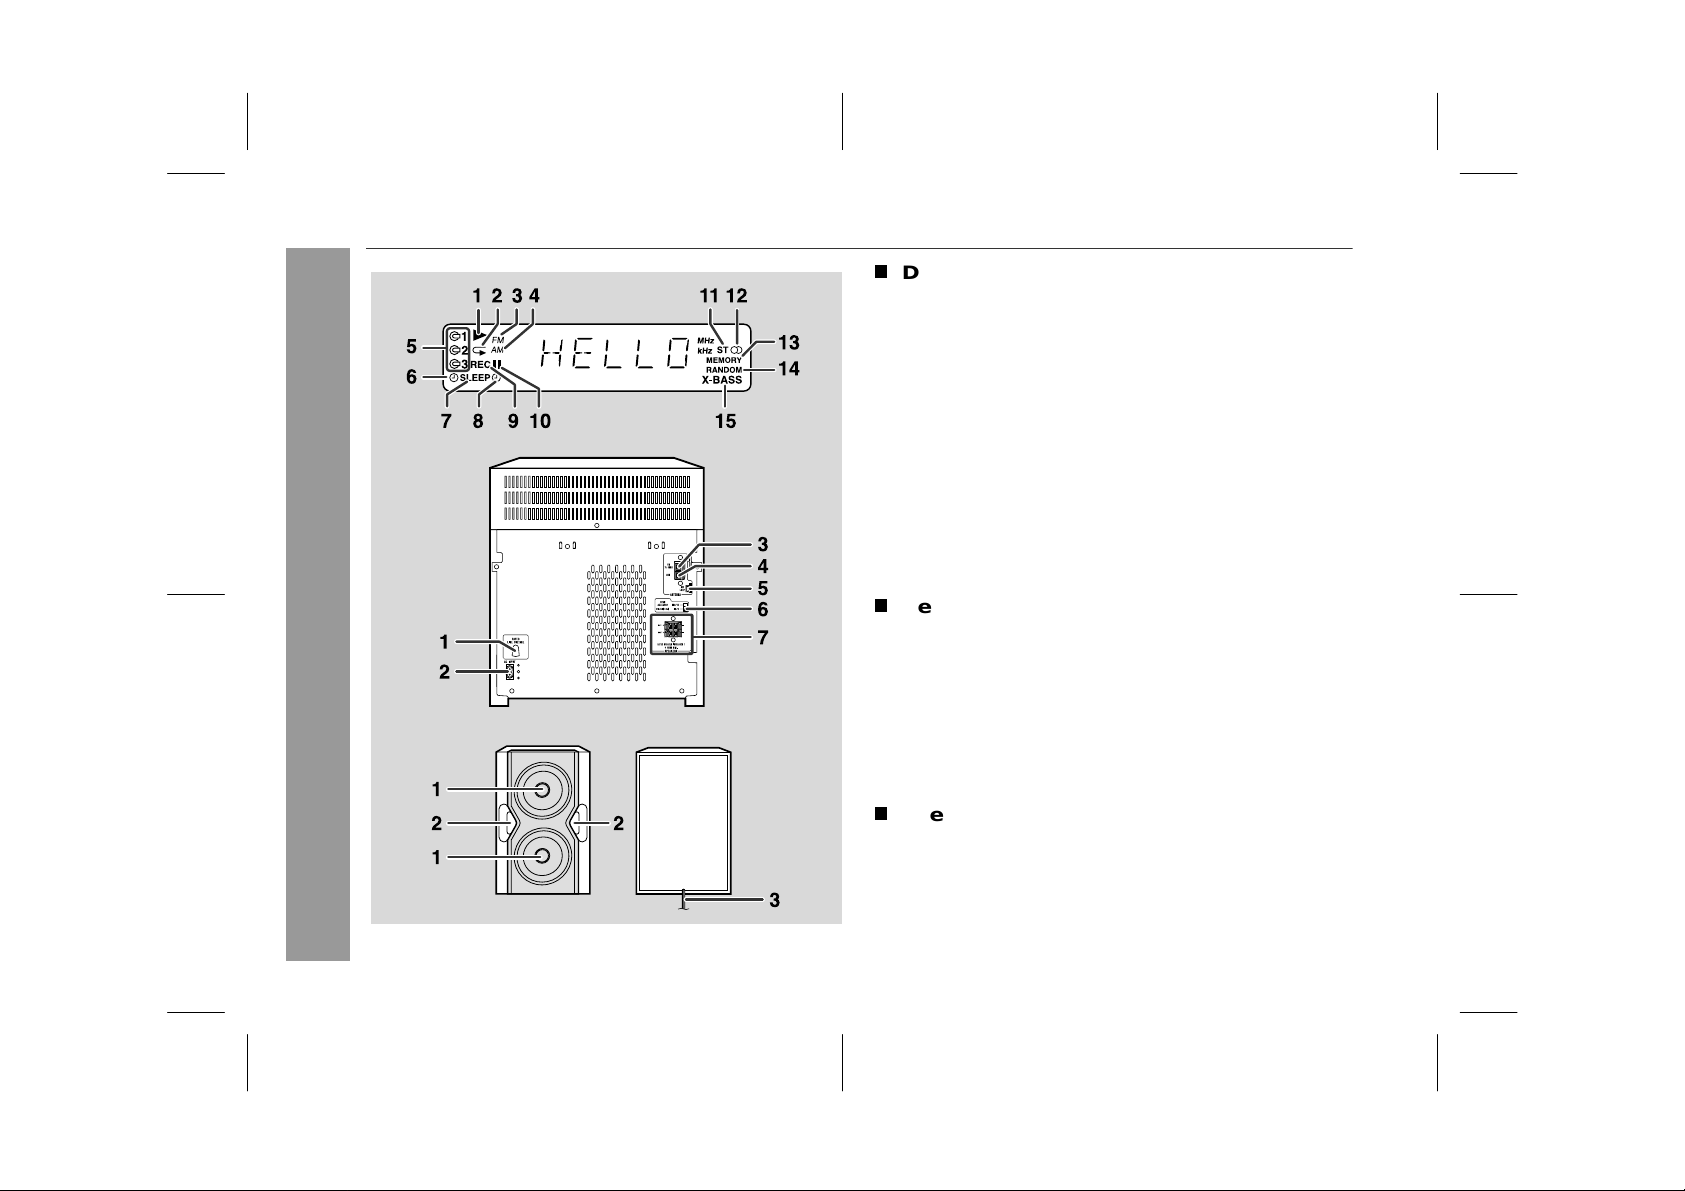
Display
1.CD Play Indicator
2.CD Repeat Play Indicator
3. FM Station Indicat or
4.AM Station Indicator
5.Disc Number I ndicators
6.Clock Indicator
7.Sleep Indicator
8.Timer Play Indicator
9.Tape 1 Record Indicator
10. CD Pause Indicator
11. FM Stere o Mo de Indicator
12. FM Stere o Receivi ng Indic at or
13. Mem or y Indicator
14. CD Random Play Indicator
15. Extra Bass Indicator
T
Rear panel
1.AC Voltage Selector . . . . . . . . . . . . . . . . . . . . . . . . . . . . . . . . 9
2. AC Power Input Socket . . . . . . . . . . . . . . . . . . . . . . . . . . . . . 9
3.FM 75 Ohms Aerial Terminal . . . . . . . . . . . . . . . . . . . . . . . 7, 8
4.FM Aerial Earth Terminal . . . . . . . . . . . . . . . . . . . . . . . . . . 7, 8
5. AM Loop Aerial Socket . . . . . . . . . . . . . . . . . . . . . . . . . . . 7, 8
6. Span Selector Switch . . . . . . . . . . . . . . . . . . . . . . . . . . . . . . 10
7. Speaker Terminals . . . . . . . . . . . . . . . . . . . . . . . . . . . . . . . 7, 8
T
Speaker system
1.Woofers
2.Bass Reflex Ducts
3.Speaker Wire
Reference pa ge
5
02/5/27 CD-XP160W(SCA)E1.fm
Page 7
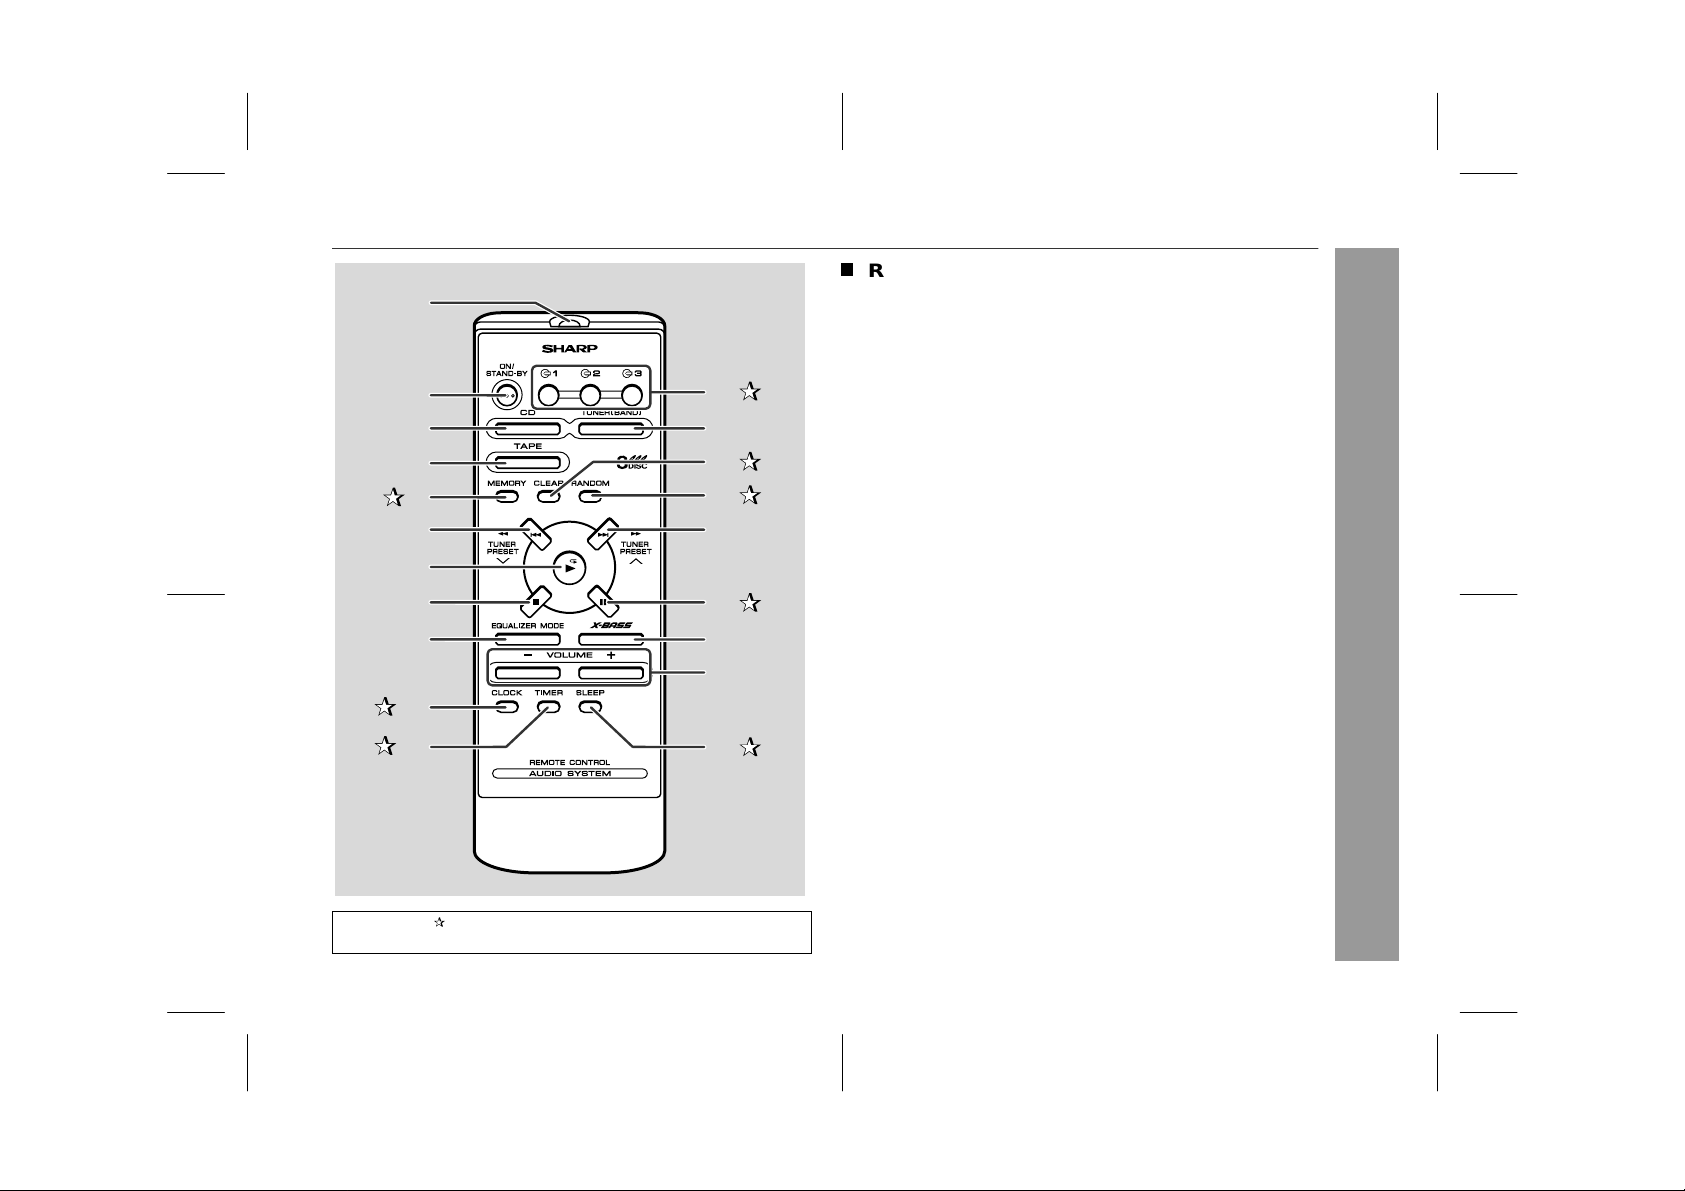
Remote control
Reference page
10
11
1
2
3
4
5
6
12
13
14
15
16
7
8
9
17
18
19
1.Remote Control Transmitter . . . . . . . . . . . . . . . . . . . . . . . . . . 11
2.On/Stand-by Button . . . . . . . . . . . . . . . . . . . . . . . . . . . . . . . . 11
3.CD Button . . . . . . . . . . . . . . . . . . . . . . . . . . . . . . . . . . . . 14, 22
4.Tape Button . . . . . . . . . . . . . . . . . . . . . . . . . . . . . . . . . . . 20, 23
5.Memory Button . . . . . . . . . . . . . . . . . . . . . . . . . . . . . 13, 17, 19
6.CD Track Down or Fast Reverse,
Tuner Preset Down Button . . . . . . . . . . . . . . . . . . . . . . . . 15, 19
7.CD Play or Repeat Button . . . . . . . . . . . . . . . . . . . . . . . . 14, 16
8.CD Stop Button . . . . . . . . . . . . . . . . . . . . . . . . . . . . . . . . . . . 15
9.Equaliser Mode Select Button . . . . . . . . . . . . . . . . . . . . . . . . 12
10.Clock Button . . . . . . . . . . . . . . . . . . . . . . . . . . . . . . . . . . 13, 24
11. Timer Button . . . . . . . . . . . . . . . . . . . . . . . . . . . . . . . . . . . . . 24
12. Disc Number Select Buttons . . . . . . . . . . . . . . . . . . 14, 17, 22
13. Tuner (Band) Button . . . . . . . . . . . . . . . . . . . . . . . . . . . . . . . . 18
14. Programme Clear Button . . . . . . . . . . . . . . . . . . . . . . . . . . . 17
15.CD Random Button . . . . . . . . . . . . . . . . . . . . . . . . . . . . . . . 16
16. CD Track Up or Fast Forward,
Tuner Preset Up Button . . . . . . . . . . . . . . . . . . . . . . . . . . 15, 19
17. CD Pause Button . . . . . . . . . . . . . . . . . . . . . . . . . . . . . . . . . 15
18. Extra Bass Button . . . . . . . . . . . . . . . . . . . . . . . . . . . . . . . . . 12
19. Volume Up and Down Buttons . . . . . . . . . . . . . . . . . . . . . . . . 12
20. Sleep Button . . . . . . . . . . . . . . . . . . . . . . . . . . . . . . . . . . . . . 25
20
CD-XP160W
General Information
- Controls and in di ca tors -
Buttons with " " mark in the illustration or highlighted in bold on the
right can be operated on the r emote cont rol only.
6
02/5/27 CD-XP160W(SCA)E1.fm
Page 8
CD-XP160W
Preparation for Use
System connections
- System connections -
7
02/5/27 CD-XP160W(SCA)E1.fm
Page 9
T
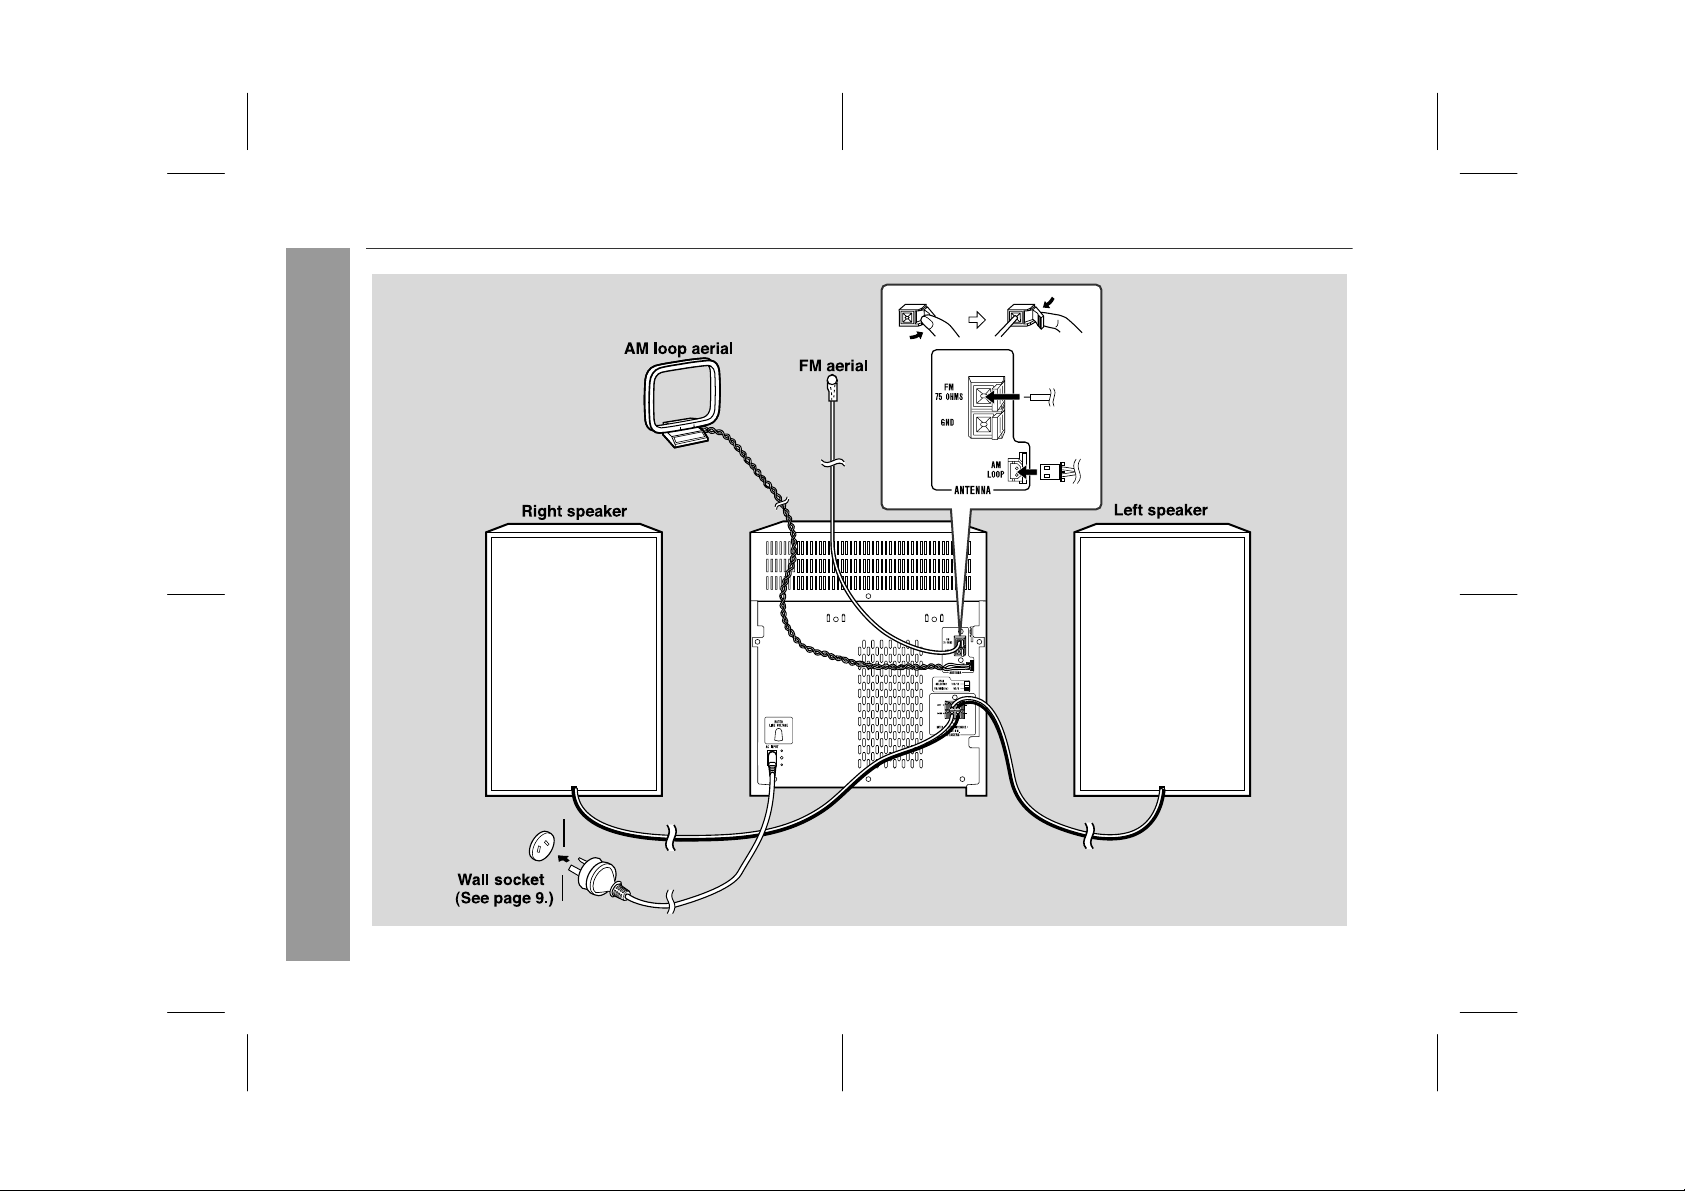
Aerial connection
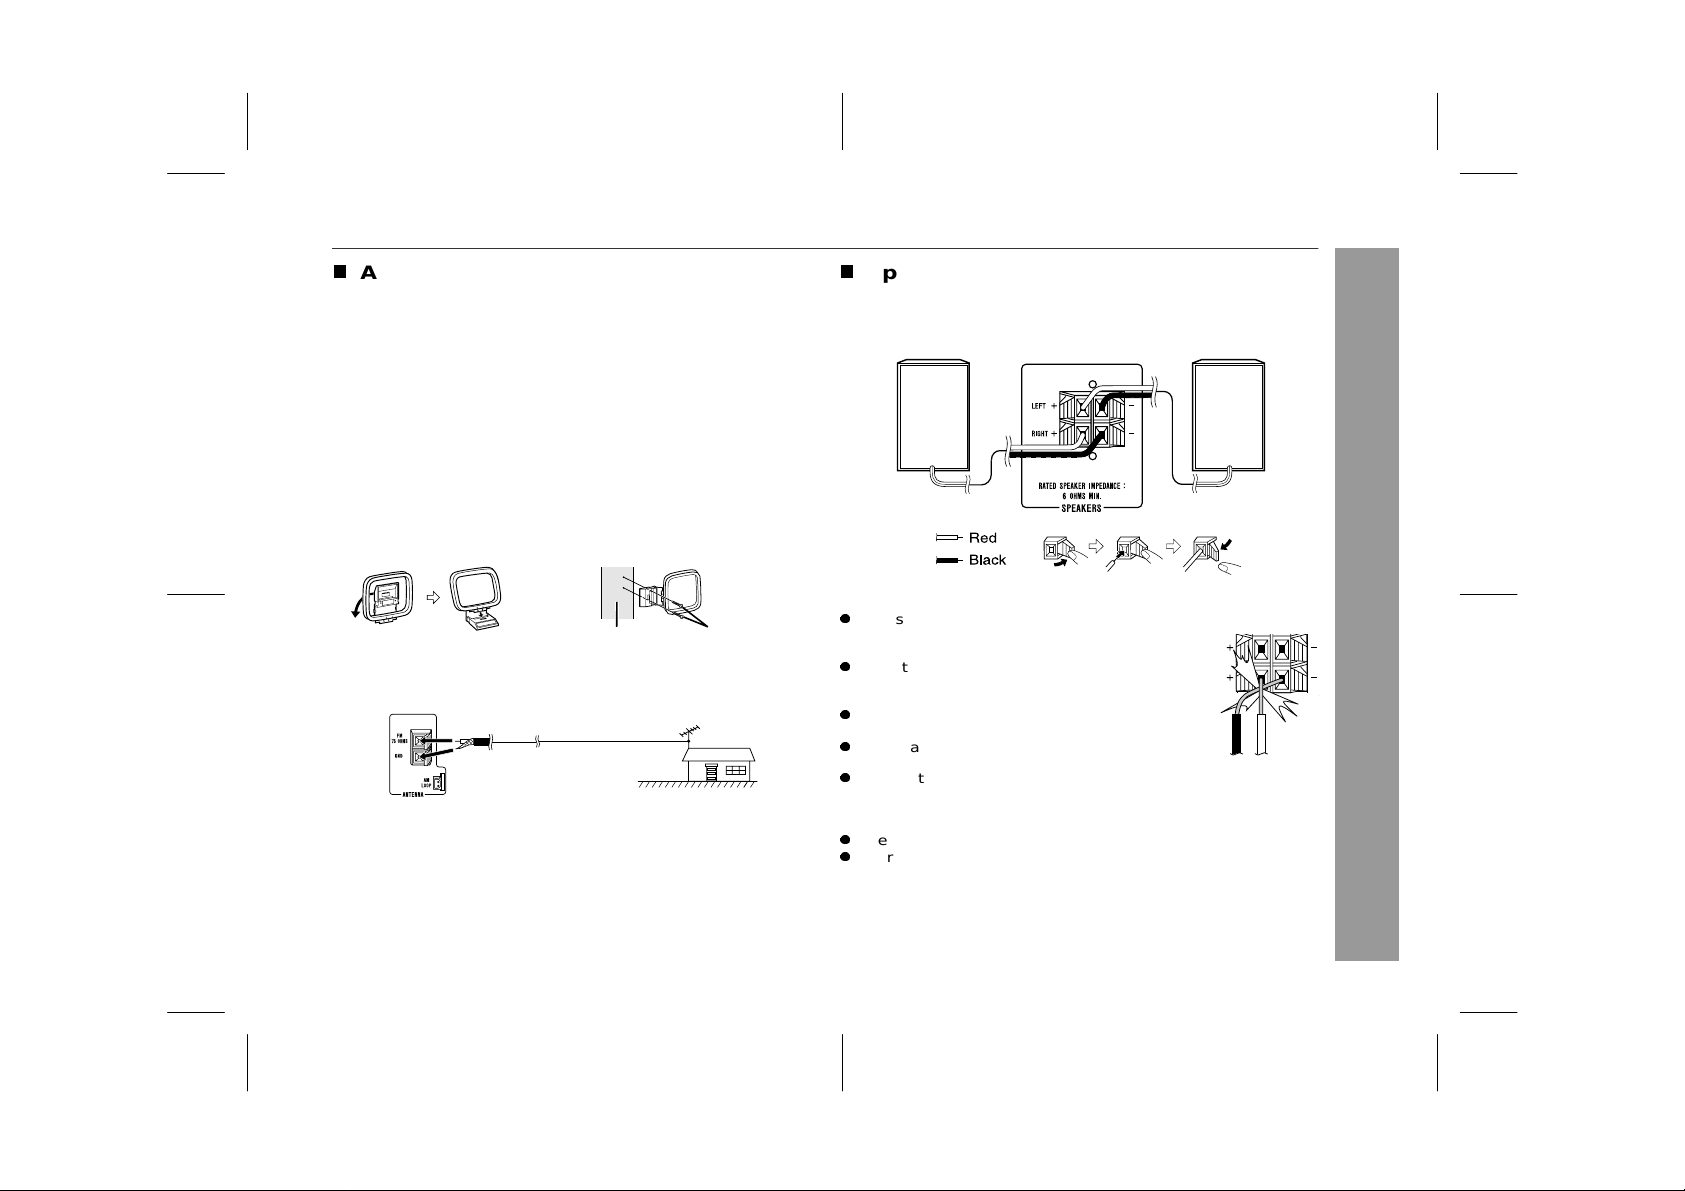
Supplied FM aerial:
Connect the FM aerial wire to the FM 75 OHMS terminal and position the FM aerial wire in the direction where the strongest signal
can be re ceived.
Supplied AM loop aerial:
Connect the AM loop aerial to the AM LOOP socket. Position the
AM loop aerial for optimum reception. Place the AM loop aerial on a
shelf, etc., or attach it to a stand or a wall with screws (not supplied).
Note:
Placing the aerial on the unit or near the AC power lead may cause noise
pickup. Place the aerial away from the unit for better reception.
Installing the AM loop aerial:
< Assembling > < Attaching to the wall >
External FM aerial:
Use an exter nal FM aer ial if you require better rec eption. Cons ult your
dealer.
75 ohm
coaxial
Note:
When an exter nal FM a erial is used, discon nect th e supplie d FM aer ial
wire.
cable
Wall Screws (not supplied)
External
FM aerial
T
Speaker connection
Connect the black wire to the minus (-) terminal and the red to the
plus (+) ter m inal.
Right speaker
Caution:
z
Use speakers with an impedance of 6 ohms or
more, as lower impedance speakers can damage
the unit.
z
Do not mistake the r ight and the left channels. The
right spe ak er is the on e on the right sid e w he n yo u
face the unit.
z
Do not let the bare speaker wires touch each
other.
z
Do not allow any objects to fall into or to be placed
in the bass reflex ducts.
z
Do not stand or sit on the speakers. You may be injured.
Notes:
z
The s peaker gr illes ar e not removable.
z
There is no physical distinction between the right and left speakers.
Left speaker
Incorrect
CD-XP160W
- System connections -
Preparation for Use
02/5/27 CD-XP160W(SCA)E1.fm
8
Page 10
CD-XP160W
Preparation for Use
System connections (continued)
- System connections -
T
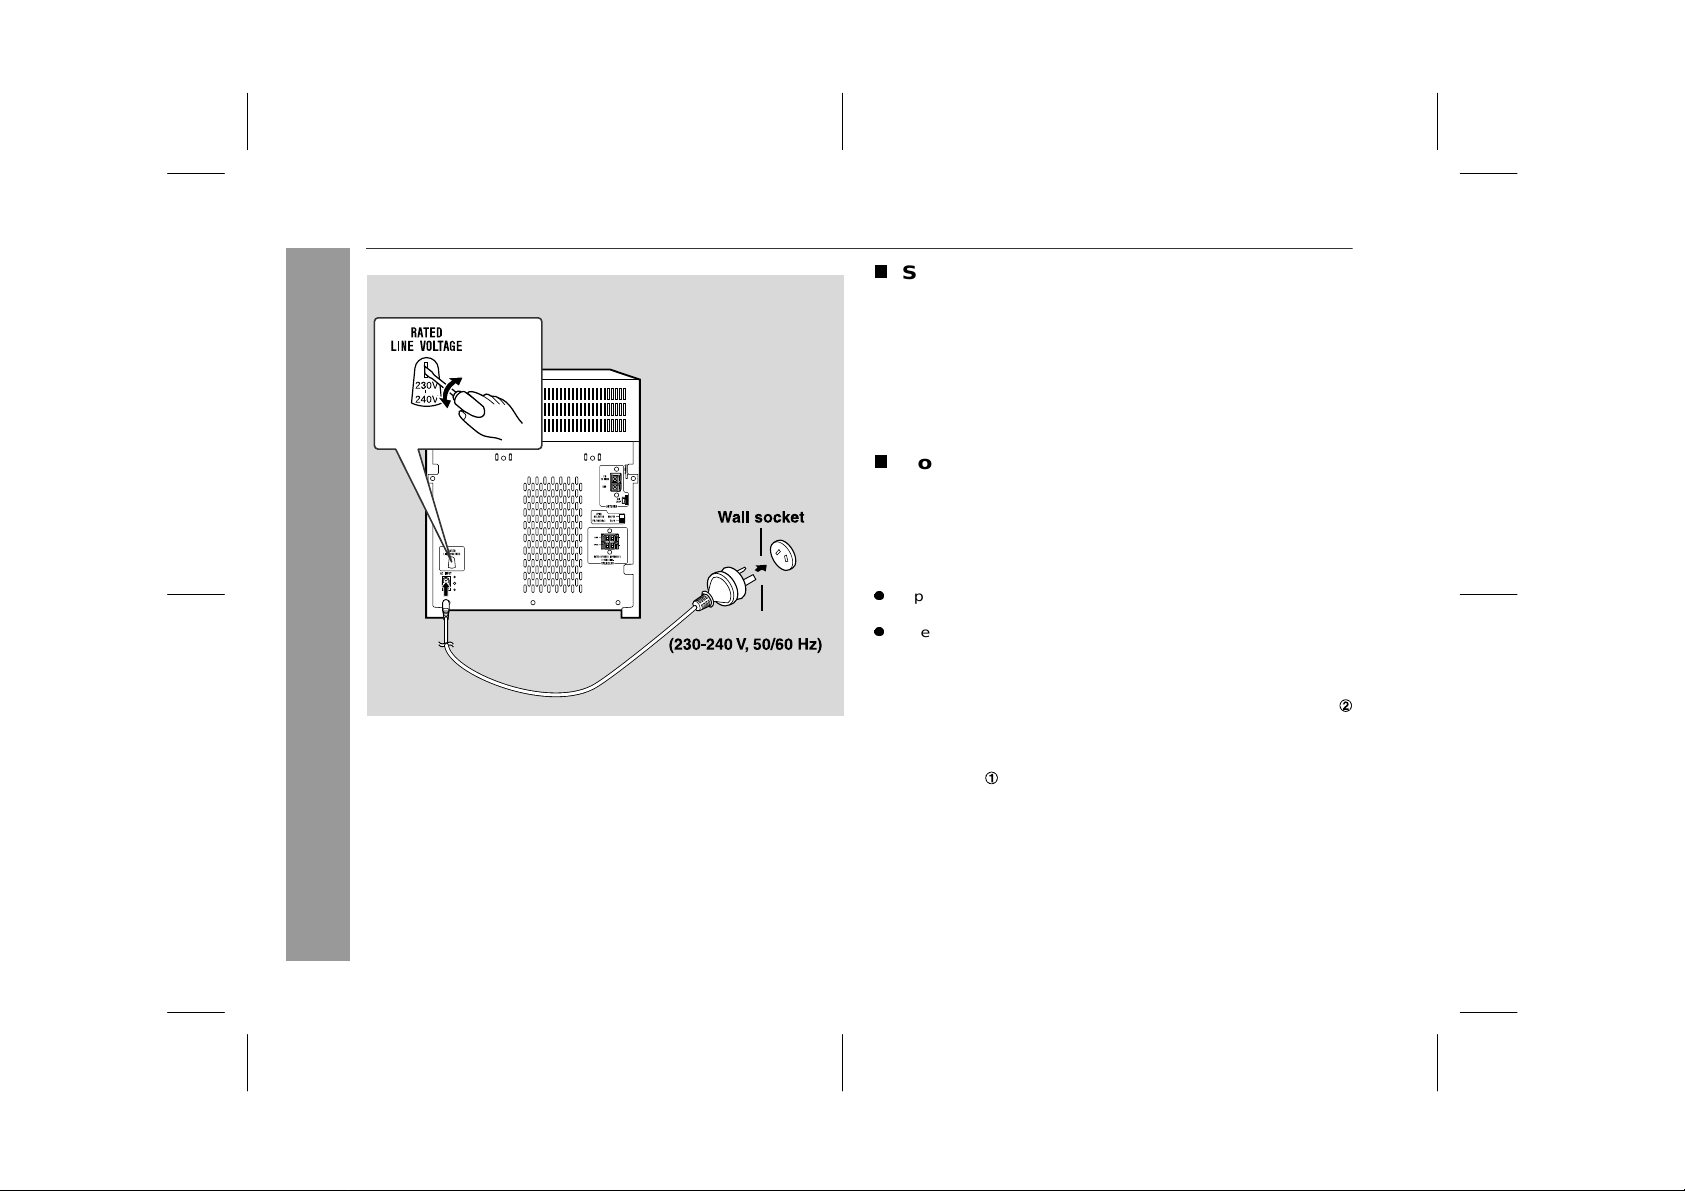
Setting th e AC voltage selector
Check the setting of the AC voltage selector located on the rear
panel before plugging the unit into a wa ll socket. If necessary, a djust
the selector to correspond to the AC power voltage used in your
area.
T urn the selector with a screwdriver until the appropriate voltage number appears in the window (110 V, 127 V, 220 V or 230 V
- 240 V AC).
T
Connecting the AC power lead
After checking all the connections have been made correctly, connect the AC power lead to the AC power input socket, then plug the
AC power lead of this unit into the wall socket. If yo u plug in the unit
first, th e un it w ill enter th e de m on str a tion mode (s e e pag e 10).
Notes:
z
Unplug the AC power lead from the wall socket if the unit will not
be in use for a prolonged period of time.
z
Nev er us e a po w er le ad oth e r than the on e s uppl ie d. Other wi s e, a
malfunction or an accident may occur.
AC Plug Adaptor
In areas (or countries) where a wall socket as shown in illustration
is used, connect the unit using the AC plug adaptor supplied with
the unit, as illustrated. The AC plug adaptor is not included in areas
where the wall socket and AC power plug can be directly connected
(see illustration ).
9
02/5/27 CD-XP160W(SCA)E1.fm
Page 11

Setting the FM/AM span selector
The International Telecommunication Union (ITU) has established
that memb er cou nt ries shou ld mai ntai n ei the r a 100 kH z or a 50 kHz
interval between broadcasting frequencies of FM stations and 10
kHz or 9 kHz for AM station. The illustration shows the 50/9 kHz
zones (regions 1 and 3), and the 100/10 kHz zone (region 2).
Before using the u ni t, set the
panel) to the interval (span) of your area.
To change the tuning zone:
1 Press the ON/STAND- BY butt on t o en t e r t he stand-b y mode.
2 Set the SPAN SELECTO R switch (on the rear panel) as follows.
z
For 100 kHz F M interva l (10 kH z i n AM) 100/10
z
For 50 kHz FM interval (9 kHz in AM) 50/9
3 Whilst pressing down the TUNER (BAND) button and the DISC
SKIP button , press th e ON/S TAND-B Y butto n until "C LEAR" ap pears.
Caution:
This operation will erase all data stored in memory including clock,
timer settings, tuner preset, and CD programme.
SPAN
SELECTOR switch (on the rear
Demonstration mode
The first time the uni t is plugged in , the
unit will enter the demonstration mode.
You will see words scroll.
To cancel the demonstration mode:
When the unit is in the power stand-by mode (demonstration mode),
press the EQUALIZER/X-BASS/ DEMO button. The demonstration
mode will be cancelled and the display
To return to the demonstration mode:
When th e unit is in the power st and-by mode, press the EQUALIZER/X-BASS/DEMO button again.
Note:
When the power is on, the EQUALIZER /X-BASS/DE MO button can
be used to select the pre-programmed equaliser and extra bass
modes.
To turn the power on
Press the ON /S TAND-BY button to turn th e pow er on .
After use:
Press the ON/STAND-BY button to enter the power stand-by
mode.
will di sappear
.
CD-XP160W
- System connections -
Preparation for Use
02/5/27 CD-XP160W(SCA)E1.fm
10
Page 12

CD-XP160W
Remote control
T
Battery installation
1 Remove the battery cover.
2 Insert the batteries according to the direction indicated in
the batte ry comp a rtm ent.
When inserting or removing the batteries, push them towards the
battery terminals.
3 Repl ac e the cove r.
T
Test of the remote control
Check the remote control after checking all the connections (see
pages 7 - 9).
Point the remote control directly at the remote sensor on the unit.
The remot e control ca n be used within the ran g e shown below:
Press the ON/STAND-BY button . Does the power t urn on ? Now, you
can enjoy music.
Remote sensor
11
Precau tio n s for b att e ry use :
z
Replace all ol d batteries wi t h new o nes at t h e same ti m e.
z
Do not mi x old and new batteries.
z
Remove the batteries if the unit is not to be used for long periods
of time. T his will p revent potential damage du e to batt ery leak age.
Caution:
- Rem ote co n t rol -
z
Do not use rec ha rge able ba tteries (nickel-c ad m iu m bat tery, etc.).
z
Installing the batteries incorrectly may cause the unit to malfunc-
Preparation for Use
tion.
Notes concerning use:
z
Replace the batteries if the operating distance is reduced or if the
operation becomes erratic. Purchase 2 "AA" size batteries (UM/
SUM-3, R6, HP-7 or similar).
z
Periodical ly clean t he transm itter on t he remot e control an d the
sensor on the unit with a soft cloth.
z
Exposing the sensor on the unit to strong light may interfere with
operation. Change t h e lighting or the dire c t ion o f the unit.
z
Keep the remo te control away from mo isture, heat, sh ock, and
vibrations.
0.2 m - 6 m
(8" - 20')
02/5/27 CD-XP160W(SCA)E2..fm
Page 13

Sound control
T
Pre-programmed equaliser/Ext ra bass
(X-BASS)
When the power is first turned on, the unit enters the X-BASS mode,
“X-BASS” is lit and the equaliser is set to FLAT.
Changing the mode:
Press the EQUALIZER/X-BASS/DEMO (EQUALIZER MODE) button repeatedly until the desired sound mode appears.
FLAT (X-BASS off)
JAZZ (X-BASS off)
The sound is not modified.
Treble is cut a little.
CD-XP160W
T
Volume control
Main unit operation:
the or button
Press
Remote control operation:
Press the VOLUME (+ or -) button to increase or decrease the volume.
to increase or decrease the volume.
.....
12 29 30 VOLMAXVOLMIN
ROCK (X-BASS off)
CLASSIC (X-BASS off)
POPS (X-BASS off)
VOCAL (X-BASS off)
FLAT (X-BASS on)
To enter o r can c el the extra bas s mode by the remot e control:
Press the X-BAS S button to light u p “X-BAS S”. The un it enters the
extra bass mode. Turn off “X-BASS” to cancel the extra bass mode.
Bass and treble are emphasised.
Treble is reduced a lot.
Bass and treble are slightly emphasised.
Vocals (midrange tones) are emphasised.
Bass frequencies are emphasised.
02/5/27 CD-XP160W(SCA)E2..fm
- Sound control -
Basic Operatio n
12
Page 14
CD-XP160W
Basic Operatio n
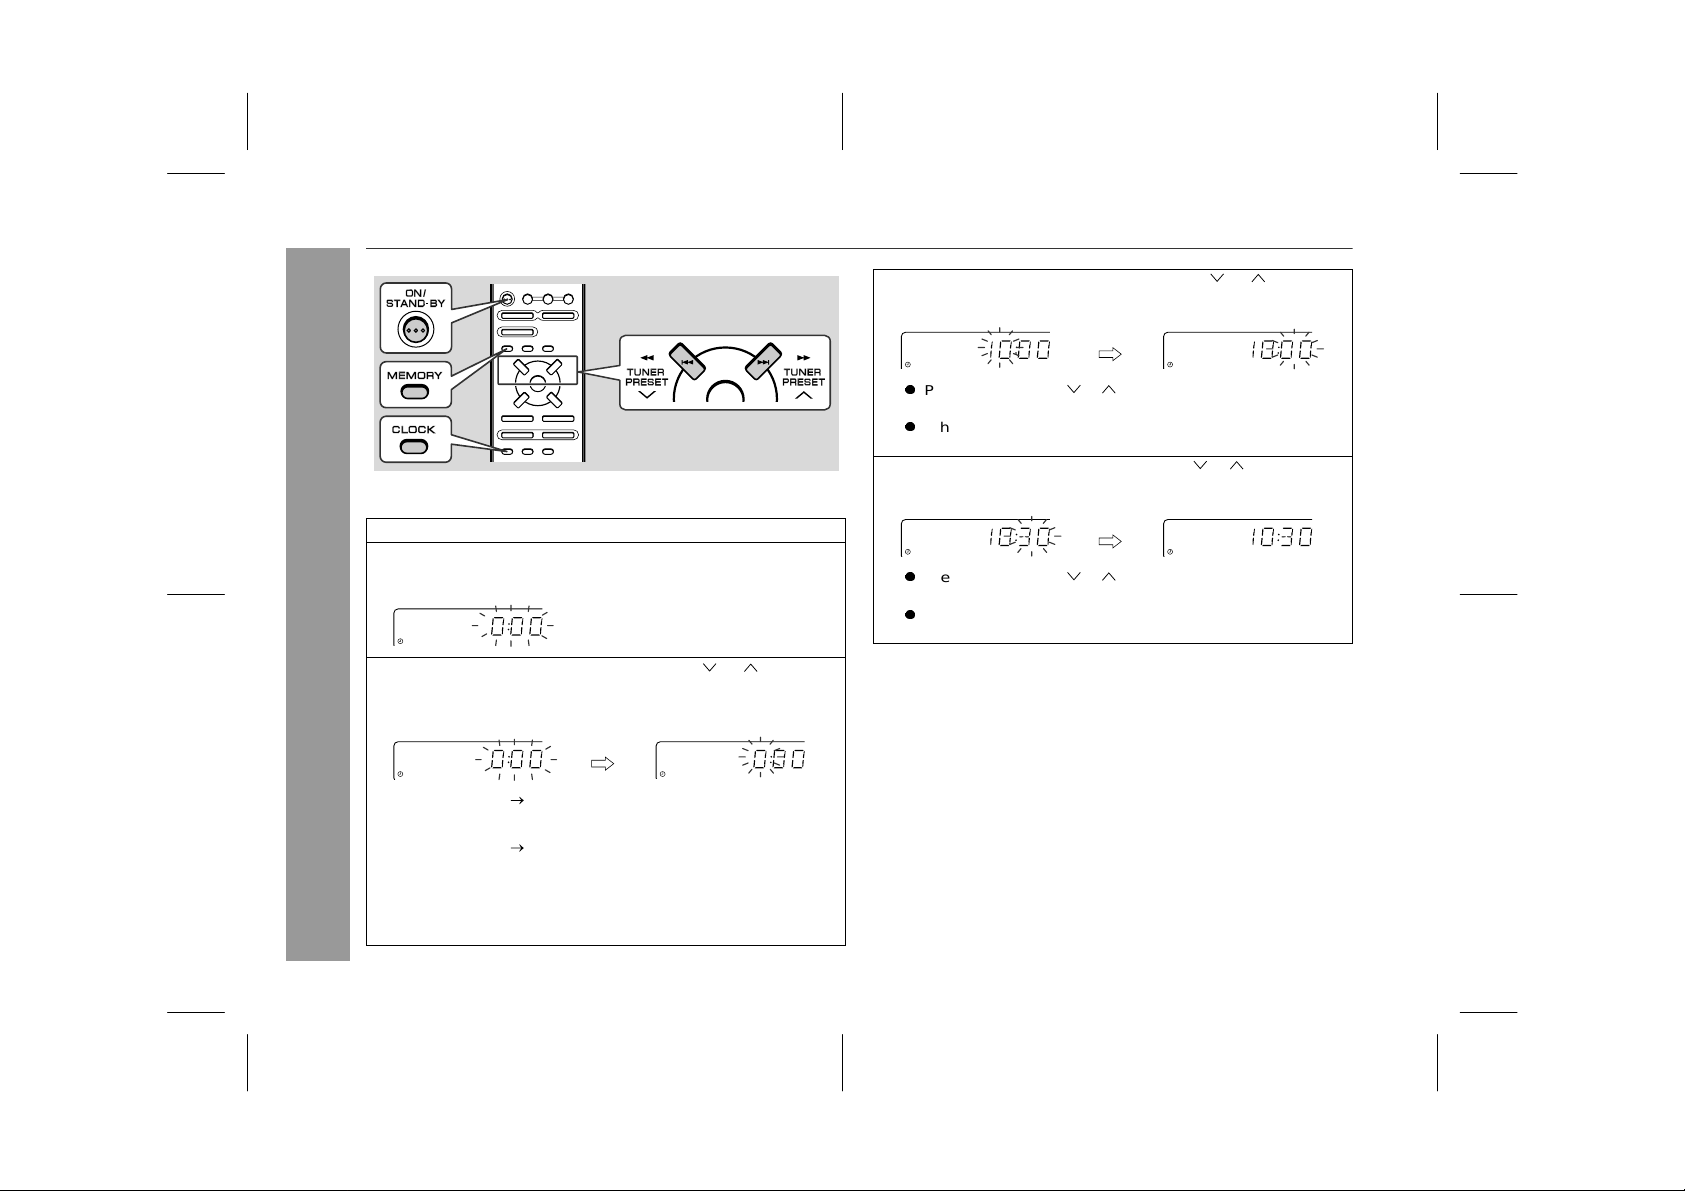
Setting the c l o ck
This may be operated only with the remote control.
In this example, the clock is set for the 24-hour (0:00) display.
1 Press the ON/STAND-BY button to turn the power on.
2 Press the CLOCK butto n and within 8 se conds, press the
MEMORY button.
3 Within 30 seconds, press the PRE SET ( or ) butt on to
selec t 24-h ou r or 12 - hou r di spla y an d th en press th e MEM -
- Setting the clock -
ORY button.
"0:00" The 24-hour display will app e a r.
(0:00 - 23:59)
"AM 12: 0 0" The 12-hour display will app ear.
(AM 12:00 - PM 11:59)
Note t hat this can only be set when the unit is first installed or it
has been reset. [Refer to "Clearing all the memory (reset)" on
page 27 for details.]
4 Within 30 second s, press the PRESET ( or ) button to
adjust the hour and then press the MEMORY button.
z
Press the PRESET ( or ) button once to advance the time
by 1 hour. Hold it dow n to adva nce co ntinuously.
z
When the 12-hour display is selected, "AM" will change automatically to "PM".
5
Within 30 seconds, press the PRESET ( or ) button to adjust the m i n u te s a n d then p r es s th e MEMOR Y button.
z
Press the PRESET ( or ) button once to advance the time
by 1 minut e. H o ld it dow n to ad vance co ntinuo us ly .
z
The hour will not advance even if minutes advance from "59 "
to "00".
To confirm the time display:
Press the CLOC K button.
The time display will appear for about 8 seconds.
Note:
The time will flash at the push of the C LOCK butto n when the AC
power supply is restored after a power failure or unplugging the unit.
Readjust the clock as follows.
To readjust the clock:
Perform "Setting the clock" from the beginning. If the "0:00" is not
flashin g in st ep 2, step 3 ( for sele cting the 24 -hour o r 12-h our d isplay) will be skipped.
To chan ge the 24-hour or 12-hour display:
1 Clear all the pro grammed contents. [R efer to " Clearing a ll the
memory (reset)" on page 27 for details.]
2 Perform "Setting the clock" from the beginning.
13
02/5/27 CD-XP160W(SCA)E2..fm
Page 15

Listening to a CD (CDs)
CD-XP160W
This system can also play audio CD-R and CD-RW discs, but cannot record.
Some au dio CD-R an d CD-RW discs may not be playable due to the
state of disc or the device tha t wa s used f or recording.
T
CD playback
1 Press the ON/STAND-BY button to turn the power on.
2 Press the CD button.
3 Press the OPEN/CLOSE button to ope n the di sc tray.
4 Place the CD(s) on the disc tray, label side up.
When lo ading a th ird d is c, pr ess the DISC S K IP bu tto n to
turn the disc tray, then place the CD in the open position.
z
CDs c an be placed on any open posit ion on the disc tr ay .
z
Be sure to p lace 8 cm (3" ) C D(s) i n th e mi dd le of the disc positions.
12 cm (5") 8 cm (3")
5 Press the OPEN/CLOSE butto n to close the disc tray.
Total number of tracks on
the CD whose number is
flashing
Total pl ayin g tim e of the CD
whose number is flashing
6 To select the CD you want to liste n to first , press one of
1 - 3 buttons on the remote control.
7 Press the / button to start playback.
z
Playback w i ll beg in from tra ck 1 on the disc you have select ed to play. After that disc finishes playing, the next disc will
automatically start playback.
z
When the last track on the third disc has finished playing, the
CD player will automatically stop.
z
When there is no CD in one of the disc 1 - 3 positions, that
position will be skip ped and the next CD will begin to play.
CD Pl ayb ack
- Listening to a CD (CDs) -
02/5/27 CD-XP160W(SCA)E2..fm
14
Page 16

CD-XP160W
Listening to a CD (CDs) (continued)
To interrupt playback:
Press the CD button on the remote control.
To resume playback from the same poin t, press
To stop playback:
Press the button.
T o remove the CDs:
Whilst in the sto p mode, pre s s t he OPEN/CL OSE button .
The disc t r a y w ill o pen . Remo v e th e t wo di sc s . The n, pres s th e DI SC
SKIP butt on t o r o t at e t he disc tray and r em ove the rema ining dis c .
Caution:
z
If you tilt the unit forward in th e power sta nd-by mode, t he disc
tray will open. The un it or CD may be da ma ge d.
z
Do not place two CDs in one disc tray.
z
Do not play discs with special shapes (heart- or octagonshaped). It may cause malfunctions.
z
Do not push the disc tray whilst it is moving.
z
Do not t urn the disc t ray by hand. Thi s may cause malfunctio ns.
z
If the pow er fails whilst t he tray is open , wait until the power is
restored.
z
If the di sc tray is st opped wi th force, "OP EN" will ap pear in t he
CD Pl ayb ack
display. If this occurs, press the OPEN/CLOSE button.
z
If TV or rad io inte rferen ce occ urs du rin g CD operation , move the
unit away from t he TV or radi o.
- Listening to a CD (CDs) -
z
If a disc is damaged, dirty, or loaded ups ide down, th e disc will
skip or not playback.
the button
T
To locate the beginning of a track
To move to the beginning of the next track:
.
Press the button for less than 0.5 seconds during playback.
To restart the track being played:
Press the button for less than 0.5 seconds during playback.
Notes:
z
You can locate t he be ginnin g of a track on a sin gle disc
z
You can skip to any track by pressing the or button
repeatedly until the desired track number appears.
T
To locate the desired po rtion
For audible fa st forward:
Press and hold down the button during playback.
For audible fa st reverse:
Press and hold down the button during playback.
Notes:
z
Normal playback will resume when the or button is
released.
z
You can locate the desired portion on a single disc only.
z
When th e end of th e la s t trac k is reach ed during fast forward, the
unit will en t er th e stop mo de. Whe n th e begi nn in g of the fir st tra c k
is reached during fast reverse, playback will start when you
releas e the
button.
only
.
15
02/5/27 CD-XP160W(SCA)E2..fm
Page 17

Advance d CD playback
T
Starti n g playback with a desired track
You can pl ay a disc s t arting wit h the des ired track.
1 Whil st in the stop mo de, pr ess one of
on the remote control or DISC SKIP button to select the desired disc.
2 Press the or button to select the desired track.
Selected disc numb e r
Selected track number
3 Press the / button to start playback.
Playba ck of the selected t r ac k is started. When the end of las t
track of the disc selected is reached, the next disc will be automatically st ar t e d .
Notes:
z
When the DISC SKIP button is pressed during playback, the next
disc will begin automatically.
z
When one of the 1 - 3 buttons on the remote control is
pressed during playback, the selected disc will begin automatically.
z
If you s el ect a disc with t he 1 - 3 buttons and a track with
the or button , a tra ck numbe r exce edi ng the to ta l tra ck
number on the disc may be displayed (maximum 99). In this
case , t he last tra ck on the s elected disc is p layed back.
the 1 - 3 buttons
T
Repeat play
All tracks on up to 3 discs, or a programmed sequence can be continuous ly repe ated.
To repeat all tracks on up to 3 discs:
Press the / button twice.
To repeat a desired track:
Perform steps 1 - 4 in the "Programmed play" section on page 17
and then press the / button twice.
To cancel repeat play:
Press the / button again. " " will go out.
T
Random play
The tracks on the disc(s) can be played in random order
cally
.
Press the RANDOM button on the remote control to begin random play.
To cancel random play:
Press the RANDOM button.
Notes:
z
If you pr ess t he button du r ing ran do m pl ay, you can move to
the track selected next by the rand om operation. O n the other
hand, the button do es n ot allow yo u t o move to the p revious
track. The beginning of the track being played will be located.
z
In random play, the CD player will select and play trac ks automatically. (You cannot select the order of the tracks.)
Caution:
After performing repeat or random play, be sure to press the button. Otherwise, the disc(s) will play continuously.
automati-
CD-XP160W
CD Pl ayb ack
- Advanced CD playback -
02/5/27 CD-XP160W(SCA)E2..fm
16
Page 18
CD-XP160W
Advanced CD playback (continued)
T
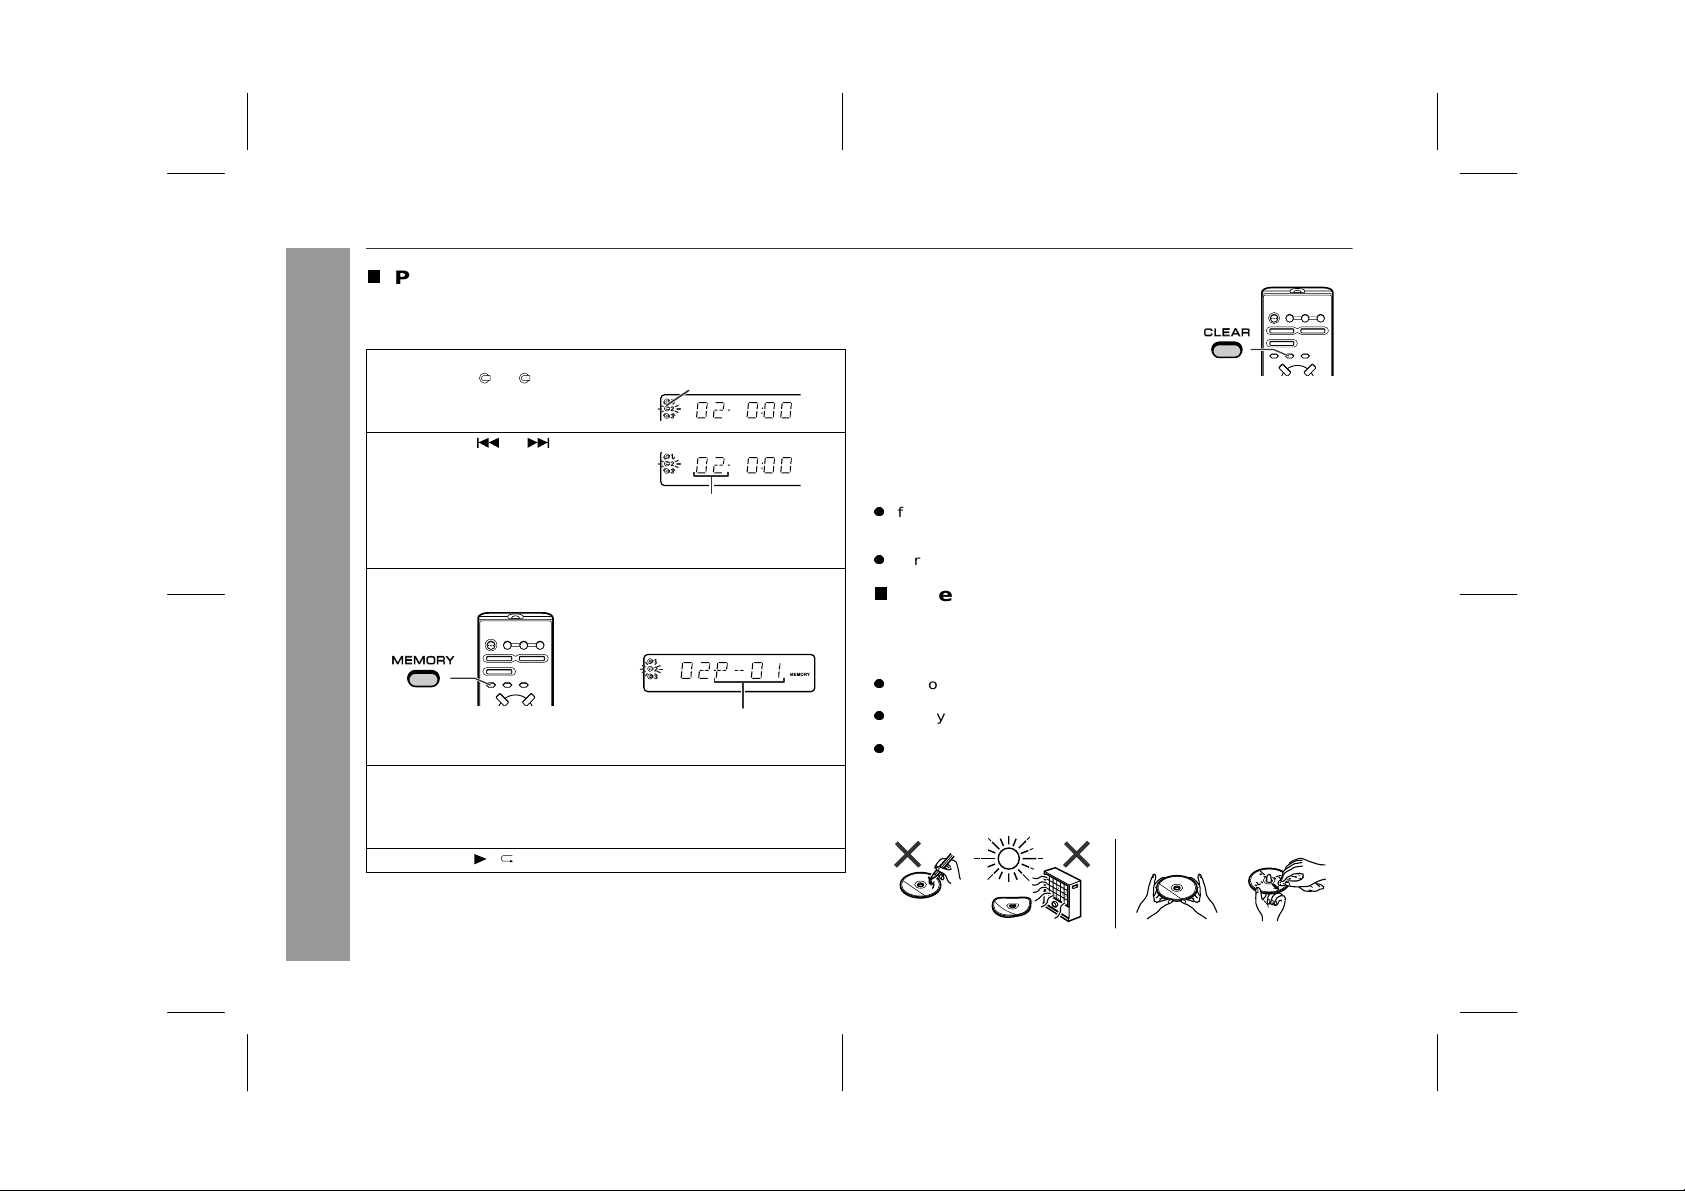
Programmed play
This may be operated only with the remote control.
You can choose up to 20 selections for playback in the order you
like.
1 Whilst in the stop mode, press
one of the 1 - 3 buttons to
select the desired disc.
2 Press the or button to
select the desired track.
If you select and memorise a track whose number exceeds the
last track number on the disc, it will not be played back.
3 Press the MEMO RY button to save the track num ber.
Selected disc number
Selec t ed t rack nu mb er
CD Pl ayb ack
- Advanced CD playback -
When the track is memorised, "MEMORY" will appear.
4 Repeat step s 1 - 3 for o t her tracks. Up to 20 t racks ca n b e
programmed.
If you make a mi st ake, the pr ogram m ed tracks ca n be cle ared
by pressing the CLEAR button.
5 Press the / button to start playback.
Play back orde r
To clear the programmed selections:
Whilst the "MEM ORY" indic ator is lit, s et the
CD to the stop mode and then press the
CLEAR button.
Each tim e the button is pressed, on e track
will be clea red, be ginn ing wit h the last tr ack
programmed. When all the tracks are
clear ed, "MEMORY" will disappear.
Adding tracks to the programme:
If a programme has been previously stored, the "MEMORY" indicator will be di sp layed. Then follow steps 1 - 3 to add tr a cks. The n ew
tracks will be stored after the last track of the original programme.
Notes:
z
If you open the dis c
stand-by mode, the programmed sequence is automatically cancelled.
z
Duri ng p rogra mme operati on, random play is not possible.
T
Care of compact discs
Compact discs are fairly resistant to damage, however mistracking
can occ ur due t o an ac cumulation of dirt on the disc surface. Follow
the guid elines below for maximum e njoyment from your CD colle ction and player.
z
Do not write on either side of the disc, particularly the non-label
side from w h ic h si gnals are r e ad . Do not mark this surf ace.
z
Keep your discs away from direct sunlight, heat, and excessive
moisture.
z
Always hold the CDs by the edges. Fingerprints, dirt, or water on
the CDs can cause noise or mistracking. If a CD is dirty or does
not play properly, clean it with a soft, dry cloth, wiping straight out
from the centre, along the radius.
NO YES
tray
, chan ge to another func tion o r en t e r the
Correct
17
02/5/27 CD-XP160W(SCA)E2..fm
Page 19

Listening to the radio
3 Press the TUNING ( or ) button to tune in to the de-
sired station.
Manual tuning:
Press t he TUNING butt on as many times as required to tune in
to the desired statio n.
Auto tuning:
When th e TUNING butt on is presse d for more tha n 0.5 seconds, scanning will start automatically and the tuner will stop at
the first receivable broadcast station.
Notes:
z
When radio interference occurs, auto scan tuning may stop
automatically at that point.
z
Auto scan tuning will skip weak signal stations.
z
To stop the au t o tuning , pr es s the TUN IN G button aga in .
To receive an FM stereo t ransmission:
Press the TUNER (BAND) button to display the "ST" indicator.
z
" " will appear when an FM broadcast is in stereo.
FM stereo mode indicator
CD-XP160W
Radio
- Listening to th e radio -
T
Tuning
1 Press the ON/STAND-BY button to turn the power on.
2 Press the TUNER (BAND) button repeatedly to select
the desired frequency band (FM or AM).
FM ster eo receiving in dic ator
z
If the FM reception is weak, press the TUNER (BAND) button to
extinguish the "ST" indicator. The reception changes to monaural, and th e so un d becom es cl ear er.
Note:
This product can receive FM stereo/FM monaural and AM monaural
broadc asts. AM stereo broadcasts will not be played in stereo.
02/5/27 CD-XP160W(SCA)E2..fm
18
Page 20

CD-XP160W
Listening to the radio (continued)
Listening to a cassette tape
T
Memorising a stat i o n
This may be operated only with the remote control.
You can store 30 A M and FM stations in memo ry and recall them at
the push of a button . (P reset tuni ng )
1 Perform steps 1 - 3 in
2 Press the MEMO RY button to
enter t he preset tun ing saving mode.
3
Within 5 seconds, press the PRESET ( or ) button to
select the pr eset channel number.
Store the stations in memory, in order, starting with preset
channel 1.
4 Within 5 seconds, press the
MEMORY button to store that
station in memory.
If the preset number indicators go out before the station is
memorised, repeat the operati on from step 2.
5 Repeat steps 1 - 4 to set other stations, or to change a pre-
set station.
When a new station is stored in memory, the station previously
memorised will be erased.
Note:
Radio / Tape Playback
The backup function protects the memorised stations for a few
hours s hould there be a power failu re or if the AC power lead d isconnected.
T
To reca l l a memo r i sed station
- Listening to the radio / Listening to a cassette tape -
Press th e PRES ET ( or ) button t o select the desi red station.
"Tuning"
on page 18.
Before play back :
z
For playback, u se no rmal o r low-no ise ta pes for
the best sound. (Metal or CrO tapes are not recommended.)
z
Do not use C-120 tapes or poor-quality tapes, as
they may caus e malfun ctions.
z
Before loading a tape into the cassette compartment, tighten the slack with a pen or a pencil.
19
02/5/27 CD-XP160W(SCA)E2..fm
Page 21
T
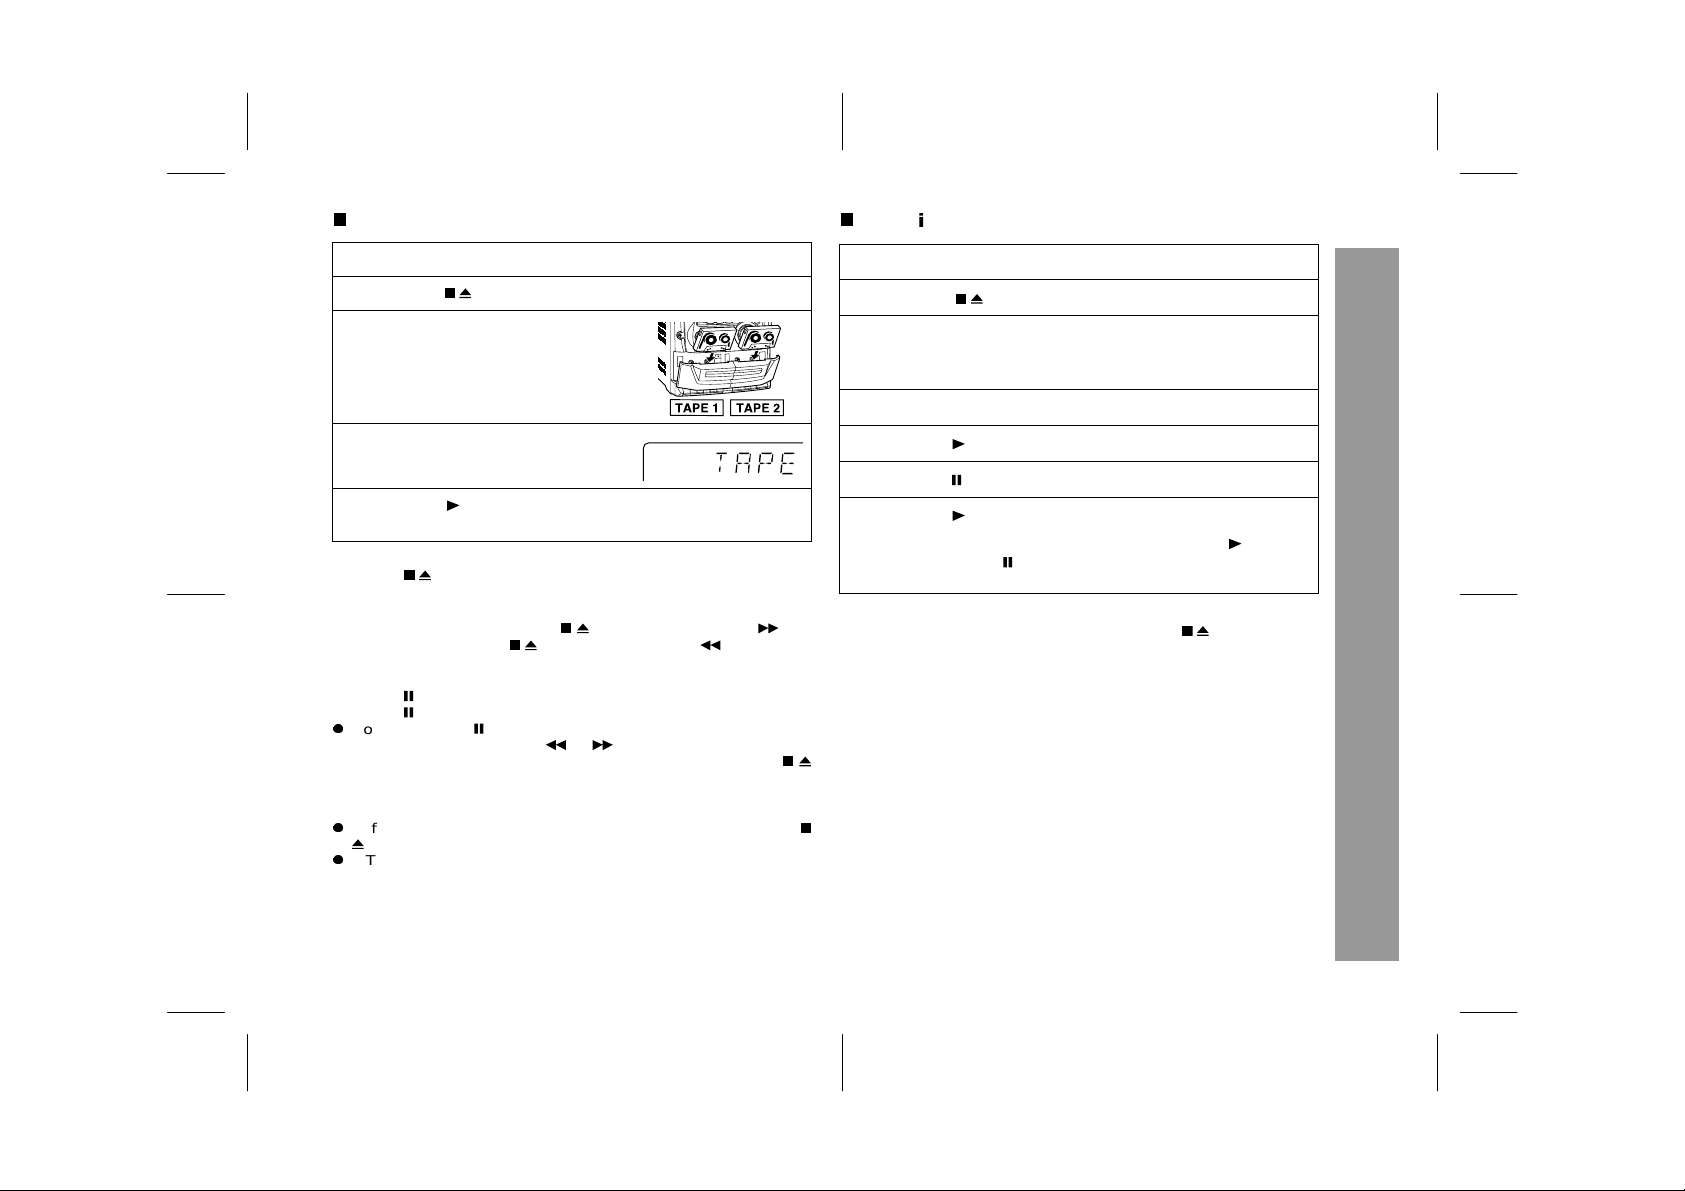
TAPE 1 or TAPE 2 playback
1 Press the ON/STAND-BY button to turn the power on.
2 Press the
button to open the cassette door.
3 Load a cassette into the TAPE 1
or TAPE 2 cassette compartment with the side to be played
facing toward you.
4 Press the TAPE button.
5 Press the button of TAPE 1 or TAPE 2 to start play-
back.
To stop playback:
Press the
Fast forward/rewind:
To advance the tape, press the
ton. To rewin d, press the
To interrupt playback (TAPE 1 only):
Press the button during playback.
Press the button again to resume playback.
z
Do not press the button whilst the fast forward or rewind operations a re in progre ss. The or button will n ot be rele ased
when the tape end is reached. Once this occurs, press the
button.
Caution:
z
Before changing from one tape operation to another, press the
button.
z
If TAPE 1 and TAPE 2 are played simultaneously, only the sound
from TAPE 2 will be audible.
button.
button, th en p ress the but -
button, then press the button.
T
Continuous playback (TAPE 2 to TAPE 1)
1 Press the ON/STAND-BY bu tton to turn the power on .
2
Press the button to open the cassette door.
3 Load cassettes into the TAPE 1 and TAPE 2 cassette
compartments with the side to be played facing toward
you.
4 Press the TAPE button.
5 Press the button of TAPE 2.
6 Press the button of TAPE 1.
7 Press the button of TAPE 1.
When TAPE 2 stops at the end of t he tape, the button of
TAPE 2 and the button of TAPE 1 will be automatically
released, and T APE 1 will start playing.
Note:
When in the continuous play mode, pressing the
2 will sta rt TAPE 1 aut o matica lly.
button of TAPE
CD-XP160W
Tape Playback
- Listening to a cassette tape -
02/5/27 CD-XP160W(SCA)E2..fm
20
Page 22

CD-XP160W
Playing karaoke
T
Karaoke play
1 Turn the MIC LEVEL co nt ro l ful ly anti-clockwis e to pro-
tect the speakers from shock noise and to avoid disturbing noises.
2 Connect the mic r ophone to the MIC socke t .
z
Karaoke
- Playing karaoke -
Use a mic rophon e with a 6. 3 mm (1/4 " ) plug, an impeda n ce
of 600 ohms.
z
Use a stan dard plug adaptor when u sing a microphone with
a 3.5 mm (1/8") di am eter plug.
3 Press the ON/STAND-BY button to turn the power on.
4 Press the CD, TUNER or TAPE button to select the au-
dio source and play it.
5 Adjust the volume of the audio source using the VOL-
UME buttons .
6 Rotate the MIC LEVEL cont rol clockwi se to increas e the
micropho ne vol ume and anti-clockwise to decrease it.
Notes:
z
When you sing too loud through the microphone, your voice may
be distorted depending on the devices connected. If this happens, lower the microphone volume.
z
If an extremely sensitive microphone is used, howling may be
generated.
z
Unidir e ctional m ic r ophone is more ap propriate for voc a l use.
If squealing occurs:
z
Reduce the mi cropho ne volum e.
z
Change the direc tio n of the micr o ph on e.
z
Reduce the volume of the main unit.
z
Move the microphone away from the speakers.
Caution:
z
When not using the microphone, remove it from the MIC socket.
z
When connecting or disconnecting the microphone, turn the MIC
LEVEL contro l fully an ti- cl ockwise.
T
Recording of mixed sound to a cassette
tape
You can record mixed sound from the microphone and CD, TUNER
or TAPE 2.
1 Perform steps 1 - 3 above.
2 Load a cassette into the TAPE 1 cassette compartment.
3 Perform steps 4 - 6 above.
4
Press the button
5
Press the button
6
Press the button
Note:
To record the microphone signals only, load a cassette into the
TAPE 1 cassette compartment and press the TAPE button. Then,
press the button of TAPE 1.
of TAPE
of TAPE
of TAPE
1.
1, which also engage s the button.
1 again to begin recording.
21
02/5/27 CD-XP160W(SCA)E3.fm
Page 23

Recording to a cassette tape
CD-XP160W
Before recording:
z
When recording important selections, make a preliminary test to
ensure that the desired material is properly recorded.
z
SHARP is not liable for damage or loss of your recording arising
from malfunction of this unit.
z
The volume and sound controls can be a d justed with no effe c t on
the recorded signal (Variable Sound Monitor).
z
For reco rding, use only normal tape s. Do not u se metal o r
CrO tapes.
z
Recording can be operated in the TAPE 1 compartment. The
TAPE 2 is for playback only.
Erase-prevention tab of cassette tapes:
z
When recording on a cassette tape,
make sure that the erase-prevention
tabs are not removed. Cassettes have
removable tabs that prevent accidental
recording or erasing.
z
To protect the recorded sound, remove
the tab after recording. Cover the tab
hole with adhesive tape to record on the
tape witho ut the tab.
Tab for
side B
Side A
Tab for
side A
T
Recording from a CD (CDs)
You can record 3 CDs continuously.
1 Press the ON/STAND-BY bu tton to turn the power on .
2 Load a cassette into the TA PE 1 cas sette compartment
with the side to be recorded on facing you.
Wind past the leader of the tape, on which recording cannot be
performed.
3 Press the CD button and load the desired disc.
4 Press one of the 1 - 3 buttons on the remote contr ol
to select the disc to be recorded first.
5 Press the button of TAPE
1, which also en gag es the
button.
CD
playback
T o stop recording:
Press the
To perform programmed recording:
1 Pre ss the CD button.
2 Programme discs and tracks (see page 17).
3
Press the button of T APE 1, which also engages the button.
and tape recording wil l sta rt.
button of TAPE 1.
Tape Recording
- Recording to a cassette tape -
02/5/27 CD-XP160W(SCA)E3.fm
22
Page 24

CD-XP160W
Tape Recording
Recording to a cassette tape (continued)
T
Recording from the radio
1 Tune in to the desired station (see page 18).
2 Load a cassette int o the TAPE 1 ca ssette compartment
with the side t o be r ecorded on facing you.
Wind pa st the leader of t he t a pe, on wh ic h re co r ding ca nn ot be
performed.
3 Press the button of TAPE 1.
4 Press the button of TAPE 1,
which also engages the button.
5 Press the button of TAPE 1 again to begin recording.
To stop recording:
Press the
Note:
If you hear a whistling noise whilst recording an AM station, move
the AM loop aerial.
T
Erasing recorded tapes
- Recording to a cassette tape -
1 Load the tape to be erased i nto the TAPE 1 cassette co mpart -
ment with the side to be erased facing toward you.
2 Pre ss t he TAPE bu tton.
3
Press the button of TAPE 1, which also eng ag es th e
to begin eras in g.
Notes:
z
Do not co nnect anything to the MI C s ocket.
z
Make su re that t h e TAPE 2 is not in use.
button of TAP E 1.
button
T
You c an reco rd from TAPE 2 to TAPE 1.
To stop dubbing:
Press the
Dubbing from tape to tape
1 Press the ON/STAND-BY button to turn the power on.
2
Load a prerecorded cassette
into the TAPE 2 cassette
compartment. Insert a blank
tape into the TAPE 1 cassette
compartment.
It is recommended that the recording tape is the same length as the
master tape.
3 Press the TAPE button.
4 Press the button of TAPE 1.
5 Press the button of TAPE 1, which also engages the
button.
6 Press the button of TAPE 2.
The button of T APE 1 will be released automatically and dubbing from TAPE 2 to TAPE 1 will begin.
button of TAPE 1.
23
02/5/27 CD-XP160W(SCA)E3.fm
Page 25

Timer and sleep operation
CD-XP160W
This may be operated only with the remote control.
Timer playback:
The un it turn s on and plays the desire d source (CD, tuner) a t the
preset time.
Sleep operation:
The radio, compact disc and cassette tape can all be turned off
automatically.
T
Timer playback
Before setting timer:
1 Press the CLOCK button to check that the cl ock is set to the
correct time. (Refer to page 13.)
2 Loa d the discs t o be playe d.
1 Press the ON/STAND-BY bu tton to turn the power on .
2 Press the CD or TU NE R (BAND) button to se lect the de-
sired function.
When you selected the TUNER (BAND), tune into the desired
station.
3 Adjust the volume using the VOLUME buttons.
Do not turn the volume up too high. Timer playback starts at
the volume yo u se t here.
4 Press the TIMER button and within 8 seconds, press
the ME MORY butto n.
5 Within 30 seconds, press the PRESET ( or ) button
to specify the hour to start, then press the MEMORY
button.
Advanced Features
- Timer and sleep operatio n -
- Timer and sleep operation -
02/5/27 CD-XP160W(SCA)E3.fm
Continued to the next page
24
Page 26
CD-XP160W
Timer and sleep operation (continued)
6
Within 30 seconds, press the PRESET ( or ) button to specify the minute to start, then press the
MEMORY button.
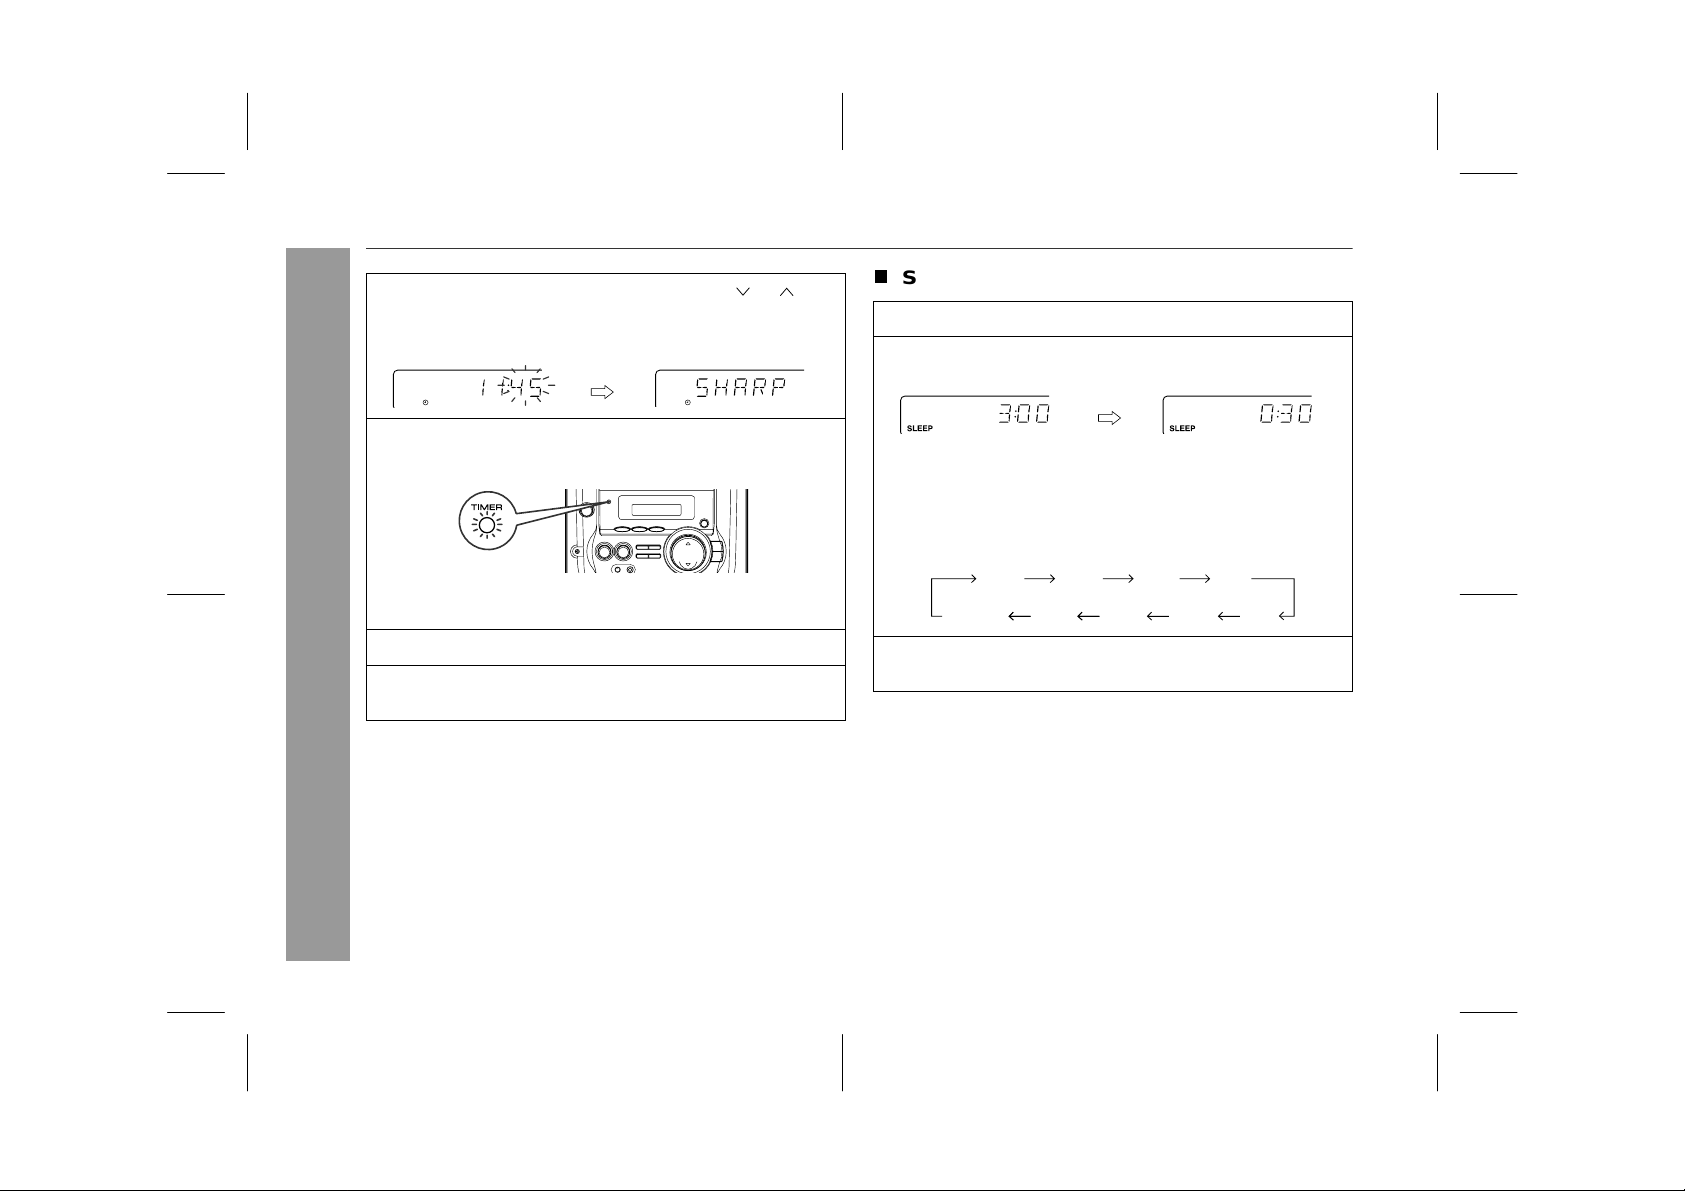
T
1 Play back the desired sound source.
2 Press the SLEEP button.
Sleep opera tio n
Advanced Features
25
7 The unit will enter the timer stand-by mode automati-
cally.
T o cancel the timer playback:
Press the ON/STAND-BY button to turn the power on.
8 When the preset ti m e is reached, playback will start.
9 It will enter the power stand-by mode one hour after the
timer playback starts.
To reset or change the time r setting:
- Timer and sleep operatio n -
Perform "Timer playback" from the beginning.
Caution:
Do not turn t he volu me up too hi gh. Playba ck st arts at th e volume
set before enteri ng the timer stand-by m ode.
T o change the sleep time:
Press the SLEEP button repeatedly to select the desired sleep
time. The time will decrease as follows.
The am ount of s leep ti me can also be c hanged whilst i n the
sleep mode.
3:00 2:00 1:30 1:00
0:10
0:15 0:300:05(cancel)
3 Your system will enter the power stand-by mode auto-
matically after t he preset tim e has elapsed .
T o cancel the sleep operation:
Press the ON/STAND-BY button whilst the sleep timer is set.
To confirm the remaining sleep time:
Press th e S LE E P but to n whilst the sl ee p ti m er is se t.
The remaining sleep time is displayed for about 3 seconds.
Note:
When yo u use the sleep op eration with a casset te, set the sleep
time long er tha n the re maini ng pl ayback time o f the cas sett e. If the
unit ente rs the st and-by mode befor e the cass ette reaches its end ,
the cassette mechanism or the tape may be damaged.
02/5/27 CD-XP160W(SCA)E3.fm
Page 27

Troubleshooting chart
CD-XP160W
Many potential problems can be resolved by the owner without calling a service technician.
If somethin g is wrong with th is product, che ck the following before
calling your authorised SHARP dealer or service centre.
T
General
Sympt om Possib le cause
z
The clock is not set to the
correct time.
z
When a butto n is pr es sed ,
the unit does not respond.
z
No sound is heard.
T
CD player
Sympt om Possib le cause
z
Playba c k do es n ot st art.
z
Playback stop s i n th e m iddle or is not performed
properly.
z
Playback sounds are skipped,
or sto pped i n t he mi ddle o f a
track.
z
Did a power failure occur? Reset
the cloc k. ( R e fer to page 13.)
z
Set this uni t to the power s tandby mode and then turn it back on.
z
If the unit still malfunctions, reset
it. (Refer to page 27.)
z
Is the volum e lev el set to "MI N" ?
z
Are the headphones connected?
z
Are the speaker wires disconnected?
z
Is the disc loaded upside down?
z
Does the disc satisfy the standards?
Is the disc distorted or scratched?
z
z
Is the unit locat ed ne ar excess ive
vibrations?
z
Is the disc ver y dirty ?
z
Has condensation formed inside
the unit?
T
Tuner
Symptom Possible cause
z
The ra dio m akes unusu al
noises continuously.
T
Cassette deck
Symptom Possible cause
z
Cannot reco r d.
z
Cannot reco rd tr ack s with
proper sound quality.
z
Cannot eras e co mplete ly .
z
Sound skipping.
z
Cannot hea r tre bl e.
z
Sound fluctuation.
T
Remote control
Symptom Possible cause
z
The remote control does
not op erate.
z
Is the un it plac ed ne ar th e TV or
computer?
z
Is the FM aer ia l or A M lo op aerial
placed properly? Move the aerial
away fr om the AC p ower lead i f
it’s lo c ated nearby.
z
Is the erase-prevention tab removed?
z
Is it a norm al tape ? (Y ou c anno t
record on a metal
z
Is there any slack?
z
Is the tape stretched?
z
Are the capstans, pinch rollers,
or heads dirty?
z
Is the AC po wer lead of th e unit
plugged in?
z
Is the ba ttery pola r it y r es pe c ted?
z
Are th e batteries dead?
z
Is the distance or angle incorrect?
z
Does the remote control sensor
receiv e st rong light ?
or CrO tape
.)
References
- Troubleshooting chart -
02/5/27 CD-XP160W(SCA)E3.fm
26
Page 28

CD-XP160W
References
Troubleshooting chart (continued)
T
If troubl e occurs
When this product is subjected to strong external interference
(mechanical shock, excessive static electricity, abnormal supply
voltage d ue to light ning, et c.) or if it is opera ted incorr ectly, it may
malfunction.
If such a problem occurs, do the following:
1 Set the unit to the stand-by mode and turn the power on again.
2 If the unit is not restored in the previous operation, unplug and
plug in the unit, and then turn the power on.
Note:
If neither operation above restores the unit, clear all the memory by
resettin g it.
T
Clearing al l the memory (reset)
1 Press the ON/STAND-BY button to enter the power stand-by
mode.
2 Whilst pressing down the TUNER (BAND) button and the DISC
SKIP button, press the ON/STAND-BY button until "CLEAR"
appears.
- Troubleshooting chart -
Caution:
This operation will erase all data stored in memory including clock,
timer settings, tuner preset, and CD programme.
T
Condensation
Sudden temperatur e changes, s tor a ge or opera tion in an extre mely
humid environment may cause condensation inside the cabinet (CD
pickup, tape heads, etc.) or on the transmitter on the remote control.
Condensation can cause the unit to malfunction. If this happens,
leave the power on with no disc (or cassette) in the unit until normal
playback i s poss ible (abo ut 1 hour). Wipe off any c onden sati on on
the transmitter wit h a soft cloth before operating the unit.
T
Before transporting the unit
1 Press the O N /S TAND-BY butt o n t o turn the power on.
2 Remove al l dis cs f r om t he un it and cl os e the di sc tray.
3 Press the ON/STAND-BY button to enter the stand-by mode.
z
“SHARP” is displayed.
4 When “SHARP” disappears, unplug the AC power lead from the
AC o utlet.
27
02/5/27 CD-XP160W(SCA)E3.fm
Page 29

Maintenance
T
Cleaning the tape-handling parts
z
Dir ty heads, capstan s or pinch r ollers can cause p oor sound a n d
tape ja ms. C lea n the se pa r ts with a co tto n swab mois tene d w ith
commercial head/pinch roller cleaner or isopropyl alcohol.
z
When cleaning the heads, pinch rollers, etc., unplug the unit
which contains high voltages.
C
B
TAPE 1
TAPE 2
A
E
D
C
D
T
Cleaning the cabinet
Periodically wipe the cabinet with a soft cloth and a diluted soap
solution , then w ith a dry cloth.
Caution:
z
Do not use ch emicals for cleani ng (petr ol, paint thinner, et c.). It
may damage th e ca bi ne t fi ni sh .
z
Do not ap ply oil to the inside of the unit . It may cause m alfunctions.
CD-XP160W
Erase head Pinch roller
z
Recor ding/P l ayb ack head Playback head
Capstan
After long use, the deck's heads and capstans may become magnetised, causing poor sound. Demagnetise these parts once
every 30 hour s of playi ng/re cord ing ti me by us ing a comme rcial
tape he ad demagnetis er. Rea d the demagnetiser's instructio ns
carefully before us e.
Headphones
z
Before plugging in or unplugging the headphones, reduce the volume.
z
Be sure your headphones have a 3.5 mm (1/8") diameter plug and
are between 16 ohms and 50 ohms impedance. The recommended impedance is 32 ohms.
z
Plugging in the headphones disconnects the speakers automatically. Adjust the volume using the VOLUME buttons.
References
- Maintenance / Headphones -
28
02/5/27 CD-XP160W(SCA)E3.fm
Page 30

CD-XP160W
Specifications
As part of our policy of continuous improvement, SHARP reserves
the right to make design and specification changes
improvement without prior no tice. The performance specificat ion figures in dicated are nominal values of productio n units. There may be
some devia tions f rom the se values in indivi dual un its.
T
General
Power source AC 110/127/220/230 - 240 V, 50/60 Hz
Power
consumption
Dimensions Width: 270 mm (10-5/8")
Weight 6.6 kg (14.5 lbs.)
T
Amplifier
Output power MPO: 100 W (50 W + 5 0 W)
References
- Specifications -
Output terminals Speakers: 6 oh ms
Input terminal Microphone: 1 mV/600 ohms
70 W
Height: 305 mm (12")
Depth: 343 mm (13-1/2")
RMS: 66 W (33 W + 33 W)
RMS: 55 W (27.5 W + 27.5 W)
T.H.D.)
Headphones: 16 - 50 ohms (recommended:
32 ohms)
(10 % T.H.D.)
for
product
(10 % T.H.D.)
(0.9 %
T
CD player
Type 3-disc multi-play compact disc player
Sign a l readout Non-contact, 3-beam semiconductor laser
D/A converter 1-bit D/A converter
Frequency
response
Dynamic range 90 dB (1 kHz)
T
Tuner
Frequency r ang e FM: 88 - 108 MHz
T
Cassette deck
Frequency
response
Sign al/noise ratio 50 dB (TAPE 1, recording/
Wow and flutter 0.3 % (WRMS)
T
Speaker
Type Twin-dr ive speaker syst em
Maximu m inp ut
power
Rated input power 33 W
Impedance 6 ohms
Dimensions Width: 200 mm (7-7/8")
Weight 2.6 kg (5.7 lbs.)/each
pickup
20 - 20,000 Hz
AM: 53 1 - 1,602 kHz
125 - 8,000 Hz (Normal tape)
50 dB (TAPE 2,
10 cm (4") woofer x 2
66 W
Height: 305 mm (12")
Dept h: 17 5 mm (6-9/16")
playback
playback
)
)
29
02/5/27 CD-XP160W(SCA)E3.fm
Page 31
WARRANTY
Consumer Electronic Products
Congratulations on Your Purchase!
This Sharp product is warranted against faults in materials and manufacture for a period of twelve (12) months
from the date of original purchase.
If service is required during the warranty period, please contact your nearest Sharp Approved Service Centre.
These repairs would be carried out at no charge to the owner, subject to the conditions specified herein.
The owner is responsible for any transportation and insurance costs if the product has to be returned for repair.
This warranty does not extend to accessories, defects or injuries caused by or resulting from causes not
attributable to faulty parts or the manufacture of the product, including but not limited to, defect or injury caused
by or resulting from misuse, abuse, neglect, accidental damage, improper voltage, liquid spillage, vermin
infestation, software, or any alterations made to the product which are not authorised by Sharp.
Please retain your sales documentation, as this should be produced to validate a warranty claim.
This warranty is in addition to and in no way limits, varies or excludes any express and implied rights and
remedies under any relevant legislation in the country of sale.
0212A
*CDXP160WSCA_OMA8 02.12.20, 4:15 PM1
Page 32

IMPORTANT
DO NOT RETURN THIS PAGE TO SHARP
For your reference, please enter the particulars of your purchase below and retain, with your purchase
documentation.
Model No.
Serial No.
Date of Purchase
Retailer
FOR LOCATION ENQUIRIES WITHIN
REGARDING YOUR
SHARP APPROVED SERVICE CENTRE
VISIT OUR WEBSITE AT
LOCAL CALL
SHARP CORPORATION OF AUSTRALIA PTY. LIMITED
1 Huntingwood Drive Blacktown NSW 2148
IMPORTANT NOTICE: This warranty applies only to products sold in Australia & New Zealand
*CDXP160WSCA_FRONT 02.12.20, 4:09 PM2
AUSTRALIA
LOCAL
www.sharp.net.au
OR CALL SHARP
1 300 135 022
A.B.N. 40 003 039 405
FOR PRODUCTS PURCHASED IN
CONTACT YOUR SELLING DEALER/RETAILER
SHARP CORPORATION OF NEW ZEALAND LIMITED
SHARP CORPORATION
NEW ZEALAND
OR CALL
SHARP CUSTOMER SERVICES
TELEPHONE:
FACSIMILE: 09 - 573 0113
WEB: www.sharpnz.co.nz
59 Hugo Johnston Drive, Penrose Auckland
09 - 573 0111
0212B
TINSE0136SJZZ
02M N YT 1
 Loading...