


BL820
®
OWNER’S GUIDE
MANUEL DU PROPRIÉTAIRE
GUÍA DEL USUARIO
www.ninjakitchen.com
1.877.646.5288

IMPORTANT SAFETY INSTRUCTIONS
For Household Use Only
WHEN USING ELECTRICAL APPLIANCES, BASIC SAFETY PRECAUTIONS SHOULD ALWAYS BE FOLLOWED, INCLUDING THE FOLLOWING:
READ ALL INSTRUCTIONS BEFORE USING YOUR NINJA ULTIMA™ SYSTEM.
POLARIZED PLUG
WARNING: To reduce the risk of electric shock, this appliance has a polarized plug (one blade is wider than the other). This plug will fit into a polarized outlet only one way. If the plug does not fit fully into the outlet, reverse the plug. If it still does not fit, contact a qualified electrician to install the proper outlet.
DO NOT modify the plug in any way.
 WARNING:
The blades are not affixed to the unit. They are removable and very sharp. Handle with care!
WARNING:
TO REDUCE THE RISK OF FIRE, ELECTRIC SHOCK OR INJURY:
1.To protect against electrical shock, do not submerge the appliance or allow the power cord to come into contact with water or any other liquid.
2.DO NOT allow young children to operate the appliance or use as a toy. Close supervision is necessary when any appliance is used by or near children.
3.Never leave an appliance unattended when in use.
4.Turn the appliance off and remove the power cord from the electrical outlet when not in use, before assembling or disassembling parts and before cleaning. To unplug, grasp the plug and pull from the electrical outlet. Never pull from the power cord.
5.DO NOT abuse the power cord. Never carry the appliance by the power cord or yank it to disconnect from electrical outlet; instead, grasp the plug and pull to disconnect.
6.DO NOT operate any appliance with a damaged cord or plug, or after the appliance malfunctions, has been dropped or damaged in any manner. This appliance has no serviceable parts. Return the appliance to EURO-PRO Operating LLC for examination, repair or adjustment.
7.DO NOT let the power cord hang over the edge of table or counter or touch hot surfaces such as the stove.
8.Always use the appliance on a dry, level surface.
9.Keep hands, hair, clothing, as well as utensils out of container while processing to reduce the risk of severe injury to persons or damage to the appliance. A scraper may be used but only when the appliance is off.
2 |
1.877.646.5288 |

English
10.CAUTION: The blades are not affixed to the unit. They are removable and extremely sharp. When handling the top blades or
the chopping blades, do not hold blades, but rather always hold by the shaft. Blades are sharp. Handle carefully!
11.Avoid contact with moving parts.
12.DO NOT attempt to sharpen blades.
13.DO NOT use the appliance if either set of blades are bent or damaged.
14.DO NOT operate this appliance on or near any hot surfaces (such as gas or electric burner or in a heated oven).
15.The use of attachments or accessories including canning jars, not recommended by the manufacturer, may result in fire, electric shock or personal injury.
16.DO NOT remove any container from the motor base while the appliance is in
operation. Always unplug the unit when not in use.
17.To reduce the risk of injury, NEVER operate the appliance without the lid in place; DO NOT try to defeat or bypass the interlock mechanism. When using the removable blades, make sure they are properly installed before operating the appliance.
18.DO NOT expose containers to extreme temperature changes.
19.CAUTION: DO NOT process hot foods or hot liquids. Allow hot ingredients to cool before processing.
20.DO NOT overfill.
21.DO NOT operate the appliance empty.
22.To reduce the risk of burns, always allow the appliance to cool before taking off parts and before cleaning.
23.If the appliance overheats, a thermal switch will become activated and shut off the motor. To reset, unplug the appliance and let it cool down for approximately 15 minutes before using again.
24.In the event that the unit overloads, the control panel lights will flash and the unit will shut down. Unplug the unit and wait 15 minutes to reset.
25.THIS PRODUCT IS INTENDED FOR HOUSEHOLD USE ONLY. Do not use this appliance for anything other than its intended use. Do not use outdoors.
26.The maximum rating is based on without the top blades inserted into the pitcher. This drives the greatest power. Other recommended attachments may draw significantly less power or current.
27.To reduce the risk of injury, never assemble the top blades in the pitcher or the chopping blade in the bowl without the pitcher or the bowl properly attached to the motor base.
28.To avoid injury, never attempt to place the single serve blade assembly onto the motor base without first assembling the blade assembly to the single serve cup.
29.DO NOT push food into the food chute with your fingers. Always use the food pusher provided.
 WARNING: Extension cords are not recommended for use with this product.
SAVE THESE INSTRUCTIONS
www.ninjakitchen.com 3

MESURES DE SÉCURITÉ IMPORTANTES
Pour usage domestique seulement
LORS DE L’USAGE D’UN APPAREIL ÉLECTRIQUE, DES MESURES
DE SÉCURITÉ ÉLÉMENTAIRES DEVRAIENT TOUJOURS ÊTRE RESPECTÉES, Y COMPRIS LES MESURES SUIVANTES :
LISEZ TOUTES LES CONSIGNES AVANT D’UTILISER VOTRE SYSTÈME NINJA ULTIMAMC.
FICHE POLARISÉE AVERTISSEMENT : Afin de réduire les risques d’électrocution, cet appareil a été muni d’une fiche polarisée (une lame est plus large que l’autre). Cette
fiche ne peut être insérée que d’un seul côté dans une prise polarisée. Si la fiche ne s’insère pas complètement dans la prise de courant, inversez-la. Si elle ne s’adapte toujours pas, contactez un électricien compétent afin d’installer la prise murale appropriée. N’altérez la fiche d’AUCUNE façon.
 AVERTISSEMENT :
Les lames ne sont pas fixées à l’appareil. Elles sont amovibles et très coupantes. Manipulez-les avec soin.
AVERTISSEMENT :
POUR RÉDUIRE LE RISQUE D’INCENDIE, D’ÉLECTROCUTION ET DE BLESSURES :
1.Pour éviter les risques d’électrocution, n’immergez pas l’appareil et assurez-vous que le cordon d’alimentation n’entre pas en contact avec l’eau ou un autre liquide.
2.NE PERMETTEZ PAS aux jeunes enfants d’utiliser l’appareil ou de s’en servir comme jouet. Une surveillance étroite est nécessaire lors de l’usage de tout appareil par des enfants ou près d’eux.
3.Ne laissez jamais l’appareil sans surveillance pendant l’utilisation.
4.Veuillez éteindre l’appareil (position « Off ») et débrancher le cordon d’alimentation de la prise de courant lorsqu’il n’est pas utilisé et avant le nettoyage, l’assemblage ou le démontage des pièces. Pour débrancher l’appareil, tirez sur la fiche et retirez-la de la prise d’alimentation. Ne tirez jamais sur le cordon.
5.PRENEZ SOIN du cordon d’alimentation. Ne transportez jamais l’appareil en le tenant par le cordon. Ne débranchez jamais l’appareil de l’alimentation électrique en tirant sur le
cordon. Pour débrancher l’appareil, tirez sur la fiche et retirez-la de la prise d’alimentation.
6.N’UTILISEZ PAS l’appareil si sa fiche ou son cordon est endommagé(e), s’il a fait défaut ou s’il a été échappé ou endommagé. Retournez l’appareil à EURO-PRO Operating LLC pour vérification, réparation ou réglage.
7.NE LAISSEZ PAS le cordon traîner sur le dessus d’une table ou d’un comptoir. Ne le laissez pas entrer en contact avec des surfaces chaudes, comme la cuisinière.
8.Posez toujours l’appareil sur une surface sèche et de niveau.
4 |
1.877.646.5288 |

9.Afin de réduire le risque de blessures graves ou de dommages à l’appareil, gardez
les mains, les cheveux, les vêtements et les ustensiles hors du récipient pendant
l’utilisation. Vous pouvez utiliser une raclette, mais seulement lorsque le mélangeur est éteint.
10.MISE EN GARDE : Les lames ne sont pas fixées à l’appareil. Elles sont amovibles et très tranchantes. Lorsque vous manipulez les lames supérieures ou les lames à hacher, ne les touchez pas directement; tenez toujours l’arbre de
ces pièces. Les lames sont très coupantes. Manipulez-les avec soin!
11.Évitez le contact avec les pièces mobiles.
12.NE tentez PAS d’affûter les lames.
13.N’UTILISEZ PAS l’appareil si le jeu de lames est tordu ou endommagé.
14.N’utilisez PAS cet appareil sur une surface chaude ou près de celle-ci (brûleur à gaz, plaque électrique ou four chaud).
15.L’utilisation d’accessoires non recommandés par le fabricant,dont les bocaux de conserve, peut causer un incendie ou des blessures, ou entraîner l’électrocution.
16.NE RETIREZ PAS le récipient du bloc-moteur lorsque l’appareil est en marche. Débranchez toujours l’appareil lorsque vous ne l’utilisez pas.
17.Pour réduire le risque de blessure, n’allumez JAMAIS l’appareil sans d’abord mettre le couvercle en place; NE TENTEZ PAS de contourner ou de désactiver le mécanisme de verrouillage. Lorsque vous utilisez les lames amovibles, assurez-vous que celles-ci sont bien installées avant d’utiliser l’appareil.
18.N’EXPOSEZ PAS les récipients à des changements extrêmes de température.
19.MISE EN GARDE : NE MÉLANGEZ PAS des aliments ou des liquides chauds. Laissez refroidir les aliments chauds avant de les mélanger.
20.NE REMPLISSEZ PAS excessivement le récipient.
21.NE FAITES PAS fonctionner l’appareil à vide.
22.Pour réduire le risque de brûlures, laissez toujours refroidir l’appareil avant de le démonter et de le nettoyer.
23.En cas de surchauffe de l’appareil, le disjoncteur thermique est actionné et coupe le moteur. Pour le réinitialiser, débranchez l’appareil et laissez-le refroidir pendant environ 15 minutes avant de l’utiliser de nouveau.
24.En cas de surchauffe de l’appareil, le disjoncteur thermique est actionné et coupe le moteur. Pour le réinitialiser, débranchez l’appareil et laissez-le refroidir pendant environ 15 minutes avant de l’utiliser de nouveau.
25.CET APPAREIL EST CONÇU POUR UN USAGE DOMESTIQUE SEULEMENT.
N’utilisez l’appareil qu’aux fins pour lesquelles il est prévu. N’utilisez pas cet appareil à l’extérieur.
26.La puissance maximale correspond à l’utilisation du récipient sans les lames supérieures intégrées. Cette utilisation exige la plus grande puissance. D’autres accessoires recommandés par le fabricant peuvent nécessiter une puissance et un courant nettement inférieurs.
27.Pour réduire le risque de blessure, ne fixez jamais le jeu de lames supérieur dans le pichet ou la lame à hacher dans le bol lorsque celuici n’est pas bien installé sur le bloc-moteur.
28.Pour éviter tout risque de blessure, ne tentez pas de fixer la lame à portion individuelle sur le bloc-moteur sans assembler d’abord la lame dans le gobelet à portion individuelle.
29.N’UTILISEZ PAS vos doigts pour pousser les aliments dans l’entonnoir. Utilisez toujours le poussoir fourni.
 AVERTISSEMENT : Il
n’est pas recommandé d’utiliser des rallonges électriques pour brancher cet appareil.
VEUILLEZ CONSERVER CES DIRECTIVES
www.ninjakitchen.com 5

IINSTRUCCIONES IMPORTANTES DE
SEGURIDAD
Para uso doméstico solamente
AL USAR APARATOS ELÉCTRICOS, SIEMPRE DEBE SEGUIR PRECAUCIONES BÁSICAS DE SEGURIDAD, INCLUYENDO LAS SIGUIENTES:
LEA TODAS LAS INSTRUCCIONES ANTES DE USAR SU NINJA ULTIMAMR SYSTEM.
ADVERTENCIA DEL ENCHUFE POLARIZADO: Para reducir el riesgo de una descarga eléctrica, este artefact posee un enchufe polarizado (una pata es más ancha que la otra). Este enchufe sólo puede conectarse a un tomacorriente polarizado de una sola forma. Si el enchufe no entra completamente en el tomacorriente, inviértalo. Si aún así no entra completamente, llame a un
electricista calificado para que instale un tomacorriente apropiado. NO intente modificar el enchufe de ninguna manera.
 ADVERTENCIA:
Las cuchillas no están fijas a la unidad. Son removibles y muy filosas. ¡Trátelas con cuidado!
ADVERTENCIA:
PARA REDUCIR EL RIESGO DE INCENDIO, DESCARGA ELÉCTRICA O DAÑOS PERSONALES:
1.Para protegerse de una descarga eléctrica, no sumerja el artefacto ni permita que el cable de alimentación entre en contacto con agua o cualquier otro líquido.
2.NO permita que los niños pequeños usen el artefacto o que lo traten como un juguete. Tenga mucho cuidado al utilizar cualquier aparato eléctrico cerca de niños.
3.Nunca deje un artefacto desatendido cuando lo use.
4.Apague el artefacto y desenchufe el cable de alimentación del tomacorriente cuando no lo use, antes de colocarle o quitarle partes y antes de limpiarlo. Para desenchufarlo, sujete
el enchufe y retírelo del tomacorriente. Nunca tire del cable de alimentación.
5.NO maltrate el cable de alimentación. Nunca levante el artefacto por el cable, o tire del cable para desconectarlo del tomacorriente; agárrelo por el enchufe y tire para desconectarlo.
6.NO utilice ningún artefacto si el cable o el enchufe están dañados o luego de una
falla, o si ha sufrido cualquier tipo de daño. Retórnelo a EURO-PRO Operating LLC para que sea examinado, reparado o ajustado.
7.NO permita que el cable cuelgue por el borde de la mesa o mesada, o que toque superficies calientes como la estufa.
8.Use siempre el artefacto sobre una superficie seca y nivelada.
6 |
1.877.646.5288 |

9.Mantenga sus manos, cabello, ropa y utensilios fuera del recipiente al procesar para reducir la posibilidad de daños graves a personas o de dañar la unidad. Puede utilizar una espátula, pero únicamente cuando el artefacto no esté funcionando.
10.CUIDADO: Las cuchillas no están fijas a la unidad. Son removibles y extremadamente filosas. Cuando agarre las cuchillas superiores o las de picar, no las agarre por el filo, sosténgalas siempre del vástago. Las cuchillas son filosas. ¡Manéjelas con cuidado!
11.Evite tocar las partes móviles.
12.NO intente afilar las cuchillas.
13.NO use el artefacto si las cuchillas están dobladas o dañadas.
14.NO use este artefacto sobre o cerca de superficies calientes (como una estufa eléctrica o de gas, o en un horno caliente).
15.El uso de accesorios no recomendados por el fabricante puede causar incendios, descargas eléctricas o daños personales.
16.NO saque ningún recipiente de la base del motor mientras el artefacto esté funcionando. Siempre desenchufe la unidad cuando no la utilice.
17.Para reducir el riesgo de heridas, NUNCA haga funcionar el artefacto sin la tapa colocada. NO intente alterar el mecanismo de traba. Al utilizar las cuchillas removibles, verifique que estén correctamente instaladas antes de encender el artefacto.
18.NO exponga las jarras a cambios extremos de temperatura.
19.CUIDADO: NO procese comida o líquidos calientes. Deje que los ingredientes calientes se enfríen antes de procesarlos.
20.NO la llene de más.
21.NO haga funcionar este artefacto cuando esté vacío.
22.Para reducir el riesgo de quemaduras, siempre deje que el artefacto se enfríe antes de remover partes o de limpiarlo.
23.Si el artefacto recalienta, se activará un interruptor térmico que apagará el motor. Para reiniciarlo, desenchufe el artefacto y déjelo enfriar durante unos 15 minutos antes de usarlo nuevamente.
24.Si la unidad se sobrecarga, las luces del panel de control parpadearán y la unidad se apagará. Desenchufe la unidad y espere 15 minutos para que se reinicie.
25.ESTE PRODUCTO ELÉCTRICO ES PARA USO DOMÉSTICO SOLAMENTE. No utilice este artefacto para ningún otro destino distinto al indicado. No lo utilice en el exterior.
26.La potencia máxima está medida sin las cuchillas superiores instaladas en la jarra. De esa forma se obtiene la mayor potencia. Otros accesorios recomendados pueden consumir mucha menos corriente.
27.Para reducir el riesgo de heridas, nunca coloque las cuchillas superiores en la jarra o la cuchilla para picar en el tazón sin tener la jarra o el tazón bien colocados sobre la base del motor.
28.Para evitar heridas, nunca intente colocar la cuchilla individual sobre la base del motor sin antes colocarla en la taza individual.
29.NO empuje alimentos dentro del tubo de entrada con sus dedos. Use siempre el accesorio para empujar incluido.
 ADVERTENCIA: No se
recomienda usar cables de extensión con este producto.
CONSERVE ESTAS INSTRUCCIONES
www.ninjakitchen.com 7

|
Contents |
|
Thank you for |
Getting to Know Your Ninja Ultima™ System........................................... |
10 |
purchasing the |
Using the Ninja Ultima™ System ............................................................. |
12 |
Ninja Ultima™ |
Assembly and Use for the Blender Pitcher............................................... |
13 |
System. |
Assembly and Use for the Single Serve Cup ............................................ |
15 |
|
Assembly and Use for the Food Processor Bowl...................................... |
16 |
|
Using the Chopping Blade Assembly ................................................. |
17 |
|
Using the Dough Blade....................................................................... |
17 |
|
Using the Discs .................................................................................. |
18 |
|
Pitcher Speed Settings & Uses ................................................................ |
19 |
|
Food Processor Speed Settings & Uses ................................................... |
19 |
|
Tips ......................................................................................................... |
20 |
|
Care & Maintenance................................................................................ |
21 |
|
Troubleshooting Guide............................................................................. |
22 |
|
Replacement Parts................................................................................... |
22 |
|
Warranty & Registration.......................................................................... |
53 |
TECHNICAL SPECIFICATIONS
Voltage: 120V., 60Hz.
Power: 1500 Watts
Pitcher Capacity:
72 oz (9 cups, 2.1 L)
64 liquid oz (8 cups, 1.8 L)
Single Serve Capacity: 16 oz (2 cups, 500 Ml)
Bowl Capacity:
64 oz (8 cups, 1.8 L)
Euro-Pro, Ninja, Ultima, Sip & Seal and Ninja Ultima are trademarks of Euro-Pro Operating LLC.
SPÉCIFICATIONS TECHNIQUES
Tension : 120 V, 60 Hz. Alimentation : 1 500 watts
Capacité du pichet :
72 onces (9 tasses, 2,1 L)
64 onces de liquide (8 tasses, 1,8 L)
Capacité du gobelet à portion individuelle :
16 onces (2 tasses, 500 Ml)
Capacité du bol :
64 onces (8 tasses, 1,8 L)
Euro-Pro, Ninja, Ultima, Sip & Seal et Ninja Ultima sont des marques de commerce de Euro-Pro Operating LLC.
ESPECIFICACIONES TÉCNICAS
Voltaje: 120 V., 60 Hz. Potencia: 1500 Vatios
Capacidad de la jarra:
72 onzas (9 tazas, 2,1 L)
64 onzas líquidas (8 tazas, 1,8 L)
Capacidad del tazón individual: 16 onzas (2 tazas, 500 Ml)
Capacidad del Tazón:
64 onzas (8 tazas, 1,8 L)
Euro-Pro, Ninja, Ultima, Sip & Seal y Ninja Ultima son marcas registradas de Euro-Pro Operating LLC.
8 |
1.877.646.5288 |

|
Table des matières |
|
Merci d’avoir |
Familiarisez-vous avec votre système Ninja UltimaMC.............................. |
24 |
acheté le système |
Utilisation du système Ninja UltimaMC .................................................... |
26 |
Ninja UltimaMC. |
Assemblage et utilisation du pichet-mélangeur....................................... |
27 |
|
semblage et utilisation du gobelet à portion individuelle ....................... |
29 |
|
Assemblage et utilisation du bol du robot culinairel................................ |
30 |
|
Utilisation de la lame à hacher .......................................................... |
31 |
|
Utilisation de la lame à pétrir............................................................. |
32 |
|
Utilisation des disques......................................................................... |
33 |
|
Réglages de vitesse et utilisations du pichet........................................... |
34 |
|
Réglages de vitesse et utilisations du robot culinaire.............................. |
34 |
|
Conseils................................................................................................... |
35 |
|
Soins et entretien..................................................................................... |
36 |
|
Guide de dépannage............................................................................... |
37 |
|
Pièces de rechange.................................................................................. |
37 |
|
Garantie et enregistrement...................................................................... |
54 |
Gracias por comprar el Ninja UltimaMR System.
Índice |
|
Partes de su Ninja UltimaMR System......................................................... |
38 |
Uso del Ninja UltimaMR System................................................................ |
39 |
Armado y uso de la jarra de la licuadora................................................. |
40 |
Armado y uso del tazón individual.......................................................... |
42 |
Armado y uso del tazón para procesar alimentos ................................... |
43 |
Uso de la cuchilla para picar............................................................... |
44 |
Uso del accesorio para amasar........................................................... |
44 |
Uso de los discos................................................................................ |
45 |
Ajustes de velocidad de la jarra y usos.................................................... |
46 |
Ajustes de velocidad del procesador y usos............................................. |
46 |
Consejos ................................................................................................. |
47 |
Cuidado y mantenimiento........................................................................ |
48 |
Guía de diagnóstico de problemas........................................................... |
49 |
Partes de reemplazo................................................................................. |
49 |
Garantía y registro................................................................................... |
55 |
www.ninjakitchen.com 9

Getting To Know Your Ninja Ultima™ System
a
b c
f |
g |
|
d |
|
|
e |
j |
k |
|
|
|
|
h |
|
|
i |
|
l
n
m
o

 /
/
a |
Single Serve Drink Cup (x2) |
|
f |
Dough Blade (bowl) |
|
||||
b |
Single Serve Blade |
|
g |
Chopping Blade (bowl) |
c |
Sip & Seal™ To-Go Lids (x2) |
|
h |
Reversible Slicer/Shredder Disc |
d |
Food Processor Bowl |
|
i |
Grating Disc |
e |
Food Processor Lid |
|
j |
Food Pusher |
|
|
|
k |
Disc Gear Shaft |
|
|
|
|
|
NOTE: Attachments are not interchangeable.
lBlender Pitcher
mLid with Locking Handle (pitcher)
nTop Blades (Removable) (pitcher)
oMotor Base
10 |
1.877.646.5288 |
English
The Ninja Ultima™ System features a patent pending dual blade system and 3 peak horsepower motor for culinary precision at home. For best results, be sure to carefully read all the instructions contained in the manual before using this appliance.
FEATURES:
•Patent Pending Ninja® Dual Stage Blade Technology
•BPA Free Blender Pitcher, Single Serve Drink Cups, Food Processor Bowl and To Go Lids
•Drip-Free Pour Spout
•Easy to Clean Control Panel
•Sturdy, Non-Slip Base
•Hidden Drain Holes - prevent water build up from dishwasher
•Lid featuring Smart Lid technology for easy release
www.ninjakitchen.com 11

Using the Ninja Ultima™ System
PLEASE KEEP THESE IMPORTANT SAFEGUARDS IN MIND WHEN USING THE APPLIANCE:
 IMPORTANT: DO NOT push food into the food chute with your fingers. Always use the food pusher provided.
 CAUTION: Avoid contact with moving parts. Keep fingers out of the food chute opening.
 IMPORTANT: When using the top blades, always add the ingredients into the blender AFTER inserting the top blades.
 CAUTION: Blades are sharp! Use extreme caution when handling the top blades. Always hold them by the shaft.
 IMPORTANT: DO NOT attempt to operate the appliance without the lid securely fastened.
 IMPORTANT: Never run the appliance empty.
 CAUTION: DO NOT process food or liquids that are hot. Allow hot ingredients to cool before processing.
 WARNING: Secure the appliance while in use by pressing down on the lid with one hand.
 CAUTION: Never remove any container or try to remove the lid from the pitcher while the appliance is still running.
 WARNING: Never leave the appliance unattended while in use.
BEFORE FIRST USE
1Remove all packaging material and labels from the appliance.
2Wash the lids, pitcher, bowl, discs, single serve cups and blades in warm, soapy water with a soft cloth.
Use caution when washing the removable top blades, chopping blades and discs as the blades are very sharp. Rinse and dry thoroughly.
OR
3All accessories are dishwasher safe except the motor base. When using the dishwasher, place the pitcher, bowl and single serve cup in the dishwasher. Place the lids and attachments on the top rack. Use caution when washing the removable top blades, chopping blades and discs as the blades are very sharp. Always hold
the top blades and chopping blades from the shaft.
4Wipe the motor base clean with a damp cloth. Do not submerge the motor base in water or any other liquid.
12 |
1.877.646.5288 |
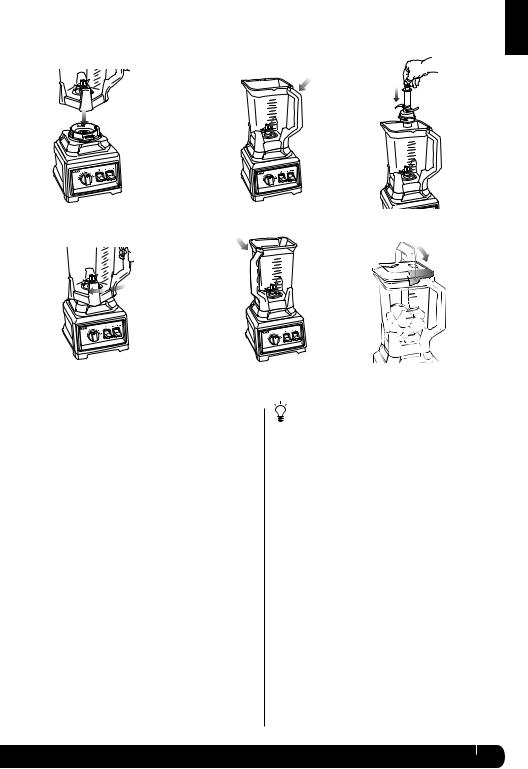
Assembly and Use for the Blender Pitcher
Assembly
English
Fig. 1 |
Fig. 3a |
Fig. 4 |
Fig. 2 |
Fig. 3b |
Fig. 5 |
 IMPORTANT: Make sure that the motor base is plugged in for use.
1Place the motor base on a clean, dry, level surface such as a counter or table top.
2Align and lower the pitcher onto the motor base. (Fig. 1) Handle should be aligned slightly to the right of the “LOCK” symbol on the motor base.
3Rotate the pitcher clockwise as far as it will go to lock in place. (Fig. 2)
NOTE: The pitcher can be placed on the motor base two ways; the handle can be on the front right corner or the front left corner. (Fig. 3a, Fig. 3b)
4Holding the top blades by the top of the shaft, place it onto the bottom blades inside the pitcher. Ensure that the top blades are seated properly by standing the top blades upright in the pitcher. Do not operate the unit if the top blades are not upright at any time. (Fig. 4)
NOTE: The top blades will fit loosely on the bottom blades but will be secured once the lid is in place.

 TIP: When pureeing, use only the bottom blades for best results.
NOTE: The bottom blades are not removable.
5When using the top blades, ensure blades are properly in place prior to adding ingredients. Add the ingredients to the pitcher, making sure that they do not exceed the 72 ounce mark on the pitcher.
NOTE: When blending any kind of liquids, such as mixtures of any drinks or smoothies, do not exceed the “MAX” liquid mark (64 ounces) on the pitcher. NOTE: If you need to add additional ingredients while the appliance is processing, do not remove the lid. Turn the appliance off, open the pour spout cap and add any additional ingredients, close cap when complete.
6Holding the lid by the handle in the upright position, place it on top of the pitcher aligning the
arrow ( ) located on the lid with the arrow (
 ) located on the pitcher’s handle. (Fig. 5) Press the handle down until you hear a click.
www.ninjakitchen.com 13
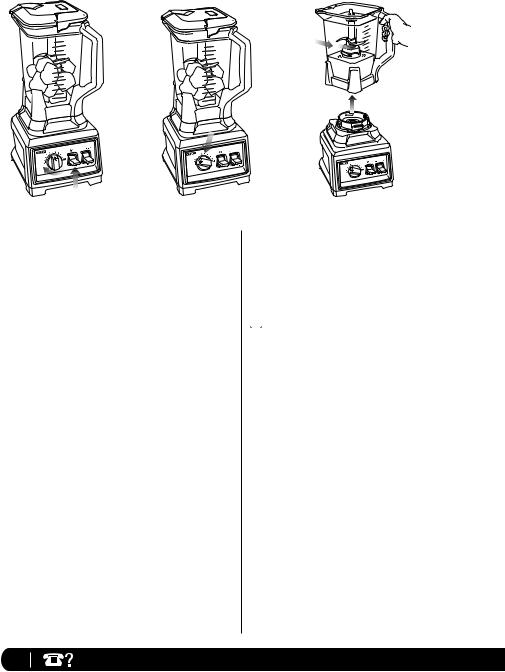
Assembly and Use for the Blender Pitcher - cont.
 WARNING: Never leave the appliance unattended while in use.
USE |
REMOVAL |

 /
/
/

Fig. 6 |
Fig. 7 |
Fig. 8 |
7Plug the motor base in for use.
8Turn the Variable Speed Dial to speed 1. (Fig. 6) The power indicator light ( ) will now turn on. To start the blender, press the “Power” toggle up, then press the “Start/Stop/Pulse” toggle up to start processing. Slowly increase to desired speed.
NOTE: As a safety feature, the power indicator light ( ) will flash and the motor will not work if the pitcher and lid are not installed correctly.
NOTE: If you need to Pulse ingredients press down on the toggle in short intervals.
9When you have reached your desired consistency, reduce speed slowly and turn the unit off by pushing up on the Start/Stop/Pulse toggle. (Fig. 7)
10Use the convenient pour spout when serving smoothies, juices and other beverages you have created! Push the pour spout back as far as it will go before pouring. For thicker consistencies,
remove the lid and the top blades carefully (by the shaft), then empty the contents from the pitcher.
11To remove the lid, press the release button on the lid, pull the lid handle up to a 90° angle and lift the lid off. Holding the pitcher with one hand while removing the lid with the other will provide the best leverage. Turn the pitcher counter clockwise and then lift off the base. Do not pour out ingredients without first carefully removing the top blades. (Fig. 8)
 CAUTION: Never insert your hands in the pitcher as the blades are sharp. Always use a spatula to dislodge food that has stuck to the sides of the pitcher. Unplug the unit before attempting to dislodge anything.
12Make sure that the unit is unplugged when not in use.

 TIPS:
TIPS:
•Use low speed settings (1-3) when blending drinks and other blended items.
•Use medium speed settings (4-6) when frozen blending, ice crushing or grinding dry ingredients.
•Use high speed settings (7-10) when creating purees such as sauces, dips and restaurant quality glazes. Top blades are needed to power through tough ingredients like ice, solid fruits and vegetables. If silky smooth results are desired, push down on the power toggle to turn off the power, carefully remove the top blades, replace the lid and continue processing.
•For softer ingredients, the bottom fixed blades are enough to fully process in one step.
14 |
1.877.646.5288 |
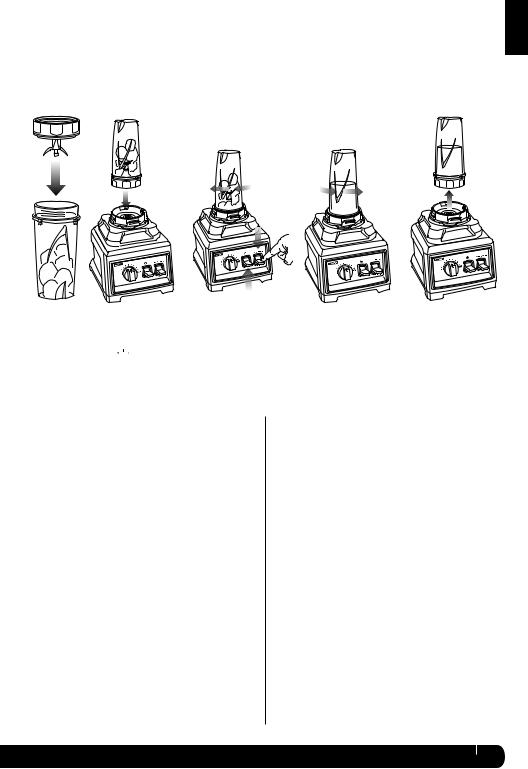
Assembly and Use for the Single Serve Cup
ASSEMBLY |
PULSE |
REMOVAL |
English
Fig. 9 |
Fig. 10 |
Fig. 11 |
Fig. 12 |
Fig. 13 |

 For best results, use short “PULSES”... Practice makes perfect!!
 IMPORTANT: Make sure that the motor base is plugged in for use.
1Place the motor base on a clean, dry, level surface such as a counter or table top.
2Add ingredients to the single serve cup. NOTE: Do not overfill! To avoid spilling, do not add ingredients past the “Max” fill line.
3Place the single serve blade onto the cup and screw it on tightly until you have a good seal. (Fig. 9)
4Turn the single serve cup upside down and place it onto the motor base, aligning the tabs on the cup with the motor base. (Fig. 10) Turn clockwise until the cup locks in place, the unit is ready for use.
(Fig. 11)
5The single serve cup only operates at one speed regardless of which number is chosen on the dial. Press down on the “Start/Stop/Pulse” toggle in short intervals until you have reached your desired consistency. (Fig. 11)
6When you have reached your desired consistency, turn the single serve cup counter-clockwise
(Fig. 12) and pull straight up to remove. (Fig. 13)
7Turn the cup upright and remove the single serve blade by twisting the blade assembly counter clockwise.
8Place the Sip & Seal™ To-Go drinking lid onto the single serve drink cup, screw on to seal and enjoy!
9Make sure that the motor base is unplugged when not in use.
www.ninjakitchen.com 15

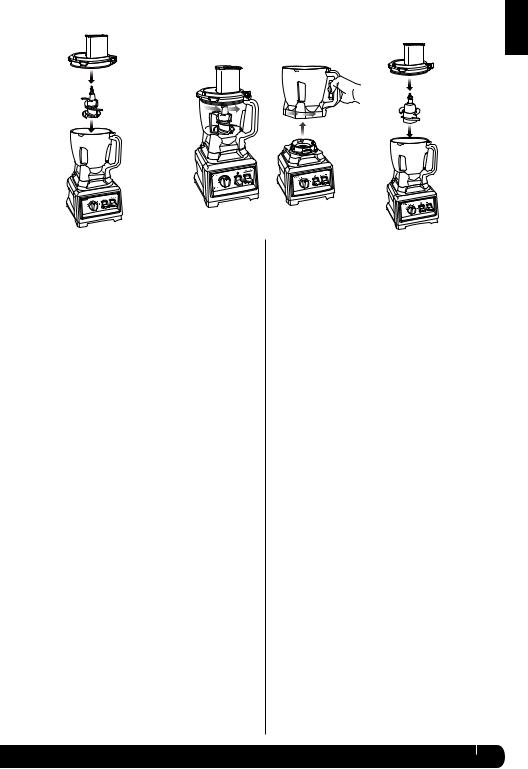
Assembly and Use for the Food Processor Bowl
 WARNING: Never leave the appliance unattended while in use.
ASSEMBLY
Fig. 14
Fig. 15
 IMPORTANT: Make sure that the motor base is plugged in for use.
1Place the motor base on a clean, dry, level surface such as a counter or table top.
2Align and lower the Bowl onto the motor base. (Fig. 14) Handle should be aligned slightly to the right of the “LOCK” symbol on the motor base.
3Rotate the bowl clockwise as far as it will go to lock in place. (Fig. 15)
4The bowl can be placed on the motor base two ways; the handle can be on the front right corner or the front left corner. (Fig. 16a, Fig. 16b)
5Holding the desired blade by the top of the shaft, place it onto the drive gear inside the bowl. Ensure that the attachment is seated properly and is standing upright. (Fig. 17)
NOTE: The blade will fit loosely on the star-shaped post.
6Add the ingredients to the bowl, making sure that they do not exceed the highest measured marking line on the side of the bowl.
Fig. 16a |
Fig. 17 |
|
Fig. 16b |
Fig. 18 |
7Holding the lid from the feed chute, place it on top of the bowl and turn clockwise aligning the arrow
( ) located on the lid with the arrow (
 ) located on the bowl’s handle. (Fig. 18)
8Plug the power cord into the electrical outlet and press up on the power toggle ( ) to turn the power “On”.
 NOTE: The 64 oz. bowl is not intended for blending drinks. Do not overfill.
NOTE: To add liquids during processing, remove the food
pusher from the feed chute to
drizzle in liquids. Do not remove the lid while in use.
TIP: Turn the unit down to the lowest setting before adding additional liquids.
16 |
1.877.646.5288 |
USE |
REMOVAL |
USE |
English
Fig. 20
Fig. 19
USING THE CHOPPING BLADE ASSEMBLY
1Holding the Chopping Blade Assembly by the shaft, place it onto the star-shaped post inside the bowl. Ensure that the attachment fits on the star-shaped post and that it is standing straight.
2Add the ingredients and secure the bowl lid onto the bowl. (Fig. 19)
3Plug the power cord into the electrical outlet and press the power toggle up ( ) to turn the power “On”.
4Select the speed that best suits your needs. Pulse ingredients for even chopping by pressing down on the “Start/Stop/Pulse” toggle in short intervals. Press up on the “Start/Stop/Pulse” toggle to run the unit continuously.
NOTE: When making dips or sauces, set the variable speed on a low setting (1-3) and press the “Start/Stop/Pulse” toggle up.
NOTE: Please refer to “Speed Settings & Uses” chart for suggested uses and speeds.
5When you have reached your desired consistency, stop the appliance by pressing the “Start/Stop/ Pulse” toggle up and wait for the blade to stop turning.
6Press the power toggle ( ) down to turn the power off.
7To remove the lid, press the release button and turn the lid counter-clockwise and lift the lid off. Hold the bowl with one hand and lift the lid with the other for best leverage. Turn the bowl counterclockwise and then lift off the base.
(Fig. 20, Fig. 21)
 CAUTION: Use care when handling the removable Chopping Blade Assembly. Blades are sharp, handle with caution. Always handle by the shaft.
Fig. 21
Fig. 22
USING THE DOUGH BLADE
1Place the motor base on a clean, dry, level surface such as a counter or table top. (Fig. 22)
2Secure the bowl onto the motor base.
3Holding the dough blade by the shaft, place it onto the star-shaped post inside the bowl. Ensure that the attachment fits on the star-shaped post and that it is standing straight.
4Add the ingredients and secure the bowl lid onto the bowl.
NOTE: For best results add dry ingredients first and then add wet ingredients.
5Plug the power cord into the electrical outlet and press up on the power toggle ( ) to turn the power “On”.
6IMPORTANT: Use only the “DOUGH/DISC” setting when mixing dough or using either disc. Press up on the Start/Stop/Pulse Toggle to start the unit.
7When finished making dough, press up on the Start/Stop/Pulse Toggle to stop the unit. Remove the bowl from the motor base. (Fig. 20, Fig. 21)
8Press the power toggle ( ) down to turn off the unit.
NOTE: As a safety feature, the power light will flash when the power toggle ( ) is pushed upwards if the lid or bowl are not installed correctly. Then the lid and bowl are installed properly and the toggle (
 ) is pushed up, the power light will become solid, indicating the unit is ready for use.
www.ninjakitchen.com 17
 Loading...