

Page 1
User Manual
SHARP B10 Smartphone
Model: SH-A01
EN
Page 2

Table of Contents
Chapter 1: Getting Started.................................................................... 1
1.1 Your Device.................................................................................................. 1
Front View............................................................................................................... 1
Back View ............................................................................................................... 1
Left View................................................................................................................. 2
Right View............................................................................................................... 2
1.2 Accessories ................................................................................................. 3
1.3 Installing SIM Card(s) and Memory Card .................................................. 3
Remove the card tray............................................................................................... 3
Install the SIM card(s) ............................................................................................. 3
Install the memory card ........................................................................................... 4
Replace the card tray ............................................................................................... 4
1.4 Charging the Battery................................................................................... 5
1.5 Turning the Device On or Off ..................................................................... 6
Turn Device On or Off ............................................................................................ 6
Restart Device ......................................................................................................... 6
Set Device to Aeroplane Mode................................................................................ 6
Set Device to Ring, Vibrate or Silent Mode............................................................ 6
Set Device to Sleep Mode ....................................................................................... 6
1.6 Locking and Unlocking the Screen ........................................................... 7
1.7 Using the Headset ....................................................................................... 8
1.8 Adjusting the Volume ................................................................................. 8
Chapter 2: The Basics........................................................................... 9
2.1 Home Screen ............................................................................................... 9
Status Bar............................................................................................................... 10
Notifications Panel ................................................................................................ 11
Open Applications ................................................................................................. 11
View Recently-Used Applications ........................................................................ 11
Control Panel ......................................................................................................... 12
Widgets.................................................................................................................. 12
Folders ................................................................................................................... 13
Set Wallpaper ........................................................................................................ 14
Manage Resources................................................................................................. 14
Managing Home Screen Panels............................................................................. 15
Changing Phone Settings....................................................................................... 15
Chapter 3: Contacts ............................................................................ 16
3.1 Adding Contacts........................................................................................ 16
3.2 Copying Contacts...................................................................................... 17
3.3 Communicating with Contacts................................................................. 17
Call Contacts ......................................................................................................... 17
Text Contacts......................................................................................................... 17
Email Contacts....................................................................................................... 18
ii
Page 3

3.4 Managing Contacts ................................................................................... 18
Edit Contacts ......................................................................................................... 18
Delete Contacts...................................................................................................... 19
Send Contact Information...................................................................................... 19
Add Contact to Blacklist ....................................................................................... 19
3.5 Favourite Contacts.................................................................................... 20
View Favourites..................................................................................................... 20
Add to Favourites .................................................................................................. 20
Remove from Favourites ....................................................................................... 20
3.6 Searching for Contacts............................................................................. 21
3.7 Grouping Contacts.................................................................................... 21
Chapter 4: Using the Phone ............................................................... 23
4.1 Making a Call ............................................................................................. 23
4.2 Answering a call ........................................................................................ 24
4.3 Ending a call .............................................................................................. 24
4.4 In-Call Options........................................................................................... 25
4.5 Call Log ...................................................................................................... 25
Chapter 5: Email & Messaging........................................................... 26
5.1 Text Message............................................................................................. 26
Create and Send Text Messages ............................................................................ 26
Receive and Manage Messages ............................................................................. 26
5.2 Multimedia Message ................................................................................. 28
Create and Send MMS Messages .......................................................................... 28
5.3 Customizing Message Settings ............................................................... 29
5.4 Email Accounts ......................................................................................... 30
Set Up Email Account ........................................................................................... 30
Add More Email Accounts.................................................................................... 31
Select Email Accounts........................................................................................... 32
Delete Email Accounts .......................................................................................... 32
5.5 Using Email................................................................................................ 33
Compose and Send Emails .................................................................................... 33
Receive Emails ...................................................................................................... 33
Read and Reply to Emails ..................................................................................... 34
Manage Email Folders........................................................................................... 35
Customize Email Settings...................................................................................... 37
Chapter 6: Using Internet ................................................................... 39
6.1 Connecting to Internet .............................................................................. 39
Wi-Fi...................................................................................................................... 39
Cellular Data Network........................................................................................... 41
6.2 Browsing a Web Page............................................................................... 42
Manage Web Page................................................................................................. 42
Chapter 7: Using Bluetooth................................................................ 44
7.1 Connecting to Bluetooth Devices............................................................ 44
iii
Page 4

Chapter 8: Multimedia Applications .................................................. 45
8.1 Photos and Videos .................................................................................... 45
Take Photos ........................................................................................................... 45
Record Videos ....................................................................................................... 46
Capture Modes....................................................................................................... 47
Review Photos ....................................................................................................... 48
Review Videos....................................................................................................... 49
Configure Camera Settings.................................................................................... 49
8.2 Viewing Photos & Videos ......................................................................... 51
Chapter 9: Programs........................................................................... 52
9.1 Chrome....................................................................................................... 52
9.2 Calculator................................................................................................... 52
9.3 Camera ....................................................................................................... 52
9.4 Gmail .......................................................................................................... 52
9.5 File Manager .............................................................................................. 53
9.6 Clock........................................................................................................... 54
9.7 Using Torch ............................................................................................... 56
9.8 Messaging.................................................................................................. 56
9.9 Gallery ........................................................................................................ 56
9.10 Contacts ................................................................................................... 56
9.11 Phone ....................................................................................................... 56
9.12 Settings .................................................................................................... 56
9.13 Recorder................................................................................................... 57
9.14 Note .......................................................................................................... 58
9.15 Calendar ................................................................................................... 58
Chapter 10: Managing Your Phone.................................................... 59
10.1 Device Settings........................................................................................ 59
10.2 Changing Basic Settings........................................................................ 63
Date and Time ....................................................................................................... 63
Display Settings..................................................................................................... 64
10.3 Using Wireless & networks .................................................................... 65
10.4 Protecting Your Phone ........................................................................... 65
Encrypt Phone ....................................................................................................... 65
Enable SIM Card Lock.......................................................................................... 65
10.5 Configuring Mobile Data Limit ............................................................... 66
10.6 Resetting the Device ............................................................................... 67
Chapter 11: Specifications ................................................................. 68
iv
Page 5
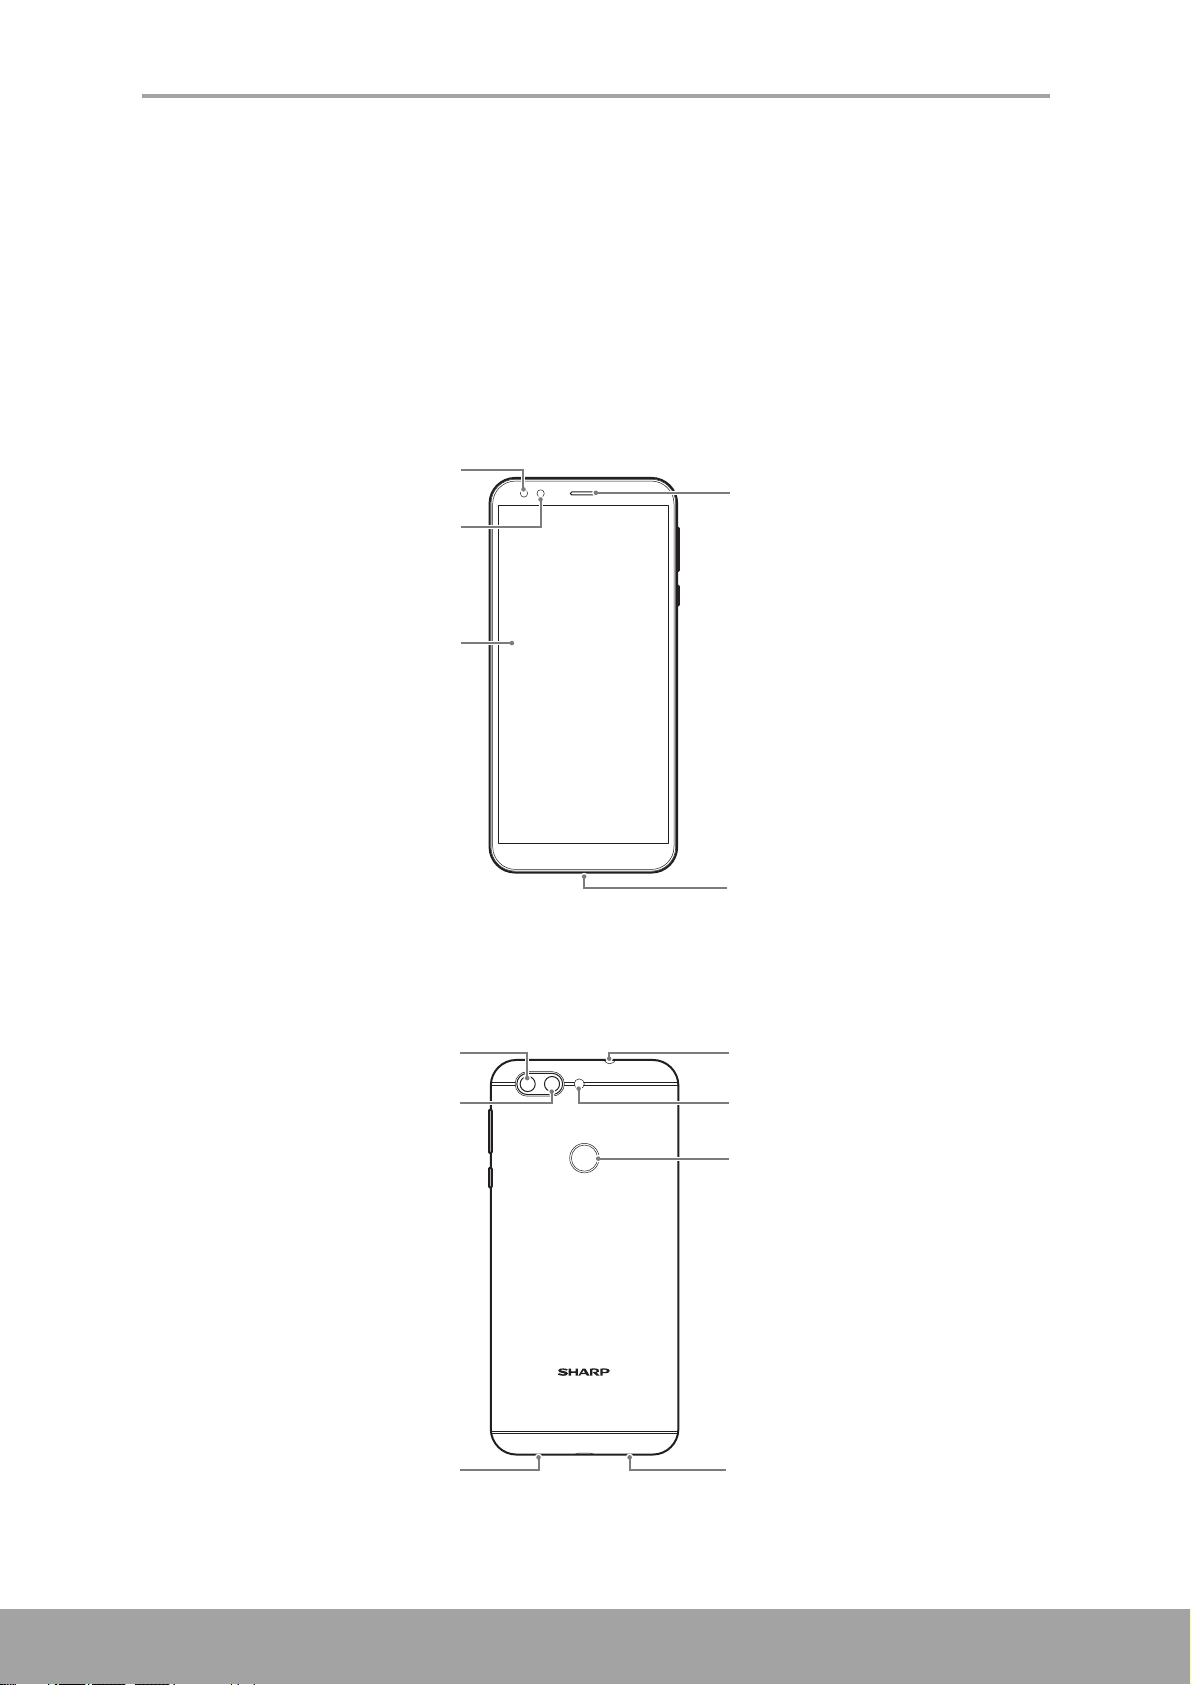
Chapter 1: Getting Started
Receiver
Touch screen
Micro USB port
Front camera
ALS-sensor
Rear camera (wide-angle)
Flash
Microphone
Speaker
Headset jack
Rear camera
Fingerprint scanner
Chapter 1: Getting Started
NOTE: Screenshots in the user manual may appear differently on your phone.
1.1 Your Device
Front View
Back View
1
Page 6
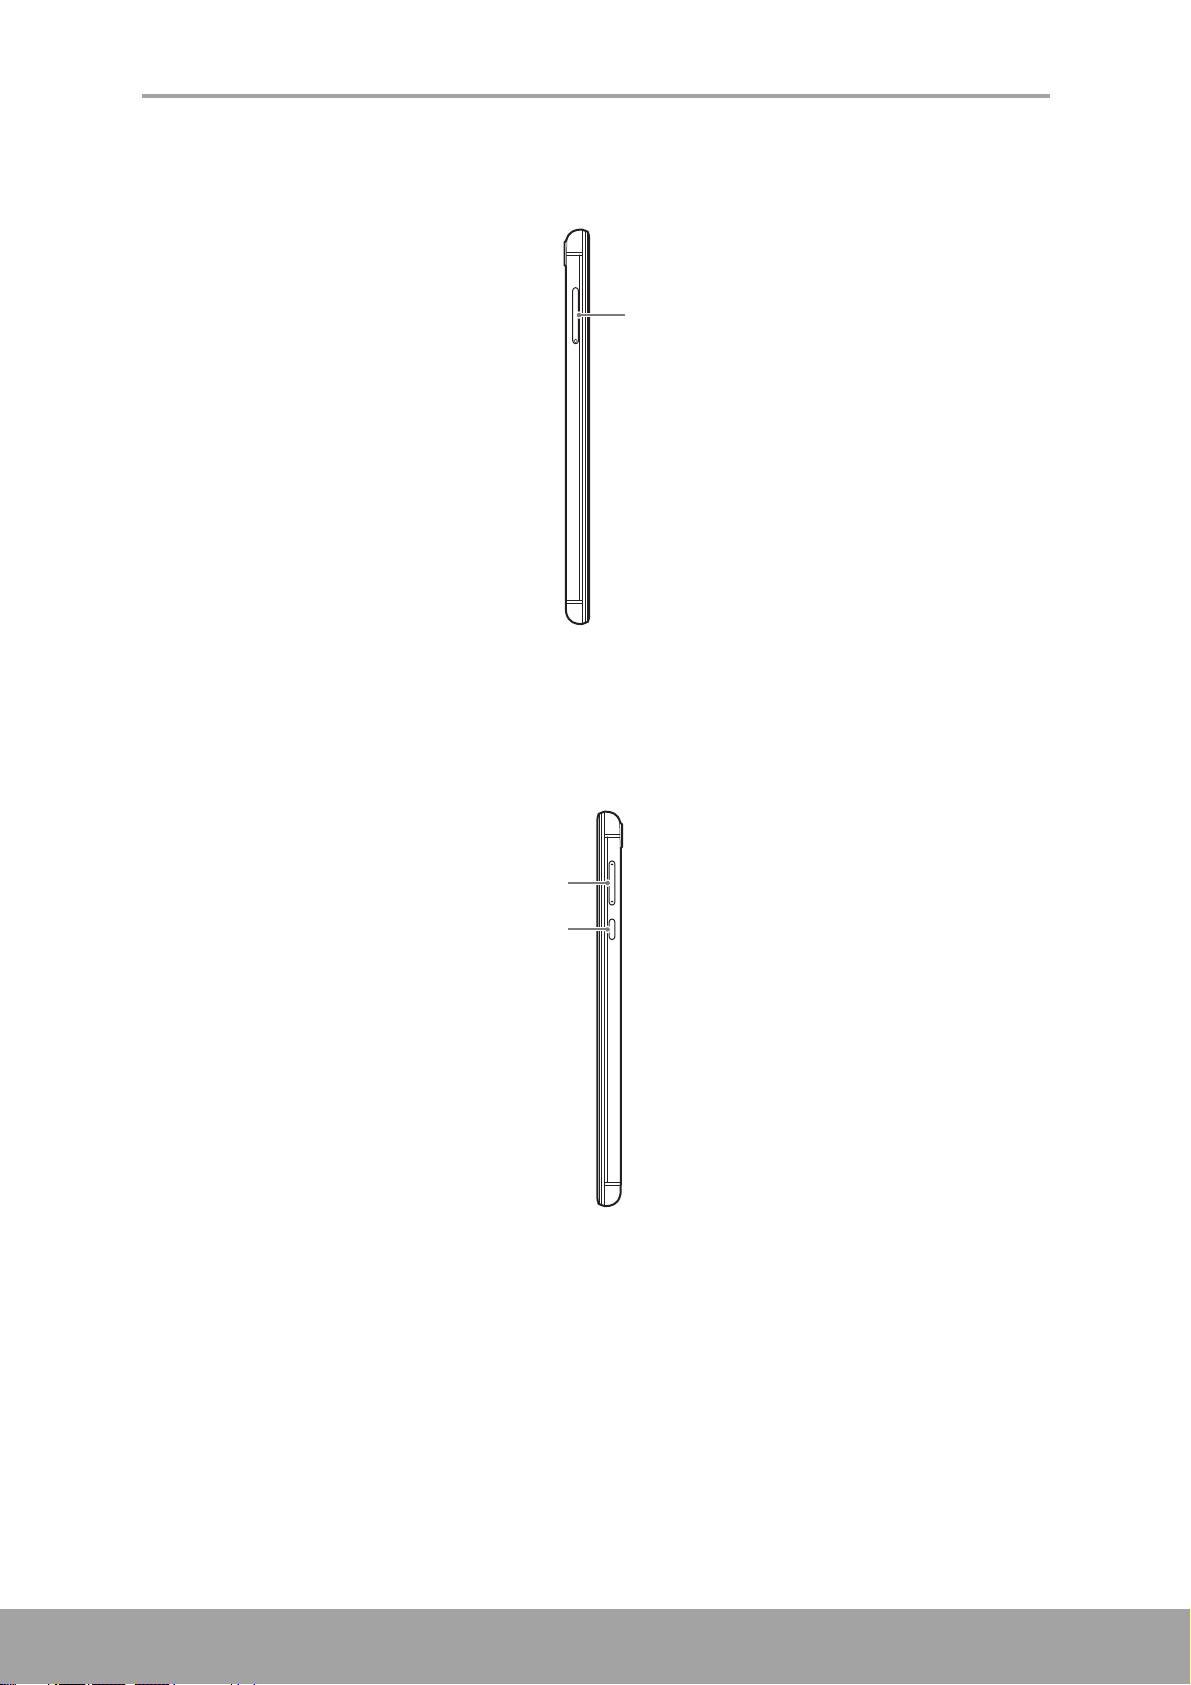
Left View
Micro SIM1 / Nano SIM2 / Micro SD
slot
Power button
Volume (+/-) button
Chapter 1: Getting Started
Right View
2
Page 7
Chapter 1: Getting Started
SIM1SIM1
S
IM
2SIM2
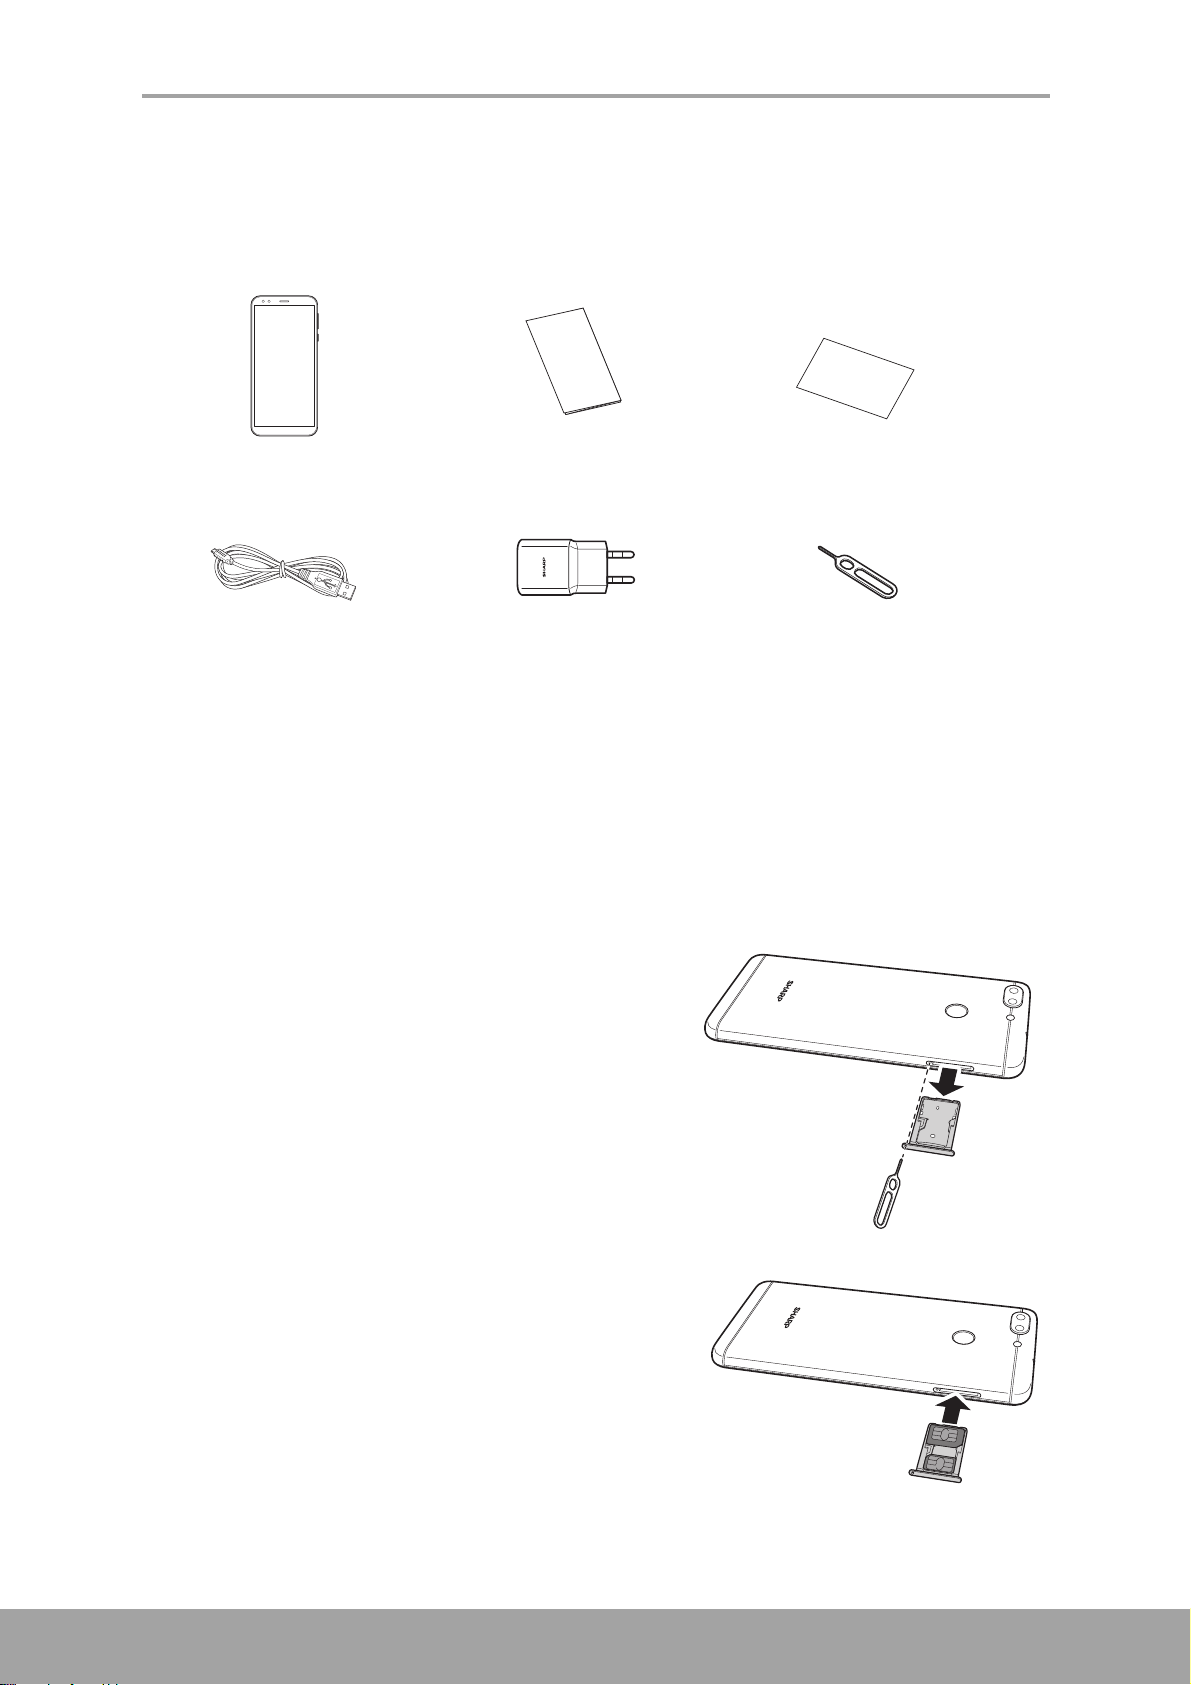
1.2 Accessories
Your package comes with the following items. If any of them is missing, please
contact your retailer.
Smartphone Quick Start Guide Warranty card
USB cable Charger Pin
1.3 Installing SIM Card(s) and Memory Card
Remove the card tray
1. Turn the device off.
2. Insert the bundled pin through the hole on
the card tray.
3. Push to eject the card tray.
Install the SIM card(s)
The card tray can be used to install one micro
SIM card and one nano SIM card, or one micro
SIM and one memory card.
Place the two SIM cards onto the tray as
illustrated.
3
Page 8

Install the memory card
Place the memory card onto the tray with the
golden connectors facing up.
Replace the card tray
Push the card tray into the card slot.
Chapter 1: Getting Started
4
Page 9
Chapter 1: Getting Started
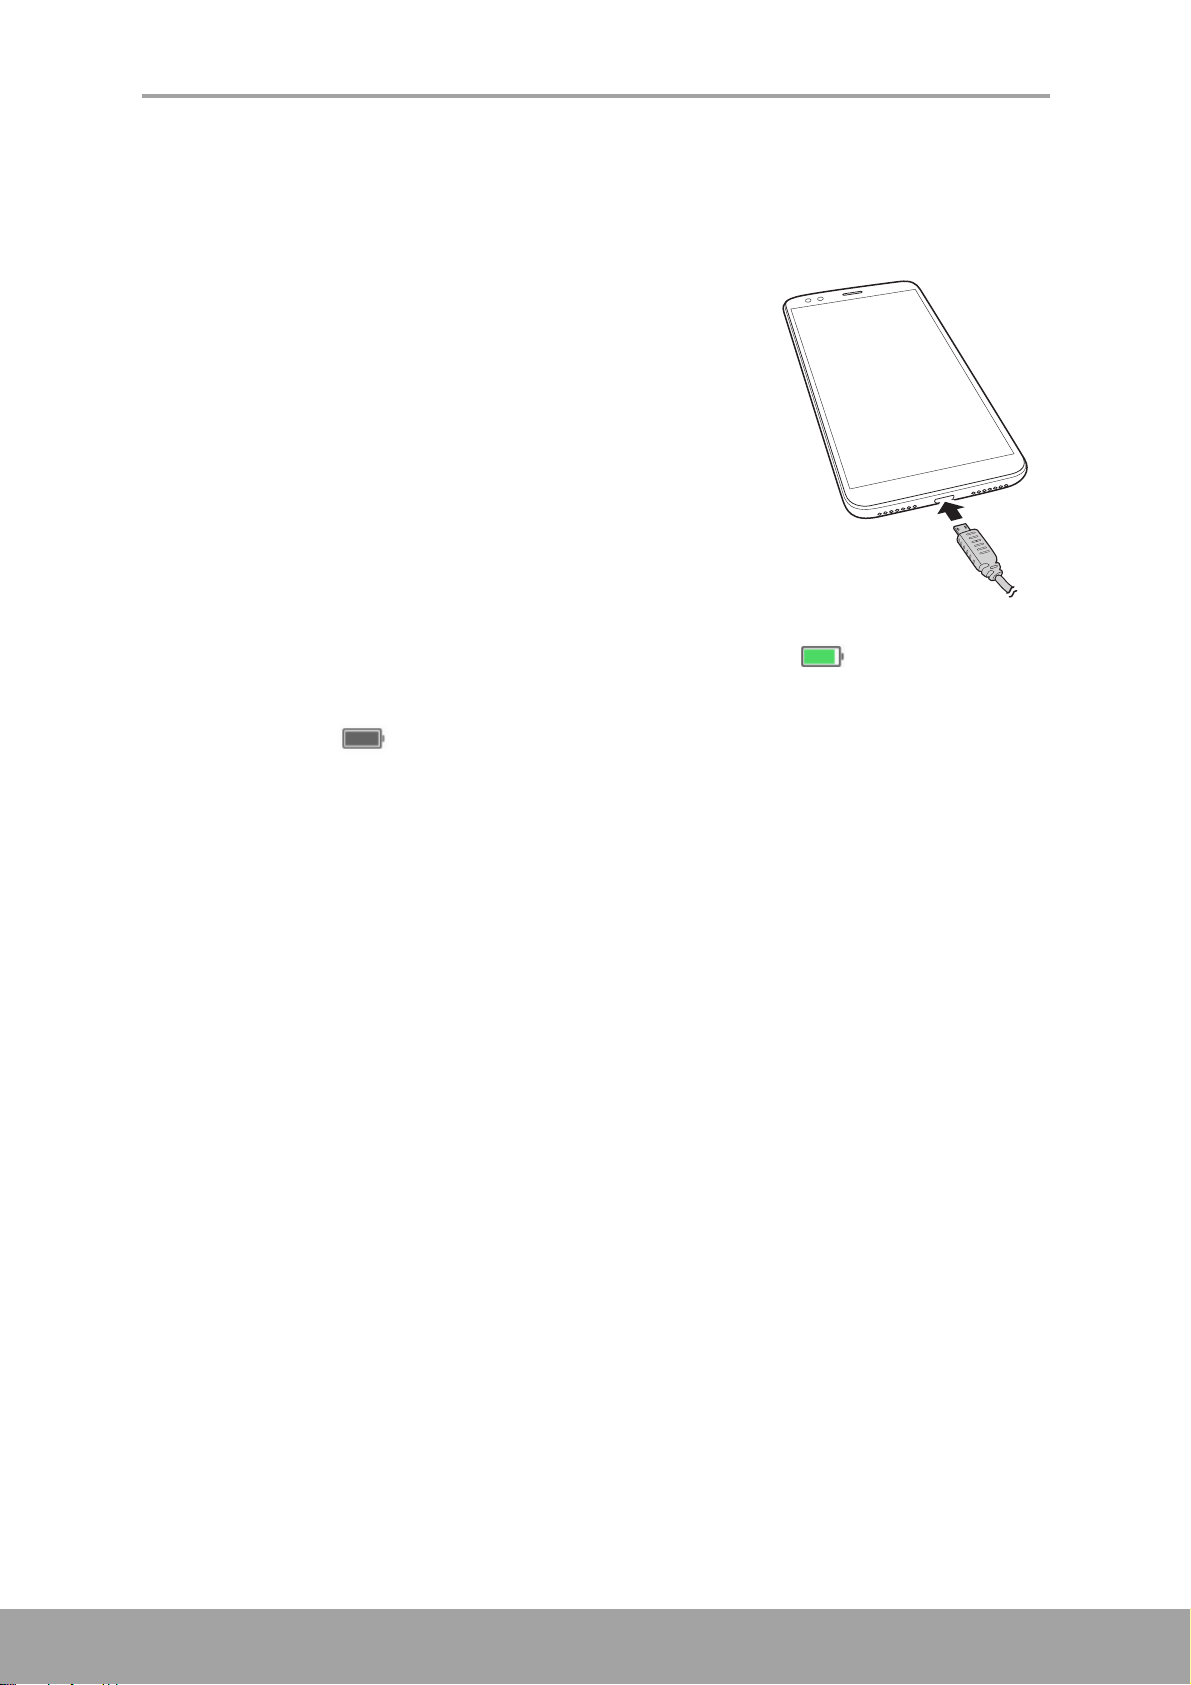
1.4 Charging the Battery
The battery that comes with the device is only partially charged.
Charge the battery
1. Connect one end of the USB cable to the Micro
USB port of the device.
2. Connect the other end of the USB cable to the
AC adapter.
3. Plug the AC adapter to a wall outlet to start
charging.
When the battery is charging and the device is turned on, the icon is displayed
on the status bar. When the battery is fully charged and the USB cable has been
disconnected, the icon is displayed on the status bar.
Warning
• Please charge indoors and in dry places.
• In case overheat protection mechanism is activated, the device will temporarily
stop charging:
When the system temperature reaches the maximum operating temperature, the
device will automatically activate the overheat protection mechanism and
temporarily stops battery charging. When the system temperature drops, the
system will automatically restart the battery charging.
NOTE: Battery life varies depending on network, applications, and ambient
temperature.
5
Page 10

Chapter 1: Getting Started
1.5 Turning the Device On or Off
After installing the SIM card and charging the battery, the device is ready to be turned
on.
Turn Device On or Off
Turn on the device
Press and hold the Power button until the device turns on.
Turn off the device
1. Press and hold the Power button for 2 seconds.
2. Tap Power off.
3. Tap Tap to power off to confirm.
Restart Device
1. Press and hold the Power button for 2 seconds.
2. Tap Restart.
3. Tap Tap to restart to confirm.
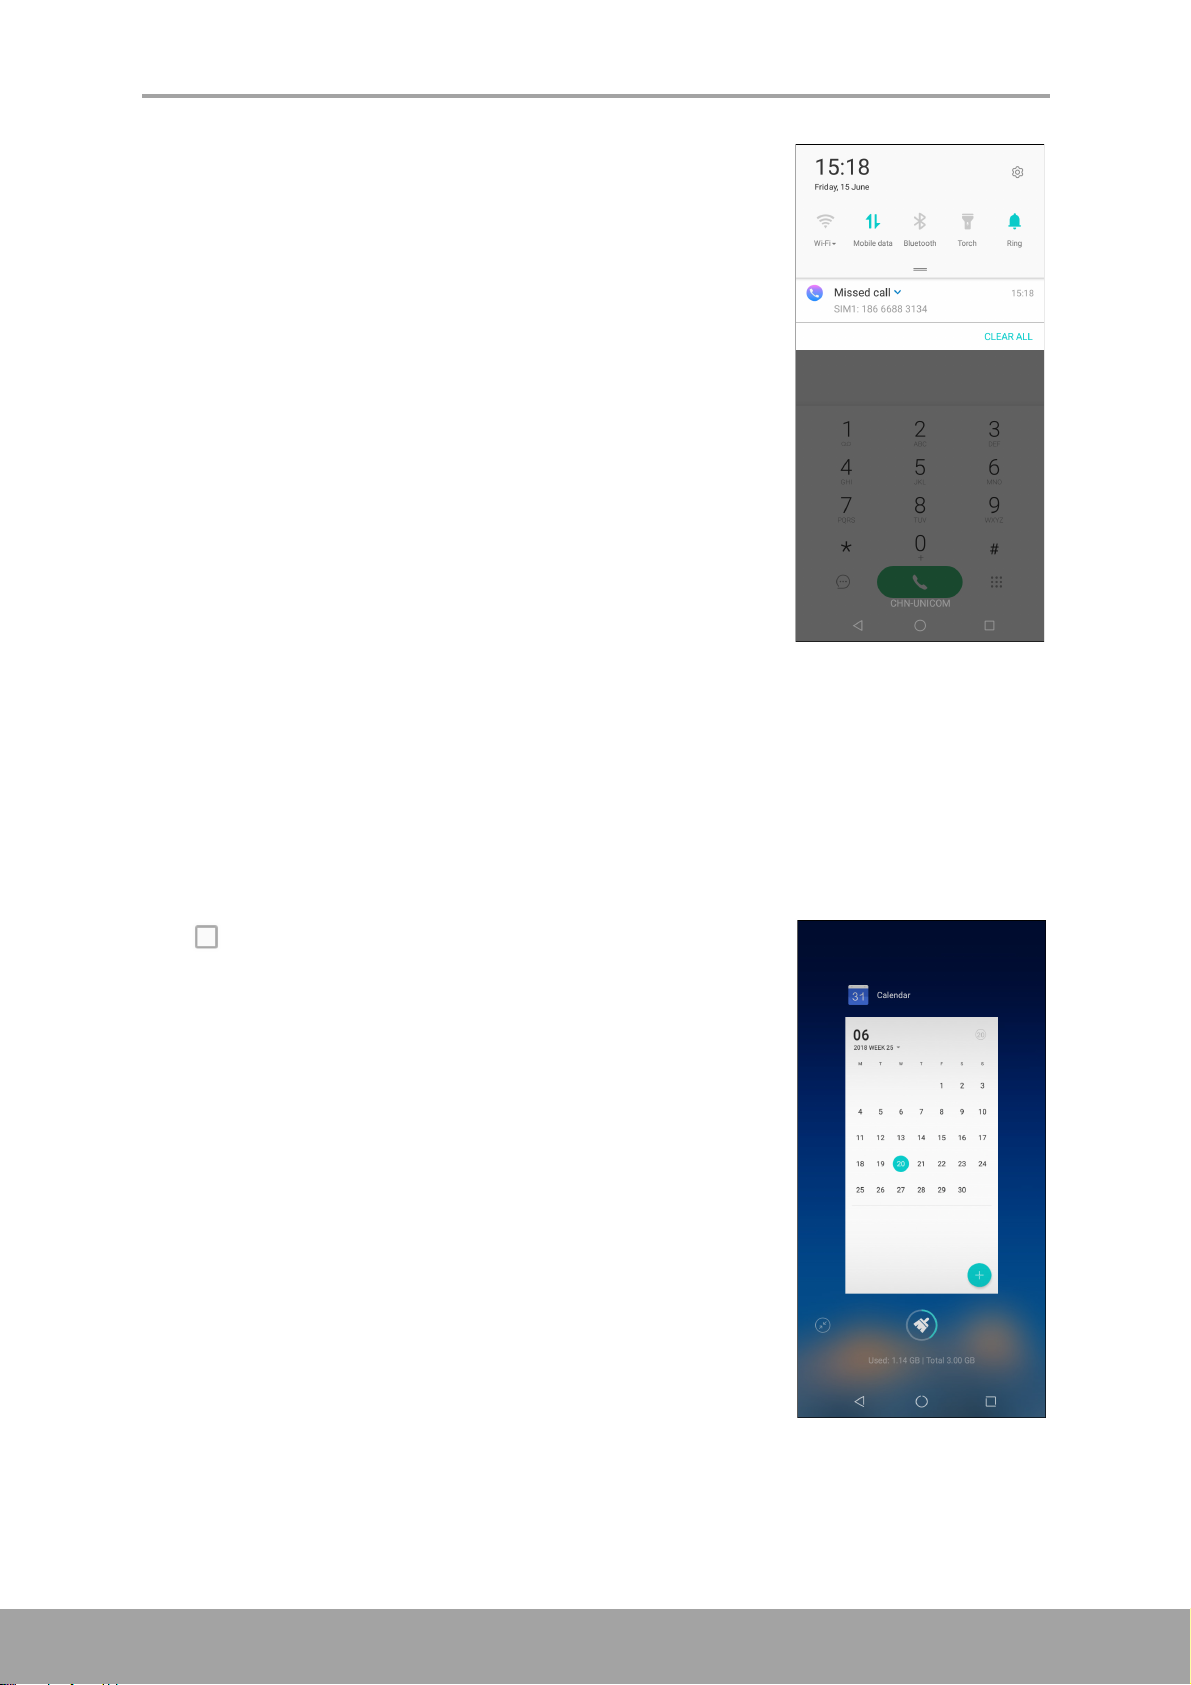
Set Device to Aeroplane Mode
1. Slide the status bar down to display the menu.
2. Further slide the menu down to display the extended
menu.
3. Tap Aeroplane mode.
Set Device to Ring, Vibrate or Silent Mode
1. Slide the status bar down to display the menu.
2. Further slide the menu down to display the extended
menu.
3. Tap the icons for Ring, Vibration, Mute to toggle
through these options.
Set Device to Sleep Mode
To set the device to sleep mode, press the Power button.
This turns the display off.
To turn the display on, press the Power button again.
6
Page 11
Chapter 1: Getting Started
Flashlight Notepad
Calculator
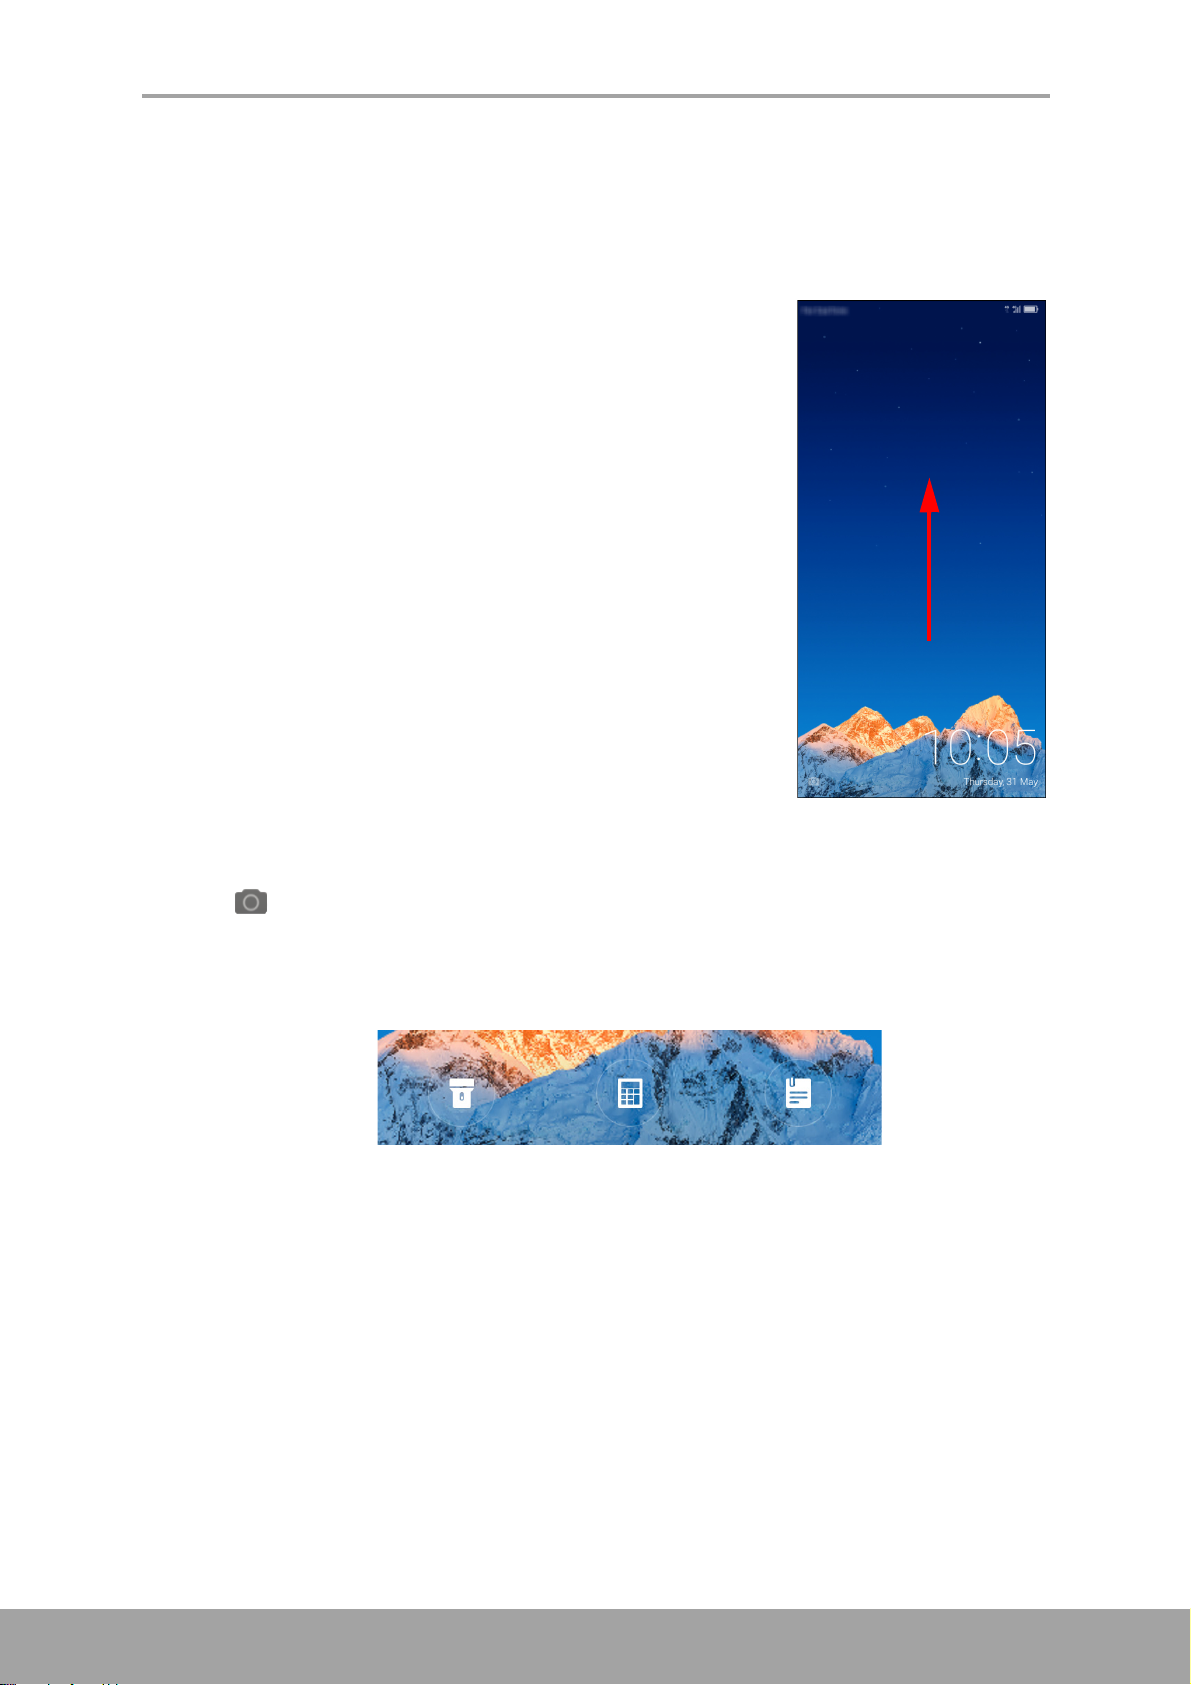
1.6 Locking and Unlocking the Screen
Lock the screen to prevent it from accidentally being touched. By default, the screen
locks after being idle for a period of time (see “Display Settings” on page 64).
Lock the screen
To manually lock the screen and turn off the display, press
the Power button.
Unlock the screen
1. If the display is turned off, press the Power button.
2. Slide up, to unlock the screen.
NOTE:
• Tap ( ) to use the Camera.
• While screen is locked, slide the bottom of the screen to the left and tap the icons
to use the functions directly.
7
Page 12
Chapter 1: Getting Started
1.7 Using the Headset
For hands-free conversation or listening to music, plug a headset to the headset jack.
NOTE:
• When using a headset, your ability to hear outside sounds may be limited.
Do not use a headset if it will endanger you.
• Do not set the headset volume to its maximum as it may damage your
hearing.
1.8 Adjusting the Volume
There are two ways to adjust the volume:
• Press the volume (+/-) button repeatedly to adjust the
volume.
• Press the volume button once.
Drag the volume slider to adjust the volume.
8
Page 13
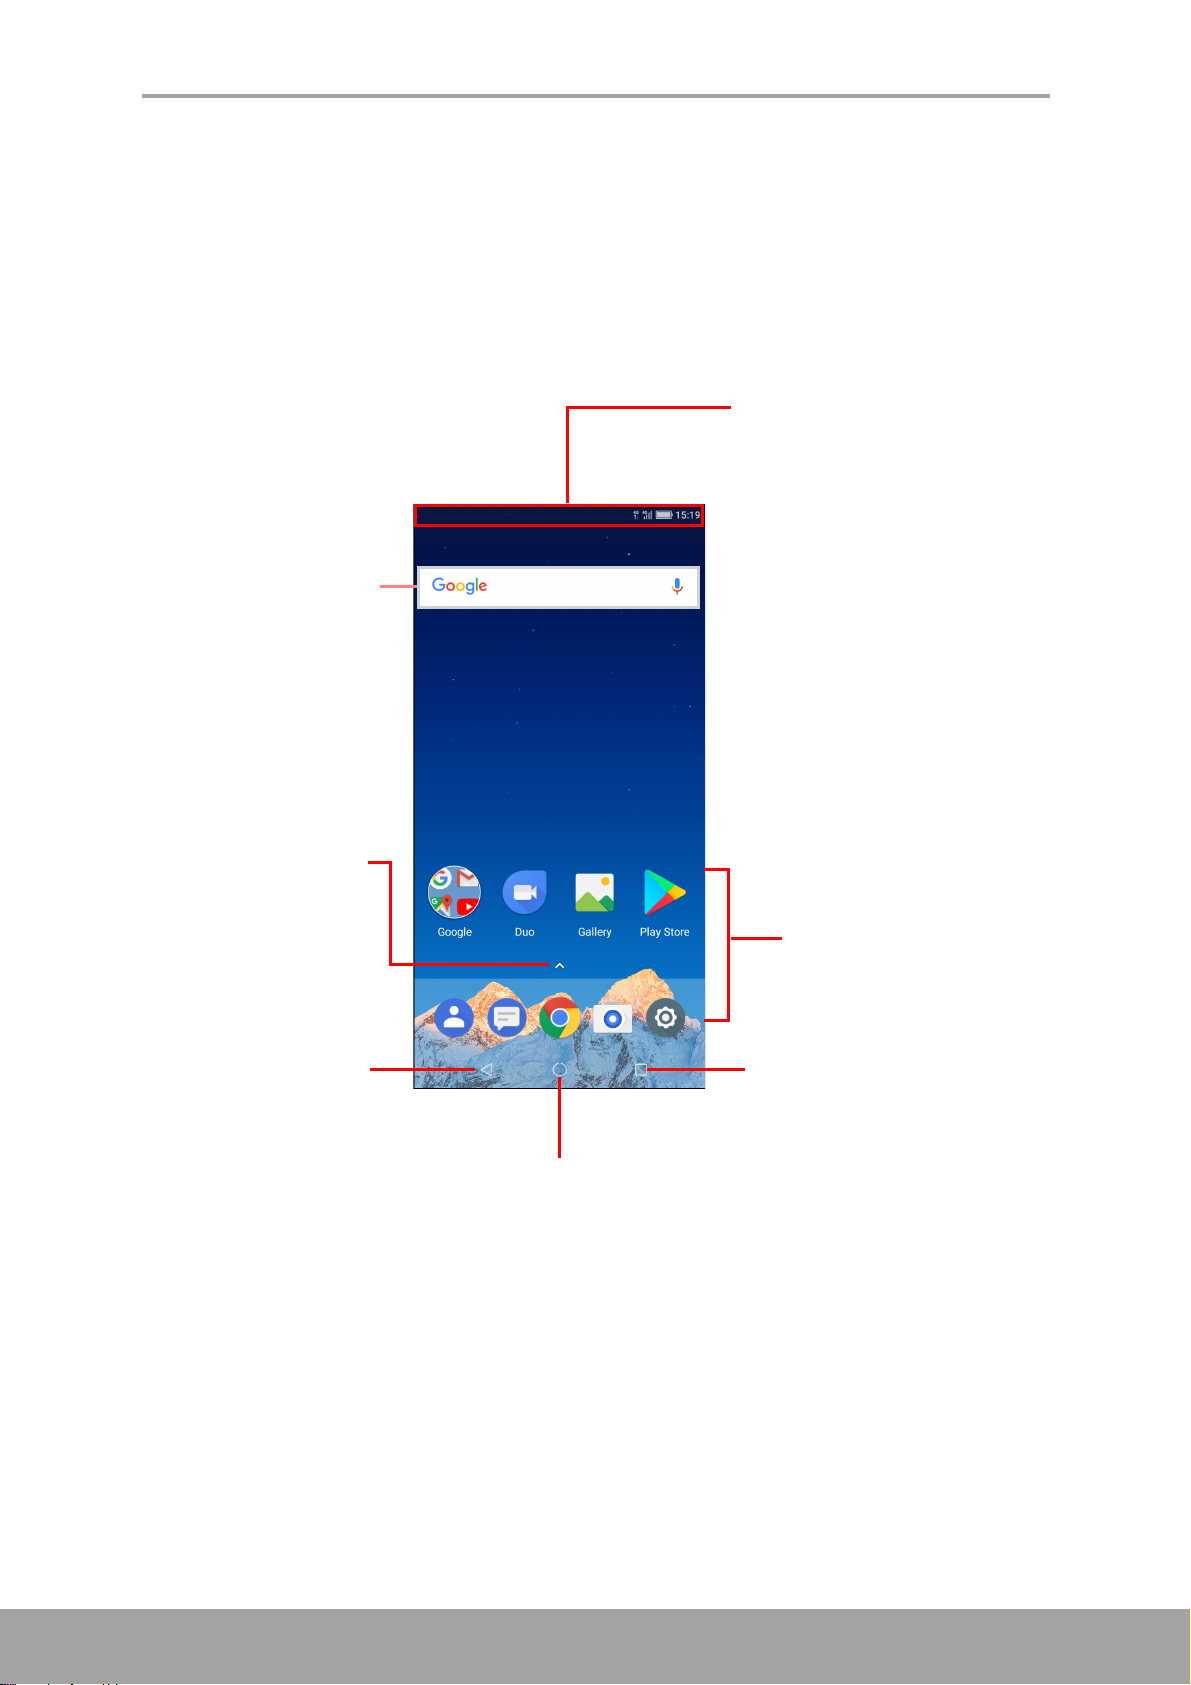
Chapter 2: The Basics
Status bar
• Displays status and
notification icons, and
clock.
• Message, connection, and
other notifications are also
displayed here.
Google Search
widget
Back
Tap to return to the
previous screen.
Recent Apps
Tap to access the recent
apps.
Home
Access the main Home screen.
Tap an icon to access
the app.
App list
List of all apps
installed on the
phone.
Chapter 2: The Basics
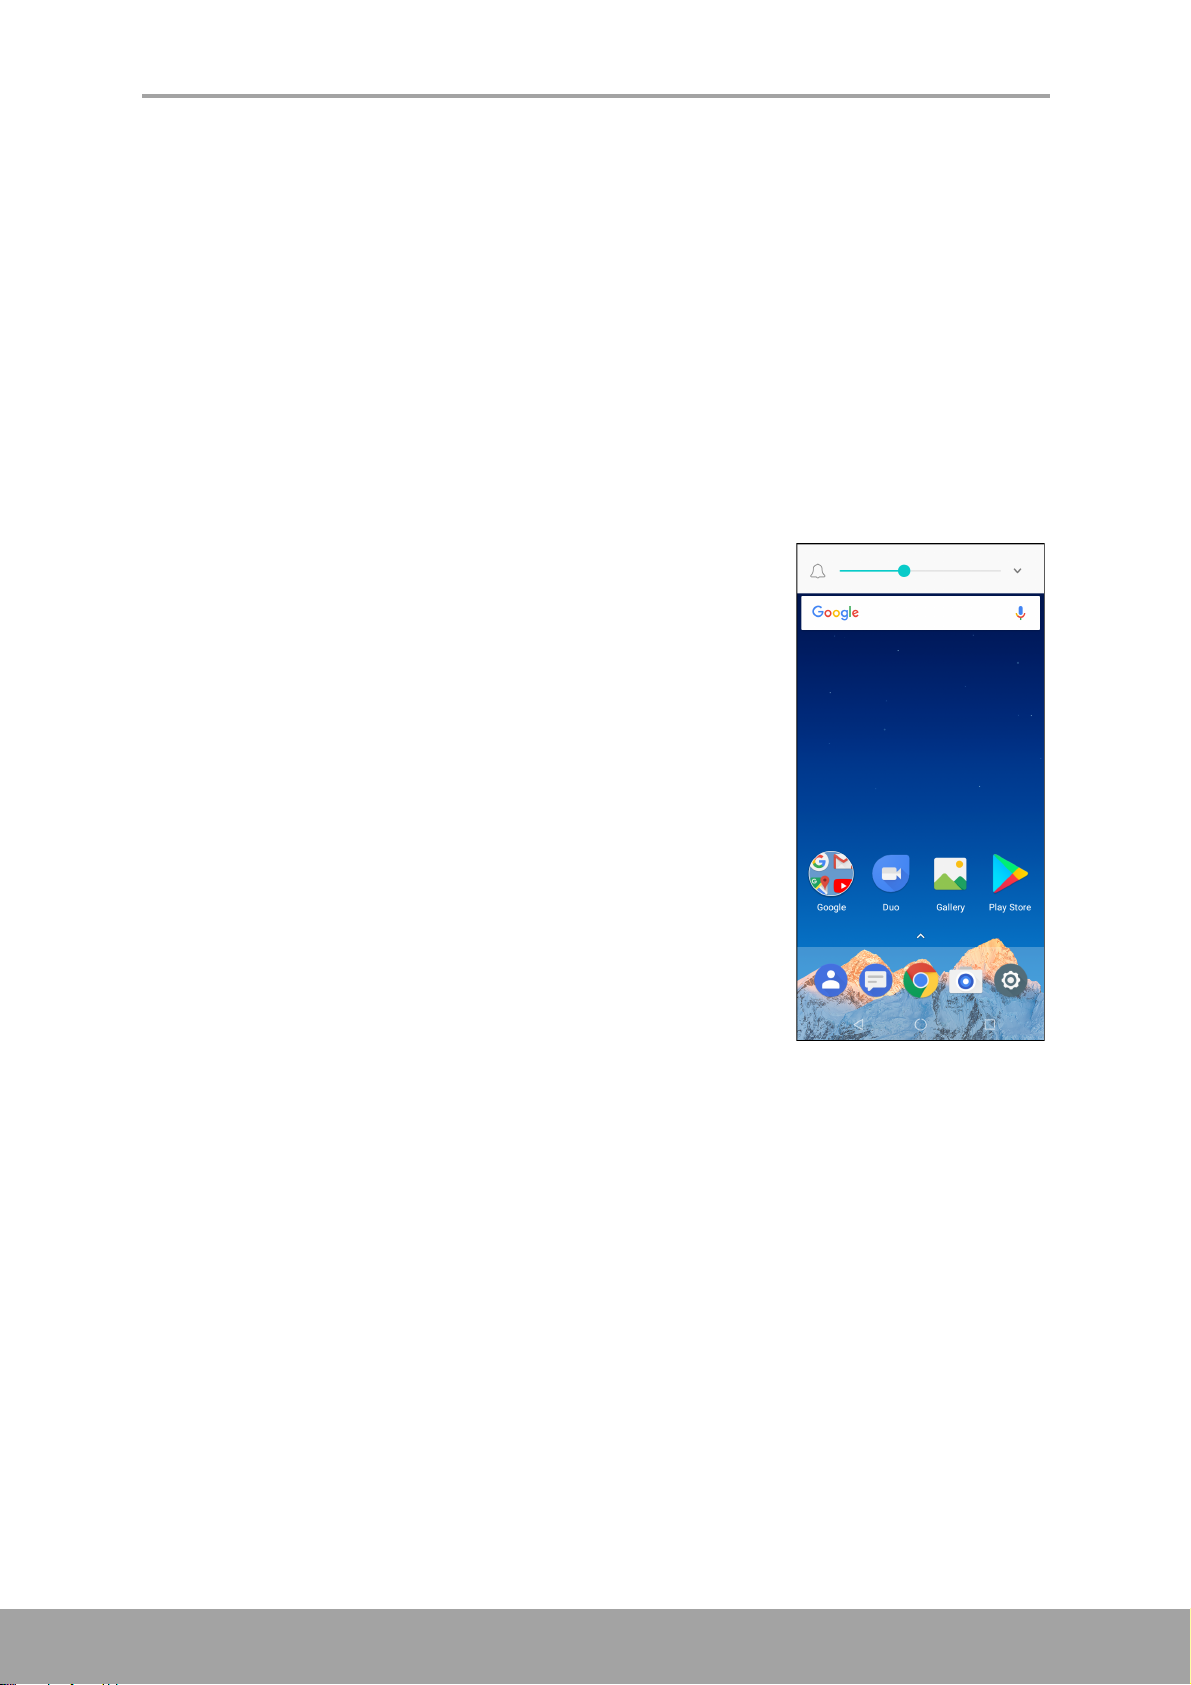
2.1 Home Screen
From the Main Home screen, you can quickly access common features and view
notifications of missed calls, received messages, check battery, and connection
status.
TIP:
• Swipe the upper arrow as shown in the above screen image to access more apps.
• Tap and hold on the Home screen to add, manage or modify features.
9
Page 14
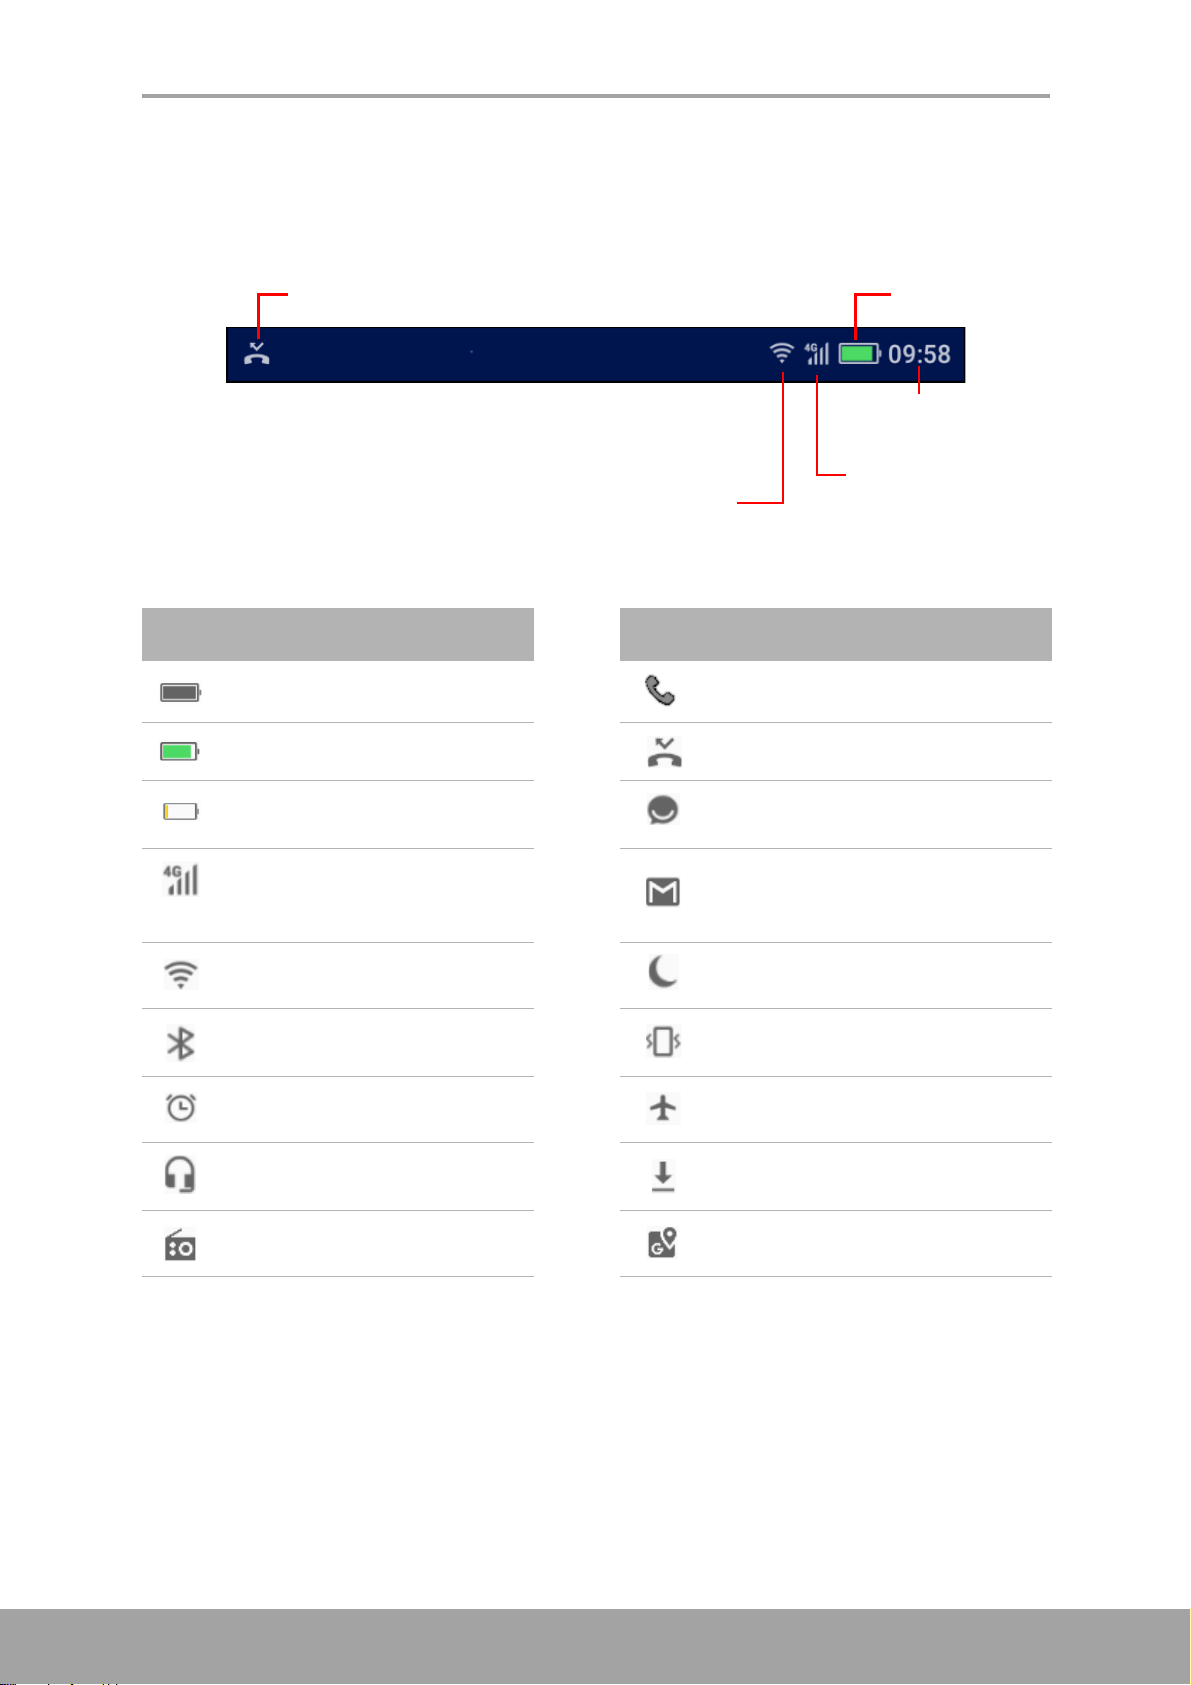
Chapter 2: The Basics
Battery icon
Wi-Fi icon
Missed call icon
Current time
Network signal
strength
Status Bar
Status bar icons indicate different types of information.
The icons on the status bar indicate the following information:
Icon Description Icon Description
Battery is full. Incoming call.
Battery is charging. Missed call notification.
Battery is completely
discharged.
4G-enabled network signal
strength. Fewer bars indicate
lower signal strength.
Wi-Fi is connected. Silent mode is activated.
Bluetooth connection is
active.
An alarm is set. Aeroplane mode is activated.
A headset is connected.
FM radio is on. Google Maps app is opened.
New text message notification.
New email notification.
Vibrate mode is activated.
File is downloading or has
finished downloading.
10
Page 15
Notifications Panel
The notifications panel displays the device activities, details
of status, or other notifications.
Open the notifications panel
Tap and slide the status bar downwards.
To open related applications, touch a notification.
Close the notifications panel
Tap and slide the status bar upwards to close the
notifications panel.
Chapter 2: The Basics
Open Applications
Tap an icon to open the application.
View Recently-Used Applications
Tap . The recently-used applications are displayed.
11
Page 16
Chapter 2: The Basics
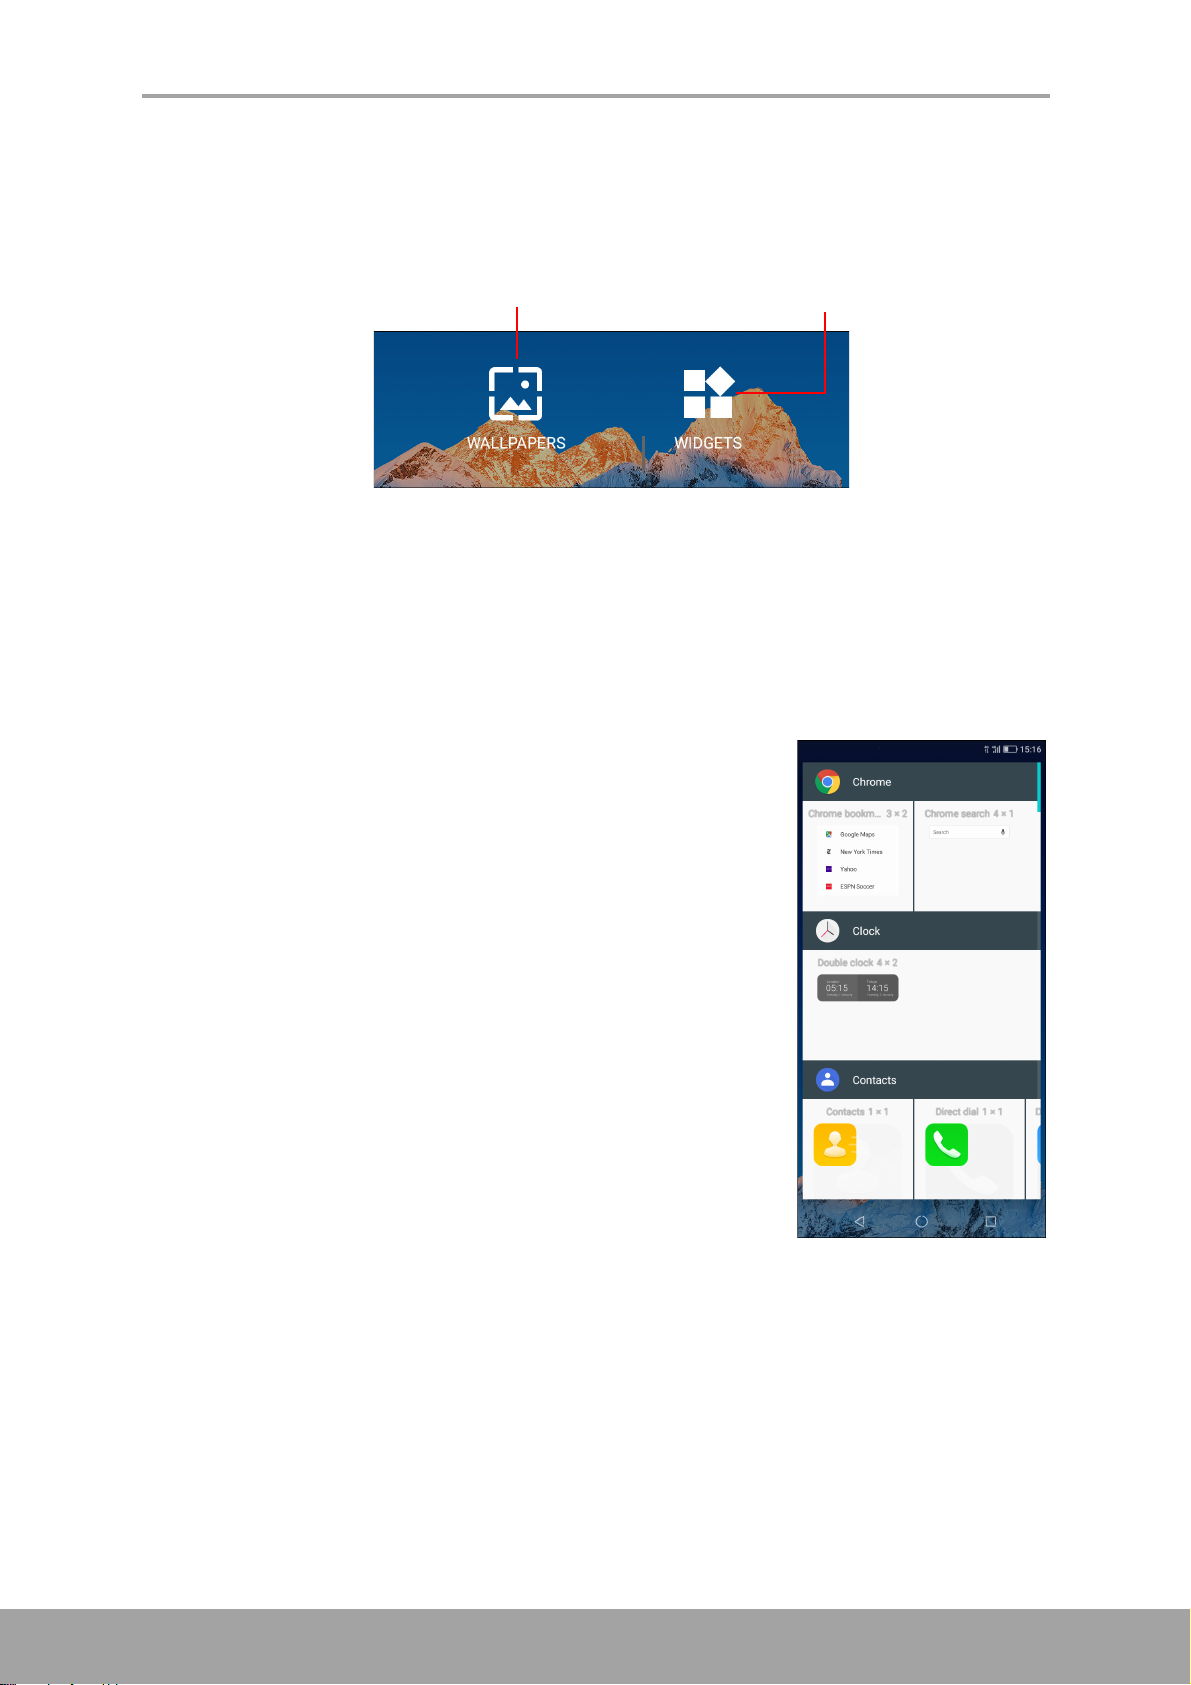
Select Wallpaper
Add Widget
Control Panel
Tap and hold on an empty spot on the Home screen to directly manage the Home
screen panels and access the control panel.
Widgets
Save time with live updates right on the Home screen and get all your personalized
updates in one place.
Add a Widget
1. Tap and hold on an empty spot on the Home screen.
2. Swipe the upper screen to select the Home screen
panel where you want to add a Widget.
3. Swipe the lower screen until you find the Widget you
want to add.
4. Tap on the Widget to add it on the selected Home
screen.
Remove a Widget
Tap and hold the widget, then drag it to X Remove.
12
Page 17
Chapter 2: The Basics
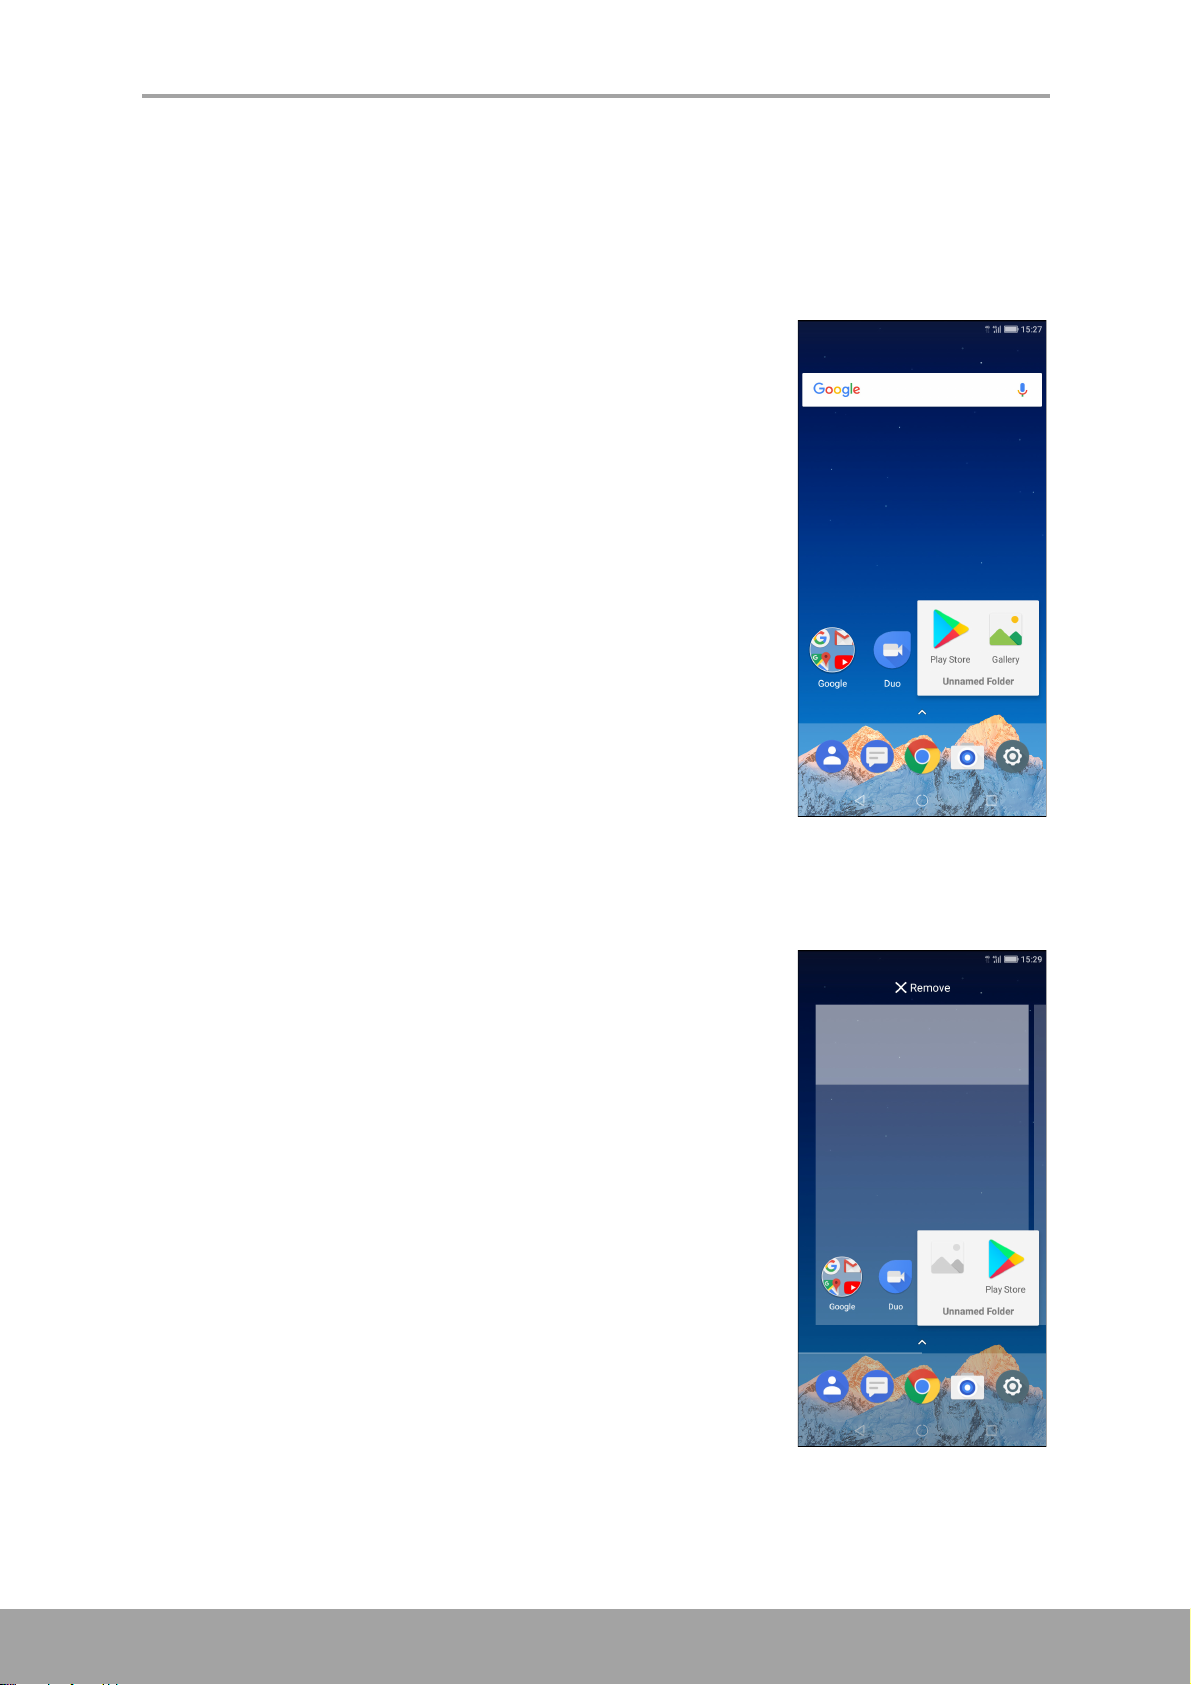
Folders
Save the space on your Home screen panels and group similar applications into a
folder.
Add a Folder
1. Drag one application to another to group them to a
folder.
2. Type the folder name.
NOTE: The default folder name is “Unnamed Folder”.
Modify a Folder
1. Tap to open the folder you wish to modify.
2. Do one of the following:
• To remove an application from the folder, tap on
the application icon then drag it out of the folder.
• To remove the application totally from the device,
drag the icon to X Remove.
• To rename the folder, tap on the folder name.
Remove a Folder
Tap and hold on the folder you wish to remove and drag it to X Remove.
13
Page 18
Chapter 2: The Basics
Set Wallpaper
Customize the device wallpaper.
1. From the Control Panel, tap WALLPAPERS.
2. Select the wallpaper from Gallery, Live wallpapers, Photos, or from Wallpapers
folder.
3. Tap on a wallpaper to use it.
Manage Resources
Manage the resources on your phone by closing the recent active applications.
1. From the Home screen, tap .
2. Do one of the following:
• Swipe an application upwards to end the individual
application.
• Tap to end all active applications and optimize
the phone’s performance instantly.
• Tap to maximize view of the recent application
list.
14
Page 19
Chapter 2: The Basics
Managing Home Screen Panels
By default your phone has one main Home Screen. A new Home Screen is added
automatically in special occasions, for example after you download an app from Play
Store.
To add an additional Home screen, simply drag the
application icon to the right.
Changing Phone Settings
In Settings menu you can configure the network connections, device, personal
settings, accounts, and system.
To access the Settings menu, tap Settings or slide the status bar downwards, then
tap . For more information on Settings menu, please refer to “Device Settings” on
page 59.
15
Page 20
Chapter 3: Contacts
Chapter 3: Contacts
Contacts is your phonebook that lets you store names, phone numbers, email
addresses and other information. You can also add the frequently used contacts to
the favourites list. See “Favourite Contacts” on page 20.
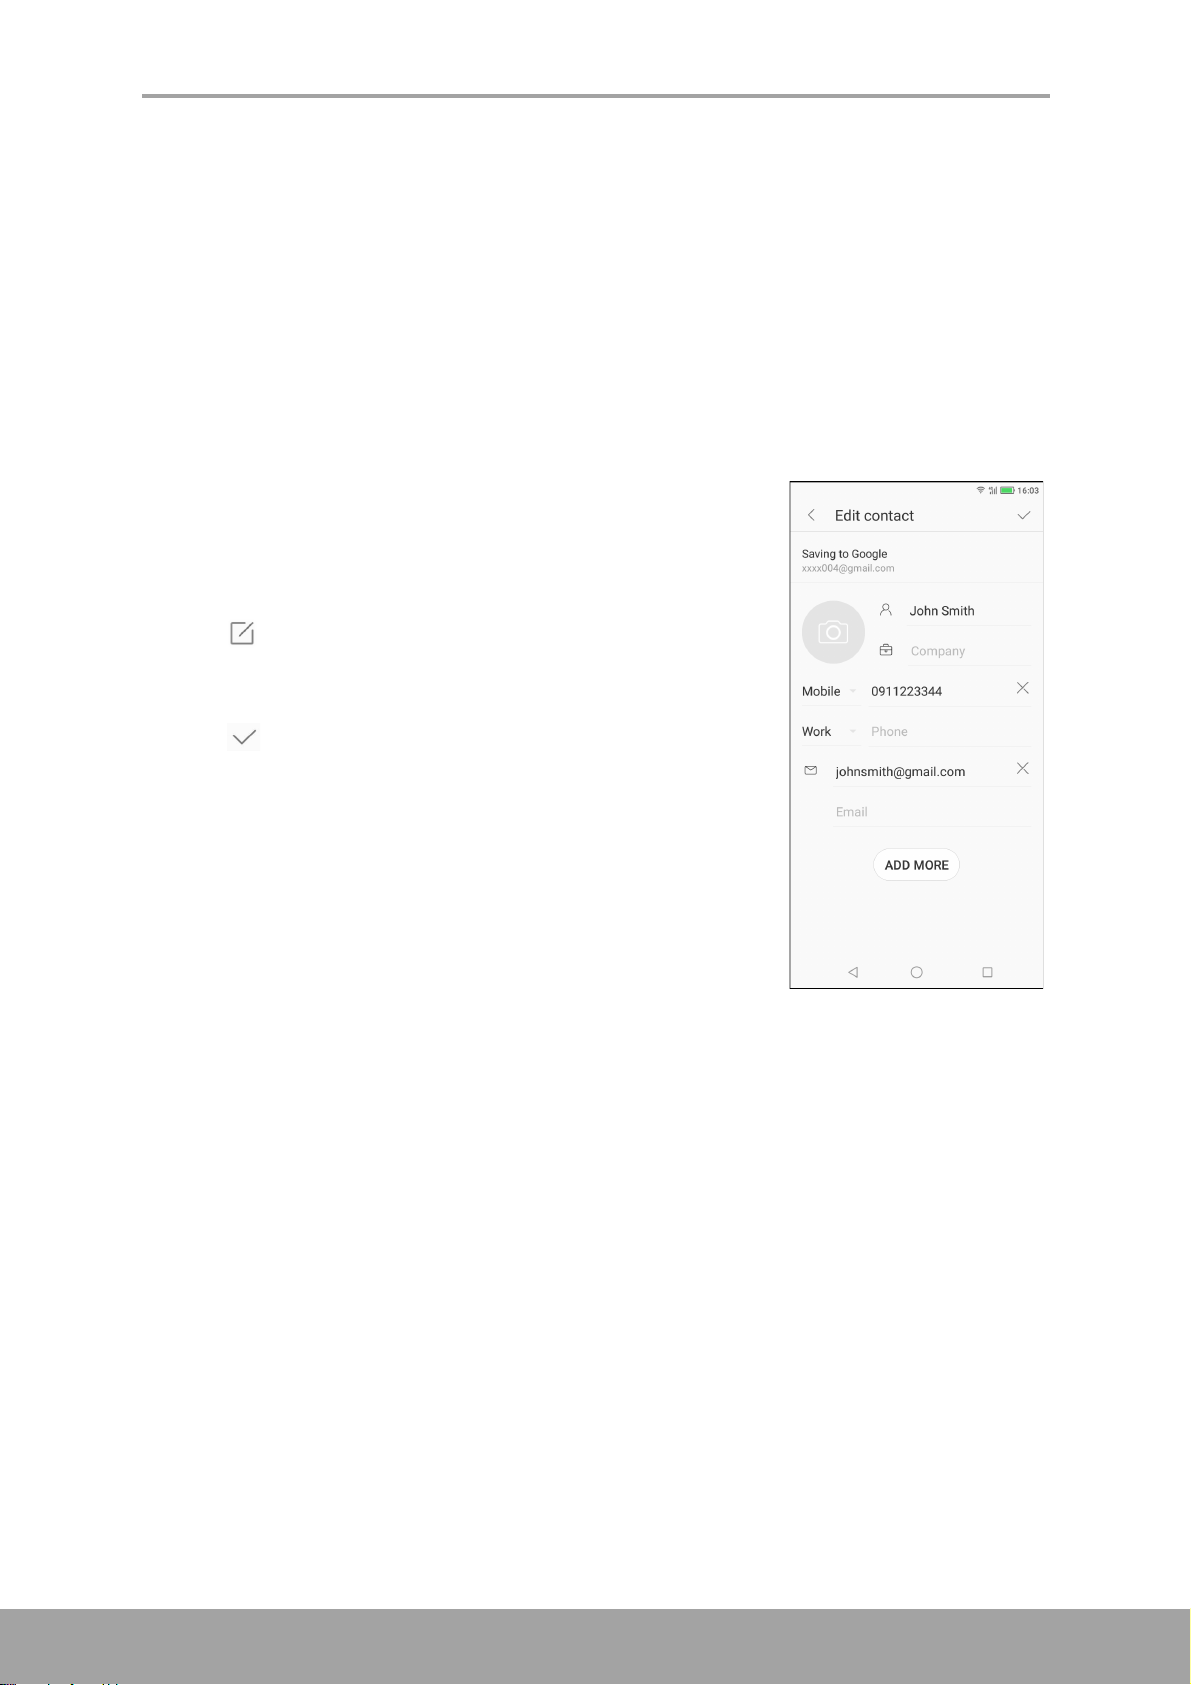
3.1 Adding Contacts
1. From the Home screen, tap Phone and select
Contacts tab.
2. Tap one of the following:
• CREATE A NEW CONTACT: To create a new
contact manually.
• SIGN IN TO AN ACCOUNT: To import contacts
from an email account.
• IMPORT CONTACTS: To import contacts from
SIM card or from a storage.
NOTE: If you have already configured Google account
in your phone, tap to add a new contact.
3. Tap one of the following:
• Saving to Device: To save the contact to phone
memory.
• Saving to SIM 1 (or Saving to SIM 2): To save
the contact to the SIM card.
• Saving to Google: To save the contact to the
Google account. This option is available only if
you have already configured Google account in
your phone.
4. Enter contact information such as name, phone
number. Tap ADD MORE to add other contact
information.
To add a contact picture, tap the photo icon ( ).
5. Tap to save the contact.
16
Page 21
3.2 Copying Contacts
You can copy contacts to and from the SIM card, the
device, memory card, or USB storage.
1. From the Home screen, tap Phone and select
Contacts tab.
2. Tap > Settings > Import contacts or Export
contacts.
3. Choose to Import/export contacts from or to the SIM
card/storage.
4. Select the contacts to copy and tap Done.
Chapter 3: Contacts
3.3 Communicating with Contacts
Call Contacts
NOTE: The available call options vary depending on the phone number(s) saved for a
specific contact and the number of SIM cards installed on the device.
1. From the Home screen, tap Phone and select
Contacts tab.
2. Tap a contact.
3. Tap the phone number to call the contact. See “Making
a Call” on page 23.
NOTE: Swipe the screen to see the call history,
messages, and contact-related agenda on your phone.
Text Contacts
1. From the Home screen, tap Phone and select
Contacts tab.
2. Tap a contact.
3. Tap .
4. Compose and send your message. See “Create and
Send Text Messages” on page 26.
17
Page 22
Chapter 3: Contacts
Email Contacts
1. From the Home screen, tap Phone and select Contacts tab.
2. Tap a contact.
3. Tap the email address.
4. Compose and send your email. See “Compose and Send Emails” on page 33.
3.4 Managing Contacts
Edit Contacts
1. From the Home screen, tap Phone and select
Contacts tab.
2. Tap the contact that you want to modify.
3. Tap .
4. Modify the necessary information or add additional
information by tapping ADD MORE.
5. Tap to save changes.
18
Page 23
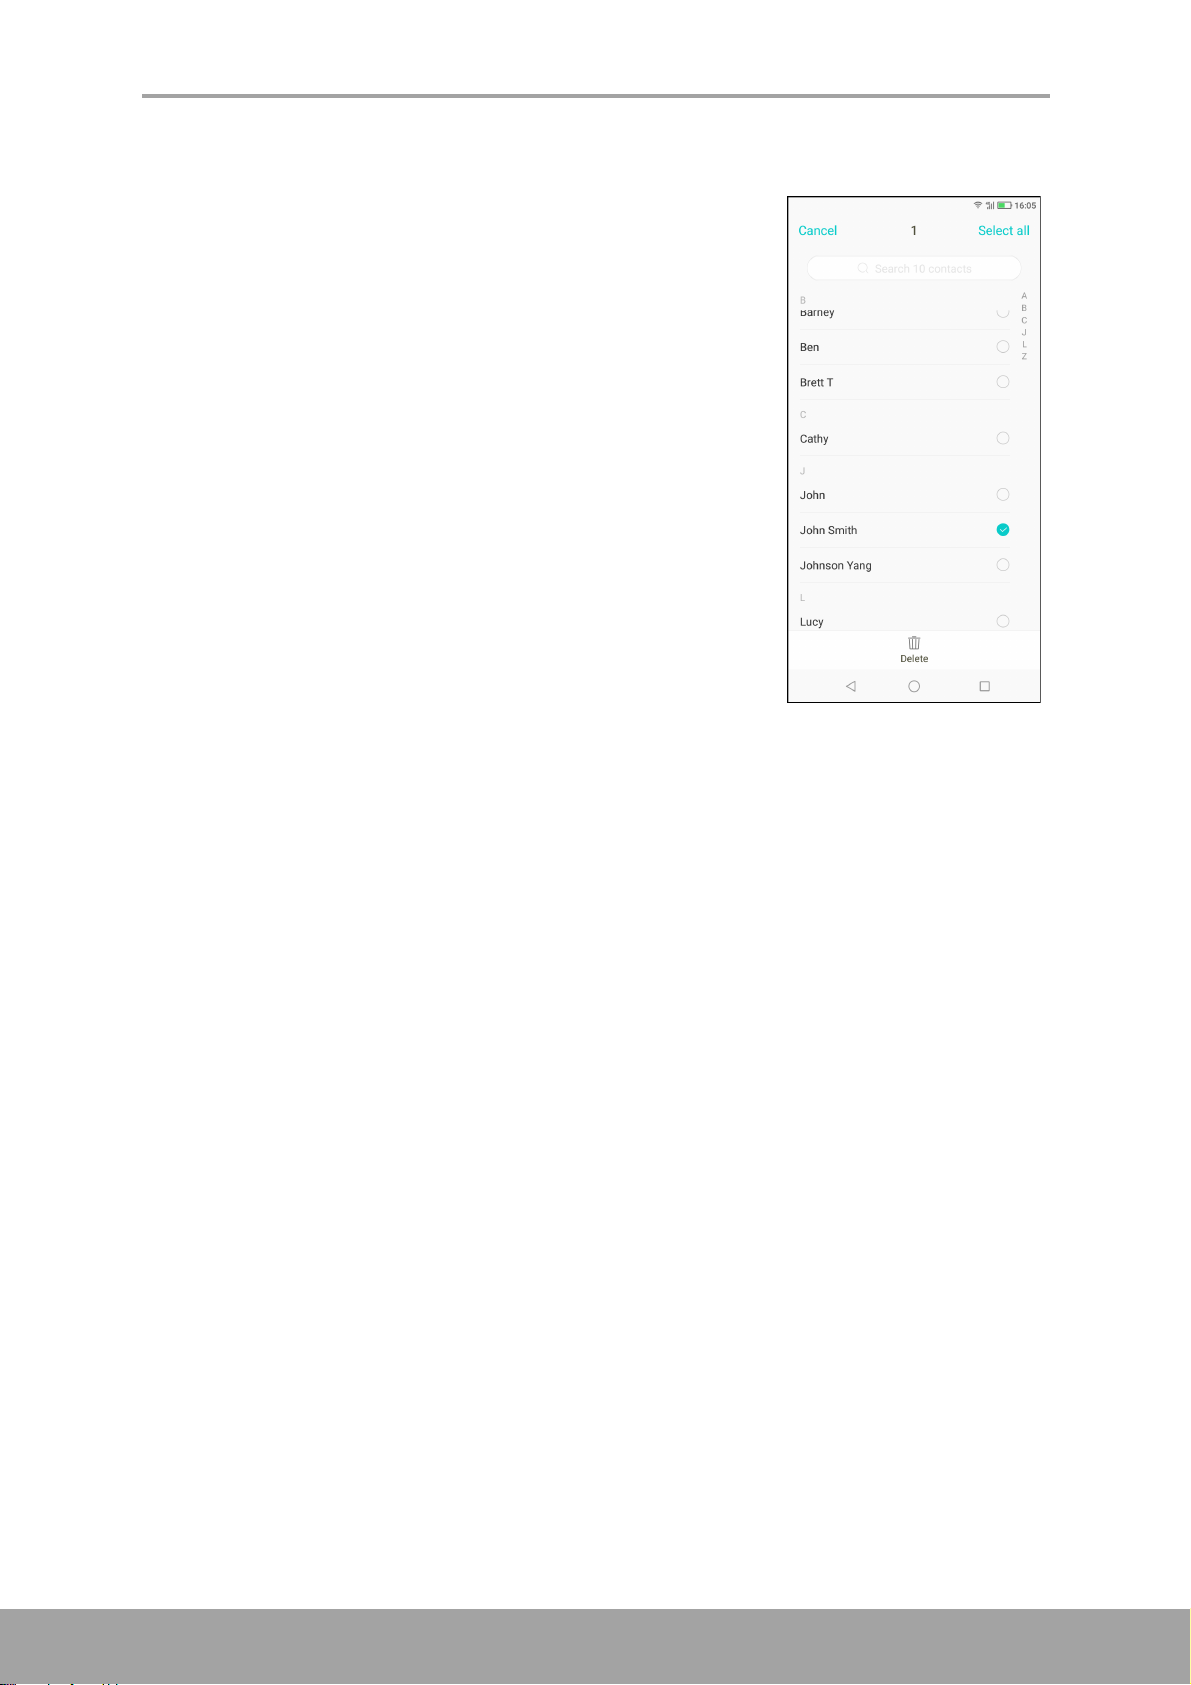
Delete Contacts
1. From the Home screen, tap Phone and select
Contacts tab.
2. Tap and hold the contact that you want to delete.
3. On the list, mark other contacts you want to delete.
4. Tap Delete.
5. Tap DELETE to confirm.
Chapter 3: Contacts
Send Contact Information
You can send contact information to other devices through a sharing application such
as Messaging, Gmail, Bluetooth, or saving to Google Drive.
1. From the Home screen, tap Phone and select Contacts tab.
2. Tap a contact.
3. Tap Share contact.
4. Tap a sharing application to send the contact information.
Add Contact to Blacklist
1. From the Home screen, tap Phone and select Contacts tab.
2. Tap the contact that you want to modify.
3. Tap Add to blacklist.
4. To undo, tap Remove from blacklist.
19
Page 24
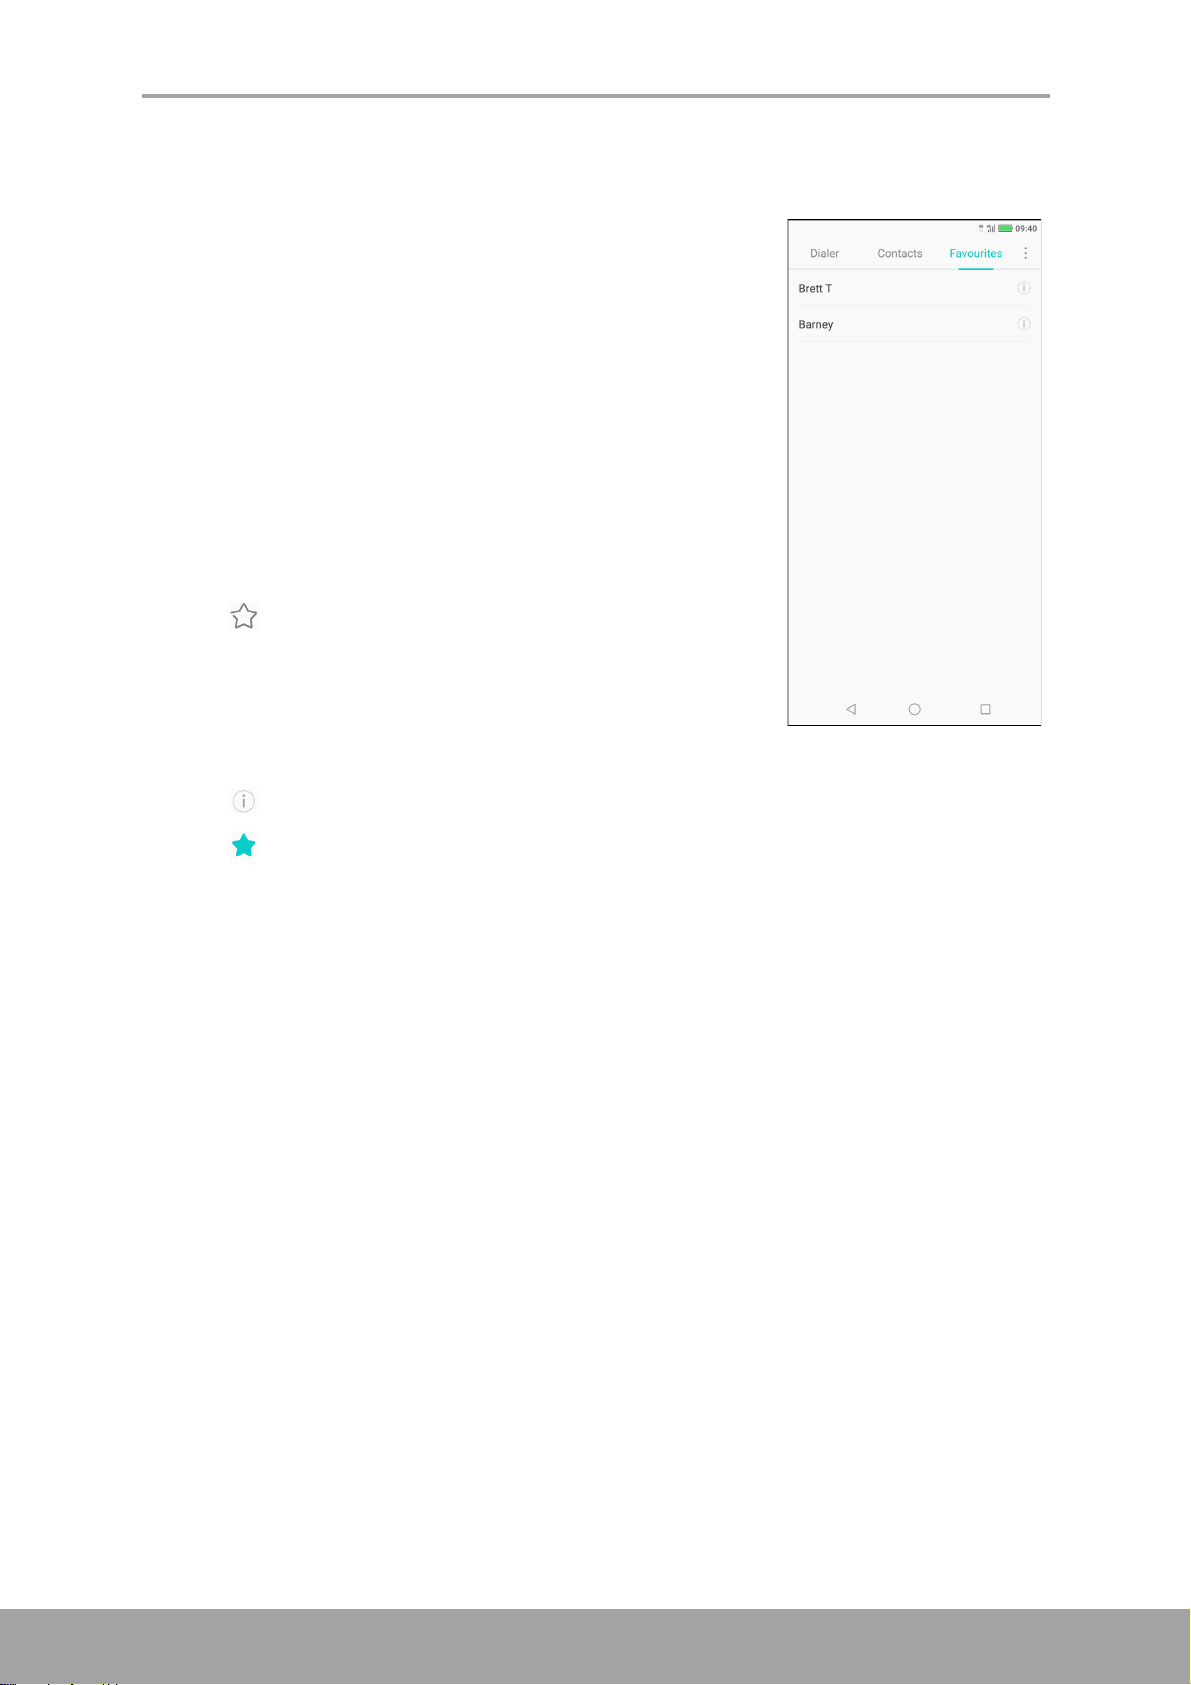
3.5 Favourite Contacts
Add the most frequently called contacts to Favourites to
access contacts quickly and easily.
View Favourites
From the Home screen, tap Phone and select Favourites
tab.
Add to Favourites
1. From the Home screen, tap Phone and select
Contacts tab.
2. Tap the contact you want to add to the Favourites list.
3. Tap .
Chapter 3: Contacts
Remove from Favourites
1. From the Home screen, tap Phone and select
Favourites tab.
2. Tap next to the contact you want to remove from the Favourites list.
3. Tap .
20
Page 25

Chapter 3: Contacts
3.6 Searching for Contacts
On the Contacts screen, do any of the following to easily search for contacts:
• Flick your finger up or down the screen to scroll the
contacts list.
• On the search box, type the first few letters of the
contact to search or enter an alphabetical index to view
contact names that start with the letter. For example, to
view names that start with “B”, tap “B” and the list of
contacts will be displayed.
3.7 Grouping Contacts
You can create groups of contacts to make it easier to find specific contacts, such as
your classmates, colleagues, and more.
1. From the Home screen, tap Phone and select
Contacts tab.
2. Tap Groups.
3. Tap to create a new group.
4. Choose to create a group under Phone, SIM card, or
Google account.
5. Give a name to the group and tap OK.
21
Page 26

6. Tap to add contacts to the group.
7. Tap the contacts from the list to start adding contacts.
8. Tap Done.
Chapter 3: Contacts
22
Page 27

Chapter 4: Using the Phone
Tap to configure the
Speed dial and Call
settings.
Dialer tab
Tap the phone number
on the keypad
Tap to hide the
on-screen keypad.
List of calls
Chapter 4: Using the Phone
To open the Phone screen, from the Home screen, tap Phone.
4.1 Making a Call
Make a call from the Phone screen
1. From the Home screen, tap Phone.
2. Tap the phone number on the keypad.
TIP: As you enter the number, matching contacts
3. Tap to call the number.
4. To end the call, tap .
appear. To call a contact, tap the contact from the
list. Tap to erase a wrong number. Tap and
hold to erase the entire number.
• If you are using dual SIM cards, select one of the
available network.
23
Page 28

Make a call from Contacts
1. From the Home screen, tap Phone and select Contacts
tab.
2. Tap the contact name.
3. Tap icon next to the desired contact phone number
to make a call.
4. To end the call, tap .
Chapter 4: Using the Phone
4.2 Answering a call
When an incoming call is received, the device may ring or
vibrate and the screen displays an incoming call message.
If the caller is listed in your Contacts, the contact’s name
appears. You may also see the caller’s phone number, if
available.
Accept or reject an incoming call
• To answer a call, tap and drag it up to towards .
• To reject the call, tap and drag it down towards
.
• To reject the call with a message, tap and drag
towards the middle of the screen, then choose a
message text from a list.
4.3 Ending a call
To end a call, tap .
24
Page 29

4.4 In-Call Options
Call history
Tap to view call details.
Tap to access more
options.
• To display the on-screen keypad, tap .
• To mute or unmute the microphone, tap .
• To use the speakerphone, tap .
• To put the call on hold, tap .
• To set up a conference call, tap and enter the
second phone number.
Chapter 4: Using the Phone
4.5 Call Log
The Call Log screen displays the most recent outgoing, received, or missed calls.
To view the call history, from the Home screen, tap Phone.
• To call an entry, tap the corresponding contact.
• To remove the entry from the list, tap and hold on the entry, you can select other
entries from the list, then tap Delete. When a confirmation message appears, tap
DELETE to confirm deletion.
25
Page 30

Chapter 5: Email & Messaging
Chapter 5: Email & Messaging
Use Messaging to send and receive text and multimedia messages. Use Gmail to
send and receive email messages using your Internet email accounts.
5.1 Text Message
A text message can only contain letters, numbers, and symbols.
Create and Send Text Messages
1. From the Home screen, tap Messaging.
2. Tap .
3. In the To field, enter the recipient’s phone number.
TIP: To add recipients from Contacts, tap and
select contact(s). Then tap Done.
4. Compose your message.
5. Tap to send your message.
• If you are using dual SIM cards, select one of the
available network.
NOTE:
• If you close Messaging before sending your
message, the unsent message will be
automatically saved as a draft.
• You can also send text messages via Contacts application. See “Text
Contacts” on page 17.
Receive and Manage Messages
When you send and receive messages from a contact, these messages are grouped
as a message thread. A message thread looks like an exchanged conversation.
Reply to a text message
1. From the Home screen, tap Messaging.
2. Tap a message thread to open it.
3. Compose your message.
4. Tap to send your message.
26
Page 31

Delete a message thread
1. From the Home screen, tap Messaging.
2. Tap the message thread you want to delete.
3. Tap > Delete thread.
4. Tap DELETE to confirm.
Chapter 5: Email & Messaging
Delete all message threads
1. From the Home screen, tap Messaging.
2. Tap and hold a message thread.
3. Select the message threads you want to delete.
4. Tap Delete.
5. Tap DELETE to confirm.
27
Page 32

Chapter 5: Email & Messaging
5.2 Multimedia Message
A multimedia message or MMS can contain letters, images, an audio or video file.
Create and Send MMS Messages
1. From the Home screen, tap Messaging.
2. Tap .
3. In the To field, enter the recipient’s phone number.
TIP: To add recipients from Contacts, tap and select contact(s). Then tap
Done.
4. To attach files to your message, tap , then tap one
of the following:
• Photo: Attach pictures from Gallery.
• Take photo: Take a picture to attach.
• Audio: Attach an audio file.
• Template: Attach a message template.
• Video: Attach a video file.
• Take video: Record a video to attach.
• Contacts: Attach a contact information.
• Subject: Add a subject line to the message.
The message automatically converts to an MMS
message.
5. Compose your message.
6. Tap to send your message.
28
Page 33

Chapter 5: Email & Messaging
5.3 Customizing Message Settings
1. From the Home screen, tap Messaging.
2. Tap > Settings.
The following message settings are available:
• Harassment settings: Use this setting to view
intercepted calls and manage blacklist.
• Mobile broadcasts: View the history of alert or
emergency messages from your area.
Text (SMS) messages
• Service center: Set the phone number of the
service center.
• Delivery reports: Enable to receive delivery
reports for each message you send.
• SMS Validity Period: Set the validity period of
unsent message.
• SMS storage location: Select where to store the
received messages.
• Manage SIM card messages: Manage sim card
messages.
Multimedia (MMS) messages
• Delivery reports: Enable to receive delivery reports for each message you
send.
• Read reports: Enable to request a read report for each message that you
send.
• Send delivery report: Enable to send a delivery report for each message you
receive.
• Send read report: Enable to send a read report if requested by the MMS
sender.
• Auto-retrieve: Enable to automatically retrieve messages.
• Roaming auto-retrieve: Enable to automatically retrieve messages when
roaming.
NOTE: If you are using dual SIM cards, select the desired network to enable its
respective setting.
29
Page 34

Chapter 5: Email & Messaging
5.4 Email Accounts
The device can send and receive emails just as you do with a computer. It supports
Google, Outlook, Hotmail, Live, Yahoo, Exchange, Office 365, and more.
Before setting up the email account, make sure the phone is connected to a wireless
network or mobile data connection.
Set Up Email Account
1. From the Home screen, tap > Gmail.
NOTE: You can also access Gmail from Google folder.
2. Tap Add an email address.
3. Select from a list of email providers.
To manually enter the email settings, tap Other. Skip to
step 6.
4. Enter your Email address and Password.
5. Tap Next.
The device will automatically retrieve the email settings.
30
Page 35

Chapter 5: Email & Messaging
6. Select an email connection protocol which best suits
your needs.
• Personal (POP3): Select to download all emails
from the mail server and save locally on the device.
Your email cannot be accessed via any webmail or
any separate client on other computers.
• Personal (IMAP): Select to keep all emails stored
on the mail server whereas the Sent emails are still
stored locally on the device. Your Incoming emails
are always available on multiple computers and/or
webmail.
• Exchange: Select to keep the Incoming and Sent
emails always available on multiple computers and/
or webmail (mail is synced between mailserver and
client).
7. Follow the on-screen instructions and enter all the
server information, Domain, Username, Password, and
other related information when requested. Tap Next to continue.
NOTE: Your account settings may vary, depending on the kind of email service for
the account. For setup parameter details, please check with your service provider.
8. Once the account setup is complete, the device will automatically retrieve your
emails.
Add More Email Accounts
1. From the Home screen, tap > Gmail.
2. Tap .
3. Tap the current email account.
4. Tap Add account.
5. Select the account type and enter the Email address
and Password.
6. Follow the on-screen instructions to complete the setup.
Once the account setup is complete, the device will
automatically retrieve your emails.
31
Page 36

Select Email Accounts
1. From the Home screen, tap > Gmail.
2. Tap .
3. Tap the current email account.
4. Tap the account you want to access.
Chapter 5: Email & Messaging
Delete Email Accounts
1. From the Home screen, tap Settings > Accounts >
Google (depends on account type).
2. Select the account you want to delete.
3. Tap > Remove account.
4. Tap REMOVE to confirm.
32
Page 37

5.5 Using Email
Email contains
attachment.
Bold text indicate message
has not been read.
Compose and Send Emails
1. From the Home screen, tap > Gmail.
2. Tap .
3. In the To field, enter the recipient’s email address.
NOTE: Tap next to the To field to enter additional
recipient’s email addresses to Cc and/or Bcc lines.
4. Tap Subject then type a subject.
5. Compose your email.
6. Tap .
Add attachments to email messages
Chapter 5: Email & Messaging
1. Before sending your message, tap > Attach file or
Insert from Drive (Google Drive).
2. Select the type of file then select the file you want to attach.
Receive Emails
Emails are automatically received in the Inbox folder when the device connects to a
network.
Manually receive e-mails
1. From the Home screen, tap > Gmail.
2. Swipe down the screen to refresh.
33
Page 38

Chapter 5: Email & Messaging
Read and Reply to Emails
The Inbox displays the email headers. Open the email to view the complete content.
Download attachments
1. From the Home screen, tap > Gmail.
2. On the Inbox screen, tap an email to open it.
3. Do any of the following:
• Tap icon on the attachment to directly
download the attachment to the phone storage.
• Tap icon on the attachment to directly
download the attachment to Google Drive.
• Tap on the attachment > . A pop-up menu
appears. Depending on the file type, tap an option:
- Save to save the attachment.
- Save all to download all attachments.
- Save to Drive to save the attachment to Google
Drive.
- Share to share the attachment via Photos, Gmail, Maps, Bluetooth,
Messaging, or Google Drive.
- Share all to share all the attachments via Photos, Gmail, Maps, Bluetooth,
Messaging, or Google Drive.
- Print to send the image to the connected printer on the network or save the
image as a PDF file.
- Download again to redownload the image.
NOTE: Only supported file types can be opened on the device.
34
Page 39

Reply or forward e-mails
1. Open the message.
2. Do any of the following:
• On the bottom of the message, tap Reply, Reply
all or Forward.
• Tap or tap > Reply all to reply the email.
• Tap > Forward.
3. Compose your message.
4. Tap .
Mark email as unread
1. Open the message.
2. Tap .
Chapter 5: Email & Messaging
Manage Email Folders
Delete emails
1. From the Home screen, tap > Gmail.
2. On the Inbox screen, tap and hold the message you
want to delete.
3. Tap to delete the message.
NOTE: If deleting the message was unintentional, you can
recover the message within a few seconds by
tapping UNDO.
Archive emails to
1. From the Home screen, tap > Gmail.
2. On the Inbox screen, tap and hold the message you
want to archive.
3. Tap to archive the message.
NOTE: If archiving the message was unintentional, you can
recover the message within a few seconds by
tapping UNDO.
35
Page 40

Chapter 5: Email & Messaging
Move emails to other folders
1. From the Home screen, tap > Gmail.
2. On the Inbox screen, tap and hold the message you
want to move.
3. Tap > Move to to view the folder list.
4. Scroll the folder list until you find the folder where you
want to move the email and tap on the desired folder.
Manage emails
1. From the Home screen, tap > Gmail.
2. On the Inbox screen, tap and hold the message.
3. Tap , then tap any of the following:
• Change labels to add label to the email.
• Add star to display the email in the Starred folder.
• Mark as important to display the email in the
Important folder.
• Mute to hide the email from the Inbox or Primary folder. The email can still be
accessed from the All mail folder.
• Report spam to report the email as a spam mail.
View other folders
If you are viewing the Inbox or Primary folder, tap to
view other folders. Tap on the folder to view the content.
36
Page 41

Chapter 5: Email & Messaging
Customize Email Settings
You can configure the settings of your email account such as account name, email
checking frequency, default account, notifications, and server settings.
Configure account settings
1. From the Home screen, tap > Gmail > >
Settings, then tap an email account.
2. Tap the options to configure the account settings such
as:
• My Account to change the account photo, control
access to the account, manage visibility settings,
the data used for personalization, and adjust
account settings.
• Inbox type to select the type of inbox.
• Inbox categories to select the folder categories to
display.
• Notifications to enable notification when an email
is received.
• Inbox notifications to set message syncing and
notification options.
• Manage labels to manage folder labels.
• Default reply action to reply to the sender or reply
to all.
• Mobile signature to add a signature to your emails.
• Smart Reply to show suggested replies when available.
• Out of Office AutoReply to activate auto reply function.
• Sync Gmail to sync with Gmail account.
• Days of emails to sync to configure the duration when to sync emails.
• Download attachments to enable auto download of attachments.
• Images to configure whether to show or ask before downloading the image
attachment.
37
Page 42

General Settings
1. From the Home screen, tap > Gmail > >
Settings > General Settings.
2. Tap the options to configure the default action,
conversation grouping options, swipe actions, and
more.
Chapter 5: Email & Messaging
38
Page 43

Chapter 6: Using Internet
Chapter 6: Using Internet
6.1 Connecting to Internet
The device connects to Internet via:
•Wi-Fi
• Cellular Data Networks
Wi-Fi
Turn Wi-Fi on
1. From the Home screen, tap Settings or slide down the
status bar and tap .
2. Tap Wi-Fi.
3. Tap to enable Wi-Fi via Settings menu.
Connect to a Wi-Fi network
1. Turn on Wi-Fi.
2. The available networks are listed. Tap a network to
connect to.
NOTE: You can also tap Add network to manually add
a connection. See “Add Wi-Fi network” on page 40.
3. If you select an unsecured network, the connection is
automatically established. Otherwise, proceed to the
next step.
4. When connecting to a secured network, you will be
prompted for the password. Enter the password, then
tap .
When Wi-Fi is connected, the connection icon is
displayed on the status bar.
39
Page 44

Add Wi-Fi network
1. From the Home screen, tap Settings or slide down the
status bar and tap .
2. Tap Wi-Fi and turn it on.
3. If the network you want to connect to is not on the list,
scroll to the bottom of the list, and tap Add network.
4. Follow the on-screen instructions and enter the
necessary information, then tap to save the
settings.
Chapter 6: Using Internet
Advanced Wi-Fi settings
1. From the Home screen, tap Settings.
2. Tap Wi-Fi.
3. Tap Advanced to access and set up more
advanced options.
40
Page 45

Chapter 6: Using Internet
Single SIM card Dual SIM cards
Cellular Data Network
Check the availability of service and plan rates of data connections with your network
service provider.
Customize the mobile network settings
1. From the Home screen, tap Settings > SIM Config.
2. Select the SIM card that you want to configure (if two SIM cards are inserted).
3. The following mobile network settings are available:
• SIM CARD/SIM1/SIM2: Active or deactive the SIM card.
• Mobile data: Turn on to enable data connection.
• Network type: Select the preferred network type. Available options: 4G/3G/
2G, 3G/2G, 2G.
• More: Enable or disable data roaming, configure APNs, select the operator,
configure preferred networks, access SIM Toolkit, and set SIM lock.
• Data traffic control: Monitor data traffic.
41
Page 46

6.2 Browsing a Web Page
Address bar
Tap to display active
web pages in
windows.
1. From the Home screen, tap Chrome.
2. Tap the search bar.
3. Type the URL then tap Go.
Chapter 6: Using Internet
Viewing the page
• To scroll the page, swipe your finger up or down.
• To zoom in on the page, move your two fingers apart from each other at the
location of the screen where you want to zoom in. In zoom mode, swipe your finger
up or down and left or right.
• To zoom out on the page, move your two fingers closer together at the location of
the screen where you want to zoom out.
Manage Web Page
While viewing a web page, tap to change view settings
or apply other functions.
• Tap to bookmark the page.
• Tap to download the page for offline reading.
• Tap to view the page information.
• Tap to refresh the page.
42
Page 47

Chapter 6: Using Internet
The following table lists the setting options. Depending on the function, some options
may be not be available.
Menu Description
New tab Load a new page tab.
New incognito tab Load a new incognito page tab.
Bookmarks To access a bookmark page.
Recent tabs View recent page tabs.
History View the pages visited.
Downloads Access the page downloaded for offline reading.
Share... Send this web page via one of the sharing applications.
Find in page Find the text on the web page.
Add to Home
screen
Desktop site Open the current web page in desktop viewing mode.
Settings Configure browser settings:
Add a shortcut to access the current web page from the Home
screen.
• Search engine: Select the home page to set as the default
search engine.
• Autofill and payments: Select to setup credit card for payments
and fill up forms.
• Passwords: Select to configure auto sign-in or saving of
passwords.
• Privacy: Select to configure privacy and security settings
including navigation error suggestions, search and site
suggestions, security reports, safe browsing, and more.
• Accessibility: Select to configure text size, zoom, and simplified
view settings.
• Site settings: Select to set background sync, enable JavaScript,
enable pop-ups, ads, and more.
• Languages: Set your preferred website language.
• Data Saver: Turn on to use Google servers to compress pages
before downloading them.
• About Chrome: View application information.
Help & feedback Access help information and send feedback to developer.
43
Page 48

Chapter 7: Using Bluetooth
Chapter 7: Using Bluetooth
To turn Bluetooth on
1. From the Home screen, tap Settings or slide down the
status bar and tap .
2. Tap Bluetooth.
3. Tap to enable Bluetooth via Settings menu.
4. To change the name of the device, tap Device name
and type the desired name which will be shown on other
devices.
5. Tap Show files received to review received files from
other Bluetooth devices.
7.1 Connecting to Bluetooth Devices
A connection to a Bluetooth device is called a partnership. You need to pair and
create a partnership with a Bluetooth device to exchange information.
1. From the Home screen, tap Settings or slide down the status bar and tap .
2. Tap Bluetooth.
3. To search for a new device, tap Refresh .
4. Tap a detected device.
5. To start pairing, tap PAI R and follow the on-screen instructions.
6. The paired Bluetooth device name is displayed.
NOTE: Once a partnership has been created, connecting to that device again will
no longer require pairing.
44
Page 49

Chapter 8: Multimedia Applications
Tap to switch
between front and
rear cameras
Tap to preview
the latest saved
photo or video
Tap to take a photo
Tap to choose the
capture mode
Tap to set flash mode
Tap to configure
camera settings
Tap to select photo size
Tap to switch to the
portrait mode
Tap to take a Wide-
Angle shot
Chapter 8:
Multimedia Applications
8.1 Photos and Videos
This device is equipped with rear and front cameras to take photos and videos. By
default, your device uses the rear camera to take photos or record videos.
Take Photos
1. From the Home screen, tap Camera.
NOTE:
• To switch between front and rear cameras, tap .
• If you want to adjust the camera settings (apply effects, choose a scene
2. Aim the device at the subject.
mode, and more), tap and do the modifications before taking a shot. See
more settings options in “Configure Camera Settings” on page 49.
45
Page 50

Chapter 8: Multimedia Applications
Tap to take a
shot
Tap to stop recording a
video
Turn on / off flash Recording time
Tap to pause
video recording
• To zoom in on the subject, move your fingers apart from each other at the
location of the screen where you want to zoom in.
• To zoom out on the subject, move your fingers closer together at the location
of the screen where you want to zoom out.
3. Tap to take the shot.
Record Videos
1. From the Home screen, tap Camera. Then tap Video to switch to Video mode.
2. Aim the device at the subject.
3. Tap start recording a video.
NOTE:
• The video recording starts immediately, after you tap .
• If you want to adjust the camera settings (video quality, timer, resolution), tap
and do the modifications before recording a video. See more settings
options in “Configure Camera Settings” on page 49.
• To zoom in on the subject, move your fingers apart from each other at the
location of the screen where you want to zoom in.
• To zoom out on the subject, move your fingers closer together at the location
of the screen where you want to zoom out.
4. Tap to stop recording.
46
Page 51

Chapter 8: Multimedia Applications
Tap to start taking a
shot.
Shooting indicators
Capture Modes
While taking photos, you can switch between several capture modes. To access the
mode, tap the mode on the Camera application screen. The available modes are as
follows:
• Time-lapse: Use this mode to take fast track videos.
• Beauty: In this mode, the camera will remove possible facial imperfection in a
photo.
• PAN O: Use this mode to capture extra wide images. It combines multiple shots
into a 180-degree panoramic picture.
• PRO: Use this mode to customize the advanced settings such as white balance,
ISO, EV, saturation, and contrast just like a professional photographer.
Take Panorama Shots
1. From the Home screen, tap Camera.
2. Tap PAN O on the camera application screen.
3. Aim the device at the subject.
4. Tap to start taking the shot.
47
Page 52

Chapter 8: Multimedia Applications
5. Start slowly moving the device in one direction and continue moving towards the
shooting indicators.
6. When the shooting indicators reach the end of the shooting point, the shooting
ends.
You can also manually stop recording by tapping .
Review Photos
After taking a photo, tap the mini window to preview the latest captured photo on the
screen and you will be directed to the Gallery directly.
• To return to the Camera mode, tap .
• To share the photo via Gmail, Messaging, Google
Maps, Bluetooth, Google Drive, or Photos, tap .
• To delete the photo, tap . When a confirmation
message appears, tap DELETE to confirm deletion.
• To edit the image, tap . Via image editing menu, you
can apply a filter, rotate, crop, configure color settings,
draw graffiti and add the mosaic effect on the image.
• To access more settings, tap .
• To add the image to the favorite folder, tap .
48
Page 53

Chapter 8: Multimedia Applications
Review Videos
After recording a video, tap the mini window to preview the latest recorded video on
the screen.
• To return to the Camera mode, tap .
• To share the video via Gmail, Messaging, Google Maps,
Bluetooth, Google Drive, Photos, or YouTube, tap .
• To delete the video, tap . When a confirmation
message appears, tap DELETE to confirm deletion.
• To access more settings, tap .
• To add the video to the favorite folder, tap .
• To play the video, tap .
Configure Camera Settings
To access the Camera settings, do the following:
On the Home screen, tap Camera > .
Tap the setting name to open its respective menu. After
you choose a function in the menu, the icon of the
respective function menu will automatically change.
For example, you chose “Multi”. The mode icon will
become .
Setting Available options
Circle
Multi
PIP
Artistic
Allows you take photo with circular shape.
Allows you take 2/4/6/9 shots and save as one image.
Allows you to take a shot using the front and rear camera at the
same time. The resulting photo will have 2 different shots.
Allows you to add a preset artistic design on the image to be
captured. Swipe the selection to scroll through the designs.
49
Page 54

Chapter 8: Multimedia Applications
Setting Available options
Watermark
Effects
HDR
Timer
Settings
Allows you to add a preset watermark on the image to be
captured. Tap More Watermark to select the watermark.
Allows you to add effects on the image to be captured. Tap an
effect to apply.
High Dynamic Range (HDR) imaging adds more ratio of light to
dark in your photographs, helping to make your photos look better.
Allows you to set the timer before capturing a photo.
Allows you to adjust other camera settings. Settings include:
Camera resolution, Video resolution, Storage path, Volume key
functions, Shutter sound, Composition, Record geolocation,
Finger Capture, Time-lapse, Restore default settings.
50
Page 55

Chapter 8: Multimedia Applications
8.2 Viewing Photos & Videos
1. From the Home screen, tap Gallery.
2. Tap a folder to view the captured images or recorded
files in thumbnails.
3. Tap an image or a video to view in full screen.
TIPS: You can do any of the following:
a To view your photos and videos, tap Photos tab to
switch to photos view or Albums tab to switch to
albums view.
b Tap + to add a new album.
c Tap and hold a thumbnail to select a photo or
video.
•Tap Share and then tap on the app that you
want to use for sharing the photo or video.
•Tap Delete to delete the photo or video.
•Tap Copy to copy the photo or video.
•Tap Move and choose a folder to move the
photo or video.
•Tap Cancel to cancel the current operation with
the photos or videos.
•Tap Select all to select all photos and videos.
•Tap Deselect to select the photo or video.
4. Tap an image or a video to view in full screen.
5. Swipe your finger to the left/right to view the previous/
next file.
51
Page 56

Chapter 9: Programs
Chapter 9: Programs
This device comes with the following pre-installed programs.
9.1 Chrome
From the Home screen, tap Chrome to view web pages. See “Connecting to Internet”
on page 39.
9.2 Calculator
With Calculator, you can perform basic arithmetic
functions on this device.
From the Home screen, tap > Calculator.
9.3 Camera
Capture images with this device. See “Photos and Videos” on page 45.
9.4 Gmail
Use Gmail to connect to your remote mailbox to retrieve new e-mail messages, or
view previously retrieved e-mail messages offline. See “Using Email” on page 33.
52
Page 57

9.5 File Manager
File Manager lets you browse the contents of your phone.
1. From the Home screen, tap > File Manager.
2. Tap the folder list and tap the folder you want to explore.
Or, tap the file path to select the storage to manage.
Managing files and folders
• To open a folder or file, tap on the folder or file or to
access all the files saved on the phone’s storage or SD
card, tap Phone Storage or SD card Storage
respectively.
• To delete, move, share, copy, add to favorites,
compress, rename, or view file or folder details, tap and
hold to view the respective options. Then tap a desired
option.
Chapter 9: Programs
• To refresh the folder content, tap .
• To sort items, tap , then tap a sorting option.
• To add a new folder, tap .
• To delete, move, share, copy, add to favorites, or compress all files or folders, tap
and hold a thumbnail, then tap All. Then tap the desired option.
53
Page 58

Chapter 9: Programs
9.6 Clock
Use Clock to add world clocks, set up alarms, or use the devices as a timer and
stopwatch.
Adding world clocks
1. From the Home screen, tap > Clock and select
Clock tab.
2. To add a world clock, tap .
3. Scroll the list and tap to select the city or type and
search desired city.
4. After selecting, tap , the selected city will appear on
the list.
Setting up alarms
1. From the Home screen, tap > Clock and select
Alarm tab.
2. To set up an alarm, tap .
3. To set the time, slide the numbers to set the hour and
minute.
4. To set repeat mode, tap Repeat and select the desired
week days. Then tap Done.
5. To add an alarm label, tap Label. Enter the label and
tap Done.
6. To vibrate when the alarm sounds, turn on Vibrate.
7. To set the ringtone, tap Ringtone and select the alarm
sound.
8. To set a background image, tap Select background
image and tap on the image you want to select. Then
tap Ok.
9. When all settings are complete, tap OK.
NOTE: By default the alarm is set on automatically. If you want to turn off the
alarm, tap the ON/OFF button ( ).
54
Page 59

Using the Timer
1. From the Home screen, tap > Clock and select
Timer tab.
2. Tap from a preset activity to automatically set the timer.
Or, slide the numbers to set the hour and minute.
3. Tap START to start timer.
Chapter 9: Programs
Using the Stopwatch
1. From the Home screen, tap > Clock and select
Stopwatch tab.
2. Tap START to start the counter.
3. Tap Lap to mark the lap or tap Pause to pause the
counter.
• When the counter is paused, tap Resume to
continue or tap Reset to reset the counter.
55
Page 60

Chapter 9: Programs
9.7 Using Torch
When using this device in a dark environment, you can use this device as a torch.
1. From the Home screen, slide the status bar down.
2. Tap to switch on the torch. Tap again to switch
off the torch.
9.8 Messaging
Use Messaging to send or receive text and MMS messages. See “Text Message” on
page 26.
9.9 Gallery
You can view your captured images, recorded video clips, and downloaded images in
Gallery. See “Viewing Photos & Videos” on page 51.
9.10 Contacts
View or manage your contact list. See See “Contacts” on page 16.
9.11 Phone
Use Phone to make phone calls or manage contact list. See “Making a Call” on
page 23.
9.12 Settings
In the Settings menu, you can view and adjust various phone settings. See “Device
Settings” on page 59.
56
Page 61

9.13 Recorder
Use Recorder to record a voice memo.
To record a voice note
1. From the Home screen, tap > Recorder.
The recording screen is displayed.
2. Tap to start recording voice.
3. To stop recording, tap .
• To pause recording, tap .
• To mark the recording, tap .
4. Type the record name, then tap Done to save.
Chapter 9: Programs
To play a voice note
1. From the Home screen, tap > Recorder.
2. To play a recording, tap a recording file from the list.
57
Page 62

9.14 Note
Use Note to type notes.
1. From the Home screen, tap > Note.
2. To create a new note, tap .
3. Type the note.
4. When done tap to save.
Chapter 9: Programs
9.15 Calendar
Use Calendar to mark important events and set reminders.
1. From the Home screen, tap > Calendar.
2. To create a new event, tap .
3. Enter the event name, location, start date/time, and end
date/time.
NOTE: To create an all-day event, tap Start and select
All day > OK to enable the function.
4. Set the reminder.
5. Tap MORE to add more details such as Repetition,
Time zone, and Description.
6. Tap Done to save.
58
Page 63

Chapter 10: Managing Your Phone
Chapter 10: Managing Your
Phone
10.1 Device Settings
From the Home screen, tap Settings or slide down the status bar and tap to view
and adjust the settings of your device.
Setting Description
Wi-Fi Manage Wi-Fi connections, scan and connect to available Wi-Fi networks.
Bluetooth Manage Bluetooth connections, set device name and connect to other
Bluetooth devices.
SIM Config Manage SIM configuration such as enable or disable the SIM card for calls
and data, set network type, control data traffic, and more.
More Manage other settings such as:
• Aeroplane mode: Disable all wireless connections.
• Personal Hotspot: Share your phone’s mobile data connection as a
portable Wi-Fi hotspot.
• Share Network: Share your phone’s mobile data connection via USB or
Bluetooth.
• WLAN Display: Enable beam app content to another compatible device.
• VPN: Set up and manage Virtual Private Networks (VPNs).
Display Auto control
brightness
Brightness Adjust the brightness of the screen.
Wallpaper Customize the device wallpaper.
Font size Set the font size.
When device is
rotated
Sleep Adjust delay before the screen automatically goes off.
Color
Temperature
Enable to automatically control brightness settings.
Enable auto rotate function and switch orientation
automatically when rotating the device.
Select the preferred color temperature from Cool,
Natural, and Warm.
Sound &
Vibration
Screen Mode Set the default screen mode.
Ring volume Adjust the volume for ringing.
Media Adjust the volume for media files.
Alarm volume Adjust the volume for alarm.
Phone Ringtone Set your default phone ringtone.
59
Page 64

Setting Description
Chapter 10: Managing Your Phone
Sound &
Vibration
Message ringtone Set your default message ringtone.
Default notification
ringtone
Also vibrate for
calls
Vibrate on tap Enable or disable vibration when selecting items on the
Vibrate on dial pad Enable or disable vibration when selecting items on the
Increase volume in
pocket
Dial pad tones Enable or disable sound when touching keys on the
Screen locking
sounds
Touch sounds Enable or disable sound when selecting items on the
Set your default message notification ringtone.
Enable or disable to vibrate when call is received.
screen.
screen.
Enable to increase volume while in pocket.
dial pad.
Enable or disable sound when locking or unlocking the
screen.
screen.
Application
& Authority
Status Bar
&
Notification
Special
Settings
Manage
Applications
Application
Access
Management
App Notification
Manager
Drop status when
lockscreen
Show statusbar
icon
Show network
speed
Led Enable or disable LED on notifications.
Somatosensory
motion
Review apps related information and manage apps.
Set app permissions.
Manage app notifications.
Enable or disable status bar to be slid down when the
phone screen is locked.
Enable or disable notification icons on statusbar, such
as unanswered calls, and more.
Enable or disable displaying network speed on the
screen.
Configure various motion-related activities, such as
capturing a screenshot with sliding down on the screen
using your three fingers, rejecting a call by turning over
the phone, and more.
Screen record Configure screen recording parameters.
60
Page 65

Setting Description
Chapter 10: Managing Your Phone
S Boost Intelligent
acceleration
Defragmentation Defragment the storage.
Background apps
management
Auto-start
management
Soft Key
Settings
Face
Unlock
Suspension ball Enable or disable displaying suspension ball on the
Select virtual
navigation keys
Hide Navigation
Bar
Facial Unlocking Enable or disable facial unlocking.
Unlock Model Select the phone’s unlocking method.
Add Face Set up facial recognition.
Optimize the system performance.
Enable or disable running apps when the screen is off
and enable or disable a theme.
Enable or disable auto start apps and enable or
disable a theme.
screen for accessing various functions for quick
access.
Set the virtual navigation keys.
Check the box to hide the Navigation Bar.
Battery Battery saver Enable or disable the battery saver feature.
Lock
Screen &
Fingerprint
Battery
Percentage
Remaining
capacity
Limit Power
Saving
Screen lock Set the lock screen by sliding the screen or with a
Fingerprint Set up fingerprint recognition.
Smart Lock This option becomes available after you set a screen
Make passwords
visible
Lock screen
message
Enable or disable displaying the remaining battery
percentage.
Review the remaining battery capacity and battery
usage data.
Enable power saving desktop that switches the phone
to the black and white mode to reduce the power
consumption.
pattern, PIN, or password.
lock. Set your phone unlocked when it is safe with you.
Enable or disable displaying passwords. If disabled,
the characters in passwords are replaced with the “*”
symbols.
Enter a welcome message.
Show notifications
on lockscreen
Light screen when
notification
Enable or disable displaying notifications on lock
screen.
Enable or disable illuminating the screen when a
notification appears.
61
Page 66

Chapter 10: Managing Your Phone
Setting Description
Accounts Google Configure your Google account sync settings.
Other account Set up other accounts.
Google Google Account Manage your Google account settings.
Services Manage your Google apps and services.
Other
Settings
System
updates
About
phone
Location Enable or disable the phone to locate itself.
Security Configure various security settings and app usage
access permissions.
Backup & reset Configure your phone’s backup and restore settings.
Storage settings Manage phone’s storage.
Languages & input Configure language and input related settings, such as
set the default OSD language, configure spell checker,
personal dictionary, virtual keyboard, physical
keyboard, and more.
Date & time Set the date and time settings.
Accessibility Configure various accessibility options, such as
TalkBack, select to speak, switch access, captions,
magnification gesture, and more.
Printing Connect your phone to a wireless printer.
Check for updates.
Review your phone related information, such as model number, processor,
memory, storage settings, and more.
62
Page 67

Chapter 10: Managing Your Phone
10.2 Changing Basic Settings
Date and Time
To automatically set the date and time
1. From the Home screen, tap Settings or slide down the status bar and tap .
2. Tap Other Settings > Date & time.
3. Tap Automatic date & time to automatically set the date and time according to
the network.
NOTE: To manually set the date and time, tap the on/off slider.
To manually set the date and time
1. From the Home screen, tap Settings or slide down the
status bar and tap .
2. Tap Other Settings > Date & time.
3. Turn off Automatic date & time.
4. Tap Set date to set the date.
• Scroll the screen up or down to select the correct
year, month, and day. Tap Set date again to exit.
5. Turn off Automatic time zone to manually select the
time zone from the list.
6. Tap Set time to set the time.
• Scroll the screen up or down to set the correct time.
Tap Set time again to exit.
• To use a 24-hour format, enable Use 24-hour
format.
63
Page 68

Chapter 10: Managing Your Phone
Display Settings
The display settings of the device affect the battery and external power level.
Turn off backlight when the phone is idle
1. From the Home screen, tap Settings or slide down
the status bar and tap .
2. Tap Display.
3. Tap Sleep.
4. Select the desired length of time.
Your setting is automatically saved.
Adjust brightness
1. From the Home screen, tap Settings or slide down
the status bar and tap .
2. Tap Display.
3. Drag the Brightness slider to adjust brightness
settings.
Your setting is automatically saved.
Change the screen orientation
1. From the Home screen, tap Settings or slide down the status bar and tap .
2. Tap Display.
3. Tap When device is rotated to enable or disable screen orientation when rotating
the device.
Other Display shortcuts
From the Home screen, slide the status bar down to show the settings menu icons.
Do any of the following (as needed):
•Tap Rotation to enable or disable phone orientation switching.
• Tap Auto Brightness to automatically adjust the screen brightness on
ambient lighting.
64
Page 69

Chapter 10: Managing Your Phone
10.3 Using Wireless & networks
Your phone enables you to manage Wi-Fi, mobile data, Bluetooth, aeroplane mode,
and hotspot.
1. From the Home screen, slide the status bar down, then slide downwards again to
display all other network related icons.
2. Do any of the following (if necessary):
• To enable or disable Wi-Fi, tap Wi-Fi.
• To enable or disable mobile data, tap Mobile data.
• To enable or disable Bluetooth, tap Bluetooth.
• To enable or disable Aeroplane mode, tap Aeroplane mode.
• To share your device mobile data connection via Wi-Fi, tap Hotspot.
10.4 Protecting Your Phone
You can protect your phone from unauthorized users by requiring the PIN code, your
personalized unlock pattern, or a password.
Encrypt Phone
Requires you to enter a numeric PIN or password to decrypt your phone each time
you power it on.
1. From the Home screen, tap Settings or slide down the status bar and tap .
2. Tap Lock Screen & Fingerprint and configure the necessary security settings.
Enable SIM Card Lock
When PIN code is enabled, you are required to enter the PIN code before making a
call.
1. From the Home screen, tap Settings or slide down the status bar and tap .
2. Tap SIM Config.
3. Select the SIM card that you want to configure (if two SIM cards are inserted).
Then tap More.
4. Tap SIM Lock and enable Lock SIM card function.
5. Enter a SIM PIN code and tap OK.
65
Page 70

Chapter 10: Managing Your Phone
10.5 Configuring Mobile Data Limit
You can set the data usage limitation and set a reminder when you reach the
maximum limit.
1. From the Home screen, tap Settings or slide down the status bar and tap .
2. Tap SIM Config > Data traffic control.
3. Swipe left or right to select the SIM card, then tap .
4. Tap Monthly available data.
5. Set Monthly available data and Monthly start date to
set limit.
6. To view the data usage used by the applications, on
Data traffic control screen, tap Data use ranking.
66
Page 71

Chapter 10: Managing Your Phone
10.6 Resetting the Device
You can reset your phone to its factory defaults.
1. From the Home screen, tap Settings or slide down the status bar and tap .
2. Tap Other Settings > Backup & reset.
3. Tap Factory data reset.
4. Tap RESET PHONE > ERASE EVERYTHING to reset.
67
Page 72

Chapter 11: Specifications
Chapter 11: Specifications
Item Descriptions
Operating System Android 7.0
Display 5.7” (18:9) LCD with HD+ (720 x 1440) resolution
Chipset MTK 6750T Octa Core 1.5GHz x 4, 1.2GHz x 4 3G RAM
32GB storage
Modem LTE/HSPA/GSM(EDGE)
Band FDD-LTE: 1/3/7/8/20
WCDMA: 1/2/5/8
GSM: 2/3/5/8
Memory 3GB (RAM) / 32GB (ROM) with microSD slot
Camera Front: 13M FF
Rear: 8M wide-angle lens +13M AF
Wi-Fi 802.11 b/g/n
Bluetooth BT4.0
GNSS GPS/A-GPS
GLONASS
Sensors Accelerometer
Proximity Sensor
Ambient Light Sensor
Fingerprint Sensor
Interface Micro-USB
3.5mm audio jack
Physical
specification of the
Battery
Dimensions 153.5 x 71.9 x 8.8 mm
Weight 175g with battery pack
cell (Typ. / Min.)
Capacity for Device
(Typ. )
4000mAh / 3900mAh
4000mAh
68
Page 73

List of Software
Chapter 11: Specifications
Mobile
phone OS
version
7.0
7.0 Windows 7 32bit/64 bit No need Supported
7.0
7.0 Windows XP 32bit SP3 Install supplied driver. Supported
7.0
7.0 Windows XP 64 bit N/A Supported
7.0 Google Chrome OS No need Supported
Only
supports
Android 3.0
or above
PC OS version Software to be installed to PC
Windows 10 32bit/64
bit
Windows Vista 32bit/
64 bit
Windows XP 32bit
SP1/SP2
Apple PC/laptop Go to Android to download
No need Supported
No need Supported
1. Update Windows XP Service
Pack 3
2. Install supplied driver.
Android File Transfer
Mobile
phone USB
driver
Supported
Not supported
... Tablet Not supported
Note1: Only Windows Media Transfer Protocol (MTP) is supported for file transfer
between mobile phones and PCs.
Note2: To avoid problems when using the USB modem/binding applications,
Windows XP SP1/SP2 users must upgrade to Windows XP SP3 for normal
operation.
Warning:
This device does not guarantee compatibility with all Micro-SIM adapter cards. Be
careful when using such adapter cards. If the adapter card is not compatible, do not
insert it by force.
69
Page 74

Chapter 11: Specifications
Driver Installation
1. Turn on your device, and connect it to your computer using the USB cable.
2. From the Windows desktop, double click on My Computer and locate the CD
Drive.
3. Browse and double click setup.exe.
4. Follow the on-screen instructions to complete the driver installation.
70
Page 75

Important Information
Please read before proceeding
• Please keep the SIM eject pin out of the reach of children. If swallowed
accidentally, it may cause suffocation or injury.
• DO NOT place sharp objects on top of the device, as they may scratch the screen.
• DO NOT drop your device or subject it to severe impacts.
Bending the body and pushing the display or keys with extreme force could
damage the device.
• DO NOT use a pen or any sharp object to tap the screen.
• DO NOT expose the device to dirty or dusty environments.
• Use this device in the temperature range of 5ºC ~ 35ºC and humidity: 35% ~ 90%.
• Charge handset in ambient temperature 5ºC ~ 35ºC; Internal Battery may leak/
overheat and performance may deteriorate outside this range.
• DO NOT place the device on an uneven or unstable surface.
• DO NOT insert any foreign objects into the device.
• DO NOT expose the device to strong magnetic or electrical field.
• DO NOT use or store this equipment in a place where it will be exposed to high
temperatures, such as near an open flame or heat-emitting equipment.
• DO NOT use it or store it where fluids such as water can splash onto it.
Raindrops, water spray, juice, coffee, steam, or other types of liquids will also
cause malfunctions.
• Refer to the rating label on the device and be sure that the power adapter complies
with the rating. Only use accessories provided by the manufacturer.
• Disconnect the device from an electrical outlet and power off before cleaning the
device.
• NEVER attempt to connect or disconnect the power adapter with wet hands.
• Clean the touch screen with a soft cloth. If needed, dampen the cloth slightly
before cleaning. Never use abrasives or cleaning solutions.
• DO NOT disassemble the device. Only a certified service technician should
perform repair.
• Please check with your Local Authority or retailer for proper disposal of electronic
products.
• For USB connection, users must use a USB 2.0 (or higher version) cable.
• The adapter shall be installed near the equipment and shall be easily accessible.
• The temperature of the device might increase while the CPU is busy handling
resource consuming activities such as high resolution video decoding. The SW
protection mechanism will ensure stop charging whenever the temperature is over
the predefined threshold and prepare for shut down if necessary. Please do not
worry.
• Use a wireless hands-free system (headphone, headset) with a low power
Bluetooth equipment.
71
Page 76

• It is confirmed that the cell phone has a low SAR.
• Keep your calls short or send a text message (SMS) instead.
This advice applies especially to children, adolescents and pregnant women.
• Use cell-phone when the signal quality is good.
• People having active medical implants should preferably keep the cell phone at
least 15 cm away from the implant.
• Actual available capacity of user storage and internal memory is less because of
the operating system, software and other functions which utilize part of this
capacity. The available capacity may change with software updates.
Safety Precautions for Battery Use
• The phone battery can not be removed, please do not disassemble.
• There is the danger of explosion if disassemble by unauthorized personnel.
• Recycle or dispose used batteries according to the local regulations.
Road and Environmental Safety
• Turn off the phone in areas with a potentially explosive atmosphere or where
flammable objects exist such as gas stations, fuel depots, and chemical plants
among others. Sparks from these areas could cause explosion or fire and result in
injury or even death.
• Do not use hand-held phones while driving a vehicle. Use hands-free devices as
an alternative.
Safety in Aircraft
Do not use the phone on board an aircraft. The phone’s network signals may cause
interference to the navigation system. As a safety measurement, it is prohibited to use
mobile phones on board in most countries.
Copyright Information
• Copyright© Sharp Corporation, 2012. All rights reserved.
• This product has an Android™ platform based on Linux, which can be expanded
by a variety of JME-based app SW.
• Android is a trademark of Google LLC.
• microSD™ is a trademark of SD Card Association.
• All products use in this device and trademarks mentioned herein are trademarks or
registered trademarks of their respective owners.
• LTE is a trade mark of ETSI.
72
Page 77

Intellectual Property Right Information
Right to all technologies and products that comprise this device are the property of
their original owners respectively.
This product has an Android platform based on Linux, which can be expanded by a
variety of Java-Script-based application SW.
The Bluetooth® word mark and logos are registered trademarks owned by
BluetoothSIG, Inc. and any use of such marks by SHARP Corporation is under
license.
Wi-Fi®, the Wi-Fi CERTIFIED logo and the Wi-Fi logo are trademarks of Wi-Fi
Alliance.
Compliance Information
SAR Information
THIS MOBILE DEVICE MEETS GUIDELINES FOR EXPOSURE TO RADIO WAVES.
Your mobile device is a radio transmitter and receiver. It is designed not to exceed the
limits for exposure to radio waves recommended by international guidelines. These
guidelines were developed by the independent scientific organization ICNIRP and
include safety margins designed to assure the protection of all persons, regardless of
age and health.
The exposure guidelines for mobile devices employ a unit of measurement known as
the Specific Absorption Rate or SAR. The SAR limit stated in the ICNIRP guidelines is
2.0 W/kg averaged over 10 grams of tissue. Tests for SAR are conducted using
standard operating positions with the device transmitting at its highest certified power
level in all tested frequency bands. The actual SAR level of an operating device can
be below the maximum value because the device is designed to use only the power
required to reach the network. That amount changes depending on a number of
factors such as how close you are to a network base station. The highest SAR value
under the ICNIRP guidelines for use of the device at the ear is 0.47 W/kg (the
measure distance of 0 mm) and at the body is 1.471 W/kg (the measure distance of 5
mm). Use of device accessories and enhancements may result in different SAR
values. SAR values may vary depending on national reporting and testing
requirements and the network band.
WEEE Notice
The WEEE logo on the product or on its box indicates that this product must not be
disposed of or dumped with your other household waste. You are liable to dispose of
all your electronic or electrical waste equipment by relocating over to the specified
collection point for recycling of such hazardous waste. Isolated collection and proper
recovery of your electronic and electrical waste equipment at the time of disposal will
allow us to help conserve natural resources. Moreover, proper recycling of the
electronic and electrical waste equipment will ensure safety of human health and
environment. For more information about electronic and electrical waste equipment
73
Page 78

disposal, recovery, and collection points, please contact your local city center,
household waste disposal service, shop from where you purchased the equipment, or
manufacturer of the equipment.
RoHS Compliance
This product is in compliance with DIRECTIVE 2011/65/EU OF THE EUROPEAN
PARLIAMENT AND OF THE COUNCIL of 8 June 2011,on the restriction of the use of
certain hazardous substances in electrical and electronic equipment and its
amendments.
RED Compliance
This device have been tested to comply with the Sound Pressure Level requirement
laid down in the applicable EN 50332-1 and/or EN 50332-2 standards. Permanent
hearing loss may occur if earphones or headphones are used at high volume for
prolonged periods of time.
Prevention of Hearing Loss
Warning statement requirement under EN 60950-1:2006+A2:2013.
To prevent hearing damage, do not listen at high volume levels for
long periods.
Simplified EU Declaration of Conformity
Hereby, UMC Poland sp. z o.o declares that the radio equipment type SH-A01 is in
compliance with Directive 2014/53/EU.
The full text of the EU declaration of conformity is available at the following internet
address: https://www.sharpconsumer.eu/
74
Page 79

Maximum transmit power
Mode Maximum Conducted Power Unit (dBm)
GSM900 33.00
GSM1800 30.50
WCDMA Band I 23.00
WCDMA Band VIII 23.00
LTE Band 1 23.00
LTE Band 3 23.00
LTE Band 7 23.00
LTE Band 8 23.00
LTE Band 20 23.00
2.4GHz Wi-Fi 18.00
v3.0+EDR 6.00
v4.0 LE -0.50
Manufacturer: UMC Poland sp. z o.o
Manufacturer Address: Ostaszewo 57B, 87-148 Łysomice, Poland
Regarding charger, Importer’s information is below:
Importer’s Name: UMC Poland sp. z o.o
Importer’s Address: Ostaszewo 57B, 87-148 Łysomice, Poland
75
Page 80

UMC Poland Sp. z o.o.
Ostaszewo 57B, 87-148 Łysomice,
Poland
SHARP CORPORATION
OSAKA, JAPAN
SMP/MAN/0001
www.sharpconsumer.eu
 Loading...