


Sharp AY-XM12CR, AY-XM7CR, AY-XM9CR, AY-XPM12CR, AY-XPM7CR Operating Manual
...
R
Air Conditioner
•Uses ozone layer friendly refridgerant R-410A.
•Verwendet das die Ozonschicht schonende Kühlmittel R-410A.
•Utilise un réfrigérant qui n’attaque pas la couche d’ozone, le R-410A.
•Utiliza refrigerante R-410A que no daña la capa de ozono.
•Utilizza il refrigerante R-410A che non danneggia il buco nell’ozono.
•Usa refrigerante R-410A amigo da camada de ozono.
•ρησιµ π ιεί ψυκτικ R-410A α&λα&ές για τ στρώµα τ υ , ντ ς.
•Gebruikt de ozon-vriendelijke koelvloeistof R- 410A.
•Ozon tabakasına zarar vermeyen R-410A So©utucu madde kullanılır.
•Использует охладитель R-410A безвредный для озонового слоя.
INDOOR UNIT |
OUTDOOR UNIT |
ZIMMERGERÄT |
AUSSENGERÄT |
UNITE INTERIEURE |
UNITE EXTERIEURE |
UNIDAD INTERIOR |
UNIDAD EXTERIOR |
UNITA' INTERNA |
UNITA' ESTERNA |
UNIDADE INTERIOR |
UNIDADE EXTERIOR |
ΕΣΩΤΕΡΙΚΗ ΣΥΣΚΕΥΗ |
Ε ΩΤΕΡΙΚΗ ΣΥΣΚΕΥΗ |
BINNEN-UNIT |
BUITEN-UNIT |
∑Ç ÜN∑TE |
DIΩ ÜN∑TE |
DZENHTZZBQ ;KJR |
ZFHEÖZBQ ;KJR |
AY-XM7CR |
AE - XM18CR |
AY-XM9CR |
AE - XM24CR |
AY-XM1 2CR |
|
AY-X PM7CR |
|
AY-X PM9CR |
|
AY-X PM1 2CR |
|
MODELS
AY-XM7CR
AY-XM9CR
AY-XM12CR
AY-XPM7CR
AY-XPM9CR
AY-XPM12CR
MULTI SPLIT TYPE ROOM AIR CONDITIONER
MEHRFACH-AUFTEILUNGS- ZIMMER-KLIMAGERÄT
CLIMATISEUR DE SALLE
DE TYPE A DIVISION MULTIPLE
ACONDICIONADOR DE AIRE PARA HABITACIÓN TIPO MULTI DIVISIÓN
TIPO A SEZIONE MULTIPLA CONDIZIONATORE D'ARIA PER ABITAZIONI
AR CONDICIONADO DE SALA DE MÚLTIPLAS UNIDADES
ΣΥΣΚΕΥΗ ΚΛΙΜ∆ΤΙΣΜOΥ ∆ΩΜAΤΙOΥ ΠOΛΛAΠΛOΥ ∆ΙAIPOYMENOY TYΠOY
MULTI-SPLIT AIRCONDITIONER
MULT∑-SPL∑T KL∑MA
RJVZFNZSQ RJZLBWBJZTH DJPLEXF VZJUJ;KJXZJUJ NBGF
OPERATION MANUAL BEDIENUNGSANLEITUNG NOTICE D'UTILISATION MANUAL DE INSTRUCCIONES MANUALE DI ISTRUZIONE MANUAL DE INSTRUÇÕES
ΕΓ ΕΙΡΙ∆Ι ΛΕΙΤ ΥΡΓΙΑΣ
GEBRUIKSAANWIJZING
KULLANMA KILAVUZU
РУКОВОДСТВО ПО ЭКСПЛУАТАЦИИ
ENGLISH DEUTSCH FRANÇAIS ESPAÑOL ITALIANO
PORTUGUÊS ΕΛΛΗΝΙΚΑNEDERLANDS
TÜRKÇE HECCRBQ
ENGLISH
Thank you for purchasing a SHARP air conditioner. Please read this manual carefully before operating the product.
CONTENTS
...........................................• PRECAUTIONS |
E-1 |
.....................• ONE-HOUR OFF TIMER |
E-13 |
• ADDITIONAL NOTES ON OPERATION ............. |
E-3 |
• TIMER OPERATION ............................ |
E-14 |
• TIPS ON SAVING ENERGY ........................ |
E-3 |
• TIPS ABOUT PLASMACLUSTER |
|
• PART NAMES .............................................. |
E-4 |
OPERATION................................................ |
E-16 |
• SETTING DUST COLLECTING FILTER |
|
• PLASMACLUSTER OPERATION ....... |
E-17 |
AND DEODORANT FILTER ........................ |
E-7 |
• SELF CLEAN OPERATION ................. |
E-17 |
• USING THE REMOTE CONTROL .............. |
E-8 |
• AUXILIARY MODE .............................. |
E-18 |
• BASIC OPERATION .................................... |
E-10 |
• OPTION KIT ......................................... |
E-18 |
• ADJUSTING THE AIR FLOW DIRECTION . E-12 |
• MAINTENANCE ................................... |
E-19 |
|
• FULL POWER OPERATION ....................... |
E-13 |
• BEFORE CALLING FOR SERVICE .... |
E-22 |
PRECAUTIONS
WARNINGS FOR USE
1 |
Do not pull or deform the power supply cord. Pulling and misuse of the power supply cord |
can result in damage to the unit and cause electrical shock. |
|
2 |
Be careful not to expose your body directly to the outlet air for a long time. It may affect |
your physical conditions. |
|
3 |
When using the air conditioner for infants, children, elderly, bedridden, or disabled people |
make sure the room temperature is suitable for those in the room. |
|
4 |
Never insert objects into the unit. Inserting objects can result in injury due to the high |
speed rotation of internal fans. |
|
5 |
Ground the air conditioner without fail. Do not connect the grounding wire to gas pipe, |
water pipe, lightning rod or telephone grounding wire. Incomplete grounding may cause |
|
|
electric shock. |
6 |
If anything is abnormal with the air conditioner (ex. a burning smell), stop the operation |
immediately and turn the circuit breaker OFF. |
|
7 |
Follow local rules and regulations for power supply cord cabling. Improper cable |
connection can cause the power supply cord, plug and the electrical outlet to overheat |
|
|
and cause fire. |
8 |
Use only the manufacture-specified power cord for replacement. Replacement should be |
performed by a qualified technician or a service person. |
WARNINGS FOR INSTALLATION / REMOVAL / REPAIR
•Do not attempt to install/remove/repair the unit by yourself. Incorrect work will cause electric shock, water leak, fire etc. Consult your dealer or other qualified service personnel for the installation/removal/repair of the unit.
This equipment complies with the requirements of Directives 89/336/EEC and 73/23/ EEC as amended by 93/68/EEC.
ENGLISH
E-1

PRECAUTIONS
CAUTIONS FOR USE
1
2 |
Do not operate the buttons with wet hand. It may cause electric shock. |
3 |
For safety, turn the circuit breaker off when not using the unit for an extended period of |
time. |
|
4 |
Check the outdoor unit mounting rack periodically for wear and to make sure it is firmly |
in place. |
|
5 |
Do not put anything on the outdoor unit nor step on it. The object or the person may fall |
down or drop, causing injury. |
|
6 |
This unit is designed for residential use. Do not use for other applications such as in a |
kennel or greenhouse to raise animals or grow plants. |
|
7 |
Do not place a vessel with water on the unit. If water penetrates into the unit, electrical |
insulations may deteriorate and cause electric shock. |
|
8 |
Do not block the air inlets nor outlets of the unit. It may cause insufficient performance |
or troubles. |
|
9 |
Be sure to stop the operation and turn the circuit breaker off before performing any |
maintenance or cleaning. A fan is rotating inside the unit and you may get injured. |
10 Do not splash or pour water directly on the unit. Water can cause electrical shock or equipment damage.
11 This appliance is not intended for use by young children or infirm persons without supervision.
Young children should be supervised to ensure that they do not play with the appliance.
CAUTIONS FOR LOCATION / INSTALLATION
•Make sure to connect the air conditioner to power supply of the rated voltage and frequency.
Use of a power supply with improper voltage and frequency can result in equipment damage and possible fire.
•Do not install the unit in a place where inflammable gas may leak. It may cause fire. Install the unit in a place with minimal dust, fumes and moisture in the air.
•Arrange the drain hose to ensure smooth drainage. Insufficient drainage may cause wetting of the room, furniture etc.
•Make sure a leak breaker or a circuit breaker is installed, depending on the installation location, to avoid electrical shock.
E-2

ADDITIONAL NOTES ON OPERATION
OPERATING TEMPERATURE RANGE
|
|
INDOOR TEMP. |
OUTDOOR TEMP. |
||||
|
upper limit |
32˚C |
D.B. |
43˚C |
D.B. |
||
COOLING |
23˚C W.B. |
- |
|
|
|||
|
|
|
|||||
lower limit |
21˚C |
D.B. |
21˚C |
D.B. |
|||
|
|||||||
|
15˚C W.B. |
- |
|
|
|||
|
|
|
|
||||
|
upper limit |
27˚C |
D.B. |
24˚C |
D.B. |
|
|
HEATING |
|
- |
18˚C W.B. |
|
|||
|
|
||||||
|
lower limit |
20˚C |
D.B. |
-7˚C |
D.B. |
||
|
|
- |
-8˚C |
W.B. |
|||
|
|
|
|||||
D.B. = Dry-bulb W.B. = Wet-bulb
•The built-in protective device may prevent the unit from operating when used out of this range.
•Condensation may form on the air outlet if the unit operates continuously in the COOL or DRY mode when humidity is over 80 percent.
WHEN POWER FAILURE OCCURS
This air conditioner has a memory function to store settings when a power failure occurs.
After power recovery, the unit will automatically re-start in the same settings which were active before the power failure, except for timer settings.
If the timers were set before a power failure, they will need to be re-set after power recovery.
PREHEATING FUNCTION
In the HEAT operation, the indoor fan may not start for two to five minutes after the unit is turned on to prevent cold air from blowing out of the unit.
DE-ICING FUNCTION
•When ice forms on the heat exchanger in the outdoor unit during the HEAT operation, an automatic de-icer provides heat for about 5 to 10 minutes to remove the ice. During de-icing, the inside and outside fans stop operating.
•After de-icing is completed, the unit automatically resumes operation in the HEAT mode.
HEATING EFFICIENCY
•The unit employs a heat pump that draws heat from the outside air and releases it into the room. The outside air temperature therefore greatly affects the heating efficiency.
•If the heating efficiency is reduced due to low outside temperatures, use an additional heater.
•It takes time to warm up and heat the entire room because of the forced air circulation system.
TIPS ON SAVING ENERGY
Below are some simple ways to save energy when you use your air conditioner.
SET THE CORRECT TEMPERATURE
•Setting the thermostat 1°C higher than the desired temperature in the COOL mode and 2°C lower in the HEAT mode will save approximately 10 percent in power consumption.
•Setting the temperature lower than necessary during cooling operation will result in increased power consumption.
BLOCK DIRECT SUNLIGHT AND PREVENT DRAFTS
•Blocking direct sunlight during cooling operation will reduce power consumption.
•Close the windows and doors during cooling and heating operations.
SET PROPER AIR FLOW DIRECTION TO OBTAIN THE BEST AIR CIRCULATION
KEEP FILTER CLEAN TO ENSURE THE MOST EFFICIENT OPERATION MAKE MOST OF THE TIMER OFF FUNCTION
DISCONNECT THE POWER CORD WHEN THE UNIT IS NOT USED FOR AN EXTENDED PERIOD OF TIME
• The indoor unit still consumes a small amount of power when it is not operating.
ENGLISH
E-3
PART NAMES
INDOOR UNIT (For models AY-XPM7CR, AY-XPM9CR, AY-XPM12CR)
1 |
1 DUST COLLECTION FILTER |
2 |
(non-washable) |
2 DEODORANT FILTER |
|
3 |
(washable) |
4 |
3 Inlet (Air) |
5 |
4 Open Panel |
|
5 Air Filters |
6 |
6 AUX. Button |
7 |
7 RECEIVER Window |
8 Indicator Panel |
|
|
9 Vertical Adjustment Louvres |
8 |
0 Horizontal Adjustment |
9 |
Louvres |
|
|
0 |
q Outlet (Air) |
q |
w Remote Control |
w
ECO


 POWER
POWER
|
e OUTDOOR Temp. Lamp |
|
|
(green |
) |
|
r TEMPERATURE INDICATOR |
|
e |
t ROOM Temp. Lamp |
|
(green |
) |
|
r |
y POWER MONITOR |
|
t |
|
|
yu PLASMACLUSTER Lamp
(blue,green)
u
ii TIMER Lamp (orange )
oo OPERATION Lamp (red 

 )
)
OUTDOOR UNIT
AE-XM18CR
!! Inlet (Air)
@@ Interconnecting
# CordRefrigerant Tube
#$ Outlet (Air)
$
NOTE: Actual units might vary slightly from those shown above.
E-4
INDOOR UNIT (For models AY-XM7CR, AY-XM9CR, AY-XM12CR) |
|
|
||
|
1 |
1 Inlet (Air) |
|
|
|
2 |
2 Open Panel |
|
|
|
3 |
3 Air Filters |
|
|
|
|
4 AUX. Button |
|
|
|
4 |
5 RECEIVER Window |
|
|
|
5 |
6 Indicator Panel |
|
|
|
|
7 Vertical Adjustment Louvres |
||
|
6 |
8 Horizontal Adjustment |
|
|
|
7 |
Louvres |
|
|
|
8 |
9 Outlet (Air) |
|
|
|
9 |
0 Remote Control |
|
|
|
0 |
|
|
|
|
|
q POWER MONITOR |
|
|
|
|
w TEMPERATURE INDICATOR |
||
ECO |
POWER |
e OUTDOOR Temp. Lamp |
|
|
(green |
) |
|
||
|
|
|
||
|
q |
r ROOM Temp. Lamp |
|
|
|
w |
(green |
) |
|
|
e |
t TIMER Lamp (orange |
) |
|
|
r |
|||
|
t |
y OPERATION Lamp (red |
) |
|
|
y |
|||
OUTDOOR UNIT |
|
|
|
|
AE-XM24CR |
! |
! Inlet (Air) |
|
|
|
|
|
|
|
|
@ |
@ Interconnecting Cord |
|
|
|
|
# Refrigerant Tube and |
|
|
|
# |
$ Outlet (Air) |
|
|
$
ENGLISH
E-5
PART NAMES
REMOTE CONTROL
DISPLAY |
|
FULL |
|
POWER |
|
MODE |
1h |
FAN |
|
SWING |
CLEAN |
|
SET/C |
11TRANSMITTER
2DISPLAY (Liquid Crystal Display)
3DISPLAY Button
4FULL POWER Button
25ON/OFF Button
6THERMO. (Thermostat) Button
7MODE Button
38FAN Button
49ONE-HOUR OFF TIMER Button
50TIMER ON Button (for setting the timer)
6qTIMER OFF Button (for setting the timer)
7wPLASMACLUSTER Button
8(only for models AY-XPM7CR/AY-XPM9CR/AY-
9XPM12CR)
0eTIME ADVANCE Button
qrTIME REVERSE Button
wtSELF CLEAN Button
e(only for models AY-XPM7CR/AY-XPM9CR/AY-
rXPM12CR)
tyTIMER SET/CANCEL Button
y |
uIndicates BATTERY COMPARTMENT is |
ubelow this mark
i |
iCLOCK Button |
o |
oSWING Button |
|
|
|
p |
|
|
f |
|
|
|
a |
|
|
|
L.C.D. REMOTE CONTROL DISPLAY |
|
C |
|
|||
s |
|
g |
||||
pTHERMOSTAT SETTING FOR AUTO AND |
|
d |
AUTO |
|
h |
|
DRY MODES |
|
|
|
|
|
|
|
|
|
|
|
|
|
aSELF CLEAN SYMBOL |
|
|
|
AM |
|
|
(only for models AY-XPM7CR/AY-XPM9CR/ |
|
|
PM |
|
|
|
AY-XPM12CR) |
|
|
|
|
|
|
sTRANSMITTING SYMBOL |
|
|
AM |
|
|
|
|
|
PM |
|
|
||
dMODE SYMBOLS |
|
|
|
|
|
j |
: AUTO |
: DRY |
|
|
|
|
k |
|
|
|
|
l |
||
|
|
|
|
|
|
|
: HEAT |
: COOL |
jTIMER ON INDICATOR/CLOCK |
|
|
||
|
|
|
|
|||
fTEMPERATURE INDICATOR |
|
Indicates the on timer preset time or current |
||||
|
time. |
|
|
|
||
gFULL POWER SYMBOL |
|
|
|
|
|
|
|
kTIMER OFF INDICATOR |
|
|
|||
|
|
|
|
|||
hFAN SPEED SYMBOLS |
|
|
Indicates the preset time for off timer or one- |
|||
: AUTO |
: LOW |
|
hour off timer. |
|
|
|
lPLASMACLUSTER SYMBOL |
|
|
||||
|
|
|
|
|||
: HIGH |
: SOFT |
|
(only for models AY-XPM7CR/AY- |
|
||
|
|
|
XPM9CR/AY-XPM12CR) |
|
|
|
E-6
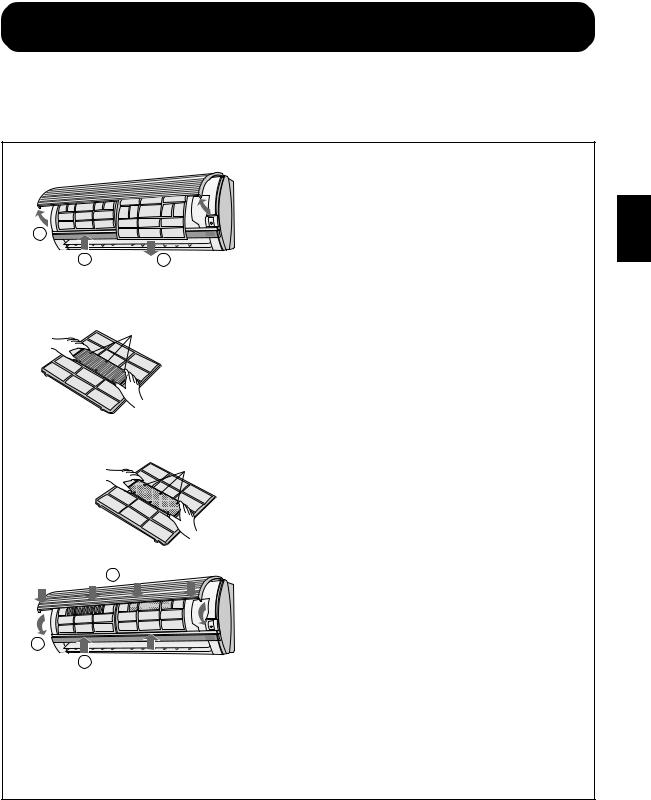
SETTING DUST COLLECTION FILTER AND DEODORANT FILTER
(only for models AY-XPM7CR/AY-XPM9CR/AY-XPM12CR)
The dust collection filter and the deodorant filter are packed as accessory of this unit. During operation of the air conditioner, the filters remove dust and tobacco smoke from the air and discharges clean air.
1
2 |
3 |
DUST COLLECTION FILTER (gray)
Set the black side facing upward.
Filter stopper
DEODORANT FILTER (green)
Filter stopper
3
1 Take out the air filters.
1 Open the open panel.
2Push the air filters up slightly to unlock them.
3Pull the air filters down to remove them.
2 Set the dust collection filter and the deodorant filter under the filter stoppers located on the air filter.
3 Reinstall the air filters
1Reinstall the air filters in the original positions.
2 Close the open panel.
3Push the arrow-marked of the panel firmly to lock it in place.
2
1
Precautions
•The filters are sealed in a plastic bag to keep their dust collection effect.
Do not open the bag until using the filters. (Otherwise the filters life may get shorter.)
•Do not expose the filters to direct sunlight. (Otherwise they may deteriorate.)
ENGLISH
E-7
 Loading...