

Page 1
GB-2
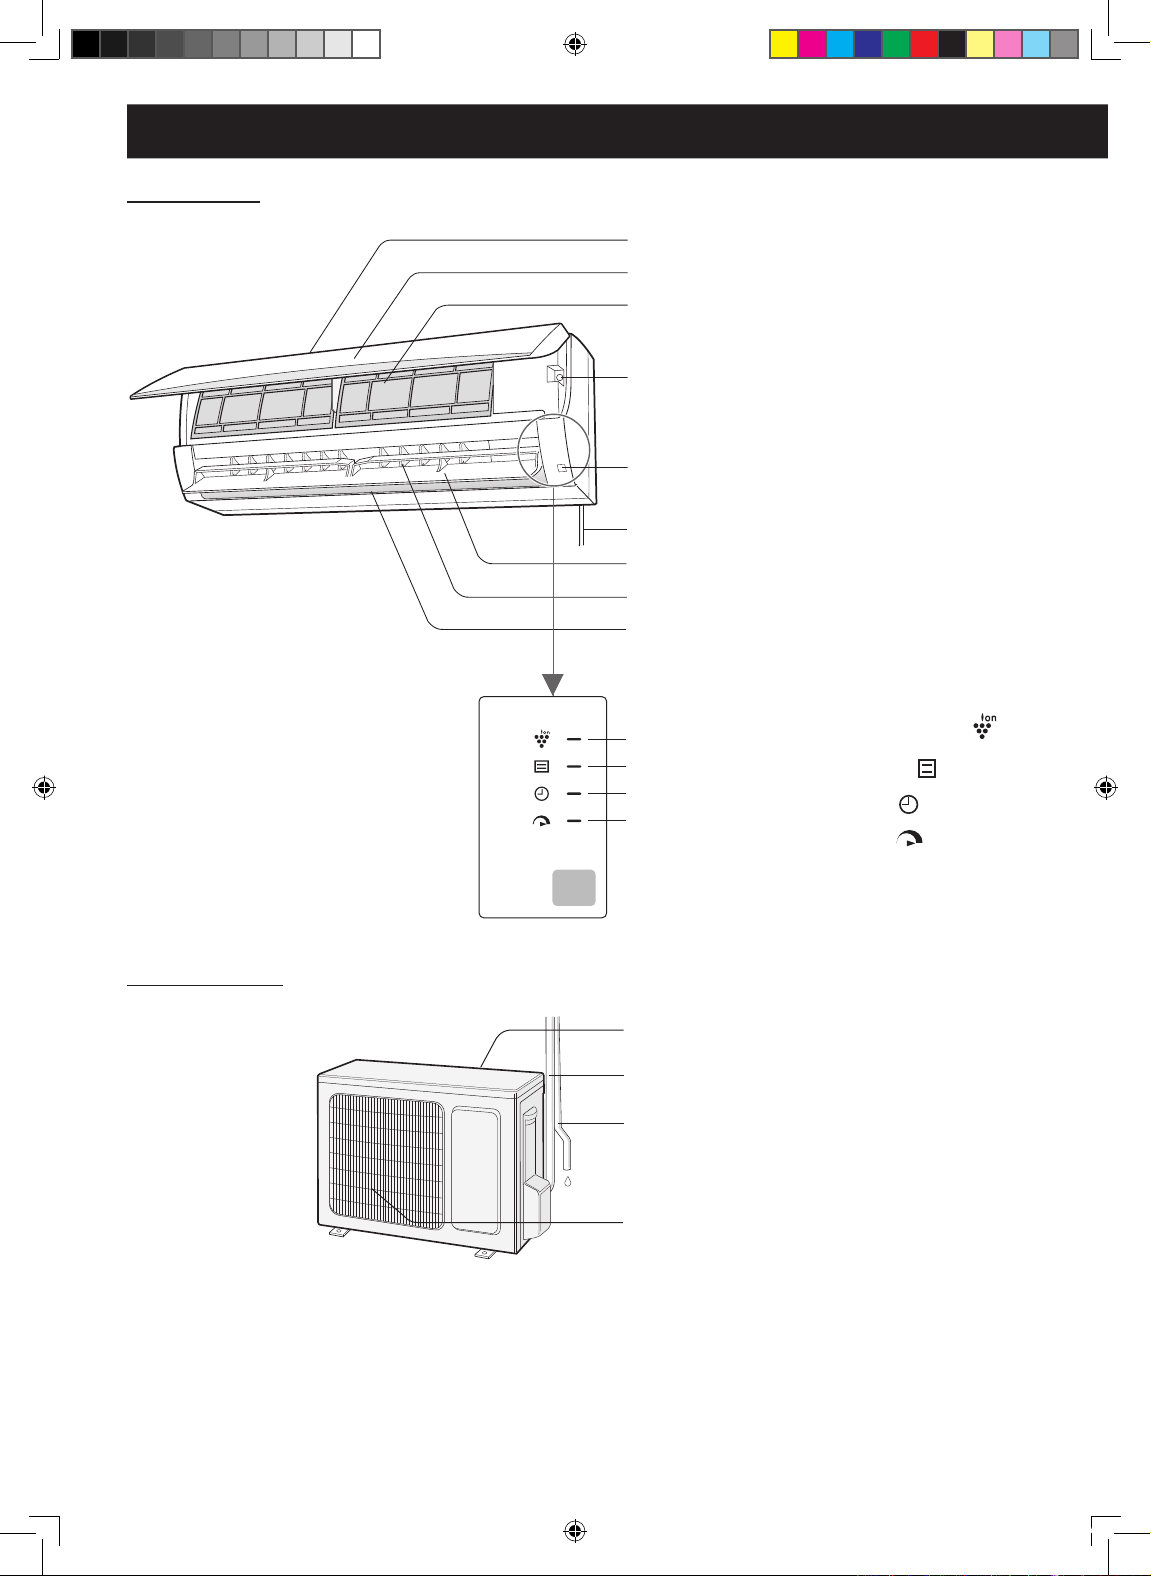
PART NAMES
INDOOR UNIT
1 Inlet (Air)
2 Open Panel
3 Air Filter
4 AUX Button
5 Receiver Window
6 Power Supply Cord
7 Vertical Adjustment Louvre
8 Horizontal Adjustment Louvre
9 Outlet (Air)
10 PLASMACLUSTER Lamp(blue
)
11 OPERATION Lamp (red
)
12 TIMER Lamp (orange
)
13 TURBO Lamp (green
)
OUTDOOR UNIT
14 Inlet (Air)
15 Refrigerant Tube and Interconnecting
Cord
16 Drainage Hose
17 Outlet (Air)
NOTE:
Actual units might vary s lightly from
those shown above.
1
2
3
4
5
6
7
8
9
10
11
12
13
14
15
16
17
AY-AP9NR_GB.indd 2 11.9.30 5:02:53 PM
Page 2
GB-3
ENGLISH
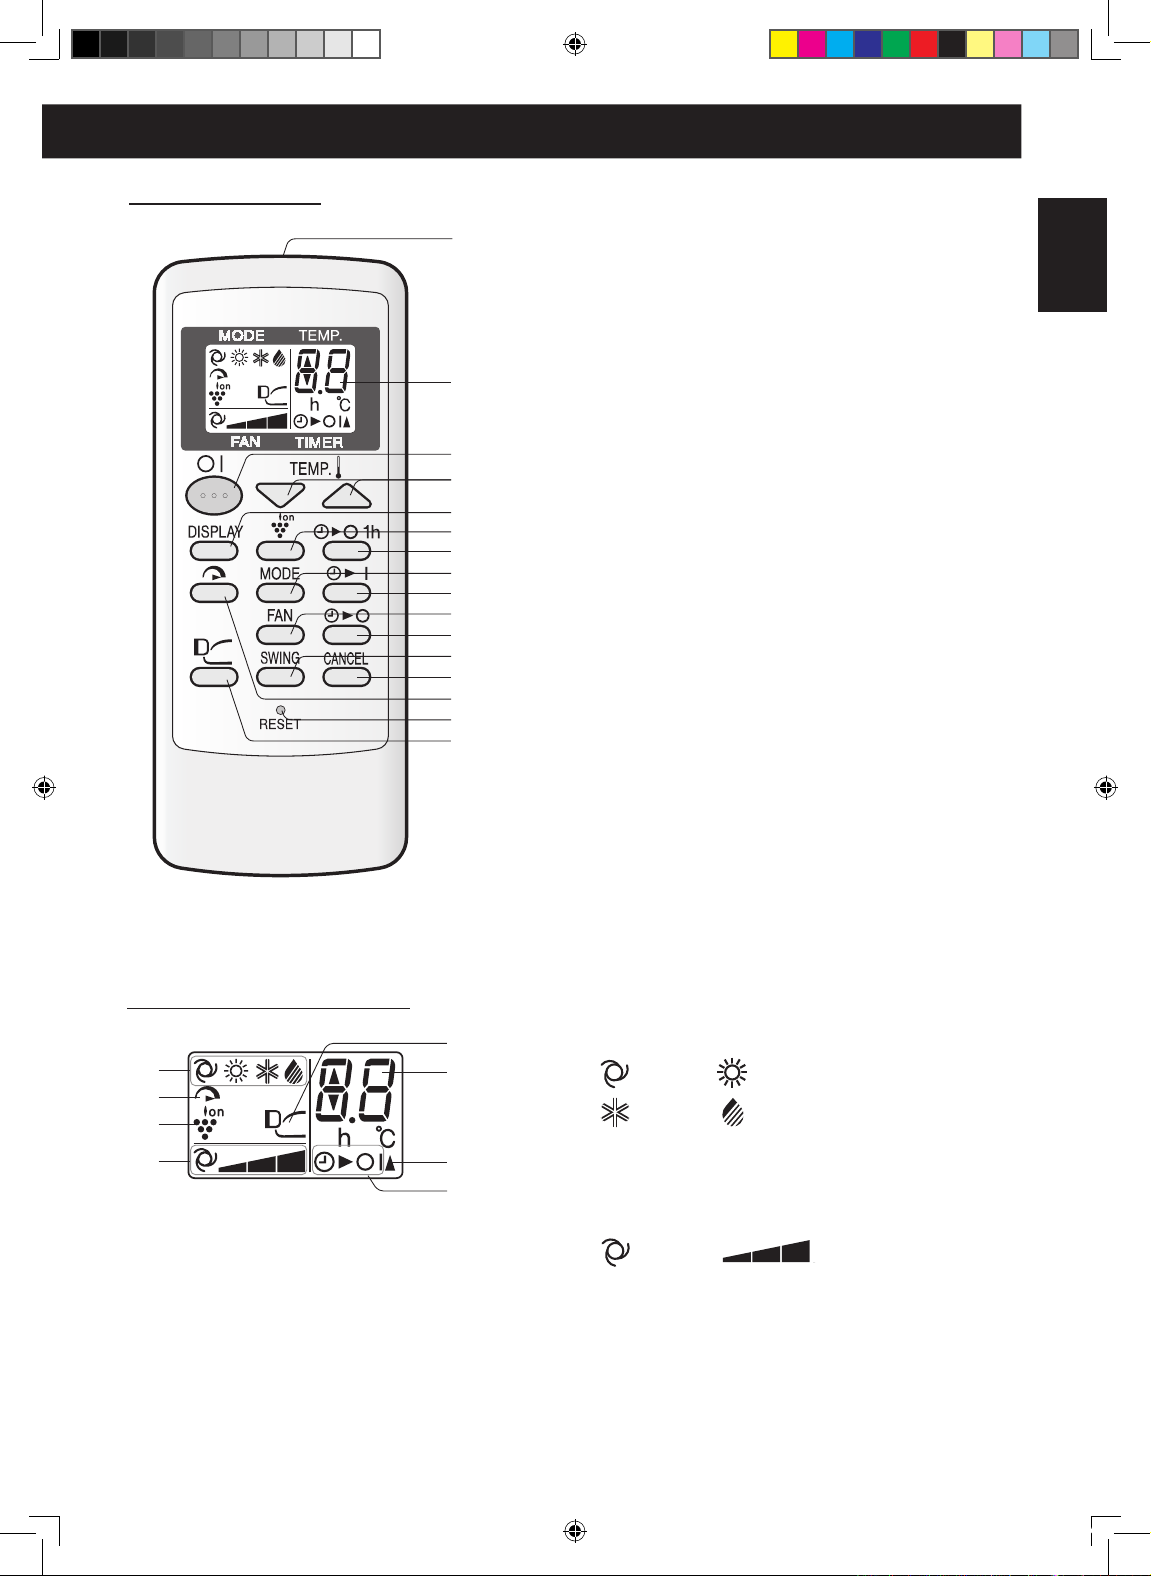
REMOTE CONTROL
1 TRANSMITTER
2 DISPLAY
3 ON/OFF Button
4 THERMOSTAT Button
5 DISPLAY Button
6 PLASMACLUSTER Button
7 ONE-HOUR OFF TIMER Button
8 MODE Button
9 TIMER ON Button
10 FAN Button
11 TIMER OFF Button
12 SWING Button
13 TIMER CANCEL Button
14 TURBO Button
15 RESET Button
16 COANDA AIRFLOW Button
REMOTE CONTROL DISPLAY
17 MODE Symbols
: AUTO : HEAT
: COOL : DRY
18 TURBO Symbol
19 PLASMACLUSTER Symbol
20 FAN SPEED Symbols
: AUTO : Manual setting
21 COANDA AIRFLOW Symbol
22 TEMPERATURE AND TIMER COUNT DOWN
Indicator
23 TRANSMITTING Symbol
24 TIMER ON / TIMER OFF Indicator
1
2
3
4
5
6
7
8
9
10
11
12
13
14
15
16
17
18
19
20
21
22
23
24
AY-AP9NR_GB.indd 3 11.9.30 5:02:54 PM
Page 3
GB-4
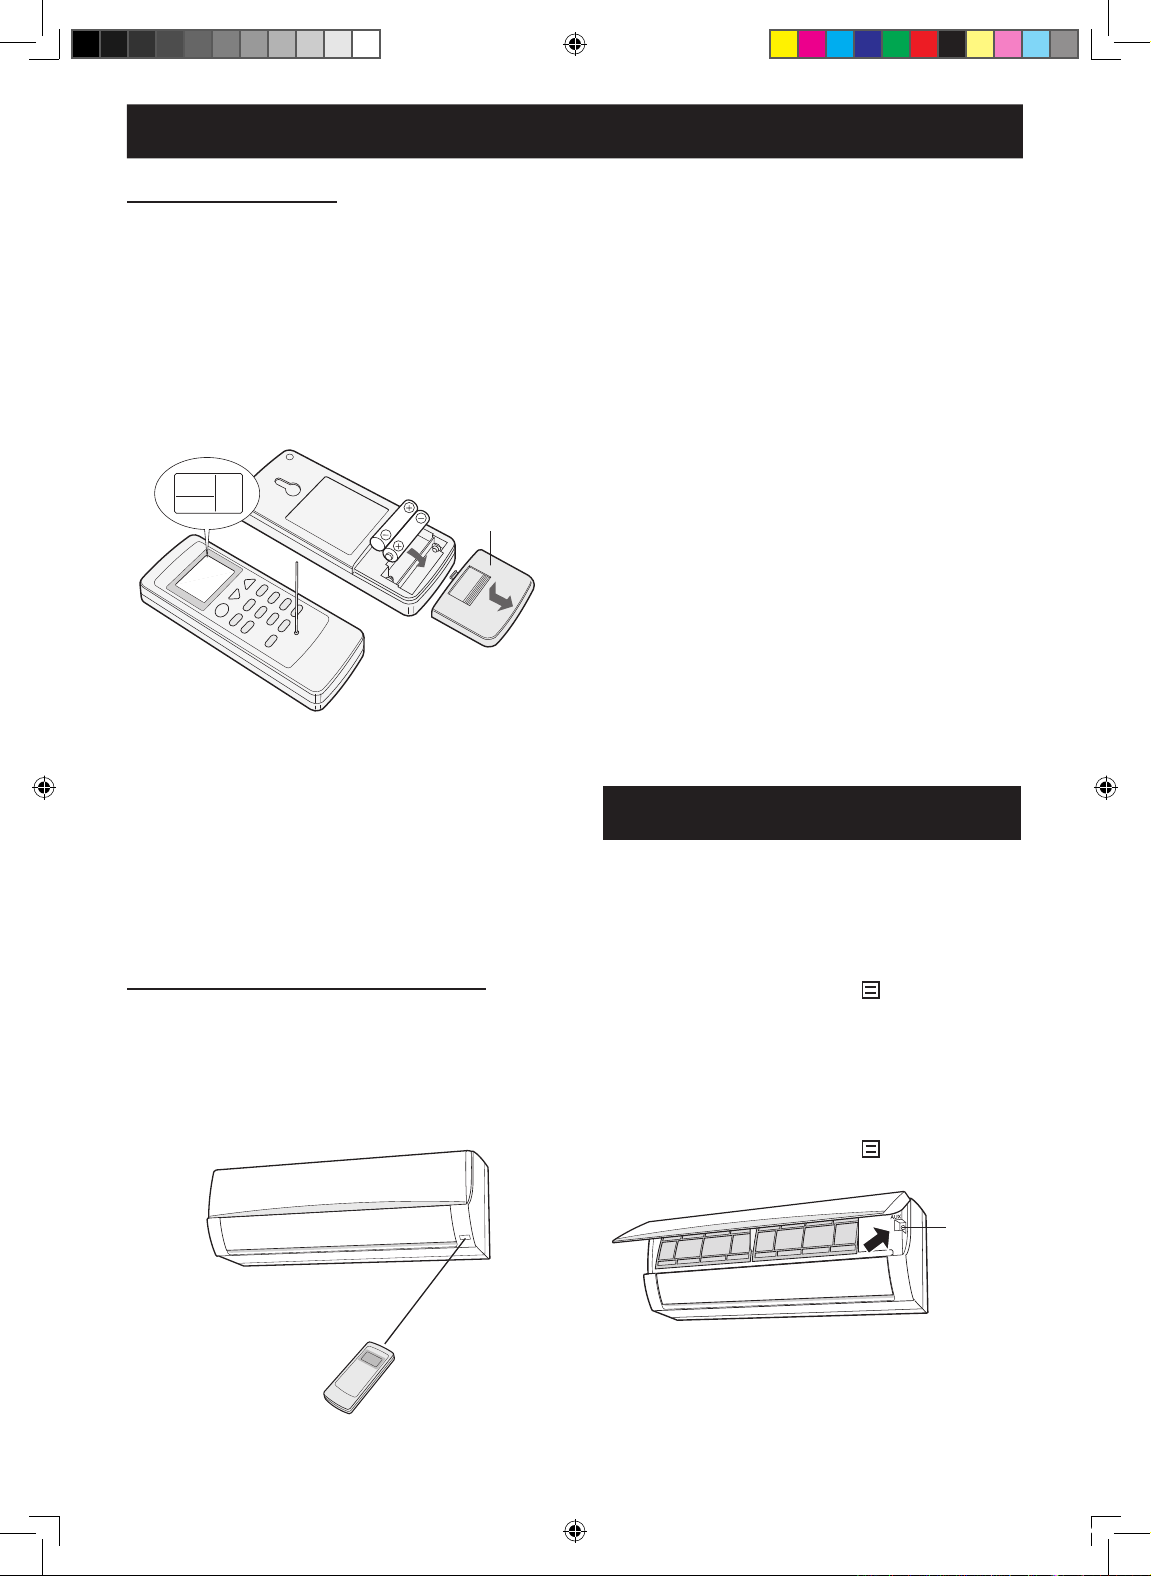
LOADING BATTERIES
Use two size-AAA (R03) batteries.
1
Remove the battery cover at the back of
the remote control.
2
Insert batteries in the compartment,
making sure the (+) and (-) polarities are
correctly aligned.
3
Reinstall the battery cover.
4
Press the RESET button using a thin
stick.
NOTE:
• The battery life is approximately one year in
normal use.
• When you replace the batteries, always change
both batteries, and make sure they are the same
type.
• If the remote control does not operate properly
after replacing the batteries, press the RESET
button using a thin stick.
• If you will not be using the unit for a long time,
remove the batteries from the remote control.
AUXILIARY MODE
Use this mode when the remote control is not
available.
TO TURN ON
Lift the open panel of the indoor unit and press
the AUX button.
• The red OPERATION lamp (
) on the unit will
light and the unit will start operating in the AUTO
mode.
• The fan speed and temperature setting are set to
AUTO.
TO TURN OFF
Press the AUX button again.
• The red OPERATION lamp (
) on the unit will
turn off.
NOTE:
• If the AUX butt on is pres sed duri ng norma l
operation, the unit will turn off.
USING THE REMOTE CONTROL
AUX
HOW TO USE THE REMOTE CONTROL
Point the remote control towards the unit’s signal
receiver window and press the desired button. The
unit generates a beep when it receives the signal.
• Make sure there is no curtain or other object
between the remote control and the unit.
• The remote control can send signals from up to 7
metres away.
CAUTION:
• Do not allow the signal receiver window to receive
strong direct sunlight, since it can adversely affect
its operation. If the signal receiver window is
exposed to direct sunlight, close a curtain to block
the light.
• Using a uorescent lamp with a quick starter in
the same room may interfere with transmission of
the signal.
• The unit can be affected by signals transmitted
from the remote control of a television, VCR or
other equipment used in the same room.
• Do not leave the remote control in direct sunlight
or near a heater. Also, protect the unit and remote
co ntrol fro m m o isture an d s h ock which ca n
discolour or damage them.
Battery cover
AY-AP9NR_GB.indd 4 11.9.30 5:02:54 PM
Page 4

GB-5
ENGLISH
1
Press the MODE button to select the
operation mode.
AUTO HEAT COOL DRY
2
Press the ON/OFF button to start
operation.
• The red OPERATION lamp ( ) on the unit
will light.
3
Press the THERMOSTAT button to set
the desired temperature.
AUTO/DRY MODE
• The temperature can be changed up to 2°C
above or below the temperature automatically
determined by the air conditioner.
COOL/HEAT MODE
• The temperature can be set within the
range of 18 to 32°C.
4
Press the FAN button to set the desired
fan speed.
AUTO SOFT LOW HIGH
• In the DRY mode, the fan speed is preset to
AUTO and cannot be changed.
5
To turn off the unit, press the ON/OFF
button again.
• The red OPERATION lamp ( ) on the unit
will turn off.
BASIC OPERATION
TIPS ABOUT AUTO MODE
In the AUTO mode, the temperature setting
and mode are automatically selected according to the room temperature when the unit is
turned on.
Modes and Temperature Settings
Room temp.
at operation
start-up
Automatic Operation
Mode
Temperature Setting
Below 21˚C
HEAT
23
˚C
21˚C-24˚C
DRY
Room Temp. -2
˚C
24˚C-26˚C
COOL
24˚C
26˚C-28˚C
COOL
25˚C
Above 28˚C
COOL
26˚C
2
5
3
1
4
AY-AP9NR_GB.indd 5 11.9.30 5:02:55 PM
Page 5

GB-6
VERTICAL AIR FLOW DIRECTION
1
Press the SWING button.
• The vertical adjustment louvre will swing continuously.
2
Press the SWING button again when the
vertical adjustment louvre comes at the
desired position.
ADJUSTING THE AIR FLOW DIRECTION
1
2
Adjustment range
COOL and DRY modes
HEAT mode
Louvre levers
HORIZONTAL AIR FLOW DIRECTION
Adjust the horizontal air ow direction with
the louver lever.
CAUTION:
Never attempt to adjust the vertical adjustment louvre
manually.
• Manual adjustment of the vertical adjustment lou
-
vre can cause the unit to malfunction.
• When the vertical adjustment louvre is positioned
at the lowest position in the COOL or DRY mode
for an extended period of time, condensation may
result.
Do not adjust the horizontal adjustment louvres to
the extreme left or right in the COOL mode with the
fan speed set to “SOFT ( )” for an extended period of time. Condensation may form on the louvres.
AY-AP9NR_GB.indd 6 11.9.30 5:02:55 PM
Page 6

GB-7
ENGLISH
In this operation, the air conditioner fan works
at "extra high" speed with a setting temperature
of 15°C in COOL and DRY modes and 32°C in
HEAT mode to rapidly cool or heat the room.
1
During operation, press the TURBO
button.
• The remote control will display “ ” .
• The temperature display will go off.
• The green TURBO lamp (
) on
the unit will light up.
TO CANCEL
Press the TURBO button again.
• The green TURBO lamp ( ) on the unit will
turn off.
NOTE:
• You can not set the temperature or fan speed
during the TURBO operation.
• To turn off the TURBO lamp, press the DISPLAY
button.
• After the unit has run for 30 minutes in TURBO
operation, the fan setting will become the "HIGH"
speed, and temperature setting will become 18°C
in COOL and DRY modes.
TURBO OPERATION
1
In cooling or dry operation, vertical adjustment
louver is set obliquely upward to deliver cool air
to the ceiling in order to avoid direct airow.
In heating operation, vertical adjustment louver
is set downward to deliver the warm air down to
the oor.
1
During operation, press the COANDA
AIRFLOW button.
• The remote control will display “ ”.
TO CANCEL
Press the COANDA AIRFLOW button again.
NOTE:
If you want the COANDA AIRFLOW setting in the
TU R B O m ode, press the COA N D A AIRFL O W
button during the TURBO operation.
COANDA AIRFLOW
1
AY-AP9NR_GB.indd 7 11.9.30 5:02:56 PM
Page 7

GB-8
ONE-HOUR OFF TIMER
When the ONE-HOUR OFF TIMER is set, the unit
will automatically turn off after one hour.
1
Pr es s t he O N E- H OU R O FF T IME R
button.
• The remote control will displays “ ”.
• The orange TIMER lamp (
) on the unit will
light up.
• The unit will stop operating after one hour.
TO CANCEL
Press the CANCEL button.
• The orange TIMER lamp (
) on the unit will
turn off.
Alternatively, turn the unit off by pressing the
ON/OFF button.
• The red OPERATION lamp (
) and the orange
TIMER lamp ( ) on the unit will turn off.
NOTE:
• T h e O N E-HOUR OFF TI M ER operatio n h a s
pr i or i ty ove r T IM E R O N an d T IM E R O FF
operations.
• If the ONE-HOUR OFF TIMER is set while the unit
is not operating, the unit starts one-hour operation
at the formerly set condition.
• If you wish to operate the unit for another hour
before the ONE-HOUR OFF TIMER is activated,
press the ONE-HOUR OFF TIMER button again
during operation.
1
CANCEL
PLASMACLUSTER OPERATION
Plasmacluster ions released into the room will
reduce some airborne mold.
1
During operation, press the
PLASMACLUSTER button.
• The remote control will display “ ”.
• The blue PLASMACLUSTER lamp on the
unit will light up.
TO CANCEL
Press the PLASMACLUSTER button again.
• The PLASMACLUSTER lamp on the unit will turn
off.
NOTE:
• Use of the PLASMACLUSTER operation will be
memorized, and it will be activated the next time
you turn on the air conditioner.
• To turn off the PLASMACLUSTER lamp, press the
DISPLAY button.
• To perform Plasmacluster operation in FAN only
mode, press the PLASMACLUSTER button when
the unit is not operating. The mode symbol of the
remote control will go off and the fan speed can
not be set AUTO.
1
AY-AP9NR_GB.indd 8 11.9.30 5:02:56 PM
Page 8

GB-9
ENGLISH
TIMER ON
1
Press the TIMER ON ( ) button
and set the time as desired.
• The time setting will change as you press
the button as follows. Hold the button down
to speed through the setting.
• The orange TIMER lamp (
) on the unit
will light.
• The time setting will count down to show the
remaining time.
Select the mode, temperature and fan speed
setting as desired.
• When the temperature is set with the TIMER
ON, the temperature will show in the display
for 5 seconds and then return to the time
display.
• The unit will turn on prior to the set time
to allow the room t o r e a c h the d e s i r ed
tem p e ra ture by t h e p r o gr amme d t i m e.
(Awaking function)
TO CANCEL
Press the CANCEL button.
• The orange TIMER lamp (
) on the unit will
turn off.
NOTE:
• Timer duration can be set from a minimum half
an hour to a maximum of 12 hours. Up to 9.5
hours, you can set in half-hour increments, and
from 10 to 12 hours, in 1-hour increments.
• The latest time setting will be memorized and will
appear on the remote control display the next
time you set the TIMER OFF or TIMER ON.
• The TIMER OFF and TIMER ON can not be set
together.
• While ONE-HOUR OFF TIMER is set, the TIMER
OFF and TIMER ON setting are unavailable.
• If the ONE-HOUR OFF TIMER is set while the
TIMER OFF or TIMER ON is activated, the TIMER ON or TIMER OFF setting will be cancelled.
TIMER OPERATION
TIMER OFF
1
Press the TIMER OFF ( ) button
and set the time as desired.
• The time setting will change as you press the
button as follows. Hold the button down to
speed through the settings.
• The orange TIMER lamp (
) on the unit
will light.
• The time setting will count down to show the
remaining time.
TO CANCEL
Press the CANCEL button.
• The orange TIMER lamp (
) on the unit will
turn off.
TIPS ABOUT TIMER OFF OPERATION
When the TIMER OFF is set, the temperature
setting is automatically adjusted to prevent the room
from becoming excessively hot or too cold while you
sleep. (Auto Sleep function)
COOL/DRY MODE:
• One hour after the time operation begins, the
temperature setting rises 1°C higher than the
original temperature setting.
HEAT MODE:
• One hour after the timer operation begins, the
temperature setting drops 3°C lower than the
original temperature setting.
1
1
CANCEL
CANCEL
AY-AP9NR_GB.indd 9 11.9.30 5:02:57 PM
 Loading...