

Page 1

OPERATION
MANUAL
(for network scanner)
LASER PRINTER
Page 2

INTRODUCTION
The optional Network Scanner Expansion Kit (AR-NS3) enables the machine to be used as a network scanner. This
manual explains only the network scanner functions of the product. For detailed information on the software in the
CD-ROM that accompanied the AR-NS3, please view the user's guide (PDF format) that is included on the CD-ROM.
For information on loading paper, replacing toner cartridges, clearing paper misfeeds, handling peripheral units, and
other copier-related information, please refer to your "Operation manual (for general information and copier
operation)".
To enable the network scanner function of this machine, a product key (password) must be entered using a key
operator program. This is only required once. Use the "NETWORK SCANNER EXPANSION KIT" program to enter
the product key. If you do not know your product key, please ask your dealer. (For information on using key operator
programs, refer to the Key operator’s guide.)
NOTES
O Before using the network scanner feature, several settings must be established from the Web page. These
settings are explained from page 3
settings must be effected by the system administrator who has the special network related backgrounds.
O The explanations in this manual assume that the person who will install the product and the users of the product
have a working knowledge of Microsoft Windows.
O The explanations of screens and procedures in this manual are for Windows XP. The screens may vary
depending on your Windows version and settings.
O For information on the operating system, please refer to your operating system manual or the online Help
function.
O This manual assumes that several options have been installed.
on. The settings must be established by the network administrator. Such
Warranty
While every effort has been made to make this document as accurate and helpful as possible, SHARP Corporation
makes no warranty of any kind with regard to its content. All information included herein is subject to change without
notice. SHARP is not responsible for any loss or damages, direct or indirect, arising from or related to the use of this
operation manual.
© Copyright SHARP Corporation 2003. All rights reserved. Reproduction, adaptation or translation without prior
written permission is prohibited, except as allowed under copyright laws.
Trademark Acknowledgments
Sharpdesk is a trademark of Sharp Corporation.
Microsoft Windows operating system is a registered trademark or trademark of the Microsoft Corporation in the
U.S.A. and other countries.
Microsoft®, Windows®, Windows® 95, Windows® 98, Windows® Me, Windows NT® 4.0, Windows® 2000,
Windows® XP, Windows® Server 2003 and Internet Explorer® are registered trademarks or trademarks of Microsoft
Corporation in the U.S.A. and other countries.
Netscape Navigator is a trademark of Netscape Communications Corporation.
Acrobat® Reader Copyright© 1987-2002 Adobe Systems Incorporated. All rights reserved.
Adobe, the Adobe logo, Acrobat, and the Acrobat logo are trademarks of Adobe Systems Incorporated.
All other trademarks and copyrights are the property of their respective owners.
The display screens, messages, and key names shown in the manual may differ from those on the actual
machine due to product improvements and modifications.
1
Page 3

TABLE OF CONTENTS
Page
INTRODUCTION................................................................. 1
ABOUT THE NETWORK SCANNER FUNCTION ..............3
SETTINGS AND PROGRAMMING REQUIRED FOR THE
NETWORK SCANNER FEATURE......................................4
O ACCESSING WEB PAGES........................................... 4
O ABOUT THE WEB PAGE..............................................4
O SETTING UP DESTINATION INFORMATION..............5
O
STORING SENDER INFORMATION (Scan to E-mail)............6
O SETTINGS FOR NETWORK SCANNING.....................7
O PROTECTING INFORMATION PROGRAMMED IN
THE WEB PAGE ("Passwords")....................................8
CONDITION SETTINGS SCREEN OF SCANNER MODE. 9
SENDING AN IMAGE .......................................................12
O BASIC TRANSMISSION METHOD............................. 12
O DESTINATION INPUT METHODS..............................16
O SCANNING AND TRANSMITTING A TWO-SIDED
ORIGINAL (when using B/W scanner module/DSPF) . 19
SCANNING SETTINGS (ORIGINAL SIZE, EXPOSURE,
RESOLUTION, AND FILE FORMAT) ...............................20
O MANUALLY SETTING THE SCANNING SIZE............20
O STORING, DELETING, AND
USING ORIGINAL SIZES............................................ 21
O ENLARGEMENT TRANSMISSION.............................22
O SELECTING THE EXPOSURE ...................................23
O SELECTING THE RESOLUTION................................23
O SELECTING THE FILE FORMAT ...............................24
SPECIAL FUNCTIONS ..................................................... 25
O ERASING EDGE SHADOWS (ERASE) ...................... 25
O TRANSMITTING A DIVIDED ORIGINAL (DUAL PAGE
SCAN) .........................................................................26
O AUTOMATIC TRANSMISSION AT A SPECIFIED TIME
(TIMER TRANSMISSION)...........................................27
O TRANSMITTING TWO ORIGINAL PAGES AS A
SINGLE PAGE (2IN1) .................................................28
O TRANSMITTING THE FRONT AND BACK SIDES OF A
CARD ON ONE SHEET OF PAPER (CARD SHOT)...29
O TRANSMITTING A LARGE NUMBER OF PAGES (JOB
BUILD).........................................................................31
O PRINTING A TRANSACTION REPORT
(TRANSACTION REPORT).........................................32
O PROGRAMMING FREQUENTLY USED OPERATIONS
(PROGRAM)................................................................33
Page
PRIORITY TRANSMISSION OF A STORED JOB............34
CANCELLING AN E-MAIL/FTP TRANSMISSION................. 35
INTERNET FAX RECEPTION...........................................36
TRANSFERRING RECEIVED INTERNET-FAXES TO
ANOTHER MACHINE WHEN PRINTING IS NOT
POSSIBLE (FORWARDING FUNCTION) .........................37
O USING THE TRANSFER FUNCTION .........................37
STORING, EDITING, AND DELETING FROM THE TOUCH
PANEL...............................................................................38
O STORING ONE-TOUCH KEYS (only addresses for
Scan to E-mail and Internet-Fax) .................................38
O EDITING AND DELETING ONE-TOUCH KEYS .........40
O PROGRAMMING A GROUP KEY ...............................41
O EDITING AND DELETING GROUP KEYS ..................42
O
STORING SENDER INFORMATION .............................. 43
O EDITING AND DELETING SENDER INFORMATION.45
O STORING A GROUP INDEX.......................................46
O PRINTING PROGRAMMED INFORMATION ..............46
O STORING A PROGRAM..............................................47
O EDITING AND DELETING PROGRAMS.....................48
TROUBLESHOOTING.......................................................49
O IF YOUR E-MAIL IS RETURNED ................................50
O IF A TRANSMISSION ERROR OCCURS ...................50
O CHECKING THE IP ADDRESS ...................................51
O IMPORTANT POINTS WHEN USING SCAN
TO E-MAIL ...................................................................52
KEY OPERATOR PROGRAMS ........................................53
O KEY OPERATOR PROGRAM LIST ............................53
O USING THE KEY OPERATOR PROGRAMS ..............53
O SETTING PROGRAMS ...............................................55
O PRINTING OUT SETTINGS ........................................61
SPECIFICATIONS.............................................................62
2
Page 4
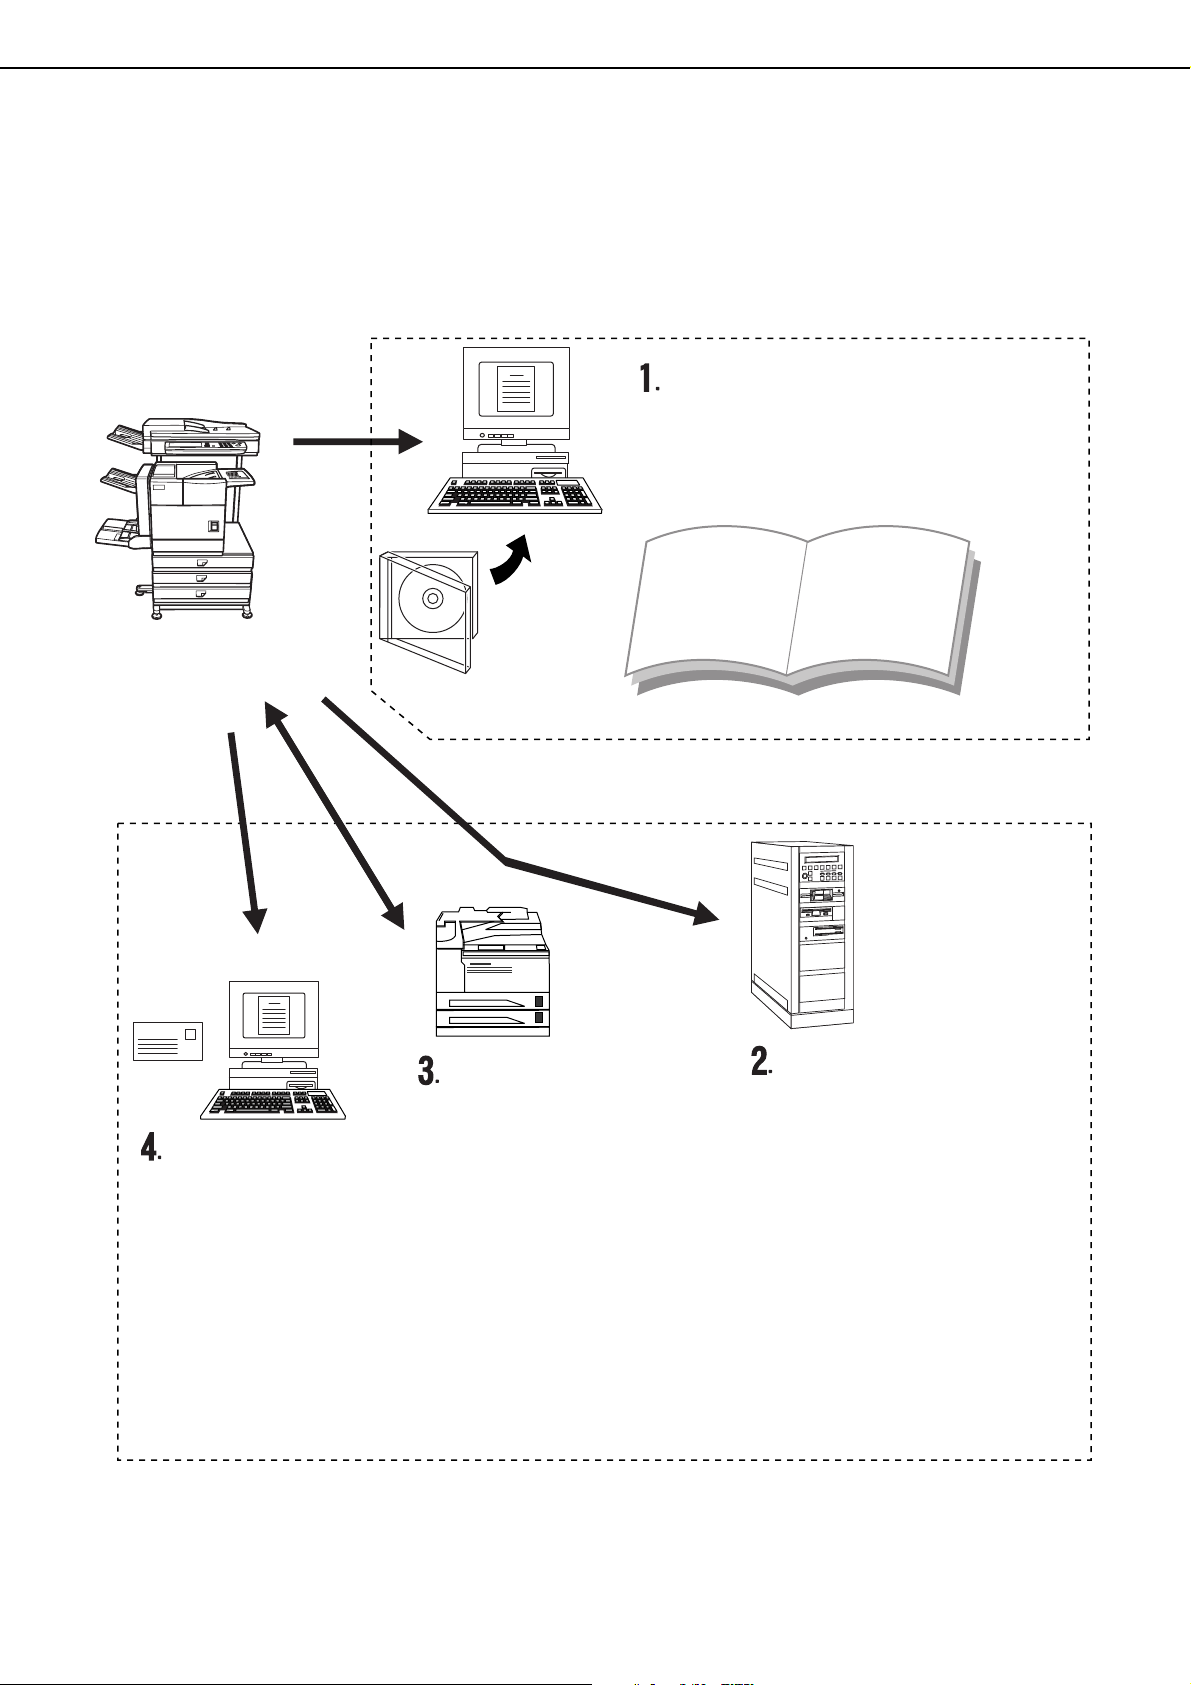
ABOUT THE NETWORK SCANNER FUNCTION
The AR-NS3 Network Scanner Expansion Kit adds network scanner functionality to your machine. A machine with
the network scanner functionality can scan a paper document, photograph, or other printed information into a data
file, and send the file to a file server or personal computer over a corporate network (intranet) or the Internet.
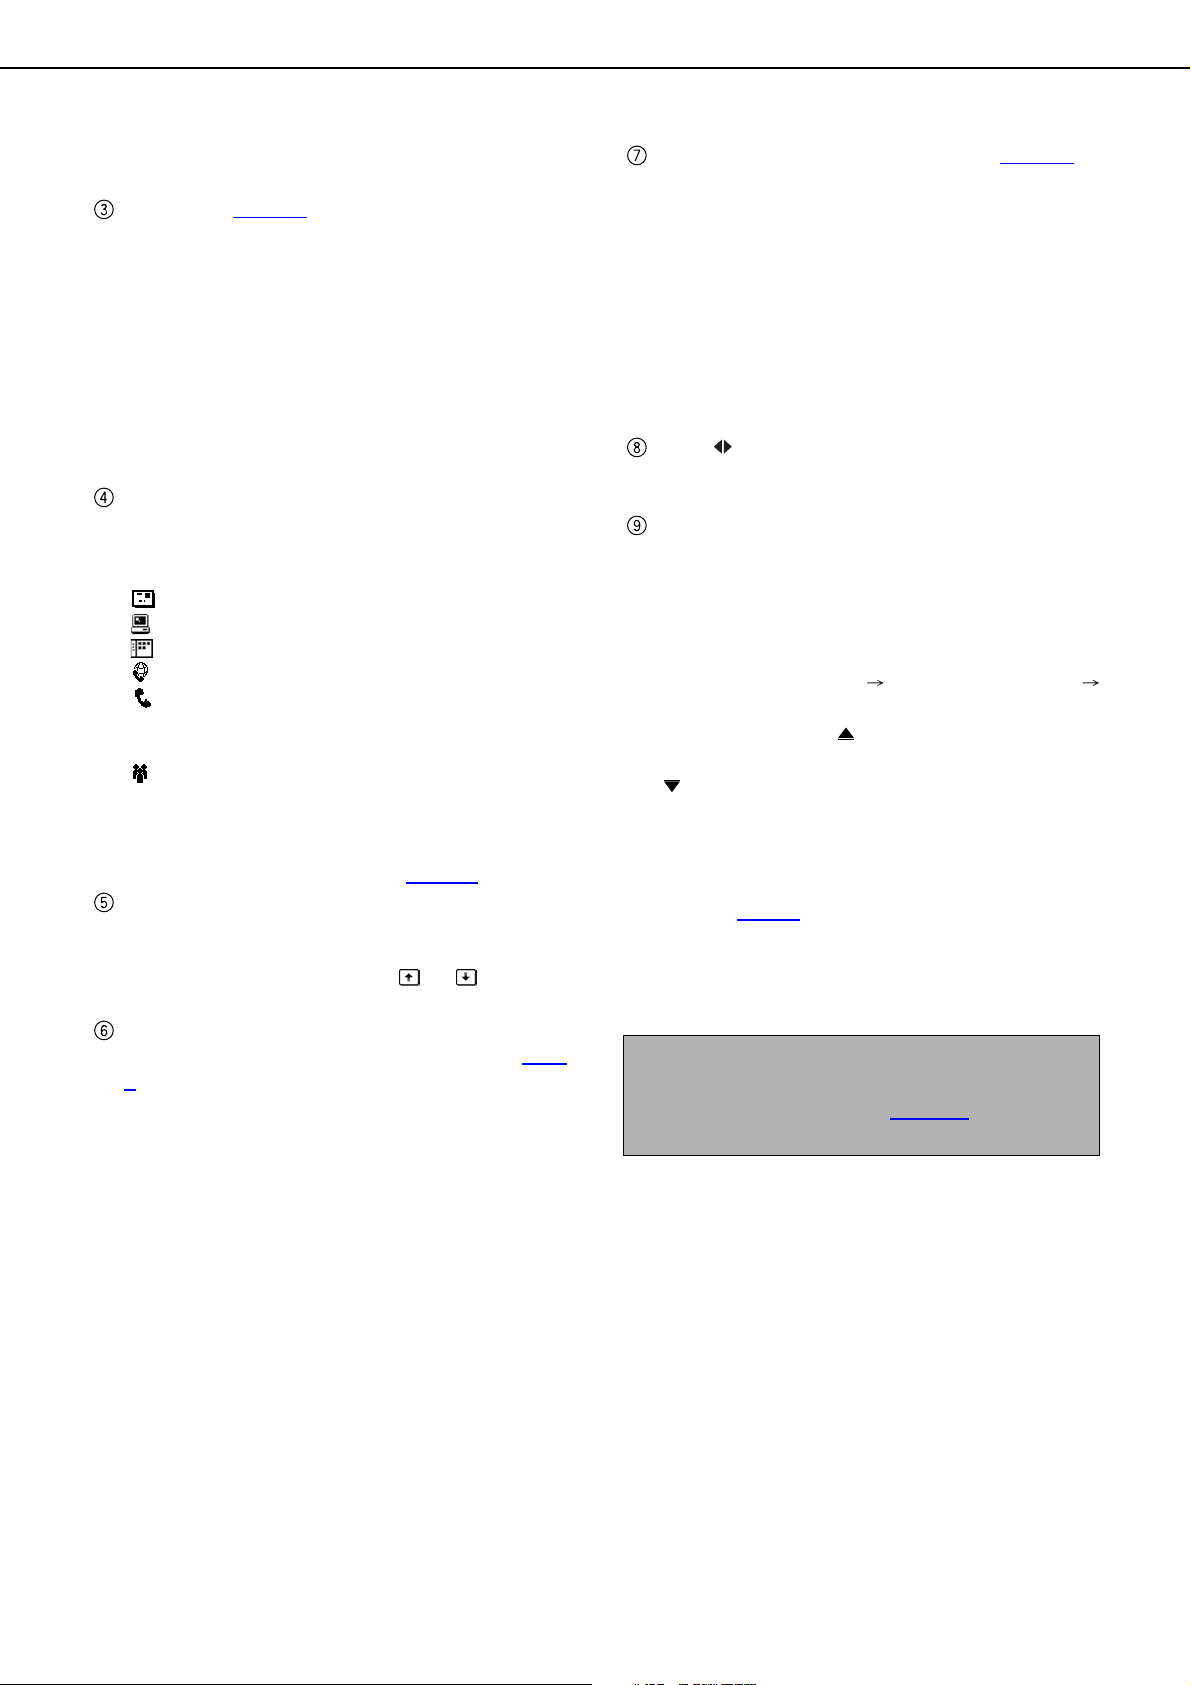
You can select from the following transmission methods, depending on where you wish to send the scanned image
data.
The scanned information can
be sent to one's own personal
desktop. (referred to as "Scan
to Desktop")
Before Scan to Desktop can be
performed, the "Network Scanner
Tool" software in the CD-ROM that
accompanied the Network Scanner
Expansion Kit must be installed.
The scanned information can be sent to an email recipient. (referred
to as "Scan to E-mail")
The scanned information
can be sent with the
Internet-Fax feature.
Internet-Fax Reception is
also available.
3
The scanned information can
be sent to a memory storage
device on a network (a
designated directory on an
FTP server). (referred to as
"Scan to FTP")
When sending scanned
information to an FTP server,
an e-mail message can also
be sent to a preset e-mail
address to inform the
recipient of the location of the
scanned image data. (referred
to as "Scan to FTP
(Hyperlink)")
Page 5

SETTINGS AND PROGRAMMING REQUIRED FOR THE NETWORK SCANNER FEATURE
To use the Network Scanner feature, settings for the SMTP server, DNS server, and destination addresses must be
established.
To establish the settings, use a computer that is connected to the same network as the machine to access the
machine's Web page. The Web page can be displayed with your Web browser (Internet Explorer 5.5 or later
(Windows)/5.1 or later (Macintosh), or Netscape Navigator 6.0 or later).
ACCESSING WEB PAGES
Use the following procedure to access the Web pages.
Open the Web browser on your computer.
1
Supported browsers:
Internet Explorer 5.5 or later (Windows)/5.1
or later (Macintosh)
Netscape Navigator 6.0 or later
In the "Address" field of your Web browser,
2
enter the IP address of the machine as a
URL.
Input the IP address
previously specified in
this product.
If you do not know the IP
address, see page 51
When the connection is completed, the following
Web page will appear in your Web browser.
.
ABOUT THE WEB PAGE
When you access the Web page in the machine, the following page (user screen) will appear in your browser.
A menu frame appears on the left side of the page. When you click an item in the menu, a screen appears in the right
frame that allows you to establish settings for that item.
For overviews of each of the menu items, refer to chapter 3 of "Operation manual (for printer)".
For detailed explanations of the procedures for establishing settings, click "General" and "Document Filing" under
"Help"in the menu frame.
Menu frame
Click the menu items displayed
here to configure the
corresponding settings.
Destination
Store, edit and delete
transmission destinations.
Sender
Store, edit and delete senders.
Admin Mode
Display the administrator screen.
You must input the user name
and password for administrator.
Web Page
To use the network scanner function, you must store transmission destinations (pages 5
sender's name (page 6
The administrator must configure network scanner settings (page 7
).
) on the administrator screen.
4
- 6) and program your
Page 6

SETTINGS AND PROGRAMMING REQUIRED FOR THE NETWORK SCANNER FEATURE
SETTING UP DESTINATION INFORMATION
Click "Destination" in the Web page menu frame to display the Destination Management screen. If you are prompted
to enter the password, enter it to display the screen. This screen allows you to store the name and address of a
destination in a one-touch key. The Destination Management screen can also be used to edit or clear stored
destinations.
A total of 999 destinations can be stored, including E-mail, FTP, Desktop, Internet-Fax, and Group destinations.
Among these, a combined total of 200 Scan to FTP and Desktop destinations can be stored.
The stored destinations appear as one-touch keys in the touch panel of the machine when you send an image,
allowing you to select the destination.
For detailed information on setting up, editing, and deleting destinations, refer to "General" under "Help".
Storing destinations for Scan to E-mail
Click "E-mail" in the Destination Management screen. Use this screen to enter the e-mail addresses of
destinations for Scan to E-mail.
When you have completed all of the entries, click "Submit". The entries will be stored.
Scan to E-mail destinations can also be stored, edited, and cleared from the touch panel of the machine. (pages 38 - 41)
To perform Scan to E-mail, the SMTP server settings must first be established. (Refer to page 8.)
Storing destinations for Scan to FTP
Click "FTP" in the Destination Management screen. Use this screen to enter the destination addresses for
Scan to FTP.
If you select the "Enable Hyperlink to FTP server to be e-mailed" checkbox, you can send an e-mail message
to a "Sender" selected from "E-mail Destination" (stored as senders in the Web page menu (page 6
that person of the location of the scanned image data and its file fo rmat. (Scan to FTP (Hyperlink))
The e-mail includes a link to the loc ation of the scann ed image data, and if th e FTP server do es not require a
user name or password (anonymous server), the recipient can display the image by simply clicking on the
address.
To perform Scan to FTP (Hyperlink), you must set the SMTP server. If you entered a host name in "Hostname
or IP Address", you will need to enter the DNS server or WINS server settings. (Refer to page 8
)), to notify
.)
Storing destinations for Scan to Desktop
Click "Desktop" in the Destination Management screen. Use this screen to enter the destination addresses for
Scan to Desktop.
Scan to Desktop can only be used if Network Scanner Tool is inst alle d in your com puter (Ne twork Scann er Tool
is included on the CD-ROM that accompanies the Network Scanner Expansion Kit.)
Y ou can store a Scan to De sktop destination in the W eb p age, or in Netwo rk Scanner Tool. We recommend that
you normally use Network Scanner Tool, which automatically establishes settings. The Web page is primarily
used when the same settings are to be established in multiple units, or when the network administrator
performs maintenance. If the information set here differs from the information set in the host computer,
transmission and reception will not take place normally. For details, refer to the User's Guide for Network
Scanner Tool in the CD-ROM that accompanies the Network Scanner Expansion Kit.
If you entered a host name in "Hostname or IP Address", you will need to enter the DNS server or WINS server
settings. (Refer to page 8
.)
Storing destinations for Internet-Fax
Click "I-Fax" in the Destination Management screen. Use this screen to enter the destination e-mail addresses
for Internet-Fax.
The destinations can also be stored, edited, and cleared from the touch panel of the machine. (Refer to pages
38 - 41.)
To perform Internet-Fax transmission, you must set the SMTP server. (Refer to page 8
.)
5
Page 7

SETTINGS AND PROGRAMMING REQUIRED FOR THE NETWORK SCANNER FEATURE
Storing Groups
If you are using Scan to E-mail or Internet-Fax transmission, a scanned image can be sent to multiple
destinations in a single operation. To use this function, you must first store the destinations in a group. Click
"Group" and then select the destinations that you wish to store in the group. Up to 500 destinations can be stored
in total. Only destinations for E-mail, Fax, and Internet-Fax, addresses searched with the g lobal address search
feature, and manually entered address can be stored in a group.
Items common to all transmission methods when storing destinations
Name, Display Name
Only alphabetical characters and symbols can be used to enter names in "Name" and "Display Name". For the
maximum number of characters that can be entered, click "General" under "Help" in the menu frame.
"Display Name" is the one-touch key name that is displayed in the touch panel of the machine. If a display
name is not stored, the first 18 characters of the name stored in "Name" ar e automatically used as the display
name.
Initial, Custom Index
Stored destinations are arranged on "indexes" when displayed in the touch panel of the machine. There are
two types of indexes: the ABC index and group indexes. The ABC index arranges destinatio ns based on the
letters entered in "Initial", which is specified with up to 10 letters. If a destination is frequently used, it is
convenient to select the "Frequently Used" checkbox to include the destination in the alphabetical
"FREQUENT USE" index. Group indexes ("Custom Index") allow you to create a nd na me indexe s (see page
8) of destinations for specific purpos es .
File Format
When you store a destination, you can also select the compressio n mode and the format of the image file that
is created when you scan an original for transmission. You can select TIFF or PDF for the file type, and MH
(G3), MMR (G4), or "None" for the compressio n mode. An initial s etting has be en made fo r the file type an d
compression mode, so you only need to make a selection if the initial settings are not satisfactory. For an
explanation of the initial settings of each of the transmission methods, click "General" under "Help" in the menu
frame.
NOTE
Internet-Fax has only one file format, TIFF-F , and thus there is no selectio n. MH (G3) or MMR (G4) can be selected
for the compression mode.
STORING SENDER INFORMATION (Scan to E-mail)
To store the sender information (Sender Name, E-mail Address) that is displayed when the recipient receives your
e-mail, click "Sender" in the menu frame and then click "Add". Information for up to 999 different senders can be
stored. Select a sender from the stored senders using the touch panel of the machine when you send an image (page
13). The selected sender appears in the sender column of the recipient's e-mail software program.
NOTE
If you do not select a sender when sending an imag e, the default sender information stor ed with the key ope rator
program "Default sender set" is automatically sent. (page 56
Click "Sender" in the Web page menu frame and enter the password to display the Sender Management screen.
Click "Add" to enter sender information that will be displayed on the destination machine (sender name and sender
e-mail address). The Sender Management screen can also be used to edit or clear stored sender information.
The sender information can also be stored, edited, and cleared from the touc h panel of the machine. (Refer to pages
43 - 46.)
)
6
Page 8
SETTINGS AND PROGRAMMING REQUIRED FOR THE NETWORK SCANNER FEATURE
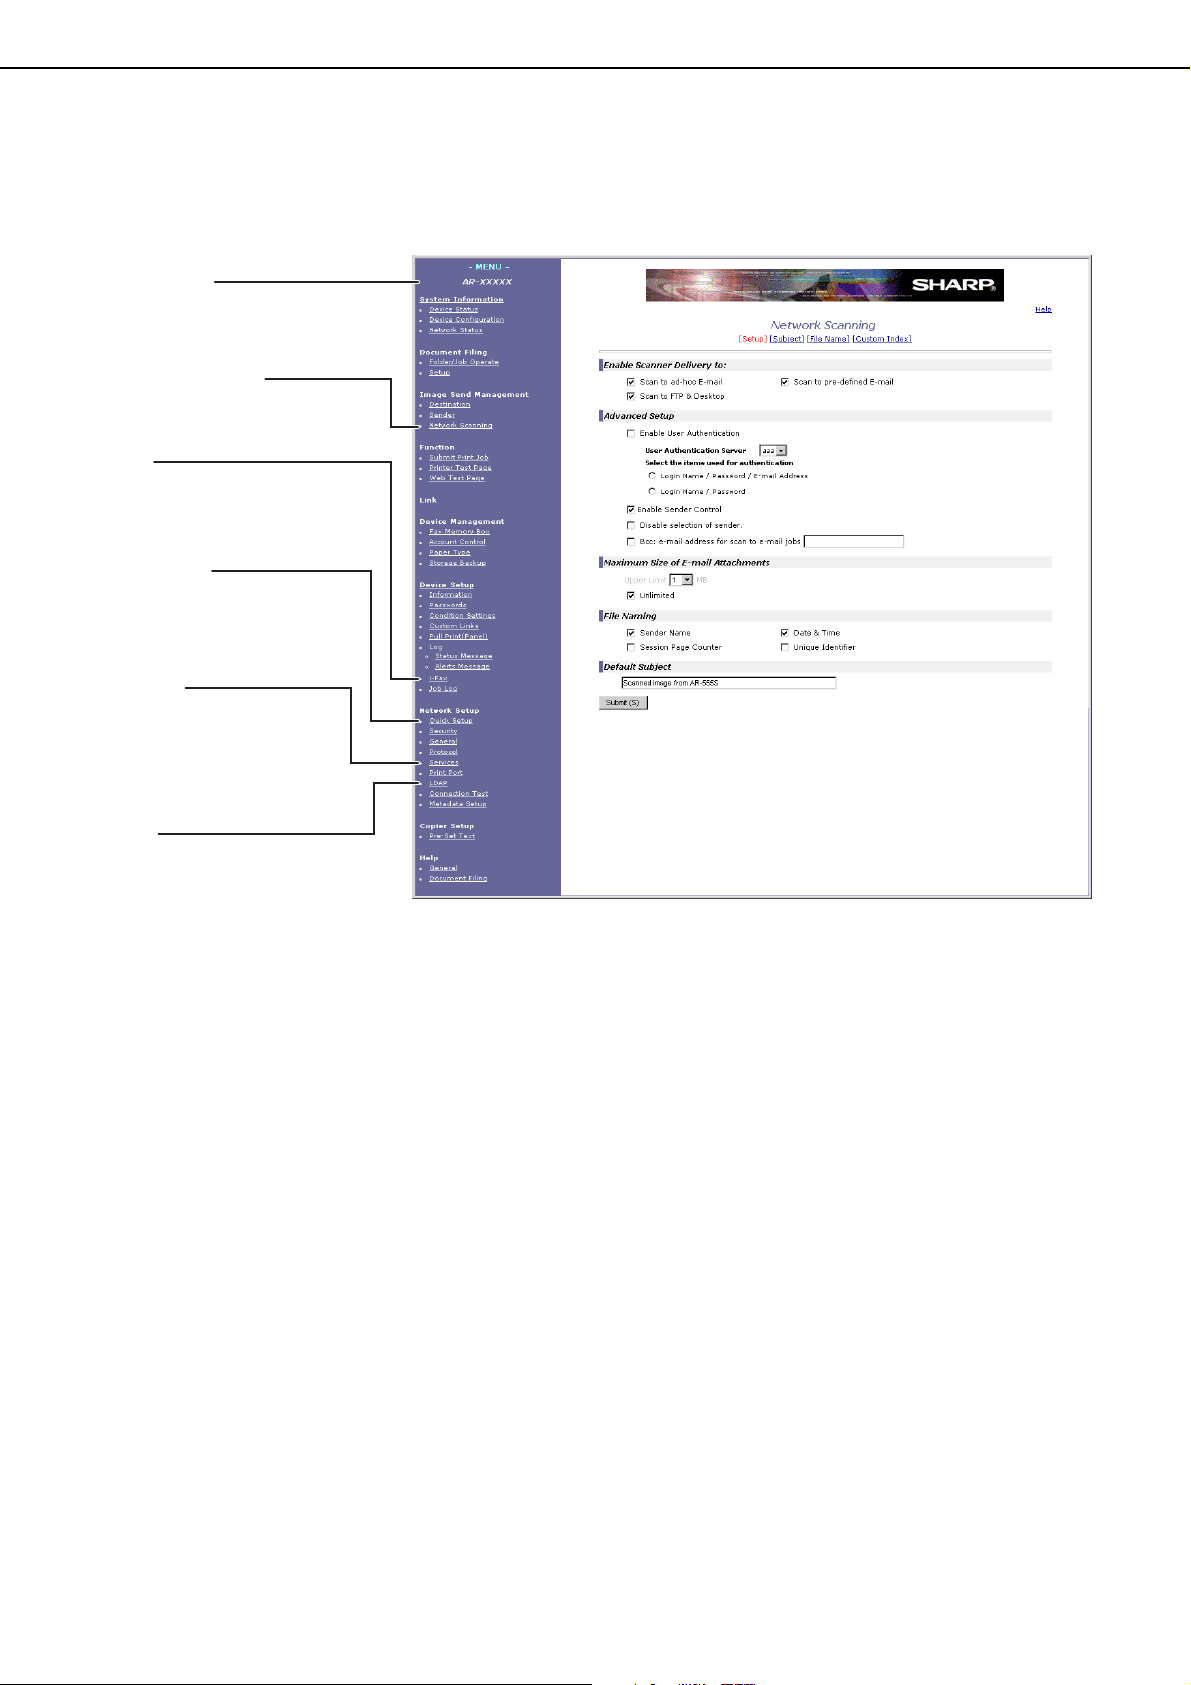
SETTINGS FOR NETWORK SCANNING
The administrator must configure the following settings.
First, click “Admin Mode” in the menu frame to display the administrator screen. Then configure each setting item.
Menu frame
Click the menu items displayed
here to configure the
corresponding settings.
Network Scanning
Configure basic settings for the
network scanner function.
i-Fax
Configure Internet-Fax
transmission and reception
settings.
Quick Setup
Configure simple settings for
the SMTP server, DNS server,
and LDAP server.
Services
Configure detailed settings
for the SMTP server and the
DNS server according to the
transmission method.
LDAP
Configure detailed settings for
global address search.
Network Scanning Setup screen
Q Basic settings for network scanning
Click "Network Scanning" in the menu frame, and then establish the required settings. After entering the settings,
be sure to click "Submit" to store them. For detailed information on setting procedures, refer to "General" under
"Help".
O Network scanning setup screen
This screen is displayed when you click "Network Scanning."
On this screen, set the scanning features to be used ("Enable Scanner Delivery to:"), the advanced functions
("Advanced Setup"), the upper limit of the file size of the image to be transmitted ("Maximum Size of E-mail
Attachments"), the default file name ("File Naming"), and the default E-mail subject ("Default Subject"). If you
use the factory default settings, you need not make settings on this screen.
O Subject screen
This screen is displayed when you click "Subject" in the network scanning setup screen.
Click "Add" to enter e-mail subjects. You can also edit or delete a subject. When you transmit a scanned image
by e-mail, you can select a subject from those previously registered on this screen.
O File name screen
This screen is displayed when you click "File Name" in the network scanning setup screen.
Click "Add" to enter file names of images to be transmitted. You can also edit or delete a file name. When you
transmit a scanned image by e-mail, you can select a file name from those previously registered on this screen.
7
Page 9

SETTINGS AND PROGRAMMING REQUIRED FOR THE NETWORK SCANNER FEATURE
O Change custom index name screen
This screen is displayed when you click "Custom Index" in the network scanning setup screen.
Programmed destinations appear as one-touch keys in the Address book screen of the touch panel, and are
normally included in the ABC index. Two types of indexes are available: the ABC index and group indexes
(custom directories). Group indexes allow you to assign any index name to the destination for easy searching.
Six group indexes are available, and a name up to six characters long can be assigned to each.
Group index names can be programmed and edited in this screen. Enter names for indexes 1 through 6 and
then click "Submit". If you wish to change a previously programmed name, enter the new name after deleting
the previous name and save it.
For information on grouping destinations in a group index, refer to page 6
between the ABC index and group indexes, refer to page 11
The custom index can also be changed from the touch panel of the machine. (Refer to page 46
.
. For information on switching
.)
Q Setting up internet-fax parameters
Various parameters concerning Internet-Fax transmission and reception must be set. These parameters are
used when you use the Internet-Fax feature.
Click "i-Fax" in the menu frame to display the i-Fax Setup screen.
If you use the Internet-Fax reception feature, you need to enter the settings for the POP3 server.
After setting the parameters, click "Submit" to store them.
Q Setting up servers
E-mail sent by Scan to E-mail, Internet-Fax transmission or Scan to FTP (Hyperlink) uses SMTP. To use any of
these transmission methods, you must enter the settings for the SMTP server.
If you use the global address search feature, you also need to enter the settings for the LDAP server.
If you entered a host name when storing a destination for Scan to FTP (Scan to FTP (hyperlink)) or Scan to
Desktop, you will need to enter the settings for the DNS or WINS server.
To set frequently used items for the SMTP server, DNS server, and LDAP server, click "Quick Setup" in the menu
frame to display the setting screen. Enter required parameters.
To set items that are not included in the quick setup screen, click “Services” or "LDAP" in the menu frame to
display the relevant setting screen. Enter required parameters.
PROTECTING INFORMATION PROGRAMMED IN THE WEB PAGE ("Passwords")
Passwords can be set to restrict Web page access and protect settings. The administrator must change the
password from the factory default setting. Also the administrator must remember the new password. The password
is required to operate the settings on the password-protected screen.
A password can be set for the administrator and passwords can be set for each user. If you use a user password,
you will not be able to establish settings that are included only in the administrator screen.
The passwords for "user" and "admin" are both initially set to "Sharp". If you wish to change the passwords when first
establishing the settings, enter "Sharp" in "Admin Password" before you establish the settings. A password must
consist of alphanumeric characters and be no more than seven characters long. Passwords are case sensitive. After
entering a password, click "Submit" to set it. After setting the password, turn the machine power off and then back on.
When you are prompted for the password, enter "user" for accessing as a user or “admin” for accessing as an
administrator at the "User name". Then, enter the relevant password. For detailed information on setting passwords,
refer to "General" under "Help".
8
Page 10
CONDITION SETTINGS SCREEN OF SCANNER MODE
ADDRESS BOOK
AUTO
READY TO SEND
.
ORIGINAL
300x300dpi
RESOLUTION
PDF MMR(G4)
FILE FORMAT
AUTO
E-MAIL/FTP
EXPOSURE
SPECIAL MODES
ADDRESS REVIEW
RESEND
FILE
ADDRESS ENTRY
MODE SWITCH
QUICK FILE
SEND SETTINGS
The condition settings screen of scanner mode is displayed by pressing th e [IMAGE SEND] key (refer to page 1-12
of "Operation manual (for general information and copier operation)") while the document filing mode, copy mode,
or job status screen appears in the touch p anel
that appears after pressing the [IMAGE SEND] key is the condition setting screen (shown below). If you have set the
display to show the address book screen (following page
[CONDITION SETTINGS] key in the address book to display the condition setting screen.
The key operator program "Default display settings" (refer to page 55
the condition setting screen (shown below) or the Address book screen (following page
key is pressed.
*1 Depending on the feature to be used, touch the [MODE SWITCH] key to select the E-MAIL/FTP mode or the
INTERNET-FAX mode.
NOTE
For information on the parts of the un it and the operati on panel th at are used for network scanning, refer to page s
1-9 to 1-12 of Operation manual (for general information and copier operation). For parts that are used for both
network scanning and printing, refer to chapter 4 of Operat ion manual (for printer).
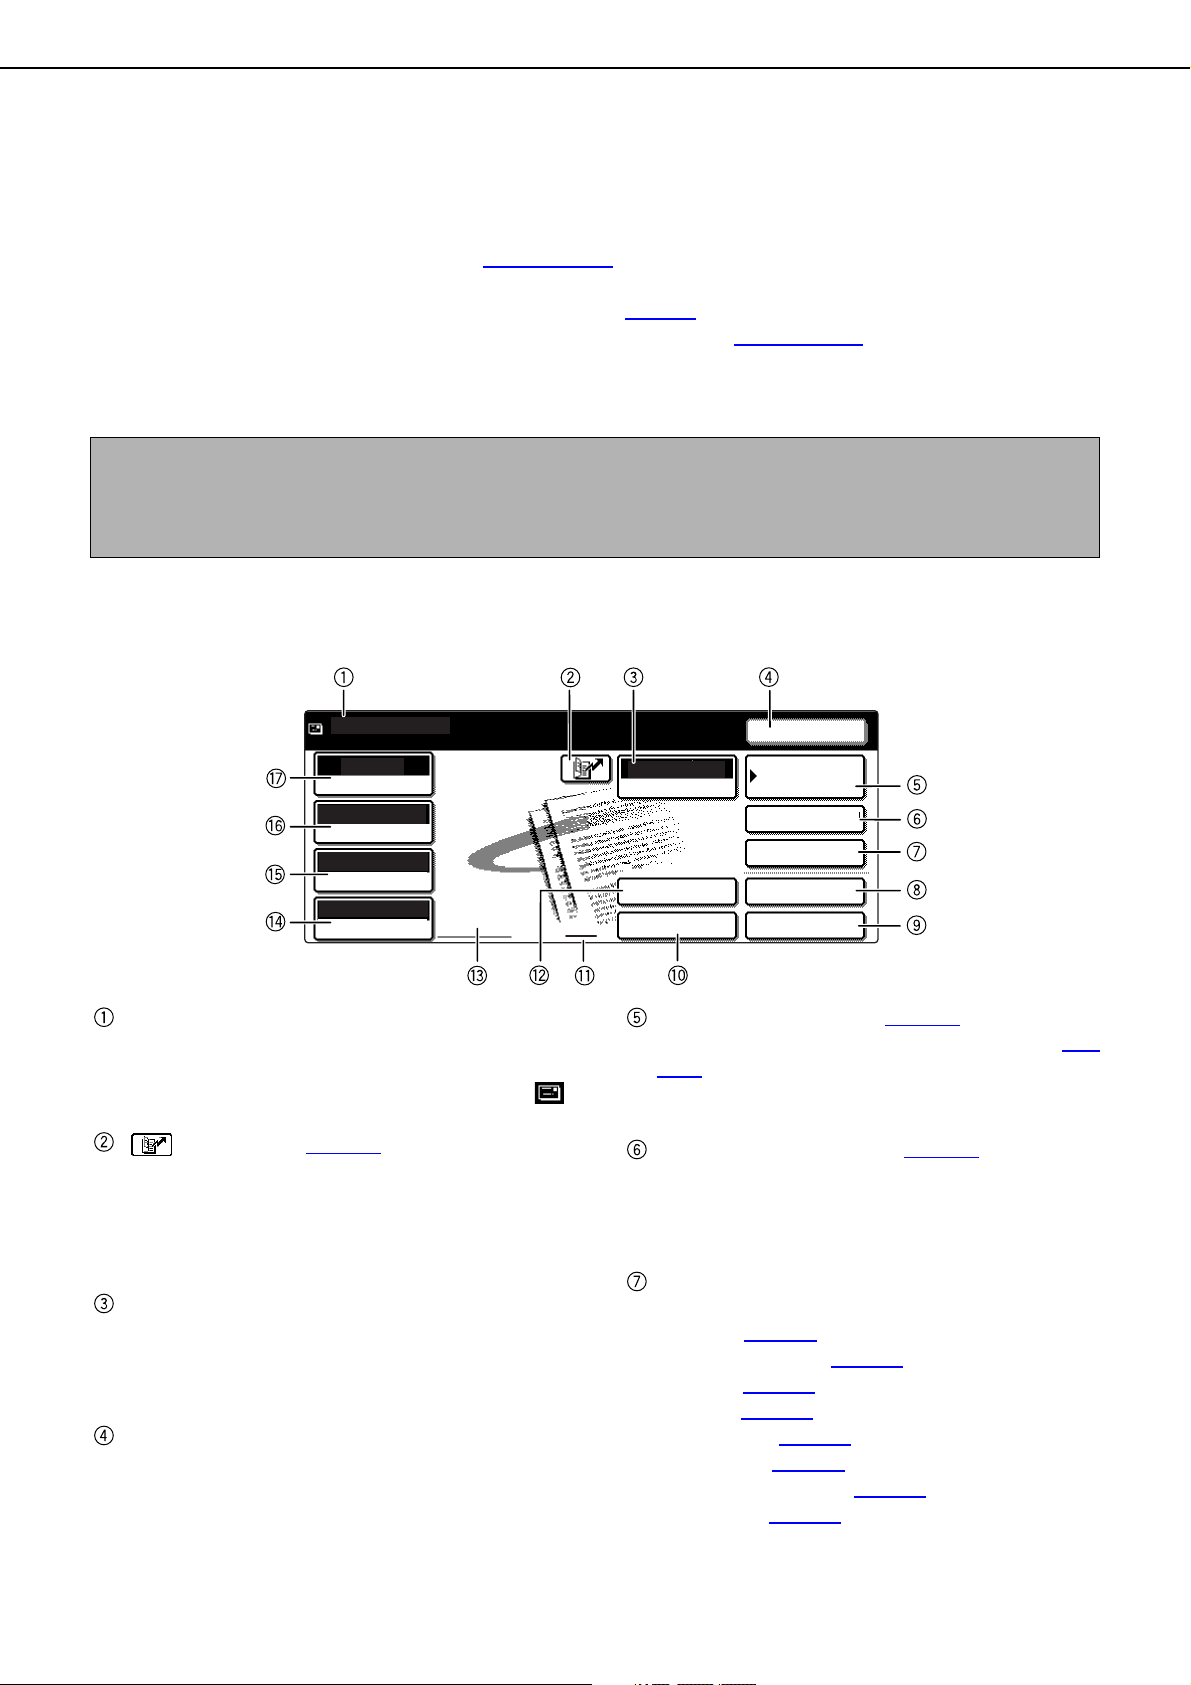
Condition settings screen
The display is initially set (factory setting) to show the following condition setting screen as the initial screen.
The illustration below shows the screen in the E-MAIL/FTP mode.
*1
. In the explanations that follow, it is assumed that the initial screen
) when the [IMAGE SEND] key is pressed, touch the
) can be used to set the display to show either
) when the [IMAGE SEND]
Message display
Messages appear here to indicate the current
status of the machine.
When the machine is ready to send, an icon
appears to the left.
[] (Quick) key (page 17
When you add a one-touch key or a group key, the
machine will automatically assign a shortened
number (in this manual, this key is called the Quick
key). Use this key for a three-digit shortened
number to simplify the transmission procedure.
[MODE SWITCH] key
Touch this key to switch between the E-MAIL/FTP
mode and the INTERNET-FAX mode. If the
machine is equipped with the facsimile feature, this
key can also be used for selecting the FAX mode.
[RESEND] key
Touch this key to send to the address to which
transmission was previously made. After an
address is specified, the [NEXT ADDRESS] button
is displayed here.
)
9
[ADDRESS BOOK] key (page 14
This displays the Address Book screen (next
page). Touch this key when you wish to use a one-
touch key that has a destination (or group)
programmed in it.
[ADDRESS REVIEW] key (page 18
When performing a br oadcast transmission, touch
this key to check your selected destinations. Your
selected destinations will appear as a list, and the
list can be edited.
[SPECIAL MODES] key
Touch this key to set the special modes.
Erase (page 25
Dual page scan (page 26
Timer (page 27
2 in 1 (page 28
Card shot (page 29
Job build (page 31
Transaction report (page 32
Program (page 33
)
)
)
)
)
)
)
)
)
)
Page 11
CONDITION SETTINGS SCREEN OF SCANNER MODE
USER 1 USER 2 USER 3 USER 4
USER 5
USER 6
GROUP
ABC
ABC GROUP
TO
FREQUENT USE ABCD EFGHI JKLMN OPQRST UVWXYZ
CC
BCC
TEST5 TEST6
TEST3
TEST1 TEST2
GLOBAL
ADDRESS SEARCH
CONDITION
SETTINGS
READY TO SEND.
ADDRESS REVIEW
RESEND
[FILE] key (page 14)
Touch this key to store a document image that you
are transmitting in the hard disk (this includes
selecting a user name, file name, and location).
[QUICK FILE] key (page 14
Touch this key to store a document image that you
are transmitting in the temporary storage folder.
[SEND SETTINGS] (page 12
Touch this key to set the subject, file name, and
sender name.
Memory and reception mode display
This shows the amount of fax memory that is free
when an optional facsimile feature is installed.
[ADDRESS ENTRY] key (page 16
When performing Scan to E-mail, touch this key if
you wish to enter the e-mail address of the recipient
manually instead of using an one-touch key.
Two-sided scanning icon display (page 19)
Icons appear here when you touch the [ORIGINAL]
key and select two-sided scanning (if a B/W
scanner module/DSPF is installed). The icons can
be touched to open function selection screen s.
)
)
)
[ORIGINAL] key (pages 19
Touch this key when you wish to manually set the
size of the original to be scanned or scan both
sides of the original (if a B/W scanner module/
DSPF is installed).
[FILE FORMAT] key (page 24
Touch this key to set the file format of scan images
that you transmit. The selected file format setting
will be highlighted above the key. The initial factory
setting is "PDF MMR(G4)".
[RESOLUTION] key (page 23
Touch this key to change the resolution setting for
the original to be scanned. The selected resolution
setting will be highlighted above the key . The initial
factory setting is "300x300dpi" (E-MAIL/FTP
mode) or "STANDA RD" (IN TERNET-FAX mode).
[EXPOSURE] key (page 23
Touch this key to change the exposure setting for
the original to be scanned. The selected exposure
setting will be highlighted above the key . The initial
factory setting is "AUTO".
- 22)
)
)
)
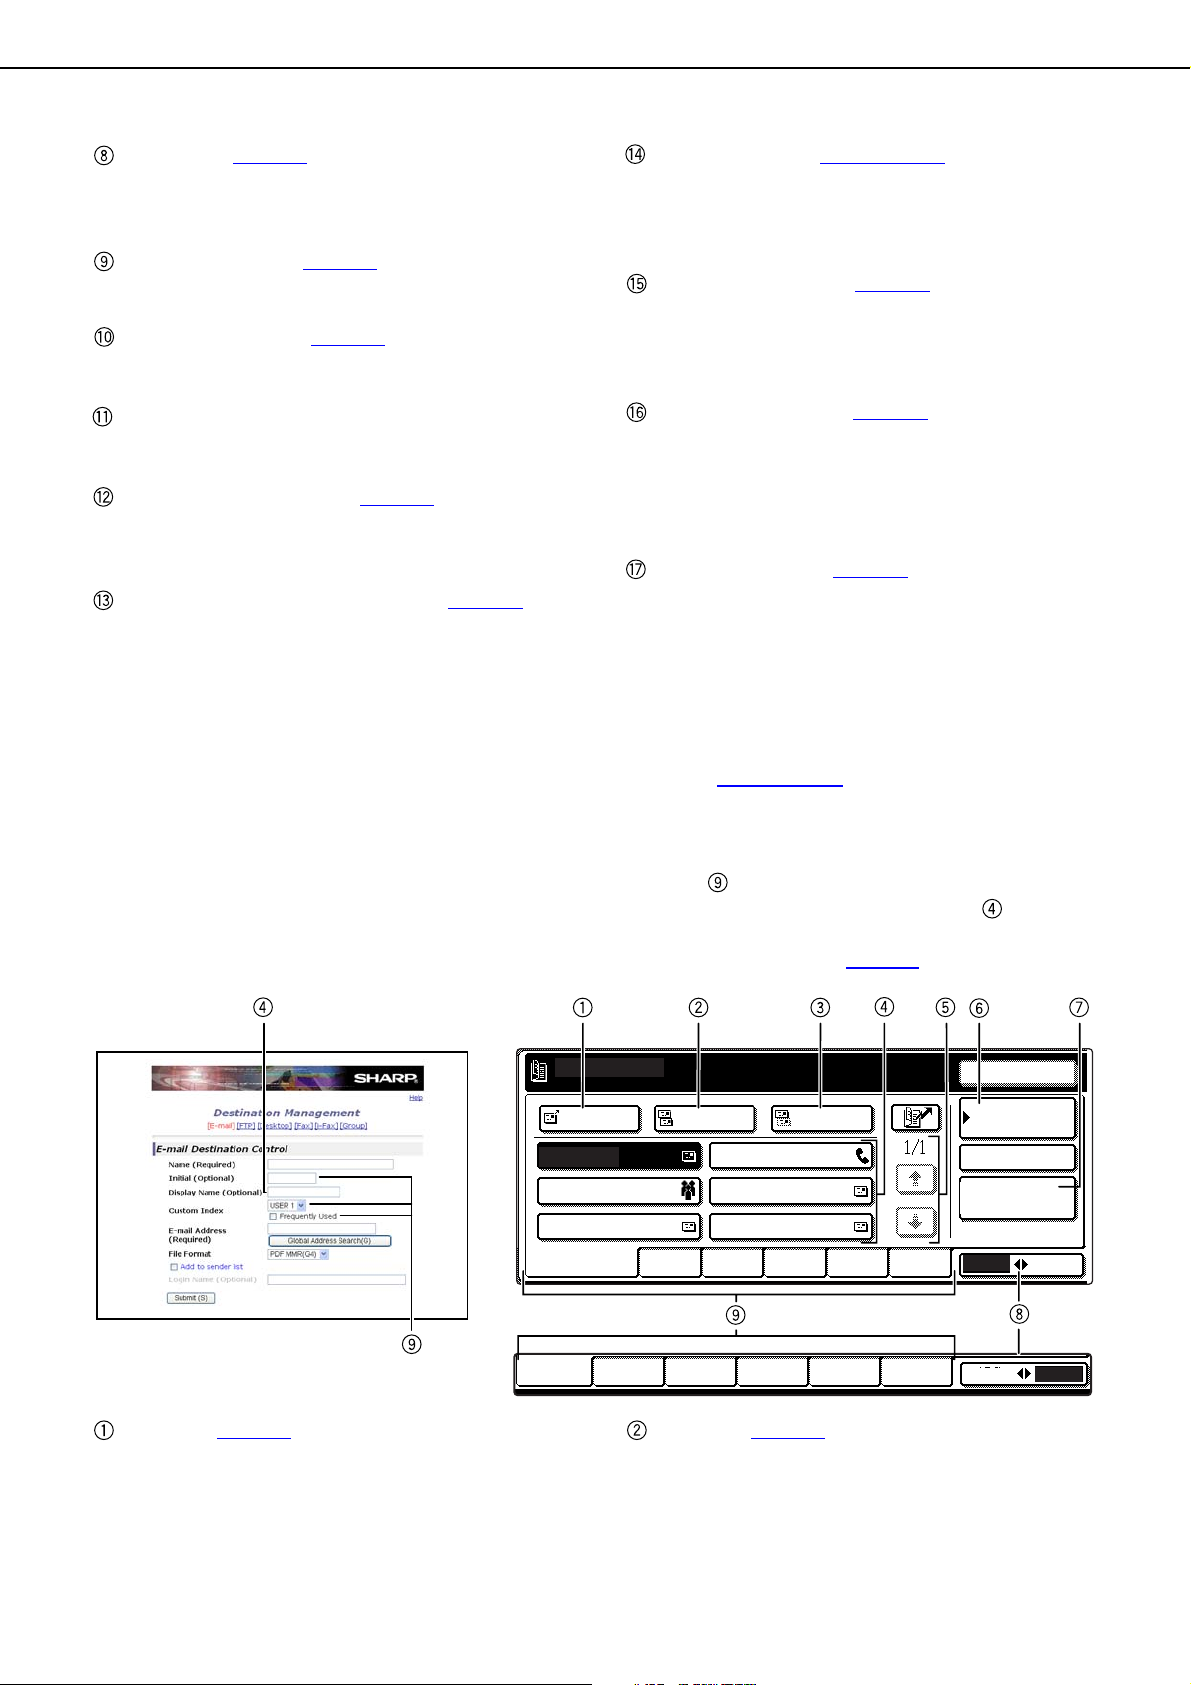
Address book screen
Touch the [ADDRESS BOOK] key in the Condition settings screen (previous page) to display the screen shown
below at right.
If you have set the initial screen to the address book screen using the key operator program, the initia l screen
will appear as follows.
Destinations stored using the Web page are grouped in indexes ( ) according to the letter entered in "Initial"
for each destination, and the name entere d in "Dis play Name" is displayed in the one-touch key ( ).
The screen shown below is the addres s bo o k scr ee n wit h a n alphabetical index. The address book screen can
be set with the group index as the initial screen (See "Default display settings" on page 55
TEST4
).
E-mail Destination Management page
[TO] key (page 14
After selecting a destination using a one-touch key
or the global address search function, touch this
key. For Scan to E-mail or Internet-Fax
transmission, you can select multiple destinations
before touching this key.
)
10
[CC] key (page 14
If you wish to a send "CC" ("Carbon Copy") of a
Scan to E-mail transmission to other recipients in
addition to the main recipient, after selecting
destinations using one-touch keys or the global
address search function, touch this key. You can
)
Page 12
CONDITION SETTINGS SCREEN OF SCANNER MODE
select multiple destinations before touching this
key.
[BCC] key (page 14
This key is displayed only if “ENABLE BCC” of the
key operator program, "BCC Setting", is set.
If you wish to send a "BCC" ("Blind Carbon Copy")
of a Scan to E-mail transmission to other recipie nts
in addition to the main recipient, after selecting
destinations using one-touch keys or the global
address search function, touch this key. Other
recipients will not be informed that a copy was sent
to the "BCC" recipients. You can select multiple
destinations before touching this key.
One-touch key display
This shows the one-touch keys that have been
stored on the selected "index card". The key type is
indicated by the icon at the right.
: Scan to E-mail
: Scan to FTP
: Scan to Desktop
: Internet-Fax
: Fax
An optional facsimile expansion kit is
required.
: Multiple destinations including Scan to E-mail
and Fax destinations
This can be changed to 6 or 9 using the key
operator program, "The number of direct address/
sender keys displayed setting" (page 55
Display switching keys
In cases where the one-touch keys cannot all be
displayed on one screen, this shows how many
screens are left. Touch the " " " " keys to
move through the screens.
[CONDITION SETTINGS] key
This displays the Condition settings screen (page
9), which is used to set various conditions.
)
).
[GLOBAL ADDRESS SEARCH] key (page 17
This feature makes it possible to search for an email address in an Internet or intranet directory
database.
To use this function, the IP address (or network
name) of the LDAP server must be set, as well as
an account name and password. These settings
are configured by accessing the Web ser ver in the
machine from a computer. Click "LDAP" in the W eb
page menu frame to display the LDAP Setup
screen.
[ABC GROUP] key
Touch this key to switch between the alphabetical
index and the group index.
Index keys
One-touch key destinations are stored on each of
these index cards (alphabetical index or group
index). Touch an index key to display the card.
Each time you touch the same index key , the order
of display of one-touch keys changes as follows:
Order of registration Alphabetical order
Reverse alphabetical order. In the case of the
alphabetical order, is displayed on the index
key. In the case of the reverse alphabetical order,
is displayed. In the case of order of registration,
no icon is displayed.
Group indexes make it possible to store one-touch
keys by group with an assigned name for easy
reference. This is done with the custom settings
(refer to page 8
destinations can be stored on the FREQUENT
USE card for convenient access.
NOTE
If desired, you can use the key operat or program,
"Default display settings" (page 55
default screen to the group address directory.
). Frequently used one-touch key
), to set the
)
11
Page 13
SENDING AN IMAGE
ORIGINAL
300x300dpi
RESOLUTION
PDF MMR(G4)
FILE FORMAT
ORIGINAL
300x300dpi
RESOLUTION
PDF MMR(G4)
FILE FORMAT
EXPOSURE
AUTO A4
300x300dpi
RESOLUTION
PDF MMR(G4)
FILE FORMAT
AUTO
EXPOSURE
ORIGINAL
300x300dpi
RESOLUTION
PDF MMR(G4)
FILE FORMAT
EXPOSURE
AUTO A4
ADDRESS ENTRY
SEND SETTINGS
BASIC TRANSMISSION METHOD
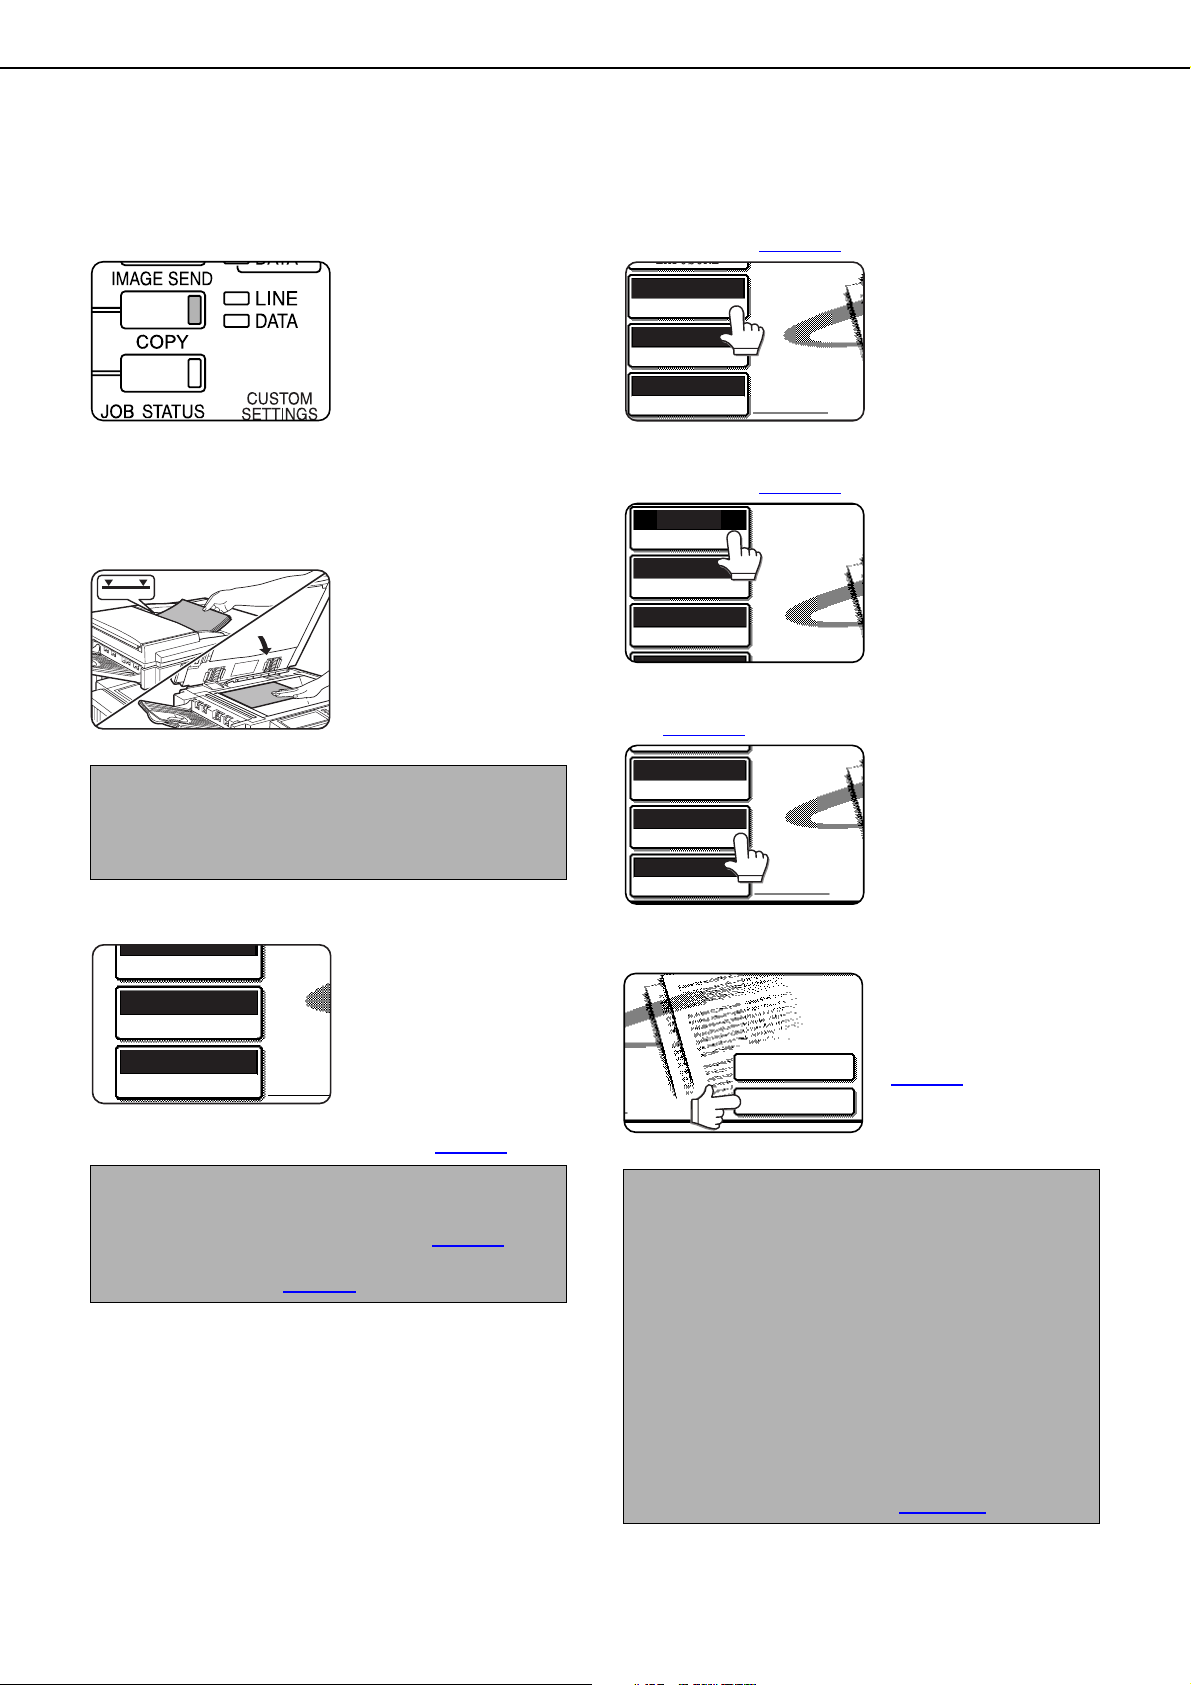
Make sure the machine is in scanner
1
mode.
When the [IMAGE
SEND] key light is on,
the machine is in
scanner mode. If the
light is not on, press the
[IMAGE SEND] key.
Depending on the
feature to be used, touch
the [MODE SWITCH] key to select the E-MAIL/
FTP mode or the INTERNET-FAX mode.
Load the original.
2
For detailed information
on loading an original,
refer to page 4-3 of
"Operation manual (for
general information and
copier operation)".
NOTE
You cannot load documents in both the automatic
document feeder and on the document glass and
send them in a single transmission.
If needed, adjust the resolution setting.
4
(Refer to page 23
If needed, adjust the exposure setting.
5
(Refer to page 23
If needed, select the file format. (Refer to
6
page 24
.)
.)
The initial factory setting
is “300x300dpi” (EMAIL/FTP mode) or
"STANDARD" (InternetFax mode).
.)
The initial factory setting
is "AUTO".
The initial factory setting
is "PDF MMR(G4)".
Check the original size.
3
AUTO A4
NOTES
To scan a two-sided original (if a B/W scanner
module/DSPF is installed), refer to page 19
To rotate the document image 90° before
transmission, see page 20
The original size is
automatically detected.
If you loaded a non-
standard size document
or wish to change the
scanning size, touch the
[ORIGINAL] key and set
the document size.
(Refer to page 20
.
.)
.
12
Touch the [SEND SETTINGS] key.
7
This step is not
necessary for Scan to
FTP or Scan to Desktop.
Go directly to step 18
(page 14
NOTES
You can skip the send settings (Proceed to step
18). If you skip these settings, the subject and the
file name that were set on the Web page and the
sender name that was set with the key operator
program (if the name is not registered, the defaul t
is the administrator name for the Web page) will
automatically be used for transmission.
Subjects, file names, and senders are stored
using the Web page. Up to 30 subjects and file
names, and up to 999 senders can be store d. You
can input the subject and the file name directly
using the procedure on the next page
).
.
Page 14

SENDING AN IMAGE
SUBJECT
SENDER NAME
SEND SETTINGS
FILE NAME
PRE-SET
No.01 Sub:schedule coordinati
No.02 Monthly schedule
No.03 Sub:Minutes of planning
RESEND
CANCEL
OK
1/5
DIRECT ENTRY
SUBJECT
Sub:schedu
SENDER NAME
SEND SETTINGS
FILE NAME
PRE-SET
No.01 Material for planning
No.02 Minutes of regular brie
No.03 Overtime management lis
OK
1/5
RESEND
CANCEL
SUBJECT
Sub:schedu
Material
SENDER NAME
SEND SETTINGS
FILE NAME
ALL SENDER
test1
test2
test3
test4
test5
test6
SENDER NAME
ABCD EFGHI JKLMN
Touch the [SUBJECT] key.
8
The subject selection
screen appears. The list
of subjects that were
registered on the Web
page is displayed.
For Scan to FTP and
Scan to Desktop, the
subject cannot be set.
Proceed to step 11.
Select the desired subject or input the
9
subject.
To select among the
displayed subjects,
touch the desired
subject. The selected
subject will become
highlighted. If you made
a mistake, touch the
correct key. The
highlighting will move to the new key.
To enter the subject directly, touch the [DIRECT
ENTRY] key and enter the subject.
The selected or entered subject will be the subject
of the e-mail.
Touch the [OK] key.
10
correct key. The highlighting will move to the new
key.
To enter the file name directly, touch the [DIRECT
ENTRY] key and enter the file name.
The selected or entered file name will be the name
of the file attached to the e-mail.
NOTE
If you select "SPECIFIED PAGES PER FILE" for
Scan to E-mail, the specified file name will be applied
to multiple files but serial numbers (such as 001) will
be added automatically.
Touch the [OK] key.
13
Touch the [SENDER NAME] key.
14
The sender name
selection screen
appears. The list of
sender names that were
registered on the Web
page is displayed.
Touch the [FILE NAME] key.
11
Select the desired file name or input the file
12
name.
The file name selection
screen appears. The list
of file names that were
registered on the Web
page is displayed.
To select among the
displayed file names,
touch the desired file
name. The selected file
name will become
highlighted. If you made
a mistake, touch the
13
NOTE
For Scan to FTP, Scan to Desktop, and Internet-Fax
transmission, the sender name cannot be set.
Proceed to step 17
Touch the desired sender name.
15
name directly, touch the [ADDRESS ENTRY] key
and then enter the e-mail address.
To enter the result of global address search, touch
the [GLOBAL ADDRESS SEARCH] key for
address search.
The selected sender will be the sender of the email.
.
The selected sender
name is highlighted. If
you made a mistake,
touch the correct key.
The highlighting will
move to the new key.
To enter the sender
Page 15

Touch the [OK] key.
CANCEL
ADDRESS ENTRY
OK
RESEND
1/1
OK
ADDRESS BOOK
E-MAIL/FTP
SPECIAL MODES
ADDRESS REVIEW
RESEND
MODE SWITCH
TO
FREQUENT USE ABCD EFGHI JKLMN OPQR
CC
BCC
TEST5
TEST6
TEST4
TEST3
TEST1 TEST2
READY TO SEND.
TO
FREQUENT USE ABCD EFGHI JKLMN OPQRS
CC
BCC
TEST5 TEST6
TEST3
TEST1 TEST2
READY TO SEND.
TEST4
ADDRESS BOOK
AIL/FTP
SPECIAL MODES
ADDRESS REVIEW
FILE
SPECIAL MODES
ADDRESS REVIEW
FILE
ADDRESS ENTRY
MODE SWITCH
QUICK FILE
SEND SETTINGS
16
NOTE
To send to the selected sender as CC, touch the
checkbox of [ADD THE SENDER TO CC] to display
a checkmark.
Touch the [OK] key.
17
Touch the [ADDRESS BOOK] key.
18
The address book
screen appears.
SENDING AN IMAGE
NOTES
Refer to pages 5
programming one-touch key destinations.
When touching a one-touch key, corresponding
information from the email destination screen is
shown in the message display. Up to 35
characters can be displayed in the message
screen, regardless of the number of characters
that have been entered.
For destination entry, in addition to the one-touch
keys in the address book screen, the manual
address entry , the Quick key or the global addre ss
search can be used. For Scan to E-mail and
Internet-Fax transmission, multiple destinations
can be specified for a broadcast transmission
(page 16
Set special functions as needed.
21
(page 33
).
) by touching the [SPECIAL MODES] key.
to 6 for information on
You can set the Erase
function (page 25
page scan function
(page 26
function (page 27
(page 28
(page 29
(page 31
), Card shot
), Job build
), and Program
), Dual
), Timer
), 2 in 1
Touch the one-touch key for the desired
19
destination.
The key you touched is
highlighted. If you touch
the wrong key , touch the
key again to cancel the
selection. The key
display will return to
normal.
Touch the [TO] key.
20
For Scan to E-mail, you
can send the "CC" or
"BCC" copies. Touch the
desired destinations and
then touch the [CC] key
or [BCC] key . "BCC" can
be set only if “ENABLE
BCC” of the key operator program, "BCC Setting",
is set. (page 56
)
If desired, touch the [FILE] key or the
22
[QUICK FILE] key.
These keys are used to
store the scanned image
in the machine's hard
disk. The stored image
can be printed or
transmitted again at a
later time.
For information on this
function, see "Document filing functions" in
chapter 7 of the Operation Manual (for general
information and copier operation).
If the [FILE] key is grayed out, only the [QUICK
FILE] key can be selected.
When you touch the [QUICK FILE] key , a message
asking you to confirm the save will appear. Touch
the [OK] key in the message screen and go to the
next step.
If you wish to cancel the save, touch the [QUICK
FILE] key after touching the [OK] key so that the
[QUICK FILE] key is no longer highlighted.
14
Page 16
SENDING AN IMAGE
READ-END
PRESS [READ-END].
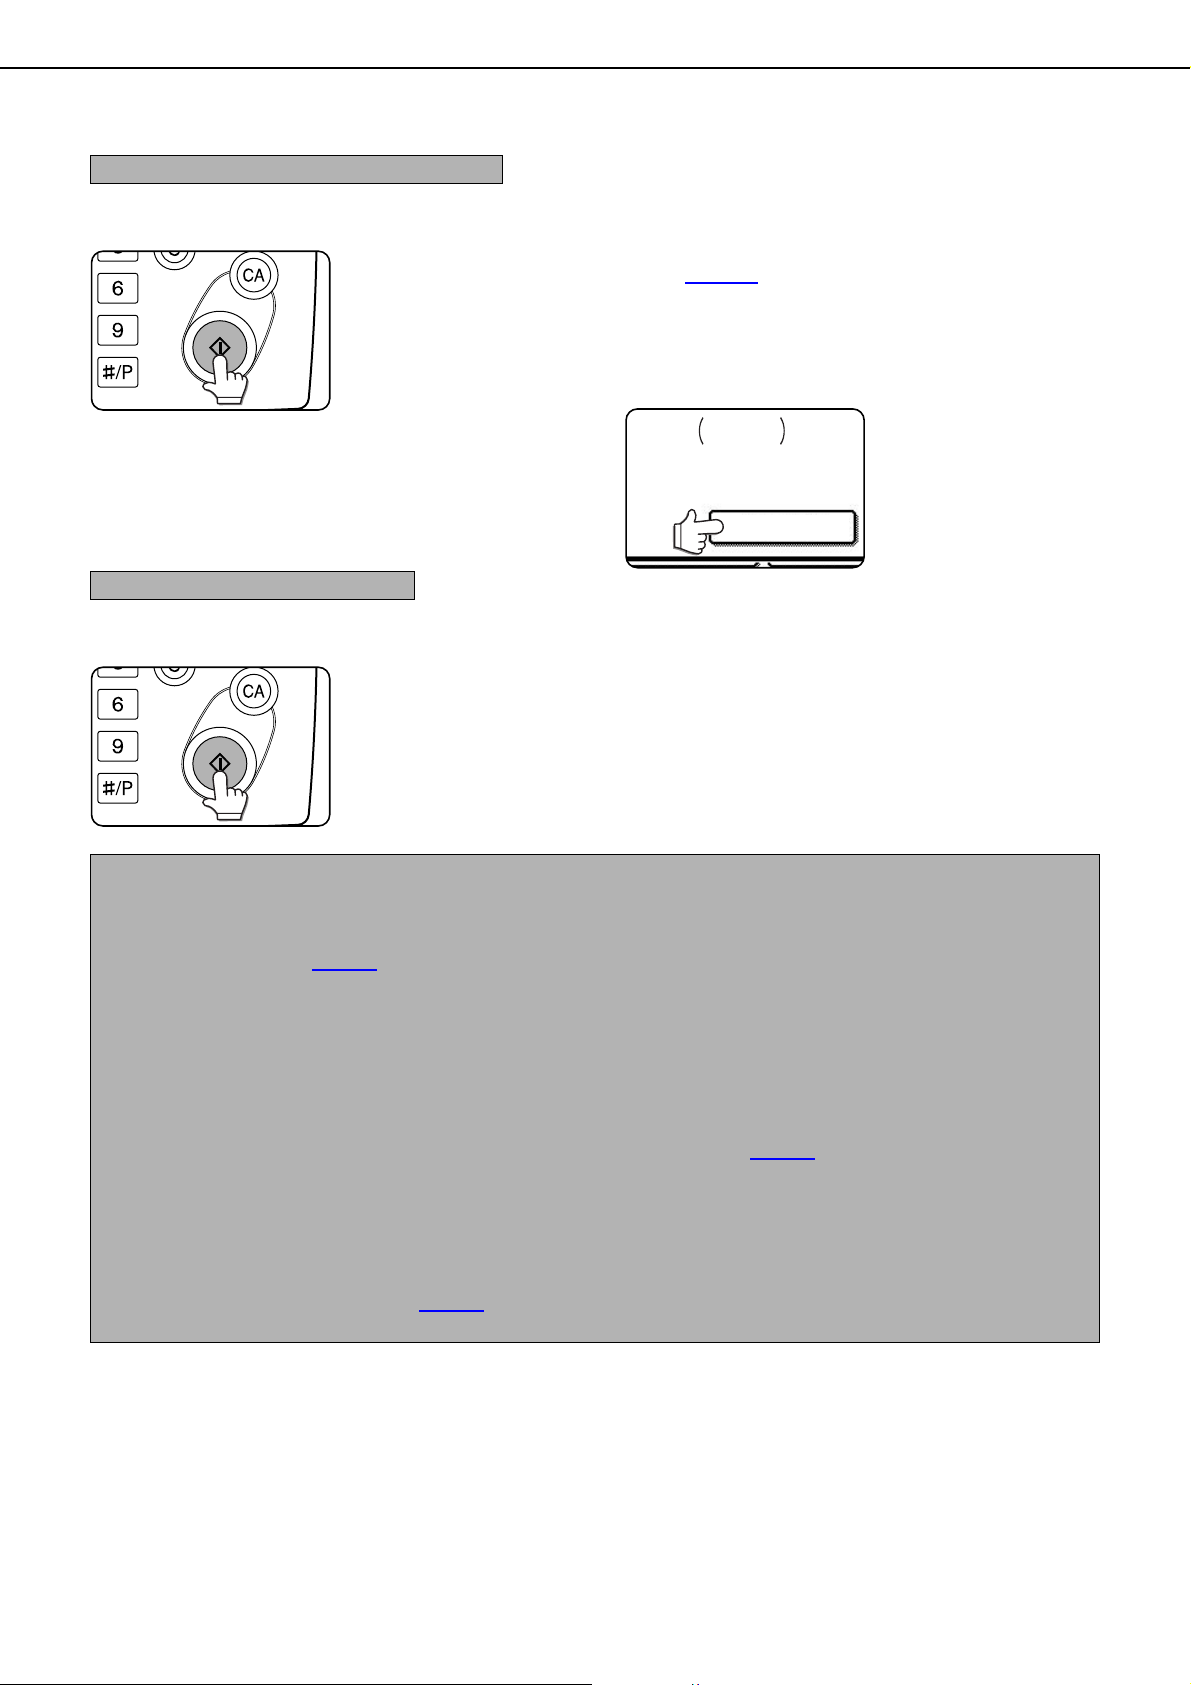
Using the automatic document feeder
Press the [START] key.
23
Scanning begins and the
transmission job is stored.
(The job is transmitted
after previously stored
transmission jobs have
been completed.)
If scanning is completed
normally, the machine
makes a beep sound to inform you that the
transmission job is stored and the [JOB STORED]
appears in the message display.
Using the document glass
Press the [START] key.
23
The original is scanned
and the [READ-END]
key appears.
If you have another page to scan, change
24
pages and then press the [START] key.
Repeat this sequence until all pages have been
scanned. You can change the resolution and
exposure settings as needed for each page (refer
to page 23
If no action is taken for one minute, scanning
automatically ends and the transmission job is stored.
After the final page is scanned, touch the
25
[READ-END] key.
(The destination is automatically called and the
document transmitted after previously stored jobs
are completed.) Open the document glass cover
and remove the document.
).
The machine makes a
beep sound to inform
you that the
transmission job is
stored and the [JOB
STORED] appears in
the message display.
NOTES
Cancelling transmission
T o cancel transmission while the [SCANNING ORIGINAL...] appears in the display or before the [READ-END] key is touched,
press the [C] key or the [CA] key. T o cancel a transmission job that is already stored, press the [JOB ST A TUS] key and cancel
the job as explained on page 35
Important points when using Scan to E-mail
Be very careful not to send image data files that are too large. Your mail server's system administrator may have placed a
limit on the amount of data that can be sent in one e-mail transmission. If this limit is exceeded, the e-mail will not be delivered
to the recipient. Even if there is no limit and your e-mail is successfully delivered, a large data file may take a long time to
be received and place a heavy burden on the recipient's network, depending on the recipient's network (Internet) connection
environment. If large image data files are repeatedly sent, the resulting burden on the network may slow down the speed of
other, unrelated data transmissions and in some cases, may even cause the mail server or network to go down. In cases
where you need to send multiple documents, try such measures as lowering the resolution mode.
You can use the key operator program, "Maximum size of e-mail attachments" (page 56
files sent by Scan to E-mail.
If the power is turned off or a power failure occurs while a document is being scanned in the automatic document feeder, the
machine will stop and a document misfeed will occur. After the power is restored, remove the document as explained on page
2-25 of "Operation manual (for general information and copier operation)".
A job number appears in the display with "JOB STORED." when a transmission job is stored. If you make a note of this
number, you can use the number to easily locate the job when checking the results of the transmission in the job status
screen for a broadcast transmission (page 18
jobs.
.
), to set a limit for the size of image
), or in the transaction report or activity report for other types of transmission
15
Page 17

SENDING AN IMAGE
ADDRESS
E-MAIL/FTP
SPECIAL
ADDRESS R
FILE
ADDRESS ENTRY
MODE SWITCH
QUICK F
SEND SETTINGS
k
l
@
i
o
p
_
CANCEL
OK
CONDITION
SETTINGS
NEXT ADDRESS
DESTINATION INPUT METHODS
In the section of "BASIC TRANSMISSION METHOD", a destination is specified with a one-touch key (step s 18 to 20).
This machine, however, provides the following destination input methods.
Manual entry: Enter the e-mail address directly. (only for Scan to E-mail and Internet-Fax transmission)
You can also enter multiple addresses for a broadcast transmission.
Destination address manual entry
(Quick) key: After touching the key, enter the three-digit number that was assigned when the address
was registered.
Global address search: Search for an e-mail address in an Internet or intranet directory database.
Touch the [ADDRESS ENTRY] key.
1
In the Internet-Fax mode, a screen for requesting
a reception report is displayed in place of the
destination type selection screen. Touch the [NO]
or [YES] key . You will return to the initial screen.
NOTE
"BCC" can be set only if “ENABLE BCC” of the key
operator program, "BCC Setting", is set. (page 56
)
Enter the e-mail address.
2
E-MAIL ADDRESS
ppd1@abcd.co
w
q
a
z
FILE FORMAT
e
s
d
c
x
r t y
f g h
v
b n m
SPACE
u
j
i
k
-
CANCEL
o
l
.
12#$
OK
p
@
ABC
If you make a mistake, touch the key to move
the cursor (
) back to the mistake and then enter
the correct character.
Touch the [OK] key.
3
The destination
selection screen will
appear.
Select where you put the destination.
4
_
abc
If you wish to enter another e-mail
5
address, repeat steps 1 through 4.
For Scan to FTP and Scan to Desktop, a
broadcast transmission cannot be performed.
NOTES
If the key operator
program has been
set so that the
[NEXT ADDRESS]
key must always
be touched (page
55) and you wish to
enter another address, touch the [NEXT
ADDRESS] key.
If you frequently use broadcasting to send
documents to the same group o f destinations, it is
convenient to program those destinations into a
group key. (page 6
)
SELECT ADDRESSEE TYPE.
TO CC BCC
Normally touch the [TO] key. However, if you are
performing a broadcast transmission and wish to
"CC" or "BCC" the document to the entered e-mail
address, touch the [CC] or [BCC] key.
After touching one of the keys, you will return to
the initial screen.
16
Page 18

SENDING AN IMAGE
E-MAIL/FTP
MODE SWITCH
ABC GROUP
GLOBAL
ADDRESS SEARCH
SETTINGS
ADDRESS REVIEW
1/2
CANCEL
OK
k
l
@
i
o
p
_
CANCEL SEARCH
Address entry with (Quick) key
Touch the key.
1
Enter the three-digit assigned number.
2
When a three-digit
number is entered, the
relevant address will be
set as a destination
address. Leading zeros
(such as 00 in 001) can
be omitted. In this case,
when you touch the
[NEXT ADDRESS] or key, the address will be
set.
If you make a mistake, press the [C] key to clear
the entered number.
Touch the desired LDAP server key.
2
SERVER CHANGE
Document division 1
Document division 2
A1210 project team
Software development centre
CANCEL
OK
1/2
To search the highlighted server, proceed to step
3.
Touch the [OK] key.
3
Enter a keyword for search.
4
GLOBAL ADDRESS SEARCH
CANCEL SEARCH
If you wish to enter another address,
3
repeat steps 1 through 2.
For Scan to FTP and Scan to Desktop, a
broadcast transmission cannot be performed.
Destination address entry with
global address search
Touch the [GLOBAL ADDRESS SEARCH]
1
key.
The server change
screen is displayed. If
only one LDAP server
has been set, the global
address search screen
is displayed. Proceed to
step 4.
w
q
s
a
x
z
Touch the [SEARCH] key.
5
TO
tanaka
tanaka a
tanaka b
tanaka c
r t y
e
f g h
d
v
c
b n m
SPACE
CC
tanaka.a@sbc.corpora
tanaka.b@sbc.corpora
tanaka.c@sbc.corpora
u
j
i
k
-
AB/ab
o
l
.
12#$
p
@
_
abc
ABC
ÀÄÂ/àäâ
The search results
appear as destination
keys.
CONDITION
DETAIL
SETTINGS
ADDRESS REVIEW
SEARCH AGAIN
ADDRESS BOOK
If matching addresses are not found, a message
indicating the result is displayed. In this case,
touch the [OK] key and touch the [SEARCH
AGAIN] key to return to step 4.
17
Page 19
SENDING AN IMAGE
tanaka
tanaka a
tana
tana
tanaka b
tanaka c
tana
CC
TO
tanaka
tanaka a
tana
tana
tanaka b
CONDITION
SETTINGS
ADDRESS REVIEW
DETAIL
SEARCH AGAIN
ADDRESS BOOK
E-MAIL/FTP
SPECIAL MODES
ADDRESS REVIEW
FILE
ADDRESS ENTRY
MODE SWITCH
QUICK FILE
SEND SETTINGS
Touch the desired destination key.
6
To display the remaining
destinations, touch the
[] key.
For detailed information
on the selected
destination, touch the
[DETAIL] key. You can
also register the
destination to the address book by touching the
[REGISTER] key.
Select the destination type.
7
Normally touch the [TO]
key. However, if you are
performing a broadcast
transmission and wish to
"CC" or "BCC" the
document to the entered
address, touch the [CC]
or [BCC] key.
NOTE
"BCC" can be set only if “ENABLE BCC” of the key
operator program, "BCC Setting", is set. (page 56
Touch the [OK] key to return to the initial screen.
NOTE
When you perform a broadcast transmission, the
compression mode set with the key operator
program, "Compression mode at broadcasting"
(page 56
all destinations.The default setting is "MMR (G4)".
), is used as the file compression mode for
Checking a broadcast transmission
job result and retransmitting an
error job
The results of a broadcast transmission can be
viewed in the following screen, which is opened by
touching the [BROADCAST XXXX] key (where
"XXXX" is the number of the job; see "NOTES" on
page 15
[DETAIL] key.
DETAIL OF
BROADCAST XXXX
002
010
)
) in the finished job screen and then the
ADDRESS
HQ ADMIN. DEPT.
SENDAI BRANCH
FILE
START TIME
10:01 11/01
STATUS
NG000000
NG00000010:10 11/01
FAILED ALL DESTINATIONS
RETRY
OK
1/ 1
8
9
Address review for broadcast
1
If you wish to enter another address,
repeat steps 6 and 7.
For Scan to FTP and Scan to Desktop, multiple
destinations cannot be specified.
Touch the [CONDITION SETTINGS] key.
You will return to the
condition setting screen.
transmission
Touch the [ADDRESS REVIEW] key and
check the destinations.
When the [ADDRESS
REVIEW] key is touched,
only the entered
destinations are displayed.
You can also displa y the
CC and BCC
If you need to clear a destination, touch its key.
destinations by touching
the relevant keys.
ABC
A [FILE] tab
This tab is displayed only if the job is stored with the
filing function. If the job is stored, you can
retransmit the same images without scanning the
originals. To retransmit, switch the screen to the
[FAILED] tab or the [ALL DESTINATIONS] tab.
B[FAILED] tab
Among selected destinations for a broadcast
transmission, the destination name, star t time, and
transmission status for error transmission are
displayed. You can perform retransmission for the
destinations for which a transmission error
occurred by touching the [RETRY] key.
C [ALL DESTINATIONS] tab
The destination name, start time, and transmission
status for all selected destinations for a broadcast
transmission are displayed. You can perform
retransmission for all the destinations by touching
the [RETRY] key.
18
Page 20
SENDING AN IMAGE
ORIGINAL
300x300dpi
RESOLUTION
PDF MMR(G4)
FILE FORMAT
AUTO A4
100%
AUTO
2-SIDED
BOOKLET
2-SIDED
TABLET
SCAN SIZE SEND SIZE
AUTO
RESEND
OK
ORIGINAL
300x300dpi
RESOLUTION
PDF MMR(G4)
FILE FORMAT
AUTO A4
B
T
SCANNING AND TRANSMITTING A TWO-SIDED ORIGINAL (when using B/W scanner module/DSPF)
If a B/W scanner module/DSPF is installed, a two-sided original can be automatically scanned and transmitted using
the automatic document feeder. Follow the steps below.
Make sure the machine is in scanner mode
1
and then load the document in the
automatic document feeder.
Touch the [ORIGINAL] key.
2
When you touch the
[ORIGINAL] key, check
the original size
displayed in the key.
Touch the [2-SIDED BOOKLET] key or the
3
[2-SIDED TABLET] key as appropriate for
the original you loaded.
If necessary, touch the
[SCAN SIZE] key and
AUTO A4
set the original size.
(page 20
)
Touch the [OK] key.
4
You will return to the
initial screen.
A two-sided original icon appears next to the
[ORIGINAL] key.
(Example: The icon that appears when the [2SIDED BOOKLET] key is touched.)
Continue from step 4 of "BASIC
5
TRANSMISSION METHOD" (pages 12
to 15).
NOTES
Booklets and tablets
Two-sided originals that are bound at the side are booklets, and twosided originals that are bound at the top are tablets.
Two-sided scanning turns off after the document is stored in memory.
Pressing the [CA] key will also cancel two-sided scanning.
OOKLET TABLE
19
Page 21

SCANNING SETTINGS (ORIGINAL SIZE,
ORIGINAL
300x300dpi
RESOLUTION
PDF MMR(G4)
FILE FORMAT
AUTO A4
AUTO A4
100%
AUTO
2-SIDED
BOOKLET
2-SIDED
TABLET
SCAN SIZE SEND SIZE
B4
A3
A4
A4R
B5R
A5
A5R
B5
OK
INCH
LONG SIZE
STANDARD SIZE SIZE INPUT
AB
OK
INCH
LONG SIZE
STANDARD SIZE SIZE INPUT
AB
5 X8
8
X
14
8
X
13
11X17
2
1
8
X
11R
2
1
8 X11
2
1
2
1
212
1
5 X8 R
212
1
MANUAL
420
X
297
(64 432)
mm
(64 297)
mm
Y
AUTO
STANDARD SIZE
MANUAL
CUSTOM
SIZE
SIZE INPUT
B4
A3
A4
A4R
B5R
A5
A5R
B5
OK
INCH
LONG SIZE
STANDARD SIZE SIZE INPUT
AB
EXPOSURE, RESOLUTION, AND FILE FORMAT)
When sending an image, you can adjust the original size, exposure, resolution, and file format settings as needed.
MANUALLY SETTING THE SCANNING SIZE
If you load an original that is not a standard size (such as an AB size), or if you wish to change the scanning size,
touch the [ORIGINAL] key and set the original size manually.
Perform the following steps after loa ding the document in the automatic document feeder or on the document glass.
NOTE
Standard sizes that can be detected are as follows:
A3, B4, A4, A4R, B5, B5R, A5 (11"x17", 8-1/2"x14", 8-1/2"x11", 8-1/2"x11"R, 5-1/2"x8-1/2")
If a non-standard size original is loaded (including special sizes), the closest standard size may be displayed, or
the original size may not appear at all.
Touch the [ORIGINAL] key.
1
Touch the [SCAN SIZE] key.
2
The sizes that can be
selected are displayed.
*If a B/W scanner
module/SPF is installed,
the [2-SIDED] keys are
not displayed.
NOTE
If you wish to rotate the original 90° when creating an
image file, touch the "ROTATE THE IMAGE 90
DEGREES" checkbox (a checkmark should appear
in the box). (only in the E-MAIL/FTP mode)
If you wish to select an inch size, touch the
[INCH] key and then touch the desired
original size key.
[INCH] is highlighted
and inch size keys are
displayed.
To return to the AB
palette, touch the [AB]
key once again.
If you wish to select a custom size, touch
the [SIZE INPUT] key and enter the size of
the original
Touch the [X] key and
use the or keys
to set the length in the X
direction, and then touch
the [Y] key and do the
same for the Y direction.
The length can be within
the range 64 to 432 mm
(2-1/2" to 17") in the X direction and 64 to 297 mm
(2-1/2" to 11-5/8") in the Y direction, set in
increments of 1 mm (1/8").
Touch the desired original size key.
3
[AUTO] is no longer
highlighted. [MANUAL]
and the original size key
you touched are
highlighted.
When using the automatic document
feeder, a setting for originals longer than
432 mm (17") (800 mm (31-1/2”) at the
maximum) is available. In this case, touch
the [LONG SIZE] key.
20
Page 22

SCANNING SETTINGS (ORIGINAL SIZE, EXPOSURE, RESOLUTION, AND FILE FORMAT)
B4
A4
A4R
OK
INCH
AB
00%
AUTO
OK
2-SIDED
TABLET
SEND SIZE
ORIGINAL
300x300dpi
RESOLUTION
PDF MMR(G4)
FILE FORMAT
A4
ORIGINAL
300x300dpi
RESOLUTION
PDF MMR(G4)
FILE FORMAT
100%
SCAN SIZE
AUTO A4
2-SIDED
BOOKLET
2-S
TAB
CUSTOM
SIZE
STANDARD SI
MANUAL
B5R
B5
A5R
RECALL
STORE/DELETE
RECALL
STORE/DELETE
Touch the [OK] key.
4
Touch the [OK] key.
5
The specified original
size is displayed as the
scan size.
You will return to the
initial screen.
The selected size appears in the top half of
6
the [ORIGINAL] key.
NOTE
You can retur n to automatic detection by pressing
the [CA] key.
STORING, DELETING, AND USING ORIGINAL SIZES
Up to 9 special original sizes can be stored. Stored sizes can be easily called up and are not erased if the power is
turned off. Storing a frequently used original size saves you the trouble of manually setting the size each time you
fax that size of document.
To cancel an original size storing, using, or deleting operation, press the [CA] key or touch the [ORIGINAL] key on
the screen.
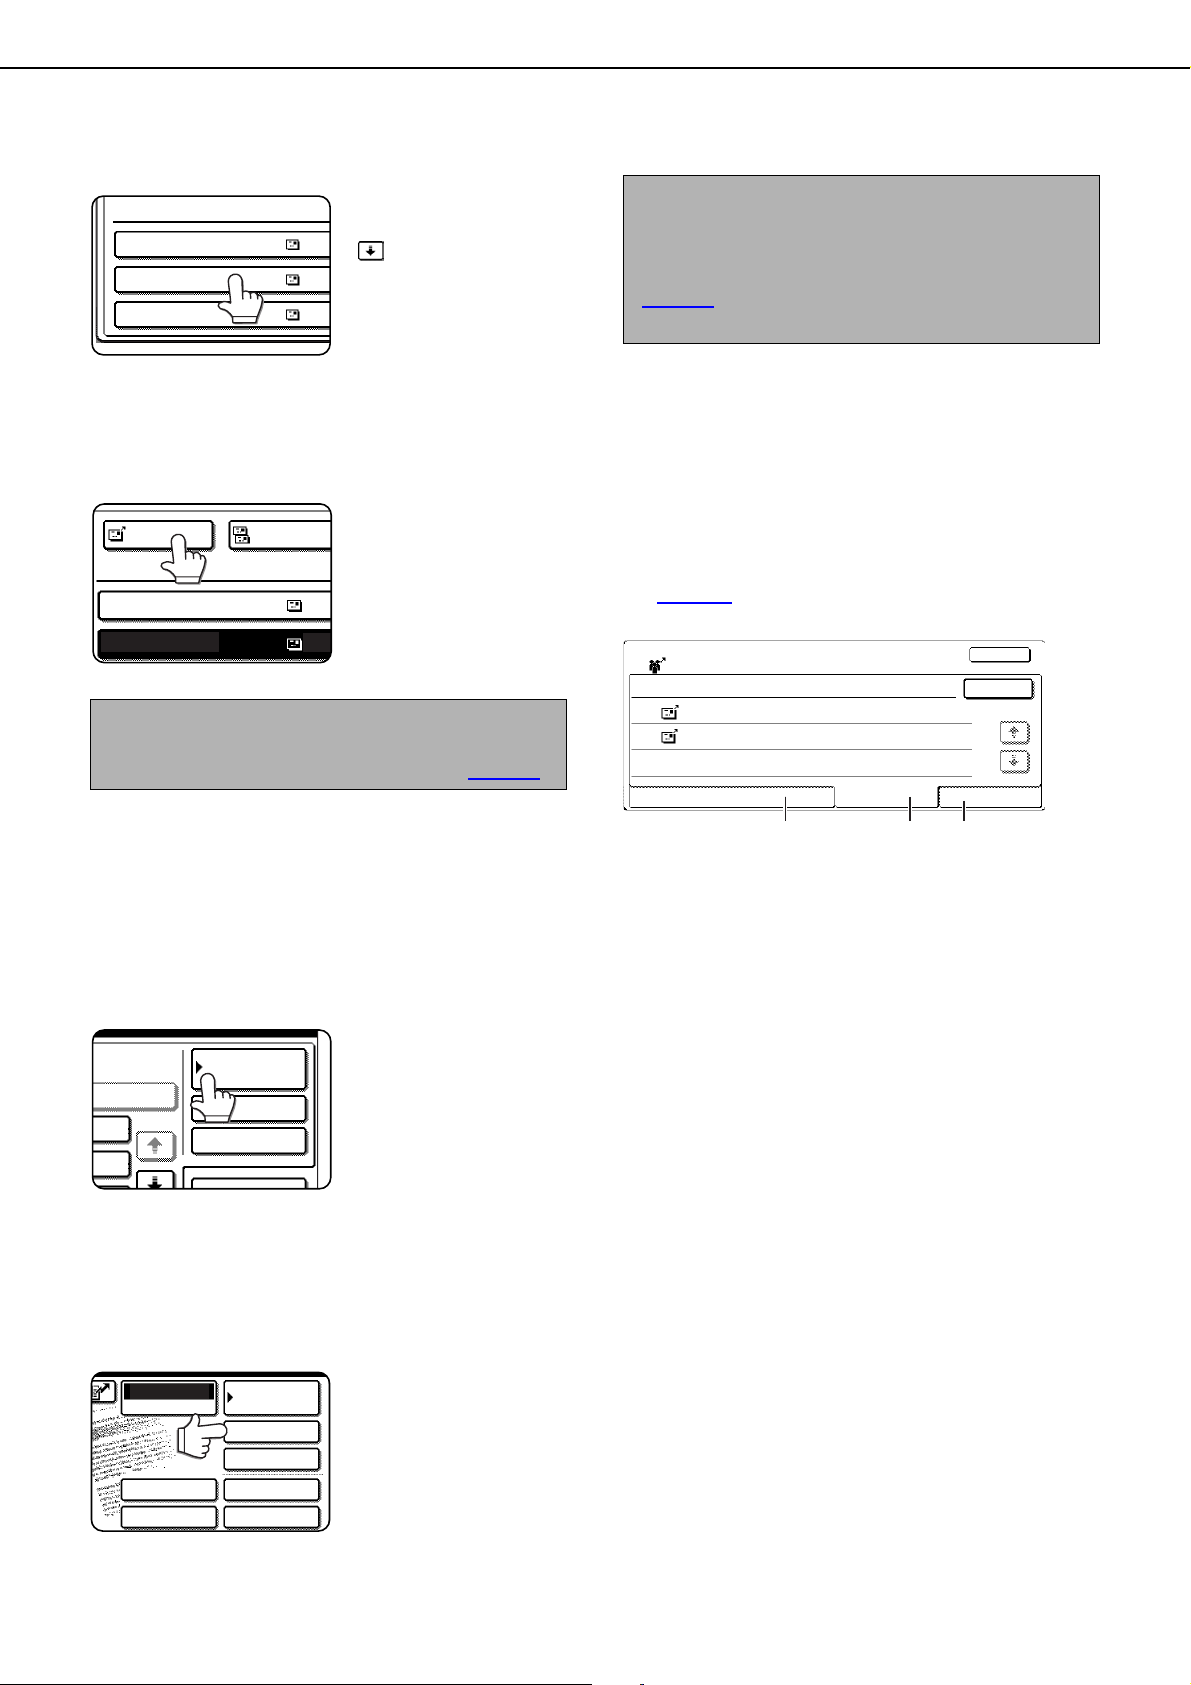
Storing or deleting an original size
1
2
3
Touch the [ORIGINAL] key.
AUTO A4
Touch the key under [SCAN SIZE].
*If a B/W scanner
module/SPF is installed,
the [2-SIDED] keys are
not displayed.
Touch the [CUSTOM SIZE] key.
21
Touch the [STORE/DELETE] key.
4
Touch the original size key ( ) that
5
you wish to store or delete.
X68 Y78
stored size, touch the key that shows the size that you
wish to delete or change.
If you are storing an original size, go to step 6.
If you are deleting an original size, go to step 8.
If you are changing an original size, go to step 8
and touch the [AMEND] key.
To store an original size,
touch a key that does not
show a size ( ).
Keys that already have an
original size stored will show
the stored size ( )
To delete or change a
X68 Y78
Page 23

SCANNING SETTINGS (ORIGINAL SIZE, EXPOSURE, RESOLUTION, AND FILE FORMAT)
CANCEL OK
420
297
(64 432)
mm
RECALL
Y
X
A
X
Y
STORE/DELETE
(64 297)
mm
RECALL
STORE/DELETE
ORIGINAL
300x300dpi
RESOLUTION
PDF MMR(G4)
FILE FORMAT
100%
AUTO
OK
2-SIDED
TABLET
SEND SIZE
B4
A3
A4
A4R
B5R
A5
A5R
B5
B4
A3
A4
A4R
OK
INCH
AB
A3
OK
SIZE
Enter the X (width) and Y (length) dimensions
6
of the original with the keys.
X (width) is initially
selected.
Enter X and then touch
the ( ) key to enter Y.
A width of 64 to 432 mm
(2-1/2" to 17") can be
entered in X, and a
length of 64 to 297 mm (2-1/2" to 11-5/8") can be
entered in Y.
Touch the outer [OK] key.
7
The original size entered in step 6 is st or ed in th e
key selected in step 5.
To exit, touch the [ORIGINAL] key.
When you touch a key that shows an
8
original size in step 5, a message screen
appears that contains the keys [CANCEL],
[DELETE], and [AMEND].
To cancel the procedure, touch the [CANCEL]
key.
To delete the selected original size, touch the
[DELETE] key.
To change the original size stored in the key,
touch the [AMEND] key. The screen of step 6
will appear to let you change the size.
To exit, touch the [ORIGINAL] key.
9
Using a stored original size
Follow steps 1 to 3 of "STORING OR
1
DELETING AN ORIGINAL SIZE".
Touch the original size key that you wish
2
to use.
1
1
/
/
X5 Y10
2
8
Touch the [OK] key.
3
The stored original size is called up.
ENLARGEMENT TRANSMISSION
If the original size for scanning is not a long size or a non-standard size, you can enlarge a transmission by specifying
the size that is to be sent.
1
2
3
Touch the [ORIGINAL] key.
AUTO A4
Touch the [SEND SIZE] key.
The sizes that can be
selected as the send
size are displayed.
*If a B/W scanner
module/SPF is installed,
the [2-SIDED] keys are
not displayed.
Touch the desired send size key.
If you wish to select an
inch size, touch the
[INCH] key and then
touch the desired send
size key.
22
Touch the [OK] key.
4
Touch the [OK] key.
5
The specified size is
displayed as the send
size.
You will return to the
initial screen.
Page 24

SCANNING SETTINGS (ORIGINAL SIZE, EXPOSURE, RESOLUTION, AND FILE FORMAT)
300x300dpi
RESOLUTION
PDF MMR(G4)
FILE FORMAT
AUTO
EXPOSURE
AUTO
MANUAL
O
1 3 5
AUTO
MANUAL
O
1 3 5
AUTO
MANUAL
OK
1 3 5
300x300dpi
RESOLUTION
PDF MMR(G4)
FILE FORMAT
AUTO
EXPOSURE
SELECTING THE EXPOSURE
Y ou can adjust the exposure manually to ma tch the type of original. After loading the original in scanner mode, follow
the steps below. The default setting for the exposure is "AUTO".
Change the exposure
Touch the [EXPOSURE] key.
1
Select [AUTO] or [MANUAL].
2
If you selected [AUTO],
the exposure will be
adjusted automatically.
If you selected
[MANUAL], touch the
or key to adjust
the exposure. (For
darker contrast, touch
the key. For lighter
contrast, touch the
key.)
Touch the [OK] key.
3
You will return to the
initial screen.
NOTES
The default value of exposure can be set using the
key operator program, "Default exposure settings"
(page 56
When using the automatic document feeder, the
exposure setting cannot be changed once
scanning has begun.
).
SELECTING THE RESOLUTION
The resolution for scanning an original can be selected. Load the original in scann er mode and then follow the steps
below. The default setting for the resolution is "300x300dpi" (E-MAIL/FT P mode) or "STANDARD" (Int ernet-Fax
mode).
Change the resolution
Touch the [RESOLUTION] key.
1
Touch the desired resolution key.
2
E-MAIL/FTP mode
READY TO SEND.
AUTO
EXPOSURE
RESOLUTION
PROGRAMMED
FILE FORMAT
AUTO
ORIGINAL
Four selections are available for the resolution.
T ouch the desired reso lution key depending on the
original to be scanned.
The selected key is highlighted.
200x200dpi
300x300dpi
400x400dpi
600x600dpi
HALF TONE
OK
23
Page 25

SCANNING SETTINGS (ORIGINAL SIZE, EXPOSURE, RESOLUTION, AND FILE FORMAT)
HALF TONE
OK
ORIGINAL
300x300dpi
RESOLUTION
PDF MMR(G4)
FILE FORMAT
EXPOSURE
AUTO A4
MH (G3
)
MMR (G4
)
NONE
(
1-99
)
OK
PER FILE
COMPRESSION MODE
For resolution other than [200x200dpi], the [HALF
TONE] key can be selected.
Internet-Fax mode
READY TO SEND.
AUTO
EXPOSURE
RESOLUTION
AUTO
ORIGINAL
STANDARD
FINE
SUPER FINE
ULTRA FINE
600x600dpi
200x100
200x200
200x400
400x400
600x600
(
dpi
OK
)
HALF TONE
Five selections are available for the resolution.
T ouch the desired resolution key dependin g on the
original to be scanned.
For resolutions other than [STANDARD], the
[HALF TONE] key can be selected.
SELECTING THE FILE FORMAT
Touch the [OK] key.
3
You will return to the
initial screen.
NOTES
The initial factory resolution setting is 300x300dpi
(E-MAIL/FTP mode) or Standard (Internet-Fax
mode). If desired, you can change the initial
setting to a different settin g using the key operato r
program, "Initial resolution setting" (page 55
).
When using the automatic document feeder, the
resolution setting cannot be changed once
scanning has begun.
When you send an image to one or more rec ipients using Sca n to E-m ail or Scan to FTP, the [FILE FORMAT] key
enables you to temporarily override the individual file format settings (FILE TYPE / COMPRESSION MODE) stored
for each recipient and send the image to all of the recipients using a single file format setting.
"PDF MMR (G4)" is initially selected.
1
2
READY TO SEND.
300x300dpi
RESOLUTION
FILE FORMAT
(a) When the "SPECIFIED PAGES PER FILE"
(b) Touch the or key to set the number of
Touch the [FILE FORMAT] key.
Select the file type and the compression
mode.
RESEND
AUTO
EXPOSURE
AUTO A4
ORIGINAL
FILE TYPE
TIFFPDF
PROGRAMMED
SPECIFIED PAGES PER FILE
COMPRESSION MODE
NONE
MMR (G4
(a) (b)
checkbox is not selected, all scanned pages
are combined into a single file. When the
checkbox is selected, one file is created per
page from pages specified with.
pages from which a file is created.
)
(
1-99
)
OK
MH (G3
)
24
Touch the [OK] key.
3
You will return to the
initial screen.
NOTES
The initial file format setting can be changed with
the key operator program "Initial file format
setting" (page 56
Even if you change the settings in the FILE
).
FORMAT setting screen, you can return to the
settings stored for each recipient by selecting
"PROGRAMMED" once again. The
[PROGRAMMED] key returns the file type to the
stored file format settings.
When you perform a broadcast transmission, the
compression mode selected in the key operator
program, "
(page 56
Compression mode at broadcasting"
)
, has precedence over the others.
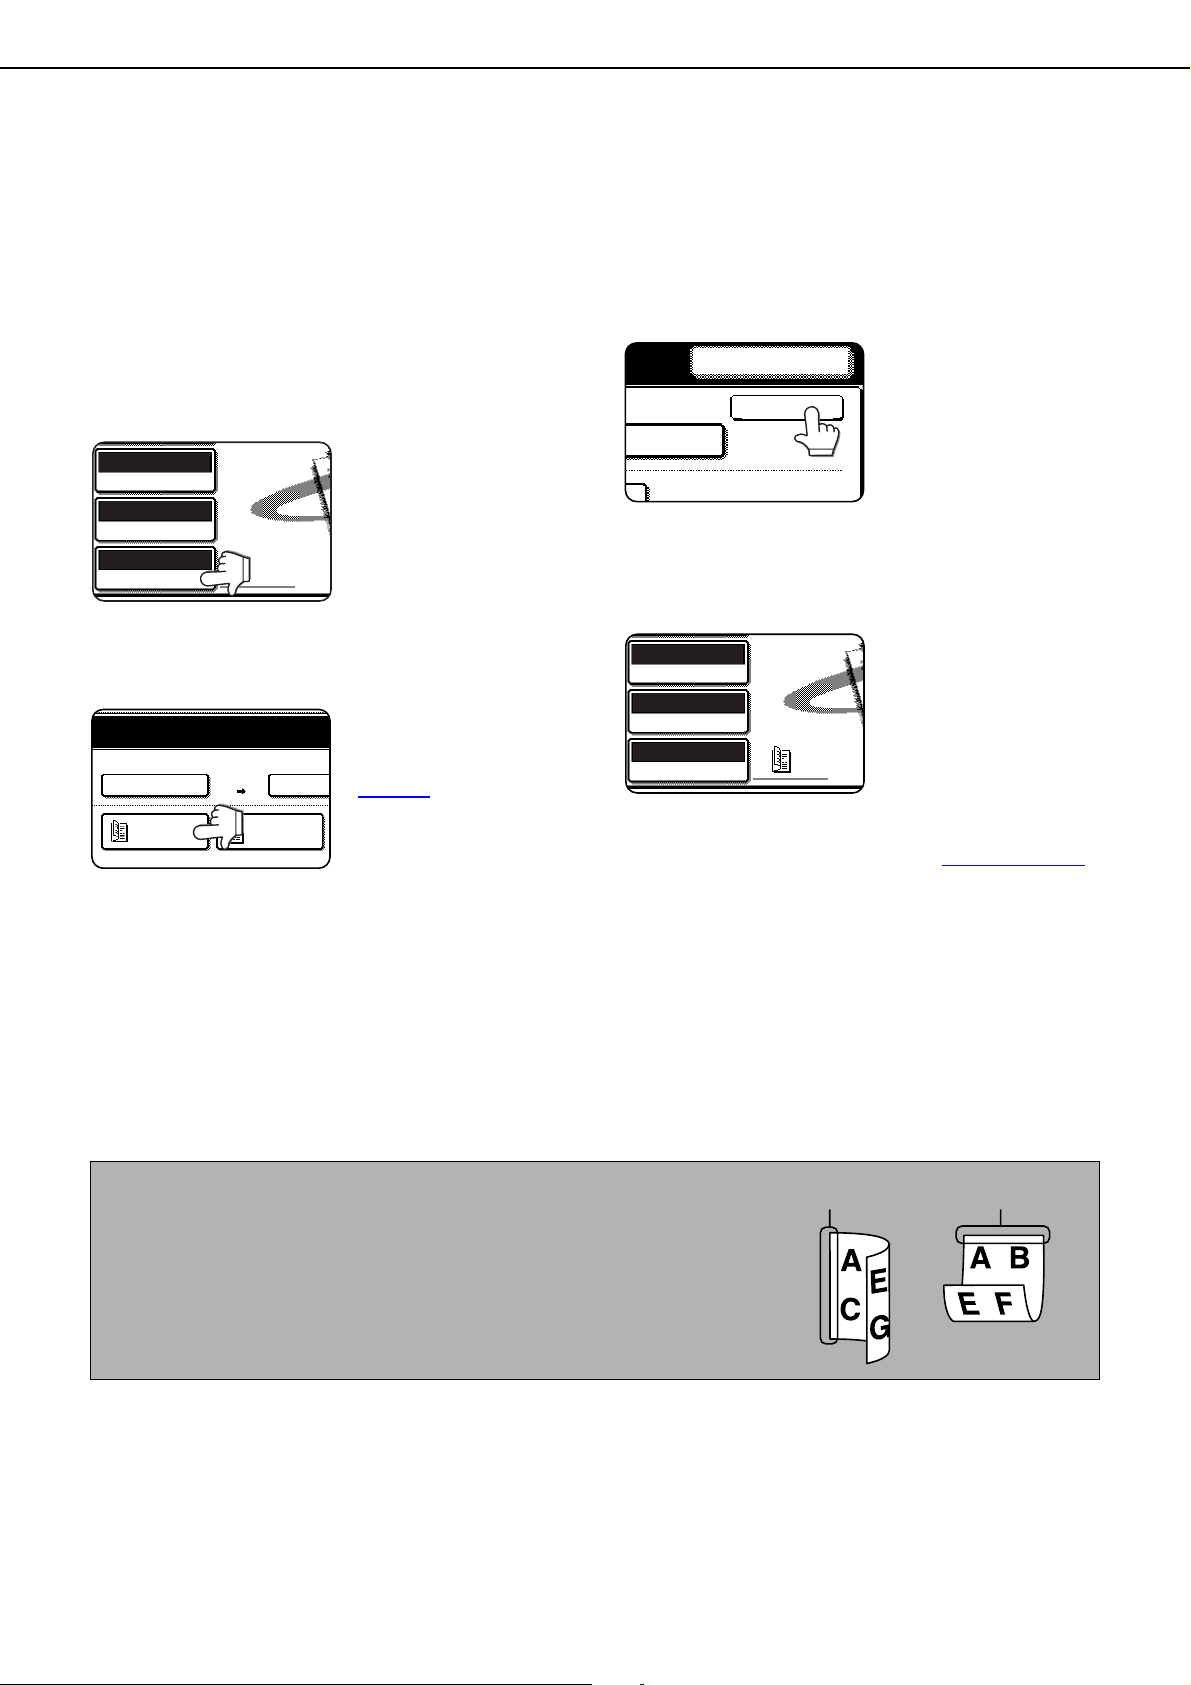
Page 26

SPECIAL FUNCTIONS
SPECIAL MODES
ADDRESS REVIEW
FILE
ENTRY
ERASE
2in1
EDGE
ERASE
ERASE
CENTRE
ERASE
EDGE+CENTRE
ERASE
(0 20)
mm
OK
OK
CANCEL
You can use vario us func tio ns for sca nnin g an d tr an sm ittin g imag e s. S et these functions as needed.
ERASING EDGE SHADOWS (ERASE)
The erase function is used to erase the shadow lines on images produced when scanning thick originals or books.
The erase modes that can be selected are shown below. The erase width is approximately 10 mm (1/2") in its initial
setting.
Your machine The other machine
EDGE ERASE
Erases shadows at edges
that appear when scanning
thick originals or books.
CENTRE ERASE
Eliminates shadow lines
produced by the bindings
of bound documents.
EDGE + CENTRE ERASE
Eliminates shadow lines around
the edges of images and
eliminates the shadow at the
centre of images.
USING ERASE
In scanner mode, touch the [SPECIAL
1
MODES] key.
If the address book screen
appears, touch the
[CONDITION SETTINGS]
key to display the
condition settings screen
(page 11
).
Transmission to
other machine
4
Using edge erase
Combining “edge erase”
with “dual page scan” on
the following page
If desired, set the width of the edge to be
erased (touch the key or the key to
set the width).
CENTRE
10
The erase width can be
set from 0 mm (0") to 20
mm (1") in 1 mm (1/8")
increments.
Touch the [ERASE] key.
2
Select the desired erase mode.
3
Select one of the three
erase modes. The
selected key will be
highlighted.
25
Touch the outer [OK] key.
5
You will return to the
screen of step 1 and an
erase icon will appear
next to the
[EXPOSURE] key.
To cancel erase, touch
the [CANCEL] key .
Send the image as explained in "BASIC
6
TRANSMISSION METHOD" (pages 12
15).
NOTE
To cancel the erase function, touch the [CANCEL]
key on the erase setting screen. (step 4)
to
Page 27

SPECIAL FUNCTIONS
SPECIAL MODES
ADDRESS REVIEW
FILE
ENTRY
DUAL PAGE
SCAN
2in1
CARD SHOT
SPEAKER
RESEND
OK
DUAL PAGE
SCAN
TRANSMITTING A DIVIDED ORIGINAL (DUAL PAGE SCAN)
When an open book is scanned and transmitted, you can use this function to divide the two open p ag es of the book
into two separate pages.
This function can only be used when the original is scanned using the document glass.
Your machine The other machine
Book or sheet original
Transmitted out as
two separate pages
When page division is set,
the original is divided
into two pages when
scanned into memory
Selecting Dual Page Scan
Follow the steps below and then send the image.
In scanner mode, touch the [SPECIAL
1
MODES] key.
If the address book
screen appears, touch
the [CONDITION
SETTINGS] key to
display the condition
settings screen (page
11).
Transmission to
other machine
[Example]
Scanned original sizeA3Transmitted document
Two A4 pages
Place the original on the document glass,
4
and perform the transmission operation.
If you have more originals to scan after pressing
the [START] key and scanning the first original,
change originals and repeat scanning until all
originals have been scanned. When finished,
press the [READ-END] key that appears in the
message display. (See step 23 - 25 of "Using the
document glass" on page 15
.)
Touch the [DUAL PAGE SCAN] key.
2
Touch the [OK] key.
3
The [DUAL PAGE
SCAN] key is
highlighted.
To cancel the selection,
touch the key once
again so that it is not
highlighted.
You will return to the
screen of step 1.
NOTE
To cancel Dual Page Scan...
Press the [CA] key.
26
Page 28

SPECIAL FUNCTIONS
SPECIAL MODES
ADDRESS REVIEW
FILE
ENTRY
ER
TIMER
PROGRAM
DAY OF THE WEEK
TIMER
CANCEL
HH.
0 00
mm.
TIME
OK
OK
CANCEL
AUTOMATIC TRANSMISSION AT A SPECIFIED TIME (TIMER TRANSMISSION)
This feature enables you to set up a transmission to be performed automatically at a specified time up to a week in
advance. A combined total of 97 timer transmission and memory transmission jobs can be store d.
NOTES
To perform a timer transmission, the document must be scanned into memory. It is not possible to leave the
document in the auto document feeder or on the document glass and have it scanned at the specified time of
transmission.
To set the date and time in the machine, refer to page 2-13 of "Operation manual (for general information and
copier operation))".
After a timer transmission is performed, the information (image, destination, etc.) is automatically cleared from
memory. (However, when the document filing function is used, the scanned document image is stored in the
machine's hard disk. For information on managing stored images, see "Document filing functions" in chapter 7
of the "Operation manual (for general information and copier operation)".)
SETTING UP A TIMER TRANSMISSION
In scanner mode, touch the [SPECIAL
1
MODES] key.
If the address book
screen appears, touch
the [CONDITION
SETTINGS] key to
display the condition
settings screen (page
11).
Touch the [TIMER] key.
2
The timer transmission
screen appears.
Select the day of the week. (Touch the
3
key or the key until the desired day is
selected.)
The initial setting is "---"
(no selection). If you
select this setting, the
transmission will be
performed as soon as
the specified time
arrives.
Select the time. (Touch the key or the
4
5
6
key until the desired time appears.)
Select the time in 24hour format.
Example:
11:00 P.M. 23:00
Touch the outer [OK] key.
You will return to the
screen of step 1 and a
timer transmission icon
will appear next to the
[EXPOSURE] key.
To cancel timer, touch the
[CANCEL] key.
Scan the image as explained in “BASIC
TRANSMISSION METHOD” (pages 12
to 15).
NOTES
Other operations can be performed after a timer tr ansmission is set up. If another oper ation is in progress when
the specified time arrives, the timer transmission will begin when the job in progress is completed.
If a timer transmission job is given priority in the job status screen (See "PRIORITY TRANSMISSION OF A STORED
JOB" on page 34
.), the time setting will be cancelled and the job performed as soon as the current job is completed.
27
Page 29

SPECIAL FUNCTIONS
SPECIAL MODES
ADDRESS REVIEW
FILE
ENTRY
ERASE
2in1
TRANSMITTING TWO ORIGINAL PAGES AS A SINGLE PAGE (2IN1)
This function allows you to reduce the size of original pages by one half to fit two pages evenly on one page when
transmitting.
Your machine
Originals
4th page
3rd page
2nd page
1st page
Portrait original
A3 and B4 (1 1" x 17", 8-1/2" x 14", and
8-1/2" x 13") sizes cannot be transmitted when using the 2 in 1 function.
A4 (8-1/2" x 1 1") and smaller sizes can
be used. There are restrictions on how
the originals are placed. Both portrait
and landscape oriented originals
should be placed vertically as shown
below.
USING THE AUTOMATIC
DOCUMENT FEEDER
1st page
Landscape original
4th page
3rd page
2nd page
Portrait original
1st page 2nd page 3rd page 4th page
Transmission to
other machine
Your machine
The other machine
Reduced to two pages
1st page
1st page
1st page
2nd page
The other machine
2nd page
2nd page
The arrangement
of the images
varies depending
on how the
original is placed
in the transmitting
machine.
Landscape original
A4
1st page
USING THE DOCUMENT GLASS
1st page 2nd page 3rd page 4th page
1st page
A4
Place the original vertically . If placed horizontally , an alarm will appear.
NOTE
If a part of original images is not contained in the transmitted paper size, transmission cannot be executed.
2nd page
2nd page
The arrangement
of the images
varies depending
on how the
original is placed
in the transmitting
machine.
USING 2IN1
In scanner mode, touch the [SPECIAL
1
MODES] key.
If the address book screen
appears, touch the
[CONDITION SETTINGS]
key to display the
condition settings screen
(page 11
).
Touch the [2in1] key.
2
The [2in1] key is
highlighted.
To cancel the selection,
touch the key once
again so that it is not
highlighted.
28
Page 30

SPECIAL FUNCTIONS
SPECIAL MODES
ADDRESS REVIEW
FILE
ENTRY
DUAL PAGE
SCAN
2in1
CARD SHOT
Touch the [OK] key.
3
SPEAKER
DUAL PAGE
SCAN
RESEND
You will return to the
screen of step 1.
OK
Send the image as explained in "BASIC
4
TRANSMISSION METHOD" (pages 12
15).
NOTE
To cancel 2in1...
Press the [CA] key.
to
TRANSMITTING THE FRONT AND BACK SIDES OF A CARD ON ONE SHEET OF PAPER (CARD SHOT)
When scanning a card, this function allows you to combine the front and back sides on a single sheet of paper. To
use this function, the original must be scanned on the document glass.
Your machine The other machine
CARD SHOT
Transmission using the "card
shot" special function
Transmission to
other machine
Front of card
Back of card
NOTE
A ratio cannot be specified and the image canno t be ro tated when using this function. If a part of original images
is not contained in the transmitted paper size, transmission cannot be execut ed. If the calculated ratio for the [FIT
TO SEND SIZE] function exceeds 400%, the actual enlargement ratio becomes 400%.
The front and back of the card
are scanned on one page.
USING CARD SHOT
In scanner mode, touch the [SPECIAL
1
MODES] key.
If the address book screen
appears, touch the
[CONDITION SETTINGS]
key to display the
condition settings screen
(page 11
).
Touch the [CARD SHOT] key.
2
The card shot screen
appears.
29
Page 31

SPECIAL FUNCTIONS
SIZE RESET
CANCEL
OK
OK
FIT TO
SEND SIZE
SIZE RESET
CANCEL
OK
OK
FIT TO
SEND SIZE
Enter the X dimension (width) and Y
3
dimension (length) of the original with the
keys.
OX (width) is initially selected. Enter X and then
touch the Y ( ) key to enter Y.
OTo return the X and Y values to the initial
settings configured in the key operator
programs, touch the [SIZE RESET] key. (key
operator's guide "CARD SHOT SETTINGS"
on page 15)
OTo have the image enlarged or reduced by a
suitable ratio based on the entered original
size and the send size so that the front and
back sides fit into the transmitted paper size ,
touch the [FIT TO SEND SIZE] key.
OTo cancel the card shot function, touch the
[CANCEL] key.
Follow steps 4 through 22 of "BASIC
6
TRANSMISSION METHOD" (pages 12
14).
Press the [START] key.
7
The front side of the card
is scanned.
Place the back side of the original face
8
down on the document glass. (see step 5)
Press the [START] key.
9
The back side of the
card is scanned.
to
Touch the outer [OK] key.
4
You will return to the
screen of step 1 and a
card shot icon will
appear next to the
[EXPOSURE] key.
Place the original on the document glass.
5
Place the front side of
the original face down
and close the document
cover.
Touch the [READ-END] key.
10
A beep will sound to inform you that the
transmission was stored.
NOTE
To cancel card shot...
Press the [CA] key.
30
Page 32

SPECIAL FUNCTIONS
SPECIAL MODES
ADDRESS REVIEW
FILE
ENTRY
MEMORY BOX
FAX OW
S
JOB
BUILD
SPECIAL MODES
SPEAKER
RESEND
OK
POLLING
TRANSMITTING A LARGE NUMBER OF PAGES (JOB BUILD)
When you need to scan more pages than can be loaded in the automatic document feeder at once, use this function
to scan the pages in sets. The maximum number of pages that can be loaded in the automatic document feeder is 50.
Example: Scanning 100 A4 (8-1/2" x 11") size pages
Original
Page 1 Page 51
50 pages 50 pages
* Divide the original pages into sets of 50 pages or less, and
scan the sets in order beginning from the set with the first
page (first A then B in the above example).
In scanner mode, touch the [SPECIAL
1
MODES] key and then touch the key.
If the address book screen
appears, touch the
[CONDITION SETTINGS]
key to display the
condition settings screen
Touch the [JOB BUILD] key.
2
Touch the [OK] key.
3
(page 11
The [JOB BUILD] key is
highlighted.
To cancel the selection,
touch the key once
again so that it is not
highlighted.
You will return to the
screen of step 1.
).
Follow steps 4 through 22 of "BASIC
5
TRANSMISSION METHOD" (pages 12
14).
Press the [START] key.
6
The pages are scanned.
When scanning is
finished, the [READEND] key appears in the
touch panel.
Place the next set of pages in the automatic
7
document feeder.
Press the [START] key. (See step 6.)
8
Repeat steps 7 and 8 until all pages have
9
been scanned, and then touch the [READEND] key.
to
Place the original in the automatic
4
document feeder.
31
Page 33

SPECIAL FUNCTIONS
SPECIAL MODES
ADDRESS REVIEW
FILE
ENTRY
TRANSACTION
REPORT
2/2
DO NOT PRINT
OK
CANCEL
TRANSACTION REPORT
PRINT AT ERROR
ALWAYS PRINT
PRINT ORIGINAL IMAGE
PRINT AT ALWAYS PRINT
PRINT ORIGINAL IMAGE
OK
OK
CANCEL
PRINTING A TRANSACTION REPORT (TRANSACTION REPORT)
When performing Internet-Fax transmission, you can use this function to print a transaction report under conditions
different from those of the relevant key operator program.
If you use this function, you can print a transaction report under your desired conditions only for the current
transmission job.
NOTES
O The settings for this function are common to those of the transaction report function included in the special
functions in the fax mode. If the settings are changed in the fax mode, the settings in the Internet-Fax mode are
also changed accordingly.
In scanner mode, touch the [SPECIAL
1
MODES] key and then touch the key.
If the address book screen
appears, touch the
[CONDITION SETTINGS]
key to display the
condition settings screen
(page 11
Touch the [TRANSACTION REPORT] key.
2
Select the desired print conditions.
3
).
Touch the checkbox of [PRINT ORIGINAL
4
IMAGE] to display a checkmark if needed.
If the checkmark is
displayed, a transaction
report including the
transmitted original will
be printed.
NOTE
If [DO NOT PRINT] is selected, this item is grayed
out.
Touch the outer [OK] key.
5
To cancel the transaction
report setting, touch the
[CANCEL] key.
32
Scan the image as explained in “BASIC
6
TRANSMISSION METHOD” (pages 12
to 15).
Page 34

SPECIAL FUNCTIONS
PROGRAM
SPECIAL MODES
TIMER
SPECIAL MODES
ADDRESS REVIEW
FILE
QUICK FILE
G.
RAM1
OK
PROGRAMMING FREQUENTLY USED OPERATIONS (PROGRAM)
This function allows you to store the steps of an operation, including the destination and scanning settings, into a
program. When you want to send a document to that destination, you can simply call up the program and the steps
will be performed automatically. This function is convenient when you frequently send documents, such as a daily
report, to the same destination. Up to eight programs can be stored.
Programs can be stored using the custom settings, and a name up to 18 characters long can be assigned.
For information on storing, editing, and deleting programs, refer to pages 47
The following settings can be stored in a program:
Destination address
2in1
Only one-touch and group keys can be used to store the destination addresses. An address cannot be entered
manually. When storing a broadcast transmission in a program, up to 500 destination address can be stored.
NOTES
A program differs from a timer transmission (page 27
takes place. A program thus allows you to repeatedly perform the same type of transmission. Note, however,
that programs do not allow you to establish a timer setting for transmission.
Internet-Fax reception operations cannot be stored in a program.
Resolution and exposure
Card shot
) in that it is not cleared from memory after transmission
Erase
and 48.
Dual Page Scan
USING A PROGRAM
In scanner mode, load the document.
1
If you are going to use Dual
Page Scan (page 26
card shot (page 29
the document on the
document glass.
Touch the [SPECIAL MODES] key and
2
then the [PROGRAM] key.
If the address book screen
appears, touch the
[CONDITION SETTINGS]
key to display the
condition settings screen
(page 11
Touch the program key you wish to
3
execute. Make sure the key is highlighted
and then touch the [OK] key.
The program key you
touched is selected and
you return to the screen
of step 2.
The [PROGRAM] key is
highlighted.
).
) and
), place
Touch the [OK] key.
4
SPEAKER
DUAL PAGE
SCAN
If needed, set the original size and other
5
settings, and then press the [START] key.
Transmission takes place according to the
program.
NOTE
Select functions that cannot be stored in a program
before you press the [START] key in step 5. These
functions include specifying the original size (See
"MANUALLY SETTING THE SCANNING SIZE" on
page 20
AND TRANSMITTING A TWO-SIDED ORIGINAL
(when using B/W scanner module/DSPF)" on page
19.), and timer transmission. (See "TIMER
TRANSMISSION" on page 27
.), two-sided scanning (See "SCANNING
RESEND
OK
You will return to the
initial screen.
.)
33
Page 35

PRIORITY TRANSMISSION OF A STORED JOB
WAITING
CO
D
STOP
INTE
FAX JOB
E-MAIL/FTP
PR
STATUS
1/1
PAGES
WAITING
WAITING
COPYING
WAITING
COMPLETE
DETAIL
STOP/DELETE
INTERNET-FAX
FAX JOB
E-MAIL/FTP
PRIORITY
STATUS
1/1
PAGES
WAITING
WAITING
2 / 000
SENDING
JOB QUEUE
If you have an urgent transmission job and multiple transmission jobs have already been stored, you can give priority
to the urgent job so that it will be transmitted imme diately after the job cu rrently being executed. This is done from the
job status screen. For details on using the job status screen, refer to page 1-14 of Operation manual (for general
information and copier operation).
Press the [JOB STATUS] key.
1
Touch the mode key ([E-MAIL/FTP] or
2
[INTERNET-FAX]).
Touch the key of the job to which you wish
3
to give priority.
The touched key is highlighted.
Touch the [PRIORITY] key.
4
The selected job moves
up to the next position
after the job currently
being executed.
When the current job is
completed, execution
begins of the job
selected in step 3.
NOTE
If the job in progress is a broadcast transmission job, the
priority job will temporarily interrupt the job after the
transmission currently in progress is finished. When the
priority job is finished, the broadcast transmission will
resume. However, if the priority job is also a broadcast
transmission, the job is begun after the current
broadcast job is completed.
34
Page 36

CANCELLING AN E-MAIL/FTP TRANSMISSION
WAITING
CO
D
STOP
INTE
FAX JOB
E-MAIL/FTP
PR
STATUS
1/1
PAGES
WAITING
WAITING
COPYING
FAX JOB
INTERNET-FAX
DETAIL
PRIORITY
STOP/DELETE
Y ou can cancel a transmission job that is in progress or that has been stored. Cancellation is done from the scanner
job status screen for the mode in which you stored tramsmission.
Press the [JOB STATUS] key.
1
Touch the mode key ([E-MAIL/FTP] or
2
[INTERNET-FAX]).
Touch the job key of the transmission job
3
you wish to cancel.
The touched key is highlighted.
Touch the [STOP/DELETE] key.
4
A message appears to
confirm the cancellation.
Touch the [YES] key to
delete the selected job
key and cancel the
transmission.
NOTE
If you do not wish to cancel the transmission, touch
the [NO] key.
35
Page 37

INTERNET FAX RECEPTION
FAX DATA
RECEIVE/FORWARD
LIST PRINT
I-FAX MANUAL
RECEPTION
For reception of Internet-Fax data, this machine connects automatically to the mail (POP3) server at specified
intervals* to check to see if new Internet-Fax data has been received. If new data has been received, this machine
reads and prints it. However , you can manually check and print new Internet-Fax data immed iately using the following
procedure.
* The setting is normally 5 minutes. This time can be adjusted using the key operator program, "Reception check
interval setting" (page 59
Internet-Fax manual reception
Press the [CUSTOM SETTINGS] key.
1
Touch the [FAX DATA RECEIVE/
2
FORWARD] key.
).
Touch the [RECEPTION START] key.
4
CUSTOM SETTINGS
I-FAX MANUAL RECEPTION
RECEPTION START
MANUAL RECEPTION KEY IN INITIAL SCREEN
The machine connects to the mail server to check
to see if new Internet-Fax data ha s been received.
If new data has been received, this machine reads
and prints it.
OK
Touch the [I-FAX MANUAL RECEPTION]
3
key.
If you touch the checkbox of [MANUAL
RECEPTION KEY IN INITIAL SCREEN] to display
the checkmark, the [I-FAX MANUAL
RECEPTION] key that has the same function as
the [RECEPTION START] key above will be
displayed in the CONDITION SETTING screen in
the INTERNET-FAX mode.
Touch the [OK] key to return to the custom
5
settings menu screen.
Touch the [EXIT] key to return to the initial
6
screen.
36
Page 38

TRANSFERRING RECEIVED INTERNET-FAXES TO ANOTHER MACHINE WHEN
FAX DATA
RECEIVE/FORWARD
SENDER NAME
CONTROL
LIST PRINT
KEY OPERATOR PROGRAM
FAX
FORW
I-FAX DATA
FORWARD
RECEIVE MODE
YES
PRINTING IS NOT POSSIBLE (FORWARDING FUNCTION)
When printing is not possible because of a paper, toner, or other problem, you can transfer received Internet-Faxes
to another Internet-Fax machine if that machine has been appropriately programmed in your machine. This function
can be conveniently used in an office or other workplace where there is another Internet-Fax machine. When an
Internet-Fax has been received to memory, the DATA light to the right of the IMAGE SEND key blinks.
NOTES
O When the transfer instruction is issued, all data that has been received in memory to that point is transferred. The
page that was being printed when the problem occurred and all following pages will be transferred.
O
Data cannot be selected for transfer.
O The result of transfer is indicated on an activity report. (See "Activity report print select setting" on page 57 and
"PRINTING OUT SETTNGS on page 61
USING THE TRANSFER FUNCTION
Q Program the e-mail address of the transfer destination
Use the key operator program to program the e-mail address of the transfer destination. (See "Set address for
data forwarding" (page 60
unless an e-mail address is programmed.
). Only one address can be programmed. The transfer function cannot be used
.)
Q Transferring received data
Press the [CUSTOM SETTING] key and
1
then touch the [FAX DATA RECEIVE/
FORWARD] key.
Touch the [I-FAX DATA FORWARD] key.
2
If there is no data to
transfer or a transfer
address has not been
programmed (See "Set
address for data
forwarding" on page
60.), a message will
appear and transfer will
not be possible.
Touch the [YES] key.
3
The machine
TRANSFER THE RECEIVED DATA TO ANOTHER
DEVICE?
NO
NOTES
O To cancel transfer
Press the [JOB STATUS] key, and then cancel the
transfer in the same way as a transmission. (See
"CANCELLING AN E-MAIL/FTP TRANSMISSION" on page 35
The data that was going to be transferred will
return to print standby status in your machine.
O If the transfer is not possible because a
transmission error occurs, the data returns to print
standby status in your machine.
automatically begins
transfer.
If you do not wish to
transfer the data, touch
the [NO] key.
.)
37
Page 39

STORING, EDITING, AND DELETING
ADDRESS CONTROL
S
DOCUMENT FILING
CONTROL
DIRECT ADDRESS PROGRAM
CUSTOM INDEX
INDIVIDUAL
GROUP
STORE
DIRECT ADDRESS / INDIVIDUAL
NAME
INITIAL
E-MAIL FAX
No.048
DIRECT ADDRESS / INDIVIDUAL
NAME
INITIAL
E-MAIL FAX
No.048
ABCD
INITIAL
NAME
ADDRESS
E-MAIL FAX
No.048
FROM THE TOUCH PANEL
One-touch and group keys for Scan to E-mail and Internet-Fax, group indexes, and senders can also be stored,
edited and deleted from the touch panel of the machine.
STORING ONE-TOUCH KEYS (only addresses for Scan to E-mail and Internet-Fax)
The touch panel of the machine can also be used to store destinations for Scan to E-mail and Internet-Fax. (Scan
to FTP destinations must be stored using the Web page (page 5
using Network Scanner Tool (page 5
).)
), and Scan to Desktop destinations must be stored
Press the [CUSTOM SETTINGS] key.
1
Touch the [ADDRESS CONTROL] key.
2
Touch the [DIRECT ADDRESS/PROGRAM]
3
key.
Click the checkbox of the transmission
5
method to be used so that a checkmark
appears. (Example: Scan to E-mail)
(a) The lowest number
(No.048) from 001 to
999 that has not been
stored appears automatically. This number is
used for entering an
address with the
(a)
Touch the [NAME] key.
6
Chapter 7 of the Operation Manual (for general
information and copier operation).
Touch the [INITIAL] key.
7
(Quick) key.
When [NAME] is
touched, the letter-entry
screen appears. Enter
up to 36 characters for
the name.
For information on
entering characters, see
Touch the [INDIVIDUAL] key.
4
38
Page 40

STORING, EDITING, AND DELETING FROM THE TOUCH PANEL
OK
J K
L
M
U
I
O
P
CANCEL
abc
ABC
INDEX
FAX INTERNET-F
ABCD
A
INITIAL
NAME
ADDRESS
E-MAIL FAX
No.048
FAXE-MAIL
KEY NAME ABCD CORPORATION
PDF/MMR(G4)FILE FORMAT
No.048
FAXE-MAIL
KEY NAME ABCD CORPORATION
PDF/MMR(G4)FILE FORMAT
No.048
Touch a letter key.
8
INITIAL
Q W
S
A
Z
X
Up to 10 search characters can be entered. If you
make a mistake, touch the key to delete the
mistake and then enter the correct character.
NOTE
The initial you enter here determines the position of
the one-touch key in the ABC index. For information
on the ABC index, refer to page 10
Touch the [OK] key.
9
Touch the [INDEX] key.
10
R
E
D
F
C V B N
T
G
SPACE
Y
U
H J K
M
I
CANCEL
O
L
.
P
ABC
OK
abc
Touch the [ADDRESS] key.
13
The E-mail address
entry screen appears.
Enter the e-mail address of the
14
destination.
AB/ab
CANCEL
12#$%
E-MAIL ADDRESS
ppd1@abcd.co
SPACE
Up to 64 characters can be entered.
If you make a mistake, touch the key to move
the cursor (
correct character.
Touch the [OK] key.
15
You will return to the one-touch key programming
screen.
REGISTRATION IS COMPLETED will appear
highlighted to the right of "No.".
NOTE
The "ADDRESS" line only shows 32 digits,
regardless of how many were digits actually
programmed.
Q
) back one space and then enter the
OK
abcABC
Touch an index key.
11
DIRECT ADDRESS / INDIVIDUAL
No.048
INDEX
SELECT THE CUSTOM INDEX WHERE YOU REGISTER THIS ADDRESS.
USER 1 USER 2
DO YOU REGISTER THIS ADDRESS AT THE [FREQUENT USE], TOO?
OSelect one of the upper row of keys ([USER 1]
through [USER 6]) to determine the location
of the one-touch key when the GROUP index
is displayed instead of the ABC index (refer to
page 10
OThe lower keys are for selecting whether to
include the one-touch key in the [FREQUENT
USE] index.
Touch the [OK] key.
12
).
NEXT EXIT
OK
USER 3 USER 4 USER 5 USER 6
YES NO
39
Check the key name.
16
The characters appearing next to the [KEY NAME]
key will be displayed in the key. Only the first 18
characters of the name entered in step 6 will be
displayed.
If you need to change the name that will be
displayed in the key, touch the [KEY NAME] key.
If you do not wish to
change the name, this
step is not necessary.
Check the file format and the compression
17
mode.
If you need to change
these settings,touch the
[FILE FORMAT] key.
If you do not need to
change the settings, this
step is not necessary.
Page 41

STORING, EDITING, AND DELETING FROM THE TOUCH PANEL
KEY NAME
I-FAX REPORT
ABCD CORPORAT
OFF
F
E-MAIL
EXIT
2/2
AMEND/DELETE
DELETE
EXIT
1/2
Settings for Scan to E-mail
File type: PDF*/TIFF
Compression mode: NONE/MH(G3)/MMR(G4)*
Settings for Internet-Fax
Compression mode: MH(G3)*/MMR(G4)
The default setting is indicated by an asterisk (*).
When you have completed the settings, touch the
[OK] key.
For Internet-Fax, check the Internet-Fax
18
report setting.
To change the setting,
touch the [I-FAX
REPORT] key.
(To use the default
setting, this operation is
not required.)
When you have finished programming the
19
one-touch key, touch the [EXIT] key.
If you wish to program another one-touch
key, touch the [NEXT] key.
NEXT
Touching the [EXIT] key
returns you to the screen
of step 4 on page 38
.
EDITING AND DELETING ONE-TOUCH KEYS
If you wish to delete a one-touch key or change the E-mail address, name, or other information programmed in a onetouch key, perform the following procedure.
1
2
3
DIRECT ADDRESS / AMEND/DELETE
SELECT ADDRESS TO AMEND/DELETE.
Press the [CUSTOM SETTINGS] key, touch
the [ADDRESS CONTROL] key, and then
touch the [DIRECT ADDRESS/PROGRAM]
key (refer to steps 1 to 3 on page 38
).
Touch the [AMEND/DELETE] key.
Touch the one-touch key you wish to edit
or delete.
EXIT
ABCD CORPORATION
ABCD GROUP D
E F
FREQUENT USE ABCD EFGHI JKLMN OPQRST UVWXYZ
CORPO.TPS
1/2
PROGRAM
ABC GROUP
O To edit a one-touch key, follow steps 4
and 5.
O To delete a one-touch key, follow steps
6 and 7.
O When you have finished editing or
deleting, touch the [EXIT] key.
NOTE
If the assigned three-digit number (see page 38, step
5) is known, you can touch the (Quick) key and
enter the three-digit number using the numeric keys
to select the desired one-touch key to edit or delete.
Touch the key corresponding to the
4
information you wish to change (change
the information in the same way as you
stored the information on pages 38
DIRECT ADDRESS / AMEND/DELETE
No.048
ABCD CORPORATION
NAME
INITIAL
ADDRESS
Make sure that your changes are correct,
5
and then touch the [EXIT] key.
A
ppd1@abcd.com
INDEX
DELETE
INTERNET-FAXFAXE-MAIL
USER 3
If you wish to change
another one-touch key,
repeat steps 3 through
5.
to 40).
EXIT
1/2
40
Page 42

STORING, EDITING, AND DELETING FROM THE TOUCH PANEL
DELETE EXIT
1/2
DELETE THE ADDRESS?
ABCD CORPORATION
NO YES
INDIVIDUAL GROUP
STORE
AL
S
USER 2
ADDRESS
The following steps are for deleting a one-touch key.
Touch the [DELETE] key.
6
NOTES
O If you cannot edit or delete a one-touch key
If you attempt to edit or delete a one-touch key in the following situations, a warning message will appear and
editing/deletion will not be possible. At this time, cancel the transmission or wait until it is completed, delete the
key from the group or the program, or cancel or change the hyperlink e-mail address.
O
The one-touch key you wish to edit or delete is currently being used for transmission or is used in a currently
stored transmission job.
O
The one-touch key is included in a group key or a program key.
O
The one-touch key is included in a group of end receiving machines for an F-code relay broadcast operation.
O
The one-touch key is used for a hyperlink e-mail address for Scan to FTP.
O Destinations for Scan to FTP and Scan to Desktop that are stored in one-touch keys cannot be edited or deleted
from the touch panel of the machine. Use the Web page to edit or delete these destinations. (page 5
Touch the [YES] key.
7
If you wish to delete
another one-touch key,
repeat steps 3, 6, and 7.
)
PROGRAMMING A GROUP KEY
Scan to E-mail and Internet-Fax destinations that have been stored in one-touch keys can be stored in group keys.
Up to 500 destinations can be stored in a group key.
To program a group key from the Web page, refer to page 6
Press the [CUSTOM SETTINGS] key, touch
1
the [ADDRESS CONTROL] key, and then
touch the [DIRECT ADDRESS/PROGRAM]
key (refer to steps 1 to 3 on page 38
Touch the [GROUP] key.
2
Follow steps 6 through 12 of "Storing one-
3
touch keys" (pages 38
to 39) to enter a
).
GROUP NAME, INITIAL, and INDEX.
.
Touch the [ADDRESS] key.
4
Touch index keys and the keys as
5
needed, and then touch one-touch keys of
the destinations that you wish to store in
the group.
DIRECT ADDRESS / GROUP
SELECT ADDRESS.
1/2
A
C GROUP
CORPO.TPS
FREQUENT USE
ABCD
B
ABCD CORPORATION
EFGHI
JKLMN
OPQRST UVWXYZ
DIRECT ENTRY
ADDRESS REVIEW
* 2
ABC
OK
GROUP
One-touch keys that have been touched are
highlighted.
If you touch the wrong key, simply touch it again to
cancel the highlighting and remove the destination
from the group.
41
Page 43

STORING, EDITING, AND DELETING FROM THE TOUCH PANEL
ABC
GROUP
ADDRESS REVIEW
DIRECT ENTRY
OK
1/2
* 0
AMEND/DELETE
NOTE
O
One group key cannot be stored in another group key.
Group keys appear grayed out and cannot be selected.
O You can enter a destination directly by touching the
[DIRECT ENTRY] key. If you select the transmission
method to be used (such as E-mail or Internet-Fax),
the relevant entry screen will be displayed. Enter the
address and specify the file type and compression
mode as needed. Then touch the [OK] key.
O If the assigned three-digit number (see page 38, step
5) is known, you can touch the (Quick) key and
enter the three-digit number using the numeric keys to
add a one-touch key to the group or delete a onetouch key from the group.
To check the destinations that you have
6
stored in the group, touch the [ADDRESS
REVIEW] key.
A list of your selected
destinations is displayed.
You can delete a displayed
destination by touching it.
When a message appears
asking if you want to delete
the destination, touch the
[YES] key.
Touch the [OK] key.
7
The number of destinations in the group appears
to the right of the [ADDRESS] key.
Check the name of the key (refer to step 16
8
on page 39
The characters appearing next to the [KEY NAME]
key will be displayed in the group key. To change
these characters, touch the [KEY NAME] key. This
step is not necessary if you do not wish to change
the characters.
Touch the [EXIT] key when you have
9
finished programming the group key.
).
If you wish to program another group key,
touch the [NEXT] key.
When you touch the [EXIT] key, you will return to
the screen of step 2.
EDITING AND DELETING GROUP KEYS
If you need to delete group key or change its name or one of its stored destinations, perform the following procedure.
Press the [CUSTOM SETTINGS] key, touch
1
the [ADDRESS CONTROL] key, and then
touch the [DIRECT ADDRESS/PROGRAM]
key (refer to steps 1 to 3 on page 38
Touch the [AMEND/DELETE] key.
2
Touch the group key you wish to edit or
3
delete.
DIRECT ADDRESS / AMEND/DELETE
SELECT ADDRESS TO AMEND/DELETE.
ABCD CORPORATION
ABCD GROUP D
E F
FREQUENT USE ABCD EFGHI JKLMN OPQRST UVWXYZ
CORPO.TPS
1/2
EXIT
PROGRAM
ABC GROUP
).
O When you have finished editing or
deleting, touch the [EXIT] key.
NOTE
If the assigned three-digit number (see page 38, step
5) is known, you can touch the (Quick) key and
enter the three-digit number using the numeric keys
to select the desired group key to edit or delete.
Touch the key of the item you wish to
4
change (to edit the item, follow the same
steps as for one-touch keys on page 38
DIRECT ADDRESS / AMEND/DELETE
No.010
GROUP NAME
INITIAL
INDEX
KEY NAME
ABCD GROUP
A
USER 2
ABCD GROUP
To edit a destination stored in a group key, touch
the [ADDRESS] key. The following screen appears.
ADDRESS
4 ADDRESSES
DELETE
EXIT
).
O To edit a group key, follow steps 4 and 5.
O
To delete a group key, follow steps 6 and
7.
42
Page 44

STORING, EDITING, AND DELETING FROM THE TOUCH PANEL
DELETE
EXIT
DELETE
EXIT
DELETE THE ADDRESS?
ABCD GROUP
NO YES
SENDER CONTROL
SETTINGS
R
KEY OPERATOR P
NG
STORE
DIRECT ADDRESS / GROUP
SELECT ADDRESS.
A
C GROUP ABCD CORPORATION
CORPO.TPS
FREQUENT USE
The one-touch keys stored in the group are
highlighted. To add another one-touch key to the
group, touch the key to highlight it.
To delete a one-touch key from the group, touch
the key so that it is no longer highlighted.
NOTE
If the assigned three-digit number (see page 38, step
5) is known, you can touch the (Quick) key and
enter the three-digit number using the numeric keys
to add a one-touch key to the group or delete a onetouch key from the group.
Make sure the edited information is
5
correct, and then touch the [EXIT] key.
ABCD
B
EFGHI
JKLMN
1/2
ADDRESS REVIEW
* 4
OPQRST UVWXYZ
If you wish to change
another group key,
repeat steps 3 through
5.
OK
DIRECT ENTRY
GROUP
ABC
The following steps are for deleting a group key.
Touch the [DELETE] key.
6
Touch the [YES] key.
7
If you wish to delete
another group key,
repeat steps 3, 6, and 7.
NOTE
If you cannot edit or delete a group key
If you attempt to edit or delete a group key in the following situations, a warning message will appear and editing/
deletion will not be possible.
O The one-touch key you wish to change or delete is currently being used for transmission or is used in a currently
stored transmission job.
O The group key is included in a program.
If the key is being used for a current transmission or currently stored transmission, cancel the transmission or wait
until it is completed and then edit or delete the key. If the key is included in a program, delete the key from the
program and then edit or delete the key.
STORING SENDER INFORMATION
Use this procedure to store the sender information (sender name and e-mail address) that is displayed when the
recipient receives your e-mail. Information for up to 999 different senders can be stored. Select a sender from the
stored senders using the touch panel of the machine when you send an image (page 13
appears in the sender column of the recipient's e-mail software program.
If you prefer to store sender information from the Web page, refer to page 6
Press the [CUSTOM SETTINGS] key.
1
Touch the [SENDER CONTROL] key.
2
Touch the [STORE] key.
3
.
). The selected sender
43
Page 45

STORING, EDITING, AND DELETING FROM THE TOUCH PANEL
INITIAL
No.001
SENDER NAME
k
l
-
.
@
i
o
p
_
CANCEL
OK
ABC
abc
LOGIN NAME
SENDER NAME
document
INITIAL
INDEX
No.001
ADDRESS
KEY NAME
OK
J K
L
M
U
I
O
P
CANCEL
abc
ABC
LOGIN NAME
SENDER NAME
document
d
INITIAL
INDEX
No.001
ADDRESS
KEY NAME
OK
THIS SENDER NAME.
LOGIN NAME
SENDER NAME
document
USER 2
d
INITIAL
INDEX
SENDER CONTROL
No.001
ADDRESS
KEY NAME
Touch the [SENDER NAME] key.
4
The "No." that automatically
appears is the lowest
number from 001 to 999
that has not yet been
programmed. When
[SENDER NAME] is
touched, the letter-entry
screen appears.
Enter the sender name.
5
SENDER NAME
w
q
s
a
x
z
e
d
c
r t y
f g h
v
b n m
SPACE
u
j
i
k
-
AB/ab
Enter up to 36 characters for the name.
Touch the [OK] key.
6
CANCEL
o
l
.
12#$
OK
p
@
_
abc
ABC
ÀÄÂ/àäâ
Touch the [OK] key.
9
Touch the [INDEX] key.
10
Touch an index key.
11
SENDER CONTROL
No.001
INDEX
SELECT THE CUSTOM INDEX WHERE YOU REGISTER THIS SENDER NAME.
NEXT EXIT
OK
Touch the [INITIAL] key.
7
Touch a letter key.
8
INITIAL
Q W
A
Z
S
X
R
E
D
C V B N
T
G
F
SPACE
Y
U
H J K
M
I
CANCEL
O
L
P
ABC
OK
abc
USER 2USER 1
USER 3 USER 4 USER 5 USER 6
Select one of the six keys ([USER 1] through
[USER 6]) to determine the location of the onetouch key when the GROUP index is displayed
instead of the ABC index.
If you touch a wrong key, simply touch the correct
key.
Touch the [OK] key.
12
Touch the [ADDRESS] key.
13
Up to 10 search characters can be entered. If you
make a mistake, touch the key to delete the
mistake and then enter the correct character.
44
Page 46

STORING, EDITING, AND DELETING FROM THE TOUCH PANEL
CANCEL
OK
LOGIN NAME
SENDER NAME
document
ppd1@abcd.com
USER 2
d
INITIAL
INDEX
SENDER CONTROL
No.001
ADDRESS
KEY NAME
LOGIN NAME
SENDER NAME
document
d
ppd1@abcd.com
INITIAL
INDEX
No.001
KEY NAME
ADDRESS
k
l
@
i
o
p
_
CANCEL
OK
AMEND/DELETE
O
document
group
Enter the e-mail address of the sender.
14
E-MAIL ADDRESS
ppd1@abcd.co
SPACE
AB/ab
CANCEL
12#$%
OK
Up to 64 characters can be entered.
If you make a mistake, touch the key to move
the cursor ( ) back one space and then enter the
correct character.
Touch the [OK] key.
15
Touch the [LOGIN NAME] key.
17
abcABC
Enter the login name.
18
LOGIN NAME
q
w
s
a
z
x
r
e
d
f
v
c
t
g
b
SPACE
y
u
j
h
m
n
i
k
-
AB/ab
CANCEL
o
l
.
12#$
OK
p
_
@
ABC
abc
ÀÄÂ/àäâ
Up to 32 characters can be entered.
If you make a mistake, touch the key to move
the cursor ( ) back one space and then enter the
correct character.
Check the key name.
16
Touch the [OK] key.
19
The characters
appearing next to the
[KEY NAME] key will be
displayed in the key.
Only the first 18
characters will be
displayed.
If you need to change
the name that will be displayed in the key, touch
the [KEY NAME] key.
If you do not wish to change the name, this step is
not necessary.
If you have finished storing senders,
20
touch the [EXIT] key. If you wish to store
another sender, touch the [NEXT] key.
EDITING AND DELETING SENDER INFORMATION
Use this procedure when you need to edit sender information or delete a sender.
Perform steps 1 and 2 of "STORING
1
SENDER INFORMATION" on page 43
Touch the [AMEND/DELETE] key.
2
The stored senders
appear.
.
Touch the one-touch key of the sender
3
that you wish to edit or delete.
The edition/deletion
screen of the touched
sender appears.
45
Page 47

STORING, EDITING, AND DELETING FROM THE TOUCH PANEL
DIRECT ADDRESS / PROGRAM
CUSTOM INDEX
L
LIST PRINT
FAX DATA
RECEIVE/FORWARD
Edit or delete the sender.
4
SENDER CONTROL / AMEND/DELETE
No.001
SENDER NAME
INITIAL
ADDRESS
KEY NAME
LOGIN NAME
document
d
ppd1@abcd.com
document
**********
INDEX
EXITDELETE
USER 2
Edit sender information in the same way that you
stored it. When finished, touch the [EXIT] key to
return to the screen of step 3.
To delete the sender, touch the [DELETE] key. A
message appears asking you to confirm your
selection. Touch the [YES] key to delete the
sender and return to the screen of step 3.
STORING A GROUP INDEX
You can assign any name up to 6 characters long to each of the USER indexes ([USER 1] to [USER 6]).
To perform this procedure from the Web page, refer to page 8
Press the [CUSTOM SETTINGS] key, and
1
then touch the [ADDRESS CONTROL] key
(refer to steps 1 and 2 on page 38
Touch the [CUSTOM INDEX] key.
2
).
.
Enter a maximum of 6 characters for the
4
index name.
Use the key to clear the displayed name and
then enter the desired name.
When finished, touch the [OK] key. The new name
appears in the screen of step 3.
If you wish to program another index
5
name, repeat steps 3 and 4.
When finished, touch the [OK] key.
To edit a user index name, re-enter the name as
explained in steps 3 and 4.
Touch an index key ([USER 1] to [USER 6]).
3
CUSTOM SETTINGS
CUSTOM INDEX
SELECT THE KEY TO BE CUSTOM NAMED.
USER 1 USER 2 USER 3 USER 4 USER 5 USER 6
You can enter a name for the selected index.
When touched, the letter entry screen appears.
OK
PRINTING PROGRAMMED INFORMATION
You can print out lists of the one-touch keys, group keys and programs that have been stored in the machine.
Press the [CUSTOM SETTINGS] key.
1
Touch the [LIST PRINT] key.
2
46
Page 48

STORING, EDITING, AND DELETING FROM THE TOUCH PANEL
SENDING ADDRESS LIST
ALL CUSTOM SETTING LIST
ADDRESS LIST
INDIVIDUAL
LIST
GROUP LIST
PROGRAM LIST
MEMORY BOX
LIST
PROGRAM AMP
PROGRAM
PROGRAM NAME
SETTINGS
ADDRESS
RESOLUTION
No.1
PROGRAM NAME
SETTINGS
ADDRESS
PROGRAM FOR ABCD
RESOLUTION
SPECIAL MODES
No.1
Touch the [SENDING ADDRESS LIST] key.
3
NOTES
O The list is printed before other print jobs waiting to be printed.
O If you attempt to print a list when no data exists, a warning message will appear.
Touch the key of the list you wish to print.
4
[PROCESSING PRINT
DATA] appears in the
message display and
printing begins.
To cancel printing, touch
the [CANCEL] key.
STORING A PROGRAM
You can store a destination address, erase, dual page scan, 2in1, card shot, and resolution and exposure settings
in a program. This enables you to call up the program and perform the transmission by means of a simplified
operation. (See "USING A PROGRAM" on page 33
NOTE
A timer setting (page 27
) cannot be included in a program.
.)
Press the [CUSTOM SETTINGS] key, touch
1
the [ADDRESS CONTROL] key, and then
touch the [DIRECT ADDRESS/PROGRAM]
key (refer to steps 1 to 3 on page 38
Touch the [PROGRAM] key.
2
Touch the [PROGRAM NAME] key.
3
the letter-entry screen appears. Enter up to 18
characters for the name.
Refer to Chapter 7 of "Operation manual (for
general information and copier operation)" for the
procedure for entering letters.
).
The "No." that
automatically appears is
the lowest number from
1 to 8 that has not yet
been programmed.
When the [PROGRAM
NAME] key is touched,
47
Touch the [SETTINGS] key.
4
Touch the keys for the settings you wish
5
to store.
ENTER PROGRAM YOU REQUIRE.
AUTO
EXPOSURE
300x300dpi
RESOLUTION
For the detailed procedures for each of the
settings, refer to the explanations of those
features on the following pages.
[RESOLUTION] (page 23
[EXPOSURE] (page 23
[ADDRESS BOOK] (page 14
[SPECIAL MODES]
OERASE (page 25
ODUAL PAGE SCAN (page 26
O2in1 (page 28
OCARD SHOT (page 29
)
)
CANCEL
E-MAIL/FTP
MODE SWITCH
)
)
)
)
)
OK
ADDRESS BOOK
ADDRESS REVIEW
SPECIAL MODES
Page 49

STORING, EDITING, AND DELETING FROM THE TOUCH PANEL
EXIT
1/2
PROGRAM
NOTE
Up to 500 destinations can be stored in a program.
Destinations can be entered using one-touch keys,
group keys, and
Touch the [OK] key.
6
(Quick) key.
Your settings are displayed. Make sure
7
they are correct.
PROGRAM
No.1
REGISTRATION IS COMPLETED
PROGRAM NAME
SETTINGS
When you are finished, touch the [EXIT]
8
key.
PROGRAM FOR ABCD
ADDRESS
RESOLUTION
SPECIAL MODES
FAX OWN ADDRESS SENDING
2 ADDRESSES
FINE
ERASE
NEXT
DUAL PAGE
SCAN
I-FAX OWN ADDRESS SEND
EXIT
DARK ORIGINALEXPOSURE
If you wish to store another program,
touch the [NEXT] key.
Touching the [EXIT] key returns you to the screen
of step 2.
Touching the [NEXT] key returns you to the screen
of step 3.
EDITING AND DELETING PROGRAMS
To edit or delete a previously stored program, touch the [AMEND/DELETE] key in the screen of step 2 of "Storing a
program" on the previous page
, and then follow these steps.
Touch the [PROGRAM] key.
1
Touch the program you wish to edit or delete.
2
DIRECT ADDRESS / AMEND/DELETE
SELECT PROGRAM TO AMEND/DELETE.
PROGRAM
PROGRAM FOR ABCD EMAIL NEWS GROUP
ABYS FAX FORMAT A
OWhen you touch the program name, the edit/
delete screen for the selected program
appears.
O
Touching the [ADDRESS BOOK] key returns
you to the screen of step 1.
To edit the program, follow the same
3
procedure as for storing the program. To
EXIT
ADDRESS BOOK
delete the program, touch the [DELETE]
key and then touch the [YES] key in the
confirmation screen that appears.
48
Page 50

TROUBLESHOOTING
If a problem or question arises, try to solve the situation using the following information before contacting your
authorised SHARP dealer.
The image cannot be scanned.
Cause: The original is loaded upside down.
Solution:The original must be placed face down.
A moiré (stripe pattern) appears on the scanned image.
Cause: A slight amount of moiré sometimes appears when printed matter is scanned.
Solution:If you are using the document glass, try shifting the position and/or angle of the original on the document
glass.
The scanned image is fuzzy or has smudges.
Cause: The document glass or the underside of the document cover is dirty.
Solution:To clean the document glass and the underside of the document cover, see page 6-2 of the Operation
manual (for general information and copier operation).
The scanned image is clipped.
Cause: The set original scanning size is smaller than the actual original size.
Solution:Set the actual original size. (page 20
If you have intentionally set a smaller size than the actual original size, place the original taking into
account the guides for the set original size. For example, when scanning an A4 (8-1/2" x 11") original
using a B5 (5-1/2" x 8-1/2") setting, align the original using the scale at the left edge to fit the area you
wish to scan into the B5 (5-1/2" x 8-1/2") scanning area.
)
The scanned image is upside down or on its side.
Cause: The original was not placed in the correct orientation.
Solution:Place the original in the correct orientation. (Refer to page 4-4 of Operation manual (for general
information and copier operation).)
You wish to rotate the scanned image 90°.
Cause: The orientation of the placed document cannot be changed.
Solution:Use the "ROTATE THE IMAGE 90 DEGREES" checkbox. (page 20
)
The scanned image range is on the opposite side of the selected image range.
Cause: The original was placed with the left and right sides reversed.
Solution:Place the original in the correct orientation. (Refer to page 4-4 of Operation manual (for general
information and copier operation).)
The received image data cannot be opened.
Cause: The viewer program used by the recipient does not support the format of the received image data.
Solution:Try selecting a different file type (TIFF or PDF) and/or a different compression format (NONE, MH (G3), or
MMR (G4)) when sending the image data. (Refer to page 24
Otherwise, open to use Sharpdesk or a viewer program that supports the above combinations of file types
and compression formats.
.)
49
Page 51

TROUBLESHOOTING
The recipient does not receive transmitted data.
Cause: An incorrect destination was selected.
Otherwise, there is a mistake in the information stored for the destination (e-mail address or FTP server
information).
Solution:Select the correct destination and make sure the correct information is stored for the destination. (Refer to
page 14
* If delivery by e-mail (Scan to E-mail) is unsuccessful, an error message such as "Undelivered Message"
.)
may be sent to the designated administrator's e-mail address. This information may help you determine
the cause of the problem.
The recipient does not receive data sent by e-mail (Scan to E-mail).
Cause: A limit has been set in the "Maximum size of e-mail attachments" of the key operator program for the
maximum size of an image file that can be sent using Scan to E-mail (the initial setting is UNLIMITED).
Solution:The limit can be set from 1 MB to 10 MB in the key operator program. Consult your key operator and
select a suitable limit.
Cause: The amount of data that can be sent in one e-mail transmission is sometimes limited by the administrator
of the mail server. Even if the amount of data sent is within the limit setting explained above, if it exceeds
the limit set by the administrator of the mail server, the data will not be delivered to the recipient.
Solution:Decrease the amount of data sent in the e-mail transmission (reduce the number of pages scanned). (Ask
your mail server administrator what the data limit is for one e-mail transmission.) (Refer to page 52
.)
Transmission takes a long time.
Cause: When there is a large amount of image information, the data file is also large and transmission takes a
long time.
Solution:In order to select resolution and data compression settings that are suited to the purpose of transmission
and create image data that is well-balanced in terms of resolution and file size, pay attention to the
following points:
Resolution
The default setting is "300x300dpi" (E-MAIL/FTP mode) or "STANDARD" (Internet-Fax mode). If the
original does not contain photographs, illustrations, or other halftone images, "300x300dpi" or
"STANDARD" mode will give you a more workable scanned image. Ohter resoution modes should only be
selected when the original includes a photograph and you want to give priority to the quality of the
photograph. Note that these modes will produce a larger file size than "300x300dpi" or "STANDARD".
IF YOUR E-MAIL IS RETURNED
If a Scan to E-mail is not successfully transmitted, an e-mail informing you of this fact is sent to the sender selected at the time
of transmission. If this happens, read the e-mail and determine the cause of the error, and then repeat the transmission.
IF A TRANSMISSION ERROR OCCURS
If a transmission error occurs when you send a scanned image, a message informing you of the error and an error
code will appear in the touch panel on the machine.
50
Page 52

TROUBLESHOOTING
L
LIST PRINT
FAX DATA
RECEIVE/FORWARD
PRINTER TEST PAGE
OK
DOCUMENT FILING
USER / FOLDER LIST
NIC PAGE
PCL EXTENDED
FONT LIST
Q Error Code Table
Error Code Description of the Error
CE-01 The network interface card is out of order.
CE-02 Cannot find the specified mail server or FTP server.
CE-03 The server was down during the scanning of the original.
CE-04 An invalid account name or password for the FTP server has been entered.
CE-05 An invalid directory of the FTP server has been entered.
CE-06 Cannot find the specified mail server (POP3 server).
CE-07 The account name or password for the POP3 server is invalid.
CE-08 The POP3 server was down during communication.
CE-00 An error other than the above has occurred.
CHECKING THE IP ADDRESS
There are three ways to check the IP address:
1. Using [LIST PRINT] in [CUSTOM SETTINGS] in the operation panel
Select NIC PAGE to print a list of the machine settings. The IP address that has been set for the machine can be
found in this list. Follow the procedure below to check the IP address using NIC PAGE.
2. Using the key operator programs
The IP address can be verified using the key operator programs. To use this procedure, consult your key operator.
3. Using the NIC Manager utility in the Software CD-ROM (2)
The NIC Manager utility in the Software CD-ROM (2) can be used to check the IP address. For details, see the
online manual (Print Server Card Users Manual) in the Software CD-ROM (2).
Q Checking the IP address from the [CUSTOM SETTINGS] screen of the operation
panel
Press the [CUSTOM SETTINGS] key.
1
The custom setting
menu screen will
appear.
Touch the [LIST PRINT] key.
2
Touch the [PRINTER TEST PAGE] key.
3
Touch the [NIC PAGE] key.
4
PROCESSING PRINT
DATA appears in the
message screen and
printing begins. To
cancel printing, touch
the [CANCEL] key.
NOTE
There are a variety of different types of network
environments. When using the machine in a network
environment, refer to the detailed explanations in the
online manual (Print Server Card Users Manual) in
the Software CD-ROM (2).
51
Page 53

TROUBLESHOOTING
IMPORTANT POINTS WHEN USING SCAN TO E-MAIL
Be very careful not to send image data files that are too large.
Your mail server's system administrator may have placed a limit on the amount of data that can be sent in one e-mail
transmission. If this limit is exceeded, the e-mail will not be delivered to the recipient. Even if there is no limit and your
e-mail is successfully delivered, a large data file may take a long time to be received and place a heavy burden on
the recipient's network, depending on the recipient's network (Internet) connection environment.
If large image data files are repeatedly sent, the resulting burden on the network may slow down the speed of other,
unrelated data transmissions and in some cases, may even cause the mail server or network to go down.
The images shown below will produce the file sizes shown below when scanned as A4 (8-1/2" x 11") size originals:
Resolution
[200x200dpi] Approx. 21 KB
[600x600dpi] Approx. 74 KB
If multiple images are scanned, the file size will be approximately (Size of each image as indicated above) x
(Number of images scanned).
Although the actual limitation depends on your network environment, a general guideline for the maximum file size
for Scan to E-mail is 2000 KB. In cases where you need to send multiple documents, try such measures as lowering
the resolution mode.
File size of text original A
when scanned
(TIFF MMR (G4) format)
(TIFF MMR (G4) format)
File size of photo original B
when scanned
Approx. 260 KB
(TIFF MMR (G4) format)
Approx. 2300 KB
(TIFF MMR (G4) format)
Original image samples
The original images shown below are samples to help you understand the above explanations. Note that these
images are smaller than the actual originals (the actual originals are A4 (8-1/2" x 11") size).
Text original A Photo original B
52
Page 54

KEY OPERATOR PROGRAMS
KEY OPERATOR PROGRAMS
SENDER CONTROL
LIST PRINT
FAX DATA
RECEIVE/FORWA
DEFAULT
SETTINGS
KEY OPERATOR CODE
COPY
SETTINGS
DOC. FILING
SETTINGS
CONTROL
DEVICE CONTROL
IMAGE SEND
SETTINGS
CONTROL
This section explains the key operator programs that are related to the network scanner feature of the machine. Key
operators should read this section well to ensure correct use of the programs. For key operator programs that are
related to general use of the machine, see the key operator's guide.
KEY OPERATOR PROGRAM LIST
Program name Page
Operation settings
Default display settings 55
The number of direct address/sender
keys displayed setting 55
Must input next address key at
broadcast setting 55
The number of file name/subject keys
displayed setting 55
Initial resolution setting 55
Scan complete sound setting 56
Default exposure settings 56
E-mail/FTP settings
Default sender set 56
Compression mode at broadcasting 56
Initial file format setting 56
Maximum size of e-mail attachments 56
BCC setting 56
I-Fax settings
I-Fax default settings
Set I-Fax own name and address 56
I-Fax speaker volume settings 57
Auto wake up print 57
Original print on transaction report 57
Transaction report print select setting 57
Activity report print select setting 57
Body text print select setting 58
I-Fax send settings
I-Fax reception report on/off setting 58
I-Fax reception report request timeout
setting 58
Rotation sending setting 58
Printing page number at receiver 58
Maximum size of e-mail attachments 58
Number of resend times at reception error 59
I-Fax receive settings
Auto receive reduce setting 59
Reception check interval setting 59
Duplex reception setting 59
Print style setting 59
Set address for data forwarding 60
POP3 communication timeout setting 60
I-Fax output tray setting 60
Anti junk mail/domain name setting 60
USING THE KEY OPERATOR PROGRAMS
Follow the steps below to use the key operator programs.
Press the [CUSTOM SETTINGS] key.
1
Touch the [KEY OPERATOR PROGRAMS]
2
key.
53
Use the numeric keys to enter the five-digit
3
key operater code number.
For the factory default
setting for the key
operator code number,
see page 2 of the key
operator’s guide.
Touch the [IMAGE SEND SETTINGS] key.
4
Page 55

KEY OPERATOR PROGRAMS
OPERATION SETTINGS
FAX SETTINGS
I-FAX SETTINGS
E-MAIL/FTP SETTIN
OK
Touch the [OPERATION SETTINGS] key,
5
the [E-MAIL/FTP SETTINGS] key or the [IFAX SETTINGS] key, depending on the
program you wish to use.
Make desired settings for the selected
6
program.
Select the desired program from among the
programs listed on the previous page
Detailed descriptions for program settings start on
the next page
.
.
Touch the [OK] key to return to the screen
7
of step 5.
If you wish to use
another program, touch
the key for that program
in the screen of step 5.
Press the [CA] key to exit the program.
8
Supplementary explanation of key operation
for key operator programs
These keys and indicator are
available on setting screens that
require the entry of numerical values.
KEY OPERATOR PROGRAMS
A
B
OPERATION SETTINGS
DEFAULT DISPLAY SETTINGS
MUST INPUT NEXT ADDRESS
KEY AT BROADCAST SETTING
INITIAL RESOLUTION SETTING
THE NUMBER OF DIRECT ADDRESS/
SENDER KEYS DISPLAYED SETTING
THE NUMBER OF FILE NAME/
SUBJECT KEYS DISPLAYED SETTING
OK
1/2
6
6
C
DE
A The name of the program category or particular item to be set will appear on the touch key. The displayed item
is selected by touching the key.
B Check mark boxes are touch keys that show the status of selections. A box with a check mark means the
function is "on" (enabled) and an unchecked box means the function is "off" (disabled). The on/off status
changes each time the box is touched.
C If the settings continue on the following screen(s), touch the and keys to move back and forth through
the screens. To return to the category selection screen, touch the [OK] key.
D The currently set numerical value is displayed.
E Numerical values can be set by touching the and keys.
15
(1-15)
54
Page 56

KEY OPERATOR PROGRAMS
SETTING PROGRAMS
The setting programs for the network scanner feature of the machine are explained here. For key operator programs
that are related to the copy function and general use of the machine, see the key operator’s guide. For programs
related to the printer and network scanner functions, see the corresponding manuals.
Operation settings
The following programs are available:
O
Default display settings
O The number of direct address/sender keys
displayed setting
O Must input next address key at broadcast setting
O The number of file name/subject keys displayed
setting
O Initial resolution setting
O Scan complete sound setting
O Default exposure settings
Default display settings
You can select the initial display that appears when
you press the [IMAGE SEND] key to change to
scanner mode or when you press the [CA] key in
scanner mode. Normally the initial display is set to
the Condition setting screen (E-MAIL/FTP mode or
FAX mode if the facsimile feature is installed).
The following five selections are available:
O Address book (ABC)
O Address book (Group)
O Fax (if the facsimile feature is installed)
O E-mail/FTP
O Internet-Fax
When an address book (ABC or Group) is selected,
the selected index of that address book (page 10
is set as the initial screen.
When [SWITCH AUTOMATICALLY TO COPY
MODE SCREEN] is selected, the display will
automatically switch to the copy mode screen if no
action is taken in the fax / image send mode screen
for 20 seconds.
The number of direct address/sender keys displayed setting
The number of one-touch keys displayed in each
address book screen can be changed from 6 (the
normal setting) to 9.
Touch [6] or [9] to select the desired number.
NOTE
For the key name that appears in each one-touch
key, a maximum of 18 characters can appear when
the number of one-touch keys displayed is set to 6. A
maximum of 10 characters can appear when the
number of one-touch keys displayed is set to 9.
Must input next address key at broadcast setting
You can select whether the [NEXT ADDRESS] key
must be touched before entering the next
destination when performing a broadcast
transmission (page 16
set so that touching the [NEXT ADDRESS] key can
be omitted except when the numeric keys are used
to enter one full fax number after another full fax
number in the fax mode.
). Normally the machine is
Example: Normal setting (factory setting)
NEXT ADDRESS NEXT ADDRESSOne-touch
XXXX
Dial
XXXX
Dial
If the box is checked, it will no longer be possible to
omit the [NEXT ADDRESS] key as shown in the
above example. Even if the next destination to be
entered is a one-touch key, the [NEXT ADDRESS]
key must be touched before the one-touch key can
be entered. If an operator attempts to enter the
next destination without touching the [NEXT
ADDRESS] key, an alarm will sound.
)
The number of file name/subject keys
Can be omitted
NEXT ADDRESS
Cannot be omitted
XXXX
Dial
Can be omitted
(fax mode only)
One-touch
displayed setting
This program is used to select the number of file
name / subject keys that are displayed in the
screen. The number of keys can be set to 3 or 6.
Touch 3 or 6 to select the desired number.
Initial resolution setting
This is used to change the default resolution
setting for transmission in network scanner mode.
The default resolution is initially set to
"300x300dpi" (E-mail/FTP mode) or "STANDARD"
(Internet-Fax mode). To change the setting, touch
the desired resolution key.
Select the transmission method to be
1
used (such as E-mail or Internet-Fax).
If you wish to use the stored image setting as the
default setting when transmitting an image that
was stored with the document filing function,
check the [APPLY THE RESOLUTION SET
WHEN STORED] box on this screen.
Touch the desired resolution key.
2
Touch the [OK] key.
3
55
Page 57

KEY OPERATOR PROGRAMS
Scan complete sound setting
This program is used to set the volume of the beep
sound that informs you that the original has been
scanned. Two volume levels are available, or the
beep can be turned off.
Default exposure settings
This program is used to set the default exposure
level for scanning originals in fax / image send
mode.
This program is initially set to "AUTO". If changed
to "MANUAL", the exposure level can be adjusted
to five levels. Level 1 is the lightest level and level
5 is the darkest level.
E-mail/FTP settings
The E-mail/FTP settings can be changed as
necessary to meet your needs.
The E-mail/FTP settings are as follows:
O Default sender set
O Compression mode at broadcasting
O Initial file format setting
O Maximum size of e-mail attachments
O BCC setting
Default sender set
If you do not select a sender when performing a
Scan to E-mail operation, the sender information
stored with this setting is automatically used.
Touch the [SENDER NAME] key and then
1
enter the sender name.
The sender name entry screen appears
Up to 20 characters can be entered.
Initial file format setting
You can change the default file format (file type,
compression mode, and file creation method) used
when the e-mail address is entered manually for a
Scan to E-mail transmission.
The initial settings are as follows:
File type: PDF
Compression mode: MMR(G4)
"SPECIFIED PAGES PER FILE" checkbox: Not
selected
Maximum size of e-mail attachments
To prevent the size of image files transmitted by
Scan to E-mail from becoming too large, you can
set a size limit.
If the size of the image file created by scanning the
original exceeds the limit, the image file is
discarded. The limit can be set from 1 MB to 10 MB
in increments of 1 MB. The initial setting is
UNLIMITED. If this setting is changed, the setting
of "Maximum size of e-mail attachments" of I-Fax
send settings will also be changed similarly (page
58).
BCC setting
If “ENABLE BCC” is set, the [BCC] key is displayed
in addition to the [TO] key and the [CC] key in the
address book screen for Scan to E-mail. If
“DISPLAY BCC ADDRESS ON THE JOB STATUS
SCREEN” is set, in the destination information
displayed on the job status screen, BCC recipients
are also displayed in a similar way to CC recipients.
If the checkmark is cleared, only the string “* BCC
DESTINATION” is displayed. Normally neither of
them is set.
Touch the [OK] key.
2
Touch the [RE.ADDRESS] key and then
3
enter the return address.
Up to 64 characters can be entered.
Touch the [OK] key.
4
The entered return address appears. Check the
address to make sure it is correct.
Compression mode at broadcasting
This setting selects the compression mode for
broadcasting using Scan to E-mail or Internet-Fax.
The compression mode set here is used for all
destinations regardless of their individual
compression mode settings.
The initial setting is MH (G3).
I-Fax settings
I-Fax default settings
The default I-Fax settings can be changed as
necessary to meet your Internet-Fax needs.
The default I-Fax settings are as follows:
O Set I-Fax own name and address
O I-Fax speaker volume settings
O Auto wake up print
O Original print on transaction report
O Transaction report print select setting
O Activity report print select setting
O Body text print select setting
Set I-Fax own name and address
Use this setting to enter the address of the machine
and the name of the user. The entered name and
address are printed at the top of each Internet-fax
page you send.
56
Page 58

KEY OPERATOR PROGRAMS
Touch the [NAME] key and enter the name.
1
The name entry screen appears.
Up to 40 characters can be entered for the name.
Refer to Chapter 7 of the Operation manual (for
general information and copier operation) for the
procedure for entering characters.
Touch the [OWN ADDRESS] key and enter
2
the e-mail address.
The address entry screen appears.
Enter up to 56 characters for the e-mail address.
If you make a mistake, press the key and reenter the correct character.
Be sure to enter the name and address regardless
of I-Fax reception report setting.
Touch the [OK] key.
3
You will return to the I-FAX NAME AND OWN
ADDRESS screen.
The name and address you entered appear. Make
sure they are correct.
I-Fax speaker volume settings
This setting lets you adjust the volume of the
Internet-fax receive signal and the communication
error signal heard through the speaker. The
receive sound is issued one time when InternetFax data is received and processing is complete.
The communication error sound is issued when an
I-Fax reception report indicating an error is
received.
KEY OPERATOR PROGRAMS
I-FAX SPEAKER VOLUME SETTING
RECEIVE SIGNAL
COMMUNICATION
ERROR SIGNAL
OK
Original print on transaction report
This program is used to have part of the first page
of the Internet-Fax printed on the transaction
report. This program is used in conjunction with the
transaction report print setting (at right), and is not
effective when printing of the transaction report is
disabled.
This program is normally configured so that part of
the fax is printed on the transaction report when a
transmission is not successful.
Transaction report print select setting
This setting is used to select the conditions for
printing out Transaction Reports. Conditions can
be selected for normal transmissions, broadcast
transmissions, and receptions.
SINGLE SENDING BROADCASTING
PRINT OUT
ALL REPORT
PRINT OUT ERROR
REPORT ONLY
NO PRINTED
REPORT
Touch the key to display the next setting. Select
the print conditions for receptions.
RECEIVING
PRINT OUT
ALL REPORT
PRINT OUT ERROR
REPORT ONLY
NO PRINTED
REPORT
The normal settings are indicated by shading
above.
PRINT OUT
ALL REPORT
PRINT OUT ERROR
REPORT ONLY
NO PRINTED
REPORT
Volume: Volume: Off
Low High
To change the volume, touch the desired volume
key.
Auto wake up print
Use this setting to select how the machine
responds if an Internet-Fax is received when the
power switch is turned off (the main power switch is
turned on).
Auto wake up print is normally turned on, which
means that the machine automatically activates
and prints the received Internet-Fax. If you turn off
this setting, received Internet-Faxes will not be
printed until the power switch is turned on.
Activity report print select setting
This program is used to have the activity report
stored in the machine's memory printed out at
regular intervals.
You can choose to have the report automatically
printed each time the number of stored
transactions exceeds 99, or have the report printed
at a specified time every day (only once per day).
The report is normally set to not print out. Select
"AUTO PRINT AT MEMORY FULL" to have the
report automatically printed when the number of
stored transactions (the combined total of
transmissions and receptions) exceeds 99.
To have the report automatically printed at a
specified time, check the "PRINT DAILY AT
DESIGNATED TIME" box and then select the time
with the "HOUR" and "MINUTE" keys that appear.
57
Page 59

KEY OPERATOR PROGRAMS
KEY OPERATOR PROGRAMS
ACTIVITY REPORT PRINT SELECT SETTING
AUTO PRINT AT MEMORY FULL
PRINT DAILY AT DESIGNATED TIME
HOUR MINUTE
13 01
OK
Touch the "HOUR" and "MINUTE" keys and then set the
hour by touching the and keys. Set the minute
in the same way. When finished, touch the [OK] key.
NOTES
O If you only select the PRINT DAILY AT
DESIGNATED TIME setting and the number of
recorded transactions exceeds 99 before the
specified time, each new transaction will delete
the oldest transaction (the oldest transaction will
not be printed).
O The activity report can also be printed out on
demand (page 57
).
Body text print select setting
With the Internet-Fax function, the image files
attached to an e-mail are normally printed. This
program is used to specify whether the body text of
e-mail is to be printed or not. Reception report emails are not printed regardless of the setting of
this program.
This setting is normally turned off (body text is not
printed).
If this setting is turned on, up to five pages of body
text of e-mail will be printed.
I-Fax send settings
The I-Fax transmission settings allow you to adjust
certain parameters for sending Internet-faxes to
better suit your needs.
The I-Fax send settings are as follows:
O I-Fax reception report on/off setting
O I-Fax reception report request timeout setting
O Rotation sending setting
O Printing page number at receiver
O Maximum size of e-mail attachments
O Number of resend times at reception error
I-Fax reception report request timeout setting
If the previous program "I-Fax reception report on/
off setting" is set, use this program to set the time
to receive the reception report. You can select a
value from 1 minute to 240 hours in 1 minute
increments. The default setting is one hour.
KEY OPERATOR PROGRAMS
I-FAX RECEPTION REPORT REQUEST TIMEOUT SETTING
SET THE TIME FOR I-FAX RECEPTION REPORT REQUEST TIMEOUT.
(1 min. - 240 hours)
HOUR
01
MINUTE
00
Touch the [HOUR] key and then set the hour by
touching the and keys. Set the minute in
the same way. When finished, touch the [OK] key.
Rotation sending setting
When transmitting a document, this setting allows
you to rotate a vertically oriented A4 (8-1/2"x11")
document to a horizontal orientation (A4R (8-1/2"
x11"R)), or rotate a B5R or A5R (5-1/2"x8-1/2"R)
document to B5 or A5 (5-1/2"x8-1/2"). The setting
is normally turned on, and documents are rotated
counterclockwise. (A4R (8-1/2"x11"R) documents
are not rotated.)
KEY OPERATOR PROGRAMS
ROTATION SENDING SETTING
ORIGINAL
SET
A4
B5R
A5R
SENDING
DIRECTION
A4R
B5
B5
A5
OK
Rotation settings can be separately established for
different document sizes. To turn off a rotation
setting, touch the checkbox of the appropriate
setting to remove the checkmark.
Printing page number at receiver
This setting lets you select whether page numbers
are printed at the top of Internet-Fax pages by the
receiving machine. The normal setting is to have
page numbers printed.
I-Fax reception report on/off setting
If the reception report function is enabled, a
reception report is requested. Even if a destination
is specified with the direct address input, a dialog
message will appear asking whether you request
the reception report.
The setting is normally not turned on.
The reception report is returned to the address that
was set using the key operator program, "Set I-Fax
own name and address" (page 56
).
Maximum size of e-mail attachments
To prevent the size of image files transmitted by
the Internet-Fax function from becoming too large,
you can set a size limit.
If the size of the image file created by scanning the
original exceeds the limit, the image file is
discarded. The limit can be set from 1 MB to 10 MB
in 1 MB increments. The initial setting is
UNLIMITED.
58
Page 60

KEY OPERATOR PROGRAMS
If this setting is changed, the setting of "Maximum
size of e-mail attachments" of E-MAIL/FTP
settings will also be changed (page 56
).
Number of resend times at reception error
If the program "I-Fax reception report on/off
setting" is set, set the number of times to retry
before an e-mail indicating Internet-Fax
communication error is to be sent. The default
setting is 2 times.
KEY OPERATOR PROGRAMS
NUMBER OF RESEND TIMES AT RECEPTION ERROR
SET THE NUMBER OF RESEND TIMES AT RECEIVING RECEPTION ERROR REPORT FROM
RECEIVER. (0 - 15 TIMES)
Use the or key to specify the number of
times and then touch the [OK] key.
2
I-Fax receive settings
The I-Fax reception settings allow you to adjust
certain parameters for receiving Internet-Faxes to
better suit your needs.
Settings that can be adjusted depend on the
peripheral devices installed.
The I-Fax receive settings are as follows:
O Auto receive reduce setting
O Reception check interval setting
O Duplex reception setting
O Print style setting
O Set address for data forwarding
O POP3 communication timeout setting
O I-Fax output tray setting
O Anti junk mail/domain name setting
Auto receive reduce setting
When you receive an Internet-Fax that includes the
sender's name and number, the received image is
slightly larger than the standard size. This setting
lets you select whether to have the received image
automatically reduced before printing to fit the
standard size.
Normally automatic reduction is turned on.
NOTE
If you turn automatic reduction off, the overall printed
image may be larger than the original and in some
cases must be split onto two pages. However, the
printed image of the original itself will be the same
size as the original, and thus clearer.
Reception check interval setting
This setting determines the interval at which the
machine checks automatically to see if the mail
(POP3) server has received new mail. After finding
a new e-mail, the machine loads the data and
prints it. The interval can be set from 0 minute to 8
hours in 1 minute increments. The default setting is
5 minutes.
If you set 0 minute, the machine does not check
automatically for new e-mails.
KEY OPERATOR PROGRAMS
RECEPTION CHECK INTERVAL SETTING
SET THE TIME INTERVAL BETWEEN AUTO CHECKS ON MAIL SERVER FOR NEW-ARRIVED
DATA (0 - 8 hours)
Touch the [HOUR] key and then set the hour by
touching the and keys. Set the minute in
the same way. When finished, touch the [OK] key.
NOTE
When the machine is turned on, the machine checks
any new e-mail in the mail (POP3) server.
Duplex reception setting
(Only if a duplex module or duplex module/
bypass tray is installed)
You can use this setting to select whether received
documents are printed on both sides of the paper.
Normally this setting is turned off. If turned on,
received documents will be printed on both sides of
the paper whenever the received document
consists of two or more pages of the same paper
size.
Print style setting
This setting determines the selection condition for
paper when printing received documents. Select
one of the three conditions below. AUTO SIZE
SELECT is normally selected.
O PRINT ACTUAL SIZE CUT OFF DISABLED
Each received image is printed at actual size
without splitting the image onto multiple sheets of
paper. If there is no paper available that is the
same size as the image or greater, the entire
document is temporarily stored in memory.
O PRINT ACTUAL SIZE CUT OFF ENABLED
Each received image is printed at actual size. If
necessary, the image is split onto multiple sheets
of paper.
O AUTO SIZE SELECT
Each received image is printed at actual size when
possible. When not possible, the image is
automatically reduced before printing.
HOUR
00
MINUTE
05
59
Page 61

KEY OPERATOR PROGRAMS
Set address for data forwarding
When a problem prevents the machine from
printing a received Internet-Fax, the transfer
function can be used to forward the received
Internet-Fax to another machine. Use this setting
to program the e-mail address of the destination
machine. Only one e-mail address can be
programmed (maximum of 64 digits).
Touch the [FORWARDING TO] key and input the
address.
Anti junk mail/domain name setting
This program is used to enter addresses from
which you wish to block I-Fax reception. Up to 50
addresses can be entered.
This program is normally disabled.
To block reception from the entered addresses,
touch the [REJECT RECEPTION] key.
To allow reception from the entered addresses,
touch the [ALLOW RECEPTION] key.
To ignore entered addresses and allow reception
from any addresses, touch the [ALL INVALID] key.
POP3 communication timeout setting
This setting determines the time the machine waits
before cancelling data reception when the mail
(POP3) server does not respond. The time can be
set from 30 to 300 seconds in 30 second
increments. The default setting is 60 seconds.
KEY OPERATOR PROGRAMS
POP3 COMMUNICATION TIMEOUT SETTING
SET THE TIME FOR STOPPING DATA RECEIVE OPERATION IN THE CASE OF NO RESPONSE
FROM MAIL SERVER. (30 - 300 sec.)
6
Entering anti junk mail/domain name
Touch the [ENTER] key.
1
The address entry screen appears.
KEY OPERATOR PROGRAMS
ANTI JUNK MAIL/DOMAIN NAME SETTING
ENTER
DELETE
ANTI JUNK MAIL SETTING
ALL INVALID
ALLOW RECEPTION
REJECT RECEPTION
Set the time by touching the and keys and
then touch the [OK] key.
I-Fax output tray setting
This setting is used to select the output tray for
received Internet-Faxes. The trays that can be
selected will vary depending on what peripheral
devices have been installed.
Enter the the e-mail address or domain
2
name.
Up to 64 digits can be entered.
If the first letter is not "@", the string is regarded as
an e-mail address. If the first letter is "@", the
string is regarded as a domain name.
(abc@sharp.co.jp is an e-mail address.
@sharp.co.jp is a domain name.)
Touch the [OK] key.
3
Deleting an anti junk mail/domain name
Touch the [DELETE] key.
1
The deletion screen will appear.
Touch the address key that you wish to
2
delete.
A message will appear. Touch the [YES] key to
delete the number.
To cancel the deletion, touch the [NO] key.
60
Page 62

KEY OPERATOR PROGRAMS
KEY OPERATOR PROGRAMS
SENDER CONTROL
LIST PRINT
FAX DATA
RECEIVE/FORWA
DEFAULT
SETTINGS
KEY OPERATOR CODE
ING
NETWORK
SETTINGS
KEY O
CODE
PRI
SET
SET
LIST PRINT
ENERGY SAVE
T DOCUMEN
ALL KEY OPERATOR PROG
IMAGE SEND
PRINTING OUT SETTINGS
Settings established with the key operator programs can be verified by printing them out.
Press the [CUSTOM SETTINGS] key.
1
Touch the [KEY OPERATOR PROGRAMS]
2
key.
Use the numeric keys to enter the five-digit
3
key operater code number.
For the factory default
setting for the key
operator code number,
see page 2 of the key
operator’s guide.
Touch the [LIST PRINT] key.
4
Touch the [KEY OPERATOR PROGRAMS
5
LISTS] key.
KEY OPERATOR PROGRAMS
LIST PRINT
KEY OPERATOR PROGRAMS LIST
IMAGE SENDING ACTIVITY REPORT
Touch the [IMAGE SEND] key.
6
NOTES
O The list is printed before other jobs waiting.
O In the screen of step 5, you can touch the [ANTI
JUNK MAIL/DOMAIN NAME LIST] key to print the
anti junk mail/domain name list. Print this list when
you wish to check the entered addresses and
domains. (See page 60
name setting.")
O Also you can touch the [IMAGE SENDING
ACTIVITY REPORT (INTERNET-FAX)] key or
[IMAGE SENDING ACTIVITY REPORT (E-MAIL/
FTP)] key to print an activity report (transmissions
and receptions). Print this list when you wish to
check the activity. In addition, you can touch the
print the settings made in the administrator screen
of the web page.
(FAX)
ANTI JUNK FAX NUMBER LIST
key and the [WEB SETTINGS LIST] key to
IMAGE SENDING ACTIVITY REPORT
(INTERNET-FAX)
IMAGE SENDING ACTIVITY REPORT
(E-MAIL/FTP)
ANTI JUNK MAIL/DOMAIN
NAME LIST
"KEY OPERATOR
PROGRAMS LIST
PROCESSING PRINT
DATA." appears in the
message screen and
printing begins.
To cancel printing, touch
the [CANCEL] key.
, "Anti junk mail/domain
OK
1/2
61
Page 63

SPECIFICATIONS
For information on power requirements, power consumption, dimensions, weight, and other specifications that are
common to all features of the machine, refer to Operation manual (for general information and copier operation).
Maximum original size A3 (11"x17")
Two-sided originals
Optical resolution 600dpi
Output resolution
Output modes 1bit/pixel
Halftone processing Error dispersion (200/300/400/600dpi)
File format
File creation method Specified pages per file/One file for all pages
Scan destinations
Supported client PC operating
systems
Management system Uses built-in Web server
Web browser
Possible (when a B/W scanner module/DSPF (AR-EF3) is installed)
E-mail/FTP: 200 x 200, 300 x 300, 400 x 400, 600 x 600dpi
Internet-Fax: 200x100, 200x200, 200x400, 400x400, 600x600dpi
E-mail/FTP File type: PDF/TIFF
Compression mode: NONE/MH (G3)/MMR (G4)
Internet-Fax File type: TIFF-F
Compression mode: MH(G3)/MMR(G4)
Scan to FTP
Scan to Desktop
Scan to E-mail, Internet-Fax
Windows 95/Windows 98/Windows Me/Windows NT Workstation 4.0
(Service Pack 6 or later)/Windows 2000 Professional/Windows XP Home
Edition/Windlows XP Professional/Windows Server 2003
Internet Explorer 5.5 or later (Windows)/5.1 or later (Macintosh), Netscape
Navigator 6.0 or later
Network protocol TCP/IP
LAN connectivity 10Base-T/100Base-TX
Supported mail system Mail servers supporting SMTP, POP3 compatible mail servers
Number of destinations 999 maximum*
Number of senders 999 maximum
Utilities Sharpdesk
* A total of 999 destinations can be stored, including E-mail, FTP, Desktop, Internet-Fax, Fax and Group
destinations. Among these, a combined total of 200 Scan to FTP and Desktop destinations can be stored.
Some discrepancies may exist in the illustrations and content due to improvements to the machine.
62
Page 64

OPERATION MANUAL (for network scanner)
ARM351N-EX1-SCANNER
 Loading...