

Page 1
LC-32LE144E
LC-32LE244E
LCD COLOUR TELEVISION
OPERATION MANUAL
SHARP ELECTRONICS (Europe) GmbH
Sonninstraße 3, D-20097 Hamburg, Deutschland
SHARP CORPORATION
http://www.sharp-eu.com
Printed in Poland
TINS-F527WJZZ
LC-32LE144E
LC-32LE244E
TINS-F527WJZZ
LE144E_244E_Cover_EN.indd 1LE144E_244E_Cover_EN.indd 1 5/31/2012 10:57:08 AM5/31/2012 10:57:08 AM
Page 2
SPECIAL NOTE FOR USERS IN THE U.K.
The mains lead of this product is fitted with a non-rewireable (moulded) plug incorporating a 3A
fuse. Should the fuse need to be replaced, a BSI or ASTA approved BS 1362 fuse marked or
ASA
and of the same rating as above, which is also indicated on the pin face of the plug, must be
used.
Always refit the fuse cover after replacing the fuse. Never use the plug without the fuse cover
fitted.
In the unlikely event of the socket outlet in your home not being compatible with the plug supplied,
cut off the mains plug and fit an appropriate type.
DANGER:
The fuse from the cut-off plug should be removed and the cut-off plug destroyed immediately and
disposed of in a safe manner.
Under no circumstances should the cut-off plug be inserted elsewhere into a 3A socket outlet, as
a serious electric shock may occur.
To fit an appropriate plug to the mains lead, follow the instructions below:
IMPORTANT:
The wires in the mains lead are coloured in accordance with the following code:
Blue: Neutral
Brown: Live
As the colours of the wires in the mains lead of this product may not correspond with the coloured
markings identifying the terminals in your plug, proceed as follows:
• The wire which is coloured blue must be connected to the plug terminal which is marked N or coloured black.
• The wire which is coloured brown must be connected to the plug terminal which is marked L or coloured red.
Ensure that neither the brown nor the blue wire is connected to the earth terminal in your threepin plug.
Before replacing the plug cover make sure that:
• If the new fitted plug contains a fuse, its value is the same as that removed from the cut-off plug.
• The cord grip is clamped over the sheath of the mains lead, and not simply over the lead wires.
IF YOU HAVE ANY DOUBT, CONSULT A QUALIFIED ELECTRICIAN.
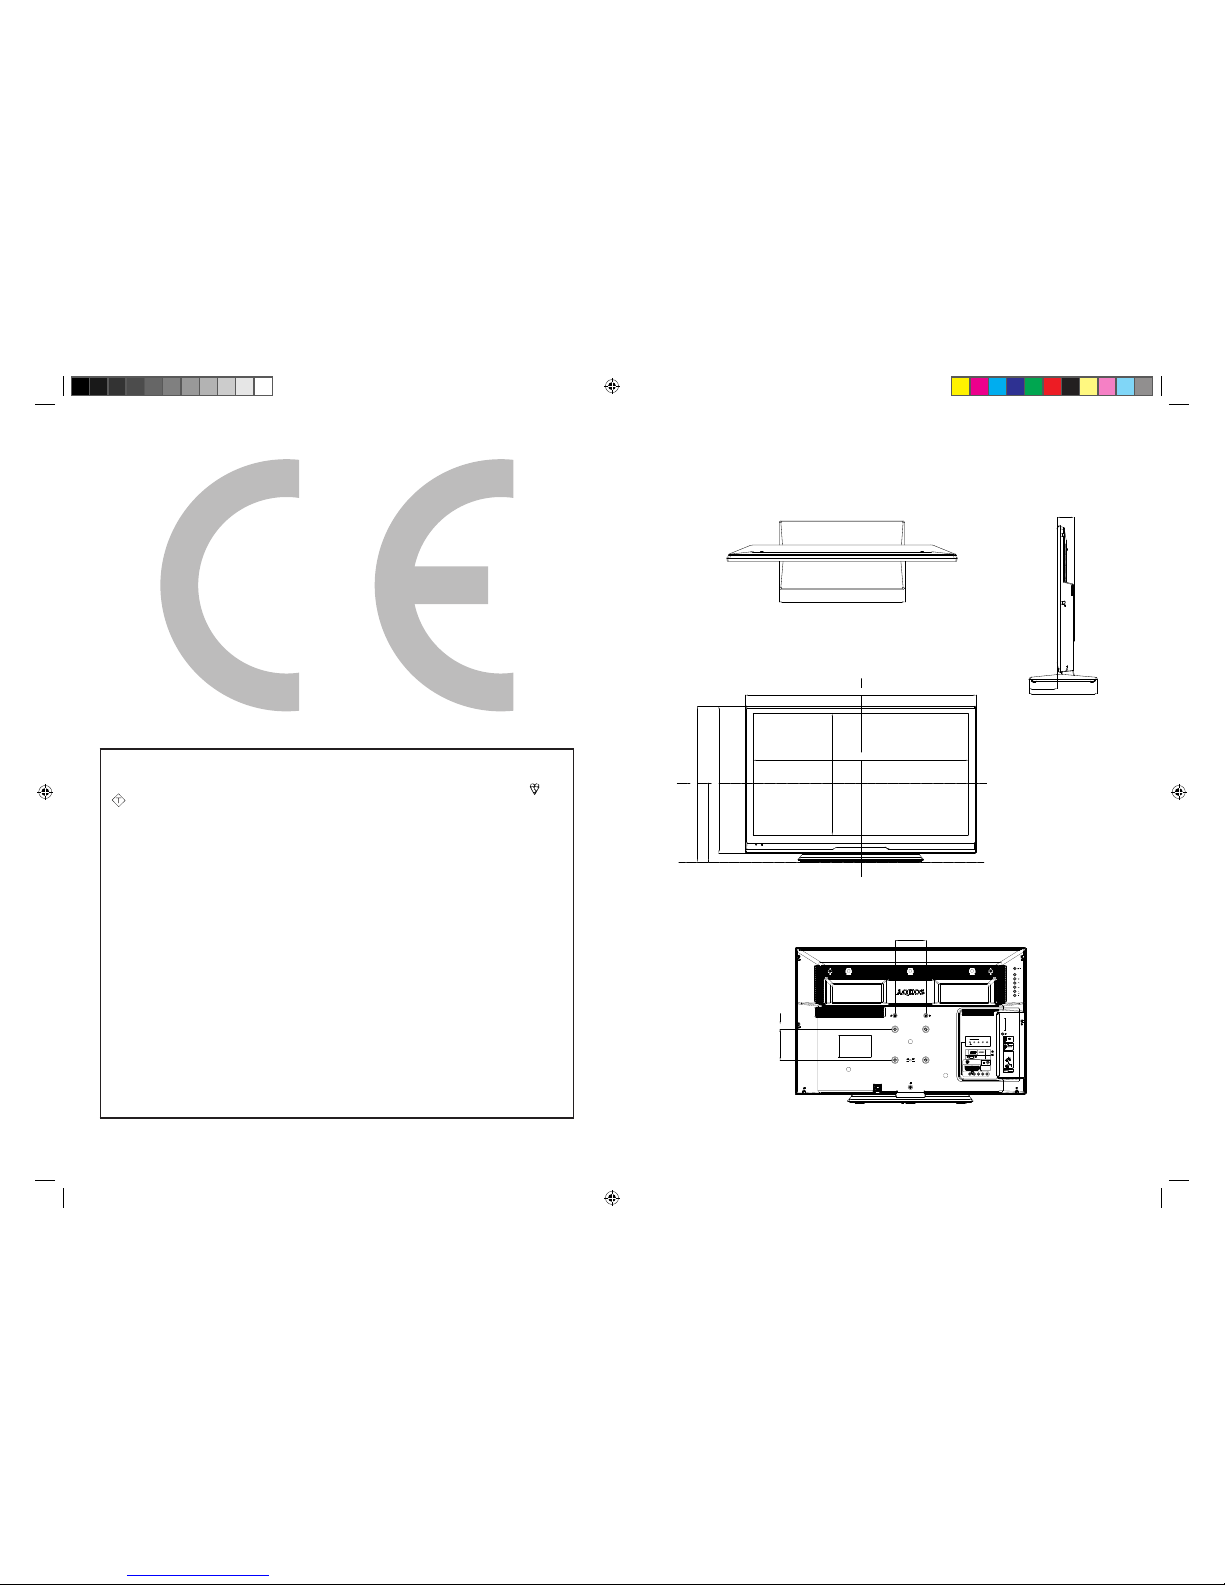
392.9
45
750
698.4
478
286
508
408
100
54
EXT 3
COMPONENT
AV INPUT
EXT 2
HDMI 1
DIGITAL
AUDIO
OUTPUT
EXT 1
SCART
ANT
PC
L-AUDIO-R
P
B(CB)YPR(CR)
C.I.
USB
HDMI 2
OUTPUT
A
A
B
/
AUDIO (L/R)
CAUTION
Use a Product with the
following thickness for
optimal connection to
HDMI cable / USB device.
HDMI : A 12mm
USB : A 10mm
B 7mm
P
MENU
92
222
100
LE144E_244E_Cover_EN.indd 3LE144E_244E_Cover_EN.indd 3 5/31/2012 10:57:08 AM5/31/2012 10:57:08 AM
Page 3

ENGLISH
-
1
OPERATION MANUAL ENGLISH
• The illustrations and on-screen displays in this operation manual are for explanation purposes and may vary slightly from
the actual operations.
Contents
Contents .................................................................. 1
Introduction ............................................................. 2
Dear SHARP customer ........................................ 2
Important Safety Precautions ............................... 2
Remote control unit .............................................3
TV (Front view) ..................................................... 4
TV (Rear view) ...................................................... 4
Preparation .............................................................. 5
Supplied accessories ........................................... 5
Mount the TV base ..............................................5
Mounting the TV on a wall .................................... 5
Installation of batteries ......................................... 6
Using the remote control ...................................... 6
Quick guide ............................................................. 7
Initial installation overview .................................... 7
Watching TV ............................................................ 9
Daily operation ..................................................... 9
Turning on/off the power ................................ 9
Changing channels ........................................ 9
Channel List ................................................... 9
Selecting external video source ...................... 9
Operation without a remote control .............. 10
EPG (Electronic Programme Guide) ...................10
TIMER MENU ......................................... 10
TIMER LIST ............................................ 10
Teletext .............................................................. 11
Using the MHEG5 application (UK only) ....... 11
Channel Setting .................................................... 12
Auto Tuning .......................................................12
Auto Tuning .................................................. 12
Tuner Mode - Antenna ........................... 12
Tuner Mode - Cable ...............................12
Manual tuning .................................................... 12
ATV Manual Tuning ...................................... 12
Channel Sort .......................................... 12
Channel Edit .......................................... 13
DTV Manual Tuning ...................................... 13
DTV mode - Antenna ............................. 13
DTV mode - Cable ................................. 13
DTV Settings .........................................................14
DTV Settings ...................................................... 14
Channels ..................................................... 14
Re-number ............................................. 14
Skip Channels ........................................ 14
Channel Sort .......................................... 14
Channel Options .......................................... 14
Skip Channels ........................................ 14
Parental Control ..................................... 14
Subtitle and Audio ........................................ 14
Subtitle Display ...................................... 14
Subtitle Type .......................................... 14
Digital Subtitle Language or 2nd ............. 14
Audio Type ............................................. 14
Audio Language or 2nd .......................... 14
Password ..................................................... 14
Parental ....................................................... 15
Local Time Setting ....................................... 15
Favorite Control ........................................... 15
Favorite Program .........................................15
Favorite Network .......................................... 15
Channel Grouping ........................................ 15
Common Interface ....................................... 15
TV Menu ................................................................ 16
Picture ............................................................... 16
Picture Settings ............................................ 16
C.M.S. Control ............................................. 16
C.M.S. Adjustment ....................................... 16
DNR ............................................................. 16
MPEG NR .................................................... 16
Sound ................................................................ 16
Adjust sound setting .................................... 16
Digital Audio Output ..................................... 17
Audio Description ......................................... 17
Setup ................................................................. 17
Language ..................................................... 17
Country ........................................................ 17
Tuner Mode ................................................. 17
Auto Tuning .................................................. 17
ATV Manual Tuning ..................................... 17
DTV Manual Tuning ..................................... 17
DTV Settings ............................................... 17
Connection Setting ..................................... 17
Lip Sync ................................................. 17
EXT1 Input ............................................. 18
Picture Position ........................................... 18
Auto Installation .......................................... 18
No Operation Off ......................................... 18
Location ....................................................... 18
Software Upgrade ........................................ 18
Auto Upgrade ........................................ 18
Auto Install ............................................. 18
Manual OAD .......................................... 18
USB Upgrade ........................................ 18
System Information ...................................... 18
Reset TV ...................................................... 18
Features ............................................................ 19
EPG (Electronic Programme Guide) .............. 19
Sleep Timer ................................................. 19
Preferences .......................................................19
HDMI-LINK Setup ........................................ 19
Enable HDMI-LINK ................................. 19
Auto Power On ......................................19
Auto Standby ......................................... 19
Teletext ........................................................ 19
Button Control Lock ..................................... 19
Auto Wide .................................................... 19
4:3 Mode ..................................................... 19
DivX® ................................................................ 19
DivX® Registration ....................................... 19
DivX® Deactivation ...................................... 19
Wide Mode ........................................................ 20
Connecting a USB device .................................... 21
USB function .....................................................21
Basic Operation ........................................... 21
View Photos ................................................. 21
Listen to Music ............................................ 21
Play Movie ................................................... 21
USB device compatibility ...................................22
Connecting external devices ............................... 24
HDMI connection ............................................... 24
YPbPr (Component connection) ......................... 24
SCART connection ............................................ 25
Speaker / Amplifier connection ..........................25
Inserting the Smartcard into CA module ............. 25
Connecting a PC ...............................................26
Digital connection ........................................ 26
Analogue connection ................................... 26
Supported display resolutions ...................... 26
Appendix ............................................................... 27
Troubleshooting ................................................. 27
Specification ...................................................... 28
Environmental specifications .............................. 29
Other information ............................................... 29
Trademarks ........................................................ 30
SHARP_LE144E_1_GB_English.indd 1SHARP_LE144E_1_GB_English.indd 1 5/31/2012 2:55:31 PM5/31/2012 2:55:31 PM
Page 4
2
-
Introduction
Dear SHARP customer
Thank you for your purchase of the SHARP LCD colour TV product. To ensure safety and many years of trouble-free
operation of your product, please read the Important Safety Precautions carefully before using this product.
Important Safety Precautions
• Cleaning—Unplug the AC cord from the AC outlet before cleaning the product. Use a damp cloth to clean the
product. Do not use liquid cleaners or aerosol cleaners.
• Use a soft damp cloth to gently wipe the panel when it is dirty. To protect the panel, do not use a chemical cloth to
clean it. Chemicals may cause damage or cracks in the cabinet of the TV.
• Water and moisture—Do not use the product near water, such as bathtub, washbasin, kitchen
sink, laundry tub, swimming pool and in a wet basement.
• Do not place vases or any other water-filled containers on this product. The water may spill onto
the product causing fire or electric shock.
• Stand—Do not place the product on an unstable cart, stand, tripod or table. Doing so can
cause the product to fall, resulting in serious personal injuries as well as damage to the product.
Use only a cart, stand, tripod, bracket or table recommended by the manufacturer or sold
with the product. When mounting the product on a wall, be sure to follow the manufacturer’s
instructions. Use only the mounting hardware recommended by the manufacturer.
• When relocating the product placed on a cart, it must be moved with utmost care. Sudden
stops, excessive force and uneven floor surface can cause the product to fall from the cart.
• Ventilation—The vents and other openings in the cabinet are designed for ventilation. Do not cover or block these
vents and openings since insufficient ventilation can cause overheating and/or shorten the life of the product. Do
not place the product on a bed, sofa, rug or other similar surface, since they can block ventilation openings. This
product is not designed for built-in installation; do not place the product in an enclosed place such as a bookcase
or rack, unless proper ventilation is provided or the manufacturer’s instructions are followed.
• The LCD panel used in this product is made of glass. Therefore, it can break when the product is dropped or
impact applied. If the LCD panel is broken, be careful not to be injured by broken glass.
• Heat sources—Keep the product away from heat sources such as radiators, heaters, stoves and other heatgenerating products (including amplifiers).
• To prevent fire, never place any type of candle or naked flames on the top or near the TV set.
• To prevent fire or shock hazard, do not place the AC cord under the TV set or other heavy items.
• Headphones—Do not set the volume at a high level. Hearing experts advise against extended
listening at high volume levels.
• Do not display a still picture for a long time, as this could cause an afterimage to remain.
• There is power consumption always if main plug is connected.
• Servicing—Do not attempt to service the product yourself. Removing covers can expose you to high voltage and
other dangerous conditions. Request a qualified person to perform servicing.
The LCD panel is a very high technology product, giving you fine picture details.
Due to the very large number of pixels, occasionally a few non-active pixels may appear on the screen as a fixed point
of blue, green or red. This is within product specifications and does not constitute a fault.
Precautions when transporting the TV
When transporting the TV, never carry it by putting pressure onto the display. Be sure to always carry the TV by two
people holding it with two hands—one hand on each side of the TV.
Wall mounting
Installing the LCD Colour TV requires special skill that should only be performed by qualified service personnel.
Customers should not attempt to do the work themselves. SHARP bears no responsibility for improper mounting or
mounting that results in accident or injury.
WARNING
To prevent the spread of fire, keep candles or other open
flames away from this product at all times.
SHARP_LE144E_1_GB_English.indd 2SHARP_LE144E_1_GB_English.indd 2 5/31/2012 2:55:32 PM5/31/2012 2:55:32 PM
Page 5
Introduction
-
3
ENGLISH
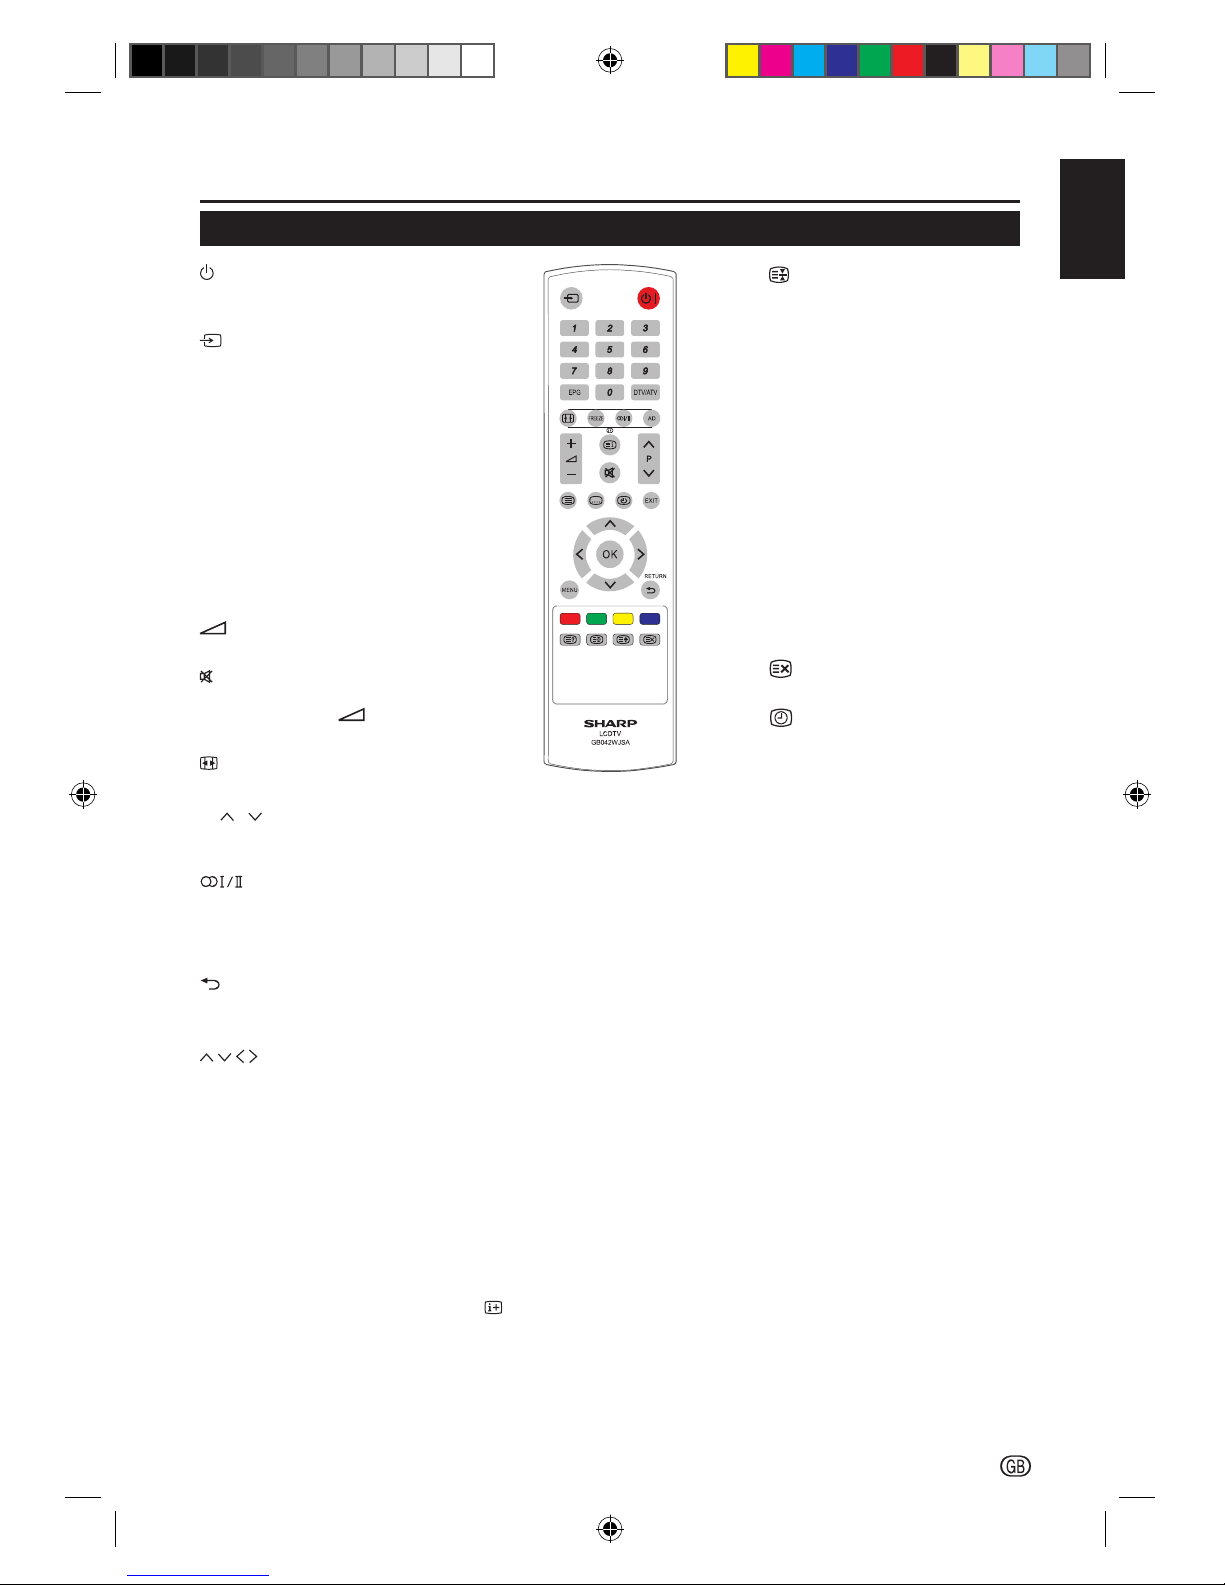
I (POWER)
Press to turn the LCD TV on or to
enter standby mode.
(INPUT SOURCE)
Press to select an input source.
0-9 DIGIT BUTTONS
Press to select a TV channel
directly.
EPG (Electronic Programme
Guide)
Press to display electronic
programme guide when watching
digital channels.
DTV/ATV
Press to switch between ATV and
DTV channels.
(k/l)
Press to adjust the volume.
Press to toggle audio on and off.
You can also press
(k/l) to
restore the previous volume level.
(Wide mode)
Press to select picture formats.
P (
/ )
Press to select programme
channel.
Press to select MONO / STEREO
/ DUAL I / DUAL II for ATV
channel. Press to select Audio
language for DTV channel.
(RETURN)
Press to return to the previous
“Menu” screen.
Press to navigate and confirm your
selection.
OK
Press to activate a setting.
MENU
Press to activate the LCD TV OSD.
EXIT
Press to exit the LCD TV OSD or
return to the previous layer.
R/G/Y/B (Colour Button)
Press to select the pictures with
various colours of text. Different
channels display different
functions.
Remote control unit
m (TELETEXT)
Press to activate Teletext.
Press again to activate Teletext
with TV.
Press again to turn off Teletext.
AD (Audio Description)
Press to switch the Audio
Description On or Off.
[ (SUBTITLE)
For DTV, press to toggle off
/ between available subtitle
languages.
For ATV, press to toggle off /
between available subtitle pages
in Teletext.
v (Top/Bottom/Full)
Press to change the font size: Full
screen, Top half, and Bottom half.
l (INDEX)
Press to return to page 100 or the
index page; and then press 0 to 9.
The teletext page will be numbered
and added to the page you select
or the secondary item.
Press to display programme
information, if available.
(HOLD)
Press to stop the scrolling of
pages.
The text decoder stops receiving
data.
k (REVEAL)
Reveal hidden information such as
answers to a quiz.
FREEZE
Press to freeze a moving image
on the screen (only available when
your input source is TV).
The SCART output signal will also
be frozen when you are watching
digital channels.
Caution: Do not freeze the video
image for long periods of time,
as this may damage the LCD TV
screen.
Press to cancel the teletext screen.
Press to display the Time screen.
SHARP_LE144E_1_GB_English.indd 3SHARP_LE144E_1_GB_English.indd 3 5/31/2012 2:55:32 PM5/31/2012 2:55:32 PM
Page 6
Introduction
4
-
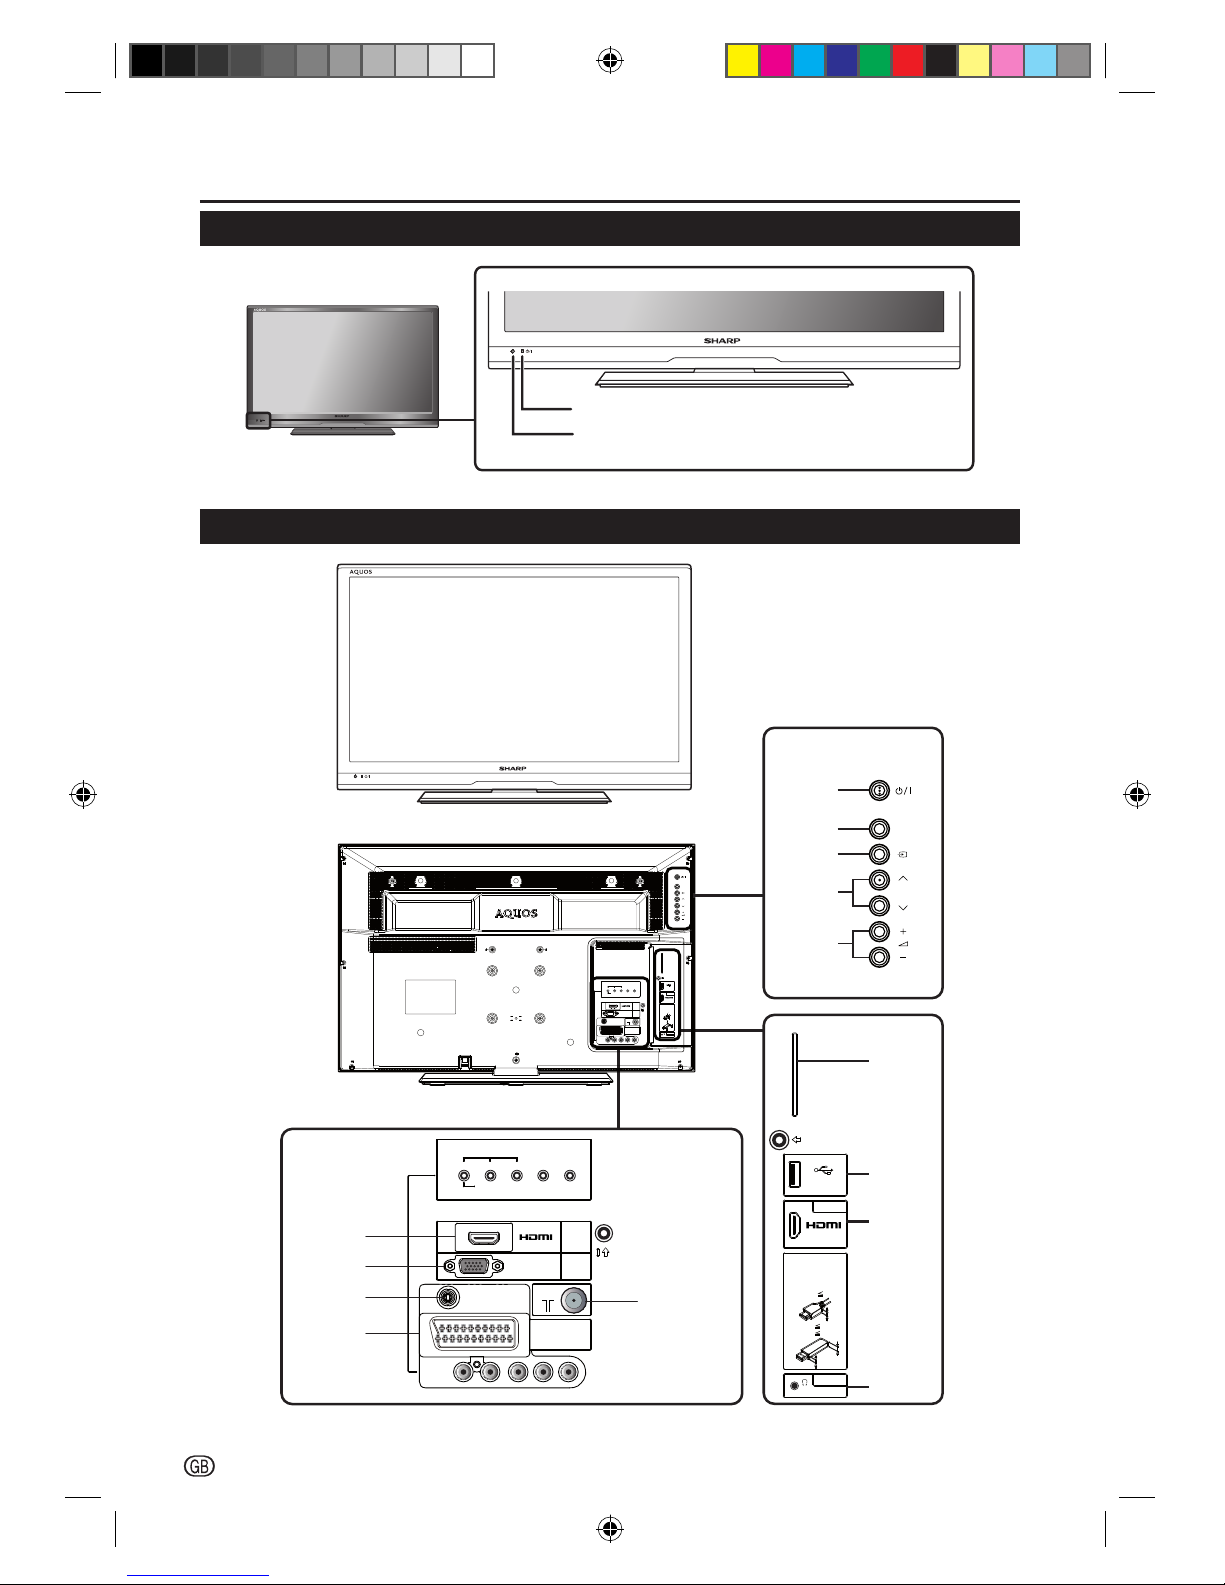
TV (Front view)
(Standby/On) indicator
Remote control sensor
TV (Rear view)
EXT 3
COMPONENT
AV INPUT
EXT 2
HDMI 1
DIGITAL
AUDIO
OUTPUT
EXT 1
SCART
ANT
PC
L-AUDIO-R
P
B(CB)YPR(CR)
C.I.
USB
HDMI 2
OUTPUT
A
A
B
/
AUDIO (L/R)
CAUTION
Use a Product with the
following thickness for
optimal connection to
HDMI cable / USB device.
HDMI : A 12mm
USB : A 10mm
B 7mm
P
MENU
C.I.
USB
HDMI 2
OUTPUT
A
A
B
/
AUDIO (L/R)
CAUTION
Use a Product with the
following thickness for
optimal connection to
HDMI cable / USB device.
HDMI : A 12mm
USB : A 10mm
B 7mm
EXT 3
COMPONENT
AV INPUT
EXT 2
HDMI 1
DIGITAL
AUDIO
OUTPUT
EXT 1
SCART
ANT
PC
L-AUDIO-R
P
B(CB)YPR(CR)
P
MENU
Common
Interface
slot
COMPONENT / CVBS and
L/R AUDIO INPUT
Headphone
Output
USB
Tuner Input
SCART
(CVBS Tuner out)
PC IN
(VGA)
HDMI 1
HDMI 2
Programme
(Channel)
Volume
Menu
Input
Source
Power
DIGITAL
AUDIO OUTPUT
SHARP_LE144E_1_GB_English.indd 4SHARP_LE144E_1_GB_English.indd 4 5/31/2012 2:55:33 PM5/31/2012 2:55:33 PM
Page 7
-
5
ENGLISH
Preparation
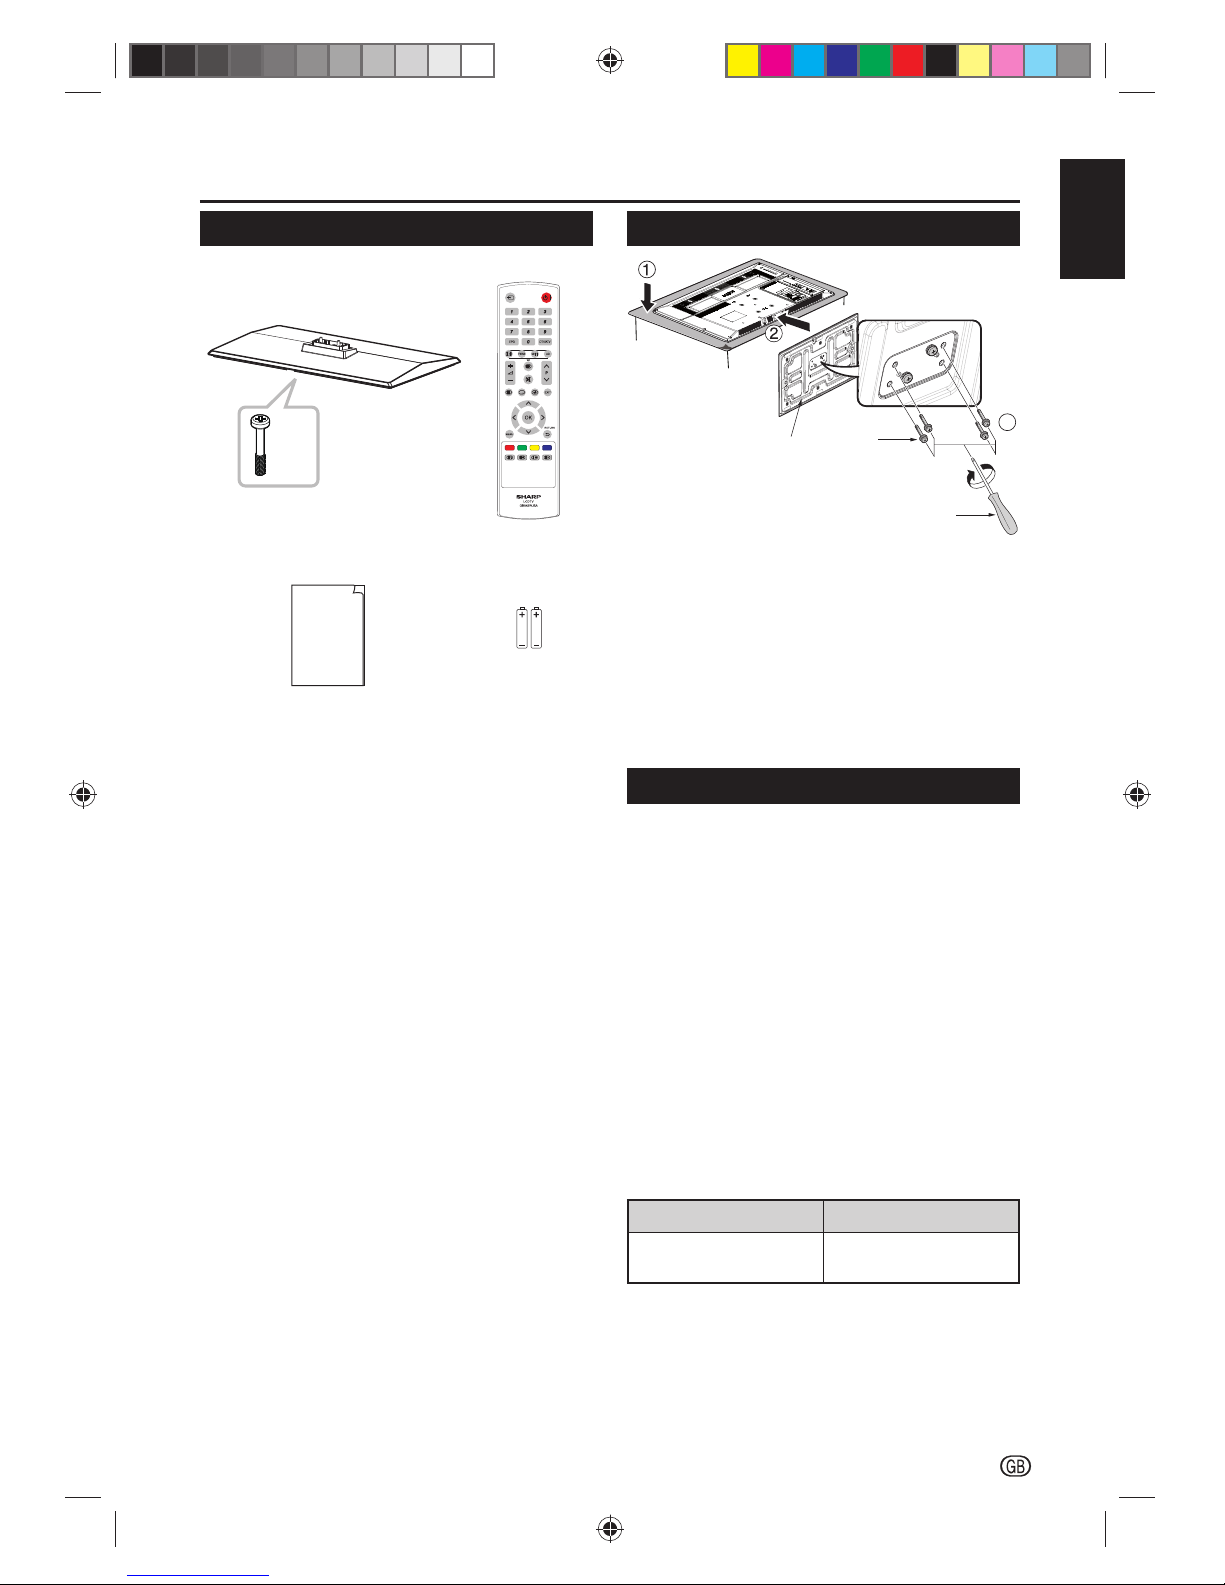
Supplied accessories
Operation Manual
x 4
Operation Manual
Stand unit and screws Remote Control (×1)
R03 (“AAA” size)
battery (x2)
Mount the TV base
E
X
T
3
COMPO
NE
N
T
AV
IN
P
UT
E
X
T
2
HD
M
I
1
DI
G
I
TA
L
A
UDI
O
O
U
TP
UT
E
X
T
1
S
C
ART
A
NT
PC
L
-A
UDI
O-
R
P
B
(
C
B
)
Y
P
R
(C
R
)
C
.
I
.
U
S
B
H
DMI
2
O
U
TP
U
T
A
A
B
/
A
U
D
IO
(
L/
R
)
C
A
U
T
I
O
N
U
s
e
a
P
r
od
u
ct w
i
t
h
th
e
f
oll
o
w
i
n
g
thic
knes
s
f
or
opt
i
mal
co
n
n
e
c
tio
n
t
o
H
D
MI
cab
le
/
USB
de
v
ic
e
.
H
DM
I
:
A
1
2
mm
U
S
B
:
A
10mm
B
7mm
P
M
E
N
U
3
Stand
Screw
Screw driver
1. Put the TV with its face down on a safe surface
covered by a soft and smooth cloth.
2. Adjust the TV base to the bottom of the TV.
Please be sure the arrow heads are facing front.
3. Fasten the screws by using a cross-head
screwdriver (not supplied).
NOTE
• To detach the TV stand, do these steps in reverse order.
Mounting the TV on a wall
• This TV should be mounted on a wall only with a
SHARP wall mount bracket.
The use of other wall mount brackets may result
in an unstable installation and may cause serious
injuries.
• Mounting the LCD colour TV requires special
skills and should only be performed by qualified
service personnel. Customers should not attempt
to do the work themselves. SHARP bears no
responsibility for improper mounting or mounting
that results in accident or injury.
• You can ask qualified service personnel about using an
optional bracket to mount the TV to a wall.
• When you mount the TV on a wall, you should attach
the supporting post.
• Detach the cable tie on the rear of the TV when using
the optional mount bracket.
• Optional accessory: AN-130AG1
Part name Part number
Wall mount bracket AN-130AG1
SHARP_LE144E_1_GB_English.indd 5SHARP_LE144E_1_GB_English.indd 5 5/31/2012 2:55:35 PM5/31/2012 2:55:35 PM
Page 8

Preparation
6
-
Installation of batteries
1. Open the battery cover.
2. Insert two R03 (“AAA” size) batteries into remote
control. Make sure the (k) and (l) ends are
facing correct direction.
3. Replace the cover.
NOTE
• If you are not going to use the remote control for a long
time, remove the batteries to avoid damaging remote
control caused by chemical leakage.
CAUTION
Improper use of batteries can result in chemical
leakage or explosion. Be sure to follow the instructions
below:
• Do not mix batteries of different types. Different
types of batteries have different characteristics.
• Do not mix old and new batteries. Mixing old and
new batteries can shorten the life of new batteries or
cause chemical leakage in old batteries.
• Remove batteries as soon as they have worn out.
Chemicals that leak from batteries can cause a rash.
If you find any chemical leakage, wipe thoroughly
with a cloth.
• The batteries supplied with this product may have a
shorter life expectancy due to storage conditions.
Note on disposing batteries:
The batteries provided contain no harmful materials
such as cadmium, lead or mercury.
Regulations concerning used batteries stipulate
that batteries may no longer be thrown out with the
household rubbish. Deposit any used batteries free of
charge into the designated collection containers set up
at commercial businesses.
Using the remote control
Use the remote control unit by pointing it towards the
remote control sensor. Objects between the remote
control unit and sensor may block proper operation.
Remote control
sensor
30º (5 m)
Horizontal &
Vertical
(5 m)
0º
Menu Operation
1. Press MENU on the remote control to display the
menu screen.
Preferences
2. Press to select the desired menu (Picture,
Sound, Setup, Features, Preferences), and then
press OK.
3. Press to select / adjust the item to the
desired level. Press OK if necessary.
4. Press EXIT to return to the previous layer.
SHARP_LE144E_1_GB_English.indd 6SHARP_LE144E_1_GB_English.indd 6 5/31/2012 2:55:38 PM5/31/2012 2:55:38 PM
Page 9

-
7
ENGLISH
Initial installation overview
Follow these steps one by one when using the TV
for the first time. Some steps may not be necessary
depending on your TV installation and connection.
Preparation
1
Connect antenna cable to the antenna terminal.
If necessary, insert CA module into the CI slot to
watch scrambled broadcasts.
Connect the AC cord to the TV.
Product shape
varies in some
countries.
NOTE
• Place the TV close to the AC outlet, and keep the power
plug within reach.
Power on and run the auto installation
2
Turn on the TV power with a/I.
EXT 3
COMPONENT
AV INPUT
EXT 2
HDMI 1
DIGITAL
AUDIO
OUTPUT
EXT 1
SCART
ANT
PC
L-AUDIO-R
P
B(CB)YPR(CR)
C.I.
USB
HDMI 2
OUTPUT
A
A
B
/
AUDIO (L/R)
CAUTION
Use a Product with the
following thickness for
optimal connection to
HDMI cable / USB device.
HDMI : A 12mm
USB : A 10mm
B 7mm
P
MENU
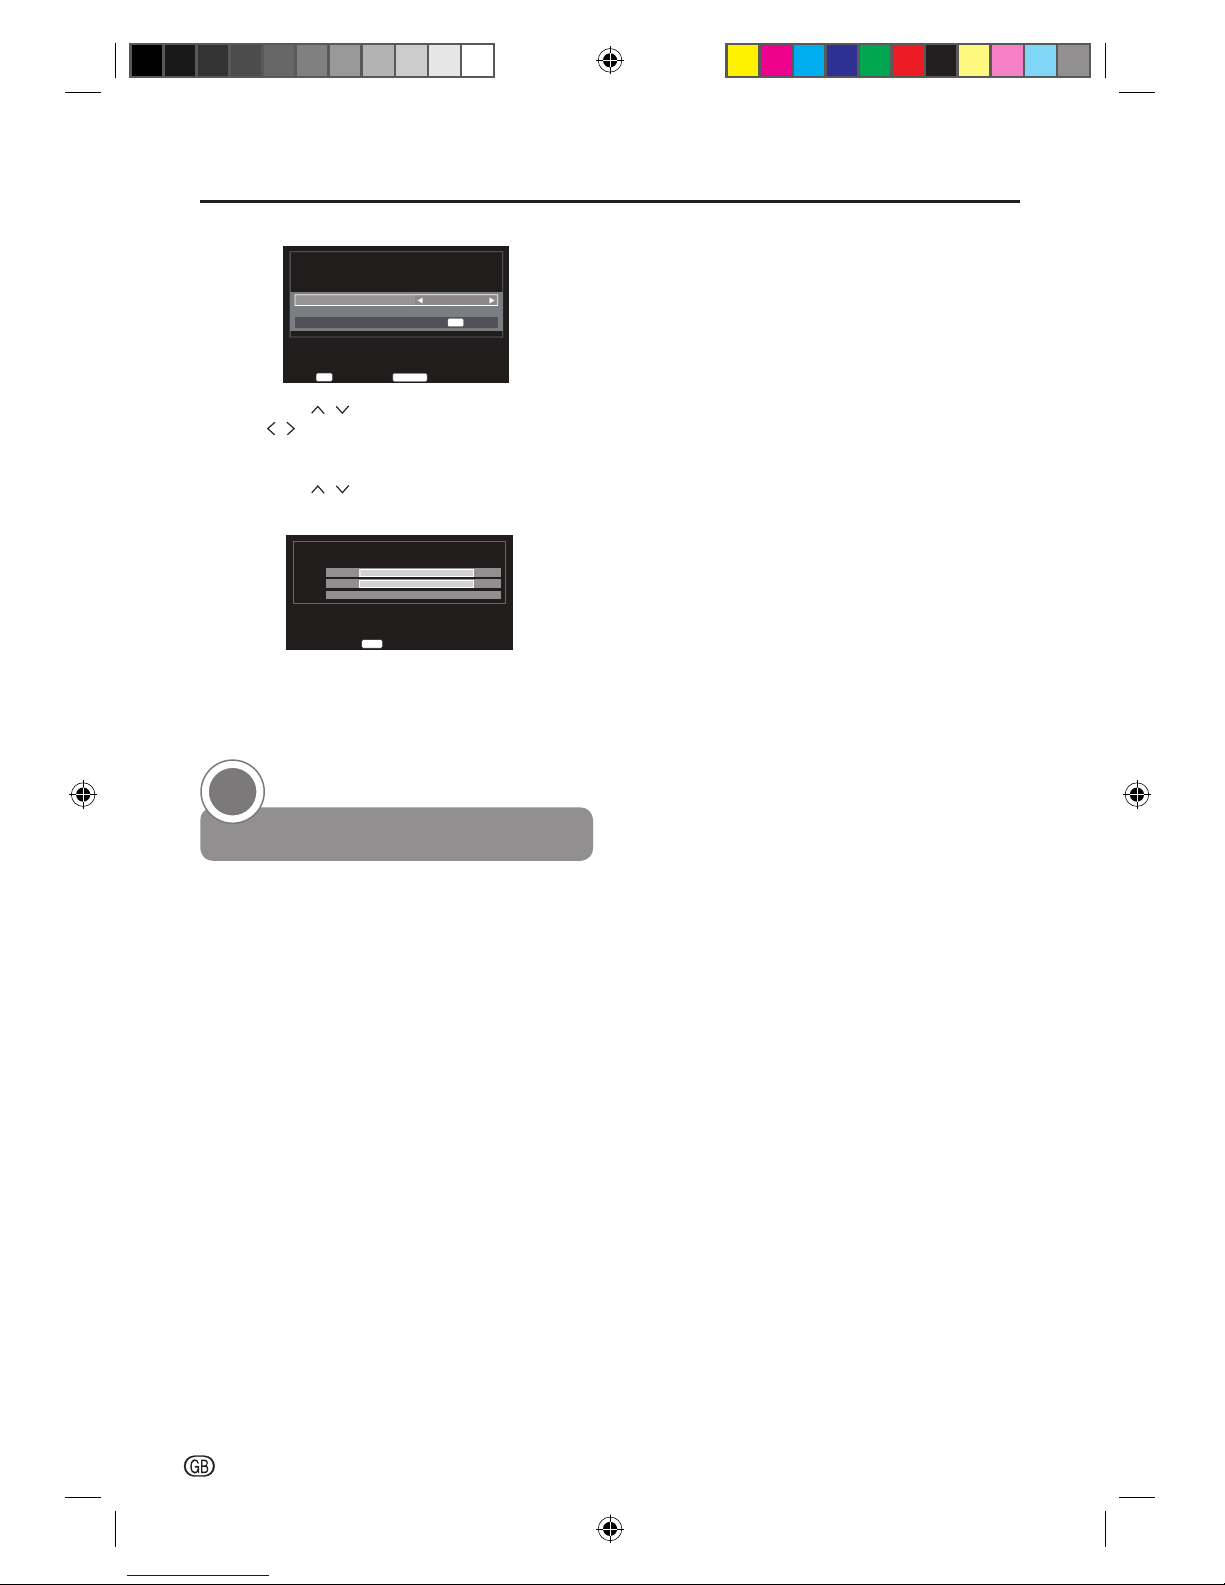
Run the initial auto installation.
Auto Installation
Language
Country
Digital Subtitle Language
Digital Subtitle Language 2nd
Audio Language
Audio Language 2nd
English
Germany
English
English
English
English
Back
RETURN
Select Tuner Mode
OK
1. Language setting
2. Country setting
3. Digital Subtitle Language
4. Digital Subtitle Language 2nd
5. Audio Language
6. Audio Language 2nd
Press
to select the above items
and set to the desired language or country,
and press OK.
7. Tuner mode
Tuner Mode
Back
RETURN
Select Location
OK
Antenna
Press to select Antenna or Cable, and
press OK.
8. TV Location setting
Location
Store
To use the TV for the display in a store showroom,
please select [Store].
[Home] mode is recommended for normal use.
Back
RETURN
Select Auto Tuning
OK
Press to select Home or Store, and press
OK.
When Store is selected, the confirmation
window appears. Press
to select YES or
NO, and press OK.
Quick guide
SHARP_LE144E_1_GB_English.indd 7SHARP_LE144E_1_GB_English.indd 7 5/31/2012 2:55:39 PM5/31/2012 2:55:39 PM
Page 10
Quick guide
8
-
9. Tuning Mode
Auto Tuning
Tuning Mode
Start Scan
ATV and DTV
OK
Back
RETURN
Enter
OK
Press to select Tuning Mode, and press
to select ATV, DTV or ATV and DTV.
10. Start searching channels
Press
to select Start Scan, and press
OK.
Auto Tuning
ATV
DTV
Stop
EXIT
Progress
1 %
0 %
Channel: C3 Station:
Found
0
0
NOTE
• You may be prompted to select your local cable
operator before running the cable scan mode.
Watch TV
3
Congratulations! Now you can watch TV.
If necessary, adjust the antenna to attain maximum
signal reception.
SHARP_LE144E_1_GB_English.indd 8SHARP_LE144E_1_GB_English.indd 8 5/31/2012 2:55:42 PM5/31/2012 2:55:42 PM
Page 11

-
9
ENGLISH
Watching TV
Daily operation
Turning on/off the power
Turn on the power by pressing the a/I button on the TV.
Turn off the power by pressing again the a/I button
on the TV.
EXT 3
COMPONENT
AV INPUT
EXT 2
HDMI 1
DIGITAL
AUDIO
OUTPUT
EXT 1
SCART
ANT
PC
L-AUDIO-R
P
B(CB)YPR(CR)
C.I.
USB
HDMI 2
OUTPUT
A
A
B
/
AUDIO (L/R)
CAUTION
Use a Product with the
following thickness for
optimal connection to
HDMI cable / USB device.
HDMI : A 12mm
USB : A 10mm
B 7mm
P
MENU
Standby mode
E
To standby mode
If the TV set is switched on, you can switch it to
standby mode by pressing B button on the remote
control.
E
Switching on from standby
To switch on from standby mode, press B button on
the remote control.
TV indicator status
B indicator
Status
Off Power off
Red Standby
Green Power on
NOTE
• If you are not going to use this TV for a long period of
time, be sure to remove the AC cord from the power
outlet.
• A small amount of electric power is still consumed even
when the power is turned off.
Changing channels
Change channels by pressing P button.
Channel List
Channel List allows you to quickly find the channel.
• Press OK to bring up the Channel List.
If the Favorite Control in the DTV Settings is set to On,
channel list will show your favorite programs, which have
been set in the Favorite Program in DTV Settings.
• Use the
button to navigate the list. Once a channel
you wish to watch is highlighted, press OK to switch to
the channel.
Selecting external video source
Once the connection is done, press b button to
display the Input Source screen, and then press
button to switch over to the appropriate external
source, and press with OK button to confirm.
Input Source
TV
EXT1
EXT2
EXT3
HDMI1
HDMI2
USB
PC
SHARP_LE144E_1_GB_English.indd 9SHARP_LE144E_1_GB_English.indd 9 5/31/2012 2:55:43 PM5/31/2012 2:55:43 PM
Page 12

Watching TV
10
-
Operation without a remote control
P
MENU
EXT 3
COMPONENT
AV INPUT
EXT 2
HDMI 1
DIGITAL
AUDIO
OUTPUT
EXT 1
SCART
ANT
PC
L-AUDIO-R
P
B(CB)YPR(CR)
C.I.
USB
HDMI 2
OUTPUT
A
A
B
/
AUDIO (L/R)
CAUTION
Use a Product with the
following thickness for
optimal connection to
HDMI cable / USB device.
HDMI : A 12mm
USB : A 10mm
B 7mm
P
MENU
This function is useful when there is no remote control
within your reach.
1. Press MENU briefly to display the direct control
screen.
2. Press P instead of , or press k/l
instead of , to select the menu option.
3. Press MENU to confirm the selection.
NOTE
• The direct control menu screen will disappear if left
unattended for several seconds.
EPG (Electronic Programme Guide)
EPG is an on-screen guide that displays scheduled
digital TV programmes. This guide is not available with
analogue channels. You can navigate, select and view
programmes.
With the EPG menu you can:
• View a list of currently broadcast digital
programmes.
• View upcoming programmes.
Switch on EPG
NOTE
• The first time you use EPG, you may be prompted
to perform an update. If so, follow the on-screen
instructions.
1. Press EPG on the remote control, the EPG will
appear and the detailed information about the
current programme is displayed.
E TIMER MENU
1. Press to select desired date, and press OK.
2. Press to select desired channel, and press
.
3. Press to select programme, and press OK.
Programme Guid 4e Rossia K
í
í
í
í
í
í
í
í
í
Deejay Chiama Italia
Deejay Hits
The Club
Deejay Tg
Deejay News Beat
Deejay News Beat
)UL$Xg
4
4
6
9
Rossia K
Radio Rossia
NTV
Rossia
75..DQDO
%LELJRQ
SeUvice ,QIoUmatioQ..
SeUvice ,QIoUmatioQ..
SIT
Back
RETURN
Save
OK
Edit
Programme Timers
4 Rossia K
"Deejay Chiama Italia".
í$XJ
ONCE
2II
Repeat
Subtitle
$XJ
4. Press to select Repeat or Subtitle, and then
press < > to adjust the setting as required.
5. Press OK to save.
E TIMER LIST
1. Press Blue button on the remote control to enter
the Timer List menu.
07:42:58 Fri, 27 Aug
Back
RETURN
Edit
OK
4
6
11
Rossia K
Rossia 2
SIT 5
Channel Date
Fri, 27 Aug
Fri, 27 Aug
Fri, 27 Aug
Time
í
í
í
Repeat
ONCE
ONCE
ONCE
Delete
Programme Timers
2. Press to select desired programme and
press OK to edit.
NOTE
• Press Red button on the remote control to delete the
timer.
3. Press to select Channel, Date, Start Time,
End Time, Repeat or Subtitle and press < > to
adjust the settings as required.
07:35:39 Fri, 27 Aug
4
6
11
Rossia K
Rossia 2
SIT 5
Channel Date
Fri, 27 Aug
Fri, 27 Aug
Fri, 27 Aug
Time
07:52í07:5
0:05í0:35
09:45í11:55
Repeat
ONCE
ONCE
ONCE
Back
RETURN
Save
OK
Edit
Programme Timers
01 Rossia K
01 Rossia K
2010027
0:05
0:35
ONCE
Off
Channel
Date
Start Time
End Time
Repeat
Subtitle
Programme Timers
4. Press OK to save the settings.
SHARP_LE144E_1_GB_English.indd 10SHARP_LE144E_1_GB_English.indd 10 5/31/2012 2:55:44 PM5/31/2012 2:55:44 PM
Page 13

Watching TV
-
11
ENGLISH
Teletext
What is Teletext?
Teletext broadcasts pages of information and
entertainment to specially equipped television sets.
Your TV receives Teletext signals broadcast by a TV
network, and decodes them into graphical format for
viewing. News, weather and sports information, stock
exchange prices and programme previews are among
the many services available.
Turning on and off Teletext
1. Select a TV channel or external source providing
a Teletext programme.
2. Press m to display Teletext.
• Many stations use the TOP operating system,
while some use FLOF (e.g. CNN). Your TV
supports both these systems. The pages are
divided into topic groups and topics.
• If you select a programme with no Teletext signal,
Teletext will not be displayed.
• The same message displays during other modes
if no Teletext signal is available.
3. Press m again to display Teletext with TV
picture.
4. Press m again to deactivate Teletext.
NOTE
• Teletext will not work if the selected signal type is RGB.
Buttons for teletext operations
Buttons Description
P ( / ) Increase or decrease the page number.
Colour
(R/G/Y/B)
Select a group or block of pages
displayed in the coloured brackets at
the bottom of the screen by pressing
the corresponding Colour (R/G/Y/B)
on the remote control unit.
0 - 9 Directly select any page from 100 to
899 by using 0 - 9.
v
(Top/
Buttom/Full)
Switch the Teletext image to Top,
Bottom or Full.
l (INDEX)
Press this button to return to page 100
or index page.
3 (HOLD)
Stop updating Teletex t pages
automatically or release the hold mode.
k
(REVEAL)
Reveal or hide hidden information such
as an answer to a quiz.
[
(SUBTITLE)
Display the subtitle or exit the subtitle
screen.
• Subtitles will not be displayed when
the service does not contain subtitle
information.
Cancel the Teletext display.
Display or exit the time screen.
Using the MHEG5 application (UK only)
Some services bring you programmes with the MHEG
(Multimedia and Hypermedia Expert Group) application
encoded, letting you experience DTV interactively.
When provided, the MHEG5 application will start when
you press the m button.
MHEG5 screen sample
SHARP_LE144E_1_GB_English.indd 11SHARP_LE144E_1_GB_English.indd 11 5/31/2012 2:55:47 PM5/31/2012 2:55:47 PM
Page 14

12
-
Channel Setting
3. Press to select Scan type, and press
to select Quick Scan or Full Scan.
4. Press to select Start Frequency, End
Frequency, Modulation, Symbol Rate or Network
ID, and use digit buttons on the remote control to
define the information or select Auto for tuning.
5. When country was selected “Others” and ATV
system was selected, press to select
System, and press to select System.
6. Press to select Start Scan, and press OK to
start auto tuning.
NOTE
• The information should be given by your cable provider.
• Network ID is only available for Quick Scan.
Manual tuning
There are two TV modes: ATV and DTV that can be
tuned-in manually using Manual Tuning.
ATV Manual Tuning
Press MENU.
Press to select Setup, and press OK.
Press to select ATV Manual Tuning, and press
OK.
E Channel Sort
Channel Sort allows you to reorder the channels.
1. Press to select desired channel and press .
ATV Manual Tuning
Position
1
2
3
4
5
6
Channel
C1
C2
C3
C4
C5
C6
Station
ннннн
ннннн
ннннн
ннннн
ннннн
ннннн
Back
RETURN
Sort Enter
OK
2. Press to select the channel you wish to
swap and press .
The positions of the two channels are swapped.
Auto Tuning
Auto Tuning
The TV automatically detects and stores all available
services in your area. This function also allows you to
perform the channel setting for digital and analogue
individually and reconfigure the settings after the initial
auto installation has been completed.
Press MENU.
Press
to select Setup, and press OK.
Press to select Auto Tuning, and press OK.
E Tuner Mode - Antenna
1. Press to select ATV and DTV, DTV or ATV,
and press OK.
Auto Tuning
Tuning Mode
Start Scan
ATV and DTV
OK
Back
RETURN
Previous settings will be lost !
Press EXIT for no change.
Enter
OK
2. When country was selected “Others” and ATV
system was selected, press to select
System, and press to select system.
3. Press to select Start Scan, and press OK to
start auto tuning.
E Tuner Mode - Cable
1. Press to select ATV and DTV, DTV or ATV,
and press OK.
Auto Tuning
Tuning Mode
Start Scan
Operator Selection
Scan Type
Start Frequency (MHz)
End Frequency
Modulation
Symbol Rate
Network ID
ATV and DTV
Quick Scan
Auto
Auto
Auto
Auto
Auto
OK
Previous settings will be lost !
Press EXIT for no change.
Back
RETURN
Edit
2. Press to select Operator Selection, and
press to select Operator Selection.
NOTE
• You may be prompted to select your local cable
operator before running the cable scan mode.
SHARP_LE144E_1_GB_English.indd 12SHARP_LE144E_1_GB_English.indd 12 5/31/2012 2:55:47 PM5/31/2012 2:55:47 PM
Page 15

Channel Setting
-
13
ENGLISH
E Channel Edit
Channel Edit allows you to change the channel number
or the channel name.
1. Press to select desired channel and press
OK.
2. Press to select an item, then press to
change the data, and then press OK.
ATV Manual Tuning
Manual fine tuning
1 BG P C69 0
ннннн
Back
RETURN
Select Change Save
OK
A BCD E F G H I
A Position:
The number to be pressed on the remote
control.
B System:
Specific to certain areas.
C Colour system:
Factory set to Auto, should only be changed
if problems are experienced, i.e. NTSC input
from external source.
D Skip:
Means nothing has been stored or the
facility to skip the channel is On.
E Signal Class:
The channel classification.
F Channel:
The channel number on which a station is
being broadcast.
G Searching:
Search up and down for a signal.
H Manual fine tuning:
Turn on to execute fine tune function.
Turn off to execute manual fine tune function.
I
Station:
Station identification. Use the buttons
to enter up to seven characters.
3. Press OK to save.
DTV Manual Tuning
Press MENU.
Press
to select Setup, and press OK.
Press
to select DTV Manual Tuning, and press
OK.
E DTV mode - Antenna
1. Press to select RF Channel and press to
select or use the digit buttons on the remote to
enter a channel.
DTV Manual Tuning
OK
RF Channel
Start Scan
5
Signal Strength
Quality
Weak Average Strong
Poor
Back
RETURN
EditInput
0−9
2. Press to select Start Scan and press
OK
to
start tuning.
E DTV mode - Cable
1. Press to select Frequency, Modulation or
Symbol Rate, and use the digit buttons on the
remote to define the information or select Auto
for tuning.
DTV Manual Tuning
OK
Frequency
Modulation
Symbol RatG
Start Scan
113.000 MH\
QAM 16
4000 KS/s
Signal Strength
Quality
Weak Average Strong
Poor
Back
RETURN
EditInput
0−9
2. Press to select Start Scan and press OK to
start tuning.
SHARP_LE144E_1_GB_English.indd 13SHARP_LE144E_1_GB_English.indd 13 5/31/2012 2:55:49 PM5/31/2012 2:55:49 PM
Page 16

14
-
NOTE
• To view a locked channel, you must enter a password.
When you select a locked channel, a password prompt
message pops up.
Subtitle and Audio
You can enable subtitles for each TV channel.
Subtitles are broadcasted via teletext or DVB-T digital
broadcasts. With digital broadcasts, you have the
additional option of selecting a preferred subtitle
language.
E Subtitle Display
Press to select On to display subtitle always.
Select Off to close subtitles.
E Subtitle Type
When watching channels with hearing impaired service,
you can enable the subtitle commentary for the hearing
handicapped. For digital channels only.
(Normal/Hearing Impaired)
E Digital Subtitle Language or 2nd
Press to select a desired subtitle language.
NOTE
• If your selected subtitle language is not broadcast, the
default language subtitle will be displayed.
• If the 1st Subtitle language you selected is not available,
the 2nd Subtitle language will be displayed.
E Audio Type
When watching channels with hearing impaired service,
you can enable the subtitle commentary for the hearing
handicapped. For digital channels only.
(Normal/Hearing Impaired)
E Audio Language or 2nd
Press to select a desired audio language.
Password
Lock TV channels or connected devices with a
four-digit code to prevent children from watching
unauthorized content.
Password
New Password
Confirm Password
Enter your password by using the digit buttons on the
remote control.
NOTE
• If you forget your password, enter “1276” to override
any existing passwords.
DTV Settings
DTV Settings
Press MENU.
Press
to select Setup, and press OK.
Press
to select DTV Settings, and press OK.
Channels
Channels
TV
Back
RETURN
5HíQXPEHU Skip
3RViWiRQ
803
804
805
806
807
805
1aPH
Rossia 1
Rossia 24
NTV
TR. 5 kaPal
BiEiJoQ
+264 +'0oYiQJ
SoUW
OK
E Re-number
1. Press the Red button on the remote to renumber
the highlighted channel.
2. Edit the channel number using the digit buttons
on the remote and press OK.
E Skip Channels
Channel Skip allows you to skip one or more channels
when pressing P on the remote to switch between
channels.
1. Press the Blue button on the remote.
A
icon appears.
E Channel Sort
Channel sort allows you to reorder the channels.
1. Press to select desired channel and press
OK. A tick icon appears.
2. Press to select the channel you wish to
swap and press OK.
The positions of the two channels are swapped.
Channel Options
E Skip Channels
1. Press to highlight the skip ( ) box.
2. Press OK. A tick appears in the box.
E Parental Control
Lock TV channels to prevent children from watching
certain channels.
1. Press to highlight the lock ( ) box.
2. Press OK. A tick appears in the box.
If you have already set the password, enter it here.
If the password had not been set, see Password to
set a new password.
SHARP_LE144E_1_GB_English.indd 14SHARP_LE144E_1_GB_English.indd 14 5/31/2012 2:55:51 PM5/31/2012 2:55:51 PM
Page 17

DTV Settings
-
15
ENGLISH
Parental
Some digital broadcasters rate their programmes
according to age.
You can set TV to display only programmes with age
ratings higher than your child’s.
This function requires a password.
1. Enter your password to access the Parental
menu.
2. Press to set the age rating from age 4~18 or
select None to turn this function off or Block All.
NOTE
• This function is available for programmes with Age
Rating information.
Local Time Setting
Set the current time.
Favorite Control
This function will show your favorite programs on the
channel list.
Favorite Program
Set your favorite program shown on the channel list.
Favorite Network
When watching the digital TV, select your favourite
network in order to allocate channels of your favourite
network on the top of channel list.
Select your favourite network and press OK.
NOTE
• This menu is available only when 1) “Norway” is
selected on country setting and 2) more than two
networks are found after automatic channel scan.
Channel Grouping
The channel group setting is to group the service type
(Video or Audio services) while changing channel by
P+/P− buttons.
It is required for Riks TV certification for Norway.
When Channel Grouping is set to On, the P+/P− will
change the services in a group, for example we have
the services in channel list like below
1. V1 (video service)
2. V2
3. V3
4. V4
5. V5
6. A1 (audio service)
7. A2
8. A3
If channel is set to On, the P+/P− will change service
among V1 to V5 when DTV video is currently selected,
the way to change service type to audio is to push
DTV/ATV button, DTV/ATV button will be changing
source among ATV, DTV video and DTV audio. The
channel grouping will be changed to On automatically
while country is set to Norway.
Common Interface
Checking the CA module information.
NOTE
• This menu is only available for digital stations.
• The content of this menu depends on the provider of the
CA module.
Module: General information on CA module displays.
Menu: Adjustment parameters of each Smartcard
displays.
Enquiry: You can input numerical values such as
passwords here.
SHARP_LE144E_1_GB_English.indd 15SHARP_LE144E_1_GB_English.indd 15 5/31/2012 2:55:53 PM5/31/2012 2:55:53 PM
Page 18

16
-
TV Menu
Picture
Press MENU.
Press to select Picture, and press OK.
Picture
Picture Settings
C.M.S. Adjustment
OK
C.M.S. Control
DNR
MPEG NR
Off
Low
Low
Picture Settings
You can customise current picture mode settings while
selecting “User” in the Picture Settings menu.
Selected
item
Description
Smart Picture Smart picture to set your TV to a
predefined picture setting.
(Dynamic/ Standard/ Sof t/ Movie/
User)
Active
Contrast
Automatically adjust the contrast of an
image according to the scene.
(Off/Low/High)
Back Light Adjust the background brighter or
darker.
Contrast Change the level of bright parts in
the picture keeping the dark parts
unchanged.
Brightness Change the level of light in the picture.
Colour Change the level of saturation.
Tint Change the colours to reddish or
bluish.
Sharpness Change the level of sharpness of fine
details.
Film Mode Automatically detects a film-based
source, analyses it and then recreates
each still film frame for high-definition
picture quality. (On, Off)
Colour
Tem per atu re
Set the colour temperature to Cool
(bluer), Medium (balanced), Warm
(redder).
Gamma
Adjustment
Selects the tone difference of the
brightness and darkness of the image
according to the type of programme
watched.
Reset Reset all adjustment item to factory
preset values.
C.M.S. Control
Select On to set the C.M.S. Adjustment to be more
natural.
C.M.S. Adjustment
Adjust the brightness of a selected colour using a sixcolour adjustment system (only if the C.M.S. Control
is On).
DNR
Filter and reduce the noise in the picture. (Off/Low/
Middle/High)
MPEG NR
When watching a DVD, the compression may cause
some words or picture elements to become distorted
or pixelated. Using the MPEG NR feature reduces this
effect by smoothing out the edges. (Off/Low/Middle/
High)
Sound
Press MENU.
Press to select Sound, and press OK.
Adjust sound setting
Sound
Dual
Treble
Dual 1
Bass
Balance
Bass Enchancer
0
0
0
Surround Sound
Off
Off
AVL
Off
Dynamic Range Control
On
Digital Audio Output
Audio Description
OK
OK
Selected
item
Description
Dual If a programme or film is being
broadcast with a soundtrack in more
than one language, the DUAL feature
allows selection between Dual1 or
Dual2.
Bass Adjust the Bass sound.
Tre ble Adjust the Treble sound.
Balance Set the balance of the lef t and right
speakers to best fit your listening
position.
SHARP_LE144E_1_GB_English.indd 16SHARP_LE144E_1_GB_English.indd 16 5/31/2012 2:55:53 PM5/31/2012 2:55:53 PM
Page 19

TV Menu
-
17
ENGLISH
Selected
item
Description
Bass
Enhancer
This function allows you to enjoy
bass-enhanced sound.
Surround
Sound
Automatically switch the TV to the
best surround sound mode available
from a broadcast. (On,Off)
AVL (Auto
Volu me
Leveling)
Reduce sudden volume changes,
for example, during commercials or
when switching from one channel to
another. (On,Off)
Dynamic
Range
Control
Set the control of audio compression
for some digital TV programmes.
(On,Off )
• MPEG-1 and MPEG-2 audio
programmes are not supported.
Digital Audio Output
Selected
item
Description
Audio Format Select the type of digital audio out.
(PCM, Auto)
Audio Delay The audio delay timing to set Auto or
Manual for audio/video display timing
adjustment.
Audio Delay
Time (ms)
When Audio Delay set to Manual,
audio delay time to adjust (only if the
Audio Delay is Manual).
Audio Description
Selected
item
Description
Audio
Description
Set the mix of visually impaired audio
with regular audio. (On, Off)
Mixing Level Adjust the volume of visually impaired
audio.
Setup
Press MENU.
Press to select Setup, and press OK.
Language
Select the menu display language.
Country
Select the country where you are located.
The TV installs and arranges channels according to
your country.
Tuner Mode
Select the tuner mode. (Antenna, Cable)
Auto Tuning
See page Channel Setting.
ATV Manual Tuning
See page Channel Setting.
DTV Manual Tuning
See page Channel Setting.
DTV Settings
See page DTV Settings.
Connection Setting
E Lip Sync
This option activates an auto audio/video display timing
adjustment function that allows HDMI source devices
to accurately perform synchronization automatically.
All of the above HDMI settings require a proper HDMI
source device. If HDMI source products do not support
these functions, the TV may not work properly when
activating these functions.
NOTE
• In a non-HDMI signal mode, this function is not available.
• If your HDMI connection is capable of 1080p and/or
your TV is capable of refresh rates greater than 60Hz or
supports Deep Colour, you will need a Category2 cable.
Conventional HDMI/DVI cables may not work properly
with this mode.
SHARP_LE144E_1_GB_English.indd 17SHARP_LE144E_1_GB_English.indd 17 5/31/2012 2:55:54 PM5/31/2012 2:55:54 PM
Page 20

TV Menu
18
-
E EXT1 Input
You can set the specifi c type of signal going into
SCART terminal. (S-VIDEO, AV)
Check the signal output type of the DVD or other
equipment connected to the SCART teminal of the TV,
referring to manufacturer’s instruction of those devices.
Select the correct input signal setting for SCART.
NOTE
• This option is available only when the input source is
SCART.
Picture Position
For adjusting a picture’s horizontal and vertical position.
Selected
item
Description
Horizontal
Position
Centres the image by moving it to
the left or right.
Vertical
Position
Centres the image by moving it up
or down.
Reset
Reset all adjustment item to factory
preset values.
NOTE
• Adjustments are stored separately for each input source.
• Depending on the input signal type, “Wide Mode”
setting or “Movie” for the USB mode, a position setting
may not be available.
• This function is not available for DTV/SAT broadcasts
with MHEG signals.
Auto Installation
See page Initial Installation Overview.
No Operation Off
When set to “4h,6h,8h”, the TV will automatically enter
standby mode if no operations are performed in 4/6/8
hours.
Location
Select the location. (Home, Store)
Software Upgrade
E Auto Upgrade
The TV automatically determines whether a new
software Searching for updates version is available
when the TV is in standby mode.
NOTE
• All countries except UK, Sweden and Italy are set to
“Off” for this function.
E Auto Install
Now checks if there is new software immediately.
E Manual OAD
When you get the software updating news from the
retailer or internet, you can update the operation
software using the OAD (Over Air Download) Download.
The updated software data will be transferred through
the TV signal.
NOTE
• Please do not switch off the TV during the downloading
process.
E USB Upgrade
This function allows you to update to the latest
software using a USB device. You must update the
software through the USB terminal.
System Information
Display the Software version.
Reset TV
If complex adjustments are made and the settings
cannot be restored to normal, you can reset the
settings to the factory preset values.
SHARP_LE144E_1_GB_English.indd 18SHARP_LE144E_1_GB_English.indd 18 5/31/2012 2:55:54 PM5/31/2012 2:55:54 PM
Page 21

TV Menu
-
19
ENGLISH
Features
Press MENU.
Press to select Features, and press OK.
EPG (Electronic Programme Guide)
See page EPG (Electronic Programme Guide).
Sleep Timer
Sleep Timer switches the TV to standby after a defined
period of time.
Preferences
Press MENU.
Press to select Preferences, and press OK.
Preferences
Button Control Lock
Teletext
Auto Wide
4:3 Mode
Auto
Off
On
4:3
OK
HDMI-LINK Setup
OK
DivX® Deactivation
DivX® Registration
HDMI-LINK Setup
HDMI-LINK Setup
Enable HDMI-LINK
Auto Standby
On
Auto Power On
On
On
E Enable HDMI-LINK
• Set to “On” to enable the following HDMI-Link function.
(On, Off)
E Auto Power On
• When set to “On”, powering on or playing from the
HDMI-CEC compliant device will automatically turn
on the TV from its standby mode and switch the input
source to the HDMI port connected with HDMI-CEC
compliant device. (On, Off)
E Auto Standby
• When set to “On”, turning off the TV will automatically
turn off the connected HDMI-CEC compliant device.
(On, Off)
Teletext
You can select Teletext language when the TV receives
Teletext signal broadcast by a TV network. (Auto, LIST)
• See page Teletext.
Button Control Lock
Locks the buttons on the TV except the power switch.
(Off)
Auto Wide
When this television receives a true Wide screen picture
and Auto format is On, it will automatically be displayed
in Wide screen format, irrespective of the television’s
previous setting. (On, Off)
4:3 Mode
Select aspect ratio behavior for Auto mode. When 4:3
is selected, the picture size will follow WSS or Scart
Pin8 Spec. If 16:9 is selected, the picture format will
change to wide screen. (4:3, 16:9)
DivX®
This is the function to confirm your registration code.
You need to register the code at www.divx.com.
1. Press MENU.
2. Press to select “Preferences”, and press
OK.
3. Press to select “DivX® Registration” or
“DivX® Deactivation”, and press
OK.
DivX® Registration
You can find your registration code on this menu. You
need to register the TV at www.divx.com before playing
the DivX® content.
DivX® Deactivation
You can find your deactivation code on this menu. You
need to deactivate the TV at www.divx.com to release
the registration.
SHARP_LE144E_1_GB_English.indd 19SHARP_LE144E_1_GB_English.indd 19 5/31/2012 2:55:54 PM5/31/2012 2:55:54 PM
Page 22

TV Menu
20
-
Wide Mode
You can manually select the size of a picture appeared
on your screen.
Selectable picture size varies with the type of signal
received.
Press
while the Wide Mode menu displays on the
screen.
• As you toggle down the options, each mode is
immediately reflected on the TV.
Selected
item
Description
Full For 16:9 squeeze pictures.
4:3 For 4:3 “standard” pictures. A side bar
appears on each side.
Panorama In this mode the picture is
progressively stretched toward each
side of the screen.
Zoom For 16:9 letterbox pictures. Bars may
appear on the top and bottom with
some programmes.
Subtitle When subtitle are included on a
letterbox format broadcast, this
setting will raise the picture to ensure
that all the text is displayed.
14:9 For 14:9 letterbox pictures. A thin
side bar appears on each side, and
you may also see bars on the top and
bottom with some programmes.
Normal When using a PC connected via
HDMI, this setting will show the
picture without over scan, i.e.
WYSIWYG. This option is only
available when watching video signal
source via HDMI.
Dot by Dot Display an image with the same
number of pixels on the screen (only
when receiving 1080i / 1080p signal).
NOTE
• Some picture sizes may not be displayable
depending on the input signal.
SHARP_LE144E_1_GB_English.indd 20SHARP_LE144E_1_GB_English.indd 20 5/31/2012 2:55:56 PM5/31/2012 2:55:56 PM
Page 23

-
21
ENGLISH
Connecting a USB device
View Photos
1. In the Photo thumbnail browser, press
to select a photo or a photo album.
Move
Select
OK
USB:\
Return
Page
P
1 \ 1
Back
RETURN
2. Press OK to view the image. The slide show begins.
3. Use the l on the remote to display control
panel for Photo mode operation
.
Listen to Music
1. In the Music thumbnail browser, press
to select a music file or a music album.
2. Press OK to play the MP3 file.
3. Use the MENU or l on the remote to display
control panel for Music mode operation
.
Play Movie
1. In the Movie thumbnail browser, press
to select a movie file.
2. Press OK to play the movie.
3. Use the MENU or l on the remote to display
control panel for Movie mode operation
.
4.
USB function
This TV is equipped with a USB1.1 and USB2.0
compatible connector that enables you to view photos,
listen to music, and play videos stored on a USB
storage device.
HDMI 2
USB
C.I.
EXT
3
CO
M
PONEN
T
Y
L
-AUDIO-R
HDM
I 1
PC
AV INPUT
E
XT 2
P
B
(C
B
)
P
R
(C
R
)
D
IG
IT
AL
A
UDI
O
OUTPUT
EXT 1
SCA
R
T
ANT
HD
M
I 2
U
SB
C
.I.
O
UTPU
T
/
AUD
I
O (L
/R
)
A
B
A
USB :
A
10 m
m
B
7
mm
HDMI
:
A 12 mm
CAUTI
O
N
Us
e
a
P
r
o
d
uct
w
i
t
h t
h
e
fol
l
owi
n
g
t
hickness
fo
r
opti
mal co
n
ne
c
t
ion to
H
DMI
ca
b
le
/ U
SB d
e
v
i
ce.
P
MEN
U
NOTE
• Depending on the USB device, the TV may not be able
to recognise the contained data.
• Use only alphanumeric characters for naming files.
• File names over 80 characters (may vary depending on
character set) may not be displayed.
• Do not disconnect a USB device or memory card from
the TV while transferring files, using the slide show
function, when a screen is switching to another or before
you exit “USB” from the “Input Source” menu.
• Do not connect and disconnect a USB device from the
TV repeatedly.
Basic Operation
1. Turn on the TV.
2. Connect the USB storage device to the USB port
on the side of your TV.
3. Press b on the remote control and press
to select USB input source and press OK. The
USB menu appears.
USB 2.0
Photo Music Movie
4. Press to select Photo, Music or Movie and
press OK. The USB thumbnail browser appears.
5. Press and OK to browse the files or
folders. Press EXIT to return to the previous
operation / folder.
SHARP_LE144E_1_GB_English.indd 21SHARP_LE144E_1_GB_English.indd 21 5/31/2012 2:55:56 PM5/31/2012 2:55:56 PM
Page 24

Connecting a USB device
22
-
USB device compatibility
USB 2.0
device
USB Memory (Mass Storage class)
File system
FAT / FAT32
Photo file
format
JPEG (*.jpg), PNG, bmp
Music file
format
MPEG1 (*.MP3)
Bitrate: 32k, 64k, 96k, 128k, 196k,
256k, 320kbps
Sampling frequency: 32k, 44.1k, 48kHz
Video file
format
MPEG1/2 (*.AVI, *.MPG, *.MPEG, *.TS)
MPEG4 (*.AVI, *.MP4, *.MKV)
H.264 (*.AVI, *.MP4, *.MKV, *.TS)
DivX (*.AVI)
XviD (*.AVI)
NOTE
• Progressive format jpeg files are not supported.
• All files in a USB device with capacity may not be played
properly.
• Operation using USB hubs is not guaranteed.
• Cables used to extend the USB device must be certified
as USB 2.0.
• Video playback via a USB device may not be possible or
the playback quality affected if the device data transfer
speed rating is too low.
• No quickly operation between play / pause / fast forward
/ rewind.
• The video might get judder or unsmooth when USB
read/write speed is under requirement (some Full HD
format).
• Files in USB 1.1 devices may not be played properly.
• Some video file formats may not be played depending
on the file.
SHARP_LE144E_1_GB_English.indd 22SHARP_LE144E_1_GB_English.indd 22 5/31/2012 2:55:57 PM5/31/2012 2:55:57 PM
Page 25

Connecting a USB device
-
23
ENGLISH
Control panel for photo/music/movie mode operations
Icon Description Photo Music Movie
Play/Pause.
Rewind. Each time you press rewind, the speed
will change (2x, 4x, 8x, 16x).
–
Fast-forward. Each time you press fast-forward,
the speed will change (2x, 4x, 8x, 16x).
–
Play the previous fi le.
Play the next fi le.
Play the slide show On or Off.
––
Stop playback and return to the list of fi les.
Repeat mode
- Off: Repeat off
- One: Repeat selected fi le once
- Folder: Repeat all fi les in the selected folder
Repeat from A to B
Set A: to set starting point
Set B: to set end of playback
Note: to cancel the repeat
––
Show playlists. Select a fi le from the playlists to
start playback.
The information will be removed by time-out
(about 15 sec) or press OK to exit.
Slow-forward.
Each time you press slow-forward, the speed
will change.
––
Single frame-forward.
Each time you press OK, the picture will change
to the next still picture.
––
Aspect Ratio. – –
Smart Picture. – –
Rotate clockwise 90º.
––
Rotate counterclockwise 90º.
––
Select photo display interval.
––
Background music.
––
Goto Time
Use the digit button on the remote control to
enter search time, and press OK.
––
NOTE
• Files in folder which are not related to a selected mode cannot be accessed.
• “Unsupported File” alert will pops up for a selected file of invalid format.
SHARP_LE144E_1_GB_English.indd 23SHARP_LE144E_1_GB_English.indd 23 5/31/2012 2:55:57 PM5/31/2012 2:55:57 PM
Page 26

24
-
Connecting external devices
E
Before connecting ...
• Be sure to turn off the TV and any devices before
making any connections.
• Firmly connect a cable to a terminal or terminals.
• Carefully read the operation manual of each external
device for possible connection types. This also
helps you get the best possible audiovisual quality to
maximise the potential of the TV and the connected
device.
HDMI connection
Example of connectable devices
E DVD E Blu-ray player/recorder
The HDMI connections (High Definition Multimedia
Interface) permit digital video and audio transmission
via a connection cable from a player/recorder. The
digital picture and sound data are transmitted without
data compression and therefore lose none of their
quality. Analogue/digital conversion is no longer
necessary in the connected devices, which also would
result in quality losses.
EXT 3
COMPONENT
AV INPUT
EXT 2
HDMI 1
DIGITAL
AUDIO
OUTPUT
EXT 1
SCART
ANT
PC
L-AUDIO-R
P
B(CB)YPR(CR)
C.I.
USB
HDMI 2
OUTPUT
A
A
B
/
AUDIO (L/R)
CAUTION
Use a Product with the
following thickness for
optimal connection to
HDMI cable / USB device.
HDMI : A 12mm
USB : A 10mm
B 7mm
P
MENU
HDMI
DVI
HDMI 2
HDMI cable
DVI-HDMI cable
HDMI device
HDMI 1 or HDMI 2
DVI/HDMI conversion
• Using a DVI/HDMI adapter cable, the digital
video signals of a DVD can also be played via the
compatible HDMI connection.
• Both HDMI and DVI use the same HDCP copy
protection method.
Supported video signal
• 576p, 480p, 1080i, 720p, 1080p. See page 26 for PC
signal compatibility.
One touch play
• When the TV is in standby mode, it will automatically
turn on and play back the image from the HDMI
source.
YPbPr (Component connection)
Example of connectable devices
E VCR E DVD E Blu-ray player/recorder
You will enjoy accurate colour reproduction and high
quality images through the (YPbPr) when connecting a
DVD recorder or other recording equipment.
EXT 3
COMPONENT
AV INPUT
EXT 2
HDMI 1
DIGITAL
AUDIO
OUTPUT
EXT 1
SCART
ANT
PC
L-AUDIO-R
P
B(CB)YPR(CR)
C.I.
USB
HDMI 2
OUTPUT
A
A
B
/
AUDIO (L/R)
CAUTION
Use a Product with the
following thickness for
optimal connection to
HDMI cable / USB device.
HDMI : A 12mm
USB : A 10mm
B 7mm
P
MENU
EXT 3
COMPONENT
AV INPUT
EXT 2
L-AUDIO-R
P
B(CB
)YPR(CR)
Component cable
Audio cable
(YPbPr) Component
Connection
SHARP_LE144E_1_GB_English.indd 24SHARP_LE144E_1_GB_English.indd 24 5/31/2012 2:55:57 PM5/31/2012 2:55:57 PM
Page 27

Connecting external devices
-
25
ENGLISH
SCART connection
Example of connectable devices
E Decoder
E
When using the SCART
Full SCART, which transmits S-Video and CVBS in, and
CVBS tuner out.
EXT 3
COMPONENT
AV INPUT
EXT 2
HDMI 1
DIGITAL
AUDIO
OUTPUT
EXT 1
SCART
ANT
PC
L-AUDIO-R
P
B(CB)YPR(CR)
C.I.
USB
HDMI 2
OUTPUT
A
A
B
/
AUDIO (L/R)
CAUTION
Use a Product with the
following thickness for
optimal connection to
HDMI cable / USB device.
HDMI : A 12mm
USB : A 10mm
B 7mm
P
MENU
EXT 1
SCART
SCART cable
Decoder
NOTE
• In cases when the decoder needs to receive a signal
from the TV, make sure to select the appropriate input
source.
Speaker / Amplifier connection
E
Connecting an amplifier with digital audio
input
EXT 3
COMPONENT
AV INPUT
EXT 2
HDMI 1
DIGITAL
AUDIO
OUTPUT
EXT 1
SCART
ANT
PC
L-AUDIO-R
P
B(CB)YPR(CR)
C.I.
USB
HDMI 2
OUTPUT
A
A
B
/
AUDIO (L/R)
CAUTION
Use a Product with the
following thickness for
optimal connection to
HDMI cable / USB device.
HDMI : A 12mm
USB : A 10mm
B 7mm
P
MENU
DIGITAL
AUDIO
OUTPUT
Speaker / Amplifier
connection
Digital audio in
(COAXIAL)
Digital audio cable
Inserting the Smartcard into CA
module
In order to receive coded digital stations, a Conditional
Access module (CA module) and a Smartcard must be
inserted into the CI (Common Interface) slot of the TV.
The CA module and the Smartcard are not supplied
accessories. They are usually available from your
dealer.
Inserting the Smartcard into the CA module
1. Carefully insert the CA module into the CI slot
with the contact-side forward.
2. The logo on the CA module must be facing
outward from the rear of the TV.
EXT 3
C
O
MPONENT
Y
L
A
U
DI
O-R
HDM
I
1
PC
AV INPUT
EXT 2
P
B
(C
B
)
P
R
(C
R
)
D
I
G
I
TA
L
A
U
DIO
OUTP
UT
EXT
1
S
C
A
R
T
ANT
HDMI
2
U
SB
C
.
I
.
OU
T
P
U
T
/
A
UD
I
O
(L
/R)
A
B
A
U
S
B
:
A 10
m
m
B
7
m
m
HD
M
I :
A 1
2 m
m
CAU
TION
Use a Pr
o
duc
t
w
i
th
t
h
e
fo
l
l
o
wing
t
h
ickness fo
r
optim
a
l
conne
cti
o
n
to
H
D
MI cable
/ USB
dev
ice.
P
M
E
N
U
NOTE
• It takes about 30 seconds to certify the license key
when you insert a Smartcard into the CI+ compatible
CA module for the first time. This process may fail when
there is no antenna input or you have never run “Auto
installation”.
• The CI+ compatible CA module sometimes upgrades
its firmware. You may not receive any TV images before
upgrading. You can only use the power button during
upgrading.
• The CI+ compatible CA module does not allow you to
output any copy protected programmes using monitor
out.
• If the TV displays an update confirmation message
for the Smartcard while receiving CI+ compatible
broadcasts, follow the screen prompts.
• Make sure that the CA module is properly inserted.
SHARP_LE144E_1_GB_English.indd 25SHARP_LE144E_1_GB_English.indd 25 5/31/2012 2:56:02 PM5/31/2012 2:56:02 PM
Page 28

Connecting external devices
26
-
Connecting a PC
Digital connection
EXT 3
COMPONENT
AV INPUT
EXT 2
HDMI 1
DIGITAL
AUDIO
OUTPUT
EXT 1
SCART
ANT
PC
L-AUDIO-R
P
B(CB)YPR(CR)
C.I.
USB
HDMI 2
OUTPUT
A
A
B
/
AUDIO (L/R)
CAUTION
Use a Product with the
following thickness for
optimal connection to
HDMI cable / USB device.
HDMI : A 12mm
USB : A 10mm
B 7mm
P
MENU
HDMI
DVI
PC
HDMI
HDMI 2
HDMI cable
DVI-HDMI cable
HDMI 1 or HDMI 2
Analogue connection
EXT 3
COMPONENT
AV INPUT
EXT 2
HDMI 1
DIGITAL
AUDIO
OUTPUT
EXT 1
SCART
ANT
PC
L-AUDIO-R
P
B(CB)YPR(CR)
C.I.
USB
HDMI 2
OUTPUT
A
A
B
/
AUDIO (L/R)
CAUTION
Use a Product with the
following thickness for
optimal connection to
HDMI cable / USB device.
HDMI : A 12mm
USB : A 10mm
B 7mm
P
MENU
DVI-I
VGA
PC
HDMI
PC
RGB cable
DVI-I/RGB
conversion cable
Supported display resolutions
Computer formats (PC)
Resolution Refresh rate
640 x 480 60Hz
800 x 600 56Hz
800 x 600 60Hz
1024 x 768 60Hz
1280 x 720 60Hz
1280 x 768 60Hz
1360 x 768 60Hz
1280 x 1024 60Hz
Video formats
Resolution Refresh rate
480i 60Hz
480p 60Hz
576i 50Hz
576p 50Hz
720p 50Hz, 60Hz
1080i 50Hz, 60Hz
1080p (HDMI only)
50Hz, 60Hz, 24Hz
SHARP_LE144E_1_GB_English.indd 26SHARP_LE144E_1_GB_English.indd 26 5/31/2012 2:56:08 PM5/31/2012 2:56:08 PM
Page 29

-
27
ENGLISH
Appendix
Troubleshooting
Problem Possible Solution
No picture 1. Connect power cord correctly.
2. Turn on power.
3. Connect signal cable correctly.
4. Press any button on the LCD TV.
Abnormal colours Connect signal cable correctly.
Twisted picture 1. Connect signal cable correctly.
2. Please use compatible signal.
Picture too dark Adjust brightness and contrast.
Audio only, no images 1. Please check if input signal is connected correctly.
2. TV-RF signal must not be lower than 50dB.
Picture only, no audio 1. Connect signal cable correctly.
2. Adjust volume to proper level.
3. Connect audio signal cable correctly.
4. TV-RF signal must not be lower than 50dB.
Cannot use remote control 1. Please change battery.
2. Turn off power for 10 seconds; and then restart power.
Cannot receive sufficient channels
through antenna
Please use the Channel Scan function to increase the number of channels
not included in memory.
No colour Please adjust the colour setup.
Blinking picture accompanied by
ghost image
1. Check the connection of antenna/signal cable.
2. Check if channel is in play mode.
3. Press signal source and change input mode.
Broken lines or segments Adjust antenna.
Keep the TV away from noise sources, such as automobiles, neon lights,
and hair dryers.
Certain TV channels are blocked
(Hope to acquire some channels)
Please use the Update Scan method to add the channels not included in
memory.
Overlapping images or ghost images Please use multi-directional outdoor antenna.
(If your TV is subject to the influence of nearby mountains or buildings).
Cannot use a function If the item you choose turns gray, that item cannot be selected.
Cannot receive programmes Please use the Update Scan method to add the channels not included in
memory.
SHARP_LE144E_1_GB_English.indd 27SHARP_LE144E_1_GB_English.indd 27 5/31/2012 2:56:12 PM5/31/2012 2:56:12 PM
Page 30

Appendix
28
-
Specification
Item
32” LCD COLOUR TV
Model: LC-32LE144E
32” LCD COLOUR TV
Model: LC-32LE244E
LCD screen size 32” diagonal
Number of dots
3,147,264 dots
(1366 x 768 x 3 dots)
6,220,800 dots
(1920 x 1080 x 3 dots)
Video Colour System PAL/SECAM/NTSC 4.43
TV Function
TV-Standard
Analogue CCIR (B/G, I, D/K, L/L’)
Digital DVB-T, DVB-C
Receiving
Channel
VHF/UHF ATV: IRA-E69, DVB-T: E5-E69
CATV S-band, S1–S41ch
TV-Tuning System Auto Preset 1599 ch, Auto Label, Auto Sort
Stereo/Bilingual NICAM/A2
Audio amplifier 5 W x 2
Speaker 33 x 140 x 36 mm
Rear
ANTENNA UHF/VHF 75
SCART SCART (CVBS input, Y/C input, RGB input, TV output )
PC IN D-sub 15 pin (AV input)
CVBS/COMPONENT CVBS (EXT2)/Y(EXT3)/Pb(Cb)/Pr(Cr), RCA pin (L/R)
SPDIF OUT Digital audio output
HDMI 1 Digital video and audio input
Side
C. I. (Common Interface) EN50221, R206001, CI Plus specification
USB Software update, multi-media play (DC5V / 500 mA)
HDMI 2 Digital video and audio input
HEADPHONE Ø 3.5mm jack (Audio output)
OSD Language
English, German, French, Italian, Dutch, Spanish, Greek, Portuguese,
Swedish, Finnish, Russian, Polish, Turkish, Hungarian, Czech, Slovak,
Danish, Norwegian, Estonian, Latvian, Lithuanian, Slovenian, Bulgarian,
Croatian, Romanian, Serbian, Ukrainian, Belarussian.
Power Requirement AC 220–240 V, 50 Hz
Power Consumption
58 W (according to EN60065)
0.15 W (Standby mode)
Weight
7.6 kg (Without stand),
8.6 kg (With stand)
Operating temperature 0°C to +40°C
• As a part of policy of continuous improvement, SHARP reserves the right to make design and specification changes
for product improvement without prior notice. The performance specification figures indicated are nominal values of
production units. There may be some deviations from these values in individual units.
NOTE
• Refer to the inside back cover for dimensional drawings.
• Audio cannot be output through the HDMI terminal.
SHARP_LE144E_1_GB_English.indd 28SHARP_LE144E_1_GB_English.indd 28 5/31/2012 2:56:12 PM5/31/2012 2:56:12 PM
Page 31

Appendix
-
29
ENGLISH
Environmental specifications
Item
*1 On-Mode (W) 38W
*2 Standby-Mode (W) 0.15W
*3 Annual Energy Consumption (kWh) 55kWh
*1 Measured according to EN62087 : 2009.
*2 Measured according to EN62301 : 2005.
*3 Annual energy consumption is calculated on the basis of the On-Mode (Standard) power consumption, watching TV 4
hours a day, 365 days a year.
NOTE
• The power consumption of On-Mode varies depending on the images the TV displays.
Other information
Cautions regarding use in high and low temperature environments
• When the unit is used in a low temperature space (e.g. room, office), the picture may leave trails or appear slightly
delayed. This is not a malfunction, and the unit will recover when the temperature returns to normal.
• Do not leave the unit in a hot or cold location. Also, do not leave the unit in a location exposed to direct sunlight or near
a heater, as this may cause the cabinet to deform and the LCD panel to malfunction.
• Storage temperature: -20°C to +60°C.
Devices connected to the protective earthing of the building installation through the MAINS connection or through
other devices with a connection to protective earthing and to a television distribution system using coaxial cable,
may in some circumstances create a fire hazard. Connection to a television distribution system therefore has to be
provided through a device providing electrical isolation within a certain frequency range (galvanic isolator, see EN
60728-11).
NOTE
• For requirements in Norway and Sweden, the requirements for isolation are also relevant for devices that can be
connected to television distribution systems.
SHARP_LE144E_1_GB_English.indd 29SHARP_LE144E_1_GB_English.indd 29 5/31/2012 2:56:12 PM5/31/2012 2:56:12 PM
Page 32

Appendix
30
-
Trademarks
• HDMI, the HDMI logo and High-Definition Multimedia Interface are trademarks or registered trademarks of
HDMI Licensing LLC in the United States and other countries.
• The “HD TV” Logo is a trademark of DIGITALEUROPE.
• The “HD TV 1080p” Logo is a trademark of DIGITALEUROPE.
• The DVB logo is the registered trademark of the Digital Video Broadcasting - DVB - project.
• Manufactured under license from Dolby Laboratories. Dolby and the double-D symbol are trademarks of
Dolby Laboratories.
• DivX®, DivX Certified® and associated logos are trademarks of Rovi Corporation or its subsidiaries and are
used under license.
• ABOUT DIVX VIDEO: DivX® is a digital video format created by DivX, LLC, a subsidiary of Rovi Corporation.
This is an official DivX Certified® device that plays DivX video. Visit divx.com for more information and
software tools to convert your files into DivX videos.
• ABOUT DIVX VIDEO-ON-DEMAND: This DivX Certified® device must be registered in order to play purchased
DivX Video-on-Demand (VOD) movies. To obtain your registration code, locate the DivX VOD section in your
device setup menu. Go to vod.divx.com for more information on how to complete your registration.
SHARP_LE144E_1_GB_English.indd 30SHARP_LE144E_1_GB_English.indd 30 5/31/2012 2:56:12 PM5/31/2012 2:56:12 PM
Page 33

-
31
ENGLISH
Attention:
Your product is marked
with this symbol. It means
that used electrical and
electronic products
should not be mixed with
general household waste.
There is a separate
collection system for
these products.
A. Information on Disposal for Users (private households)
1. In the European Union
Attention: If you want to dispose of this equipment, please do not use the ordinary dust
bin!
Used electrical and electronic equipment must be treated separately and in accordance
with legislation that requires proper treatment, recovery and recycling of used electrical
and electronic equipment.
Following the implementation by member states, private households within the EU
states may return their used electrical and electronic equipment to designated collection
facilities free of charge*. In some countries* your local retailer may also take back your old
product free of charge if you purchase a similar new one.
*) Please contact your local authority for further details.
If your used electrical or electronic equipment has batteries or accumulators, please
dispose of these separately beforehand according to local requirements.
By disposing of this product correctly you will help ensure that the waste undergoes the
necessary treatment, recovery and recycling and thus prevent potential negative effects
on the environment and human health which could otherwise arise due to inappropriate
waste handling.
2. In other Countries outside the EU
If you wish to discard this product, please contact your local authorities and ask for the
correct method of disposal.
For Switzerland: Used electrical or electronic equipment can be returned free of charge
to the dealer, even if you don’t purchase a new product. Further collection facilities are
listed on the homepage of www.swico.ch or www.sens.ch.
B. Information on Disposal for Business Users
1. In the European Union
If the product is used for business purposes and you want to discard it:
Please contact your SHARP dealer who will inform you about the take-back of the
product. You might be charged for the costs arising from take-back and recycling. Small
products (and small amounts) might be taken back by your local collection facilities.
For Spain: Please contact the established collection system or your local authority for
take-back of your used products.
2. In other Countries outside the EU
If you wish to discard of this product, please contact your local authorities and ask for the
correct method of disposal.
The battery supplied with this product contains traces of Lead.
For EU: The crossed-out wheeled bin implies that used batteries should not be put to
the general household waste! There is a separate collection system for used batteries, to
allow proper treatment and recycling in accordance with legislation.
Please contact your local authority for details on the collection and recycling schemes.
For Switzerland: The used battery is to be returned to the selling point.
For other non-EU countries: Please contact your local authority for correct method of
disposal of the used battery.
SHARP_LE144E_1_GB_English.indd 31SHARP_LE144E_1_GB_English.indd 31 5/31/2012 2:56:12 PM5/31/2012 2:56:12 PM
 Loading...