

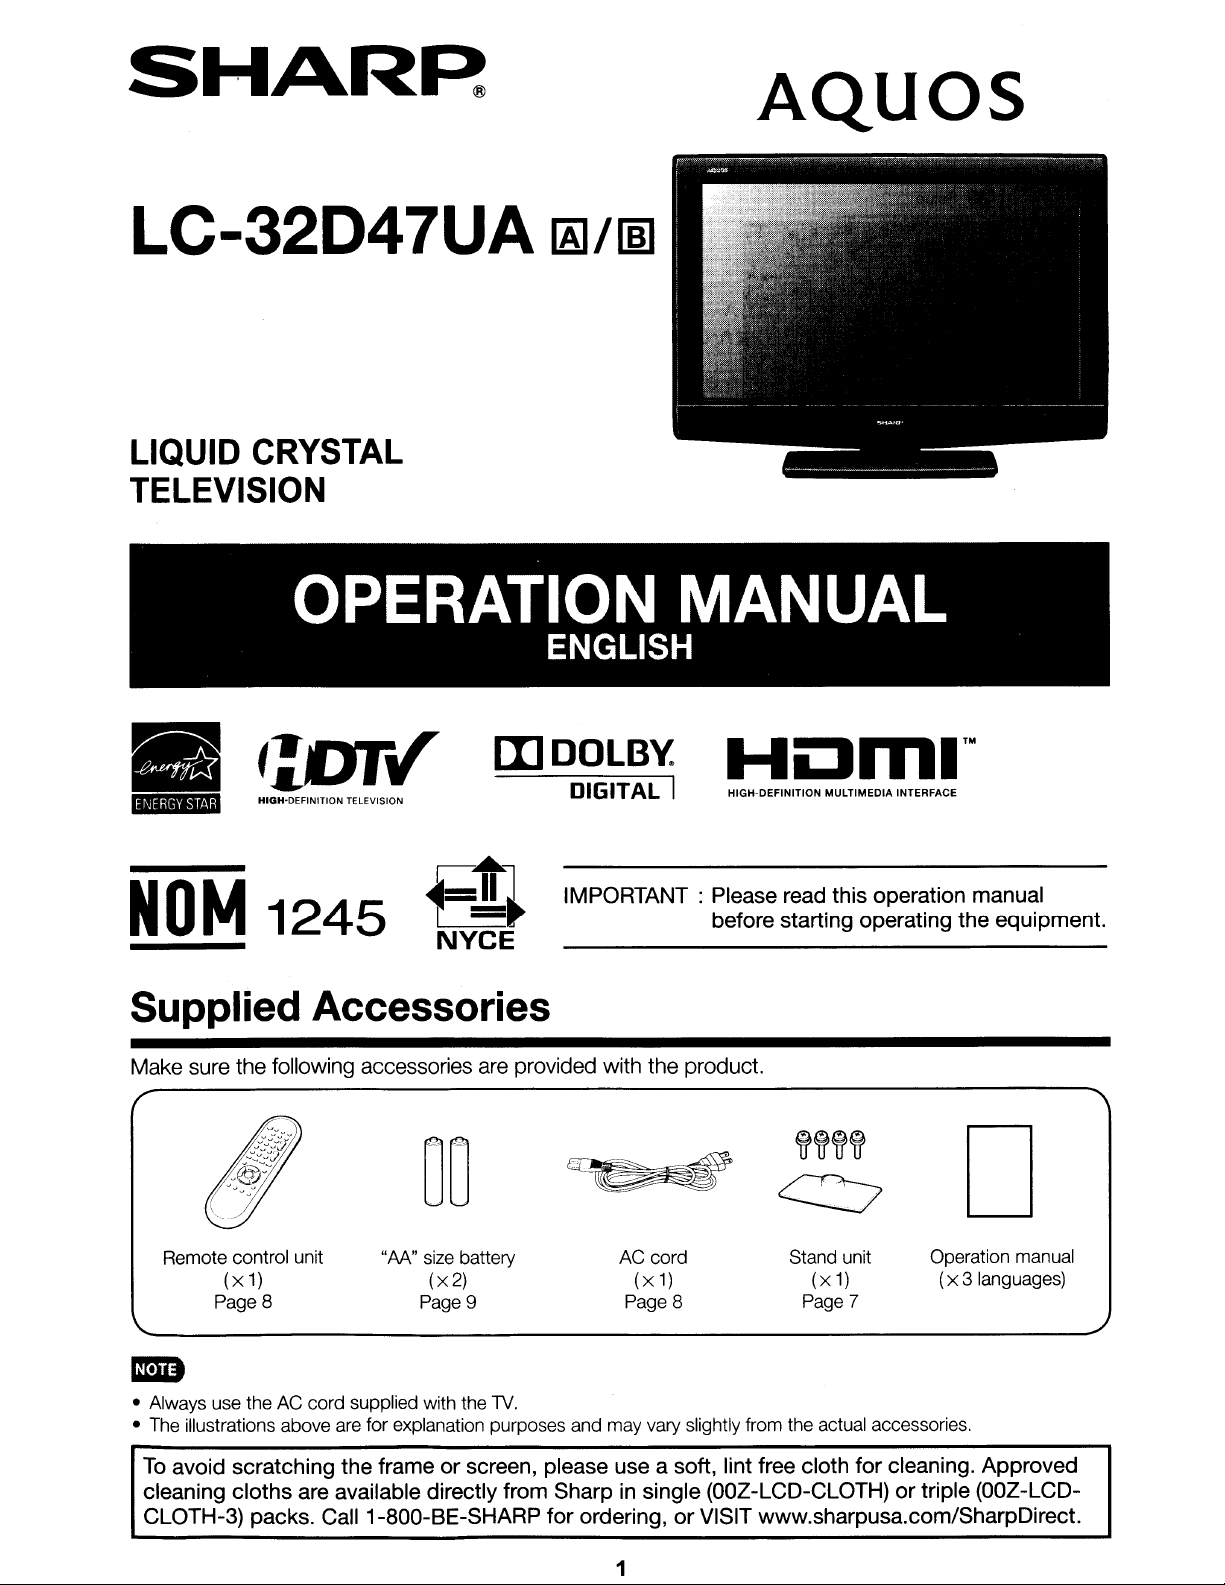
Sharp Aquos LC-32D47UA Operation Manual
SHAR~
AQuas
LC-32D47UA
LIQUID CRYSTAL
TELEVISION
OPERATION
III
'1.+11'5
t:DTv
HIGH-DEFINITION TELEVISION
IIlDOLB~
lAJ/lID
ENGLISH
DIGITAL
I
MANUAL
HIGH-DEFINITION MULTIMEDIA INTERFACE
IMPORTANT: Please read this operation manual
NOM
1245
m
NYCE
before starting operating the equipment.
Supplied Accessories
Make sure the following accessories
Remote control unit
(x1)
Page 8
• Always use the AC cord supplied with the
• The illustrations above are for explanation purposes and may vary slightly from the actual accessories.
To
avoid scratching the frame or screen, please use a soft, lint free cloth for cleaning. Approved
cleaning cloths are available directly from Sharp
CLOTH-3) packs. Call 1-800-BE-SHARP for ordering,
"AA"
are
provided with the product.
~~~fff
00
size battery
(x2)
Page 9 Page 8 Page 7
TV.
~
~
AC cord
(x
1)
in
single (DOl-LCD-CLOTH)ortriple (DOl-LCD-
or
VISIT www.sharpusa.com/SharpDirect.
Stand unit Operation manual
(x
1)
D
(x 3 languages)
1
IMPORTANT:
To
aid reportingincaseofloss or theft, please record
N's
the
model and serial numbersinthe space
provided. The numbers are located at the rear of the
N.
Model No.:
Serial No.:
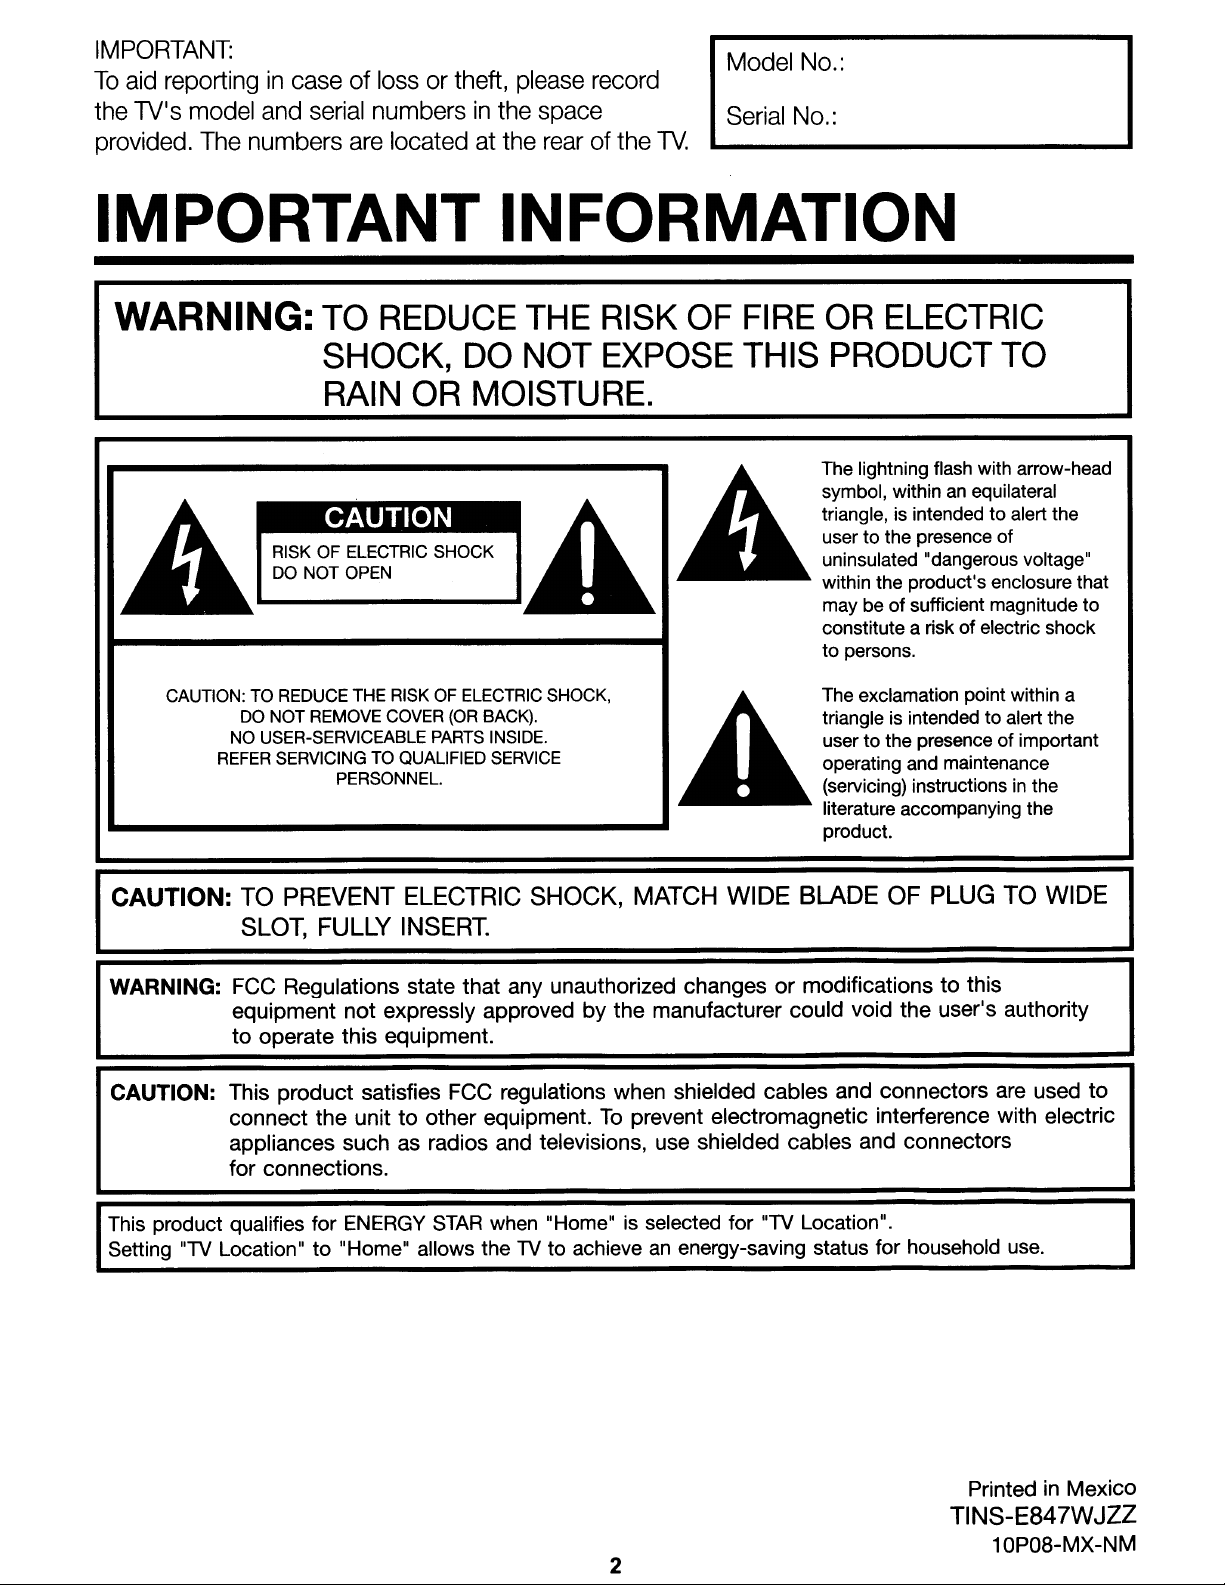
IMPORTANT INFORMATION
WARNING:
TO
REDUCE THE RISK OF FIRE OR ELECTRIC
SHOCK, DO NOT EXPOSE THIS PRODUCT TO
RAIN OR MOISTURE.
The lightning flash with arrow-head
an
symbol, within
triangle,isintended to alert the
RISKOFELECTRIC
DO
NOT
CAUTION:TOREDUCE
DO
NOT
REMOVE
NO
USER-SERVICEABLE
REFER
SERVICINGTOQUALIFIED
OPEN
THE
RISKOFELECTRIC
COVER
PERSONNEL.
SHOCK
(OR
PARTS
SHOCK,
BACK).
INSIDE.
SERVICE
user to the presence of
uninsulated "dangerous voltage"
within the product's enclosure that
may be of sufficient magnitude to
constitute a risk
to persons.
The exclamation point within a
triangle is intended to alert the
user to the presence of important
operating and maintenance
(servicing) instructionsinthe
literature accompanying the
product.
CAUTION: TO PREVENT ELECTRIC SHOCK, MATCH WIDE BLADE OF PLUG TO WIDE
SLOT, FULLY INSERT.
equilateral
of
electric shock
WARNING:
FCC
Regulations state that any unauthorized changes or modifications to this
equipment not expressly approved by the manufacturer could void the user's authority
to operate this equipment.
CAUTION: This product satisfies
connect the unit to other equipment.
appliances such
as
for connections.
This
product
Setting "TV Location"
qualifies
for
ENERGY STAR when "Home" is selected
to
"Home"
allows the TVtoachieve an energy-saving status
FCC
regulations when shielded cables and connectors
To
radios and televisions,
2
are
used to
prevent electromagnetic interference with electric
use
shielded cables and connectors
for
"TV Location".
for
household use.
PrintedinMexico
TINS-E847WJZZ
10P08-MX-NM
IMPORTANT INFORMATION
DECLARATION OF CONFORMITY:
SHARP LIQUID CRYSTAL TELEVISION, MODEL LC-32D47UA IAI/[§]
of
the
This device complies with Part 15
conditions:
(1)
This device may not cause harmful interference, and
received, including interference that
RESPONSIBLE
For Business Customers: URL http://www.sharpusa.com
INFORMATION:
This equipment has been tested and foundtocomply
pursuant
against harmful interference in a residential installation. This equipment generates, uses and can
radiate radio frequency energy and,
cause harmful interference
will not
television reception, which can
encouraged
- Reorient
- Increase the separation between
- Connect the equipment into an outlet on a circuit different from that
- Consult
to
occurina particular installation. If this equipment does cause harmful interferencetoradio or
connected.
PARTY:
SHARP ELECTRONICS CORPORATION
Sharp Plaza, Mahwah,
TEL: 1-800-BE-SHARP
Part 15ofthe FCC Rules. These limits are designedtoprovide reasonable protection
to
to
trytocorrect the interference by oneormoreofthe following measures:
or
relocate the receiving antenna.
the
dealeroran experienced radiolTV technician
New
radio communications. However, there is no guarantee that interference
be
determinedbyturning the equipment
FCC Rules. Operation is subjecttothe following
(2)
this device
may
cause undesired operation.
Jersey 07495-1163
with the limits
if
not installed and used in accordance with the instructions, may
the
equipment and receiver.
for
help.
must
accept
for
a Class B digital device,
off
and
on, the user is
to
which the receiver is
two
any interference
"NotetoCATV
National Electrical Code that provides guidelines
be connected to the grounding systemofthe building, as closetothe pointofcable entry as practical.·
This
containingasmall
materials
For
authorities,
lamp
Sharp
system installer: This reminder is providedtocall the
for
product
utilizes
tin-lead
amount
may
disposal
recycling
at
1-800-BE-SHARP
be
regulated
or
recycling
the
Electronic
organization:
information,
Industries
CATV
system installer's attentiontoArticle 820-40ofthe
proper grounding and, in particular, specifies that the cable ground shall
solder,
of
mercury.
due
to
www.lamprecycle.org
and
fluorescent
Disposal
environmental
please
Alliance:
contact
www.eiae.org,
of
considerations.
or
(For
Trademarks
• Manufactured under license from Dolby Laboratories. Dolby
Dolby Laboratories.
HDMI
• "HDMI, the
HDMI
Licensing LLC."
logo and High-Definition Multimedia Interface
and
the double-D symbol
are
trademarks or registered trademarks of
lamp
these
your
U.S.A.
are
trademarks of
local
the
only)
• Products that
energy efficiency.
have
earned the
ENERGY
STAR®
are
designed to protect the environment through superior
3
DEAR
SHARP
CUSTOMER
Thank you for your purchase ofthe Sharp Liquid Crystal Television. To ensure safety and many years
of trouble-free operation of your product, please read the Important Safety Instructions carefully before
using this product.
IMPORTANT SAFETY INSTRUCTIONS
Electricity is used to perform many useful functions, but it can also cause personal injuries and property damage
if improperly handled. This product has been engineered and manufactured with the highest priority on safety.
However, improper use can result
observe the following instructions when installing, operating and cleaning the product.
and prolong the service life
before using the product.
1)
Read these instructions.
2)
Keep these instructions.
3)
Heed
all
warnings.
4)
Follow
all
instructions.
5)
Do not use this apparatus near water.
6)
Clean only with dry cloth.
7)
Do not block any ventilation openings. Install in accordance with the manufacturer's instructions.
8)
Do not install near any heat sources such as radiators, heat registers, stoves, or other apparatus (including
amplifiers) that produce heat.
9)
Do not defeat the safety purpose of the polarizedorgrounding-type plug. A polarized plug has two blades
with one wider than the other. A grounding type plug has
wide blade or the third prong
consult
10)
Protect the power cord from being walked onorpinched particularly at plugs, convenience receptacles,
and the point where they exit from the apparatus.
11)
Only use attachments/accessories specified by the manufacturer.
12)
Use only with the cart, stand, tripod, bracket, or table specified by the manufacturer, or sold
with the apparatus. When a cart is used, use caution when moving the cart/apparatus
combination to avoid injury from tip-over.
13)
Unplug this apparatus during lightning storms or when unused for long periodsoftime.
14)
Refer all servicing to qualified service personnel. Servicingisrequired when the apparatus has been
damaged
have fallen into the apparatus, the apparatus has been exposed to rain or moisture, does not operate
normally,
an
electrician for replacementofthe obsolete outlet.
in
any
way,
or
has been dropped.
in
electric shock and/orfire.Inordertoprevent potential danger, please
To
ensure your safety
of
your Liquid Crystal Television, please read the following precautions carefully
two
blades and a third grounding prong. The
are
provided for your safety. If the provided plug does not fit into your outlet,
such as power-supply cord or plug is damaged, liquid has been spilledorobjects
Additional Safety Information
15)
Power
Sourcesmarking label. If you are not sure
local power company. For products intended
operating instructions.
16)
Overloading-Do
can result in a risk
17)
Object and Liquid
touch dangerous voltage points or short-out parts that could result
liquid
of
any kind on the product.
18)
Damage Requiring
service personnel under the following conditions:
a)
When theACcord or plug is damaged,
b)
If liquid has been spilled, or objects have fallen into the product,
c)
If the product has been exposed to rainorwater,
d)
If the product does not operate normally by following the operating instructions.
Adjust only those controls that are covered by the operating instructions as
of other controls may result in damage and will often require extensive work by a qualified technician
to restore the product to its normal operation,
e)
If the product has been dropped or damagedinany
f) When the product exhibits a distinct change in performance - this indicates a need for service.
19)
Replacement
replacement parts specified by the manufacturer
Unauthorized substitutions may result
20) Safety
21) Wall
Check-Upon
perform safety checks to determine that the product is
or
ceiling
according to the method recommended by the manufacturer.
This product should be operated only from the typeofpower source indicated on the
of
the typeofpower supply to your home, consult your product dealer or
to
operate from battery power, or other sources, refer to the
not overload wall outlets, extension cords,orintegral convenience receptacles as this
of
fire or electric shock.
Entry-Never
Service-Unplug
Parts-When
completionofany service or repairs to this prOduct, ask the service technician to
mounting-When
push objectsofany kind into this product through openingsasthey may
in
a fire or electric shock. Never spill
this product from the wall outlet and refer servicing to qualified
an
improper adjustment
way,
and
replacement parts are required,besure the service technician has used
or
have the same characteristics as the original part.
in
fire, electric shock, or other hazards.
in
proper operating condition.
mounting the product on a wall or ceiling, be suretoinstall the product
4
IMPORTANT SAFETY INSTRUCTIONS
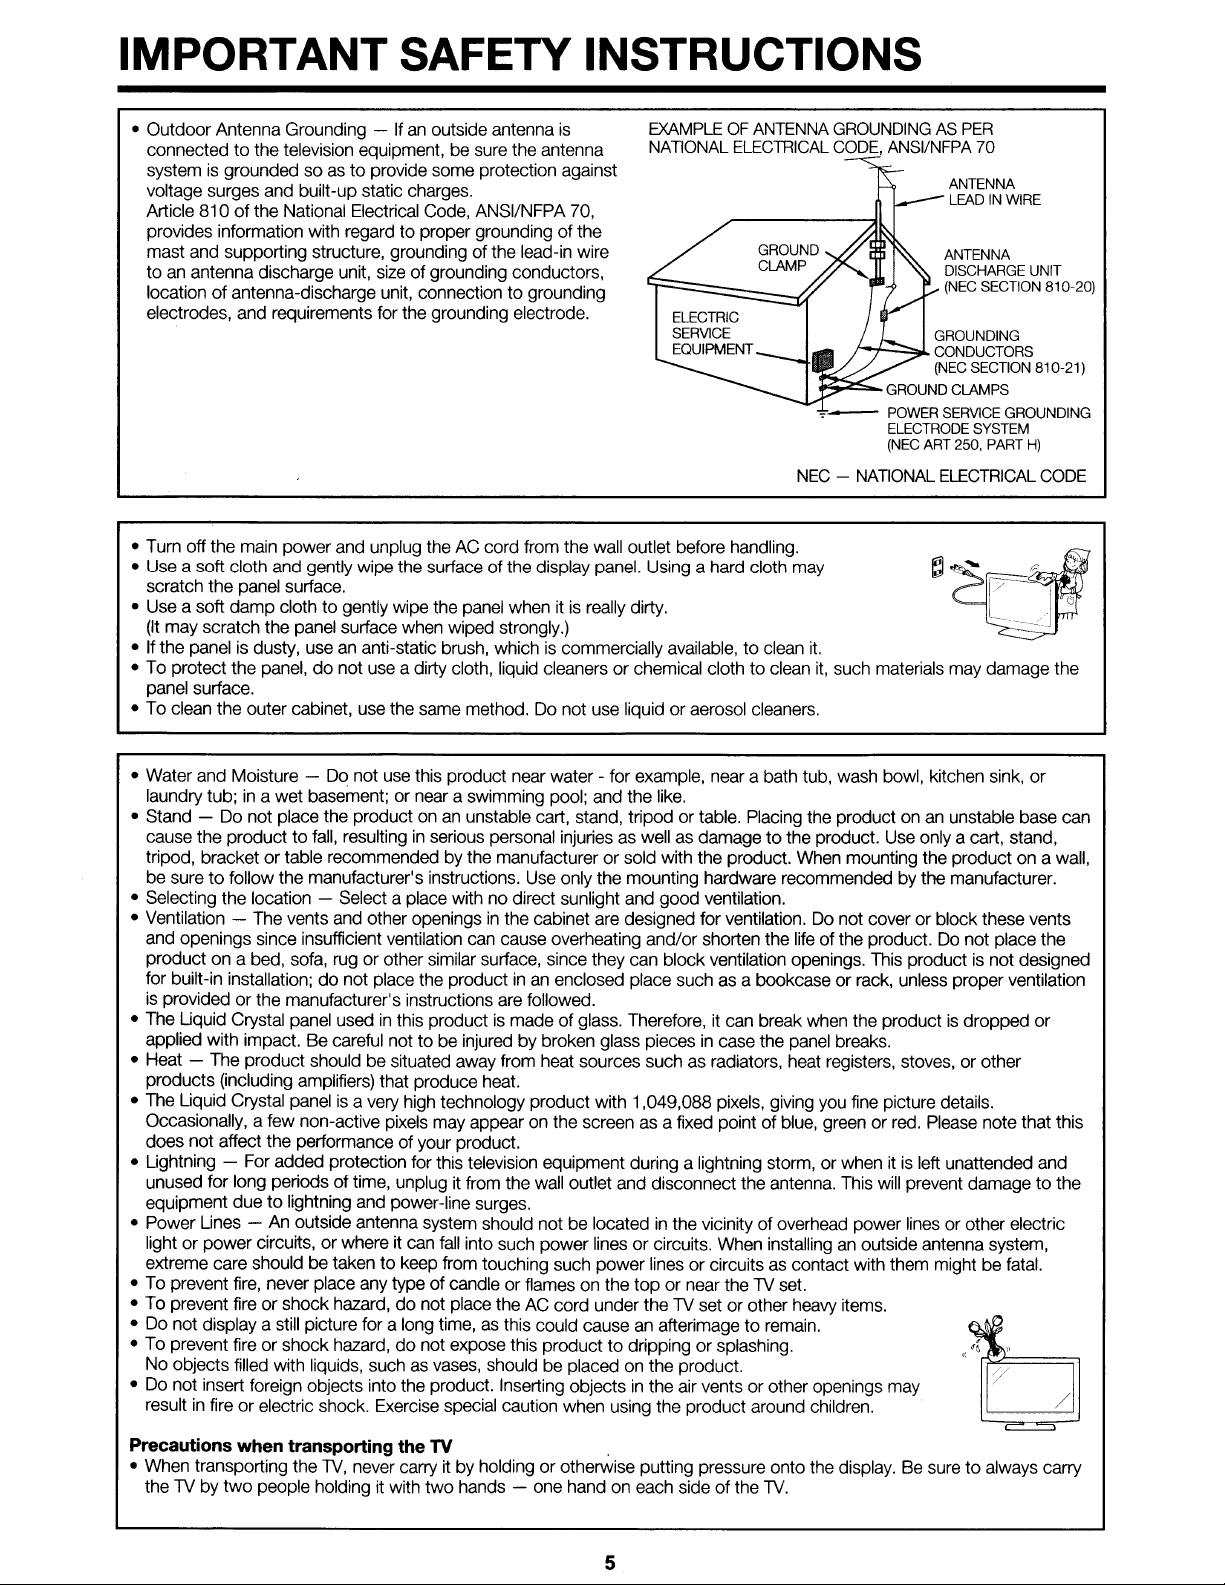
• Outdoor Antenna Grounding - Ifanoutside antenna is
connected
system is grounded so astoprovide some protection against
voltage surges and built-up static charges.
Article
provides information with regard to proper grounding
mast and supporting structure, groundingofthe lead-in wire
to
an antenna discharge unit, size of grounding conductors,
location
electrodes, and requirements for the grounding electrode.
• Tum off the main power and unplug the AC cord from the wall outlet before handling. q;:j
•
~~~t~~~~ec~~~~~~~:~~I.y
• Use a soft
(It
may scratch the panel surface when wiped strongly.)
If
the panel is dusty, use an anti-static brush, whichiscommercially available, to clean
•
• To protect the panel,donot use a dirty cloth, liquid cleaners or chemical clothtoclean
panel surface.
• To clean the outer cabinet, use the same method. Do not use liquidoraerosol cleaners.
to
the television equipment, be sure the antenna
810
of the National Electrical Code, ANSI/NFPA 70,
of
antenna-discharge unit, connectiontogrounding
wipe the surface ofthe display panel. Using a hard cloth may
damp
clothtogently wipe the panel when itisreally dirty. _ .
of
the
EXAMPLEOFANTENNA
NATIONAL
ELECTRICAL
GROUNDINGASPER
CODE,
ANSI/NFPA
J-;~::::..L
"""'~-
~-
NEC-NATIONAL
it.
it,
GROUND
POWER
ELECTRODE
(NEC
such materials may damage the
70
ANTENNA
LEADINWIRE
ANTENNA
DISCHARGE
(NEC
SECTION
GROUNDING
CONDUCTORS
(NEC
SECTION
CLAMPS
SERVICE
SYSTEM
ART
250,
PART
ELECTRICAL
~
....
UNIT
810-21)
GROUNDING
H)
CODE
r/_
...
__
._C'
...•.....
810-20)
jo'
• Water and Moisture - Do not use this product near water - for example, near a bath tub, wash bowl, kitchen sink, or
laundry tub;
• Stand - Do not place the product on an unstable cart, stand, tripod or table. Placing the product on an unstable base can
cause the product
tripod, bracket ortable recommended by the manufacturerorsold with the product. When mounting the product on a wall,
be suretofollow the manufacturer's instructions. Use only the mounting hardware recommended by the manufacturer.
• Selecting the location - Select a place with no direct sunlight and good ventilation.
• Ventilation - The vents and other openings
and openings since insufficient ventilation can cause overheating and/or shorten the life of the product. Do not place the
product on a bed, sofa, rug or other similar surface, since they can block ventilation openings. This product is not designed
for built-in installation;donot place the productinan
is providedorthe manufacturer's instructions are followed.
• The Liquid Crystal panel used
applied with impact. Be careful not to be injured by broken glass piecesincase the panel breaks.
• Heat - The product should be situated away from heat sources such as radiators, heat registers, stoves, or other
products (including amplifiers) that produce heat.
• The Liquid Crystal panel is a very high technology product with 1,049,088 pixels, giving you fine picture details.
Occasionally, a few non-active pixels may appear on the screen as a fixed point of blue, green
does not affect the performance of your product.
• Lightning - For added protection for this television equipment during a lightning storm, or when itisleft unattended and
unused for long periodsoftime, unplug it from the wall outlet and disconnect the antenna. This will prevent damagetothe
equipment due
• Power Lines - An outside antenna system should not be located
light or power circuits,orwhere it can
extreme care should be takentokeep from touching such power linesorcircuits as contact with them might be fatal.
• To prevent fire, never place any type of candle or flames on the
• To prevent fire
• Do not display a still picture for a long time, as this could cause an afterimagetoremain.
• To prevent fire
No
objects filled with liquids, such as vases, should be placed on the product.
• Do not insert foreign objects into the product. Inserting objects
resultinfire or electric shock. Exercise special caution when using the product around children.
in
a wet basement; or near a swimming pool; and the like.
to
fall, resultinginserious personal injuries as well as damagetothe product. Use only a cart, stand,
in
the cabinet are designed for ventilation. Do not cover or block these vents
enclosed place such as a bookcase or rack, unless proper ventilation
in
this productismade of glass. Therefore, it can break when the productisdropped
to
lightning and power-line surges.
in
the vicinity of overhead power lines or other electric
fall
into such power linesorcircuits. When installing an outside antenna system,
top
or near the TV set.
or
shock hazard,donot place the AC cord under the TV set or other heavy items.
or
shock hazard,donot expose this producttodrippingorsplashing.
in
the air vents or other openings may
or
red. Please note that this
or
Precautions when transporting the TV
• When transporting the
the TV by
two
people holding it with
TV,
never carry it by holding or otherwise putting pressure onto the display. Be suretoalways carry
two
hands - one hand on each sideofthe
5
TV.
IMPORTANT SAFETY INSTRUCTIONS
CHILD SAFETY:
It Makes A Difference
Congratulationsonyour
purchase!Asyou
How
and Where
enjoy
your
new
You
Use Your Flat Panel Display
product,
please
THE ISSUE
• The home theater entertainment experience is a growing trend and larger flat panel
displays are popular purchases. However, flat panel displays are not always supported
on the proper stands or installed according
• Flat panel displays that are inappropriately situated on dressers, bookcases, shelves,
desks, speakers, chests
THIS MANUFACTURER CARES!
• The consumer electronics industry is committedtomaking home entertainment enjoyable
and safe.
TUNE INTO SAFETY
• One size does NOT fit all. Follow the manufacturer's recommendations for the safe
installation and use
• Carefully read and understand
• Don't allow children
• Don't place flat panel displays on furniture that can easily be used as steps, such as
a chest
of
drawers.
• Remember that children can become excited while watching a program, especially
on a "largerthan life" flat panel display. Care should be taken
display where it cannot be pushed, pulled over, or knocked down.
• Care should be taken
display so that they cannot
of
your flat panel display.
all
enclosed instructions for proper use of this product.
to
climb onorplay with furniture and television sets.
to
route
all
cords and cables connectedtothe flat panel
be
pulledorgrabbed bycurious children.
or
carts may
to
place or install the
to
fall
over and cause injury.
keep
these
safety
tipsinmind:
the manufacturer's recommendations.
WALL MOUNTING: IF
PANEL DISPLAY, ALWAYS:
• Use a mount that has been recommended by the display manufacturer and/or listed
an
independent laboratory (such as UL, CSA,
by
• Follow
• If you have any doubts about your ability
• Make sure that the wall where you are mounting the display is appropriate. Some
• A minimum
all
instructions supplied bythe display and wall mount manufacturers.
contact your retailer about professional installation.
wall mounts are not designed
block construction. If you are unsure, contact a professional installer.
of
two
heavy.
4I~~.
YOU
DECIDETOWALL
to
safely install your flat panel display,
to
be mounted to walls with steel studsorold cinder
people are required for installation. Flat panel displays can
Note: CEA
consumer electronics industry. More than 2,200 companies enjoy the benefits
membership, including legislative
industry promotion and the fostering
is
the preeminent trade association promoting growth in the $161 billion U.S.
ETL).
MOUNT
YOUR FLAT
advocacy, market research, technical training and education,
of
business and strategic relationships.
be
www.CE.org/safety
of
CEA
6
QUICK REFERENCE
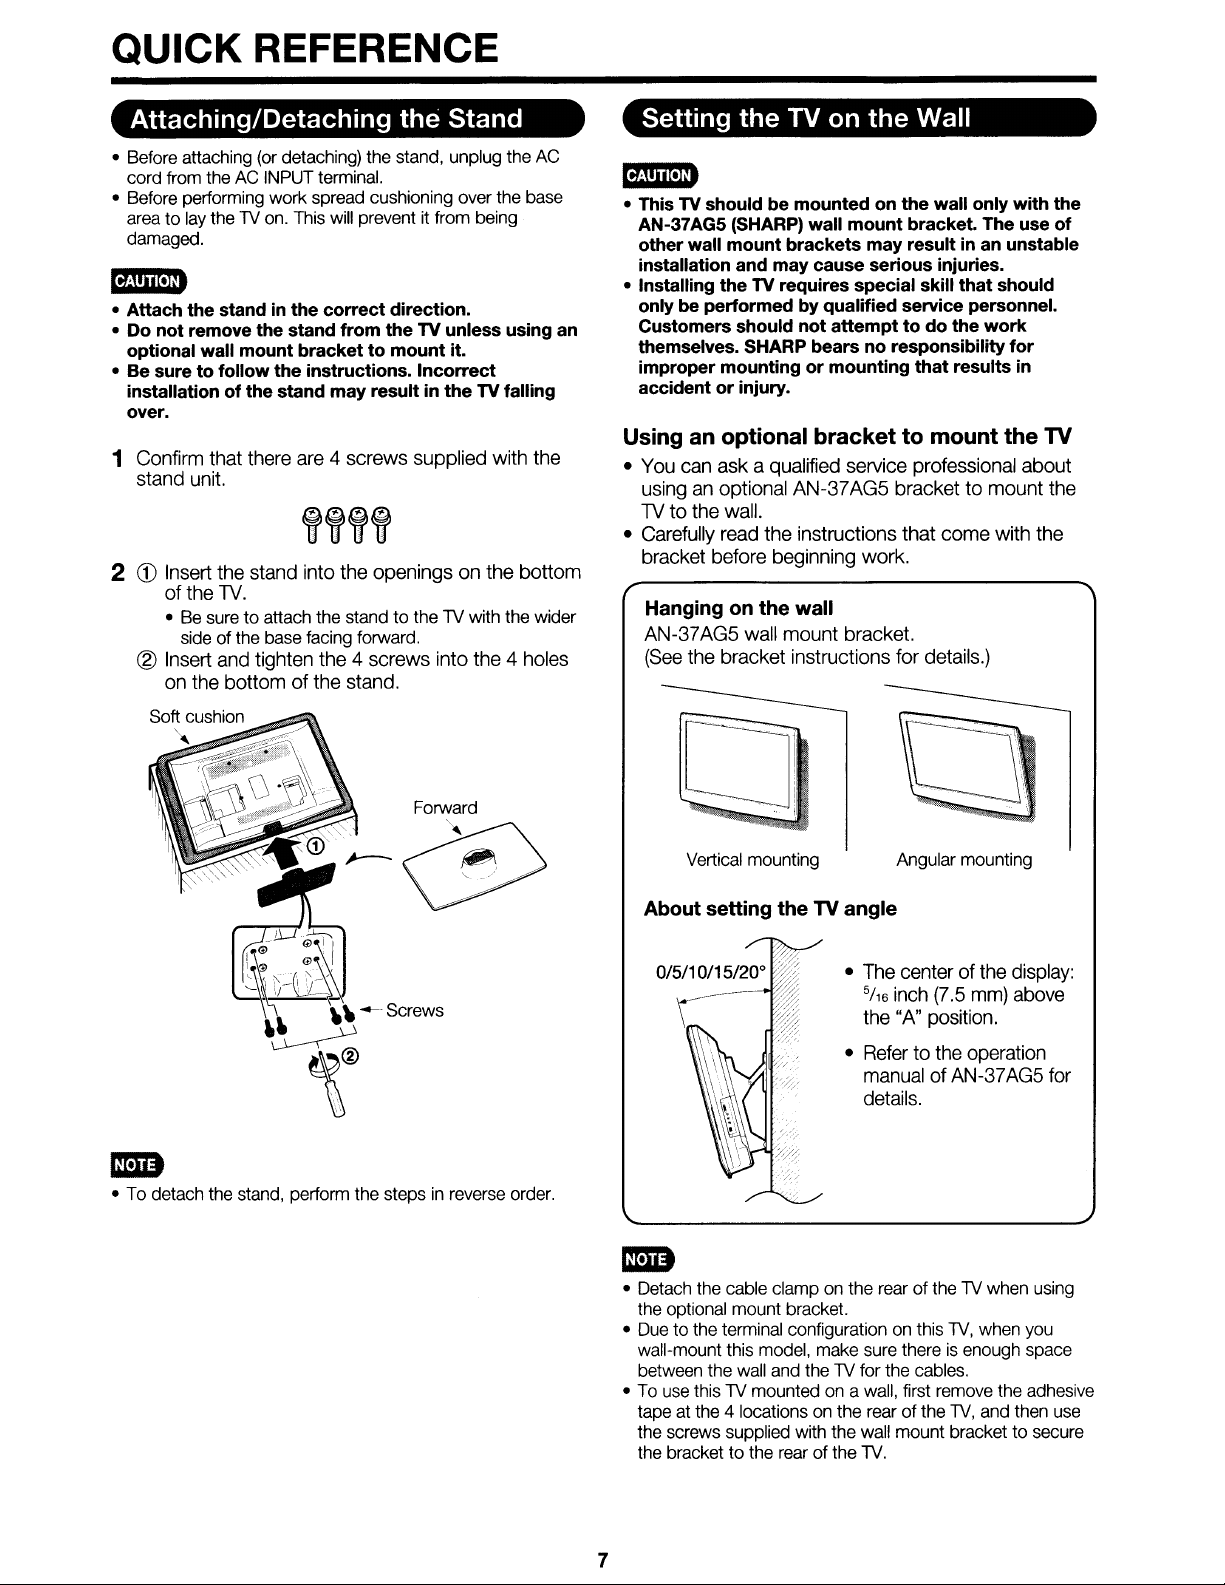
Attaching/Detaching the Stand Setting the TV on the Wall
• Before attaching (or detaching) the stand, unplug the AC
cord from the AC INPUT terminal.
• Before performing work spread cushioning over the base
area
to
lay the
"TV
on. This will prevent it from being
damaged.
• Attach the standinthe correct direction.
Do
not remove the stand from the TV unless using an
•
to
optional wall mount bracket
• Be sure to follow the instructions. Incorrect
installation ofthe stand may result in
over.
mount it.
the
TV falling
1 Confirm that there are 4 screws supplied with the
stand unit.
2
CD
Insert the stand into the openings on the bottom
of
the
TV.
• Be suretoattach the standtothe
of
the base facing forward.
side
"TV
with the wider
® Insert and tighten the 4 screws into the 4 holes
of
on the bottom
the stand.
rI!mD
• This TV shouldbemounted on the wall only with the
AN-37AG5 (SHARP) wall mount bracket. The use of
other wall mount brackets may result
installation and may cause serious injuries.
• Installing the TV requires special skill that should
be
only
Customers should not
themselves. SHARP bears
improper mounting or mounting
accidentorinjury.
Using an optional bracket to mount the TV
• You can ask a qualified service professional about
using an optional AN-37AG5 bracket
TV
• Carefully read the instructions that come with the
bracket before beginning work.
AN-37AG5 wall
(See
performed by qualified service personnel.
to
the wall.
attempt
to do the work
no
responsibility
Hanging on the wall
mount
bracket.
the bracket instructions for details.)
that
in
an unstable
results
to
mount the
for
in
• To detach the stand, perform the stepsinreverse order.
01
Vertical mounting
About setting the TV angle
,.
::;:
mm
• Detach the cable clamp on the rearofthe
the optional mount bracket.
• Due to the terminal configuration on this
wall-mount this model, make sure there
between the wall and the
• To use this
tape at the 4 locations on the rear
the screws supplied with the wall mount bracket
the bracket
"TV
mounted on a wall, first remove the adhesive
to
the rearofthe
"TV
Angular mounting
• The center ofthe display:
5/
inch (7.5 mm) above
16
the "A" position.
• Refer to the operation
manual of AN-37AG5 for
details.
"TV,
is
for the cables.
of
the
"TV,
"TV.
"TV
when using
when you
enough space
and then use
to
secure
7
QUICK REFERENCE
QUICK INSTALLATION TIPS Experiencing HD images
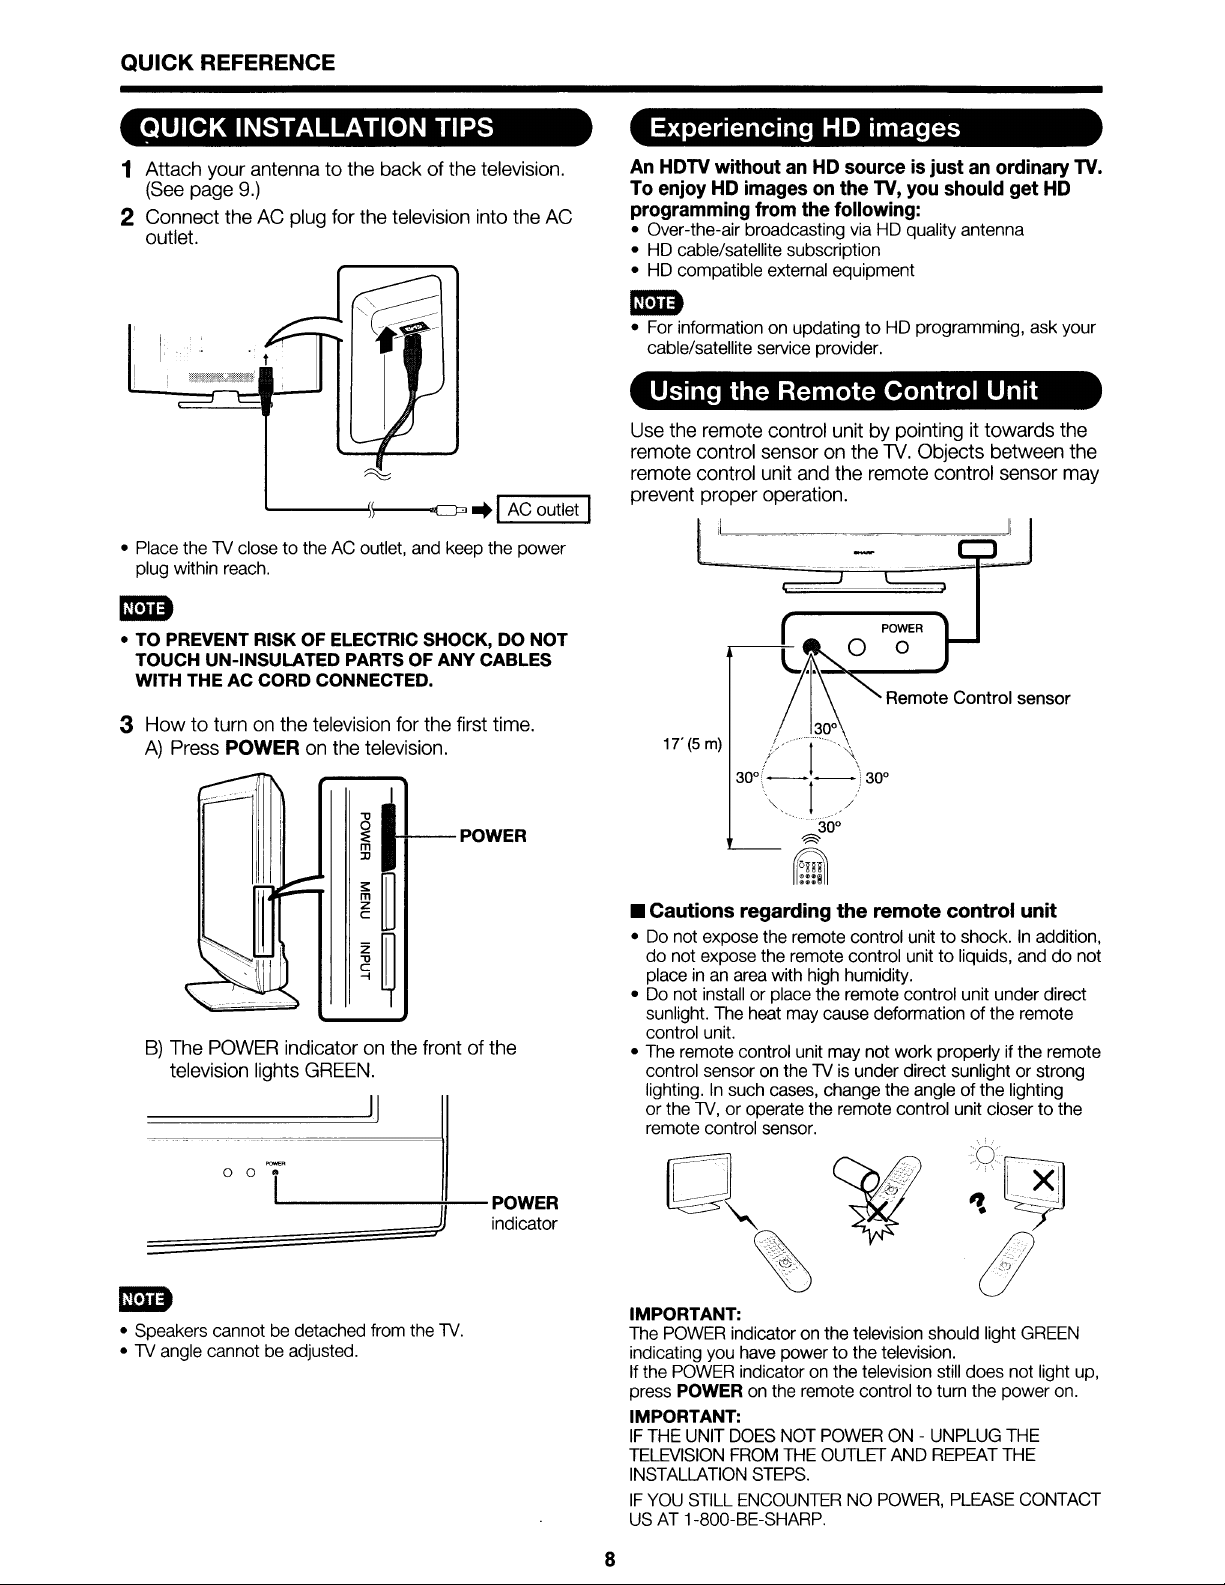
1 Attach your antenna to the back of the television.
(See
page
9.)
2 Connect the AC plug for the television into the AC
outlet.
withoutanHD
To
enjoyHDimagesonthe
programming
• Over-the-air broadcasting via HD quality antenna
• HD cable/satellite subscription
• HD compatible external equipment
from
sourceisjustanordinary
TV,
the
following:
An
HDTV
ED
• For information on updatingtoHD programming, ask your
cable/satellite service provider.
Using the Remote Control Unit
Use the remote control unit by pointing it towards the
l....-_-...J,I---c::::J3
• Place the1Vclose to the AC outlet, and keep the power
plug within reach.
..
, AC outlet I
remote control sensor on the
remote control unit and the remote control sensor may
prevent proper operation.
lV.
ED
• TO PREVENT RISK OF ELECTRIC SHOCK, DO NOT
TOUCH UN-INSULATED PARTS OF ANY CABLES
WITH THE AC CORD CONNECTED.
you
should
Objects between the
get
HD
TV.
3
How
to turn on the television for the first time.
A)
Press POWER on the television.
~
'-'1---
m
:D
B)
The POWER indicator on the frontofthe
television lights GREEN.
II
_.
o 0 i
=
l
JJ
POWER
POWER
indicator
1T(5m)
• Cautions regarding the remote control unit
• Do not expose the remote control unittoshock.Inaddition,
do
not expose the remote control unittoliquids, anddonot
place in an area with high humidity.
• Do not install or place the remote control unit under direct
sunlight. The heat may cause deformation
control unit.
• The remote control unit may not work properly if the remote
control sensor on the
lighting.
or
remote control sensor.
In
the 1V,oroperate the remote control unit closertothe
such cases, change the angleofthe lighting
1V
is under direct sunlight or strong
of
the remote
• Speakers cannot be detached from the 1V.
•
1V
angle cannot be adjusted.
IMPORTANT:
The POWER indicator on the television should light GREEN
indicating you have power
If
the POWER indicator on the television still does not light up,
POWER on the remote control
press
IMPORTANT:
IF
THE UNIT DOES NOT POWER ON - UNPLUG THE
TELEVISION FROM THE OUTLET AND REPEAT THE
INSTALLATION STEPS.
IF
YOU
STILL ENCOUNTER NO POWER, PLEASE CONTACT
US AT 1-800-BE-SHARP.
to
the television.
to
turn the power on.
8
Preparation
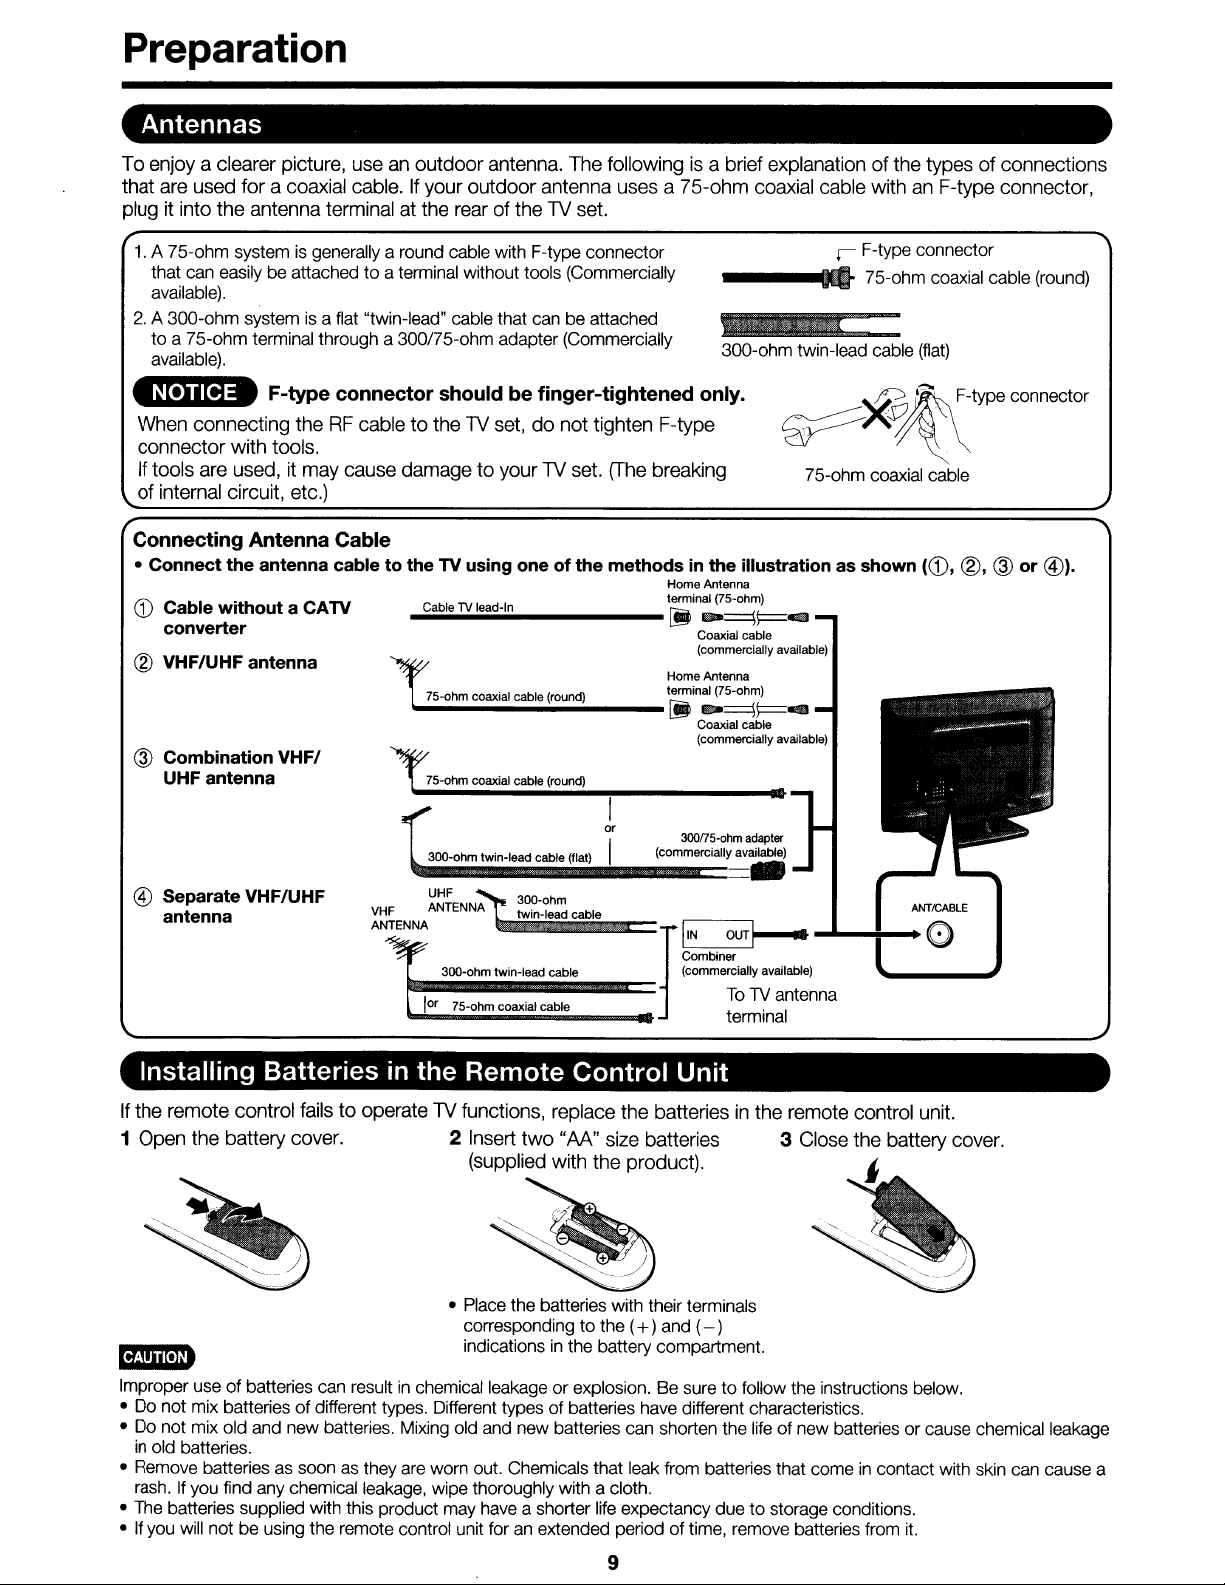
Antennas
To enjoy a clearer picture, useanoutdoor antenna. The followingisa brief explanation of the types of connections
that are used for a coaxial cable. If your outdoor antenna uses a 75-ohm coaxial cable with
plug it into the antenna terminal at the rear of the
1V
set.
an
F-type connector,
1.
A 75-ohm systemisgenerally a round cable with F-type connector
to
that can easily be attached
available).
2.
A 300-ohm systemisa flat "twin-lead" cable that can be attached
to
a 75-ohm terminal through a 300/75-ohm adapter (Commercially
available).
NOTICE
When connecting theRFcable to the1Vset,donot tighten F-type
connector with tools.
If tools are used, it may cause damage to your
of internal circuit, etc.)
Connecting Antenna Cable
• Connect the antenna cable to the TV using one of the methodsinthe illustration as shown
CD
Cable without a CATV
converter
F-type connector should be finger-tightened only.
® VHF/UHF antenna
@ Combination
UHF antenna
@ Separate VHF/UHF
antenna
VHF/
a terminal without tools (Commercially
1V
set.
(The
.....
Cab__.le..TVioile.a..d-..'n
7S-ohm coaxial cable (round) terminal (7S-ohm)
"---_
'Ys-ohm
3QO-ohm
....
__
UHF
VHF
ANTENNA twin-lead cable
ANTENNA
......
_----[jJi
coaxial cable (round)
I
()(
twin-lead cable (flat) (commercially available)
...
~
300-ohm
I
~--====.
----I
300-ohm twin-lead cable
-
breaking
Home Antenna
terminal (7S-ohm)
~
"~I==-
Coaxial cable
(commercially available)
Home Antenna
-~I==
Coaxial cable
(commercially available)
3OOflS-ohm
II
adapter
~:m~n:UT~
300-ohm twin-lead cable (commercially available)
~IIIIII_IIIIIIIIII
lor 75-ohm coaxial cable
'"""'_
.............................
---...
E=
J
ToTVantenna
terminal
r F-type connector
.••
,75-ohm coaxial cable (round)
~
~A~~\
75-ohm coaxial cable
---"'i--"+
(flat)
$A.'
F-type connector
<CD,
®,
ANTICABLE
'0
@ or @).
Installing Batteriesinthe Remote Control Unit
If
the remote control failstooperate1Vfunctions, replace the batteriesinthe remote control unit.
1 Open the battery cover. 2 Insert
• Place the batteries with their terminals
Improper use of batteries can result
• Do not mix batteries of different types. Different types of batteries have different characteristics.
• Do not mix old and new batteries. Mixing old and new batteries can shorten the life of new batteries or cause chemical leakage
in
old batteries.
• Remove batteries as soon as they are worn out. Chemicals that leak from batteries that comeincontact with skin can cause a
rash. If you find any chemical leakage, wipe thoroughly with a cloth.
• The batteries supplied with this product may have a shorter life expectancy duetostorage conditions.
If
you will not be using the remote control unit for an extended period oftime, remove batteries from
•
in
chemical leakage or explosion. Be suretofollow the instructions below.
two
"AA" size batteries 3 Close the battery cover.
(supplied with the product).
corresponding
indications
to
the (+)and (- )
in
the battery compartment.
9
j
it.
Part Names
TV (Fron't)
II
-
*OPC: Optical Picture Control
TV (Rear/Side)
~
...
--
m
:D
~
~
...
--
c
z
~
...
--
A
()
:I:
v
,.
-
I
I
••.
I
-_
..
-
-_
..•
---.
1
\..
POWER
~
•
Remote control sensor
OPC sensor' (See page 18.)
POWER indicator (See page 12.)
~
~
+
~
r
~1
~
VIDEO
~~
AUDIO
~~
*1
See page11for external equipment connection.
*2
See page 17 for button operations.
*3
See page 8 for connecting the AC cord.
*4 See page
INPUT3
terminals
SERVICE
terminal
21
for details on the PC Audio Select function.
L..-------INPUT
~-----------
INPUT 4 terminal (PC-IN)
AUDIO terminal (shared for INPUT 4 and INPUT
INPUT 5 terminal (HDMI)
1 terminals
INPUT 2 terminals
5)
*4
mID
• The illustrationsinthis operation manual are for explanation purposes and mayvary slightly from the actual operations.
10
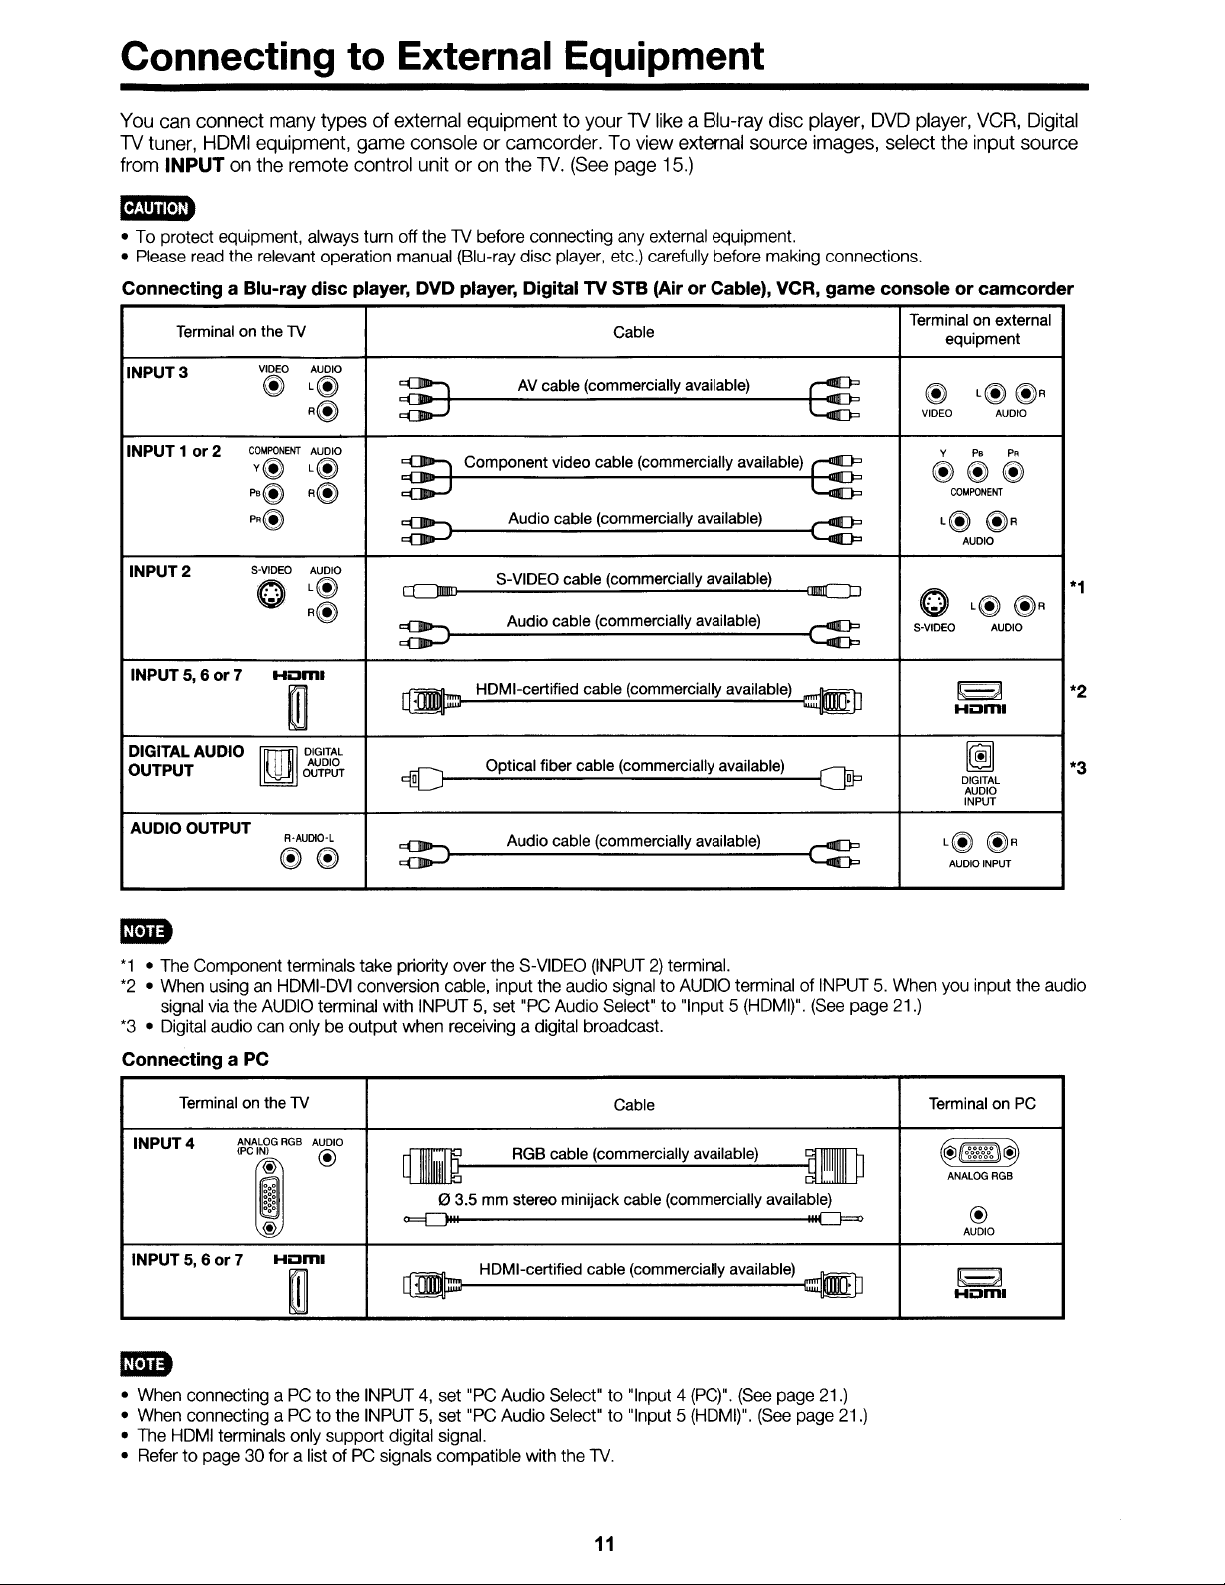
Connecting to External Equipment
You can connect many typesofexternal equipmenttoyourTVlike a Blu-ray disc player, DVD player, VCR, Digital
TV tuner, HDMI equipment, game console or camcorder. To view external source images, select the input source
from INPUT on the remote control unit or on the
TV.
(See page 15.)
BmD
•Toprotect
•
Please
Connecting a Blu-ray
INPUT 3
INPUT 1
INPUT 2
INPUT5, 6or7
DIGITAL AUDIO
OUTPUT
AUDIO OUTPUT
equipment,
read
the
relevant
Terminal on the TV
VIDEO
@
COMPONEm-
or2
v@
P8@
PA@
S-V1DEO
.
to
Hom,
m
I
[ill
R·AUDIO-L
@ @
always
tum off theTVbefore
operation
disc
AUDIO
L@
R@
AUDIO
L@
R@
manual
player, DVD player, Digital TV STB (AirorCable), VCR,
(Blu-ray
:E
~
cCiit-J
Component video cable (commercially available)
connecting
disc
player,
AV
cable (commercially available)
Audio cable (commercially available)
any
etc.)
Cable
external
carefully
~
AUDIO
L@
R@
CC]IDIJD
S-VIDEO cable (commercially available)
Audio cable (commercially available)
~
HDMI-certified cable (commercially available)
~
I
DIGITAL
AUDIO
OUTPUT
CJ
Optical fiber cable (commercially available)
Audio cable (commercially available)
~
equipment.
before
making
connections.
game
e
~
L...Iimj,
c::g:
aIIIlIC:D
c:g:
~
oP
c::g
consoleorcamcorder
Terminal on external
equipment
L@@R
@
VIDEO
@@@
(;)
.
S-VIDEO
P.
v
CQMPONEm-
L@
AUDIO
L@
K='A
Hom,
~
DIGITAL
AUDIO
INPUT
L@
AUDIO
AUDIO
PA
@R
@R
AUDIO
@R
INPUT
*1
*2
*3
*1•The
*2•When
*3•Digital
Connecting a
INPUT5,6or7
•
•
•
•
Component
usinganHDMI-DVI
signal
via
the
audio
PC
Terminal on the TV
INPUT 4
When
When
The
HDMI
Refertopage30for a
ANALOG
(PC
connecting aPCto the
connecting aPCto
terminals
terminals
AUDIO
can
onlybeoutput
RGB
IN)
...
...
...
...
~
@
I
Hom,
m
only
take
conversion
terminal
AUDIO
@
INPUT4,set
the
INPUT5,set
support digital
listofPC
priority
over
the
with
INPUT5,set
when
cable,
receiving
S-VIDEO
input
"PC
a digital broadcast.
RGB cable (commercially available)
(INPUT2)terminal.
the
audio
Audio
Select"to"Input5(HDMI)".
signaltoAUDIO
Cable
Q]illJ
o3.5 mm stereo minijack cable (commercially available)
O:::::==:[J
III
HDMI-certified cable (commercially available)
~
"PC
Audio
Select"to"Input4(PC)".
"PC
Audio
Select"to"Input5(HDMI)".
signal.
signals
compatible
with
the
TV.
11
terminalofINPUT5.When
(See
page
21.)
m
Ill~
~
(See
page
21.)
(See
page
21.)
you
input
Terminal on
~(~\~
ANALOG
RGB
@
AUDIO
E/Jl
Hom,
the
PC
audio
Watching TV
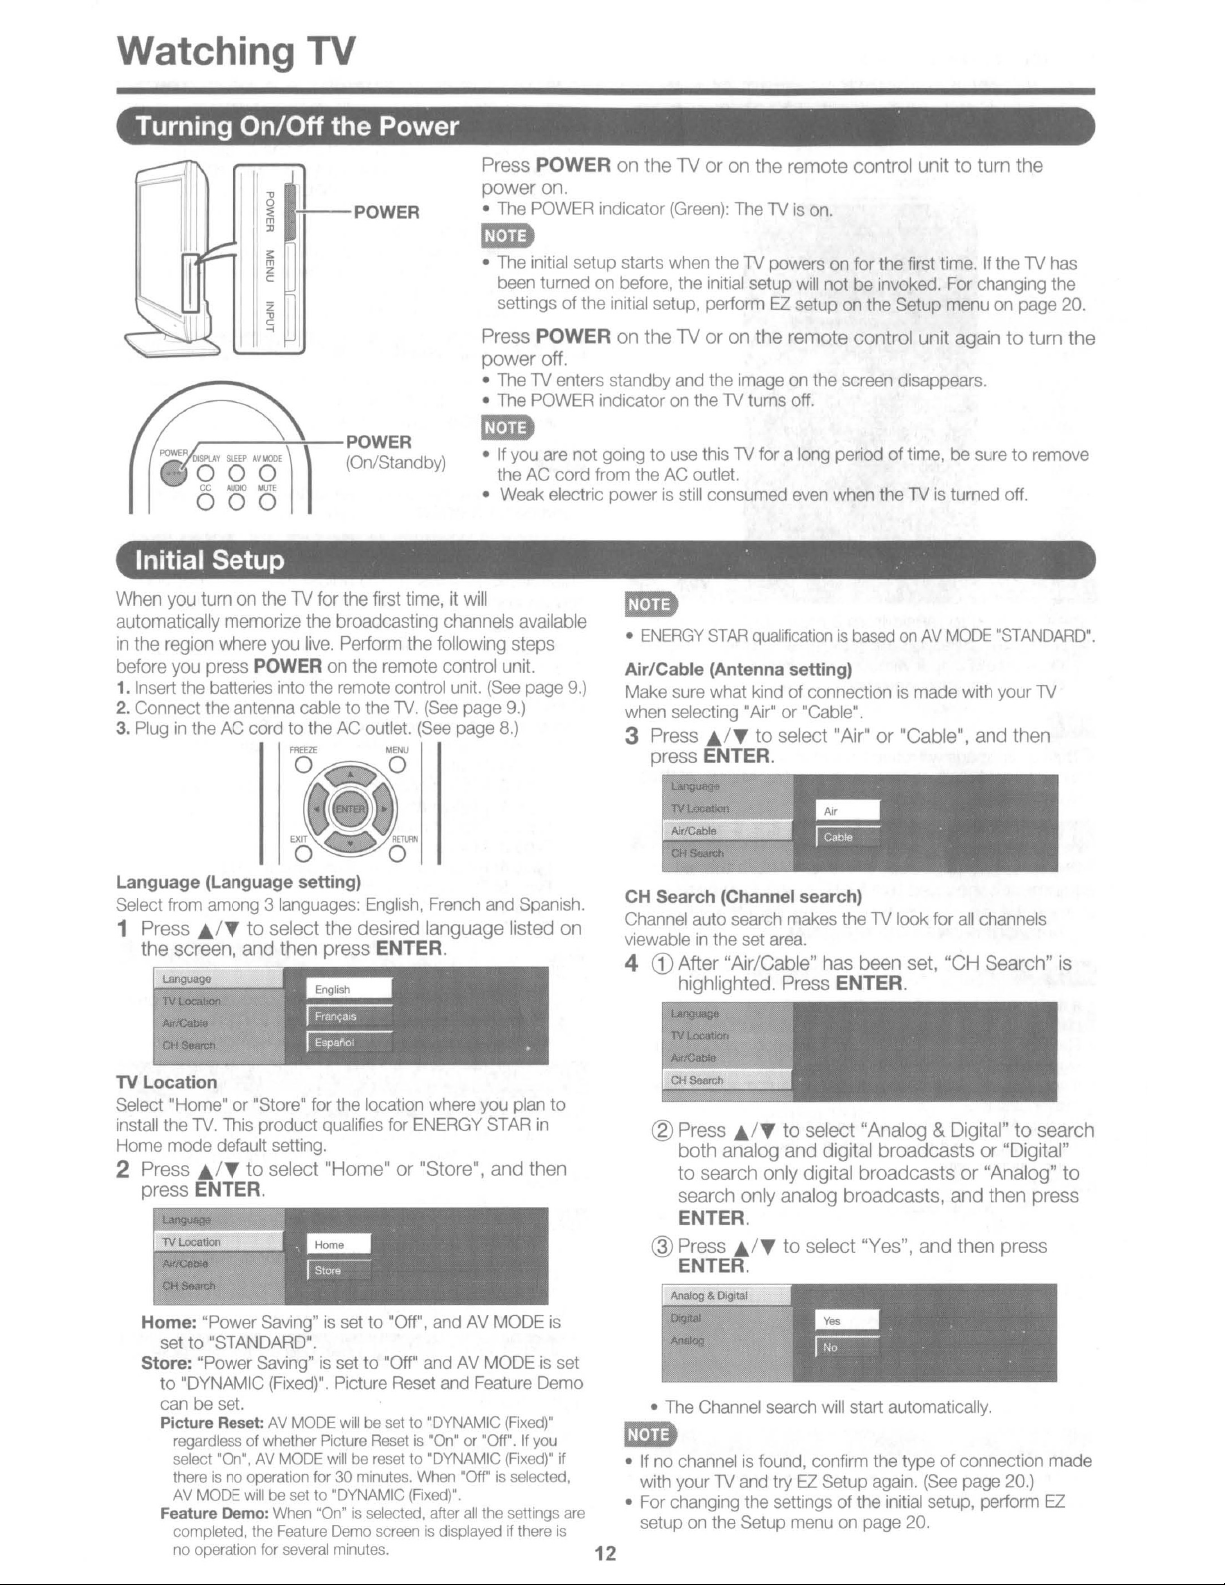
Turning On/Off the Power
~--~::---POWER
(On/Standby)
Press POWERonthe
power on.
• The POWER indicator (Green): The1Vis
• The initial setup starts when the1Vpowers on
-
been turned on before, the initial setup will not be invoked. For changing the
settings ofthe initial setup, perform
Press POWERonthe
power off.
• The1Venters standby and the image on the screen disappears.
• The POWER indicator on the
• If you are not goingtouse this1Vfor a long periodoftime,besuretoremove
-
• Weak electric power is still consumed even when the
the AC
cord
from the AC outlet.
TVoron
TVoron
Initial Setup .
When
you
turnontheTVfor
automatically
in
the
before
1.
Insert the batteries into the remote control unit. (See page 9.)
2. Connect the antenna cable
3.
Pluginthe AC cordtothe AC outlet. (See page 8.)
region
you
memorize
where
press
you
POWER
the
first
the
broadcasting
live.
Perform
on
the
remote
to
the 1V. (See page 9.)
time,itwill
channels
the
following
control
available
steps
unit.
•
ENERGY
-
Air/Cable (Antenna setting)
Make sure what kindofconnection is made with your
when selecting "Air" or "Cable".
3 Press
press
the remote control unit to turn the
on.
for
the first time. If the1Vhas
EZ
setup on the Setup menu on page 20.
the remote control unit again to turn the
1V
turns off.
1V
is turned off.
STAR
qualificationisbasedonAV
~.I~
to select "Air" or "Cable", and then
ENTER.
MODE
"STANDARD".
1V
language
Select from among 3 languages: English. French and Spanish.
1 Press
the screen, and then press
TV
location
Select "Home"or"Store" for the location where you plan
install the 1V. This product qualifies for ENERGY STAR in
Home
2 Press
press
Home: "Power Saving"
Store: "Power Saving" is set
(language setting)
./~
to select the desired language listed on
ENTER.
mode
default setting.
j,j~
to select "Home" or "Store", and then
ENTER.
is
set
to
"Oft",
and AV MODE
setto"STANDARD".
to
"Oft" and AV MODEisset
to
"DYNAMIC (Fixed)". Picture Reset and Feature Demo
can be set.
Picture Reset:
regardless of whether Picture
select
thereisno
AV
MODE
Feature Demo:
completed,
no
operation
AV
MODE
"On",AVMODE
operation for30minutes.
willbesetto"DYNAMIC
the
for
willberesetto"DYNAMIC
When
"On"isselected, after
Feature
several
willbesetto"DYNAMIC
Resetis"On"
Demo
screenisdisplayedifthere
minutes.
When
(Fixed)".
or
"Off"isselected,
all
(Fixed)"
"Off".
If
(Fixed)"
the settings
to
is
you
if
are
is
CH Search (Channel search)
Channel auto search makes the1Vlook for
viewable
4
• If no channel is found, confirm the typeofconnection made
-
• For changing the settings
12
in
the set area.
CD
After "Air/Cable" has been set, "CH Search"
highlighted. Press ENTER.
®Press
@ Press
• The Channel search will start automatically.
with your
setup on the Setup menu on page 20.
Ji/~
both analog and digital broadcasts or "Digital"
to search only digital broadcasts or "Analog" to
search only analog broadcasts, and then press
ENTER.
ENTER.
1V
to select "Analog & Digital" to search
./~
to select "Yes", and then press
and tryEZSetup again. (See page 20.)
of
the initial setup, perform EZ
all
channels
is
 Loading...