

Page 1
SHAR~
LC-26D40U
LC-32D40U
LIQUID CRYSTAL TELEVISION
TELEVISEUR
ACL
TELEVISOR CON PANTALLA
DE CRISTAL LIQUIDO
OPERATION MANUAL
MODE D'EMPLOI
MANUAL DE OPERACION
AQuas
NOM
1245
[][]
IDOLBYI
DIGITAL
HIGH-DEFINITION
MULTIMEDIA
INTERFACE
c-
.......
l
1-
ll
t
NYCE
HIGH-DEFINITION TELEVISION
Page 2
LC-26D40U
LC-32D40U
LIQUID CRYSTAL TELEVISION
ENGLISH
OPERATION MANUAL
• The illustrations and on-screen displays in this operation
manual are for explanation purposes and may vary
slightly from the actual operations.
• Menu items that are not selectable are grayed out.
• The examples used throughout this manual are based on
the LC-32D4QU model.
IMPORTANT:
To aid reporting
in
caseoflossortheft, please record the
TV's model and serial numbers
in
the space provided. The
numbers are located at the rear
of
the TV.
Model No.:
Serial No.:
IMPORTANT INFORMATION
WARNING: TO REDUCE THE RISK OF FIRE OR ELECTRIC SHOCK, DO
NOT EXPOSE THIS PRODUCT
TO
RAIN OR MOISTURE.
The lightning flash with arrow-head
symbol, within
an
equilateral triangle,
is intended to alert the user
to
the
presence
of
uninsulated "dangerous
voltage" within the product's
enclosure that may be
of
sufficient
magnitude
to
constitute a risk
of
electric shocktopersons.
•
RISKOFELECTRIC
SHOCK
DO
NOT
OPEN
CAUTION:TOREDUCE
THE
RISKOFELECTRIC
SHOCK,
DO
NOT
REMOVE
COVER
(OR
BACK).
NO
USER-SERVICEABLE
PARTS
INSIDE.
REFER
SERVICINGTOQUALIFIED
SERVICE
PERSONNEL.
The exclamation point within a
triangle is intended to alert the user
to
the presenceofimportant
operating and maintenance
(servicing) instructions in the
literature accompanying the product.
@-1
Page 3
@-2
IMPORTANT INFORMATION
CAUTION: TO PREVENT ELECTRIC SHOCK, MATCH WIDE BLADE OF PLUG TO
WIDE SLOT, FULLY INSERT.
CAUTION:
DO NOTPLACETHIS PRODUCT ON AN UNSTABLE
CART;
STAND, TRIPOD, BRACKET, ORTABLE.
THE PRODUCT MAY FALL CAUSING SERIOUS PERSONAL INJURYAND SERIOUS DAMAGE TO
THE PRODUCT. USE ONLYWITH A
CART,
STAND, TRIPOD, BRACKET; ORTABLE RECOMMENDED
BY THE MANUFACTURER OR SOLD WITH THE PRODUCT: FOLLOW THE MANUFACTURER'S
INSTRUCTIONS WHEN INSTALLING THE PRODUCT AND USE MOUNTING ACCESSORIES
RECOMMENDED BY THE MANUFACTURER. A PRODUCTAND CART COMBINATION SHOULD BE
MOVEDWITH CARE. QUICK STOPS, EXCESSIVE FORCE, AND UNEVEN SURFACES MAY CAUSE
THE PRODUCTAND CART COMBINATION TO OVERTURN.
WARNING: FCC Regulations state that any unauthorized changes
or
modifications to this equipment not expressly
approved
by
the manufacturer could void the user's authority to operate this equipment.
CAUTION:
This product satisfies FCC regulations when shielded cables and connectors are used to connect the unit to other
equipment.
To
prevent electromagnetic interference with electric appliances such as radios and televisions, use shielded
cables and connectors for connections.
"Note to CATV system installer: This reminder is provided to call the CATV system installer's attention to Article 820-40ofthe National
Electrical Code that provides guidelines for proper grounding and,
in
particular, specifies that the cable ground shall be connected to
the grounding system
of
the building, as close to the pointofcable entryaspractical."
This product utilizes tin-lead solder, and fluorescent lamp containing a small amount
of
mercury. Disposalofthese materials may be
regulated due to environmental considerations. For disposal or recycling information, please contact your local authorities or the
Electronic Industries Alliance: www.eia.org
Trademarks
• Manufactured under license from Dolby Laboratories. "Dolby" and the double-D symbol are trademarksofDolby
Laboratories.
• "HDMI, the
HDMIIogo
and High-Definition Multimedia Interface are trademarksorregistered trademarks of HDMI
Licensing LLC."
• WOW, SRS and
Ce)
symbol are trademarksofSRS Labs, Inc.
WOW
technology is incorporated under license from SRS Labs, Inc.
Page 4
DEAR SHARP CUSTOMER
Thank
you
for
your
purchaseofthe Sharp
Liquid
Crystal Television. To ensure safety and many years
of
trouble-free operationofyour
product, please read the Important Safety
Instructions
carefully before
using
this
product.
IMPORTANT SAFETY INSTRUCTIONS
Electricity is used to petform many useful functions, but it can also cause personal injuries and property damage if
improperly handled. This product has been engineered and manufactured with the highest priority on safety. However,
improper use can result
in
electric shock and/or fire.Inorder to prevent potential danger, please observe the following
instructions when installing, operating and cleaning the product.
To
ensure your safety and prolong the service life of
your Liquid Crystal Television, please read the following precautions carefully before using the product.
1)
Read these instructions.
2)
Keep these instructions.
3)
Heed all warnings.
4)
Follow
all
instructions.
5)
Do not use this apparatus near water.
6)
Clean only with dry cloth.
7)
Do not block any ventilation openings. Installinaccordance with the manufacturer's instructions.
8)
Do not install near any heat sources suchasradiators, heat registers, stoves, or other apparatus (including
amplifiers) that produce heat.
9)
Do not defeat the safety purpose ofthe polarizedorgrounding-type plug. A polarized plug has two blades with
one wider than the other. A grounding type plug has two blades and a third grounding prong. The wide blade or
the third prong are provided for your safety. If the provided plug does not fit into your outlet, consult
an
electrician for replacement ofthe obsolete outlet.
10)
Protect the power cord from being walked on or pinched particularly at plugs, convenience receptacles, and the
point where they exit from the apparatus.
11)
Only use attachments/accessories specified by the manufacturer.
12)
Use only with the cart, stand, tripod, bracket,ortable specified by the manufacturer, or sold with the
I)
apparatus. When a cart is used, use caution when moving the cart/apparatus combinationtoavoid
injury from tip-over.
13)
Unplug this apparatus during lightning storms or when unused for long periods of time.
14) Refer all servicing
to
qualified service personnel. Servicing is required when the apparatus has been damaged
in
any way, suchaspower-supply cord or plug is damaged, liquid has been spilledorobjects have fallen into the
apparatus, the apparatus has been exposed to rain
or
moisture, does not operate normally,orhas been
dropped.
Additional Safety Information
15)
Power
Sources-
This product should be operated only from the type of power source indicatedonthe marking
label. If you are not sure of the type of power supply
to
your home, consult your product dealerorlocal power
company. For products intended
to
operate from battery power, or other sources, refertothe operating
instructions.
16)
Overloading-Donot overload wall outlets, extension cords, or integral convenience receptacles as this can
result
in
a risk of fire or electric shock.
17)
Object and liqUid
Entry-
Never push objects of any kind into this product through openingsasthey may touch
dangerous voltage points
or
short-out parts that could resultina fireorelectric shock. Never spill liquidofany
kind on the product.
18) Damage Requiring
Service-
Unplug this product from the wall outlet and refer servicingtoqualified service
personnel under the following conditions:
a)
When the AC cordorplug is damaged,
b)
If liquid has been spilled, or objects have fallen into the product,
c)
If the product has been exposedtorain or water,
d)
If the product does not operate normally by following the operating instructions.
Adjust only those controls that are covered by the operating instructions
asanimproper adjustment of other
controls may result
in
damage and will often require extensive work by a qualified technician to restore the
product
to
its normal operation,
e)
If the product has been droppedordamagedinany
way,
and
f)
When the product exhibits a distinct changeinperformance - this indicates a need for service.
19)
Replacement
Parts-When
replacement parts are required, be sure the service technician has used replacement
parts specified by the manufacturer or have the same characteristics
as
the original part. Unauthorized
substitutions may result in fire, electric shock, or other hazards.
20)
Safety
Check-Upon
completion of any serviceorrepairstothis product, ask the service technician to petform
safety checks to determine that the product is
in
proper operating condition.
21)
Wallorceiling
mounting-When
mounting the productona wall or ceiling, be suretoinstall the product
according
to
the method recommended by the manufacturer.
@-3
Page 5
IMPORTANT SAFETY INSTRUCTIONS
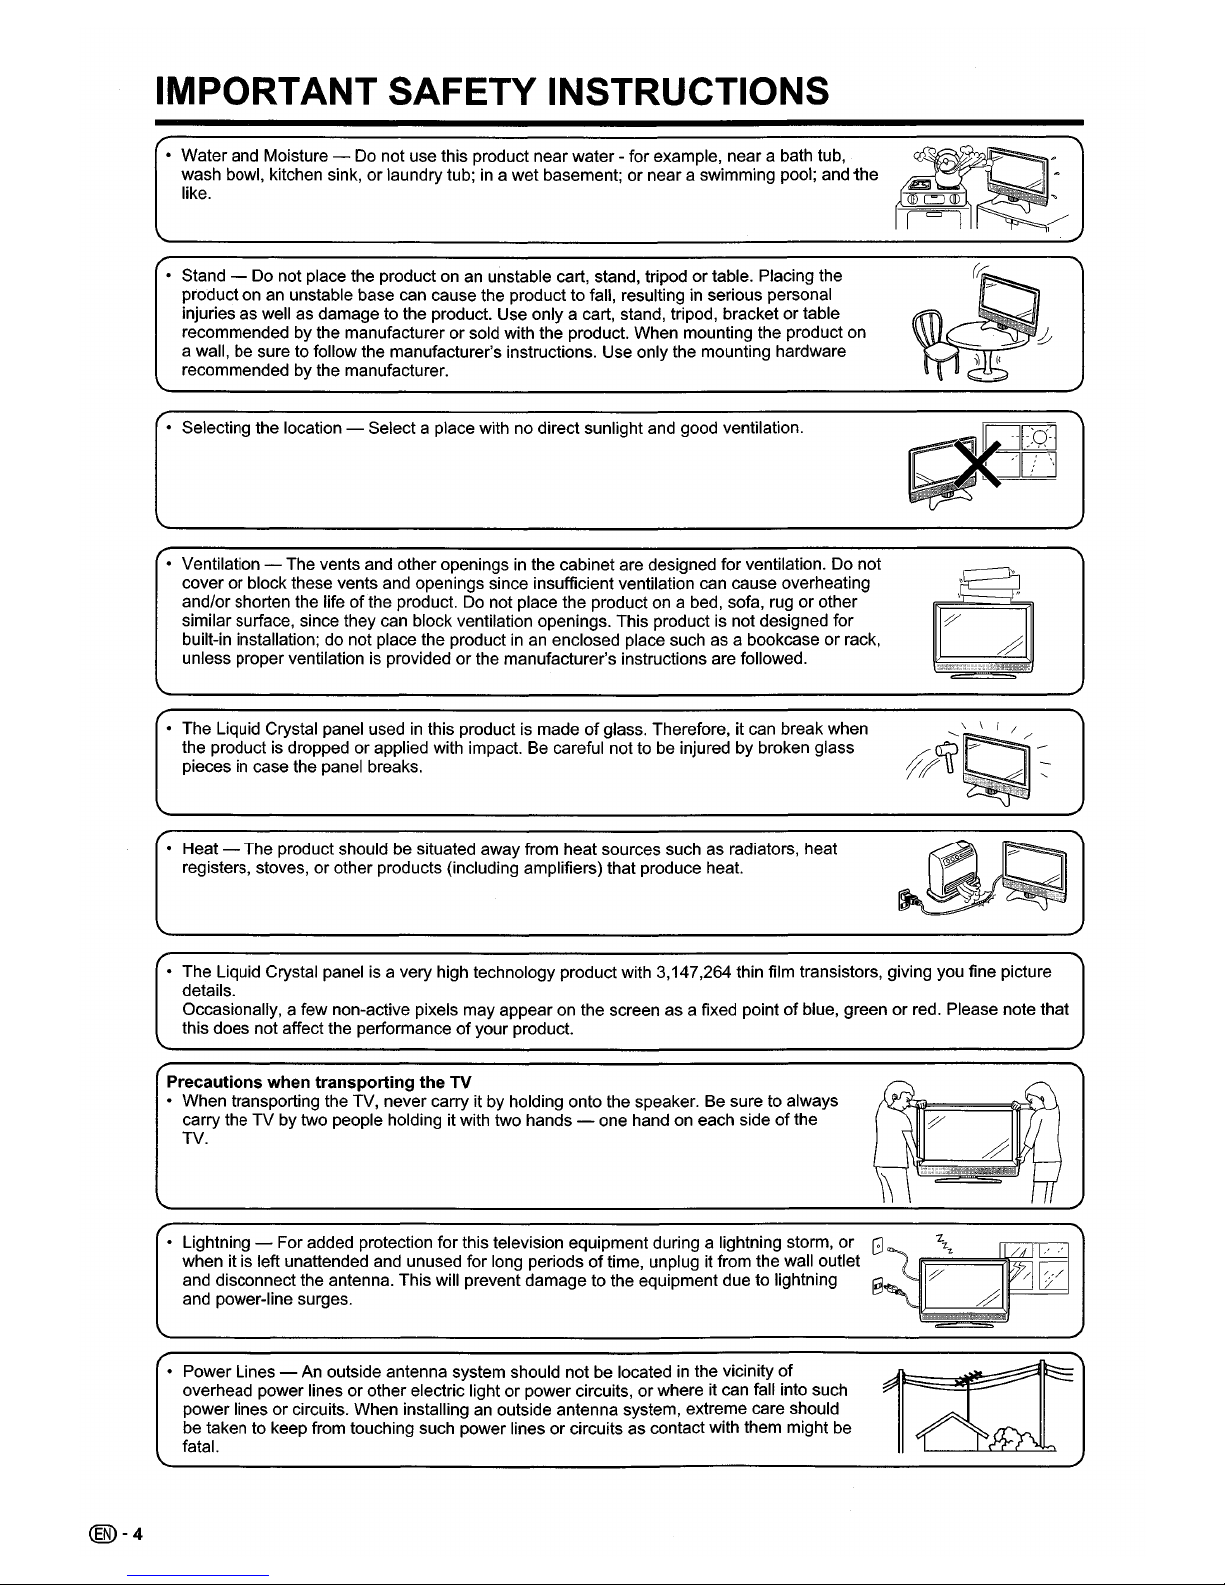
• Water and Moisture - Do not use this product near water - for example, near a bath tub,
wash bowl, kitchen sink,
or
laundry tub;ina wet basement; or near a swimming pool; and
the
like.
• Stand - Do not place the product on
an
unstable cart, stand, tripodortable. Placing the
product on an unstable base can cause the product to fall, resulting
in
serious personal
injuries as well as damage to the product. Use only a cart, stand, tripod, bracket
or
table
recommended by the manufacturer
or
sold with the product. When mounting the product on
a wall, be sure to follow the manufacturer's instructions. Use only the mounting hardware
recommended by the manufacturer.
• Selecting the location - Selecta place with no direct sunlight and good ventilation.
• Ventilation - The vents and other openings in the cabinet are designed for ventilation. Do not
cover
or
block these vents and openings since insufficient ventilation can cause overheating
and/or shorten the life
ofthe
product. Do not place the product on a bed, sofa, rugorother
similar surface, since they can block ventilation openings. This product
is
not designed for
built-in installation; do not place the product in an enclosed place such as a bookcase
or
rack,
unless proper ventilation
is
providedorthe manufacturer's instructions are followed.
• The Liquid Crystal panel used
in
this product is madeofglass. Therefore, it can break when
the product is dropped
or
applied with impact. Be careful not to be injured by broken glass
pieces
in
case the panel breaks.
• Heat- The product should be situated away from heat sources such as radiators, heat
registers, stoves, or other products (including amplifiers) that produce heat.
0
'
I'
I "
Y
#
jj\fjjEm,:n;:.,
••
,c;.,t(:l.c~
@-4
• The Liquid Crystal panel is a very high technology product with 3,147,264 thin film transistors, giving you fine picture
details.
Occasionally, a few non-active pixels may appear on the screen as a fixed point
of
blue, greenorred. Please note that
this does not affect the performance
of
your product.
Precautions when transporting the
TV
11
h\
• When transporting the TV, never carry it by holding onto the speaker. Be sure to always
carry the TV by two people holding it with two hands - one hand on each side
of
the
;/
~~
TV.
#
1\
r---t
~\
11
• Lightning - Foradded protection for this television equipment during a lightning storm,
or
G'(
z
27-
/41]
when it is left unattended and unused for long periodsoftime, unplug it from the wall outlet
::/
(dE
and disconnect the antenna. This will prevent damage to the equipment due to lightning
and power-line surges.
~
/
-
• Power Lines - An outside antenna system should not be locatedinthe vicinity
of
Td:Jr
overhead power linesorother electric light or power circuits,orwhere it can fall into such
power lines or circuits. When installing an outside antenna system, extreme care should
be taken to keep from touching such power lines or circuits as contact with them might be
fatal.
Page 6

IMPORTANT SAFETY INSTRUCTIONS
• Outdoor Antenna Grounding - Ifan outside antenna is connected to the television equipment, be sure the antenna
system is grounded so as to provide some protection against voltage surges and bUilt-up static charges.
Article 810
of
the National Electrical Code, ANSI/NFPA 70, provides information with regard to proper grounding
of
the mast and supporting structure, groundingofthe lead-in wire to an antenna discharge unit, sizeofgrounding
conductors, location
of
antenna-discharge unit, connection to grounding electrodes, and requirements for the grounding
electrode.
EXAMPLE OF ANTENNA GROUNDING AS PER
NATIONAL ELECTRICAL CODE, ANSI/NFPA 70
ANTENNA
DISCHARGE UNIT
(NEC SECTION 810-20)
/~-~
GROUNDING CONDUCTORS
(NEC SECTION 810-21)
~~-GROUND
CLAMPS
":"'-
POWER SERVICE GROUNDING
ELECTRODE SYSTEM
(NEC ART 250, PART H)
GROUND
CLAMP
NEC - NATIONAL ELECTRICAL CODE
• To prevent fire, never place any type
of
candleorflames on the topornear theTVset.
• To prevent fire or shock hazard, do not expose this product to dripping or splashing.
No objects filled with liquids, such as vases, should be placed on the product.
• To prevent fire
or
shock hazard, do not place the AC cord under the TV setorother heavy
items.
• Turn
off
the main power and unplug the AC cord from the wall outlet before handling.
• Use a soft cloth and gently wipe the surface
of
the display panel. Using a hard cloth may
scratch the panel surface.
• Use a soft damp cloth to gently wipe the panel when it is really dirty.
(It may scratch the panel surface when wiped strongly.)
• Ifthe panel is dusty, use an anti-static brush, which is commercially available, to clean
it.
• To protect the panel, do not use a dirty cloth, liquid cleaners or chemical cloth to clean it,
such materials may damage the panel surface.
• Do not display a still picture for a long time, as this could cause an afterimage to remain.
(00-5
Page 7
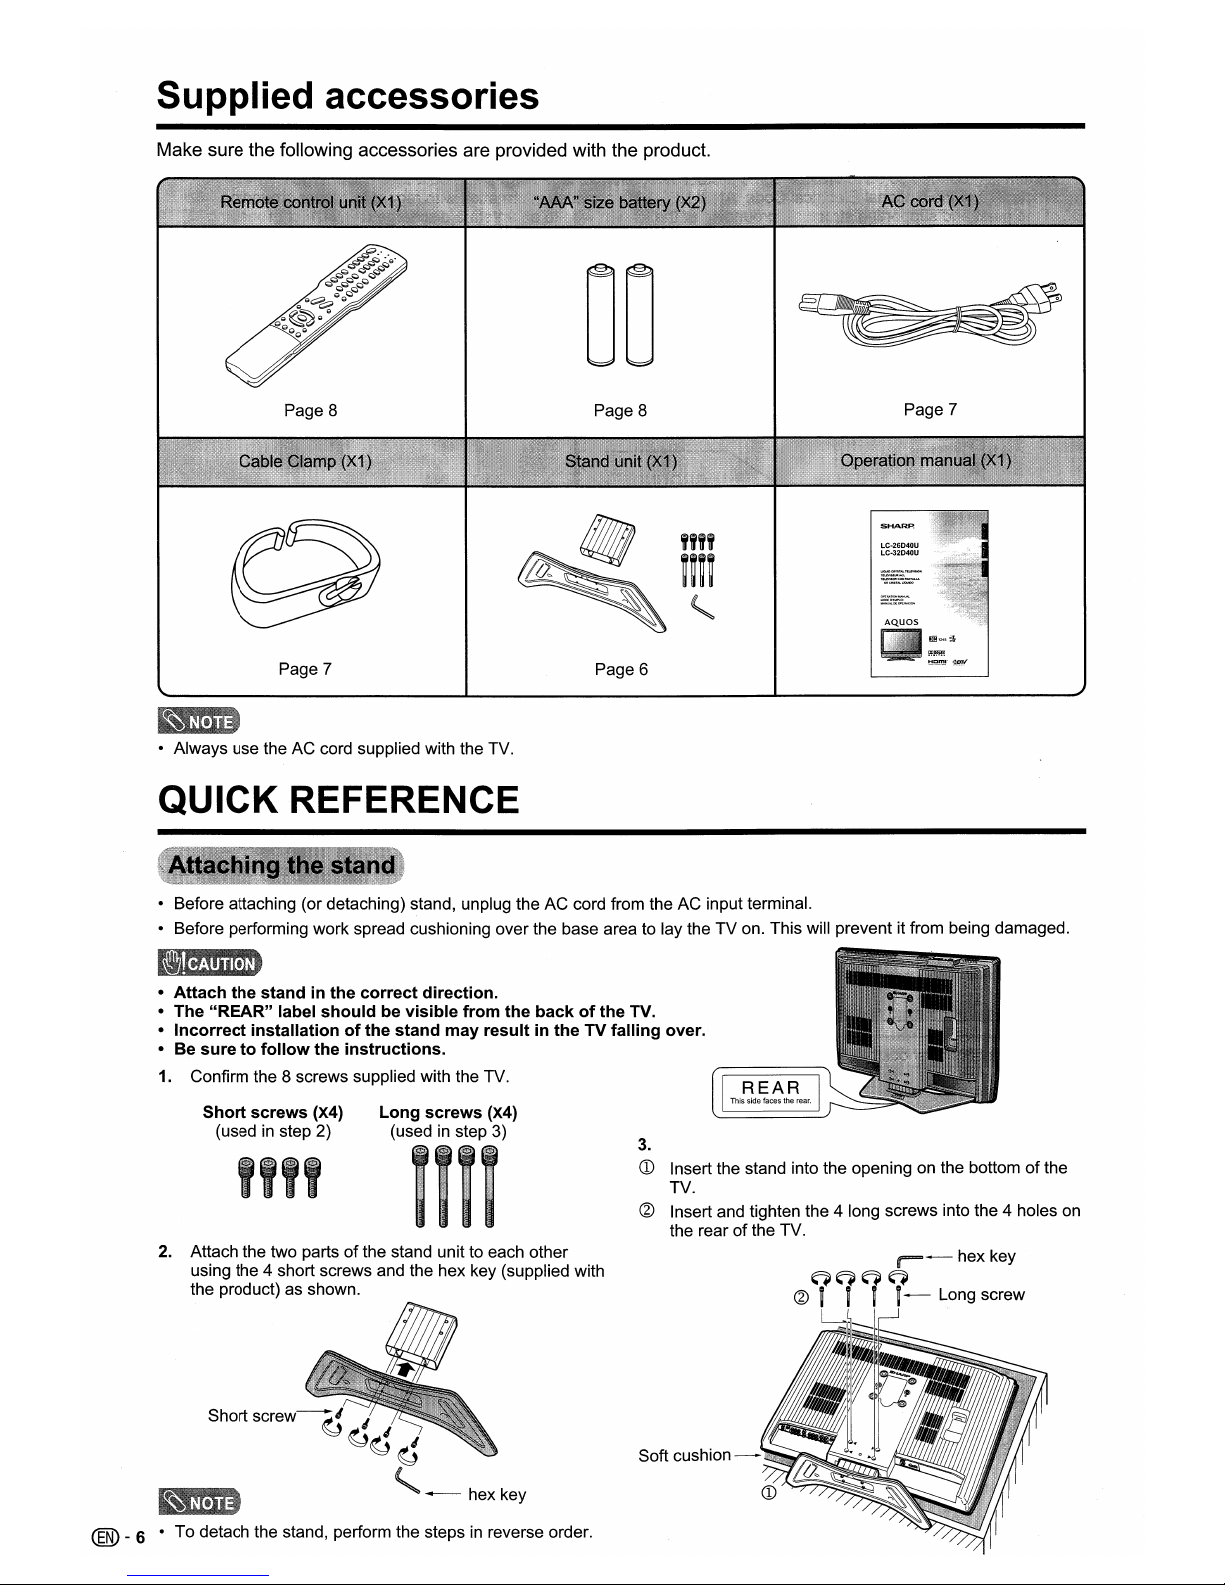
Supplied accessories
Make sure the following accessories are provided with the product.
Page 8 Page 8
Page 7
LC-26D40U
LC-32D40U
AQuas
Page 7
Page 6
8QM124S$
• Always use the AC cord supplied with the TV.
QUICK REFERENCE
• Before attaching (or detaching) stand, unplug theACcord from theACinput terminal.
• Before performing work spread cushioning over the base area to lay the
TV
on. This will prevent it from being damaged.
•
Attach
the
standinthe
correct
direction.
• The
"REAR"
label
shouldbevisible
from
the
backofthe
TV.
•
Incorrect
installationofthe
stand
may
resultintheTVfalling
over.
• Be
suretofollow
the
instructions.
1. Confirm the 8 screws supplied with the TV.
Short
screws
(X4)
(used in step 2)
""
Long
screws
(X4)
(used in step 3)
I
~",.;",
...
,.,.·,.;.:;,,;::::)
I:~"i,:
..
",i"."",;"i,.:}
I~";".,l"i":,,;,,i,,.,.:i
1
7
,
..•:,.•
",.",
.•",..
",:.)
,
~
m !
3.
CD
Insert the stand into the opening on the bottomofthe
TV.
@ Insert and tighten the 4 long screws into the 4 holes on
the rear
of
the TV.
2. Attach the two parts
of
the stand unit to each other
using the 4 short screws and the hex key (supplied with
the product) as shown.
Short
screw~
,
~d
'
~
~---
hex key
® _6 •
To
detach the stand, perform the stepsinreverse order.
1-
hex key
G~~q
@
ii'
i-
Long screw
Soft
cushion-~£\'-~~I
Page 8
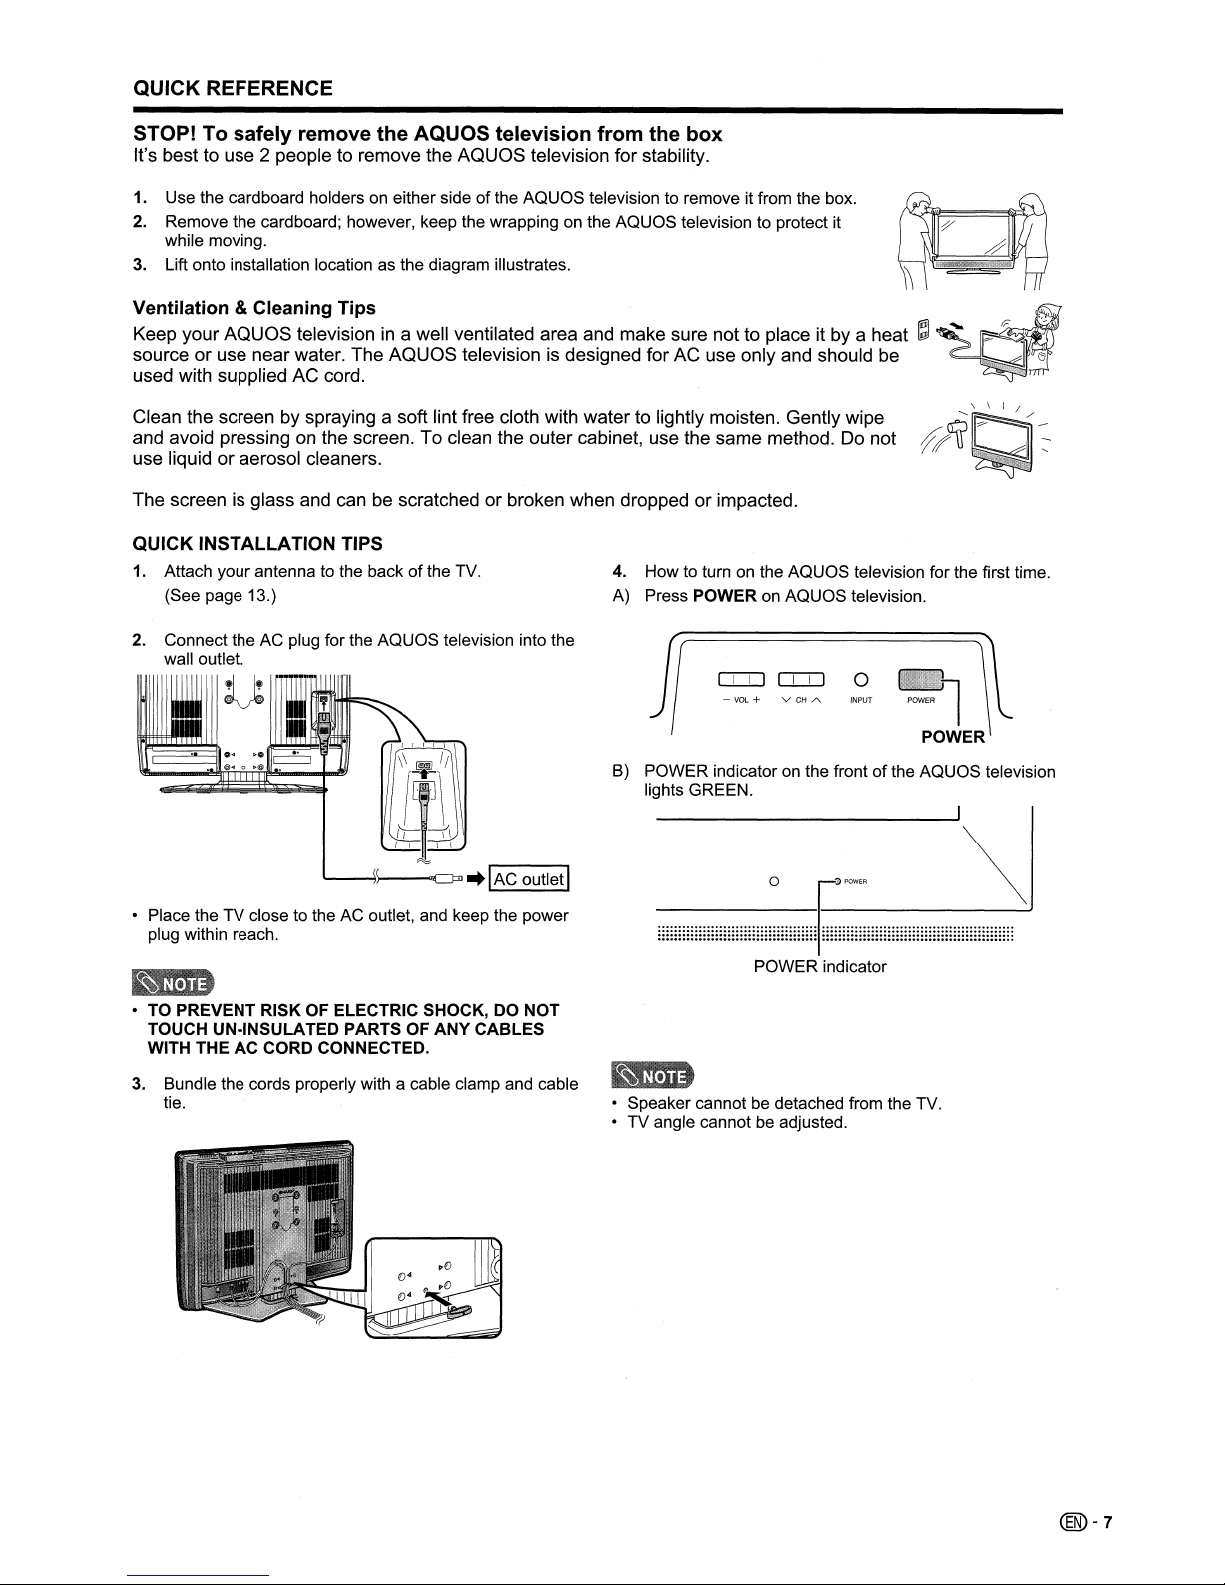
QUICK REFERENCE
STOP! To
safely
remove
the
AQUaS
television
from
the
box
It's best to use 2 people to remove the
AQUaS
television for stability.
1. Use the cardboard holders on either side ofthe AQUOS television to remove it from the box.
2. Remove the cardboard; however, keep the wrapping on the AQUOS television to protect it
while moving.
3.
Lift onto installation location as
the
diagram illustrates.
Ventilation &Cleaning Tips
ij"'\
Keep your
AQUaS
televisionina well ventilated area and make sure not to place it by a heat
~~'
r-
..
~.,
....
:".,.,.,.".,.,.,:,.,.~,.,.,."tr,.,.,.r,.,.
""""""""""""""""""""""""".,.'.:'.:.
~J
source or use near water. The
AQUaS
televisionisdesigned for AC use only and should be
~
(j
used with supplied AC cord. '
Clean the screen by spraying a soft lint free cloth with water to lightly moisten. Gently wipe
and avoid pressing
on
the screen. To clean the outer cabinet, use the same method. Do not
use liquid or aerosol cleaners.
The screen is glass and can be scratched or broken when dropped or impacted.
.........
\ \ I /
QUICK INSTALLATION TIPS
1. Attach your antenna to the backofthe TV.
(See page 13.)
2. Connect the AC plug for the AQUOS television into the
wall outlet.
U
• Place the TV close to the AC outlet, and keep the power
plug within reach.
• TO PREVENT RISK OF ELECTRIC SHOCK, DO NOT
TOUCH UN-INSULATED PARTS OF
ANY
CABLES
WITH THEACCORD CONNECTED.
3.
Bundle the cords properly with a cable clamp and cable
tie.
4. How to turn on the AQUOS television for the first time.
A) Press POWER on AQUOS television.
CITJ CITJ
0
- VOL + V
CH
A INPUT
B) POWER indicator on the frontofthe AQUOS television
lights GREEN.
POWER indicator
• Speakercannot be detached from the TV.
• TV angle cannot be adjusted.
@-7
Page 9
QUICK REFERENCE
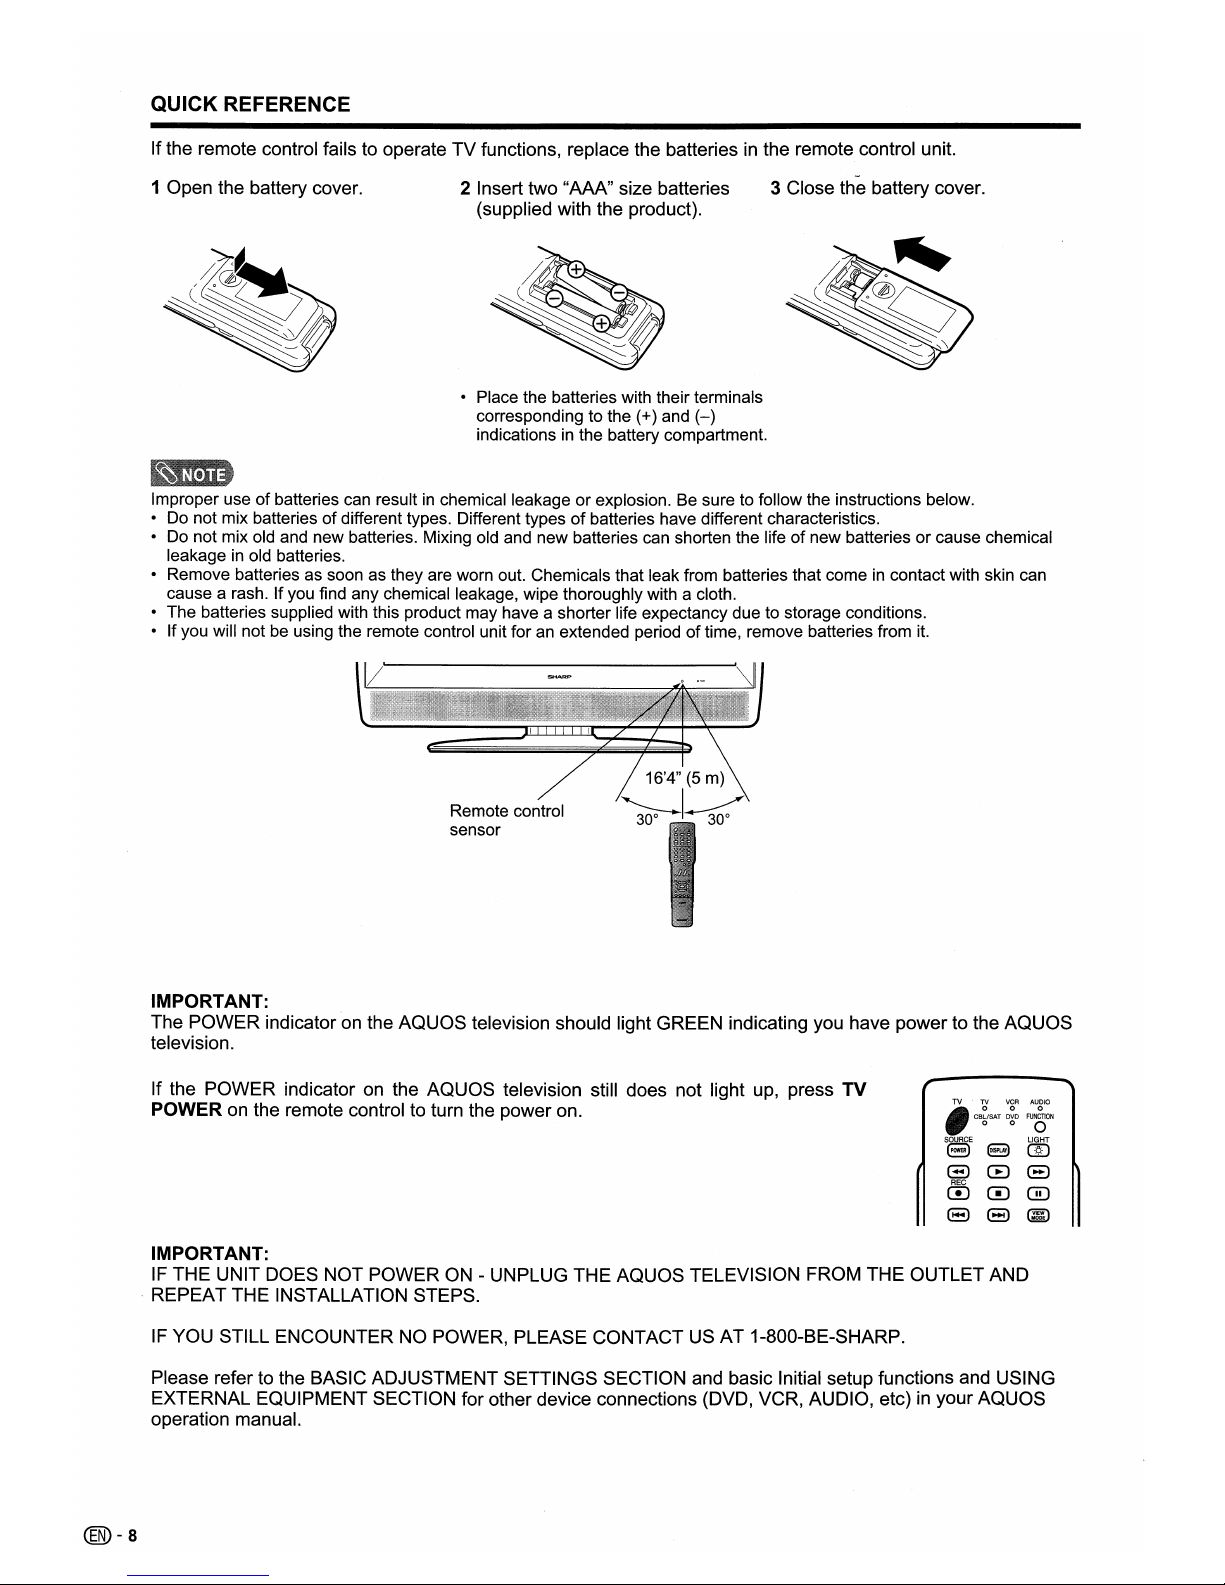
Ifthe remote control fails to operate TV functions, replace the batteriesinthe remote control unit.
1 Open the battery cover.
2 Insert two "AAA" size batteries
(supplied with the product).
• Place the batteries with their terminals
corresponding to the (+) and
(-)
indicationsinthe battery compartment.
3 Close the battery cover.
Improper useofbatteries can resultinchemical leakageorexplosion. Be sure to follow the instructions below.
• Do not mix batteries
of
different types. Different typesofbatteries have different characteristics.
• Do not mix old and new batteries. Mixing old and new batteries can shorten the life
of
new batteriesorcause chemical
leakage
in
old batteries.
• Remove batteries as soon as they are worn out. Chemicals that leak from batteries that come
in
contact with skin can
cause a rash. If you find any chemical leakage, wipe thoroughly with a cloth.
• The batteries supplied with this product may have a shorter life expectancy due to storage conditions.
• If you will not be using the remote control unit for an extended period
of
time, remove batteries from it.
Remote control
sensor
IMPORTANT:
The POWER indicator
on
the
AQUaS
television should light GREEN indicating you have power to the AQUOS
television.
If the POWER indicator
on
the AQUOS television still does not light up, press TV
POWER
on
the remote control to turn the power on.
@)-a
IMPORTANT:
IF
THE UNIT DOES NOT POWERON- UNPLUG THE AQUOS TELEVISION FROM THE OUTLET AND
. REPEAT THE INSTALLATION STEPS.
IF
YOU STILL ENCOUNTER NO POWER, PLEASE CONTACT US AT 1-800-BE-SHARP.
Please refer to the BASIC ADJUSTMENT SETTINGS SECTION and basic Initial setup functions and USING
EXTERNAL EQUIPMENT SECTION for other device connections (DVD, VCR, AUDIO, etc)
in
your AQUOS
operation manual.
Page 10
Contents
IMPORTANT INFORMATION 1
Trademarks............................................•.................2
DEAR SHARP CUSTOMER 3
IMPORTANT SAFETY INSTRUCTIONS 3
Supplied accessories 6
QUICK REFERENCE 6
Attaching the stand 6
Contents 9
Part names 10
TV (Front) 10
TV (Rear)
11
Remote control unit 12
Preparation 13
Using the remote control unit 13
Cautions regarding remote control unit 13
Antennas 13
Watching TV 14
Preparation 14
Turning on the power 14
Turning off the power 14
Initial setup 14
Simple button operations for
changing channels 16
Simple button operations for
changing volume/sound 17
Display the channel information 17
Setting MTS/SAP stereo mode 18
Setting
WOW™
surround sound 18
Basic
adjustment
settings
19
Menu operation buttons 19
Menu items 19
Favorite chaRnel setting 20
Labeling channels 20
Picture adjustments
21
Color temperature
21
Cinema mode
~
21
Back lighting
21
Sound adjustment 22
Digital audio output. 22
Using external
equipment
23
Displaying an external equipment image 23
Connecting a DVD player or a digital TV STB
(Air or Cable) 24
Connecting a VCR, game console
or camcorder 24
Using digital audio output 24
Connecting HDMI equipment 25
Displaying an image from HDMI equipment 25
Selecting HDMI audio input source 25
Useful
adjustment
settings
26
Reset 26
Input label 26
AV mode 27
Selecting the digital audio language 27
View mode for 4:3 programs 28
View mode for HD programs 28
Picture scroll 28
Aspect 28
Audio output select 29
Sleep timer 29
Closed captions and digital closed captions 30
Caption setup
31
Password setting for parental control 32
Parental control (V-CHiP) 33
TV Parental Guidelines (TV Guidelines) 34
Voluntary movie rating system (MPAA) 34
Canadian rating systems 35
Canadian English ratings 36
Canadian French ratings 36
How to temporarily release
the V-CHIP block 36
Reactivating the temporarily released
V-CHIP block 36
Other
viewing
options
37
Freezing images 37
Signal meter 37
Presetting remote control function 37
Appendix
41
Removing the stand
41
Setting the TVonthe wall
41
Troubleshooting 42
Troubleshooting-Digital broadcasting 42
Specifications 43
Optional accessories 43
Dimensional
drawings
44
@-9
Page 11
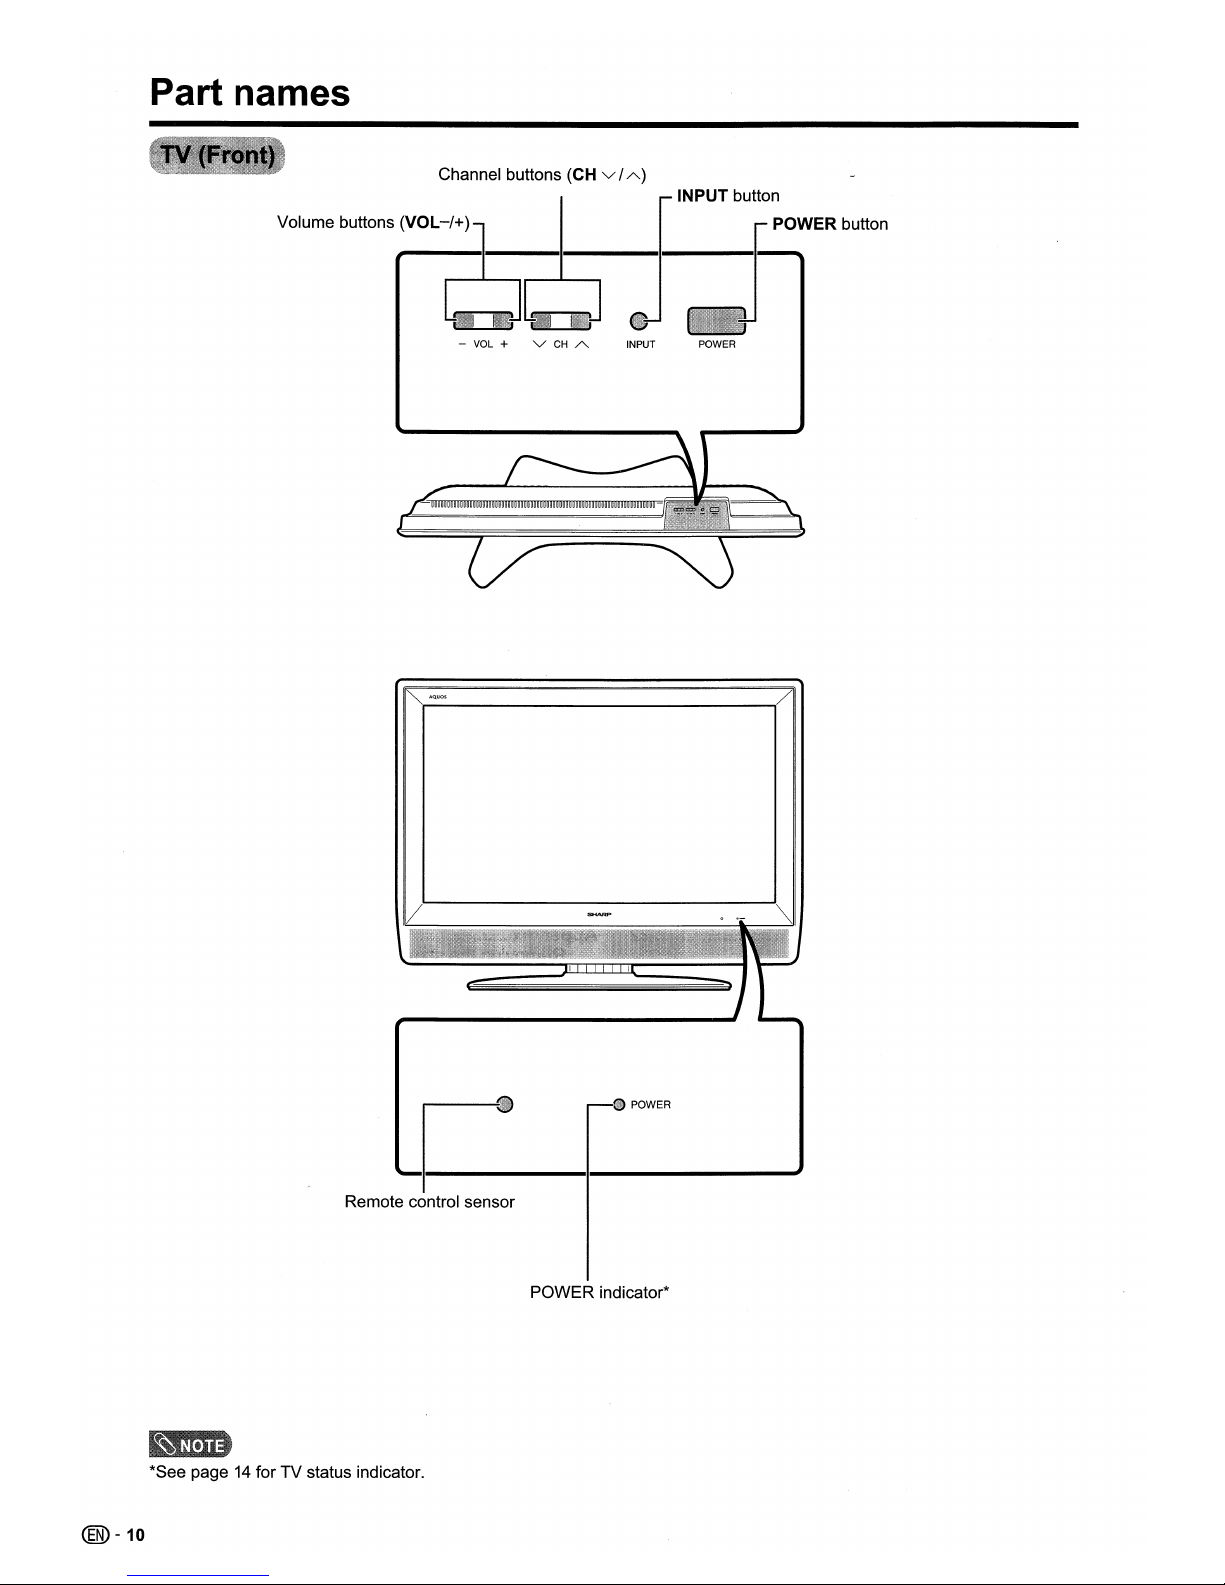
Part names
Channel buttons (CH v /
A)
Volume buttons (VOL
-/+)
INPUT button
POWER button
- VOL + V
CH
A •
INPUT POWER
~AQ.UOS
/
~._)~~)t
_I_._POWER
__
----'"
Remote control sensor
POWER indicator*
@-10
*See page 14 for TV status indicator.
Page 12
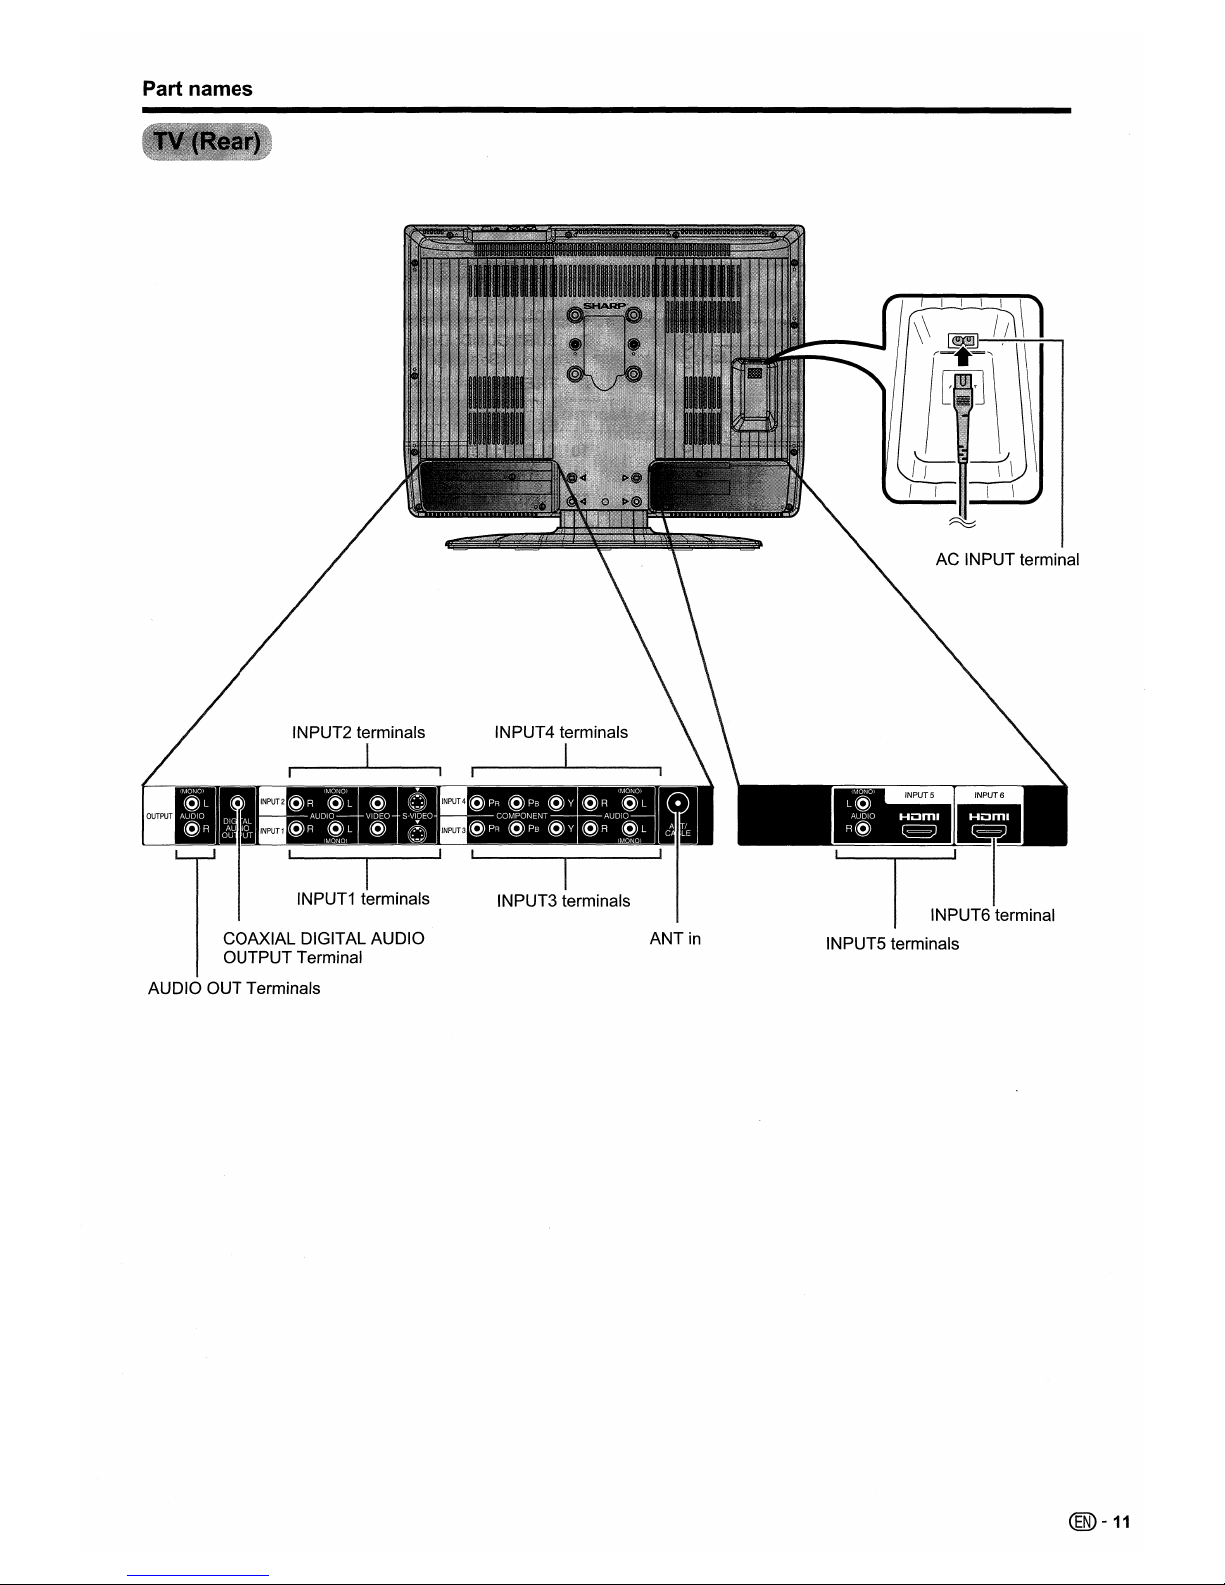
Part names
I
INPUT1 terminals
COAXIAL DIGITAL AUDIO
OUTPUT Terminal
AUDIO OUT Terminals
I
INPUT3 terminals
ANT
in
INPUT6 terminal
INPUTS terminals
@-11
Page 13
Part names
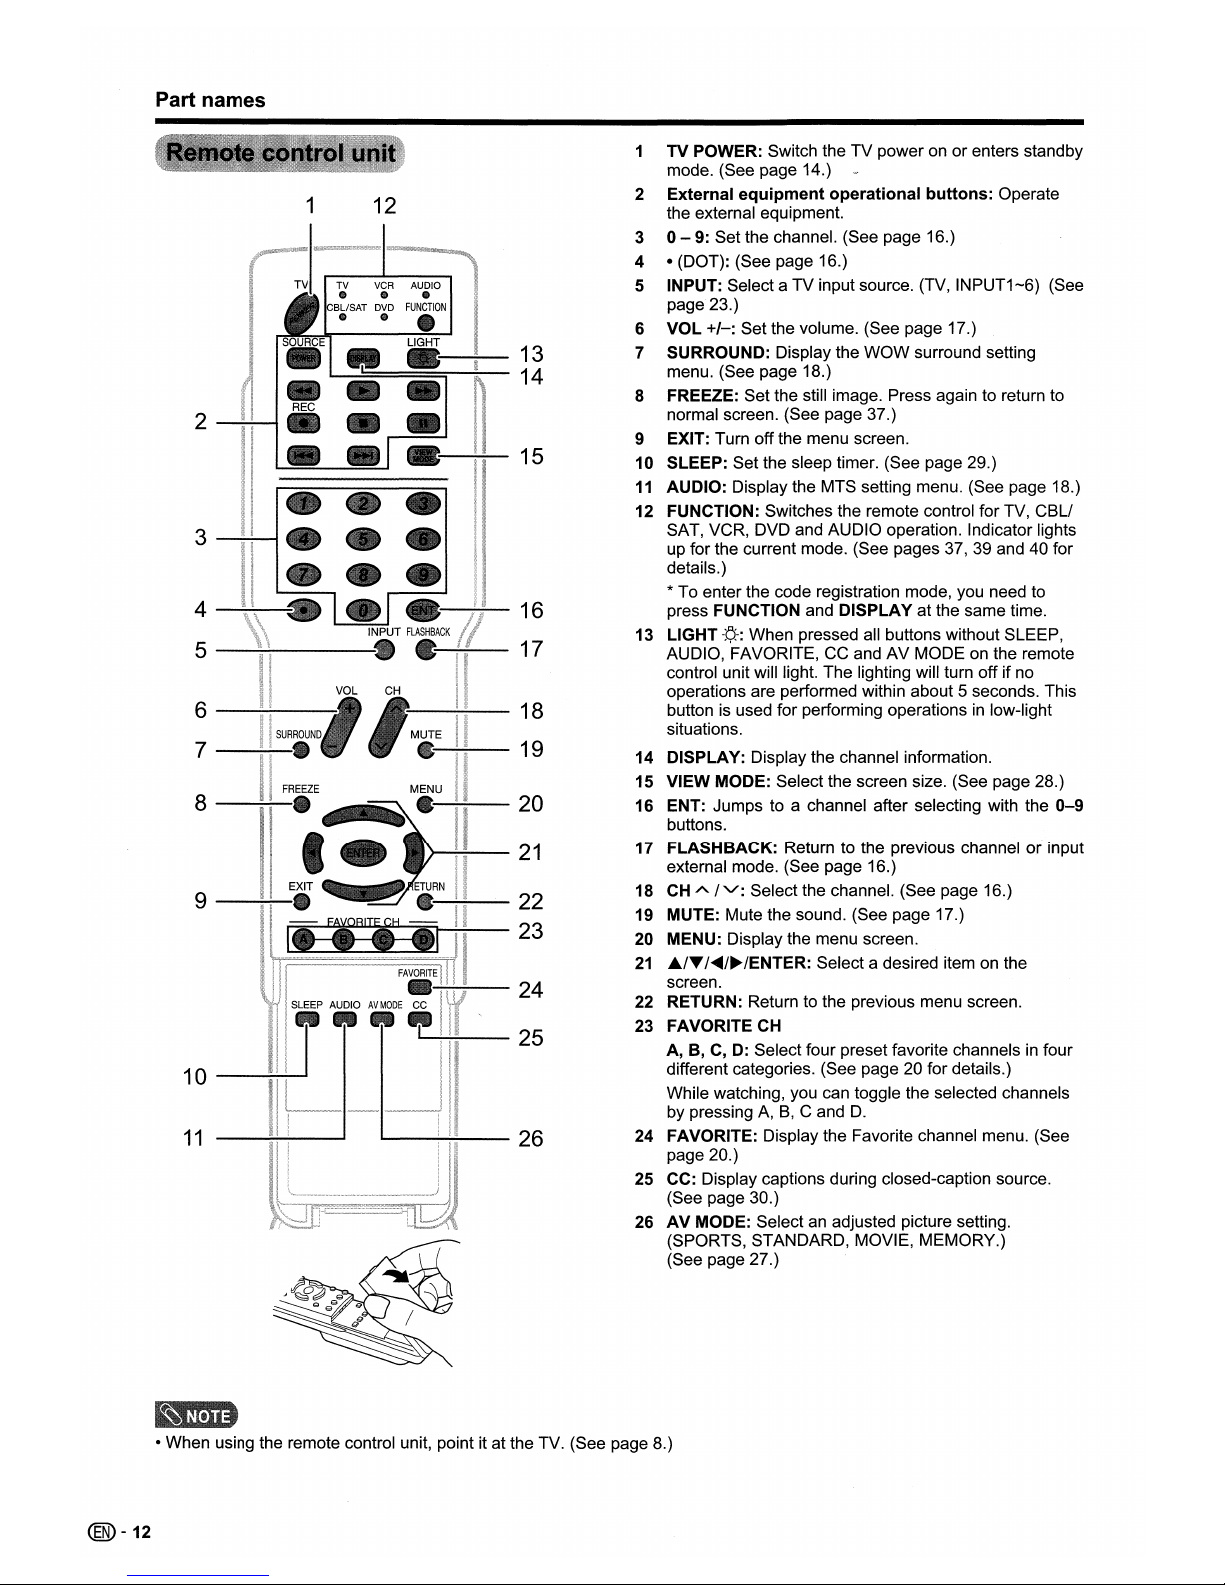
1
TV POWER: Switch the TV power on or enters standby
mode. (See page 14.)
1
12
2
External
equipment
operational
buttons:
Operate
the external equipment.
3
0-
9: Set the channel. (See page 16.)
4
• (DOT): (See page 16.)
5
INPUT: Select a TV input source. (TV, INPUT1-6) (See
page 23.)
6
VOL
+/-:
Set the volume. (See page 17.)
13
7
SURROUND: Display the WOW surround setting
14
menu. (See page 18.)
8
FREEZE: Set the still image. Press again to return to
2
normal screen. (See page 37.)
9
EXIT: Turn off the menu screen.
15
10
SLEEP: Set the sleep timer. (See page 29.)
11
AUDIO: Display the MTS setting menu. (See page 18.)
12
FUNCTION: Switches the remote control for TV, CBLI
3
SAT, VCR, DVD and AUDIO operation. Indicator lights
up for the current mode. (See pages
37,39
and 40 for
details.)
* To enter the code registration mode, you need to
4
16
press FUNCTION and DISPLAY at the same time.
17
13
LIGHT
-¢-:
When pressed all buttons without SLEEP,
5
AUDIO, FAVORITE, CC and AV MODE on the remote
control unit will light. The lighting will turn off if no
operations are performed within about 5 seconds. This
6
18
button is used for performing operationsinlow-light
situations.
7
19
14
DISPLAY: Display the channel information.
15
VIEW MODE: Select the screen size. (See page 28.)
8
20
16
ENT: Jumps to a channel after selecting with the
0-9
buttons.
21
17
FLASHBACK: Return to the previous channel or input
external mode. (See page 16.)
9
22
18
CH
A
IV':
Select the channel. (See page 16.)
19
MUTE: Mute the sound. (See page 17.)
23
20
MENU: Display the menu screen.
21
"/~/<llIlII/~/ENTER:
Select a desired item on the
24
screen.
22
RETURN: Return to the previous menu screen.
25
23
FAVORITE
CH
A, B,C,D:
Select four preset favorite channelsinfour
10
different categories. (See page 20 for details.)
While watching, you can toggle the selected channels
by pressing
A,B,C and
D.
11
26
24
FAVORITE: Display the Favorite channel menu. (See
page 20.)
25
CC: Display captions during closed-caption source.
(See page 30.)
26
AV
MODE: Selectanadjusted picture setting.
(SPORTS, STANDARD, MOVIE, MEMORY.)
(See page 27.)
• When using the remote control unit, point it at the TV. (See page 8.)
@-12
Page 14
Preparation
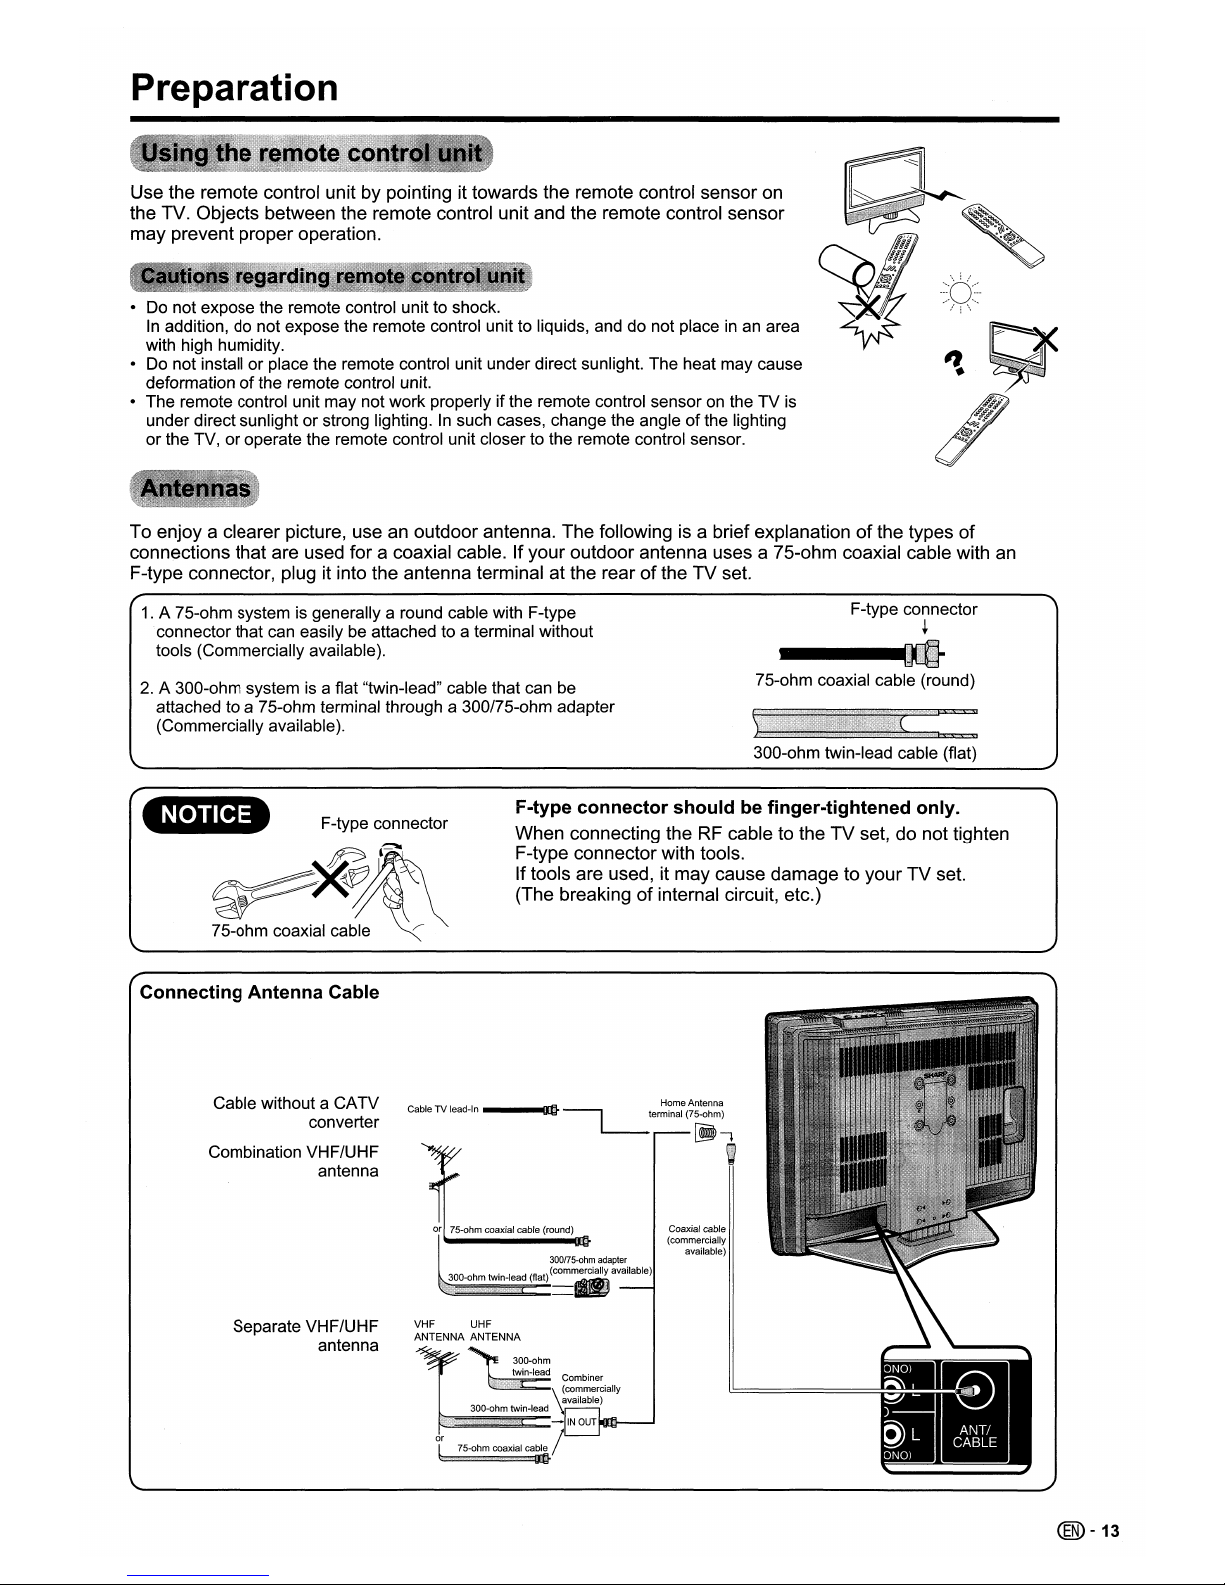
Use the remote control unit by pointing it towards the remote control sensor
on
the TV. Objects between the remote control unit and the remote control sensor
may prevent proper operation.
• Do not expose the remote control unit to shock.
In
addition, do not expose the remote control unit to liquids, and do not placeinan area
with high humidity.
• Do not install or place the remote control unit under direct sunlight. The heat may cause
deformation
of
the remote control unit.
• The remote control unit may not work properly if the remote control sensor
on
the TV is
under direct sunlight or strong lighting.
In
such cases, change the angleofthe lighting
or the TV, or operate the remote control unit closer to the remote control sensor.
To enjoy a clearer picture, use an outdoor antenna. The followingisa brief explanationofthe types
of
connections that are used for a coaxial cable. If your outdoor antenna uses a 75-ohm coaxial cable with
an
F-type connector, plug it into the antenna terminal at the rearofthe TV set.
1.
A 75-ohm system is generally a round cable with F-type
connector that can easily be attached to a terminal without
tools (Commercially available).
2.
A 300-ohm systemisa flat "twin-lead" cable that can be
attached to a 75-ohm terminal through a 300/75-ohm adapter
(Commercially available).
F-type connector
+
---.
75-ohm coaxial cable (round)
300-ohm twin-lead cable (flat)
NOTICE
F-type connector
~l~
~~~
-
75-ohm coaxial cable
~
F-type
connector
should
be finger-tightened only.
When connecting theRFcable to the TV set, do not tighten
F-type connector with tools.
Iftools are used, it may cause damage to your TV set.
(The breaking
of
internal circuit, etc.)
Coaxial cable
(commercially
available)
300/75-ohm
adapter
_iiEiiE~=(f1a~t)
(com.
available)
Combiner
~
commerciallY
available)
300-ohm twin-lead
.1111111~==-
IN
OUT
or /
t 75-ohm coaxial
ca;.
VHF UHF
ANTENNA ANTENNA
CableTVlead-In
__
.-JnmrFl
HomeAntenna
blit
----,
terminal (75-ohm)
l--
~~
,
Separate VHF/UHF
antenna
Cable without a CATV
converter
Combination VHF/UHF
antenna
Connecting
Antenna
Cable
@-13
Page 15
Watching TV
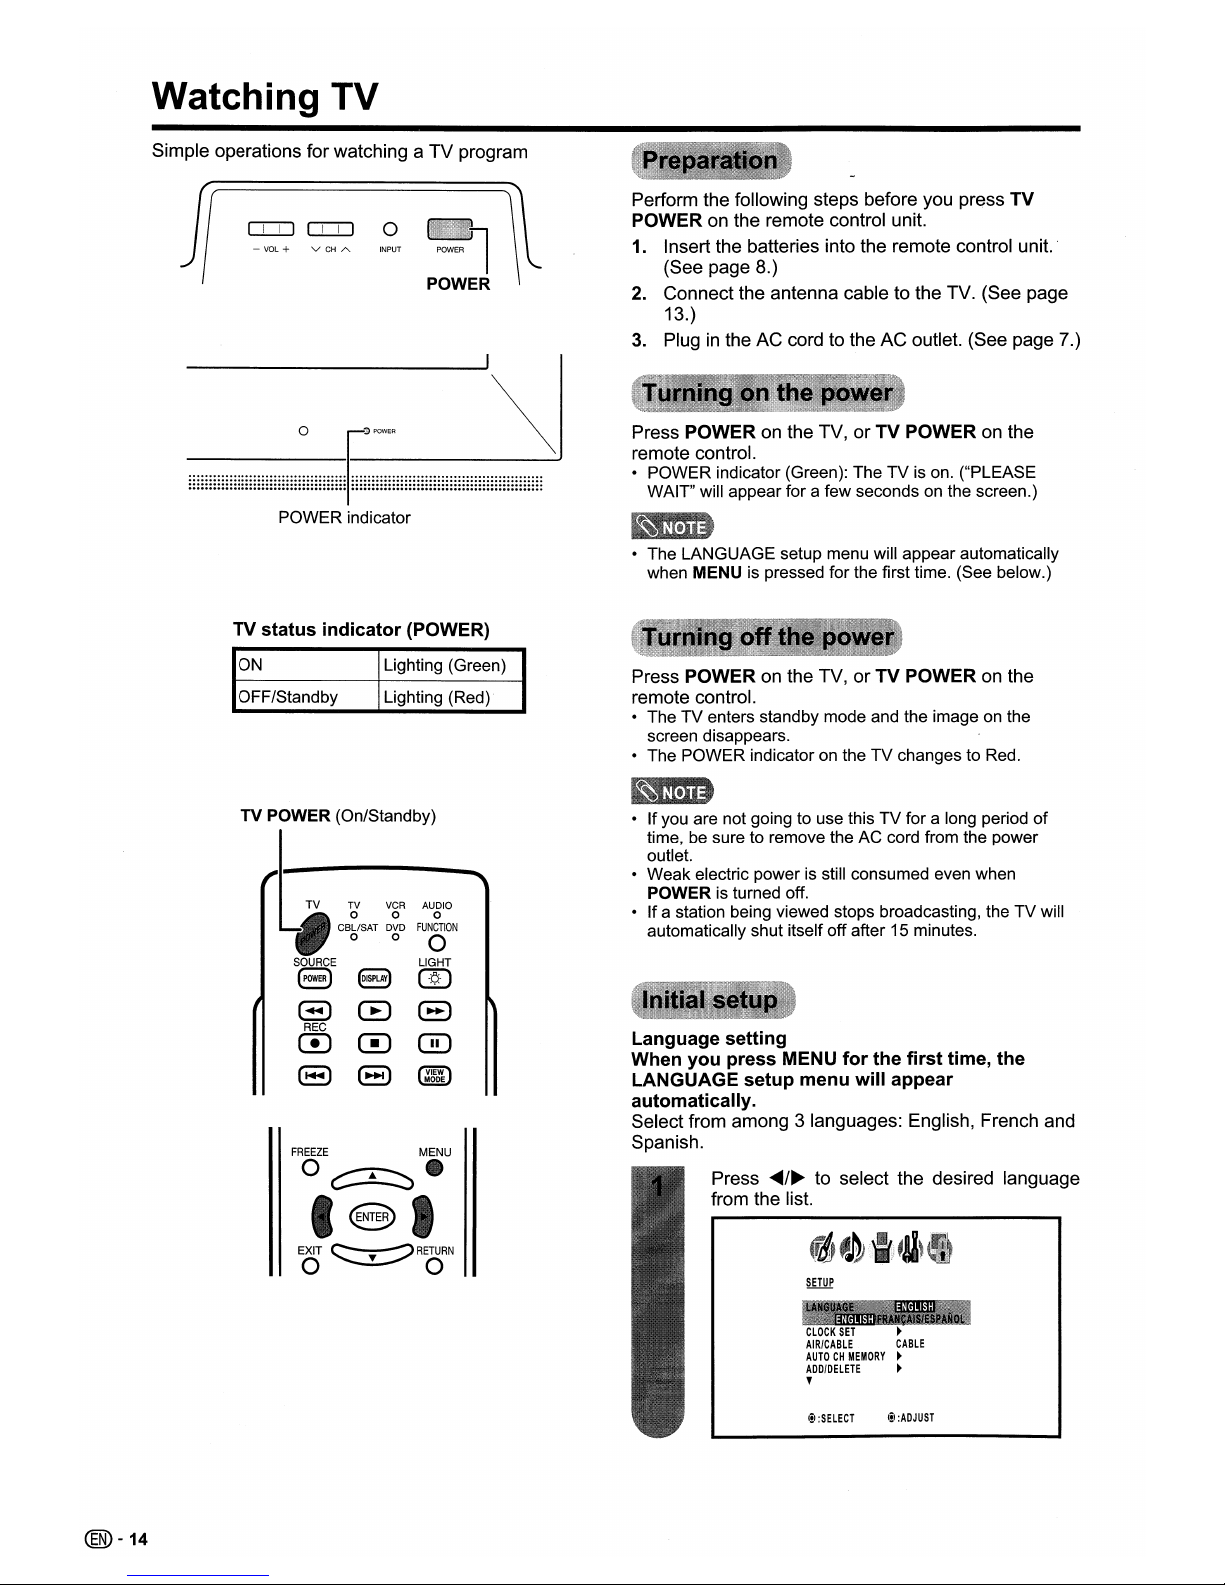
Simple operations for watching a TV program
Perform the following steps before you press TV
POWER
on
the remote control unit.
1. Insert the batteries into the remote control unit. .
(See page 8.)
2.
Connect the antenna cable to the TV. (See page
13.)
3.
Pluginthe AC cord to the AC outlet. (See page 7.)
POWER
-
VOL
+ v
CH
A INPUT
o:::D
o:::D
0
Press POWERonthe TV, or TV POWERonthe
remote control.
• POWER indicator (Green): TheTVis on. ("PLEASE
WAIT" will appear for a few seconds on the screen.)
POWER indicator
• The LANGUAGE setup menu will appear automatically
when MENU is pressed for the first time. (See below.)
TV
status
indicator
(POWER)
ON
OFF/Standby
Lighting (Green)
Lighting (Red)
Press POWERonthe TV, or TV POWERonthe
remote control.
• The TV enters standby mode and the image on the
screen disappears.
• The POWER indicator on the
TV
changes to Red.
I!I
:ADJUST
I!I
:SELECT
CLOCK
SET
~
AIR/CABLE
CABLE
AUTOCHMEMORY
~
ADD/DELETE
~
,
Press
~/~
to select the desired language
from the list.
• Ifyou are not going to use this TV for a long period
of
time, be sure to remove the AC cord from the power
outlet.
• Weak electric power is still consumed even when
POWER is turned off.
• Ifa station being viewed stops broadcasting, the
TV
will
automatically shut itself off after 15 minutes.
Language
setting
When
you
press MENU
for
the
first
time,
the
LANGUAGE
setup
menu
will
appear
automatically.
Select from among 3 languages: English, French and
Spanish.
TV VCR
AUDIO
0 0
0
CBLlSAT
DVD
FUNCTION
0 0
0
SOURCE
LIGHT
(3
8
CID
(3
CB
8
REC
CD
m
m
(3 (8
@ID
MODE
@
EXIT
~
RETURN
O~O
FREEZE
MENU
O~.
TV POWER (On/Standby)
@-14
Page 16
Watching TV
(SETUP).
EXIT:CANCEL
AUTOCHMEMORY
PROGRAMMING
NOW
PLEASE
WAIT
~-
SETUP
LANGUAGE
ENGLISH
CLOCK
SET
~
AIR/CABLE
CABLE
...
1
ADDIDELETE
,
I!I
:SELECT
I!I
:ADJUST
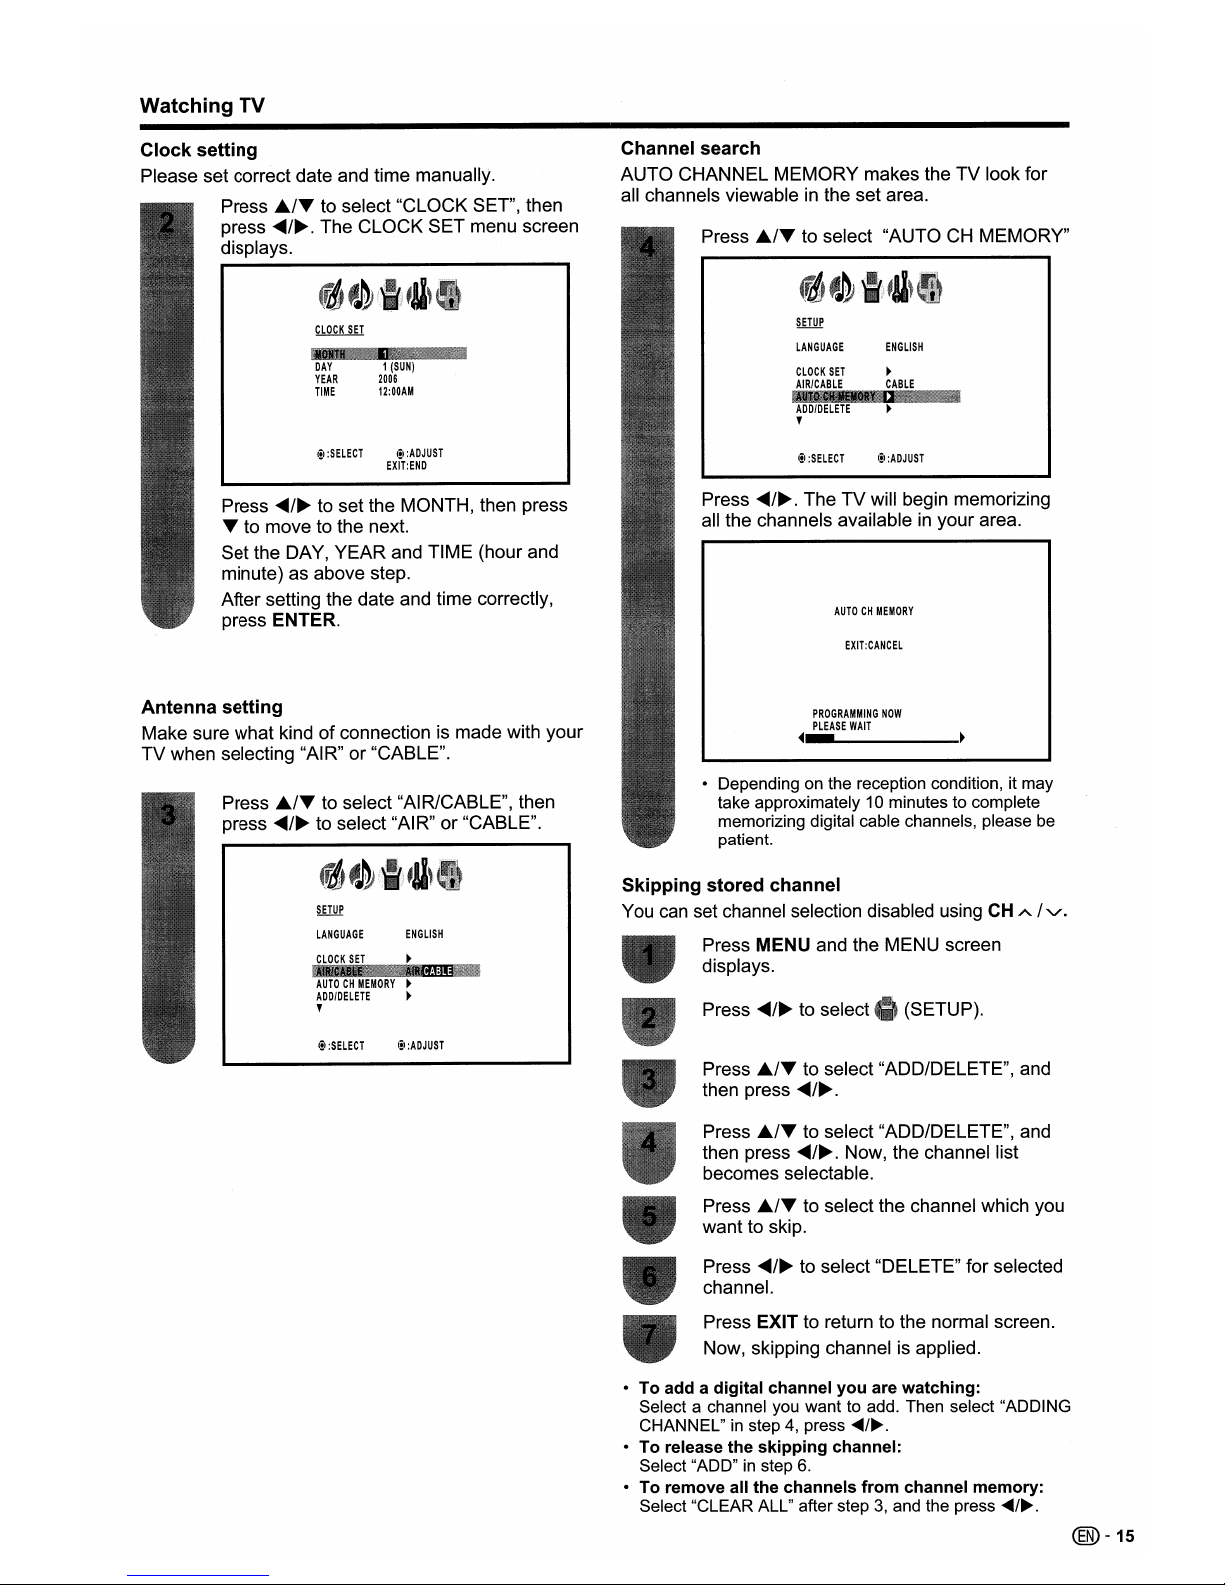
• Depending on the reception condition, it may
take approximately 10 minutes to complete
memorizing digital cable channels, please be
patient.
Press
<lllIIII/~.
The TV will begin memorizing
all the channels available
in
your area.
Press Ji../T to select "AUTOCHMEMORY"
Press
<lllIIII/~
to select "DELETE" for selected
channel.
Press EXIT to return to the normal screen.
Now, skipping channel is applied.
Press
<lllIIII/~
to select
Press
Ji../T to select "ADD/DELETE", and
then press
<lllIIII/~.
Press Ji../T to select "ADD/DELETE", and
then press
<lllIIII/~.
Now, the channel list
becomes selectable.
Press
Ji../T to select the channel which you
want to skip.
Channel search
AUTO CHANNEL MEMORY makes the TV look for
all channels viewable
in
the set area.
Skipping
stored
channel
You
can
set channel selection disabled using
CH
A/V'.
Press MENU and the MENU screen
displays.
I!I
:ADJUST
I!I
:SELECT
Press
<lllIIII/~
to set the MONTH, then press
T to move to the next.
Set the DAY, YEAR and TIME (hour and
minute) as above step.
After setting the date and time correctly,
press ENTER.
DAY
1
(SUN)
YEAR
2006
TIME
12:00AM
Press Ji../T to select "AIR/CABLE", then
press
<lllIIII/~
to select "AIR" or "CABLE".
I!I
:SELECT
I!I
:ADJUST
EXIT:END
SETUP
LANGUAGE
ENGLISH
CLOCK
SET
~
~W!
"
..
it·':I'
••
AUTOCHMEMORY
~
ADD/DELETE
~
,
Antenna
setting
Make sure what kindofconnection is made with your
TV when selecting "AIR" or "CABLE".
Clock
setting
Please set correct date and time manually.
Press Ji../T to select "CLOCK SET", then
press
<lllIIII/~.
The CLOCK SET menu screen
displays.
• To add a
digital
channel
you
are
watching:
Select a channel you want to add. Then select "ADDING
CHANNEL"
in
step4,press
.....
/~.
• To release
the
skipping
channel:
Select "ADD"instep
6.
•Toremove all
the
channels
from
channel
memory:
Select "CLEAR ALL" after step3,and the press
.....
/~.
@-15
Page 17

Watching TV
Method
1
Using CH
A I'V on the remote control unit
or
on the
TV.
EXIT
~RETURN
O~O
- FAVORITE CH -
• When selecting a 1-digit channel number, it is not
necessary to press 0 before the number.
• When you enter
0-9 only, channel selection will be made
ifthere is no operation within a few seconds.
To
select
a 1or2-digit
channel
number
(e. g., Channel 5):
Press
5~ENT
•
FLASHBACK
will not work if no channel has been
changed after the TV is turned on.
Method
3
Using remote control buttons 0-9, • (DOT) to select
channels for VHF/UHF/CATV/DIGITAL.
Method
2
1 Press
FLASHBACK to switch to the previously
tuned channel.
2 Press
FLASHBACK again to switch back to the
currently tuned channel.
MUTE
o
CH
•
•
INPUT
FLASHBACK
o
FREEZE
MENU
0c::::I:::::>0
888
VOL
SURROUND
j+)
oU
You can change channelsinseveral ways.
AQuas
To
selecta3-digit
channel
number
(e. g., Channel 115):
Press
1~1~5~ENT
To
selecta4-digit
channel
number
(e. g., Channel 22.1):
Press
2~2~
• (DOT)
~1
~ENT
SH.4RP
• When you enter
0-9
only, channel selection will be made
ifthere is no operation within a few seconds.
• If you push "0" by itself, nothing will happen.
• Complete the above steps within a few seconds.
• When you enter
0-9
and • (DOT), channel selection will
be made ifthere is no operation within a few seconds.
@-16
Page 18

Watching TV
Press DISPLAY to display the current channel (or
input source) information
on
the screen.
When the TV receives a digital signal, press once, the
digital information will appear.
• Broadcast program name
• Station name • Remaining time
• Audio language • Program name
• V-CHIP RATING • HD or SD mark
• Closed Caption mark • V-Chip mark
25
A
MUTE
&10
VOL
SURROUND
o
-
VOL
+ v
CH
A.
INPUT
POWER
VOLUME
Changing the
volume
You can change the volume on the TV or on the
remote control unit.
Using
VOL
+/-
• To increase the volume, press VOL+.
• To decrease the volume, press
VOL-.
•
VOL+/-
on the TV operates the same as
VOL+/-
on the
remote control unit.
Using MUTEonthe remote
control
unit
Mutes the current sound output.
Press DISPLAY again, the analog information will appear.
• Clock
• Channel number or VIDEO mode selected
• Channel label (if preset)
• Stereo or SAP (second audio program) audio status
• Content rating
• View mode
SURROUND
o
VOL
A
MUTE
&I.
STEREO
SAP
TV-PG
L V
SLEEP
TIMER
2hOOm
SIDE
BAR
TV
ABCD
CABLE
Press DISPLAY again to clear the display.
Press MUTE.
• "MUTE" will be displayedonthe screen, and
the sound is silenced.
MUTE
CLOCK
12:00AM
SUN
7
• Mute can be canceled ifyou press
VOL+/-
or MUTE.
• Analog channel status will display on the screen for
approx. 4 seconds. Digital channel status will display for
approx. 10 seconds.
@-17
Page 19

Watching
TV
The TV has a feature that allows receptionofsound
other than the main audio for the program. This
feature is called Multi-channel Television Sound
(MTS). The TV with MTS can receive mono sound,
stereo sound and Secondary Audio Programs (SAP).
The SAP feature allows a TV station to broadcast
other information, which could be audio
in
another
language or something completely different like
weather information.
You can
enjoy
Hi-Fi stereo
soundorSAP
broadcasts
where available.
• Stereo
broadcasts
View programs like live sporting events, shows and
concerts
in
dynamic stereo sound.
• SAP
broadcasts
Receive TV broadcastsineither MAIN or SAP sound.
MAIN sound: The normal program soundtrack (either
in
mono or stereo).
SAP sound: Listen to a second language, supplementary
commentary or other information. (SAP
is
mono sound.)
If
stereo
soundisdifficulttohear.
• Obtain a clearer sound by manually switching to
fixed mono-sound mode.
SURROUND(j
(J~.
MUTE
_ - v 0
- FAVORITE CH -
~
~ ~ ~
SRS WOW is a special combinationofSRS Labs
audio technologies that creates a thrilling surround
sound experience with deep, rich bass from stereo
sound sources. Your TV's audio will sound fuller,
richer, and wider. SRS WOW consists
of
three
features; SRS 3D, FOCUS, and TruBass.
Select STEREO mode (see "Setting MTSI
SAP stereo mode"
on
this page).
I!I
:SELECT
I!I
:AOJUST
!
.,
A¥i'l@
71~.
FOCUS
OFF
TruBass
OFF
HOMI
HOM
I
,
SRS 3D: Press
...../~to turn on or off the
surround sound effect.
FOCUS: Press
...../~to turn on or off the vocal
emphasis effect.
TruBass: Press
...../~to select the bass
expansion effect high, low or off.
Press SURROUND and
the"
(AUDIO)
menu screen displays. "WOW SRS 3D" will
be
highlighted.
Press
£./T
to select the desired WOW
feature you want to adjust.
After your desired setting, press EXIT to
return to the normal screen.
You can enter to the same menu screen from
.,
(AUDIO) menu.
25
25
o
ON
I!I
:AOJUST
I!I
:SELECT
BASS
TREBLE
BALANCE
SPEAKERS
,
@
EXIT
~RETURN
e~o
- FAVORITE CH -
0----@---@----®
• MTS only operates whileinTV mode.
• When the TV receives a stereo or SAP broadcast, the
word "STEREO" or "SAP" displays on-screen every
time you turn the TV on, change the channel,
or
press
DISPLAY.
FAVORITE
o
SLEEP AUDIOAVMODE
CC
0_00
Changing
MTS
You can change MTS as shown below to match the
television broadcast signal.
Press AUDIO and
the"
(AUDIO) menu
screen displays. "MTS" will
be
highlighted.
Press
AUDIO again or
<lllIIII/~
to select "STR
(STEREO)", "SAP" or "MONO".
Press EXIT to return to the normal screen.
@-18
Page 20

Basic
adjustment
settings
Use the following buttonsonthe remote control to
operate the menu.
CD
CD
CD
0®®
0®®
0®8
INPUT
FLASHBACK
00
VOL CH
SURROUND{J
r;
MUTE
o -
&I
0
FREEZE
MENU
o~.
• I
EXIT
~RETURN
• •
- FAVORITE CH -
0---@---@----@
AQUOS
Listofmenu itemstohelp
you
with
operations
AV
MODE Page 27
BRIGHTNESS Page
21
CONTRAST Page
21
COLOR Page
21
TINT Page
21
SHARPNESS Page
21
COLOR TEMPERATURE Page
21
RESET (Picture
adjustments)
Page 26
MTS Page 18
BASS Page 22
TREBLE Page 22
BALANCE Page 22
SPEAKERS Page 29
WOW
SRS 3D Page 18
FOCUS Page 18
TruBass
Page 18
HDMI Page 25
AUDIO LANGUAGE Page 27
DIGITAL OUTPUT Page 22
RESET (Sound
adjustments)
Page 26
RETURN: Press to return to the previous step.
Ji../T/<ttt4/~:
Press to select a desired itemonthe
screen or adjust a selected item.
ENTER: Press to go to the next step or complete
the setting.
MENU:
SHARP
Press to open the menu screen.
LANGUAGE Page 14
CLOCK SET Page 15
AIR/CABLE Page 15
AUTO
CH
MEMORY Page 15
ADD/DELETE Page 15
CLOSED CAPTION Page 30
CC
ADVANCED Page
31
VIEW MODE Page 28
PICTURE SCROLL Page 28
CINEMA MODE Page
21
ASPECT Page 28
SIGNAL METER Page
37
BACK
LIGHTING Page
21
EXIT: Press to exit from the menu screen.
All changed settings will be saved.
The lower part of the menu screen
is
an
operational guide for the remote control.
It will change
in
accordance with each menu
setting screen.
c!t:SELECT
ENTER:SET
c!t
:ADJUST
EXIT:END
FAVORITE
CH
Page 20
CH
LABEL
Page 20
VIDEO
LABEL
Page 26
(00-19
Page 21

Basic
adjustment
settings
This function allows you to program 4 favorite
channels. By setting the favorite channels
in
advance,
you can select your favorite channels easily.
To create channel labels
Select a channel you want to label.
Programming favorite channel
Select the channel you want to register as a
favorite channel.
Press FAVORITE and the FAVORITE CH
menu screen displays.
Press MENU, then press
~/~
to select
fll,
(OPTION).
Press
../Tto select "CH LABEL", then press
~/~.
TheCHLABEL menu will appear.
Press
../Tto select "SET/CLEAR". Press
~/~
to select "SET" then press ENTER.
:CH
12
RETURN
CH
LABEL
SET
Press EXIT to return to the normal screen.
I!I
:SELECT
I!I
:ADJUST
ENTER:
SET
Repeat steps 1-5 for other channels. You
can assign a label to each channel.
The characters rotation as follows:
r-~O···9~A···Z~
~+~SPACE~
Ifthe character which you desire appears, press
ENTER. Repeat this step to enter the rest
of
the
characters.
When you finish inputting the label name, press
ENTER.
Press
~/~
to enter a characterinthe first
space. Press the button repeatedly until the
character you want appears on the screen.
I!~
SELECT
ENTER:
SET
11-
FAVORITE CH -
You can jump to the registered favorite
channels directly using four FAVORITE CH.
Press
~/~
to select the position, and then
press ENTER to register.
Press
~/~
to select "SET", and then press
ENTER.
Press EXIT to return to the normal screen.
• You can entertothesame menu screen from __, (OPTION)
menu.
Deleting a favorite channel
Repeat steps 1 to 2inabove procedure.
Press
~/~
to select "CLEAR", and then
press ENTER.
Press
~/~
to select the registered favorite
channel you want to release, and then press
ENTER.
Press EXIT to return to the normal screen.
To erase channel labels
Select a channel with a label which you
want to remove.
Press MENU, then press
~/~
to select
#11'
(OPTION).
Press
../Tto select "CH LABEL", then
press
~/~
to display the CH LABEL menu.
Press
../Tto select "SET/CLEAR". Press
~/~
to select "CLEAR", then press ENTER.
Press EXIT to return to the normal screen.
Repeat steps 1-4 to erase other channel
labels.
@-20
Page 22

Basic adjustment settings
Adjusts the picture to your preference with the following
picture settings.
Press MENU and the MENU screen
displays.
For a better white balance, use color temperature
correction.
Press MENU and the MENU screen
displays.
(PICTURE).
(SETUP).
White with Reddish tone
Neutral
White with Blueish tone
Video content viewing mode
Film content viewing mode
Press
<lllIIII/~
to select
Press
<lllIIII/~
to select the mode you prefer.
Press
~/T
to select "COLOR
TEMPERATURE".
Press
<lllIIII/~
to select "FILM" or "VIDEO".
Press
~/T
to select "CINEMA MODE".
Press EXIT to return to the normal screen.
Press
<lllIIII/~
to select
A smoother motion maybeobtained by setting the
CINEMA MODE to FILM when you view a DVD from
the DVD player connected with the component input.
Press MENU and the MENU screen
displays.
For more color
intensity
For more
sharpness
Skin tones
become greenish
For more contrast
For more
brightness
(PICTURE).
STANDARD
PICTURE
AV
MODE
_tlflll.f"CLO!!Y
CONTRAST
40
COLOR
25
TINT
0
SHARPNESS
25
,
Iii
:SELECT
Iii
:ADJUST
For less contrast
Skin tones
become purplish
For less
brightness
For less
sharpness
For less color
intensity
Press
<lllIIII/~
to select
Press
~/T
to select a specific adjustment
item (BRIGHTNESS, CONTRAST, COLOR,
TINT, SHARPNESS).
Press
<lllIIII/~
to adjust the item to the desired
level.
Press EXIT to return to the normal screen.
BRIGHTNESS
CONTRAST
COLOR
TINT
SHARPNESS
Press
~/T
to select "BACK LIGHTING".
Press EXIT to return to the normal screen.
@-21
(SETUP).
Press
<lllIIII/~
to adjust the screen brightness.
Press
<lllIIII/~
to select
BACK LIGHTING adjusts the screen brightness for
improved picture clarity.
Press MENU and the MENU screen
displays.
• For resetting all Picture adjustment items to the factory
preset values, press
It../T to select "RESET", and then
press
...../~(see page 26 for further information).
Page 23

Basic
adjustment
settings
You can adjust the sound quality to your preference
with the following settings.
You can output digital audio to
an
AV amplifier
or similar device whose DIGITAL AUDIO INPUT
terminal is connected to the COAXIAL DIGITAL
AUDIO OUTPUT terminal
on
the TV. Please select
an
audio output format compatible with the audio
format
of
the program you are watching and the
equipment connected.
Press MENU and the MENU screen
displays.
- FAVORITE CH -
@--@----@-®
Press
....-/~
to
select.
(AUDIO).
Press MENU and the MENU screen
displays.
Press
./T
to select "DIGITAL OUTPUT".
I!I
:ADJUST
I!I
:SELECT
RESET
!
,
AUDIO
LANGUAGE
~
Press
....-/~
to select "PCM" or "DOLBY
DIGITAL".
I!I
:ADJUST
I!I
:SELECT
AUDIO
MTS
STEREO
•
-."
...
*-,.-,
---.---,
TREBLE
25
BALANCE
0
SPEAKERS
ON
,
Press
./T
to select a specific adjustment
item (BASS, TREBLE, BALANCE).
Press
....-/~
to
select.
(AUDIO).
Press
....-/~
to adjust the item to the desired
level.
PCM
The coaxial digital audio output
terminal outputs audio signal
in
PCM form. If your digital audio
system does not support Dolby
Digital, select "PCM".
BASS
For weaker bass For stronger
DOLBY
DIGITAL
bass
TREBLE
For weaker
For stronger
treble treble
BALANCE
Decrease audio
Decrease audio
from the right
from the left
speaker
speaker
The coaxial digital audio output
terminal outputs audio signal
in
Dolby Digital form. It reproduces
sound from surround program
of
digital.
Press EXIT to return to the normal screen.
Press EXIT to return to the normal screen.
• For resetting all Audio adjustment items to the factory
preset values, press
..
1''' to select "RESET", and then
press
...../~(see page 26 for further information).
@-22
Page 24

Using
external
equipment
You can connect many typesofexternal equipment to your TV like a DVD player, VCR, Digital TV tuner, HDMI
equipment, game console or camcorder. To view external source images, select the input source from INPUT
on
the remote control unit oronthe TV.
This explanation is for the setting when connecting a
DVD player to the INPUT3 terminal.
• To protect equipment, always turn off the TV before
connecting a DVD player, VCR, Digital TV tuner, HDMI
equipment, game console, camcorder or other external
equipment.
(])
o
®®
(§)
INPUT
FLASHBACK
o
• See pages 24 and 25 for external equipment connection.
• Please read the relevant operation manual (DVD player,
etc.) carefully before making connections.
• Refer to your external equipment operation manual for
the signal type.
VOL
CH
SURROUND
j+).
AMUTE
aU&!
a
FREEZE
MENU
0
0
8
@
8
EXIT
RETURN
0
0
- VOL + v
CH
A.
INPUT POWER
To watch a DVD image, select "INPUT3" from
"SOURCE SELECTION" menu using 0-6
on
the
remote control.
SOURCE SELECTION
O.
TV
1. INPUT1
2. INPUT2
-
~'"'
..
4. INPUT4
5.
INPUT5
6.
INPUT6
[O-6]:SELECT
• Each time INPUT is pressed, SOURCE SELECTION item
toggles.
• You can also select SOURCE SELECTION item by
pressing
..
IT.
@-23
Page 25

Using external
equipment
You can use the INPUT1-4 terminals when connecting to a DVD player, a Digital TV STB (Air or Cable) and
other audiovisual equipment.
When
using
component
cable.
(INPUT3
or
4)
Component video
cable (commercially
available)
Audio cable
(commercially
available)
When
using
composite
cable. (INPUT1or2)
AV cable
(commercially available)
DVD player!
Digital TV STB
DVD player!
Digital TV STB
• See page 25 for connecting a DVD player or a Digital TV STB to the HDMI terminal.
A VCR, game console, camcorder and other
audiovisual equipment can
be
conveniently connected
using the INPUT1 or 2 terminals.
It
is
possible to output audio through the COXIAL
DIGITAL AUDIO OUTPUT terminal. (See page 22 for
details.) PCM audio outputs from the terminal.
AV cable
(commercially
available)
Coaxial digital cable
To coaxial
digital
input
of
external
audio
devices
S-video cable
(commercially
....----+-----1--1
available)
• The S-video terminal takes priority over the video
terminals.
000
VCR/Game
console!
~
Camcorder
@-24
Page 26

Using external
equipment
You can use the INPUTS or 6 terminal when connecting HDMI equipment.
When using an HDMI-DVI
conversion cable, use INPUT5
.-.======:::::::::::::::::===~==..I'"
and AUDIO terminal.
[]]
~
e=J
HOMI
equipment
I!I
:ADJUST
I!I
:SELECT
,
AUDIO
A
WOW
SRS3DOFF
FOCUS
OFF
TruBass
OFF
:uiill
;Po/-
iii
Press
~/~
to
select.
(AUDIO).
Press MENU and the MENU screen
displays.
Press
~/~
to select "HDMI" or "DVI".
Press £./.." to select "HDMI".
HOMI: When you connect the HDMI device to
the TV, select this setting.
OVI: When you connect the DVI device to
the TV with analog audio cords, select
this setting.
[O-6]:SELECT
6.
INPUT6
SOURCE SELECTION
O.
TV
1. INPUT1
2. INPUT2
3. INPUT3
4. INPUT4
To watchanHDMI equipment image, select
"INPUTS" or "INPUT6" from "SOURCE
SELECTION" menu using INPUT on the
remote control unit
or
on the TV. (See page
23.)
• Referto your external equipment operation manual for
the signal type.
Press EXIT to return to the normal screen.
@-25
Page 27

Useful
adjustment
settings
Ifcomplex adjustments are made and the settings
cannot be restored to normal, you can reset the
settings to the factory preset values.
Let you set the input terminal displayed when using
the "SOURCE SELECTION" menu or channel display.
Resetting
picture
adjustments
Each picture adjustments return to the following
factory settings:
AV MODE STANDARD
BRIGHTNESS / COLOR / SHARPNESS center (25)
CONTRAST (40)
TINT center (0)
COLOR TEMPERATURE MEDIUM
INPUT
FLASHBACK
00
VOL
CH
SURROUND
j+)
AMUTE
oUUO
FREEZE
MENU
o e
Press MENU and
the
MENU screen
displays.
Press
~/~
to select
(PICTURE).
1!1
:SELECT
l!l
:ADJUST
Press EXIT to return to the normal screen.
2.INPUT2
3.INPUT3
4.INPUT4
5.
INPUTS
6.INPUT6
Press
~/~
to select the new label for the
selected input source.
Press MENU and the MENU screen
displays.
-
Uses the default label name
VCR
Video cassette recorder
DVD
DVD video
DTV
DigitalTVset-top box
SAT
Satellite box
CBl
Cable box
HD
HDMI equipment
Press
~/~
to select
fJ!i,
(OPTION).
Press
./T
to select "VIDEO LABEL", and
then press
~/~.
The VIDEO LABEL menu screen displays.
Press
./T
to select the specific input
source which you want to change.
'"
>
A
COLOR
TEMPERATURE
MEDIUM
A
AUDIO
LANGUAGE
~
DIGITAL
OUTPUT
PCM
..
~*.;.-
Press
./T
to select "RESET", and then
press
~/~.
The TV screen return to the normal screen,
and "RESET" will be displayed a few
seconds.
Press
./T
to select "RESET", and then
press
~/~.
Resetting
audio
adjustments
Each audio adjustments return to the following factory
settings:
BASS center (25) BALANCE center (0)
TREBLE center (25)
Press MENU and the MENU screen
displays.
Press
~/~
to
select.
(AUDIO).
The TV screen return
to
the normal screen,
and
"RESET" willbedisplayed a few seconds.
• The channel setup settings will not be changed.
• The language settings will not
be
changed.
® -
26.
The password number setting will notbechanged.
• You cannot change label for "TV" input.
Page 28

Useful adjustment settings
I§I
:ADJUST
I§I
:SELECT
RESET
2.
3.
SPANISH
4.NOINFO
5.NOINFO
6.NOINFO
7.NOINFO
[0·7]:SELECT
ENTER:SET
AUDIO
LANGUAGE
Press EXIT to return to the normal screen.
Press
<lllIIII/~
to
select.
(AUDIO).
Press
£.IT
to select "AUDIO LANGUAGE",
and then press
<lllIIII/~.
Press
./T
to select your desired language,
then press ENTER.
When two or more audio languages are included
in
a digital signal, you can select oneofthe audio
languages.
Press MENU and the MENU screen
displays.
For a clear-cut image
emphasizing high contrast,
useful for sports viewing
BRIGHTNESS
25
CONTRAST
40
COLOR
25
TINT
0
SHARPNESS
25
,
I§I
:SELECT
I§I
:ADJUST
PressAVMODE and the (PICTURE)
menu screen displays. "AV MODE" will be
highlighted.
Press
<lllIIII/~
to select the desired mode.
• The mode can be chosen from the list below.
SPORTS
FAVORITE
o
SLEEP AUDIO
AV
MODE
CC
00.0
@
EXIT
~RETURN
_~O
- FAVORITE CH -
0-@--@--@
AV
mode gives you four viewing options to choose
from to best match the surrounding environment
of
the TV, which can vary due to factors like room
brightness, type
of
program watched or the type
of
image input from external equipment.
O~O
STANDARD
For a highly defined image
in
a normal lighting
MOVIE
For a movie
MEMORY
Allows the user to
customize settings as
desired. You can set
the mode for each input
source.
Press EXIT to return to the normal screen.
• Each timeAVMODE is pressed, AV MODE item toggles.
• You can select a different AV MODE item for each input
mode. (For example, select STANDARD for TV input and
SPORTS for VIDEO input.)
@-27
Page 29

Useful
adjustment
settings
Press VIEW MODE.
• The View mode menu displays.
• The menu lists the view mode options
selectable for the type
of
video signal currently
being received.
For adjusting a picture's vertical positioninZOOM
mode.
Press MENU and the MENU screen
displays.
[O·3]:SELECT
(SETUP).Press
<lllIIII/~
to select
SCROLL ADJUSTMENT screen displays.
To raise the picture, press
...
To lower the
picture, press
T.
The scroll amounts are as follows:
• 480i/480p signal source:
ZOOM:
-10
to +20
Press
~JT
to select "PICTURE SCROLL",
and then press
<lllIIII/~.
Press EXIT to return to the normal screen.
SIDE BAR:
Suitable for viewing conventional 4:3
programs
in
their normal format.
Press 0-3 to select each view mode directly
while the view mode menu is still on the
screen.
• Each time VIEW MODE is pressed, VIEW
MODE item toggles.
• You can also select VIEW MODE item by
pressing
./T.
• You can sequentially select a view mode that
has its own aspect ratio.
VIEW
MODE
......
1.
S.STRETCH
2.
ZOOM
3.
STRETCH
o
o
S.STRETCH (Smart stretch):
Suitable for stretching 4:3 programs
to fill the screen.
•InSIDE BAR, S.STRETCH and STRETCH mode,
PICTURE SCROLL will not work.
When the ASPECT is set to ON and the TV recieves
a 480i signal, the picture size is automatically
selected (as described
in
the following table).
Press MENU and the MENU screen
displays.
ZOOM:
Suitable for viewing wide-screen
2.35:1anamorphic DVDs
in
full
screen.
STRETCH:
This mode is useful for 1.78:1 DVDs.
When viewing 1.85:1 DVDs, stretch
mode will still show very thin black
bands at the top and bottom
of
the
screen.
Press
<lllIIII/~
to select
(SETUP).
Press EXIT to return to the normal screen.
Press
..ITto select "ASPECT", and then
press
<lllIIII/~
to select "ON" or "OFF".
User-set mode
ZOOM
SIDE BAR
STRETCH
4:3 Normal
Not defined
4:3 Letter box
16:9 Full
• You can enter to the same menu screen from
(SETUP) menu.
• When this function is not available, "NOT AVAILABLE"
will display.
Stretch mode is available for HD programs.
Suitable for viewing wide-screen 1.78:1aspect-ratio
programs. When viewing 1.85:1 programs, the stretch
mode will still show very thin black bands at the top
and bottom
of
the screen.
@-28
Page 30

Useful
adjustment
settings
Allows you to select what controls the audio output.
Press MENU and the MENU screen
displays.
Press
~/~
to
select.
(AUDIO).
Press Ji"./T to select "SPEAKERS".
Allows you to set a time when the TV automatically
switches to standby.
- FAVORITE CH -
FAVORITE
o
SLEEP AUDIO
AV
MODE
cc
_DOD
Press EXIT to return to the normal screen.
SLEEP
Oh07m
SLEEP
2hOOm
SLEEP
Oh10m
Each time you press SLEEP, the remaining
time setting switches as shown below.
SLEEP
OhOOm
step up by 10 minutes
(Sleep
timer
off)
+
+
+
+
SLEEP
1h50m
This display will disappear after a few
seconds, the sleep timer automatically
starts counting down.
• Ifyou want to adjust the sleep timer again, you
can press SLEEP repeatedly then change the
time setting.
Press SLEEP.
• The remaining time displays when the sleep
timer has been set.
STEREO
25
25
Iii
:ADJUST
rJJ···~
Iii
:SELECT
AUDIO
MTS
BASS
TREBLE
• Sound via speakerisadjusted with
VOL
+/-
on the remote control unit
or
VOL
-/+
on the TV.
• Sound via the AUDIO OUTPUT
terminal is not adjustable and outputs
at a consistent level.
• Sound via the AUDIO OUTPUT
terminal is adjusted with
VOL
+/-
on
the remote control unit
or
VOL
-/+
on
the TV.
• Sound via speaker is muted.
Press
~/~
to select "ON" or "OFF".
ON
OFF
• Select
"OhOOm"
by pressing SLEEP repeatedly to cancel
the sleep timer.
• The TV will enter the standby mode when the remaining
time reaches zero.
@-29
Page 31

Useful adjustment settings
I!I
:SELECT
I!I
:ADJUST
Tune the TV to the desired program.
I!I
:ADJUST
I!I
:SELECT
CC
ADVANCED
VIEW
MODE
PICTURE
SCROLL
,
CC
ADVANCED
VIEW
MODE
PICTURE
SCROLL
,
• When a Digital signal is received, you can
choose from CS1, CS2, CS3, CS4, CS5, CS6,
C1, C2, C3, C4, T1, T2, T3, T4 and OFF.
• Depending on the broadcast signal, some
Analog Captions will function with a Digital
broadcast signal.
Press CC to display "CLOSED CAPTION"
menu.
Press
CC repeatedly to select your desired
Closed Caption mode.
• When an Analog signal is received, you can
choose C1, C2, T1, T2 and OFF.
In
the Closed Caption system, there canbemore
than one caption service provided. Each
is
identified
by its own number. The "C1" and "C2" services
display subtitles of TV programs superimposed over
the program's picture. Generally, Closed Captions
in
English are transmittedonC1
and Closed Captions
in
other languages are transmittedonC2.
In
the Closed Caption system, the "Text1" or "Text2"
services display text that is unrelated to the program
being viewed (e.g., weather or news). These services
are also superimposed over the program currently
being viewed.
Not all programs and VHS videotapes offer closed
captions. Please look for the
"[CC]"
symbol to ensure
that captions will
be
shown.
Digital Closed Caption service
is
a new caption
service available only
on
digital TV programs (also
at the discretion of the service provider). It
is
a more
flexible system than the original Closed Caption
system, because it allows a variety
of
caption
sizes and font styles. When
the
Digital Closed
Caption service
isinuse, it willbeindicated by
the appearance
of
a 3-letter abbreviation that also
indicates the language
of
the Digital Closed Captions:
ENG (English), SPA (Spanish), FRA (French) or other
language codes.
Your TV is equipped with
an
internal Closed Caption
decoder. It allows you to view conversations,
narration and sound effects as subtitles
on
your TV.
Closed Captions are available on some TV programs
and
on
some VHS home video tapes at the discretion
of
the program provider.
- FAVORITE CH -
~
FAVORITE
o
SLEEP AUDIOAVMODE
CC
000.
Press EXIT to return to the normal screen.
• You can enter to CLOSED CAPTION menu from
(SETUP) menu.
• To turn the Closed Caption feature off, select "OFF".
• Ifthe program or video you selected is not closed-captioned, no captions will display on-screen.
• Iftext is not available
in
your viewing area, a black rectangle may appear on-screen. If this happens, set the Closed
Caption feature to "OFF".
• When selecting Closed Captions, the captioning will be delayed approx. 10 seconds.
• Ifno caption signal is received, no captions will appear, but the television will remain
in
the Caption Mode.
• Misspellings or unusual characters may occasionally appear during Closed Captioning. This is normal with Closed
Captioning, especially with live programs. This is because during live programs, captions are also entered live. These
transmissions do not allow time for editing.
• When Captions are being displayed, on-screen displays, such as volume and mute may be seen but may interfere with
Closed Captions.
• Some Cable TV systems and copy protection systems may interfere with the Closed Captioned signal.
• If using an indoor antenna or if TV reception is very poor, the Closed Caption Decoder may not appear or may appear with
strange characters or misspelled words.
In
this case, adjust the antenna for better receptionoruse an outdoor antenna.
@-30
Page 32

Useful
adjustment
settings
Selectable parameters availableineach
adjustment
item.
TEXT SIZE: AUTO, SMALL,
STANDARD, LARGE
TEXT TYPE: AUTO, DEFAULT, MONO
W.
SERIF, PROP.
W.
SERIF, MONO WIO SERIF,
PROP.
WIO SERIF,
CASUAL, CURSIVE,
SMALL CAPITALS
TEXT COLOR: AUTO, BLACK, WHITE,
RED, GREEN, BLUE,
YELLOW, MAGENTA,
CYAN
TEXT EDGE: AUTO, NONE, RAISED,
DEPRESSED, UNIFORM,
LEFT DROP SHADOW,
RIGHT DROP SHADOW
BACKGROUND COLOR: AUTO, BLACK, WHITE,
RED, GREEN, BLUE,
YELLOW, MAGENTA,
CYAN
• This feature is designed to customize Digital Captions
only.
• The "AUTO" value depends on the broadcasting station.
(SETUP).
TEXT
SIZE
• -
7~,.
CC
ADVANCED
TEXT
TYPE
~
TEXT
COLOR
~
TEXT
EDGE
~
BACKGROUND
COLOR
~
I!I
:SELECT
I!I
:ADJUST
I!I
:SELECT
ENTER:SET
SMALL
STANDARD
LARGE
Press
~/~
to select
Press
Ji../"If
to select "CC ADVANCED", and
then press
~/~.
The CC ADVANCED menu
displayed.
• You can adjust 5 items here.
Press
Ji../"If
to select a specific adjustment
item, then press
~/~.
The selectable
parameter of each items will appear.
This function allows you to adjust the closed caption
screen appearance to suit your preference.
Press MENU and the MENU screen
displays.
Press
Ji../"If
to select the desired parameter.
Press EXIT to return to the normal screen.
@-31
Page 33

Useful
adjustment
settings
hE:
d[
I!I
:SELECT
I!I
:ADJUST
LOCKS
V·CHIP
OFF
V·CHIP
SET
~
V·CHIP
SETlDTV}~
&2
&JU
[O·9]:SELECT
ENTER:SET
EXIT:END
iii
The screen returns to LOCKS menu. Your
new password has been set.
[O·9]:SELECT
ENTER:SET
EXIT:END
Enter the same password again to confirm,
then press ENTER.
Input the 4-digit password by using
0-9,
then press ENTER.
Press
£./T
to select
"NEW
PASSWORD"
then press
~I
~.
'
Enter a new password using
0-9,
then
press ENTER.
Changing
the
password
Allows you to change your 0urrent password.
Repeat steps
1 to 3insetting
a password.
• The password entering menu displays.
(LOCKS).
Enter the same password again to confirm,
then press ENTER, the password is now
registered and the LOCKS menu will appear
on the screen.
[O·9]:SELECT
ENTER:SET
EXIT:END
[O·9]:SELECT
ENTER:SET
EXIT:END
LOCKS
___
1
Press MENU and the MENU screen
displays.
Press
~/~
to select
Press
£./T.
The password entering menu
displays.
Select and enter a password (4 digits) using
the
number
buttons
(0-9), then press
ENTER.
"*"appears instead
of
the number.
Setting a
password
Allows you to use a password to protect certain
settings from being accidentally changed.
IMPORTANT:
Three conditions must be met to enable the V-Chip
CD
Password is registered.
® V-CHIP settings have been made.
® "V-CHIP" is set to "ON".
•Asa precautionary measure, make a noteofyour
password
and keepitinafamiliar
place.
• The "V-CHIP SET (DTV)" will only be selectable when
a new rating system can be downloaded via digital
broadcasting
in
the U.S.
@-32
Page 34

Useful adjustment settings
V-CHIP isanelectronic filtering device built into your TV. This tool gives parents a great degree of control over
broadcasts accessed by their children. It allows parents to select programs judged suitable for child viewing
while blocking ones judged not suitable. It does so automatically once you activate the V-CHIP feature
in
your
TV.
V-CHIP SET menu will not be selectable from the menu if you do not first configure your password.
(See page 32 for password setting for parental control.)
• The U.S. has two rating systems for viewing content: movie ratings and TV Parental Guidelines.
• The TV Parental Guidelines work
in
conjunction with the V-CHIP to help parents screen out inappropriate
television shows from their children.
• Movie ratings are used for original movies rated by the Motion Picture Association
of
America (MPAA) as
watched
on
cable TV and not edited for television. The V-CHIP can alsobeset to block MPAA-rated movies.
TV Parental Guidelines
TV-Y
(All children)
TV-Y7 (Directed to older children)
Content
FANTASY SEXUAL
ADULT
SEXUAL
VIOLENCE VIOLENCE
SITUATIONS
LANGUAGE DIALOG
x
Suggested
age
TV-G (General audience)
TV-PG (Parental Guidance suggested)
TV-14 (Parents strongly cautioned)
TV-MA
(Mature audience only)
X
X
X
X
X
X
X
X
X
X
X
X: Content rating can be set.
Voluntary movie rating system (MPAA)
G
PG
PG-13
Age
R
NC-17
X
General audiences. All ages admitted.
Parental guidance suggested. Some material may not be suitable for children.
Parents strongly cautioned. Some material may be inappropriate for children under 13.
Restricted. Under 17 requires accompanying parent
or
adult guardian (age variesinsome
jurisdictions
).
No one 17 and under admitted.
X is an older rating that is unified with NC-17 but may be encoded
in
the dataofolder movies.
• Ifyou select "PG-13", this will automatically block the higher ratings "R", "NC-17" and "X".
• Voluntary movie rating system only uses an age-based rating.
@-33
Page 35

Useful
adjustment
settings
Press MENU and the MENU screen
displays.
Repeat steps 1 to 5
in
TV
Parental
Guidelines
(TV Guidelines).
1!1
:SELECT
1!1
:ADJUST
1!1
:SELECT
1!1
:ADJUST
PG
:
OFF
PG·13
:
OFF
R :
OFF
NC·17
:
OFF
X :
OFF
• See page 33 for setting details.
Press EXIT to return to the normal screen.
Press
~/.
to select "MOVIE RATING".
Then press
~/~.
The RATING SET menu
displays.
Press
~/.
to select desired setting, then
press
~/~
to select the settings "ON"
or
"OFF".
(LOCKS).
MOVIE
RATING
~
CAN
ENG
RATING
OFF
CAN
FRE
RATING
OFF
• When you select TV-Y?, TV-PG, TV-14
or
TV-MA, "DISPLAY TO SET CONTENTS"
will appear on the screen. Press
DISPLAY
to explain the rating. Press
i..r"
to select
the desired rating you want. Press
..../~to
select the setting "ON"
or
"OFF". Then press
RETURN.
• See page 33 for setting details.
Press
~/.
to select "TV RATING". Then
press
~/~
to select the desired rating.
Input the 4-digitpassword by using
0-9,
then press ENTER.
The LOCKS menu displays.
Press
~/.
to select "V-CHIP SET", then
press
~/~.
The V-CHIP SET menu displays.
Press
~/~
to select
Press
JJ.J
•.
The password entering menu
displays.
Press RETURN. The LOCKS menu
displays.
Press
~/.
to select "V-CHIP", then press
~/
~
to select "ON".
Your setting are now set into memory.
• If "V-CHIP" is not set to "ON", the V-CHIP
setting will not work.
1!1
:SELECT
1!1
:ADJUST
Press EXIT to return to the normal screen.
@)-34
Page 36

Useful adjustment settings
• The TV rating systemsinCanada are based on the Canadian Radio-Television and Telecommunications
Commission (CRTC) policy on violence
in
television programming.
• While violence is the most important content element to be rated, the structure developed takes into
consideration other program content like language, nudity, sexuality and mature themes.
• When setting the V-CHIP on the Canadian system you can choose either the Canadian English ratings or the
Canadian French ratings.
Canadian English ratings
Age
E
C
C8+
G
PG
14+
Exempt: Includes news, sports, documentaries and other information programming; talk shows,
music videos, and variety programming.
Children: Intended for younger children under the age of 8 years. Pays careful attention to themes
that could threaten their sense
of
security and well-being.
Children over 8 years old: Contains
no
portrayal of violenceasthe preferred, acceptable, or only
way to resolve conflict; nor encourage children to imitate dangerous acts which they may see
on
the screen.
General: Considered acceptable for all age groups. Appropriate viewing for the entire family,
contains very little violence, physical, verbal or emotional.
Parental Guidance: Intended for a general audience, but may not
be
suitable for younger children
(under the age of 8) because it could contain controversial themes or issues.
Over 14 Years: Could contain themes where violence is one
of
the dominant elementsofthe
storyline, but it must
be
integral to the development of plot or character. Language usage could
be
profane and nudity present within the contextofthe theme.
Adults: Intended for viewers 18 years and older and might contain depictions of violence, which
18+ while related to the development of plot, character or themes, are intended for adult viewing.
Could contain graphic language and portrayals of sex and nudity.
Canadian French ratings
E
G
8ans+
Age
13ans+
16ans+
18ans+
Exempt programming.
General: All ages and children, contains minimal direct violence, but may
be
integrated into the
plot
in
a humorous or unrealistic manner.
General but inadvisable for young children: May be viewed by a wide public audience, but could
contain scenes disturbing to children under 8 who cannot distinguish between imaginary and real
situations. Recommended for viewing with parent.
Over
13
years: Could contain scenes of frequent violent scenes and therefore recommended for
viewing with parent.
Over
16
years: Could contain frequent violent scenes and intense violence.
Over 18 years: Only for adult viewing. Could contain frequent violent scenes and extreme
violence.
@-35
Page 37

Useful
adjustment
settings
Press MENU and the MENU screen
displays.
Repeat steps 1 to 5
in
Canadian
English
ratings.
MOVIE
RATING
~
CAN
ENG
RATING
OFF
I!I
:SELECT
1!1
:ADJUST
V·CHIP
SET
TV
RATING
OFF
• See page 35 for setting details.
Press
AfT
to select "CAN FRE RATING".
Then press
<lllIIIIf~
to select the desired rating.
Press EXIT to return to the normal screen.
The V-CHIP block
is
working and censors
a broadcast, "THIS PROGRAM HAS BEEN
BLOCKED!" displays.
Press MUTE while the V-CHIP
is
working
and then the password entering menu
displays.
(LOCKS).
1!1
:SELECT
1!1
:ADJUST
CAN
FRE
RATING
OFF
V·CHIP
SET
TV
RATING
OFF
MOVIE
RATING
~
• See page 35 for setting details.
Press
AfT
to select "CAN ENG RATING".
Then press
<lllIIIIf~
to select the desired rating.
Press
AfT
to select "V-CHIP SET", then
press
<lllIIIIf~.
The V-CHIP SET menu displays.
Input the 4-digit password by using
0-9,
then press ENTER.
The LOCKS menu displays.
Press
AfT.
The password entering menu
displays.
Press
<lllIIIIf~
to select
Press RETURN. The LOCKS menu
displays.
Enter your 4-digit password with
0-9.
At this time V-CHIP block temporarily
releases.
Press
AfT
to select "V-CHIP", then press
<lllIIIIf
~
to
select "ON".
Your setting are now set into memory.
• If"V-CHIP" is not set to "ON", the V-CHIP setting
will not work.
1!1
:SELECT
I!I
:ADJUST
You can reactivate the temporarily released V-CHIP
block as shown below.
Method 1:
Change to the other channel.
Method 2:
Switch off the TV power.
• Performing anyofthe two above will activate the V-CHIP
block.
Press EXIT to return to the normal screen.
@-36
Page 38

Other
viewing
options
Allows you to capture and freezeanimage from a
moving image that you are watching.
FREEZE
MENU
.~O
8@8
EXIT
~
RETURN
O~O
- FAVORITE CH -
0---®---@---@
Press FREEZE.
• A moving image is captured.
Press FREEZE again to cancel the
function.
You can operate the connected AV products (AV
Receiver, Cable Box, SAT tuner, DTV, VCR, DVD,
LD) using the presetting manufacturer function of your
remote control unit.
TV
TV VCR AUDIO
goo
0
"'~~
CBLlSAT
DVD
FUNCTION
pO
0 0
(I)
SOURCE
LIGHT
8
rn
8
CB
(3
REC
C!J
0
0
8)
(3
@ID
MODE
• When this function is not available, "NOT AVAILABLE"
will display.
• The still image automatically goes out after
30
minutes.
• Ifyou are using the freeze function and a broadcast
activates the V-CHIP block, the freeze function will be
cancelled and a V-CHIP block message will appear.
@
INPUT
FLASHBACK
00
Presetting
manufacturer
codes
In
order to receive digital air broadcasts, you need a
digital broadcast antenna. You can confirm the antenna
configuration through the "SIGNAL METER" menu.
Press FUNCTION until the LED for your
device lights up.
After the LED for your device lights up,
press FUNCTION and DISPLAY at the
same time to enter the code registration
mode. The LED will blink.
Press
0-9
to enter the manufacturer code.
(See page 38.)
• Preset mode is finished once the LED no
longer lights up.
After registering the code, the LED will stop
blinking then turn off after one second. (If
you perform
an
incorrect operation, the LED
will blink quickly then turn off.)
CHANNEL
(DIGITAL)
23.002
~
•
40
SIGNAL
METER
Press
~/~
to select r (SETUP).
Press
<llllIII/~.
• The strength of the digital signal is displayed.
The signal information is based
on
the current
channel.
Press
lit..!'"
to select "SIGNAL METER".
Press EXIT to return to the normal screen.
If necessary, adjust the direction of the antenna to
obtain the maximum signal strength.
Signal
strength
Press MENU and the MENU screen
displays.
@-37
Page 39

Other
viewing
options
Manufacturer codes
• Numbers marked with * are SAT codes, all others are
DVD/LD
BRAND
REMOTE CONTROL
CODE NUMBER
Denon
02
JVC
09, 13
Kenwood
21
Magnavox
04
Marantz
04
Mitsubishi
06
Panasonic
02,22
Philips
04,23
Pioneer
08,11,20
Proscan
03
RCA
03,24
Samsung
07, 12
Sharp
01,10
Sony
05,25
Toshiba
04
Yamaha
02
Zenith
04
CATV/SAT
BRAND
REMOTE CONTROL
CODE NUMBER
Anvision
04,05
Cable Star
04,05
Eagle
05
General Instrument
02,03,07,12,13,"14,
19,22
Jerrold
02,03,07,12,13,14,
19,22,31,32,33,34,
35,36,37,38,39,40
Magnavox
04,05,09,14,17,18,
20,21,24,25
Oak Sigma
8
Panasonic
16,23
Philips
04,05,09,15,17,18,
20,21,24,25
Pioneer
08,10,29,30,43*,46
Randtek
04,05
RCA
16, 27,
44*,
45*
Scientific Atlanta
01,26
Sony
28
Viewstar
04,05,09,15,17,18,
20,21,24,25
Zenith
06, 14
REMOTE CONTROL
CODE NUMBER
01
AUDIO BRAND
Sharp
VCR BRAND
REMOTE CONTROL
CODE NUMBER
Akai
25,26,37
Audio
15,22,30
Broksonic
32
Canon
04
Capehart
34
Craig
10,31
Curtis Mathis
04
Daewoo
34
DBX
15,22,30
Dynatech 29
Emerson
21,32,35
Fisher
09,
10,
11
Funai
28,29
G.E.
04
Goldstar
24
Hitachi
06,47
Instant Replay 04
JC Penney
04,
06,
"24,
30
JVC
15,41,42,53
Kenwood
14,15
Lloyds
29
Magnavox
04,05,08
Magnin
31
Marantz
30
Memorex
04,10,24,29
Minolta
06
Mitsubishi
17,18,39,40
MontgomeryWard
02,43
Multitech 29
NEC
15,22,30
Panasonic
44,45
Pentax
05,06
Philco
05
Philips
05,08
RCA
06,07,33,51
Realistic
01,02,10,24
Samsung
23,31
Sanyo
10,14,52
Scott 20
Sears
06,11,24
Sharp
01,02,03
Shintom
36
Sony
12,13,38
Sound Design
29
Sylvania
05,08
Symphonic 29
Tatung
15
Teac
15,29
Teknika
27,29
Thomas 29
TMK
21
Toshiba
19,20
Video Concepts 30
Yamaha
15,29,30
Zenith
16
@-38
Page 40

Other
viewing
options
2
2
•
•
•
VOL
SURROUND
j+)
0<:/(
FREEZE
MENU
o~o
888
EXIT
e----')
RETURN
O~O
- FAVORITE CH -
0-@---@-@
AQuas
•
•
•
VOL CH
SURROUND{J
(JMUTE
o - v 0
~-3
AQuas
Cable
control
buttons
When the FUNCTION is set to CBL/SAT, the cable
converter connected to the TV can
be
operated using
1 to
4.
1 SOURCE POWER
Turns the cable converter power
on
and off.
2
0-9
Press a button (or buttons) that corresponds to the
channel that you wish to watch.
3
FLASHBACK
*
Press to switch between the current channel
and the channel you were watching immediately
before.
4
CH
AIV'
Press
CH
A or
CHV'to tuneina higher or lower
channel.
* Some manufacturers do not preset FLASHBACK.
• CABLE and SAT cannot be selected at the same time.
SAT
control
buttons
1 SOURCE POWER
Turns the cable converter power
on
and off.
2
0-9,·
(DOT)
Press a button (or buttons) that corresponds to the
channel that you wish to watch.
3 ENTER,
./T
I~/~
ENTER: Press to activate the selected function.
.I""'/~/~:
Press the button to select itemsonthe
SAT GUIDE screen or SAT MENU
screen.
• CABLE and SAT cannot be selected at the same time.
@-39
Page 41

Other
viewing
options
W
AM"-UT-E
...;.;-.-
1
o
VCR
control
buttons
The remote control unit butten will function as follows
when the
FUNCTION
of
the remote control unit is set
to VCR.
• Press INPUT until the input connected to the VCR is
selected. The following 1 to 8 can be used to control the
VCR.
1
CH
A/~
Press to select the channelofthe TV tuner on the
VCR.
2 SOURCE POWER
Turns the powerofthe VCR on and off.
3
II
Sets pauses and still pictures.
4
....
Rewinds the tape and allows picture search.
5 •
Stops the tape transport.
6 REC
Starts recording.
7
..
Rapidly advances the tape
and
allows picture search.
8
~
Starts playback.
DVD
control
buttons
The remote control unit button will function as follows
when the FUNCTIONofthe remote control unit is set
to DVD.
• Press INPUT until the input connected to the DVD player
is selected. The following 1 to 10 can be used to control
the DVD player.
1
~
Pressing quickly once takes you to the startofthe
next chapter. Each time you press
it,
you move
ahead to the start
of
the next chapter.
2
~
Pressing quickly once takes you to the startofthe
chapter currently playing. Each time you press
it,
you move back to the startofthe previous
chapter.
3 SOURCE POWER
Turns the power of the DVD player on and off.
4 II
Set pauses and still pictures.
5
...
Hold down to goinreverse.
6 •
Playback stops when pressed.
With some DVD players, pressing the button
twice may open the disc tray.
7 MENU
When this button is pressed, the DVD menu will
display.
8 ENTER,
i../T
/~/~
ENTER: Press to activate the selected function.
i../T/~/~:
Press the button to select items on
the DVD MENU screen.
7
3
5
INPUT
VOL CH
SURROUND
j+)
O(J(
5--
•••
--9
6
II
~
...
_1_1
4
2
_1_1
_!iEIlE\
l1I..&
f'Vi'EW\
II
~
..
~
1
--1--
CD CD
CD
0®®
0®®
0®®
INPUT
FLASHBACK
'0
FREEZE
MENU 7
O~.--
a-I
I
EO~RORN
- FAVORITE CH -
0--@----@--@
3 10
t
TV TV VCR AUDIO
g
e~
(B~/SAT
D~D
FUN
..
~TION
pOY'
0 0 •
SOURCE
LIGHT
•
~
rn
AQUOS
VOL
CH
SURROUND()
(jMUTE
o - v 0
a
AQUOS
FREEZE
MENU
O~O
8s8
o
<::::::I::/
RON
- FAVORITECH-
0--@----@--@
g
T;~
(~/SAT
:~:
F~~~;:N
pO
0 0 •
2
__
S•E
8@
4-
J
-
•••
6 II:
$:
II
CD
CD CD
0®®
0®®
0®®
INPUT
FLASHBACK
.0
(00-40
9
..
Hold down to fast forward.
10
~
Starts playback.
Page 42

Appendix
Before detaching (or attaching) stand, unplug the AC cord from the AC INPUT terminal.
• Do
not
remove
the
stand
from
theTVunless
usinganoptional
wall
mount
brackettomount
it.
Before
attaching/detaching
stand
• Before performing work make sure to turn off the TV.
• Before performing work spread cushioning over the base area to lay the TV on. This will prevent it from being
damaged.
1
Soft cushion
2
Unfasten the four screws used to secure the stand
in
place.
Detach the stand from the TV.
(Hold the stand so it will not drop from the edge
of
the
base area.)
• To attach the stand, perform the above steps
in
reverse order.
•
Installing
the
TV requires special
skill
that
should
onlybeperformedbyqualified
service
personnel.
Customers
should
not
attempttodo
the
work
themselves. SHARP bearsnoresponsibility
for
improper
mountingormounting
that
resultsinaccidentorinjury.
Using an
optional
brackettomount
the
TV
• You can ask a qualified service professional about usinganoptional AN-26AG1 bracket for LC-26D4QU or AN37AG2 bracket for LC-32D4QU to mount the TV to the wall.
• Carefully read the instructions that come with the bracket before beginning work.
Hangingonthe
wall
Wall mount bracket. (See the bracket instructions for details.)
About
setting
the
TV angle
Vertical mounting
Angular mounting
LC-26D40U
Up
to 20°
LC-32D40U Up to 10°
• Detach the cable clamp
on
the rear of the TV when using the optional mount bracket.
(00-41
Page 43

(00-42
Appendix
Problem
Possible
Solution
• No power • Check ifyou pressed TV POWER on the remote control unit. (See page 14.) If
the indicator on the TV does not light up, press
TV POWER on the TV.
•
Is
the AC cord disconnected? (See page 7.)
• Has the power been turned on? (See page 14.)
• Unit cannot be operated.
• External influences such as lightning, static electricity, may cause improper
operation.
In
this case, operate the unit after first turning on the powerofthe TV
or unplugging the AC cord and replugging it
in
after 1 or 2 minutes.
• Remote control unit does not
•
Is
the FUNCTION set correctly? Set it to the TV setting position.
operate.
• Are batteries inserted with polarity
(+,-)aligned? (See page 8.)
• Are batteries worn out? (Replace with new batteries.)
• Are you using it under strong or fluorescent lighting?
•
Is
a fluorescent light illuminated near the remote control sensor?
• Picture is cut off screen.
• Are screen mode adjustments such as view mode choose made correctly? (See
page 28.)
• Strange color, light color, or color
• Adjust the picture tone. (See page 21.)
misalignment
•
Is
the room too bright? The picture may look darkina room thatistoo bright.
• Power is suddenly turned off.
•
Is
the sleep timer set? (See page 29.)
• Check the power control settings. (See page 14.)
• The unit's internal temperature has increased.
Remove any objects blocking vent or clean.
• No picture •
Is
connection to other components correct? (See pages 24 to 25.)
•
Is
correct input signal source selected after connection? (See page 23.)
•
Is
the correct input selected? (See page 23.)
• Is picture adjustment correct? (See page 21.)
• No sound •
Is
the volume too low? (See page 17.)
•
Is
"OFF" selectedin"SPEAKERS"? (See page 29.)
The exampleofan
error
message
Possible
Solution
displayedona screen
• DIGITAL CHANNEL SIGNAL
• Check the antenna cable. Check that the antenna is correctly setup.
STRENGTH
IS
LOW
• DIGITAL CHANNEL
IS
• Itissubscription channel. Contact the service provider.
SCRAMBLED
• AUDIO ONLY
• The channel has audio contents only.
Cautions
regarding use in
high
and
low
temperature
environments
• When the unitisusedina low temperature space (e.g. room, office), the picture may leave trails or appear slightly
delayed. This
is
not a malfunction, and the unit will recover when the temperature returns to normal.
• Do not leave the unit
in
a hot or cold location. Also, do not leave the unitina location exposed to direct sunlight or near
a heater, as this may cause the cabinet to deform and the Liquid Crystal panel to malfunction.
Storage temperature:
-4°F
to +140°F
(-20°C
to +60°C) .
Page 44

Appendix
Item
Model: LC·26D40U
Model: LC-32D40U
LCD panel
26" Advanced Super View & BLACK
32" Advanced
Super View &
BLACK
TFT LCD
TFT LCD
Number
of
dots
3,147,264 dots (1366 x 768 x 3 dots)
TV-standard (CCIR)
AmericanTVStandard ATSC/NTSC System
TV
Receiving
VHF/UHF
VHF 2-13ch, UHF 14-69ch
Function
Channel
CATV
1-125ch (non-scrambled channel only.)
Digital
Terrestrial
2-69ch
Broadcast
(8VSB)
Digital
Cable*
1-125ch (non-scrambled channel only.)
(64/256
QAM)
Audio multiplex
BTSC System
Backlight
60,000 hours (at Backlight Standard position)
Audio out
10Wx2
Terminals
Rear
INPUT 1
AV
in, S-VIDEO in
INPUT 2
AV
in, S-VIDEO
in
INPUT 3 COMPONENT in, Audio
in
INPUT 4
COMPONENT in, Audio
in
INPUT 5 HDMIinwith HDCP, Audio
in
INPUT 6
HDMI
in
with HDCP
ANT/CABLE
75
n Unbalance, F Type x 1 for Analog (VHF/UHF/CATV) and Digital (AIR/CABLE)
DIGITAL
AUDIO
OUTPUT
Coaxial Digital audio output x 1 (PCM/Dolby Digital)
OUTPUT
Audio out
OSD language
English/French/Spanish
Power Requirement
AC 120 V, 60 Hz
Power Consumption
145 W (Standby 1W)
170 W (Standby 1W)
w/o stand
26.1 Ibs.l11.8
kg
37.5Ibs.l17.0
kg
Weight
with stand 29.8 Ibs.l13.5
kg
43.0 Ibs.l19.5
kg
Dimension
w/o stand
26
7
/
8
x 19
41
/
46
X 4
17
/
32
inch
32
5
/
16
x 23
9
/
32
X 4
39
/
64
inch
(W
x H x D)
with stand
26
7
/
8
x
21
49
/
64
X 10
49
/
64
inch
32
5
/
16
x 25
5
/
8
X 10
49
/
64
inch
Accessories
Remote control unit (x1), AC cord (x1), "AAA" size battery (x2), Cable clamp (x1),
Stand unit (x1), Operation manual (x1)
Operating temperature
+32°F to +104
OF
(O°C
to +40°C)
* Emergency alert messages via Cable are unreceivable.
• As part
of
policyofcontinuous improvement, SHARP reserves the right to make design and specification changes for
product improvement without prior notice. The performance specification figures indicated are nominal values
of
production
units. There may be some deviations from these values in individual units.
The listed optional accessories are available for
the LCD colour TV. Please purchase them at your
nearest shop.
• Additional optional accessories may be available in
near future. When purchasing, please read the newest
catalogue for compatibility and check the availability.
2
Wall mount bracket
(for LC-26D4QU)
Wall mount bracket
(for LC-32D4QU)
AN-26AG1
AN-37AG2
@-43
Page 45

Dimensional drawings
LC-26D40U
~"
I.
217132
(539)
,I
Unit:
inch/(mm)
26
7
/8
(682)
r",
.....
·Q_'O.
------+-1---.-----,//
22
23
/64
(567.9) i
I
-1------------1----
co
-----.-
---
i
~
i
~
a
I
,
~
~
~
i/
+
~
~
L(IJI
IIJ
~
I=J
a
o
----.:---
a
£
-J.
:;:,,:1:
N
~SH.
~,
IJ
~
l
I::
Ii
I
Ie
i
Ii
~~
i
o.
~~1~~
I
~
illllllll
10
49
/64
(274)
,I
LC-32D40U
G"",:::::
::::::::,mA0,
I.
217hd539)
,I
3
5
/8
(92) 4
39
/64
(117)
27
9
/16
(700)
i"'-.'r
-----j-
j
__
--.-
__
-<'/
i
17/8(200)
I
I
i
-
--------------r------~-------
e-
e--
i
~
i
~
CO
i
~
~
1/ i
~
-J.
L~\.-
__
-1fJ
LO
.----.-~lilllilll1lttm~i[rn]]
1··I·-I-II(·I·"H·"I"+JILI··I··I··1
o~
ill
Ii>
~
~L
.I-+-+~-I-+~+-I-t-t-+-:-
~-·:---!-!-l++-/++~+-+llIIIlIIIl
i
TI
i
II
.---------"'L..--...,
m@ i @ [
••
'--------'I
.III!
@~@
~
,-til..
•..1
III
ill
II •
.ell--
@-44
Page 46

CLEARING THE PASSWORD
Ifyou forget the password, clear the password using the following procedure.
CD
ED
CD
-
VOL
+ V
CH
A
o
INPUT
POWER
CD
CD
(J)
o
CD
CD
CD
@)
INPUT
FLASHBACK
00
Press and
holc:j
both VOL -
on
the TV and 0onthe remote control simultaneously for a few
seconds until (LOCKS) menu appears
on
the screen.
Now the old password was cleared. You can set the new password. (See page 32.)
The password
is
• As a precautionary measure, make a note of your password above, cut it from this manual, and keep itina safe place.
@-45
Page 47

Calling
for
Service
For locationofthe nearest Sharp Authorized Service, or to obtain product literature, accessories, supplies, or
customer assistance, please call1-800-BE-SHARP.
LIMITED WARRANTY
CONSUMER LIMITED WARRANTY
SHARP ELECTRONICS CORPORATION warrants
to
the first consumer purchaser that this Sharp brand product (the
"Product"), when shipped
in
its original container, will be free from defective workmanship and materials, and agrees that
it will, at its option, either repair the defect or replace the defective Product or part thereof with a new or remanufactured
equivalent at no charge to the purchaser for parts or labor for the period(s) set forth below.
This warranty does not apply to any appearance items of the Product nor to the additional excluded item(s) set forth
below nor to any Product the exterior
of
which has been damaged or defaced, which has been subjected to improper
voltage or other misuse, abnormal service or handling, or which has been altered or modified
in
design or construction.
In
order to enforce the rights under this limited warranty, the purchaser should follow the steps set forth below and
provide proof of purchase to the servicer.
The limited warranty described herein isinaddition to whatever implied warranties may be grantedtopurchasers by
law. ALL IMPLIED WARRANTIES INCLUDING THE WARRANTIES
OF
MERCHANTABILITY AND FITNESS
FOR
USE
ARE
LIMITEDTOTHE
PERIOD(S)
FROM
THE
DATEOFPURCHASE
SET
FORTH
BELOW. Some states do not allow
limitations
on
how longanimplied warranty lasts, so the above limitation may not applytoyou.
Neither the sales personnel of the seller nor any other person
is
authorized to make any warranties other than those
described herein, or to extend the duration of any warranties beyond the time period described herein on behalf of
Sharp.
The warranties described herein shall be the sole and exclusive warranties granted by Sharp and shall be the sole and
exclusive remedy available to the purchaser. Correction
of
defects,inthe manner and for the periodoftime described
herein, shall constitute complete fulfillment of all liabilities and responsibilities
of
Sharp to the purchaser with respect to
the Product, and shall constitute full satisfaction of
all
claims, whether based on contract, negligence, strict liability or
otherwise.
In
no event shall Sharp be liable, orinany way responsible, for any damages or defectsinthe Product which
were caused by repairs or attempted repairs performed by anyone other than
an
authorized servicer. Nor shall Sharp be
liable or
in
any way responsible for any incidental or consequential economic or property damage. Some states do not
allow the exclusion of incidental or consequential damages, so the above exclusion may not apply to you.
THIS WARRANTY
GIVES
YOU
SPECIFIC LEGAL RIGHTS. YOU
MAY
ALSO
HAVE
OTHER RIGHTS WHICH
VARY
FROM
STATETOSTATE.
Model
Specific
Section
Your
Product
Model
Number
&Description:
Warranty
Period
for
this
Product:
Additional
Item{s) Excluded
from
Warranty Coverage
(if
any):
Where
to
Obtain Service:
WhattodotoObtain Service: LC-32D40U
LC-26D40U -LC-32D40U LCD Color Television
(Be sure to have this information available when you need
service for your Product.)
One (1) year parts and labor from the date
of
purchase.
Non-rechargeable batteries.
From a Sharp Authorized Servicer located
in
the United
States.
To
find the location of the nearest Sharp Authorized
Servicer, call Sharp toll free at 1-800-BE-SHARP.
Contact your Sharp Authorized Servicer to obtain in-home
service for this Product. The Servicer will come to your home
and if it
is
necessary to remove the Product, the Servicer will
reinstall
it.
Be sure to have
ProofofPurchase available.
LC-26D40U
@-46
Ship prepaid or carryinyour Product to a Sharp Authorized
Servicer.
Be
sure to have
ProofofPurchase available. If you
ship the Product,
be
sure itisinsured and packaged securely.
TO
OBTAIN PRODUCT INFORMATION, CALL 1-800-BE-SHARP OR VISIT
www.sharpusa.com
SHAR~
SHARP ELECTRONICS CORPORATION
Sharp Plaza, Mahwah, New Jersey 07430-2135
SHARP CORPORATION
Page 48

111111111I111111111111111111111111111
J3Y00131B
SH06/04crsD
SHARR
SHARP ELECTRONICS CORPORATION
Sharp Plaza, Mahwah, New Jersey 07430-2135
SHARP CORPORATION
Printed in Thailand
Imprime en Tha"ilande
Impreso en Tailandia
9JDJ3Y00131B
06P04-TH-NO
Page 49

CAUTION SHEET/NOTICE DE PRECAUTION/HOJA DE PRECAUCIONES '
This
side
faces
the
rear.
REAR
• Attach the standinthe correct direction.
• The
"REAR"
label should be visible from the back of the
TV.
Refer to
the figure.
• Incorrect installation of the stand may result
in
theTVfalling
over.
•Besure to follow the instructionsinthe operation manual.
• Fixez
Ie
socle dansIebon sens.
• L'etiquette
«REAR»
(ARRIERE) doit etre visible du dos du televiseur.
Voir schema.
•
Un
montage incorrect du socle peut
entraTner
la chute du televiseur.
• Suivez attentivement les instructions donnees dans
Ie
mode d'emploi.
• Acople
el
soporteenla direcci6n correcta.
• La etiqueta "REAR" debe quedar visible desde la parte trasera del
televisor. Consulte la ilustraci6n.
• La instalaci6n incorrecta del soporte puede causar la carda del televisor.
• Asegurese de seguir las instruccionesenel
manual de operaci6n.
7290000175
SH
Page 50

PRODUCT
Pleasedonot
If
you
SHARP
TV
Marketing
Sharp
Visit
PEZ01-01
send
have
commentsorsuggestions
ELECTRONIC
Department
Plaza,
Mahwah,NJ07430-2135
our
websiteathttp://www.sharpusa.com/
REGISTRATION
any
productsorother
CORPORATION
DEPARTMENT
correspondencetothis
about
our
U.S.A.
address.
product,
please
write
to:
SHAR~
I·,
I "
'
..
~:
..
-'
"'.
-"-
.•
'
"I
..
"
-
'..'
.......
be
sharp
PO BOX 171098
DENVER CO 80217-1098
11'11.11"'111.111.111'111'1.1111"11.1
••1••
1.1.1••111
1.111.11
Page 51

SHARR
.......
be
sharp
ThisisyoLir
original
the
meet
Sharp
receipt
processingofwarranty
becomes
yourneeds
IMPORTANT!
Product
Registration
misplacedorlost.
and
claims.
desires.
The
Please
Card.
Proper
Returning
additional
fill
out
information
and
return
registration
this
card
within
the
next1Ddays.
serveasproofofpurchaseinthe
affect
warranty
helpusto
develop
will
will
can
not
also
coverage,
new
but
may
products
event
expedite
that
your
best
AQuaS'M
3.
1.
1.
il
First
Name
Street
City
E-mail
2.
Your
3.
Marital
4.
Dateofpurchase:
5.
Model
6.
Serial
(on
backofunit)
7.
Did
you
1.
8.
Where
9.
Where
1.
2.
3.
4.
5.
10.
What
of
this
01.DSharp
02.DPrior
03.DStyle/Appearance
04.DSlimness
05.DPriceNalue
06.0Screen
07.[lWarranty
08.l]Durability
11.
Please
1.
2.
3.
4.
5.
12.
Where
1.
2.
3.
13.
What
Sharp
01.DNo
02.DRCA
03._Zenith
04.
2.~Mrs.
Mr.
Address:
dateofbirth:
Month
status:
1.
I-Married
number:
number:
purchaseanextended
I]
Yes
did
you
purchase
did
you
first
learn
Salesperson
Friend/Relative
Magazine
ArticleorReview
Sharp
Website
Magazine
Advertisement
were
the
two
product?
check
D
D
0
will
[J
[J
other
product?
most
(checkupto
Reputation
Experience
Size
the
location
Living
Room
Adult's
Bedroom
Child's
Bedroom
Family/Rec
Kitchen
you
install
Wall
Table
Entertainment
brandsofTVs
Other
Brands
Considered
Sony
this
about
important
where
Room
this
Center
did
Ms.
service
2.
D
product?
this
Sharp
factors
two)
with
Sharp
this
unit
television?
you
seriously
05.:=J
06.0Panasonlc
07.
['J
08.
D
Year
2.
IJ
plan
for
No
product?
6.
D
7.
D
8.
D
9.
=:J
10.UOther
that
09.
10.
11.
12.
13.
willbeused.
6.
C
7.
C
8.
C
9.
D
4.
D
5.
0
6.
0
consider
Hitachi
Samsung
Toshiba
4.
Miss
Initial last
Single
this
product?
(check
Newspaper
In-Store
Display
Sunday
Insert
Product
Carton
influenced
Portability
Recommended
a
Friend/Relative
Recommended
a
Salesperson
PictureQuality
Other
Basement
Home
Office
Mobile
HomelTrailer
Other
UnderaCabinet
Night
Stand
Other
before
09.=Sanyo
10.
11.DPhilips
12.[JOther
Name
only
one)
Advertisement
your
selection
by
by
selecting
c::.:
JVC
Register
State
this
ONLINEatwww.sharpusa.com/
Apt.
No.
ZIP
Code
14.
Not
including
yourself,
and
other
1.
D
No
Male
1.
I I
1.
II
15.
Occupation:
ProfessionallTechnical
Upper
Middle
Sales/Marketing
Clerical/Service
Tradesman/Machine
Are
youoryour
16.
A
Homemaker?
Retired?
A
Student?
Self
Employed/Business
Working
In
the
A
Veteran?
17.
Which
01.
~
02.
03.
-
04.
-
05.
~
06.
C
07.
e
18.
Levelofeducation:
1.
L
2.
3.
LJ
19.
Which
1.
D
2.
n
3.
II
4.
D
20.
For
your
1.[JOwn?
21.
How
recently
1.
2.
3.
adults
One
Female
2.
2.
Management/Executive
ManagemenL.
.......................... ......................
fromaHome
Military?
group
Under
$15,000-$19,999
$20,000-$29,999
$30,000-$39,999
$40,000-$49,999
$50,000-$59,999
$60,000-$74,999
Completed
Completed
Completed
credit
American
MasterCard,
Dept.
Do
primary
Within30Days
Within
Within
whatisthe
livinginyour
ElseinHousehold
Age
C
(check
all
that
......................
Worker.
Operator/Laborer
spouse:
......................
.........................
....................
......
describes
$15,000
(check
High
College
Graduate
cardsdoyou
Express,
Visa.
Store,
Oil
Not
Use
Credit
residence,doyou:
did
you
move
1 - 3
Months
4- 6
Months
household?
yrs.
yrs.
apply)
...
...
.......................
Owner?
Office?
..
your
annual
highest
School
School
use
regularly?
Diners
Discover
Company,
Cards
into
GENDER
level
your
2.
=
..
family
completed)
Club
etc.
current
PLEASE
PEZ01
and
AGE
(in
years)ofchildren
Child
under1Year
Male
Female
2.
1.
::::J
'-~
2.
1.
~
You
I I
I I
1..1
[J
C
C
You
income?
$75,000-$99,999
08.
09.
$100,000-$124,999
-_.-
~-
10.
$125,000-$149,999
-
11.
$150,000-$174,999
12.
$175,000-$199,999
[J
$200,000-$249,999
13.
[J
$250,000&over
14.
2.
C
Rent?
residence?
7
to12Months
4.
Have
5.
the
CONTINUEONBACK
Age
Spouse
1.
2.
3.
4.
CJ
5.
:J
.~I
6.
Spouse
1.
2.
3.
4.
5.
6.
7.
Ago
Not
Moved
Last12Months
*01
TV
yrs.
yrs.
in
>->->-
Page 52

Whichofthe
22.
Buy/LeaseaNew
Buy/LeaseaUsed
Please
01.
02.
03.
check
0
0
23.
04.
05.
II
06.I]HaveaDog
07
08.
09.
:::J
I
10.
-
11.
12
Thanks
for
taking
market
research
mailings
and
services
indicated
information
you
participateinthis
Failuretoreturn
are
relate
above.
about
not.
followingdoyou
Vehicle
Vehicle
..
all
that
applytoyour
ShopbyCatalog/Mail
Shop
via
the
Internet
MemberofFrequent
DonatetoCharitable
OwnaCompact
HaveaCat
OwnaWireless/Cellular
Subscribetoan
Speak
Spanish
OwnanApple/Macintosh
OwnaCD-ROM
the
timetofill
studies
special
offers
directlytothe
Through
activitiesinwhich
Please
opportunity.
this
card
Disc
Online/Internet
out
and
reports.
fromanumberoffine
specific
this
selective
check
here
r I
will
not
diminish
plantodo
household.
Flyer
Program
Causes
Player
Phone
Computer
this
questionnaire.
They
interests,
program,
you
are
If,
for
1-6
will
involved
some
your
within
Months
C
Service
also
hobbies,
you
reason,
warranty
the
next6or12months?
7-12
1.
2.
Your
answers
allow
youtoreceive
companies
whose
and
other
willbeabletoobtain
and
less
about
you
would
rights
I-'Iease rola nere.
Months
[J
IJ
willbeused
Important
products
thoseinwhich
prefer
and
Information
more
not
for
...
To
helpusunderstand
24.
activitiesinwhich
01
Bicycling
J
02.
Golf
Physical
03.
[J
04
Running/Jogging
Snow
05.
06.
Tennis
1--,
07
Cam
08.[]Fishing
09.[]Hunti
iJ
10
Powerboating
11.
Sailing
12.[Grandchildren
I[J
Needlework/Knitting
13.
[
14
Sewing
Flower
15.
16.
Vegetable
17.
~
Crafts
Buy
18.
19
Automotive
20.
Electronics
Home
21.
~.
Do-It-Yourself
22.
Recreation
- I
23.
ListentoRecordslTapes/CDs
~
J
24
Avid
to
,-
25.[JBiblelDevotional
Using
the
25.
important activities:
numbersinthe
our
youoryour
Fitness/Exercise
Skiing
ping/Hiking
ng/Shooting
Gardening
Gardening
Prerecorded
Work
Workshop/
Vehicles
Book
Reading
customers'
spouse
Videos
(RV's)
Reading
above
list,
lifestyles,
enjoy
please
participatingona
26.0Health/Natural
27.IPhotography
28
29
30.
31
32."Cruise
33.ITravelinUSA
34.0Gourmet
35
36.
37.
38.
39.IReal
40
41.
42.
43
44.[[Wildlife/Environmental
45.IDietingIWeight
46.
47.[[Self-Improvement
48.IWalking
49.
50.
51.
please
indicate
regular
--,
Cultural/Arts
Fashion
0
U
0
[]
L
[[
[]
0
I
1[[
[]
indicate
Clothing
Art/Antique
Foreign
Wines
Stamp/Coin
Collectibles
Our
Stocks/BondInvestme
Contests/Sweepstakes
Casino
Science
Science/New
Watching
Home
Moneymaking
Collecting
Travel
Ship
Cooking/Fine
Nation's
Estate
Investments
Gambling
Fiction
for
Health
SportsonTV
Video
your3most
Vacations
Collecting
the
interests
basis.
Foods
Events
Heritage
Control
Technology
Recording
Opportunities
and
Foods
nts
Issues
...
Copyright©2003
All
Rights
Reserved
III
III
111111
IIIIIIIIIIII!IIIIIIIIIIII
J3YI0117ASH
.JSTJ
Please
Printed in Thailand
seal
with
tape.Donot
staple
.
 Loading...