

Page 1

Page 2
L
-20 1
LIQUID CRYSTALTELEVISION
ENGLISH
OPERATION MANUAL
IMPORTANT INFORMATION
WARNING: TO REDUCE THE RISK OF FIRE OR ELECTRIC SHOCK, DO
NOT EXPOSE THIS PRODUCT TO RAIN OR MOISTURE.
@
RISK OF ELECTRIC SHOCK.
The lightning flash with arrowhead symbol, within an equilateral triangle, is intended to alert
the user to the presence of
uninsulated "dangerous voltage"
Page 3
IMPORTANT INFORMATION
WARNING: FCC Regulations state that any unauthorized changes or modifications to this equipment
not expressly approved by the manufacturer could void the user's authority to operate this equipment.
iU.S.A.
ONLY-I
CAUl'ION: TO PREVENT ELECTRIC SHOCK, MATCH WIDE BLADE OF
PLUG TO WIDE SLOT, FULLY INSERT.
"Note to CATV system installer:This reminder is provided to call the CATV system installer's attention to Article 820-40
of
the National Electrical Code that provides guidelines for proper grounding and,inparticular, specifies that the cable
ground shall be connected to the grounding system of the building, as close to the point of cable entry as practical:'
This product utilizes tin-lead solder, and fluorescent lamp containing a small amount of mercury.
Disposal of these materials may be regulated due to environmental considerations. For disposal or
recycling information, please contact your local authorities or the Electronic Industries Alliance:
www.eia.org
IMPORTANT:
To aid reporting in case of loss or theft, please
record the TV's model and serial numbers in the
space provided. The numbers are located at the
rear of the TV.
Model No.:
Serial No.:
IU.S.A.
ON~!J
Page 4

DEAR SHARP CUSTOMER
Thank
you
for
your
purchaseofthe
Sharp
lCD
Color
TV product. To ensure safety and
many years
of
trouble-free operationofyour
product, please read
the
Safety Precau-
ticms carefully before using
this
product.
IMPORTANT SAFETY PRECAUTIONS
Electricity is used to perform many useful functions, but it can also cause personal injuries and property
damage if improperly handled. This product has been engineered and manufactured with the highest
priority on safety. However, improper use can result
in
electric shock and/or fire. In order to prevent
potential danger, please observe the following instructions when installing, operating and cleaning the
product. To ensure your safety and prolong the service life of your LCD color TV prOduct, please read
the following precautions carefully before using the product.
III Read
instructions-All
operating instructions must be read and understood before the product is
operated.
III Keep this manual
in
a safe
place-These
safety and operating instructions must be kept in a
safe place for future reference.
III Observe
warnings-All
warnings on the product and in the instructions must be observed
closely.
III Follow
instructions-All
operating instructions must be followed.
III
Attachments-Do
not use attachments not recommended by the manufacturer. Use of inad-
equate attachments can result in accidents.
III Power
source-This
product must operate on a power source specified on the specification
label. If you are not sure of the type of power supply used
in
your home, consult your dealer or
local power company. For units designed to operate on batteries or another power source, refer
to the operating instructions.
III Power cord
protection-The
power cords must be routed properly to prevent people from
stepping on them or objects from resting on them. Check the cords at the plugs and product.
III If the AC adapter is misplaced or needs to be replaced, obtain the same type of adapter from a
SHARP service center or your dealer.
III
Overloading-Do
not overload AC outlets or extension cords.
Overloading can cause fire or electric shock.
III Entering of objects and
liquids-Never
insert an object into the product through vents or openings. High voltage flows in the product, and inserting an object can cause electric shock and/or
short internal parts. For the same reason, do not spill water or liquid on the product.
III
Servicing~Do
not attempt to service the product yourself. Removing covers can expose you to
high voltage and other dangerous conditions. Request a qualified service person to perform
servicing.
III
Repair-If
any of the following conditions occurs, unplug the power cord from the AC outlet, and
request a qualified service person to perform repairs.
a.
When the power cord or plug is damaged.
b.
When a liquid was spilled on the productorwhen objects have fallen into the product.
c.
When the product has been exposed to rain or water.
d.
When the product does not operate properly as described in the operating instructions.
Do
not touch the controls other than those described in the operating instructions. Improper
adjustment of controls not described in the instructions can cause damage, which often
requires extensive adjustment work by a qualified technician.
e.
When the product has been dropped or damaged.
f.
When the product displays an abnormal condition. Any noticeable abnormality in the product
indicates that the product needs servicing.
III Replacement
partS-In
case the product needs replacement parts, make sure that the service
Page 5
IMPORTANT SAFETY PRECAUTIONS (Continued)
IlI!II
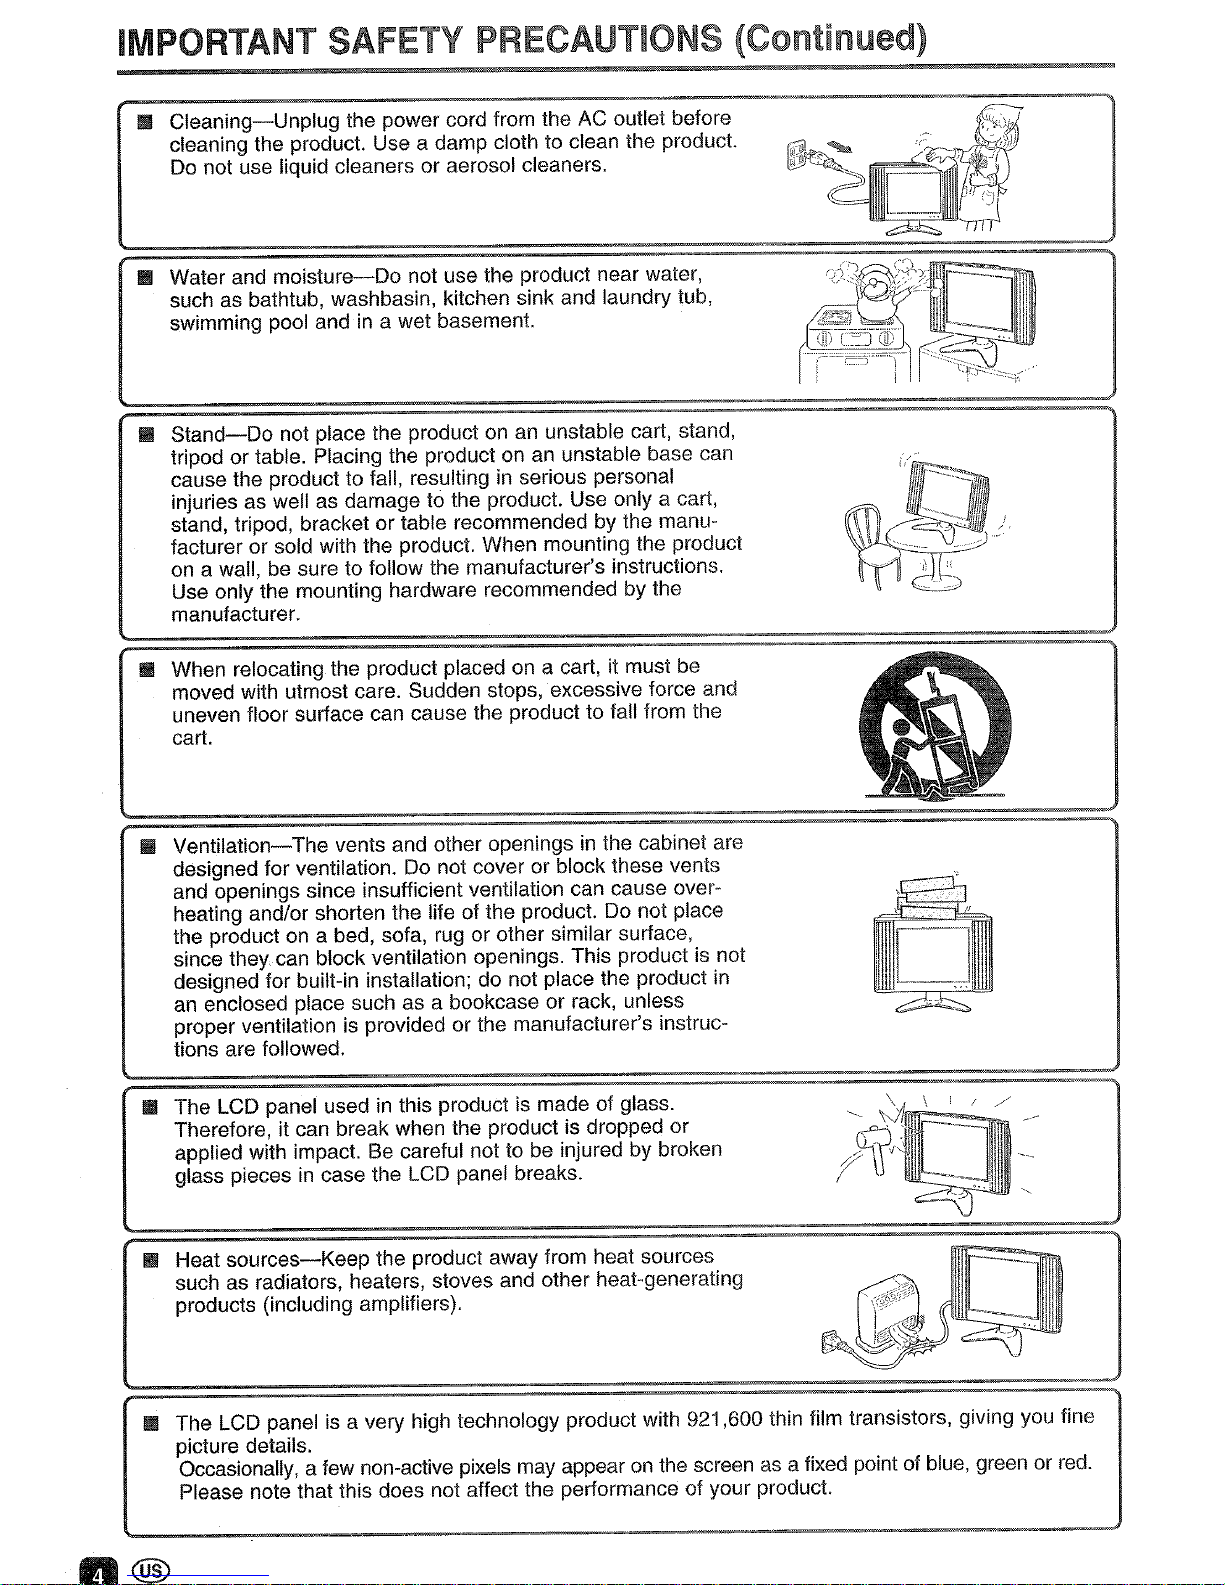
Cleaning-Unplug
the power cord from the
AC
outlet before
cleaning the product. Use a damp cloth to clean the product.
Do
not use liquid cleaners or aerosol cleaners.
IIIIIl
Water and
moisture-Do
not use the product near water,
such as bathtub, washbasin, kitchen sink and laundry tub,
swimming pool and
in
a wet basement.
IIIIIl
Stand-Do
not place the productonan
unstable cart, stand,
tripod or table. Placing the product
onanunstable base can
cause the product to fall, resulting
in
serious personal
injuries as well as damage to the product. Use only a cart,
stand, tripod, bracket or table recommended by the manufacturer or sold with the product. When mounting the product
on
a wall, be sure to follow the manufacturer's instructions.
Use only the mounting hardware recommended by the
manufacturer.
IlI!II
When relocating the product placed on a cart, it must be
moved with utmost care. Sudden stops, excessive force and
uneven floor surface can cause the product to fall from the
cart.
IIIIIl
Ventilation-The
vents and other openingsinthe cabinet are
designed for ventilation.
Do
not cover or block these vents
and openings since insufficient ventilation can cause overheating and/or shorten the life of the product. Do not place
the product
on
a bed, sofa, rug or other similar surface,
since they can block ventilation openings. This product is not
designed for built-in installation; do not place the product
in
an
enclosed place such as a bookcase or rack, unless
proper ventilation is provided or the manufacturer's instructions are followed.
IlI!II
The LCD panel usedinthis product is made of glass.
Therefore, it can break when the product is dropped or
applied with impact. Be careful not to be injured by broken
glass pieces
in
case the LCD panel breaks.
IlI!II
Heat
sources-Keep
the product away from heat sources
such as radiators, heaters, stoves and other heat-generating
products (including amplifiers).
IlI!II
The LCD panel is a very high technology product with 921,600 thin film transistors, giving you fine
picture details.
Occasionally, a few non-active pixels may appear
on
the screen as a fixed point of blue, green or
red.
Please note that this does not affect the performance of your product.
Page 6
IMPORTANT SAFETY PRECAUTIONS (Continued)
iIIIIII
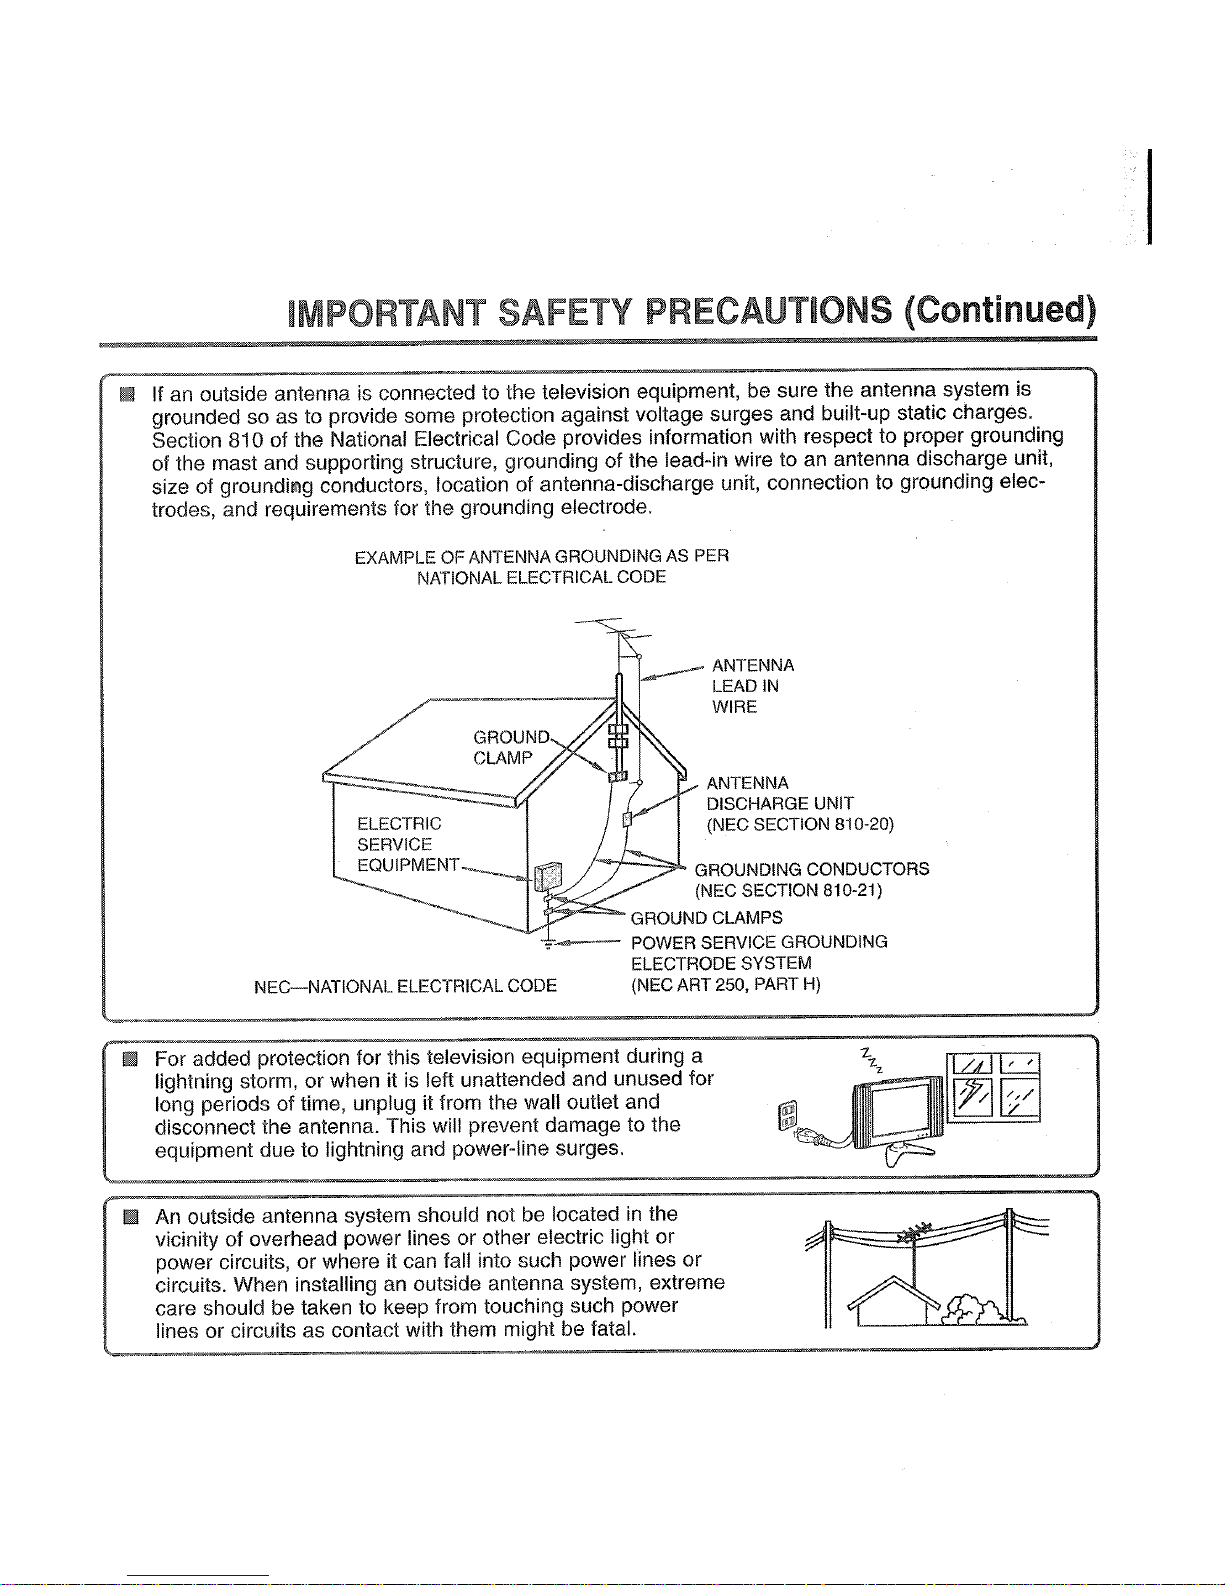
If
an
outside antenna is connected to the television equipment, be sure the antenna system is
grounded so as to provide some protection against voltage surges and built-up static charges.
Section 810 of the National Electrical Code provides information with respect to proper grounding
of the mast and supporting structure, grounding of the lead-in wire to
an
antenna discharge unit,
size of grounding conductors, location of antenna-discharge unit, connection to grounding electrodes, and requirements for the grounding electrode.
EXAMPLE OFANTENNAGROUNDING AS PER
NATIONAL ELECTRICAL CODE
___
ANTENNA
LEAD
IN
WIRE
ANTENNA
DISCHARGE UNIT
(NEC SECTION 810-20)
GROUNDING CONDUCTORS
(NEC SECTION 810-21)
GROUND CLAMPS
,,--
POWER SERVICE GROUNDING
ELECTRODE SYSTEM
NEC-NATIONAL
ELECTRICAL CODE (NEC ART 250, PART
H)
iIIIIII
For added protection for this television equipment during a
lightning storm, or when it is left unattended and unused for
long periods of time, unplug it from the wall outlet and
disconnect the antenna. This will prevent damage to the
equipment due to lightning and power-line surges.
iIIIIII
An
outside antenna system should notbelocatedinthe
vicinity of overhead power lines or other electric light or
power circuits, or where it can fall into such power lines or
circuits. When installing
an
outside antenna system, extreme
care should be taken to keep from touching such power
lines or circuits as contact with them might be fatal.
Page 7
CONTENTS
Page
DEAR SHARP CUSTOMER 3
IMPORTANT
SAfETY
PRECAUTIONS 3-5
SUPPLIED ACCESSORIES 7
PREPARATION 8-10
Using the Remote Control 8
Batteries
for
the Remote Control 8
Power Connection 9
Antenna Connection
9,1()
FRONT AND REAR CONTROL OPTIONS 11-13
Removing the
Back
Cover
""'
13
Listening
with
Headphones 13
REMOTE CONTROL 14
BASIC OPERATION 14-17
Turning
on POWER 15
Switching TVIVIDEO [AV"lIAV2ICOMPONENT/CARDITV] Modes 15
Sound Volume 16
ON/OFf
Standby 16
Changing the Channels 17
SELECTING MENU ITEMS 18
ADJUSTMENT 19-35
Adjusting
the SLEEP TIMER Settings 19
Adjusting
the BRIGHTNESS Settings 20
Adjusting
the
LANGUAGE Settings
21
Adjusting
the VIDEO ADJUST Settings 22, 23
Adjusting
the
PRESET Settings 24
SET UP 25, 26
Adjusting
the BLUE SCREEN Settings 27
Adjusting
the CLOSED CAPTION Settings 28
Adjusting
the
V-CHIP Settings 29-35
MEMORY CARD PLAYBACK
36-41
Memory Cards 36
Card Precautions 37
Preparation 38
Pulling
out
the
PC
Card Adapter 38
TurningonCARD Mode 39
Selecting the Playback Mode 40,41
CARD ADJUSTMENT 42-47
Selecting CARD SETTING Items
42
Adjusting
the SLIDE SHOW Settings
43
Adjusting
the
MY PROGRAM Settings 44, 45
Adjusting
the ROTATE Settings 46
Adjusting
the SOUND Settings 47
CONNECTING WITH EXTERNAL DEVICES 48-50
TROUBLESHOOTING 51-53
SPECifiCATIONS 54
DIMENSIONAL DRAWINGS 55
Page 8
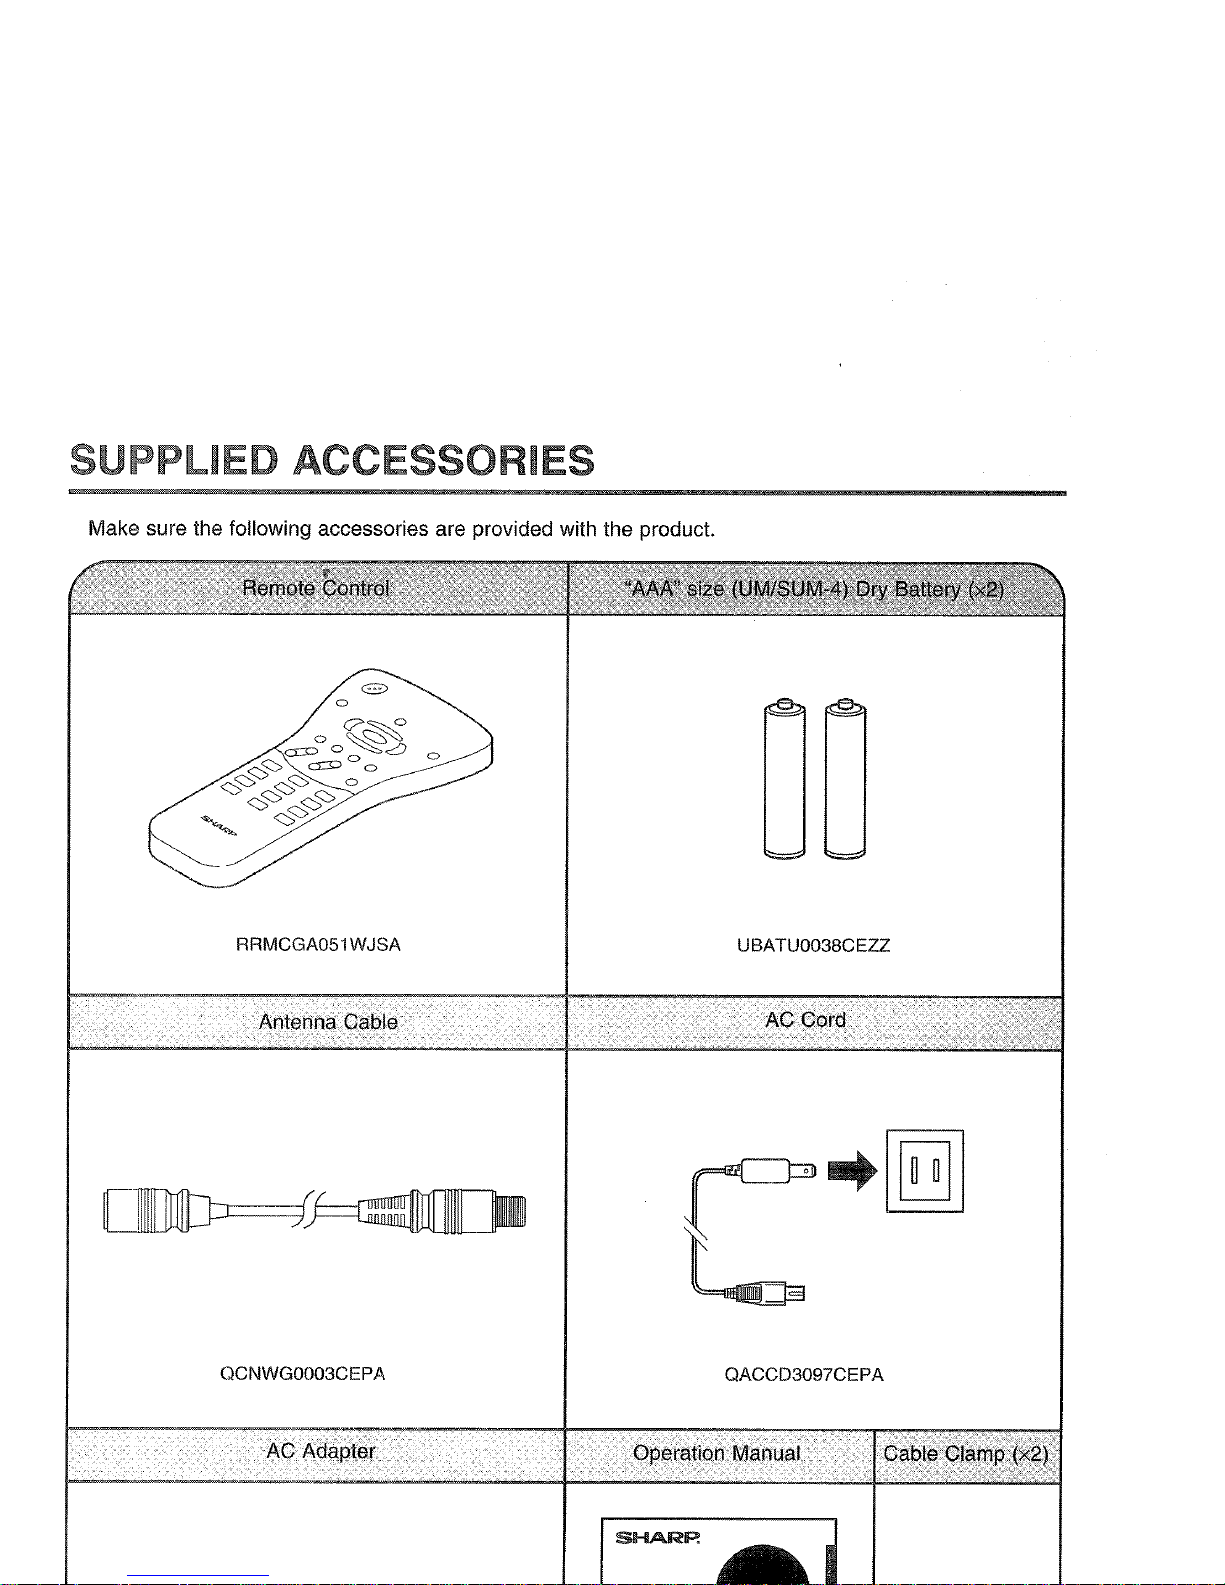
SUPPLIED ACCESSORIES
Make sure the following accessories are provided with the product.
o
RRMCGA051WJSA UBATU0038CEZZ
[JJJ=..l-1
----1
QCNWG0003CEPA
QACCD3097CEPA
Page 9
sunlight
The heat
In
such a
or
operate Ihe
?
@
in
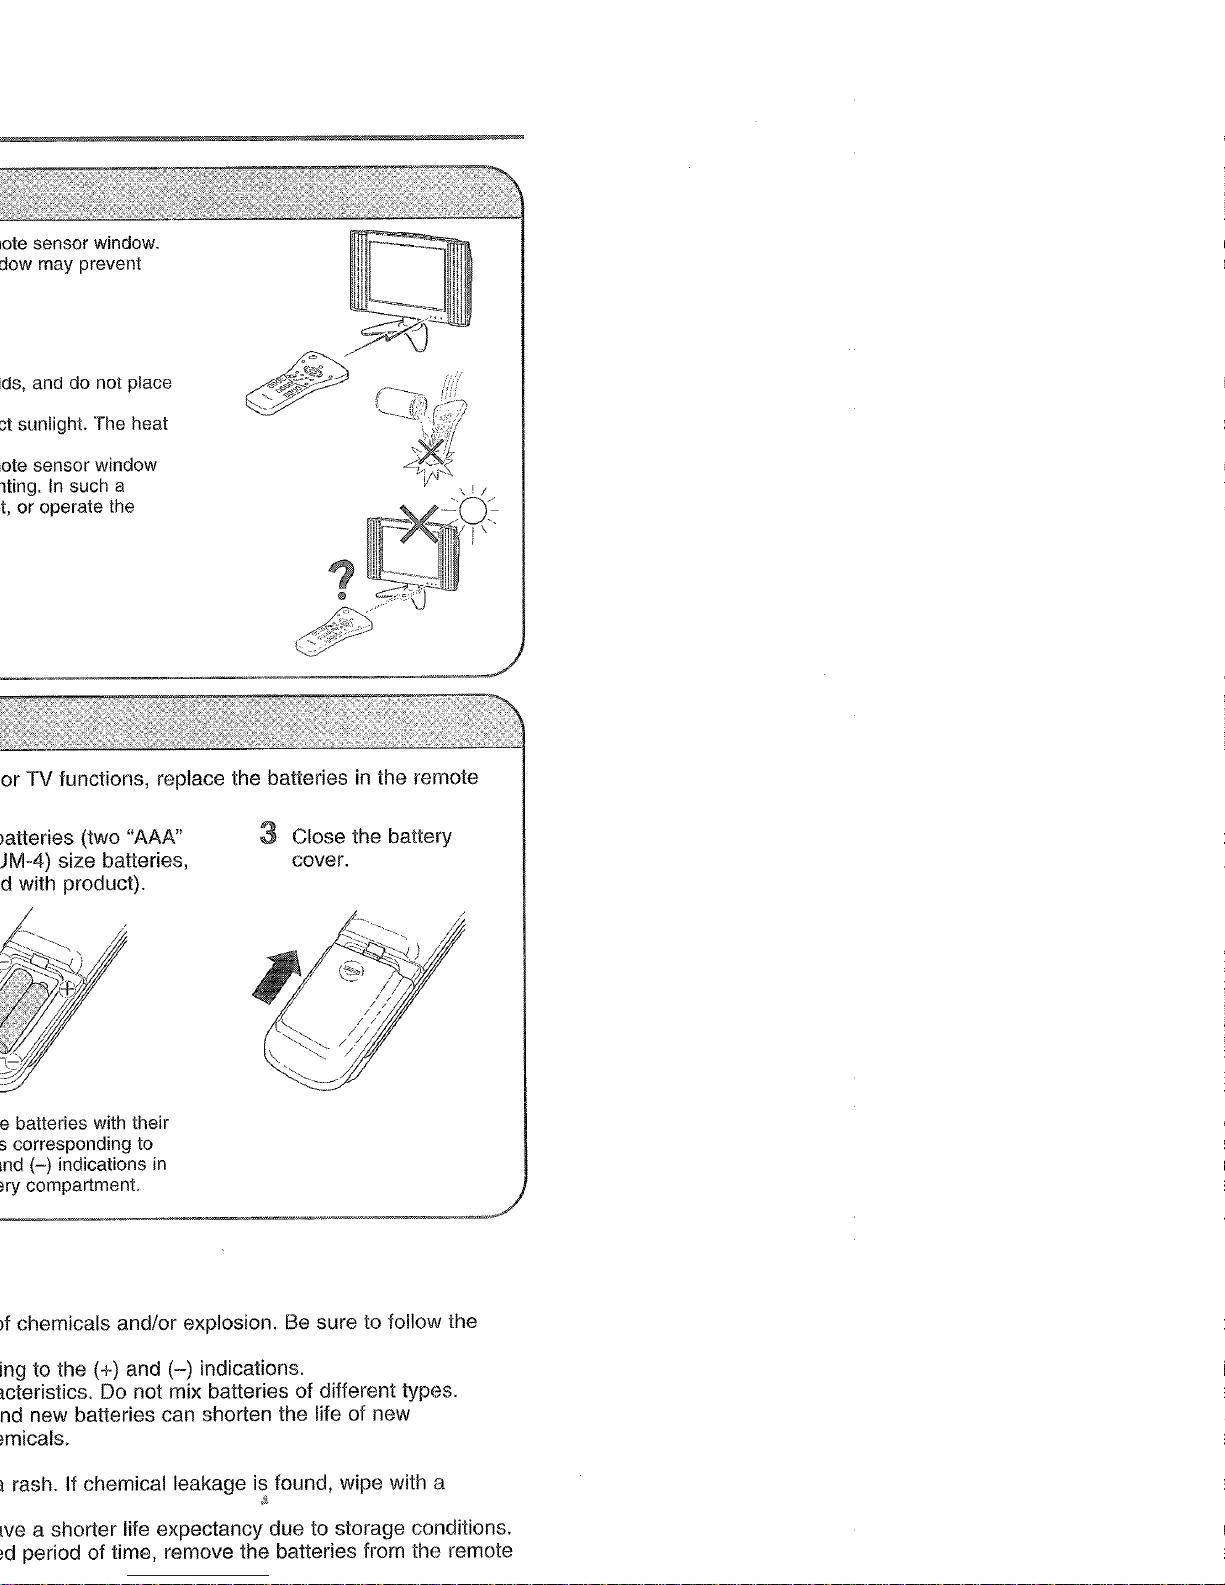
the remote
3 Close the battery
cover.
10
chemicals and/or explosion. Be sure to follow the
(-)
indications.
Page 10
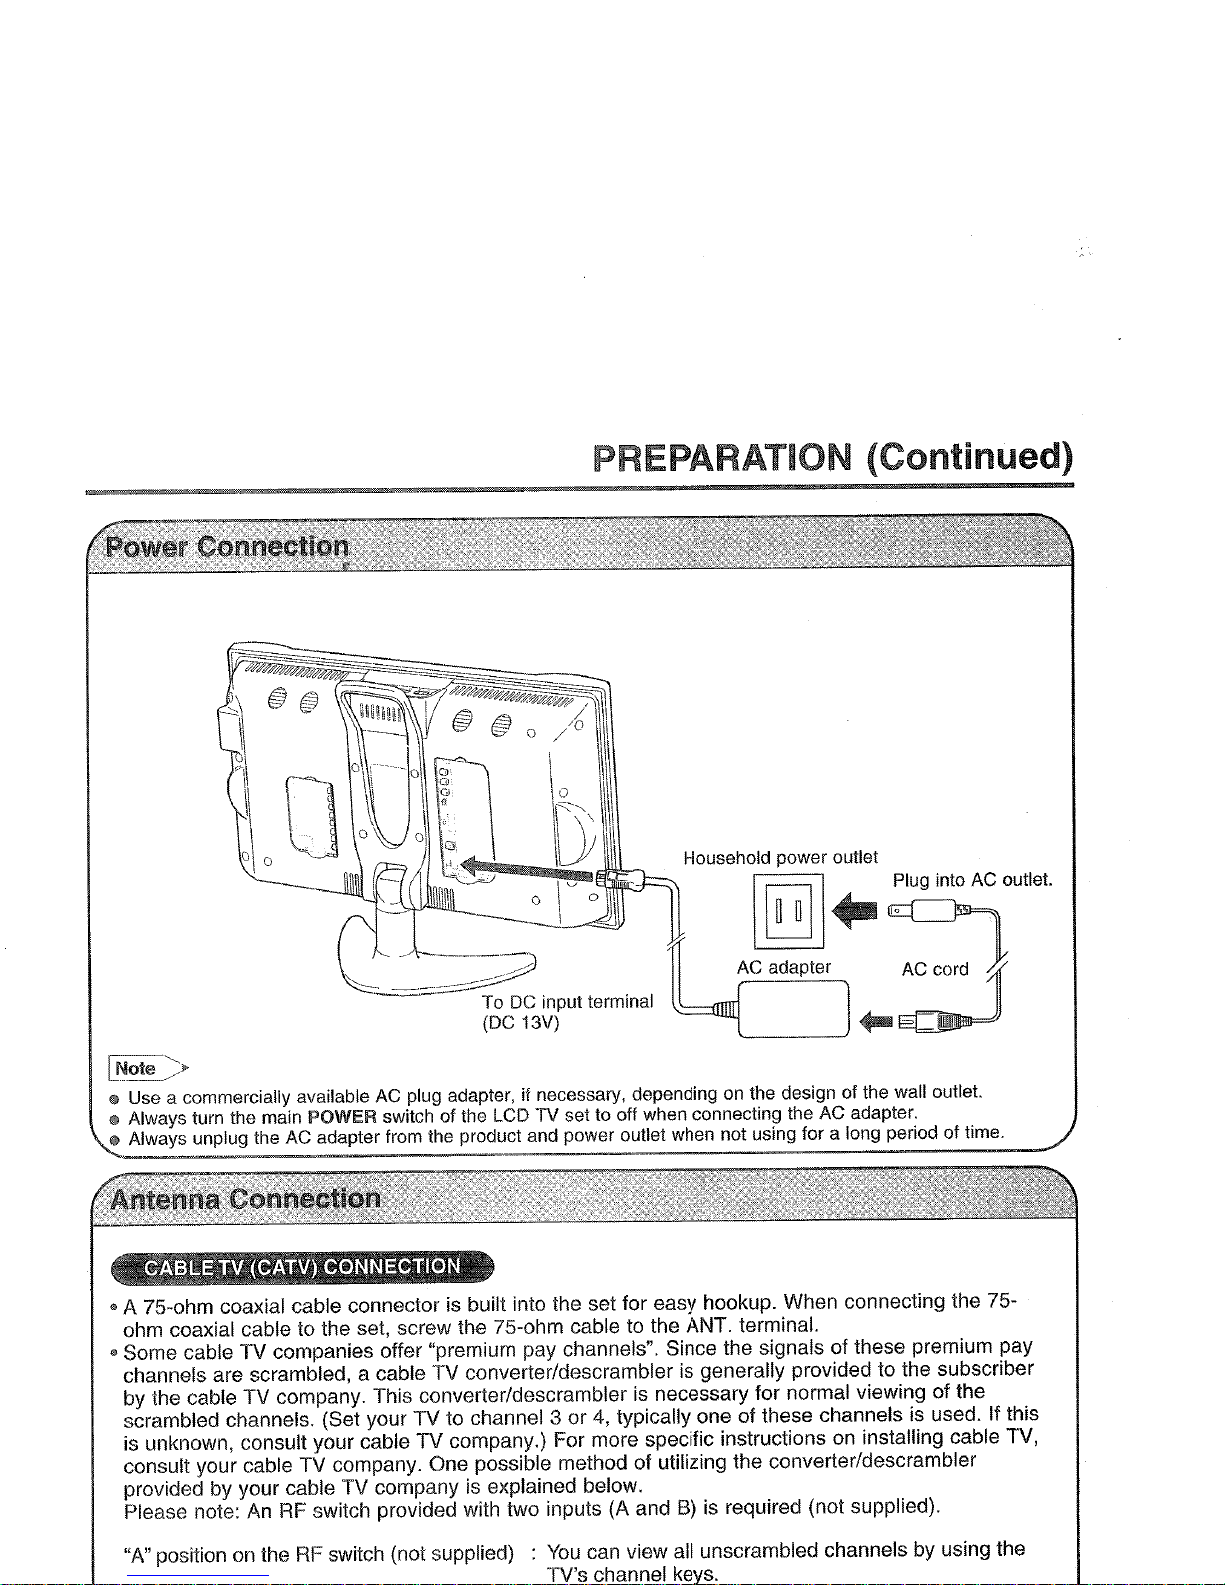
PREPARATION (Continued)
--
ToDCinput terminal
(DC 13V)
Household power outlet
II
~
0
II..
~I"g
Irno AC
omlet
\
'---1'lTnn
AC
adapt"
..
'3
[r,!~te
-=::fr
@ Use a commercially available AC plug adapter, if necessary, depending on the design of the wall
outlet
@ Always turn the main POWER switch of the LCD TV set to off when connecting the AC adapter.
@ Always unplug the AC adapter from the product and power outlet when not using for a long period of time.
G A 75-ohm coaxial cable connector is built into the set for easy hookup. When connecting the 75-
ohm coaxial cable to the set, screw the 75-ohm cable
to
the ANT. terminal.
"Some
cable TV companies offer "premium pay channels". Since the signals of these premium pay
channels are scrambled, a cable TV converter/descrambler is generally provided to the subscriber
by the cable TV company. This converter/descrambler is necessary for normal viewing of the
scrambled channels. (Set your TV to channel 3 or
4,
typically one of these channels is used. If this
is unknown, consult your cable TV company.) For more specific instructions
on
installing cable TV,
consult your cable TV company. One possible method of utilizing the converter/descrambler
provided by your cable TV company is explained below.
Please note:
An
RF
switch provided with two inputs (A and 8) is required (not supplied).
"A"
positionontheRFswitch (not supplied) :
You
can view all unscrambled channels by using the
TV's channel keys.
Page 11
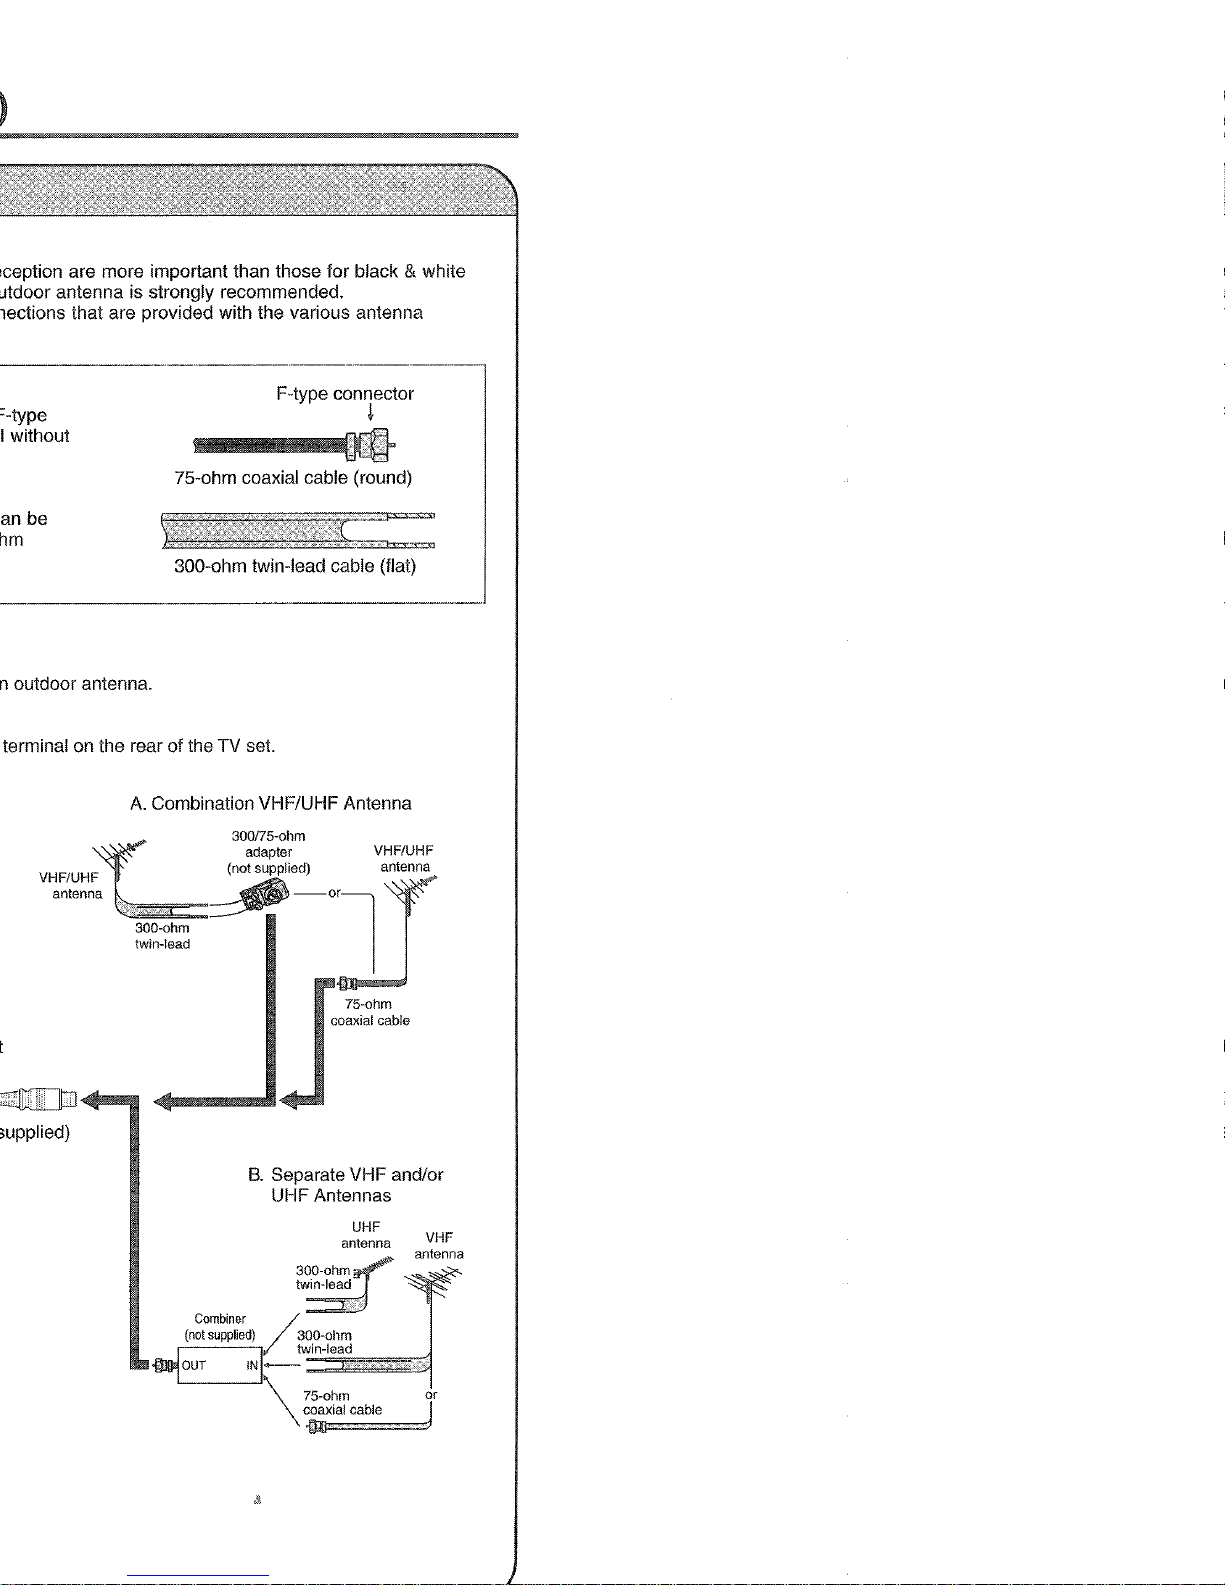
F-type connector
+
75-ohm coaxial cable (round)
300-ohm twin-lead cable (flat)
_
terminal on the rear of the TV set.
A.
Combination VHF/UHF Antenna
VHF/UHF
antenna
300-ohm
twin-lead
300/75-ohm
adapter
(not supplied)
VHF/UHF
antenna
75-ohm
coaxial cable
or
J
VHF
antenna
B.
Separate VHF and/or
UHF Antennas
UHF
antenna
Combiner
/j
(not
supplied)
300-ohm
~OUTINI~-t\~:in:-I~ea:id~~~~
\
~~~~~~~bl:
Page 12
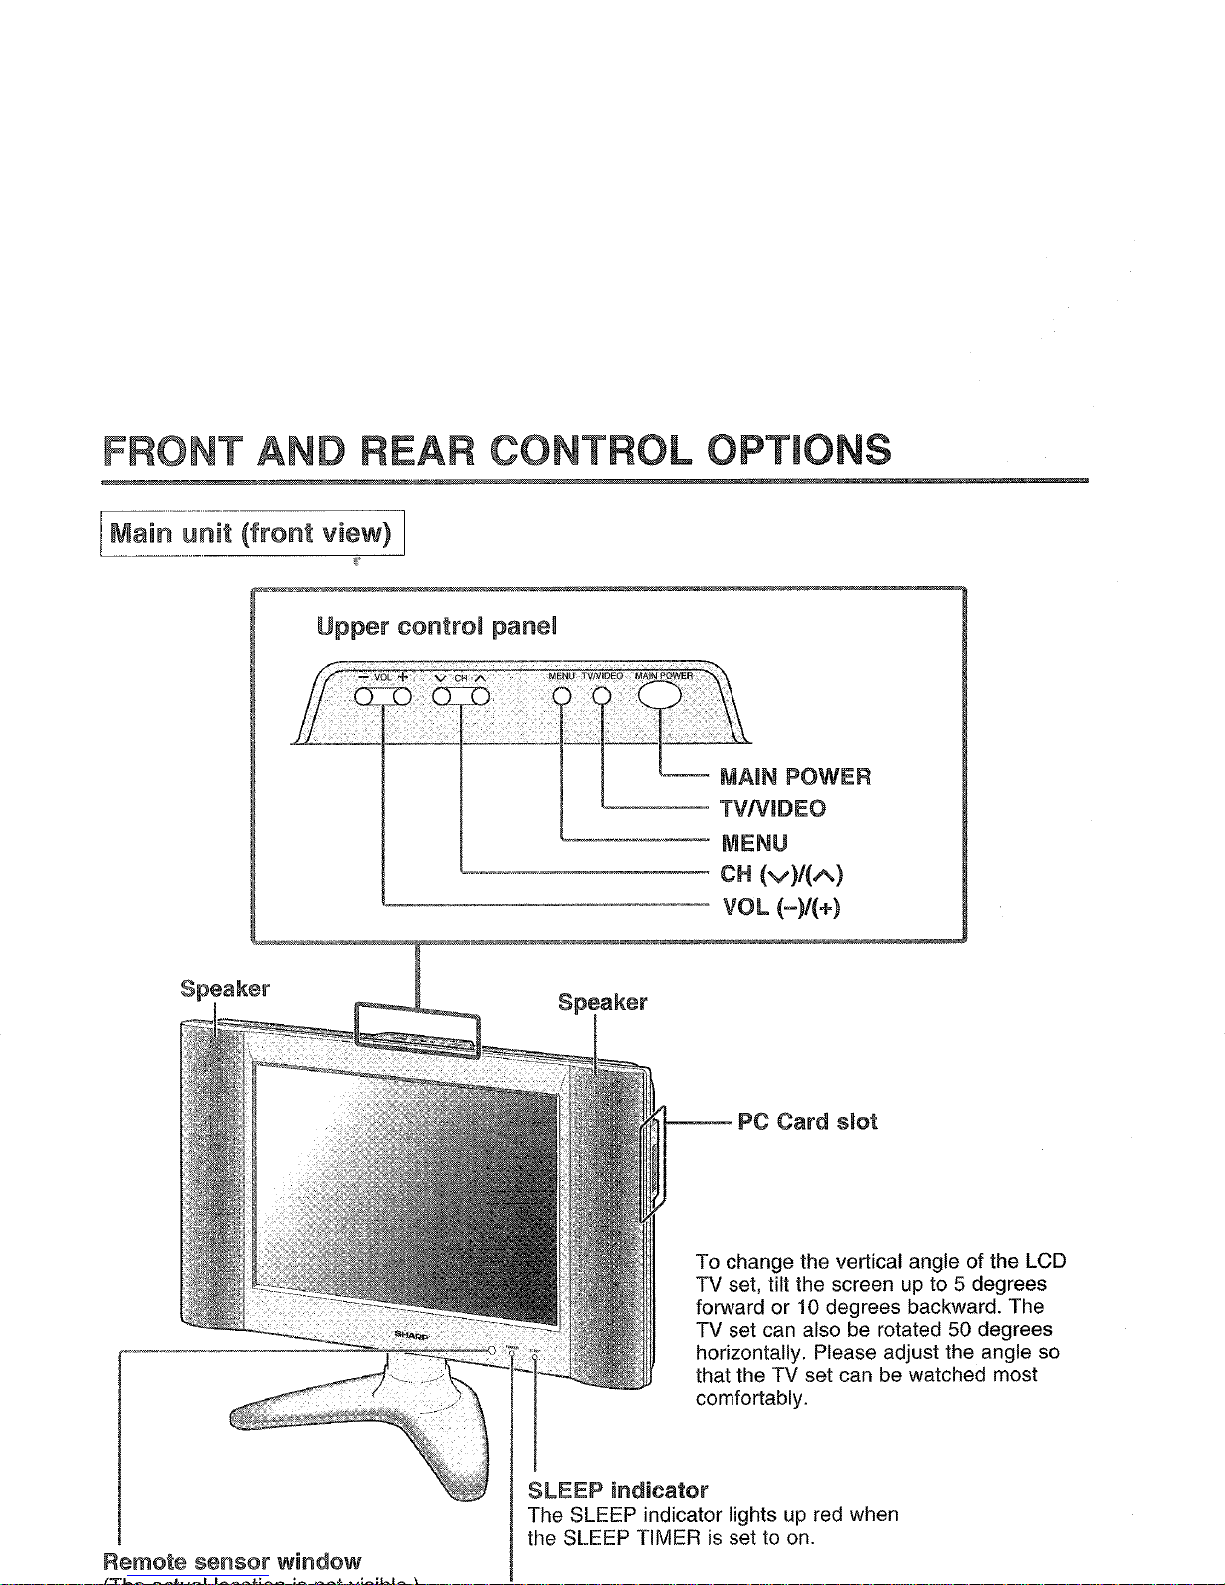
FRONT AND REAR CONTROL OPTIONS
Upper
control
panel
MAIN POWER
1...---
TVNIDEO
"---"-'"--~-
MENU
'--~".~"~--._----
CH
(V)/(A)
'---'-----------
VOL (-)/(+)
Remote
sensor
window
PC
Card
slot
To change the vertical angle of the LCD
TV set, tilt the screen
up
to 5 degrees
forward or 10 degrees backward. The
TV set can also be rotated 50 degrees
horizontally. Please adjust the angle so
that the TV set can be watched most
comfortably.
SLEEP
indicator
The SLEEP indicator lightsupred when
the SLEEP TIMER is set to on.
Page 13
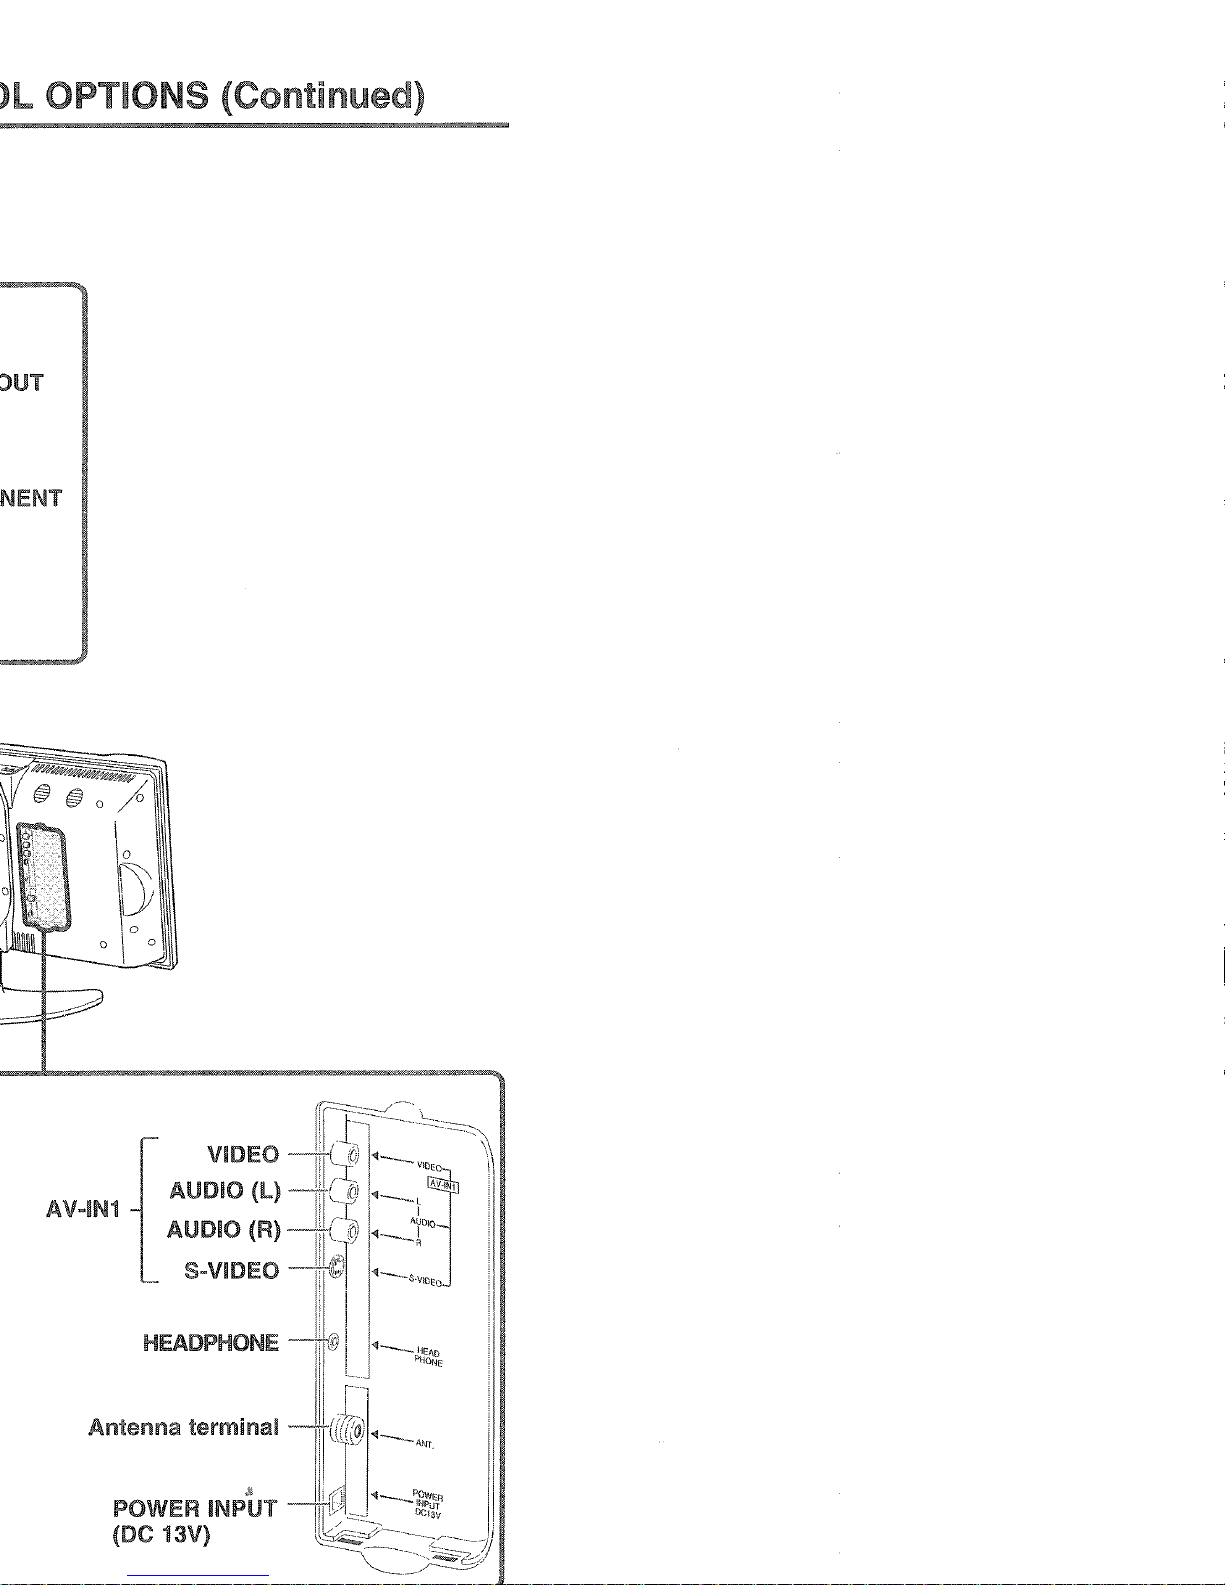
VIDEO
AUDIO
(l)
AUDIO (R)
S~VIDEO
HEADPHONE
Jj
POWER INPUT
(DC 13V)
Page 14
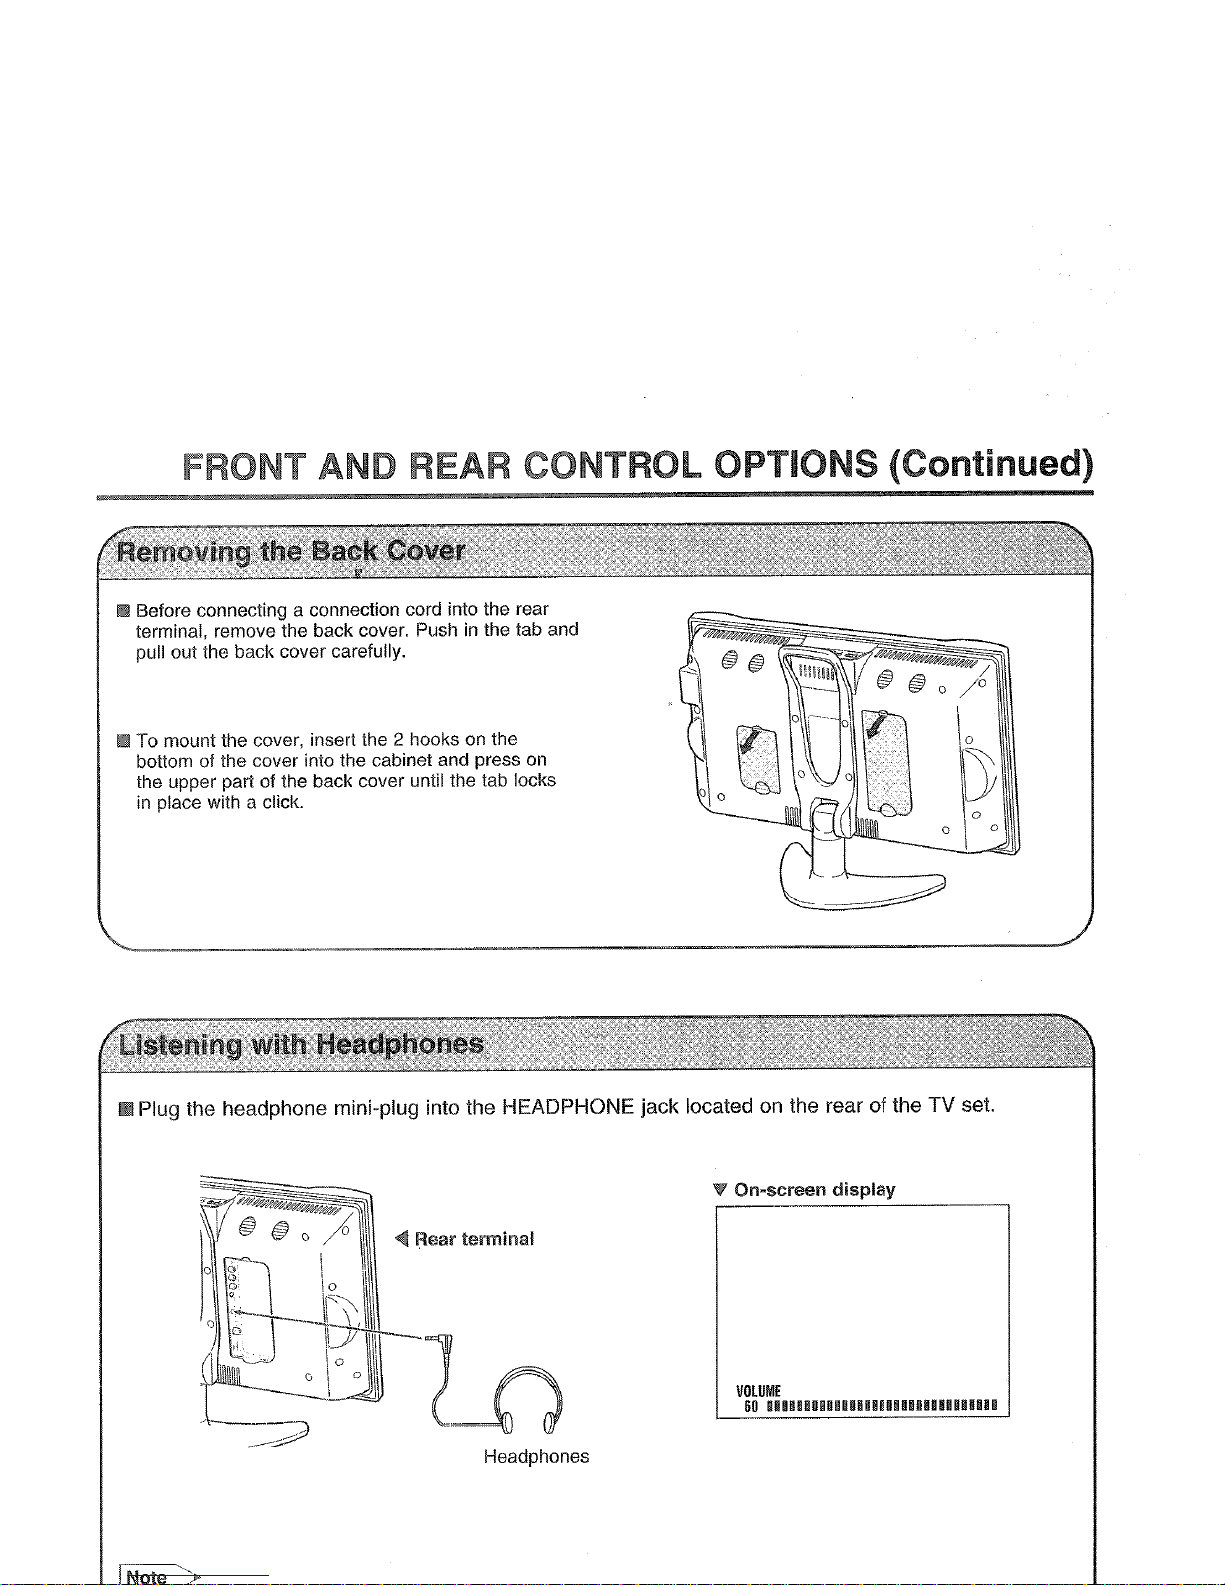
FRONT AND REAR CONTROL OPTIONS (Continued)
I!I!
Before connecting a connection cord into the rear
terminal, remove the back cover. Push
in
the tab and
pull out the back cover carefully.
I!I!
To mount the cover, insert the 2 hooks on the
bottom of the cover into the cabinet and press
on
the upper part of the back cover until the tab locks
in
place with a click.
mPlug the headphone mini-plug into the HEADPHONE jack located
on
the rear of the TV set.
Headphones
W On-screen
display
VOLUME
60
UIBUlilllRUUilllilllllIlUlllU
INote
.>
Page 15

/"--7--
ENTERI
A/T
1*(Cursor
control)
~~-
CARD*2
--TVNIDEO
-+--,-
MENU
--,--
flASHBACK*3
CH
(A)/(v)
rn
I{------
Channel Select
11001
*1
Displays the receiving
channel for
10 seconds.
*2Turns
on
CARD mode to play
back a memory card.
*3
Returns to the previous
channel.
*4
Selects audio settings.
in
the United States. For Brazil,
-,
system
User
setting
TVlVideo
(N358)
Not
required
ch
or
N/A
(N358)
Not
required or
N/A
--
(N358)
Set
color system
to
ch
PAL-M
(see
page
23)
(N358)
Set
color system
to
ch
PAL-N
(see
page
23)
,----
when the
color
systemissettoN358inTV
mode
and
Video
remove
flickering
and
color
bleeding.
Page 16
BASIC OPERATION (Continued)
MAIN POWER
POWER indicator
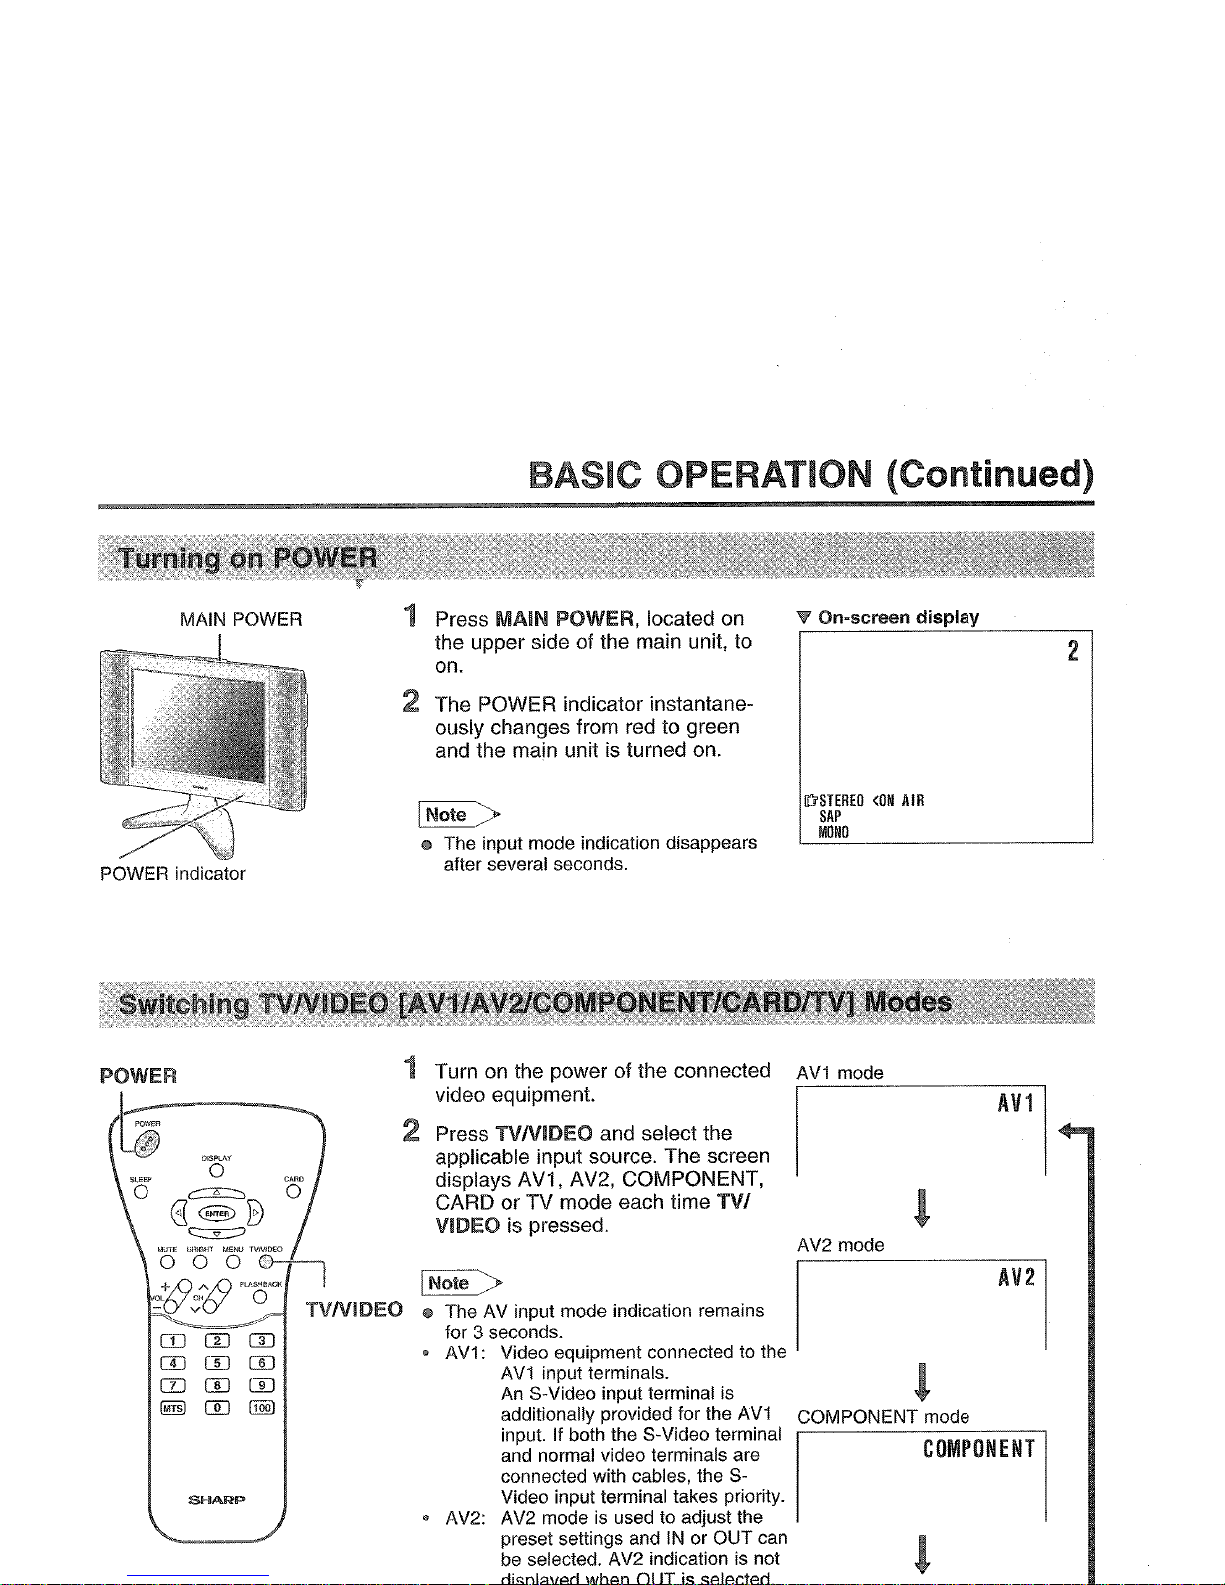
1 Press MAIN POWER, located on
the upper side of the main unit, to
on.
2 The POWER indicator instantane-
ously changes from red to green
and the main unit is turned on.
INote >
o The input mode indication disappears
after several seconds.
W'
On-screen
display
liiSTEREO
<ON
AIR
SAP
MONO
2
AV1
mode
AV2 mode
~
I
@ The AV input mode indication remains
for 3 seconds.
• AV1: Video equipment connected to the
AV1
input terminals.
An
S-Video input terminal is
additionally provided for the
AV1
COMPONENT mode
input. If both the S-Video terminal
I I
and normal video terminals are
COMPONENT
connected with cables, the SVideo input terminal takes priority.
• AV2: AV2 mode
is
used to adjust the
preset settings and
IN
or OUT can
be selected. AV2 indication is not
1 Turn
on
the power of the connected
video equipment.
2 Press TVNIDEO and select the
applicable input source. The screen
displays AV1, AV2, COMPONENT,
CARD or TV mode each time
TV!
VIDEO is pressed.
DOW
~
@E>B
~
OJ
m m
CD
rn rn
CD
CD CD
~
[[)
(j]Q]
POWER
Page 17
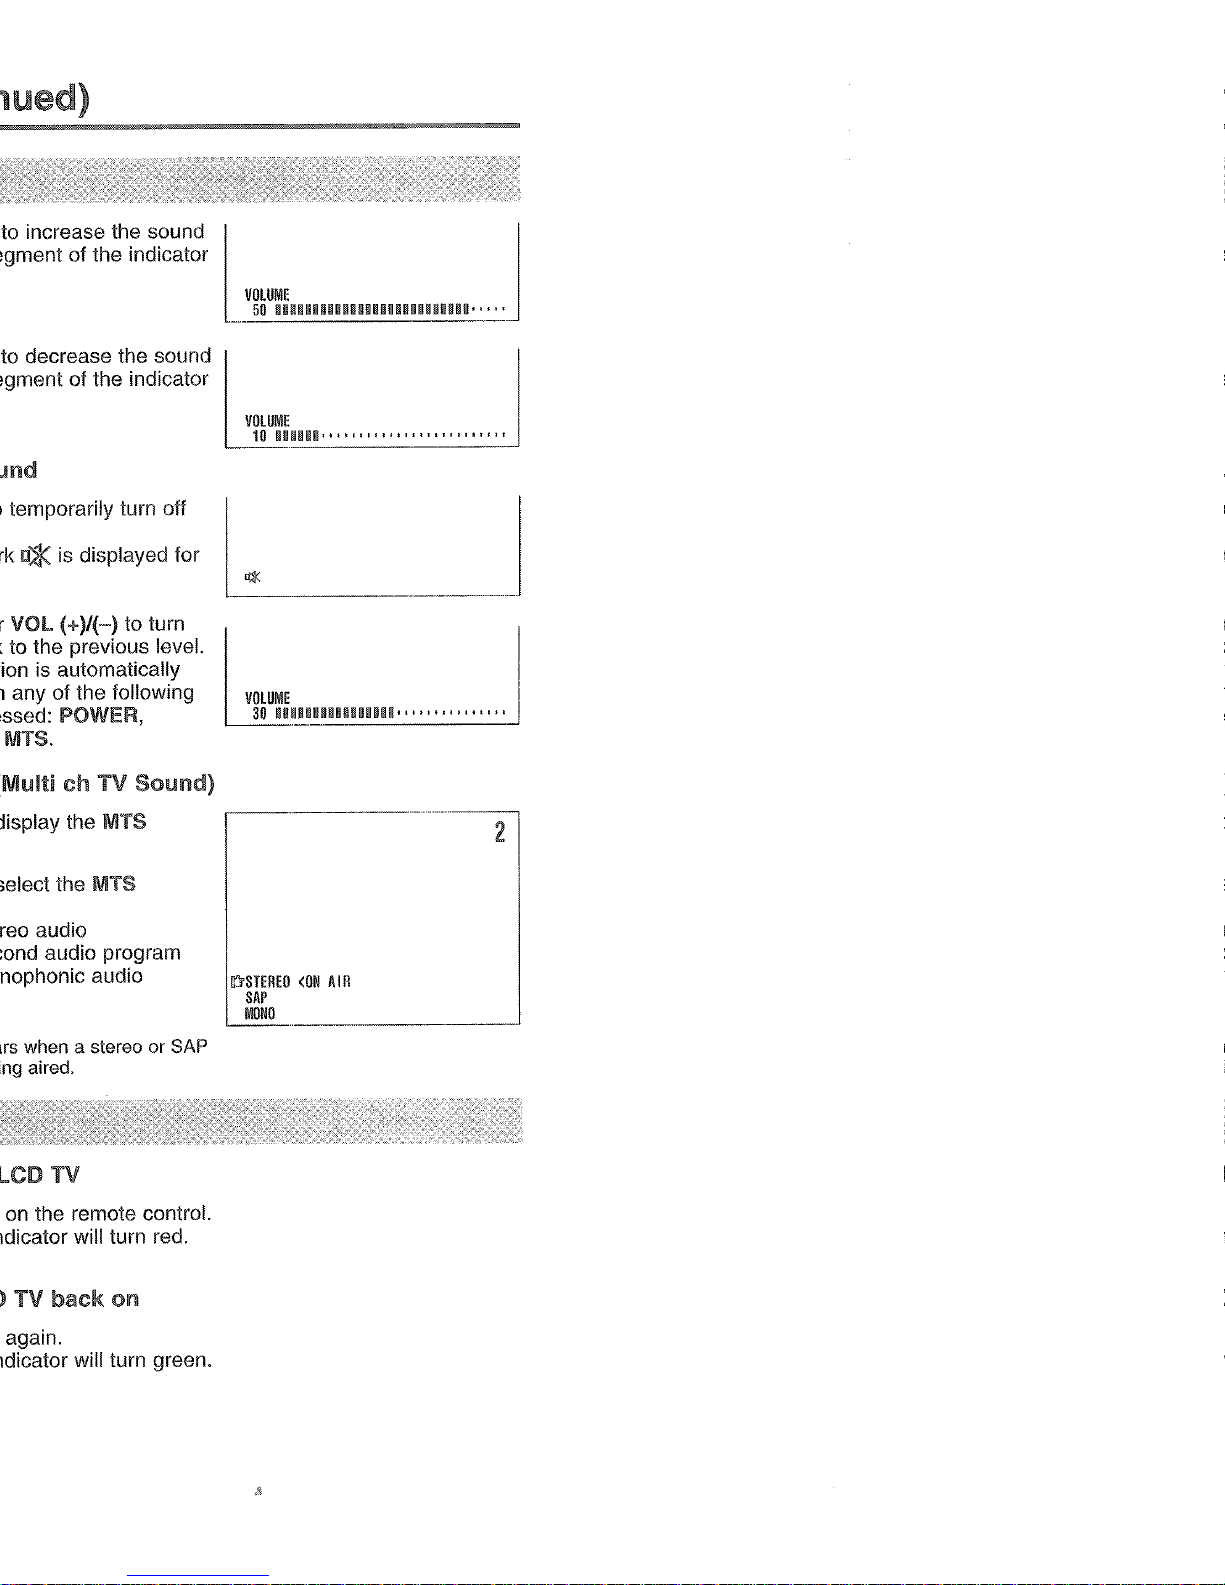
to decrease the sound
u:$(isdisplayed for
is
automatically
TV
on
the remote control.
red.
TV
back
on
'r.~
.J
2
It'rSTEREO
<ON
AIR
SAP
MONO
Page 18
BASIC OPERATION (Continued)
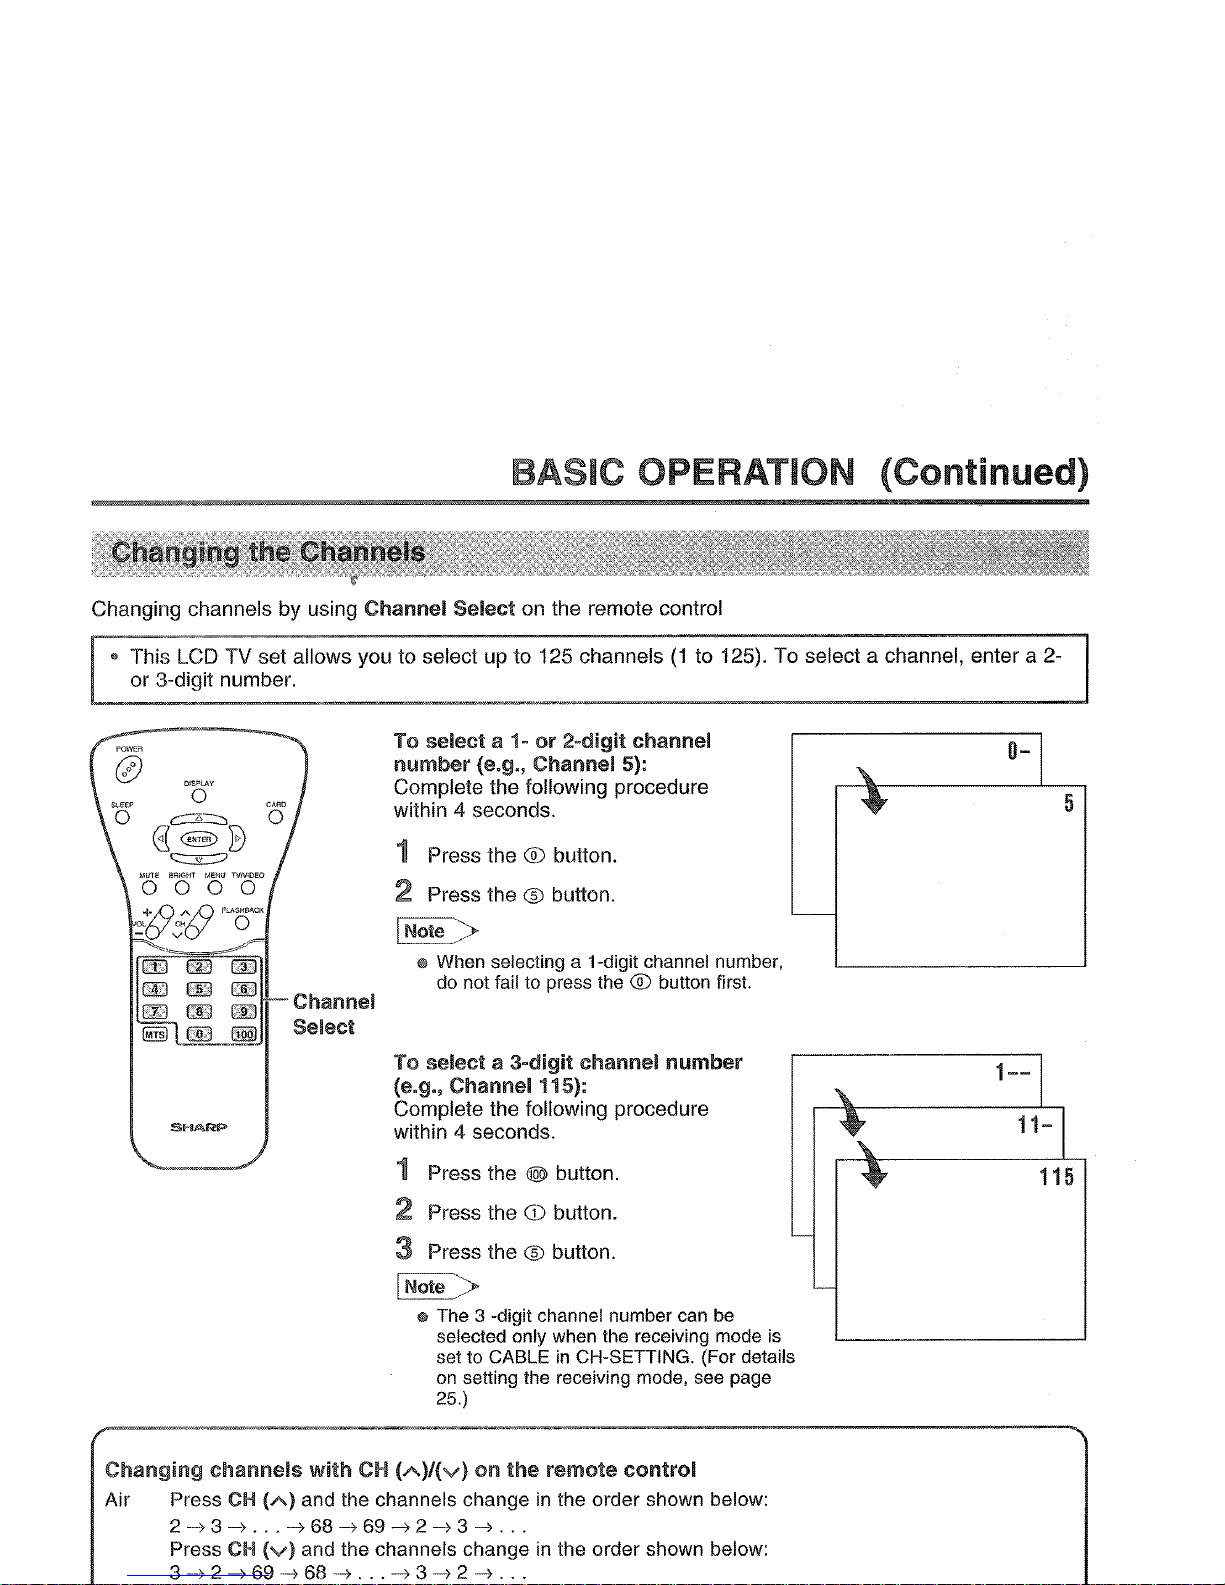
Changing channels by using
Channel
Select
on the remote control
is LCD TV set allows you to select up to 125 channels
(1
to 125). To select a channel, enter a 2-
3-digit number.
Channel
Select
To
select
a 1-or2-digit
channel
number
(e.g.,
Channel
5):
Complete the following procedure
within 4 seconds.
1 Press the ® button.
2 Press the ® button.
I
Note
:>
@
When
selecting a i-digit
channel
number,
do
not
failtopress
the®button
first.
To
selecta3-digit
channel
number
(e.g.,
Channel
115):
Complete the following procedure
within 4 seconds.
1 Press the @ button.
2 Press the
G)
button.
:3
Press the ® button.
I
Note_>
@
The
3 -digit
channel
number
can
be
selected
only
when
the
receiving
mode
is
settoCABLEinCH-SETTING.
(For details
on
setting
the
receiving
mode,
see
page
25.)
5
Changing
channels
with
CH
(A)/(V)
on
the
remote
control
Air Press
CH
(A)
and the channels changeinthe order shown below:
2-)3-)...-)68-)69-)2-)3 ->
...
Press
CH
(v)
and the channels changeinthe order shown below:
3
--)
2 -> 69
-->
68
--)
. . .-)3 -> 2-)...
Page 19

EXIT:.
SElECT:~
ENTER:*
(Page 19)
I!!ISLEEP
TIMER
@RETURN
In'
SLEEP
TIMER
1---
REMAI
NI
(Pages
22,
23)
@]VIDEO
AOJUST(TVI
0RETURN
In'
PICTURE
I
301>
TINT
I
01>
COLOR
I
01>
BLACK
LEVELIBI>
SHARFNESSI01>
OOLOR
SYSTEMIN3581'
RESET
SElECT:~
ENTER:*
EXIT:.
(Pages
20,
24)
..
_-
IlIIPRESET
0RETURN
In'
BRIGHTNESS
IBRIGHT]
AUTO
POWER
OFF
10FF
I
UPSIDE
I
NORMAL
I
RIGHTtLEFTINORMAL
I
_.
AV2
IN/OUT
liN
I
SELECT:~
ENTER:*
EXIT:.
Page 28)
IlIDCLOSEO
CAPTION
@RETURN
Ill'
MODE
10FF
I
DATA
IOH
1
I
'---
SELECT:~
ENTER:*
EXIT:.
(Pages 31-35)
INPUT
SECRET
NO,
'----,
- - - -
EXIT:.
(Pages 21, 25-27)
---
I!i!JSET
UP
0RETURN
Ill'
BLUE
SCREEN
10FFI
LANGUAGE
>
CR-SETTlNG>
S
SHECT:~
ENTER:*
EXIT:.
EXIT:.
on
be
selected.
in
the United
the
MENU
the
desired
ENTER.
Page 20

ADJUSTMENT
60
REMAIN
---
REMAIN
The SLEEP TIMER is turned off
when ---
is
displayed.
INote >
o The SLEEP TIMER screen automatically
disappears in 3 seconds.
MENU
You can set the SLEEP TIMER to automatically turn off the TV.
Directly
setting
the
SLEEP TIMER
1 Press SLEEP to display the SLEEP
TIMER screen.
2 Press SLEEP to set the sleep timer
(in minutes).
The time can
be
setinincrements
of 30 minutes andinthe range
between30and 120 minutes.
SHARP
Setting
the
SLEEP TIMERonthe
MENU screen
1 Press MENU to display the MENU
screen.
2 Press
A./T
to move the cursor to
SLEEP TIMER.
MENU
Il'i'~SLEEP
TIMER
I!!\!JV
IDEO
ADJUST
IlIDPRESET
IlIDCLOSED
CAPT
ION.
IIiIV-CHIP
BLOCK
~SET
UP
3 Press ENTER to display the
SLEEP TIMER screen, and press
ENTER.
4 Press
441
Jl>
to set the sleep timer
(in minutes) and press
ENTER.
The time canbesetinincrements
of 30 minutes and
in
the range
between 30 and 120 minutes.
~SLEEP
TIMER
@RETURN
Il'i'
SLEEP
TIMER
[---
REMAIN]
SELECT:O
ENTER:.
EXIT:.
Page 21

BRIGHTNESS
[BRIGHT]
3 seconds.
in
a dimly lit area)
the
BRIGHTNESS
em
the
to move the cursor to
MENU
~SLEEP
TIMER
·
~V
IDEO
ADJUST
•
lD'I!IDPRESET
•
~CLOSED
CAPTI
ON.
I\!lv-GHIPBLOCK
•
~SET
UP
•
SELECT:~
ENTER:.
EXIT:.
to move the cursor to
I!IDPRESET
GlRETURN
lD'
BRIGHTNESS
[BRIGHT]
AUTO
POWER
Off
[OFF
]
UPSIDE
[NORMAL]
RIGHT
/LEFT
[NORMAL]
AV2
IN/OUT
[
IN
]
SELECT:~
ENTER:.
EXIT:.
to change the setting,
I!IDPRESET
GlRETURN
lD'
BRIGHTNESS
[BRIGHT]
AUTO
POWER
OFF
[OFF
]
UPSIOE
[NORMAL]
RIGHT/LEFT
[NORMAL]
gAV2
IN/OUT
[
IN
]
Page 22

ADJUSTMENT
(Continued)
The language for the On-Screen Display can be ENGLISH, SPANISH or FRENCH.
1 Press MENU to display the MENU
screen.
2 Press
.AI?
to move the cursor to
SET UP, and press ENTER.
3 Press
.AI?
to move the cursor to
LANGUAGE, and press ENTER.
4 Press
.AI?
to select the lan-
guage.
5 Press MENU to return to the main
screen.
MENU
It'i'~SLEEP
TIMER
>
~V
IDEO
ADJUST
>
~PRESET
>
~CLDSED
CAPT
ION>
rmV-CHIP
BLOCK
•
I§JSET
UP
•
SELECT:~
ENTER:.
EXIT:"
MENU
~SlEEP
TIMER
>
~V
IDEO
ADJUST
>
~PRESET
>
I§JCLOSED
CAPT
ION.
rmV-CHIPBLOCK
It'i'I§JSET
UP
SELECT:~
ENTER:.
EXIT:"
I§JSET
UP
0RETURN
BLUE
SCREEN
[OFF]
It'i'
LANGUAGE
>
CH-SETTI
NG>
SELECT:~
ENTER:.
EXIT:"
LANGUAGE
It'i'
ENGl!
SH
EspAtioL
FRANCAIS
SElECT:~
EXIT:"
Page 23

to move the cursor to
MENU
Il'i'~SLEEP
TIMER
I!!1lV
IDEO
AOJUST
~PRESET
I!!!JCLOSEO
CAPT
I
ON~
Ii!IV-CHIPBLOCK
~
I!!!JSET
UP
~
SELEGT:~
ENTER:.
EXIT:.
MENU
~SLEEP
TIMER
•
Il'i'~V
IDEO
ADJUST
•
~PRESET
•
I!!!JCLOSEO
CAPT
ION.
IiiIV-CHIP
BLOCK
•
I!!!JSET
UP
SELECT:~
ENTER:.
EXIT:.
to move the cursor to
~VIOEO
AOJUST(TV)
ElRETURN
Il'i'
PICTURE
30j·
TINT
OJ.
COLOR
OJ.
BLACK
LEVEL
0
j~
SHARPNESS
[ 0
j.
COLOR
SYSTEM[N358
j.
RESET
SELECT:~
ENTER:.
EXIT:.
to change the setting.
ElRETURN
Il'i'
PICTURE
30
SELECT:~
AOJUST:~
EXIT:.
Page 24

ADJUSTMENT
(Continued)
TV mode
Selected item
Press
<Il.
Press
~.
,-
PICTURE Decrease contrast
<4-
-
...
Increase contrast
+
-,-
TINT Toward purple
m-.::;=-+---=.:;:
m
Toward green
COLOR Lower color intensity
.,.-
-
Higher color intensity
+
BLACK LEVEL Less bright
<4-
-
More bright
+
SHARPNESS
Soft picture
,
Sharp picture
<4-
-
+
COLOR SYSTEM
L N358
<Ho
PAL-M
<Ho
PAL-N
"']
AV mode
----",
--'-_0"
Selected item Press
<Il.
Press
~.
PICTURE
Decrease contrast Increase contrast
<4-
-
1--
+
TINT Toward purple
m-:;;=·---i---·-::;:-rn
Toward green
--
COLOR
Lower color intensity
<4-
-
Higher color intensity
+
BLACK LEVEL
Less bright More bright
<4-
-
----
+
SHARPNESS Soft picture
<4-
-
Hard picture
+
RED-BLUE
More red level
m
More blue level
<4-
-
+
GREEN Less green level
More green level.,.-
----.:
---
COLOR SYSTEM Press
<Ill
~
to select the COLOR SYSTEM.
L
N358
<Ho
N443
<Ho
PAL
<Ho
PAL-M
<Ho
PAL-N
<Ho
SECAM
<Ho
PAL60"']
!!II
When the COMPONENT mode is selected
L NTSC <....
PAL
"']
[[ote>
® TINT is displayed only when N358 or N443 is selected.
@
In
BLUE SCREEN, VIDEO ADJUST displayedinmagenta cannot be selected.
® Selecting RESET will return all settings to the factory settings.
@ This product
is
factory settocomply with the color systeminthe United States (NTSC-N358). For Brazil (PAL-M),
Page 25

MENU
ENTER
~SLEEP
TIMER
~VIDEO
ADJUST
Il"r~PRESET
~CLOSED
CAPT
ION.
IiiJV-CHIPBLOCK
.
~SET
UP
~PRESET
0RETURN
Il"r
BRIGHTNESS
[BRIGHT]
AUTO
POWER
OFF
[OFF
]
UPSIDE
[NORMAL]
RIGHT/LEFT
[NORMAL]
AV2
IN/OUT
[
IN
J
SELECT
:E!Gil
ENTER:"
EXIT:.
..
_._---
~PRESET
0RETURN
Il"r
BRIGHTNESS
[BRIGHT]
AUTO
POWER
OFF
[OFF
]
UPSIDE
[NORMAL]
RIGHTIlEFT
[NORMAL]
AV2
IN/OUT
[
IN
]
ADJUST:@
ENTER:"
EXIT:_1J
-+
Suitable for viewingina well-lit area.
Saves energy.
-+
Sufficiently bright when
viewing
in
a dimly lit area.
LCD
TV setisturned off when there
is
no signal for 5
minutes_
is
inactive.
-+
To
display images
upside down for special uses.
-+
To
display mirror
images for special
uses.
is
selected, Output volume is fixed, Speaker
output
is
available.
"*
]Line Output
is
selected, Output volumeisvariable,
Speaker output is Mute.
in
SOUND SETTING
Page 26

ADJUSTMENT (Continued)
IIIlI!
CHANNEL SETTING
It is necessary to set the receiving mode to
AIR
or CABLE channels to receive locally broadcast TV
programs.
1 Press MENU to display the MENU
screen.
2 Press
4l'wqr
to move the cursor to
SET
UP,
and press ENTER.
3 Press
4/T
to move the cursor to
CH-SETIING, and press ENTER.
4 Press
4/T
to move the cursor to
AIR/CABLE, and press ENTER.
5 Press
4/T
to move the cursor to
the desired mode.
6 Press MENU to return to the main
screen.
MENU
flmSLEEP
TIMER
!!mVIDED
ADJUST
~PRESET
!!mCLOSED
CAPT
ION.
I!!lY-CHIPBLOCK
It)~SET
UP
SELECT:~
ENTER:.
EXIT:"
~SET
UP
WlRETURN
BLUE
SCREEN
[OFF]
LANGUAGE
•
It)
CH-SETTI
NG.
SELECT:~
ENTER:.
EXIT:"
CH-SETTING
WlRETURN
It)AIR/CABLE.
CH
SEARCH.
CH
MEMORY.
SELECT:~
ENTER:.
EXIT:"
AIR/CABlE
It)
AIR
CABLE
Page 27

EXIT:G
CH
SEARCH
AIR
2
START:tiiQli>
CM-SETTING
@RETURN
AI
R/CABLE.
IlJ
CH
SEARCH-
CH
MEMORY.
in
<II.
CH
A./V
to move the
UP,
and press
CH
MEMORY
AIR
2
CH
MEMORY
AIR
2
TO
ADD:E,@J
EXIT:G
~
add
channel
21~
erase
channel
2
to
the TV
memOlYtoth"TVmemory
r----
.
--
"1!1
to erase
from
TV
memory
CM-SETTING
A.f?'
to move the
@RETURN
UP,
and press
~~R,~m~:
CM
MEMORY·
L-TO_E_RA_S_E:-=@=::·,
._E_X_IT-=:G"'·,'-'
Page 28

ADJUSTMENT (Continued)
III BLUE SCREEN
Automatically turns the screen blue if a broadcast signal is not received.
SHARP
1 Press MENU to display the MENU
screen.
2 Press
,AfT
to move the cursor to
SET UP, and press ENTER.
3
Press,AfT
to move the cursor
to BLUE SCREEN, and press
ENTER.
4 Press
~f
~
to select ON or OFF,
and press ENTER.
5 Press MENU to return to the main
screen.
MENU
~SLEEP
TIMER
l!!!IV
IDEO
ADJUST
~PRESET
•
I!i!iICLOSEO
CAPT
ION.
I!!lV-CHIPBLOCK
•
Il'i'I\iiISET
UP
•
SELECT:@
ENTER:.
EXIT:.
I\iilSET
UP
(,llRETURN
Il'i'
BLUE
SCREEN
[OFF]
LANGUAGE
•
CH-SETTING.
SELECT:@
ENTER:.
EXIT:.
I\iilSET
UP
(,llRETURN
Il'i'
BLUE
SCREEN
[ON
]
LANGUAGE
•
CH-SETTING.
ADJUST:@
ENTER:.
EXIT:.
INote >
@ When received signals are weak or interfered with by some other signals, the BLUE SCREEN function may be
activated. To watch the TV under such conditions, set BLUE SCREEN
to
OFF.
@ When the AV-IN1, AV-IN2 or COMPONENT input mode is selected, if no signal is being input, the BLUE SCREEN
function is activated. .
Page 29

is
'~"
and CH2.
MENU
~SlEEP
TIMER
>
~V
IDEO
ADJUST
~PRESET
It'r~CLOSED
CAPTION.
I!!IV-CHIP
BLOCK
•
~SET
UP
SElECT:O
ENTER:.
~ClOSED
CAPTION
0RETURN
It'r
MODE
IDFF
DATA
ICH
1
EXIT:W
SElECT:O
ENTER:.
EXIT:®:iP
~ClOSED
CAPTION
It'r
0~5~~R~CAPTlONl
DATA
ICH
1 1
t j
[Qj1:J
ADJUST:ii\2D
ENTER:.
EXIT:W
OFF.
Page 30

ADJUSTMENT (Continued)
III
V~CHIP
o This function allows TV programs to be restricted and TV usage to be controlled based on FCC data. It prevents
children from watching violent
or
sexual scenes that may be harmful.
• Restriction of TV programs includes two ratings that contain information about the program: the MPAA rating and
the TV Parental Guidelines. The MPAA rating is restricted by age. TV Parental Guidelines are restricted by age
and content.
o Since a TV program may use either the MPAA rating
or
the TV Guidelines, both should be adjusted for complete
control.
[1]
MPAA
RATING
-
RATING
G
GENERAL AUDIENCES. All ages admitted.
."
PG
PARENTAL GUIDANCE SUGGESTED. Some material may not be suitable for children.
age
PG-13
PARENTAL STRONGLY CAUTIONED. Some material may be inappropriate for children under 13.
base R
RESTRICTED. Under 17 requires accompanying parent or adult guardian.
NC-17
NO ONE 17 AND UNDER ADMITTED.
X
X is an older rating that is unified with NC-17 but may be encoded
in
the data of older movies.
~-
MPAA
RATING
(examples)
Example 1:
PG-13 in the age-based rating is
blocked, this will also automatically
block the higher ratings
R,
NC-17
andX.
1. User setting
2.
Blocktable
G
I
G
notto
block
PG
notto
block
BLOCK
Select
PG·13
age
block
R BLOCK
base
autoblock
NC-17 BLOCK
autoblock
X BLOCK
autoblock
Example
2:
R in the age-based rating is
blocked, this will also automatically
block the higher ratings NC-17 and
X.
INote
>.
1.
Usersetting
G
PC
PG-13
R BLOCK
NC-17
BLOCK
X BLOCK
2.
Blocktable
i G
::~~
II
" PG
not
to
block
age
I--
P-G-_1-3
-l
~:::~~
base
Select
block
autoblock
autoblock
Page 31

¢::::
content base
~
0
(Violence) (Sexual (Adult (Sexually
Dialog)
jgj jgj jgj jgj
jgj
jgj jgj jgj
--
f-------
-_
..
jgj jgj jgj jgj
X X X X
..
__
..
_--
X X X
X
X
X
X
._
Page 32

ADJUSTMENT (Continued)
III SETTING
VmCHIP
[1]
MPAA
RATING
1 Press MENU to display the MENU
screen.
2 Press
£I?
to move the cursor
to V-CHIP BLOCK, and press
ENTER.
3 INPUT SECRET NO. will be
displayed. Input the 4-digit
secret number by using the
channel select keys.
4 Press
£I?
to move the cursor to
MPAA, and press ENTER.
MENU
ItJI!PlSLEEP
TIMER
~V
IDEO
AOJUST
~PRESET
~CLOSED
CAPT
I
ON~
It!IV-CHIPBLOCK
~
~SET
UP
I>
MENU
I!PlSLEEP
TIMER
~V
IDEO
ADJUST
~PRESET
~CLOSED
CAPT
ION-
ItJIt!IV-CHIP
BLOCK
-
Ii!!ISET
UP
-
I
NPUT
SECRET
NO.
It!IV-CHIPBLOCK
GlRETURN
ItJ
MPAA
-
TVOUI
DELI
NES-
STATUS
[OFF]
SELECT:~
ENTER:.
EXIT:.
5
Press
£I?
to move the cursor to
MPAA
PG, and press ENTER.
IiOlRETURN
0
[-----[
ItJ
PO
[-----1
PO-13
[-----1
R
[-----1
NC-17
[-----1
Page 33

Ii!lHHIP
BLOCK
~RETURN
MPAA
"
!J'1
TVGUI
OELI
NES-
STATUS
[OFF]
SELECT:O
ENTER:.
EXIT:.
TV
GUiDEliNES
~RETURN
TV-Y
[
-----]
!J'1
TV-Y7
[-----]
TV-G
[-----]
TV-PG
[-----]
TV-14
[-----]
THIA
[-----]
BLOCK
CONTENT"
[
]
SELECT:O
ENTER:.
EXIT:.
._--_
..
_._._
...
-
TV
GUIDELINES
~RETURN
TV-Y
[
-----]
!J'1
TH7
[BLOCK]
TV-G[BLOCK]
In
addition,
TV-PG
[BLOCK]
TV-14
[BLOCK]
in
CONTENT
TV-MA
[BLOCK]
BLOCK
CONTENT'
[0
L SV
FV]
AOJUST:O
ENTER:E8
EXIT:.
Page 34

ADJUSTMENT (Continued)
• Setting BLOCK CONTENT
1 Repeat steps 1 to 3 of [1] MPAA
RATING.
2 Press
AI'''
to move the cursor to
TV GUIDELINES, and press
ENTER.
3 Press
AI'"
to move the cursor to
BLOCK CONTENT, and press
ENTER.
SHARP
4 Press
AI'"
to move the cursor to
the desired item, and press
ENTER.
5
Press"
~
to select BLOCK or
----- (unblock), and press ENTER.
6 Press MENU to return to the
main screen.
fliIHHIP
BLOCK
@RETURN
MPAA
Il"r
TV
GUIDELINES'
STATUS
[OFF]
SELECT:~
ENTER:,-
EXIT:.
TV
GUIDELINES
@RETURN
TV-Y
[-----J
TV-Y7
[-----]
TV-G[-----
J
THG
[-----]
TV-14
[-----
J
TV-MA
[-----]
Il"r
BLOCK
CONTENT'
[ J
SELECT:~
ENTER:,-
EXIT:.
BLOCK
CONTENT
@RETURN
D
[-----
J
Il"r
l
[-----]
S [-----J
v [-----J
FV
[-----J
SELECT:~
ENTER:,-
EXIT:.
BLOCK
CONTENT
@RETURN
D
[-----]
Il"r
l
[BLOCK]
S [-----J
v [-----J
FV
[-----
J
Page 35

I
NPUT
SECRET
NO.
o1 2 3
MENU
IJ'1~SlEEP
TIMER
I!IDVIOED
ADJUST
I!!IDPREm
~ClDSED
CAPT
ION.
mlV-CHIP
BLOCK
•
~m
UP
MENU
~SlEEP
TIMER
I!IDV
IDEO
ADJUST
I!!IDPREm
~ClOSED
CAPT
ION.
IJ'1m1V-CHIP
BLOCK
•
~SET
UP
•
NO.
will
be
on
the screen.)
ENTER:.
EXIT:.
TV-Y
I
NPUT
SECRET
NO.
V-CHIP
HAS
BEEN
ACTIVATED
V-
is
temporarily
an
incorrect
NO.
IS
is
displayed.Inthis
WHilE
V-CHIP BLOCK IS ACTIVATED
Page 36

ADJUSTMENT (Continued)
EXIT:.
INPUT
SECRET
NO.
INPUT
SEcmNO.
Repeat steps 1 to 3 of [1] MPAA
RATING, then INPUT SECRET
NO.
willbedisplayed.
2 Input the 4-digit secret number by
using the channel select keys; the
Channel V-CHIP select mode will
be
Select displayed. Set V-CHIP BLOCK
again.
OIO"'Y
c::::=c::::::,
E(<§VB
c::::::=:::::::
[5] CHANGiNG THE V-CHiP BLOCK SETTiNGS
1
SHARP
EXIT:.
[6] CHANGiNG OR CLEARiNG THE SECRET NUMBER
If you forget the secret number, clear the secret number as follows.
Upper control panel
1 Repeat steps 1 to 3 of [1] MPAA
of the main unit
RATING, or 1 to 2 of [4]
CANCELING THE V-CHIP
v
CH
A
MENU
BLOCK SCREEN WHILE V-CHIP
~._--
BLOCK IS ACTIVATED, then
INPUT SECRET
NO.
will
be
displayed.
CH(A)
2 Press and hold both
CH
(A)
and
VOL
(+)
VOL (+)onthe TV set simultane-
MENU
ously until the message INPUT
SECRET
NO.
blinks.
3
Press MENU to exit.
Page 37

the memory card using a digital camera or
in
CARD mode.
AG
of Germany.
PC
card adapter
(commercially available)
CompactFlash
o
Memory Stick
PC
card adapter (commercially available)
Page 38

MEMORY CARD PLAYBACK
(Continued)
Card Precautions
III Precautiol1s 011 Handling
Follow the precautions given below when handling the memory cards and PC card adapter as failure to
do so may result
in
damage to data or malfunction.
® Playback of images stored
on
memory cards other than those listedinthe tableonpage 36 is
not guaranteed.
® Read the operation manuals for both the memory card and PC card adapter carefully as there
may be restrictions
on
PC
card adapter operations regarding memory card storage capacity.
® For details
on
the proper storage and handling of the memory card and PC card adapter being
used, refer to the operation manuals supplied with both products.
® It may not be possible
in
some cases to play back images which have been created, modified,
copied or otherwise edited using a PC.
® Always turn the LCD TV off before inserting or removing the
PC
card adapter or memory card
loaded
in
the
PC
card adapter.
® Never turn off the LCD TV during memory card operations (such as when ACCESSING DATA is
displayed or during a SLIDE SHOW playback) as this may result
in
loss of data recorded on the
memory card.
® During CARD mode, do not subject the system to vibration or shock of impact, and never
remove the
PC
card adapter or memory card loadedinthe
PC
card adapter as this may result
in
loss of data recordedonthe memory card.
® Do not bend, drop or subject the memory card or PC card adapter to shock of impact.
®
Do
not store the memory card or
PC
card adapterinhot, humid locations or locations subject to
direct sunlight.
® Avoid use and storage
inanenvironment where strong static electricity or electrical noise is
generated.
® Do not disassemble or modify the memory card or
PC
card adapter.
III
Storil1g data
Recorded data may be lostinthe following cases. Sharp bears absolutely no responsibility for
recorded data that may be lost.
Data may be lost
IF:
* The user or third party uses the memory card incorrectly.
* The memory card is subjected to the adverse effects of static electricity or electrical noise.
* The PC card adapter or a memory card loaded
inaPC
card adapter is pluggedinor unplugged
while the power is turned on.
* The LCD TV is turned off during memory card operations (such as when ACCESSING DATA is
displayed or during a SLIDE SHOW playback).
We
recommend that valuable data be backed up by copying to another media (such as MO disk,
floppy disk, or hard disk) before accessing that image data with this system.
Page 39

on
which
to
turn off the LCD
or unplugging the
PC
PC
card
PC
card adapter,
in
the column below.)
PC
card adapter
PC
card adapter.
* Example of inserting a
memory card into a PC
card adapter.
Cutout
* Insert the
PC
card adapter
correctly in the direction
shown by the arrow.
* Be sure to insert the card
straight.
Card release lever
PCCmd<
Page 40

MEMORY CARD PLAYBACK
(Continued)
ACCESSING DATA is displayed on
the screen.
After data from the card is loaded,
CARD is displayed on the screen.
~
(}
After purchasing the LCD TV, CARD
playback mode is set as the factory
settings. The next time the card is
played back, the image is displayed
in the last playback mode.
II!
INDEX MODE
Press POWER to turn on the LCD
TV.
2 Press CARD to change to CARD
mode.
3 Press CARD to select a playback
mode. Each time CARD is pressed,
the playback mode changes as
follows.
II!
CARD
Images on the card are displayed
one by one
in
full-screen, and the
next and previous images can be
displayed
by
selecting with
~/~.
II!
SLIDE SHOW
Images are automatically displayed
in sequence, one by one.
The display interval for each image
can be selected from:
5SEC,
i0SEC,
iMIN,
i5MIN,
or
GOMIN
'----+-
Channel
Select
SHARP
Page 41

to select the desired
~
cycles images
<4
in
reverse sequence.
ACCESSING
DATA
in
sequence, one by
45.)
ON
is
is
Page 42

MEMORY CARD PLAYBACK
(Continued)
w
III INDEX plElyback
mode
it is possible to display nine images at a time.
Selection marker (yellow)
2 Select
an
image using
AI'"
1<41
~,
and press
ENTER
Only the
selected image is displayed
on
the
screen
in
CARD playback mode.
1 Press CARD to switch to INDEX
MODE.
Nine images are displayed
on
the
screen at a time.
I-Note-~>
@ The DISPLAY button does not function on the INDEX MODE screen.
@ In INDEX MODE, the contents displayed differ as described below depending on the ORDER TO SHOW setting made
for SLIDE SHOW playback mode.
NORMAURANDOM: All image files on the memory card are displayed nine at a time.
MY PROGRAM: Only images registered for
SET
PROGRAM are displayed.
Page Forwarding
1 Press
~
to move the selection
marker to the image
on
the right
side.
2 Press
~
to move the selection
marker to the triangular mark
I>
on
the right end of the screen.
The triangular mark
I>
turns yellow.
Page 43

to
make
various
settings
suchasSLIDE
SHOW,
MY
the
desired
itembyfollowing
the
steps
below
and
mode.
(see
page
39)
display
the
MENU
screen.
move
the
cursortoCARD
SETTING,
and
press
select
the
desired
setting
item,
and
press
ENTER.
[
OSEC
I
[MY
PROGRAM]
[
ON
I
EXIT:.
.
EXIT:.
---
EXIT:.
EXIT:.
~
® The displayed items differ depending
on
the setting conditions.
® The selected item chages to yellow.
@ Items
in
magenta cannot be selected.
®
To
return to the previous screen, select
RETURN.
@ CARD SETTING
is
displayedonthe
MENU screen only during CARD mode.
® CARD SETTING cannot be selected until
the system determines that the card can
be used.
® CLOSED CAPTION is not displayed
on
the MENU screen during CARD mode.
SelectTVlVlDEO mode and then set the
CLOSED CAPTION settings.
@ The only VIDEO ADJUST settings
available during CARD mode are
PICTURE, RESET and RETURN.
@ COLOR SYSTEM
is
always settoN358
and cannotbechanged during CARD
mode.
® The BLUE SCREEN, CH-SETTING,
CLOSED CAPTION, V-CHIP BLOCK,
AUTO
POWER OFF functions and video
output do not operate during CARD
mode.
® If
MY
PROGRAM is setinORDER
TO
SHOW for SLIDE SHOW settings, only
registered images will be played back
in
INDEX MODE.
® The
ROTATE
settings cannot be selected
in
INDEX MODE.
Page 44

CARD ADJUSTMENT
(Continued)
Ii
You
can set the desired display time and playback order. REPEAT setting is also available.
1
Press CARD to change to CARD
mode.
2 Press CARD to switch to SLIDE
SHOW as the playback mode.
3
Press MENU to display the MENU
screen.
MENU
II'1IiJ1CARD
SETTING.
4
Press
,A/T
to move the cursor to
~SLEEP
TIMER·
~V
IDEO
ADJUST-
CARD SETTING, and press
~PRESET
•
ENTER.
mlV-CHIPBLOCK-
~SET
UP
rn
CD
SELECT:O
ENTER:.
EXIUJIjI
[j2Q)
5
Press
,A/T
to move the cursor to
IiJICARD
SETTING
SLIDE SHOW
SETIING,
and press
~RETURN
11'1
SliDESHOW
SETT
lNG-
SHARP
ENTER.
MY
PROGRAM
ROTATE
SOUNO
SETTING
SElECT:O
ENTER:.
EXIT:.
6 Press
,A/T
to select the desired
setting item, and press ENTER.
7 Press
<41lfP'
to change the setting,
and press ENTER.
[III The following SLIDE SHOW settings
are available.
SLIDESHOW
SETTING
~RETURN
11'1
INTERVAL
[5SEC]
ORDERTOSHOW
[MY
PROGRAM]
REPEAT
I
ON
]
INTERVAL:
r"'5S>EC~10SEC
-<----»
1M1N
"'I
60MIN~15MIN..-------J
ORDER TO SHOW:
C;>!I!O~MAl~RANDOM"'I
SELECT:O
ENTER:.
EXIT:.
SlIOE
SHOW
SETTING
~RETURN
11'1
INTERVAL
[mc]
ORDERTOSHOW
[MY
PROGRAM]
REPEAT
[ON]
Page 45

in
SLIDE SHOW playback mode.
IiiJ!1CARD
smI
NG
I
,Ar'V
to move the
0RETURN
i:J
SliDESHOW
SETT
I
NG~
MY
PROGRAM
ROTATE
SOUND
SETTING
IiiJ!1CARD
smI
NG
0RETURN
SLIDE
SHOW
SETTING-
i:J
MY
PROGRAM
~
ROTATE
~
SOUND
SETTI
NG
•
.._..
_-_
...__....
-
MY
PROGRAM
0RETURN
i:J
SET
PROGRAM
ERA
SEA
LL
PROGRAM~
SELECT:\l~
in
the
- Registration area
Selection marker (red)
<l
~E~---==-==---":":"':=
l~
Selection area
<J
and
I>
and pressing
~.
MY
PROGRAM is selected
in
Page 46

CARD ADJUSTMENT
(Continued)
6 Press &..fT
f~f
l>-
to select the Selection marker (yellow)
image to be registered, moving the
selection
marker
(yellow) in the
selection area, and press ENTER.
The
image
is then registered in the
registration
area
that was specified
in step 4. (see page 44)
7 Repeat steps:> and
£)
to register
more images.
[Note>
@
The
previous
six
images
are
displayed
by
aligning
the
selection marker
(yellow)
with
the
triangular
mark<Iand
pressing
<l\1.
The
next
six
images
are
displayed
by
aligning
the
selection
marker
(yellow)
with
the
triangular
markI>and
pressing
Il>.
oIfan
imageisregisteredina location
number
for
which
another
image
has
already
been
registered,
the
previous
imageisdropped
from
the
registered
entries
and
overwrittenbythe
new
image.
SELECT:~
ENTER:.
EXIT:.
~CARD
SETTING
@RETURN
SLIDE
SHOW
SETTING·
[lJ
MY
PROGRAM
ROTATE
SOUNO
SETTING
MY
PROGRAM
@RETURN
SET
PROGRAM
"
[lJ
ERASE
ALL
PROGRAM"
3 Press &..fT to move
the
cursor to
ERASE
ALL
PROGRAM, and press
ENTER. All imagesinthe
registration area will be erased.
'--':::='-+-
MENU
II
Erasing
the
MY PROGRAM
Settings
1 Press
MENU
to display
the
MENU
screen, press &..fT to move the
cursortoCARD
SETTING, and
press ENTER to display the
CARD
SETTING screen.
2 Press &..fT to
move
the
cursor
to
MY
PROGRAM, and press ENTER.
Page 47

.1&./"'"
to move the
to move the cursor to
lirnCARO
sm I
NG
EilRETURN
SllDESHOW
smI
NG.
MY
PROGRAM
IlJ
ROTATE
SOUND
sm I
NG
to rotate the image.
in
CARD or SLIDE
PROGRAM setting.
on
the ROTATE
Page 48

CARD ADJUSTMENT (Continued)
w
You can listen to the audio from TV or external devices such as VCR or DVD player, etc. through the TV
set while card playback.
SELECT:O
ENTER:.
EXIT:.
!!!!JeARO
SETTING
0RETURN
SLIDE
SHOW
SETTING'
MY
PROGRAM
ROTATE
11'1
SOUNO
SETTING
SOUNO
SETTING
0RETURN
11'1
TV
[•• ]
AV1
[..]
AV2
[
..
j
COMPONENT
[•• j
1 Press CARD to change to CARD
mode.
2 Press MENU to display the MENU
screen, press
Ja,{"4'
to move the
cursor to CARD SETTING, and
press ENTER to display the
CARD SETTING screen.
ENTER!
AITI
3
Press AI"4' to move the cursor to
~~
SOUND SETTING, and press
m
CD
MENU
ENTER.
rn rn
4 Press AI"4' to select the desired
(]J
(]J
(]J
G:QQ]
setting item, and press ENTER.
MTS
SElECT:O
ENTER:.
EXIT:.
5 Press
~
~
to select
ON
or --
(OFF), and press ENTER.
i!!
You
can select only one of the
following items for the SOUND
SETTING during card playback.
@ TV: Outputs the audio from TV prior
to switching to CARD mode.
STEREO audio or SAP
is
set as
the audio
on
the television
screen.
•
AVi:
Outputs the audio from AV-INi
terminal.
• AV2: Outputs the audio from AV-IN2
terminal.
• COMPONENT:
SOUNDsmI
NG
0RETURN
11'1
TV
[ON]
AV1
[•• ]
AV2
[•• j
COMPONENT
[•• ]
AOJUST:O
ENTER:.
EXIT:.
Page 49

S-VIDEO connection is recommended.
in
a malfunction.
A
Page 50

CONNECTING
WITH
EXTERNAL
DEVICES
(Continued)
..
_
.....
_._-_._------
~onnecting
a VCR, eve player
or
a video camera
(~Y:~~1/21COMPONE
t'
-{3~E;-B
-
PR
"---0>
[
:J
rc:
Audio
(l)
.\--,-~~~~~~"",",Audio
(R)
1
VCR
DVD Player
Page 51

DEVICES
(Continued)
out~ut)
I
\-H+--I--Connect a VCR,
Audio amplifier,
etc.
Page 52

TROUBLESHOOTING
II
Before calling
for
repair service,
check
the
following
items
for
possible remedies
to
the encountered symptoms.
TV
set I
_.
__
..
_ _ _
..
__
._
_-----_
_._
_--._-------------------------,-----,
Problem
There is no
picture or
sound.
There is no
picture.
There is no
picture from
AV-IN
1.
There is no
sound.
~
I~~IID
There is
no
picture or
sound, just
noise.
Check item
o Make sure the AC adapter is properly inserted in the
power outlet.
G Reception other than those of broadcasting stations
can be considered.
G Make sure the input mode is set to TV.
" Make sure the main power switch of the main unit is
on.
" Make sure the BLACK LEVEL is properly adjusted.
" Fluorescent lamp may have reached the end of
service life.
" Make sure the S-Video terminal is free of connections.
" Make sure the volume is not set to minimum.
" Make sure the sound is not set to mute.
" Make sure that headphones are not connected.
" Make sure the antenna cable is properly connected.
" Consider whether TV signals are being properly
received.
Reference
Pages
9
15
15
22,23
54
49
9
Picture is not
clear.
Picture is light
or improperly
tinted.
" Make sure the antenna cable is properly connected.
" Consider whether TV signals are being properly
received.
" Check color adjustment.
o Check color system setting.
9
22,23
Page 53

Check item
- -
---------------~-------I
in
a location exposed to direct sunlight
Page 54

TROUBLESHOOTING
(Continued)
r------l
iCard
!
, I
~.
~__.___J
I
1
-_._-_.
__
.
__
.....
_--~-_
...._..
_._
...
_-_
...
-
IReference
Problem
Check item
Pages
i
~_._._._._-_
...__..
_-
I
!
$
Check if data is recorded on the memory card.
Data
on
the card cannot be
@
Check if CARD mode is turned
on
as the input
I
39
f
I
I
played back.
selection.
"
Images which have been processed by a PC
I
i
sometimes cannot be played back by this equipment.
I
_._
...
_
.._..__..
_
.....__...
_------_._--_.
'--.
__
..
_
...
_.
-_.
NO CARD INSERTED*1 is
$
Check that the memory card and/or
PC
card adapter
38
displayed.
are inserted.
...
__
._
..__._-
..
-
---_._
...
_---_._---
NO IMAGEINTHE
CARD*1
is
"
Use a memory card containing recorded image data.
-
displayed.
_._.
__
..
_
.._....._.........__...
_._.
__
.
ACCESSING DATA'2 is
@
This message disappears after data has finished
-
displayed.
loading.
--_._
...
__
..
_
........-...........
__
._._._
..
_-_.
...._
..
-
.
...
_._._-_
...
_._._-
PLEASE SET MY PROGRAM is
@
Register images for MY PROGRAM.
44,45
displayed.
i
I
*1 CARD SETTING
on
the MENU screen is displayedinmagenta and cannot be selected.
*2
Desired operaions may be selected after data has been loading from the card.
Page 55

LC-20B1U
.-
19.7" Advanced Super View
& BLACK TFT LCD
A/Twn
NTSC/P
AL
-M/PAL-N
._--
181
ch.
MTS+SAP
_
..
Yes
. -
430 cd/m
2
--
H:
170°V:170°
2.5 W x 2
..
-
o 2
in.
(5 em), 2 pes.
-_
..
_.-
AV-IN1, S-VIDEO-IN
AV-IN2/AV-OUT
F-Type
..._
....
_---
PC
Card TypeII(PC card adapter)
JPEG files complying with DCF format
...
_.-
DC13V,AC110-240 V, 50/60 Hz
AC
adapter,
AC cord, Cable clamps
Page 56

DIMENSIONAL DRAWINGS
Unit:
inch/mm
24.8/630
15.8/401.3
i..-·--··----
-
,
I
,
._-----1------
,
I
,
I
L..-.._._
....._.__
...
.+-=-==-=-
===4=======?'
f.--
"'1..::..4.9,/379
--.----==1
1.2/107·L
2.9/72.6
1.58/40
Page 57

ortoobtain
product
literature, accessories, supplies,orcustomer
labor for the period(s) set forth below.
in
design or construction.
in
lieu of, and exclusive of, all other
If,
under
in
the manner and for the period of time described
in
the Product which were caused
or
in any
LC-20B1 U LCD ColorTelevision
(Be sure to have this information available when you need service for
your Product.)
One (1) year parts and labor from the date of purchase.
None
From a Sharp Authorized Servicer located
in
the United States.
To
find the location of the nearest Sharp Authorized Servicer, call
Sharp toll free at 1-800-BE-SHARP.
Ship prepaid or carry in your Product to a Sharp Authorized Servicer.
Be sure to have
ProofofPurchase
available. If you ship the Product,
be sure it is insured and packaged securely.
CORPO
CORPORATION
ION
Page 58

V
ALIDIN
CANADA ONLY
LIMITED WARRANTY
Consumer Electronics Products
Congratulations
on
your
purchase!
Sharp Electronics of Canada Ltd. (hereinafter called "Sharp") gives the following express warranty to the first consumer purchaser for this
Sharp brand product. when shipped
in
its original container and sold or distributedinCanada by Sharp or byanAuthorized Sharp Dealer:
Sharp warrants that this product
is
free, under normal use and maintenance, from any defectsinmaterial and workmanship. If any such
defects should
be
foundinthis product within tile applicable warranty period, Sharp shall, at its option, repair or replace the product as
specified herein.
This warranty shall not apply to:
(a) Any defects caused or repairs required as a result of abusive operation, negligence, accident, improper installation or inappropriate
use as outlined
in
the owner's manual.
(b) Any Sharp product tampered with, modified, adjusted or repaired
by
any party other than Sharp, Sharp's Authorized Service Centres
or Sharp's Authorized Servicing Dealers.
(c) Damage caused or repairs required as a result of the use with items not specified or approved by Sharp, including but not limited to
head cleaning tapes and chemical cleaning agents.
(d) Any replacement of accessories, glassware, consumable or peripheral items required through normal use of the product including but
not limited to earphones, remote controls. AC adapters, batteries, temperature probe, stylus, trays, filters, belts, ribbons, cables and
paper.
(e)
Any cosmetic damage to the surface or exterior that has been defaced or caused by normal wear and tear.
(f) Any damage caused by external or environmental conditions, including but not limited to transmission line/power line voltage or liquid
spillage.
(g)
Any product received without appropriate model, serial number and
CSNcUL
markings.
(h)
Any products used for rental or commercial purposes.
(i) Any installation, setup and/or programming charges.
Should this Sharp product fail to operate during the warranty period, warranty service may be obtained upon delivery of the Sharp product
together with proof of purchase and a copy of this LIMITED WARRANTY statement to an Authorized Sharp Service Centre or
an
Authorized Sharp Servicing Dealer.Inhorne warranty service may be provided at Sharp's discretiononany Sharp television with the
screen size of
2'7"
or larger and on any Sharp Over-the-Range Microwave Oven,
This warranty constitutes the entire express warranty granted by Sharp and no other dealer, service centre or their agent or employee is
authorized to extend, enlarge or transfer tllis warranty on behalf of Sharp, To the extent the law permits, Sharp disclaims any and all
liability for direct or indirect damages or losses or for any incidental, special or consequential damages or loss of profits
reSUlting
from a
defect
in
material or workmanship relating to the prOduct, including damages for the loss of time or use of this Sharp product or the loss
of information. The purchaser will be responsible for any removal, reinstallation, transpoltation and insurance costs incurred, Correction of
defects,
in
the manner and period of time described herein, constitute complete fulfillment of all obligations and responsibilities of Sharp
to the purchaser with respect to the product and shall constitute full satisfaction of all claims, whether based
on
contract, negligence, strict
Page 59

 Loading...