

Page 1
SHARP,
LC-15S5U
LIQUID CRYSTAL TELEVISION
TELIEVISEUR ACL
TELEVISOR CON PANTALLA DE
CRISTAL LJQUlDO
/
- _ ,-_ _ -- =_ _= =,=__ =--_ -"- ___ _._.......
OPERATION MANUAL
MODE D'EMPLOI
MANUAL DE OPERACION
............ _L
..... _T
AQUOS
F..NHANCED DEFINITfON TELeVISiON
_" MONITOR
Products that have earned the ENERGY STARe are designed to protect the environment
through superior energy efficiency
Les produits agre6s ENERGY STARe sent congus pour prot¢ger I'environnement par un
rendement 6nerg6tique sup6rieur
Los productos que han ganado la marca ENERGY STARe han side disefiados unaeficiencia
superior en el use de la energia
Page 2
DEAR SHARP CUSTOMER
, ,1,1,1_,,1,i = = = = .......................................11 =
Thank you for your' purchase of the Sharp Liquid Crystal Television, To ensure safety and many years
of trouble-free operation of your product, please read the Important Safety Precautions carefully
before using this product,
Electricity is used to perform many usefuf functions, but it can also cause personal injuries and property damage if
improperly handled This product has been engineered and manufactured with the highest priority on safety However,
improper' use can resuft in electric shock and/or fire In order to prevent potential danger', please observe the following
instructions when installing, operating and cleaning the product. To ensure your safety and prolong the service life of
your LCD color TV product, please read the following precautions carefully before using the product.
= Read instructions--A_i operating instructions must be read and understood before the product is operated
a Keep this manual in a safe place--These safety and operating instructions must be kept in a safe place for future
reference
= Observe warnings--All warnings on the product and in the instructions must be observed closely
m Fotiow instructions--Afl operating instructions must be foJlowed
,. Attachments--Do not use attachments not recommended by the manufacturer: Use of inadequate attachments
can result in accidents
= Power source--This product must operate on a power source specified on the specification label. If you are
not sure of the type of power supply used in your' home, consult your' dealer or local power company For units
designed to operate on batteries or another power source, refer to the operating instructions,
[] AC cord protection_The AC cord must be routed properly to prevent people from stepping on it or objects from
resting on it Check the cord at the plugs and product
,_ Overloading--Do not overload AC outlets or extension cords
Overloading can cause fire or electric shock.
= Entering of objects and liquids--Never insert an object into the product through vents or openings. High voltage
flows in the product, and inserting an object can cause electric shock andtor short internal pa_'ts For the same
reason, do not spill water or liquid on the product
-. Servicing--Do not attempt to service the product yourself. Removing covers can expose you to high voltage and
other dangerous conditions, Request a qualified service person to perform servicing.
[] Repair--if any of the following conditions occurs, unplug the AC cord from the AC outlet, and request a qualified
service person to perform repairs
a, When the AC cord or plug is damaged
b When a liquid was spilled on the product or when objects have fallen into the product
c. When the product has been exposed to rain or water
d When the product does not operate properly as described in the operating instructions.
Do not touch the controls other than those described in the operating instructions, Improper adjustment of
controls not described in the instructions can cause damage, which often requires extensive adjustment work
by a qualified technician.
e When the product has been dropped or damaged
f When the product displays an abnormal condition. Any noticeable abnormality in the product indicates that the
product needs servicing
a Replacement parts--in case the product needs replacement parts, make sure that the service person uses
replacement parts specified by the manufacturer, or those with the same characteristics and performance as the
original parts. Use of unauthorized parts can result in fire, electric shock andlor other danger.
,. Safety checks--Upon completion of service or repair work, request the service technician to perform safety
checks to ensure that the product is in p[oper operating condition
[] Wall or ceiling mounting--When mounting the product on a wall or ceiling, be sure to install the product
according to the method recommended by the manufacturer-
= Polarization--This AC cord may be equipped with a polarized alternating current line plug (a plug having one
blade wider than the other)_ This plug will fit into the power outlet only one way This is a safety feature. If you are
unable to insert the plug fully into the outlet, try reversing the plug If the plug should still fail to fit, contact your
electrician to replace your obsotete outlet
Do not defeat the safety purpose of the polarized plug
Page 3
IMPORTANT SAFETY PRECAUTIONS (Continued)
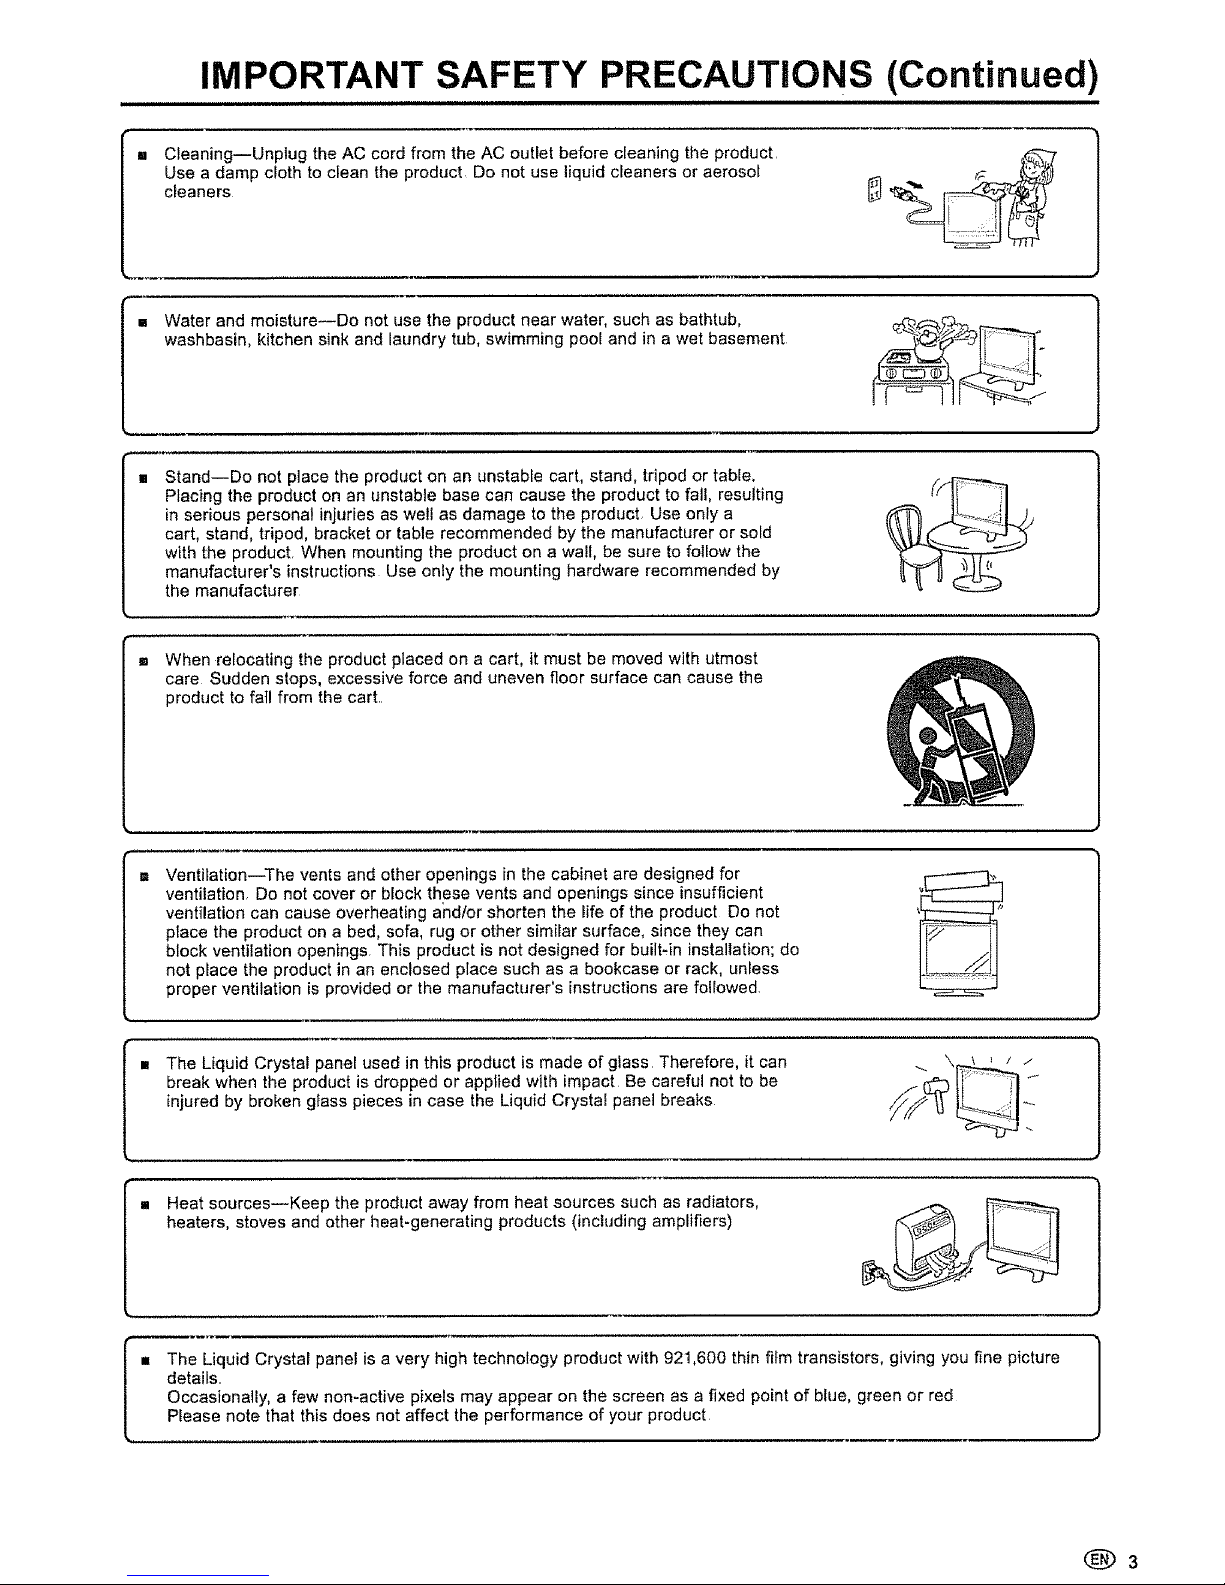
CleaningiUnplug the AC cord from the AC outFet before cleaning the product,
Use a damp cloth to clean the product, Do not use liquid cfeaners or aerosol
cleaners
Water and moisture--Do not use the product near water, such as bathtub,
washbasin, kitchen sink and laundry tub, swimming pool and in a wet basement
Stand--Do not place the product on an unstable cart, stand, tripod or table,
Placing the product on an unstable base can cause the product to fall, resulting
in serious personal injuries as well as damage to the product, Use only a
cart, stand, tripod, bracket or table recommended by the manufacturer or sold
with the product, When mounting the product on a walt, be sure to follow the
manufacturer's instructions Use only the mounting hardware recommended by
the manufacturer
m When relocating the product placed on a cart, it must be moved with utmost
care Sudden stops, excessive force and uneven floor surface can cause the
product to fail from the cart..
Ventilation--The vents and other openings in the cabinet are designed for
ventilation. Do net cover or block these vents and openings since insufficient
ventilation can cause overheating andfor shorten the life of the product Do not
place the product on a bed, sofa, rug or other similar surface, since they can
block ventilation openings. This product is not designed for built=in installation; do
not place the product in an enclosed place such as a bookcase or rack, unless
proper ventilation is provided or the manufacturer's instructions are followed
= The Liquid Crystal panel used in this product is made of glass Therefore, it can ... \_ ' / _"
break when the product is dropped or applied with impact Be careful not to be lI_ _
injured by broken glass pieces in case the Liquid Crystal panel breaks
,. Heat sources--Keep the product away from heat sources such as radiators, .-.-t-_ _
heaters, stoves and other heat-generating products (including amplifiers)
m The Liquid Crystal panel is a very high technology product with 921,600 thin film transistors, giving you fine picture
details.
Occasionally, a few non-active pixels may appear on the screen as a fixed point of blue, green or red
Please note that this does not affect the performance of your product
(_3
Page 4
iMPORTANT SAFETY PRECAUTUONS (Continued)
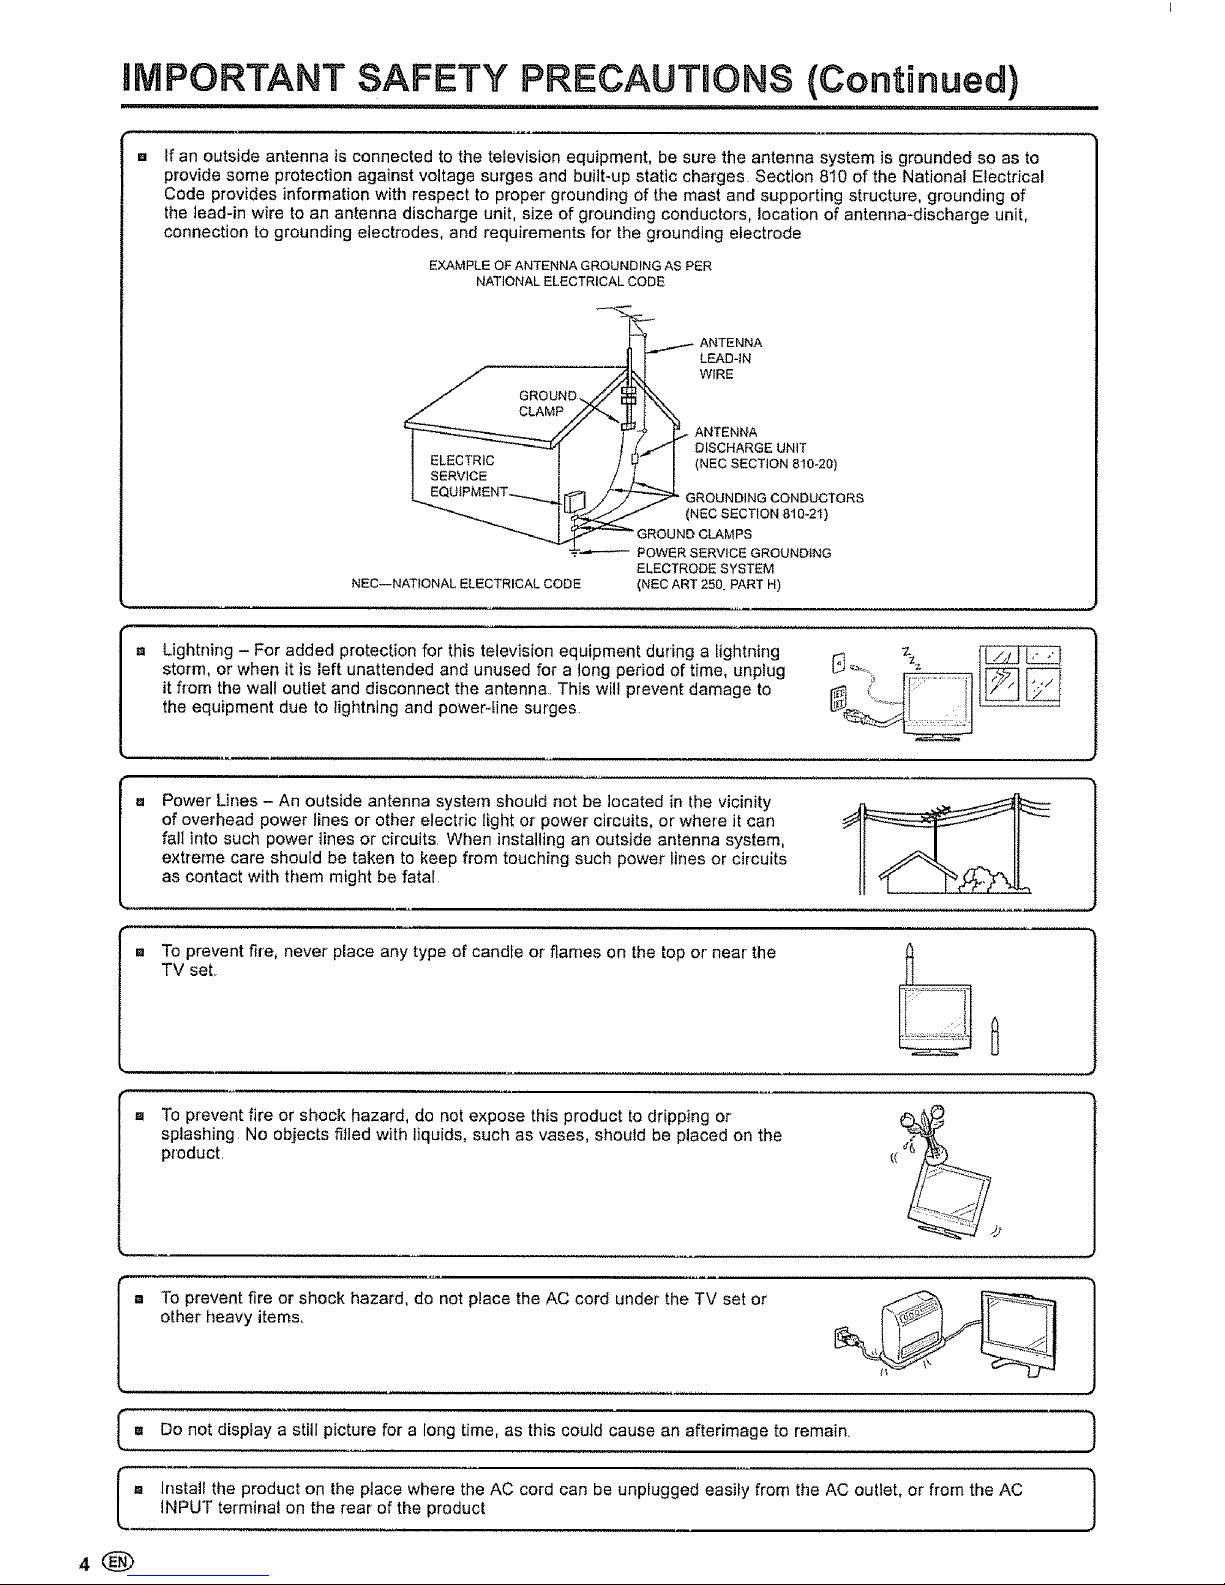
if an outside antenna is connected to the television equipment, be sure the antenna system is grounded so as to
provide some protection against voltage surges and built-up static charges Section 810 of the Nationaf Electrical
Code provides information with respect to proper grounding of the mast and supporting structure, grounding of
the lead-in wire to an antenna discharge unit, size of grounding conductors, location of antenna-discharge unit,
connection to grounding electrodes, and requirements for the grounding electrode
EXAMPLE OF ANTENNA GROUNDING AS PER
NATIONAL ELECTRICAL CODE
_/ ANTENNA
II r- LEAD-IN
/ _WIRE
/ GROUND.//_ F\
../ CLAMP /.Z-._ I1 t "%.
J ........ _ J _,,,/I DISCHARGE UNIT
I i i_L_I NECSECT,ON0,0-20,
L,_ ''4u'rqv'=''4' ""_r[ _ // _ GROUNDING CONDUCTORS
I_,_ (NECSECTION810-2_)
--_',,,-..._ _ GROUND CLAMPS
=' POWER SERVICE GROUNDING
ELECTRODE SYSTEM
NED--NATIONAL ELECTRICAL CODE (NEC ART 250 PART H)
Lightning - For added protection for this television equipment during a lightning
storm, or when it is left unattended and unused for a long period of time, unplug
it from the wall outlet and disconnect the antenna, This will prevent damage to
the equipment due to lightning and powerqine surges
Power Lines - An outside antenna system should not be located in the vicinity
of overhead power lines or other electric light or power circuits, or where it can
fall into such power lines or circuits When installing an outside antenna system,
extreme care should be taken to keep from touching such power lines or circuits
as contact with them might be fatal
To prevent fire, never place any type of candle or flames on the top or near the
TV set,,
To prevent fire or shock hazard, do not expose this product to dripping or
splashing No objects filled with liquids, such as vases, should be placed on the
product,
m To prevent fire or shock hazard, do not place the AC cord under the TV set or
other heavy items,
Do not display a still picture for a long time, as this could cause an afterimage to remain, )
Install the product on the place where the AC cord can be unplugged easity from the AC outlet, or from the AC /
iNPUT terminal on the rear of the product
J
U
I"
4®
Page 5

Contents
i imlll
IMPORTANT INFORMATION ...................................... 1
DEAR SHARP CUSTOMER .......................................... 2
IMPORTANT SAFETY PRECAUTIONS ...................... 2
Supplied Accessories ................................................. 5
Before Using the LCD TV Set ................................... 6
Preparation ................................................................ 7
Installing Batteries in the Remote Control ...............7
Using the Remote Control ..................................... 7
Antenna Connection ............................................. 8
Power Connection .... ................................................. 9
Part Names of the Main Unit .................................. 10
Listening with Headphones .............................. 10
How to Fix the Cables ............................................ 1t
Part Names of the Remote Control ....................... 12
Connecting with External Devices ........................ 13
Outputting Video and Audio (Video Output) ........ 13
EZ SETUP .................................................................... 14
EZ SETUP during the First Power On ................ 14
Basic Operation ........................................................ 15
Turning On and Off the Main Power ................ 15
Standby ................................................................... 15
Switching the input Modes
(INPUT1/INPUT2/INPUT3/TV) ....................... !5
Sound Volume ..................................................... 16
Changing Channels ........................................... 16
Selecting Menu Items ............................................. t7
Basic Adjustment Settings ...................................... 19
AV MODE ............................................................ t9
OPC .................................................................... I9
BACKLIGHT ................................................................ 20
PICTURE Adjustments ........................................ 20
COLOR TEMPERATURE ....................................... 21
AUDIO Adjustments ................................................ 21
Useful Features ........................................................ 22
CH SETUP ..................................................................22
SETUP ................................................................. 23
V-CHIP Settings ...................................................... 24
CLOSED CAPTION ...................................................28
VIEW MODE .............................................................29
AUDIO ONLY ......................................................... 30
BLUE SCREEN ................................................. 30
SLEEP TIMER ...................................................... 3!
NO SIGNAL OFF ............ ....................................... 3t
NO OPERATION OFF ..............................................3t
PICTURE FLIP ....................................................... 32
Troubleshooting ...................................................... 33
Specifications .......................................................... 34
Calling for Service .................................................. 35
LIMITED WARRANTY .............................................. 35
Dimensional Drawings
• The dimensional drawings for the LCD TV set are
shown on the inside back cover
SuppUied Accessories
ii i, iii ii mlII'HH,II lUlml I I III I III HmH,,,ml
Make sure the following accessories are provided with the LCD TV set
Rem0te''c'ontro unt " Accord AAA' sze batter;as x2 = _
. .... : ....... : :: : .... ( )
pages 7 and 12
page tl
ii_ !_if_
page 9 page 7
page 11
Lc.t_u
_QUO$
J
Page 6
Before Using the LCD TV Set
:::::::::::::::::::::::::::: mmmHHH = H
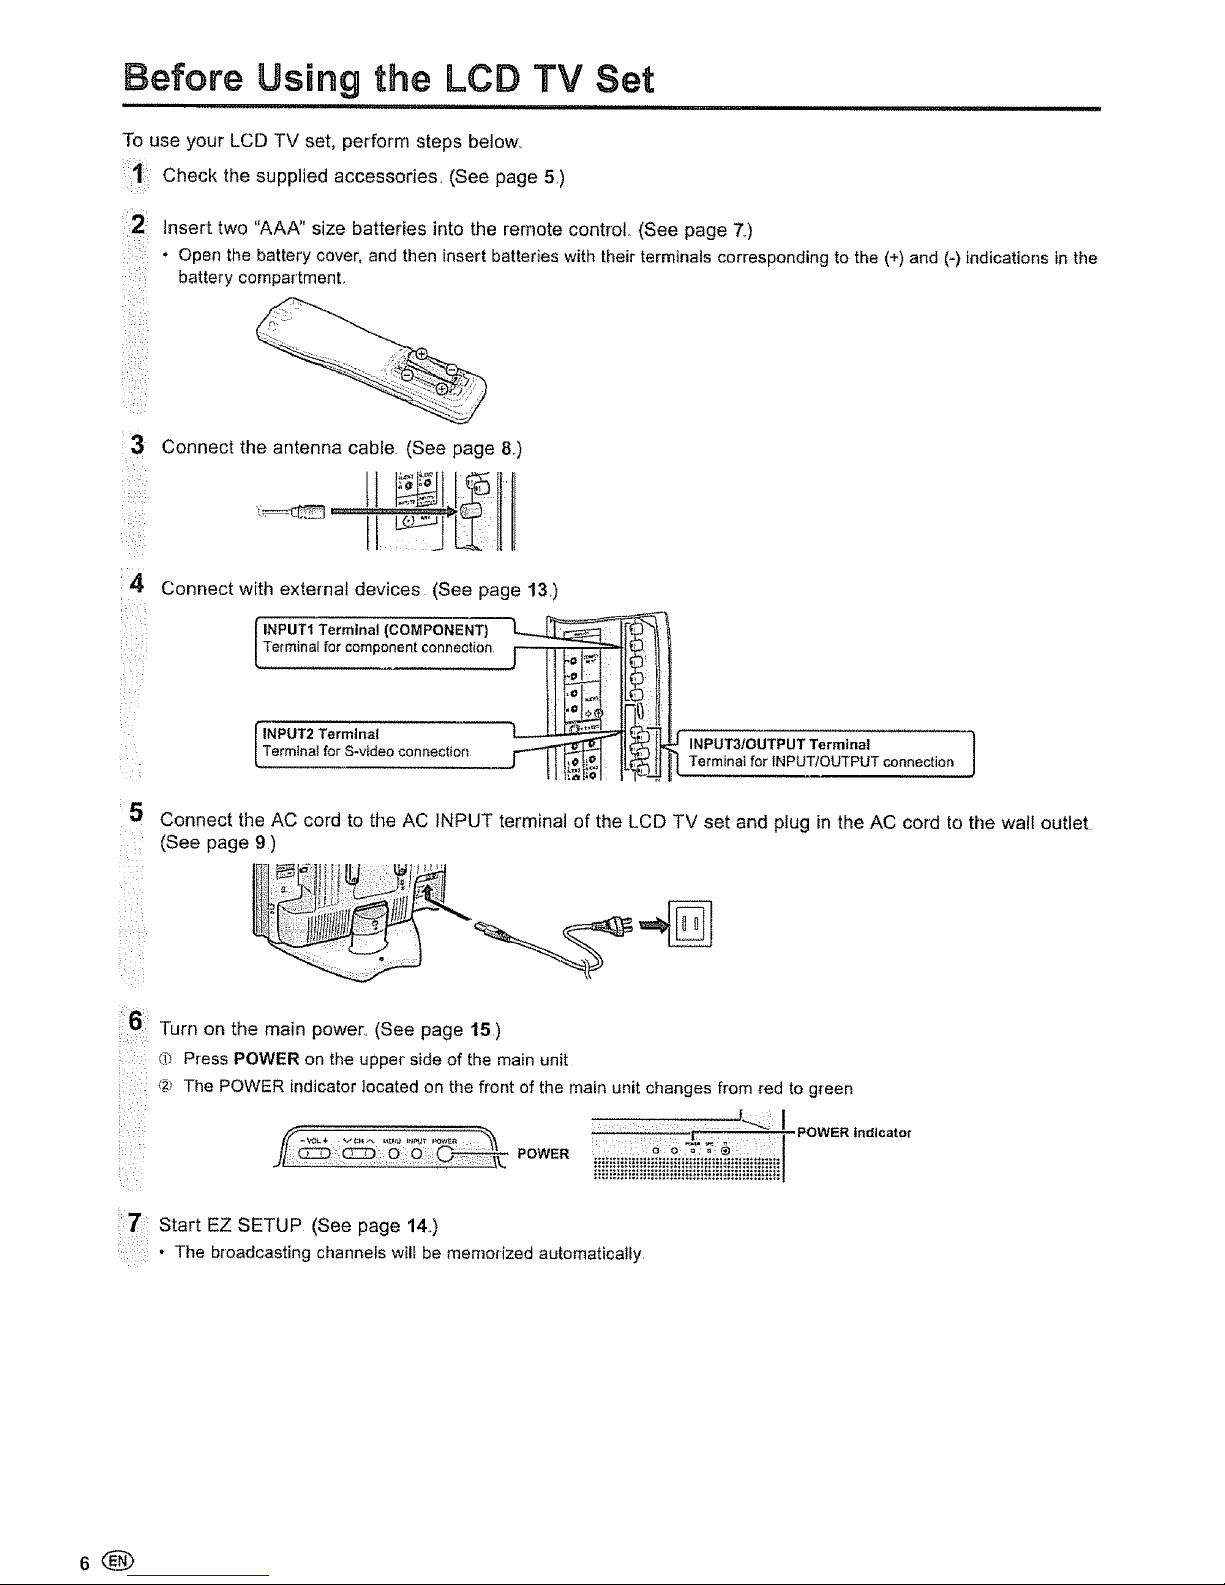
To use your LCD TV set, perform steps below.
Check the supplied accessories, (See page 5)
:2
insert two "AAA" size batteries into the remote control. (See page 7.)
• Open the battery cover, and then insert batteries with their terminals corresponding to the (+)and (-) indicationsin the
battery compartment.
Connect the antenna cable (See page 8)
:Z Connect with external devices (See page 13)
[ INPUT1 Terminal (COMPONENT) _1
Terminal for component connection , ,, ,,_"'_,
INPUT3/OUTPUT Terminal ]
Terminai for INPUT/OUTPUT connection
_5
i_> _i
Connect the AC cord to the AC INPUT terminal of the LCD TV set and plug in the AC cord to the wall outlet
(See page 9)
16: Turn on the main power,. (See page 15)
i
: (T_Press POWER on the upper side of the main unit
,_ The POWER indicator located on the front of the main unit changes from red,to gi'een
POWER indicator
f(. _÷ v c,,_=,,_,,,,_,_:. :'I"_ .................
)/ PowERii;iiii_,il_, ,
:7: Start EZ SETUP (See page 14,.)
i:
..........: The broadcasting channels wilt be memorized automatically
Page 7
Preparation
innnl,nl nnnnllll,nl,i
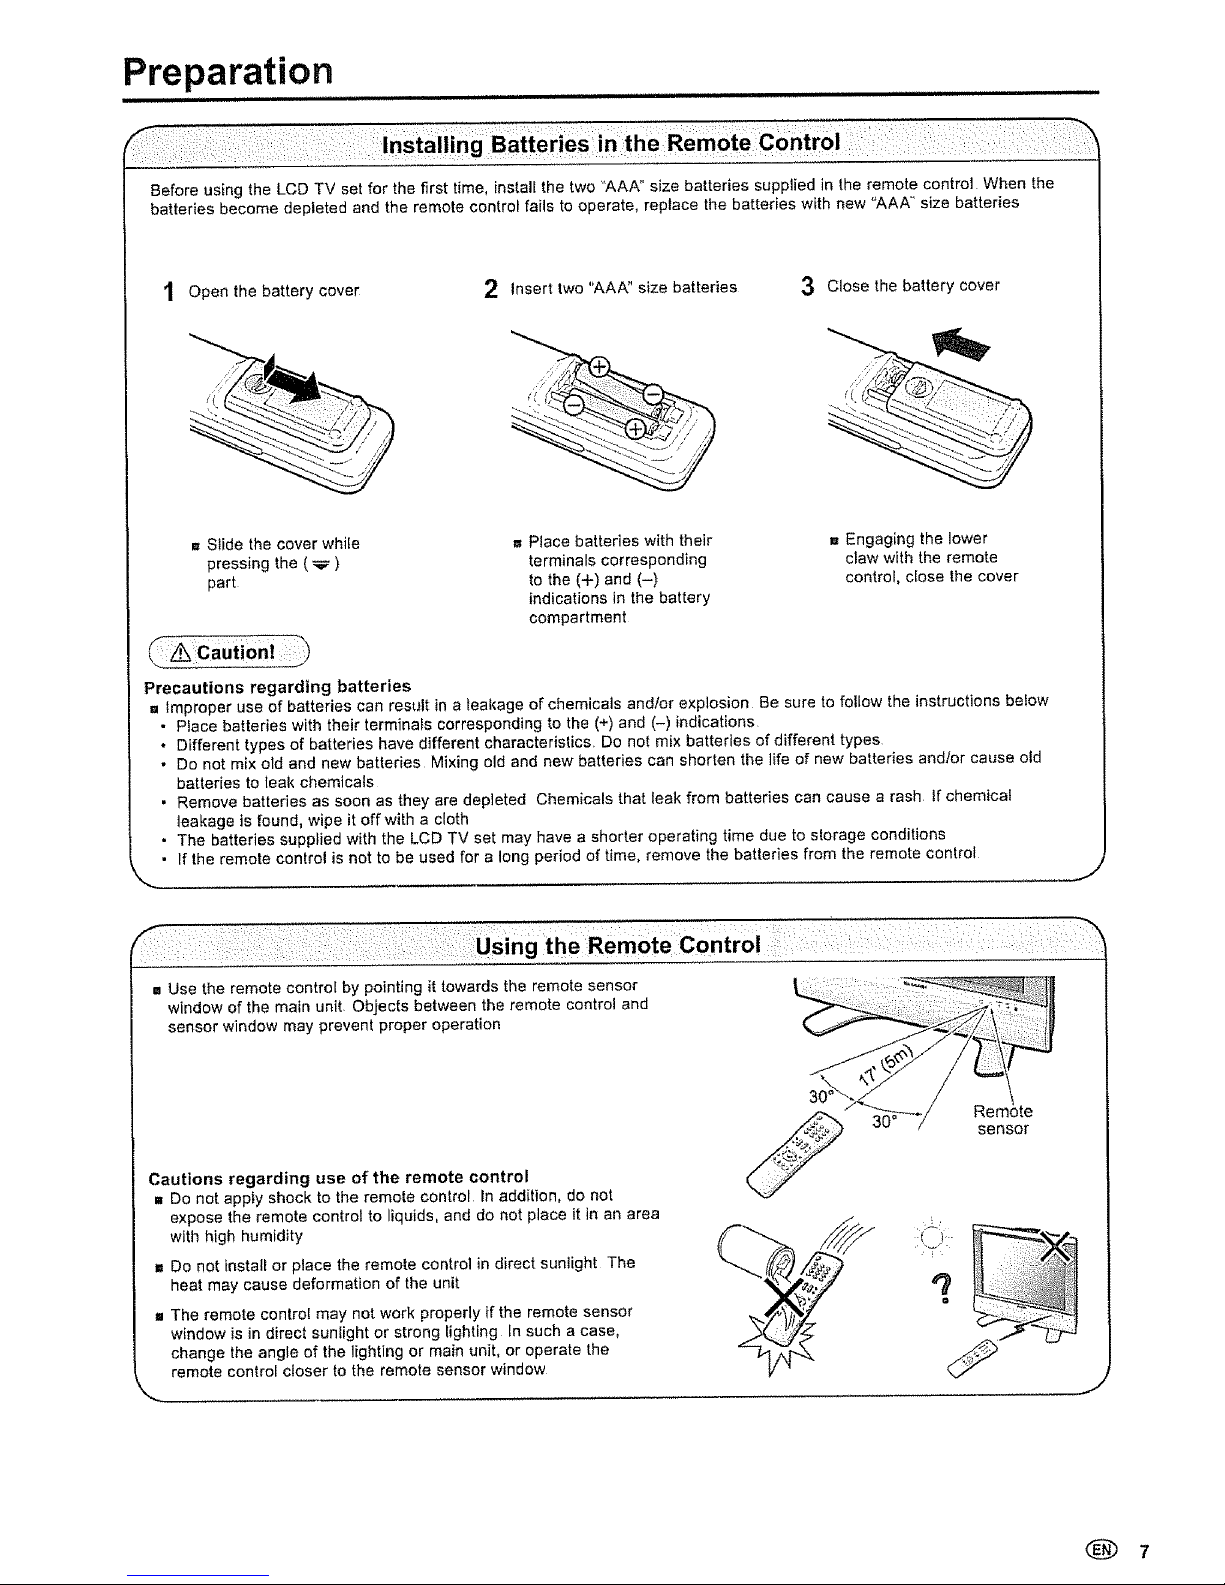
Before using the LCD TV set for the first time, install the two "AAA" size batteries supplied in the remote control When the
batteries become depleted and the remote control fails to operate, replace the batteries with new <'AAA" size batteries
Open the battery cover
2 Insert two "AAA" size batteries 3 Close the battery cover
-, Stide the cover while
pressing the ( _ )
part
_-Z_ Caution _..f)
Precautions regarding batteries
= Place batteries with their
terminals corresponding
to the (+) and (-)
indications in the battery
compartment
i= Engaging the lower
claw with the remote
control, close the cover
,_ tmproper use of batteries can restJit in a leakage of chemicals and/or explosion Be sure to follow the instructions befow
• Place batteries with their terminals corresponding to the (+) and (-) indications
• Different types of batteries have different characteristics Do not mix batteries of different types
• Do not mix old and new batteries Mixing old and new batteries can shorten the life of new batteries andlor cause old
batteries to leak chemicals
• Remove batteries as soon as they are depleted Chemicals that leak from batteries can cause a rash if chemical
leakage is found, wipe it offwith a cloth
• The batteries supplied with the LCD TV set may have a shorter operating time due to storage conditions
• If the remote control is not to be used for a long period of time, remove the batteries from the remote control
= Use the remote control by pointing it towards the remote sensor
window of the main unit Objects between the remote control and
sensor window may prevent proper operation
;ontrol ::; :
Cautions regarding use of the remote control
.. Do not apply shock to the remote control In addition, do not
expose the remote control to liquids, and do not place it in an area
with high humidity
= Do not install or place the remote control in direct sunlight The
heat may cause deformation of the unit
,,, The remote control may net work properly if the remote sensor
window is in direct sunlight or strong lighting tn such a case,
change the angle of the lighting or main unit, or operate the
remote control closer to the remote sensor window
',...
30°
sensor
J
(_ 7
Page 8
Preparation (Continued)
,ran n n ,H,,n-
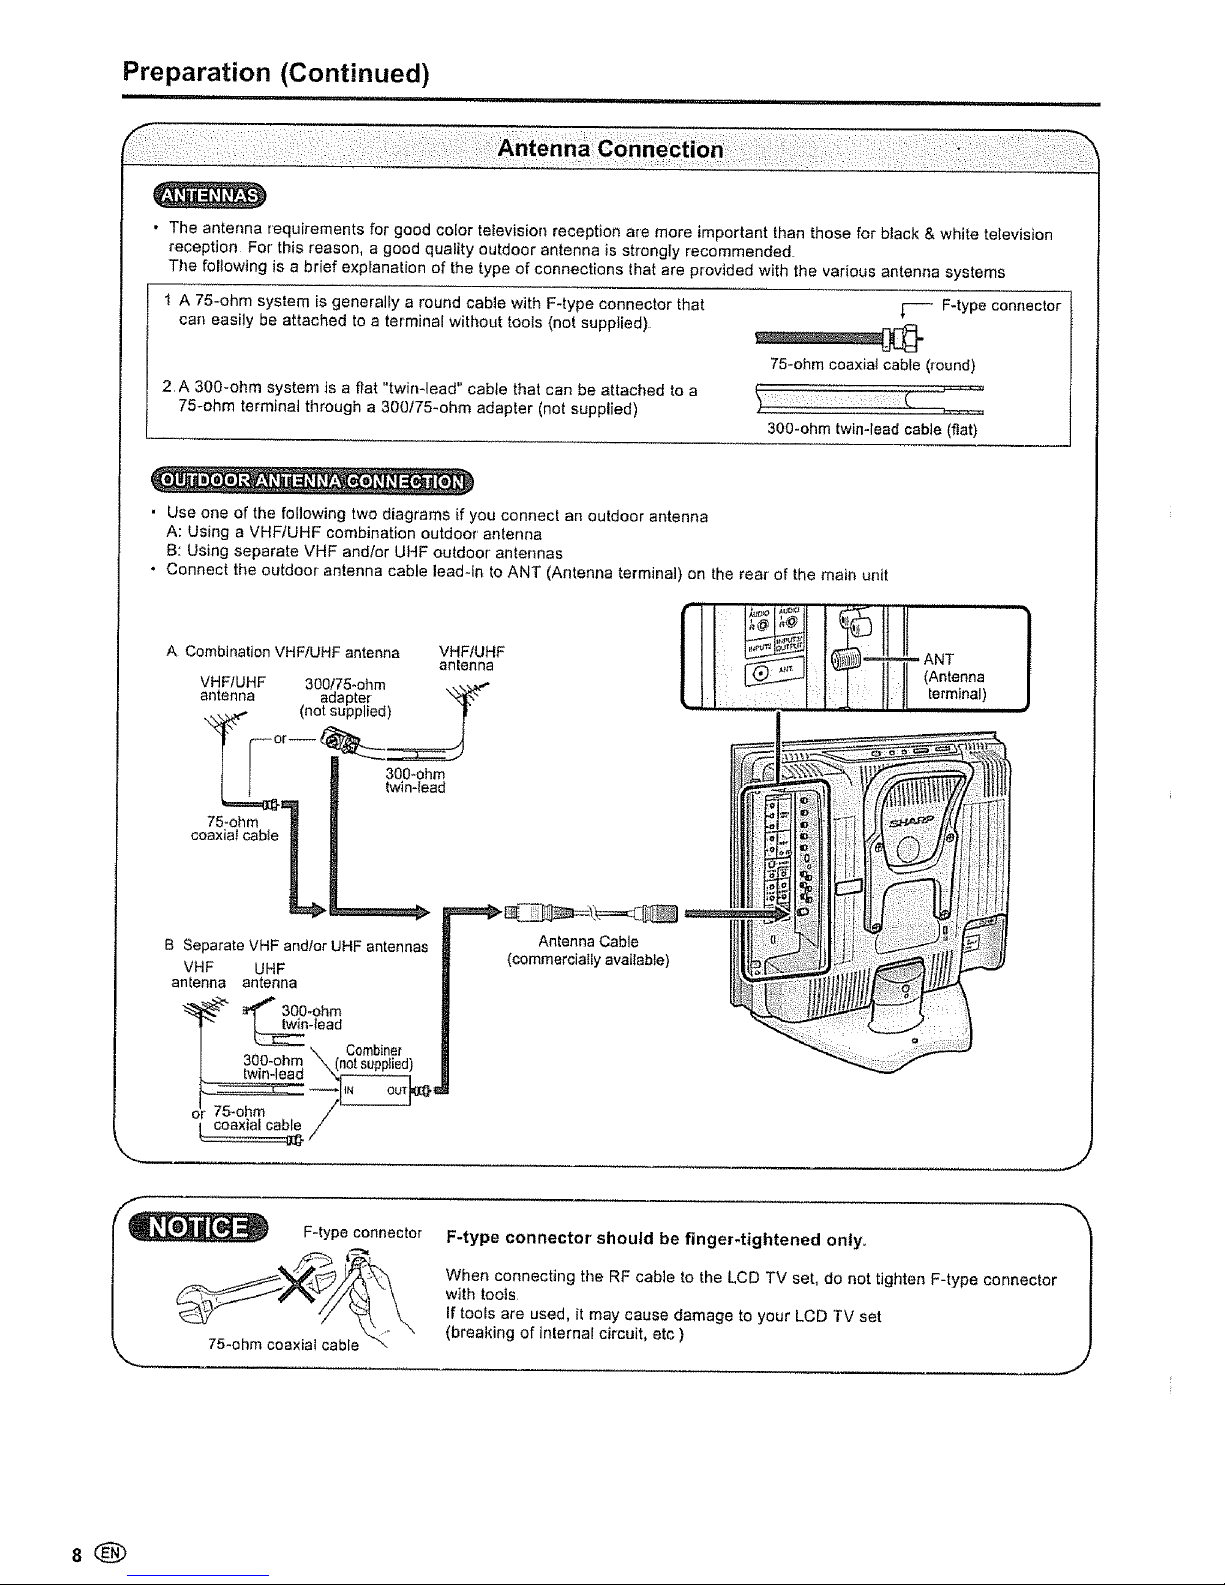
• The antenna requirements for good color television reception are more important than those for black & white television
reception For this reason, a good quality outdoor antenna is strongly recommended
The following is a brief explanation of the type of connections that are provided with the various antenna systems
1 A 75-ohm system is generally a round cable with F-type connector that
can easily be attached to a terminal without tools (not supplied)
2A 300-ohm system is a fiat "twin-lead" cable that can be attached to a
75-ohm terminal through a 300/75-ohm adapter (not supplied)
_-- F-type connector
75-ohm coaxial cable (round)
300-ohm twin-lead cable (flat)
• Use one of the following two diagrams if you connect an outdoor antenna
A: Using a VHFiUHF combination outdoor' antenna
B: Using separate VHF and/or UHF outdoor antennas
• Connect the outdoor antenna cable lead-in to ANT (Antenna terminal) on the real of the main unit
ACombinationVHFiUHFantennaVHFIUHF I II _1 1_ I1II ....
antenna P,r_
v.F,u.F300,,,-ohm.... !]1 I=ifT" .(Antenna
antenna adapter _ U I I:tj i111,erm,na,)
\%,_ (not supplied) _t ..... ' "
_| 300-ohm
fwin-lead
75-ohm 3
coaxiatcable ! .
B Separate VHF andlor UHF antennas Antenna Cable
VHF UHF (commercially available)
anlenna antenna
_-_ eft_''_ 3O0-ohrn
_n-tead ,, ::
\ Combiner
300-ohm \tnot sunplied'_
dr 75-ohm
( coaxial cable /
}
F-type connector
75-ohm coaxial cable
F-type connector should be finger-tightened only,
When connecting the RF cable to the LCD TV set, do not tighten F-type connector
with tools
If tools are used, it may cause damage to your LCD TV set
(breaking of internal circuit, etc )
......... J
8®
Page 9
Preparation (Continued)
. A 75-ohm coaxiat cable connector is built into the LCD TV set for easy hookup When connecting the 75-ohm coaxial
cable to the LCD TV set, screw the 75-ohm cable to the ANT terminal
• Some cable TV companies offer "premium pay channels", Since the signals of these premium pay channels are
scrambled, a cable TV converter/descrambler is generally provided to the subscriber by the cable TV company
This converteddescrambler is necessary for normal viewing of the scrambled channels (Set your TV to channel 3
or 4, typically one of these channels is used If this is unknown, consult your cable TV company ) For more specific
instructions on installing cable TV, consult your cable TV company One possible method of utilizing the converter/
descrambler provided by your cable TV company is explained below
Please note: An RF switch provided with two inputs (A and B) is required (not supplied)
"A" position on the RF switch (not supplied): You can view atl unscrambled channels by using the TV's channel keys
"B" position on the RF switch (not supplied):You can view the scrambled channels via the converterldescrambier by
using the converter's channel keys
RF switch (not supplied)
Cable
TV line
. Consult your SHARP Dealer or Service Center for the type of splitter. RF switch or combiner that might be required
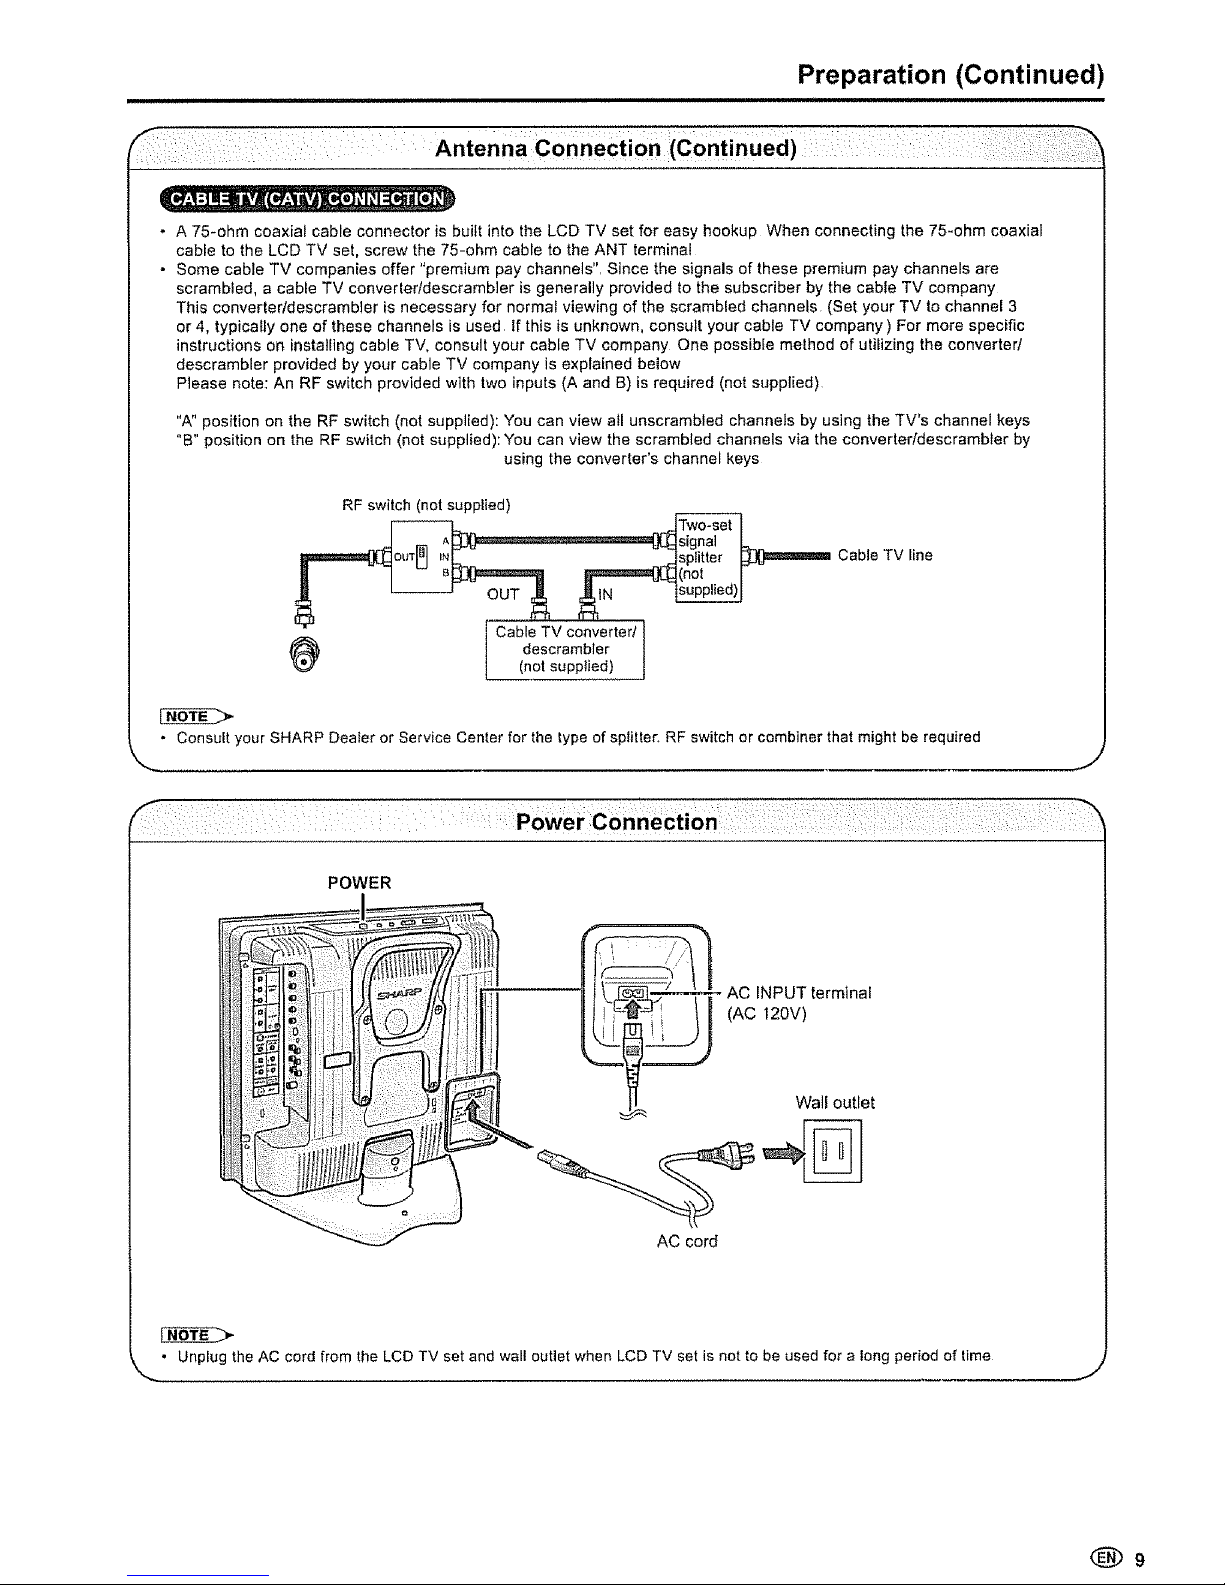
POWER
_._ _-/"-'_ _- AC INPUT terminal
!_ _'_ / (AC 120V)
Wall outlet
AC cord
• Unplug the AC cord from the LCD TV set and walt outlet when LCD TV set is not to be used for a long period of time
Page 10
Part Names of the Main Unit
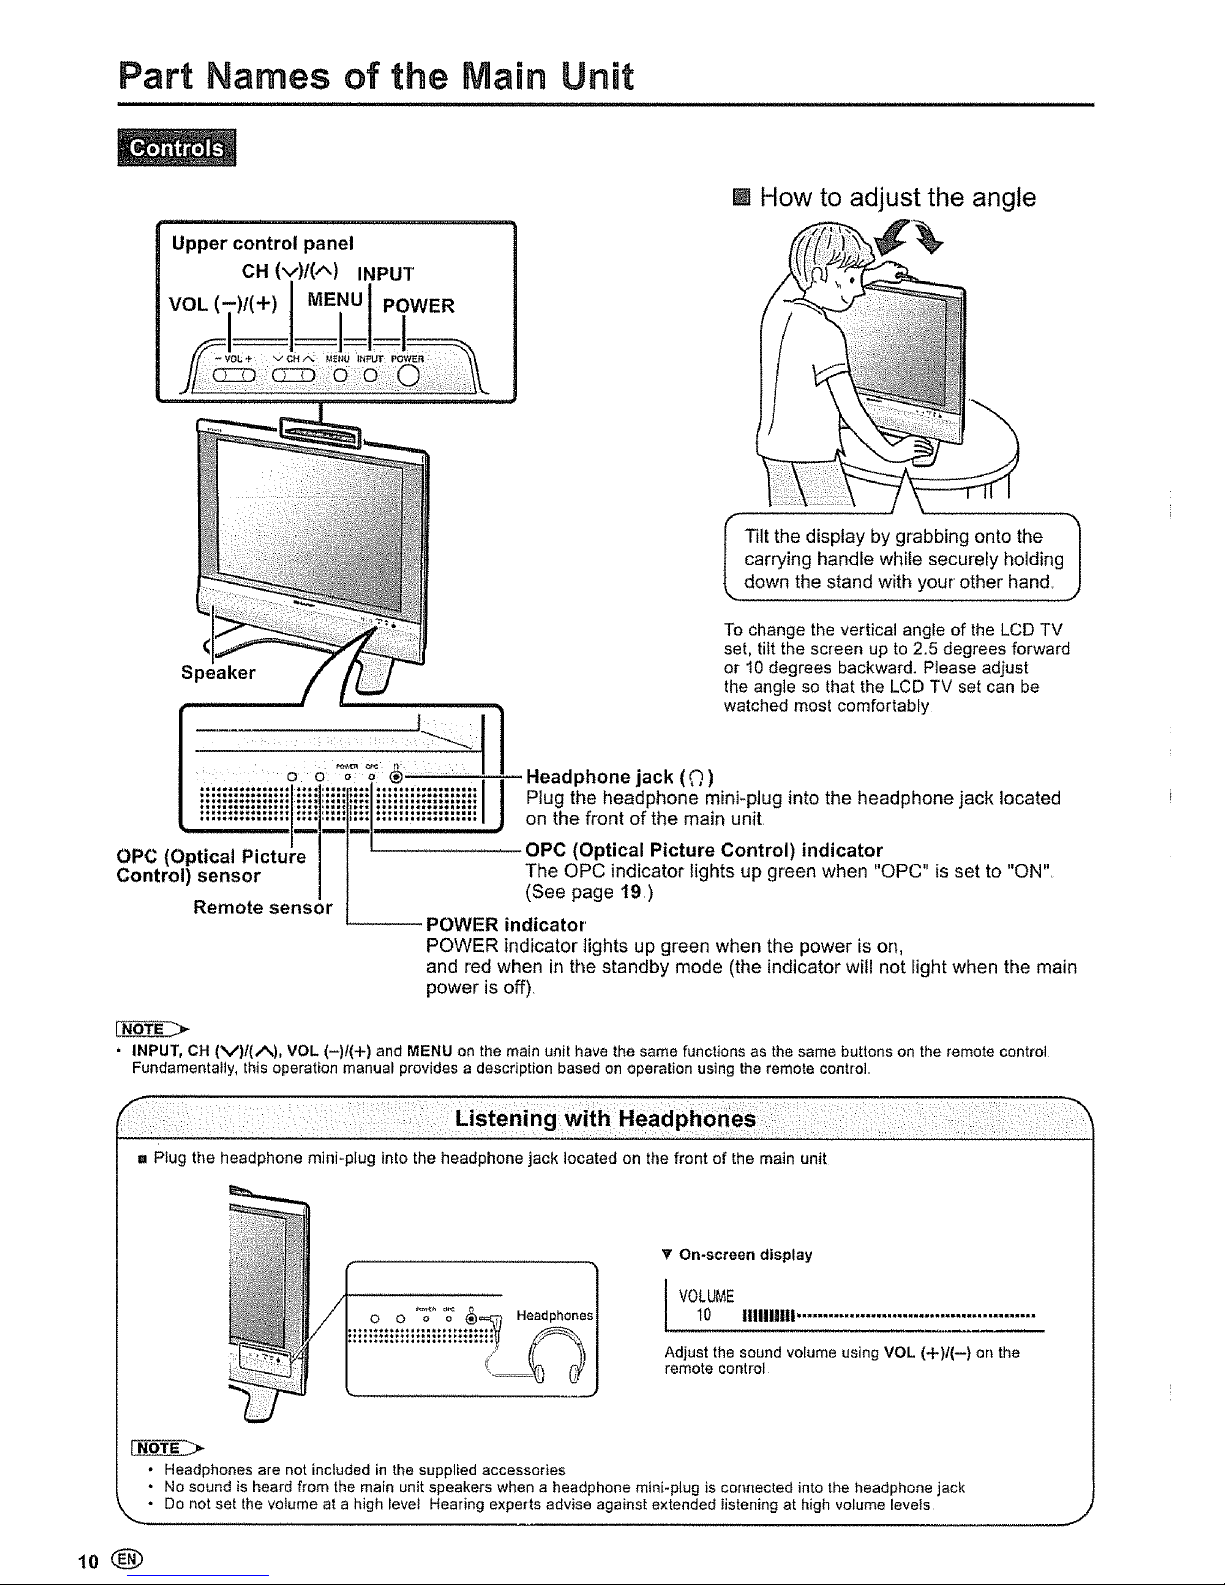
Upper control panel
CH (v)/(A) INPUT
MENU POWER
[] How to adjust the angle
Speaker
I Tilt the display by grabbing onto the
carrying handle while securely holding
dOWnt he stand with y°ur °ther hand J
To change the vertical angle of the LCD TV
set, tilt the screen up to 2.5 degrees forward
or !0 degrees backward. Please adjust
the angle so that the LCD TV set can be
watched most comfortably
OPC (Optical Picture
Control) sensor
Remote sensor
Headphone jack (Q)
Plug the headphone mini_plug into the headphone jack located
on the front of the main unit
OPC (Optical Picture Control) indicator
The OPC indicator lights up green when "OPC" is set to "ON"
(See page 19)
POWER indicator
POWER indicator fights up green when the power is on,
and red when in the standby mode (the indicator will not Rightwhen the main
power is off)
• INPUT, CH (V)f(_%), VOL (-)t(+) and MENU on the main unit have the same functions as the same buttons on the remote control
Fundamentai_y, this operation manual provides a description based on operation using the remote control
1. Plug the headphone mini-plug into the headphone jack located on the front of the main unit
_' On-screen display
VOLUME
10 illlllJtll .............................................
Adjust the sound volume using VOL (+)/(--) on the
remote control
• Headphones are not included in the supplied accessories
• No sound is heard from the main unit speakers when a headphone mini-plug is connected into the headphone jack
_.. • De not set the votome at a high _eve_ Hearing expe_ts advise against extended Iistening at high volume levels J
Page 11
Part Names of the Main Unit (Continued)
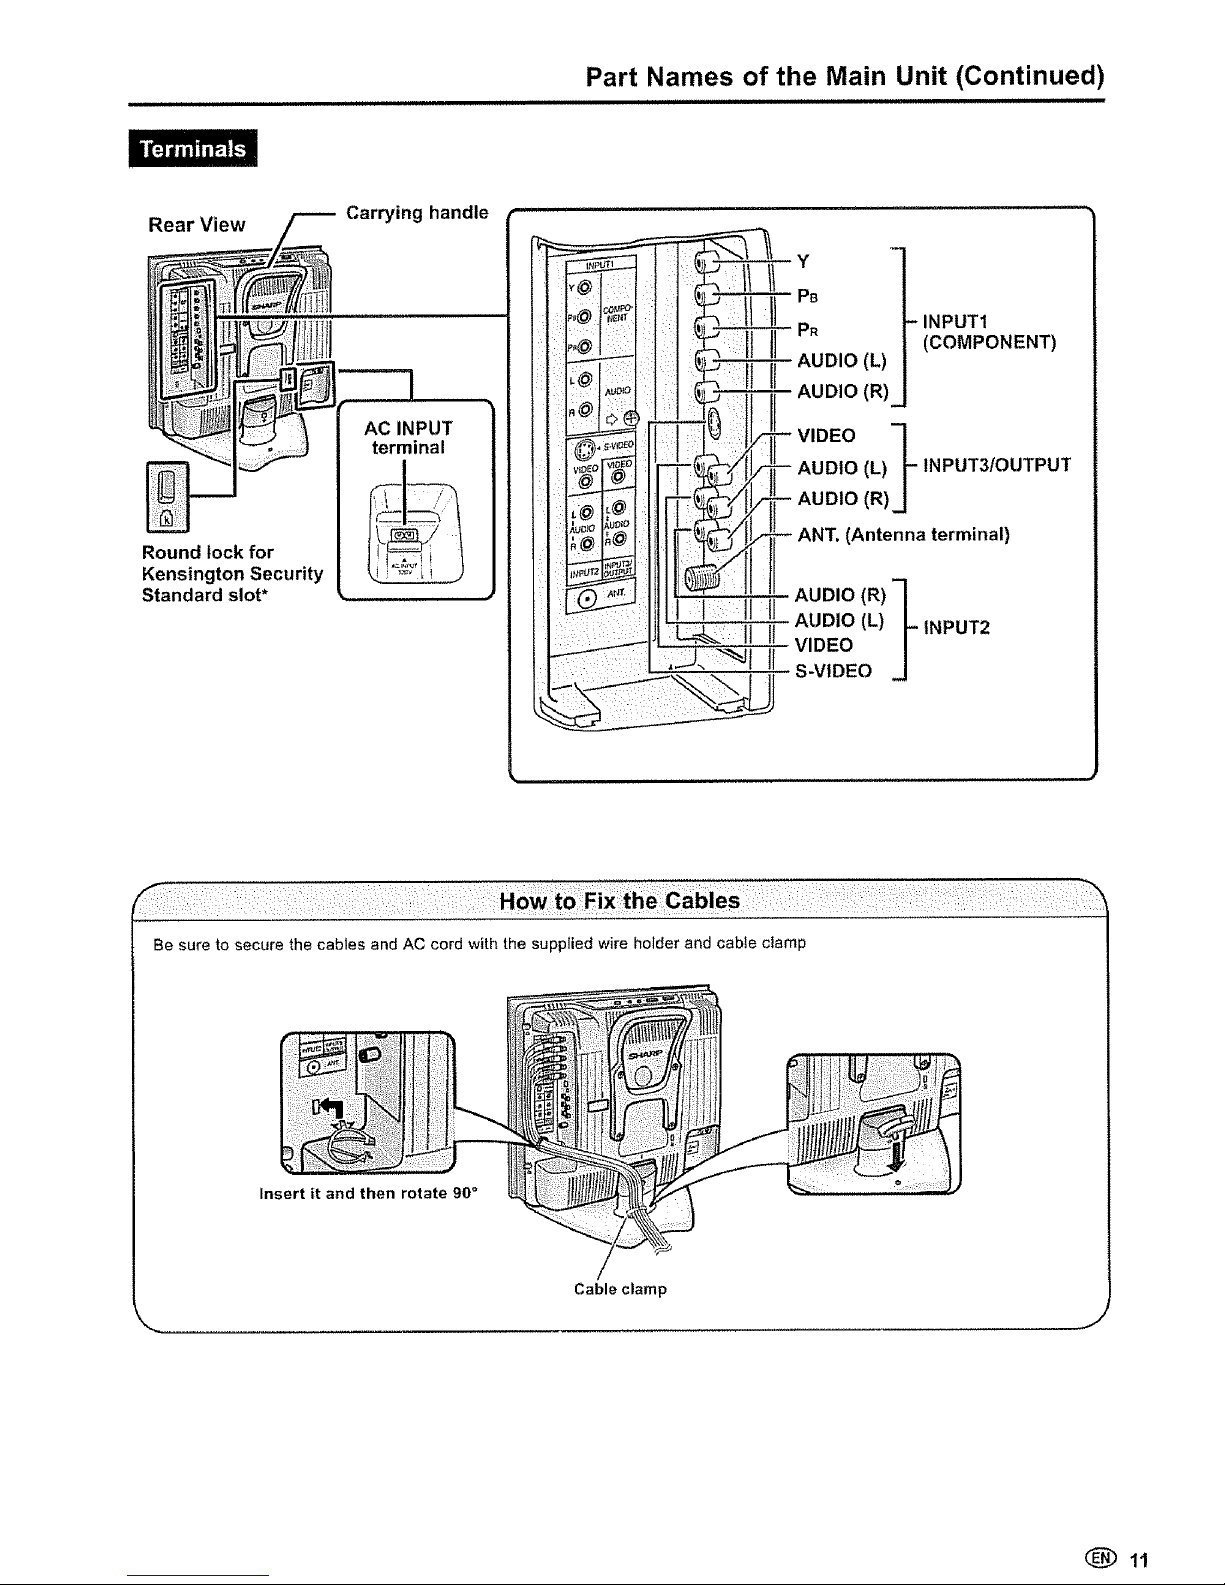
Rear View
Round lock for
Kensington Security
Standard slot*
Carrying handle
AC INPUT
terminal
{L)
AUDIO (R)
INPUT1
(COMPONENT)
(R)(L)_- INPUT3/OUTPUT
(Antenna terminal)
AUDIO (R) __
AUDIO (L) INPUT2
VIDEO
S-VIDEO
Be sure to secure the cables and AC cord with the supplied wire holder and cabie clamp
Insert it and then rotate 90 °
Cable clamp
J
Page 12
Part Names of the Remote Control
U=_lUJI............................
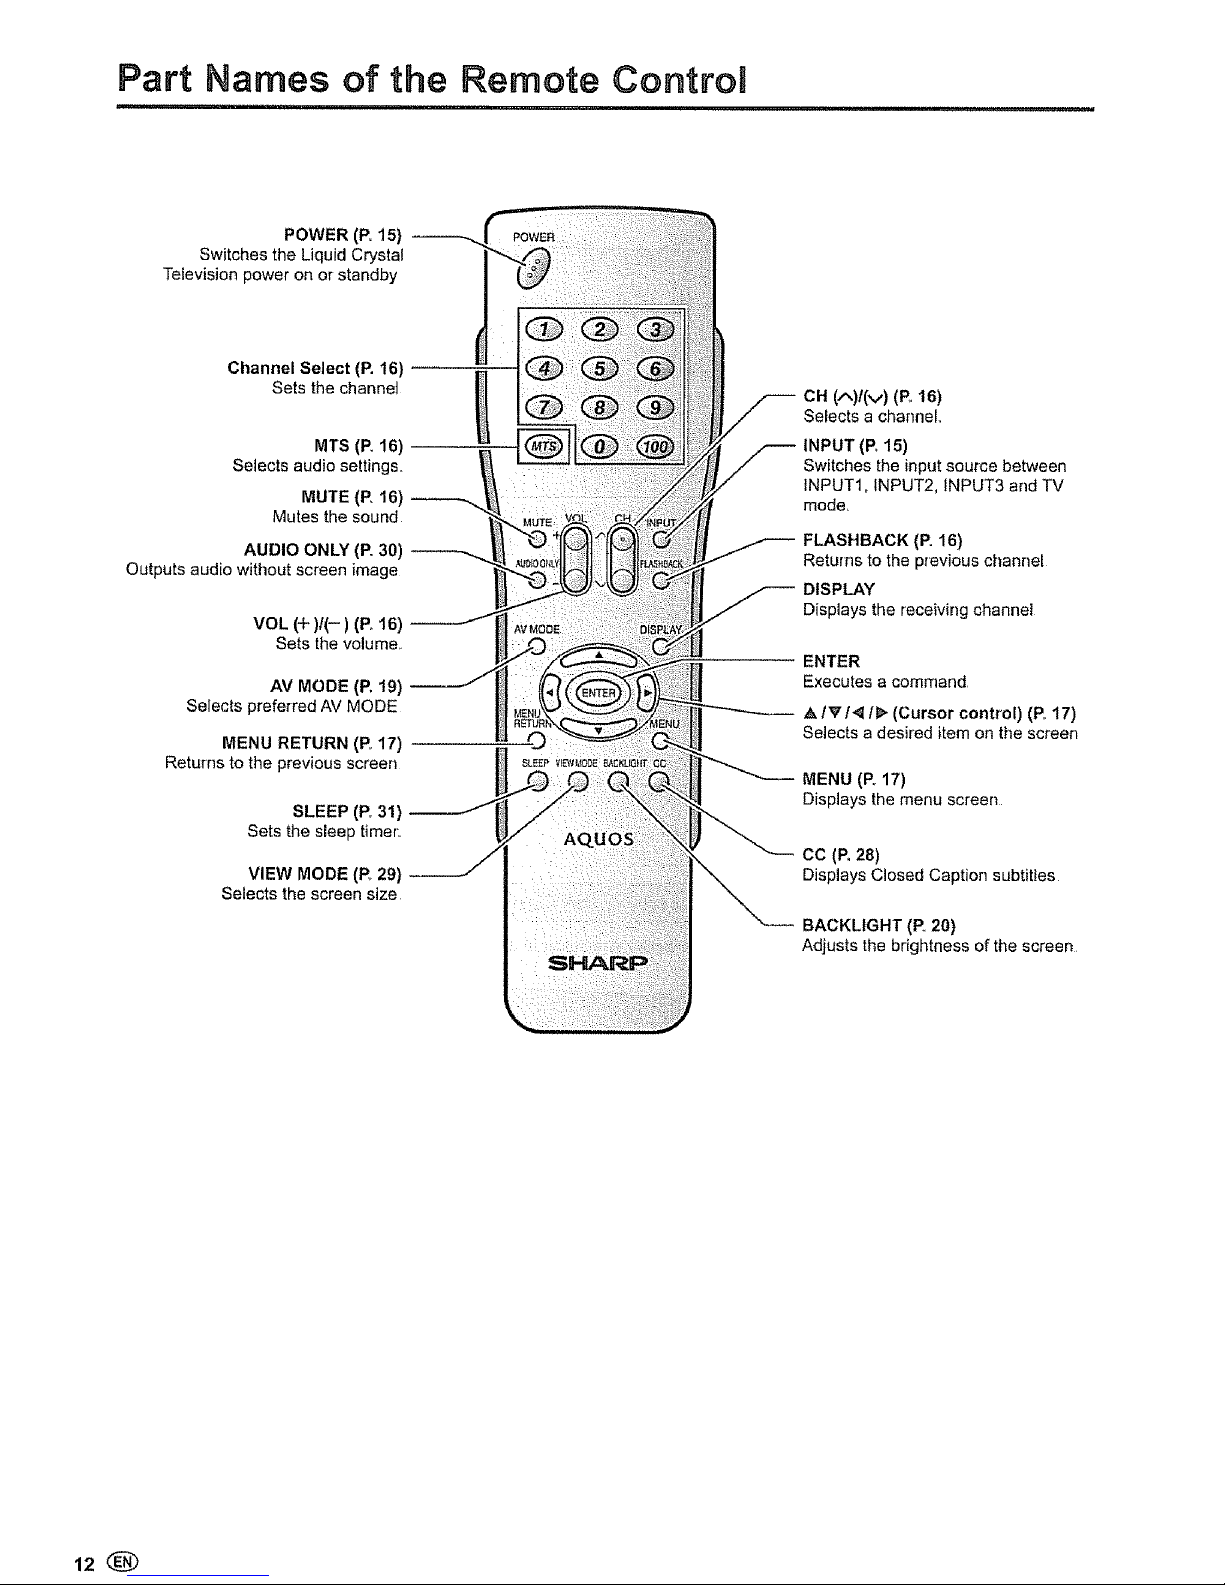
POWER (R 15)
Switches the Liquid Crystal
Television power on or standby
Channel Select (P. 16)
Sets the channeJ
MTS (P. 16)
Setects audio settings_
MUTE (P, 16)
Mutes the sound
AUDIO ONLY (P. 30)
Outputs audio without screen image
VOL (4-)/(- ) (Po16)
Sets the volume,,
AV MODE (P. t9}
Selects prefe{red AV MODE
MENU RETURN (P, 17)
Returns to the previous screen
SLEEP (Po3!}
Sets the sleep timer
VIEW MODE (R 29}
Selects the screen size
CH (A)I(v) (E 16)
Selects a channel
INPUT (Po15)
Switches the input source between
INPUT1, INPUT2, 1NPUT3 and TV
mode,
FLASHBACK (E 16)
Returns to the previous channel
DISPLAY
Displays the receiving channel
ENTER
Executes a command
,&1_14 I!_ (Cursor control) (R 17)
Selectsa desired item on the screen
MENU (Po17)
Displays the menu screen
cc (P.28)
Displays Closed Caption subtitles
BACKLIGHT (R 20)
Adjusts the brightness of the screen
Page 13
Connecting with E×ternaB Devices
= = HHI == =' ='= ::::::::::::::::::::::::::::::::::::::::::::::
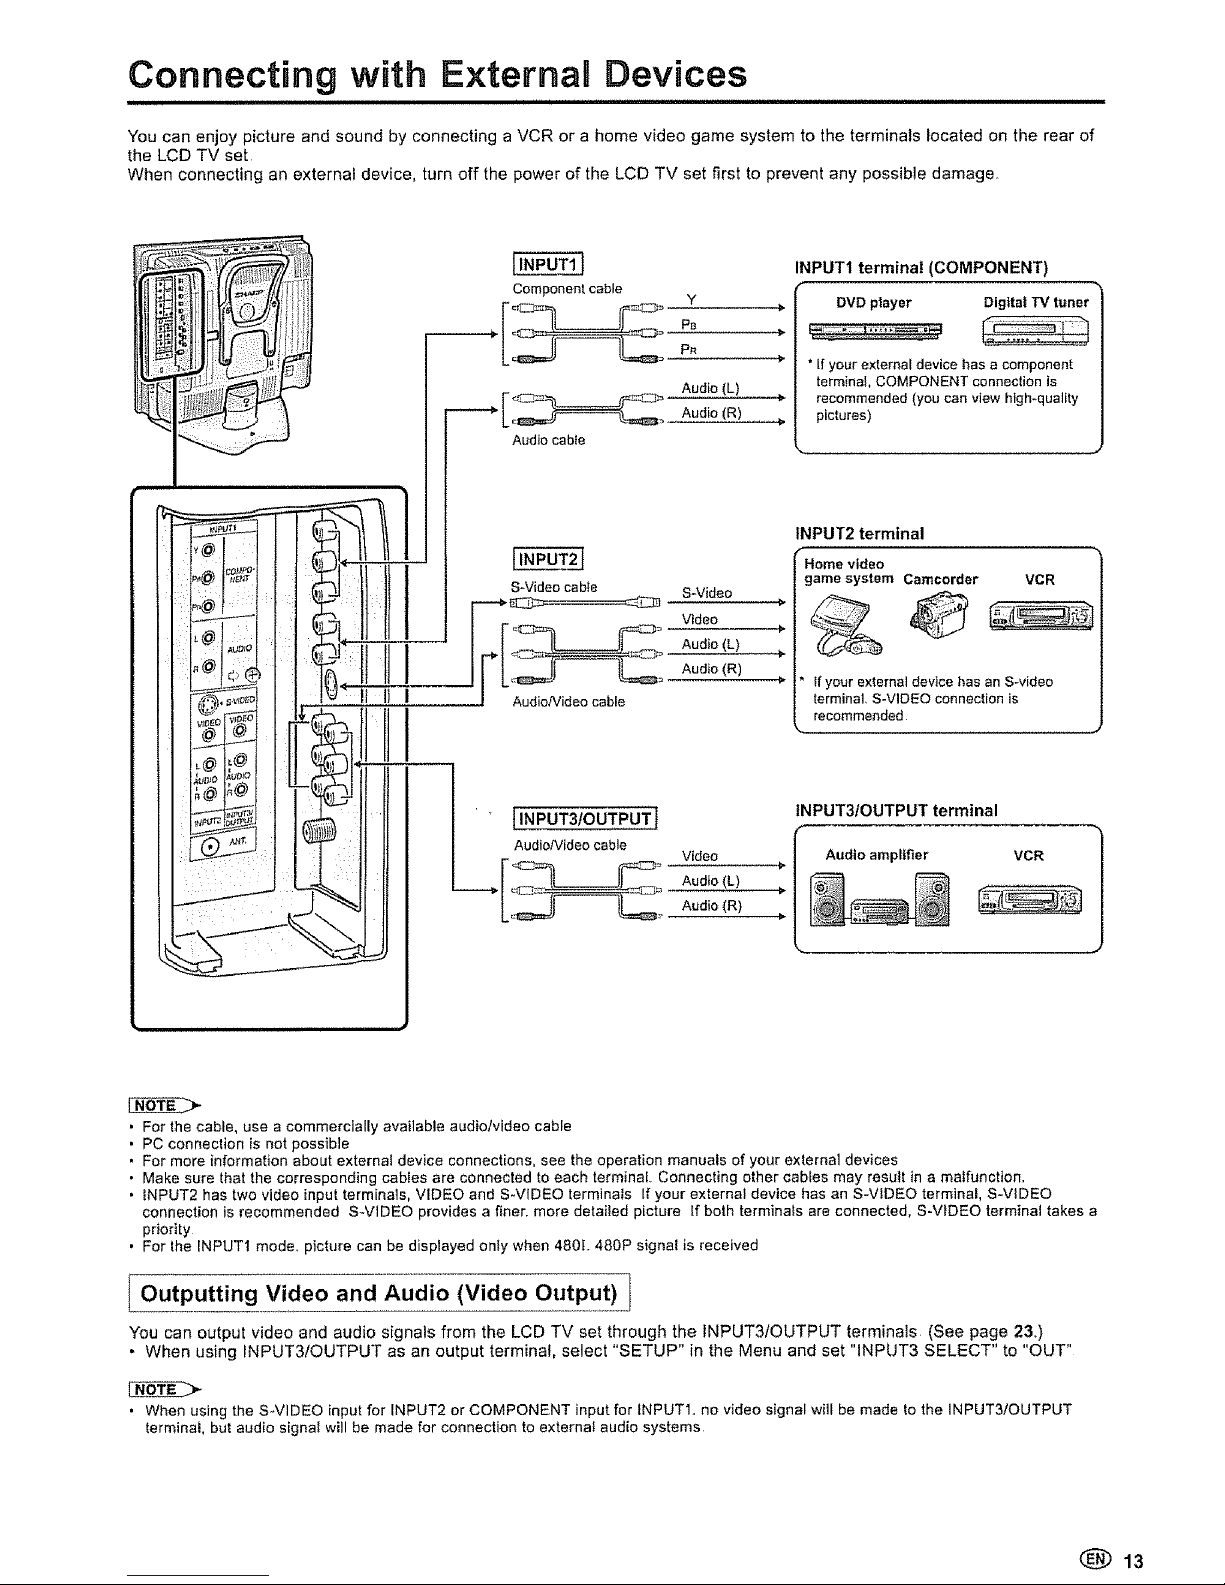
You can enjoy picture and sound by connecting a VCR or a home video game system to the terminals located on the rear of
the LCD TV set
When connecting an external device, turn off the power of the LCD TV set first to prevent any possible damage,
Component cable
Y
P_
P_
Audio(L)
L_-, _--==z_ Audio (R)
Audio cabte
S-Video cabte
S-Video
Video _-
Audio (L)
" . Audio(R)
AudioNideo cable
AudioNideo cable Video _ I
Aod,o .t.
INPUT1 terminal (COMPONENT)
DVD player Dig_ta| TV tuner
* If your external device has a component
terminal, COMPONENT connection is
recommended (you can view high-quality
pictures)
INPUT2 terminal
Home video
game system Camcorder VGR
Ifyour external device has an S-video
terminal, S-VIDEO connection is
recommended
J
tNPUT3/OUTPUT terminal
Audioampl|fler VCR
. For the cable, use a commercially available audio/video cable
• PC connection is not possible
• For more information about externat device connections, see the operation manuals of your external devices
• Make sure that the corresponding cables are connected to each terminal Connecting other cables may resutt in a malfunction,
• INPUT2 has two video input terminals, VIDEO and S-VIDEO terminals If your external device has an S-VIDEO terminal, S-VIDEO
connection is recommended SWtDEO provides a finer, more detailed picture If both terminals are connected, S-VIDEO terminal takes a
priority
• For the INPUT1 mode, picture can be displayed onfy when 480t. 480P signal is received
I Outputting Video and Audio
(Video Output)
You can output video and audio signals from the LCD TV set through the INPUT3/OUTPUT terminals (See page 2&)
• When using INPUT3/OUTPUT as an output terminal, select "SETUP" in the Menu and set "INPUT3 SELECT" to "OUT"
• When using the S-VIDEO input for INPUT2 or COMPONENT input for tNPUTI, no video signal will be made to the INPUT3/OUTPUT
terminal, but audio signat will be made for connection to external audio systems
(_ 13
Page 14
EZ SETUP
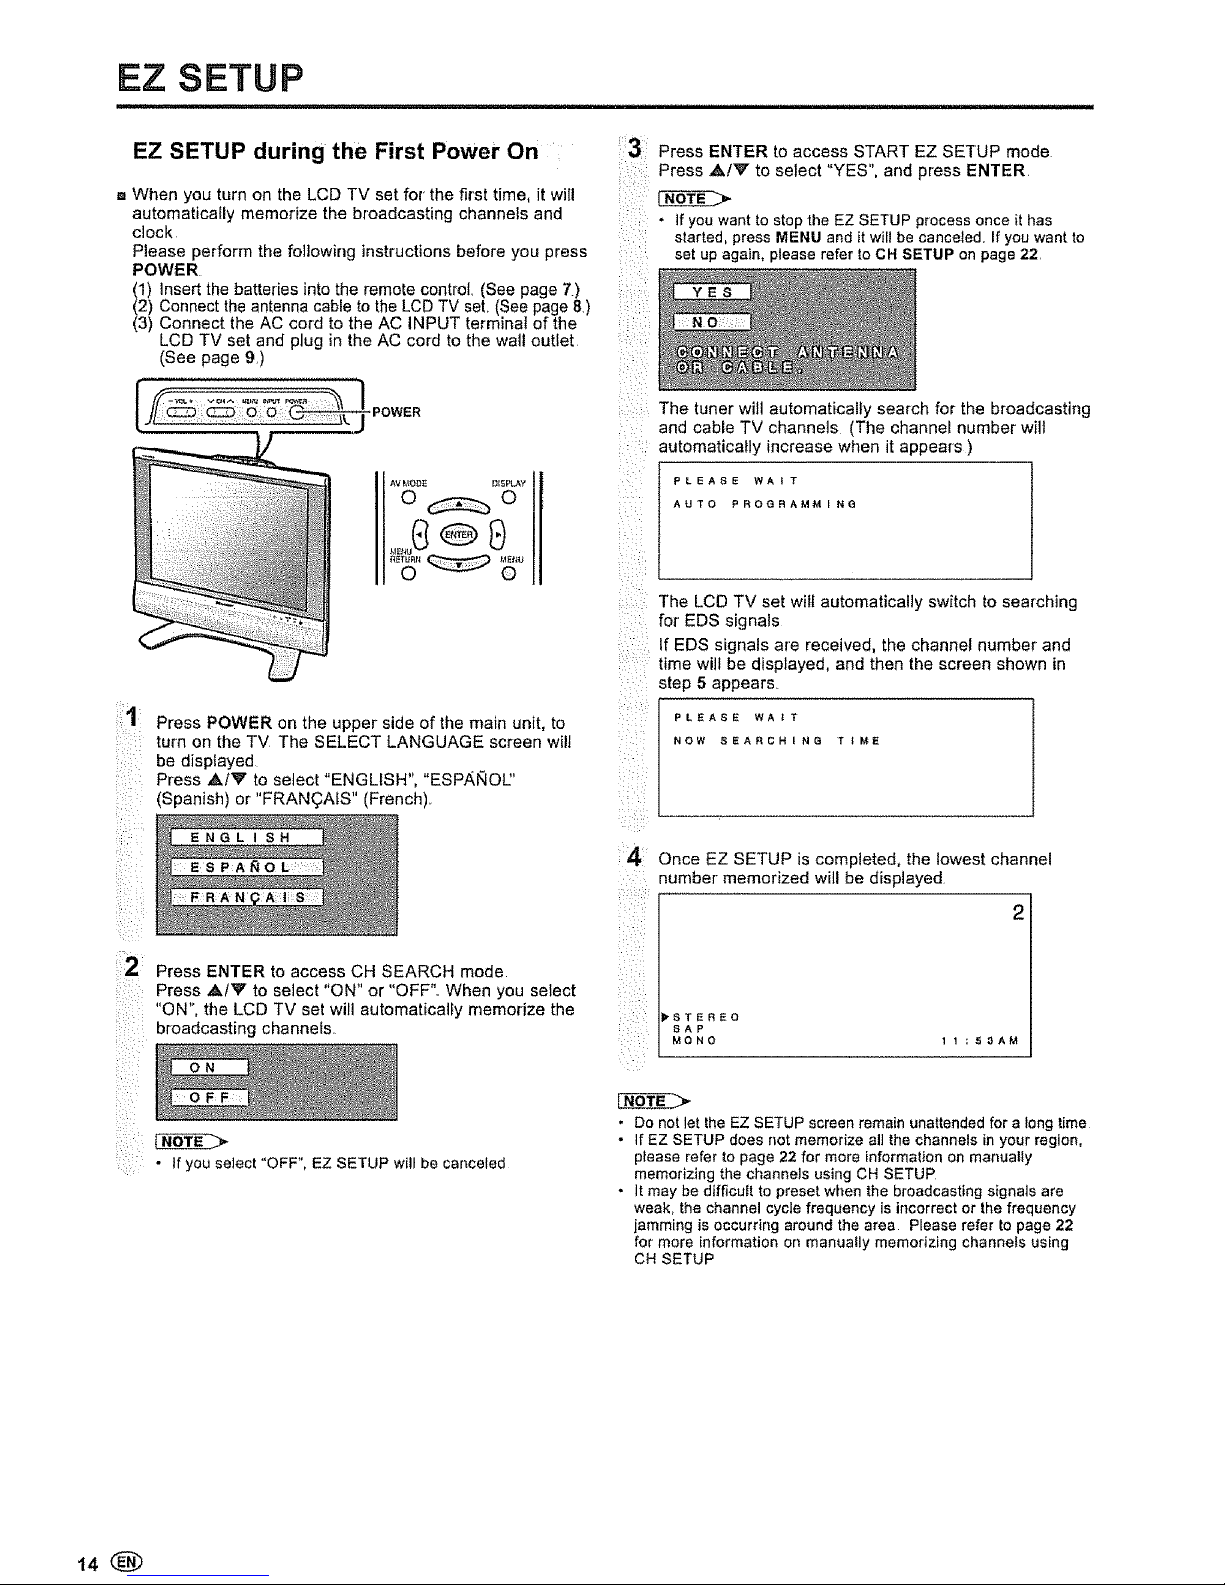
EZ SETUP during the First Power On
m When you turn on the LCD TV set for' the first time, it will
automatically memorize the broadcasting channels and
clock
Please perform the following instructions before you press
POWER
111insert the batteries into the remote controt (See page 7.)
Connect the antenna cable to the LCD TV set, (See page 8,)
(3) Connect the AC cord to the AC INPUT terminal of the
LCD TV set and plug in the AC cord to the wall outlet
(See page 9,)
ii!,1
> •
Press POWER on the upper side of the main unit, to
turn on the TV The SELECT LANGUAGE screen wilt
be displayed
Press ,&iV to select "ENGLISH", "ESPAI_OU'
(Spanish) or "FRAN(_AfS" (French),,
: ESP:AI_OL : :
12
i_iiii:ii:::_i
_i::_i_,I:
,,x
Press ENTER to access CH SEARCH mode
Press ,&iV to select "ON" or "OFF". When you select
"ON", the LCD TV set will automatically memorize the
broadcasting channels
OFF
• if you se]ect "OFF", EZ SETUP willbe canceled
3 Press ENTER to access START EZ SETUP mode
Press ,&/V to select "YES", and press ENTER,
;!
: • If you want to stop the EZ SETUP processonce it has
started, press MENU and it will be canceted, If you want to
set up again, please refer to CH SETUP on page 22
:il
i •:¸I¸!
z ,':
The tuner will automatically search for the broadcasting
and cable TV channels (The channel number will
automatically increase when it appears )
PLEASE WA_T
AUTO PROGRAMMING
The LCD TV set will automatically switch to searching
for' EDS signals
tf EDS signals are received, the channel number and
time will be displayed, and then the screen shown in
step 5 appears
PLEASE WA_
NOW SEARCHING TIME
Once EZ SETUP is completed, the lowest channel
number memorized will be displayed
2
_STEREO
SAP
MONO 11:E_AM
• Do not let the EZ SETUP screen remain unattended for a long time
• If EZ SETUP does not memorize all the channels in your region,
please refer to page 22 for more information on manually
memorizing the channels using CH SETUP
• It may be difficult to preset when the broadcasting signals are
weak, the channel cycle frequency is incorrect or thefrequency
jamming is occurringaround the area Please refer to page 22
for more information on manually memorizing channels using
CH SETUP
14
Page 15
Basic Operation
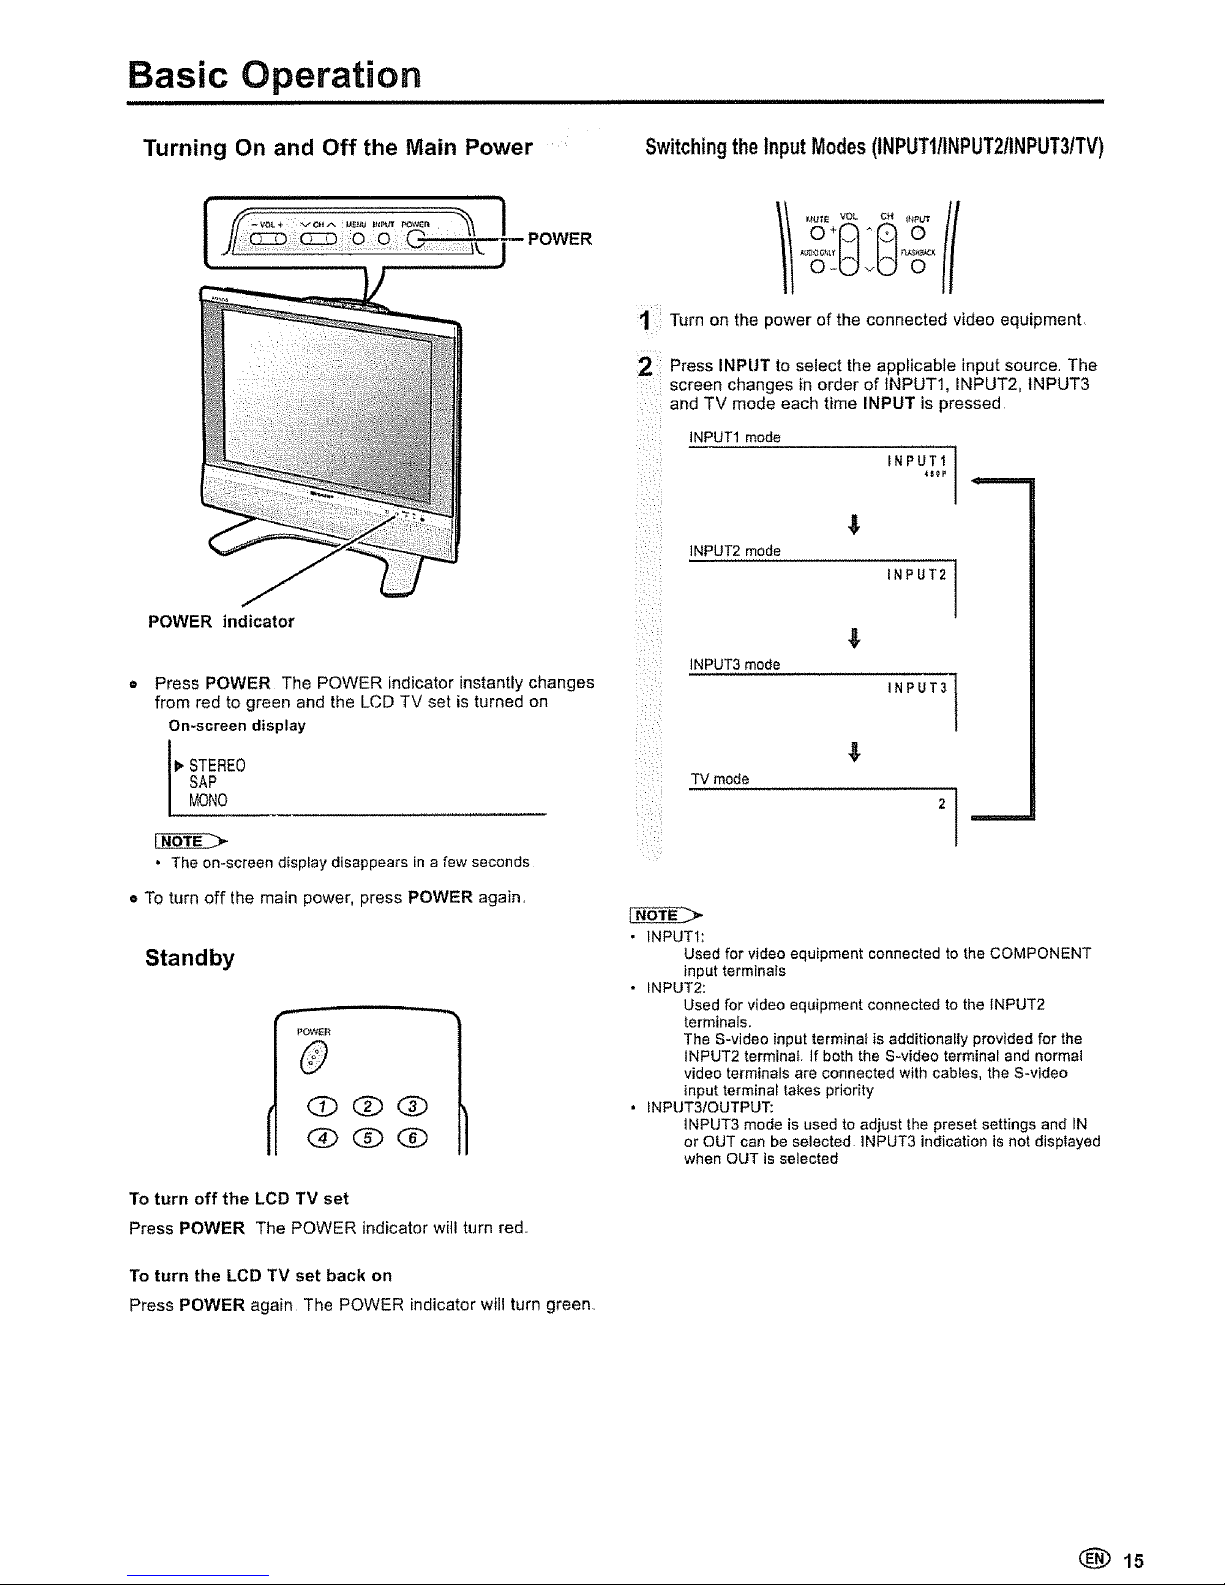
Turning On and Off the Main Power
Switchingthe InputModes(INPUT1/INPUT2/INPUT3/TV)
POWER
POWER indicator
Press POWER The POWER indicator instantly changes
from red to green and the LCD TV set is turned on
On-screen display
1_ TEREO
SAP
MONO
• The on-screen display disappears in a few seconds
o To turn off the main power, press POWER again.
Standby
POWER
0
O0(i)
(g) QQ
To turn off the LCD TV set
Press POWER The POWER indicator wi]l turn red.
To turn the LCD TV set back on
Press POWER again The POWER indicator will turn green.
1
_ii _,
k'i :_iI
Turn on the power of the connected video equipment
Press INPUT to select the applicable input source. The
screen changes in order of INPUT1, INPUT2, 1NPUT3
and TV mode each time INPUT is pressed
INPUT1 mode
INPUTI
lNPUT2 mode
INPUT2
INPUT3 mode
]
INPUT3
TV mode
2 I
• INPUT1:
Used for video equipment connected to the COMPONENT
input terminals
• INPUT2:
Used for video equipment connected to the INPUT2
terminals.
The S-video input terminal is additionally provided for the
tNPUT2 terminal if both the S-video terminal and normal
video terminals are connected with cables, the S-video
input terminal takes priority
. INPUT3IOUTPUT:
lNPUT3 mode is used to adjust the preset settings and IN
or OUT can be selected INPUT3 indication is not displayed
when OUT is selected
(_ 15
Page 16
Basic Operation (Continued)
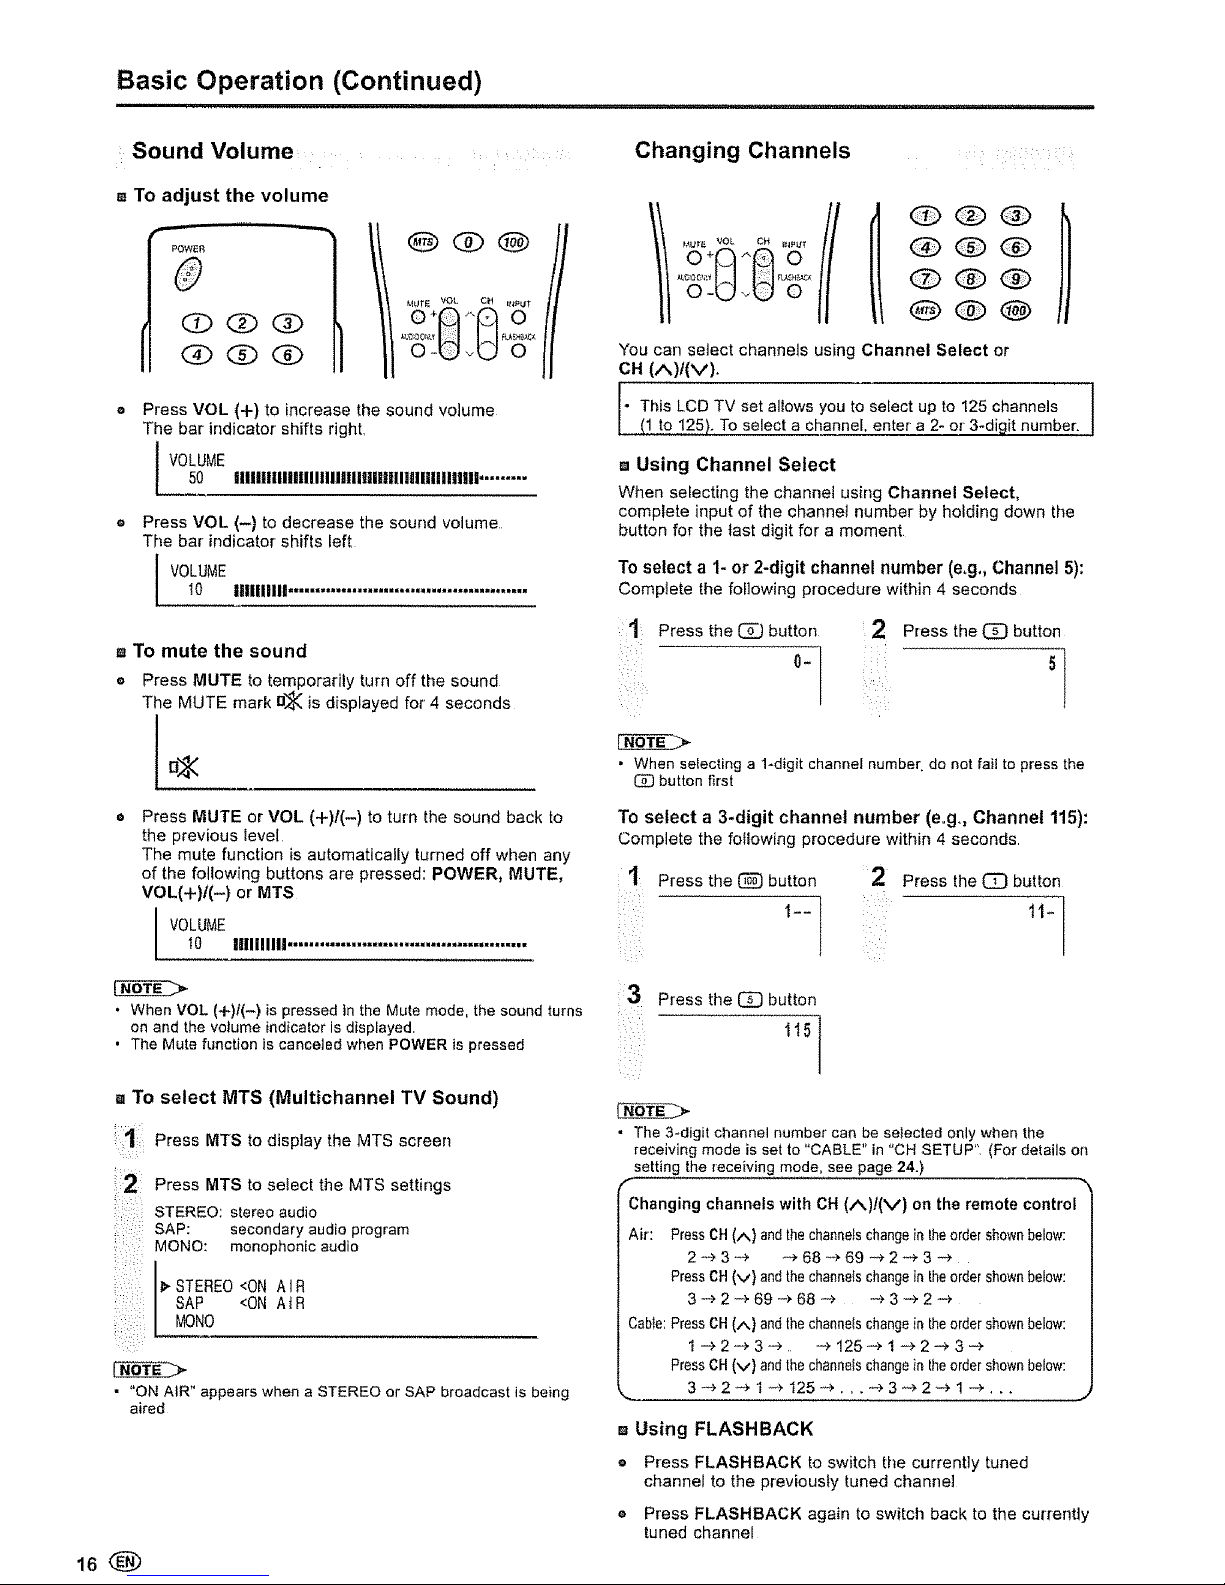
Sound Volume ....
a To adjust the volume
POWER
0
0(i)(i)
(g) (i)
4UTE VOL CH IPI_UT
o+A ,A o
Press VOL (+) to increase the sound volume
The bar indicator shifts right.
VOLUME
50 UlIlUUliUlllIlIIJllIllilIlIllalIIUllUlli .........
Press VOL (-) to decrease the sound volume
The bar indicator shifts left
L VOLUME10 I11111111!.............................................
m To mute the sound
o Press MUTE to temporarily turn off the sound
The MUTE mark n_l_is displayed for' 4 seconds
Changing Channels ....
OQO
QOQ
OQQ
You can select channels using Channel Select or
CH(^)l(v).
I
• Tis LCD TV set allows you to select up to 125 channels ]
Mhto 125). To select a channel, enter a 2-or 3-digit number.
I
m Using Channel Select
When selecting the channel using Channel Select,
complete input of the channel number' by holding down the
button for the last digit for a moment
To select a 1- or 2-digit channel number (e+g,,Channel 5):
Complete the following procedure within 4 seconds
:1' Press the _ button
0-
Press the _ button
5
Press MUTE or VOL (+)/(-) to turn the sound back to
the previous ieve[
The mute function is automatically turned off when any
of the following buttons are pressed: POWER, MUTE,
VOL(+)I(-) or MTS
l VOLUMEt0 Illlilllll .............................................
• When VOL (+)I(-) is pressed in the Mute mode, the sound turns
on and the volume indicator is displayed.
• The Mute function is canceled when POWER is pressed
a To select MTS (Multichannel TV Sound)
1
i12
_LU(, _,
_:IL:: ¸
Press MTS to display the MTS screen
Press MTS to select the MTS settings
STEREO: stereo audio
SAP: secondary audio program
MONO: monoptlonic audio
l> STEREO<ON AIR
SAP <ON At R
MONO
• "ON AIR" appears when a STEREO or SAP broadcast is being
aired
• When selecting a 1*digit channel number do not fail to press the
button first
To select a 3-digit channel number (e.g,, Channel 115):
Complete the following procedure within 4 seconds
1 Press the (_) button 2 Press the _ button
1t-
;3 Press the _ button
i :i
115
• The 3-digit channel number can be selected only when the
receiving mode is set to "CABLE" in "CH SETUP", (For details on
setting the receiving mode, see page 24.)
f
Changing channels with CH (A)/(V) on the remote control
Air: PressCH(/,.) andthechannelschangein theordershownbelow:
2-_ 3--+ _ 68 +_"69 "e 2 _" 3 -*
PressCH(v} andthechanne{schangein theordershownbelow:
3 -> 2 -_,69 -_ 68 _ _ 3 _, 2
Cable:PressCH(/,,) andthechannelschangein theordershownbelow:
1-+2_3-_, -_ 125-+ 1 -+-2-_ 3 _
PressCR(v} andthechannelschangein theordershownbelow:
,, Using FLASHBACK
• Press FLASHBACK to switch the currently tuned
channel to the previously tuned channel
= Press FLASHBACK again to switch back to the currently
tuned channel
Page 17
Basic Operation (Continued)
= nnmmH,= === ::::::::::::::::::::::
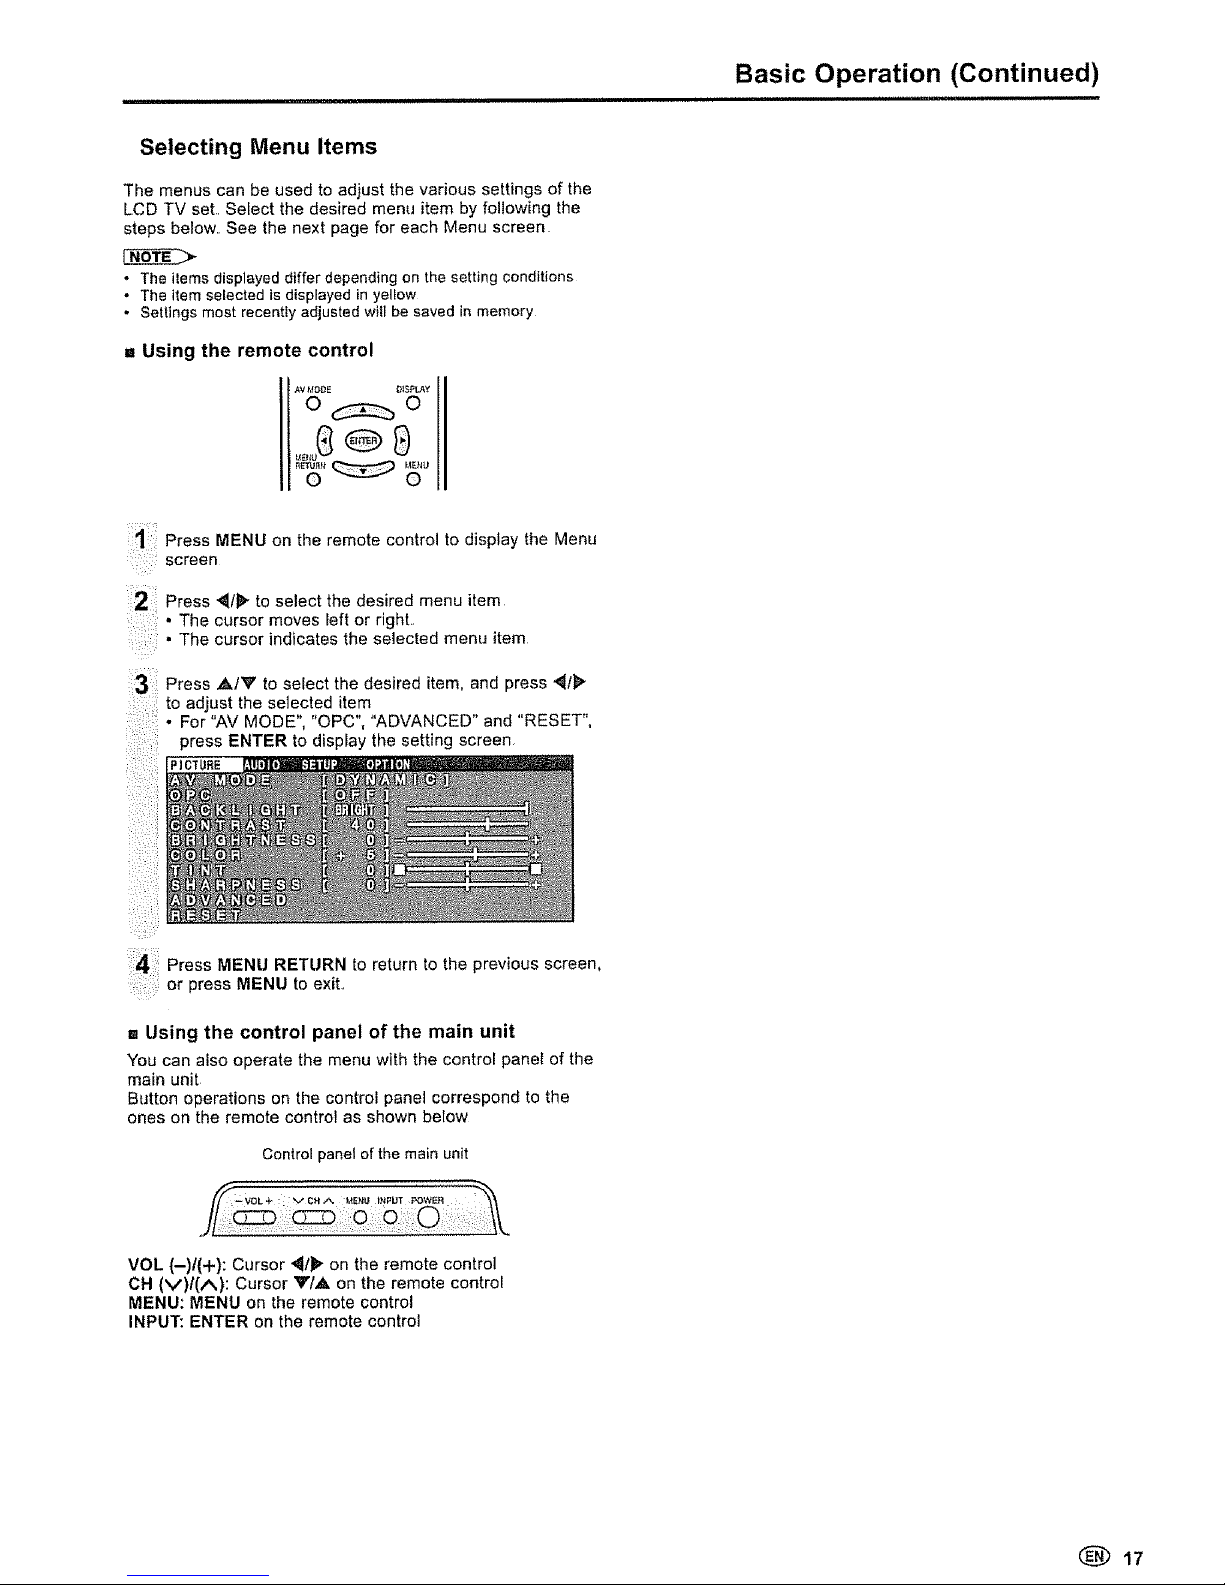
Selecting Menu Items
The menus can be used to adjust the various settings of the
LCD TV set., Select the desired menu item by following the
steps below, See the next page for each Menu screen
. The items displayed differ depending on the setting conditions
• The itemselected is displayed in yeltow
• Settings most recently adjusted witl be saved in memory
,, Using the remote control
Press MENU on the remote control to display the Menu
screen
Press _t_ to select the desired menu item
• The cursor moves left or right,,
: • The cursor indicates the selected menu item
Press ,&IV to select the desired item, and press '_tl>"
to adjust the selected item
For-AVMOOE","OPC","AOWNCEO"and"RESET",
press ENTER to display the setting screen,
Press MENU RETURN to return to the previous screen,
or press MENU to exit,,
m Using the control panel of the main unit
You can also operate the menu with the control panel of the
main unit
Button operations on the control panel correspond to the
ones on the remote control as shown below
Control panel of the main unit
VOL (-)/(+): Cursor '_1_- on the remote control
CH (V)/(A): Cursor VIA on the remote control
MENU: MENU on the remote control
INPUT: ENTER on the remote control
(_) 17
Page 18

Basic Operation (Continued)
i i
,_ Menu setting screens
For details on setting each menu item, refer to the page number indicated below
• The illustrations and on-screen displays in this manual are for explanation purposes and may vary slightly from the actual
appearance_
° Depending on the setting condition, such as an inputmode, it may not be possible to adjust orset some items In such cases, the alert
message (Example: NOT AVAILABLE WiTH THiS SIGNAL ) is displayed on the menu setting screen
PICTURE
Page
AV MODE ................................................. 19
OPC .............................................................. 19
BACKLIGHT ................................................ 20
CONTRAST ............................................ 20
BRIGHTNESS .................................................. 20
COLOR .................................................. 20
TiNT .............................................................. 20
SHARPNESS .................................................... 20
ADVANCED ................................................ 21
RESET ......................................... 20
/k
_ ENTER_RETUBN_,I_]_MENuR_L_:_
The bar above is an operational guide for the remote |
control, The bar will change in accordance with |
each menu setting screen. J
AUDIO
Page
TREBLE ................................................... 21
BASS ................................................................... 21
BALANCE ........................................................... 21
RESET ............................................................... 21
SETUP
Page
CH SETUP ...................................................... 22
MTS ............................................... 16, 23
INPUT3 SELECT ............................................... 23
V-CHIP BLOCK ........................................... 24-27
CLOSED CAPTION ........................................... 28
LANGUAGE ...................................... 14, 23
OPTION
Page
VIEW MODE ............................................. 29
AUDIO ONLY .............................................. 30
BLUE SCREEN ............................................... 30
SLEEP TIMER ............................................... 3t
NO SIGNAL OFF ............................................ 31
NO OPERATION OFF ......................................... 31
PICTURE FLIP .................................................. 32
18
Page 19
Basic Adjustment Settings
..................... , ,,, ,,,,,,,,,,,r,,,r,,,,,,.,,,,,.,,r,,,,,,,,,,,,,,,
AV MODE OPC
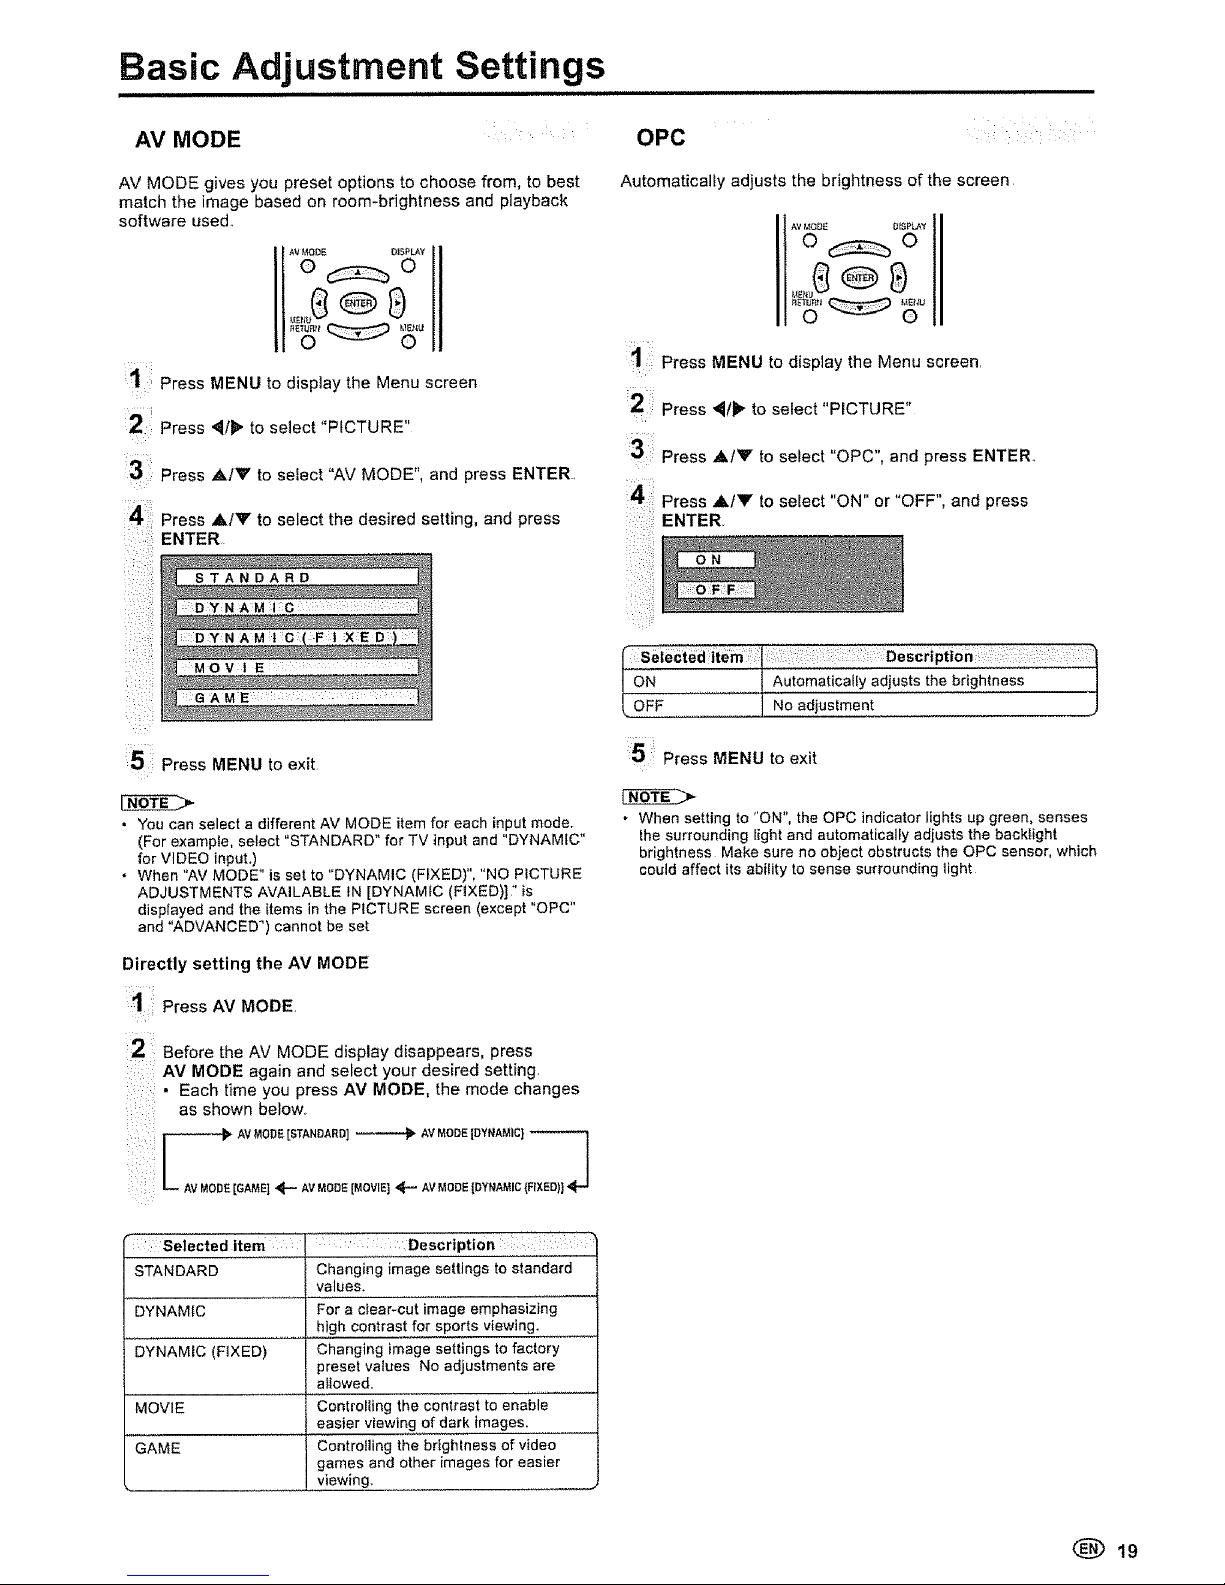
AV MODE gives you preset options to choose from, to best
match the image based on room-brightness and playback
software used.,
AV MODE DISPIp_-Y
o_o
1:= Press MENU to display the Menu screen
Press '_t_ to select "PICTURE"
3: Press `&/V to select "AV MODE", and press ENTER.
4' Press A/y to select the desired setting, and press
ENTER
i : !_i
i;
::: DYNAM F t XED !
v,
::GAME :
:5 Press MENU to exit
• You can select a different AV MODE item for each input mode.
(For example, select "STANDARD" for TV input and "DYNAMIC"
for VIDEO input.)
• When "AV MODE" is set to "DYNAMIC (FIXED)", "NO PICTURE
ADJUSTMENTS AVAILABLE IN [DYNAMIC (FIXED)]" is
displayed and the items in the PICTURE screen (except "OPC"
and "ADVANCED") cannot be set
Directly setting the AV MODE
11 Press AV MODE
2 Before the AV MODE display disappears, press
AV MODE again and select your desired setting.
• Each time you press AV MODE, the mode changes
as shown below..
AVMODE[GAME]_'-- AVMODE[MOVIE]_ AVMODEIDYNAMIC{FIXED]]
Automatically adjusts the brightness of the screen
1
:3•!11
_i__'ii:I
AV MOgE D_SPIAY
o_o
Press MENU to display the Menu screen.
Press _/_" to select "PICTURE"
Press ,&IV to select "OPC", and press ENTER..
Press ,a/V to select "ON" or "OFF", and press
ENTER,
_ltem:::i :: :::i : :: ,Description: :::::i :: _
ON I Aut0maticaliY adjusts thebrightness
,OFF......... . Noadiustment _______J
5 :: Press MENU to exit
• When setting to "ON", the OPC indicator lights up green, senses
{he surrounding light and automatically adjusts the backlight
brightness Make sure no object obstructs the OPC sensor, which
could affect its ability to sense surrounding light
';Selected item Description
STANDARD Changing image settings to standard
values.
DYNAMIC For a clear-cut image emphasizing
high contrast for sports viewing.
DYNAMIC (FtXED) ......... Changing image settings to factory
preset values No adjustments are
allowed,
MOVIE Controlling the contrast to ena'bie .............
easier viewing of dark images.
GAME Controlling the brightness of video
games and other images for easier
viewing.
19
Page 20
Basic Adjustment Settings (Continued)
i iiiii i ..............................................
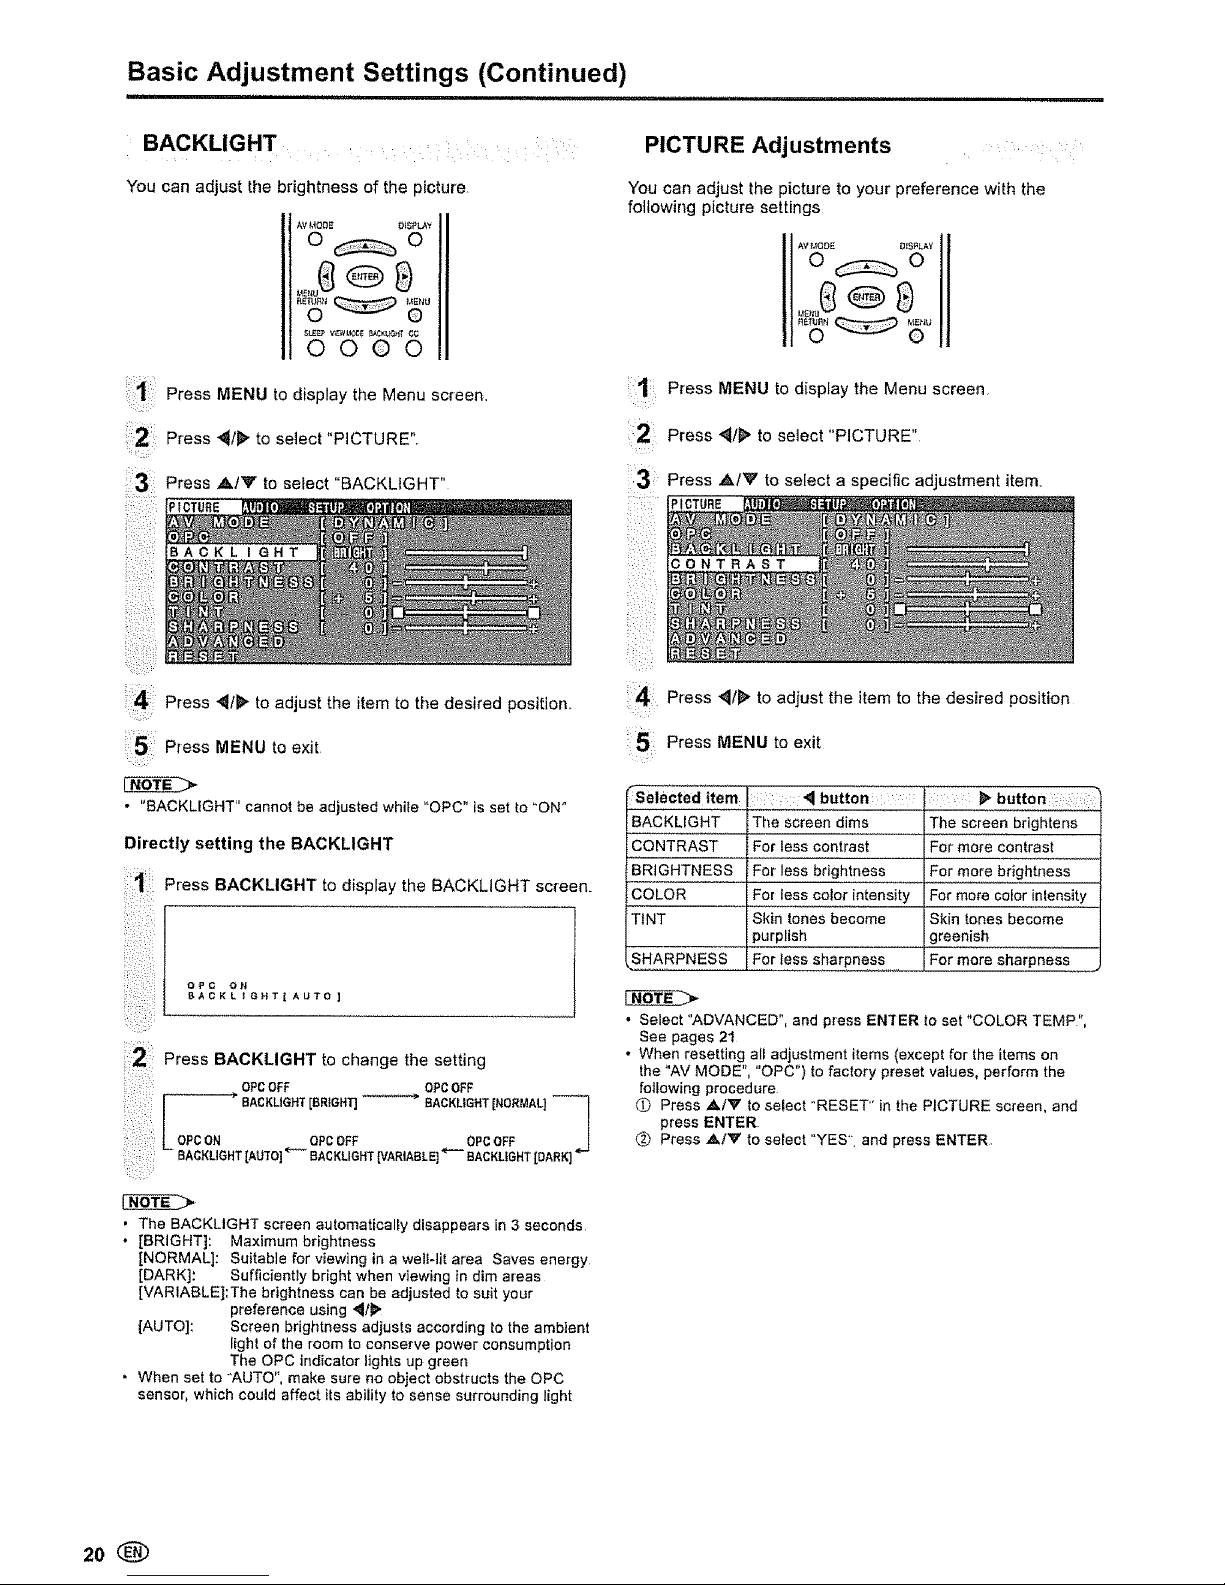
BACKLIGHT ....
You can adjust the brightness of the picture
AV MODE OISPLAY
o_o
0000
Press _111_"to adjust the item to the desired position,,
P_ess MENU to exit
• "BACKLIGHT" cannot be adjusted while "OPC" is set to "ON"
Directly setting the BACKLIGHT
Press BACKLIGHT to display the BACKLIGHT screen.
OPC O_'4
BAGKL t GHT| AUTO ]
';i,!ii:i!_i,i
:2 Press BACKLIGHT to change the setting
OPCOFF OPCOFF
--"""-_ BACKLIGHT[BRIGHT] BACKLIGHT[NORMAL]--_
OPCON OPCOFF OPCOFF
- BAORLIGHT[AUTO]_ BACKLIGHT[VARIABLE]*'-" BACRLfGHT[DARK]_'_
NO__TE_7>
, The BACKLIGHT screen automatically disappears in 3 seconds
• [BRIGHT]: Maximum brightness
[NORMAL]: Suitable for viewing in a well-lit area Saves energy
[DARK]: Sufficiently bright when viewing in dim areas
[VARIABLE]:The brightness can be adjusted to suit your
preference using '_/_"
[AUTO]: Screen brightness adjusts according to the ambient
light of the room to conserve power consumption
The OPC indicator lights up green
° When set to "AUTO", make sure no object obstructs the OPC
sensor, which could affect its ability to sense surrounding light
PICTURE Adjustments
You can adjust the picture to your preference with the
following picture settings
2!
!i¸¸¸•3
Press MENU to display the Menu screen
Press _I_' to select "PICTURE"
Press ,A/V to select a specific adjustment item,
PICTURE
Press _l_ to adjust the item to the desired position
5 Press MENU to exit
selected item : ::_1 button
t ........
BACKLIGHT The screen dims
CONTRAST
BRIGHTNESS
COLOR
TINT
SHARPNESS
For less contrast
For less brightness
For less color intensity
Skin tones become
purplish
For less sharpness
button::
The screen Brigh{e}is
For more contrast
For more bMghmess
For more color inlensity
Skin tones become
greenish
For more sharpness
• Select "ADVANCED", and press EN'tER to set "COLOR TEMP",
See pages 21
• When resetting all adjustment items (except for the items on
the "AV MODE", "OPC") to factory preset values, perform the
following procedure
_) Press ,&iV to select "RESET" in the PICTURE screen, and
press ENTER
_) Press A/V to select "YES" and press ENTER,
20
Page 21

Basic Adjustment Settings (Continued)
i i i i i i
COLOR TEMPERATURE
AUDIO Adjustments
You can adjust the color temperature to give a better white
balance
You can adjust the sound quality to your preference with the
following settings
AVMOD_ [_ESP_Y
o_o
AV _,IODE OI_PLAY
o_o
1 Press MENU to display the Menu screen
Press _1t_- to select "PICTURE".
3 Press ._.IY to select "ADVANCED", and press ENTER
O V A N 0 E D
z
Press ,&IV to select "COLOR TEMP", and press
ENTER
COLOR TEMP, '....... _.....
R E D ]
GREE N :[ :0 ]
B LU E [ :0 ]
R ES:E :
;: : M I DD L:E
5 Press ,&/'V" to select the desired item, and press
ENTER
6 Press MENU to exit
USER Can set your desired color*
HIGH White with bluish tone
MIDDLE l
LOW White with reddish tone
* When you select "USER", the following items are adjustable
BLuEGREENREDItem]l!! WeakerWeake'r'greenWeaker_lredbluebUtt°n [ StrongerSir0ngerStr°ngerbutt0nbluegreenred: ::_j!/
. When resetting the items in the "USER setting to factory preset
vatues, perform the following procedure
Press _./Y to select "RESET" in the ADVANCED screen, and
press ENTER
¢_') Press A/Y to select "YES", and press ENTER
i =
21
Press MENU to display the Menu screen
Press _t1_ to select "AUDIO"°
Press ,&IV to select a specific adjustment item.,
41
S!
Press _t_" to adjust the item to the desired position
Press MENU to exit
selected item button ;:: :: _,button : ;:
TREBLE For weaker treble For stronger treble
BASS For weaker bass For stronger bass
BALANCE Decrease audio from Decrease audio from
the right speaker the left speaker .
• The items on the AUDIO menu cannot be set when "INPUT3
SELECT" is set to "OUT a)il_VAO",
• When resetting all adjustment items to factory preset values,
perform the following procedure
0 Press ,&IY to select "RESET", and press ENTER
(9 Press AI'V" to select "YES", and press ENTER
(_) 21
Page 22
Useful Features
CH SETUP
,,,EZ SETUP
When you move to an area with different broadcasting
signals, you may have to set the channel numbers and the
time with the EZ SETUP function To activate EZ SETUP,
perform the following procedure.
O Press ,&IV toselect "CH SETUP' in the SETUP screen (see
page 18). and press ENTER.
_._Press ,&/V to se ect "EZ SETUP". and press ENTER
(_ Press ,&IV to se ect "YES". and press ENTER
Refer to page 14 for more information on EZ SETUP 3
!
a Setting the AIRICABLE
It is necessary to set the receiving mode to AfR or CABLE
channels to receive locally broadcast TV programs
1,
i3
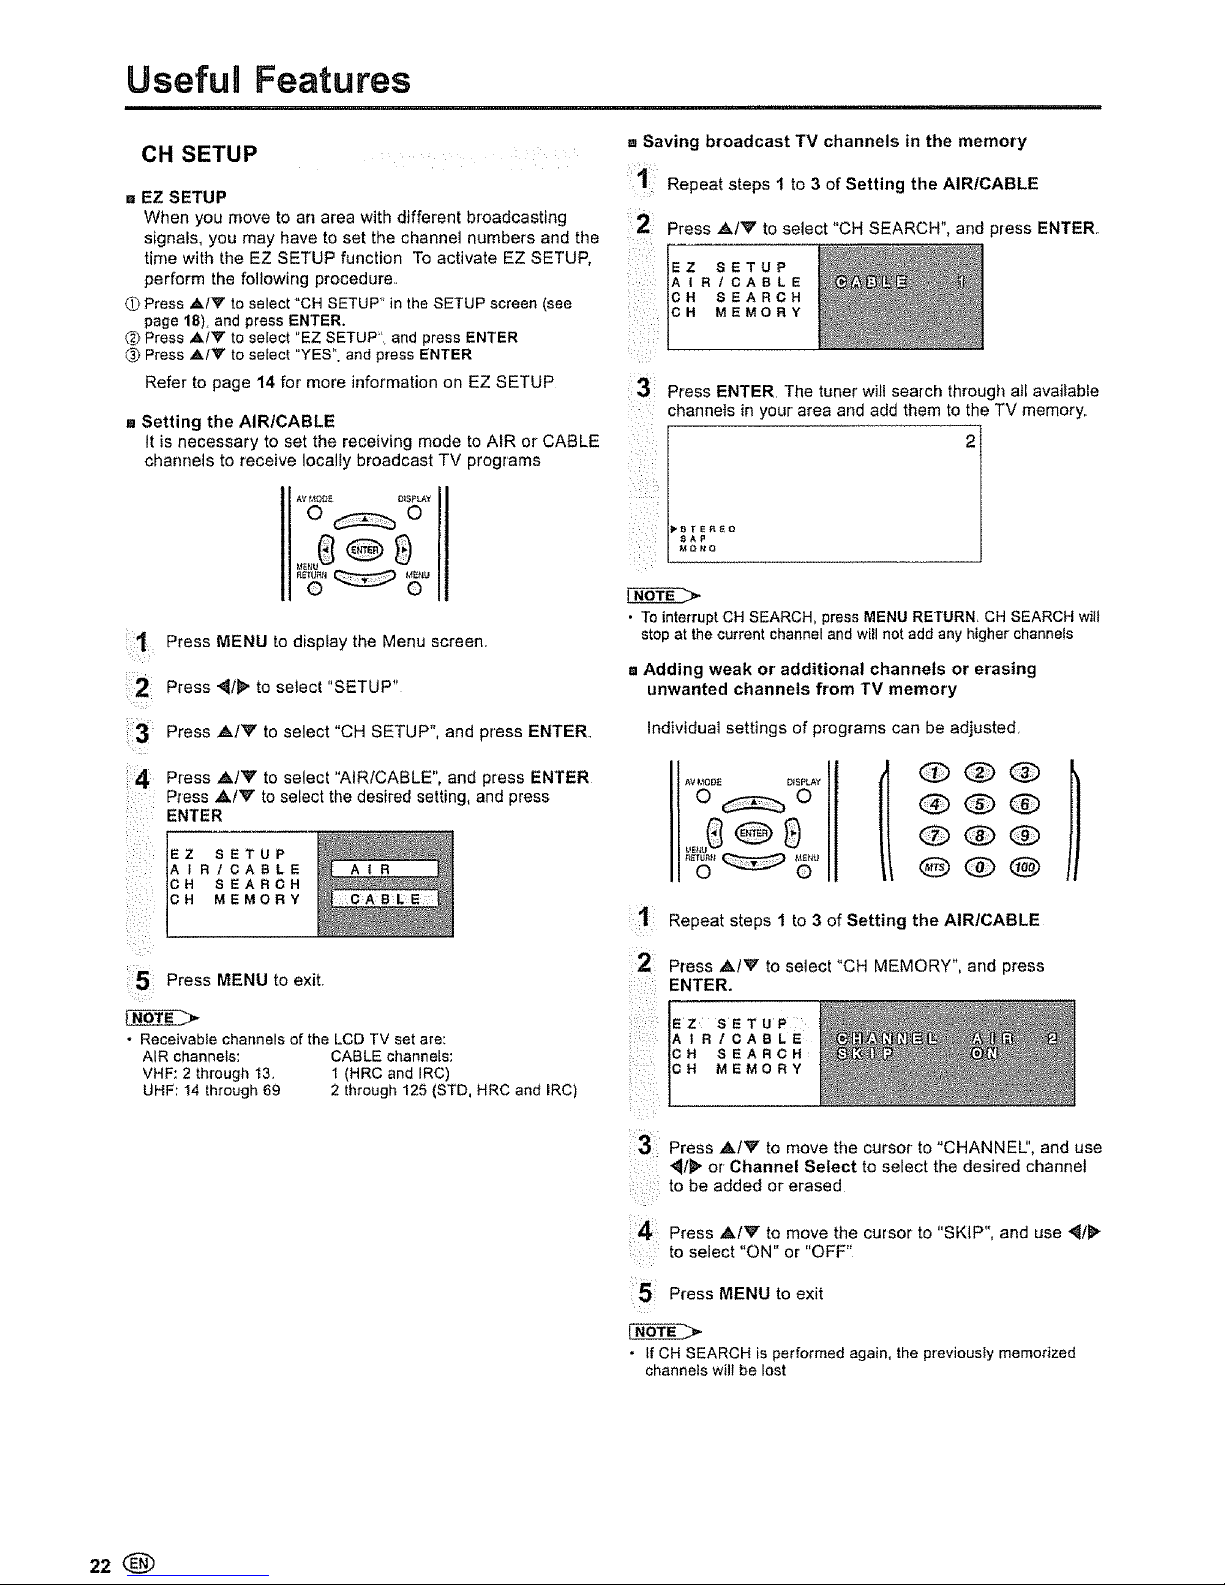
Press MENU to dispiay the Menu screen.
Press ._/_ to select "SETUP"
Press A/V to select "CH SETUP", and press ENTER.
Press A/V to select "AIR/CABLE", and press ENTER
Press A/V to select the desired setting, and press
ENTER
Z SETUP
IR/CABLE
H SEARCH
H MEMORY
5 Press MENU to exit.
* Receivable channels of the LCD TV set are:
AIR channels: CABLE channels:
VHF: 2 through13. 1 (HRC and IRC)
UHF: 14 through69 2 through 125 (STD, HRC and IRC)
,_Saving broadcast TV channels in the memory
Repeat steps 1 to 3 of Setting the AIR/CABLE
Press A/V to select "CH SEARCH", and press ENTER.
Z SETUP
IR/CABLE
H SEARCH
H MEMORY
Press ENTER The tuner will search through at[ available
channels in your area and add them to the TV memory.
_B_ER£O
SA9
MQNQ
• To interrupt CH SEARCH, pressMENU RETURN. CH SEARCH wilt
stop at the current channel and will not add any higherchannels
'! Adding weak or additional channels or erasing
unwanted channels from TV memory
Individual settings of programs can be adjusted,
[t t
i ¸1!•¸¸¸
21
ii: il i iiii!:!ii
31¸
i_i::_i!
14
Repeat steps 1 to 3 of Setting the AIRICABLE
PressAtVtoselect"CHMEMORY",andpress
ENTER.
EZSETUP
AIR/CABLE
CH SEARCH
CH MEMORY
Press AIV to move the cursor to "CHANNEl", and use
"_t_ or-Channel Select to select the desired channel
to be added or erased
Press ,&tV to move the cursor to "SKIP", and use '_lli_
to select 'ON" or OFF'
Press MENU to exit
• If CH SEARCH is performed again, the previousFymemorized
channels will be lest
22®
Page 23
i i uulluuuuu,,i,
SETUP
Useful Features (Continued)
2!i¸
•3 !
:_ii _i_
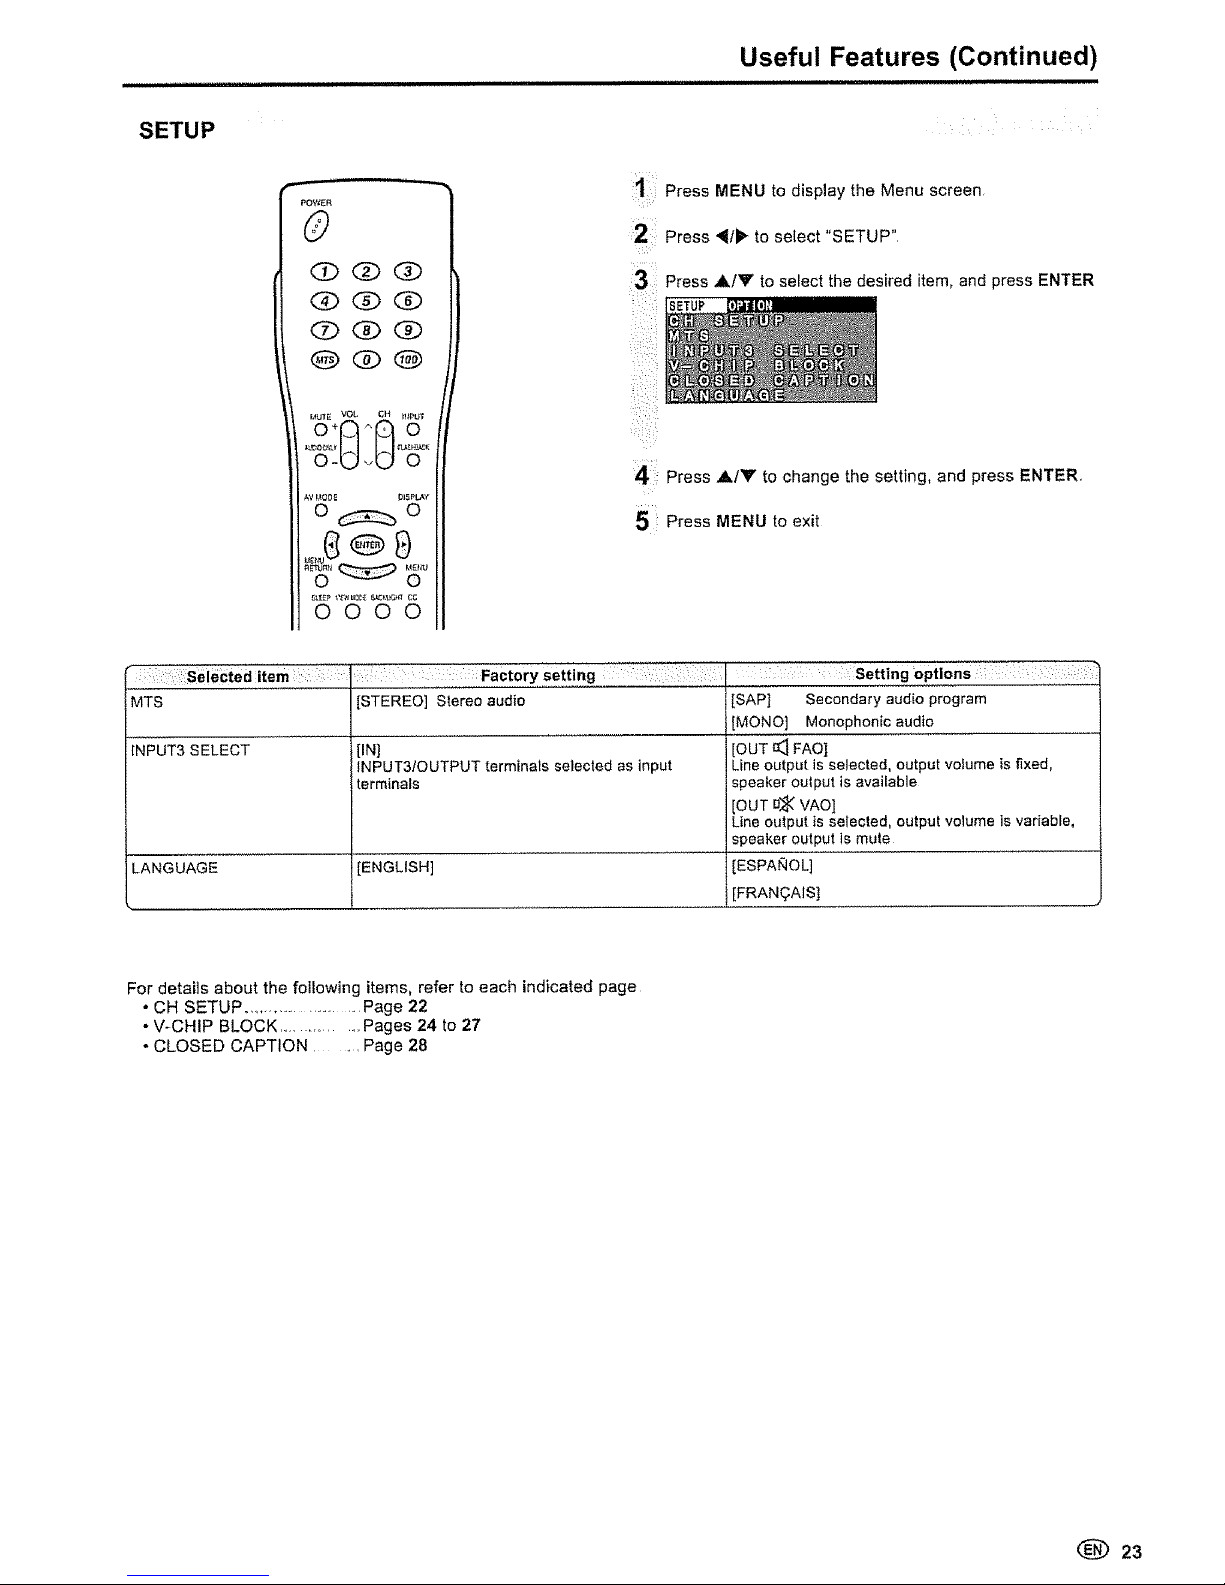
Press MENU to display the Menu screen.
Press '_ti_ to select "SETUP"
Press AiY to select the desired item, and press ENTER
4: Press A/Y to change the setting, and press ENTER.
5 i Press MENU to exit
" , :i:::selected item ,:i : : :: : Factory setting : i:Settingoptlons' -- : :_iii _': ,
MTS STEREO] Stereo audio SAP] Secondary audio program
MONO] Monophonic audio
INPUT3 SELECT IN] [OUT _ FAO]
INPUT3./OUTPUT terminals selected as input Line outputis selected, output volume is fixed,
terminals speaker output isavailable
[OUT U_K"VAO]
Lineoutputisselected,outputvolumeisvariable,
speaker output is mute
LANGUAGE [ENGLISH] [ESPAI_IOL]
[FRAN(_AIS]
For details about the foifowing items, refer to each indicated page
• CH SETUP ........................... Page 22
- V-CHIP BLOCK ................. Pages 24 to 27
• CLOSED CAPTION ........ Page 28
(_ 23
Page 24
Useful Features (Continued)
m !H'n'
V-CHIP Settings
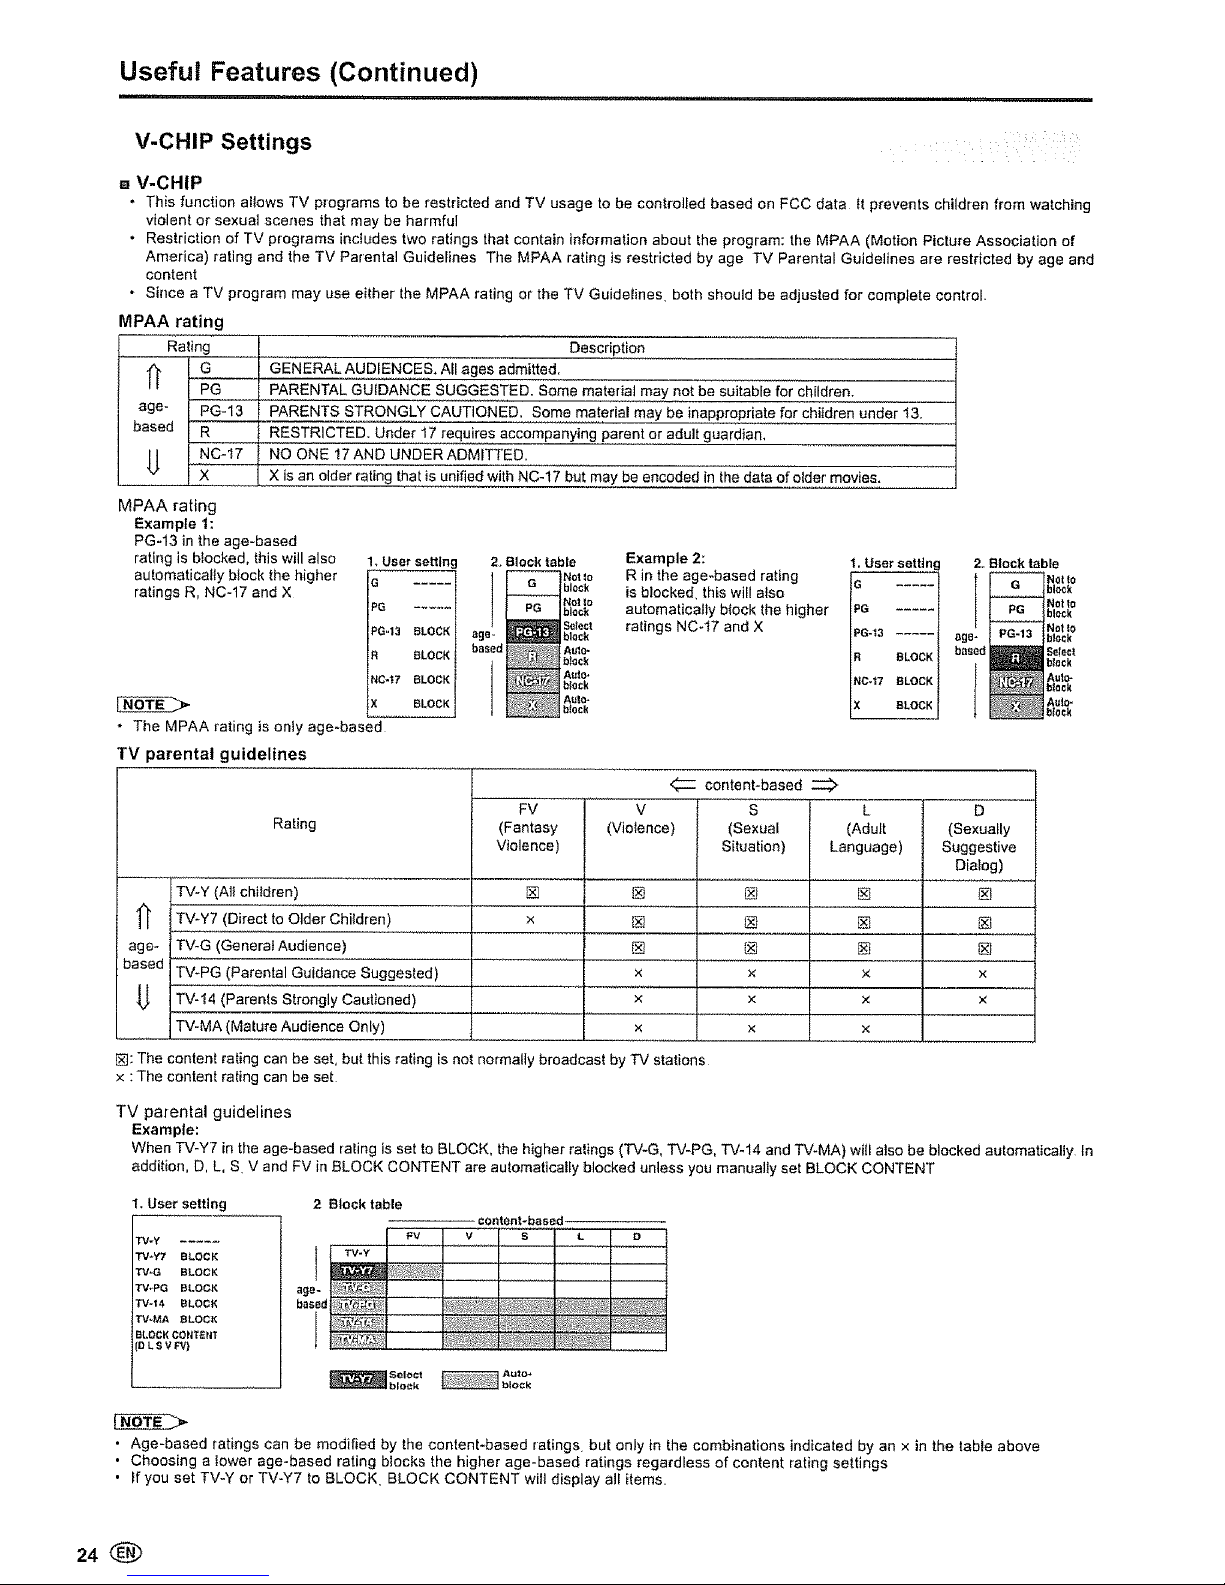
a V-CHIP
= This function atiows TV programs to be restricted and TV usage to be controlled baaed on FCC data It prevents children from watching
violent or sexual scenes that may be harmful
• Restriction of TV programs includes two ratings that contain information about the program: the MPAA (Motion Picture Association of
America) rating and the TV Parental Guidelines The MPAA rating is restricted by age TV Parental Guidelines are restricted by age and
content
• Since a TV program may use either the MPAA rating or the TV Guidelines both should be adjusted for complete control.
MPAA rating
t Rating .......I
2ge I PG-laF
Description
GENERAL AUDIENCES+ All ages admitted.
PARENTAL GUIDANCE SUGGESTED. Some material may not be suitable for children.
PARENTS STRONGLY CAUTIONED. Some material may be inappropriate for children under t3,
RESTRICTED. Under 17 requires accompanying parent or adult guardian,
NO ONE 17AND UNDER ADMITTED.
X is an older rating that is unified with NC-17 but may be encoded in the data of older movies,
MPAA rating
Example t:
PG-13 in the age-based
rating is blocked, this will also
automatically block the higher
ratings R, NC-17 and X
1,User setttn
s
PG .....
PO,,13 BLOCK
BLOCK
!NC-t7 BLOCK
X BLOCK
* The MPAA rating is onty age-based
TV parental guidelines
2. Block table
i _ No.o
black
Nor to
block
Select
age, block
_i_i_:!,_S_,_ black
_ _ black
Example 2:
R in the age-based rating
is blocked, this will also
automatically b(ock the higher
ratings NC-17 and X
1.User setting
IG-13 ....
PG .....
R BLOCK
INC47 aLaCK
2, Block table
I -- Notlo
G block
Not a
PG block
-- !NoHa
sge- PG-13 blo_k
based a blackSeloct
Auto-
black
Au_o-
block
Rating
TV-¥(AI ch,dren)
1_ TV-Y7 (Direct to Older Children)
age- TV-G (GeneraIAudience)
based Tv-PG (Parental Guidance Suggested)
U _Parents Strongly Cautioned) ...............
TV-MA (Mafute Audience Only)
FV
(Fantasy
Violence)
[]
(VioIence)
[]
[]
x
x
×
content-based
V S L D
(Sexual (Adult (Sexually
Situation) Language) Suggestive
Dialog)
® []
x × ×
× x ×
x x
[_: The content rating can be set, but this rating is not normally broadcast by TV stations
x : The content rating can be set
TV parental guidelines
Example:
When "FJ-Y7 in the age-based raling is set to BLOCK, the higher ratings (TV-G, TV-PG, TV-14 and TV-MA) will also be blocked automaficaliy tn
addition, D, L, S V and FV in BLOCK CONTENT are automatically blocked unless you manually set BLOCK CONTENT
I. User setting
TV_y .....
W-Y7 BLOCK
TV*G BLOCK
TV.PG BLOCK
TV.t4 BLOCK
W-MA eLOC_
BLOCKCONT_NT
[DLBVFVt
2 Block table
content-based
FV V S L O
I
TV-Y
I
Select
_ block Aulo_blo_k
• Age-based ratings can be modified by the content-based ratings but only in the combinations indicated by an x in the table above
• Choosing a tower age-based rating b_ocks the higher age-based ratings regardless of content rating settings
• If you set TV-Y or TV-Y7 to BLOCK BLOCK CONTENT will display all items
24®
Page 25
Useful Features (Continued)
Canadian Rating Systems
. The TV rating systems in Canada are based on the Canadian Radio-Television and Telecommunications
Commission (CRTC) policy on violence in television programing.
• While violence is the most important content element to be rated, the structure developed takes into consideration
other program content like language, nudity, sexuality and mature themes..
• When setting the V-CHIP on the Canadian system you can choose either the Canadian English ratings or the
Canadian French ratings.
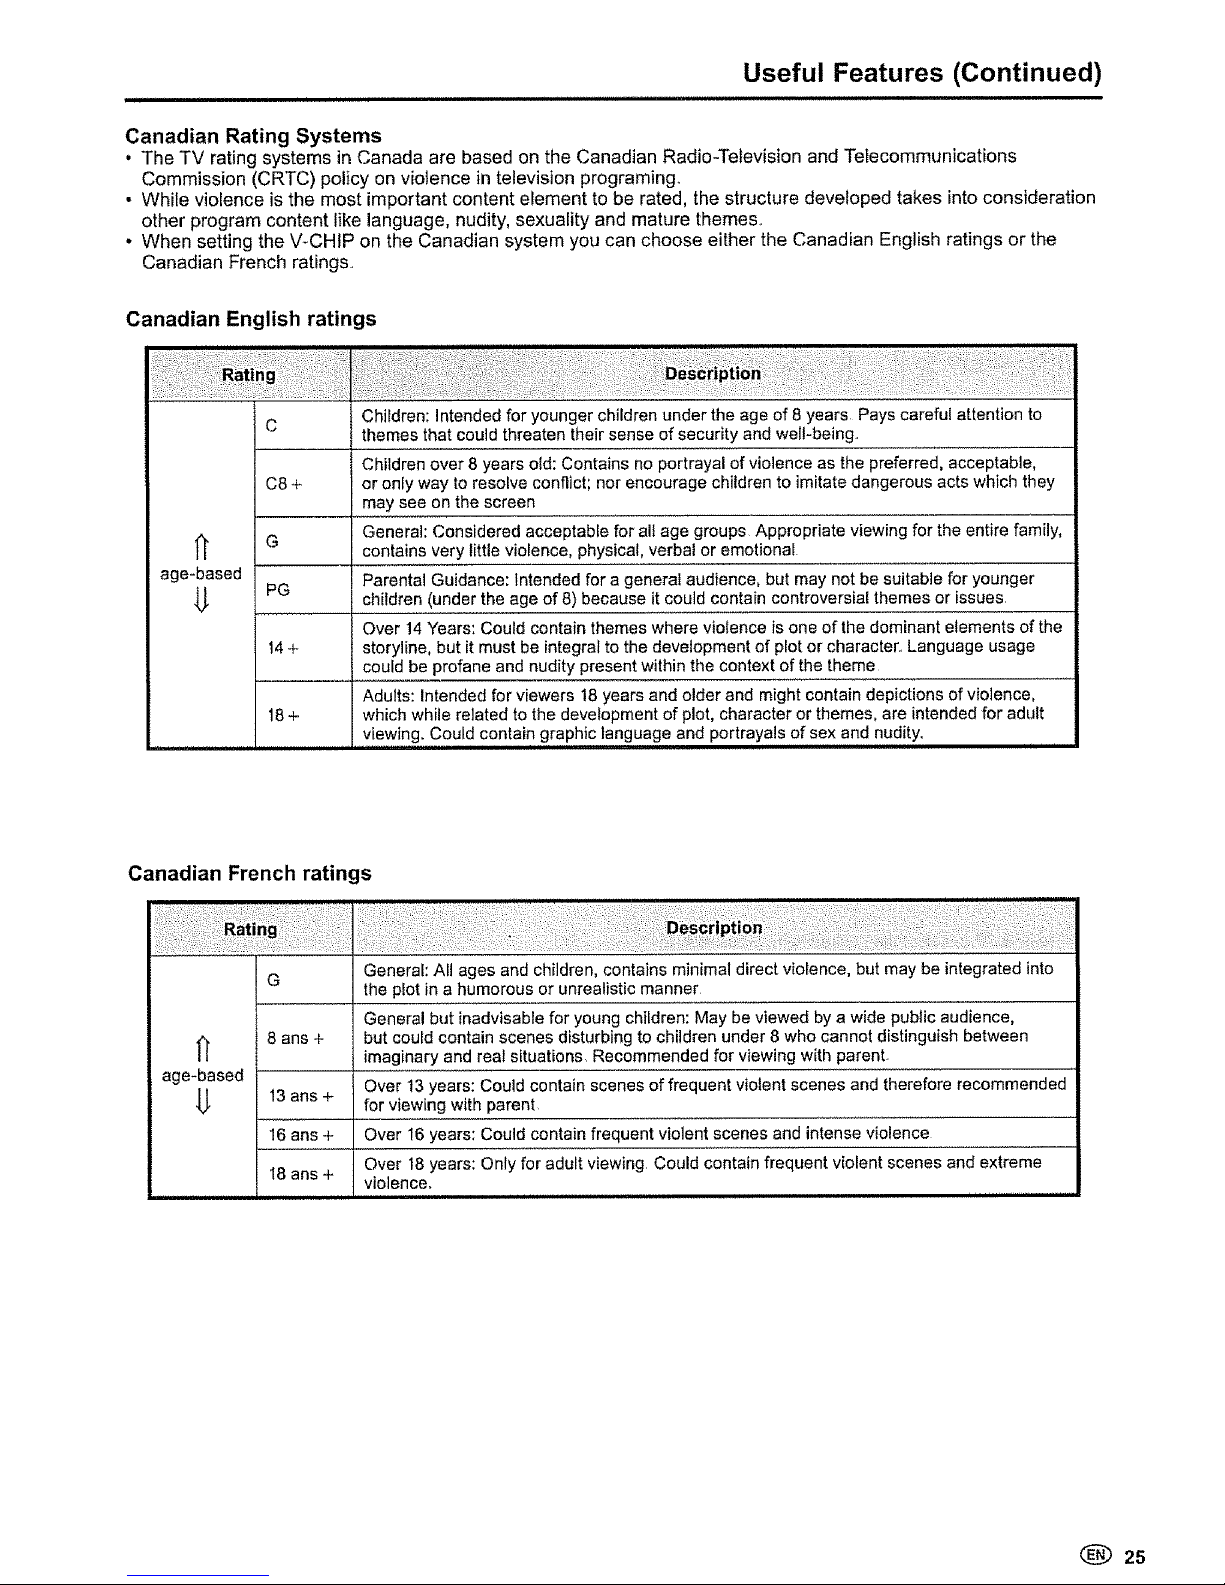
Canadian English ratings
C
C8+
G
age-based
PG
t4+
18+
,i i
i
!iii ii iii i!ii ii!iiii
Children: Intended for younger children under the age of 8 years Pays careful attention to
themes that could threaten their sense of security and wel!-being.
Children over 8 years old: Contains no portrayal of violence as the preferred, acceptable,
or only way to resolve conflict; nor encourage children to imitate dangerous acts which they
may see on the screen
General: Considered acceptable for alt age groups Appropriate viewing for the entire family,
contains very little violence, physical, verbal or emotional
Parental Guidance: Intended for a general audience, but may not be suitable for younger
children (under the age of 8) because it could contain controversial themes or issues
Over 14 Years: Could contain themes where violence is one of the dominant elements of the
storyline, but it must be integral to the development of plot or character.. Language usage
could be profane and nudity present within the context of the theme
Adults: Intended for viewers 18 years and older and might contain depictions of violence,
which while related to the development of plot, character or themes, are intended for adult
viewing. Could contain graphic language and portrayals of sex and nudity.
ii ,i,iii1,11 iii ..........
Canadian French ratings
N
age-based
U
G
8 ans +
13 arts +
16 arts +
18 arts +
General: All ages and children, contains minimal direct violence, but may be integrated into
the plot in a humorous or unrealistic manner
General but inadvisable for young children: May be viewed by a wide public audience,
but could contain scenes disturbing to children under 8 who cannot distinguish between
imaginary and real situations Recommended for viewing with parenL
Over 13 years: Could contain scenes of frequent violent scenes and therefore recommended
for viewing with parent
Over 16 years: Could contain frequent violent scenes and intense violence
Over 18 years: Only for adult viewing Could contain frequent violent scenes and extreme
violence.
.................... , , ,,,, i i i i ii H llll Hi
(_ 25
Page 26
Useful Features (Continued)
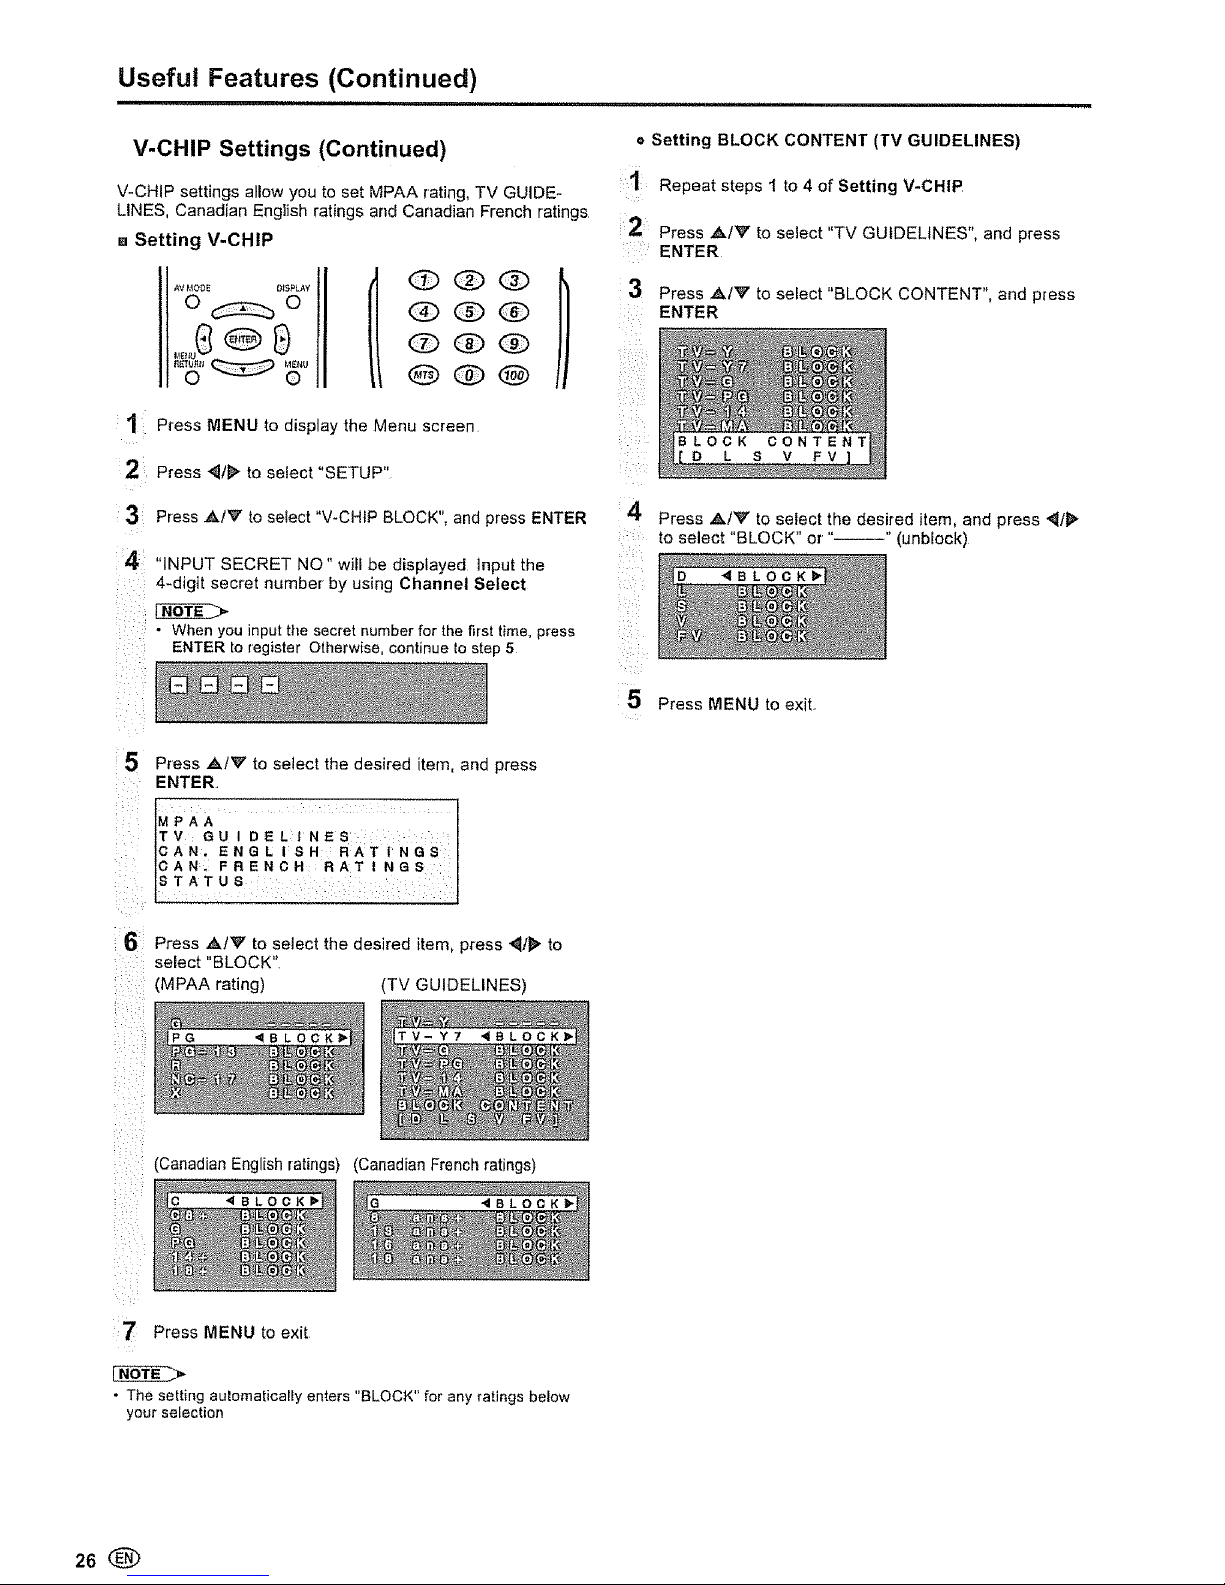
V-CHIP Settings (Continued)
V-CHiP settings allow you to set MPAA rating, TV GUIDE-
LINES, Canadian English ratings and Canadian French ratings
a Setting V-CHIP
O(Z) O /
OOQ
QQQ
1 Press MENU to display the Menu screen
2 Press _1/_ to select "SETUP"
3 Press `&/_F to select "V-CHIP BLOCK". and press ENTER
4
"INPUT SECRET NO" wiil be displayed lnput the
4-digit secret number by using Channel Select
• When you input the secret number for the first time, press
ENTER to feg=ster Otherwise, continue to step 5
e Setting BLOCK CONTENT (TV GUIDELINES)
Repeat steps 1 to 4 of Setting V-CHIP
2: Press `&/'_" to select "TV GUIDELINES", and press
ENTER
3 Press `&IV to select "BLOCK CONTENT", and press
ENTER
i :
'4
LOCK
O L S V FV
Press ,&/V to seiect the desired item, and press _1t1_
to select "BLOCK" or" " (unbiock)
4BLOCK_
5 Press MENU to exit.
5
Press AtV to select the desired tern, and p_ss
ENTER
MPAA
TV GUIDELINES
CAN. ENGLISH RATINGS
CAN. FRENCH RATINGS
STATUS
6 Press ,&IV to select the desired item. press _t_" to
select "BLOCK"
(MPAA rating) (TV GUIDELINES)
V-Y7 4BLOCK
(Canadian English ratings) (Canadian French ratings)
_BLOQK
7 Press MENU to exit
• The setting automatically enters "BLOCK" for any ratings below
your selection
28®
Page 27
Useful Features (Continued)
11H mH in= n ='='H'I,H'
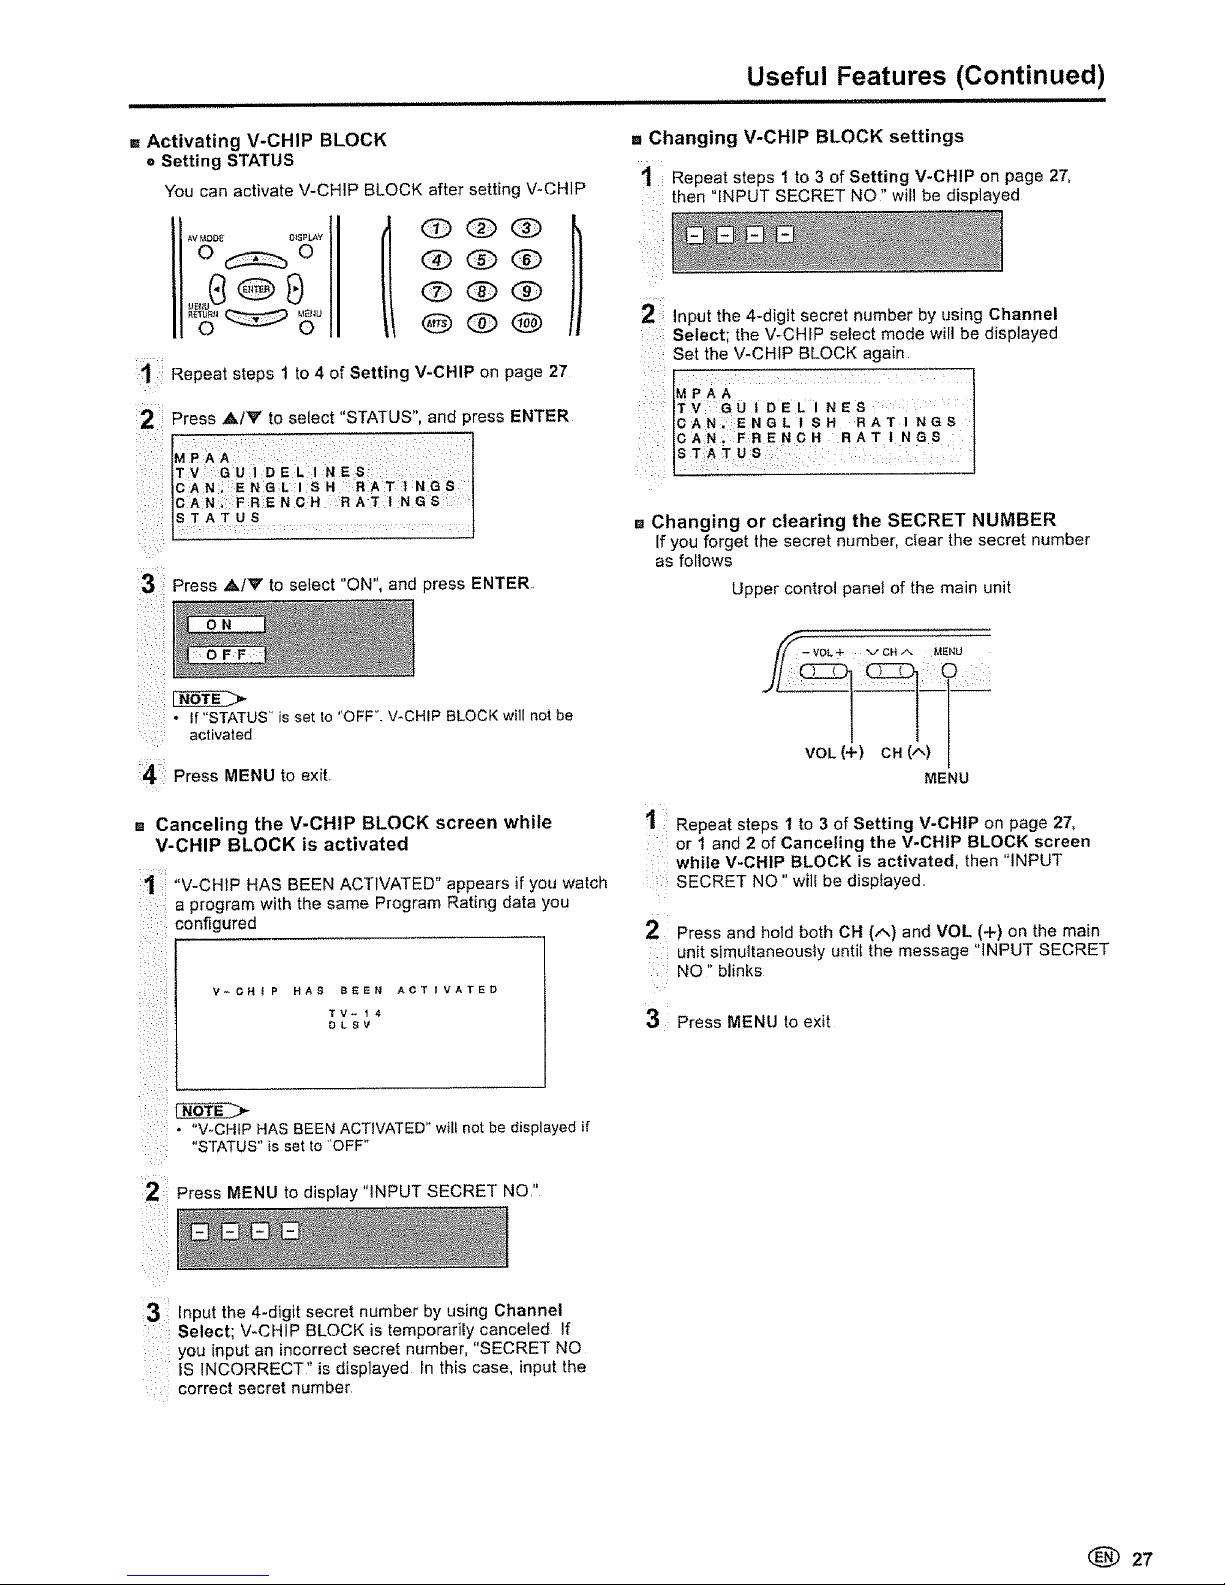
= Activating V-CHIP BLOCK
o Setting STATUS
You can activate V-CHIP BLOCK after setting V-CHIP
I 000
000
QQO
1 Repeat steps t to 4 of Setting V-CHIP on page 27
Press A/V to select "STATUS", and press ENTER
T V: D E L:I NE
CAN; ENGL I SH RAT t NGS
cAN RENCH :RAT I NGS 1
STATUS
l
}
31;Press ,&/Y to select "ON", and press ENTER,
i
= Changing V-CHIP BLOCK settings
Repeat steps 1 to 3 of Setting V-CHIP on page 27,
then "[NPUT SECRET NO" will be displayed
2 input the 4-digit secret number by using Channel
Select; the V-CHIP select mode will be displayed
Set the V-CHtP BLOCK again
TV :GUIDELINES :
CAN_ :ENGL | SH RATINGS
ICAN_ FRENCH RAT I AGe
[sTAtues : ' J
u Changing or clearing the SECRET NUMBER
If you forget the secret number, cfear the secret number
as follows
Upper control panel of the main unit
Press MENU to exit.
= Canceling the V-CHIP BLOCK screen while
V-CHIP BLOCK is activated
t "V-CHIP HAS BEEN ACTIVATED" appears if you watch
a program with the same Program Rating data you
: configured
i
; : V-CHIP HAS B_EEN ACTIVATED
TV- t 4
: D L 8 V
• "V-CHiP HAS BEEN ACTIVATED wtll notbe d splayed if
"STATUS" is set to 'OFF"
2; Press MENU to display "INPUT SECRET NO,"
i
VOL (+) CH (,",)
MENU
t Repeat steps 1 to 3 of Setting V-CHIP on page 27,
or 1 and 2 of Canceling the V-CHIP BLOCK screen
: while V-CHIP BLOCK is activated, then "INPUT
SECRET NO" will be dispfayed
Press and held both CH (/,,) and MOL (+) on the main
unit simultaneously until the message "INPUT SECRET
NO" blinks
3 Press MENU to exit
3 Input the 4-digit secret number by using Channel
Select; V-CHIP BLOCK is temporarily canceled if
: you input an incorrect secret number, "SECRET NO
:: IS INCORRECT" is displayed in this case, input the
correct secret number
27
Page 28
Useful Features (Continued)
= .....................
CLOSED CAPTION
Directly setting the CLOSED CAPTION
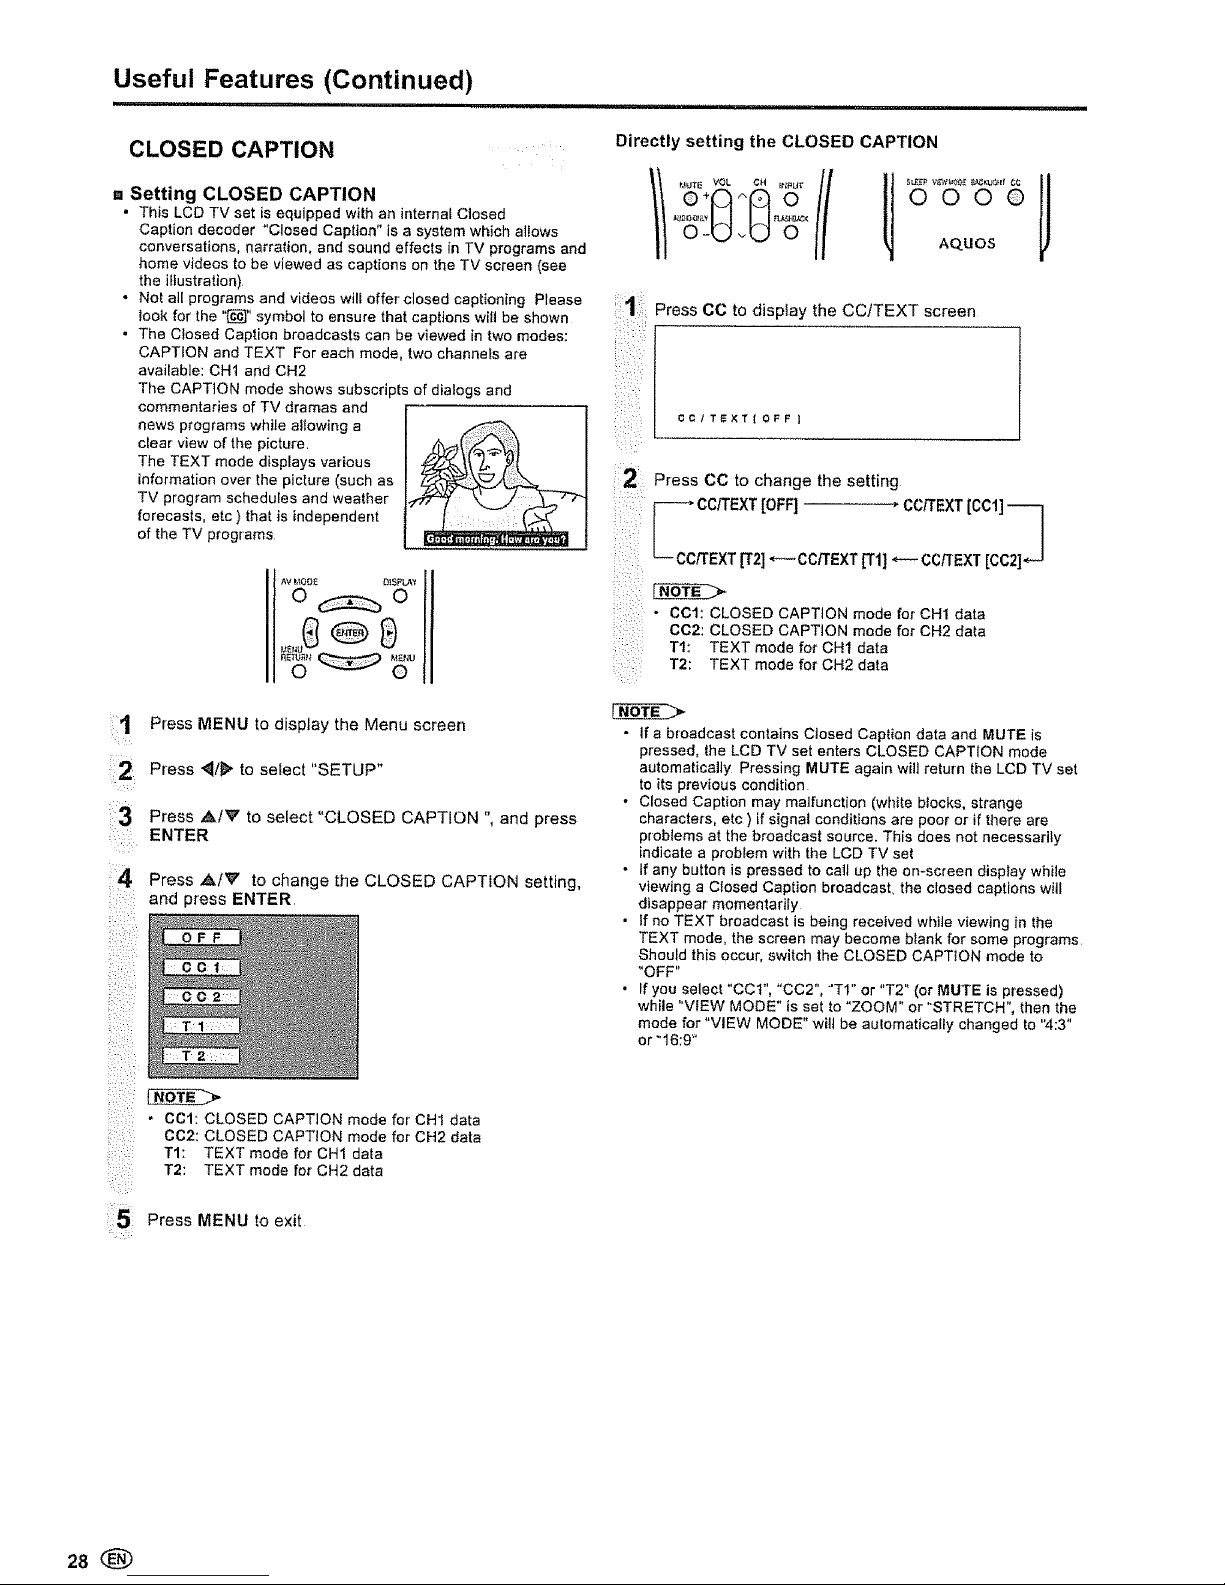
,. Setting CLOSED CAPTION
• This LCD TV set is equipped with an internal Closed
Caption decoder "Closed Caption" is a system which aliows
conversations, narration, and sound effects in TV programs and
home videos to be viewed as captions on the TV screen (see
the illustration)
° Not air programs and videos will offer closed captioning Please 1:
look for the "_" symbol to ensure that captions wifl be shown
• The Closed Caption broadcasts can be viewed in two modes:
i
CAPTION and TEXT For each mode, two channefs are
available: CHt and CH2
The CAPTION mode shows subscripts of dialogs end
commentaries of TV dramas and
news programs while allowing a
clear view of the picture
The TEXT mode displays various
information over the picture (such as
TV program schedules and weather
forecasts, etc ) that is independent
of the TV programs
II _,IOTE VOL CH _rI_UT II
o+p-'t o
oS, tU
000©
AqUOS
Press CC to display the CC/TEXT screen
CCITEXT[OFF ]
Press CC to change the setting
r- ,o ix,,cc1
.... _-- CCrrEXTg2! _--¢crrEXT IT1]_-- CC_'EXT[CC21_
• CCI: CLOSED CAPTtON mode for CH1 data
CC2: CLOSED CAPTION mode for CH2 data
TI: TEXT mode for CH1 data
T2: TEXT mode for CH2 data
1:3
i¸¸¸4
i: i}i_i:_}
i,{_!i::,
i{ x>i
i{5}
Press MENU to display the Menu screen
Press "_/_' to select "SETUP"
Press A/'_ to select "CLOSED CAPTION ", and press
ENTER
Press ,&/V to change the CLOSED CAPTION setting,
and press ENTER
OFF
C O I:
C02 =
T 2
• CCl: CLOSED CAPTION mode for CH1 data
C02: CLOSED CAPTION mode for CH2 data
TI: TEXT mode for CH1 data
T2: TEXT mode for CH2 data
Press MENU to exit
____>
• If a broadcast contains Closed Caption data and MUTE is
pressed, the LCD TV set enters CLOSED CAPTION made
automatically Pressing MUTE again will return the LCD TV set
to its previous condition
• Closed Caption may malfunction (white blocks, strange
characters, etc ) if signal conditions are poor or if there are
problems at the broadcast source. This does not necessarily
indicate a ptobtem with the LCD TV sel
• If any button is pressed to call up the on-screen display while
viewing a Closed Caption broadcasL the closed captions will
disappear momentarily
• If no TEXT broadcast is being received while viewing in the
TEXT mode, the screen may become blank for some programs
Should this occur, switch the CLOSED CAPTION mode to
"OFF"
• If you select "CCI", "CC2", "TI" or "T2" (or MUTE is pressed)
while "VIEW MODE" is set to "ZOOM" or "STRETCH", then the
mode for "VIEW MODE" wilt be au!omatically changed to "4:3"
or "16:9"
28
Page 29
Useful Features (Continued)
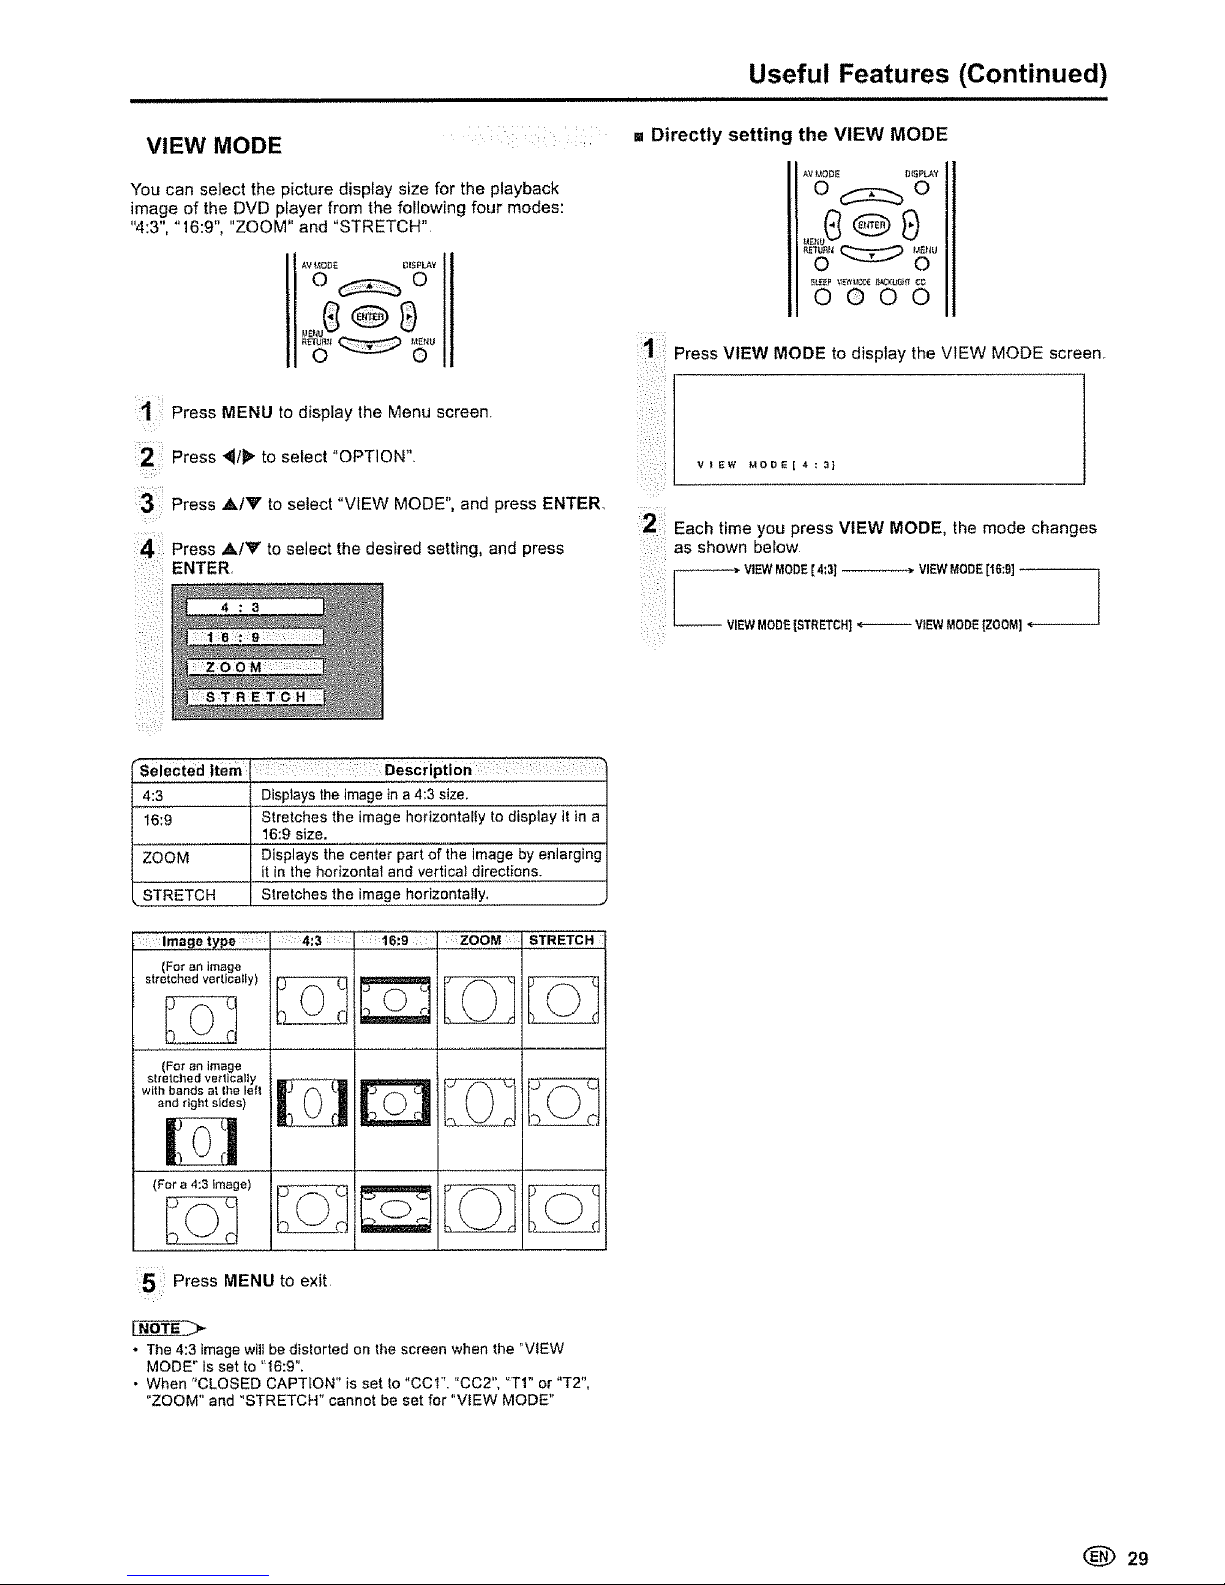
VIEW MODE
You can select the picture display size for the playback
image of the DVD player from the following four modes:
4.3, 16.9, "ZOOM" and "STRETCH"
ii:iiii:iii
1 Press MENU to display the Menu screen.
12: o t
Press e select "OPTION"
[ :
:3:: Press A/V to select "VIEW MODE", and press ENTER, :
: 2 ;:;
Press A/V to select the desired setting, and press
ENTER,
)
:::ST:RETCH
., Directly setting the VIEW MODE
AV_,_ODE DISPLAY
o _::Z::b 0
0000
Press VIEW MODE to display the VIEW MODE screen
VIEW MOD_[4;3]
Each time you press VIEW MODE, the mode changes
as shown below
VI53/VMODE [ 4:3] _ VIEW MODE[16:9]
VIEWMODE [STRETCH1_ ViEW MODE[ZOOM] <-
selected item =
4:3
16:9
ZOOM
: : ::Description:: ::: : ; : :
DiSp!,aYS,!,he,!ma,gein a 4:3 size,
Stretches the image horizontally to display ff in a
16:9 size.
Displays the' ce'nter part of the image by enlarging
it in the horizontal and vertical directions.
Stretches the image horizontally.
STRETCH
::':lmagetype : 4:3 : :16:9 ,I Z,° OM STRETCH
For an Image
sttelc led vert ca y
:5 Press MENU to exit
• The4:3 imagewill bedistorted on the screen when the "VIEW
MODE" isset to '16:9".
• When "CLOSED CAPTION" is set to "CCI'. "CC2", "TI" or "T2",
"ZOOM" and "STRETCH" cannot be set for "VIEW MODE"
(_ 29
Page 30
Useful Features (Continued)
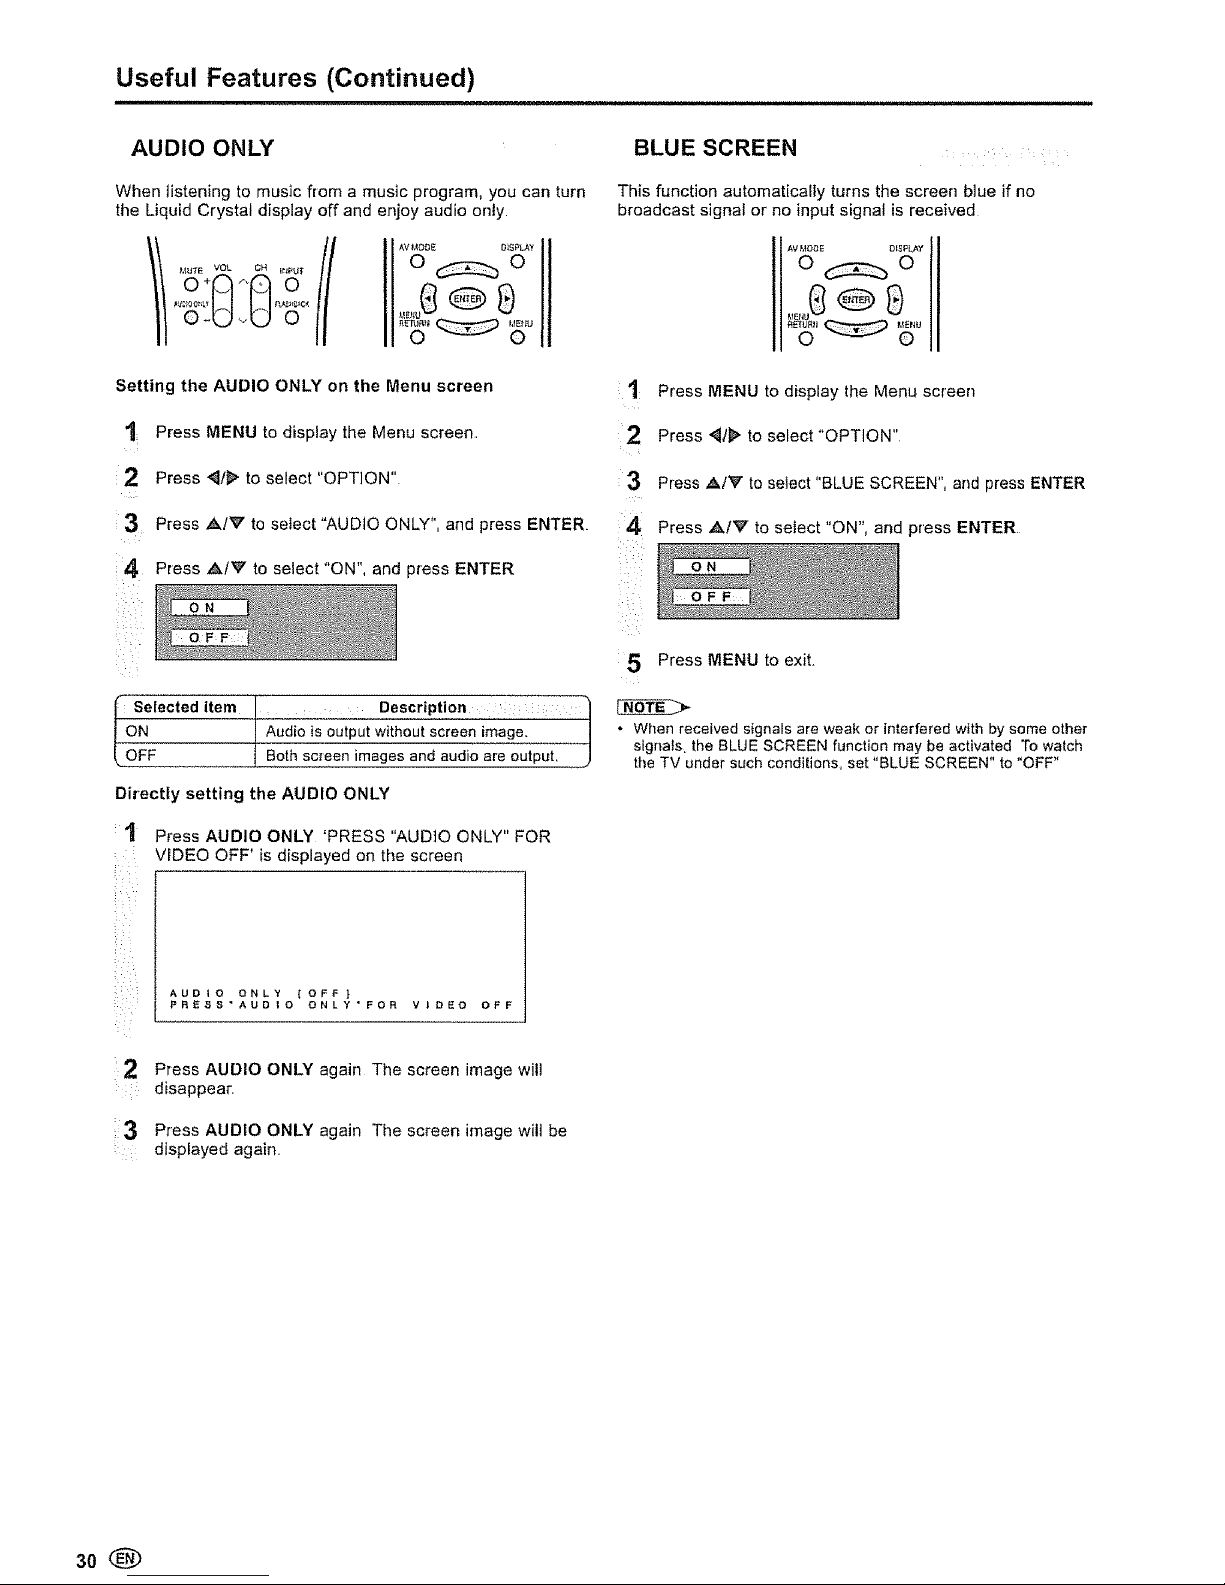
AUDIO ONLY
When listening to music from a muslc program, you can turn
the Liquid Crystal display off and enjoy audio only
AVI,IODE DISPLAY
o_o
Setting the AUDIO ONLY on the Menu screen
"1 Press MENU to display the Menu screen
2 Press {/F to select "OPTION"
3 Press ,_/V to select "AUDIO ONLY", and press ENTER
4 Press A/V to select "ON", and press ENTER
I Selected item L_ L _ Description :
ON I Audio is output without screen image, j
Directly setting the AUDIO ONLY
t
Press AUDIO ONLY 'PRESS "AUDIO ONLY" FOR
VIDEO OFF' is displayed on the screen
AUDIO ONLY {OFF}
PRESS'AUDIO ONLY'FOR VIDEO OFF
i 2 Press AUDIO ONLY again The screen image will
. disappear.
3 Press AUDIO ONLY again The screen image witt be
: displayed again
BLUE SCREEN
This function automatically turns the screen btue if no
broadcast signal or no input signal is received
1 Press MENU to display the Menu screen
2 Press {t_ to select"OPTION"
3
_4
Press AIV to select "BLUE SCREEN", and press ENTER
Press _k/V to select "ON", and press ENTER
OFF
5 Press MENU to exit.
• When received signals are weak or interfered with by some other
sigrlals_the BLUE SCREEN function may be activated Towatch
the TV under such conditions, set "BLUE SCREEN" to "OFF"
3o
Page 31

Useful Features (Continued)
SLEEP TIMER NO SIGNAL OFF
You can set the SLEEP TIMER to automatically turn off the TV
POWEi_
0
AV MODE D_$1&AY
o_o
©000
Setting the SLEEP TIMER on the Menu screen
:i Press MENU to display the Menu screen
2 Press _/_ to select"OPTiON".
:3 Press Al'_r to select "SLEEP TIMER", and press
ENTER
14 Press ,,_,/V/"_I_" to select "30MiN", "60MIN", "90MIN",
"I20MIN", "150MIN" or "OFF", and press ENTER
i,:: 60M;l:N
20
::: 50M
5:: Press MENU to exit
. After you set the SLEEP TIMER, pressing POWER on the main
unit or POWER on the remote contro! will cancel the SLEEP
TIMER setting
• 5 minutes before the SLEEP TIMER turnsoff the LCD TV set.
'5MIN REMAINING" is displayed on the screen for 4 seconds
The SLEEP TIMER counts down and shows a similar 4-second
display for each remaining minute unfit the timer turns off the
LCD TV set
Directly setting the SLEEP TIMER
1 Press SLEEP to display the SLEEP TIMER screen
!
i
BLEEP TIh_E_ tO_Ft
2 Press SLEEP to change the setting
[150MINI, [120MINl- [90MINI
.... (minutes)
• The SLEEP TIMER screen automatically disappears in 3
seconds
The NO SIGNAL OFF function allows you to save energy
When set to "ENABLE", the power will automatically shut
down if no signal inputs for 5 minutes
1
3:1
,_.V_,_OOI_ B_SPLAY
o_o
Press MENU to display the Menu screen_
Press _/1_ to select "OPTION"
Press A/W to select "NO SIGNAL OFF", and press
ENTER
to
E _
press
•_ Press AIy select" NABLE, and ENTER.
D I S A:B L E
5; Press MENU to exit
• "DISABLE" is factory preset value
• This function can work only in TV mode
• If interfered with by other broadcast or radio waves, "NO StGNAL
OFF" may not work properly even when the broadcast is over
NO OPERATION OFF
When set to "Enable", the power will automatically shut down
if there is no operation for 3 hours
1 Repeat steps 1 and 2 of NO SIGNAL OFF
2 Press ,&tY to select "NO OPERATION OFF", and
press ENTER
4¸¸¸¸
Press A/W to select "ENABLE", and press ENTER
D I iS A B LE
• 5 minutes before the power shuts down, remaining
time is displayed every minute
Press MENU to exit
• "DISABLE" is factory preset value
(_) 31
Page 32

Useful Features (Continued)
PICTURE FLIP
You can set the orientation of the picture
11 Repeat steps 1 and 2 of NO SIGNAL OFF
:21 Press A/_V to select "PICTURE FLIP", and
press
:; ENTER,
Press ,AIr to select the desired mode, and press
ENTER,
31
i____i:_:_
: H ,
M I R R0 R :,
Press MENU to exit
[NORMAL]
Nermai image orientation
[MIRROR]
To display mirror images
for special uses
[UPSIDE DOWN]
To display upside down
images for special uses
[ROTATE]
To display rotated images
for special uses,
32
Page 33

Troubleshooting
i i i i i i
[] Before calling for repair services, make the following checks for possible remedies to the encountered symptoms
LCD TV set]
Problem Check item
• Make sure the AC cord is properly inserted in the power
outleL
There is no • Reception other than those of broadcasting stations can -
picture or be considered
sound • Make sure the input mode is set to TV, 15
• Make sure the POWER switch of the main unit is on 15
...... 'Make sure the BRIGHTNESS is properly adjusied .... 20
There is no , Fluorescent lamp may have reached the end of service 34
picture,
There is no life.
picture from • Make sure the S-VtDEQ terminal has nothing connected 13
INPUT1/2/3. • Make sure the AUDIO ONLY is not set to ON.. 30
f__ • Make sure the volume is not set to minimum 16
q ._ • Make sure the sound is not set to mute 16
There is no • Make sure that headphones are not connected.. 10
sound
• Make sure the antenna came is properly connected_ 8, 9
There is no • Bad reception could be the problem.
picture or
sound, just
noise
• Make sure the antenna cable is properly connected. 8, 9
• Bad reception could be the problem -
Picture is not
clear
• Check color adjustment, 20, 2t
Picture is light
i or improperly
tinted.
• Press the BACKLtGHT button or set the BACKLIGHT or 20
: : }'_:_) BRIGHTNESS settings°
,:_'_ The picture is • Check CONTRAST and BRIGHTNESS adjustment. 20
: .......,,, too dark.
,0-,_::,,_:;.":_....... Fluorescent lamp may have reached the end of service 34
' " life.
• Check the batteries of the remote control 7
Remote control does not work • Make sure the remote sensor window is not in strong 7
lighting.
• External influences such as lightning, static electricity,
etc,, may cause improper operation. In this case,
Unit cannot be operated, operate the unit after first turning the power off, or
unplugging the AC cord and re-plugging it in 1 or 2
minutes.
Reference page
9
(_ 33
Page 34

Troubleshooting (Continued)
Before calling for repair services, make the following checks for possibte remedies to the encountered symptoms.
Antenna
Problem Check item
* The reception may be weak,
The picture is not sharp • The quality of the broadcast may also be bad.
The picture moves, • Make sure the antenna is facing the right direction
• Make sure the outside antenna is connected.
. Make sure the antenna is facing the right direction,
The picture is doubled or tripled • There may be reflected electric waves from mountains or buildings.
° There may be interference from automobiles, trains, high voltage tines, neon lights,
etc
The picture is spotted • There may be interference between the antenna cable and AC cord,. Try positioning
them further apart
• ls the unit receiving interference from other devices?
There are stripes on the screen Transmission antennas of radio broadcasting stations, transmission antennas of
or colors fade amateur' radios and cellular phones may also cause interference
• Use the unit as far apart as possible from devices that may cause possible
interference
"t
a Cautions regarding use in high and low temperature environments /
• When the unit is used in a low temperature space (e g room_ office), the picture may leave hails or appear slightly delayed This is nol|
• a malfunction, and the unit will recover when the temperature returns to normaJ |
Do not leave the unit in a hot or co_d ]ocafion Also, do not leave the unit in a location exposed to direct sunlight or near a heater, as |
this may cause the cabinet to deform and t_le LCD panel to malfunction |
Storage temperature: -4 F to +140 F (-20 C to +60°C) J
Specifications
iii i i iiiii ii i i IH i i i
Items Model
LCD panel
Number of dots
Video color systems
TV Standard (CClR)
TV Tuning System
TV function
STEREO
CATV
Brightness
LC-15S5U
t5" Advanced Super View & BLACK TFT LCD
92t,600 dots VGA
N358
NTSC
PLL 181 ch,
MTS+SAP
125 ch.
430 cd/m _
Lamp life (Fluorescent lamp ) 60,000 hours*
V!ewing angles .......................................................... H: 17Q_ Vi17 O° ...............................
Audio amplifier
Terminals
OSD language
INPUT1
INPUT2
INPUT31OUTPUT
Antenna
Headphone
2,1Wx2
AUD!O-IN _COMPONENT-IN
AUDIO-IN, VIDEO-IN, S-VIDEO*IN
AUDIO-IN, VtDEOqN/AUDtO-OUT, VIDEO-OUT
F-Type
Mini-jack for stereo (_3,5 mm)
EnglishtSpanishlFrench
Power supply AC 120V, 60Hz
Power consum )tion 50 W (0,8 W standby): AC i20V
Disptay only 7.9 Ibs./3.6 kg
Weight ...............................
DiSPlaY with stand . 9,5 IbsJ4,3 kg
Operating temperature 32 F to +104°F (0°C to +40°C)
• Typical time for power output decrease of about oneq}atf assuming continuous use in a room with normal lighting, normal brightness and
temperature at 77°F/25_C
Dimensional Drawings
• The dimensional drawings are shown on the inside back cover
= As a part of policy of continuous improvement, SHARP reserves the right to make design and specification changes for the LCD TV set
improvement without prior notice The performance specification figures indicated are nominal values of production units There may be
some deviations from these values in individual units
34®
Page 35

Calling for Service
For location of the nearest Sharp Authorized Service, or to obtain product literature, accessories, supplies, or
customer assistance, please call 1-800-BE-SHARP.
LIMITED WARRANTY
CONSUMER LIMITED WARRANTY
SHARP ELECTRONICS CORPORATION warrants to the first consumer purchaser that this Sharp brand product
(the "Product"), when shipped in its original container, will be free from defective workmanship and materials, and
agrees that it wilt, at its option, either repair the defect or replace the defective Product or part thereof with a new or
remanufactured equivalent at no charge to the purchaser for parts or labor for the period(s) set forth below
This warranty does not apply to any appearance items of the Product nor to the additional excluded item(s) set forth
below nor to any Product the exterior of which has been damaged or defaced, which has been subjected to improper
voltage or other misuse, abnormal service or handling, or which has been altered or modified in design or construction
fn order to enforce the rights under this limited warranty, the purchaser should follow the steps set forth below and
provide proof of purchase to the servicer
The limited warranty described herein is in addition to whatever implied warranties may be granted to purchasers by
law. ALL IMPLIED WARRANTIES INCLUDING THE WARRANTIES OF MERCHANTABILITY AND FITNESS FOR
USE ARE LIMITED TO THE PERIOD(S) FROM THE DATE OF PURCHASE SET FORTH BELOW Some states do
not allow limitations on how fong an implied warranty lasts, so the above limitation may not apply to you
Neither the sales personnel of the seller nor any other person is authorized to make any warranties other than those
described herein, or to extend the duration of any warranties beyond the time period described herein on behalf of Sharp
The warranties described herein shall be the sole and exclusive warranties granted by Sharp and shall be the sole and
exclusive remedy available to the purchaser Correction of defects, in the manner and for the period of time described
herein, shall constitute complete fulfillment of all liabilities and responsibilities of Sharp to the purchaser with respect
to the Product, and shall constitute full satisfaction of all claims, whether based on contract, negligence, stdct liability
or otherwise In no event shall Sharp be liable, or in any way responsible, for any damages or defects in the Product
which were caused by repairs or attempted repairs performed by anyone other than an authorized servicer Nor shall
Sharp be liable or in any way responsible for any incidental or consequential economic or property damage Some
states do not allow the exclusion of incidental or consequential damages, so the above exclusion may not apply to you
THIS WARRANTY GIVES YOU SPECIFIC LEGAL RIGHTS YOU MAY ALSO HAVE OTHER RIGHTS WHICH
VARY FROM STATE TO STATE.
Model Specific Section
Your Product Model Number, &Description:
LC-15S5U LCD Color Television
Warranty Period for this Product:
Additional Item(s), Excluded from
Warrant v Coveraqe _if anY}:
Where to Obtain Service:
What to do to Obtain Service:
(Be sure to have this information available when you need
service for your Product)
One (1) year parts and labor from the date of purchase
Non-rechargeable batteries
From a Sharp Authorized Servicer located inthe United States.
To find the location of the nearest Sharp Authorized Servicer,
call Sharp toll free at 1-800-BE-SHARP
Ship prepaid or carry in your Product to a Sharp Authorized
Servicer. Be sure to have Proof of Purchase available If you
ship the Product, be sure it is insured and packaged securely
TO OBTAIN PRODUCT INFORMATION, CALL 1-800-BE-SHARP OR VISIT www sharpusa corn
®
SHARP ELECTRONICS CORPORATION
Sharp Plaza, Mahwah, New Jersey 07430-2135
SHARP CORPORATION
(_ 35
Page 36

VALID IN CANADA ONLY _ .- _ ® . . _ _
LIMITED WARRANTY
Consumer Electronics Products
Congratulations on your purchase!
Sharp Electronics o{ Canada Ltd (hereinafter catled "Sharp") gives the fo_iewing express warranty to the first consumer purchaser for this
Sharp brand product, when shipped in its originat container end sold or distributed in Canada by Sharp or by an Authorized Sharp Dealer:
Sharp warrants that this product is free, under normal use and maintenance, from any defects in material and workmanship If any such
defects should be found in this product within the applicable warranty period, Sharp shall, at its option repair or replace the product as
specified herein
This warranty shall not apply to:
(a) Any defects caused or repairs required as a result of abusive operation, negligence, accident, improper installation or inappropriate
use as outlined in the owner's manua_
(b) Any Sharp product tampered with, modified adjusted or repaired by any party other than Sharp. Sharp's Authorized Service Centres
or Sharps Authorized Servicing Dealers
(e) Damage caused oFrepairs required as a result of the use with items not specified or approved by Sharp, including but not limited to
head cleaning tapes and chemical cleaning agents
(d) Any replacement of accessories, glassware, consumable at peripheral items required through norma_use of the product inctudingbut
not limited to earphones, remote controls. AC adapters batteries, temperature probe, stylus trays, filters, be_ts, ribbons, cables and
paper
(e) Any cosmetic damage to the surface or exterior that has been defaced or caused by normal wear and teat:
(f) Any damage caused by external or environmenta_ conditions, including but not limited to transmission tinelpower line voltage or liquid
spillage
(g) Any product received without appropriate model, serial number and CSNcUL markings
(h) Any products used for rental or commercial purposes
(1) Any installation, setup and/or programming charges
Should this Sharp product fail to operate during the warranty period, warranty service may be obtained upon delivery of the Sharp product
together with proof of purchase and a copy of this LIMITED WARRANTY statement to an Authorized Sharp Service Centre or an
Authorized Sharp Servicing Dealer in home warranty service may be provided at Sharp's discretion on any Sharp television with the
screen size of 27" or larger and on any Sharp Over-the-Range Microwave Oven
This warranty constitutes the entire express warranty granted by Sharp and no other dealer, service centre or their agent or employee is
authorized to extend, enlarge or transfer this warranty on behaIf of Sharp To the extent the law permits, Sharp disclaims any and all
liability for d{reet or indirect damages or losses or for any incidental, special or consequential damages or loss of profitsrasuSfing from e
defect in material or workmanship reJatieg to the product, including damages for the toss of time or use of this Sharp productor the loss
of information The purchaser will be responsible for any removat re[nstallation, transportation and insurance costs incurred Cerrectfon of
defects_ in the manner and period of time described herein, constitute complete fulfillment of all obligations and responsibilities of Sharp
to the purchaser with respect to the product and shall constitute full satisfaction of al_claims whether based on contract, negtlgence, strict
liabilityor otherwise
WARRANTY PERIODS:
Audio Products
Camcorder
DVD Products
Projector
LCD & Plasma Display TV
Microwave Oven
Television Products
VCR Products
Vacuum Cteaner
Parts & Labour (exceptions noted)
1 year
t year
1 year
I year (lamp 90 days)
1 year
1 year (magnetron component-4 additional years)
1 yea_ (picture tube component-1 additional year)
1 year
1 year
_b obtain the a;_lc ;_nd zddrcs,_ o_"tfie nearest Aut_orlzcd Sh;/rp Set'dec Centre or De:tier, ptt:asc contact:
SI'IARP ELECTRONICS OF CANADA LTD 335 Brlt:lnl_i:l [1.o:ld EZr,, _Iis,_iss;tug:t, Ont;irio L4Z tW9
For more information on this Warranty, Sharp Extended Warranty
Offers, Sharp Canada Products, Accessory Sales, Dealer or Service
Locations, please call (905) 568-7140
Visit our Web site: wwwosharpoca
SHARP
O_ SERVICE _
Revision 04/22t03
38®
Page 37

LC-.15S5U
MODE D'EMPLOi
FRAN( AIS
IMPORTANT :
Pour faciliter Ia d_claration de perte ou de vot, veuillez noter
les num_ros de mod,_le et de s_rie dans I'espace pr_vu _ cet
effet Vous trouverez ces num_ros au dos du t_l_viseur.
N° de module :
N° de s_rie :
INFORMATIONS IMPORTANTES
AVERTISSEMENT : POUR RC:DUIRE LES RISQUES D'INCENDfE OU
D'C:LECTROCUTION, N'EXPOSEZ PAS CET APPAREtL ]k LA PLUIE
OU ,ik L'HUMID1T¢:o
__RISQUE D'#LECTROCUTION
NE PAS OUVR R
ATTENTION ; AFIN DE R_DUtRE LE RISQUE
D'_LECTROCUTION, NE PAS RETtRER LE COUVERCLE
(OU PANNEAU ARRIERE),
PAS DE PIECES R#PARABLES PAR L'UTILtSATEUR A
L'INTI_RIEUR,
CONFIER TOUTE PROCEDURE D'ENTRETtEN/_ UN
PERSONNEL D'ENTRETfEN QUALIFI#
Ce symbote (6clair dans un triangle 6qultat_raf)
avertit l'utilisateur de la pr6sence dans le
boTtierde I'appareit d'une _tension
dangereuse_ non isol_e su_samment _lev6e
pour causer une 61ectrocution aux personnes.
Ce symbole (point d'exciamation dans un
triangle _quilat_ral) avertit l'utilisateur de fa
presence d'instructions d'utilisation et
d'entretien (d_pannage) importantes dans ta
documentation accompagnant I'appareil,
i i i i i i i i ii iiii nllulllnnnl
ATTENTION : POUR NE PAS RISQUER UNE ELECTROCUTION, PR_SENTEZ LA FICHE
AVEC SA LAME LA PLUS LARGE FACE A LA FENTE CORRESPONDANTE
DE LA PRISE ET ENFONCEZ-LA ]k FOND.
ATTENTION :
NE PAS PLACER CETAPPAREIL SUR UNE TABLE, UN CHARIOT, UN TRiPlED OU UN SUPPORT
QUI N'EST PAS STABLE. L'APPAREtL POURRAIT TOMBER ET CAUSER DES BLESSURES
GRAVES ET SUBIR DES DOMMAGES IMPORTANTS. UTILISER SEULEMENT SUR UNE TABLE, UN
CHARIOT, UN THe:PIED OU UN SUPPORT RECOMMAND#S PAR LE FABRICANT OU VENDU AVEC
L'APPAREIL. SUIVRE LES INSTRUCTIONS DU FABRICANT POUR _NSTALLER L'APPAREIL Em
UTILfSER LES DISPOSITIFS DE MONTAGE RECOMMANDI_S PAR LE FABRICANT. UENSEMBLE
APPAREtL/SUPPORT DOlT _TRE De:PLACe: AVEC SOIN DES ARR_TS BRUSQUES, UNE FORCE
EXCESSIVE ET DES SURFACES IN'GALES PEUVENT FAIRE BASCULER L'ENSEMBLE
AVERTISSEMENT : Les r_gles de la FCC stipufent que tout changement ou modification apport_(e) & cet appareit sans
l'autorisation expresse du fabricant peut entra'fner la r_vocation du droit de rutilisateur d'utfliser cet appareil.
[ f_TATS-UNIS SEULEMENT]
_Notea Iintentionde !mstallateur de televtson parc_ble : Nous attirons t'attention de l'instailateur de televisionpar c_ble sur I'article
820-40 du Code Nationalde I'_lectricite qui fournit des directivespour rexecution correcte de la raise & laterre et sp_cifie notamment que
la terre du c_ble dolt _tre reliee au r6seau de mise _ ia terre du b&timenL leplus pres possible du pointd'entree du c_bte _
!"I_TATS-UNIS SEULEMENT]
Cet appareil comprend des soudures d'etain-plomb, ainsi qu'une lampe fluorescente contenant une petite quantite de mercure
fl se peut que fa mise au rebut de ces materiaux soit soumise _ des r6glementations environnementales Pour obtenir plus
de d_tails sur la mise au rebut ou le recyclage, veuillez contacter les autorites locales concern_es ou consulter Ie site Web d'
Electronic Industries Alliance : www.eia.org
O 1
Page 38

CRER CLaENT SHARP
Nous vous remercions pour' votre achat de ce t_l_viseur & cristaux liquides Sharp. Pour en assurer' la
s_curit_ et le ben fonctionnement pendant de Iongues ann_es, veuillez life attentivement los consignes
de s6curit(_ importantes avant I'utilisation,,
CONS GNES DE SECURnT¢: UMPORTANTES
ilmmmuml i,,, ii iiiii i ,!ill i i ii
L:etectricite remptit de nombreuses fonctions utiles, mais si on t'utilise mat, elle pout occasionner des blessures et des
deg&ts materiels. Bien que la conception et ta fabrication de ce produit aient 6t_ ax6es sur ta s6curit_, une mauvaise
utilisation de l'appareil peut faire courir un risque d'electrocution et/ou d'incendie Pour ne pas vous exposer & de teis
dangers, respectez les consignes suivantes torsque vous instatlez, utilisez ou nettoyez re t616viseur Pour votre s6curit6
et prolonger la duree de service de votre t6teviseur couleur LCD, lisez attentivement ce qui suit avant l'utilisation :
[] Lisez les instructions--N'utilisez pas cot appareil sans avoir lu et bien compris routes les instructions d'utilisation
[] Conservez ce mode d'emploi dens un endroit seriCes instructions de s6curit_ et d'utilisation doivent _tre
rang6es dans un endroit sQr afin de pouvoir _tre consult6es facilement.
[] Respectez les mises en garde--Toutes los rnises en garde qui se trouvent sur i'appareil et dens le mode d'emploi
doivent _tre strictement respect_es
[] Suivez los instrucNons--Toutes tes instructions d'utifisation doivent _tre suivies
[] Accessoires--N'utilisez pas des accessoires qui ne sent pas recommand_s par le fabricant L'utilisation
d'accessoires inad_quats peut _tre & l'origine d'un accident,
[] Atimentation 61ectrique--Cet appareil ne dolt 6tre utiiis6 qu'avec I'atimentation sp6cifi_e sur I'_tiquette
signal6tique. En cas de doute sur le type de courant de votre domicile, consultez votre revendeur ou la compagnie
d'_lectricit6 locale Pour les appareils fonctionnant sur batteries ou sur tout autre type d'aiimentation, consultez le
mode d'emploi
m Protection du cordon d'alimentation--Piacez le cordon d'alimentation correctement de mani_re qu'il ne puisse pas
6tre pi_tine ou comprim6 par un objet V6rifiez le cordon au niveau des fiches et _ la sortie de t'appareil
[] Surcharge etectrique--Ne depassez pas la capacit6 61ectrique des prises de courant ou des rallonges Ceci ferait
courir un risque d'incendie ou d'61ectrocution
[] P6n6tration d'objets et de liquides--N'introduisez jamais d'objets dans les orifices ou ouvertures d'a6ration de t'appareiL
Ils pourraient toucher des pieces sous haute tension a I'int6rieur de rappareil et provequer une 6[ectrocution ou un court-
circuit Pour la m_me raison, veillez & ne jamais renverser de liquide sur I'appareil
[] D6pannage_N'essayez pas d'effectuer vous-m_me un d6pannage Le retrait des couvercles peut vous exposer
une haute tension et _fid'autres conditions dangereuses Confiez tout d6pannage & un technicien quaiifi_
[] Reparation--Debranchez le cordon d'alimentation de la prise de courant et faites effectuer la r_paration par un
_echnicien qualifi_ dans los cas suivants :
a si le cordon d'atimentation ou la fiche secteur est endommage(e) ;
b si du tiquide a _te renverse sur I'appareit ou si des objets sent tombes a llnterieur ;
c si t'appareit a _t_ expos_ & la pluie ou _ l'eau ;
d si l'appareil ne fonctionne pas de la mani_re decrite dans le mode d'emplei ;
Ne touchez qu'aux commandes indiqu_es dans le mode d'emploi Un regiage incorrect d'autres commandes
peut causer des dommages et rend souvent necessaire un r6glage complet par un technicien qualifi6
e si !'appareit est tomb_ ou a _t_ endommag_ ;
f. si l'appareil pr_sente une anomalie Toute anomafie constatee est te signe qu'une r_paration est n_cessaire
[] Pi_ces de rechange--Si des pi_ces sent a remplacer, assurez-vous que le techntcien utilise bien los pi_ces de
rechange prescrites par te fabricant ou des pi_ces ayant les m_mes caract_ristiques et performances que les
pieces d'origine. L'utilisation de pi_ces non autoris_es peut occasienner un incendie ou une _lectrocution et/ou
•exposer _ d'autres risques
[] V6rifications de s_curit_Apr6s un d_pannage ou une r_paration, demandez au technicien d'effectuer les
v_rificafions de s_curit_ n_cessai_es pour s'assurer que le t_l_viseur est en ben _tat de fonctionnement
[] Montage au piafond ou au mur_-Si vous montez l'appareil au tour ou au plafond, observez la procedure
d'instafiation recornmand¢e par le fabricant
[] Potarisation--II se peut que le cordon d'alimentation de courant alternatif soit dote d'une fiche secteur polarisee
(fiche ayant une tame plus large que I'autre) Cette fiche ne peut 6tre enfonc6e dans la prise du secteur
murale que dans un seu! sens Ceci est une caract_ristique de s_curite Si vous ne pa[venez pas & enfoncer
comptetement la fiche dans la prise, essayez de i'enfencer dans !'autre sens Si cela n'est pas possible,
votre prise est de mod¢le ancien et vous devrez la faire remplacer par un ¢lectricien, Ne passez pas outre la
caracteristique de securit_ de la fiche polarisee
2db
Page 39

CONSIGNES DE SECURITE IMPORTANTES (Suite)
i iiiiiiiiiiiiiii i iiiiiiiiiiiiiiiiiiiiii I iiii iiiiiiiiii 1111111111111111111111111111111111111111
Nettoyage--Avant de nettoyer I'appareil, d6branchez le cordon d'alimentation de
la prise de courant Utilisez un chiffon humide pour nettoyer Fappareil, N'utilisez
pas de produits de nettoyage liquides ou en aerosol,
Eau et humidit_--N'utitisez pas f'appareil pres de I'eau (baignoire, lavabo, _vier,
cuve de lessivage, piscine, etc) ou dans un sous-sol humide
[] Support--Ne placez pas I'appareil sur un chariot, support, tr6pied ou table
instable, Ii pourrait blesser gravement quelqu'un en tombant et Ctre endommag¢
N'utilisez qu'un chariot, support, tr6pied, console ou table recommand_(e) par le
fabricant ou vendu(e) avec l'appareiL Si vous montez l'appareil au mur, suivez les
instructions du fabricant N'utilisez que les pieces de montage recommandees par
le fabricant
Lorsque vous d6placez I'appareil alors qu'il se trouve sur un chariot, procSdez
avec les plus grandes precautions Des arr6ts brusques, une force excessive ou
des irregularit_s du ptancher peuvent provoquer sa chute du chariot
Iii
Aeration--Les orifices et autres ouvertures du boitier sent destines a l'aeration
Ne les bouchez pas et ne ]es couvrez pas Une a6ration insuffisante peut
provoquer une surchauffe etlou raccourcir la dur6e de service de t'appareil Ne
placez pas I'appareil sur un lit, un canap6, un tapis ou une autre surface similaire
car ceci pourrait boucher les ouvertures d'a6ration Cet apparel! n'est pas pr_vu
pour _tre encastr_ Ne le placez pas dans un endroit clos tel qu'une biblioth_que
ou un casier, sauf si I'a_ration est suffisante et si les instructions du fabricant sont
respect6es
U Le panneau _ crtstaux liquides de cet appareil est en verre II peut donc se briser _ , _ ,-
s'il tombe ou s'il subit un choc Veillez _ ne pas vous blesser avec des morceaux
de verre si le panneau _ cristaux liquides vient _ se briser
i
Ill Sources de chaleur--Ne placez pas cet appareil pres de sources de chaleur
telles que radiateurs, appareils de chauffage, po_les ou autres appareils
dCgageant de la chaleur (y compris tes amplificateurs)
li Le panneau a cristaux liquides est un produit de tres haute technologie II compte 92 t 600 transistors en couche
mince (TFT) qui assurent une image finement d6taill6e,
il est possible que quelques pixels de I'_cran (points fixes bleus, verts ou rouges sur recran) ne soient pas actifs
Ceci n'affecte pas la performance du televiseur
(_ 3
Page 40

RMPORTANTES (Suite)
CONSHGNES DE SE CURITE
Si le televiseur est raccord_ _ une antenne ext_rieure, assurez-vous que celle-ci est retire _ la terre afin de p[ot6ger
le poste centre les sautes de tension et f'accumutation de charges 61ectrostatiques
La section 810 du Code national de l'6tectricite fournit des informations sur la mise & la terre correcte du m_t
d'antenne et de sa structure de support, la mise _ la terre de la descente d'antenne & une unit6 de d6charge
d'antenne, [e calibre des conducteuts de terr'e, I'emptacement de l'unite de decharge d'antenne, le raccordement aux
61ectrodes de terre et les conditions requises pour l'electrode de terre.
EXEMPLE DE MtSE A LA TERRE DUNE ANTENNE
SELON LE CODE NATIONAL DE L'_LECTRICtTI_
_<-_ DESCENTE
'" _LJ D'ANTENNE
.,,_COLLIER DE MISE ///'D_"kt_.
1BOiTtER DE _ / ,J_"'fl D'ANTENNE
I LT- I
% _,_rl _] ._ _ CONDUCTEUR$ DE TERRE
_"_,_.,...,_ I"_ _ (NED SECTION 810-21)
_"-"--'-'-'-'-_"COLUERS DE MISE A LA TERRE
SLECTRODE DE TERRE DE
LA COMPAGNIE D'f_LECTRICtT._
NEC - CODE NATIONAL DE L'$LECTRICIT_ (NEC ART 250 PARTtE H)
1_ Foudre -- Pour mieux prot6get ce televiseur pendant un orage ou torsqu'il doit
rester Iongtemps sans surveillance et inutilis6, d6branchez-le de la prise du
secteur murale et d6connectez l'antenne Ceci l'empOchera d'6tre endommage
par la foudre ou les surtensions de la ligne electrique.
<i1 '../
Lignes electriques -- L'antenne exterieure ne dolt pas se trouver & proximit6 de tignes
61ectriquesaeriennes ou d'autres circuits d'eclairage ou de distribution electriclue E!te ne doit
pas non plus O,treinstatI6e sur une position dbe elle pourrait tomber sur ces lignes ou circuits
Lots de I'installation d'une antenne exterieure, routes les precautions doivent 6tre prises pour
ne pas toucher ces lignes ou circuits electriques Tout contact avec eux pourrait &.tremortel
B
Ne ptacez pas de bougies ni de flammes hues sur le t61eviseur ou _ sa proximitO,
afin d'eviter les incendies
El Veitlez & ne pas eclabousser ni faire tomber de l'eau sur cet appareil afin d'@viter
les incendies ou ies 61ectrocutions. Ne placez jamais d'objets rempfis de liquide,
comme des vases, sur cet appareiL
ml Pour Oviter un risque d'incendie ou de d6charge elecb'ique, ne placez pas le
cordon d'alimentation sous le televiseur ou tout autre objet lourd,
(_ pas sur image trop long, pour eviter une remanence d'image j
Ne faites
d'a[r#t
1_1 nstallez te produit & un endroit ot_ ii est facile de debrancher le cordon d'alimentation de la prise de courant ou de la 1
borne AC INPUT a I'arriere du produit
J
4(Z>
Page 41

Table des mati res
.................. ulllllluu,
INFORMATIONS IMPORTANTES ............................. 1
CHER CLIENT SHARP ........................................... 2
CONSIGNES DE SI'--CURIT_ IMPORTANTES ....... 2
Accessoires fournis ................................................. 5
Avant I'emp!oi du t_l_viseur LCD ......................... 6
Preparation ............................................................. 7
installation des piles dans la t61_commande .......7
Utilisation de la t616commande ........................... 7
Raccordement de l'antenne ................................. 8
Branchement sur I'alimentation ..............................9
Noms des pi_ces de l'unit_ principale .............. 10
Ecoute avec un casque .................................. 10
Comment fixer les c_bles ..................................... 11
Nom des pi_ces de la t_l_commande ................. 12
Raccordement &des appareils externes ........... 13
Sortie de I'image et du son (sortie vid6o) ...........13
PRI_RI_GLAGE CANAL
(Avec r6glage HORLOGE AUTOMATIQUE)oo° 14
PRF_RI_GLAGECANALpendantlapremBremisesoustensi0n.,t4
Operations de base .............................................. 15
Mise sous et hors tension ................................. 15
Veille ....................................................................... 15
Commuter tes modes d'entr_e
(ENTREE1/ENTREE2/ENTRE_E3fTV)............. 15
Volume sonore ....................................................... 16
Changement de canal ..........................................16
Comment s6lectionner un 6l_ment de menu ....17
Param_tres d'ajustement de base ...................... 19
MODE AV ................................................................ 19
OPC (ContrSte optique image) .............................. 19
RI_TRO-t_CLAI RAGE ........................................... 20
R_glages IMAGE ...........................................................20
TEMPERATURE DE COULEUR .............................21
R6glages AUDIO .... ................................................... 21
Caract_ristiques utiles ........................................... 22
R#GLAGE CANAL ......................................................22
INSTALLATION ...........................................................23
R6glage de CLASSE PUCE V ................................24
SOUS-TITRAGE .................................................... 28
MODE VUE .................... ......................................... 29
AUDIO SEUL ......................................................... 30
ECRAN BLEU ........................................................ 30
MINUTERIE RI_GLAGE ..........................................31
AUCUN SGN ARRI_T (Aucun signal : Arr_t) ........31
PAS D'OPI_, ARRI_T (Pas d'operation : Arret) .... 31
IMAGE TOURNANTE ........... ................................ 32
Guide de d_pannage ............................................... 33
Fiche technique ....................................................... 34
GARANTIE LIMITI_E ................................................ 35
Dimensions de I'appareU
• Les {_Dimensional Drawings _ (dimensions de I'appareil)
du t616viseur LCD se trouvent sur la face interne du
couvercle arriere.,
Notez que lesvaleurs num6dques sont indiqu_es en anglais
et que l'unit6de lengueur estle pouce etle millim_tre (mm)
Accessoires fournis
i u ii lu i IIMII,UlUI'U IHI I I I UUllUUU I I II I I I U
Assure-vous que les accessoires suivants sont fournis avec le teI6viseur LCD
,, ,,, .... , , : : :
....: T6_commande : Cordon dalimentatlon
| ;:
, , ,, , ...... , ,,. , , , ...........
\
pages 7 et 12
page tt
page 9 page 7
page 11
[
S
Q 5
Page 42

Avant I'emploi du tdl_viseur LCD
mll .......................
iiiiiiiiii nnnl
Pour utiliser votre tel_viseur LCD, suivez la d6marche ci-dessous.
1 V6rifiez les accessoires fournis (Voir page 5.)
121 Introduisez deux piles de format <<AAA )>darts la t61Ocommande (Voir page 7)
° Ouvrez le couvercle des pJtes, puis ins_rez les piles en respectant les indications de polarit_ des homes (+) et (-)
dans le logementde piles
i
13: Branchez te c&ble d'antenne+ (Voir page 8,)
Raccordez les appareils externe& (Voir page l&)
Soi_meINPUT1(COMPONENT)
I Borne de conrlexion en composantes I It l,o_'+_--il _:_
.......... ":l:"+
.................. ++!° _
ioom°°ooo°o°x+oo+-v,°+o
!/_!
i__i;i:i!/
!_i:+_ii_:!i'i,:i_i
Borne INPUT3tOUTPUT 1
Borne de connexion ENTRI_E/SORTIE
Branchez le cordon d'alimentation _ la borne AC INPUT du t616viseur LCD et branchez le cordon
d'alimentation darts la prise du secteur murale (Voir page &)
6::Mise sous tension. (Voir page 15.)
:: _) Appuyez sur POWER dans ie haut de i'unite principale
<9 Let¢moin POWER (Alimentation) a ravant de f'unit¢ principale passe du ,ouge au vert
|
:: ,,°................. _ ...... ........... ++..o+.POWE,
j/ ,ow,, {iiiiiiiiiii!Hi!i!i!iiiii!iii_iiiiiiiiiiiil
:7 Lancez le PRI_REGLAGE CANAL (Voir page 14)
• Les canaux de diffusion sont m_moris_s automatiquement
6(!)
Page 43

Preparation
iiiluuuulu illuuuuruuull IllUlUlUUUUUlHHI
Avant d'utiliser ie te16viseur LCD pour Ia premiere fois, mettez en place les deux piles de format _{AAA >_fournies, dans ia
telecommande Lorsque les piles sont epuis_es et que la telecommande ne fonctionne plus, remplacez-les par des piles
neuves de format {_AAA >)
10uvrezle couvercle des 2 Introduisez deux piles de 3 Fermez le couvercle des piles
piles format {{ AAA _
[] Deplacez le couvercle
en appuyant sur _a
partie ( _ )
I\i_ Attention
[] Installez les piles
dans le compartiment
des piles, en
respectant [es
indications de polarite
des bornes (+) et (-)
m En engageant la gr[ffe
inf6rieure clans ta
telecommande, fermez
le couvercte
Precautions pour les piles
ImSi les piles ne sont pas correctement utilisees, elles peuvent couler etlou exp!oser Observez tes instructions ci-dessous.
• lnstallez les piles, en respectant les indications de polarite des bornes (÷) et (-)
• Des piles de types diff_rents n'ont pas (es m_mes caracteristiques N'utilisez pas plusieurs types de piles ensemble
• N'utilisez pas des piles neuves avec des piles usagees Ceci raccourcirait la dur6e de service des piles neuves et/ou
pourrait faire couler ]es piles usagees.
• Retirez [es piles des qu'elles sont epuisees Le liquide chimique qui en coule peut provoquer des eruptions cutanees
Si un produit s'echappe, essuyez-le avec un chiffon
• Les piles, fournies avec le televiseur LCD, peuvent avoir une duree de fonctionnement plus courte, en raison des
conditions de stockage
• Si vous prSvoyez que la telecommande restera Iongtemps inutilisee, retirez [es piles de la telQcommande
J
.... lde la t_l_command
Jl Utitisez la telecommande en la dirigeant vers le capteur de
t_lecommande sur I'unit6 principale Le fonctionnement de la
t61ecommande peut etre emp6che par la presence d'objets entre
elle et le capteur
Prbcautions d'utilisation de la t_l_commande
II Ne soumettez pas la telecommande & des chocs En outre,
n'exposez la t_,lecommande &des liquides et ne la placez pas
dans un endroit soumis & une humidit_ _levee
M N'installez pas ou ne placez pas la t_Iecommande en piein soleil
La chaleur pourrait la d6former
[] La telecommande risque de ma[ fonctionner s[ le capteur de
teIecommande revolt directement les rayons du sofeiI ou un fort
eclairage Changez clans ce cas rorientation de I'eclairage ou de
runite principale, ou utilisez la telecommande plus pres du capteur
de telecommande
de
30" t6t_commande
J
Q 7
Page 44

Prdparation (Suite)
,11i i1,1.
L'antenne joue un rdle plus important pour la reception couleur que pour la r_ception noir et blanc tl est donc vivement
recommande dutiliser une antenne ext6rieure de bonne qualit_
Vous ttouverez ci-dessous une brave explication des modes de raccordement pour les differents systemes d'antenne
1 Une antenne de 75 ohms comporte generatement un c&ble fond avec un
connecteur type F qui peut etre facilement raccorde sans outils a la borne
(non fourni)
Une antenne de 300 ohms comporte un c_ble plat & deux conducteurs
(c&ble meplat) pouvant 6tre raccord_ _, une borne de 75 ohms par
rinterm_diaire d'un adaptateur 300/75 ohms (non fourni)
_--Connecteur type F
C_bte coaxial de 75 ohms (rond)
C_ble meplat de 300 ohms (plat)
. Utilisez run des deux schemas ci-dessous pour raccorder I'antenne ext6rieure
A : Utilisation d'une antenne ext6rieure m[xte VHFIUHF
B : UtitisatJon d'antennes ext_deures VHF etlou UHF separees
• Raccordez _ec,_ble d'antenne ext6fieure _ ANT (Borne d'antenne) au dos de runite principafe
A Antenne mixte VHFtUHF Antenne
VHF/UHF
Antenne Adaptateur ... _,,_,
VHF/UHF 300/75 ohms ",_,:"
\._ (non fourni) r'
|| Cable mep]at
300 ohms
C&bte coaxial 3
de 75 ohms
|
C&ble d antenne (disponible
8 Antennes VHF elJou UHF s_parees clans le commerce)
Antenne Antenne
VHF UHF
• C bI m+pfat
I" e°ms
] C#+blem_pla_ _ (M_n_}loeuXr_U+
J
z"__ Connecteur type F
\
£
C_ble coaxia_ de 75 ohms
Le connecteur de type F doit 6tre exctusivement serrd & la main+
Lois du branchement du c_bte RF au tel_viseur LCD, ne serrez pas le
connecteur de type F avec des outi]s
L'utilisation d'autils peut endommager votre te]6viseur LCD
(Rupture dun circuit interne, etc )
J
80
Page 45

Pr6paration (Suite)
i
\
• Le t616viseur LCD est dot6 d'un connecteur pour c,'_ble coaxial de 75 ohms rendant facile le raccordement Pour
raccorder le c&bfe coaxial de 75 ohms au t6l_viseur LCD, le visser sur la borne d'antenne (ANT)
• Certaines compagnies de t61_vision par c_bte proposent des _(canaux payantes _ Les signaux de ces canaux sont
crypt,s et un convertisseudd_codeur de t6t_vision par cable est gen_rafement fourni _ I'abonne par la soci_t_ de
t_t6vision par cable Ce convertisseurld6codeur est n6cessaire pour voir en clair les canaux crypt6es (Reglez votre
t_]_viseur sur ]a canal 3 ou 4 car I'une de ces canaux est gen6ralement utilis_e Si vous avez des doutes, consultez votre
compagnie de tef6vision par c_ble ) Pour plus d'informations sur I'installation de la t_l_vision par c_ble, adressez-vous
votre compagnie de t_16vision par c;_ble L'une des methodes possibles d'utilisation du convertisseurld_codeur fourni par
votre compagnie de td_16vision par cable est expliquee ci-dessous
Veuitfez remarquer qua : Un commutateur RF muni de deux entr_es (Aet B) est n_cessaire (non fourni).
Position _ A _ du commutateur RF (non fourni) : Vous pouvez voir toutes tes canaux non crypt_es en utilisant les
touches de selection des canaux du t61_viseur
Position _ B _ du commutateur RF (non fourni) : Vous pouvez voir les canaux crypt_es via le convertisseurld_codeur en
utilisant les touches de s61ection des canaux du conver'_isseur
Commutateur RF (non fourni)
I Convertisseuddecodeur de t_levision
par c&ble (non fourni)
Llgne de t_l_vision
par c&bie
IREMARQUE)'-
• Pour le type de r_partiteur, commutateur RF ou mulliplexeur _ventuellement necessaires, consultez votre revendeur ou service
apr_s_vente SHARP
POWER
(Alimentation)
Borne AC iNPUT
(CA 120 V)
Prise du secteur murate
Cordon d'alimentation
• D6branchez le cordon d'alimentation du tel_viseur LCD et de la prise du secteur murale si te tet_viseur LCD ne doit pas _tre
ulilise pendant un certain temps
O9
Page 46

Noms des pi ces de l'unJt principale
Tableau de commande sup_rieur
CH (Canal) (v)/(,",) INPUT (Entree)
POWER
VOL (Volume)(--)/(+) MENU (A|imentation)
// i:
[] Comment r6gier I'angle
f
Inclinez l'affichage en saisissant la
poign_e de transport tout en maintenant
fermement le support de I'autre main,
(
Haut-parleur
o ' 11
Capteur OPC
(Contr61e optique
d'image) -- T6moin POWER (Alimentation)
Capteur de
t61_commande
IREMARQUE_"
Pour modifier ['angle vertical du t_l_viseur
LCD, 1'_cran peut 6tre inclin_ jusqu'_ un
maximum de 2,5 degr6s vers l'avant ou de 10
degr_s vers !'arri_re Veui!lez r6gler
I'inclinaison et l'erientation du tel6viseur LCD,
sur la position offrant te meilleur confort de
vision
Prise pour casque ( ,Q)
Branchez ta mini-fiche casque dans la prise pour
casque situ_e _ I'avant de I'unite principale
T_moin OPC (Contrale optique d'image)
Le t_moin OPC est allum6 en vert Iorsque <_OPC _
est r6gl_ sur _ MARCHE _ (Volt page t9 )
Le temoin POWER est altum6 en vert Iorsque l'apparei! est sous tension, et est
altum6 en rouge en mode de veitle (le t_moin est 6teint torsque I'appareil n'est
pas sous tension).
• INPUT, CH (V)f(,A,), VOL (-)I(+) et MENU sur t'unite principafe remplissent les m6mes fonctions que les touches correspondantes sur
Ja t_t6commande
Co mode d'emploi foumit essentieIJement une description bas_e sur le [onctionnement _ t'aide de la talecommande
: ::=;iii::fill:
EllBranchez la mini-fiche du casque & la prise pour casque situee _fiI'avant de I'unite principale
0 0 o Casque
Affichage & I'dcran
VOLUME
10 UlIlIIIIi .............................................
Ajustez le volume du son en utilisant VOL (+)/(--) de
la t_l_commande
* Le casque nest pas fourni comme accessoire
• Aueun son n'est _mis par les haut-pafleu_s de I'unite principale lorsqu un casque a mini-fiche est branche darts la prise pour casque
• Ne regloz pas le volume sonore E un niveau trop 61eve Les experts de l'audition mettent en garde centre l'_coute prolongee &
un volume sono_e eieve
J
@
Page 47

Noms des pi_ces de I'unitd principale (Suite)
Vue arri_re
Verrou rond pour
fente standard de
sdcuritd
Kensington*
Poign_edetransport
Borne
AC INPUT
AUDIO L (gauche)
AUDIO R (droite)
m
INPUT1
'COMPO-
RENT)
(COMPO-
SANT)
7_ INPUT3/L (gauche) OUTPUT
R (droite) _J
(Borne d'antenne)
1
AUDIO R (droite) /
I l II {I AUDIO L(gauche)__ INPUT2
,J. "_%JI II VIDEO
S-VIDEO
Attachez les c&b[es et te cordon d'alimentation & raide du porte-ills et du serre-c_ble fournis
Ins_rez4e et fattes pivoter & 90°
Attache pour c&ble
O 11
Page 48

Norn des pi ces de RatdNdcornrnande
POWER (po 15) ===---__J
Met ie t_t_viseur a cristaux
tiquides en marche ou en vei]le
S61ection des canaux (p.,16)
R_.gle le canal
MTS (p. 16)
Selectionne les r,_g]ages audio.
MUTE (p, 16)
Coupe ie son
AUDIO ONLY (p. 30)
Sortie audio sans image & 1'6crrar}.
POWER
VOL (+)/(-) (p. 16)
R_gte levotume
AV MODE (po19)
S_lectionne le MODE AV pr6f_r_
MENU RETURN (p. 17)
Permet de tevenir _ t'6cran pr_c6dent.
SLEEP (p. 31)
R_g]e la minuterie d'extinction
VIEW MODE (p. 29)
S_lectionne le format de 1'6ctan
CH (A)/(v) (p. 16)
S61ectionne le canal
INPUT (p, 15)
Commute la source d'entr_e entre
lea modes ENTREE1, ENTR_:E2,
ENTREE3 et TV
FLASHBACK (po16)
Ram_ne au canal anterieuL
DISPLAY
Affiche le canal de reception et rheure
actuelle pendant 10 secondes
ENTER
Execute une commande
AIVl_tl_(Touches de r6glage) (p. 17)
Selectionne un 6{_ment d_sir_ sur
l'6cran de r6glage
MENU (p. 17)
Affiche l'_cran du menu
CC (p. 28)
Affiche les sous-titrages
BACKLIGHT (po 20)
Ajuste fa luminosit_ de I'_cran.
12Q
Page 49

Raccordement des appareils externes
Vous pouvez profiter de rimage et du son en raccordant un magn6toscope ou une console de jeu vid6o aux bomes situ_es
I'arri_re du t_l_viseur LCD
Lorsque vous raccordez un appareil externe, coupez d'abord t'afimentation au t_!6viseur LCD afin d'6viter des dommages
_ventuels
@
C_ble _ composen[
I
I
i
c
CAbleaudiolvid_o
PB
Pr_
AudioL (g_uche)
AudioR(d_oile)
S-Video
Video
AudioL(gauche)
A_b R(¢oite)
VidOo
AudioL(gauche)
AudioR(droile)
Borne INPUT1 (COMPONENT)
Lecteur DVD TunerTVnum6rique
"Si I'appareil externe comporte une borne
composanL utilisez do preference una
liaison COMPONENT. (Cola vous
permettra de visionnerdes images de
qualit_ sup_rieure
Borne INPUT2
Console de
jeu vtd6o Cam6scope Magn6toscope
Si I'appareiJ ex(erne comporte une
borne S-video. ulilisez de preference
une liaison S-VIDEO
Borne
INPUT3/OUTPUT
Ampllflcateur audio
Magn_toscope I
LREMARQUE_
•Comme c_ble, utilisez un c_ble audio/video disponible darts le commerce
• Le raccordement _ un ordinateur n'est pas posslibte
• Pour plus d'informations sur le raccordement d'apparei!e externes, consultez feurs modes d'emploi respectifs
• Assurez-vous de raccorder Ie c_ble correspondent _ cheque borne Le branchement d'autres c_bles pout entra_ner un
dysfonctionnement
• tNPUT2 comporte deux bornes d'entree video, les bornes VIDEO et S-VIDEO Si vetre appareil externe a une borne S-VIDEO, la
connexion S-VIDEO est recommand_e, car S-VIDEO procure one image plus fine et d_teill_e Si lee deux bornes sont raccord_es, la
borne S.VIDEO prend la priorit_
• En mode EMPRISE1, Fimage ne pout 6tre affichee qua Iorsque le signal 480](, 480P est re_u
I Sortie de I'image et du son (sortie viddo) 1
Vous pouvez _mettre [es signaux video et audio du t_t_viseur LCD par lee bornes tNPUT3/OUTPUT (Voir page 23)
* Lorsque vous utilisez INPUT31OUTPUT comme borne de sortie, selectionnez _ iNSTALLATION >>dans I'ecran de MENU
et r_glez <_S_LECT ENTREE3 _ sur <_SORTIE _>
• Lorsque vous utilisez t'entr_e S-VIDEO pour INPUT2 ou I'entr6e COMPONENT pour INPUT1, aucun signal video n'est fourni & la borne
INPUT3/OUTPUT, mais le signal audio est fourni _ la chaine audio raccord6e
Q 13
Page 50

PRERSGLAGE CANAL
PR :RI GLAGECANALpendantlapremiereraisesoustension
B Lorsquevous mettez le t616viseurLCD sous tensionpouria
premi6refois, ii m6morise automatiquement lescanaux de
t_[6diftusion et l'heure
Veuillez proc6deraux op6retions suivantesavaot d'appuyer sur
POWER
(1) Introduisezlespiles darts la t616commande(Voir page 7.)
2) Br'anchezlecable d'antenne sur le t616viseurLCD (Volt pageB)
3) Branchez le cordon d'aIimentation & taborne AC INPUT du
t616viseurLCD et branchez tecordon d'alimentation dans la
prise du secteur murale (Voir page 9)
............ _-T-"_ 1 POWER (Alimentation)
J
Appuyez sur POWER de I'unitL, principate pour mettre
le t61_viseur sous tension L'6cran CHOISIR LANGUE
::::: apparai't
Appuyez sur A/V pour s61ectionner <(ENGLISH >_
(Anglais), <(ESPAI_OL _>(Espagnol) ou (( FRAN(_AIS >_..
!i!2:
ES P:A _O;
FRA
Appuyezsur ENTERpouracc6derau mode RECHER CANAL
Appuyezsur ,&.IV pour s61ectionner((MARCHE>_eu(( ARRt_T_
Lorsquevous s61ectionnez((MARCHE_, te t6i6viseurLCD
m6moriSeautomatiquementlescanauxde t616diffusion
F'_MARQ_
• S{vouss6tectionnez((ARRt_T_,,PR_R_GLAGECANALestannul6
3: Appuyez sur ENTER pour acceder au mode LANCER
PREREGLAGE AUTO CANAL
Appuyez sur _/_ pour s61ectionner _(OUI _, et appuyez sur
: ENTER
• Si vousd6sirezinterromprelaprocedurede PRER_GLAGE
CANALlorsqu'eltead6marr6,appuyezsur MENU Laproc6dure
esta!orsennuiee Si vousd6sirezde nouveauproc6der&
i'inslalJatio_,reportez-vousaREGLAGE CANAL enpage22
i
:i
Le tuner recherche automatiquement ies canaux de
teiediffusion et de t_f_v[sion par c_bte (Le num6ro du
: canal augrnente automatiquement Iorsqu'il apparaiL)
i;.i_i:
ii_i_ i
,ii!
ATTENDEZ SVP
AUTO PROQRAMMAT]ON
Le t_leviseur LCD passe automatiquement & ]a
recherche des signaux EDS
Si des signaux EDS sor_tre£us, le num6ro du canal et
t'heure sent affich6s, et t'6cran pr6sent6 & I'6tape 5 apparaft.
ATTENOEZ SVP
RECHEBOH£ HEUBE
4
Lorsque PRERF_GLAGE CANAL est termin6, le ptus
)etit num_ro de canal memoris6 est affich6
,ST_R_O
SAP
MONO
_:53AM
IREMARQUE_.-
• Ne laissez pas i'ecran PRI_REGLAGE CANAL affiche pendant
une periode proloegee
• Si PR_R_GLAGE CANAL ne m6morise pas tous lee canaux
de votre t6gion, veuillez vous reporter en page 22 pour Ies
informations Bur la m6morisa_ion manue_le des cenaux en
utilisant R_GLAGE CANAL
• II peut 6tre difficite de memofiser des canaux Iorsque lee signaux
de telediffusion sent faibles, si ta fr6quence du cycle des canaux
est incorrecte ou si des brouillages de frequence se produisent
dans la r_gion, Reportez-vous en page 22 pour des informations
plus d6taill(_es sur la m6morisation manuel[e des canaux avec
REGLAGE CANAL
14®
Page 51

Opdrations de base
iiiiiiiiiiirlllllllllllllll II'IMII'IIII'I'I I I I
Mise sous et hers tension Commuter les modes d'entrde
(ENTRI_E1/ENTREE2/ENTRC:E3/TV)
POWER
T_moin POWER (Alirnentation)
@ Appuyez sur POWER Le t6moin POWER passe
instantan_ment du rouge au vert et le t6f6viseur LCD
s'allume
Afflchage & I'_cran
STEREO
SAP
iv1ONO
FR"_R QUE"_-
• L'indicateur affich6 disparaR quelques secondes plus tard
@ Pour mettre l'appareil hors tension, appuyez de nouveau
sur POWER
Veiile
POWER
O
t P_J'_E VOL CH INPU"t l/
°+A A 2
°8":U
Altumez l'appare v deo raccord6 au t_,t6viseur
21:Appuyez sur INPUT pour s_lectionner la source d'entr6e
: applicable L'6cran change dens I'ordre du mode ENTREE1,
ENTRI_E2, ENTREE3 et TV, cheque fois que Yon appuie sur
INPUT
Mode ENTR_E1
? Mode ENTREE2
ENTREE2
Mode ENTREE3
[
[:i Mode TV
ENTREE3
]
]
• ENTREE1 :
Pour un appareil vid6o raccerd_ aux homes d'entr_e
COMPONENT
• ENTRt_E2 :
Pour un appareil vid_,o raccord_ au× bomes INPUT2 Le t_l_viseur
est _galement dot_ d'une borne dentr_e Swid#o pour I'entr_e
INPUT2 Si des appareits sent raecord6s 8 la i'ois ala borne S-video
et aux bornes video normales, la borne d'entr_e S-video a prioril_
- ENTRI_E3/SORTIE :
Le mode ENTREE3 permet de r_gter le t_l_viseur au×
caract_ristiques pr_definies et de s_lec[ionner le mode ENTRt_E ou
SORTIE L'indteation ENTREE3 ne s'affiche pas torsque te mode
s_lectionne est SORTIE
Pour 6teindre le t_l_viseur LCD
Appuyez sur POWER Le t¢moin POWER devient rouge,
Pour ratlumer le t_l_viseur LCD
Appuyez de nouveau sur POWER Le t_moin POWER
devient vert.
(_ 15
Page 52

Op6rations de base (Suite)
i
Volume sonore .....
! Pour r6gler |e volume
POWER
0
_gt_TE VOL Ctt IIIPUT
o*A,,A o
@ Appuyez sur VOL (+) pour augmenter le volume sonore
Uindicateur ,_segments se dCplace vers la droite
VOLUME
50 IltllIlilIIIIIllUillIIIIiUlItllIlUllIUllU .........
Appuyez sur VOL (-) pour diminuer le volume sonore
L'indicateur & segments se depiace vers la gauche
VOLUME
10 lU|IIlIll .............................................
[] Mise en sourdine
@ Appuyez sur MUTE pour couper rnomentanement le
son. Le symbole de SOURDINE D_ s'affiche pendant 4
secondes..
Appuyez sur MUTE ou VOL (+)/(-) pour i'amener le son
au niveau ant@ieur
La fonction de sourdine est automatiquement d6sactiv6e
iorsque vous appuyez sur t'une des touches suivantes :
POWER, MUTE, VOL(+)I(-) ou MTS
VOLUME
I 10 IIIII1ti1! .............................................
!
[REMAROUE_
• Lorsque l'on appuie sur VOL (+)I(-) en mode Sourdine_ re son
s'act[ve et l'indicateur de volume s'affiche
• La fonction de sourdine est annul_e Iorsque I'on appuie sur
POWER
Changement de canal
/ l/°°°o @ @
@@@
Pour changer de canal, utilisez los touches de S61ection
des canaux ou CH (A)t(v).
11 Cel61@iseurLCDvouspermetdes6lectionnerjusqu', 125canau×(1,t25) Pours61eclionneruncanal,saisissezunnum¢ro& 20u3 chimes
[] Utilisation de S61ection des canaux
Lorsque vous s61ectionnez le canal avec S61ection des
canaux, terminez ta saisie du t'lum6ro de canal en maintenant
la touche du dernier digit enfonc6e pendant un moment
Pours_lecti0nnerunnum_rodecanal_10u2chiffres(ex.: canal5):
Comptetez la procedure qui suit & l'int6rieur de 4 secondes
1 Appuyez sur fa touche (_
0-
i!
2
/} ('
Appuyezsurla touche(_
5
• Lots de la selection d'un num_ro de canal a 1 chiffre appuyez
d'abord sans faute sur la touche
Pour s61ectionner un canal a 3 chiffres (ex.: canal 115) :
Compl6tez la proc6dure qui suit _ l'interieur de 4 secondes
!/1 ¸
¸!•:¸•I •
_,ii/
!¸:¸¸3:¸
LC:_:
ii_I_}_}_
J(X
Appuyezsurtatouche_ 2 AppuyezsurlatoucheC_D
1-- 11-
Appuyezsur tatouche(_D
115
[] Pour sdlectionner MTS (son multicanal de t616viseur)
1
.x
ii}2 i
hA' ,_
{::! :iii
Appuyez sur MTS pour afficher I'¢cran MTS
Appuyez sur MTS pour s_lectionner les r_glages MTS
STC:R_O: audio st_r_o
SAP : second programme audio
MONO : audio mono
_- STEREO<ANTENNE
SAP <ANTENNE
MONO
. (( ANTENNE _ apparatt pendant la diffusion en mode ST_ZRE_O
ou SAP
• Las61ectiond'uncanal&3chiffresn'estpossibl.equa Iorsquele mode
deriaceptioeest r_glesur _ CABLE_>dans {_REGLAGECANAL_ (Pour
plusd'informationssur ler6gtugedumodeder6ception,voirpage24)
PourchangerlescanauxaveclestouchesCH(A)!(V} delat_l_cemmande
Antenna:LersquevousappuyezsurCH(A), tescanauxchungenlda_sI'erdmsuivant:
2 -_ 3 -÷ -> 68 -_ 69 -_ 2 -e 3 _,
LorsquevousuppuyezsurCH(v), loscunauxchangenlclans!ordresuivunt:
3 -.4-2 .-> 69 -_ 68 ->. _ 3_ 2-->
C&b_e:Lorsquev0usappuyezsu_CH(A), lescanauxchengentdunst'erdresuivant:
1-+2_3_ . _ 125 -e 1 _ 2 ---e*3 -> ..
LorsqueveusuppeyezsurCH(v). lescanuuxchangentdunsIordresuivani:
k._ 3 -.e 2 -> 1 -_ 125 -:' -_ 3 _ 2 _ 1 ->
[] Utilisation de FLASHBACK
@ Appuyez sur FLASHBACK pour passer du canal
actuellement syntonis6 sur te canal pr6cedemment syntonis6
@ Appuyez de nouveau sur FLASHBACK pour revenir sur
te canal couramment syntonise
(Z)
Page 53

Comment sdlectionner un dl_ment de menu
Les menus peuvent 6tre utilis6s pour effectuer de nombreux
r6glages sur le te[_viseur LCD Choisissez I'_lement souhail6 dans
un menu en proc6dant de la fa_on suivante indiqu6e cidessous
Pour chaque ecran de menu, reportezwous ,_la page suivante
RLS___
•Les 61_mentsaffich6s varient en fonction des conditions de
param6trage
• L'61ementsetectionn_ es! affich6 en jaune
• Los derniers param6tres ajust6s seront sauvegard6s en m_moire
Utilisation de la t61_commande
1 Appuyez sur MENU de la teiecommande pour afficher
l'ecran MENU,
2 Appuyez sur {t_ pour sefectionner Fel6ment de menu
desir6e_
: : • Le curseur se deplace vers la gauche ou la droite,,
: • Le curseur indique l'616ment de menu s6iectionn_
3: Appuyez sur ,_./V pour s6fectionner 1'61ementsouhait_, et
appuyez sur _/1_" pour ajuster t'616ments_lectionn_
* Pour _{MODE AV _, _{OPC _, {_AVANCE _ et
{{REINITfAL _, appuyez sur ENTER pour afficher l'_cran
: de paramStrage
i
i
i
:4 Appuyez sur MENU RETURN pour retourner & I'ecran
pr6c_dente, ou appuyez sur MENU pour quitter
U Utilisation du tableau de commande de I'unitd
principale
Vous pouvez aussi utiliser le tableau de commande de
l'unite principale pour los r_glages de menu
Los touches du tableau de commande correspondent & celle
de ]a tel_commande, comme indiqu_ cFdessous
Tableau de commande de I'unit_ principale
VOL (-)/(+): Curseur _1/1_de la teI6commande
CH (V)/(A): Curseur _l_ de la telecommande
MENU: MENU sur la t#_16commande
INPUT: ENTER sur la t_lecommande
Operations de base (Suite)
0 17
Page 54

Operations de base (Suite)
g Ecrans de param6trage de menu
Pour plus de d_taiis concernant ]e param_trage de chaque _l_ment de menu, reportez*vous au num_ro de page indiqu_ci-dessous
fRENIARQUE_
• Les illustrations et affichages & l'_cran de ce mode d'emploi sont & des fins explicatives et peuvent varier Idg_rement par
rapport _ I'apparence r_elle.
• En fonct[on des conditions de parametrage, par exemple un mode dentree, il peut s'av_rer impossiblede r_gler ou de d_finir certains
el6ments Darts un tel cas, un message d'avertissement (p ex : NON DISPONISLE AVEC CE SIGNAL ) s'affiche sur r_-crande
param_tragedu menu
fMAGE
Page
MODE AV ............................................. 19
OPC ..................................................... 19
R_TRO-$CLR ............................................ 20
CONTRASTE ................................ 20
LUMINOSITE_ .................................................. 20
COULEUR ........................................................... 20
TEINTE ..................................... 20
NETTETE_ ...............................................................20
AVANCE_ .............................................................. 21
R_INITIAL ................................................ 20
AUDIO
• A ,,,,,,,,,,, u,u,,u,,
La barre ci-dessus est un guide opdrationnel pour la
t_l_commande, Cette bane change conformdment
chaque dcran de param_trage de menu,
i i i , i i, i, i i , i i i i
Page
AIGUS ......................................................... 21
GRAVES ................................................................ 21
BALANCE .............................................................. 21
RE_IN1TIAL....................................................... 21
{NSTALLATION
Page
RE_GLAGE CANAL ............................................. 22
MTS .......................................................... 16, 23
SI_LECT ENTREE3 ..................................... 23
CLASS. PUCE V ......................................... 24-27
SOUS-TITRAGE ........................................... 28
LANGUE ................................................ 14, 23
OPTIONS
Page
MODE VUE .......................................... 29
AUDIO SEUL ........................................................30
_CRAN BLEU .................................................. 30
MINUT REGLAGE ................................... 31
AUCUN SGN ARRC:T ............................... 31
PAS D'OP_. ARR_T ................................ 31
IMAGE TOURNANTE ................................... 32
18O
Page 55

Param tres d'ajustement de base
i = = n m=,,,m= He,,,= =============== :::::::::::::::::::::::::
MODE AV
OPC (Contr61e optique image)
MODE AV vous propose un choix d'options predefinies, vous
permettant de fairs correspondre au mieux l'image, en fonction
de la ium[nosit6 de la piece et du Iogicie[ de Iecture utilis6
]%' 5o
:1::Appuyez sur MENU pour afficher l'ecran de MENU°
2 Appuyez sur '_/_" pour selectionner <{ IMAGE _
3 Appuyez sur _./Y pour s61ectionner <<MODE AV >>,et
: appuyez sur ENTER.
4: Appuyez sur ,&/_Y pour selectionner I'option souhait_e,
:i et appuyez sur ENTER
DYNAM'I QU E:::
DYN:AM:I QUE i
J E U : ......
5 Appuyez sur MENU pour quitter
[REMARQU_
* Vous pouvez s_ectionner une option de MODE AV, diff6rente pour
chaque mode d'entr6e. (Par exemple, setectionnez €{STANDARD _
pour le mode d'entree TV et {<DYNAMIQUE _ pour l'entr6e VIDEO)
, Lorsque _ MODE AV _ est r_gl6 sur <<DYNAMtQUE (FIXI_) o,
_ PAS REGLAGE IMAGES D{SPONIBLE DANS [DYNAMIQUE
(FIXE)]. o s'affiche ettes 616meets de menu IMAGE (& l'exception
de {_OPC _ et ,{ AVANC_ _) ne fonetionnent pas
Regte automatiquement la iuminosit_ de I'ecran,
i,i , 5o
i Appuyez sur MENU pour afficher I'ecran de MENU
2 Appuyez sur "_II_"pour selectionner e IMAGE _
3: Appuyez sur ,_-fY pour selectionner <<OPC >>,et
appuyez sur ENTER
4 :!
Appuyez sur A/_ pour seiectionner <<MARCHE >)ou
{_ARRET _>, et appuyez sur ENTER
IOption s(_isctionn_e[:: :Descrlption :: : : :::: ]
_-_-RCHE Ajustemeni aui0matique de']a luminosit6 l
_,_ ! Pas d;aiustement )
5 : Appuyez sur MENU pour quitter
• Avec un r_giage sur <_MARCHE _ le t_moin OPC est aIlum6 en
verl. d_tecte la lumi6re environnante et ajuste automatiquement
la fuminosite de r_troSclairage Veiilez ace qu'aucun objet
n'obstrue le capteur OPC. ce qui pourrait engraver sa facult_ de
d6tecter la Iumi_re environnante
R6glage direct du MODE AV
I Appuyez sur AV MODE
:2 Avant disparition de f'ecran MODE AV, appuyez de
nouveau sur AV MODE et selectionnez te reglage de
votre choix.
• Chaque fois que vous appuyez sur AV MODE, le
mode change de la mani_re indiquee ci=dessous
" oPtion s_lectionn6e ..... Description :
STANDARD Mettre lee reglages d'image sur lee
vaieurs standard.
DYNAMIQUE Pour une image bien eerie accentuant le
contrasts, pour la visualisationdes sports.
DYNAMIQUE (FIXE_) Mettre lee reg_ages d'image sur les
valeurs prereglees en usine Aucun
ajustement n'est permis.
CINI_MA Conlr61e_le con|taste pour perme_re une
vieualisation plus aisle des images sembres.
JEU ContrSler la luminosit6 des jeux video
et d'autres images pour permettre une
visualisation plus aisee.
Q 19
Page 56

Param tres d'ajustement de base (Suite)
i nu =,re,n== ,
RETRO-ECLAIRAGE .... ....
Vous pouvez ajuster la luminosit6 de l'image_
AV F4ODE DISPLAY
o_o
,6®8
00©0
Appuyez sur MENU pour afficher I'ecran de MENU,
12
i:3
:<,41
iii,_i:i
i iij:bi
!//!
!¸¸¸¸¸4¸¸}¸¸¸
5
Appuyez sur _/_ pour selectionner (<IMAGE _>
Appuyez sur ,&fV pour s61ectionner (_R_TRO-#CLR >_
Appuyez sur _1/I)" pour ajuster 1'61ement sur la position
souhaitee
Appuyez sur MENU pour quitter,
• _ R_TRO-ECLR _ ne peut pus e.tre regle Iorsque (<OPC _>est
r6gle sur _(MARCHE _
R6glage direct RIeTROqECLR
1
, /}i/
]i¸:}/:_
_/ix!{
:i:_!i/i,
i2
i'
Appuyez sur BACKLtGHT pout afficher I'ecran
RC:TRO-C:CLR,
OPC _ARCHE
R_TRO-_CLR[AUTOI
Appuyez sur BACKLIGHT pour changer le param_tre
L o_c_ARC._ o_o ARR_'r OFC ARR_T |
RZIRO._CLR[AUTOI _ R_TRO,_CLR{VARIABLEI_--R_I'RO,_CLR[FONC_]'(-'
REL-R-E--M-ARQUE_-
• L'_cran RE_TRO-PCLR disparai_, automatiquement au bout de 3
secondes
• [LUMINEUX]: Lumioosit6 maximale
[NORMAL]: Convient pour une visualisation dans une piece
bien 6claitee _conomise t'6nergie
[FONC$]: Convient a une utilisation dans des endroi_speu 6claif6s
[VARIABLE]: La luminosite peut 6tre t_glee selon vos
pr_f6rences avec ",_/I_
[AUTO]: La luminosite de l'_cran s ajusle en fonction de
I'_clairage ambiant de la piece pour economise[
l'ene_gie. Le t_moin OPC est altume en vett
• Avec le r6glage _(AUTO _L veillez & ce qu'aucun objet n'obstrue
le capteur OPC, ce qui pourrail entravet sa faculte de d_lecter la
tumi_re environnan_e
R_glages IMAGE
Vous pouvez ajuster I'image selon vos preferences, au
moyen des regtages d'image suivants
::1: Appuyez sur MENU pour afficher I'ecran de MENU
Appuyez sur '_t_ pour s61ectionner (< IMAGE >>
13 Appuyez sur ,€,t_ pour selectionner un element de
:: r_glage specifique
y :
¸¸41¸
/ !!
DONTRASTE
Appuyez sur '_1_ pour ajuster l'_tement sur la position
souhait_e
Appuyez sur MENU pour quitter,
"l_l_ments_lecttorln_
'R'_'TRo-I_CLR
CONTRASTE
LUMINOStTI_
COULEUR
TEtNTE
NETTET_
: Touche "_ : Touche
!Pour diminuer la luminosit_ Pout augmenterlaluminosit6
Pour' moins de con!ras!e ,pout plus de contraste
R_duclion de la luminosil6 AugmenlationdelaluminosiVa
Pourunec_uleurm0ins.!n!ense.P0.u[unecouleurplusintense
Les teintes de la peau Los teintes de la peau
deviennent violettes deviennent verd&tre
Pour moins de nettet_ Pour plus de nettet_
, Selectionnez ({AVANC# _ et appuyez sut ENTER pout d_finir
<(TEMP COULEUR _, Voir pages 21
• Lors de la reinttiatisation de tous los 6lements de r6glage (a
l'exception des Old-moots des menus (( MODE AV >>,_(OPC >>)sut
los valeuts pr6reglees en usine, effectuez la procedure suivante
(_) Appuyez sur .A./_@"pour selectionner ({R_IN1TIAL >_sur l'_cran
de IMAGE, et appuyez sur ENTER
(_ Appuyez sur _/V pour s_lectionner (( OUI _, et appuyez sur
ENTER
®
Page 57

Param tres d'ajustement de base (Suite)
.................. ,, ,,,, ,,,,,,,,,.,,,,,,,,,,,,,,,.,,,,,,,,,,
TEMPERATURE DE COULEUR
Vous pouvez ajuster Ia temp6rature de couteur pour obtenir
un meilteur 6quilibre du bianc
1 Appuyez sur MENU pour affichar l'_cran de MENU,,
2 Appuyez sur _tltll_pour s_lectionner _ IMAGE _,
3 Appuyez sur AtV pour s61ectionner _ AVANC_ _, et
appuyez sur ENTER
4
Appuyez sur AIV pour s61ectionner {{ TEMP
COULEUR _, et appuyez sur ENTER
TEMP OOULEUR
ROUGE [ 0] UTILISAT.
HAUT
MOYEN
BAS
5:1 Appuyez sur ,A/'V' pour setect{onner l'option souhaitee,
puis appuyez sur ENTER.
6 Appuyez sur MENU pour quitter.
O-ptfo,s_lectE0nn_e : : Description :; : : !
I UTiL.iSATI Permei de definir'ia'couteur de vot_ _ I
! HAUT I Blanc avec ieinie bieu_tre |
I, BAS [ Blanc avec teinte rouge&tre )
* Lorsque vous s61ectionnez {<UTILISAT _, il est possible d'ajuster
les 61_ments suivants
ROUGE
VERT
BLEU
::: i::;Touche_ Touchel_
Rouge moins intense Rouge plus intense
Vert moins intense Vert plus intense
Bleu moins intense Bleu plus tn!ense
[REMARQUE._
* Pour r0tablir les regfages usine du param6tre _{UTILISAT _.
procedez de ta proc6dure suivante
_) Appuyez sur _/V pour selectionner {{ Rt_INITIAL _ sur
I'ecran de AVANCE, et appuyez sur ENTER
L_ Appuyez sur AI_ pour sOlecfionner {c OUI _. et appuyez sur
ENTER
R_glages AUDIO
Vous pouvez regter la qualite sonore selon vos preferences,
au moyen des reglages suivants
1 Appuyez sur MENU pour afficher t'_cran de MENU
2 Appuyez sur _!_ pour selectionner _{AUDIO _>
3
:4:1
Appuyez sur ,_IV pour s_.lectionner un Ol6ment de
r6giage sp_cifique
Appuyez sur _I1_ pour ajuster I'_lOment sur Ia position
souhaitee.
5 Appuyez sur MENU pour quitter
_.i6ments_leclionn_ : 'i:'":' Touche <_
t',!Gu S Pour des ai.gus plus faib_es
GRAVES Pour des basses
plus fa,ibles ....
LBALANCE Diminue le volume du
t haut-parleur de droite
Touche _ :
Pourdes aigusplus intenses
Pour des basses
plus intenses
Diminue fe volume du
haut-parleur de gauch%
• Les elements du menu AUDIO ne peuvent pas _tre regles
torsque _ S#LECT ENTRleE3 _ est rOgl_ sur _{SORTIE a_
VAO _
• Lors de la r_initialisation de tousles elements de r_gtage sur ies
valeurs prOreglees en usine, effectuez la procedure suivante
(_ Appuyez sur AI_ pour selectionner {{ RI_INITIAL _, et
appuyez sur ENTER
Appuyez sur AtY pour s_lectionner _€OUI _>,et appuyez sur
ENTER
O 21
Page 58

Caract dstBques utines
111= 11,,1 11
REGLAGE CANAL
[] PRI_RI_GLAGE CANAL
Lorsque vous vous d6placez darts un endroit aux
diff6rents signaux d'emission, vous devez regter te
num6ro du canal et t'heure _ !'aide de la fonction
PRERF.GLAGE CANAL Proc_dez de ta proc6dure
suivante pour activer PRt_Ri_GLAGE CANAL..
O Appuyez sur _,/V pour s_lectionner _ RI_GLAGE CANAL _ sur
l'6cran iNSTALLATION (voir page 18 ) et appuyez sur ENTER
d_)Appuyez sur A/V pour s_lectionner _ PRI_R_GL CANAL _,et
appuyez sur ENTER
(_)Appuyez sur ,_k/V pour s61ectionner _OUI _ et appuyez sur
ENTER
Reportez-vous a la page 14 pour le detail sur
PRE_Rg:GLAGE CANAL
[] R_glage ANTENNEICABLE (ANT°/CABLE)
Pour pouvoir capter les emissions de t61_vision diffusees
tocatement, 11est n6cessaire de s_lectionner le mode de
r6ception (ANTENNE ou C/_BLE)o
I Appuyez sur MENU pour afficher l'ecran de MENU
Appuyez su_ _/_" pour sfilectionner _ INSTALLATION _
:i_14.
Appuyez sur AtV pour selectionner {<RI_GLAGE
CANAL _, et appuyez sur ENTER
Appuyez sur A/V pour selectionner _ ANT/CABLE _,
et appuyez sur ENTER
Appuyez sur _k/_ pour selectionner le reglage
souhait6, et appuyez sur ENTER
IPRI_R EGL CANAL
IANT /CABLE
/REChER. CANAL
5 Appuyez sur MENU pour quitte_:
• Les canaux pouvant_tre regussur le televiseur LCD sont :
Canaux hertziens (ANTENNE) : Canaux CABLE :
VHF : 2 _ 13. ! (HRC et fRC)
UHF : 14_ 69 2 a 125 (STD, HRC et iRC)
[] M_morisation des canaux de t_l_vision
R_p_tez les etapes 1 a 3 de Reglage ANTENNE/
:: CABLE (ANT, ICABLE)_
!2
:3
Appuyez sur _/_ pour s61ectionner <_RECHER
CANAL _, et appuyez sur ENTER
PR_R£GL CANAL
ANT. /CABLE
RECHER, CANAL
M_MO I RE CANAL
Appuyez sur ENTER Le syntoniseur recherche tous les
canaux disponibles de votre rSgion et les ajoute darts ia
m_moire du t_l_viseur
• Pour interrompre RECHER, CANAL, appuyez sur MENU RETURN
La RECHER CANAL s'arrSte sur te canal en cours et n'ajoutera
aucun canat plus _leve
[] Ajout des canaux faiblement capt.s ou additionnels,
ou suppression de canaux non d6sirds de la m_moire
du t_16viseuro
¸¸1:¸¸¸i¸
!2 ¸
:i141
•_i_,__i_
5¸
IIest possible d'ajuster des regtages individuels de programmes
I 000 1
QOQ
R_petez tes _tapes 1 a 3 de R6glage ANTENNEI
CABLE (ANT°/CABLE).
Appuyez sur _/_ pour selectionner <{M_MOIRE
CANAL >>,et appuyez sur ENTER.
PR_REGL CANAL
ANT, ICABLE
REOHERoCANAL
_MOIRE CANAL
Appuyez sur A/V pour amener te curseur sur
{{CANAL _ pule utilisez _/_ ou S_lectlon des
canaux pour s_lectionner le canal souhait_ & ajouter
ou supprimer:
Appuyez sur _k/V pour amener le curseur sur
{{ SAUT >_et utifisez {/_, pour selectionner
{{ MARCHE _ ou _ ARR_T _>
Appuyez sur MENU pour quitter
22Q
• Si RECHER CANAL est a nouveau execute, les canaux
pr6c6demment memorises seront perdus
Page 59

Caract6ristiques utiles (Suite)
i i iiil,lll,ll,
INSTALLATION
1 Appuyez sur MENU pour afficher r_cran de MENU
2 Appuyez sur _t_ pour selectionner _{ iNSTALLATiON )_
3 Appuyez sur ,&tV pour selectionner t'61ement seuhaite,
et appuyez sur ENTER
INSTALLATION
Appuyez sur ,&fV pour changer le reglage, et appuyez
sur ENTER
5 Appuyez sur MENU pour quitter
Et6ment select|onnd :' R6glage d'usine Option de reglage
MTS [ST_R_O] Audio stereo [SAP] Programme audio secondaire
MONO] Audio monophonique
;ELECT ENTREE3 ENTRI_E] [SORTIE t:_ FAO]
3ornes INPUT3tOUTPUT selectionn_es comme La sortie de ligne est selectionn_e Le volume de
_ornes d'entr_e sortie est fixe Le son du haut-parleur n'est pas coupe
[SORTIE _ VAO]
La sortie ligne est se{ectionnee, le volume de sortie
variable, le son du haut-parleur est coupe
LANGUE ENGLISH] (Anglais) [ESPAr_OL] (Espagnol)
[FRAN(_AIS]
Pour plus de details concernant les elements suivants, reportez-vous _ chaque page indiquee
• RI_GLAGE CANAL .... Page 22
• CLASS PUCE V ........... Pages 24 & 27
• SOUS-TITRAGE .... Page 28
Q 23
Page 60

Caracteristiques utiles (Suite)
.4H,' m' u.
Rdglage de CLASSE PUCE V
CLASS, PUCE V
• La puce antiviotence vous pe_met de bloquer (a (_ception de certaines emissions et de contrBler ('utilisatien du tel_viseur sur la base
des donnees de la FOG EUe est destinee a emp_cher les enfants de regarder des scenes choquantes de violence ou de sexe
• Deux classifications existent pour (e blocage de ta reception d'4_missions de tel4wision : la classification MPAA (Association
cin,_matographique americaine) et les TV Parenta$ Guidelines La classification MPAA est uniquement bas_e sup I'_ge Les TV Parental
Guidelines soot basees sur I'&ge et le contenu
• Les 6missions de television peuvent utiliser' lune ou I'autre de ces classifications Pour un contrBle campier vous devez denc rBgler
votre paste pour ces deux c_assificafions
Classification MPAA (Association cin_matographique am_ricaine)
Classification Description
1_ G TOUS PUBLICS. Convenable pour tous]es _ges.
....PG............IACCORD PARENTAL SOUHAITABLE. Certaitles scL_nes peuvent choquer les enfant_
selon PG-13 PRUDENCE VIVEMENT,RECOMMANDEE AUX PARENTS. Certaines sc_nes peuvent ch _uer les enfants de mains de 13 arts.
I'&ge _ ......................
RESTRICTION, )nterdlt aux mains de 17 ans non accompegnes d'un parent ou tuteur adulte.
U NC-17 INTERDITAUX MOtNS DE 17 ANS,
X La classe X esl mainlenant ancienne eta et_ unifiee avec la dasse NC-17. Elle eat encore codee dens Jes donn_es de films anciens.
Classification MPAA
Exemple 1 :
Dens la classification
selon I'_ge, le niveau
PG-13 est bioque Ceci
a pour effet de bloquer
automatiquement les
niveaux supBrieurs,
c'est-&-dire R, NC-17 et
X
1 S_lectton par
I'utlltsateur
a .......
pG .......
S BLOCAGS
PG_I3 BLOCAGE
NC'17 BL0CAG£
2. Tableau
de blocage
Non
_] bloqud
I _ ( Non
bIoqu_
' _ SBtectlonnez
Selon_ (( BLOCAGE)>
I'_ge eloqud
_utomattque_
Bloqu,_
automa_fquor_
Btoqu5
automatiquorr
Exemp{e 2 :
Darts la c(assification
selon ]'&ge, le niveau
Rest bloqu@ Ceci a
pour effet de bloquer
automatiquement les
niveaux sup_rieurs.
c'est&-dire NC-17 et X
1, S,_]ectfonpar 2. Tableau
Vuttllsateut de blocage
G ....... ] _bIoqa_
Non
PG _ btoqu_
PS-13 Selon_b_oqu8
I+_go _ S{_locttonnez
B BLOCAGE _ <(BLOGAGE)>
eloqu_
NC-17 BLOCAG_ I _utomatlquoment
_utom_tlquomeni
, La classification MPAA est uniquement basee sur l'&ge
TV parental guidelines
Classification
abie pour lous Ies enfants)
1"_ _naNe pour les enfants
ii __partirde 7 arts)
)TV-G(touspu iicS)
I -PG(accordpo,enta,sou.a.ob,e>
U )TV-14 (iccord parentai indispensable)
I TV-MA (pubiic aduite seulement) ........
I (violeFVede
ti!!ion) ....... I
selon le contenu :c_
V
(violence)
D
(dialogues
caractBresexuel)
[]
x
x
x
S L
(scenes de (langage
sexe) choquant)
[] []
x X
X X
X X
[]
[]
X
x
_: Vous pouvez choisJr ce niveau de classification selon (e contenu ma s i_nest generalement pas code dens les _missions
X: Vous pouvez choisir ce niveau de classification selon le contenu
TV parental guidelines
Exemple :
Lorsque TV-Y7 dana )a classification selon rage est regl6 sur BLOCAGE tes niveaux sup_rieurs (TV-G TV-PG TV-14 et TV-MA) seront aussi bIoques
automatiquement De plus, D L S V el FV sent automatiquement bloques dens BLOCAGE CONTENU, saul si vous r_glez manueIlement BLOCAGE CONTENU
1, S_lection par 2. Tabieau de bIocage
I'uttllsateur
T_-Y .......
TV-Y7 BLOCAGE
TWG BLOCAGE
W-PG BLOCAGE
W-14 BLOCAGE
rV.MA BLOCAGE
BLOCAGE CONT_'N U
(a L S v FV)
FM
_il a "_v-Y
Selon du contenu
V S L
_ Sdlectionnez BloqtJ6
((BLOCAGE)) _automatiquement
LREMARQUE_-
• La c)assification se)on I'_ge peu_ 6tre modifiee par ta classification selon le contenu, ma_s seuiement pour les combinaisons indiqu_es par
un X dens le tableau ci-dessus
* Si vous choisissez un niveau inferieur de la classification selon t'_ge ceci bloque les niveaux sup_rieurs de cette classification, quef que
suit Ie niveau choisi pour ]a classification selon le contenu
• Si vous placez TV-Y ou TV-Y7 sur BLOCAGE tousles niveaux de BLOCAGE CONTENU soot affiches
24O
Page 61

Caract ristiques utiles (Suite)
= H,,=,l
Syst_mes canadiens de classification
• Les syst_mes de classification t616visuelfe au Canada sont bas6s sur la ligne de conduite de la Canadian Radio-
Television and Telecommunications Commission (CRTC - Commission canadienne de radio-t616vision et
t616communication) concernant ta violence darts les programmes t616vis6s_
• Alors que la violence repr6sente le contenu te plus important & classifier, la structure d6velopp6e tient compte
d'autres contenus de programme, comme le langage, la nudit6, la sexualit6 et les th_mes aduites,
, Lors du r_glage de PUCE V sur le syst6me canadien, vous pouvez choisir soit la classification canadienne
anglophone soit la classification canadienne francophone
Classification canadienne anglophone
I lll l, , , ,,,,,..... ,I,l,,ll Ill II, U'II,
Enfants : Prevus pour des enfants plus jeunes de moins de 8 ans. Accorde une attention
C particuliere aux themes qui pourraient menacer leur sens de ta securite et leur bien-etre
Enfants de ptus de 8 ans : Ne renferme aucune representation de violence comme maniere
C8 + preferee, acceptable, ou unique de resoudre un confl t n encourag pas non plus fes
enfants a imiter des actes dangereux qu'ils peuvent voir sur recran
General : Consider_ comme acceptable pour tous les groupes d'_ge Spectacle approprie
1'_ G pour toute la famille, contient tres peu de violence, physique, verbale ou emotionnelle
selon Accord parental : Destine _ une audience generale, mais peut ne pas convenir & des enfants
l'&ge PG plus jeunes (&ges de moins de 8 ans) car it peut contenir des themes ou des sujets controverses
U" Plus de 14 arts : Pourrait contenir des themes ou la viotence est un des elements dominants
14 + de I'intrigue, mais il doit etre essentiel au deveioppement de I'histoire ou du personnage Le
langage utilise pourrait 6tre impie et la nudite presente dans le contexte du theme
Adultes : Est destine e des spectateurs d'au moins 18 ans et pourrait contenir des
descriptions de violence qui, bien que tiees au developpement de I'histoire, d'un personnage
18 + ou des themes, sont destinees a un public adulte. Pourrait contenir des images, un langage
et des representations relatives au sexe et _ fa nudit&
i i.... i i I'HU,',l ' I H'
Classification canadienne francophone
N
selon
l'&ge
T G
8 ans +
13 ans +
16 arts +
18 ans+
i
General : Tous les &ges et enfants, renferme un minimum de violence directe, mais peut _tre
integree dans I'histoire de maniere humoristique ou non realiste
General mais deconseilte pour des jeunes enfants : Peut etre regarde par une large
audience, mais pourrait contenir des scenes derangeantes pour des enfants de moins de 8
ans qui ne peuvent pas faire la distinction entre des situations imaginaires et reelles
Recommande pour 6tre regarde avec un parent..
Plus de 13 ans : Pourrait contenir des scenes violentes frequentes et est donc recommande
pour une visualisation avec un parent
Plus de 16 ans : Pourrait contenir des scenes violentes frequentes et une violence importante.
Plus de 18ans : Uniquement pour adulte Pourrait contenir des scenes violentes frequentes
et une violence extreme.
,uH ,i ................... i mllIH I HHU"
Q 25
Page 62

Caractdristiques utiles (Suite)
i1,11,11,1,111,lU ,, !
R_glage de CLASSE PUCE V (Suite)
Le reglage PUCE V permet de sp6cifier la classe MPAA, TV
GUIDELINES, les codes anglophones du Canada et les codes
fiancophones du Canada
[] R6glage PUCE V
OQQ /
QQQ
QQQ
Appuyez sur MENU pour afficher r6cran de MENU
2:
3
_i_ii'_ii:
i_::i:_
:_.i_ _i
Appuyez sur _1_ pour s_tectionner- _(INSTALLATION )_
Appuyez sur AIV pour s_lectionner (( CLASS. PUCE V _),
et appuyez sur ENTER
_<ENTRER N° SECRET_ )_s'affiche. Saisissez le
numero secret & 4 chiffres a raide des touches de
S61ection des canaux
_EMARQU-EE_
• Lorsque vous entrez le num6ro secret pour fa premiere fois,
appuyez sur ENTER pour enregistrer Sinon, continuez
r@tape 5
5 Appuyez sur A/V pour selectionner I'eiement
souhait_., et appuyez sur ENTER
.u#A:A........ .......... l
T:V: GU I:DEL I NES:: : i
: COD ES :ANG DU O:ANA /
:6:
i '
Appuyez sur Zk/V pour s61ectionner r_,ternent souhait¢,
appuyez sur '_/l_ pour s_lectionner (_BLOCAGE _
(Classification MPAA) (TV GUIDELINES)
_i_ii:,i_:I_I_i_i_i_
(Classification canadienne (Classification canadienne
angtephone) francophone)
Appuyez sur MENU pour quitter
• Le reg}age introduit automatiquement _ BLOCAGE >_pour toute
classification inf_.rieute a volre s_lection
[] Pourchoisirun niveauBLOCAGECONTENU(TV GUIDELINES)
R_petez les etapes t &4 de R6glage PUCE V
2 Appuyez sur _/'_ pour s_tectionner <_TV
.... GUIDELINES )h at appuyez sur ENTER
3 Appuyez sur ,_/V pour s6lectionner (_BLOCAGE
CONTENU _),et appuyez sur ENTER
D
4
i:
_ i__ _
i :b
5
Appuyez sur .,&/V pour s_lectionner I'¢lement
souhait6, et appuyez sur _t_ pour selectionner
{_BLOCAGE )) ou {_....... >_(d_bloquer)
<BLOCAGE
Appuyez sur MENU pour quitter
26(2)
Page 63

Caract ristiques utiles (Suite)
[] Activation de CLASS. PUCE V
@Pour choisir un niveau I_TAT
Vous pouvez obtenir CLASS PUCE V apres avoir regle
PUCE V
l"o" s`°
OOO /
QQQ
OQO
@OQ
t Rep_tez les etapes 1 &4 de R6glage PUCE V en page
:2 Appuyez sur Ak/V pour selectionner {{ ETAT _>,et
appuyez sur ENTER
TV GU: :DE L t NES
CODE SANG DUCANADA
: {CO DE S ];: F R D U C A N A D A
ETAT ......... 1
3 Appuyez sur ,&IV pour s61ectionner {_MARCHE _, et
appuyez sur ENTER,
• Si _ ETAT _ est regl6 sur _ARR_T _, CLASS PUCE V
n'est pas op_rationnel
4 Appuyez sur MENU pour quitter.
[] Uannulation de I'_cran de CLASS. PUCE V alors
que le BLOCAGE de PUCE Vest activ6
{_PUCE V ACTiVER >>s'affiche si vous regardez une
emission avec le m_me niveau de programme que
ceiui que vous avez s_lectionn6
PUCE V ACTIVER
TV-14
DLSV
[] Pour changer le niveau CLASS° PUCE V
11
il;
2:Saisissez le num6ro secret & 4 chiffres _ I'aide des
touches de S_lection des canaux ; I'_cran du mode
de s6]ection CLASS, PUCE V s'affiche alors R6g_ez
de nouveau le blocage CLASS PUCE V
TV :GUIDELIN£S
O:O DES A NG: D U C A NA D A
: CODES: :FR; DU :CANADA:
R6p_tez tes 6tapes 1 & 3 du R_glage PUCE V en page
27, puis (_ENTRER NoSECRET _ s'affiche
[] Changer ou supprimer le NO. SECRET
Si vous oubliez le numero secret, supprimez*le en
proc_dant comme suit
Tableau de commande superieur de I'unit6 principale
VOL (+) CH (^)
(Volume) (Canal)
MENU
1:: Repetez les crapes t & 3 du R_glage PUCE V en page
: 27, ou les _tapes 1et2 de Uannulation de l',_cran de
CLASS,, PUCE V alors que le BLOCAGE de PUCE V
est active, puis {<ENTRER N° SECRET _ s'affiche
3_
Pressez et maintenez enfonces simu_tan6ment CH (,,,,) et
VOL (+) sur l'unite principale, jusqu'a ce que le message
{{ ENTRER N° SECRET >_clignote
Appuyez sur MENU pour quitter
IREMARQUE_
• _{PUCE V ACTIVER i_ne s'affiche pas si {__TAT _>est
:: r_gl6 sur {{ ARR_T _
2: Appuyez sur MENU pour afficher {{ ENTRER N o
SECRET _,
]
!
3 Saisissez le numero secret _ 4 chffffes &I'aide des
touches de S_lection des canaux Ceci d_sactive
temporairement le btocage CLASS PUCE V Si vous
saisissez un no, secret incorrect, _ NO SECRET
ERRONE _>s'affiche Dans ce cas, saisissez le bon
: num_ro secret
O 27
Page 64

Caract ristiques utiles (Suite)
SOUS_ITRAGE
[] R_glage du SOUS-TITRAGE
• Ce t_leviseur LCD est dote dun decodeuf de sous-titrage
interne, La fonction _ Sous4]trage _ est un syst_me qui
transcrit a I'ecran tes dialogues, narrations et effets sonores
d'emissions de television ou sources video sous Is forme de
sous4itres (voir Fillustration)
• Toutes tes emissions et sources video n'offrent pas de sous=
titrage Le syn'lbole _ [] _>indique qu'un sous4itrage est
disponible
• Vous pouvez visionner une emission sous4itree en deux modes
S-TITRE et TEXTE Deux canaux_ CANAL1 et CANAL2, sont
disponibles pour chaque mode
En mode S-TiTRE Ies sous-titres des dialogues et
commentaires d'emissions
dramatiques ou d'actualites
saffichent a l'ecran tout en laissant
limage bien visible,
En mode TEXTE diverses
informations (programme
des emissions, m_,teo e_c )
independantes de I'emission
regardee s'affichent ,_i'ecran
Rdglage direct de SOUS-TITRAGE
!
o ÷ OOO0
'o 8
AQLIOS
: Appuyez sur CC pour afficher I'ecl"arl CCtTEXTE
(SoustitragelTexte)
i :
CC J'_E_(TE [A_R_T J
Appuyez sur CC pour changer le reglage,
• COl: Mode SOUS-TtTRAGE pour les donnees CANAL1
CC2: Mode SOUS-TtTRAGE pour les donnees CANAL2
TI: Mode TEXTE pour les donnees CANAL1
1"2: Mode TEXTE pour les donnees CANAL2
::1 Appuyez sur MENU pour afficher I'ecran de MENU,
2 Appuyez sur 4!/_ pour selectionner (_INSTALLATION _>
1:3 Appuyez sur -Al_ pour selectionner {_SOUS-TITRAGE _>,
et appuyez sur ENTER
4, Appuyez sur AI_ v pour changer ]'option de
SOUS*TITRAGE, et appuyez sur ENTER
i:_:i:)S_II_
iL ii
<
i:,!7,
!/: X!
:1:5
r_E_
• CCl: Mode SOUS-TITRAGE pour les donnees CANAL1
CC2: Mode SOUS-TITRAGE pour les donnees CANAL2
TI: Mode TEXTE pour les donnees CANAL1
T2: Mode TEXTE pour tes donnees CANAL2
Appuyez sur MENU pour quitter
• Si vous appuyez sur MUTE lorsque vous regardez une
emission pour laqueile un SOUS-TITRAGE est disponible,
le televiseur LCD passe automatiquement en mode SOUS-
TITRAGE Une seconde pression sur MUTE, ram6ne le
teJeviseur LCD a son etat anterieur
• En eas de mauvaise reception de I'emission ou de problemes e
la source emettrice il se peut que te sous-titrage ne fonctionne
pas normalement (carres blancs, ca_acteres tronques, etc )
Ceci n'est pas necessairement te signe d'une anomalie du
televiseur LCD
• Si vous appuyez sur une touche pour faire apparaitre
l'affichage sur ecran quand vous regardez une emission sous-
titree, les sous4itres disparaissent momentanement,
• Lorsque te tel_viseur est en mode TEXTE et que l'emission
n'est pas teletexte, i'_c[an devient sans image pour certaines
emissions Placez alors le mode de SOUS*TtTRAGE sur
_ ARR#T _
• Si vous selectionnez (_CCl _, {{ CC2 _, 4{T1 _ ou {( T2 _
(ou MUTE est p_esse) lorsque {{ MODE VUE >>est regle
su_"<{ZOOM _ ou {_ALLONGE )_,le {_MODE VUE _ passe
automatiquement e {(4:3 _ ou a _{16:9 _
28O
Page 65

Caract ristiques utiles (Suite)
MODE VUE
Vous pouvez selectionner fe format d'affichage d'image pour
rimage lue par le lecteur DVD, parmi les quatre modes
suivants : {{ 4:3 )>,{{ t6:9 _>,_{ZOOM >>et {<ALLONGE _)
AV MO_ D!SPLAY
o_o
°
:1::: Appuyez sur MENU pour afficher r6cran de MENU,
2 Appuyez sur _I_" pour s_lectionner {_OPTIONS )>
3 Appuyez sur A/Y pour selectionner _ MODE VUE >),et
appuyez sur ENTER
Appuyez sur AtY pour s_lectionner l'option souhait_e,
et appuyez sur ENTER
::'l 6 ::9
:Z O O
:ALL O N G E
_pt_0,s_lect_onn_e
4:3
16:9
ZOOM
ALLONGE
Description
AfSche!'imagedans un format4:3,
_tire {'imagehorizontalement pour I'afficher dan's
un format 16:9,
Aff_chela partie centrale de I'image en
l'agrandissant dens !e sens horizonta! et vert!ca!:
I_tire1'imagehorizontalement,
[] Rdglage direct du MODE VUE
1 ::i
Appuyez sur VIEW MODE pour afficher I'_cran MODE VUE
MODE VUE|4:3J
21
Chaque fois que vous appuyez sur VIEW MODE, le
mode change de la mani6re indiqu_e ci-dessous
MODEVUE [ 4:3} * MODEVUE [t6:9]
MODEVUE{ALLONGE] _ MODEVUE [ZOOMI ,_--
Typed'image
(Image etlree
vertlcalemenl)
: 4:3
16:9
{Image 61[tSe
verficatement avec des
bandes attr les c_t_s tY'_]
gauche et dro{te)
ZOOM ALLONGE
5 Appuyez sur MENU pour quitter
• Uimage4:3 sera d_forme sur [_cran Iorsque _{MODE VUE _ est
regt_ sur {{ 16:9a
• Quand _ SOUS-TITRAGE ))est r_glb sur {_CC1 )_,<_CC2 _>,<_TI _
ou e T2 _),il est impossibled'activer {{ZOOM _)et _{ALLONGE >_
comme _ MODE VUE ))
Q 29
Page 66

Caract6ristiques utiles (Suite)
AUDIO SEUL
Lorsque vous ecoutez ta musique d'un programme musical,
vous pouvez 6teind_e I'affichage & cristaux tiquides et
profiter uniquement du son
leCRAN BLEU
Cette fonction fair passer automatiquement i'6cran au bleu
Iorsque aucun signal de t61evision ni signal d'entr6e ne sent
regus
R6glage de AUDIO SEUL sur le MENU
t Appuyez sur MENU pour afficher l'ecran de MENU
2 Appuyez sur '_/_" pour s61ectionner <_OPTIONS >>
Appuyez sur ,A/V pour s6tectienner {<AUDIO SEUL >>,
et appuyez sur ENTER
4, Appuyez sur A/V pour s61ectionner <_MARCHE )>,et
appuyez sur ENTER
ARR_T : :
0-ptions6_ecttonn6e] :: Description
MARCHE ! UaudIoest envoy6 sans Image sur l'6cran, l
R6glage direclde AUDIO SEUL
Appuyez sur MENU pour afficher I'6cran de MENU
2 Appuyez sur _/_" pour selectionnei" {<OPTIONS >>..
:3 Appuyez sur ,&IV' pour selectionner <{ECRAN BLEU )_,
: appuyez sur ENTER
Appuyez sur .A/V pour s61ectionner <_MARCHE >>,
appuyez sur ENTER
5
Appuyez sur MENU pour' quitter.
R_LEEE6B_o_u___>-
• Lorsque les signaux capt6s sent faibtes ou parasit6s par d'autres
signaux quelconques, iI se peu! que ia fonction _CRAN BLEU
soit acUv6e Pour continuer a [egarder fa t_46visiondans de telles
conditions, [6gIez _ _CRAN BLEU _ sur {_ARR_T )_
1: Appuyez sur AUDIO ONLY, <{APPUYEZ "AUDIO
: ONLY" DESACTtVER V_DEO >>apparaft a _'6cran
i _ii!
if'_i_ i
AUDIO ONLY _ARR_T_
APPUYEZ*AUDIO ONLY"
D_SACTIVER V_D_O
2 Appuyez une nouvetle lois sur AUDIO ONLY Uimage
' affich6e dispar_ft
3 Appuyez une nouvelle fois sur AUDIO ONLY L'image
r6apparait
30
Page 67

Caract6ristiques utiles (Suite)
i ii lulll iii i1:::::::::::::::::::::::::::::::::::::
MINUTERIE RI_GLAGE
Vous pouvez regler la MINUTERIE REGLAGE pour qu'eile
mette automatiquement le t_viseur hors tension
AV MODE DISPLAY
o_o
0000
Comment rdgler la MINUTER1E RI_GLAGE sur I'_cran MENU
Appuyez sur MENU pour afficher1'6cran de MENU
:2 Appuyez sur '_/_ pour s6lectionner ,, OPTIONS _
:3: Appuyez sur AIY pour selectionner ,, MINUT
REGLAGE _, et appuyez sur ENTER
4:: Appuyez sur ak/Y/_/_ pour s61ectionner ,, 30MIN _,,
_(60MIN >>,(_90MIN _),_ 120MIN _, _ t50MIN _ ou
(_ARR_T _, et appuyez sur ENTER
5 Appuyez sur MENU pour quitter
_REMARQUE_
• Une lois la MINUT REGLAGE r_gl_e, appuyez sur POWER de
l'unit6principale ou sur POWER de ta t_tecommandepour
annuler le r_glage MINUT. REGLAGE.
• 5 minutes avantque la MfNUT. REGLAGEn'61eignelet_l_viseur
LCD, l'indication _ 5MIN RESTANTES_ s'affiche a I'Ocranpendant
4secondes La MINUT REGLAGE effectue ledecompte et
pr_senteun affichage similaire de 4 secondes pour chaqueminute
restante,jusqu'_ ce que la minuterie 6teigne let_lOviseurLCD
Comment r_gler directement la MINUTERIE REGLAGE
i: Appuyez sur SLEEP pour afficher I'_cran MINUT.
: REGLAGE
:
MtNUT t_EGLAG_ t ARtt_T ]
:: i
;2 Appuyez sur SLEEP pour changer le rCglage
<=°'"''°°7
[150MtN]------_ [120MIN], [90MIN]
...... (minutes)
• UOcran MINUT REGLAGE disparait automatiquement au bout de
3 secondes
AUCUN SGN ARRET (Aucun signal : Arr6t)
La fonction AUCUN SGN ARRI_T vous permet d'economiser
I'_nergie
Avec le parametre _(ACTIVER _, i'alimentation se coupe
automatiquement si aucun signal n'entre pendant 5 minutes
3®9
1 7Appuyez sur MENU pour afficher l'_cran de MENU.
21Appuyezsur _/b" pour s¢lectionner {_OPTIONS _.
3:: Appuyez sur .al_ pour s_lectionner _ AUCUN SGN
ARR#T >_,et appuyez sur ENTER
4 Appuyez sur _t_ pour s¢lectionner _{ACTIVER >>,et
appuyez sur ENTER
D 1_8 AOt" I V ER:
5 Appuyez sur MENU pour quitter
• 4{DESACTIVER >>est la valeur predCfinie en usine
• Cette fonction ne marche qu'en mode TV
• En cas d'interf_rence par une autre emission ou d'autres ondes
radio, i! se peut que _ AUCUN SGN ARR_T >>ne fonctionne pas
bien m_me apr_s la fin de I'_mission
PAS D'OPI_. ARRET (Pas d'op_ration : Arr_t)
Avec le paramOtre (_ACTtVER _, I'alimentation se coupe
automatiquement si aucune operation n'est effectu_e
pendant 3 heures
:1 R_p_tez fes 6tapes I et 2 de AUCUN SGN ARRET
(Aucun signal : Arr_t)
2 Appuyez sur AtV pour s_fectionner _ PAS D'OPE
: ARRET >>,et appuyez sur ENTER
_,(i!::__
x i }i:)¸
Appuyez sur ,&/_ pour s¢lectionner {_ACTIVER _>,et
appuyez sur ENTER
TIVER
_CTt:VER
• 5 minutes avant l'extinction, te temps restant s'affiche
toutes les minutes
4 Appuyez sur MENU pour quitter
• (_DESACTIVER >_est la valeur predbfinie en usine
Q 31
Page 68

Caractdristiques utiles (Suite)
IMAGE TOURNANTE ,
Vous pouvez rL=gterl'orientation de t'imageo
A_'MOOE OISF_Y
o_o
G®8
!i2
ii:i:,ii_,iI:_
3i:;_
_/_!_i_I•
11::41:¸¸¸
Repetez les etapes 1 et 2 de AUCUN SGN ARRET
(Aucun signal : Arr_t)
Appuyez sur A/V pour s61ectionner <<iMAGE
TOURNANTE _, et appuyez sur ENTER
Appuyez sur ,a,/V pour selectionner le mode souhait6,
et appuyez sur ENTER
M f::R O
:::ROTAT:| O:N
::E'NV:E:R:S : :
Appuyez sur MENU pour quitter
[NORMAL]
Orientation normale de
l'image.
[MiROIR]
Pour amche_ des images
invers6es iors
d'utilisations sp_ciaies
[ENVERS]
Pour afficher des images
retournees, lots
d'utiHsations sp6ciales,
[ROTATION]
Pour afficher des images
[ourrt_es, lot's
d'utilisations sp_ciales
32Q
Page 69

Guide de d6pannage
I Avant de faire appel & un service de rOparations, effectuer les contrOles suivants pour de possibles solutions aux
symptSmes rencontrOs
T616viseur LCD 1
Probl_me
Pas d'image
ni de son,,
Pas d'image
Pas d'image
& la borne
INPUT1/2/3.
ili!!ii!iii!i
i
Pas de son.
Pas d'image
ni de son.
Bruit vid0o
seulement
Point & v6rifier
, Assurez-veus que le cordon d'alimentation est bien
enfonc6 dans la prise de courant.
• Le poste capte peut-Otre un signal autre qu'une
Omission d'un canal.
• Assurez-vous que le mode d'entrOe est TV
• Assurez-vous que rinterrupteur POWER (Alimentation)
de runit6 principale enclench0,
• Assurez-vous que LUMINOSIT_ est correctement rOglee,
• La tampe fluorescente a peut-Otre atteint la fin de sa
duree de service
• Assurez-vous qu'il n'y a pas de c&bie raccord6 _ la borne
S-VIDEO
. Assurez-vous que AUDIO SEUL n'est pas regl0 sur MARCHE,
• Assurez-vous que le son n'est pas r0gl0 au minimum.
• Assurez-vous que le son n'est pas mis en sourdine.
• Assurez-vous qu'un casque n'est pas branch&
• Assurez-vous que le c_ble d'antenne est correctement
connect&
• Une mauvaise rOception peut etre _ rorigine du
probl0me.
• Assurez-vous que le c&ble d'antenne est correctement
, connector,
Image nest . u ' " ti
Q_..:,. • Une ma valse recep on peut Otre _ rorigine du
-,,_i pas clawe probl_me
O
!¸¸ _,i'
La tOl0commande ne
fonctionne pas.
L'unit6 ne pout pas 6tre
utilisOe,
Image p&le
ou teintes
incorrectes.
Image trop
sombre.,
• V_rifiez le r_glage des couleurs.
• VOrifiez sile SYSTEME COULEUR correct est
sOlectionn&
• Appuyez sur la touche BACKLIGHT ou choisissez le
r0glage RI_TRO-_CLR ou LUMINOSITE.
• VOrifiez le r_glage de I'element de menu CONTRASTE
et LUM1NOSIT#.
. La lampe fluorescente a peut-etre atteint Ia fin de sa
dur0e de service.
• VOrifiez los piles de la t_l_commande
• V0rifiez sile capteur de tOl_commande n'est pas sous
un 6clairage intense_
Des influences extemes comme la foudre, I'_lectricit6 statique,
etc., peuvent entrafner un fonctionnement incorrect,Dans ce
cas, utilisez rappareil apr_s avoir d'abord coup0 I'alimentation
du tOlOviseurLCD,ou apr_s avoir d_branch0 le cordon
d'alimentationet t'avoir rebranche apr_s 1ou 2 minutes,
Pageder_f_rence
9
15
15
20
34
t3
3O
16
16
10
8,9
8,9
20, 21
20
20
34
7
7
(_) 33
Page 70

Guide de d pannage (Suite)
m Avant de faire appel a un service de r@arations, effectuer les eontr5les suivants pour de possibles solutions aux sympt6mes rencontres.
[ Antenne
Probleme Point & v6rifier
• La r6ception est peut-_tre faible
L'image n'est pas nette , La qualit6 de t'emission diffus6e est peut 0tre m0diocre
[.'image beuge , Assurezwous que I'antenne est bien orient6e.
• Assurez-vous que !iantenne exteme nlest pas debranch0e.
L'image est double ou triple , Assurez-vous que I'antenne est bien orient0e_
• Des ondes 61ectriques sont peut _tre r_fl_chies par des immeubles ou montagnes.
• Des perturbations sont peut _tre caus_es par des automobiles, trains,
L'image est tachee ]ignes haute tension, noons, etc.
• I1peut y avoir des interferences entre le c_ble d'antenne et le cordon
d'atirnentation. Eloignez-le davantage.
• L_appareil n'est-il pas perturb0 par d'autres appareils?
Les antennes d'emetteurs de radio ou d'6metteur de radio-amateurs et les
Rayures ou couleurs t61_phones portables peuvent 0galement provoquer des perturbations.
d61av6es • Utilisez le tel6viseur aussi loin que possible des appareils susceptibles de
provoquer des perturbations
[] Prdcautions en cas d'utilisation dans des endroits _ temp6rature basse ou _lev6e
- Lorsque t_appareil est utifis6 darts un endroit (piece, bureau) & basse temperature, rimage peut laisser des traces ou apparaffre avec
un t6get retard !1ne s'agit toutefois pas d'une anomalie de fonctionnement, st Is fonctisnnement normal de l'appareil est r_labli
Iorsque la temperature redevient normaie
• Ne laissez pas I'appareil darts un endroit a temperature basse ou _levee Ne le laissez pas non plus dans un endroit dtrectement expos_ aux
rayons du so{ell ou a une source de chaleur, pour evitsr que le b_ti ne soit deform6 su que le panneau LCD ne foncfionne pas normalement
Temperature de stockage : -20°C a +60"C (-4°F _ +140"F)
Fiche technique
LC-15S5U
Panneau LCD
Nombre de points
Systemes de couleur video
Norme de t61_vision (CCIR)
Fsnction de Systeme de syntonisafion de t_levision
tel6vision STEREO
LCD TFT ASV & NOIR, 15 POUCES
921.600 points VGA
N358
NTSC
PLL 181 canaux
MTS+SAP
Television par c&ble 125 canaux
Luminosite
Duree de service de lampe (Lampe fluorescente)
Angles de vision
Amplificateur audio
INPUT1
INPUT2
Bsrnes INPUT3/OUTPUT
Antenne
Casque
Langue de l'affichage sur ecran
Alimentation
Consommation elecfrJque
I_cran seut
Poids
Avec ecran et socte
Temp6rature de service
430 cd/m =
60.000 heures*
H : 170° V : 170"
2,1Wx2
AUDtOdN, COMPONENT-IN
AUDIO-IN, VIDEO-IN, S-VIDEO-IN
AUDIO-IN, VIDEO-IN/AUDIO-OUT, VIDEO-OUT
Type F
Mini-jack pour stereo (e3,5 ram)
Anglais/Espag nol/Fran_ais
CA 120V, 60Hz
50 W (0,8 W veille) : CA 120V
7.9 Ibs./3,6 kg
9,5 Ibs./4,3 kg
+32°F & +104°F (0°C a +40°C)
D_lai typique necessairs pour reduirs de msitie Hntensit_ de la lampe. & condition que le tel_viseur LCD ssit utiiis6 & une temperature
ambiante de 25°C/77°F sous un ecfairage et une luminosit_ standard
Dimensions de I'appareil
• Les _ Dimensional Drawings _ (dimensions de I'appareil) se trouvent sur la face interne du couvercle arriere
SHARP se reserve le droit d'apporter des modifications a }a presentation et aux caracteristiques du t6levisesr LCD a fin d'amelioration,
sans avertissement prealabie Les valeurs indiqu6es dans ce document ssnt tes valeurs nsminales des appareils de s6rie mais de
legeres differences peuvent 6Ire csnstat_es d'un appareit & tautre
Page 71

POUR CANADA SEUI. EMENT
i
GARANTIE LIMITIeE
Produits Electronique grand public
Bravo ! Vous venez de faire un excellent achat !
Sharp _lectrontqae du Canada Llee (cFapres nominee _Sharp") donne ta garanlie expresse suivanle e I'acheteur initial du produit ct-
dessous mentionn_ de Sharp, si le produit est emballe dons son conlenant original et s+il eat vendu et dlsifibue au Canada par Sharp ou
par un Detaillant autorlse Sharp
Sharp garantit que ledit produtt eat. s*il eat utilis_ et entretenu normatemenl, exempt de defaut de fabrication Si un defaut de fabrication
est decelL' durant la periode de garantte atipulOe. Sharp s'engage e rOparer ou remplacer, solon son chofx, le produit epecifie c]-dessous
La garantie offede par Sharp ne s'applique pea :
(at Aax appatells qui ant eta t'objel d'un emploi abusif, de negligence, d'un accident, dune installation inadequate ou d'une ulilisallan
non appropriee, tel qu'tl eat mentionn,e dons le manuel du prepdetaire;
(b) Aux produits Sharp altar,s, modifies, regl_.s ou r_pares ailleurs qu'aux bureaux de Sharp, aun centre agre_ de service Sharp oue
un Detalltant autorise au service Sharp;
(c) Au dommages cause ou r{_,.paratien requtae e la suite de l'utilisafion avec des articles non destgn6s ou approuves par Sharp. y
compris, mais non limit{,saux rubens pour neltoyage de t6te et los nettoyaets chfmiques;
(d) Au remplacement des accessoires, des pieces en verre, des articles consommabtes ou peripheriques, devenu necessaIre _ la suite
d'une utillsatlon normale du produit, y compris, mais sans en 6tre limlte, aux eceuteurs, los teleeommandes, les adaptateurs c a. lea
piles, la sonde de temperature, les pointes de lecture, los plateaux, los filtres, tes courroies, rubens, papier ou autre;
(e) Aux defauta cosm_tiques e la surface ou& !'exterieur de I'appareil, et qui sent causes par une usure normale;
{f) Aux dommages causes par des conditions exterieures el relatives a I'environnement, y compris, mais non timit6 e du llquide
repandu, une tension de la lipne electrlque ou de transmission trap etevee ou autre;
{g) Aux produtts dent le numero de serie et de meddle oule marquage CSAicUL. ou los deux. ant at6 enleves ou effaces;
(h) Aux produfts de consommatien ou utiltaes a des tins de location;
(it Aux coots d'inslatlafion, configuration eUou programmation
Siun defaut de fabrication est dace!6 dons ce preduit Sharp au cours de la periode de la £arantie La reparation sous garantie est offerte
& la condition qua [e produit Sharp soit livre accompagne de la preuve d*achat et une copie de cette GARANTIE LIMITSE aun centre
agree de service Sharp ou eun D6taillanl autorise au service Sharp La garantie de service e domicile pout etre offeda, a [a discre-
tion de Sharp. sUr toua los t61eviaeurs Sharp dent l',_cran eat de 27 pouces ou plus el sur les fous miero-onde Sharp au*dessus de la
cuisini,_.re
La garanfie ci+dessus constitue la seule garantie expresse accordee par Sharp Aucun autre detatllant, aucun centre de service. [eurs
repr_sentants ou employee, ne sent aulorise e prolonger la duree de la garantie, e fournir des garanties autres ou a transferer carte
garantle au nora de Sharp Dons ta mesure De la Ioi en vigueur le permet. Sharp d(._cfine route responsabilile pour lee pertes ou les
dommages directs ou indtrecls, pour los penes ou les dommages imprevus et pour les pertes de profits Indirecles resultant d'un d_faut
de fabrication du produit, y compris lea dommages reli6s _ }a porte de temps ou d'utilisation de ce produit Sharp L'echeleur doit assure-
er lee cools de d_montage, de r_instaltation, de transport el d'assurance de I'apparetl La r_Paration des defecluestl_s, aelon la mani6re
et durant la p_riode de temps ci-haut d_crites, constitue I'execution complete de routes tes obligations et lee responsabilites de Sharp
vis-_-vis de t'acheteur ence qut a trait au produit el constiiuera un acqutttement complet pour route r_clamation, qu'elle sott bas_e surle
conlrat, la negligence, la responsabilitO article ou aulre
PIERIODES DE GARANTIE Pieces et travail (exceptions not_es)
Produtls audio 1 an
Cam6scope I an
Produits DVD 1 an
Teleprojecleurs 1 an (ampoule 90jours)
TV a affichage aux cristaux liquids 1 an
T_l_vlsien _ _,cran plasma 1an
Four au micro-andes 1 an (magnetron 4 arts supplementalres_pt_ces seulement)
T_tevisien 1 an (tube cathodtque t an supplementaire)
Magn,_toscapes 1 an
Asptrateurs 1 an
........................ II I' I"l'q i]'llil 'll"l'lrl'_lfI
Pour obtenir le nora el I'adresse du Cemre de sen'ice ou du Ddtaittanl autoris_ au sen,ice Sharp le phls pros, ;,euillez _crlre ou tt31dphoner it:
SHARP _LECTRONIQUE DU CANADA LT_E. 335 Britannia Road East. Mississauga, Dorado L4Z 1W9
Pour plus de renseignements sur cette garantie, sur des offres de
garantie prolongee de Sharp, sur des produits de Sharp Canada,
sur la vente d'accesseires, sur i'emplacement de detaillants ou de
centres de service chez le d_taillant, veuilfez composer te
(905) 568_7140,.
Visitez notre site web : wwwsharp,ca
i,lll II II1111'1 .............................rl
_" LE SERVICE
÷ °
I'1'111
O 35
Page 72

I Illl'l'lll.... ' "l'lrl'l'
LC=15S5U
MANUAL DE OPERACION
ESPAi OL
_, ' '1'1"lllll'l"'l'l
II1'111
IMPORTANTE:
Para facilitar el reporte en caso de p6rdida o robo, escdba
pot favor los numeros de modelo y de serie en el espacio
suministrado Los nt_meros est_n ubicados en la parte
trasera de1 TV
Numero de Modelo:
Numero de Serie:
w
INFORMACION IMPORTANTE
i ADVERTENCIA: PARA REDUCIR EL RIESGO DE FUEGO 0 DESCARGA ELI_CTRICA, NO
EXPONGA ESTE PRODUCTO A LA LLUVIA O HUMEDAD
............................ ,, ,,,
i
A I R1ESGODEDEsCARGAI
,WJLI E CTR,CANOABR'R
i i ii i iiiiiiiiiiii1,1,11,
PRECAUCION:PAPA REDUClREL RIESGODEDESCARGA
ELECTRfCA,NO RETIRELACUB1ERTA
(0 LA PARTETRASERA)
NO HAYPARTES INTERNAS PARASERVICIO POR
PARTE DEL USUARIO.
DEJEELSERVICIOA PERSONALSERVICtOCUALIFICADO
i iii iiiii iiiiii ii
El simbolo del rel_mpago con la flecha, dentro
de un trianguIo equiI_tero, sirve para alertar al
usuario de la presencia de "voltaje peligroso"
en el interiordel producto que puede ser de
suficiente magnitud como para constituir riesgo
de descarga el&ctrica alas personas
_k l signo de exclamaci6n dentro de un triangulo
sirve para alertar al usuario de fa presencia de
importantes instrucciones en la operaci6n y
mantenirniento (servicio) en ta iiteratura que
acompaEa el producto
1
PRECAUClON: PARA PREVENtR UNA DESCARGA ELECTRICA, HAGA COINCIDIR LA LAMINA /
ANCHA DEL ENCHUFE CON LA RANURAANCHA, E INSERTE COMPLETAMENTE,
J
PRECAUCION:
NO COLOQUE ESTE APARATO EN UN CARRtTO, SOPORTE, TRIPODE, MI_NSULA O MESA
rNESTABLe.ELAPARA'rOPODR{ACAERSEYCAUSARLES ONESGRAVESAPERSONASO
ESTROPEARSE SERIAMENTE UTIL{CELO SOLAMENTE CON UN CARRITO, SOPORTE, TRIPODE,
M#NSULA O MESA QUE HAYA SIDO RECOMENDADO POR EL FABRICANTE O VENDIDO
JUNTO CON EL APARATO. SIGA LAS 1NSTRUCCIONES DEL FABRICANTE CUANDO tNSTALE
EL APARATO, Y UTILICE TAMBiI_N LOS ACCESORIOS DE MONTAJE RECOMENDADOS POR EL
FABRICANTE LA COMBINACION DEL APARATO Y EL CARRITO DEBERA MOVERSE CON MUCHO
CUIDADO. LAS PARADAS R/_PIDAS, LA FUERZA EXCESlVA Y LAS SUPERFICIES IRREGULARES
PUEDEN SER LA CAUSA DE QUE LA COMBINACION DEL APARATO Y EL CARR1TO VOLTEE
ADVERTENCIA: Las regutaciones de la FCC se_aIan que cualquier cambio o modificaciEn no autorizado en este equipo,
los cuates no hayan sido expresamente aprobados por el fabricante, podrian anular la autorizaci6n del usuario para
utilizar este equipo EEE.UU. SOLAMENTE]
"Nora al instalador del sistema de CAP,,/: El instatador del sistema debe recordar el Articulo 82040 del C6dtgo Nacional El_ctrico que
contiene las guias de los conoctmientos b_sicos y. en particular, especifica que et cable a tierra debe set conectado al sistema de toma de
t[erra det edificio, _o m&s cerca posible al punto de entrada del cable come sea pr,_ctico '_ [ EE.UU. SOLAMENTE I
Este producto utiliza soldadura de plomo fin& y l&mpara fluorescente que contiene una pequeEa cantidad de mercurio La
eliminaci6n de estos materiales podr& estar regulada debido alas consideraciones medioambientales Para obtener informaci6n
sobre la eliminaci6n o reciclado, p6ngase en contacto con tas autoridades de su Iocalidad o con Electronic Industries Alliance:
www eia org
(_I
Page 73

ESTnMADO CLIENTE DE SHARP
i,,,,n,,nl................... HH
Gracias por haber adquirido este televisor SHARP con pantalla de cristal liquido, Para garantizar su
seguridad y muchos a_os de uso sin problemas de su producto, por favor lea cuidadosamente las
precauciones de seguridad importantes antes de usar este producto.
La electricidad se usa para realizar muchas funciones utiles, pero tambi6n puede causar lesiones en personas y daSos
en la propiedad si se utiliza incorrectamente Este producto ha sido dise_Sado y fabricedo con ta m_s aita prioridad en
ta seguddad Sin embargo, su uso incorrecte puede provocar descargas el_ctricas y/o incendios, Para evitar peligros
potenciales, por favor tenga muy en cuenta las instrucciones siguientes al [nstalar, operar y limpiar et producto Para
garantizar su seguridad y prolongar Ia vida de uso del televisor LCD en color, pot favor lea las siguientes precauciones
antes de usar el producto
[] Lea las instrucciones--Todas las instrucciones para la operaci6n deben ser leidas y entendidas antes de operar
et producto
[] Guarde este manual en un lugar seguro--Estas instrucciones de seguridad y operaci6n se deber_n guardar en
un lugar seguro para poder realizar consuttas en el futuro
[] Observe las advertencias--Todas las advertencias en el producto yen las instrucciones se deber&n observar at
pie de la letra
[] Siga Ias instrucciones--Todas [as instrucciones de operaci6n se deber&n seguir
[] Accesorios extra--No utilice accesorios extra que no est_n recomendados pot el fabricante El uso de
accesorios extra inadecuados puede provecar accidentes
[] Fuente de energia--Este producto debe operarse con la fuente de energia especificada en la etiqueta de
especificaci6n. Si no esta seguro del tipo de suministro electrico de su casa, consulte a su distribuidor o a la
compaS[a de electricidad Para aquellas unidades disefiadas para operar con pitas u otra fuente de energia,
consulte las instrucciones de operacion
[] Protecci6n del cable de CA--El cable de CA debe colocarse adecuadamente para evltar que la genre los p[se o
que otros objetos queden encima de ello Verifique el cable en el enchufe yen el producto.
I Sobrecarga--No sobrecargue las tomas de corriente de CA ni los cables de extensi6n.
La sobrecarga puede causar incendios o desca_gas el6ctricas
ta lnserci6n de objetos y liquidos--Nunca inserte un objeto dentro del producto por las rejiHas o aberturas Alto
voltaje fluye por el producto, y la inserci6n de un objeto puede causar descargas el_ctdcas y/o cortocircuitos en
las partes internas Por la misma raz6n, no derrame agua ni ningt_n otto Ifquido sobre el producto
[] Servicio--No trate de manipular el producto por si solo El desmontaje de las tapas le puede exporter a altos
voltajes y a otras condiciones petigrosas Pida a una persona cualificada que manipu[e el producto
[] Reparaci6n--Si alguna de las slguientes condiciones ocurre, desconecte el cable de CA de la toma de cerriente
de CA, y pida a una persona cualificada que reatice las reparaciones
a Cuando el cable de CA o el enchufe este daft,ado
b..Cuando se haya dert'amado liquido en el producto o un objeto haya ca[do dentro del mismo.
c Cuando el producto haya sido expuesto a Iluvia o agua.
d,Cuando el producto no funcione correctamente, tal y como se describe en las instrucciones de
operaci6n
No toque etros controles aparte de los que est&n descritos en las instrucciones de operaci6n Un real ajuste de
los controles no descdtos en las instrucciones puede causar dafios, 1oque generalmente requerir_ un arduo
trabajo de ajuste per parte de un t6cnico cualificade.
eCuando el p_oducto se haya caido o daSado
f Cuando el producto muestre alguna condici{Sn anormal. Cualquier anormalidad que se detecte en el producto
indica que necesita servicio de reparaci6n.
[] Piezas de repuestoiEn caso de que el producto neeesite piezas de repuesto, asegtJrese de que la persona
que reallce la reparaci6n utilice piezas especificadas por el fabricante, o aquellas con [as mismas caractedsticas
y funcionamiento que las piezas originales El use de piezas no autorizadas puede dar lugar a incendios,
descargas electricas y/u otros peligros
[] Chequeos de seguridad--Una vez completado et servicio de reparaciSn, pida al tecnico que realice Ios
chequeos de seguridad para asegurarse de queet producto est6 en perfectas condiciones de funcionamiento.
[] Montaje en ta pared o en el techo--Cuando monte el producto en la pared o en el techo, aseg0rese de instalar[o
de acuerdo con el m6todo recomendado per el fabricante
[] Potarizaci6n--Este cable de CA puede estar equipado con un enchufe polarizado papa linea de corriente alterna
(un enchufe que tiene una patitla m_s grande que la otra) Este enchufe se acoplar_ en la toma de corriente s61o
de una manera Esta es una caracteristica de seguridad Si no le es posible introducir el enchufe en la toma,
trate de inttoducirlo en direcci6n opuesta Si haciendo esto no lograra todavfa realizar la conexi6n, contacte con
su electricista para cambiar la toma de cordente obsotet&
No inutitice el prop6sito de seguridad det enchufe polarizado
2®
Page 74

PRECAUCIONESDESEGURIDADIMPORTANTES(Continuacibn)
i iiiiiiiiii i i iiiiiiiiiiiiiii iiiiiiiiiiiiiiiiii ::::::::::::::::::::: i iiiiiiiiiiiii iiiiillllllllllllll
! Limpieza--Desenchufe el cable de CA de ta toma de corriente de CA antes de
timpiar el producto.. Utilice un trapo h_medo para limpiar el producto. No utilice
limpiadores llquidos o aerosoles
I Agua y h_Jmedad--No utilice este producto cerca del agua, come en una baSera,
fregadero, tina de lavabo, piscina o en un s6tano mojado
Soporte--No coioque el producto en carro, soporte, tripode o mesa inestable.
AI colocar el producto en una base in•stable se podr_ dar lugar a que se
caiga, ocasionando graves lesiones en personas y al mismo tiempo daSos at
producto Utilice solamente carros, soportes, tripod•s, abrazaderas o mesas
recomendadas pot el fabricante o vendidas con el producto Cuando monte
e! producto en la pared, asegurese de seguir las instrucciones del fabricante
Utilice solamente el equipo de montaje recomendado per el fabricante
r
Cuando traslade ei producto enun carro, debe hacerlo con el mayor cuidado.
Paradas sObitas, fuerza excesiva y superficies desniveladas en el suelo pueden
dar lugar a que el producto se caiga del carro.
• Ventilaci6n--Las rejillas y otras aperturas en la cubierta est&n diseSadas para la
ventilaci6n. No cubra o bloquee estas rejillas y aperturas, ya que una ventilaci6n
insuficiente puede causar sobrecalentamiento yto disminuir el cicfo de vida del
producto. No cofoque el producto en una ca•a, sof&, alfombra u otras superficies
simitares, pues estas bloquean las aperturas de ventilaciSn. Este producto no
est_ diseSado para ser instalado dentro de otro producto; no coloque el producto
en un espacio cerrado, come en un estante para tibros o armado, a menos que
se le d6 la ventitaciSn necesaria o se sigan las instrucciones del fabricante
[] La pantalla de cristaf liquido utilizada en esle aparato est& hecha de cristal. _ , _ /
Por Io tanto, se puede romper si el producto se ca• o se Ie da un golpe.. Tenga
cuidado de no herirse con trozos de cristal en caso de que se rompa ta pantaila
de cristal Hquido
I Fuentes de caior--Mantenga el producto alejado de fuentes de calor come _t--._ _
radiadores, calefactores, estufas y otras fuentes generadoras de calor
(incluyendo amplificadores)
• La pantatla de cristal [iquido esun producto de alta tecnologia con 921.600 transistores de pelicula fina, que
proporcionan excelentes detaHes de imagen.
De vez en cuando, algunos ptxeles no activos pueden aparecer en la pantaIla como puntos fijos en azul, verde o rojo..
Por favor, recuerde que esto no afecta e] funcionamiento de su producto.
Page 75

PRECAUCIONESDESEGURnDADnMPORTANTES(Continuaci6n)
mnn=u ...................
Si se conecta una antena exterior al televisor, asegL_resede que el sistema de antena est_ conectado a tierra para obtener
cierta protecci0n ante tos aumentos de vo]taje y la acumulaci0n de cargas est_ticas La secciOn 810 dei C6digo Electrico
Nacionat efrece informaci0n r'elacionadacon la conexi0n a tierra correcta del poste y la estructura de apoyo, la conexi6n a tierra
del cable de entrada a una unidad de descarga, el tamaSo de tos conductores de conexiOn a tierra, Ia ublcaci0n de la unidad de
descarga de antena, la eonexi6n a los elect_odos de conexi6n a tierra, y los requisitos para el elecbodo de conexi6n a tierra
EJEMPLO DE CONEXION A TIERRA DE LAANTENA
SEGON EL CC)DfGO EL_-CTRfCO NACIONAL
/_ABRAZADERA DE _I
_ ___Lj.,,f_'*'_ ]_ (Ut__ _[ECEC,oESC Ao.R2G_DEANT ENA
//_'-'_ CONDUCTORES DE CQNEXION ATIERRA
StSTEMA DE CONEXI(DN A TIERRA
DEL ELECTRODO DE SERVIClO ELECTR_CO
NEC--C(3DtGO EL_CTRICO NACIONAL (NEC ART, 250_ APARTAOO H)
a Tormentas ei6ctricas -- Para una mayor protecci6n del televisor durante una
tormenta de rayos, y cuando se deja descuidado y sin usar durante largos
periodos de tiempo, desenchDfelo de la toma de cordente de la pared y
desconecte ta antena Esto evitar_ daSos al televisor debidos a rayos y subidas
de tensi6n
Cables de electricidad -- Nodeber_ ubicarse un sislema de antena exterior eercano a .,_.._ ._
cables de electdddad que pasen pot encima del mismo u otras luces el6ctricas o circuites
de alimentaci6n, o donde puede caer sobre tales cables de electricidad o circuitos Cuando
instale un sistema de antena exterior, deber_,tomar un cuidado extreme para evitar tocar
tales cables de electricidad o circuitos, pues el eontacto con elios podriaresultar fatal
[] Para irrtpedir un incendio, no ponga nunca ningun tipo de vela o llama a! __
descubierto encima o cefca de] televisor.
l_ Para impedir un incendio o una descarga el6ctrica, no exponga este aparato
al goteo ni alas saipicaduras, Tampoeo deber&n ponerse encima del producto
objetos llenos de I[quidos como, por ejemplo, tloreros
[] A fin de evitar el peligro de incendio o descarga el_ctrica, no coloque el cable de _ _
CA bajo et televisor ni otros objetos pesados
No permita que una imagen permanezca visualizada durante un largo tiempo, ya que esto puede ocasionar que
dicha imagen quede "quemada" sobre ta pantatia•
I"
4®
Instale e! producto en un tugar donde el cable de CA se pueda desconectar f,_cilmente de la toma de corriente de
CA o del terminal AC INPUT en el lado tfasero def producto
]
]
Page 76

indice
INFORMACION tMPORTANTE .................................... 1
ESTIMADO CLIENTE DE SHARP ............................. 2
PRECAUClONES DE SEGURIDAD IMPORTANTES .... 2
Accesorios suministrados ....................................... 5
Antes de utilizar el televisor LCD ............................ 6
Preparaci6n ................................................................ 7
instalaciSn de las pilas en el control remoto ......... 7
Utilizaci0n del control remoto ......................................7
ConexiSn de la antena ..................................................8
ConexiSn de la alimentaciSn ......................................9
Nombres de las partes del aparato principal ....... 10
Escucha con auriculares ......................................... 10
CSmo fijar los cables .........................................................11
Nombres de las partes del control remoto .......... 12
Conexi6n de dispositivos externos ...................... !3
Salidas de video y audio (salida de video) ........... t3
PREAJUSTE DE CANAL (Con el ajuste de
RELOJ AUTOMATICO) ...................................... t4
PREAJUSTE DE CANAL durante la primera
vez que se conecta la alimentaciSn ............... t4
Operaciones b_sicas .................................................. 15
Encendido y apagado de ta alimentaciSn
principal .............................................................. 15
Espera .................................................................. t5
Cambio de los modos de entrada
(ENTRADA ItENTRADA2/ENTRADA31
TV)..............................................................................I5
Volumen de sonido .............................................. 16
Cambio de canales ................................................. t6
SelecciSn de las opciones de! menu ........................t7
Ajustes b,_sicos ....................................................... 19
MODO AV .................................................................... t9
OPC (Control de imagen 5ptico) ...............................19
LUZ TRASERA ...................................................... 20
Ajustes de IMAGEN .....................................................20
TEMPERATURA DEL COLOR ................................21
Ajustes de AUDIO ........................................................21
Funciones _tiles ........................................................ 22
AJUSTE DE CANAL .......................................................22
INSTALACION ..............................................................23
Ajustes de V-CHIP ................................................ 24
CLOSED CAPTION .............................................. 28
MODO DE VISION ...................................................... 29
AUDIO SOLAMENTE ..............................................30
PANTALLA AZUL ................................................... 30
TEMPORIZADOR PARA DORMIR ................... 31
APAGADO SIN SEPAL .......................................... 31
APAGADO SIN OPERACtON ............................. 31
CAMBIOS DE IMAGENES ..................................... 32
Solucibn de problemas .......................................... 33
Especificaciones ..................................................... 34
Pianos dimensionales
• Los"DimensionalDrawings"(pianosdimensionales)del televisor
LCDsemuestranenlacubiedatraserainterior
Estoindicaque10sval0resnumeric0ssedescribenenlaformaingles&
ytaunidaddetongitudse describeenpufgadasy milimetr0s(ram)
Accesorios suministrados
Asegurese de que los siguientes accesorios hart sido provistos con el televisor LCD
p_gtna 7 y 12
p_gina 9
J
p_gina 7
p&gina 11 p=fg|na 11
J
(_5
Page 77

Antes de utilizar entelevisor LCD
Para utilizar su televisor LCD, realice los pasos que siguen a continuaci6n
Verifique los accesorios suministrados. (Consulte la p&gina 5)°
;!3
iI,_!_ii_:_
lnstale dos pilas tamafio "AAA" (suministradas) en el control rernoto_ (Consutte la p_gina 7,)
• Abra la cubierta de tas pilas y cotoque las piias haciendo colncidir los terminales con las indicaciones (+) y (-) en el
compartimiento de las pilas
Conecte el cable de antena (Consutte la p&gina 8).
!:!4::i
Realice la
conexi6n de los dispositivos externos. (Consulte la pagina 13.)
Terminal para la conexi6n de componenie
Terminal para la conexi6n S-video
Terminal INPUT3/OUTPUT ]
Terminal para ta conexi6n ENTRADAJSALIDA.
:5 Conecte el cable de CA al terminal AC INPUT del televisor LCD y a la toma de corriente de la pared.
(Censulte la pfigina 9)
:_i_ ::If :i{: ::l_I_!'t
i_i• _
Conecte la atimentaci6n, (Consulte la pagina 15,)
Presione POWER en el lado superior del aparato principal
@ El indicador de POWER (Encendido), Iocalizado en la parte delantera del aparato principal, cambia de rojo a verde
.......... L..._ J
: :,.:, ,°°,o.o..°.ow..
,owE, _iiii_°.,iii.,°.,,.,: _;:_;i_i,il.
Irficie PREAJUSTE DE CANAL (Consulte la p_gina 14)
• Los canales se memorizar&n automaticamente
Page 78

Preparacibn
Antes de utilizar el televisor LCD per primera vez, instale las dos pilas tamaSo "AAA (suministradas) en el control remote
Cuando las pilas se agoten y el control remote no pueda funcionar, reemptace las pilas per otras nuevas tamafio "AAA"
1 Abra la cubierta de las pifas
/
2 Inserte dos pilas tamaSo "AAA" 3 Cierre la cubierta de las pilas
II Deslice ta cubierta
mientras presiona la
parte ( _' )
Precauciones relacionadas con las pilas
[] Co[oque las pilas haciendo
coincidir los terminales (+)
y (-) come se indica en
el compartimiento de las
mismas
[] Haciendo coincidir la
pestaSa inferior con el
control remote, cierre la
tapa
[] El use incorrecto de las pilas puede dar lugar a una fuga de productos quimicos ylo explosi6n Asegurese de seguir las
siguientes instrucciones
• Coloque [as pilas haciendo coincidir los terminales (+) y (-) come se indica.
• Diferentes tipos de pilas tienen diferentes caracteristicas No mezcle pilas de diferentes tipos
• No mezcte pilas usadas y nuevas. AI mezctar una pila usada y una nueva se podr& reducir la duraci6n de la pila nueva
y/o causer fugas de productos quimicos en la pila usada
, Quite las pilas cuando se hayan descargado per complete Los productos quimicos que se fugan de las pilas pueden
causar sarpullido, Si detecta una fuga de productos quimicos, tirnpielos con un trapo
• Las pitas suministradas con el televisor LCD pueden durar menos de Io normal debido a las condiciones de
aimacenamiente
• Si no va a utilizar el control remote durante un largo periodo de tiempo, retire las pilas del control remote
lid Utilice el control remote apunt&ndolo hacia la ventana del sensor
remote situada en el aparato principal Los objetos que se hallen
entre el control remote y la ventana del sensor remote podrian
impedir un correcto funcionamiento
Sensor
30° remote
Precauciones con respecto a la uttlizaci6n del control remoto
m No golpee et control remote AdemEs, no exponga el centre!
remote a los liquidos, y no Io coloque tampoco en un lugar donde
haya mucha humedad
[] No instale ni ponge el control remote directamente bajo la luz del
sol Et calor puede deformarlo
[] Puede que el control remote no funcione correctamente si ta
ventana del sensor remote se encuentra bajo la luz directa del
sol o una luz fuerte En este case, cambie el ,_ngulo de la tuz o
det aparato principal, o utilice et control remote m&s cerca de la
ventana del sensor remote
J
(_ 7
Page 79

Preparacibn (Continuacibn)
• Los requisites de antena pare una buena recepci6n de televisi6n en color son mas importantes que aqueilos pare la recepci6n de
televisi6n en blanco y negro Pot esta raz6n, se recemienda encarecidamente el uso de una antena exterior de buena catidad
Lo siguiente es una breve explicaci6n del tipo de conexiones provistas con los diferentes sistemas de antenas:
1 El sistema de 75 ohmios es generalmente un cable redondo con un
conector tipo F que se puede conectar f&citmente a un terminal sin
herramientas (no suministrado)
2 El sistema de 300 ohmios es un cable "bifilar" piano que se puede
cenectar a un terminal de 75 ohmios a traves de un adaptador 300/75
ohmios (no suministrado)
r--- Coneclor ripe F
Cable coaxial de 75 ohmios (redondo)
Cable bifilar de 300 ohmios (piano)
• .... • 9 • ...... _ " " 0"
• Utflice uno de los dos diagramas siguiente si quiere conectar una antena exterior
A: Utilizando una antena exterior con ta combinaci6n VHF/UHF
B: Utilizando antenas exteriores separadas pare VHF yto UHE
• Conecte el cable procedente de una antena exterior a ANT (terminal de antena) de la parle posterior del aparato principal
A Combinaci6n de antenas de VHF/UHF Antena de
VHF/UHF
Antena de Adaptador de .. 3.3_-_
VHF/UHF 300!75 ohmios qt."
..._,_ (no suministrado)
{| Cable bifitar de
300 ohmios
Cable coaxial3
de 75 ohmios I
L
B Antenas de VHF y/o UHF separadas
Antena de Antena de
VHF UHF
Cablebinlarde
_ ohmios
\ Combinad0r
Cabte bffilar ae \..(no suministrado)
Cable coaxial //
de 75 ohmies /
/
Cable de antena
(disponible en tiCndas)
Cable coaxial de 75
Conector tipo F
El conector tipo F s61o debe apretarse con los dedos.
A! conectar el cable RF al televisor LCD, no apdete el conector ttpo F con
herramientas
Si liege a emplearse una herramienta, puede dafiarse el televisor LCD
(rotura de un circuito interne, etc )
1
8®
Page 80

,,,,,,, ,,, ,,,,,,,,,,,,,,,,, i
Conexibn de la antena (Continuacibn)
Preparacibn (Continuacibn)
i nil illunllnl I inlllnl :::::::::::::::::::::::::::::
• Para facilitar la conexi6n, et televisor LCD Ileva incorporado un conector para cable coaxial de 75 ohmios Cuando
conecte el cable coaxial de 75 ohmios al televisor LCD, enrosque el cable de 75 ohmios af terminal de antena (ANT)
• Afgunas compaSias de televisi6n pot cable ofrecen "canales de pago especiales" Como fas seSafes de estos canales
de pago especiales est_n codificadas, la compaSia de televisi6n por cable generalmente suministra un convertidor/
decodificador para televisJbn por cable al abonado Este convertidorldecodificador es necesario para una recepci6n
normal de los canales codificades (ponga el televisor en el canal 3 6 4, ya queen general uno de 6stos se usa para
este prop6sito Si no sabe cu&l es, consulte con su compaSia de televisi6n per cable) Si necesita instrucciones mas
detalladas sobre la instalaci6n de la televisi6n por cable, consulte a su compaSla de tetevisi6n per cable Abajo se explica
un m6todo posible de utilizaci0n del convertidor/decodificador suministrado por su compaSia de televisi6n por cable
Por favor, tenga en cuenta que es necesario tener un conmutador RF equipado con dos entradas (A y B) (no suministrado)
Posici6n "A" del conmutador RF (no suministrado): Se pueden ver todos los canales no codificados utilizando los
botones de canal del televisor
Posici6n "B del conmutador RF (no suministrado): Se pueden ver los canales codificados a trav_s de! convertidor/
decodificador utilizando los botones de canal del convertidor
Conmutador RF (no suministrado)
_ " *----_ Linea de TV per cable
• Consulte con su distribuidor o cenlro de reparaciones SHARP para m&s informaci6n sobre el ripe de diviser de serial,
conmutador o combinador de seSat de RF que podrla ser necesario
: : Conexibn dela alimentacibn .... :
POWER (Alimentaci6n)
_! Terminal AC
11 Yl tl cA, ov
INPUT
Toma de corriente de la pared
Cable de CA
• Desenchufe siempre el cable de CA de! televisor LCD y de la toma de corriente de la pared cuando no vaya a utflizar el
televisor LCD durante un largo periodo de tiempo
J
(_9
Page 81

Nombres de Uaspartes del aparato principal
i=,,=HIH,,IH, ,=== Hr'
Panel de control superior
CH (Canat)(v)/(^) iNPUT (Entrada)
VOL (Volumen)(--)i(-F)l MENU POWER(Alimentacibn)
J/
[] C6mo ajustar el ngulo
I nctine la pantalla sosteniendo el asa
de transporte al tiempo qua empuja
firmaments et soporte con la otra mane
Altavoz
Sensor de OPC
(Conti"ol de
imagen 6price)
Sensor remote
Pars cambiar el anguro vertical det televisor
LCD, incline ia pantalla hasta 2,5 grades
hacia delante _ 10 grades hacia atr_s
Ajuste el &ngulo de manera qua pueda ver el
televisor LCD cSmodamente
..................... .....o, Toma de auriculares (_,_.)
........I ' "'=': ............. Enchufe los auricuiares con miniciavija en la toms de audculares
_,_t _ qua se encuentra en la parts detante,a del aparate princ.pa,
l
tndicador de OPC (Control de imagen 6ptico)
El indicador de OPC se pone verde cuando "OPC" se
co]oca en "ENCEN" (Consulte la p_gina 19 )
Indicador de POWER (Encendido)
El indicador de POWER se pone verde cuando ia alimentacion est_
conectada y rojo cuando se encuentra en el mode de espera
(el indicador no se encender,'_ si la alimentaciSn principal esta
apagada)
• Los botones INPUT, CH (V)/(A), VOL (-)f(+) y MENU de! aparato principaltienen ias mismas funciones qua los mismos botones del
contro__emoto Fundamentafmente. este manual de operaci*Snefface una descripci6n basada an la operacI6n utilizando el control remote
I_1Enchufe los audcuIares con miniclavija en la toms de auricuiares qua se encuentra en la parts delantera det aparato principal
O o o
V Vtsualizacibn en pantalla
VOLUMEN
10 !111111111.............................................
Ajuste et votumen del sonido utilizando VOL (+)fH en el
contro_ remote
• Los auriculares no est;_nincluidoscon losaccesorios suministrados
• Cuandola minidavijadeIosauricularesseconectaa Iat0madeaudcuiaresnoseeyesonidoprocedentedetos altavocesdel aparstoprincipal
• Noajasteelvotumenaun nivelalto LosexpertosenaudiciSnrecomiendannoexponersea vot_rnsnesaltosdurantepetiodosdeliempoprolongados
10®
Page 82

Nombres de las partes del aparato principal (Continuacibn)
..................... ,,,, ,,,,,,,,,,,,,,,,,,,,,,,,,,,,,
Vista posterior
Seguro redondeado
para laranura estbndar
de seguridad de
Kensington*
Asa de transporte
Terminal AC
INPUT
Y
PB
PR
AUDIO L (I)
AUDIO R(D)
-_INPUTI
(COMPONENT)
(COMPONENTE)
VIDEO __
L (I) INPUT3/OUTPUT
R(D)
ANT. (Terminal de antena)
Asegurese de fijar los cables y eI cable de CA con el soporte y la abrazadera de cables suministrados
Ins_rte{o y girelo 90°
Abrazadera para cables
(_ 11
Page 83

Nombres de las partes dei contro remeto
iiiiiiiiiii ii rn nl rnl,ii iiii1,1111, ii! ,i ,
POWER (p, 15)
Activa o deja en modo de espera la
alimentaci6n det televisor de cristal
ttquido
Seleccibn de canales (p, 16)
Establece el canal,
MTS (p. t6)
Setecciona opciones de audio
MUTE (p, 16)
oilencia el sonido,
AUDIO ONLY (p, 30)
Salida de audio sin la imagen en la
pantalla
VOL (+)f(-) (po16)
Ajusta el volumen
AV MODE (p. 19)
Selecciona el MODO AV que prefiera
MENU RETURN (p, 17)
Hace regresar a ta panta!la anterior,
SLEEP (p. 31)
Ajusta el temporizador para dormir_
VIEW MODE (p. 29)
Selecciona et tamat_o de ia pantalfa
CH(-",)!(v)(p.16)
Selecciona canates
INPUT (po 15)
Cambia la fuente de entrada entre
los medos ENTRADA1, ENTRADA2,
ENTRADA3 y TV
FLASHBACK (p, 16)
Hace regresar al canal anterior.
DISPLAY
Visualiza el canal receptor y ta hora
actual pot !0 segundos
ENTER
Ejecuta un comando
A IVI_I I1_ (Control del cursor)(p.,17)
Selecciona una opci6n
deseada en la pantalla
MENU (p, 17)
Visuatiza la pantalia del mene.
CC (p, 28)
Muestra los subtitulos
en modo Ctosed Caption
BACKLIGHT (po 20)
Ajusta el brillo de la pantaIla
12®
Page 84

Conexibn de dispositivos externos
Nu,u H n ru,,,,,= = =Hum=
Se puede disfrutar de imagen y sonido conectando una videograbadora o consola de videojuegos a los terminales ubicados
en la parte trasera det televisor LCD
Cuando vaya a conectar un dispositivo externo, desconecte primero ]a afimentaciOn del televisor LCD para evitar cuaiquier
posible daOo,
Cable de componente Y
Audio L 0)
k,
AuR,die D) b.
Cable de audio
Cable de S-video S-vtdeo
Vldeo _.
Audio L(I)
Audio R (D)
I Cable deaudio/video
Video
Audio L (I)
Audio R (D)
Cabtedeaudiolvideo
Terminal INPUT1 (COMPONENT)
Stnton]zadorde
Reproductor de DVD televlsidndigital
• Si su dispositivo extereo tiene unterminal
componente, se racomienda la conexibn
a COMPONENT (Podra ver imageries de
gran caiidad)
Terminal INPUT2
Consota de
videoJuegos Vtdeoc_maraV_deograbadora
Si su dispositivo e×temo liene un terminal
S-video, se recomienda la conexi6n a
S-VIDEO
l=
Terminal INPUT3IOUTPUT
Ampllficador de audio Videograbadora
,Para el cable de conexi0n, utilice un cable de audio/video disponible en tiendas
• No se puede coneclar a un PC
• Para m_s informacion sobre las conexiones de dispositivos externos, consuite los manuales de sus dispositivos externos
, Asegurese de que los cables correspondientes est_n conectados a cada terminal Si se conectan otros cables es posible qua se
produzca un mal funcionamiento
, INPUT2 posee dos terminafes de entrada de video, VIDEO y S-VIDEO Si su dispositivo externe posee un terminal S-VIDEO, se
recomienda realizar la conexiOn S-VIDEO S-VIDEO proporciona una imagen m&s flea y m_s detaIlada Si ambos terminales est&n
conectados, el terminal S-VIDEO tendra prioridad
• Para el modo ENTRADA1, se podr& visualizer Ia imagen s0io cuando se recibe sepal 480L 480P
I Salidas de video audio de video)
(salidaY
Usted podr_ sacar se_ales de video y audio del televisor LCD a trav6s del terminal de 1NPUT3/OUTPUT (Consuite la p&gina 23 )
• Cuando utilice INPUT3fOUTPUT como un terminal de satida, seleccione "INSTALACI6N" en fa pantalla del MENU y
ponga "SELEC ENTRADA3" en "SAL1DA",
• Cuando utifice la enfrada S-VIDEO para INPUT2 o la entrada COMPONENT pare INPUT1, no se realiza ninguna se5al de video al
terminal INPUT3/OUTPUT, pero la serial de audio se har& para la conexiOn a sistemas de audio externos
(_ 13
Page 85

PREAJUSTE DE CANAL
,n,m, ,,,, i ,,,,n,mn,
[] Cuando encienda eitelevisor LCD pot primera vez,6ste memodzar&
autom&ticamente_oscanales de emisi6n y lahora det re!oj,
Siga ]as instrucciones siguientes antes de presionar POWER
(1) Inserte las pilas en ei control remoto (Consulte la pagina 7.)
(2) Conecteelcable de antenaal televisorLCD,(Consultetap_gina8 ) :_
(3) Conecte el cable de CA al terminat AC INPUT del
televisor LCD y enchufe el cable de CA en una toma
de corriente. (Consuite la p_gina 9)
[_ ..............._'_ ] POWER(Alimentaci6n)
JL_ _: o:o,:tC---& j
L
PREAJUSTE DE CANAL durante la primera 3: Presione ENTER para acceder al modo tNICIAR
vez que se conecta la alimentaci6n MEMORIADE CANALES
Presione _klV para seleccionar "S[", y p_esione ENTER
• si desea detener el p_oceso PREAJ CANAL una vez
inc ado, pres one MENU y el proceso se cancelar_ Si
Presione POWER en el lade superior det aparato
principal, para encender el televisor Se visuatizara la
pantaIla SELECCIONAR IDIOMA.
Presione ,&/V para seleccionar "ENGLISH" (Ingi6s),
ESPANOL" o "FRAN_AIS" (Frances)
Presione ENTER para acceder al mode BUSQUE. CANAL
Presione ,&/'_ para seleccionar "ENCEN" o "APAGADO"
Cuando seleccione "ENCEN ", el televisor LCD
memorizara automaticamente los canales de emisi6n,
• si setecciona APAGADO", PREAJ CANAL se canceiar_
desea iniciar de nuevo el proceso de preparaci6n, consulte
AJUSTE DE CANAL en la p_gina 22
El sintonizador buscar& automaticamente los canates de
emisi6n y los canales de televisi6n por cable (El nt_mero
de canal aurnentar& autom_ticamente cuando aparezca )
ESPERE POR FAVOR
PROQRAMAGtON AUTOMAT_CA
El televisor LCD cambiar_ autom_ticamente para
buscar sefiales EDS,
: Si se reciben sefiales EDS, el nt3mero del canal y la
hora se visualizar_n, y luego aparecer_ fa pantalla
mostrada en el paso 5,
i_i_':_ii__i
ESPER£ POR FAVOR
BUSOANDO HORA
Una vez comptetado PREAJ CANAL, se visualizar_ el
n_mero det canal mas bajo que haya sido memorizado
•4
i_: i_,
_'ES SREO
MONO
t1153AM
• No deje que la pantalfa PREAJ CANAL se visualice durante
mucho tiempo sin estar atendfda,
• Si el proceso PREAJ CANAL no memoriza todoslos canates
de su zona, consutte la p_gina 22 para obtener m_s informaci(_n
acerca de ta memorizaci6n manual de los canales utilizando
AJUSTE DE CANAL
* Cuando las seSates de emision sean debiles, la frecuencia
del cicio de los canales no sea correcta o se produzcan
interferenciasde frecuencia en ta zone ser,_diftcil memorizar
loscanales Consulte la pagina 22 para tener mas informaci6n
acerca de tamemorizaci6n manual de los canales utilizando
AJUSTE DE CANAL
14®
Page 86

Operaciones bbsicas
Encendido y apagado de la alimentacibn
principal
Cambio de los modos de entrada
(ENTRADA1/ENTRADA2tENTRADA3/TV)
' Power
Indicador de POWER (Encendido)
Presione POWER, El indicador de POWER cambia en
forma instant&nea rojo a verde y se enciende eEtelevisor
LCD,
Vtsualfzacibn en pantalla
_ EST_REO
SAP
t_DNO
• El indicador en la pantalla desaparece despues de unos segundos
Para apagar la alimentaci6n principal, presione POWER
otra vez
Espera
i ,
F --'_
POWER
0
1
21
ii_: •
i_ir "-i
_i ii !
/,
_i% _,_UIE VOL CH Et_PUT II
o+A-.o
°StU
Conecte la atimentaci6n del equipo de video conectado
Presione INPUT para seleccionar la fuente de entrada
deseada La pantalla va cambiando en el orden
ENTRADA1, ENTRADA2, ENTRADA3 y TV cada vez
que se presiona INPUT
Modo ENTRADA1
ENTRADA1
_DOP
Modo ENTRADA2
ENTRADA2
Modo ENTRADA3
ENTRADA3
Modo TV
• ENTRADAI:
Se utiltza para el equipo de v{deo conectado a los te_minales de
entrada de COMPONENT
• ENTRADA2:
Seutiliza papaelequipo devideo conectado alos terminalesde INPUT2
Para ta enirada de INPUT2 hay provisto un terminal de entrada
de Swideo adicionel SI el terminat de S-video y los terminales de
v{deo normales est_n ambos coneclados con cabies, el terminal
de entrada de SMdeo lendr_ prioddad
• ENTRADA3/SALIDA;
Etmodo ENTRADA3 se u{ifiza paraajustar lasopciones de preajuste
y con el se puedeseleceionar el modo de entrada (ENTR) o de
saiida (SALtDA) La indicaci6n ENTRADA3 no se visualiza cuando el
modo selecc{onado es el de salida (SALtDA)
Para apagar el televisor LCD
Presione POWER El indicador de POWER se pondr& rojo
Para vo|ver a encender el televisor LCD
Vuelva a presionar POWER Et indicador de POWER se
pondr& verde
(_ 15
Page 87

Operaciones b sicas (Continuacibn)
Volumen de sonido .... :
Para ajustar el volumen
POW;_ R
0
'°s';U II
Presione VOL (+) para subir el votumen de sonido
Et indicador de barra se desplaza a derecha
VOLUMEN
50 IIIIIIIIIIIIII!i1111111111111111111t1111111111.........
Presione VOL (-) para bajar el volumen de sonido
El indicador de barra se desplaza a izquierda
VOLUMEN10 I!t1111111.............................................
[] Para silenciar el sonido
• Presione MUTE para suprimir temporalmente el sonido
La marca "o_" se visuatizar_ durante 4 segundos
@
Presione MUTE o VOL (+)I(-) para escuchar el sonido
de nuevo al nivel anterior:
La funci6n de silenciamiento se desactivara
autom_ticamente cuando se presione cualquiera de los
siguientes botones: POWER, MUTE, VOL(+)/(-) o MTS
[ VOLUMEN10 IIIIIiiiii .............................................
• Cuando se presiona VOL (+)1(-) en el modo Silenctar, el sontdo
se enclende y aparece et indicador de voIumen
• La funci6n de silenciamiento se cancela al presionar POWER
[] Para seteccionar MTS (Sonido de televisibn multicanal)
if2i
il;:i?il
Presione MTS para visuatizar fa pantalla MTS
Presione MTS para seleccionar las opciones MTS
ESTC:REO: audio est_reo
SAP: programa de audio secundario
MONa: audio monof6nico
1_EST#REO <£N AIRE
SAP <EN AIRE
MONO
• "EN AIRE" aparece cuando se esta emitiendo una transmisi6n
ESTi_REO o SAP
Cambio de canales
/ l/ooot
® ® ®
0@@
Puede seleccionar canales utifizando los botones de
Selecci6n de canates o CH (A)t(V)
1" Este,eleviso,LCD,epermi,ese,ecciona,hasta125cana,es(1 a125) I
Paraseleccionarancanal, intraduzcaunnt_merode 26 3 digitas
[] Usa de Selecci6n de canales
Cuando se selecciona un canal con Seleccibn de canales,
termine de intraducir el namero de canal sosteniendo pot un
memento el bot6n del ultimo digito
Paraselecci0natunnurnerodecanalde162digitos(p0rejemplo,elcanal5):
Complete el procedimiento siguiente dentro de 4 segundos
Presione el bot6n @, 2: Presione el bot6n C_
5
• Cuando seleccione un numero de canal de 1 digito, no se otvide
de presionar primero el bot6n (_
Paraseleccionarun canalde3digitos (parejemplo,el canal115):
Complete el procedimiento siguiente dentro de 4 segundos
1 Presione el bot6n
1--
Presione el bot6n C_
115
2 Presione el bot6n (_
1t-
• Elnumerode cana_de3 dlgitospuedasaleccionarses6{ocuandoel modo
derecepci6nest_ajustadoen"CABLE"en"AjUSTEDECANAL"(Paravet
detallessabrec6moajustarelmododerecepci6nconsu!teta p_gina24)
f
CambtodecanalesconlosbotonesCH(A)f(V) del controlremoto
AIRE: PresianeCt.{(^) yloscaaalescambia_,Cnen elardenmastradoabajo:
(A6reo) 2 -_ 3 ->. -e 68 -> 69 -> 2 -_ 3 ->
PresioneCl-I(v) y!ascanalescambiar_nenelardenmastradoabajo:
3 -+ 2 -4, 69 -_ 68 -e. -_3_2 -e
CABLE:PresioneCH(/'4 Yloscanalescambia_anenelardenmostradoabajo:
1-_ 2 -> 3 -e -> 125 -+ 1 -> 2 -> 3
PresioneCH(v) yloscanalescambia_nenelardenmoslradoabajo:
3.e2-e1.e125-+ _3 e2_1_
[] Usa de la funci6n FLASHBACK
@
@
Presione FLASHBACK para pasar del canal que est_
sintonizado al canal que se sintoniz6 anteriormente
Vuelva a presionar FLASHBACK para regresar al canal
qua estaba actualmente sintonizado
Page 88

Operaciones b_sicas (Continuacibn)
Seleccibn de las opciones del menu
Los menOs pueden usarse para ajustar los variados ajustes
del televisor LCD,. Seleccione la opci6n de men0 deseada
mediante el use de los pesos siguientes Consulte la
sigulente p&gina pare ]a panta]la de cada men0
• Las opciones que aparecen vaHan dependiendo de las
condiciones de ajuste,
• La opci6n seleccionade aparece en color amarillo
• Los ajustes que se hart realizado per 01timevez se guardr&n en
_amemofia
[] Usando el control remote
AV MODE _PLAY
o_o
® 9
50
Presione MENU del control remote pare visuatizar la
pantalla del MEN0,
2 Presione,_/_,narase_ecoionarlaopci_neeseaaaon
: elmenO
• El cursor se mueve a fa izquierda o a ]a derecha
• El cursor [ndica la opci6n seleccionada det menu
3: Presione A/V paraseleccionarlaopci6n deseada y
luego presione _t!!_ para ajustar esa opci6n,
..... •Para el caso de "MODO AV", "OPC", "AVANZADO" y
"REINICIAR", presione ENTER para que aparezca ta
pantalta de ajuste,
Presione MENU RETURN para regresar ala pantalla
anterior, o presione MENU para salir
[] Usando el panel de control del aparato principal
Tambibn puede operar el mem:_con el panel de control de[
aparato principal
Las operaciones de botSn sobre e[ panel de control
corresponden a los del control remote, come se muestra a
continuaci6n
Pane! de control det aparato principal
VOL (-)1(+): Cursor _t_ en el control remote
CH (M)/(A): Cursor Yf,A en e! control remote
MENU: MENU en el control remote
INPUT: ENTER en el control remote
(_ 17
Page 89

Operaciones b&sicas (Continuacibn)
inlUl ii , nuulun nl,nnnnnnn i
El Pantallas de ajuste del men(i
Para ver detalles sobre el ajuste de cada opci6n de menu, consulte el numero de p_gina que se indica a continuaci6n
• Las ilustraciones y visuaEizactones en pantalla de este manual de operaci6n se ofrecen con fines explicativos y pueden set un
poco diferentes de las que aparecen realmenteo
• Dependiendo de las condiciones de ajuste, coma puede ser ei mode de entrada, quiz&s no sea posible ajustar o seleccionar algunas
opciones En estos cases, aparecera el mensaje de alefta (Ejemplo: NO DtSPONIBLE CON ESTASEI_IAL) en la pantalla de ajuste de1menu
IMAGEN
P&gina
MODe AV .................................................. I9
OPC ............................................................ t9
LUZ TRASERA ........................................... 20
CONTRASTE ........................................ 20
BRILLO .......................................................... 20
COLOR ................................................ 20
MATIZ ....................................................... 20
NITIDEZ .................................................... 20
AVANZADO ............................................. 2l
REINICIAR .......................................... 20
La barra que aparece arriba es una guia de operaci6n |
del control remoto, Esta barra cambiar& de acuerdo /
con cada pantalla de ajuste det menflo i
k.
)
AUDIO
P&gina
AGUDOS .................................................. 2!
GRAVES .............................................. 21
BALANCE ...................................................... 21
REINICIAR ..................................................... 21
[NSTALACION
Pagina
AJUSTE DE CANAL ..................................... 22
MTS .................................................................. 16, 23
SELEC. ENTRADA3 ......................................... 23
BLOQ. DE V-CHIP .................................... 24-27
CLOSED CAPTION .................................... 28
IDIOMA ........................................................ 14, 23
OPCIONES
P&gina
MODe DE VISION ............................... 29
AUDIO SOLAMENTE ..............................................30
PANTALLA AZUL ........................................ 30
TEMP. DORMIR ........................................... 31
APA SIN SEI_IAL ........................................... 31
APA. SIN OPERA ....................................... 31
CAMBIO IMAGENES .............................................32
18®
Page 90

Ajustes b sicos
MODO AV
MODO AV cuenta con opciones preestablecidas que usted
puede seleccionar, con el fin de que se ajuste de la mejor
manera a ia brillantez de la habitaci6n y el programa de
reproducci6n que se est_ empleando
:1 ; Presione MENU para visualizar ta pantalla del MEN0
2 Presione _/_" para seleccionar "IMAGEN"
3: Presione AtV para sefeccionar "MODO AV",
y presione ENTER,
:4 Presione _lklY para seleccionar el ajuste que usted
desee, y presione ENTER
[
: :D I:NAMI:CO : ;
UEGO ::
5 Presione MENU para salir
• Puede seleccionar una opci6n MODO AV diferente para cada
modo de entrada (Por ejemplo, seleccione "ESTANDAR" para ia
entrada del televisor y "DtNAMICO '* para la enlrada de VIDEO )
• Cuando "MODO AV" se pone en "D]NAMICO (FIJO)", aparece
el mensaje "NO HAY AJUSTE IMAGEN EN [DINAMiCO/FIJO]" y
]as opciones del menu IMAGEN (excepto 'OPC" y "AVANZADO")
no pueden ajustarse
Ajuste directo de MODO AV
11 Presione AV MODE
t
2 Antes de que desaparezce la pantalla de MODO AV,
vue[va a presianar AV MODE y seleceione el ajuste
: que usted desee hacer
• Cada vez que presiona AV MODE, el modo cambia
: como se muestra a continuaci0n,
.... Mooo.vIEs.*.°..l------.Mooo*vco,.A.,ool------1
-,00o,v,,0,oo,.-,,o0oAv,,,,=.,.,-,o0o.v,o,.,.,0o,,.o,,.-
DINAMICO
PELtCULA
JUEGO
Opci6n seleccionada : Descripcibn
ESTANDAR Cambio de ajustes de imagen a valores
estandares,
P.raobtene,oo_Jr_gen="yniii_aq_e............
aumente ei conlraste para ver deportes, .......
Cambio deajusfesde imagena valores
preeslabtscidos,No se permitsrea}izarajustes,
Control del contrasts para una mejor
visuatizaci6n de imagenes oscuras,
C0nl_otde la brillantez devideoj_egos yolras
imagenes para obtener unamejor!magen:......................
OPC (Control de imagen bptico) : :
Ajusta autom_ticamente el brillo de la pantalla
i Presione MENU para visualizar la pantalla del MENU
:2 Presione '_t1_ para seleccionar "IMAGEN"
3 Presione AtY para seleccionar "OPC", y presione
ENTER,
4: Presione AIV para seleccionar "ENCEN" o
"APAGADO", y presione ENTER,
: :: A P A:G A:D 0::;
[0p6!6n Se!ec¢io.ad a :: : Oescripci6n "::::
l ENCEN. Ajusta autom;&ticamente el_
[ APAGADO No hay ajuste.
:15 Presione MENU para salir
• Si se coloca en "ENCEN ", el indicador de OPC se pone verde,
detecta la tuz cJrcundante y ajuste en forma automatlca la
britlantez de tuz trasera AsegL_rese de que no haya ning_n
objeto que obstruya el sensor de OPC, 1ocual pedria afectar su
capacidad de detector la iuz circundante
(_) 19
Page 91

Ajustes b&sicos (Continuacibn)
LUZ TRASERA
Puede ajustar el bri{Io de la imagen,
AVMODE D_SPLA¥
o_o
0000
1 Presione MENU para visualizar Ia pantalta del MENU,
2 Presione ',_/_ para seleccionar"lMAGEN"
3 Presione ,&/V para seieccionar"LUZ TRASERA"
uz TRASER
4 Presione _11/_ para ajustar la opci6n en la posici6n que
usted desee
5 Presione MENU para salir
* "LUZ TRASERA" no puede ajustarse mientras "OPC" esta "ENCEN °
Ajuste directo de LUZ TRASERA
1 Presione BACKLIGHT pare visualizar la pantalia LUZ TRASERA
i
OPC ENC_N.
LUZ TRASJ_RA [AUTO l
:2 Presione BACKLtGHT para cambiar el ajuste
: OPCAPAGADO OPCAPAGADO
' La pantalla LUZ TRASERA desaparecera automaticamente en 3
segundos
• [BRILLO]: M&xima brillantez
[NORMAL]: Indicado para ver la televis]6n en un lugar bien
iluminado, Ahorra energia
[OSCURO]: Suficientemente bdllante cuando se ve en un lugar
poeo ifuminado
[VARIABLE]: Et bdllo puede ajustarse a la medida de sus
prefe[encias utilizando _/_
[AUTO]: La brillantez de ta pantalla se ajuste de acuerdo con
la luz ambiente de{ {a habitacl6n a fin de cutdar el
consumo de electficidad El indicador de OPC se
pone en verde,
• Si se ha seIeccionado "AUTO', asegurese de que no haya ningun
objeto que obstruya el sensor de OPC 1o cual podrta afectar su
capacldad de detecter la fuz circundante
Ajustes de IMAGEN
Puede ajustar la imagen como usted Io desee mediante los
siguientes ajustes.
1 Presione MENU para visualizar la pantaila de{ MENU
2 Presione {t_" para seleccionar"lMAGEN"
Presione AIV para seleccionar una opci6n de ajuste
especlfica,
3
4 Presione _1t1_para ajustar la opci6n en ia posici6n que
usted desee
5 Presione MENU para satir
0pctdnseleCci0nada
LUZ TRASERA
CONTRASTE
BRILLO
COLOR
MATIZ
NITIDEZ
Bot6n "_
Para menus bril{o
Para manes contraste
Para un negro m&s
intense
Para men0r intensidad
de color
El tono de la piel se
hace mAs p0rpura
Pare menus nitidez
Bot6n I_
Para m&s brillo
Pare m_s contraste
Pare un negro menus
intenso
Para mayor intensidad
de color
El tono de la piel se
hace verdoso
Pare m_s nitidez
• Seleccione "AVANZADO", y presione ENTER para ajustar
"TEMPE COLOR", Consulte las p&ginas 21
• Cuando se restablezcan todas las opciones de ajuste (con
excepci6n de las opciones en los metals "MODO AV', "OPC") a
los valores preestablecidos en fabrica, Ileve a cabo el siguiente
procedimiento
_ Presione AIV pare seleccionar "REINtCIAR" en {a pantalla
IMAGEN, y presione ENTER
(_ Presione A/V para seleccionar "S{", y presione ENTER
20CA>
Page 92

TEMPERATURA DEL COLOR
Puede ajustar la temperatura del color para obtener un
mejor balance del blanco
:: Presione MENU para visualizar la pantatla del MENU
2 Presione _f_" para seleccionar"lMAGEN"
Presione A/_" para seleccionar "AVANZADO', y
: presione ENTER
AVANZADO
Presione ,,&/V para seleccionar "TEMPE COLOR", y
:)resione ENTER.
TEMPE. COLOR
Re J O : i[ 0 ]
VERDE[ 0 ]
A Z U L:[ : 0 ]
R E N IC I :A R :
Presione ,dlk/W para seleccionar la opciSn deseada, y
presione ENTER
6: Pres]one MENU para salir
!
0pci6nSefeccionada : : Descripci6n : :'_
! USUARIO I Pued'e'ai'usiar e! c°lo[ que usted desee" /!
| ALTA I Blanco con tone azulado ]
IMEolo I i
L BAJA Blaneo con tone rojizo I
* SI selecciona "USUARIO", podr_ ajustar las siguientes opciones
Opt onseecc01tada
ROJO
VERDE
AZUL
:;:: : ::: :B0tbn _ I : Bot6n 1_ :
Rojo menos intense Rojo mas intense
Verde menos intense Verde m_s intense
Azul menes intense Azul m_s intense
• AI reiniciar lae opciones del ajuste USUARIO" a los vatores
preeslabfecldos de f_brica, lleve a cabo los siguientes
procedimien!os.
O Presione .A/T para sefeccionar"REINICIAR" en la pantalla
AVANZADO, y presione ENTER
C_ Presione AtW para seleccionar"St", y presione ENTER
Ajustes b&sicos (Continuacibn)
..........mnn n i i
Ajustes de AUDIO
Puede ajustar la cafidad del sonido a su preferencia
mediante los siguientes ajustes
111_ii
2 i¸
Presione MENU para visuatizar la pantatta del MENU
Presione '_f_, para seleccionar "AUDIO"
Presione ,,&/Y para seleccionar una opci6n de ajuste
especifica,
4:
5 i!
Presione '_t_ para ajustar la opci6n en la posici6n que
usted desee
Presione MENU para salir
0pct6nseleccl0nada
AGUDOS
GRAVES
BALANCE
Bot6n _ ' :B0t6n 1_"
Para menos agudos Para m&s agudos
Para menos graves Para m_.s.graves
Disminuye el audio de! Disminuye e! audio del
attavoz derecho allavoz izquierdo
• Las opciones del menu AUDIO no pueden ajustarse cuando
"SELEC ENTRADA3" est& ajuslado a 'SALIDA e_l( VAO"
• Cuando se restablezcan todas las opciones de ajuste a los
valores preestablecidos de f_brica, !leve a eabo e] siguiente
procedimiento
O Presione ,&rlF para seleccionar "REINICIAR". y presione
ENTER
(2_ Presione ,&IY para setecctonar r' S 1", y presione ENTER
(_) 21
Page 93

Funciones QtiUes
AJUSTE DE CANAL
B PREAJUSTE DE CANAL
Cuando se muda a una &rea con seSales de transmisi6n
diferentes, puede tener que ajustar tos nt]meros de
canales y la hora con la funciSn PREAJUSTE DE
CANAL Para activar PREAJUSTE DE CANAL, Iteve a
cabo eEsiguiente procedimiento
<_>Presione`&IV" para se[eccionar"AJUSTE DE CANA£' en la
pantalla INSTALAC_N (consulteia p_gina 18)y presione ENTER
<9Presione,&IV paraseleccionaP"PREAJ CANAL",y presioneENTER
_) Presione,&/V para se{eccionar "SI"; y presione ENTER
Para mayor informaciSn acerca de PREAJUSTE DE
CANAL, consulte la pagina 14+
m Ajuste de la funcibn AIRE/CABLE
Para poder recibir los programas de tetevisiSn
transmitidos iocalmente, es necesario ajustar el medo de
recepciOn de canales AIRE (a6reos) o pot CABLE
Presione MENU para visuatizar la pantalla del MENU,
:2
ii' :
Presione _/_" para seJeccionar "INSTALACION"
Presione A/V para seleccionar "AJUSTE DE CANAL",
y presione ENTER,
4 Presione ,&IV para seleccionar "A]REICABLE", y
presione ENTER
Presione ,&/V para seteccienar el ajuste que usted
desee, y presione ENTER
REAJ+ CANAL
IREICABLE
0SQUI=. CANAL
EMOR I A CANAL
i
5 Presione MENU para salir
• Los canales que puede recibir con el televisorLCD son:
Canales AIRE: Canales por CABLE:
VHF: 2 a 13. 1 (HRC e [RC)
UHF: 14 a 69 2 a 125 (STD, HRC e IRC)
m Para guardar canales de TV en la memoria del televisor
1
2: _
:i
3
Repita tos pasos 1 a 3 de Ajuste de la funcibn AIRE/
CABLE
Presione ,&IV para seleccionar"BUSQUE CANAU', y
presione ENTER.
IPREAJ ANAL
AIRE/_BLE
BOSQU +CANAL
MEMOR I A CANAL
Presione ENTER Et sintonizador buscar_, entre todos
los canales disponibles en su area y los afadir_ a +a
memeria del televisor
WESTER_O
SAP
MOHO
• Para detene_BUSQUE CANAL, presione MENU RETURN.
80SQUE CANAL se detendr_ en el canal actual y no aSadir&n
otros canales mas altos
m Adicibn de canales de seSal d_bil o adicionales o
borrade de canales no deseados de la memoria del
televisor
Pueden ajustarse las opciones individuaies de p_ogramas
OQQ
QQQ
OQO
2
13
5¸
Repita los pasos 1 a 3 de Ajuste de ta funci6n AIRE/
CABLE
Presione,&/Vparaseleccionar"MEMORIACANAH',y
presione ENTER
REAJ+CANAL
|RE/CABLE
0SQUE+ CANAL
EMORIA CANAL
Presione ,&/V para mover el cursor a "CANAU', y
utilice '_/_" o Seleccion de canales para seleccionar
el canal deseado a ser agregade o borrado
Presione ,&fV para mover el cursor a "OMIS. ++,y utilice
_1/_ para seleccionar "ENCEN," o "APAGADO",
Presione MENU para sal;r,.
• Si se realiza BUSQUE CANAL otra vez, los canates previamente
memodzados se perde+an
22®
Page 94

iiii u i
INSTALACION
Funciones _tiles (Continuacibn)
POWER
0
0(!)(!)
(g_QO
QQQ
_(g)@
AVI._ODE DISPLAY
o_o
,?
0000
:1 Presione MENU para visuafizar la pantaila del MENU
Presione _/_- para seteccionar "INSTALACION"
Presione ,&tV para seleccionar la opci6n deseada, y
presione ENTER
}
"h:!i /]
4_
:
Presione Ate" para cambiar et ajuste, y presione
ENTER
Presione MENU para salir
: : Opci6n Seleccionada .... Ajuste de f&brica ...... i
MTS [EST_REO] Audio estereo [SAP] Programa secundario de audio
[MONO] Audio monof6nico
SELEC ENTRADA3 [ENTR J {SALIDA I_ FAO]
Terminales INPUT3/OUTPUT seleccionados como Se selecciona !a linen de saltda, se fija el volumen de
terminales de entrada saiida, se dispone de una salida para altavoces
_AUDAn_VAO]
selecciona la linen de salida, el voiumen de salida
es variable, la salida para altavoces esla silenciada
IDIOMA [ENGLISH] (lngl6s) I.ESPA_IO L]
[FRANOAIS] (Frances)
Para mayores detalles de INs siguientes opciones, consutte INS p&ginas que se indican,
• AJUSTE DE CANAL ...... P&gina 22
• BLOQ DE V-CHIP ....... P_ginas 24 a 27
• CLOSED CAPTION ....... P&gina 28
(_ 23
Page 95

Funciones dtiles (Continuacibn)
=
Ajustes de V.CHIP
II V-CHIP
• Esta funci6n permite restringir programas de television y controlar el use del televisor mediante dates FCC [mpide que _os ni_os
puedan vet escenas vioientas o sexuates que poddan series dafJnas
• La restdccion de programas de televisiSn inciuye dos categodas basadas en la informacion sabre los programas: la categoda MPAA
(AsociactSn de la pellcula de America) y la categoria de Directdces Paternales pars TV La categoda MPAA restringe los programas
per edad La categoria de Directrices Paternales para TV restringe los programas per edad y contenido
• Dado queun programs de television puede usarla categorla MPAA o la categoda de Directdces para TV deber_n ajustarse ambas para un complete centre!
Categoria MPAA
Categoria
G
PG
Basada PG-13
en la R
edad NC-17
U ×
Descdpci6n
AUDiENCIAS GENERALEs. Se admiten todas las edades.
SE ACONSEJA ORIENTACJ6N PATERNAL. Puede qua parte del material no sea adecuado para nifios.
SE EXHORTAPRECAUCIONPATERNALPuedeque pade del materialseainapropiadopars ni_os men0resde 13 asss
RESTRING_DO. Se requiere qua los menores de 17 a_os esten acompaSados de sus padres o tutores
NO SE ADMtTE A NADtE CON 17 AI_OS O MENOS.
La categorta X es una categoda antigua qua se encuentra unificada con NC-17, pete todavia puede
encontrarse codificada entos dates de peliculas antiguas.
Categorla MPAA
1 Ajuste del 2 lrabiB de 1 Ajuste de!
Ejemplo 1: usuado bloqueo Ejemplo 2: usuarto
2,, Tabta de
Si se bloquea PG-13 en la
categorta basada en ta
edad, tambi6n se
bloquearan
autom&ticamente las
categorIas superiores R,
NC-17 y tambien X
O] _ NO se
G G bloquea
no SO
PG ....... PG btoquoa
bloqueo
PG43 BLOQUE Bssz :ts selecctonsdo
R BLOQUE od_ :I sutobloque_
so
NC47 BLOQUI_O sosut°bl°quea
sutobloquea
. LB categorta MPAA se basa sofamente en ta edad
Directrices paternates pars TV
Categoria
TV-Y (todos los niSos)
1_ TV-Y7 (didgido a niSos mayores)
8asr_daTV-G (audiencia general)
enla
edad TV-PG (se aconseja orientaci6n paternal)
U TV-14 (se exhoda precauci6n paternal)
TV-MA (s6_o para adultos)
FV
(violencia
fant&stica)
X
Si se bloquea Ren la
categoda basada en ta
edad, tambien se
bloquearan
autam_ticamente tas
categorias superiores
NC-17 y tambien X
PG43
R BLOQUEC
NC-17 BLOQUEC
X BLOQUEC
Basada en el contenido
V S
(violenda) (situaciones
sexuates)
[] []
[] []
X
x
x
L
(lenguaje
adults)
[]
[]
[]
x X
X X
x X
D
(dialogos
sexuatmente
sugestivos)
[]
[]
[]
X
X
[]: Se puede ajustar Ia categoria basada en el contenido pero normalmente los canales de tetevisiSn no la emiten
X: Se puede ajustar la categorla basada en el contenido
Directrices patemales para TV
Ejemp!o:
CuandoTV-Y7enlacategorlabasadaen laedadesteajustadoen BLOQUEO,se b!oquear,_nautom&ticamentelascategorlasm_saltas:TV-G,TV.PG,TV-14y
TV-MAAdem&s,D,L,S,V yFVenBLOQUEOCONTENIpOsebloquear&nautom_ticamenteamenosque!asajuslemanuatmenteenBLOQUEOCONTENIDO
1, Ajuste de] usuario
W-Y
W-W BLOQUEO
W_ BLOQUEO
W_G BLOQUEO
w=14 BLOQUEO
W-MA BLOQU_O
BLOQUEOCONTENIDO
LSVF_
2 Tabla de bisques
FV
B s i
aasz_da en el contenldo
V _ L D
se
b_oqueo autobloques
selecclonado
• Las categorias basadas en la edad pueden modificarse mediante las categortas basadas en et contenido, pare solamente en fas
combinaciones indlcadas con una X en la tabla de arriba
• AI bloquear una categorla basada en la edad, se bloquean las arras mas altas basadas tambien en la edad, independientemente de los
ajustes hechos en las categorias basadas en el contenido
• Si ajusta TV-Y o TV-Y7 en BLOQUEO, BLOQUEO CONTENIDO visualizar_ todas las opciones
Page 96

Funciones tiles (Continuacibn)
nnnn,n i nnnllllllll i I i IIIIIH
Sistemas de categorias canadienses
• Los sistemas de categorias de televisi6n en Canad& se basan en las politicas establecidas per la Comisi6n
Canadiense de Radio Televisi6n y Comunicaciones (CRTC) en cuanto a la violencia en la programaci6n,r
• Si bien la violencia es el elemento de contenido m&s importante que se clasifica, la estructura que se ha
desarrollado toma en cuenta otro tipo de contenido, come son el lenguaje, escenas de desnudez, Easexuatidad y
temas adultos,,
• Cuando ajuste el V-CHIP en un sistema canadiense, usted puede escoger la categoria anglo+canadiense o la
franco-canadiense,
Categorias anglo-canadienses
C
C8+
G
PG
14+
184+
n
Basada
en la
edad
V
NiSos: Destinado para niSos de 8 aSos o menos Presta especial atenci6n a los temas que
pudieran amenazar su sentido de seguddad y bienestar
NiSes de m_s de 8 aSos: No induye escenas de violencia come la manera prefenda,
aceptable o t_nica de reselver conflictos; no alienta a los niSes a imitar actos peligrosos que
pudieran ver en la pantalla
General: Se considera aceptable para todos los grupos de edades Adecuado para toda la
famitia; contiene muy poca vielencia fisica, verbal o emocionai.
Directrices Paternales: Dirigido ata audiencia en general, pero posiblemente no adecuado pare
niSos pequer_os (menos de 8 a_,os)ya que puede centener temas o elementos controvertidos
M&s de 14 a_os: Puede centener temas en los que +avielencia es une de los elementos
dominantes de la historia, pere debe ser integral en el desarrolle de la trama o el persenaje, El
lenguaje utilizado puede set grosero y haber escenas de desnudez en ei contexto de la trama
Aduttos: Dirigido a espectadores de m&s de 18aries y puede contener violencia si est&
relacionada con la trama, el personaje o los temas, y est& enfocade para ser visto per
adultos, Puede contener tenguaj, e expHcito y escenas de sexo o desnudez+
Categorias franco-canadienses
n
Basada
en la
edad
i i
::: ::
,;==: c i 5oria : :; :
G
8 ans +
13 ans +
16 ans +
t8 ans +
t I I Jlllllllllllllll I
General: Todas las edades y niilos, contiene violencia directa minima, pero puede estar
integrada en _atrama de una forma divertida o irreaL
General pero no se recomienda para ni_,os pequeSos: Puede ser vista par un amplio
publico, pere puede contener escenas que perturben a los niSes menores de 8 aSos que no
distinguen entre situaciones ima,g!narias y rea!es, Recomendade para verse ,con los padres
M&s de 13 at3os: Puede contener escenas de violencia frecuente y per le tanto, se
recamienda ver con los padres
Mas de 16 af'_os: Puede contener escenas frecuentes de violencia e intense violencia
Mas de I8 aries: S61o para aduttos Puede contener escenas frecuentes de violencia y
extreme violencia,
nn nl ii I .................. iiiii nl
(_ 25
Page 97

Funciones _tiles (Continuacibn)
,i,iiiiiiiiii, i,,i mmllnl
Ajustes de V-CHIP (Continuacibn)
Los ajustes V-CHIP te petmiten ajustar el regimen MPAA, TV
GUIDELINES, _osregfmenes para ingt6s canadiense y
franc_s canadiense
[] Ajuste de V-CHIP
i%,
I OQQ /
QQO
OQQ
Q@O
I Presione MENU para visuaiizar la pantalla de1 MEN0.
!
2 Presione _/P, para seleccionar"lNSTALAClON"
3 Presione .a,/V para seleccionar"BLOQ DE V-CHIP", y
presione ENTEE
4, Se visualizara "tNTRO. N..° SECRETO". Introduzca un
numero secreto de 4 dlgitos utilizando los botones de
Selecci6n de canates,
• Cuando intfoduzcaeEn_mero secreto por primera vez,
presione ENTER para registrado De otra forma cont n,3e
con el paso 5
5 Presione ,&/V para seleccionar ta opcion deseada, y
?resione ENTER°
MPAA
TV QUIDEL
: RA:T ! NQS D:E :NG _D CANADA
;; RAT: NG8 : DE KER: :DE: CANADA::
:; ::: E S;TADO l
6 Presione ._,IV para seleccionar la opc;6n deseada,
presione _1/_' para seleccionar "BLOQUEO",
(Categoria MPAA) (TV GUIDELINES)
: : {Categariasangl0-canadienses)(Categorias franco-canadienses)
i
41BLOQUEO
? :
Presione MENU para salir
• La opci6n va en forma automatica a "BLOQUEO" para cua_quier
categoda pot debajo de su sefecciSn
O Ajuste de BLOQUEO CONTENIDO (TV GUIDELINES)
:1: Repita los pasos 1 a 4 de Ajuste de V-CHIP
Presione A/V para se_eccionar "TV GUIDELINES", y
presione ENTER.
3 Presione ,_/"_ para seleccionar"BLOQUEO
CONTENtDO", y presione ENTER
Presione ,&t'V" para seleccionar la opci6n deseada, y
presione {/_ para seieccionar "BLOQUEO" o bien
.... (desbloqueo).
Presione MENU para saiir
Page 98

Funciones Otiles (Continuacibn)
i i iiiiiiiiii i IIIIIIIIIIIil1111111111111 II I
[] Activaci6n del BLOQUEO DE V-CHIP
® Ajuste de ESTADO
Podr_ activar el BLOQ DE V-CHIP despu6s de
establecer V-CHIP
AV MC}DE O{SPLAX
° d_ZZZ:)0
I (Z>QO I
(:D0
C)( Q
1 Rep{talos Dasos 1 a 4 de Ajuste de V-CHIP enla
pagina 27
2 PresioneAlVpara seleccionar"ESTADO",y presione
ENTER
MPAA
TV GD DELINES
RATINGSDEKING. DE
RATINGS DEK FR, DE
ESTADO
CANADA
CANADA
Presione A/V paraseleccionar"ENCEN",ypresione
ENTER
• Si "ESTADO" se pone en "APAGADO" el BLOQ DE
V-CHIP no se acttvara
4 Presbne MENU para sa]ir
[] Cancelacibn de la pantalla BLOQUEO DE V-CHIP
cuando se encuentre activo BLOQUEO DE
V-CHIP
1 si usted ve un programa con Ios mismos datos de
calificaci6n de programa qae usted configur6 se
visualizar& "V-CHIP HA SlDO ACTWADO"
V-OH P HA 81DO ACTIVADO
LSV
[] Para cambiar las opciones del BLOQUEO DE
V-CHIP
ii!il
i_i_,
!;ii
!!II
Repita los pasos 1 a 3 de Ajuste de V-CHtP en la
p&gina 27 y se visualizar& "INTRO N ° SECRETO"
Introduzca un numero secreto de 4 digitos utilizando los
botches de Selecci6n de canales; se visuaiizar_ et modo
de seEecci6n V-CHIP Ajuste BLOQ DE V-CHIP otra vez
IM .....
X
TV :iGU] DE L t NES : J
RAT NGS DEK I NG_DE CANADA
RAT NGS DEK FR. DE CANADA :J
EsTA:DO : ; ::
J
[] Para cambiar o cancelar el No° SECRETO
Si olvida el nt)mero secreto, borre el m]mero secreto de
la forma siguiente
Panel de control superior del aparato principal
MENU
"1 Repita los pasos 1 a 3 de Ajuste de V-CHIP en Ja
pagina 27, o 1 y 2 de Cancelaci6n de la pantalla
..... BLOQUEO DE V-CHIP cuando se encuentre activo
: BLOQUEO DE V-CHtP, y se visualizara "INTRO N °
SECRETO"
2 Mantenga presionados CH (^) y VOL (+)
: simult&neamente en el aparato principa! hasta que
parpadee el mensaje "INTRO, N ° SECRETO"
3 Presione MENU para salir,
• "V-CH_PHA SIDO ACTIVADO" no se visualizara s{
"ESTADO"se pone en "APAGADO"
2 Presione MENU para visualizar"lNTRO N_,SECRETO"
3
Introduzca un numero secreto de 4 digitos utilizando
los botones de Selecci6n de canales, y el BLOQ
DE V-CHIP se cancelar_ temporalmente Si introduce
un numero secrete incorrecto se visuaiizara "EL
NO SECRETO ES INCORRECTO" En este caso,
introduzca el numero secreto correcto
(_ 27
Page 99

Funciones Otiles (Continuacion)
i iH=ll HH =
CLOSED CAPTION
[] Ajuste de CLOSED CAPTION (Subtitulos)
• Este televisor LCD esta equipado con un decodificador interne
pare Closed Caption "Closed Caption" es un sistema qua
permite vet a mode de subtttu_os en la pantalla del televisor
las conversaciones, narraciones y efectos de sonido de
los programas de tetevisi6n y videos dom6sticos (yea la
ilustracion)
• No todos ios programas y videos ofrecen subtitulos Le
rogamos qua busque et simboto '[_]" pare asegurarse de que
apareceran los subtitu_os
. Las emisiones con subtitulos pueden verse en des modes:
CAPTION y TEXTO Hay dos canates disponibles para cada
made: CANAL 1 y CANAL 2
El made CAPTION muestra subtitulos o dJalogos y comentarios
de telenove!as y programas de
noticias permitiendo al mismo
tiempe una visi6n clara de ta imagen
El mode TEXTO visuaiiza
Infermaci6n variada encima de le
imagen (tat come la pregramaci6n
de la televisi6n el pren6stico del
tiempe eta ) que es indepandiente
de los pregramas de televisi6n
1
!2
i__iii;
i:4
Presione MENU para visuatizar ta pantatla det MENU,
Presione _1_' pare seleccionar "INSTALACION"
Presione _k/V para seleccionar "CLOSED CAPTION"
y presione ENTER
Presione ,&/V para cambiar el ajuste de CLOSED
CAPTION, y presione ENTER
• CCl: Mode CLOSED CAPTION pare dates CANAL 1
CC2: Mode CLOSED CAPTION pare dates CANAL 2
TI: Mode TEXTO para dates CANAL I
T2: Mode TEXTO para dates CANAL 2
Ajuste directo de CLOSED CAPTION
0000
AQUOS
1 Presione CC pare visualizer la pantafla de CCITEXTO
t
i CCiTEXTO { APAGAt30 I
i 2 Presione CC para cambiar el ajuste,,
L'-- CCiTEXTO[T21_-cCfrEXTO [TI]*--- cc,q'EXTO[CC21_J
: • CCl: Mode CLOSED CAPTION para dates CANAL 1
CC2: Mode CLOSED CAPTION pate dates CANAL 2
TI: Mode TEXTO para dates CANAL 1
T2: Mode TEXTO pare dabs CANAL 2
• Si la emisbn contiene dates Closed Caption y se presiona
MUTE, el televisor LCD entre autom_ticamente en el mode
CLOSED CAPTION AI presionar MUTE de nuevo, et televisor
LCD volver,_ a su estado anterior.
• Si las condicienes de recepci6n de la seSat no sen buenas o
s[ hay problemas en Ja fuente de emisi6n, CLOSED CAPTION
podria no func[onar bien (bloques blancos, caracteres extraSas,
etc ) Esto no indica necesariamente que el televisor LCD tenga
alg0n probiema
• Si se presiona cualquier bot6n para vet la visuatizaci6n en
pantalla mientras se est_ viendo un pragrama con subtitulos
los subtitulos desaparecer_n momant_neamente.
• Si no se est_ recibiendo una emisi6n con TEXTO mientras se
esl& viendo la televisidn con el mode TEXTO, Ia pantalfa podria
penerse en blanco pare algunos programas Si se diera el
case, penga el mode de CLOSED CAPTION en "APAGADO"
. Si seiecc[ona "CCI", "CC2", "T1" o "T2" (e se pulse MUTE)
mientras qua "MODe DE VtSI6N" se ajusta a "ZOOM" o
"ALARGAMtENTO", entonces ei made pare "MODe DE
VISION" cambiar_ autom_ticamente a "4:3" e "16:9"
::5 Presione MENU para sa[ir
28 (_
Page 100

Funciones _tiles (Continuacibn)
, ,,,,, ,,,,,,,,,,,,,,,,,,,..,
MODO DE VISION
Puede seleccionar el tamaSo de visuatizaci6n de [a imagen
para reproductor de DVD de las siguientes cuatro maneras:
"4:3", "t6:9", "ZOOM" y "ALARGAMIENTO",
AV MODE BISF_LAY
o_o
II Ajuste directo de MODO DE VISION
AV MOD_ DISPLAY
o (::::::z::_°
OOOO
Presione VIEW MODE para visualizar la pantalla
MODO DE VISION
Presione MENU para visualizar la pantalta del MEN0,,
Presione dlF para seleccionar "OPCIONES"
3 Presione A/Y para seteccionar "MODO DE VISION", y
prosioneENTER
Presione AIr para seleccionar taopci6n que usted
.... desee, y presione ENTER.,
!ii :¸i! i:i!i!i¸
i:i2il_
:_,;/_:_i__'
MODO DE VIB_ONI4:B}
Cada vez que presiona VIEW MODE, el modo cambia
como se muestra a continuaci6n
_opci6n seleCcionada
4:3 Muestra ta imagen en tama_o 4:3.
Atarga hodzontaimente la imagen para veda
16:9 en tamaSo 16:9.
Muestra la parte central de la imagen
ZOOM agrand_ndola horizontal y verticalmente.
A,,__LARGAMIENTO Alarga Iaimagen horizontaimente.
Tip0delmagen: ; : 4:3 ..... : 16:9 ZOOM ALARGA_!ENT0
(Para tm,_genes
alargadas
bandas a los _ados
Izquierdoy derecho)
5 Presione MENU para satir
. La imagen de 4:3 se vera distorsionada en ta pantatla si "MODO
DE VISION" se ha seieccionado en "_6:9"
. Cuando se ajuste "CLOSED CAPTION" a "CCI', 'CC2", "TI" o
"T2", no ser& posible ajustar "ZOOM" ni "ALARGAMtENTO" para
"MODO DE VISION"
(_ 29
 Loading...