

Page 1

AQUOS ea
User Guide
Page 2

Page 3

AQUOS ea User Guide Contents
1
Introduction
About the User Guide........................................................ 3
Accessing Instructions on Handset................................... 3
Getting Started
Package Contents............................................................... 6
Parts & Functions.............................................................. 6
USIM Card............................................................................ 7
Internal Storage and SD Card......................................... 10
Charging Handset..............................................................13
Power On/Off................................................................... 15
Using Touchscreen............................................................ 16
Handset Initial Settings...................................................17
Importing Data from Other Mobiles............................... 19
Basic Operations
Basic Operations...............................................................26
Confirmation when First Activating Applications......... 30
Applications.......................................................................32
Using Recent Apps Window............................................. 33
Handset Phone Number.................................................... 34
Using Manner Mode.......................................................... 35
Using Airplane Mode.........................................................36
Text Entry.........................................................................37
Google Account................................................................. 38
Google Play....................................................................... 40
Security Codes.................................................................. 42
USIM PIN............................................................................43
Turning Off Display (Screen Lock)..................................44
Updating Software........................................................... 45
Handset Interface
Lock Screen Basics........................................................... 48
Home Screen Basics.......................................................... 49
Icons at Display Top (Status Bar)...................................49
Checking Handset Status & Notifications (Notifications
Window/Quick Settings Window).................................... 51
Customizing Home Screen................................................ 53
Capturing Screenshots (Clip Now)...................................56
Scrolling Screen Automatically (ScrollAuto)...................59
Disabling Touch Operation Temporarily (Childlock)....... 60
Phone
Placing/Answering Calls...................................................62
Optional Services..............................................................66
Making Call Settings........................................................ 70
Address Book.................................................................... 71
Messaging & Internet
Messaging.......................................................................... 76
Sending S! Mail/SMS.........................................................76
Opening & Replying to S! Mail/SMS................................ 78
Using Gmail....................................................................... 80
Using Email........................................................................82
Using the Internet (Chrome)............................................85
AQUOS ea
Page 4

2
Camera
Capturing Photos/Videos................................................. 90
Music & Images
Listening to Music (Play Music)...................................... 94
Viewing & Managing Photos/Videos (Album)..................96
Connectivity
Connecting by Wi-Fi.......................................................100
Using Tethering.............................................................. 103
Using Bluetooth® Function............................................ 104
Global Services
Global Roaming............................................................... 108
Calling from Outside Japan...........................................109
Handset Settings
About Settings............................................................... 114
Notifications Settings................................................... 115
Sound Settings................................................................116
Illumination Settings......................................................118
Display Settings............................................................. 119
Useful Settings...............................................................122
Battery & Energy Saving Settings................................124
Call Settings................................................................... 125
Home Applications Setting............................................ 126
Apps Settings................................................................. 126
Storage Settings.............................................................127
Memory Settings.............................................................128
Data Usage Settings...................................................... 129
More Settings................................................................. 130
Location Settings........................................................... 131
Lock & Security Settings.............................................. 132
Languages & Input Settings.......................................... 136
Backup & Reset.............................................................. 138
Accounts Settings.......................................................... 141
Google Settings.............................................................. 141
Date & Time Settings.................................................... 142
Accessibility Settings.................................................... 143
Printing Settings............................................................145
About Phone....................................................................145
Radio Wave Exposure and Specific Absorption Rate (SAR)
Information..................................................................... 170
Water & Dust Resistance.............................................. 171
For Assistance
File Storage.....................................................................148
Backup & Restore...........................................................148
Automatic Data Communication & Sync Settings.........149
Troubleshooting.............................................................. 149
Specifications..................................................................151
Warranty & After-Sales Service................................... 153
Customer Service............................................................153
Safety Precautions
Safety Precautions.........................................................156
Important Product Information.....................................164
Handset & Hardware Care............................................. 165
General Notes................................................................. 168
Page 5
Introduction
3
About the User Guide
Thank-you for purchasing this product.
Before Using This Product
Read "Safety Precautions" thoroughly beforehand for proper
usage.
Accessible services may be limited by subscription contract
conditions.
Descriptions in the User Guide
In the User Guide, most operation descriptions are based on
handset at time of purchase.
Unless noted otherwise, descriptions are for Home Screen.
"Confirmation" refers to a window that appears after
operation, such as authentication prompt window, selection
window or caution window.
Some operation descriptions may be omitted.
Screenshots & Key Labels
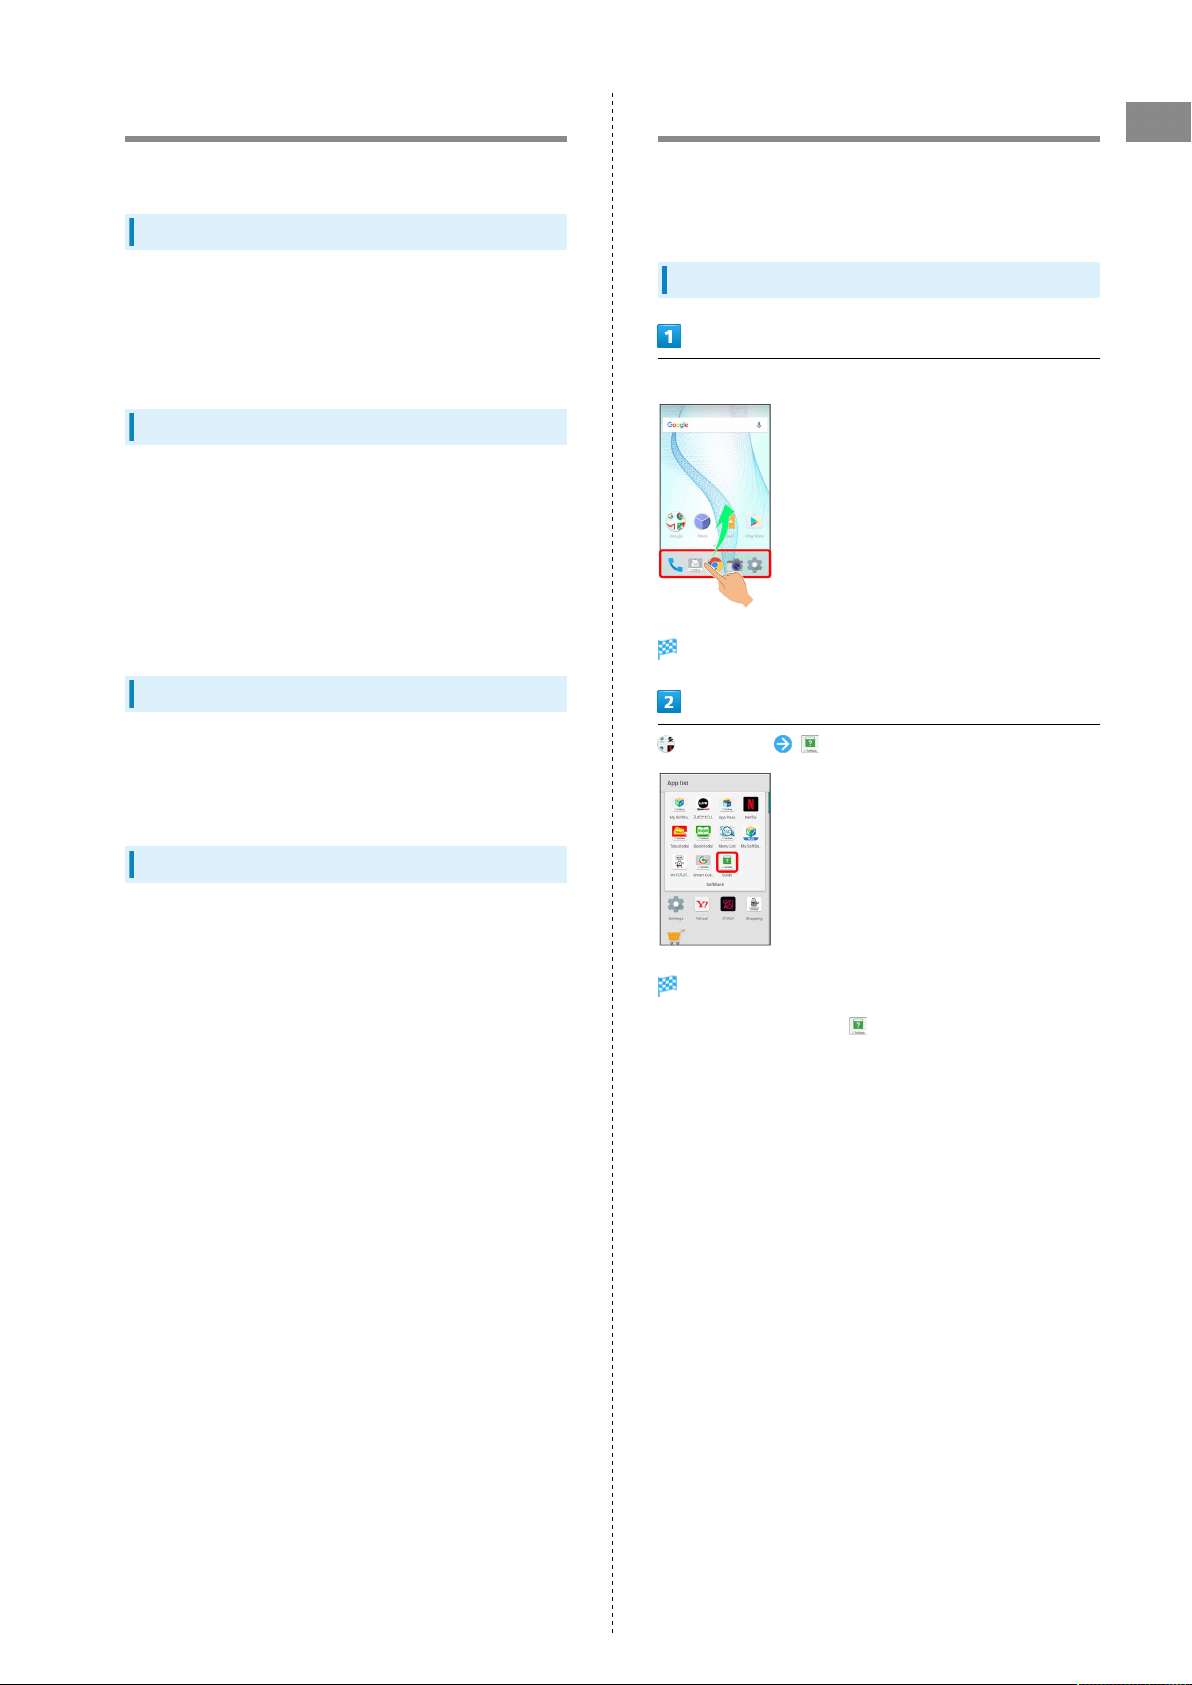
Accessing Instructions on Handset
View instructions in Guide when unsure of operation or have a
question.
Also, access the FAQ site.
Launching Guide
In Home Screen, Flick Hot Sheet up
App list opens.
Introduction
Screenshots in the User Guide may differ in appearance with
actual Display. Key labels in the User Guide are simplified for
description purposes and differ with actual Display.
Other Notations
In the User Guide, the product is referred to as "handset."
microSD™/microSDHC™/microSDXC™ Card is referred to as "SD
Card."
"606SH" here refers to this mobile phone "AQUOS ea."
(SoftBank) (Guide)
Guide top screen opens.
・
Information on usage of (Guide) appears at initial
startup. Follow onscreen prompts.
AQUOS ea
Page 6
4
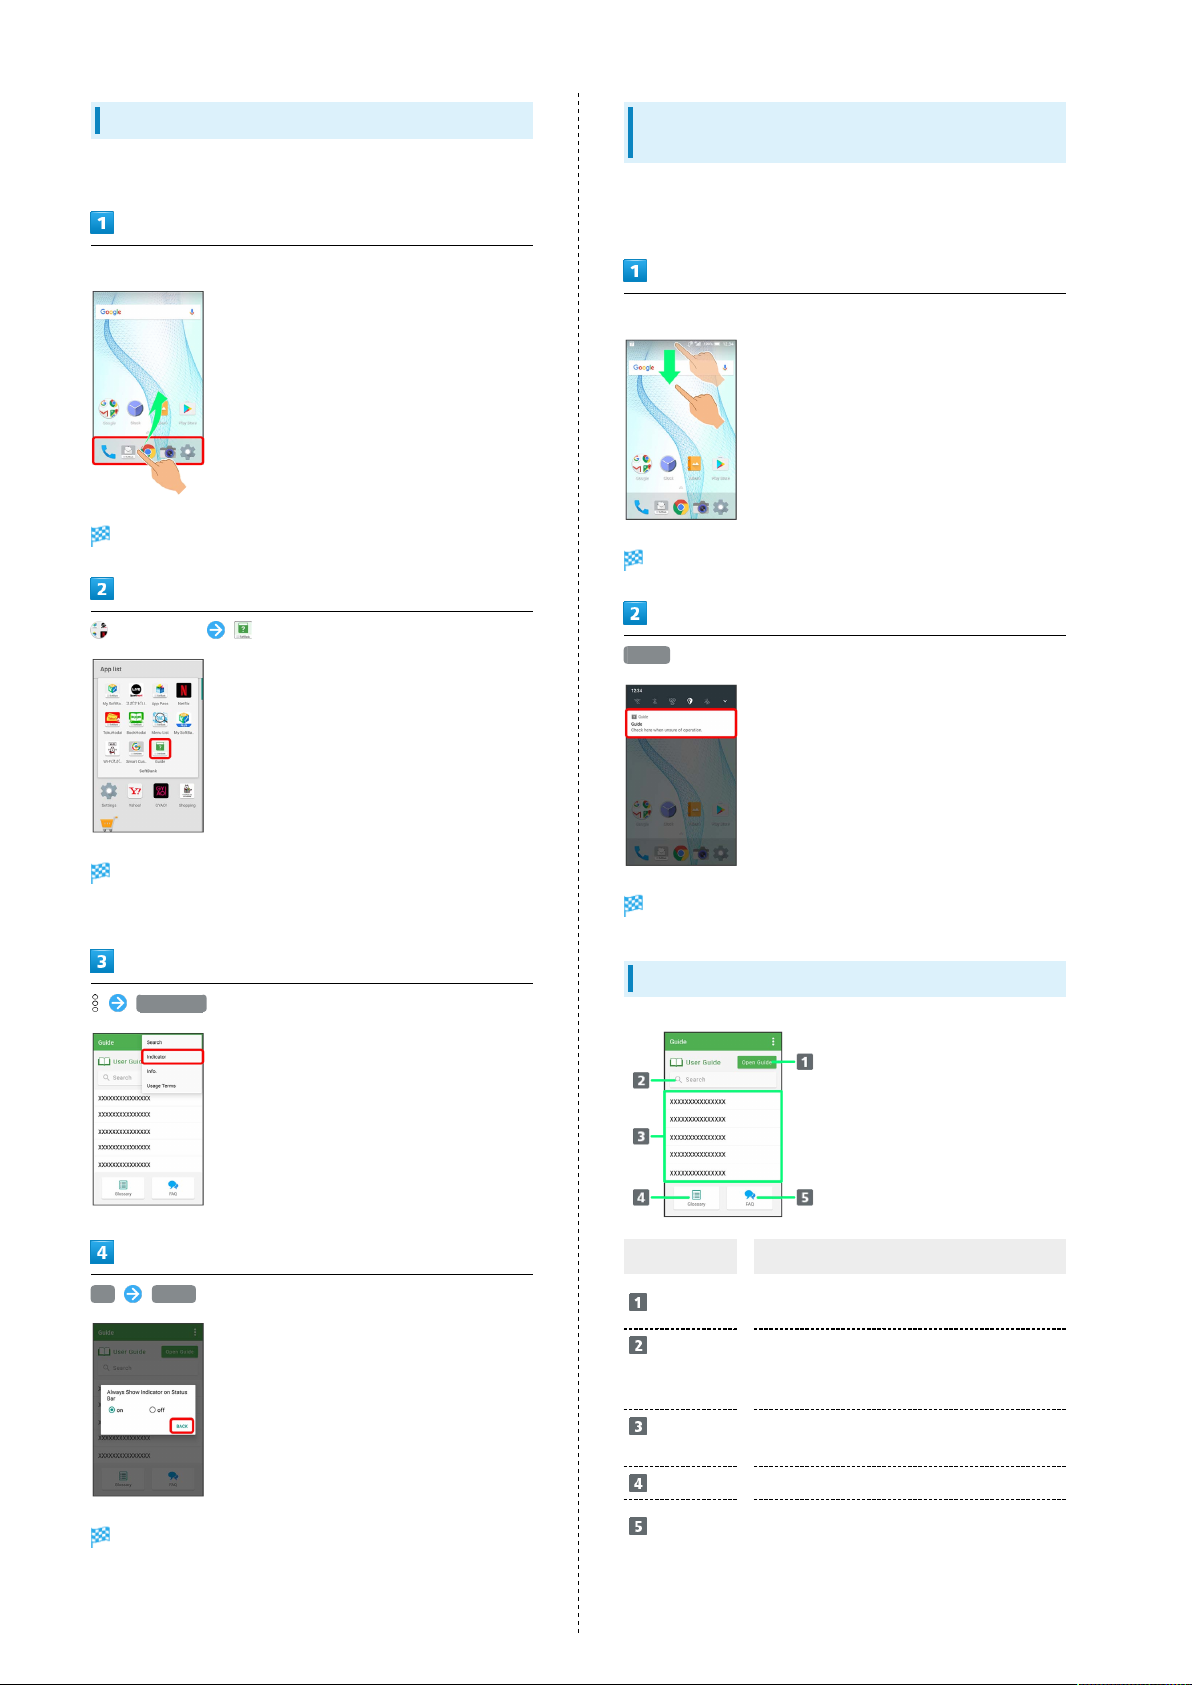
Showing Status Bar Indicator
Show indicator to launch Guide from Notifications Window.
In Home Screen, Flick Hot Sheet up
App list opens.
(SoftBank) (Guide)
Launching Guide from Notifications
Window
Launch the Guide quickly for how to use functions, etc. when
indicator is set to appear.
Drag Status Bar down
Notifications Window opens.
Guide
Guide top screen opens.
・If confirmation appears, follow onscreen prompts.
Indicator
on BACK
Indicator is shown.
Guide top screen opens.
Using Guide
Item Description
Open Guide
Enter
information
to search for
Most
viewed items
Glossary
FAQ
Check how to operate handset by
category.
Search for items in Guide.
Most viewed items appear here randomly.
Tap an item to open it in User Guide.
Look up unfamiliar terms.
Check frequently asked questions, and
quickly access the FAQ mobile site.
Page 7

Getting Started
Package Contents............................................................... 6
Parts & Functions.............................................................. 6
USIM Card............................................................................ 7
Internal Storage and SD Card......................................... 10
Charging Handset..............................................................13
Power On/Off................................................................... 15
Using Touchscreen............................................................ 16
Handset Initial Settings...................................................17
Importing Data from Other Mobiles............................... 19
Page 8
6
Package Contents
Package Contents
・Handset (AQUOS ea)
・Battery is built into handset.
・Handset back cover is not removable.
・TV Antenna Cable (Complimentary sample)
・クイックスタート (Japanese)
・お願いとご注意 (Japanese)
・Warranty
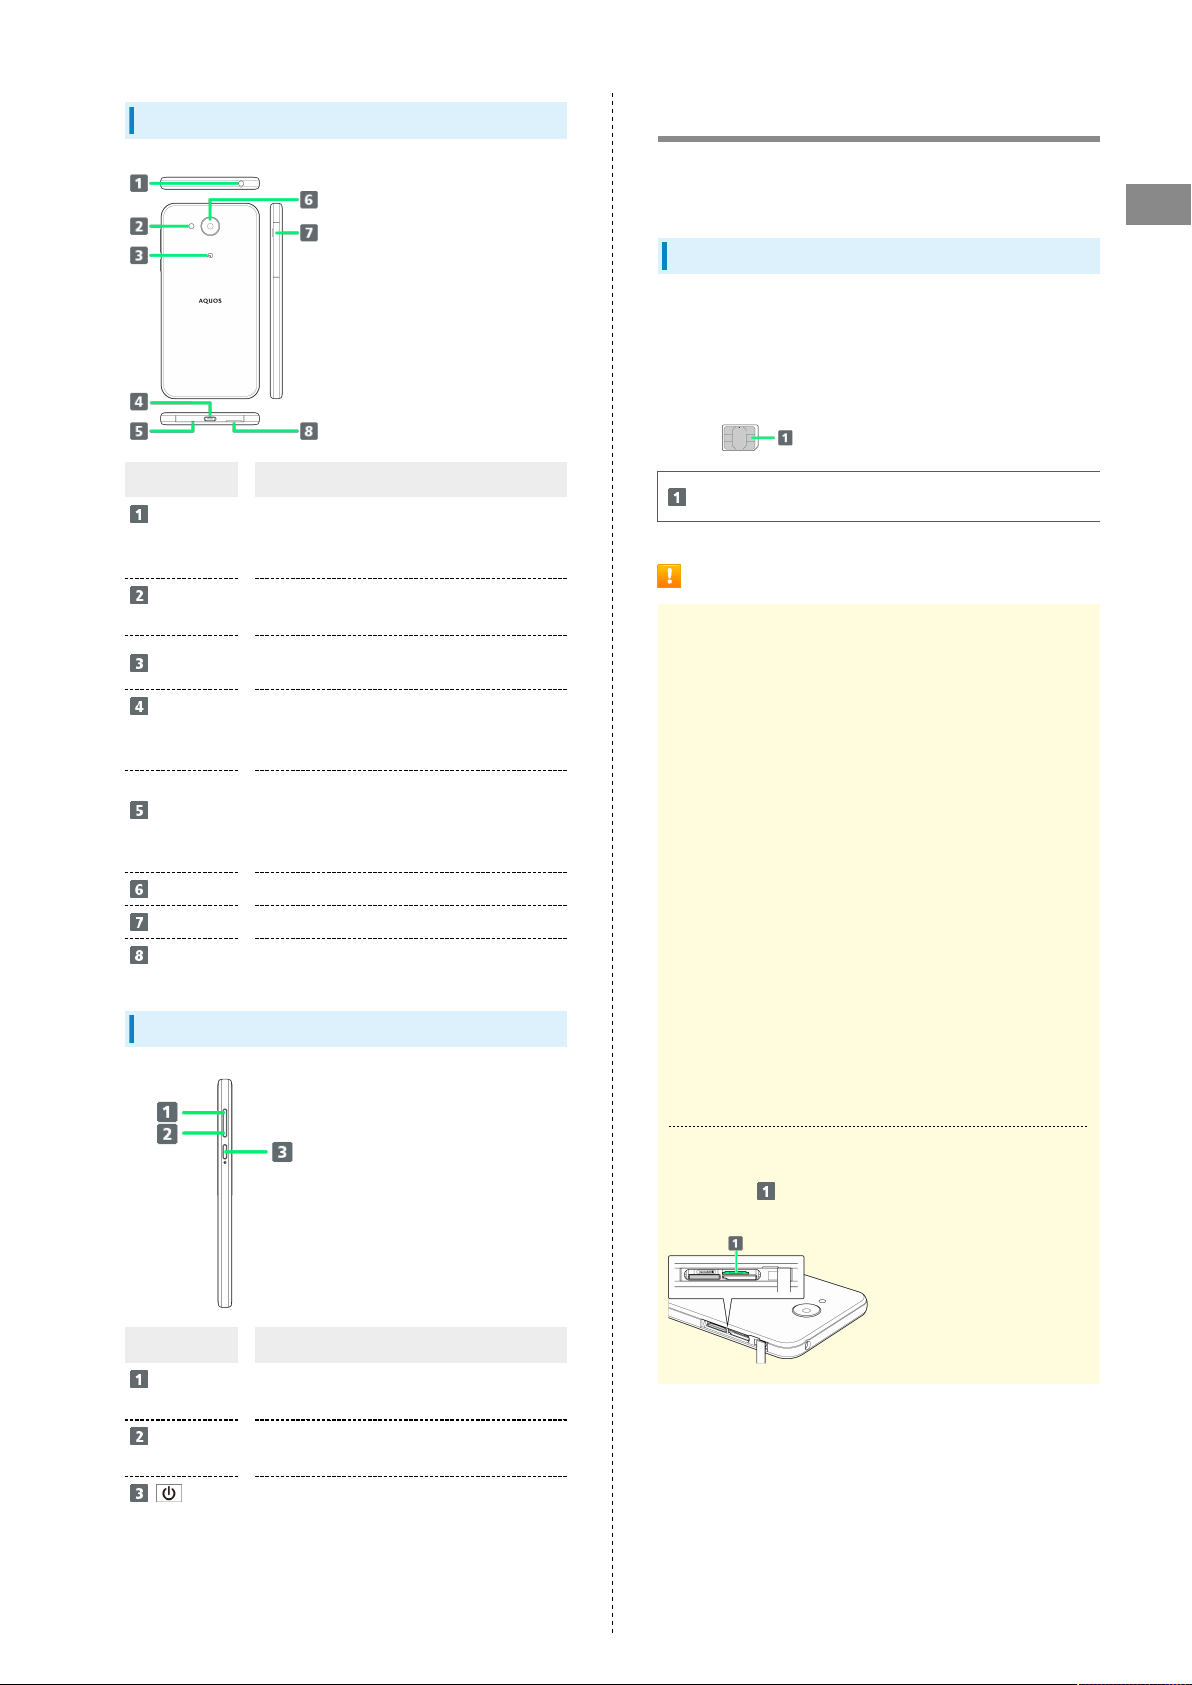
Parts & Functions
Handset (Front)
Name Description
Earpiece/
Speakerphone
Mic
Proximity/
Light Sensor
Display
Front
Camera
Charging/
Notification
Lamp
Hear the other party's voice here. Use as
mic when talking through Speakerphone.
Make sure not to cover Earpiece/
Speakerphone Mic.
Proximity Sensor prevents Touchscreen
misoperation during calls. Light Sensor
adjusts Display brightness according to
ambient light.
Touchscreen-type display; operate with
your fingers on Display.
Use to shoot photos or videos of yourself.
Illuminates while charging or for missed
calls and notifications.
Page 9
7
Handset (Back and Sides)
Name Description
Earphones-
Microphone
Jack
Mobile
Light
FeliCa mark
External
Connection
Jack
Mic/
Recorder Mic
Camera
Card Slot
Speaker
Connect TV Antenna Cable or Earphones
with Mic (sold separately) here.
Use as a camera flash, flashlight, etc.
Hold up to reader/writer to use NFC/
Osaifu-Keitai®.
Connect AC Adaptor or Micro USB Cable
here.
Talk to the other party here. Also use
while recording videos or when talking to
emopa.
Make sure not to cover Mic/Recorder Mic.
Shoot photos or videos.
Insert/remove SD Card and USIM Card.
Listen to music, video sound, TV, etc.
Handset Keys
USIM Card
USIM Card is an IC card containing phone number and other
customer information.
Getting Started
Handling USIM Card
・See instructions included with USIM Card for handling.
・Avoid applying labels. May damage USIM Card.
・USIM is replaceable (at cost) in case of loss/damage.
・Wipe clean with a dry, soft cloth.
・Always keep the IC (gold) chip clean.
IC (gold) chip
USIM Card Cautions
About USIM Card
Observe the following when using USIM Card.
・Always follow emergency procedures to suspend service if
your USIM Card or handset (USIM Card inserted) is lost/
stolen. For details, contact Customer Service.
・Customer is responsible for any damage caused by
inserting USIM Card in an other-brand IC card reader, etc.
SoftBank Corp. is not responsible in such case.
・It is recommended that you back up information that is
saved on USIM Card. SoftBank Corp. is not responsible for
damages from saved information that is lost.
・Always power off handset before inserting/removing
USIM Card.
・Note that USIM Card specifications and performance may
change without notice.
・Return USIM Card to SoftBank Corp. when canceling
subscription.
・USIM Card is the property of SoftBank Corp.
・Returned USIM Cards are recycled for environmental
purposes.
Name Description
Volume Up
Key
Volume
Down Key
(Power Key)
Increase volume.
Decrease volume. Long Press in lock screen
to activate/cancel Manner mode.
Turn Display off/on. Long Press for power
on/off or reboot.
About IMEI Sheet
IMEI Sheet ( ) can be found when Card Slot Cap is open.
Do not pull out IMEI Sheet.
AQUOS ea
Page 10
8
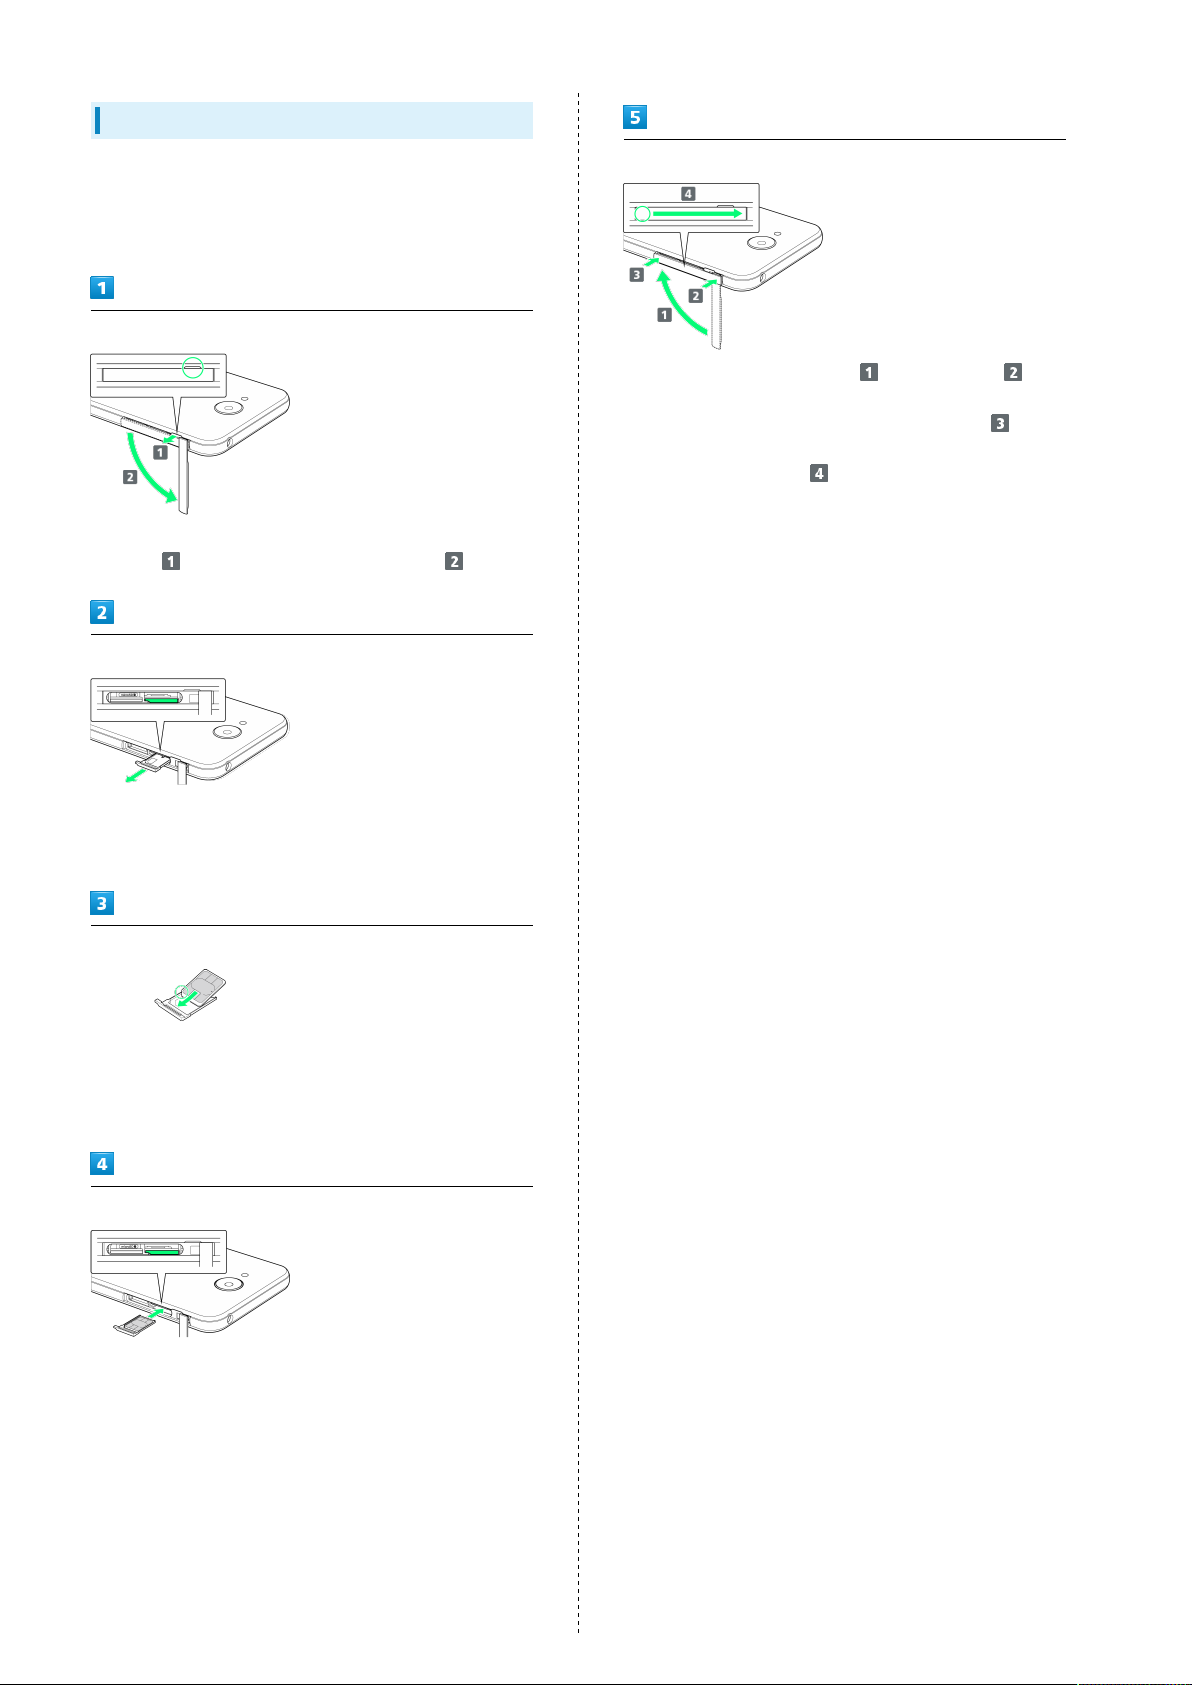
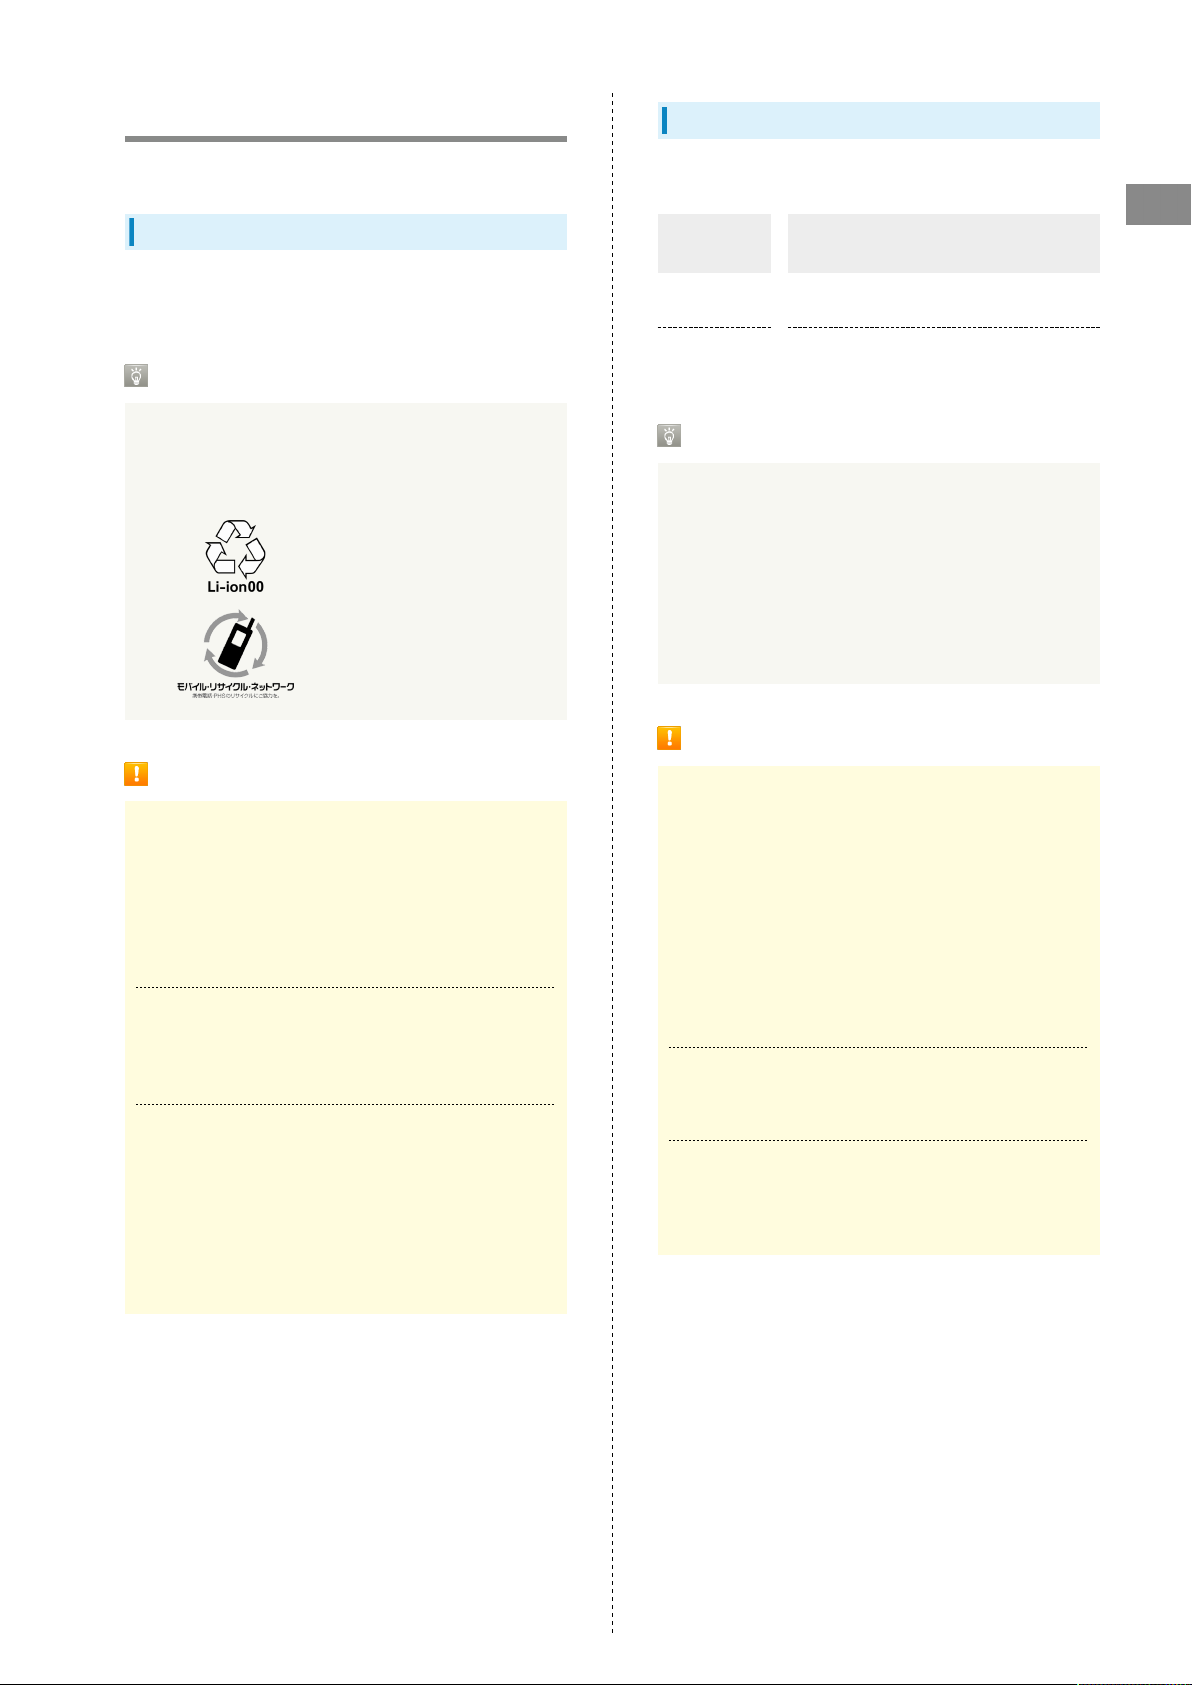
Inserting USIM Card
Always power off beforehand.
・Set USIM Card in USIM Tray beforehand. Do not insert USIM
Card without setting it in USIM Tray.
Open Card Slot Cap
・Pull away toward you by notch (where circled ○) with
finger ( ), and turn open in direction shown ( ).
Pull out USIM Tray
Close Card Slot Cap
・
Lift Card Slot Cap in direction , reinsert hinge ( ),
fit Card Slot Cap so that there is no gap between it and
handset, and then push along in direction shown ( ).
・To close, push firmly by sliding with finger from circled
area (○) toward hinge ( ).
・Do not pull USIM Tray forcefully or at an angle; damage may
result. Gently pull it out horizontally by hooking a finger on
it.
Set USIM Card in USIM Tray
・Place gently, noting orientation of USIM Card (notch/IC
(gold) chip facing up).
・Make sure USIM Card is in USIM Tray. Inserting USIM Tray
with USIM Card on its edge may cause damage.
Insert USIM Tray into USIM Card Slot (right opening)
・Insert gently all the way horizontally, noting orientation of
USIM Tray.
・Do not insert USIM Tray upside down.
Page 11
Removing USIM Card
9
Always power off beforehand.
Open Card Slot Cap
・Pull away toward you by notch (where circled ○) with
finger ( ), and turn open in direction shown ( ).
Pull out USIM Tray
・Do not pull USIM Tray forcefully or at an angle; damage may
result. Gently pull it out horizontally by hooking a finger on
it.
Close Card Slot Cap
・
Lift Card Slot Cap in direction , reinsert hinge ( ),
fit Card Slot Cap so that there is no gap between it and
handset, and then push along in direction shown ( ).
・To close, push firmly by sliding with finger from circled
area (○) toward hinge ( ).
SIM-Unlocking Handset
Handset can be SIM-unlocked. SIM-unlocking handset allows
other-carrier SIM cards to be used with it.
・Some services, functions, etc. may have restrictions when
an other-carrier SIM card is used. SoftBank Corp. does not
guarantee operation whatsoever.
・For details on SIM unlocking, see SoftBank Website.
Getting Started
Remove USIM Card
Insert USIM Tray into USIM Card Slot (right opening)
・Do not insert USIM Tray at an angle; damage may result.
Insert gently all the way horizontally, noting orientation of
USIM Tray.
・Do not insert USIM Tray upside down.
AQUOS ea
Page 12
10
Internal Storage and SD Card
Handset supports SD Card up to 256 GB. Some SD Cards may
not operate properly.
Internal storage can be used for saving data including system
data, applications, and video and photos taken with Camera.
Internal Storage/SD Card Cautions
Data on Internal Storage/SD Card
Data on internal storage/SD Card may be lost/altered
due to accidents, malfunctions, repairs, handset upgrade/
replacement, mishandling, etc. Back up important data
regularly. SoftBank Corp. is not liable for any damages
resulting from loss/alteration of data.
・Do not insert or remove SD Card forcefully.
・Do not touch terminals or expose them to metal objects.
・Never power off while reading or writing data.
・Make sure not to erase or overwrite data accidentally.
microSDXC Card
About IMEI Sheet
IMEI Sheet ( ) can be found when Card Slot Cap is open.
Do not pull out IMEI Sheet.
SD Card Caution
Keep SD Card away from infants; may cause choking if
swallowed.
Inserting SD Card
Handset supports microSDXC Cards (SDXC-compatible SD
Cards). microSDXC Cards are supported by SDXC-compatible
devices only.
Exchanging Data with Non-SDXC-Compatible
Devices
To exchange data between handset and non-SDXC-
compatible devices, use SD Cards (microSD/microSDHC
Cards) supported by handset and those devices. Inserting a
microSDXC Card used on handset in a non-SDXC-compatible
device may corrupt card data. In such cases, do not format
the microSDXC Card on that device even if prompted to do
so.
Formatting deletes all microSDXC Card data and changes
the file system. The original storage capacity may
be unavailable after formatting. To use a corrupted
microSDXC Card, format it on an SDXC-compatible device.
Save Location
By default, data, including photos and videos taken
with handset, is saved in internal storage. Even with
downloaded commercially-available applications described
as saving data on SD Card, data is saved in internal
storage.
・To save photos and videos taken with handset on SD
Card, insert SD Card before using Camera, then change
save location as follows.
In Home Screen, Flick Hot Sheet up (SHCamera)
COMMON Save To microSD
Open Card Slot Cap
・Pull away toward you by notch (where circled ○) with
finger ( ), and turn open in direction shown ( ).
Insert SD Card into SD Card Slot (left opening)
・Insert SD Card with terminals facing down gently all the
way horizontally.
Close Card Slot Cap
・
Lift Card Slot Cap in direction , reinsert hinge ( ),
fit Card Slot Cap so that there is no gap between it and
handset, and then push along in direction shown ( ).
・To close, push firmly by sliding with finger from circled
area (○) toward hinge ( ).
Page 13
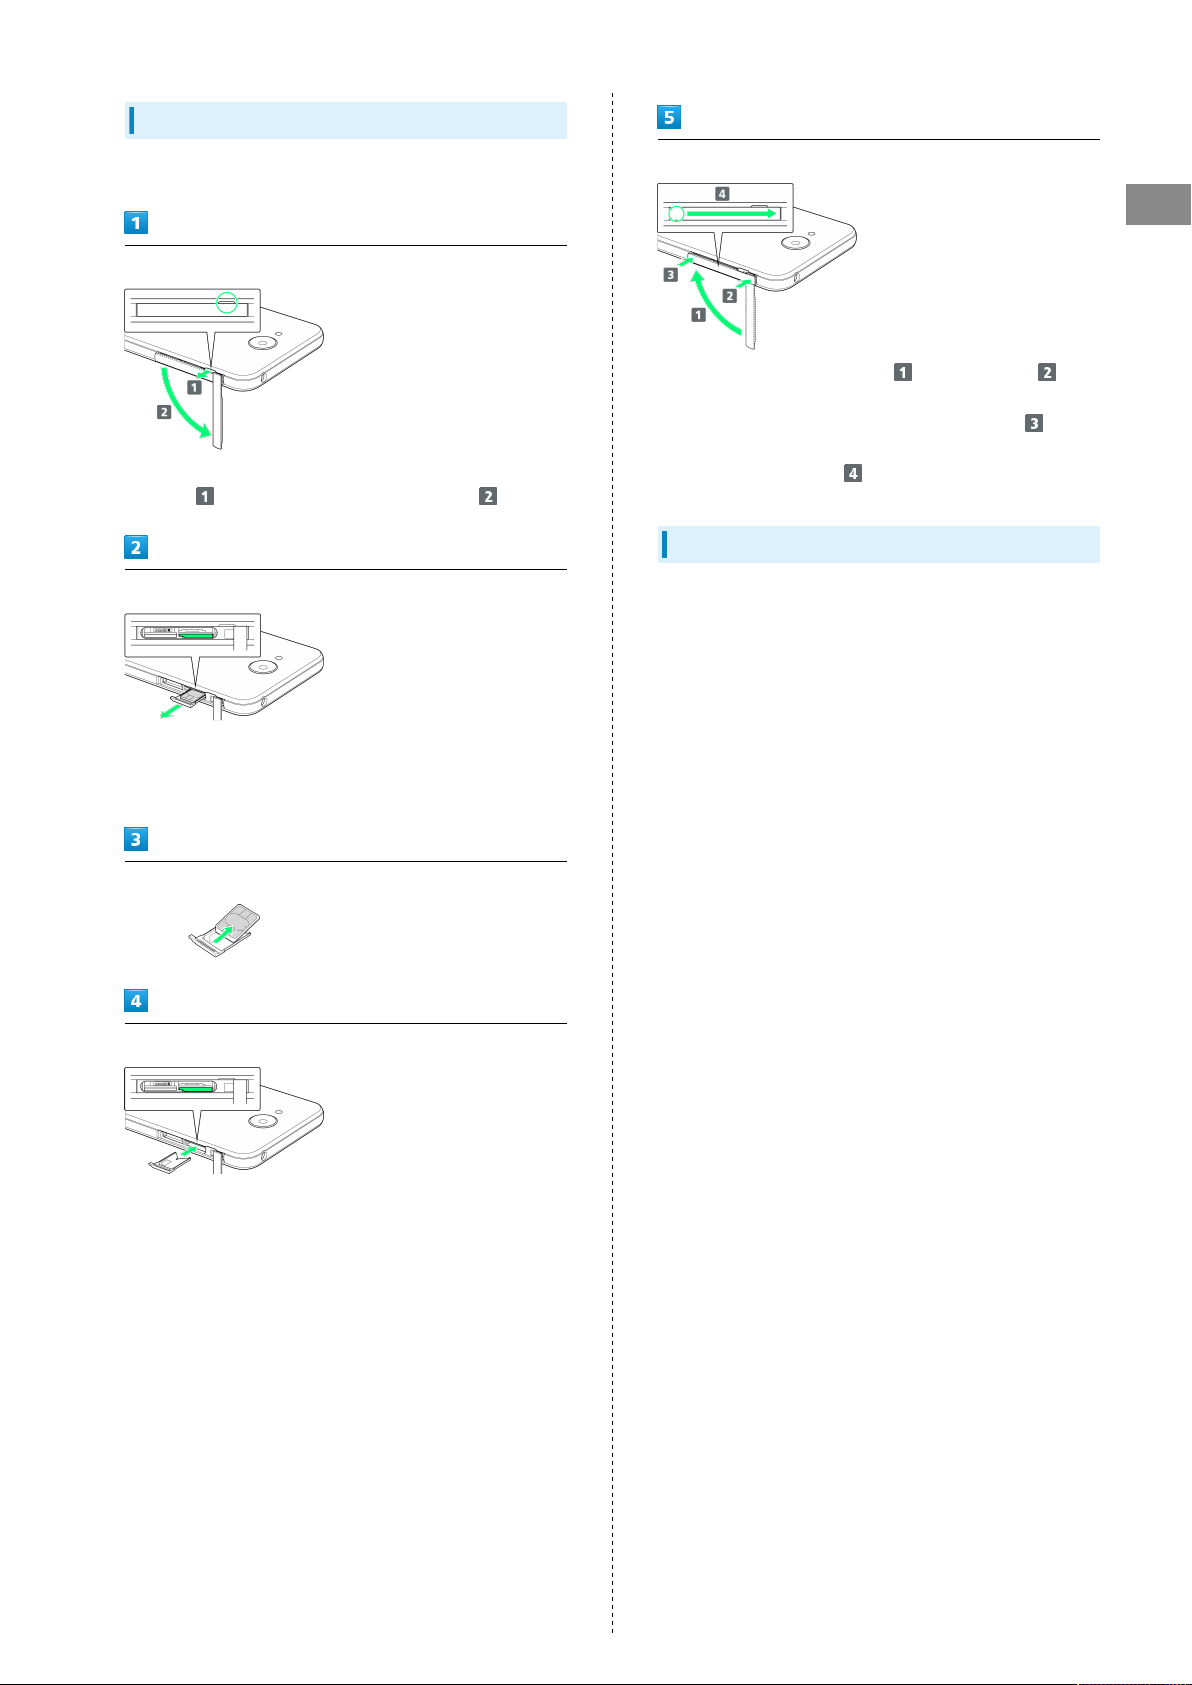
Formatting SD Card
11
When using a new SD Card for the first time, always format it
on handset.
・Formatting erases all data on SD Card. Format SD Card with
caution.
・When formatting, keep handset charged or charge it
adequately beforehand.
・Insert SD Card beforehand. See "Inserting SD Card" for
details.
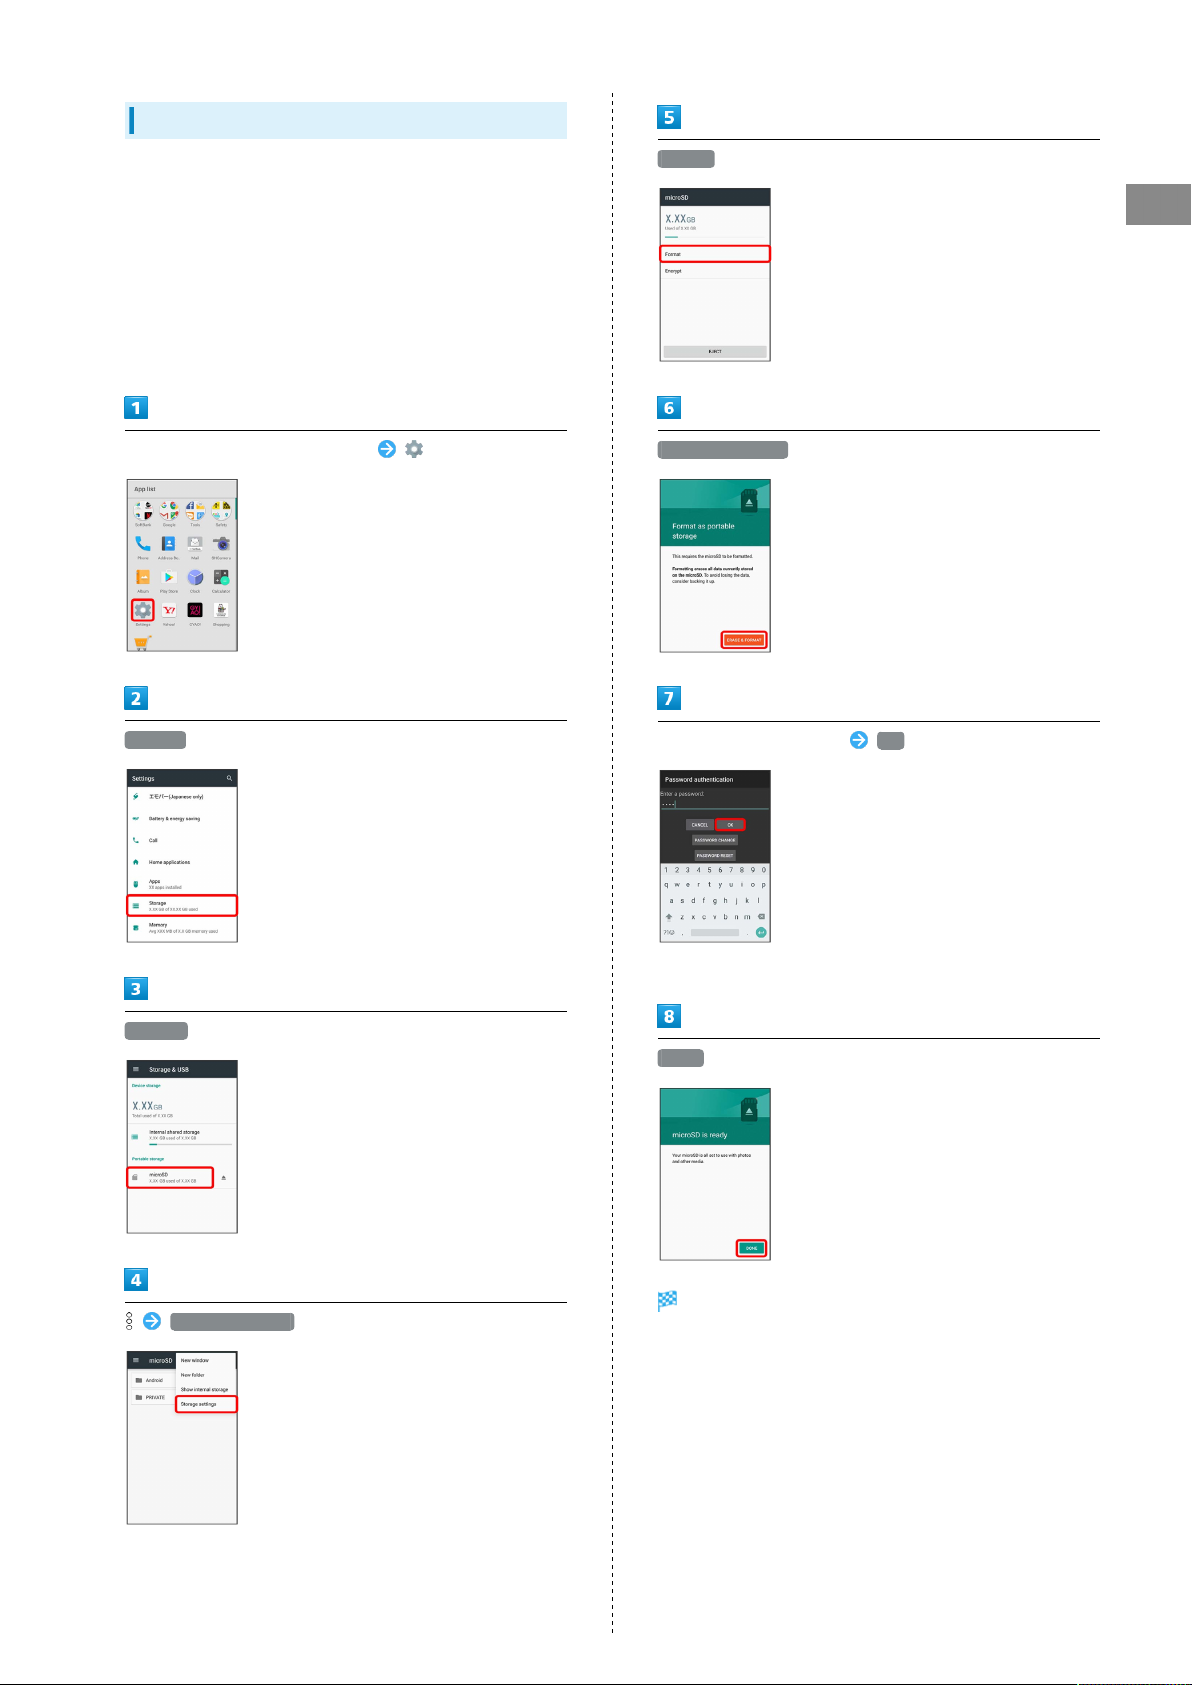
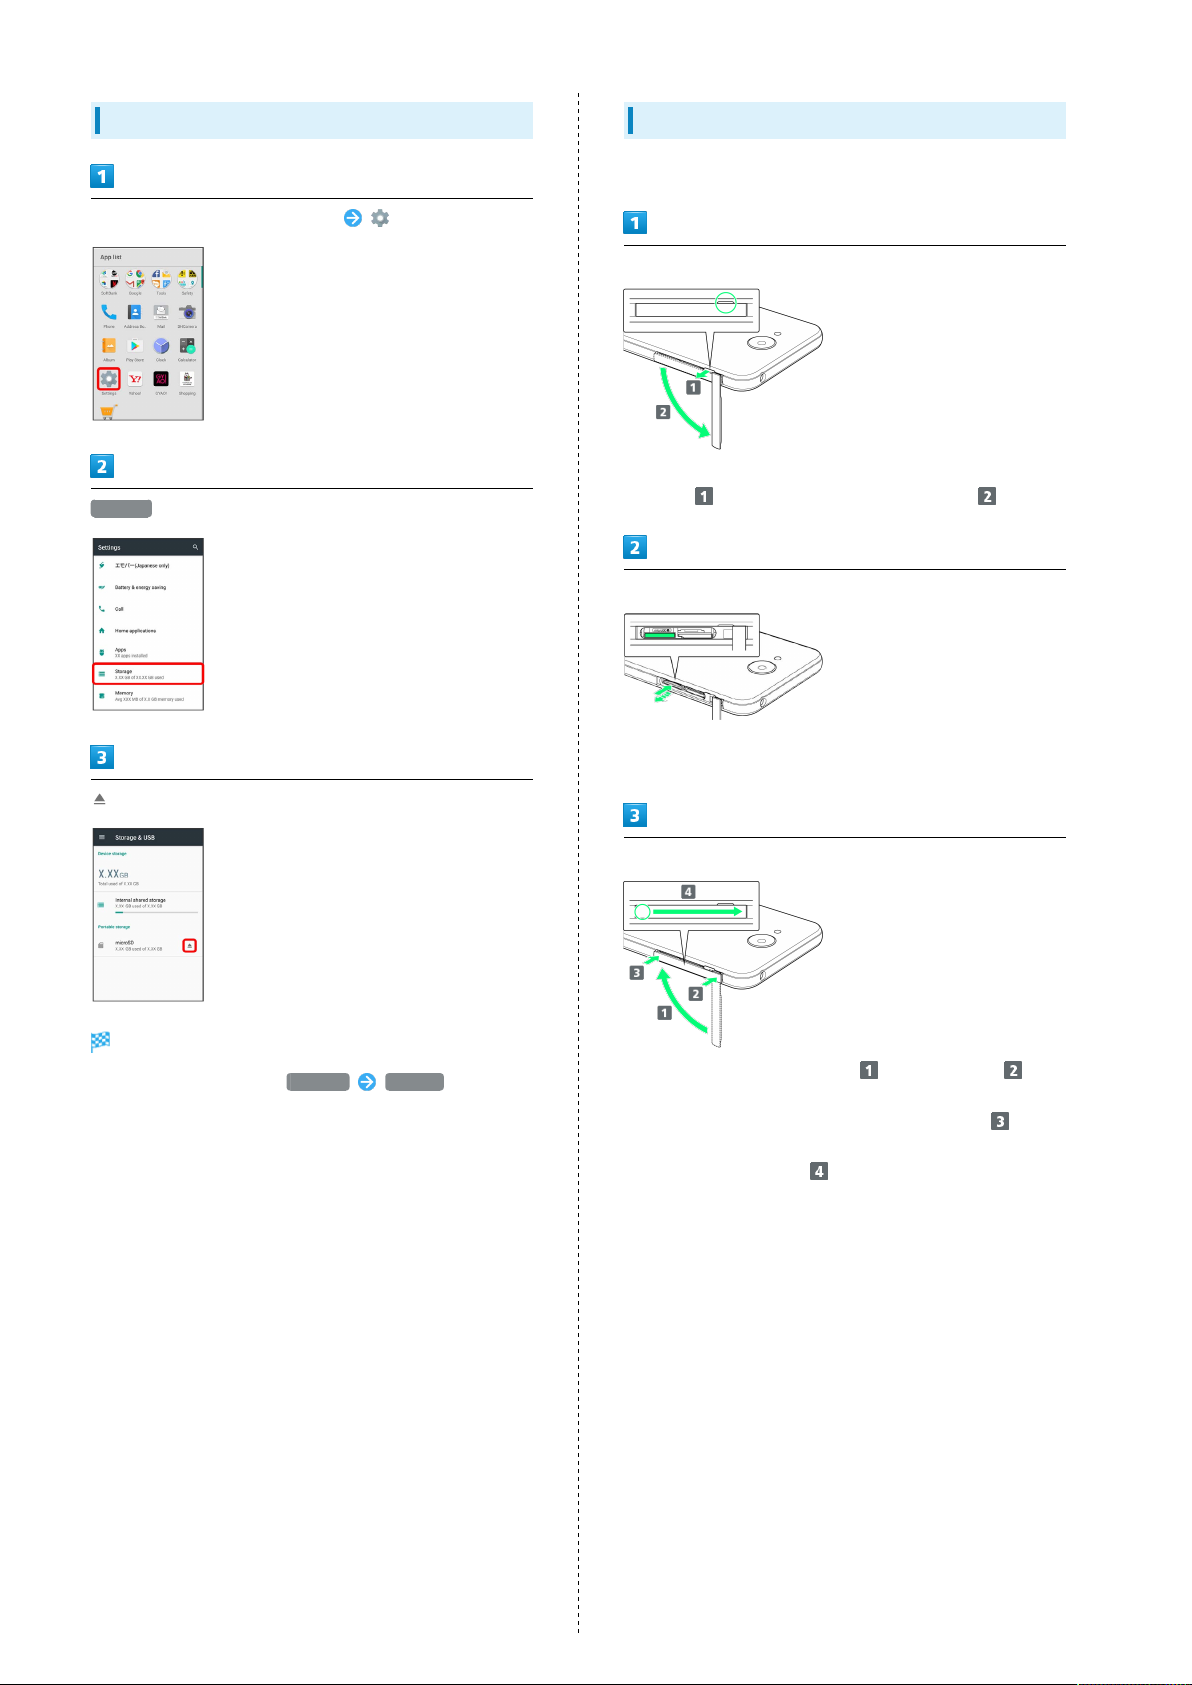
In Home Screen, Flick Hot Sheet up (Settings)
Format
Getting Started
ERASE & FORMAT
Storage
microSD
Storage settings
Enter Operation Password OK
・If Operation Password is unset, follow onscreen prompts.
DONE
All data on SD Card is erased.
AQUOS ea
Page 14
12
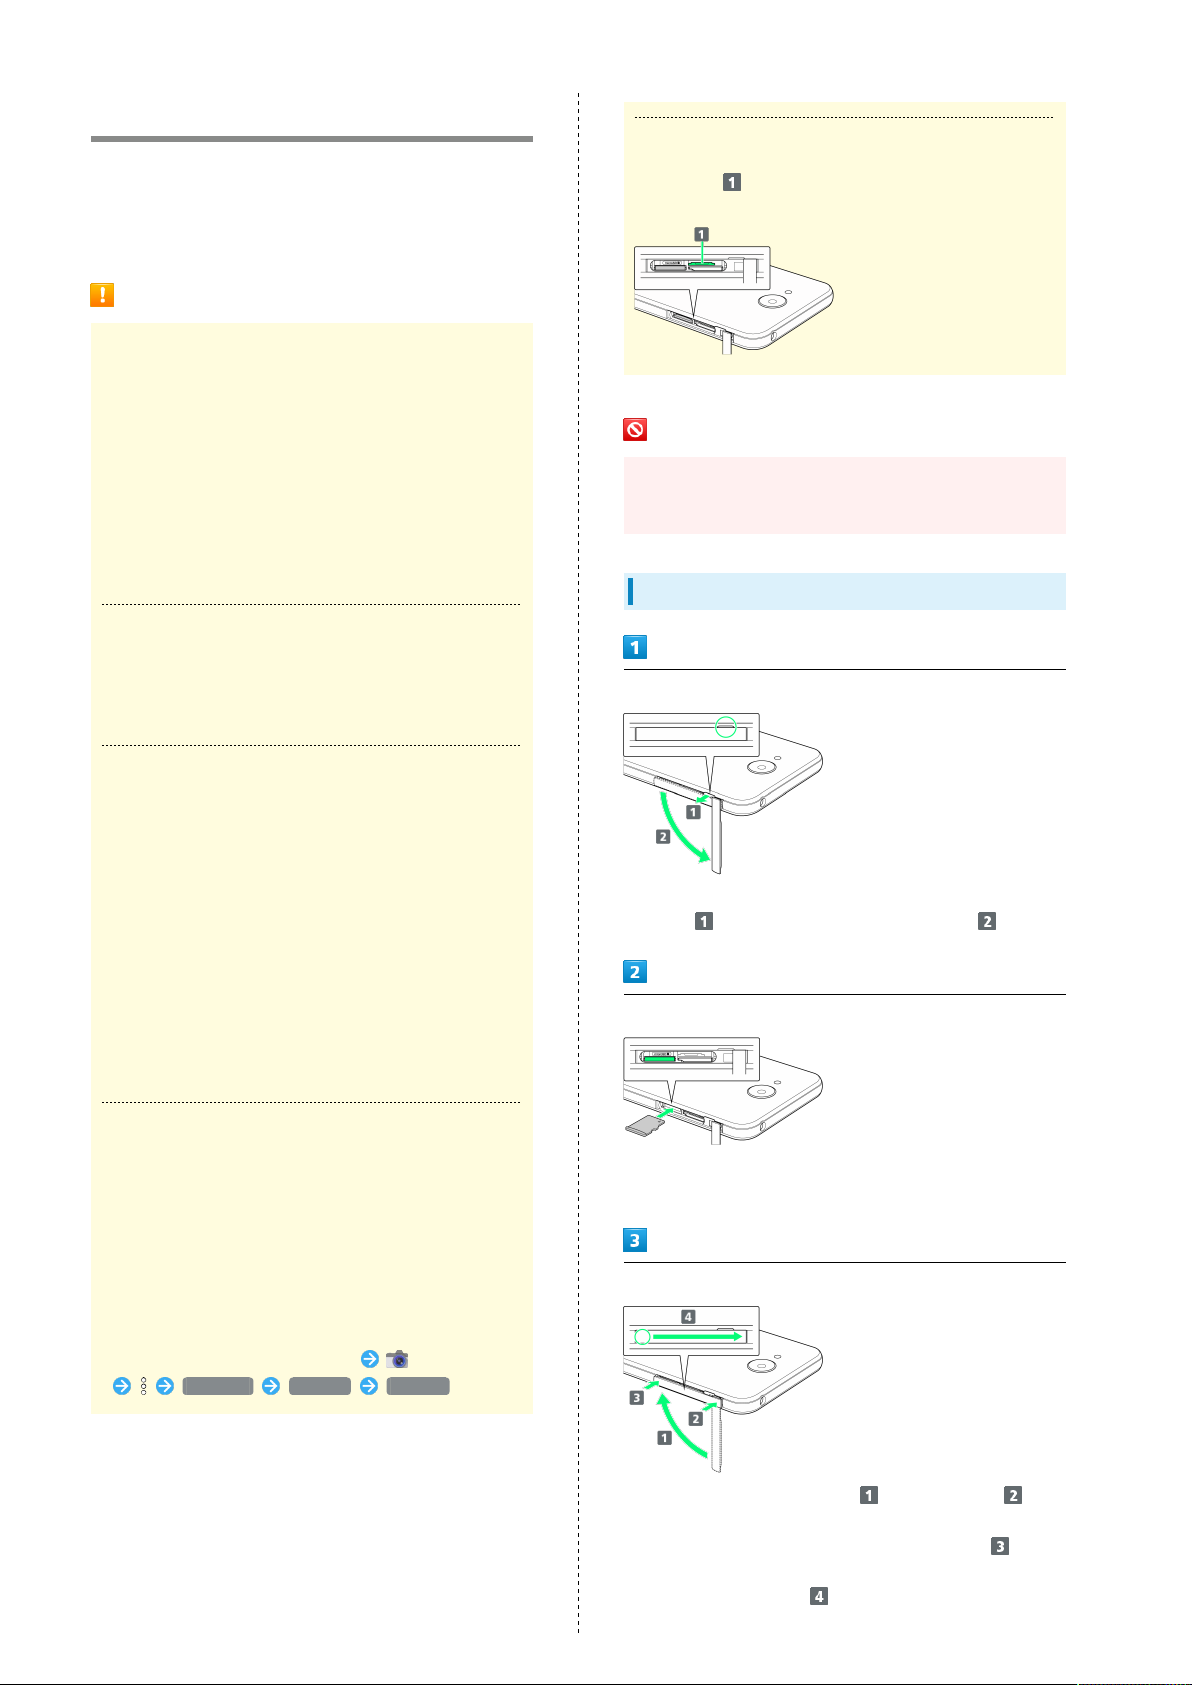
Unmounting SD Card
In Home Screen, Flick Hot Sheet up (Settings)
Storage
Removing SD Card
Always unmount SD Card beforehand.
Open Card Slot Cap
・Pull away toward you by notch (where circled ○) with
finger ( ), and turn open in direction shown ( ).
Remove SD Card
SD Card is unmounted.
・
To mount SD Card again, microSD MOUNT .
・Press in on SD Card slightly and release finger; SD Card pops
out. Pull out gently horizontally.
Close Card Slot Cap
・
Lift Card Slot Cap in direction , reinsert hinge ( ),
fit Card Slot Cap so that there is no gap between it and
handset, and then push along in direction shown ( ).
・To close, push firmly by sliding with finger from circled
area (○) toward hinge ( ).
Page 15
13
Charging Handset
Battery is built into handset.
Internal Battery
A lithium-ion battery is built into handset; it is not
removable.
Recycling
This product requires a lithium-ion battery. Lithiumion batteries are recyclable. To recycle a used lithiumion battery, take it to any shop displaying the recycling
symbol.
About Charging
The following charging options are available.
Charging
Option
AC Adaptor
USB charging
Connect handset and AC Adaptor (sold
separately) directly.
Connect handset and a PC with Micro USB
Cable (optional accessory).
Description
Charging/Notification Lamp
Charging/Notification Lamp illuminates red while charging;
illuminates green when charge is almost full.
Charging/Notification Lamp goes out when charge is full.
・If Charging/Notification Lamp is blinking, charging is not
working properly. Make sure that you are using Charger
and products specified by SoftBank Corp. If you are using
specified products only, contact a SoftBank Shop or
SoftBank Customer Support, General Information.
Getting Started
Battery Cautions
Storage
To help maintain performance and life of Internal Battery,
do not store in the following conditions (battery level
should be at approximately 40% for optimal storage).
・Full (immediately after charging is complete)
・Exhausted (too low to power on handset)
Bulges of Internal Battery
Depending on use, bulges may appear near end of battery
life; this does not affect safety.
Internal Battery Replacement
Internal Battery is a consumable item; may need to be
replaced if operating time shortens noticeably. Internal
Battery is not user replaceable; its replacement incurs fees
and requires handset submission to a SoftBank Shop or
other appropriate servicer. For details, contact a SoftBank
Shop or SoftBank Customer Support, General Information.
Charging Cautions
Water Resistance
AC Adaptor (sold separately) and Micro USB Cable (optional
accessory) are not waterproof. Never connect Micro USB
plug while handset or Charger is wet.
Handset is water resistant; however, if Micro USB plug
is inserted while it is wet, liquid (tap water, beverage,
sea water, pet urine, etc.) or a foreign object adhered to
handset or Micro USB plug may cause overheating, burnout,
fire, malfunction, burns, etc. due to electric shock, shortcircuiting, etc.
Handling Cords
Do not pull, bend, or twist cord; may damage the cord.
About Charging Abroad
SoftBank Corp. is not liable for problems resulting from
charging handset abroad.
AQUOS ea
Page 16
14
Charging with AC Adaptor
Purchase and use ZSDBA4 (Micro USB Quick Charge™ 2.0 AC
Adaptor)1 or ZSDBA6 (Micro USB 1.0 A AC Adaptor)2.
For information on other peripheral devices, see SoftBank
Website.
The following explains how to charge handset using ZSDBA4
(Micro USB Quick Charge™ 2.0 AC Adaptor).
1 SB-AC12-HDQC (SoftBank SELECTION Qualcomm® Quick
Charge™ 2.0 AC Adaptor for smartphones)
2 SB-AC13-HDMU (SoftBank SELECTION Micro USB 1.0 A AC
Adaptor for smartphones)
Insert Micro USB plug of AC Adaptor into External Connection
Jack
Charging by PC
Connect handset to a PC with Micro USB Cable (SHDDL1;
optional accessory).
・Make sure that PC is turned on.
・Charging may not be possible/take a long time depending on
connection and PC conditions.
・Never connect Micro USB plug while handset or Micro USB
Cable is wet.
Insert Micro USB plug of Micro USB Cable into External
Connection Jack
・Insert Micro USB plug in correct orientation; otherwise,
External Connection Jack may be damaged. Check contours
and orientation of Micro USB plug, then insert it with tabs
(○) facing down.
・Insert Micro USB plug in correct orientation; otherwise,
External Connection Jack may be damaged. Check contours
and orientation of Micro USB plug, then insert it with tabs
(○) facing down.
Raise plug on AC Adaptor and plug into household AC outlet
Charging/Notification Lamp illuminates once charging
starts.
・Charging/Notification Lamp goes out when charge is full.
After charging, remove Micro USB plug from External
Connection Jack, then unplug AC Adaptor and lower plug
Insert USB plug of Micro USB Cable into USB port on PC
Charging/Notification Lamp illuminates once charging
starts.
・Charging/Notification Lamp goes out when charge is full.
After charging, remove Micro USB Cable from handset and PC
Page 17
15
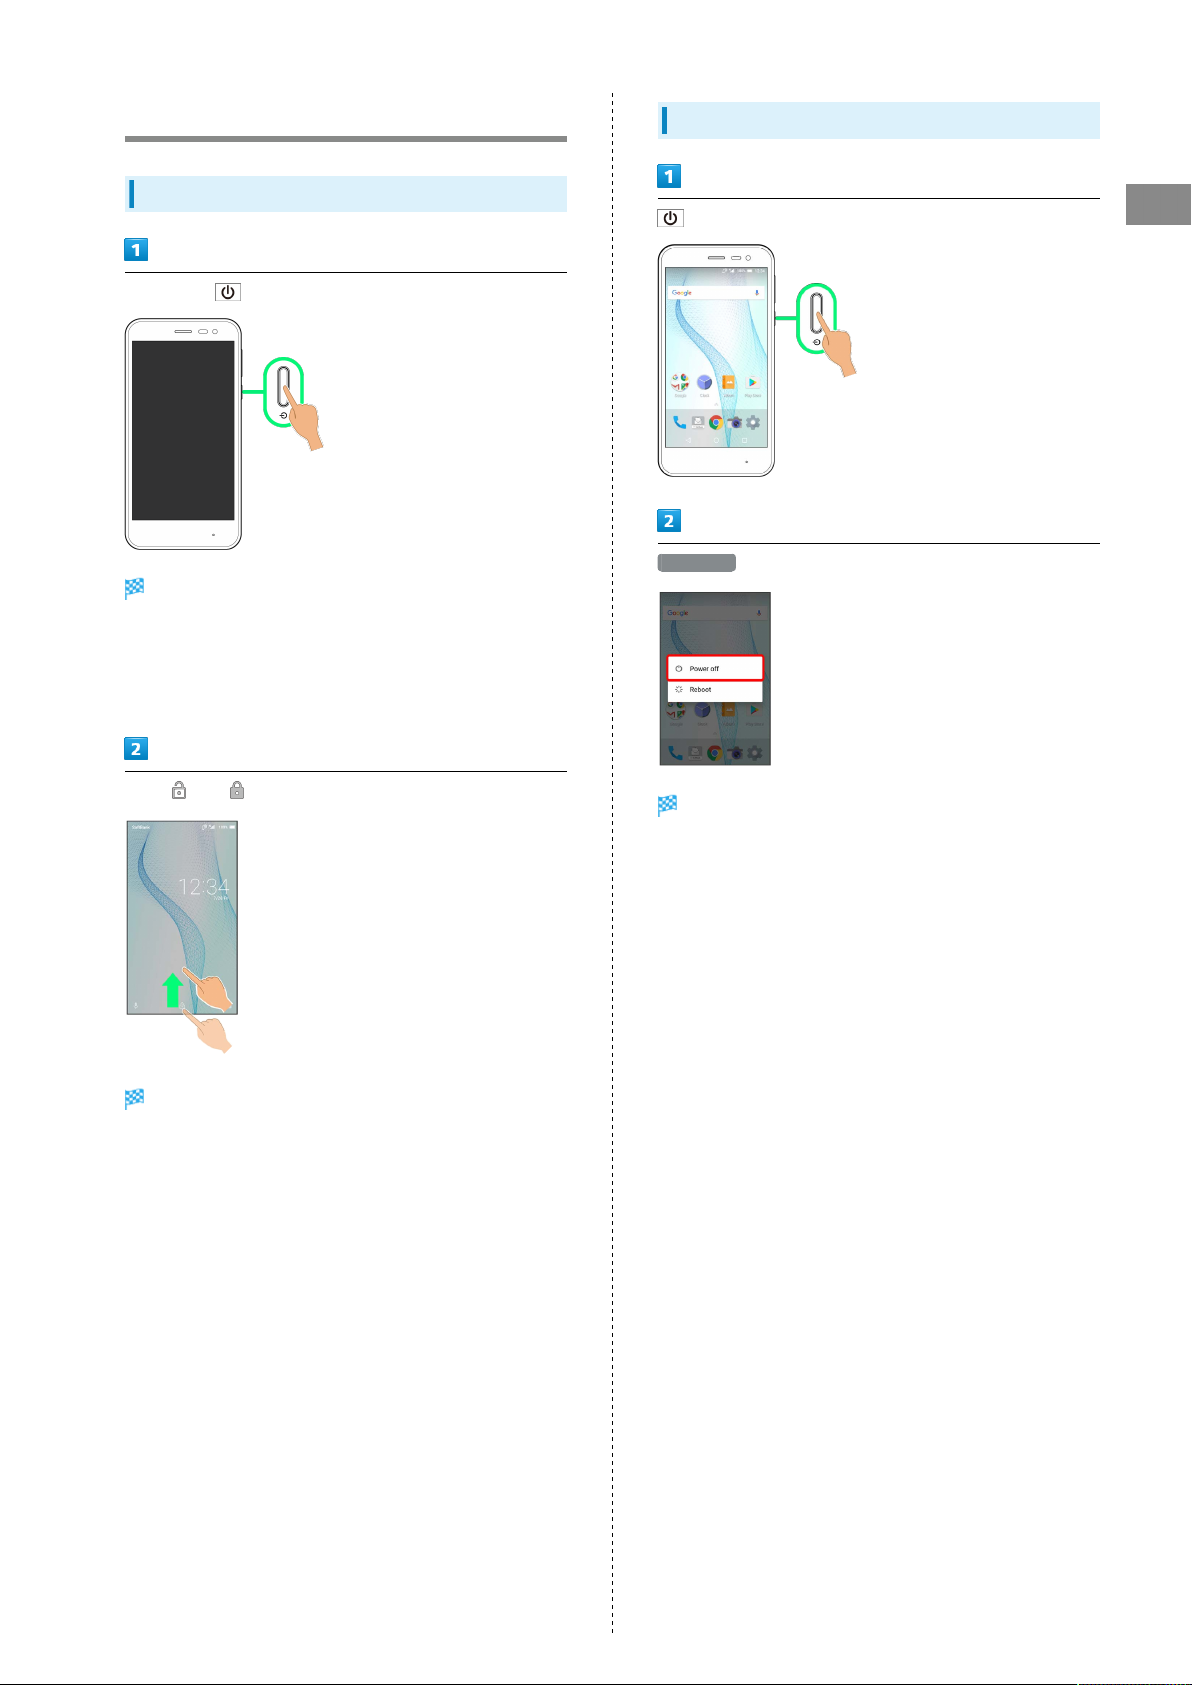
Power On/Off
Powering On
Long Press until SHARP logo appears
Handset powers on, and lock screen appears after a while.
・If confirmation appears, follow onscreen prompts.
・An initial settings wizard may appear the first time handset
is powered on. For details on initial settings, see "Handset
Initial Settings."
Powering Off
(Long Press)
Getting Started
Power off
Drag or up
Home Screen appears.
Handset powers off.
AQUOS ea
Page 18
16
Using Touchscreen
Handset uses a touchscreen-type Display. Operate with your
fingers on Display.
About Touchscreen
In Case of Unintended Operation
If handset initiates operation without Touchscreen
(Display) being operated or does not respond after
Touchscreen being operated, Press to turn off
Display, Press again to turn on Display and then
operate handset.
Touchscreen Usage Notes
Touchscreen may not respond in these situations:
・Use with gloves/long fingernails
・Use of pens, pencils or sharp objects
・Use with objects on/against Display
・Use while wet
Touch & Hold
Contact Display lightly; release finger when screen changes.
Drag
Touch icon or other item lightly, move it where desired, and
release finger.
Touchscreen Usage Cautions
To prevent malfunctions, do not:
・Touch Display with wet fingers
・Use if Display is wet
If Display is wet, wipe it with a soft cloth.
・Subject Display to force/pressure
・Place a sticker or shield (commercially-available
protective film, privacy protector shield, etc.) on Display
Tap
Contact Display lightly and briefly.
Flick
Contact Display lightly, then brush screen up/down or left/
right.
Page 19
17
Pinch/Spread
Contact Display lightly, then move fingers toward each other
(Pinch) or away from each other (Spread).
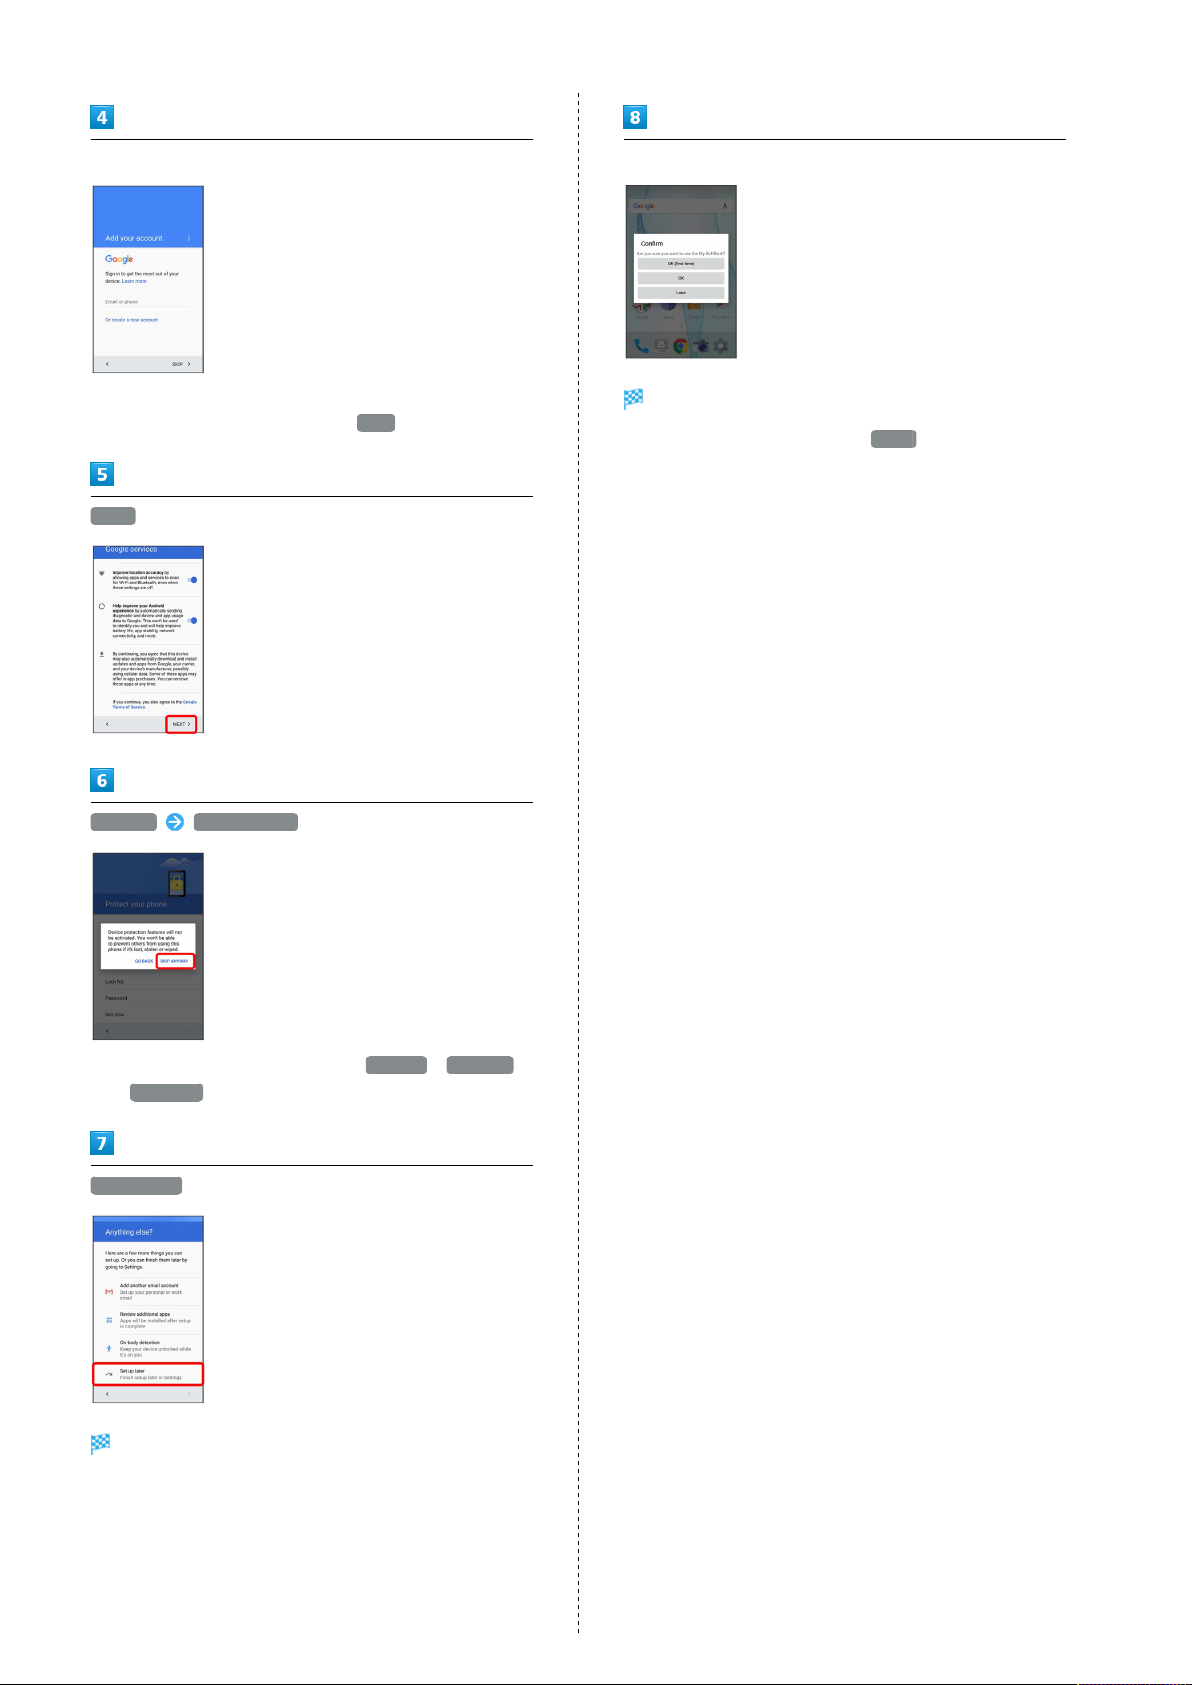
Handset Initial Settings
When powering on the first time, an initial settings wizard
appears for optionally making Wi-Fi, Google™ account, and
other settings. Follow onscreen instructions to set items.
Insert USIM Card before powering on handset.
Making Initial Settings
Depending on your environment, screen content, setting items
and steps may differ.
Follow onscreen prompts on your handset.
Tap 日本語(日本) English GET STARTED
Getting Started
・
To place an emergency call, Tap EMERGENCY .
・
To set visual assistance, Tap VISION SETTINGS . See
"Accessibility Settings" for details.
Set up as new
・
Tap Keep your apps & data to copy data from another
mobile. Follow onscreen prompts.
Set Wi-Fi items
・Follow onscreen prompts.
・
To skip Wi-Fi settings, select Use cellular network for
setup / Don't use any network for setup . Continue by
following onscreen prompts.
AQUOS ea
Page 20
18
Set up a Google Account
・See "Google Account" for details on a Google Account.
・
To skip Google Account setup, Tap SKIP .
NEXT
Set up My SoftBank
Initial settings are complete.
・
To skip My SoftBank setup, Tap Later .
Not now SKIP ANYWAY
・
To set up Screen lock option, select Pattern , Lock No.
or Password . See "Lock & Security Settings" for details.
Set up later
Handset restarts.
Page 21

19
Importing Data from Other Mobiles
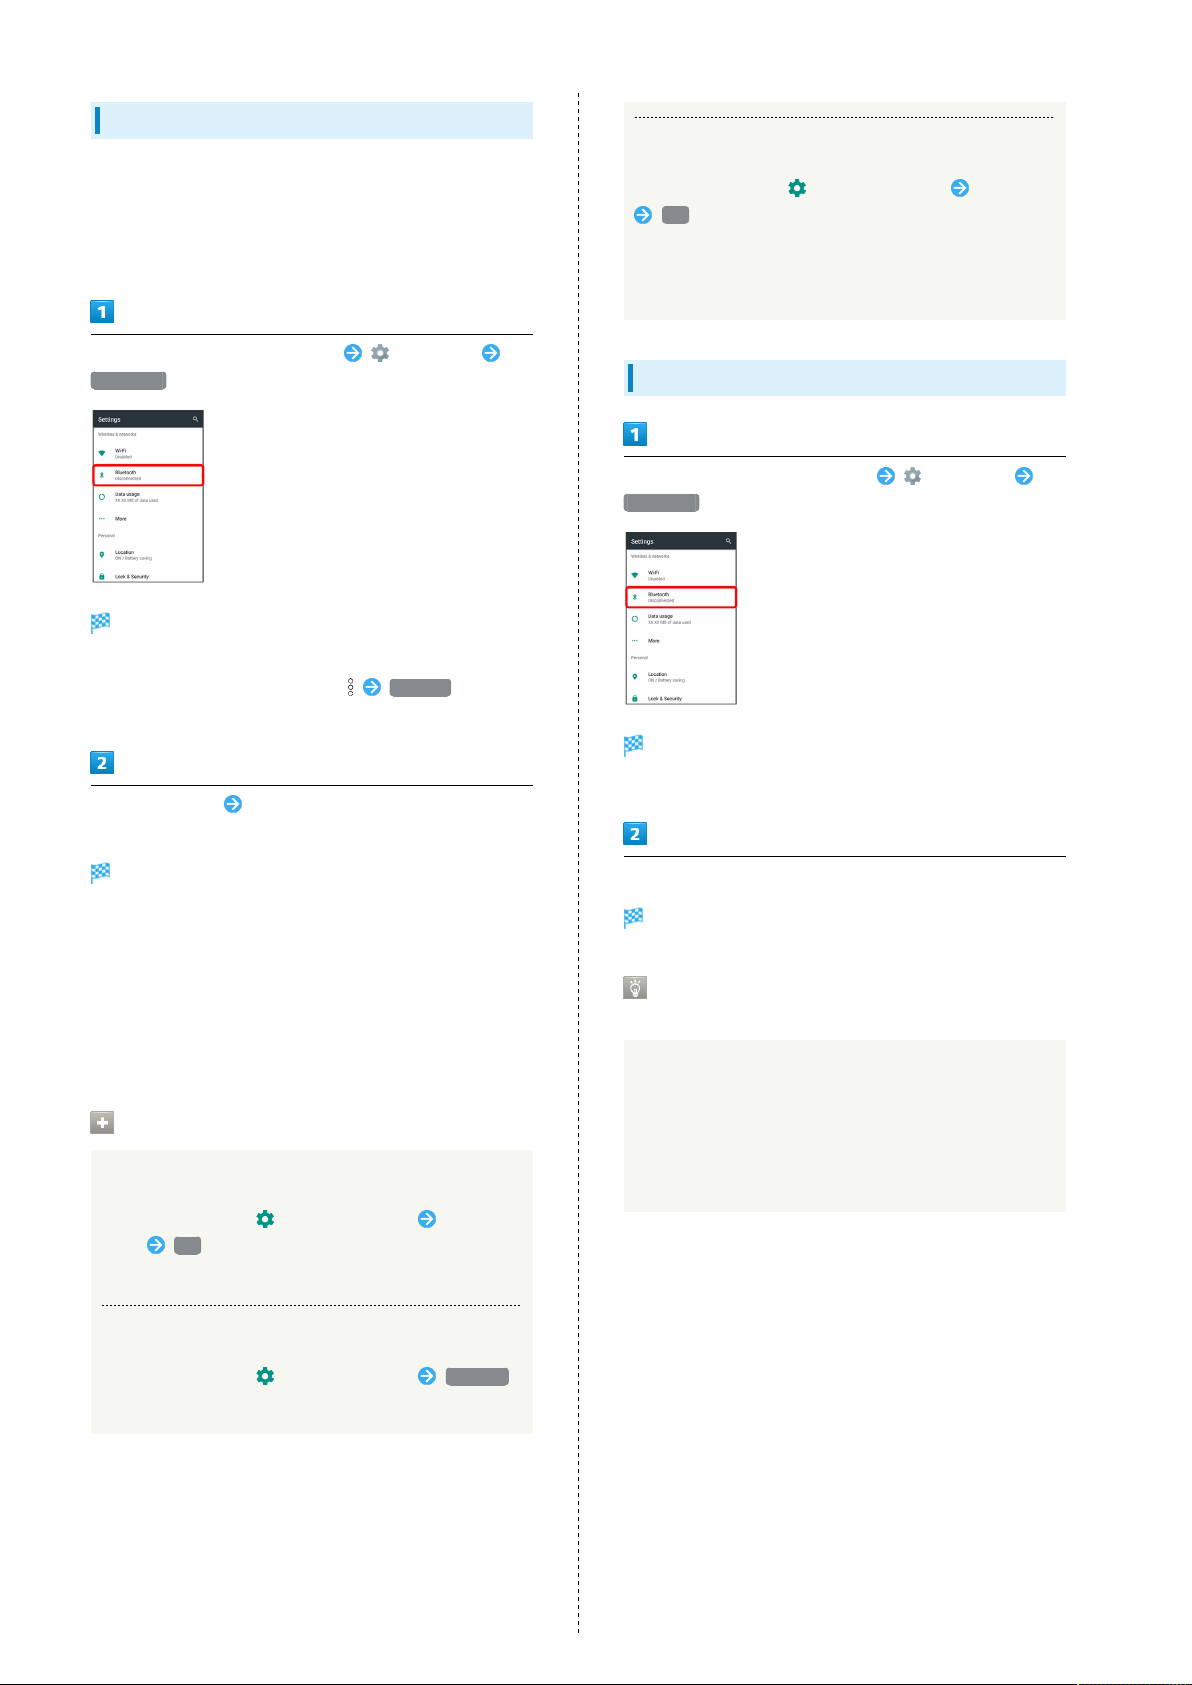
Import data from other mobiles, etc. using Bluetooth® or SD
Card.
Enabling Bluetooth® Function
In Home Screen, Flick Hot Sheet up (Settings)
Bluetooth
Bluetooth® menu opens.
Troubleshooting
Q. Cannot use Bluetooth
A. Handset may be in Airplane mode. If in Airplane mode,
Bluetooth® function is disabled. Bluetooth® function
can be enabled again after placing handset in Airplane
mode.
®
Bluetooth® Cautions
Connection
Bluetooth® connection may not be possible with some
Bluetooth® devices. In addition, noise may interfere with
wireless or handsfree conversations.
File Transfer
Files may not appear correctly on recipient devices.
Getting Started
Off
Bluetooth® is enabled ( On appears).
・
To disable Bluetooth®, Tap On ( Off appears).
Bluetooth® Connection Operations
Renaming Handset Name that Appears on Other
Devices
In Bluetooth® menu, Rename this device Enter
name RENAME
・Available when Bluetooth® is enabled.
Setting Whether to Give Priority to aptX
In Bluetooth® menu, Qualcomm® aptX™ /
at the right end of aptX line OK
・Available when Bluetooth® is enabled.
・
Tap to toggle off ( ), to toggle on ( ).
・Changes are applied to devices connected after setting
changes are made. Disconnect and reconnect handset to
devices to apply changes.
®
AQUOS ea
Page 22
20
Pairing Bluetooth® Devices
Search for and pair nearby Bluetooth® devices. Paired
Bluetooth® devices can be connected easily.
・Enable Bluetooth® on handset and set target devices to be
discoverable first.
In Home Screen, Flick Hot Sheet up (Settings)
Bluetooth
Bluetooth® menu opens; found Bluetooth® devices appear
in Available devices field.
Connecting to Bluetooth® Devices by Service
In Bluetooth® menu, for target device Tap item
OK
・Available when Bluetooth® is enabled.
・Available when handset is paired with a device that
supports corresponding service.
Connecting to Paired Bluetooth® Devices
In Home Screen, Flick Hot Sheet up (Settings)
Bluetooth
・
If target device does not appear, Refresh to try
searching again.
Tap target device Follow onscreen prompts for
authentication
Pairing completes; handset connects to some devices (e.g.,
handsfree devices) automatically.
・Authentication procedure varies by device. Passkey entry
may be required.
・Passkey is a 1 to 16-digit number or a set of characters/
symbols required for authentication between handset and
other devices.
・Paired devices appear in Paired devices field.
Pairing Operations
Renaming Paired Devices
In Bluetooth® menu, for target device Enter
name OK
・Available when Bluetooth® is enabled.
Bluetooth® menu opens.
・Paired Bluetooth® devices appear in Paired devices field.
Tap target device
Handset connects to the device.
Connection by Accepting Connection
Requests
Handset automatically accepts connection requests from
paired devices. For unpaired devices, set handset to be
discoverable, then perform pairing operation on other
devices. When connection request arrives, follow onscreen
prompts.
・If confirmation appears, follow onscreen prompts.
Unpairing Devices
In Bluetooth® menu, for target device FORGET
・Available when Bluetooth® is enabled.
Page 23
21
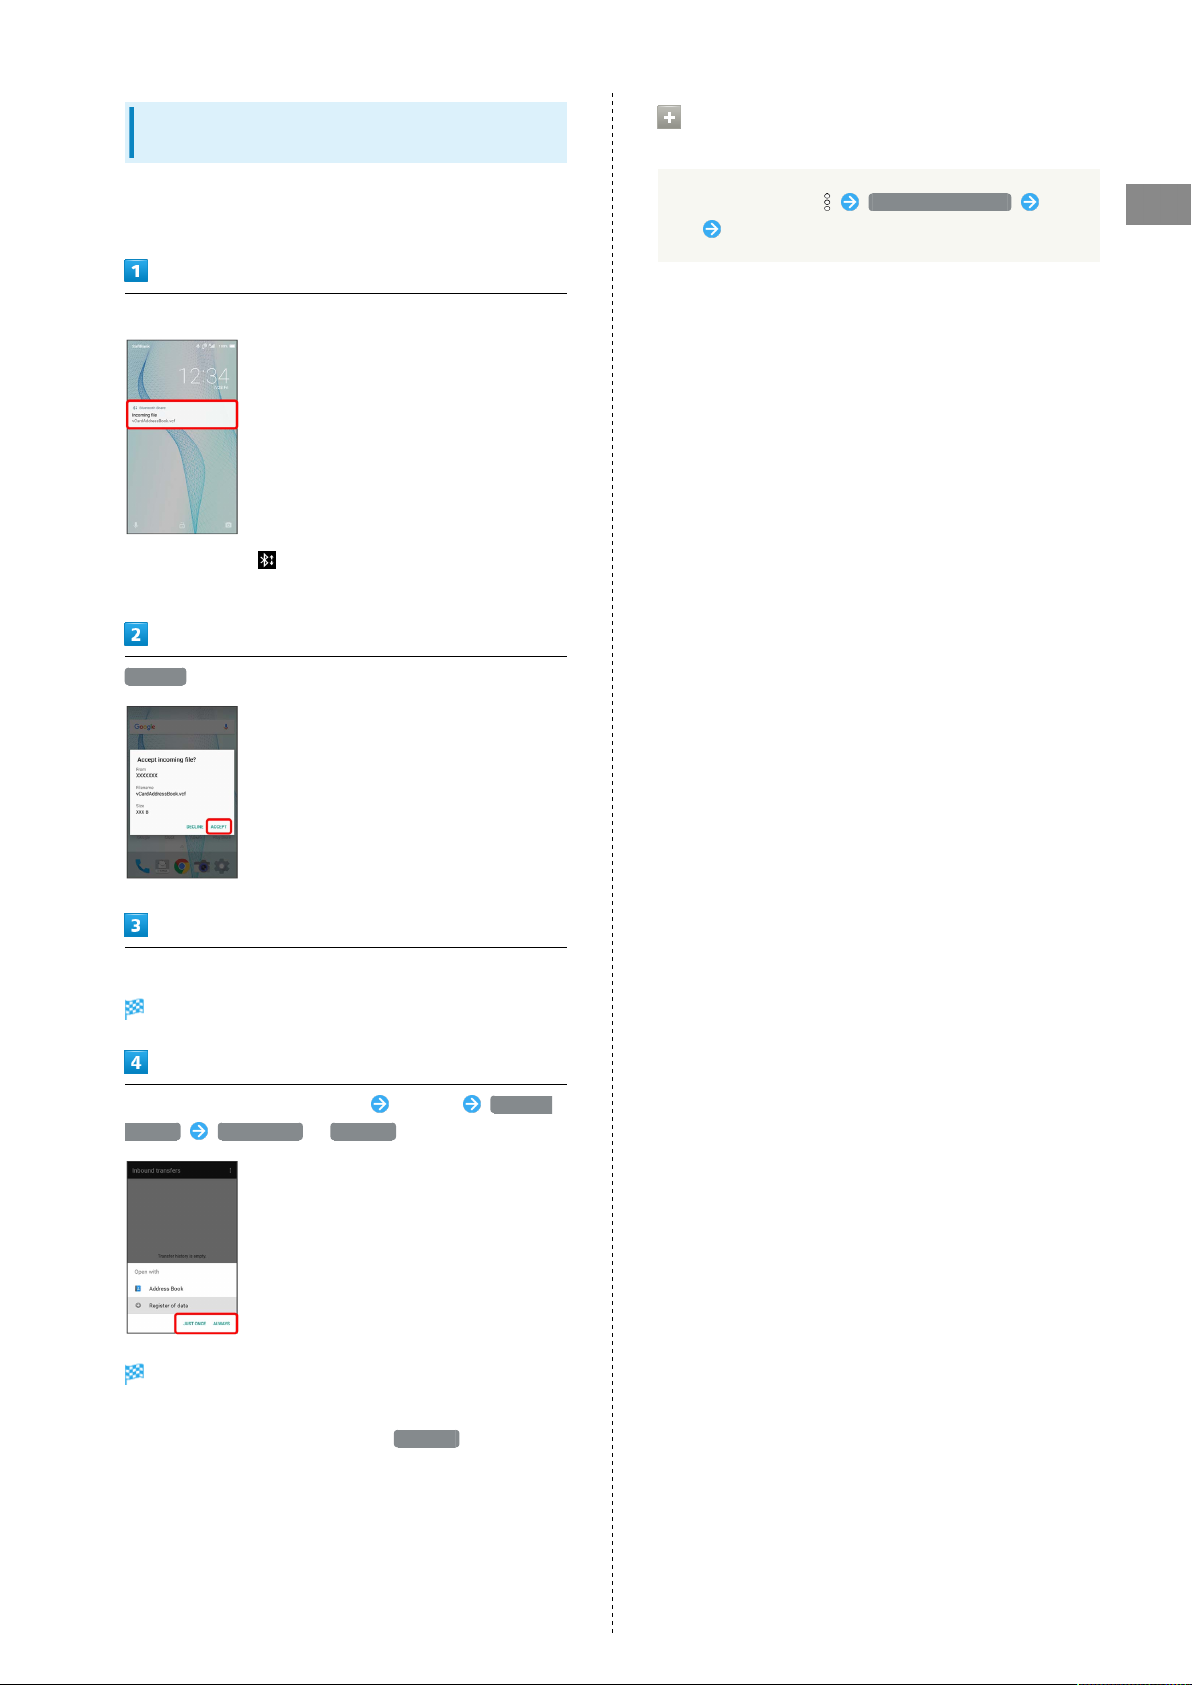
Receiving Data via Bluetooth® (e.g.,
Address Book)
When data reception request arrives, notification appears in
lock screen. To receive data:
Tap Bluetooth® share notification twice
・
In Home Screen, appears on Status Bar. Drag Status Bar
down, then Tap Bluetooth® share notification.
ACCEPT
Opening Files Received by Bluetooth
®
Transfer
In Bluetooth® menu, Show received files Tap
file Follow onscreen prompts
Getting Started
After data reception, Drag Status Bar down
Notifications Window opens.
Tap Bluetooth® share notification Tap file Register
of data JUST ONCE / ALWAYS
Data is saved.
・If confirmation appears, follow onscreen prompts.
・
To always use selected option, Tap ALWAYS .
AQUOS ea
Page 24
22
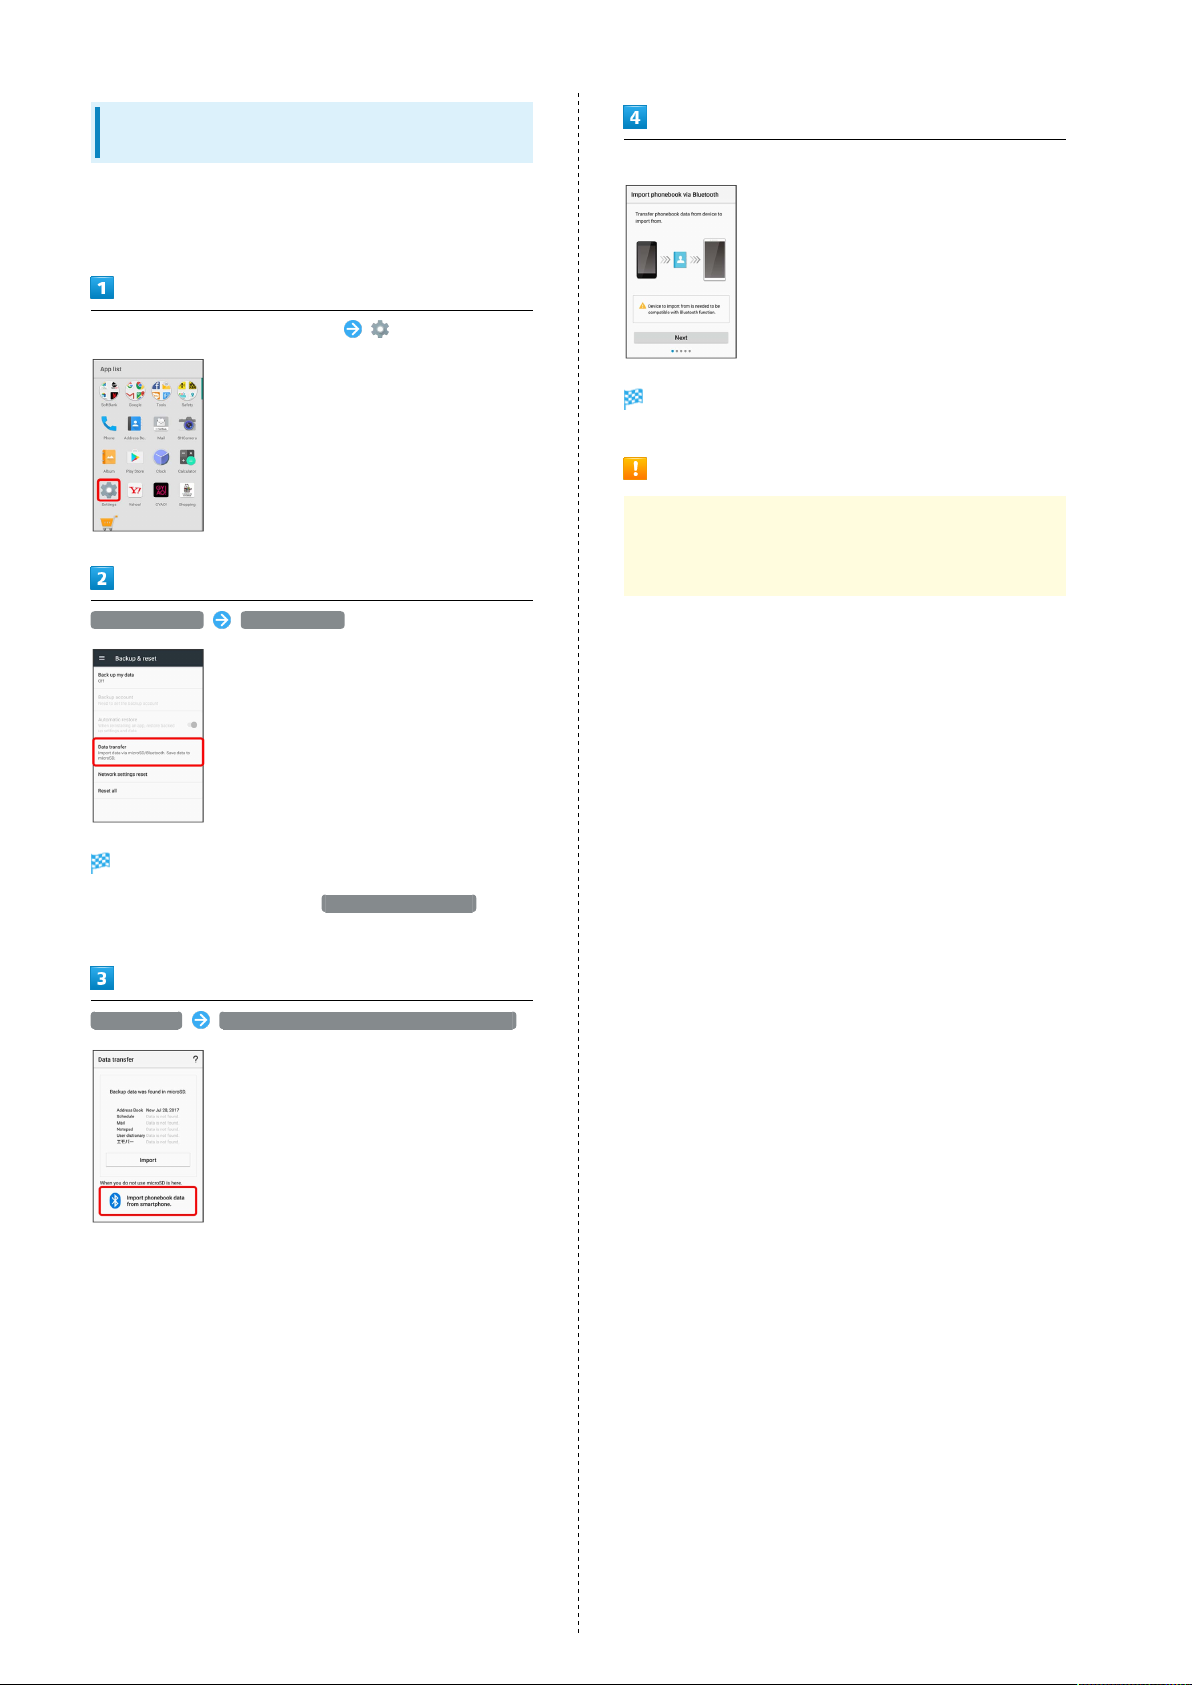
Importing Contacts via Bluetooth® (Data
Transfer)
Import contacts from other mobiles using Bluetooth®.
・Enable Bluetooth® beforehand.
In Home Screen, Flick Hot Sheet up (Settings)
Backup & reset Data transfer
Follow onscreen prompts
Import of contacts is complete.
Caution for Importing Data
Import is not available if there is only a little free space
in internal storage. Process stops if Battery runs low.
Operate with adequate battery charge whenever possible.
Data transfer window opens.
・
In Data transfer window, Tap Function information to
view a video tutorial (Japanese) on Sharp Website.
Data import Import phonebook data from smartphone.
・If SD Card is not inserted or there is no backup file on
inserted SD Card, Select device to import from window
appears. Follow onscreen prompts.
Page 25
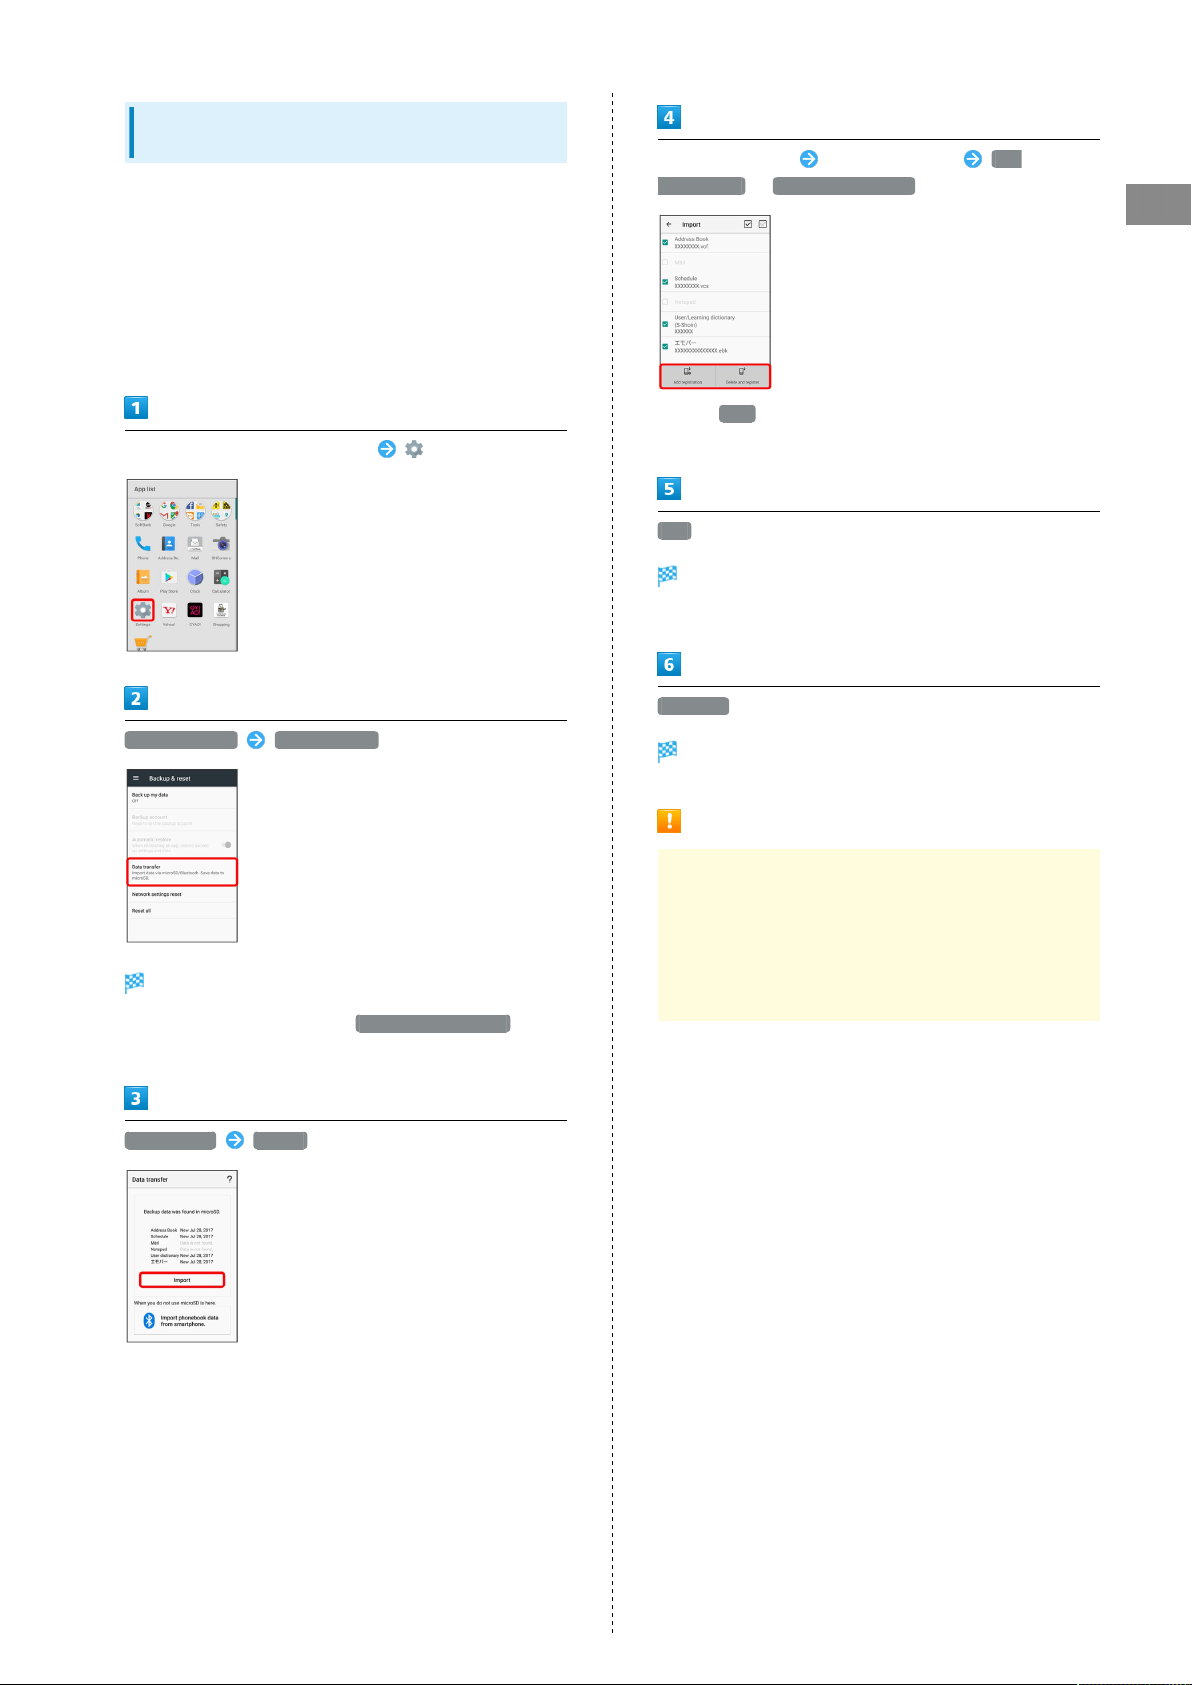
Importing Data from SD Card (Data
Transfer)
Import data (Address Book, Mail, Schedule (Calendar), Notepad,
User/Learning dictionary, emopa) saved to SD Card on other
mobiles or handset to handset.
・Insert SD Card containing a backup file beforehand. See
"Inserting SD Card" for details.
・Address Book data (contacts) may not be imported correctly
depending on the device used for saving them.
In Home Screen, Flick Hot Sheet up (Settings)
Tap item to import Tap file to import Add
registration / Delete and register
・
When Mail is selected, Mail application activates. Follow
onscreen prompts.
YES
Import starts.
・If confirmation appears, follow onscreen prompts.
23
Getting Started
Backup & reset Data transfer
Data transfer window opens.
・
In Data transfer window, Tap Function information to
view a video tutorial (Japanese) on Sharp Website.
Data import Import
Complete
Import is complete.
Cautions for Importing Data
Import is not available if there is only a little free space
in internal storage. Process stops if Battery runs low.
Operate with adequate battery charge whenever possible.
When importing User/Learning dictionary (S-Shoin),
existing User/Learning dictionary (S-Shoin) data in internal
storage is deleted.
・If SD Card is not inserted or there is no backup file on
inserted SD Card, Select device to import from window
appears. Follow onscreen prompts.
AQUOS ea
Page 26

24
Page 27

Basic Operations
Basic Operations...............................................................26
Confirmation when First Activating Applications......... 30
Applications.......................................................................32
Using Recent Apps Window............................................. 33
Handset Phone Number.................................................... 34
Using Manner Mode.......................................................... 35
Using Airplane Mode.........................................................36
Text Entry.........................................................................37
Google Account................................................................. 38
Google Play....................................................................... 40
Security Codes.................................................................. 42
USIM PIN............................................................................43
Turning Off Display (Screen Lock)..................................44
Updating Software........................................................... 45
Page 28
26
Basic Operations
Lock Screen
After a period of inactivity, Display turns off to save battery
power (Screen lock active).
Press to open lock screen; screen can be unlocked.
・Lock screen also appears at power on.
To unlock screen and use handset, Drag or up. For
details on lock screen, see "Lock Screen Basics."
Navigation Bar
Tap icons on Navigation Bar (Display bottom) for the
following functions/operations.
Name Description
(Back
key)
(Home
key)
(Recents
key)
(Keyboard
key)
(Menu
key)
Return to the previous screen. Appears
as for onscreen keyboard; Tap to
close keyboard.
Return to Home Screen.
Open a list of recently used applications
to activate or remove them from the list.
Change keyboard/input method. Appears
when keyboard is open.
Open menu. Appears for some applications.
Home Screen & App List
Most handset operations start in Home Screen or in app list.
In Home Screen, Flick Hot Sheet up for app list and activate
applications, change handset settings, etc. (To change Home
Screen, switch to another home screen app.)
See "Home Screen Basics" for details.
Selecting Options and Navigating
Screens
Tap items, icons, onscreen keys, etc. to open assigned items.
・
To return to the previous screen, Tap .
・
To return to Home Screen, Tap at Display bottom.
Page 29
27
Menu Operations
Tap at Display top or bottom for available settings and
items.
・Screens may also have settings and items that are available
by Touching & Holding Display.
Handset Settings and Making Settings
In Home Screen, Flick Hot Sheet up (Settings) to
customize operation of handset functions.
・
Checkbox ( / ) or switch ( / ) appears for
some options. Tap to enable ( / ) or disable ( /
) option.
Basic Operations
・Drag/Flick slider, spinner, etc. to adjust some settings. If
available, Tap for additional settings.
Portrait Orientation & Landscape
Orientation
The screen changes to landscape orientation when handset is
rotated sideways.
・Depending on the current screen, the orientation may not
change even by changing handset orientation.
AQUOS ea
Page 30
28
Multi-Window
Split screen to view and operate two applications.
Activate the two applications beforehand. Viewing and
operating (Address Book) and (Phone) is described as
an example.
・Viewing in Multi-Window is not available for some
applications.
Recent apps window opens.
Multi-Window Operations
Switching between Applications
Tap application
・Activate application beforehand.
Exiting Multi-Window
Touch & Hold or Flick pane bar ( ) up/down
Touch & Hold application to operate Drag to top of
Display
Multi-Window opens, and Dragged application opens at
top of Display.
・
Alternatively, Touch & Hold while viewing application
to operate.
From application history at bottom of Multi-Window, Tap next
application
Tapped application opens at bottom of Multi-Window.
Page 31

29
One-Handed Operation (ShrinkScreen)
Shrink screen for easier one-handed operation.
Recent apps window opens.
(ShrinkScreen)
Enlarging Part of Screen (Magnifier)
Enlarge part of the screen.
Basic Operations
Recent apps window opens.
(Magnifier)
Screen shrinks.
About ShrinkScreen
Some screens may not be shrunk.
Full-screen view is restored when screen orientation is
changed to landscape or when Display turns off.
Shrunk Screen Operations
Moving Shrunk Screen
In shrunk screen, Drag screen to change its
position OK
Enlarging/Reducing Shrunk Screen Size
In shrunk screen, Pinch or Spread screen OK
Restoring Full-Screen View
Magnifier activates; part of the screen is enlarged
(enlarged area).
・Drag enlarged area to target position.
About Magnifier
User interface items in enlarged area are selectable;
selecting an item exits Magnifier.
Exiting Magnifier
Tap enlarged area or perform and
In shrunk screen, Fullscreen
AQUOS ea
Page 32

30
Using Screen Search
Touch & Hold for information related to onscreen
content.
・Sign in to a Google Account beforehand.
・When launching for the first time, follow onscreen prompts
to enable Screen search.
Disabling Screen Search
In Home Screen, Flick Hot Sheet up (Settings)
Google Search Screen search (
appears)
・
If Screen search is disabled, (Google) activates
when Touching & Holding .
Capturing Screenshots
Long Press and Volume Down Key at the same time to
capture a screenshot of the current screen.
Confirmation when First Activating Applications
Set the operation of applications when activating for the
first time.
The type and content of a confirmation differ with the
application. The following explains two types of confirmation:
First things first and Battery optimization.
Setting Required Permissions for
Applications
Permit applications to use data on handset, Camera, etc.
Activating (Album) for the first time is described as an
example.
・An application may not function correctly if permission to
use it is not set.
In Home Screen, Flick Hot Sheet up (Album)
・May be unavailable for some applications.
・
View captured screenshots in (Album), etc.
・Alternatively, use Clip Now and slide your finger along the
edge of Display to capture a screenshot. See "Capturing
Screenshots (Clip Now)" for details.
In First things first confirmation, NEXT
DENY / ALLOW
Setting is complete.
・
Normally, select ALLOW to permit usage of the function.
・For several functions, continue in the same way.
Page 33

31
Other Ways to Set Required Permissions
for Applications
Setting Functions to Use by Application
In Home Screen, Flick Hot Sheet up (Settings)
Apps Tap application Permissions Tap
function
・
Tap function to toggle on ( )/off ( ).
Setting Applications with Permitted Usage by
Function
In Home Screen, Flick Hot Sheet up (Settings)
Apps App permissions Tap function
Tap application
・
Tap application to toggle on ( )/off ( ).
Setting Battery Optimization
Enable Battery optimization to prevent applications from
running while Display is turned off (except while charging).
Activating (TV) for the first time is described as an
example.
・If Battery optimization is enabled, applications are disabled
while Display is turned off (except while charging).
Consequences such as failure to perform scheduled TV
recording, may occur.
In Home Screen, Flick Hot Sheet up (Tools)
(TV)
Basic Operations
・If confirmation for giving permission appears, follow
onscreen prompts.
In Battery optimization confirmation, Next
NO / YES
Setting is complete.
・
Normally, select YES to ignore Battery optimization.
AQUOS ea
Page 34

32
Other Ways to Set Battery
Optimization
In Home Screen, Flick Hot Sheet up (Settings)
Apps Special access Battery
optimization Not optimized All apps Tap
application Optimize / Don't optimize DONE
・
Alternatively, in Home Screen, Flick Hot Sheet up
(Settings) Battery & energy saving Battery
Battery optimization Not optimized
All apps Tap application Optimize / Don't
optimize DONE .
Applications
Activating Applications
In Home Screen, Flick Hot Sheet up Tap application
Application activates.
・If confirmation appears, follow onscreen prompts.
Setting Required Privileges for Using
Applications
Some applications first require permission to access
handset data or privileges to access important functions
such as photographing.
Confirmation appears for applications requiring permission
when first activated. Follow onscreen prompts.
・See "Confirmation when First Activating Applications" for
details.
Page 35

33
Exiting Applications
In any application, Tap repeatedly
Home Screen returns and application exits.
・
Home Screen also returns when Tapping on Navigation
Bar, but application does not exit. In this case, Tap
and exit it from recent apps window. See "Using Recent
Apps Window" for details.
Where to Obtain Applications &
Updates
Use Google Play™ to obtain new applications or update
installed ones. See "Google Play" for details.
Using Recent Apps Window
Open a list of recently used applications to activate or remove
them from the list. In addition, use Childlock, ShrinkScreen,
and Magnifier.
Opening Recent Apps Window
Basic Operations
Recent apps window opens.
Opening Most Recently Activated
Application
In recent apps window,
AQUOS ea
Page 36

34
Recent Apps Window Layout
Tap to activate recently used applications.
Activate Childlock.
See "Disabling Touch Operation Temporarily (Childlock)"
for details.
Remove application from the list.
Remove all applications from the list.
Pin a screen.
Shrink the screen.
See "One-Handed Operation (ShrinkScreen)" for details.
Enlarge part of the screen.
See "Enlarging Part of Screen (Magnifier)" for details.
3
1
2
Handset Phone Number
Checking Your Phone Number
In Home Screen, Flick Hot Sheet up (Settings)
Settings appear.
・Handset number is shown below "Profile."
・
Alternatively, Tap Profile to check your phone number
(Profile window).
Profile Operations
Editing Profile
1 Flick left/right to remove from the list.
2 If two or more applications are shown, Drag applications
downward to view hidden applications.
3 Appears when Screen pinning is enabled. See "Lock &
Security Settings" for details.
In Profile window, Edit information
YES
・
To show/add entry fields, Tap , and to delete, .
Sending Profile
In Profile window, Send Tap send method
YES
Application activates.
・If confirmation appears, follow onscreen prompts.
Deleting Saved Information
In Profile window, Delete YES
・Preset information will not be deleted.
Page 37

35
Using Manner Mode
Mute ringtones and other handset sounds to avoid disturbing
others around you.
Manner Mode Options
Settable options are the following.
Manner
Mode Option
Standard
manner
Total silence
Alarms only
Priority only
Ringtones and other handset sounds are
muted; handset vibrates for incoming
calls/messages, etc. Alarm sounds
according to (Clock) settings. Media
sounds still play.
Ringtones and other handset sounds
are muted; handset does not vibrate
for incoming calls/messages, etc. Alarm
sounds and media sounds are also muted.
Ringtones and other handset sounds
are muted; handset does not vibrate
for incoming calls/messages, etc. Alarm
sounds and media sounds still play.
Ringtones and notification sounds play
according to the settings in Priority
only allows under MORE SETTINGS .
Other handset responses are the same as
when Manner mode is canceled. See "Sound
Settings" for details.
Description
Activating Manner Mode
Camera shutter sound, video recording tones, etc. still play
even in Manner mode.
Drag Status Bar down with two fingers
Basic Operations
Quick Settings Window opens.
Manner mode
Manner mode window opens.
・If Manner mode is already active, selected Manner mode
option name appears. Tap to cancel Manner mode; Tap again
to open Manner mode window.
Standard manner / Total silence / Alarms only /
Priority only DONE
Manner mode activates.
AQUOS ea
Page 38

36
Operations of Manner Mode Using
Volume Up/Down Key
When screen is unlocked, the following operations are
possible with Volume Up/Down Key.
・When Manner mode is active, Press Volume Up/Down Key
(a volume bar appears) and Tap END NOW to cancel
Manner mode. Tap for all volume bars including the
one for media sounds. (Volume bar operation may be
unavailable depending on Manner mode option.)
・When Manner mode is canceled, Press and hold Volume
Down Key for Standard manner. Press Volume Down Key
again for Total silence.
・When Total silence or Alarms only is set, Press Volume
Up/Down Key (a volume bar appears) and then Press
Volume Up Key for Standard manner. Press Volume Up Key
again to cancel Manner mode.
Manner Mode Operations
Canceling Manner Mode
In Quick Settings Window, Tap Manner mode option name
・
Alternatively, in Manner mode window, Tap Manner
mode ( appears).
Using Airplane Mode
Leaving power on, suspend signal-transmitting functions.
Activating Airplane Mode
Drag Status Bar down with two fingers
Quick Settings Window opens.
Airplane mode
Canceling Manner Mode Automatically after a
Certain Period
In Manner mode window, Tap - / + to set period
after which Manner mode is canceled DONE
・To keep Manner mode active until you cancel it manually,
Tap Until you turn this off .
Airplane mode activates.
Canceling Airplane Mode
In Quick Settings Window, Airplane mode
Airplane Mode Caution
Activating Airplane mode disables Wi-Fi and Bluetooth®,
interrupting corresponding transmissions.
Wi-Fi/Bluetooth® connections can be used even in Airplane
mode by enabling Wi-Fi/Bluetooth® after activating
Airplane mode ; make sure that such connection/
transmission is allowed in your current location before use.
Page 39

37
Text Entry
Keyboards
Use onscreen keyboards for text entry.
・
Tap Text entry field for keyboard. To hide it, Tap .
・Text entry descriptions are for Google Keyboard (default
input method).
Enabling One-Handed Mode
Shrink onscreen keyboard for easier one-handed operation;
switch between Left-handed mode and Right-handed mode
as needed.
When keyboard is open, Touch & Hold / and slide
finger over /
・
Tap / to switch between Right-handed mode and
Left-handed mode.
・
Tap to disable One-handed mode.
Switching Keyboards
In a text entry window,
Entry mode is switched.
・
Tap / to toggle between alphabet entry mode and
number/symbol/emoji/emoticon entry mode.
Entering Letters
To enter Phone:
Basic Operations
Keyboard Layout
Enter characters.
Toggle case.
Switch to number/symbol/emoji/emoticon keyboard.
Enter comma. Touch & Hold to specify settings or
enable One-handed mode.
Enter space.
Delete characters.
Insert line break. Touch & Hold for options; enable
One-handed mode, move to other entry fields, or enter
emoji/emoticons.
Enter period. Touch & Hold for a set of other
punctuation marks and symbols.
In a text entry window,
/
Phone is entered.
・
To toggle case, Tap / before typing a letter. (By
default, the first word of each sentence is capitalized
automatically.)
AQUOS ea
Page 40

38
Google Account
Use a Google Account and get more convenience with Google
services. A Google Account is required to use some services or
fully use some applications.
Google Account Cautions
Google Account Mail Address & Password
Be careful not to forget your Google account mail address
and password.
Google Account Operations & User Interface
Operations and user interface are subject to change due to
automatic application updates or other reasons.
Creating a Google Account
In Home Screen, Flick Hot Sheet up (Settings)
Accounts
Or create a new account
Enter first name Enter last name NEXT
・If confirmation appears, follow onscreen prompts.
Add account
Google
Enter birthday and gender NEXT
Enter username (mail address) NEXT
Add your account appears.
Enter password Re-enter password NEXT
Page 41

39
Enter phone number for recovery NEXT
VERIFY
SMS is sent to the entered phone number.
Select whether to enable data backup Select whether to
receive news and offers from Google Play NEXT
Basic Operations
Account is created.
・If confirmation appears, follow onscreen prompts.
Signing in to a Google Account
If an application requires a Google Account, Add your account
appears. Sign in with an existing Google Account to use the
application.
In Add your account, enter mail address NEXT
I AGREE
NEXT
Enter password NEXT
Follow onscreen prompts
You are signed in to your Google Account.
AQUOS ea
Page 42

40
Google Play
Download a variety of applications (free/paid) from Google
Play. Change the setting of downloaded applications to enable
manual or automatic updates. Sign in to a Google Account
beforehand.
Google Play Cautions
Application Installation Disclaimer
Many different kinds of applications can be installed
on handset from Google Play (provided by Google Inc.).
SoftBank Corp. is not responsible in any way for userinstalled applications (quality, reliability, legality, fitness
for a purpose, credibility, accuracy, etc.) or resulting
malfunctions (viruses, etc.).
Google Play Operations & User Interface
Operations and user interface are subject to change due to
automatic application updates or other reasons.
Purchasing Applications
In Home Screen, Flick Hot Sheet up (Play Store)
Google Play opens.
・If confirmation appears, follow onscreen prompts.
Tap paid application Tap price Follow onscreen
prompts
Application downloads and installs.
Installing Free Applications
In Home Screen, Flick Hot Sheet up (Play Store)
Google Play opens.
・If confirmation appears, follow onscreen prompts.
Tap free application INSTALL ACCEPT
Application downloads and installs.
Purchased Applications
Payment
Pay once. Re-downloads of uninstalled applications are free
of charge.
Use on Other Android Devices
Install same application on other Android devices under
same Google Account at no added cost.
Refund Requests
Request refunds within designated period. Returned
applications are deleted from handset; no payment is
required. One refund request per application.
In Google Play, My apps & games Tap
application REFUND
・See "Getting Help with Google Play" for details.
Application Purchase Disclaimer
Purchase applications at your own risk. SoftBank Corp. is
not responsible for any disadvantage resulting for user or
third parties.
Page 43

41
Updating Installed Applications
In Home Screen, Flick Hot Sheet up (Play Store)
Google Play opens.
・If confirmation appears, follow onscreen prompts.
My apps & games
Uninstalling Applications
Applications installed via Google Play can be uninstalled.
In Home Screen, Flick Hot Sheet up (Play Store)
Basic Operations
Google Play opens.
・If confirmation appears, follow onscreen prompts.
My apps & games
Tap application UPDATE
Application downloads and installs.
・If confirmation appears, follow onscreen prompts.
Making Application Update Settings
Setting Automatic Update Options
In Google Play, Settings Auto-update
apps Select update option
Setting Automatic Update by Application
In Google Play, My apps & games Tap
application Auto-update
・If confirmation appears, follow onscreen prompts.
・
Tap Auto-update to toggle on ( )/off ( ).
・Automatic update is not available for some applications.
Tap application UNINSTALL OK
Application uninstalls.
Getting Help with Google Play
In Google Play, Help & feedback
Google Play Help window opens.
Follow onscreen prompts
A description for each item appears.
AQUOS ea
Page 44

42
Security Codes
Main Security Codes
The following are main security codes required for handset
use.
Type Description
Operation
Password
Center Access
Code
PIN
Lock No.
Operation Password and Center Access
Code
A code required for using some functions.
See "Operation Password and Center
Access Code" for details.
A four-digit code set in subscription
contract.
See "Operation Password and Center
Access Code" for details.
A code for USIM Card.
See "USIM PIN" for details.
A code for unlocking screen.
See "Lock & Security Settings" for details.
Setting Operation Password
In Home Screen, Flick Hot Sheet up (Settings)
Lock & Security
Operation password setting OK Enter Operation
Password OK
Center Access Code is a four-digit code set in subscription
contract; necessary to use optional services from landlines,
etc.
・Do not forget Center Access Code. If you forget the code,
contact us for recovery. For details, contact SoftBank
Customer Support, General Information.
・Be careful not to reveal security codes to others. If misused
by others, SoftBank Corp. is not liable for any resulting
damages.
Re-enter Operation Password OK OK
Operation Password is set.
Operation Password Usage Notes
Changing Operation Password
Refer to the steps for setting Operation Password.
(Current Operation Password is required to proceed.)
Resetting Operation Password
When prompted for Operation Password, Tap PASSWORD
RESET then Tap OK . Continue by following onscreen
prompts.
・My SoftBank authentication is required to reset
Operation Password. Set My SoftBank authentication
from (My SoftBankプラス) (My SoftBank Plus).
Page 45

43
USIM PIN
USIM PIN and USIM Card Lock
When USIM card lock is enabled, PIN (a code for USIM Card)
is required for handset use each time handset is powered on;
helps prevent unauthorized use by others.
・Enable USIM card lock by enabling PIN.
・PIN is 9999 by default.
PIN Entry Cautions
PIN entry is required when changing PIN, when powering
handset on with USIM card lock enabled, etc.
・Entering incorrect PIN three consecutive times activates
PIN Lock. To cancel, Personal Unblocking Key (PUK) is
required; contact SoftBank Customer Support, General
Information.
・Entering incorrect PUK ten consecutive times activates
PUK Lock, disabling handset. For recovery, USIM Card
must be reissued at a SoftBank Shop (fees apply).
Enabling USIM PIN
When PIN (a code for USIM Card) is enabled, PIN entry is
required for handset use each time handset is powered on
with USIM Card installed.
In Home Screen, Flick Hot Sheet up (Settings)
Lock & Security
Lock & Security menu opens.
Set up USIM card lock Lock USIM card Enter PIN
OK ( appears)
Basic Operations
USIM card lock is enabled.
Disabling USIM Card Lock
In Lock & Security menu, Set up USIM card lock
Lock USIM card Enter PIN OK ( appears)
Operation at Power On
When USIM card lock is enabled, PIN entry window appears
each time handset is powered on. To use handset:
Enter PIN
Handset is usable.
AQUOS ea
Page 46

44
Changing USIM PIN
Enable USIM card lock first. See "Enabling USIM PIN" for
details.
In Home Screen, Flick Hot Sheet up (Settings)
Lock & Security
Set up USIM card lock Change USIM PIN Enter
current PIN OK Enter new PIN OK Re-
enter new PIN OK
Turning Off Display (Screen Lock)
Screen Lock
After a period of inactivity, Display turns off to save battery
power (Screen lock active). Screen lock prevents accidental
Touchscreen operation.
・
To activate Screen lock manually, Press when Display is
turned on.
If Screen Lock Activates while Playing
Music
Music continues to play. For operation, Press to open
lock screen and use operation panel (operations may vary
depending on application).
Unlocking Screen
PIN is changed.
When Display is turned off (Screen lock active),
Lock screen appears.
In lock screen, Drag or up
Screen is unlocked.
・For enhanced security, set handset to require pattern
drawing or Lock No./password entry for unlocking screen as
needed. See "Lock & Security Settings" for details.
Another Way to Turn On Display
Set Display to turn on when handset is picked up and held
still (Turn screen on by holding). See "On/Off with Motion
Settings" for details.
Page 47

45
Updating Software
Software Updates
At specified time, handset automatically checks for/downloads
firmware updates as required.
・Software Update cannot be performed if application or
function is in use.
・Alternatively, update firmware manually.
Software Update Cautions
Applications
Applications may be updated or newly added, or names,
icons, operations and user interfaces of applications may
be changed.
During Update
Handset cannot be used until Software Update completes;
it may take some time to complete.
Updating Software Manually
Operate handset where signal reception is good and without
changing location. Also operate with adequate battery charge.
Signal becoming weak or Battery becoming low during an
update may cause an update failure.
・Remove Micro USB Cable (optional accessory) from handset
beforehand; otherwise, Software Update may not complete
properly.
・An update failure may disable handset.
In Home Screen, Flick Hot Sheet up (Settings)
About phone
Basic Operations
Data Backup
Saved data may be lost depending on condition of handset
(malfunctioning, damaged, water seepage, etc.). It is
recommended that you back up important data before
updating software. SoftBank Corp. is not responsible for
damages from loss of data.
Software update
Software update menu opens.
Software update YES Follow onscreen prompts
Software Update starts.
Software Update Operations
Enabling/Disabling Automatic Updates
In Software update menu, Automatic Update Settings
NOT AUTOMATICALLY UPDATE or AUTOMATICALLY
UPDATE OK
Changing Automatic Update Start Time
In Software update menu, Update Schedule Settings
Select time OK OK
AQUOS ea
Page 48

46
Page 49

Handset Interface
Lock Screen Basics........................................................... 48
Home Screen Basics.......................................................... 49
Icons at Display Top (Status Bar)...................................49
Checking Handset Status & Notifications (Notifications
Window/Quick Settings Window).................................... 51
Customizing Home Screen................................................ 53
Capturing Screenshots (Clip Now)...................................56
Scrolling Screen Automatically (ScrollAuto)...................59
Disabling Touch Operation Temporarily (Childlock)....... 60
Page 50

48
Lock Screen Basics
Lock screen appears at power on or when is Pressed
while Display is turned off (Screen lock active).
From lock screen, unlock screen or quickly activate
(SHCamera) or (Voice Search).
Lock Screen Layout
Change Wallpaper for lock screen as needed. See "Setting
Wallpaper" for details.
Notifications of incoming calls/messages or from
applications, etc. appear here.
Activate (Voice Search) (Drag up).
Show message set for lock screen.
Date and time
Messages and news from emopa appear here (emopa
2
area).
Unlock screen (Drag or up).
Activate (SHCamera) (Drag up).
1
Notifications (Missed Calls, New
Messages, Etc.)
Notification appears in lock screen for missed calls, new
messages and information from applications.
Tap notification twice to open it.
Notification Count & Grouping
Notifications may be grouped depending on the number of
unread notifications. To show all notifications, Tap the
bottom notification twice.
1 Set message for lock screen beforehand. See "Lock &
Security Settings" for details.
2 Appear when emopa is configured. See "エモパーを利用す
る (http://help.mb.softbank.jp/aquos-ea/pc/09-01.html)"
(Japanese) for details.
Page 51

49
Home Screen Basics
Most operations start from Home Screen. Add shortcuts to
frequently-used applications and widgets.
To change Home Screen, switch to another home screen app.
Home Screen Layout
Desktop sheet
Place application shortcuts, folders, widgets freely.
Flick left/right to toggle sheets.
Hot Sheet
Place application shortcuts and folders freely. Flick up
for app list.
Icons at Display Top (Status Bar)
Indicators (new message notification, handset status, etc.)
appear at the top of Display.
Handset Interface
Status Bar Layout
Toggling Sheets
Home Screen consists of several sheets.
Flick left/right to toggle sheets.
・Adding application shortcuts and widgets in Home Screen
adds more sheets. See "Adding Shortcuts" / "Adding
Widgets."
Notifications, warnings, etc. appear here. (Notification
Indicators)
Handset status and other information appear here.
(Status Indicators)
AQUOS ea
Page 52

50
Main Notification Indicators
Notification Indicators appear on the left.
・Notification Indicators do not appear in lock screen.
Indicator Description
Bright Keep On
Call (Dialing/Arriving/in Progress)
Call on Hold
Missed Call
New Answer Phone Message
New Voicemail
New SMS/S! Mail
New Email
New Gmail
Alarm Sounding/Snoozing/Upcoming Alarm
Calendar Event
RelaxView enabled by RelaxAuto
TV Viewing in Progress
TV Recording in Progress
Application Update Available
Application Installation Complete
Data Downloaded
Bluetooth® Data Reception Request
Mounting SD Card
Screenshot Captured
Screenshot Failed
Screenshot Captured (Clip Now)
More Notifications
Main Status Indicators
Status Indicators appear on the right.
Indicator Description
Battery Strength
Charging
Signal Strength
No Signal (4G LTE/4G/3G)
4G LTE/4G Data in Use
3G Data in Use
Airplane Mode
Wi-Fi Connected
Bluetooth® On
Bluetooth® Connected
Manner Mode (Standard manner)
Manner Mode (Total silence)
Manner Mode (Alarms only)
Manner Mode (Priority only)
Getting Location Information
NFC Ready
Answer Phone Set
Answer Phone Set (Message Recorded)
Alarm Set
NFC/Osaifu-Keitai® Lock Set
NFC/Osaifu-Keitai® Lock Set (USIM Card
2
only)
Hiragana/Kanji Mode
Half Alphabet Mode
Half Numeric Mode
Full Alphabet Mode
Full Numeric Mode
Character Code Mode
3
3
1
3
3
3
3
1 Corresponding indicator appears when handset is connected
to FDD-LTE (SoftBank 4G LTE) or AXGP (SoftBank 4G).
Between these Networks, handset connects to SoftBank 4G
whenever possible.
2 Appears when a USIM Card with NFC locked on another
mobile phone is then installed in handset.
3 Intended for use with S-Shoin (Japanese keyboard).
Page 53

51
Checking Handset Status &
Notifications (Notifications
Window/Quick Settings Window)
Open notifications, check handset status or change various
settings.
Opening Notifications Window/Quick
Settings Window
Drag Status Bar down
Notifications Window opens.
・
To close Notifications Window, Tap or Drag bottom of
Notifications Window up.
Notifications Window Layout
Notifications and active functions
Use corresponding functions.
Delete all notifications and close Notifications Window.
1 Usable functions depend on the notification. As an
example, dial or send an SMS to the phone number of a new
call.
1
Notifications Window Operations
Opening/Closing Quick Settings Window
In Notifications Window, Drag down/up or Tap /
at Display top
Handset Interface
Drag Status Bar down again
Quick Settings Window opens.
・
Alternatively, Tap at Display top to open Quick Settings
Window.
・Alternatively, to open Quick Settings Window, Drag Status
Bar down with two fingers with Notifications Window
closed.
Switching between Detailed & Simple Views for
Notifications in Notifications Window
In Notifications Window, Drag notification up/down with
two fingers at the same time, or Pinch/Spread
・Unavailable for some notifications.
Deleting Notifications
In Notifications Window, Flick notification left/right
・Some notifications may not be deleted.
AQUOS ea
Page 54

52
Quick Settings Window Layout
Adjust Display brightness.
Set Wi-Fi.
Set Bluetooth® function.
Toggle Location on/off.
Turn on/off Mobile Light.
Toggle RelaxView on/off.
Toggle Wi-Fi tethering on/off.
Enable/disable account sync.
Toggle Data saver on/off.
Indicate position of Setting key sheet.
Open Settings.
Open/close Quick Settings Window.
Set Manner mode.
Enable/disable Auto-rotate screen.
Enable/disable Airplane mode.
Toggle Energy saving on/off.
Toggle VeilView on/off.
Toggle Reader/Writer, P2P on/off.
Open Wireless output menu.
Toggle Bright Keep on/off.
Open Edit screen for Quick Settings Window.
Adding Setting Keys
In Quick Settings Window, EDIT Touch & Hold
Setting key below "Drag to add tiles" Drag Setting key
to target location
Deleting Setting Keys
In Quick Settings Window, EDIT Touch & Hold
Setting key Drag to "Drag here to remove"
Resetting Quick Settings Window
In Quick Settings Window, EDIT Reset
1
1 Flick Setting key area left/right to toggle sheets.
Customizing Quick Settings Window
Rearranging Setting Keys
In Quick Settings Window, EDIT Touch & Hold
Setting key Drag Setting key to rearrange it
Page 55

Customizing Home Screen
53
Set Wallpaper for Home Screen, rearrange icons, as well as add
folders, shortcuts and widgets.
Setting Wallpaper
Touch & Hold open area of Home Screen
WALLPAPERS
Home screen / Home screen and lock screen
Setting is complete.
・
Tap Home screen to set the image as Wallpaper for Home
Screen only. Tap Home screen and lock screen to set the
same image as Wallpaper for Home Screen and lock screen.
・To set the image as Wallpaper for lock screen only, Tap
Lock screen .
Handset Interface
Tap option (e.g., Album(wallpaper) ) Select image
・Operations may vary depending on selected option. Follow
onscreen prompts.
AQUOS ea
Page 56

54
Adding Folders
Add folders to collect icons.
・Folders can also be created in Hot Sheet and app list.
In Home Screen, Touch & Hold icon to place in folder
Drag to another icon to group with
Adding Shortcuts
Add shortcuts for applications in Home Screen.
In app list, Touch & Hold application and Drag to "Add to home
screen"
Release finger at location to add shortcut
Folder is added, and two icons are saved in the folder.
Folder Operations
Changing Folder Names
In Home Screen, Tap folder Tap area to enter folder
name at bottom of window Enter folder name
Tap / /location other than window in
Home Screen
・Change folder names the same way in app list. After
Tapping , Tap /location other than app list
window.
Placing Icons in Folder
In Home Screen, Touch & Hold icon Drag to folder
・Place icons the same way in app list.
Moving Icons Out of Folder
In Home Screen, Tap folder Touch & Hold icon
Drag it out of folder
・Move icons the same way in app list.
Shortcut is added.
・Drag to sheet visible at edge of Display to toggle sheets
and add. Drag to rightmost sheet to add one more sheet and
add.
Deleting Shortcuts
In Home Screen, Touch & Hold icon Drag to "Remove"
Deleting Folders
In Home Screen, Touch & Hold folder Drag to "Remove"
Page 57

55
Adding Widgets
Add Album, Analog clock, etc. as follows.
Touch & Hold open area of Home Screen
WIDGETS
Removing Widgets
In Home Screen, Touch & Hold widget Drag to "Remove"
Rearranging Home Screen Sheets
Touch & Hold open area of Home Screen
Handset Interface
・Alternatively, Pinch Home Screen to rearrange sheets.
Touch & Hold sheet to move
A list of widgets opens.
Touch & Hold widget
Drag to location to add widget
・The leftmost sheet cannot be moved.
Drag to location to change place
Sheet is moved.
Return to Home Screen.
Widget is added.
・Drag to sheet visible at edge of Display to toggle sheets
and add. Drag to rightmost sheet to add one more sheet and
add.
AQUOS ea
Page 58

56
Moving Icons/Widgets
Icons can also be rearranged in Hot Sheet and app list.
In Home Screen, Touch & Hold icon/widget
Drag to target location
Release to place icon/widget.
・To a folder: Drag icon to target folder.
Capturing Screenshots (Clip Now)
Slide finger along the edge of Display to capture a screenshot.
Capture permanent screenshots for saving as image files or
temporary screenshot for temporary use.
Enabling Clip Now
In Home Screen, Flick Hot Sheet up (Settings)
Useful
Useful menu opens.
Clip Now
Clip Now menu opens.
Clip Now ( appears)
Clip Now is enabled.
・
Tap Clip Now to toggle on ( )/off ( ).
Page 59

57
Capturing Permanent Screenshots
Capture screenshots for saving as files. Webpages opened
from browser (e.g., Chrome) are saved with their URL.
・Some screens may not be captured, or URL may not be saved.
Touch upper left (upper right) corner of Display
Screen shrinks.
Slide finger to the right (left) along the top edge of Display
Opening Permanent Screenshots
In Home Screen, Flick Hot Sheet up (Tools)
(Clip Now)
Handset Interface
Screenshot list appears.
・If confirmation appears, follow onscreen prompts.
Tap screenshot
Permanent screenshot is captured.
Screenshot appears (screenshot details).
・URL appears for webpage screenshots. Tap URL to open
corresponding webpage.
・When Auto-rotate screen is enabled, rotating handset
90 degrees changes screenshot list to screenshot details
automatically.
Screenshot Operations
Sharing Screenshots
In screenshot list, Touch & Hold screenshot (
appears) Tap sharing option Follow
onscreen prompts
・Multiple screenshots can be selected.
Deleting Screenshots
In screenshot list, Touch & Hold screenshot (
appears) YES
・Multiple screenshots can be selected.
AQUOS ea
Page 60

58
Capturing and Opening Temporary
Screenshot
Capture screenshot of webpage, etc. for saving it temporarily.
Captured screenshot can be opened while using other
applications as well.
・Only one temporary screenshot can be captured. It cannot be
saved as a file.
Touch upper right (upper left) corner of Display Slide
finger down along the edge of Display
Temporary screenshot is captured; portion of screenshot
appears at the right (left) of Display.
・If confirmation appears, follow onscreen prompts.
Setting Clip Now
In Home Screen, Flick Hot Sheet up (Settings)
Useful Clip Now
Clip Now menu opens.
Set each item
Setting is complete.
Clip Now Setting Operations
Viewing Instructions for Clip Now
Drag portion of screenshot at the right (left) of Display to
the left (right)
Temporary screenshot appears.
・To move screenshot aside, Drag it to the right (left) of
Display.
Deleting Temporary Screenshot
While temporary screenshot appears, Touch & Hold
screenshot ( appears) Drag screenshot to
In Clip Now menu, Help
Setting Whether to Capture Permanent
Screenshots by Sliding Operation
In Clip Now menu, Slide operation settings
Horizontal direction Screenshot / Disable
・
Disable is not available when Vertical direction under
Slide operation settings is set to Disable .
Setting Whether to Capture Temporary
Screenshot by Sliding Operation
In Clip Now menu, Slide operation settings Vertical
direction Memo / Disable
・
Disable is not available when Horizontal direction
under Slide operation settings is set to Disable .
Setting Whether to Show Sharing Options after
Capturing Temporary Screenshot
In Clip Now menu, Display share options
・
Tap Display share options to toggle on ( )/off ( ).
・
Display share options can be set when Vertical
direction under Slide operation settings is set to
Memo .
Deleting All Permanent Screenshots
In Clip Now menu, Delete All YES
Page 61

Scrolling Screen Automatically
(ScrollAuto)
Scroll the screen up and down automatically.
Enabling ScrollAuto
Setting Whether to Show Status Bar Indicator
while Running Target Applications
In ScrollAuto menu, Notify in status bar
・
Tap Notify in status bar to toggle on ( )/off ( ).
Viewing Tutorial on ScrollAuto
59
In Home Screen, Flick Hot Sheet up (Settings)
Useful
Useful menu opens.
ScrollAuto
In ScrollAuto menu, Let's try! Follow onscreen
prompts
Using ScrollAuto
The feature may not follow the setting with certain
applications.
Drag up slowly
appears.
・
When Display is Dragged down, appears instead.
Handset Interface
ScrollAuto menu opens.
Turn ON/OFF ScrollAuto ( appears)
ScrollAuto is enabled.
・
Tap Turn ON/OFF ScrollAuto to toggle on ( )/off ( ).
ScrollAuto Operations
Setting ScrollAuto to Applications
In ScrollAuto menu, Set Apps Tap application(s)
・
Tap application to toggle on ( )/off ( ).
・If confirmation appears, follow onscreen prompts.
Slide finger to and release
Screen scrolls automatically.
・If confirmation appears, follow onscreen prompts.
・
To change scrolling speed, Tap or .
・Screen may not scroll depending on where you start
Dragging.
・Scroll stops when Display is Tapped or after five minutes.
ScrollAuto Usage Note
ScrollAuto does not work when Display is Flicked or
Dragged quickly.
ScrollAuto supports vertical scrolling only.
AQUOS ea
Page 62

60
Disabling Touch Operation
Temporarily (Childlock)
Set Childlock to disable touch operation temporarily and
prevent unintended operation.
Setting Childlock
Answer calls normally even while Childlock is set.
(Childlock)
OK
Childlock is set.
Canceling Childlock
When Display is turned off, Unlock screen
・To cancel Childlock when Display is turned on, Press
to turn off Display first.
Page 63

Phone
Placing/Answering Calls...................................................62
Optional Services..............................................................66
Making Call Settings........................................................ 70
Address Book.................................................................... 71
Page 64

62
Placing/Answering Calls
How to dial directly to make a call and answer a call, as well
as options when a call is arriving/during a call are described.
Support for VoLTE and HD Voice
Handset supports VoLTE and HD Voice for high-quality call
sound. See "Using VoLTE" and "Using HD Voice" for details.
Placing Calls
In Home Screen, Flick Hot Sheet up (Phone) Dial
Dialpad window opens.
Use onscreen dialpad to enter number
To end call, End call
Call ends.
Emergency Calls
Emergency Location Report
Making emergency calls (110, 119 or 118) automatically
reports handset location to corresponding agency (police,
etc.). This system is referred to as Emergency Location
Report, and notifies location based on positioning from
base stations.
・Location Report does not incur registration/transmission
fees.
・Location/signal conditions affect positioning accuracy.
Always provide location and call purpose.
・Hiding Caller ID (using 184, etc.) cancels Location Report.
However, corresponding agency may obtain location
information in life threatening situations.
・Location Report is not sent for calls made while outside
Japan.
・Include area code for landline numbers.
・
To correct number, Tap to delete digit(s), then enter
correct number.
CALL
Handset dials the number.
・Call begins when other party answers.
After Making an Emergency Call with Reject
Call Enabled
Reject call is disabled for about two hours to receive calls
from corresponding agency. To manually enable Reject call
again after making an emergency call:
Drag Status Bar down Unblock all calls for emergency
calls. RESTORE PREVIOUS SETTINGS TO BLOCK
CALLS. YES
Troubleshooting
Q. Call does not connect
A. Did you dial all digits for the number? Dial all digits
for numbers starting with a "0" area code, etc.
A. Is the signal weak? Change locations and call again.
Emergency Call Cautions
Areas Where Usable
Emergency calls from handset can be made only in SoftBank
service areas.
Page 65

Airplane Mode
Note that emergency calls cannot be made in Airplane
mode. Drag Status Bar down with two fingers and cancel it.
63
Answering Calls
When a call arrives, Drag Answer down
Call connects.
・
When screen is unlocked, Tap Answer at Display top.
To end call, End call
Call ends.
Missed Calls
For unanswered calls, notification appears in lock screen.
Phone
Notification
・Tap notification twice to check missed call records and
call back as needed.
・
When screen is unlocked, appears on Status Bar.
Drag Status Bar down for Notifications Window, then
Tap notification. When CALL and SMS appear below
notification, Tap to call back or send SMS.
AQUOS ea
Page 66

64
Arriving Call/Answer Phone Operations
Placing Call on Hold
As call is arriving, Drag Answer Holding down
・
When screen is unlocked, Tap Hold at Display top.
・Caller incurs call charges while on hold.
・
To answer call, Tap Answer .
・
To end call, Tap End call .
Answering with Answer Phone
As call is arriving, Drag down Absence Memo
・
When screen is unlocked, Incoming call
Absence Memo .
Playing Back Answer Phone Messages
In lock screen, Tap notification twice Tap message
・When screen is unlocked, Drag Status Bar down for
Notifications Window, then Tap notification Tap
message.
・Once playback ends, Display returns to message list.
・
To stop playback, Tap Stop .
Call Window Layout/In-Call Operation
Other party name/number
Other party photo
Call time
Mute own voice.
Adjust volume.
Record call.
End call.
HD Voice call in progress
Show dialpad.
Open menu.
Use Speakerphone.
1
Rejecting Arriving Calls
As call is arriving, Drag down Reject
・
When screen is unlocked, Incoming call
Reject .
Forwarding Arriving Calls
As call is arriving, Drag down Forwarding
・
When screen is unlocked, Incoming call
Forwarding .
・Set a phone number to forward calls to beforehand. See
"Call Forwarding" for details.
Stopping Ringtone and Vibration
As call is arriving, Volume Down Key
・
Alternatively, Drag down Silent ; when screen is
unlocked, Tap Incoming call Silent .
1 Also appears as call is arriving or on hold, and also in Call
History.
In-Call/Voice Memo Operations
Adjusting Call Volume
During call, Volume Up/Down Key
・
Alternatively, Tap Volume - / + during calls.
Recording Call (Voice Memo)
During call, Voice Memo
・
To end recording, Tap Stop .
Playing Back Voice Memos
In Home Screen, Flick Hot Sheet up (Settings)
Call Answer phone Voice Memo List Tap
Voice Memo
・
To stop playback, Tap Stop .
Placing Call on Hold
During call, Menu Hold
・
To resume call, Tap Unhold .
Page 67

Connecting/Disconnecting Bluetooth® Device
(Headset, Etc.) for Handsfree Conversation
During call, Menu Bluetooth ON / Bluetooth OFF
・Available when handset is paired with a Bluetooth® device
with handsfree functionality (e.g., headset).
Opening Address Book
During call, Menu Address Book
Placing Current Call on Hold & Calling Another
Number
During call, Menu Add Call Use onscreen
dialpad to enter number CALL
Troubleshooting
65
Using VoLTE
VoLTE (Voice over LTE) is a system enabling voice calls over
LTE networks. Compared to voice calls over conventional 3G
connections, high-sound quality calls and reduced time until
ringtones sound are possible (requires separate subscription).
・Available when the counterpart model is a VoLTE-compatible
model from SoftBank/Y!mobile. In addition, it is necessary
for both handset and the counterpart model to be within
the SoftBank 4G LTE (FDD LTE) service area, with "VoLTE
voice call" and "Use 4G" enabled.
・VoLTE is unavailable during international roaming.
Disabling VoLTE
In Home Screen, Flick Hot Sheet up (Settings)
More VoLTE voice call ( appears)
・
Tap VoLTE voice call to toggle on ( )/off ( ).
Phone
Q. Difficulty with call
A. It may be difficult to make a call in a location with
noise.
A. Check the call volume when using Speakerphone. It may
be difficult to make a call with a raised call volume.
Q. The other party cannot hear me
A. Are you covering Mic/Recorder Mic on the bottom
surface of handset with your finger, etc.? Make sure
not to cover Mic/Recorder Mic.
Q. Sound experiences popping during a call
A. Are you moving location during a call? Popping may
occur when switching areas for a better signal. This is
not a malfunction.
VoLTE Caution
VoLTE uses 4G network service, and is unavailable when
4G network service is disabled on handset. If VoLTE is
unavailable, follow the steps below to check whether 4G
network service is enabled ( appears).
In Home Screen, Flick Hot Sheet up (Settings)
More Cellular networks Use 4G
・
If disabled ( ), Tap Use 4G to enable it ( ).
Using HD Voice
HD Voice supports a wide range of audio tones for clearer,
more natural-quality voice calls.
・Available when the counterpart model is an HD Voice-
compatible model from SoftBank/Y!mobile.
・HD Voice is compatible with VoLTE and 3G network. Use HD
Voice with VoLTE for voice calls of even higher quality.
AQUOS ea
Page 68

66
Optional Services
Use these optional services for voice calls:
Optional Services
The following optional services are available.
Service Description
Call
Forwarding
Voicemail
Call Waiting
Group Calling1Merge multiple calls.
Notify Caller
ID
Call Barring
1 Requires separate subscription.
Divert all/unanswered calls to a preset
number.
Divert all/unanswered calls to Voicemail
Center; access messages via handset/
touchtone phones.
1
Answer calls during a call.
Send or hide your number when placing
calls.
Restrict incoming/outgoing calls by
conditions.
Call Forwarding
In Home Screen, Flick Hot Sheet up (Settings)
Call
Call settings appear.
Voicemail/divert
Voicemail/divert menu opens.
Settings/stop
Divert menu opens.
Always or No answer Enter number
・
For No answer , Tap WAIT TIME and select ring time as
needed.
Page 69

OK
67
Voicemail
Call Forwarding is set.
Canceling Call Forwarding
In Divert menu, Stop call forward YES
In Home Screen, Flick Hot Sheet up (Settings)
Call
Call settings appear.
Voicemail/divert
Voicemail/divert menu opens.
Settings/stop
Divert menu opens.
Phone
Always or No answer VOICEMAIL
・
For No answer , Tap WAIT TIME and select ring time as
needed.
OK
Voicemail is set.
When New Message is Recorded
appears on Status Bar. To play message, Tap New
voicemail in Notifications Window, then follow voice
guidance.
Canceling Voicemail
In Divert menu, Stop call forward YES
AQUOS ea
Page 70

68
Call Waiting
Requires separate subscription.
In Home Screen, Flick Hot Sheet up (Settings)
Call
Call settings appear.
Other service settings
Group Calling
Requires separate subscription.
During a call, Menu Add Call
Enter number CALL
When call connects, Menu Merge calls
Group Calling starts.
Other service settings appear.
Call waiting ( appears)
Call Waiting is set.
When Call Arrives during Another Call
A tone sounds; Drag right to answer.
Notify Caller ID
In Home Screen, Flick Hot Sheet up (Settings)
Call
Call settings appear.
Other service settings
Other service settings appear.
Canceling Call Waiting
In Other service settings, Call waiting ( appears)
Notify caller ID Hide number or Show number
Caller ID is set.
Page 71

Call Barring
69
Restrict outgoing/incoming calls and SMS messages.
・When attempting to place/send a call/SMS while calling is
restricted, a message appears. Message may take time to
appear in some areas.
Restriction Description
All outgoing
calls
Bar int'l call
Local & home
only
Restrict all
incomings
Bar if abroad Reject calls while outside Japan.
In Home Screen, Flick Hot Sheet up (Settings)
Call
Restrict all outgoing calls.
Restrict international calls; while outside
Japan, calls within current country are
allowed.
Restrict international calls; while outside
Japan, calls within current country and to
Japan are allowed.
Reject all calls.
Restrict / Not restrict
Restriction is set.
Call Barring Operations
Canceling All Outgoing Call Restrictions
In Call barring menu, Bar outgoing calls Stop all
outgoing calls YES
Canceling All Incoming Call Restrictions
Phone
In Call barring menu, Bar incoming calls Stop all
incoming calls YES
Restricting Outgoing Calls to Specified
Numbers
In Call barring menu, Restrict destinations Enter
Operation Password OK Specified phone
number Switch on/off ( appears) Call
permitted list <Empty> Enter number OK
Call settings appear.
Call barring
Call barring menu opens.
Bar outgoing calls or Bar incoming calls Tap option
Restricting Outgoing Calls to Numbers Saved in
Address Book
In Call barring menu, Restrict destinations Enter
Operation Password OK Restrict address book
( appears)
Rejecting Calls from Specified Numbers
In Call barring menu, Reject call Specified
numbers ADD A NUMBER Enter number YES
Rejecting Calls from Numbers Not Saved in
Address Book
In Call barring menu, Reject call Not registered
numbers ( appears)
Rejecting Calls with No/Undisplayable Caller ID
or from Payphones
In Call barring menu, Reject call Number not sent
/ Payphone / Unavailable ( appears)
Troubleshooting
Q. Calling is not barred
A. Are you using Call Forwarding or Voicemail? Calling
may not be barred even if All outgoing calls and
Restrict all incomings are set.
AQUOS ea
Page 72

70
Making Call Settings
Call Settings
Check call information and make settings. Settable items are
the following.
Item Description
Quick
responses
Answer phone
Voicemail/
divert
Int'l call
settings
Call barring
Other service
settings
Edit an SMS message to send to a caller
when unable to answer.
Play back Answer Phone and Voice Memos
and set operation of Answer Phone.
Enable and set operation of Voicemail and
Call Forwarding.
See "Optional Services" for details.
Set a country code list for international
calls and Abroad assistant.
See "Calling from Outside Japan" for
details.
Set call restrictions, rejection, etc.
See "Optional Services" for details.
Set notification of caller ID and Call
Waiting.
See "Optional Services" for details.
Call Setting Operations
Editing SMS Message to Send to Caller when
Unable to Answer
In Call settings, Quick responses Tap message to
edit Enter message OK
Setting/Canceling Answer Phone
In Call settings, Answer phone Answer phone
Mannermode / ON / OFF
Setting Answering Message for Answer Phone
In Call settings, Answer phone Answering message
setting Normal / Drive / Public
Setting Answering Time for Answer Phone
In Call settings, Answer phone Answer time
setting Select time SET
In Home Screen, Flick Hot Sheet up (Phone)
Settings
Call settings appear.
・
Alternatively, in Home Screen, Flick Hot Sheet up
(Settings) Call for Call settings.
Set each item
Setting is complete.
Page 73

Address Book
71
Save phone numbers and mail addresses as well as birthdays,
nicknames, etc.
Set ringtones for each contact as needed.
Address Book Caution
Contacts may be altered/lost if handset is left uncharged
or due to accidents, malfunctions, repairs, handset
upgrade/replacement, mishandling, etc. Back up important
contacts and other data regularly. SoftBank Corp. is not
liable for any damages resulting from loss/alteration of
contacts.
Adding New Contacts
In Home Screen, Flick Hot Sheet up (Address Book)
YES
Contact is saved.
Operations when Saving Contacts
Saving Photo
In window for saving new contact, Tap image frame (face
image) Tap save method Save operation
Setting Operation for Arriving Voice Call
In window for saving new contact, Ring Set Tap
item Follow onscreen prompts
・Set operation such as type of ringtone, vibration, etc.
Phone
Address Book opens.
Add new entry
Window for saving new contact opens.
・If confirmation appears, follow onscreen prompts.
Tap item Complete entry
Adding Groups
In Address Book, Add/edit group Add
Tap Group name entry field Enter group name
Save
・If confirmation appears, follow onscreen prompts.
Setting Groups
In window for saving new contact, Group setting
Tap group ( appears) Decision
・To add a group, in window for saving new contact,
Group setting Add .
・If no groups are saved, confirmation for adding group
appears. Tap YES for window for saving new group.
Enter group name, etc. and Tap Save .
Showing Other Savable Items
In window for saving new contact, Other
・Save chat, nickname, organization, etc.
Saving Type of Phone Number, Etc.
In window for saving new contact, Tap type ( , etc.)
Tap type to save
・For Custom, enter type name.
AQUOS ea
Page 74

72
Saving Multiple Different Phone Numbers, Etc.
to Contact
Dialing from Address Book
In window for saving new contact, for item to add
to Enter number, etc.
Deleting Entered Phone Number, Etc.
In window for saving new contact, for item to delete
Saving Contact from Dialpad Window
Save a number entered in dialpad window directly to
Address Book.
In Home Screen, Flick Hot Sheet up (Phone)
Dial Tap dialpad keys to enter number to save
Add to Address Book Follow onscreen prompts
Syncing with Contacts on Server
Sync handset Address Book with Google contacts on server.
Also sign in to a Google Account before syncing with a
non-Google Account.
In Home Screen, Flick Hot Sheet up (Settings)
Accounts Tap account type Tap application or
data to sync ( appears)
・If multiple accounts of the same type are saved, after
Tapping an account type, Tap an account.
In Home Screen, Flick Hot Sheet up (Address Book)
Address Book opens.
・
Alternatively, in Home Screen, Flick Hot Sheet up
(Phone) AddressBook .
Tap index
・Flick index left/right for hidden indexes.
・Tap selected index again to show subindexes (e.g., D, G, J,
M, P, T, and W for A). Tap subindex for hidden contacts
whose last names' readings start with the subindex.
Tap contact
Contact opens.
at right of number
Handset dials number. Call begins when other party
answers.
Page 75

To end call, End call
Call ends.
73
Phone
AQUOS ea
Page 76

74
Page 77

Messaging & Internet
Messaging.......................................................................... 76
Sending S! Mail/SMS.........................................................76
Opening & Replying to S! Mail/SMS................................ 78
Using Gmail....................................................................... 80
Using Email........................................................................82
Using the Internet (Chrome)............................................85
Page 78

76
Messaging
S! Mail
Exchange messages with S! Mail-compatible SoftBank handsets
and email compatible devices (other mobiles, PCs, etc.) beyond
SMS character entry limit; attach media files.
SMS
Exchange short messages (up to 160 single-byte characters)
using handset numbers as addresses.
Gmail
Gmail is Google's webmail service. Handset automatically syncs
with Gmail.
Email
Sending S! Mail/SMS
Sending S! Mail/SMS
In Home Screen, Flick Hot Sheet up (Mail)
Use email (POP3/IMAP4) on handset.
・Set up an email account beforehand.
・Sending/receiving email on handset syncs handset and
mail server; sent/received messages (in the POP protocol,
received messages only) are also accessible from PCs.
・Alternatively, enter phone numbers or mail addresses in
Recipient field directly.
Phonebook / Outgoing History / Incoming History /
Mail Group
・
Tap Phonebook , Outgoing History , or Incoming
History to select recipients from Address Book, Outgoing
History, or Incoming History.
・
Tap Mail Group to select a mail group and set all the
members as recipients.
Page 79

Sending of S! Mail/SMS
77
Select recipient(s) OK
・
Tap Phonebook , Outgoing History , Incoming History ,
or Mail Group to change the recipient list.
・
After setting recipients, Tap to check recipients'
phone numbers/mail addresses or set them to Cc/Bcc.
・If recipients are set to Cc/Bcc, the message is sent as S!
Mail.
・
To delete a recipient, Tap and then .
Alternatively, Tap and then Delete recipient .
Tap Subject field/Text entry field Enter subject/text
S! Mail and SMS Switching
S! Mail and SMS automatically switch at sending, depending
on whether a subject is entered, text length, etc.
・When creating a message, check which it is sent as at top
of Display.
・"New Mail" appears: message is sent as S! Mail.
・"New SMS" appears: message is sent as SMS.
・
In Home Screen, Flick Hot Sheet up (Mail)
Common Settings SMS/S!Mail Automatic
Switching ( appears) to allow selection between
(S! Mail) and (SMS) when creating a message.
About Drafts
If is Tapped while creating S! Mail or SMS, the
message is saved as a draft.
Drafts are saved to Draft Box in folder list, and are
indicated as in thread list. Open an S! Mail/SMS draft
to edit and send it.
Messaging & Internet
・
Tap to attach a file.
・If a subject is entered or a file is attached, the message is
sent as S! Mail.
Send
S! Mail/SMS is sent.
・Failed S! Mail/SMS messages are saved as drafts.
AQUOS ea
Page 80

78
Opening & Replying to S! Mail/SMS
Handset receives S! Mail/SMS messages automatically by
default. Optionally, retrieve messages manually, and also
retrieve all messages saved on the server.
Opening New S! Mail/SMS
When message arrives, new message notification and
Notification Indicator appear.
Tap notification twice
Opening S! Mail/SMS
In Home Screen, Flick Hot Sheet up (Mail)
Thread list opens.
Tap thread
Thread details open.
・To open new message from Notification Indicator, Drag
Status Bar down for Notifications Window, then Tap
corresponding notification.
・For two or more new messages, thread list opens.
Spam Mail
Set spam filtering to save messages from senders not
in Address Book to Spam thread list. New message
notification does not appear. To check messages saved to
Spam thread list:
In Home Screen, Flick Hot Sheet up (Mail)
Spam mail
・If confirmation appears, follow onscreen prompts.
Thread details open.
・To open message drafts or unsent messages, Tap a thread
indicated by to open thread details including draft/
unsent messages.
Tap message
S! Mail/SMS message window opens.
Widgets
Use widgets to view mail information in Home Screen.
Widgets appear in simple (top of screenshot) and detailed
(bottom of screenshot) views. Check number of unread
messages in simple view. Check date/time and preview of
messages in addition to number of unread messages in
detailed view. Content of latest message appears if all
messages are read.
Page 81

79
Message Operations
Deleting All Server Mail
In thread list, Handle Server Mail Delete all
mails Delete OK
Checking Available Storage on Mail Server
In thread list, Handle Server Mail Check
storage space
Protecting Messages
In thread details, Touch & Hold a message
・
To cancel protection, Tap again.
Saving Attachments
In S! Mail message window, for attachment to
save ( ) Save
Replying to S! Mail/SMS
In S! Mail/SMS message window, /
Enter text Send
Messaging & Internet
Deleting Threads in Thread List
In thread list, Touch & Hold thread Delete
・To select multiple threads, Touch & Hold first thread,
and then Tap other threads.
Deleting Messages in Thread Details
In thread details, Touch & Hold a message
Delete
Reporting Spam in S! Mail/SMS Message Window
In S! Mail/SMS message window, Declare Spam
Yes
Listing Addresses of Sender/Recipients in
Thread Details
In thread details, List Address
Listing Addresses of Sender/Recipients in S!
Mail/SMS Message Window
Message is sent.
In S! Mail/SMS message window,
AQUOS ea
Page 82

80
Using Gmail
Use Gmail (Google's webmail service) as well as your work/
personal email.
Setting an Account
Set up a Google Account or an email account to use Gmail.
When activating (Gmail) for the first time, account setup
menu appears; complete setup.
・Account setup menu does not appear if you are already
signed in to a Google Account.
・To use your existing account, information such as username
(ID), password, and server name is required.
In Home Screen, Flick Hot Sheet up (Google)
(Gmail)
Creating/Sending Gmail
In Home Screen, Flick Hot Sheet up (Google)
(Gmail)
Message list opens.
・If confirmation appears, follow onscreen prompts.
Account setup menu opens.
・If confirmation appears, follow onscreen prompts.
Add an email address
Tap account type
Message composition window opens.
Enter recipient, subject and text
Message is sent.
Operations when Creating Message
Adding Cc/Bcc Recipients
In message composition window, in Recipient field
Enter recipient
Follow onscreen prompts
Account setup is complete.
Attaching Files
In message composition window, Attach file
Select where file is saved Select file
・
To attach files saved in Google Drive, select Insert from
Drive .
Page 83

Selecting Recipients from Address Book
In message composition window, Add from
Contacts Select recipient
Saving Current Message as Draft
While creating message, Save draft
Discarding Current Message
In message composition window, Discard
Discard
81
Opening Gmail
In Home Screen, Flick Hot Sheet up (Google)
(Gmail)
Message list opens.
Opening New Gmail
When message arrives, new message notification appears in
lock screen.
・When Display is turned off, Charging/Notification Lamp
flashes.
In lock screen, Tap new message notification twice
Message window opens.
・For two or more new messages, message list opens; Tap one.
・
When screen is unlocked, or appears on Status Bar.
Drag Status Bar down, then Tap notification.
Tap message
Message window opens.
Operations when Opening Messages
Replying to Messages
In message window, for message to reply to
Create message
・
To reply to all, for message to reply to Reply all .
・
Alternatively, to reply, Tap Reply or Reply all below
message.
Forwarding Messages
Messaging & Internet
In message window, for message to forward
Forward Create message
・
Alternatively, to forward, Tap Forward below message.
Resetting Messages as Unread
In message window,
・Alternatively, in message list, Tap icon for message to
reset as unread ( appears) .
Deleting Messages
In message window,
・Alternatively, in message list, Tap icon for message to
delete ( appears) .
AQUOS ea
Page 84

82
Archiving Messages
In message window,
・Alternatively, in message list, Tap icon for message to
archive ( appears) .
Using Email
Send/receive email using (Email), an email-only
application.
Setting an Account
Syncing Accounts Manually
In message list, Drag down
・Sync sent and received messages manually at any time
regardless of the automatic sync settings.
Set up an email account to use email.
When activating (Email) for the first time, account setup
menu appears; complete setup.
・Information such as username (ID), password, and server
name is required.
In Home Screen, Flick Hot Sheet up (Tools)
(Email)
Account setup menu opens at first activation.
Follow onscreen prompts to set up account
Account setup is complete.
Page 85

Creating/Sending Email
In Home Screen, Flick Hot Sheet up (Tools)
(Email)
83
Discarding Current Message
In message composition window, Discard
DISCARD
Adding Quick Response Text
In message composition window, Insert quick
response Select text
Opening New Email
Message list opens.
Message composition window opens.
Enter recipient, subject and text
When message arrives, new message notification appears in
lock screen.
・When Display is turned off, Charging/Notification Lamp
flashes.
In lock screen, Tap new message notification twice
Message window opens.
・For two or more new messages, message list opens; Tap one.
・
When screen is unlocked, appears on Status Bar. Drag
Status Bar down, then Tap notification.
Messaging & Internet
Message is sent.
Operations when Creating Message
Adding Cc/Bcc Recipients
In message composition window, in Recipient field
Enter recipient
Attaching Files
In message composition window, Attach file
Select where file is saved Select file
Saving Current Message as Draft
While creating message, Save draft
AQUOS ea
Page 86

84
Opening Email
In Home Screen, Flick Hot Sheet up (Tools)
(Email)
Message list opens.
Tap message
Syncing Accounts Manually
In message list, Drag down
・Sync sent and received messages manually at any time
regardless of the automatic sync settings.
Message window opens.
Operations when Opening Messages
Replying to Messages
In message window, for message to reply to
Create message
・
To reply to all, Reply all .
Forwarding Messages
In message window, for message to forward
Forward Create message
Resetting Messages as Unread
In message window,
・Alternatively, in message list, Tap icon for message to
reset as unread ( appears) .
Deleting Messages
In message window, OK
・Alternatively, in message list, Tap icon for message to
delete ( appears) OK .
Page 87

85
Using the Internet (Chrome)
Use Chrome simply by entering words to search for or URLs.
TLS
TLS (Transport Layer Security) is a protocol for encrypting
sent/received data. While in a screen connected by
TLS, data is encrypted to safely send/receive private
information, credit card numbers, corporate secrets,
etc., and provide protection against online threats
(eavesdropping, falsification, impersonation, etc.).
TLS Caution
When opening a secured page, users must decide as their
responsibility whether or not to open the page with use
of TLS. SoftBank Corp. and the Certification Authorities
Symantec Website Security G.K. and Cybertrust make no
guarantees whatsoever to users regarding security of TLS.
Using Chrome
Chrome Operations
Signing in to My SoftBank
Access My SoftBank to check service charges or reward
points, change contract details (subscribed price plan,
optional services, etc.), check handset email address, use
anti-spam settings, etc.
In Chrome, Bookmarks SoftBank
My SoftBank Follow onscreen prompts
Searching within Current Webpage
In Chrome, Find in page Enter search text
Search results are highlighted.
Saving (Downloading) Images
In Chrome, Touch & Hold image Download image
・
appears on Status Bar when image is saved. To
open the image, Tap download complete notification in
Notifications Window.
・
Open saved (downloaded) image from (Files),
(Album), etc.
Messaging & Internet
In Home Screen, Flick Hot Sheet up (Google)
(Chrome)
Chrome activates.
・If confirmation appears, follow onscreen prompts.
Tap Text entry field at top of Display Enter search words
or URL
Opening Saved (Downloaded) Image, Etc.
In Home Screen, Flick Hot Sheet up (Tools)
(Files) Tap image, etc.
Search results or webpage opens.
AQUOS ea
Page 88

86
Adding Bookmarks
In Home Screen, Flick Hot Sheet up (Google)
(Chrome)
Chrome activates.
Open target webpage
Opening Bookmarks
In Home Screen, Flick Hot Sheet up (Google)
(Chrome)
Chrome activates.
Bookmarks
Current webpage is saved as a bookmark.
Bookmark Operations
Editing Bookmarks
In Chrome, Bookmarks for bookmark to
edit Edit Edit each item
Moving Bookmarks
In Chrome, Bookmarks for bookmark to
move Move Select location
・SoftBank folder and bookmarks in SoftBank folder cannot
be moved.
Deleting Bookmarks
In Chrome, Bookmarks for bookmark to
delete Delete
Bookmarks window opens.
Tap bookmark
Corresponding webpage opens.
Page 89

87
Checking Browsing History
In Home Screen, Flick Hot Sheet up (Google)
(Chrome)
Chrome activates.
History
Opening New Tabs
Open multiple webpages in different tabs to switch between
them easily.
In Home Screen, Flick Hot Sheet up (Google)
(Chrome)
Chrome activates.
New tab
Messaging & Internet
History window opens.
Tap record
Webpage opens.
Another tab opens.
Tab Operations
Opening Recent Tabs
In Chrome, Recent tabs Tap tab
Viewing Webpages without Leaving Browsing
History, Cookies, Etc.
In Chrome, New incognito tab Follow onscreen
prompts
AQUOS ea
Page 90

88
Setting Chrome
Make Chrome settings. Settable items are the following.
Item Description
Sign in to
Chrome
Search engine Select a search engine.
Autofill forms
Save
passwords
Home page Set a homepage.
Privacy
Accessibility Set text size, etc.
Site settings
Data Saver
About Chrome
Sign in to your Google Account and make
settings for tabs, bookmarks, history, etc.
View account information.
Enable or disable automatic form entry, or
edit address and credit card information.
Enable or disable the saving of user
names and passwords by webpages,
confirm/delete webpages that have saved
passwords, etc.
Set whether to show suggestions for an
access error, whether usage and error
reports are sent, etc.
Set whether to allow cookies, enable
JavaScript, etc.
Set whether to economize data usage by
compressing webpages before reading
them.
View version information, etc. about
Chrome.
In Home Screen, Flick Hot Sheet up (Google)
(Chrome)
Chrome activates.
Settings Set items
Settings are complete.
・For some items, additional settings may appear when
Tapping the item.
Page 91

Camera
Capturing Photos/Videos................................................. 90
Page 92

90
Capturing Photos/Videos
By default, photos and videos taken with handset are saved to
handset (internal storage).
To save them on SD Card, insert SD Card before using Camera,
then change save location as follows.
In Home Screen, Flick Hot Sheet up (SHCamera)
COMMON Save To microSD
Camera Cautions
General Use
Mind etiquette when using Camera.
Test Camera before shooting special moments.
Do not use Camera in places where shooting is prohibited.
Shot images may not be used/transferred without
copyright holder (photographer) permission, except for
personal use.
If Lens Becomes Dirty
Fingerprints/smudges on lens prevent capturing of clear
images. Wipe lens with a soft cloth beforehand.
Avoid Exposure to Direct Sunlight
Aim Back Camera at subject
・Drag up/down to adjust brightness.
・Drag left/right or Pinch/Spread to adjust zoom.
・Tap subject for focus lock.
To cancel focus lock, Tap area outside the focus mark.
/ Volume Up/Down Key
Be careful not to expose lens to direct sunlight for long
periods. May discolor color filter and affect color of
images.
Continuous Recording Time
Recording capacity is 2 GB per file (recording stops when
exceeded). To continue recording, start another session.
Mobile Light Warning
Do not turn on Mobile Light close to eyes, look directly at
Mobile Light when on, or shine Mobile Light in eyes; may
affect eyesight or cause other problems.
Capturing Photos
In Home Screen, Flick Hot Sheet up (SHCamera)
Shutter sound plays; photo is saved to internal storage.
・If focus is locked, alternatively, Tap the focus mark to
capture photo.
・
To capture photos continuously, Press / Volume Up/
Down Key for 1+ seconds.
Page 93

91
Recording Videos
In Home Screen, Flick Hot Sheet up (SHCamera)
Aim Back Camera at subject
・Drag up/down to adjust brightness.
・Drag left/right or Pinch/Spread to adjust zoom.
Viewfinder Layout
Front/Back Camera switch
Switch between Front Camera and Back Camera.
Mobile Light
Change Mobile Light setting.
Settings
Access various Camera settings.
Shooting mode
Change shooting mode.
Record video
Capture photo
Album/thumbnail
Open Album, or view immediately captured photo/video.
Camera
・
To capture photos while recording video, Tap or Press
Volume Up/Down Key.
・Tap subject for focus lock.
To cancel, Tap area outside the focus mark.
Tone sounds and video is saved to internal storage.
・Indicators shown in Viewfinder and available functions/
settings vary depending on Camera type and shooting mode.
Troubleshooting
Q. Cannot open Camera/Camera exits suddenly
A. Camera does not open if battery level is low. Charge
handset adequately before using Camera.
A. Continuing to use Camera while handset is warm causes
warning to appear, after which Camera saves captured
image data and exits.
A. Camera exits automatically after a period of inactivity.
Q. Images are dark/grainy
A. Is there a strong light near the subject, or a strong
light source in the screen? Avoid letting a strong light
source (the sun, light, etc.) in the screen. Leaving
handset in a warm place for a long time or where
Camera is in direct sunlight for a long time may affect
image quality.
Q. Images captured with Mobile Light appear whitish
A. A finger or cover near the lens can reflect light from
Mobile Light and cause captured images to appear
whitish.
AQUOS ea
Page 94

92
Page 95

Music & Images
Listening to Music (Play Music)...................................... 94
Viewing & Managing Photos/Videos (Album)..................96
Page 96

94
Listening to Music (Play Music)
Playing Music
Supported file formats:
・3GPP, MP4, MP3, AMR, OGG Vorbis, WAVE, MIDI, XMF,
RTTTL/RTX, OTA, iMelody, ADTS raw AAC, FLAC
Tap item Tap song
In Home Screen, Flick Hot Sheet up (Google)
(Play Music)
Listen Now opens.
・If confirmation appears, follow onscreen prompts.
Music library
Song plays.
・
For SONGS (in ), Tap song directly.
・Depending on category, after Tapping an item, Tap another
item (e.g., album name).
Opening Music Playback Screen
While playing song, Drag playback bar at Display bottom up
Music Playback Screen Layout
Music library opens.
ARTISTS / ALBUMS / SONGS / GENRES
Song image
Toggle repeat all songs, repeat current song, normal
playback.
Drag slider to adjust playback position.
Song rating
Play previous song/play current song from beginning.
Song title/artist
Show playback queue (list of songs to be played).
Add to playlist, go to artist, etc.
Toggle shuffle playback on/off.
Play next song.
Song rating
Pause/play
Page 97

95
Creating Playlists
In Home Screen, Flick Hot Sheet up (Google)
(Play Music)
Listen Now opens.
・If confirmation appears, follow onscreen prompts.
Music library for item/song to add to
playlist Add to playlist
Adding Currently Playing Song to a
Playlist
In Music Playback screen, Add to playlist Tap
playlist name
Song is added to playlist.
NEW PLAYLIST
Enter name and description CREATE PLAYLIST
Music & Images
Playlist is created.
AQUOS ea
Page 98

96
Viewing & Managing Photos/
Videos (Album)
Photos/videos captured on handset and downloaded images are
automatically sorted into Event and Map categories.
Viewing Photos/Videos
View captured/downloaded photos and videos.
Filtering Files by Shooting Mode in File List
Tap to show shooting mode types ( All Video , Rapid
Shooting pic , Photo Sphere and Background Blur )
below Filter Change. Tap shooting mode type to access
files sorted into the shooting mode. Alternatively, to show
shooting mode types, Flick left edge of Display to the
right.
・
To cancel filter, Tap .
Image File format
Photo JPEG, PNG, GIF, BMP, WebP
Video 3GPP, MPEG-4, MPEG-TS, WebM, Matroska
In Home Screen, Flick Hot Sheet up (Album)
File list opens.
・Flick up/down for hidden photos/videos.
Tap photo/video
Icons Appearing for Photos/Videos in File List
Icon appears for photos/videos, indicating corresponding
shooting mode or setting specified for them.
・
appears for photos captured with Rapid Shooting pic.
Tap photo, then Tap in file view window, to open
photos as index at Display bottom (Rapid Shooting pic
index window).
・
appears for photos captured using DeFocus mode on
another handset model. Tap photo, Tap in file view
window, then Drag slider left/right to adjust intensity of
defocusing effect.
・
appears for photos captured with an application
capable of 360-degree panorama shots. Tap photo, then
Tap in file view window, to view photo rotatable
360 degrees from left to right, and top to bottom.
・
appears for photos/videos that are set to be hidden.
Photo/Video Viewing Operations
Using Slideshow
In file list or file view window, Slideshow
・To stop slideshow, Tap image.
Photo/video opens (file view window).
・
For video playback, Tap , then follow onscreen prompts.
About File List
Categories in File List
Tap to show file categories ( All , All(Date)
, Folder , Event and Map ) below View Change.
Tap category to access files sorted into the category.
Alternatively, to show file categories, Flick left edge of
Display to the right.
・
When activating Album for the first time, All file list
opens. Album activates in the last-used state thereafter
(file list or folder list opens).
Saving Images as Wallpapers or Address Book
Contact Photos
In file list or file view window, Register image
Follow onscreen prompts
Deleting Images
In file view window, YES
・
If is hidden, Tap Display first.
Zooming In/Out on Photos/Videos
In file view window, Tap Display twice or Pinch/Spread
Switching Views in File List
In file list, folder list, or file view window,
Settings Thumbnail view Multi-tile view /
Grid view / Grid (large) view
Page 99

97
Setting Whether to Show Images More Clearly
In file list, folder list, or file view window,
Settings Detail up
・
Tap Detail up to toggle on ( )/off ( ).
Selecting a Range of Photos from Rapid
Shooting Pic
In Rapid Shooting pic index window, Clip range
Drag / right and left to select the desired
range YES
Photos that have not been selected are deleted.
Selecting Desired Photos from Rapid Shooting
Pic
In Rapid Shooting pic index window, Tap desired photo to
set as favorite ( appears)
・
In Rapid Shooting pic index window, Tap Display
only marked images to show only photos set as
favorites.
Selecting and Deleting Photos from Rapid
Shooting Pic
In Rapid Shooting pic index window, Delete
selection Tap photo(s) to delete ( appears)
Delete YES
Setting a Photo/Video to be Hidden in Album
In file list, Tap photo/video to hide (
appears)
・
Tap to hide ( appears), to show (
appears).
・If confirmation appears, follow onscreen prompts.
Setting Multiple Photos/Videos to be Hidden in
Album
In file list, Display/Hide images Select images
to hide Tap photos/videos to hide ( appears)
OK YES
・
Tap photo/video to toggle selected ( )/unselected
( ).
Hiding Specified Photos/Videos in Album
In file list, Display/Hide images Hide images
Photos/videos set to be hidden ( ) are hidden in
Album.
・
To show hidden photos/videos, Tap Display/Hide
images Display images .
・Alternatively, to switch hide/show setting, in file view
window, Tap Hide images / Display images .
・In applications other than Album, even photos/videos set
to be hidden appear.
Music & Images
Selecting and Saving Photos from Rapid
Shooting Pic
In Rapid Shooting pic index window, Tap photo
Register image Follow onscreen prompts
Switching Rapid Shooting Pic Index Window
Views
In Rapid Shooting pic index window, Switch to grid
view / Switch to preview
Saving Current Image as Photo (Atokara
Capture)
In video file view window, Drag left or right
to show frame to capture
Current image is saved to internal storage.
・
To move backward/forward frame by frame, Tap /
or Drag frame left/right.
・To save the current image as a photo and share it, Tap
. Follow onscreen prompts.
Troubleshooting
Q. Cannot open photos or videos
A. The database may be disabled. Connect handset to a PC
using Micro USB Cable, and delete the DATABASE folder
in ¥PRIVATE¥SHARP¥PM on internal storage before
opening photos or videos.
AQUOS ea
Page 100

98
 Loading...