

Sharp Aquas LC-52LE920UN, Aquas LC-60LE920UN, Aquos LC-52LE920UN, Aquos LC-60LE920UN Operation Manual
Page 1
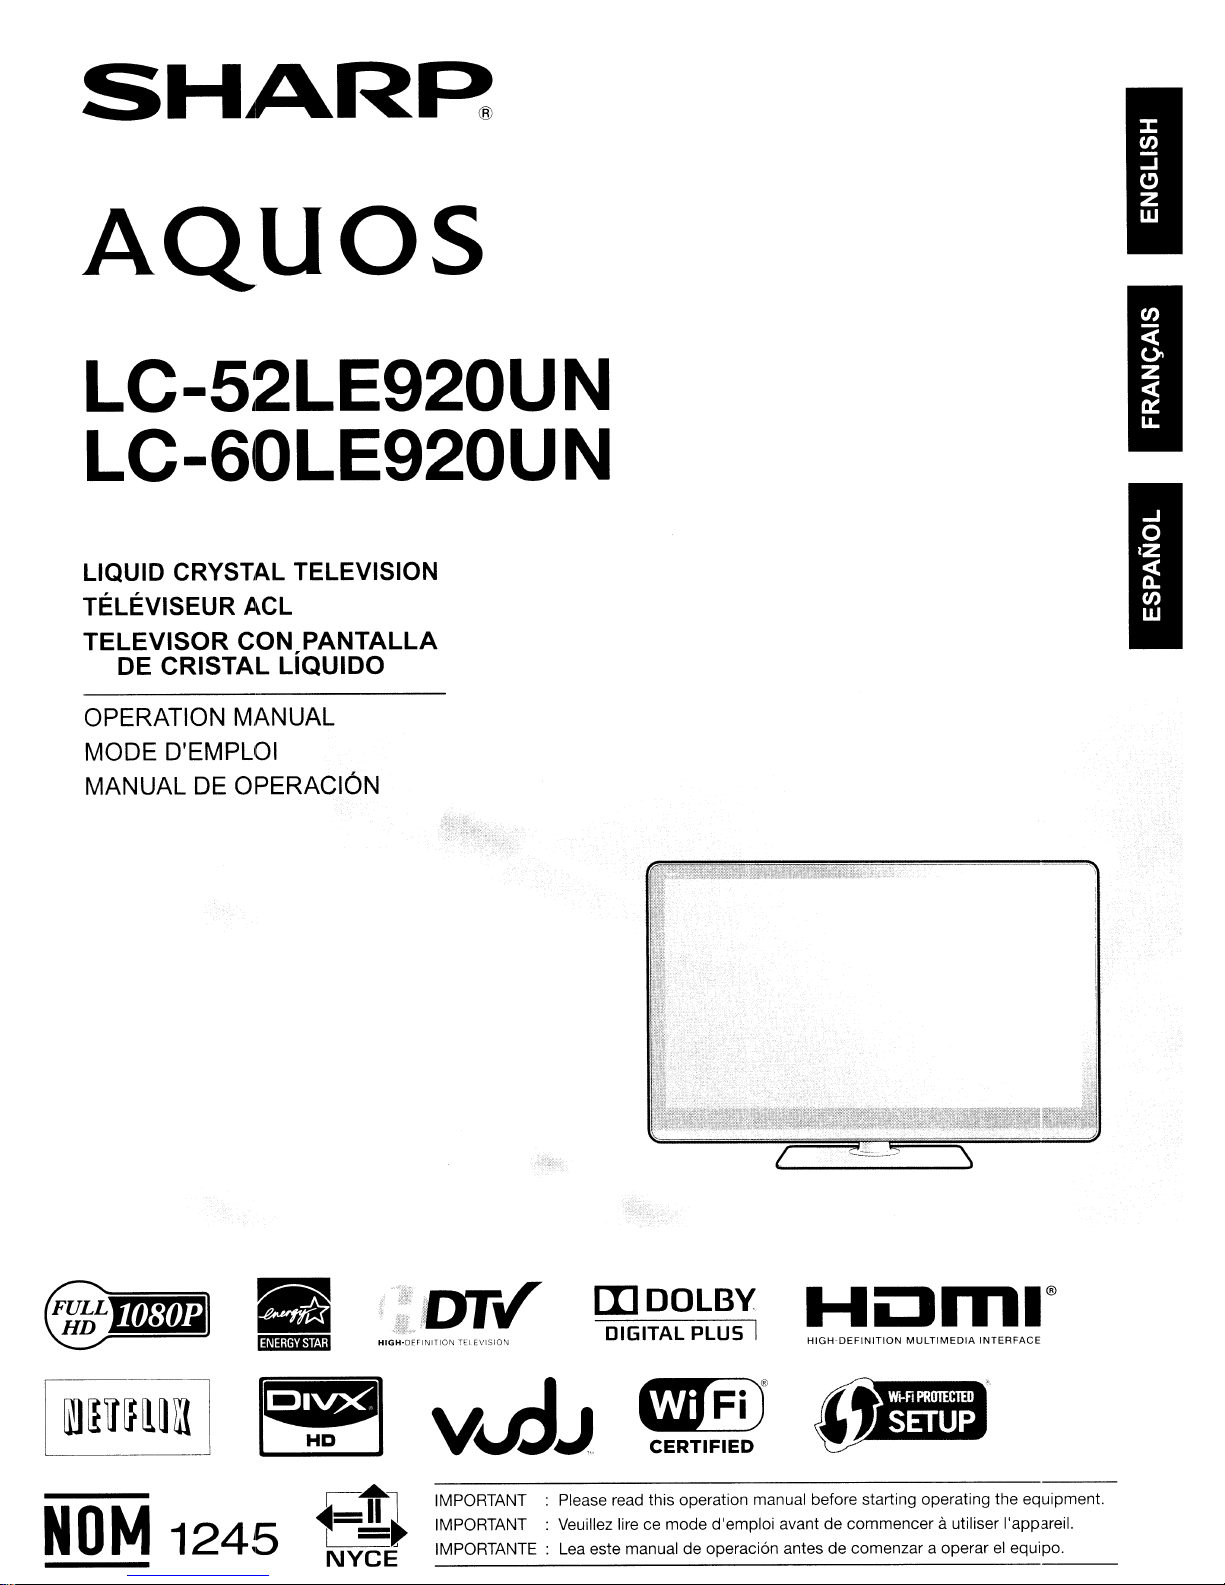
SHAR~
AQuas
LC-52LE920UN
LC-60LE920UN
LIQUID CRYSTAL TELEVISION
TELEVISEUR ACL
TELEVISOR
DE CRISTAL LlQUIDO
OPERATION MANUAL
MODE D'EMPLOI
MANUAL DE OPERACION
CON PANTALLA
•
li~i#;itt4i"';1
NOM
1245
~,~.:DTv'
HIGH-DErINITION
[l]DOLBY
TELEVISION
DIGITAL PLUS I
HIGH-DEFINITION
MULTIMEDIA
INTERFACE
Iiffi)®
CERTIFIED
IMPORTANT : Please read this operation manual before starting operating the equipment.
IMPORTANT : Veuillez lire ce mode d'emploi avant de commencer
IMPORTANTE : Lea este manual de operaci6n antes de comenzar a operar
autiliser I'appareil.
el
equipo.
Page 2

LC-52LE920UN
LC-60LE920UN
LIQUID CRYSTAL TELEVISION
ENGLISH
OPERATION MANUAL
IMPORTANT:
To aid reporting
TV's model and serial numbersinthe space provided. The
numbers are located at the rear
in
caseofloss or theft, please record the
of
the
TV.
Model No.: ]
L..._s_er_'a_1
I
_N_O._:
_
IMPORTANT INFORMATION
WARNING: TO REDUCE THE RISK OF FIRE OR ELECTRIC SHOCK, DO
NOT
RISK OF ELECTRIC SHOCK
DO NOT OPEN
A
CAUTION: TO REDUCE THE RISK OF ELECTRIC SHOCK,
DO NOT REMOVE COVER
NO USER-SERVICEABLE PARTS INSIDE.
REFER SERVICING TO QUALIFIED SERVICE
CAUTION: TO PREVENT ELECTRIC SHOCK, MATCH WIDE BLADE OF PLUG TO WIDE
SLOT, FULLY INSERT.
EXPOSE THIS PRODUCT TO RAIN OR MOISTURE.
The lightning flash with arrow-head
symbol, within an equilateral triannle,
•
PERSONNEL.
(OR
BACK).
is intended
presence
voltage" within the
enclosure that may beofsufficient
magnitude
electric
The exclamation point within a
triangle is intended
to
the presenceofimportant
operating and maintenance
(servicing) instructions
literature accompanying the product.
to
alert the usertothe
of
uninsulated "dangerous
product's
to
constitute a risk
shock
to persons.
to
alert the user
in
the
of
WARNING:
approved by the manufacturer could void the user's authoritytooperate this equipment.
CAUTION:
This product satisfies FCC regulations when shielded cables and connectors are usedtoconnect the unittoother
equipment.
cables and connectors
FCC Regulations state that any unauthorized changesormodificationstothis equipment
To
prevent electromagnetic interference with electric appliances such as radios and televisions, use shielded
for
connections.
not
expresslyI
~
@-
1
Page 3
IMPORTANT INFORMATION
DECLARATION OF CONFORMITY:
SHARP
This device complies with Part 15ofthe FCC Rules. Operation is subjecttothe following
(1)
received, including interference that may cause undesired operation.
RESPONSIBLE
For
INFORMATION:
This equipment has been tested and found to
Rules. These limits are designedtoprovide reasonable protection against harmful interferenceina residential installation. This
equipment generates, uses and can radiate radio frequency energy and, if not installed and usedinaccordance with the
instructions. may cause harmful interferencetoradio communications. However, there is no guarantee that interference will not
occurina particular installation. If this equipment does cause harmful interference to radio or television reception, which can be
determined by turning the equipment off and on, the user is encouraged to try to correct the interference by one or more of the
following measures:
--.
_.
LIQUID
This device may not cause harmful interference, and
Business
Reorient or relocate the receiving antenna.
Increase the separation between the equipment and receiver.
Connect the equipment into an outlet on a circuit different from thattowhich the receiverisconnected.
Consult the dealer oranexperienced radiofTV technician for help.
CRYSTAL
PARTY:
SHARP
Sharp
TEL:
ELECTRONICS
Plaza,
1-800-BE-SHARP
Customers:
TELEVISION,
CORPORATION
Mahwah,
URL
New
Jersey
http://www.sharpusa.com
MODEL
07495-1163
comply
LC-52LE920UN/LC-60LE920UN
(2)
this device must
with the limits for a Class B digital device, pursuanttoPart 15 of the FCC
accept
any interference
two
conditions:
FCC Compliance Statement
This device complies with part 15ofthe FCC Rules. Operation is subject to the following
(1)
This device may not cause harmful interference, and
Interference that may cause undesired operation.
Wireless
For
This device is going to be operatedin5.15-5.25GHz frequency range, it is restrictedinindoor environment only.
Important: Any changes
authoritytooperate the equipment.
FCC Radiation Exposure Statement: This equipment complies with FCC radiation exposure limits set forth for
environment. This equipment should be installed and operated with minimum distance 20cm between the radiator &your body.
product
Radio
availableinthe USA/Canada market, only channel 1-11 can be operated. Selectionofother channels is not possible.
or
modifications not expressly approvedbythe party responsible for compliance could void the user's
(2)
this device must accept any interference received, Including
two
conditions:
an
uncontrolled
Industry Canada Statement
This Class B digital apparatus complies with Canadian ICES-003.
Cet appareil numerique delaclasse
Operation is subject to the following
(1)
This device may not cause harmful interference, and
interference that may cause undesired operationofthe device. This device and its antenna(s) must not be colocated or
operationinconjunction with any other antenna or transmitter.
Wireless Radio
For product availableinthe USA/Canada market, only channel 1-11 can be operated. Selectionofother channels is not possible.
The device could automatically discontinue transmissionincaseofabsenceofinformation to transmit, or operational failure.
Note that this is not intendedtoprohibit transmissionofcontrol or signaling information or the use of repetitive codes where
required by the technology.
Important: Any changes or modifications not expressly approved by the party responsible for compliance could void the user's
authority to operate the equipment.
IC Radiation Exposure Statement: This equipment complies with
uncontrolled environment. This equipment should be installed and operated with minimum distance 20 cm between the radiator
& your
body
Best
two
conditions:
conforme a
la
norme NMB-003 du Canada.
(2)
this device
must
accept
IC
RSS-102 radiation exposure limits set forth for
any interference received. Including
an
"Note to
Electrical Code that provides guidelines for proper grounding
grounding system of the building,asclosetothe point of cable entryaspractical."
This
Setting
@-
2
CATV
system installer: This reminderisprovided to call the
product
qualifies
"TV
Location"to"Home"
for
ENERGY
STAR
allows
when
"Home"isselected
theTVto
achieveanenergy-saving
CATV
and,inparticular, specifies that the cable ground shallbeconnected to the
system installer's attention to Article 820-40 of the National
for
"TV
Location".
status
for
household
use.
Page 4
DEAR
SHARP
CUSTOMER
Thank you for your purchaseofthe Sharp Liquid Crystal Television. To ensure safety and many years
of trouble-free operation of your product, please read the Important Safety Instructions carefully before
using this product.
IMPORTANT SAFETY INSTRUCTIONS
Electricityisusedtoperform many useful functions, but it can also cause personal injuries and property damage
if improperly handled. This product has been engineered and manufactured with the highest priority on safety.
in
However, improper use can result
observe the following instructions when installing, operating and cleaning the product.Toensure your safety
and prolong the service life of your Liquid Crystal Television, please read the following precautions carefully
before using the product.
1)
Read these instructions.
2)
Keep these instructions.
3)
Heed all warnings.
4)
Follow all instructions.
5)
Do not use this apparatus near water.
6)
Clean only with dry cloth.
7)
Do not block any ventilation openings. Installinaccordance with the manufacturer's instructions.
8)
Do not install near any heat sources such as radiators, heat registers, stoves, or other apparatus (including
amplifiers) that produce heat.
9)
Do
not defeat the safety purposeofthe polarized or grounding-type plug. A polarized plug has
with one wider than the other. A grounding type plug has
or
wide blade
consult an electrician for replacement of the obsolete outlet.
10)
Protect the power cord from being walked on or pinched particularly at plugs, convenience receptacles,
and the point where they exit from the apparatus.
11) Only use attachments/accessories specified by the manufacturer.
12)
Use only with the cart, stand, tripod, bracket, or table specified by the manufacturer,orsold
with the apparatus. When a cart is used, use caution when moving the cart/apparatus
combinationtoavoid injury from tip-over.
13)
Unplug this apparatus during lightning storms or when unused for long periodsoftime.
14)
Refer all servicingtoqualified service personnel. Servicingisrequired when the apparatus has been
damaged
have fallen into the apparatus, the apparatus has been exposed to rain or moisture, does not operate
normally, or has been dropped.
the third prong are provided for your safety. If the provided plug does not fit into your outlet,
in
any way, such as power-supply cord or plug is damaged, liquid has been spilled or objects
electric shock and/or fire.Inordertoprevent potential danger, please
two
two
blades and a third grounding prong. The
Il
blades
Additional Safety Information
15)
Power
Sourcesmarking label. If you are not sureofthe typeofpower supplytoyour home, consult your product dealer
local power company. For products intendedtooperate from battery power, or other sources, refertothe
operating instructions.
16) Overloading- Do not overload wall outlets, extension cords,
can resultina risk of fire or electric shock.
17) Object and Liquid
touch dangerous voltage pointsorshort-out parts that could resultina fire or electric shock. Never spill
of
liquid
18) Damage Requiring
service personnel under the following conditions:
19)
Replacement
replacement parts specified by the manufacturer or have the same characteristics as the original part.
Unauthorized substitutions may result
20) Safety Check- Upon completion of any service or repairstothis product, ask the service technician
perform safety checkstodetermine that the product isinproper operating condition.
21) Wall
according
any kind on the product.
a)
When the AC cord or plug is damaged,
b)
If liquid has been spilled,orobjects have fallen into the product,
c)
If the product has been exposedtorain or water,
d)
If the product does not operate normally by following the operating instructions.
Adjust only those controls that are covered by the operating instructions as
of
other controls may resultindamage and will often require extensive work by a qualified technician
to
restore the producttoits normal operation,
e)
If the product has been dropped or damagedinany way, and
f)
When the product exhibits a distinct changeinperformance - this indicates a need for service.
or
ceiling
This product should be operated only from the typeofpower source indicated on the
or
integral convenience receptacles as this
Entry-
Parts-When
mounting-When
to
the method recommended by the manufacturer.
Never push objects of any kind into this product through openings as they may
Service-
Unplug this product from the wall outlet and refer servicing to qualified
an
improper adjustment
replacement parts are required, be sure the service technician has used
in
fire, electric shock, or other hazards.
mounting the product on a wallorceiling, be suretoinstall the product
or
to
®D-
3
Page 5
IMPORTANT SAFETY INSTRUCTIONS
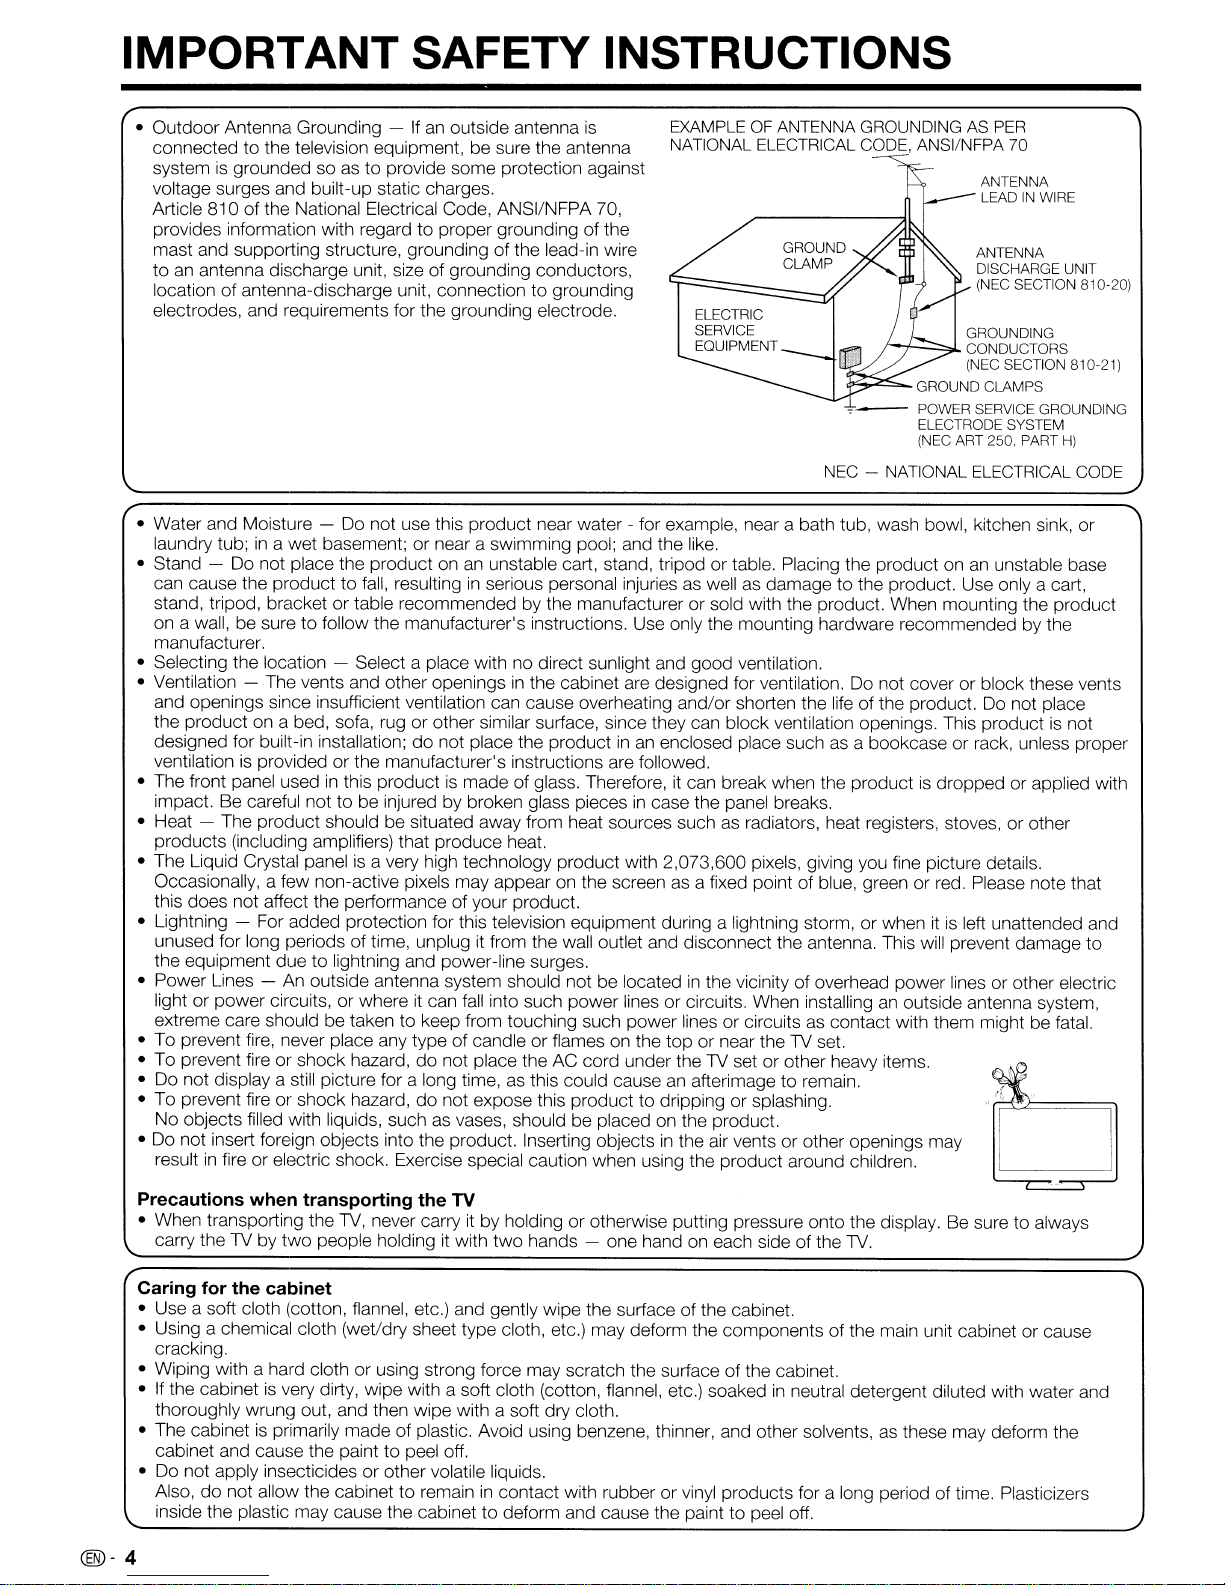
• Outdoor Antenna Grounding -Ifan
outside antenna
connected to the television equipment, be sure the antenna
system
is
grounded soasto provide some protection against
voltage surges and built-up static charges.
Article 810 of the National Electrical Code, ANSI/NFPA 70,
is
EXAMPLE OF ANTENNA GROUNDING AS PER
NATIONAL ELECTRICAL CODE, ANSI/NFPA 70
ANTENNA
LEAD
IN
WIRE
provides information with regard to proper grounding of the
mast and supporting structure, grounding of the lead-in wire
to
an
antenna discharge unit, size of grounding conductors,
location of antenna-discharge unit, connection to grounding
electrodes, and requirements for the grounding electrode.
ELECTRIC
SERVICE
EQUIPMENT
J-.j-..::.::::::::,.l CONDUCTORS
~..c==-
NEC - NATIONAL ELECTRICAL CODE
ANTENNA
DISCHARGE UNIT
(NEC SECTION 810-20)
GROUNDING
(NEC SECTION 810-21)
GROUND CLAMPS
POWER SERVICE GROUNDING
ELECTRODE SYSTEM
(NEC ART 250, PART
H)
• Water and Moisture - Do not use this product near water - for example, near a bath tub, wash bowl, kitchen sink, or
laundry tub;
• Stand - Do not place the product on
can cause the product to
in
a wet basement; or near a swimming pool; and the like.
an
fall,
resultinginserious personal injuries as well as damage to the product. Use only a cart,
unstable cart, stand, tripod or table. Placing the product onanunstable base
stand, tripod, bracket or table recommended by the manufacturer or sold with the product. When mounting the product
on a wall, be sure to follow the manufacturer's instructions. Use only the mounting hardware recommended by the
manufacturer.
• Selecting the location - Select a place with no direct sunlight and good ventilation.
• Ventilation
and openings since insufficient ventilation can cause overheating and/or shorten the life of the product.
the product on a bed, sofa, rug or other similar surface, since they can block ventilation openings. This product
designed for built-in installation;
ventilation
• The front panel used
impact.
• Heat - The product should be situated away from heat sources such
-The
vents and other openingsinthe cabinet are designed for ventilation.Donot cover or block these vents
do
is
not place the productinan
provided or the manufacturer's instructions are followed.
in
Be
careful not to be injured by broken glass piecesincase the panel breaks.
this productismade of glass. Therefore,itcan break when the productisdropped orapplied with
enclosed place suchasa bookcase or rack, unless proper
as
radiators, heat registers, stoves, or other
Do
not place
is
not
products (inclUding amplifiers) that produce heat.
• The Liquid Crystal panel
Occasionally, a few non-active pixels may appear on the screen
is
a very high technology product with 2,073,600 pixels, giving you fine picture details.
as
a fixed point of blue, green or red. Please note that
this does not affect the performance of your product.
• Lightning - For added protection for this television equipment during a lightning storm, or when
itisleft unattended and
unused for long periods oftime, unplug it from the wall outlet and disconnect the antenna. This will prevent damage to
the equipment due to lightning and power-line surges.
• Power Lines - An outside antenna system should not be located
light or power circuits, or where
it
can
fall
into such power lines or circuits. When installinganoutside antenna system,
in
the vicinity of overhead power lines or other electric
extreme care should be taken to keep from touching such power lines or circuits as contact with them might be fatal.
• To prevent
• To prevent fire or shock hazard, do not place the AC cord under the
• Do not display a still picture for a long time,
• To prevent fire or shock hazard, do not expose this product to dripping or splashing.
fire,
never place any type of candle or flames on the top or near theTVset.
TV
as
this could causeanafterimage to remain.
set or other heavy items.
,
!~
No objects filled with liquids, such as vases, should be placed on the product.
• Do not insert foreign objects into the product. Inserting objects
result
in
fire or electric shock. Exercise special caution when using the product around children.
in
the air vents or other openings may
Precautions when transporting the TV
TV,
• When transporting the
carry the
TV
by two people holdingitwith
never carryitby holding or otherwise putting pressure onto the display.Besure to always
Caring for the cabinet
• Use a soft cloth (cotton, flannel, etc.) and gently wipe the surface of the cabinet.
• Using a chemical cloth (wet/dry sheet type cloth, etc.) may deform the components
cracking.
• Wiping with a hard cloth or using strong force may scratch the surface
•
If
the cabinetisvery dirty, wipe with a soft cloth (cotton, flannel, etc.) soakedinneutral detergent diluted with water and
thoroughly wrung out, and then wipe with a soft dry cloth.
• The cabinet
is
primarily made of plastic. Avoid using benzene, thinner, and other solvents, as these may deform the
cabinet and cause the paint to peel off.
• Do not apply insecticides or other volatile liquids.
Also,
do
not allow the cabinet to remainincontact with rubber or vinyl products for a long period of time. Plasticizers
inside the plastic may cause the cabinet to deform and cause the paint to peel off.
@-4
two
hands - one hand on each side of the
of
the cabinet.
TV.
of
the main unit cabinet or cause
Page 6
IMPORTANT SAFETY INSTRUCTIONS
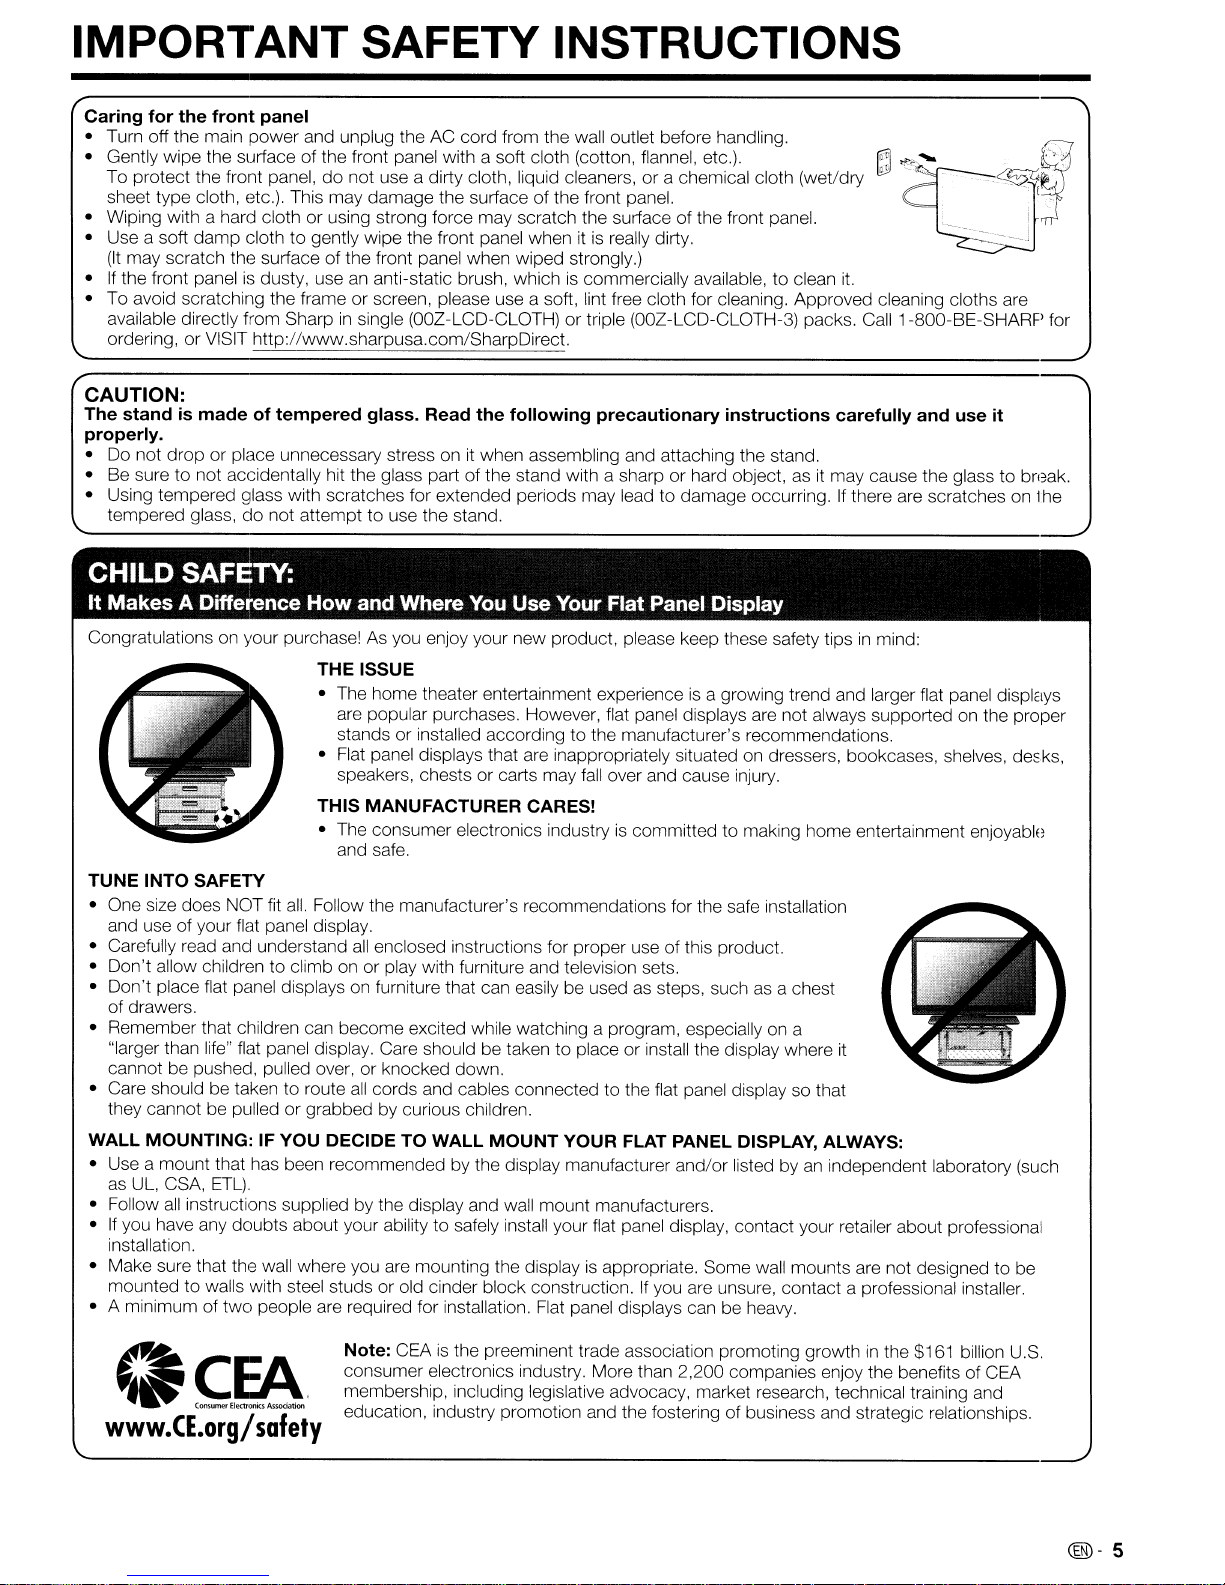
Caring
• Turn off the main power and unplug the AC cord from the wall outlet before handling.
• Gently wipe the surface of the front panel with a soft cloth (cotton, flannel, etc.).
• Wiping with a hard cloth or using strong force may scratch the surface of the front panel.
• Use a soft
• If the front panel
• To avoid scratching the frame or screen, please use a soft, lint free cloth for cleaning. Approved cleaning cloths are
for
the
front panel
do
To protect the front panel,
sheet type cloth, etc.). This may damage the surface of the front panel.
damp
clothtogently wipe the front panel when itisreally dirty.
(It
may scratch the surface of the front panel when wiped strongly.)
is
dusty, useananti-static brush, whichiscommercially available, to clean
available directly from Sharp
ordering, or VISIT http://www.sharpusa.com/SharpDirect.
not use a dirty cloth, liquid cleaners, or a chemical cloth (wet/dry
in
single (OOZ-LCD-CLOTH) or triple (00Z-LCD-CLOTH-3) packs. Call1-800-BE-SHARP for
I;lJ
~
it.
...
~ce:J':f""'.,
_.~
.,
------------~~-l
CAUTION:
The
standismadeoftempered
properly.
• Do not drop or place unnecessary stress onitwhen assembling and attaching the stand.
• Be sure to not accidentally hit the glass part of the stand with a sharp or hard object,
• Using tempered glass with scratches for extended periods may lead to damage occurring.
tempered glass,
do
not attempt to use the stand.
glass.
Read
the
following precautionary instructions carefully and use it
asitmay cause the glass to break.
If
there are scratches on the
CHILD SAFETY:
It
Makes
Congratulations on your purchase!Asyou enjoy your new product, please keep these safety tipsinmind:
TUNE INTO SAFETY
• One size does NOT fit
and use of your flat panel display.
• Carefully read and understand
• Don't allow children to climb on or play with furniture and television sets.
• Don't place flat panel displays on furniture that can easily be used
of drawers.
• Remember that children can become excited while watching a program, especially
"larger than life" flat panel display. Care should be taken to place or install the display where
cannot be pushed, pulled over, or knocked down.
• Care should be taken to route
they cannot be pulled or grabbed by curious children.
WALL MOUNTING: IF YOU DECIDE TO WALL
• Use a mount that has been recommended by the display manufacturer and/or listed byanindependent laboratory (such
as
• Follow
If
•
installation.
• Make sure that the wall where you are mounting the display
mounted to walls with steel studs or old cinder block construction.
• A minimum of
A Difference
UL,
CSA,
ETL).
all
instructions supplied by the display and wall mount manufacturers.
you have any doubts about your ability to safely install your flat panel display, contact your retailer about professional
two
How
and Where You Use Your Flat Panel Display
THE ISSUE
• The horne theater entertainment experienceisa growing trend and larger flat panel displays
are popular purchases. However, flat panel displays are not always supported on the proper
to
stands or installed according
Flat
panel displays that are inappropriately situated on dressers, bookcases, shelves, de::ks,
•
speakers, chests or carts may
THIS MANUFACTURER CARES!
• The consumer electronics industryiscommittedtomaking home entertainment enjoyable
and safe.
all.
Follow the manufacturer's recommendations for the safe installation
all
enclosed instructions for proper use of this product.
all
cords and cables connected to the flat panel display so that
MOUNT
people are required for installation.
the manufacturer's recommendations.
fall
over and cause injury.
as
steps, suchasa chest
on
a
YOUR FLAT PANEL DISPLAY, ALWAYS:
is
appropriate. Some wall mounts are not designed to be
If
you are unsure, contact a professional installer.
Flat
panel displays can be heavy.
it
~.~;,.
{
Note: CEA
consumer electronics industry. More than 2,200 companies enjoy the benefits of CEA
<I~~.
membership, including legislative advocacy, market research, technical training and
education, industry promotion and the fostering of business and strategic relationships,
www.CE.org/safety
is
the preeminent trade association promoting growthinthe $161 billion U.S.
@l-
5
Page 7
Contents
IMPORTANT INFORMATION 1
DEAR SHARP CUSTOMER 3
IMPORTANT SAFETY INSTRUCTIONS
3-5
Supplied Accessories 7
QUICK REFERENCE
Attaching the Stand 7
QUICK INSTALLATION TiPS " 8
Using the Remote Control Unit .. .. ... .. ..... ... 8
Preparation
Antennas 9
Installing Batteries
in
the Remote Control Unit 9
Part Names
TV (Front) .. .. ... .. ... .. ... .. .. ... .. ... .. ... ...10
TV
(Rear)
.. .. . .. .. .. . .. .. . .. .. .. ... .. .. ... .. ...10
..
Remote Control Unit. . ... .. ... .. .. . .. .. .. . .. .
11
Introduction to Connections
Experiencing HD Images . ... .. .. . .. .. .. ..... .. 12
Types
Displaying
of
Connection .... .. ..... .. ... .. ... .. ... 12
an
External Equipment Image. .. ....12
Connecting to External Equipment
Connecting a Blu-ray Disc/DVD Player or
HD Cable/Satellite Set-top Box 13-14
Connecting a VCR, Game Console,
Camcorder or Cable/Satellite Set-top Box. ... 14
Connecting
Connecting a
an
Audio Amplifier. .. .. .. .. . .. .. ...15
PC
.. .. . .. .. .. . .. .. .. ... .. ... ....16
Watching TV
Turning On/Off the Power 17
Initial Installation 17-18
Direct Button Operation
Changing Channels 19
Changing Volume .. .. ... .. ... .. .. . .. .. ... .. 19
MUTE 19
Sleep Timer .. . .. .. ... .. .. ... .. ... .. ..... ... 19
FLASHBACK 19
FREEZE 19
AV
MODE 20
INPUT 20
APPS 20
POWER SAVING 20
Closed Captions and
Digital Closed Captions
VIEW MODE 22
21
On-Screen Display Menu
On-Screen Display Menu Operation 23
Menu Operation Buttons 23
Menu Items 24
Picture Settings 25-26
Audio Settings 27
Power Control. . ... .. ... .. .. .... . .. . .. .. .. . .. .. 28
System Options 29-31
Initial Setup 32-35
Information 36-38
Enjoying Photo/MusicNideo Playback
Viewing Photos, Listening to Music and
Watching Videos 39
Photo Mode 40-41
Music Mode 42
Video Mode 42-43
USB Memory Device Compatibility 43
Other Viewing Options
Presetting Remote Control Function 44
Operating the Connected Equipment 44-45
Using AQUOS LINK
Controlling HDMI Equipment
Using AQUOS LINK 46-48
Link Operation Menu 48-49
Using a PC
Displaying a PC Image on the Screen 50
Adjusting the
Setting Audio Input
PC
Compatibility Chart
RS-232C Port Specifications 52
PC
Image
51
51
51
Using the Internet
Connecting to the Internet 53-54
Internet Setup 55-56
Displaying Updated Information and
Support Service 56
Entering Text (Software Keyboard) 57
Using the Browser 58-61
Enjoying Movies and Some Other Applications
via the Internet 62
Instantly Watching Movies from Netflix 62-63
Enjoying Movies and Internet Applications
with VUDU 64-65
Appendix
Removing the Stand 67
Setting the TV on the Wall 68
Optional Accessory 68
Troubleshooting 69-70
Troubleshooting - Error Message 70
Trademarks
71
Specifications
TV 72
Wireless LAN USB Adapter 73
Informationonthe Software License for
..
This Product. ...... ....... .. .. ..... .. .... .. ...
74
Calling for Service ... .. .. ....... .................75
LIMITED WARRANTY 75
Dimensional Drawings
• The dimensional drawings for the LCD
on the inside back cover.
"TV
set are shown
• The illustrations and on-screen displays
the actual operations.
• The examples used throughout this manual are based on the LC-60LE920UN model.
@-6
in
this operation manual are for explanation purposes and may vary slightly from
Page 8
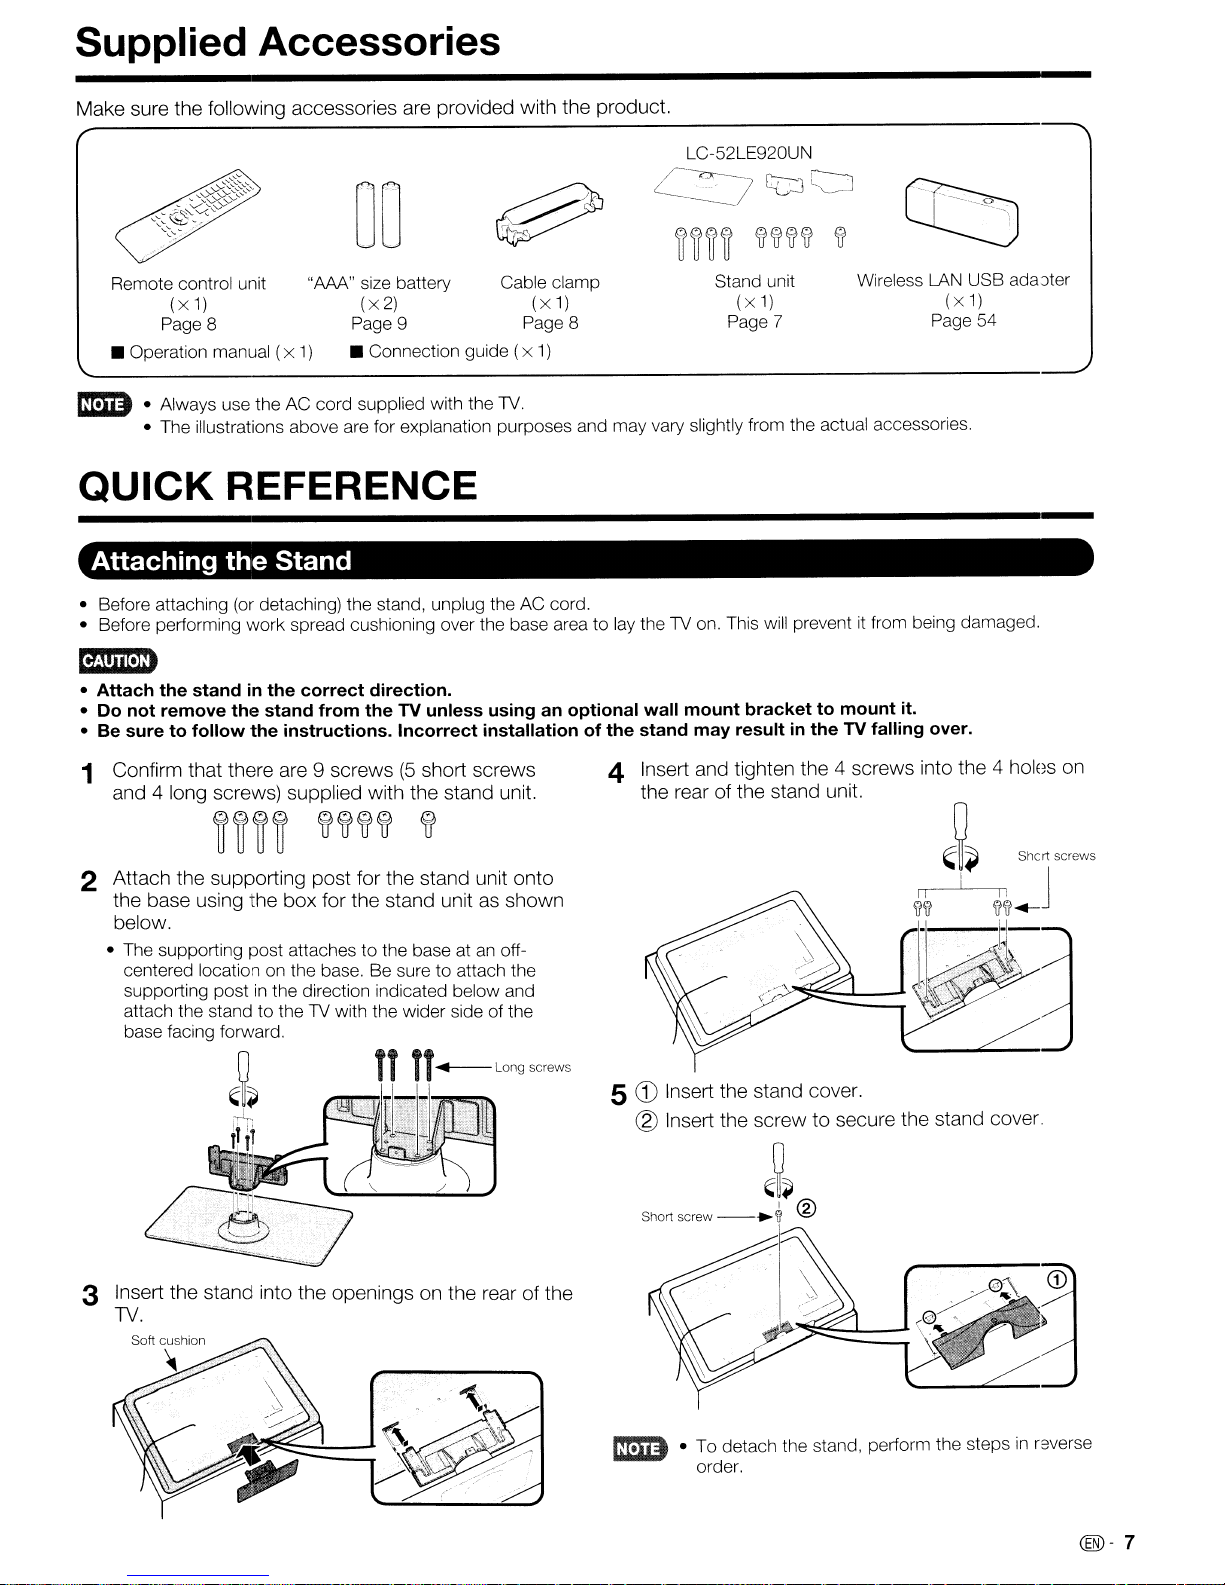
Supplied Accessories
Make sure the following accessories are provided with the product.
LC-52LE920UN
QJ
00
Remote control unit
(x
1)
Page 8
• Operation manual
ImID
QUICK
• Before attaching
• Before performing work spread cushioning over the base area to lay the TV on. This will prevent
• Attach the stand
• Do not remove
• Be sure to follow
•Always use the AC cord supplied with the
• The illustrations above are for explanation purposes and may vary slightly from the actual accessories.
REFERENCE
Attaching
the
(or
in
the
"APA" size battery Cable clamp
(x2)
Page 9 Page 8
(x
1)
• Connection guide (
TV.
(x
x 1)
1)
Stand
detaching) the stand, unplug the AC cord.
the
correct direction.
stand from the TV unless using an optional wall mount bracket to mount it.
the
instructions. Incorrect installationofthe
~~~~
stand may resultinthe
L[::J~
tflff'ft'ft
Stand unit
(x
1)
Page 7
Iff
Wireless LAN USB ada-Jter
(x
1)
Page 54
it
from being damaged.
TV falling over.
1 Confirm that there
and 4 long screws) supplied with the stand unit.
~~~~
are
9 screws(5short screws
~~~~
~
2 Attach the supporting post for the stand unit onto
the base
below.
• The supporting post attaches to the base atanoffcentered location on the base. Be sure to attach the
supporting post
attach the stand to the TV with the wider side of the
base facing forward.
using'
he box for the stand unitasshown
in
the direction indicated below and
3 Insert the stand into the openings on the rear of the
N.
4 Insert and tighten the 4 screws into the 4 holes
the rear of the stand unit.
5
CD
Insert the stand cover.
® Insert the screw to secure the stand cover.
,~~
Short screw
--.~
®
on
• To detach the stand, perform the stepsinr,werse
order.
@-7
Page 9
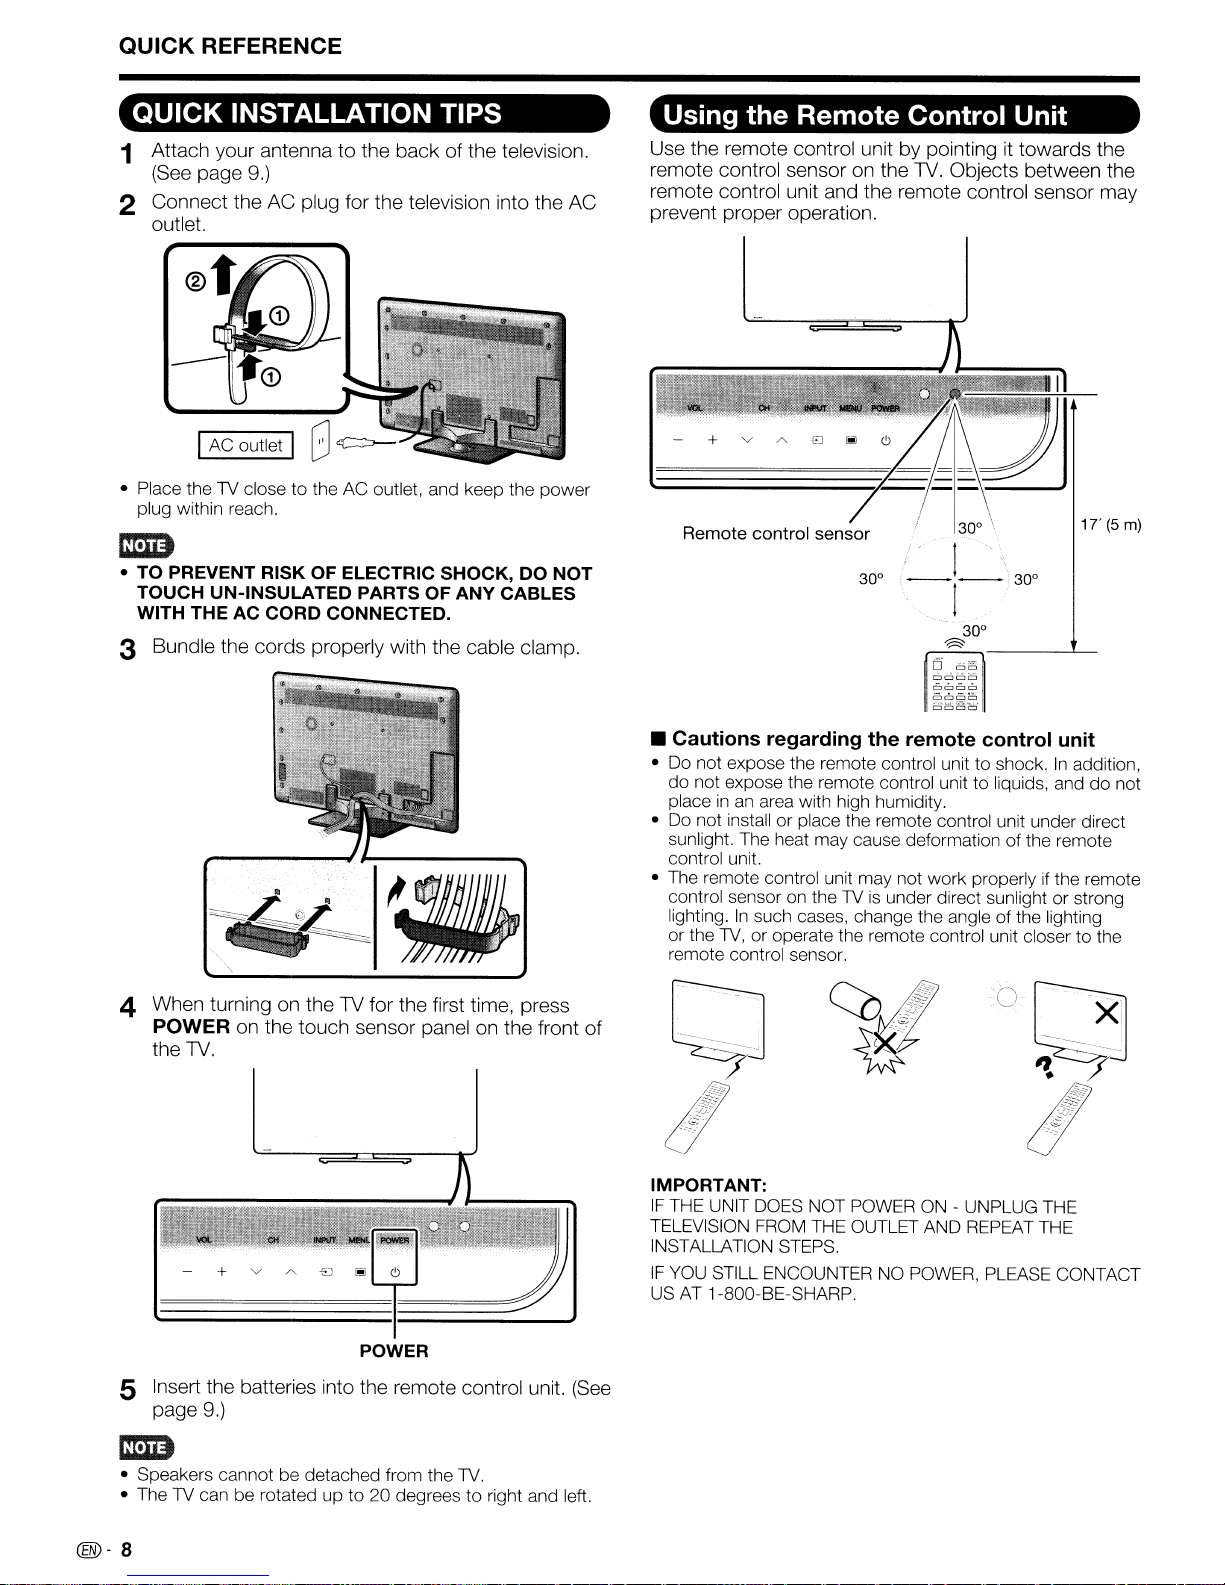
QUICK REFERENCE
QUICK INSTALLATION TIPS
1 Attach your antenna
(See
page
9.)
to
the back of the television.
2 Connect the AC plug for the television into the AC
outlet.
• Place the1Vclose to the AC outlet, and keep the power
plug within reach.
mm
• TO PREVENT RISK OF ELECTRIC SHOCK,
TOUCH UN-INSULATED PARTS OF ANY CABLES
WITH THE AC
CORD
CONNECTED.
3 Bundle the cords properly with the cable clamp.
DO
NOT
Using the Remote Control Unit
it
30°
towards the
1T(5m)
30°
Use the remote control unit by pointing
remote control sensor
remote control unit and the remote control sensor may
prevent proper operation.
Remote control sensor
on
30°
the
TV.
Objects between the
/
.
I'
----
I
30°
~
~ci~~
6666
ClCJCl
Cl
ClCJCJ
CJ
4 When turning on the
POWER
the
TV.
on
the touch sensor panelonthe front of
TV
for the first time, press
• Cautions regarding the remote control unit
• Do not expose the remote control unit to shock.Inaddition,
do
not expose the remote control unit to liquids, and do not
inanarea with high humidity.
place
• Do not install or place the remote control unit under direct
sunlight. The heat may cause deformation of the remote
control unit.
• The remote control unit may not work properly if the remote
control sensor
lighting.
or the 1V, or operate the remote control unit closer to the
remote control sensor.
IMPORTANT:
IF
THE UNIT
TELEVISION
INSTALLATION STEPS.
IF
YOU
STILL ENCOUNTERNOPOWER, PLEASE CONTACT
USAT1-800-BE-SHARP.
on
In
the1Vis
such cases, change the angle of the lighting
DOES
NOT POWERON- UNPLUG THE
FROM
THE OUTLET AND REPEAT THE
under direct sunlight or strong
POWER
5 Insert the batteries into the remote control unit.
page
9.)
mm
• Speakers cannot be detached from the 1V.
1V
• The
@-8
can be rotated up to 20 degrees to right and left.
(See
Page 10

Preparation
Antennas
To
enjoy a clearer picture,
that
are
used
for
a coaxial cable. If
plug it into
commercially
the
antenna
available cables.
Connecting Antenna Cable
• Connect the antenna cabletotheTVusing one of the methodsinthe illustration as shown
CD
Cable without a CATV
converter
@
VHF/UHF
@ Combination
UHF
antenna
VHF/
antenna
useanoutdoor
terminal at
----------
~5-ohm
antenna.
your
outdoor
the
rearofthe
Cable
"TV
lead-In terminal (75-ohm)
75-ohm coaxial cable (round) terminal (75-ohm)
10-0
coaxial cable (round)
The
following is a brief explanationofthe
antenna
TV set. For
,;"",..
uses a
connecting
75-ohm
Home Antenna
~
ca~F=<J
Coaxial cable
Home Antenna
~
ca~\==<J
Coaxial cable
coaxial
the
antenna
cable
cabletothe
with an
typesofconnections
F-type
(CD,
connector,
TV,
use
@, @ or @).
or
300-ohm twin-lead cable (flat) I
@ Separate
antenna
1.
A 75-ohm systemisgenerally a round cable with F-type connector
that
can
2.
A 300-ohm systemisa flat "twin-lead" cable that canbeattached
to a 75-ohm terminal through a 300/75-ohm adapter. \
~
When
connector
If
tools
of
internal circuit, etc.) 75-ohm coaxial cable
VHF/UHF
easilybeattached to a terminal without tools.
F-type
connecting
are used, it
. .
theRFcabletotheTVset,donot
with tools.
VHF UHF
ANTENNA ANTENNA
connector
may
cause
300-ohm
twin-lead cable
300-ohm twin-lead cable
lor
75-ohm
coaxial cable
should be finger-tightened only.
tighten
damagetoyour
TV set. (The breaking
300n5-ohm
F-type
adapter
iF-type
-----.occ-
.",.
300-ohm twin-lead cable
~.__
'cV~
--
75-ohm coaxial cable
.",(
/.~~F-type
Xv,
Installing Batteriesinthe Remote Control Unit
If
the
1
remote
Open
the
control
battery
failstooperate
cover. 2 Insert
TV functions, replace
the
two
"AAA"
product).
the
batteriesinthe
size batteries (supplied
with
remote
control unit.
3 Close
connector
(flat)
.....
"
\,
the
battery
(round)
connector
cover.
Emim
Improper
•
•
• Remove batteries
•
•
use
Do
not
Do
not
in
old batteries.
rash.Ifyou
The
If
you
of batteries can resultinchemical leakage or explosion.Besure
mix
batteries of different types. Different types of batteries
mix
old
and
new batteries. Mixing old
as
find
batteries supplied with this product
will
notbelIsing the remote control unit foranextended period of time, remove batteries from
soonasthey
any
chemical leakage,
are
• Place the batteries
with their terminals
corresponding to the (
and
battery compartment.
and
new batteries
worn out. Chemicals that
Wipe
thoroughly with a cloth.
may
have
a shorter
life
+)
(- ) indicationsinthe
~~"'')
R.I
---
~
have
can
shorten the
leak
expectancy due to storage conditions.
to follow the instructions below.
different characteristics.
from batteries that comeincontact with skin car cause a
life
of new batteriesorcause chemical leakage
it.
@-9
Page 11
Part Names
TV
(Front)
II
~I------
l=
~
--
--
_~
Q
~
...
~
..
J
JI
Remote control sensor
TV
(Rear)
+ V A
VOL- I + INPUT POWER
CHV//\
-EJ
I!!J
MENU
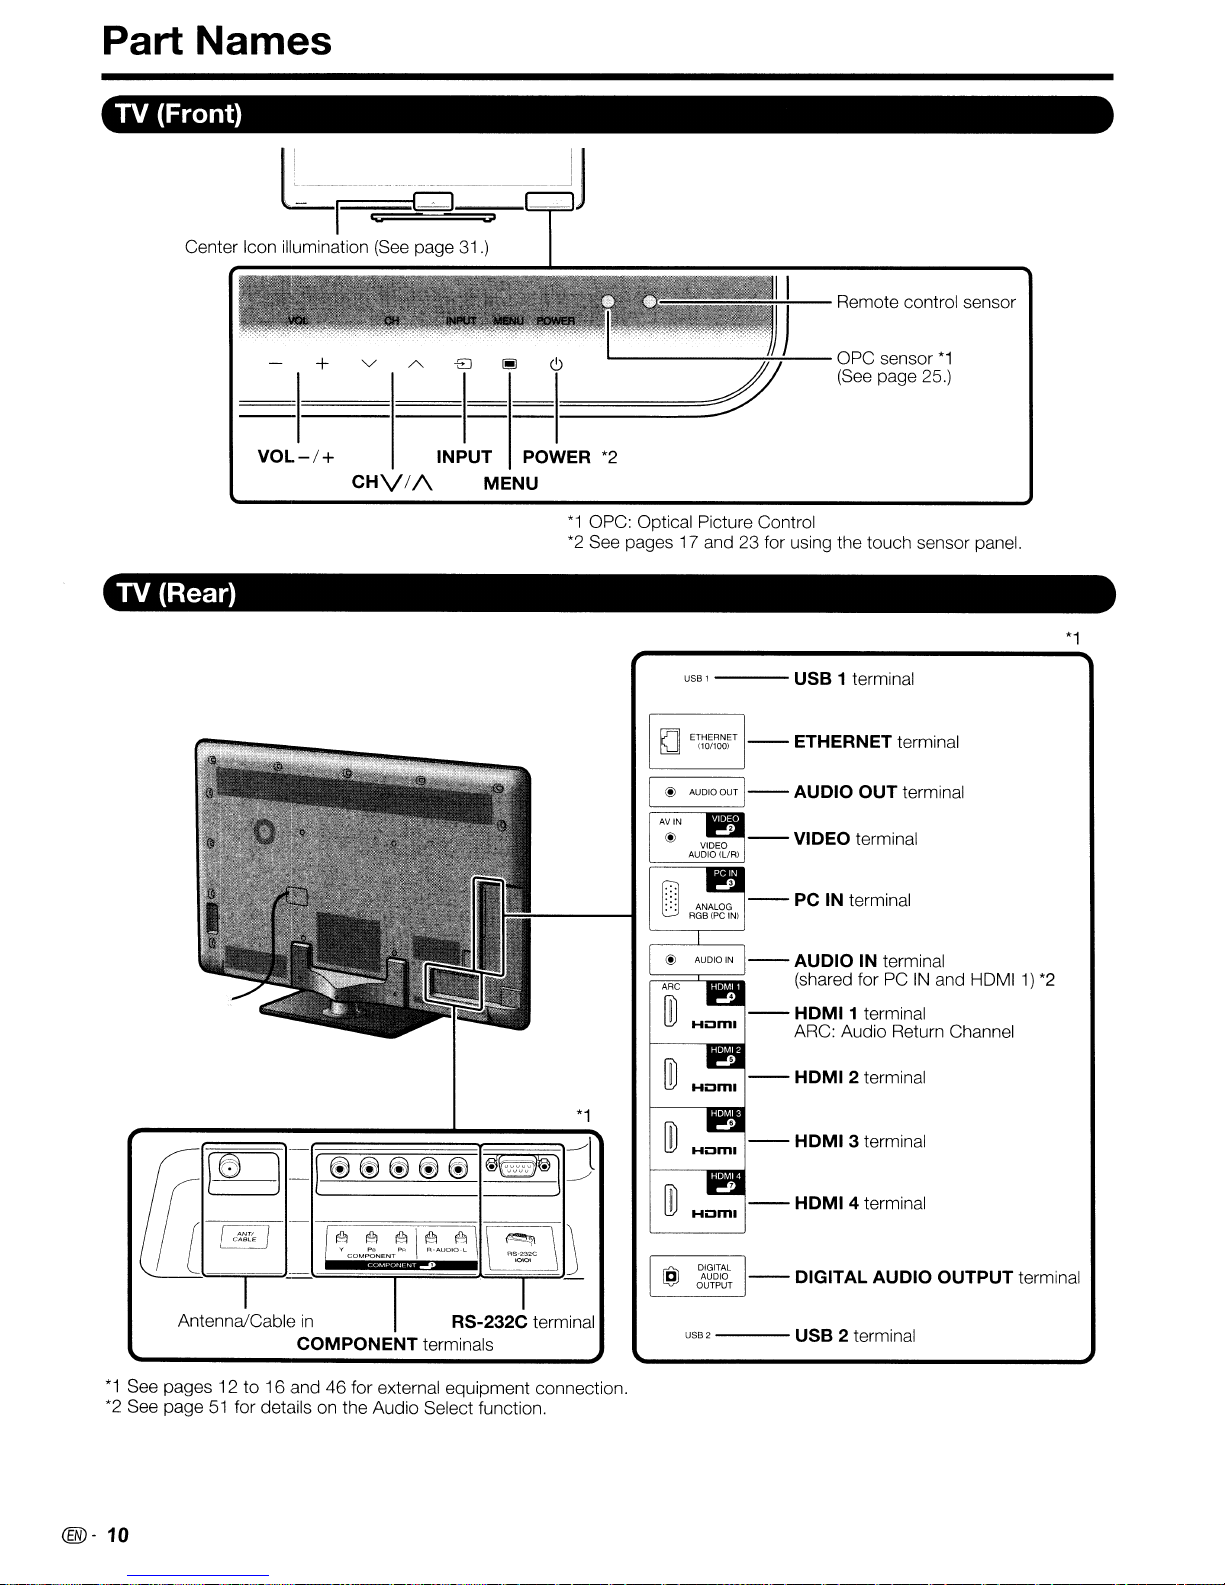
*1
*2
'--------.,.;.:.+--
*2
OPC: Optical Picture Control
See pages 17 and 23 for using the touch sensor panel.
USB 1 USB 1 terminal
[ @ AUDIQQUT 1--AUDIO OUT terminal
AVIN
OPC sensor
(See
page 25.)
*1
*1
Antenna/Cable
*1
See pages 12 to 16 and46for external equipment connection.
*2
See page51for details on the Audio Select function.
@-
10
in
COMPONENT terminals
*1
RS-232C terminal
;::::::;::;=r::;;;;;;;;;;;
--
--
--
--
USB2
---
AUDIO IN terminal
(shared forPCIN
HOM
I 1 terminal
ARC: Audio Return Channel
HDMI 4 terminal
DIGITAL AUDIO OUTPUT terminal
USB 2 terminal
and
HDMI1)
*2
Page 12
Part
Names
Remote
Control
Unit
1
2 i
{
----;;1"-1
:;-L
II
"'!T!!!vL""ST""B""D~V~!!'V!CR~~!!U!!DI~O~I-
~ ~
I
~'"....
DISPLAY
ISOURCE'
~
18
19
~ ~
1
3
4
5
-----:I~I
I
II
-~
----
.....
OPTION
SLEEP
-:- -:-
-.
.REG
~~~~~
FREEZE
~~I~I
20
--
21
111I11I11I
6~1
7-~
8
-----:I~;
9
10
11
12
13
-....;;..;....;.
14
15
_-;.:-I!.:....,!
16
17-......;1---;;1
mm
- When using the remote control unit, pointitat the TV.
.11I11
t •
i "";;;;;;;;;;=..J
II
GG
AVMODE
VIEVIMODE
--;~
-:- -:-
II
MUTE
II
II.
ll~--
11
,I
AQUaS
!i
III
i
i:
~FAV
I i
FAVORITE~
I
'_~
-
....
11
Ii
ii
I!
I {
I
I:
I
AQuas
SHARP
FlASHBACK
':;;---:'I~I
INPUT
IE
I
-=-~-
Ri....:
APP--------,
2
••
-I
~-22
II
II
II
l
N
...:.:---
III
3"";'-;'
';.--
II
23
--
24
25
26
27
28
29
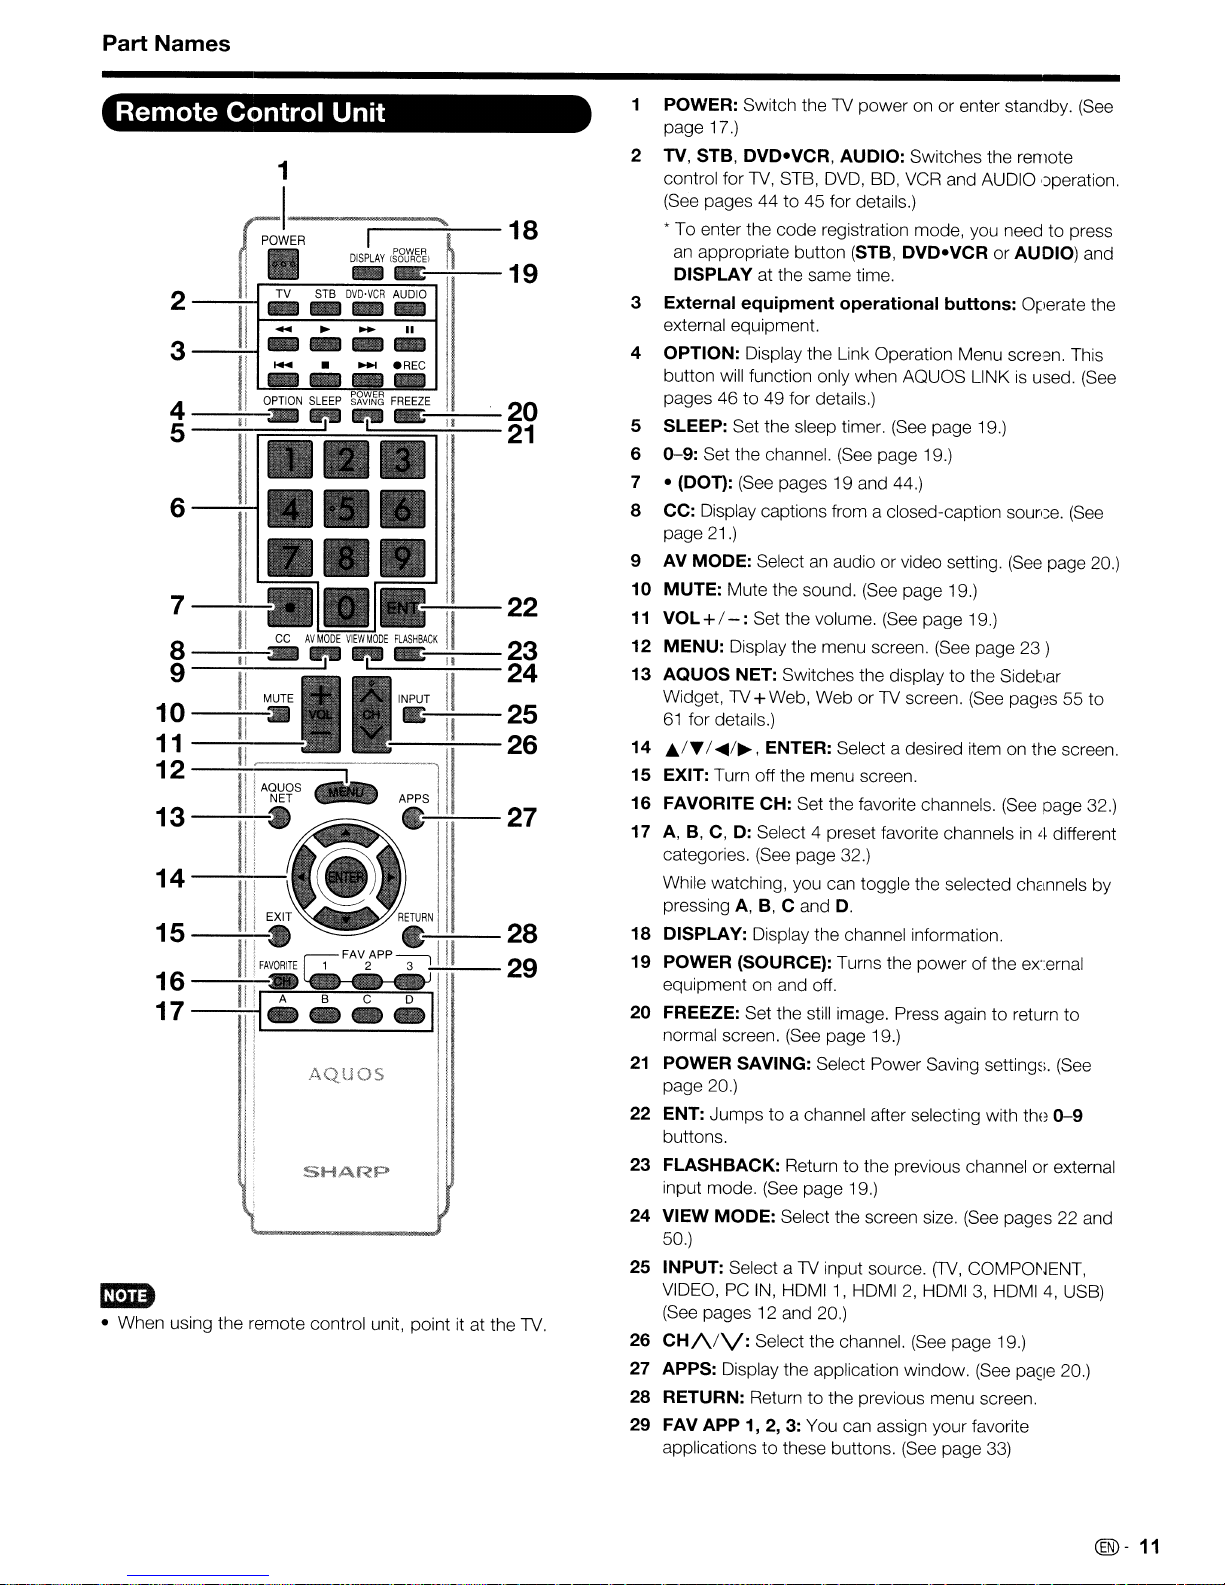
1 POWER: Switch the TV power on or enter standby.
page 17.)
2 TV, STB,
control for
(See pages 44 to 45 for details.)
* To enter the code registration mode, you need to press
an
DISPLAY
External
3
external equipment.
4 OPTION: Display the Link Operation Menu scre3n. This
button will function only when AQUOS LINK
pages46to 49 for details.)
5 SLEEP: Set the sleep timer.
0-9:
6
7 - (DOT): (See pages 19 and 44.)
8 CC: Display captions from a closed-caption
page 21.)
9 AV MODE: Select
10
MUTE:
11
VOL
12
MENU:
13
AQUOS
Widget,
61
14 J;,/T /
15
EXIT: Turn off the menu screen.
16
FAVORITE CH: Set the favorite channels.
17 A,
categories.
While watching, you can toggle the selected channels by
pressing A, B, C and
18
DISPLAY: Display the channel information.
19
POWER (SOURCE): Turns the power of the ex-ernal
equipment on and off.
20
FREEZE: Set the still image. Press again to return to
normal screen.
21
POWER SAVING: Select Power Saving
page 20.)
22
ENT: Jumps to a channel after selecting with the
buttons.
FLASHBACK:
23
input mode.
24
VIEW
50.)
25
INPUT: Select a TV input source.
VIDEO,
(See
26
CH/VV:
27 APPS: Display the application window.
28
RETURN: Return to the previous menu screen.
29
FAV
applications
DVD-VCR,
TV,
appropriate button (STB,
at the same time.
equipment
Set the channel.
Mute the sound. (See page 19.)
+/- :Set the volume.
Display the menu screen.
NET: Switches the display to the SidetJar
TV+Web, Web or TV screen.
for details.)
....
/~,
ENTER: Select a desired item on ttle screen.
B,
C, D: Select 4 preset favorite channelsin4 different
(See
(See
MODE:
PC
IN,
pages 12 and 20.)
Select the channel.
APP
1, 2, 3: You can assign your favorite
to
AUDIO: Switches the remote
STB,
DVD,
BD, VCR and AUDIO ,)peration.
DVD-VCRorAUDIO) and
operational
(See
page 19.)
an
audio or video setting.
(See
page 32.)
D.
(See
page 19.)
Returntothe previous channel or external
page 19.)
Select the screen size.
HDMI1,HDMI2,HDMI3,HDMI4,USB)
these buttons. (See page
(See
(See
buttons:
page 19.)
page 19.)
(See
page
(See
(See
(TV,
COMPONENT,
page 19.)
(See
is
sourGe.
(See
pages 55 to
(See
setting~;.
pages 22 and
33)
(See
Operate the
used.
(See
(See
page
23)
page 32.)
(See
0-9
pa~le
20.)
20.)
@-
11
Page 13
Introduction to Connections
Experiencing
HD
Images
An HDTV without an HD source is just an ordinary TV.
To enjoy HD images on the TV, you should get
HD
programming from the following:
• Over-the-air broadcasting via HD quality antenna
• HD cable/satellite subscription
• HD compatible external equipment
• For informationonupdatingtoHD
programming,
ask
your
cable/satellite service provider.
Types of Connection
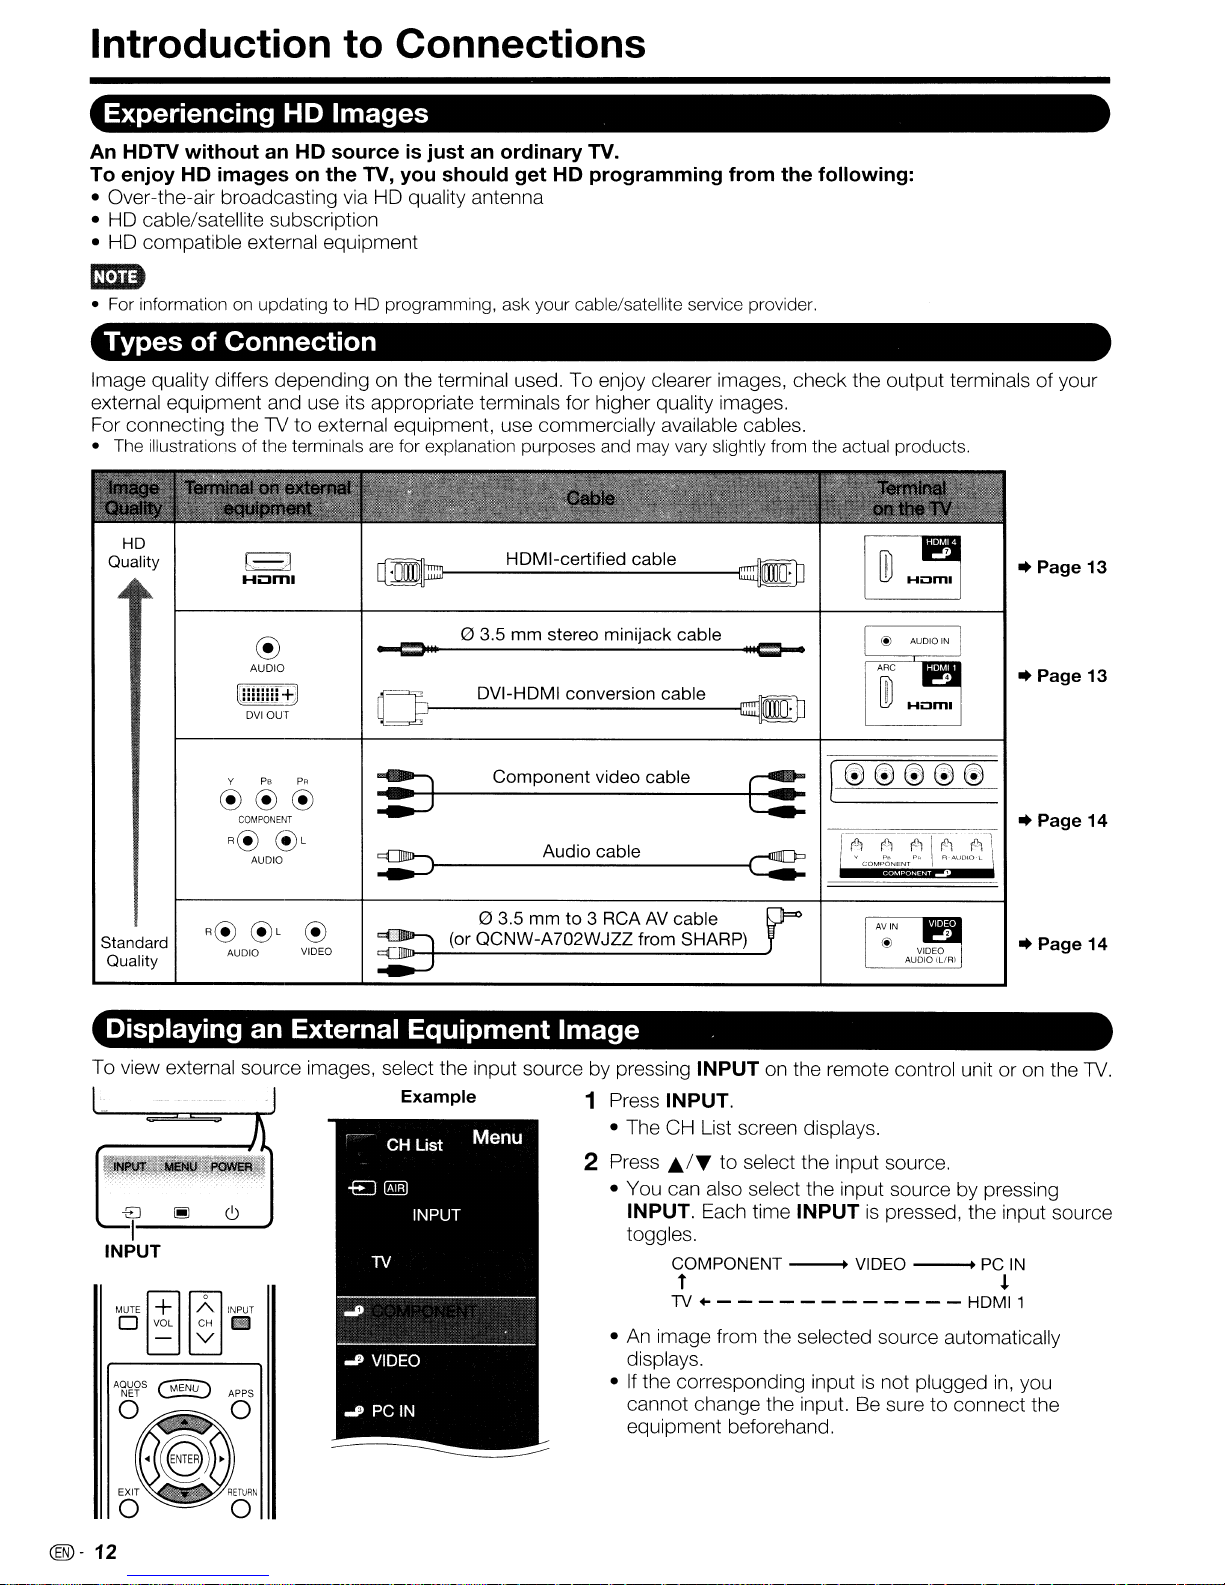
Image quality differs depending on the terminal used. To enjoy clearer images, check the output terminals of your
external equipment and use its appropriate terminals for higher quality images.
TV
For connecting the
• The illustrationsofthe terminals are for explanation
HD
Quality
to external equipment, use commercially available cables.
@
AUDIO
w!!!!!rEJ
DVIOUT
~J-
......-.c:=111
Oe--
purposes
H_D_M_I_-c_e_rt_if_ie_d_c_a_b_le
o
3.5
mm
__
D_V_I-_H_D_M_I_c_o_n_ve_r_si_o_n_c_a_b_le_--1~
stereo
and
may
minijack
__
vary slightly
----1~
cable
II
from
Ie=--
the
actual
products.
..
Page 13
..
Page 13
Standard
Quality
Y Ps
®®®
COMPONENT
R@
AUDIO
®L
PR
®
VIDEO
~
:;:J---C;:
~
~l----------{~
Component
Audio
o
3.5
mmto3
(or
QCNW-A702WJZZ
video
cable
cable
RCAAVcable
from
SHARP)
~
f'lIIIID='
..
Page 14
..
Page 14
Displaying an External Equipment Image
To view external source images, select the input source by pressing INPUT on the remote control unit or on the
Example 1 Press INPUT.
• The CH List screen displays.
-EJ
1-----
INPUT
MUTE
~
o VOL CH
- v
~
~o
C,)
INPUT
II'J
2 Press
~.I~
to select the input source.
• You can also select the input source by pressing
INPUT. Each time INPUT
is
pressed, the input source
toggles.
COMPONENT _ VIDEO I PC
IN
t !
TV..- - - - - - - - - - - - HDMI 1
•
An
image from the selected source automatically
displays.
•
If
the corresponding inputisnot plugged
cannot change the input. Be sure to connect the
equipment beforehand.
in,
you
TV.
(®-
12
Page 14

Connecting to External Equipment
You can connect many types of external equipment to your
source from
For connecting theTVto external equipment, use commercially available cables.
INPUT
on the remote control unit or on the
TV.
TV.
To view external source images, select the input
(See
pages 12 and 20.)
Emitm)
• To protect equipment, always turn off the TV before connecting any external equipment.
• Please read the relevant operation manual (Blu-ray disc player, etc.) carefully before making connections.
Connecting a Blu-ray Disc/DVD Player or HD Cable/Satellite Set-top Box
•
When
The HOMI (High Definition Multimedia Interface) terminalisan
video signals using a single cable. The
• Blu-ray disc player •
•
using
HOMI
HO
cable/satellite set-top box
cable (HOMI 1, 2, 3or4):
HOMI
terminal supports high-resolution video input.
OVO
player
HOM
I-certified cable
audio-video interface that enables a connection for audio and
Back
panel
vertical inputs
em
• To enjoy 1080p display capability, connect your external equipment usinganHOMI-certified cable or a component cable and
set the equipment to 1080p output.
• Supported Audio format: Linear PCM, sampling rate 32/44.1 /48kHz.
• When you connect external equipment using a OVI-HOMI conversion cable or when you connect ARC-compatible
equipment, use
• When using OVI-HOMI conversion cable
• Blu-ray disc player •
•
HO
cable/satellite set-top box
HOMI
1.
(HOMI1):
OVD
player
03.5
mm stereo minijack cable
lri;;iiiiiiii.~--=III
~.,.
@
IlOCffiiliIB
.
I.
0 OVI-HOMI conversion cable
Back
panel
vertical inputs
I~~~~~I
III=--"*"i+@
~"*trn
II
~~r::;;;;;;;
Hi:lm
L
r
U
Hum,·
•
~
em
• When using a OVI-HOMI conversion cable, you should makeananalog audio connection.Inthis case,inaddition to
to
connecting a OVI-HOMI conversion cable to the HOMI 1 terminal, connect a 0 3.5 mm stereo minijack cable
terminal and set "Audio Select" to "HOMI+Analog".
(See
page 51.)
the AUDIO
IN
@-
13
Page 15
Connecting to External Equipment
• When using Component cable
• Blu-ray disc player •
• HD cable/satellite set-top box
DVD
(COMPONENn:
player
Audio cable
Component video cable
mm
• To enjoy 1
set the equipment to 1
• See page 13 for connecting a Blu-ray disc player, DVD player or
D8Dp
display capability, connect your external equipment usinganHDMI-certified cable or a component cable and
D8Dp
output.
PR(Red)~
Ps
(Blue)
Y
(Geeen)
an
HD cable/satellite set-top box to the HDMI terminal.
=rtf
-1-1-1-1-1-
_.
~+--:.t~+~*--:+-
fJ------
~~~~~
Back
panel
horizontal inputs
fl
AUDIO-R
AUDIO-L
-
-
(Red)
IWMe)
Connecting a VCR, Game Console, Camcorder or Cable/Satellite Set-top Box
• When using Composite cable (VIDEO):
• Game console •
• Camcorder • Cable/Satellite set-top box
VCR
~:B
\(]1Jjl~lJJ::llJ
RCAtoRCA adapter
(commercially available)
:;:~.".
•
,~
.
"""
"I"":
or : SHARP)
--+--
(commercially available:
~r~gC~~~~~D~~~:i
L)-------.;-------J
Back panel
vertical inputs
f~~~e)
I
,'.
I!lIl
i [I
n~~~~g?N'
~UDiO
it>,
Huml
i
.-
1
i
I ,
·-·------T-·-·---·
f
I
.:j'
[-'-f:(~-=n
I
rn
iC!!1'Jd
mm
• For theAVcable to connect to the VIDEO terminal, use a plug described below.
AUDIO (LEFr)
2
3
4 AUDIO
Composite Video
A&V
Ground
(RIGHT)
(EARTH)
@-
14
Page 16
Connecting to External Equipment
Connecting an Audio Amplifier
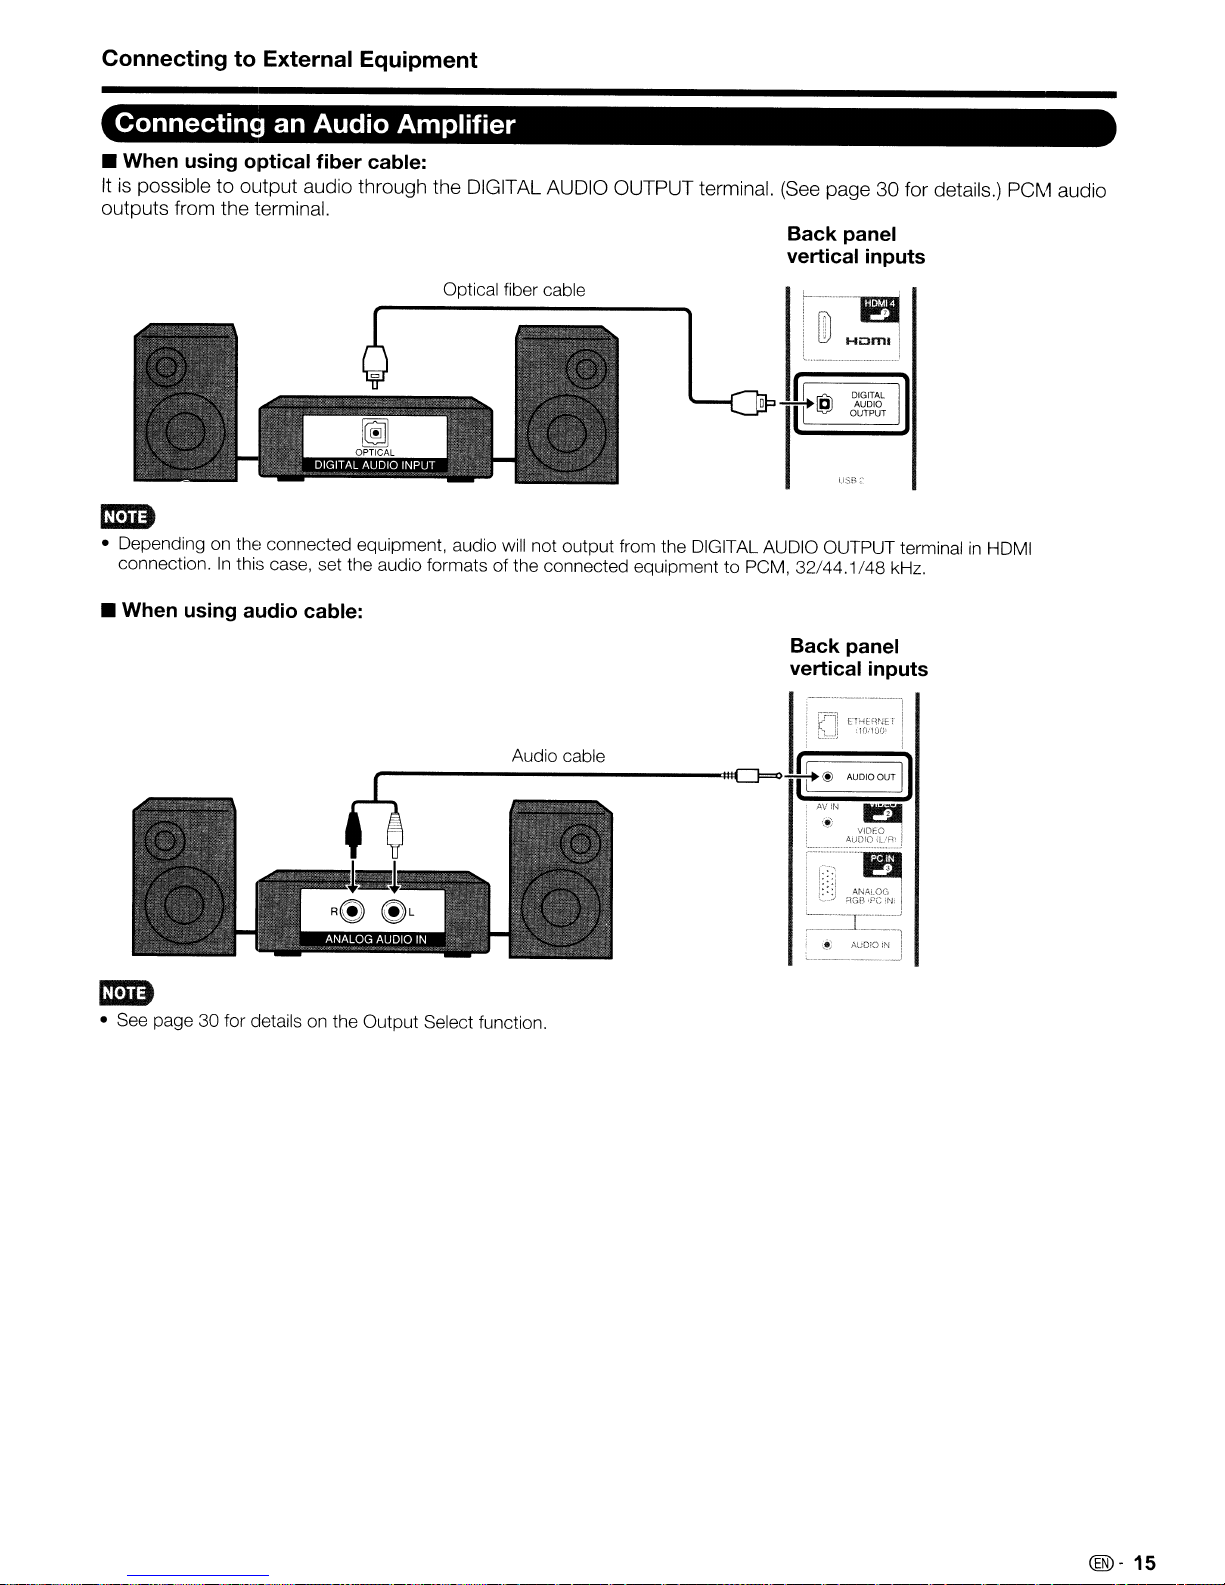
• When using optical fiber cable:
Itispossible to output audio through the DIGITAL AUDIO OUTPUT terminal.
outputs from the terminal.
(See
page 30 for details.) PCM audio
Back panel
vertical inputs
Optical fiber cable
r..-.---_
i
l!J
HLJml
I
._,
DIGITAL I
OAJ,-D~
USB
;.'
OPTICAL
. .
~
..
La,
II,
o 1t
'fi)::::::,
L••__.__._.
~
t9J
em
• Depending on the connected equipment, audio will not output from the DIGITAL AUDIO OUTPUT terminalinHDMI
connection.
• When using audio cable:
In
this case, set the audio formats of the connected equipment to PCM, 32/44.1/48 kHz.
Back panel
vertical inputs
,-------1
:
~
ETHEmJET I
L.bJ!
\
1O:1!YY
Audio cable
, I
I
mm
• See page 30 for details on the Output Select function.
'-'
-[_.~'
.
,~:,
L
AuDiO
,N
....---J
l
I
@-
15
Page 17
ConnectingtoExternal Equipment
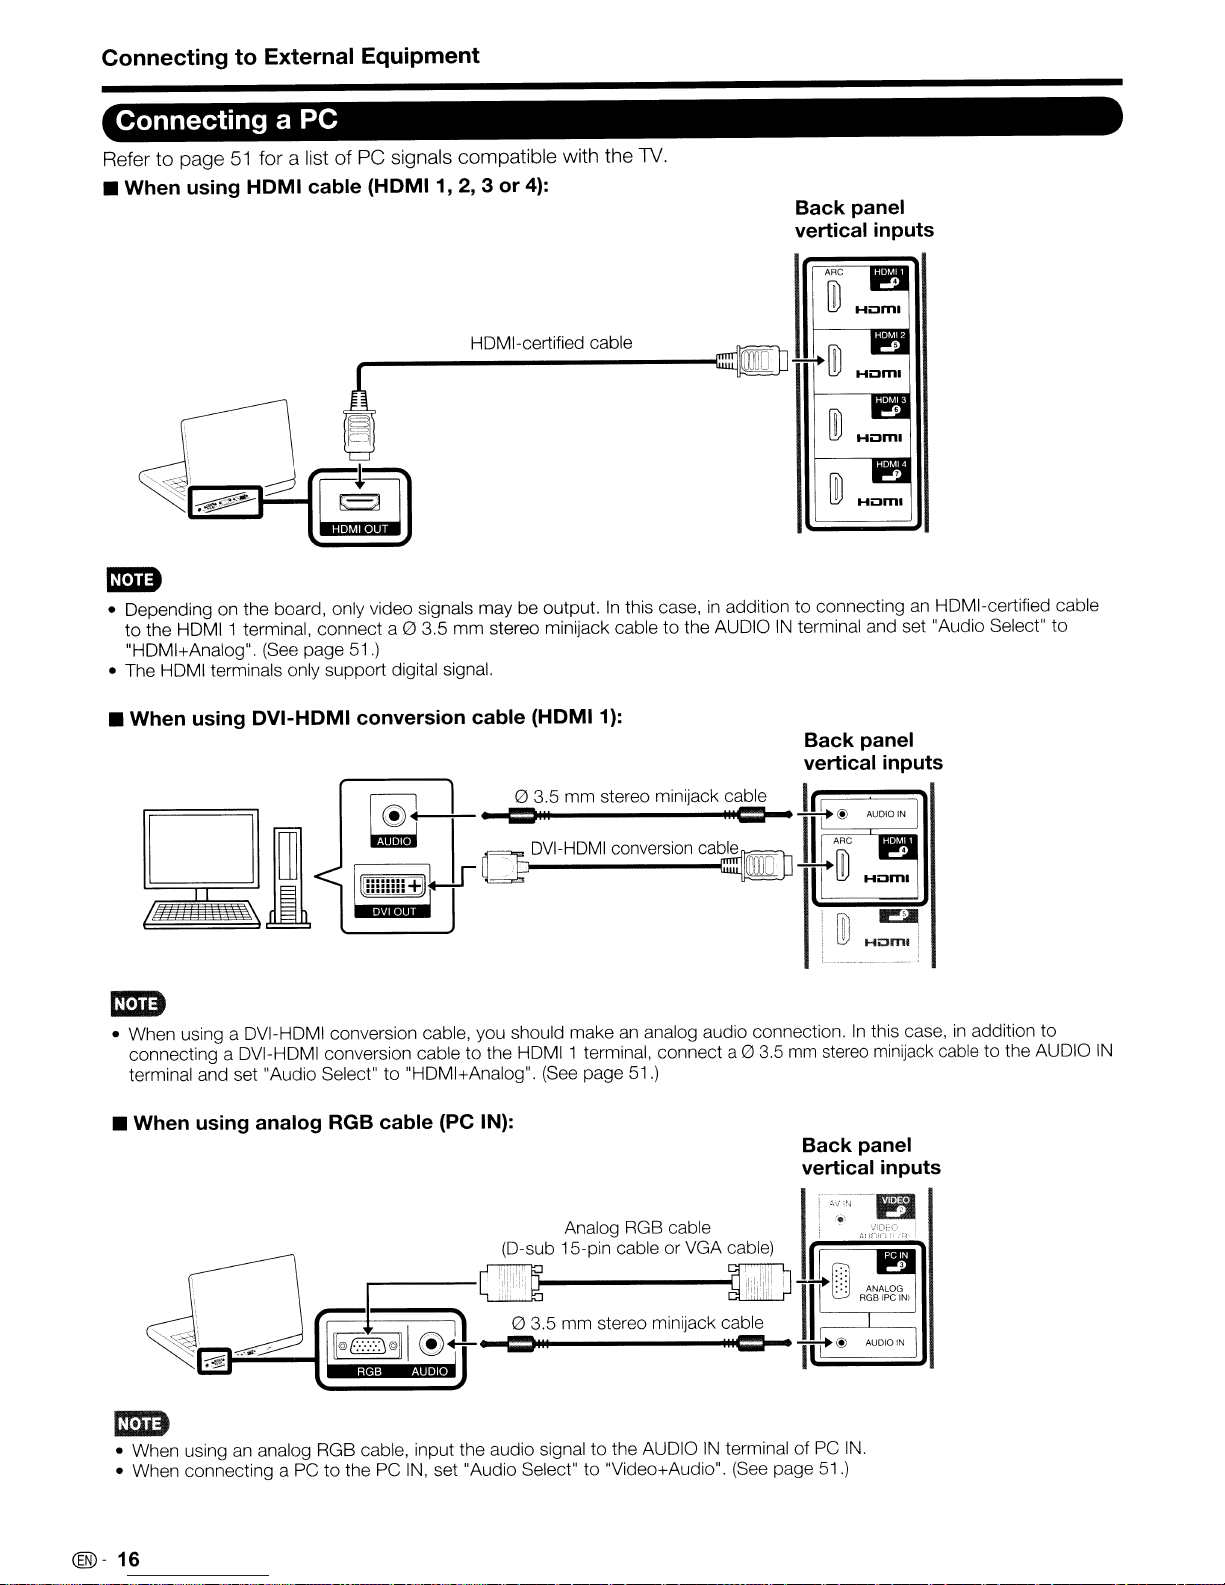
Connecting a PC
Refer to page51for a list ofPCsignals compatible with the
• When using HOMI cable (HOMI 1, 2, 3or4):
N.
Back panel
vertical inputs
ARC
ill
HOM
I-certified cable
,
".~\
l2tiF~9
"'I~I~
• Depending on the board, only video signals may be output.Inthis case,inaddition to connectinganHOMI-certified cable
to the HDMI 1 terminal, connect a 0 3.5
"HDMI+Analog". (See page
• The HDMI terminals only support digital signal.
• When using OVI-HOMI conversion cable
,,.....------~~~
J I
mm
51
.)
stereo minijack cable to the AUDIOINterminal and set "Audio Select" to
(HOMI1):
f---_
C;;;lJ!);;~
.....
m
;;;;H;;i:J;;m;;I;)1
I@l
~
ill
Hi:Jml i
I
• When using a DVI-HDMI conversion cable, you should makeananalog audio connection.Inthis case,inaddition to
mm
connecting a DVI-HDMI conversion cable to the HDMI 1 terminal, connect a0 3.5
terminal and set "Audio Select" to "HDMI+Analog". (See page 51.)
• When using analog RGB cable (PC IN):
stereo minijack cable to the AUDIO
Back panel
vertical inputs
IN
Em
• When usingananalog RGB cable, input the audio signal to the AUDIOINterminal of PC
• When connecting aPCto the PC
@-
16
IN,
set "Audio Select" to "Video+Audio".
(See
IN.
page 51.)
Page 18
Watching TV
Turning
On/Off
POWER (On/Standby)
1---
POWER
II
TV
CJ
CJ
........
CJ CJ
....
CJ
CJ
OPTION
SLEEP
CJ
CJ CJ
the
STB
• _
DISPLAY
CJ
DVD'VCR
CJ CJ
CJ
CJ
~st~~
Power
j~8~~~,
CJ
AUDIO
II
CJ
.REC
CJ
FREEZE
CJ
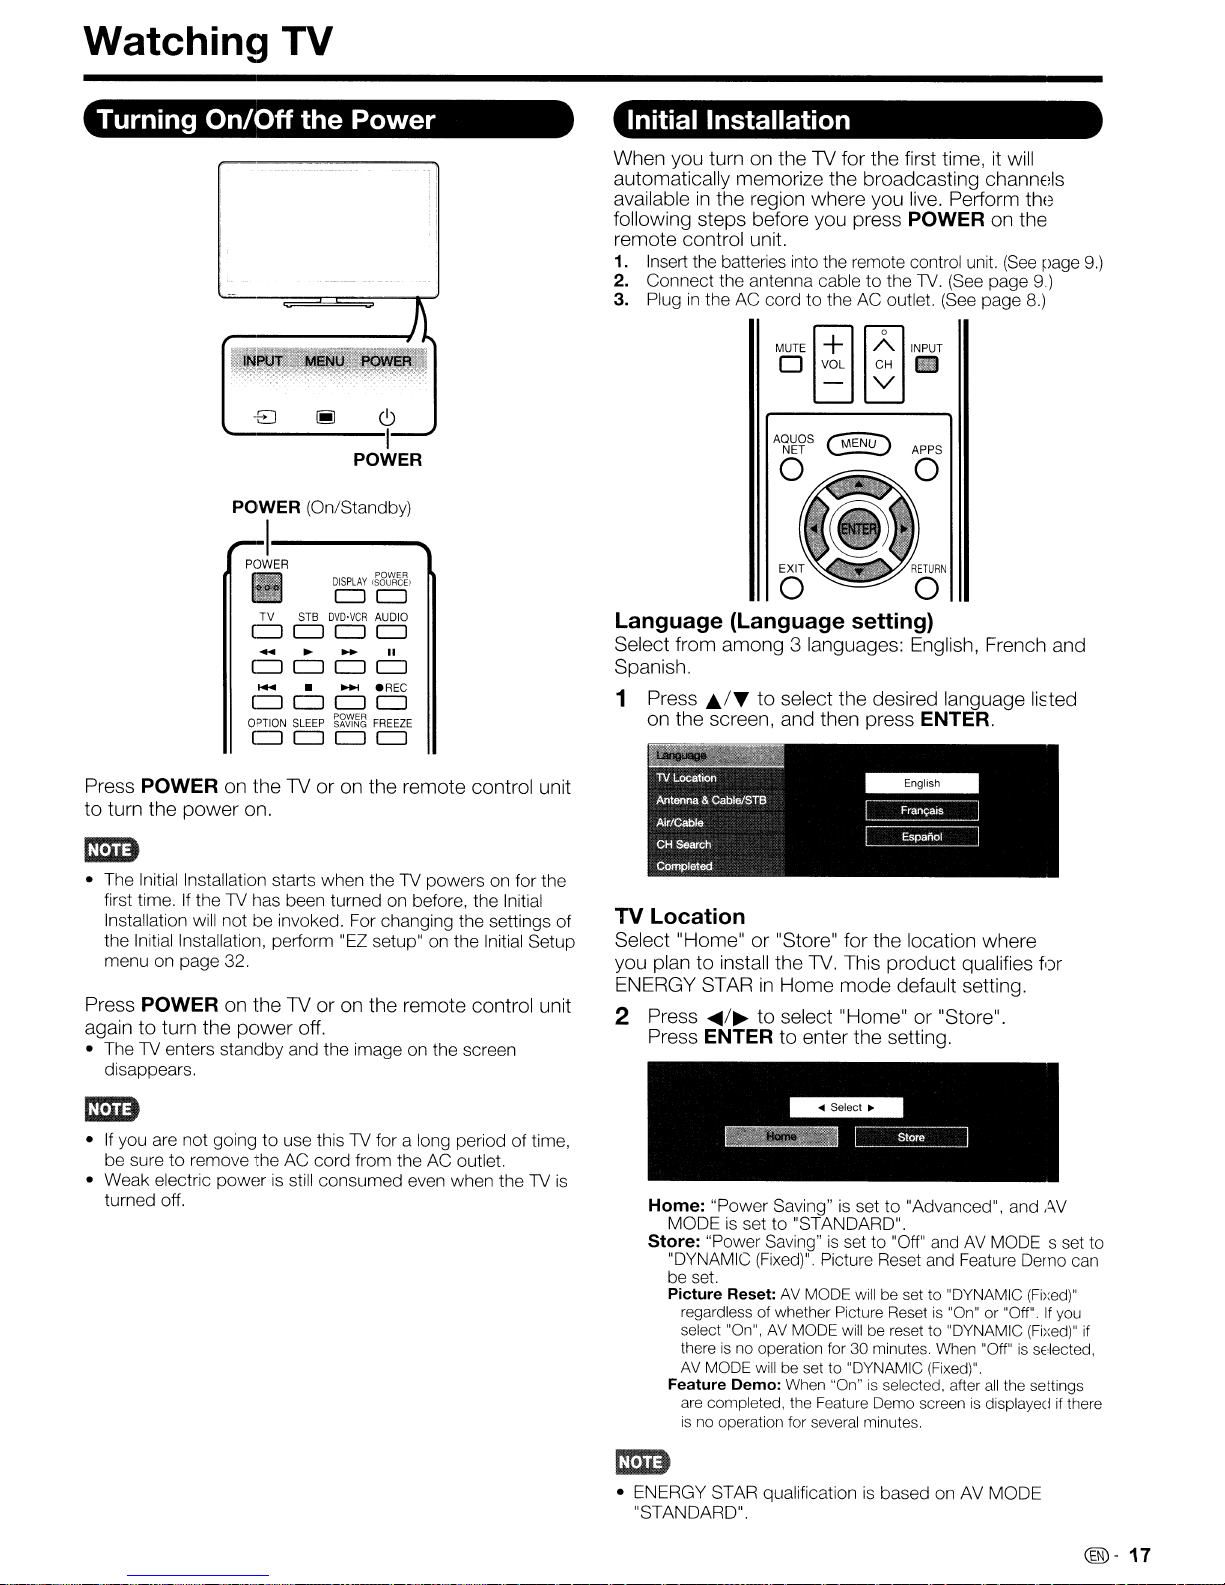
Initial Installation
When you turn on the TV for the first time, it will
automatically memorize the broadcasting channels
available
following steps before you press
in
the region where you live. Perform the
POWER on the
remote control unit.
1. Insert the batteries into the remote control unit.
2.
Connect the antenna cable to the 1V.
3. Plug
in
the AC cord to the AC outlet.
MUTE
~
o VOL CH '
~o
- V
~1i.~RETURN
(See
INPUT
(See
(See
page
page 8.)
page
9)
o 0
Language (Language setting)
Select from among 3 languages: English, French and
Spanish.
1 Press
Ji./""
to
select the desired language
on the screen, and then press ENTER.
Ided
9.)
Press POWER on the TVoron the remote control unit
to turn the
• The Initial Installation starts when the1Vpowers on for the
first time. If the
Installation will not be invoked. For changing the settings of
the Initial Installation, perform "EZ setup" on the Initial Setup
menu on page 32.
power
on.
1V
has been turned on before, the Initial
Press POWER on the TVoron the remote control unit
again to turn the
• The1Venters standby and the image on the screen
disappears.
•Ifyou are not going to use this1Vfor a long period of time,
be sure to remove the AC cord from the AC outlet.
• Weak electric power is still consumed even when the
turned off.
power
off.
1V
TV Location
Select "Home"or"Store" for the location where
you plantoinstall the
ENERGY STARinHome
2 Press
Press
is
Home:
MODE
Store: "Power Saving"
"DYNAMIC
be set.
Picture Reset:
regardless
select "On", AV MODE will be resetto"DYNAMIC (Fixed)"
thereisno
AV
Feature Demo: When "On" is selected, after
are completed, the Feature Demo screen
is no operation for several minutes.
...../~to select "Home"or"Store".
ENTER to enter the setting.
"Power Saving"isset to "Advanced", and AV
is
set to "STANDARD".
MODE will be set to "DYNAMIC (Fixed)".
TV.
This product qualifies for
mode
default setting.
is
set to
(Fixed)".
of
operation for30minutes. When "Off"issE·lected,
Picture Reset and Feature Demo can
AV
MODE will be setto"DYNAMIC (Fi):ed)"
whether Picture Reset is "On" or "Off".Ifyou
"Off"
andAVMODE s set to
if
all
the settings
is
displayed if there
• ENERGY STAR qualificationisbased on AV MODE
"STANDARD".
@-17
Page 19
Watching TV
&
Antenna
Cable/STB
Select the type of connection you will use to
watch
3 Press
lV.
..../~to select "Antenna8.Cable" or "Set-
top box". and then press
• To watchTVviaanantenna
(without
and then gotostep
• To watchTVvia
Make sure to cllange
terrlllr,al you are ccnllecting your
the operation manual of tile connected equipment for
setting up the
uSing
a set-top box), select "Antenna & Cable".
a set-top box. select "Set-top box".
equpmeill.
4.
INPUT
ENTER.
01'
cabie connection
to the specific input
seHop
box. See
Completed
6 The settings confirmation screen
Confirm the information displayed on the screen,
and then press
Examples of the settings confirmation screen
When oneormore channel is received after
"Antenna
search was carried out.
ENTER.
& Cable" was selected in step 3 and a
is
displayed.
Air/Cable (Antenna setting)
Make sure what kind of connectionismade with your
TV when selecting "Air" or "Cable".
4 Press
CH
Channel auto search makes the TV look for
channels viewableinthe set
S When "Air"
Press
..../~to select
ENTER
to
enter
".Air"
Hle
or "Cable".
setting.
Search (Channel search)
al'ea.
is
selectedinAntenna setting:
Press
..../~to select" Start", and then press
ENTER.
all
When no channelisreceived after "Antenna &
Cable" was selected in step 3 and a search was
carried out.
Language
TV
Location
& Cable/STB
Anntena
Air/Cable
search
Resu~
Channel notfound.
Antenna/Cable are not properly connected
or Air/Cable setup is incorrect.
Please
check
and Air/Cable setup.
: EngliSh
-Home
: Antenna & Cable
: Cable
: No channel
your Antenna/Cable connection
--
When
search was carried
"Set-top
box" was selectedinstep 3 and a
out
When "Cable"isselectedinAntenna setting:
Press
.1..-
to select "Analog8.Digital Searcrl
Start" to search both analog and digital broadcasts,
or to select "Analog Search Start" to search only
analog broadcasts. and then press
• Tile Channel search will start automatically.
• To exit the Channel searcrl screen, select "Cancel".
arld then press ENTER
@-
18
ENTER.
•Ifno channelisfound, confirm the type of connection
made with your TV and try "EZ Setup" again.
(See page 32,)
• For changing the settings
"EZ setup" on the Initial Setup menu on page 32.
• To see the list of channels found during Channel search,
press INPUT. and then press
of
the Initial Installation, perform
~.
Page 20
Direct Button Operation
OPTION
SLEEP
~~~~
CJ
FREEZE
_
MUTE
•
CC
AV
MODE
VIEW
MODE
fLASHBACK
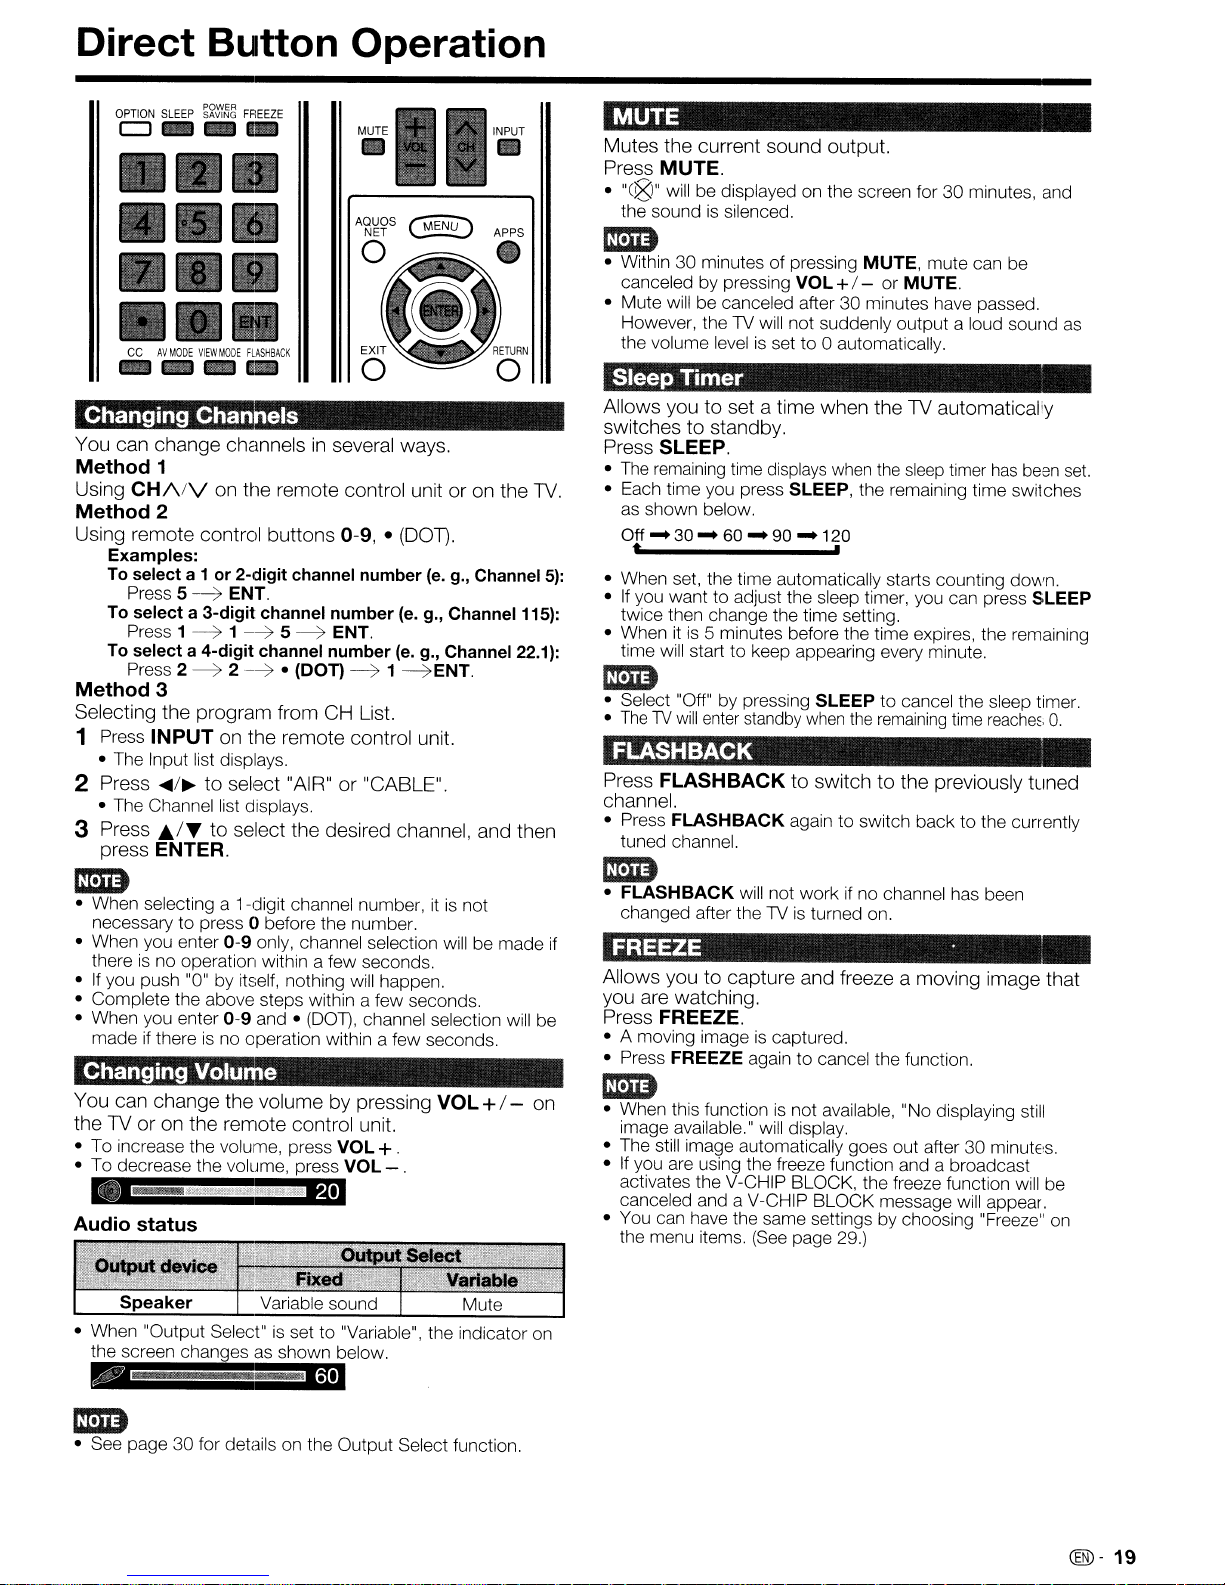
Changing Channels
You
can
change
Method
Using
Method
Using
Method
Selecting
1 Press
2
3
1
CH/\lV
2
remote
Examples:
To select a
Press 5
To select a 3-digit channel number (e. g.,
Press 1
To select a 4-digit channel number
Press 2
3
the
INPUT
The
Input list displays.
•
Press
..../~to
•
The
Channel list displays.
Press
J;./T
press
ENTER.
mm
• When selecting a 1-digit channel number, itisnot
necessary to press 0 before the number.
• When you enter
thereisno operation within a few seconds.
If
you push "0" by itself, nothing will happen.
•
• Complete the above steps within a few seconds.
• When you enter
You
theTVoronthe
• To increase the volume, press
• To decrease the volume, press
Audio status
if
made
thereisno operation within a few seconds.
Changing Volume
can
change
•
__
channels
on
Hle
control
1 or 2-digit channel number
-----7
ENT.
-----71-----75-----7
-----7
2
---"7
program
on
the
select
to
select
0-9
0-9
the
remote
"~~"""dt$'';;lP''
in several
remote
buttons
ENT.
• (DOT)
from
CH
remote
"AIR"or"CABLE".
the
desired
only, channel selection willbemade
and •
(DOT),
volumebypressing
control
ways.
control
0-9, •
-----7
control
VOL+.
VOL
unitoron
(DOT).
(eo
1 -----7ENT.
List.
channel,
channel selection will be
unit.
- .
g
the
(eo
go,
Channel
Channel 115):
g., Channel 22.1):
unit.
and
then
VOL+ / -
TV.
5):
on
MUTE
Mutes
the
current
Press
MUTE.
•
"C@"
will be displayed on the screen for 30 minutes, and
the sound
mm
• Within 30 minutes of pressing
canceled by pressing
• Mute will be canceled after 30 minutes have passed.
However, the
the volume
is
sound
silenced.
TV
will not suddenly output a loud sound
levelisset to 0 automatically.
VOL
output.
MUTE,
+/- or
mute can be
MUTE.
Sleep Timer
Allows
switchestostandby.
Press
•
• Each time you press SLEEP, the remaining time switches
• When set, the time automatically starts counting down.
•
• When
mm
• Select "Off" by pressing
•
youtosetatime
when
theTVautomaticaJiy
SLEEP.
The
remaining
as
shown below.
Off
...30...60...90...
t ,
If
you want to adjust the sleep timer, you can press
twice then change the time setting.
time will start to keep appearing every minute.
The1Vwill
time
displays
itis5 minutes before the time expires, the remaining
enter
standby
when
120
SLEEP
when
the
sleep
timer
to cancel the sleep timer,
the
remaining
time
FLASHBACK
Press FLASHBACKtoswitchtothe
channel.
• Press
FLASHBACK
tuned channel.
again to switch back to the currently
previously
mm
•
FLASHBACK
changed after the
if
FREEZE .
Allows
you
Press FREEZE.
• A moving imageiscaptured.
• Press
youtocapture
are
watching.
FREEZE
will not work if no channel has been
TVisturned on.
and
freeze a
again to cancel the function.
moving
mm
• When this functionisnot available, "No displaying
image available." will display.
• The still image automatically goes out after 30
•Ifyou are using the freeze function and a broadcast
activates the V-CHIP BLOCK, the freeze function will be
canceled and a V-CHIP BLOCK message will appear.
• You can have the same settings by choosing "Freeze"
the menu items.
(See
page 29.)
as
has
been
set.
SLEEP
reache~,
image
0,
tuned
that
still
minutE'S.
on
mm
• See page 30 for details on the Output Select function.
@-19
Page 21
Direct Button Operation
AVMODE
AV
MODE
fromtobest
TV,
which
typeofprogram
from
Press
• Press AV
screen disappears. The mode changes as shown below:
Example:
When the input source
VIDEO
AUTO
DYNAMIC
Example:
When the input source
AUTO
DYNAMIC
• "x.v.Color" can only be selected whenanx.v.Color
AUTO: Optimizes the image quality automatically based
STANDARD:
MOVIE: For a movie.
GAME: Lowers image brightness for easier viewing.
PC: For
USER: Allows the user to customize settings
x.v.Color: Supports the x.v.Color international standard
DYNAMIC: For a clear-cut image emphasizing high
DYNAMIC (Fixed): Changes the image and sound
gives
you
several
match
the
can
vary
duetofactors
watchedorthe
external
AV MODE.
t •
t •
signal
on the room brightness and image signal.
lighting.
You can set the mode for each input source.
for wide color space. The x.v.Color signal allows you
to experience colors that conventional color signals
cannot reproduce.
contrast, useful for sports viewing.
settings to the factory preset values. No adjustments
are allowed.
equipment.
Current
MODE
-
-
is
again before the mode displayed on the
STANDARD
(Fixed)-
STANDARD
(Fixed)-
input using HDMI 1 to
PC.
DYNAMIC -
For
a highly defined
viewing
surrounding
AV
MODE
is
TV,
-
MOVIE
DYNAMIC -
is
PC IN or
-
MOVIE
optionstochoose
environmentofthe
like
room
brightness,
typeofimage
displays.
COMPONENT
-
GAME
USER
[TV]
HDMI1
- GAME -
x.v.Color'-
4.
imageina normal
to 4
USER[J]
as
input
or
PC
desired.
INPUT
To view external source images, select the input source
pressing INPUT on the remote control unitoron
the
TV.
1 Press INPUT.
• The CH List screen displays.
2 Press
Jt'/~
or
press
INPUT
source.
•Animage from the selected source automatically displays.
• Each time INPUTispressed, the input source toggles.
•
If
the
corresponding
the
input.Besuretoconnect
inputisnot
againtoselect
plugged
the
in,
equipment
the
you
cannot
beforehand.
input
change
Im1D
• See pages 12 to 16 and 46 for external equipment
connection.
APPS
Allows
applications.
youtodirectly
activate
various
types
of
Im1D
• See pages 39, 56, 62 and 64 for details of viewable
applications.
• You can display the application window by choosing
"APPS" on the menu items.
• When this function
function now" will display.
is
(See
not available, "Can not operate this
page 29.)
POWER SAVING
Allows
decrease
backlight
Press
• Each time you press POWER SAVING, the mode changes
youtoset
the
lifespan.
the
power
Power
consumption
POWER SAVING.
as
shown below.
Off - Standard - Advanced
t ,
Saving
level in
and
order
increase
to
the
Im1D
• You can have the same settings by choosing "Power
Saving" on the menu items.
(See
page 28.)
by
Im1D
• You can select a differentAVMODE item for each input
mode.
(For
example, select STANDARD forTVinput and
DYNAMIC for COMPONENT.)
• When you play games, "GAME"
MODE.
You
cannot set "GAME" or "PC" when theTVis
•
to the Internet or when the input source
• You can have the same settings by choosing
on the menu items.
@-20
(See
page 25.)
is
recommended for
"USB".
"AV
connected
MODE"
is
AV
Page 22
Direct Button Operation
Closed Captions and Digital Closed Captions
Your TVisequipped withaninternal Closed Caption
It
decoder.
and sound effects
Captions are available on some TV programs and on
some VHS home video tapes at the discretion of the
program provider.
allows you to view conversations, narration
as
subtitles on your
TV.
Closed
1 Press CC.
• This will present the Closed Caption information display.
2 Press
CC
while the Closed Caption information
still on the screen.
• Press repeatedly until you select the desired closed
caption service.
is
Digital Closed Caption serviceisa new caption service
TV
available only on digital
discretion of the service provider).
programs (also at the
It
is
a more flexible
system than the original Closed Caption system,
it
because
styles. When the Digital Closed Caption service
allows for a variety of caption sizes and font
is
in
use,itwill be indicated by the appearance of a 3-letter
abbreviation that also indicates the language of the
ENG
Digital Closed Captions:
FRA
(French) or other language codes.
Not
all
programs and VHS videotapes offer closed
captions. Please look for the
(English), SPA (Spanish),
"[CC)"
symbol to ensure
that captions will be shown.
In
the Closed Caption system, there can be more than
is
one caption service provided. Each
identified by its
own number. The "CC1" and "CC2" services display
subtitles of TV programs superimposed over the
program's picture.
In
the Closed Caption system, the "Text1" or "Text2"
is
services display text that
unrelated to the program
being viewed (e.g., weather or news). These services
are also superimposed over the program currently
being viewed.
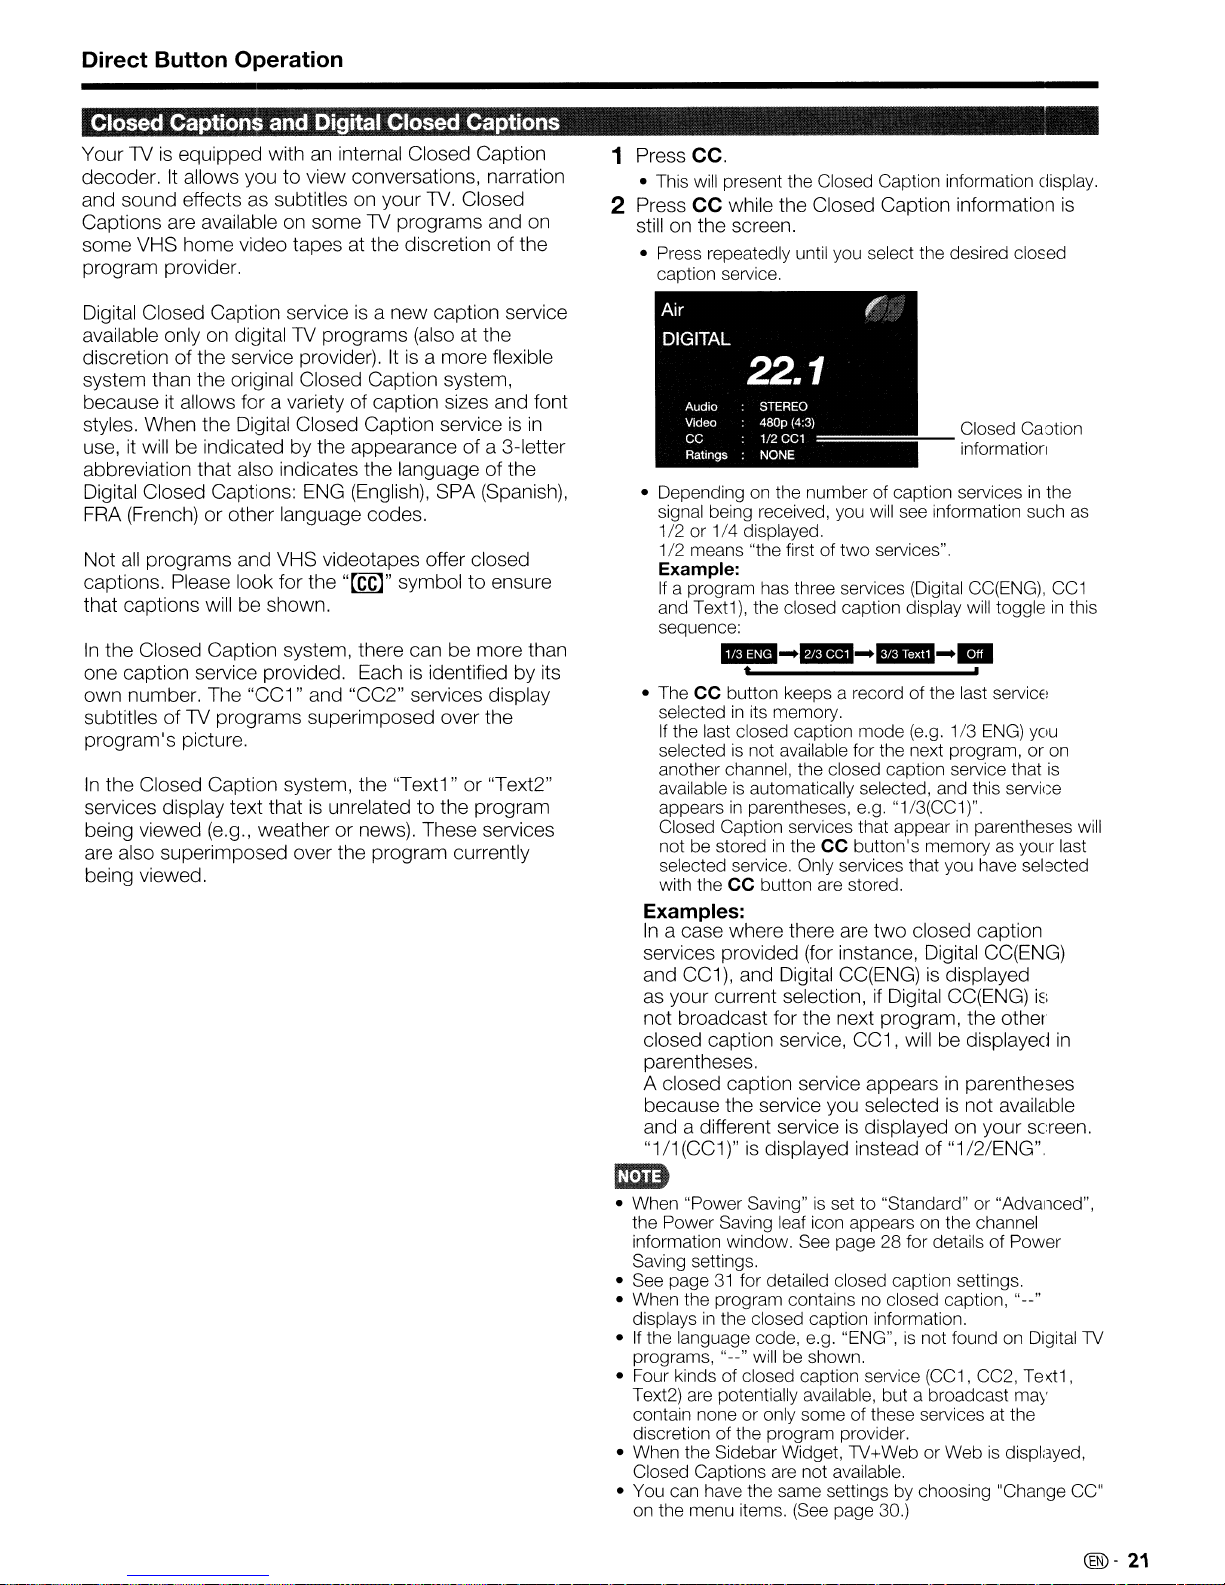
Air
DIGITAL
22.1
Audio
Video
CC
Ratings
• Depending on the number of caption servicesinthe
signal being received, you will see information such as
1/2
or 1/4 displayed.
1/2
means "the first of
Example:
If
a program has three services (Digital CC(ENG),
and Text1), the closed caption display will toggleinthis
sequence:
• The CC button keeps a record of the last
selectedinIts memory.
If
the last closed caption mode (e.g. 1/3
selected
another channel, the closed caption service that
availableisautomatically selected, and this service
appears
Closed Caption services that appear
not be stored
selected service. Only services that you have sel9cted
with the
Examples:
In
a case where there are
services provided (for instance, Digital CC(ENG)
and CC1), and Digital CC(ENG)
as
your current selection,ifDigital CC(ENG)
not broadcast for the next program, the other
closed caption service, CC1, will be displayed
parentheses.
A closed caption service appears
because the service you selected
and a different service
"1/1(CC1)"
STEREO
480p
(4:3)
1/2
eCl
=====
NONE
two
services".
IIEI-F1&I-IIIII-.
t ,
is
not available for the next program, or
in
parentheses, e.g. "1/3(CC1)".
in
the CC button's memoryasyour last
Closed Caotion
information
in
CC button are stored.
two
closed caption
is
displayed
in
parentheses
is
not available
is
displayed on your screen.
is
displayed instead of "1/2/ENG"
CC1
serviCE:
ENG)
you
on
is
parentheses will
i~:
in
rmlD
• When "Power Saving"isset to "Standard" or "Advanced",
the Power Saving leaf icon appears on the channel
information window. See page 28 for details of Power
Saving settings.
• See page
• When the program contains no closed caption, "--"
displays
•
If
the language code, e.g. "ENG",isnot foundonDigital1V
programs, "--" will be shown.
• Four kinds of closed caption service (CC1, CC2,
Text2) are potentially available, but a broadcast may
contain none or only some ofthese services at the
discretion of the program provider.
• When the Sidebar Widget, 1V+Web or Web
Closed Captions are not available.
• You can have the same settings by choosing "Change CC"
on the menu items.
31
for detailed closed caption settings.
in
the closed caption information.
(See
page 30.)
Te><t1,
is
displayed,
@-21
Page 23
Direct Button Operation
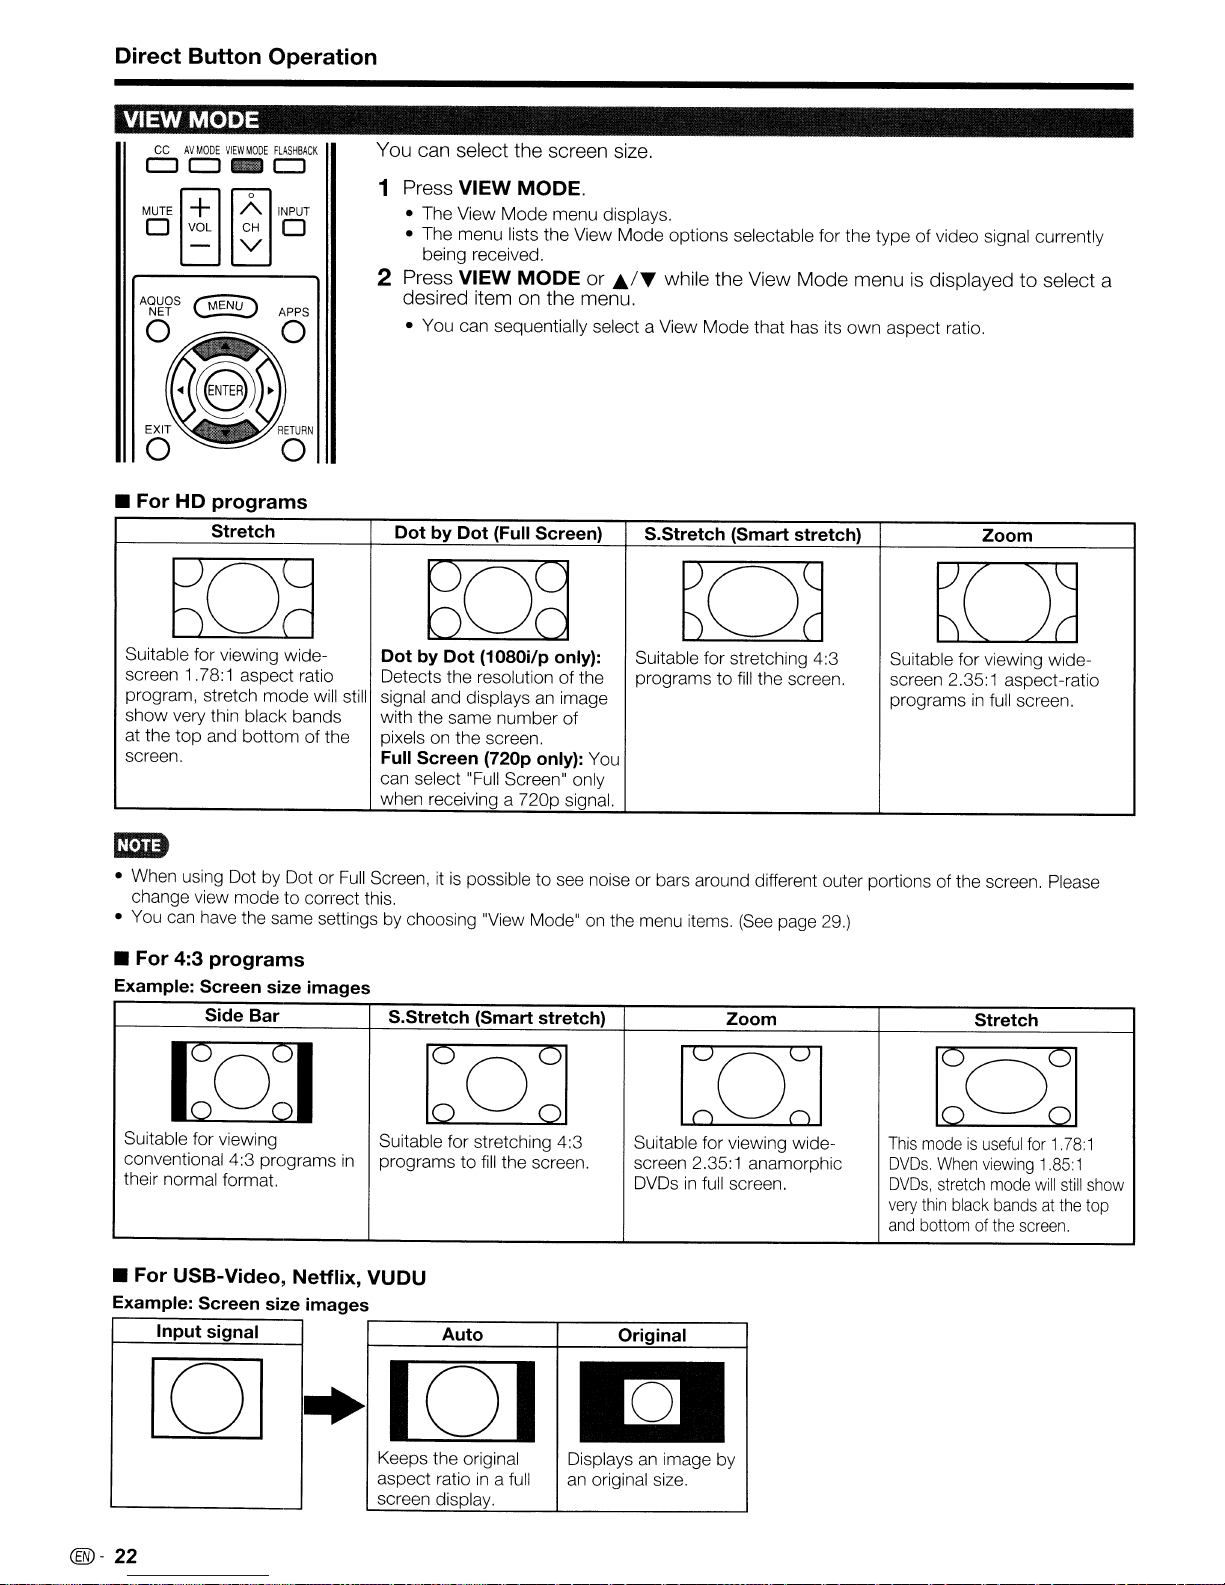
VIEW
• For
MODE
CC
AV
MODE
VIEW
00_0
MUTE
~
o VOL CH 0
HD
MODE
~o
- V
programs
Stretch
FLASHBACK
INPUT
[]a
Suitable for viewing widescreen 1.78:1 aspect ratio
program, stretch
show
very thin black bands
at the
top
screen.
and
mode
bottom
will still
of the
You can select the screen size.
1 Press VIEW MODE.
• The View
• The menu lists the View
being received.
2 Press VIEW
desired item
• You can sequentially select a View
DotbyDot
ESrn
DotbyDot
Detects the resolution of the programstofill
signal and displays an image
with the same number of
pixels on the screen.
Full Screen (720p only): You
can select "Full Screen" only
when receiving a 720p signal.
Mode
menu displays.
MODE
on
the menu.
(Full Screen) S.Stretch (Smart stretch)
or
Mode
options selectable for the typeofvideo signal currently
J;..IT
while the View Mode menuisdisplayed to select a
Mode
0
(1080i/p only):
Suitable for stretching 4:3
that has its
own
aspect ratio.
Zoom
D
Suitable for viewing wide-
the screen. screen 2.35:1 aspect-ratio
programs
in
full screen.
Full
• When using Dot by Dot or
change view modetocormct this.
• You can have the same settings by choosing "View Mode" on the menu items.
• For 4:3 programs
Example: Screen size images
Side Bar
1M)
Suitable for viewing
conventional 4:3 programs
their normal format.
• For USB-Video, Netflix,
Example: Screen size images
Input signal Auto
Screen, itispossibletosee noise or bars around different outer portions of the screen. Please
S.Stretch (Smart stretch)
bQd
Suitable for stretching 4:3 Suitable for viewing wide-
in
programstofill
VUDU
,...----------,---------,
I---...:...:..:~---+---.=....:....:~.:..::.:c..----l
the screen. screen 2.35:1 anamorphic
ern
in
DVDs
Original
full screen.
[OJ
·101
an
Keeps the original
in
aspect ratio
screen display.
a full
Displays
an original size.
image by
(See
Zoom
page 29.)
Stretch
l:c~:1
This
modeisuseful
DVDs.
When
DVDs,
stretch
very
thin
and
bottomofthe
black
for1.78:
viewing
1.85:1
mode
will
bandsatthe
screen.
still
1
show
top
@-
22
Page 24
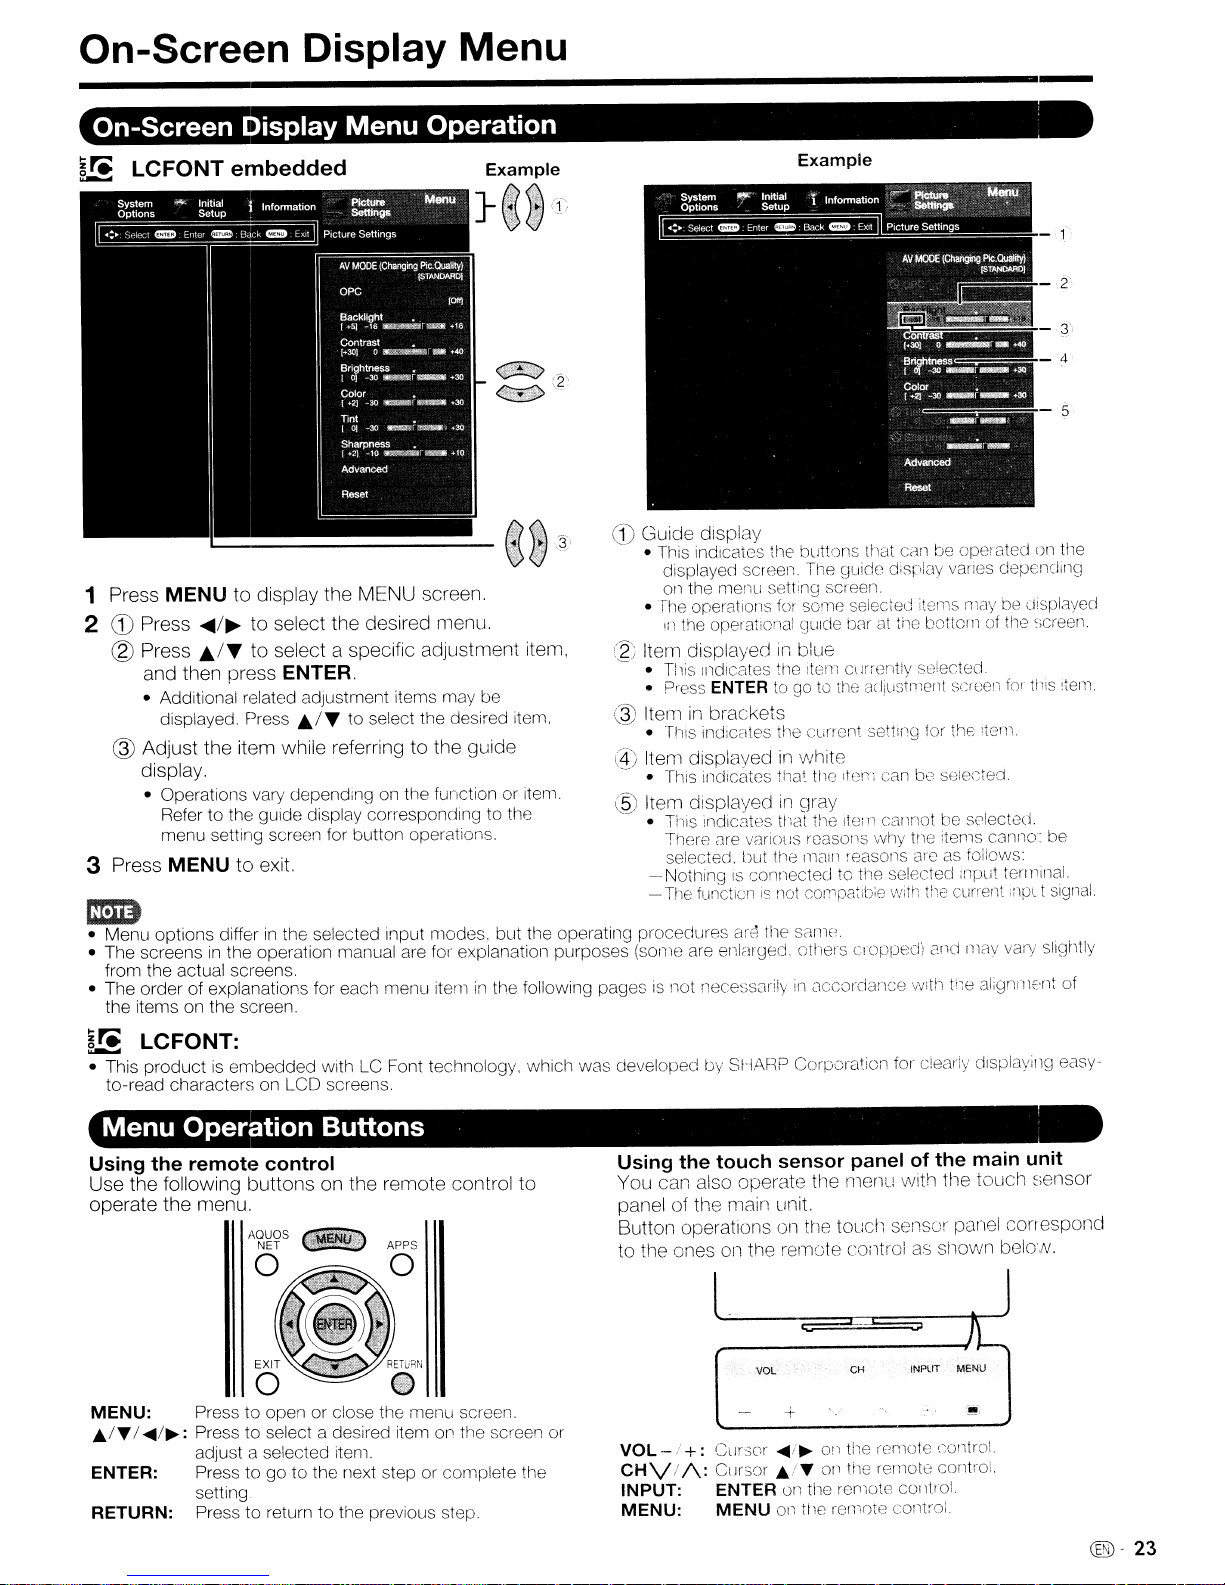
On-Screen Display
Menu
--------------------------------------
On-Screen Display Menu Operation
~~
LCFONT
1 Press
2
CD
MENU
Press
® Press
and then press
• Additional related adjustment items may be
displayed. Press
embedded
to display the MENU screen.
...../~to select the desired menu.
J;./T
to select a specific adjustment item,
ENTER.
J;./T to select the desired item.
@ Adjust the item while referring to the guide
display.
• Operations vary depending on the functionoritem.
Refer to the guide display corresponding to the
menu setting screen for button operations.
3 Press
MENU
to exit.
CD
Guide display
• This indicates the buttons Ih8t can be operated on tile
displayed screen. The guide disr:,jay vanes depeneJlng
on the menu setting screen.
The
operations
•
!ii the oper3tional
@ Item displayed iii blue
• This Illdlcates the ItemCl!rrentlv selected
Press
•
~,
Iteminbrackets
•
(1)
Item displayedinwhite
• This indicates
ENTERtogo to rile acljllsill1enl screen
ThiS
indicates tile Clinont setting for the Item
@ Item displayed
• This indicates
Theme
ore
selected.
- Notillng
The
-
IJut
IS
functionisnot
Example
for
some selected items
gUlcle
illa!
tile
in
gray
t/1dt
VilriOUS
connectedtothe selected input terminal
the itoin cannot be selected.
roi:lSOI1S
ti-18
mall1
cor~lpa:lb:e
Im1D
• Menu options differinthe selected input modes, but the operating procedures are tile samf,
• The screens
from the actual screens.
• The order of explanations for each menu item
the items on the screen.
in
the operation manual are for explanation purposes (some are 8nlmgeci. others cropp8cn 2nd
in
the following pagesISnot necessClriiyInClccorclcliice W!til ti,e alignl1lc·nt of
[Jaratthe
!tOIT;
can be selected.
why tno items canna: be
reasons arcasfoilows:
witi1
maybecJ!spiayed
bottom of
H~e
current i11Pl t
mciY
the
'icreen.
for
t!'is
Item.
signal.
vary Sligrltly
~~
LCFONT:
• This product is embedded
to-read characters on LCD screens.
With
LC Font technology. which was developed
Menu Operation Buttons
Using
Use the following buttons on the remote control to
operate the menu.
MENU:
ENTER: Press
RETURN: Press to return to the previous step.
A./T
the
I
~/~:
remote
Press to open or close the
Press to select a desired item
adjust a selected item.
setting_
control
to
go to the next step or complete the
lTJenu
screen.
Oil
the screen or
rJy
SH.li,RP
Using
the
touch
You can also operate the menu
Corporation for clearly displaying easy-
sensor panel of
yvith
panel of the main unit.
Button operationsonthe
to the ones
all
the
VOL
rellllcJ!e
tOLlell
sensor panel correspond
COiltl'01assl10wn
INPUT 'MENU
CH
+
VOL-
.:+:Cursor
CHV':
INPUT: ENTER on tile rernote COilllo!.
MENU:
1\: Cursor
MENU
....
;~
011 the remote control.
A./T
011 the remote contro!.
011
tl18
ren,me COlllro!.
the
main unit
the touch
~.
~;ensor
bela,N.
@-
23
Page 25
On-Screen Display Menu
Menu Items
mm
• WhenAVMODEisset to "AUTO", part of the menu may not be displayed correctly or the setting range of the menu may be
changed.
• Some menu items may not be displayed depending on the selected input source.
_ Picture Settings
AV
MODE (Changing Pic.Quality) Page 25
OPC Page 25
Backlight Page 25
Contrast Page 25
Brightness Page 25
Color Page 25
Tint Page 25
Sharpness Page 25
Advanced Pages 25-26
C.M.S.-Hue Page 25
C.M.S.-Saturation Page 25
C.M.S.-Value Page 25
Color Temp Page 26
Motion Enhancement Page
Quad Pixel Plus Page 26
Active Contrast Page 26
Gamma Adjustment Page 26
Black Level Page 26
Film
Mode Page 26
Digital Noise Reduction Page
Monochrome Page 26
Range of OPC Page 26
Reset. Page 25
~
Audio Settings
- Auto Volume Page 27
Treble Page 27
Bass Page 27
Balance Page 27
Surround Page 27
Bass Enhancer Page 27
Reset. Page 27
Clear Voice Page 27
tt
Power
Audio Only Page 28
Power Saving Page 28
No Signal Off Page 28
No Operation Off Page 28
@-
24
Control
26
26
"System
View Option Pages
AQUOS LINK Setup Page 47
Input Terminal Setting Pages 30,
Menu Design Pages 30-31
Game Play Time Page
Operation Lock Out. Page
leon Light Up Setting Page
Demo Mode Page
~Initial
EZ
Broadcasting Setup Pages 32-33
Internet Setup Pages 55-56
Language Page 33
DivX®
Individual Setup Pages 33-35
Wall Mount Audio Setup Page 33
FAV
Reset. Page 33
Options
29-30,43
APPS Page 29
USB Operation Panel Page 43
View Mode Page 29
Freeze Page 29
Change Audio Page 29
Change CC Page 30
Audio Setup Page 30
PC
input.. Page
Audio Select.. Page
Input Skip Page 30
Input Label Page
HDMI Setup Page 30
Output Select.. Page 30
Color System Page 30
Channel Selecting Effect Page 30
Program Title Display Page 30
Position Page 30
Caption Setup Page
Setup
Setup Page 32
Language Page 32
TV Location Page 32
Antenna
Air/Cable Page 32
CH Search Page 32
Completed Page 32
CH Setup Page 32
Favorite CH Page 32
Antenna Setup-DIGITAL Page 33
Setup Page 43
Secret No Page 33
Parental CTRL Pages 33-35
APP Key Assign Page 33
& Cable/STB Page 32
U Information
Identification Page
Digital Caption Info Page 36
Software Update Pages 36-38
Manual Update Pages 36-38
Auto Update Setting Page 36
Netflix Help Page 63
Vudu Help Page 65
51
51
51
30
31
31
31
31
31
36
Page 26
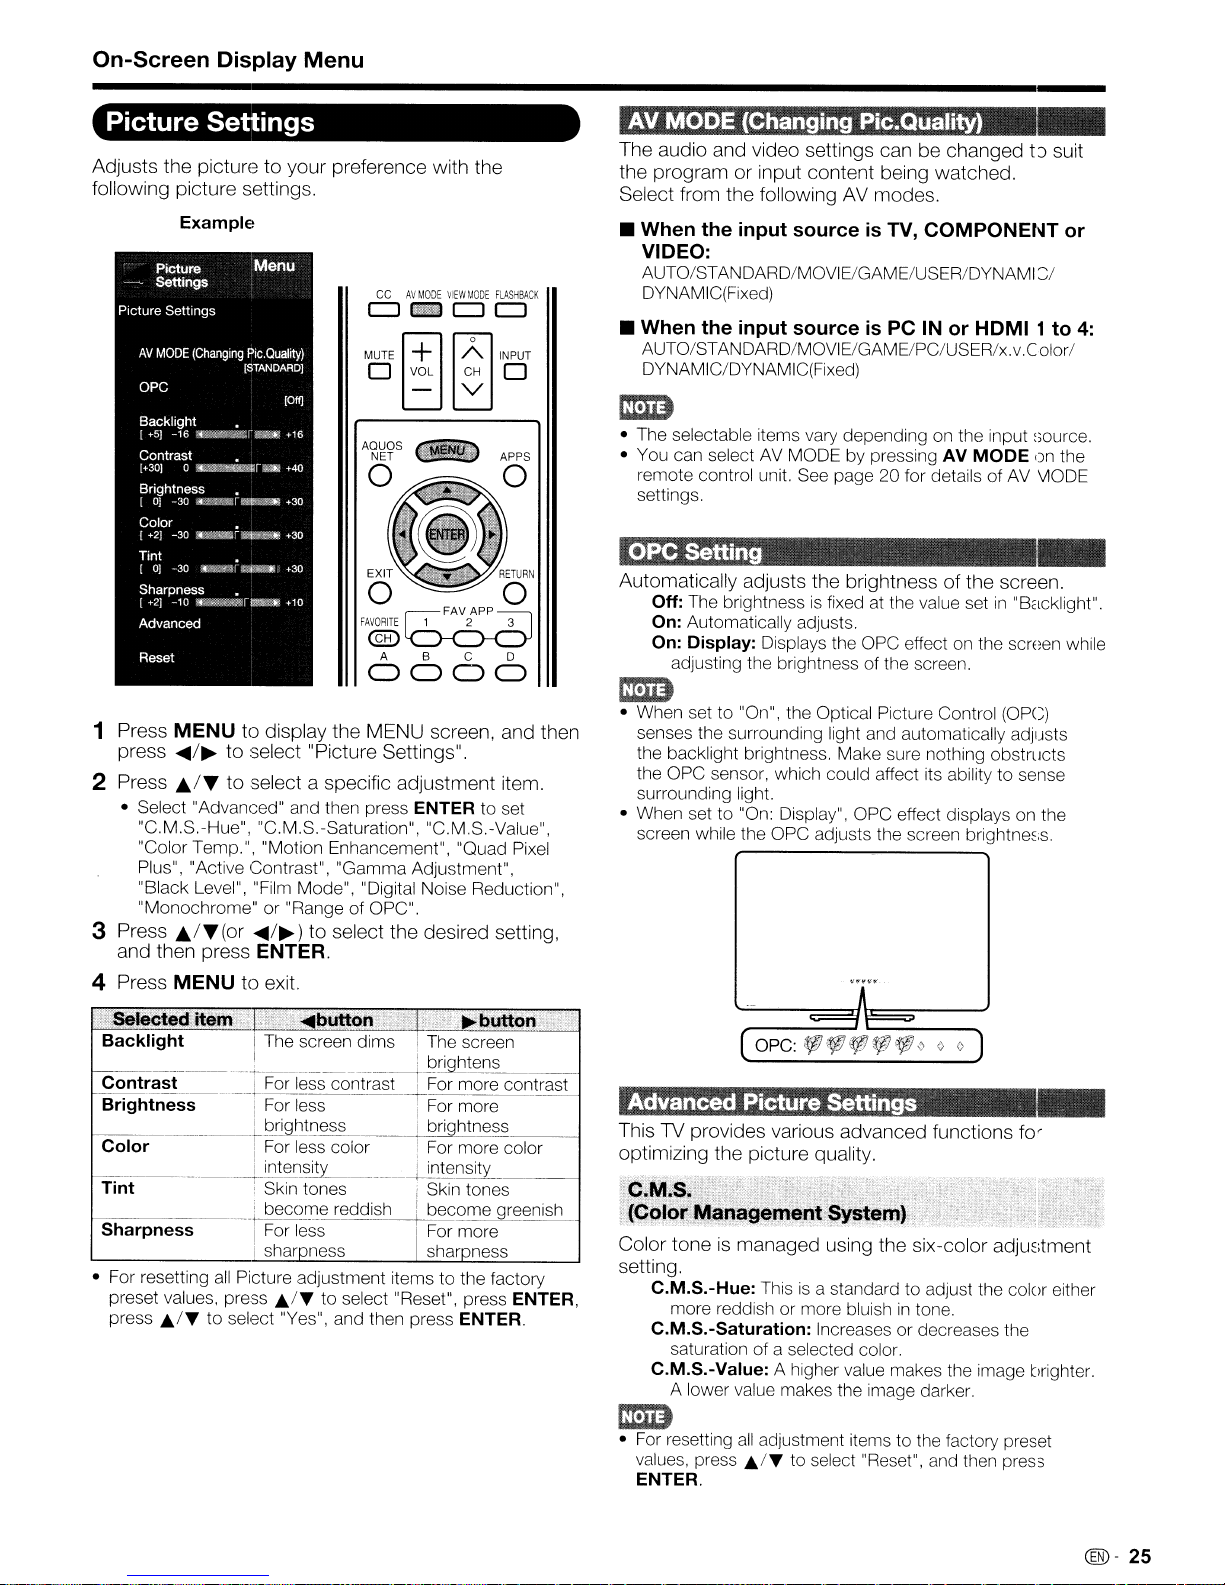
On-Screen Display Menu
Picture Settings
Adjusts
following
1
2 Press AI'''
3
4
the
picturetoyour
picture
Example
Picture
Settings
Picture Settings
AV
MODE
(Changing
oPC
Backlight •
[+5J
-16
r~~~r·~~
Contrast •
[+30J0_nr11m
Brightness •
[oJ-30
~_r
Color •
{+2]
~30
tilip.mr~
Tint
[OJ-30
Sharpness •
(+2)
-10
~~~r~~
Advanced
Reset
i~.~~f
settings.
Menu
Pic.
QUality)
[STANDARDJ
__
Ci~1¥1»
[Off]
+16
+40
+30
+30
+30
+'0
preference
CCAVMODE
CJ
c:::!l
MUTE
~
o VOL CH 0
- V
o 0
fAV091TE
@)
ABC
1 2 3
~
with
VIEW
FAVAPP
0000
Press
MENU
press
...../~to
• Select "Advanced" and then press
"C.M.S.-Hue", "C.M.S.-Saturation", "C.M.S.-Value",
"Color Temp.", "Motion Enhancement", "Quad
Plus", "Active Contrast", "Gamma Adjustment",
"Black Level", "Film Mode", "Digital Noise Reduction",
"Monochrome" or "Range ofOPC".
Press
A/"(or
and
then
Press
MENU
to
display
select"
to
selectaspecific
.....
press
/~)
ENTER.
to
exit.
the
Picture
to
select
MENU
Settings".
adjustment
ENTER to set
the
screen,
desired
the
MOD,
fLASHBACK
CJ
CJ
~o
INPUT
setting,
RETURN
0
and
item.
Pixel
then
AV
MODE
The
audio
the
programorinput
Select
from
(Changing Pic.Quality)
and
video
settings
content
the
followingAVmodes.
canbechangedt)suit
being
watched.
• When the input sourceisTV, COMPONENT or
VIDEO:
AUTO/STANDARD/MOVIE/GAME/USER/DYNAMI2,1
DYNAMIC(Fixed)
• When the input sourceisPC IN or HDMI 1 to
AUTO/STANDARD/MOVIEIGAMElPC/USER/x.v.ColorI
DYNAMIC/DYNAMIC(Fixed)
mm
• The selectable items vary depending on the input
• You can selectAVMODE by pressing AV
remote control unit.
settings.
OPe
Setting
Automatically
Off:
The
brightnessisfixedatthe value
On: Automatically adjusts.
On: Display: Displays the OPC effect
adjusting the brightness of the screen.
mm
• When set to "On", the Optical Picture Control (OPe)
senses the surrounding light and automatically adjusts
the backlight brightness. Make sure nothing obstructs
the OPC sensor, which could affect its ability to sense
surrounding light.
• When set to
screen while the OPC adjusts the screen
See
page20for details ofAVV10DE
adjusts
"On:
the
brightnessofthe
Display", OPC effect displays on the
MODE
setin"Backlight".
on
brightne~;s.
~;ource.
r)n
the
screen.
-
the screen while
4:
_ ...
"
selecte~ltenF
Backlight I The screen dims i
Contrast-----
I----"---------+__
Brightness i
I:
i
t
Color I For less color , For more color
[--
___._____
Tint ; Skin tones ; Skin tones
Sharpness
• For resetting
preset values, press
press
Jt..1"
~~
____
I
I sharpness sharpness
all
Picture adjustment items to the factory
to select "Yes", and then press ENTER.
button·;;]
For
less
co-ntrast+~~~~:
For
less For more
~htness
_____
bec(2.02~eddish
For
less I
Jt..1"
to select "Reset", press ENTER,
~tenslty
---+
I
.'
....
bl;ltton
The
screen
I
briQhtness
become greenish
For
contrast
more
Advanced Picture Settings
ThisTVprovides
optimizing
'C,M.S,.-,?
i(Co!or
Color
setting.
M~~~g!m,ent.
toneismanaged
C.M.S.-Hue: This
more reddish or more bluish
C.M.S.-Saturation: Increases or decreases the
saturation of a selected coior.
C.M.S.-Value: A higher value makes the image brighter.
A lower value makes the image darker.
the
various
picture
advanced
quality.
...."n.'·
Sy~em)
using the
is
a standard to adjust the color either
functions
;.
'.
six-color
in
tone.
adju~;tment
mm
•
For
resetting
values,
ENTER.
all
press Jt../" to select "Reset", and then press
adjustment items to the factory preset
fo'
coo-
25
Page 27
On-Screen Display Menu
For a better white balance, use color temperature correction.
High: White with bluish tone
Mid-High: t
Middle:
Mid-Low:
Low:
White
balance
+30
andaminimum
R Gain (LO/HI):
G Gain (LO/HI):
B Gain (LO/HI):
White with reddish tone
canbeadjusted
of
-30
for
-30
through +30
-30
through +30
-30
through +30
betweenamaximum
each
color
temperature.
1m)
•
For
resetting
values,
ENTER.
Use
Motion
more
clearly.
AquoMotion240: Turns the
or off to display motion picture more smoothly and
clearly.
120Hz High/120Hz Low:
Off: Normal image.
all
press ~JT to select "Reset",
adjustment items to the factory preset
Enhancementtoview
LED
For
obtaining a clearer image.
and
then press
fast-action
scanning backlight
video
on
1m)
• "Motion Enhancement" may cause image noise.Ifthis
occurs, turn the function "Off".
AV
• When
being input, "Motion Enhancement"isnot available.
MODEisset to "GAME" or "PC", orPCformat
Automatically
encodedat24
each still film frame for high-definition picture quality.
Advanced(High)/Advanced(Low): Select a desired
to remove jerkiness from
Standard: Detects, analyzes, converts
Off: Normal viewing mode.
of
mm
• "Film Mode" does not function when you setAVMODE to
"GAME".
• "Standard" does not function when channel display shows
an
input signal resolution of 480p, 720p, or 1080p.
• "Film Mode"
• "Advanced(High)" and "Advanced(Low)" do not function
when you set
Producesaclearer
Auto: Automatically adjusts the
High/Middle/Low: Select a desired
clearer video image.
Off:
detects
No
adjustment.
is
a film-based source (originally
frames/second), analyzesitthen recreates
film
contents.
film
not available duringPCformat input.
AV
MODE to "PC".
video
image.
level
of noise reduction.
level
mm
• "Digital Noise Reduction"isnot available when you set
MODE to "PC" orPCformatisbeing input.
AV
• When
is
For viewing a
On:
Off: Normal color.
MODEisset to "GAME", "Auto"isnot available.
videoinmonochrome.
For
viewinginmonochrome.
level
source.
for viewing a
AV
Enables
Automatically
the
Adjusts
parts
gamma
of-2by
Adjusts on-screen black level
smoother
On: Produces smooth diagonal
Off:
No
scene.
On: Automatically adjusts the image contrast.
Off:
No
the
and
dark
canbesettoa
pressing
High: The black
Low: The black
diagonal linebydetailed
adjustment.
adjusts
adjustment.
differencesofpicture
parts.
the
The
adjustment rangeofthe
maximumof+2
....
or~.
level
gets brighter.
level
gets darker.
image
to
line.
contrast
tones
between bright
and a
your preferred level.
lID
• "Black
Level"isavailable for input signal from Composite
Video, Component 480i and analog broadcasts
cable).
dot
control.
according
minimum
(air
and
to
The brightness level range
adjustments can
The
adjustment
a
maximum
Max.:
-15
Min.:
-16
be
rangeofthe
of+16
through +16
through +15
of
the
OPC
sensor's automatic
set accordingtoyour
OPC
sensor
andaminimumof-16.
preferences.
canbeset
mm
• The "Range of OPC" settings
is
set to "On".
• The maximum setting cannot be set to a smaller number
than the minimum setting.
• The minimum setting cannot be set to a bigger number
than the maximum setting.
on
• Depending
OPC
sensor might not operateifthe adjustment
small.
the brightness of the surrounding
are
active only when "OPC"
light,
range
the
is
to
@D-
26
Page 28

On-Screen Display Menu
Audio Settings
You can adjust the sound quality to your preference
with the following settings.
Example
MUTE
~
~o
OVaL
AQUaS
NET
- V
INPUT
CH
0
III APPS
o 0
,,,lewo
0-0
fAVORITE
@)
ABC
0000
1 Press MENU to display the MENU screen, and then
press .../~to select "Audio Settings".
2 Press
3 Press
4 Press MENU to exit.
SeleCted
Treble
Bass
Balance
J;",I.."
to select a specific adjustment item.
• Select "Auto Volume", "Surround", "Bass Enhancer" or
"Clear Voice", and then press
J;.t"
(or ...
and then press ENTER.
ite~§'I;l'£;'~'
~
/~)
•.
~bulton'
I For weaker treble For stronger treble
I
For weaker bass
I
Decrease audio Decrease audio
I from the right
speaker
to select the desired setting,
ENTER to set each item.
FAVAPP
1 2 3
~
,.,,,;:
..
;F;;;!i~~";5~·
I
For stronger bass
from the left
speaker
D
Auto
Volume
Different sound sources sometimesdonot have the
same loudness level, such as a program and
commercial breaks. The Automatic Volume Control
(Auto Volume) reduces this problem by equalizing
levels.
High: Reducing the loudness gaps among different
sound sources strongly.
Middle:
Reducing the loudness gaps among different
Low:
sound sources slightly
Surround '
The surround function produces Surround effect from
the speakers.
On: Makes
sound.
Off: Outputs the normal sound.
mm
• Audio Settings menuisgrayed out when "Output Select"
setto"Variable".
• For some discs, setup may be required on your DVD
player.
your DVD player.
it
possible to enjoy natural, realistic surround
(See
page 30.)
In
this case, please refer to the operation rlanual
Bass Enhancer
This function allows
On: Bass Enhancer function
Off: Normal sound.
you
to enjoy bass-enhanced sound.
is
on.
mm
• Audio Settings menuisgrayed out when "Output Select"
,
set to "Variable". (See page 30.)
Clear
This function emphasizes speech against background
noise for greater clarity.
Voice
it3
is
of
is
• Audio menu
"Variable", (See page 30.)
• For resetting Audio adjustment items, except "Clear Voice",
to the factory preset values, press
press
ENTER.
is
grayed out when "Output Select"isset to
Ji./T
ENTER, press Ji./T to select "Yes", and then press
to
select "Reset",
(@-
27
Page 29
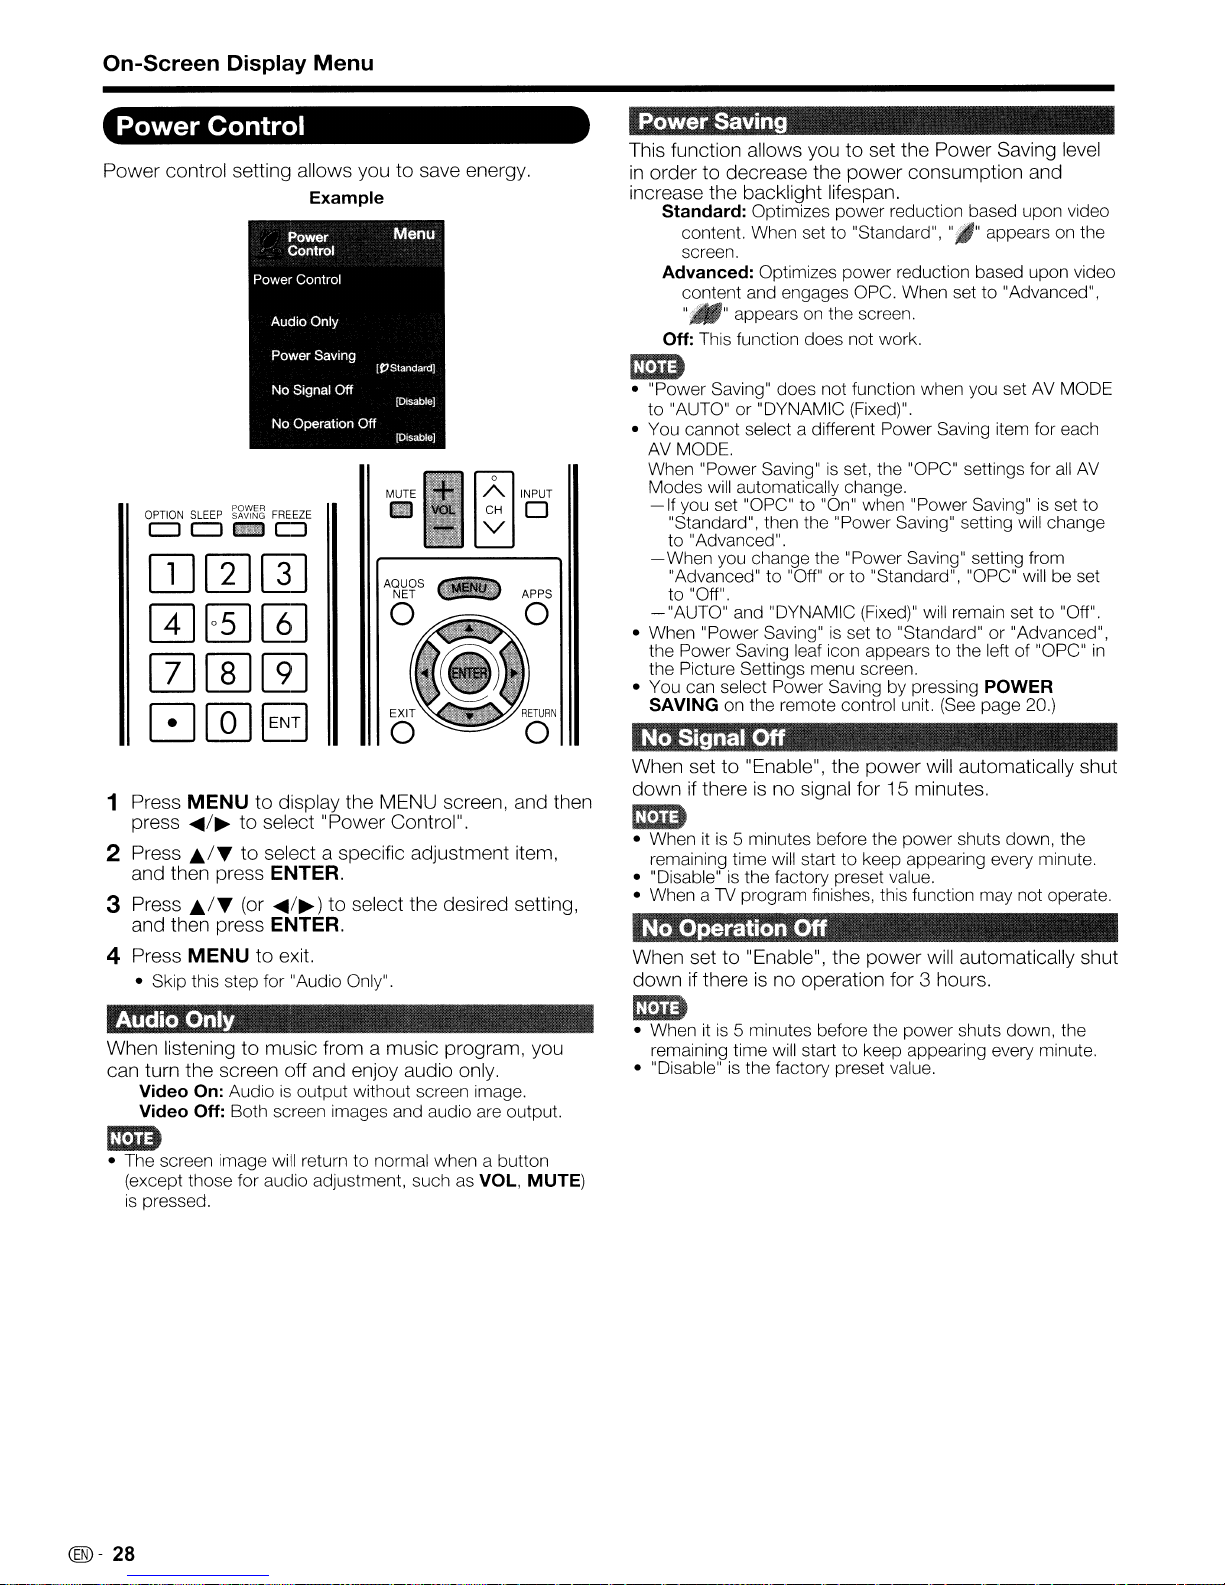
On-Screen Display Menu
Power
Power control setting allows you to save energy.
OPTION
Control
SLEEP
CJCJ_CJ
~~~~~
FREEZE
Example
lID
'""
CH 0
I
'"
V
I
"'"'
Power
This function allows you to set the Power Saving level
in
order to decrease the power consumption and
increase the backlight lifespan.
Saving
Standard: Optimizes power reduction based upon video
""I"
content. When set to "Standard",
screen.
Advanced: Optimizes power reduction based upon video
content and engages OPC. When set to "Advanced",
appears on the
"M" appears on the screen.
Off: This function does not work.
1m)
• "Power Saving" does not function when you set AV MODE
to "AUTO" or "DYNAMIC (Fixed)".
• You cannot select a different Power Saving item for each
AV
MODE.
When "Power Saving"
Modes will automatically change.
-If
you set "OPC" to "On" when "Power Saving"isset to
"Standard", then the "Power Saving" setting will change
to "Advanced".
-When
-"AUTO"
• When "Power Saving"isset to "Standard"or"Advanced",
the Power Saving leaf icon appears to the left of "OPC"
the Picture Settings menu screen.
• You can select Power Saving by pressing
SAVING
you change the "Power Saving" setting from
"Advanced" to "Off" or to "Standard", "OPC" will be set
to "Off".
and "DYNAMIC (Fixed)" will remain set to "Off".
on the remote control unit.
is
set, the "OPC" settings for
POWER
(See
page 20.)
all
AV
in
1 Press MENU to display the MENU screen, and then
press
~/~
to select "Power Control".
2 Press
3 Press
./~
to select a specific adjustment item,
and then press
./~
(or
and then press
ENTER.
~/~)
to select the desired setting,
ENTER.
4 Press MENU to exit.
• Skip this step for "Audio Only".
Audio Only
When listening to music from a music program, you
can turn the screen off and enjoy audio only.
Video
On:
Audioisoutput without screen image.
Video Off: Both screen images and audio are output.
1m)
• The screen image will return to normal when a button
(except those for audio adjustment, such as
is
pressed.
VOL, MUTE)
No
Signal Off
When set to "Enable", the power will automatically shut
if
down
thereisno signal for 15 minutes.
1m)
• Whenitis
remaining time will start to keep appearing every minute.
• "Disable"
• When a
No
When set to "Enable", the power will automatically shut
down
5 minutes before the power shuts down, the
is
the factory preset value.
TV
program finishes, this function may not operate.
Operation Off
if
thereisno operation for 3 hours.
1m)
• Whenitis
remaining time will start to keep appearing every minute.
• "Disable"
5 minutes before the power shuts down, the
is
the factory preset value.
@-
28
Page 30

On-Screen Display Menu
System Options
Example
Allows
you
• Select "Freeze" againonthe menu and press ENTER to
youtocapture
are
watching.
return to the normal image.
and
freeze a
moving
image
that
rmD
• You can select Freeze by pressing FREEZEonthl3
control unit. See page 19 for details of Freeze function.
remote
OPTION
SLEEP
~~~~~
000_
CC
AV
MODE
VIEW
MCDE
FREEZE
FLASHBACK
MUTE
o
INPUT
II
_0_0
1
Press
MENU
press
..../~to
2
Press
A/.
then
press
3
Press
J;./.
and
then
4
Press
MENU
View
Option
These
and
operated
The
functions
video
with
application
"APPS"onthe
to
to
ENTER.
(01'
press
to
are
settings.
the
window
MENU
display
select
selectaspecific
....
/~)
the
"System
to
select
MENU
Options".
adjustment
the
screen,
desired
ENTER.
exit.
useful
for
adjusting
The
View
remote
Option
control
canbedisplayedbyselecting
screen.
functions
unit.
the
and
item
setting,
audio
can
then
and
be
mm
• You can display the application window by pressing APPS
on
the remote control unit.
(See
page 20.)
Allows
available
•
TheTVhas
other
is called
with
and
allows a TV station
which
completely
You can enjoy Hi-Fi stereo sound or SAP broadcasts
where available.
• Stereo broadcasts: View programs like
• SAP broadcasts: Receive
If stereo sound
• Obtain a clearer sound by manually switching to fixed
You can change MTSasshown below to match
television broadcast signal.
Press ENTER to toggle between audio modes.
Examples: when receiving
STEREO
STEREO
MAIN + SAP mode:
MONO mode: MONO
youtochange
for
the
MTS/SAP
than
MTS
Secondary
couldbeaudioinanother
events, shows and concerts
or SAP sound.
MAIN sound: The normal program soundtrack (eit'ler
mono or stereo).
SAP sound: Listen to a second language, suppler1entary
commentary or other information.
mono-sound mode.
stereo mode
a feature
the
main
Multi-channel
can
receive
different like
mode:
STEREO-
+ SAP mode:
the
audio
program
Audio
that
audio
Television
mono
Programs
to
broadcast
weather
you
allows
for
TV
is
difficult to hear.
MTS
ST(SAP)-SAP(ST)-
t
MAIN-SAP
when
multiple
are
watching.
receptionofsound
the
program.
Sound
sound,
in
MONO
stereo
(SAP).
The
other
information,
languageorsomething
information.
live
dynamic stereo sound.
broadcastsineithm MAIN
(SAPismono s'Jund.)
and SAP
audio
This feature
(MTS).
The
sound
SAf)
sporting
thE
MOI\IO
feature
in
• Digital broadcasting audio mode
The types of audio transmittedina digital broadcas1 include
SURROUND
is
possible for multiple audio tracks to accompany E single
video track.
as
wellasMONO and STEREO.Inaddition,
is
TV
it
function
This
Select
Mode
menu
The View Mode menu varies depending on the input source.
changes
"View
Option"onthe
screen.
the
screen
menutodisplay
size.
mm
• You can select View Mode by pressing VIEW
the remote control unit.
- See page 22 for adjusting the video being input from a
TV,
other audiovisual equipment, USB-Video, Netflix or
VUDU.
See
page50for
-
adjusting
the
video being input from a
the
MODE
View
on
PC.
Press ENTER to toggle between audio modes.
Example: when receiving Digital broadcasting
STEREO
• MTS only operates while
L..
(Audio1)
SURROUND
-
STEREO
(Audio3)
inTVmode.
(Audio2)
.....
@-
29
Page 31

On-Screen Display Menu
~
Allows
Select
Caption
•
youtochange
"Change
information.
The
information displayed varies dependingonthe program
you
are watching.
the
CC"onthe
Closed
Caption
menutodisplay
display.
the
Closed
mm
• You can change Closed Caption by pressingCCon the
remote control unit.
Caption function.
Input Terminal Setting
You
can
output
similar
is
on
compatible
are
device
connectedtothe
the
TV. Please
with
watching
PCM:
The
in
PCM
form.Ifyour digital audio system does not
support Dolby Digital, select "PCM".
Dolby Digital: The optical output terminal outputs audio
signalinDolby Digital form.Itreproduces sound from
surround program of digital.
See
page21for details of Closed
digital
audiotoanAVamplifier
whose
and
optical output terminal outputs audio signal
DIGITAL
DIGITAL
selectanaudio
the
audio
formatofthe
the
equipment
AUDIO
AUDIO
connected.
INPUT
OUTPUT
output
program
or
terminal
terminal
format
you
~._~>-:,~;,~~·.·7.
Allows
youtoselect
Fixed: Sound
the remote control unit or VOL- / +onthe
Sound
and outputs
Variable: Sound
with
on
the
Sound
via
via
the
VOL +/-
TV.
via
speakerismuted.
Color~s.tem~·:;;~··[·
Select
equipment
the
video
signal
from
the
Auto/NTSC/PAL-M/PAL-N
~er~
what
controls
speakerisadjusted with VOL +/- on
the
audio
output.
TV.
AUDIO
at
OUT terminalisnot adjustable
a consistent
via
the
on
the remote control unit or VOL - / +
AUDIO
level.
OUT
terminalisadjusted
[JZ1~~ii~~~~TI!~
list
system
below:
compatible
with
your
mm
• "Color System" can onlybeset for the
•Ifyou have already set the Secret No., input the 4-digit
here.
secret number
number.
See page 33 for setting a secret
Menu Design
VIDEO.
This setting allows
("PC IN",
on
Lets
the
select
• Using the software keyboard, you can enter up to
10
"HDMI1","HDMI 2", "HDMI 3"
the
Input
Yes: Skips the input.
No: Does not skip input.
you
set
CH Listorchannel display. Press
the
new
characters for text.
youtoskip
Selection operation.
the
input terminal displayed
name
for
(See
the
page 57.)
the
input
HDMIorPCINInput
and
"HDMI
when
itf'"/.....
mode.
using
/~
4")
to
mm
• You cannot change labels if the input source
To
watchanHDMIorPCINequipment
"HDMI 1","HDMI
CH
List using INPUTonthe
the
TV.
Auto View:
Enable: To use View Mode based on signal
recognition, including
Disable: No function.
2",
"HDMI3"or
remote
an
HDMI
"HDMI4"from
signal.
mm
• Refer to your external equipment operation manual for the
signal type.
• When connecting a DVI-HDMI conversion adapter/cable to
the HDMI terminal, the image may not come
image,
control
isTVor USB.
select
the
unitoron
in
clearly.
mm
•Insome cases, "Channel Selecting Effect" does not work.
~
,~~-
,-";,~,.~~,,--~':
.
~r.ggntljl'llim.Pisp.I!'.~la::l"'::
Select
digital
For adjusting a
position.
the
CH
broadcasting.
Yes: "Program Info." displays.
No: "Program Info." does not display.
H-Pos.: Centers the image
right.
V-Pos.: Centers the image
.--:.~
display
picture's
~
:.
when
horizontal
__
changing
and
by
movingitto the left or
by
moving it up or down.
channels
vertical
for
mm
• For resetting adjustments to the factory preset values,
• When connecting aPCto the
• The screen position variable ranges dependonthe View
• Adjustments are stored separately according to input
• "Position" does not work when Netflix or
..ITto select "Reset", and then press
press
position will be automatically adjusted.Itcannot
manually adjusted.
Mode or the signal type. The ranges can be
position-setting screen.
source.
HDMI
terminal, the image
seenonthe
VUDUisused.
ENTER
be
@)-
30
Page 32

On-Screen Display Menu
Cami.On
~p~
.'"
oj!
•.
~~~
__
This function allows you to adjust the closed caption
screen appearance to suit your preference. You can
adjust 7 items: "Caption Size", "Font Style", "Foreground
Color", "Foreground Opacity", "Background Color",
"Background Opacity" and "Character Edge".
Example:
Selectable items available for "Font Style",
Default:
Type
Type
Type
Type
Type
Type
Type
Type
The font specified by broadcasting station or
default font.
0:
Proportional font usedinthe MENU screen.
1:
Monospaced with serifs.
2:
Proportionally spaced with serifs.
3:
Monospaced without serifs.
4:
Proportionally spaced without serifs.
5:
Casual font type.
6:
Cursive font type.
7:
Small capitals.
ImIi)
• For resetting adjustments to the factory preset values,
press
£/"f
to select "Reset", and then press ENTER.
• The default value depends on the broadcasting station.
Game Play Time
This function displays the elapsed game time so you
do
not lose track of the time. To display the elapsed
time, select "GAME" for the AV MODE before starting
the game.
On: The elapsed time
you switch to GAME mode
Off: No adjustment.
is
displayed every 30 minutes when
in
external input mode.
Icon Light Up Setting
When this functionisset to "On", the LEDonthe front
of theTVturns on.
• "On"isthe factory preset value.Ifyou want to turn off the
LED,
set the function to "Off".
Demo Mode
You can select the image from several types of demo
mode.
Quattron/Quad Pixel PluslAquoMotion2401
AQUOS Net/Feature
If
you select "Auto Play", you needtoset playback type.
Continuous: Play Demos continuously.
10 min.: Play Demos every 10 minutes.
20 min.: Play Demos every 20 minutes.
DemolAuto Play
ImIi)
• This function will be canceled when you press EXIT on the
remote control unit.
• When "Demo Mode"
"Feature Demo", pressing FREEZE pauses/restart:> demo.
• "Demo Mode" may not be selected depending on input
signal type or application status.
• "Demo Mode" may be automatically canceled depending
on input signal type.
is
set to "Quattron", "AQUOS Net"
or
Operation Lock Out
This function locks the operation buttons on the
and the remote control.
Off: No adjustment.
RC Control Lock:
locked.
Button Control Lock:
POWER, are locked.
When "RC Control Lock" or "Button Control Lock"
selected, a confil'mation screen appears.
On: Locks the operation buttons.
Off: No adjustment.
All
buttons on the remote control are
All
buttons on the
TV,
TV
except
is
ImIi)
• To unlock the buttons on the remote control by using the
touch sensor panel of the main unit (see page
CD
Press MENU to display the MENU screen, and then
press VOL - /
® Press
@ Press
@)
• To unlock the buttons on the
remote control, and then select "Off"
Out".
CHV
then press INPUT.
CHV
Press
MENU
+ to select "System Options".
/
1\
to select "Operation Lock Out", and
/
1\
to select "Off", and then press INPUT.
to exit.
TV,
press
in
23):
MENU
"Operation Lock
on the
@.
31
Page 33

On-Screen Display
Menu
Initial Setup
Example
MUTE
r±l
08
~
••
o e
INPUT
o
~Y'RETURN
FAV APP
FA.~
1 Press
MENU
..../~to select "Initial Setup".
press
to display the MENU screen, and then
2 Press J;,/T to select a specific adjustment item,
and then press
• When you select
CTRL" or "Reset", you can enter the 4-digit secret
number here. See page 33 for setting a secret number.
3 Press J;./T (or
and then press
4 Press
MENU
ENTER.
"EZ
....
/~)
ENTER.
to exit.
Setup", "CH Setup", "Parental
to select the desired setting,
EZsetup
You can runEZSetup again, even after setting up the
preset channels.
Language: Select from among 3 languages (English,
French and Spanish).
TV Location: Select "Home" or "Store" for the location
TV.
where you plan to install the
in
for ENERGY STAR
Home: "Power Saving"isset to "Advanced", and AV MODE
set to "STANDARD".
Store: "Power Saving"isset to "Off" andAVMODEisset to
"DYNAMIC (Fixed)". Picture Reset and Feature Demo can be
set.
Picture Reset:AVMODE will be set to "DYNAMIC (Fixed)"
regardless of whether Picture Resetis"On" or "Off".Ifyou
select "On",AVMODE will be reset to "DYNAMIC (Fixed)"
if
thereisno operation for 30 minutes. When "Off"
selected,AVMODE will be set to "DYNAMIC (Fixed)".
Feature Demo: When "On"isselected, after
are completed, the Feature Demo screen IS displayed
thereisno operation for several minutes.
• ENERGY STAR qualificationisbased onAVMODE
"STANDARD".
Antenna &Cable/STB: Select the type of connection
you
will
usetowatch
Air/Cable: Make sure what kind of connection
with your
CH Search: Channel auto search makes the
all
Completed: The settings confirmation screen
displayed. Confirm the information displayed on the
screen.
TV
when selecting "Air" or "Cable".
channels viewableinthe set area.
Home mode default setting.
TV.
This product qualifies
is
all
the settings
if
is
made
TV
look for
is
ED
• See Initial Installationonpages 17 to 18 for setting each
item.
•
If
no channelisfound, confirm the type of connection
made with your
•
If
you select "Analog Search Start" and initiate the channel
search, the
TV
and try "EZ Setup" again.
CH
Memory for Cable Digital will be deleted.
Broadcasting setup
If
Initial
Installation does not memorize
in
your region, follow the instructions below to manually
all
memorize the channels,
Air/Cable: Make sure what kind of connection
with your
CH Search: Channel auto search makes the
all
CH Memory: You can select the channels to skip
ANALOG
DIGITAL (Cable).
On:
TV
when selecting "Air" or "Cable".
channels viewableinthe set area.
(Air),
ANALOG (Cable), DIGITAL
Skips channels. (Channel selection disabled using CH
IVV·)
Off: Does not skip channels. (Channel selection enabled using
CH/VV·)
Remove Scrambled CH: This function makes the
look for and then delete digital cable channels that
are scrambled and so unavailable
process may take more than 20 minutes.
Yes: Starts to remove scrambled channels.
No: This function does not work.
in
the set area. The
ED
• See Initial Installationonpages 17 to 18 for setting each
item.
If
no channelisfound, confirm the type of connection
•
TV
made with your
•
If
you select "Analog Search Start" and initiate the channel
search, the CH Memory for Cable Digital will be deleted.
and try channel search again.
This function allows you to program 4 favorite
in
channels,
favorite channels
favorite channels easily.
is
To register your favorite channel:
Select "Register" and then press ENTER. Press
~
ENTER to register.
To delete your favorite channel:
Select" 1 Data Clear" and then press ENTER. Press
Ji.1" 1
then press
To delete
4 different categories. By setting the
in
advance, you can select your
to
select the positioninthe category, and then press
~/~
to select the channel you want to delete, and
ENTER. Select "Yes" and then press ENTER.
all
the favorite channels, select
ED
• Before setting the channel, select the channel you want to
register
• You can display the "Favorite CH" screen by pressing
FAVORITE
as
a favorite channel.
CH
on the remote control.
the channels
is
made
TV
look for
in
each
(Air)
and
TV
II.!'''
"All
Data Clear".
1
~I
@-
32
Page 34

On-Screen Display Menu
r
Ante~.oa
In
order to receive digital air broadcasts. you need
se~~~IGliAL
~
.c'<c
a digital broadcast antenna. You can confirm the
antenna configuration through the "Antenna Setup-
If
DIGITAL" screen.
necessary, adjust the direction of
the antenna to obtain the maximum signal strength.
Signal Strength: The signal strength
is
displayed. The signal informationisbased on the
current channel.
Channel Strength: Input the 2-digit channel number
to check the signal strength of the selected channel.
Make sure the signal
channel.
• This function is available for DIGITAL
is
strong enough for each
of
DIGITAL channel
(Air)
only.
Language I
You can also select a language from the Initial Setup
menu. Select from among
3 languages: English,
French and Spanish.
Wall MountA, dio Setup
This selects the optimal audio for the program you are
currently watching even when the
wall.
Yes: Selects the optimal audio.
No: No adjustment.
~
Assign
You can assign your favorite applications to the FAV
APP1,2,
assigning
that button to display the
and 3 buttons on the remote control. After
an
application to a button, you can press
top
application.
Current
APP1/APP2IAPP3: You can assign any of the following
Setup: Checks the current setting.
applications to these buttons.
VUDUlNetflixlUSB
Media/AAL
TVismounted to a
screen of the assigned
(AQUOS Advantage Live)
Individual Setup
Allows you to use a secret number to protect
settings from being accidentally changed.
IMPORTANT:
Three conditions must
be
met to enable the V-Chip
pages 34 to 35):
1. Secret No.
2. V-ChipN-Chip
• The "V-Chip (DTV Only)" will only be selectable when a new
rating system can be downloaded via digital broadcasting
U.S
3. "Status"
is
registered.
(DTV
is
set to "On".
Only) settings have been made.
• Setting the Secret No.
You can set and change the secret number by using
0-9.
Yes: Changes or sets the Secret No.
No: The confirmation screen to clear the Secret
appears when the Secret No. has been set. When the
Secret No. has not been set, the previous scrEen will
be displayed.
• Secret No. Clear
You can clear your secret number.
Yes: Your secret number
No: Your secret number
• As a precautionary measure, make a note of your secret
number and keep
•
If
the secret numberiscleared, the Status setting
automatically sets to "Off". "V-Chip" and "Status" will not
be selectable from the menu.
itina familiar place.
is
cleared.
is
not cleared.
Co3rtain
r~o.
in
(see
the
• For resetting adjustments to the factory preset values,
press
J;./T
to select "Reset", and then press ENTER.
Reset
If
complex adjustments are made and the settings
cannot be restored to normal, you can reset the
settings to the factory preset values.
•Ifyou have already set the Secret No., input the 4-digit
secret number here.
• The Channel Setup settings will not be changed.
• The Language settings will not be changed.
• The Secret number settings will not be changed.
• The TV Location settings will not be changed.
Used to enable or disable the parental control function.
melU
This function will not be selectable from the
if
youdonot first configure your secret number.
On: Enables Parental CTRL.
Off: Disables Parental CTRL.
(®-
33
Page 35

On-Screen Display Menu
V-CHIPisan
TV.
This tool gives parents a great degree of control
over broadcasts accessed by their children.
parents to select programs judged suitable for child
viewing while blocking ones judged not suitable.
does so automatically once you activate the V-CHIP
feature
selectable from the menu
your secret number.
• The U.S. has
Parental Guidelines and movie ratings.
• The TV Parental Guidelines work
V-CHIP
shows from their children.
• Movie ratings are used for original movies rated by the
Motion Picture Association of America (MPAA) as watched
on cable
also be set to block MPAA-rated movies.
Im1D
• The setting automatically enters "Block" for any ratings
below your selection.
If
Statusisnot setto"On", the configuration settings will
•
not work.
electronic filtering device built into your
in
your
TV.
"V-Chip" and "Status" will not be
if
youdonot first configure
two
rating systems for viewing content: TV
in
to
help parents screen out inappropriate television
TV
and not edited for television. The V-CHIP can
conjunction with the
It
allows
It
•
TV
Parental Guidelines
Example
Press Jj,/'If to adjust the item to your desired position.
"6"
indicates the itemisblocked. Press
MENU
to exit.
Suggested age
TV-V:
TV-V7: Directed to older children.
TV-G: General audience.
TV-PG: Parental Guidance suggested.
TV-14: Parents strongly cautioned.
TV-MA:
All
children.
Mature audience only.
Example
•
MPAA
Press
"6"
G:
General audiences.
PG:
suitable for children.
PG-13: Parents strongly cautioned. Some material may be
inappropriate for children under 13.
R:
Restricted. Under 17 requires accompanying parent or
adult guardian (age varies
NC-17: No one 17 and under admitted.
X:
Xisan
encoded
(Voluntary movie rating system)
Example
1;..1'''
to adjust the item to your desired position.
indicates the itemisblocked. Press
All
ages admitted.
Parental guidance suggested. Some material may not be
in
some jurisdictions).
older rating thatisunified with
in
the data of older movies.
MENU
NC-1
to exit.
7 but may be
Im1D
• Voluntary movie rating system only usesanage-based
rating.
When settinganindividual content-based rating item:
1 Press
~
or ENTER to access blocked content
items from the currently selected age-based rating
item.
2 Press
Jj/'''
press
ENTER to unblock
to selectanindividual item, and then
it
("6"
is
removed). Repeat
the same steps for the other items.
3 Press
.....
or
RETURN
to register after
all
individual
content rating items are set.
Content
FV:
Fantasy violence.
V:
Violence.
S:
Sexual situation.
L:
Adult language.
D:
Sexually suggestive dialog.
@-34
IZI
:The content rating can be set, but this rating
normally broadcast by TV stations.
X : Content rating can be set.
is
not
Page 36

On-Screen Display Menu
Canadian Rating Systems (Canadian English ratings
and Canadian French ratings)
• The TV rating systemsinCanada are based on the
Canadian Radio-Television and Telecommunications
Commission (CRTC) policy on violence
programming.
• While violence
be rated, the structure developed takes into consideration
other program content like language, nudity, sexuality and
mature themes.
• When setting the V-CHIP on the Canadian system you
can choose either the Canadian English ratings or the
Canadian French ratings.
is
the most important content element to
in
television
• Canadian English Ratings
Example
Press
AfT
to adjust the item to your desired position.
"6"
indicates the itemisblocked. Press
E:
Exempt: Includes news, sports, documentaries and other
information programming; talk shows, music videos, and
variety programming.
C:
Children: Intended for younger children under the age of 8
years. Pays careful attention to themes that could threaten
their sense
C8+: Children over 8 years old: Contains no portrayal
of violence as the preferred, acceptable, or only way
to resolve conflict; nor encourage children to imitate
dangerous acts which they may see on the screen.
G:
General: Considered acceptable for
Appropriate viewing for the entire family, contains very little
violence, physical, verbal or emotional.
PG:
Parental Guidance: Intended for a general audience, but
may not be suitable for younger children (under the age of
becauseitcould contain controversial themes or issues,
14+: Over 14 years: Could contain themes where violence
is
one of the dominant elements of the storyline, but
must be integral to the development of plot or character.
Language usage could be profane and nudity present
within the context
18+: Adults: Intended for viewers 18 years and older and
might contain depictions
the development of plot, character or themes, are intended
for adult viewing. Could contain graphic language and
portrayals of sex and nudity.
of
security and well-being.
of
the theme.
of
violence, which while related to
MENU
all
age groups.
to exit.
it
• Canadian French Ratings
Example
Press
AfT
to adjust the item to your desired position.
"6" indicates the item
E:
Exempt programming,
G:
General:
violence, but may be integrated into the plot
or unrealistic manner.
8an5+: General but inadvisable for young children:
be viewed by a wide public audience, but could contain
scenes disturbing to children under 8 who cannot
distinguish between imaginary and
Recommended for viewing with parent.
13an5+: Over 13 years: Could contain scenes
violent scenes and therefore recommended for vieNing with
parent.
16an5+: Over 16 years: Could contain frequent violent scenes
and intense violence,
18an5+: Over 18 years: Only for adult viewing. Could contain
frequent violent scenes and extreme violence.
•
How
All
ages and children, contains minimal direct
to temporarily release the V-CHIP BLOCK
is
blocked. Press
real
MENU
situations.
When the V-CHIP BLOCKisworking and cens:xs a
broadcast, "V-CHIP HAS BEEN ACTIVATED." displays.
1 Press ENTER while the V-CHIP
is
working, and
then the secret number setting menu displays.
2 Input the 4-digit secret number by using
time V-CHIP BLOCK temporarily releases.
• Reactivating the temporarily released V··CHIP
8)
BLOCK
You can reactivate the temporarily released V-CHIP
BLOCK as shown below.
• Select "Status" setting from the Parental CTRL menu to
reactivate BLOCK.
• Select "V-Chip" setting ("MPAA", "TV Guidelines", "Can.
English Ratings"
Parental CTRL to reactivate BLOCK.
• Switch off the TV power.
(See
page 33.)
or
"Can. French Ratings") from the
(See
pages
to exit.
in
a humorous
rvlay
of
frequent
0-9.
:::4
At this
to 35.)
• Performing any
BLOCK.
of
the three above will activate the V-CHIP
@-
35
Page 37

On-Screen Display Menu
Information
Example
i Infonnation
Information
Identification
Digital Caption Info.
Software
Netflix Help
Vudu Help
1 Press
2 Press
3 Press
4 Press
MENU
....
press
JI;..!"If
and then press
J;.1"If
and
then press ENTER.
MENU
Update
1
..
Menu
to
display
to
select "Information".
to
select a specific
ENTER.
(or
....
to
exit.
1..)
to
the
select
MENU screen,
adjustment
the
desired setting,
and
item,
then
Identification
The
current versionofthe1Vsoftware is displayed.
Digital Caption Info.
(Digital Caption Information)
This function allows viewing of digital closed caption
information for the digital broadcast program being viewed.
em
•
This
listisnot displayed for analog broadcasts or external
input audio/video.
• This information
Text2,
andisnot displayedina
Software Update
This is used
enhance
the1Vfunctions.
is
not includedinCC1, CC2, Text1, or
to
upgrade
list.
the
system software
AQUaS
NET
to
~
~
APPS
2 Press
3 Input the 4-digit secret
press
•Ifyou
J;.1"If
to
ENTER.
have
already
select "Software Update",
set
the
Secret
No.,
go to step
Example
numberbyusing 0-9.
Software Update
Enter your Secret
No
and
then
3.
CEEEJ
4 Press
•
_M.ainl1af,~m:tate
Select the
J;.1"If
Update
The
Network
USB memory:
Setting", and then press ENTER.
operations thereafter
method
Update: Downloads
network
device
and
containing
to
select "Manual
..-.:;.
for
manually
then
updates
Updates
the
the
update
Update"or"Auto
vary
dependingonthe
updating
the
update
the
software.
software
file.
(See
usingaUSB
the
software.
file
via
the
(See
page
pages37to
setting.
37.)
memory
38.)
em
• A broadband connection
update
56.)
•Itmay
depending
the
take
software
time
to access
on
the
,N~\1tQ')JJi~~t,;se.1t!ng~i;i;;.:-f.·
When
the1Vis on, or
this function enables the
and
check
Yes:
No:
for
Enables
Disables
updates
Auto Update Setting.
Auto
and
using
Internet connection
Update Setting.
Internet Setup
the
network.
and
download
when
NetflixorVUDU is used,
1Vtoconnecttothe
automatically.
(See
the
and
other factors.
are
required
pages53to
update
network
to
:.~~
o 0
1 Press
@-
36
press
MENU
....
1
..
to
display
to
select "Information".
MENU
screen,
and
then
When an
Press
display
updateisavailable, a
....
1
..
to
select "Yes",
the
download
I-··'··~·
screen. (See
.;;..
~
.'..
$,
;.
messageisdisplayed.
and
then press ENTER
page
37.)
.
..
- -
Si.
to
I
em
•
This
function does not work
or Internet Setup
is
not
when
available.
a broadband connection
Page 38

On-Screen Display Menu
•
Updating
1 Press
"Network Update", and then press
• The1Vconnects to the network and checks for updates.
• To cancel, press
2 The current version of the
of firmware are displayed. To update the
software, select "Yes", and then press
the
Software
~/~
on the Manual Update screen to select
via
the
Network
ENTER.
ENTER.
1V
and the latest version
1V
ENTER.
4 When the software
screen
process
Press
is
displayed indicating that the upda:e
is
completed.
ENTER.
is
successfully updated, a
The1Vrestarts, andittakes a while until the system
update
•Ifthe software was not updated successfully, check the
is
completed. Do not unplug the AC cord.
broadband connection and Internet Setup, and then try
updating the software again.
Failedtocomplete update
Please
retry
from
Software
Update menu.
~
• When a server connection cannot be established or
updateisnot available, a messageisdisplayed.
If
a server connection cannot be established, check the
broadband connection and Internet Setup.
Cannot
reach
the
network
try
again
server
settIngs
Check
the
and
~
ThereISno
newer software
than
the
present
versIon
~
3 After the update file
is
downloaded, the software
update process begins.
an
• Updating
the
Software
with a
USB
Memory
Device
To check for the availability of a software update, visit
If
http://www.sharpusa.com/products/support/.
you
have any questions, please
call 1-800-BE-SHARP (800-237-4277).
~
• Do not remove the USB memory device or unplug
the AC cord while the software is being updated.
• Be sure to properly follow the whole procedure
described below, step by step. Otherwise, for
example, the TV cannot read the data
memory device and software updating will fail.
1 Insert the USB memory device with the upd3.te file
into the USB 1 or USB 2 terminal on the 1V.
• When you update the software, use only one
terminal. Either USB 1 or USB 2isusable.
in
the USB
LSB
~
• Do not unplug the AC cord while the software is
being updated.
2 Press
~/~
on the Manual Update screen to select
"USB Memory", and then press
ENTER.
@)-
37
Page 39

On-Screen Display Menu
3 Press ENTER to start checking the data
in
memory device.
4 During the data checking, "Checking" blinks.
• The current version of theTVsoftware and the version
file
of the update
displayed. To update the
file, select "Yes", and then press ENTER.
on the USB memory device are
TV
software with the update
Example
the USB
5 Press ENTER to start updating.
•
Example
B!iD
•
Do
not remove the USB memory device or unplug
AC cord while the software is being updated.
the
6 When the software
screen
process
After this screen
turns off and then turns on again.
is
displayed indicating that the update
is
completed.
is
successfully updated, a
is
displayed, theTVautomatically
Example
If
the USB memory deviceisnot properly installed or
•
the correct update file cannot be found on the USB
an
memory device,
Check the file on the USB memory device, and then
reinsert the USB memory device correctly.
error messageisdisplayed.
If
the update has failed, check the fileinthe USB
•
memory device and try Software Update again.
Failed to complete update
Retry Software Update
If
system
update
falls
contact the customer service center.
7 After the screen shown below
agam,
is
displayed, press
ENTER.
System software was
successfully
Remove the USB
~.~-
~
memory
~.-.--
updated
..
device
8 Remove the USB memory device.
@-
38
Page 40

Enjoying
You can enjoy viewing photos, listening to music and watching videos from external USB memory devices.
Photo/MusicNideo
Playback
ImIi)
• Depending on the USB memory device, the TV may not be able to recognize the recorded data.
• Use only alphanumeric characters for naming files.
•
File
names over 80 characters (may vary depending on character set) may not be displayed.
•
Do
not remove a USB memory device or memory card from the TV while transferring files, using the slide show function, or
switching screens, or before you exit "USB" from the
•Donot insert and remove a USB memory device to and from the TV repeatedly.
• When using a card reader, be sure to insert Memory first before using the card reader.
• USB input cannot be selected when displaying the browser (including the Sidebar Widget). Close the browser first.
CH
List.
Viewing Photos, Listening to Music
and Watching Videos
1 Insert the USB memory device with recorded
photos, music or videos into the USB 1 or USB 2
terminal on the
• The USB Media screenisdisplayed.
•
If
USB memory devices are inserted into both
terminals, the USB 1 terminal has priority.
• The display varies depending on the type of data
recorded
TV.
in
the USB memory device.
r!J!lmD
• Do not use a USB extension cable when connecting
a USB memory device to the USB terminal on the TV.
• Using a USB extension cable may prevent the TV
from performing correctly.
Example
4 Press
...../~to select the desired folder, and then
press
ENTER.
mm
• Youdonot need to select the driveinstep 3 when there
only one driveinthe connected USB device.
• Up to 16 drives can be displayed.
Displaying the USB Media Screen ,
The USB Media screen can be displayed even by using
the menu screen.
MUTE
~
ffiJO
o VOL
- V
• When displaying the
screen
1 Press
INPUT
to display the CH List screen.
2 Press Ji./T or press
• The display varies depending on the type of data
recorded
in
the USB memory device.
ImIi)
• You cannot enter this mode when a USB memory device
not inserted into the
• "VIEW MODE"isfixed during the Photo or Music mode.
During "Video mode", you can select "Auto" or "Original".
data
INPUT
TV.
INPUT
CH
with the
again to select "USB".
CH
List
is
is
2
3
• When displaying the
data
with the APPS
1 Press APPS to display the application window.
2 Press
...../~to select "USB Media", and then press
ENTER.
• You can also display the USB Media screen bv
pressing FAV APP on the remote control unit. See
page 33 for details on the
function.
FAV
APP Key Assign
@D-
39
Page 41

Enjoying Photo/MusicNideo Playback
Photo
Mode
Viewing Thumbnails .
Example
EX'T~.III~
o
FAVORITE
11'
@)
lQ----C)----C)J
ABC
FAV APP
nr
n.
2
r
3l
ED
D
••••
• Buttons for thumbnail operations
~~
ENTER
RETURN
A (red)
B (green)
C (blue)
D (yellow)
mm
• When there are invalid photo files, the X mark will be
displayed for the file.
• You can see the
size of the selected photo
screen (shooting date
Display the photo.
Return to the previous process.
Select the images to be displayed. Press
this button to add or remove a checkmark.
Display the music list screen.
Start the slide show.
Display the USB MENU screen.
file
name, shooting date,
in
the lower-left corner ofthe
is
only availableinthe
file
size and pixel
EXIF
file
format).
Slide Show
The photos displayed on the thumbnail selection
screen are displayed as a slide show.
• Buttons for slide show operation
~~~
RETURN
C (blue)
D (yellow)
Return to the thumbnail selection screen.
Reveal/hide the Guide Display.
Display the USB MENU screen.
mm
• The selected BGMisplayed repeatedly.
• The slide show continues until you press
• For setting the slide show speed, select "Select Slide Show
Interval" on the USB MENU screen.
RETURN .
USB Menu .
Example
. USB MENU
Select Slide Show BGM
Set All Slide Show Image
Reset All Slide Show Image
Specify the length of time before the next image
appears.
1 Press 0 to display the USB MENU screen.
2 Press
3 Press
JIJ../T
to select "Select Slide Show Interval",
and then press
Jt,,/T
"BOsec", and then press ENTER.
ENTER.
to
select "5sec", "10sec", "30sec" or
mm
• Depending on the photo files, the length of the slide show
interval may differ from the selected interval time.
Viewing Individual Photos
The photo selected on the thumbnail selection screen
is
displayed.
• Buttons for individual display operation
·v,
~/~
RETURN Return to the thumbnail selection screen.
A (red)
Go to the previous/next photointhe same
directory.
Rotate the photo by 90 degrees to the left.
B (green) Rotate the photo by 90 degrees to the right.
C (blue) Reveal/hide the Guide Display.
mm
• Rotating photos only applies to the temporarily selected
item and this setting
@)-
40
is
not saved.
Page 42

Enjoying
Photo/MusicNideo
Playback
A~~~S
~
APPS
~.o
EXIT •
'.'
,RETURN
o @
FAVORITE
@)
ABC
Cii)
"
Sele~t
You can select the music to be playedinthe
background while the slide show
1 Press 0 to display the USB MENU screen.
2 Press
3 Select the music.
~li~~,~~~~~GM
J;.!V
and then press
• The list screenisdisplayed.
• You can display the list screen by pressing B on the
thumbnail selection screen.
• Checkmarks are added to the selected music.
to select "Select Slide Show BGM",
ENTER
•
musIC1'iilmuS>c2
• SONG01MP)
B SONG 02.MP3 I
..
a~
•
SONG
• SONG
1:1'
SONG
1:1'
SONG
IWIv'Pl
0':>
06
0.'
~
MP:,
M~l
MP:~
~
Example
FAVAPP
1 2 3
S
__
'f'l1lJtIC3
.muSJC~
D
is
being displayed.
•
mUSIC
I
-l:,:,
I
':OB
I
..
?'J
I
3:':'
I
JZ.,
setlRe$ltAI~~ltdeShoVilmage::~~;~~~~~~l~:~~l
Set or reset the images to be displayed.
1 Press 0 to display the USB MENU screen.
2 Press
3 Press C to start the slide show.
5
•Ifno images have been selected, "Cannot display the data"
is
./T
"Reset
to select "Set
All
Slide Show Image", and then press
All
Slide Show
ENTER.
• When you select "Set
checkmarks are added to
• When you select "Reset
all
the checkmarks from
• picture 1
.pictl,lre2
,
"
"
-
-III
displayed and the slide show does not start.
All
All
all
Example
'1iit_
..
"'A
a'
a a a a
~-"
•
fA
a
a
-
a
'"
Slide Show Image",
all
the images.
Slide Show Image", remove
the images.
•
pIcture
4
3
~.
a a
~.~
li
iltpicture5
'--'
'-
J..
:f
a
·,'\"'\:t-,~'.i"";.v·
,
-
:
'-
a a
Ima~le"/
;1:-"
a
'.
.
..
a
~
·,f·
'"
• Buttons for slide show BGM select operation
,.:,(t
••.
·ii;·:...
'ti
""
....
,n
';'
,"Buttons
./T/~/.
ENTER Play music.
RETURN Return to the previous process.
A (red)
B (green) Stop music.
C (blue) Play/Pause music.
D (yellow) Display the USB MENU screen.
':,'
Select a desired item.
Select the music to be played back. Press
this button to add or remove a checkmark.
Descript!9n
:t'i,·,
4 Press RETURN to display the thumbnail selection
screen, and then press C to start the slide show
and the background music.
•
All
of the music files are selected by default.
@-
41
Page 43

Enjoying
Photo/MusicNideo
Playback
Music
Mode
AQUaS
NET
Example
~EN
~
APPS
:.:,
o •
FAVORITE
@)
ABC
• Buttons for music mode
~"Butt9na"
A/"'/~/~
ENTER
RETURN
A (red)
B (green) Stop music.
C (blue) Play/Pause music.
D (yellow)
- --
i~l...'
Select a desired item.
Play music.
Return to the previous process.
Select the music to be played back. Press
this button to add or remove a checkmark.
Display the USB MENU screen.
mm
• When there are invalid music files, the X mark will be
displayed for the
• The displayed play time may differ slightly from the actual
play time depending on the files.
USB
Menu
,SetlREtSet
Set or reset the music to be played back.
1 Press D to display the USB MENU screen.
2 Press
J,"/'"
Auto Play", and then press ENTER.
• When you select "Set
added to
• When you select "Reset
checkmarks from
3 Press C to play back the music.
file.
USB MENU
~I
AQtQ
to select "Set
all
the music files.
AVAPP
1 2 3
~
~~,
;nescnpuon
Example
Pia
All
Auto Play", checkmarks are
All
all
the music files.
D
,;:t"'"
All
Auto Play"/"Reset
Auto Play", remove
)~-
all
,
the
All
Video
• Buttons for file selecting operations
-'Button$~,
A/"'/~/~
ENTER
RETURN
A (red)
D (yellow)
• Buttons for playing mode
~-
Bu:ttoRs,
A
...
~
~ The reverse speed changes every time you
RETURN
A (red)
B (green) Stop a video.
C (blue) Reveal/hide the Guide Display.
Mode
Example
~
-',t
.'~:
- DeSctiptlOit
Select a desired item.
When selecting a video file: Play the
video.
Return to the previous process.
Select/deselect items (checkmarks are
addded to the selected items).
Display the USB MENU screen.
-
'~:c'
,
'.;'E'
DeScription
Gotothe beginning of a file by pressing A
once and the previous file by pressing A
twice.
Gotothe next file.
The fast forward speed changes every time
you press
goes to the next
press
the
Go backtothe file selection screen.
Jump to the scene where playback was last
stopped.
~.
After playing to the end, the
file
and starts to play.
~.
After going back to the beginning,
1V
starts to play the same
"l~!;
.%&
file.
,p:;"c
,
:;tiC,'
1V
mm
•Ifno music files have been selected, "Cannot playback the
audio file"
automatically.
@-
42
is
displayed and the musicisnot played back
Page 44

Enjoying
Photo/MusicNideo
Playback
• Using the control panel
You can use the control panel for video playback
operations.
You can call up this operation panel by pressing
MENU
Panel" from "System Options"
after you press Ji./T to select "USB Operation
> "View Option".
System Options
[8
PLAY
0.0-111/0074:<'
.
II
•
lumP
..
...
CC
~
...
""d~
II:.
R(l.su~
mm
• Reverse/fast forward continues from one filetoanother
during continuous playback.
• Use "CC" on the operation panel to change the Closed
Caption display. You can also switch the Closed Caption
display by using "System Options"
"Change CC" or by pressing CC on the remote control
unit.
• Use "Audio" on the operation panel to change the audio.
You can also switch the audio by using "System Options"
"View Option" > "Change Audio".
USB
Menu
Example
USB MENU
Reset All
Auto
Play
3
DivX®
Thisisthe functiontoconfirm your registration code.
You need to register the code at http://www.divx.com.
1 Press
2 Press
3 Press J;./T
Setup
MENU
ENTER.
ENTER.
press
to
display the menu screen.
~/~
to select "Initial Setup", and then press
to
select
"DivXID
> "View Option" >
Setup", and then
•
Div~
VOD registration
You can find your registration code on this menu. You
need to register the
playing the
•
DivX®
DivX
VOD deregistration
1V
content.
at http://www.divx.com bl3fore
You can find your deregistration code on this menu.
You need to deregister the
1V
at http://www.divx.com
to release the registration.
USB
USB memory USB Memory, USB card reader (Mass
device Storage class)
File system
Photo file JPEG (.jpg) (DCF2.0 compliant)
format
Music file MP3 (.mp3)
format Bitrate: 32k, 40k, 48k, 56k, 64k, 80k,
>
Memory
*.avi
*.mkv
*.asf ASF
*.wmv
*,mp4
*.mov
*.mpg
*.mpeg
(SMP4)
Device Compatibility
FAT/FAT32
96k, 112k, 128k, 160k, 192k, 224k,
256k,320kbps
Sampling frequency: 32k, 44.1k,46kHz
DivX
3.11/4.xl5.1/6.0
XviD
Motion Jpeg
DivX
3.11
DivX
3.11
H.264
MPEG4
/4.xl5.1 /6.0
XviD
H.264
MPEG4
/4.xl5.1 /6.0
XviD
H.264
MPEG4
VC-1
VC-1
H.264
MPEG4
XviD
MPEG2
MPEG1
AVI
MKV
ASF
MP4
PS
mm
• Progressive format jpeg files are not supported.
in
USB
1,1
• Music files
• Operation using USB hubs
• Some video file formats may not be played depending on
the file.
devices may not be played properly.
is
not guaranteed.
MF'3
Dolby Digital
LPCM
ADPCM
MP3
Dolby Jigital
LPCM
ADPCM
MP3
Dolby Digital
LPCM
ADF'CM
WMA
Dolby Digital
MPEG Audio
LPCM
@-43
Page 45

Other Viewing Options
Presetting Remote Control Function
AV
OTV,
products
VCR,
You can operate the connected
receiver, cable box, SAT tuner,
LO)
using the presetting manufacturer function of your
remote control unit.
POWER
(AV
OVO,
B
TV
2
---.;;...-=::....=;
6-~
r-----;::::===~~-
AQUaS
NET
~-=::""";':---7
~-;.;--11
INPUT
III
::--~II:---
1.1
'lIl
APPS
12
13
BO,
Operating the Connected Equipment
To operate the connected equipment, press STB,
or
DVD·VCR
(cable/satellite set-top box),
The remote control unit button will function
• When you operate VCR,
the terminal connected to your device.
• CABLE and SAT cannot be selected at the same time.
1 POWER (SOURCE)
• Turns the connected equipment power on and off.
2~
• Starts playback.
3
........
• Rewinds the tape and allows picture search.
• Hold down togoin
AUDIO to select your device. (STB
OVO,
BO,
VCR
or AUDIO.)
as
follows.
(VCR,
reverse.
OVOorBO,
OVO,
press INPUT to select
BO)
(OVO,
BO)
(VCR)
4.
• Stops the tape transport.
• Playback stops when pressed. With some OVO/Blu-ray
disc players, pressing the button twice may open the disc
(OVO,
•
(DOT)
down
BO)
of
the previous chapter.
(STB)
to fast forward.
tray.
5H~
• Pressing quickly once takes you to the startofthe chapter
currently playing. Each time you press it, you move back
to the start
6
0-9,
• Press a button (or buttons) that corresponds to the
channel that you wish to watch.
7~~
• Rapidly advances the tape and allows picture search.
(VCR)
• Hold
(VCR)
(OVO,
BO)
(OVO,
BO)
811
• Sets pauses and still pictures.
(VCR,
OVO,
BO)
:.O~ETURN
~14
o 0
Presetting manufacturer codes
1 Press
2 Press
3 Press
4 After registering the code, the
an
appropriate button (STB,
AUDIO) to operate the connected equipment.
an
appropriate button (STB,
AUDIO) and DISPLAY at the same time to enter
the code registration mode.
0-9
page 45.)
• Preset modeisfinished once the LED no longer lights
up.
then turn off after one second.
incorrect operation, the LED will blink quickly then
turn off.)
to enter the manufacturer code.
DVD·VCR
DVD·VCR
LED
will stop blinking
(If
you perform
(See
or
or
an
9~
• Pressing quickly once takes you to the startofthe next
chapter. Each time you press it, you move ahead to the
start of the next chapter.
10
eREC
• Starts recording.
11
FLASHBACK
• Press to switch between the current channel and the
channel you were watching immediately before. Some
manufacturers
12
CH/\lV
• Press
• Press to select the channel of the TV tuner on the VCR.
13
• When this buttonispressed, the OVO/BO menu will
14
• /;",/TI
• ENTER: Press to activate the selected function. (STB,
CH/\orCHV
channel.
(VCR)
MENU
display.
./T/
GUIDE screen or STB MENU screen.
Press the buttontoselect items on the OVO/BO menu
screen.
OVO,
(STB)
(OVO,
/~,ENTER
/~:
(OVO,
BO)
(VCR)
do
BO)
Press the button to select items on the STB
BO)
(OVO,
BO)
not preset FLASHBACK.
to tuneinto a higher or lower
(STB)
(STB)
@-
44
Page 46

Other Viewing Options
Manufacturer codes
VCR BRAND
AUDIO DYNAMICS
BROCKSONIC
CANON
CRAIG 12
CURTIS MATHIS 04
DBX
EMERSON
GE
INSTANT REOlYA 04
JC PENNEY 04
JVC
KENWOOD 09
MAGNAVOX
MAGNIN 12
MEMOREX 04
MONTGOMERY WARD 02
NEC
PANASONIC
PENTAX 05
PHllCO
PHILIPS
QUASAR 04
REALISTIC
SAMSUNG 11, 12
SHARP
SONY
SYLVANIA
TATUNG
TEAC 09
TMK
YAMAHA
REMOTE CONTROL CODE
09
13
04
09
10,13,14
04
09,16,17,22
04,05,06
09
04,18,19,20,21
04,05
04,05,06
01,02
01,02,03
07,08,15
04,05,06
09
10
09
NUMBER
STB BRAND
ANVISION
CABLE
EAGLE 05
G.INSTRUMENT
GERROlD
JERROLD
STAR
REMOTE CONTROL CODE
04,05
04,05
02,03,10,11,17,20
17
02,03,10,11,
25-34
MAGNAVOX
04,05,08,12,15,16,
18,19,22,23
MOTOROLA
OKASIGMA
PANASONIC
PHILIPS
38
07
14,21
04,05,08,13,15,16,
18,19,22,23
PIONEER 07
RANDTEK
RCA
S.ATLANTA
VIEWSTAR
04,05
14,36*,37*
01,09,24
04,05,08,13,15,16,
18,19,22,23
ZENITH
• Numbers marked with * are SAT codes,
codes.
AUDIO BRAND
SHARP
SHARP (SOUND BAR)
06,35
REMOTE CONTROL CODE I
01
02
NUMBER
all
others are STB
NUMBER
12,
:~O,
DVDIBDILD BRAND
DENON 24
JVC
KENWOOD
MAGNAVOX 26
MARANTZ 26
MITSUBISHI 28
PANASONIC
PHILIPS
PIONEER
PROSCAN 25
RCA
SAMSUNG
SHARP
SONY
TOSHIBA
YAMAHA 24
ZENITH
• Depending on the brand, the codes of someBDplayers
may not
be
supported.
REMOTE CONTROL CODE
NUMBER
31
36
24,37
26,38
30,33,35
25,39
29,34
23,32,41,42
27,40
26
26
cw-
45
Page 47

Using AQUOS LINK
Controlling HOMI Equipment Using
What's AQUOS LINK?
• Using the
compatible system equipment (Blu-ray disc equipment,
• By connecting AQUaS LINK-compatible devices with HOMI-certified cables to the
recorder or
•
AQUaS
HOMI
CEC (Consumer Electronics Control) protocol, with AQUaS LINK you can interactively operate
AV
amplifier using the remote control of the
LINK allows you to operate the HOMI-connected equipment with one remote control.
HOMI-certified cable
AQUaS
AQUaS
BD Player
Audio system
AQUaS
AV
amplifier,
lV.
HOMI-certified
--------~II
• Use HOMI 1 to connect
ARC-compatible equipment.
Optical fiber cable
LINK-compatible
LINK
OVO).
cable'
-~·rn
lV,
you can control a
Example
I
'AC
rn
USB2
Back panel vertical inputs
• For connecting the1Vto
• Point the remote control toward the 1V, not to connected
• Video noise may occur depending on the type of
to
• Up
• These operations affect the
3 pieces of
the equipment and select the appropriate input source using INPUT.
POWER
AQUaS LINK-compatible equipment, use commercially available cables.
HOMI
HOMI
cable used. Make sure to useanHOMI-certified cable.
HOMI
recording equipment and oneAVamplifier can be connected using this system.
HOMI
equipment selectedasthe current input source.Ifthe equipment does not operate, turn
Connected AQUaS LINK-compatible devices can be operated without
DISPLAY
(W.rt.~~)
changing the settings of the remote control unit.
B
TV
STB
DVD'VCR
CJ CJ
-
~
1+4
• _
----
OPTION
SLEEP
----
_CJCJD
AUDIO
CJ CJ
-
.REC
~Z~~~
FREEZE
II
OPTION button will function only when AQUaS LINK
• One Touch Play
While thelVisinstandby mode,itautomatically turns on and plays back the
image from the
• One Touch Recording
Press
eREC
LINK-compatible recorder. The
connected
• Single remote control
The AQUaS LINK automatically recognizes the connected
you can control the
• Control the AQUOS LINK-compatible audio system
Set the volume of AQUaS LINK-compatible audio system.
HOMI
while you are viewing a broadcast received with the AQUaS
HOM
I device and starts recording.
equipment.
source.
AQUaS
lV
and the devicesasif
is
used.
LINK automatically recognizes the
HOMI
device and
using a universal remote control.
on
mm
• The above descriptionisan
in
• The steps
• Refer to this operation manual and the operation manual of the AQUaS LINK device to be used with this 1V.
@-46
"AQUaS LINK Setup" on page 47 need to be completed beforehand.
example of the AQUaS LINK function.
Page 48

Using
AQUaS
LINK
AQUaS
System Options
AQUaS
1 Press
press
2 Press
then press ENTER.
3 Press
ENTER.
4 Press
and then press ENTER.
5 Press
~Q.uOS
Select AQUOS LINK Control to disable AQUOS LINK
function even when
deviceisconnected to the1V. This function prevents
the device from starting to operate unexpectedly.
On:
Off:
LINK Setup
Example
System
Options
LINK Setup
AQUaS
LINK Control
Auto Power On
Selecting Recorder
Channel Select Key
Audio Return Channel
MENU
...../~to select "System Options".
J;..!~
J;..!~
J;./~
MENU
Menu
[On)
[Yes)
{Auto)
to display the MENU screen, and then
to select "AQUOS LINK Setup", and
to select a specific item, and then press
(or
...../~) to select the desired setting,
to exit.
AQUaS
UNKCOOtroI·
an
AQUOS LINK-compatible
You can operate
equipment.
AQUaS
LINK function does not work.
AQUaS
NET APPS
:.~.
o 0
HOMI
LINK-compatible
Chanriel'SjJ~KeL.l·
This function can be set for each input terminal.
On:
The remote control unit of theTVcan be used to
select the channel, display program informaticn, and
perform other operations of a connected AQUOS
LINK-compatible recorder.
Off: This function does not work.
Audio
This function allows you to listen to the1Vaudio Ilia
audio equipment without using
which conventionally
Requirements for using an ARC-compatible AV
amplifier:
• ARC-compatibleAVamplifier connected to the ARC-
• Useofan
Returna"neI':.:..;.
is
compatible HOMI terminal
(Refer to the operation manual of the
equipment for details.)
ARC-compatible cable.
Auto: You can listen to the TV audio with ARC-
compatible audio equipment.
Off: This function does not work.
;o.;,,;,;;,,
__
required.
(HOMI
__
IIi1imllm
............
an
optical fiber cable,
1).
ARC-compatibIE~
mm
•IftheTVaudio cannot be output from the AV amplifier even
after making the necessary settings, connect the
AV
amplifier withanoptical fiber cable and select "Off".
TV10the
·A~
Pqy!e1iQaii~~t.~·:~··
If
thisisactivated, the One Touch Play function
enabled.
Yes: While the
turns on and plays back the image from the HOMI
source.
No: This function does not work.
..
selectlng~J:llc!Sldie~'!'
When multiple AQUOS LINK-compatible devices are
connected, this function allows you to set the recorder
for recording when you press
remote control unit.
Press
J;./~
TVisin
to select the recorder for recording.
.
is
standby mode,itautomatically
r
\::.
eREC
on the
1V's
mm
• When an AQUOS LINK-compatible audio system or other
equipment
"Sub"
is
connected between the TV and recorder,
is
displayed.
®-
47
Page 49

Using AQUOS LINK
POWER
EJ
TV
CJ
........
....
1:& _
OPTION
CJ CJ
DISPLAY
t~8Jt,~~,
CJ
STB
DVD'VCR
CJ
• _
---
SLEEP
AUDIO
CJ·CJ
.REC
~~~~S
FREEZE
CJ
CJ
II
One Touch Recording
This function allows easy one-touch recording of the
program being viewed on the
compatible equipment with a recording function by
simply pressing
Prepare the connected
recorder
• Make sure that the antenna cableisconnected.
• Check that there
recording media
•
an
Recorder"
• By default, the recorder connected to HOMI 1
for recording.
Press
• When you are viewing a broadcast received with the
AQUaS
Recorder", recording to the
broadcast being viewed starts.
• When you are viewing a broadcast received with equipment
other than the
in
pressing
recording.
for
the 1V, use
eREC
"Selecting Recorder" or other external input equipment,
eREC
recording.
"AQUaS
to
select the equipment for recording.
to start recording.
LINK-compatible recorder selectedin"Selecting
AQUaS
eREC
AQUaS
Check
is
sufficient available space on the
(HOD,
OVO,
LINK-compatible recorder selected
on the remote control does not start
TV
to AQUaS
on the remote control.
LINK-compatible
the
following items.
etc.).
LINK Setup" and "Selecting
AQUaS
recorder of the
L1NK-
is
selected
One Touch Playback
AQUaS LINK allows you to operate the HDMIconnected equipment with one remote control.
~
Press
• The last played programisplayed back. You can use the
following buttons during broadcast viewing .
'1i1i'suttons";'
'*i'.
(SOURCE) on and off.
to start playing back a title.
•
,""
. -
.J.~
;r:·
POWER Tums the power of the HOMI connected devices
........
~
~~
•
II
...
...
Hold down togoin
Starts playback.
Hold down to fast forward.
Playback stops.
Sets pauses and still pictures.
Pressing quickly once takes you
chapter currently playing. Each time you press
you move back to the start of the previous chapter.
Pressing quickly once takes you to the start of the
next chapter. Each time you press
ahead to the start of the next chapter.
"l'~r~Oescriptlor\,~l'~j"~1'
reverse.
to
•
,.
the start of the
it.
you move
'.~.~
it,
Link Operation Menu
.....
..
~
CJ CJ CJ
....
• _
c::::
.REC
CJ CJ CJ CJ
OPTION
SLEEP
~~~~S
lIIICJCJCJ
FREEZE
II
MUTE
Ii)
A~~?S
~
o
INPUT
CH
0
V
~
APPS
(JJwQ]
[I]rnw
[I]w[2]
8[Q]E]
CCAVMODE
CJ CJ CJ CJ
VIEW
MODE
fLASHBACK
0(1"
~.~
EXIT
fAVORITE
@
ABC
~
.'
1 2 3
°
.
RETURN
FAVAPP
D
••••
Turning On/Off AQUOS LINK-compatible
Equipment
You can manually turn on/off the power of connected
AQUaS LINK-compatible equipment.
1 Press OPTION to display the Link Operation Menu
screen.
2 Press Ji./T to select "Recorder Power On/Off", and
then press ENTER.
3 Select "On"
(or
off)
(or
"Off") and press ENTER to turn
the equipment.
on
mm
• The buttons
Blu-ray disc players currently available.
- BO-HP20U, BO-HP50U
@-48
.../...
do not function with the following
Page 50

Using
AQUaS
LINK
Using the Devjce Operation Panel Timer Recording
You can use the device operation paneltocontrol
playback operations.
1 Press OPTION to display the Link Operation Menu
screen.
2 Press
3 Press
J;;./~
then press
J;;./~
to
select "Device Operation Panel", and
ENTER.
/
~/~
to
select the desired operation.
mm
•
This
function works
equipment
connected.
This section explains
AQUOS LINK-compatible equipment.
with
the
only
Device
how
when
AQUaS LINK-compatible
Control
to play
Panel
back
1 Power on the AQUOS LINK-compatible equipment,
and select appropriate external input.
2 Press OPTION
screen.
3 Press
J;;./~
then press
•
The
title
compatible equipment
4 Select the title with
to start playback.
to
display the Link Operation Menu
to
select "Play from Rec. List", and
ENTER.
list
data
from
the
connected AQUOS
displays.
J;;./~
/
....
/~,
and then press ~
mm
•
This
function works
equipment
You can call
AQUOS LINK-compatible equipment.
is
up
1 Press OPTION
screen.
2 Press
J;;./~
press
ENTER.
• The setup menuofthe AQUOS LINK-compatible
equipment is displayed.
only
when
AQUaS LINK-compatible
connected.
a setup menu from the connected
to
display the Link Operation Menu
to
select "Show Start Menu", and then
mm
•
Dependingonthe
standby
•
The
BD-HP20U
setup
mode,
menu
selecting
Compatible
You can switch the media (HDD or
or
recording on the AQUOS LINK-compatible recorder.
1 Press OPTION
screen.
2 Press
J;;./~
and then press
3 Select the desired media such
•
The
Media
"Change
•
Select
the
statusofthe
etc),
the
will
currently
Me
notbedisplayed
available.
a Type forAQUOS [;INK·
~corder
to
display the Link Operation Menu
to
select "Change Media of Device",
ENTER.
type
toggles
MediaofDevice".
mediatobe
equipment (recordingorin
setup
menu
will
with
DVD)
as
each
time
operatedbythe
function
a titleinthe
notbedisplayed.
DVD or HDD.
you
is
L1NK-
the
player
for playback
press
ENTER
player.
You can callupthe AQUOS LINK-compatible
recorder's EPG and preset timer recordings using the
TV's remote control.
1 Press OPTION to display the Link Operation Menu
screen.
2 Press
3 Select the program
J;;./~
to select "Link Booking (Rec. Book)",
and then press
•
The
recorder's
•
You
can
use
the
colored buttons.
ENTER.
EPGisdisplayed.
to
record.
~.IT
/
....
/~,
ENTER, RETURN, EXIT
mm
•
This
function works
recorder
Refertothe
•
You can selecttolistentothe TV sound only from the
AQUOS LINK-compatible audio system and manually
change its sound mode.
is
connected.
operation
1 Press OPTION to display the Link Operation Menu
screen.
2 Press
3 Press
J;;./~
Device", and then press
J;;./~
then press
•
The
sound
sound
from
is
audible.
•
You
can
Select "By AQUOS SP", and then press EN1'ER to
listentothe TV sound.
1 Press OPTION
screen.
2 Press
J;;./~
and then press
•
The
sound
•
Refertothe
compatible
.HDMI Device Selection
If
multiple HDMI devices are connectedina
chain, you can specify which devicetocontrol here.
1 Press OPTION
screen.
2 Press
J;;./~
and then press
each time you press ENTER.
1 Press OPTION to display the Link Operation Menu
screen.
in
2 Press
J;;./~
then press
•
The
AQUaS
only
whenanAQUaS LINK-compatible
manualofthe
recorder
.~.
to
select "Change Audio Output
to
select "By AQUOS audio SP", and
ENTER.
from
theTVspeakerismuted
the
AQUaS LINK-compatible
use
VOL+/
to
to select "Change Surround Mode",
ENTER.
mode
operation
audio
to
to select "Choosing Operating Device",
ENTER. The HDMI device
to select "AQUOS LINK Setup", 3nd
ENTER.
LINK
ENTER.
-
and
MUTE.
display the Link Operation Menu
changes
system
display the Link Operation Menu
Setup
each
time
manualofthe
for
details.
..
- . .
menu
screenisdisplayed.
you
AQUaS
for
dEtails.
-
and
only
audio
press
L1~~K
dai~y
to;:J9les
and
rIm
the
system
ENTER
-
-
@)-
49
Page 51

Using a PC
Displaying a PC Image
VIEW
MODE
CCAVMODE
00_0
MUTE
o VOL CH 0
~
- V
VIEW
MODE
[?J0
FLASHBACK
INPUT
You can select the screen size.
1 Press VIEW MODE.
2 Press VIEW MODE or
mm
• Connect the PC before making adjustments. (See page 16.)
• Selectable screen size may vary with input signal type.
• You can have the same settings by choosing "View Mode" on the menu items. (See page 29.)
Example: Screen size images
Input signal
4:3
on
the Screen
• The View
• The menu lists the View
being received.
desired item on the menu.
• You can sequentially select a View Mode that has its
Normal
Mode
menu displays.
Mode
options selectable for the typeofvideo signal currently
..
/~
while the View Mode menuisdisplayed to select a
Zoom Stretch Dot
[[JJ
[OJ
IIII
Keeps the original For viewing
in
aspect ratio
screen display.
a full widescreen
programs. The
and
bottomofthe
image
is
cropped.
top
An image fully fills the
screen.
own
aspect ratio.
by Dot
IQI
Detects the resolution
of
the
signal
and
displaysanimage with
the
same
number of
pixelsonthe screen.
Input signal
16:9
Stretch Dot by Dot
[Q]
ITIJ
An image fully fills the
screen.
Detects the resolution
of the signal and
displays
the same number of
pixels on the screen.
an
image with
@)-
50
Page 52

Using a PC
Example
AQUaS
NET
o 0
me~"
o 0
1 Press
2 Press };,'/"f to select "Input Terminal Setting", and
3 Press
4 Press
S Press
Adjusting the PC Image
~Auto
For automatically adjusting the
mm
• When "Auto Sync.'issuccessful, "Completed" displays.
not, "Auto Sync." failed.
• "Auto Sync." may
• "Auto Sync." may
resolution, has unclear (black) edges, or
executing "Auto Sync.".
• Be sure
starting "Auto Sync.".
*f,n~~
Ordinarily you can easily adjust the pictureasnecessary
to change image position using "Auto Sync.".
cases, however, manual adjustment
optimize the image.
mm
• For resetting
preset values, press
ENTER.
•
Itisnot necessary to adjust the "Clock" or "Phase" when a
digital signal
• The default cursor position may not be
because the screen position variable ranges may be
asymmetrical.
• The screen position variable ranges depend on the View
MENU
press
...../~to select "System Options".
then press ENTER.
J!JJJ"f
and then press ENTER.
J!JJJ"f
and then press ENTER to set each item.
J!JJJ"f
setting, and then press ENTER.
~c.
Yes: Auto Sync. starts and "Now adjusting the image."
displays.
No: This function does not work.
to
to display the MENU screen, and then
to select "PC input" or "Audio Select",
to select a specific adjustment item,
(or
....
/~)
to select or adjust the desired
(f()r
AnaiQg
fail
failifthe computer image has low
connect thePCto the1Vand switchiton before
PC
IngUt
PC
image.
evenif"Completed" displays.
~ync:
H-Pos.: Centers the image by movingitto the
V-Pos.: Centers the image by moving
Clock: Adjust when the image flickers with vertical
stripes.
Phase: Adjust when characters have low contrast or
when the image flickers.
all
"Fine Sync." adjustment itemstothe factory
..ITto select "Reset", and then press
is
being input, so it cannot be selected.
Mode or the signal type. The ranges can be seen on the
position-setting screen.
Setting Audio Input
Audio Select
APPS
This function sets the terminal to output the computer
audio.
The adjustment items vary depending on the input
source. Select the input source corresponding to the
terminal connected to the
desired item.
.PCIN
Video: Select this when the1VandPCare connected
Video+Audio: Select this when the
•
HDMI1
HDMI(Digital): Select this when the1VandPCare
HDMI+Analog: Select this when the
mm
• When "Audio Select"isset to "HDMI(Digital)", souncl will
not be produced
connect HDMI-compatible equipment. To produce :;ound,
·ft19deqnlyf~
is
moved while
is
needed to
it
up or down.
in
the center,
left
In
some
or right.
.
If
you should make an analog audio connection.
•
If
you wanttoconnect HDMI-compatible equipment
using only
"HDMI(Digital)".
PC Compatibility Chart
Itisnecessary to set thePCcorrectly to display XGA
and WXGA signal.
VGA
SVGA
XGA 1024 x 768
WXGA 1360 x 768 47.7 kHz 60 Hz
SXGA
SXGA+
UXGA 1600 x 1200 75.0 kHz
1080p
VGA and XGA are registered trademarks of International I
Business Machines Corp.
PC
and then adjust the
using
an
analog RGB cable and the audioisnot input.
connected using
input via a 0 3.5 mm stereo minijack.
connected using an HDMI-certified cable and audio
input via the same cable.
connected using a DVI-HDMI conversion cable and the
is
audio
input
an
HDMI-certified cable, set "Audio Select"
Resolution
720 x 400
640 x 480 37.9 kHz 72 Hz
800
1280 x 1024 64.0 kHz 60 Hz
1400 x 1050 65.3 kHz 60 Hz
1920 x 1080
an
analog RGB cable and the audio
via
a 0 3.5 mm stereo minijack.
if
you use onlyanHDMI-certified cable to
Horizontal Vertical VESA
Frequency Frequency Standard
31.5 kHz
31.5 kHz
37.5 kHz
35.1 kHz 56 Hz
x 600
37.9 kHz
48.1 kHz 72 Hz
46.9 kHz 75 Hz
48.4 kHz
56.5 kHz
60.0 kHz 75 Hz
67.5 kHz
1V
andPCare
1V
andPCare
70 Hz
60
Hz
75 Hz
60 Hz
60 Hz
70 Hz
60
Hz
60
Hz
is
to
---
0
0
0
0
0
0
0
0
0
0
0
0
0
0
---
is
@-
51
Page 53

Using a PC
RS-232C
Port Specifications
• PC control of the TV
• The N can be controlled from a PC using the RS-
232C terminal.
• Use a cross-type RS-232C cable (commercially
available) for the connections.
mm
• This operation system should be used by a person who
accustomed to using computers.
• Communication conditions
Set the RS-232C communication settings on the PC to
match the
The
N's
communication conditions.
N's
communication settings are as follows:
9,600 bps
8 bits
None
1 bit
None
• Communication procedure
Send the control commands from thePCvia
232C connector.
The N operates according to the received command
and sends a response message to the
Do
not send multiple commands at the same time.
Wait until thePCreceives the OK response before
sending the next command.
the
PC.
is
RS-
• Command format
Eight
ASCII
codes +
Command 4-digits Parameter 4-digits
CR
7 I
Command 4-digits: Command. The text of four characters.
Parameter 4-digits: Parameter
0-9,
x,
blank, ?
• Parameter
Input the parameter values, aligning left, and
blank(s) for the remainder.
(Be
sure that 4 values are
input for the parameter.)
When the input parameterisnot withinanadjustable
range,
"ERR"
returns. (Refer to "Response code format".)
Any numerical value can replace the "x" on the table.
ITIIIJ
~
When "?"isinput for some
commands, the
present setting
value responds.
fill
with
~
• Response code format
Normal response Problem response (communication
~
~
Return code
~
(ODH)
error or incorrect command)
~
~
Return code
(ODH)
• Command table
• Commands not indicated here are not guaranteed to operate.
CONTROL
ITEM
POWER ON
POWER SETTING
INPUT SELECTION TOGGLE
AV
MUTE
SURROUND
AUDIO SELECTION
SLEEP TIMER
CHANNEL
CC
COMMAND
MODE SELECTION
SETIINGR:S : P
TV
1-7
DIRECT
CHANNEL
(ANALOG)
DIRECT
CHANNEL
(DIGITAL)
CH UP
CH
DOWN
COMMAND
P : 0 :W : R
iT iG : D
: T : V :
o
~C~
2 : L
DC:
D:C:
C:H:D:W
PARAMETER
~W
I-'0~:
~~4-':'0~ff
DO:
1 :
0:
1-'
'--i--':
1
x:
On
Power
'-+-''-+-''-f::P::..:ow"-'e''-r-=O''-n--------------+::-po'''w'''e::::.r
Off
(Toqqle) It input-switches by the toqqle.
1:
COMPONENT. 2: VIDEO.3:PC
5: HDMI 2. 6: HOMI 3.7:HDMI 4
0: (Toggle).
1:
4: USER.
8: x.v. Color. 100: AUTO
Volume (0-60)
Only PC
Only PC
0: (Toggle)
3
6:
8: Dot by Dot [PCI
10: Auto [USB-Video. Netflix. VUDUI.
11
0: (Toggle).
STANDARD. 2: MOVIE. 3: GAME.
5:
DYNAMIC (Fixed).6:DYNAMIC.7:PC.
mode.
(0-180)
mode.
(0-40)
[AV].
Zoom
Zoom
1 Side Bar
[AV].
4: Stretch
IPCI.7:Stretch [PCI.
Onginal [USB-Video. Nelllix. VUDUI
1:
On. 2 Off
[AV].2:S.Stretch
[AV].
[AV].g:Full Screen
a (Toggle). 1: On. 2 Off
(Toaale)
0:
Off.
1:
OFF
TIMER
3:
OFF
TIMER
The channel
(1-135)
. I(0100-9999)
(1-999)
':':
: _ (0-999)
: 0
..
: 1
x:
(0-9999)
(0-6383)
The channel
The channel number ofTV-1
(Toqqle) Toqqle operationofa closed caption,
- 30 MIN.2:OFF
- 90 MIN"4:OFF
number
of TV
numberofTV +1
IN.
4: HDMI
5: Normal [PC]
[AV]
TIMER
TIMER
- t20MIN.
- 60
CONTROL
--+T=h~e-,=P-"ow~ee'-r-"O"-n-"co",-mC'-m",a",n,,-d,-,,r81E"'e"'ct"'ed"'---
1.
IAV]
MIN.,
CONTENTS
The
PowerOncommand accepted.
It
shiftstostandby.
O.:c:n:.=:c::::.:'-"-------------------+
It
input-switchestoTV(Achannel remains as it
Although
it can choose now, it
0:
Althoughitcan
1:
Only available when 4:3 signalisbeing input.
5,6:Only available when 4:3 signalisbeing input
8: [PC] Available except
[AV]
9: Only available when
10, 11: Available when USB-Video, Netflix
An input change
In
Air,
In
Cable,1-1
DIGITAL Air (Two-Part numbers. 2-dlqit plus 2-diQlt)
DIGITAL Cable (Two-Part numbers, 3-digit plus 3-digit)
Front half of DIGITAL CABLE CHANNEL NO (Desionate
DIGITAL Cable (Two-Part numbers. 3-dlglt plus 3-diglt)
Rear half
DIGITAL Cable lOne-Part numbers 5-dloit. less than
DIGITAL Cable (One-Part numbers, 5-di it. more than 10,000)
Ifitis
not1Vdisplay,itwill input-switchto1V.
IfitIS
not1Vdisplay,Itwill input-switchto1V.
choose
Only available when
is
2-69chiseffective
35chiseffective
of
DIGITAL CABLE CHANNEL NO (DeSignate mInOr channel)
(Itisthe same as an Input chanqe key)
is
toggle operationininside.
now, it is toggle operationininside.
when
UXGAISbeing input.
1080i/pisbeing input.
720pisbeing Input.
included
if
it
is
not TV display
or
is.
(Last memory))
VUDUisused.
maar
100001
(same function as
(same function as
--!
channel)
CHAl
CHV)
mm
•Ifan
underbar U appears
Ifanasterisk
•
(*)
appears, enter a valueinthe range indicatedinbrackets under CONTROL CONTENTS.
• Any numerical value can replace the "x" on the table.
@-
52
in
the parameter column, enter a space.
Page 54

Using the Internet
• By connecting your1Vto a broadband system, you can access the Internet from the 1V.
• Display the "Sidebar Widget" on the screen to check out the latest Internet information and access a ranqe of
useful information for
• You can use "AQUaS Advantage Live" to obtain the latest software and information and to view Netflix
VUDU videos.
* About the original
• The original home pageisa website set up specifically for
• The website
and a frequently asked questions section.
is
Connecting to the Internet
• To connect your1Vto the Internet, you must have a broadband Internet connection.
If
youdonot have a broadband Internet connection, consult the store where you purchased your1Vor ask your
•
Internet service provider or telephone company.
• When
an
Internet connectionismade,anEthernet and wireless connection cannot be used at the same time.
Use only one
of
AQUaS
home
worth visitingasit
the connection types.
users from the original home page*.
page
provides a range of useful information, including tipsonusing your AQUaS
(See
page 55.)
AQUaS
ald
owners.
• Using an
UseanETHERNET cable (commercially available) to connect the ETHERNET terminal on the1Vto your broadband
router (commercially available).
ETHERNET
cable
ETHERNET
110/1001
ETHERNET cable
Hub or broadband router
f------c:::::::J
------1~.
- • - • - •
Modem
·I~
PC
Internet
@-
53
Page 55

Using the Internet
• Using the wireless LAN USB
adapter
When using the Sharp wireless LAN USB adapter (supplied). make sure that no video/audio cables or other AC
power cords are placed close to or on the wireless LAN USB adapter, as this may interfere with the wireless
LAN signal and limit the LAN connection quality.
Try to provide as much free space around the device for best
performance.
• Be suretoturn off theTVbefore connecting or disconnecting the Sharp wireless LAN USB adapter.
TV.
• For a wireless LAN connection, you must use "Wireless Setup" to connect the access point and
~------l--
Wireless LAN router/
access point
-
----,-
- - - - - -
(See page 55.)
-I~
Modem
Internet
mm
• Do not use a wireless LAN USB adapter other than the supplied Sharp wireless LAN USB adapter, as operations cannot be
guaranteed.
• This TV has received the following certifications when connected
USB adapter.
CERTIFIEDTM
- Wi-Fi
- Wi-Fi Protected
• Operations cannot be guaranteed when used with access points that do not have
• A wireless LAN router/access point
manual of your access point for setup.
If
your access pointisset to a stealth mode (that prevents detection by other devices), you may not be able to establish a
•
connection.
• A wireless LAN connection and performance cannot be guaranteed for
wireless LAN signal may be poor or drop, or the connection speed may become slower.
- When used
- When placed near objects that obstruct the signal
- When used with other wireless devices that emit the same frequency
- When used
electromagnetic interference
• When there
2.4-GHz cordless telephones, and microwave ovens),
supports IEEE802.11 aln
your access point.
• For users outside the United States, be sure to select your country before using the wireless LAN function. (See page 56.)
• A stable connection speed
connection
• Before transferring to a third party or disposal, be sure to initialize the wireless LAN settings.
• Please follow the legislation
In
in
in
is
if
the wireless LAN speedisunstable.
(certification program from the Wi-Fi
SetupTM
this case, disable the stealth mode on the access point.
buildings made with concrete, reinforced steel, or metal
the vicinity of microwave ovens and other devices that emit a magnetic field, electrostatic charge, or
significant interferenceinthe 2.4-GHz frequency (such as from other wireless LAN devices,
(certification program from the Wi-Fi
is
required to connect the TVtothe Internet using a wireless LAN. See the operation
itisrecommended that you use a wireless LAN router/access point that
(5
GHz) and set the access point to transmit at 5 GHz. For setup details, see the operation manual of
is
required to play back streaming content, suchasfrom Netflix and VUDU. UseanEthernet
in
your country when using the wireless LAN USB adapter outdoors.
inanenvironment using the supplied Sharp wireless LAN
Alliance~)
Alliance~)
Wi-Fi®
certification.
all
residential environments.Inthe following cases, the
Bluetooth~
devices,
@-
54
Page 56

Using the Internet
Internet Setup
~
Connection
Tme
AQUaS
NET
"e~.
• 0
APPS
1 Press MENU to display the MENU screen, and then
~f~
press
2 Press
press
3 Press
press
4 Press
press
S Press
then press
•Ifyou select "Wired", the signalisdetected and setup
is
performed automatically. Use
and change the settings as necessary. (See page 56.)
•Ifyou select "Wireless", use "Wireless Setup" to
configure the access point settings.
!·Yflr~~,~tliAI~,.
If
your access point supports Wi-Fi Protected Setup
(WPS),itis
for the wireless connection. You can press the WPS
button
automatically.
• The name of the WPS button function may differ depending
1 Confirm the current settings
2 Press
3 Press
4 Press
on
on the access point. See the operation manual of the
access point for details.
•If"Wired"isselected, press
press
• Confirm the settings.Ifeach setting itemiscorrect,
press
If
you are configuring the wireless setup for the first
•
time or changing the settings, go to step
ENTER.
ENTER.
• To select and registeranaccess point manually, select
"Search" or "Manual Setup" and make the necessary
settings.
to select "Initial Setup".
AfT
to select "Internet Setup", and then
ENTER.
AfT
to
ENTER.
AfT
ENTER.
~f~
recommended that you use this function
the access point to configure the settings
AfT
ENTER.
MENU
~f~
AfT
select "Network Setup", and then
to select "Connection Type", and then
to select "Wired" or "Wireless", and
ENTER.
"IP
Setup" to check
,<""6~~'_.""
to select "Wireless Setup", and then
to exit.
to select "Change", and then press
to select "WPS", and then press
~.~¥!j;:l¢¥¥'j,~il:;JI;:~.;E.::lJ:il;,;,·~:..J£:.::ll
in
"Connection Type".
~/~
to select "Wireless".
3.
S Press
AfT
to select "Push button", and then press
ENTER.
• To configure the setting
Follow the on-screen instructions and the operation
manual of the access point
via
PC,
select "PIN cocle".
to
configure the settings.
6 Select "Next" to complete the settings.
• The connection process starts and the WPS button on
the access point can be pressed.
7 Press the WPS button
• Pressing the WPS button displays a confirmation
screen. Please wait until a connection
8 When a connection
details are displayed. Press
on
the access point.
is
establi:3hed.
is
established, the connection
ENTER.
Interactive Service
If
you do not want other people to connect to the
in
Internet
keep the
1 Press
press
2 Press
press ENTER.
3 Press
press
4 Press
your absence, you can make settings to
TV
away from the Internet.
MENU
~f~
AfT
AfT
ENTER.
• Input the 4-digit secret number by using 0-9.
.....f~to select "No", and then press ENTER.
•Ifyou want to allow Internet connection, select "Yes",
and then press
to display the MENU screen, and then
to select "Initial Setup".
to select "Internet Setup", and
to select "Interactive Service", and then
ENTER.
tren
S Press MENU to exit.
Checking Your Internet Connection
Press AQUOS NET twice or three times to switch to
the TV+Web or Web screen.
• When the original home page appears, now you
connected to the Internet.
arE
mm
•Ifyou have failed to connect to the Internetinthe
operation, thenanerror message will appear.
EXIT to return to the normal TV screen and check
press
(see
the relevant settings
If
you still cannot connect to the Internet, please consult
•
your Internet service provider or telephone company.
page 56).
In
atove
thi~
case,
@-
55
Page 57

Using
the
Internet
• If you cannot connect to the Internet
Perform the procedures below to check your
network settings.
JPSetuP.
1 Press EXIT to display the
2 Press
3 Press
MENU
press
...../~to select "Initial Setup".
Ji../T
to display the MENU screen, and then
to select "Internet Setup", and then
normal1V
screen.
press ENTER.
4 Press
Ji../T
to select "Network Setup", and then
press ENTER.
5 Press
Ji../T
to select "IP Setup", and then press
ENTER.
• Check that numbers are displayed for each setting.
•
If
there are any settings without numbers, specify the
numbers by following the on-screen instructions.
• For information on how to enter text, see page 57.
Example
1V's
Displaying Updated Information and
Support Service
This function can be used to display up-to-date
information on the Sidebar Widget via the Internet and
allow you to receive support service over the network.
SidebarWidget .
1 Press
2 Press
AQUaS
NET repeatedly to display the
Sidebar Widget.
• Each time you press
toggles
Sidebar Widget - TV+Web - Web -
• When you are not connected to the Internet, a network
function explanation screen
The
• The web page for the selected titleisdisplayed.
• The service details vary depending on circumstances.
as
shown below:
t ,
services displayed
Ji../T
to select a title, and then press ENTER.
AQUOS
vary
NET, the screen image
TV
is
displayed.
dependingoncircumstances.
3 Press EXIT to return to the normal1V screen.
lID
•Ifyou start up the Sidebar Widget while a Closed Caption
is
displayed, the Closed Captionisautomatically hidden.
• Web page appearances may differ depending on the type
of screen (TV+Web or Web).
is
• When a still image
not appear even
• When displaying TV+Web with a channelinwhich the
is
V-Chip
unit do not function.
enabled, the cursor keys on the remote control
displayed, the Sidebar Widget does
if
you press
AQUOS
NET.
6 Press
Setting
1 Repeat steps 1 to 4
2 Press
MENU
the
Ji../T
to exit.
Country
in
IP Setup.
to select "Country", and then press
ENTER.
3 Press
Ji../T
to select "US", "Canada", "Mexico" or
"Others", and then press ENTER.
•Ifyou select "Others", you need to set the desired area.
4 Press
FSettin'g,th'egip.Cot;ie
1 Repeat steps 1 to 4
2 Press
MENU
to exit.
f
}: ;'
in
Ji../T
to select "Zip Code", and then press
ENTER. After "Change"
IP Setup.
is
highlighted, press
ENTER again.
3 Enter your zip code.
• Use
0-9
keyboard.
4 After "Complete"
5 Press
on the remote control unit, or use the software
is
highlighted, press ENTER.
MENU
to exit.
AQUaS
Advantage Live
1 Press APPS to display the application window.
2 Press
3 Press
4 Press EXIT to return to the normal1V screen.
...../~to select "AQUOS ADVANTAGE LIVE",
and then press ENTER.
• You can also display the AQUOS ADVANTAGE
screen by pressing FAV APP on the remote control
unit. See page 33 for details on the
Assign function.
Ji../T/.....
My
Account: Register your AQUOS LCD today and
receive a free 3 month warranty extension! Use
this service to complete registration, view user and
warranty information.
live
Support: Connect to Sharp service center over
the internet to receive remote assistance for AQUOS.
Sharp advisors will remotely connect to AQUOS
and can provide variety
performance diagnostic, etc.
terms and conditions when using Live Support.
Mail Center: Stay connected with
Learn More: Learn more about the many benefits of
AQUOS Advantage membership available
New
Software: Stay
LCDTVsoftware.
User
Guide:
your AQUOS LCD
/~
to select the desired service.
of
services suchassetup,
up
to date with the latest
In
depth AQUOS operating instructions for
TV.
FAV
You
must agree to the
SHARP
news
APP Key
and
to
you.
AOUOS
LIVE
more!
@-
56
mm
• The display may change as a result of a software update.
Page 58

Using
the
Internet
Entering Text (Software Keyboard)
When you are editing an input screen or specifying the
Ethernet settings used for accessing the Internet, enter
text from the software keyboard.
m:m
• You can enter up to 128 characters for text.
The text you enter
To move the cursor (the current input position), use
"'Ca"
~/~
Press
alphabet, number or sign.
(The
selectable types depend on the input source.)
or
to select the type of characters entered:
"K
is
displayed as you typeitin.
-"
on the software keyboard.
Caps
Off/Caps
If
"alphabet"isselectedin"Character Set", this switch3S
characters between uppercase and lowercase.
Each time you press ENTER, the character type switches
shown below:
Caps Off:
Caps On: only the first character
Caps Lock:
Done
Applies the entered information and closes the software
keyboard.
Quit
Closes the software keyboard without applying the entered
information.
• You can also close the software keyboard by pressing
EXIT
on
On/Caps
all
the characters are lowercased
all
the characters are uppercased
the remote control unit.
Lock
is
uppercased
r=J
Displays the
inserted.
Clear
Erases the character string.
• When the cursor
string to the right
• When the cursor
will be erased.
icon"
....,J
",
indicating that a new line
is
somewhereina line: the character
of
the cursor will be erased.
is
at the right end of a line: the entire line
ha3
been
as
While you are entering text. likely input conversion candidates
are displayed based on what you typed
• You can also enter text by pressingA,B or C on the remote
control unit.
in.
Buttol'1s.:.
Moves the focus up. When the focusisat the top edge, this moves the focus to
the opposite edge (bottom edge)
Moves the focus down. When the focusisat
focus to the opposite edge (top edge).
Moves the focus left. When the focusisat the left edge. this moves the focus to
the opposite edge (right edge).
When the focusison "Character Set", this selects the character type
backwards).
When the focusisin
Moves the focus right. When the focusisat the right edge, this moves the focus to
the opposite edge
When the focusison "Character Set", this selects the character type (mo\'ing
forwards).
When the focusisinaninput box. this moves the cursorinthe input box
right.
Closes the software keyboard without applying the original input elements for the
Erases the textinthe input box where the cursoriscurrently located.
When the cursorisat the endofa sentence, this acts as a backspace.
Directly enters the single-byte number for that button.
CCAVMODE
CJ
MUTE
o VOL CH 0
'JIEW
CJ
§]
MODE
CJ CJ
~o
- V
\''v~~='',,"/
o
11'
F-66JVAPP
2 3
FAVORITE
@)lQ-
ABC
CD~E3CD
fL
\SHBAC,
INPUT
/
RETURN
@)
...
T
....
~
ENTER Performs the processing for the button currently
EXIT entered text.
RETURN
0-9
A (red) Directly enters prediction candidate 1.
B (green) Directly enters prediction candidate
C (blue) Directly enters prediction candidate
D
D (yellow) Enters a space,
Delete
If
the cursorISat the right end of a
character at a time.
• You can also delete text by pressing RETURN on he
remote control unit.
. .
.:::
an input box. this moves the cursorinthe input box t,) the left.
(left
edge).
Description "
2,
3.
line,
this erases
the bottom edge, this moves the
in
the focus.
te;<1
'.
(mOving
t:J
one
.
the
@l-
57
Page 59

Using
the
Internet
Using
ENTER
• Press
EXIT
• Press the button to return to the1Vscreen.
RETURN
• Press the button to return to the previous page.
Example:
the
Browser
.•
/T/
/~
./T
I
/~
to select a link that you wanttojump,
and then press ENTER.
The
image shown below, whichisonly for
explanation, is subject to change.
About links
• Web pages on the Internet often include "links" that
to
allow you
jumptoother web pages (or sites).
• "Links" can take various forms, including words
in
or images, but they always work
the same way
letting you jump to the link destination when you
select them.
as
• Selected items (such
in
enclosed
a yellow frame.
links of text input fields) are
• You can jump from a "link" to the corresponding link
destination.
Bm:itD
•Ifthe poweriscut due to a power failure or the1Vbeing
unplugged while you are using the Internet, information
as
such
bookmarks or cookies may not be saved correctly.
mm
When a security notification windowisdisplayed:
• Press
• This window appears when you visit a web page that has
•In"Security Settings" you can set whether or not this
When a cookie confirmation window appears:
Choose whether or not to accept the cookie (see page 61),
and then press
•In"Cookies" settings you can set whetherornot this
ENTER to close the window.
security protection, or when you move from a protected
page to
window
an
unprotected page.
is
displayed. (See page 61.)
ENTER.
window
cookies at once.
is
displayed. You can also opt to delete
(See
page 61.)
all
the
Pages with security protection are
Tab clearly shown as such.
If
content on a pageiscontinued on another page,
directions to that page are shown clearly.
You can use •
page.
• Where there
direction pressed, the text or image
If
this happens, press the same direction button
several times.
.1'''
I
....
/~
to
go to the continuationofa
is
link text or a link imageinthe
is
selected first.
mm
When
"~"
is
displayedina page:
• The page failed to load successfully, oritcontains images
with formats that cannot be displayed on the 1V. Try
tr
reloading the page by selecting"
toolbar.
(see page
59)inthe
To users who access the Internet from a
• When you access the Internet from this
procedures may not be the same
browser-based access
onaPC.
as
PC
TV,
regular
the
• You cannot download files.
• You cannot view a history of the pages you have
visited.
• You cannot change the startup page displayed
when you press
AQUOS
NET.
• Pop-up windows appearinseparate tabs.
• On some pages, video and audio cannot be
played, and text or images may not be displayed
correctly.
@-
58
Page 60

Using the Internet
Using the Toolbar
You can use the toolbar to control the browser and to
specify settings.
~.IlIIP:l0'
o 0
FMORiTE
1 2 3
@)
~
ABC
<:iii) €i>
AVAPP
G!)
RETURN
0
GED
1 Press 0 on the remote control unit to display the
toolbar.
2 Press
.SeleCteditem
...../~to select a function, and then press
ENTER.
.;~':.
"
"
.Description.
..
y,
rL
Displays the linked pageina new tab.
Displays the Tab menu.
"'~:
.
,;
Using Tabs
You can use tabs to view up to 3 web pages at
same time. Each page appearsina separate tab, and
you can switch between the tabs.
~he
1 Press B on the remote control unit to display the
Tab menu.
• You can also display the Tab menu by clicking
the toolbar.
~:;.~S~Iee:t~
Select This Displays the web pageinth·;)
Close This
Close Other Tabs Closes the other (unselected) tabs.
Create
.
..
2 Press
3 Press
then press ENTER.
itit~;
Tab
New
..../~to select a tab.
..ITto select the item you want to use, and
1tJ,
~
;'t~):ioeSCt1Pti.on.",.
selected tab.
Closes the selected tab.
• You can also press C on the
remote control unit to close a
tab.
Tab
Creates a new tab.
• You can also press A on
remote control unit to
tab.
".n"
J~
':he
cre3.te
in
a
L
~
~
Q
Q
~
~
=-
Returns to the previous page.
Goes back to the original page when you
have viewed the previous page.
Refreshes the page.
Interrupts a page whileitis
Displays the original home page.
Select this to open a bookmark.
Adds the current page to your bookmarks.
Displays the Browser menu.
loading.
@-
59
Page 61

Using the Internet
of
Saving the URL
Adding a web page to your bookmarks allows you to
return to that page later by simply selecting it from your
list of bookmarks.
the Current Page
Editing Bookmarks
You can rearrange or delete the bookmarks.
• Switching between the URL and title name
A~~~S
~
APPS
:fj~,
o 0
FAVORITE
@)
ABC
Ei!i) 0 0
1 Display the page that you want to bookmark.
2 Press D on the remote control unit to display the
toolbar.
3 Press
4 Select "Yes", and then press ENTER.
Opening a Bookmarked Page
1 Press D on the remote control unit to display the
2 Press
3 Press
...../~to select
press
ENTER.
• The pageisadded to your bookmarks.
toolbar.
.....
/~
to select "0"
ENTER.
press
• Your bookmarks listisdisplayed.
./T
I
.....
access, and then press
• The selected pageisdisplayed.
•
If
you have bookmarked11or more web pages, press
~/~
to scroll through your bookmarks list.
When opening a bookmarkina
CD
Press A instead of ENTER.
• The Bookmarks menu appears.
/~
® Select "Open
ENTER.
FAVAPP
1 2 3
~
"~"
to select the page you want to
ENTER.
in
New Tab", and then press
D
in
the toolbar, and then
in
the toolbar, and then
new
tab:
1 Press D on the remote control unit to display the
toolbar.
2 Press
3 Press
.....
/~
to select "0"
ENTER.
press
• Your bookmarks listisdisplayed.
./T
the bookmarks list, and then press A on the remote
control unit.
• The Bookmarks menu appears.
to select the title you want to edit from
in
the toolbar, and then
4 Select "Display by Address" or "Dispiay by Title"
the Bookmarks menu, and then press ENTER.
• Rearranging displayed items
1 Press D on the remote control unit to display the
toolbar.
2 Press
3 Press
4 Press
• Deleting bookmarks
.....
/~
to select "0"
ENTER.
press
• Your bookmarks listisdisplayed.
./T
to select the title you want to display
in
a different position from the bookmarks list, and
then press A on the remote control unit.
• The Bookmarks menu appears.
./T
and then press
to select "Move Up" or "Move Down",
ENTER.
in
the toolbar, and then
1 Press D on the remote control unit to display the
toolbar.
2 Press
3 Press
4 Press
5 Press
.....
/~
to select "0"
ENTER.
press
• Your bookmarks listisdisplayed.
./T
to select the title you want to delete,
and then press A on the remote control unit.
• The Bookmarks menu appears.
./T
to select "Delete", and then press
ENTER.
• To delete
ENTER.
all
the bookmarks, select "Delete All".
...../~to select "Yes", and then press
in
the toolbar, and then
in
@-60
Page 62

Using
the
Internet
Browser
You
can check or modify your browser settings from
settings
the Browser menu.
The Browser menu includes a display settings menu
and a security settings menu.
~
••
~RETURN
o 0
FAVORITE
@j)
ABC
FAV
APP
11'
lQ----C)----CY
MC
M.
2
C
3l
0
800.
1 Press 0 to display the toolbar.
2 Press
..../~to select
"~"
in
the toolbar, and then
press ENTER.
3 Press
..../~to select the settings menu you want to
access.
4 Press
JIJ../T
to select and confirm the item
you
to set.
5 Press
JIJ../T/....
/~
to specify the required setting,
and then press ENTER.
6 Press 0 to exit.
Zoom
In/Out:
Zoom
in: Displays content enlarged to 200%.
Normal:
Zoom
Encoding:
Western
Page
displayed page.
Reset:
Yes:
No: Does not reset the browser settings.
Displays content at 100%.
out:
Displays content reducedto75%.
Selects the desired encoding from the list below:
(ISO-8859-1)/Unicode (UTF-8)
Information:
Resets the browser settings.
Displays information about the currently
want
Security:
Save
Setting:
displayed when you move from a protected page to
unprotected page.
To change this setting, remove the tick, select
Setting" and then press ENTER.
Root
Certificates/CA
certificates. To disable a certificate, select the cE,rtificate
to be disabled and press A to display the sub-menu.
Select "Disable", and then press
• Disabled certificates are shown untickedinthE,
certificate list screen.
Cookies:
Accept
Reject
accept cookies.
Prompt
that uses cookies, this option displays a confirrTation
message.
Delete
Server
Browser
Certificates:
server.
• This
Information:
product
If
you select this option, a message
Certificates:
all: Select this option to accept
all: Select this option when you do not wa
before
All
accepting:
Cookies:
Displays certificates for the conrected
Displays browser information.
contains
When you open a paqe
Deletes
all
NetFront
Displays the list of
ENTER.
all
your cookies.
Browser
ACCESS CO., LTD.
• ACCESS,
are registered
ACCESS CO., LTD. in
Japan
©
2009
the
ACCESS
logo
and
trademarksortrademarks
the
United States,
and/or
other
countries.
ACCESS CO., LTD. All rights
NetFront
reserved.
• This
the
Independent
software
is based in part on
JPEG Group.
the
•••
AC@ESSTM
NetFront
is
an
":3ave
cookie~;.
1t
to
Df
of
work
of
n,
mm
• "Reset" does not reset the certification enable/disable and
Encoding settings.
@-
61
Page 63

Using
the
Internet
Enjoying Movies and
Some
Other
Applications via the Internet
You can watch movies available on the Internet or
make use of other Internet applications with this
Please check that the most current software
loaded on TV by selecting "Auto Update Setting" on
"Software Update" (see page 36) or by visiting
http://www.sharpusa.com/products/support/
to check for a download of
the
newest software
TV.
is
version.
Instantly Watching Movies from Netflix
This function allows you to enjoy Netflix through the
Internet.
Netflixisan
offering rental-by mail and streaming instantly to Netflix
members.
• To enjoy this function, make a broadband Internet
connection to both your
54),
perform the following operation.
online
DVD
and Blu-ray Disc rental service,
PC
and the1V(see pages 53
and then set Internet Setup
(see
pages 55 to 56), then
to
rmm
• The quality depends on the network speed and original bit
rate.
• For more information on Netflix visit http://www.netflix.com/
help or login to your Netflix account and click "Help" at the
top of the page.
is
• Netflix
• Illustrations are examples and may differ from the actual
Netflix screens. The display and operations may change as
a result of a software update.
• Use Netflix without configuring a proxy server. Part or
Netflix may not be available when connectingtothe Internet
via
only availableinthe U.S.
all
a proxy server.
4 Obtain the Netflix activation code.
• If you do not have a Netflix account
CD
Press
./T
to select "no-start my
and then press ENTER.
The screen of the TV
® Subscribe by visiting http://www.netflix.com/sharp
of
from your
@ Press
then press ENTER.
• If you have a Netflix account
Press J;./T to select "yes-activate instant streaming
from Netflix", and then press ENTER.
PC.
./T
to select "I'm
The
The screenofthe TV
screenofthe
FREE
now
a member", and
TV
trial",
POWER
EJ
TV
0000
..........
....
----
OPTION
0000
STB
•
SLEEP
DISPLAY
(~8J1,'t~,
00
DVD'VCR
AUDIO
....
REC
o
~£~~~
FREEZE
EXIT~III1~
o 0
fAVORITE
@)
1 Press APPS to display the application window.
2 Press
ENTER.
~/~
to select "NETFLlX", and then press
3 Read the Disclaimer displayed on the screen.
you agree, press
"Agree", and then press ENTER.
(If
you do not agree, this service cannot be used.)
@-
62
J./T
on the last page to select
FAVAPP
1 2 3
~
5 You will see the following window.
• The activation codeisdisplayed.
the
The screen of
If
TV
Page 64

Using the Internet
6 Using
your
PC, visit
and
then
enter
'liTllll
~~
Activate Your Netfllx Ready DevIce
• After a period of time, the 1Vwill be activated, and the
empty instant Oueue screen will be displayed.
http://www.netflix.com/activate.
the
activation
The
screen of the PC
code
displayed in
~'"
step
,.
9
The
title
you
selectedisdisplayed.
5.
• To return to the step8,press
Press
J;..I~
to
select
"play",
or~to
start
playback.
The
screen of the TV
...
and
then
press
ENTER
ttothe Instant
7
To
addamovietothe
select
the
"AddtoInstant"
Instantly"
• After a period of time, the instant Oueue registered
using your
8
Press
press
• When registrat on and set-up
jump from the application window to the instant Oueue
screen.
Netflix Content on
•
You
pressing
page 33 for detailsonthe
function.
• When there
Oueue, press .... /
thumbnails so you can perform a quicker search.
• The parental control settings on the 1V
to
controls for your instant Oueue, go to Netflix.com/
YourAccount.
• The time required to display the instant Oueue screen
varies depending on the Internet connection status and
the number of titles
web
page
PC
will
.../~to
select
ENTER.
(See
steps 1 to 2
can also display the instant Oueue screen by
FAV
APP
The
are
35)
do not apply to Netflix. To adjust the parental
instant
buttononNetflix
using
your
appear on the1Vscreen.
the
desired
in
Settings for Watching
the
TV.)
on
the remote control unit.
FAV
screen of
more than one titleinthe instant
~~
to scroll through several
in
the instant Oueue.
Que"ue
Oueueofthe
PC.
title,
and
are
completed, you can
APP Key Assign
the
TV
(see
N,
"Watch
then
See
pages 33
•
• After a period of time, playback of the movie be!jins.
• The buttons that can be used during playback
F Buttons
.1.&
II
~~
...
ENTER
~
~
RETURN
EXIT
-CO"
.....
h:;-
"
Stops playback and displays the movie title "creen
(springboard).
Sets pauses and still pictures, PressIIor ~ to
return to playback.
Displays the TnckPlay screen and fast forwards
playback.
Displays the TrickPlay screen and reverses
playback.
Displays the TrickPlay screen and pauses playback.
Displays the TrickPlay screen. advances one frame
forward, and pauses playback.
Displays the TrickPlay screen, advances one frame
backward, and pauses playback.
Displays Netflix home screen.
Closes the Netflix home screen and switche,' the
TV
to INPUT mode.
,
De$criptio~
Deactivating Netflix Function
1
Press
MENU
2 Press ...
ENTER.
3 Press
4
A/~
ENTER.
Press
~/~
ENTER.
• To confirm the Netflix status, check the information
displayed
to
display
/~
to
select
"Information",
to
select "Netflix
to
select
"Deactivate",
on
the screen and click "OK".
the
menu
Help",
screen.
and
and
and
.';.;
then
then
then
;;
~
press
press
press
,,-
@-
63
Page 65

Using the Internet
Enjoying Movies and Internet Applications with VUDU .
You can enjoy movies and Internet applications with VUDU. VUDU Moviesisthe leading HD on-demand video
service. VUDU Movies
is
built into your1Vand utilizes your existing Internet connection to deliver the highest
quality on-demand video available today.
Example
VUDU Movies features:
• True 1080p HD, the only service to offer 1080p quality video ondemand
• Over 16,000 titles available on-demand
in
• Over 3,000 titles available
else
51
surround sound, delivered through state-of-the-art Dolby Digital
•
Plus
• The latest Hollywood hits available the same day as DVD
• No subscription fees required
HD, more than are available anywllere
mm
• To enjoy this function, make a broadband Internet connection to both yourPCand the TV
to
Internet Setup (see pages 55
• For more information on VUDU visit http://www.VUDU.com.
• Your Internet connection
requirements:
SO
(DVD
quality): 480p 1
HD (HDTV quality): 720p 2.25
HDX (BD quality): 1080p 4.5
is
• VUDU Movies
• Illustrations are examples and may differ from the actual VUDU screens.
is
• VUDU
not available when connectingtothe Internet via a proxy server.
only availableinthe
56), then perform the following operation.
is
vitaltoyour VUDU experience. Please refer to the chart below for minimum bandwidth
Mbps
to 2
Mbps
Mbps
to 4.5
Mbps
Mbps
to 9 Mbps
US.
(see
pages 53 to 54), and then set
Getting Started
POWER
B
TV
CJ CJ CJ
..............
aD
....
flm) _
OPTION
CJ
From the VUDU app screen, you can view trailers of
the latest movies and up-to-date information on
or you can access other Internet applications.
• Internet application contentissubject to change.
• For complete instructions on using VUDU Movies, please
http://wwwVUDU.com/Docsinorder to view an in-
visit
depth online manual.
STS
GiD
• _
SLEEP
c:::J
DISPLAY
(~8Ji,~~,
CJCJ
OVO'VCR
AUDIO
CJ
sa
mg
.REC
lEI
CJ
~Z~~~
FREEZE
CJ
c:::J
II
~1@fiJ~
o 0
FAVORITE
@)
1 2 3
~
RETURN
FAVAPP
DVD
1 Press APPS to display the application window.
2 Press
3 Press
..../~to select "VUDU", and then press
ENTER.
• The VUDU app screenisdisplayed.
• You can also display the VUDU app screen by pressing
FAV APP on the remote control
details on the
.It,.!''''
then press
• Follow the instructions on the screen.
FAV
APP Key Assign function
I
..../~to select the desired item, and
ENTER.
unit
See page 33 for
Watching a Movie on VUDU .
Whenitcomes time to watch a movieonVUDU, you
an
will need to set up
1 Press
2 Press
Itt.!'"
I
Click here
to
..../~to select "SIGN up now", and then
press
ENTER.
account.
..../~to select "Sign up for
VUDU
now!
get started", and then press ENTER.
3 Enter your e-mail address.
•
An
activation e-mail will be sent to your
the link to complete the activation process.
• Following the instructions on the screen, make
necessary settings.
PC.
Click on
all
the
@-
64
Page 66

Using the Internet
• If the Settings on the PC Are Incorrect
The screen as shown below will be displayed.
Following the instructions on the screen, send e-mail
all
again and make
the necessary settings.
Example
• Operational buttons during playback
~
~
~~
•
II
I100lIlI
~
Hold
downtogoinreverse.
Starts playback.
Hold
downtofast
Playback
Sets
Pressing
chapter currently
you
Pressing
next
aheacltothe
pauses
move
chapter.
stops.
and
quickly
backtothe
quickly
Each
startofthe
forward.
still
pictures.
once
playing.
once
time
takes
youtothe
Each
startofthe
takes
youtothe
you
press
next
chapter.
time
previous
it,
start of
you
press
startofthe
you
move
chapter.
Deactivating the VUDU Function
1 Press
2 Press
3 Press
4 Press
MENU
ENTER.
ENTER.
ENTER.
to display the menu screen.
~/~
to select "Information", and then press
J1J/''f
to select "Vudu Help", and then press
~/~
to select "Yes", and then press
the
it,
Troubleshooting - VUDU
VUDU cannot be accessed.
• If you are able to access
AOUaS
access VUDU, please
1-888-554-VUDU (8838).
• If you are
(e.g.
appropriate section
your device manufacturer for assistance.
Net) from your device,
not
abletoaccess any
AOUaS
Net) from your device, please consult the
The activation e-mail was not obtained.
•
Check
your junkorspam
find the activation e-mailinthe folders, reconfirm th'3 e-mail
address
settings again .
If
you encounter any other issues during activati:m,
you have entered, and then try your
refer to the following online resources:
Detailed VUDU Manual: Available at
http://wwwVUDU.com/Docs.This
all
aspects of the revolutionary VUDU service with
to
easy-to-follow instructions.
VUDU FAQ: To learn more about VUDU, visit the
Frequently Asked Questions at
http://www.vudu.com/support.
VUDU Customer Care: When you need to talk live
with someone, contact VUDU Customer Care at
1-888-554-VUDU (8838) 7 a.m. to 8 p.m. Pacific, 7
days a week (except holidays).
other
network
but
contact
of
this operation manualorcontact
VUDU
e-mail folders. If you are unable
are
not
Customer
network
services
able
services
accou
introduceE you
(e.~J.
to
Care at
1t
to
@-
65
Page 67

Using the Internet
DISCLAIMERS
This Sharp device facilitates the accesstocontent and services provided by third parties. The content and
services accessible via this device belong
third party content and services must be
such content or service provider. Sharp shall not be liable to you or any third party for your failure
such authorization or terms of use. Unless otherwise specifically authorized by the applicable content or service
provider,
modify, copy, distribute, transmit, display, perform, reproduce, upload, publish, license, create derivative works
from, transfer or sell
all
third party content and services provided are for personal and non-commercial use; you may not
in
any manner or medium any content or services available via this device.
to
and may be proprietary to third parties. Therefore, any use of such
in
accordance with any authorization or terms of use provided by
to
abide by
Sharp
services. Any questions, comments or service-related inquiries relatingtothe third party content or service
should be made directly
You may not be able
is
not responsible, nor liable, for customer service-related issues related to the third party content
to
the applicable content or service provider.
to
access contentorservices from the device for a variety of reasons which may be
unrelated
configure your device properly. Sharp, its directors, officers, employees, agents, contractors and affiliates shall
not be liable to you or any third party with respect
or whether or not it could have been avoided.
ALL THIRD PARTY CONTENT OR SERVICES ACCESSIBLE VIA THIS DEVICE
ON AN "AS-IS" AND "AS AVAILABLE" BASIS AND SHARP AND ITS AFFILIATES MAKE NO WARRANTY
OR REPRESENTATION OF ANY KIND TO YOU, EITHER EXPRESS OR IMPLIED, INCLUDING, WITHOUT
LIMITATION, ANY WARRANTIES OF MERCHANTABILITY, NON-INFRINGEMENT, FITNESS
PURPOSE OR ANY WARRANTIES OF SUITABILITY, AVAILABILITY, ACCURACY, COMPLETENESS, SECURITY,
TITLE, USEFULNESS, LACK OF NEGLIGENCE OR ERROR-FREE OR UNINTERRUPTED OPERATION OR USE
OF
YOUR REQUIREMENTS OR EXPECTATIONS.
SHARP
THIRD PARTY CONTENT OR SERVICE PROVIDERS, NOR ANY ASPECTOFTHE CONTENT OR SERVICE
RELATED TO SUCH THIRD PARTY PROVIDERS.
IN
NO EVENT WILL SHARP AND/OR
DIRECT, INDIRECT, SPECIAL, INCIDENTAL, PUNITIVE, CONSEQUENTIAL OR OTHER DAMAGES, WHETHER
THE THEORY OF LIABILITY
STRICT LIABILITY OR OTHERWISE AND WHETHER OR NOT SHARP AND/OR
ADVISED OF THE POSSIBILITY OF SUCH DAMAGES.
to
the device itself, including, but not limited to, power failure, other Internet connection, or failure
to
such failures or maintenance outages, regardless of cause
IS
PROVIDED TO YOU
FOR
A PARTICULAR
THE CONTENT OR SERVICES PROVIDED TO YOU OR THAT THE CONTENT OR SERVICES WILL MEET
IS
NOT AN AGENTOFAND ASSUMES NO RESPONSIBILITY
ITS
AFFILIATES BE LIABLE TO YOU OR ANY THIRD PARTY
IS
BASED ON CONTRACT, TORT, NEGLIGENCE, BREACH OF WARRANTY,
FOR
THE ACTS OR OMISSIONS
ITS
AFFILIATES HAVE BEEN
FOR
or
to
OF
ANY
@-
66
Page 68

Appendix
Removing the Stand
• Before detaching
(or
attaching) the stand, unplug the AC cord.
mmmD
• Do
not
remove
• LC-52LE920UN
Before attaching/detaching the stand
• Before performing work, make sure to turn off the
• Before performing work spread cushioning over the base area to
damaged.
1 2
Loosen the screw used to secure the stand cover
and remove the cover.
the
stand from
the
TV unless using an optional wall
TV.
CD
Unfasten the four screws used to secure the
stand
® Detach the stand from the
it
mount
lay
will not drop from the edge of the base area.)
brackettomount
theTVon. This will preventitfrom bning
in
place.
it.
TV.
(Hold the stand so
ctm
• To attach the stand, perform the above stepsinreverse order.
• LC-60LE920UN
Before attaching/detaching the stand
• Before performing work, make sure to turn off the
1
CD
Loosen the screw used to
secure the stand cover.
2
Unfasten the four screws used to
secure the stand
® Remove the cover.
TV.
in
place.
3
Detach the stand from the
TV.
ctm
• To attach the stand, perform the above stepsinreverse order.
@-
67
Page 69

Appendix
Setting the TV on the Wall
EmmD
• ThisTVshould be
wall
mount
• Installing
should
mounting
brackets
the
not
attempttodo
that
Using an optional
• You can ask a qualified service professional about usinganoptional AN-52AG4 bracket to mount the1Von
• Carefully read the instructions that come with the bracket before beginning work.
mountedonthe
may
resultinan unstable installation and
TV requires special skill
results in
bracket
the
accidentorinjury.
to mount the TV
wall only with
work
themselves.
the
wall
mount
that
should onlybeperformed by qualified service personnel. Customers
SHARP
bears no responsibility
bracket
may
AN-52AG4
cause
serious injuries.
for
improper
(SHARP).
The
useofother
mounting
or
the
wall.
Hanging on the wall
AN-52AG4 wall mount bracket.
(See
the bracket instructions for details.)
Vertical mounting
Angular mounting
mm
• Detach the
•Touse thisTVmountedona wall, remove
then use the
cable
clamponthe rearoftheTVwhen
screws
supplied with
the
wall
theACcord
mount
using
brackettosecure
LC-52LE920UN
0/5/10/15/20°
LC-60LE920UN
0/5/10°
AN-52AG4
the
optional
holder
and
About setting the TV angle
LC-52LE920UN
• The center of the display:
%4
inch(1mm) above the "b" position.
LC-60LE920UN
• The center of the display:
43/
inch (16.7 mm) above the "f" position.
64
• Refer to the operation manual of
AN-52AG4 for details.
mount
the
the
bracket.
screwsatthe
brackettothe
4 locationsonthe rearofthe TV, and
rearofthe TV.
Optional Accessory
The listed optional accessoryisavailable for the Liquid
Crystal Television. Please purchaseitat your nearest shop.
• Additional optional accessories
future. When purchasing, please read
compatibility
@-
68
and
check
the
maybeavailableinthe
availability.
the
newest
near
catalogue
for
Wall
mount
bracket
AN-52AG4
Page 70

Appendix
Troubleshooting
Problem
• No power
• Unit cannot be operated.
• Remote control unit does not
operate.
is
• Picture
screen.
• Strange color, light color, or color
misalignment
• Power
cut off/with sidebar
is
suddenly turned off.
Possible Solution
..
Page 9
Page 17
lV.
31
Pres:3
TV
• Check if you pressed POWER on the remote control unit.
Is
the AC cord disconnected?..Page 8
•
• Has the power been turned on?
• External influences such
In
operation.
unplugging the
Is
the equipmenttobe operated by the remote control unit set correctly?
•
to set the remote control unit to the setting for operating the
• Are batteries inserted with polarity (+,-)aligned?
• Are batteries worn out? (Replace with new batteries.)
• Are you using
Is
a fluorescent light illuminated near the remote control sensor?
•
Is
"RC Control Lock" selectedin"Operation Lock Out"?..Page
•
•Isthe image position correct?..Pages 30 and
•
Are
screen mode adjustments
..
Pages 22
• Adjust the picture tone .
Is
the room too bright? The picture may look darkina room thatistoo bright.
•
Is
the sleep timer set?..Page 19
•
• Check the power control settings.
• The unit's internal temperature has increased. Remove any objects blocking v(mt or
clean.
this case, operate the unit after first turning off the power of theTvor
AC
it
under strong or fluorescent lighting?
and
as
cord and repluggingitin
50
..
..
Page 17
lightning, static electricity, may cause improper
after 1 or 2 minutes.
..
51
suchaspicture
Pages 25 and 26
..
Page 28
size
made correctly?
• No sound
Is
connectiontoother components correct?..Pages 12 to 16 and 46
•
•
Is
the volume too low?..Page 19
Is
"Variable" selectedin"Output Select"?..Page 30
•
• Have you pressed
• Check the audio output of the connected external equipment.
low or muted?
• When external equipment
configure the audio
• When audio
terminal, check the "Audio Select" setting...Page
• Even when external equipmentisconnected usinganHDMI-certified cable,anaudio
cable connection may be required depending
media being played back.
cable to the HDMI 1 terminal, connect a
AUDIO
• When connecting a PC viaanHOMI-certified cable, check the following:
IN
terminal and set "Audio Select"
-
Is
the audio output of the PC configured correctly? Check the audio output
settings and output audio format
Only PCM format audio can be output. Compressed audio (with a samplin9 rate
of 32kHz, 44.1 kHz, or 48kHz) and DTS format audio cannot be output.
- Depending on the board, only video signals may be output.
addition to connectinganHDMI-certified cable to the HDMI 1 terminal,
MUTEonthe remote control
is
connected via an HDMI cable, you may need to
to
be output through the HDMI cable.
is
not output from external equipment connected to thePCINorHDMI
In
this case,inaddition to connectinganHDMI-certified
in
Sound Properties on the
o 3.5 mm stereo minijack cable to the AUDIO
"HDMI+Analog"
to
•Ifyou are using a DVI-HDMI conversion cabletoconnect external equipment to the
lV,
check the following:
-
Isanaudio cable connected? The DVI-HDMI conversion cableisfor video only.
Connect a 0 3.5 mm stereo mini jack cable to listen to the audio.
Is
HDMI 1 being used? When thelVis
audio and video are not output together even if a 0 3.5
is
connectedtothe shared AUDIOINterminal forPCIN
- Check the "Audio Select" setting. Set "Audio Select" to "HDMI+Analog" .
...
Page
51
unit?..Page 19
Is
the volume 1
51
on
the type of equipment and the
00
0 3.5 mm stereo minijack cable to the
to
"HDMI+Analog"
IN
terminal and set "Audio Select"
connected to another HDMI terminal, the
...
Page
51
PC.
In
this case,
mm
stereo minijack cable
and HDMI 1.
in
comect
..
Page
51
1
a
@-
69
Page 71

Appendix
• No picture
Problem Possible Solution
•
Is
connection to other components correct?
•Isthe correct input selected?
•Is"On" selectedin"Audio Only"?
•Ifthe PC imageisnot displayed, check the following:
- When connecting a laptop PC to the
is
settoexternal monitor.
PC
- Check the resolution setting on the PC.
..
Page
51
..
Pages 12 and 20
..
Page 28
..
Pages 12 to 16 and 46
TV,
check that display output mode of the
Is
a non-compatible signal being input?
• Picture quality of HD programs
poor.
• The
TV
cracking sound.
• The original home page cannot •
be displayed.
• Some Internet functions used on • The TV has only limited functions compared with regular PC browsers .
aPCare not available from the
TV.
sometimes makes a
is
• To enjoy HD images from external equipment, you are required to set up HDMI
connection or component connection.
If
the program contentisnot ofHDquality,HDimages cannot be displayed. Check
•
that the program you are viewing provides HD images.
• The HD cable/satellite set-top box may need to be configured to output
via cable/satellite.
• The cable/satellite broadcast may not support a signal resolution of 1080p.
• This
is
not a malfunction. This happens when the cabinet slightly expands and
in
contracts according to change
performance.
Is
the ETHERNET cable connected correctly?
• Check the settings of "Internet Setup".
temperature. This does not affect the TV's
..
Page 53
..
Pages55to
56
Troubleshooting - Error Message
The example of an error message
displayed on a screen
• Failed to receive broadcast.
• No broadcast now.
Error code
E202
E203
Possible Solution
• Check the antenna cable. Check that the antennaiscorrectly
setup.
• Check the broadcast timeinthe program guide.
HD
images
..
Page 58
•
An
incompatible audio signal has
been received. Change the output
device audio settings
to
PCM.
Cautions regarding use
• When the unitisusedina low temperature space (e.g. room, office), the picture may leave trails or appear slightly delayed.
This
is
not a malfunction, and the unit will recover when the temperature returns to normal.
• Do not leave the unit
heater, as this may cause the cabinet to deform and the front panel to malfunction.
Storage temperature: - 4
in
a hot or cold location. Also,donot leave the unitina location exposed to direct sunlight or near a
OF
to + 140°F (- 20°C to +
-
in
high and low temperature environments
• This messageisdisplayed whenanaudio format other than
PCM
is
input. (Dolby Digital and
supported.)
- Set the audio output format of connected external HDMI
equipment to PCM.
- Refer
to
the operation manual of the external equipment for
setting details.
BO°C)
DTS
audio formats are not
@-
70
Page 72

Appendix
CLEARING
If
you forget the secret number, clear the secret number using the following procedure.
1 Select
display menu, see page 23.)
• "Color system"
• "EZ Setup" or "Reset" (+--Initial Setup menu).
• "CH Setup"
• "Parental CTRL"
• "Interactive Service"
• "Software Update" ( Information menu).
2 Press and hold both
The
THE
SECRET
an
item from the list below to display the secret number input screen. (For operating the on-scr'3en
(+--
secret
number
NUMBER
(+--
"Input Terminal Setting"
"Broadcasting Setup" +--Initial Setup menu).
(+--
"Individual Setup" +--Initial Setup menu).
(+--
"Internet Setup" +--Initial Setup menu).
CHI\.
and
VOL+
is
ITIJJ
+--
System Options menu).
on theTVsimultaneously until the message appears on the screen.
.
Imm
•Asa precautionary measure, make a note of your secret number above, cutitfrom this manual, and keepitin
a safe place.
Trademarks
• Manufactured under license from Dolby Laboratories. Dolby and the double-D symbol are trademarksofDolby
Laboratories.
~
~
• "HDMI, the
Licensing LLC in the United States and other countries."
• Products that have earned
efficiency.
• L C
7,,;;
This
displaying easy-to-read characters on LCD screens. However, other fonts are used for some screen pages, too.
x=.
v=.=C=o=lo=r="
:=.='='
• Netflix and the Netflix logo are the registered trademarks of Netflix, Inc.
L..--.-
•
VUDUTM
•
DivX®,
• ABOUT DIVX VIDEO:
plays DivX video. Visit
• ABOUT DIVX VIDEO-ON-DEMAND: This DivX Certified® device must be registered
Demand
Go
to
• The Wi-Fi CERTIFIED Logo is a certification mark of the Wi-Fi Alliance.
• The Wi-Fi Protected Setup Mark is a markofthe Wi-Fi Alliance.
1.---
HDMIIogo
C. L C F 0 N
product
is embedded with LC Font technology, which was developedbySHARP Corporation for clearly
=a=nd=x=,v=,=C=o=l=o=r=a=r=e=tr=a=d=e=m=a=rk=s=of=S=O=
is a trademark of VUDU, Inc.
DivX Certified® and associated logos are registered trademarksofDivX, Inc. and are used under license.
(VOD)
vod.divx.com with this
content. To generate the registration code, locate the DivX VOD section in the device setup menu.
and High-Definition Multimedia Interface are trademarks or registered trademarks
the
ENERGY ST
T.
I}~
Y -
7"
AR®
are designedtoprotect
;;
hnd
LC
logo mack
the
environment through superior
an"egisle,ed
leadema'ks ofSHARP Co,p",a';on. I
n=y=c=o=rp=o=r=at=io=n=.=================~
DivX®
is a digital video
www.divx.com
codetocomplete
format
for
more information and software toolstoconvert your files into DivX video.
created by DivX, Inc. Thisisan
the
registration process and learn more about DivX VOD.
official DivX Certified device that
in
ordertoplay DivX Video-:m-
_
of
HC~
~
ener~
~
~
----l
~
(@-
71
Page 73

Specifications
Item
LCD
panel
Size
Resolution
TV-standard
(CCIR)
VHF/UHF
CATV
TV
Function
Receiving
Channel
Digital Terrestrial
Broadcast
(8VSB)
Digital cable"
(64/256 QAM)
Audio multiplex
Audio out 10W
VIDEO
PCIN
HDMI1
HDMI2
HDMI3
Back panel
vertical
inputs
Terminals
HDMI4
AUDIO
IN
AUDIO OUT Audio out
DIGITAL
AUDIO
OUTPUT
Model: LC-52LE920UN
1
52" Class
2,073,600 pixels
(52
/32"
Diagonal)
(1
,920 x 1,080)
American TV Standard ATSC/NTSC System
VHF 2-13ch, UHF 14-69ch
1-135ch (non-scrambled channel only)
2-69ch
1-135ch (non-scrambled channel only)
BTSC System
x 2 + 15 W
AVin(035
ANALOG RGB
Audioin(0
HDMI
in
with HDCP, Audioin(0
0NF)
mm to 3 RCA AV cable)
(PC)in(15-pin mini D-sub female connector),
3.5 mm stereo jack)
3.5
HDMIinwith HDCP
HDMIinwith HDCP
HDMIinwith HDCP
Audioin(0
3.5 mm stereo jack)
(0
3.5 mm stereo jack)
Optical Digital audio output x 1 (PCM/Dolby Digital)
ETHERNET Network connector
USB 1 Photo/MusicNideo mode, Software update
USB 2 Photo/MusicNideo mode, Software update
Back panel
horizontal
inputs
COMPONENT COMPONENT
ANT/CABLE 75
n Unbalance, F Type x 1 for Analog (VHF/UHF/CATV) and Digital (AIR/CABLE)
RS-232C 9-pin D-sub male connector
in
OSD language English/French/Spanish
Power Requirement AC 120
V,
60 Hz
Power Consumption 180 W (0.5 W Standby with AC 120
Weight
x H x
2
D)
Dimension'
0N
Operating temperature
TV + stand
TV only 73.9 Ibs.l33.5 kg
TV + stand 49
TV only
86.0 Ibs.l39.0 kg
8
x 33
31
29
/
32
15/
16
49
5
/
%x
+32°F to +104°F
2
x
13
%4
inch
x 1 35/&4 inch
(O°C
to +40°C)
Model: LC-60LE920UN
60" Class (60
mm
stereo jack)
230 W (0.5 W Standby with AC 120
V)
121.3Ibs.l55.0
'/3tDiagonal)
kg
98.1 Ibs.l44.5 kg
56
56
21
/
32
21
/
32
x 38
x
35
25
/&4
x
14
'/2
61
/&4
x 1
9/'6
V)
inch
inch
.,
Emergency alert messages via Cable are unreceivable.
'2
The dimensional drawings are shown on the inside
• As partofpolicy of continuous improvement, SHARP reserves the righttomake design and specification changes for
product improvement without prior notice. The performance specification figures indicated are nominal valuesofproduction
units. There may be some deviations from these values
@-72
back
cover.
in
individual units.
Page 74

Specifications
Wireless LAN USB Adapter
FCC
This device complies with part 15
(1)
This device may not cause harmful interference, and
interference that may cause undesired operation. Changes or modifications not expressly approved by the party responsible
for compliance could void the user's authority to operate the equipment. To comply with the FCC
requirements, this device and its antenna must not be co-located or operated
transmitter.
The device for the band 5150-5250 MHz
mobile satellite systems;
The maximum antenna gain permitted (for devices
limit; and High-power radars are allocated as primary users (meaning they have priority) of the bands 5250-5350 MHz
5650-5850 MHz and these radars could cause interference and/or damage to LE-LAN devices.
Product Name Dual Band 802.11 n USB2.0 Adapter
Standard
Host Interface
Frequency Band
Security WPA-PSK
Modulation BPSK@6/9 Mbps
Transmit Power and Sensitivity
Current Consumption
(5V
Weight
Dimensions
(W
x H x
D)
Operating Temperature
DC)
of
the FCC Rules. Operationissubject to the following two conditions:
(2)
this device must accept any interference received, including
in
conjunction with any other antenna or
is
only for indoor usage to reduce potential for harmful interference to co-channel
in
the bands 5250-5350 MHz and 5470-5725 MHz) to comply with the e.i.r.p.
Specification
IEEE
802.11
alb/gin
USB 2.0
2412-2484 MHz
5.150-5.850
8Hz
Static WEP (64/128 bit, key Index 1 only)
(TKIP)
WPA2-PSK
(AES)
DBPSK@1Mbps
DQPSK@2Mbp
CCK@5.5/11 Mbps
QPSK@12/18Mbps
16-QAM@24Mbps
64-QAM@48/54Mpb and above,
Tx
Output Power: (Typical)
Rx
up to 300Mbps
2.48Hz
11
b 15 +/- 1.5
11g
15+/-1.5dBm
11
n 20MHz 15+/- 1.5dBm
11
n 40MHz 15 +/- 1.5 dBm
58Hz
(5150-5250MHz, 525D-5350MHz)
11
a 13 +/- 1.5 dBm
11
n 20MHz 14.5 +/- 1.5 dBm
11
n 40MHz 14.5 +/- 1.5 dBm
58Hz
(5470-5725MHz, 5725-5850MHz)
11
a 13 +/- 1.5 dBm
11
n 2DMHz 13 +/- 1.5 dBm
11
n 40MHz 13 +/- 1.5 dBm
Rx
Sensitivity: (Typical)
-84 dBm
-72 dBm
@11
@54
dBm
Mbps
Mbps
-64 dBm @64-QAM, 20MHz channel spacing
-61
dBm @64-QAM, 40MHz channel spacing
Tx:
440 mA Max
Rx:
440 mA Max
0.034 Ibs/15 g
1
'/'6X27/
57
X 2
/
64
inch
64
(26.6 x 10.6 x 73.3 mm)
+32°F
to
+104of(DOC
to +40°C)
RF
exposure compliance
clnd
@-73
Page 75

Information on the Software License for This Product
• Software composition
The software includedinthis productiscomprisedofvarious software components whose individual copyrights
are held by SHARP or by third parties.
• Software developed by SHARP and open source software
The copyrights for the software components and various relevant documents included with this product that were
developed or written by SHARP are owned by SHARP and are protected by the Copyright Act, international treaties,
and other relevant laws. This product also makes use of freely distributed software and software components
whose copyrights are held by third parties. These include software components covered by a GNU General Public
License (hereafter
• Obtaining source code
Someofthe open source software licensors require the distributor to provide the source code with the executable
software components. GPL and LGPL include similar requirements. For information on obtaining the source code
for the open source software and for obtaining the GPL, LGPL, and other license agreement information, visit the
following website:
http://www.sharpusa.com/gpl
We are unable to answer any questions about the source code for the open source software. The source code for
the software components whose copyrights are held by SHARP
• Acknowledgements
The following open source software components are includedinthis product:
• linux kernel/busybox/glibc/zlib/libpng/libjpeg/libiconv/DirectFB/OpenSSL/XMLRPC-EPI/mtd-utils/ExpatlQtI
U-BootIWMDRM/AGG(ver2.3)/device-mapper/libfreetype/cURUlibxmI2/lua/lua-xmlreader/lua-slncrypto/
Ffmpeg/SQLite/libzzip
• Software Copyrights
XMLRPC-EPI
Copyright 2000
libjpeg
This software
Portions
OpenSSL
Copyright
This product includes software developed by the OpenSSL Project for use
Toolkit. (http://www.openssl.org)
SSLeay
Copyright
This product includes cryptographic software written by Eric Young (eay@cryptsoft.com).
Expat
Copyright
Copyright
Qt
Copyright
Contact: Ot Software Information (qt-info@nokia.com)
WMDRM
Content owners use Windows Media digital rights management technology (WMDRM) to protect their
intellectual property, including copyrights. This device uses WMDRM software to access WMDRMprotected content.
Microsoft to revoke the software's ability to use WMDRM to play or copy protected content.
Revocation does not affect unprotected content. When you download licenses for protected content,
you agree that Microsoft may include a revocation list with the licenses. Content owners may require
you to upgrade WMDRM to access to their content.
access content that requires the upgrade.
libfreetype
Copyright
cURL
Copyright
libxml2
Copyright
Lua
Copyright
Lua-xmlreader
Copyright
Lua-slncrypto
Copyright
libzzip
Copyright
GPL),
a GNU Lesser General Public License (hereafter
is
LGPL)
not distributed.
or other license agreement.
© Epinions, Inc.
is
copyright © 1991-1998, ThomasG.Lane.
of
this software are basedinpart on the workofthe Independent JPEG Group.
© 1998-2008 The OpenSSL Project.
in
the OpenSSL
© 1995-1998 Eric Young (eay@cryptsoft.com)
© 1998, 1999, 2000 Thai Open Source Software Center Ltd and Clark Cooper.
© 2001, 2002, 2003, 2004, 2005, 2006 Expat maintainers.
© 2009 Nokia Corporation and/or its subsidiary(-ies).
If
the WMDRM software fails to protect the content, content owners may ask
If
you declineanupgrade, you will not be able to
©
2006,2007,2008,2009,2010
by David Turner, Robert Wilhelm, and Werner Lemberg.
© 1996-2010, Daniel Stenberg, (daniel@haxx.se)
© 1998-2003 Daniel Veillard.
All
Rights Reserved.
© 1994-2008 Lua.org, PUC-Rio
© 2008 A.S. Bradbury
© 2005 Malete Partner, Berlin, partner@malete.org
© Guido Draheim guidod@gmx.de
@-
74
Page 76

Calling for Service
For location of the nearest Sharp Authorized Service, or to obtain product literature, accessories, supplies, or
customer assistance, please call 1-800-BE-SHARP.
LIMITED WARRANTY
CONSUMER
SHARP ELECTRONICS CORPORATION warrants
"Product"), when shipped in its original container, will be free from defective workmanship and materials, and agrees that it will, at its option,
either repair the defect or replace the defective Product
purchaser for parts or labor for the period(s) set forth below.
This warranty does not apply
been removed, defaced, changed, altered or tampered with. This warranty does not cover installation or signal reception problems. This
limited warranty will not apply if the Product has been or is being used
forthe non-commercial, household use
for commercial purposes orina commercial setting, there are warranties available to coveryour useofthis Product, the terms of wh ch may
vary. Please contact
In
order to enforce your rights under this limited warranty, you should follow the steps set forth below.
purchasetothe servicer, which proof must include the dateofpurchase.
To
the extent permitted by applicable state law, the warranties set forth areinlieu of, and exclusive of, all other warranties, express or
implied. Specifically ALL OTHER WARRANTIES OTHER THAN THOSE SET FORTH ABOVE ARE EXCLUDED, ALL EXPRESS AND
IMPLIED WARRANTIES INCLUDING THE WARRANTIES OF MERCHANTABILITY, FITNESS FOR USE, AND FITNESS FOR A PARTICULAR
PURPOSE ARE SPECIFICALLY EXCLUDED.
DISCLAIMED
PURCHASE SET FORTH BELOW. THIS WARRANTY GIVES YOU SPECIFIC LEGAL RIGHTS. YOU MAY ALSO HAVE OTHER FliGHTS
WHICH VARY FROM
The warranties given herein shall be the sole and exclusive warranties granted by Sharp and shall be the sole and exclusive remedy
available
permitted. Correctionofdefects,inthe manner and for the period of time described herein, shall constitute complete fulfillment of
liabilities and responsibilities of Sharptothe purchaser with respecttothe Product, and shall constitute full satisfaction of all claims,
whether based on contract, negligence, strict liability or otherwise. Sharp does not warrant nor shall Sharp be liable, orinany way
responsible, for Products which have been subject
lack of reasonable care, alteration, modification, tampering, misuse, improper operationormaintenance or any damages or defectsinthe
Product which were caused by repairs or attempted repairs performed by anyone other than a Sharp authorized servicer. Nor shall Sharp
be liable
warranties or on remedies for breachincertain transactions;insuch states, the limits herein may not apply.
LIMITED WARRANTY
to
the first consumer purchaser that this Sharp brand Liquid Crystal Display product (the
or
part thereof with a new or remanufactured equivalent at no chargetothe
to
any appearance itemsofthe Product or if the serial number or model number affixedtothe Product has
in
of
the Product by consumers in their home or residence. Ifyou intendtoor already use this Product
1-888-GO-SHARP
OR
EXCLUDED, THE DURATION OF SUCH IMPLIED WARRANTIESISLIMITED TO THE PERIOD(S) FROM THE
STATETOSTATE.
to
the purchaser and only for the time periods set forth herein. No other representationsorpromises made by anyone are
orinany way responsible for any incidental or consequential economic or property damage. Some statesdonot allow limits on
for further information.
IF,
UNDER APPLICABLE
to
abuse (including, but not limited to, impropervoltage), accident, misuse, negligence,
a commercial setting or application; this warranty is meant solely
You
must be abletoprovide proof of
STATE
LAW, IMPLIED WARRANTIES MAY NOT VALIDLY BE
DATE
OF
all
THIS LIMITED WARRANTY IS VALID ONLY IN THE FIFTY (50) UNITED STATES, THE DISTRICT OF
Model
Specific
Your
Product
Warranty
Additional
Warranty
WheretoObtain
WhattodotoObtain
TO
OBTAIN
Section
Model
Period
for
Exclusions
Coverage
Service:
PRODUCT
Number&Description:
this
Product:
from
(if any):
Service:
INFORMATIONORPURCHASE
ACCESSORIES
OR
VISIT
LC-52LE920UN/LC-60LE920UN LCD ColorTelevision
(Be sure
Product.)
One
In
to
mounting or other encumbrance which would unreasonably interfere with
servicing the Product. The Servicer will remount the Product after service,
provided that such remounting is not into a complex
tion. Any additional labor and materials required
Product above and beyond the foregoing are
may resultinadditional charges and are the responsibilityofthe consumer.
Image Retention resulting from a fixed image being displayed for long
periods of time is not covered by this Limited Warranty (see Operation
Manual on
From a Sharp Authorized Servicer located
location of the nearest Sharp Authorized Servicer. please call Sharp
at 1-800-BE-SHARP.
Contact your Sharp Authorized Servicer
product. The Servicer will
unit for repair at the Servicer's facility and return
completed. Be suretohave
to
have this information available when you need service
(1)
year parts and labor from the dateofpurchase.
order for the Producttobe serviced, the Product must be readily available
the servicer, free and clearofany complex or non-standard installation,
howtoprevent this).
cometoyour location and if necessary
ProofofPurchase
AND
www.sharpusa.com
EXTENDED WARRANTIES,
COLUMBIA
in
to
obtaininhome service for this
AND
PUERTO RICO.
or
non-standard installa-
to
remove and/or reinstall a
not
covered by this warranty,
the United States.Tofind the
the
available.
CALL
rem)ve
settoyou once
1-800-BE-SHARP
lor
1:011
your
free
the
(@-
75
Page 77

VA
..
L.I.D.I.N.C.A.N.A.D.A.O.N.L.Y···_SHARR···········_
LIMITED WARRANTY
ConsumerElectronics Products
Congratulations
Sharp Electronics of Canada Ltd. (hereinafter called "Sharp") gives the following express warranty to the first consumer purchaser for this
Sharp brand product, when shipped
Sharp warrants that this product is free, under normal use and maintenance, from any defects
defects should be found
specified herein.
This warranty shall not apply to:
(a) Any defects caused
use as outlined in the owner's manual.
(b) Any Sharp product tampered with, modified, adjusted or repaired by any party other than Sharp, Sharp's Authorized Service Centres
or
Sharp's Authorized Servicing Dealers.
(c) Damage caused
head cleaning tapes and chemical cleaning agents.
(d) Any replacement of accessories, glassware, consumable
not limited to earphones, remote controls, AC adapters, batteries, temperature probe, stylus, trays, filters, belts, ribbons, cables and
paper.
(e) Any cosmetic damage to the surface or exterior that has been defaced or caused by normal wear and tear.
(f) Any damage caused by external or environmental conditions, including but not limited to transmission line/power line voltage
spillage.
(g) Any product received without appropriate model, serial number and
(h) Any products used for rental or commercial purposes.
(i) Any installation, setup and/or programming charges.
Should this Sharp product fail to operate during the warranty period, warranty service may be obtained upon delivery of the Sharp product
together with proof of purchase and a copy of this LIMITED WARRANTY statement to an Authorized Sharp Service Centre or an
Authorized Sharp Servicing Dealer.
screen size of 27"
This warranty constitutes the entire express warranty granted by Sharp and no other dealer, service centre
authorized to extend, enlarge or transfer this warranty
liability for direct or indirect damages or losses
defect
in
of information. The purchaser will be responsible for any removal, reinstallation, transportation and insurance costs incurred. Correction of
defects,
to the purchaser with respect to the product and shall constitute full satisfaction of all claims, whether based on contract, negligence, strict
liability or otherwise.
materialorworkmanship relating to the product, including damages for the loss of timeoruse of this Sharp product or the loss
in
the manner and period of time described herein, constitute complete fulfillment of all obligations and responsibilities of Sharp
in
or
or
repairs required as a result of the use with items not specified or approved by Sharp, including but not limited to
or
larger and on any Sharp Over-the-Range Microwave Oven.
in
its original container and soldordistributedinCanada by Sharp or by an Authorized Sharp Dealer:
this product within the applicable warranty period, Sharp shall, at its option, repairorreplace the product as
repairs required as a result of abusive operation, negligence, accident, improper installationorinappropriate
In
home warranty service may be provided at Sharp's discretion on any Sharp television with the
on
or
for any incidental, special or consequential damages or loss of profits resulting from a
on
your purchase!
in
material and workmanship.Ifany
or
peripheral items required through normal use of the product including but
CSNcUL
behalf of Sharp. To the extent the law permits, Sharp disclaims any and all
markings.
or
their agentoremployee is
such
or
liquid
WARRANTY PERIODS:
For more information on this Warranty, Sharp Extended Warranty
Offers, Sharp Canada Products, Accessory Sales, Dealer or Service
Revision 06/14/10
Audio Product
BD/DVD
Projector
LCD TV
Microwave Oven
Air Purifier
Portable Air Conditioner
To obtain the name and address
SHARP ELECTRONICS
Product
OF
Locations, please call (905) 568-7140
Visit our
Web
Parts
& Labour (exceptions noted)
1 year
1 year
1 year (lamp 90 days)
1 year
1 year (magnetron component-4 additional years)
1 year
1 year
of
the nearest Authorized Sharp Service Centre or Dealer. please contact:
CA ADA LTD. 335 Britannia Road East, Mississauga. Ontario L4Z IW9
site: www.sharp.ca
\
,,0
foE
THE
SHARP
.-
SERVICE
~~
~J'
.....
<'
~
C
~,<'f
(@-76
Page 78

Dimensional Drawings
LC-52LE920UN
;
••
..
,-----------!---~---
--
49
9
45
116
(1157) ,
------------
..
------,
5/8
3
15
14
_ .i _
(1260)
(400)
I
•
----+------------
.'
....
35
1
/64
(39) (158)
--~--~--
, I
6
I
I
Unit: inch (mm)
Unite: pouce (mm)
Unidad: pulgada (mm)
15
/64
AN-52AG4
.,.
,.
.,:'.
LC-60LE920UN
r-----------
+---.---'r~~-----t--------__:
-I
L{)I
~i~i
~:~!
2G
~
!---. _-------.!
<0
~~!
N
I
i I
I !
'
t
'---~--------_._._--l--...--...-----------1----'
-r-..
i
~l
i
(D
:
I
L{)i
M
1
;
I I
1 !
I I
; I
i
1-=:':===~~~~~~==:::
_.
-.. .
52
17
132
._-..-.-
56
(13342)
...
--.-
15
;-4-'
21
/32
(1439)
; I
i I
.
_J.-
- -
3
14
(400)
---.
--
-----_._---+-;
•
I
,
--
..
-------- 1
wi
"""!
~:
Ni
~i
Ni
27/
32
41
2
/64'
(67) . ;
_
4
1'/64
(106) !
---
...
(580) :
...........
i
If----'+--
. 135/64
(39)
'....'----'-
13
25/
(340) ,
"'+---~
64
I
i 22
;.4------
I
9
1
116
(39.7)
"I
•
6
(174)
•
55
/64
AN-52AG4
i I
...'.-._..
,..-t-
------../..----=-
----
- -
.------.....
-
, 14
12
'
I (368) i
1-.------1
i
41
2
(67)
._-++--~--
13
4
/64
(1067)
---~-----..--
i
/
: 19116
64
• ; i
(397)
I '
:
Page 79

SHAR~
SHARP ELECTRONICS CORPORATION
Sharp Plaza, Mahwah, New Jersey 07495-1163
SHARP CORPORATION
PrintedinMexico
au
Imprime
Impreso
TINS-E586WJZZ
10P06-MX-NM
Mexique
en
Mexico
Page 80

SHARR
Connection Guide
[ENGLISH]
AQuas
• The best image qualityisobtained by using a digital source and digital connections:
HOMI
BEST (Provides the best video/audio performance)
Component
BETTER
(Component cables provide better picture performance than Composite)
Composite GOOD (Analog Connection - Not preferred)
• For connecting the
1V
to external equipment, use commercially available cables.
•
To
purchase cables and other accessories direct from Sharp please visit http://www.sharpusa.com/
SharpOirect or
call
Sharp at 1-87-
SEE
AQUaS (1-877-332-7867).
•
La
meilleure qualite d'image est obtenueenutilisant une source et des connexions numeriques :
HOMI
MEILLEUR
(Offre
les meilleures performances video/audio)
Composant
MIEUX
(Les
cables composants offrent une meilleure performancesauniveau des
images que les cables composites)
Composite BON (Connexion analogique - non recommandee)
• Pour raccorder
Ie
televiseur a
un
equipement externe, utilisez des cables disponibles dansIecommerce.
• Pour acheter des cables et d'autres accessoires directement aupres de Sharp, accedez
au
site http://
www.sharp.ca.
ou
appelez Sharpau(905)568-7140.
LC-52LE920UN
LC-60LE920UN
LC-52LE925UN
LC-60LE925UN
Guide de connexion
GUla de Conexi6n
[FRANCAIS]
[ESPANOL]
•Lamejor calidad de imagenseobtiene usando una fuente digital y conexiones digitales:
HOMI
OPTIMa (Ofreceelmejor desempeno de video/audio)
Componente MEJOR (Los cables de los componentes ofrecen mejor desempeno de imagenes que
los cables mixtos)
Cables
mixtos BUENO (Conexi6n anal6gica -nose
prefiere)
• Para conectar
el1Vaun
equipo externo, utilice cables comercialmente disponibles.
TMAN-A038WJZZ
Page 81

To
view
external
source
images,
select
the
input
sourcebypressing
INPUTonthe
remote
control
unitoron
the
TV.
IENGLISH I
Connecting
an Antenna/Cable
Connecting
an HD Cable/Satellite
Set-top
Box
Hi:lm.
00
Hi:lm.
Back
panel
vertical
inputs
Back
panel
vertical
inputs
WI
~'!!~
R@
@L
COMPONENT OUT
@@@
YPePR
• When
using
Component
cable (COMPONENT):
AUDIO-L
=\
J !
(White)-
~~O_R~j
b~_~
~ ~
~
Y(G""I:;\
~
j
f~====;-
p;.(~::~:
'!'~:L~
I
~."!)
te.
'
Back
panel
horizontal
inputs
• When using OVI-HOMI conversion cable (HOMI
1):
When
using a DVI-HDMI conversion cable, you should
make
an
analog audio connection.Inthis case,
in
addition to connecting a DVI-HDMI conversion cable to
the
HDMI
1 terminal, connect a 0 3.5 mm stereo minijack
cable to the AUDIO
IN
terminal and set "Audio Select" to
"HDMI+Analog".
rCable
S
Ir.------~III
IN
~
~L1NEOUT
a
. @
l'I,,::::::+:je--
D----......c.::::111
OUT 0 AUDIO
•••
~;;.
• When using HOMI cable (HOMI 1,2,3or4):
The
HDMI
(High
Definition Multimedia Interface) terminal
is
an
audio-video interface that enables a connection for audio I
ARC
and
video signals using a single cable.
The
HDMI
terminal m
,"pport,
hi9:i::illiO,eo
iopol
qm~
~
~
~
f-------------o
~
00
HOMI
LINE OUT
em
When
you
connect
external
equiprnent
usingaDVI-HDMI
conversion
cableorwhen
you
connect ARC-cornpatible equiprnent,
use
HDMI
1.
F-type
connector
----,
III
(commercially available:
03.5
mm to 3
RCAAVcable) or
(QCNW-A702WJll. from
SHARP)
75-ohm
coaxial cable (round)
Home
Antenna
terminal
(75-ohm)..
Coaxial
cable
-
......
--~~pe:J
CableTVlead-In
Connecting a Cable/Satellite
Set-top
Box
You
can
use
the
VIDEO terminal
with
a 0 3.5 mm to 3 RCAAVcable.
• For
theAVcabletoconnecttothe
VIDEO terminal, use a plug
described
below.
Pin
number
Description
~
1
AUDIO
(LEFT)
!
!!
r 2
Composite
Video
3 A&V
Ground
(EARTH)
4
AUDIO
(RIGHT)
2.A
300-ohm
systemisa flat
"twin-lead"
cable
that
can
be
300/75-ohm adapter -----.
attachedtoa
75-ohm
terminal
'1::.'::'
==:::::==.
::1:'
= •
througha300/75-ohm
adapter
~~~-_?:~
cable
(commercially available).
Combiner
3.A
separate VHF/UHF
antenna
300~~h;"'",I
J§r--L_--+---~
~
has
two
antenna
cables.
Use
twin-lead
cable
t=::==J
a
combiner
(commercially \ !
..
j
available)toconnect
the
antenna
300-ohm
lor [ I
~~~
I
cablestoa
75-ohm
terminal.
tWin-lead
cable
III
75-ohm coaxial cable
Check
the
typeofantenna
cable
you
are using.
(for receiving cable-TV
withoutaset-top
box,
including
unscrambled
cableHDchannels,
or
off-air HDTV broadcasts)
1.A75-ohm
system is generally
a
round
cable
with F-type
connector
that
can easily
be
attachedtoa terminal
without
tools
(commercially available).
em
For
informationonthe antenna type,
see
the operation
manualofyour
TV.
Page 82

Connecting Multiple Devices to the TV
Back panel
vertical inputs
ANTI
CABLE
Back panel
horizontal inputs
Cable
When connecting the
1V
without
the
use
of
a cable/satellite settop
box, connect the
antenna cable
to
the
RF-IN terminal on the
VCR.
@ (commercially available:
o
3.5 mmto3 RCA
AV
cable)
or
(QCNW-A702WJZZ from SHARP)
The above
is
a connection example. For information on connecting external equipment to the
1V, see the operation manual of the equipment.
Cable/Satellite
set-top
box
Cables required:
CD
Coaxial cable
@ Composite cable
Connecting a PC
Connecting a Cable/Satellite Set-top Box and VCR
DIGITAL
AUDIO
OUTPUT
AV!N
Back panel
vertical inputs
@
AUDIO
OUT
Ifl
~
ANTI
CABLE
or
Back panel
horizontal inputs
HD Cable/
Satellite
set-top
box
TV I
4UD'he~1I
~·i
1f
, t::\\ •
R~~
__
••
You
can connect the
1V
using a splitter only when
the connection involves a
cable set-top box. When
you use the satellite
set-top box, connect a
dedicated cable directly
to
the satellite set-top box.
Cables required:
CD
Coaxial cable
@ HDMI-certified cable
WOptical fiber cable
1mB
The aboveisa connection example. For information on connecting external equipment to the
1V, see the operation manual of the equipment.
Connecting a Game Console
You can use the VIDEO terminal with a 0 3.5mmto3RCA
AV cable.
• For the
AV
cabletoconnecttothe VIDEO terminal, use a plug described below.
Back panel
vertical inputs
Back panel
vertical inputs
1mB
The aboveisa connection example. For detailed information on the connection, see the
operation manual of the equipment.
The illustrations of the terminals are for explanation purposes and may vary slightly from the actual products.
Page 83

SHAR~
SHARP ELECTRONICS CORPORATION
Sharp Plaza, Mahwah, New Jersey 07495-1163
SHARP CORPORATION
Page 84

H
~
Protect
Your
Investment
Register your product for:
~
Recall Notifications
We
contact
our
customersincaseofrecall.
~
Owner
Verification
Registration
can
serveasverificationofyour
ownershipinthe
event
of
product
theftorloss.
~
Efficient Service
Completing
this
card
will
help
you
obtain
more
efficient
warranty
service
in
case
thereisa
problem
with
your
product.
~
Don't
forget
We
know
you
are
busy,
but
registeringisimportant,
quick
and
easy!
Or
register
online
at
www.sharpusa.com
Page 85

PRODUCT
REGISTRATION
DEPARTMENT
Pleasedonot
send
any
productsorother
correspondencetothis
address.
If
you
have
commentsorsuggestions
about
our
product,
please
write
to:
SHARP
Consumer
Electronics
Group
Sharp
Plaza.
Mahwah.NJ07430-2135
U.S.A.
Register
onlineatwww.sharpusa.com
c C Y
01
SHARP ELECTRONICS CORPORATION
PO BOX 171098
DENVER CO 80217-1098
First-Class
Postage
Required
Post Office will
not deliver
without proper
postage.
II..I. II
.....I.I
...
III.•.I
...
1111
...I.I..I..I. I.I..I..I.I
...
II
Page 86

SHAR~
IMPORTANT!
Thisisyour
processingofwarranty
needs
Sharp
Product
and
desires.
1.
1.
Mr
2.
First
Name
Mrs.
Street
City
E-mail
Address:
2.
Your
dale01birth:
3. Marilalslatus:
4.
Daleofpurchase:
5.
Model
(011
back
6.
Serial
(on
back
7.
A.
Where
1
2
3
4
5
6
7
8
9.
10.
B.
Did
1
8. A.
Please
1
2 Adulrs
3
4
5.
B.
Where
1
2
3
9.
How
important
(5 pornt
4=Higll
1.
Sharp
2 PriceNalue. .
3
Design
4.
Picture
5.
Audio
6
Product
7.
InpllUOutput
8 Bllilt-in luners 2
10.
Where
1
2 friend/relative 9
3
4
5
6
7
11.
What
most
(checkupto
1
2
3
4 In-store
5
6
7
8
9
10TVadvertising
11
12
13.
12. A.
What
Sharp
1
2
3
4
5
6
7
8 Mitsublshi
9
10
B. Including this
currently
1 1
2 2
Month
1.
number:
ofUI/it)
number:
of
1I111!)
did
you
purchase
Electronic
Superstore
Hi-Fi
Specialty
Receivedasa
Mass
Merchant
Warehouse
Clul)
Mail
Order
(Crutchlield.
Discount
Store
Computer
Store
Internet
Retailer
DUice
Superstore
you
purchaseanextended
Yes
check
the
location
LivinQ
Room
Bedroom
Chlld's
Bedroom
Bathroom
Home
Office
will
you
instalilhistelevision?
Wall
Table
Entertainment
were
the
scale)
1=No
Importance,
fmportaoce.
5=Most Important
Reputation....
Quality
Quality.. . 1 2
features
Options
did
you
lirstlearn
Salesperson
Magazine
articleorreview
Sharp
website
Magazlneadvertisernent
Newspaper
advertisement
Television
commercial
influenced
your
twO)
Recommendation
Recommendation
Sales
promotion
comparrsonofmodels
Past
experience
Recommendationbyexpertorproduct
Comparison
shopping
Shopping,com.
Sharp
website
Online
user
reviews/message
Online
advertising
Nel,/spaper
advertrsing
Magazineadvertisrng
other
brandsofTVs
Product?
(efleekupfo
No
other
brands
Dell
HP
Hitachi
JVC
LG
Magnavox
Panasonrc
Philips
purchase.
own?
Please
Registration
claims.
The
additional
Register
3.
Ms.
/
Married
Store
Gift
Center
following featuresonyour
Year
Single
/ /
Day
MOil/II
this producl?
(Best
Buy.
Circuit
(Harvey.
Tweeter.PCRichard.
(Sears.
etc.)
{COSleo.
Sam's
Club.
etc.)
(Target.
Wal-Mart
(RadioShack.
(Amazon.
(Staples
about
decision10purchaseaSharp
bya
byafriend/relative
(Rebate
with
etc.)"
conSidered11Pioneer
how
etc.)
CompUSA,
Buy.com.
Dt/lce
Depot,
service
plan
2
where
this unit willbeused:
6
7 famlly/Rec
8
9.
4
5
2=Lvw
Importance.
No
ImJ!OIt~IlC~
1 2
...
1 2
2.
1 2
2.
2
this
product?
8 In-store
10
11
12
13
advertisement
salesperson
discount
sale
brand
website
(MySimon
boards
did
you
seriously consider
two)
12
13
14.
15.
16.
17
18
19.
20.
many
LCDorPlasma
fill
out
and
return
within
the
Card.
Returning
this
card
will
not
affect
information
will
also
helpusto
warranty
develop
ONLINEatwww.sharpusa.com
4.
Miss
Initial last
Name
Apt.
City.
etc.)
BJ's
Wholesale)
etc)
etc.)
elc.)
with this
product?
No
Mobile
HomelTrailer
Home
Theater
Basement
UnderaCabUlet
Night
Stand
purchase
3=Mediumlmportance.
~
3 4
3.
3 4
3.
3 4
3.
3 4
3. 4.
display
Nev,spaper
Product
carton
Internet
advertisement
Online
articleorreview
Internet
shopping
etc.)
reviewer
PriceGrabber.
before
Polaroid
RCA
Samsul1g
Sanyo
Sony
Syntax/Olevla
ToshibiJ
WeslingllOlIse
Zenilh
televisionsdoyou
5.
Year
etc.)
Room/Den
decision?
4
4
4
IIlsert
TV?
tlormore
Mosl
Iffll!QrtilnJ
\'Iebsite
selecting this
State
ZIP
Code
13.
What
devices
will
1
Video
Game
2
Cable
set
3
HD
Cable
4
Satellite
5
HD
Satellile
6
HD
Playback
(Blu-Ray.
DVO
14.
Below
your
what
from
altitudes lit all'and
completely'.
1 Iliketo
withmylifestyle
fecllllologyisimportant
tome
3.lhketechnology
4 lamverv
itcomestomvcareer 2 3 5 6 7 8 9
5.
I hketo
andstvle 1 2 3 5 6 7 8 9
6.lamconstantlylooklllglornew
wavstoentertain mvself.. 1 2 3 5 6 7 8 9
7 I
spend
tun
Myfalllrlyisby
irnporlantthinginmy
9 Mostolmysparetrmelsdevoled
to
actiVities
10IputalotoftllTle
into
11.
Technology
life
15.
Not including yourself.
years)ofchildren
1Noone
Male
1 2
16. Dccupation/Employment Status'
(cflecka/l
ProtessionallTechnrcal
UppelManagement/Executive
Middle
Sales/Marketing
Clerical/Service
Traejesman/Machille
Teacher/Educator..
Healthcare
Homemaker
Military..
Retired
Sell
WQlk
17.
Which
18.
Levelofeducation: (c/leck
19.
For
20.
What
21.
When
market. doyouorsomeoneinyour
Player/Recorcler
is a lislofslatemenls
attitudes lowardstechnology
extenl
each
slalemenl describes
Ira
IOwhere I
(circle
Impress
people
competitive
show
off
rnv
taste
mostofmv
stuff
rnycareer... 2 3 5 6 7 8 9
easier
01.
02
03
04
05
06
07
2 Dialup 4
2
spare
with
rnyfriends 1 2 3 5 6 7 8 9
far
the
withmyfalllily 1 2 3 5 6 7 8 9
and
has
made
and
elseinhousehold
Female
Age/Years
t/l<1tapplv)
Management
Worker
-
Physician!Nurs~/Other.,.
Employed/Business
from
Home
Office...
group
describes
Under
$15.000
$15.000-519999
$20.000-529.999
$30.000-$39.999
S40.000-$49.999
$50.000-559.999
S60.000-574999
1
Completed
2
Completed
your
primary residence,doyou:
typeofinternel
1
None
new
productslhat
1
Tendtobuv
Tendtowait
while
before
next10days.
coverage,
but
may
new
products
that
expedite
best
meet
c C
LCDTV
No.
you
connecttothis
Console
top
TV
set
top
TV
DeVlf:e
HD-DVD)
means
10
means
ONE
when
time
most
life
energy
my
whatisthe
other
OperMor/Laoorer
High
College
accessdoyou
sllch
unlillhe
buying?
TV?
8
OVR
(TiVo.
etc)
box
box
which
that
Ihat
(lUmber
fvr
DoesNotOescribe~OescribesYour
Your
AlliludesAtAll
2 3 5 6 7 8 9
doinq
1 2 3 5 6 7 8 9
1 3 4 5 6 7 8 9
adults livinginyour
Male
yrs
VIS12.
OWIl€1
your
annuallamily
h/(}IJest
School
3
have
the
itemsassoon
item
PLEASE
9
10
11
12.
13
14
mayor
may
and
your
lifestyle.
your
atlitudesbycircling a
the
statement
the
statement
EACH
staremellt)
GENDER
and
2
CIliid
Female
You
income?
08
09
10
11
12
13
14
level
completed)
3
Completec1
1
O\'m')
use
athome?
Broadband
Cable
D$L
lalest technologies
household:
asthev
113S
been
around
CONTINUEONBACK
VCR
AudiO
System
Computer
Video
Camera
DiOltal
Camer"
Antenna
(for
rooftop
tablelop
antenna)
notbeusedtodescribe
Please
Does
not
descnbe
Describes
your
Alti.!udes
AGE
(in
household?
under1yr
Age/Years
yrs
'lIS
Spouse
01
02
03
04
05
06
07
08
09
10
11
12
13
575.000-599999
5100.000-5124.999
S125 000·$149999
S150.000-$174.999
$175000-S199999
$200.000·S249.999
$250000 &
Graduate
appearonthe
are
available?
fora
your
YO
indicate
number
atlifudes
Completely
over
SCllOOI
Satellite
~~~
the
valli
1
01
Rent?
to
10
10
10
10
10
10
10
10
10
10
10
Page 87

22.
To
helpusunderstand
our
customers'
lifestyles,
please
indicate
the
interests
and
activitiesinwhich
youoryour
spouse
enjoy
participatingona
regular
basis.
Home
life
01.
Grandchildren
02.
Home
Improvement/Do-It-Yourself
03.
Gardening
04.
OwnaDog
05.
OwnaCat
leisure
06
Cultural/Art
Events
07.
Avid
Book
Reading
08.
Bible/Devotional
Reading
09.
Gourmet
Cooking/Fine
Foods
10.
Wines
11.
Art/Antique
Collecting
12
Stamp/Coin
Collecting
13.
Crafts
14
Sewing/Needlework/Knitting
Travel
15.
Airline
Club/Frequent
Flyer
16.
TravelinUSA
17.
Foreign
Travel
18.
Cruise
Ship
Vacations
19.
RV
Vacations
20.
Casino
Gambling
Investing
and
Money
21.
ShoppingbyCatalog/
Mail
Order
22.
ShoppingbyInternet
23.
Use
Credit
Cards
Regularly
24.
DonatetoCharitable
Causes
25.
Investments/Money
Making
Opportunities
26.
Contests/Sweepstakes
Great
Outdoors
27.
Hunting/Shooting
28
Fishing
29
Camping/Hiking
30.
Wildlife/Environmental
Issues
31.
Boating/Sailing
Sports,
Fitness&Health
32
Physical
Fitness/Exercise
33.
Walking
for
Health
34.
Health/Natural
Foods
35.
Dieting/Weight
Control
36.
Self-Improvement
37
Golf
38.
Biking
39.
Snowboarding/Snow
skiing
40.
NASCAR
Thanks
for
taking
the
timetofill
out
tllis
Questionnaire
Your
answers
willbeused
for
market
research
studies
and
reports
They
will
also
allow
youtoreceive
important
mailings
and
special
offers
from
a
numberofline
companies
whose
products
and
services
relate
directlytothe
specific
IIlterests.
hobbies.
and
other
information
indicated
above.
Through
this
selective
program
you
\;"IillbeableTOobtain
more
intorl1la~ion
about
activitiesinwhich
you
are
involved
and
less
about
thoseinwhich
you
are
not
Please
check
here
if.
for
some
reason.
you
would
preter
not
to
participateinthis
opportunity.
Failuretoreturn
this
card
will
not
diminish
your
warranty
rights.
Copyright
© 2007
All
Rights
Reserved
TCADEA243WJZZ
Please seal
with
tape. Do
not
staple.
PrintedinMexico
Page 88

Page 89

Movies
delivered
2 ways
Instantly
new
SHARR
......
iii
-...,
-
---
..
-
•
for
watch
Internet
•
•
1
Watch
No
additional
M"'_
•
~
._---
--
---
low
movies
connected,
as
much
fee -
price!
streamed
as
you
included
......
I~
--.
- ---
--
..
-
---
--
want,
.K
...
--
,--
to
Sharp TV!
as
often
in all
as
Netflix
your
you
unlimited
....
•
/I
.-
--
---
---
want
plans
•
Start
Go
to:
your
FREE Trial!
-
Page 90

Page 91

Page 92

BEN
EFIIS Receive a Free Three-Month Limited Warranty Extension With Your Activation
l
'
AqUaS
ADVANTAGE-
•
LIVE
Activate
Your FREE
Membership
Today
Call us:
1-87-SEE-AQUOS
(1-877-332-7867)
Or
visit
our
web
site:
www.AQUOSADVANTAGE.com
FREE Three-Month Limited
Warranty Extension Included
>
>
>
Premium Connected Services
AQUaS
Advantage LIVE
allows Sharp advisors
to
connecttoyour AQUaS
LCD-lV
via
the Internet. By connecting
to
yourTVyour Sharp advisor can:
•
Assist
with
initial
product setup
• Review your connectivity and cable setup
• Personalize settings to your viewing preference
•
Perform
a complete
systems
checkup
Dedicated
Member
Support
Une
Calls
to ,
-87
-SEE-AQUaS
are
routed directly
to professionally trained
AOUaS Advantage
advisors
who
are
available to assist
you
with:
• Setting
up
your
new
AQUaS
LCD-TV
•
Maximizing
your
high-definition
vie'.ving
experieflce
Priority
Services,·
including
• Next-business-day service scheduling
• Expedited turnaround
times
for
service
visits
• Complimentary
loanerifyour
TVisremoved
from
your
hOme
for
service
>
>
>
Expanded
Member
Support
Options Including
• Extended support
hOurs
• Access
to
live
web chat
Accesstoour
Exclusive
Member
web site containing
•
Your
own
personalized
hOme
page
•
Tips
for getting
the
bestHDpicture
Quarterly
newsletters
and
program updates
Access
to
Exclusive Specials
and Promotions!
·8IIoe6ts
are
8V8iIIIOilIlriIlO
Sharp
CUSlQmI!WS
resd1g
In
the
fift)I
Ln1ed
States,
Aooess
to
priority
SEli'\Iice5
elISGd
on
locatlon
IfId
~
Fo'
mo<9
morma!O'l
at
101
a
<XIf1i
ollhe
terms
a'Id
CO"Il:itJons.
\lisII
www.aquoudv.ntall....
;omOlcai
us atl·81·SEE·AOUOS (1·877·332.7867).
Sharp
and
/\OlIOS
are
raQISI\lf8CllrOOemal\<s
01
Sharp
Corporal""'.
!VI
OClMlI'll_
connec1kln
os
r<IQl.WOd
to
lJliim
N:1JOS
~
LNE
5lI"oices.
LWE
Sll<\ooaS
ara
J'lOI
avaiallle
on
III
fTIO<'lllIIl
AQUaS
AOVANTAGE-
Page 93

3
RELAX
Once connected, diaI1-87*SEE-AQUOS to experience the
benefits of LIVE support. Your personal advisor will ensure that
your
new
AQUaS
LCD-TV is set
up
for
maximum
enjoyment.
Page 94

 Loading...