

Page 1

MODEL
AJ-1800
AJ-2000
COLOUR INKJET PRINTER
SETUP GUIDE AND
OPERATION MANUAL
●
GETTING STARTED
Page
3
●
SETTING UP THE PRINTER
●
LOADING PAPER
●
SETTING UP FOR Windows
●
SETTING UP FOR Macintosh
●
APPENDIX
5
16
20
36
40
Page 2

FOR CUSTOMERS IN U.K.
IMPORTANT
The wires in this mains lead are coloured in accordance with the following code:
As the colours of the wires in the mains lead of this apparatus may not correspond
with the coloured markings identifying the terminals in your plug, proceed as follows.
The wire which is coloured BLUE must be connected to the terminal which is marked
with the letter N or coloured black.
The wire which is coloured BROWN must be connected to the terminal which is
marked with the letter L or coloured red.
The apparatus must be protected by a 3A fuse in the mains plug or distribution board.
CAUTION: DO NOT CONNECT THE LIVE (BROWN) WIRE OR THE NEUTRAL (BLUE)
WIRE TO THE EARTH TERMINAL OF YOUR 3-PIN MAINS PLUG.
BLUE:
BROWN:
Neutral
Live
This equipment complies with the requirements of Directives 89/336/EEC and 73/23/EEC as amended by
93/68/EEC.
Dieses Gerät entspricht den Anforderungen der EG-Richtlinien 89/336/EWG und 73/23/EWG mit Änderung
93/68/EWG.
Ce matériel répond aux exigences contenues dans les directives 89/336/CEE et 73/23/CEE modifiées par la
directive 93/68/CEE.
Dit apparaat voldoet aan de eisen van de richtlijnen 89/336/EEG en 73/23/EEG, gewijzigd door 93/68/EEG.
Dette udstyr overholder kravene i direktiv nr. 89/336/EEC og 73/23/EEC med tillæg nr. 93/68/EEC.
Quest’ apparecchio è conforme ai requisiti delle direttive 89/336/EEC e 73/23/EEC, come emendata dalla
direttiva 93/68/EEC.
Este equipamento obedece às exigências das directivas 89/336/CEE e 73/23/CEE, na sua versão corrigida
pela directiva 93/68/CEE.
Este aparato satisface las exigencias de las Directivas 89/336/CEE y 73/23/CEE, modificadas por medio de
la 93/68/CEE.
Denna utrustning uppfyller kraven enligt riktlinjerna 89/336/EEC och 73/23/EEC så som kompletteras av
93/68/EEC.
Dette produktet oppfyller betingelsene i derektivene 89/336/EEC og 73/23/EEC i endringen 93/68/EEC.
Tämä laite täyttää direktiivien 89/336/EEC ja 73/23/EEC vaatimukset, joita on muutettu direktiivillä
93/68/EEC.
The CE mark logo label is affixed to any equipment to which the above directives apply to.
(This sentence is not applicable in any country where the above directives are not
required.)
Page 3

Cautions
Follow the cautions below when using this unit.
z The unit is affect ed by the envi ronm ent in w hich it is inst alled. Do not insta ll you r unit
in the following area.
−Dusty areas
If dust enters the internal parts of the unit, damage or poor-quality output can
result.
−Areas in direct sunlight
Direct sunlight can distort the plastic parts of the unit and result in poor-quality
output.
−Excessively hot, cold, humi d, or dry areas (f or example, nea r heaters, humi difiers,
or air conditioners)
This may result in damp paper, condensation within the internal mechanisms,
misfeeds, and dirty output.
z Operating Conditions
Temperature : 10-35 degrees Celsius (50-95 degrees Fahrenheit)
Relative humidity : 20%-85%
Note : When the temperature reaches 30 degrees Celsius (86 degrees Fahrenheit),
the relative humidity must be 60% or less.
z The power outlet should be installed near the equipment, and should be easily
accessible.
z When movi ng th e un it, be s ure to fir s t tu rn the p owe r s wi tch off, and then re move t he
power cord from the outlet.
z Place the unit on a firm, level surface.
z Be sure to use only ink tanks of SHARP genuine supplies.
z If you get ink spots on your skin, wash them with water as soon as possible.
z Store the spare ink tanks out of the reach of children.
Page 4

CONTENTS
GETTING STARTED
MAIN FEATURES.........................................................................................................3
USER'S MANUAL.........................................................................................................3
SETTING UP THE PRINTER
CONFIRMING THE CONTENTS..................................................................................5
PART NAMES AND FUNCTIONS................................................................................6
UNPACKING.................................................................................................................8
ATTACHING THE TRAYS............................................................................................8
CONNECTING THE INTERFACE CABLE ...................................................................9
CONNECTING THE POWER CORD .........................................................................11
INDICATOR LIGHTS ..................................................................................................11
INSTALLING THE PRINT HEADS AND INK TANKS.................................................12
LOADING PAPER
LOADING PAPER INTO THE PAPER TRAY.............................................................16
LOADING THE BYPASS TRAY WITH PAPER ..........................................................19
SETTING UP FOR Windows
HARDWARE AND SOFTWARE REQUIREMENTS...................................................20
BEFORE INSTALLATION...........................................................................................20
INSTALLING THE USB DRIVER (Windows 98).........................................................21
INSTALLING THE PRINTER DRIVER .......................................................................22
INSTALLING THE PRINTER DRIVER BY "ADD PRINTER"......................................26
ALIGNING THE PRINT HEAD....................................................................................32
HOW TO USE THE ONLINE MANUAL......................................................................34
HOW TO PRINT .........................................................................................................35
BONUS SOFTWARE..................................................................................................35
SETTING UP FOR Macintosh
HARDWARE AND SOFTWARE REQUIREMENTS...................................................36
INSTALLING THE PRINTER DRIVER .......................................................................36
ALIGNING THE PRINT HEAD....................................................................................38
HOW TO USE THE ONLINE MANUAL......................................................................38
HOW TO PRINT .........................................................................................................39
APPENDIX
SPECIFICATIONS OF THE PRINTER .......................................................................40
SUPPLIES ..................................................................................................................41
PAPER TYPE .......... ...... ....... ...... ....... ...... ....... ...... ....... ...... ....... ...... ...... ......................41
INTERFACE CABLE...................................................................................................41
INDEX.........................................................................................................................42
SOFTWARE LICENSE ...............................................................................................43
2
Page 5

GETTING STARTED
MAIN FEATURES
z Attrac tive high-speed printing. AJ-2000 provides you with high speed printing of 12ppm
(A4/8.5"x11", monochrome) or 8ppm (A4/8.5"x11", colour). AJ-1800 offers high-speed
printing of 10ppm (A4/8.5"x11", monochrome) or 6ppm (A4/8.5"x11", colour).
z 1200dpi printing with smoothing produces outstanding quality images.
z Carbon black ink enables print quality similar to a laser printer.
z Each ink tank is independent, they can be used until completely spent, ensuring
minimum waste. The print hea d is als o fully deta chabl e, requir ing no sp ecial t ools for
replacement.
z The printer is equipped with a 150 sheet capacity paper tray, allowing the user to print
big jobs without constantly refilling the tray.
*1
z USB interface
also provided as standard.
z This printer can b e used with Windows 95, Windows 98, Windows NT 4.0, Windows
2000, and Mac OS 8.5 or later version.
*1
USB is available wit h a PC/AT compatible computer that wa s originally equipped
with USB and had W indows 98 or Windows 2000 prein stalled. As for Macintosh,
USB is available with Mac OS 8.5 or later and a computer that was originally
equipped with USB.
*2
Peripherals can be plugged or unplugged while the computer and they are
connected to a power source.
enables simple connections with Hotplug*2. A parallel interface is
GETTING STARTED
USER'S MANUAL
The contents of each manual for the printer is as follows.
Setup Guide and Operation Manual (this manual)
Explains what steps and warnings need to be followed before printing.
Getting Started
Provides you with infor mation on how to us e this manual and the Online Man ual, a list
of cautions, an introduc tion to the print er, and other useful tips tha t will help you s et up
the printer.
Setting up the Printer
Lists the setup p rocedures i ncludin g how to co nnect the printer to a compute r and to a
power source.
Loading Paper
Explains how to insert paper into the printer, and other requirements for printing.
Setting up for Windows
Setting up for Macintosh
Explains how to install the printer driver into a computer.
Appendix
Provides you with information on printer specifications and printer supplies.
3
Page 6

USER'S MANUAL
Online Manual
After preparing the printer as shown in this manual, check the Online Manual for information
on preference requirements for printing and troubleshooting.
How to Use the Online Manual
Explains how to use the Online Manual.
Printer Properties
Explains how to configure items in the printer driver.
Print
Provides information on how to print a document.
Print Status Window (Windows only)
Explains the function of the print status window.
Sharing Printer (Windows only)
Explains how to shar e the p rinter, and s etup proc edur es for sha ring the prin ter th rough
a network.
Maintenance
Provides information on how to align and change printer supplies. Instructions for
cleaning the printer is also provided.
Troubleshooting
Provides instructions for how to solve problems.
Conventions used in this manual and Online Manual
In this manual, the following icons are used to provide the user with information pertinent to
the use of the printer.
Warns the user that injur y may res ult if the co nten ts o f the wa rning are
not properly followed.
Cautions the user that damage to the machine or one of its
components may resul t if the contents o f the caution are not p roperly
followed.
Notes provide information relevant to the machine regarding
specifications, functions, performance, o peration and such, that may
be useful to the user.
Trademark acknowledgements
Microsoft and Windows are trademarks of Microsoft Corporation in the U.S.A. and other countries.
IBM and PC/AT are trademarks of International Business Machines Corporation.
Apple, Macintosh and ColorSync are trademarks of Apple Computer, Inc.
Adobe and Acrobat are trademarks of Adobe Systems Incorporated.
All other trademarks and copyrights are the property of their respective owners.
4
Page 7

SETTING UP THE PRINTER
Here we explain how to connect the printer to a computer, and a power source, after
removing the printer from its packaging.
Read this chapter carefully before use.
CONFIRMING THE CONTENTS
The following items are packed with the printer in the box.
After opening the box, please check if the following are included with the printer.
If any of the following items are missing, please contact your point of purchase.
SETTING UP THE
PRINTER
Colour print head
Power cord
Setup Guide and
Operation Manual
(this manual)
AJ-1800/2000 Series
Software CD-ROM
Printer Driver
Online Manual
MGI PhotoSuite III SE *
*
For the information about
this program, refer to
their instructions.
Black print head
Colour ink tanks
(magenta, yellow, cyan)
Black ink tank
Paper tray
Output tray
z Interface cables for connecting the printer to yo ur computer are not included.
Please purchase the appropriate cable for your computer.
Do not unpack the print heads and the ink tanks until installing them in the printer.
z
z The box a nd pr ote ctiv e m ate rial s wil l be ne ede d for tr an sp or tation. Do not throw
them away.
Lift the printer carefully
holding at the bottom when
taking it out from the box.
5
Page 8
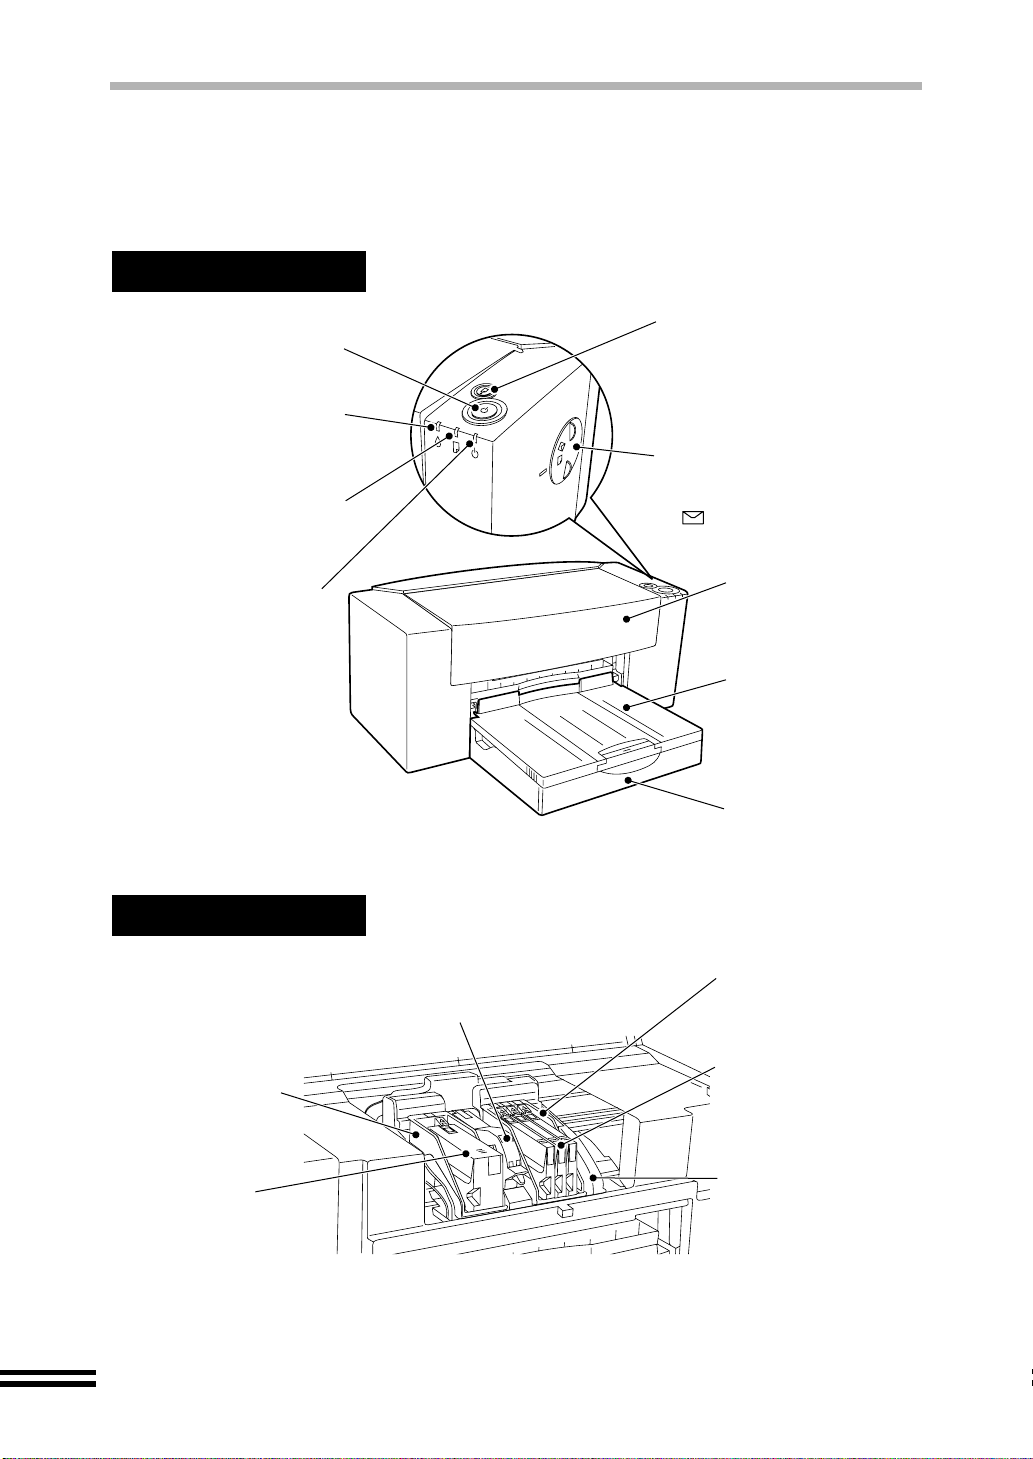
PART NAMES AND FUNCTIONS
The following illustrati on lists the pa rt names a nd functio n. Before op erating, it is adv isable
to familiarise yourself with the printer.
The illustration below shows the printer with all the parts installed.
Front Side
Paper button
Power button
Press to turn the printer on
or off.
Ink lamp
The light blinks when the ink
is empty, or the ink tank is
not inserted correctly.
Paper lamp
The light blinks when the
printer is out of paper, or a
misfeed has occurred.
Power lamp
The indicator is lit when the
printer is ready to print.
*
If the printer has been kept
idle for more than 20 minutes,
the power will go off and so
will the power lamp.
The printer can be restarted
when the power button is
pressed, or any print job is
sent from your computer.
Press this button after solving a
paper jam or empty.
Depressing the button for a few
seconds will activate the test
print.
Paper knob
When printing onto an envelope
or thick paper, adjust the knob
to setting.
its original setting after printing.)
(Return the knob to
Front cover
Open this cover to
change the ink tanks
or print heads.
Output tray
The document is
deposited onto the tray
after printing. Extend
the tray when printing
long documents.
Paper tray
Adjustable to suit a
variety of paper sizes.
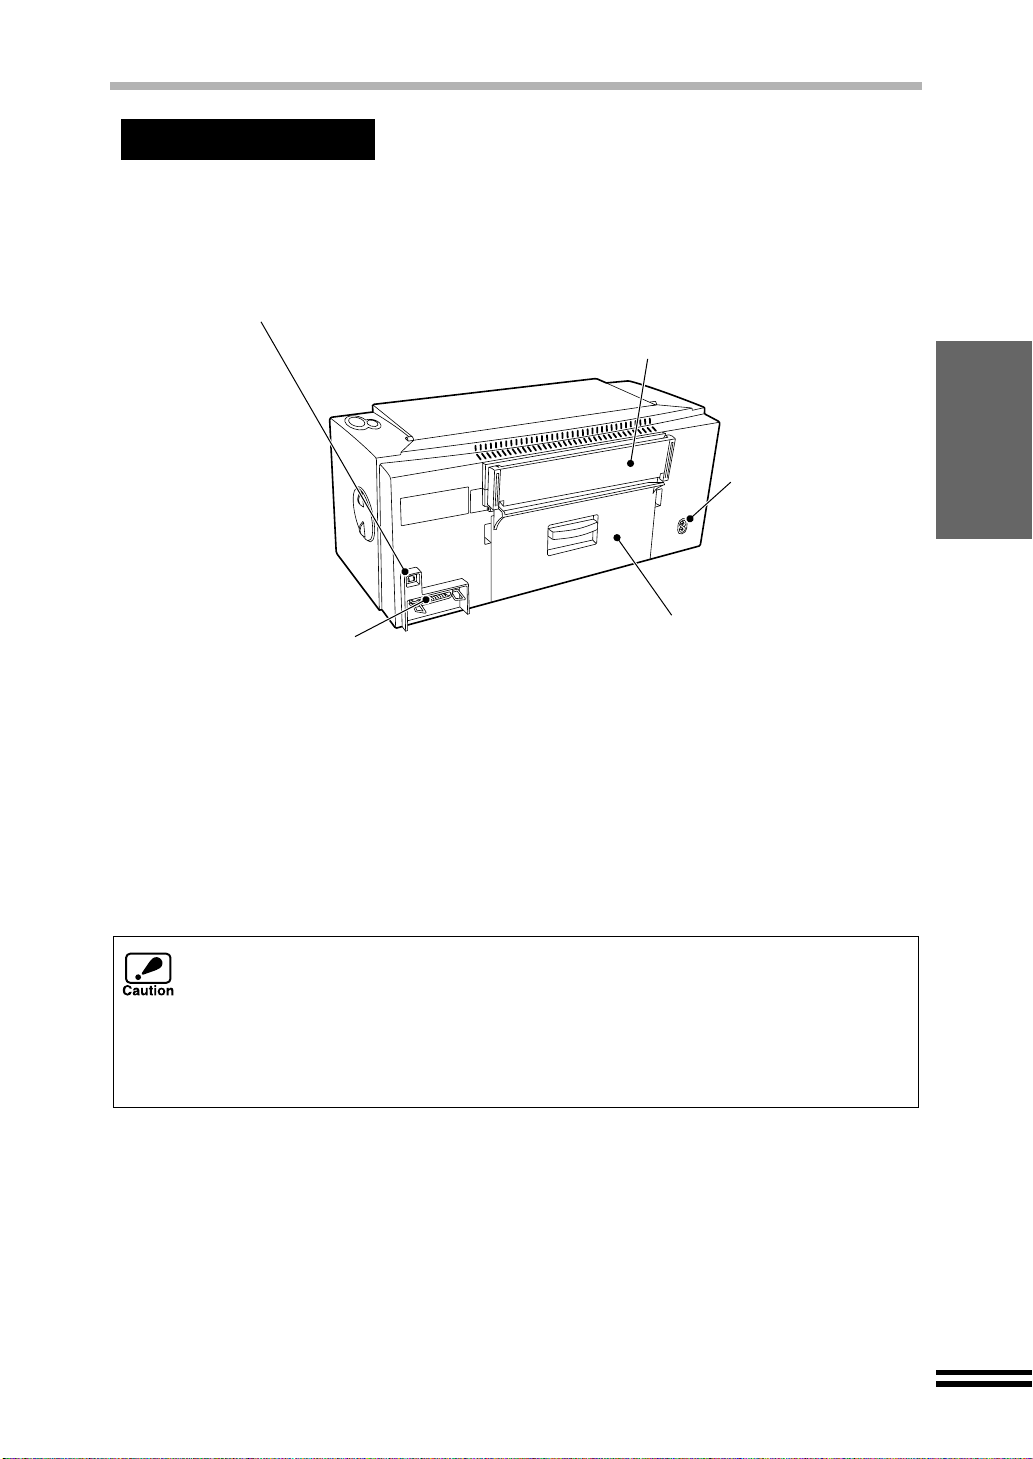
Internal Part
Print head latch
Secures the print head into
position for operation.
Black print head
Applies ink to the
paper.
Black ink tank
6
Colour print head
Applies ink to the paper.
Cyan ink tank
Yellow ink tank
Magenta ink tank
Carriage
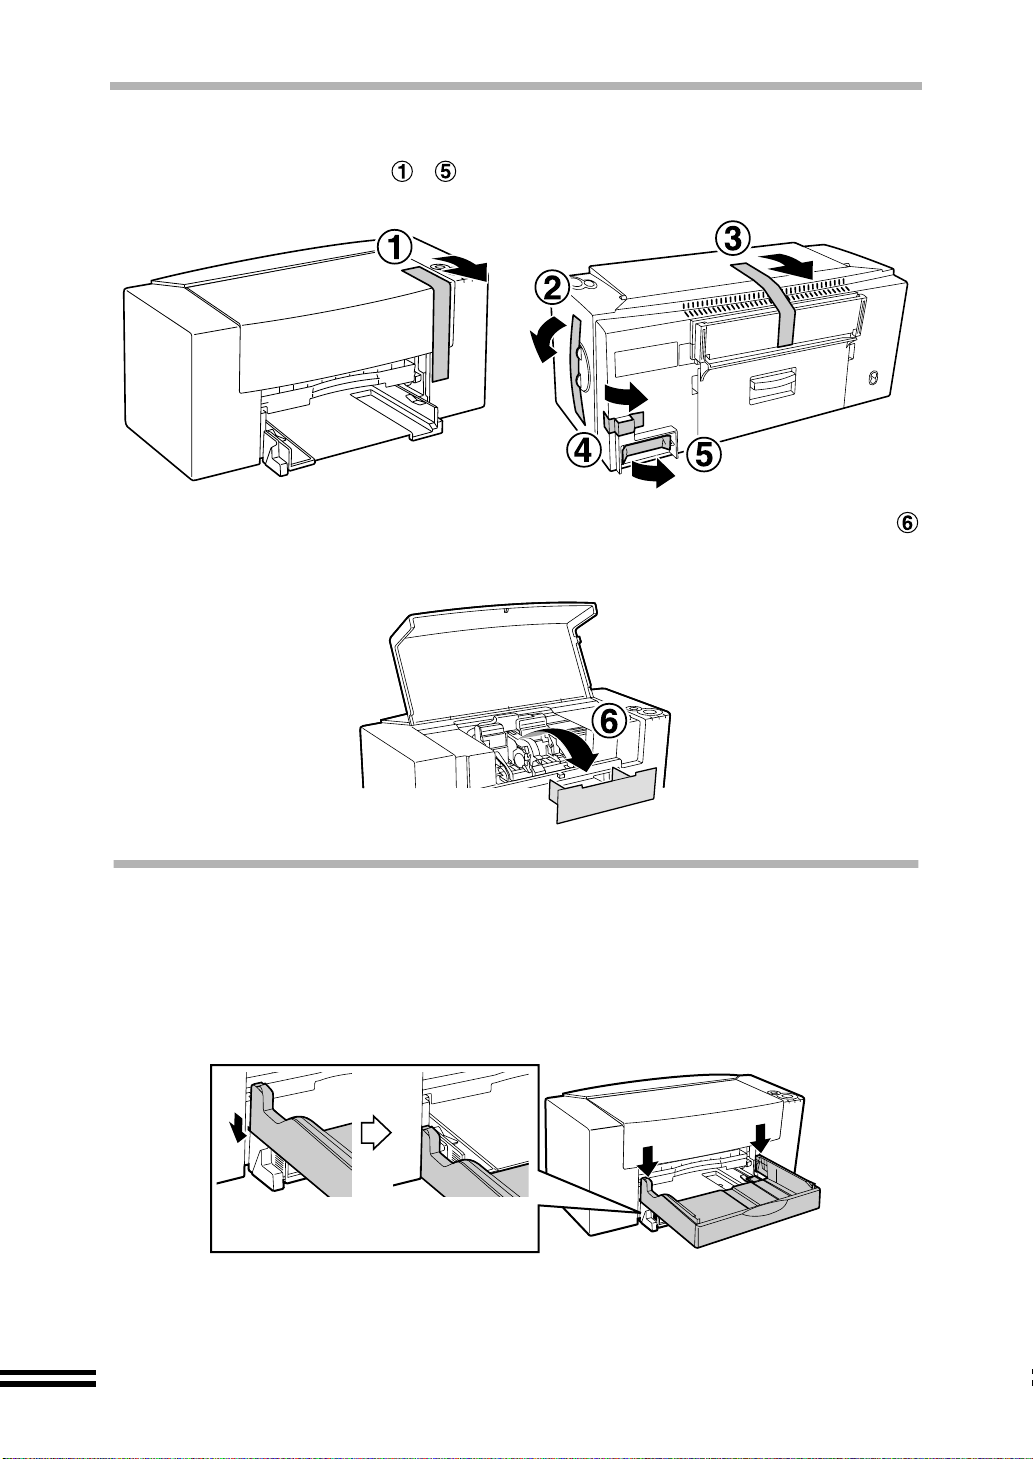
Page 9
Rear Side
PART NAMES AND FUNCTIONS
USB interface connector (B type)
Use a USB cable to connect the
printer to your computer. It is possible
to insert the cable after the printer has
been switched on.
Parallel interface
connector (36pin)
Use a parallel interface cable
(IEEE1284) to connect the
printer to your computer.
* When the power cord is connected to the outlet, power for the printer is turned on automatically.
Bypass tray
Use this tray to print on a single page.
When printing large banners, make sure to
use this tray. Insert paper into the tray print
side up. When printing onto thick paper,
open the tray until it reaches position 2.
(The tray has two stop positions.)
Power socket
Plug the power cord *
into the socket.
Jam cover
Open this cover to remove
jammed paper.
HOW TO SHUT OFF POWER
SETTING UP THE
PRINTER
Turn off the power by pressing the power button and ensure
1
that the power lamp is extinguished.
Unplug the power cord from the outlet.
2
z Be sure that the plug in the ou tlet is readily accessible to all persons. Power is
present in the pro duct even if the power button is off in order to maintain good
print quality.
z To comple tel y shut of f the po wer , firs t tur n off the power us in g the po wer butto n.
Then unplug the power cord, after first ensuring that the carriage has returned to
its home position on the right side of the pr inter and the green powe r lamp has
been extinguished.
7
Page 10
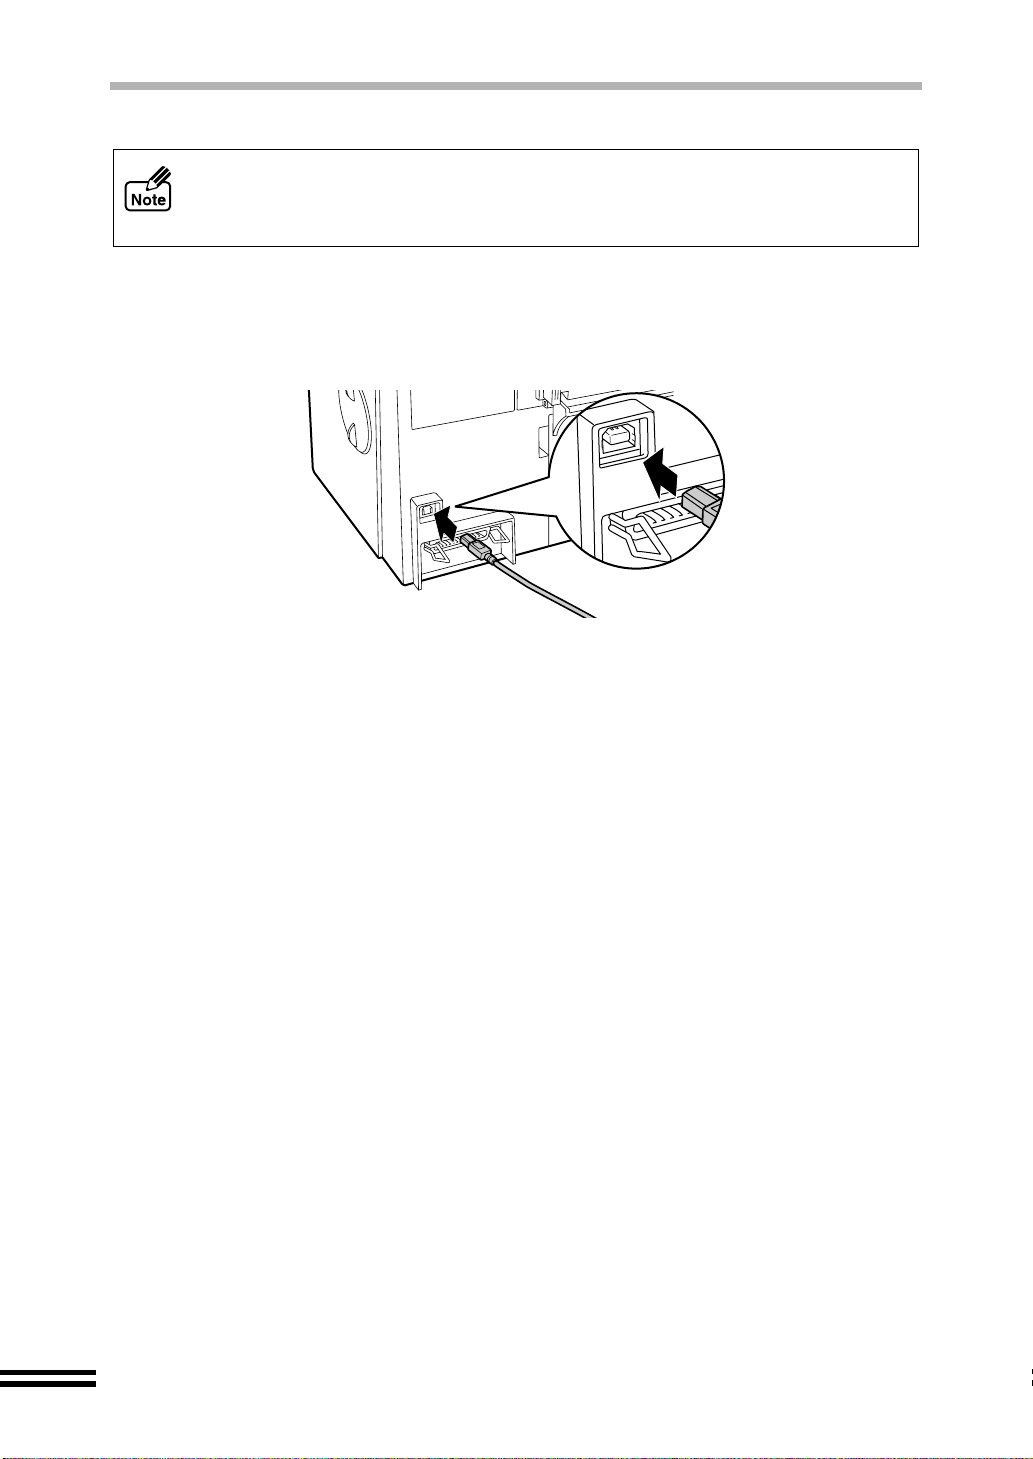
UNPACKING
Remove the tape - shown in the illustrations.
1
Open the front cover, and remove the protective material
2
shown in the illustration.
ATTACHING THE TRAYS
Attach the paper tray and output tray to the front of the printer.
Follow the steps shown below.
Attach the paper tray by firmly pushing down both edges.
1
Make sure that the paper tray has been
securely attached to the printer.
8
Page 11

ATTACHING THE TRAYS
Attach the output tray as shown in the illustration.
2
Place this projection
toward the printer.
CONNECTING THE INTERFACE CABLE
This printer includes both USB and parallel interface connectors.
Interface cables for connecting the printer to your computer are not included with this printer.
Please purchase the appropriate cable for your computer.
Do not connect both the USB interface cable and the parallel interface cable to this
printer at the same time.
SETTING UP THE
PRINTER
Connecting the Parallel Interface Cable
Obtain an IEEE1284 shielded parallel interface cable.
1
Ensure that your computer and printer are turned of f.
2
Insert the cable int o the parallel inte rface connector loc ated on
3
the rear of the printer, and fasten with clasps.
Insert the other end of the cable into the interface connector of
4
your computer.
9
Page 12
CONNECTING THE INTERFACE CABLE
Connecting the USB Interface Cable
USB is available w ith a PC/AT compatible com puter that was originally equi pped
with USB and had W indows 98 or Windows 2000 preinstalled. As for Macintosh,
USB is available with Mac OS 8.5 or later and a computer that was originally
equipped with USB.
Obtain a shielded USB interface cable.
1
Insert the cable into the USB interface connector located on the
2
rear of the printer.
Insert the other end of the cable into the interface connector of
3
your computer, or the USB hub connected to your computer.
10
Page 13
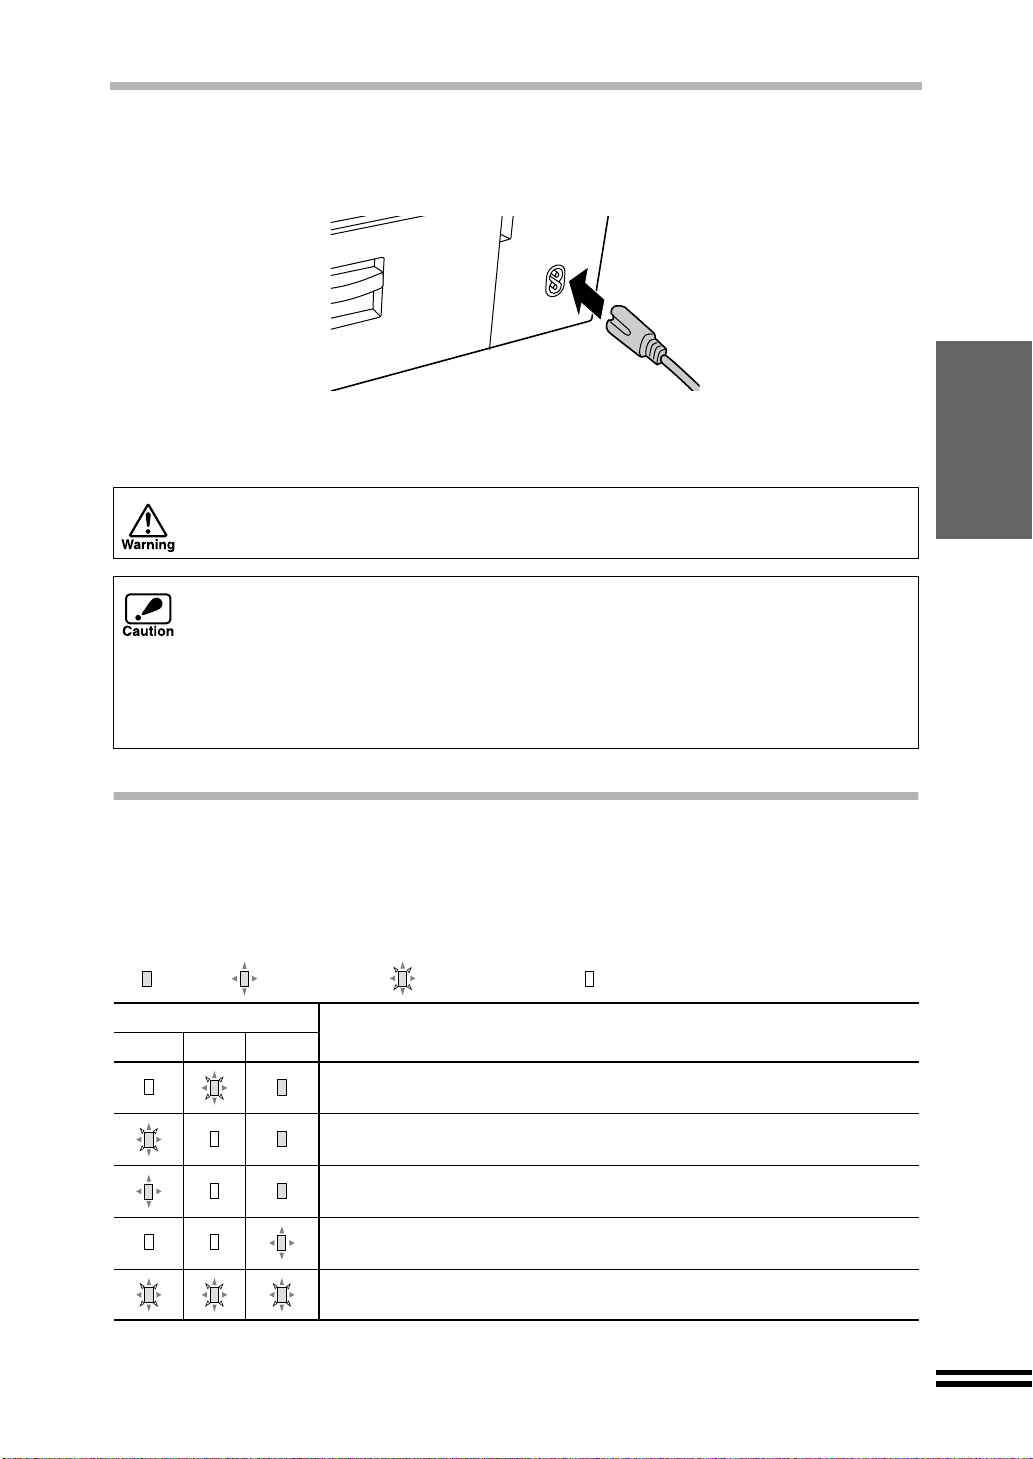
CONNECTING THE POWER CORD
Insert the power cord into the socket on the rear of the printer.
1
Connect the other end of the power cord to an outlet.
2
Power for the printer is turned on automatically.
Do not connect the printer to other than 100V-240V outlet. Plugging the printer into
an incompatible power supply may cause irreparable damage.
z Be sure that the plug in the ou tlet is readily accessible to all persons. Power is
present in the pro duct even if the power button is off in order to maintain good
print quality.
z To comple tel y shut of f the po wer , firs t tur n off the power us in g the po wer butto n.
Then unplug the power cord, after first ensuring that the carriage has returned to
its home position on the right side of the pr inter and the green powe r lamp has
been extinguished.
SETTING UP THE
PRINTER
INDICATOR LIGHTS
When only the green power lamp is lit, the printer is working properly.
When a printer error oc curs, a light will indica te what problem has occ urred, as explained
below.
......lit ......blinking ......f ast b linking ......extinguished (lamp is off)
Light condition
Paper
Ink
For more details on solving a problem, ref er to the T roubleshooting section in the Online Manual.
Power
Paper tra y is empty, or a paper jam has occurred.
Load more paper or remove the jammed paper and press the paper button.
No ink, or a print head is not installed.
Change the ink tank, or install a print head.
Front cover is open.
Close the front cover.
The printer is warming up, or receiving data. Please wait.
The carriage is not operating normally, or some errors may have
occurred inside the printer.
Problem and Solution
11
Page 14
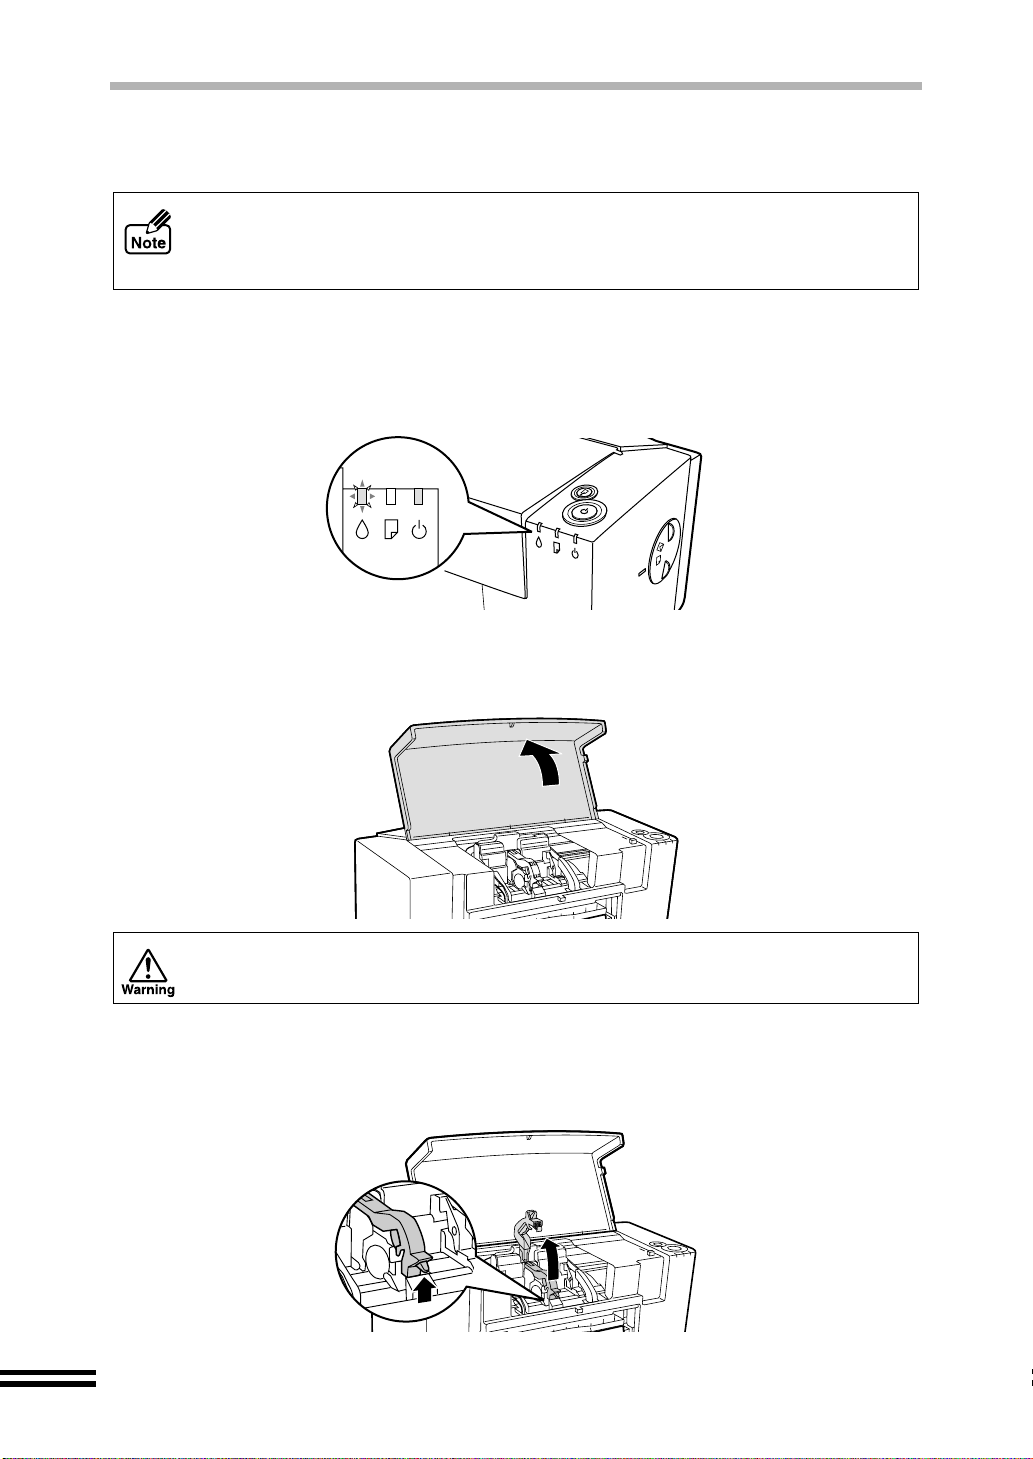
INSTALLING THE PRINT HEADS AND INK TANKS
Follow the steps below for installation.
This section describes how to install the print heads and ink tanks when you install
them for the first time after purchasing this printer. Refer to "Changing the Ink
Tank" or "Changing the Print Head" in your online manual when you chan ge ink
tank or print head after installing.
Installing the Print Heads
Make sure that the power lamp is lit, and the ink lamp is blinking
1
rapidly.
If the power lamp is not lit, press the power button.
Open the front cover.
2
Do not try to move the carriage manually by force.
Raise the print head latch.
3
Raise the latch until it comes in contact with the front cover.
12
Page 15
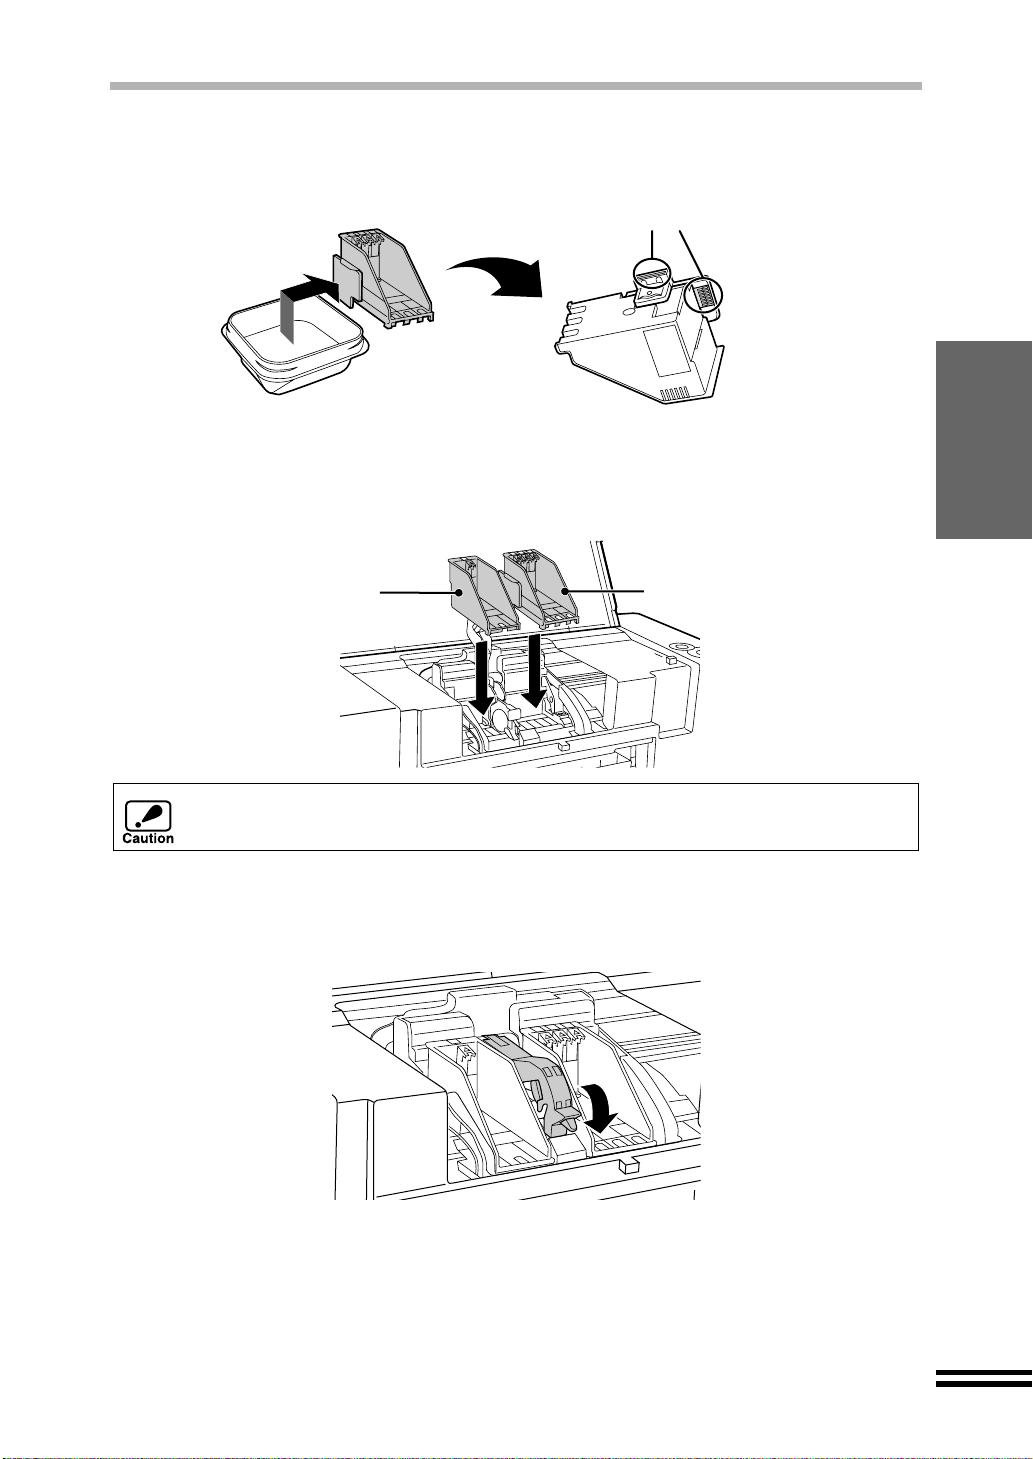
INSTALLING THE PRINT HEADS AND INK TANKS
Remove the print heads from their protective cases.
4
Do not touch the metal portion of
the print head directly. Doing so
may lead to improper printing.
Insert the print heads.
5
Insert the black print hea d in to the lef t carria ge openi ng, and th e colo ur print head
into the right carriage opening.
Black print head Colour print head
SETTING UP THE
PRINTER
Be careful not to dam age the print head s. If any of them is damaged, the printer
may not work properly.
Lower the print head latch.
6
Lower the latch until it clicks into the latched position.
13
Page 16

INSTALLING THE PRINT HEADS AND INK TANKS
Inserting the ink tanks
Unpack the ink tanks from their protective wrapping and slowly
1
remove the tape.
z Hold the in k tank upright when remov ing the tape. Do not touch the unc overed
opening on the ink tank, as ink will get on your hands.
z Ensure that there are no pieces of tape remaining on the ink tank.
Turn the ink tanks upside down, and then immediately insert
2
each of them to the print head of the corresponding number.
Match the ink tank number
to the print head number.
Make sure that each tab
securely fixes the ink tank
by pressing here.
Do not touch this portion.
The printer may not print
if it is dirty.
Properly align the tab
when inserting.
Ensure the number on the print head corresponds to the number on the ink tank.
14
Page 17

Close the front cover.
3
INSTALLING THE PRINT HEADS AND INK TANKS
SETTING UP THE
After closing the cov er the car riage wil l retu rn to its hom e posit ion, and the in k will
be fed to the print head (this could take a while).
Confirm the ink lamp is not blinking.
4
If the ink lamp continues to blink, open the front cover, return to step 5 of "Installing
the Print Head" and follow the procedures once more.
To keep good print head quality, keep all the ink tanks installed to the corresponding
print head.
During ink tank repla cement, if the c over is lef t open for mo re than 8 minute s, the
carriage will automatically return to its home position.
PRINTER
15
Page 18

LOADING PAPER
Follow the steps below to load paper into the paper tray or bypass tray.
You can load plai n paper and other sp ecial paper. For detailed informat ion of paper type,
see page 41.
LOADING PAPER INTO THE PAPER TRAY
Remove the output tray , and open the front lid of paper tray .
1
Adjust the guides and shown in the illustration to the width
2
of the paper.
Load the paper.
3
Load the paper print side down into the paper tray. Make sure to push the paper to
the right side and the rear side of the tray.
16
Page 19

LOADING PAPER INTO THE PAPER TRAY
Move the guides ( , ) to touch the edges of the paper.
4
When loading envelopes
Set the paper knob to the "Thick Paper ( )" setting.
Load the envelope f ace down with the flap to the ri ght, and then a djust the pap er
guides to the width of the envelope.
LOADING PAPER
Notes for loading envelopes
z Load envelopes in portrait direction into the paper tray.
z
Do not use non-standard envelopes, envelops with clasps, or window envelopes.
z Be sure to select each of Com10, DL, C 6, and Invita tion A2 on th e paper size
setting of the printer d river. (For detailed inform ation on printer driver, re fer to
the online manual.)
When loading index cards, postcards or birthday cards
Set the paper knob to the "Thick Paper ( )" setting.
Set guide up, and then fit guide and against the loaded cards.
Be sure to load in
portrait direction.
Most paper and enve lopes will be fed correctly from the paper tray. Howev er, if
paper or envelopes a re par ti cu la rly s ti ff or h eav y, they shou ld be fed one at a time
through the bypass tray. This will avoid wrinkling or misfeeding.
Close the front lid of paper tray by firmly pushing on its right
5
edge.
With some sizes of paper, gu ide ma y stick out of the paper tray . In this case,
print with the front lid of the paper tray open.
17
Page 20

LOADING PAPER INTO THE PAPER TRAY
Attach the output tray.
6
Pull out the output tray extension to the proper position, and
7
then raise the paper stop guide.
Place this projection
toward the printer.
z Be sure that paper is free of rips, dust, wrinkles, and curled or bent edges.
z Make sure all the paper in the stack is the same size and type.
z Fan the paper and tap it against a flat surface to ensure it is even before loading
into the printer.
2
z The paper tray can hold up to 150 sheets of 75g/m
to keep the total thickness of the loaded paper stack below 15mm.
z When loading postcard size paper into the paper tray, load it in portrait direction.
z When loading paper, ensure there is no space between the paper and the guide,
and check if the guide is no t set too narrow c ausing the pap er to bend. Loa ding
paper in these ways will result in document skew or a paper jam.
z The paper knob s hould a lways be set to t he "Normal Paper ( )" setting except
while printing on thick paper or envelopes.
z When not usin g the printer for an extended period, remove all paper from the
paper tray and store it in a dry place. If paper is left in the printer for an extended
period, the paper will absorb moisture from the air, resulting in paper jams.
z When adding new paper to the paper tray, remove the old paper already
contained in the tray, place i t on top of the new paper. Then load it all into the
paper tray. Placing n ew paper on top of the paper alrea dy contained in the tray
may result in feeding two sheets at one time.
(20lbs.) plain paper. Be sure
18
Page 21

LOADING THE BYPASS TRAY WITH PAPER
If you wish to print on ba nner paper or anothe r paper type not loaded i nto the main paper
tray, use the bypa ss f eed. O nly o ne sh eet of paper (or up to 5 she ets of ban ner p ape r) c an
be placed in the bypass tray at a time.
Open the bypass tray located on the rear of the printer.
1
Load the paper print side up.
2
Align the paper with the r ight side of the bypass tray and press the paper bu tton.
The paper will be fed slightly into the printer.
LOADING PAPER
When loading an envelope
Open the bypass tray until it reaches position 2 (the tr ay has two sto p positions),
set the paper knob to the "Thick Paper ( )" setting.
Load the envelope face up with the flap to the right, and position against the right
edge of the tray as shown bellow. Refer to "Notes for loading envelopes" on page 17.
Position 1
Position 2
When loading banner paper
Open the bypass tr ay until i t reache s position 2, and set the pape r along the righ t
side edge of the tray.
z Maximum 5 sheets of banner paper can be used.
z When printing onto banner paper, ensure to use an application software
supporting banner paper.
z The paper knob s hould a lways be set to t he "Normal Paper ( )" setting except
while printing on thick paper or envelopes.
19
Page 22

SETTING UP FOR Windows
To use this printer with your computer, the printer driver should be installed onto your
computer's hard drive. In this chapter, you will learn how to install them and how to use the
Online Manual.
The following terms are used in this chapter.
CD-ROM
Means the supplied CD-ROM with the AJ-1800/2000 Series Software.
Drive D (the field to be typed "D:\...")
This assumes that your computer's CD-ROM drive is drive D.
(If your computer's CD-ROM drive letter is not Drive D, change the CD-ROM drive letter
to correspond to the letter of your CD-ROM drive.)
Be sure to read the Readme.txt file before installing the printer driver.
(The location of the Readme.txt file is D:\README\ENGLISH\README.TXT)
HARDWARE AND SOFTWARE REQUIREMENTS
Check the following hardwar e and software requirements in order to install the AJ-1800 /
2000 Series Printer Driver.
Computer type
Operating system Windows 98, Windows 95, Windows 2000 ,
Display 640 x 480dots (VGA) or better
Hard disk free space 10MB or more
Other requirement for hardware An environment on which any of the operating
* Compatible with Windows 98 or Windows 2000 preinstalled model with USB interface
equipped as standard.
IBM PC/AT or compatible computer equipped with a
USB* or bi-directional parallel interface (IEEE1284)
Windows NT 4.0 (Service Pack 3 or later)
systems listed above can fully operate
BEFORE INSTALLATION
The method to install the printer driv er varies depending on your operati ng system and the
cable connecting the printer and your computer. Check your operating system and your
cable type, and then follow the steps shown below to install the printer driver.
Operating system
Windows 98
Windows 95
Windows 2000 *
Windows NT 4.0 *
Interface Reference pages for how to install
USB
Parallel
Parallel
USB/Parallel
Parallel
"Installing the USB driver (Windows 98)" (page 21)
next, step 6 and later of "Installing onto Windows 95 / 98" (page 26)
"Installing onto Windows 98 (Parallel interface) / 2000" (page 22)
"Installing onto Windows 95" (page 24)
"Installing onto Windows 98 (Parallel interface) / 2000" (page 22)
"Installing onto Windows 2000 / NT 4.0" (page 29)
* The administrator's authorisation is required to install a printer driver.
20
Page 23

INSTALLING THE USB DRIVER (Windows 98)
If the printer is connected to your computer by USB cable, you have to install the USB driver
before installing the printer driver. To install the USB driver, follow the steps shown below.
Make sure that the printer is connected to your computer by
1
USB cable.
Turn on the printer, and then turn on your computer.
2
"Add New Hardware Wiza rd" window will ap pear. If this window d oes not appear,
refer to "Failed to Instal l the Pr in ter Dr iv er (US B Inter fac e)" in " Tro ubl eshoo ting" of
the online manual.
Click the "Next" button.
3
Check the radio button for "Search for the best d river for your
4
device (recommended)", and then click the "Next" button.
Insert the supplied CD-ROM into your CD-ROM drive.
5
Select the "Specify a location:", type "D:\ENGLISH\WIN9X\USB",
6
and then click the "Next" button.
(Change "D" to correspond to the letter of your CD-ROM drive.)
Click the "Next" button.
7
Click the "Finish" button.
8
You have completed the installation of the USB driver.
After installing the USB driver, the "Add Printer Wizard" will appear. Move on to the
step 6 of "Installing onto Windows 95 / 98" (page 26).
The USB driver will remain in your system even after uninstalling the printer driver.
SETTING UP FOR
Windows
21
Page 24

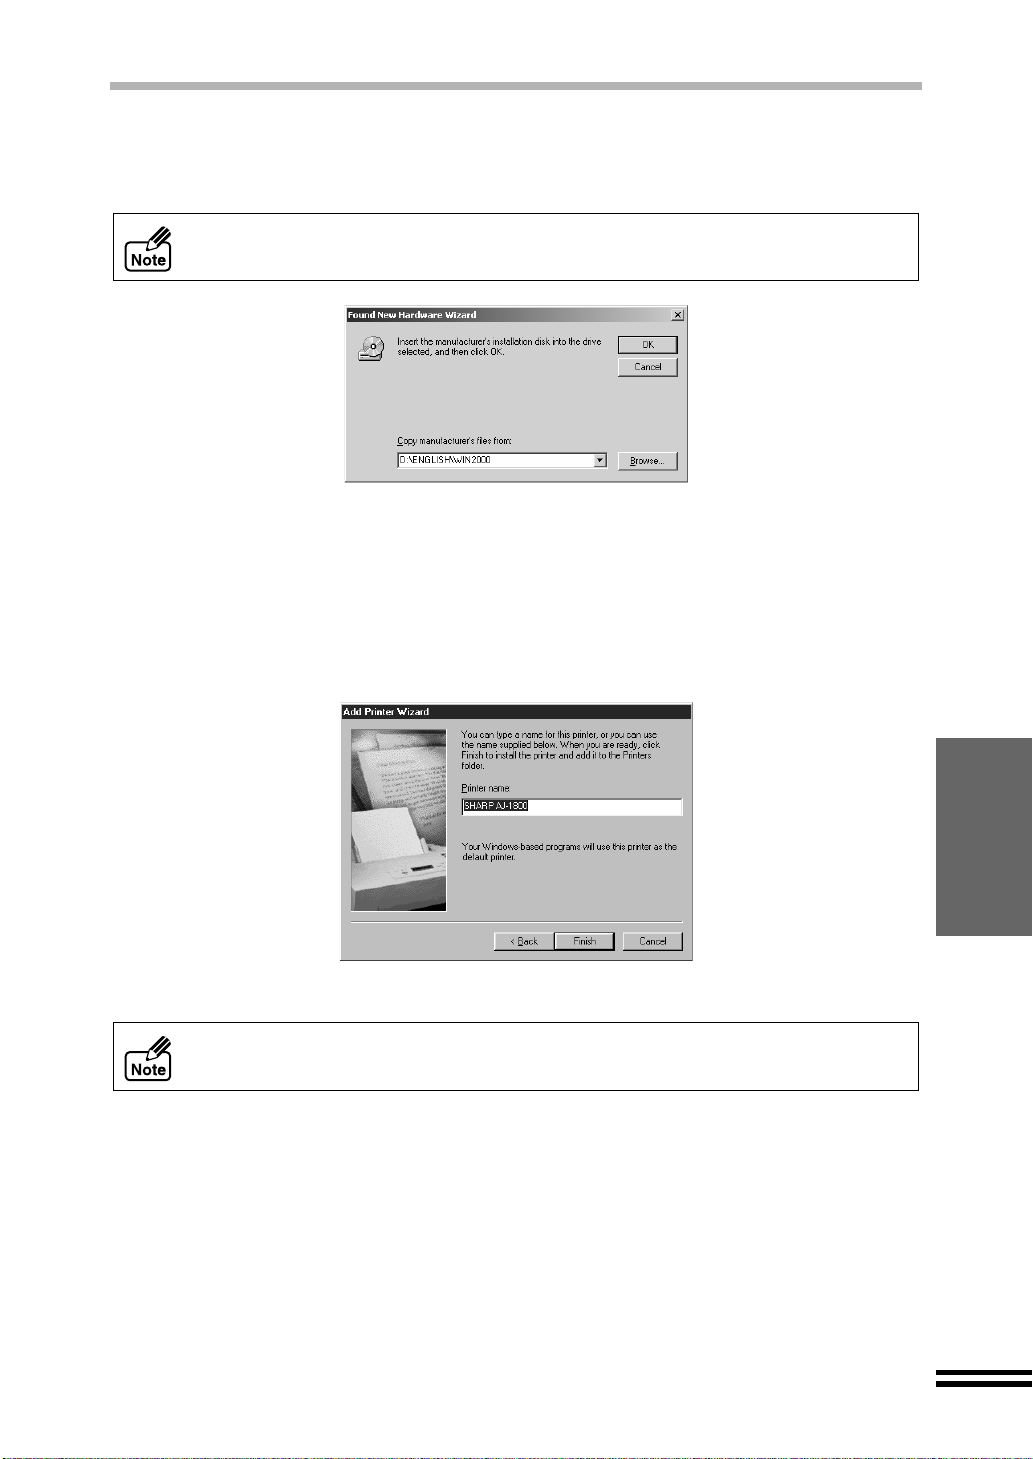
INSTALLING THE PRINTER DRIVER
Installing onto Windows 98 (Parallel interface) / 2000
z The screen images in this section are those of Windows 98.
z The contents of each screen image are those of the AJ-1800.
Make sure that the printer is connected to your computer.
1
Turn on the printer, and then turn on your computer.
2
On this step, "Add New Hardware Wizard" on Windows 98 or "Found New
Hardware Wizard" on Windows 2000 will appear.
If neither of these screens will appear on your computer, refer to either of "Installing
onto Windows 95 / 98" (page 26) or "Installing onto Windows 2000 / NT4.0"(page 29)
according to your operating system.
Click the "Next" button.
3
Insert the supplied CD-ROM into your CD-ROM drive.
4
Check the radio button for "Search for the best d river for your
5
device (recommended)", and then click the "Next" button.
On Windows 2000, che ck the radio button for "Search f or a suitable dr iver for my
device (recommended)", and then click the "Next" button.
Select the "Specify a location:", type "D:\ENGLISH\WIN9X", and
6
then click the "Next" button.
(Change "D" to correspond to the letter of your CD-ROM drive.)
22
Page 25
INSTALLING THE PRINTER DRIVER
On Windows 2000, perform the following steps:
1) Select the "Specify a location:" and click the "Next" button.
2) Type "D:\ENGLISH\ WIN2 000" and click the "OK" button.
(Change "D" to correspond to the letter of your CD-ROM drive.)
To install the driver successfully, be sure to select the "Specify a location".
Click the "Next" button.
7
If "Digital Signature Not Found" window appears on Windows 2000, click the "Yes"
button. This window will not affect your operation.
Click the "Finish" button.
8
If the program displ ays "Do you want your W indows-based programs to use this
printer as the default printer?", check "Yes".
You have completed the installation of the printer driver.
Before attempting to print a test pa ge, align the print head by the procedure on
page 32.
SETTING UP FOR
Windows
23
Page 26
INSTALLING THE PRINTER DRIVER
Installing onto Windows 95
The contents of each screen image are those of the AJ-1800.
Make sure that the printer is connected to your computer.
1
Turn on the printer, and then turn on your computer.
2
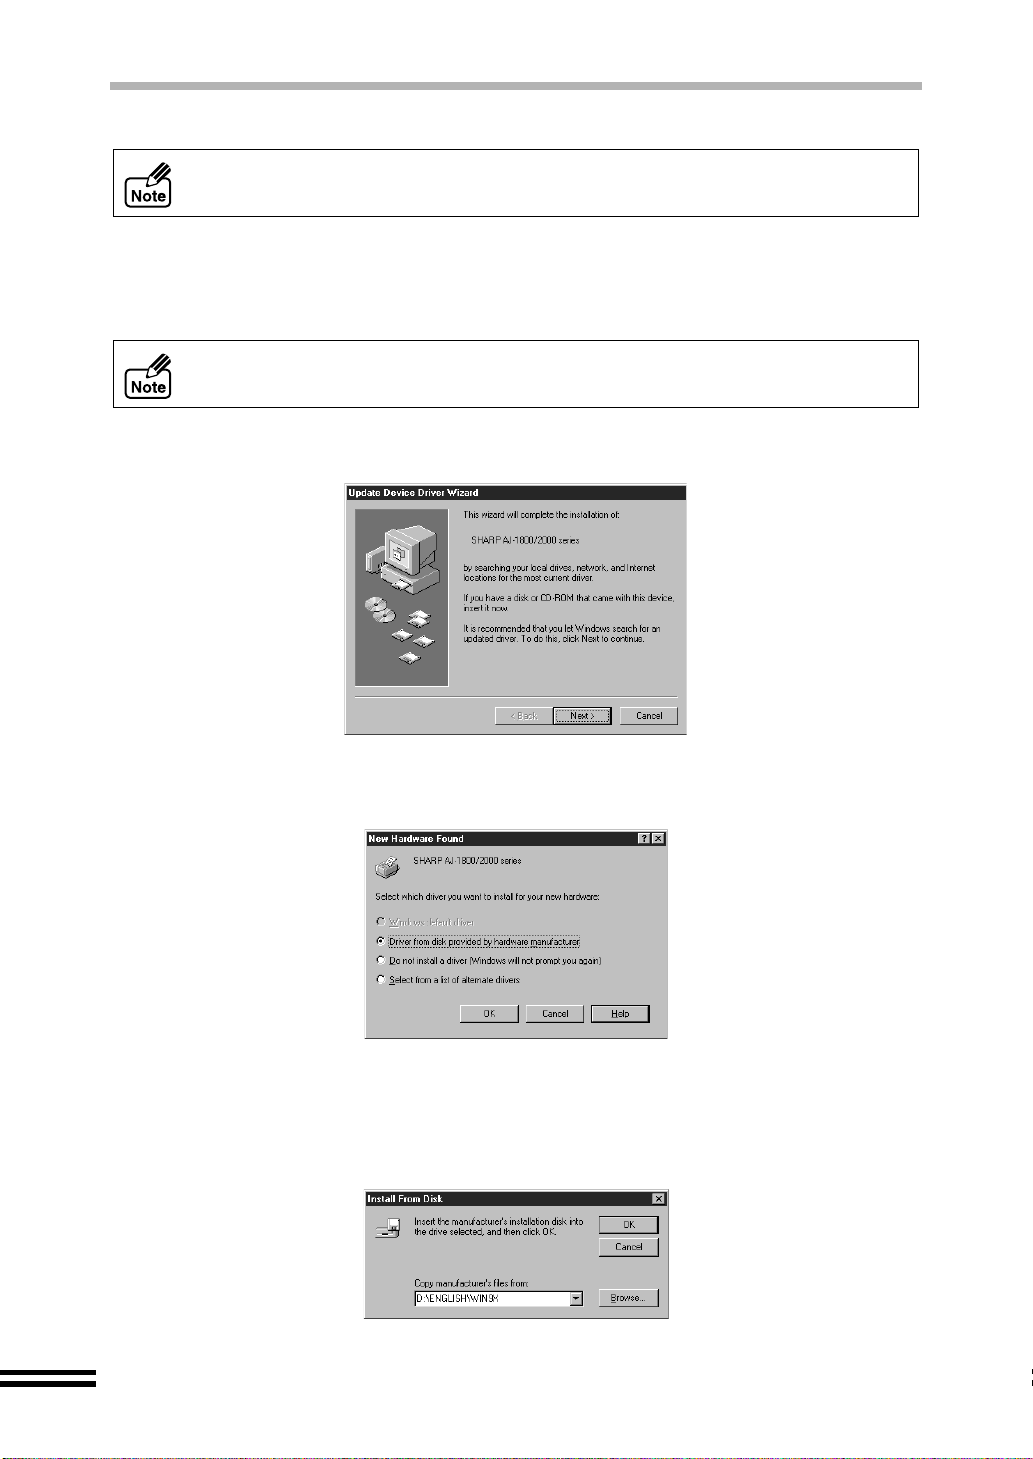
"Update Device Driver Wizard" or "New Hardware Found" window will appear.
If neither the "Update Device Driver Wizard" window nor the "New Hardware
Found" window appears, refer to "Installing onto Windows 95 / 98" (page 26).
If the "Update Device Driver Wizard" window appears, click the "Next"
button and proceed to step 3.
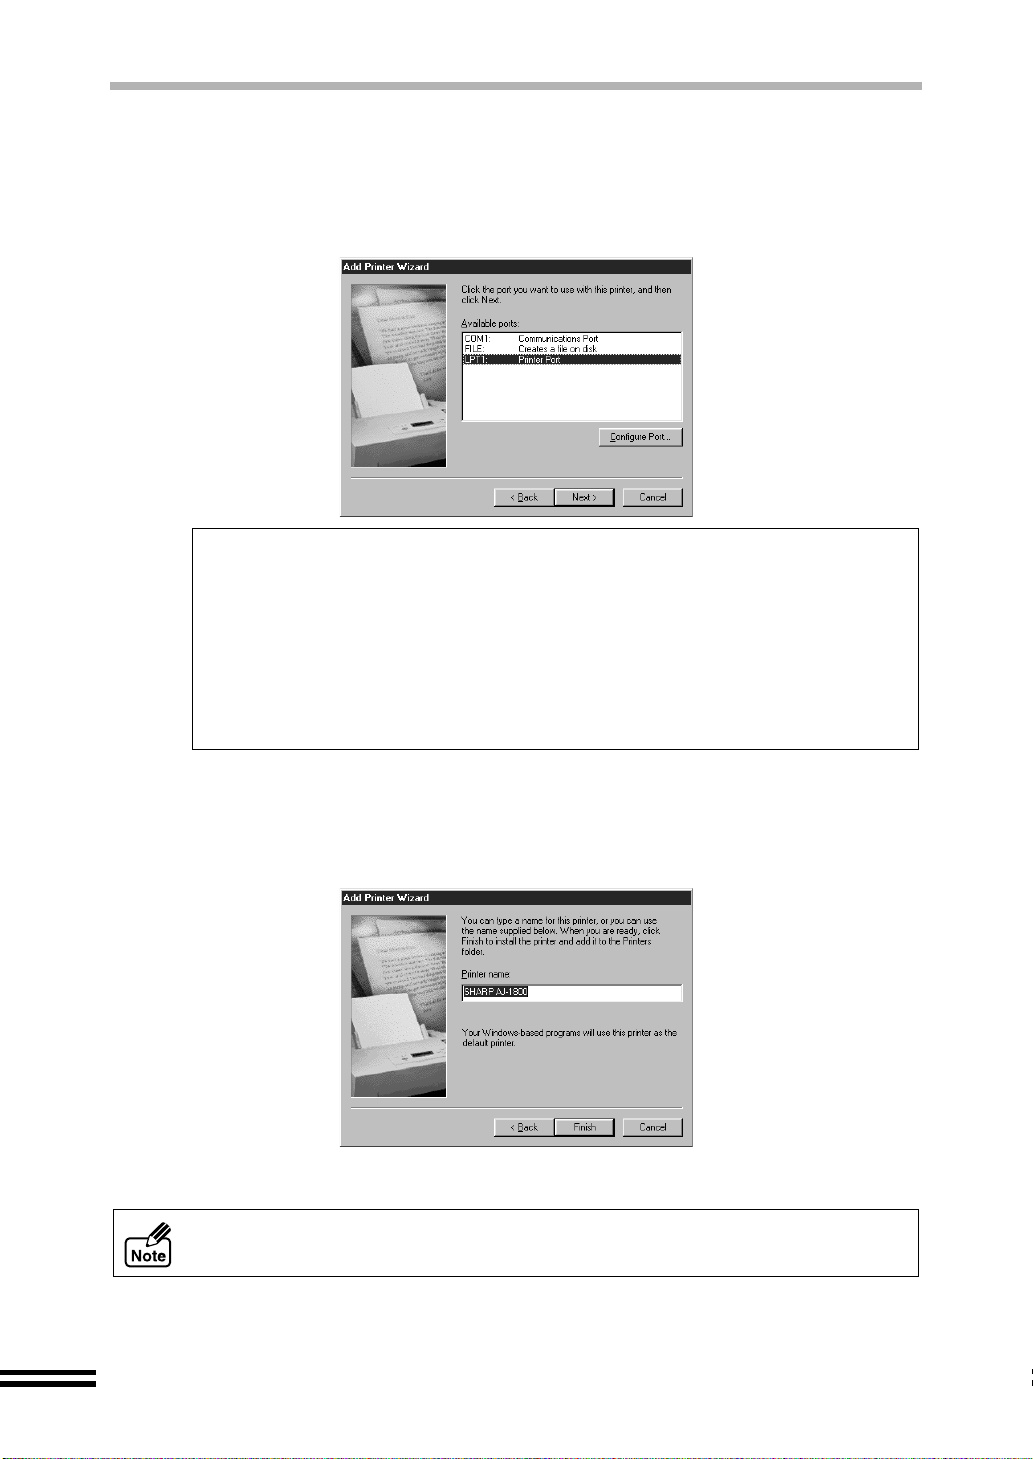
If the "New Hardware Found" window appears, perform the following
steps and proceed to step 6.
1) Check the radio button for "Driver from disk provided by hardware manufacturer",
and click the "OK" button.
2)
Insert the supplied CD-ROM into your CD-ROM drive, ty pe "D:\ENGLISH\WIN9X",
and then click the "OK" button.
(Change "D" to correspond to the letter of your CD-ROM drive.)
Go to step 6.
24
Page 27

INSTALLING THE PRINTER DRIVER
Click the "Other Locations" button.
3
Insert the supplied CD-ROM into your CD-ROM drive, type
4
"D:\ENGLISH\WIN9X", and then click the "OK" button.
(Change "D" to correspond to the letter of your CD-ROM drive.)
Click the "Finish" button to continue the installation.
5
Click the "Finish" button.
6
If the program displ ays "Do you want your W indows-based programs to use this
printer as the default printer?", check "Yes".
If the "Insert Disk" window appears, perform the following steps:
1) Click the "OK" button.
2) When the "Copying Files" window appears, type "D:\ENGLISH\WIN9X" and click
the "OK" button.
(Change "D" to correspond to the letter of your CD-ROM drive.)
You have completed the installation of the printer driver.
Before attempting to print a test pa ge, align the print head by the procedure on
page 32.
SETTING UP FOR
Windows
25
Page 28

INSTALLING THE PRINTER DRIVER BY "ADD PRINTER"
Installing onto Windows 95 / 98
z The screen images in this section are those of Windows 98.
z The contents of each screen image are those of the AJ-1800.
Make sure that the printer is connected to your computer.
1
Turn on the printer, and then turn on your computer.
2
Click the "Start" button, select "Settings" and then click "Printers".
3
When the "Printers" window appears, double-click the "Add
4
Printer" icon.
Click the "Next" button.
5
Check the radio button for "Local printer", and click the "Next" button.
6
To use this printer shared, refer to "Sharing Printer" in the online manual.
26
Page 29

INSTALLING THE PRINTER DRIVER BY "ADD PRINTER"
Click the "Have Disk" button.
7
Insert the supplied CD-ROM into your CD-ROM drive. (If you are
8
using the USB interface, confirm that CD-ROM is in the CD-ROM
drive.)
Type "D:\ENGLISH\WIN9X", and then click the "OK" button.
9
(Change "D" to correspond to the letter of your CD-ROM drive.)
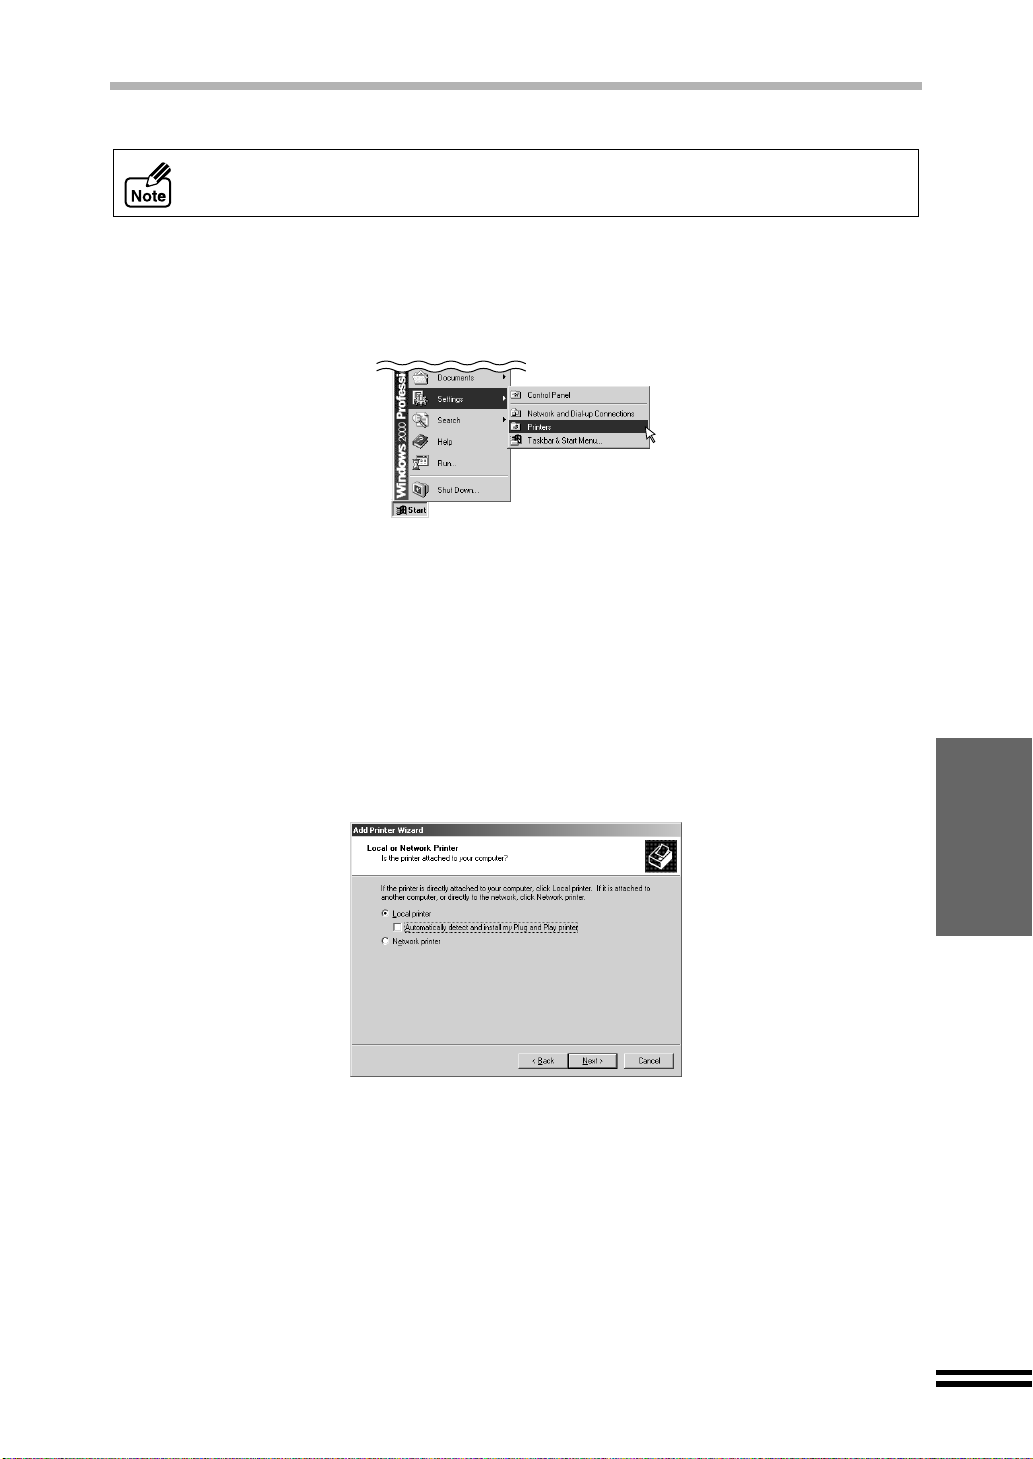
Select the model of your printer, and then click the "Next" button.
10
SETTING UP FOR
Windows
27
Page 30
INSTALLING THE PRINTER DRIVER BY "ADD PRINTER"
Select the port to be used, and click the "Next" button.
11
If you are using Windows 95 / 98, and your printer is connected by parallel
interface cable, select LPT port (typically "LPT1"). On the other hand, if your
operating system is Windows 98, and your printer is connected by USB cable,
select "USB port" (typ ic al ly "U SB -P RN 0 ") .
With a Windows98 preinstalled computer connected to this printer by USB cable
z If the "USB port" does not appear on the screen, ins tall the USB driver onto
your computer, following the steps shown in "Installing the USB driver
(Windows 98)" (page 21).
z If you reinstalled the USB driver and printer driver after having uninstalled the
printer driver, more than two USB ports, for example, USB-PRN0, USB-PRN1, and
USB-PRN2, may be displayed on the screen as your options. In this case, select
the newest port, which has the largest port number. If there are any port numbers
which are not in use, the printer will work properly.
Click the "Finish" button.
12
If the program displ ays "Do you want your W indows-based programs to use this
printer as the default printer?", check "Yes".
You have completed the installation of the printer driver.
Before attempting to print a test pa ge, align the print head by the procedure on
page 32.
28
Page 31
INSTALLING THE PRINTER DRIVER BY "ADD PRINTER"
Installing onto Windows 2000 / NT 4.0
z The screen images on this section are those of Windows 2000.
z The contents of each screen image are those of the AJ-1800.
Make sure that the printer is connected to your computer.
1
Turn on the printer, and then turn on your computer.
2
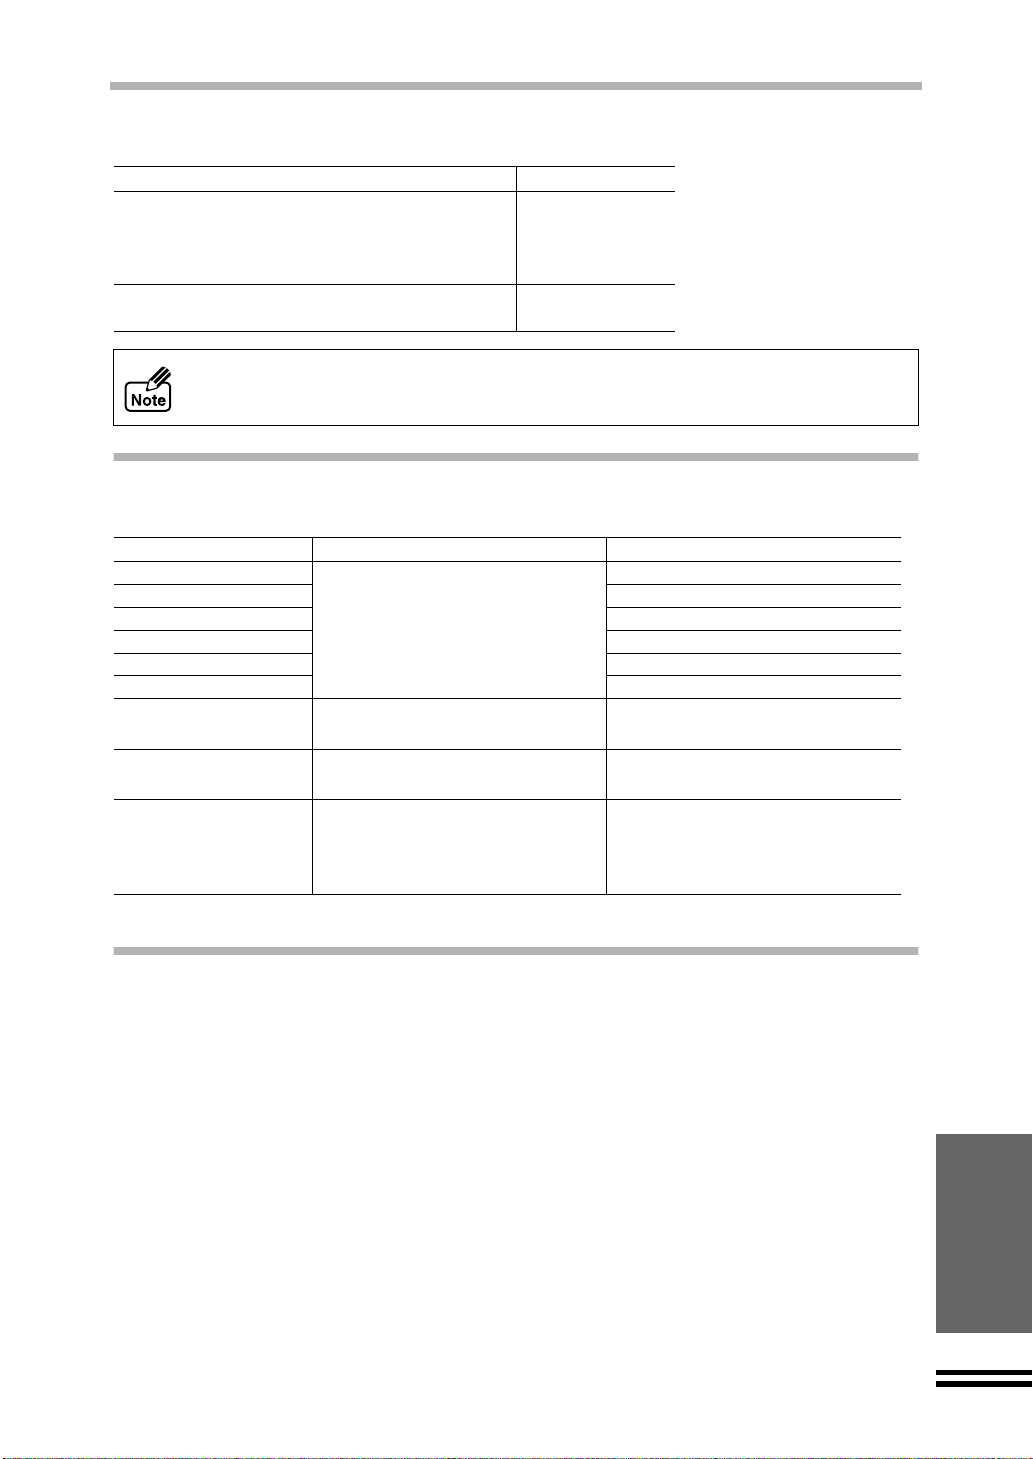
Click the "Start" button, select "Settings" and then click "Printers".
3
When the "Printers" window appears, double-click the "Add
4
Printer" icon.
On Windows 2000, "Welcome to the Add Printer Wizard" window
5
will appear. Click the "Next" button.
On Windows NT 4.0, the screen will not appear. Go on to the next step.
Check the radio button for "Local printer", and click the "Next"
6
button.
On Windows NT 4.0, check "My Computer" and then click the "Next" button.
To use this printer shared, refer to "Sharing Printer" in the online manual.
SETTING UP FOR
Windows
29
Page 32

INSTALLING THE PRINTER DRIVER BY "ADD PRINTER"
Select the port to be used, and click the "Next" button.
7
If your operating system is Windows 2000:
If your printer is connected by parallel interface cable, select the LPT port (typically
"LPT1"). If your prin ter is connected by USB cable, select the USB port (t ypically
"USB001").
If your operating system is Windows NT 4.0:
Select the LPT port (typically "LPT1").
Click the "Have Disk" button.
8
Insert the supplied CD-ROM into your CD-ROM drive, type
9
"D:\ENGLISH\WIN2000", and then click the "OK" button.
On Windows NT 4.0, type "D:\ENGLISH \WIN NT40", an d then click the "OK " button.
(Change "D" to correspond to the letter of your CD-ROM drive.)
Select the model of your printer, and then click the "Next" button.
10
30
Page 33

INSTALLING THE PRINTER DRIVER BY "ADD PRINTER"
Click the "Next" button.
11
If the program displ ays "Do you want your W indows-based programs to use this
printer as the default printer?", check "Yes".
Check the radio button for "Do not share this printer" and click
12
the "Next" button.
On Windows NT 4.0, check "Not shared", and click the "Next" button.
To use this printer shared, refer to "Sharing Printer" in the online manual.
Check "Yes", and click the "Next" button.
13
On Windows NT 4.0, check "Yes", and click the "Finish" button.
You have completed the installation of the printer driver.
After confirming the message on the screen, click the "Finish"
14
button.
If "Digital Signature Not Found" window appears, click the "Yes"
15
button.
This window will not affect your operation.
You have completed the installation of the printer driver.
Before printing align the print head by the procedure on next page.
SETTING UP FOR
Windows
31
Page 34

ALIGNING THE PRINT HEAD
Before printing for the first time or after replacing the print head, make sure to align the print
head position.
Follow the steps below to align the print head.
Make sure that A4 sized paper is set in the tray.
1
Click the "Start" button, select "Settings" and then click "Printers".
2
Click the "SHARP AJ-1800" or "SHARP AJ-2000" icon and from
3
the "File" menu select "Properties" and then click the "Setup" tab.
The printer driver setup screen will appear when "Printing Preferences" of
Windows 2000 or "Document Defaults" of Windows NT 4.0 is selected.
Click the "Advance" tab and then click the "Maintenance"
4
button.
Click the "Start" button of "Print alignment patterns".
5
Click the "OK" button.
6
The "Align print head" dialog box will appear, and a test chart will be printed.
Check the test chart results, and change the preferences to the
7
best setting for each pattern.
1) Select a pattern sample for "Pattern A".
Look at the chart A on your test chart. Se lect the number under the pattern sample,
in which is located the closest to the centre of the two vertical lines.
Example:
-8
-8 -7 -6 -5 -4 -3 -2 -1 0 +1 +2 +3 +4 +5 +6 +7 +8
32
A
+8
Page 35

ALIGNING THE PRINT HEAD
2) Select a pattern sample for "Pattern B".
Look at the chart B on your test chart. Se lect the number under the pattern sample,
in which is located the closest to the centre of the two horizontal lines.
Example:
-6 +8
-8 -7 -6 -5 -4 -3 -2 -1 0 +1 +2 +3 +4 +5 +6 +7 +8
3) Select pattern samples for "Pattern C" and "Pattern D" respectively.
Look at the chart C and D on your test chart. Select the numbers under the pattern
samples, which have the straightest lines.
Example:
cracked line straight line
-6 -5 -4 -3 -2 -1 0 +1 +2 +3 +4 +5 +6
Click the "OK" button in the "Align print head" dialog box.
8
The print head will align itself.
z If you cannot find any satisfactory pattern sample for each of "Pattern A" to
"Pattern D" settin gs, select the best ones among the printed pattern samples,
and then go back to step 5. (For Macintosh, go back to step 3 on page 38.)
z The printer can not perfor m othe r ope ratio ns whi le ali gning the print head.
-6
B
C or D
+1
SETTING UP FOR
Windows
33
Page 36

HOW TO USE THE ONLINE MANUAL
The Online Manual provides detailed instructions for operating the printer and a list of
methods for dealing with printing problems.
To access the Online Manual, your computer must have Acrobat Reader 4.0 or a later
version. If it is not installed, refer to "Installing Acrobat Reader" (next page).
Turn on your computer.
1
Insert the supplied CD-ROM into your CD-ROM drive.
2
Click the "Start" button, and select "Run".
3
Type "D:\MANUAL\ENGLISH\MANUAL.PDF" and click the "OK"
4
button.
(Change "D" to correspond to the letter of your CD-ROM drive.)
The following window will appear.
Click the to read the Online Manual.
5
To close the Online Manual, click the button located at the top-right of the
window.
z The Online Manual can be printed out using Acrobat Reader. SHARP
recommends printing out the sections which you refer to regularly.
z Refer to the "Read er Online Manual" in Help for more detai ls on the operation
and function of Acrobat Reader.
34
Page 37

HOW TO USE THE ONLINE MANUAL
Installing Acrobat Reader
To install Acrobat Reader, about 10MB of hard disk space is required.
Turn on your computer.
1
Insert the CD-ROM into the CD-ROM drive.
2
Click the "Start" button, and select "Run".
3
Type "D:\ACROBAT\AR405ENG.EXE" and click the "OK" button.
4
(Change "D" to correspond to the letter of your CD-ROM drive.)
Follow the on-screen instructions to install Acrobat Reader.
HOW TO PRINT
Make sure that the paper of the desired size and type is loaded
1
in the tray.
Open the document you intend to print, and select "Print" from
2
the application's "File" menu.
Verify the "Printer Name" is set to "SHARP AJ-1800" or "SHARP
3
AJ-2000" and click the "Properties" button.
Specify the print settings including the number of copies,
4
media type, and print quality, and then click the "OK" button to
start printing.
For more information on print settings, refer to the online manual.
BONUS SOFTWARE
To install MGI PhotoSuite III SE on the supplied CD-ROM, ple ase refer to the follow ing proc ed ures .
After turning on your computer, insert the CD-ROM.
Click the "Start" button, and select "Run".
1
Type "D:\MGI\PS3\SETUP.EXE" and click the "OK" button.
2
(Change "D" to correspond to the letter of your CD-ROM drive.)
Follow the on-screen instructions to install PhotoSuite III SE.
SETTING UP FOR
Windows
35
Page 38

SETTING UP FOR Macintosh
To use this printer with your computer, the printer driver should be installed onto your
computer's hard drive. In this chapter, you will learn how to install them and how to use the
Online Manual.
The following term is used in this chapter.
CD-ROM
Means the supplied CD-ROM with the AJ-1800/2000 Series Software.
Be sure to read the Readme file before installing the printer driver.
(The location of the Readme file; CD-ROM - Readme folder - English folder - Readme)
HARDWARE AND SOFTWARE REQUIREMENTS
Check the following hardwar e and software requirements in order to install the AJ-1800 /
2000 Series Printer Driver.
Computer type Models equipped with USB interface as standard
Operating system Mac OS 8.5 or later
Display 640 x 480dots (VGA) or better
Hard disk free space 10MB or more
Other requirement for hardware An environment on which any of the operating
systems listed above can fully operate
INSTALLING THE PRINTER DRIVER
The AJ-1800/2000 series printer driver is provided on a CD-ROM.
The contents of each screen image are those of the AJ-1800.
Make sure that the printer is connected to your computer by
1
USB cable.
Turn on the printer, and then turn on your computer.
2
Insert the supplied CD-ROM into your CD-ROM drive.
3
Double-click the CD-ROM icon on the desktop.
4
Double-click the "Installer" icon.
5
Check if the appropriate language has been selected, and then
6
click the "Next" button.
Normally, the correct language is selected automatically.
After confirming the messa ge on the screen, click the "Install"
7
button and then click the "Continue..." button.
36
Page 39

INSTALLING THE PRINTER DRIVER
Make sure that "Eas y Install" is s elected, and click the "Ins tall"
8
button.
If a dialog box appears, which prompts you to confirm whether all the applications have
been quitted, click the "Continue" button.
Click the "Restart" button.
9
You have completed the installation of the printer driver.
Restart your system, and then specify your printer following the steps shown
below.
Selecting the printer
Select "Chooser" from the Apple Menu ( ) located at the top-
1
left of the desktop.
The following window will appear.
Click "AJ-1800/2000" icon and make sure that "AJ-1800" or
2
"AJ-2000" appears in the right box.
The printer is ready for printing.
For the information on the installed printer driver, see the online manual.
SETTING UP FOR
Macintosh
Before printing align the print head by the procedure on next page.
37
Page 40

ALIGNING THE PRINT HEAD
Before printing for the first time or after replacing the print head, make sure to align the print
head position.
Follow the steps below to align the print head.
Make sure that A4 sized paper is set in the tray.
1
Select "Print" from the "File" menu of your application, and
2
then click the "Maintenance" button ( ).
Click the "Start" button of "Print alignment patterns".
3
Click the "Print" button.
4
The "Align print head" dialog box will appear, and a test chart will be printed.
Check the test chart results, and change the preferences to the
5
best setting for each pattern.
For the following procedure, refer to the step 7-1 on page 32.
HOW TO USE THE ONLINE MANUAL
The Online Manual provides detailed instructions for operating the printer and a list of
methods for dealing with printing problems.
To access the Online Manual, your computer must have Acrobat Reader 4.0 or a later
version. If it is not installed, refer to "Installing Acrobat Reader" (next page).
Turn on your computer.
1
Insert the supplied CD-ROM into your CD-ROM drive.
2
Double-click the CD-ROM icon on the desktop.
3
38
Page 41

HOW TO USE THE ONLINE MANUAL
Double-click the "Manual" folder, double-click the "English"
4
folder and then double-click the "Manual (pdf)" icon.
The following window will appear.
Click the to read the Online Manual.
5
To close the Online Manual, click the button located at the top-left of the
window.
z The Online Manual can be printed out using Acrobat Reader. SHARP
recommends printing out the sections which you refer to regularly.
z Refer to the "Read er Online Manual" in Help for more detai ls on the operation
and function of Acrobat Reader.
Installing Acrobat Reader
To install Acrobat Reader, about 10MB of hard disk space is required.
Turn on your computer.
1
Insert the supplied CD-ROM into your CD-ROM drive.
2
Double-click the CD-ROM icon on the desktop.
3
Double-click the "Acrobat" folder and double-click the "
4
Installer" icon
Follow the on-screen instructions to install Acrobat Reader.
.
HOW TO PRINT
Make sure that the paper of the desired size and type is loaded
1
in the tray.
Open the document you intend to print, and select "Print" from
2
the application's "File" menu.
Specify the print settings. Click the "Print" button to start printing.
3
For more information on print settings, refer to the online manual.
Reader
SETTING UP FOR
Macintosh
39
Page 42

APPENDIX
This chapter shows specifications of the printer, supplies, and how to store the supplies.
SPECIFICATIONS OF THE PRINTER
Name AJ-1800 AJ-2000
Type On demand, thermal inkjet type
Resolution Max. 1200dpi x 1200dpi
Monochrome 10.0ppm 12.0ppm
Printing speed
Paper
Void area
Print description language Host based printing system
Interface
Paper tray
capacity
*6
Ink life
External dimensions (W x D x H) 440mm x 358mm x 191mm (17.3" x 14.1" x 7.5")
Weight 6.5kg (14.3lbs.)
Power supply AC 100V-240V (±10%), 50Hz/60Hz ( ±10%)
Power
consumption
Operation
condition
Storage condition
Noise level
*1
When printing SHARP original data with draft mode.
*2
For the Bypass Tray, the maximum paper size is 5-sheeted A4/8.5"x11" banner.
*3
Holds up to total thickness of 15mm paper stack.
*4
Holds up to total thickness of 5mm paper stack.
*5
With 75
*6
When using 20.3cm x 25.4cm (8"x 10") size paper at 5% image area in normal usage.
*1
Colour 6.0ppm 8.0ppm
Width Max. 215.9mm (8.5") Min. 76.2mm (3")
Length
Min.
Recommendation
Paper tray
Output tray
Bypass tray 1 sheet
Black 700 sheets
Colour 350 sheets
Idle 9.5W
Printing Max. 45.0W
Temperature 10°C - 35°C (50°F - 95°F)
Relative humidity 20% - 85%
Temperature -25°C - 40°C (-13°F - 104°F)
Relative humidity 15% - 90%
2
g/m
(20lbs.) plai n paper.
*2
*3
*4
Max. 355.6mm (14") Min. 127mm (5")
Top 3mm, Bottom 3mm,
Left 3mm, Right 3mm
Top 19mm, Bottom 19mm,
Left 10mm, Right 10m m
IEEE1284-compliant bi-directional parallel interface
USB interface (B type)
Max. 150 sheets of plain pa per
Max. 50 sheets of plain paper
Sound Power Level L
Printing: 6.3[B], Print mode: Sharp Special,
Standby: Background noise level
Sound Pressure Level L
Printing: 47[dB(A)], Prin t mode : Be st,
Standby: Background noise level
Noise emission measurement i n accordance with ISO 7779.
WA
*5
*5
(1B=10dB)
PA
(bystander positions)
As a part of our policy of continuous improvement, SHARP reserves the r ight to make
design and specification changes for product improvement without prior notice. The
performance specification figures indicated are nominal values of production units.
There may be some deviations from these values in individual units.
40
Page 43
SUPPLIES
Supply Part Number
Ink tank (Black) AJ-T20B
Ink tank (Cyan) AJ-T20C
Ink tank (Magenta) AJ-T20M
Ink tank (Yellow) AJ-T20Y
Print head (Black type) AJ-H20B
Print head (Colour type) AJ-H20C
z When storing spare ink tanks and print heads, leave them unopened in their
packaging until you are ready to use them.
z For best results, use ink tanks within 6 months of installation.
PAPER TYPE
Paper type Weight Note
Plain paper
Coated paper Use whiter side for printing.
Photo paper Use glossy si de for printing.
Transparency * Use rougher si de for printing.
T-shirt transfer
Label
Banner
Envelope
Card
* Be sure to use SHARP recommended OHP films.
2
60g/m
- 200g/m
(16lbs. - 110lbs. index)
2
(20lbs.)
75g/m
Max. size : A4 x 5, 8.5"x11" x 5
75g/m2 - 90g/m2
(20lbs. - 24lbs.)
110g/m2 - 200g/m2
(110lbs. index)
Max. thickness :
0.3mm
2
Insert through bypass tra y.
INTERFACE CABLE
Please purchase the appropriate cable for your computer.
Parallel interface cable
Shielded type bi-directional parallel interface cable (2m (6feet) Max.)
USB interface cable
Shielded twisted pair cable (2m (6feet) Max.: hig h- sp eed trans mi ssion equivalent)
APPENDIX
41
Page 44

INDEX
A
Acrobat Reader................................ 35, 39
Aligning the print head ..................... 32, 38
Appendix..................... ...... ....... ...... ....... . 40
Attaching the trays ................................ ... 8
B
Banner paper ................................... 19, 41
Black ink tank................................... 14, 41
Black print head ............................... 13, 41
Bonus software ...................................... 35
Bypass tray ............................................ 19
C
Card ................................................. 17, 41
Carriage ................................................. 12
Colour ink tank................................. 14, 41
Colour print head.............................. 13, 41
Connecting
− Parallel interfac e cable............... ....... ... 9
− Power cord.........................................11
− USB interface cable ........................... 10
E
Envelope.................................... 17, 19, 41
F
Front cover............................................. 12
Front side................................................. 6
G
Guide ..................................................... 16
H
Hardware requirements.................... 20, 36
I
IEEE1284................................................. 9
Indicator lights........................................11
Ink lamp............................................ 11, 12
Ink tank ............................................14, 41
Installing
− Acrobat Reader............................ 35, 39
− Ink tank .............................................. 14
− Print head........................................... 12
− Printer driver ................................ 20, 36
− USB driver.......................................... 21
Interface cable.............................. 9, 10, 41
Internal part..............................................6
J
Jam cover................................................. 7
L
Loading paper
− Bypass tray ........................................19
− Paper tray...........................................16
M
Main features............................................3
O
Online Manual ..............................4, 34, 38
Output tray..........................................9, 16
P
Paper button.............................. ....... ...... ..6
Paper knob....... ...... ..........................17, 19
Paper lamp.............................................11
Paper tray............................ ...... ....... ..8, 16
Paper type. ....... ......................................41
Parallel interface.......................................9
Part names...............................................6
Port...................................................28, 30
Power button ......................................7, 11
Power cord.........................................7, 11
Power lamp ......................................11, 12
Power socket..........................................11
Print head.........................................12, 41
Print head latch ................................12, 13
Printer driver
− Macintosh...........................................36
− Windows 2000..............................22, 29
− Windows 95..................................24, 26
− Windows 98..................................22, 26
− Windows NT 4.0.................................29
Printing
− How to print..................................35, 39
R
Rear side..................................................7
S
Software requirements .....................20, 36
Specifications of the printer....................40
Supplies..................................................41
T
Thick paper.......................................17, 19
U
Unpacking ................................................8
USB interface ......... ...... ....... ...... ....... ......10
42
Page 45

SOFTWARE LICENSE
PLEASE READ THIS LICENSE CAREFULLY BEFORE USING THE SOFTWARE.
BY USING THE SOFTWARE, YOU ARE AGREEING TO BE BOUND BY THE
TERMS OF THIS LICENSE.
1. License.
The application, demonstration, system and other software accompanying this License, whether
on disk, in read only memory, or on any other media (the "Software") and related documentation
are licensed to you by SHARP. You own the disk on which the Software is recorded but SHARP
and/or SHARP'S Licensors retain title to the Software and related documentation. This License
allows you to use the Software on one or more computers connected to a single printer and make
one copy of the Software in machine-readable form for backup purposes only. You must
reproduce on such copy the SHARP copyright notice, the copyright notice of SHARP'S Licensors
and any other proprietary legends of SHARP and/or its Licensors that were on the original copy
of the Software. You may also transfer all your license rights in the software, the backup copy of
the Software, the related documentation and a copy of this License to another party, provided the
other party reads and agrees to the terms and conditions of this License.
2. Restrictions.
The Software contains copyrighted material, trade secrets and other proprietary material which is
owned by SHARP and/or its Licensors and in order to protect them you may not decompile,
reverse engineer, disassemble or otherwise reduce the Software to a human-perceivable form. You
may not modify, network, rent, lease, loan, distribute or create derivative works based upon the
Software in whole or in part. You may not electronically transmit the Software from one
computer to another or over a network.
3. Termination.
This license is effective until terminated. You may terminate this License at any time by
destroying the Software and related documentation and all copies thereof. This License will
terminate immediately without notice from SHARP and/or SHARP'S Licensors if you fail to
comply with any provision of this License. Upon termination you must destroy the Software and
related documentation and all copies thereof.
4. Export Law Assurances.
You agree and certify that neither the Software nor any other technical data received from
SHARP, nor the direct product thereof, will be exported outside the United States except as
authorized and as permitted by the laws and regulations of the United States. If the Software has
been rightfully obtained by you outside of the United States, you agree that you will not re-export
the Software nor any other technical data received from SHARP, nor the direct product thereof,
except as permitted by the laws and regulations of the United States and the laws and the
regulation of the jurisdiction in which you obtained the Software.
5. Government End Users.
If you are acquiring the Software on behalf of any unit or agency of the United States
Government, the following provisions apply. The Government agrees:
(i) if the Software is supplied to the Department of Defense (DoD), the Software is classified as
"Commercial Computer Software" and the Government is acquiring only "restricted rights" in
the Software and its documentation as that term is defined in Clause 252.227-7013 (c)(1) of
the DFARS; and
(ii) if the Software is supplied to any unit or agency of the United States Government other than
DoD, the Government's rights in the Software and its documentation will be as defined in
Clause 52.227-19 (c)(2) of the FAR or, in the case of NASA, in Clause 18-52.227-86 (d) of
the NASA Supplement to the FAR.
43
Page 46

6. Limited Warranty on Media.
SHARP warrants the disks on which the Software is recorded to be free from defects in materials
and workmanship under normal use for a period of ninety (90) days from the date of purchase as
evidenced by a copy of the receipt. The entire liability of SHARP and/or its Licensors and your
exclusive remedy will be replacement of the disk which fails to meet the limited warranty
provided by this Clause 6. A disk will be replaced when it is returned to SHARP or a SHARP
authorized representative with a copy of the receipt. SHARP will have no responsibility to
replace a disk damaged by accident, abuse or misapplication.
ANY IMPLIED WARRANTIES ON THE DISKS, INCLUDING THE IMPLIED
WARRANTIES OF MERCHANTABILITY AND FITNESS FOR A PARTICULAR PURPOSE,
ARE LIMITED IN DURATION TO NINETY (90) DAYS FROM THE DATE OF DELIVERY.
THIS WARRANTY GIVES YOU SPECIFIC LEGAL RIGHTS, AND YOU MAY ALSO HAVE
OTHER RIGHTS WHICH VARY FROM JURISDICTION TO JURISDICTION.
7. Disclaimer of Warranty on Software.
You expressly acknowledge and agree that use of the Software is at your sole risk. The software and
related documentation are provided "AS IS" and without warranty of any kind and SHARP and
SHARP'S Licensor(s) (for the purpose of provisions 7 and 8, SHARP and SHARP'S Licensor(s) shall
be collectively referred to as "SHARP") EXPRESSLY DISCLAIM ALL WARRANTIES, EXPRESS
OR IMPLIED, INCLUDING, BUT NOT LIMITED TO, THE IMPLIED WARRANTIES OF
MERCHANTABILITY AND FITNESS FOR A PARTICULAR PURPOSE. SHARP DOES NOT
WARRANT THAT THE FUNCTIONS CONTAINED IN THE SOFTWARE WILL MEET YOUR
REQUIREMENTS, OR THAT THE OPERATION OF THE SOFTWARE WILL BE
UNINTERRUPTED OR ERROR-FREE, OR THAT DEFECTS IN THE SOFTWARE WILL BE
CORRECTED. FURTHERMORE, SHARP DOES NOT WARRANT OR MAKE ANY
REPRESENTATIONS REGARDING THE USE OR THE RESULTS OF THE USE OF THE
SOFTWARE OR RELATED DOCUMENTATION IN TERMS OF THEIR CORRECTNESS,
ACCURACY, RELIABILITY, OR OTHERWISE. NO ORAL OR WRITTEN INFORMATION OR
ADVICE GIVEN BY SHARP OR A SHARP AUTHORIZED REPRESENTATIVE SHALL CREATE
A WARRANTY OR IN ANY WAY INCREASE THE SCOPE OF THIS WARRANTY. SHOULD
THE SOFTWARE PROVE DEFECTIVE, YOU (AND NOT SHARP OR A SHARP AUTHORIZED
REPRESENTATIVE) ASSUME THE ENTIRE COST OF ALL NECESSARY SERVICING, REPAIR
OR CORRECTION, SOME JURISDICTIONS DO NOT ALLOW THE EXCLUSION OF IMPLIED
WARRANTIES, SO THE ABOVE EXCLUSION MAY NOT APPLY TO YOU.
8. Limitation of Liability.
UNDER NO CIRCUMSTANCES INCLUDING NEGLIGENCE, SHALL SHARP BE LIABLE
FOR ANY INCIDENTAL, SPECIAL OR CONSEQUENTIAL DAMAGES THAT RESULT FROM
THE USE OR INABILITY TO USE THE SOFTWARE OR RELATED DOCUMENTATION,
EVEN IF SHARP OR A SHARP AUTHORIZED REPRESENTATIVE HAS BEEN ADVISED OF
THE POSSIBILITY OF SUCH DAMAGES. SOME JURISDICTIONS DO NOT ALLOW THE
LIMITATION OR EXCLUSION OF LIABILITY FOR INCIDENTAL OR CONSEQUENTIAL
DAMAGES SO THE ABOVE LIMITATION OR EXCLUSION MAY NOT APPLY TO YOU. In no
event shall SHARP'S total liability to you for all damages, losses, and causes of action (whether in
contract, tort (including negligence) or otherwise) exceed the amount paid by you for the Software.
9. Controlling Law and Severability.
For a portion of the Software related with Apple Macintosh and Microsoft Windows, this license
shall be governed by and construed in accordance with the laws of the state of California and
Washington, respectively. If for any reason a court of competent jurisdiction finds any provision
of this License, or portion thereof, to be unenforceable, that provision of the License shall be
enforced to the maximum extent permissible so as to effect the intent of the parties, and the
remainder of this License shall continue in full force and effect.
10. Complete Agreement.
This License constitutes the entire agreement between the parties with respect to the use of the
Software and related documentation, and supersedes all prior or contemporaneous understandings or
agreements, written or oral, regarding such subject matter. No amendment to or modification of this
License will be binding unless in writing and signed by a duly authorized representative of SHARP.
44
Page 47

SHARP CORPORATION
PRINTED IN CHINA
2001B
TINSE0007ESZ1
KS
Page 48

documentation manual, user maintenance, brochure, user reference, pdf manual
This file has been downloaded from:
User Manual and User Guide for many equipments like mobile phones, photo cameras, monther board, monitors, software, tv, dvd, and othes..
Manual users, user manuals, user guide manual, owners manual, instruction manual, manual owner, manual owner's, manual guide,
manual operation, operating manual, user's manual, operating instructions, manual operators, manual operator, manual product,
 Loading...