


Sharp AF-S50CX, AF-R55CX, AF-R50CX, AF-S60CX, AF-R60CX User Manual
...AF-S50CX 
AF-S60CX 
AF-R50CX
AF-R55CX
AF-R60CX
AF-R70CX
ROOM AIR CONDITIONER
INSTALLATION AND OPERATION
MANUAL
CONTENTS
PAGE
|
|
FOR YOUR PROTECTION .................... |
2 |
|
|
CONSUMER LIMITED WARRANTY ..... |
3 |
|
|
INSTALLATION INSTRUCTIONS |
|
|
|
• CHECK WINDOW AREA ........................ |
4 |
|
|
• LOCATlON .............................................. |
4 |
|
|
• ACCESSORIES ...................................... |
5 |
|
|
• SUGGESTED TOOLS ............................ |
5 |
|
|
• INSTALLATION....................................... |
6 |
|
|
PRECAUTIONS |
|
|
|
• CAUTION FOR USE ............................ |
8 |
|
|
• GROUNDING INSTRUCTIONS ........... |
8 |
|
|
• NOTES ON OPERATION .................... |
9 |
|
|
• ENERGY EFFICIENCY TIPS ............... |
9 |
|
|
HOW TO OPERATE |
|
|
|
• PARTS NAMES ................................... |
10 |
|
|
• COOLING OPERATION ...................... |
11 |
|
|
• TO CHANGE TEMPERATURE SETTING .......... |
11 |
|
|
• TO CHANGE FAN SPEED AND OPERATION MODE.. |
12 |
|
|
• ENERGY SAVER ................................. |
13 |
This INSTALLATION AND OPERATION |
|
|
|
|
|
• TO CHANGE AIR FLOW DIRECTION ....... |
13 |
MANUAL explains the proper use of your |
new |
|
|
|
|
• ON TIMER OPERATION ..................... |
14 |
Sharp Air Conditioner. Read these instructions |
|
|
|
|
|
• OFF TIMER OPERATION .................... |
15 |
carefully before installing or operating your air |
|
|
|
|
|
• USING THE REMOTE CONTROL ....... |
16 |
conditioner. The INSTALLATION AND |
OP- |
|
|
ERATION MANUAL should be kept in a safe |
CLEANING AND MAINTENANCE ........ |
18 |
|
place for handy reference. |
|
BEFORE CALLING FOR SERVlCE ...... |
19 |
As an ENERGY STAR Partner, Sharp Electronics has determined that these products (AF-S50CX, AFS60CX) meet the ENERGY STAR guidelines for energy efficient air conditioners. To meet these guidelines,
air conditioners must be at least 15% more efficient than the minimum Federal standard.
FOR YOUR PROTECTION
To aid in answering questions if you call for service or for reporting loss or theft, please record below the model and serial number located on the right side of the unit.
MODEL NUMBER
SERIAL NUMBER
DATE OF PURCHASE
Dealer Name
Address
City
State
Zip
Telephone
TO PHONE: Dial 1-800-BE-SHARP (237-4277) for:
SERVICE (for your nearest Sharp Authorized Servicer)
PARTS (for your Authorized Parts Distributor) ACCESSORIES
ADDITIONAL CUSTOMER INFORMATION
TO WRITE: For service problems, warranty information, missing items and other assistance:
Sharp Electronics Corporation
Customer Assistance Center 1300 Naperville Drive Romeoville, IL 60446-1091
Please provide the following information when you write or call: model number, serial number, date of purchase, your complete mailing address (including zip code), your daytime telephone number (including area code) and description of the problem.
2
CONSUMER LIMITED WARRANTY
CONSUMER LIMITED WARRANTY
SHARP ELECTRONICS CORPORATION warrants to the first consumer purchaser that this Sharp brand product (the "Product"), when shipped in its original container, will be free from defective workmanship and materials, and agrees that it will, at its option, either repair the defect or replace the defective Product or part thereof with a new or remanufactured equivalent at no charge to the purchaser for parts or labor for the period(s) set forth below.
This warranty does not apply to any appearance items of the Product nor to the additional excluded item(s) set forth below nor to any Product the exterior of which has been damaged or defaced, which has been subjected to improper voltage or other misuse, abnormal service or handling, or which has been altered or modified in design or construction.
In order to enforce the rights under this limited warranty, the purchaser should follow the steps set forth below and provide proof of purchase to the servicer.
The limited warranty described herein is in addition to whatever implied warranties may be granted to purchasers by law. ALL IMPLIED WARRANTIES INCLUDING THE WARRANTIES OF MERCHANTABILITY AND FITNESS FOR USE ARE LIMITED
TO THE PERIOD(S) FROM THE DATE OF PURCHASE SET FORTH BELOW. Some states do not allow limitations on how long an implied warranty lasts, so the above limitation may not apply to you.
Neither the sales personnel of the seller nor any other person is authorized to make any warranties other than those described herein, or to extend the duration of any warranties beyond the time period described herein on behalf of Sharp.
The warranties described herein shall be the sole and exclusive warranties granted by Sharp and shall be the sole and exclusive remedy available to the purchaser. Correction of defects, in the manner and for the period of time described herein, shall constitute complete fulfillment of all liabilities and responsibilities of Sharp to the purchaser with respect to the Product, and shall constitute full satisfaction of all claims, whether based on contract, negligence, strict liability or otherwise. In no event shall Sharp be liable, or in any way responsible, for any damages or defects in the Product which were caused by repairs or attempted repairs performed by anyone other than an authorized servicer. Nor shall Sharp be liable or in any way responsible for any incidental or consequential economic or property damage. Some states do not allow the exclusion of incidental or consequential damages, so the above exclusion may not apply to you.
THIS WARRANTY GIVES YOU SPECIFlC LEGAL RIGHTS. YOU MAY ALSO HAVE OTHER RIGHTS WHICH VARY FROM
STATE TO STATE.
Your Product Model Number & Description:
Warranty Period for this Product:
Additional Item(s) Excluded From Warranty Coverage (If any):
Where to Obtain Service:
What to Do to Obtain Service:
AF-S50CX, AF-S60CX, AF-R50CX, AF-R55CX, AF-R60CX or AF-R70CX Room Air Conditioner. Be sure to have this information available when you need service for your Product.
One (1) year parts and labor from date of purchase. The warranty period continues for a total of five (5) years from date of purchase for the Sealed Cooling System parts; labor and service are not provided free of charge for this additional period.
Appearance items of the Product, knobs, filter, or accessories, mounting kit, seals, or any printed materials.
From a Sharp Authorized Servicer located in the United States. To find the location of the nearest Sharp Authorized Servicer, call Sharp Toll Free at 1-800-BE-SHARP.
Contact your Sharp Authorized Servicer to obtain in-home service for this
Product. The Servicer will come to your home, and if it is necessary to remove the Product, the Servicer will reinstall it. Be sure to have Proof of Purchase available.
TO OBTAIN SUPPLY, ACCESSORY OR PRODUCT INFORMATION, GO TO OUR WEBSITE AT www.sharp-usa.com OR CALL 1-800-BE-SHARP.
SHARP ELECTRONICS CORPORATION
Sharp Plaza, Mahwah, New Jersey 07430-2135
3
INSTALLATION INSTRUCTIONS
Before beginning installation, read these instructions carefully.
Use the enclosed MOUNTING KIT for proper installation.
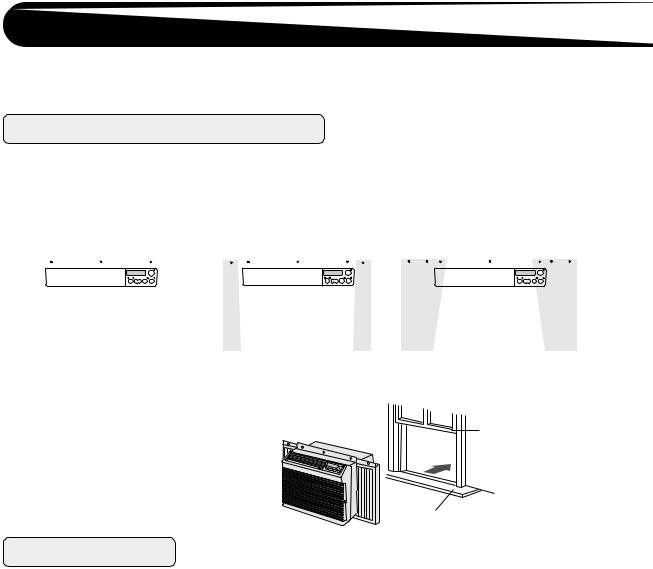
CHECK WINDOW AREA
The mounting kit is designed for wooden sill double or single hung sash-type windows.
Minimum opening |
Mounting kit fully closed |
|
|
Mounting kit fully opened |
||||||||||||||||||||||||||||||||||||||||||
(Without mounting kit) |
|
|
||||||||||||||||||||||||||||||||||||||||||||
|
|
|
|
|
|
|
|
|
|
|
|
|
|
|
|
|
|
|
|
|
|
|
|
|
|
|
|
|
|
|
|
|
|
|
|
|||||||||||
|
|
|
|
|
|
|
|
|
|
|
|
|
|
|
|
|
|
|
|
|
|
|
|
|
|
|
|
|
|
|
|
|
|
|
|
|
|
|
|
|
|
|
|
|
|
|
17 23/32" (450mm) |
|
|
21 21/32" (550mm) |
|
|
33 7/16" (850mm) |
||||||||||||||||||||||||||||||||||||||||
|
|
|
|
|
|
|
|
|
|
|
|
|
|
|
|
|
|
|
|
|
|
|
|
|
|
|
|
|
|
|
|
|
|
|
|
|
|
|
|
|
|
|
|
|
|
|
|
|
|
|
|
|
|
|
|
|
|
|
|
|
|
|
|
|
|
|
|
|
|
|
|
|
|
|
|
|
|
|
|
|
|
|
|
|
|
|
|
|
|
|
|
|
|
|
|
|
|
|
|
|
|
|
|
|
|
|
|
|
|
|
|
|
|
|
|
|
|
|
|
|
|
|
|
|
|
|
|
|
|
|
|
|
|
|
|
|
|
|
|
|
|
|
|
|
|
|
|
|
|
|
|
|
|
|
|
|
|
|
|
|
|
|
|
|
|
|
|
|
|
|
|
|
|
|
|
|
|
|
|
|
|
|
|
|
|
|
|
|
|
|
|
|
|
|
|
|
|
|
|
|
|
|
|
|
|
|
|
|
|
|
|
|
|
|
|
|
|
|
|
|
|
|
|
|
|
|
|
|
|
|
|
|
|
|
|
|
|
|
|
|
|
|
|
|
|
|
|
|
|
|
|
|
|
|
|
|
|
|
|
|
|
|
|
|
|
|
|
|
|
|
|
|
|
|
|
|
|
|
|
|
|
|
|
|
|
|
|
|
|
|
|
|
|
|
|
|
|
|
|
|
|
|
|
|
|
|
|
|
|
|
|
|
|
|
|
|
|
|
|
|
|
|
|
|
|
|
|
|
|
|
|
|
|
|
|
|
|
|
|
|
|
|
|
|
|
|
|
|
|
|
|
|
|
|
|
|
|
|
|
|
|
|
|
|
|
|
|
|
|
|
|
|
|
|
|
|
|
|
|
|
|
|
|
|
|
|
|
|
|
|
|
|
|
|
|
|
|
|
|
|
|
|
|
|
|
|
|
|
|
|
|
|
|
|
|
|
|
|
|
|
|
|
|
|
|
|
|
|
|
|
|
|
|
|
|
|
|
|
|
|
|
|
|
|
|
|
|
|
|
|
|
|
|
|
|
|
|
|
|
|
|
|
|
|
|
|
|
|
|
|
|
|
|
|
|
|
|
|
|
|
|
|
|
|
|
|
|
|
|
|
|
|
|
|
|
|
|
|
|
|
|
|
|
|
|
|
|
|
|
|
|
|
|
|
|
|
Window opening from stool to lower |
|
|
sash bottom must be 14 |
27/32" (377mm) |
Lower sash bottom |
or more. |
|
|
|
|
|
Stool
LOCATION
•The air conditioner should be installed on a firm foundation to minimize noise and vibration. For safe installation, repairs, replacement and secure positioning, make sure foundation is solid and level.
•The room air conditioner must be installed in an area within reach of a properly rated grounded outlet.
•Use of extension cords of any kind is not recommended.
•Never place any obstacles around air inlet.
4
INSTALLATION INSTRUCTIONS
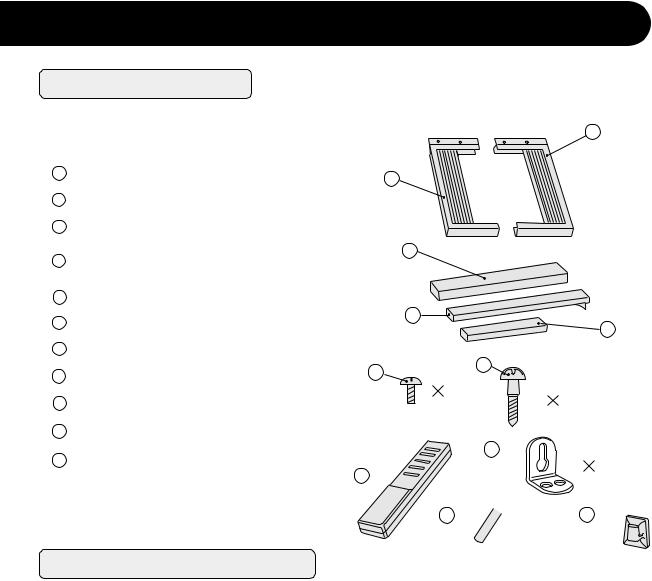
ACCESSORIES
No. |
Accessories |
Q'ty |
|
|
|
1 |
Right closure assembly |
1 |
|
|
|
2 |
Left closure assembly |
1 |
|
|
|
3 |
Window sash foam seal |
1 |
|
|
|
4 |
Window sash foam seal |
1 |
(adhesive type) |
|
|
|
|
|
|
|
|
5 |
Bottom gasket |
1 |
|
|
|
6 |
Screws (L=1", 25.4mm) |
7 |
|
|
|
7 |
Screws (L= 13/32", 10mm) |
6 |
8 |
Base pan angle |
2 |
|
|
|
9 |
Remote control |
1 |
|
|
|
10 |
Battery |
2 |
|
|
|
11 |
Remote control hook |
1 |
|
|
|
SUGGESTED TOOLS
1.Screw driver (medium size Phillips)
2.Tape measure or ruler
3.Knife or scissors
1
2
3
4
5
6
7
6
7
8 
2
9 
10
 11
11
 2
2
5

INSTALLATION INSTRUCTIONS
INSTALLATION
WARNING: Make sure the unit is turned off and unplugged before working.
1 Cut the window sash foam seal (adhesive type) to the proper length and attach it to the underside of the window sash.
Jamb
Sill
Sash
Window sash foam seal (adhesive type)
Insert the right closure assembly and the |
||
2 left closure assembly into |
the top |
angle |
and the bottom channels. |
|
|
Secure the right and left |
closure |
to the |
cabinet with six of the provided screws. (L= 13/32", 10mm)
3 Open the window sash and place the air conditioner on the sill.
Balance the unit on the sill and close the window sash securely behind the top angle.
WARNING:
At this step, make sure the unit is inclined approximately 1 cm (3/8") to the back.
If the unit is not properly inclined, the water collected in the bottom tray during operation will not drain properly and may flow into the room where the air conditioner is installed.
4 Insert the bottom gasket into the space between the window sill and the bottom of the unit to seal outside air.
If there is space between the bottom channel and the sill, fill the gap with a thin board or other hard filler.
Closure assembly
unit
sill
incline backwards approximately
1cm (3/8")
Bottom gasket 
6
 Loading...