


Sharp AE-X09NCJ, AE-X12NCJ, AE-X18NCJ, AE-X24NCJ, AE-X28NCJ User Manual
...Split Type Inverter Room Air Conditioner
OPERATION MANUAL
MODELS: AY-X09NCJ AE-X09NCJ
AY-X12NCJ AE-X12NCJ
AY-X18NCJ AE-X18NCJ
AY-X24NCJ AE-X24NCJ
AY-X28NCJ AE-X28NCJ
Thank you for selecting SHARP Air-Conditioner. Please read this manual carefully before operation and keep it for further reference.
CONTENTS
Operation and maintenance
Notice for operation ………………………………………………. |
3 |
|
Name and function of each part ………………………………… |
4 |
|
Operation of wireless remote control …………………………… |
5 |
- 8 |
Emergency operation …………………………………………….. |
9 |
|
Care and cleaning ………………………………………………… |
10 |
|
Troubleshooting …………………………………………………… |
11 |
|
Operating Tips………………………………………………………...12 Notices for use ……………………………………………………. 12
Installation service
Notices for installation ……………………………………………. 13 Installation dimension diagram ………………………………….. 15 Installing indoor unit ………………………………………………. 16 Installing outdoor unit …………………………………………….. 18 Test operation and check after installation …………………….. 19 Specifications ……………………………………………………… 20 Warranty Statement…………………………………………………..26
NOTE: All the pictures in this manual are just schematic diagrams. The actual product is the standard.
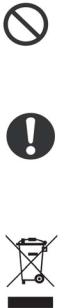
This symbol stands for the items that should be prevented.
This symbol stands for the items that should be followed.
Do not dispose this product as unsorted municipal waste.
Collection of such waste should be separated for special treatment as required by local regulations.
2

Notices for operation
Please read the following carefully before operating
 The product should be installed by a licensed air conditioning contractor in accordance with AS/NZS3000:2000 and your electricity supplier’s rules. This product is designed to operate on 220-240VAC,
50Hz. Operating outside of these limits may cause damage to the product.
 For safety, be sure to turn the product off at the circuit breaker before performing any maintenance or cleaning or when the product is not used for extended periods.
 There are local council rules regarding the maximum allowable noise levels emitted by air conditioning units. Check with your local council before installation.
 Do not leave windows and doors open for a long period while operating the air conditioner. It will decrease the air conditioning capacity.
 Do not block the air intake or outlet vents of both the indoor and outdoor units. This can decrease the air conditioning capacity or cause a malfunction.
 This unit is thermostatically controlled and will turn on and off automatically according to your settings. Selecting the most appropriate temperature can save electricity.
 If you notice anything abnormal with the air conditioner’s operation (eg burning smell or noise), turn the unit off immediately and disconnect from the power supply.
 Keep combustible materials away from the air conditioner by at least 1.5m, as it can cause a fire or explosion.
 Do not attempt to repair the air conditioner by yourself. Attempting repair could cause the risk of electric shock or fire. Please contact your local Sharp Approved Service Centre.
 Please do not cut off or damage the power cords and control cords.
If they are damaged, please refer the matter to a qualified air conditioning contractor.
To change the airflow direction, adjust the vertical and lateral air flow direction by using the remote control.
 Do not insert your hands or objects into the air intake or outlet vents.
 Do not expose animals and plants directly in front of the output air flow as it may have a detrimental effect on them.
 Do not expose yourself to cold output air for prolonged periods as it may affect your health.
 This air conditioner is designed for normal residential use. Do not use for any other purpose such as food preservation or drying clothes.
 Splashing water on the air conditioner can cause an electric shock or malfunction.
 Do not place a space heater or cooking appliance near the air conditioner.
3

Name of parts
(1) Power cord (AYX09NCJ and AYX12NCJ only)
(2) Remote controller
(3) Front panel
(4) Filter
(5) Horizontal louver
(6) Wall pipe
(7) Binding tape
(8) Connection Pipe
(9) Drain hose
(10) Drain connector
Accessory list:
1x Remote Control
2x AAA Batteries
1x Operation Manual
1x Wall Plug
NOTE: Actual units might vary slightly from those shown above
4
Operation of wireless remote control
Indoor Front Panel Lights : RED power light should be on while power is applied. If blinking please call for service. ORANGE = Heat, BLUE = Cool.
Note: Be sure that there are no obstructions between indoor receiver and remote control. Take care not to drop or throw the remote. Do not spill any liquid on the remote control. Do not leave remote control directly in sunlight or hot environments.
 ON/OFF button
Press this button to turn unit on and off. Sleep function will be cancelled if unit is turned off.
MODE button
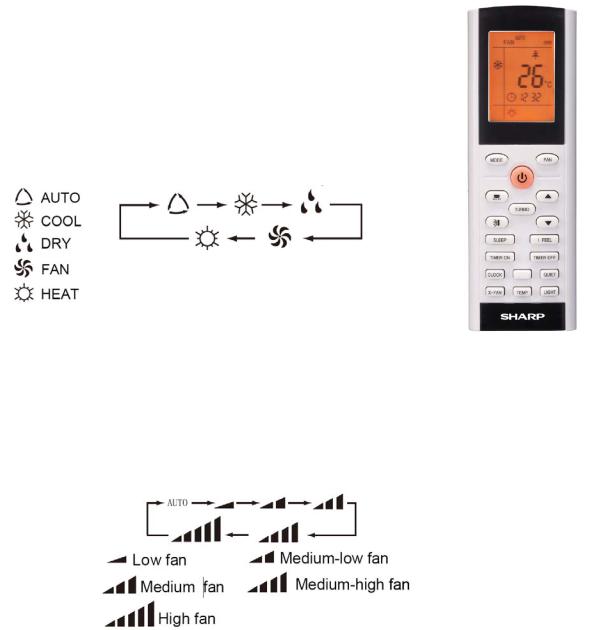
Press this button, Auto, Cool, Dry, Fan, Heat mode can be selected in the following sequence. Auto mode is default when first turned on. Under Auto mode, the temperature will not be displayed on the remote but there is a temperature display on the indoor unit; Under Heat mode, the HEAT initial value is 28°C (82°F); Under other modes, the initial value is 25°C (77°F).
(Only for cooling and heating unit as for cooling only unit, it won’t have any action when it receives the signal of heating operation.)
SLEEP button
Press this button to turn Sleep mode on or off. Sleep mode “off” is default when unit is first turned on. Sleep function is cancelled when unit is switched off. Sleep mode duration can be adjusted. Sleep mode is not available under the Fan and Auto modes.
FAN button
Press this button to select between Auto, Low, Middle and High speed fan settings. Auto fan speed is default when unit switched on.
Under DRY mode, Low fan speed only can be set up.
CLOCK button
Press this button to set clock function. The clock symbol will blink and display. Within 5 seconds the time can be adjusted by pressing or button. Hold down button continuously for rapid time change. Press clock button again to complete time setting.
5
Operation of wireless remote control con’t.
Note: This wireless remote control is universal, and it could be used for various units. Some buttons on this control may not be applicable to this unit.
X-FAN button
Pressing X’FAN button in COOL or DRY mode, the icon  is displayed and the indoor fan will continue operation for 10 minutes in order to dry the indoor unit even though you have turned off the unit. X-FAN OFF is default. X-FAN is not available in AUTO, FAN or HEAT mode.
TURBO button
Under Cool or Heat mode the TURBO function will operate the air conditioner at maximum power. Pressing the TURBO button turns the TURBO function on or off. After the TURBO function is turned on, the TURBO signal is displayed. The signal will automatically be cancelled if mode or fan speed is changed.
and button
Preset temperature is increased and decreased by pressing these buttons. Continuously pressing and holding for 2 seconds changes the preset temperature rapidly. The preset temperature adjustment is unavailable under the Auto Mode.
LIGHT button
Press this button to turn indoor display light ON or OFF. Light ON is default when unit is switched on.
QUIET button
Press this button, the QUIET icon is under the Auto Quiet mode (display “ ” and “Auto” icon) and
QUIET mode (display “ ” icon) and QUIET OFF (there is no icon displayed). After powered on, the QUIET OFF is default.
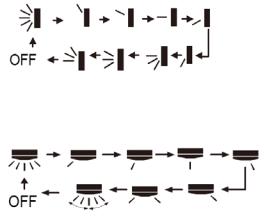
 SWING UP and DOWN button
Press this button to select swing angle as below:
 Indicates the guide louver swings back and forth in the five places, as shown in the figure.
 SWING LEFT and RIGHT button
Press this button to set left and right swing angle cycling as below:
6
Operation of wireless remote control con’t.
TIMER ON button – selects or presets a time you wish the air conditioner to turn on.
Press this button to select TIMER ON setting. Pressing the or button during the first 5 seconds adjusts the time value by one minute each time pressed. Holding the or button down for more than 2 seconds changes the time rapidly. While time is blinking, press TIMER ON button to confirm setting. After setting, repressing the TIMER ON button cancels the operation.
Note: To operate TIMER ON function correctly set the clock to the current time.
TIMER OFF button – selects or presets a time you wish the air conditioner to turn off.
Press this key to enter TIMER OFF setup, in which case the TIMER OFF icon will blink. The method of setting TIMER OFF is the same as TIMER ON.
TEMP button
Press this button to set up and select: setting temperature (displaying the room), indoor ambient temperature (displays current indoor temperature), outdoor ambient temperature (displays current outdoor temperature), if there is no outdoor ambient temperature the original display status will circulate as follows: No signal displayed. Remark: when operating this button the setting temperature is displayed all the time on the wireless remote control.
I FEEL button
Press this button once to turn on the I FEEL function. When the “I FEEL” symbol is displayed the remote control will send a temperature reading to the indoor unit every 10 minutes. The air conditioner will adjust accordingly to remote control location. Press the “I FEEL” button again to cancel operation.
About X-FAN function: This function indicates that the indoor fan will continue to blow after the unit is turned off so moisture in the indoor unit will be removed. This will help avoid mould.
1.Having set X-FAN function on; Turning off the unit by pressing ON/OFF button indoor fan will continue running for about 10 min. at low speed. In this period, press X-FAN button to stop indoor fan directly.
2.Having set X-FAN function off: After turning off the unit by pressing ON/OFF button, the unit will be shut
down directly.
About AUTO RUN function: When AUTO RUN mode is selected, the setting temperature will be displayed on the display, the unit senses the room temperature automatically to select a suitable running method for room comfort.
About TURBO function: When TURBO mode is selected the unit will run at super-high fan speed to cool or heat quickly so that the ambient temperature approaches the preset temperature as soon as possible.
About LOCK: Press or buttons simultaneously to lock or unlock the keypad. If the remote controller
is locked, the icon  will be displayed on it. In which case, press any button, the mark will flicker three times. If the keyboard is unlocked, the mark will disappear.
About switch between Fahrenheit and Centigrade: Under status of unit off, press MODE and button simultaneously to switch between °C and °F.
About Quiet function: If Auto Quiet mode has been selected, after the room temperature reached the setting temperature or 10mins later, the air conditioner will immediately enter into the Quiet running status, at this time the fan speed is not adjustable.
7
Operation of wireless remote control con’t.
Introduction of Special Function
●Press SLEEP button to select Sleep 1 (  ), Sleep 2 (
  ), Sleep 3 (
  ), and cancel. Sleep cancel is default setting.
●Sleep 1 in Cool and Dry modes: after one hour, the main unit setting temperature will
increase 1°C. After 2 hours the setting temperature increases to 2°C, the unit will run at this setting temperature; In Heat mode: after two hours, the setting temperature will decrease 1°C, 2 hours, setting temperature will decrease 2°C , then the unit will run at this setting temperature.
|
Temp Range |
Cool Mode |
Temp Range |
Heat Mode |
Sleep 2 |
16-23°C |
+ 1°C every hour up to 3°C |
16°C |
N/A |
|
24-27°C |
+ 1°C every hour up to 2°C |
17-20°C |
- 1°C after first hour |
|
28-29°C |
+ 1°C every hour up to 1°C |
21-27°C |
-1°C every hour up to 2°C |
|
30°C |
- 1°C after 7 hours |
28-30°C |
-1°C every hour up to 3°C |
● Sleep 3
(1)Under Sleep 3 mode, press and hold "Turbo" button continuously, remote control enters into user individual sleep setting status. The time of remote control will display "1hour ", the setting temperature "88" will display the corresponding temperature of last sleep curve setting and blink
(2)To change the set temperature, adjust by pressing "" and " " buttons. Press "Turbo" button to confirmation;
(3)At this time, 1hour will be automatically increased at the timer position on the remote control, (that are "2 hours" or "3 hours" or " 8 hours "), the place of setting temperature “88” will display the corresponding temperature of last setting sleep curve and blink;
(4)repeat the above (2) (3) operation, until 8 hours temperature setting finished, sleep curve setting finished, at this time, the remote control will resume the original timer display; temperature display will resume to the original timer display; temperature display will resume to original setting temperature.
● Sleep 3
The user could accord to sleep curve setting method to inquire the presetting sleep curve, enter into user individuation sleep setting status, but do not change the temperature, press "Turbo" button directly for confirmation.
Note: Sleep function can not be set under the Fan and Auto mode. Under Dehumidify mode, only Sleep 1 can be set. When selecting the Sleep mode function, the Quiet function is set automatically, different Quiet status could be optional and turned off.
8
Operation of wireless remote control con’t.
Changing batteries and notices
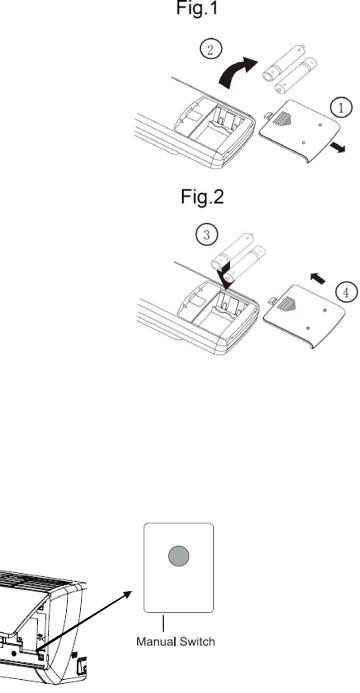
(1) Slightly press down and push the back cover of wireless remote controller. (As show in Fig 1.)
(2) Take out the old batteries.
(3)Insert two new AAA1.5V dry batteries, and pay attention to the polarity. (As shown in Fig 2.)
(4)Attached the back cover of wireless remote controller
NOTE:
●When changing the batteries, do not use the old or different batteries, otherwise, it can cause the wireless remote controller to malfunction.
●If the wireless remote controller will not be used for a long time, please take batteries out, so leakage will not damage the wireless remote controller.
●The remote controller should be placed 1m away from the TV set or stereo sound sets.
The operation should be in its receiving range.
●If the remote control cannot operate normally, please take the batteries out, and then reinsert it 30s later; if it is also abnormal, please replace the batteries.
●If the main unit needs to be remote controlled, please aim remote controller at the receiver of main unit in order to improve the receiving sensitivity of the main unit.
●When the remote controller sends out signal, a mark  will flicker for about 1s. The bell will ring if the main unit receives effective signal.
Emergency Operation
When the wireless remote control is lost or damaged, please use the manual switch on the main unit. Operation will be in Auto Run mode and the temperature setting or fan speed cannot be changed.
The manual switch can be operated as follows:
●To operate: Press the AUTO button and the unit will enter into AUTO RUN mode. The microcomputer will monitor the room temperature to select the (COOL, HEAT, FAN) mode automatically, to obtain the comfortable effect.
●To turn off: Press the AUTO button to switch the unit off.
AUTO
9
 Loading...