

Page 1
66GS-62H
COLOUR TELEVISION
OPERATION MANUAL
Page 2

1
TERMS OF GUARANTEE
Subject to the conditions listed below Sharp Electronics (U.K.) Ltd. (Hereinafter called
«the Company») guarantee to provide for the repair of, or at its option replace the
Sharp Equipment, or any component thereof, (other than Batteries), which is faulty or
below standard, as a result of inferior workmanship or materials.
The conditions of the guarantee are:
1. This guarantee shall only apply to defects or faults which are notified to the Company, or its approved Service Facility within one year from the date of purchase of
the equipment.
2. This guarantee covers equipment intended for private domestic use only.
This guarantee does not apply to equipment used in the course of a business, trade
or profession.
3. This guarantee does not cover any faults or defects caused by accident, misuse,
fair wear and tear, neglect, tampering with the equipment, or any attempt at adjustment or repair other than by an approved Service Facility.
4. In the unlikely event of that your equipment should require repair, please contact
the dealer or supplier from whom it was purchased.
5. The cost of carriage to and from the Dealer, Supplier or Sharp approved Service
Facility shall be borne by the purchaser.
6. No person has any authority to vary the terms or conditions of this guarantee.
7. This guarantee is offered as an additional benefit to the consumer’s
statutory rights and does not affect rights in any way.
In the unlikely event of this equipment requiring repair during the guarantee period,
you will need to provide proof of date of purchase to the repairing company.
Please Keep your invoice or receipt, which is supplied at the time of purchase.
Page 3
2
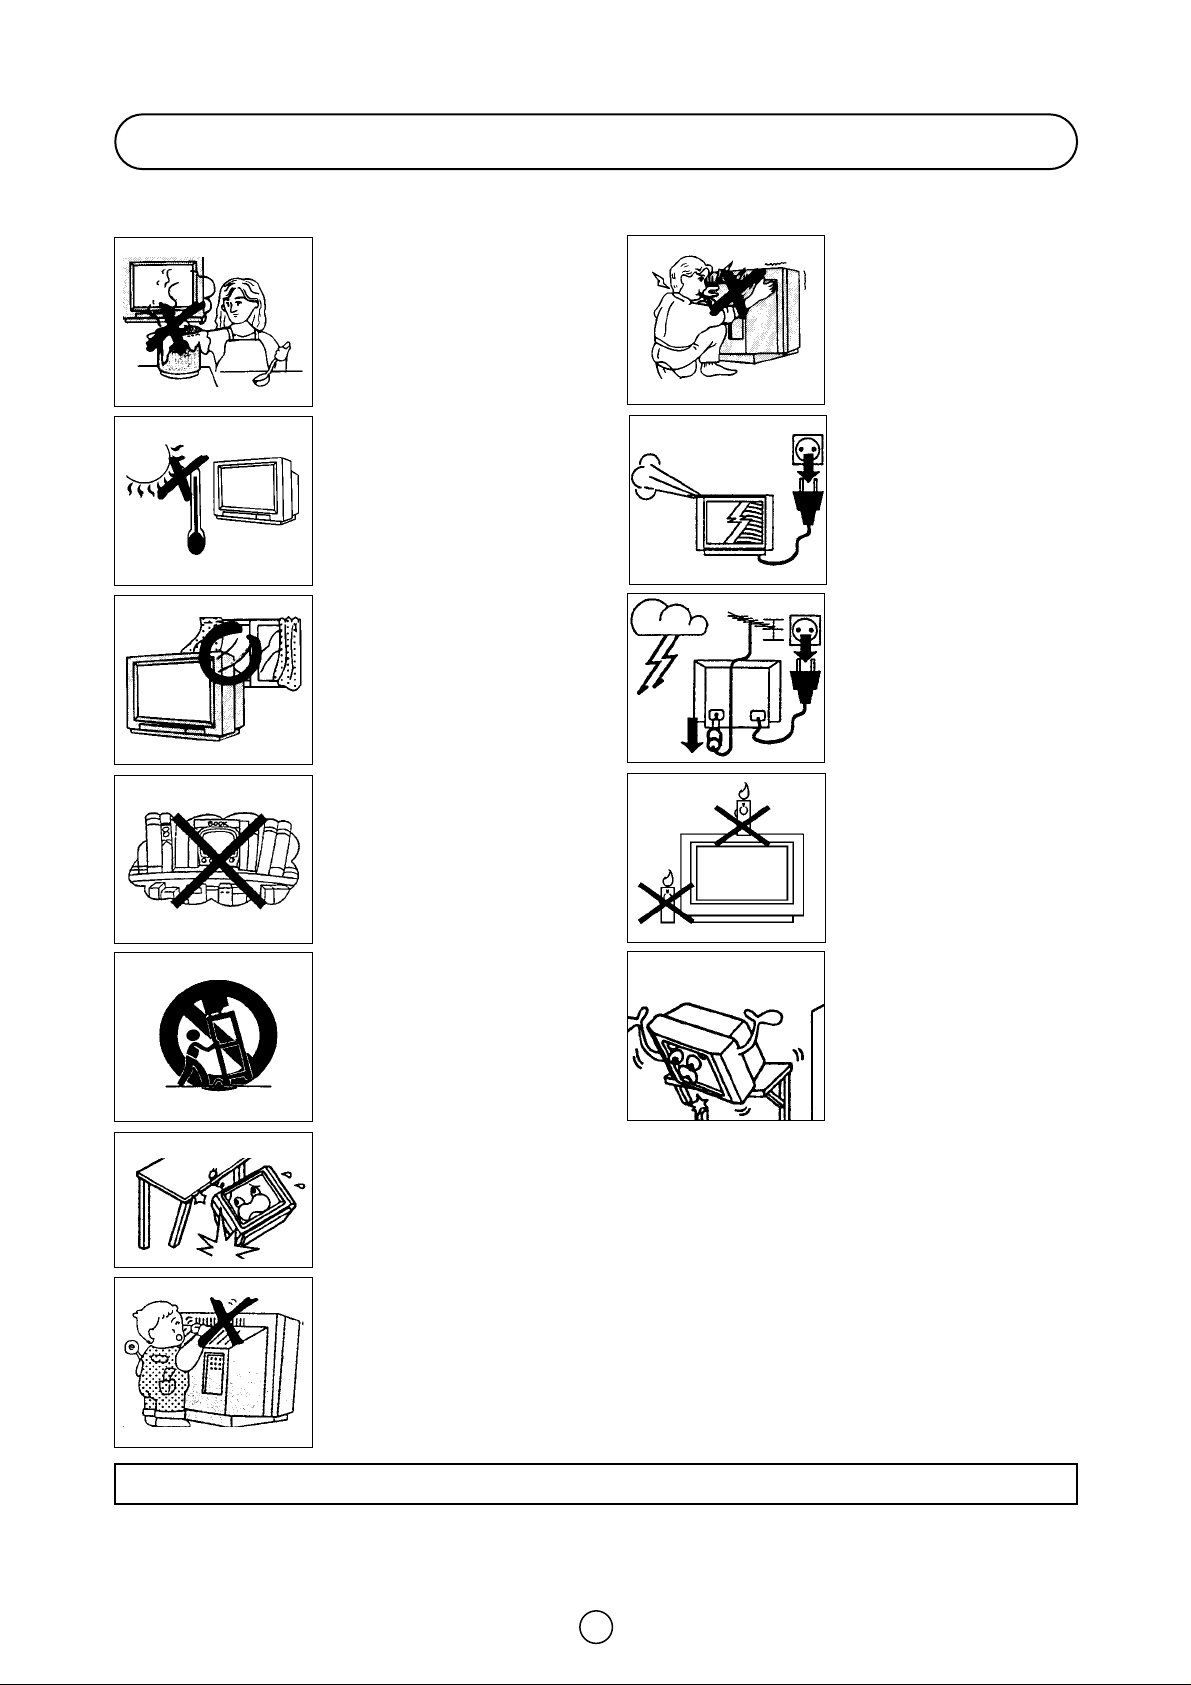
Safety precautions
This equipment complies with the requirements of Directives 89/336/EEC and 73/23/EEC as amended by 93/68/EEC.
Never insert or drop any metallic or inflammable objects into the ventilation holes of the TV set, this
can cause fire, electrical shock or electrical failure. Do not place a flower vase or anything else
containing liquid on the TV set, as liquid spilt on the TV set can cause serious problems.
To prevent fire or electrical
shock, do not use the TV set
in an excessively damp place.
Position the TV set out of
direct sunlight and away from
heat, as high temperatures
can damage the cabinet, CRT,
or other electronic parts.
Do not cover the ventilation
holes at the back of the TV
set, this can cause fire or
other serious problems. Leave
an adequate open space
behind the TV set for good
ventilation.
Always disconnect your
television from the mains and
the aerial cable during
thunderstorms.
Even if your television is
switched off, it can still be
damaged by lightning striking
the mains and/or aerial cable.
Unplug the power cord from
the wall outlet immediately if
the TV set begins to make
unusual noises or give off
smoke or an odd smell, then
call your dealer for service.
Do not install this equipment
in a confined space such as a
bookcase or a built-in cabinet.
Television equipment and cart
combination should be moved
with care. Quick stops,
excessive force and uneven
surfaces may cause the
equipment and cart
combination to overturn.
Wall or shelf mounting should
follow the manufacturer’s
instructions, and should use a
mounting kit approved by the
manufacturer.
To prevent fire, never place
any type of candle or naked
flames on the top or near the
TV set.
Never remove the back of the
cabinet, as there is high
voltage in the TV set.
Please call for service.
Do not place this television equipment on an unstable cart, stand or table. The television
equipment may fall, causing serious injury to a child or an adult, and serious damage to the
equipment.
Use only with a cart or stand recommended by the manufacturer, or sold with the television
equipment.
CAUTION:Make sure that the main power is switched off when going out.
Page 4
3
Congratulations! You are now the proud owner of a SHARP Colour Television Receiver. To ensure proper operation,
please read this manual carefully. After reading, keep this manual in a safe place for future reference.
Dear SHARP Customer
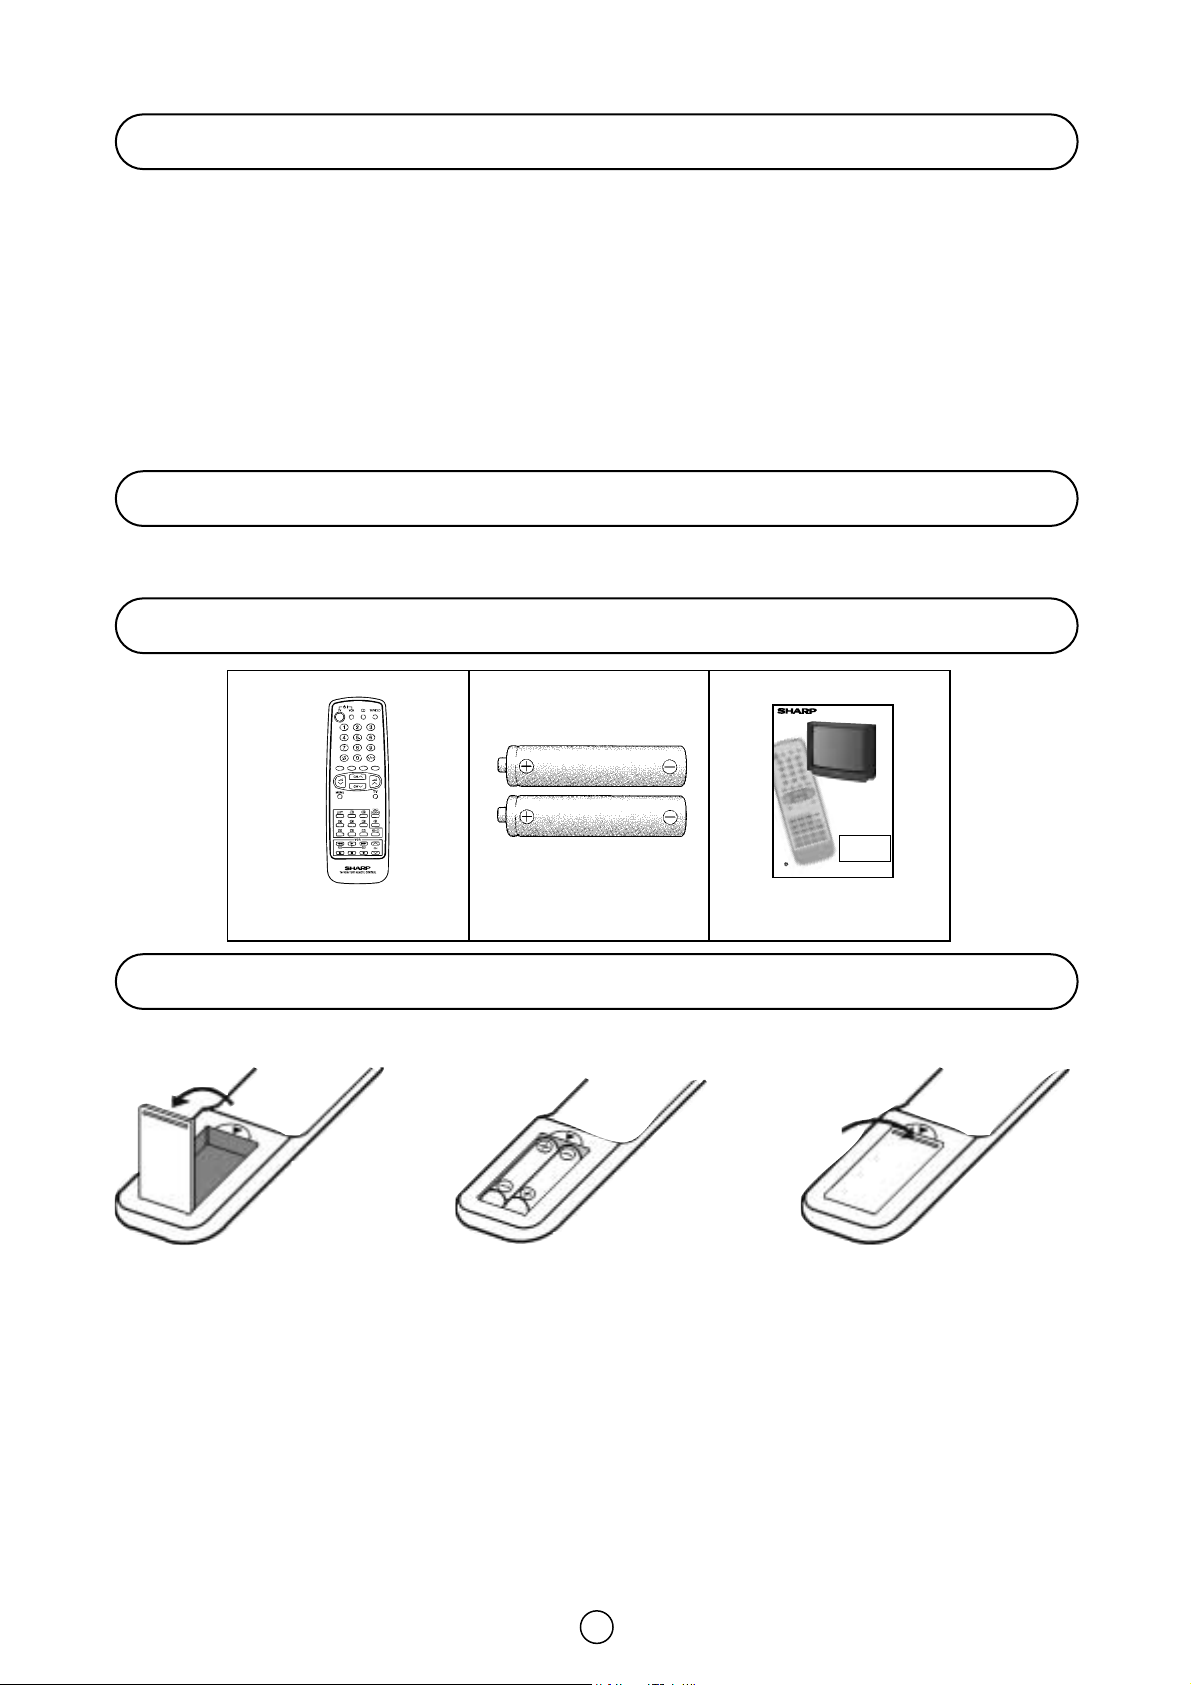
Accessories
Remote Control Battery Installation
Contents
Terms of guarantee ..........................................................1
Safety precautions ...........................................................2
Contents ...........................................................................3
Accessories.......................................................................3
Remote Control Battery Installation .................................3
Controls & Terminals ........................................................5
Aerial Connections............................................................6
Auto Installation ........................................................7 to 8
Switching on .....................................................................9
Menu Structures..............................................................10
TV Channel Setting .........................................................11
TV operation (Channel selection) ....................................15
Picture Adjustments .......................................................16
Audio Adjustments .........................................................17
On Timer and Off Timer...................................................19
Child Lock (Channel Block) ............................................20
POSTCODE and VCR Mode ...........................................22
TV/VIDEO Selector .........................................................23
Sub-titles.........................................................................23
Headphone Jack ............................................................23
Teletext Mode ................................................................24
21-pin Euro-SCART and 21-pin Audio/Video ................27
Typical connections .......................................................28
Troubleshooting .............................................................29
General Specifications for Television Receiver ..............30
Index ...............................................................................31
Remote control
Size-AA Dry Batteries
Operation Manual
Before using the TV set for the first time, install the supplied dry batteries in the remote control.
NOTE
• Remove batteries if weak or if the unit is not in use for long periods.
•
Do not mix old and new batteries.
• Incorrect installation of the batteries may damage the remote control.
With your thumb nail, pull
up the slit as indicated by
the arrow to remove the
battery cover.
Insert two batteries 1,5 V
(size «AA»). Be sure to
match the battery A/D terminals with the A/D marks
inside the compartment.
Replace the battery cover.
66GS-62H
COLOUR TELEVISION
OPERATION MANUAL
Please read this operation manual carefully
before using the colour television.
If you require any advice or assistance
regarding your Sharp product, please visit
our web-site www.sharp.co.uk/support.
Customers without Internet access may
telephone 08705 274277 during office hours
(or (01) 676 0648 if telephoning from Ireland.
Printed on recycled paper
Page 5
4
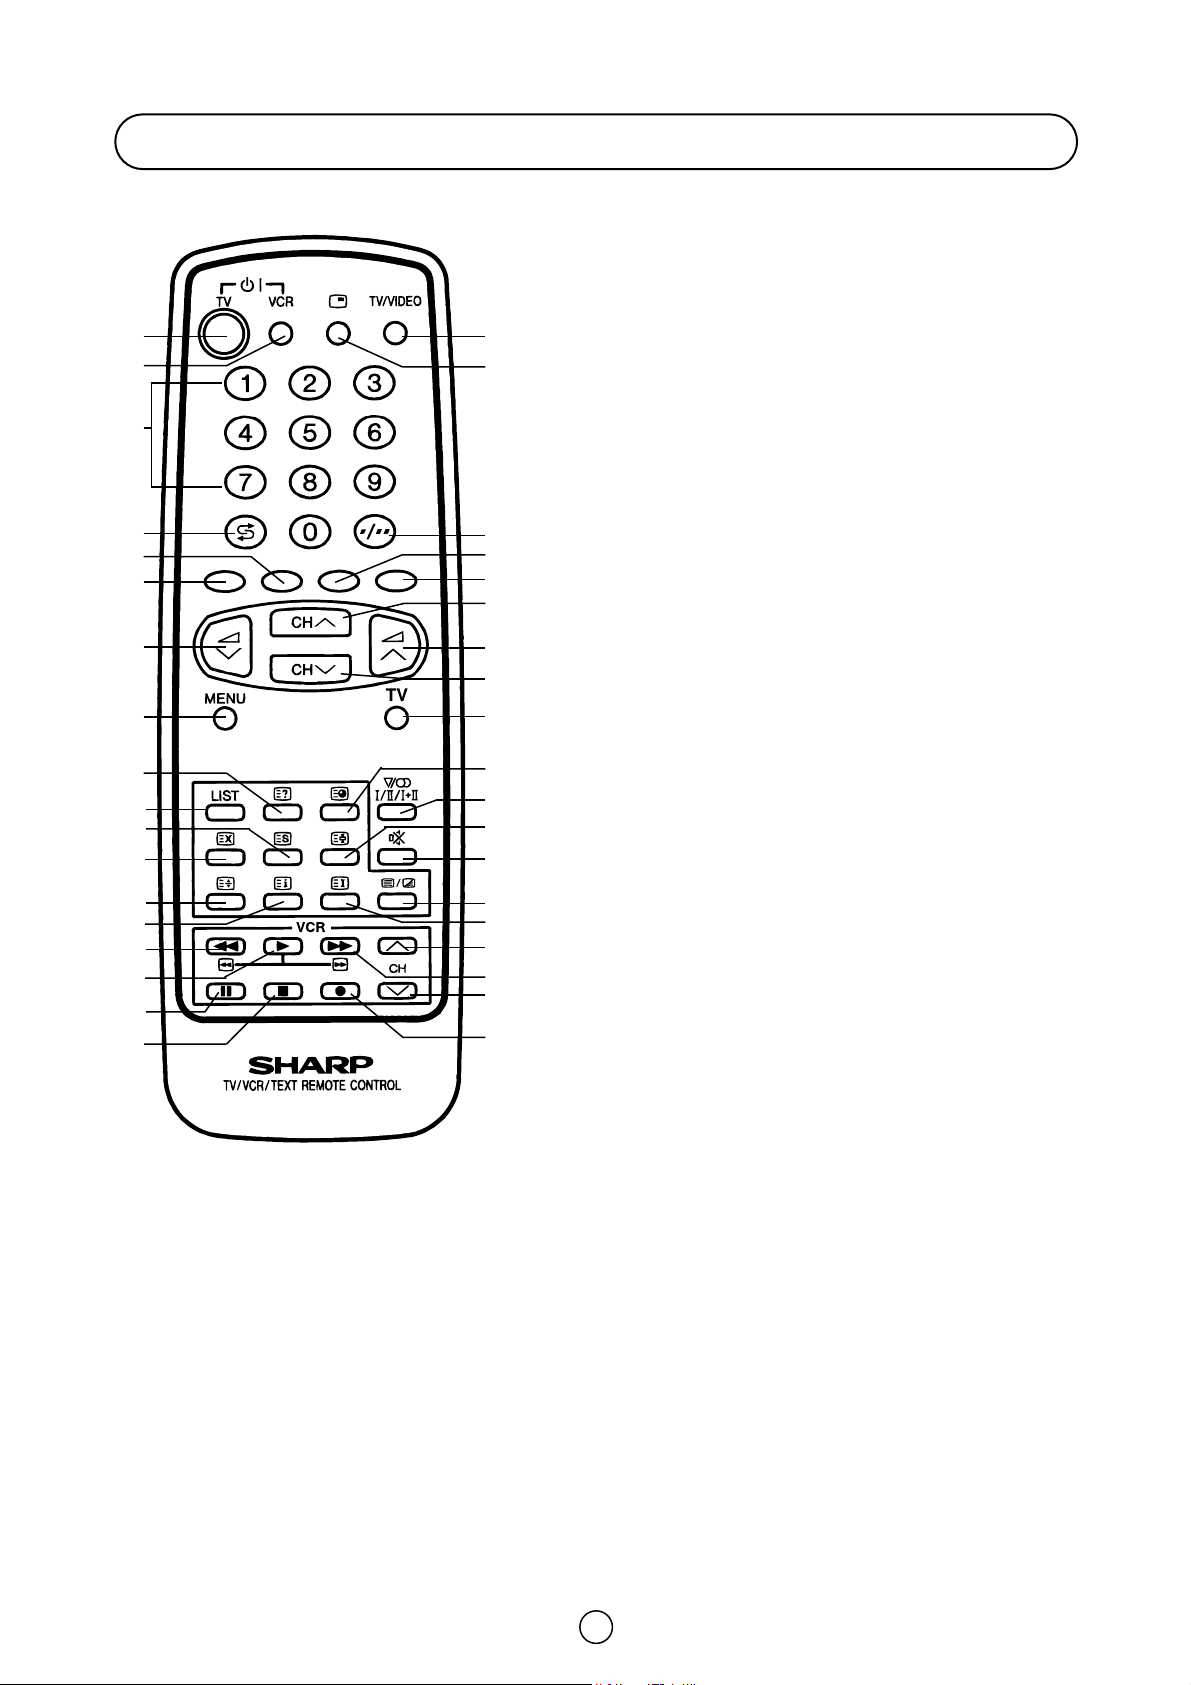
Remote Control
TV 1. Stand-by ON/OFF switch (TV)
Video 2. Power ON/OFF switch (VCR)
TV 3. Digit buttons 0~9
4. Flashback button
Teletext 5. Colour button (green)
6. Colour button (red)
TV 7. Volume Down/Cursor control left
8. Menu button
Teletext 9. Reveal button
10. List selector
11. Store button
12. Cancel button
13. Top/Bottom/Full button
14. Reset button
Video 15. Rewind/picture search/reverse
16. Play button
17. Pause / Still button
18. Stop button
TV 19. TV/VIDEO selector
20. Channel call button
21. Single/Double entry
Teletext 22. Colour button (yellow)
23. Colour button (cyan)
TV 24. Channel Up/Cursor control Up
25. Volume Up/Cursor control Right
26. Channel Down/Cursor control Down
27. TV button / Subtitle
TV/Teletext 28. Time button
TV 29. Sound mode selector
Teletext 30. Hold button
TV 31. Sound Mute button
Teletext 32. Text/Mix button
33. Index button
Video 34. Channel Up selector
35. Fast forward/picture search/forward
36. Channel Down selector
37. Record button
1. 19.
23.
21.
24.
25.
26.
27.
28.
29.
30.
31.
32.
34.
37.
36.
35.
33.
22.
20.
4.
5.
6.
7.
8.
10.
11.
12.
13.
15.
18.
17.
16.
14.
9.
2.
3.
Page 6
5
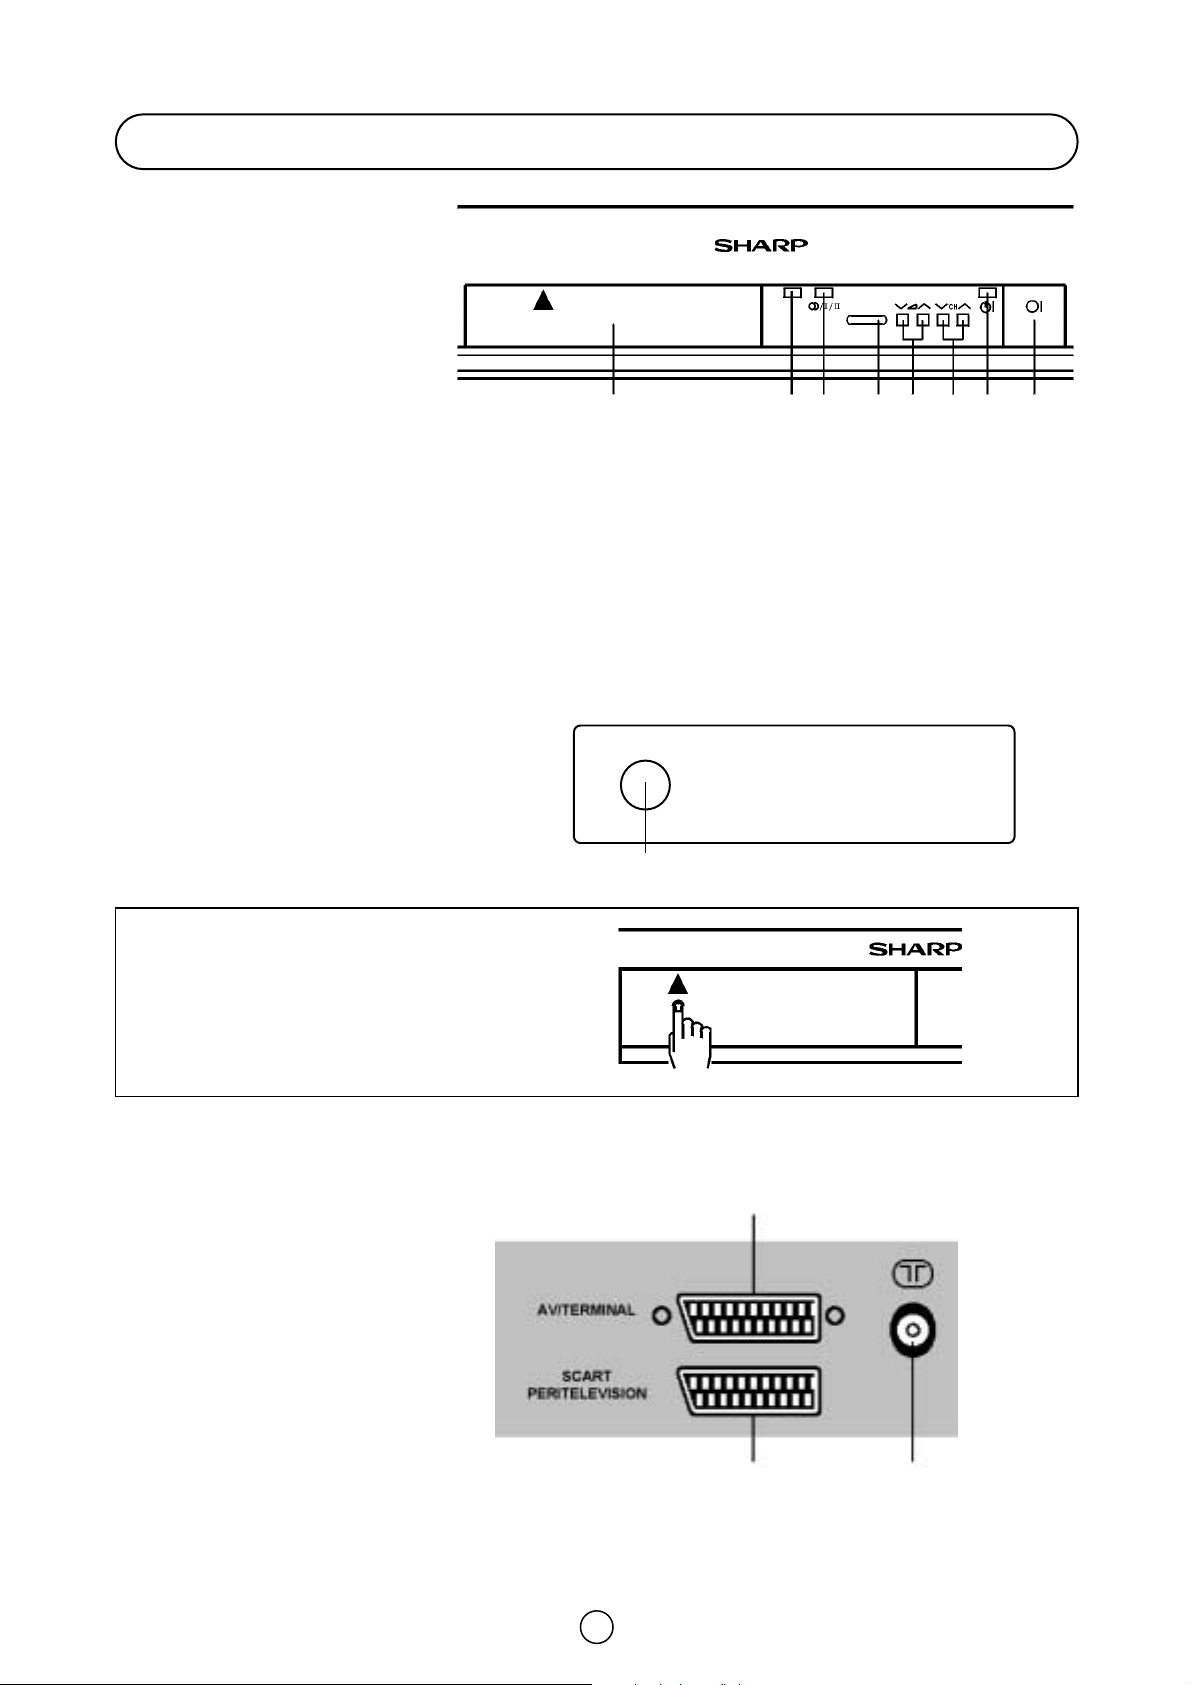
HOW TO OPEN THE DOOR
Press the top of the door, opening it slightly.
Hook your finger inside and pull open.
FRONT TV
1. Main Power On/Off Switch
2. Power Indicator
3. Program Selector (UP/DOWN)
4. Volume Buttons (UP/DOWN)
5. Remote Control Sensor
6. Sound Indicator
7. Remote Control Indicator
8. DOOR
Behind the door
9. Headphone Socket
(3,5 mm Ø 16 ~ 600 ohms)
Controls & Terminals
REAR TV
RF Input
1. Antenna terminal
21-pin In/Out
2. 21-pin Euro SCART (RGB)
3. 21-pin Audio/Video (AV-1)
With S-Video Input
2
3
1
9
8
6
7
5 4 3 2 1
n
VIDEO AUDIO
L/S/G/I R/S/G/I
Page 7
6
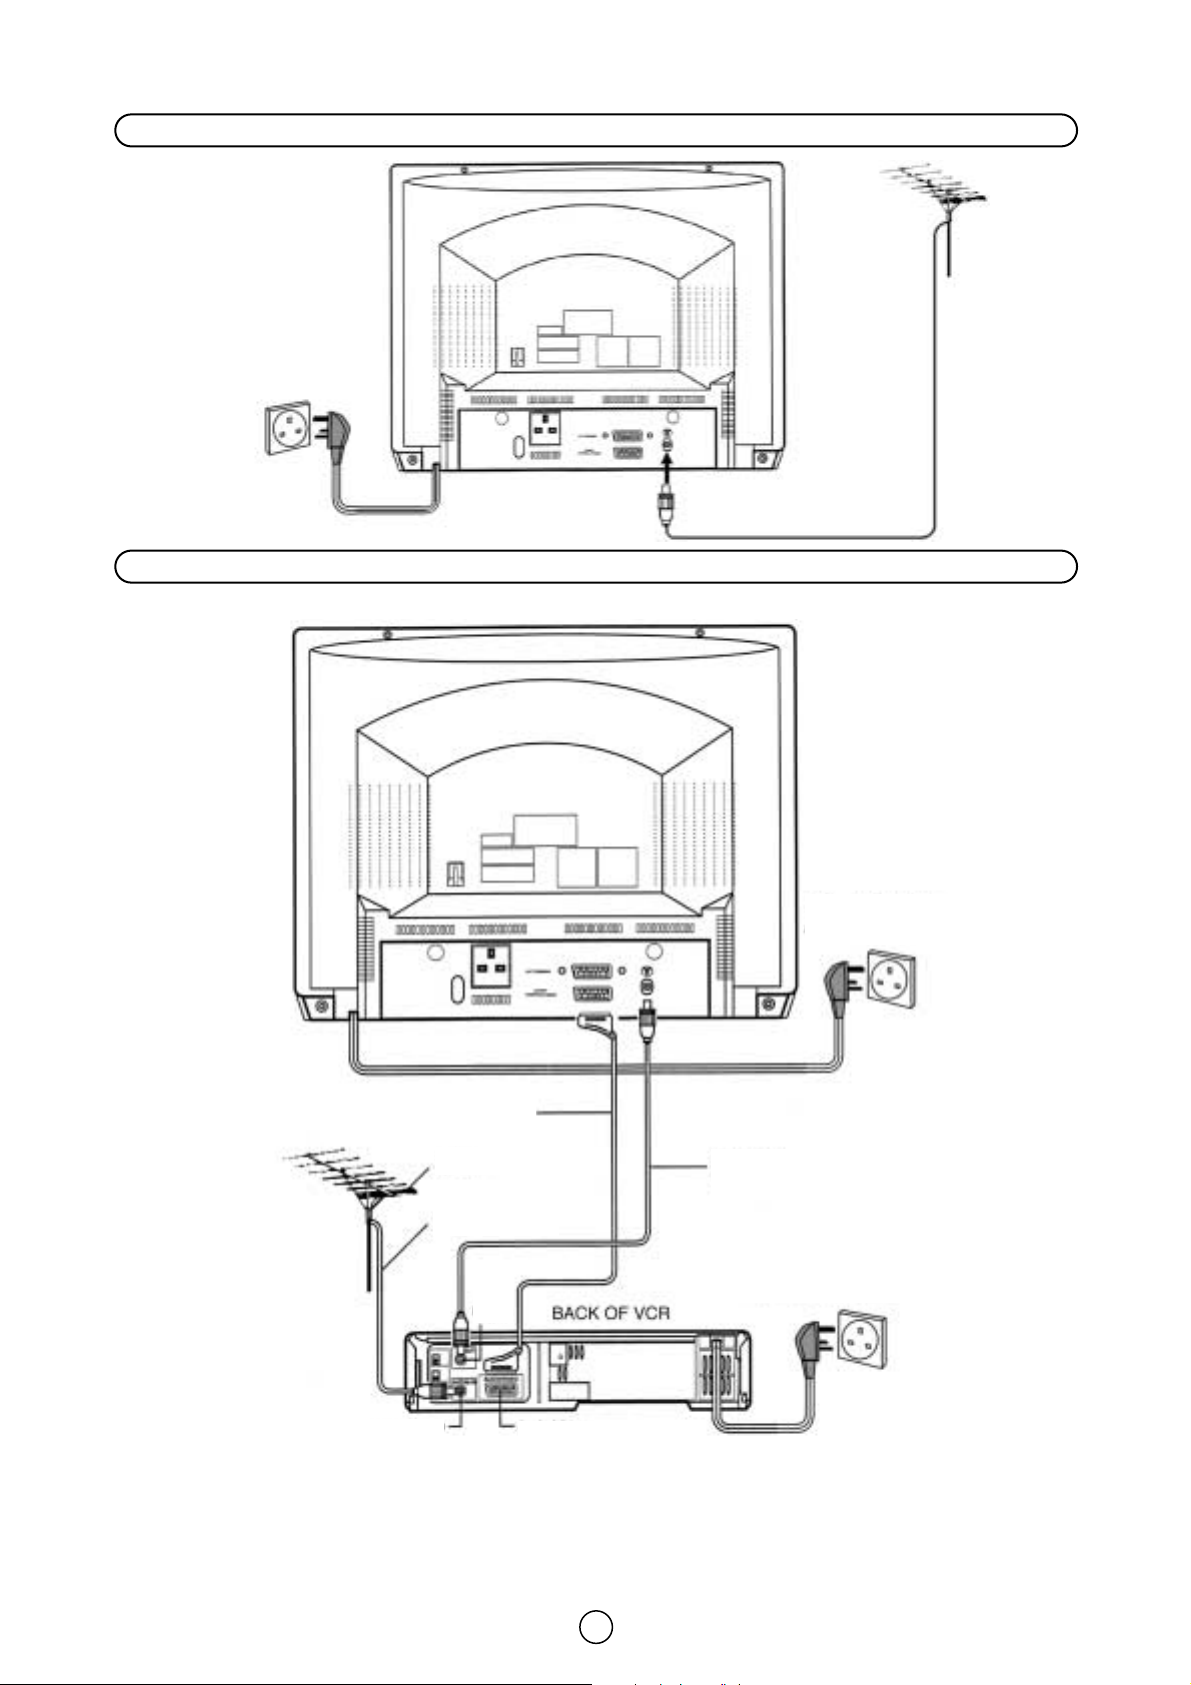
Aerial connections - TV set only -
Aerial connections - VCR and TV -
REAR OF TV
Mains Outlet Socket
AC 220~240V, 50 HZ
Mains Outlet Socket
AC 220~240V, 50 HZ
Mains Outlet Socket
AC 220~240V, 50 HZ
Aerial Cable
(Not supplied)
Aerial (Not supplied)
Aerial Lead
(Not supplied)
Audio/Video
Aerial in
RF
out
SCART Lead
(Not supplied)
NOTE: See on - Typical connections - (page 28) for details of further connection possibilities.
Page 8

7
Auto Installation System
Your television set is provided with an Automatic Installation System
which makes installation easier.
This new system is activated when you turn on the TV for the first time.
Procedure:
1. Connect the antenna jack in the antenna input terminal on the rear side
of your TV-set. Then connect the TV power cable to a 220 ~ 240V a.c.
system.
2. Press the main power button (®), on the right hand side of the TV set,
and the AUTO INSTALLATION message will appear on the screen.
3. Put batteries into the remote control and follow the instructions on
the screen.
The TV will go through the following steps Automatically and sequentially:
Automatic Channel Sorting System (ASS): The TV set SEARCHES FOR
FREQUENCIES, memorises the channels found, and sorts them (according to technical criteria) from Pr-01 of the TV, to a maximum of 99 programmes.
This tuning system may take several minutes to perform.
Editing: When the AUTOMATIC SEARCH has been completed, the list of
memorised programmes appears. In this menu, you can change the order
of the channels and change or give the channels a four letter name.
NOTE: You may not have to follow this procedure if it has already been
done for you at the establishment where you purchased your TV. If this is
the case, please go on to the section entitled «Switching ON» (page 9).
If you need to repeat the AUTO INSTALLATION, read on.
TO REPEAT THE AUTO INSTALLATION
1. Press the MENU button to see the Main Menu.
2. Press the BLUE button to see the «TUNING Menu».
3. Press the Cursor UP button to select AUTO-TUNE.
4. Press the MENU button to start the AUTO INSTALLATION.
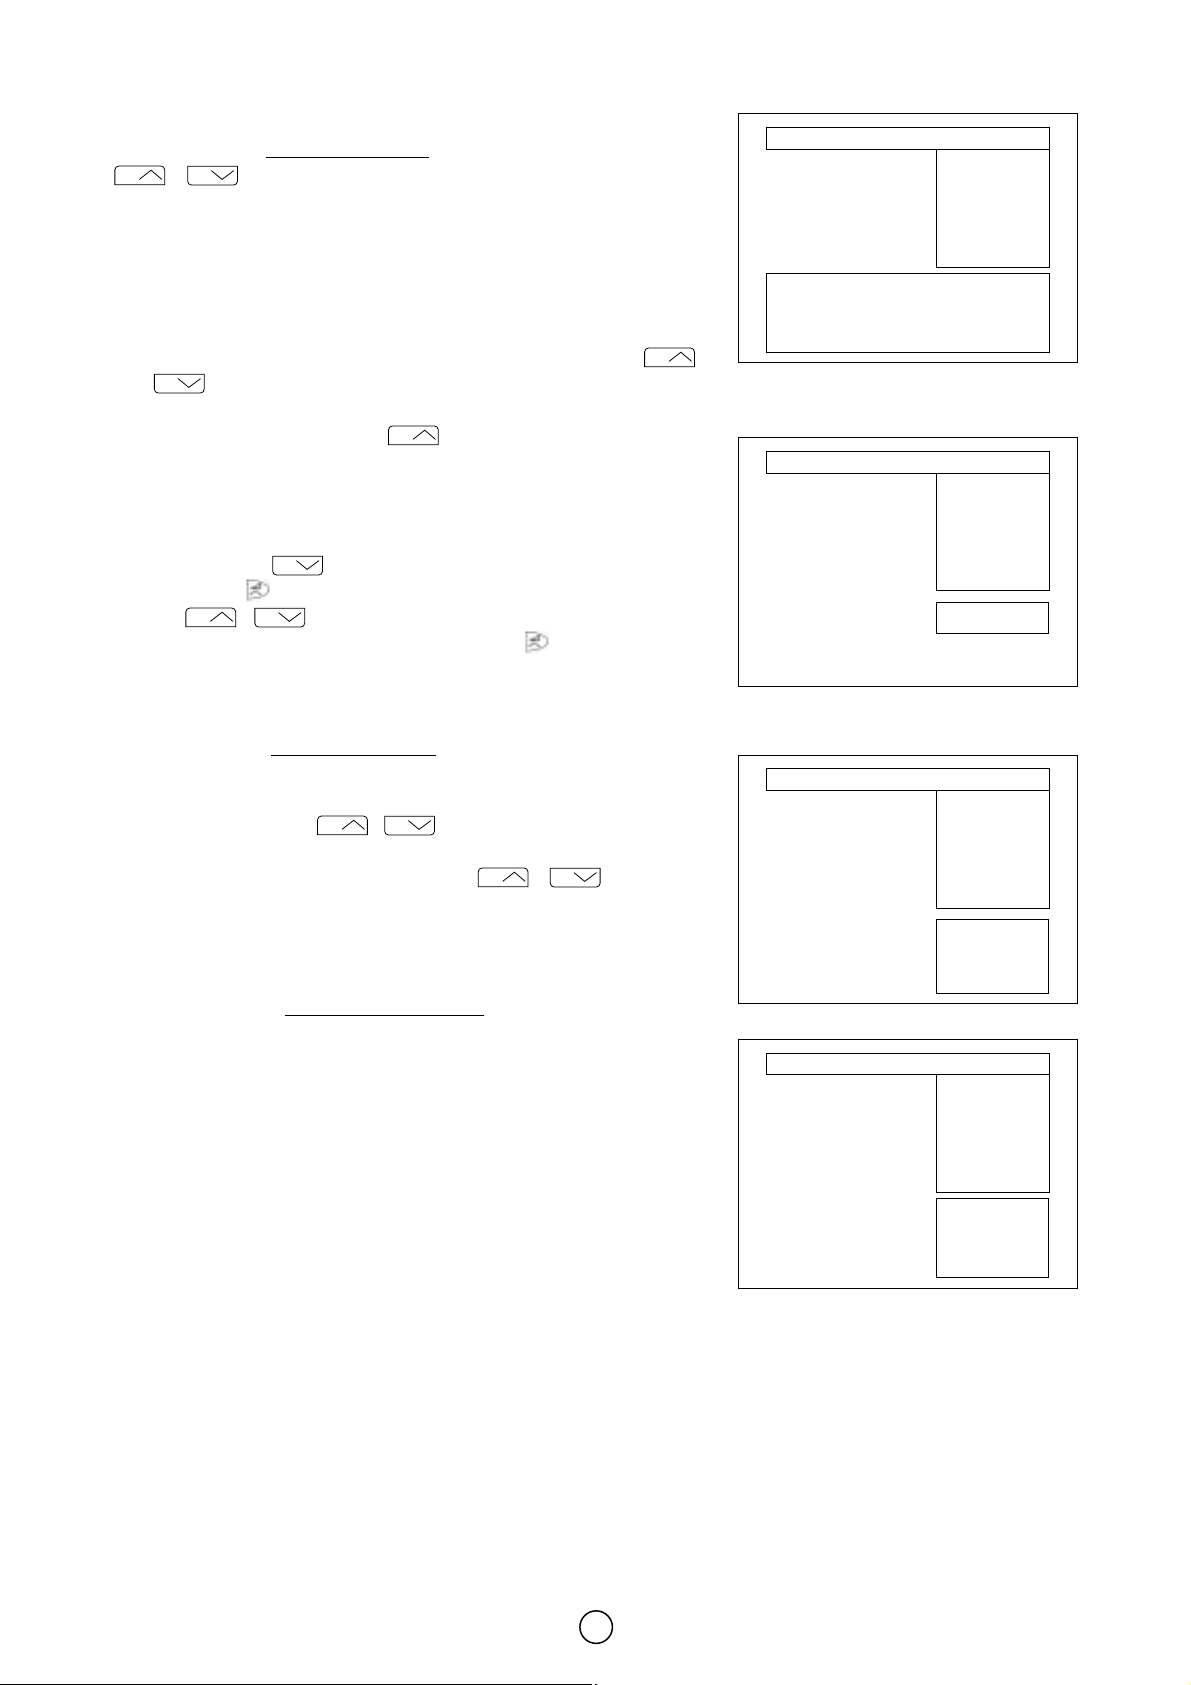
Stored programmes
When the TV has finished the automatic search, the «Stored
programmes» menu will appear on screen with a list of the channels
which have been memorised with the available options:
a) Select programme to be edited /
b) Edit this program Red button
c) Go to sorting mode Green buton
d) Delete this program Yellow button
e) Exit this menu Blue button
With these options, you will be able to organise the real channels (CH **)
memorised in the TV programmes (Pr 01 … Pr 99) and put them into your
own preferred order.
The following is a detailed explanation of options a), b),c), d) and e), on
page 8.
Auto Installation
Pr 01 CH21 BBC1
Pr 02 CH31 BBC2
Pr 03 CH41 ITV
Pr 04 CH51 CH4
Pr 05 CH61 CNN
Pr 06 –––– ––––
Pr 07 –––– ––––
Pr 08 –––– ––––
Pr 09 –––– ––––
Pr 10 –––– ––––
Stored programmes:
Edit this program
Go to sorting mode
Delete this program
Exit this menu
Be sure the antenna cable ...
Press any button in
the handset to start.
Searching,
please wait.
Pr 01
01 %
SHARP
AUTO INSTALLATION
(red)
(green)
(yellow)
(blue)
Power Indicator
Main power button
1., 4.
3. 2.
CH
CH
CH
Page 9
8
a) Select a programme to be edited
Use this option to select a programme
from the list. Each time you press
/ the memorised channel will be viewed and will remain
selected on the list by means of a white background.
b) Edit this program
Use this option for giving a name made up of four digits to the channels
or for changing the one which appears on some channels, in the following
way:
b.1. Select the channel using the Cursor UP/DOWN buttons /
.
b.2. Press the RED button.
b.3. Press the Cursor UP button to change the first letter. Letters
A to Z of the alphabet, a blank space and the numbers 0 to 9 will
appear sequentially. Some of the broadcasting stations names such
as BBC1 or ITV are already incorporated in the TV and appear
among the alphabet to make this task easier. Press the Cursor
DOWN button to go backwards in the sequence.
b.4. Press the buttons for changing the position of the cursor and
the / . buttons for changing the letters. When you have
finished the fourth letter, press the cursor button to quit the
Change of Name option.
c) Go to sorting mode
Use this option for sorting the channels
(CH) into the desired programme
(Pr), as follows:
c.1. Select the programme (Pr) you wish to change using Cursor
UP/DOWN buttons / (marked with white background).
c.2. Press the GREEN button.
c.3. Press the Cursor UP/DOWN buttons / to move the
channel (CH) to the required position.
c.4. Press the GREEN button to finish.
d) Delete this program
Use this option for cancelling programmes
which are badly tuned or
repeated. When the YELLOW button is pressed, the TV will ask for
confirmation that you wish to cancel, and you must press the yellow
button again. The channels that follow it on the list will automatically
rearrange themselves by moving up one programme (Pr) place, to restore
the space of the canceled channel (CH).
e) Exit
Use this option to quit the menu by pressing the BLUE button.
CHCHCHCHCHCHCHCHCHCHCH
CH
Pr 01 CH21 BBC1
Pr 02 CH31 BBC2
Pr 03 CH41 ITV
Pr 04 CH51 CH4
Pr 05 CH61 CNN
Pr 06 –––– ––––
Pr 07 –––– ––––
Pr 08 –––– ––––
Pr 09 –––– ––––
Pr 10 –––– ––––
Stored programmes:
Edit this program
Go to sorting mode
Delete this program
Exit this menu
Pr 01 CH21 BBC1
Pr 02 CH31 BBC2
Pr 03 CH41 ITV
Pr 04 CH51 CH4
Pr 05 CH61 CNN
Pr 06 –––– ––––
Pr 07 –––– ––––
Pr 08 –––– ––––
Pr 09 –––– ––––
Pr 10 –––– ––––
Stored programmes:
(red)
(green)
(yellow)
(blue)
Press the MENU
button to exit.
Pr 01 CH21 BBC1
Pr 02 CH31 BBC2
Pr 03 CH41 ITV
Pr 04 CH51 CH4
Pr 05 CH61 CNN
Pr 06 –––– ––––
Pr 07 –––– ––––
Pr 08 –––– ––––
Pr 09 –––– ––––
Pr 10 –––– ––––
Stored programmes:
Insert the marked
programme in the
position you wish.
Press green button to
finish.
Pr 01 CH21 BBC1
Pr 02 CH31 BBC2
Pr 03 CH41 ITV
Pr 04 CH51 CH4
Pr 05 CH61 CNN
Pr 06 –––– ––––
Pr 07 –––– ––––
Pr 08 –––– ––––
Pr 09 –––– ––––
Pr 10 –––– ––––
Stored programmes:
WARNING!
This programme
will be erased.
Press yellow button
again to confirm.
or press any other
button to cancel.
Page 10
9
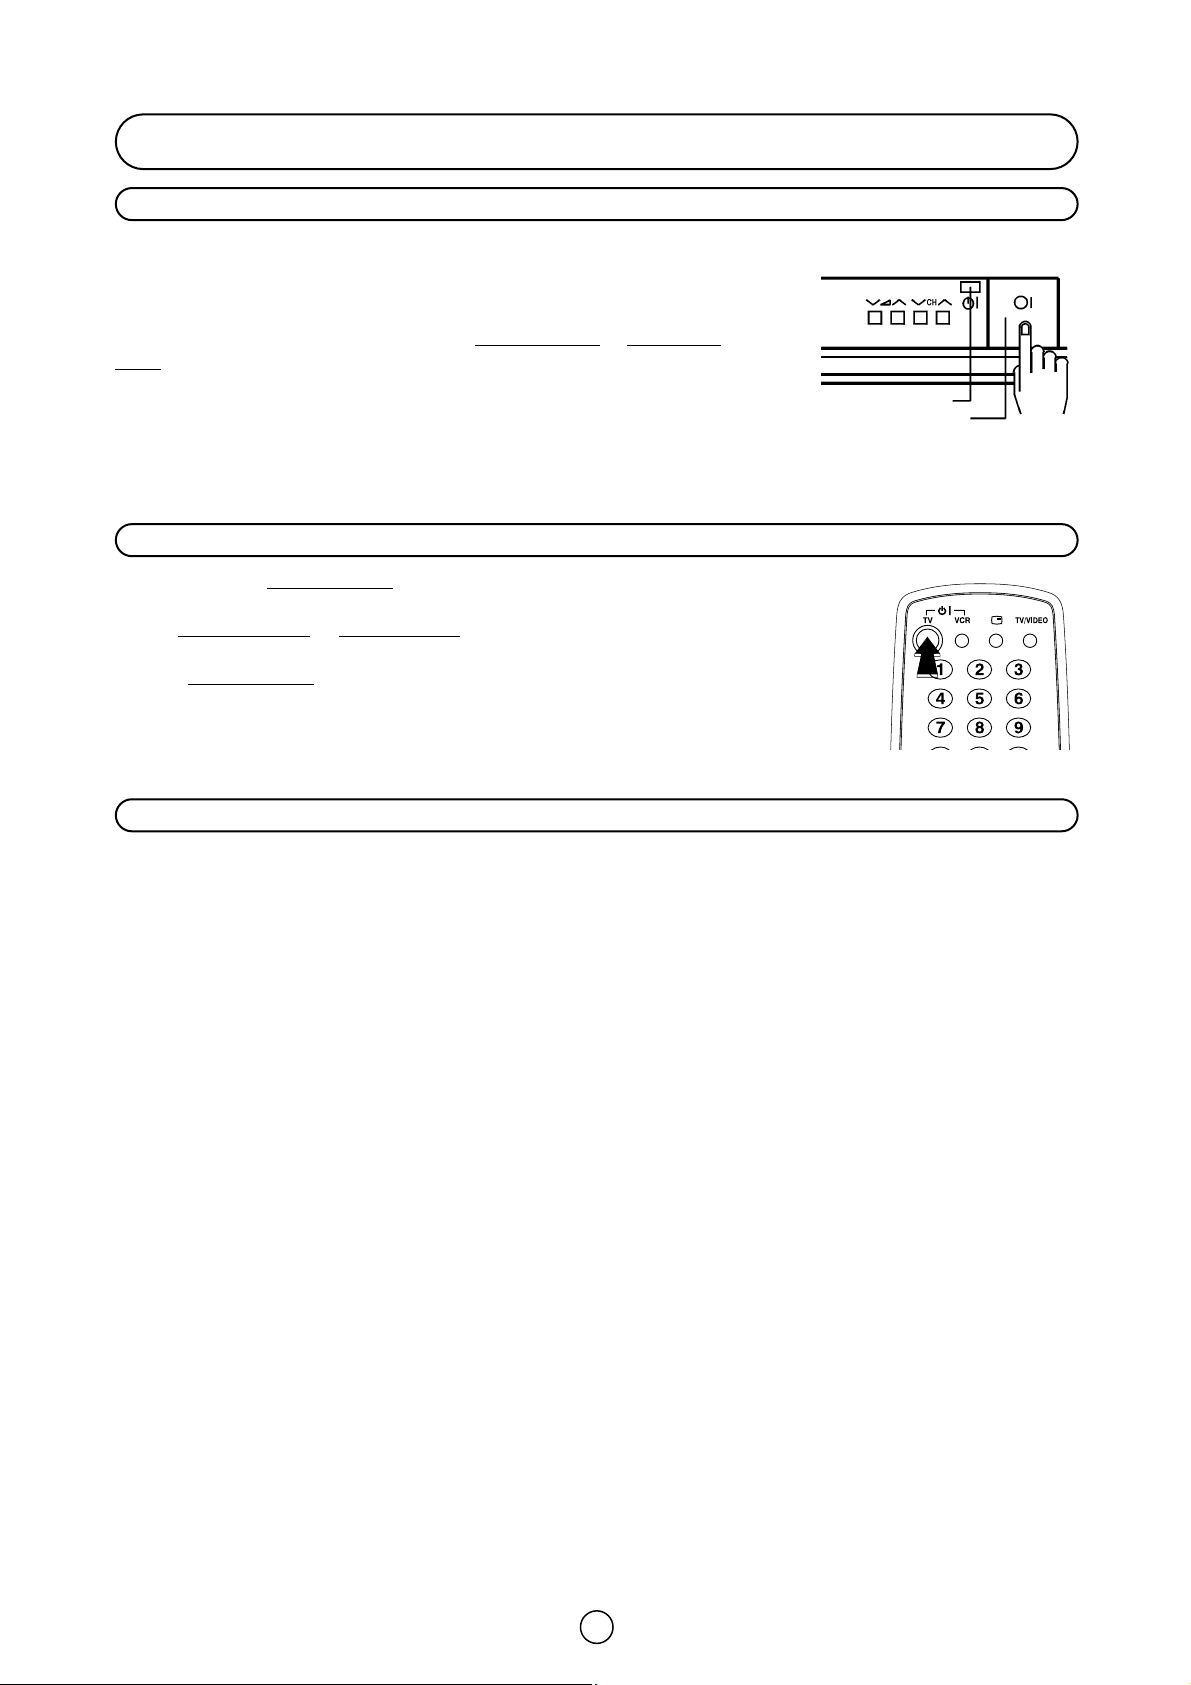
Switching on
Power supply on/off button
This TV memorizes the Mode last used when it was switched off. When the
main power button (
®
) is pressed to turn on the set, the power indicator
will light and the set will resume in either the Stand-by mode
or Programme
mode, depending upon its condition when it was switched off.
On-Off/Stand-by button
When the TV is in Stand-by mode, to turn ON the TV press the Stand-by button (æTV) on
the remote control, or one of the four buttons on the TV (
Va/\, V
CH/\). The TV will chan-
ge from Stand-by mode
to Program mode, the sound indicator will light a few moments and
an image will appear on the screen. Press the Stand-by button (
æ
TV) again and the TV will
return to Stand-by mode
.
Blue background off timer
If weak signal conditions in TV or VCR mode, the screen will turn blue. The blue background off-timer is then engaged,
unless a good signal is received, the set will automatically switch to standby mode afer 15 minutes.
Power Indicator
Main power button
Page 11
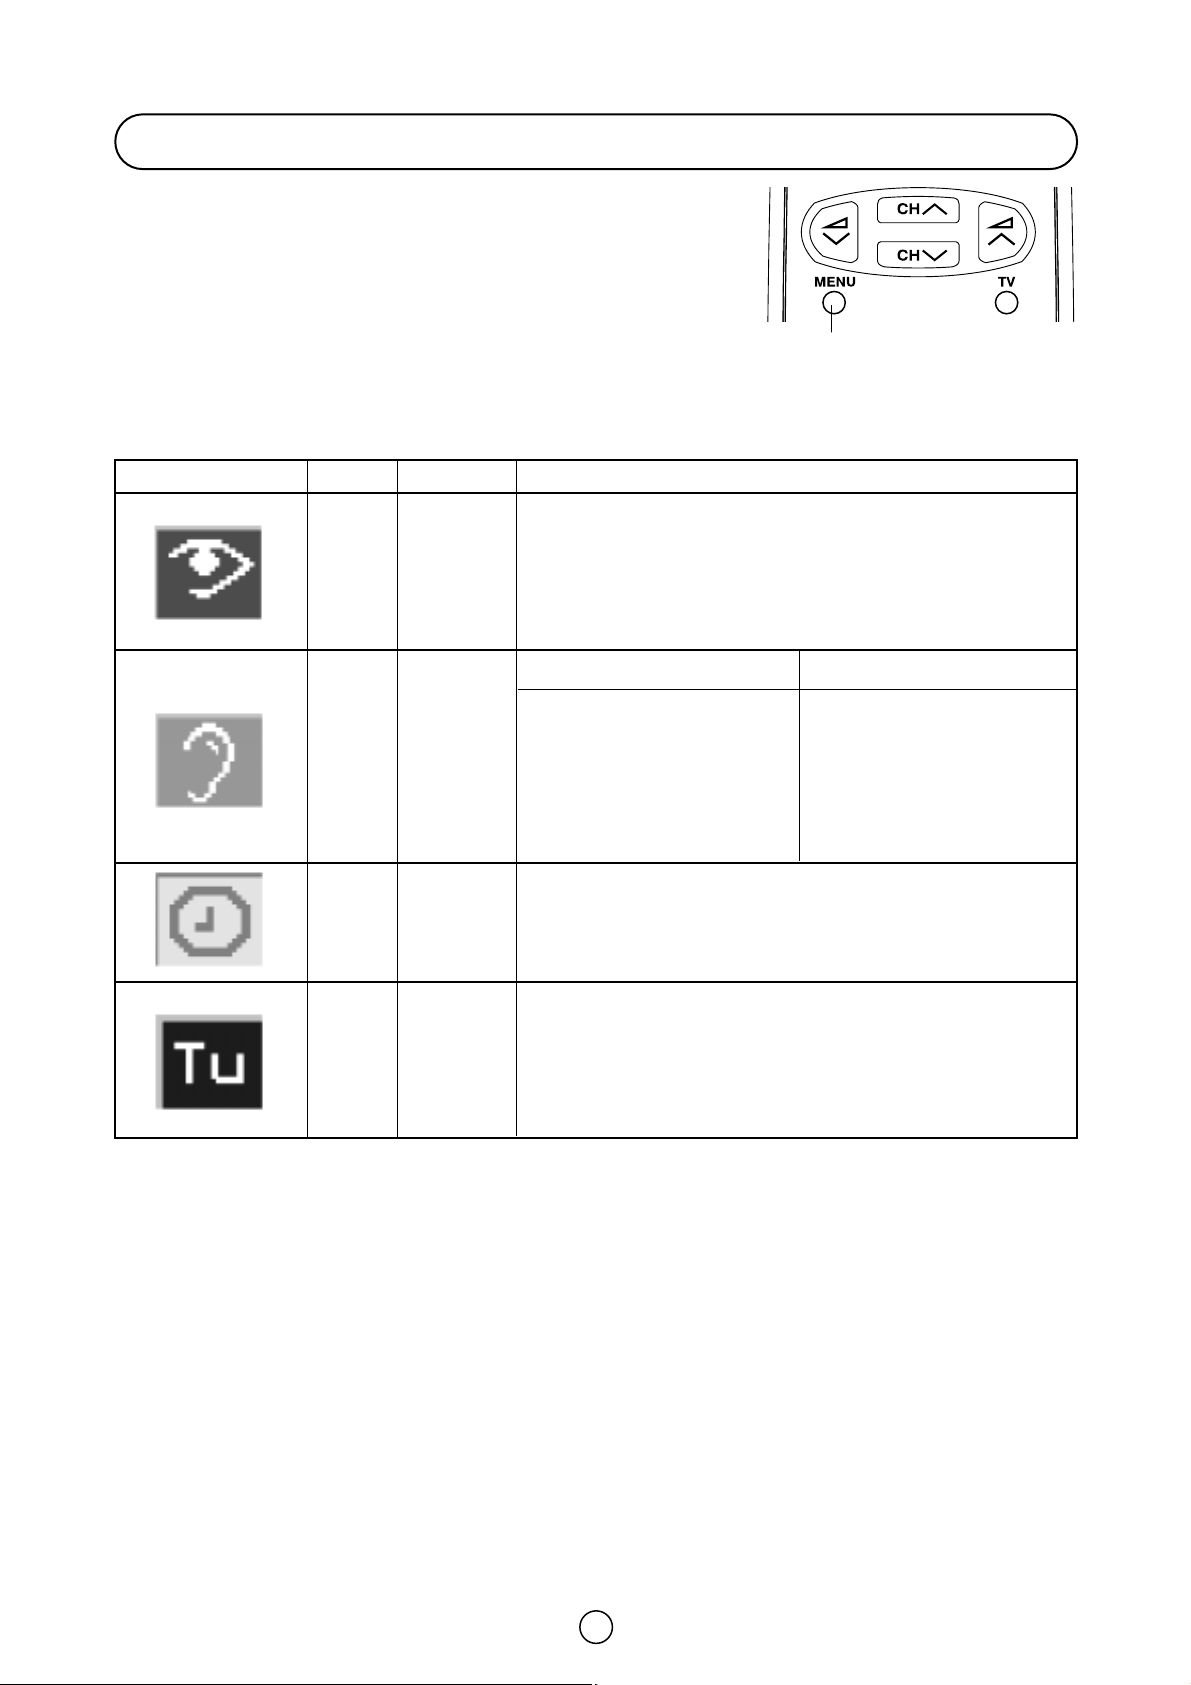
Main Menu Button Menu Functions / Options
10
CHANNEL: CH (Aerial) / CC (Cable)
SEARCH (Frequency Tuning)
FINE TUNE
MODE: TV / VCR / SKIP
EDIT: Edit this program / Go to sorting mode / Delete this program/
Exit this menu
AUTO-TUNE: AUTO INSTALLATION
Menu Structures
This TV set has: a MAIN MENU with four basic menus, which permit
access to the different functions of the TV.
These menus are as indicated below.
MENU Button
By pressing the MENU Button:
CONTRAST
COLOUR
BRIGHTNESS
SHARPNESS
NORMALISE
TINT CONTROL
ECO MODE
VOLUME
BASS
TREBLE
BALANCE
NORMALISE
LOUDSPEAKERS (MODE)
SPATIAL EXPANDER
ON TIMER: TIME / SWITCH ON
OFF TIMER: OFF / 120 Min. / 90 Min. / 60 Min. / 30 Min.
CHILD LOCK: LOCK ALL / LOCK PROGRAMME / CLEAR LOCK
DEMO
POST CODE
VOLUME
BASS
TREBLE
BALANCE
NORMALISE
HEADPHONES (MODE)
LOUDSPEAKERS
HEADPHONES
PICTURE
ADJUST-
MENTS
AUDIO
ADJUST-
MENTS
OTHER
FUNCTIONS
INSTALL
AND
TUNE
RED
GREEN
BLUE
YELLOW
Page 12

This function frees you of troublesome channel presetting procedures.
Simply follow the instructions below to automatically store all on-air and
cable real channels into the programme channel memories.
1. Press the MENU button to see the MAIN Menu.
2. Press the BLUE button to see the TUNE Menu.
TUNE Menu
3. Press the Cursor UP button to select AUTO-TUNE (blue
box).
4. Press the MENU button to see the AUTO INSTALLATION Menu.
5. Press any button to start the AUTO INSTALLATION.
SEARCHING
The TV set SEARCHES FOR FREQUENCIES, memorises the channels
found and sorts them (according to technical criteria) from Pr-01 of
the TV, to a maximum of 99 programmes.
This tuning process may take several minutes to perform.
When the AUTOMATIC SEARCH has been completed, the "Stored
programmes" menu will appear on screen. In this menu, you can
change the order of the channels and change or give the channels a
four letter name.
If you wish to rename the channels, or change the order; refer to the
page 8, chapter Stored programmes.
If you wish to go out of the menu, press the BLUE button .
11
TV Channel Setting
AUTO-TUNE
EDIT
MODE
F-TUNE
SEARCH
Pr 06
CH21
CHANNEL
Press MENU button
to Auto-tune
WARNING! All
pretuned channels
will be lost
MAIN Menu
TUNE Menu
SEARCHING
Auto Channel Preset with Sorting (ACSS: Automatic Channel Sorting System)
Be sure the antenna cable ...
Press any button in
the handset to start.
Searching,
please wait.
Pr 01
01 %
SHARP
AUTO INSTALLATION
Pr 01 CH21 BBC1
Pr 02 CH31 BBC2
Pr 03 CH41 ITV
Pr 04 CH51 CH4
Pr 05 CH61 CNN
Pr 06 –––– ––––
Pr 07 –––– ––––
Pr 08 –––– ––––
Pr 09 –––– ––––
Pr 10 –––– ––––
Stored programmes:
Edit this program
Go to sorting mode
Delete this program
Exit this menu
(red)
(green)
(yellow)
(blue)
CH
Page 13

12
Manual Channel Preset (PRESET USING REAL CHANNEL NUMBERS)
1. Depending on the programme channel you want to preset, press
the 6 button to select single / double digit entry.
2. Select the programme channel number you want to preset with
the 0 ~ 9 digit buttons.
3. Press the MENU button to see the MAIN Menu.
MAIN Menu
4. Press the BLUE button to see the TUNE Menu.
TUNE Menu
5. Press the Cursor LEFT/RIGHT buttons / to select (with
white letters) the Channel type: CH (Aerial) or CC (Cable).
6. Enter the real channel number you want to store with the 0 ~ 9
digit buttons (two digit entry only).
7. Press the GREEN button to memorize.
8. Press the TV button to clear the on-screen display.
Repeat the above procedure for presetting other programme.
CHANNEL
SEARCH
F-TUNE
MODE
EDIT
AUTO-TUNE MEMORIZE
Pr 06
CH21
CH
CC
TUNE Menu
GREEN
MAIN Menu
Page 14

13
Manual Channel Preset (PRESET USING FREQUENCY TUNING)
1. Depending on the programme channel you want to preset, press
the 6 button to select single / double digit entry.
2. Select the programme channel number you want to preset with
the 0 ~ 9 digit buttons.
3. Press the MENU button to see the MAIN Menu.
MAIN Menu
4. Press the BLUE button to see the TUNE Menu.
TUNE Menu
5. Press the Cursor LEFT/RIGHT buttons / to select (with
white letters) the Channel type: CH (Aerial) or CC (Cable).
6. Press the Cursor DOWN button to select SEARCH.
SEARCH
7. Press the Cursor LEFT/RIGHT buttons / to start preset.
The tuning sequence will stop when a signal is detected, if the signal
is not the required channel press or to continue.
8. Press the GREEN button to memorize.
9. Press the TV button to clear the on-screen display.
Repeat the above procedure for presetting other programme channels.
CHANNEL
SEARCH
F-TUNE
MODE
EDIT
AUTO-TUNE MEMORIZE
Pr 06
CH21
SEARCH
GREEN
CHANNEL
SEARCH
F-TUNE
MODE
EDIT
AUTO-TUNE
Pr 06
CH21
CH
CC
TUNE Menu
MAIN Menu
CH
Page 15

14
After preset has been performed
The following features are available for preset channels:
Fine tuning
When a preset programme channel is not exactly tuned, you can fine
tune the channel in this mode.
1. Select the programme channel number you want to tune using the
0 ~ 9 digit buttons.
2. Press the MENU button to see the MAIN Menu.
MAIN Menu
3. Press the BLUE button to see the TUNE Menu.
TUNE Menu
4. Press the Cursor DOWN button twice to select FINE TUNE
(blue box).
FINE TUNE Menu
5. Press and hold the Cursor LEFT or RIGHT buttons, until the
best tuning position is found, for the best picture and sound.
After Fine tuning the programme number will turn from green to
yellow.
6. Press the GREEN button to memorize.
7. Press the TV button to clear the on-screen display.
Repeat the above procedure for other programme channels as
required.
Mode
This feature allows you to select TV, VCR, SKIP. First follow the above
steps 1., 2., and 3. The TUNE Menu will appear on screen.
4. Press the Cursor DOWN button to select MODE
5. Press the Cursor RIGHT button to select:
TV: If the TV signal is weak the image can shake.
In this case put it in TV mode.
VCR: In some case, the upper part of the picture may be distorted
when receiving signal from a VCR via RF terminal on the TV
set.
Selecting this option will help to reduce his effect.
En estos casos hay que poner el modo «VÍDEO».
SKIP: Allows you to SKIP channels you do not want to view when
using channels selector / buttons.
7. Press the GREEN button to memorize.
8. Press the TV button to clear the on-screen display.
Repeat the above procedure for other programme channels as
required.
CHANNEL
SEARCH
F-TUNE
MODE
EDIT
AUTO-TUNE
MEMORIZE
TV
VCR
SKIP
Pr 06
CH21
MODE
GREEN
CHANNEL
SEARCH
F-TUNE
MODE
EDIT
AUTO-TUNE MEMORIZE
MEMORIZE
Pr 06
CH21
FINE TUNE Menu
GREEN
CHANNEL
SEARCH
F-TUNE
MODE
EDIT
AUTO-TUNE
Pr 06
CH21
CH
CC
TUNE Menu
MAIN Menu
CH
CH
CH
CH
Page 16

15
TV Operation
Channel Selection
Channel selector (CH
œ /
CH ∑) buttons
Select the programme channel number you want to see, using the
channel selector buttons (CH
œ
/
CH ∑).
You can clear the on-screen display by pressing the TV button .
Note: The channels that are in SKIP mode cannot be seen when using this method.
Use numerical buttons to display these channels.
Single/Double entry selector (6)
This button selects between one or two digit channel number entry.
0~9 Digit buttons
You can select channels by pressing the 0 ~ 9 digit buttons on the remote control.
For single and double digit entry see section B above.
Flash-back button (
ee
)
Press this button to switch the currently viewed channel to the previously viewed channel, and vice versa.
This function is only available in programme channel selection mode.
I.e. not when AV terminals are in use.
Press
PR *
Single digit
entry mode
PR * *
Double digit
entry mode
3
Press
PR 01
Previously
viewed channel
PR 12
Currently
viewed channel
Pr 01
Pr 02
Pr 03
Pr 04
Pr 05
Pr 06
Pr 07
Pr 08
Pr 09
Pr 10
Page 17

16
Picture quality: CONTRAST, COLOUR, BRIGHTNESS, SHARPNESS,
NORMALISE, TINT CONTROL and ECO MODE are adjustable in this
menu.
1. Press the MENU button to see the MAIN Menu.
2. Press the RED button to see the PICTURE Menu.
PICTURE Menu
3. Press the Cursor UP/DOWN buttons / to select an
option from the list: CONTRAST, COLOUR, BRIGHTNESS, SHARPNESS or NORMALISE.
The selected item will appear on screen in a blue box.
4. Adjust the picture quality to your liking with the Cursor LEFT/RIGHT
buttons / .
NORMALISE Menu
Press the MENU button if you wish to normalize video levels to
default factory settings.
5. Continuously press / arrows to access the TINT
CONTROL and ECO MODE options.
TINT CONTROL
7.a. Select TINT CONTROL and press the Cursor LEFT/RIGHT
buttons / , to adjust your desired skin colour (blue or red).
ECO MODE
7.b. Select ECO MODE “ON” to reduce contrast in areas of the pictu-
re that are excessively white.
8. Press the TV button to close the Menu.
CHCHCH
CH
TINT
CONTROL
➜
MAIN Menu
PICTURE Menu
NORMALISE Menu
TINT CONTROL
TINT
CONTROL
➜
ECO MODE
ECO MODE
ECO MODE
OFF
Picture Adjustments
NORMALISE
SHARPNESS
BRIGHTNESS
COLOUR
CONTRAST
➜
NORMALISE
SHARPNESS
BRIGHTNESS
COLOUR
CONTRAST
➜
Press the
MENU button
to normalise...
RED
Page 18

17
Audio Adjustments
Loudspeakers Sound Volume ( / )
Use the / buttons to increase/decrease the volume level. The
volume indicator will appear on the screen.
Note: To adjust the headphones volume, see the “SOUND menu” on
page 18.
Sound mute button
cc
Press the button to mute the sound. “MUTE” appears on the screen.
Press the button again to turn the sound back on.
Sound Mode Selector button (
55
)
Press the button to change the sound in the speakers. The sound mode will appear on the screen.
Depending on the sound transmission the sound reproduction can be chosen as indicated below:
When the TV set is receiving a STEREO programme, the TV selects STEREO automatically, and you can change:
STEREO MONO
When the TV is receiving a BILINGUAL programme, the TV selects DUAL CHANNEL A automatically, and you can
change:
DUAL CHANNEL ADUAL CHANNEL BDUAL CHANNEL A B MONO
When the TV is receiving a MONO (NICAM) programme, the TV set selects MONO NICAM automatically, and you can
change:
MONO NICAM MONO (FM)
When the TV is receiving a MONO (FM) programme, the TV set selects MONO automatically but the sound mode
cannot be change.
Note: See the -SOUND MODE- (page 18) to change the Sound Mode in the headphones.
Sound Indicator: When the TV set is receiving a STEREO, BILINGUAL or MONO NICAM programme the Sound
Indicator lights.
External source: When you are watching the TV-set through the Euro-SCART, AV-1 or S-Video terminals, the Sound
Mode Selector button and Sound indicator light are not operative.
MUTE
STEREO
MONO
Page 19

18
Sound quality (VOLUME, BASS, TREBLE, BALANCE, NORMALISE, SOUND MODE and SPATIAL EXPANDER) are
adjustable in this menu.
1. Press the MENU button to see the MAIN Menu.
2. Press the GREEN button to see the SOUND Menu.
SOUND Menu
3. Press the RED button to select LOUDSPEAKERS or press the
GREEN button to select HEADPHONES.
4. Press the Cursor UP / DOWN buttons / to select an
option from the list: VOLUME, BASS, TREBLE, BALANCE or NORMALISE.
The selected option will appear in white letters on a blue background
5. Adjust the sound quality according to your preferences with the
Cursor LEFT / RIGHT buttons / .
NORMALISE
Select NORMALISE and press the MENU button to normalise
audio levels to default factory settings.
6. Press the Cursor DOWN button to see more options:
SPEAKERS (Mode), HEADPHONES (Mode), and SPATIAL EXPANDER.
SOUND Mode
7. Press the Cursor UP / DOWN buttons / to select:
LOUDSPEAKERS or HEADPHONES.
8. Press the Cursor LEFT / RIGHT buttons / to change to
sound mode, as indicated on page 17, in the "Sound Mode Selector"
chapter.
Select SPATIAL EXPANDER and press the Cursor LEFT / RIGHT
buttons / to activate or deactivate the SPATIAL EXPANDER
Effect [].
9. Press the TV button to close the Menu.
CHCHCH
CH
CH
Sound Setting Mode
SPATIAL
EXPANDER
HEADPHONES
STEREO
LOUDSPEAKERS
NORMALISE
BALANCE
TREBLE
BASS
VOLUME
➜
NORMALISE
BALANCE
TREBLE
BASS
VOLUME
➜
➜
Press the
MENU button
to normalise...
LOUDSPEAKERS
LOUDSPEAKERS
SOUND Menu
NORMALISE
SOUND Mode
LOUDSPEAKERS
HEADPHONES
RED GREEN
SPATIAL EXPANDER: the spatial expander effect depends on whether the feed is MONO or STEREO.
If the source feed is MONO, it produces a “Pseudo Stereo” effect.
If the source feed is STEREO, it produces a spatial expander effect, expanding the stereophonic image.
Note: the SPATIAL EXPANDER Effect do not work with headphones.
MAIN Menu
GREEN
Page 20

19
In this mode you can set the ON-TIMER an OFF-TIMER, set the CHILD LOCK, view the all functions implemented in
your TV set demonstration and set the POSTCODE.
1. Press the MENU button to see the MAIN Menu.
2. Press the YELLOW button to see the FEATURES Menu.
FEATURES Menu
3. Press the Cursor UP/DOWN buttons / to select an
option from the list:
ON TIMER, OFF TIMER, CHILD LOCK, DEMO or POSTCODE.
The selected item will appear on screen in white letters on a blue
background.
ON TIMER
The On-Timer is used to automatically switch on the TV set during the
day.
4. Press the Cursor RIGHT button to select the "TIME" (current
time) in white letters.
5. To programme the current TIME: In order to be able to run this
function, it is essential to adjust the current time.
Automatic TIME adjustment: If you are receiving a channel with Teletext, the TIME is automatically synchronized
with the Teletext clock.
* Important: If a signal via satellite is being received, or if correct time cannot be obtained, the time will have to be
adjusted manually.
Manual TIME adjustment: To adjust the time manually, this should be done with the 0 to 9 digit buttons.
6. Press the Cursor RIGHT button to select: SWITCH ON in white letters.
7. Adjusting the SWITCH ON Time. Once the current TIME has been adjusted, the SWITCH ON Time can be set with
the 0 to 9 digit buttons.
The GREEN button is used to cancel the SWITCH ON function.
8. Press the TV button to close the Menu.
9. Press the Stand-by button ( æ TV) on the remote control to put the TV into switch on Stand-by Mode.
* As a safety precaution, in the case of nobody being home when the television switches on automatically, the television will disconnect itself after 120 minutes; if it is to continue to run, any button on the remote control functions should
be pressed.
Note: In the event of a power cut, disconnection from the plug or television switch, all the data on the ON TIMER will be
cancelled.
OFF TIMER
The OFF TIMER automatically switches the TV set to standby mode
after a predetermined period, (30, 60, 90 or 120 minutes).
4. Pressing the Cursor RIGHT button , select the desired period in
white letters.
Select OFF to disconnect off-timer.
5. Press the TV button to close the Menu.
Note: The OFF TIMER data will be cancelled if you turn off the TV by
the Standby button (æ TV) on the remote control or with the Main
power button (®) on the TV set.
➜
TIME 08:30
SWITCH ON **:**
DEMO
CHILD LOCK
OFF TIMER
ON TIMER
➜
0FF
120 Min.
90 Min.
60 Min.
30 Min.
FEATURES Menu - ON TIMER
OFF TIMER
CANCEL
GREEN
MAIN Menu
YELLOW
Features setting mode
ON TIMER
OFF TIMER
CHILD LOCK
DEMO
CH
CH
Page 21

20
You can lock a TV channel to prevent unsupervised TV viewing by following these procedures; the protection can apply
to the television itself "LOCK ALL" or to specific programmes "LOCK PROGRAMME". With the CHILD LOCK function,
you can also programme a time period during which the TV will be protected.
1. Press the MENU button to see the MAIN Menu.
2. Press the YELLOW button to see the FEATURES Menu.
FEATURES Menu
3. Press the Cursor DOWN button twice to select CHILD
LOCK in white letters on a blue background.
4. Press the MENU button to see the CHILD LOCK Menu.
CHILD LOCK Menu
4. Press the Cursor UP/DOWN buttons / to select an
option from the list:
LOCK ALL, LOCK PROGRAMME or CLEAR LOCK
The selected item will appear on screen in a blue box.
LOCK ALL
Select this option for protecting the access to the whole TV.
If necessary, repeat steps 1. to 4. to see the CHILD LOCK Menu.
6. Press the Cursor RIGHT button to select the protection type
(white letters):
Select «NONE»: To cancel the protection.
Select «ALWAYS LOCKED»: The access to the TV will be
protected throughout the day.
Select «START: **:**/STOP: **:**»: to block access to the TV
during the desired period of time. Enter the hours and minutes
using the numeric buttons 0 ~ 9 to set the starting and ending
times of the lock period.
7. Press the GREEN button to memorize.
From this time forward, whenever the protection conditions are met,
the screen will be blocked and the "LOCKED MODE" message will be
displayed.
Press any number key on the remote control to unlock the TV.
NOTE: Since the “key” for unlocking the TV is the remote control, please remember to remove and keep it in a
safe place.
Child Lock (Channel Block)
DEMO
CHILD LOCK
OFF TIMER
ON TIMER
➜
Press the MENU
button to input at
CHILD LOCK menu
FEATURES Menu
CLEAR LOCK
LOCK PROG.
LOCK ALL
NONE
ALWAYS LOCKED
START: **:**
STOP: **:**
CHILD LOCK Menu - LOCK ALL
MEMORIZE
GREEN
MAIN Menu
YELLOW
CH
CH
CH
Page 22

The demonstration function allows you to see all the menus implemented
in this TV set.
1. Press the MENU button to see the MAIN Menu.
2. Press the YELLOW button to see the FEATURES Menu.
3. Press the Cursor DOWN button to select DEMO.
4. Press the MENU button to begin the demonstration.
5. Press any button on remote control to exit this function when you wish.
CH
21
LOCK PROGRAMME
Select this option to protect the access to separate programmes.
1. Press the MENU button to see the MAIN Menu.
2. Select the programme channel number you want to protect using the
0 ~ 9 digit buttons or the channel selector / buttons.
3. Repeat steps 1. to 4. (page 20) to see the CHILD LOCK Menu.
4. Press the Cursor DOWN button to select LOCK PROGRAMME
(blue background).
5. Press the Cursor RIGHT button to select the protection type (white
letters):
Select «NONE»: To cancel the protection from the selected
programme.
Select «ALWAYS LOCKED»: To protect the access from the selected
programme throughout the day.
Select «START **:** STOP **:**»: to block access to the selected channel during the desired period of time. Enter
the hours and minutes using the number keys (0 ~ 9) set the starting and ending times of the lock period.
6. Press the GREEN button to memorize.
From this time forward, whenever the protection conditions are met, the screen will be blocked and the "LOCKED
MODE" message will be displayed.
Press any digit button to unlock the TV.
NOTE: Since the “key” for unlocking the TV is the remote control, make sure you do not misplace it.
CLEAR LOCK
This option enables you to erase all the adjustments made to the CHILDLOCK function.
If necessary repeat steps 1. to 4. (page 20) to see the CHILD LOCK Menu.
5. Press the Cursor UP button to select CLEAR LOCK.
6. Press the MENU button to confirm that you want to initialize the
CHILD LOCK system.
7. Press the TV button to clear the on-screen display.
8. Use the CLEAR LOCK to cancel any previously set CHILD LOCK
programmes to avoid malfunction when a new program is set.
CH
Demo
CLEAR LOCK
LOCK PROG.
LOCK ALL
LOCK PROGRAMME Menu
CLEAR LOCK
LOCK PROG.
LOCK ALL
NONE
ALWAYS LOCKED
START: **:**
STOP: **:**
Press the MENU button
to clear the CHILD
LOCK system.
CLEAR LOCK menu
MEMORIZE
GREEN
Notes:
In order for the timed protection to function correctly, the internal TV clock must be set at the right time. To
check the time setting see section "Automatic or Manual time adjustment" on page 19.
DEMO
CHILD LOCK
OFF TIMER
ON TIMER
➜
Press the MENU
button to start the
DEMO.
CH
CH
CH
Page 23

This option allows you to set a code, which will be displayed at TV switch on time. There is a password to change the
code.
1. Press the MENU button to see the MAIN Menu.
2. Press the YELLOW button to see the FEATURES Menu.
3. Press the Cursor UP button to see the POSTCODE Menu.
4. ENTER PSW (Password): enter the 4-digit using the number buttons 0
to 9.
It is indispensable to enter the password in order to continue
configuring the postcode.
5. When the password has been set:
Press the RED button to change the password or
Press the GREEN button to memorize the password and to
have access to the next item.
6. ENTER CODE (Postcode): Press the Cursor UP/DOWN buttons
/ to set or change the first letter/number. Letters A to Z
of the alphabet, a blank space and the numbers 0 to 9 will appear
sequentially.
7. Press the Cursor LEFT / RIGHT buttons / for changing the
position of the cursor and the / buttons for changing the
letters (repeat this action for other letters/numbers).
8. When you have finished the eighth letter, Press the BLUE button
to confirm the postcode.
9. When the postcode has been set:
Press the GREEN button to activate the postcode or
Press the RED button if you wish to cancel all the data.
About Postcode: If you enter and memorise your postcode, in the
event of loss or the set being stolen and later recovered, the postcode
can be used to identify your TV.
Notes: As a precautionary measure, make a note of your "Password"
and the "Postcode", and keep it in a familiar place.
IF YOU LOSE OR FORGET YOUR «PASSWORD», CONTACT YOUR
TECHNICAL SERVICE OR DEALER.
22
Postcode
VCR Mode
Channel selectors (V CH /\)
These buttons are used for changing channels and setting the timer.
Play button B
Press this button to start playback.
Record button M
Press to start recording. If the video cassette is protected
against recording, it will be ejected.
Stop button L
Press this button to stop playback or recording.
Operate button Bl VCR
Press this button to turn your VCR on.
Fast forward/picture search forward FFand
Rewind/picture search reverse GGbuttons
Both these buttons have the following function:
To move through the cassette faster, press to STOP
button and then press the FFor GGbutton to fast forward or rewind the cassette.
Press the STOP button to stop fast forward or rewind.
Picture Search
During playback, press the FFbutton for forward
GG
picture search, or the button for reverse search.
Press the PLAY button to resume normal playback.
SHARP VCR can be operated using the TV remote control.
For further details, please refer to operation manual of your VCR.
POST CODE Menu
ENTER PSW (Password)
ENTER PSW
----
POSTCODE
Password set
ENTER CODE (Postcode)
ENTER PSW
****
RED BUTTON: CHANGE PASSWORD
GREEN BUTTON: CONTINUE
POSTCODE
➜
Postcode set
ENTER CODE
************
DEACTIVATE: RED BUTTON.
ACTIVATE : GREEN BUTTON
POSTCODE
ENTER CODE
*
-------
POSTCODE
Press BLUE button to confirm
CH
CH
CH
CH
CH
Page 24

23
TV/Video selector button (TV/VIDEO)
With this button you can select either source of input for the TV.
1. When the TV/VIDEO button is pressed, the «TV/Video Menu»
selection menu apears.
2. Press the button of the corresponding colour to select one of
the input sources, as indicated in the diagram.
The selected input will appear on the screen.
3. Press the TV/VIDEO button again to exit the menu.
CLOCK button (f)
Press the button to display the current time on the screen.
Note: that this function operates only if the station you are tuned to broadcasts a teletext signal.
TV Button (Subtitles/ Clear menus)
The function of the TV button depends on what you have on the screen.
When there is a menu on the screen: Press the TV button to close the Menu.
When your are viewing the TELETEXT: Press the TV button to exit the Teletext.
When you are watching a TV program:Press the TV button to directly access the subtitles. During the search for
the subtitles (Pg. 888 of the Teletext), the «SBT» indicator will be displayed at the upper left area of the screen. If the
channel you are watching transmits Teletext feed, the subtitles page will be displayed on the screen.
Press the TV button to exit subtitles mode.
Headphones jack
1. Press the MENU button to see the MAIN Menu.
2. Press the GREEN button to see the SOUND Menu.
3. Press the GREEN button to select HEADPHONE VOLUME.
4. Adjust the headphone volume with the Cursor LEFT/RIGHT / buttons.
5. Make sure that you insert the headphone plug all the way.
6. Press the TV button to close the Menu.
Note: the SPATIAL EXPANDER Effect cannot be adjusted for the headphones.
Channel Call button (
l
)
Press the button to display the current programme number and the sound
mode on the screen. The name if it has been set, the remaining time for
off-timer, the real-timer and the on-timer, if they have been set, are also
displayed on the screen.
Press the button again to make the on-screen disappear.
If the channel you are viewing has been set to be skipped with the
channel skip function, the programme number is displayed in red. If the
channel was fine-tuned, programme number will be displayed in yellow.
INSIDE THE DOOR
3,5 mm ø Jack plug
Earphone or Headphone
Impedance 16~600 Ω
Caution: To protect your ears, reduce the volume of headphones before connecting them.
Other Features
TV/Video Menu
OFF TIMER: 120 Min.
TIMER: 10:30
ON TIMER: 18:00
BBC1: 01
STEREO
GREEN
YELLOW
BLUE
RED
n
S-VIDEO
VIDEO AUDIO
L/S/G/I R/S/G/I
Page 25

24
What is Teletext?
Teletext is an information service, organized like a magazine, which is provided by some television stations in addition to regular television broadcasting.
Your television recives special Teletext signals broadcast by a TV station,
processes the information and displays it graphically on the screen. News,
weather and sports information, stock exchange prices, program preview and
closed captioning for the deaf are among the many services available through
Teletext.
Teletext information is organized much like a magazine: according to pages
and sub-pages. The basic unit of displayed information is the page. A subpage is one of a series of pages.
Teletext reception is controlled by using the remote control. Refer to the
appropriate button descriptions for operation of the Teletext functions.
Teletext features
Depending on the TV programme, the Teletext pages are transmitted using
different systems. Your SHARP TV is adjusted to receive two Teletext
systems, namely FLOF and LIST, which are automatically identified by the
receiver.The user can easily identify them by the manner in which they appear
on the screen.
To switch ON and switch OFF the Teletext
1. Select the TV channel with Teletext information that you want to see.
2. Press the TEXT/MIX button(a/b) once or twice (See Note1) to select
Teletext mode.
3. Press the TV button to exit Teletext mode.
TELETEXT Mode
....................................................
TELETEXT
400300200100
RED GREEN YELLOW CYAN
LIST
....................................................
TELETEXT
WeatherMovir
Sports
News
RED GREEN YELLOW CYAN
FLOF
Basic TEXT features common to the two systems
a) Fast Page Selection
1. Select the appropriate programme channel.
2. Press the TEXT/MIX (a/b) button once or twice (See Note1) to select Teletext mode.
3. To recall a page number displayed in the coloured brackets, simply press the corresponding coloured button.
b) 0~9 digit buttons
Enter a desired page number with the 0~9 digit buttons. (To select P.100: press 1, 0, 0).
c) Page selector (UP/DOWN)
You can sequentially select page numbers by pressing the cursor UP/DOWN buttons / (channel selector
buttons in the TV mode).
CH
CH
Note1: This model has the “LATERAL Teletext” function described on Pg. 26.
Page 26

25
TEXT/MIX button (
aa/bb
)
Every time this button is pressed, the Teletext is displayed in different modes, following the sequence described:
TV Mode
LATERAL Teletext Mode: superimposed on the right
TELETEXT Mode: full screen
MIX Mode: Teletext superimposed over the current program.
TV Mode
HALF/PAGE button (
s
)
Each time you press the button, the power/lower half of the teletext page is magnified and displayed on the screen.
This button does not work in “LATERAL Teletext” mode (See Note1).
HOLD button (
a
)
Any teletext page or subpage can be held on the screen by pressing the HOLD button.
Press the button again to cancel the hold mode.
REVEAL button (
d
)
Press this button to reveal hidden information such as the answer to a quiz.
Press the button again to hide the information.
CLOCK button (
f
)
In TV mode: When the TV signal with TEXT data is received, by pressing this button the real time information will
appear on the top right area of the screen.
In Teletext mode: When a selected Teletext page has hidden subpages, these pages can be seen in the following
manner:
1. Press the CLOCK button ( f ). Screen will show « = = = = ».
2. Enter 4 digits corresponding to the subpage desired. E.g. 0021 for subpage number 21.
3. Wait until page appears.
NOTE: You can use this button together with the DISPLAY CANCEL (k) button. This means that you can view
the main TV picture until the subpage has been found. The on screen TV icon in the top left side of the screen will show
«TXT». When the subpage has been found, the screen will change to the subpage number.
Press the TEXT/MIX (a/b) button to view the subpage.
CANCEL button (
k
)
With this button Teletext information is cancelled and TV picture is restored. «TXT» indication is shown on screen.
In this position, the TV programme can not be changed, being in Teletext/Cancelled mode. When a change takes place
in the Teletext information, the upper time of the cancelled page or some other indication of special pages is shown on
screen. To uncancel, press TEXT/MIX (a/b) button and the whole teletext is shown.
NOTE: This button can be used together with the clock button while awaiting subpages.
This button does not work in “LATERAL Teletext” mode (See Note1).
RESET button (
h
)
Press the reset button (h) to return back to index page and go out from Teletext mode.
LIST button
Pressing this button you force the teletext to LIST Mode. It means that row 24 (bottom row of Teletext) will not have
transmitter information, only the pages that have previously been stored in the memory. (More information on the next
page - Teletext Page memory List -).
Pressing LIST button again we go out from LIST Mode and system is going to be identified again (FLOF).
INDEX button (
j
)
Press the INDEX button (j) to return back to index page.
Other TEXT features common to the two systems
Note1: This model has the “LATERAL Teletext” function described on Pg. 26.
Page 27

26
This function allows you to display and consult the Teletext, on the
right side of the screen, while viewing the image of the current
channel.
The LATERAL Teletext is activated on the first click of the TEXT/MIX
button (a/b).
When the LATERAL Teletext is used, the following Teletext buttons
are not available:
● Cancel button (
k): To cancel the Teletext information
● Upper/Lower/Full Button (
s): To magnify the upper/lower half.
LATERAL Teletext
LATERAL Teletext
Teletext Page memory List
a) How to Operate Page Memory
Your TV has 40 teletext page number memories for fast recall of teletext information.
In programme positions 1 through 9, four teletext page numbers can be stored in each position; a total of 36 pages.
In programme positions 10 through 99, only one programme with 4 page numbers can be stored. If you try to store
more than 4 page numbers in a programme position between 10 and 99, the previously stored page numbers will be
erased.
Select the programme channel number into which you want to store teletext page numbers.
1. Press the TEXT/MIX (a/b) button to enter the teletext mode.
2. Press the LIST button to change from FLOF system to LIST mode.
3. Press a coloured button corresponding to the coloured brackets on the screen for page number storage.
4. Enter the teletext page number using the 0~9 digit buttons (enter three digits) or channel selector /
buttons.
5. Repeat steps 3. and 4. until the numbers for the desired pages have been entered.
6. Press the STORE (g) button to memorize the page numbers you require. The symbol «STORE» appears on the
screen.
7. Press the TV button to exit the teletext mode.
CH
CH
P300
(LIST TELETEXT)
400300200100
P100
(FLOF TELETEXT)
Wheather
Movie
Sports
News
YELLOW
P425
400425200100
If you want to store,
press button
Input
4, 2, 5
Press
LIST
and
YELLOW
buttons
LIST
Advanced TEXT operation -LIST mode-
RED GREEN YELLOW CYAN
b) Fast Page Selection - LIST mode -
1. Select the appropriate programme channel.
2. Press the TEXT/MIX (a/b) button to enter the teletext mode.
3. Press the LIST button to change from FLOF system to LIST mode.
4. To recall a page number displayed in the coloured brackets, simply press the corresponding coloured button.
5. Press the LIST button (a) again to return to FLOF Mode.
Page 28

27
21-pin Euro-SCART (RGB)
21-pin Audio/Video (AV-1) with S-Video Input
21-pin Euro-SCART and 21-pin Audio/Video
1. Audio right output
2. Audio right input
3. Audio left output
4. Common earth for audio
5. Eartth for blue
6. Audio left input
7. Blue input
8. Audio-video control
9. Earth for green
10. Not used
11. Green input
12. Not used
13. Earth for red
14. Not used
15. Red input
16. Red/Green/Blue control
17. Earth for video
18. Earth for Red/Green/Blue control
19. Video output
20. Video input
21. Plug shield
1. Audio right output
2. Audio right input
3. Audio left output
4. Common earth for audio
5. Earth
6. Audio left input
7. Not used
8. Audio-video control
9. Earth
10. Not used
11. Not used
12. Not used
13. Earth
14. Not used
15. Chroma S-Video input
16. Not used
17. Earth for video
18. Earth
19. Video output
20. Video input / S-Video input
21. Plug shield
REAR TV
21-pin In/Out
1. 21-pin Audio/Video (AV-1)
with S-Video Input
2. 21-pin Euro SCART
(Full connect, RGB)
RF Input
3. Antenna terminal
2
1
3
Page 29

28
Typical connection (Videorecorder/Decoder) through the 21-pin Eur o-SCART
Please refer to the operation manual of your VCR for details.
RF in
RF in
VCR
RF out
SCART/AV
TV
21-pin Euro-SCART
Typical connection (Videorecorder and TV) through the RF terminal and Decoder through
the 21-pin-Euro-SCART
RF in
21-pin Euro-SCART
Typical connection (DVD, Decoder and TV) through the 21-pin Euro-SCART
Decoder
Video out
Audio out
SCART/AV
TV
DVD player
Decoder
Page 30

29
Quick
Service
Check List
Problems
Remote control does not work ●● ● ●
Bars on screen ●●
Picture distorted ●● ●
Picture rolls vertically ●●●
No colour ●●●●●
Poor reception on some channels ●●●●
Picture weak ●●●●●
Picture lines or streaks ●●●
Picture ghosting ●●●●
Picture blurred ●● ●
Sound OK, picture poor ●●●●●●●
Picture OK, sound poor ●● ●
No picture or sound
●●●●● ● ●●
Try a new channel to check
for possible station trouble
Possible Causes/Remedies
TV not plugged in Outlet power OFF
Main power button of TV not ON
Antenna not connected to terminal
at the back of the TV set
If outside antenna is used,
check for broken wires
Check for local interference
Turn OFF using the Main Power button,
then turn ON again after a minute
Adjust COLOUR control
Check batteries in the Remote Control
Try fine tuning to correct
Check if the Brightness or Contrast setting in the
picture setting mode might be all the way to the minus
side
Increase the volume
If the fault cannot be corrected by using this guide, remove the mains plug from the wall socket and contact the dealer
or supplier from whom it was purchased. Where this is not possible, please visit our web-site at
www.sharp.co.uk/support. Customers without Internet access may telephone 08705 274277 (or (01) 676 0648 if
telephoning from Ireland) during office hours.
Certain replacement parts and accessories may be obtained from our Main Parts Distributor, who can be contacted on
the following numbers:
Willow Vale Electronics Ltd.
0121 766 5414 and 0161 205 7531
In the unlikely event of this equipment requiring repair during the guarantee period, you will need to provide proof of the
date of purchase to the repairing company. Please keep your invoice or Receipt, which is supplied at the time of
purchasing.
Troubleshooting
Page 31

30
General Specifications for Television Receiver
Model: 66GS-62H
1. Receiving Broadcast Standard CCIR TV Standard system PAL-I
2. Receiving Channel UHF: CH 21 - CH 69 (I 21 - 69)
VHF: IR A-J (CH01-CH09)
CATV:CC01-CC68 (Hyperband)
3. Receiving System Sound: NICAM/IRG Stereo
Colour System: PAL
Field Frequency: Pal 50/60 Hz Capability
4. Power Source 220V-240V AC 50 Hz
5. Power Consumption at 240V AC 50Hz 87 W
6. Power Consumption at (Stand-by) 3 W max.
7. Audio Output (mpo)
Internal speaker: 10 + 10 W
8. Dimensions (Approx.) width: 736 mm
height: 570 mm
depth: 471 mm
9. Viewing Area (diagonal measurement) 66 cm (28”)
10. Weight (Approx.) 30,5 Kg.
11 Speaker (2 pcs.) 6x13 cm
12 Antenna Input Impedance UHF 75 Ohm Unbalanced
13. Safety CE - MARK
14. EMC CE - MARK
15. Accessories & etc.
a) User Instruction Yes
b) Remote Control Yes
c) Battery 2 pcs.
16. Other Features:
a) Auto Installation System
b) ACSS function (Audio Channel Sorting System)
c) 99 Channel Programming System
d) Cable and Hyperband
e) Teletext
f) OSD System (On Screen Display)
g) Tint Control
h) Blue Back Noise Mute Function
i) Digital Stereo NICAM and IGR Stereo Decoder
j) Child Lock System
k) ON-OFF Timer
l) 21pin Euro SCART Conector (RGB)
m) 21pin Audio/Video Connector (A/V-1) with S-Video Input
n) Head Phone Terminal
o) Postcode Security
NOTE: THE “AV LINK” FUNCTION IS NOT AVAILABLE IN THIS MODEL
Page 32

31
Index
21-pin Audio/Video......................................................27
21-pin Euro-SCART (RGB) ........................................27
A
Accessories...................................................................3
After preset has been performed................................14
Antenna Connections ...................................................6
Audio Adjustments......................................................17
Auto Channel Preset ..................................................11
Auto Installation System ...............................................7
Automatic Channel Sorting System........................7, 11
B
Balance ......................................................................18
Bass ...........................................................................18
Bilingual .....................................................................17
Blue back off-timer .......................................................9
Brightness ..................................................................16
C
Clock button .........................................................23, 25
Colour ........................................................................16
Contrast .....................................................................16
Controls & Terminals ...................................................6
Current time ...............................................................19
Channel Selection ......................................................15
Child lock (Channel Block) ........................................20
D
Delete (Programme) ....................................................8
Demonstration ............................................................21
E
ECO mode..................................................................16
Edit (Programme) .........................................................8
F
Features Setting Mode ...............................................19
Fine tuning .................................................................14
FLOF (Teletext) ..........................................................24
FRONT TV ...................................................................5
G
Guarantee.....................................................................1
H
Headphone jack .........................................................23
L
LATERAL Teletext......................................................26
LIST (Teletext) ...............................................24, 25, 26
M
Main power button .......................................................9
Manual Channel Preset ........................................12, 13
Menu Structures .........................................................10
Mono ..........................................................................17
O
OFF-Timer .................................................................19
ON-Timer ...................................................................19
Other Features ..........................................................23
P
Picture Adjustments ...................................................16
Postcode.....................................................................22
R
REAR TV .....................................................................5
Remote Control ............................................................4
Remote Control Battery Installation .............................3
S
Safety precaution .........................................................2
Sharpness ..................................................................16
SKIP ...........................................................................14
Sorting (Programme) ...................................................8
Sound Indicator ..........................................................17
Sound mute ................................................................17
Sound Setting Mode ..................................................18
Specifications .............................................................30
Stand-by button ............................................................9
Stereo .......................................................................17
Subtitles ....................................................................23
Switching on .................................................................9
T
Teletext ......................................................................24
Tint control .................................................................16
Treble .........................................................................18
Troubleshooting .........................................................29
TV/Video selector .......................................................23
Typical connections ...................................................28
V
Volume (Headphones)..........................................18, 23
Volume (Loudspeakers)........................................17, 18
Page 33

32
Notes
Page 34

å
SHARP ELECTRONICA ESPAÑA, S.A.
SHARP ELECTRONICS (U.K.) LTD
Sharp House, Thorp Road, Newton Heath,
Manchester M40 5BE
PRINTED IN SPAIN
TINS-6908BMN0
03/01
 Loading...