

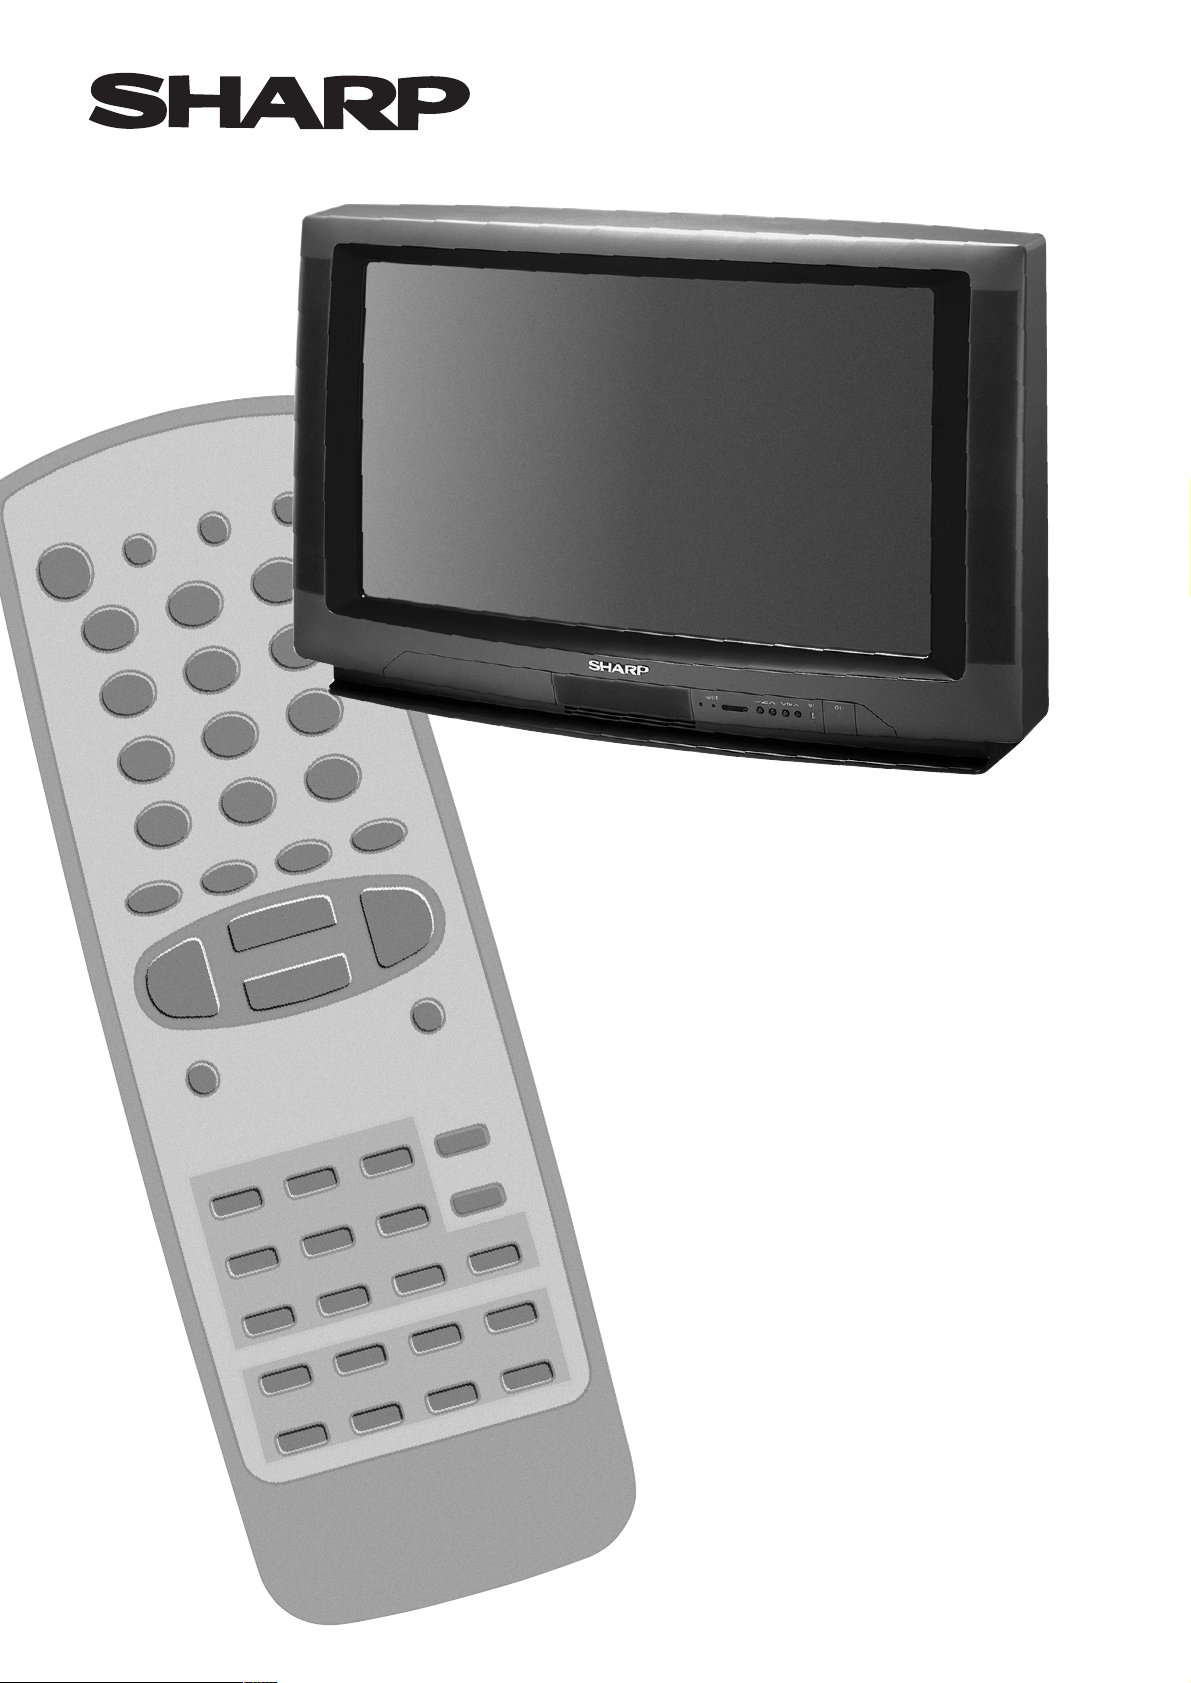
66FW-53H
76FW-53H
COLOUR TELEVISION
OPERATION MANUAL
9
Printed on recycled paper
4.
5.
6.
7.
8.
12.
15. 34.
35.
36.
37.
31.
32.
33.
19.
21.
23.
27.
28.
29.
30.
25.
24.
26.
22.
20.
16.
17.
18.
13.
14.
9.
10.
11.
1.
2.
3.
1
TERMS OF GUARANTEE
Subject to the conditions listed below Sharp Electronics (U.K.) Ltd. (Hereinafter
called «the Company») guarantee to provide for the repair of, or at its option replace
the Sharp Equipment, or any component thereof, (other than Batteries), which is
faulty or below standard, as a result of inferior workmanship or materials.
The conditions of the Guarantee are:
1. This guarantee shall only apply to defects or faults which are notified to the
Company, or its approved Service Facility within one year from the date of
purchase of the equipment.
2. This guarantee covers equipment intended for private domestic use only. This
guarantee does not apply to equipment used in the course of a business, trade
or profession.
3. This guarantee does not cover any faults or defects caused by accident, misuse,
fair wear and tear, neglect, tampering with the equipment, or any attempted at
adjustment or repair other than by an approved Service Facility.
4. In the unlikely even of your equipment requiring repair, please contact the Dealer
or Supplier from whom it was purchased.
5. The cost of carriage to and from the Dealer, Supplier or Sharp approved Service
Facility shall be borne by the purchaser.
6. No person has any authority to vary the terms or conditions of this guarantee.
7. This guarantee is offered as an additional benefit to the consumer’s statutory
rights and does not affect rights in any way.
In the unlikely event of this equipment requiring repair during the guarantee period, you will need to
provide proof of date of purchase to the repairing company.
Please keep your invoice or receipt, which is supplied at the time of purchase.
2
“SHARP” consumer electronic products have established a world-wide reputation for unsurpassed quality and precision
manufacturing techniques since 1924, when the famous SHARP trademark first appeared on a radio receiver.
Your new SHARP Colour TV uses the very latest electronic circuitry and engineering advances for the best possible
performance.
Given proper care, your new TV will provide many years of entertainment for the entire family. Please read the following
instructions before operating this set.
CAUTION: Make sure that the main power is switched off when going out.
Dear SHARP Customer
Contents
Safety Precaution
Terms of guarantee ........................................................ 1
Safety precaution ........................................................... 2
Feature List ..................................................................... 3
Accessories .................................................................... 3
Remote Control Battery Installation .............................. 3
Antenna Connections (Installation) ................................ 4
Controls & Terminals ...................................................... 6
Switching on ................................................................... 7
Auto Installation .............................................................. 8
TV operation - Channel selection - .............................. 10
Picture Adjustments ..................................................... 11
Wide Mode ................................................................... 13
Audio Adjustments ....................................................... 15
On Timer and Off Timer ................................................ 19
Help, Demo and Post Code ......................................... 20
Child Lock (Chanel Block) ............................................ 21
Menu Structures ........................................................... 23
Teletext Mode ............................................................... 24
TV Channel Setting (Advanced) ....................................28
TV/VIDEO Selector ....................................................... 32
Headphone Jack .......................................................... 33
VCR mode ..................................................................... 34
21-pin Euro-SCART and 21-pin Audio/Video .............. 35
Typical connections ...................................................... 36
Troubleshooting ............................................................ 38
General Specifications for Television Receiver ........... 39
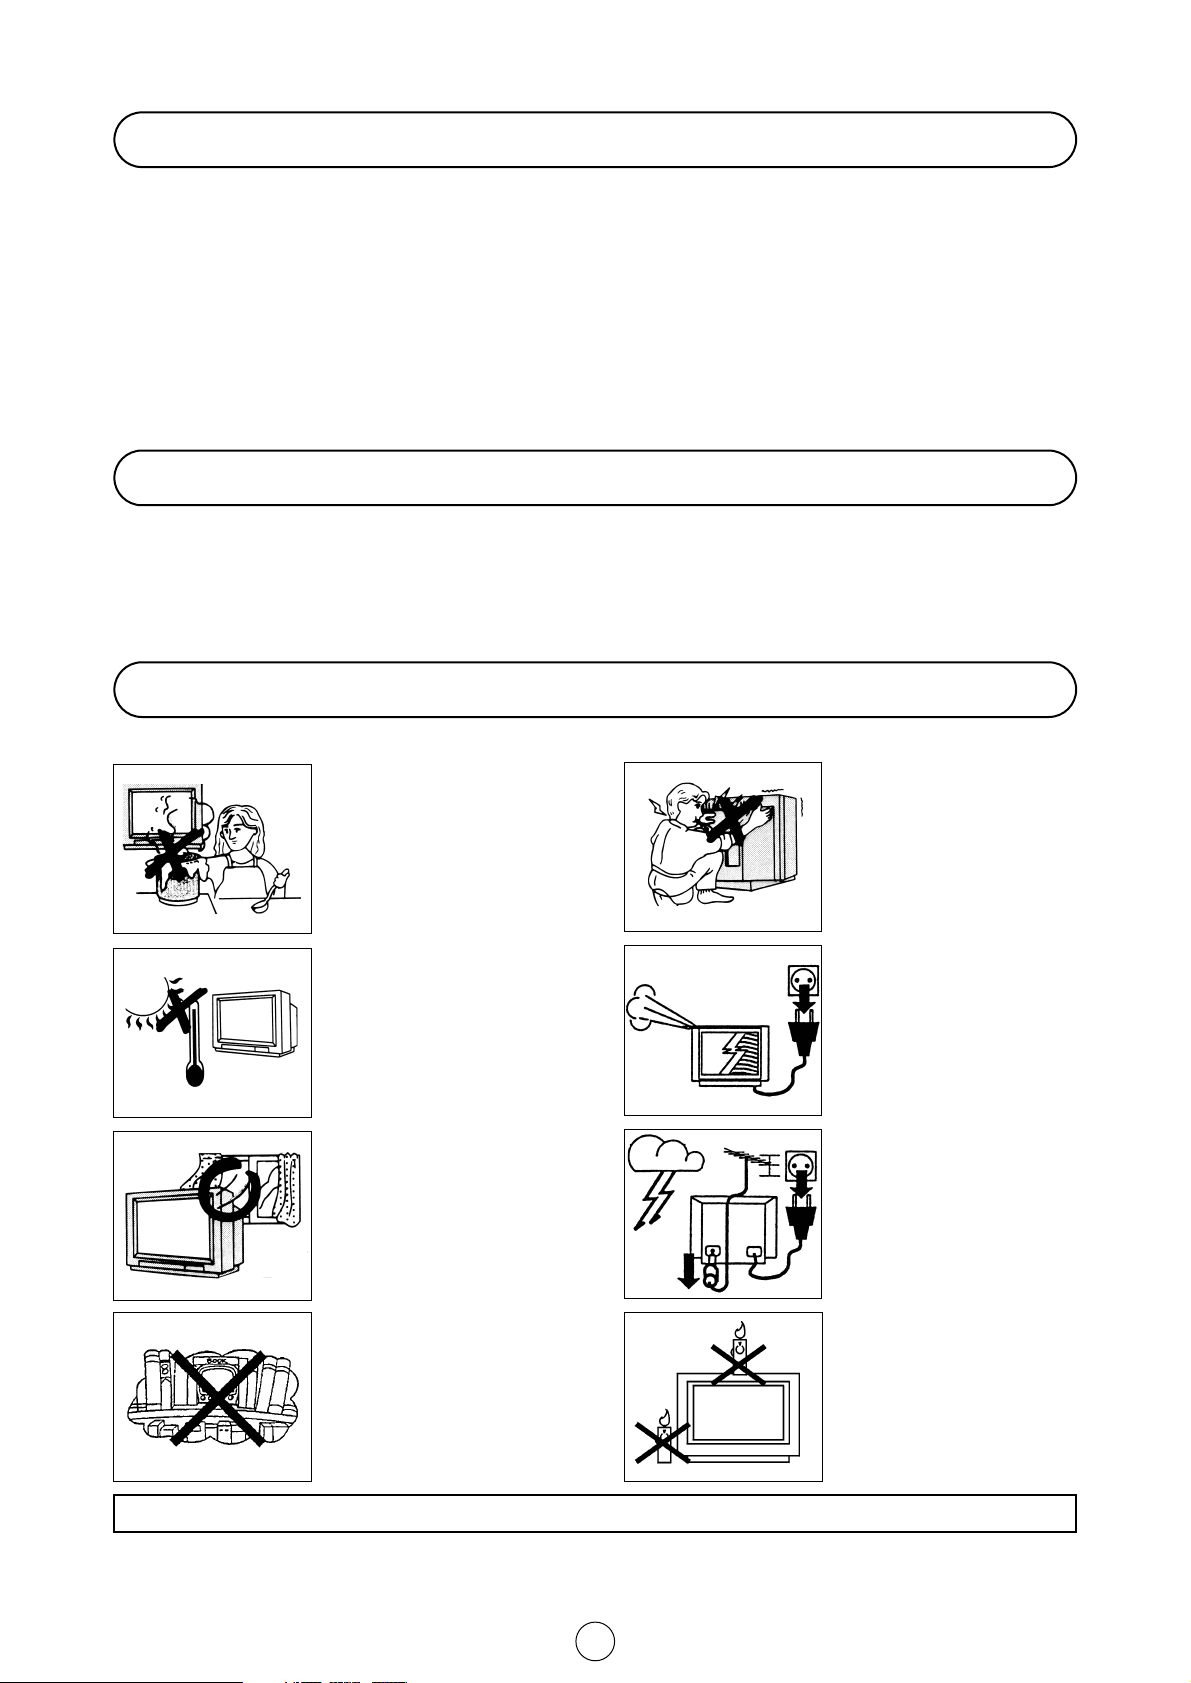
To prevent fire or electrical
shock, do not use the TV set
in an excessively damp place.
Position the TV set out of
direct sunlight and away from
heat, as high temperatures
can damage the cabinet, CRT,
or other electronic parts.
Do not cover the ventilation
holes at the back of the TV
set, this can cause fire or
other serious problems. Leave
an adequate open space
behind the TV set for good
ventilation.
Always disconnect your television from the mains and the
aerial cable during thunderstorms.
Even if your television is
switched off, it can still be
damaged by lightning striking
the mains and/or aerial cable.
Never remove the back of the
cabinet, as there is high voltage in the TV set.
Please call for service.
Unplug the power cord from
the wall outlet immediately if
the TV set begins to make
unusual noises or give off
smoke or an odd smell, then
call your dealer for service.
Do not install this equipment
in a confined space such as a
bookcase or a built-in cabinet.
To prevent fire, never place
any type of candle or naked
flames on the top or near the
TV set.
This equipment complies with the requirements of Directives 89/336/EEC and 73/23/EEC as amended by 93/68/EEC.
3
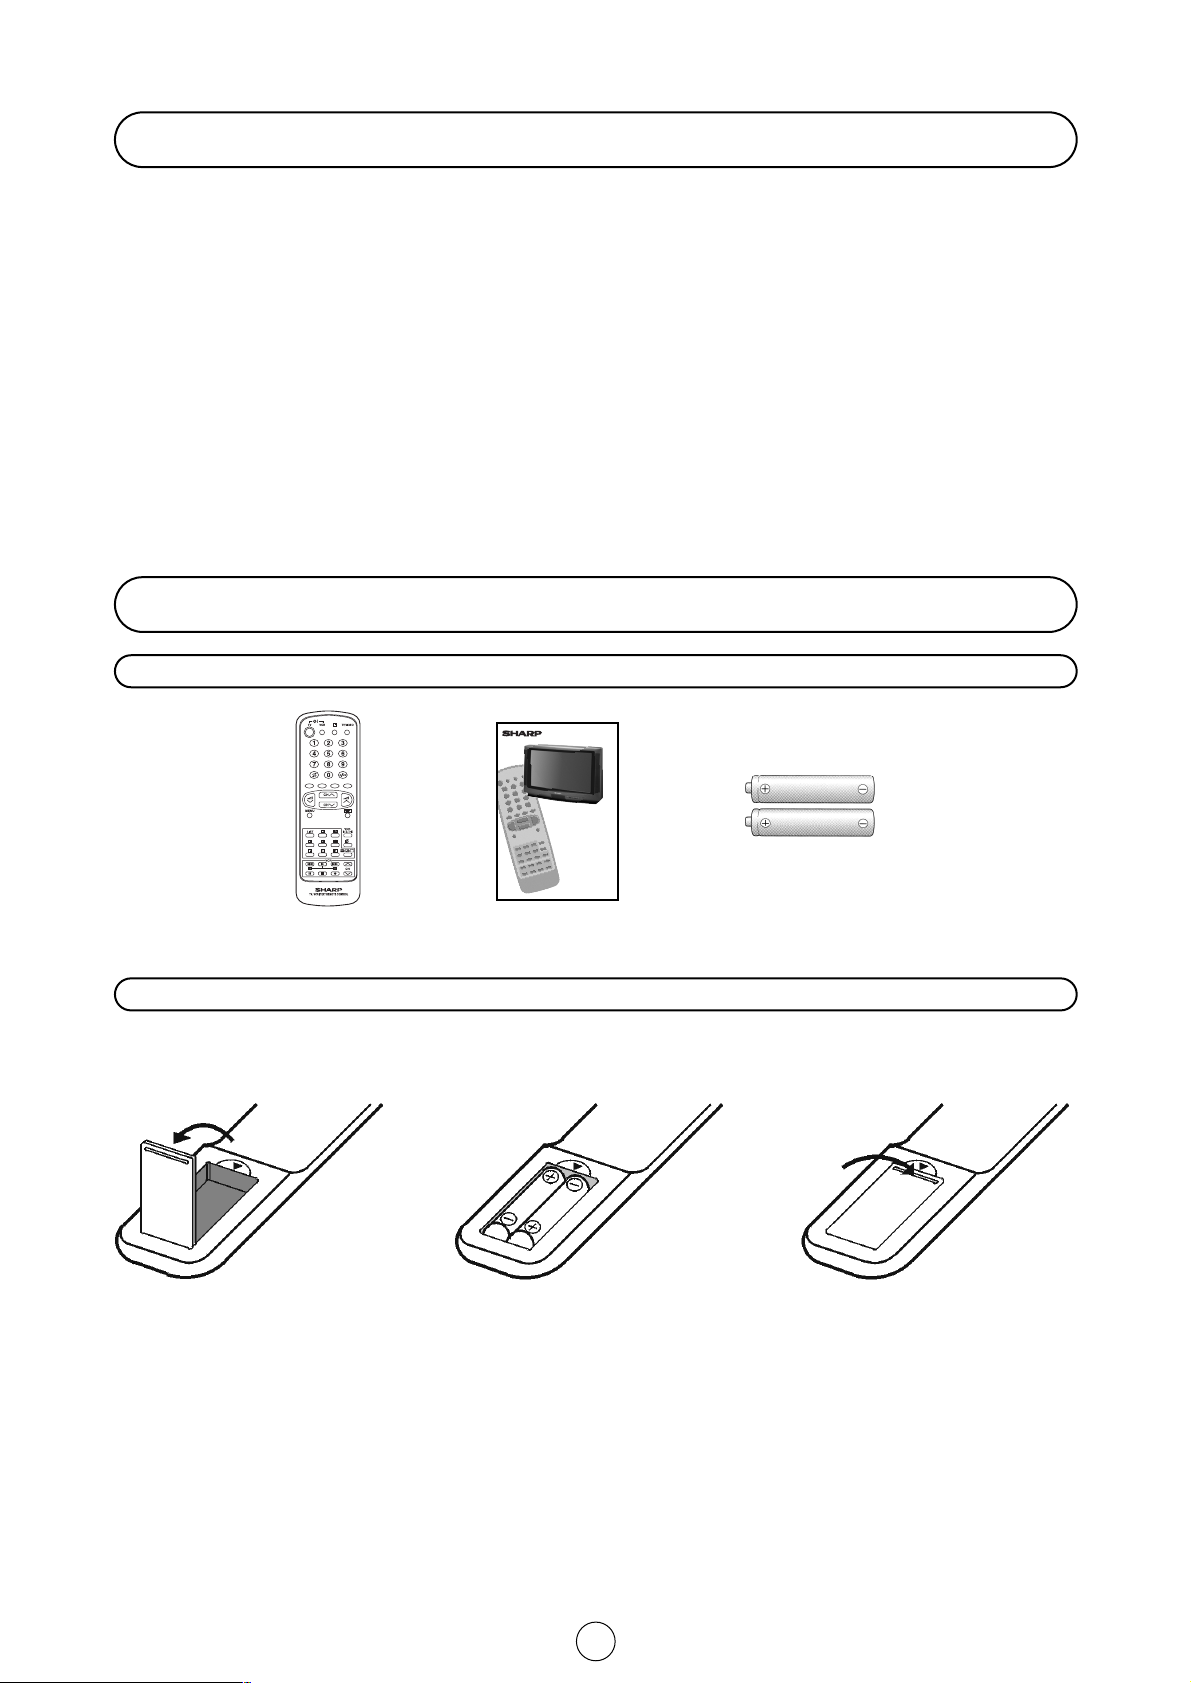
NOTE:•Remove batteries if weak or if the unit is not in use for long periods.
•
Do not mix old and new batteries.
•
Incorrect installation of the batteries may damage the remote control.
Quick reference Guide
Accessories
Remote Control Battery Installation
Before using the TV set for the first time, install the supplied dry batteries in the remote control.
Remote control
Operation Manual Type-AA Dry Batteries
With your thumb nail, pull up the
slit as indicated by the arrow to
remove the battery cover.
Insert two batteries 1.5 V (Size «AA»).
Be sure to match the battery A/
D
terminals with the A/Dmarks inside
the compartment.
Replace the battery cover.
•
Digital Comb Filter
•
Auto Installation System
•
ACSS function (Auto Channel Sorting System)
•
99 Channel Programming System
•
Cable and Hyperband
•
Teletext
•
OSD System (On Screen Display)
•
Tint Control
•
NTSC Hue Control
•
ECO mode
•
Wide Mode Function
•
Picture rotation
•
Digital Stereo NICAM
•
AVC (Automatic Volume Correction)
•
AV/SCART Volume
•
Graphic Equalizer
•
ON-OFF Timer
•
Interactive Help
•
Child Lock System
•
21 pin Euro SCART Connector (RGB)
•
21 pin Audio/Video Connector (AV-1) With S-Video Input
•
21 pin Audio/Video Connector (AV-2)
•
Front Audio/Video Input Terminal
•
NTSC playback AV Input
•
Front S-Video Input Terminal
•
Headphone Terminal
•
Blue Back Noise Mute Function
Feature list
66FW-53H
76FW-53H
COLOUR TELEVISION
OPERATION MANUAL
9
Printed on recycled paper

4
Aerial connections - TV set only -
Aerial connections - VCR and TV -
Note: See on -Typical connections- (page 36) for details of further connection possibilities.
,
Mains Socket Outlet
AC 220~240 V
50 Hz
AV-2
AV-1
RGB
L L
BACK OF TV
WOOFER
RR
FRONTREAR
SCART Lead
(Not supplied)
Aerial
(Not supplied)
Aerial Lead
(Not supplied)
RF OUT
ANTENNAIN
Aerial in
RF out
AUDIO/VIDEO
Audio/Video
BACK OF VCR
Mains Socket Outlet
AC 220-240 V, 50 Hz
Aerial Cable
(Not supplied)
Mains Socket Outlet
AC 220-240 V, 50 Hz
5
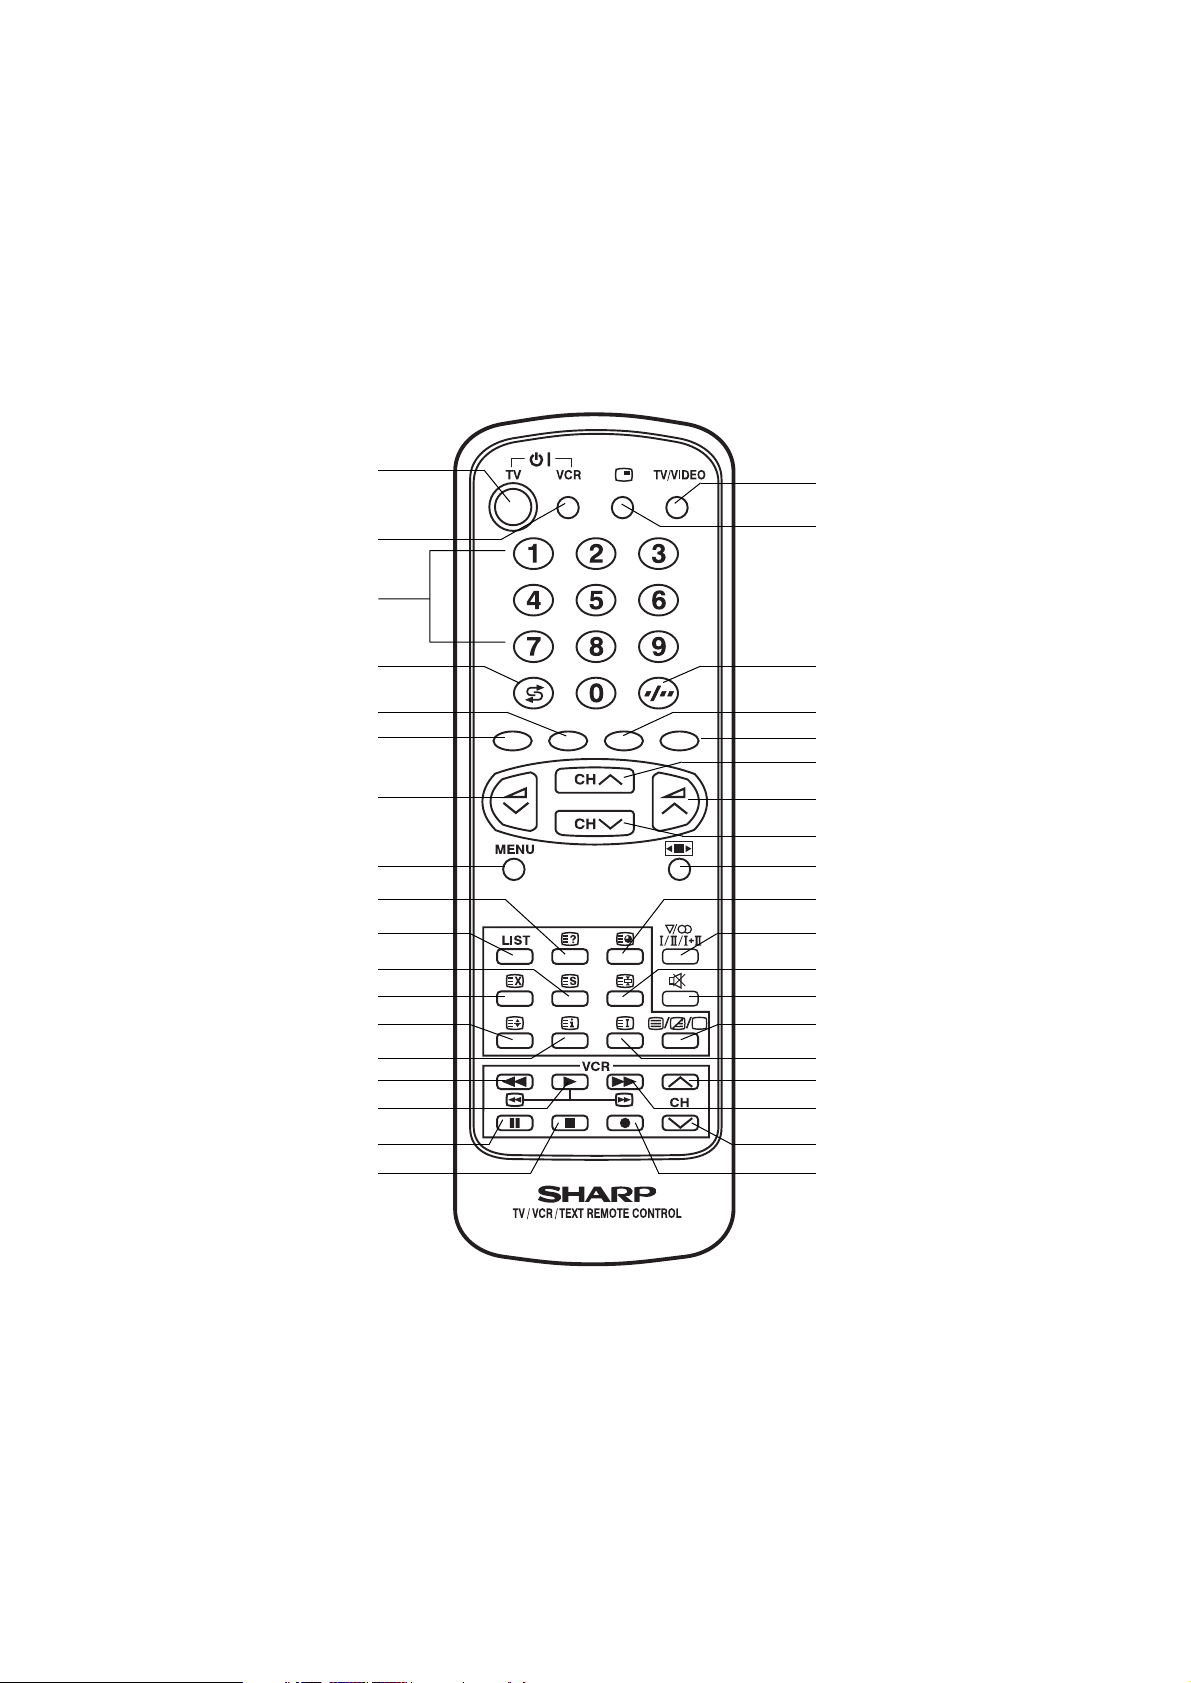
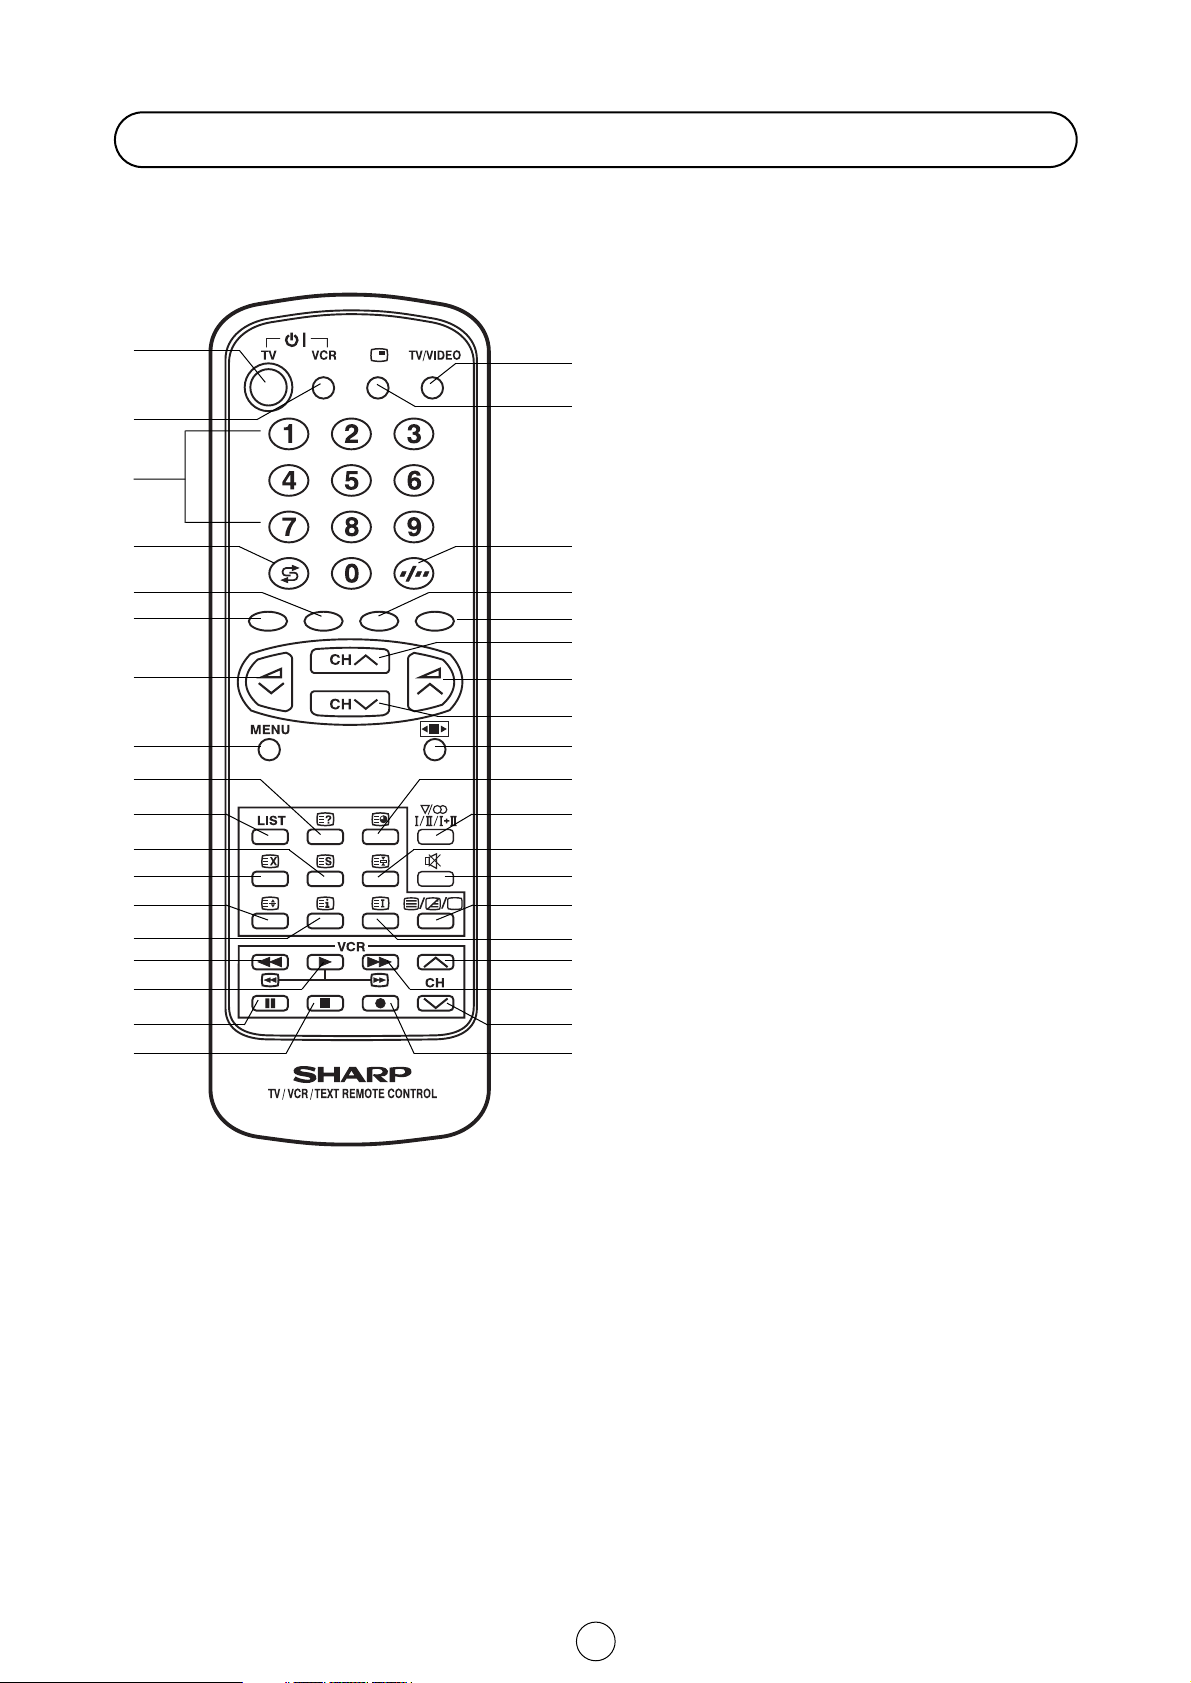
TV 1. Stand-by ON/OFF switch (TV)
Video 2. Power ON / OFF switch (VCR)
TV 3. Digit buttons 0 ~ 9
4. Flashback button
Teletext 5. Colour button (green)
6. Colour button (red)
TV 7. Volume DOWN/Cursor control LEFT
8. Menu button
Teletext 9. Reveal button
10. List selector
11. Store button
12. Cancel button
13. Half page button
14. Cursor button
Video 15. Rewind/picture search/reverse
16. Play button
17. Pause / Still button
18. Stop button
TV 19. TV / VIDEO selector
20. Call button
21. Single/Double entry
Teletext 22. Colour button (yellow)
23. Colour button (cyan)
TV 24. Channel UP/Cursor control UP
25. Volume UP/Cursor control RIGHT
26. Channel DOWN/Cursor control
DOWN
27. Wide Mode selector
TV /Teletext 28. Time button
TV 29. Sound mode selector
Teletext 30. Hold button
TV 31. Sound Mute button
Teletext 32. Text/Mix/Picture button
33. Index button
Video 34. Channel Up selector
35. Fast forward/picture search/forward
36. Channel Down selector
37. Record button
Remote control
4
5
6
7
8
12
15 34
35
36
37
31
32
33
19
21
23
27
28
29
30
25
24
26
22
20
16
17
18
13
14
9
10
11
1
2
3
6
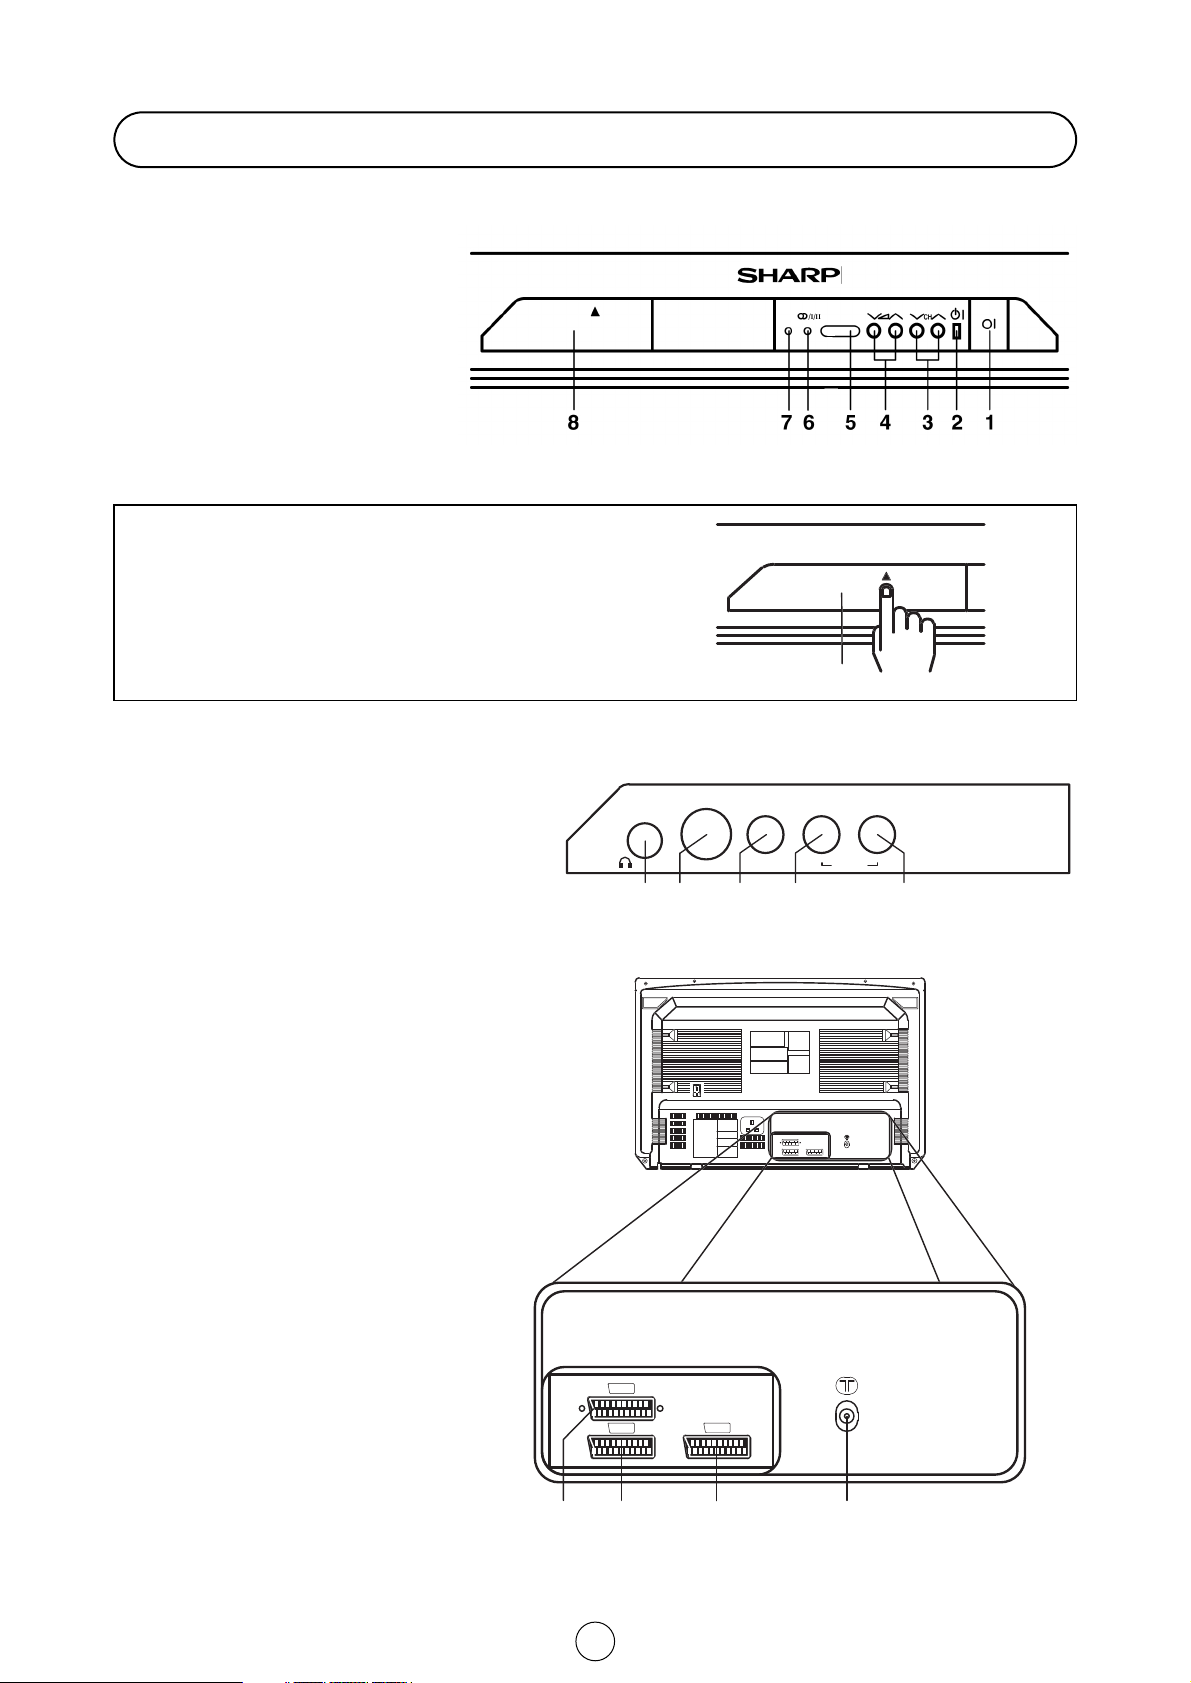
Controls & Terminals
FRONT TV
1. Main Power On/Off Switch
2. Power Indicator
3. Program Selector (UP/DOWN)
4. Volume Buttons (UP/DOWN)
5. Remote Control Sensor
6. Sound Indicator
7. Remote Control Indicator
8. Door
HOW TO OPEN THE DOOR
Press the top of the door, opening it slightly
hook your finger inside and pull open.
Behind the door
10. Headphone Socket (3.5 mm
ø
/ 16~600 B)
11. S-Video input terminal
12. Video Input Terminal (PAL/SECAM/NTSC)
13. Audio Input Terminal (left)
14. Audio Input Terminal (right)
REAR TV
21-pin In/Out
1. 21-pin Audio/Video (AV-2)
With PAL/SECAM/NTSC Video Input
2. 21-pin Audio/Video (AV-1)
With PAL/SECAM/NTSC/S-Video Input
3. 21-pin Euro SCART (RGB)
With PAL/SECAM/NTSC Video Input
RF Input
4. Aerial terminal
9
L/S/G/I R/D/D/D
S-VIDEO VIDEO
10 11 12 13 14
AV-2
AV-1
RGB
AUDIO
L L
WOOFER
RR
FRONTREAR
1
42 3
7
STATION REAL CHANNEL FREQUENCY
SIGNALS NUMBERS MHZ
VHF I-1 (A) ÷ I-9 (J) CH-01 ÷ CH-09 45.75 ÷ 215.25
UHF I-21 ÷ I-69 CH-21 ÷ CH-69 471.25 ÷ 855.25
C M1/S1 ÷ M10/S10 CC-01 ÷ CC-10 105.25 ÷ 168.25
A U-1/S-11 ÷ U-10/S-20 CC-11 ÷ CC-20 231.25 ÷ 294.25
T S-21 ÷ S-41 CC-21 ÷ CC-41 303.25 ÷ 463.25
V CC-42 ÷ CC-63 48 ÷ 304
CC-64 ÷ CC-68 69.25 ÷ 98.25
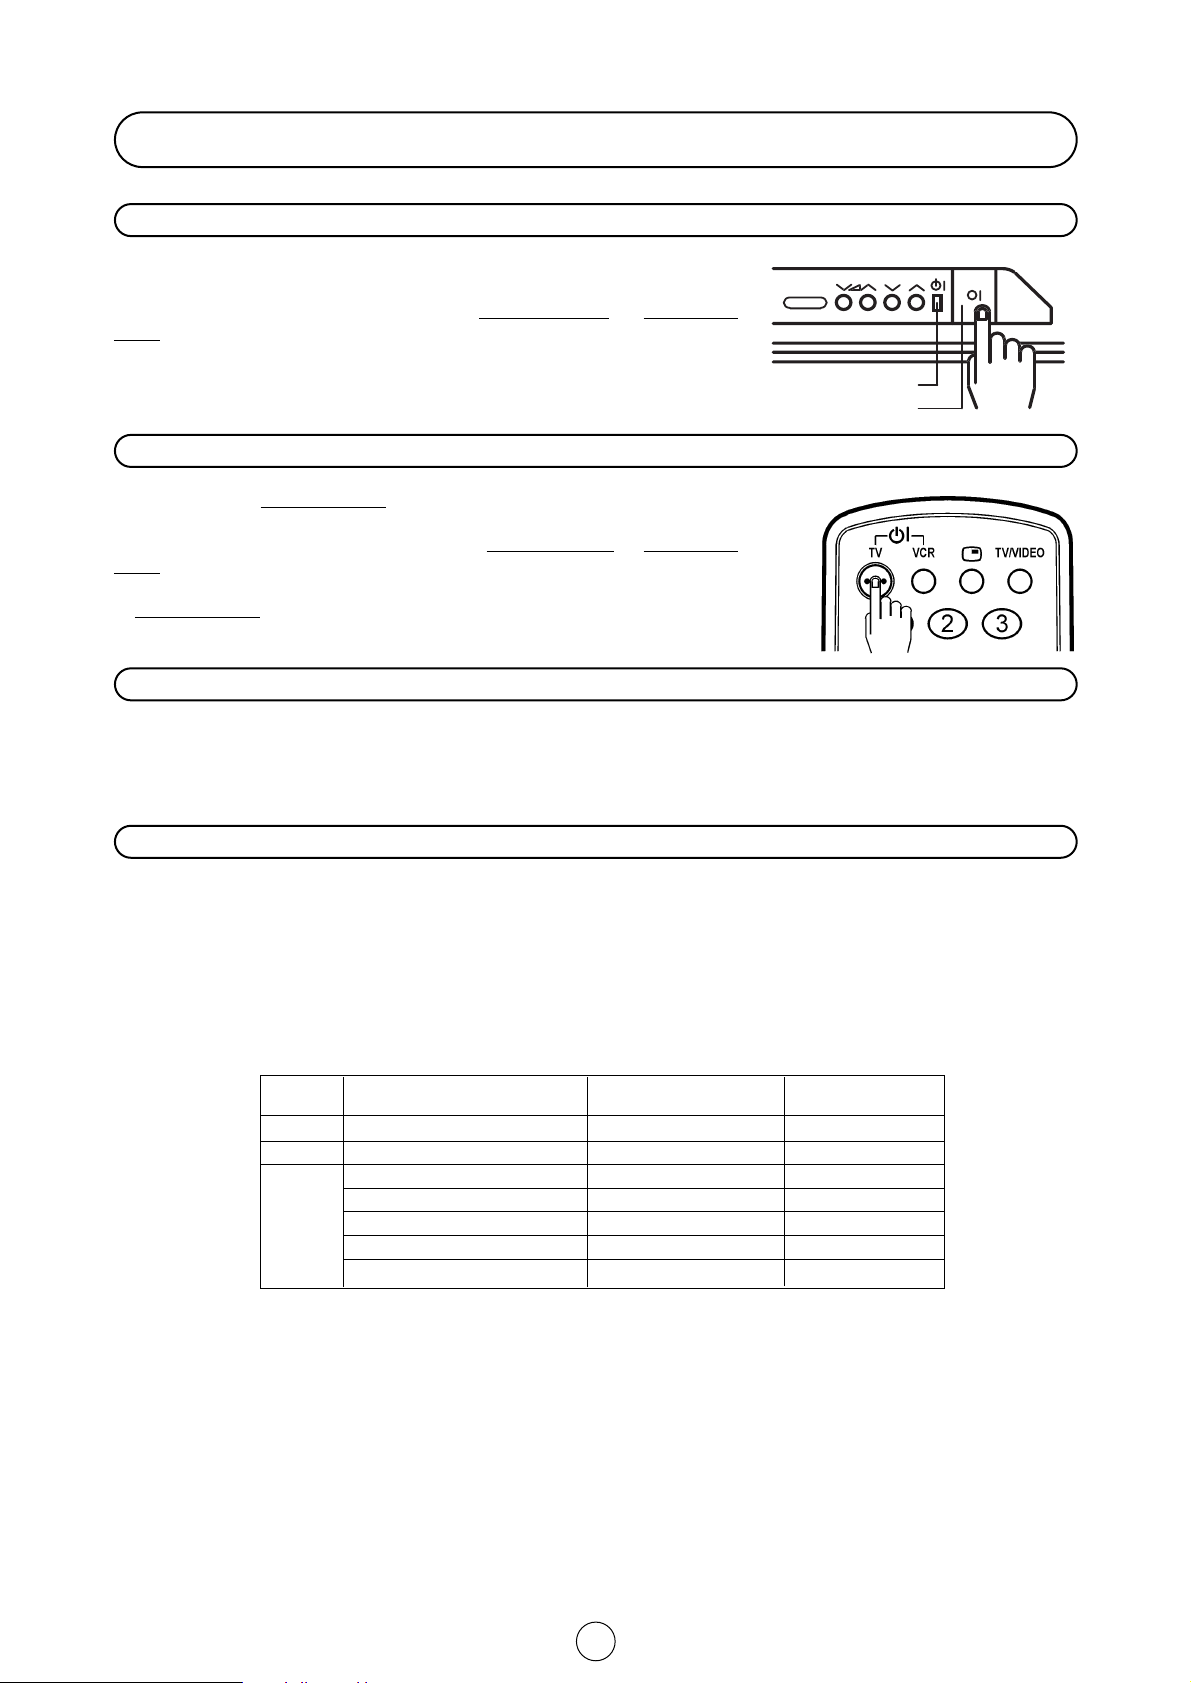
Power indicator
Main power button
Switching on
Power supply on/off button
This TV memorizes the Mode last used when it was switched off. When the
main power button (
I) is pressed to turn on the set, the power indicator will
light and the set will resume in either the Stand-by mode
or Programme
mode, depending upon its condition when it was switched off.
On-Off/Stand-by button
When the TV is in Stand-by mode
, to turn ON the TV press the Stand-by but-
ton (
B
l
TV) on the remote control, or one of the four buttons on the TV
(
Va/\, V
CH/\). The TV will change from Stand-by mode to Programme
mode, the sound indicator will light a few moments and an image will appear
on the screen. Press the Stand-by button (
B
l
TV) again and the TV will return
to Stand-by mode
.
Blue back off timer
If noise appears in TV or VCR mode, the screen turns blue. The blue back off-timer is then engaged and will automatically switch to Stand-by mode after 15 minutes.
Real Channel Number (terrestrial/cable TV Programmes)
Channel setting is mainly performed using the remote control. Please follow the instructions with the remote control in
hand.
Television broadcasting stations have channel numbers assigned to them (real channel numbers). You can assign your
own channel number to a real channel and store it in the programme preset memory.
CORRESPONDING REAL CHANNEL
CH
8
Auto Installation System
Your television set is provided with an Automatic Installation System which makes Installation easier.
This new system is activated when you turn on the TV for the first time.
Procedure:
1. Put batteries into the remote control and connect the antenna jack into the antenna input terminal at the rear of your
TV, as shown on pages 3 and 4.
2. Connect the TV power cable to a 220 ~ 240 V system.
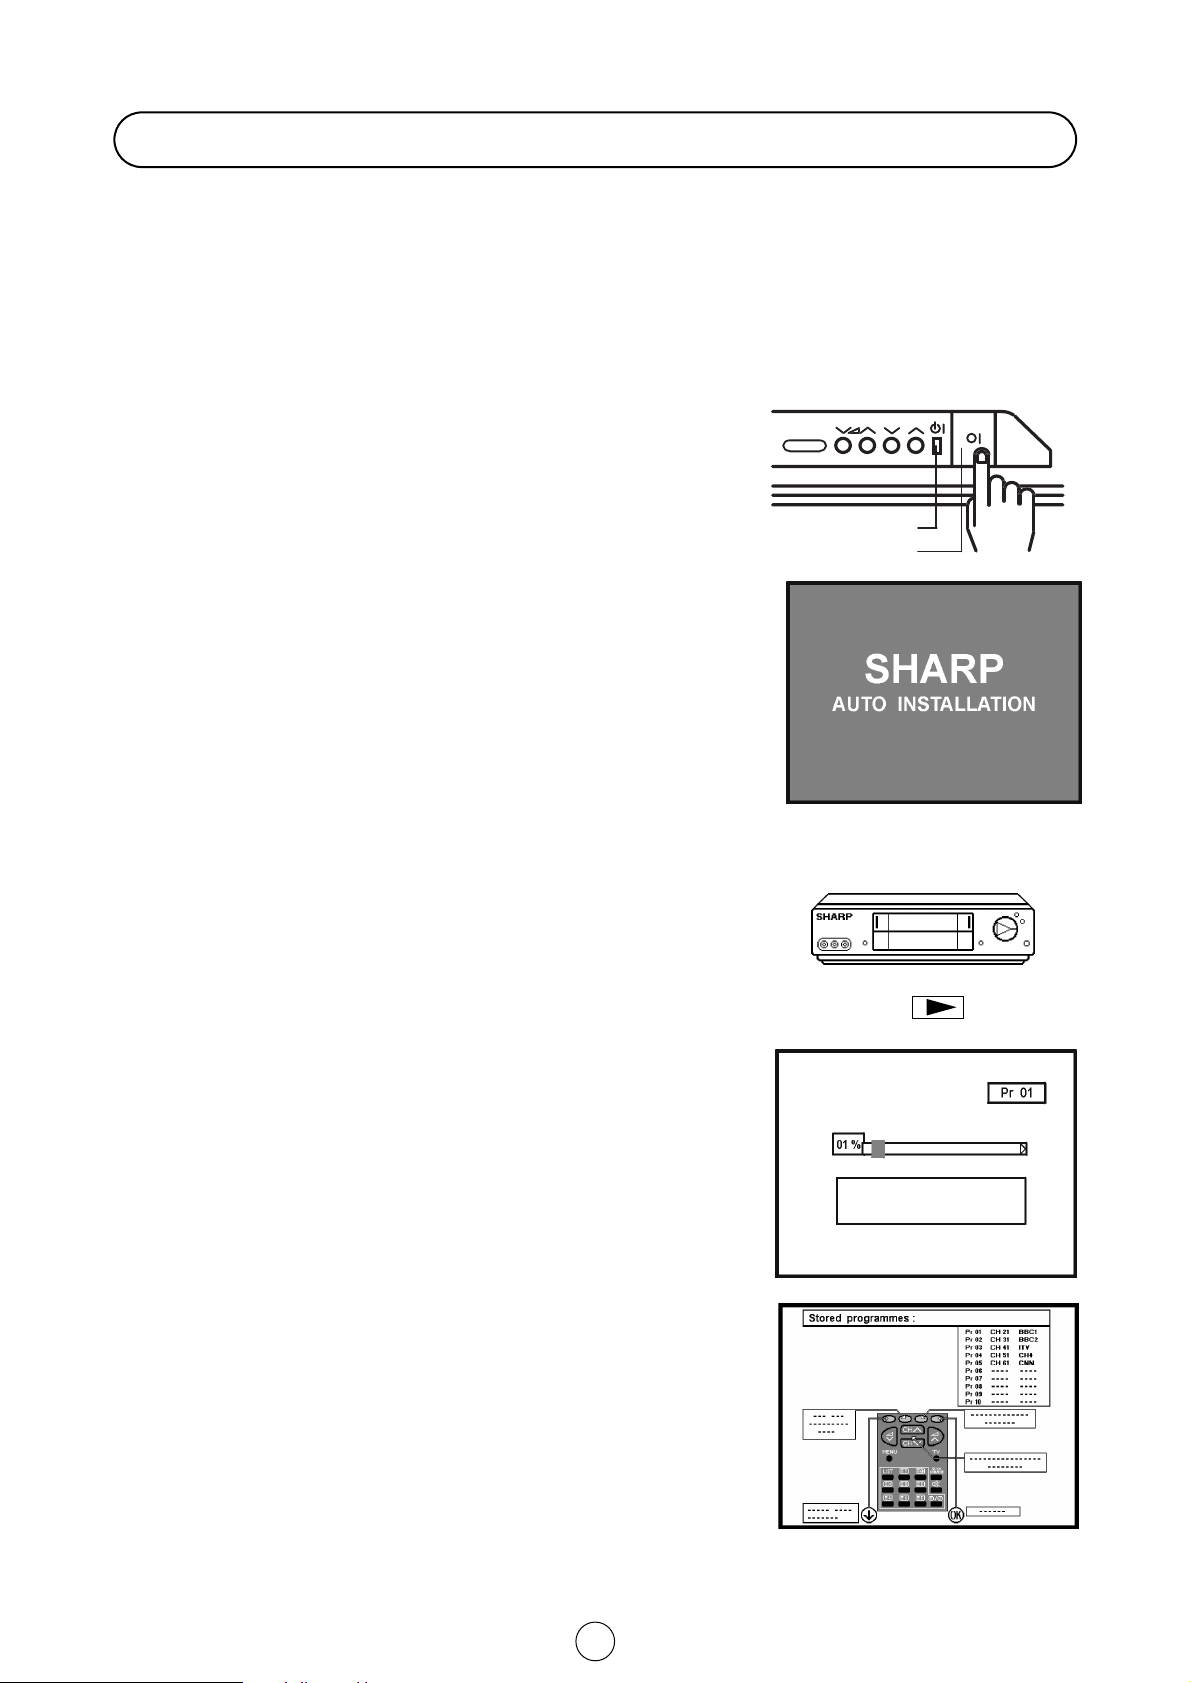
3. Press the main power button (
I), on the right hand side of the TV
set, to start the “AUTO INSTALLATION”.
4. The red power indicator will light.
5. The “AUTO INSTALLATION” message will appear on your TV
screen.
•
The TV is ready to preset automatically all local channels for you.
•
If the TV is being used with a VCR, turn on the VCR and play back
a pre-recorded tape.
6. Now, press any button on the TV remote control and follow the
instructions on the screen, to start Auto Channel Preset.
Automatic Channel Sorting System (ACSS): The TV set SEARCHES
FOR FREQUENCIES, memorises the channels found, and sorts them
(according to technical criteria) from Pr-01 of the TV, to a maximum of
99 programmes.
Notes: This tuning process may take several minutes to perform.
If you need to repeat the “AUTO INSTALLATION”, please read TV
Channel Setting (page 28).
Stored programmes: When the AUTOMATIC SEARCH has been
completed, the "Stored programmes" Menu will appear on screen and
you can change the order of the channels and change or give the
channels a four letter name with the available options:
a) Select programme to be edited.
b) Delete this programme.
c) go to sorting mode.
d) Edit this programme.
e) Exit.
For a more detailed explanation see page 9.
If you wish exit from the menu, press the BLUE button.
Power indicator
Main power button
Auto Installation
VCR
Automatic searching and sorting.
Press the menu button to cancel.
CH
9
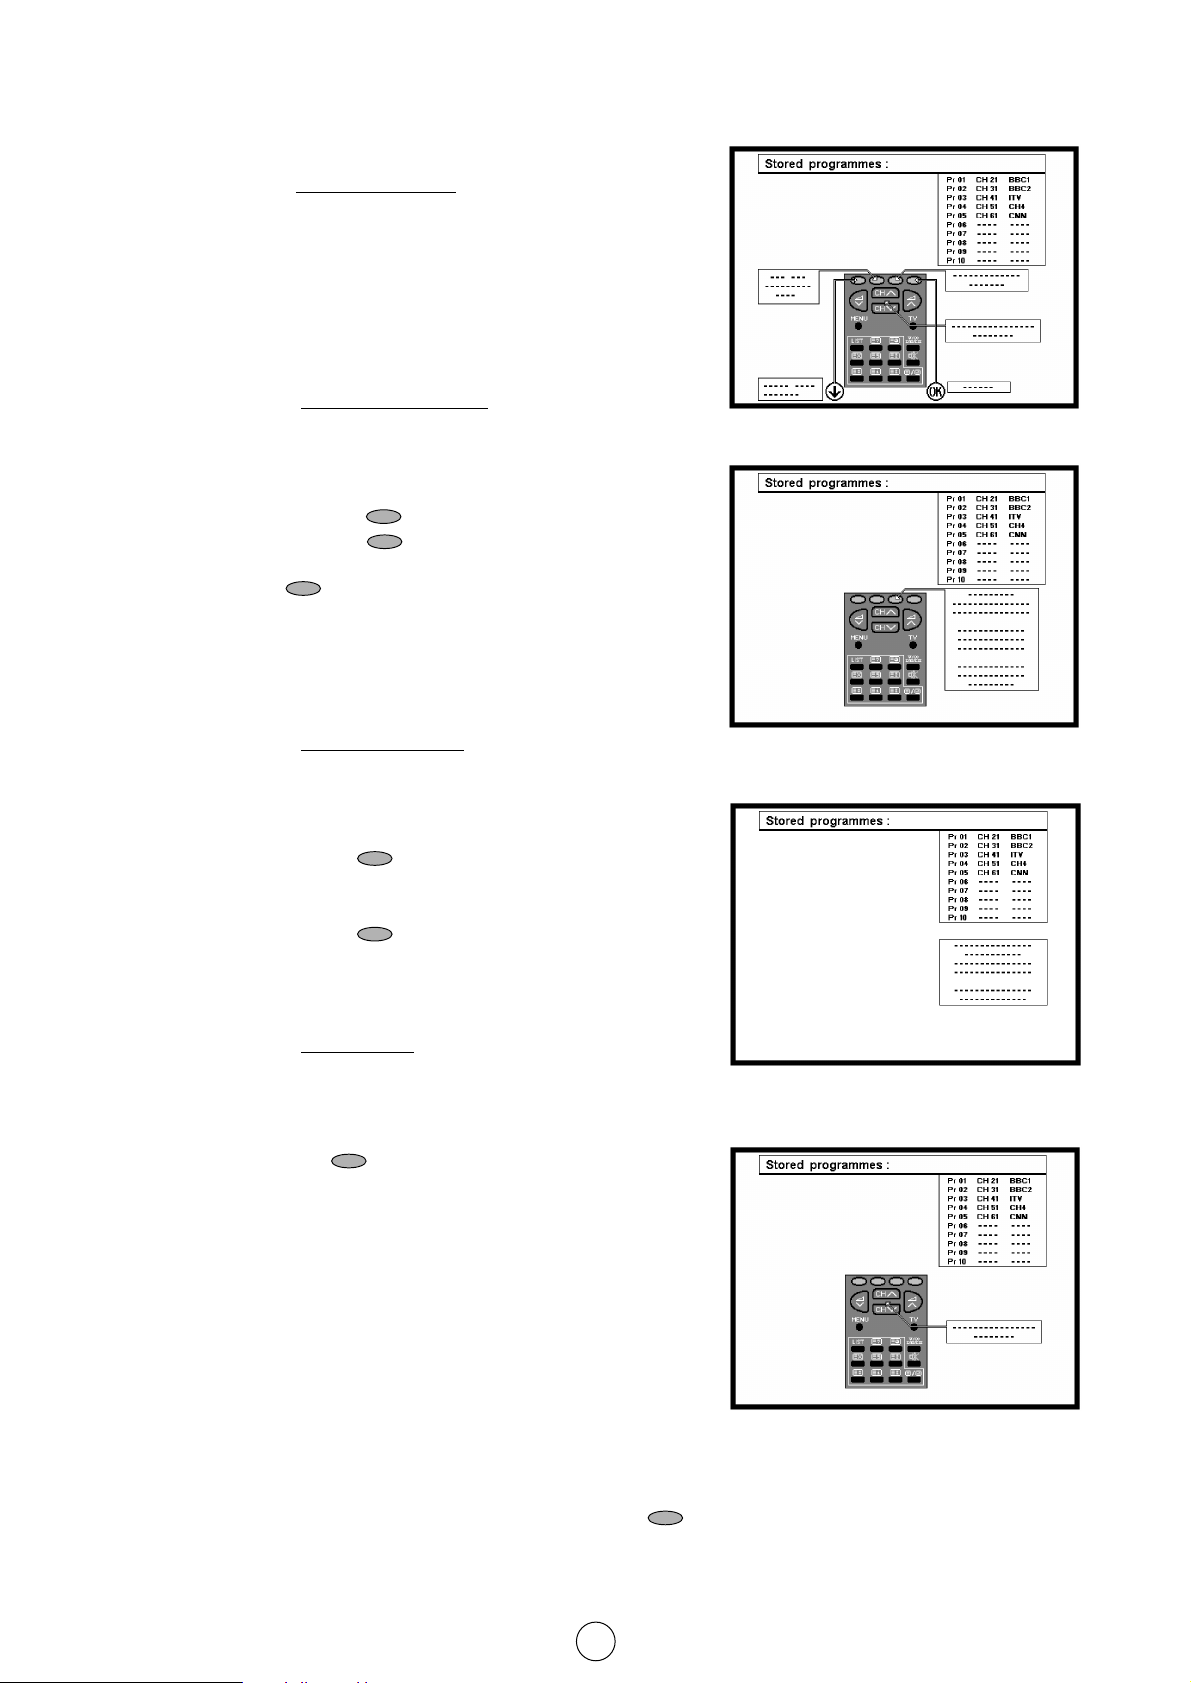
Stored programmes Menu
a) Select programme to be edited.
Use this option to select a prog
ramme from the list. Each time
you press
E or F the memorised channel will be
viewed and will remain selected on the list by means of white
background.
b) Delete this programme.
Use this option for cancelling prog
r
ammes which are badly tuned
or repeated.
b.1 Select the programme (Pr) you wish to delete using Cursor
UP/DOWN buttons
E/ F (marked with white
background).
b.2 Press the YELLOW button to see the “Delete Menu”.
When the YELLOW button is pressed, the TV will ask for
confirmation that you wish to cancel, and you must press the
YELLOW button again. The channels that follow it on the list
will automatically rearrange themselves by moving up one
programme (Pr) place, to restore the space of the cancelled
channel (CH).
c) Go to sorting mode
Use this option for sor
ting the channels (CH) into the desired
programme (Pr), as follows:
c.1 Select the programme (Pr) you wish to change using Cursor
UP/DOWN buttons
E/ F (marked with white
background).
c.2 Press the GREEN button to see the “Sorting Menu”.
c.3 Press the Cursor UP/DOWN buttons
E/ F to move the
channel (CH) to the required position.
c.4 Press the GREEN button to finish.
d) Edit this programme
Use this option for giving a name
made up of four digits to the
channels or for changing the one which appears on some
channels, in the following way:
d.1 Select the channel using the Cursor UP/DOWN buttons
E/ F.
d.2 Press the RED button to see the “Edit Menu”.
d.3 Press the Cursor UP/DOWN buttons
E/ F to change
the first letter. Letters A to Z of the alphabet, a blank space and
the numbers 0 to 9 will appear sequentially. Some of the
broadcasting stations names such as BBC1 or CH4 are already
incorporated in the TV and appear among the alphabet to make
this task easier.
d.4 Press the
I button for changing the position of the cursor and
the
E/ F buttons for changing the letters (repeat this
action for other letters).
d.5 When you have finished the fourth letter, press the
I button to
quit the “Edit Menu” option.
e) Exit
Use this option to quit the menu by pressing the BLUE button .
Stored programmes Menu
Delete Menu
Sorting Menu
Sorting Menu
10
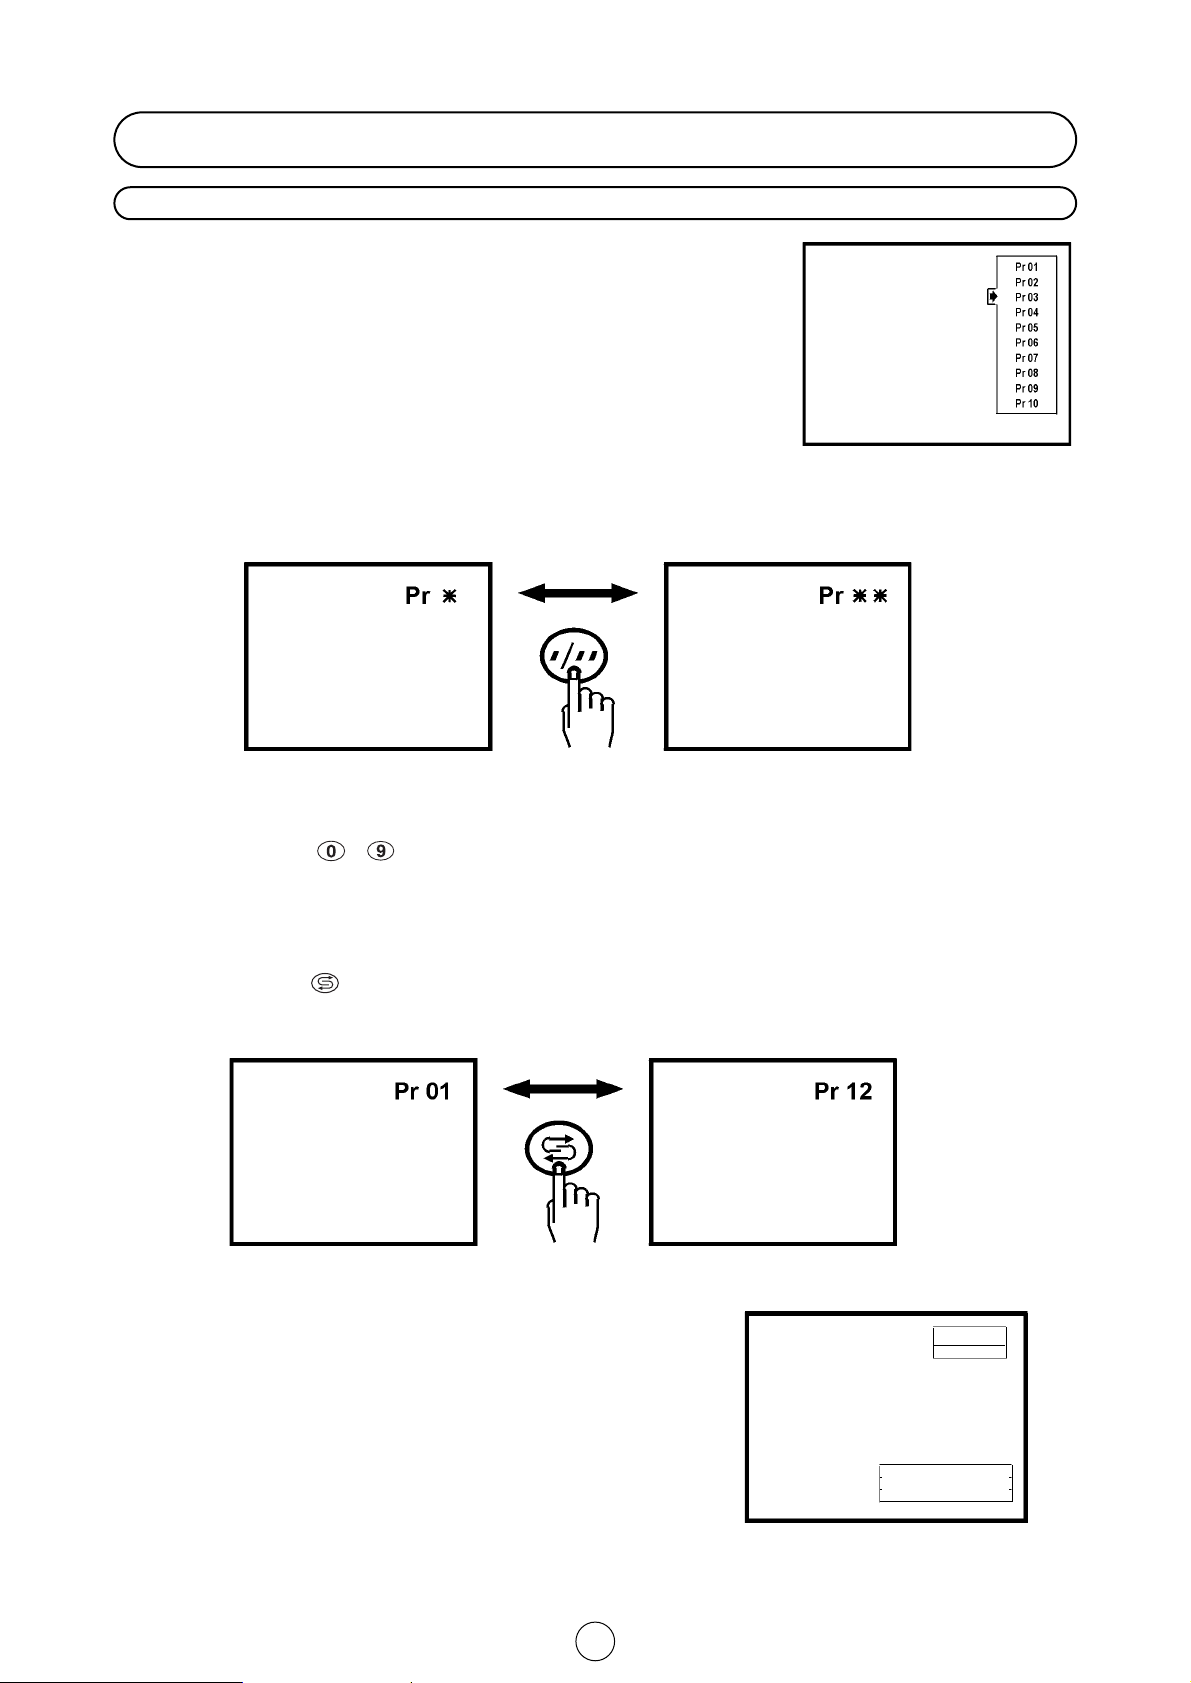
Channel selector buttons E/F
Select the programme channel number you want to see, using the
channel selector buttons
E or F.
When you press these buttons the list of programmes appears.
Press the
E or F again to select another program.
Note: The channels that are in SKIP mode cannot be seen with these
buttons. Use numerical buttons to display these channels.
Single/Double entry selector button 6
This button selects between one or two digit channel number entry.
0~9 Digit buttons
~
You can select channels by pressing the 0 ~ 9 digit buttons on the remote control.
(For single and double digit entry see section B above).
Flash-back button
Press this button to change from the current channel to the channel previously selected. Press the button again to
switch back to the original channel.
Channel Call button (l)
Press this button to display the current programme number and the
name if it has been set and the sound mode on the screen. If the on or
off timer have been set this information will be displayed also.
Press the button again to make the on-screen display disappear.
If the channel you are viewing has been set to be skipped with the
channel skip function, the programme number and name, if set, are
displayed in red. If the channel was fine-tuned, programme number
and name, will be displayed in yellow.
Channel Selection
TV OPERATION
Single digit
entry mode
Double digit
entry mode
Previously
viewed channel
Currently
viewed channel
NAME Pr
MONO
TIME :12:21
ON TIMER :15:35
OFF TIMER :120 Min
11
Picture Adjustments
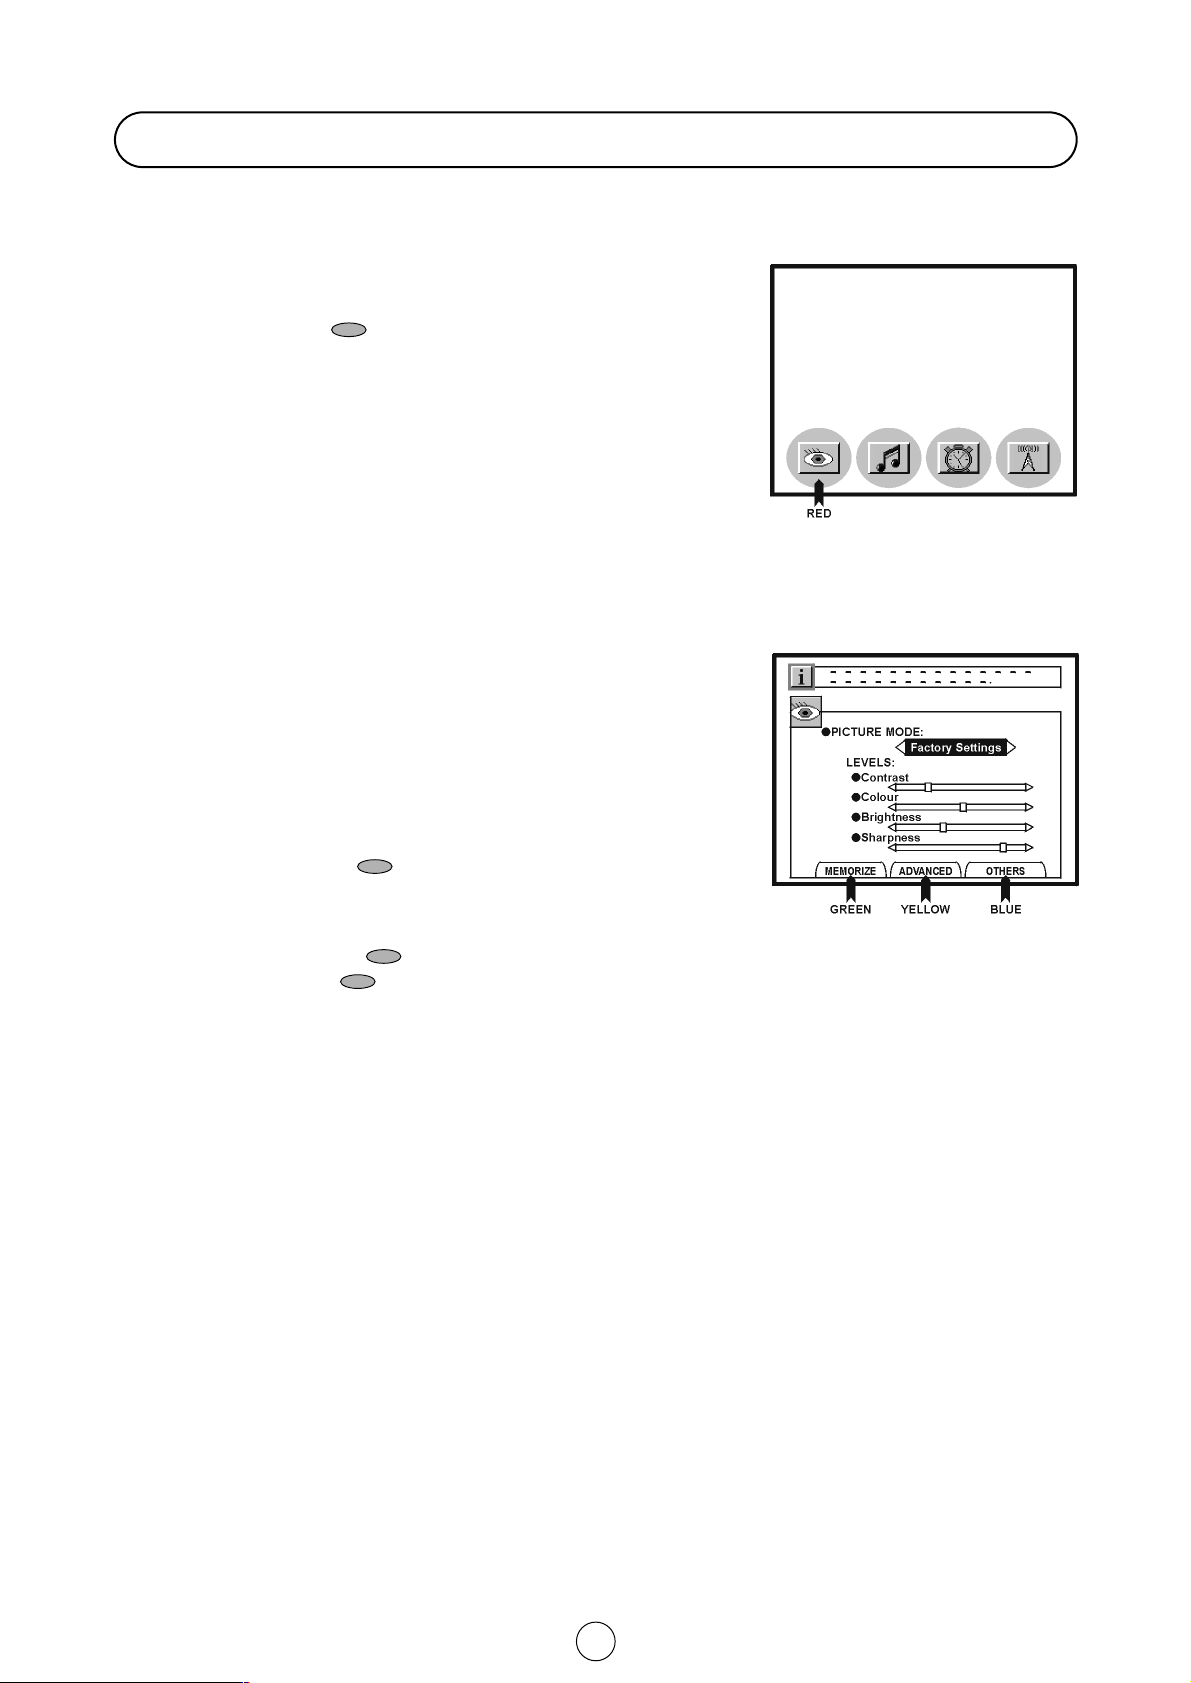
Picture quality are adjustable in this menu.
1. Press the MENU button ● to see the MAIN Menu.
2. Press the RED button to see the PICTURE LEVELS Menu
PICTURE LEVELS Menu
3. Press the Cursor LEFT/RIGHT buttons
C / I to select a prede-
termined level: Factory settings / Memorized / Cinema / Rich /
Game.
4. Press the Cursor UP/DOWN buttons E/ F to select a
parameter from the list: Contrast, Colour, Brightness or
Sharpness.
The red point mark indicates the selected parameter.
5. Adjust the picture quality to your liking with the Cursor
LEFT/RIGHT buttons
C / I.
6. Press the GREEN button if you wish to memorize the
“Personal” levels in the “Memorized” position of PICTURE MODE.
In this menu you can switch to the following menus:
Press the YELLOW button to see the ADVANCED Menu.
Press the BLUE button to see the OTHERS Menu.
7. Press the MENU button ● to close the PICTURE Menu.
MAIN Menu
PICTURE LEVELS Menu
 Loading...