

Page 1

DANSK
ENGLISH
NORSK
SUOMI
SVENSKA
54GT-25S
Page 2

ENGLISH
1
INSTALLATION
BASIC OPERATION
Connect the antenna cable to the TV set.
Plug in your TV into the mains supply
(220~240 V/ 50 Hz).
Inser t two (AA or UM-3, 1,5 V) batteries into
the remote control.
Position the positive and negative ends of the
batteries as indicated.
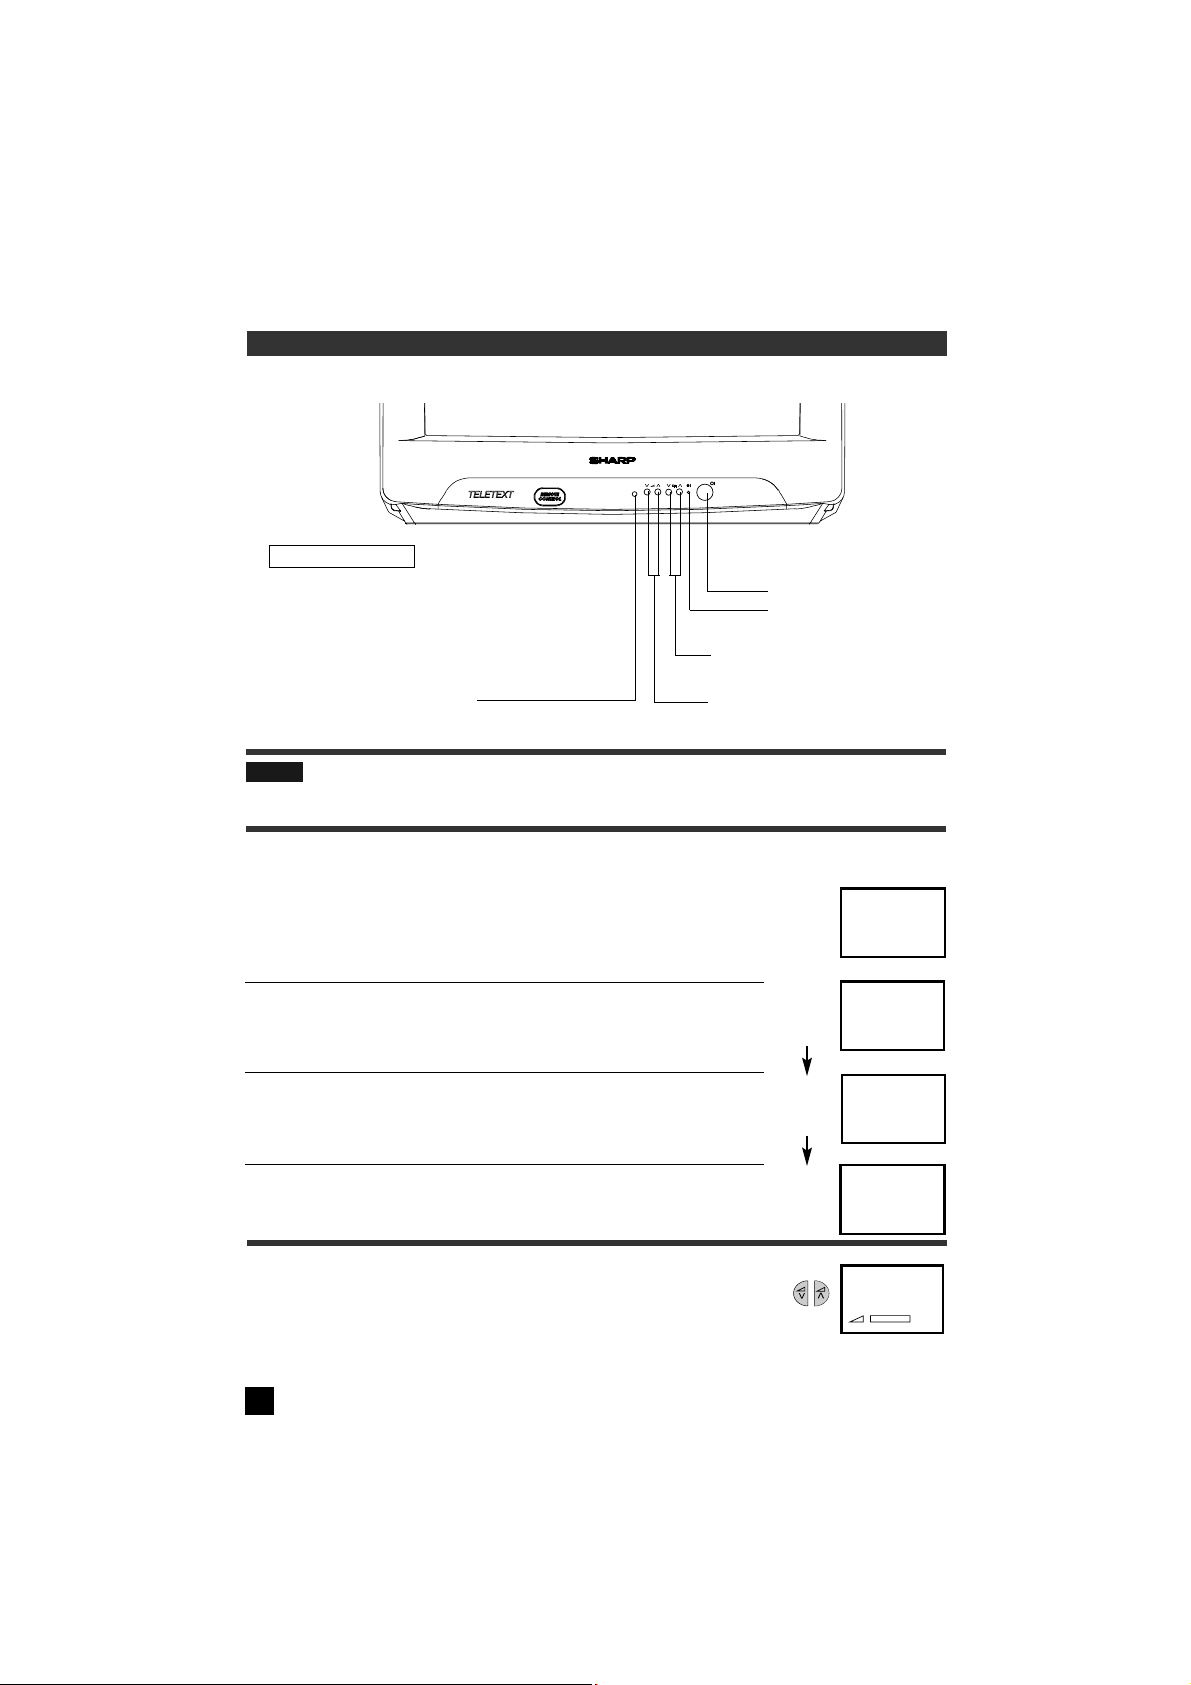
Press the POWER (®) button on the TV set
to turn on TV.If the TV set remains in the
Stand-by mode, press the Stand-by on (æ)
button on the remote control.
STANDBY/ON (æ)
Press To turn the set ON
Press again To turn the set to
STANDBY
TV/VIDEO Select
Press Switch to external video
input mode
Press again Switch to TV
mode.
Infrared Transmitter Window
Aim this window at the
infrared sensor on your
TV set
FLASHBACK (e)
Returns to previously viewed channel
VOLUME UP (œ)/DOWN (∑)
(œ) Increases sound
(∑) Decreases sound
(These are also used for menu
set up)
SOUND MUTE (c)
Press Mutes sound
Press again Restores sound to
previous level
Channel Select buttons
TELETEXT control
These buttons are used to operate
TELETEXT functions.
(See page 10, 11 and 12)
TIME (f)
Press the button to display the
current time on the screen. This
function only operates if the station you are tuned to broadcasts
a teletext signal.
CHANNEL UP (œ)/DOWN (∑)
(œ) Selects next higher channel
(∑) Selects next lower channel
(These are also used for menu
set up)
TEXT/MIX/PICTURE
Single/Double (
6
) Entry selector
MENU
Used to call the MENU screen.
CALL (l)/CHILD LOCK (t)
Used to display the different current
settings on the screen.
Used to unlock the channel when the
TV picture is blue and “t“ mark
displays on the screen.
AC 220~240 V
50Hz
Page 3
2
BASIC OPERATION (CONTINUED)
NOTE: If noise appears in TV or VCR mode, the screen turns blue. The blue back off-timer is then
engaged and will automatically switch the set to Stand-by mode after 15 minutes.
POWER ( l) button
POWER indicator
CHANNEL UP (œ) or DOWN
(∑) button
VOLUME UP (œ) or DOWN (∑) button
TV Front
Remote control sensor
❚ Changing the Channels
To select a one-digit channel (eg. Program 5)
(1) Press the button.
(2) If 5- is indicated and picture does not change, press the
6
button to switch over to the 1 - digit select mode and press 5
again.
To select a two-digit channel (eg. Program 15)
(1) Press 6button to set the 2-digit select mode.
(2) Press button
(3) Press button.
❚ Adjusting the Sound Volume
Press VOLUME UP (œ)/DOWN (∑) button to adjust the volume.
❚ Watching a TV Programme
6
PR 5
PR - -
PR 1 -
PR 15
PR 5
llllllllll
Page 4
ENGLISH
3
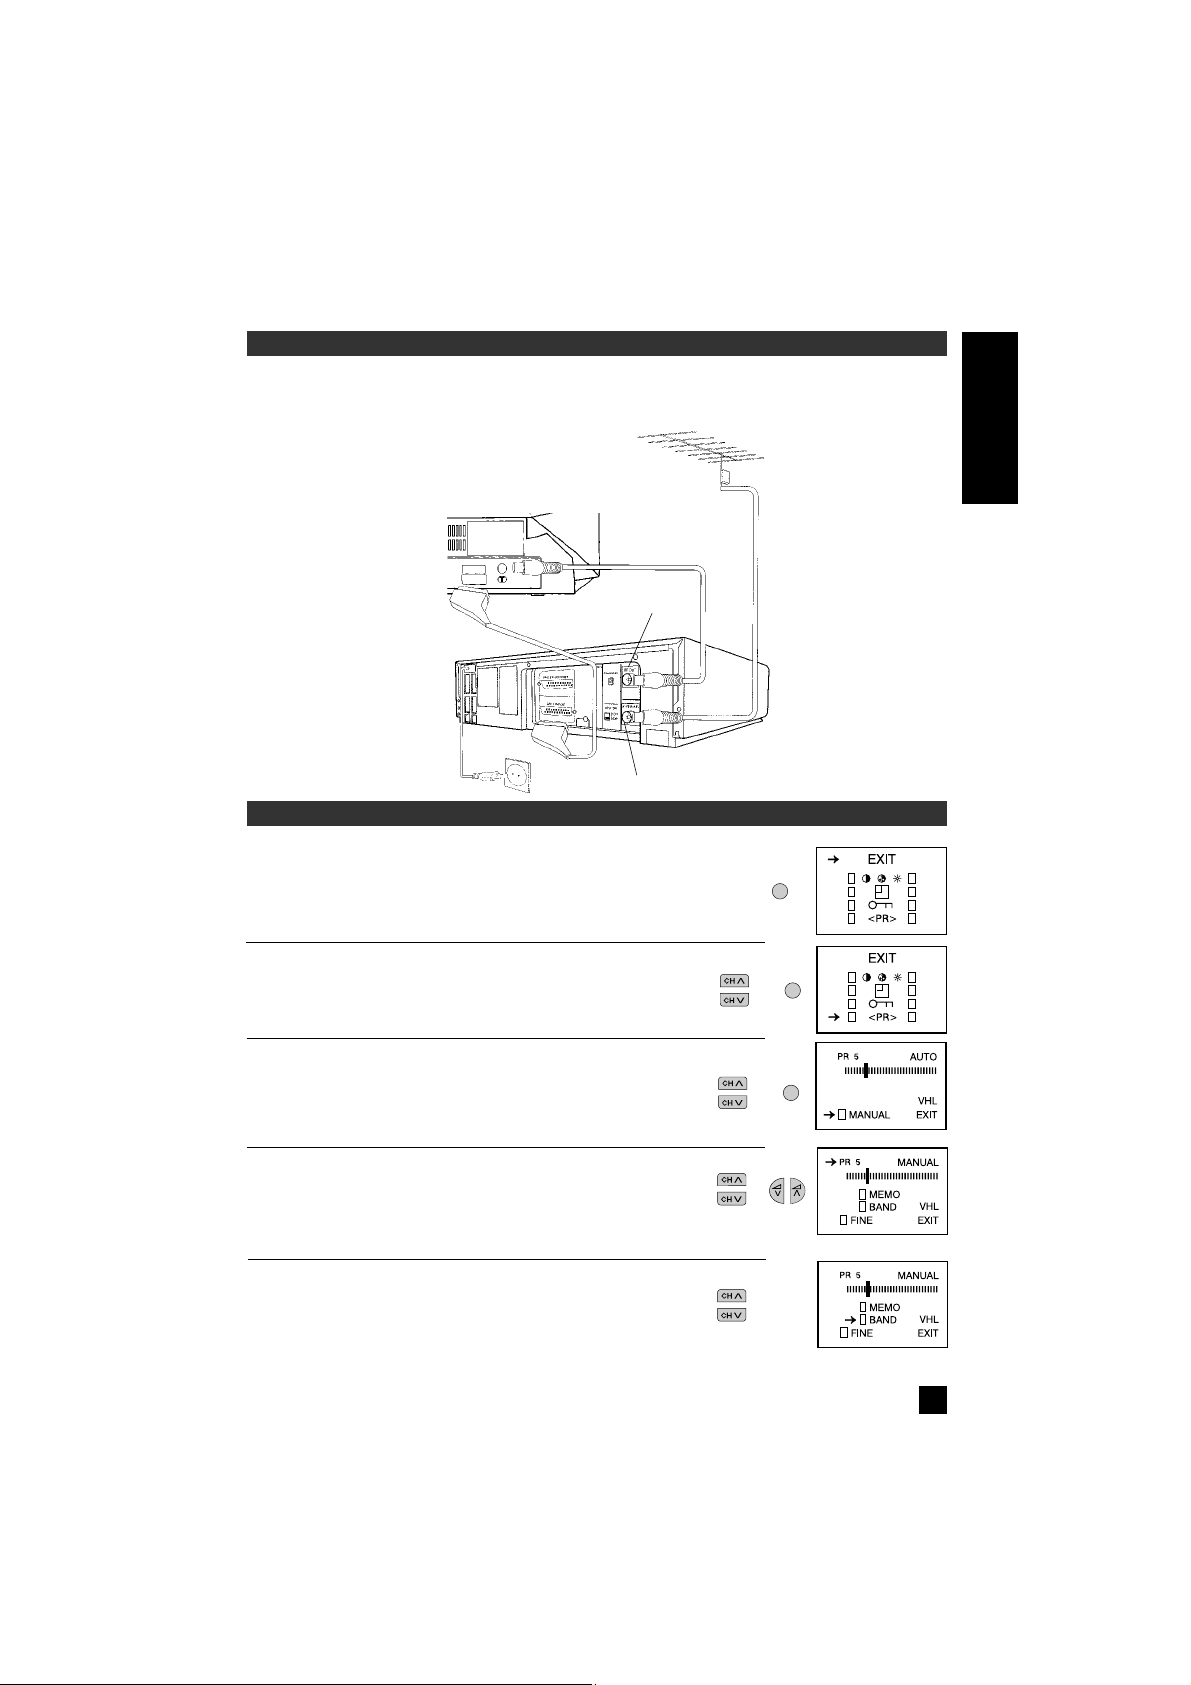
Please refer to the operation manual of your VCR for details.
Enjoy the stunning visuals of a VCR or DECODER by connecting them to this TV set through
its Euro-SCART 21-pin terminal.
TYPICAL CONNECTIONS
PRESETTING THE CHANNELS
❚ Manual Channel Preset
1 Press MENU to call the MAIN menu screen.
2 Press CHANNEL UP (œ) or DOWN (∑) to select
«<PR>», and press the MENU.
3 Press CHANNEL UP (œ) or DOWN (∑) to select
«MANUAL», and press the MENU.
4 Press CHANNEL UP (œ) or DOWN (∑) to select «PR»,
and select the channel number (1-99) with VOLUME UP
(œ) or DOWN (∑) or 0-9 digit buttons.
5 Press CHANNEL UP (œ) or DOWN (∑) to select
«BAND» and press MENU to change the position
«BAND».
(VHL VHH UHF)
MENU
MENU
MENU
TV
RF-Cable
Scart-Cable
IN
OUT
VCR
Antenna
Page 5
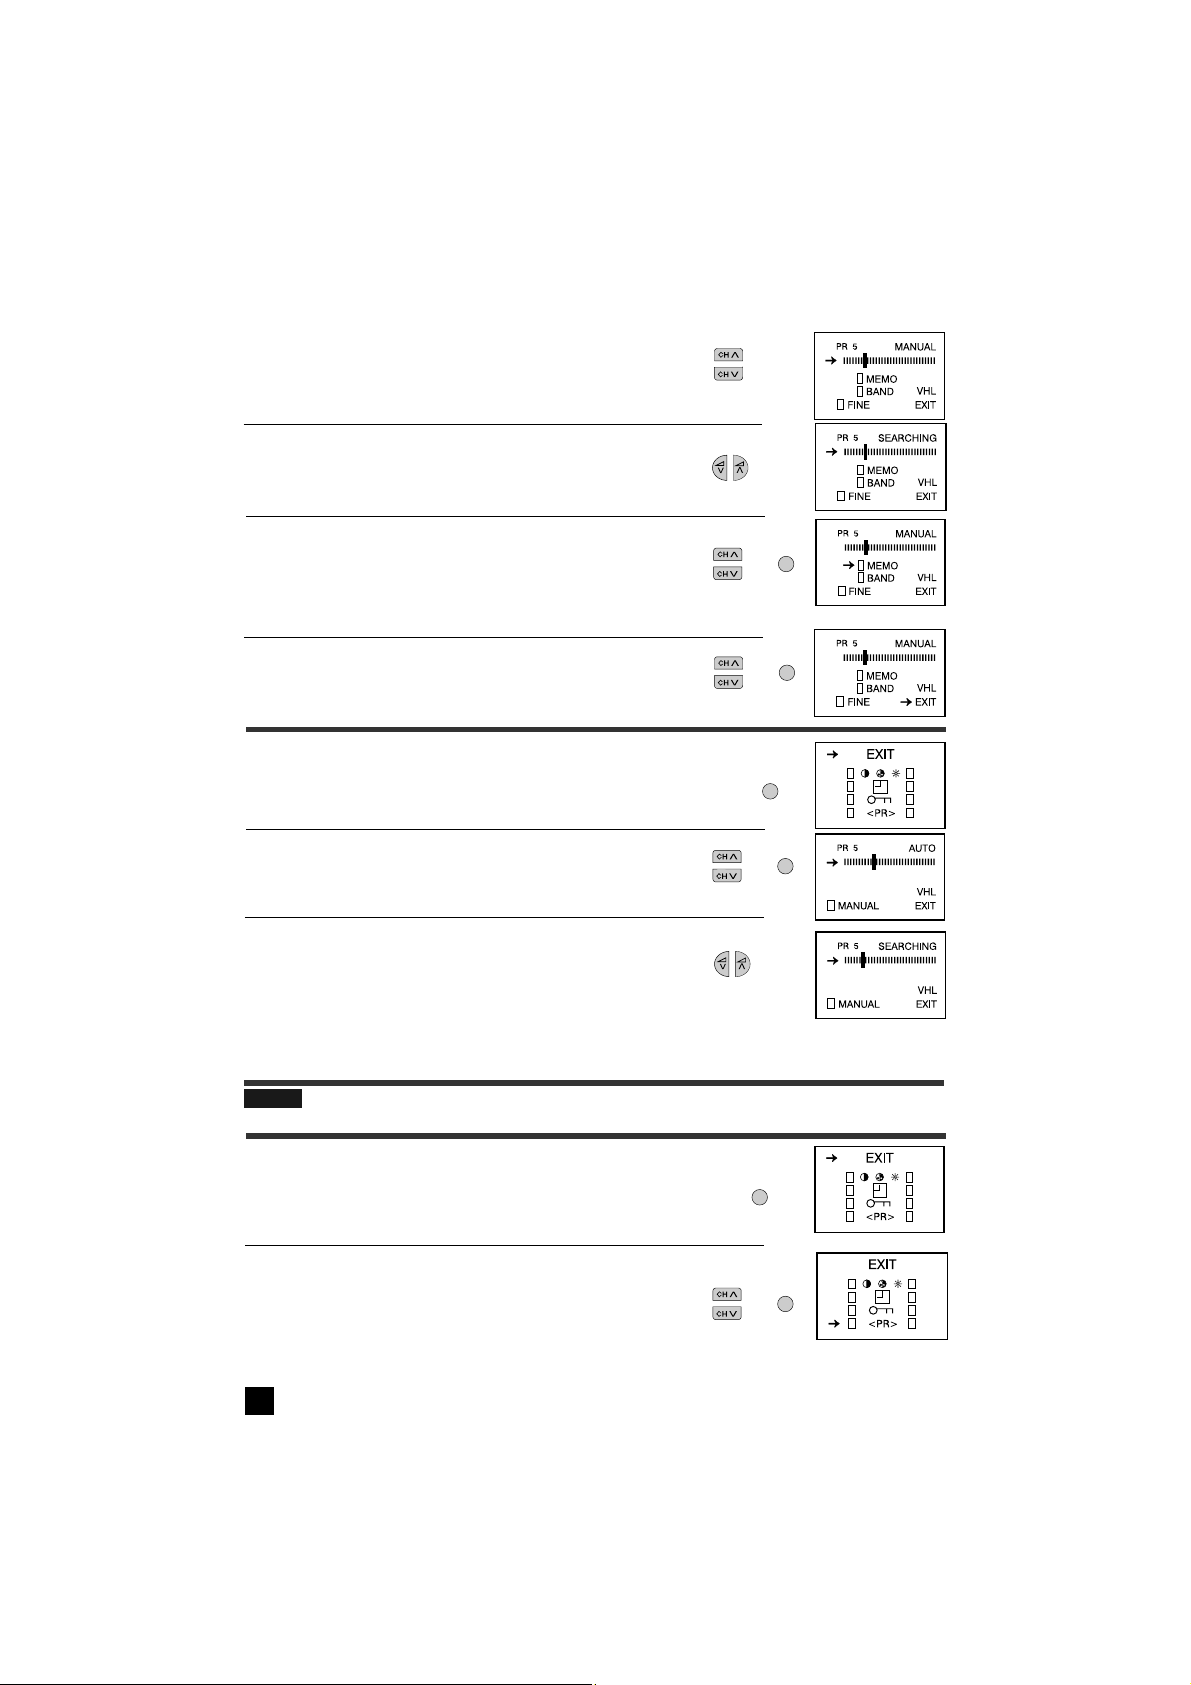
All the TV stations in your area that can be received by the TV set are
automatically preset between channels 1 to 99.The screen shows whatever is
on channel 1 when full auto channel preset is finished.
4
❚ Auto Channel Preset
1 Press MENU to call the MAIN menu screen.
2 Press CHANNEL UP (œ) or DOWN (∑) to select «<PR>»,
and press MENU.
3 Press VOLUME UP (œ) or DOWN (∑) on the remote
control to start Auto Channel Preset.
NOTE: To stop Auto Channel Preset, press the MENU button on the remote control.
❚ FineTuning
1 Press MENU to call the MAIN menu screen.
2 Press CHANNEL UP (œ) or DOWN (∑) to select
«<PR>», and press the MENU.
MENU
MENU
MENU
MENU
MENU
MENU
6 Press CHANNEL UP (œ) or DOWN (∑) to select
«MANUAL» position ( llllllIIllll ).
7 Press VOLUME UP (œ) or DOWN (∑) to start preset.
The tuning sequence will stop when a signal is detected,
if the signal is not the required channel press again the
button to continue
8 Press CHANNEL UP (œ) or DOWN (∑) to select
«MEMO», and press MENU to memorize.
9 Repeat steps 4 to 8 if you wish to preset other channels.
10 Press CHANNEL UP (œ) or DOWN (∑) to select
«EXIT», and press MENU to return to normal screen.
Page 6

ENGLISH
5
Repeat steps 1 to 4 above from page 5. (Fine Tuning)
5 Press CHANNEL UP (œ) or DOWN (∑) to select «PR»
6 Select a channel number you wish to cancel skip with the VOLUME UP (œ) or DOWN (∑).
Select a skipped channel number displayed in red.
7 Press CHANNEL UP (œ) or DOWN (∑) to select «SKIP», and press MENU.
The displayed channels number will turn from red to green.
8 Press CHANNEL UP (œ) or DOWN (∑) to select «EXIT», and press MENU.
Cancelling Skip
5 Press CHANNEL UP (œ) or DOWN (∑) to select
«<PR>»
6 Select a channel number you wish to skip with the
VOLUME UP (œ) or DOWN (∑).
7 Press CHANNEL UP (œ) or DOWN (∑) to select
«SKIP» mode, and press MENU.
The channel number will turn from green to red.
8 Repeat steps 5 to 7 if you wish to skip other channels.
9 Press CHANNEL UP (œ) or DOWN (∑) to select «EXIT», and press MENU.
MENU
❚ Skipping channels
This function lets you skip vacant channels or channels that you never watch
when you select channels with the CHANNEL UP or DOWN buttons.
Setting Skip
Repeat steps 1 to 4 above from page 5 (Fine Tuning).
MENU
MENU
MENU
3 Press CHANNEL UP (œ) or DOWN (∑) to select
«MANUAL», and press MENU.
4 Press CHANNEL UP (œ) or DOWN (∑) to select «FINE»
and press the MENU.
5 Press and hold VOLUME UP (œ) or DOWN (∑) until the
best tuning position is found. After Fine Tuning the channel
number will turn from green to yellow.
6 Press the CHANNEL UP (œ) or DOWN (∑) to select
«EXIT», and press MENU.
The screen will turn to normal screen.
Page 7

6
TIMER SETTING
❚ ON Timer
Automatically turns power ON after the set length of time has passed.
1 Press MENU to call the MAIN menu screen.
2 Press CHANNEL UP (œ) or DOWN (∑) to select
«TIMER», and press MENU.
3 Press CHANNEL UP (œ) or DOWN (∑) to select «
ON» mode.
L
MENU
MENU
1 Press MENU to call the MAIN menu screen, press
CHANNEL UP (œ) or DOWN (∑) to select
«PICTURE», and press MENU.
2 Press CHANNEL UP (œ) or DOWN (∑) to select
the items to adjust.
3 Adjust the picture quality to your liking with the
VOLUME UP (œ) or DOWN (∑).
4 Repeat steps 2 and 3 above to adjust other items.
5 You can clear the on-screen display by selecting
«EXIT» using CHANNEL UP (œ) or DOWN (∑),
and press MENU.
Selected item
B CONTRAST SHARPNESS
C COLOUR N NORMAL
A BRIGHTNESS
PICTURE ADJUSTMENT
❚ Adjusting the Picture
Picture quality (CONTRAST, COLOUR, BRIGHTNESS, SHARPNESS) are adjustable in this
menu.
MENU
MENU
MENU
MENU
NOTE: Selecting «N OFF» you can reset the picture parameters
to the factory levels.
Press MENU to restore the factory setting «N ON» mode.
Page 8

ENGLISH
7
MENU
❚ OFF Timer
Automatically turns power OFF after the set length of time has passed.
Repeat steps 1 to 2 above from page 7.(ON TIMER)
3 Press CHANNEL UP (œ) or DOWN (∑) to select «
OFF» mode.
4 Press VOLUME UP (œ) or DOWN (∑) to set the time.
(from 10 min. to 12 hour 50 min. at 10 min. interval).
The timer starts count down.
5 When you have finished setting the time, press
MENU.
L
NOTE:
• In order to know when the ON Timer programme has been run properly, when the TV is in the
Standby mode, the ON Timer indicator remains flashing in red.
• As a safety precaution, in case nobody is at home when the television switches on automatically,
the television will turn itself of automatically after 120 minutes; if it is to continue to run, any button
of the remote control functions should be pressed.
• In the event of a power cut, disconnection from the plug or the television is switched off at the
mains switch, all the data on the ON Timer will be cancelled.
5 Press STANDBY/ON (æ) to put the TV set into Standby mode. Power indicator flashes.
When the preset of time (in the above example, 8 hour and 30 minutes) has passed, the
power turns ON and a picture appears on the screen.
4 Press VOLUME UP (œ) or DOWN (∑) to set the time.
(from 10 min. to 12 hour 50 min. every 10 min. interval).
NOTE: In the event of a power cut, disconnection from the plug or the television is switched off
at the mains switch, all the data on the OFF Timer will be cancelled.
Page 9

8
HINWEIS:
• When you select the channel which you locked, the TV picture will be blue
and «t» mark dislays on the screen.
• Press (l/t) button to unlock the channel.
• Because the remote control is the «key» to unlocking TV channel you must
remember not to let the remote control out of your sight.
3 To select the channel you want to lock with
VOLUME UP (œ) or DOWN (∑)
(you can also select the channel using 0-9 digit
button).
4 Press CHANNEL UP (œ) or DOWN (∑) to select
«t» and press MENU.
(«t» mark will display on top right)
5 Press CHANNEL UP (œ) or DOWN (∑) to select
«EXIT», and press MENU.
MENU
MENU
1 Press MENU to call the MAIN menu screen.
2 Press CHANNEL UP (œ) or DOWN (∑) to select
«t» menu and press MENU.
MENU
MENU
CHILD LOCK (CHANNEL BLOCK)
<How to use this system>, You can lock a TV channel to prevent unsupervised TV viewing by
following these procedures:
NOTE: You can also protect the SCART connection.
Page 10

ENGLISH
9
❚ Cancelling Child Lock
1 Press MENU to call the MAIN menu screen.
2 Press CHANNEL UP (œ) or DOWN (∑) to select
«t» menu and press MENU.
3 Press VOLUME UP (œ) or DOWN (∑) to select the
channel you wish to cancel
(you can also select the channel using 0-9 digit
buttons).
MENU
MENU
4 Press CHANNEL UP (œ) or DOWN (∑) to select
«r» and press MENU.
(«t» mark will disappear in top right)
5 Press CHANNEL UP (œ) or DOWN (∑) to select
«EXIT», and press MENU.
MENU
MENU
Page 11

10
TELETEXT MODE
Basic Operation
Select a TV channel which is broadcasting the Teletext programme you would like to watch.
Press the TEXT/MIX/PICTURE button a/b/Q to select the TELETEXT mode.
Enter three digits using the 0~9 digit buttons to select a page number. (The CHANNEL
buttons E/F can also be used).
Press the TEXT/MIX/PICTURE button a/b/Q to super impose a Teletext broadcast onto
the current TV programme screen (MIXED Mode).
Press the TEXT/MIX/PICTURE button a/b/Q to go out from Teletext Mode.
INDEX
NEWS . . . . . .P200
SPORTS . . . .P300
MOVIE . . . . . .P400
WEATHER . . .P500
100
SPORTS
- - - - - - - - - - - -
- - - - - - - - - - - -
- - - - - - - - - - - -
- - - - - - - - - - - -
SPORTS
- - - - - - - - - - - -
- - - - - - - - - - - -
- - - - - - - - - - - -
- - - - - - - - - - - -
300
3
0
0
EXIT
TV programme
TELETEXT Mode
New page
MIXED mode
Press
Press PressSelect page
s
a
❚ Other Features
HALF PAGE button
Press the button, the upper/lower
half of the Teletext page is magnified.
HOLD button
Press to hold or cancel the hold
on the current page.
d
j
REVEAL button
Press to reveal or hidden information such as the answer to a
quiz.
INDEX button
Press to return back to index
page.
h
g
RESET button
Press to return to TV mode.
STORE button
Press to memorize the page numbers at LIST mode [].
LIST
LIST button
Press the LIST button to change
the system:FLOFLIST [].
COLOUR buttons
To recall a page displayed in the
coloured brackets, press the
corresponding coloured button.
[] More information on - How to Operate Page Memory - (page11).
Page 12

ENGLISH
11
CLOCK button
In TV Mode: When the TEXT data is received, by pressing this button the real time
information will appear on the screen.
In TELETEXT Mode: When a selected Teletext page has hidden subpages or timed
pages, these pages can be seen by the following manner:
Press the CLOCK button f. Screen will shown “SUBPAGE: - - - “
Enter 4 digits corresponding to the subpage desired. E.g.0021 for subpage num-
ber 21.
Wait until the page appears.
NOTE:You can use this button together with the CANCEL button k.This means
that you can view the main TV picture until the subpage has been found.The on
screen icon a at the top left side of the screen will change when the subpage has
been found.
Press the TEXT/MIX/PICTURE button a/b/Q to view the subpages.
CANCEL button
With this button Teletext information is cancelled and TV picture is restored. a
Indication is shown on screen.
In this position, the TV programme cannot be changed, being in Teletext/Cancelled
mode.When a change takes place in the Teletext information, the upper time of the
cancelled page or some other indication of special pages is shown on screen.
To uncancel, pressTEXT/MIX/PICTURE button a/b/Q and the whole Teletext is
shown.
NOTE: This button can be used together with the CLOCK button f while awaiting
subpages.
How to Operate Page Memory - LIST Mode-
Your TV has 32 Teletext page number memories for fast recall of Teletext information.
In programme positions 0 through 6, four Teletext page numbers can be stored in
each position; a total of 28 pages.
In programme positions 7 through 99, only one programme with 4 page numbers
can be stored. If you try to store more than 4 page numbers in a programme position
between 7 and 99, the previously stored page numbers will be erased.
Select the programme channel number into which you want to store Teletext page
numbers.
Press the TEXT/MIX/PICTURE button a/b/Q to select the Teletext Mode.
Press the LIST button Q to change from FLOF system to LIST Mode.
Press a coloured button Q corresponding to the coloured brackets on the screen
for page number storage.
f
k
Page 13

12
SAFETY PRECAUTION
This equipment complies with the requirements of Directives 89/336/EEC and 73/23/EEC as
amended by 93/68/EEC
The 5 cm in the
drawing indicates the
minimum ventilation
distance.
Enter the Teletext page number using the 0~9 digit buttons (enter three digits).
Repeat steps 4. and 5. until the numbers for the desired pages have been entered.
Press the STORE button g to memorize the page numbers you require.The “STORE”
appears on the screen.
Press theTEXT/MIX/PICTURE button a/b/Q twice to exit the Teletext Mode.
Press
LIST
and
YELLOW
buttons
Input
If you want to store,
press button
(FLOF TELETEXT)
LIST
YELLOW
News Sports
Movie
Weather
Page Selection - LIST Mode -
Select the appropriate programme channel.
Press the TEXT/MIX/PICTURE button a/b/Q to select the Teletext Mode.
Press the LIST button Q to change from FLOF system to LIST Mode.
To recall a page number displayed in the coloured brackets, simply press the corresponding
coloured button.
Page 14

ENGLISH
13
TROUBLESHOOTING
The following conditions do not always denote trouble. Therefore, performs the checks described
below before calling for service.
If the problem cannot be corrected by the use of this guide, pull the power plug out from the electrical
outlet and call for service.
Quick
Service
Check List
Problems
Remote control does not work
●● ● ●
Bars on screen
●●
Picture distorted
●● ●
Picture rolls vertically
●●●
No colour
●●●●●
Poor reception on some channels
●●●●
Picture weak
●●●●●
Picture lines or streaks
●●●
Picture ghosting
●●●●
Picture blurred
●● ●
Sound OK, picture poor
●●●●●●●
Picture OK, sound poor
●● ●
No picture or sound
●●●●● ● ●●
Try a new channel to check for possible station
trouble
Possible Causes/Remedies
TV not plugged in
Outlet power OFF
Main Power button of TV not ON
Antenna not connected to terminal at the back
of the TV set
If outside antenna is used, check for broken
wires
Check for local interference
Turn off using the Main Power button, then turn
ON again after a minute
Adjust COLOUR control
Check batteries in the Remote Control
Try fine tuning to correct
Check if the Brightness or Contrast setting in
the picture setting mode might be all the way to
the minus side
Increase the volume
This unit is equipped with a microprocessor. Its performance could be adversely affected by external
electrical noise or interference. If this should happen, unplug the unit and plug it in again after a few minutes.
Page 15

SHARP ELECTRONICS (EUROPE) GmbH
Sonninstraße 3, 20097 Hamburg, Deutschland
SHARP ELECTRONICA ESPAÑA, S.A.
Polígono Industrial Can Sant Joan
Sant Cugat del Vallés (Barcelona), España
PRINTED IN SPAIN
TRYKT I SPANIEN
TRYKT I SPANIA
PAINETTU ESPANJASSA
TRYCKT I SPANIEN
TINS-7045BMN0
11/00
 Loading...