

Page 1
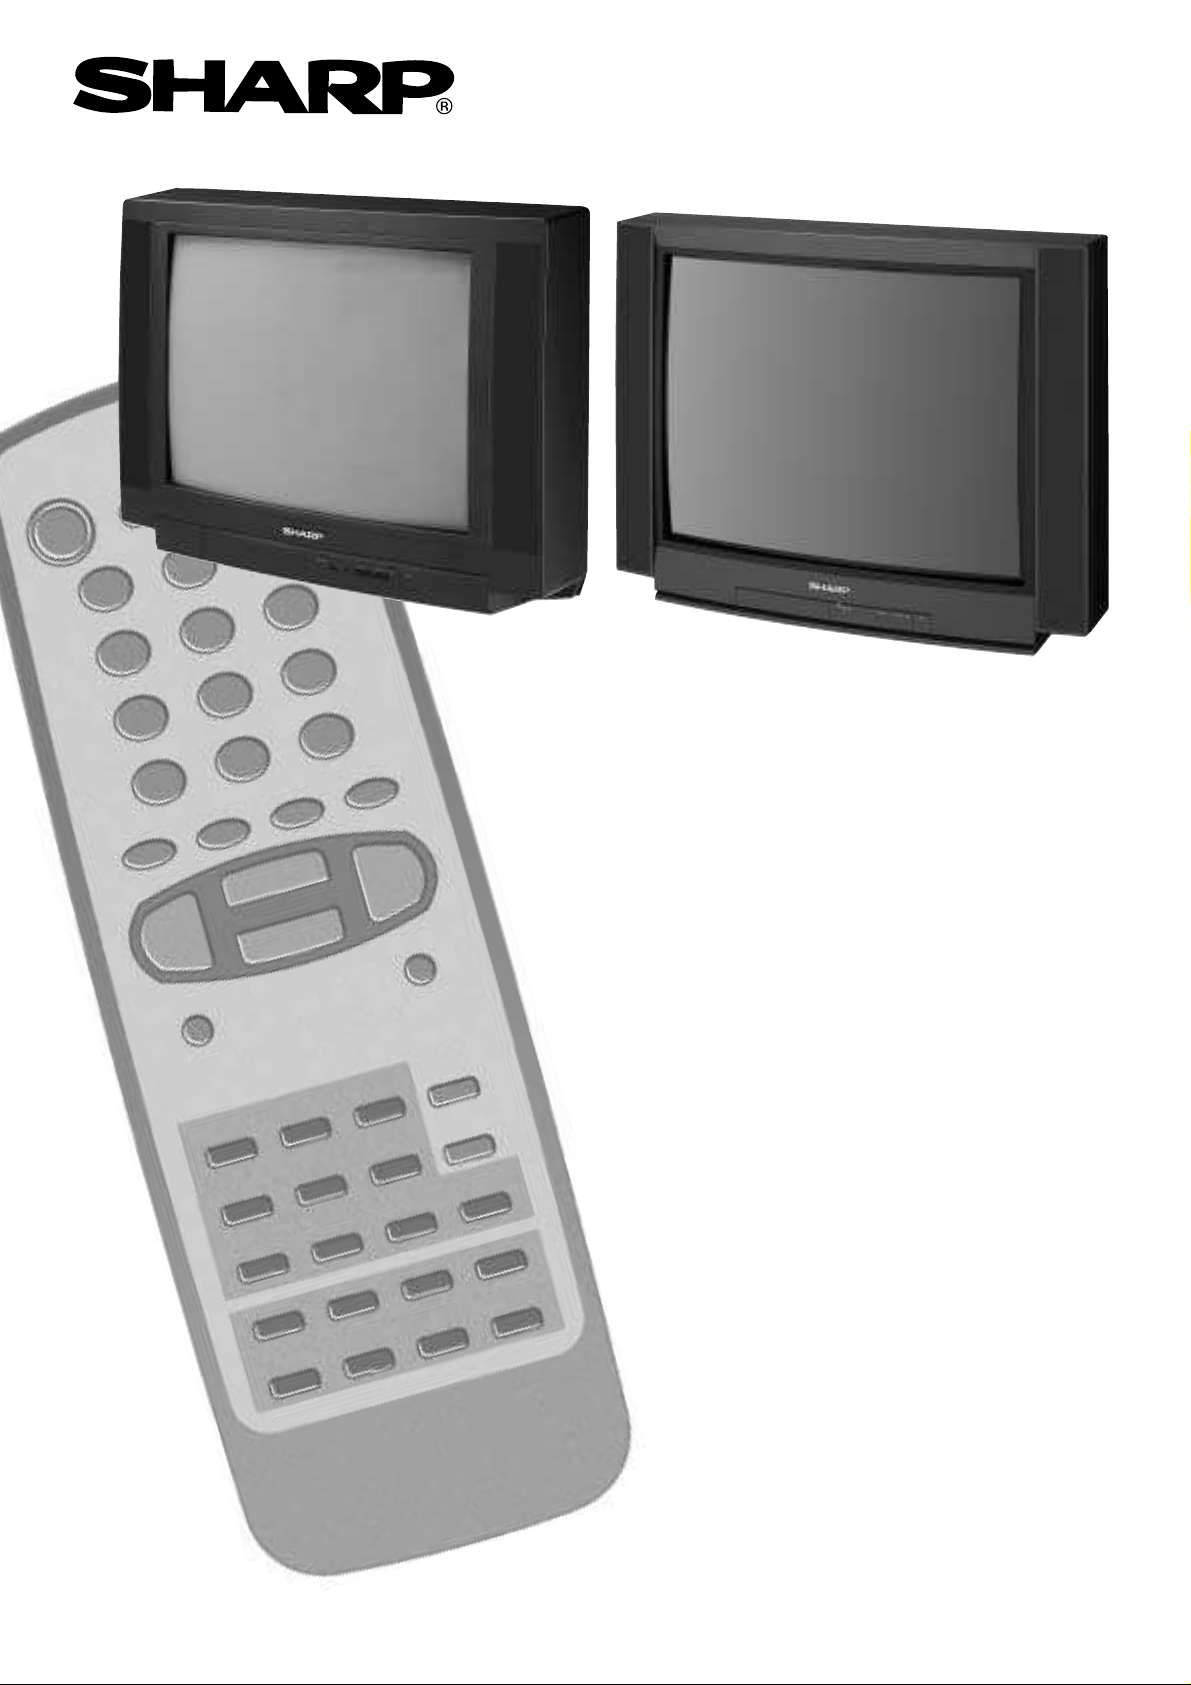
54GS-61S
70GS-61S
COLOU R TELEVISION
OPERATION MA NUAL
Page 2
Contents
Contents . . . . . . . . . . . . . . . . . . . . . . . . . . . . . . . . . . . . . .1
Safety precaution . . . . . . . . . . . . . . . . . . . . . . . . . . . . . . .1
Features list . . . . . . . . . . . . . . . . . . . . . . . . . . . . . . . . . . .1
Accessories . . . . . . . . . . . . . . . . . . . . . . . . . . . . . . . . . . .2
Remote Control Battery Installation . . . . . . . . . . . . . . . . .2
Antenna Connections . . . . . . . . . . . . . . . . . . . . . . . . . . . .2
Controls & Terminals . . . . . . . . . . . . . . . . . . . . . . . . . . . .5
Auto Installation . . . . . . . . . . . . . . . . . . . . . . . . . . . . . . . .6
Switching on . . . . . . . . . . . . . . . . . . . . . . . . . . . . . . . . . . .8
TV operation (Channel selections) . . . . . . . . . . . . . . . . . .9
Audio Adjustments . . . . . . . . . . . . . . . . . . . . . . . . . . . . .10
TV/Video Selector, Headphone Jack and VCR Mode . .11
Menu Structures . . . . . . . . . . . . . . . . . . . . . . . . . . . . . . .12
Picture Adjustments . . . . . . . . . . . . . . . . . . . . . . . . . . . .13
Sound Setting Mode . . . . . . . . . . . . . . . . . . . . . . . . . . .14
Features Setting Mode . . . . . . . . . . . . . . . . . . . . . . . . . .15
On Timer . . . . . . . . . . . . . . . . . . . . . . . . . . . . . . . . . . . . .15
Off Timer . . . . . . . . . . . . . . . . . . . . . . . . . . . . . . . . . . . . .16
TV Channel Setting . . . . . . . . . . . . . . . . . . . . . . . . . . . . .17
Teletext Mode . . . . . . . . . . . . . . . . . . . . . . . . . . . . . . . . .21
Child Lock (Channel Block) . . . . . . . . . . . . . . . . . . . . . .24
21-pin Euro-SCART and 21-pin Audio/Video . . . . . . . . .26
Typical connections . . . . . . . . . . . . . . . . . . . . . . . . . . . .27
Troubleshooting . . . . . . . . . . . . . . . . . . . . . . . . . . . . . . .28
General Specifications for Television Receiver . . . . . . .29
Index . . . . . . . . . . . . . . . . . . . . . . . . . . . . . . . . . . . . . . . .30
Dear SHARP Customer
Congratulations! You are now the proud owner of a SHARP Colour Television Receiver. To ensure proper operation,, please read this manual carefully. After reading, keep this manual in a safe place for future reference.
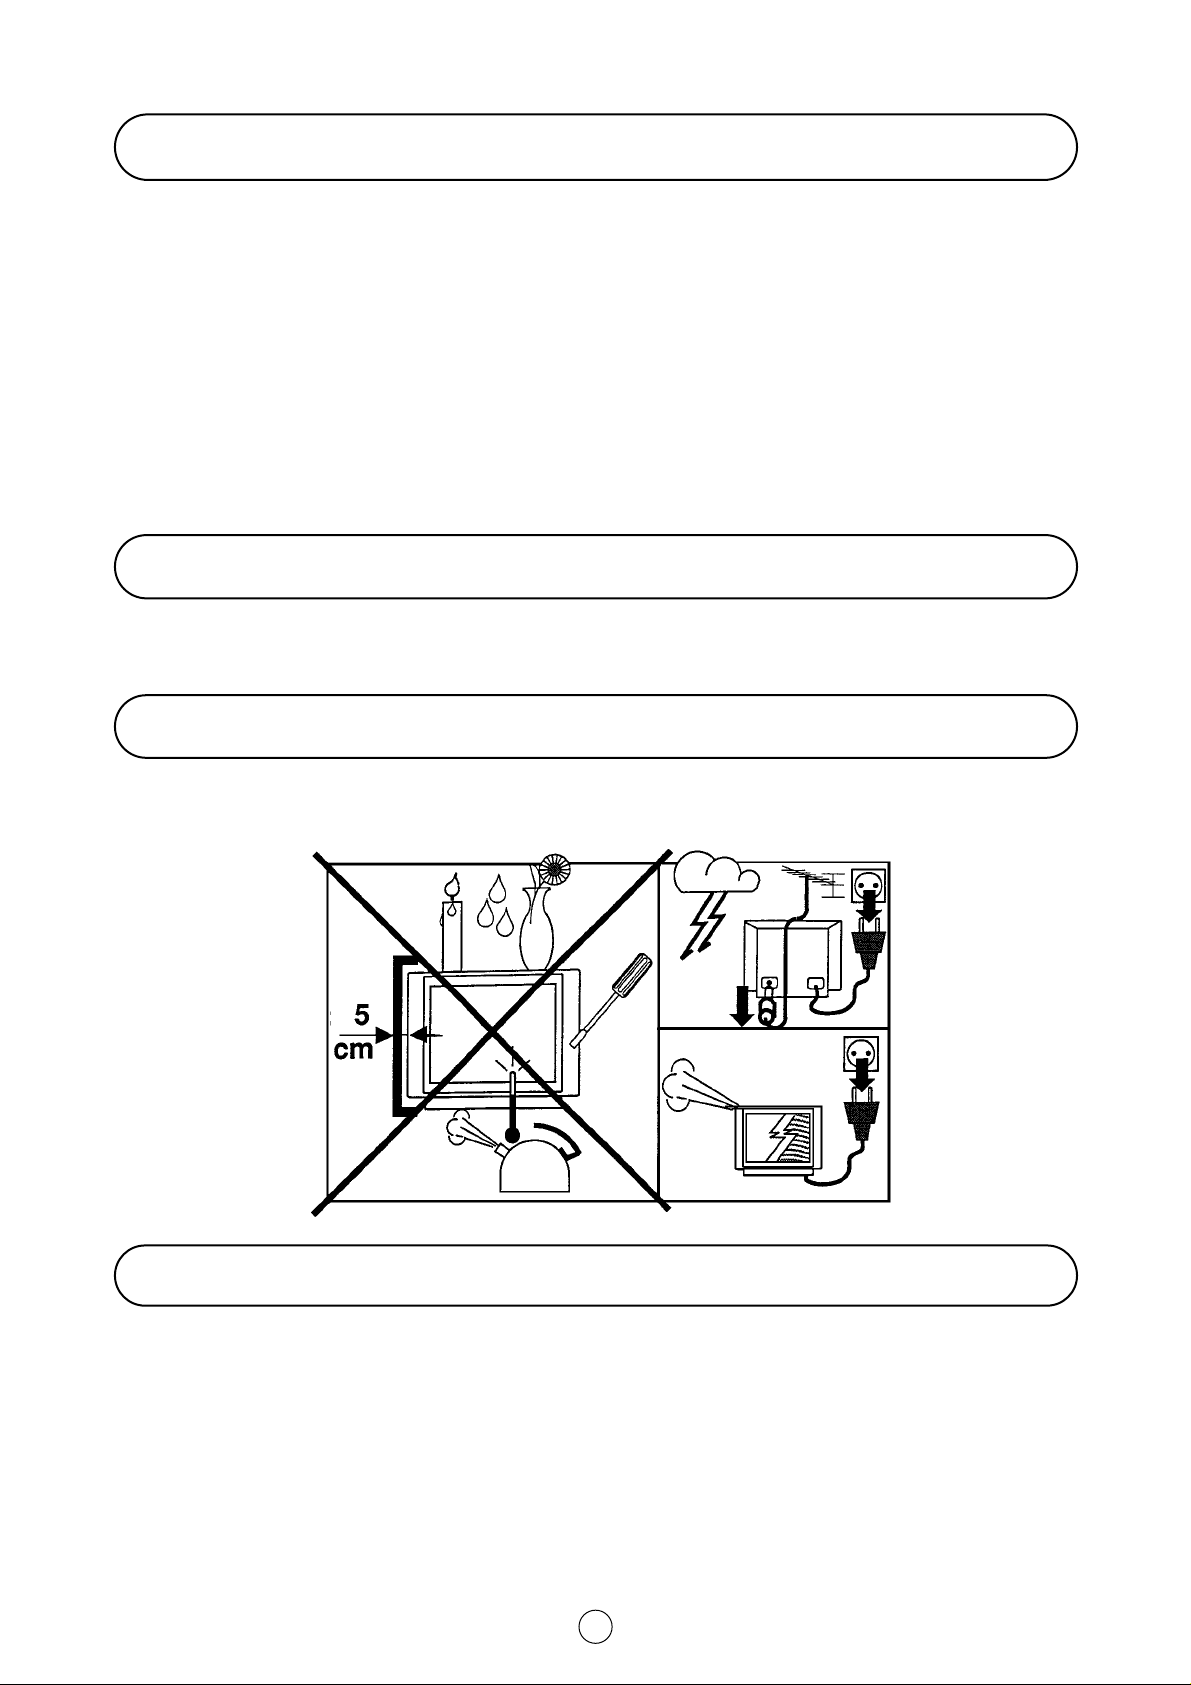
Safety precautions
This equipment complies with the requirements of Directives 89/336/EEC and 73/23/EE C a s a mended by 93/68/EEC.
The 5 cm in the d rawing
indic at es the m inimu m
ventilation distanc e.
Features list
Auto Installatio n Syst em
•
ASS function (Auto Channel Sorting Syst em)
•
99 Channel Programming System
•
Cable and Hyperb and
•
Teletext
•
OSD System (On Screen Display)
•
Tint Control
•
Stereo (IGR)
•
A.S.L. (Automatic Sound Lim it er)
•
ON-OFF Timer
•
21 pin Euro SCART Connector (RGB)
•
21 pin Audio /Video Connecto r (AV-1)
•
Headphone Terminal
•
Blue Back No ise M ut e Funct io n
•
Child Lock System
•
1
Page 3
Quick reference Guide
54GS-61S
70GS-61S
FARBFERNSEHGERAT
BEDIENUNGSANLEITUNG
å
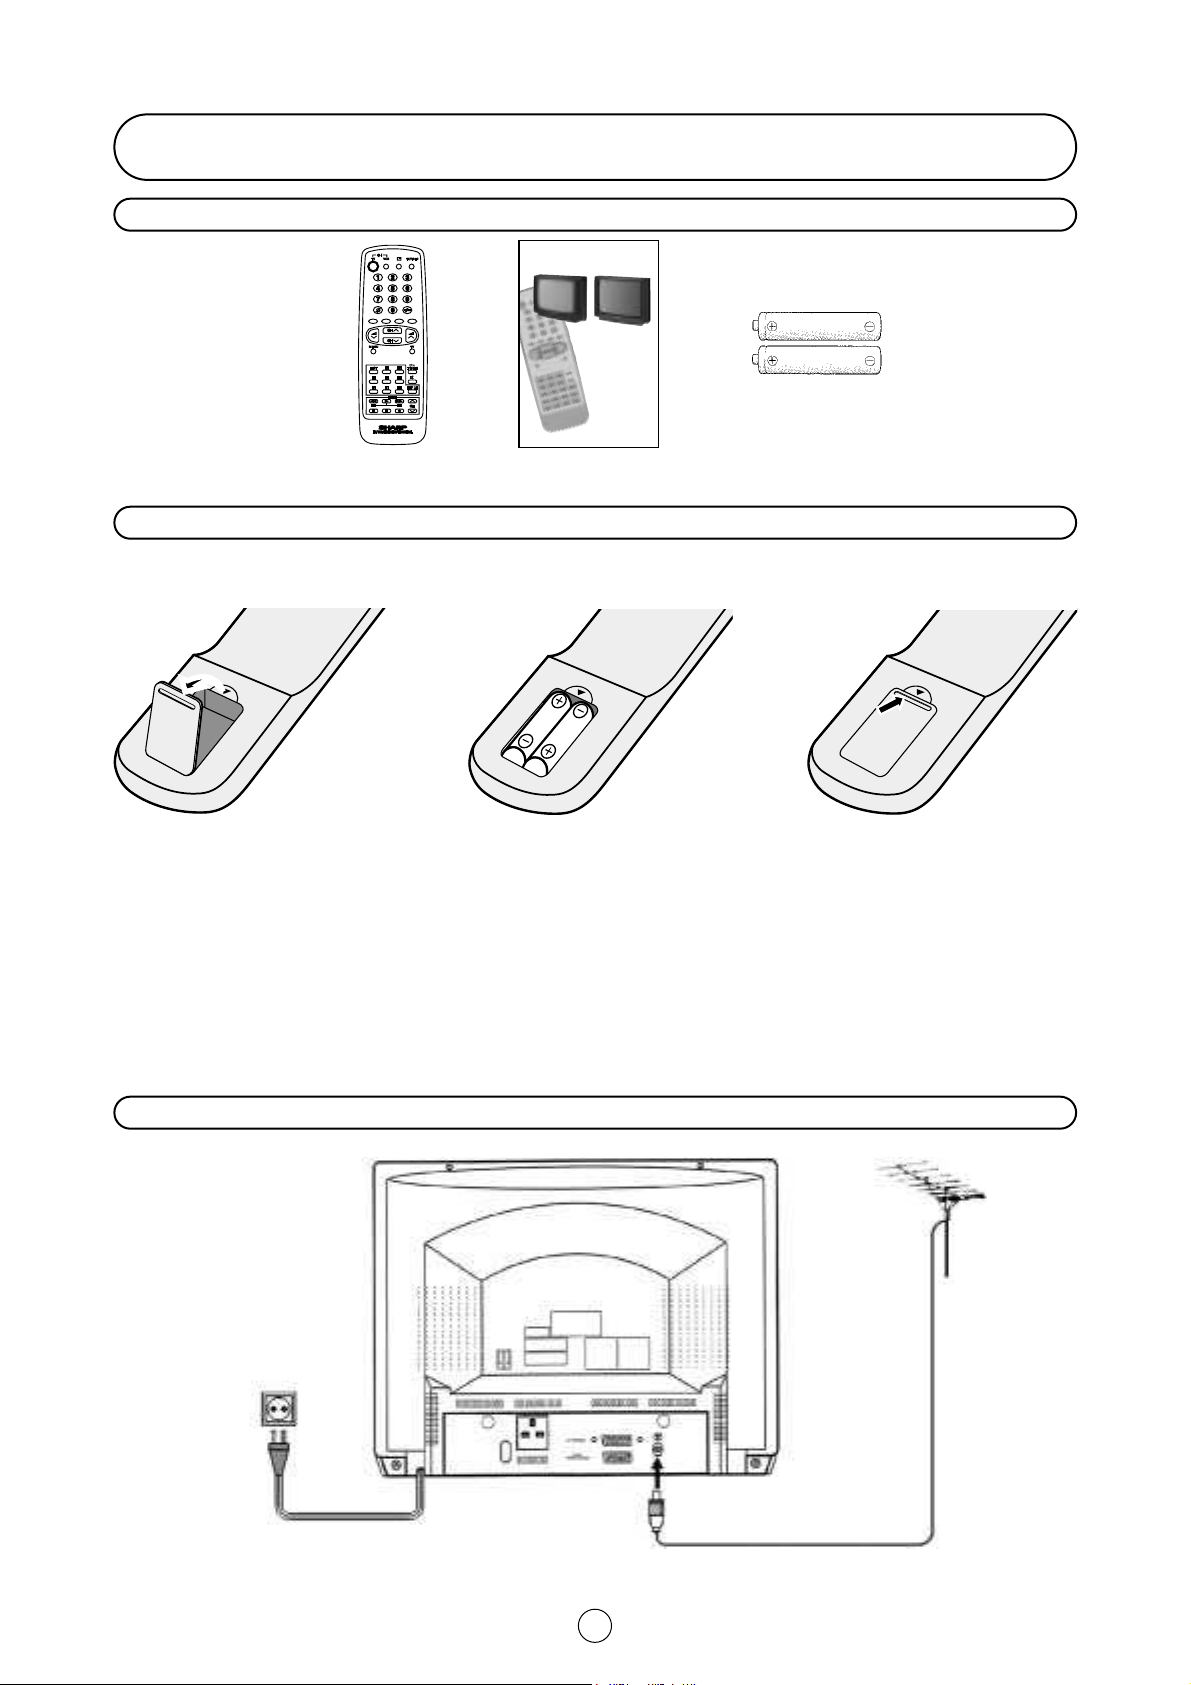
Accessories
Remote control Operation Manual Type-AA Dry Batteries
Remote Control Battery Installation
Before using the TV set for the first time, install the supplied dry batteries in the remote control.
1. With your thumb nail, pull up
the slit as indicated by the
arrow to remove the battery
cover.
2. Insert tw o b att eries 1.5 V (Size
"AA" ). Be sure to matc h the battery A/D terminals with the A/D
marks inside the compartment.
NOTE: • Remove batteries if weak or if the unit is not in use for long periods.
• Do not mix old and new batteries.
• Incorrect installation of the batteries may damage the remote control.
Antena connections -TV set only -
Einlegen der Batterien
1. Nehmen Sie den Deckel ab und setzen
Sie zwei Batterien vom Typ «AA» oder
Mains Socket Outlet
AC 220~240 V, 50 Hz
«UM-3», wie auf dem Bild gezeigt ein.
2. Positiver und negativer Pol der Bat terien
wie abgebildet einlegen.
3. Replace the battery cover.
2
Page 4
Antenna connection s - VCR and TV -
BACK OF TV
Mains Socket Outlet
AC 220~240 V, 50 Hz
Aerial
(Not supplied)
Aerial Lea d
(Not supplied)
Aerial in
SCART Lead
(Not supplied)
Aerial Cable
(Not supplied)
Mains Socket Outlet
AC 220~240 V, 50 Hz
BACK OF VCR
RF out
Audio/Video
NOTE: See on -Typical connections- (page 27) for details of further connection possibilities.
3
Page 5
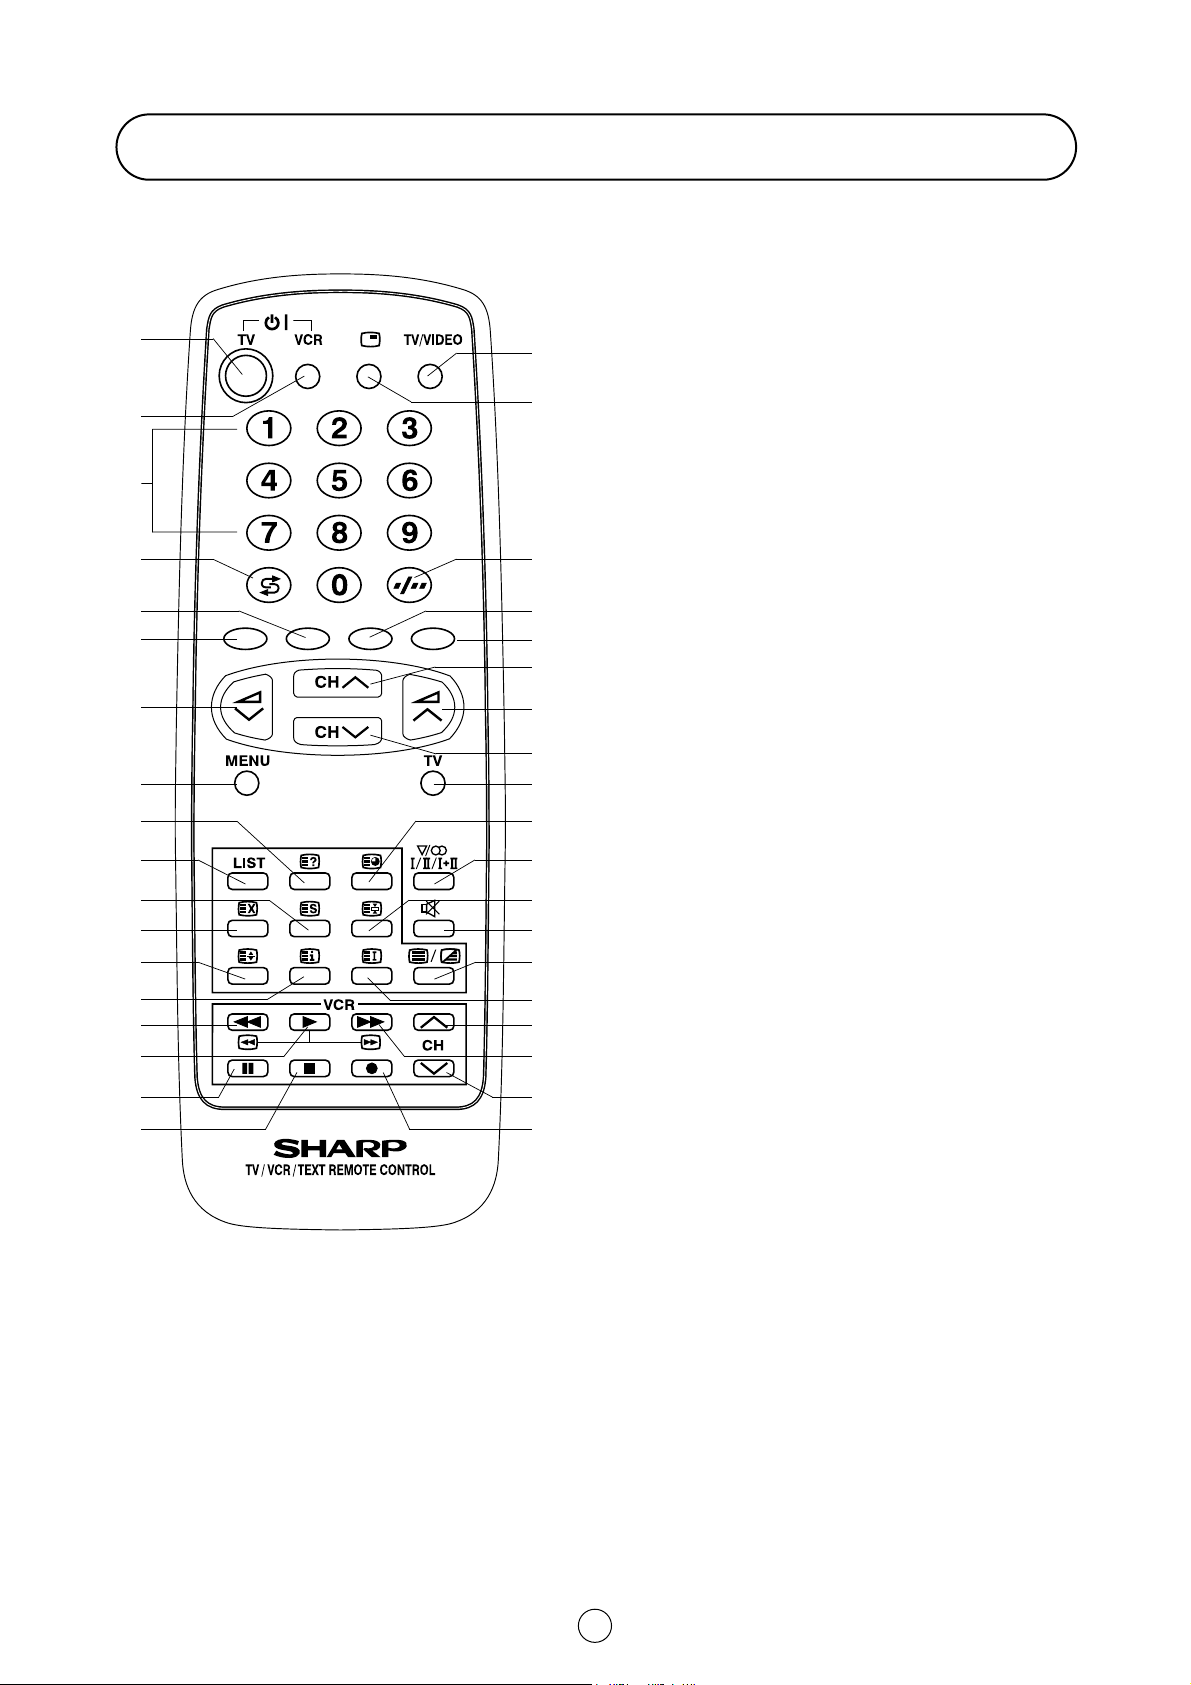
Remote control
TV 1. Stand-by ON/OFF switch (TV)
Video 2. Power ON / OFF switch (VCR)
10.
11.
12.
13.
14.
15.
16.
17.
18.
1.
2.
TV 3. Digit buttons 0 ~ 9
19.
20.
Teletext 5. Colour button (green)
4. Flashback button
6. Colour button (red)
3.
TV 7. Volume Down/Cursor control Left
8. Menu button
4.
21.
Teletext 9. Reveal button
10. List selector
5.
6.
7.
8.
9.
22.
23.
24.
25.
Video 15. Rewind/picture search/reverse
26.
27.
28.
29.
TV 19. TV / VIDEO selector
30.
31.
32.
Teletext 22. Colour button (yellow)
33.
34.
TV 24. Channel Up/Cursor control Up
35.
11. Store button
12. Cancel button
13. Top/ Bottom/Full button
14. Reset button
16. Play button
17. Pause / Still button
18. Stop button
20. Channel call button
21. Single/Double entry
23. Colour button (blue)
25. Volume Up/Cursor control Right
36.
37.
26. Channel Down/Cursor control Down
27. TV button
TV/Teletext 28. Time button
TV 29. Sound mode selector
Teletext 30. Hold button
TV 31. Sound Mute button
Teletext 32. Text/Mix button
33. Index button
Video 34. Channel Up selector
35. Fast forward/picture search/forward
36. Channel Down selector
37. Record button
4
Page 6
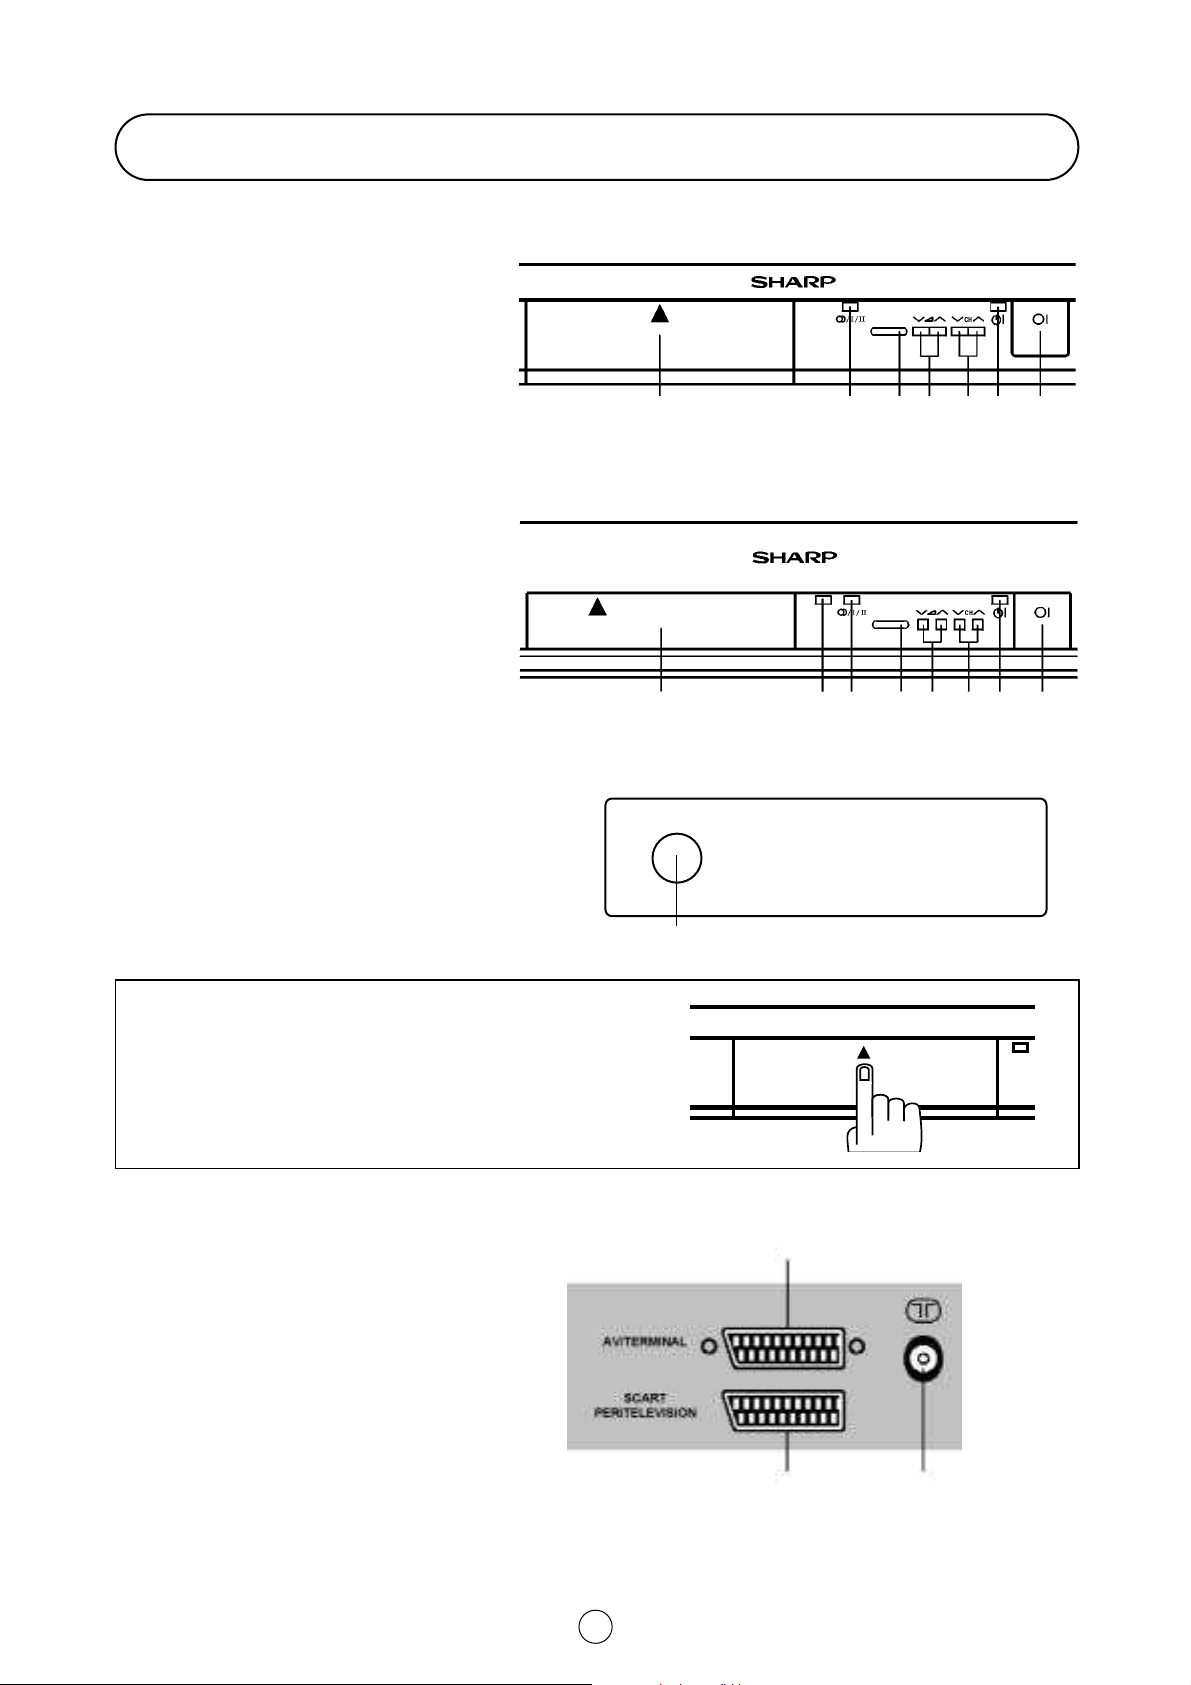
Controls & Terminals
å
FRONT TV
1. Main Power
On/Off Switch
2. Power Indicator
3. Program Selector
(UP/DOWN)
4. Volume Buttons
(UP/DOWN)
5. Remote Control Sensor
6. Sound Indicator
7. Remote Control Indicator
(Only for model 70GS-61S)
8. DOOR
54GS-61S
70GS-61S
8
6 5 4 3 2 1
Behind the door
9. Headphone Socket
(3.5 mm Ø / 16~600 Ω)
HOW TO OPEN THE DOOR
Press the top of the door, opening it slightly.
Hook your finger inside and pull open.
REAR TV
RF Input
1. Antenna terminal
n
8
675 4 3 2 1
L/S/G/I R/S/G/I
VIDEO AUDIO
9
3
21-pin In/Out
2. 21-pin Euro SCART (RGB)
3. 21-pin Audio/Video (AV-1)
With S-Video Input
2
5
1
Page 7
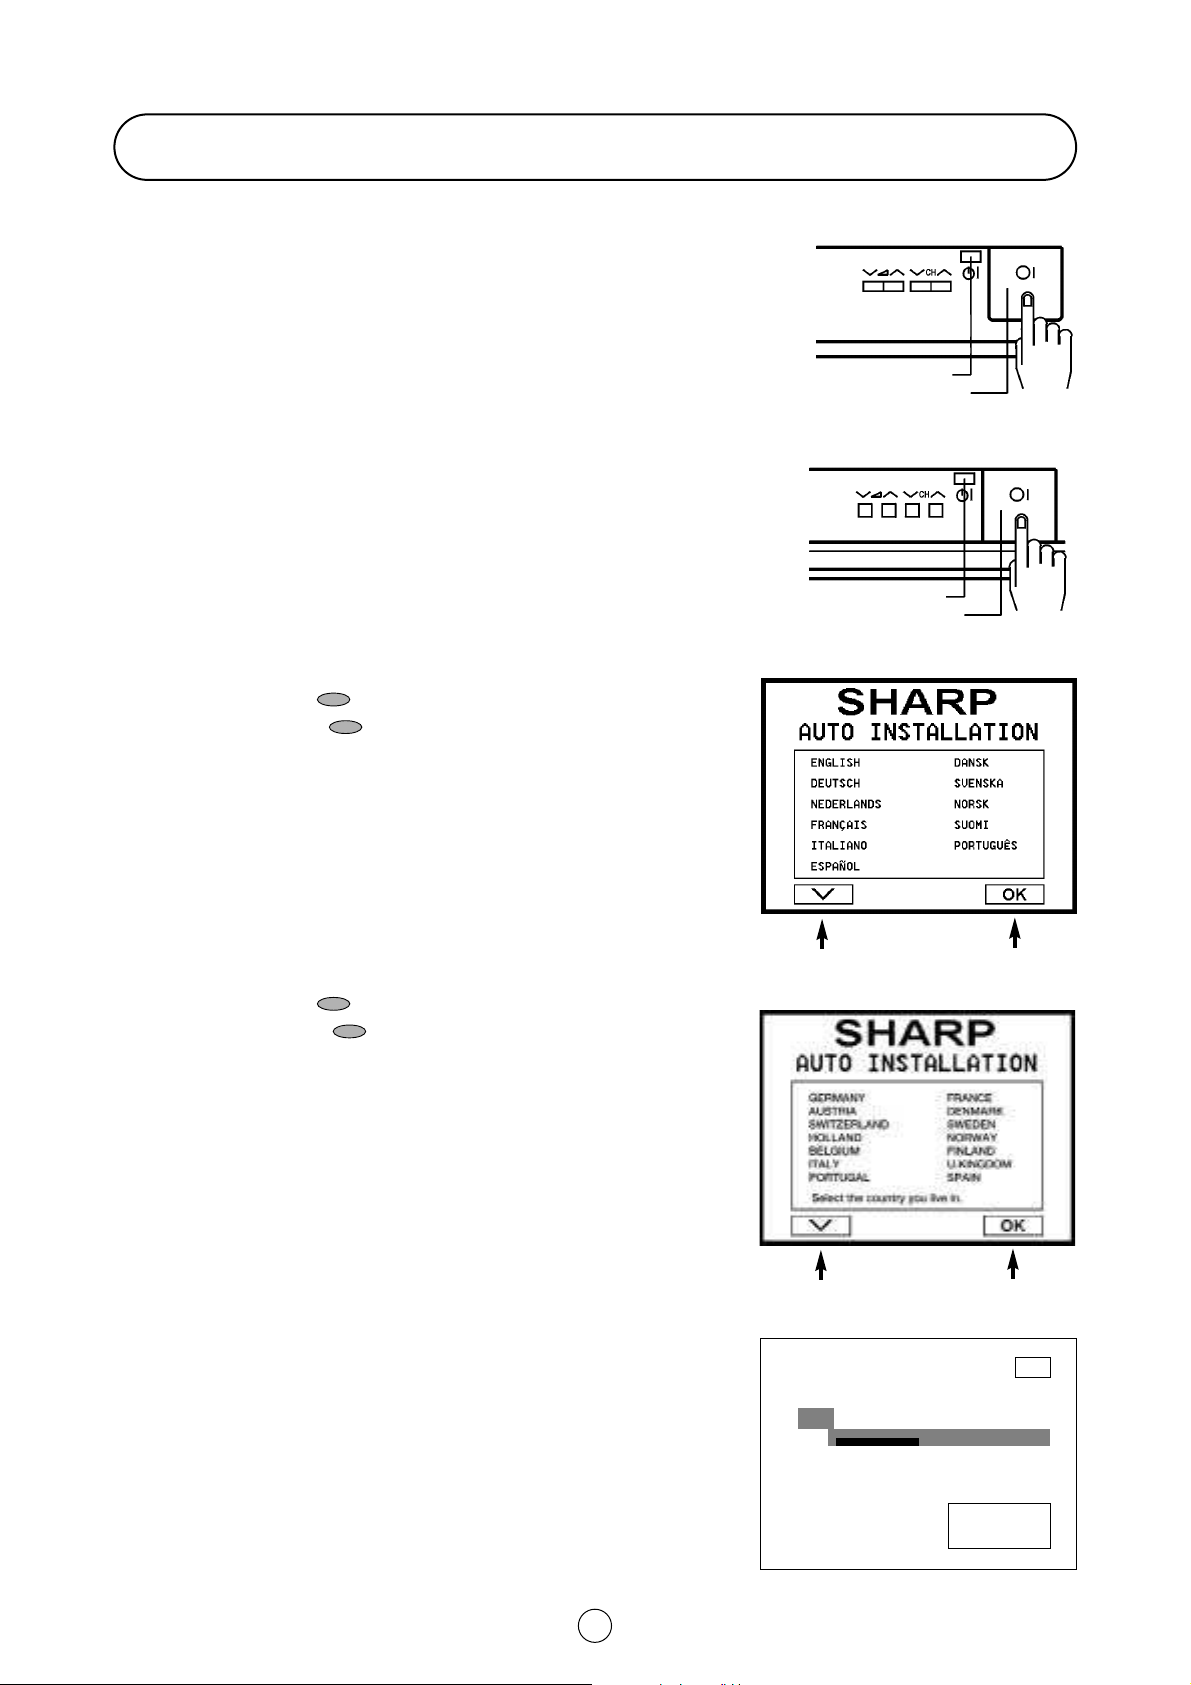
Auto Installation
Auto Installation System
Yo ur t elevision set is p rovid ed w it h an Auto mat ic Inst allation System w hic h
makes Installation easier.
This new system is activated when you turn on the TV for the first time.
Procedure:
1. Conn ect t he antenna jack in t he antenna input t erminal on t he rear side
of your TV-set. Then connect the TV power cable to a 220 ~ 240 V
system.
2. Press the main p ower b utto n (®), o n the right hand side of the TV set,
and the AUTO INSTALLATION message will appear on the screen.
3. Put bat teries into the remot e control and follow the instruct ions on th e
screen.
The TV will go throug h the follo wing st eps Autom atically and seq uentially:
54GS-61S
Power Indicator
Main power button
70GS-61S
Power Indicator
Main power button
Language: To select the menu language:
4. Press the RED button to select the language.
5. Press the BLUE button to continue.
Country: To select your country:
6. Press the RED button to select your country.
7. Press the BLUE butt on to c ont inue and follo w t he instruct ions o n
the screen.
Automatic Channel Sorting System (ASS): The TV set SEARCHES FOR
FREQUENCIES, memorises the c hannels found, and sort s them (according
to technical criteria) from Pr-01 of the TV, to a maximum of 99 programmes.
This tuning process may take several minutes to perform.
Editing:When the AUTOMATIC SEARCH has been comp let ed , the "St o red
programm es" m enu appears on t he screen. In this menu, you can c hange
the order of the channels and change or give the channels a four-letter
name.
On next page is a detailed explanation of editing options about "Stored
programmes" menu.
Language
RED
Contry
RED
Searching
BLUE
BLUE
Pr01
NOTE: You may not have to follow this proc edure if it has already been
done fo r you at the estab lishment w here you purchased your TV. If this is
the case go on to the section entitled "Switching ON" (page 8).
If you need to repeat the AUTO INSTALLATION, read on page 17 –Auto
Channel preset…-.
01 %
Searching,
please wait.
6
Page 8
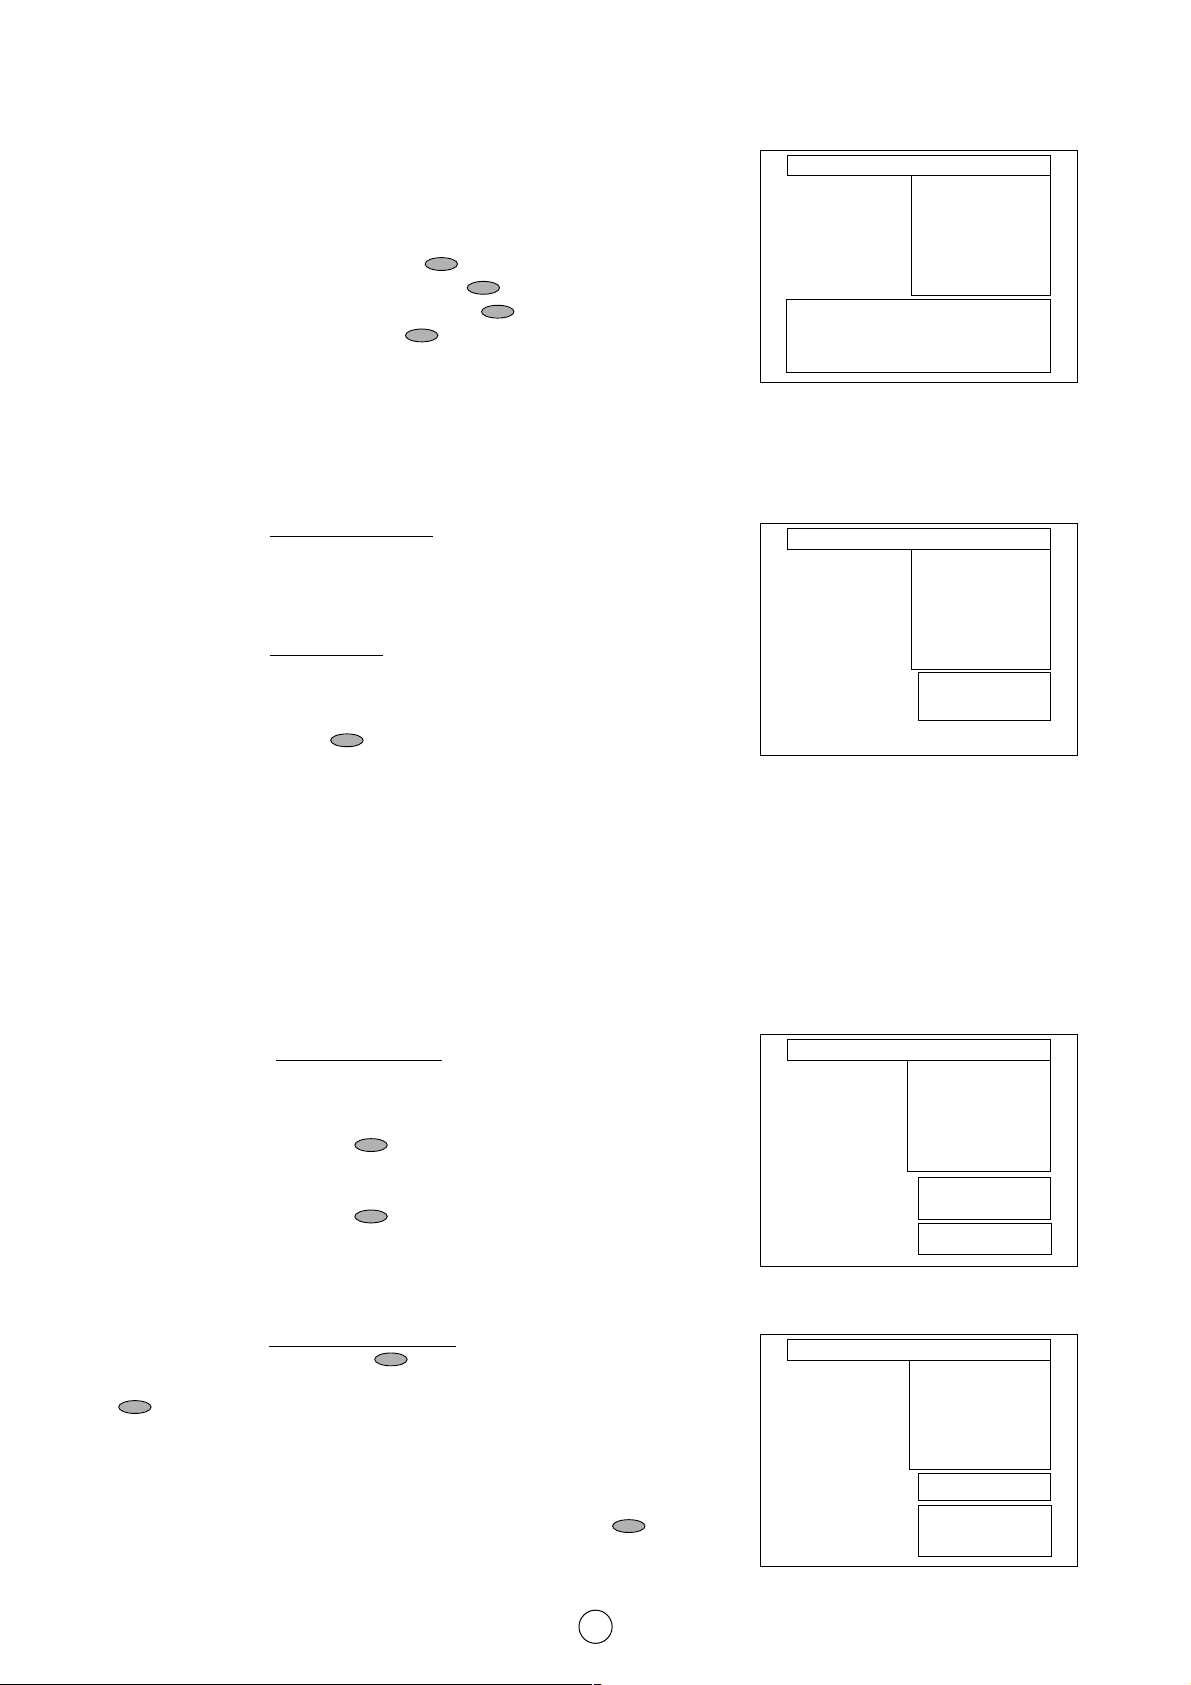
Stored programmes
When the TV has finished the auto matic search, t he "Sto red programm es"
menu will app ear on screen wit h a list of the channels, whic h have been
memorised with the available options
a) Select programme to be edited 씮 E/F.
b) Edit this program 씮 RE D button .
c) Go to sorting mode 씮 GREE N button .
d) Delete this program 씮 YELLOW button .
e) Exit this menu 씮 BLUE button .
With these op tions, you will b e able to organise the real channels (CH **)
memorised in t he TV programmes (Pr 01 ... Pr 99) and put t hem into yo ur
own preferred order.
The following is a detailed explanation of options a), b), c), d) and e).
Stored programmes menu
Stored programmes:
red
green
yellow
blue
Pr 01 CH21 BBC1
Pr 02 CH31 BBC2
Pr 03 CH41 ITV
Pr 04 CH51 CH4
Pr 05 CH61 CNN
Pr 06 –––– ––––
Pr 07 –––– ––––
Pr 08 –––– ––––
Pr 09 –––– ––––
Pr 10 –––– ––––
Edit this programm
Go to sorting mode
Delete this programm
Exit this menu
a) Select a programme to be edited.
Use this op tion to select a pr
ogramme f rom the list. Each time yo u press
E/F t he memorised c hannel will be view ed and w ill remain selected
on the list by means of white background.
b)Edit this program (Change name)
Use this op tio n for g iving a name
made up o f fo ur dig its t o t he channels or
for changing the one, which appears on some channels, in the following
way:
b.1 Select the channel using the Cursor UP/DOWN buttons E/F.
b.2 Press the RED button .
b.3 Press the Cursor UP button E to change the first letter.
Letters A to Z of the alphab et, a blank spac e and the numbers 0 t o 9 will
appear sequentially. Some of the broadcasting stations names such as
BBC1 or ITV are already incorporated in the TV and appear among the
alphabet to make this task easier.
Press the Cursor DOWN button F to go backwards in the sequence.
b.4 Press the I buttons for changing the position of the cursor and the
E/F buttons for changing the letters.
When you have finished the fourt h lett er, press the Cursor I but ton t o qu it
the Change of Name option.
c) Go to sorting mode (Sort channels)
Use this op tion for sort ing the channels
(CH) int o the desired program me
(Pr), as follows:
c.1 Select the p rogramm e (Pr) you wish to c hange using Cursor U P/DOWN
buttons E/F (marked with white background).
c.2 Press the GREEN button .
c.3 Press the Cursor UP/ DOWN butt ons E/F t o move the channel
(CH) to the required position.
c.2 Press the GREEN button to finish.
Change name
Stored programmes:
Sort channels
Stored programmes:
Pr 01 CH21 BBC1
Pr 02 CH31 BBC2
Pr 03 CH41 ITV
Pr 04 CH51 CH4
Pr 05 CH61 CNN
Pr 06 –––– ––––
Pr 07 –––– ––––
Pr 08 –––– ––––
Pr 09 –––– ––––
Pr 10 –––– ––––
Press the MENU
button to exit.
Pr 01 CH21 BBC1
Pr 02 CH31 BBC2
Pr 03 CH41 ITV
Pr 04 CH51 CH4
Pr 05 CH61 CNN
Pr 06 –––– ––––
Pr 07 –––– ––––
Pr 08 –––– ––––
Pr 09 –––– ––––
Pr 10 –––– ––––
Insert the marked
programme in the
position you wish.
Press green button
to finish.
d)Delete this program (Delete channels)
Use this op tio n fo r canc elling pr
ogrammes which are bad ly tuned or repeated. When the YELLOW butto n is pressed, the TV will ask fo r co nfirmation t hat you wish t o cancel, and you must press the YELLOW butt on
again. The channels that follow it o n t he list w ill aut om atically rearrange themselves by moving up one programme (Pr) place, to restore the space
of t he c anc elled channel (CH).
e) Exit this menu
Use this option to quit the menu by pressing the BLUE button .
Delete channels
Stored programmes:
Pr 01 CH21 BBC1
Pr 02 CH31 BBC2
Pr 03 CH41 ITV
Pr 04 CH51 CH4
Pr 05 CH61 CNN
Pr 06 –––– ––––
Pr 07 –––– ––––
Pr 08 –––– ––––
Pr 09 –––– ––––
Pr 10 –––– ––––
WARNING!
This programme will be erased
Press yellow button again
to confirm.
Or press any
other button to cancel
7
Page 9
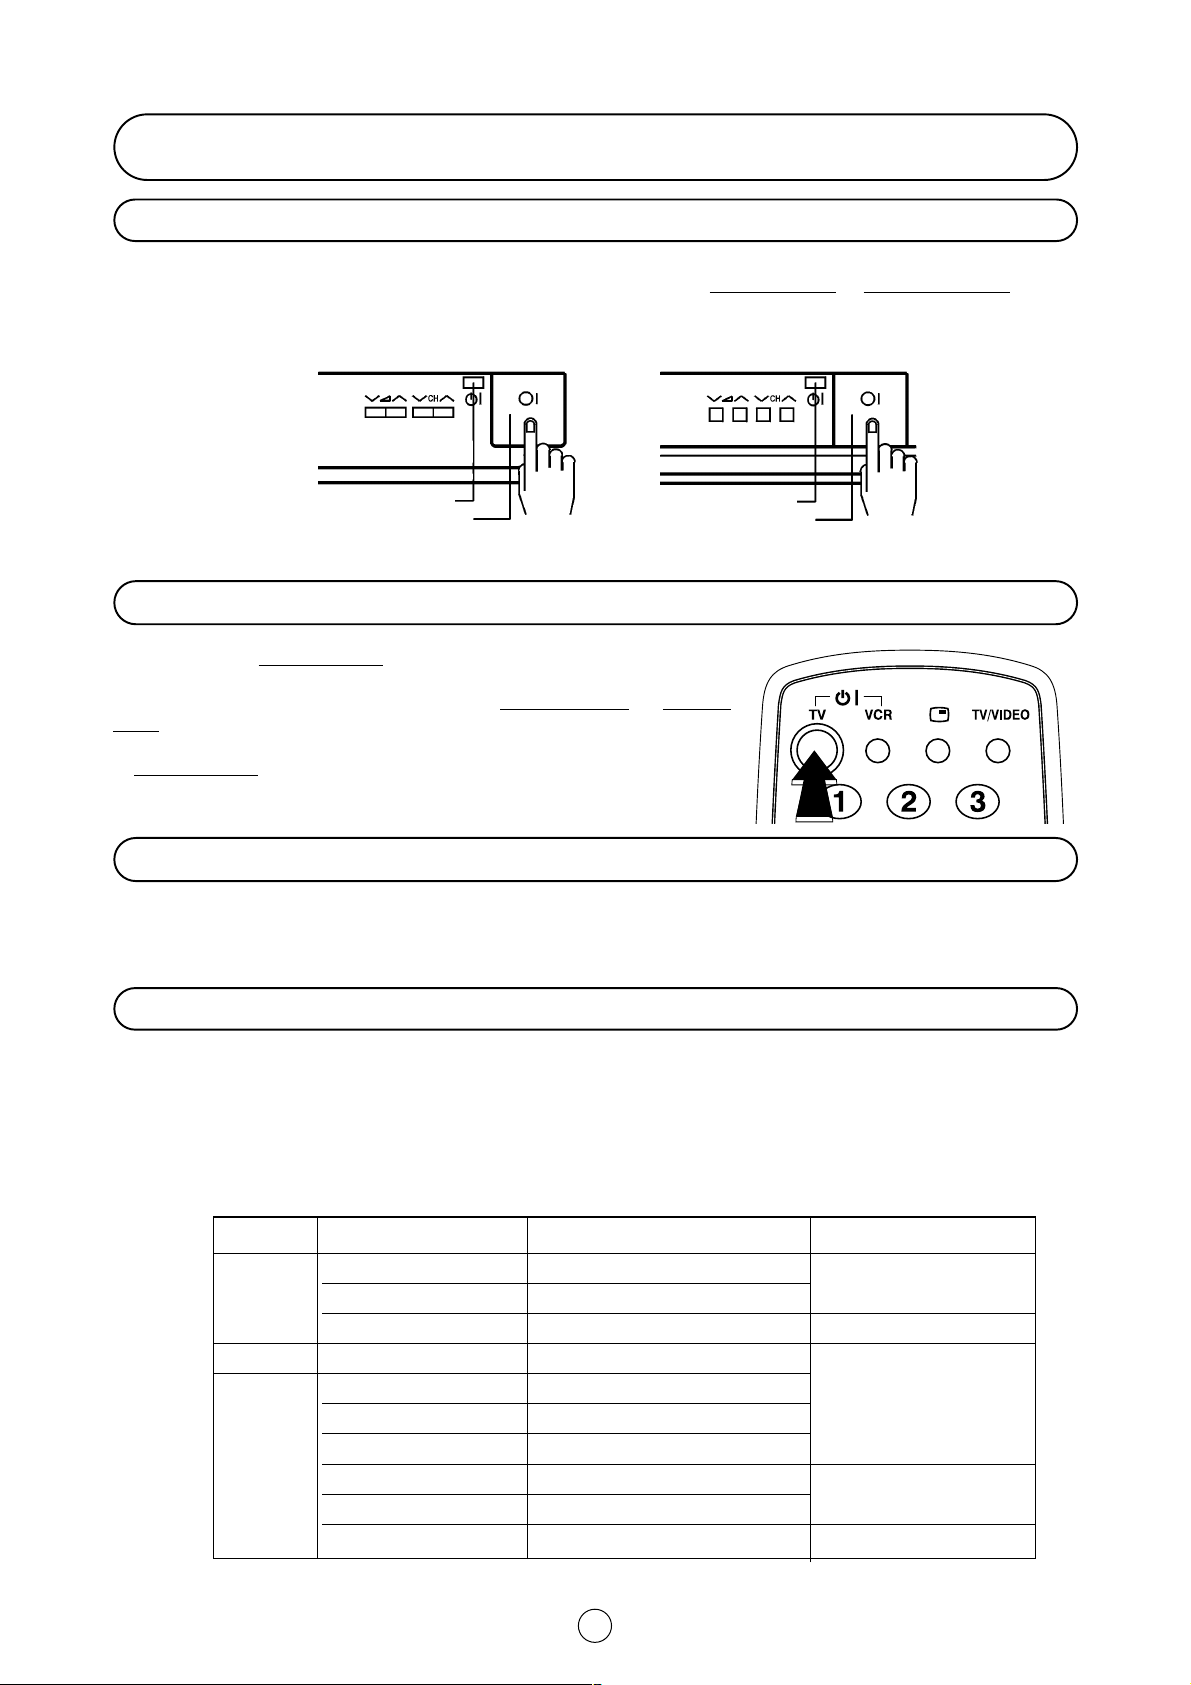
Switching on
Power supply on/off button
This TV memorizes the Mode last used when it was switched off. When the main power button (l) is pressed to turn on
the set, t he po w er indic ato r w ill light and th e set w ill resume in either the Stand - b y mo d e or Programm e mod e, d epending upon its condition when it was switched off.
54GS-61S
Power Indicator
Main power button
70GS-61S
Power Indicator
Main power button
On-Off/Stand-by button
When the TV is in Stand- by mode, to t ur n ON the TV press the Stand-by b utton (æ TV) on the remote control, or one of the four but tons on the TV
(
Va/\, VCH/\
mode, the sound ind ic at or w ill lig ht a few mo m ents and an image w ill app ear
on the screen. Press the Stand-by b utton ( æ TV) again and the TV will return
to Stand-by mode.
). The TV will change from Stand-by mode to Program
Blue back off timer
If noise appears in TV or VCR mode, the sc reen turns b lue. The blue back off- t im er is then engaged and w ill auto matically swit ch the set t o St and -by m ode after 15 minut es.
Real Channel Number (terrestrial/cable TV Programmes)
Channel setting is m ainly perform ed using t he remote c ont rol. Please follow t he instruc tio ns wit h the remot e co ntrol in
hand.
Television bro adcast ing st ations have channel numb ers assigned t o them (real channel numbers). You c an assign your
own c hannel number to a real channel and store it in t he p rog ramm e c hannel memory.
CORRESPONDING REAL CHANNEL
STATION SIGNALS REAL CHANNEL NUMBER ESPECIALLY AVAILABLE
V E-2 ~ E-4 CH 02 ~ CH 04
H E-5 ~ E-12 CH 05 ~ CH 12
F A ~ H CH 13 ~ CH 20 In Italy
UHF E-21 ~ E-69 CH 21 ~ CH 69
C
A
T
V
M1/S1 ~ M10/S10 CC 01 ~ CC 10
U1/S11 ~ U10/S20 CC 11 ~ CC 20
S21 ~ S41 CC 21 ~ CC 41
M1 ~ M7 CC 42 ~ CC 48
B1 ~ B7 CC 49 ~ CC 55
S’1/S21 ~ S’5/S25 CH 75 ~ CH 79 I n Switzerland
In Holland
8
Page 10

TV Operation
Channel Selection
C hannel selector (CH
/\ /
CH V) buttons
Select the p rogramm e channel numb er you w ant to see, using t he channel
selector butt o ns (E/F).
As you press these but tons a list o f channels appears.
Press the E/F again to select another channel.
Note: The channels that are in SKIP mod e c annot be seen with t his
but t o ns. Use numeric al b ut tons to d i sp lay t hese channels.
Single/D ouble entry selector (3)
This butt o n select s between one or t wo dig it channel numb er entry.
PR *
Single digit
entry mode
Press
3
Double digit
entry mode
0~9 Digit buttons
Yo u c an select channels by pressing t he 0 ~ 9 digit butt o ns o n t he remot e c o nt rol.
For single and dou b le d igit entry see sectio n B ab ove.
PR * *
Pr 01
Pr 02
➜
Pr 03
Pr 04
Pr 05
Pr 06
Pr 07
Pr 08
Pr 09
Pr 10
Flash-bac k button ( )
Press this button to switc h t he c urrently viewed channel to th e previously view ed c hannel, and vic e versa.
This functio n is o nly available in pro gramm e c hannel selectio n m o d e.
I.e. not when AV terminals are in use.
Pr 12
Channel Call button (
Previously
viewed channel
)
l
Pr 01
Press
Currently
viewed channel
Press the butt on t o disp lay the c urrent prog ramme numb er and the so und
mode on the screen. The name if it has been set, the remaining time for offtimer, the real-t im er and the on- t imer, if they have been set, is also disp layed on t he sc reen.
Press the butt o n again t o m ake t he on-screen disap p ear.
If the channel you are viewing has been set t o b e skip ped with the c hannel
skip function, the programme number is displayed in red. If the channel was
fine-t uned , programme number will b e displayed in yellow.
OFF TIMER: 120 Min.
TIMER : 10:30
ON TIMER : 18:00
BCC1 01
STEREO
9
Page 11

Audio Adjustments
Loudspeakers Sound Volume (C/I)
Use the C/I buttons to increase/decrease the volume level. The volume indicat or
will app ear on t he sc reen.
Note: To adjust t he headp ho nes volum e, see the “SOUND menu” o n page 14.
Sound mute button (c)
Press the butt o n t o m ute the sound . “M UTE” ap pears on the screen. Press the button again to turn t he sound back o n.
MUTE
Sound Mode Selec t or button
/i
I/II/I+II
Press the butt o n t o c hange t he soun d in t he sp eakers. The sound mo de will app ear on t he sc reen.
STEREO
MONO
Depending on the sound t ransm issio n t he sound reproduc tion can b e c ho sen as indicated b elow :
When the TV set is receiving a STEREO programme, the TV selects STEREO automatic ally, and you can c hange:
STEREO씯씮MONO
When the TV is receiving a BILINGUAL programme, the TV selects DUAL CHANNEL A automatically, and you can
change:
DUAL CHANNEL A씯씮DUAL CHANNEL B씯씮DUAL CHANNEL A B씯씮MONO
When the TV is receiving a MONO (FM) programme, the TV set select s M ONO automat ically b ut the so und m od e cannot b e c hange.
Note: See the -SOUND MODE- (page 14) to ch ange the Sound Mod e in the headp ho nes.
Sound Indi cator: When the TV set is receiving a STEREO, BILINGUA L or MONO NICAM programme the Sound Indicator
lights.
External source: When you are watching t he TV- set through t he Euro-SCART, AV- 1 or S-Video term inals, the Sound
Mod e Select or butt o n and Sound indicato r lig ht are not operative.
10
Page 12

Other Features
VIDEO AUDIO
L/S/G/I R/S/G/I
n
TV/Video selector button (TV/VIDEO)
TV/Video Menu
With this button you can select either source of input for the TV.
1. When the TV/VIDEO but ton is pressed, t he «TV/ Video Me nu» selec-
tion menu appears.
2. Press the but to n of t he correspo nding c olo ur to select one o f the
input sources, as indicated in the diagram.
The selected input will appear on the screen.
3. Press the TV/VIDEO button again to exit the menu.
CLOCK button (
f
)
RED
Press the button to display the current time on the screen.
Note: that this function operates only if the station you are tuned to broadcasts a teletext signal.
Headphone jack
1. Press the MENU button , to see the MAIN Menu.
2. Press the GREEN button to see the SOUND Menu.
3. Press the GREEN button to select HEADPHONE VOLUME.
4. Adjust the headphone volume with the Cursor LEFT / RIGHT
C/I
buttons.
Caution: To protect your ears, reduce the volume of the headphones before connecting them.
5. M ake sure that yo u insert t he headp ho ne p lug all the w ay.
6. Press the TV but t o n
to c lo se t he M enu.
Note: the SPATIAL EXPANDER Effect cannot be adjusted fo r t h e headph ones.
GREEN
YELLOW
BLUE
INSIDE THE DOOR
VCR Mode
SHARP VCR can be op erated using t h e TV remote c o nt rol.
Channel selectors (V CH /\)
These buttons are used fo r c hanging c hannels and sett ing t he
timer.
Play button B
Press this button to start playback.
Record buttons M
Press both buttons simultaneously to start recording. If the
video c assett e is protect ed against recording, it will be ejected.
Stop button L
Press this button to stop playback or recording.
Operate button Bl VCR
Press this button to turn your VCR on.
3.5 mm Ø Jack plug
Earphone or Headphone
Impedance 16~600 Ω
F
F
Fast forward/picture search forward (
) and
Rewind/picture search reverse (GG) buttons.
Both these buttons have the following function:
To m o ve throug h t he c assett e fast er, press to STOP but t on
and then press the FFor GGbutton to fast forward or
rewind the cassette.
Press the STOP button to stop fast forward or rewind.
Picture Search
During playb ack, p ress the
search, or the
GG
button for reverse search
FF
but ton for fo rward pict ure
Press the PLAY button to resume normal playback.
For further det ails, p lease refer to op eratio n m anual of yo ur VCR.
11
Page 13

Menu Structures
This TV set has: a MAIN MENU with four basic menus, which permit
access to the different functions of the TV.
These menus are as indicated below.
MENU Button
By pressing the MENU Button:
Main Menu Button Menu Functions / Options
CONTRAST
PICTURE
RED
ADJUSTMENTS
COLOUR
BRIGHTNESS
SHARPNESS
NORMALISE
TINT CONTROL
ECO MODE
GREEN
YELLOW
BLUE
AUDIO
ADJUSTMENTS
OTHER
FUNCTIONS
INSTALL
AND
TUNE
LOUDSPE AKERS
VOLUME
BASS
TREBLE
BALANCE
NORMALISE
LOUDSPEAKERS (MODE)
SPATIAL EXPANDER
A.S.L.
LANGUAGE
ON TIMER: TIME / SWITCH ON
OFF TIMER: OFF / 120 Min. / 90 Min. / 60 Min. / 30 Min.
DEMO
CHILD LOCK: LOCK ALL / LOCK PROGRAMME / CLEAR LOCK
CHANNEL: CH (Aerial) / CC (Cable)
SEARCH (Frequency Tuning)
FINE TUNE
MODE: TV / VCR / SKIP
EDIT: Edit this program / Go to sorting mode / Delete this program/
Exit this menu
AUTO-TUNE: AUTO INSTALLATION
HEADPHONES
VOLUME
BASS
TREBLE
BALANCE
NORMALISE
HEADPHONES (MODE)
12
Page 14

Picture Adjustments
Picture quality: CONTRAST, COLOUR, BRIGHTNESS, SHARPNESS, NORMALISE, TINT CONTROL and ECO MODE are a djustable in this menu.
1. P ress the MENU button , to see the MAIN Menu.
2. P ress the RED button to see the PICTURE Menu.
PICTURE Menu
3. P ress the Cursor UP/DOWN buttons E/F to select an option
from t he list: CONTRAST, COLOUR, BRIGHTNESS, SHARPNESS or
NORMALISE.
The selected item will appear on screen in a blue box.
4. Adjust the pict ure quality to your liking w ith the Cursor LEFT/RIGHT
C/I
buttons
.
NORMALISE Menu
5. Press the MENU butt on , if you w ish to normalize video levels to
default factory settings.
6. Press continuously E/F arrows will appear the TINT CON-
TROL and ECO MODE
MAIN Menu
RED
PICTURE Menu
CONTRAST
COLOUR
BRIGHTNESS
SHARPNESS
NORMALISE
➜
NORMALISE Menu
CONTRAST
COLOUR
BRIGHTNESS
TINT CONTROL
7.a. Selec t TINT CONTROL and p ress the Cursor LEFT/RIGHT butto ns
C/I
, to adjust your desired skin colour ( blue or red).
ECO MODE
7.b. Select ECO M ODE “ON” t o reduce co ntrast in areas of the pic ture
that are excessively white.
8. P ress the TV button , to close the Menu.
SHARPNESS
NORMALISE
➜
TINT CONTROL
TINT
CONTROL
ECO MODE
➜
ECO MODE
TINT
CONTROL
ECO MODE
Press the MENU
butt on to
normalise...
OFF
➜
13
Page 15

Sound Setting Mode
Sound q uality (VOLUME, BASS, TREBLE, BALANCE, NORMALISE, SOUND MODE, SPATIAL EXPANDER and A.S.L.)
are adjustable in this menu.
1. Press the MENU but t o n , t o see the MAIN M e nu.
2. Press the GREEN button to see the SOUND Menu.
SOUND Menu
3. Press the RED butt on to select LOUDSPEAKERS or press the
GREEN but t o n to select HEADPHONES.
4. Press the Cursor UP / DOWN buttons E/F to s elect an opt ion
from t he list : VOLUME, BASS, TREBLE, BALANCE or NORMALISE.
The select ed o p tion wi ll appear in white lett ers o n a b lue bac k g round
5. Adjust the sound quality according to your preferences with the Cursor
C/I
LEFT / RIGHT buttons
.
NORMALISE
Select NORM ALISE and press the MENU but ton , t o norm alise audio
levels to default f actory sett ing s.
6. Press the Cursor DOWN butto n F t o see more op tions:
SPEAKERS (Mod e), HEADPHONES (Mode), SPATIAL EXPANDER. And
A.S.L.
MAIN Menu
SOUND Menu
VOLUME
BASS
TREBLE
BALANCE
NORMALISE
➜
LOUDSPEAKERS
RED GREEN
NORMALISE
VOLUME
BASS
TREBLE
GREEN
LOUDSPEAKERS
HEADPHONES
LOUDSPEAKERS
BALANCE
NORMALISE
Press the MENU
butt on to normalise
➜
SOUND Mode
7. Press the Cursor UP / DOWN buttons E/F to select: LOUDSPE-
SOUND Mode
AKERS or HEADPHONES.
C/I
8. Press the Cursor LEFT / RIGHT buttons
to change to sound mode,
LOUDSPEAKERS
STEREO
as indicat ed on page 10, in the " So und Mode Selecto r" c hap t er.
Select SPATIAL EXPANDER and press the Cursor LEFT / RIGHT butto ns
C/I
to ac t ivat e or d eactivate the SPATIAL EXPANDER Effect [].
Select A.S.L. (Automatic Sound Limiter) and press the Cursor LEFT /
C/I
RIGHT buttons
to activate or deactivate the Au tomatic Sound Limi ter
[]
9. Press the TV butt o n t o c lo se t he M enu.
HEADPHONES
SPATIAL
EXPANDER
A.S.L.
➜
SPATIAL EXPANDER: the spat ial exp and er effect depends o n w het her t he feed is MONO or STEREO.
If the source feed is M ONO, it produc es a “Pseudo St ereo” effect .
If the source feed is STEREO, it p rod uces a spatial expand er effect , exp and ing t he st ereopho nic im age
Automatic Sound Limiter (A.S.L.): Quite frequent ly, different audio so urces d o not have the same volume level;
for examp le, t h is can occ ur when changing f rom a movie to a c o mmercial. The Automatic Sound Limit er solves this
prob lem b y ad justing the vo lume t o t he same level.
Note: the SPATIAL EXPANDER Effect and A.S.L. do no t work w ith headphon es.
14
Page 16

Features setting mode
In this mod e you c an select a LANGUAGE for sc reen menus, set the ONTIMER an OFF-TIMER, view the all func tio ns imp lemented in yo ur TV set
demonstration and set the CHILD LOCK.
1. Press the MENU but t o n , t o see the MAIN Menu.
2. Press the YELLOW button to see the FEATURES Menu
FEATURES M e nu
3. Press the Cursor UP/DOWN buttons E/F to select an option from
the list:
LANGUAGE, ON TIMER, OFF TIMER, DEMO or CHILD LOCK.
The selected item will appear on screen in white letters on a blue
background.
M enu LANGUAGE
I
4. Press the Cursor RIGHT button
to select the list of languages.
5. Press the Cursor UP/DOWN buttons E/F to select the menu
language.
The select ed languag e will ap pear in white lett ers.
6. Press the GREEN button to m emorize.
7. Press the TV but t o n , t o c lo se t he M enu.
ON TIMER
The On-Timer is used to automatically switch on the TV set during the day.
I
4. Press the Cursor RIGHT button
to select the "TIME" (current time) in
whit e lett ers.
5. To programme the current TIME: In order to be able to run this function,
it is essential to ad just the current t im e.
Automatic TIME adjustment: If you are receiving a channel with Teletext,
the TIME is automatic ally sync hronized w ith the Teletext clo c k .
* Important: If a signal via satellite is being received, or if correct time cannot b e obtained, t he t im e w ill have to b e adjusted manually.
Manual TIME adjustment: To adjust the time manually, this should be
done w it h the 0 to 9 d ig it butt o ns.
MAIN Menu
YELLOW
FEATURES M enu - LANGUAGE
LANGUAGE
ON TIMER
OFF TIMER
DEMO
➜
FEATURES Menu - ON TIMER
LANGUAGE
ON TIMER
OFF TIMER
DEMO
➜
ENGLISH
DEUTSCH
NEDERLANDS
FRANÇAIS
ITALIANO
ESPAÑOL
DANSK
SVENSKA
NORSK
SUOMI
PORTUGUÊS
MEMORIZE
GREEN
TIME 08:30
SWITCH ON **:**
CANCEL
GREEN
I
6. Press the Cursor RIGHT button
to select : SWITCH ON in white letters.
7. Adjusting the SWITCH ON Time. Once the current TIME has been adjusted, the SWITCH ON Time can be set with the
0 to 9 d ig it but t o ns.
The GREEN butto n is used t o c anc el t he SWITCH ON function.
8. Press the TV button t o c lo se t he M enu.
9. Press the Stand-by b utton (æ TV) on the remot e c o nt rol to put the TV into swit c h o n St and -by M o d e.
* As a safety p recaution, in the case of nobo dy being home when the television switc hes on automatically, the television
will d isco nnect it self after 120 m inutes; if it is t o c ont inue to run, any but t on o n the remot e co ntrol f unct io ns should be
pressed.
Note: In the event of a p ower cut, disconnection from t he plug or t elevision switch, all the data on the ON TIMER will be
cancelled.
15
Page 17

OFF TIMER
The OFF TIMER automatically switches the TV set to standby mode after
a predetermined period, (30, 60, 90 or 120 minutes).
4. Press the Cursor RIGHT button
I
to select “OFF.”
FEATURES Menu - OFF TIMER
LANGUAGE
ON TIMER
5. Press the Cursor UP/DOWN buttons E/F to set the desired
time in white letters.
Select “OFF” to disconnect off-timer.
OFF TIMER
DEMO
➜
OFF
120 Min.
90 Min.
60 Min.
30 Min.
MEMORIZE
6. Press the GREEN button to memorize.
GREEN
After the selected time has passed, the TV will turn itself off automatically,
and switch to Stand-by mode.
7. Press the TV button , to close the Menu.
Note: The OFF TIMER data will be cancelled if you turn off the TV by the Standby button (æ TV) on the remote control
or with the Main power button (®) on the TV set.
DEMO (Demonstration)
The demonstration function allows you to see all the menus implemented
in this TV set.
1. Press the MENU button , to see the MAIN Menu.
2. Press the YELLOW button to see the FEATURES Menu.
3. Press the Cursor DOWN button F to select DEMO.
4. Press the MENU button to begin the demonstration.
5. Press any button on remote control to exit this function when you wish.
LANGUAGE
ON TIMER
OFF TIMER
➜
DEMO
Press the MENU
button to start
the DEMO
16
Page 18

TV Channel Setting
Auto Channel Preset with Sorting (ACSS: Automatic Channel Sorting System)
This function frees you of troublesome channel presetting procedures.
Simply fo llow t he instruct ions below to auto matically st ore all on-air and
cable real channels into the programme channel memories.
1. Press the MENU button , to see the MAIN Menu.
2. Press the BLUE button to see the TUNE Menu.
TUNE Menu
3. Press the Cursor UP button E to select AUTO-TUNE (blue box).
4. Press the MENU button fto see the AUTO INSTALLATION Menu.
Language
5. Press the RED button to select the menu language.
6. Press the BLUE button to continue.
MAIN Menu
TUNE Menu
CHANNEL
SEARCH
F-TUNE
MODE
EDIT
AUTO-TUNE
Language
Press MENU button
to Auto-tune
WARNING! All
pretuned channels
will be lost.
BLUE
Pr 06
CH21
Country
7. Press the RED button to select your country.
8. Press the BLUE butt o n t o continue and f o llo w the inst ructions o n
the screen.
Searching
The TV set SEARCHES FOR FREQUENCIES, memorises the channels
found and sorts them (according to technical criteria) from Pr-01 of the TV,
to a maximum of 99 programmes.
This tuning process may take several minutes to perform.
Stored programmes
When the AUTOMATIC SEARCH has been com pleted, the " Stored programmes" m enu will ap p ear on screen. In this menu, you c an c hange the
order of t he c hannels and c hange o r give t he c hannels a four letter name.
If you wish to rename the channels, or c hange t he ord er; refer to the page
7, chapter Stored programmes.
If you wish to go out of the menu, press the BLUE button .
RED
Country
RED
Stored programmes:
green
yellow
blue
red
Pr 01 CH21 BBC1
Pr 02 CH31 BBC2
Pr 03 CH41 ITV
Pr 04 CH51 CH4
Pr 05 CH61 CNN
Pr 06 –––– ––––
Pr 07 –––– ––––
Pr 08 –––– ––––
Pr 09 –––– ––––
Pr 10 –––– ––––
Edit this programm
Go to sorting mode
Delete this programm
Exit this menu
BLUE
BLUE
17
Page 19

Manual Channel Preset (PRESET USING REAL CHANNEL NUMBERS)
1. Depending o n the prog ramme channel you want to p reset, press
the 6 b utton to select single / do ub le d igi t ent ry.
2. Select the programme channel number you want to preset with the
0 ~ 9 dig it butt o ns.
3. Press the MENU butt o n to see the M AIN Menu.
MAIN Menu
4. Press the BLUE butto n to see th e TUNE Menu.
TUNE M e nu
The “CHANNEL” option is already select ed .
5. Press the Cursor RIGHT buttons I, to choose the CH / CC option.
6. Press the Cursor DOWN butt on F to select (with w hite lett ers)
the Channel type: CH (Aerial) or CC (Cable).
7. Enter the real channel number you want to store with the 0 ~ 9 digit
but t o ns (two d ig it ent ry o nly).
8. Press the GREEN but ton to memor ize.
MAIN Menu
TUNE Menu
CHANNEL
SEARCH
F - TUNE
MODE
EDIT
AUTO - TUNE MEMORIZE
CH
CC
BLUE
CH 21
Pr 06
8. Press the TV butt o n to clear t he on-screen disp lay.
9. Repeat the above p rocedure for presett ing o t her p rog ramm e.
GREEN
18
Page 20

Manual Channel Preset (PRESET USING FREQUENCY TUNING)
1. Depending o n the programm e channel you want t o preset, p ress
the 6 b utton to select single / do ub le d ig it ent ry.
2. Select the programme channel number you want to preset with the
0 ~ 9 dig it butt o ns.
3. Press the MENU butt o n to see the M AIN Menu.
MAIN Menu
MAIN Menu
4. Press the BLUE butto n to see th e TUNE Menu.
BLUE
TUNE M e nu
The “CHANNEL” option is already select ed .
5. Press the Cursor RIGHT buttons I, to choose the CH / CC option.
6. Press the Cursor DOWN butt on F to select (with whit e lett ers)
the Channel type: CH (Aerial) or CC (Cable).
7. Press the Cursor LEFT C buttons to select CHANNEL
8. Press the Cursor DOWN butto n F to select SEARCH.
SEARCH
9. Press the Cursor LEFT/RIGHT buttons C/ I to start p reset.
The tuning sequence will stop when a signal is detected, if the signal is not t he required c hannel press C or I to continue.
10. Press the GREEN but ton to memo rize.
11. Press the TV butt o n to clear t he on-screen disp lay.
TUNE Menu
CHANNEL
SEARCH
F - TUNE
MODE
EDIT
AUTO - TUNE
SEARCH
CHANNEL
SEARCH
F-TUNE
MODE
EDIT
CH
CC
Pr 06
CH 21
Pr 06
CH 21
12. Repeat the above procedure for presetting other programme chan-
nels.
AUTO-TUNE MEMORIZE
GREEN
19
Page 21

After preset has been performed
The following f eatures are available for preset channels:
FINE TUNI NG
When a preset programme channel is not exactly tuned, you can fine tune the
channel in this m ode.
1. Select the programme channel number you want to tune using the
0 ~ 9 dig it butt o ns.
2. Press the MENU butt o n t o see the MAIN M e nu.
M AIN Menu
3. Press the BLUE butto n to see the TUN E Menu.
TUNE M e nu
4. Press the Cursor DOWN button F twice to select FINE TUNE (blue
box ).
FINE TUNE M e nu
5. Press and hold t he Cursor LEFT C or RIGHT I butt o ns, until the best
tuning p o sition is fou nd , f or the best p icture and sound.
After Fine tuning th e prog ramm e number will t urn f rom g reen to yellow.
6. Press the GREEN but ton to memo rize.
7. Press the TV butt o n to clear t he on-screen disp lay.
MAIN Menu
TUNE Menu
CHANNEL
SEARCH
F-TUNE
MODE
EDIT
AUTO -TUNE MEMORIZE
CH
CC
FINE TUNE Menu
CHANNEL
SEARCH
F-TUNE
BLUE
Pr 06
CH 21
Pr 06
CH 21
Repeat the above p roc ed ure for o t her p rog ramm e c hannels as required.
Mode
This feature allows you to select TV, VCR, SKIP. First follow the above
steps 1., 2., and 3. The TUNE Menu will appear on sc reen.
4. Press the Cursor DOWN butt on F to select M ODE.
5. Press the Cursor RIGHT button I to choose the TV / VCR / SKIP
option.
6. Press the Cursor DOWN butt o n F to select (with w hite letters)
TV, VCR or SKIP:
TV: If t h e TV signal is weak the image can shake.
In this case put it in TV mode.
VCR: In some c ase, the up p er p art of t he p ic t ure may b e d ist or t ed when
receiving signal from a VCR via RF terminal on the TV set.
Selecting t his o p t io n will help to reduce his effect.
SKIP: Allows you t o SKIP channels you do not want t o view when using
channels selector (CH ∑/CH œ) but t o ns.
7. Press the GREEN but t o n to memo rize.
MODE
EDIT
AUTO - TUNE MEMORIZE
MODE
CHANNEL
SEARCH
F-TUNE
MODE
EDIT
AUTO - TUNE MEMORIZE
TV
VCR
SKIP
GREEN
Pr 06
CH 21
GREEN
8. Press the TV butt o n t o c l ear the on-screen disp lay.
9. Repeat the above p rocedure fo r other p rogramme c hannels as requi-
red.
20
Page 22

TELETEXT - Mode
What is Teletext?
Teletext is an informatio n service, organized like a magazine, which is provid ed
by som e television stat ions in additio n to regular television broadc asting. Your
television receives special Teletext signals bro adcast by a TV station, p rocesses
the information and displays it graphically on the screen. News, weather and
sports informat io n, stock exchange pric es, p rog ram p reviews and closed c ap tioning for the deaf are among the many services available through Teletext.
Teletext inform ation is o rganized much like a magazine: accord ing t o pag es and
sub- pages. The basic unit of displayed info rmation is the p age. A sub- page is
one of a series of pages.
Teletext receptio n is cont rolled b y using t he remote cont rol. Refer to t he appropriate button descriptions for operation of the Teletext functions.
Teletext features
Depending on the TV programme, the Teletext pages are transmitted using different system. Your SHARP TV is adjusted to rec eive two Teletext systems, namely FLOF and LIST, which are automatically identified by the receiver. The user can
easily identify t hem by the manner in which they app ear on t he sc reen.
NEWS SPORT
GREEN
RED
FLOF
TELETEXT
MOVIE
YELLOW
WEATHER
CYAN
100 200
RED
LIST
TELETEXT
GREEN
300
YELLOW
400
CYAN
To switch ON and switch OFF the Teletext
1. Select the TV channel with Teletext inform at io n t hat yo u w ant t o see.
2. Press the TEXT/M IX butt o n (a/b) to select Teletext mode.
3. Press the TV butt o n ● t o exit Teletext m o d e.
Basic TEXT features common to the two systems
a) Fast Page Selec tion
1. Select the app ropriate prog ramm e c hannel.
2. Press the TEXT/MIX but t o n (a/b) to select Teletext mo d e.
3. To recall a page num b er d isp layed in t he c olo ured bracket s, sim p ly p ress t he co rrespo nding co lo ured b utton.
b) 0-9 digit buttons
Enter a desired page number w it h the 0-9 d ig it but t o ns. (To select P.100: press 1, 0, 0).
c) Page select or (UP/DOWN )
Yo u can sequentially select page numbers b y pressing the Cursor UP/DOWN buttons E/F (channel selector buttons in t h e TV mode).
21
Page 23

Other TEXT features common to the two systems
TEXT/ MIX butt on (a/b)
Every time this but ton is pressed, t h e Telet ext is displayed in d iff erent mo d es, f ollo w ing the sequence desc rib ed :
In TV mode: Press the TEXT/M IX butt o n (a/b) to select Teletext m ode.
In Teletext mode: Press the TEXT/MIX butt on (a/b) to sup erimpose a telet ext broad cast ont o the c urrent TV pro-
gramme screen.
In Mixed mode : Press the TEXT/MIX button (a/b) again to return to the normal teletext screen.
s
HALF PAGE button (
Each time you press t he b ut t o n, t h e upper/lower half of t he t eletext p ag e is magnif ied and displayed o n t he sc reen.
)
HOLD button (
Any teletext page or subp age c an b e held o n t he sc reen by p ressing t he HOLD button.
Press the butt o n again t o cancel the hold mod e.
REVEAL button (
Press this button to reveal hidd en info rmat io n suc h as t he answ er to a q uiz.
Press the butt o n again t o hi d e t he info rmat io n.
CLOCK button (
In TV mode : When the TV signal with TEXT dat a is received, by p ressing this b utton t he real time informat ion will
appear on t he t op right area of the sc reen.
In T eletext mode: When a selected Teletext page has hidden subpages, these pages can be seen in the following man-
ner:
1. Press the CLOCK b ut t o n (
2. Enter 4 d igi t s c o rrespo nd ing to the sub page desired. E.g. 0021 for sub p age number 21.
3. Wait unt il t he p age appears.
NOTE: You can use this b utton toget her w ith the DISPLAY CANCEL button (
TV picture until the sub p age has b een found . The on sc reen TV icon in t he t o p left side of t he sc reen will show " TXT".
When the subpag e has been found , t he sc reen will c hange t o the subp age numb er.
Press the TEXT/MIX (a/b) butt o n t o view t he sub p ag e.
CANCEL button (
With this butt o n Teletext inform at io n is c anc elled and TV pict ure is restored. «TXT»Indication is sho w n o n sc reen.
In this po sitio n, t he TV programm e cannot b e changed , b eing in Teletext/Canc elled mo d e. When a change takes place
in the Teletext inform atio n, t he up p er tim e of t he c anc elled p age or so me ot her ind ic at ion o f sp ec ial p ages is show n o n
screen. To unc anc el, p ress TEXT/ MIX (a/b) butto n and the whole t eletext is sh own.
NOTE:This button c an be used t o get her w it h the cloc k b u t t o n w hil e awaiting subpages.
a
f
d
k
)
)
)
f
). Screen will show « = = = = »
k
). This means that you can view the main
)
h
RESET button (
Press the reset b ut ton (
LIST button (LIST)
Pressing this button you force the teletext to LIST Mode. It means that row 24 (bottom row of Teletext) will not have transmitter information, only the pages that user you have previously stored in the memory . (More information on the next page
-Teletext Page memory List -).
Pressing LIST button again we go out from LIST Mod e and system is going t o b e id ent ified again (FLOF).
INDEX button (
Press the INDEX but t o n (
)
h
) to return back t o index page, and g o o ut from Teletext mo d e.
j
)
j
) to return back t o index page.
22
Page 24

Advanced TEXT operation - LIST mode -
Teletext Page m em ory List
a) How to Opera t e Pa ge Memory
Yo ur TV has 40 teletext p age numb er m emories f or f ast recall of t eletext inform atio n.
In programme p o sit io ns 1 through 9, fo ur t eletext page numb ers c an b e st o red in each p o sition; a total of 36 p ages.
In programme positions 10 through 99, only one programme with 4 page numbers can be stored. If you try to store more
than 4 page num b ers in a prog ramm e p o sit io n between 10 and 99, the previously sto red p age num b ers w ill be erased.
Select the p rog ramm e ch annel numb er int o which yo u w ant t o st o re teletext page numb ers.
1. Press the TEXT/MIX (a/b), butt on to enter t he telet ext m o d e.
2. Press the LIST butt o n t o c hang e from FLOF system to LIST mod e.
3. Press a colo ured b utton c o rrespo nd ing t o t he c o lou red b rac k ets o n the screen for page number storage.
4. Enter the teletext p age numb er using the 0 ~ 9 d igi t b ut ton s (enter three digits) or channel selector E/ F but -
tons.
5. Repeat step s 3. and 4. until the numbers fo r t he d esired p ages have been entered
6. Press the STORE ( ) b utton t o memorize the page numb ers you require. The symbol «STORE» ap pears on the
screen.
7. Press the TV but t o n t o exit the teletext mo de.
P100
(FLOF TELETEXT)
Press
LIST
and
YELLOW
P300
Input
4, 2, 5
(LIST TELETEXT)
P425
buttons
GREEN
MOVIE
YELLOW
WEATHER
CYAN
LIST
300200100
YELLOW
400
425200100
If you want to store press
NEWS SPORT
RED
button
b) Fast Page Selec t ion - LIST mode -
1.Select the appropriate programme channel.
2.Press the TEXT/MIX (a/b) button to enter the teletext mode.
3. Press the LIST button to change from FLOF system to LIST mode.
4.To recall a page number displayed in the coloured brackets, simply press the corresponding coloured button.
5.Press the LIST button again to return to FLOF system.
400
23
Page 25

Child Lock (Channel Block)
Yo u can lo ck a TV channel to prevent unsupervised TV viewing b y fo llow ing t hese proc ed ures; the prot ect io n can ap ply
to the television itself "LOCK ALL" or to specific programmes "LOCK PROGR AMME". With the CHILD LOCK function, you
can also prog ramm e a t im e p eriod during w hich the TV will be prot ec t ed .
1. Press the MENU but t o n , t o see the MAIN M e nu.
2. Press the YELLOW button to see the FEATU RES M e nu.
FEATURES M e nu
3. Press the Cursor UP button E to select CHILD LOCK in white letters
on a blue bac k gro und .
4. Press the MENU but t o n t o see the CH I LD LOCK Menu.
CHILD LOCK Menu
5. Press the Cursor UP/ DOWN buttons E/F to select an option from
the list:
LOCK ALL, LOCK PROGRAMM E or CLEAR LOCK
The select ed item will ap p ear on sc reen in a blue bo x.
MAIN Menu
FEATURES M enu
LANGUAGE
ON TIMER
OFF TIMER
DEMO
➜
CHILD LOCK
CHILD LOCK
➜
YELLOW
ENGLISH
DEUTSCH
NEDERLANDS
FRANÇAIS
ITALIANO
ESPAÑOL
DANSK
SVENSKA
NORSK
SUOMI
PORTUGUÊS
MEMORIZE
Press the MENU
button to enter
the CHILD LOCK
menu.
CHILD LOCK Menu - LOCK ALL
Select this o p tion for protec t ing t he access to t he w ho le TV.
If necessary, repeat steps 1. to 4. to see the CHILD LOCK Menu.
6. Press the Cursor RIGHT button I t o select t he prot ection t ype (white
letters):
Select «NONE»: To cancel t he p rot ec t io n.
Select «ALWAYS LOCKED»: The access to the TV will be protected
througho ut the day.
Select «START: **:**/ STOP: **:**»: t o blo ck ac cess to the TV during the
desired period of t im e. Enter the hours and minutes using t h e numeric buttons 0 ~ 9 t o set t he st art ing and end ing t im es of t he lock p eriod .
7. Press the GREEN but t o n to m emo rize.
From this tim e forward, whenever the protection c onditions are met, t he
screen will be b lo cked and the «LOCKED MODE» message w ill b e d isplayed.
Press any number key on the remot e co ntrol to unlo ck the TV.
NOTE: Since the “key” for unlocking the TV is the remote control, mak e sure you do not misplace it.
24
CHILD LOCK Menu - LOCK ALL
LOCK ALL
LOCK PROG.
CLEAR LOCK
NONE
ALWAYS LOCKED
START : **:**
STOP: **:**
➜
MEMORIZE
GREEN
Page 26

LOCK PROGRAMM E
LOCK PROGRAMME menu
Select this o ption to protect the access t o sep arate p rog ramm es
1. Press the TV butt o n , to clear the o n-screen disp lay.
2. Select the programme channel numb er you want to protect using the
0 ~ 9 dig it but t o ns or the channel selector E/F buttons..
LOCK ALL
LOCK PROG.
CLEAR LOCK
NONE
AUTO (VPS)
ALWAYS LOCKED
START: **:**
STOP: **:**
3. Repeat steps 1. to 4. (Page 24) to see the CHILD LOCK Menu.
4. Press the Cursor DOWN button F to select LOCK PROGRAMME
(blue background ).
5. Press the Cursor RIGHT button I to select the protection type (white let-
ters):
➜
MEMORIZE
Select «NONE»: To cancel t he p rotectio n f rom the selected programme.
Select « AUTO (V PS )»: to activate automatic protection. In this mode, the
GREEN
selected channel will only be locked w hen the VPS code is received.
Some channels send t he VPS code w hen the program t hey are broadcasting is no t recommend ed f o r children.
Select «ALWAYS LOCKED»: To prot ec t t he access from t he select ed programme t hroug ho ut the day.
Select « START : **:**/STOP: **: **»: to block access to the selected channel during the desired period of time. Enter the
hours and minutes using the number keys (0 ~ 9) s et the starting and end ing times of t he lock perio d .
6. Press the GREEN button to memo rize.
From this tim e forward, w henever the protect ion cond itions are met, t he screen will be bloc ked and t he «LOCKED
MODE» m essage will be displayed.
Press any digit bu t ton to unlo ck the TV.
NOTE: Since the “key” for unlocking the TV is the remote control, mak e sure you do not misplace it.
CLEAR LOCK
CLEAR LOCK menu
This optio n enables you to erase all the adjustment s made to t he CHILDLOCK funct io n.
LOCK ALL
If necessary repeat steps 1. to 4. (Page 20) to see the CHILD LOCK Menu.
LOCK PROG.
5. Press the Cursor UP button E to select CLEAR LOCK.
6. Press the MENU button to confirm that you want to initialize the CHILD
LOCK system.
CLEAR LOCK
Press the MENU
button to clear
the CHILD LOCK
SYSTEM.
7. Press the TV button to clear the o n-screen disp lay.
8. Use the CLEAR LOCK to cancel any previously set CHILD LOCK pro-
grammes to avoid malfunc t i on when a new program is set .
Notes:
In order for t he t im ed protec t io n t o fu nc t io n correctly, the internal TV clock must be set at t he right time. To
check t he t im e sett ing , see sect io n "Auto mat ic or Manual time adjust m ent " on p age 15.
25
Page 27

21-pin Euro-SCART and 21-pin Audio/Video
REAR TV
21-pin In/Out
1. 21-pin Audio/Video (AV-1)
With S-Video Input
2. 21-pin Euro SCART
(Full connect, RGB)
1
RF Input
3. Antenna terminal
21-pin Euro-SCART (RGB)
1. Audio right output
2. Audio right input
3. Audio left o ut put
4. Commo n earth f o r aud io
5. Earth for blue
6. Audio left inp u t
7. Blue input
8. Audio-video c o nt rol
9. Earth for green
10. Not used
11. Green input
12. Not used
13. Earth for red
14. Not used
2
15. Red input
16. Red/Green/Blue c o nt rol
17. Earth for video
18. Earth for Red/Green/B lue co ntrol
19. Video outp ut
20. Video input
21. Plug shield
3
21-pin Audio/Video (AV-1) with S-Video Input
1. Audio right output
2. Audio right input
3. Audio left o ut put
4. Commo n earth f o r aud io
5. Earth
6. Audio left inp u t
7. Not used
8. Audio-video c o nt rol
9. Earth
10. Not used
11. Not used
12. Not used
13. Earth
14. Not used
15. Chroma S-Video inp ut
16. Not used
17. Earth for video
18. Earth
19. Video outp ut
20. Video input / S-Video inp ut
21. Plug shield
26
Page 28

Typical connection (Videorecorder/Decoder) through the 21-pin Euro-SCART
Please refer to the operation manual of your VCR for details
Typical conn ection (Vi deorecorder and TV) through th e RF terminal and Decoder through the 21-pin Euro-SCART
VCR
Decoder
RF in
SCART/AV TV
RF out
RF in
21-pin Euro-SCART
Typical conn ection (DVD, Decoder and TV) thr ough the 21-pin Eu ro-SCART
SCART/AV TV
DVD Player
Video out Audio out
21-pin Euro-SCART
Decoder
RF in
27
Page 29

Troubleshooting
The following c ond it ions d o not always d enote t rouble. Therefore, performs t he chec ks d escrib ed b elow b efore calling
for service.
If the problem cannot be co rrec ted by the use of this guide, pull the pow er plug out from the electrical outlet and call for
service.
Quick
Service
Check List
Possible Causes/Remedies
Problems
Try a new channel to check
for possible station trouble
TV not plugged in Outlet power OFF
Main powe r button of TV not ON
Antenna not connected to terminal
at the back of the TV set
If outside antenna is used,
check for broken wires
Check for local interference
Turn OFF using the Main Powe r button,
then turn ON again after a minute
Adjust COLOUR control
Check batteries in the Remote Control
Try fine tuning to correct
Check if the Brightness or Contrast setting in the pictu-
re setting mode might be all the way to the minus side
Increase the volume
Remote control does not work ●● ● ●
Bars on screen ●●
Picture distorted ●● ●
Picture rolls vertically ●●●
No colour ●●●●●
Poor reception on some channels ● ●●●
Picture weak ●●●●●
Picture lines or streaks ●●●
Picture ghosting ● ●●●
Picture blurred ●● ●
Sound OK, picture poor ● ●●● ● ●●
Picture OK, sound poor ●● ●
No picture or sound
●●●●● ● ●●
28
Page 30

GENERAL SPECIFICATIONS FOR TELEVISION RECEIVER
Model: 54GS-61S, 70GS-61S
1. Receiving Broadcast Standard CCIR TV Standard system B/G, PAL
2. Receiving Channel VHF: E 2 - E 12 CH
UHF: E 21 - E 69 CH
CATV: S 01 - S 41 (Hyper band)
3. Receiving System Sound: GERMAN STEREO (IGR)
Colour System: PAL
Field Frequency: Pal 50/60 Hz Capability
4. Power Source 220V-240V AC 50 Hz
54GS-61S 70GS-61S
5. Power Consumption at 240V AC 50Hz 52 W 87 W
6. Power Consumption at (Stand-by) 3 W max. 3 W max.
7. Audio Output (mpo):
Internal speaker: 10 + 10 W 10 + 10 W
8. Dimensions (Approx.) Width: 601 m/m 736 m/m
Height: 461 m/m 570 m/m
Depth: 478 m/m 469 m/m
9. Viewing Area (diagonal measurement) 51 cm (21") 66 cm (28")
10. Weight (Approx.) 20 Kg 30,5 Kg
11. Speaker (2 pcs.) 6x13 cm. 6x13 cm.
12. Antenna Input Impedance UHF 75 ohm Unbalanced
13. Safety CE - MARK
14. EMC CE - MARK
15. Accessories & etc.
a) User Instruction Yes
b) Remote Control Yes
c) Battery 2 pcs.
16. Other Features:
a) Auto Installation System
b) ACSS function (Auto Channel Sorting System)
c) 99 Channel Programming System
d) Cable and Hyperband
e) Teletext
f) OSD System (ON Screen Display)
g) Tint Control
h) Stereo (IGR)
i) ON-OFF Timer
j) 21 pin Euro SCART Connector (RGB)
k) 21 pin Audio/Video Connector (AV-1) with S-Video Input
l) Headphone Terminal
m) Blue Back Noise Mute Function
n) Automatic Sound Limiter (A.S.L.)
o) Child Lock System
NOTE: THE “AV LINK” FUNCTION I S NOT AVAILABLE IN THIS MODEL
29
Page 31

Index
21-pin Audio/Video . . . . . . . . . . . . . . . . . . . . . . . . . 26
21-pin Euro-SCART (RGB) . . . . . . . . . . . . . . . . . . . 26
A
Accessories . . . . . . . . . . . . . . . . . . . . . . . . . . . . . . . 2
After preset has been performed . . . . . . . . . . . . . . 20
Antenna Connections . . . . . . . . . . . . . . . . . . . . . . 2, 3
A.S.L. (Automatic Sound Limiter) . . . . . . . . . . . . . . .14
Audio Adjustments . . . . . . . . . . . . . . . . . . . . . . . . . 10
Auto Channel Preset . . . . . . . . . . . . . . . . . . . . . . . . 17
Auto Installation System . . . . . . . . . . . . . . . . . . . . . . 6
Automatic Channel Sorting System . . . . . . . . . . 6, 17
B
Balance . . . . . . . . . . . . . . . . . . . . . . . . . . . . . . . . . . 14
Bass . . . . . . . . . . . . . . . . . . . . . . . . . . . . . . . . . . . . 14
Bilingual . . . . . . . . . . . . . . . . . . . . . . . . . . . . . . . . . 10
Blue back off-timer . . . . . . . . . . . . . . . . . . . . . . . . . . 8
Brightness . . . . . . . . . . . . . . . . . . . . . . . . . . . . . . . 13
C
Clock button . . . . . . . . . . . . . . . . . . . . . . . . . . . 11, 22
Colour . . . . . . . . . . . . . . . . . . . . . . . . . . . . . . . . . . . 13
Contrast . . . . . . . . . . . . . . . . . . . . . . . . . . . . . . . . . 13
Controls & Terminals . . . . . . . . . . . . . . . . . . . . . . . . . 5
Current time . . . . . . . . . . . . . . . . . . . . . . . . . . . . . . 15
Channel Selection . . . . . . . . . . . . . . . . . . . . . . . . . . 9
Child Lock (Channel Block) . . . . . . . . . . . . . . . . . . 24
D
Delete (Programme) . . . . . . . . . . . . . . . . . . . . . . . . . 7
Demonstration . . . . . . . . . . . . . . . . . . . . . . . . . . . . 16
E
ECO mode . . . . . . . . . . . . . . . . . . . . . . . . . . . . . . . .13
Edit (Programme) . . . . . . . . . . . . . . . . . . . . . . . . . . . 7
F
Features Setting Mode . . . . . . . . . . . . . . . . . . . . . . 15
Fine tuning . . . . . . . . . . . . . . . . . . . . . . . . . . . . . . . 20
FLOF (Teletext) . . . . . . . . . . . . . . . . . . . . . . . . . . . . 21
FRONT TV . . . . . . . . . . . . . . . . . . . . . . . . . . . . . . . . 5
H
Headphone jack . . . . . . . . . . . . . . . . . . . . . . . . . . . 11
M
Main power button . . . . . . . . . . . . . . . . . . . . . . . . . . 8
Manual Channel Preset . . . . . . . . . . . . . . . . . . 18, 19
Menu Structures . . . . . . . . . . . . . . . . . . . . . . . . . . . 12
Mono . . . . . . . . . . . . . . . . . . . . . . . . . . . . . . . . . . . 10
O
OFF-Timer . . . . . . . . . . . . . . . . . . . . . . . . . . . . . . . 16
ON-Timer . . . . . . . . . . . . . . . . . . . . . . . . . . . . . . . . 15
Other Features . . . . . . . . . . . . . . . . . . . . . . . . . . . . 11
P
Picture Adjustments . . . . . . . . . . . . . . . . . . . . . . . . 13
R
REAR TV . . . . . . . . . . . . . . . . . . . . . . . . . . . . . . . . . . 5
Remote Control . . . . . . . . . . . . . . . . . . . . . . . . . . . . 4
Remote Control Battery Installation . . . . . . . . . . . . . 2
S
Safety precaution . . . . . . . . . . . . . . . . . . . . . . . . . . . 1
Sharpness . . . . . . . . . . . . . . . . . . . . . . . . . . . . . . . . 13
SKIP . . . . . . . . . . . . . . . . . . . . . . . . . . . . . . . . . . . . 20
Sorting (Programme) . . . . . . . . . . . . . . . . . . . . . . . . 7
Sound Indicator . . . . . . . . . . . . . . . . . . . . . . . . . . . 10
Sound mute . . . . . . . . . . . . . . . . . . . . . . . . . . . . . . 10
Sound Setting Mode . . . . . . . . . . . . . . . . . . . . . . . 14
Specifications . . . . . . . . . . . . . . . . . . . . . . . . . . . . . 29
Stand-by button . . . . . . . . . . . . . . . . . . . . . . . . . . . . 8
Stereo . . . . . . . . . . . . . . . . . . . . . . . . . . . . . . . . . . . 10
Switching on . . . . . . . . . . . . . . . . . . . . . . . . . . . . . . . 8
T
Teletext . . . . . . . . . . . . . . . . . . . . . . . . . . . . . . . . . . 21
Tint control . . . . . . . . . . . . . . . . . . . . . . . . . . . . . . . 13
Treble . . . . . . . . . . . . . . . . . . . . . . . . . . . . . . . . . . . 14
Troubleshooting . . . . . . . . . . . . . . . . . . . . . . . . . . . 28
TV/Video selector . . . . . . . . . . . . . . . . . . . . . . . . . . 11
Typical connections . . . . . . . . . . . . . . . . . . . . . . . . 27
V
Volume (Headphones) . . . . . . . . . . . . . . . . . . . 11, 14
Volume (Loudspeakers) . . . . . . . . . . . . . . . . . . 10, 14
L
LIST (Teletext) . . . . . . . . . . . . . . . . . . . . . . . 21, 22, 23
30
Page 32

å
SHARP ELECTRONICS (EUROPE) GmbH
Sonninstraße 3, 20097 Hamburg, Germany
SHARP ELECTRONICA ESPAÑA, S.A.
Polígono Industrial Can Sant Joan
Sant Cugat del Vallés (Barcelona), Spain
PRINTED IN SPAIN
9
TINS-XXXXBMN0
03/01
Page 33

documentation manual, user maintenance, brochure, user reference, pdf manual
This file has been downloaded from:
User Manual and User Guide for many equipments like mobile phones, photo cameras, monther board, monitors, software, tv, dvd, and othes..
Manual users, user manuals, user guide manual, owners manual, instruction manual, manual owner, manual owner's, manual guide,
manual operation, operating manual, user's manual, operating instructions, manual operators, manual operator, manual product,
 Loading...