

Page 1
13
Web-site: www.sharp.co.uk/support Help Line (office hours only): 0990-274277
Picture Adjustment
Adjusting the Picture
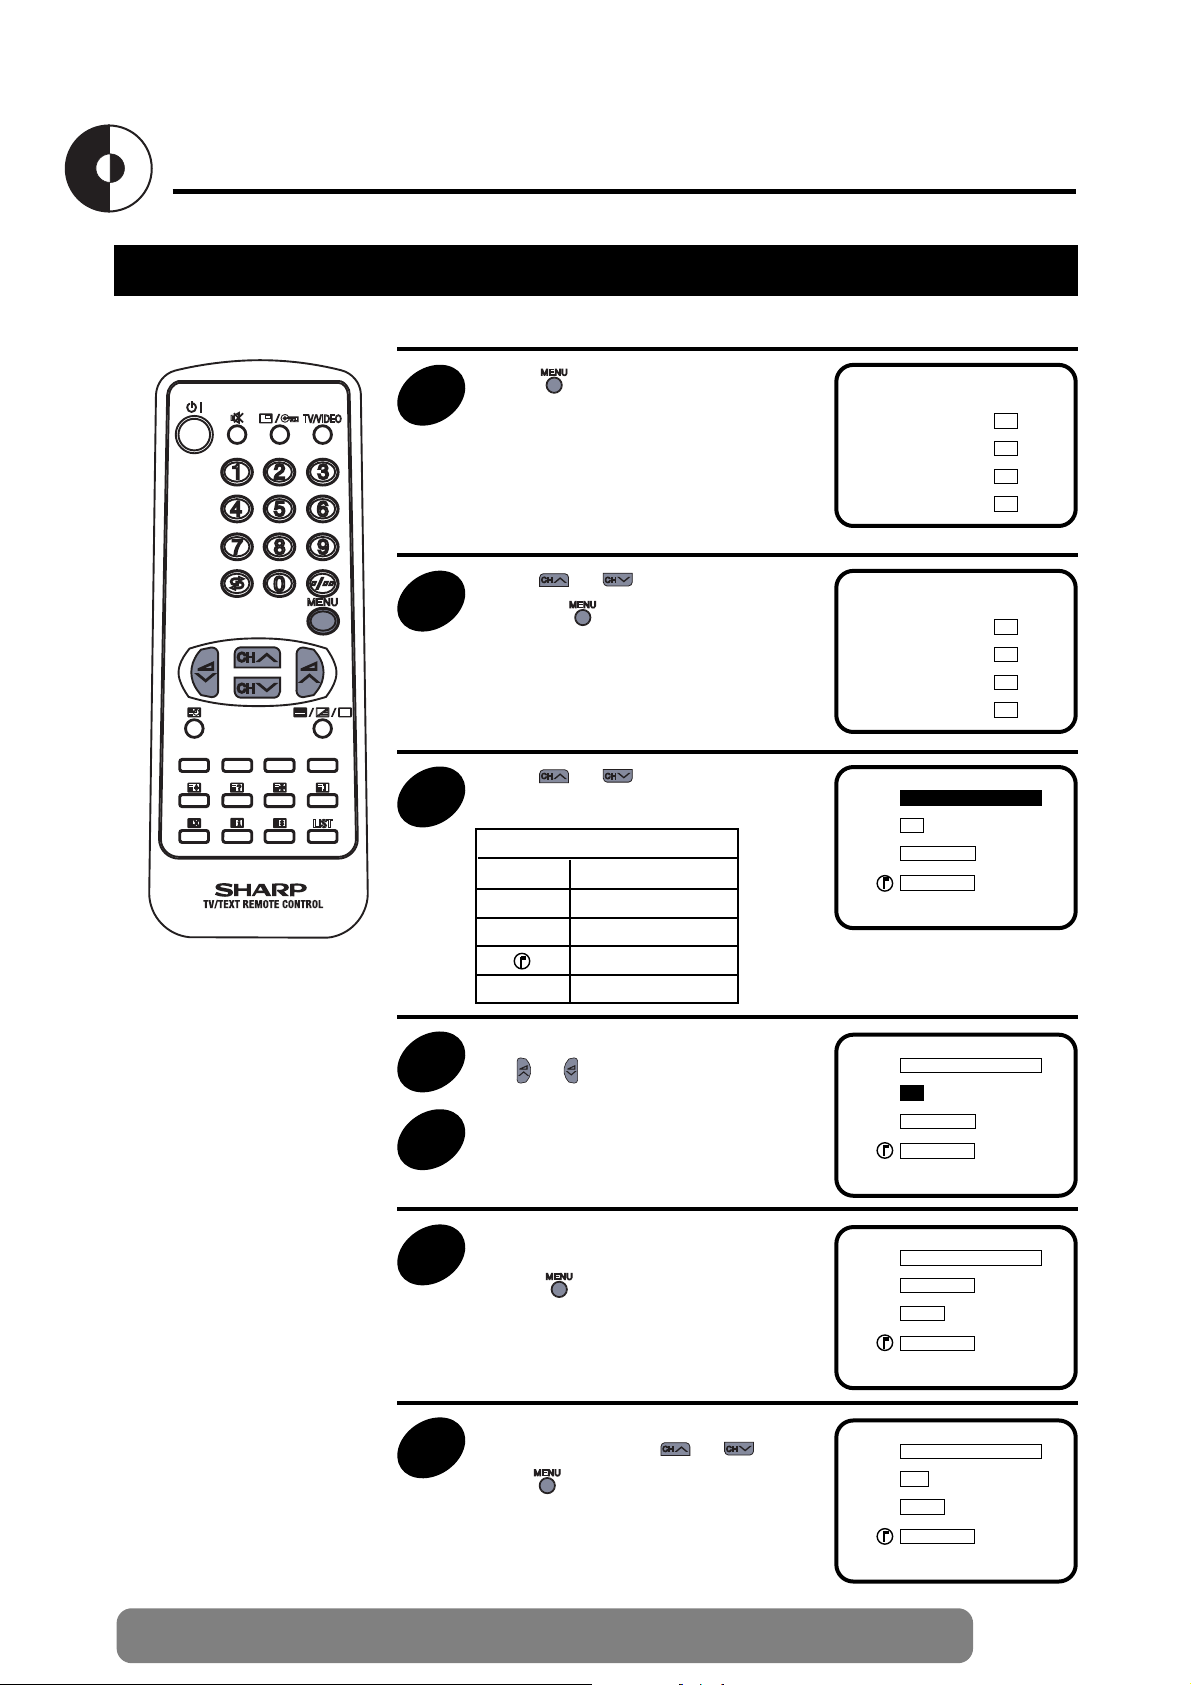
1
Press to call the MAIN menu
screen
EXIT
PICTURE
TIMER
LOCK
TUNING
➜
2
Press or to select “PICTURE”,
and press .
EXIT
PICTURE
TIMER
LOCK
TUNING
➜
3
Press or to select the items to
adjust.
B
C
A
lllllllllllllllllllllllllllllllllllll
llllllllllllllllllll
llllllllllllllllllll
Picture quality (CONTRAST, COLOUR, BRIGHTNESS, SHARPNESS) are adjustable in this menu.
B CONTRAST
C COLOUR
A BRIGHTNESS
SHARPNESS
N NORMAL
N OFF
EXIT
B
C
A
lllllllllllllllllllllllllllllllllllll
llllllllllllllllllll
llllllllllllllllllll
N OFF
EXIT
Selected item
4
Adjust the picture quality to your liking
with or
5
Repeat steps 3 and 4 above to adjust
other items.
B
C
A
llllllllllllllllllll
lllllllllllllllllllllllllllll
llllllllllllllllllll
N ON
EXIT
6
By selecting “N” you can reset the picture
parameters to the factory levels.
Press to restore the factory setting
“N ON” mode.
B
C
A
llllllllllllllllllllllllllllllllll
lllllllllllllllllllllllllllll
llllllllllllllllllll
N OFF
EXIT
7
You can clear the on-screen display by
selecting “EXIT” using or , and
press .
Page 2
14
Web-site: www.sharp.co.uk/support Help Line (office hours only): 0990-274277
Timer Setting
ON Timer
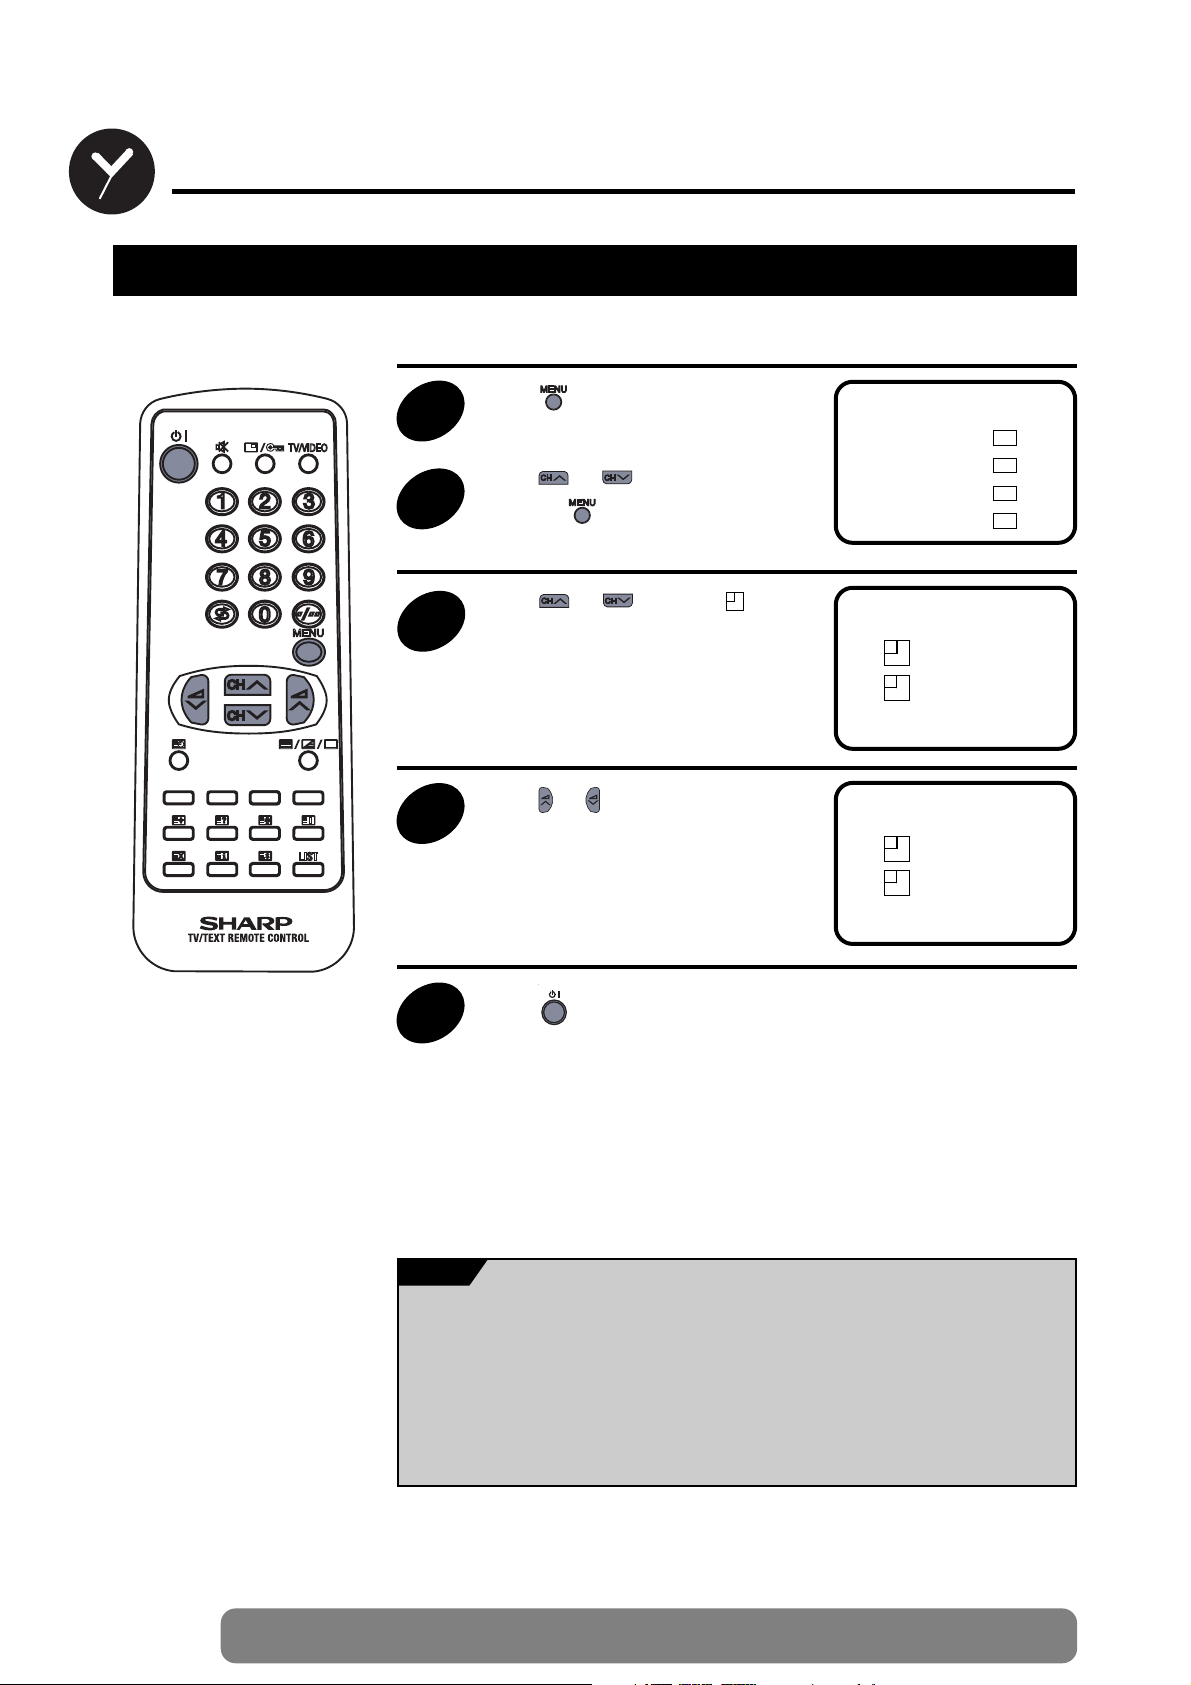
1
Press to call the MAIN menu
screen
EXIT
PICTURE
TIMER
LOCK
TUNING
➜
2
Press or to select “TIMER”,
and press .
3
Press or to select “ ON”
mode.
Automatically turns power ON after the set length of time has passed.
ON 00:00
OFF 00:00
➜
ON 08:30
OFF 00:00
➜
4
Press or to set the time. (from 10
min. to 12 hour 50 min., in 10 min. increments)
5
Press to put the TV set into
Standby mode.Power indicator flashes
red.
When the preset period of time (in the
above example, 8 hours and 30 minutes)
has passed, the power turns ON and a
picture appears on the screen.
• In order to know when the ON Timer programme has been run properly, when the
TV is in the standby mode, the ON Timer indicator remains flashing in red.
• As a safety precaution, in case nobody is at home when the television switches on
automatically, the television set will turn itself of automatically after 120 minutes; if it
is to continue to run, any button of the remote control functions should be pressed.
• In the event of a power cut, disconnection from the plug, or the television is
switched off at the mains switch, all the data on the ON Timer will be cancelled.
NOTE
Page 3
15
Web-site: www.sharp.co.uk/support Help Line (office hours only): 0990-274277
Timer Setting (Continued)
OFF Timer
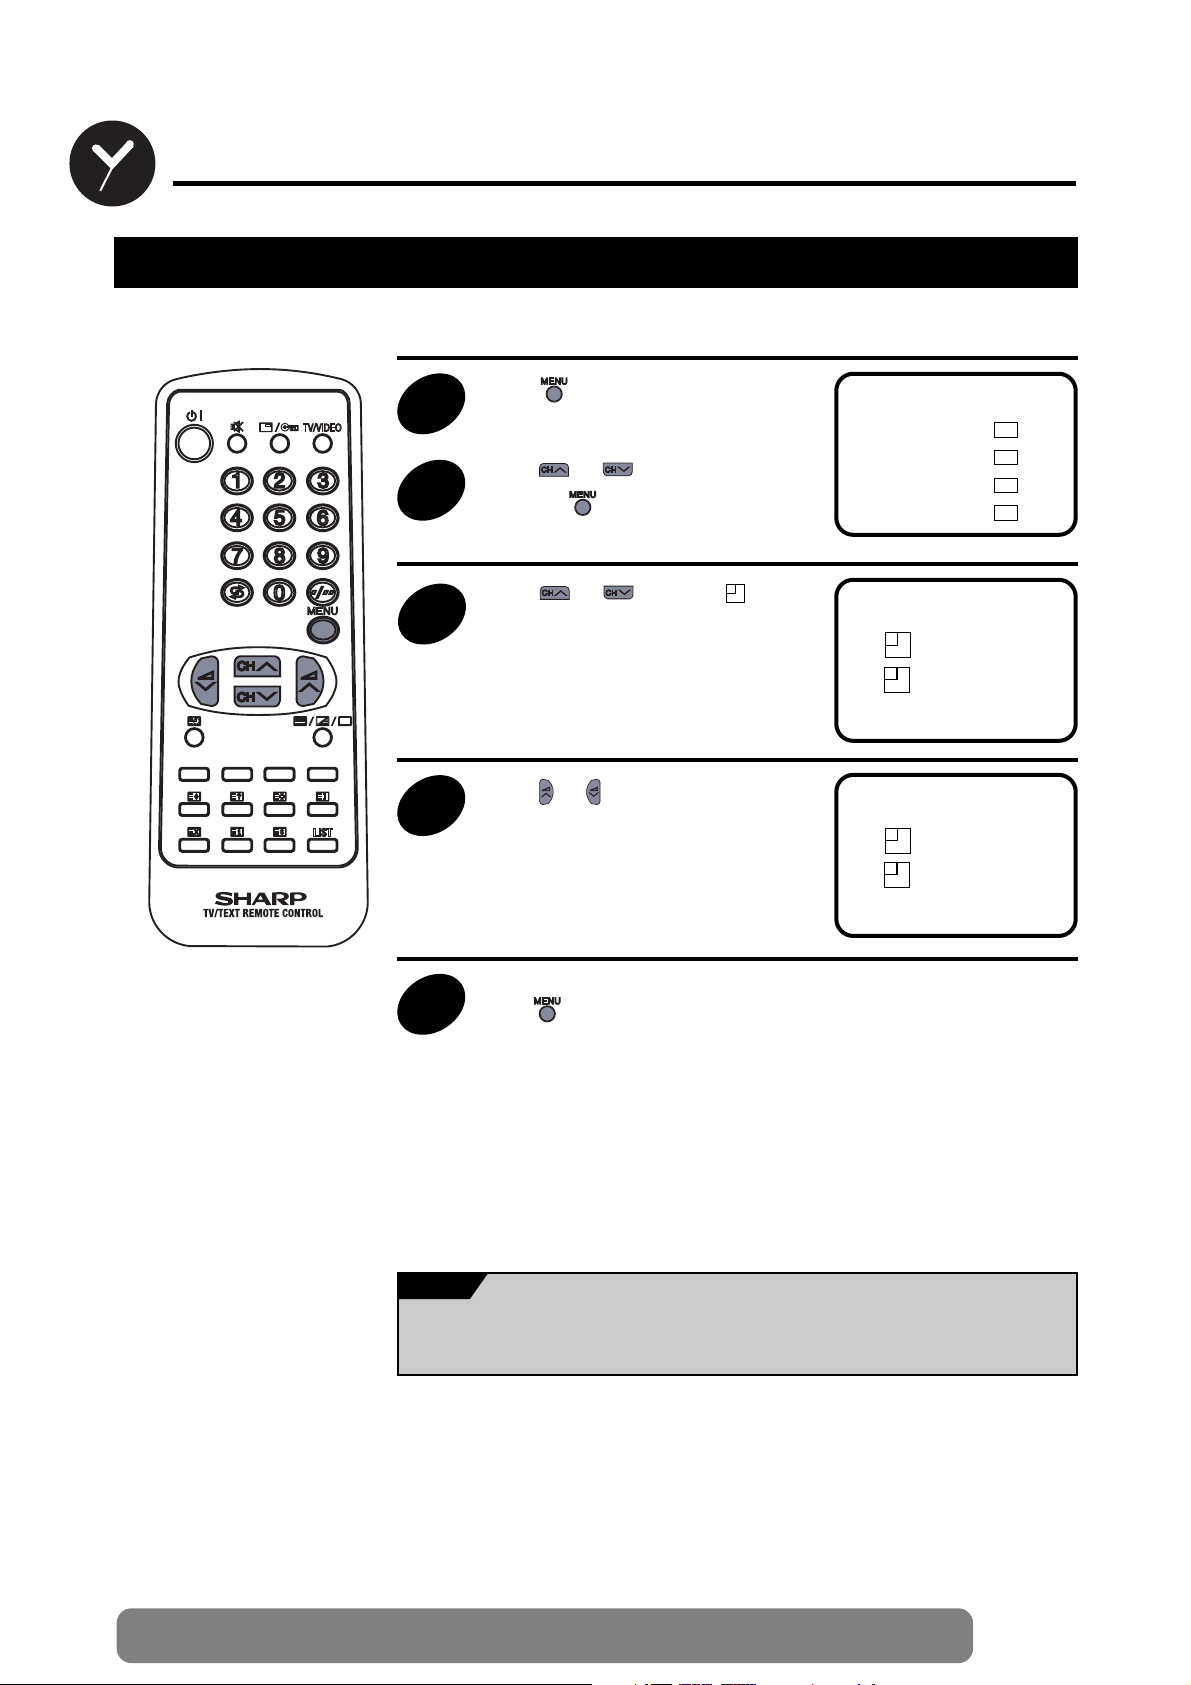
1
Press to call the MAIN menu
screen
EXIT
PICTURE
TIMER
LOCK
TUNING
➜
2
Press or to select “TIMER”,
and press .
3
Press or to select “ OFF”
mode.
Automatically turns power OFF after the set length of time has passed.
ON 00:00
OFF 00:00
➜
ON 00:00
OFF 01:30
➜
4
Press or to set the time. (from 10
min. to 12 hour 50 min., in 10 min. increments)
The timer starts to count down.
5
When you have finished setting the time,
press .
When the preset period off time (in the
above example, 1 hour and 30 minutes)
has passed, the TV set turns to Stand-by
mode.
In the event of a power cut, disconnection from the plug, or the television is switched
off at the mains switch, all the data on the OFF Timer will be cancelled.
NOTE
Page 4

16
Web-site: www.sharp.co.uk/support Help Line (office hours only): 0990-274277
Child Lock (Channel Block)
Setting Child Lock
You can lock a TV Programm position to prevent unsupervised TV viewing by following these procedures:
1
Press to call the MAIN menu
screen
EXIT
PICTURE
TIMER
LOCK
TUNING
➜
2
Press or to select “LOCK”,
and press .
3
Select the programme you want to lock
with or .(You can also select the
programme using the 0-9 digit buttons.)
5
Repeat steps 2-3 if you wish to lock other
programme.
PR 1
LOCK
➜
4
Press or to select “LOCK”,
and press . (The mark “t“ will
appear in the upper right corner.)
FREE
EXIT
PR 1
LOCK
➜
FREE
EXIT
t
6
Press or to select “EXIT”, and
press .
PR 1
LOCK
➜
FREE
EXIT
t
You can also protect the SCART connection.
• When you select the programme which you locked, the TV picture will be blue and
the mark «t» appears on the screen.
• Press (
l/t
) button to unlock the channel.
• Since the remote control is the “Key” to unlock the programme, you must remem-
ber not to let the remote control out of your supervision.
NOTE
CAUTION
!
Page 5
17
Web-site: www.sharp.co.uk/support Help Line (office hours only): 0990-274277
Child Lock (Continued)
Cancelling Child Lock
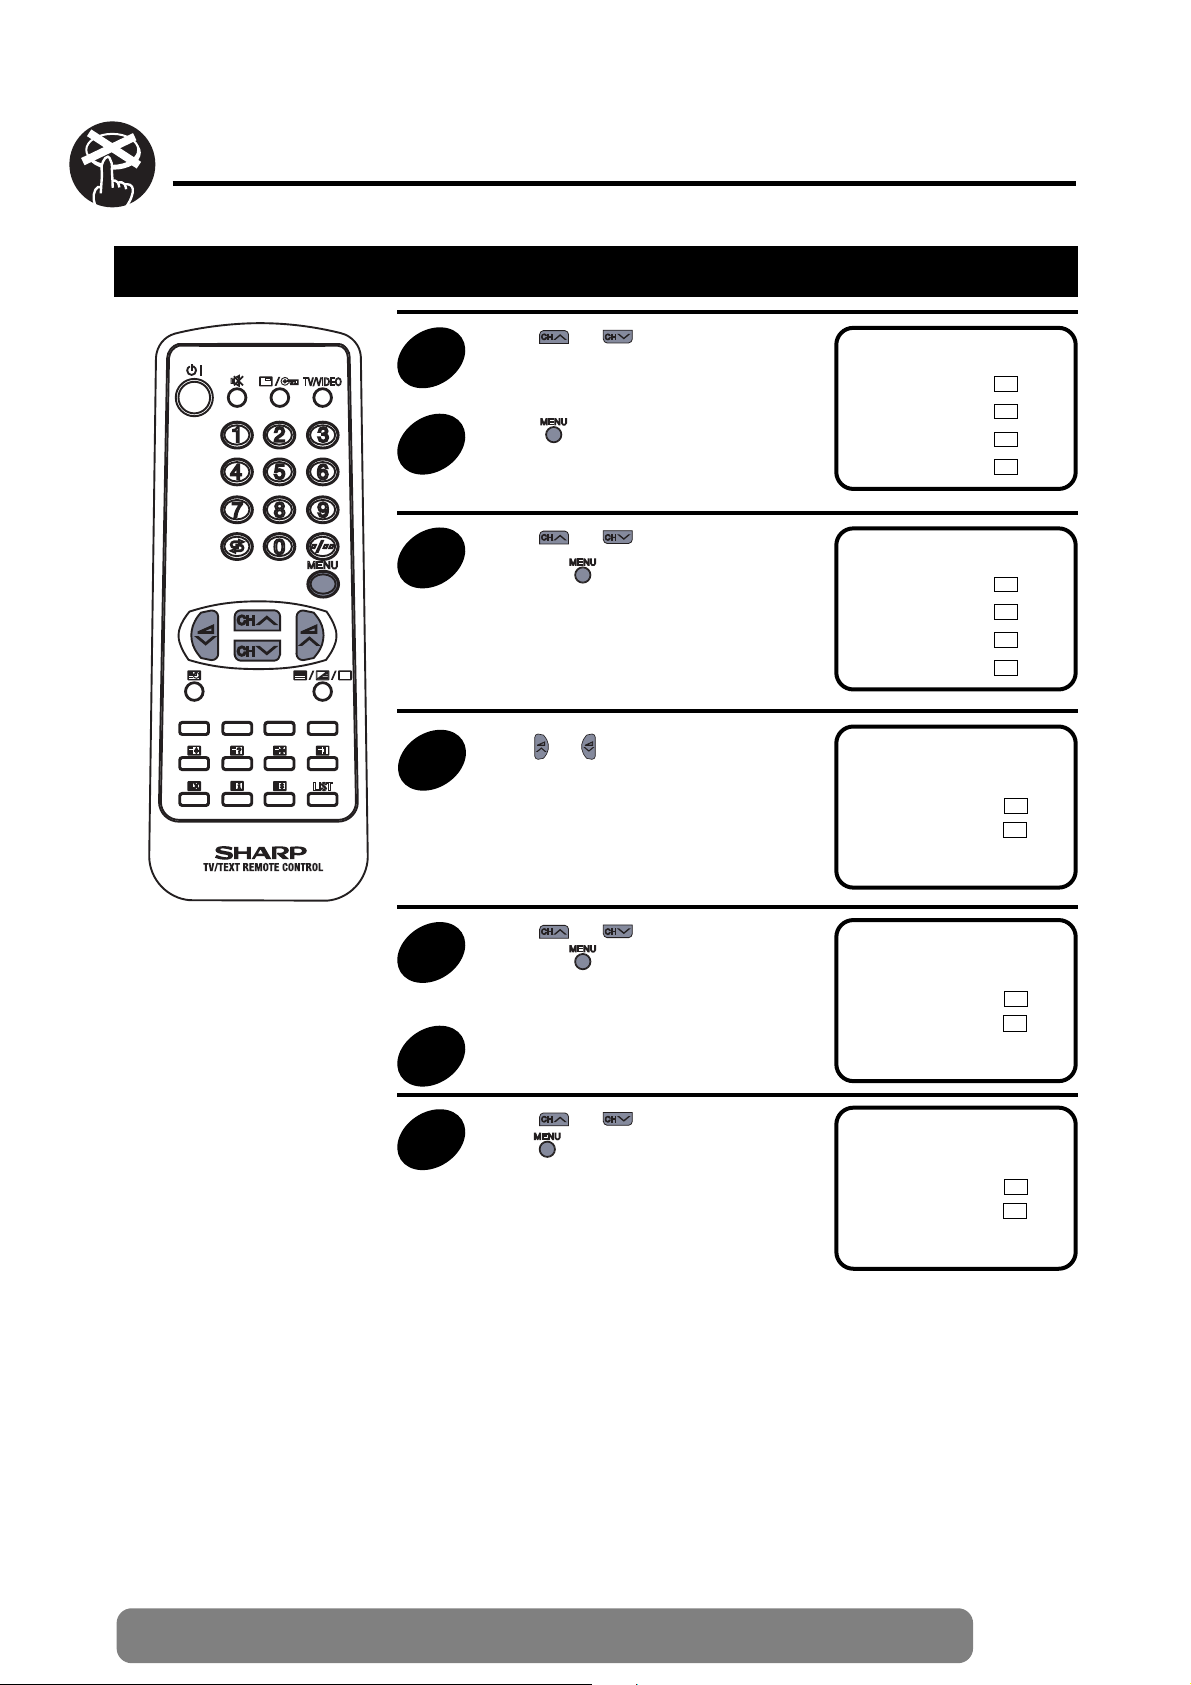
1
Press or to select except for
locked programme.
EXIT
PICTURE
TIMER
LOCK
TUNING
➜
2
Press to call the MAIN menu
screen.
3
Press or to select “LOCK”,
and press .
EXIT
PICTURE
TIMER
LOCK
TUNING
➜
4
Press or to select the programme
position you wish to cancel.
6
Repeat steps 4-5 if you wish to cancel
other programmes.
PR 1
LOCK
➜
5
Press or to select “FREE”,
and press . (The mark “t“ will
disappear from the upper right corner.)
FREE
EXIT
PR 1
LOCK
➜
FREE
EXIT
t
7
Press or to select “EXIT”, and
press .
PR 1
LOCK
➜
FREE
EXIT
t
Page 6

Press
18
Web-site: www.sharp.co.uk/support Help Line (office hours only): 0990-274277
Other functions
Flashback
Press .
The programme previously viewed returns
to the screen.
Example:
If, after switching from programme 5 to
programme 7, is pressed, the
programme will change to programme 5.
Press again to return to
programme 7.
Switches back to the programme you were watching just before
the current programme.
PR 5
PR 5
PR 5
PR 7
PR 5
PR 7
e
Press button 7
Press
e
Press
Sound Mute
Silences the sound.
c
1
Press
The symbol “c” appears on the screen,
and the sound is silenced.
2
Press again.
The volume returns to its previous level.
Page 7

19
Web-site: www.sharp.co.uk/support Help Line (office hours only): 0990-274277
Other functions (Continued)
TV/VIDEO
Each time you press , the input
toggles between SCART and TV
programmes.
Switches between TV broadcasts and AV input programmes.
SCART
PR 5
Call
Displays the current programme number, the timer and other settings on the
screen.
1
Press
The time remaining on the ON timer, OFF
Timer and Programme number appears
on the screen.
(When no Timer is set, nothing appears
on the screen).
ON 08:30
PR 5
OFF 01:30
2
Press once again.
The programme number, ON Timer and
OFF Timer display disappears from the
screen.The screen returns to the normal
screen.
Page 8

20
Web-site: www.sharp.co.uk/support Help Line (office hours only): 0990-274277
Teletext Mode
Basic Operation
Teletext is an information service, organized like a magazine, which is provided by some television stations in
addition to regular television broadcasting.
To switch ON, select a page number and switch OFF the Teletext
1
Select a TV channel, which is broadcasting the Teletext programme you
would like to watch.
2
Press the TEXT/MIX/PICTURE button a/b/Q to select the TELETEXT
mode.
3
Enter three digits using the 0~9 digit buttons to select a page number.
(The CHANNEL buttons / can also be used).
5
Press the TEXT/MIX/PICTURE button a/b/Q to go out from Teletext
Mode.
4
Press the TEXT/MIX/PICTURE button a/b/Q to superimpose a
Teletext broadcast onto the current TV programme screen (MIXED Mode).
Select a TV channel, which is broadcasting the Teletext programme you would like to watch.
Press the TEXT/MIX/PICTURE button a/b/Q to select the TELETEXT mode.
To recall a page number displayed in the coloured brackets, simply press the corresponding coloured button .
1
2
3
Fast Page Selection
Page 9

21
Web-site: www.sharp.co.uk/support Help Line (office hours only): 0990-274277
Teletext Mode (Continued)
Other Teletext Features
s
a
d
j
h
g
LIST
HALF PAGE button:
Press the button, the
upper/lower half of the
Teletext page is magnified.
HOLD button:
Press to hold or cancel the
hold on the current page.
REVEAL button:
Press to reveal or hidden
information such as the
answer to a quiz.
INDEX button:
Press to return back to
index page.
RESET button:
Press to return to TV mode.
LIST button:
Press the LIST button to
change the system:
FLOF Ö LIST [1].
COLOUR buttons:
To recall a page displayed
in the coloured brackets,
press the corresponding
coloured button.
STORE button:
Press to memorize the
page numbers at LIST
mode [1].
[1] More information on - How to Operate Page Memor y - (page 22).
CLOCK button:
In TV Mode: When the TEXT data is received, by pressing this button the real time information will appear on
the screen.
In TELETEXT Mode: When a selected Teletext page has hidden subpages or timed pages, these pages can
be seen by the following manner:
1 Press the CLOCK button f. Screen will show « SUBPAGE: - - - - »
2 Enter 4 digits corresponding to the subpage desired. E.g. 0021 for subpage number 21.
3 Wait until the page appears.
NOTE:You can use this button together with the CANCEL button k.This means that you can view the main
TV picture until the subpage has been found.The on screen icon a at the top left side of the screen will
change when the subpage has been found.
Press the TEXT/MIX/PICTURE button a/b/Q to view the subpage.
CANCEL button:
With this button Teletext information is cancelled and TV picture is restored.a Indication is shown on
screen.
In this position, the TV programme cannot be changed, being in Teletext/Cancelled mode.When a change
takes place in the Teletext information, the upper time of the cancelled page or some other indication of special pages is shown on screen.
To uncancel, press TEXT/MIX/PICTURE button a/b/Q and the whole Teletext is shown.
NOTE: This button can be used together with the CLOCK button f while awaiting subpages.
k
f
Page 10

22
Web-site: www.sharp.co.uk/support Help Line (office hours only): 0990-274277
Teletext Mode (Continued)
Teletext operation - LIST Mode -
1
Select the programme channel number into which you want to store Teletext
page numbers.
2
Press the TEXT/MIX/PICTURE button a/b/Q to select the Teletext
Mode.
3
Press the LIST button to change from FLOF system to LIST Mode.
5
Enter the Teletext page number using the 0 ~ 9 digit buttons (enter three
digits).
4
Press a coloured button corresponding to the coloured brackets on the
screen for page number storage.
7
Press the STORE button g to memorize the page numbers you require.
The «STORE» appears on the screen.
6
Repeat steps 4 and 5 until the numbers for the desired pages have been
entered.
8
Press the TEXT/MIX/PICTURE button a/b/Q twice to exit the Teletext
Mode.
Page Selection - LIST Mode -
Select the appropriate programme channel.
Press the TEXT/MIX/PICTURE button a/b/Q to select the Teletext Mode.
Press the LIST button to change from FLOF system to LIST Mode.
To recall a page number displayed in the coloured brackets, simply press the corresponding coloured
button.
How to Operate Page Memory
Your TV has 32 Teletext page number memories for fast recall of Teletext information.
In programme positions 0 through 6, four Teletext page numbers can be stored in each position; a total of 28 pages.
In programme positions 7 through 99, only one programme with 4 page numbers can be stored.If you try to store more
than 4 page numbers in a programme position between 7 and 99, the previously stored page numbers will be erased.
Press
LIST
and
YELLOW
buttons
input
If you want to store, press
button.
(FLOF TELETEXT)
(LIST TELETEXT)
LIST
YELLOW
News Sports
Movie
Weather
1
2
3
4
Page 11

23
Web-site: www.sharp.co.uk/support Help Line (office hours only): 0990-274277
Troubleshooting
Quick
Service
Check List
Problems
Remote control does not work
● ● ● ●
Bars on screen
● ●
Picture distorted
● ● ●
Picture rolls vertically
● ● ●
No colour
● ● ● ● ●
Poor reception on some channels
● ● ● ●
Picture weak
● ● ● ● ●
Picture lines or streaks
● ● ●
Picture ghosting
● ● ● ●
Picture blurred
● ● ●
Sound OK, picture poor
● ● ● ● ● ● ●
Picture OK, sound poor
● ● ●
No picture or sound
● ● ● ● ● ● ● ●
Try a new programme to check for possible sta-
tion trouble
Possible Causes/Remedies
TV not plugged in
Outlet power OFF
Main Power button of TV not ON
Aerial not connected to terminal at the back of
the TV set
If outside aerial is used, check for broken wires
Check for local interference
Turn off using the Main Power button, then turn
ON again after a minute
Adjust COLOUR control
Check batteries in the Remote Control
Try fine tuning to correct
Check if the Brightness or Contrast setting in
the picture setting mode might be all the way to
the minus side
Increase the volume
This unit is equipped with a microprocessor. Its performance could be adversely affected by external electrical noise
or interference. If this should happen, unplug the unit and plug it in again after a few minutes.
Page 12

24
Web-site: www.sharp.co.uk/support Help Line (office hours only): 0990-274277
Calling for Service
If the problem cannot be corrected by the use of this guide, remove the mains plug from the wall socket, and
contact the Dealer or Supplier from whom the unit was purchased in order to obtain service. Where this is not
possible, please visit our web-site www.sharp.co.uk/support.
Customers without Internet access may telephone
0990-274277
during office hour.
Certain replacement parts and accessories may be obtained from our Main Parts Distributor, who can be
contacted on the following numbers:
Willow Vale Electronics Ltd.
0121 766 5414
In the unlikely event of this equipment requiring repair during the guarantee period, you will need to provide proof
of the date of purchase to the repairing company. Please keep your invoice or Receipt, which is supplied at the
time of purchasing.
Euro-SCART 21-Pin Terminal
1. Audio right output
2. Audio right input
3. Audio left output
4. Common earth for audio
5. Earth for blue
6. Audio left input
7. Blue input
8. Audio-video control
9. Earth for green
10. Not used
11. Green input
12. Not used
13. Earth for red
14. Not used
15. Red input
16. Red/Green/Blue control
17. Earth for video
18. Earth for Red/Green/Blue control
19. Video output
20. Video input
21. Plug shield
For greater A/V enjoyment, various audio and video devices may be connected via the Euro-Scart 21-Pin Terminal.
For example, one can revel in the stunning visuals from a VCR and the dynamic sounds of an audio system. For
your interest, here is just one example of an integrated A/V system.
21-Pin Euro-SCART
Audio; Mono Input/Output.
NOTE
Specifications
MODEL 51GT-25H
1. Receiving Broadcast Standard CCIR TV Standard system PAL - I
2. Receiving System UHF: E 21 - E 69 CH
3. Receiving System Colour System: PAL
Field Frequency: PAL 50/60 Hz Capability
4. Power Source AC220V-240V, 50 Hz
5. Power Consumption at 240 V AC 50 Hz 52 W
6. Power Consumption at Stand-by 7 W
7. Audio Output (MPO) 4 W
8. Dimensions (approx.) Width: 539 mm
Height: 468 mm
Depth: 484 mm
9. Viewing Area (diagonal measurement) 51 cm (21”)
10. Weight (approx.) 19 Kg
11. Internal Speaker 10 cm Round
12. Aerial Input Impedance UHF 75 ohms Unbalanced
13. Safety EN60065, CE - MARK, BEAB
14. EMC EN55013, EN55020, CE - MARK
Desing and specifications are subject to change without notice.
Page 13

Page 14

ŒŒ
SHARP ELECTRONICA
ESPAÑA, S.A.
SHARP ELECTRONICS (U.K.) LTD.
Sharp House, Thorp Road, Newton Health,
Manchester M40 5BE
PRINTED IN SPAIN
TINS-6898BMN0
8/00
 Loading...