

Page 1
E1 SAFETY PRECAUTIONS
ENGLISH
(Verso)
FRANÇAIS
Contents
[ SAFETY
E1
PRECAUTIONS ]
[ ACCESSORIES ]
E2
[ ANTENNA
E3
CONNECTION ]
• Connecting to an
antenna
• Connecting to an
antenna via a VCR
[ CONNECTING TO
E4
OTHER
EQUIPMENTS ]
[ CONNECTING AND
E5
WATCHING DVD ]
• Connecting to a DVD
player
• Watching DVD
[ PART NAMES ]
E6
• TV set
• Remote control
• Installing batteries
Please read this operation manual
carefully before using the colour
television.
[ BASIC OPERATION ]
E7
• Turn on the power
• On-screen display
language selection
• Channel selection
• Adjusting volume
[ CHANNEL
E8
SETTING ]
[ PICTURE OR
E9
SOUND
ADJUSTMENT ]
[ TIMER SETTING ]
E10
• On timer
• Off timer
• Reminder on-screen
timer
• Beep reminder
COLOUR TELEVISION
29L-FG1BV
29L-FG1SV
OPERATION MANUAL
[ FEATURES ]
E11
• Blue back
• Auto select
• Power save
• 16:9 mode
• Child lock
[ USEFUL
E12
FEATURES ]
• Channel/Timer display
• Channel recall
• TV/Video selection
• Surround sound
• Mute
• Sound mode
• Equalizer
• Favourite channels
[ TROUBLESHOOTING ]
E13
[ SPECIFICATIONS ]
E14
[ DEFINITION OF
E15
TERMS ]
TINS-C749WJZZ
06P11-MSP
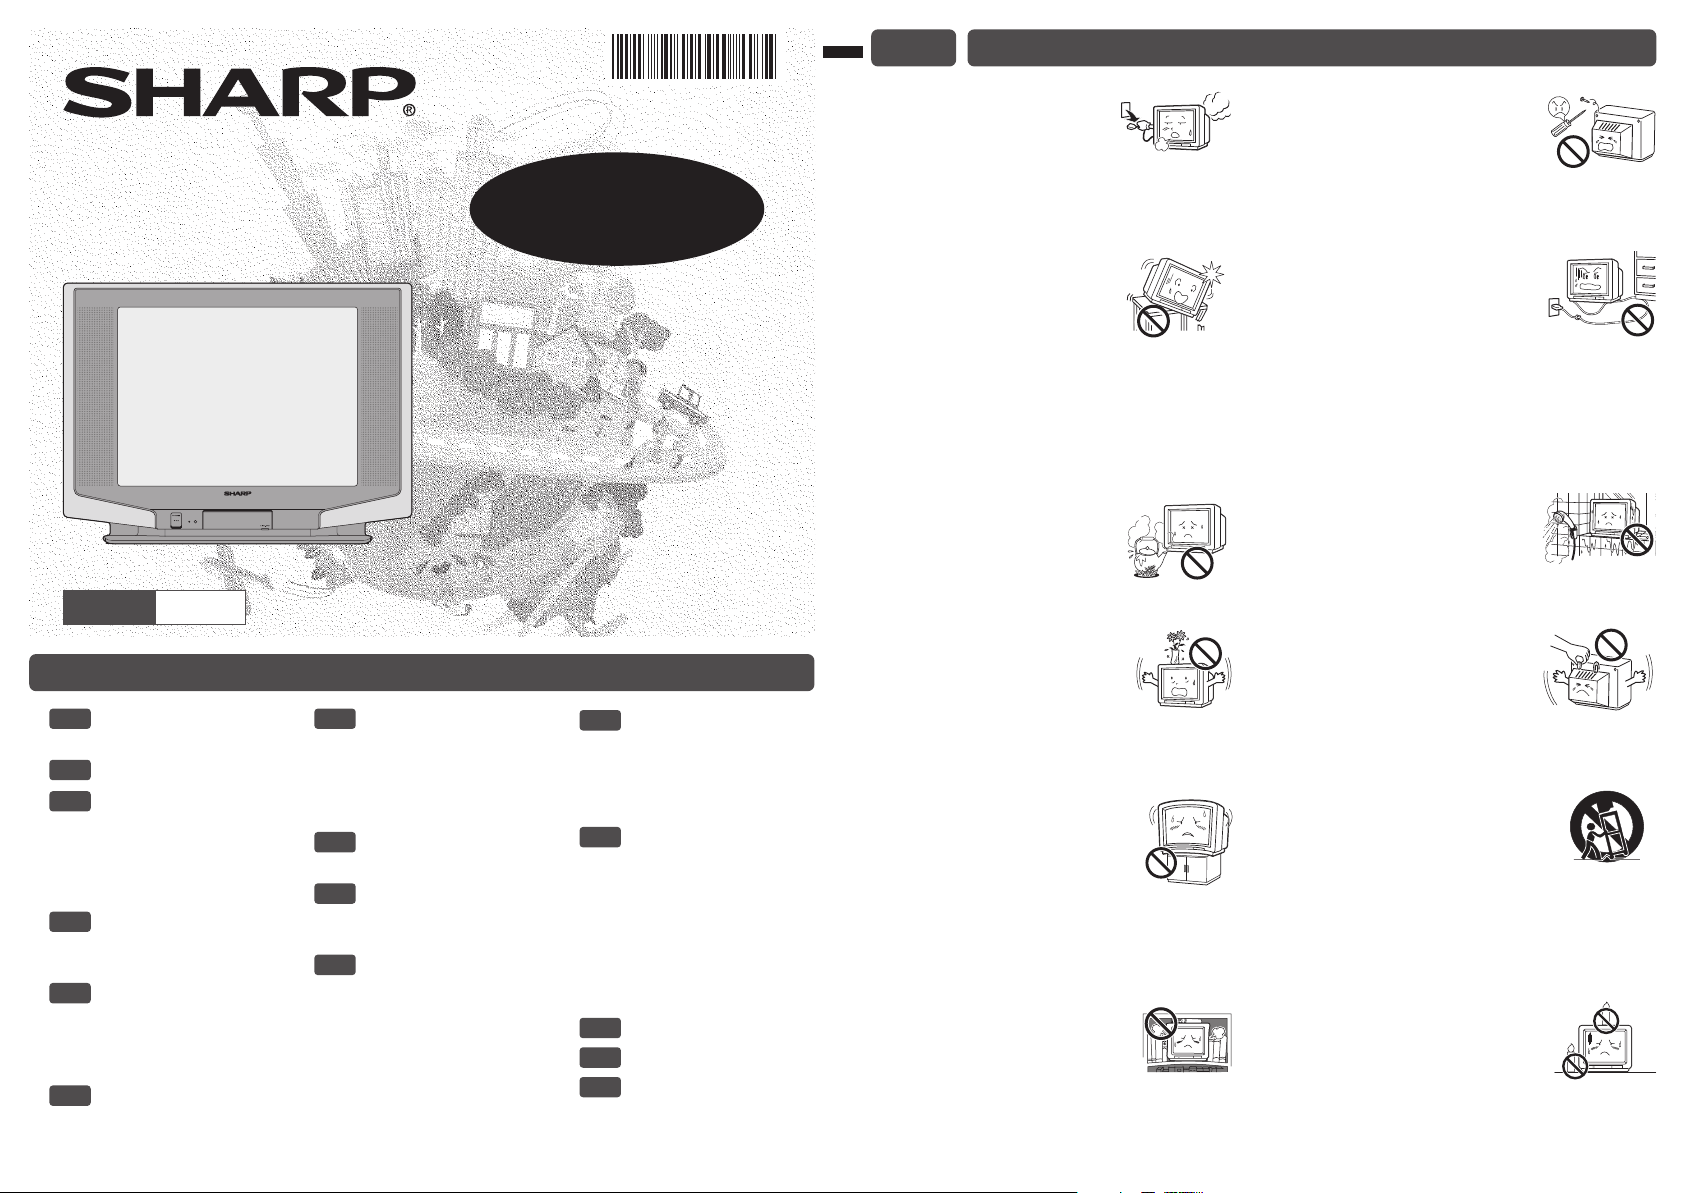
Damage
Turn off the power and unplug
the power cord from the wall
outlet immediately if the TV set begins to make
any unusual noises or gives off smoke or an
unusual smell. Then call your dealer for service.
Unstable surface
and shocks
Do not place this TV set on an
unstable cart, stand, shelf, or
table. The TV set may fall, causing serious
injury to a child or adult, and serious damage to
the set. Sharp recommends securing the TV set
to a stable surface or wall to prevent the set
from falling due to sudden shocks or impact.
Moisture
To prevent electrical shock, do
not use the TV set in an
excessively damp place.
Liquid entry
Do not place a flower vase
or anything else containing liquid
on the TV set, as liquid spilt on the TV set can
cause electrical shock or failure.
TV Set position
Do place the TV set onto an even
stand, table or rack which size is
bigger than the TV set.
If the TV set is put onto a smaller
size or uneven stand, table or rack may cause
the TV cabinet to distort.
Do not put or insert anything between TV set
and the stand, table or rack.
Ventilation
Do not place this TV set in a
confined area, such as on a
bookshelf or in a built-in case. Leave adequate
space behind the TV for proper ventilation.
Servicing
To reduce the risk of electric
shock, do not remove the back
of the cabinet. This TV set
contains dangerous voltage.
Power-cord
protection
To prevent electrical shock, do
not subject the AC power cord to
damage by bending or twisting it, or by placing
heavy items on top of it and do not place the AC
power cord under the TV set. If the AC power
cord becomes damaged, unplug it from the wall
outlet immediately and call your dealer for
service.
Water
To prevent fire or electrical
shock, do not place the TV set
near a bathroom, swimming pool or other area
where it may become wet.
Object entry
Never insert or drop any metallic
or inflammable objects into the
ventilation openings of the TV set, as this can
cause fire, electrical shock, or electrical failure.
Uneven surface and
excessive force
Television equipment and cart
combination should be moved with care. Quick
stops, excessive force, and uneven surfaces
may cause the equipment and cart combination
to overturn.
Fire prevention
To prevent fire, never place any
type of candle or naked flames on
the top or near the TV set.
Page 2
E2 ACCESSORIES
E4
CONNECTING TO OTHER EQUIPMENTS (Continued)
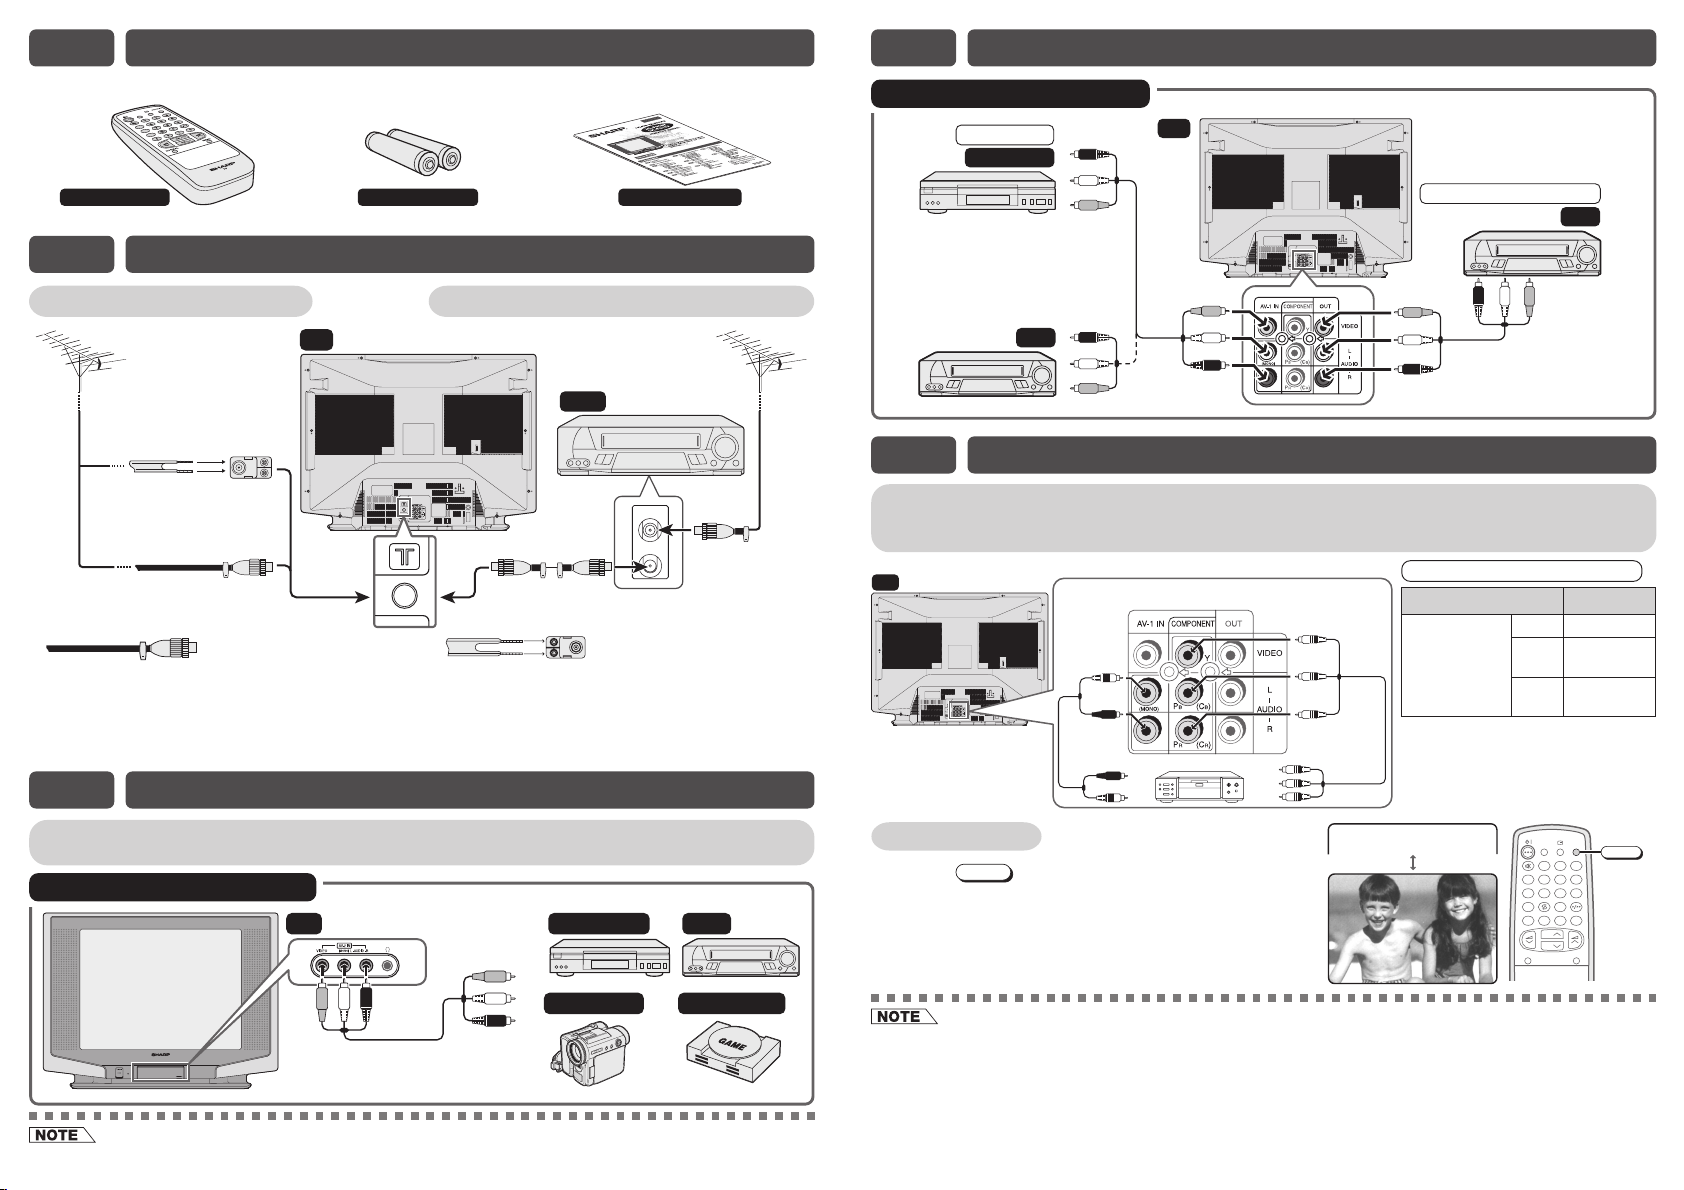
The following accessories are included with this television.
R
E
POW
E
V
A
S
AGE
U
ANG
L
E
D
MO
UND
SO
OUND
RR
SU
Remote Control Size-AA batteries
E3 ANTENNA CONNECTION
Connecting to an antenna
TV
75-ohm
75-ohm
impedance
converter
(not supplied)
Antenna in
300-ohm
twin-lead
flat feeder
(not supplied)
coaxial cable
(round cable)
(not supplied)
Standard DIN45325
plug (IEC 169-2)
If your outdoor antenna uses a 75-ohm coaxial
cable with a standard DIN45325 plug (IEC 169-2),
plug it into the antenna jack at the rear of the set.
Connecting to an antenna via a VCR
VCR
To RF out
terminal
If your outdoor antenna uses a 300-ohm twin-lead
flat feeder, connect a 300-ohm to 75-ohm
impedance converter and plug it into the antenna
jack at the rear of the set.
E4 CONNECTING TO OTHER EQUIPMENTS
Operation manual
To antenna
in terminal
Example of rear terminals usage
For Playback
DVD Player
To Audio/Video
out terminals
To Audio/Video
out terminals
VCR
TV
Yellow : To VIDEO
White : To AUDIO (L)
Red : To AUDIO (R)
For Recording and Editing
VCR
To Audio/Video
in terminals
E5 CONNECTING AND WATCHING DVD
Connecting to a DVD player
The DVD input terminals (COMPONENT-IN) on the rear of the TV can be used to input highquality images from a DVD player.
TV
Red : To AUDIO IN (R)
White : To AUDIO IN (L)
To audio out
(L/R) terminals
DVD input terminals
DVD player
Green : To Y
B (CB
Blue : To P
Red : To P
R (CR
To colour-difference
(component video)
out terminals
Connecting the video terminals
)
DVD input terminals DVD player
)
COMPONENT-IN
P
VIDEO
P
Y Y or Y/Y
B(CB)PB(CB) or
R(CR)PR(CR) or
B-Y/Pb
R-Y/Pr
Enjoy playback from a video disc player, VCR or other video equipment by connecting them to
this TV set using the Audio/Video in terminals.
Example of front terminals usage
TV
To Audio/Video
out terminals
DVD Player
VCR
Camcorder Video Game
Yellow : To VIDEO
White : To AUDIO (L)
Red : To AUDIO (R)
• When using the RF terminal connection, set the TV to channel zero to make initial adjustments for the VCR.
Watching DVD
screen.
TV/VIDEO
to select “COMPONENT”, DVD input
! Press
@ Turn on the DVD player and begin playback.
• For playback of monaural audio, connect the external source to the audio input left terminal on the front or rear of the
TV set (MONO) to hear the same sound from both speakers.
• The audiovisual cords required to connect the TV set with video equipment may differ from those shown in the above
diagram. See the operation manual of your video equipment for connection details.
• The above recording and editing connections are intended solely for personal use and not for the illegal copying of
audiovisual material protected by copyright laws.
• The rear COMPONENT-IN terminals have the priority over the rear AV1-IN terminals.
If 2 equipments are connected to the TV set from the rear COMPONENT-IN terminals and rear AV1-IN terminals at the
same time, COMPONENT-IN picture will be automatically displayed.
POWER
LANGUAGE
SOUND MODE
SURROUND
NORMAL
SAVE
TV/VIDEO
123
456
7809
BACD
CH
CH
MENU
TV/VIDEO
TNENOPMOC
Page 3
E6 PART NAMES
TV set
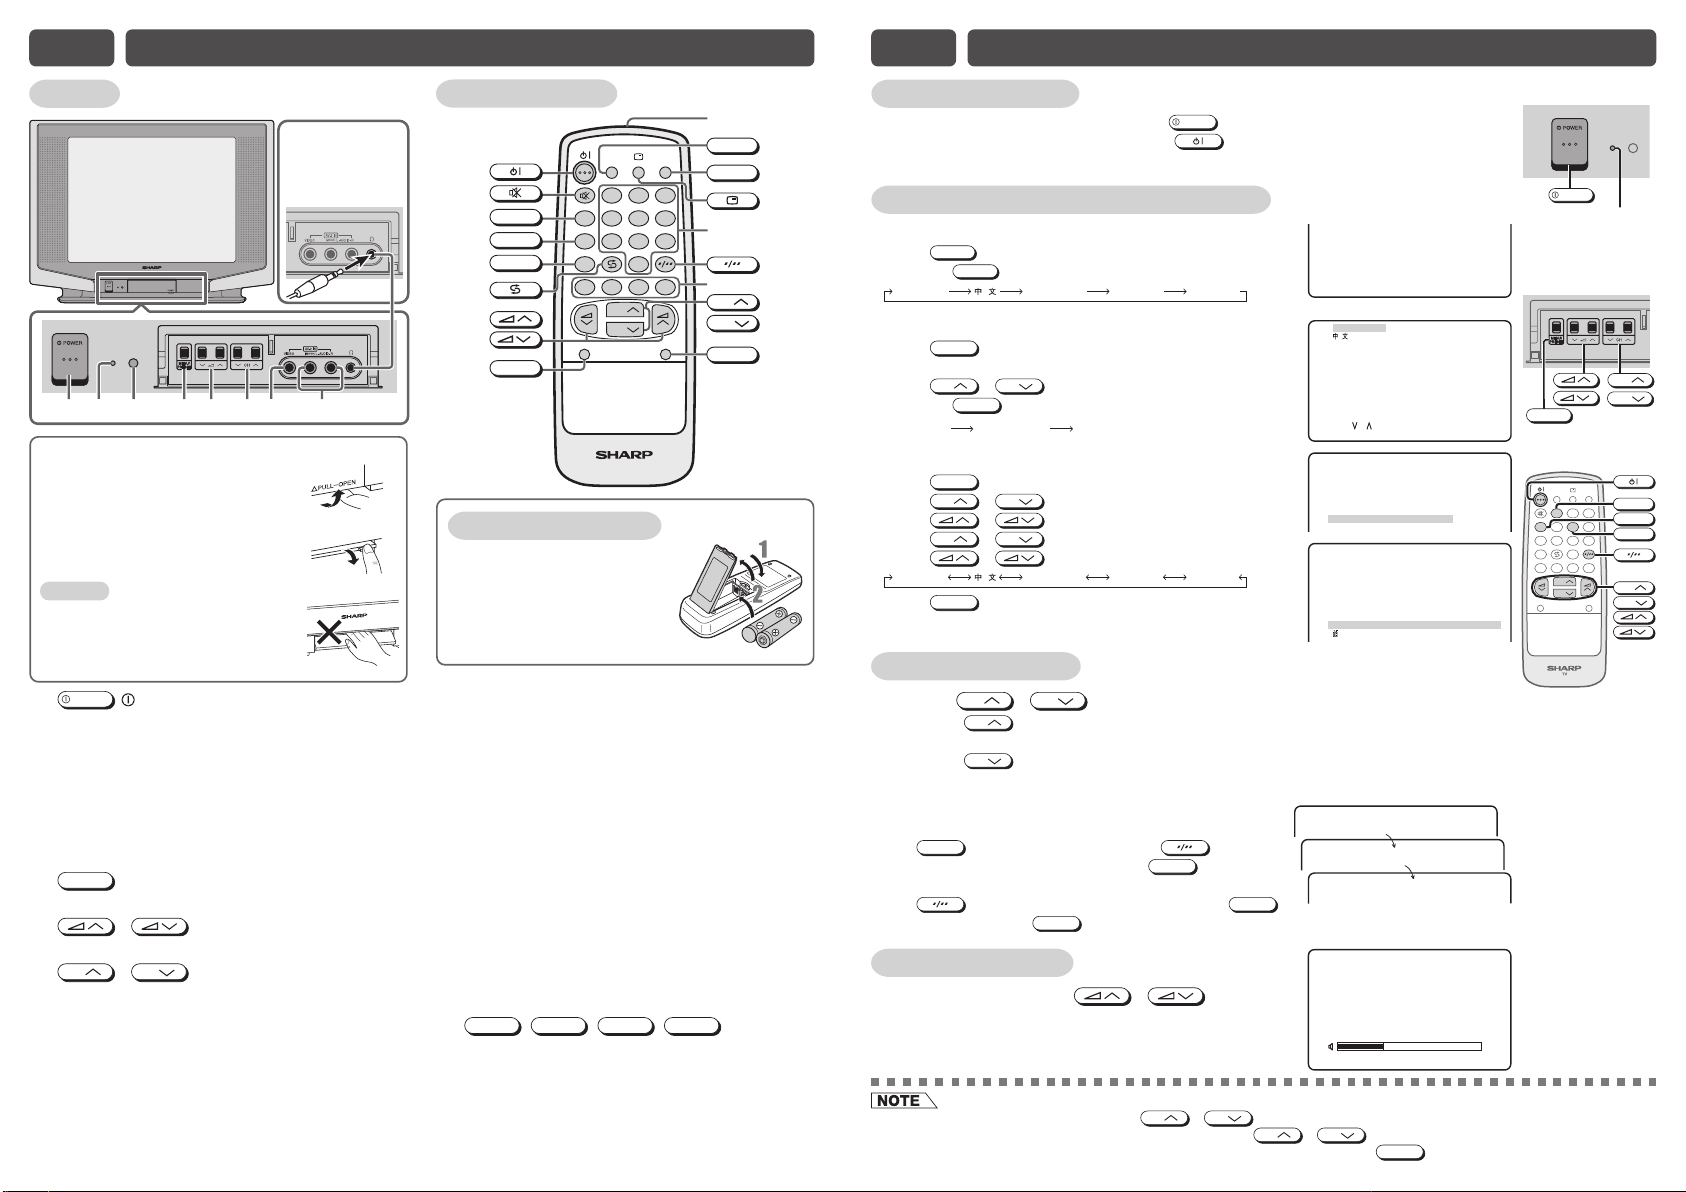
Headphone jack
•
Insert headphone
plug into headphone
jack to listen to audio
with headphone.
9
145623 7 8
To open the door
Using the projection located under
the “√PULL-OPEN” indication, pull
and lift the door open.
To close the door
Using the projection, lower the
door until closed.
Caution:
• When opening or closing the door, do
not insert your fingers into the gap
between the door and front panel.
This may result in an injury.
POWER
1
2 Power indicator
3 Infrared sensor window
4
5 / Volume up/down buttons
6
7 Video input terminal (AV-2 IN)
8 Audio input terminals (AV-2 IN)
9 Headphone jack
POWER switch
Turns on and off the main power.
Power can be turned on by the remote control
when the indicator is lit red.
Receives the infrared wave from the remote
control.
MENU/PRESET
MENU/PRESET button
Tunes the channels. Used for MENU setup.
Adjusts the volume.
CH
CH
/
Channel up/down buttons
Selects the channels. Tunes or sets the channels.
Connects to a camcorder, video game, etc.
Connects to a camcorder, video game, etc.
Use to listen to the audio with headphone.
Remote control
U
POWER SAVE
!
@
#
$
%
^
&
*
LANGUAGE
SOUND MODE
SURROUND
NORMAL
POWER
SAVE
123
LANGUAGE
456
SOUND MODE
78
SURROUND
BACD
CH
CH
NORMAL
TV/VIDEO
9
0
MENU
TV
TV/VIDEO
W
R
CH
CH
MENU
(
)
Q
E
T
Y
Installing batteries
Pull up or replace back the
1
battery cover.
Insert two batteries (size
2
AA). Be sure to match the
battery j/k terminals.
!
Turns the TV on or to Standby mode.
@
Mutes the sound and restores sound to previous level.
#
Changes the on-screen display language.
$
Switches between MOVIE, MUSIC, NEWS and
CUSTOM.
%
Produces a virtual surround sound.
^
Returns to previously viewed channel.
&
Adjusts the volume. Used for MENU setup.
*
Resets all settings.
(
Switches POWER SAVE mode on or off.
)
Switches between TV broadcasts and AV input
programmes.
Q
Displays the channel and timer settings on the screen.
W
Number buttons.
E
Switches between one- or two-digit mode channel
selection.
A
R
Operate the Favourite Channel.
T
Selects the channel. Used for MENU setup.
Y
Calls the MENU screen.
U
Infrared transmitter window
Aim this window at the infrared sensor window on
your TV set.
B
,
C
,
D
,
buttons
E7 BASIC OPERATION
Turn on the power
• When the power indicator is off, press
• When the power indicator is red, press on the remote control. The power
indicator changes to green and a picture appears.
On-screen display language selection
Remote Control
• Press
• Pressing
TV set
• Press
• Press
• Pressing
MENU screen
• Press
• Press
• Press / to display CH-SETTING menu.
• Press
• Press / to select desired language.
• Press
LANGUAGE
to select desired language.
LANGUAGE
ENGLISH
MENU/PRESET
changes the language as shown below.
FRANCAIS
for more than two seconds, the language
Ti’ng ViŸt
select mode appears.
CH
Language CH-Setting Normal screen
MENU
CH
CH
ENGLISH
MENU
CH
/
MENU/PRESET
to select desired language.
changes the screen as shown below.
to call MENU screen.
CH
/
/
to select “CH-SETTING”.
CH
to select “LANGUAGE”.
FRANCAIS
Ti’ng ViŸt
until normal screen appears.
Channel selection
! Using
• Press
CH
CH
1 / 2 / ... / 98 / 99 / AV1 (or COMPONENT) / AV2 / 0 / 1 / 2 ...
• Press
CH
1 / 0 / AV2 / AV1 (or COMPONENT) / 99 / 98 / ... / 2 / 1 / 0 ...
CH
/
and channels change as shown below.
and channels change as shown below.
@ With the number buttons (on remote control)
• To select a one-digit channel, such as 5, press
5
. If “5-” is indicated, press to select
one-digit input, and then press
• To select a two-digit channel, such as 15, press
to select the two-digit input. Press
and then press
5
.
Adjusting volume
! Adjust volume using / .
• The volume bar disappears approximately five
seconds after the volume has been adjusted.
• When the power indicator is red, either
• Channels that have been skipped cannot be selected by
• The AV1 (or COMPONENT) and AV2 input channels can be selected using
POWER
.
MELAYU
MELAYU
5
again.
1
CH
CH
/
on the TV can be pressed to turn on the power.
ENGL ISH
HENGLI S
IFRANCA S
Ti’ng ViŸt
M
ELAYU
SELECT : CH
M
ENU
PICTURE
SOUND
FEATURE
TI
M
ER
CH- SETT ING
CH- SETT ING
POS I T ION
COLOUR- SYSTE
SOUND- SYST E
M
SKI P
AUTO
M
ANUAL
LANGUAGE ENGLI SH
BOOSTER
AUT12O
M
AUTO
OFF
168. 25
OFF
,
VOLUME19
CH
CH
/
.
TV/VIDEO
.
[ TV Set (Bottom) ]
[ Behind the door ]
MENU/PRESET
LANGUAGE
SOUND MODE
SURROUND
NORMAL
M
Hz
––
–1
51
POWER
Power indicator
POWER
TV/VIDEO
SAVE
1 23
4 5 6
9
78
0
BACD
CH
CH
MENU
CH
CH
1
LANGUAGE
5
CH
CH
Page 4
E8 CHANNEL SETTING
E9 PICTURE OR SOUND ADJUSTMENT
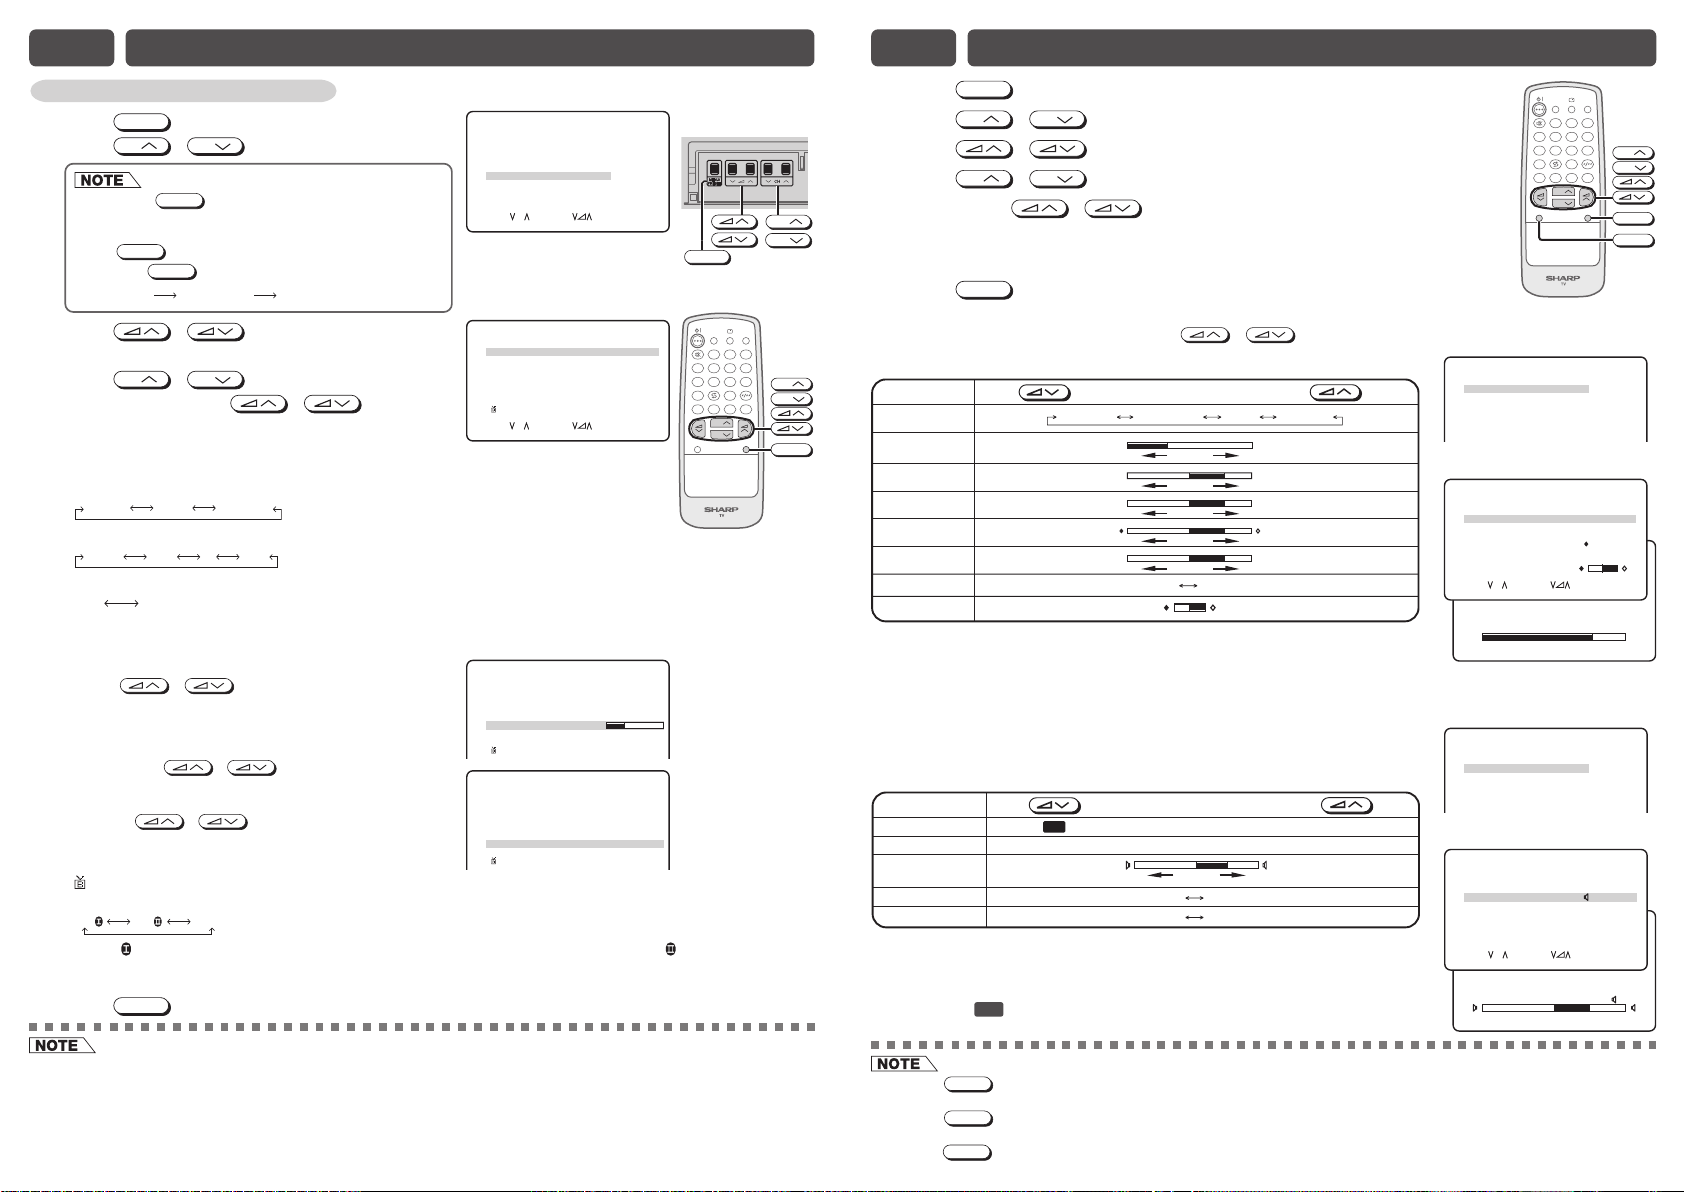
Enables individual channel setting.
! Press
@ Press
# Press / to display CH-SETTING
menu.
$ Press
% Each time you press / , setting for
individual items changes as follows:
MENU
to call MENU screen.
CH
If you press
CH
/
MENU/PRESET
to select “CH-SETTING”.
on TV set for more than two
seconds during normal screen, the LANGUAGE mode
screen will appear.
MENU/PRESET
Press
• Pressing
again to display CH-SETTING menu.
MENU/PRESET
changes the screen as shown below.
Language CH-Setting Normal screen
CH
CH
/
to select desired setting.
M
ENU
PICTURE
SOUND
FEATURE
TI
M
ER
CH- SETT ING
SELECT : CH ENTER:
CH- SETT ING
POS I T I ON
M
COLOUR- SYSTE
SOUND- SYST E
M
SKI P
AUTO
M
ANUAL
LANGUAGE ENG
R
BOOSTE
SELE CT : CH ADJUST : RETURN:
RETURN:
12
AUTO
AUTO
OFF
168. 25
OFF
LISH
M
ENU
M
Hz
M
ENU
• POSITION
The channel position changes to the higher or lower number.
• COLOUR-SYSTEM
AUTO SECAMPAL
• SOUND-SYSTEM
B/G D/KIAUT O
• SKIP
ON OFF
When set “SKIP” to “ON”, the channel number are set to SKIP. To turn off SKIP, press the number
buttons to select the desired channel and then set “SKIP” to “OFF”.
• AU TO
Press / and Auto Channel Tuning is
started. Auto tuning bar will shown during Auto
Search only.
• MANUAL (FINE tuning)
CH- SETT ING
POS I T ION
COLOUR- SYSTE
SOUND- SYST E
M
SKI P
AUTO
M
ANUAL
LANGUAGE ENGL ISH
BOOSTE
R
12
AUTO
M
AUTO
OFF
168. 25
OFF
M
Hz
i) Each time / is pressed, the frequency
changes to allow fine tuning and the colour of channel
number changes to yellow to indicate fine tuning.
ii) Press / for more than 2 seconds, the
“Manual Channel Tuning” will start. If a signal is found,
the Manual Channel Tuning will stop searching.
CH- SETT ING
POS I T ION
COLOUR- SYSTE
SOUND- SYST E
M
SKI P
AUTO
M
ANUAL
LANGUAGE ENGL ISH
BOOSTE
R
12
AUTO
M
AUTO
OFF
168. 25
OFF
M
Hz
• BOOSTER
Picture quality may improve in regions with weak signal strength using this function.
ON OFFON
• If ON is selected and the picture quality is still not good enough, please switch to ON .
• If signal strength is strong enough for the selected channel, the effect is negligible and may produce
instability. In such case select “OFF”.
^ Press
MENU
until normal screen appears.
[ Behind the door ]
CH
MENU/PRESET
POWER
SAVE
123
LANGUAGE
456
SOUND MODE
78
SURROUND
BACD
CH
CH
NORMAL
CH
TV/VIDEO
9
CH
0
CH
MENU
MENU
! Press
@ Press
MENU
to call MENU screen.
CH
CH
/
to select “PICTURE” or “SOUND”.
# Press / to display PICTURE or SOUND menu.
$ Press
CH
CH
/
to select adjustment items.
% Adjust using / .
• Wait for approximately five seconds to return to PICTURE/SOUND menu.
^ Repeat steps 4 and 5 above to adjust other items.
& Press
The following table lists the adjustment items shown in the PICTURE/SOUND
menu and how they change as you press / .
PICTURE menu table
Selected item Press Press
VIDEO MODE
CONTRAST To decrease contrast
COLOUR For less colour intensity For more colour intensity
BRIGHTNESS For less brightness
TINT To move tint toward red
SHARPNESS For less sharpness For more sharpness
PICTURE NR (see note below)
WHITE TEMP To more reddish background To more bluish background
• TINT can only be selected and adjusted when receiving NTSC broadcasts. (AV input)
• Picture Noise Reduction
Noise might be generated on images when playing deteriorated video tapes or
when receiving broadcasts with relatively weak signals. In these cases, set
PICTURE NR to “ON” to reduce the noise. However, when receiving good images
without noise, you can get better image quality by turning OFF this feature.
• WHITE TEMP can only be adjusted on PICTURE menu.
• If any items is adjusted, VIDEO MODE will automatically change to CUSTOM.
SOUND menu table
Selected item Press Press
EQUALIZER (Refer to for details on Equalizer) E12
SURROUND*
BALANCE To shift balance
AVL*
BASS+ The BASS+ is ON The BASS+ is OFF
• AVL is advised to be set to “ON” when compact disk (CD) is being playback.
*1: SURROUND mode can be set between
(i) OFF EPS (While receiving signal from antenna)
(ii) OFF ESS (While receiving signal from AV input)
*2: Please see
MENU
until normal screen appears.
DYNAMIC STANDARD SOFT CUSTOM
To increase contrast
– +
–
+
For more brightness
To move tint toward green
–
+
ON OFF
1
(Please see note below)
To shift balance
2
toward left
The AVL is ON The AVL is OFF
ON OFF
toward right
ON OFF
→
←
→
←
for details on Definition of Terms.
E15
POWER
TV/VIDEO
SAVE
123
LANGUAGE
456
SOUND MODE
9
78
SURROUND
0
BACD
CH
CH
NORMAL
MENU
M
ENU
PICTURE
SOUND
FEATURE
TI
M
ER
CH- SETT ING
[ PICTURE menu screen ]
PICTURE
VIDEO
M
ODE
CONTRAST
COLOUR
BRI GHTNESS
TINT
SHARPNESS
PICTURE NR
W
HI TE TEMP
SELECT : CH ADJUST: RETURN:
CONTRAST 50
M
ENU
PICTURE
SOUND
FEATURE
TI
M
ER
CH- SETT ING
CUST
– 10
+25
– 20
ON
O
50
20
[ SOUND menu screen ]
SOUND
EQUALI ZER
SURROUND EPS
BALANCE 15
AVL ON
+
BASS
SELECT : CH ADJUST: RETURN:
BALANCE 15
ON
M
CH
CH
MENU
NORMAL
M
ENU
M
ENU
• Switching COLOUR-SYSTEM:
Set the system to “AUTO ” for normal TV reception. The AUTO mode automatically detects the receiving signal system and changes the
reception system of the TV set. When the picture is not stable, switching to an appropriate system may improve the picture quality.
• Switching SOUND-SYSTEM:
Set the system to “AUTO ” for normal TV reception. The AUTO mode automatically detects the receiving signal system and changes the
reception system of the TV set. When the sound is not stable, switching to an appropriate system may improve the sound quality.
• When using FINE, the channel number changes from green to yellow.
• Pressing
(factory-setting) position.
• Pressing
menu to the standard (factory-setting) position.
• Pressing
NORMAL
while a PICTURE/SOUND selection is displayed, only the selected mode is reset to the standard
NORMAL
while the PICTURE/SOUND menu screen is displayed will reset all the items of PICTURE/SOUND
NORMAL
will reset all the items of PICTURE menu and SOUND menu to the standard (factory-setting) position.
Page 5
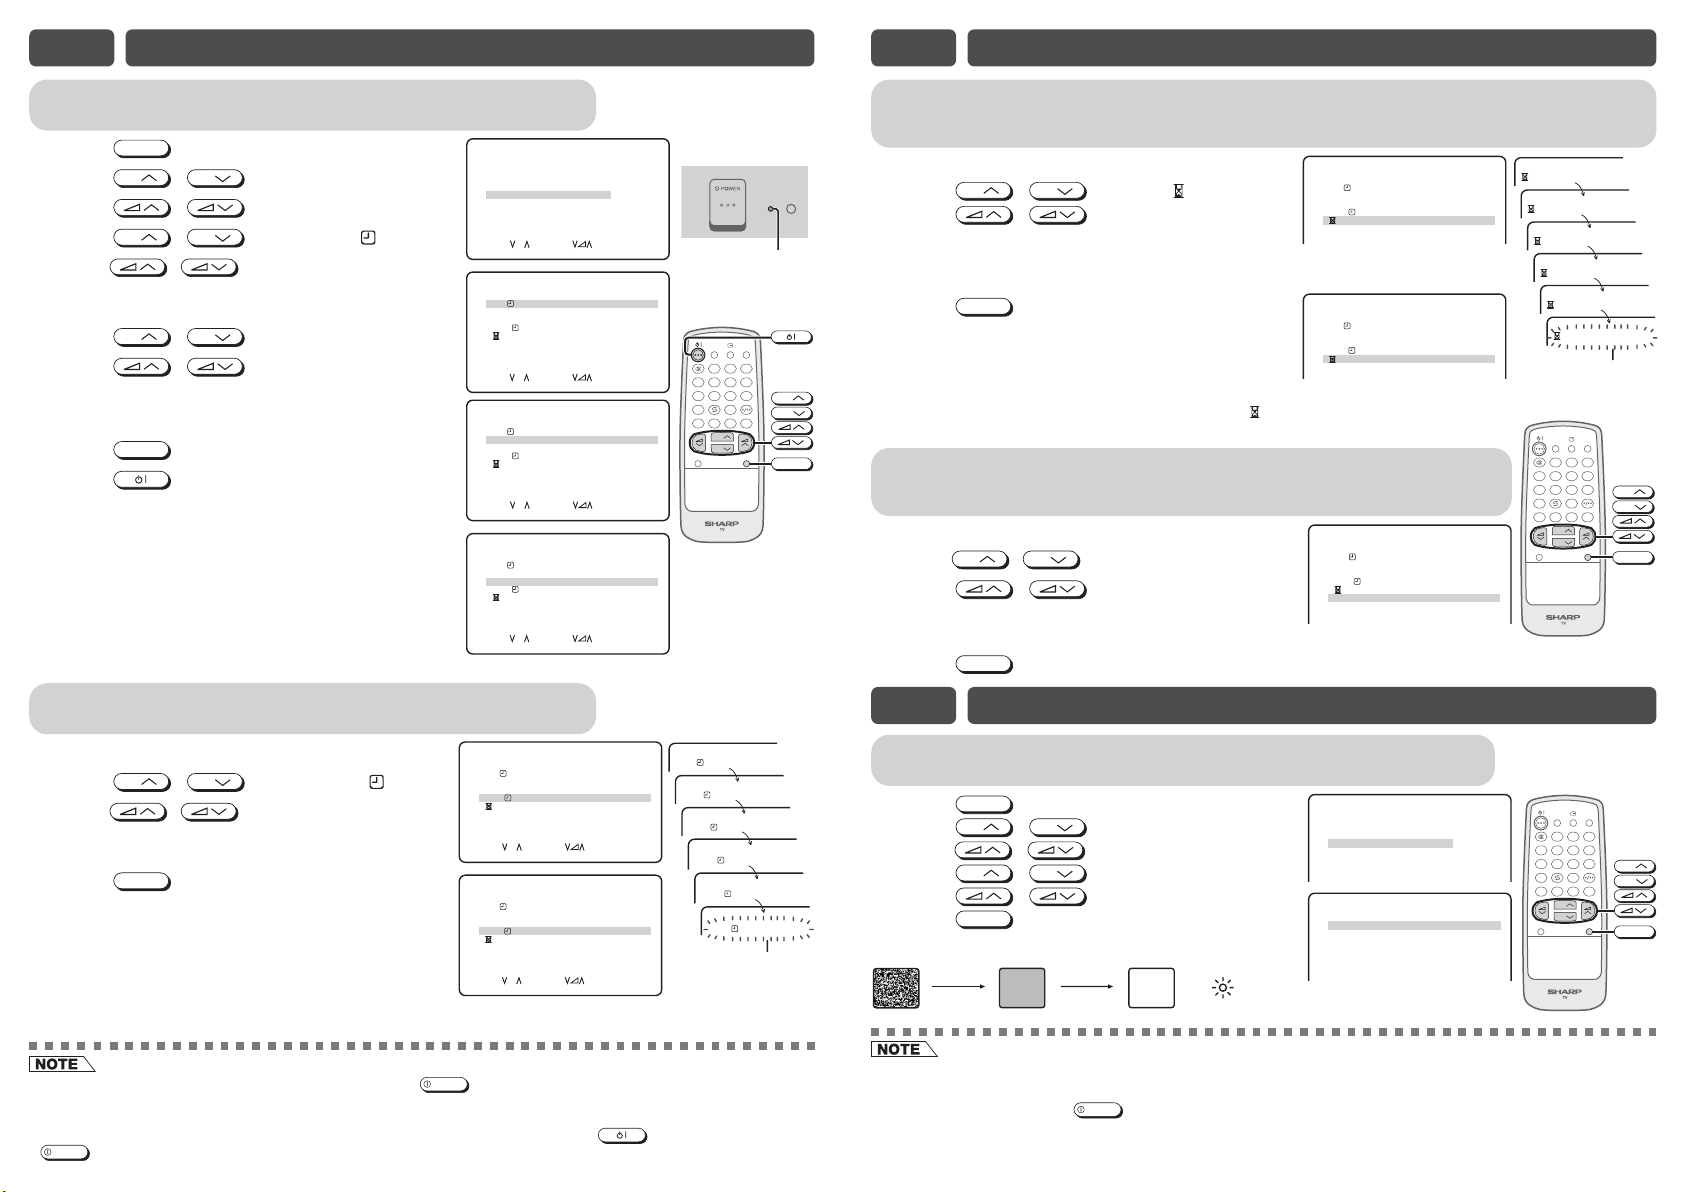
E10 TIMER SETTING
E10 TIMER SETTING (Continued)
On timer
Automatically turns power on after a set length of time has passed.
! Press
@ Press
# Press / to display TIMER menu.
$ Press
MENU
to call MENU screen.
CH
CH
CH
/
CH
/
to select “TIMER”.
to select “ON ”.
M
ENU
PICTURE
SOUND
FEATURE
TI
M
ER
CH- SETT ING
SELECT : CH ENTER :
% Press / to set time for TV to turn on.
• Maximum time that can be preset is 12 hours and
50 minutes. Timer start to count down after setting.
^ Press
CH
CH
/
to select “POSITION”.
& Press / to set the channel.
TIMER
ON 8 :0 0
POS I T ION ––
VOLU
M
E ––
OFF –– : ––
BEEP RE
M
INDER OFF
SELECT : CH ADJUST: RETURN:
* Repeat step 6 to 7 above to select and set the
“VOLUME”.
( Press
MENU
until normal screen appears.
) Press to put TV set into Standby mode.
• Power indicator lights up orange to indicate On
Timer is set.
• When the preset length of time setting has passed,
the power turns on and a picture appears on the
screen.
• The ON TIMER speaker volume gradually
increases from zero to preset volume.
TIMER
ON 8 :0 0
POS I T ION 78
VOLU
M
E ––
OFF –– : ––
BEEP RE
M
INDER OFF
SELECT : CH ADJUST: RETURN:
TIMER
ON 8 :0 0
POS I T ION 78
VOLU
M
E23
OFF –– : ––
BEEP RE
M
INDER OFF
SELECT : CH ADJUST: RETURN:
RETURN:
––: ––
––: ––
––: ––
[ TV Set (Bottom) ]
M
ENU
POWER
SAVE
123
LANGUAGE
M
ENU
M
ENU
M
ENU
SOUND MODE
SURROUND
NORMAL
456
78
Power indicator
(Orange)
TV/VIDEO
9
0
BACD
CH
CH
MENU
CH
CH
MENU
Reminder on-screen timer
Lets you know when a preset length of time has passed by displaying a countdown timer on
the screen. This is useful for timer cooking while you watch TV.
! Repeat step 1 to 3 of ON TIMER.
@ Press
CH
CH
/
to select “ ”.
# Press / to set time.
• Maximum time that can be preset is 12 hours and
50 minutes.
• The example at right shows that the Reminder will
be activated after one hour and 50 minutes.
$ Press
MENU
until normal screen appears.
• Five minutes before the preset length of time
expires (in the example, after one hour and 45
minutes) and each minute thereafter, the remaining
time appears on the screen for several seconds
with the beeping sound. (When BEEP REMINDER is set to “ON”)
• When the preset length of time has passed, “ 0:00” flashes in red with the
beeping sound. (When BEEP REMINDER is set to “ON”)
Beep reminder
It is a function to alert with beeping sound that the Reminder is expiring
soon with the remaining time OSD displays.
! Repeat step 1 to 3 of ON TIMER.
@ Press
CH
CH
/
to select “BEEP REMINDER”.
# Press / to select “ON” or “OFF”.
• ON: To alert users with beeping sound that the
timer are expiring soon.
• OFF: The beeping sound is off.
$ Press
MENU
until normal screen appears.
TIMER
ON ––: ––
POS I T ION ––
VOLU
M
E ––
OFF
M
INDER OFF
BEEP RE
TIMER
ON ––: ––
POS I T ION ––
VOLU
M
E ––
OFF
M
INDER OFF
BEEP RE
TIMER
ON ––: ––
POS I T ION ––
VOLU
M
E ––
OFF
M
INDER
BEEP RE
––: ––
––: ––
––: ––
1:50
–– : ––
––: ––
ON
LANGUAGE
SOUND MODE
SURROUND
NORMAL
POWER
SAVE
123
456
78
0
BACD
CH
CH
0:05
0:04
Flashing
TV/VIDEO
9
MENU
0:03
0:02
0:01
CH
CH
MENU
0:00
Off timer
Automatically turns power off after a set length of time has passed.
! Repeat step 1 to 3 of ON TIMER.
@ Press
CH
CH
/
to select “OFF ”.
# Press / to set time for TV to turn off.
• Maximum time that can be preset is 12 hours and
50 minutes. Timer start to count down after setting.
$ Press
• Five minutes before the preset length of time
• A flashing display of the remaining time appears
• The On Timer is cancelled if the power is turned off using
• If the TV set is turned on by the On Timer, then the TV set will be automatically turned off in two hours if no buttons
are pressed on the TV set or remote control.
• The Off timer is cancelled if the power is turned off or set to the Standby mode using
POWER
MENU
until normal screen appears.
expires, the remaining time appears on the screen.
during the last few seconds. When the preset
length of time has passed, the TV set enters the
Standby mode.
on the TV set, or if the power is otherwise interrupted.
TIMER
ON ––: ––
POS I T ION ––
VOLU
M
E ––
OFF
BEEP RE
M
INDER
SELECT : CH ADJUST: RETURN:
TIMER
ON ––: ––
POS I T ION ––
VOLU
M
E ––
OFF
BEEP RE
M
INDER
SELECT : CH ADJUST: RETURN:
POWER
.
OFF 0: 05
M
ENU
M
ENU
OFF 0: 04
OFF 0: 03
–– : ––
––: ––
OFF
2:30
––: ––
OFF
on the remote control or
OFF 0: 02
OFF 0: 01
OFF 0: 00
Flashing
E11 FEATURES
Blue back
Automatically turns the screen blue if a broadcast signal is not received.
! Press
@ Press
# Press / to display FEATURE menu.
$ Press
% Press / to select “ON” or “OFF”.
^ Press
When BLUE BACK is set to “ON”:
No signal Blue back TV off
• The Reminder also works in the Standby mode. Power is automatically turned on five minutes before the preset length
of time expires. The TV set automatically returns to the Standby mode approximately 1 minute after the timer expired if
no buttons are pressed on the TV set or remote control.
• The Reminder is cancelled if
• Poor reception due to weak signals and too much noise may activate BLUE BACK, despite the presence of a broadcast
signal. To continue watching TV under these conditions, switch “BLUE BACK” to “OFF”.
• When Off timer is set, the OFF TIMER setting has priority over BLUE BACK.
MENU
CH
CH
MENU
after 3 seconds
to call MENU screen.
CH
/
/
to select “FEATURE”.
CH
to select “BLUE BACK”.
until normal screen appears.
(Indicator)
after 15 minutes
POWER
Standby mode
on the TV set is pressed or if the power is otherwise interrupted.
Power indicator
lights up red
M
ENU
PICTURE
SOUND
FEATURE
TI
M
ER
CH- SETT ING
FEATURE
BLUE BACK ON
AUTO SE LECT ON
W
ER SAV
E
PO
16: 9
M
ODE OF F
CHI LD LOCK
POWER
TV/VIDEO
SAVE
123
LANGUAGE
456
SOUND MODE
9
78
SURROUND
BACD
CH
CH
OFF
NORMAL
CH
0
CH
MENU
MENU
Page 6
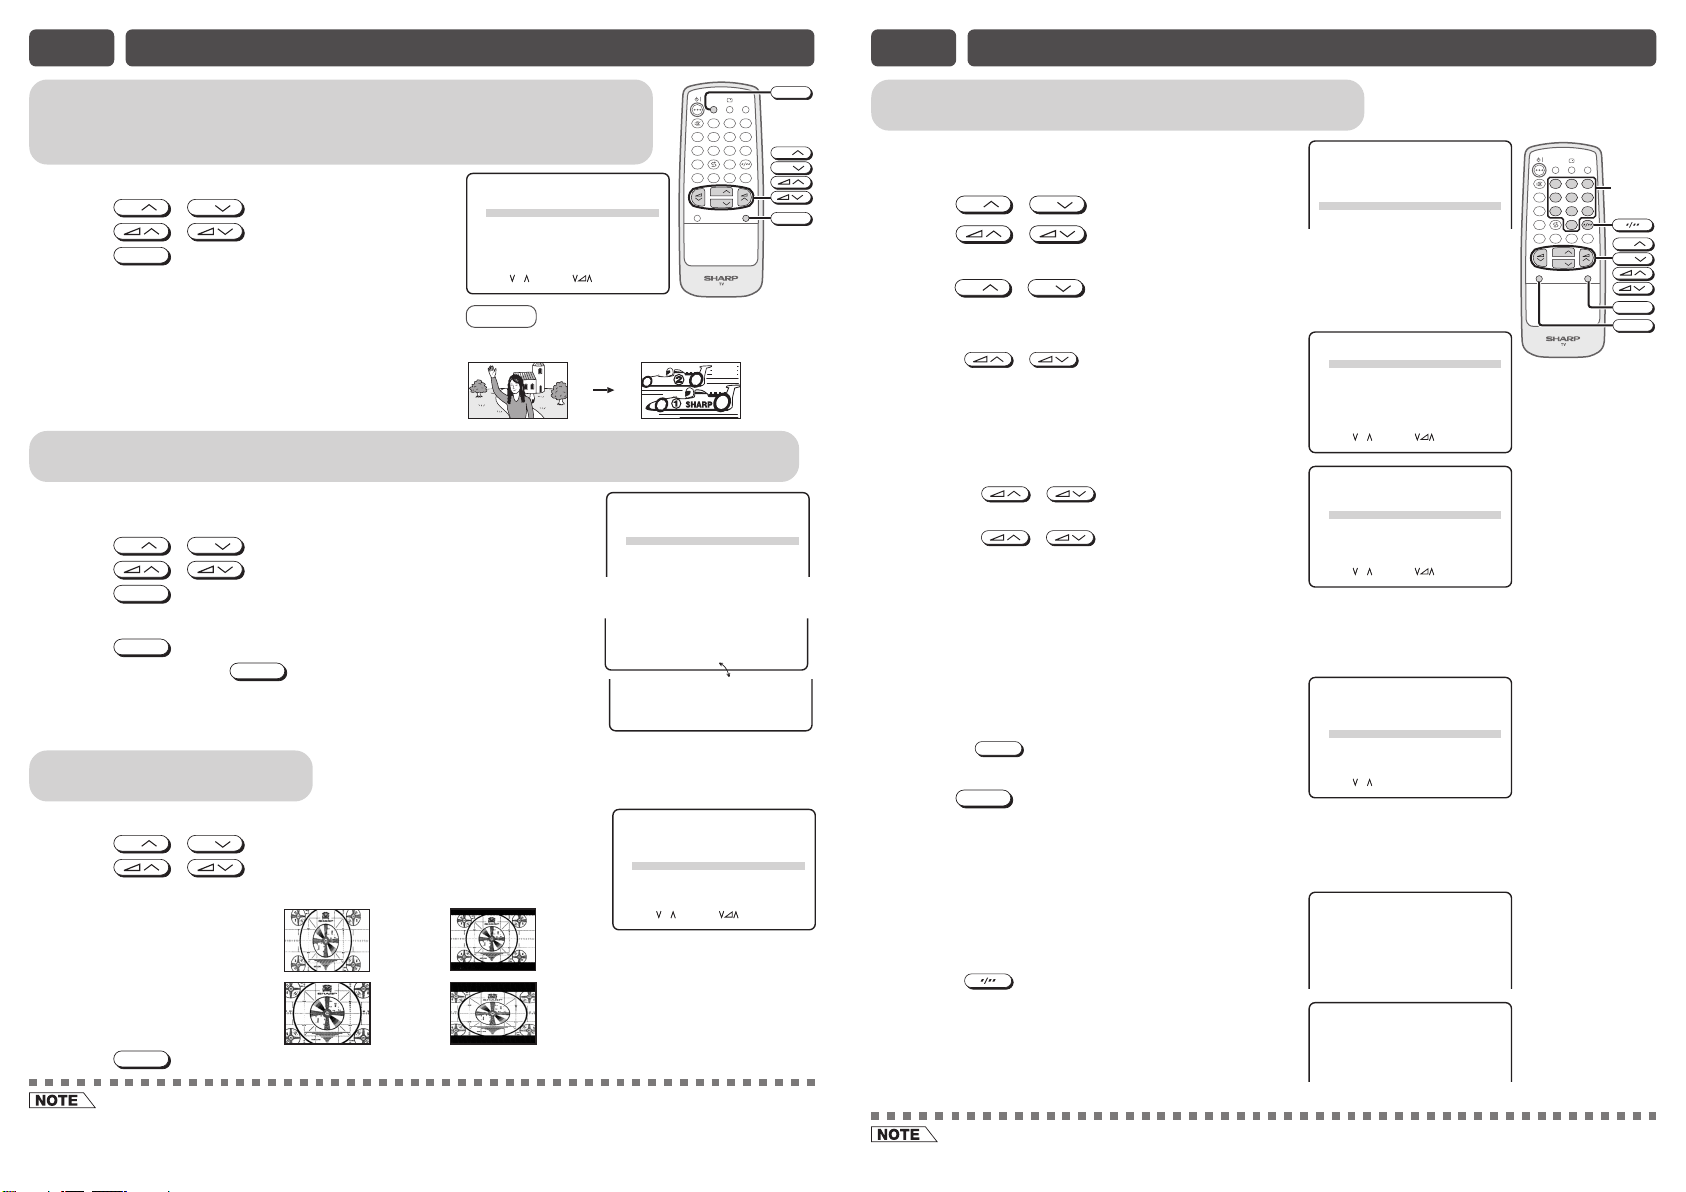
E11 FEATURES (Continued)
E11 FEATURES (Continued)
Auto select
When video equipment, such as a video game system or camcorder, is
connected to the front (AV-2 IN) terminals, this TV set automatically selects
the input mode (AV2).
! Repeat step 1 to 3 of BLUE BACK.
@ Press
CH
CH
/
to select “AUTO SELECT”.
# Press / to select “ON” or “OFF”.
$ Press
To use the Auto Select function, confirm the following:
• The TV set is turned on. (Power indicator lights up
green.)
• The video equipment, such as a video game system or
camcorder, is connected to the front (AV-2 IN) terminals.
MENU
until normal screen appears.
FEATURE
BLUE BACK OFF
AUTO SE LECT ON
PO
W
ER SAV
E
16: 9
M
ODE OFF
CHI LD LOCK
SELECT : CH ADJUST: RETURN:
Example
Connect the video equipment
to the front (AV-2 IN) terminals.
8 AV2
OFF
M
ENU
Input mode (AV2)
is automatically selected.
LANGUAGE
SOUND MODE
SURROUND
NORMAL
POWER
SAVE
TV/VIDEO
123
456
78
0
BACD
CH
CH
Power save
This function reduces the picture brightness to create a softer image while saving electricity.
MENU screen
! Repeat step 1 to 3 of BLUE BACK.
@ Press
CH
CH
/
to select “POWER SAVE”.
# Press / to select “ON” or “OFF”.
$ Press
MENU
until normal screen appears.
FEATURE
BLUE BACK OFF
AUTO SE LECT ON
PO
W
ER SAV
E
16: 9
M
ODE O FF
CHI LD LOCK
Remote Control
POWER
! Press
@ Each time you press
POWER SAVE
directly enter to the POWER SAVE mode screen.
POWER SAVE
, the mode switches between “ON”
and “OFF”.
# The POWER SAVE mode screen disappear approximately five seconds.
ON
POWER
OFF
AVES
AVES
16:9 mode
Selects the width of the picture.
! Repeat step 1 to 3 of BLUE BACK.
@ Press
CH
CH
/
to select “16:9 MODE”.
# Press / to select “ON” or “OFF”.
Format of signal Input Mode set to “OFF” Mode set to “ON”
16:9 format signal
4:3 format signal
$ Press
MENU
until normal screen appears.
FEATURE
BLUE BACK OFF
AUTO SE LECT ON
PO
W
ER SAV
E
16: 9
M
ODE ON
CHI LD LOCK
SELECT : CH ADJUST: RETURN:
POWER SAVE
Child lock
Preventing children from watching TV or certain channels.
9
CH
CH
MENU
MENU
ON
Setting the CHILD LOCK mode (For the first time)
! Repeat step 1 to 3 of BLUE BACK.
@ Press
CH
CH
/
to select “CHILD LOCK”.
# Press / to display CHILD LOCK
menu.
$ Press
CH
setting as follow:
• LOCK TV
Press / to select “LOCK TV” to “ON”
or “OFF”.
• ON: LOCK TV will lock the entire TV for viewing.
• OFF: LOCK TV deactivated.
• POSITION/LOCK STATUS
i) Press / or Number buttons (0~9)
to set the position. (e.g. 25)
ii) Press / to select “LOCK STATUS”
to “ON” or “OFF”.
• ON: Channel position set above (e.g. 25) will
CH
/
to select desired individual
FEATURE
BLUE BACK OFF
AUTO SE LECT ON
W
ER SAV
E
PO
M
ODE OF F
16: 9
CHI LD LOCK
CHI LD LOCK
LOCK TV ON
POS I T I ON ––
LOCK STATUS OFF
W
ORD 00 00
PASS
W
ITCH OFF TV TO ACTIVATE CHILD LOCK
S
SELE CT : CH ADJUST : RE TURN:
CHI LD LOCK
LOCK TV OFF
POS I T I ON 2 5
LOCK STATUS ON
W
ORD 00 00
PASS
W
ITCH OFF TV TO ACTIVATE CHILD LOCK
S
SELECT : CH ADJUST: RETURN:
OFF
POWER
TV/VIDEO
SAVE
123
456
7809
BACD
CH
CH
MENU
Number
buttons
CH
CH
MENU
NORMAL
LANGUAGE
SOUND MODE
SURROUND
NORMAL
M
ENU
M
ENU
be locked. You may not able to view the
channel position set above.
• OFF: Channel position set above (e.g. 25) will not be locked.
• PASSWORD
Enter 4 digits PASSWORD using Number buttons
(0~9) on the remote control. (For example: 0000)
• Press
NORMAL
to reset the entered number to
“0000”.
% Press
MENU
until normal screen appears.
CHI LD LOCK
LOCK TV OFF
POS I T I ON ––
LOCK STATUS OFF
PASS
W
ORD 0 000
W
ITCH OFF TV TO ACTIVATE CHILD LOCK
S
SELECT : CH ADJUST:0
–
9RETURN:MENU
• The CHILD LOCK mode will be activated after the
OFF
TV is turned off and on again.
To turn OFF or to change setting of CHILD LOCK mode
M
ENU
! While “CHILD LOCK ON” screen appear.
@ Enter 4 digits PASSWORD using Number buttons
(0~9) on the remote control. (For example:0000)
• Press to clear the entered number.
CHI LD LOCK ON
PLEASE INPUT PASS
*25* ––
W
ORD
• If the wrong PASSWORD is entered, “PASSWORD
INCORRECT” screen will appear. Input the
PASSWORD again in this case.
PASSWORD I NCORRE CT
25
• If the video equipment is connected to the rear terminals on the TV set, the video mode will not be automatically selected.
• When TV is power on with AV2 jack plug in, even video equipment is off, the AV2 mode is still selected. Use the
remote control to return to a TV channel.
• If you forget your PASSWORD, please input “2398” to enter, then change to new PASSWORD.
Page 7
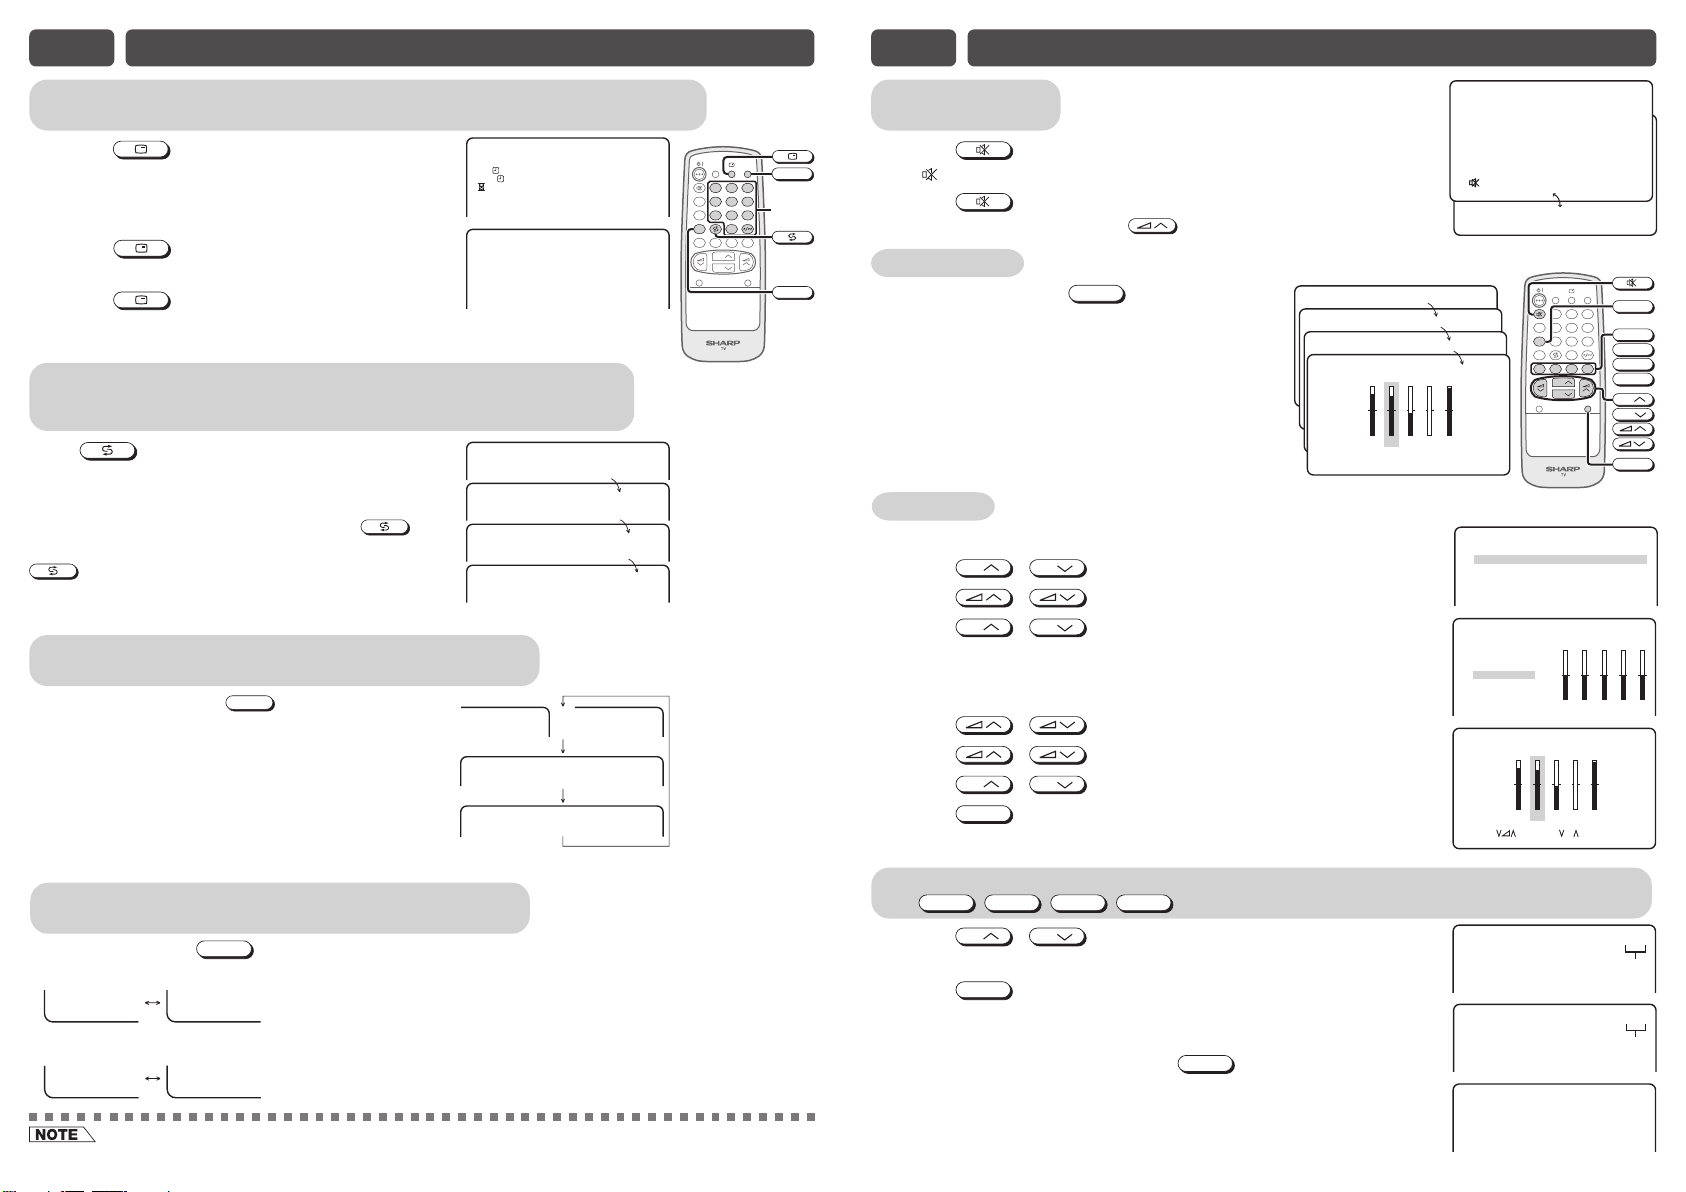
E12 USEFUL FEATURES
E12 USEFUL FEATURES (Continued)
Channel / Timer display
Displays the current channel number, the timer, and other settings on the screen.
! Press .
• The time remaining on the On timer, Off timer, and
Reminder appears on the screen.
ON 8 :0 0
OFF 2 : 30
1:50
@ Press again.
• The channel number appear on the screen.
# Press once again.
• The display disappears.
Channel recall
Switches back to the channel you were watching just before the current
channel.
Press .
• The channel previously viewed returns to the screen.
Example:
After switching from channel 5 to channel 7, is
pressed, the channel will change to channel 5. Press
again to return to channel 7.
TV / Video selection
Switches between TV broadcasts and AV input programmes.
• Each time you press the
between AV1 (or COMPONENT), AV2 and TV
programme.
TV/VIDEO
, the input switches
or
TNENOPMOC
Mute
Silences the sound.
POWER
TV/VIDEO
SAVE
123
LANGUAGE
456
SOUND MODE
7809
SURROUND
5
BACD
NORMAL
TV/VIDEO
Number
buttons
CH
CH
MENU
SURROUND
5
7
5
7
1VA
2VA
52
! Press .
•“ ” appears on the screen, and the sound is silenced.
@ Press again, the volume returns to its previous level.
• Mute will be cancelled if the is pressed at any time.
Sound mode
Each time you press the
between MOVIE, MUSIC, NEWS and CUSTOM.
MOVIE: Movie mode
MUSIC: Music mode
NEWS: News mode
CUSTOM: Custom mode
SOUND MODE
, the mode switches
+
–
100 300 1K 3K 8K
Equalizer
! Repeat step 1 to 3 of PICTURE OR SOUND ADJUSTMENT.
@ Press
CH
CH
/
to select “EQUALIZER”.
# Press / to display EQUALIZER menu.
$ Press
CH
“CUSTOM”.
• When “MOVIE”, “MUSIC” or “NEWS” is adjusted, EQUALIZER will
automatic change to “CUSTOM” mode.
CH
/
to select “MOVIE”, “MUSIC”, “NEWS” or
% Press / to display CUSTOM screen.
^ Press / to select EQUALIZER bar.
& Press
* Press
CH
MENU
CH
/
to adjust higher or lower.
until normal screen appears.
POWER
TV/VIDEO
OVI EM
USI CM
EWSN
USTOMC
SOUND
EQUALI ZER
SURROUND OFF
BALANCE 0
AVL ON
BASS
EQUALI ZER
M
OV I E +
M
US IC
W
NE
CUSTO
SELECT : CHADJUS T : RET URN:MENU
LANGUAGE
SOUND MODE
SURROUND
NORMAL
+
S
M
USTOMC
+
–
100 300 1K 3K 8K
SAVE
123
456
9
78
0
BACD
CH
CH
MENU
ON
–
100 300 1K 3K 8K
SOUND MODE
A
B
C
D
CH
CH
MENU
Surround sound
Produces a virtual surround sound from the TV’s speakers.
Each time you press
• While receiving signal from antenna
SURROUND
OFF
• While receiving signal from AV input
SURROUND
OFF
• The surround effect can be adjusted using SOUND menu.
SURROUND
SURROUND
S
EP
SURROUND
S
ES
, the mode changes in the following order:
Favourite channels
A
The
! Press
(e.g. Channel 12)
@ Press
• The display will disappear after three seconds, and then the selected
channel is preset.
# To watch favourite channel, press
• The preset favourite channel will be displayed. (e.g. Channel 12)
B
,
CH
A
for example, until channel number turns white.
C
,
CH
/
D
,
buttons can be used to select up to four favourite channels.
to select your favourite channel.
A
.
$ To preset another favourite channel, repeat steps 1 and 2 above.
• To change a preset favourite channel, repeat steps 1 and 2 above.
1 2
Displayed in
green or yellow
1 2
Turns to white
12
Page 8
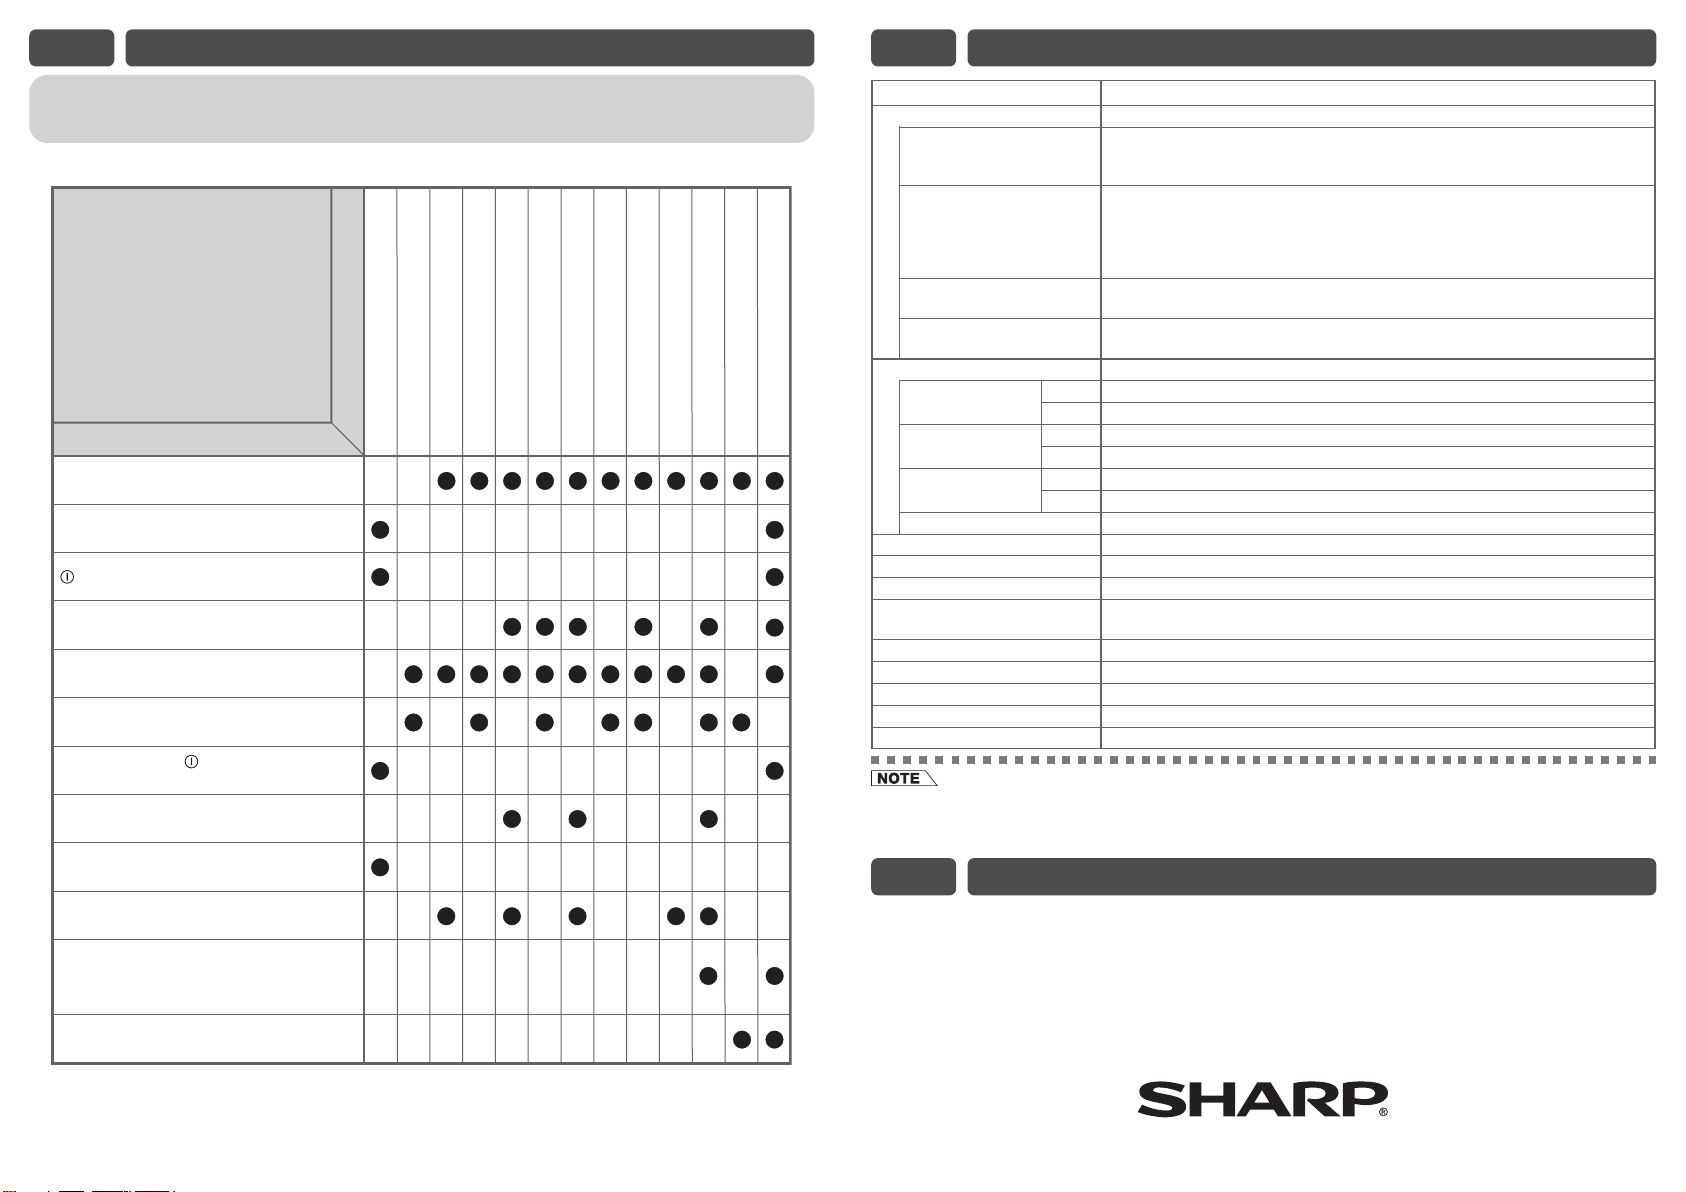
E13 TROUBLESHOOTING
E14 SPECIFICATIONS
The following problems do not always indicate a hardware failure. Therefore, please use the
troubleshooting guide below before calling for repair service.
If, after following the guide none of the remedies work, unplug the TV set and call for service.
Quick
Service
Check List
Possible Causes/Remedies
Try a new channel to check for possible station
trouble.
TV not plugged in.
Outlet power OFF.
POWER switch of TV not ON.
Antenna not connected to terminal at the back
of the TV set.
If outside antenna is used, check for broken
wires.
Check for local interference.
Turn OFF using the POWER switch,
then turn ON again after a minute.
Adjust COLOUR control.
Problems
Remote control does not work.
Bars on screen.
Picture distorted.
Picture rolls vertically.
No colour.
Poor reception on some channels.
Picture weak.
Picture lines or streaks.
Picture ghosting.
Picture blurred.
Sound OK, picture poor.
Picture OK, sound poor.
MODEL 29L-FG1BV/29L-FG1SV
Receiving System World multi 18 system
Reception Channels
No picture or sound.
Receiving Frequency 44.25 MHz – 863.25 MHz
Channel Tuning 100-Channel Electronic Tuner with Full Auto Tuning System
Picture Tube 29-Inch Flat CRT
Terminals Audio/video input × 2 (front × 1, rear × 1), Audio/video output × 1 (rear),
Sound Output 7.5 W (RMS) × 2, total 15 W (RMS)
Power Source AC 110 – 240V, 50/60 Hz
Power Consumption 138 W
Dimensions 810 (W) × 618 (H) × 516.5 (D) mm
Weight 41 kg (Approx.)
• Design and specifications are subject to change without notice.
• Receiving system: These receiving systems, encompassing all currently available technology, include those with
planned broadcast, videotape and laserdisc hardware and software.
TV Broadcasts/ PAL-I SECAM-B/G
VCR Playback PAL-B/G SECAM D/K, K1
VCR Playback NTSC 4.43/5.5 MHz/60 Hz NTSC 4.43/6.5 MHz/50 Hz
VCR Playback SECAM-L (French SECAM) NTSC 3.58 MHz
(Using Video-in terminals) PAL 60 Hz
Laserdisc Player Playback PAL 5.5 MHz/60 Hz PAL 6.5 MHz/60 Hz
(Using RF-in terminals) PAL 6.0 MHz/60 Hz
PAL-B/G VHF E2–E12 ch
SECAM-B/G
PAL-D/K VHF C1–C12 ch, R1–R12 ch
SECAM-D/K, K1
PAL-I VHF B–J ch
CATV S1–S20 ch, S21–S41 ch (Hyper)
PAL-D/K
NTSC 4.43/6.0 MHz/60 Hz SECAM-I (6.0 MHz)
NTSC 4.43/6.5 MHz/60 Hz
NTSC 4.43/5.5 MHz/50 Hz
NTSC 4.43/6.0 MHz/50 Hz
UHF E21–E69 ch
UHF C13–C57 ch, R21–R69 ch
UHF 21–69 ch (Hong Kong)
Headphone jack × 1 (front), DVD input (COMPONENT-IN) × 1 (rear)
Check batteries in the remote control.
Try fine tuning to correct.
Contrast setting in picture mode might be all
the way to the minus side. Press the
NORMAL button on the remote control to
correct.
Increase the volume.
This unit is equipped with a microprocessor. Its performance could be adversely affected by external
electrical noise or interference. If this should happen, unplug the unit and plug it in again after a few
minutes.
E15 DEFINITION OF TERMS
Extended Pseudo
Stereo (EPS)
Extended Spatial
Stereo (ESS)
AVL
The Incredible Mono module (I-Mono) generates two channels from one mono input
signal. When the sound of the mono input signal is processed, the listener gets the
impression that the sound is essentially a stereo signal.
The listener gets the impression of a sound reproduced by two virtual speakers,
positioned at a larger distance between each other than between the actual
speakers. So, the stereo image is expanded by this widening sound effect.
The AVL reduces the audio input signal in the MAIN channel (L, R) to a selectable
maximum output level if it exceeds this level at the input of the stage.
SHARP CORPORATION
 Loading...