

COLOR TELEVISION
MODELS
13N-M100
13N-M150
B
L OPERATION MANUAL L
A
s an ENERGY STAR
E
NERGY STAR
trademark.
CONTENTS
• Important Information ...................................2 ~ 3
• Supplied Accessories .........................................3
• Before Operating Your Television ........................3
• Antenna Connections ...................................3 ~ 4
• Quick Reference Control Operation ..............5 ~ 7
• EZ SETUP during First Power On ...................... 8
• Demo Mode ........................................................ 9
• Accessing the MAIN MENU screen without
Remote Control ..................................................9
• Language..........................................................10
This operating manual includes basic
operating instructions in Spanish and French.
SPANISH is on page 6, 27.
FRENCH is on page 7.
®
P
®
guidelines for energy efficiency. ENERGY STAR
artner, SHARP has determined that this product meets the
PAGE
• Sleep Timer ...................................................... 10
• Video Adjust ..................................................... 11
• Closed Caption ................................................. 12
• Parent Control........................................... 13 ~ 19
• V-CHIP .................................................. 13 ~ 19
• Energy Save ..................................................... 20
• Set Up....................................................... 21 ~ 24
• EZ Setup ....................................................... 21
• Channel Setting..................................... 22 ~ 24
• Blue Screen................................................... 24
• Using the Video and Audio Input Jacks ............ 25
• Before Calling for Service ......................... 26 ~ 27
• Calling for Service ............................................ 28
• Limited Warranty............................................... 28
®
is a
U.S .
7209 PE
registered
PAGE
1
Welcome to the SHARP F amily. W e are pleased that you are now the o wner of a SHARP Color Television
– built for outstanding quality, reliability and performance.
Every SHARP Color Television set is tuned and adjusted for proper color and sound, and has passed
through the most stringent quality control tests at the factory . W e have prepared this OPERATION MANU AL
so that you may adjust the picture and color to your personal viewing preference.
We sincerely hope that you receiv e the greatest satisf action and enjoyment from y our new SHARP Color
Television set for years to come.
Please read these instructions carefully, and keep them handy for your future reference.
IMPORTANT
T o aid reporting in case of loss or theft, please record the TV’ s
model and serial numbers in the space provided. The numbers
are located at the rear of the TV.
Model No.:
Serial No.:
Important Information
There are two important reasons for prompt warranty registration of your new SHARP television set,
using the REGISTRATION CARD packed in with the set.
FIRST – WARRANTY
This is to assure that you will immediately receive the full consumer benefit of the parts, service and labor
warranty applicable to your purchase.
SECOND – CONSUMER PRODUCT SAFETY ACT
To assure that you will promptly receive any safety notification on inspection, modification or recall that
SHARP may be required to give under the 1972 Consumer Product Safety Act. PLEASE READ
CAREFULLY THE IMPORTANT “LIMITED WARRANTY” CLAUSE ON THE LAST PAGE.
WHAT IS ENERGY STAR
TVs and VCRs use energy both when the y are on and when they are off . Americans spend more than $1
billion a year on energy consumed by TVs and VCRs when they are not in use. The new ENERGY
STAR® models will reduce that energy “leakage” by up to 75 percent. Ultimately, this will mean more than
$500 million a year in energy savings for consumers.
The energy savings will help reduce the burning of fossil fuels and the related carbon dioxide pollution
that contributes to global warming. If e v ery American family replaced their TVs and VCRs with ENERGY
STAR® models, it would reduce carbon dio xide emissions by fiv e million tons ev ery year — equiv alent to
eliminating the pollution from more than one million cars.
By using ENERGY STAR® products, you will sav e money on y our electric bills and use less energy. That
makes good economic sense and it’s good for our environment.
®
WARNING:
CAUTION: TO REDUCE THE RISK OF
DO NOT REMOVE COVER (OR BACK).
NO USER-SERVICEABLE PARTS INSIDE.
REFER SERVICING TO QUALIFIED SERVICE
“Note to CATV system installer: This reminder is pro vided to call the CATV system installer’s attention
to Article 820-40 of the National Electrical Code that provides guidelines for proper grounding and, in
particular, specifies that the cable ground shall be connected to the grounding system of the b uilding,
as close to the point of cable entry as practical.”
2
EXPOSE THIS APPLIANCE TO WET LOCATIONS.
ELECTRIC SHOCK,
PERSONNEL.
TO REDUCE THE RISK OF FIRE OR ELECTRIC SHOCK, DO NOT
The lightning flash with
arrowhead within a triangle is
intended to tell the user that
parts inside the product are a
risk of electric shock to
persons.
The exclamation point within a
triangle is intended to tell the
user that important operating
and servicing instructions are
in the papers with the
appliance.
Important Information (Continued)
WARNING - FCC Regulations state that any unauthorized changes or modifications to this equipment
not expressly approv ed by the man ufacturer could v oid the user’s authority to operate
this equipment.
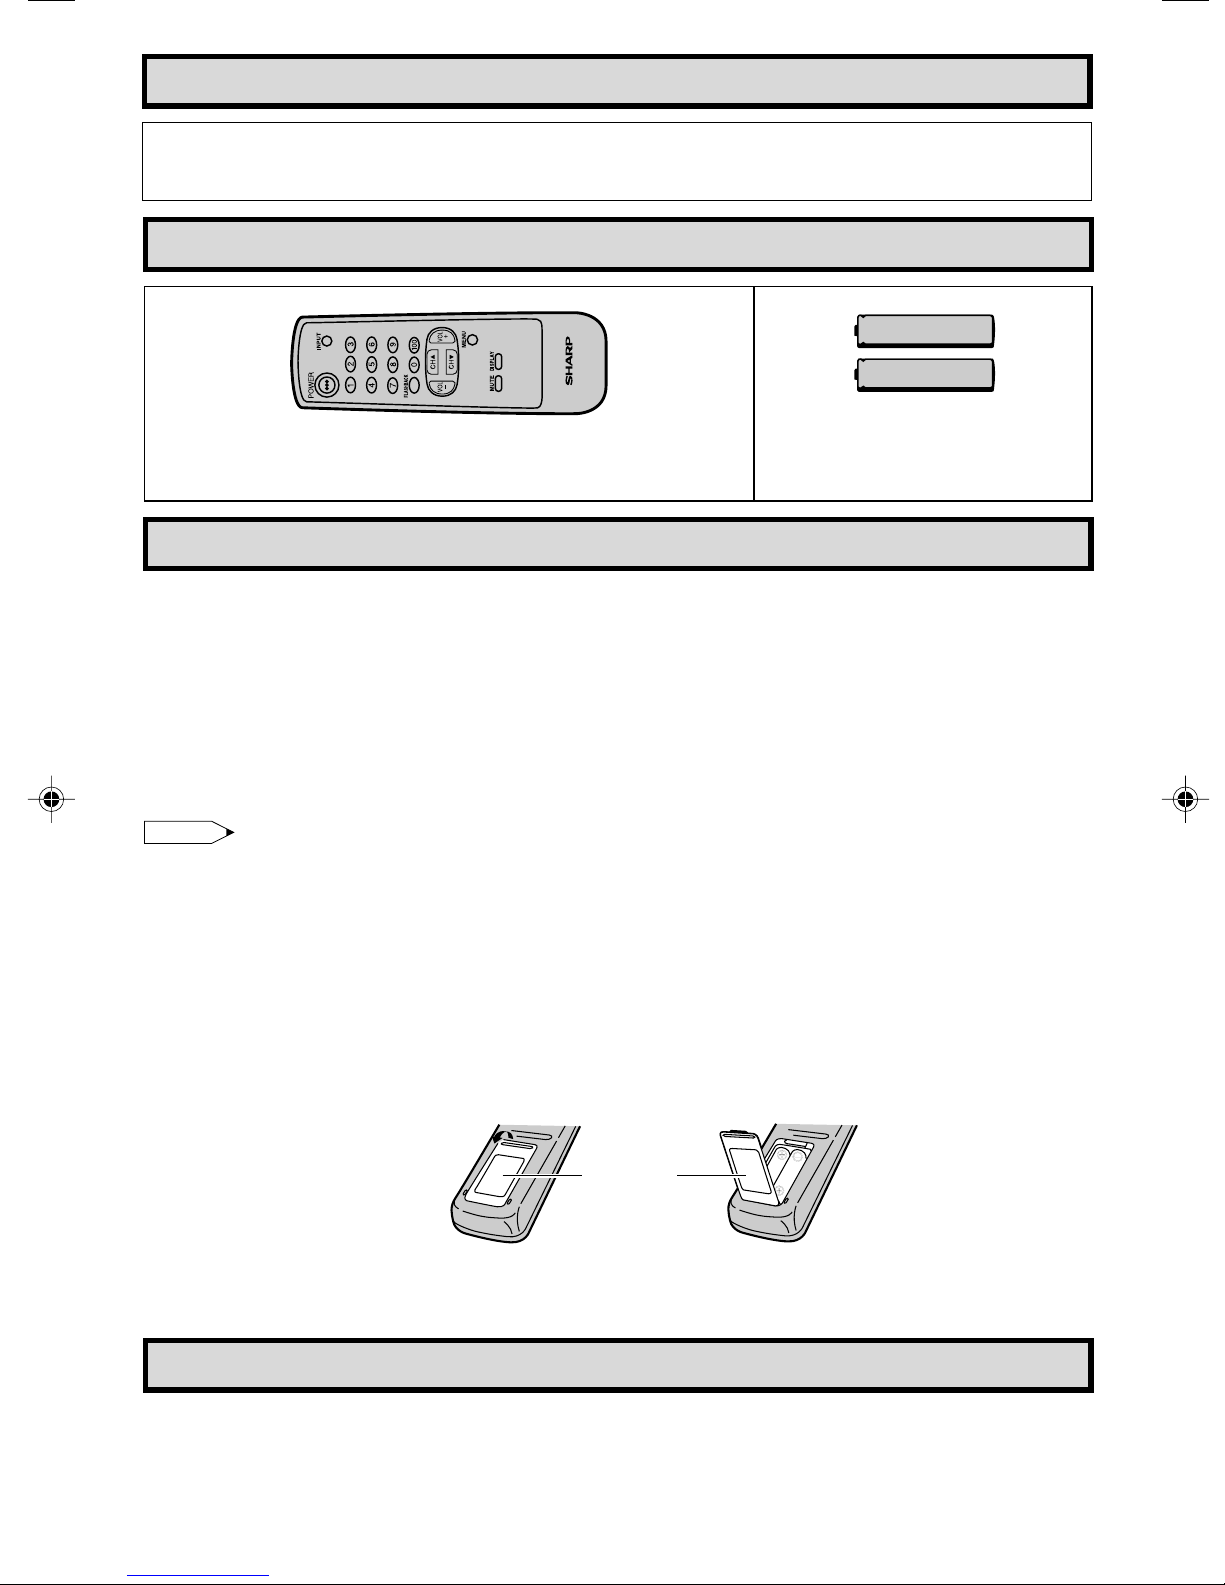
Supplied Accessories
TV
Infrared Remote Control/Part Number
RRMCG1324CESA (13N-M100)
RRMCG1324CESB (13N-M150)
Size AA
Dry Batteries
Before Operating Your Television
Location
• For normal operation, your TV should be located in an area of the room where cool adequate ventilation
is provided. Do not place the bac k of the tele vision set in a place where free airflow will be restricted.
• Any magnetic f orce may disturb the color picture . Mak e sure that magnets, electric clocks, to ys using
magnets or any other magnetic substance, such as iron are kept well away from this TV set.
Power
Your TV oper ates on 120 Volts, 60 Hertz (normal household current) and has a polarized plug. If you
are unable to insert the plug fully into the outlet, try reversing the plug. Should it fail to fit, contact an
electrician. Do not defeat the safety feature of the polarized plug.
Note:
• If the set will not be used for a long period, such as during a vacation, unplug the set from the wall
outlet to economize power. (If the TV set is plugged in, a slight current still flows, even with the
POWER BUTTON in the OFF position.)
• Lines and other noise may appear in TV broadcast images when an FM tuner or r adio is located near
the TV and both radio and TV broadcasts are being received. Should such noise appear, turn off
either the TV or the radio.
• If you are listening to an AM broadcast, turn the TV off. AM broadcast signals may not be received
due to the interference of the TV.
L Before using the television, prepare the Remote Control
To use the remote control, insert batteries first.
Insert the batteries
• With your thumbnail, pull up the slit as indicated by the arrow to remove the back cover. Insert two
batteries (size “AA”). Be sure to match the battery e/d terminals with the e/d marks inside the
compartment.
Pull up
Antenna Connections
Antennas
• The antenna requirements for good color television reception are more impor tant than those for
black & white television reception. For this reason, a good quality outdoor antenna is strongly
recommended.
The following is a brief explanation of the type of connections that are provided with the various
antenna systems:
Battery
Cover
3
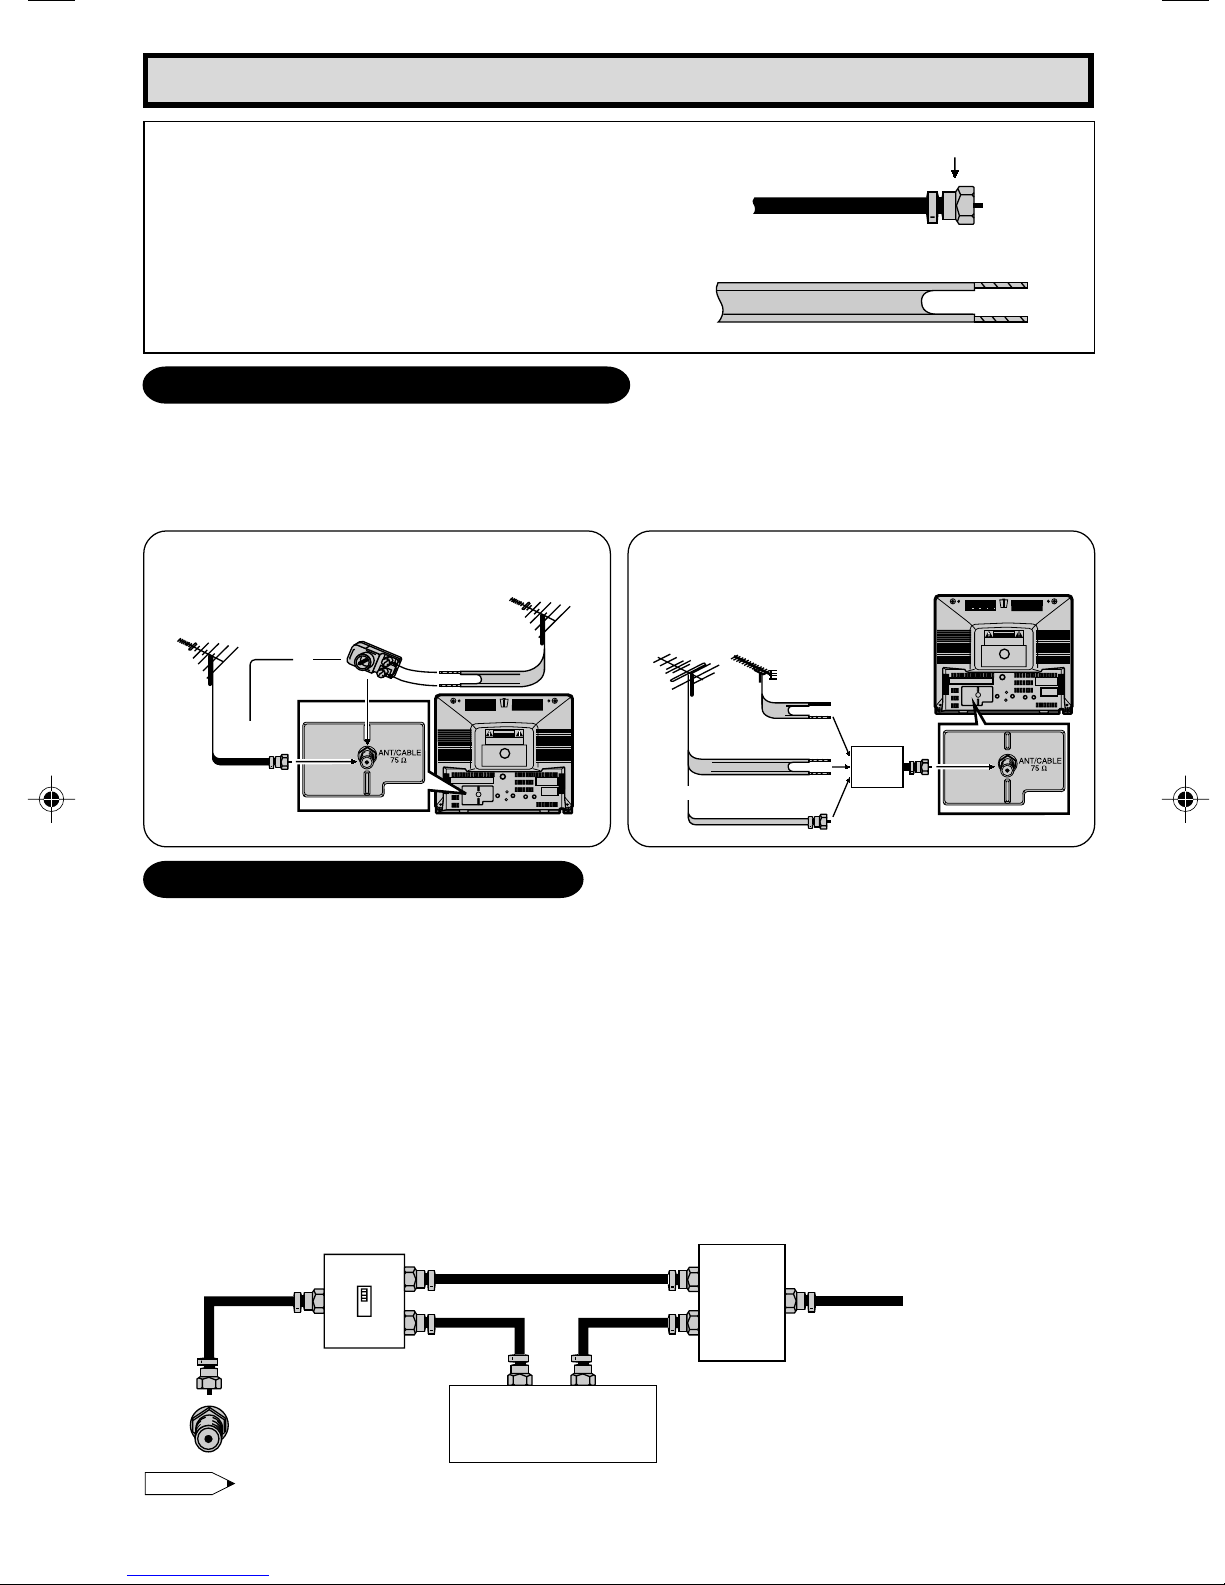
Antenna Connections (Continued)
1. A 75 ohm system is generally a round cable
F-type connector
with F-type connector that can easily be
attached to a terminal without tools (not
supplied).
2. A 300 ohm system is a flat “twin-lead” cable
75-ohm coaxial cable (round)
that can be attached to a 75 ohm terminal
through a 300-75 ohm ADAPTOR (not
supplied).
300-ohm twin-lead cable (flat)
OUTDOOR ANTENNA CONNECTION
• Use one of the following two diagrams if you connect an outdoor antenna.
A: Using a VHF/UHF combination outdoor antenna.
B: Using separate VHF and/or UHF outdoor antenna.
• Connect an outdoor antenna cable lead-in to the CO AXIAL CABLE CONNECT OR on the rear of the
TV set.
A. Combination VHF/UHF Antennas
VHF/UHF ANTENNA
300-ohm
twin-lead
CAUTION
CAUTION
RISK OF ELECTRIC SHOCK
RISK OF ELECTRIC SHOCK
DO NOT OPEN
DO NOT OPEN
REAR OF TV
VHF/UHF ANTENNA
or
75-ohm
coaxial cable
300/75-ohm
ADAPTOR
(Not supplied)
B. Separate VHF/UHF Antenna
VHF
ANTENNA
or
UHF
ANTENNA
300-ohm
twin-lead
300-ohm
twin-lead
75-ohm coaxial
cable
COMBINER
(not supplied)
IN OUT
REAR OF TV
CAUTION
CAUTION
RISK OF ELECTRIC SHOCK
RISK OF ELECTRIC SHOCK
DO NOT OPEN
DO NOT OPEN
CABLE TV (CATV) CONNECTION
• A 75 ohm coaxial cable connector is built into the set for easy hookup. When connecting the 75 ohm
coaxial cable to the set, screw the 75 ohm cable to the COAXIAL CABLE CONNECTOR.
• Some cable TV companies offer “premium pay channels”. Since the signals of these premium pay
channels are scrambled, a cable TV conv erter/descrambler is generally provided to the subscriber by
the cable TV company. This conv erter/descrambler is necessary for normal viewing of the scrambled
channels. (Set your TV on channel 3 or 4. T ypically one of these channels is used. If this is unknown,
consult your cable TV company.) For more specific instructions on installing cable TV, consult your
cable TV company. One possible method of utilizing the converter/descrambler provided by your
cable TV company is explained below.
Please note: RF switch equipped with position A/B (not provided) is required.
“A” position on the RF switch (not supplied) : You can view all unscrambled channels using the TV’s
channel keys.
“B” position on the RF switch (not supplied) : You can view the scrambled channels via the conv erter/
RF switch (not supplied)
OUTAIN
B
OUT
Cable TV converter/
descrambler
(not supplied)
descrambler using the converter’s channel keys.
Two-set
signal
splitter
Cable TV Line
(not
IN
supplied)
Note:
• Consult your SHARP Dealer or Service Center for the type of splitter, RF switch or combiner that
might be required.
4

Quick Reference Control Operation
Quick Reference Control Operation
L Location of Controls (ENGLISH)
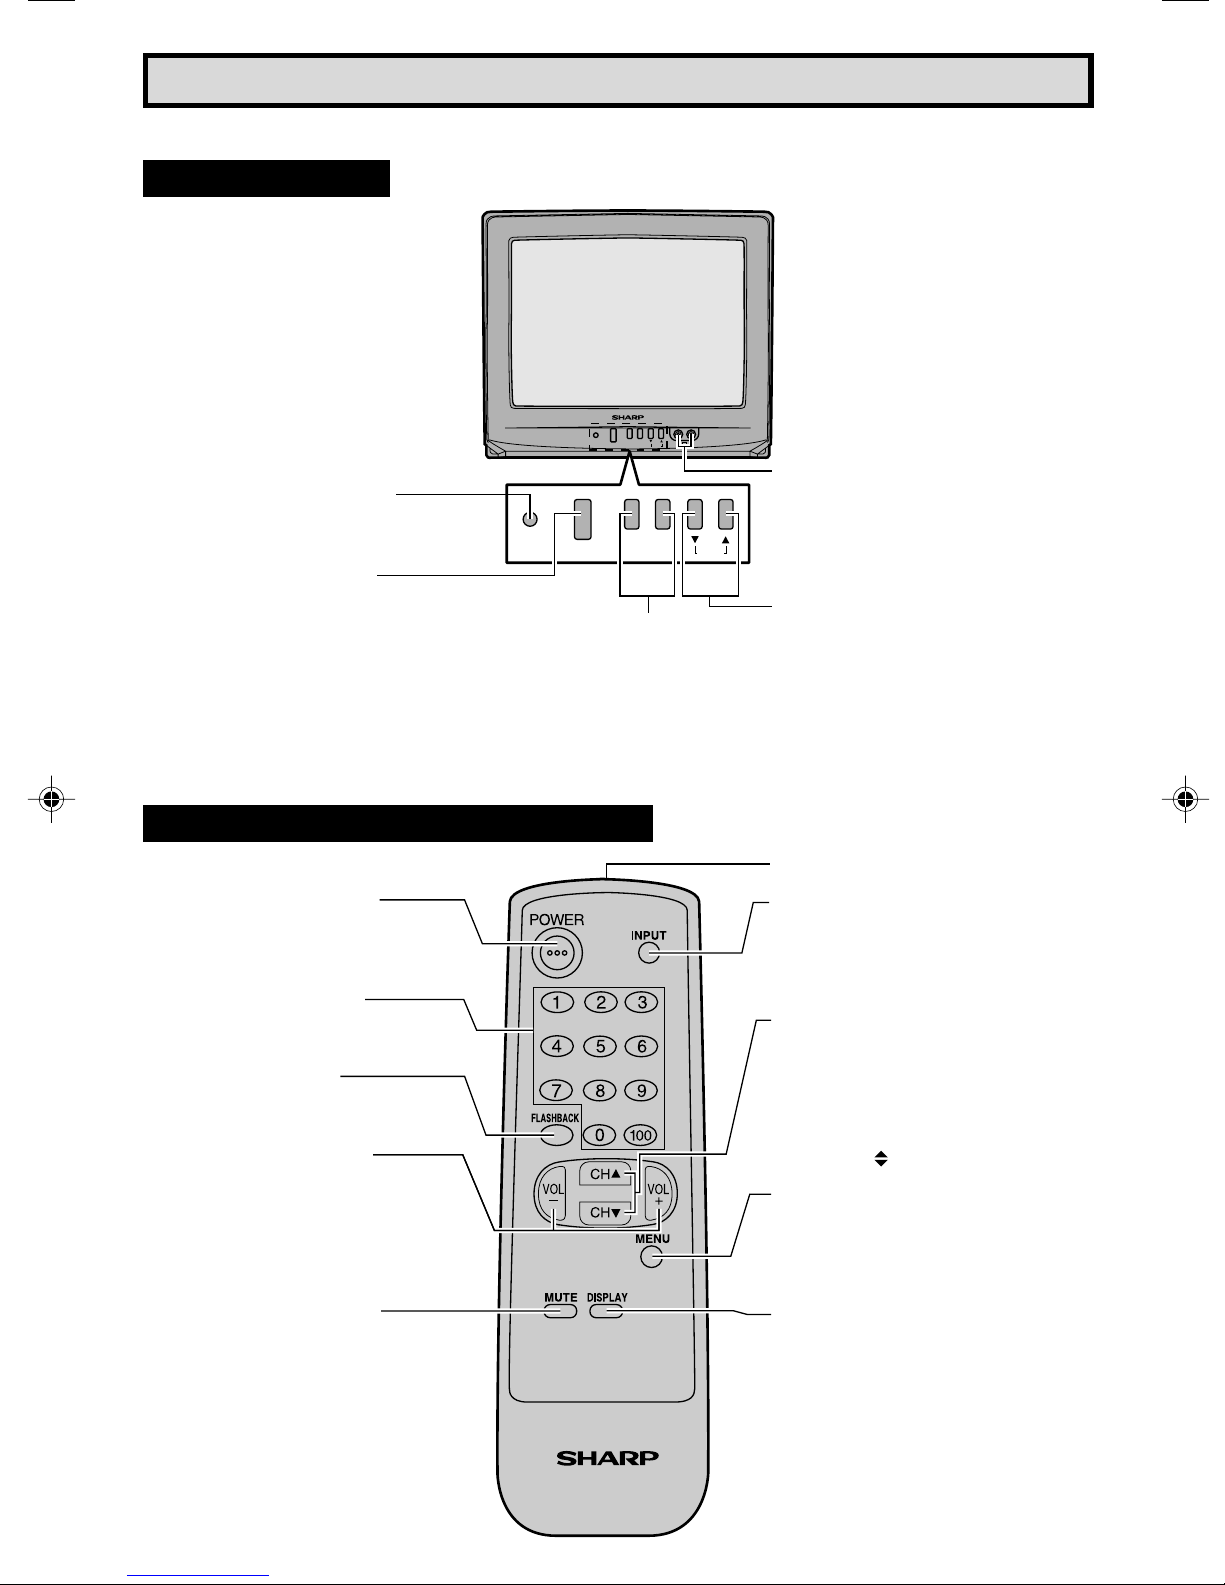
Front Panel
CH
–
VOL
+
POWER
SENSOR AREA FOR
REMOTE CONTROL
POWER
POWER
Press → On.
Press again → Off.
VOLUME UP/DOWN
(+) Increases sound.
(–) Decreases sound.
VIDEO IN AUDIO
MENU
VIDEO/AUDIO IN TERMINALS
–
VOL
CH
+
MENU
CHANNEL UP/DOWN – MENU
(8) Selects next higher channel.
(9) Selects next lower channel.
• Press both at the same time to
access the MAIN MENU screen.
Basic Remote Control Functions
POWER
Press → On.
Press again → Off.
REMOTE KEYPAD
Accesses any channel from keypad.
FLASHBACK
Returns to previous channel.
VOLUME UP/DOWN
(+) Increases sound.
(–) Decreases sound.
• In menu mode, changes or selects
the TV adjustments.
MUTE
Press → Mutes sound.
Press again → Restores sound.
• CLOSED CAPTION appears when
sound is muted.
Infrared Transmitter Window
INPUT
Press → Switch to external video input
mode.
Press again → Switch to TV mode.
See page 25.
CHANNEL UP/DOWN
(8) Selects next higher channel.
(9) Selects next lower channel.
• See pages 22 ~ 24 for channel
presetting.
• Moves the “
” mark of the MENU
screen.
MENU
Press → Accesses MAIN MENU.
Press again → Exits MAIN MENU.
DISPLAY
Press → Displa ys receiving channel for
four seconds.
Press again → Removes display.
• Temporarily displays receiving
channel when in Closed Caption
mode.
TV
5
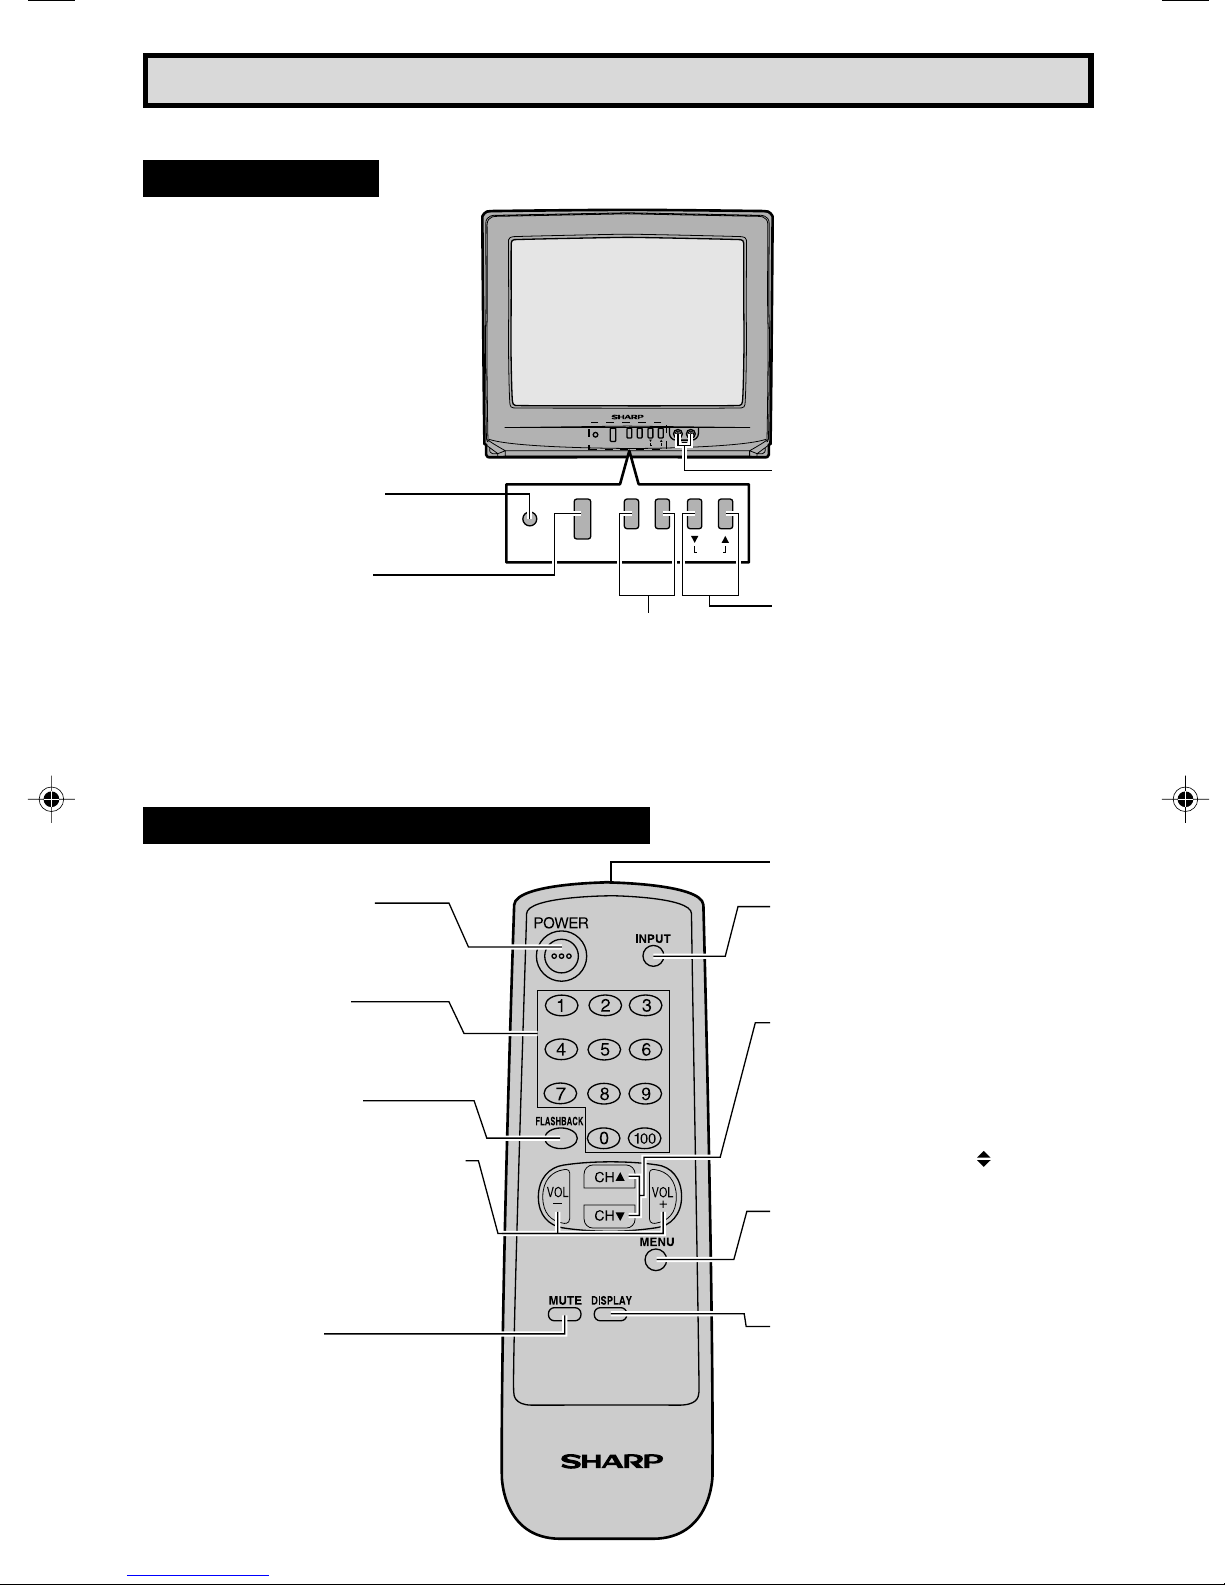
Referencia rápida de los controles de operación
L Ubicación de los controles (ESPAÑOL)
Panel Delantero
CH
–
VOL
+
VIDEO IN AUDIO
MENU
TERMINALES DE ENTRADA
VIDEO/AUDIO
–
VOL
CH
+
MENU
CANAL SUPERIOR/INFERIOR (CH) –
MENU
(8) Selecciona el siguiente canal
superior.
(9) Selecciona el siguiente canal
inferior.
• Pulse ambos al mismo tiempo para
acceder a la pantalla de MENU
PRINCIPAL.
ZONA DEL SENSOR DEL
MANDO A DISTANCIA
ALIMENTACION (POWER)
Pulsando → Enciende (On).
Pulsando nuevamente → Apaga (Off).
POWER
POWER
AUMENTO/DISMINUCION
DEL VOLUMEN (VOL)
(+) Aumenta el sonido.
(–) Disminuye el sonido.
Funciones Basicas Del Control Remoto
ALIMENTACION (POWER)
Pulsando → Enciende (On).
Pulsando nuevamente → Apaga
(Off).
TECLADO A DISTANCIA
Para tener acceso a cualquier canal
empleando las teclas.
RETORNO AL CANAL
ANTERIOR (FLASHBACK)
Para volver al canal anterior.
AUMENTO/DISMINUCION
DEL VOLUMEN
(VOLUME UP/DOWN)
(+) Aumenta el sonido.
(–) Disminuye el sonido.
• En modo de MENU cambia o
selecciona el ajuste del televisor.
SILENCIAMIENTO (MUTE)
Pulsando → Silencia el sonido.
Pulsando nuevamente → Restaura el
sonido.
• CLOSED CAPTION aparece
automáticamente cuando el sonido
es silenciado. Siempre y cuando la
transmisión tenga esta señal.
TV
V entanilla del transmisor de infrarrojos
ENTRADA (INPUT)
Pulsando → Cambìa al modo de
entrada de video externo.
Pulsando nuevamente → Cambìa al
modo de TV.
CANAL SUPERIOR/INFERIOR
(CHANNEL UP/DOWN)
(8) Selecciona el siguiente canal
superior.
(9) Selecciona el siguiente canal
inferior.
• En el modo de MENU, mueve la
marca “
”.
MENU (MENU)
Pulsando → Accede al MENU PRINCIPAL.
Pulsando nuevamente → Sale del
MENU PRINCIPAL.
VISUALIZACION (DISPLAY)
Pulsando → Aparece el canal de recepción por cuatro segundos.
Pulsando nuevamente → Elimina la
visualización.
• En el modo de “Closed Caption” se
muestra el canal de recepción por
un corto tiempo.
6
Référence rapide sur les commandes
L Emplacement des touches (FRANÇAIS)
Panneau Avant
CH
–
VOL
+
VIDEO IN AUDIO
MENU
PRISES D’ENTRÉE VIDÉO/AUDIO
–
VOL
CH
+
MENU
TOUCHES DES CANAUX
CROISSANT/DÉCROISSANT (CH) –
MENU
(8) Sélectionne le canal supérieur
suivant.
(9) Sélectionne le canal inférieur
précédent.
• Appuyez simultanément sur ces deux
touches pour accéder à l’écran
MENU PRINCIPAL.
ZONE DE DETECTION DU
CAPTEUR
ALIMENTATION (POWER)
Appuyer pour mettre sous tension.
Appuyer de nouveau pour mettre
hors tension.
POWER
POWER
AUGMENTATION/RÉDUCTION
DU VOLUME SONORE (VOL)
(+) Pour augmenter le volume du son.
(–) Pour diminuer le volume du son.
Fonctions de base de la télécommande
ALIMENTATION (POWER)
Appuyer pour mettre sous tension.
Appuyer de nouveau pour mettre hors
tension.
PAVE NUMERIQUE DE
COMMANDE A DISTANCE
Sélectionne directement le canal
voulu sur le pavé numérique.
RETOUR (FLASHBACK)
Rappelle le canal regardé précédent.
AUGMENTATION/RÉDUCTION DU
VOLUME SONORE
(VOLUME UP/DOWN)
(+) Pour augmenter le volume du son.
(–) Pour diminuer le volume du son.
• Pour changer ou sélectionner les
réglages du téléviseur en mode
menu.
SOURDINE (MUTE)
Appuyer → Mise en sourdine du son.
Appuyer de nouveau → Rétablissement du son.
• CLOSED CAPTION apparaît lorsque
le son est mis en sourdine.
TV
Fenêtre d’émission du signal infrarouge
ENTRÉE (INPUT)
Appuyer pour sélectionner le mode
vidèo externe.
Appuyer de nouveau pour sélectionner
la télévision.
TOUCHES DES CANAUX CROISSANT/DÉCROISSANT
(CHANNEL UP/DOWN)
(8) Sélectionne le canal supérieur
suivant.
(9) Sélectionne le canal inférieur
précédent.
• Déplace le curseur “
” sur l’écran
du MENU.
RÉGLAGE (MENU)
Appuyer → Accès au MENU
PRINCIPAL.
Appuyer de nouveau → Sortie du
MENU PRINCIPAL.
AFFICHAGE (DISPLAY)
Appuyer pour afficher le canal reçu
pendant quatre secondes.
Appuyer de nouveau pour faire
disparaître le canal.
• Pour afficher temporairement le
canal reçu en le mode Sous-titres.
7
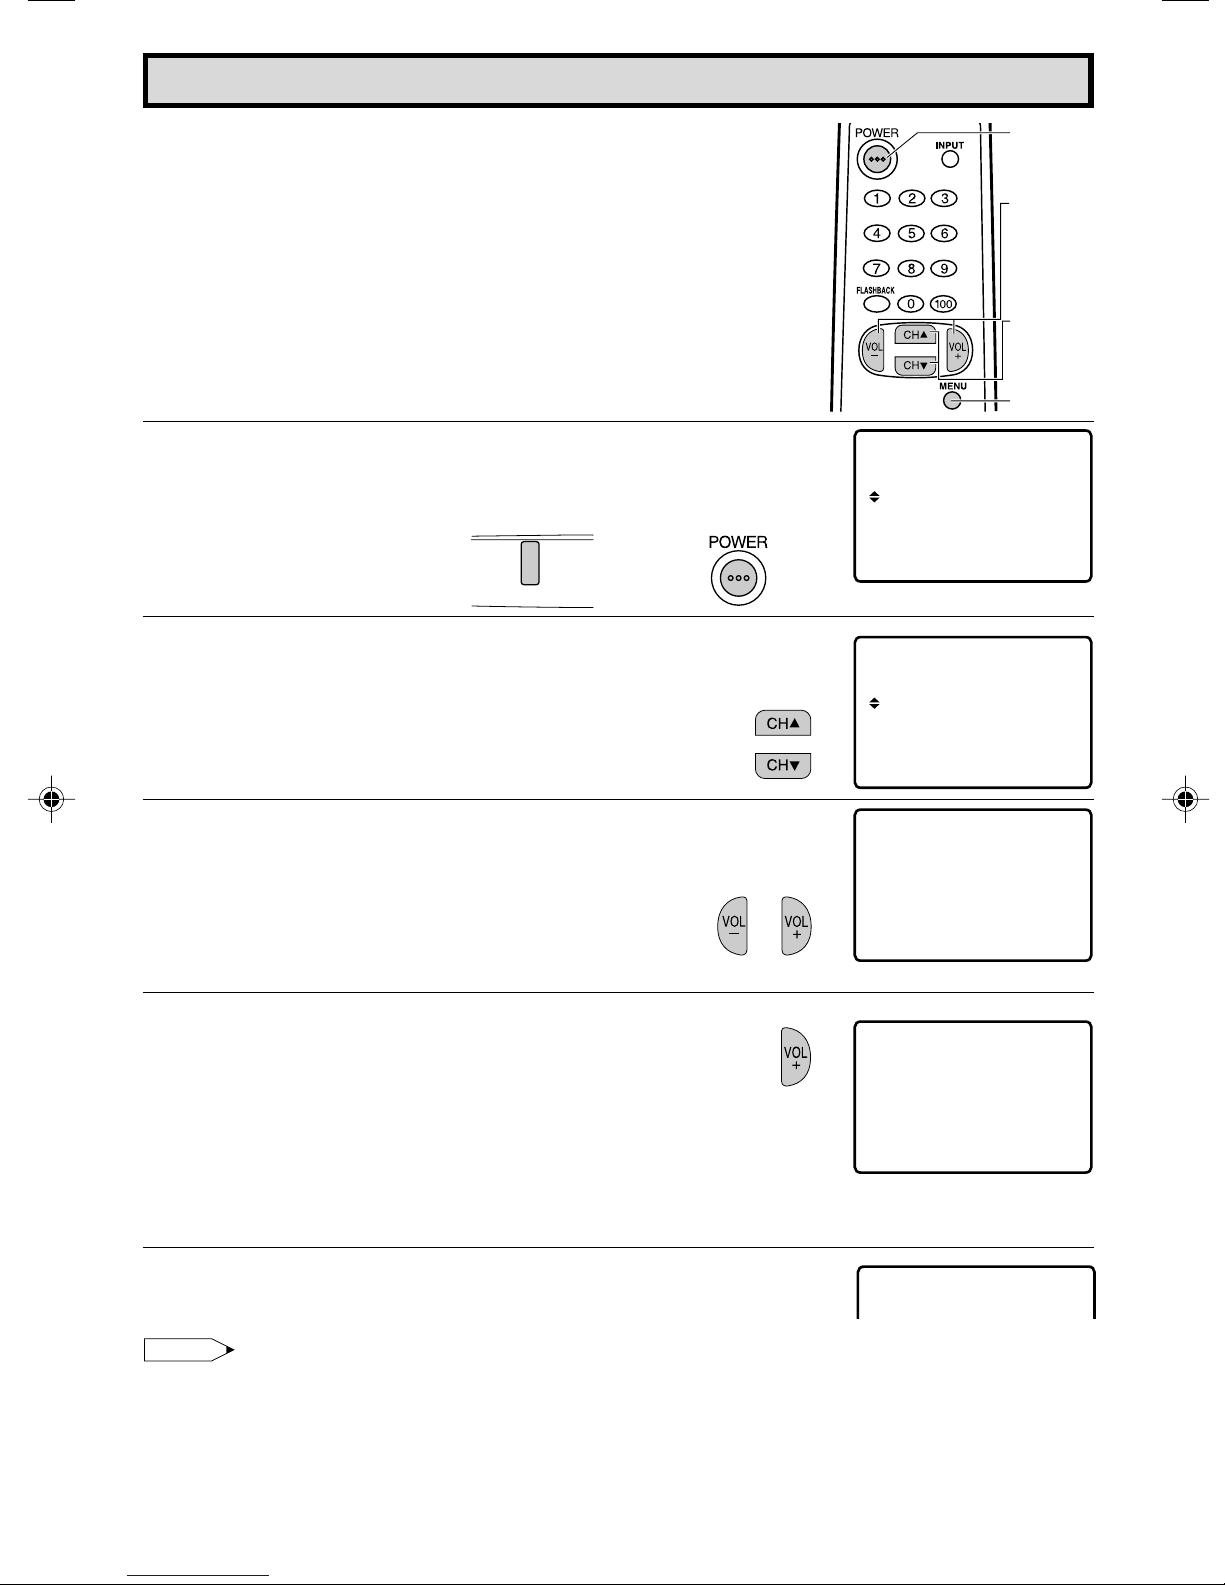
EZ SETUP during First Power On
L When you turn on the TV for the first time, it will automatically
memorize the broadcasting channels.
Please perform the following instructions before you press the
power button.
(1) Insert the batteries into the remote control. (See page 3)
(2) Connect the antenna cable to the TV set. (See page 3 ~ 4)
(3) Plug in the AC POWER cord to the wall outlet.
1 Press the
POWER
button on the TV set or on the Remote Control
to turn on the TV. The SELECT LANGUAGE mode will be
displayed.
2 Press
CH UP
(8) or
DO WN
(On the Set)
POWER
(9) to select “ENGLISH”, “SPANISH
(Remote Control)
(ESPAÑOL)” or “FRENCH (FRANÇAIS)”.
POWER
VOLUME
(+)/(–)
CHANNEL
UP ( 8)/
DOWN (9)
MENU
L A NGU AGSELECT E
ENGL I SH
ESPAÑOL
FR NCAIS
A
SE ECT : CH8 / 9
L
SE :TL+–/
VO
(SELECT LANGUAGE mode)
L A NGU AGSELECT E
ENGL I SH
ESPAÑOL
FR NCAIS
A
SE ECT : CH8 / 9
L
SE :TL+–/
VO
3 Press
VOL (+)
or
(–)
to access EZ SETUP mode.
OR C A BL E .
ANTENNCONNEC T A
TS ART SETUP?ZE
YE : VOL +
NO :
S
VOL –
(EZ SETUP mode)
4 Press
VOL (+)
.
The tuner will automatically search for the
broadcasting and cable TV channels. (The CH No.
will automatically increase when it appears.)
WA I TPLE EAS
AU18TO RGGAMM I NORP
If you want to stop the EZ SETUP process once it
has started, press
V OL (–)
and it will be canceled.
TSOP:
VOL –
If you want to SETUP again, please refer to page
21 on SETUP.
5 Once EZ SETUP is completed, the lowest channel number
memorized will be displayed.
Note:
• If EZ SETUP does not memorize all the channels in your region, please refer to page 22 for more
information on manually memorizing the channels using CHANNEL SETTING.
• It may be difficult to PRESET when the broadcasting signals are weak, the channel cycle frequency
is incorrect or the frequency jamming is occuring around the area. Please refer to pages 22 ~ 24 for
more information on manually memorizing the channels using CHANNEL SETTING.
8
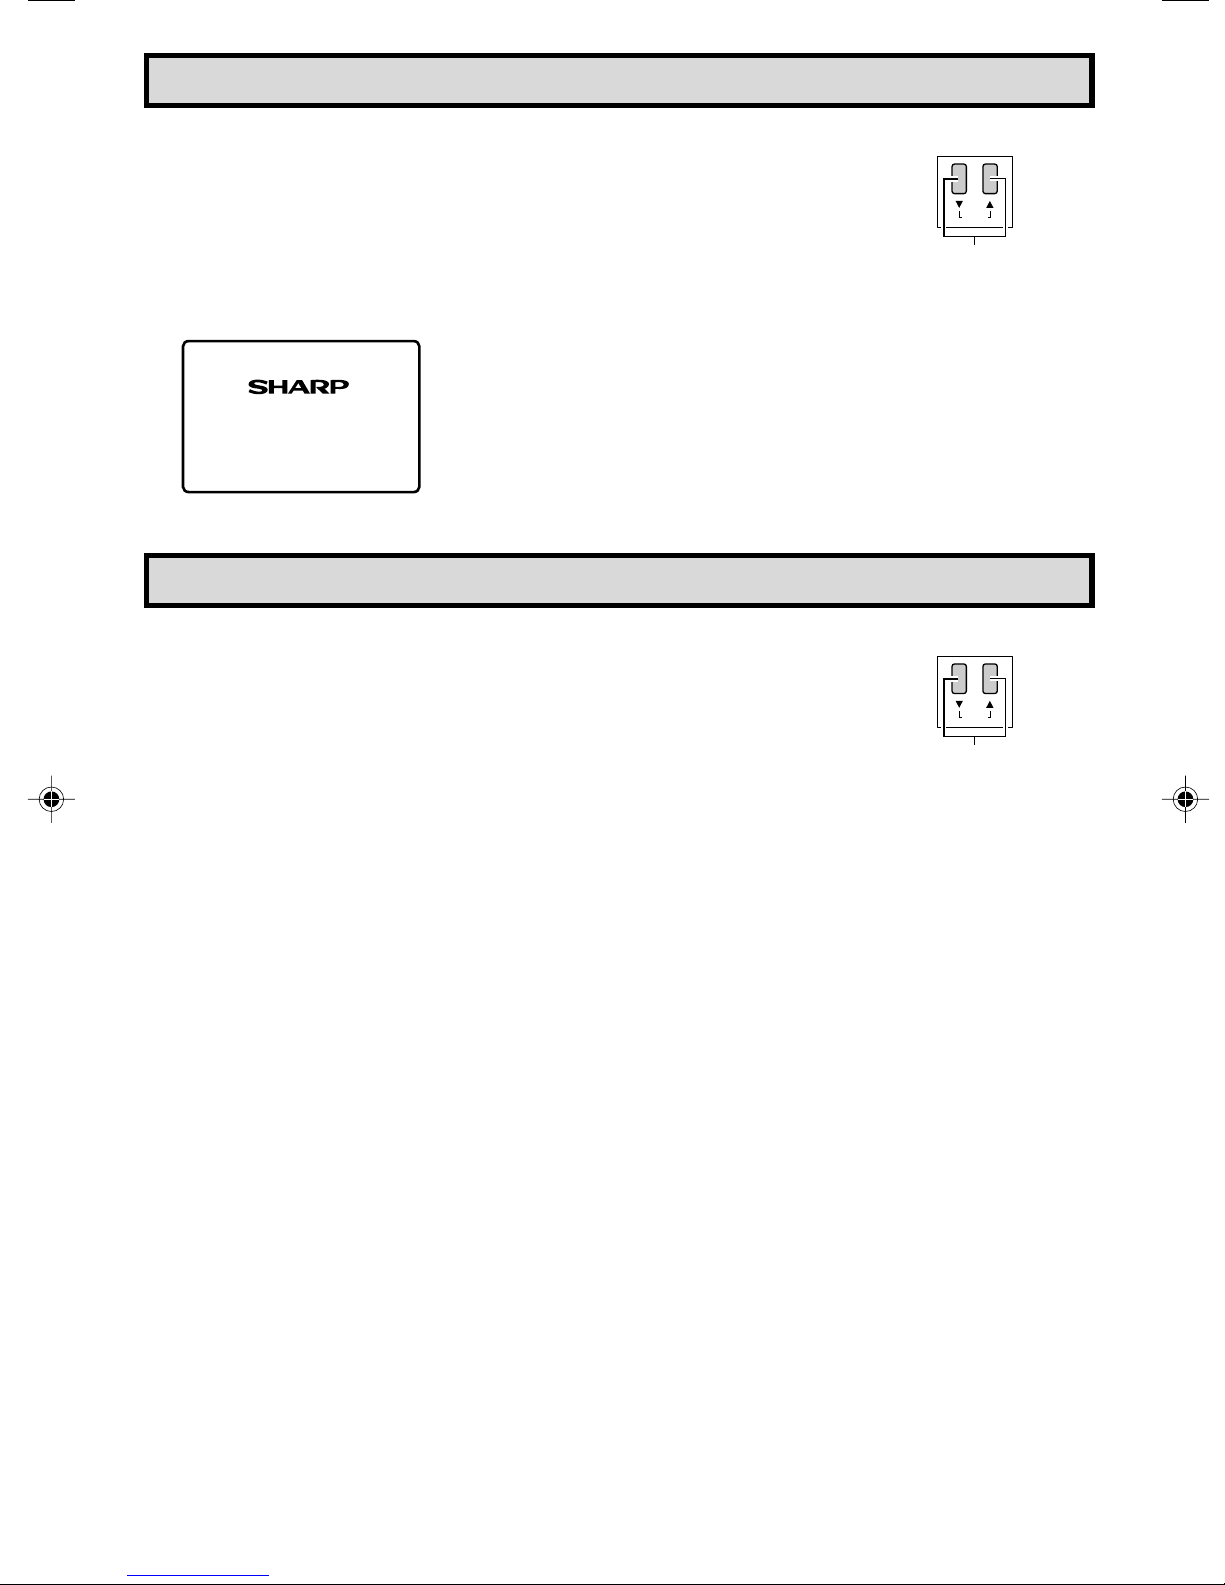
Demo Mode
• To quickly learn more about the TV set, press and hold f or more than
three seconds both
CH UP (
88
8
88
)
and
DOWN (
99
9
)
on the TV set. The TV
99
(On the Set)
set will go into DEMO mode and briefly explain the various features.
• To cancel DEMO mode, again press both
CH UP (
88
8
88
)
and
DOWN (
99
9
99
)
CH
MENU
on the TV set.
CHANNEL
88
UP (
8
)/DOWN (
Example:
DEMO mode display
CForm
oem
SHARP
SHARP
PMrio
ndd
uc
s
t
s
88
buttons
Accessing the MAIN MENU screen without Remote Contr ol
• If you misplaced your Remote Control y ou can still access most settings
via the MAIN MENU screen when you press both
DOWN (
99
9
)
on the TV set.
99
CH UP (
88
8
88
)
and
• Some features of y our TV set will not be accessib le without the Remote
Control. If you lost your Remote Control, contact a Sharp Ser vice
Center for a replacement.
(On the Set)
CHANNEL
88
UP (
8
)/DOWN (
88
buttons
CH
MENU
99
9
99
99
9
99
)
)
9
 Loading...