

OPERATOR'S MAN U AL
SMT
MODEL # ORDER #
SMT-354037E 1.103-841.0
To locate your local Shark Commercial Pressure Washer Dealer nearest you,
visit www.sharkpw.com
9.800-504.0-D10/26/16

TABLE OF CONTENTS
Important Trailer Safety Information 4-8
What to Check and How to Check 9
Important Safety Information 10-12
Component Identifi cations 13
Accessory Assembly Instructions 14
Assembly Instructions 15
Installation 16
Operating Instructions 17
Detergents & General Cleaning Techniques 18
Shut Down & Clean-up Procedures 19
Storage 19
Troubleshooting 20-21
Maintenance Charts 22
Oil Change Record 22
Preventative Maintenance 24
Maintenance & Service 25-27
2
Shark SMT • 9.800-504.0

TABLE OF CONTENTS
Notice
This trailer is equipped to meet applicable U.S. Federal safety standards. Check local and state requirements
regarding brakes and any additional equipment that may be required. Any modifi cations or additions including
load-equalizing hitches, without written factory consent: usage in an abnormal manner including overloading
voids all manufacturers’ warranties and liability.
WARNING: This Owner's Manual contains safety information and instructions for your trailer.
You must read this manual before loading or towing your trailer.
You must follow all safety precautions and instructions.
Model Number ______________________________
Serial Number ______________________________
Date of Purchase ____________________________
The model and serial numbers will be found on a decal at tached to the
pressure washer. You should record both serial number and date of purchase
and keep in a safe place for future ref er ence.
PATENT PENDING
3
Shark SMT • 9.800-504.0

IMPORTANT TRAILER SAFETY INFORMATION
Referencing the Utility Trailer in this
Manual
All references to the trailer or component parts to
either left or right are made with the assumption that
you are standing behind the trailer facing forward. Your
left hand or right hand is the equivalent on the trailer.
Tire Safety
The most common cause of trailer tire failure is underinflation. Therefore, it is important that you always
maintain the specifi ed air pressure as indicated by the tire
manufacturer on the tire's side-walls. This information can
also be found on the tire label or the air pressure molded
on the tire side-wall.
The most important things you can do to maintaining
proper tire pressure are observe all tire and trailer
maximum carrying capacities, avoid road hazards, and
inspect the tires for cuts, slashes and other irregularities.
These practices, along with other care and maintenance,
can improve handling, help protect you and others from
avoidable breakdowns and accidents, improve fuel
economy, and increase the life of your tires.
Make tire safety a regular part of your trailer maintenance
routine. The time you spend is minimal compared to the
amount of time, inconvenience, and potential safety
hazards that can occur from a fl at tire or failure.
Basic Tire Maintenance
Properly maintained tires improve the load-carrying
capability of your trailer. You can help avoid fl at tires and
tire failures by main taining proper tire pressure, observing
tire and trailer capacity limits, avoiding road hazards, and
inspecting your tires regularly.
Identifying Your Recommended Tire
Pressure and Maximum Load Carrying
Capacity for Your Trailer
Both the tire placard and the VIN label are permanently
attached on top of the frame of your trailer and have the
required information printed on them. They also list the
maximum load that can be placed on the trailer without
exceeding the load limits of the tires or the trailers other
components. These labels indicate the manufacturer’s
information including:
• Recommended tire size.
• Recommended tire infl ation pressure.
• The maximum weight the trailer is designed
to carry.
• Gross vehicle weight rating of the trailer.
• Gross axle weight rating of the trailer.
Understanding Tire Pressure and Load
Limits
Tire infl ation pressure is the level of air in the tire that
provides it with the load-carrying capacity and affects
the overall performance of the trailer. The tire infl ation
pressure is a number that indicates the amount of air
pressure that is inside the tire. It is measured in pounds
per square inch (PSI). The tire must be infl ated to the air
pressure as designated on the labels. Also listed on the
labels is the air pressure in kilo Pascals (kPa), which is a
metric measurement. Tire manufacturers determine the
air pressure to maximize the amount of weight the tires
can safely carry. The proper tire pressure for your trailer
tires is referred to as the "recommended cold infl ation
pressure." It is diffi cult to obtain the recommended tire
pressure if your tires are not cold when the reading is
taken because the air will expand when it is warmed by
towing down the road, thus increasing the air pressure
inside. If air is added to a tire that is low the air pressure
should never exceed the recommended pressure.
It is important to check your trailer’s tire pressure at least
once a month for the following reasons:
Most tires will naturally lose air over time.
Tires can lose air suddenly if driven over an object that
punctures or cuts the tire. Sometimes a sharp blow from
a pothole or curb can knock the tire loose from the rim
causing immediate defl ation.
Maintaining Proper Tire Pressure
Locate the recommended tire pressure on the trailer's tire
information placard or owner's manual.
Record the tire pressure of all tires. If the tire pressure is
too high in any of the tires, slowly release air by gently
pressing on the tire valve stem with the edge of your tire
gauge until you get the correct pressure.
If the tire pressure is too low, note the difference between
the measured tire pressure and the correct tire pressure.
These "missing" pounds of pressure are what you will
need to add.
Add the missing pounds of air pressure to each tire that
is under infl ated.
Check all tires to make sure they have the same air
pressure.
If you have been towing your trailer and think that a tire
is under infl ated, fi ll it to the recommended cold infl ation
pressure indicated on your trailer's tire label placard or the
VIN label. You can also check the sidewall of the tire for a
correct tire infl ation pressure. Your tire will have a slightly
lower air pressure because the tire is warm when you are
infl ating it, but it will be much better than to continue to
tow it with the under infl ation it may have had. Once the
trailer has been parked long enough to allow the tires to
cool down, recheck the tire pressure and add additional
air to return the tire pressure to the recommended level.
4
Shark SMT • 9.800-504.0

IMPORTANT TRAILER SAFETY INFORMATION
Tire Size
To maintain the trailer's carrying capacity and safety,
purchase only the same size tires as what were originally
supplied on the trailer.
Safety Tips
Slow down if you have to go over a pothole or other object
in road.
Do not run over curbs and try not to strike the curb when
parking.
For a free brochure visit:
www. nhtsa.dot.gov
IMPORTANT: Before towing this trailer be sure to read
the instructions and warnings supplied in this manual.
Also read the information supplied with your tow
vehicle so you know and understand it's limitations.
Never Tow the Trailer Before Checking:
• Coupler and latch assembly show no signs of
wear or damage.
• Coupler hitch and hitch ball are of the same size.
• Coupler and safety chains are safely secured
to the hitch.
• Check all fasteners for proper tightness.
• Load is securely tied down to the trailer.
• Wheel lug nuts are properly tightened to the
right torque.
• Wheel bearings are properly adjusted and
maintained.
• Load is within the maximum load carrying
capacity of trailer.
• Tires are properly infl ated and are road worthy.
• All trailer lighting is working properly.
IMPORTANT: The load must be distributed equally on
the bed of the trailer if possible. Heavy, concentrated
loads may cause damage or possible failure of the
trailer.
WARNING: Loads place on the trailer must be securely
tied to the trailer. Always use appropriate tie downs
designed to restrict loads from moving when properly
attached. Failure to do so will allow shifting of the load
causing potential trailer failure and/or loss of the load
and personal injury.
This trailer is equipped to meet all applicable federal
safety standards in effect the day of manufacture. Check
local and state requirements regarding any additional
equipment that may be required.
The addition of optional equipment to your trailer may in
crease the total weight of your trailer package to where
it now exceeds the maximum load carrying capacity of
the trailer.
Tow Vehicles
WARNING: Serious injury or property damage can
result if the total weight of your loaded trailer exceeds
the capacity of the hitch and/or your tow vehicle.
It is very important that you know and understand the
towing capabilities of your tow vehicle. This is especially
true with the braking abilities of the tow vehicle. You
should check with your authorized dealer to see what the
capabilities are for the total towing load and the maximum
allowable tongue weight for the vehicle you plan on using
for towing.
It is also important that the lighting system in the tow
vehicle has suffi cient capacity support the additional
load the trailer lighting will add to the system. A heavy
duty fl asher may be required to make your turn signals
function properly.
Trailer Ball & Couplers
WARNING: Failure to properly engage the hitch ball in
the coupler ball socket and securely lock the coupler
latch mechanism can cause the trailer to become
detached from the tow vehicle while traveling, which
may cause serious injury or property damage.
Ball diameter for which rating (GVWR) shall not exceed
the gross trailer weight marked on the trailer coupler.
The hitch balls have the rated load they are capable of
towing stamped Into the top of the ball.
Make sure the ball that you use to tow your trailer has the
same capacity rating as the coupler.
Do not use a different size ball than the size the coupler
is designed to use.
Class Coupler Ball Diameter
II 3,500# GVWR 2”
III 5,000# GVWR 2”
IV 8,000# GVWR 2”
5
Shark SMT • 9.800-504.0
IMPORTANT TRAILER SAFETY INFORMATION
Hitch Coupler Troubleshooting
If the coupler becomes damaged it must be repaired
or replaced before towing. When the coupler is placed
on the ball, the latch should close fi rmly. Keep the latch
mechanism lightly oiled and clean. Items to check for are
as follows:
1. Latch does not grasp ball securely:
• Check the ball size. Make sure the ball and
coupler are the same size.
2. Latch does not snap into full latch position:
• Check adjustment. Latch mechanism may be
too tight.
• Check to see that the coupler housing has not
been damaged, keeping the ball hitch from fi tting
completely into the housing as designed.
3. Keep the tongue blocked up when not in use so the
coupler and mechanism are not in the ground being
exposed to dirt and moisture.
4. Apply a small amount of an automotive grease to the
ball before hitching coupler to prevent wear of the two
parts during towing.
5. Make sure the latch safety pin is in position before
towing.
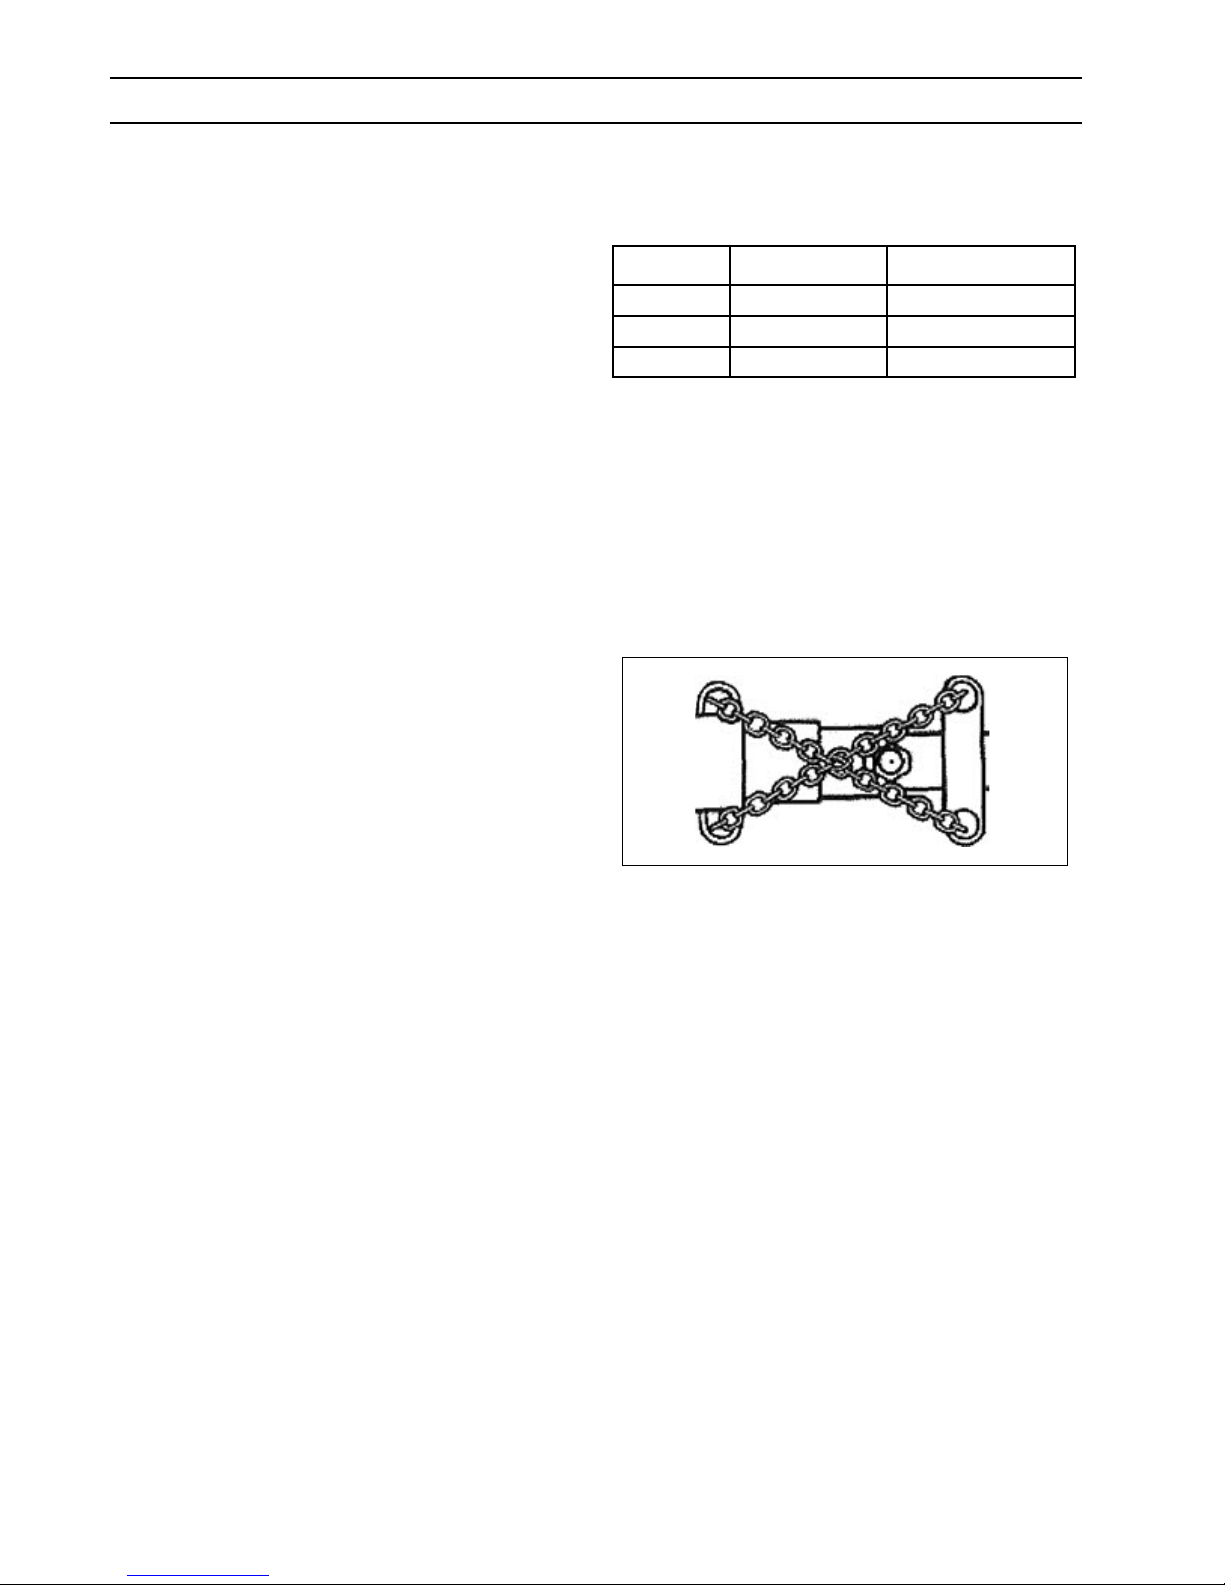
Safety Chains
Listed in the chart below are the different class sizes
of safety chains and the rated load each chain must be
capable of withstanding.
TRAILER CLASS
TRAILER WEIGHT
GVWR IN LBS.
I to 2,000 2,000
II 2,000 to 3,500 3,500
III 3,500 to 5,000 5,000
WARNING: Failure to properly attach safety chains
between the trailer and tow vehicle can result in a
runaway trailer.
WARNING: To avoid accidents, before trailering:
• Hitch only to ball size marked on coupling.
• Ball clamp must capture ball and lever or hand
wheel is fully clamped.
• Cross safety chains under coupling.
• Allow only enough slack for turns.
MINIMUM BRAKING
STRENGTH IN LBS.
Coupler & Ball Engagement
If the coupler and towing ball resist attempts to make
engagement, do not force latch assembly. Instead, check
the ball diameter to verify that it conforms to Society of
Automotive Engineers (SAE) specifi cations. Standard
two-inch diameter ball should be within the limits of
2.000-inches to 1.970-inches. Balls larger than 2.000inches will not readily fi t the coupler. A two-piece coupler
ball is not recommended.
If the coupler becomes damaged it must be repaired
or replaced before towing. When the coupler is placed
on the ball, the latch should close fi rmly. Keep the latch
mechanism lightly oiled and clean.
Improper engagement of the coupler and ball can cause
damage if the vehicles separate in transit, thus, caution
must be exercised to insure a secure hook-up. Lower the
coupler onto the ball with the coupler latch in the vertical
position. Continue to lower the trailer tongue until the jack
clears the ground, then fl ip the coupler latch to its locked
(horizontal) position. At this point visually observe that
the ball is fully engaged in the ball hitch. An even better
check to make sure the two are fully engaged is to raise
the tongue of the trailer again using the jack. Raise until
the ball hitch connection starts to raise the rear of the
tow vehicle. If the connection was not properly made, the
ball and socket will separate as the tongue of the trailer
is raised.
Bottom View
The safety chains on your trailer are an added insurance
that it will not become detached from the tow vehicle. All
safety chains are provided with an added clasp to keep
them from becoming accidentally detached from the tow
vehicle. Your trailer hitch on the tow vehicle should
have two attaching holes or rings for attaching the safety
chains, preferably one on each side of the ball hitch.
Crisscross the chains under the tongue, the chain on the
left side of the trailer tongue attached to the right side
of the ball hitch, the chain on the right side of the trailer
tongue attached to the left side of the ball hitch.
This prevents the trailer tongue from dropping to the road
should the coupler or ball hitch fail. The chains should
be rigged as tight as possible with just enough slack to
allow tight turns to be made. This can be accomplished by
twisting the chain hook in a clockwise or counterclockwise
direction thus twisting the link spacing and making the
chain shorter. Also by keeping your chains as short as
possible you prevent them from dragging on the road
and wearing the chain links. If for any reason you fi nd
it necessary to replace a safety chain, use only original
equipment.
6
Shark SMT • 9.800-504.0

IMPORTANT TRAILER SAFETY INFORMATION
Load-Carrying Capacity
Located on the front left-hand side of the frame, (either
the inside or the outside) is the VIN (Vehicle Identifi cation
Number) tag. It will show the GVWR (Gross Vehicle Weight
Rating) which is the maximum load that can be applied
to the tires on the trailer. The GVWR and the carrying
capacity of the trailer are based on the tire size installed
on the trailer.
The GVWR is the maximum carrying capacity of the trailer
with its respective tires. It may not necessarily equal the
total GVWR of the trailer less the empty weight of the
trailer because there may be another controlling factor
such as frame strength that reduces the carrying capacity
to what is listed on the VIN tag.
The tire label will list the tire size that was installed on
the trailer as original equipment when it was sold to you,
the consumer. It also lists the maximum carrying capacity
of the trailer.
IMPORTANT: The total weight of the load must never
exceed the weight of cargo listed on the tire label and/
or the maximum load carrying capacity listed on the
VIN tag on your trailer. The GVWR (Gross Vehicle
Weight Rating) listed is the maximum total weight of
the trailer with accessories and all cargo allowable to
be carried on the tires that are installed on the trailer.
WARNING: Fishtailing caused from improper tongue
weight on the tow vehicle hitch ball can cause loss of
control of the tow vehicle and resulting serious injury
or property damage.
CAUTION: The maximum load applied to the trailer
must never exceed the carrying capacity of the trailer
as stated on the VIN label and/or the tire placard. Doing
so may cause failure of one or more component parts
of the trailer causing potential damage to the trailer
and/ or a potential accident. All concentrated loads
must be spread over as large an area as possible to
eliminate potential damage to the decking.
Shown below is an example of the tire label that is placed
on your trailer showing the items just discussed above.
Once you have familiarized yourself with the information
supplied on the ex ample tire label and VIN tag, check the
tire size and capacity of your trailer as shown on the VIN
tag on your trailer.
TIRE AND LOADING INFORMATION
RENSEIGNEMENTS SUR LES PNEUS ET LE CHARGEMENT
The weight of cargo should never exceed
TIRE SIZE COLD TIRE PRESS.
REAR XXXXXXX XXX KPA (XX PSI)
INTER XXXXXXXXX
FRONT XXXXX
SPARE XXXXX
MANUFACTURED BY: KARCHER NORTH AMERICA INC. DATE OF MFG.:XX/XXXX
GVWR (XXXX KG (XXXX LB)
GAWR (EACH AXLE)
XXXX KG (XXXX LB) XXXX XXXX XXX KPA (XX PSI) SINGLE
THIS VEHICLE CONFORMS TO ALL APPLICABLE U.S. FEDERAL MOTOR VEHICLE SAFETY STANDARDS
IN EFFECT ON THE DATE OF MANUFACTURE SHOWN ABOVE.
V.I.N. : TYPE : TRAILER
XXXXXXXXXXXXXXXXX
WITH TIRES RIMS AT COLD
XXXX kg or XXXX lbs
TRX-XXXX
SEE OWNER’S
MANUAL FOR
ADDITIONAL
INFORMATION
VOIR LE MANUAL
DE L’USAGER
POUR PLUS DE
RENSEIGNEMENTS
Proper Weight Distribution & Tongue
Weight
Ensuring that your trailer has the proper GVWR is very
important. Once that has been established and you
have the load on the trailer it is equally important that
you have proper weight distribution.
Tongue Weight
The tongue weight on your trailer is 10%-15% of the
total weight of the trailer and all the cargo that it is carrying. This is the amount of weight that is then transferred
to the tow vehicle through the ball hitch.
Example: The total weight of the trailer with load is 800
pounds. The tongue weight should not be less than 80
pounds (10%).
Too light of tongue weight can cause the trailer to
“fi shtail” (sway Weight Rating) as you travel down the
highway. This creates excessive strains on the tow
vehicle, hitch and on the trailer itself. It can very easily
lead to an accident.
To adjust for too light of a tongue weight the load must
be shifted for ward with respect to the axle. This will
increase the weight that is transferred to the tongue.
Adjustments should be made until the tongue weight
falls within 10% -15% recommended range. Likewise,
if you have too much tongue weight adjust the weight
backwards with respect to the axle until the tongue
weight falls in the recommended range
Tow vehicles vary on how much tongue weight they
can support for proper towing.
7
Shark SMT • 9.800-504.0
IMPORTANT TRAILER SAFETY INFORMATION
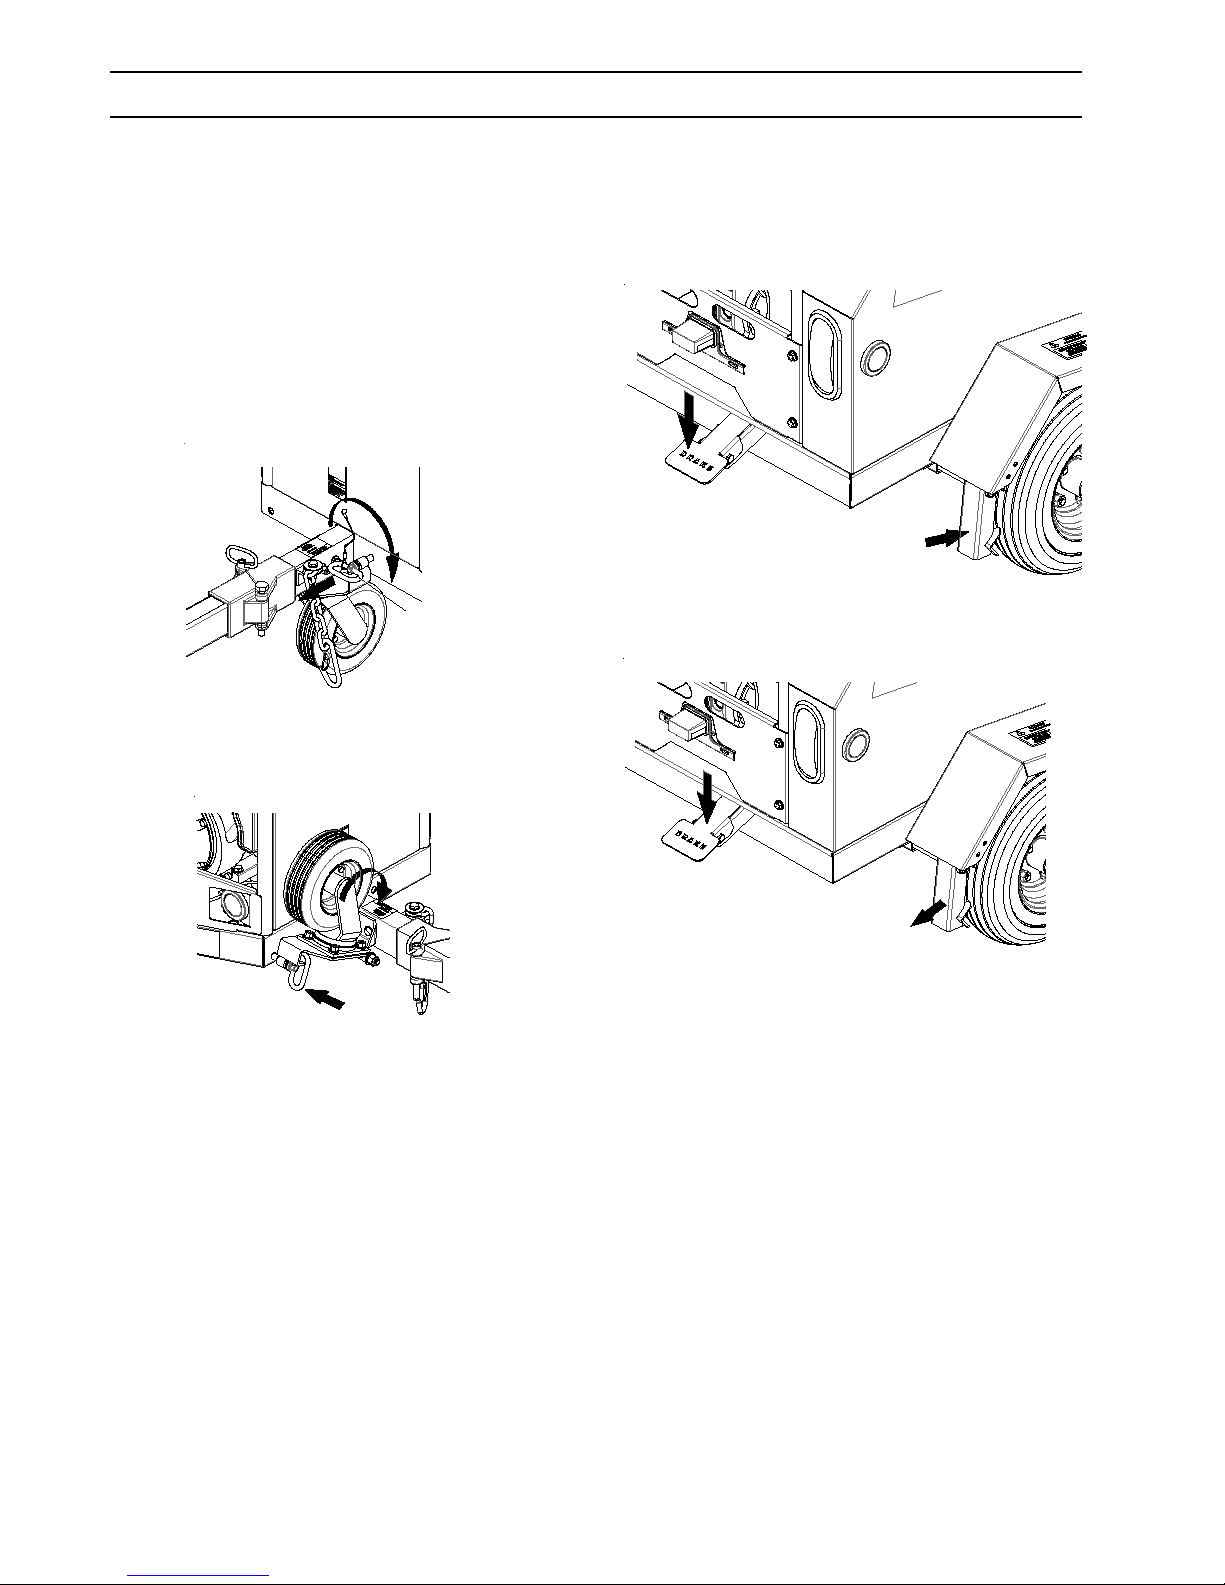
Caster Operations
This trailer has a caster for manual transporting
while using the pressure washer and to keep the
trailer tongue off the ground when not trailering.
WARNING: The caster must be in the up position
when trailering the unit.
STEP 1: Release the quick release pin by rotating
it clock wise. Pull Quick release pin from receptacle. Rotate the caster clockwise.
Trailer Brake Operations
WARNING: To avoid injury, the trailer brake must
be set when operating the pressure washer or
when not in use.
Quick release
pin
STEP 2: Insert quick release pin in receptacle.
Lock quick release pin in place by rotating pin
counter clockwise. Reverse step to lower caster.
NOTE: Before towing, diesel shut-off valve must
be in the OFF position.
To set the brake, press down on the brake pedal
until it engages on the back tires.
To release the brake, push the center of the brake to
release see that it has disengaged from the back tire.
CAUTION: This brake has a spring mechanism
that will return brake to its dis-engaged state.
Make sure foot or hand is moved out of the pinch
point area.
8
Shark SMT • 9.800-504.0
WHAT TO CHECK AND HOW TO CHECK
WHAT TO CHECK AND HOW TO CHECK
Tire Pressure
Proper air pressure for your tires is printed on the
sidewall. Check pressure while tires are cold. Do not
raise or lower pressure to meet load. Pressure other
than recommended pressure will lead to excessive tire
wear or tire failure. Balancing recommended.
Wheels
1
Check wheels for hole elongation or “out of round”. This condi-
34
tion can be caused by lug nuts
not being tight or being too tight.
Trailer wheels can be damaged
2
5
by chuck holes or curb jumping.
You may not be aware of the road shock to the wheels
without periodic checks. Replace any wheel that is
bent. Replace any wheel if you see elongation of the
bolt holes.
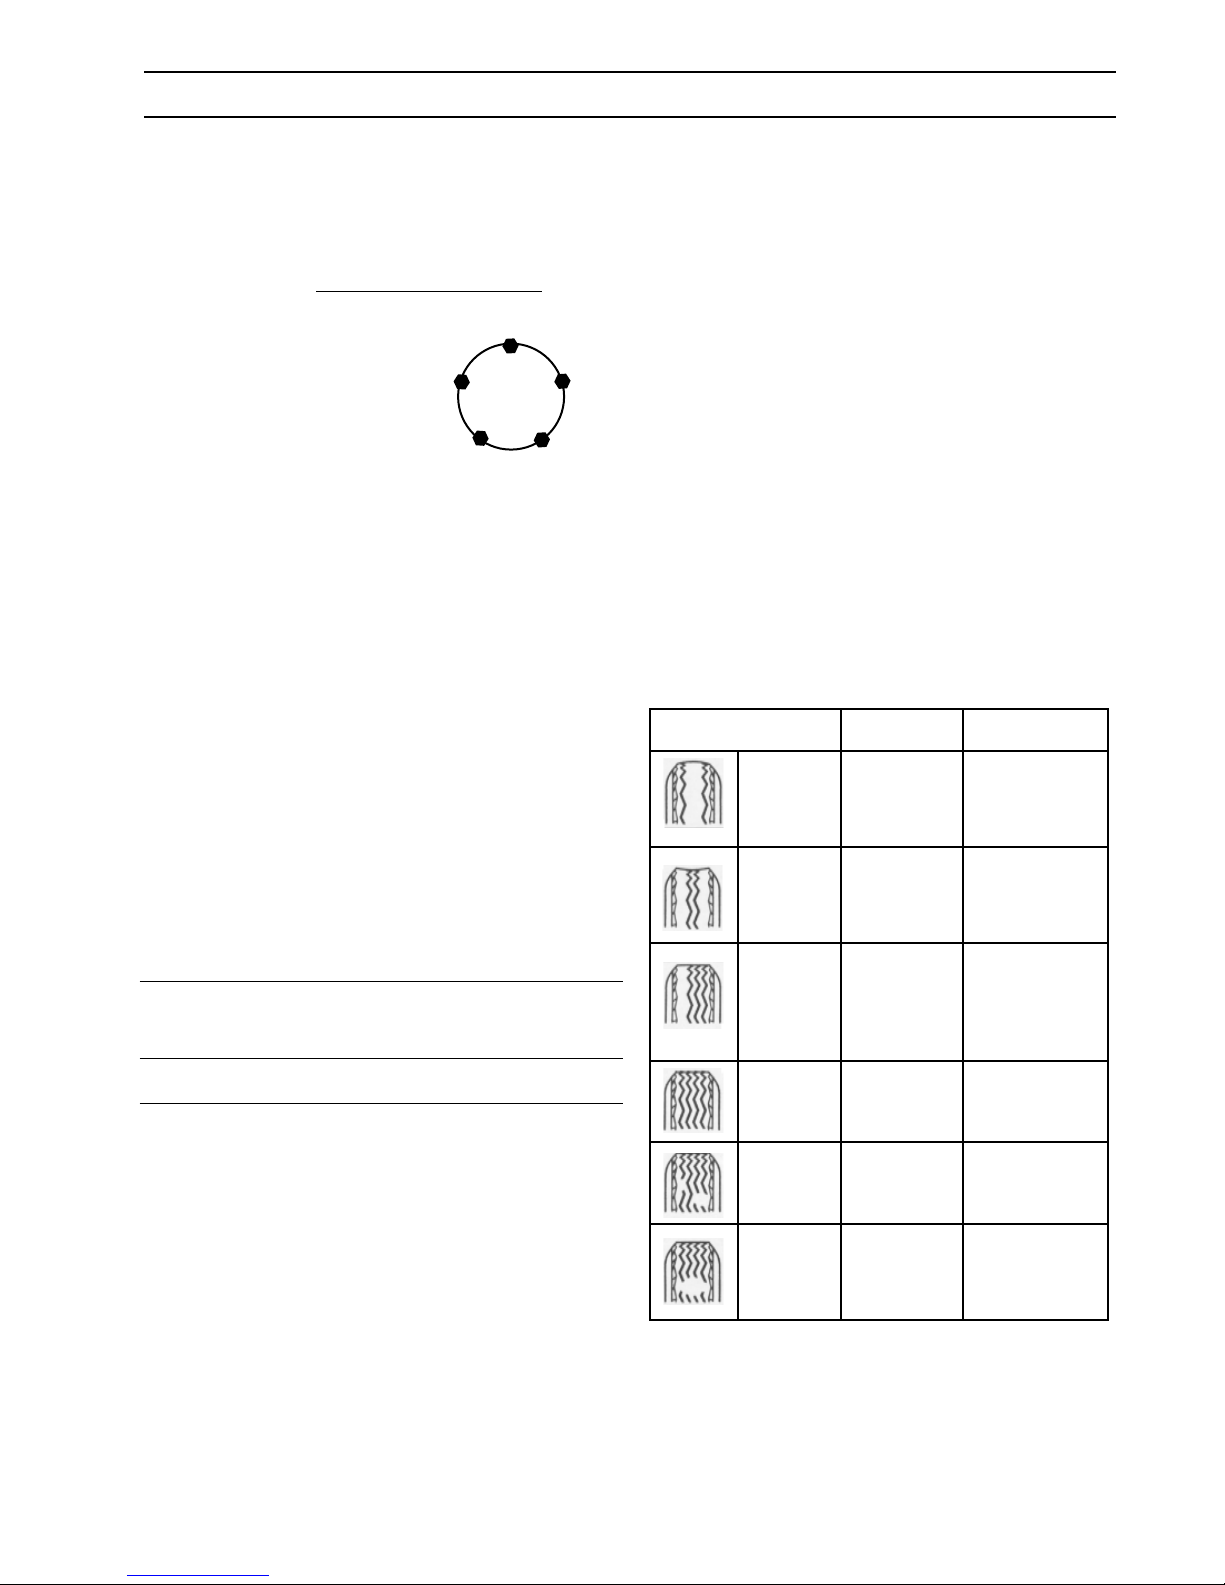
Wheel Lugs
Wheel lug nuts must be tightened with a torque wrench.
Refer to the chart below for proper torque.
1. Start all bolts or nuts by hand to prevent cross
threading.
2. Tighten bolts or nuts following sequence at right.
3. The tightening of the fasteners should be done in
stages. Following the recommended sequence,
tighten fasteners per wheel torque chart below.
4. Wheel nuts/bolts should be torqued before fi rst
road use and after each wheel removal. Check and
re-torque after the fi rst 10 miles, 25 miles and
again at 50 miles. Check periodically thereafter.
Wheel Torque Requirements
WHEEL
SIZE
1st Stage 2nd Stage 3rd Stage
TORQUE SEQUENCE
Tires
Before mounting tires onto wheels make certain that
the rim size and contour is approved for the tire as
shown in the Tire and Rim Association Yearbook or the
tire manufacturer’s catalog. Also make sure the tire will
carry the rated load. If the load is not equal on all tires
due to trailer weight distribution, use the tire rated for
the heaviest wheel position.
NOTE: The capacity rating molded into the sidewall
of the tire is not always the proper rating for the tire if
used in a trailer application. Use the following guideline:
1. LT and ST tires: use the capacity rating molded
into the tire.
2. Passenger Car Tires: Use the capacity rating
molded into the tire sidewall divided by 1.10.
Use tire mounting procedures as outlined by the Rubber
Manufacturer’s Association or the tire manufacturers.
NOTE: Tire wear should be checked frequently
because once a wear pattern becomes fi rmly
established in a tire it is diffi cult to stop, even if
the underlying cause is corrected.
WEAR PATTERN CAUSE ACTIONACTION
Adjust pressure
Center
Wear
Edge
Wear
Side Wear
Over
Infl ation
Under
Infl ation
Loss of
camber or
overloading
to particular
load per tire
catalog.
Adjust pressure
to particular
load per tire
catalog.
Make sure load
doesn't exceed
axle rating.
Align at alignment shop.
16" 20 - 25 50 - 60 80-90
Ball Coupler Hitches
Coupler assembly includes a latch lever and latch
lever safety pin or hitch pin. Be sure the latch lever is
locked and the pin properly secured before moving
your trailer. The pin can be engaged fully only if ball is
properly seated in the coupler.
Shark SMT • 9.800-504.0
Toe Wear
Cupping
Flat
Spots
Incorrect
toe-in
Out of
balance
Wheel
lockup & tire
skidding
Align at alignment shop.
Check bearing
adjustment and
balance tires.
Avoid sudden
stops when
possible and
adjust brakes.
9
 Loading...