

Page 1
MANUAL
RGB ILLUMINATION SET
Page 2

2
Table of Contents
1. Specifications . . . . . . . . . . . . . . . . . . . . . . . . . . . . . . . . . 3
1.1 Pacelight P1 . . . . . . . . . . . . . . . . . . . . . . . . . . . . . . . 3
1.2 Pacelight RGB LED Strip S1 . . . . . . . . . . . . . . . . . . . . . . . . . . 3
1.3 Pacelight RGB Fan F1 . . . . . . . . . . . . . . . . . . . . . . . . . . . . 4
2. Safety Instructions . . . . . . . . . . . . . . . . . . . . . . . . . . . . . . . 5
3. Installation . . . . . . . . . . . . . . . . . . . . . . . . . . . . . . . . . . 6
3.1 Connect to the Mainboard . . . . . . . . . . . . . . . . . . . . . . . . . . 6
3.2 Connect to the Power Supply. . . . . . . . . . . . . . . . . . . . . . . . . . 6
3.3 Connect the Fans . . . . . . . . . . . . . . . . . . . . . . . . . . . . . . 7
3.4 Connect the LEDs . . . . . . . . . . . . . . . . . . . . . . . . . . . . . . 8
3.5 Attaching the Pacelight P1 . . . . . . . . . . . . . . . . . . . . . . . . . . 9
4. Software Installation . . . . . . . . . . . . . . . . . . . . . . . . . . . . . . 10
5. Menu Overview . . . . . . . . . . . . . . . . . . . . . . . . . . . . . . . . 11
6. Fan Compatibility . . . . . . . . . . . . . . . . . . . . . . . . . . . . . . . 12
7. LED Control . . . . . . . . . . . . . . . . . . . . . . . . . . . . . . . . . . 13
7.1 Manual LED Control . . . . . . . . . . . . . . . . . . . . . . . . . . . . . 13
7.2 Channel Synchronization . . . . . . . . . . . . . . . . . . . . . . . . . . . 14
7.3 LED Control by Week . . . . . . . . . . . . . . . . . . . . . . . . . . . . 15
7.4 Lighting Modes. . . . . . . . . . . . . . . . . . . . . . . . . . . . . . . 16
7.5 Advanced Lighting Options . . . . . . . . . . . . . . . . . . . . . . . . . . 17
8. Fan Control . . . . . . . . . . . . . . . . . . . . . . . . . . . . . . . . . . 18
9. Advanced . . . . . . . . . . . . . . . . . . . . . . . . . . . . . . . . . . 19
9.1 Fan Failure Warning . . . . . . . . . . . . . . . . . . . . . . . . . . . . . 19
9.2 Time Control Dimmer . . . . . . . . . . . . . . . . . . . . . . . . . . . . 20
9.3 Assign Program . . . . . . . . . . . . . . . . . . . . . . . . . . . . . . 21
Page 3
3
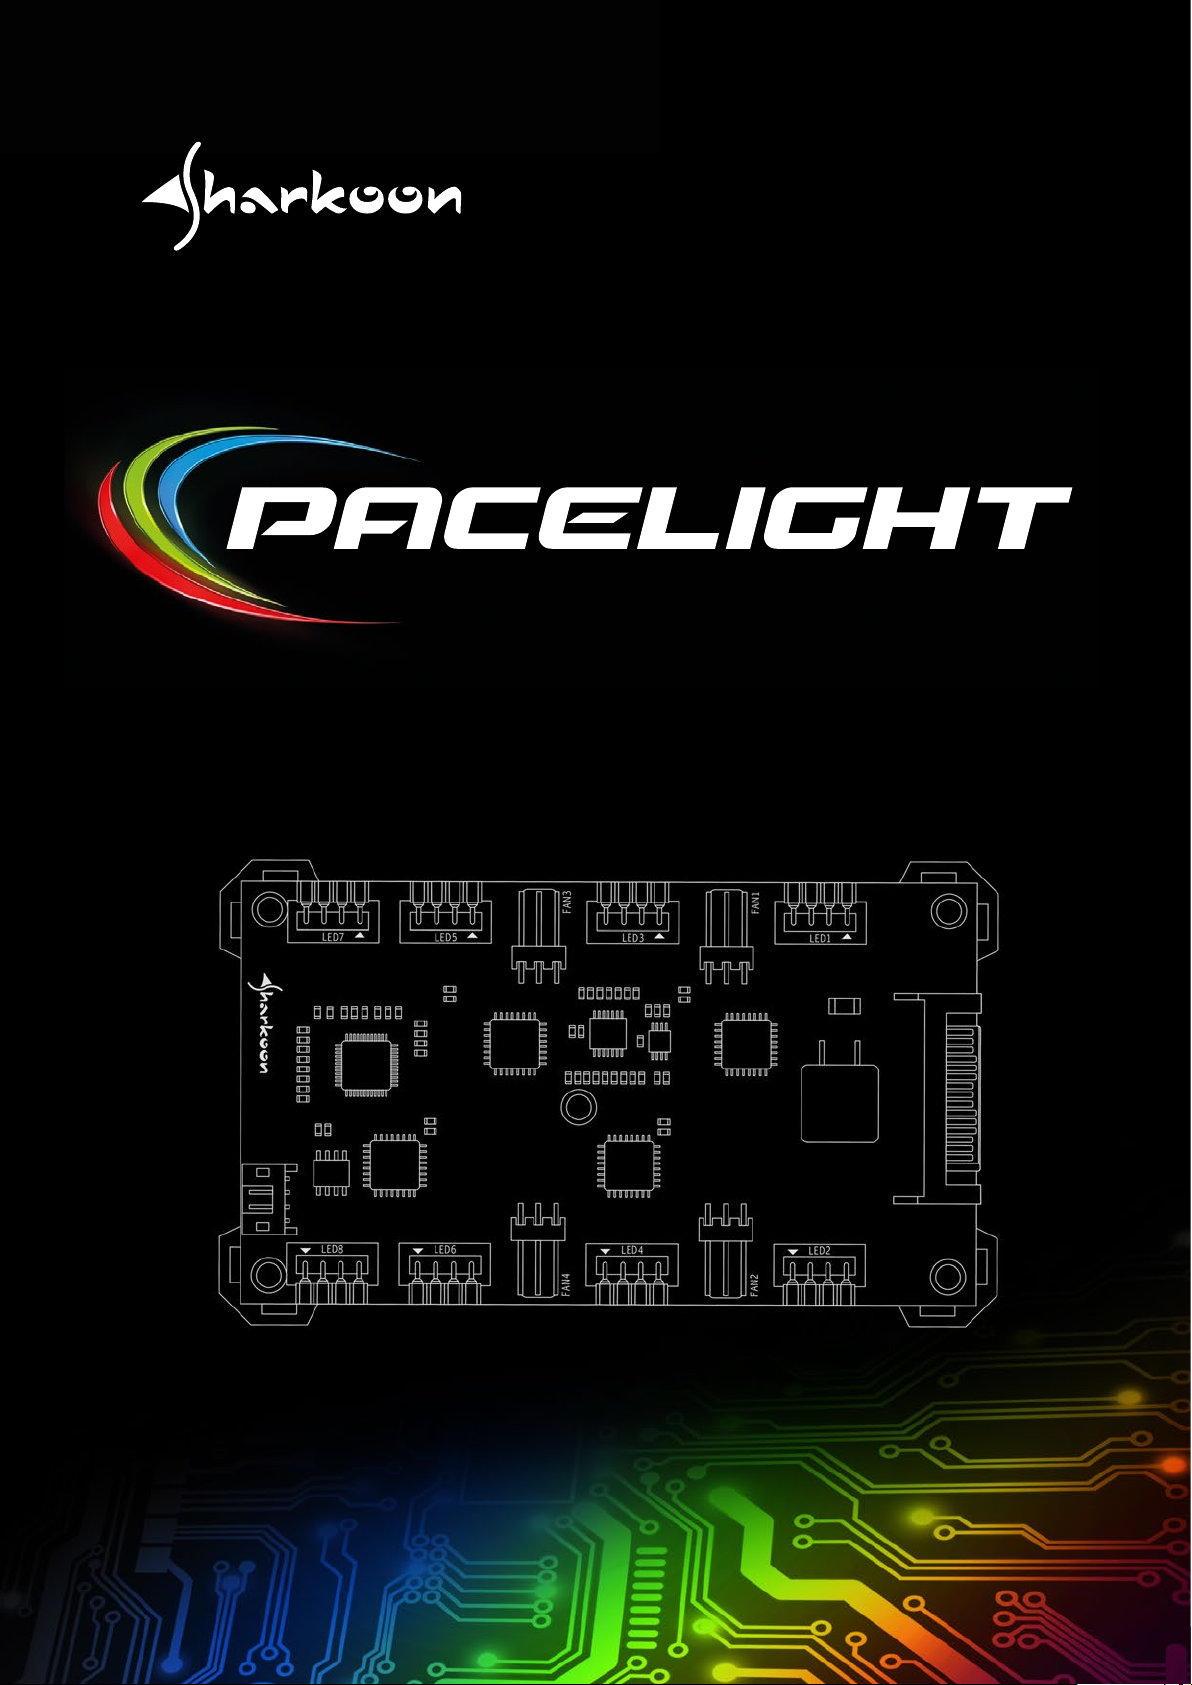
1. Specifications
1.1 Pacelight P1
RGB Channels
Fan Channels
Input Voltage
Connector
USB Connector
Max. LED Current
Max. Fan Current
Fan Output Voltage
Max. Fan Starting Current
Microcontroller
Fan Controller Type
LED Controller Type
Supported Operating Systems
Fixation
Weight
8
4
12 V DC
15-Pin SATA
9-Pin Internal
50 mA (Per Color)
0.5 A (Per Connector)
12 V
2 A
4x 8bit MCU
PWM
PWM
Windows 7/8/10
Self-Adhesive / Cable Tie
44 g
Cable Length
Dimensions (L x W x H)
1.2 Pacelight RGB LED Strip S1
LE D Type
Length
Width
No. of LEDs
Connector
Pinout
Cable Length
Fixation
Rated Voltage
Rated Current
Weight
60 cm
110 x 66 x 11 mm
5050 RGB
360 mm
10 mm
18
4-Pin (2.5 4 mm)
12 V – G - R - B
60 cm
Magnetic / Self-Adhesive
12 V DC
280 mA
30 g
Dimensions (L x W x H)
360 x 10 x 3 mm
Page 4
4
1. Specifications
1.3 Pacelight RGB Fan F1
General
Fan Speed
Bearing Type
Max. Airflow
Max. Air Pressure
Max. Noise Level
MTBF
Illumination
Connector Fan
Connector LED
Pinout
Cable Length
Electrical Specifications
Rated Voltage
Rated Current Fan
1,400 rpm ± 10 %
Fluid Dynamic Bearing
93.22 m³ /h
1.13 mm H²0
23 dB (A)
Min. 50,000 Hours
6x RGB LED
3-Pin Connector
4-Pin (2.5 4 mm)
12 V – G - R - B
50 cm + 5 cm LED / 45 cm Fan
12 V
0.15 A
Rated Current LED Fan
Rated Power Fan
Rated Power LED Fan
Start Voltage
Weight incl. Cable
Dimensions (L x W x H)
0.08 A
1.8 W
1 W
5 V
125 g
120 x 120 x 26 mm
Page 5
5
2. Safety Instructions
In some cases, certain individuals may experience epileptic seizures if exposed to certain light frequencies,
flickering light sources and patterns. Consult your doctor if you or one of your family members suffer from
epilepsy. Even some people without a history of seizures or epilepsy may have an undiagnosed ailment. Seek
medical attention if any of the following symptoms occur: visual impairment, eye and muscle twitching, loss of
consciousness, disorientation, involuntary movements and spasms.
The Pacelight RGB LED Strips S1 contain magnets for mounting. To prevent data loss, do not install them near
HDDs, SSDs, DRAM or other storage devices.
Sharkoon assumes no liability for any data loss, especially due to improper handling.
Page 6

6
3. Installation
3.1 Connect to the Mainboard
Turn off your computer before installing the Pacelight P1, fans and LED strips.
Then connect the provided USB cable, as shown, to the Pacelight P1 and the internal USB por t on the mainboard.
3.2 Connect to the Power Supply
To power the Pacelight P1, connect an available SATA plug from the power supply, as shown.
Page 7
7
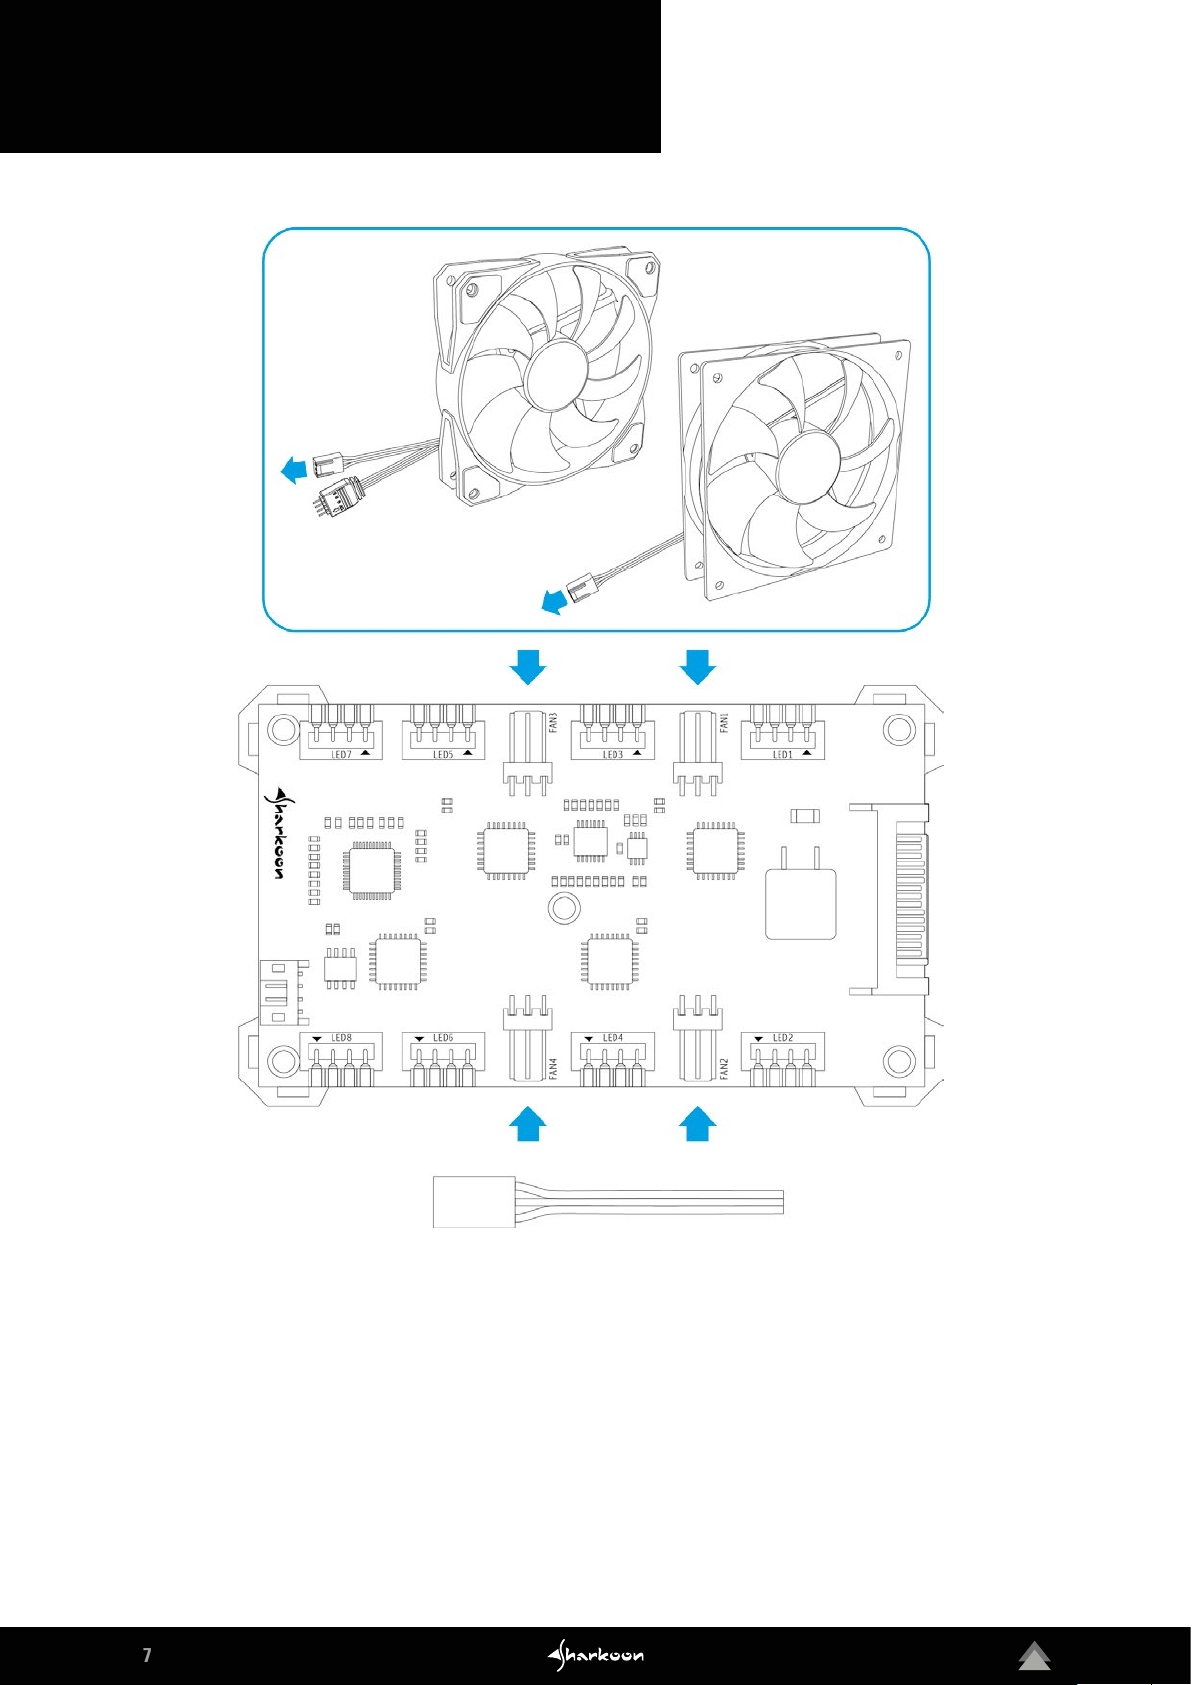
3. Installation
3.3 Connect the Fans
Up to four fans, with or without LEDs, can connect to the Pacelight P1. Please refer to the following section for
information on connecting the LED fan control and LED strips.
To connect a fan, attach its 3-pin fan connector to the indicated connector of the Pacelight P1.
Page 8

8
3. Installation
3.4 Connect the LEDs
Up to eight LED elements can be connected to the Pacelight P1. To connect the LED fan control or LED
strips, connect the 4-pin LED connector to the Pacelight P1, as shown. For fans or LED strips from third party
manufacturers, ensure that the correct connector layout is 12 V – G - R – B.
Always combine the connection of the fan with its corresponding LED control. Start in ascending order,
beginning with the “FAN1” / “LED1” marked connectors on the Pacelight P1.
Note: When connecting the LED control or LED strips, ensure that the 4-pin LED connector is aligned correctly.
This is marked with an arrow, as is the connector of the Pacelight P1. The two arrows must be aligned across
from each other, as shown.
Page 9

9
3. Installation
3.5 Attaching the Pacelight P1
Attach the Pacelight P1 to the inside of the case with the self-adhesive backing or by running cable ties through
the cutouts in the silicone pad.
Caution: Do not remove the silicone pad on the Pacelight P1; short-circuiting may result if it directly contacts a
conductive surface.
After successful installation, turn on your computer.
Page 10

10
4. Software Installation
Download the Pacelight P1 software directly from the Sharkoon homepage at ww w.sharkoon.com. Unzip the zip
file to a location of your choice and then double-click on Pacelight_Setup.exe to launch the installation.
Follow the instructions on the installation wizard. The default installation language will automatically be
the same language as your operating system. To change the language at any time, right-click on the icon in
the taskbar.
After restarting your computer, the Pacelight soft ware will automatically appear in your taskbar. Ensure that the
Pacelight soft ware is always active in the background to access its full functionality.
Page 11

11
5. Menu Overview
A B
C
A
LED control:
Adjust the illumination of the connected LEDs manually or by day of the week. It is also possible to select and
control lighting effects.
B
Fan control:
Test here the connected fans for compatibilit y and also control the fan speed. Infographics for each connected
fan are displayed within the overview.
C
Advanced:
Set a fan failure warning with custom illumination, dim LEDs according to time of day, or assign LEDs a custom
illumination based on the active program.
Page 12

12
6. Fan Compatibility
The Pacelight P1 is designed and optimized for use with the Pacelight RGB Fan F1. When using fans other than
the ones included with the Pacelight P1, they must be initialized.
To initialize a fan, open the “Fan Control” menu and click on the gray fan icon below the on/off slide bar for the
fan needing to be initialized. The fan icon will change color to blue during initialization. The duration of the initialization depends on the hardware and may take a few minutes.
The corresponding fan is compatible if the fan icon turns green at the end of the initialization. If it turns red, the
Pacelight P1 cannot control the fan. If it remains blue, the initialization must be restarted.
Page 13

13
7. LED Control
7.1 Manual LED Control
With the manual LED control, up to eight LED channels can be controlled within the single color, multi colors or
rainbow colors lighting modes.
To do this, first click the on /off slide bar to
activate the desired LED channels. A freely
chosen name can also be assigned to each
channel in the text field next to it. Use the
adjacent drop-down menu to select the
desired lighting mode.
Page 14

14
7. LED Control
7.2 Channel Synchronization
With the manual LED control, the possibilit y exists to synchronize the pulsating and stroboscope lighting effects
for selected LED channels. For more about the lighting effects, go to the “Advanced Lighting Options” section.
During synchronization, the lighting ef fect set under “LED1”, along with the selected frequency, will also
transfer the same lighting effect to the individual selections “LED2” to “LED8”. The selected lighting modes are
not affected.
To synchronize LED channels, click on the arrow icon, located to the right of the on/off slide bar, of each channel
to be synchronized. The synchronization icon color will change from gray to blue when active. Depending on the
hardware, the synchronization process can take up to several seconds.
Page 15

15
7. LED Control
7.3 LED Control by Week
All active LED channels can be regulated collectively by day of the week through the LED control week listings.
The lighting modes single color, multi colors and rainbow colors are also possible.
First, activate the LED channels by clicking the on/off slide bar next to the desired day of the week. Then use
the drop-down menu next to the day to select the lighting mode bundle for all active LED channels. In addition,
lighting effects can also be selected. See “Advanced Lighting Options” for more information.
Depending on the hardware, the lighting mode updates can take up to several seconds.
Page 16

16
7. LED Control
7.4 Lighting Modes
Single Color:
The single color lighting mode permanently
illuminates the corresponding LEDs in one of
the 16.8 million colors. The color selection is
made through either a circular color selector,
RGB slider or a predefined color palet te.
Multi Colors:
The multi colors lighting mode illuminates
the connected LEDs in six of 16.8 million
colors, alternating the color at intervals of
one second. The color selections are made
through either a circular color selector, RGB
slider or a predefined color palette.
Rainbow Colors:
No colors are selected for the rainbow colors
mode. Instead, the colors red, yellow, green,
blue, light blue and pink alternate without interruption at an interval rate of one color per
second.
Page 17

17
7. LED Control
7.5 Advanced Lighting Options
Every LED can be assigned one of two lighting effects in addition to its general lighting modes: Pulsating dims
the LEDs in short intervals; stroboscope lets them flicker frantically. Each frequency can be slowed or quickened
via the adjacent slide bar.
It is also possible for the manual LED control and day of the week LED control to transfer settings from one LED
channel to another. To do so, first select the LED channel to be changed by clicking on the colored box to the
right of the lighting mode. Ensure that no LED channels are synchronized. Then, under “Copy Settings From”
within the illumination mode window, select the LED channel whose settings are to be transferred to the current
LED channel.
Page 18

18
8. Fan Control
Fans can be initialized within the „Fan Control“ tab, with the fan speed being controlled for initialized fans up to
12 V in a range defined during initialization.
To adjust the fan speed of an initialized fan, first activate it by clicking the on/off slide bar. For a better overview,
the fan can be renamed in the adjacent text field. Then, by using the slide bar, the fan speed can be individually
adjusted.
For better control, the infographic fields measure volts and fan speed of the respective fan in intervals of ever y
few of seconds. Above the slide bar, the info field lists detailed values of the volts, RPM and current amp rate.
Page 19

19
9. Advanced
9.1 Fan Failure Warning
In the event of a fan failure, a warning can be set within the “Advanced” menu. The corresponding LEDs will blink
in a specified color 20 seconds after the failure. An exclamation mark is also displayed in the task list until the
problem is solved.
To set up a warning, activate the feature by clicking on the slide bar next to “Fan Failure Warning”. Click on the
gears icon to open the corresponding color selection. You can also select a color via the circular color selector,
RGB slider and predefined color palet te.
In the event of a fan failure, the affected fan is turned off when normal speed fluctiations have been excluded. In
addition to manually eliminating the fault, the option is also available to turn off the fan warning via an additional
warning message and then return it to the last known LED setting.
Page 20

20
9. Advanced
9.2 Time Control Dimmer
Also found in the “Advanced” menu is the Time Control Dimmer. With this, the corresponding LEDs can be
dimmed overall within a fixed period from an individual value between 50% and 100%.
To enable LED dimming by time, activate it by clicking the on/off slide bar next to “Time Control Dimmer”. Then,
click on the gear icon to open the time and dimming selection window. Insert the desired values manually or click
on the drop-down menus.
Page 21

21
9. Advanced
9.3 Assign Program
Under “Assign Program” within the “Advanced” menu, custom illumination can be set up into five programs.
Whenever a saved program is launched, the corresponding LEDs will change to the colors defined within
that program. If more than one program is launched from the list, priority is given according to the preceding
numbers (1 to 5).
To assign programs and lighting, activate the on/off slide bar next to “Assign Program” and then click on the gear
icon. The standard illumination modes of single color, multi colors and rainbow colors are available.
To assign a program, click on the folder icon next to the program name and then choose the path to the exe file
of the program. Delete the complete program path to deselect the program, or assign another program via the
folder icon.
Page 22

22
Legal Disclaimer
Legal Disclaimer:
For potential loss of data, especially due to inappropriate handling, SHARKOON assumes no liability.
All named products and descriptions are trademarks and/or registered trademarks of the respective manufacturers and are accepted as protected.
As a continuing policy of product improvement at SHARKOON, the design and specifications are subject to
change without prior notice. National product specifications may vary.
The legal rights of the enclosed software belong to the respective owner. Please observe the license terms of
the manufacturer before using the software.
All rights reserved especially (also in extracts) for translation, reprinting, reproduction by copying or other
technical means. Infringements will lead to compensation. All rights reserved especially in case of assignation
of patent or utility patent. Means of delivery and technical modifications reserved.
Disposal of your old product:
Your product is designed and manufactured with high quality materials and components, which can be recycled
and reused.
When this crossed-out wheeled bin symbol is attached to a product, it means the product is covered
by the European Directive 2012/19/EU.
Please be informed about the local separate collection system for electrical and electronic products.
Please act according to your local rules and do not dispose of your old products with your normal household
waste. The correct disposal of your old product will help prevent potential negative consequences to the
environment and human health.
SHARKOON Technologies GmbH
Siemensstraße 38
D-3544 0 Linden
Germany
© SHARKOON Technologies 2018
info@sharkoon.com
www.sharkoon.de
 Loading...