

Page 1
Manual
Page 2

2
Contents
1. Specifications . . . . . . . . . . . . . . . . . . . . . . . . . . . . . . . . . 3
1.1 General . . . . . . . . . . . . . . . . . . . . . . . . . . . . . . . . . 3
1.2 Button Properties . . . . . . . . . . . . . . . . . . . . . . . . . . . . . . 3
1.3 DPI Properties . . . . . . . . . . . . . . . . . . . . . . . . . . . . . . . 4
1.4 Software Properties . . . . . . . . . . . . . . . . . . . . . . . . . . . . . 4
1.5 Cable and Connector. . . . . . . . . . . . . . . . . . . . . . . . . . . . . 4
1.6 Package Contents. . . . . . . . . . . . . . . . . . . . . . . . . . . . . . 4
2. Connecting . . . . . . . . . . . . . . . . . . . . . . . . . . . . . . . . . 5
3. Overview. . . . . . . . . . . . . . . . . . . . . . . . . . . . . . . . . . . 5
4. Software Installation . . . . . . . . . . . . . . . . . . . . . . . . . . . . . . 6
5. Software Overview . . . . . . . . . . . . . . . . . . . . . . . . . . . . . . . 7
6. Button/Speed . . . . . . . . . . . . . . . . . . . . . . . . . . . . . . . . . 8
6.1 Changing Button Assignments. . . . . . . . . . . . . . . . . . . . . . . . . . 9
7. DPI Settings . . . . . . . . . . . . . . . . . . . . . . . . . . . . . . . . . 10
8. Illumination . . . . . . . . . . . . . . . . . . . . . . . . . . . . . . . . . . 11
9. Macro Manager . . . . . . . . . . . . . . . . . . . . . . . . . . . . . . . . 12
10. Profile Options . . . . . . . . . . . . . . . . . . . . . . . . . . . . . . . . . 13
Page 3
3
2. Xxxxxxxxxxxx
1. Specifications
1.1 General
Max. DPI/CPI
Min. DPI/CPI
Sensor
Chip
Illumination
Max. Polling-Rate
Lift-Off Distance
Frames Per Second
Inches Per Second
Max. Acceleration
Weight Tuning System
Mouse Feet
Color Versions
Weight without Cable
15,000
100
Optical
PixArt 3360
RGB
1,000 Hz
2 mm
12,000
250
50 g
4, PTFE
Black, Green
134 g
Dimensions (L x W x H)
Supported Operating Systems
1.2 Button Properties
Number of Buttons
Programmable Buttons
Durable Omron Switches in Left and Right
Mouse Buttons
Operating Life Cycles of Buttons
127 x 83 x 42 mm
Windows 7/8/10
12
12
Min. 10 Million Clicks
Page 4
4
2. Xxxxxxxxxxxx1. Specifications
1.3 DPI Properties
DPI Steps*
DPI Switch
DPI Indicator
* DPI Steps can be individually customized via the soft ware
1.4 Software Properties
Gaming Sof tware
Onboard Memory for Game Profiles
Capacity of Onboard Memory
Number of Profiles
1.5 Cable and Connector
Connector
600 / 2,400 / 4,800 / 7,200 / 10,000 / 15,000
LED
16 kB
5
USB
Gold-Plated USB Plug
Textile Braided Cable
Cable Length
1.6 Package Contents
Drakonia II
Additional Set of Mouse Feet
Transport Bag
Manual
180 cm
Page 5
5
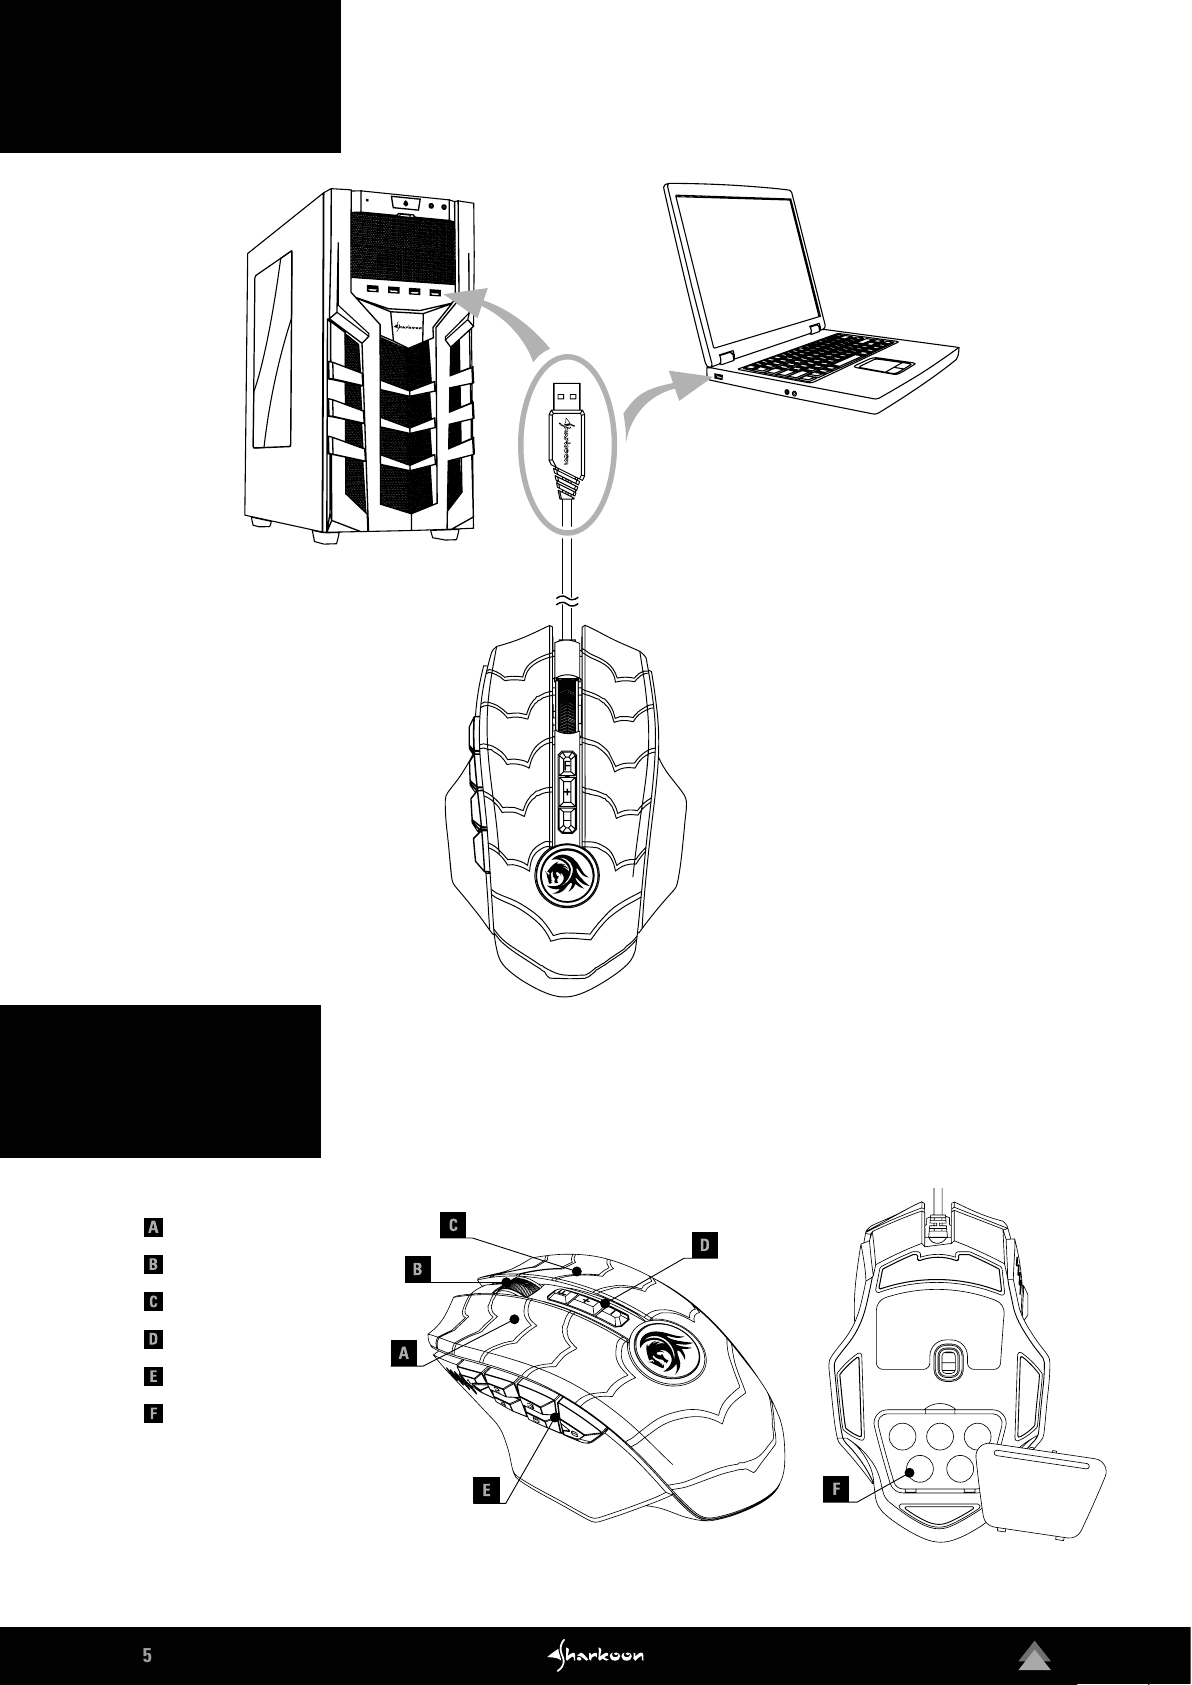
2. Connecting
3. Overview
Left Mouse But ton
Scroll Wheel
Right Mouse Button
DPI Switch
Thumb Buttons 1-6
Weight Tuning System
Page 6

6
4. Software Installation
Download the gaming soft ware for the Drakonia II from the Sharkoon website at www.sharkoon.com. Unzip the
ZIP file in a folder of your choice and then double click the file "Drakonia_II.exe" to launch the installation.
Follow the instructions of the setup wizard and then click on "Finish" to complete the installation. The Drakonia II
symbol will then appear in the taskbar. The software has now been successfully installed.
1
2
4
To start the gaming software, double click on the Drakonia II symbol in
the taskbar. Please note: The gaming software continuously runs in the
background while the computer is on. Only this allows the full range of
functions of the Drakonia II to be used. The Drakonia II symbol will be
displayed in the Windows taskbar while the gaming soft ware is running.
3
5
Page 7

7
5. Software Overview
Game Profiles: At the top of the gaming software, one of five game profiles can be selected at any time. Game Profiles
contain all the settings of the menus in "Button/Speed", "DPI Settings" and "Illumination". Macros are stored independently of game profiles. After selecting a game profile, it must be activated by clicking on "Apply" at the bottom of the
software.
Button/Speed: In the menu "Button/Speed" the button assignment of the Drakonia II as well as its speed and polling
rate can be changed. It is also possible to assign macros or multimedia functions. To help identify the individual buttons, a " top view" and "side view" picture of the Drakonia II is available. Each change to the button assignment must be
confirmed by clicking on "Apply"!
DPI Settings : Under "DPI Settings" up to six separate DPI levels can be set. Changes must also be confirmed here by
clicking on "Apply".
Illumination: Here, different lighting effects can be selected and adjusted. As in the previous menus, any changes
must be confirmed by clicking on "Apply".
Macro Manager: The Macro Manager menu allows you to record, modify or delete macros. These are stored separately and independently of the active game profile. All macros are, however, available for use in any desired game
profile.
Profile Options: At the bottom of the gaming software, profiles can be saved on the PC, loaded or reset to factory
settings. "Apply ", for confirming all selections and changes, is also here.
Page 8

8
6. Button/Speed
In the Button/Speed settings, buttons for the currently selected game profile can be reassigned or provided with
functions. In addition, the acceleration, mouse pointer speed, scroll speed, double-click speed as well as the polling
rate can be adjusted.
Page 9

9
6. Button/Speed
6.1 Changing Button Assignments
Each of the t welve buttons on the Drakonia II has a factory default setting that can be changed via the sof tware. To change an assignment, select the button you want to change from the gray list to the right of the Drakonia II picture. If you are
unsure which button is the one you want, you can use the picture as an aid. Click on "Top View" or "Side View" to switch
views. The numbering of the buttons within the picture matches the numbering within the adjacent gray list. Now click in
the desired field of the mouse button to be reassigned and select a function from the drop-down menu.
Click: This corresponds to the simple left-click. At least
one button on the Drakonia II must be assigned this function!
Menu: This corresponds to the contex t menu, selected,
by default, with a right-click.
Scroll : Enables vertical and horizontal scrolling in scrollable elements.
Forward/Back: For structured navigation back and forth
in the Web.
Keyboard Key/Shortcuts: Allows the assignment of a
keyboard key or keyboard combination to the chosen
mouse button. Please note that certain keys, depending
on the keyboard layout and keyboard type, may be excluded from the assignment.
Basic Commands: These are basic Windows commands
such as "Cut", "Copy" and "Save".
Advanced Commands: These are commands for fast navigation in Windows as well as on the Web.
Multimedia Commands: This category of command controls the media player you have selected in Windows.
Please note : The selected media player can be changed
at any time in Windows Default Apps.
Macros: Here, macros can be selected which you have
already created. Alternatively, the macro manager can be
star ted with which you can record new macros.
Fire Key: Opens the menu for setting the Rapid Fire feature. Mouse or keyboard key commands can be triggered
a number of times with one click of the assigned mouse
button.
DPI: Here are commands for selecting the DPI levels.
Profile: Switches to the next higher profile. Please note :
This only works through, from profile to profile, when the
command is assigned in other profiles.
Polling Ra te: Here are commands for selecting the polling
rates.
Deactivated: Disables the chosen mouse button.
Page 10

10
7. DPI Settings
All six preset DPI levels can be changed in the DPI Settings menu. You have the option of setting each DPI level
to a desired DPI number from 100 to 15,000 DPI. For each level, the DPI number can be set separately for the X
and Y axis. It is also possible to disable any chosen DPI level. To help with orientation, the currently selected DPI
level is always displayed directly above the DPI slide controls.
The DPI levels are named, from lef t to right, DPI1 to DPI6 with a green dot in front of their name. To disable a DPI
level, click on the green dot. This will now turn gray to indicate that the selected DPI level has been disabled.
When selecting the level with the "DPI Loop", "DPI +" and "DPI -" button commands, the disabled DPI level will be
skipped.
To change a DPI level, simply move the slide control to the desired DPI number. The number is displayed below
the slide control for both the X and Y axes. To set the DPI separately for each axis, click the red chain-link icon
below the name of the selected DPI level. The chain-link icon changes and turns gray to indicate that the DPI
number can now be set differently for horizontal and vertical mouse movement. Finally, click on "Apply" to confirm any changes.
Page 11

11
8. Illumination
In this menu, the lighting of the Drakonia II can be uniformly selected and adjusted for the logo, the thumb buttons
and the scroll wheel. There are four lighting effects to choose from, as well as the deactivation of the lighting.
The DPI display is always lit white and cannot be deactivated. Please note : The lighting may briefly flicker while
changing.
The four lighting effects available are: "Pulsating Spectrum", "Permanent", "Pulsating" und "Spectrum".
Pulsating Spectrum: The lighting changes color within the RGB spectrum, whereby the color is faded in and out
when changing. The effect can be adjusted for brightness and frequency.
Permanent: This illuminates the mouse permanently in a chosen color. The color can be changed using the RGB
color box or the slide bars below. It is also possible to adjust the brightness.
Pulsating: This illuminates the mouse as in the effect "Permanent". In addition, the lighting is faded in and out at
short intervals. The frequency of this effect can be adjusted.
Spectrum: As with the "Pulsating Spectrum" effect, the color changes in the RGB spectrum, but the color transition is fluid. This effect can be adjusted in brightness and frequency.
Page 12

12
9. Macro Manager
In the Macro Manager,
macros with up to 62 key
commands can be recorded,
edited and deleted. Macros
are independent of game
profiles but can be used for
any of these profiles after
they have been recorded.
Before a macro can be used,
it must be assigned to a
mouse button in the button/
speed menu. Please note:
Depending on the keyboard
and keyboard layout, certain
keys are excluded from the
macro recording.
Select Macro: Here, macros
can be created and deleted.
To create a macro, click on
"New" and then give a name.
To delete, select the macro to be deleted and click on "Delete". Finally, with the dialog box that opens, you have
the option of confirming the deletion of the macro.
Macro Editor: The Macro Editor displays all the key sequences of a recorded macro, the total time required to run
the macro, and the number of inputs. To record a macro, click on the green icon with the white dot in the middle
(below in the macro editor) and execute the commands to be recorded. To stop a recording, click on the green
icon with the white square in the middle. Each recorded command is listed twice in the editor: once for pressing
the button and once for releasing it. In the "Status" column, a downward pointing arrow indicates the press and
an upward pointing arrow indicates the release. The pressed key is displayed in the column "Input". If desired,
the column "Delay (ms) " shows a delay in milliseconds (more on this in the following section). Please note : The
Drakonia II thumb but tons can be recorded directly in the Macro Editor. The lef t and right mouse button functions
and the scroll wheel function can be added using the Edit Tool (see the "Edit Tool" section for more details).
Options: The "Record Delay between Key Strokes" option incorporates the real delays between pressing and
releasing a key or a key sequence into the macro. Alternatively, the "Set Delay Time for All" option also allows a
uniform delay in milliseconds to be specified. With the option "Number of Loops" a macro can be executed up to
255 times by pressing the assigned mouse but ton. With the option "Repeat Macro when Button is Pressed", the
macro will be continually repeated until the mouse button assigned with the macro is released.
Edit Tool: With the Edit Tool, individual key commands of a recorded macro can be modified. To do this, click on
the key command to be modified in the Macro Editor and select from the Edit Tool. You can choose to delete the
recorded key command or move it up or down in the recorded key sequence. You can also copy, cut or paste the
selected key command. It is also possible to insert the function of the left or right mouse button and the scroll
wheel into the key sequence. Click on "Mouse Button" to do this.
Page 13

13
10. Profile Options
At the bottom of the Drakonia II software are the profile options, which can be accessed, at any time, independently of the menus. Here, you can save or load profiles on the PC for later use. There are also options for resetting one or all profiles to factory settings as well as the option "Apply" . This must be used to confirm any changes
made in the Button/Speed, DPI Set tings and Illumination menus. Switching profiles must also be confirmed with
"Apply ".
Save Profiles/Load Profile: In addition to the five game profiles in the onboard memory of the mouse, any number
of game profiles can be saved on the PC. To save a profile, first make sure that the desired profile is activated.
Then click on "Save Profile" and choose a desired name and location on your PC. By default, all game profiles
are saved under "Documents" in a Drakonia II folder automatically created during installation. Previously saved
game profiles on the PC can be loaded into the mouse‘s onboard memory via "Load Profile". To do this, click on
"Load Profile" and select a game profile previously saved on the PC. The currently active game profile is replaced
by the game profile to be loaded.
Reset Profile/Reset All: These options can be used to reset just the active profile or all profiles to factory settings. Simply click on the desired option and confirm your choice again in the following dialog box.
Apply: Changes within the menus "Button/Speed", "DPI Settings" and "Illumination" as well as switching profiles
must be confirmed by clicking on "Apply".
Page 14

14
Legal Disclaimer
For potential loss of data, especially due to inappropriate handling, SHARKOON assumes no liability.
All named products and descriptions are trademarks and /or registered trademarks of the respective manufacturers and are accepted as protected.
As a continuing policy of product improvement at SHARKOON, the design and specifications are subject to change without prior notice. National product specifications may vary.
The legal rights of the downloadable software belong to the respective owner. Please observe the license terms
of the manufacturer before using the soft ware.
All rights reserved especially (also in extracts) for translation, reprinting, reproduction by copying or other
technical means. Infringements will lead to compensation. All rights reserved especially in case of assignation
of patent or utility patent. Means of delivery and technical modifications reserved.
Disposal of your old product
Your product is designed and manufactured with high quality materials and components, which can be recycled
and reused.
When this crossed-out wheeled bin symbol is attached to a product, it means the product is covered by
the European Directive 2012/19/EU.
Please be informed about the local separate collection system for electrical and electronic products.
Please act according to your local rules and do not dispose of your old products with your normal household
waste. The correct disposal of your old product will help prevent potential negative consequences to the environment and human health.
SHARKOON Technologies GmbH
Siemensstraße 38
D-35440 Linden
Germany
© SHARKOON Technologies 2018
info@sharkoon.com
www.sharkoon.com
 Loading...