

Page 1
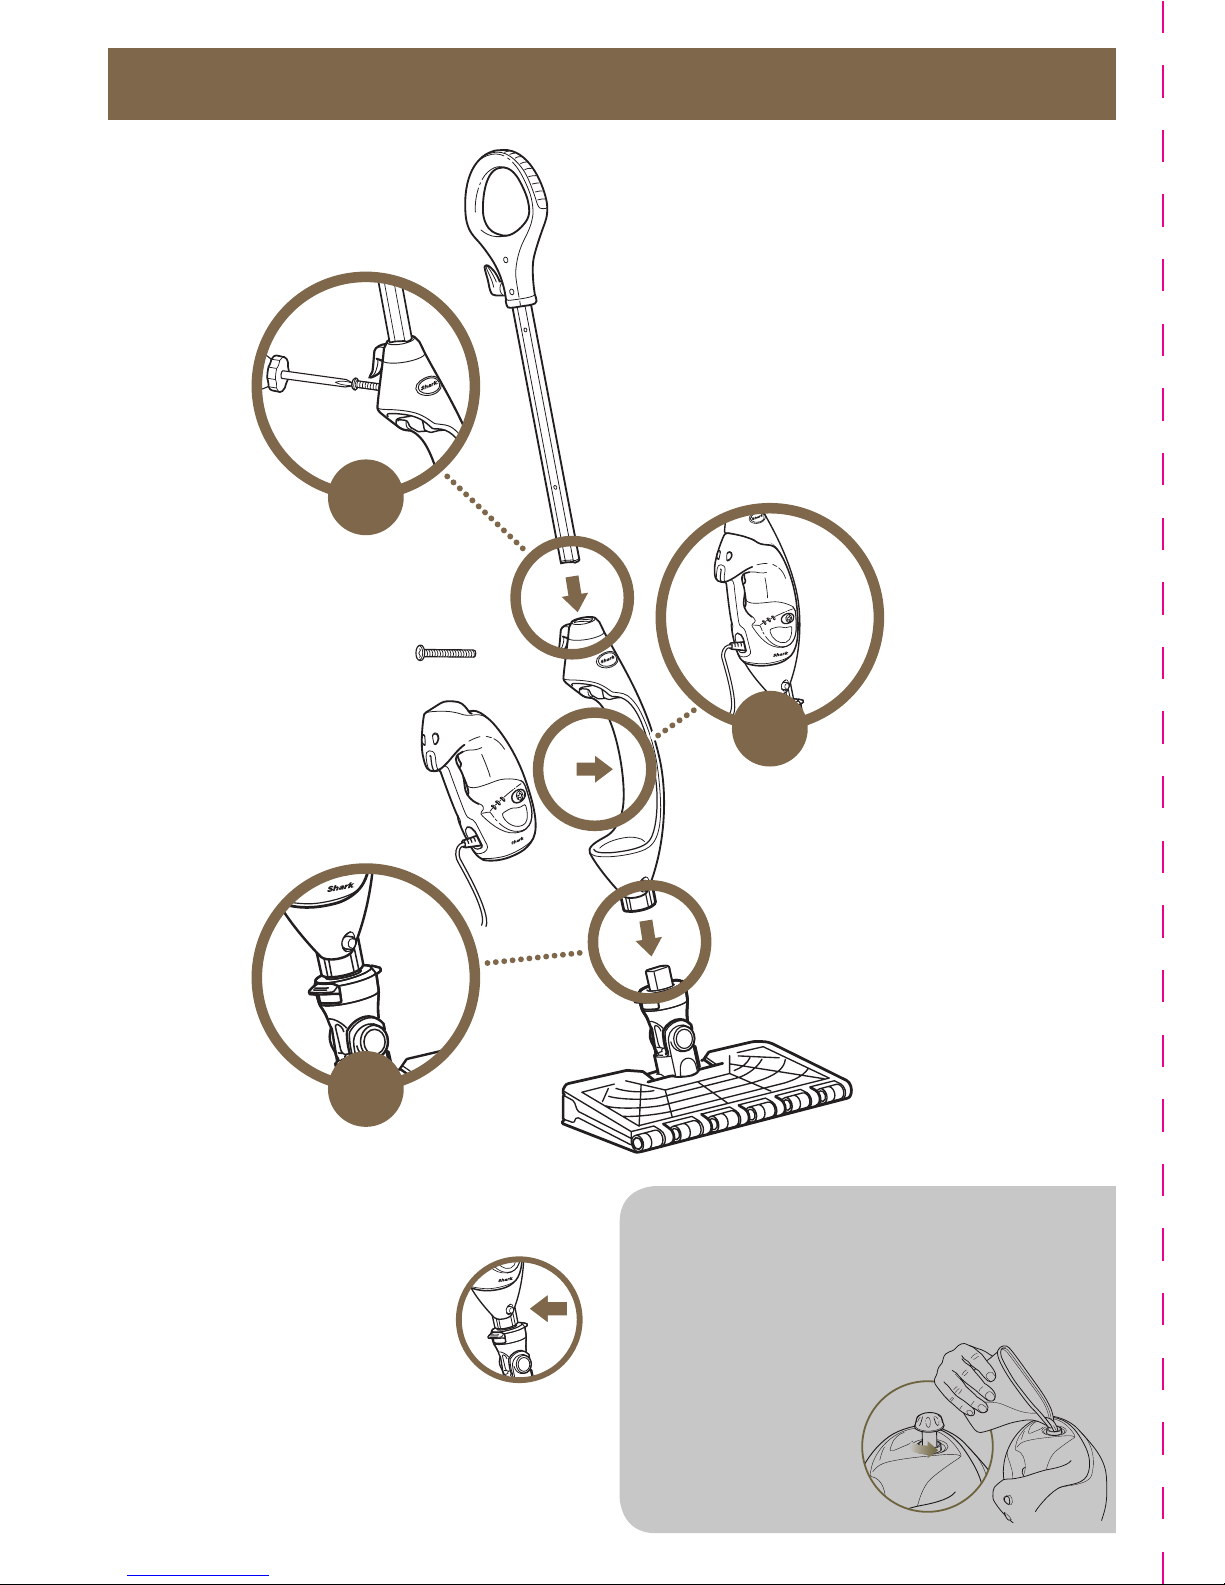
ASSE M B LY
1
3
(Click)
2
(Click)
Filling the Water Tank
Turn the water tank cap counterclockwise to
remove. Use the filling flask to pour water into
the tank. Do not overfill. Replace the cap on
the water tank. We recommend
using distilled water to
prolong the life of
your Shark Pro
Steam Mop.
TO REMOVE the Intelli-Mop™
Head, press the release button
on front of the unit.
NOTE: Sweep or
vacuum your floors
prior to cleaning with
your Steam Mop.
Page 2

For questions or to register your product, contact us at:
1-800-798-7398 or visit us online at sharkclean.com
@sharkcleaning
S3973D_160614
Page 3

Please be sure to read the enclosed Owner’s Guide prior to using your unit.
QUICK
START
GUIDE
PRO STEAM MOP
With Lift-Away
®
Use this Quick Start Guide
to learn about your
new Pro Steam Mop’s
great features.
Page 4

WHAT’S INSIDE:
For additional parts and accessories, visit sharkclean.com
©2016 SharkNinja Operating LLC. Shark , Intelligent Steam Control, Lift-Away, and Steam Pocket are registered trademarks
of SharkNinja Operating LLC. Intelli-Mop, Dir t Grip, and Steam Blaster are trademarks of SharkNinja Operating LLC.
A
Steam Mop Handle
B
Steam Mop Body
C
Steam Mop Lift-Away
®
D
Intelli-Mop™ Head
E
Dirt Grip™ Pad (x1)
F
Filling Flask
G
Concentrator Nozzle
H
Garment Steamer
I
Triangle Head with Steam Blaster™
J
Triangle Pad with Scrubber
B
F
G
E
D
A
C
H
I J
Page 5

CLEANING
USING YOUR PRO STEAM MOP
With the Intelli-Mop™ Head, you can quickly and easily attach and release the Dirt Grip™
Pads without touching them. No more wrestling with dirty, wet pads. The Dirt Grip Pads
are double-sided, washable and reusable. For pad attachment and removal instructions
see the following page.
Your Pro Steam Mop is ideal for deep cleaning and cutting through dirt
and grime in high-traffic areas, as well as for sanitizing* floors.
*Sanitization studies were conducted under controlled test conditions.
Household conditions and results may vary. With the Intelli-mop head only
in SCRUB mode. Not in above floor mode or when using Steam Blaster. See
Owner’s Guide for instructions.
Plug the power cord into an outlet.
The STEAM CONTROL button will flash blue.
Press the STEAM CONTROL button to
select your steam setting: Once for DUST,
twice for MOP, and three times for SCRUB.
Pressing a fourth time will place the unit in
STANDBY MODE.
SETTING
IDEAL FOR
THESE SEALED
SURFACES
RECOMMENDED
USAGE
DUST
Laminate
Hardwood
Marble
Light cleaning and dusting
Loosening and lifting light dirt
Cleaning delicate surfaces
MOP
Hardwood
Marble
Tile
Stone
Cleaning most surfaces and large areas
Basic, everyday cleaning
Removing spots and smaller messes
Cleaning moderate and heavy-traffic areas
SCRUB
Hardwood
Marble
Tile
Stone
Deep cleaning and cleaning hard-to-clean surfaces
Tough cleaning and removing stuck-on messes and stains
Deep cleaning heavy-traffic areas
Cutting through heavy dirt and grime
Sanitizing* floors
Page 6

ABOVE-FLOOR CLEANING
Slide nozzle onto the Handheld Steamer.
DIRECT STEAM NOZZLE
For spot cleaning and direct steaming
CUSTOM CLEANING ACCESSORIES HOW TO ATTACH
Remove the Handheld Steamer by pressing the release button and pulling it away from
the cradle.
Note: In Handheld Mode, the STEAM CONTROL is preset to SCRUB to optimize above-floor
cleaning and garment steaming.
Snap the desired accessory into the main nozzle of the Handheld Steamer. Then squeeze the
steam trigger to activate steam.
Using 3-to-5-second bursts of the trigger will allow you to steam longer and with more control.
Once done with handheld steaming, press the STEAM CONTROL button until the light flashes
blue to put the unit in STANDBY MODE. Let cool for 2 to 3 minutes before removing mop
head, pads, or handheld accessories and storing.
Slide the Garment or Upholstery Bonnet onto
the Garment Steamer. Elastic will hold the
bonnet in place.
Snap the bristle over the Garment Steamer
and bonnet then click the Garment Steamer
onto the Handheld Steamer.
GARMENT STEAMER
Freshen clothing, fabrics and
upholstery
CAUTION: Make sure the Steam Mop is unplugged or in Standby Mode while attaching or
removing the accessories. Avoid touching the accessories, as they will be very hot after steaming.
It is recommended that you allow the pads to cool off before removing them from the accessories
to avoid possible scalding injury.
Page 7

INTELLI-MOP™ HEAD TECHNOLOGY
TOUCH-FREE PAD ATTACHMENT
2
3 4
1
1
1. Lift the mop straight up by the handle
until the Intelli-Mop Head is hanging
straight down. Center the mop head
above the pad. Press down the release
buttons on the sides of the head post, and
both sides of the mop head will drop open.
2. Slip the Intelli-Mop Head’s 4 corner
tabs into the 4 corner pockets of the
Dirt Grip™ Pad.
3. Gently press the Intelli-Mop Head to the
floor on one side of the pad, and that side
will click into place.
4. Flip the other side of the Intelli-Mop Head
over onto the floor to click into place.
1. Lift the mop straight up by the handle
until the Intelli-Mop Head is hanging
straight down. Press down the release
buttons on the sides of the head post, and
both sides of the mop head will drop open.
TOUCH-FREE PAD REMOVAL
Page 8

DIRT GRIP™ PADS
DOUBLE-SIDED, WASHABLE, REUSABLE
Our washable Dirt Grip Pads are made with fibers specially designed to absorb and trap dirt.
This gives your floors an amazing clean, with minimal streaking and short dry times.
For best cleaning results, we recommend replacing your
Dirt Grip Pads following 20 normal uses.
PAD CARE
Machine wash the Dirt Grip Pads separately with warm
water using liquid detergent.
NEVER USE BLEACH, POWDERED DETERGENT,
OR FABRIC SOFTENERS as they may damage
the Dirt Grip Pads.
You can purchase replacement Dirt Grip Pads
and other accessories by visiting sharkclean.com
or calling 1-800-798-7398.
STEAM BLASTER™ TECHNOLOGY
When you need an extra burst of steam to
clean tough, dried messes and stuck-on stains,
use the Steam Blaster.
1. Flip back the Intelli-Mop™ Head so that it is
behind the mop body.
2. Tilt the mop handle back. This will cause the
Steam Blaster to emit a concentrated blast
of steam onto the floor.
3. To stop the Steam Blaster spray, simply tilt
the mop handle forward.
4. Flip the Intelli-Mop Head back into its
original position and continue cleaning.
2
3
4
1
 Loading...