

Page 1
S3973 Series
OWNER’S GUIDE
GUIDE D’UTILISATION
MANUAL DEL PROPIETARIO
Page 2

IMPORTANT SAFETY INSTRUCTIONS
For Household Use Only
WHEN USING YOUR SHARK® LIF TAWAY® PRO STEAM POCKET® MOP,
BASIC SAFETY PRECAUTIONS SHOULD
ALWAYS BE FOLLOWED, INCLUDING THE
FOLLOWING:
READ ALL INSTRUCTIONS BEFORE USING
YOUR SHARK LIFT-AWAY PRO STEAM
POCKET MOP.
WARNING: DANGER OF SCALDING.
The steam emitted from the Steam Mop
is very hot and may cause scalding.
Please use caution when using the
Steam Mop.
WARNING: KEEP STEAM MOP AWAY
FROM CHILDREN.
POLARIZED PLUG:
This Steam Mop has a polarized plug (one
blade is wider than the other). As a safety
feature, this plug will fit into a polarized outlet
only one way. If the plug does not fit fully
into the outlet, reverse the plug. If it still does
not fit, contact a qualified electrician. Do not
attempt to defeat this safety feature. It is not
recommended to use an extension cord with
this product.
WARNING:
TO REDUCE THE RISK OF FIRE, ELECTRIC
SHOCK OR INJURY:
1. When in use never turn the Steam Mop over on
its side or direct steam toward people, pets or
plants.
2. Use the system only for its intended use.
3. DO NOT use for space-heating purposes.
4. DO NOT use outdoors.
5. DO NOT leave the Steam Mop unattended
when plugged in. Always unplug the power cord
from the electrical outlet when not in use and
beforeservicing.
6. DO NOT allow the Steam Mop to be used by
children. Close attention is necessary when
used near children, pets, or plants.
7. Use only as described in this owner’s guide.
8. Use only manufacturer’s recommended
accessories.
9. DO NOT use with damaged cord or plug. If
Steam Mop is not working as it should or
has been dropped, damaged, left outdoors,
or dropped into water, return it to SharkNinja
Operating LLC for examination and repair.
Incorrect reassembly or repair can cause a risk
of electrical shock or injury when the Steam Mop
is used.
10. To protect against a risk of electric shock, DO
NOT immerse the Steam Mop in water or any
other liquids.
1 1-800-798-7398
Page 3

English
11. DO NOT handle the plug or Steam Mop with
wet hands or operate it without wearing shoes.
12. DO NOT pull or carry by cord, use cord as
a handle, close a door on cord, or pull cord
around sharp edges or corners. Do not run
Steam Mop over cord. Keep cord away from
heated surfaces.
13. DO NOT unplug by pulling on power cord. To
unplug, grasp the plug not the power cord.
Do not use extension cords or outlets with
inadequate current-carrying capacity.
14. DO NOT put any objects into the the steam
nozzle openings. Discontinue use if the steam
nozzle is blocked.
15. DO NOT put hands or feet under the Steam
Mop. It gets very hot.
16. Use ONLY on flat, horizontal surfaces. DO NOT
use on walls, counters, or windows.
17. DO NOT use on leather, wax-polished furniture,
synthetic fabrics, velvet, or other delicate,
steam-sensitive materials.
18. DO NOT add cleaning solutions, vinegar,
scented perfumes, oils, or any other chemicals
to the water used in the Steam Mop as this
may damage it or make it unsafe for use. If you
live in a hard-water area, we recommend using
distilled water in your Steam Mop.
™
19. Never leave any Dirt Grip
while using or storing for any period of
time, as this may damage your surfaces.
20. You can release the Dirt Grip pad after you have
unplugged the Steam Mop and allowed it to
cool.
pad in one spot
21. When cleaning the exterior of the Steam Mop,
unplug the power cord from the electrical outlet and
clean the Steam Mop with a dry or damp cloth. Do
not pour water or use alcohol, benzene, or paint
thinner on theSteam Mop.
22. Extreme caution should be exercised when
using the Steam Mop to clean stairs.
23. Never use Steam Mop without the Dirt Grip pad
attached.
24. Keep your work area well lit.
25. Store Steam Mop indoors in a cool, dry place.
26. To avoid circuit overload, do not operate another
appliance on the same socket (circuit) as the
Steam Mop.
27. To avoid scalding injuries, always unplug and
allow the Steam Mop to cool before removing
or changing mop heads, accessories, or Dirt
Grip pads.
WARNING: Your Steam Mop is
designed to clean hard floor surfaces that will
withstand high heat. Do not use on unsealed
wood or unglazed ceramic floors. On surfaces
that have been treated with wax and on some
no-wax floors, the sheen may be removed
by the heat and steam action. It is always
recommended to test an isolated area of the
surface to be cleaned before proceeding. We
also recommend that you check the use and
care instructions from the floor manufacturer.
SAVE THESE INSTRUCTIONS
2sharkclean.com
Page 4

Thank you for purchasing the Shark® Lift-Away® Pro Steam Pocket® Mop.
This Owner’s Guide is designed to help you get a complete understanding of your new Shark Lift-Away Pro Steam
Pocket Mop. Please read it carefully and keep for future reference.
For a list of what is included with this model, refer to box's top panel.
If you should have a question about your Shark Lift-Away Pro Steam Pocket Mop, please call Shark Customer Service
at 1-800-798-7398.
The Shark Lift-Away Pro Steam Pocket Mop is an amazing solution for deep steam cleaning. Whether you need to battle
tough stains with the Steam Blaster™ or handle general cleaning and hard floor sanitization*, our next-generation IntelliMop™ Head and Dirt Grip™ pads offer the ultimate in versatility and efficiency, making cleaning simple, quick and easy.
* Sanitization studies were conducted under controlled test conditions. Household conditions and results may vary.
With the Intelli-mop head only in SCRUB mode. Not in above floor mode or when using Steam Blaster.
REGISTER YOUR PURCHASE:
registeryourshark.com
1-800-798-7398
RECORD THIS INFORMATION:
Model Number: ____________________________________
Date of Purchase (Keep receipt): _________________________
TECHNICAL SPECIFICATIONS:
Voltage: 120V, 60 Hz
Watts: 1500W
Water Capacity: 300 ml (10.14 oz.)
™
RECOMMENDED SCHEDULE FOR REPLACING WASHABLE DIRT GRIP
PADS:
Every 3 months
FOR BEST CLEANING PERFORMANCE:
See the Caring for Your Steam Pocket Mop section for more detail. Vacuum or sweep before mopping.
3 1-800-798-7398
Page 5

Contents
English
Thank you for
purchasing
the Shark
Lift-Away
®
®
Pro
Steam Pocket
Mop.
Getting Started ............................................................................................... 5
Assembling Your Steam Pocket Mop ............................................................... 7
Using Your Steam Pocket Mop ........................................................................ 8
Intelligent Steam Control® ............................................................................... 9
®
Above-Floor Cleaning ....................................................................................10
Using the Direct Steam Nozzle .......................................................................11
Using the Garment Steamer ...........................................................................12
Using the Accessory Hose and the Precision Clean Accessory.........................13
Caring For Your Steam Pocket Mop ................................................................14
Ordering Additional Accessories .....................................................................15
Troubleshooting Guide ...................................................................................16
Frequently Asked Questions ...........................................................................17
Warranty .......................................................................................................18
4sharkclean.com
Page 6
Getting Started
When assembling your Steam Mop there may be a little water in or around the water tank. This is because we test all
our Steam Mops before you buy them, so you get a quality Shark® Lift-Away® Pro Steam Pocket® Mop.
a
b
c
d
e
j
f
g
h
i
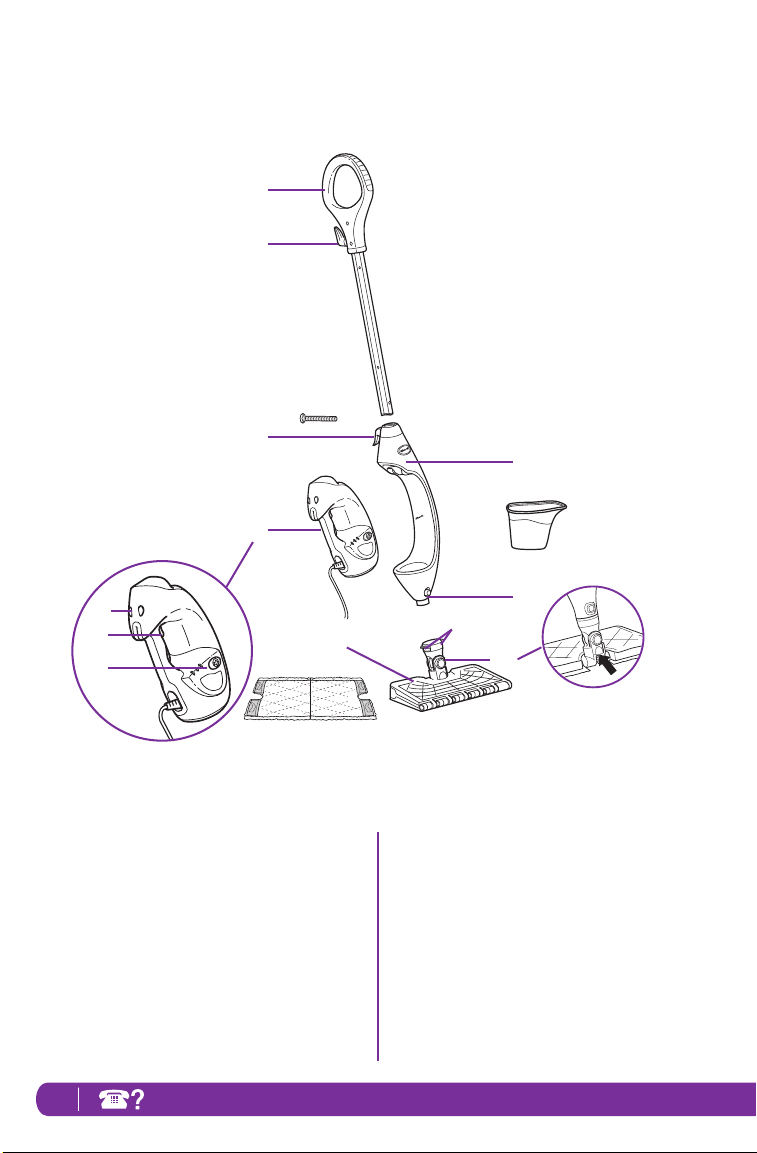
a Steam Mop Handle
b Upper Cord Wrap
c (1) 6 mm x 54 mm Large Screw*
d Lower Cord Wrap
e Steam Mop Body
f Removable Handheld Steamer
g Release Button for Handheld Steamer
*Phillips or flat head screwdriver can be used. Screwdriver not included.
5 1-800-798-7398
o
n
k
l
m
h Steam Trigger
i Steam Control Panel
j Filling Flask
k Mop Head Release Button
™
l Dirt Grip
m Steam Blaster
n Intelli-Mop™ Head
o Dirt Grip Pad
Pad Release Buttons
™
Nozzle
Page 7
For a full list of what is included with your Steam Mop, please refer to the inside flap of your box.
CAUTION:
Test in a small inconspicuous area and contact your surface manufacturer/installer for
specific information on your surface.
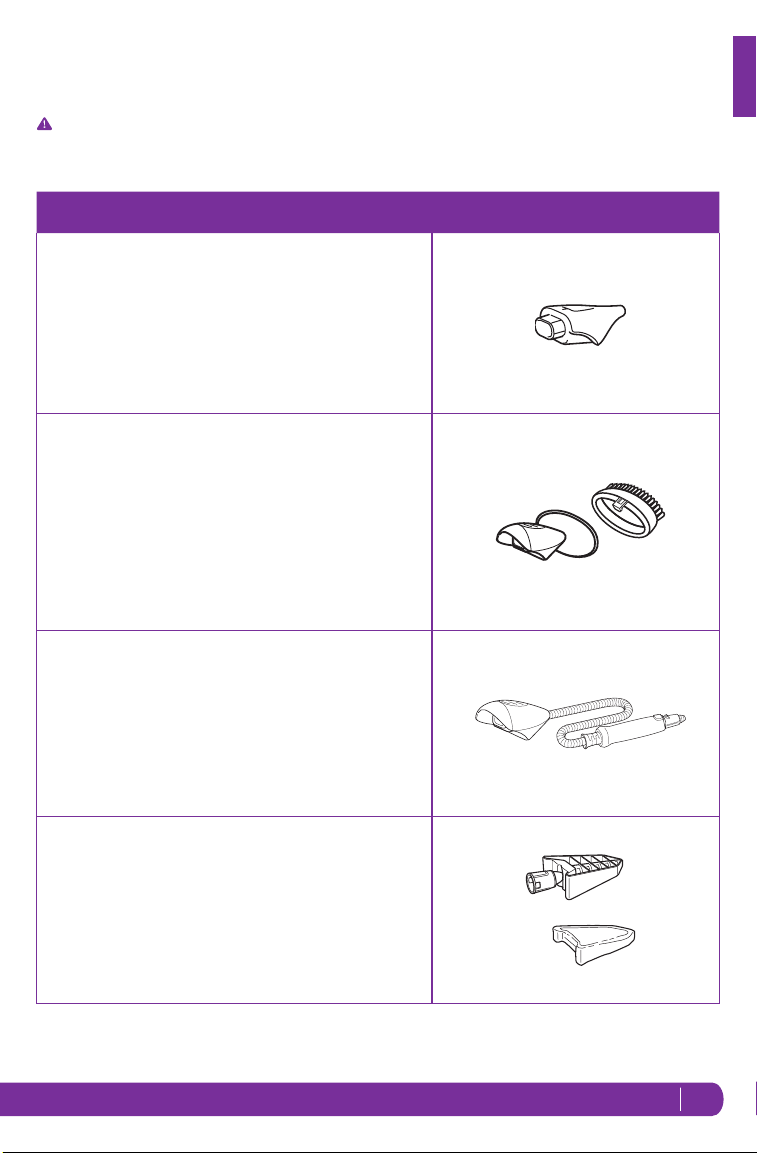
HANDHELD ACCESSORIES
DIRECT STEAM NOZZLE
Use steam to break down dirt and hard surfaces and wipe
away grime.
Use 3-to-5-second bursts of steam using the trigger on the
handle unit for best results.
GARMENT STEAMER
WITH BONNET AND BRISTLE FRAME
Ideal for removing wrinkles from clothing and for freshening and
grooming upholstery.
Do not use this tool without the Microfiber Bonnet attached.
English
ACCESSORY HOSE
For optimal range and mobility when cleaning above-floor
surfaces.
PRECISION CLEAN POCKET ACCESSORY AND PAD
Ideal for small, uneven surfaces, corners, and edges. Do not use
without a Precision Clean Pocket Pad attached.
6sharkclean.com
Page 8
Assembling Your Steam Pocket® Mop
fig. 1 fig. 5 fig. 6fig. 4
fig. 2a
fig. 3fig. 2b
WARNING: Always make sure the Steam Mop is
UNPLUGGED when not in use. Never fill the Steam
Mop or attach the mop head when the Steam Mop
is plugged into an electrical outlet. Unplug from
the electrical outlet and allow to cool before you
fill the mop, or attach or remove the head. To
prolong the life of your Steam Mop, we recommend
using distilled water. Make sure you add only
water to the tank. Chemicals or cleaning solutions
(including vinegar) may damage the Steam Mop
and could be unsafe for you and your family.
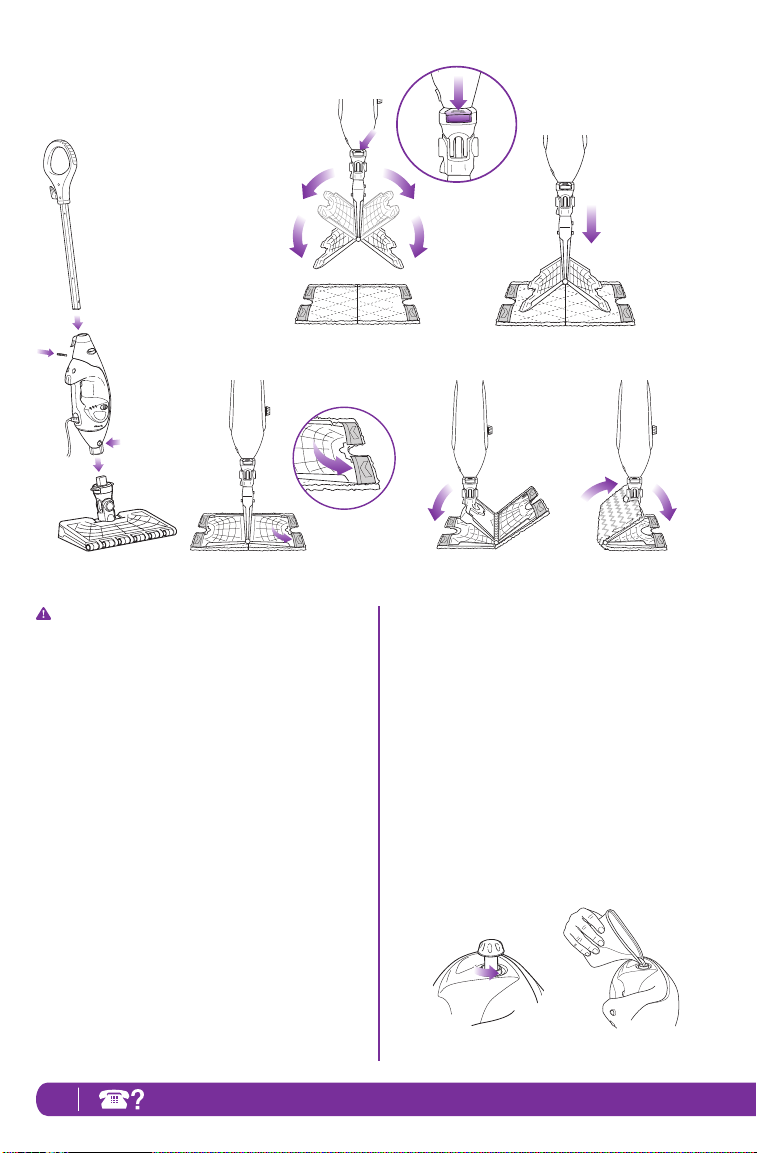
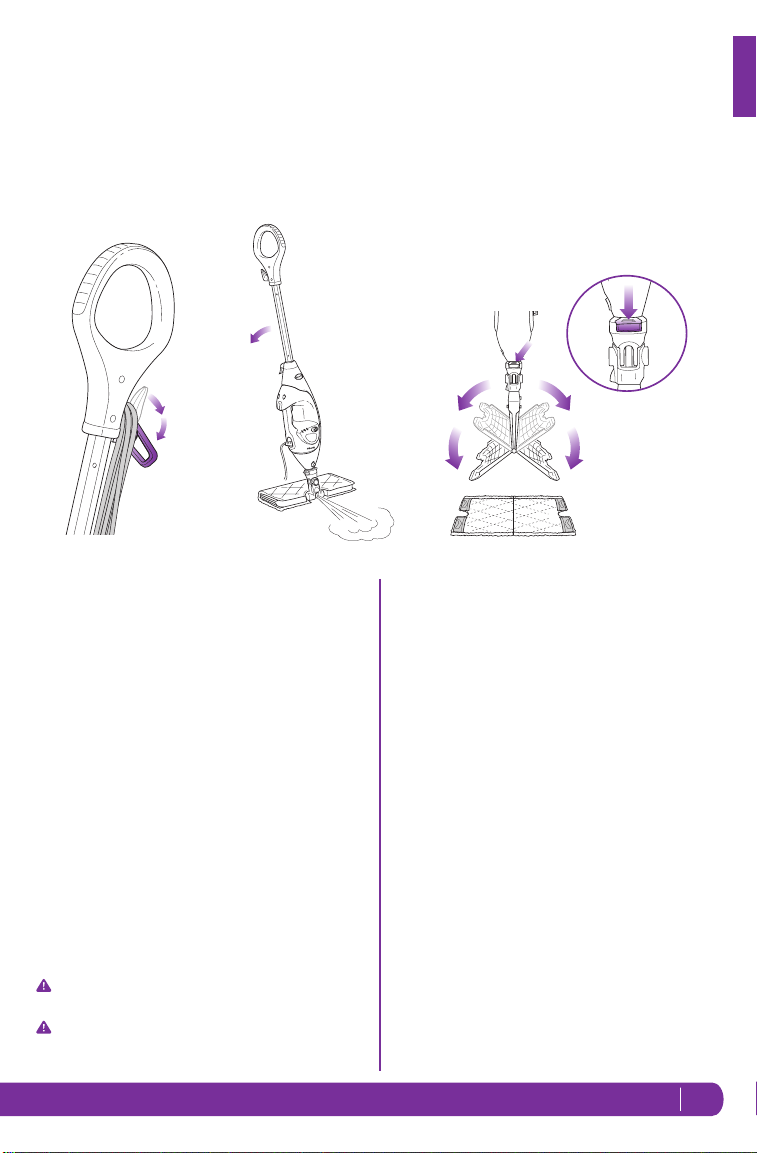
STEAM MOP ASSEMBLY
1 Screw the mop handle into the Steam Mop body
(screwdriver not included) (fi g. 1).
2 Slide the Intelli-Mop™ Head post into the Steam Mop
body. Push until you hear it click securely into place.
(fig. 1) To detach the Intelli-Mop Head, press the
release button on the front of the unit above the head
connection (fig . 1) and slide off.
7 1-800-798-7398
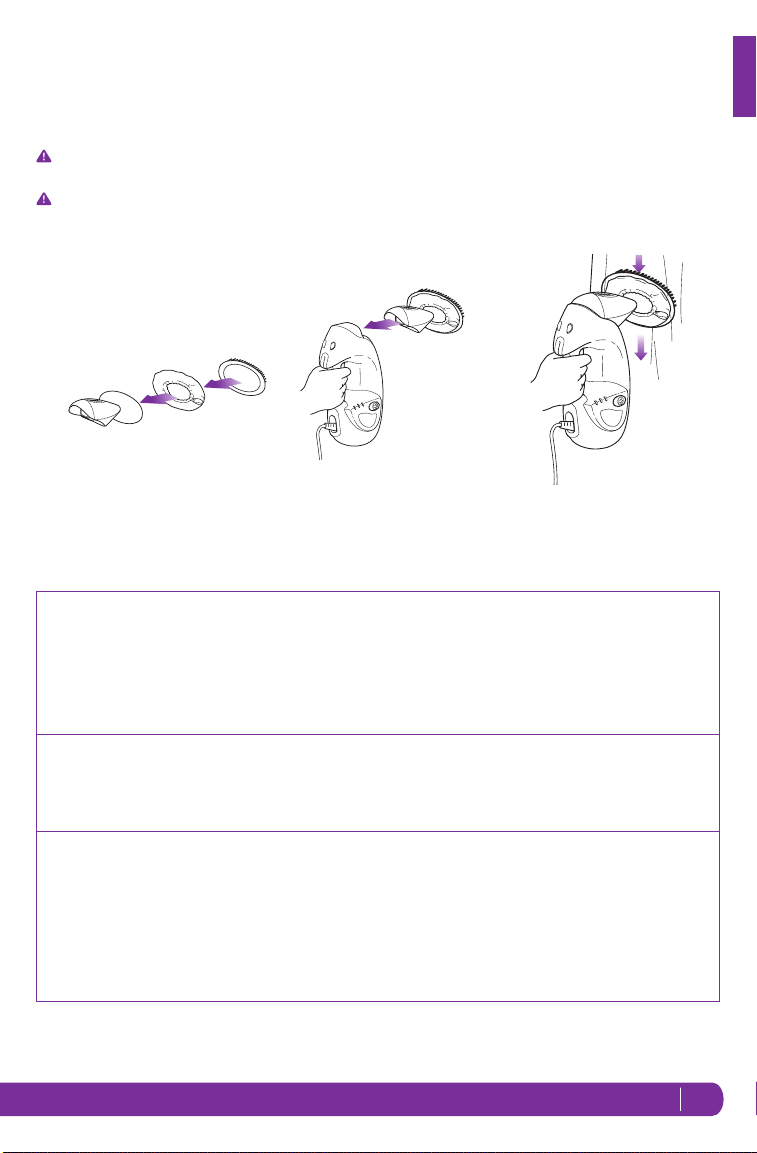
3 To attach the Dirt Grip™ pad, spread the pad on
the floor with the pocket side up. Lift the mop and
center the Intelli-Mop Head above the pad, then
press down on the release buttons on the neck of
the steam mop head (fig. 2a). Both sides of the
Intelli-Mop Head will drop open (fig. 2b). Slip the
Intelli-Mop Head’s four corner tabs into the four
corner pockets of the pad (fig. 3 and fig. 4). Gently
press one side of the Intelli-Mop Head to the floor
until that side clicks into place (fig. 5). Repeat on
the other side (fig. 6).
4 Open the water tank cap (fig. 7), fill the tank with
water, then replace and tighten the cap. Use the
filling flask and pour water into the tank (fig. 8). Do
not overfill. Replace the cap on the water tank.
fig. 7
fig. 8
Page 9
Using Your Steam Pocket® Mop
IMPORTANT: Make sure you do not use the Shark® Lift-Away® Pro Steam Pocket® Mop without attaching a Dirt
Grip™ pad and adding water to the water tank first. When you are using the Steam Mop for the first time, it
might take longer than the normal 30 seconds to start steaming.
IMPORTANT: Do not use on unsealed wood or unglazed ceramic floors. On surfaces that have been treated with
wax and on some no-wax floors, the sheen may be removed by the heat and steam action. Test an isolated area
of the surface to be cleaned before proceeding. Check the use and care instructions from the floor manufacturer.
fig. 11a
fig. 9 fig. 10 fig. 11b
NOTE: To prolong the life of your Steam Mop, we
recommend using distilled water.
NOTE: Sweep or vacuum your floors prior to
cleaning with your Steam Mop.
1 Twist the upper cord holder to unwrap the power cord
completely (fig. 9). Plug into an electrical outlet.
2 When it's first plugged in, the unit will be in Standby
mode. The 3 lights below the Steam Control Button
will blink to indicate Standby mode.
3 To select the steam mode, press the Steam Control
Button once for DUST (1 blue light) twice for MOP (2
blue lights) or three times for SCRUB (3 blue lights).
Pressing a fourth time will place the unit on Standby.
4
Clean your floors with a forward and backward motion.
5 When you need an extra burst of steam to clean
a stuck-on stain, you can use the Steam Blaster™
feature. Flip the head over so that it is behind the
mop body, then tilt the mop handle down. This will
cause the the Steam Blaster (fig. 10) to emit a
concentrated blast of steam onto the stain.
CAUTION: While in Steam Blaster mode, do not
leave stationary for more than one minute.
CAUTION: Do not scrub any one area for an
extended period of time.
6 To stop the Steam Blaster spray, simply raise the
handle. You can then flip the mop head back into its
original position and continue cleaning.
7 When you are done mopping, press the Steam Control
Button until you return to Standby mode
8
To remove the Dirt Grip pad, simply lift the mop
.
straight up by the handle until the Intelli-Mop™ Head is
hanging straight down. Press down on the pad release
buttons on the neck of the mop head (fig 11a), and
both sides of the head will drop open, releasing the
pad (fi g 11b).
9
Once the Dirt Grip pad has been rel
Intelli-Mop Head. To close, gently p
the
Intelli-Mop Head
to the floor until that side clicks
eased, close the
ress one side of
into place. Repeat on the other side.
10 When the water tank is empty, the Steam Mop will
stop producing steam. You can refill the water tank
at any time as long as the Steam Mop is unplugged.
Follow the water tank filling instructions on page 7.
NOTE: Please wait 2 to 3 minutes for the Steam Mop
to cool off before switching the mop head. Never
leave the Steam Mop with a damp or wet Dirt Grip
pad on any floor for an extended period of time.
English
8sharkclean.com
Page 10
Intelligent Steam Control
®
The Shark® Lift-Away® Pro Steam Pocket® Mop has 3 unique Intelligent Steam Control settings so you can use
the right amount of steam for the cleaning task at hand. See below for tips on when to use each setting.
SETTING IDEAL FOR THESE SEALED
SURFACES
DUST
Laminate
Hardwood
LIGHT STEAM
MOP
NORMAL STEAM
SCRUB
Marble
Hardwood
Marble
Tile
Stone
Hardwood
Marble
HEAVY STEAM
Steam Blaster
Tile
Stone
For an extra burst of steam, you can use the Steam Blaster feature in DUST, MOP, or SCRUB.
™
Follow the instructions found on the “Using your Steam Pocket Mop” page.
RECOMMENDED USAGE
Cleaning delicate surfaces
Light cleaning and dusting
Loosening and lifting light dirt
Cleaning most surfaces and large areas
Basic, everyday cleaning
Removing spots and smaller messes
Cleaning moderate and heavy-traffic areas
Deep-cleaning and cleaning hard-to-clean surfaces
Tough cleaning and removing stuck-on messes and stains
Deep-cleaning heavy-traffic areas
Cutting through heavy dirt and grime
Sanitizing* floors
TO SANITIZE* WITH THE STEAM MOP USING THE INTELLI-MOP™ HEAD AND THE DIRT GRIP™ PAD:
1 Attach a clean Dirt Grip pad to the mop head.
2 Plug in the unit and press the Steam Control Button to select the SCRUB Setting.
3 Wait 30 seconds for the unit to begin producing steam.
4 Start mopping on an appropriate sealed hard floor surface with a forward and backward motion. After three minutes,
your unit is ready to be used to sanitize.
5 Using a forward and backward motion, move the unit over the area you seek to sanitize. Repeat at least 15 times.
* Sanitization studies were conducted under controlled test conditions. Household conditions and results may vary.
With the Intelli-mop head only in SCRUB mode. Not in above floor mode or when using Steam Blaster.
9 1-800-798-7398
Page 11
Above-Floor Cleaning
For a full list of what is included with your Steam Mop, please refer to box's top panel.
English
The Shark® Lift-Away® Pro Steam Pocket® Mop is
designed to clean surfaces that can withstand high heat
and moisture. Do not use on unsealed wood surfaces
(especially antique wood furniture), unglazed ceramic
tile, painted surfaces, or surfaces that have been
treated with wax, oils, varnishes, or shellac. The sheen
may be removed by the heat, steam, and friction of the
cleaning accessories. It is always recommended to test
an isolated area of the surface to be cleaned before
proceeding.
fig. 12
We also recommend you check the use and care
instructions from the surface manufacturer. When
cleaning finished wood surfaces, use broad, continuous
strokes. To prevent surface damage, avoid focusing
steam or allowing the cleaning accessories to remain
stationary in any one spot.
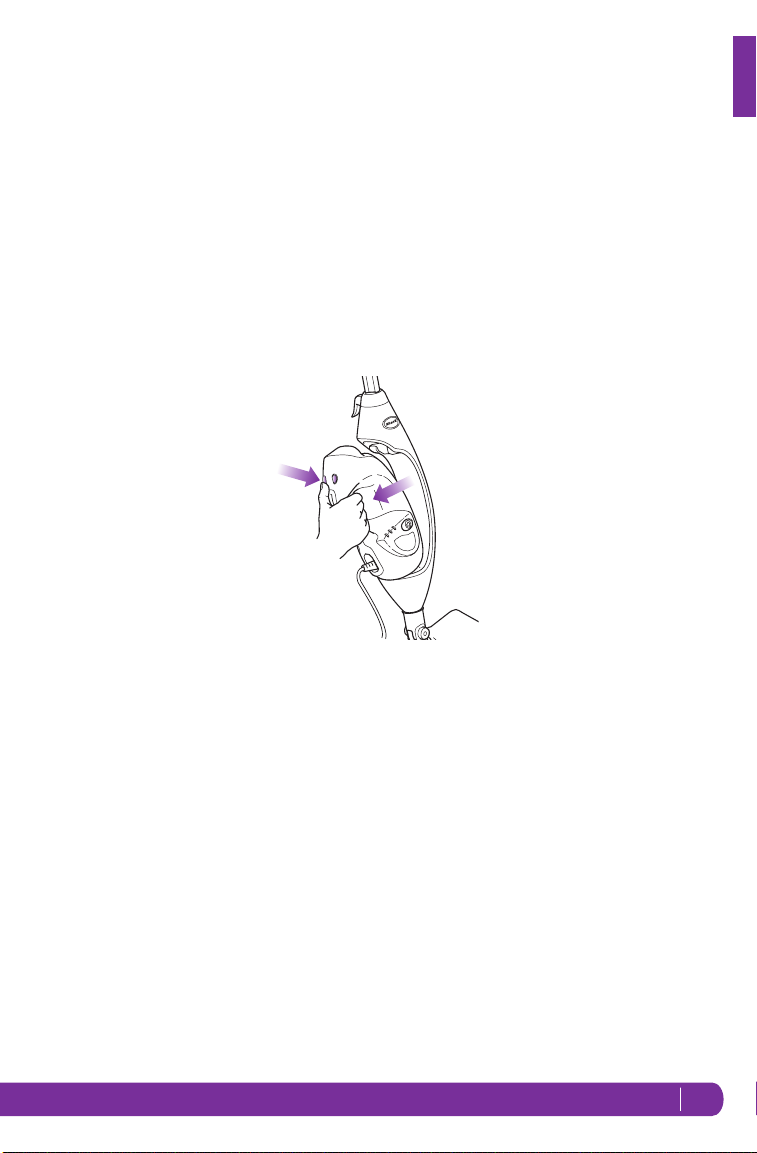
• Remove the Handheld Steamer by pressing on the
release button and pulling away from the cradle.
Be careful to NOT press the steam trigger as you
remove the handheld steamer. (fig. 12)
• The Handheld Steamer is automatically set
to SCRUB mode. Squeeze the steam trigger to
activate steam. You may select other steam modes
depending on the accessory and the use.
• With all attachments, control Steam better by using
3-to-5-second bursts of the trigger. This will allow
you to steam longer and with more control.
10sharkclean.com
Page 12
Using the Direct Steam Nozzle
For a full list of what is included with your Steam Mop, please refer to box's top panel.
PLEASE KEEP THESE IMPORTANT SAFEGUARDS IN MIND WHEN USING THE APPLIANCE:
CAUTION: Do not press the steam trigger until the Direct Steam Nozzle is snapped into the main
nozzle of your Handheld Steamer.
CAUTION: Do not press the steam trigger while removing the Direct Steam Nozzle. Avoid touching
the tip of the Direct Steam Nozzle, as this will be very hot after steaming.
NOTE: To remove the Direct Steam Nozzle, press and hold down the Handheld Release Buttons. Then slide
out the Direct Steam Nozzle using the grip.
NOTE: The Handheld Steamer may continue to emit steam for a few seconds after the trigger is released. This
is normal, and the steaming will eventually come to a stop.
fig. 13 fig . 14
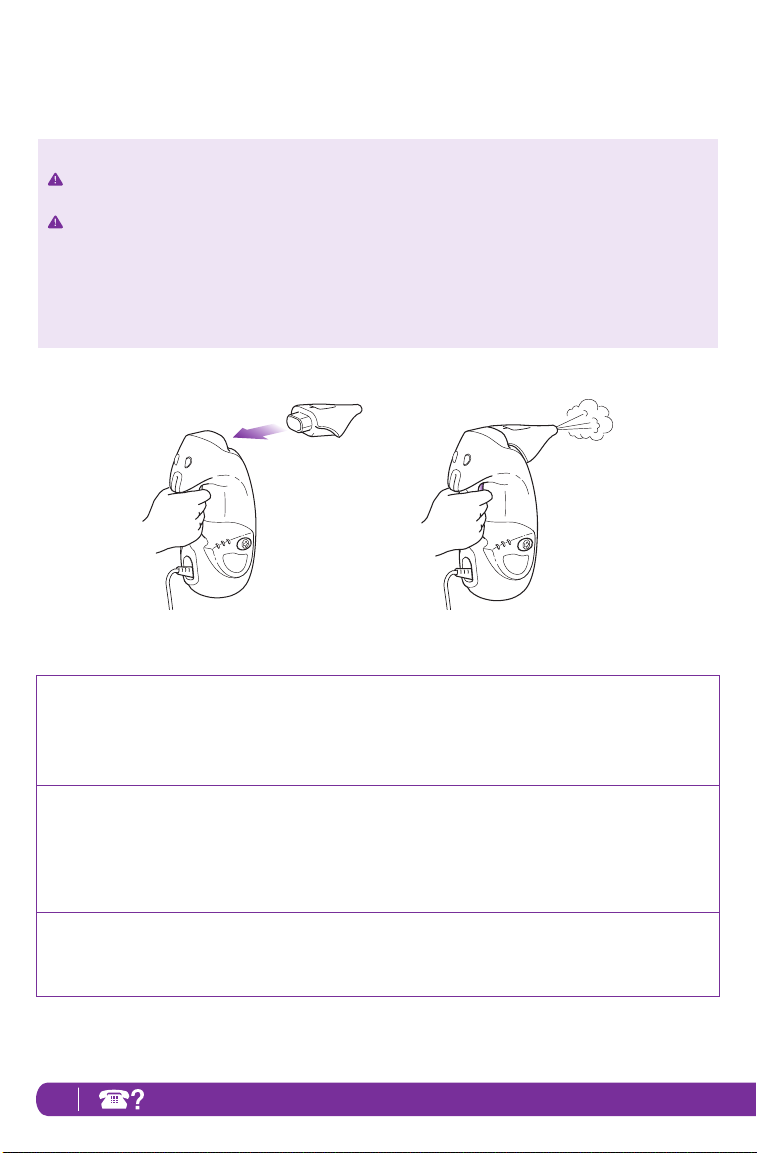
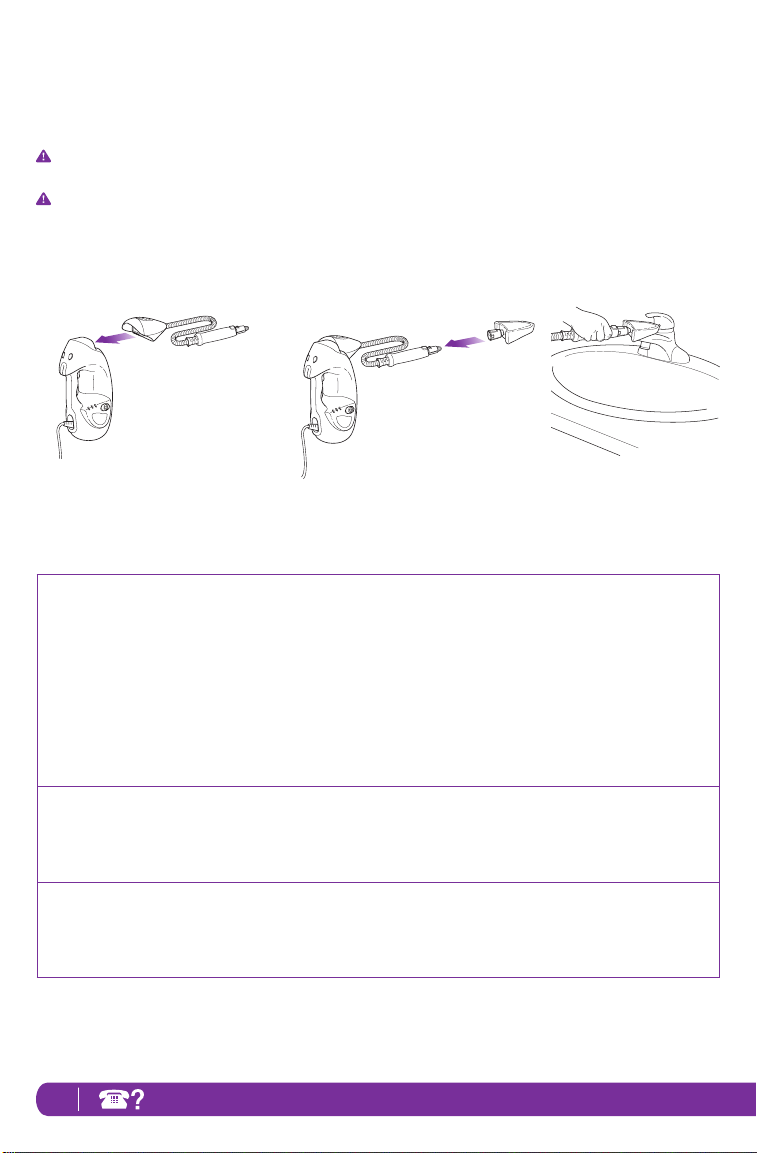
How to Attach/Detach:
• The Direct Steam Nozzle slides directly on to the handheld steamer. (fig. 13)
• To remove, wait 2 to 3 minutes for the tool to cool, hold the release button and pull the tool away from the unit.
Usage:
• The Direct Steam Nozzle creates direct steam spray to clean hard-to-reach nooks and crannies, flat surfaces, toys
and other places where germs may build up. (fig. 14)
• Spray direct steam and wipe clean with a wet cloth or paper towel.
Cleaning Tips:
• For effective cleaning, hold the steam output nozzle 1 to 2 inches away from the surface you’re cleaning.
11 1-800-798-7398
Page 13
Using the Garment Steamer
For a full list of what is included with your Steam Mop, please refer to box's top panel.
CAUTION: Make sure the Handheld Steamer is unplugged or in Standby mode while attaching or
removing the accessory. Avoid touching the accessory, as it will be very hot after steaming.
CAUTION: To avoid scalding injuries, always unplug and allow the Steam Mop to cool before removing or
changing accessories or pads.
fig. 15 fig. 17fig. 16
How to Attach/Detach:
• Use the lavender loop on the side of the bonnet to slide over the nozzle opening of the Garment Steamer. (fig. 15)
• Snap the bristle frame over the bonnet with the bristles placed at the top of the Garment Steamer bonnet.
• Attach the assembled Garment Steamer to the Handheld Steamer by snapping it into the main nozzle. (fig. 16)
• To remove, wait 2 to 3 minutes for the tool to cool, hold the release button and pull the tool away from the unit.
English
Usage:
• The Garment Steamer is ideal for removing wrinkles from clothing and for freshening and grooming upholstery.
• The bonnet and frame with bristles provides controlled steaming for fabrics and upholstery.
Cleaning Tips:
• Pressing the steam trigger in 3-to-5-second bursts, move slowly up and down over your garments or upholstery.
(fig. 17)
• Always determine color fastness of any fabric, especially with reds or blues:
– Take a clean, moist, warm towel and gently rub a small area on the fabric that is as out of sight and out of the
way as possible.
– If color bleeds onto the towel, you may need to have the piece professionally cleaned.
12sharkclean.com
Page 14
Using The Accessory Hose and The Precision Clean Accessory
For a full list of what is included with your Steam Mop, please refer to box's top panel.
CAUTION: Make sure the Handheld Steamer is unplugged or in Standby mode while attaching or
removing the accessory. Avoid touching the accessory, as it will be very hot after steaming.
CAUTION: To avoid scalding injuries, always unplug and allow the Steam Mop to cool before removing or
changing accessories or pads.
fig. 19fig. 18 fig. 20
How to Attach/Detach:
• First attach the Accessory Hose to the Handheld Steamer by snapping the Accessory Hose into the main nozzle.
(fig. 18)
• Slide the Precision Clean Pocket Pad over the Precision Clean Pocket Accessory so it fits snugly. Cinch the elastic
band and slide the locking toggle to tighten. Attach the Precision Clean Pocket Accessory by connecting it to the
Direct Steam Nozzle until it clicks into place.
• Do not use the Precision Clean Accessory without the Precision Clean Pocket Pad attached.
• Press the Flat Scrubber Tool onto the Accessory Hose until it clicks into place. (fig. 19)
• To remove, wait 2 to 3 minutes for the tool to cool, hold the release button and pull the tool away from the unit.
Usage:
• The Precision Clean Pocket Accessory is ideal for small, uneven surfaces. The pointed tip is great for edges and
corners. (fig. 20)
Cleaning Tips:
• Additional attachments are available for your accessory hose. Please visit sharkclean.com for more information.
13 1-800-798-7398
Page 15
Caring for Your Steam Mop
English
fig. 23
fig. 21
fig. 22
AFTER USE AND STORAGE
1 Press the Steam Control Button until it starts to blink,
indicating that you are in Standby mode. Unplug the
cord from the outlet and place the Steam Mop into
the upright position. Let it cool.
2 To remove the Dirt Grip™ pad, lift the Steam Mop straight
up by the handle until the Intelli-Mop™ Head is hanging
straight down. Press the pad release buttons on the
neck of the mop head, and both sides of the Intelli-Mop
Head will drop open, releasing the pad. Once the pad
has been released, close the Intelli-Mop Head.
3 If the
Intelli-Mop Head
pad can still be removed. Press down on the release
button on the Intelli-Mop Head post to release the pad
(fig. 21).
4 Empty the water tank before storing. To empty the
tank, hold the Steam Mop beside a sink. Open the
water tank lid, then lean the unit over the sink. Let
the water drain out, then close the lid.
5 To store the Steam Mop, wait until after it has cooled
and the steam has been released. Then remove the
Intelli-Mop Head and hang the mop by its handle on a
large hook (not included) (fig. 22).
is not attached to the mop, the
fig. 24
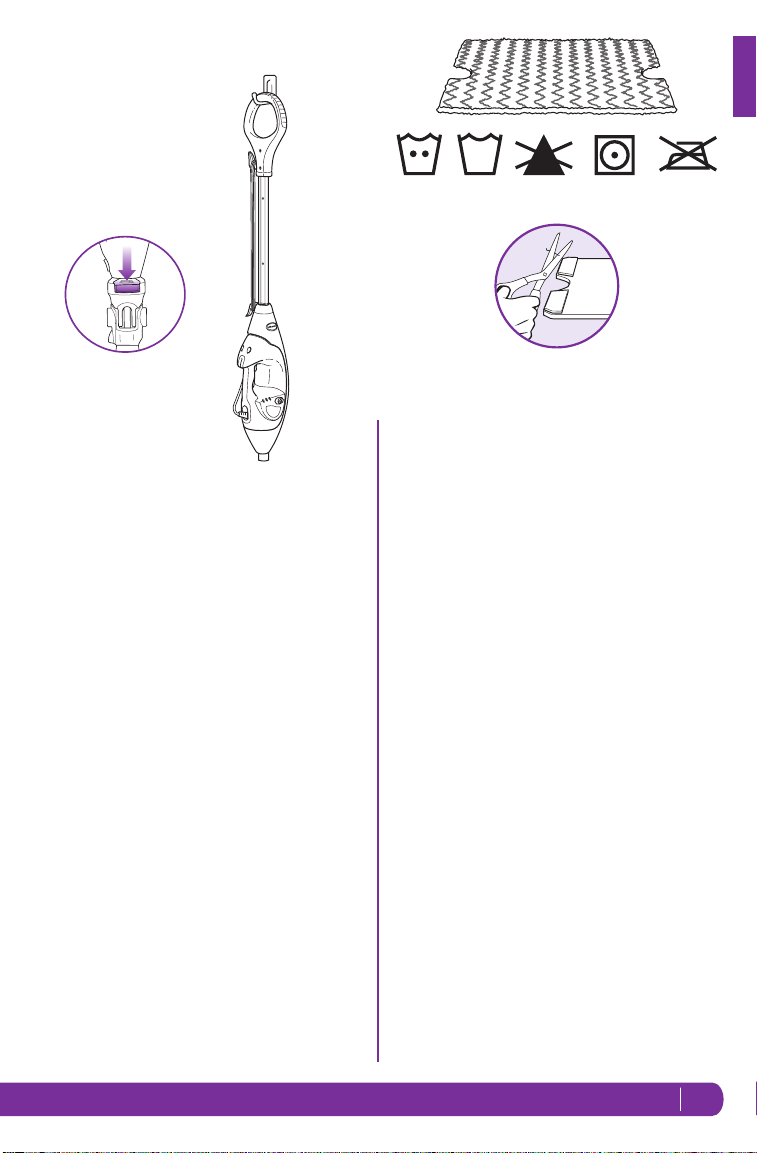
DIRT GRIP™ PAD CARE INSTRUCTIONS
Care
Machine-wash the Dirt Grip pads separately with warm
water using liquid detergent.
NEVER USE BLEACH, POWDERED DETERGENT, OR
FABRIC SOFTENERS as they may damage or leave
a coating on the Dirt Grip pads that will reduce their
cleaning performance and absorbency. Dirt Grip pads
should be line-dried or tumble-dried on a low setting, as
this will extend the life of the microfiber fabric (fig. 23).
Loose fibers can indicate wearing of the microfiber
fabric. Do not pull the loose fibers, as this can cause the
weave to come undone. Simply trim the loose fibers with
scissors (fig. 24).
Replacement Dirt Grip pads
For best cleaning results, we recommend replacing your
Dirt Grip pads every 3 to 4 months following normal use.
As with any fabric, dirt particles, grease, friction, and
repeated washing can cause the fibers to break down, and
you may notice an increase in the effort needed to push or
pull the mop.
You can purchase replacement Dirt Grip pads and
other accessories by visiting sharkclean.com or calling
1-800-798-7398.
STEAM NOZZLE CARE
If you believe the main steam nozzle or the Steam Blaster
nozzle is clogged, please contact Customer Service at
1-800-798-7398 or consumer-services@sharkninja.com
™
14sharkclean.com
Page 16
Ordering Additional Accessories
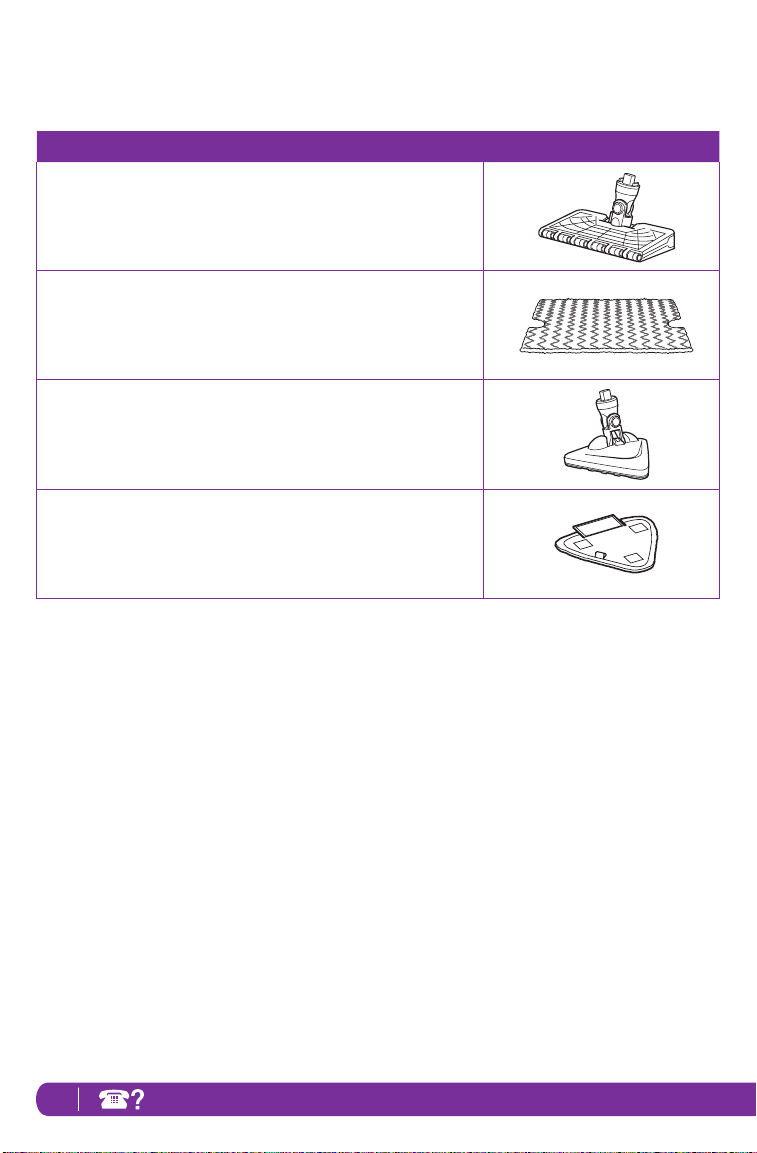
ACCESSORY
Intelli-Mop™ Head
Great for all-purpose cleaning. Get an extra boost for tough stains from the Steam
Blaster™, and cut your cleaning time in half with the hands-free two-sided pad.
Dirt Grip™ Pad
Double-sided pad. Easy, hands-free installation and removal. Washable and
reusable.
Triangle Scrubber Head
Triangle shape is perfect for cleaning corners and hard-to-reach areas.
Equipped with a Steam Blaster to help loosen stains and a deployable
scrubber to tackle stuck-on spots.
Triangle Scrubber Pad
Ideal for cleaning corners and other hard-to-reach spaces. Easy to install
and remove.
15 1-800-798-7398
Page 17

Troubleshooting Guide
PROBLEM POSSIBLE REASONS & SOLUTIONS
The Steam Mop should be securely plugged into an electrical outlet. Check your fuse or
circuit breaker or try a different outlet.
Make sure the water tank is full, the unit is plugged in, and the light around the Steam
Control Button is solid.
The Steam Mop isn’t
producing any steam.
The Steam Mop is
producing intermittent
steam.
I can’t select a Steam
Setting.
I am getting streaky/
cloudy floors.
If the lights below the Steam Control Button are not illuminated, try a different electrical outlet.
If the lights below the Steam Control Button are blinking, press the Steam Control
Button to select a Steam setting.
If the lights below the Steam Control Button are solid, wait 30 seconds for the unit to warm up.
If after following the above steps the Steam Mop still does not produce any steam, contact
Customer Service at 1-800-798-7398 or consumer-services@sharkninja.com
This is normal—for more consistent steam select the SCRUB setting.
Also make sure the water tank is full.
Make sure the Steam Mop is plugged in and the lights below the Steam Control Button
are solid.
If your Steam Mop is producing steam but the lights below the Steam Control Button
are not lit, call customer service at 1-800-798-7398.
The Dirt Grip™ pad might be dirty. If it is, flip it over to the clean side or change it
entirely. If you washed the Dirt Grip pad with powdered detergent, then it could be
damaged and require replacement.
This could also be an indication of soap or grease residue that has accumulated on the
floor. As the Steam Mop uses only a small amount of water, it may not be enough to rinse
off the accumulation of residue that the steam is bringing to the surface. We suggest
rinsing the floor with nothing but water, letting it dry, and then steam mopping again with a
clean Dirt Grip pad. One or more rinses will generally remove the residue.
A more stubborn case may require you to rinse the floor with a mix of one part vinegar
and two parts water* (but DO NOT put vinegar or any other cleaner into the Steam
Mop's water tank.)
*Please consult your flooring manufacturer’s care and maintenance instructions before
applying any cleaning products or solutions including vinegar.
English
16sharkclean.com
Page 18

Frequently Asked Questions
QUESTION ANSWER
Can I use the Steam Mop on
carpets?
What surfaces can I use the
Steam Mop on?
Can I put something other than
water in the water tank of the
Steam Mop?
No, the Steam Mop is not designed for carpet cleaning.
The Steam Mop is designed for use on all sealed hard floor surfaces. We
recommend that you first test an isolated area of the floor surface to be cleaned as
well as review the use and care instructions from your floor manufacturer.
WARNING: Do not use on leather, wax-polished furniture, synthetic
fabrics, velvet, or other delicate, steam-sensitive materials.
NOTE: On surfaces treated with wax and on some no-wax floors, the sheen
may be removed by the heat or steam action of the unit. Test an isolated area of
flooring first to see if sheen is affected.
DO NOT add cleaning solutions, scented perfumes, oils, or any other chemicals
to the water used in this appliance, as this may damage the unit or make it
unsafe for use. We recommend using distilled water in your Steam Mop.
17 1-800-798-7398
Page 19

ONE (1) YEAR LIMITED WARRANTY
SharkNinja Operating LLC warrants this product to be free from defects in material and workmanship for a period
of one (1) year from the date of the original purchase, when utilized for normal household use, subject to the following
conditions, exclusions, and exceptions.
If your appliance fails to operate properly while in use under normal household conditions within the warranty period,
return the complete appliance and accessories, freight prepaid. For assistance with warranty service options or
customer support, please call Customer Service at 1-800-798-7398 or visit sharkclean.com.
If the appliance is found to be defective in material or workmanship, SharkNinja Operating LLC will repair or replace
it free of charge. Proof of purchase is required and a fee of $19.95 will apply to cover the cost of return freight.*
The liability of SharkNinja Operating LLC is limited solely to the cost of the repair or replacement of the unit at our
option. This warranty does not cover normal wear of parts and does not apply to any unit that has been tampered with
or used for commercial purposes. This limited warranty does not cover damage caused by misuse, abuse, negligent
handling, or damage due to faulty packaging or mishandling in transit. This warranty does not cover damage or defects
caused by or resulting from damages from shipping or from repairs, service, or alterations to the product or any of its
parts that have been performed by a repair person not authorized by SharkNinja Operating LLC.
This warranty is extended to the original purchaser of the unit and excludes all other legal and/or conventional
warranties. The responsibility of SharkNinja Operating LLC warranty, if any, is limited to the specific obligations
expressly assumed by it under the terms of the limited warranty. In no event is SharkNinja Operating LLC liable for
incidental or consequential damages of any nature whatsoever. Some states/provinces do not permit the exclusion or
limitation of incidental or consequential damages, so the above may not apply to you.
This warranty gives you specific legal rights, and you may also have other rights which vary from state to state or
province to province.
*Important: Carefully pack item to avoid damage in shipping. Be sure to include proof of purchase date
and to attach tag to item before packing with your name, complete address, and phone number with a
note giving purchase information, model number, and what you believe is the problem with the item. We
recommend you insure the package (as damage in shipping is not covered by your warranty). Mark the
outside of your package “ATTENTION CUSTOMER SERVICE”.
English
Product Registration
Please visit registeryourshark.com or call 1-800-798-7398 to register your new Shark® product within ten (10) days
of purchase. You will be asked to provide the store name, date of purchase, and model number, along with your name and
address.
The registration will enable us to contact you in the unlikely event of a product safety notification. By registering, you
acknowledge you have read and understood the instructions and the accompanying warnings set forth in this owner’s guide.
18sharkclean.com
Page 20

CONSIGNES DE SÉCURITÉ IMPORTANTES
Pour usage domestique seulement
LORS DE L’UTILISATION DE LA
VADROUILLE À VAPEUR SHARKMD
LIF T-AWAYMD PRO STEAM POCKETMD,
DES MESURES DE SÉCURITÉ DE BASE
DOIVENT TOUJOURS ÊTRE RESPECTÉES,
INCLUANT LES SUIVANTES:
LIRE TOUTES LES DIRECTIVES AVANT
D’UTILISER VOTRE VADROUILLE SHARK
LIFT-AWAY PRO STEAM POCKET.
AVERTISSEMENT: RISQUE DE
BRÛLURE.
La vapeur émise par la vadrouille à
vapeur est très chaude et peut provoquer
des brûlures. Veuillez utiliser la
vadrouille à vapeur avec précaution.
AVERTISSEMENT: GARDER LA
VADROUILLE À VAPEUR HORS DE PORTÉE
DES ENFANTS.
FICHE POLARISÉE:
Cette vadrouille à vapeur est munie d’une fiche
polarisée (une lame est plus large que l’autre).
À des fins de sécurité, cette fiche s’insère
dans une prise polarisée dans un seul sens.
Si la fiche ne s’insère pas entièrement dans
la prise, inversez la fiche. Si elle ne s’insère
toujours pas, communiquez avec un électricien
accrédité. Ne pas tenter de contourner ce
dispositif de sécurité. Il n'est pas recommandé
d'utiliser une rallonge électrique avec ce
produit.
AVERTISSEMENT:
AFIN DE RÉDUIRE LES RISQUES D’INCENDIE,
D’ÉLECTROCUTION OU DE BLESSURE:
1. Lors de son utilisation, ne jamais faire pencher
la vadrouille à vapeur sur le côté et ne pas
diriger la vapeur vers les personnes, les
animaux ou les plantes.
2. Employer le système uniquement pour son
utilisation prévue.
3. NE PAS UTILISER comme source de
chauffage domestique.
4. NE PAS UTILISER cet appareil à l’extérieur.
5. NE PAS LAISSER la vadrouille à vapeur sans
surveillance lorsqu’elle est branchée. Toujours
débrancher le cordon d’alimentation de la prise
électrique lorsque l’appareil n’est pas utilisé et
avant d’effectuer son entretien.
6. NE PAS LAISSER les enfants se servir de
la vadrouille à vapeur. Porter une attention
particulière lorsque le produit est utilisé à
proximité d’enfants, d’animaux ou de plantes.
7. Utiliser l’appareil uniquement comme le décrit le
guide du propriétaire.
8. Utiliser seulement les accessoires
recommandés par le fabricant.
9. NE PAS UTILISER l’appareil si le cordon
d’alimentation ou la fiche sont endommagés.
Si la vadrouille à vapeur ne fonctionne pas
comme prévu, est tombée, a été endommagée,
a été laissée à l’extérieur ou est entrée en
contact avec de l’eau, retournez-la à SharkNinja
Operating LLC aux fins d’examen et de
réparation. Des réparations ou un réassemblage
incorrects peuvent présenter des risques de
décharges électriques ou de blessures quand la
vadrouille à vapeur est utilisée.
10. Pour se protéger contre les décharges
électriques, NE PAS IMMERGER la vadrouille à
vapeur dans l’eau ou tout autre liquide.
19 1-800-798-7398
Page 21

11. NE PAS MANIPULER la fiche ou la vadrouille
à vapeur avec les mains mouillées et ne pas
l’utiliser sans porter de chaussures.
12. NE PAS TIRER sur le cordon, ni transporter
l’appareil par le cordon, ni utiliser le cordon
comme une poignée, ni fermer une porte sur
le cordon, ni tirer le cordon autour de bords ou
de coins pointus. Ne pas faire fonctionner la
vadrouille à vapeur sur le cordon. Éloigner le
cordon d’alimentation des surfaces chaudes.
13. NE PAS DÉBRANCHER l’appareil en tirant sur
le cordon d’alimentation. Tirer sur la fiche et
non le cordon d’alimentation pour débrancher
l’appareil. Ne pas utiliser de rallonge ou de
prise ayant une intensité de courant admissible
inadéquate.
14. NE PAS INSÉRER d’objets dans les ouvertures
de la buse à vapeur. Cesser l’utilisation de
l’appareil si la buse à vapeur est bloquée.
15. NE PAS METTRE les mains ou les pieds sous
la vadrouille à vapeur. La chaleur est intense.
16. Utiliser l’appareil SEULEMENT sur des surfaces
planes horizontales. NE PAS UTILISER sur les
murs, les comptoirs ou les fenêtres.
17. NE PAS UTILISER sur du cuir, des meubles
cirés, des tissus synthétiques, du velours ou
d’autres matériaux sensibles à la vapeur.
18. NE PAS AJOUTER de produits nettoyants,
de vinaigre, de parfums, d’huiles ou tout autre
produit chimique à l’eau utilisée par la vadrouille
à vapeur, car cela risque de l’endommager
ou de présenter un danger. Si vous habitez
dans une zone où l’eau est dure, nous vous
recommandons d’utiliser de l’eau distillée dans
votre vadrouille à vapeur.
MC
19. Ne jamais laisser le tampon Dirt Grip
à un seul endroit pendant son utilisation
ou son rangement, car cela pourrait
endommager vos surfaces.
20. Retirer le tampon Dirt Grip après avoir
débranché la vadrouille à vapeur et lui avoir
permis de se refroidir.
21. Lors du nettoyage de l’extérieur de la vadrouille à
vapeur, débrancher le cordon d’alimentation de la
prise de courant et nettoyer la vadrouille à vapeur
avec un chiffon sec ou humide. Ne pas verser d’eau
ou utiliser d’alcool, de benzène ou de diluant sur la
vadrouille à vapeur.
22. Une extrême prudence est de rigueur lors
de l’utilisation de la vadrouille à vapeur pour
nettoyer les escaliers.
23. Ne jamais utiliser la vadrouille à vapeur sans y
fixer le tampon Dirt Grip.
24. Garder la zone de travail bien éclairée.
25. Ranger la vadrouille à vapeur à intérieur dans
un endroit frais et sec.
26. Pour éviter une surcharge du circuit, ne pas
utiliser un autre appareil sur la même prise
(circuit) que celle de la vadrouille à vapeur.
27. Pour éviter les brûlures graves, toujours
débrancher la vadrouille à vapeur et la laisser
refroidir avant de retirer ou de changer les têtes
de vadrouille, les accessoires ou les tampons
Dirt Grip.
AVERTISSEMENT: la
vadrouille à vapeur est conçue pour nettoyer
des planchers à surface dure capables de
supporter de hautes températures. Ne pas
utiliser sur des planchers en bois non scellés
ou en céramique non vernie. Sur des surfaces
cirées ou sur certains planchers sans cirage,
le lustre peut être enlevé par la chaleur et la
vapeur. Il est recommandé de toujours tester
une partie isolée de la surface à nettoyer avant
de débuter. Il est également recommandé
de consulter les instructions d’utilisation et
d’entretien du fabricant de planchers.
Français
CONSERVER CES INSTRUCTIONS
20sharkclean.com
Page 22

Merci d’avoir acheté la vadrouille SharkMD Lift-AwayMD Pro Steam PocketMD.
Ce manuel du propriétaire a été conçu pour vous aider à acquérir une compréhension approfondie de votre nouvelle
vadrouille Shark Lift-Away Pro Steam Pocket. Veuillez lire ce manuel soigneusement et le conserver pour référence
ultérieure.
Pour une liste de ce qui est inclus avec ce modèle, consultez le panneau supérieur de la boîte.
Pour toute question sur votre vadrouille Shark Lift-Away Pro Steam Pocket, veuillez appeler le service à la clientèle de
Shark au 1800798-7398.
La vadrouille Shark Lift-Away Pro Steam est la solution pour tout nettoyage à la vapeur en profondeur. Que vous ayez
besoin de lutter contre les taches tenaces avec le Steam BlasterMC ou que vous fassiez du nettoyage général et de
la désinfection de plancher*, notre tête de vadrouille Intelli-MopMC et nos tampons DirtGripMC de nouvelle génération
offrent le summum en matière de polyvalence et d’efficacité, ce qui rend votre nettoyage simple, rapide et facile.
* Les études de désinfection ont été effectuées dans des conditions contrôlées. Les résultats et les conditions liés à
l’entretien ménager peuvent varier. Avec la tête Intelli-Mop uniquement en mode
«SCRUB» (FROTTER)
. Pas en mode
de nettoyage au-dessus du sol ou en mode Steam Blaster.
* Sanitization studies were conducted under controlled test conditions. Household conditions and results may vary.
With the Intelli-mop head only in SCRUB mode. Not in above floor mode or when using Steam Blaster.
ENREGISTREZ VOTRE ACHAT:
registeryourshark.com
1800798-7398
NOTEZ LES RENSEIGNEMENTS CI-DESSOUS:
Numéro de modèle: _________________________________
Date d’achat (conserver le reçu): ________________________
CARACTÉRISTIQUES TECHNIQUES:
Tension: 120V, 60Hz
Puissance: 1500W
Capacité en eau: 300ml(10,14oz)
HORAIRE RECOMMANDÉ DE REMPLACEMENT DES TAMPONS DIRT GRIPMC LAVABLES:
Tous les 3mois
POUR LE MEILLEUR RENDEMENT DU NETTOYAGE:
Voir la section «Prendre soin de votre vadrouille à vapeur» pour plus de détails. Passer l’aspirateur
ou balayer le plancher avant d’utiliser la vadrouille.
21 1-800-798-7398
Page 23

Table des matières
Merci d’avoir
acheté la
vadrouille Shark
Lift-Away
Steam Pocket
MD
Pro
MD
Mise en route ............................................................................................... 23
Assemblage de votre vadrouille à vapeur ........................................................ 25
MD
Utilisation de la vadrouille à vapeur ................................................................ 26
Intelligent Steam ControlMD ............................................................................ 27
Nettoyage au-dessus du sol .......................................................................... 28
.
Utilisation de la buse à vapeur directe ............................................................ 29
Utilisation du vaporisateur pour vêtement ....................................................... 30
Utilisation d’accessoires pour tuyau et pour nettoyage à précision ................... 31
Prendre soin de votre vadrouille à vapeur ....................................................... 32
Commander des accessoires supplémentaires ............................................... 33
Guide de dépannage ..................................................................................... 34
Foire aux questions ....................................................................................... 35
Garantie ....................................................................................................... 36
Français
22sharkclean.com
Page 24

Mise en route
Lors du montage de votre vadrouille à vapeur, il peut y avoir un peu d’eau dans le réservoir d’eau ou autour de ce
dernier. En effet, nous testons toutes nos vadrouilles à vapeur avant que vous les achetiez, de sorte que vous obtenez
une vadrouille SharkMD Lift-AwayMD Pro Steam PocketMD de qualité.
a
b
c
d
e
j
f
g
h
i
a Poignée de vadrouille à vapeur
b Rembobineur supérieur
c Une(1) grande vis de6mmx54mm*
d Rembobineur inférieur
e Corps de la vadrouille à vapeur
f Vaporisateur portatif et amovible
g Bouton de déverrouillage pour le vaporisateur
*L’utilisation d’un tournevis Phillips ou à tête plate peut être nécessaire. Tournevis non inclus.
23 1-800-798-7398
o
n
h Gâchette à vapeur
i Panneau de contrôle à vapeur
j Godet de remplissage
k Bouton de déverrouillage de la tête de la vadrouille
l Boutons de déverrouillage de tampon Dirt Grip
m Buse du Steam Blaster
n Tête de l’Intelli-Mop
o Tampon Dirt Grip
k
l
m
MC
MC
MC
Page 25

Pour obtenir une liste complète de ce qui est inclus avec votre vadrouille, veuillez consulter le rabat de la boîte.
AVERTISSEMENT:
testez sur une surface peu visible et communiquez avec le fabricant ou
l’installateur de la surface pour obtenir des renseignements sur celle-ci.
ACCESSOIRES PORTATIFS
Buse à vapeur directe
Utilisez la vapeur pour déloger la saleté, les surfaces dures
et la crasse.
Utilisez 3 à 5secondes de souffles de vapeur en utilisant
la gâchette sur la poignée de l’appareil pour de meilleurs
résultats.
VAPORISATEUR
AVEC BONNET ET CADRE MUNI DE POILS
Parfait pour enlever les plis des vêtements ainsi que pour
rafraîchir et entretenir les meubles en tissu.
N’utilisez pas cet outil sans y avoir fixé le bonnet en microfibres.
ACCESSOIRES POUR TUYAU
Pour une accessibilité et une mobilité optimales lors des
nettoyages de surface au-dessus du sol.
Français
ACCESSOIRES DE POCHE ET TAMPON POUR NETTOYAGE
DE PRÉCISION
Parfait pour les petites surfaces inégales, les coins et les
bordures. N’utilisez pas cet outil sans y avoir fixé le tampon de
poche pour nettoyage de précision.
24sharkclean.com
Page 26

Assemblage de votre vadrouille à vapeur
fig. 2a
fig. 3fig. 2b
fig. 1 fig. 5 fig. 6fig. 4
AVERTISSEMENT: assurez-vous toujours que la
vadrouille à vapeur est DÉBRANCHÉE lorsqu’elle
n’est pas utilisée. Ne remplissez jamais la
vadrouille à vapeur et ne joignez jamais la tête de
la vadrouille lorsque cette dernière est branchée
sur une prise électrique. Débranchez-la de la prise
électrique et laissez-la refroidir avant de la remplir,
ou de fixer ou de retirer la tête. Pour prolonger
le cycle de vie de votre vadrouille à vapeur, nous
vous recommandons d’utiliser de l’eau distillée.
Assurez-vous de n’ajouter que de l’eau dans le
réservoir. Les produits chimiques et les solutions
de nettoyage (y compris le vinaigre) peuvent
endommager la vadrouille à vapeur et pourraient
être dangereux pour vous et votre famille.
ASSEMBLAGE DE LA VADROUILLE À VAPEUR
1 Vissez la poignée de la vadrouille dans le corps de la
vadrouille à vapeur (tournevis non inclus) (fig.1).
2 Faites glisser la tête de l’Intelli-MopMC dans le corps
de la vadrouille à vapeur. Poussez jusqu’à ce que vous
entendiez un déclic indiquant qu’elle est solidement
en place (fig.1). Pour retirer la tête de l’Intelli-Mop,
appuyez sur le bouton de déverrouillage à l’avant de
l’appareil sur le dessus du raccord de la tête (fig.1) et
faites glisser.
25 1-800-798-7398
MC
3 Pour fixer le tampon Dirt Grip
, étalez le tampon sur le
sol, la pochette sur le dessus. Soulevez la vadrouille et
centrez la tête de l’Intelli-Mop au-dessus du tampon puis
appuyez sur les boutons de déverrouillage sur le col de
la tête de la vadrouille à vapeur (fig.2a). Les deux côtés
de la tête de l’Intelli-Mop s’ouvriront (fig.2b). Faites
glisser les onglets des quatre coins de la tête de l’IntelliMop dans les quatre pochettes à angle du tampon
(fig.3 et fig.4). Poussez délicatement un côté de la tête
contre le sol jusqu’à ce que ce côté s’enclenche (fig.5).
Répétez l’opération de l’autre côté (fig.6).
4 Ouvrez le bouchon du réservoir à eau (fig. 7), remplissez
le réservoir puis remettez le bouchon en place et
vissez-le bien. Utilisez le godet de remplissage et versez
de l’eau dans le réservoir (fig.8). Ne pas trop remplir le
réservoir. Replacez le bouchon sur le réservoir d’eau.
fig. 7
fig. 8
Page 27

Utilisation de la vadrouille à vapeur
IMPORTANT: assurez-vous de ne pas utiliser la vadrouille SharkMD Lift-AwayMD Pro Steam PocketMD sans y attacher
un tampon Dirt GripMC et sans ajouter de l’eau dans le réservoir d’abord. Lorsque vous utilisez la vadrouille à vapeur
pour la première fois, le démarrage de la vapeur peut prendre plus que les 30secondes habituelles.
IMPORTANT: ne pas utiliser sur des planchers en bois non scellés ou en céramique non vernie. Sur des surfaces cirées
ou sur certains planchers sans cirage, le lustre peut être enlevé par la chaleur et la vapeur. Tester une partie isolée de la
surface à nettoyer avant de continuer. Consulter les instructions d’utilisation et d’entretien du fabricant de planchers.
fig. 11a
fig. 9 fig. 10 fig. 11b
REMARQUE: pour prolonger le cycle de vie de votre
vadrouille à vapeur, nous vous recommandons d’utiliser
de l’eau distillée.
REMARQUE: balayez ou passez l’aspirateur sur vos
planchers avant de les nettoyer avec votre vadrouille à
vapeur.
1 Faites pivoter le support à cordon supérieur afin de
dérouler complètement le cordon d’alimentation (fig. 9).
Brancher le cordon dans une prise électrique.
2 Quand il est branché pour la première fois, l’appareil se
met en mode de veille. Les trois voyants sous le bouton
de contrôle de la vapeur clignotent pour indiquer le mode
de veille.
3 Pour sélectionner le mode de vapeur, appuyez sur le
bouton de contrôle de la vapeur une fois pour «DUST»
(ÉPOUSSETER) (un voyant bleu), deux fois pour «MOP»
(VADROUILLER) (deux voyants bleus) ou trois fois pour
«SCRUB» (FROTTER) (trois voyants bleus). Appuyer une
quatrième fois mettra l’appareil en mode veille.
4 Nettoyez vos planchers avec un mouvement de va-et-vient.
5 Lorsque vous avez besoin d’un souffle supplémentaire
de vapeur pour nettoyer une tache rebelle, vous pouvez
utiliser la fonction Steam BlasterMC. Retournez la tête
de sorte qu’elle est derrière le corps de la vadrouille,
puis inclinez la poignée de la vadrouille vers le bas. Cela
activera la fonction Steam Blaster (fig.10) pour produire
un jet de vapeur concentré sur la tache.
AVERTISSEMENT: Lorsqu'en mode Steam Blaster,
ne laissez pas la tête de la vadrouille sur un seul
endroit pour plus qu'une minute.
AVERTISSEMENT: ne frottez pas la même surface
pendant une période de temps prolongée.
6 Pour arrêter la fonction Steam Blaster, il suffit de soulever
la poignée. Vous pouvez ensuite retourner la tête de
la vadrouille dans sa position d’origine et continuer le
nettoyage.
7 Lorsque vous avez terminé de passer la vadrouille,
appuyez sur le bouton de contrôle de la vapeur pour
revenir en mode de veille.
8 Pour retirer le tampon Dirt Grip, soulevez simplement
la vadrouille vers le haut par la poignée jusqu’à ce que
la tête de l’Intelli-MopMC soit suspendue verticalement.
Appuyez sur le bouton de déverrouillage du tampon au
col de la tête de la vadrouille (fig.11a), et les deux côtés
de la tête s’ouvriront pour libérer le tampon (fig.11b).
9 Dès que le tampon Dirt Grip a été libéré, refermez la tête
de l’Intelli-Mop. Pour la fermer, poussez délicatement un
côté de la tête de l’Intelli-Mop contre le sol jusqu’à ce que
ce côté s’enclenche. Répétez l’opération de l’autre côté.
10 Lorsque le réservoir d’eau est vide, la vadrouille à vapeur
arrêtera de produire de la vapeur. Vous pouvez remplir
le réservoir d’eau à tout moment tant que la vadrouille
à vapeur est débranchée. Suivez les instructions de
remplissage du réservoir d’eau à la page25.
REMARQUE: veuillez attendre 2 à 3minutes pour
que la vadrouille à vapeur refroidisse avant de
changer la tête de la vadrouille. Ne laissez jamais la
vadrouille à vapeur avec un tampon Dirt Grip humide
ou mouillé sur un plancher pour une période de
temps prolongée.
Français
26sharkclean.com
Page 28

Contrôle de la vapeur intelligent
MD
La vadrouille SharkMD Lift-AwayMD Pro Steam PocketMD a trois réglages intelligents uniques de contrôle de la
vapeur de sorte que vous pouvez utiliser la bonne quantité de vapeur pour la tâche de nettoyage à accomplir. Voir
ci-dessous pour obtenir des conseils sur l’utilisation de chaque réglage.
RÉGLAGE
«DUST»
(ÉPOUSSETTER)
«LIGHT STEAM»
(VAPEUR LÉGÈRE)
«MOP»
(VADROUILLER)
«NORMAL STEAM»
(VAPEUR NORMALE)
«SCRUB»
(FROTTER)
«HEAVY STEAM»
(VAPEUR ABONDANTE)
Steam Blaster
MC
IDÉAL POUR CES SURFACES
Plancher lamellé
Bois dur
Marbre
Bois dur
Marbre
Tuile
Pierre
Bois dur
Marbre
Tuile
Pierre
Nettoyage des surfaces délicates
Nettoyage léger et dépoussiérage
Dissolution et soulèvement de la saleté légère
Nettoyage de la plupart des grandes surfaces
Nettoyage quotidien de base
Nettoyage des taches et des petits dégâts
Nettoyage des zones à circulation modérée et intense
Nettoyage en profondeur et des surfaces difficiles à nettoyer
Nettoyage des dégâts difficiles et des taches rebelles
Nettoyage en profondeur des zones à circulation intense
Suppression de la saleté et de la crasse épaisses
Désinfection* de planchers
UTILISATION RECOMMANDÉE
Pour obtenir un souffle supplémentaire de vapeur, vous pouvez utiliser la fonction
SteamBlaster en mode «DUST» (ÉPOUSSETER), «MOP» (VADROUILLER) ou «SCRUB»
(FROTTER). Suivez les instructions figurant sur la page «Utilisation de votre vadrouille
àvapeur».
POUR DÉSINFECTER* AVEC LA VADROUILLE À VAPEUR EN UTILISANT LA TÊTE DE L’INTELLI-MOPMC ET LE
TAMPON DIRT GRIPMC:
1 Fixez un tampon Dirt Grip propre à la tête de la vadrouille.
2 Branchez l’appareil et appuyez sur le bouton de contrôle de la vapeur pour sélectionner le réglage «SCRUB»
(FROTTER).
3 Attendez 30secondes pour que l’appareil commence à produire de la vapeur.
4 Commencez à passer la vadrouille sur une surface de plancher dur scellé appropriée avec un mouvement de
va-et-vient. Après trois minutes, votre appareil est prêt à être utilisé pour désinfecter.
5 En utilisant un mouvement de va-et-vient, déplacez l’appareil dans la zone que vous souhaitez désinfecter.
Répétezau moins 15fois.
* Les études de désinfection ont été effectuées dans des conditions contrôlées. Les résultats et les conditions liés à
l’entretien ménager peuvent varier. Avec la tête Intelli-Mop uniquement en mode
de nettoyage au-dessus du sol ou en mode Steam Blaster.
27 1-800-798-7398
«SCRUB» (FROTTER)
. Pas en mode
Page 29

Nettoyage au-dessus du sol
Pour obtenir une liste complète de ce qui est inclus avec votre vadrouille à vapeur, veuillez consulter le panneau
supérieur de la boîte.
MD
La vadrouille Shark
Lift-AwayMD Pro Steam PocketMD
est conçue pour nettoyer les surfaces qui peuvent résister
aux températures élevées et à l’humidité. Ne pas utiliser
sur des planchers en bois non scellés (surtout sur les
meubles en bois antique), en céramique non vernie,
sur des surfaces peinturées ou des surfaces cirées,
huilées, vernies ou laquées. Le lustre peut être enlevé
par la chaleur, la vapeur et la friction des accessoires de
nettoyage. Il est recommandé de toujours tester une partie
isolée de la surface à nettoyer avant de débuter.
Il est également recommandé de consulter les
instructions d’utilisation et d’entretien du fabricant de
planchers. Lorsque vous nettoyez les surfaces en bois
fini, donnez des coups de vadrouille en continu. Pour
prévenir l’endommagement de la surface, éviter de
concentrer de la vapeur ou de laisser les accessoires de
nettoyage à un seul endroit.
Français
• Retirer le vaporisateur portatif en appuyant sur
le bouton de déverrouillage et en l’enlevant du
support. Faites attention de NE PAS APPUYER
sur la gâchette en retirant le vaporisateur portatif.
(fig.12)
fig. 12
• Le vaporisateur portatif est automatiquement
configuré au mode «SCRUB» (FROTTER).
Appuyez sur la gâchette pour activer la vapeur. Vous
pouvez sélectionner d’autres modes de vapeur selon
l’accessoire et l’usage que vous faites.
• Peu importe l’accessoire utilisé, en appuyant 3 à
5secondes sur la gâchette vous aurez un meilleur
contrôle de la vapeur. Ceci vous permettra de
contrôler et de vaporiser la vapeur plus longuement.
28sharkclean.com
Page 30

Utilisation de la buse à vapeur directe
Pour obtenir une liste complète de ce qui est inclus avec votre vadrouille à vapeur, veuillez consulter le panneau
supérieur de la boîte.
VEUILLEZ TOUJOURS GARDER CES CONSIGNES IMPORTANTES À L’ESPRIT LORSQUE VOUS UTILISEZ
L’APPAREIL:
AVERTISSEMENT: n’appuyez pas sur la gâchette jusqu’à ce que la buse à vapeur directe soit fixée
au-dessus de la buse principale de votre vaporisateur portatif.
AVERTISSEMENT: n’appuyez pas sur la gâchette en remplaçant la buse à vapeur directe. Évitez
de toucher le bout de la buse à vapeur directe, puisqu’elle sera très chaude après son utilisation.
REMARQUE: afin de retirer la buse à vapeur directe, maintenez les boutons de déverrouillage du vaporisateur
portatif. Puis, faites glisser la buse à vapeur directe en utilisant la poignée.
REMARQUE: le vaporisateur portatif peut continuer d’émettre de la vapeur pendant quelques secondes après
avoir relâché la gâchette. C’est tout à fait normal et la vapeur cessera éventuellement.
fig. 13 fig . 14
Fixer et détacher:
• La buse à vapeur directe se glisse directement en place dans le vaporisateur portatif. (fig.13)
• Pour retirer, attendez entre 2 et 3minutes pour que l’outil refroidisse, appuyez sur les boutons de déverrouillage et
retirez l’outil de l’appareil.
Utilisation:
• La buse crée un jet de vapeur pour nettoyer les recoins et les fissures difficiles à atteindre, les surfaces planes, les
jouets, et d’autres endroits où les microbes peuvent se développer. (fig.14)
• Vaporisez la vapeur et nettoyez à l’aide d’un linge humide ou d’un papier absorbant.
Conseils de nettoyage:
• Pour obtenir un nettoyage efficace, tenez la sortie de vapeur à 2,5 ou à 5,1cm (1ou 2po) de la surface à nettoyer.
29 1-800-798-7398
Page 31

Utilisation du vaporisateur pour vêtements
Pour obtenir une liste complète de ce qui est inclus avec votre vadrouille à vapeur, veuillez consulter le panneau
supérieur de la boîte.
AVERTISSEMENT: assurez-vous que le vaporisateur portatif est débranché ou en mode veille lorsque
vous enlevez ou vous fixez un accessoire. Évitez de toucher à un accessoire, puisqu’il sera très chaud
après utilisation.
AVERTISSEMENT: pour éviter les brûlures graves, toujours débrancher la vadrouille à vapeur et la
laisser refroidir avant de retirer ou de changer les accessoires ou les tampons.
fig. 15 fig. 17fig. 16
Fixer et détacher:
• Utilisez la boucle lavande sur le côté du bonnet pour glisser l’ouverture du vaporisateur à vêtement. (fig.15)
• Mettez le cadre muni de poils par-dessus le bonnet avec les poils au-dessus du bonnet du vaporisateur.
• Fixez le vaporisateur assemblé au vaporisateur portatif en la fixant à la buse principale. (fig.16)
• Pour retirer, attendez entre 2 et 3minutes pour que l’outil refroidisse, appuyez sur les boutons de déverrouillage et
retirez l’outil de l’appareil.
Français
Utilisation:
• Le vaporisateur pour vêtement est idéal pour enlever les plis des vêtements et pour rafraîchir et entretenir les
meubles en tissu.
• Le bonnet et le cadre muni de poils offrent une vaporisation contrôlée pour les tissus y compris ceux des meubles.
Conseils de nettoyage:
• En appuyant sur la gâchette entre 3 et 5secondes, déplacez le vaporisateur lentement de haut en bas sur les
vêtements et les meubles en tissu. (fig.17)
• Déterminez toujours la résistance de la couleur des tissus, surtout les tissus de couleur rouge ou bleu:
– Prenez un linge propre, humide et tiède, et frottez délicatement une petite partie sur le tissu à un endroit le plus
discret possible.
– Si la couleur se dégrade sur le linge, il est possible que vous deviez faire nettoyer le vêtement par un
professionnel.
30sharkclean.com
Page 32

Utilisation de l’accessoire tuyau et de l’accessoire de nettoyage
deprécision
Pour obtenir une liste complète de ce qui est inclus avec votre vadrouille à vapeur, veuillez consulter le panneau
supérieur de la boîte.
AVERTISSEMENT: assurez-vous que le vaporisateur portatif est débranché ou en mode veille lorsque
vous enlevez ou vous fixez un accessoire. Évitez de toucher à un accessoire, puisqu’il sera très chaud
après utilisation.
AVERTISSEMENT: pour éviter les brûlures graves, toujours débrancher la vadrouille à vapeur et la
laisser refroidir avant de retirer ou de changer les accessoires ou les tampons.
fig. 19fig. 18 fig. 20
Fixer et détacher:
• Premièrement, fixez l’accessoire tuyau au vaporisateur portatif en fixant la buse principale à l’accessoire tuyau.
(fig.18)
• Fixez le tampon de poche pour nettoyage de précision à l’accessoire de poche pour nettoyage de précision afin
qu’il s’emboîte bien. Ajustez l’élastique et glissez le bouton verrouillable pour serrer. Fixez l’accessoire de poche
pour nettoyage de précision en le fixant à la buse à vapeur directe jusqu’à ce qu’un déclic s’enclenche en place.
• N’utilisez pas l’accessoire de poche pour nettoyage de précision sans que le tampon de poche pour nettoyage de
précision ne soit fixé.
• Appuyez sur la brosse plate au-dessus de l’accessoire tuyau jusqu’à ce qu’elle se verrouille en place. (fig.19)
• Pour retirer, attendez entre 2 et 3minutes pour que l’outil refroidisse, appuyez sur les boutons de déverrouillage et
retirez l’outil de l’appareil.
Utilisation:
• L’accessoire de poche pour nettoyage de précision est idéal pour les petites surfaces inégales, les coins et les
bordures. Le bout pointu est idéal pour les bordures et les coins. (fig.20)
Conseils de nettoyage:
• Des accessoires supplémentaires sont disponibles pour votre accessoire tuyau. Veuillez visiter sharkclean.com pour
plus d’informations.
31 1-800-798-7398
Page 33

Prendre soin de votre vadrouille
à vapeur
fig. 21
fig. 23
Français
fig. 24
fig. 22
APRÈS L’UTILISATION ET RANGEMENT
1 Appuyez sur le bouton de contrôle de la vapeur
jusqu’à ce qu’il commence à clignoter, indiquant que
vous êtes en mode de veille. Débranchez le cordon
de la prise et placez la vadrouille à vapeur en position
verticale. Laissez-la refroidir.
2 Pour retirer le tampon Dirt GripMC, soulevez la vadrouille
à vapeur vers le haut par la poignée jusqu’à ce que la
tête de l’Intelli-MopMC soit suspendue verticalement.
Appuyez sur les boutons de déverrouillage du tampon au
col de la tête de la vadrouille, et les deux côtés de la tête
de l’Intelli-Mop s’ouvriront pour libérer le tampon. Dès
que letampon Dirt Grip a été libéré, refermez la tête de
l’Intelli-Mop.
3 Si la
tête Intelli-Mop
tampon peut toujours être retiré. Appuyez sur le bouton de
déverrouillage sur la tête de l’Intelli-Mop pour dégager le
tampon (fig.21).
4 Videz le réservoir à eau avant le rangement. Pour
vider le réservoir, tenez la vadrouille à vapeur à côté
d’un évier. Ouvrez le couvercle du réservoir d’eau,
puis penchez l’appareil au-dessus de l’évier. Laissez
l’eau se vider, puis fermez le couvercle.
5 Pour ranger la vadrouille à vapeur, attendez qu’elle ait
refroidi et que la vapeur d’eau soit libérée. Ensuite,
retirez la
par sa poignée sur un grand crochet (non inclus)
(fig.22).
n’est pas fixée à la vadrouille, le
tête de l’Intelli-Mop et accrochez la vadrouille
INSTRUCTIONS POUR PRENDRE SOIN DU
TAMPON DIRT GRIP
MC
Soins
Lavez les tampons Dirt Grip à la machine séparément dans
de l’eau chaude avec du détergent liquide.
N’UTILISEZ PAS D’AGENTS BLANCHISSANTS OU
D’ADOUCISSANTS, car ils pourraient endommager les
tampons ou laisser une couche de résidus qui pourrait
réduire l’efficacité de nettoyage et d’absorption des
tampons Dirt Grip. Les tampons Dirt Grip devraient être
séchés sur une corde à linge ou par culbutage à faible
chaleur, car cela permettra de prolonger la durée du
cycle de vie du tissu en microfibre (fig.23).
Les fibres lâches peuvent indiquer l’usure du tissu en
microfibre. Ne tirez pas sur les fibres lâches, car cela
peut défaire l’armure du tissu. Il suffit de couper les
fibres lâches avec des ciseaux (fig.24).
Tampons Dirt Grip de remplacement
Pour obtenir les meilleurs résultats de nettoyage, nous
recommandons de remplacer vos tampons Dirt Grip tous
les 3 ou 4mois après une utilisation normale. Comme
avec tout tissu, les particules de saleté, la graisse, la
friction, et les lavages répétés peuvent briser les fibres, et
vous remarquerez peut-être une augmentation de l’effort
nécessaire pour pousser ou tirer sur la vadrouille.
Vous pouvez acheter des tampons Dirt Grip de
remplacement et d’autres accessoires en visitant
sharkclean.com ou en composant le 1800798-7398.
SOIN DE LA BUSE À VAPEUR
Si vous pensez que la buse à vapeur principale ou que la
buse Steam Blaster
MC
sont bouchées, veuillez communiquer
avec le service à la clientèle au 1800798-7398 ou à
consumer-services@sharkninja.com.
32sharkclean.com
Page 34

Commander des accessoires supplémentaires
ACCESSOIRE
Tête de l’Intelli-Mop
MC
Idéale pour tout type de nettoyage. Obtenez un coup de pouce supplémentaire
pour les taches tenaces en employant le Steam BlasterMC et réduisez de moitié le
temps de nettoyage avec le tampon à mains libres recto verso.
Tampon Dirt Grip
MC
Tampons recto verso. Installation et retrait faciles à mains libres. Lavable et
réutilisable.
Tête à brosse triangulaire
Sa forme triangulaire est parfaite pour nettoyer les coins et les endroits
difficiles à atteindre. L’appareil est équipé d’un jet de vapeur pour aider à
supprimer les taches et une brosse déployable pour lutter contre les taches
rebelles.
Tampon-brosse triangulaire
Idéal pour nettoyer les coins et les autres espaces difficiles à atteindre.
Facile à installer et à enlever.
33 1-800-798-7398
Page 35

Guide de dépannage
PROBLÈME RAISONS ET SOLUTIONS POSSIBLES
La vadrouille à vapeur devrait être bien branchée dans une prise électrique. Vérifiez les
fusibles ou les disjoncteurs ou essayez une autre prise.
Assurez-vous que le réservoir d’eau est plein, que l’appareil est branché et que le
voyant autour du bouton de contrôle de la vapeur est allumé.
Si les voyants sous le bouton de contrôle de la vapeur sont éteints, essayez une autre prise
La vadrouille à vapeur
ne produit pas de
vapeur.
La vadrouille à vapeur
produit de la vapeur
intermittente.
Je ne peux pas
sélectionner un réglage
de vapeur.
J’obtiens des planchers
striés ou ternes.
électrique.
Si les voyants sous le bouton de contrôle de la vapeur clignotent, appuyez sur ce
bouton pour sélectionner un réglage de vapeur.
Si les voyants sous le bouton de contrôle de la vapeur sont allumés, attendez 30 secondes
pour que l’appareil se réchauffe.
Si après avoir suivi les étapes ci-dessus, la vadrouille à vapeur ne produit toujours pas de
vapeur, communiquez avec le service à la clientèle au 1800798-7398 ou à consumerservices@sharkninja.com
C’est normal. Pour obtenir plus de vapeur cohérente, sélectionnez le réglage «SCRUB»
(FROTTER).
Assurez-vous également que le réservoir d’eau est plein.
Assurez-vous que la vadrouille à vapeur est branchée et que les voyants sous le bouton
de contrôle de la vapeur sont allumés.
Si votre vadrouille à vapeur produit de la vapeur, mais les voyants sous le bouton
de contrôle de la vapeur ne sont pas allumés, appelez le service à la clientèle au
1800798-7398.
Le tampon Dirt GripMC pourrait être sale. Dans l’affirmative, retournez-le sur le côté
propre ou changez-le complètement. Si vous lavez le tampon Dirt Grip avec un
détergent en poudre, il pourrait s’endommager et devra être remplacé.
Cela pourrait aussi être une indication de résidus de savon ou de graisse accumulés sur
le sol. Puisque la vadrouille à vapeur n’utilise qu’une petite quantité d’eau, cette dernière
peut ne pas être suffisante pour rincer l’accumulation de résidus que la vapeur pousse à
la surface. Nous vous suggérons de rincer le sol à l’eau simplement, de le laisser sécher,
puis d’utiliser la vadrouille à vapeur de nouveau avec un tampon Dirt Grip propre. Il faut au
moins un rinçage généralement pour enlever le résidu.
Les résidus plus tenaces peuvent exiger de rincer le sol avec un mélange d’une partie
de vinaigre et de deux parties d’eau* (mais NE METTEZ PAS de vinaigre ou tout autre
nettoyant dans le réservoir d’eau de la vadrouille à vapeur).
*Veuillez consulter les instructions d’entretien et de soins du fabricant de revêtements
de sol avant d’appliquer des produits ou des solutions de nettoyage, y compris le
vinaigre.
Français
34sharkclean.com
Page 36

Foire aux questions
QUESTION RÉPONSE
Puis-je utiliser la vadrouille à
vapeur sur les tapis?
Sur quelles surfaces puis-je
utiliser la vadrouille à vapeur?
Puis-je mettre autre chose
que de l’eau dans le réservoir
d’eau de la vadrouille à
vapeur?
Non, la vadrouille à vapeur n’est pas conçue pour le nettoyage de tapis.
La vadrouille à vapeur est conçue pour être utilisée sur toutes les surfaces de
plancher scellé en bois dur. Nous vous recommandons d’abord de tester une zone
isolée de la surface du sol à nettoyer, ainsi que de consulter les instructions sur
l’utilisation et les soins de votre fabricant de recouvrement de sol.
AVERTISSEMENT: ne pas utiliser sur du cuir, des meubles cirés, des
tissus synthétiques, du velours ou d’autres matériaux sensibles à la
vapeur.
REMARQUE: sur des surfaces cirées ou sur certains planchers sans cirage, le
lustre peut être enlevé par la chaleur et la vapeur de l’appareil. Testez une zone
isolée du plancher d’abord pour voir si son lustre est affecté.
NE PAS AJOUTER de produits nettoyants, de parfums, d’huiles ou tout autre
produit chimique à l’eau utilisée par l’appareil, car cela risque d’endommager
l’appareil ou de présenter un danger. Nous vous recommandons d’utiliser de
l’eau distillée dans votre vadrouille à vapeur.
35 1-800-798-7398
Page 37

GARANTIE LIMITÉE D’UN (1) AN
SharkNinja Operating LLC garantit ce produit contre toute défectuosité de matériau ou de main-d’œuvre pour une
période d’un (1)an à compter de la date d’achat d’origine lors de l’utilisation dans le cadre d’un usage domestique
normal, sujet aux conditions, aux exclusions et aux exceptions suivantes.
Si votre appareil ne fonctionne pas comme il le devrait lors d’un usage domestique normal pendant la période de garantie,
veuillez le retourner au complet avec ses accessoires, port payé d’avance. Pour obtenir de l’assistance avec les options du
service de la garantie ou de l’assistance, veuillez appeler notre service à la clientèle au 1800798-7398 ou visiter notre
site Web sharkclean.com.
Si l’appareil présente bel et bien un défaut de matériau ou de main-d’œuvre, SharkNinja Operating LLC le réparera
oule remplacera sans frais. Une preuve d’achat est exigée et des frais de 19,95$ seront facturés pour couvrir les frais
deretour*.
La responsabilité de SharkNinja Operating LLC est limitée au coût de réparation ou de remplacement de l’appareil, à
sa seule discrétion. La garantie ne couvre pas l’usure normale des pièces et ne s’applique pas aux appareils utilisés de
façon abusive ou à des fins commerciales. La garantie limitée ne couvre pas les dommages causés par une mauvaise
utilisation, une utilisation abusive, une manipulation négligente ou des dommages causés par un défaut d’emballage
ou une manutention inadéquate lors du transport. Cette garantie ne couvre pas les dommages ou les défauts survenus
pendant l’expédition, les réparations, l’entretien ou la modification du produit ou des pièces de celui-ci, qui ont été
effectués par un réparateur non autorisé par SharkNinja Operating LLC.
La garantie s’applique au premier acheteur de l’appareil et exclut toute autre garantie légale ou conventionnelle. La
responsabilité de SharkNinja Operating LLC, s’il y en a une, se limite aux obligations spécifiques exprimées en vertu
de la garantie limitée. En aucun cas SharkNinja OperatingLLC ne peut être tenu responsable d’incidents ou de
dommages indirects de quelque nature qu’ils soient. Certains états américains ou certaines provinces canadiennes
n’acceptent pas l’exclusion ou la limitation de dommages accessoires ou indirects, auquel cas cette disposition ne
s’appliquerait pas.
Cette garantie vous confère des droits juridiques particuliers selon la loi; vous pouvez aussi bénéficier d’autres droits qui
varient d’une province ou d’un État à l’autre.
*Important: emballez soigneusement l’appareil pour éviter tout dommage pendant le transport. Avant
d’emballer l’article, assurez-vous de joindre une preuve d’achat et d’apposer une étiquette sur l’article
indiquant votre nom, adresse complète et numéro de téléphone, ainsi que de joindre une note fournissant
des renseignements sur l’achat, le numéro de modèle et le problème que présente le produit. Il est
recommandé de souscrire une assurance d’expédition (les dommages causés par le transport ne sont pas
couverts par la garantie). Indiquez la mention «A/S DU SERVICE À LA CLIENTÈLE» sur l’emballage.
Français
Enregistrement du produit
Veuillez consulter le site registeryourshark.com ou composer le 1800798-7398 pour enregistrer votre nouveau
produit SharkMD au plus tard dix (10)jours après l’achat. Le nom du magasin, la date d’achat, le numéro de modèle ainsi
que votre nom et votre adresse vous seront demandés.
L’enregistrement nous permettra de vous joindre dans le cas peu probable d’un avis de sécurité touchant le produit.
Lorsque vous enregistrez votre produit, vous reconnaissez avoir lu et compris les instructions et les avertissements
présentés dans le guide du propriétaire.
36sharkclean.com
Page 38

INSTRUCCIONES IMPORTANTES DE SEGURIDAD
Para uso doméstico únicamente
AL UTILIZAR SU MOPA SHARK® LIF TAWAY® PRO STEAM POCKET®, SIEMPRE
SE DEBEN SEGUIR PRECAUCIONES DE
SEGURIDAD BÁSICAS, ENTRE LAS QUE SE
INCLUYEN LAS SIGUIENTES:
LEA TODAS LAS INSTRUCCIONES ANTES
DE USAR SU MOPA SHARK LIFT-AWAY
PRO STEAM POCKET.
ADVERTENCIA: PELIGRO DE
QUEMADURAS.
El vapor que emite la mopa a vapor está
muy caliente y puede causar
quemaduras. Proceda con precaución
cuando utilice la mopa a vapor.
ADVERTENCIA: MANTENGA LA MOPA
A VAPOR LEJOS DE LOS NIÑOS.
ENCHUFE POLARIZADO:
Esta mopa a vapor tiene un enchufe polarizado
(una pata es más ancha que la otra). Como
característica de seguridad, este enchufe
se conecta en un tomacorriente polarizado
solo de una forma. Si el enchufe no calza
por completo en el tomacorriente, invierta el
enchufe. Si aun así no calza, comuníquese
con un electricista calificado. No intente
anular esta característica de seguridad. No se
recomienda utilizar un cable de extensión con
este producto.
ADVERTENCIA:
PARA REDUCIR EL RIESGO DE INCENDIO,
DESCARGA ELÉCTRICA O LESIÓN:
1. Cuando esté en uso, nunca coloque la mopa a
vapor sobre uno de sus lados ni dirija el vapor
hacia las personas, mascotas o plantas.
2. Use el sistema solamente para su uso previsto.
3. NO lo use para calefaccionar ambientes.
4. NO lo use al aire libre.
5. NO deje la mopa a vapor sin supervisión
mientras esté enchufada. Desenchufe el cable
de alimentación del tomacorriente siempre que
no esté en uso y antes del mantenimiento.
6. NO permita que los niños usen la mopa a
vapor. Es necesario prestar mucha atención
cuando se use cerca niños, mascotas o
plantas.
7. Use la mopa a vapor solamente como se
describe en este Manual del propietario.
8. Use solamente accesorios recomendados del
fabricante.
9. NO use la mopa a vapor si el cable de
alimentación o el enchufe están dañados. Si la
mopa a vapor no funciona como debería o se
ha caído, dañado, o se ha dejado al aire libre o
caído al agua, devuélvala a SharkNinja Operating
LLC para su examinación y reparación. El
reensamblaje o la reparación incorrectos pueden
causar un riesgo de descarga eléctrica o
lesiones al usar la mopa a vapor.
10. Como protección contra el riesgo de descarga
eléctrica, NO sumerja la mopa a vapor en agua
ni en ningún otro líquido.
11. NO manipule el enchufe ni la mopa a vapor con
las manos mojadas ni la opere sin calzado.
37 1-800-798-7398
Page 39

12. NO tire de la mopa a vapor ni la transporte por
el cable, no use el cable como asa, ni cierre
una puerta por encima del cable ni tire del
cable por encima de bordes filosos o esquinas.
No pase la mopa a vapor por encima del cable.
Mantenga el cable alejado de superficies
calientes.
13. NO desenchufe la mopa a vapor tirando del
cable de alimentación. Para desenchufarla,
tome el enchufe, no el cable de alimentación.
No use cables de extensión ni tomacorrientes
con capacidad inadecuada de corriente
soportada.
14. NO coloque ningún objeto dentro de las
aberturas de la boquilla de vapor. Suspenda el
uso si la boquilla de vapor está bloqueada.
15. NO coloque las manos ni los pies debajo de la
mopa a vapor. Alcanza altas temperaturas.
16. Use la mopa a vapor SOLAMENTE sobre
superficies planas y horizontales. NO use la
mopa a vapor sobre paredes, encimeras ni
ventanas.
17. NO use la mopa a vapor sobre cuero, muebles
lustrados con cera, telas sintéticas, terciopelo
ni sobre otros materiales delicados sensibles al
vapor.
18. NO añada líquidos de limpieza, vinagre,
esencias, aceites ni ningún otro producto
químico al agua usada en la mopa a vapor, ya
que esto puede dañarla o hacer que no sea
seguro usarla. Si vive en un área donde el
agua es dura, recomendamos que use agua
destilada en la mopa a vapor.
™
19. Nunca deje una almohadilla Dirt Grip
en el mismo lugar mientras se usa o se
guarda por cualquier período, ya que esto
puede dañar las superficies.
20. Puede liberar la almohadilla Dirt Grip después
de haber desenchufado la mopa a vapor y
haber dejado que se enfríe.
21. Cuando limpie la parte externa de la mopa a
vapor, desenchufe el cable de alimentación del
tomacorriente y limpie la mopa a vapor con un
paño seco o húmedo. No vierta agua ni use alcohol,
benceno o solvente de pintura sobre la mopa a
vapor.
22. Se debe proceder con extrema precaución al
usar la mopa a vapor para limpiar escaleras.
23. Nunca use la mopa a vapor sin acoplar la
almohadilla Dirt Grip.
24. Mantenga su área de trabajo bien iluminada.
25. Almacene la mopa a vapor bajo techo en un
lugar fresco y seco.
26. Para evitar que el circuito se sobrecargue,
no opere otro aparato en el mismo enchufe
(circuito) que la mopa a vapor.
27. Para evitar lesiones por quemaduras, siempre
desenchufe la mopa a vapor y espere a que se
enfríe antes de retirar o cambiar los cabezales
de la mopa, los accesorios o las almohadillas
Dirt Grip.
ADVERTENCIA: Su mopa a
vapor está diseñada para limpiar superficies
de pisos duros que pueden soportar mucho
calor. No la use sobre pisos de madera sin
sellar ni sobre pisos de cerámica sin esmaltar.
La acción del calor y del vapor puede quitar
el brillo de superficies tratadas con cera y de
algunos pisos no tratados con cera. Siempre
se recomienda probar sobre un área aislada
de la superficie que se tenga que limpiar antes
de proceder. También se recomienda que
verifique las instrucciones de uso y cuidado
del fabricante del piso.
Español
CONSERVE ESTAS INSTRUCCIONES
38sharkclean.com
Page 40

Gracias por comprar la mopa Shark® Lift-Away® Pro Steam Pocket®.
Este Manual del propietario está diseñado para ayudarlo a comprender en profundidad su nueva mopa Shark LiftAway Pro Steam Pocket. Lea estas instrucciones detenidamente y consérvelas para referencia futura.
Para obtener la lista de los elementos que se incluyen con este modelo, consulte el panel superior de la caja.
Si tiene alguna pregunta sobre su mopa Shark Lift Away Pro Steam Pocket, comuníquese con el Servicio al Cliente de
Shark llamando al 1-800-798-7398.
La mopa Shark Lift-Away Pro Steam es una solución sorprendente para la limpieza profunda con vapor. Ya sea que
deba luchar contra manchas difíciles con Steam Blaster™ o encargarse de la limpieza general y de la desinfección de
pisos duros*, nuestro cabezal Intelli-Mop™ y las almohadillas Dirt Grip™ de avanzada ofrecen lo mejor en cuestión de
versatilidad y eficiencia, lo que hace que la limpieza sea simple, rápida y fácil.
* Los estudios sobre desinfección se llevaron a cabo en condiciones controladas. Las condiciones normales de una
casa y los resultados pueden variar. Con el cabezal Intelli-Mop solamente en el modo
SCRUB (FREGAR)
. No se
llevaron a cabo en modo por encima del piso o en modo Steam Blaster.
REGISTRE SU COMPRA:
registeryourshark.com
1-800-798-7398
REGISTRE ESTA INFORMACIÓN:
Número de modelo: _________________________________
Fecha de compra (conserve el recibo): _____________________
ESPECIFICACIONES TÉCNICAS:
Voltaje: 120V, 60Hz
Vatios: 1500W
Capacidad de agua: 300ml (10,14 oz)
PROGRAMA RECOMENDADO DE REEMPLAZO DE LAS ALMOHADILLAS LAVABLES DIRT GRIP™:
Cada 3meses.
PARA OBTENER EL MEJOR RENDIMIENTO DE LIMPIEZA:
Consulte la sección Cómo cuidar su mopa a vapor para obtener más detalles. Pase la aspiradora o barra antes de
pasar la mopa.
39 1-800-798-7398
Page 41

Índice
Gracias por
comprar la
®
Pro
®
mopa Shark
Lift-Away
Steam Pocket
Introducción.................................................................................................. 41
Cómo ensamblar su mopa a vapor ................................................................. 43
®
.
Cómo usar su mopa a vapor .......................................................................... 44
Intelligent Steam Control®.............................................................................. 45
Limpieza por encima del piso ......................................................................... 46
Cómo usar la boquilla de vapor directo ........................................................... 47
Cómo usar el vaporizador para ropa ............................................................... 48
Cómo usar el accesorio de manguera y el accesorio de precisión de limpieza ... 49
Cómo cuidar su mopa a vapor ....................................................................... 50
Cómo solicitar accesorios adicionales ............................................................. 51
Guía de solución de problemas ...................................................................... 52
Preguntas frecuentes .................................................................................... 53
Garantía ....................................................................................................... 54
Español
40sharkclean.com
Page 42

Introducción
Al ensamblar su mopa a vapor, puede encontrar un poco de agua dentro o alrededor del tanque de agua. Esto se debe
a que probamos todas nuestras mopas a vapor antes de venderlas para brindarle una mopa Shark® Lift-Away® Pro
Steam Pocket® de calidad.
a
b
c
d
e
j
f
g
h
i
a Asa de la mopa a vapor
b Enrollacables superior
c (1) Tornillo grande* de 6 mm x 54 mm
d Enrollacables inferior
e Cuerpo de la mopa a vapor
f Vaporizador portátil removible
g Botón de liberación del vaporizador portátil
*Se puede usar un des tornillador Phillips o de cabeza plana. El des tornillador no est á incluido.
41 1-800-798-7398
o
n
h Gatillo de vapor
i Panel de control de vapor
j Frasco de llenado
k Botón de liberación del cabezal de la mopa
l Botones de liberación de las almohadillas Dirt Grip
m Boquilla Steam Blaster
n Cabezal Intelli-Mop
o Almohadilla Dirt Grip
k
l
m
™
™
™
Page 43

Para obtener una lista completa de los elementos que se incluyen con su mopa a vapor, consulte la solapa interna
de la caja.
PRECAUCIÓN:
Realice una prueba en un área pequeña discreta y comuníquese con su fabricante/
instalador de superficies para obtener información específica al respecto.
ACCESORIOS PORTÁTILES
BOQUILLA DE VAPOR DIRECTO
Use vapor para descomponer la suciedad y las superficies
duras, así como para limpiar la mugre.
Para obtener los mejores resultados, aplique ráfagas de
vapor de 3 a 5segundos de duración utilizando el gatillo
enla unidad de asa.
VAPORIZADOR PARA ROPA CON COFIA Y MARCO
CONCERDAS
Es ideal para quitar las arrugas de la ropa y para refrescar y
cepillar los tapizados.
No use esta herramienta sin acoplar la cofia de microfibra.
ACCESORIO DE MANGUERA
Para un alcance y una movilidad óptimos al limpiar superficies
por encima del piso.
ACCESORIO DE PRECISIÓN DE LIMPIEZA DE BOLSILLO Y
ALMOHADILLA
Ideal para superficies, esquinas y bordes pequeños e irregulares.
No lo use sin acoplar la almohadilla de precisión de limpieza de
bolsillo.
Español
42sharkclean.com
Page 44

Cómo ensamblar su mopa a vapor
fig. 1 fig. 5 fig. 6fig. 4
fig. 2a
fig. 3fig. 2b
ADVERTENCIA: Siempre asegúrese de que la
mopa a vapor esté DESENCHUFADA cuando no
la use. Nunca llene la mopa a vapor ni acople
el cabezal de la mopa cuando la mopa a vapor
esté enchufada a un tomacorriente. Desenchufe
la mopa del tomacorriente y espere a que se
enfríe antes de llenarla o acoplar o retirar el
cabezal. Para prolongar la vida útil de su mopa a
vapor, le recomendamos que use agua destilada.
Asegúrese de agregar solamente agua al tanque.
Los productos químicos o los líquidos de limpieza
(incluido el vinagre) pueden dañar la mopa a vapor
y podrían no ser seguros para usted y su familia.
CÓMO ENSAMBLAR LA MOPA A VAPOR
1 Atornille el asa de la mopa al cuerpo de la mopa a
vapor (no se incluye un destornillador) (Fig.1).
2 Deslice el soporte del cabezal Intelli-Mop™ dentro del
cuerpo de la mopa a vapor. Empuje hasta que haga
clic al colocarlo en su lugar firmemente. (Fig. 1). Para
separar el cabezal Intelli-Mop, presione el botón de
liberación que se encuentra en la parte delantera de la
unidad por encima de la conexión del cabezal (Fig. 1)
y deslice el cabezal hacia afuera.
43 1-800-798-7398
3 Para acoplar la almohadilla Dirt Grip™, estire la
almohadilla sobre el piso con el lado de los bolsillos
hacia arriba. Levante la mopa y centre el cabezal
Intelli-Mop por encima de la almohadilla; luego,
presione hacia abajo los botones de liberación del
cuello del cabezal de la mopa a vapor (Fig. 2a).
Ambos lados del cabezal Intelli-Mop se abrirán
(Fig. 2b). Deslice las cuatro aletas de las esquinas del
cabezal Intelli-Mop dentro de los cuatro bolsillos de las
esquinas de la almohadilla (Fig. 3 y Fig. 4). Presione
suavemente un lado del cabezal Intelli-Mop hacia el
piso hasta que ese lado haga clic al colocarlo en su
lugar (Fig. 5). Repita el procedimiento en el otro lado
(Fig. 6).
4 Abra la tapa del tanque de agua (Fig. 7), llene el
tanque con agua y, luego, vuelva a colocar la tapa y
ajústela. Use el frasco de llenado y vierta el agua en el
tanque (Fig. 8). No exceda la capacidad del tanque.
Vuelva a colocar la tapa en el tanque de agua.
fig. 7
fig. 8
Page 45

Cómo usar su mopa a vapor
IMPORTANTE: Asegúrese de no usar la mopa Shark® Lift-Away® Pro Steam Pocket® sin acoplar una almohadilla
™
Dirt Grip
posible que la emisión de vapor demore más de 30segundos, que es el tiempo normal.
IMPORTANTE: No la use sobre pisos de madera sin sellar ni sobre pisos de cerámica sin esmaltar. La acción
del calor y del vapor puede quitar el brillo de superficies tratadas con cera y de algunos pisos no tratados
con cera. Pruebe la mopa a vapor sobre un área aislada de la superficie que se tenga que limpiar antes de
proceder. Verifique las instrucciones de uso y cuidado del fabricante del piso.
NOTA: Para prolongar la vida útil de su mopa a vapor, le
NOTA: Barra o pase la aspiradora sobre sus pisos antes
1 Gire el soporte para el cable superior para desenrollar el
2 Cuando se enchufe la unidad por primera vez, estará en
3 Para seleccionar el modo de vapor, presione el botón
4 Limpie sus pisos con un movimiento hacia adelante y
5 Cuando necesite una ráfaga de vapor adicional para
y agregar agua al tanque de agua en primer lugar. Al usar la mopa a vapor por primera vez, es
fig. 9 fig. 10 fig. 11b
recomendamos que use agua destilada.
de limpiarlos con su mopa a vapor.
PRECAUCIÓN: No friegue una misma área durante
un tiempo prolongado.
6 Para detener el chorro de Steam Blaster, simplemente
eleve el asa. Luego, puede girar el cabezal de la mopa
para que vuelva a su posición original y continuar
cable de alimentación por completo (Fig. 9). Enchúfelo a
un tomacorriente.
limpiando.
7 Cuando termine de limpiar, presione el botón Steam
Control (Control de vapor) hasta que vuelva al modo de
modo de espera. Las 3 luces que se encuentran debajo
del botón Steam Control (Control de vapor) parpadearán
para indicar el modo de espera.
espera.
8 Para retirar la almohadilla Dirt Grip, simplemente levante
la mopa por el asa hacia arriba hasta que el cabezal
Intelli-Mop™ quede colgando hacia abajo. Presione
Steam Control (Control de vapor) una vez para el modo
DUST (POLVO) (1 luz azul), dos veces para el modo
MOP (MOPA) (2 luces azules) o tres veces para el modo
SCRUB (FREGAR) (3luces azules). Si presiona el botón
por cuarta vez, colocará la unidad en modo de espera.
hacia abajo los botones de liberación de la almohadilla
que se encuentran sobre el cuello del cabezal de la
mopa (Fig.11a) y ambos lados del cabezal se abrirán
para liberar la almohadilla (Fig.11b).
9 Una vez que haya liberado la almohadilla Dirt Grip,
cierre el cabezal Intelli-Mop. Para cerrarlo, presione
hacia atrás.
limpiar manchas adheridas, puede usar la función
Steam Blaster™. Gire el cabezal para que se ubique
detrás del cuerpo de la mopa y, luego, incline el
asa de la mopa hacia abajo. Esto hará que Steam
Blaster (Fig. 10) emita una ráfaga de vapor concentrado
hacia la mancha.
PRECAUCIÓN: Mientras que la mopa esté en modo
Steam Blaster, no deje inmóvil durante más de un
minuto.
suavemente un lado del cabezal Intelli-Mop hacia el
piso hasta que ese lado haga clic al quedar en su lugar.
Repita el procedimiento en el otro lado.
10 Cuando el tanque de agua esté vacío, la mopa a vapor
dejará de producir vapor. Usted puede rellenar el tanque
de agua en cualquier momento, siempre y cuando la
mopa a vapor esté desenchufada. Siga las instrucciones
de llenado del tanque de agua de la página 43.
NOTA: Espere de 2 a 3 minutos hasta que la mopa
a vapor se enfríe antes de encender el cabezal de la
mopa. Nunca deje la mopa a vapor con una almohadilla
Dirt Grip húmeda o mojada sobre ningún piso durante
un tiempo prolongado.
fig. 11a
44sharkclean.com
Español
Page 46

Intelligent Steam Control
®
La mopa Shark® Lift-Away® Pro Steam Pocket® tiene 3 configuraciones Intelligent Steam Control (Control
de vapor inteligente) únicas para que pueda usar la cantidad de vapor correcta para la tarea de limpieza que esté
realizando. Consulte la información que se encuentra a continuación para obtener consejos sobre cuándo usar cada
configuración.
CONFIGURACIÓN IDEAL PARA ESTAS
SUPERFICIES
DUST
(POLVO)
Laminado
Madera
LIGHT STEAM
(VAPOR LEVE)
MOP
(MOPA)
NORMAL STEAM
(VAPOR NORMAL)
SCRUB
(FREGAR)
Mármol
Madera
Mármol
Baldosas
Piedra
Madera
Mármol
HEAVY STEAM
(VAPOR INTENSO)
Steam Blaster
Baldosas
Piedra
Para una ráfaga de vapor adicional, puede configurar la función Steam Blaster en DUST (POL-
™
VO), MOP (MOPA) o SCRUB (FREGAR). Siga las instrucciones que figuran en la página “Cómo
usar su mopa a vapor”.
USO RECOMENDADO
Limpiar superficies delicadas
Limpiar y desempolvar en forma leve
Aflojar y levantar suciedad leve
Limpiar la mayoría de las superficies y áreas amplias
Realizar una limpieza básica diaria
Eliminar manchas y desechos más pequeños
Limpiar áreas de tránsito moderado e intenso
Realizar una limpieza profunda y limpiar superficies
difíciles de limpiar
Limpiar con intensidad y eliminar manchas y desechos
adheridos
Realizar una limpieza profunda de áreas con tránsito
intenso
Deshacerse de la suciedad y la mugre intensas
Desinfectar* los pisos
PARA DESINFECTAR* CON LA MOPA A VAPOR MEDIANTE EL USO DEL CABEZAL INTELLI-MOP™ Y LA
ALMOHADILLA DIRT GRIP™, REALICE LO SIGUIENTE:
1 Acople una almohadilla Dirt Grip limpia al cabezal de la mopa.
2 Enchufe la unidad y presione el botón Steam Control (Control de vapor) para seleccionar la configuración de
SCRUB (FREGAR).
3 Espere 30segundos para que la unidad comience a producir vapor.
4 Comience a limpiar sobre una superficie adecuada de piso duro sellada con un movimiento hacia adelante y hacia
atrás. Después de tres minutos, la unidad está lista para que la use para desinfectar.
5 Con un movimiento hacia adelante y hacia atrás, mueva la unidad sobre el área que quiera desinfectar. Repita el
procedimiento, por lo menos, 15veces.
* Los estudios sobre desinfección se llevaron a cabo en condiciones controladas. Las condiciones normales de una
casa y los resultados pueden variar. Con el cabezal Intelli-Mop solamente en el modo
llevaron a cabo en modo por encima del piso o en modo Steam Blaster.
45 1-800-798-7398
SCRUB (FREGAR)
. No se
Page 47

Limpieza por encima del piso
Para obtener la lista completa de los elementos que se incluyen con su mopa a vapor, consulte el panel superior
de la caja.
®
La mopa Shark
Lift-Away® Pro Steam Pocket® está
diseñada para limpiar superficies que pueden soportar
mucho calor y humedad. No la utilice sobre superficies
de madera sin sellar (especialmente sobre muebles de
madera antiguos), baldosas de cerámica sin esmaltar,
superficies pintadas o superficies que han sido tratadas
con cera, aceites, barniz o laca. La acción del calor,
del vapor y de la fricción de los accesorios de limpieza
puede quitar el brillo. Siempre se recomienda probar
sobre un área aislada de la superficie que se tenga que
limpiar antes de proceder.
También se recomienda que verifique las instrucciones
de uso y cuidado del fabricante de la superficie. Cuando
limpie superficies de madera acabadas, hágalo con
pasadas continuas y amplias. Para prevenir daños a
la superficie, evite concentrar el vapor o dejar que los
accesorios de limpieza queden detenidos en el mismo
lugar.
• Retire el vaporizador portátil presionando el botón
de liberación y tirando de la horquilla. Tenga
cuidado de NO presionar el gatillo de vapor mientras
retira el vaporizador portátil (Fig. 12).
fig. 12
Español
• El vaporizador portátil está configurado
automáticamente en el modo SCRUB (FREGAR).
Apriete el gatillo de vapor para activar el vapor.
Puede seleccionar otros modos de vapor en función
del accesorio y del uso.
• Con todos los aditamentos, controle mejor el vapor
mediante ráfagas del gatillo que duren de 3 a 5
segundos. Esto le permitirá emitir vapor por más
tiempo y con un mayor control.
46sharkclean.com
Page 48

Cómo usar la boquilla de vapor directo
Para obtener la lista completa de los elementos que se incluyen con su mopa a vapor, consulte el panel superior de
la caja.
TENGA EN CUENTA ESTAS IMPORTANTES INDICACIONES AL UTILIZAR EL APARATO:
PRECAUCIÓN: No presione el gatillo de vapor hasta que la boquilla de vapor directo esté colocada
en la boquilla principal del vaporizador portátil.
PRECAUCIÓN: No presione el gatillo de vapor mientras retira la boquilla de vapor directo. Evite
tocar la punta de la boquilla de vapor directo, ya que estará muy caliente luego de emitir vapor.
NOTA: Para retirar la boquilla de vapor directo, presione y sujete los botones de liberación portátiles. Luego,
deslice hacia afuera la boquilla de vapor directo usando el mango.
NOTA: El vaporizador portátil puede continuar emitiendo vapor durante unos pocos segundos después de que
se libera el gatillo. Esto es normal, y el vapor se detendrá finalmente.
fig. 13 fig . 14
Cómo acoplar/desarmar:
• La boquilla de vapor directo se desliza directamente sobre el vaporizador portátil. (Fig. 13)
• Para retirarla, espere de 2 a 3 minutos hasta que la herramienta se enfríe, mantenga presionado el botón de
liberación y tire de la herramienta para separarla de la unidad.
Uso:
• La boquilla de vapor directo crea un chorro de vapor directo para limpiar rincones y huecos difíciles de alcanzar,
superficies planas, juguetes y otros lugares donde se acumulan gérmenes (Fig. 14).
• Aplique un chorro de vapor directo y limpie con un paño húmedo o con una toalla de papel.
Consejos de limpieza:
• Para realizar una limpieza efectiva, sostenga la boquilla de salida de vapor 1 o 2 pulgadas alejada de la superficie
que esté limpiando.
47 1-800-798-7398
Page 49

Cómo usar el vaporizador para ropa
Para obtener la lista completa de los elementos que se incluyen con su mopa a vapor, consulte el panel superior de
la caja.
PRECAUCIÓN: Asegúrese de que el vaporizador portátil esté desenchufado o en modo de espera
mientras acopla o retira el accesorio. Evite tocar el accesorio, ya que estará muy caliente luego de
emitir vapor.
PRECAUCIÓN: Para evitar lesiones por quemaduras, siempre desenchufe la mopa a vapor y espere a
que se enfríe antes de retirar o cambiar los accesorios o las almohadillas.
fig. 15 fig. 17fig. 16
Cómo acoplar/desarmar:
• Use la presilla de color lavanda al lado de la cofia para deslizarla sobre la abertura de la boquilla del vaporizador
para ropa (Fig. 15).
• Coloque el marco con cerdas sobre la cofia, con las cerdas ubicadas en la parte superior de la cofia del vaporizador
para ropa.
• Acople el vaporizador para ropa ensamblado al vaporizador portátil colocándolo dentro de la boquilla principal
(Fig.16).
• Para retirarla, espere de 2 a 3 minutos a que la herramienta se enfríe, mantenga presionado el botón de liberación
y tire de la herramienta para separarla de la unidad.
Español
Uso:
• El vaporizador para ropa es ideal para quitar las arrugas de la ropa y para refrescar y cepillar los tapizados.
• La cofia y el marco con cerdas le proporcionan un vapor controlado para telas y tapizados.
Consejos de limpieza:
• Presione el gatillo de vapor para producir ráfagas de 3 a 5 segundos de duración, y mueva el vaporizador en forma
ascendente y descendente sobre la ropa o los tapizados lentamente (Fig. 17).
• Determine siempre la resistencia al desgaste de los colores de cualquier tela, especialmente los rojos y los azules:
– Tome una toalla limpia, húmeda y tibia, y frote suavemente una pequeña área de la tela que sea lo menos
visible y esté lo más apartada posible.
– Si la toalla se tiñe de color, es posible que el artículo necesite un lavado profesional.
48sharkclean.com
Page 50

Cómo usar el accesorio de manguera y el accesorio de precisión
delimpieza
Para obtener la lista completa de los elementos que se incluyen con su mopa a vapor, consulte el panel superior de
lacaja.
PRECAUCIÓN: Asegúrese de que el vaporizador portátil esté desenchufado o en modo de espera
mientras acopla o retira el accesorio. Evite tocar el accesorio, ya que estará muy caliente luego de
emitir vapor.
PRECAUCIÓN: Para evitar lesiones por quemaduras, siempre desenchufe la mopa a vapor y espere a
que se enfríe antes de retirar o cambiar los accesorios o las almohadillas.
fig. 19fig. 18 fig. 20
Cómo acoplar/desarmar:
• Primero, acople el accesorio de manguera al vaporizador portátil colocando la manguera accesoria en la boquilla
principal (Fig. 18).
• Deslice la almohadilla de precisión de limpieza de bolsillo sobre el accesorio de precisión de limpieza de bolsillo
para que encaje correctamente. Ajuste la banda elástica y deslice el interruptor de traba para apretarla. Acople el
accesorio de precisión de limpieza de bolsillo conectándolo a la boquilla de vapor directo hasta que haga clic al
quedar en su lugar.
• No use el accesorio de precisión de limpieza sin que la almohadilla de precisión de limpieza de bolsillo esté
acoplada.
• Presione la herramienta plana para fregar hacia el accesorio de manguera hasta que haga clic al quedar en su
lugar (Fig. 19).
• Para retirarla, espere de 2 a 3 minutos a que la herramienta se enfríe, mantenga presionado el botón de liberación
y tire de la herramienta para separarla de la unidad.
Uso:
• El accesorio de precisión de limpieza de bolsillo es ideal para superficies pequeñas irregulares. La punta aguda es
excelente para bordes y esquinas (Fig. 20).
Consejos de limpieza:
• Hay disponibles aditamentos adicionales para su accesorio de manguera. Para obtener más información, visite
sharkclean.com.
49 1-800-798-7398
Page 51

Cómo cuidar su mopa a vapor
fig. 23
fig. 21
fig. 22
DESPUÉS DEL USO Y ALMACENAMIENTO
1 Presione el botón Steam Control (Control de vapor)
hasta que comience a parpadear, lo que indica que
está en el modo de espera. Desenchufe el cable del
tomacorriente y coloque la mopa a vapor en posición
vertical. Déjela enfriar.
2 Para retirar la almohadilla Dirt Grip™, levante la mopa a
vapor por el asa hacia arriba hasta que el cabezal IntelliMop™ quede colgando hacia abajo. Presione los botones
de liberación de la almohadilla que se encuentran sobre
el cuello del cabezal de la mopa y ambos lados del
cabezal Intelli-Mop se abrirán para liberar la almohadilla.
Una vez que haya liberado la almohadilla, cierre el
cabezal Intelli-Mop.
3 Si el
cabezal Intelli-Mop
almohadilla aún puede retirarse. Presione hacia abajo el
botón de liberación del soporte del cabezal Intelli-Mop para
liberar la almohadilla (Fig. 21).
4 Vacíe el tanque de agua antes de almacenar la mopa.
Para vaciar el tanque, coloque la mopa a vapor junto
a un fregadero. Abra la tapa del tanque de agua y,
luego, incline la unidad sobre el fregadero. Deje que
el agua escurra y, luego, cierre la tapa.
5 Para almacenar la mopa a vapor, espere a que la
mopa se enfríe y que se haya liberado el vapor. Luego,
retire el cabezal Intelli-Mop y cuelgue la mopa por su
asa en un gancho grande (no incluido) (Fig. 22).
no está acoplado a la mopa, la
fig. 24
INSTRUCCIONES SOBRE EL CUIDADO DE LA
ALMOHADILLA DIRT GRIP
™
Cuidado
Lave a máquina las almohadillas Dirt Grip, por separado,
con agua tibia y detergente líquido.
NUNCA USE LEJÍA, DETERGENTE EN POLVO NI
SUAVIZANTES, ya que podrían dañar las almohadillas
Dirt Grip o dejar una capa sobre ellas que reduciría
su rendimiento para la limpieza y su absorción. Las
almohadillas Dirt Grip deben secarse en una cuerda
o a máquina en una configuración baja, ya que así se
extenderá la vida útil de la tela de microfibra (Fig. 23).
Las fibras sueltas pueden indicar el desgaste de la
microfibra. No tire de las fibras sueltas, ya que esto
puede deshacer el tejido. Simplemente recorte las fibras
sueltas con tijeras (Fig. 24).
Almohadillas Dirt Grip de reemplazo
Para obtener los mejores resultados al limpiar,
recomendamos reemplazar sus almohadillas Dirt Grip de
3 a 4 meses después de su uso normal. Como sucede
con cualquier tela, las partículas de suciedad, la grasa, la
fricción y el lavado reiterado pueden aflojar las fibras, y es
posible que note que necesita hacer un mayor esfuerzo
para empujar la mopa o tirar de ella.
Puede comprar las almohadillas Dirt Grip de reemplazo
y otros accesorios en sharkclean.com o llamando al
1-800-798-7398.
CUIDADO DE LA BOQUILLA DE VAPOR
Si cree que la boquilla de vapor principal o la boquilla
Steam Blaster
™
están tapadas, comuníquese con el
Servicio al Cliente llamando al 1-800-798-7398 o
escríbanos a consumer-services@sharkninja.com
Español
50sharkclean.com
Page 52

Cómo solicitar accesorios adicionales
ACCESORIO
Cabezal Intelli-Mop™
Es excelente para una limpieza multiuso. Obtenga una ráfaga adicional de Steam
™
para las manchas difíciles y reduzca su tiempo de limpieza a la mitad
Blaster
con la almohadilla de dos lados que no requiere el uso de las manos.
Almohadilla Dirt Grip™
Almohadilla de dos lados. Instalación y retiro fáciles que no requieren el uso
de las manos. Lavable y reutilizable.
Cabezal triangular para fregar
Su forma triangular es perfecta para limpiar esquinas y áreas difíciles
de alcanzar. Está equipado con una Steam Blaster para ayudar a aflojar
manchas y un fregador desplegable para tratar manchas adheridas.
Almohadilla triangular para fregar
Ideal para limpiar esquinas y otros espacios difíciles de alcanzar. Fácil de
instalar y retirar.
51 1-800-798-7398
Page 53

Guía de solución de problemas
PROBLEMA MOTIVOS Y SOLUCIONES POSIBLES
La mopa a vapor debe estar firmemente enchufada en un tomacorriente. Verifique su
fusible o disyuntor, o pruebe con otro tomacorriente.
Asegúrese de que el tanque de agua esté lleno, la unidad esté enchufada y la luz
alrededor del botón Steam Control (Control de vapor) esté encendida fija.
Si las luces que se encuentran debajo del botón Steam Control (Control de vapor) no están
iluminadas, pruebe con otro tomacorriente.
La mopa a vapor no
produce vapor.
La mopa a vapor
produce vapor en forma
intermitente.
No puedo seleccionar
una configuración de
vapor.
Los pisos quedan
desparejos/empañados.
Si las luces que se encuentran debajo del botón Steam Control (Control de vapor) están
parpadeando, presione el botón Steam Control (Control de vapor) para seleccionar una
configuración de vapor.
Si las luces que se encuentran debajo del botón Steam Control (Control de vapor) están
encendidas fijas, espere 30 segundos hasta que la unidad se caliente.
Si después de haber seguido los pasos anteriores la mopa a vapor todavía no produce
vapor, comuníquese con el Servicio al Cliente llamando al 1-800-798-7398 o escríbanos a
consumer-services@sharkninja.com
Esto es normal; para obtener un vapor más uniforme, seleccione la configuración
SCRUB (FREGAR).
También asegúrese de que el tanque de agua esté lleno.
Asegúrese de que la mopa a vapor esté enchufada y de que las luces que se
encuentran debajo del botón Steam Control (Control de vapor) estén encendidas fijas.
Si su mopa a vapor está produciendo vapor, pero las luces que se encuentran debajo
del botón Steam Control (Control de vapor) no están encendidas, comuníquese con el
Servicio al Cliente llamando al 1-800-798-7398.
Es posible que la almohadilla Dirt Grip™ esté sucia. Si está sucia, gírela para usar el
lado limpio o cámbiela. Si lavó la almohadilla Dirt Grip con detergente en polvo, podría
estar dañada, en cuyo caso es necesario reemplazarla.
Este problema también podría ser un indicio de que se han acumulado restos de jabón o
grasa en el piso. Como la mopa a vapor usa solo una poca cantidad de agua, es posible
que no sea suficiente para enjuagar los restos acumulados que el vapor hace salir a la
superficie. Sugerimos enjuagar el piso solamente con agua, dejar que se seque y, luego,
pasar la mopa a vapor nuevamente con una almohadilla Dirt Grip limpia. Por lo general,
uno o más enjuagues son suficientes para eliminar los restos.
En casos más rebeldes, es posible que deba enjuagar el piso con una mezcla de una
parte de vinagre y dos partes de agua* (pero NO ponga vinagre ni ningún otro limpiador
en el tanque de agua de la mopa a vapor).
*Consulte las instrucciones de cuidado y mantenimiento de su fabricante del piso antes
de aplicar cualquier producto o líquido de limpieza, incluido el vinagre.
Español
52sharkclean.com
Page 54

Preguntas frecuentes
PREGUNTA RESPUESTA
¿Puedo usar la mopa a vapor
en alfombras?
¿En qué superficies puedo
usar la mopa a vapor?
¿Puedo poner algo que no sea
agua en el tanque de agua de
la mopa a vapor?
No, la mopa a vapor no está diseñada para la limpieza de alfombras.
La mopa a vapor está diseñada para usar en todas las superficies de pisos duros
sellados. Recomendamos que trate primero un área aislada del piso que limpiará y
que revise las instrucciones de uso y cuidado de su fabricante del piso.
ADVERTENCIA: No use la mopa a vapor sobre cuero, muebles
lustrados con cera, telas sintéticas, terciopelo ni sobre otros materiales
delicados sensibles al vapor.
NOTA: La acción del calor y del vapor de la unidad puede quitar el brillo de las
superficies tratadas con cera y de algunos pisos no tratados con cera. Haga
una prueba en un área aislada del piso, en primer lugar, para ver si se afecta
el brillo.
NO añada líquidos de limpieza, esencias, aceites ni ningún otro producto
químico al agua que se usa en este aparato, ya que esto puede dañar la unidad
o hacer que no sea seguro usarla. Le recomendamos que use agua destilada en
su mopa a vapor.
53 1-800-798-7398
Page 55

GARANTÍA LIMITADA DE UN (1) AÑO
SharkNinja Operating LLC garantiza la calidad de este producto y que este se encuentra libre de defectos en los
materiales y la mano de obra por un período de un (1) año desde la fecha de compra original cuando el aparato se
utilice para uso doméstico, lo cual está sujeto a las siguientes condiciones, exclusiones y excepciones.
Si su aparato no funciona correctamente cuando se usa en las condiciones normales de una casa dentro del período
de garantía, devuelva el aparato y los accesorios completos, con flete prepago. Para obtener asistencia con las
opciones de servicio de la garantía o ayuda al cliente, comuníquese con el Servicio al Cliente llamando al 1-800-7987398 o visite nuestra página web sharkclean.com.
Si nota que el aparato es defectuoso en los materiales o la mano de obra, SharkNinja Operating LLC lo reparará o
sustituirá sin costo. Se requiere una prueba de compra y se aplicará una tarifa de 19,95USD para cubrir el costo del
flete de devolución.*
La responsabilidad de SharkNinja Operating LLC se limita solo al costo de reparación o de reemplazo de la
unidad, a nuestra elección. Esta garantía no cubre el deterioro normal de las piezas ni se aplica a ninguna unidad
que haya sido alterada o utilizada para fines comerciales. Esta garantía limitada no cubre los daños causados por
el uso incorrecto, el abuso, la manipulación negligente, ni los daños debidos al embalaje defectuoso o al maltrato
durante el transporte. Esta garantía no cubre los daños ni los defectos causados por el transporte o la reparación, el
mantenimiento o la alteración del producto o de cualquiera de sus piezas que hayan sido realizados por un técnico no
autorizado por SharkNinja Operating LLC.
Esta garantía se extiende al comprador original de la unidad y excluye toda otra garantía legal y/o convencional. La
responsabilidad de SharkNinja Operating LLC, si la hubiera, se limita a las obligaciones específicas asumidas
expresamente por la compañía de conformidad con los términos de esta garantía limitada. SharkNinja Operating
LLC no es responsable, en ningún caso, por daños incidentales o emergentes de ningún tipo. Algunos estados/
provincias no permiten la exclusión o la limitación de los daños incidentales o emergentes, por lo que lo anterior puede
no aplicarse en su caso.
Esta garantía le otorga derechos legales específicos, y usted también puede tener otros derechos que varían según el
estado o la provincia.
*Importante: Embale el producto con cuidado para evitar que se dañe durante el transporte. Asegúrese
de incluir una prueba de la fecha de compra y de acoplar una etiqueta al producto antes de embalarlo
con su nombre, su dirección completa y su número de teléfono, junto con una nota que proporcione
la información de compra, el número de modelo y el problema que cree que tiene el producto.
Recomendamos que asegure el paquete (ya que los daños durante el transporte no están cubiertos por
su garantía). Marque el exterior del paquete como “ATTENTION CUSTOMER SERVICE” (A LA ATENCIÓN
DEL SERVICIO AL CLIENTE).
Español
Registro del producto
Visite la página registeryourshark.com o llame al 1-800-798-7398 para registrar su nuevo producto Shark® en
el término de diez (10) días después de la compra. Se le pedirá que proporcione el nombre de la tienda, la fecha de
compra y el número de modelo, junto con su nombre y dirección.
El registro nos permitirá contactarlo en el caso poco probable de que debamos comunicarle una notificación de
seguridad del producto. Al registrar el producto, reconoce haber leído y comprendido las instrucciones de uso y las
advertencias adjuntas incluidas en este Manual del propietario.
54sharkclean.com
Page 56

SharkNinja Operating LLC
U.S.: Newton, MA 02459
Canada: Ville S t. Laurent, Québec H4S 1A7
1-800-798-7398
sharkclean.com
© 2016 SharkNinja Operating LLC
S3973_11_E_F_S_IB_160616_1
PRINTED IN CHINA/ IMPRIMÉ EN CHINE/ IMPRESO EN CHINA
Mon–Fri, 8am–10pm ET, and Sat & Sun, 9am–6pm ET
Toll Free Customer Support Telephone:
Shark, Lift-Away, Steam Pocket, and Intelligent Steam Control are registered trademarks of SharkNinja
Operating LLC. Intelli-Mop, Dirt Grip and Steam Blaster are trademarks of SharkNinja Operating LLC.
Shark, Lift-Away, Steam Pocket et Intelligent Steam Control sont des marques déposées de SharkNinja Operating
LLC. Intelli-Mop, Dirt Grip et Steam Blaster sont des marques de commerce de SharkNinja Operating LLC.
Shark, Lift-Away, Steam Pocket e Intelligent Steam Control son marcas comerciales registradas de SharkNinja
Operating LLC.Intelli-Mop, Dirt Grip y Steam Blaster son marcas comerciales de SharkNinja Operating LLC.
1-800-798-7398
consumer-services@euro-pro.com
Soutien à la clientèle par téléphone sans frais:
les samedis et dimanches, de 9 h à 18 h HE
Du lundi au vendredi, de 8 h à 22 h HE et
with our hassle-free
We are here to help
return service.
de retour sans souci.
CALL US.
APELLEZ-NOUS.
Nous sommes ici pour vous
aider avec notre service
Problems?
des problèmes?
Questions or
Des questions ou
Illustrations may differ from actual product. We are constantly striving to improve our products; therefore the
specifications contained herein are subject to change without notice.
Les illustrations peuvent différer du produit réel. Nous tentons constamment d’améliorer nos produits; par
conséquent, les spécifications indiquées dans le présent guide peuvent être modifiées sans préavis.
Las ilustraciones pueden diferir del producto real. Nos esforzamos constantemente por mejorar nuestros
productos, por lo que las especificaciones que se incluyen en el presente pueden cambiar sin previo aviso.
For SharkNinja U.S. Patent information, visit sharkninja.com/ USPatents
Pour obtenir de l’information sur les brevets de SharkNinja aux É.-U., visitez sharkninja.com/USPatents
Para obtener información sobre las patentes de SharkNinja en los EE.UU., visite sharkninja.com/USPatents.
de 8 a. m. a 10 p. m. hora oficial del Este (Eastern Time, ET),
Llame sin costo a Servicio al cliente: De lunes a viernes
y los sábados y domingos de 9 a. m. a 6 p. m. ET.
Estamos aquí para ayudarle
devolución sin problemas.
con nuestro servicio de
LLÁMENOS.
problemas?
¿Preguntas o
 Loading...